

Page 1

Boost Mobile
Nextel
iDEN
Digital Multi-Service Data-Capable Phone
®
®
i50sx Phone User’s Guide
Page 2

Page 3

Table of Contents
Introduction .......................................................................................... 1
Welcome to Boost Mobile...............................................................................1
Boost Customer Care.......................................................................................1
Getting Started...................................................................................... 3
i50sx Phone Features.......................................................................................4
i50sx Phone Menu Tree...................................................................................5
i50sx Phone Icon Glossary..............................................................................6
Battery.............................................................................................................7
Turning Your i50sx Phone On/Off .................................................................9
Enabling Security ..........................................................................................10
The SIM Card................................................................................................11
Keypad Lock .................................................................................................16
Status of Your i50sx Phone...........................................................................18
My Information .............................................................................................19
Using T9
Display Essentials ...............................................................................27
Display Screen...............................................................................................27
Status Icons....................................................................................................28
Text Display Area .........................................................................................29
Call Information Icons...................................................................................30
Menu Icon......................................................................................................30
Display Options.............................................................................................30
Navigating Menus and Lists..........................................................................31
Main Menu Options.......................................................................................32
®
Text Input....................................................................................20
Phonebook........................................................................................... 35
Phonebook Entries and Speed Dial Numbers................................................36
Phonebook Icons ...........................................................................................36
Accessing Your Phonebook ..........................................................................37
About PhonebookEntries..............................................................................37
i
Page 4

Pause Digit Entry...........................................................................................46
Plus Dialing ...................................................................................................47
Digital Cellular....................................................................................49
Phone Calls....................................................................................................50
Emergency Calling ........................................................................................54
Special Dialing Codes ...................................................................................55
Receiving a Phone Call.................................................................................55
Sending Unanswered Calls to Voice Mail ....................................................55
Missed Calls ..................................................................................................56
Ending a Phone Call......................................................................................56
Recent Calls...................................................................................................56
Call Timers....................................................................................................59
Hands-Free Speakerphone.............................................................................60
Mute...............................................................................................................60
Call Hold .......................................................................................................61
Call Forwarding.............................................................................................61
Caller ID........................................................................................................64
Call Restrictions ............................................................................................65
Boost Mobile 411 ..........................................................................................65
Boost Mobile Voice Mail.................................................................... 67
Setting Up Your Voice Mail Box..................................................................67
Receiving Voice Mail Messages...................................................................68
Logging into your Boost Mobile Voice Mail................................................69
Advanced Voice Mail Features .....................................................................72
Boost Mobile Voice Mail Tree......................................................................80
Messaging Services .............................................................................81
Boost Mobile Text Messaging ......................................................................81
Numeric Messaging.......................................................................................82
Message Center .............................................................................................82
boostmobile.com
ii
Page 5

Boost 2WAY........................................................................................ 85
Private Call....................................................................................................85
Call Alerts......................................................................................................87
Datebook..............................................................................................93
Datebook Icons..............................................................................................94
Viewing Your Datebook ...............................................................................94
About Datebook Events.................................................................................96
Adding New Events.......................................................................................97
Editing Events ...............................................................................................99
Deleting Events .............................................................................................99
Datebook Event Reminders.........................................................................100
Customizing Datebook Setup......................................................................100
Memo ................................................................................................. 103
Adding a New Memo ..................................................................................103
Viewing a Memo.........................................................................................103
Editing a Memo...........................................................................................104
Deleting a Memo .........................................................................................104
Boost Wireless Web.......................................................................... 105
Boost Wireless Web Navigation Keys........................................................105
Starting the Microbrowser...........................................................................106
Java Apps .......................................................................................... 107
Accessing Java Apps Menu.........................................................................107
Installing Java Apps ....................................................................................107
Running Java Apps......................................................................................108
Customizing the i50sx Phone........................................................... 109
Settings........................................................................................................109
Shortcuts......................................................................................................125
iii
Page 6

Accessories......................................................................................... 129
i50sx Faceplates...........................................................................................129
Batteries.......................................................................................................131
Chargers.......................................................................................................132
Other Important Information ......................................................... 135
Boost Customer Care...................................................................................135
Understanding Status Messages..................................................................135
Boost Mobile Terms and Conditions of Prepaid Service ............................138
Safety and General Information ..................................................................145
Limited Warranty Motorola Communication Products...............................153
Patent and Trademark Information..............................................................161
Index .................................................................................................. 163
iv
boostmobile.com
Page 7

DECLARATION OF CONFORMITY
Responsible Party Name: Motorola, Inc.
Address: 8000 West Sunrise Boulevard, Plantation, FL 33328 USA
Phone Number: 1 (800) 453-0920
Hereby declares that the product:
Product Names: i85s and i50sx and i55sr
Model Number: H40XAH6RR1BN
Conforms to the following regulations:
FCC Part 15, subpart B
Class B Digital Device
Date: Sep. 19, 2001
Note: This equipment has been tested and found to comply with the limits for a
Class B digital device, pursuant to part 15 of the FCC Rules. These limits are
designed to provide reasonable protection against harmful interference in a
residential installation. This equipment generates, uses and can radiate radio
frequency energy and, if not installed and used in accordance with the instructions,
may cause harmful interference to radio communications. However, there is no
guarantee that interference will not occur in a particular installation.
If this equipment does cause harmful interference to radio or television reception,
which can be determined by turning the equipment off and on, the user is
encouraged to try to correct the interference by one or more of the following
measures:
--Reorient or relocate the receiving antenna.
--Increase the separation between the equipment and receiver.
--Connect the equipment into an outlet on a circuit different from that to which the
receiver is connected.
--Consult the dealer or an experienced radio/TV technician for help.
Per FCC CFR 47 Part 2 Section 2.1077(a)
v
Page 8

vi
Page 9

Introduction
Welcome to Boost Mobile
Welcome to Boost Mobile - wireless for a new generation.
With Boost Mobile pre-paid, there’sno need to worry about credit checks or
chalkingup huge monthly bills, becausequite simply, there aren’tany.By
paying for your phone calls up front, you’ll keep your monthly costs under
control and get all the mobile freedom you really want.
AndBoostMobile hasgotthe latest Motorola handsets withthe coolestfeatures,
like Boost 2WAY; ourdigital two-way radiofeature, Boost Wireless Web and
the hottestJavagames. Plus, you get instant access to Nextel’s world-class
digital iDEN
Boost Customer Care
You can contactBoost Customer Care 7 days a week simply by dialing 611
from your i50sx phone, or by calling1-888-BOOST-4U (1-888-266-7848). Our
Boost Customer Careteam will assist you in answeringallyour questions. Or,
visit boostmobile.com for a variety of Boost Customer Care services online.
®
network.
1
Page 10

boostmobile.com
2
Page 11

Getting Started
This sectionwill help you get started using your phone. It contains detailsabout
some of the features andfunctions described in the Getting Started Guide.
This section includes:
i50sx PhoneFeatures Page 4
i50sx Phone Menu Tree Page 5
i50sx PhoneIconGlossary Page 6
Battery Page 7
Turning Your i50sx Phone On/Off Page 9
Enabling Security Page 10
The SIM Card Page 11
Keypad Lock Page 16
Statusof Your i50sx Phone Page 18
My Information Page 19
Using T9® Text Input Page 20
3
Page 12
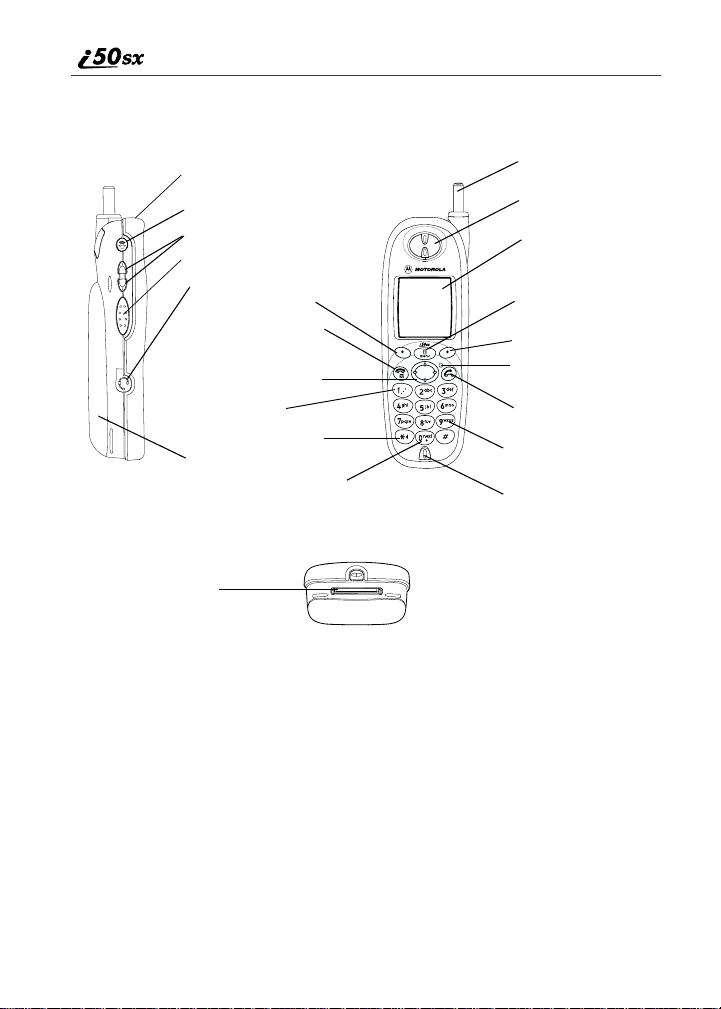
i50sx Phone Features
Power B utton/Status Light
Boost 2WAY
Push-To-Talk (PTT) Button
Headset Jack
Battery Cover
SIDE VIEW
Accessory Connector
SpeakerKey
Volume Control Buttons
OptionKey
End/Home Key
4-WayNavigation Key
Punctuation Key
Back Key/PauseDialing
Next WordKey/International
Plus Dialing
BOTTOM VIEW
FRONT VIEW
Antenna
Earpiece
Display
Menu Key
Option Key
Photosensor
Send Key
AlphaNumeric Keypad
Microphone
boostmobile.com
4
Page 13

i50sx Phone Menu Tree
c
tto navigatethrough the menus and
S
from the idle screen. Use
m
under thedisplay option toperform the desiredphone functions.
B
Phonebook
[New Entry]
Entries (If Any)
Main Menu Item
New
Menu P
k
Ring/Vibe
Phone Setup
Settings
Main Menu Item
F
Applications (If Any)
Java System
Java Apps
Main Menu Item
ABOUT
Menu P
7
New
Menu P
Edit
View
Delete Contact
In Call Setup
Security
RESET SYSTEM
Menu P
DEINSTALL
Capacity
Sort By
Delete Number
Capacity
Personalize
Initial Setup
Voice Volume
FORMAT SYSTEM
Main Menu Item
Main Menu Item
Sort By
Service Status
H
Datebook
Main Menu Item
;
Call Forward
Main Menu Item
U
Voice Mail
Messages
Message Center
z
Call Timers
Last Call
Main Menu Item
Menu P
Week View
Change
All Calls
Off
Forward
Text Msgs
Net Alert
Phone Reset
Phone Lifetime
R
Memo
CANCEL STORE
(DELETE)
Go to Today
New
Detailed
Menu P
Retrieve Stat
Kbytes Reset
Prvt/Grp Reset
Prvt/Grp Lifetime
Setup
E
Menu P
Call Alert
Main Menu Item
Received Call Alerts
(If Any)
U
My Info
Name
Main Menu Item
n
[New Entry]
Shortcuts
Main Menu Item
Menu P
j
View
Prvt ID
Shortcuts (If Any)
New
Line 1
Edit
Store
Carrier IP
Reorder
Delete
Delete
Delete All
Sort By
IP1 Address
IP2 Address
Delete All
Recent Calls
View
Delete
Web
Main Menu Item
Your home page displays.
i50sx Phone Menu Tree
You can access themain menu options by pressing
submenus. Press
Menu P
Delete All
Memory Meter
Recent Calls
Main Menu Item
Recent Calls (If Any)
Delete All
Menu P
Call Alert Queue
5
Page 14
i50sx Phone Icon Glossary
z
You may see these icons while usingyour i50sx phone:
Voice Mail
Miscellaneous
y
Web
Main Menu
7
F
Status
Signal Strength
Info
s
Call
Line 1 Active
Line 1 Forward
G
0
Line and
Mobile
Phonebook
T
Picker Up
Navigation
g
Alert
Text Message
R
Settings
Java Apps
m
Mobile IP
Battery Strength
6
]
Incoming Call
E
Work
Private
h
+
Picker Down
d
Net
R
Packet Data
Y
Outgoing Call
X
Picker Left
e
T9 Word
Message Read
#
Q
Messages
Phonebook
R
b
Packet Activity
Z
Missed Call
S
Main
Home
N
C
Menu
Picker Right
P
f
T9 Alpha
w
Call Forward
;
Phone In Use
Private In Use
c
i
Hold
On
Connected
D
V
Pager
A
a
Up-Down Arrows
2
T9 Numeric
,
Datebook
=
Vibrate All
Call
End
?
Fax
T9 Symbols
Memo
O
-
Other
W
Mark
Locked
M
Call Alert
:
Silent On
*
Datebook Alarm
>
Recurring Appt
Check
Bullet
<
k
8
T9 Caps Lock
Secure Data
T9 Uppercase
!
Call Timers
Speaker Off
u
$
Recent Calls
j
Vibrate On
[
{
x
My Info
U
Vibrate then Ring
\
The icon of the main menu feature in use displays in the top left of the status
icon rows. For a list of the main menu options, see “Main Menu Options” on
page 32.
boostmobile.com
6
Page 15
Battery
Battery
Your i50sx phone comes with a Lithium Ion batteryand charger. Remove the
battery fromthe protectiveplasticsafety trayprovided inthe original packaging.
After attaching the battery, make sure you charge it, before you use your phone
for the first time. See “Batteries” on page 131 for the charging times for your
phone’s battery. The first time you chargeyourphone’s battery, charge for 30
minutes more than the time shownon page 131. Aftertheinitial charging, the
batterycanbe chargedin the time shown on page 131.
NOTE: Use only batteries approved for this product.
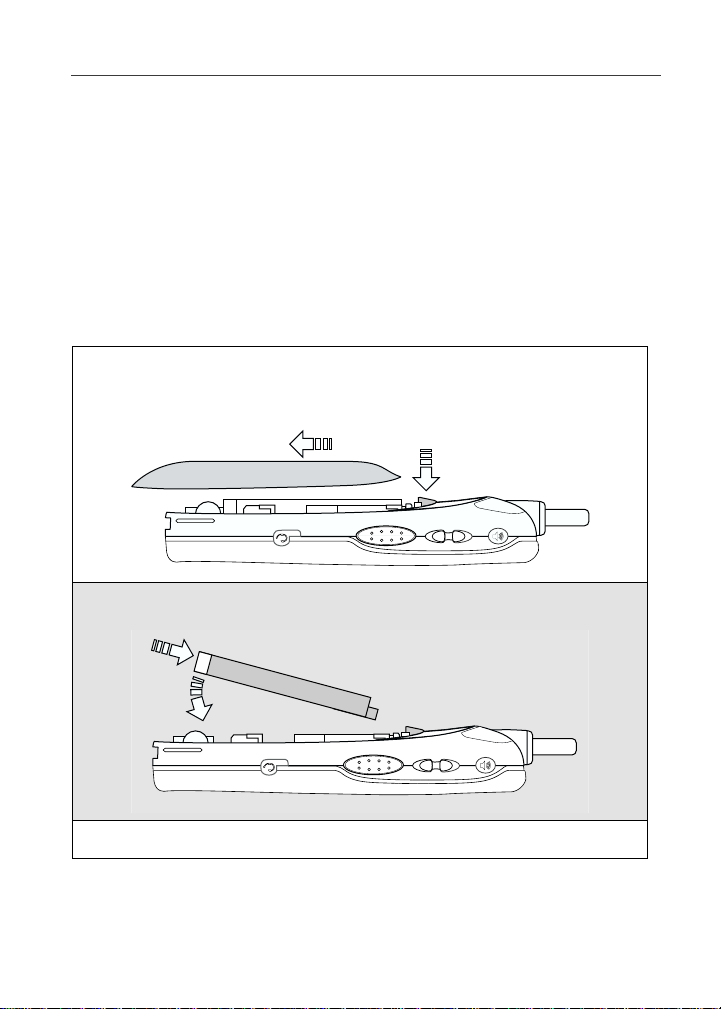
Attaching the Battery
1
Remove the battery cover located on the back of the phone by pressing
the battery coverrelease buttonand sliding thebatterycover awayfrom
the antenna.
Release button
2
Insert the top of the battery into the battery area. Press down on the
bottom of the battery to secure it.
3
Replace the batterycoverand push forwarduntil you hear a click.
7
Page 16
Detaching the Battery
1
Ensure that the phone is powered off before attemptingtodetach the
battery. See “Turning Your i50sx Phone On/Off” on page 9.
2
Press the batterycoverrelease button and slide the battery cover away
from the antenna.
3
Remove the battery by pushingthebattery toward the antenna and
liftingit out of the phone.
Charging the Battery
1
With your phone’s keypad facing up, plug the charger’s connector into
the left side of the accessoryconnector on the bottom of the phone.
NOTE: To reduce damage to the phone’s bottom
connector,the charger’s cable or accessory
button, the charger accessory button should
always be used.
Charger Accessory Button
2
If the charger has folding electricalprongs, flip open the prongs.
3
Plug the charger into an electrical outlet.
boostmobile.com
8
Page 17

Turning Your i50sx Phone On/Off
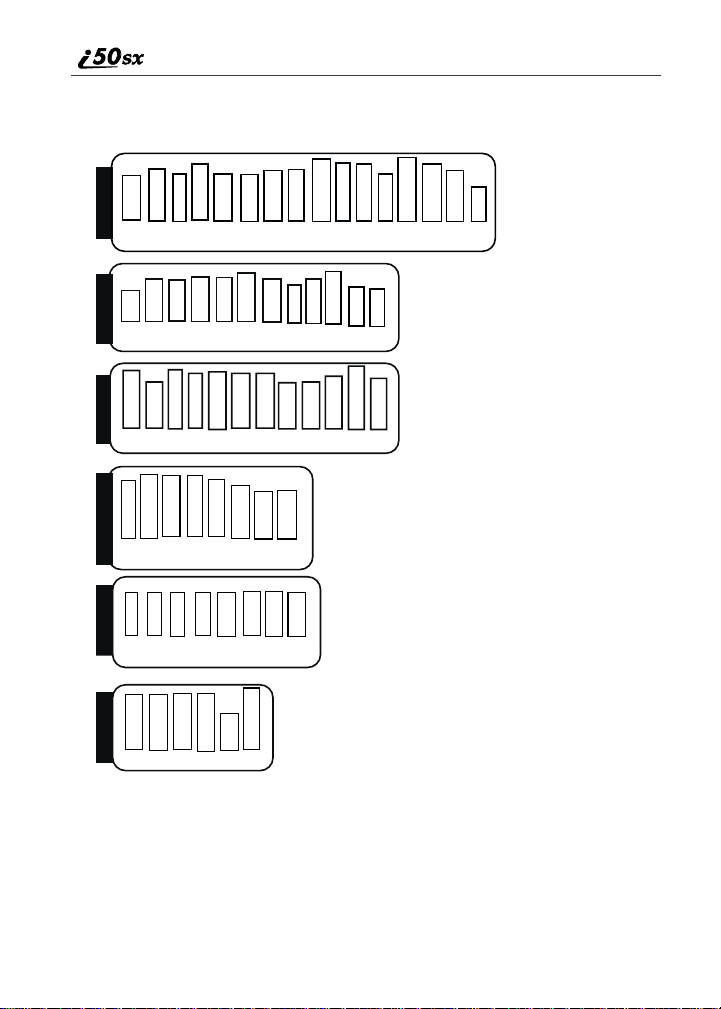
Battery Charging Status
The batterystrength indicator icon found on your phone’sdisplay screen shows
the amount of power in the battery.
When Using Phone
Icon
Display
Battery
Strength
abcd
Low
Battery
11% to
40%
41% to
70%
Fully
Charged
When Charging Battery
Icon
Display
Battery
Strength
A short, chirp-like sound indicates a low battery. This indicates thatyou have
approximately five minutesof talktimeremaining.
For best results,charge the batteries within the temperaturerangeof50
o
104
F(10oCto40oC).
The battery can be charged with the phoneeither turned on or off. For best
results,charge it with the phone turnedoff.
efgd
1flashingbar 1flashingbar,
Low
Battery
1 continuous bar
31% to
60%
1 flashing bar,
2 continuous bars
61% to
90%
3 continuous bars
Fully
Charged
o
Fto
Turning Your i50sx Phone O n/ O ff
NOTE: To register for the first time on the Nextel National Network, you
must turn on your i50sx phone in your local calling area.
To power the phone on:
1
For optimal signalstrength, extend the antenna.
9
Page 18

2
Pressandhold p at the topofthe phone untilthe status lightglows red
and Powering On displays.
3
As your new i50sx connects to the Nextel National Network, youwill
see the Boost Mobile icon and a connecting message.
When the idlescreen displays with Boost, you are ready to use your
i50sx phone!
If your display reads No Service or doesn’t change to the idle screen when you
turn on your phone, and you know you are in a Boost Mobile coverage area,
contactBoost Customer Care.For details on BoostMobile coverage areas, go to
boostmobile.com.
To power the phone off:
1
Press and hold p on the top of the phone until you see the message
Powering Off.
2
Push down the antenna.
Enabling Security
It is a good idea to enable security the first time youpower on your phone or
within 20 days of the first activation of your phone.
1
Turnyour phone on (see“Turning Your i50sx PhoneOn/Off”onpage9
of this guide).
2
From the idle screen, press m
3
Press S to scroll to Web.
4
Press A under SELECT.A series of screens will display.
5
You are prompted to enable security.Press A under Yes.
6
Press e to return to the idle screen.
boostmobile.com
10
Page 19

The SIM Card
The SI M Card
Your i50sx phone comes with a built-in levelof security protection through the
use of the SIM (Subscriber Identity Module) card, which you should have
alreadyinsertedintoyournewi50sx phone. The SIM card stores all your
Phonebook inform ation and your Boost Mobile account identification
information. Since this informationis stored on the SIM card, notinyourphone
itself,you canremovetheinformation by removing the SIM card.
The SIM card is located in the SIM Card Holder on the back of the phone,
underneath thebattery. You can verifythat the SIM cardis in place byremoving
the batteryand viewing the SIM card through the SIM card cover.
See “Inserting/Removingthe SIM Card” on page 14 forinformation on locating
the SIM card.
NOTE: Except formaking emergency calls, yourphone will not
functionwithoutthe SIM card.
SIM Card Personal Identification Num ber (P IN)
To prevent unaut horized use of your account,youcanprotect yourSIM cardby
enabling the SIM PIN security feature. W ith the SIM PIN enabled, you must
enter your PIN each time the phone is poweredon.You can changeor disable
your PIN if desired.
NOTE: It is recommended that you enable theSIM PIN security feature
to prevent fraudulent use of the SIM card, your i50sx phone, and
your account.
Enabling/Disabling the PIN Security Feature
Once the PIN securityfeature is enabled,youare prompted to enter your PIN
each time you turn on your phone. Untila valid PIN is entered, youcanuse the
phone only to make emergencycalls .
AfterthePIN is accepted,the phone registers on the networkand the idle screen
displays.
When the PIN security feature is disabled, the phone can be used without
entering a PIN.
IMPORTANT: It is recommended that you enable the PIN security feature to protect
personal data on your SIM card. This prevents anyone from using your
phone and accessing your personal data.
11
Page 20

To enable SIM PIN security
1
At the idle screen, press m andthenpressR to scroll to Settings.
2
Press A under SELECT.The Settings screen displays.
3
Press R to scroll to Security.PressA under SELECT to access the
Security screen.
4
At the Security screen, pressR to scroll to SIM PIN.PressA
under SELECT to access the SIM PIN screen.
5
Press R to scroll to On or Off. On enables the SIM PIN security
feature; Off disables the SIM PIN security feature. Press A under
SELECT.
6
At the Verify SIM PIN Code screen, enter the currentSIM PINand
press A under OK.
NOTE: Your default SIM card PINis0000.
Once you have enabled the SIM PIN security feature, it is recommended that
you change your PIN to a 4- to 8-digit number known only to you (see
“Changing the PIN” on page 13).
Entering the SIM PIN
NOTE: Incorrectly entering your PIN three times causes the SIM
card to be blocked. To unblockyo ur SIM card, yo u must
contact Boost Customer Care. For more information, see
“Unblocking the PIN” on page 14.
1
From theEnterSIM PIN Codescreen, enter your4-to 8-digitPIN. An
asteriskappears for each characterentered. The default SIM PIN is
0000.
NOTE: Other than emergency dialing, you will be unable to use any
of the phone functions, including receiving phone calls, until
you enter the PIN.
2
Press A under OK.
boostmobile.com
12
Page 21

The SIM Card
If you enter an incorrectPIN,themessage “SIM PIN incorrect: Try again”
appearson your phone’sscreen. After three consecutive incorrect attempts,the
SIM card is blocked.
Once blocked,the phone will not allow you to enter your PIN again, even after
powering the phone off and back on. If this happens, see “Unblocking the PIN”
on page 14.
Changing the PIN
NOTE: In order to change the PIN, the SIM PIN security feature must
be set to On. See “Enabling/Disabling the PIN Security
Feature” on page 11.
1
From the idle screen, press m andthenpressR to scroll to Settings.
2
Press A under SELECT.The Settings screen displays.
3
Press R to scroll to Security.PressA under SELECT to access the
Security screen.
4
At the Security screen, press R to scroll to New Passwords.PressA
under SELECT to access the New Passwordsscreen.
5
At the NewPasswords screen, pressR toscroll to SIM PIN and press
A under SELECT.
6
At the Enter Old SIM PIN Code screen, enter the current SIM PIN
and press A under OK.
NOTE: The default SIM PIN is 0000.
7
At the EnterNewSIMPINCode screen,enter a new4- to 8-digit SIM
PIN and press A under OK.
8
At the Re-enterNewSIMPIN Code screen, re-enter the new SIM PIN
to confirm, and press A under OK.
13
Page 22
Unblocking the PIN
If you forget your PIN and unsuccessfully enter it three times, access to your
phone will be blocked.
NOTE: Before you begin, obtain the PIN Unblocking Key (PUK) code
from Boost CustomerC are, then read and understand the PIN
unblocking sequence. When entering the key press sequence,
each key press must occur within 5 seconds of the prior key
press.
To unblock the PIN:
IMPORTANT: If you unsuccessfully enter the PUK codeten times,
1
Press **05s.
2
Enter the 8-digit PUK code.
3
Press s.
4
Enter a new 4- to 8-digit SIM PIN and press s.
5
Re-enter your SIM PIN and presss.
the SIM card is permanently blocked and must be
replaced. If this happens, all data will be lost. You will
get a messagetocontact your service provider.
Contact Boost Customer Care for assistance. If the
SIM card is blocked, the
outgoing Emergency calls.
i50sx phone onlyallows
If you entered the codes properly, the SIM Unlockedscreen displays.
Inserting/Removing the SIM Card
IMPORTANT: If you remove yourSIM card and insert anotherSIM card into your
phone, someinformation does not display when you usethe phone
with the new SIM card. AllPhonebook information remains stored on
your original SIM card. The following information does not display:
• Datebook events • Call filtering settings in Styles
• Call Forwarding settings • InformationstoredinMemo
• Net Alert notifications • Browser Bookmarks
• Recent Calls list
14
boostmobile.com
Page 23
The SIM Card
IMPORTANT: Do not touch the gold-colored areasof the SIM card. To avoid loss or
1
damage, do not remove your SIM card from yourphone unless
absolutely necessary.
With the phone powered off, remove the battery cover and battery. See
“Detachingthe Battery” on page 8.
2
With the antenna facingaway
from you, and the back of the
phone exposed andfacing up,
locate the SIM cover and gently
push it forward.
3
Hold the SIM card with the gold
contacts facing down and the
clippedcorner in thebottom left.Do
not touch the gold- colored areas of
the SIM card.
000800137866150
4
Carefully place the SIM card with the cut corner in the bottom left
position intothe phone, until it lies flat in the SIM cardholder.
5
To remove the SIM card, very
carefully lift it out of its holder.Do
not touch the gold-colored areas of
the SIM card.
NOTE: Protect the SIMcard as you
would any delicate object.
When the SIM card is not in
the phone, you should
store it in something
protective, such as an
envelope.
000800137866150
15
Page 24
Keypad Lock
The i50sx phone includesa Keypad Lockfeature t hat enables you to quickly
lock the phone’s keypad to avoid inadvertentlypressing keys or placing calls.
Once Keypad Lock is activated, you can only perform the following tasks:
• turnyourphoneon and off
• unlock the keypad
• receive incoming calls, messages, and alerts
NOTE: Emergency calls cannot be placed while Keypad Lock is
activated.
Beforelocking your phone’s keypad,youmaywant to read this entiresection to
learnhowtorespondtoincomingcalls,messages,andalerts.
Activating Keypad Lock
From the idle screen, press m*.ThemessageKeypad Locked
displayson your phone.
Wheneverakeyispressed while in Keypad Lock mode,the unlock instructions
display briefly.
When you receive an incoming call, message, or alert, Keypad Lock is
temporarily disabled.Youcan respond to the incoming call, message or alert.
When finished, press e until you return to the idle screen. Once you return to
the idle screen, KeypadLock will automatically reactivat e.
Receiving Incoming Calls
When you receive an incoming phone call (see “Receiving a Phone Call” on
page 55), KeypadLock is temporarily disabled.
Press B under YES or press s to answer the call. When you end the
call, the Recent Callslistappears. Presse or press B under EXIT to
reactivate Keypad Lock and return to the idle screen.
Or,
Press B underNOorpresse to send the call to Voice Mail and
reactivate Keypad Lock.
boostmobile.com
16
Page 25

Keypad Lock
Receiving Boost 2WAY Calls
When you receive an incoming Private Call or Call Alert (see “Boost 2WAY”
on page 85), Keypad Lock is temporarily disabled.
1
Press and hold the Boost 2WAYPTT button on the side of the phone.
Begin talkingafter the phone emits a chirping sound. Releasethe Boost
2W AY PTT button to listen.
2
When you end the call, the Recent Calls list appears.Press e or press
B under EXIT to reactivate Keypad Lock and return to the idlescreen.
Receiving New Voice Mail
When you receive new Voice Mail (see “Receiving Voice Mail Messages” on
page 68), KeypadLock is temporarily disabled.
WhenNew Voice Mail Message displays, press A under EXIT to
return to the idle screenand reactivate Keypad Lock.
Or,
Press A under CALL to access Voice Mail. Once you have finished,
press e to exit Voice Mail. The Recent Calls list displays. Press e or
press B under EXIT to reactivate Keypad Lockand return to the idle
screen.
Receiving New Text Messages
When you receive new Text Messages (see “Numeric Messaging” on page 82),
Keypad Lock is temporari ly disabled.
WhenNew Text Message displays, press A under EXIT to return to
the idle screenandreactivateKeypad Lock.
Or,
Press B under READ to read the message. Press B under SAV E or
DELETE. Once you havefini shed, press e or press A underEXITto
reactivateKeypadLockreturntotheidlescreen.
17
Page 26
Receiving New Net Alerts
When you receive new Net Alerts, Keypad Lock is temporarily disabled.
When New Browser Message displays, press A under EXITtoreturn
to the idle screen and reactivate Keypad Lock.
Or,
Press B under GOTO. Press A under View. PressA under OK or
Reply. Once you have finished, press e until you return to the idle
screen and reactivate Keypad Lock.
Deactivating Keypad Lock
From the idle screen, press m*.ThemessageK eypad Unlocked
displaysbriefly.
Status of Your i50sx Phone
Your i50sx phone has a status light that displays around the p button. The
statuslightindicates the status of your connect ion.
Status Light
Indicator
Flashing Red Signing on to the network. Please wait.
Solid Red No service or out of coveragearea.
i50sx Phone Status
If you are in a coverage area, keep your phone
on anditwill attempt to connectto the network
every two minutes. If the phone does not
connect after15 minutes, contact Boost
Customer Care.
boostmobile.com
18
Page 27

My Information
Status Light
Indicator
Flashing
Green
Solid Green In use.
i50sx Phone Status
Inservice/Readytouse.
NOTE: Boost 2WAY is only available in your
home calling area.
My Information
You can select My Info from the main menu to display or edit the following:
• Name — Enteryournameinthisfield.
• PrivateID— Your Private ID is displayedinthisfield. Your PrivateID is
the number others use to contact you using Boost 2W AY .
• Phone Number— Your phone number is displayed in this field. Your
phone numberis automati cally entered when you receive your first phone
call.
• IP Addresses — These fields display the IP addresses you use to access
the Internetwithyourphone.
Viewing/Editing My Information
1
From the idle screen, press m.
2
Press R to scroll to My Info.PressB under SELECT. The My
Information screen displays.
3
Use S to scroll through the fields.
4
Toedit the displayed information, press B under CHANGE. Edit
information as desired.
5
Press B under OK to save the changes.
6
To return to the idle screen, press A under EXIT.
19
Page 28

Using T 9®Text Input
Your i50sx phone has embedded software, calledT9®Text Input, thatmakes
typing on a phone keypad much like typingon a computer keyboard: it
eliminates the traditional “multi-tap” method of text entry. As you type, you
pressonlyone key per letter.T9 Text Input matchesyour keystrokestowords in
its linguist ic database of approximately60,000 words and proper names. You
may also store additional words you frequently use in your own user database,
which is incorporated into the T9 database.
T9 Text Inputis availablewhenyou are typing information into yourphone(for
example,in the Phonebook or Datebook) and while using Boost WirelessWeb
services.
T9 TextInputEntry Modes
Four text entry modes are available in T9 Text Input: Alpha, Word, Symbols,
and Numeric. When you are using T9 Text Input, an icon in the top right corner
of your phone’s display screen (next to the battery strength indicatoricon)
indicates the T9 Text Input entry mode you are using:
Icon* T9 Entry Mode
Name
w Alpha Standard “multi-tap” keypad
# Word Entering words and
! Symbols Entering punctuation and
, Numeric Entering keypad numbers.
* T9 icons do not display while you are using Boost Wireless Web services.
boostmobile.com
Used For...
text entry.
punctuation with one keypress per character.
symbols such as “@” or “?”.
20
Page 29

Using T9®Text Input
Choosing a Text Entry Mode on Boost Wireles s Web
When you are using Boost Wireless Web services, T9 Text Input becomes
available wheneveryouaccess a screen that requires you to enter text.Theright
displayoption on your phone’s screen indicatesyourcurrent T9 Text Inputtext
entry mode:
• ALPHA and alpha for Alpha mode
• WORD or word for Word mode
• SYM1, SYM2, SYM3,orSYM4 for Symbols mode
• NUM for Numeric mode
To change text entry modes, pressB under text entry mode until the desired
mode displays.
NOTE: The rest of the instructions for using T9 Text Input apply only to
entering text in applications other than Boost Wireless Web
applications (for example, Phonebook or Datebook).
Choosing a Text Entry Mode
You can selectyour t ext entry mode from a menu available wheneverthe phone
displays a screen that requires you to enter text (for example, the Name screen
or Title screen).
To choose a text entry mode:
1
From any screen thatrequires text input (except Memo), press m to
access the Entry Methodmenu.
A check mark appears next to the currenttexte ntry mode. When you
access a screen that requirestextinput, the default text entry mode is
Alpha.
2
Press S to scroll to the desired T9 T ext Input text entry mode.
3
Press B under SELECT.
The phone returns to the text entryscreen. An icon displays indicating
theactivetextentrymode.
NOTE: The Memo feature accepts only numeric input.
21
Page 30
Choosing a Language
To change the language of the T9 Text Input database:
1
From any screenthatrequires text input,press m to access the Entry
Method menu.
2
Press S to scroll to Languages.
3
Press B under SELECT.
4
Press S to scroll to the language you want T9 Text Inputto use.
5
Press B under SELECT.
NOTE: This feature is not available when using T9 Text Input with
Boost Wireless Web services.
Using Alpha Mode
To enter text (letters and numbers) while in Alpha text entry mode:
• Pressanykey on the alphanumerickeypad to enter the letters and numbers
on that key. For example, to enter the letter Y, press 9 three times.
• Pressand hold a key to capitalize a letter, or press Q to capitalizethe
highlighted letter.
• Pausebriefly to leave the currently displayed character in place andmove
on to the next place in the text entry field.
• PressP to create a space in the text entry field.
• PressA underDELETE to delete one character. Press and holdA under
DELETE to delete an entire entry.
Using Word Mode
In Word mode, T9 Text Input analyzestheletters on the keypadbutton you
press and arranges them to create words. As you type, T9 Text Input matches
your keystrokes to words in its database and will display the most commonly
used matching word.
boostmobile.com
22
Page 31

Using T9®Text Input
Special Key Functions
Some of your phone’s keys assume different functionswhile in T9 Text Input
Word mode.
Backspace and Erase
PressA underDELETE once to backspaceor to erasea single character.Press
and hold A under DELETE to erase the entire textentryfield.
Space
Press R once to accept a word and insert a space when entering text.
Next Word in Database
If the displayedwordis not the word you want to enter, you can display other
words. Press 0 to display morewordsin the database that matchthekeystroke
sequence you entered.
Shift and Caps Lock
Press # to make the nextletter typeduppercase (Shift), to make allsubsequent
letters types uppercase (Caps Lock), or to go back to lowercaseletters.
These icons appear in the top row of your display screen:
• $ for Shift to uppercase
• x for Caps Lock
When neither of these icons appear,letters typed are lowercase.
Punctuation
In Word mode, T9 Text Input uses Smart Punctuation t o quickly apply basic
rules of grammar to insert the correct punctuation within a word and at the end
of a sentence.
• Press1 to insertpunctuation.One of eightbasic punctuationsymbols will
be inserted (. , - ’ @:?;).
• Press0 to change the inserted punctuation symbol to anotheroftheeight
basic punctuation symbols.
• PressR to accept the punctuation and continue typing.
NOTE: Additional punctuation symbols are available in Symbols mode.
23
Page 32

EnteringaWord
To enter a word using Word mode:
1
Choose Word as your text entry mode.
2
Type a word by using one key press per desired letter.
For example, to type “test” press 8378.
IMPORTANT:The displayed word may change as you type it. Do
3
After you have finishedtyping the word, if the word that appears is not
not try to correct the word as you go. Type to the
end of the word before editing.
the desired word, press0 to change thewordon the displaytothe next
most likely word in the database.
Repeat until the desired word appears.
If the desired worddoesnotappear,you can add it to the databaseof
words by deleting the displayedword and usingtheinstructionsin
“Adding Words to the User Database” on page 24.
Adding Words to the U s er Database
To add words to the T9 database:
1
Change from Word text entrymode to Alpha text entry mode.(See
“Choosing a Text Entry Mode” on page 21.)
2
Type the word using Alpha text entry mode.
3
Return to Word text entry mode.
4
Press R to add a space.
The word you typed in Alpha text entry mode is now in the database.
NOTE: You cannot store alphanumeric combinations, such as Y2K.
boostmobile.com
24
Page 33

Using T9®Text Input
Using Symbols Mode
To use Symbols text entry mode:
1
Choose Symbols as your text entrymode.
A row of 32 symbols appears along the bottom of your phone’sdisplay
screen,just above the displayoptions and menuicon.(Press T to view
the complete row.)
2
Press T to highlight the symbol you want to enter into the text entry
field.
3
Press B under SELECT to enter the symbol.
Using Numeric Mode
To use Numeric text entry mode,chooseNumeric as your text entry mode and
press the number buttonson your keypad to enter numbers.
25
Page 34

26
boostmobile.com
Page 35

Display Essentials
Your i50sx phone’s display screen tells you what you need to know as you use
your phone.
This section includes:
DisplayScreen Page 27
Status Icons Page 28
Text Display Area Page 29
Call Information Icons Page30
Menu Icon Page 30
Display Options Page 30
NavigatingMenus and Lists Page 31
Main Menu Options Page 32
Display Screen
Any time your phone is powered on, the displayscreen provides you with
informat ion and options.
Idle Screen
The Boost idle screen displays any time the phone is powered on, but not
engaged in some activity.
The idlescreen consists ofelementscommon tomanyof the screensyour phone
displays:
• statusand applicati on icons
• textdisplay area
• menu icon
• display options
27
Page 36

The Boost idle screen displays Boost and the time and date. You must start at
the Boost idle screen to access many of your phone’s features and functions.
BOOST TIP:You can always access the Boost idle screen
by pressing
e.
Status Icons
Statusicons provide you with information about your phone and its functions.
These icons are context sensitive;meaning, the icons thatappear depend on the
task you are performing. Status icons appear in the two rows at the top of the
displayscreen. Some appearat all times.Others appear only whenyour phone is
engaged in certainactivities or when you have activated certain features.
Icon Indicates.. .
abcd
fg
opqrs Signal Strength — strength of the network
e
d
Battery Strength — remaining battery charge.
More bars on the battery indicate a greater charge.
See “Battery Charging Status” on page 9 for
detailedinformation about battery strength icons.
signal. More bars next to the antennaindicate a
strongersignal. Four bars is the maximum signal.
0 Active Line — 0 indicates Line 1 is active.
G CallForward— phone is set to forward calls.
c Phone In Use — phone is connectedon an active
h Private In Use — number being called is a
Y PacketData Ready — your phone is set up for
Z Packet Data Activity — phone is sending or
28
See “Call Forwarding” on page 61.
call.
Private ID.
Packet Databut has not been successfully Mobile
IP registered.
receivingdata.
boostmobile.com
Page 37

Text Display Area
] Mobile IP — your phone has successfully
{ Secure Data — phone is accessing theWireless
. Text Message — you have one or more unread
y Voice Mail — you have one or more unheard
u Speaker Off — phone’s speaker is off.
-[\* Ring/Vibe — youhavecustomizedthewayin
w#,!
$x
The icon of the main menu feature in use always appears in the top left of the
statusicon rows.Fora list of themainmenu icons,see“Ma in Me nu Options” on
page 32.
registered and is ready to use Nextel's iDEN
Packet Data network.
Web usinga secureconnection.
Text Messages or Net Alert messages.
Voice Mail messages.
which the phone is set to notify you when you
receive callsandothertypes of messages. See
“Ring Style and Notification Type” on page 111.
T9 Text Input — you are using T9 Text I nput to
enter text.See “Using T9® TextInput” on page
20.
Text Display Area
On the idle screen,thetext display area shows Boost and the time and date.
When you access otherscreens, this area displays menu options,messages,
names, phone numbers, and other information.
The number of lines of text displayedinthetextdisplay area depends on which
display view is selected:
• Standard view
• Compressed view
• Zoom view
In Standard view,f ive lines of text are displayed.
NOTE:Standard view is the default display setting. Unless otherwise
noted, illustrations in this User’s Guidedepict Standard view.
29
Page 38

Call Information Icons
Each of the following icons appear on the left side of the text display area
providing you with information about your phone’sline.
Icon Indicates...
D In Call - phone is on an active call.
E Incoming Call - phone is receiving an
X Outgoing Call - phone is placing an
z
? End Call - phone has ended the activecall.
incoming call.
outgoingcall.
On Hold - phone has a call on hold.
Menu I con
The menu icon S appears on any screen from which a menu can be accessed.
To access a menu, press mon your keypad.
Menusarecontext sensitive. That means thattheoptions on thenewlydisplayed
menu apply to the task you are currentlyperforming.
Pressingm from the idle screen accesses the main menu.
Display Options
Two displayoptions appearat the bottom of most screens.These options enable
you to perform a wide variety of actions, including:
• changing
• savingandviewing information
• runningprograms
• canceling previous actions
You activate a display option by pressing A below it.
30
boostmobile.com
Page 39

Navigating Menus and Lists
The idlescreendisplay options providequick access to twomain menu features.
You can controlwhichdisplay optionsappearon the idle screen using the
Personalize feature in the Settingsmenu (see “Changing Idle Screen Options”
on page 116). The display options on screens other than the Boost idle screen
cannot be customized.
Navigating Menus and Lists
The i50sx phone is menu driven. By navigating menus, you access submenus
which lead to all ofthe functionsand features thatare builtintoyour phone. Use
the menus to:
• store calls
• manage your Phonebook and Datebook
• changeyour phone settings
• browse the Boost Wireless Web
• and more
Some features include lists of names, numbers, or other information. These list
items can be accessedthesame way menu options are.
To access the items in a menu or list, scroll using the four-way navigation key
N near the center of your keypad.
• Scrolldown by pressing the lower portionof the navigation key R.
• Scrollupby pressing the upper portion of the navigation key Q.
• Holdingdown the appropriatepart of the navigation key speeds up
scrolling.
• Ifmore itemsappear inamenuor list thancanbe displayed inthe textarea,
a down arrow or up arrow appears in the left sideof the screen indicating
that more options may be accessed by scrolling up or down.
31
Page 40

Main Menu Options
To access the main menu, press m from the Boost idle screen.
The mainmenu optionsare shown in thenexttable. You canchange the order in
which they appear byusingthePersonalize feature (see “Reordering Main
Menu” on page 116).
Menu Item Use to ...
7 Web Browse the Boost Wireless Web.
F Java Apps Run pre-installed Java games on your phone.
m Settings Customizeyourphone: Ring/Vibe, PhoneSetup, In Call
b Phonebook Store and retrieve a list of stored entriesforcalli ng,
R Messages Receive, store, access,andmanage Voice Mail, Text
GCall Forward Use settingsto forward calls in various situations.
= Datebook Schedule and organizeevents, by the day or the month,
O Memo Input and store numbers to access later.
z Call Timers Display the duration of phone calls, Private Calls, and
j Recent Calls Access a list of the last 20 sent, received, or missed
n Shortcuts Associate a menu option with a number on the
Setup,Security, Personalize, Initial Setup,andVoice
Volume .
editing,vi ewing, and deleting.
Messages, and Net Alerts.
such as appointments and meetings.
Kilobytes sent and received.
calls. Calls can be made from this list.
alphanumeric keypadforquickandeasyaccess.
32
boostmobile.com
Page 41

Main Menu Options
U My Info View the name, Private ID, phone number, and IP
: Call Alert Store Boost 2WAYmessage alerts to respond to at your
To choose the highlighted main menu selection, press B under SELECT. To
exitthemain menu and return to the Boost idle screen, press A under EXIT or
press e.
addressof your phone.
convenience.
33
Page 42

34
boostmobile.com
Page 43

Phonebook
The Phonebook allows you to store up to 250 frequently used names and
numbers.
When youstore information inyourPhonebook, it is savedonyour SIM card. If
you move your SIM card to another Boost Mobile SIM-based phone, you can
access information in your Phonebook from that phone.
NOTE:If you use a different SIM card in your phone, some information
stored in the phone will not be transferred. See “Inserting/
Removing the SIM Card” on page 14.
This section includes:
Phonebook Entries and Speed Dial Numbers Page 36
Phonebook Icons Page 36
AccessingYour Phonebook Page 37
About Phonebook Entries Page 37
Viewing Phonebook Entries Page 38
Sorting Phonebook Entries Page 38
Adding Phonebook Entries Page 39
Deleting Phonebook Entries Page 45
Pause Digit Entry Page 46
Plus Dialing Page 47
35
Page 44

Phonebook Entries and Speed Dial Numbers
Your Phonebookcanstore multiple phone numbers to a single name. For
example,you canentersomeone’s name into your Phonebook once and then
add that person’s home, office, mobilephone, andfaxnumbers to the name.
You can store up to seven phone numbers, a Private ID, and an IP address.
Each number stored inyourPhonebook is automatically assigneda Speed Dial
numberthatcorrespondstoitslocation in your Phonebook.Each phone number
uses one Speed Dial location, even if it is assigned to the same name as other
phone numbers.The phone number stored in location 1 is assigned Speed Dial
number1, thephone number stored inlocation 2 is assigned Speed Dial number
2, and so forth, to location250.
NOTE:Private IDs do not haveassociated Speed Dial numbers.
Phonebook Icons
Icons that appear to the right of entries in your Phonebook convey information
about those entries.
When you enter a number in your Phonebook, you can designat e the number’s
type using any of the following icons:
W Mobile
h Private
+ Work
Q Main
L Home
b Pager
A Fax
Z Other
] IP
For more informationonentering numbers into your Phonebook, see “Adding
Phonebook Entries” on page 39.
boostmobile.com
36
Page 45

Accessing Your Phonebook
The “picker” arrows appearing around the numbertypeiconindicates multiple
numbers stored under one name:
ef Pickers
Accessing Your Phonebook
If PHBK is one of your displayoptions:
From the idle screen, press A under PHBK.
If PHBK is not one of your display options:
1
From the idle screen, press m.
2
Press R to scroll to Phonebook.
3
Press A under SELECT.
USER TIP:You can also access the Phonebook while you are on an
This brings you to the Phonebook screen. From thisscreen, you can view,sort,
add, edit,and delete Phonebook entries, check Phonebook capacity,or make
calls.
activecall. Press
and press
A under SELECT.
m then press R to scroll to Phonebook
About Phonebook Entries
Each Phonebook entry may contain the following information:
• Thenameassociatedwiththeentry— Typically, this is the name of the
person whosenumber you are storing in the Phonebook.
• The type of number to be stored — Mobile, Private, Work, Main, Home,
Pager,IP,Fax,orOther.
• Thenumbertobestored— Every Phonebookentry must contain a
number. This numbermaybe any type of phone number, Private ID, or an
IP address.
• A Speed Dial number — You may accept the default Speed Dial number
or assign a different one.
37
Page 46

Viewing Phonebook Entries
Names with more than one numberassigned to them appear with ef
surrounding the icon to the right of the name. For example, if you had stored a
home and work number for Joe Smith, the entry for Joe Smith’s home phone
number would looklike this:
Joe Smith eLf
Whenthenameishighlighted,pressT to scroll to the icons representing each
of the numbers assigned to that name.
To view any of the numbers assigned to a name:
1
From the Phonebook screen, press S to scroll to the name associated
with the number you want to see.
2
Press T to view the icons representingthe numbers assigned to that
name.
3
When the icon representing the number you want to view is displayed,
press A under VIEW.
Or,
If there isaPrivate ID stored for the entry, press m.ThenpressR to
scrollto View and press A under SELECT.
4
Press S to view the other numbers stored for this name.
Sorting Phonebook Entries
You can sort your Phonebook entriesby:
• Name — thenameyouenteredfortheentry
• Speed # — the Speed Dial location of the entry
NOTE:Private IDs cannot be accessed from the Phonebook when
sorted by Speed Dial location.
boostmobile.com
38
Page 47

About Phonebook Entries
To sort your Phonebook list:
1
From the Phonebook screen, press m to view the Phonebook Menu
screen.
2
Press R to scroll to Sort By.
3
Press A under SELECT.
4
Press R to scroll to the desired sorting method: Name or Speed #.
5
Press A under SELECT.
Checking Phonebook Capacity
Your Phonebookcanstore up to 250 separate numbers.To see how many
entriesare stored in your Phonebook:
1
From the Phonebook screen, press m to view the Phonebook Menu
screen.
2
Press R to scroll to Capacity.
3
Press A under SELECT.
The Capacity screen shows how many storagespaces in your
Phonebook are in use and how many are empty.
Adding Phonebook Entries
Using the following instructions, you will enter the information in the order the
items appearon the Phonebook Entry Details screen.However, you can enter
this information in any order by pressing S to scroll through the items on the
Entry Details screen.
You canleave an item blankorunchanged bypressing S to scroll past it on the
Entry Details screen.
NOTE:Number and type are required for a valid Phonebook entry.
To cancel a Phonebook entry at any time, press e to return to the idle screen.
39
Page 48

To add a Phonebook entry:
1
To access the Entry Details screen:
From the Phonebook screen, with[New Entry] highlighted, press A
under SELECT.
Or,
From thePhonebook screen, press m.ThenpressR to scrollto New
and press A under SELECT.
2
If you want to assign a name to your Phonebook entry:
With the Name field highlighted, press A under CHANGE.
From the Namescreen, enter the name using the alphanumeric keypad.
See “Using T9® Text Input” on page 20 for information about entering
text into this field.
When you are finished, press A under OK.
The Entry Details screen returns with the Type field highlighted.
3
With the Type field highlighted, press A under CH ANGE.
From the Type Editor screen, press S to scroll to the type of number
you want to assign to the Phonebookentry.
Press A under SELECT.
The Entry Details screen returns with the # field highlighted.
boostmobile.com
40
Page 49

About Phonebook Entries
4
Assign a number to your Phonebookentry:
With the # field highlighted, press A under CHANGE.
Type the number using the alphanumeric keypad. For phone numbers,
use the 10-digitformat. For PrivateIDs use
Area ID*Network ID*Member ID (the asterisks mustbe included as
part of the Private ID).
To delete a digit, press A under DELETE.
See “Pause Digit Entry” on page 46 and “Plus Dialing” on page 47 for
information on using these features when storing phone numbers in
your Phonebook.
NOTE:The number can be up to 20 characters long.
When you are finished, press A under OK.
The Entry Details screen returns with the Speed # field highlighted.
5
The default Speed Dialnumber assigned to the phone number is
displayedintheSpeed # field. This is alwaysthe nextavailable Speed
Dial location.
NOTE:Private IDs do not haveassociated Speed Dial numbers.
To accept the default Speed Dial location, press A under OK.
If you want to assign the phone number to a different Speed Dial
location:
With the Speed # field highlighted, press A under CHANGE.
Press A under DELETE to delete the current Speed Dial number.
Type the new Speed Dial number using the alphanumeric keypad.
When you are finished, press A under OK.
NOTE:If you change the Speed Dial number to one already in use,
you will be prompted to overwrite the entry that is currently
in that location. Pressing
existing entry from your Phonebook.
A under YES will delete the
41
Page 50

6
If you want to store more numbers to the name associated with this
Phonebook entry:
Press R to scroll to Type and thenpress A under CHANGE.
AnewType field appears for the additionalnumber.
Enter the information for the additional number using step 3 through
step 7.
NOTE:Each name in your Phonebook may have up to seven phone
numbers, one Private ID, and one IP address associated with
it.
7
When you have entered all the information for this Phonebookentry,
press A under DONE.
Storing Numbers and Private IDs Fast
Your phone gives you two ways to store numbers quickly: from the idle screen
and from the Recent Calls list.
To store a number from the idle screen:
1
From the idle screen, use the alphanumeric keypad to enter the number
you want to store. For phone numbers,use the 10-digit format. For
Private IDs, use Area ID*Network ID*Member ID.
2
Press m to access the Dialing Menu screen.
3
With Store Numberhighlighted, press A under SELECT.
This displays the Store To screen.
42
boostmobile.com
Page 51

About Phonebook Entries
4
To store to a new entry, press A under SELECT. The Entry Details
screen willdisplay with the number entered in the field.
Or,
To store to an existing entry, press R to scroll the list of names in
your Phonebook. Or press the first letter of the entry to jump to the
entry. Once the desired entry is highlighted, press A under SELECT.
The Phonebook information for that entry displays with the number
enteredinthe# field and the Type field highlighted.
5
PressA under CHANGE. PressR to scroll to the type of number you
want to assign to the Phonebook entry. Press A under SELECT.
6
If you want to addmorei nformation to the Phonebook entry, follow the
applicable instructions in “Adding Phonebook Entries” on page 39.
7
Press A under DONE.
To store a number from the Recent Calls list:
1
From the Recent Callsscreen,pressR to scroll to the number you
want to store.
2
Press A under STORE. This displays the Store To screen with [New
Entry] highlighted.
3
To store a new entry,pressA under SELECT. The Entry Details
screen displays with the number entered in the # field and the Name
field highlighted.
Or,
To store to an existing entry,pressR to scrollthrough the names in
your Phonebook. Or, press the first letter of the entry to jump to the
entry. Once the desired entry is highlighted, press A under SELECT.
The Phonebook information for that entry displays.
4
Press R to scroll to the type of number you want to assign to the
Phonebook entry. Press A under CHANGE.
43
Page 52

5
If you want to addmorei nformation to the Phonebook entry, follow the
applicable instructions in “Adding Phonebook Entries” on page 39.
6
Press A under DONE.
To store a Private ID from the Recent Calls list:
1
Press R to scroll to the Private ID number you want to store.
NOTE:The Store option for Private ID numbers (e.g., 123*123*1234),
will not display in the Recent Calls list.
2
With the Private ID highlighted, press m to accesstheRecent Calls
Menu.PressR to scroll to Store.PressA under SELECT. This
displays the Store To screenwith [New Entry] highlighted.
3
To store to a new entry,pressA under SELECT. The Entry Details
screendisplays with the PrivateID iconentered in the Type field, the
Private ID number entered in the # field, and the Name field
highlighted. With the Name field highlighted, press A under
CHANGE. Enter the name using the alphanumeric keypad. Press A
under OK.
Or
To store to an existing entry, press R to scroll through the names in
your Phonebook. Once the desiredentry is highlighted, press A under
SELECT. The Entry Details screen displays with the Private ID icon
enteredintheType field, the Private ID number enteredinthe # field,
and the Name field highlighted.
4
Press A under DONE.
Editing Phonebook Entries
1
From the Phonebook screen,press R to scrolltothe entry youwant to
edit.
2
Press m to view the Phonebook Menu.
boostmobile.com
44
Page 53

About Phonebook Entries
3
Press R to scroll to Edit.
4
Press A under SELECT.The Entry Details screendisplays.
5
Followthe applicable instructions in “Adding Phonebook Entries” on
page 39 to edit the various fields.
NOTE:To add additional numbers to an existing entry, follow the
applicable instructions in “Adding Phonebook Entries” on
page 39.
Deleting Phonebook Entries
1
From the Phonebook screen,press R to scrolltothe entry youwant to
delete.
2
Press m to view the Phonebook Menu.
3
Press R to scroll to Delete Contact or Delete Number.
Delete Contact deletes the name and all numbersassociatedwiththat
name.
Delete Number deletes the number associated with the icon that is
currently displayedin the Phonebooklist for the name. The name and
all the other numbers will remain.
4
Press B under SELECT. A warning screen displays requiring you to
confirm the deletion.
45
Page 54

Pause Digit Entry
Whenstoring a number, you canprogram yourphone so that it willnot only dial
a number but also pause before entering another seriesof numbers such as a
personal identification number (PIN) or password. This feature is particularly
usefulfor accessingautomated services such as yourhomevoice mailfromyour
i50sx phone.
Example:Let’s say you have a home voice mail account that you wanttocheck
while at an event. And, to access that account you must do the following:
• dialyourhome telephone number
• press# while the home voice mail greeting is being played
• enter your PIN to access your messages
You can program your phone to enter all of the above information for you by
separating each entry with a pause. The stored data wouldlook like this:
2135557777P#P1234. In this example, the first ten-digits represent the number
that mustbedialed to accessyour home voice mail.TheP represents a 3 second
pause.The# interrupts your greeting.Thesecond P representsanother 3 second
pause. The last four digitsrepresent your PIN.
To create a three-second pause, follow the steps below:
Press and hold * for two seconds. The pause symbol (P) will appear
on the displayscreen.
NOTE:You can enter up to 20 characters in a single entry,stored or
dialed. You can program your phone to pause for more than 3
seconds. Performing the above step twice will program two
pauses and cause your phone to wait 6 seconds before entering
the next setofnumbers.
46
boostmobile.com
Page 55

Plus Dialing
Plus Dialing
NOTE:Your phone has not been set up to make international calls or
roam outside of the United States. Please contact Boost
Customer Care at 1-888-BOOST-4U (1-888-266-7848) if you
would like to have access to international dialing from your
i50sx phone.
This feature enables you to place an international call from most countries—
without entering the local international access code. Use Plus Dialingfor all
Phonebookentries if you plan to travel outside the United States. You can enter
phone numbers into your Phonebook using either Plus Dialing and Storing
NumbersFastor Adding Phonebook Entries and PlusDialing.
To add a phone number using Plus Dialing and StoringNumbers Fast:
1
Press and hold 0 for two seconds. A “0” appears, then changes to a
“+”.
NOTE: The network translates the “+” into the appropriate international access
code needed to place the call.
2
Enter the countrycode, city code, or area code, and phone number.
3
Continueby following theremaininginstructionsfor“Storing Numbers
and Private IDs Fast” on page 42.
To add a phone number using Adding Phone Book Entries and Plus Dialing:
1
Beginbyfollowingtheinstructionsfor “AddingPhonebook Entries” on
page 39. Before you type the number to be stored, followthe rest of
these instructions for using Plus Dialing.
2
Press and hold 0 for two seconds. A “0” appears, then changes to a
“+”.
NOTE: The network translates the “+” into the appropriate international access
code needed to place the call.
3
Enter the countrycode, city code, or area code, and phone number.
Continue withthe Phonebook entry, following the remaining
instructions for “Adding Phonebook Entries” on page 39.
47
Page 56

48
boostmobile.com
Page 57

Digital Cellular
The i50sx phone uses Nextel’s All-Digital National Network fordigital cellular
service.
This section includes:
Phone Calls Page 50
Emergency Calling Page 54
Special Dialing Codes Page 55
Receivinga Phone Call Page 55
Sending Unanswered Calls to Voice Mail Page 55
Missed Calls Page 56
Recent Calls Page 56
Call Timers Page 59
Hands-Free Speakerphone Page 60
Mute Page 60
Call Hold Page 61
Call Forwarding Page 61
Caller ID Page 64
Call Restrictions Page 65
Boost Mobile 411 Page 65
49
Page 58

Phone Calls
Your i50sx phone provides the following featuresformaking phone calls:
• Direct Dial
• Phonebook
• Recent Calls
• Speed Dial
• Turbo Dial
• Last Number Redial
Using Direct Dial
1
From the idle screen,usethe keypad to enterthe10-digit phone number
youwanttocall.
2
Press s to place the call.
3
Press e to end the call.
NOTE:See “Plus Dialing” on page 47 for information on making
If you make a mistake:
• To clear one digit, press A under DELETE.
• To clearalldigits, press and hold A under DELETE.
• To insert a digit, press T to move the cursor.
• To cancel, press e.
®
international calls.
Making Calls from the Phonebook
After you have entered phone numbers into your Phonebook,you can use these
numbers to make phone calls.For information on entering numbers into your
Phonebook, see “Adding Phonebook Entries”on page 39.
boostmobile.com
50
Page 59

To make calls from the Phonebook:
1
From the idle screen,ifPHBKis one of your display options, press A
under PHBK.
Or,
Fromtheidlescreen,pressm,thenpressR to scroll to Phonebook.
Press B under SELECT.
2
Press R to scroll through the names in your Phonebook.
Or,
Use the alphanumeri c keypad to enter the firstletter of the name and
press R to scrollthrough the names beginningwith that letter.
Stop when the name of the person you want to call is highlighted.
3
If more than one number is storedfor the person you want to call, ef
appearsaround the icon to the right of the person’sname.
Press T to scrollthrough the iconsrepresenting the numbersst ored for
that person.
Or,
Press B under VIEW to view all the numbers stored for this person.
Then press R to scroll to the number you want to call.
Phone Calls
For more information on assigning multiple numbers tooneperson, see
“Adding PhonebookEntri es” on page 39.
4
Press s to place the call.
5
Press e to end the call.
51
Page 60

Making Calls from the Recent C alls Li st
Your phone stores the numbers of the last 20 calls you received or sent in the
RecentCalls list.
1
From the idle screen, press R.
Or,
From the idle screen, press m.PressS to scroll to RecentCalls.
Press B under SELECT.
2
Press S to scroll through the list of received or sent recent calls until
you reach the desired call.
3
To view additionalinformation about the call:
Press B under VIEW.
Or,
Press m to access the Rec. Calls Menu.ThenpressR to scroll to
View and press B under SELECT.
4
Press s to place the call.
5
Press e to end the call.
Using Speed Dial
Each phonenumber stored in your Phonebookis assigned a SpeedDialnumber.
You can use the Speed Dial number to quicklyplace a call.
1
From the idle screen, enter the Speed Dialnumber assigned to the
phone number you want to call.
2
Press #. The number’s Phonebookentry information will display.
3
Press s to place the call.
4
Press e to end the call.
boostmobile.com
52
Page 61

Phone Calls
Using Turbo Dial
Turbo Dial allows youto call the numbersinyourPhonebook associated with
Speed Dial numbers1 through9 by pressing and holding the corresponding
numerickeyonthekeypad.
Press and hold a number (keys 1 through 9).
NOTE:Turbo Dial cannot be accessed while the browser is active, nor
while Keypad Lock or SIM Lock is active.
Last Number Redial
Press and hold s to redial the last number you called.
NOTE:If you receive “System Busy, Try Later,” press s to redial the
number automatically. You will hear a ring-back tone when the
call is successfully placed.
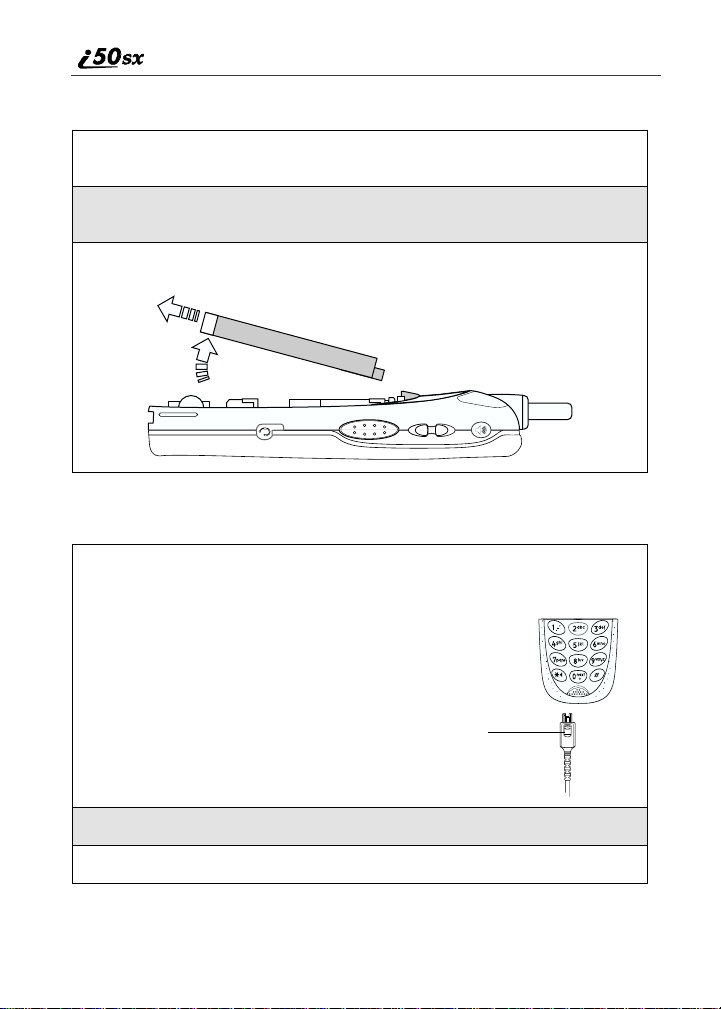
Making TTY Calls
You can use your phone to make calls using a TTY device.
When you make a TTY call, the call begins in the TTY mode you last selected.
You canchangethe TTY mode during a call.For more information on choosing
a TTY mode, see “Setting TTY Mode `” on page 123.
1
Connectone end of a 2.5mmcable into thejackon the phone.(Tolocate
the jack, see page 4.) Connectthe other end of the cord into your TTY
device.
2
Enter the phone number you wish to call and press s.
Placing International Phone Calls
NOTE:Your phone has not been set up to make international calls or
roam outside of the United States. Please contact Boost
Customer Care at 1-888-BOOST-4U (1-888-266-7848) if you
would like to have access to international dialing from your
i50sx phone.
53
Page 62

When making an international call from outside of the United States and
Canada, you caneither enter the international accesscode directly (forexample,
011 in the United States) or use Plus Dialing.
You can make international calls while traveling outside of the United States
and Canada from your Phonebook if you have stored the numbers with Plus
Dialing. See “Adding PhonebookEntries ” on page 39 and “Plus Dialing” on
page 47 for more information.
NOTE:Your service default is “International Calls Restricted.” Contact
Boost Customer Care to obtain international dialing access.
NOTE:International calls placed within the United States and Canada
do not require an international access code.
To make an international call using Plus Dialing:
1
Press and hold 0 for two seconds. A “0” appears,then changes to a
“+”.
NOTE:The network translates the “+” into the appropriate
international accesscode neededto place the call.
2
Enter the countrycode,city code, or area code (as needed), and phone
number.
3
Press s to place the call.
4
Press e to end the call.
Emergency Calling
Your phone supports emergency calling. Emergency calls can be made even
when the SIM card is blocked or not in the phone.
To place a call inan emergency, press 911s. You will be connectedto
the nearest emergency dispatchcenter. If youare on an active call, you mustend
it before calling 911.
NOTE: If you have enabled the Keypad Lock feature, you must unlock
the phone’s keypad before any call can be made, including 911
emergency calls.
54
boostmobile.com
Page 63

Special Dialing Codes
Special Dialing Codes
Non-Emergency Numbers
Boost Mobile supports many “non-emergency” numbers (such as #77, 311,...)
providedby local and state governments.Thesenumbers are used to report
non-emergency incidents. If the situation includes imminent danger or loss of
life, you shoulddial 911.
Telecommunications R elay S ervice
Boost Mobile supports servicesforcommunicating with speechand/or hearing
impaired individuals. You can press 711 to reach a local
Telecommunications Relay Center. You will then be connectedtoyour
destination number. Relay service works through a Communications Assistant
who reads messages typed into a TDD/TTY device by a speech or hearing
impairedindividual to you. The Communications Assistantthen types your
spoken messages to the hearingor speech impaired individual.
Telecommuni cations Relay Service is available 24hoursa day, seven days a
week, and everycallisstrictly confidential.
NOTE: Using 711 to reach Telecommunications Relay Service may not be available in
all areas.
Receiving a Phone Call
Incoming calls are indicatedby a ring, vibration, or backlight illumination.
The screen displays:
• the caller’s name (if stored in your Phonebook), and the icon indicating
numbertype(work,home, m obile, etc.), or
• the 10-digit phone number if Caller ID information is available.
Otherwise, the screen displays Incoming Call.
Press s or press B under YES to answer the call.
Sending Unanswered Calls t o Voice Mail
Press e or press B under NO while your phone is ringing to transfer
incoming calls directly to Voice Mail. The y icon will appear on the
idle screento remind you that you have a stored voice mail message.
55
Page 64

Missed Calls
Missedcalls are shown on the displayscreen with the missed call icon V.
Ending a Phone Call
Simply press e.
NOTE: The Recent Calls list displays briefly after each call.
Recent Ca lls
The Recent Calls feature stores the phone numbersof the 20 most recentcalls
you have made and received, including Private Calls. You can accessRecent
Calls to:
• view your recent calls
• store numbers to the Phonebook
• delete recentcalls
• call numbersontheRecent Calls list
NOTE: The Recent Calls list displays briefly after each call.
Recent Calls Icons
For PrivateCalls and numbers storedinyourPhonebook, an icon appears to the
right of the name or number indicating the Phonebook type of the number used
in the call. See “Phonebook Icons” on page 36 for more information about
Phonebook types.
For phone calls, an icon appears to the left of the name or number indicating the
type of call:
• N indicates an incoming call
• a indicates an outgoing call
• V indicates a missed call (Missedcalls appear on your Recent Calls list
only if you have CallerID.)
For Boost 2WAY calls, an icon appearsto the left of the name or number
indicating the type of call:
• h indicates a Private Call
56
boostmobile.com
Page 65

Recent Calls
Viewing Recent Calls
If thenumber of the recentcall is storedin your Phonebook, thename associated
with the number displays.
To view your Recent Calls list:
1
From the idle screen, press R.
Or,
From the idle screen, press m.PressS to scroll to RecentCalls.
Press B under SELECT.
2
Press S to scroll the list of recent calls.
Getting Detailed Information About Recent Calls
To get more information about a recent call:
1
From the Recent Calls screen, press S to scroll to the call for which
you want more information.
2
Press m to access the Rec. Calls Menu.ThenpressR to scroll to
View and press B under SELECT.
The Call Details screen displaysinformation such as the name associated with
the number of the recentcall (ifstored in your Phonebook),the number, the
date, time, and duration of the call.
57
Page 66

Storing a Recent Call Number to the Phonebook
To store a number from the Recent Calls list to the Phonebook:
1
From the Recent Calls screen, press S to scroll to the number you
want to store.
2
Press B under STORE.
Or,
Press m to access the Rec. Calls Menu.ThenpressR to scroll to
Store and press A under SELECT.
This displays the Store To screen with [New Entry] highlighted.
3
To store a Recent Call number of Private ID to the Phonebook, follow
step 3-6 in “Storing Numbersand Private IDs Fast” on page 42.
Calling From the Recent Calls List
See “Making Calls from the Recent Calls List” on page 52.
Deleting Recent Calls
To delete a recent call:
1
From the RecentCalls screen, pressS to scroll to the call you want to
delete.
2
Press m to access the Rec. Calls Menu.
3
Press R to scroll to Delete.
4
Press B under SELECT.
5
Press A under YES to confirm the deletion.
boostmobile.com
58
Page 67

Call Timers
To delete allcalls on the Recent Calls list:
1
From the Recent Calls screen, press m to access the Rec. Calls
Menu.
2
Press R to scroll to Delete All.
3
Press B under SELECT.
4
Press A under YES to confirm the deletion.
Call Time rs
Call Timersmeasure the durationofyourcellular phone calls and PrivateCalls,
as well as the number of Kilobytes sent andreceived by your phone.
The Call Time rs menu displays the following options:
• Last Call — displays the duration of your most recent phone call.
• PhoneReset — keeps a runningtotal of your phonecall minutes, until you
reset it.
• Phone Lifetime — displaysthe totalminutes of all your phone calls.
• Prvt/GrpReset — keeps a running total of all of your Private minutes,
until you reset it.
• Prvt/Grp Lifetime — displays the total minutes of all your Private Calls.
• Kbytes Reset — keeps a runningtotal of the number of Kilobytes sent and
receivedby your phone, until you reset it.
To view the Call Tim ers menu:
1
From the idle screen, press m.
2
Press R to scroll to Call Timers.
3
Press B under SELECT.
To view or reset a Call Timers option:
1
From the Call Timersmenu, press R to scroll to the Call Timers
option youwant to view or reset.
59
Page 68

2
Press B under SELECT.
3
If the feature does not include an option to reset or you do not wish to
reset the option, press A under DONE when you are finished viewing.
To reset a feature,press A under RESET. When the confirmation
screen appears, press A under YES to confirm the reset.
NOTE:The values displayed by Call Timers should not be used for
billing.
Hands-Free Speakerphone
The i50sx phone provides the convenience of a hands-freespeakerphone for
placingsaferphone calls.
The speakerphoneopti on (SPEAKER)is available whenever you are on an
active call.
NOTE:During speakerphone operation, you may either speak or listen,
but you cannot do both at the same time.
To turn the speakerphone on:
While on an active call, press B under SPEAKER.
While speakerphone is on, Spkrphone On appears in the text display area.
To turn the speakerphone off:
Press B under SPEAKER.
Mute
Use the Mute feature to listento incoming audio without allowing sound from
your phone’s microphone to be transmitted over the phone line.
To turn mute on:
While on an active call, press B under MUTE.
boostmobile.com
60
Page 69

Call Hold
While mute is on, UNMUTE appears as a display option.
To turn mute off:
Press B under UNMUTE.
Call Ho ld
When you are on an active call, you can place the callon hold.
To place an active call on hold:
1
Press m to access the Call Menu.
2
Press R to scroll to Hold.
3
Press B under SELECT.
4
Resume the callbypressing B under RESUME.
Call Forwarding
Boost Mobile’s Call Forwarding featuresforward calls to the number you
designate. The following Call Forwarding optionsareavailable:
• All Calls — When this option is turned on, all calls will be automatically
sent to a number you specify. When this option is turned
off,your Detailed optionswill be activated.
• Detailed — Choosing this option enablesyou to forward calls you missed
to Voice Mail or other numbers, depending on why you missed each call:
• Busy — your phone is engaged in other activities.
• No Answer — you do not answer.The phone will ring 4 times before
forwarding the call.
• Unreachable — your phone is out of coverage or powered off.
61
Page 70

When your phone is set to forwardAllCalls, the CallForward icon appears on
the top row of your display screentoindicate t he call forwarding option is on.
Icon Indicates...
G Line1isactive; calls from Line1 are being
forwarded.
TurningOnCallForwarding
1
Press m then press R to scroll to Call Forward.
2
Press B under SELECT.
3
At the Call Forwardscreen, the Forward field is highlighted.Press
B under CHANGE.
4
Press S to scroll to All Calls.
5
Press B under SELECT.
6
Press R to scroll to the To field and press B under CHANGE.
62
boostmobile.com
Page 71

Call Forwarding
7
To activate a call forwarding number:
If you have never used Call Forwarding before, the Forwardscreen
appears. To entera call forwarding number, type the number on your
phone’skeypadorpressB under SEARCH to select from numbers
stored in your phone.Press B under OK.
Or,
If you have used Call Forwarding before, the call forwarding number
youlastusedisdisplayed.PressB under CHANGE to access the
Forward screen.
To forward your calls to this number, press B under OK.
To forward your callsto a different number, press and hold A under
DELETE to erase the displayednumber.Type the new number on your
phone’skeypadorpressB under SEARCH to select from numbers
stored in your phone.Press B under OK.
Your calls will now be forwarded to the number that you selected.
Turning Off Call Forwarding
1
Press m then press R to scroll to Call Forward.
2
Press B under SELECT.
The Call Forward screen displayswith the Forward field highlighted.
3
Press R to scroll to the To field and press B under CHANGE.
4
Press S to scroll to Off and press B under SELECT.
You will now receive all calls on your phone. When you are unavailable, your
calls willbe forwarded according to your Detailed call forwarding settings. By
default, the Detailed option is set to forward your calls to Voice Mail. Turning
off Call Forwarding restores your ability to receive Voice Mail messages when
you are unavailable (see “Turning Off Call Forwarding” on page 63).
63
Page 72

Caller ID
If you subscribeto CallerID,yourphoneautom atically displays the phone
number or name (if the 10-digitphonenumber is stored in your Phonebook) of
the person calling(unless blockedby the caller),enablingyoutodecide whether
to take the call or forward it to Voice Mail.
NOTE:Caller ID information is not available on all calls.
Acaller’s name is displayedif you have entered the person’s number into your
Phonebook (see“Adding Phonebook Entries” on page 39). Otherwise, the
caller’s phone number will be displayed.
Maintaining Your Privacy with Per-Call and Per-Line
Blocking
Boost Mobile provides two methods to prevent those youcall from seeing your
number on their own Caller ID displays.
NOTE:Your i50sx phone number cannot be blocked from calls made to
911, 800, 855,866, 877, 888, or other toll-free phone numbers.
Per-Call Blocking
You can block delivery of your phone numbertoother Caller ID units for a
singlephone call.
To set:
Press *67before dialing the call.
Per-Line Blocking
You can permanently block deliveryof your phone numberon everycall you
make. You must order this feature by contacting Boost Customer Care.
To disable on a per-call basis:
Press *82before the call.
boostmobile.com
64
Page 73

Call Restrictions
Call Restrictions
You can prevent your phone from making or receiving specific types of calls.
Boost Mobile currentl y offerstwo typesof Call Restricti ons:
• no incoming calls
• no outgoing calls (except 911)
Contact BoostCustomer Care for more information.
Boost M obile 411
The Directorythat puts you straight through — Now there is no need to make
two calls, memorizea number, or hunt for a pen to write a numberdown.Boost
Mobile 411 is your mobile directoryservice that connects you straight through
to the number you want.
WhitePageListings
You can requesta telephone number for any person, business, or government
agency in the continental United States and Hawaii. Operators can also provide
addressinformation if available.
Yellow Page Listings
Youcanaskthe operatortoperform a search by category if thespecificbusiness
nameisunknown. Forexample,youcan requestinformation forasurfshop near
your home or school.
Nationwide Call Completion
Boost Mobile 411 operators can connect you to any listing in the continental
United States and Hawaii. If requested, the operator will stay on the line while
connecting to the number.
Driving Directions
Boost Mobile 411 operators are able to provide directions to reach a specific
destination.Operatorswill work with you to determine your starting pointand
provideclear directions to the destination.
65
Page 74

Restaurant Reservations
Boost Mobile411 operators can assist in finding a restaurant and then
coordinate reservations. A Boost Mobile 411 operator will confirm your
reservation information through a return phonecall. For your convenience,the
reservation will be in your name.
NOTE: Reservation service may not be available for all restaurants.
Movie Listings and Show Times
Boost Mobile 411 operators have accessto movie listings at most theaters inthe
continental United States and Hawaii. You only needtoask for a specific movie
or movie theater to get currentmovies, locations or show times. Additional
information suchas running time,synopsis, and ratingsare also available. Show
times and listings are available 24-48hours in advance.
Local Event Information
You can requestinformation on local events such as sporting events, concerts ,
state and county fairs and other current events. Boost Mobile 411 operators can
provide dates, times, and locations for these events.
66
boostmobile.com
Page 75

Boost Mobile Voice Mail
Record a personalize d greetinganduse your BoostMobile Voice Mail when
you are not availableto answercalls .
This section includes:
Setting Up Your Voice Mail Box Page 67
Receiving Voice Mail Messages Page 68
Logging into your Boost MobileVoice Mail Page 69
AdvancedVoice Mail Features Page 72
Boost Mobile Voice Mail Tree Page 80
This section coversthe mostcommonly used VoiceM ail features. Onceyoulog
into VoiceMail, there are a number of innovative features you can access. They
are also covered in this section. After you access Voice Mail, an automated
systemtells you each menu option and which key to press to make a menu
selection. See “Boost Mobile Voice Mail Tree” on page 80.
Setting Up Your Voice Mail Box
You must set up your Voice Mail box before you can retrieve messages. The
followingsteps will tell you how to setup your mailbox. Before getting started,
see “Recording Your Active Greeting” on page 72 for information you may
want to include in your greeting.
1
Using your i50sx phone, enteryour10-digit Boost Mobile Personal
Telephone Number (PTN). For example: 2135557777.
If you are calling from a phone other than your i50sx phone,dialyour
10-digit Boost Mobile PersonalTelephone Number (PTN). W hen you
hear the greeting, press * to access your Voice Mail box.
The system prompts you to Enteryourpassword. Enter the last seven
digitsof your Boost MobilePersonal Telephone Number. For example:
5557777.Thisis your temporary password.
67
Page 76

2
Follow the system instructions to:
• Create a new four- to seven-digit password(see“Changing Your
Password” on page 71).
• Record your name (see “Recording Your Name” on page 71).
• Record a greeting (see “Recording Your Active Greeting” on page
72).
3
When the system says “Enjoy using Boost Mobile Voice Mail”, your
mailbox is set up.
Receiving Voice Mail Messages
Yourphone is pre-programmed with default CallForwarding settings toforward
your calls to Voice Mail when you are not available. The default setting is
Detailed with the If Busy, If No Answer and If Unreachable fieldssetto your
Voice Mail access number.
New Message Indicators
When you receive a new message:
• New Voice MailMessage willdisplayonthescreen.
• Your phone will alert you every 30 seconds until you press B under
CALL or A under EXIT.
NOTE:See “Alert Timeout” on page 124 for information on how to
customize your alert notification.
Sending Unanswered Calls to Voice Mail
Press e or press A under NO while your phone is ringing to transfer
incoming calls directly to Voice Mail. The
idle screento remind you that you have a stored Voice Mail message.
boostmobile.com
y icon will appear on the
68
Page 77

Logging into your Boost M obile Voice Mail
Loggi ng into your Boost Mobil e Voice Mail
To log into Voice Mail, you must first access the Message Center on your
phone.
1
From the idle screen, press B under MESG. The Message Center
screen displays.
2
Press R to scroll to Voice Mail. The numbers of new and total Voice
Mail messages display.
3
Press B under CALL to log into Boost Mobile Voice Mail. Calling
displaysasyou are connected to the network.
NOTE:If your hear a message that says, “Enter the phone number
of the subscriber you are trying to reach,” enteryourown
10-digit Boost Mobile Personal Telephone Number. When the
greeting plays,press
4
When prompted, enter your password.
5
Follow the system instructions for playing, saving, and deleting
messages. For more information, see “Boost Mobile Voice Mail Tree”
on page 80.
NOTE:You mustreceive a message before you canaccess Voice Mail
for the first time from your i50sx phone. (Tip: You can leave
yourself a message.)
* to receive a password prompt.
Main Voice Mail Menu
You are at the main Voice Mail menu when you hear the options listedbelow.
• To play your messages, press 1. (This option plays only if you have new
or saved messages.)
• To recorda message, press2.
• To change your greeti ng, press 3.
• To accessyourpersonal options press 4.
If you press * while you are in a sub-menu, you will go to the previous menu.
If you press **, you will go to the main Voice Mail menu.
69
Page 78

From the mainVoiceMail menu, press # to exit Voice Mail. At any time, you
mayendthecallbypressinge.
Playing Messages
When you receivea new VoiceMail message,youcan either listen toit
immediately or later.PressB under CALL to listen now or press A under
EXIT to listen later.
Options available while listening to your messages:
Replay previoussixseconds. Press 1
Rewind to beginning of message. Press 11
Pause/continue the currentmessage. Press 2
Fast forward6 seconds. Press3
Fast forwardto end of message. Press 33
Playthedateandtimestamp. Press55
Options available while a message is playingor afterit has played:
Copy themessage toanothersubscriber. (See
“Recording, Copying,and Replying to
Messages” on page 75.)
Delete the message. Press 7
Replytoamessage. Press 8
Save the message. Pr ess 9
Skip to the next message. Press #
Press 6
Saving and Deleting Messages
While a message is playingorafter you have finished listening to it, you can
save it or delete it. To save a message, press 9. To delete a message,press 7.
To have messages automatically saved, see “Automatic Playback” on page 74.
boostmobile.com
70
Page 79

Logging into your Boost M obile Voice Mail
Messagesthat arenotsaved or deleted remainin your mailbox as newmessages.
All messages are automatically deleted after 21 days.
Recovering Deleted Messag es
To retrieve deleted messages, press *3. This option only applies to the
current Voice Mail session. If you end the call, the messageswillbe
permanently deleted.
IMPORTANT:
After exiting the Voice Mail session, you
cannot recover deleted messages.
Changing Your Passwo rd
To change your current password:
1
From the main Voice Mail menu, press 4 to access Personal Options.
2
Press 4 to access Personal Preferences.
3
Press 1 to modify password.
4
Enter your new password. This passwordmust be all numbers. It must
be 4- to 7-digits long.
5
Press ** to return to the main menu.
NOTE:If you forget your password, contact Boost Customer Care.
IMPORT ANT:
For security purposes, it is recommended that
you do not choosesequential or repeateddigits
like 1-2-3-4 or 5-5-5-5 for your password.
Recording Your Nam e
When you send, reply to, or copy a message, your nameresponse precedes the
message.To record or re-record your name at any time:
1
From the main Voice Mail menu, press 4 to access Personal Options.
2
Press 4 to access Personal Preferences.
3
Press 3 to access the Record Your Name option.
71
Page 80

4
Press 2 to record your name.
5
Press ** to return to the main menu.
Recording Your Active Greeting
ThroughBoost Mobile Voice Mail service, therearea number of ways in which
people can reach you. Youmay want to include one or all of the following
optionsin your greeting so that callers will know they are available.
• Press
• Press
• Press
To record or alter your greeting at any time:
1
2
3
4
1 to send a numeric message.
2 to send an operatorassi sted message. (This option is available
onlyifyou are a subscriber ofOperatorAssistedMessaging.Contact Boost
Customer Care for more information.)
# to skip the greeting and recorda messageimmediately.
From the main Voice Mail menu, press 3 t o changeyourgreeting.
Press 1 to play, press 2 to record or re-record, or press 3 to delete
your activegreeting.
Record your greeting and press # when you have finished.
Press ** to return to the main menu.
Advanced Voice Mail Features
Multiple Greetings
Boost Mobile Voice Mailservice allows you to have up to five different
greetings. You can designatewhich greeting willbe your activegreeting at any
given time. For example, instead of your regulargreeting, you may wish to
activatea different greeting for days when you are traveling or on vacation.
The greeting that was recorded during your initial Voice Mail box setup is
Greeting 1. This is your default active greeting.
boostmobile.com
72
Page 81

Advanced Voice Mail Features
Recording Additional Greetings
To record additional greetings:
1
From the main Voice Mail menu, press 3 to access the Greetings
menu.
2
Press 4 to modify greetings.
3
Enter the greeting number you wish to create or modify.
4
Press 2 to record a greeting.
5
Record your greeting and press # when you have finished.
6
Press ** to return to the main menu.
Selecting Your Active Greeting
To select your activegreeting:
1
From the main Voice Mail menu, press 3 to access the Greetings
menu.
2
Press 3 to select another greeting to be active.
3
Enter the number of the greeting thatyou would liketo be active.
4
The system will confirm your active greetingnumber.
5
Press 1 to play your active greeting.
6
Press ** to return to the main menu.
Greetings Schedule
You can choose to have your greetings automatically activated based on a predetermined time schedule. By activating the GreetingSchedule, Greetings 1, 2
and 3 will automatically play according to the time schedule listed below.
Greeting 1
Evenings and
Weekends
5:00 pm --7:59am,Monday --Friday
24-hours,Saturday and Sunday
73
Page 82

Greeting 2
Greeting 3
Weekday
Mornings
Weekday
Afternoons
8:00 am -- 11:59 am
Monday -- Friday
Noon -- 4:59 pm
Monday -- Friday
Activating Your G re eting Schedule
To activate the greeting schedule:
1
From the main Voice Mail menu, press 3 to access the Greetings
menu.
2
Press 9 to activate your greeting schedule.
3
Press ** to return to the main menu.
Automatic Playback
By default, the playback mode of your Voice Mail service is set to Normal.
Boost Mobile’s Automatic Playback featureautomaticall y plays and savesnew
messageswhen you log in. To activate Automatic Playback:
1
From the main Voice Mail menu, press 4 to access Personal Options.
2
Press 4 to access Personal Preferences.
3
Press 2 to access Playback Preferences.
4
Press 2 to switch between Automatic and Normal Playback.
5
Press ** to return to the main menu.
Changing the Playback Ord er of Messages
With Boost Mobile Voice Mail service,you can select the order in which you
want unheard messages to be played. You may listen to the last received
messagefirst, or you may listen to the firstreceived message first. To select the
boostmobile.com
74
Page 83

Advanced Voice Mail Features
order in which new messages should be played:
1
From the main Voice Mail menu, press 4 to access Personal Options.
2
Press 4 to access Personal Preferences.
3
Press 2 to access Playback Preferences.
4
Press 1 to switch between the playback orders.
5
Press ** to return to the main menu.
Recording, Copying, and Reply in g t o Messages
These functions allow you to record and send, reply to, or copy a message to an
assigned destinationaddress or Group List number.
If you record a complete or partialmessage, but do not send it, Boost Mobile
Voice Mail service will refer to this message as an “in preparation” message.
Before sendingmessages you may want to see “Delivery Options” on page 76.
To record and send a message:
1
From the main Voice Mail menu, press 2 to access Record a Message.
2
Record your message and press # to end the message.
3
Press 9 at the prompttoindicate that you want to send the message or
press 5 for DeliveryOptions.
4
Enter the mailboxnumber and/or group list number(s). (A mailbox
numberis the 10-digit Boost Mobile Personal Telephone Number of a
Boost Mobile customer. The name of the recipient plays if it is
recorded.)
5
Press # to send.
6
Press ** to return to the main menu.
NOTE:You can only send messages using this method to Boost Mobile
customers in your home market.
75
Page 84

Delivery Options
After you have created a message, you can assignthemessage to a category
before you send it. Below is a list of the options that can be applied to a
message:
Urgent
Recipient will hear this message before other
messages.
Private
Recipient cannot copy the message to another
mailbox or phone number.
Notification of
Non-Delivery
Future Delivery
You will be notifiedifthe recipienthas not listened
to your message by a certain date and time.
Youcanspecifyatimeanddate(uptothree
months in advance) for the message to be
delivered. (See “Time and Date Charts” on page
79.)
IMPORTANT: Once a messagehas been sent
for future delivery, it cannot be
retrieved or deleted.
To set a special delivery option:
1
After recording your message but before sending it, press 5 for
Delivery Options.
2
Press the number that corresponds with the desired delivery option:
• Press1 for Urgent.
• Press2 for Private.
• Press3 for Notification of Non-Delivery. At prompt, specify
time and date.
• Press4 for Future Delivery of Messages. At prompt,specify
time and date.
• Press9 to send the message immediately.
3
The list of options will be presentedagain. Select an additional option
or press 9 to send the message.
4
Enter the destination mailbox or Group List number of the recipient(s).
boostmobile.com
76
Page 85

Advanced Voice Mail Features
5
Press # to send.
6
Press ** to return to the main menu.
Working With Group Lists
The Group List feature enables you to create a list and assign it a unique name.
Then,youcan add mailbox numbers,group lists or individuals— by name— to
the list. Once you createa list you can send a voice message to everyone on the
list by enteringthegrouplist number. You can have up to 40 group lists. Each
listcanholdupto50addresses.
Creating Group Lists
TosetupaGroupList:
1
From the main Voice Mail menu, press 4 to access Personal Options.
2
Press 2 to access your Group Lists.
3
Press 2 to create a Group List.
4
Enter the one- or two-digit grouplistnumber and press #.
5
Recordanameforthelistandpress#.
6
Select groupmembers by mailbox number, GroupList, or name.
7
Press # to save all entries added to the list.
8
Press ** to return to the main menu.
Modifying a Group List
1
From the main Voice Mail menu, press 4 to access Personal Options.
2
Press 2 to access Group Lists.
3
Press 4 to modify a Group List.
4
Enter the number of the Group List you want to modify.
77
Page 86

5
Press 1 to add a new recipient.
6
Press # to save your changes.
7
Press ** to return to the main menu.
Deleting a Group List
1
From the main Voice Mail menu, press 4 to access Personal Options.
2
Press 2 to access Group Lists.
3
Press 3 to delete a Group List.
4
Enter the numberoftheGroupList you want to delete. The system will
play the name of the Group List.
5
Press # to delete the list.
6
Press ** to return to the main menu.
Message Forwarding
This featureallows you to program your phone to automatically forward
incoming messages to another mailbox. There are three typesof forwarding:
Immediate, Silent, and Delayed. They are described below:
• Immediate Forwarding - Caller is notifiedthat the messagewill be
forwarded.
• Silent Forwarding - Caller is not notified that themessage will be
forwarded.
• Delayed Forwarding -Ifacaller’s message is not retrieved aftera certain
amount of time, themessagewill automatically be forwarded to another
mailbox or telephone number.
1
From the main Voice Mail menu, press 4 to access Personal Options.
2
Press 5 to modify ForwardingOptions.
boostmobile.com
78
Page 87

Advanced Voice Mail Features
3
Select the applicable option below:
• To createa forwarding number, press 2.
• If you have alreadycreated a forwarding number, press 2 to
modify the number.
• To enableor disable Message Forwarding, press 3.
• To change the forwarding type, press 4.
• Press 1 for Immediate Forwarding
• Press 2 for Silent Forwarding
• Press 3 for Delayed Forwarding
4
Press ** to return to the main menu.
NOTE:You can only forward messages to Boost Mobile customers in
your homemarket.
Time and Date Charts
Time and Date Charts can be referenced for specifictasks throughout Boost
Mobile Voice Mail service.
24-hour Clock
Boost Mobile VoiceMailservice uses a 24-hour clock:
NOTE:To compute the 24-hour clock for pm, add 1200.
Below is a list of hours translatedinto 24-hour time:
12-hour
Clock
24-hour
Clock
12:00 am 4:00am 8:00 am 12:00 pm 4:00pm 10:00 pm
0000 0400 0800 1200 1600 2200
Dates
All dates must have 4 digits in the MM/DD format (2 digits for the month and 2
digitsfortheday).January is 01, February is 02, etc. The first day of the month
is 01, the second day of the month is 02, etc. For days of the week, Sunday is 1,
Monday is 2, etc.
79
Page 88

Boost Mobi le Voice Mail Tree
3 Seconds
Replay Last
Play Messages
1236789
To access Voice Mail:
From your own i50sx phone, follow the instructions in the beginning
of this chapter.
From any other phone:
1. Dial your own 10-digit Boost Mobile phone number.
If prompted, enter your own 10-digit Boost Mobile phone number.
2. Press * when you hear your greeting.
3. Enter your password.
Boost Mobile Voice Mail Tree
Play
Record
Message
Messages
Main Menu
1
2
Fast
Copy
Pause/
Continue
Change Greeting
Change
Greetings
3
Delete
Forward
Message
Greeting
Greeting
Play Active
Select Active
Record Active
12347
Access
Personal
Group Lists
Options
Personal
our Own
2
Exit
Options
Personal
Voice Mail
4
#
Save
Reply To
Message
Message
Message
Play Next
Greeting
Greeting
Greeting
Delete Active
Modify Another
Activate Greeting
Modify
Playback
Password
Preferences
4
Global Options
Preferences
123
Main
Menu
Menu
Previous
*
**
Message
#
Schedule
9
Name
Record
Recover
Deleted Messages
*3
80
boostmobile.com
Page 89

Messaging Services
Your i50sx phone offers two-way Text Messaging that helpskeepyou in touch
with family and friends, regardless of your lifestyle demands. Text Messaging
uses the Boost Wireless Web to provide immediate contact, even when you
can’t make or takea call.Boost Mobile two-way Text Messaging allowsyouto
send, receive, and respond to text messages quickly and discreetly, at the push
of a button.
NumericMessaging allows numeric messagestobe sent through Boost Mobile
Voice Mail (see “Recording Your Active Greeting” on page 72).
The main topics covered in this section are:
Boost Mobile Text Messaging Page 81
NumericMessaging Page 82
MessageCenter Page 82
Boost Mobile Text Messaging
Your i50sx phone refers to two-way Text Messages as Net Alerts.
With Boost Mobile two-wayTextMessaging, you can:
• Send and receive messages (up to 500 characters in length) withpreset
replies and respond to them at the touch of a button.
• Createandstore your own frequently used responses that lets you send
informative answers without keying in text.
• Send messages to one individual from your phone or contactseveral at
once from any email systemor boostmobile.com.
• Respondtomessageswhenyou’re at a movie or in a noisy location.
To activate this servi ce, contact Boost Customer Care at 1-888-BOOST-4U (1888-266-7848) or dial611from your i50sx phone. For additionalinformationon
how to use this service, visit boostmobile.com.
Sending a Text Mess age
Boost Mobile two-way Text Messagingprovides two choices for sending
messages: Web Messagingor Email Messaging.
81
Page 90

Web Messaging on boostmobile.com
Boost Mobile’s Web Messagingenables you to send a message to yourself,
someone else,or a group of Boost Mobile customers.
For more informationorto send a Web message, go to boostmobile.com and
click on Send a Message.
Email Messaging
From any email account,typethe10-digit phone number of a Boost Mobile
customer in the To field and add @myboostmobile. com (for example,
2135557777@myboostmobile.com).Theentire message can be up to 500
characters.
Numeric Messaging
Numericmessaging is available through Boost Mobile VoiceMail.These
messages can be displayed directly on your i50sx phone. To leave a numeric
message:
• The caller must press “1” during your Voice Mail greeting.
• Once the caller presses “1,” only numeric messages can be sent.
Message Center
The Message Center enables you to access all messaging servi ces through one
screen.
To access the MessageCenter:
If MESG is one of your display options:
From the idle screen, press B under MESG.
If MESG is not one of your display options:
1
From the idle screen, press m.
2
Press R to scroll to Messages.
3
Press B under SELECT.
boostmobile.com
82
Page 91

Message Center
The Message Centerscreen displays the number of messages you have in each
message service — Net Alert (Boost Mobile two-way Text Messaging) and
other Wireless W eb-based mail, Voice Mail,andText Msgs(Numeric
Messages).
To access any message service:
1
From the Message Centerscreen, press R to scroll to the message
serviceyou want to access.
2
Press B under the display option on the right. This option varies
depending on the message service selected.
Notification of New Messages
When you receive a new message:
• New Text Message or New Browser Message willdisplayonthescreen.
• Your phone will alert you every 30 seconds until you press B under
READ or B under EXIT.
Accessing New Messag es
When you receive a message, you can view it immediately or later.
Viewing a Message Immediately
1
Press B under READ. The message displays.
2
If the messagefills more than one screen, use S to scroll through the
rest of the message.
3
Press A under SAVE to save the message.
Or,
Press B under DELETE to delete the message.
83
Page 92

Viewing a Message Later
Press A under EXIT. The . icon will appear on the idle screen to
remind you that you have a stored message.
Viewing Stored Mess ages
1
In the Message Center screen, press S to scroll down to Text Msgs.
The number of new messages and the total number of messages are
displayed.
2
Press B under SELECT.The Text Msg Inbox screenappears.
3
Press S to scroll to the message you want to read and press B under
READ.
4
If the messagefills more than one screen, use S to scroll through the
rest of the message.
5
Press A under SAVE to save the message.
Or,
Press B under DELETE to delete the message.
84
boostmobile.com
Page 93

Boost 2WAY
Boost 2WAY is a digital two-wayradi o feature that allowsyoutocommunicate
with your friendsalldaylongfora fraction of the cost of regular cellularcalls.
NOTE: Boost 2WAY is only available in your local calling area.
This sectionincludes everythingyouwillneedto know to take advantageof
Boost 2WAY (digital two-way radio) service:
Private Call Page 85
Call Alerts Page 87
Private Call
There are several ways to reach an individual using Boost2WAY:
• Enter the person’s Private ID from the keypad.
• Selecttheperson’s PrivateID from yourPhonebook.
• Selecttheperson’s PrivateID from your Recent Calls list.
NOTE: The Recent Calls list displays briefly after each Private Call.
Whether you dial the person’s Private IDdirectly or use a numberstored in your
Phonebookor Recent Calls list,you must have theindivi dual’s Private IDtouse
Boost 2WAY. To learn how to store names and numbers, see “Phonebook” on
page 35.
BOOST TIP: Tofind out your own Private ID, see “My Information” on
NOTE: When dialing or storing a Private ID, the asterisks must be
page 19.
entered as part of the Private ID in order to make a Boost 2WAY
Private Call.
Making a Private Call from the Keypad
1
Enter the Private ID of the person you are trying to call.
85
Page 94

2
Press and hold the Boost 2WAY Push-To-Talk (PTT) button on the side
of the phone to talk. Begin talking after the phone emits a chirping
sound.
3
Release the Boost 2W AY PTT button to listen.
Making a Private Call from the P honebook
If you have stored a person’s Private ID in your Phonebook (see “Adding
PhonebookEntries” on page39),you can use yourPhonebook to make a Private
Call to that person:
1
From the idle screen, press m.
2
Press R to scroll to Phonebook.PressB under SELECT.
3
From the Phonebook screen, press S to scroll throughthe names until
the desiredname or Private ID is highlighted. (If the Private icon
appearsto the right of the number, the numberis the Private ID).
If more than one number is stored for an entry, press T until
i
idisplays.
4
Press and hold the Boost 2WAY PTT buttonon the side of the phone.
Begin talkingafter the phone emits a chirping sound.
5
Release the Boost 2W AY PTT button to listen.
Making a Private Call from the Rece nt Calls List
1
From the idle screen, press m.
2
Press R to scroll to Recent Calls.PressB under SELECT.
3
From the RecentCalls screen, pressS to scroll tothedesired name or
PrivateID. If more than one number is stored for an entry,press T
until the
idisplays.
boostmobile.com
86
Page 95

Call Alerts
4
Press and hold the Boost 2WAY PTT buttonon the side of the phone.
Begin talkingafter the phone emits a chirping sound.
5
Release the Boost 2W AY PTT button to listen.
For more information on the Recent Calls list, see “Recent Calls” on page 56.
Receiving a Private Call
When you receive a two-way call,yourphoneemits a chirping sound. Private
in Use and the Private ID orthe name of the caller(if storedi n your Phonebook)
displays on the screen.
1
Wait for the caller to stop talking.
2
Press and hold the Boost 2WAY PTT button. Begin talking after the
phone emits a chirpingsound.
3
Release the Boost 2WAY PTTbutton to listen.
Storing Private IDs
For information on how to store Private IDs to your Phonebook,see “Adding
Phonebook Entries” on page 39.
For information on how to quickly store Private IDs, see “StoringNumbers and
Private IDs Fast” on page 42.
Call Ale rts
Youcansend a Call Alert,which lets recipientsknowthat youwould liketotalk
with them. When you send an alert, the recipient will receive a series of beeps
and your name or Private ID will appearon the display.
87
Page 96

Placing a Call Alert from the Keypad
1
Enter the Private ID of the person you want to call. Be sure to enter
Area ID*Network ID*Member ID.
2
Press B under ALERT. The ReadytoAlertscreen displays.
3
Press and hold the Boost 2WAY PTT button until Alert Successful
displays. The recipient’s phone sounds the alert intermittently until the
user of the phone answers,queues, or clears the alert.
Placing a Call Alert from the Phonebook
1
From the idle screen, press m.
2
Press R to scroll to Phonebook.PressB under SELECT.
3
From the Phonebook screen, press S to scroll to the Phonebook entry
for the person you want to alert. If more than one numberis stored for
the entry, press T until
4
Press B under ALERT. The ReadytoAlertscreen appears.
5
Press and hold the Boost 2WAY PTT button until Alert Successful
displays. The recipient’s phone sounds the alert intermittently until the
user of the phone answers,queues, or clears the alert.
idisplays.
Ready to Alert Screen
ReadytoAlertis used to confirm your request for the alert and to promptyou
to push the Boost 2WAY PTT button:
• If you press the Boost 2WAY PTT button, the Call Alert is sent, and the
phone displaysthe RecentCalls screen.
• For Call Alerts placed from the keypad, pressing A under CANCEL
causes the phone to return to the dialing screen with the previously entered
number displayed.
• For Call Alertsplaced from the Phonebook,pressi ng A under CANCEL
causes the phone to return to the Phonebook screen.
• If you do nothing, the phone will revert to the idle screen.
boostmobile.com
88
Page 97

Call Alerts
Receiving Call Alerts
When you receivea Call Alert,your phone emits a series of chirps and displays
the nameornumber of the caller.You can answer, queue, or clearthe Call Alert:
• To answer the CallAlert, press the Boost 2WAY PTTbutton and begin
talkingafter the phone emits a chirping sound.
• To queue the Call Alert, press B under QUEUE.
• To cleartheCallAlert, press A under CLEAR.
NOTE: Until you answer, queue or clear the Call Alert, you will not
receive any additionalphone or PrivateCalls.
BOOST TIP: You can turn down the Call Alert chirp volume by
pressing the volume buttons on the side of your phone.
Call Alert Queue
Call Alertqueuing enablesyou to save up to eight Call Alertsinalist, or queue.
To storea Call Alert intheCall Alert Queue,press B under QUEUE when you
receiveanincomingCallAlert.
Accessing the Call Alert Queue
1
From the idle screen, press m.
2
Press R to scroll to Call Alert.
3
Press B under SELECT.The Call AlertQueuescreen displays.
Viewing Call Alert Dateand Time
TofindoutthedateandtimeaCallAlertwasreceived:
1
From the Call Alert Queue screen, press S to scroll to the desired
Call Alert.
2
Press m to access the Call Alert Menu.
3
Press R to scroll to View.
4
Press B under SELECT.
89
Page 98

Sorting Call Alerts
To sort your Call Alerts by the order they were received:
1
From the Call Alert Queue screen, press m to access the Call Alert
Menu.
2
Press S to scroll to Sort By.
3
Press A under SELECT.
4
Press S to scroll to First on Top or Last on Top.
5
Press A under SELECT.
Responding to a Call Alert From the Queue
1
From the Call Alert Queue screen, press S to scroll to the Call Alert
you want to respond to. You can respond by sending a Call Alert or
placing a Private Call.
2
To send a Call Alert, press B under ALERT and then press the Boost
2WAY PTT button.
Or,
To place a Private Call, press the Boost 2WAYPTT button.
The Call Alert will be removedfromthe queue.
Deleting a Call Alert From the Queue
To delete a Call Alert from the queue:
1
From the Call Alert Queue screen, press S to scroll to the entry you
want to delete.
2
Press m to access the Call Alert Menu.
3
Press R to scroll to Delete.
boostmobile.com
90
Page 99

Call Alerts
4
Press B under SELECT.
5
When the confirmation screen appears, press B underYES to delete
the entry.
To delete all Call Alertsfromthe queue:
1
From the Call Alert Queue screen, press m to access the Call Alert
Menu.
2
Press R to scroll to Delete All.
3
Press B under SELECT.
4
When the confirmation screen appears, press B underYES to delete
all Call Alerts.
91
Page 100

92
boostmobile.com
 Loading...