

Page 1

i285 Boost Mobile
TM
Phone User’s Guide
Page 2

Page 3

Contents
Introduction...................................................1
Welcome to Boost MobileTM— Wireless for
a New Generation................................................ 1
Getting Started ..............................................2
Opening the Battery Door....................................3
Battery.................................................................. 5
Powering On and Off ........................................... 8
Enabling Over-the-Air Security ............................ 9
Finding Your Phone Number ............................. 10
Phone Basics..................................................... 11
SIM Security.......................................................14
Locking the Keypad ........................................... 16
Faceplates .........................................................17
Accessories........................................................ 17
Boost Mobile
Making Calls ................................................19
Receiving Calls .................................................. 19
Call Icons...........................................................20
Entering the Number to Call............................... 20
Using Mute.........................................................22
TM
Customer Care......................... 17
Making Emergency Phone Calls........................23
Call Alerts.................................................... 24
Sending Call Alerts.............................................24
Receiving Call Alerts..........................................24
Using the Call Alert Queue.................................24
Recent Calls................................................ 26
Storing Recent Calls to Contacts.......................26
Deleting Recent Calls.........................................27
Entering Text............................................... 28
Using Alpha Mode..............................................28
Using Word Mode ..............................................28
Special Function Keys........................................29
Using Numeric Mode..........................................30
Using Symbols Mode .........................................30
Contacts ...................................................... 31
Viewing Contacts ...............................................32
Creating Entries .................................................33
Storing Numbers Faster.....................................34
Editing Entries....................................................35
Deleting Entries..................................................35
Checking Capacity .............................................35
i
Page 4

Creating Pauses and Waits............................... 35
International Numbers........................................ 36
Memo............................................................37
Advanced Calling Features ........................38
Call Hold ............................................................ 38
Creating Pauses and Waits While Dialing ......... 38
Making International Calls.................................. 39
Setting One Touch Boost
Call Timers......................................................... 40
Making TTY Calls...............................................40
Special Dialing Codes........................................ 42
TM
Walkie-Talkie........ 39
Boost MobileTMPhone Serv ices................43
Caller ID.............................................................43
Per-Call Blocking ...............................................43
Per-Line Blocking............................................... 43
Boost Mobile
Yellow Page Listings..........................................43
Nationwide Call Completion...............................44
Driving Directions...............................................44
Restaurant Reservations ...................................44
Movie Listings and Show Times ........................ 44
ii
TM
411........................................... 43
Local Event Information .....................................44
Ring Tones.................................................. 45
Setting Your Phone to Vibrate............................45
Assigning Ring Tones to Contacts.....................46
Ring and Vibrate ................................................46
Viewing Ring Tone Assignments .......................46
Downloading More Ring Tones..........................47
Managing Memory .............................................47
Deleting Custom Ring Tones.............................47
Message Center.......................................... 48
Accessing the Message Center .........................48
Message Center Options ...................................48
Receiving M essages................................... 49
Message Notifications........................................49
Message Center.................................................50
Voice Mail Messages .................................. 51
Receiving a Message.........................................51
Accessing Voice Mail from
the Message Center...........................................51
Sending Unanswered Calls to Voice Mail ..........51
Page 5

Boost MobileTMVoice Mail .........................52
Setting Up Your Voice Mail Box.........................52
Changing Your Password.................................. 53
Recording Your Name ....................................... 53
Advanced Voice Mail Features.......................... 54
SMS and Boost MobileTMText and
Numeric Messages......................................59
SMS Messages..................................................59
Boost Mobile
Alerts.................................................................. 60
Boost Mobile
TM
Text Messages and Web
TM
Numeric Messages ..................62
Boost MobileTMWireless Web Services ...63
Starting the Microbrowser.................................. 63
Call Forwarding...........................................65
Forwarding All Calls........................................... 65
Turning Off Call Forwarding............................... 65
Forwarding Missed Calls.................................... 66
Viewing Call Forwarding Settings......................66
Java®Applications......................................67
Running Applications......................................... 67
Suspending Applications....................................67
Resuming Applications.......................................67
Ending Applications............................................68
Downloading Applications..................................68
Installing Applications.........................................68
Deleting Applications..........................................68
Managing Memory .............................................69
Shortcuts on the Main Menu..............................69
Java Applications and GPS Enabled .................70
Customizing Your Phone. .......................... 72
Setting the Volume.............................................72
Setting Your Phone to Not Ring.........................72
Using a Headset.................................................73
Using Settings....................................................73
Optional Features...............................................76
GPS Enabled ............................................... 77
IMPORTANT: Things to Keep in Mind...............77
Making an Emergency Call................................78
Viewing Your Approximate Location ..................79
Enhancing GPS Performance............................80
Updating Satellite Almanac Data .......................81
Setting Privacy Options......................................82
iii
Page 6

Using GPS with Map Software...........................83
Boost MobileTMCustomer Care ................ 92
Profiles.........................................................86
Viewing Profiles .................................................86
Switching Profiles...............................................86
How Changing Settings Affects Profiles ............ 86
Temporary Profiles............................................. 87
Creating Profiles................................................88
Editing Profiles...................................................88
Deleting Profiles................................................. 88
Setting Call Filtering...........................................89
Shortcuts......................................................90
Creating aShortcut............................................ 90
Using a Shortcut................................................90
Editing a Shortcut...............................................90
Deleting Shortcuts.............................................. 91
iv
Understanding Status Messages .............. 93
Boost Mobile
of Prepaid Service ...................................... 95
TM
Terms and Conditions
Safety and General Information .............. 105
RF Operational Characteristics........................105
Portable Radio Product Operation and EME
Exposure..........................................................105
Electro Magnetic Interference/Compatibility.....108
Medical Devices...............................................108
Operational Warnings ......................................109
Operational Cautions .......................................110
Accessory Safety Information ..........................111
MOTOROLA LIMITED WARRANTY ......... 113
Patent and Trademark Information ......... 117
Index .......................................................... 118
Page 7

DECLARATION OF CONFORMITY
Per FCC CFR 47 Part 2Section 2.1077(a)
Responsible Party Name: Motorola, Inc.
Address: 8000 West Sunrise Boulevard
Plantation, FL 33322 USA
Phone Number: 1 (800) 453-0920
Hereby declares that the product:
Product Name: i285
Model Number: H75XAH6RR3AN
Conforms to the following regulations:
FCC Part 15, subpart B, section 15.107(a),
15.107(d) and section 15.109(a)
Class BDigital Device
Note: This equipment has been tested and
found to comply with the limits for a Class
B digitaldevice,pursuant to part 15 of the
FCC Rules. These limits are designed to
provide reasonable protection against
harmful interferencein a residential
installation. This equipment generates,
uses and can radiate radio frequency
energy and, if not installed and used in
accordance with the instructions, may
causeharmfulinterferenceto radio
communications. However, there is no
guarantee that interference will not occur
in a particular installation.
If this equipment does cause harmful
interference to radio or television reception,
which can be determined by turning the
equipmentoff andon, theuser is
encouraged to try to correct the interference
by one or moreof the following measures:
• Reorient or relocate the receiving
antenna.
• Increasethe separation between the
equipment and receiver.
• Connect the equipment into an outlet on
a circuit differentf rom that to which the
receiver is connected.
• Consultthe dealer or anexperienced
radio/TV technician for help.
v
Page 8

Page 9

Introduction
Welcome to Boost MobileTM— Wireless for a New Generation
WithBoostMobileTMpre-paid, there’sno need to
worry about credit checks orchalking up huge
monthlybills,because quite simply, there aren’t
any. By paying for your phone calls up front, you’ll
keep control of your monthly costs and get all the
mobile freedom you really want.
And Boost Mobile
handsetswiththe coolest features,like Boost
Walkie-Talkie, BoostTMWireless Web, and Text
Messaging. Plus, you getinstantaccess to
Nextel’s world-class digital iDEN network.
TM
has got the latest Motorola
TM
1
Page 10
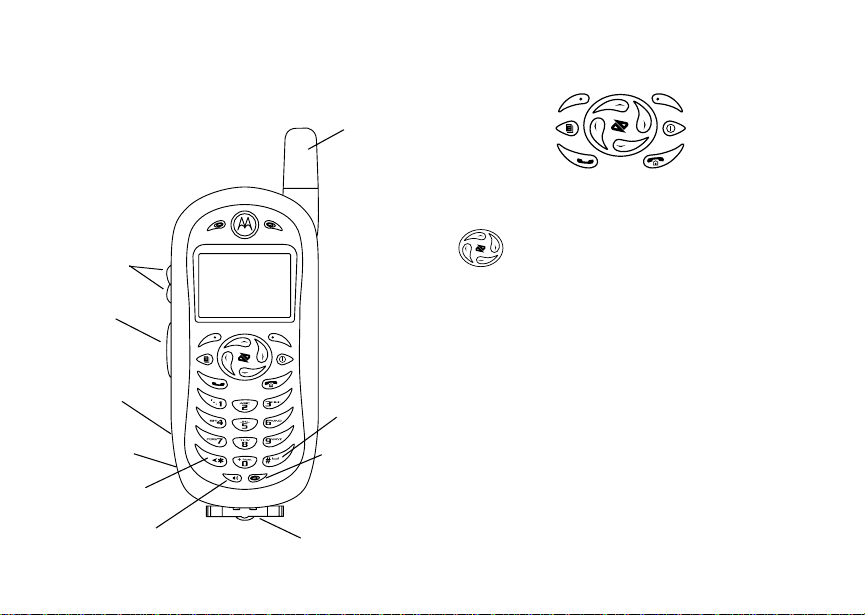
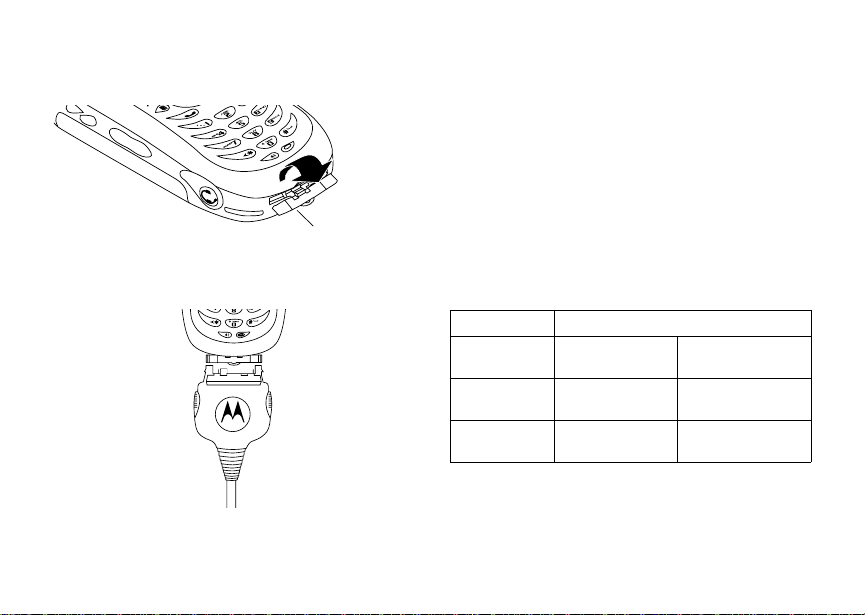
Getting Started
volume
controls
TM
Boost
Walkie-Talkie
Button
speaker
(in back)
audio jack
backkey
TM
Boost
Walkie-Talkie
speaker on/off
2
antenna
space key
microphone
accessory connector
p Power button.
Navigation key — press the arrows to
scrollthroughmenus andlists.
Menu key — accesses context-sensitive
m
menus.
Option key — selectsthe option
A
appearing above it on thedisplay.
s Send key — placesphonecalls.
End key —ends phone calls; returns to
e
idle screen; in browser mode, returns to
Web main menu.
To start using your i285 phone:
• Make sure your SIM is in place.
• Chargethe battery.
• Activate your service.
• Enable over-the-air security.
Page 11
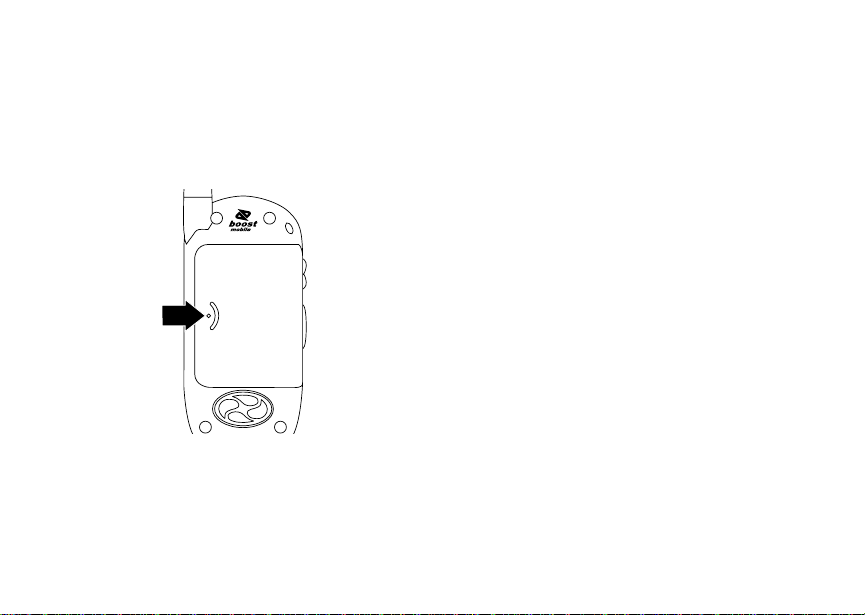
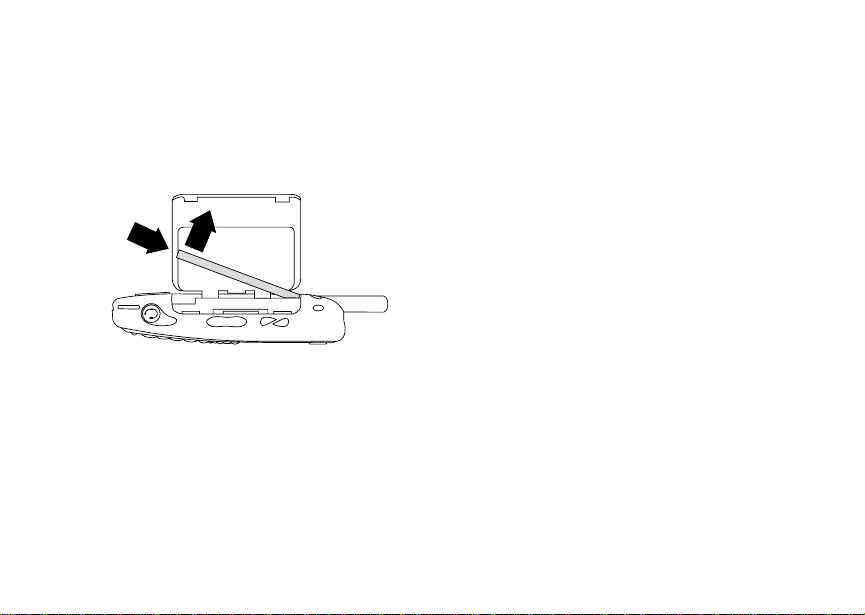
Opening the Battery Door
Opening the Battery Door
1 Make sure the phone is powered off. See
“Powering On and Off” on page 8.
2 Using the fingergrip,slidethe battery door until
it springsopen.
Inserting and Removing Your SIM
Important: Do not touch the gold-coloredareas of
The SIM is designed for optimal Contacts storage
and feature use. For Boost Mobile
compatibility information, visit
www.boostmobile.com/cs_faqs_thesimcard.html.
If you remove your S IM anduse it with another
phone,or use another SIM with your phone, the
following information is erased:
• The recent calls list
• Call forwarding settings
• Web alerts
• Options set using the MMS Setup menu
• InformationstoredinMemo
• 3 most recent GPS Enabled locations
• Options set using the Personalize menu
• V oice records*
• Voice names*
Note: In some cases, Contacts may not be
your SIM.
TM
SIM
accessible if you move your SIM to
another phone. Contacts entries created
with your i285 phoneare not readableby
an older iDEN S IM-based phone.
3
Page 12
Getting Started
* See “Optional Features” on page 76.
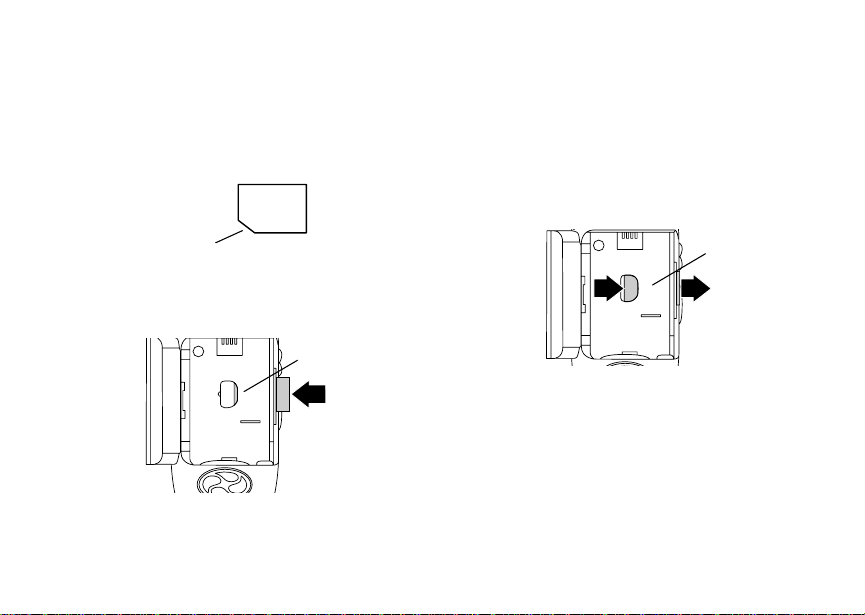
Inserting Your SIM
1 With your phone powered off, open the battery
door and remove the battery.
2 Hold your SIM as shown.
cut corner
3 Carefully slide your SIMinto your phone until it
lines up with the marks above and below the
SIM card holder.
SIM holder
4
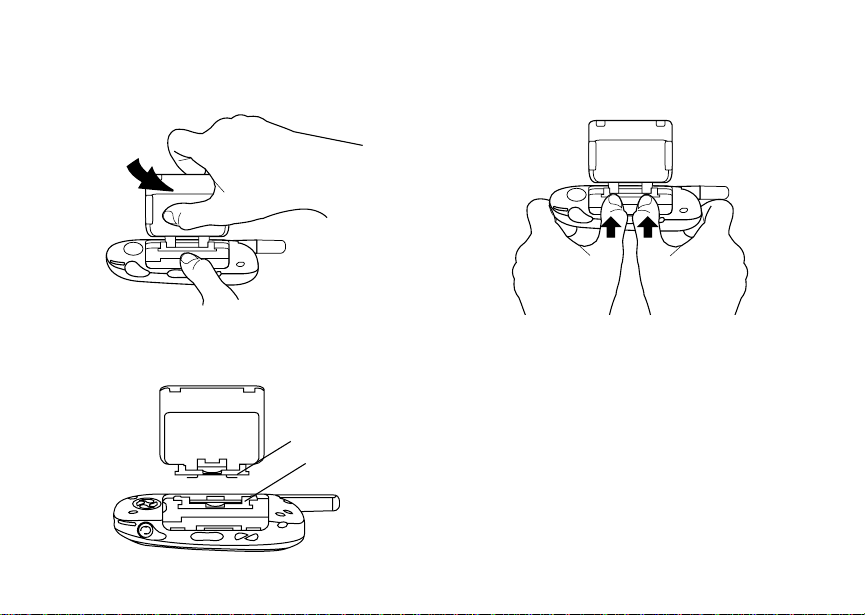
Removing Your SIM
Important: To avoid loss ordamage, donot remove
your SIM from your phone unless
absolutely necessary.
1 With your phone powered off, open the battery
door and remove the battery.
2 Slide your SIM out of the SIM holder.
SIM holder
Note: Protect your SIM asyou would any
delicate object. S tore it carefully.
Page 13
Battery
Battery
Inserting the Battery
1 With the phone powered off, open the battery
door.
2 Insertthe top of the batteryinto the batteryarea.
Make sure the gold contacts onthe battery touch
the gold c ontacts in the battery area. Press the
bottom of the battery to secure it.
gold
connectors
3 Close the battery door.
Charging the Battery
Your phone comes with a battery charger.
1 Plug the charger into an electricaloutlet.
5
Page 14
Getting Started
2 Open the connector cover.
flap
3 Plug the other end of the chargerinto the
accessory connector.
DeviceAttached appears on the display.
6
Tip: To remove the charger from the accessory
connector: Press the buttons on thesides
of the plug. Pull the plug straight out.
4 If you have purchased optional batteries or
chargers, see “Charging Times”.
Note: While the phone is charging, the keypad
backlight will not illuminate.
Charging Times
See your Lithium Ion battery and travel charger to
determine the appropriatecharging time.
Recommended charging times:
Battery Charger
Rapid Mid-Rate
Slim
(included)
High
Performance*
2 hours 3 hours
2 hours 4 hours
For best results, charge the batteries within the
temperature range of 50°F to 104°F (10°C to
40°C).Prolonged chargingis not recommended.
*High Performance batteryand battery door
available as an accessory sold separately.
(included)
Page 15
Battery
Removing the Battery
1 With the phone powered off, open the battery
door.
2 Remove the battery by pushing the battery
toward the antenna, pulling on the ribbon and
lifting it out.
Battery Use and Maintenance
• TheMotorola iDEN Approved LithiumIon
chargers provide optimum performance. Other
chargers may not fully charge the iDEN Lithium
Ion batteryor may yield a reduced number of
lifetime charge cycles.
• Extreme temperatures degrade battery
performance.Do not store the batterywhere
temperatures exceed 140°F (60°C) or fall below
4°F (-20°C).
• Lithium Ion batteries have a self discharge rate
and withoutuse, lose about 1% oftheir charge
per day.
• The battery capacity is degraded ifthe battery is
storedfor long periods while fully charged. If
long term storage is required, store at half
capacity.
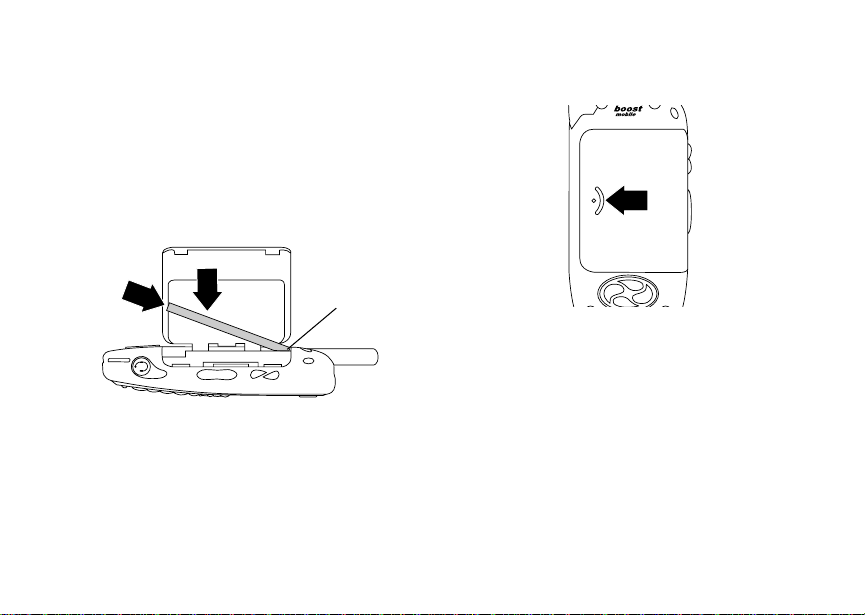
Removing and Replacing the B atte ry Door
Although it is not necessary to remove or replace
the battery door to use your phone, on some
occasionsyoumaywishtodoso.
Removing the Battery Door
1 Remove the battery.
7
Page 16
Getting Started
2 Grip the phone and battery door firmly and pull
the battery door , as shown.
Replacing the Battery Door
1 Position the battery door with its hinge resting in
frontof the slot in the phone.
hinge
slot
8
2 Press the hinge of the battery door into the slot
until it snaps into place.
Powering On and Off
To power your phone on:
Press p.
Page 17

Enabling Over-the-Air Security
As your phone connects to thenetwork, you will
see the Boost icon and aconnecting message.
When the idle screen appears, the phone is ready
to use.
s
iP
d1
BOOST
MesgContcs
S
To power the phone off:
Pressand hold p.
Enabling Over-the-Air
Security
To receive Over-the-Air Radio Service Software
(OARSS) Security you must enable security the
firsttime you power onyour phone or within 20
days of first activation of yourphone.
1 Press A under Ok .
Note: If you press A under Later, the idle
screen will appear. The next time you
select Web fromthemainmenu,youwill
bepromptedtoenable securitybeforeyou
can use Boost Mobile
services.
2 You are prompted to enable security. Press A
under Yes. A series of screens and then the
default homepage displays.
3 Press e to return to the idle screen.
Within 24 hours of enabling security, you will
receivea Web alert containingyour Personal
Telephone Number (PTN), Boost Mobile
CustomerCarenumber,andBoostTMWalkie-Talkie
number.
1 When you receive a Web alert sayingNew
Browser Message - Receive Programming
Info,pressA underGoto.
2 You are prompted to accept changesto your
lists. Press A under Ok.
3 You are prompted again to accept changes to
your lists. Press A under Ok.
4 A confirmation screen displays.Press A under
Ok.
5 Press e to return to the idle screen.
TM
WirelessWeb
TM
9
Page 18

Getting Started
Finding Your Phone Number
My Info lets you view your phone number, Boost
Walkie-Talkie number, and other phone
information:
1 Press m to access the main menu.
2 Scroll to MyInfo.
3 Press A under Select.
4 Scroll to see your information:
•Name— Enter your name. See “Entering
Text”onpage28.
•Line1— yourphone number is filled in when
you receive your first Web alert after enabling
over-the-airsecurity on your phone.
• Direct Connect (Boost Walkie-Talkie) —
Your Boost
numberthat others use to contact you using
Boost
when you receive your first Web alert after
enabling over-the-airsecurity on your phone.
•Ckt— Your circuit data number is the number
youuseifyouwanttouseyourphoneto
transfer circuit data. Youreceivethis number
from Boost Mobile
• Carrier IP — The IP address assignedto
BoostMobile
your phone.
10
TM
Walkie-Talkie number is the
TM
Walkie-Talkie service.It is filled in
TM
Customer Care.
TM
.Itisfilledinwhenyouactivate
• IP1 Address — TheIP address assigned to
TM
you for using the Internet with your phone.
• Service Status — This information may be
used by Boost Mobile
thereis a problem with your phone’sservices.
TM
Customer Care if
Boost MobileTMVoice Mail
You must set up yourvoice mail box before you
canretrievemessages.See“SettingUpYour
VoiceMailBox”onpage52.
Customizing Features
You can controlmany featuresof your phone,
including the volumeof incomingsound,rings,and
othertones.See “CustomizingYourPhone” on
page 72.
Page 19

Phone Basics
Phone Basics
Any time your phone is powered on, the display
provides you with information and options.
s
iP
BOOST
MesgContcs
S
The screen shown above is the idle screen. The
idle screen appears when your phone is on, but not
engaged inany activity.
Text Area
This area displays menus, messages, names,
phone numbers, and other information.
Display Options
Two display options appear at the bottom of most
screens. You select a display option by pressing
theoptionkeybelowit.
d1
status icons
text area
menu icon
display options
Menus and Lists
Your phone’s featuresare arrangedin menus,
submenus, and lists.
Toaccesstheitemsinamenuorlist,scrollusing
the navigationkey at the top of your keypad. This
key lets you scroll up, down, left, or right. Pushing
down the appropriate part of the navigation key
speeds up scrolling.
In this guide, this symbol > tells you to select a
menu or list item. For example, Settings >
Securitymeans:
1 Scroll to Settings on the mainmenu.
2 Press A under Select tosee the Settings
screen.
3 Scroll to Securityand press A under Select to
see the Security screen.
Menu Key
Many features provide context-sensitive menus
that let you access related features and actions.
The S icon appears any time a context-sensitive
menu is available. Press m to access the menu.
11
Page 20

Getting Started
Main Menu
All your phone’sfeaturescan be accessed through
the main menu. When you areusinga feature, the
icon for that feature appears in the upper left
cornerof the display.
n Re-Boost Recharge your account
a Web Browsethe Web.
Text Messaging Access to Boost Text
BoostLIVE Access and buy ring
Java Apps Java applications on your
q
m Ring Tones
list of r ing tones
Ring Tones menu
12
from your handset.
Messaging.
tones and wallpapers.
phone.See page 67.
Assign ring tones and
turn ringeroff. See
page 45.
b Settings
Display/Info
Phone Calls
DC (Walkie-Talkie)
Personalize
Options
Volume
Security
Advanced
j My Info Viewpersonalphone
Profiles
p
new profile form
list of profiles
Profiles menu
l GPS Find your approximate
Shortcuts Createshortcuts to
s
VoiceRecord Record andplay audio
Customize your phone.
Seepage72.
information,including
phone number and
TM
Walkie-Talkie
Boost
number.See page10.
Groupsof settings you
applytogether. See
page 86.
geographicallocation.
Seepage77.
screens.See page 90.
messages.
Page 21

Phone Basics
k Call Alert
list of call alerts
Call A lert menu
C Contacts
new contact form
list of contacts
Contacts menu
e Messages
[Compose
Message]
Voice Mail
Inbox
Drafts
Sent Items
SMS
Net Alert
i Recent Calls
list of calls
recent calls menu
CallSetup menu
Lists call alerts. See
page 24.
Create, view, store, edit
contacts. See page 31.
Access messages. See
page 69.
Lists recent calls.See
page 26.
h Call Timers Phoneusageinformation.
Seepage40.
f Call Forward Set call forwarding
options.See page 65.
g Memo Storeanumberto access
later.Seepage37.
Status Icons
Status icons appear in the two rows at the top of
the display. Some appear at alltimes.Others
appearonly when yourphoneis engagedincertain
activities or when you have activated certain
features.
abcd
efgd
opqr
s
A Phone In Use — Your phone is
B Boost
1 Active Phone Line — 1 indicates
GHI
JKL
Battery Strength — More bars on
the batteryindicatea greater
charge.
Signal Strength — More bars next
to the antenna indicate a stronger
signal.
active on a phone call.
TM
Yourphone is active on aBoost
Walkie-Talkie call.
Walkie-TalkieIn Use—
TM
phoneline1isreadytomakecalls.
Call Forward — Your phone is set
to forward calls. See “Call
Forwarding”on page 65.
13
Page 22

Getting Started
vM Ringer Off —Your phoneisset not
to ring. See “Setting Your Phone to
Vibrate” on page 45.
u Speaker Off — Sets Boost
Walkie-Talkie sound to come
through the earpiece rather than
through the speaker. Your phone
does not ring for Boost
Walkie-Talkie calls if Alert Type is
set to Silent or Vibrate.
TM
TM
wy Messages — You haveone or
more messages. See “Messages”
on page 69.
ljik
mn
T9 Text Input — You are using T9
Text Input to enter text. See
“Entering Text” on page 28.
DEF Internet — You areready to
NO TTY — You are ready to useyour
14
browsethe internetorarebrowsing
the internetusing a secure
connection.
phonetomakecallsusinga
teletypewriter device. See “Making
TTY Calls” on page 40.
SIM Security
Your SIM stores all your Contacts and protects
your personalinformation. Since this information is
stored on your SIM, not in your phone, you can
remove the informationby removingyour SIM.
Note: Except for making emergency calls, your
phone will not function without the SIM.
To prevent unauthorized use of your phone, your
SIM is protectedby a PIN that you enter each time
the phone is poweredon. You can changethe PIN
or turn off the requirement that it be entered.
Turning the PIN Requirement On and Off
When the SIM PIN requirement is off,your phone
canbeusedwithoutenteringaPIN.
Important: When the SIM PIN requirement is off,
When the SIM PINrequirement is on, you are
prompted to enter your PIN each time you power
on your phone.
the personal data on your SIM is not
protected. Anyone can use your phone
and access your personal data.
Page 23

SIM Security
Note: If a SIM PIN is required, your phone will
not function until the SIM PIN is entered,
exceptfor making emergency calls.
1 From the main menu, select Settings >
Security > SIM PIN.
2 Scroll to Onor Off.
3 Press A under Select.
4 Enter the current SIM PIN.
Note: When you receive your phone, the SIM
PIN is 0000. Change your PIN toprevent
fraudulentuse of theSIM card (see
“Changing the PIN”).
5 Press A under Ok .
Entering the PIN
1 When the Enter SIM PIN Code screen appears
afteryou poweron yourphone, enter your SIM
PIN.
2 Press A under Ok .
The message SIM Unlocked displays.
Important: If you enteryour PIN incorrectly3 times,
your SIM is blocked. To unblock your
SIM, you must contact Boost Mobile
Customer Care. See “Unblocking the
PIN”.
TM
Changing the PIN
Note: The SIM PIN requirement must be turned
on in order to access this feature.
1 From the main menu, select Settings >
Security > Change Password > SIM PIN.
2 At the Enter Old SIM PIN Code screen, enter
the current SIM PIN.
3 Press A under Ok .
4 At the Enter New SIM PIN Code screen, enter
the new 4- to 8-digit SIM PIN.
5 Press A under Ok .
6 At the Re-enter New SIM PIN Code screen,
re-enter the new SIM PIN to confirm.
7 Press A under Ok .
Changed: SIM PIN displays.
Unblocking the PIN
If you enter your PINincorrectly three times, your
SIM is blocked. To unblock your SIM, you must
contactBoostMobile
PIN Unblock Code (PUK).
Important: If you unsuccessfully enter the PUK
TM
Customer Care toget a
code 10 times, your SIM is permanently
blocked and must be replaced. If this
happens, all data is lost. You will get a
15
Page 24

Getting Started
message to contact Boost Mobile
Customer Care. Except for making
emergency calls, your phone will not
function with a blocked SIM.
TM
To unblock the PIN:
1 Press *, # , m ,1.
2 At your Boost Mobile
representative’srequest,providethe information
needed to give you a PUK code.
TM
Customer Care
3 Select Unblock PIN.
4 Enter the PUK code.
5 Enteranew4-to8-digitSIMPIN.
6 Re-enter your SIM PIN.
Note: Thesestepsmustbeperformedinquick
succession.
If you entered the codes properly, SIM Unlocked
appearson the display.
Locking the Keypad
Lockingthe phone’s keypad prevents its buttons
from being pressed. When the keypad is locked,
you can only:
• Power the phone on and off
• Unlock the keypad
16
• Respond to incoming calls, messages, and
alerts
Important: Emergency calls cannot be placed while
the keypad is locked.
To lock the keypad:
1 From the idle screen, press m.
2 Press *.
If you press akey while the keypad is locked,
instructions for unlocking the keypad display
briefly.
To unlock the keypad:
1 From the idle screen, press m.
2 Press *.
Whilethekeypadislocked,youcanrespondto
incomingcalls,messages,and alerts just asyou
do when the keypad is not locked. When finished,
press e to return to the idle screen. The keypad
remains locked.
You also have the option of setting your phone to
automaticallylock the keypad if there has been no
activity for a specified time.
1 From the main menu, select Settings >
Security > Keypad Lock.
Page 25

Faceplates
2 To lock the keypad immediately, select Lock
Now.Youwillbe giventheoptionto pressm and
* to lock and unlock the keypad.
3 T o set a specific time for the keypad to lock if
therehas been noactivity,selectAuto Lockand
press A under Change.
The keypad can be set to lock in 5, 10, 15 or 20
minutesif the keypadis not touched during the
specifiedtime.To turntheauto lock off, repeatstep
3 a nd selectOff.
Faceplates
Removing the Faceplate
1 Turnthe Motorolo logo button, which is located
at the top of the faceplate, a 1/4 turn (90
degrees) counterclockwise.
2 Pull on the faceplate on t he sides of the phone’s
display and pull it away from the main body of
the phone. The faceplateis held in placewith
twotabsoneachsideaswellastwotabsatthe
bottom.
Attaching the Faceplate
1 Align the tabs on the bottom of the faceplate with
the slots in the bottom of the phone.
2 Push the faceplate into place until it snaps into
position.
3 TurntheMotorolalogobutton1/4turnclockwise
to lock the faceplateinto position.
Accessories
Your phone comes with a Lithium Ion Battery and
travel charger.
Variousaccessoriesare availablefor use with your
i285 phone, includingfrontcovers,vehiclebattery
chargers, batteries,High Performancebattery
doors,hands-free accessoriesand more.
To order additionalaccessories, go to
www.boostmobile.com or call1-888-BOOST-4U
(1-888-266-7848).You can alsocontact yourBoost
TM
Mobile
Boost Mobile
www.boostmobile.com.
AuthorizedDealership.For informationon
TM
retailstore locations, go to
Boost MobileTMCustomer Care
Boost MobileTMCustomer Care: 1-888-BOOST-4U
(1-888-266-7848) or dial 611 from your i285
phone.
17
Page 26

Getting Started
Main Menu
Re-Boost
Web
Text Messaging
BoostLIVE
Java Apps
Java Applications (if any)
Deinstall
Permissions
License Info
Java System
Reset System
Delete All
Ring Tones
Settings
18
VibeAll On/Off
Available Ring Tones
Vibrate
Silent
Assign w/vibe
Assign w/vibe
Overview
Memory Usage
Delete
Display/Info
Phone Calls
DC (
Walkie-Talkie) Options
Volume
Security
Advanced
My Info
Name
Line 1
Direct Connect
(Boost Walkie-Talkie)
Carrier IP
IP1 Address
CKT
Service Status
Profiles
[New Profile]
Profiles (if any)
View
Edit
New
Delete
Delete All
Setup
GPS
Position
Privacy
Interface
Shortcuts
[New Entry]
Shortcuts (if any)
Edit
New
Reorder
Delete
Delete All
Voice Record
Contacts
[New Contact]
New
Search
Capacity
Filter
Call Setup
Delete All
Contacts (if any)
View
New
Search
Edit
Delete Contact
Delete Number
Capacity
Filter
Call Setup
Delete All
Call Alert
Received Call Alerts (if any)
Store
View
Delete
Delete All
Sort By
Recent Calls
Messages
[Create Mesg]
Voice Mail
Inbox
Drafts
Sent Items
SMS
Net Alert
Recent Calls
Recent Calls (if any)
Store
View
Delete
Delete All
Call Alert Queue
Call Setup
Call Timers
Last Call
Phone Reset
Phone Lifetime
DC (Walkie-Talkie) Reset
DC (Walkie-Talkie) Lifetime
Circuit Reset
Circuit Lifetime
Kbytes Reset
Call Forward
All Calls
- To
Retrieve Status
Detailed
- If Busy
- If No Answer
- If Unreachable
Retrieve Status
Memo
Store to Cntcs
Cancel
Delete
Page 27

Making Calls
Your i285 phone makes 2 types of calls: digital
cellular phone calls and Boost
calls.With Boost
your phone as along-range, digitalwalkie-talkie.
TM
Walkie-Talkie calls, you use
To make aphone call:
1 Enter the number you want to call.
2 Press s to place the call.
3 Press
TomakeaBoost
1 Enter the Boost
e to end thecall.
TM
Walkie-Talkiecall:
TM
Walkie-Talkie number you
want to call.
2 Press and hold the Boost
on the side of your phone. Begin talking after
your phone emits a chirping sound.
3 Releasethe Boost
listen.
Tip: To let someone know you want to talk to
him or her on a Boost
send a call alert. See “Call Alerts” on page
TM
24.
TM
Walkie-Talkie
TM
Walkie-Talkie button
Walkie-Talkie button to
TM
Walkie-Talkie call,
Dialing Boost Walkie-Talkie Numbers
EveryBoostTMWalkie-Talkie numberhas3 parts —
an area ID, anetwork ID, and a memberID —with
an asterisk between each of these parts. For
example: 999*999*9999.
TM
WhenyouplaceaBoost
must enter the whole BoostTMWalkie-Talkie
Walkie-Talkie call, you
numberincluding the asterisks.
TM
Tip: When you storea Boost
number in Contacts it is good practice to
include the whole Boost
numberincluding the asterisksin case you
travel with your phone, or another Boost
Walkie-Talkie user, outside of your network.
Walkie-Talkie
TM
Walkie-Talkie
TM
Receiving Calls
When you receivea phone call, your phone rings,
vibrates, or lights up its backlight.
To answer a phonecall:
Press s. -or-
Press A under Yes. -or-
Pressany key on the keypad.
To send a phone call to voice mail instead of
answering it:
Press e. -or-
19
Page 28

Making Calls
Press A under No.
To end a phone call:
Press e.
TM
WhenyoureceiveaBoost
your phone emits a chirping sound.
To answer a Boost
TM
1 Waitfor the caller to finish speaking.
2 Press and hold the Boost
on the side of your phone. Begin talking after
your phone emits a chirping sound.
3 Releasethe Boost
listen.
Walkie-Talkiecall,
Walkie-Talkie call:
TM
Walkie-Talkie button
TM
Walkie-Talkie button to
Call Icons
When you make a call,calliconsappearin the text
area of the phone’s display.
X Placinga phonecall.
W Receiving a phone call.
Y Phone call is active.
Z Phone call is on hold.
U Phone call ended.
20
When you miss a call, this icon appears in the text
area:
V You missed a phonecall.
Ente ring the Number t o Call
To enter the number you want to call, you can:
• Use the numbers on the keypad
• Select the number from the recent calls list
• Select the number from Contacts
• Redial the last phone number called
• Use Speed Dial or Turbo Dial
• UseOne Touch One Touch Boost
Walkie-TalkietomakeaBoostTMWalkie-Talkie
call
• Use a TTY device — see “Making TTY Calls” on
page 40
From the Keypad
To enter the number you want to call, press the
numbers on the keypad.
Ifyoumakeamistake:
• To cleara digit, press A under Delete.
®
TM
Page 29

Enteringthe Number to Call
• To clearall digits,press and hold A under
Delete.
• To insert or delete a digit anywhere in the string
of digits you have entered, scroll left or right.
• To cancel, press e.
From the Recent Calls List
The recent calls list storesthe last 20 callsyou
made or received.
To select a number from the recent callslist as the
numberyou want to call:
1 From the idle screen, scroll down. -or-
From the main menu, select Recent Calls.
2 Scrollto the nameor number you want to call.
From Contacts
If you have numbers stored in Contacts, you can
use these numbers to make calls.For information
on entering numbers into Contacts, see “Creating
Entries” on page 33.
Calling from the Contacts List
1 From the main menu, select Contacts.
2 Scrollto the nameor number you want to call.
Tip: To find Contactsentries faster, use the
keypad to enter the first letter of the name.
3 Place the call now. -or-
Scrollleftor right to displaythe Contactstype for
the number you want to call.
TM
IfyouaremakingaBoost
your phone places the call to the Boost
Walkie-Talkie number stored in the Contacts entry,
even if the Boost
displayed.
TM
Walkie-Talkie icon is not
Walkie-Talkiecall,
TM
Ifyouaremakingaphonecall:
• Your phone places the call to the phone number
assigned to the Contacts type displayed.
• If the Contactstype displayed is nota phone
number,yourphoneplaces the call to the phone
number stored in the Contacts entry.
• If the Contactstype displayed is nota phone
number and you have more than one phone
numberstored in the Contacts entry,yourphone
prompts you toselectthe phone number you
wantto place the call to.
Calling from a Contacts Entry
1 From the main menu, select Contacts.
2 Scrollto the nameor number you want to call.
3 Press A under View. -or-
If View is not one ofyour options:Press m.
Select View.
21
Page 30

Making Calls
4 Place the call now. -or-
Scroll to view more numbers. When you place
the call, it is made to the number displayed.
Redialing the Last Number
Press and hold s to place acall to the last phone
number you called.
Using Speed Dial and Turbo Dial
Each phone number stored in Contacts is assigned
a Speed Dial number which you can useto enter
that number.
Turbo Dial lets you place calls to thephone
numbersassociated with Speed Dial numbers 1
through 9 without entering the number.
Speed Dial
1 From the idle screen, use the keypad to enter
the SpeedDial number assigned to the phone
numberyou want to call.
2 Press #. Turbo Dial
From the idle screen, press and hold the Speed
Dialnumber (1 through9)assigned to the phone
numberyou want to call.
22
®
Using One Touch Boost
TM
Walkie-Talkie
One Touch BoostTMWalkie-Talkiesets your phone
to call the most recent BoostTMWalkie-Talkie on
the recent calls list, or to a Boost
numberyou choose, every time you press the
TM
Walkie-Talkie button. See “Setting One
Boost
Touch BoostTMWalkie-Talkie”on page 39.
TM
Walkie-Talkie
Using Mute
Muting callslets you listen to incomingsound
withouttransmitting sound.Mute is available
whenever you are on an active call.
To turn mute on:
Press A under Mute.
Whilemuteison,Unmute appears as a display
option.
To turn mute off:
Press A under Unmute.
Page 31

Making Emergency Phone Calls
Making Emergency Phone
Calls
Your phone supports emergency calling.
Emergency phone calls can be made even when
your SIM is blocked or notin your phone.
Dial 911 to be connected to an emergency
responsecenter. If you areon an active call, you
must end it before calling 911.
When you make an emergency call, your phone’s
GPS Enabled feature can help emergencyservice
personnel find you, if you are ina location where
yourphone's GPS antenna has established a clear
view of the open sky and yourlocal emergency
response center has the equipment to process
locationinformation. See “GPS Enabled” on page
77, and particularly “IMPORTANT: Things to Keep
inMind”onpage77and“MakinganEmergency
Call” on page 78, for more information on the
limitations of this feature. Because of the
limitationsof this feature, always provideyour best
knowledge of yourlocation to the emergency
response center when you make an emergency
call.
Important: Emergency calls cannot be placed while
the keypad is locked.
Important: If you have not registered on the
network, emergencyc alls cannot be
placed while your SIM card is in your
phone.
23
Page 32

Call Alerts
Sending a call alert lets the recipient know you
want to talk to him or her on a Boost
Walkie-Talkiecall.
When you send a call alert, the recipient’s phone
emits a seriesof beeps and displays your name or
TM
Walkie-Talkienumber.
Boost
The recipientcan:
• Answer — begina Boost
TM
withthe sender
• Queue — store the call alert to the call alert
queue, which is a list of call alerts
• Clear — dismiss and delete the call alert
Sending Call Alerts
1 Enter the BoostTMWalkie-Talkie number you
wantto send to,as you would when making a
TM
Boost
Walkie-Talkie call.
2 Press A under Ale rt. Ready to Alert appears
on the display.
3 Press the Boost
AlertSuccessful appears on thedisplay.
Note: If the alert is not successful, this may
meanthepersonyouaretryingtoreachis
on a call or hasthe phone turned off.
24
TM
Walkie-Talkie button until
TM
Walkie-Talkie call
Receiving Call Alerts
When you receive a call alert, you must answer,
queue, or clear it. You cannot receive phone calls
TM
or Boost
Walkie-Talkiecallsuntilyou do.
To answer acall alert, press the Boost
Walkie-TalkiebuttontomakeaBoost
TM
TM
Walkie-Talkie call to the sender.
To queue a callalert,press A under Queue.
To clear a callalert, press A under Clear.
Note: The recent calls list also stores call alerts
you have received. They appear as
TM
Walkie-Talkie calls. Call alerts
Boost
remainin your recent calls list until you
delete them or until they reach the end of
the list.
Using the Call Aler t Queue
When you queue a call alert, it remainsin the call
alert queue until you make a Boost
call to the sender or delete it.
Viewing Call Alerts
1 From the main menu, select Call Alert.
2 Scroll through the list.
TM
Walkie-Talkie
Page 33

Viewing Date and Time
To view the date and time acall alertwas received:
1 From the main menu, select Call Alert.
2 Scrollto the callalert you wantinformation on.
3 Press m.
4 Select View.
Responding to Call Alerts in the Queue
After you queue a call alert, you can respond to it
by making a Boost
senderor sending a callalertto the sender.
Making a Boost
Sender
1 From the main menu, select Call Alert.
2 Scrolltothecallalertyouwanttorespondto.
3 Press the Boost
the call.
This removes the call alert from the queue.
Sending a Call Alert to the Sender
1 From the main menu, select Call Alert.
2 Scrolltothecallalertyouwanttorespondto.
3 Press A under Ale rt. Ready to Alert appears
on the display.
TM
Walkie-Talkiecallto the
TM
Walkie-Talkie Call to the
TM
Walkie-Talkiebuttontobegin
Using the Call Alert Queue
TM
4 Press the Boost
AlertSuccessful appears on the display.
Walkie-Talkie button until
Deleting Call Alerts
To delete a call alert from the queue:
1 From the call alert queue, scroll to the call alert
you want to delete.
2 Press m.
3 Select Delete.
4 Press A under Yes to confirm.
To delete all call alerts from the queue:
1 From the call alert queue, press m.
2 From the call alert menu, select Delete All.
3 Press A under Yes to confirm.
Sorting Call Alerts
Tip: Youmusthaveatleastonecallalertinthe
queue to access this feature.
To sort call alerts by the order they were received:
1 From the main menu, select Call Alert.
2 Press m.
3 Select Sort By.
4 Scroll to First on Top or Last on Top.
5 Press A under Select.
25
Page 34

Recent Calls
The recent calls list storesthe numbers of the 20
most recent calls you have made and received.
To view therecentcallslist:
1 From the idle screen, press the down arrow on
the navigation key. -or-
From the main menu, select Recent Calls.
2 Scroll through the list.
If the number of a recent call is stored in Contacts,
the name associated with the number appears on
the recent calls list.
An icon appears beside the name or number
indicating the Contacts type of the number used in
thecall.See“Contacts”onpage31.
For phone calls, an icon appears to the left of the
name or number giving moreinformationaboutthe
call:
X A call you made.
W A call you received.
V A missed call. Missed calls appear on the
recent calls list only if you have Caller ID.
26
Note: The recent calls list also stores call alerts
you have received. They appear as
TM
Walkie-Talkie calls. Call alerts
Boost
remainin your recent calls list until you
delete them or until they reach the end of
the list.
To get more informationon arecent call:
1 From the recent calls list, scroll to thecall you
wantinformationon.
2 Press A under View. -or-
If View is not one ofyour options:Press m.
Select View.
This displays information such as the name
associatedwiththe call,the number,the date,
time,and duration of the call.
Storing Recent Calls to Contacts
1 From the recent calls list, scroll to the number
you want tostore.
2 Press A under Store. -or-
If Store is not one of your options: Press m.
Select Store.
Tip: If Store is not on this menu, the number is
already stored in Contacts.
Page 35

3 T ostore the number as a new entry, select [New
Contact]. -or-
To store the number to anexistingentry,select
the entry.
4 With the Contacts type field highlighted, scroll
left orright todisplay the Contacts type you want
to assign the number. For information on
Contacts types, see page 31.
5 If you want to add more information to theentry,
follow the applicable instructions in “Creating
Entries” on page 33.
6 Press A under Done.
Deleting Recent Calls
To delete a call:
1 From the recentcalls list, scroll to thecall you
wantto delete.
2 Press m.
3 Select Delete.
4 Press A under Yes to confirm.
To delete all calls:
1 From the recentcalls list,press m.
2 Select Delete All.
3 Press A under Yes to confirm.
Deleting Recent Calls
27
Page 36

Entering Text
You can enter text into your phone using the
traditionalmethodof pressing a key several times
for each character, or by pressing a key once for
each letter while words likely to be the one you
want are chosen from a database. You can also
enter symbols and numbers into a text field.
In screens that requireyou to enter text, you see
the following icons near the top right corner. These
icons tell you which text input mode you are using:
Alpha — Press a key several times for each
l
character.
Word — Press a key once for eachletter
j
whilewords likely to be the oneyou want are
chosen from a database.
Symbols — Enter punctuation and other
i
symbols.
Numeric —Enternumbers.
k
When you access a screen that requiresyou to
entertext, you start in Alpha mode.
To choose a text inputmode:
1 At a screenthat requiresyou to enter text, press
m.
28
2 A checkmark appears next to the current text
input mode. Scroll to the text input mode you
wantto use.
3 Press A under Select.
Using Alpha Mode
• Press any key on the keypadto entertheletters,
numbers,andsymbolson thatkey.For example,
to enter the letter Y, press 9 3times.
• Typealetterthenscrolluptomakethatletter
uppercase, or type a letter then scroll down to
make that letter lowercase.
• See “Special Function Keys” on page 29 for
more information on adding spaces,
capitalization, and punctuation.
Using Word Mode
In Word mode, T9 TextI nput analyzes t he letters
on thekeypadbutton youpressandarrangesthem
to create words. Asyou type, T9 TextInput
matches your keystrokes to words in its database
and displays the most commonlyused matching
word. You can add you own words to this
database.
Entering a Word
1 Select Word as yourtext input mode.
Page 37

Special Function Keys
2 Type aword by pressingone key foreach letter.
For example, to type “test” press 8378.
The displayed word may change as you type it.
Do not try to correct the word as you go. Type to
the end of the word before editing.
3 If the word that appears is not the desired word,
press 0 to change the word on the display to
the next most likelyword in thedatabase.
Repeatuntil thedesired word a ppears.
If the desired word does not appear,you can add it
to the database.
Adding Words to the Database
1 Select Alpha as your text input mode.
2 Type the word using Alpha mode.
3 Select Word as yourt ext input mode.
4 Press #.
ThewordyoutypedinAlphatextentrymodeis
now in thedatabase.
Note: You cannot store alphanumeric
combinations,suchas Y2K.
Choosing a Language
To change the language of the database:
1 At a screenthat requiresyou toenter text, press
m.
2 Select Languages.
3 Scrollto the languageyou want foryour
database.
4 Press A under Select.
Special Function Keys
Some of the phone’s keys assume different
functions while in Alpha or Wordmode.
Spaces
Press # for a space.
Capitalization
Press and hold # to make the next lettertyped
uppercase (shift), to make all subsequent letters
typed uppercase (caps lock), or to go back to
lowercase letters.
29
Page 38

Entering Text
These icons appear in the top rowof yourdisplay:
Shift is on.
m
Caps lock is on.
n
When neither of these icons appear, letters typed
are lowercase.
Note: Your phone automatically makes the first
lettero f a sentenceuppercase.
Punctuation
Press 1 or 0 to insertpunctuation. Continueto
press the key to view the list of symbols available
through that key. Pause to select the symbol you
want.
Note: Additionalpunctuationsymbolsare
available in Symbols mode.
Using Numeric Mode
1 Select Numeric as your text input mode.
2 Press the number buttonson your keypad to
enter numbers.
Using Symbols Mode
1 Select Symbols as your textinput mode.
30
A row ofsymbolsappears along the bottom of
your phone’s display. Scroll right to view the
complete row.
2 Scrollleft or right to choose the symbolyou want
to enter.
3 Press A under Select.
Page 39

Contacts
Contacts stores up to 600 numbers or addresses.
Each Contactsentry can store severalnumbersor
addresses.
InformationstoredinContactsissavedonyour
SIM.
A Contacts entry contains:
• A name — Aname is required if your are storing
more than one number or address to thee ntry;
otherwise, it is optional. Typically, this is the
name ofthe person whose contact information is
stored in the entry.
• Aringtone—Youcanassignaringtoneto
eachentry. This is the sound your phone makes
when you receive phone calls or callalertsfrom
any of the numbers stored in theentry.
• A Contacts type — Each number or address
storedmust be assigneda Contactstype:
A Mobile phone number
B DC Boost
TM
Walkie-Talkie
number
C Work1 phonenumber
D Work2 phone number
E Home phone number
F Email emailaddress
G Fax phone number
H Pager phonenumber
J IP IP address
K Other phone number
• A number or address — Each Contacts entry
must containa numberor address. This may be
any type of phone number, Boost
Walkie-Talkie number, email address, or IP
address.
Note: Youcan store numbers up to64 digits
long, but every 20 digits must be
separated by a pause or wait. See
“Creating Pauses and W aits” on page 35.
TM
31
Page 40

Contacts
• A Speed Dial number — When you store a
phone number, it is assigned a Speed Dial
number.You can accept the default Speed Dial
numberor changeit.
• Avoicename — Ifyou createa voice namefor a
number,you can then dial that number bysaying
the voice name into your phone.This icon
appears P t othe leftof the Contacts type icon if
a voice name is assigned.
Note: This is an optionalfeature. See “ Optional
Features” on page 76.
Viewing Contacts
To access Contacts:
Press A under Contcs. -or-
From the main menu, select Contacts. -or-
Ifyouareonacall:Pressm. Select Contacts.
To view entries:
1 From the Contacts list, scroll to the entry you
wantto view.
2 If an entry has more than one number or
address stored, <> surrounds the Contacts type
icon.Scrollleftor right to view the icon for each
numberstoredin the entry.
32
3 Whentheiconforthenumberoraddressyou
want to view is displayed, press A under View.
-or-
If View is not one ofyour options:Press m.
Select View.
4 Scrollto view theothernumbersand addresses
storedfor the entry.
Tip: Toview more entries,continuescrolling.
Searching for a Name
To search for a name in Contacts:
1 From the Contacts list, press m.
2 Select Search.
3 Enter the name you want to see. See “Entering
Text”onpage28.
4 Press A under Ok .
Your phone finds the name you entered or the
nearestmatch.
Showing Only BoostTMWalkie-Talkie Numbers
To set Contacts to show only entries that contain
TM
Walkie-Talkie number entries:
Boost
1 From the Contacts list, press m.
2 Select Filter.
Page 41

Creating Entries
3 With Show DC highlighted, press A under
Select.
To set Contacts to show all entries:
1 From the Contacts list, press m.
2 Select Filter.
3 Scroll to Show All.
4 Press A under Select.
Creating Entries
A number or address and a Contacts type are
required for allContacts entries. Other information
is optional.You may enter the i nformationin any
order by scrolling through the entry details.
After you have entered the number or address,
Contacts type,andanyotherinformation you want,
you can press A under Done to save the entry to
Contacts.
To cancel a Contacts entry at any time press, e
to return to the idle screen.
Tip: In some fields that require you to enter
information, you can begin entering the
information from the keypad instead of
pressingA under Change.
To create a Contacts entry:
1 To access the entry detailsscreen:
Select Contacts> [New Contact]. -or-
From the Contacts list, press m.ScrolltoNe w .
Press A under Select.
2 Ifyouwanttoassignanametotheentry:
With the Name field highlighted, press A under
Change.
Enter the name. See “Entering Text” on page
28. When you are finished,press A under Ok.
3 Ifyouwanttoassignaringtonetothename:
With the Ringer field highlighted, press A under
Change.
Scrolltotheringtoneyouwanttoassign.Press
A under Select.
4 ToassignaContactstypetothenumberor
addressbeingstored:
Withthe Contactstype fieldhighlighted,press A
under Change.
Scroll to the Contacts type you want to assign.
Press A under Select.
5 To store anumber oraddress:
With the # field(or ID for an emailaddress,or IP
for an I P address) highlighted, pressA under
Change.
33
Page 42

Contacts
Enter the number or address. For phone
numbers, use the10-digit format. For email
addresses, see “EnteringT ext” onpage 28.
Tip: Press A under Browse to selecta number
or address from Contacts, the recent calls
list,or Memo.
When you are finished, press A under Ok.
6 If you want to assign a SpeedDial numbert o the
number, press A under Change with the
[Options] field highlighted. See “Assigning
Options”.
7 If you want to add morenumbersor addresses
to the entry:
Scrollpast theinformation you already entered.
Enter the additional information for the entry
using step 2 through step 6. You must assign a
name to the entry, if you have not already.
8 Press A under Done.
Assigning Options
1 If you have not already, press A under Change
with t he [Options] field highlighted
2 The default Speed Dial number assigned to a
phonenumber is displayedin the Speed # field.
This is always the next available Speed Dial
location.
34
Ifyouwanttoassignthephonenumbertoa
different Speed Dial location:
With the Speed # field highlighted, press A
under Change.
Press A under Delete to delete the current
Speed Dial number.
Enter the new Speed Dial number using the
keypad.
When you are finished, press A under Ok.
3 When you arefinished, press A under Back.
Storing Numbers Faster
To store numbers to Contacts from the recent call
list, see “Storing Recent Calls to Contacts” on page
26.
To store numbers to Contacts from Memo, see
“Memo” on page 37.
To store numbers to Contacts from the idle screen:
1 Use the keypad to enter thenumber you want to
store.
2 Press m.
3 Select Store Number.
4 To storethe number as a new entry,select[New
Contact]. -or-
Page 43

Editing Entries
To store the number to anexistingentry,select
the entry.
5 With the Contacts type field highlighted, scroll
left orright todisplay the Contacts type you want
to assign the number.
6 If you want to add more information to theentry,
follow the applicable instructions in “Creating
Entries” on page 33.
7 Press A under Done.
Editing Entries
1 From the Contacts list, scroll to the entry you
wantto edit.
2 Press m.
3 Select Edit. The entry details screen displays.
4 Follow the applicable instructions in “Creating
Entries” on page 33to editthe various fields.
Deleting Entries
Delete an Entry
1 From the Contacts list, scroll to the entry you
wantto delete.
2 Press m.
3 T o delete the entire entry, scroll to Delete
Contact.
4 Press A under Select.
5 Press A under Yes to confirm.
Delete a Number or Address
1 From the Contacts list, scroll to the entry that
contains the number oraddress you wantto
delete.
2 With the Contacts type field highlighted, scroll
left or right to display the Contacts type for the
numberyou want to delete.
3 Press m.
4 Scroll to Delete Number.
5 Press A under Select.
6 Press A under Yes to confirm.
Checking Capacity
To see how many numbers are stored in Contacts:
1 From the Contacts list, press m.
2 Select Capacity.
Creating Pauses and Waits
When storing a number,you can programyour
phoneto pause orwait between digitswhile
dialing. A pausemakes your phone pause for 3
seconds beforedialingfurther. A wait makes your
phone wait for your response before dialingfurther.
35
Page 44

Contacts
This featureis useful when using voice mail or
otherautomatedphone systemsthat requireyouto
dial a phone number and then enter an access
number.
To program a pause:
Pressand hold * until the letter P appears.
The P represents a 3-second pause.
If you store 17035551235P1234, when you select
this number and make a call, your phone dials the
first 11 digits, pauses for 3 seconds, then dials the
last 4 digits.
If you want apause longer than 3 seconds, press
and hold * more than once. Each P represents
a 3-second pause.
To program a wait:
Pressand hold * until the letter W appears.
The W means your phone waits before dialing
further.
If you store 17035551235W1234,when you select
this number and make a call, your phone dials the
first11 digits and then waits. A message appears
asking if you wantto send ther est oft he digits.
Press A under Yes to dial the last 4 digits.
36
Tip: You can create pauses and waitswhile
dialing anumber from the keypad.See
“Creating Pauses and Waits While Dialing”
on page 38.
International Numbers
When storing a number that you plan to use for
international calls, use Plus Dialing:
1 Press and hold 0 for two seconds. A “0”
appears, then changes to a “+”.
Note: The network translates the “+” into the
appropriate international access code
needed to place the call.
2 Enter the country code, city code or areacode,
and phone number.
For information about making international calls,
see “Making International Calls” on page 39.
Page 45

Memo
Memoletsyoustoreanumber,makeacalltothat
number, and save it to Contacts.
To create a memo:
1 From the main menu, select Memo.
2 Enter the number using your keypad.
3 Press A under Store.
Toviewthememolater:
1 From the main menu, select Memo.
To deletethe memo:
1 From the main menu, select Memo.
2 Press and hold A under Delete.
3 Press A under Store.
To edit the memo:
1 From the main menu, select Memo.
2 Enter the new number.
3 Press A under Store.
To make a call to thememo number:
1 From the main menu, select Memo.
2 Press s.
To store the memo number to Contacts:
1 From the main menu, select Memo.
2 Press m.
3 Press A under Select.
4 To storethe number as a new entry,select[New
Contact]. -or-
To store the numberto an existing entry,select
the entry.
5 With the Contacts type field highlighted, scroll
leftor right to displaytheContactstypeyou want
to assign the number.
6 If you want to add more information to theentry,
follow the applicable instructions in “Creating
Entries” on page 33.
7 Press A under Done.
37
Page 46

Advanced Calling Features
Call Hold
Call Hold lets you put an activecall on hold and
makeasecondcall.
To put a call on hold:
1 Whileonanactivecall,pressm.
2 Scroll to Hold.
3 Press A under Select.
4 If you want to makethe call activeagain, press
A under Resum.
Tomakeasecondcallwhileacallisonhold:
1 Enter the number you want to call.
Tip: To enter the number from Contacts: Press
m. Select Contacts.
2 Press s to place the call.
To end thesecondcall and make the call on hold
active again:
Press e.
Tomakethecallonholdactiveandputtheactive
call on hold:
38
Press A under Switch.
Creating Pauses and Waits While D ialing
You can enter a pause or wait while dialing a
number.For more informationon pausesand
waits, see “Creating Pauses and Waits” on page
35.
To create a pausewhiledialinga phonenumber:
1 From the keypad, enter the digits you want to
occur before the pause.
2 Press m.
3 Select Insert Pause.
4 Enter the digits you want to occurafter the
pause.
To create a wait while dialing a phone number:
1 From the keypad, enter the digits you want to
occur before the wait.
2 Press m.
3 Select Insert Wait.
4 Enter the digits you want to occurafter the wait.
Page 47

Making International Calls
Your service defaultis “International Calls
Restricted.” ContactBoost Mobile
Care to obtain international dialing access.
CallsplacedbetweentheUnitedStatesand
Canadado not requirean international access
code.
Plus Dialing lets you place an international call to
most countries without entering the local
international access code.
1 Press and hold 0 for two seconds. A “0”
appears, then changes to a “+”.
Note: The network translates the “+” into the
appropriate internationalaccesscode
needed to place the call.
2 Enter the country code,city code or areacode,
and phone number.
Setting One Touch Boo s t
TM
Customer
TM
Walkie-Talkie
One Touch BoostTMWalkie-Talkie sets your phone
to call the most recent Boost
number on the recent calls list, or a Boost
Walkie-Talkie number you choose, every time you
press the Boost
TM
Walkie-Talkie button.
TM
Walkie-Talkie
TM
Making International Calls
To set your phone to call the most recent Boost
Walkie-Talkienumber on the recent calls list:
1 From the main menu, select Settings >DC/GC
Options> One Touch DC .
TM
2 Scroll to Last Call.
3 Press A under Select.
TM
To set your phone to call a Boost
numberyou choose:
1 From the mainmenu,selectSe ttings >DC/GC
Options > One Touch DC > Assigned
Number.
2 T o enter the Boost
wantyour phone to call everytime youpressthe
TM
Boost
Walkie-Talkie button:
TM
Walkie-Talkie number you
Walkie-Talkie
Enterthe number using your keypad. -or-
Press A under Search.SelectContacts,
Recent Calls ,orMemo.Select the number you
wantto enter.
3 Press A under Ok .
TM
To turn off One Touch Boost
1 From the mainmenu,selectSe ttings >DC/GC
Options > One Touch DC.
Walkie-Talkie:
2 Scroll to Off.
3 Press A under Select.
39
Page 48

Advanced Calling Features
Call Timers
Call timers measure the duration of yourphone
calls,Boost
use, as well as thenumberof Kilobytessent and
receivedby yourphone:
•LastCall— displaysthe duration of your most
recent phone call.
• Phone Reset —keeps a running total of your
phone call minutes, until you reset it.
• Phone Lifetime —displays the total minutesof
all your phone calls.
• DC (Walkie-Talkie) Reset — keeps a running
totalof all ofyour Boost
minutes, until you reset it.
• DC (Walkie-Talkie) Lifetime — displays the
totalminutes of all your Boost
calls.
• Circuit Reset — keeps a running total of all of
your circuit data use, until you reset it.
• Circuit Lifetime —displays the total minutesof
all of your circuit data use.
• Kbytes Reset — keeps a running total of t he
numberof Kilobytessent and receivedby your
phone, until you reset it.
40
TM
Walkie-Talkie calls, and circuit data
TM
Walkie-Talkie call
TM
Walkie-Talkie
To view orreset a timer:
1 From the mainmenu,selectCall Timers.
2 Select the feature you want to view or reset.
3 To view afeaturewithout resetting: Press A
under Done when you are finished viewing.
-or-
To reset a feature: Press A under Reset.Press
A under Yes to confirm.
Note: The values displayed by Call Timers
should not be used for billing. Call timers
are estimates only.
Making TTY Calls
To use your phone t o makephone calls using a
teletypewriter (TTY) device:
1 Connectone end ofa 2.5mm cable into the
audio jack on your phone. Connect the other
endofthecabletoyourTTYdevice.
2 Make sure that your phone’s TTY feature is on
and select the TTY mode you want to use.
3 Use your phone to enter phone numbers and
make calls.
Page 49

Making TTY Calls
When you make aTTY call,these icons appear on
the phone’s display:
N Phonecall isactive.
O Phone call is on hold.
TTY device features such as Turbo-Code,
High-Speed, and Interruption are not supported by
your phone. These features must be turned off or
disabled to use your TTY device with your phone.
TurningOntheTTYFeature
Your phone’s TTY feature must be on if you want
to make TTY calls, set theTTY mode, or change
the TTY baud rate. To make sure theTTY feature
is on:
From the main menu, select Settings > Phone
Calls >TTY. This field must say On.
Choosing a Mode
Your phone supports these TTY modes:
• TTY —You type and read text on your TTY
device.
•VCO(Voice-Carry-Over) —Youspeak into your
phone and read t ext replies on your TTY device.
• HCO (Hearing-Carry-Over) — You type text on
your TTY device and listen to voice replies on
your phone speaker.
To change mode while not in a call:
1 From the main menu, select Settings > Phone
Calls >TTY >Type.
2 Press A under Cha nge.
3 Scrollto theTTY mode you want.
4 Press A under Select.
When you make a TTYcall, the call begins in the
TTY mode you last selected.
To change mode during a callusing your phone:
1 Press m.
2 Select TTY > Type.
3 Selectthemodeyouwant.
To change mode during a call using your TTY
device,issue one of the followingcommands:
• “VCOplease” —t o select VCO mode
• “HCO please” — to select HCOmode
• “HCOoffplease”— to turnoffHCO mode
41
Page 50

Advanced Calling Features
Important: When you are using HCO, the sound
coming from your phone speaker may
be uncomfortablyloud. Use caution
when putting the phone to yourear.
(For information on setting the volume
of your phone speaker, see “Setting the
Volume” on page 72.)
Changing the TTY Baud Rate
4 By default, your phone’sTTY baud rate is set to
45.45, the baud rate required for TTY calls
within the U.S. To make calls outside the U.S.,
set your TTY baud rate to 50.0
Special Dialing Codes
Call Restrictions
You can prevent your phone from making or
receiving long d istance, incoming, and outgoing
(except911) calls.
Contact Boost Mobile
information.
Telecommunications Relay Service
Boost MobileTMsupports services for
communicating with speech and/orhearing
impaired individuals.You candial 711 to reach a
local Telecommunications Relay Center. You will
42
TM
Customer Care for more
then be connected to your destination number.
Relay serviceworks through a Communications
Assistant who reads messages typed into a
TDD/TTY device by a speech or hearing impaired
individual to you. The Communications Assistant
thentypesyourspokenmessagesto the hearingor
speechimpairedindividual.Telecommunications
Relay Service is available 24 hours a day, 7days a
week, and every call is s trictly confidential.
Note: Using 71 1 to reach Telecommunications
RelayService may not beavailable in all
areas.
Page 51

Boost MobileTMPhone Services
Contact Boost MobileTMCustomer Care to obtain
these services or for additional information:
Note: Some servicesare notavailable outside
of the continentalUnited States.
Caller ID
Your phone automatically displaysthe phone
numberor name (if the 10-digitphone number is
stored in your Contacts) of the person calling
(unless blocked by the caller), enabling you to
decidewhethertotakethe call or forwardit tovoice
mail.
Caller ID information is not available on all calls.
Per-Call Blocking
You can block deliveryof your phone number to
otherCaller ID units for a singlephone call:
Press *67before dialing the call.
TM
Your Boost Mobile
blockedf rom calls made to 911, 800, 855, 866,
877, 888, or other toll- free phone numbers.
phone number cannot be
Per-Line Blocking
You can permanently block delivery of your phone
numberon every call you make.
To disable on a per-call basis:
Press *82before dialing the call.
Boost MobileTM411
The Directorythat puts you straight through—
Now there is no need to make 2 calls,memorize a
number, or hunt for apen to write a number down.
BoostMobile
that connectsyou straight throughto the number
you want.
TM
411is your mobile directory service
White Page Listings
You can requesta telephone number for any
person, business, or government agency in the
continental United States and Hawaii. Operators
can also provide address information if available.
Yellow Page Listings
You can ask the operatorto perform a search by
category if the specific businessname is unknown.
Forexample,you can requestinformationfor a surf
shop near your home or school.
43
Page 52

Boost MobileTMPhone Services
Nationwide Call Completion
Boost MobileTM411 operatorscan connect you to
any listing in the continental United States and
Hawaii. If requested, the operator will stay on the
line while connecting to the number.
Driving Directions
Boost MobileTM411 operators are able to provide
directions to reach a specific destination.
Operators will work with you to determine your
starting point and provide clear directions to the
destination.
Restaurant Reservations
Boost MobileTM411 operatorscan assist in finding
a restaurant and then coordinate reservations. A
Boost Mobile
reservation information through areturn phonecall.
For your convenience, the reservation will be in
your name.
Note: Reservation service may not beavailable
44
TM
411 operatorwill confirm your
for all restaurants.
Movie Listings and Show Times
Boost MobileTM411 operators have access to
movielistingsat mosttheaters in thecontinental
UnitedStates and Hawaii.You onlyneedto ask for
a specific movie or movie theater to get current
movies, locations or show times. Additional
information such as running time, synopsis, and
ratingsare also available.Show times and listings
are available24-48 hours in advance.
Local Event Information
You can request information on local events such
as sportingevents, concerts,state and countyfairs
and other current events. Boost Mobile
operators can providedates,times, and locations
for these events.
TM
411
Page 53

Ring Tones
To set theringtone your phone makes when you
receivephone calls,messagenotifications, or call
alerts:
1 From the mainmenu,selectRing Tones.
2 Make sure VibeAll is set to Off .
3 Scrollthroughthe list of ring tonesandselectthe
one you want to assign. Vibrate setsyourphone
to vibrateinsteadof makinga sound;Silent sets
your phone to neither vibrate nor make a sound.
Tip: Highlighting a ring tone lets you hear it.
4 Press A under Assig n.
5 Scrolltothefeatureyouwanttoassignthering
tone to.
6 Press A under Select.
Tip: A checkmark next to a feature means the
currentring tonehasbeenassignedtoit.To
remove the assignment: Scroll to the
feature. Press A under Select.
7 To assign the ring tone to other features, repeat
step 5 through step 6.
8 When you arefinished, press A under Done.
Setting Your Phone to Vi brate
You can set your phone to vibrate insteadof
makinga sound when you receiveall phone calls,
TM
Walkie-Talkie calls,messages
Boost
notifications, and call alerts.
1 From the mainmenu,selectRing Tones >
VibeAll.
2 Scrollleft or right to set VibeAll to On.
Tip: Pressing the volumecontrols to turn down
the volume as faras possible sets VibeAll
to On.
To set your phone to vibrate instead of making a
sound for some featuresbut not others:
1 From the mainmenu,selectRing Tones.
2 Make sure VibeAll is set to Off .
3 Scroll through the list of ring tones to Vibrate.
4 Press A under Assig n.
5 Scrollto thefeature you want to set to make no
sound.
Note: To set ring options for Boost
Walkie-Talkie calls, see “Setting Your
PhonetoNotRing”onpage72.
6 Press A under Select.
7 To assign Vibrate to anotherfeature, repeat
step 5 through step 6.
TM
45
Page 54

Ring Tones
8 When you arefinished, press A under Done.
These icons indicatehow the ringer is set.
u DC/GC speaker set to off.
v The phone always vibrates instead of ringing.
M The phone does not ring for phone calls.
These icons may appear at the same time.
Assigning Ring Tones to Contacts
You can set thering tone your phone makes when
you receive phone calls or call alerts from
someone you have stored in Contacts.
1 From the mainmenu,selectRing Tones.
2 Make sure VibeAll is set to Off .
3 Scroll through the list of ring tones to the one
you want to assign. Highlighting a ring tone lets
you hear it.
4 Press A under Assig n.
5 Select AContact.
6 Scrollto the Contacts entry you want to assign
theringtoneto.
7 Press A under Select.
46
Ring and Vibrate
To set a your phone to ring and vibrate when you
receive phone calls or call alerts:
1 From the main menu, select Ring Tones.
2 Make sure VibeAll is set to Off .
3 Scrollthroughthelistof ring tonesandselectthe
one you want to assign.
4 Press m.
5 Select Assign w/Vibe.
6 Select the feature you want to set to ring and
vibrate.
7 When you arefinished, press A under Done.
Thisicon S appears on the display.
Viewing Ring Tone Assignments
1 From the mainmenu,selectRing Tones.
2 Make sure VibeAll is set to Off .
3 Highlight any ring tone.
4 Press m.
5 Select Overview.
6 Scrollto view ring tones assignedto features
and Contact entries.
Page 55

Downloading More Ring Tones
Downloading M ore Ring
Tones
Ifyouwanttouseotherringtones,youcan
download them into your phone for a fee.Go to
www.boostmobile.com update fora selection of
custom ring tones and downloading instructions.
Note: Ring tonespurchasedfrom this web site
may be downloaded only once. If you
delete aringtone from your phone, you
must purchase it again to download it
again.
Managing Memory
To view the amountof memory available for
custom ring tones:
1 From the main menu, select Ring Tones.
2 Make sure VibeAll is set to Off .
3 Highlight any ring tone.
4 Press m.
5 Select Memory Usage.
Deleting custom ring tones frees memory.
Deleting Custom Ring Tones
To delete a custom ring tone:
1 From the main menu, select Ring Tones.
2 Make sure VibeAll is set to Off .
3 Scrollto the ring tone you want t o delete.
4 Press m.
5 Select Delete.
6 Press A under Yes to confirm.
47
Page 56

Message Center
The message center manages your messages.
When you receive the following types of
messages, you can access them through the
messagecenter:
• Voice mail messages
• Short Message Service (SMS) messages
• Two-Waymessages(NetAlerts)
You can listen to or view these messages, delete
them, or continue to store them inthe message
center.
Accessing the Message Center
Press A under Mesg. -or-
From the main menu, select Messages.
Message Center Options
•VoiceMail— access voice mail messages you
have received.
•SMS— access SMS messagesyou have
received.
48
•NetAlert— access Two-Way messages you
have received.
Page 57

Receiving Messages
When you receive a voice mail message, Short
Message Service (SMS) message, or Net alert,
you have 2 ways to accessthe message:
• Respond to the message notification that
appears when the message is received.
• Dismiss the message notification and access
the message later through the message center.
Message Notifications
When you receivea message, your phone notifies
youwithtextonthedisplayandanotificationtone
or vibration. You can access the message or
dismiss the notification.
If you dismiss the notification, the message is not
deleted.It can be accessed through the message
center.
If you arenot on a phone call when you receivea
message, your phone sounds a notification tone
every 30 seconds until you access the message,
dismiss the notification, or the alert time-out
expires.
Setting Notification Options
To control whether your phone sounds message
notificationtones while you are onphonecalls:
1 From the main menu, select Settings > Phone
Calls >Notifications.
2 Choose the option you want:
• Receive All — Tones sound during calls for
all types of messages.
•MsgMailOnly— Tones sound during calls
for SMS messages; tones for allothertypes
of messages are held until you end calls.
• Delay All — Tones for all types of messages
are held untilyou end calls.
Note: Delay All is the default setting.
3 Press A under Select.
Tip: To set notification options duringa call:
Press m. Select In Call Setup >
Notifications.
49
Page 58

Receiving Messages
Message Center
All your messagesare stored in themessage
center.T he message center shows how many
messages you have of each type.
To access your messagesthrough the message
center:
1 Press A under Mesg. -or-
From the main menu, select Messages.
2 Scrolltothetypeofmessageyouwantto
access.
3 Press A under the display option on the left.
Note: In order for you to access voice mail for
the first time, you must access it bydialing
into your voice mail box using your PTN. If
thereis already a message in yourvoice
mail box, then youcan access your voice
mail throughthe message center.
50
Page 59

Voice Mail Messages
Receiving a Message
When you receive a voice mail message, New
Voice Mail Message appears on the display.
TM
To call Boost Mobile
listen to the message:
Press A under Call.
To dismiss the message notification:
Press A underBack.Thisicon
the display, reminding you that you have a new
message.
Accessing Voice Mail from the Message Center
1 From the main menu, select Messages > Voice
Mail.
2 Press A under Cal l to call Boost Mobile
voice mail system.
’s voice mail system and
y appears on
TM
’s
Sending Unanswered Calls to Voice Mail
To send a phone call to voice mail instead of
answering it:
Press e. -or-
Press A under No.
If the caller leaves a message, this icon
appearson the display, reminding you that you
have a newmessage.
y
51
Page 60

Boost MobileTMVoice Mail
Note: To receivevoice mailmessages, youmust
firstset up your voice mailbox.
Setting Up Your Voice Mail Box
Using your i285 phone, dial your 10-digitBoost
TM
Mobile
example: 7035557777. Follow the system
instructionsto create a new4- to 7-digitpassword,
record yourname, and recorda greeting. Whenthe
system says, “Thank you forusing Boost Mobile
Voice Mail,” your mailbox is set up.
If you arecalling from a phone other than your
i285, dial your 10-digit Boost Mobile
you hear the greeting, press the star key to access
your voice mail box. The system will prompt you to
enteryour password.Enterthe last 7 digits of your
Boost Mobile
is your temporary password.
You are at the main voice mail menu when you
hear the optionslisted below.
• To play your messages,press 1. (This option
PersonalTelephone Number (PTN). For
TM
PTN. When
TM
PTN. For example: 5557777. This
plays only if you have new or saved messages.)
52
TM
• To record a message, press 2.
• To changeyour greeting, press 3.
• To access your personaloptionspress 4.
Ifyoupress*whileyouareinasub-menu,youwill
go totheprevious menu.I f youpress** ,you
willgo to the main voice mail menu. From the main
voice mail menu, press # to exit voice mail. At
any time, you may end the call by pressing e.
Playing Messages
When you receivea new voicemail message,you
caneitherlistentoitimmediatelybypressingA
under Call, or laterby pressing A underExit.
These are optionsavailable while you are listening
to your messages:
• Replay — press1.
• Rewind to beginning of message — press 11.
• Pauseor continuet he current message— press
2.
• Fast forward — press 3.
• Fastforwardtoendofmessage—press
33.
• Playthe date and time stamp— press 55.
These options are available while a message is
playing or afterit hasplayed:
Page 61

Changing Your Password
• Forward the message to another subscriber —
press 6.
• Delete the message— press 7.
• Reply to a message — press8.
• Save the message — press 9.
• Skip to the next message — press #.
Messages that are not saved or deleted remain in
your mailbox as new messages. All messages are
automaticallydeletedafter 21 days.
To retrieve deleted messages, press *3.
This option only applies to the current voice mail
session.If you endthe call, the messages will be
permanently deleted.
Important: After exiting the voice mail session, you
cannot recover deleted messages.
Changing Your Password
1 From the main voice mail menu, press 4 to
access personaloptions.
2 Press 4 to access personal preferences.
3 Press 1 to modify password.
4 Enter your newpassword. It must be 4to 7digits
long.
Note: It isimportant that you choose a number
that is easy for you to remember, but hard
for someone else to guess. Passwords
usingallthesamedigits,forexample
4,4,4,4 or a sequential series of digits,
1,2,3,4, will not be accepted.
5 Press ** to return to the main menu.
Note: If you forget your password, contact
Customer Care.
Recording Your Name
When you send, reply to, or copya message, your
name response precedesthe message. To record
or re-record your name at any time:
1 From the main voice mail menu, p ress 4 to
access personal options.
2 Press 4 to access personalpreferences.
3 Press 3 to access the record your name
option.
4 Press 2 to record your name.
5 Press ** to return to the main menu.
Recording Your Active Greeting
You may want to includeone or allof the following
optionsin your greeting so that callers will know
they are available.
53
Page 62

Boost MobileTMVoice Mail
• Press 1 to send an umeric message.
• Press 2 to send an operator-assistedmessage.
(Thisoption is availableonly if you area
subscriber of Operator Assisted Messaging.
Contact BoostMobile
information.)
• Press # to skip the greeting and record a
message i mmediately.
To record or alter your greeting at any time:
1 From the main voice mail menu, press 3 to
changeyour greeting.
2 Press 1 to play, press2 torecord or re-record, or
press 7 t o delete your active greeting.
3 Record your greeting and press # whenyou
have finished.
4 Press ** toreturn to the main menu.
TM
Customer Carefor more
Advanced Voice Mail Features
Multiple Greetings
You can create up to 5 different greetingsand
designate which greeting will be your active
greeting at any given time. The greeting that was
recorded during your initialvoice mail box setup is
greeting 1. This is your default active greeting.
54
To record additional greetings:
1 From the main voice mail menu, p ress 3to
access the greetings menu.
2 Press 4 tomodifygreetings.
3 Enter the greeting number you wish to create or
modify.
4 Press 2 to record a greeting.
5 Record your greeting and press # whenyou
have finished.
6 Press ** tor eturn to themain menu.
To select your active greeting:
1 From the main voice mail menu, p ress 3to
access the greetings menu.
2 Press 3 toselectanothergreeting to be active.
3 Enter the number of the greeting that you would
like to be active. The system will confirmyour
active greeting number.
4 Press 1 toplay your active greeting.
5 Press ** tor eturn to themain menu.
Page 63

Advanced Voice Mail Features
Greetings Schedule
You can choose to have your greetings
automatically activated based on a pre-determined
time schedule.By activatingthe Greeting
Schedule, Greetings1, 2, and3 will automatically
play accordingto the time schedule listed below.
Greeting 1 Evenings and
Weekends
Greeting 2 Weekday
Mornings
Greeting 3 Weekday
Afternoons
5:00 pm – 7:59 am,
Monday – Friday
24-hours, Saturday
and Sunday
8:00 am –11:59am
Monday – Friday
Noon–4:59pm
Monday – Friday
To activate the greetingschedule:
1 From the main voice mail menu, press 3 to
access the greetings menu.
2 Press 9 toactivate your greetingschedule.
3 Press ** toreturn to the main menu.
Note: The greeting schedule, when on, will
override any other greeting that you may
set as active. If a greeting is not recorded,
asystemstandardgreetingwillbeplayed.
Automatic Playback
By default, the playback mode ofyour voice mail
service is set to normal. This feature automatically
playsand saves new messages when you log in.
To activate automatic playback:
1 From the main voice mail menu, p ress 4to
access personal options.
2 Press 4 toaccess personalpreferences.
3 Press 2 toaccess playbackpreferences.
4 Press2 to switchbetween automatic and normal
playback.
5 Press ** tor eturn to themain menu. Changingthe Playback Order of Messages
Youcanselecttheorderinwhichyouwant
unheardmessages to be played.You may listento
the last received message first, or you may listen to
the firstreceivedmessagefirst.To selecttheorder
in which new messages should be played:
1 From the main voice mail menu, p ress 4 to
access personal options.
2 Press 4 toaccess personalpreferences.
3 Press 2 toaccess playbackpreferences.
4 Press 1 to switch between the playback orders.
5 Press ** tor eturn to themain menu.
55
Page 64

Boost MobileTMVoice Mail
Recording, Forwarding, and Replying to Messages
These functions allow you to record and send,
reply to, or forward a message to an assigned
destination addressor group list number. If you
record a completeor partial message, but donot
send it, Boost Mobile
TM
Voice Mailservice will refer
to this message as an “inpreparation” message.
To record and send amessage:
1 From the main voice mail menu, press 2 to
record a message.
2 Record your message and press # to end the
message.
3 Press 9 at the prompt to indicate that you want
to send the message or press 5 for delivery
options.
4 Enter the mailbox number and/or group list
number(s). (A mailbox numberis the 10-digit
Boost Mobile
customer. The Boost MobileTMcustomermust
be in your local calling area. The name of the
TM
PTN of a Boost Mobile
TM
recipient plays if it is recorded.)
5 Press # tosend.
6 Press ** toreturn to the main menu.
Note: Youcan only send messages using this
method to Boost Mobile
TM
customers in
your home market.
56
Delivery Options
After you have created a message, you can assign
the message to a category before you send it.
Belowis alist ofthe options that can beappliedto
a message:
•Urgent— Recipient will hear this message
before other messages.
•Private— Recipient cannot copy the message
to another mailbox or phone number.
• Notification of Non-Delivery — You willbe
notified if the recipienthas not listened to your
message by a certain date and time.
•FutureDelivery— You can specify a timeand
date (up to 3 months in advance)for the
messagetobedelivered.
Note: All dates must have digits in the MM/DD
format(2 digits for the month and 2 digits
for the date).For example, January2nd
would be 0102.
Important: Once a message has been sent for
To set a specialdelivery option:
1 After recording your message, but before
sending it, press 5 for delivery options.
future delivery,it cannot be retrieved or
deleted.
Page 65

Advanced Voice Mail Features
2 Press the number that corresponds with the
desired delivery option:
• Press 1 for urgent.
• Press 2 for private.
• Press 3 for notification of non-delivery. At
prompt, specify time and date.
• Press 4 for future delivery of messages. At
prompt, specify time and date.
• Press 9 to send the message immediately.
3 The list of options will be presented again.
Select an additional option or press 9 to send
the message.
4 Enter the destinationmailboxor group list
number of the recipient(s).
5 Press # tosend.
6 Press ** toreturn to the main menu.
Working With Group Lists
Thisfeatureenablesyoutocreatealistandassign
it a unique name. Then, you can addmailbox
numbers,group lists, or individuals.Once you
createalistyoucansendavoicemessageto
everyoneon the list byentering the group list
number.Youcanhaveupto40grouplists.Each
list can hold up to 50 addresses.
To set up a group list:
1 From the main voice mail menu, p ress 4to
access personal options.
2 Press 2 toaccess your Group Lists.
3 Press 2 tocreate a Group List.
4 Enter the 1- or 2-digitgrouplist number and
press #.
5 Recorda name for thelistand press #.
6 Select group members by mailbox number,
grouplist,or name.
7 Press # tosave all entriesaddedto the list.
8 Press ** tor eturn to themain menu.
To modify a group list:
1 From the main voice mail menu, p ress 4to
access personal options.
2 Press 2 toaccess group lists.
3 Press 4 tomodify agroup list. E nter the number
of the group list you want to modify.
4 Press 1 toadd a newrecipient.
5 Press # to save your changes.
6 Press ** tor eturn to themain menu.
Deleting a group list:
1 From the main voice mail menu, p ress 4to
access personal options.
57
Page 66

Boost MobileTMVoice Mail
2 Press 2 toaccess group lists.
3 Press 3 todeletea group list.
4 Enter the number of the group list you wantto
delete.The system will play the name of the
group list.
5 Press # to delete the list.
6 Press ** toreturn to the main menu.
Message Forwarding
Note: Youcan only forward messages to Boost
This featureallowsyou to program your phone to
automaticallyforwardincoming messagesto
another mailbox. There are 2types of forwarding:
notified and silent.Notified forwardingprompts the
callerthat the messagewillbe forwarded. Silent
forwarding does not prompt the caller that the
message will be forwarded.
To modify forwarding options,
1 From the main voice mail menu, press 4 to
access personaloptions.
2 Press 5 tomodifyforwarding options.
3 Select the applicable option below:
• To create a forwardingnumber, press 2.
• If you have already created a forwarding
number, press 2 to modify the number.
58
Mobile
TM
customers in yourhome market.
• To enable or disable message forwarding,
press3.
• To changethe forwarding type, press 2.
4 Press ** tor eturn to themain menu.
Page 67

SMS and Boost Mobile
TM
Text and Numeric
Messages
SMS Messages
ShortMessage Service(SMS) messagesareshort
text messages, also called text and numeric
messages. You can send SMS messages through
any emailaccount or on www.boostmobile.com.
Your phone receives SMS messagessent to its
SMS address, but does notsend SMSmessages.
Your phone's SMS address is your
PTN@myboostmobile.com.
If your phone is poweredoff when you receive a
message, your phone notifies you the next time
you power it on.If you are out ofyour coverage
area,your phone alerts you when you return to
your coverage area.
Yourphone attemptsto deliverthesemessagesfor
up to 7 days.
Receiving a Message
When you receivea text and numeric message,
New Text Message appears on the display.
To view the message:
1 Press A under Read.
2 Ifthemessagefillsmorethanonescreen,scroll
to read it.
3 To keep themessage, press A under Save. -or-
To delete the message, scroll to the end of the
message and press A under Delete.
To dismiss the message notification:
Press A under Back.Thisiconw appears on
the display, reminding you that you have a new
message.
Reading from the Message Center
1 From the main menu, select Messages > SMS.
2 Scrollto the message you want to read.
3 Press A under Read.
4 Ifthemessagefillsmorethanonescreen,scroll
to read it.
5 To keep themessage, press A under Save. -or-
To delete the message, scroll to the end ofthe
message and press A under Delete.
59
Page 68

SMS and Boost MobileTMText and Numeric Messages
Calling and Storing Numbers
If an SMS messageyou receive contains a phone
number,you can call that number by pressing s
whileviewingthe message.
If an SMS messageyou receive contains a phone
number, Boost
call or send a callalertto that number,or storethat
numberto Contacts. Press m while viewing the
message to access these options.
TM
Walkie-Talkie number, you can
To call the number, select Call Back.
To send a call alert, select Alert,thenpressthe
PTT button.
To store the number to Contacts, selectStore
Number.
Boost M obileTMText Messages and Web Alerts
Boost MobileTMtext messages can be sentand
receivedthrough any email account and on
www.boostmobile.com. Your phone sends and
receivesBoostMobile
Boost Mobile
TM
Your phone's Boost Mobile
addressis PTN@messaging.myboostmobile.com.
60
TM
Wireless Web Services.
text messages through
TM
TextMessaging
When you receive a B oost Mobile
your phone notifies you with a Web alert. Each
Web alert lets you view the Boost Mobile
TM
text message,
TM
text
message associated with it.
Web alerts appear in themessage center. Boost
TM
Mobile
Mobile
text messages appear in the Boost
TM
WirelessWeb Services browser.
Receiving a Message
When you receive a B oost MobileTMtext message,
a W eb alert notificationappears on thedisplay.
To view the message:
Press A under Goto.
This lets you read the message through Boost
TM
Mobile
To dismiss the Web alertnotification:
WirelessWeb Services.
Press A under Back.Thisiconw appears on
the display, reminding you that you have a new
Web alert.
Page 69

Boost MobileTMText Messages and Web Alerts
Deleting Web Alerts
When you delete a Webalert, the Boost Mobile
text message is not deleted, but itis no longer
accessible through the message center.You can
still access the message through Boost Mobile
WirelessWeb Services.
1 From the main menu, select Messages.
2 With Web Alert highlighted,press A under
Goto.
3 Press m.
4 Select Delete.
TM
TM
Sending Boost MobileTMText Messages
To send a Boost MobileTMtextmessage from your
phone:
1 From the main menu, select Web > Te xt
Messaging > Send Message.
2 Ifyouaresendingthemessagetoanew
address, select New Address. -or-
Ifyouaresendingthemessagetoanaddress
you already sent a message to, select Sent
Address. Select Ok.
3 Select Compose New to send a new message.
-or-
Select Sentto send apreviously sent message.
Selectthesentmessageyouwanttosendand
select Ok.
4 Press A under Send.
To send a messageto a new address:
1 Enterthe phone number or emailaddressof the
person you are sending the message to.
2 Press A under Options and select OK.
3 Select Compose New tosend anewmessage.
-or-
Select Sentto send apreviously sent message.
Selectthesentmessageyouwanttosendand
select Ok.
4 Press A under Options and select Send.
To send a message to a sent address:
1 Select the phone number or email address you
want t o send to .
2 Select Compose New tosend anewmessage.
-or-
Select Sentto send apreviously sent message.
Selectthesentmessageyouwanttosendand
select Ok.
3 Press A under Options and select Send.
61
Page 70

SMS and Boost MobileTMText and Numeric Messages
Boost MobileTMNumeric Messages
Boost MobileTMNumeric Messaging is available
through Boost Mobile
messages can be displayeddirectly on your i285
phone.To leavea numeric message:
• The caller must press “1” during your Voice Mail
greeting.
• Oncethe caller presses “1” only numeric
messages can be sent.
These messages appear one you phone as SMS
messages.
62
TM
Voice Mail.These
Page 71

Boost MobileTMWireless Web Services
Boost MobileTMWireless Web is a service that lets
you access Internet based information directly from
the screen of yourWAP (WirelessApplication
Protocol) enabledphone. In the palm of your hand,
you can access the Boost Mobile
Services to:
• Send and receive email
• Checksurf and snow reports,and sports scores
• Find your nearest movie location and show
times
• Checkyour daily horoscope
• Make CD purchases
• Access your account
• andmuch more
Your i285 phone will be automaticallyset up for
Boost Mobile
activateyour account. Please refer to
boostmobile.com for pricingon Boost Mobile
TM
Wireless Web as soon as you
WirelessWeb Services.
TM
WirelessWeb
TM
If you decide Boost Mobile
for you, simplycall Boost Mobile
and ask your Care Representativeto cancel the
Boost Mobile
TM
WirelessWeb service.
TM
WirelessWeb is not
TM
Customer Care
Starting th e Microbrowser
Just as you use Netscape Navigator®or Microsoft
Internet Explorer to browse the Web fromyour
desktop, the microbrowser allows you to explore
and use avariety of Internet services.To begin
usingthe Boost Mobile
1 Press
m to access the Main Menu.
2 Scroll to Web .
3 Press A under SELECT.
4 Your home page displays.
Note: The first time you access Web,youwillbe
askedto enable security to ensure your
information remains private and secure.
• Press
display: Generating…, Computing…,
Sending))))).
• You may be asked to (re)enable
security as Boost Mobile
services or uponyour return to the U.S.
after traveling.
TM
WirelessWeb:
A under Yes. Thephone will
TM
adds new
®
63
Page 72

Boost MobileTMWireless Web Services
• When transmitting highly personal or
sensitive data, such as a credit card
number,you will see the Secure Data icon
{. This icon indicates that the data is
encrypted during transmission.
5 Scrollto highlightthe service you wish to access
and press A under Ok . -or-
Pressthe number shown to the left to
automatically jump to that service.
Press * to return to the previous screen.
To return to the home page, press e.
6 To exit the browser,press e until the idle
screendisplays. -or-
Pressand hold
displays with Exit Browser highlighted.
m.TheBrowser Menu screen
Press A under OK. When you re-enter Web,
you will enter on the page from which you exited
Boost MobileTMWireless Web Navigation Keys
•Home—Presse to return to your home
page.
•Back—Press* to return to a previous
screen.
64
•Scroll— A scroll bar on the leftof the phone’s
display indicatesthat additional text canbe
viewed. Scroll using the navigation key.
Tip: While navigatingthrough Boost Mobile
Wireless Web screens, a number may
appearto the left of the application or topic
youwanttoaccess. Pressthe
corresponding number on the keypad for
quicker access to that application or topic.
When transmitting highly personalor sensitive
data, such as a creditcard number, this icon
Eappears,indicating that the data is encrypted
duringtransmission.
Note: Youmay be asked to (re)enablesecurity
as Boost Mobile
upon your return to the U.S. after
traveling.
For multimediademos,CustomerQuickStart
Guides,and otherinstructionfor Boost Mobile
WirelessWeb Services, go to
www.boostmobile.com.
TM
adds new services or
TM
TM
Page 73

Call Forwarding
Call forwarding sends calls to the phone numbers
you specify. You can forward all calls to one
numberor forward missed calls to different
numbers depending on the reason you missed the
call.
Forwarding All Calls
When you set your phone to forward all calls, an
icon appears in the top row of the display:
G Phoneline1isactive;callstophoneline1
are being forwarded.
To forward all calls:
1 From the mainmenu,selectCall Forward.
2 Press A under Cha nge.
3 Select All Calls.
4 Scroll to To.
5 Press A under Cha nge.
6 If you specifieda forwarding number for all calls
before, this number displays. Press A under
Change.
To forward calls to this number, press A under
Ok. -or-
To delete this number, pressand hold A under
Delete.
7 T oenter the number you want toforward calls to:
Enterthe number using your keypad. -or-
Press A under Search.SelectContacts,
Recent Calls ,orMemo. Select the number you
wantto enter.
8 Press A under Ok .
All your calls are now forwarded to the number you
specified.
Tip: In some fields, you can select an option by
scrolling left or right instead of pressing A
under Change.
Turning Off Call Forwarding
If you don’t want all your calls forwarded, turn the
feature off:
1 From the mainmenu,selectCall Forward.
2 Press A under Cha nge.
3 Select All Calls.
4 Scroll to To.
5 Press A under Cha nge.
6 Scroll to Off.
7 Press A under Select.
65
Page 74

Call Forwarding
All your callsare now sent to your phone.
Calls you miss are forwarded accordingto the
optionsset for missed calls.By default,missed
calls are forwarded to voice mail.
Forwarding Missed Calls
You can specifya forwardingnumber for eachtype
of missed call:
•IfBusy—Yourphone is on acall or transferring
data.
•IfNoAnswer— You do not answeron the first
4rings.
• If Unreachable — Yourphone is out of
coverage or powered off.
Note: If you want a type of missed call sent to
voicemail,thecallforwardingnumberfor
that type of missed call must be your
voice mail access number.
Toforwardmissedcalls:
1 From the mainmenu,selectCall Forward.
2 Press A under Cha nge.
3 Select Detailed.
4 Scroll to If Busy to specifya forwardingnumber
for calls received when your phone is busy.
5 Press A under Cha nge.
66
6 If youspecified a forwarding number forthis type
of call before, this number displays. Press A
underChange.
To forward calls to this number, press A under
Ok and go to step 9. -or-
To delete this number, pressand hold A under
Delete.
7 To enter the number you want to forward this
type of call to:
Enterthe number using your keypad. -or-
Press A under Search.SelectContacts,
Recent Calls ,orMemo. Select the number you
wantto enter.
8 Press A under Ok .
9 Repeatstep 4 through step 8 for No Answer
and If Unreachable.
When you are finished, press A under Back.
Viewing Call Forwarding Settings
1 From the main menu, select Call Forward.
2 With To highlighted, press m.
3 Select Retrieve Status.
Page 75

Java®Applications
Your phone arrives with Java applications installed
and ready to run.You candownload and install
more Java applications.
To download and install more Java applications, go
to www.boostmobile.com.
Note: Using Java applications may cause your
phone to use up more battery power than
otheruses of your phone.
Running Applications
Torunanapplicationthathasashortcutonthemain
menu:
1 From the main menu, selectthe application or
suite of applications you want to run.
2 If you have selecteda suiteof applications, select
the application you want to run.
To run anapplication that does not have a shortcut
on the main menu:
1 From the main menu, select Java Apps. 2 Select the application or suite of applications you
wantto run.
3 If you have selecteda suiteof applications, select
the application you want to run.
Tip: If you don’t hear thesoundsassociated with
the Java application, select Settings >
Volume and check the volumes of Java
Speaker and Java Earpiece.
Suspending Applications
When you suspend an application, it does not stop
running. It goes to the background so that you can
run another application in the foreground.
To suspend an application:
Press e or close the flip.
To view your suspendedapplications:
From the Java menu, select Suspended Apps.
You can have up to3 applications running at one
time — 1 runningin the foreground and 2in the
background.
Resuming Applications
You can resume a suspended application at any
time. This brings it to the foreground.
1 From the Java menu, select Suspended Apps. 2 Selectthe applicationyou wantto resume.
67
Page 76

Java®Applications
Ending A pplicati ons
To end an application:
1 From the main menu, select Java Apps. 2 If the application you want to end is part of a suite
of applications, select the suite.
3 Scroll to the application you want to end. 4 Press m. 5 Select End.
To end all applications:
1 From the main menu, select Java Apps. 2 Scroll to Suspended Apps. 3 Press m. 4 Select End All. 5 If you want to end all applications without letting
them exit,pressA under EndNow.
Tip: You can also end applications from the
Suspended Apps screen.
Downloading Applications
If you want to runmore Java applications, you can
download them into your phone. Go to
www.boostmoblie.com update for aselection o f
Javaapplications and downloadinginstructions.
68
Installing Applications
Before runningmost application you have
downloaded, you must install them.
1 From the main menu, select Java Apps. 2 Select the application or suite of applications you
want toinstall.
3 If you want to create a shortcut to the Java
application on the mainmenu: Press A under
Next.PressA underYes.
4 Press A under Done.
Deleting Applications
To delete an application:
1 From the main menu, select Java Apps. 2 Scroll to the application you want to delete. 3 Press m. 4 Select Deinstall. 5 Press A under Yes to confirm. 6 When your phone has finisheddeleting the
application,press A under Done.
To delete all Java applications:
1 From the main menu, select Java Apps. 2 Scroll to Java System. 3 Press m.
Page 77

Managing Memory
4 Select Delete All. 5 Press A under Yes to confirm.
Managing Memory
To view the amount of memory availablefor Java
applications:
1 From the main menu, select Java Apps > Java
System.
2 Press A under Next. 3 To see more memory information, press A under
Next again.
Deleting Java applications frees memory.
Note: Java applicationdata is stored in your
phone using the same memory space used
to store voice records, ring tones, and
wallpaper images. Deleting some of these
other items frees memory space for Java
applications.
Shortcuts on t he Main Me nu
When you install an application, you can create a
shortcut to the application on the main menu.
Tocreateashortcuttoanapplicationthatisalready
installed:
1 From the main menu, select Settings >
Personalize > Menu Options > Add/Remove
Apps. -or-
From themain menu: Press m.Select Main Menu
Setup > Add/Remove Apps.
2 Scroll to view the list of Java applications. Any
applicationthat has a shortcut on themain menu
has a checkmark next to it.
3 Scrolltotheapplicationyouwanttocreatea
shortcutfor.
4 Press A under Done. To remove ashortcut:
1 From the main menu, select Settings >
Personalize > Menu Options > Add/Remove
Apps. -or-
From themain menu: Press m.Select Main Menu
Setup > Add/Remove Apps.
2 Scroll to view the list of Java applications. Any
applicationthat has a shortcut on themain menu
has a checkmark next to it.
3 Selectthe applicationyou wantto remove the
shortcutfor.
4 Press A under Done.
69
Page 78

Java®Applications
Java Applications and GPS Enabled
Some Java applications can make use of your
phone’s GPS feature to determine the approximate
geographicallocation of yourphone. (See “GPS
Enabled” on page 77 formore information on the
GPS feature.) However, for privacy reasons, y ou
may not always want Java applications to access
the location of your phone. Your phone protects your
privacy by giving you the option to block all orsome
Javaapplications from accessingthe locationof
your phone.
Setting Privacy for All Java Applications
These options control the privacy of all Java
applicationson your phone:
• Restricted — No Java or similar software
applicationsmay access the locationof your
phone.However,location information may still be
available to the phone’s owner, fleet manager, or
accountadministrator.
• Unrestricted — AllJava applications may access
the location of your phone, without notifying you.
70
• By Permission — When aJava application
attempts to access the location of your phone,
you are promptedt o givepermission.However,
location information may still be available to the
phone’s owner, fleet manager, or account
administrator.
See “Setting Privacy Options” on page 82 for
information on choosing these options.
Granting or Denying Permission
If you choose By Permission, youmust grant or
denyeachJavaapplicationaccessto the locationof
your phone when the application requests access
for the first time. Y ou may be required to grant or
denysubsequent requestsfrom the same
application,depending on the privacy setting you
choose for the individual Java application (see
“Setting Privacy for Each Java Application”on page
71).
When a Java applicationrequestsaccessthe
location of your phone, a screen appears informing
you.
To deny this request:
1 Press A under Deny. The applicationdoesnot
accessthe location of your phone.
2 Selectthe denying option you want:
Page 79

Java Applications and GPS Enabled
• Always — Ifthe application requests access to
the location of your phone again, the requestis
denied withoutnotifying you.
• For this session — Ifthe application requests
access to the location of your phone again
beforeyou poweroffyourphone,the requestis
denied withoutnotifying you.
•OnlyOnce— If the application requests
access to the location of your phone again, you
are prompted to grant or deny permission.
To grant this request:
1 Press A under Grant. The applicationaccesses
your phone’s location.
2 Select the granting option you want:
• Always — Ifthe application requests access to
the location of your phone again, the requestis
grantedw ithout notifyingyou.
• For this session — Ifthe application requests
access to the location of your phone again
beforeyou poweroffyourphone,the requestis
grantedw ithout notifyingyou.
•OnlyOnce— If the application requests
access to the location of your phone again, you
are prompted to grant or deny permission.
Setting Privacy for Each Java Application
After a given Java applicationrequests access to
the location of your phone for the first time, you have
the opportunity to setGPS privacy option for that
Java application.
1 From the main menu, select Java Apps. 2 Selectthe applicationor suite ofapplications you
wantto set theprivacy option for.
If the application has requestedaccess to the
location of your phone, m appears when you
highlight the application.
3 Press m. 4 Select Permissions. 5 Select the privacy option you wantfor this
application:
•Always— The application always has
permission to access the locationof your
phone,without notifying you.
•Ask— When theapplication requestsaccess
to thelocation of your phone, you are prompted
to grant or deny permission (see “Granting or
DenyingPermission”onpage70).
• Never —W hen theapplicationrequests
accessto the location of your phone, the
request is denied without notifying you.
71
Page 80

Customizing Your Phone
Setting the Volume
To set thevolumeof the sound coming from the
phone’s earpiece or speaker:
1 From the main menu, select Settings > Volume.
2 Scroll to Earpiece to set the earpiece volume.
-orScroll to Speaker to set the speakervolume.
3 Press A under Cha nge.
4 To select the volume:
Scrollleft orright. -or-
Pressthe volume controls.
5 Press A under Ok .
To set thevolumeof the phone’s ring:
Pressthe volume controls.
For another way to set the volume of the phone’s
ring,or the volume of many other sounds your
phone makes:
1 From the main menu, select Settings > Volume.
2 Scrollto the option you want andmake the
change. Choose Line 1 to set thevolume of the
phone’s ring when you get a call on that line.
72
See “Volume Features”on page 74.
Setting Your Phone to Not Ring
To set your phone to make no sound when you
receivephone calls,BoostTMWalkie-Talkiecalls,
messagenotifications,and callalerts, see “Setting
YourPhonetoVibrate”onpage45.
To set your phone to vibrate instead of making a
sound when you receive Boost
calls,even if youwant your phone t o ring for other
features:
1 From the main menu, select Settings >DC/GC
Options > Alert T ype.
Tip: If Alert Type does not appear: From the
main menu, select Ring Tones.Makesure
VibeAll is set to Off.Repeatstep1.
2 Press A under Cha nge.
3 Scroll to Vibrate.
4 Press A under Select.
TM
Walkie-Talkie
Page 81

Using a Headset
Using a Headset
Ifyouuseaheadsetorsimilardevicewithyour
phone,you can setyour phone to send incoming
sound to the headset only, or to the headset and
the speaker at thesame time:
1 From the mainmenu,selectSettings >
Advanced > Headset/Spker.
2 Press A under Cha nge.
3 Scroll to HdsetOnlyto send incomingsound to
the headset only. -or-
Scroll to Hdset&Spkr tosend incoming sound to
the headset and the speaker at the same time.
4 Press A under Select.
Using Settings
Settings contains many submenusthat let you
customizeyour phone.
Display/Info Features
The Display/Info menu controls how thekeypad
and display appear:
• Wallpaper — changesthe wallpaperthat
appears on the idle screen.
• Backlight — controlshow long the backlight
stayson after you make or receivea call.
•Clock— controlswhetherthe time and date
appears on the idle screen, sets the format of
the time and date, and setsthe year.
•Contrast— sets the contrast on thedisplay.
• Language — sets the language that your phone
displays.
Phone Calls Features
The Phone Calls menu controls how your phone
handles phone calls:
• Set Line —sets phone line 1 as the active line
for outgoingcalls.
•AnyKeyAns— If this feature is on, youcan
answer calls by pressing any key on the keypad.
•AutoRedial— setsyourphoneto automatically
redialcalls you makewhen the system is busy.
• Auto Ans — sets your phone to automatically
answer an incoming call after a specified
number of rings. When this feature is on, the
phone answers by connecting you to the caller;
it does not send the call to voice mail, unless
you are out of coverage oron the line.
•MinuteBeep— causes abeep tosound every
minuteof an active call.
•CallDuration— causes the durationof a callto
appear on the phones display when the call
ends.
73
Page 82

Customizing Your Phone
• TTY — lets you use your phone with a TTY
device. See “Making TTY Calls” on page 40.
• Notifications — See “Setting Notification
Options” on page 69.
DC (Walkie-Talkie) Options Features
TheWalkie-Talkie Optionsmenu controlshow your
phone handles BoostTMWalkie-Talkiecalls.
•OneTouchDC— See“SettingOne Touch
TM
Boost
Walkie-Talkie”on page 39.
•AlertType—controls how yourphone notifies
youwhenyoureceiveBoost
calls. See page 72.
TM
Walkie-Talkie
Volume Features
The Volume menu sets thevolumeof sounds your
phone makes:
•Line1—sets ring volume for phone line 1.
• Messages — sets the volume of message
notifications.
• Earpiece— sets the volume of sound coming
out of the earpiece.
• Speaker— sets the volume of sound coming
outofthespeaker.
•Keypad—setsthe volume of sound associated
withpressingkeys and buttons.
74
•Data— sets the volume ofsounds that notifies
you that you arereceiving a circuit data call.
Personalize Features
The Personalize menu makes main menu items
easierto access.
• Menu Options — Reorder Menu lets you
changethe orderof the itemson the main menu
by grabbing and moving them; Add/Remove
Apps letsyoucreateashortcuttoaJava
application on the main menu.
•UpKey— sets the main menu item you access
when you scroll up fromthe idle screen.
•DownKey— sets the main menu item you
access when you scroll down from the idle
screen.
• LeftKey — setsthe main menu itemyouaccess
when you scrollleft from the idle screen.
•RightKey—sets the main menu item you
access when you scroll right from the idle
screen.
• Left Sftkey— sets the main menu item you
accesswhenyoupresstheleftoptionkeyfrom
the idle screen.
• Right Sftkey — sets the main menu item you
accesswhenyou pressthe right optionkey from
the idle screen.
Page 83

Using Settings
•PowerUp— sets the main menu item you see
when you power on your phone. To set the idle
screen to be thefirstthingyou see when you
power on your phone, select Default Ready.
Security Features
The Security menu lets you turn securityfeatures
on and off and change passwords:
• Phone Lock — turns on a feature that locks
your phone, either immediately or automatically
aftera set period of inactivity.A n unlock code is
required to enable this feature, to unlock the
phone, and to set a new Unlock code. Contact
Boost Mobile
unlock code.
•KeypadLock— locks the phone’skeypad,
either immediately or automatically after a set
periodof inactivity. See “LockingtheKeypad”on
page 16 for more information on locking and
unlocking the keypad.
•SIMPIN— enablesand disablesyour phone’s
SIM PIN security feature. See “Turning the PIN
Requirement On and Off” on page 14.
•GPSPIN— enablesand disablesyour phone’s
GPS PIN security feature. See “Setting the GPS
PIN Security Feature” on page 83.
TM
CustomerCare for your default
• Change Passwords — changesyour phone
unlock code, security code, SIM PIN, and GPS
PIN.
Advanced Fea t ures
The Advanced menu contains advanced and rarely
used Settingsfeatures.
• Alert Timeout — controls the amount of time a
tone continuesto sound when you receivea
message notificationor call alert.
• Headset/Spker — See “Using a Headset” on
page 73.
• Connectivity — Network ID sets the phone’s
network IDs and their roamingoptions under the
direction of Boost Mobile
MasterReset lets Boost Mobile
Carereset your servicein the eventof a security
or provisioning problem.
• Reset Defaults — Reset Settings returns all
settings to their original defaults; Reset All
returns all settingsto their original defaultsand
erases all stored lists. Use only under the
direction of Boost Mobile
• ReturntoHome— controlshow longtherecent
callslist displays after calls.
• Phone Only — prevents your phone from
makingor receiving Boost
TM
Customer Care;
TM
Customer
TM
Customer Care.
TM
Walkie-Talkie calls.
75
Page 84

Customizing Your Phone
•BaudRate— sets the baud rate at which your
phone communicates with a laptop computer,
PC, or similar device.
Optional Features
Speakerphone, VoiceRecord, and Voice-Activated
Dialing can be purchased for an additional fee on
www.boostmobile.com.
76
Page 85

GPS Enabled
Your phone’s GPS Enabled feature uses
information from Global Positioning System (GPS)
satellites orbiting the Earth to determine the
approximate geographical locationof your phone,
expressed as latitudeand longitude. The
availability and accuracy of this location
information(and the amount of timethat it takesto
calculateit)will varydependingon the environment
in which you are using the GPS feature. For
example, GPS location fixes are often difficult to
obtainindoors,in covered locations,between high
buildings,or in other situations whereyou have not
established a clear broad view of the sky. SEE:
“IMPORTANT: Things to Keep in Mind”.
When you make a 911 emergency call, the GPS
feature of your phone can help emergency
personnel locate you if your phone has adequate
accessto GPS satellitesignals and your
emergencyresponsecenteris equippedtoprocess
such information.
You can also use theGPS feature to view your
approximate location. Location information
appearson the phone’sdisplay.
If your phone is connected to a laptop computeror
similar device, software running on that device can
requestyour location. To protect your privacy,you
can control whether these requests are granted.
IMPORTANT: Things to Keep in Mind
If you are using the GPS feature of your phone
while driving, please give full attention to driving
and to theroad.
Whereadequatesignalsfrommultiplesatellites
are not available (usually because your GPS
antenna cannot establish a view of a wide area of
open sky), the GPS feature of your phone WILL
NOT WORK. Such situations include but are
not limited to:
• In underground locations
• Inside of buildings, trains, or other covered
vehicles
• Under any other metal or concrete roof or
structure
• Between tall buildings or under dense
tree-cover
• Near a powerful radio or television tower
77
Page 86

GPS Enabled
• When your GPS antenna is covered (for
example, by your hand or other object) or
facing the ground
• In temperature extremes outside the
operating limits of your phone
Walking or driving very slowly may also
substantially reduce GPS performance.
Even where location information can be
calculated in such situations,it may take much
longer to do so, and your location estimate may
not be as accurate. Therefore,in any 911 call,
always reportthe location to the emergency
response center if you can and if you cannot,
remain on your phone for as long as the
emergency response center instructs you.
Even where adequate signals from multiple
satellites are available, your GPS feature will
only provide an approximate location, often
within 150 feet (45 meters) but sometimes
much further from your actual location. Advice
on how to improveGPS performance is
provided in “Enhancing GPS Performance” on
page 80.
While the GPS feature of your phone can be a
valuable navigational aid, it does not replace the
need for careful navigatingand good judgment.
Never rely solely on one device for navigation.
Rememberthat the accuracy of the location
78
informationand the time needed to obtain it will
vary dependingon circumstances, particularly the
ability to receive signals from adequate numbers of
satellites.
On emergency calls, your phone uses assistance
informationfrom the phone network to improvethe
speed and accuracy of your phone’s location
calculation: if such assistance information
becomes unavailable, it may reduce thespeed and
accuracyof the locationcalculation.
The satellitesusedby the GPS feature of your
phone are controlled by the U.S. government and
aresubject to changesimplementedin accordance
with the Department of DefenseGPS user policy
and the Federal Radionavigation Plan. These
changesmay affectthe performance of the GPS
feature of your phone.
Making an Emergency Call
Dial 911 to be connected to an emergency
responsecenter. If you areon an active call, you
must end it before calling 911.
When you make an emergency 911 call, the GPS
feature of your phone begins to seek information to
calculate your approximate location. It will take
the GPS feature of your phone some time to
determine your approximate location. Even
where your phone has good access to sufficient
Page 87

Viewing Your Approximate Location
GPS satellitesignalsand network assist data, it
may take 30 seconds or more to determine the
approximate location. This time will increase where
thereis reduced access to satellitesignals. When
your approximate location is determined, itis made
available to theappropriateemergencyr esponse
center.
In some cases, your local 911 emergency
response center may not be equipped to
receive GPS location information. For this
reason, and because the GPS location information
reported is only approximateor may not be
available in your location (see “IMPORTANT:
Thingsto Keep in Mind” on page 77), always
report your locationto the911 operator you
speak to when making an emergency call, if able,
just asyou would when using aphone without GPS
capabilities.
Note: If youare concernedaboutwhetheryour
local911 emergency response center is
equipped to receive GPS location
information, contact your local authorities.
In general, if your phone has access to signals
from more GPS satellites, your location will be
determined faster and more accurately than if your
phone has access to signals from fewer GPS
satellites.
If your phone does not have adequate access to
GPS satellitessignals, the locationof the nearest
cell tower in contact with your phone is
automatically made available to the emergency
responsecenter, if the center has the capability to
receive such information.
See“Enhancing GPS Performance”on page 80 for
informationon how to help your phone determine
your location.
Viewing Your Approximate
Location
1 From the main menu, select GPS > Position.
2 Scroll to view the entirescreen.
This displays the following information about the
last time your location was calculated:
• Thetime (as Greenwich Mean Time) and date
that the location was last calculated
• The approximate location, expressed as latitude
and longitude
• Theestimated accuracy of thecalculated
location.Thisestimate of accuracyisonlya very
roughestimate and mayvary substantiallyfrom
the actual accuracy of the approximate location
informationreported.
79
Page 88

GPS Enabled
• The number of satellites used to calculate the
location. In general, more satellites make for
better accuracy.
To calculate your location again:
Press A under Rfrsh.
It may takeyour phone several minutes to
complete the process of determining your location.
During this time, a message usually appears on
your phone’s display saying your phone is
scanning for satellites.For tipson getting the best
locationcalculation,see “Enhancing GPS
Performance”.
The Position screen displays the updated
information.
To cancel a location calculation before it is
completed:
Press A under Cancel to return to the Position
screen. -or-
Press e to return to the idle screen.
Each time approximate location of your phone is
calculated, the latest location information is stored
in your phone and remains there even when your
phone is powered off. You will see this information
thenexttimeyouviewthePosition screen.
80
If you received a phone call oralertwhile
attemptingt o determineyour location,the Position
screenwill disappear, but your phone will continue
attempting to determine its location. If it is
successful, the new location information will be
displayed the nexttime you view the Position
screen.
Enhancing GPS Performance
Sometimes the G PS feature of your phone may be
unable to complete a locationcalculation
successfully. If this happens when you are making
an emergency call, the location of thenearestcell
tower in contact with your phone is madeavailable
to the appropriate emergency response center if
the center has the capability to receive such
information. If this happens when you are trying to
view your location on the phone’sdisplay,you will
see a message indicatingthat your phone cannot
accesssatellites.
To improve accuracy and increase your chances of
a successful calculation, do thefollowing while
your phone is determining your approximate
location:
Page 89

Updating Satellite Almanac Data
• S tay in the open. The GPS feature works best
wherethere is nothing between your phone and
a large amount of opensky. If possible,go
outside, away from tall buildings and foliage.
While performance in a building is improved by
movingcloserto windows, glasswithcertainsun
shielding films may block satellite signals.
• Hold your phone to enhance reception. Signals
from GPS satellites are transmitted to your GPS
antenna, whichis insidethe back of your phone,
opposite the earpiece, above the labelwith your
service provider’s name on it. Hold your phone
away from your body, giving the antenna clear
access to satellite signals. Do not cover the
antennaarea with your fingersor anything else.
GPS antenna area
• Standstill.If possible,standstilluntilyour phone
is finished determining your location. Moving
your phone at awalking pace while your phone
is calculating your approximate location may
substantially decrease GPS performance.
• Ina car.When usingtheGPSEnabledfeaturein
a car, positionyour phone so that the GPS
antennahas goodaccess to GPS signals
through the car’s windows. Typically, the GPS
antenna has best access to GPS signals ina car
when placed near a window.
Note: Although movingyour phone at a walking
pace decreases GPS performance,
movingit at thespeed of a movingcar
does not.
• Stay in network coverage.Depending on who
your service provide r is, the network will provide
your phone with information that helps
determine your location more quickly and
accurately.
Updating Satellite Almanac
Data
Anotherway to keep the GPS feature of your
phone workingwell is tokeep your satellite
almanacdata up to date.
81
Page 90

GPS Enabled
The United States government maintains an
almanac of data about where GPS satellitesare as
they orbit the Earth. This information isavailable to
your phone. Keeping your satellite almanacup to
date helps your phone determine your location
more quickly.
The almanac containsinformation about the
locationof satellites, their operational status, and
other satellite information. Keeping this information
updatedenhances the performance of your GPS
feature. In most cases, your phone will be able to
get a fixin strong satellitesignal conditions with
outdated almanac data, but it may take longer.
Note: When you make an emergency call, your
phone does not rely upon the almanac to
determine your location.
If your satellite almanac data is out of date, your
phone may prompt you toupdateit. Follow the
instructions that appear on the phone’s display.
Youmaybeaskedtogotoawebsiteorcalla
customer care number.
Setting Privacy Options
Your phone’s GPS privacyoptionscontrol whether
softwareapplicationsmayviewthe locationof your
phone.You may setyour phone to one of these
GPS privacy options:
82
• Restricted — No software applications may
view the locationof your phone. However,
location information may still be available to the
phone’s owner, fleet manager, or account
administrator.
• Unrestricted — All applications may view the
location of yourphone,without notifying you.
•ByPermission— When an application
attempts to view the location of your phone, you
willbe prompted to give permission. However,
location information may still be available to the
phone’s owner, fleet manager, or account
administrator.
Note: Privacy optionsdo not apply to the
transmission of location information
during emergency 911 calls.
To set your GPS privacy options:
1 From the main menu, select GPS > Privacy.
2 If your GPS PIN security feature is enabled,
enter your GPS PIN. (See “Setting th e GPS PIN
Security Feature” for more information.)
3 Scroll to the privacy setting you want.
4 Press A under Select.
Page 91

Using GPS with Map Software
Setting the GPS PIN Security Feature
To prevent your GPS privacy settings f rom being
alteredwithout your knowledge, your GPS privacy
optioncanbeprotectedbyaPIN.
When you receiveyour phone, the GPS security
featureisturnedoff,soyoudonothavetoentera
GPS PIN to access your GPS privacy options. If
you turn this feature on, you will be required to
entera GPS PIN to access your GPS privacy
options.
To turn the GPS Enabled securityfeature on or off:
1 From the main menu, select Settings >
Security > GPS PIN.
2 Scroll to Onor Off.
3 Press A under Select.
4 Enter the current GPS PIN.
Note: When you receive your phone, your GPS
PIN is 0000.
5 Press A under Ok .
To change your GPS PIN:
1 From the main menu, select Settings >
Security > Change Password > GPS PIN.
2 Enter the current GPS PIN.
Note: When you receive your phone, your GPS
PIN is 0000.
3 Press A under Ok .
4 Enter the new 4- to 8-digit GPS PIN.
5 Press A under Ok .
6 Enter the new 4- to 8-digit GPS PIN to confirm.
7 Press A under Ok .
Using GPS with Map Software
You can use theGPS featureof your phone to
provideapproximate locationdata to alaptop
computer or similar device that is running
interactivemap software such as thatmadeby
DeLorme or Microsoft. This way, if your phone has
good access to GPSsignals, your approximate
positionon a map canbe madeavailable as you
travel in a vehicle.
To do this,connect your phone to your laptop (or
otherdevice) with a data cableand set your phone
to transmitdata(see“GettingStarted” on page84).
Your phone then providesyour approximate
location to the device running the map software,
whichdisplays yourlocation on a map.Your phone
provides an updated location every second and the
map software displaysyourchanginglocation on
its map.
See“Enhancing GPS Performance”on page 80 for
more details on obtaining good location
information.
83
Page 92

GPS Enabled
Note: Because your phone is continuously
determining your location, using the GPS
feature of your phone with map software
uses the phone’s battery power quickly.
Software Compatibility
Your phone sends location information to your
laptop orother device using the standard National
MarineElectronics Association (NMEA) format.
Your phone supports output messagesin
NMEA-0183 format and supports the following
NMEA-0183 sentences: GGA, GLL, GSA, GSV,
RMC, andVTG.
The map software running on your laptop or other
device must support NMEA 3.0.
84
Getting Started
To connect your phone toyour laptop or other
device:
1 Open the connector cover.
flap
2 With the phone’s display facing up, insert the
data cable’s connector into the accessory
connector, until you heara click.
Page 93

3 InsertthedataplugintotheCOMportofyour
laptop or other device.
Make sure no other application is using the COM
port selected.
Make sure the COM port settingsof your laptop or
otherdeviceare set to the following:
• Bits per second:4800
• Data bits: 8
• Parity:None
• S top bits: 1
• Flow control: Hardware
Using GPS with Map Software
To set your phone to send location information to
your laptop or other device:
1 From the main menu, select GPS > Interface.
2 With NMEA OUT highlighted, press A under
Change.
3 Scroll to On.
4 Press A under Select. Your phone is now
sending location data to your laptop or other
device.
To stop your phone from sendinglocationdata to
your laptop or other device:
Set NMEA OUT to Off.
Each time you power your phone on, NMEA OUT
is automatically set to Off.
85
Page 94

Profiles
A profile is a group of settings saved together so that
you can apply them to your phoneeasily.
A profile contains these settings:
•RingTones— sets all optionsdescribed in “Ring
Tones” onpage 45, except assigning ring tones to
Contacts.
• Display/Info —setsWallpaper, Color Palette,
Text Size,andBacklight options.See
“Display/Info Features” on page 73.
• Phone Calls —setsSet Line and Auto Ans
options. See “Phone Calls Features” on page 73.
• V olume — sets all options described in “Volume
Features” on page 74.
•CallFilter— controls which calls, call alerts, and
message notifications your phoneresponds to.
See “SettingCall Filtering” on page 89.
• Advanced — sets headsetoption. See “Using a
Headset” on page 73.
Your phone arrives with pre-set profiles.You can
also create your own profiles.
Viewing Profiles
To view the profiles stored in your phone:
1 From the main menu, select Profiles. 2 Selecttheprofileyouwanttoview.
Tip: The profile that is currently in effect on your
phone has a checkmark next to it.
3 Press m. 4 Select View. 5 Scroll and select settings to view their values.
Switching Profiles
To apply a profile to your phone:
1 From the main menu, select Profiles. 2 Selecttheprofileyouwanttoapply.
Theprofileyouselectedisnowineffect.
HowChangingSettingsA ffects Profiles
Manyof the settings contained in profiles can be set
without switching or editing profiles— for example,
by selecting Settings or Ring Tones to set options,
or by setting the volume ofthe phone’s ring using
the volume controls.
86
Page 95

Temporary Profiles
When you do this, your phone either:
• Updates the profilein effect to reflect these
changes, without notifyingyou -or-
• Creates a temporary profile that contains these
changes
To set your phone to create a temporary profile that
containschanges you make tosettings:
1 From the main menu, select Profiles. 2 Press m. 3 Select Setup > Temp Profile. 4 Set this option to On.
To set your phone to update the profile in effect to
reflectany changes you make to settings:
Set Temp Profile to Off in step4.
Temporary Prof i le s
If your phone is set to create temporary profiles, a
temporary profile is created when you make
changest o settings withoutswitching or editing
profiles.
A temporary profile is based on the profile in effect
when you made the changes, but reflects the
changedsettings. Making more changes further
updates the temporary profile,for aslong as it is in
effect.
A temporary profile stays in effect until you switch
profiles, power off your phone, or delete it (or the
profile it isbased on) from the list of profiles.
If you do not store a temporaryprofile, it isdeleted
when you switch profiles or poweroff your phone.
A temporary profile is automatically given the same
name as the profileit is based on, but with an
asterisk (*) in front of it.
When you view a temporary profile’s settings, the
options that differ from the profile it is based onhave
an asterisk in front of them.
Storing a Temporary Profile
To store atemporary profileas anew profile:
1 From the main menu, select Profiles. 2 Scroll to the temporary profile. 3 Press m. 4 Select StoreAsNew. 5 Enter the name you want to give the profile. See
“Entering Text” on page 28.
When you are finished, press A under Done.
To overwrite the profile that temporaryprofile is
based on:
1 From the main menu, select Profiles. 2 Scroll to the temporary profile.
87
Page 96

Profiles
3 Pressm. 4 Select Store Changes.
The temporary profile is stored with the name of the
profile it isbased on. The profileit is basedon, asit
existed before you made changes to settings, is
gone.
Creating Profiles
1 From the main menu, select Profiles. 2 Select [New Profile]. -or-
Scroll to any profile. Press m. Select New.
3 Enter the name you want to give the profile.See
“Entering Text” on page 28.
When you are finished, press A under Ok.
4 If you want to base this profile on an existing
profile: Select Copy from. Select the profile you
want to base this profile on. If you do not choose
a profile to copy from, the new profile is based on
a default profile.
5 Press A under Create. 6 Scrollthrough the list of options and set their
values.
7 Press A under Done.
88
Editing Profiles
1 From the main menu, select Profiles. 2 Scrolltotheprofileyouwanttoedit. 3 Press m. 4 Select Edit. 5 Follow the applicable instructions in “T emporary
Profiles” to edit the various fields.
Deleting Profiles
To delete aprofile:
1 From the main menu, select Profiles. 2 Select the profile you want to delete.
Note: A temporary profile isautomatically deleted
when the profile it is based on is deleted.
3 Press m. 4 Select Delete. 5 Press A under Yes to confirm.
To delete all profiles:
1 From the main menu, select Profiles. 2 Press m. 3 Select Delete All. 4 Press A under Yes to confirm.
Page 97

Setting Call Filtering
The call filtering setting in each profile lets you
controlw hich calls, call alerts, and message
notificationsyour phone notifiesyou of,and which it
ignores.
To set call filtering:
1 While settingoptions for a profile,select Cal l
Filter.
2 To set filtering options for phone calls, select
Phone.
•Offsets your phone to notify you of allphone
calls.
•Allsetsyour phone to ignore all phone calls.
• All Contacts sets yourphone to notifyyouonly
of phone calls from numbers stored in
Contacts.
•SomeCntcssets yourphone to notify youonly
of phone calls from numbers you select from
Contacts.
3 If you set the Phone option to Some Cntcs,
select up to 5 Contacts entries that contain phone
numbersyou want to be notified of callsfrom.
When you are finished, press A under Done .
TM
4 To set filteringoptions for Boost
calls, select DC/GC.
Walkie-Talkie
Setting Call Filtering
•Offsetsyour phone to notify you of allBoost
Walkie-Talkie calls.
•Onsets your phone to ignore all Boost
Walkie-Talkie calls.
TM
TM
5 To set filteringoptions for call alerts,selectAlerts.
•Offsetsyour phone to notify you ofall call
alerts.
•Onsets your phone to ignore all call alerts.
6 To set filteringoptions for message notifications,
select Notifications.
•Offsetsyour phone to notify you ofall
messages.
• Voice Messages setsyour phone notto sound
atoneorvibratewhenyoureceivevoice
messages.
• TextMessagessets your phone notto sound a
tone or vibratewhen you receivetext
messages.
•Allsets your phone not to sound a tone or
vibratewhen youreceiveany message.
Note: When you receive a typeof messageyou
haveset not to sound a toneor vibrate,the
messages notification screen appears as
usual.
7 Press A under Done.
89
Page 98

Shortcuts
Shortcuts lets you access most menu options by
pressinga numberon your keypador saying the
voice name of the shortcut. You create the shortcut
and then use it to take you tothat screen any time.
Creating a Sho rtcut
1 Go tothe menu item you want to create a shortcut
for.
Forexample,ifyouwanttocreateashortcutto
the screen for creating a new Contacts entry:
From the main menu, select Contacts > [New
Contact].
2 Press and hold m until a confirmation screen
appears.
3 A key number for the shortcutis displayed. 4 To assign this keynumberto the shortcut,press
A under Ok. -or-
To choose another key number:
Press A under Delete.
Press the key number you want to assign to the
shortcut.
Press A under Ok.
Using a S hortcut
If you know the shortcutnumber:
1 From the idle screen, press m. 2 On your keypad, press the number assigned to
the shortcut.
If you do not know the shortcut number:
1 From the main menu, select Shortcuts. 2 Scrollto the shortcutyou want to use.
Editing a Shortcut
To change the number assigned to ashortcut:
1 From the main menu, select Shortcuts. 2 With any shortcut highlighted, press m. 3 Select Reorder. 4 Highlight the shortcut you want t o move. 5 Press A under Grab. 6 Scroll to the place where you want the shortcut to
appear.
7 Press A under Insert. 8 Repeatstep 4 through step 7 forall t he items you
want to move.
9 Press A under Done.
90
Page 99

To change the name or number assigned to a
shortcut:
1 From the main menu, select Shortcuts. 2 Scrollto any shortcut. 3 Press m. 4 Select Edit.
Deleting Shortcuts
To deletea shortcut:
1 From the main menu, select Shortcuts. 2 Scrollto theshortcut you want to delete. 3 Press m. 4 Select Delete. 5 Press A under Yes to confirm.
To delete all shortcuts:
1 From the main menu, select Shortcuts. 2 With any shortcut highlighted, press m. 3 Select Delete All. 4 Press A under Yes to confirm.
Deleting Shortcuts
91
Page 100

Boost Mobile
TM
Customer Care
You can contact Boost MobileTMCustomer Care 7
days a weeksimply by dialing 611 from your i285
phone,or by calling1-888-BOOST-4U
(1-888-266-7848). Our Boost Mobile
Care team will assist you in answering all your
questions.Or,visit boostmobile.com for a varietyof
Boost Mobile
TM
Customer Care services online.
Beforeyou contactBoost Mobile
for service or to resolve an issue, be sure to have
your Boost Mobile
your model number (located on your phone
underneath the battery), andthe IDnumber printed
on your SIM card. You’ll want torecordthese
numbers, and keep them handy, so that you can
replacethe batterypriorto contacting Boost
TM
Mobile
Please have the following information available to
give to the representative who answers your
Customer Care.
TM
Personal TelephoneNumber,
inquiry.
• YourP ersonal Telephone Number (PTN).
• Yourphone's model number ( located
underneath the battery).
• The ID numbers printed on your SIM.
92
TM
Customer
TM
Customer Care
You'll want to keep this information handy so that
you can replace the battery and power up your
phone should the representative need you to
accessotherinformation on itduringyour call.
 Loading...