

Motorola GP338 User Guide

GP338
Portable Radio
User Guide
6804110J55

Copyright Information
The Motorola products described in this manual may include copyrighted Motorola computer programs
stored in semiconductor memories or other mediums. Laws in the United States and other countries
preserve for Motorola certain exclusive rights for copyrighted computer programs, including the exclusive
right to copy or reproduce in any form the copyrighted computer program. Accordingly, any copyrighted
Motorola computer programs contained in the Motorola products described in this instruction manual may
not be copied or reproduced in any manner without the express written permission of Motorola.
Furthermore, the purchase of Motorola products shall not be deemed to grant either directly or by
implication, estoppel, or otherwise, any license under the copyrights, patents, or patent applications of
Motorola, except for the normal non-exclusive, royalty free license to use that arises by operation of law in
the sale of a product.
© 1999 by Motorola, Inc.
All Rights Reserved.
Motorola Technology Sdn. Bhd. (Company No. 455657-H),
Bayan Lepas Free Industrial Zone, Phase 3,
11900 Penang, Malaysia.
Printed in Malaysia.
, and Motorola, are trademarks of Motorola, Inc.
Menu Navigation
(refer to the Menu Navigation Chart on the reverse
side of this page)
1. ) to enter Menu Mode.
2. + or ? to scroll through the list.
3. ) to select Menu items.
4. Continue to use + or ? to scroll through
sub-list, and ) to select sub-menu items, if
necessary.
5. ( to exit sub-menu or hold ( to exit
Menu Mode.
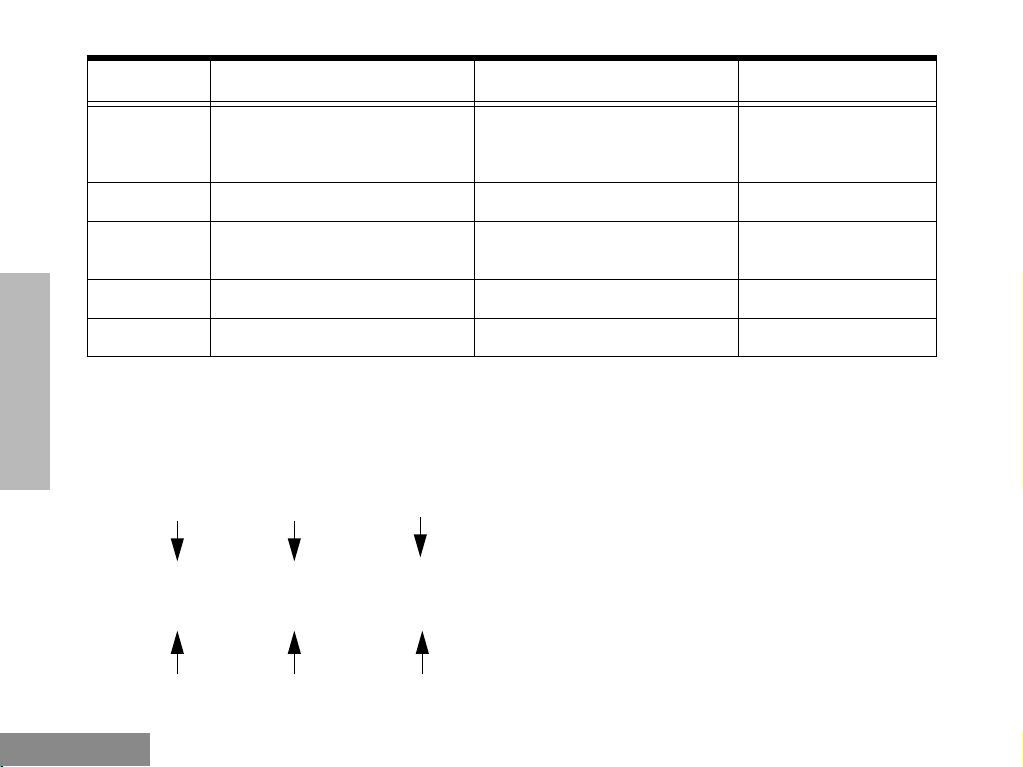
Programmable ButtonsÕ Audio Indicators
Programmable
Buttons
Scan
Tx Power
Squelch
Option Board
Keypad Lock
Repeater/
Talkaround
Positive
Indicator Tone
Start Scan oper-
ation
Radio transmits
at low power
Radio operates in
tight squelch
Activates radioÕs
option board
RadioÕs keypad is
locked
Radio DOES
NOT use the
repeater
Negative
Indicator Tone
Stop Scan oper-
ation
Radio transmits
at high power
Radio operates in
normal squelch
Deactivates
radioÕs option
board
RadioÕs keypad is
unlocked
Radio uses the
repeater
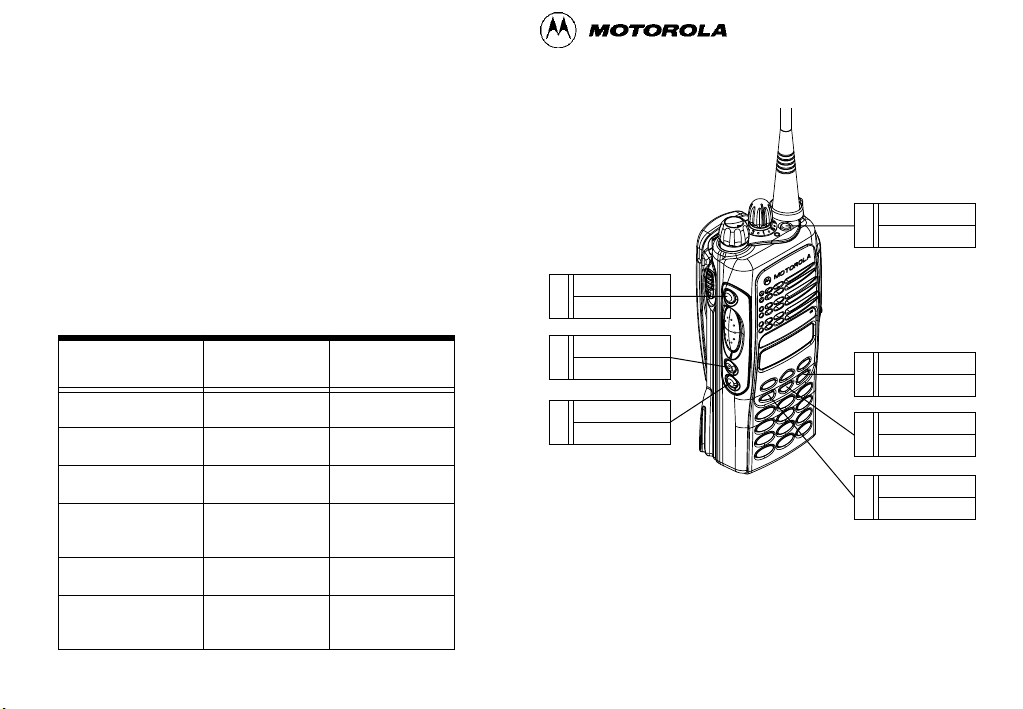
GP338 Quick Reference Card
SP:
1
LP:
SP:
2
LP:
SP:
3
LP:
SP:
4
LP:
NOTE: ¥ Enter the functions for your radioÕs 7 program-
mable buttons in the boxes provided above.
¥ In the boxes above, SP represents Short
Press, while LP represent Long Press.
SP:
5
LP:
SP:
6
LP:
SP:
7
LP:
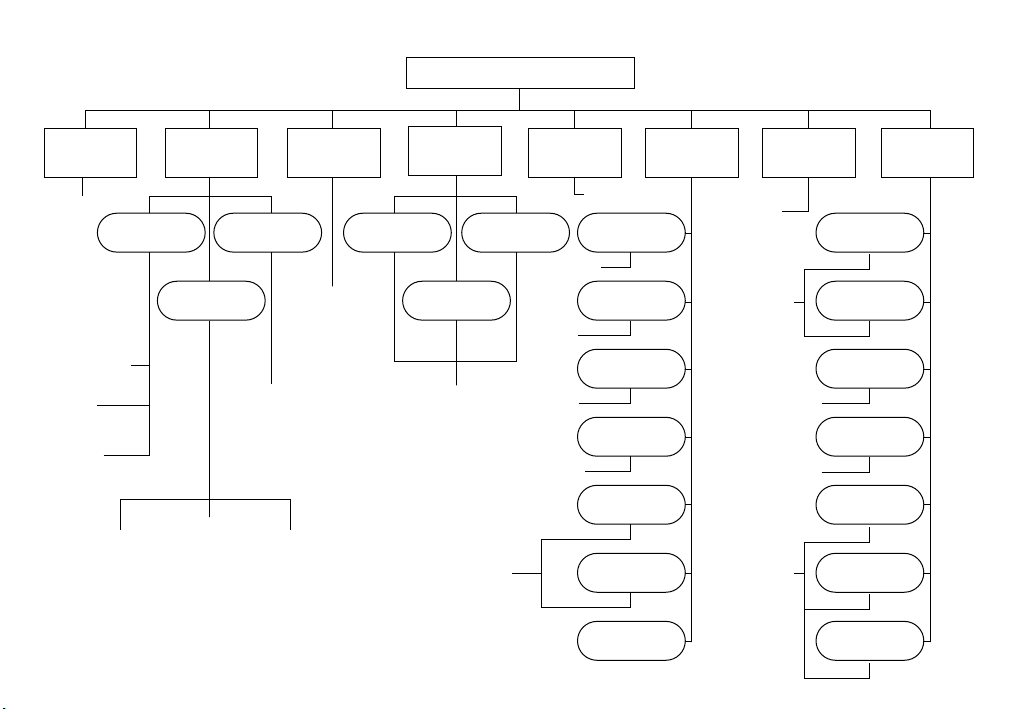
Menu Navigation Chart
Menu
System
Scan
On/Off
Scan List
Add Entry
Delete
Entry
Edit
Priority
Add Entry
Program
Lists
RadioCall
List
Phone List
Edit Entry
Delete
Entry
Phone
Select ID
& Call
Edit Entry
Radio
Call
Selective
Call
Call Alert
Select ID
& Call
Radio
Check
On/Off
Zone Utilities
Select
Zone
Squelch
Normal/
Tight
High/
Low/
Auto
Set
Time
Set
Alarm
Power
Level
Clock
Reminder
Alarm
Option
Board
Light
Disable
Software
Ver#
Rptr/
Talkarnd
Repeater
Mode/
Talkarnd
Mode
On/Off
Select ID
& Tone
Select Call
& Tone
On/Off
Audio/
Tones
Alert Vol
Lvl
Tone Disable
Name Tone
Tag
Call Tone
Tag
Escalert
Companding
Keypad
Tones

Contents
CONTENTS
Radio Overview . . . . . . . . . . . . . . . . . . . . 1
Parts of the Radio. . . . . . . . . . . . . . . . . . . . . . . . 1
On/Off/Volume Knob . . . . . . . . . . . . . . . . . 2
Channel Selector Knob. . . . . . . . . . . . . . . . . 2
Push-to-Talk (PTT) Button . . . . . . . . . . . . . 2
Microphone . . . . . . . . . . . . . . . . . . . . . . . . . 2
LED Indicator. . . . . . . . . . . . . . . . . . . . . . . . 2
Programmable Buttons. . . . . . . . . . . . . . . . . 2
Keypad Keys (for keypad radios only) . . . . 5
LCD Screen . . . . . . . . . . . . . . . . . . . . . . . . . . . . 7
Indicator Tones . . . . . . . . . . . . . . . . . . . . . . . . . 9
Programmable ButtonsÕ Audio Indicators . . . . . 9
Improved Audio Features . . . . . . . . . . . . . . . . 10
Low Level Expansion (LLE) . . . . . . . . . . . 10
Companding . . . . . . . . . . . . . . . . . . . . . . . . 10
Getting Started . . . . . . . . . . . . . . . . . . . . 11
Battery Information . . . . . . . . . . . . . . . . . . . . . 11
Battery Status . . . . . . . . . . . . . . . . . . . . . . . 11
Charging your Battery . . . . . . . . . . . . . . . . 11
Accessory Information. . . . . . . . . . . . . . . . . . . 12
Attaching the Battery . . . . . . . . . . . . . . . . . 12
Removing the Battery . . . . . . . . . . . . . . . . 12
Attaching the Antenna . . . . . . . . . . . . . . . . 13
Removing the Antenna. . . . . . . . . . . . . . . . 13
Attaching the Belt Clip . . . . . . . . . . . . . . . . 14
Removing the Belt Clip . . . . . . . . . . . . . . . 14
Turning the Radio On or Off . . . . . . . . . . . . . . 15
Adjusting the RadioÕs Volume . . . . . . . . . . . . . 15
Selecting a Radio Channel . . . . . . . . . . . . . . . . 15
Sending a Call. . . . . . . . . . . . . . . . . . . . . . . . . . 15
Receiving a Call . . . . . . . . . . . . . . . . . . . . . . . . 16
Radio Calls . . . . . . . . . . . . . . . . . . . . . . . . 17
Selective Call . . . . . . . . . . . . . . . . . . . . . . . . . . 17
Making a Selective Call . . . . . . . . . . . . . . . 17
Receiving a Selective Call . . . . . . . . . . . . . 17
Call Alert . . . . . . . . . . . . . . . . . . . . . . . . . . . . . 17
Radio Check . . . . . . . . . . . . . . . . . . . . . . . . . . . 18
Emergency Alarms . . . . . . . . . . . . . . . . . . . . . . 19
Radio Call List . . . . . . . . . . . . . . . . . . . . . . . . . 20
Editing an Entry (for keypad radios only) . 20
Select Zone . . . . . . . . . . . . . . . . . . . . . . . . . . . . 20
Talkaround . . . . . . . . . . . . . . . . . . . . . . . . . . . . 21
Squelch . . . . . . . . . . . . . . . . . . . . . . . . . . . . . . . 21
Power Level . . . . . . . . . . . . . . . . . . . . . . . . . . . 22
Tone Tagging . . . . . . . . . . . . . . . . . . . . . . . . . . 22
Name Tone Tagging . . . . . . . . . . . . . . . . . . 23
Call Tone Tagging . . . . . . . . . . . . . . . . . . . 23
Scan . . . . . . . . . . . . . . . . . . . . . . . . . . . . . 24
Starting or Stopping a Scan Operation . . . . . . . 24
CONTENTS
iii
English

Contents
Using the Menu . . . . . . . . . . . . . . . . . . . . . 24
Using the Scan key. . . . . . . . . . . . . . . . . . . 24
Talkback. . . . . . . . . . . . . . . . . . . . . . . . . . . . . . 25
Deleting a Nuisance Channel. . . . . . . . . . . . . . 25
Adding a Deleted Nuisance Channel back to the
Scan List . . . . . . . . . . . . . . . . . . . . . . . . . . . . . 25
Editing the Scan List . . . . . . . . . . . . . . . . . . . . 26
CONTENTS
To Add or Delete Items in the Scan List . . 26
Prioritization of a Scan List member . . . . . . . . 27
Setting the priority of a scan list member . 28
Phone . . . . . . . . . . . . . . . . . . . . . . . . . . . 29
Making a Phone Call . . . . . . . . . . . . . . . . . . . . 29
Entering the Phone Mode. . . . . . . . . . . . . . 29
Sending the Access Code . . . . . . . . . . . . . . 29
Sending the Phone Number . . . . . . . . . . . . 30
The Phone Conversation . . . . . . . . . . . . . . 31
Ending the Phone Call . . . . . . . . . . . . . . . . 32
Phone List . . . . . . . . . . . . . . . . . . . . . . . . . . . . 32
Adding an Entry to the Phone List (for keypad
radios only). . . . . . . . . . . . . . . . . . . . . . . . . 32
Deleting an Entry . . . . . . . . . . . . . . . . . . . . 33
Editing an Entry (for keypad radios only) . 33
Audio/Tone Settings . . . . . . . . . . . . . . . 35
Utilities . . . . . . . . . . . . . . . . . . . . . . . . . . .37
General Instructions . . . . . . . . . . . . . . . . . . . . . 37
Setting the Time . . . . . . . . . . . . . . . . . . . . . . . . 38
English
General Instructions. . . . . . . . . . . . . . . . . . . . . 35
iv
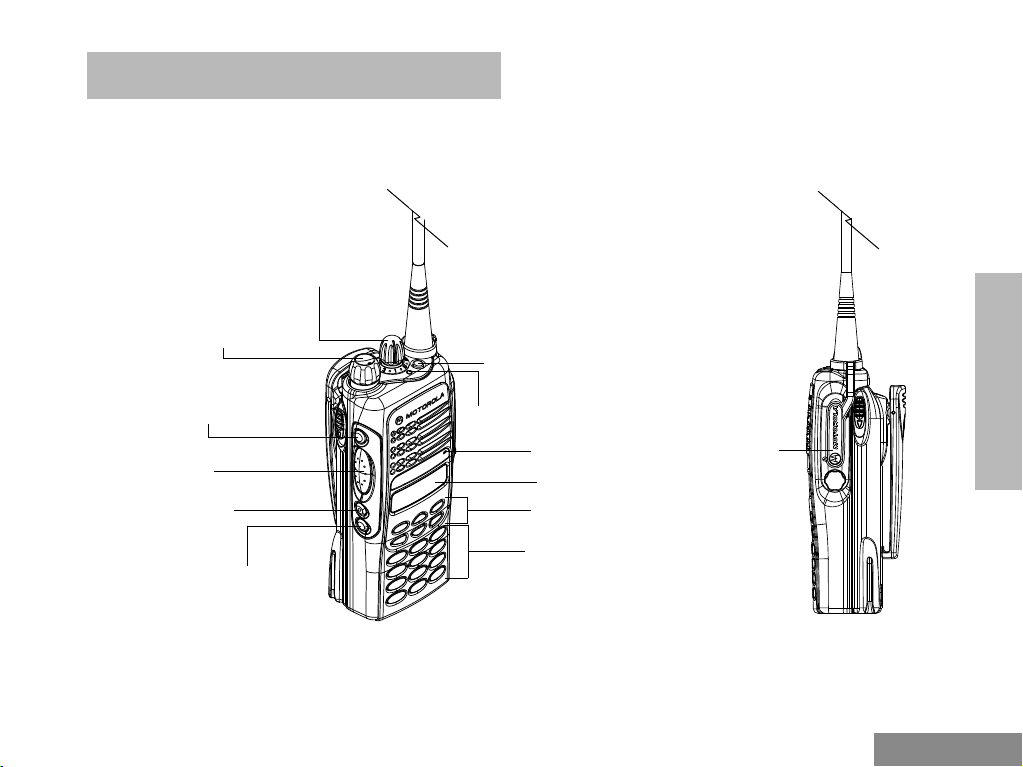
RADIO OVERVIEW
PARTS OF THE RADIO
Channel Selector
Knob
On/Off/Volume
Knob
Side Button 1
(programmable)
Push-to-Talk
(PTT) Button
Side Button 2
(programmable)
Side Button 3
(programmable)
Top Button
(programmable)
LED Indicator
Microphone
LCD Screen
Menu Keys
Keypad
Radio Overview
RADIO OVERVIEW
Dust Cover
covering the
Accessories
Port
1
English

Radio Overview
RADIO OVERVIEW
On/Off/Volume Knob
Used to turn the radio on or off, and to adjust the
radioÕs volume.
Channel Selector Knob
Used to switch the radio to different channels.
Push-to-Talk (PTT) Button
Press and hold down this button to talk, release
it to listen.
Microphone
Speak clearly into the microphone when sending
a message.
LED Indicator
Used to give battery status, power-up status,
radio call information and scan status.
Programmable Buttons
Several of the radioÕs buttons can be
programmed as short-cut buttons for many of
the radioÕs features. Programmable buttons are
the:
¥ Top button,
¥ three side buttons, and
¥ three front buttons (when the radio is NOT in
Menu Mode)
< ? >
Check with your dealer for a complete list of the
functions your radioÕs programmable buttons
support.
The following table shows the functions available
by
¥ quickly pressing and releasing the program-
mable buttons (short press), or by
¥ pressing and holding the programmable but-
tons for a period of time (at least 1.5 seconds) before releasing (long press), or by
¥ pressing and holding down the programma-
ble buttons while checking the status or making adjustments.
English
2
Radio Overview
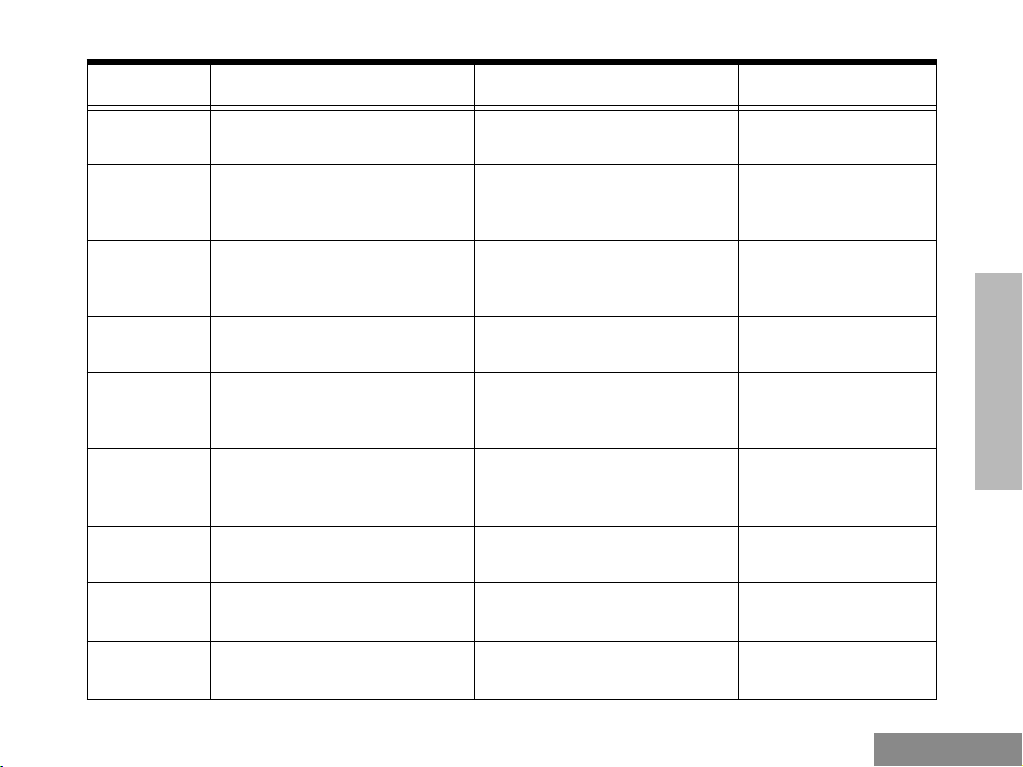
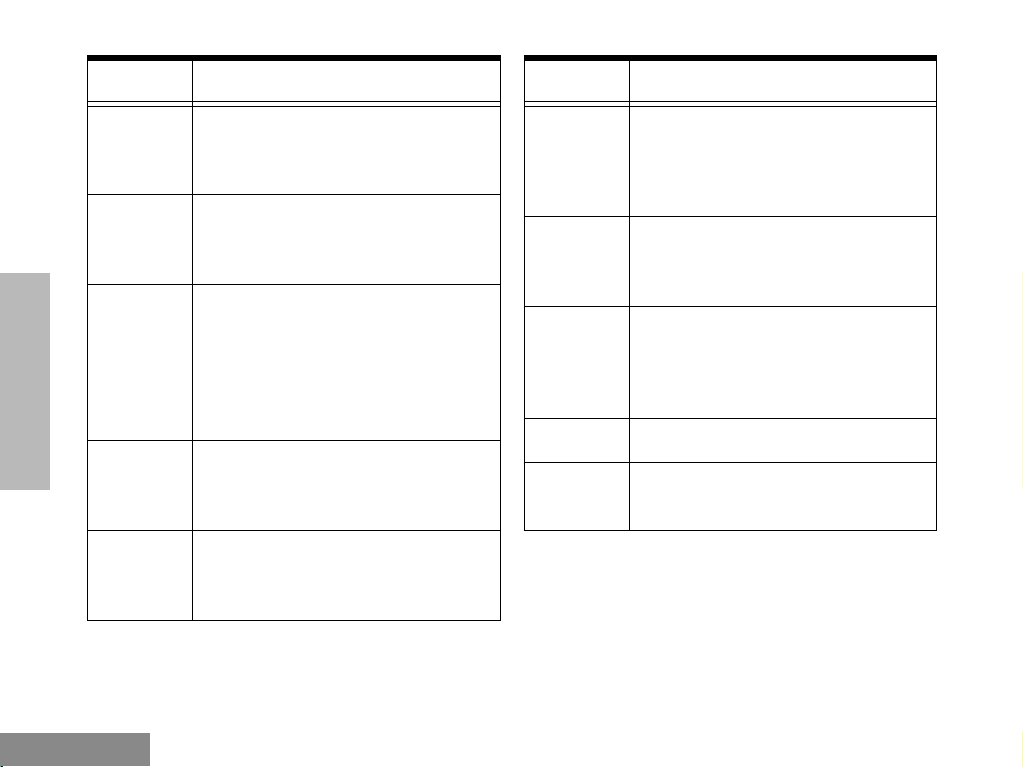
Button Short Press Long Press Press and Hold
Emergency
*
Monitor/Permanent Monitor
To initiate an Emergency Alarm.
Ñ
To cancel your radioÕs Emergency
status.
To continually monitor the selected
channel.
Volume Set Ñ Ñ
Battery Gauge Ñ Ñ
Scan/Nuisance Channel Delete
Tx Power
Keypad Lock Ñ
Repeater/
Talkaround
Squelch
To toggle between the start/stop of
the Scan operation.
To toggle your radioÕs transmit
power level between High and Low
power.
To choose to/not to transmit
through the repeater.
To toggle your radioÕs squelch level
between tight/normal squelch.
To delete a nuisance channel while
scanning.
To toggle your radioÕs transmit
power level between High and Low
power.
To toggle between locking/unlocking your radioÕs keypad.
To choose to/not to transmit
through the repeater.
To toggle your radioÕs squelch level
between tight/normal squelch.
Ñ
To monitor the selected
channel for any activity.
To sound a tone for
adjusting the radioÕs volume level.
RADIO OVERVIEW
To check the batteryÕs
status.
Ñ
Ñ
Ñ
Ñ
Ñ
3
English
Radio Overview
Button Short Press Long Press Press and Hold
RADIO OVERVIEW
To toggle the activation/deactiva-
Option Board
Phone
Speed Dial
Radio Call
Light
*
If Emergency function is required, it can ONLY be programmed to the Top Button.
Depending on how your radio has been programmed by your dealer, these functions are activated EITHER through short press OR
long press, but not both.
tion of your radioÕs option board (if
one is installed).
To make a Phone Call.
To easily access the phone numbers in your phone list.
To make a radio call.
To turn on your radioÕs backlight.
To toggle the activation/deactivation of your radioÕs option board (if
one is installed).
To make a Phone Call.
To easily access the phone numbers in your phone list.
To make a radio call.
To turn on your radioÕs backlight.
Ñ
Ñ
Ñ
Ñ
Ñ
Menu Keys Menu/Select Key
Exit
Menu/SelectUp
Used to enter Menu Mode. When already in
Menu Mode, this key is also used to make Menu
selections.
( + )
< ? >
Exit Key
Used to back up one level in the Menu hierarchy
(short press); also used to exit the Menu Mode
(long press).
Left
Down Right
English
4

Radio Overview
Up Key
Used for scrolling when in Menu Mode.
Down Key
Used for scrolling when in Menu Mode. This key
can also be programmed as a programmable
key.
Right Key
Moves the cursor right or inserts a space when
editing. This key can also be programmed as a
programmable key.
Left Key
Used as a backspace key when editing. This key
can also be programmed as a programmable
key.
Keypad Keys (for keypad radios only)
1 2 3
4 5 6
7 8 9
* 0 #
These keys are used when dialing a phone
number, making a radio call, and when entering
information for the radioÕs programming lists.
When entering information for the programming
lists, each key can generate numeric and
character information.
Pressing a key will cause the Þrst character of
the keyÕs character cycle to appear on the LCD
screen; subsequent pressing of the same key
will cause subsequent characters in the cycle to
appear. For example, to enter the character ÒSÓ,
press the Ò7Ó key four (4) times.
The following table shows the character cycle for
each key.
RADIO OVERVIEW
5
English
Radio Overview
Number of Times Key is Pressed
RADIO OVERVIEW
Key
0
1
2
3
4
5
6
7
8
9
*
#
1 2 3 4 5 6 7 8 9 10 11
0 ( ) < >
1 & % # *
A B C 2 a b c 2
D E F 3 d e f 3
G H I 4 g h i 4
J K L 5 j k l 5
M N O 6 m n o 6
P Q R S 7 p q r s 7
T U V 8 t u v 8
W X Y Z 9 w x y z 9
* / + - =
Blank
#
Space
- . ! ? Õ Ó , ; :
English
6
Radio Overview
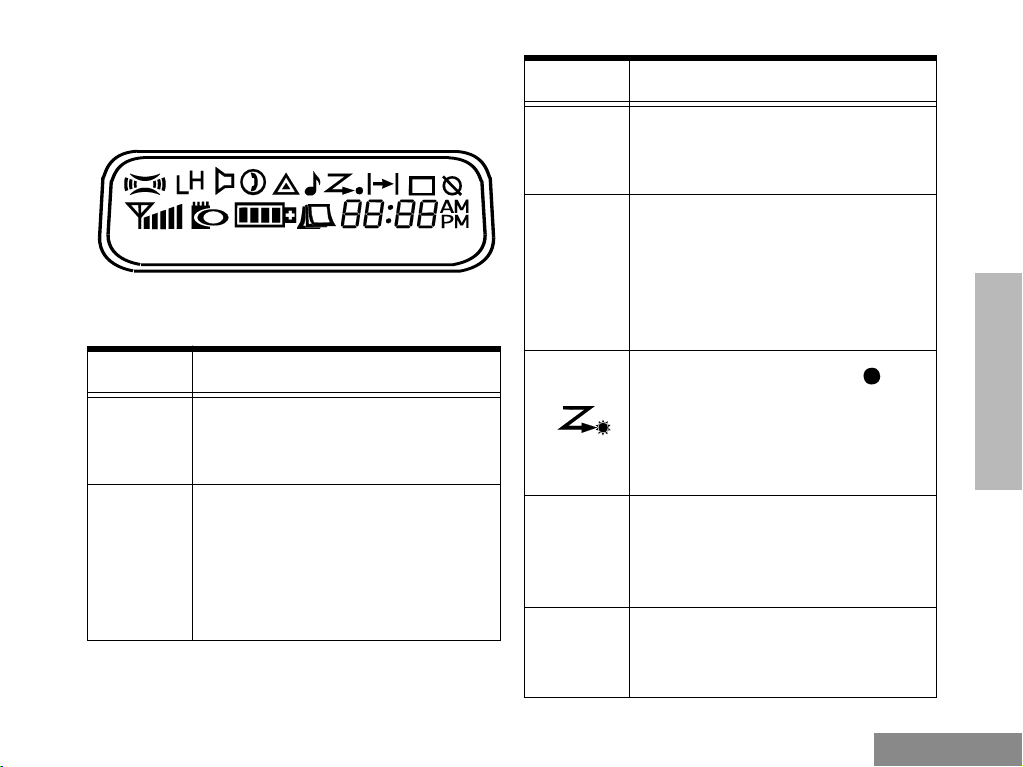
LCD SCREEN
Used to display channel, menu as well as other
iconic information.
Symbol Name and Description
Companding Indicator
A
S
R
Indicates that you have activated
the companding feature.
Power Level Indicator
ÒLÓ is lit up when your radio is
conÞgured to transmit in Low
Power, while ÒHÓ is lit up when
your radio is conÞgured to
transmit in High Power.
Symbol Name and Description
Phone Indicator
D
G
H
E
Indicates that you are performing
a Phone operation.
Scan Indicator
Indicates that you have activated
the Scan feature. Also during
Scan, indicates that there is
some activity on a non-priority
channel.
Priority 1 Scan Indicator (
ßashing)
During Scan, indicates that there
is some activity on a Priority 1
channel.
Priority 2 Scan Indicator
During Scan, indicates that there
is some activity on a Priority 2
channel.
Emergency Indicator
Indicates that you are making an
Emergency Call.
RADIO OVERVIEW
7
English
Radio Overview
RADIO OVERVIEW
Symbol Name and Description
Call Received Indicator
F
C
J
K
L
Indicates that you are receiving a
Selective Call/Call Alert.
Monitor Indicator
Indicates that you are monitoring
the selected channel.
Talkaround Indicator
When lit, indicates that you are
not transmitting through the
repeater. When not lit, you are
transmitting through the
repeater.
Programming Mode Indicator
Indicates that you are editing one
of the Program Lists.
Keypad Lock Indicator
Indicates that your keypad is
locked.
Symbol Name and Description
Signal Strength Indicator
M
N
P
Q
U
Shows the signal strength. Five
bars indicates the strongest
signal.
Option Board Indicator
Indicates that an option board is
activated.
Battery Level Indicator
Shows the remaining charge in
your battery based on how many
bars are displayed.
Not applicable for this radio
Clock
Shows the time.
English
8
 Loading...