

Page 1
SPLIT-TYPE AIR CONDITIONERS
OPERATING INSTRUCTIONS
INDOOR UNIT
MSC-A07YV
MSC-A09YV
MSC-A12YV
OPERATING INSTRUCTIONS For customers
To use this unit correctly and safely, be sure to read this operating instructions
•
before use.
Bedienungsanleitung Für Kunden
Um diese Einheit richtig und sicher zu verwenden, unbedingt diese Bedienungs-
•
anleitung vor der Inbetriebnahme durchlesen.
NOTICE D’UTILISATION A l’attention des clients
Pour avoir la certitude d’utiliser cet appareil correctement et en toute sécurité, veuillez
•
lire attentivement cette notice d’instructions avant de mettre l’appareil en fonction.
GEBRUIKSAANWIJZING Voor de klant
Om dit apparaat op de juiste manier en veilig te gebruiken, dient u eerst deze
•
gebruiksaanwijzing aandachtig door te lezen.
MANUAL DE INSTRUCCIONES Para los clientes
Para emplear correctamente este aparato y por razones de seguridad debe leer
•
este manual de instrucciones de manejo antes de su utilización.
LIBRETTO D’ISTRUZIONI Per gli utenti
Per utilizzare correttamente quest’unità, leggere questo libretto d’istruzioni atten-
•
tamente e per intero.
√¢∏°π∂™ §∂π∆√Àƒ°π∞™ °È· ÙÔÓ ÂÏ¿ÙË
°И· У· ¯ЪЛЫИМФФИ‹ЫВЩВ ·˘Щ‹ ЩЛУ МФУ¿‰· ЫˆЫЩ¿ О·И МВ ·ЫК¿ПВИ·, ‚В‚·ИˆıВ›ЩВ
•
fiЩИ ¤¯ВЩВ ‰И·‚¿ЫВИ ·˘Щfi ЩФ ВБ¯ВИЪ›‰ИФ Ф‰ЛБИТУ ЪИУ ·fi ЩЛУ ¯Ъ‹ЫЛ.
INSTRUÇÕES DE OPERAÇÃO Para os clientes
Para utilizar esta unidade correctamente, certifique-se de que lê estas instruções
•
de operação antes da utilização.
BRUGSANVISNING Til kunden
Læs denne brugsanvisning før brugen så korrekt og forsvarlig anvendelse af klima-
•
anlægget sikres.
BRUKSANVISNING För kunder
För att använda enheten på rätt och säkert sätt ska denna bruksanvisning läsas
•
innan enheten tas i bruk.
‹fiLETME TAL‹MATLARI Sat›n al›c›lar için
Bu birimi do¤ru ve güvenli olarak çal›flt›rmak için, kullanmadan önce bu iflletme
•
talimatlar›n› mutlaka okuyun.
РУКОВОДСТВО ПО ЭКСПЛУАТАЦИИ Для пользователей
Для обеспечения правильного и безопасного использования прибора следует
•
до начала его эксплуатации внимательно прочитать данное руководство.
English
Deutsch
Français
Nederlands
Español
Italiano
∂ППЛУИО¿
Português
Dansk
Svenska
Türkçe
Русский
Page 2
CONTENTS
SAFETY PRECAUTIONS ........................................................................................................................................................ 2
NAME OF EACH PART............................................................................................................................................................ 3
PREPARATION BEFORE OPERATION .................................................................................................................................. 4
I FEEL... AUTO OPERATION ................................................................................................................................................... 6
MANUAL OPERATION (COOL, DRY, HEAT/FAN) ................................................................................................................... 7
AIR FLOW VELOCITY AND DIRECTION ADJUSTMENT ...................................................................................................... 7
ECONO COOL OPERATION ................................................................................................................................................... 8
TIMER OPERATION (ON/OFF TIMER) ................................................................................................................................... 8
WHEN THE AIR CONDITIONER IS NOT GOING TO BE USED FOR A LONG TIME ............................................................ 8
MAINTENANCE ....................................................................................................................................................................... 8
CLEANING THE CATECHIN AIR FILTER ................................................................................................................................ 9
REPLACEMENT OF THE AIR CLEANING FILTER ................................................................................................................. 9
BEFORE CONTACTING THE SERVICE REPRESENTATIVE, CHECK THE FOLLOWING AGAIN ...................................... 10
WHEN YOU THINK THAT TROUBLE HAS OCCURRED ...................................................................................................... 10
INSTALLATION, RELOCATION AND INSPECTION .............................................................................................................. 11
SPECIFICATIONS ................................................................................................................................................................. 11
SAFETY PRECAUTIONS
• Since rotating parts and parts which could cause an electric shock are used in this product, be sure to read
these “Safety Precautions” before use.
• Since the cautionary items shown here are important for safety, be sure to observe them.
Marks and their meanings
WARNING: Incorrect handling could cause a serious hazard, such as death, serious injury, etc. with a high prob-
CAUTION: Incorrect handling could cause a serious hazard depending on the conditions.
Meanings of symbols used in this manual
• The colour of the sticker affixed to the unit is written in the parentheses.
(Black) : Never insert your finger or stick, etc.
(Black) : Never step onto the indoor/outdoor unit and do not put anything on them.
(Yellow) : Danger of electric shock. Be careful.
(Blue) : Be sure to disconnect the power supply plug from the power outlet.
(Blue) : Be sure to shut off the power.
• After reading this manual, keep it together with the installation manual in a handy place for easy reference.
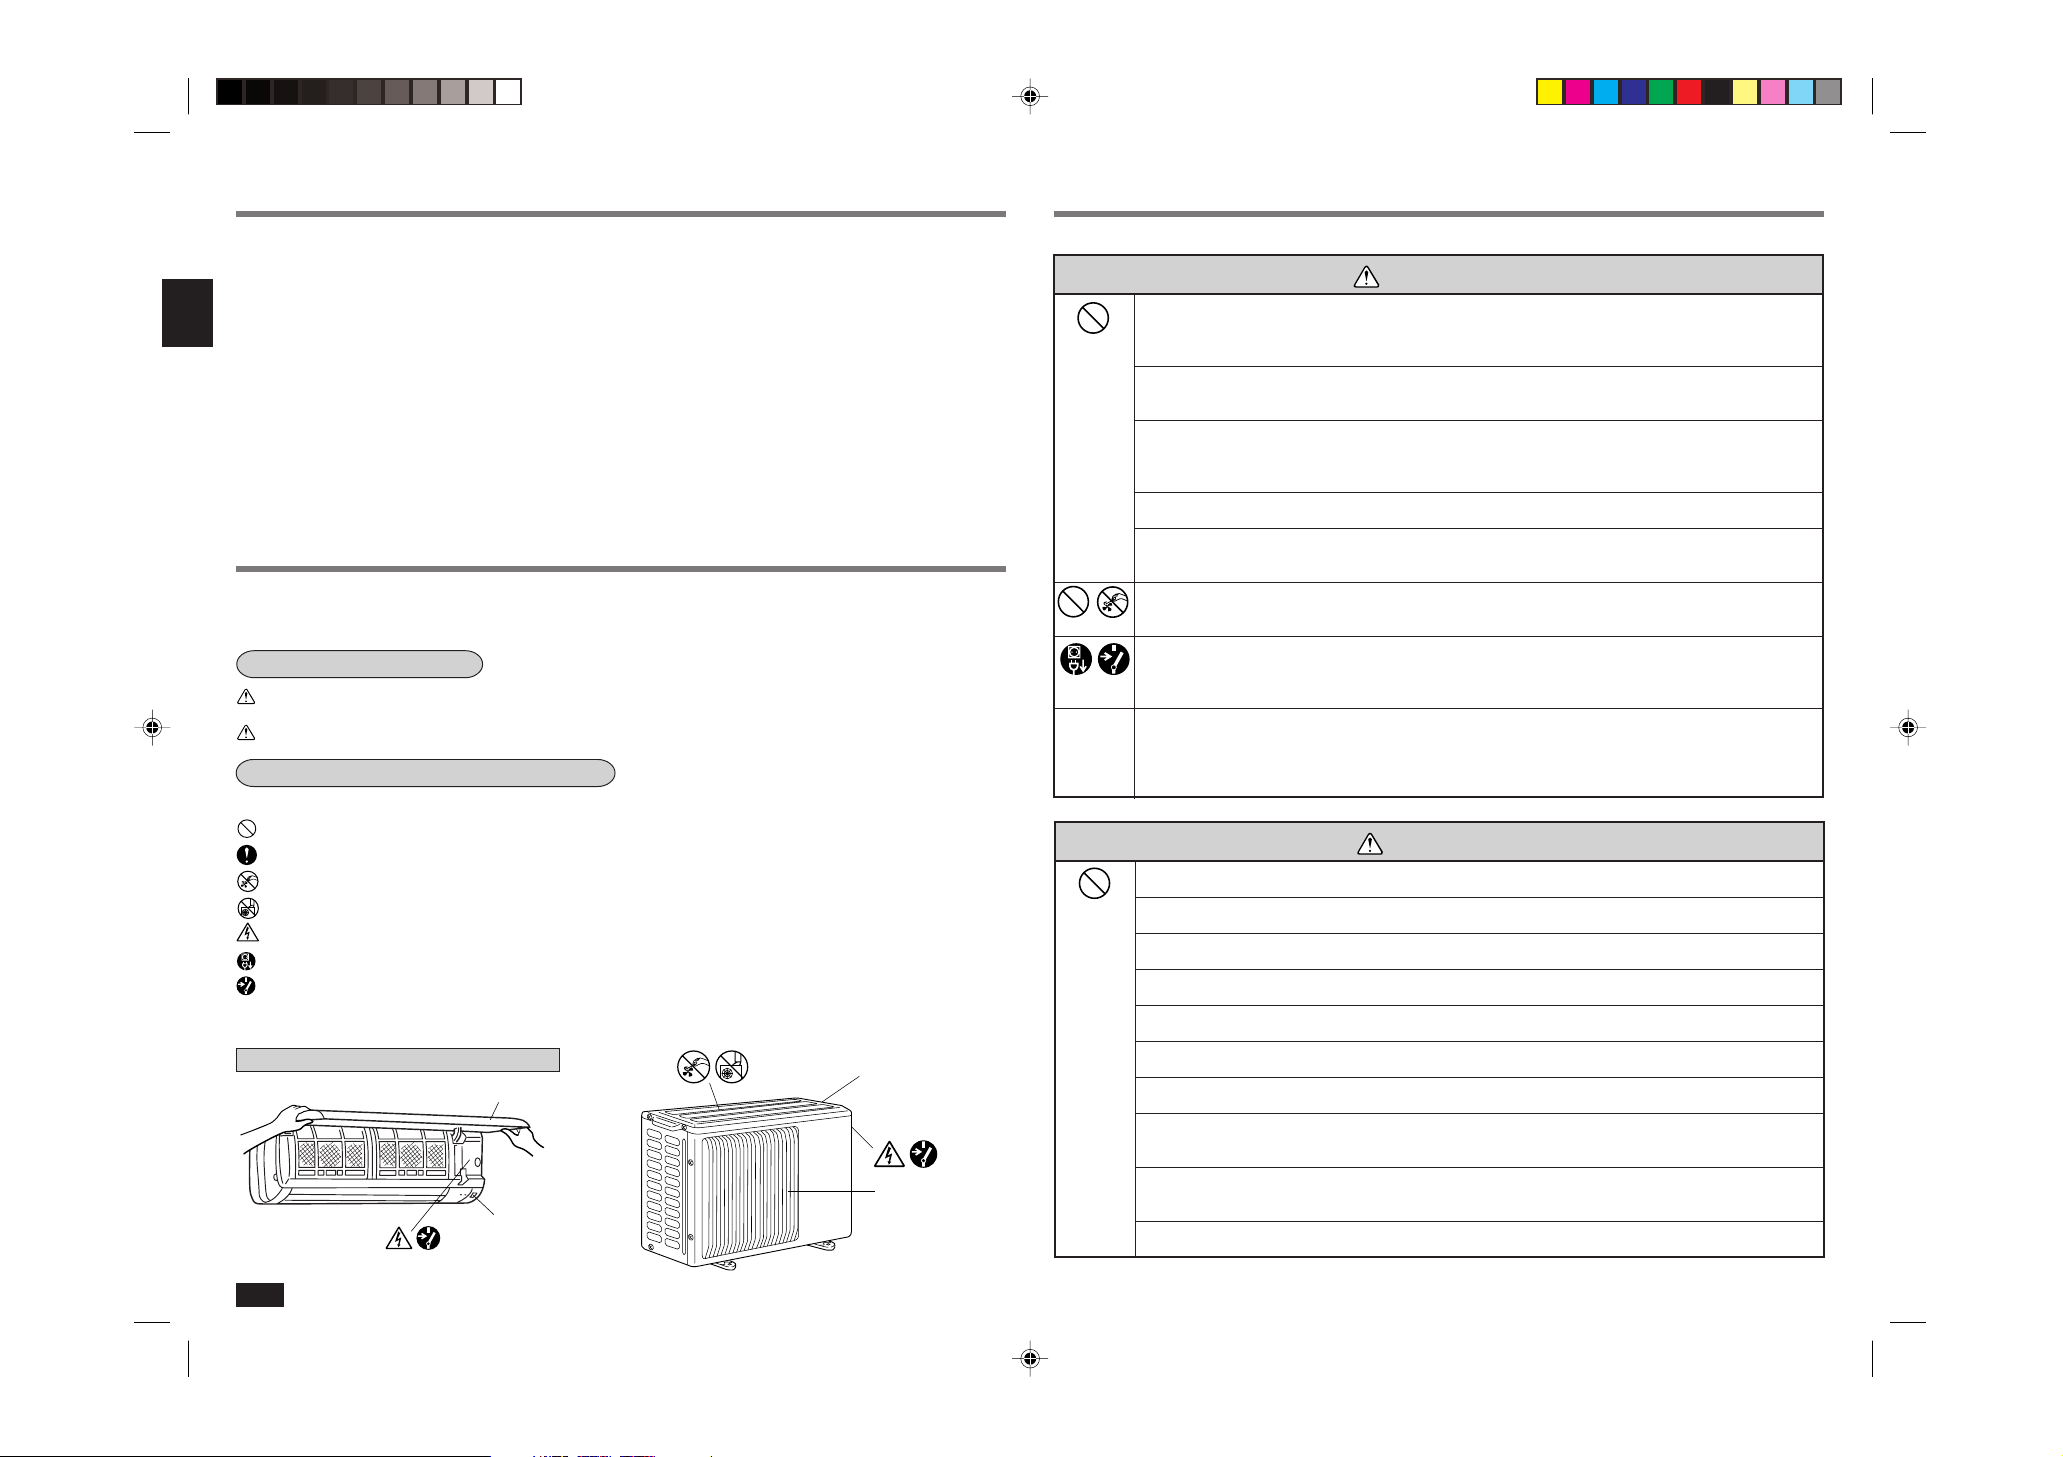
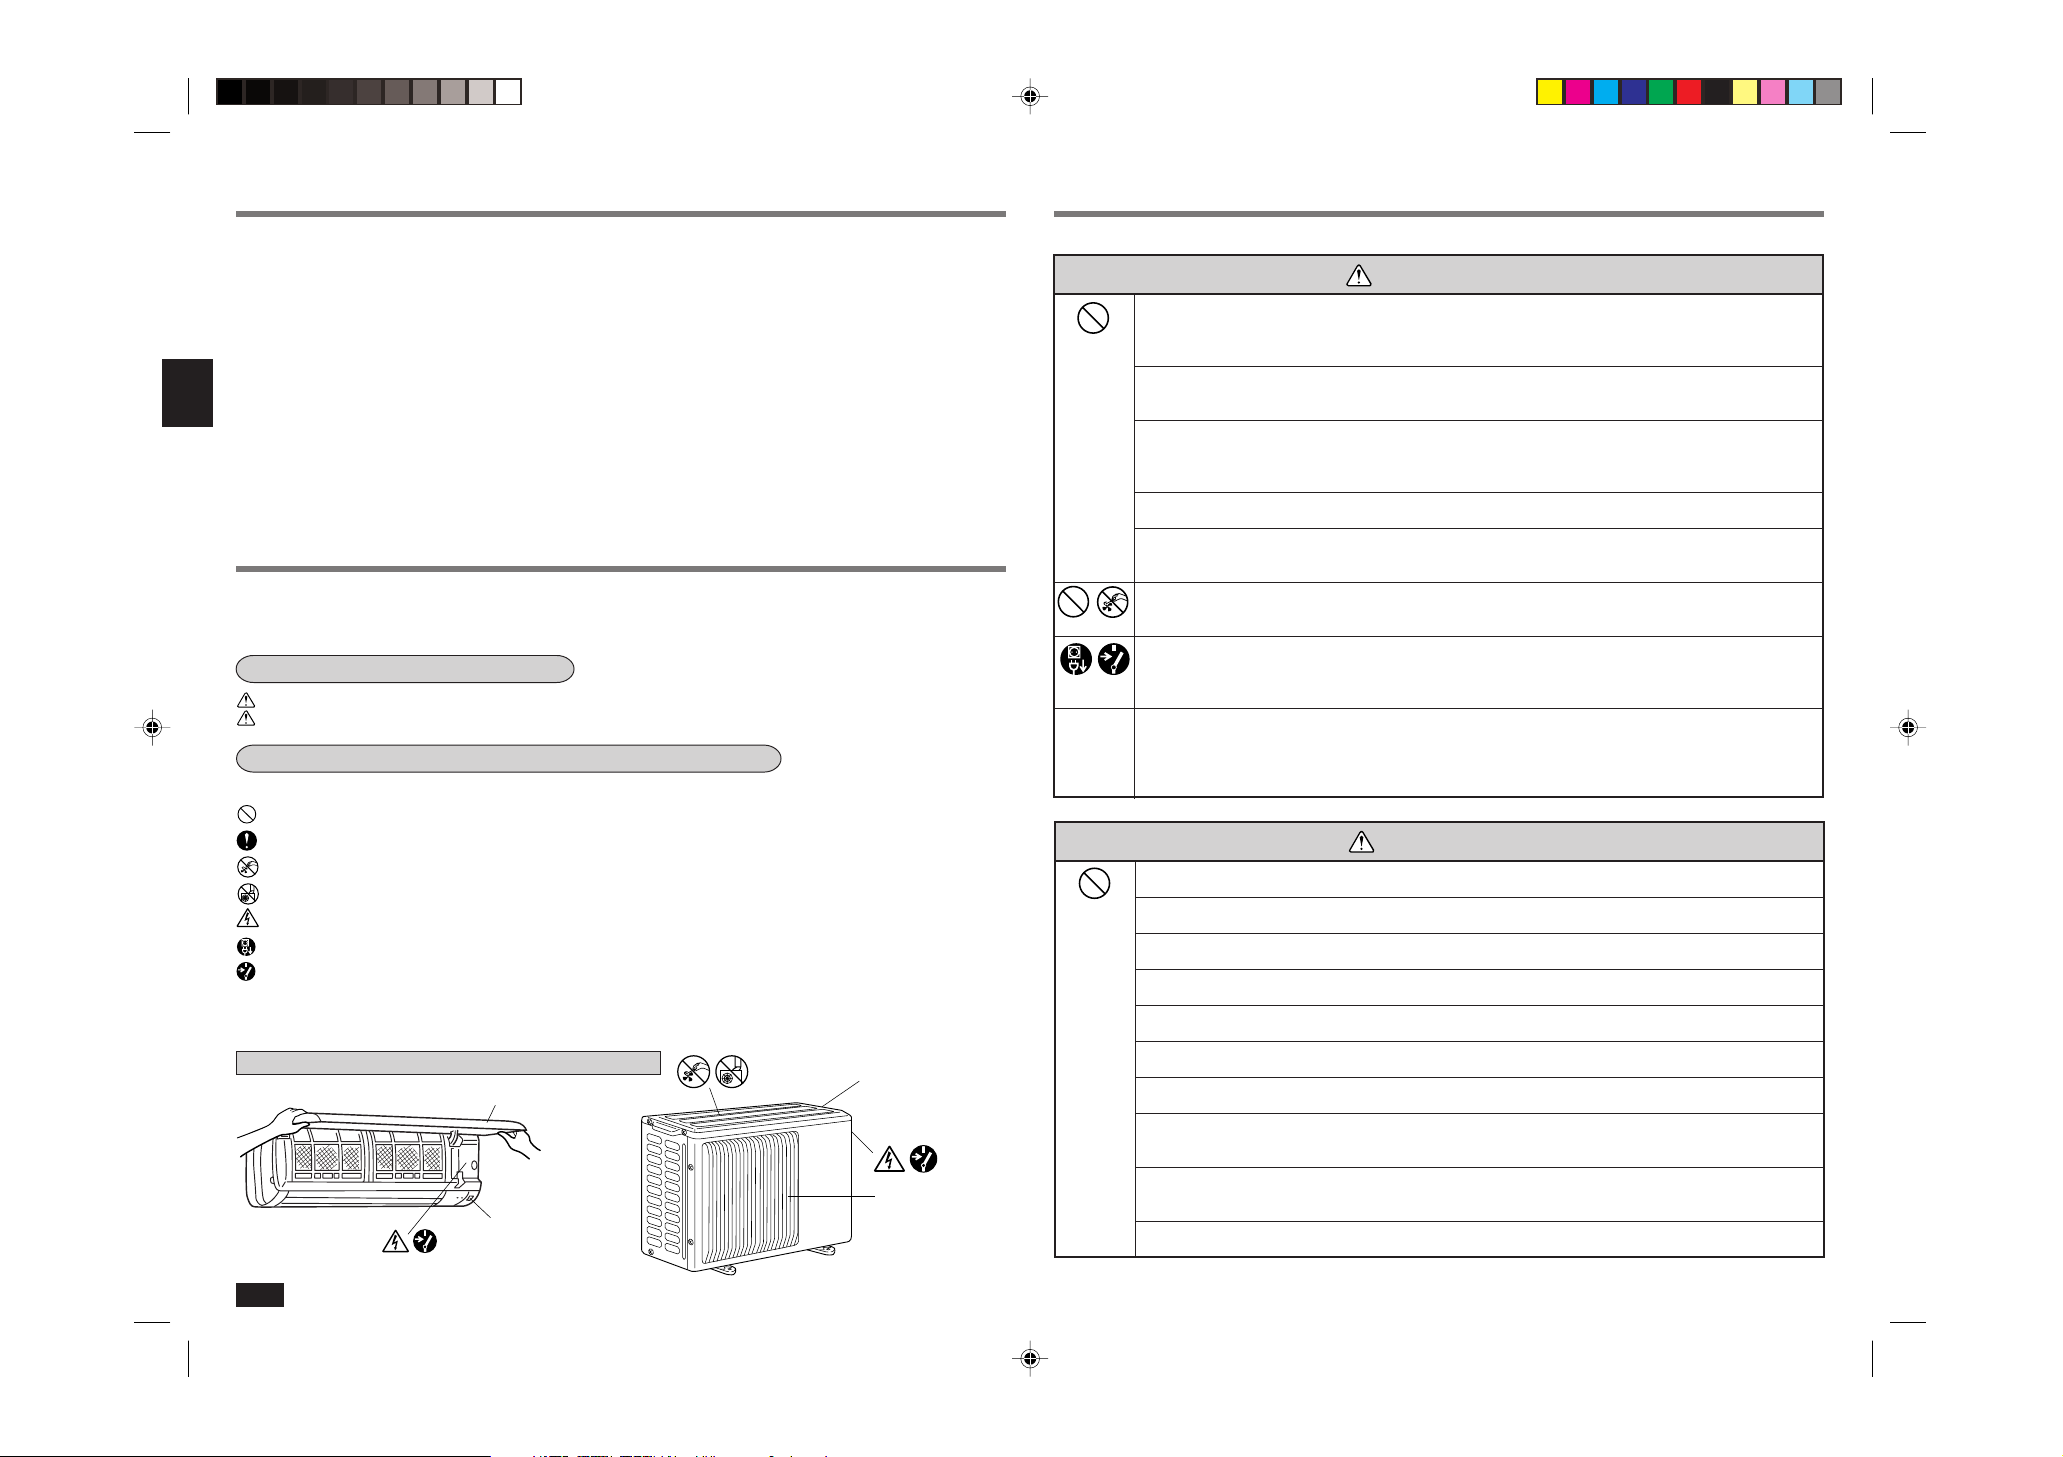
Warning mark positions and safety devices
ability.
: Be sure not to do.
: Be sure to follow the instruction.
ENCLOSURE
FRONT PANEL
AIR OUTLET
ENCLOSURE
This air conditioner is NOT intended for use by children or infirm persons without supervisions.
•
WARNING
Do not use intermediate connection of the power supply cord or the extension cord and do not
connect many devices to one AC outlet.
• A fire or an electric shock may result from poor contact, poor insulation, exceeding the permissible
current, etc.
Do not scratch or process the power supply cord, etc.
• Do not put heavy object on the power supply cord and do not scratch or process the cord. The cord may
be damaged and this may cause a fire or an electric shock.
Do not turn the breaker off/on or disconnect/connect the power supply plug during operation.
• This may cause a fire due to spark, etc.
• Be sure to turn off the breaker or disconnect the power supply plug absolutely after switching the indoor
unit off with the remote controller.
Do not expose your skin directly to cool air for a long time.
• This could damage your health.
The customer should not install this unit.
• If this is done incorrectly, it may cause a fire, an electric shock, or injury from the unit falling, water
leaking, etc. Consult your dealer.
Do not insert your finger or a stick, etc. into the air inlet/outlet.
• Since the fan rotates at high speed, this may cause an injury.
• Young children should be supervised to ensure that they do not play with the air conditioner.
When an abnormality (burning smell, etc.) occurs, stop the air conditioner and disconnect the power
supply plug or turn off the breaker.
• If the unit continues to be operated in an abnormal condition, it may cause a fire, trouble, etc. In this case,
consult your dealer.
Repairs or relocation should not be done by the customer.
• If this is done incorrectly, it may cause a fire, an electric shock, or injury from the unit falling, water
leaking, etc. Consult your dealer.
• If the power supply cord is damaged, it must be replaced by the manufacturer or its service agent in order
to avoid a hazard.
CAUTION
When the air filter is to be removed, do not touch the metal parts of the indoor unit.
• This may cause an injury.
Do not use an insecticide or flammable spray.
• This may cause a fire or deformation of the cabinet.
Do not put a pet or houseplant where it will be exposed to direct airflow.
• This could injure the pet or plant.
Do not leave the unit on an installation stand which is damaged.
• The unit may fall and this may cause an injury.
Do not step onto an unstable bench when maintaining the unit, etc.
• This may cause an injury, etc. if you fall down.
Do not pull the power supply cord.
• The core wire of the power supply cord may be disconnected and this may cause a fire.
Do not charge or disassemble the batteries and do not throw them into a fire.
• This may result in leakage, fire or an explosion.
Do not operate the unit for a long time in high humidity, e.g. leaving a door or window open.
• In the cooling mode, if the unit is operated in a room with high humidity (80% RH or more) for a long time,
water condensed in the air conditioner may drop and wet or damage furniture, etc.
Do not use the unit for special purposes.
• Do not use this air conditioner to preserve precision devices, food, animals, plants and art objects.
This may cause deterioration of quality, etc.
Do not put a stove, etc. where they are exposed to direct airflow.
• This may cause imperfect combustion.
2
Page 3
SAFETY PRECAUTIONS NAME OF EACH PART
CAUTION
When the unit is to be cleaned, switch it off and disconnect the power supply plug or turn off the
breaker.
• Since the fan rotates at high speed during operation, this may cause an injury.
When the unit is not going to be used for a long time, disconnect the power supply plug or turn off
the breaker.
• Otherwise, dirt may collect and this may cause a fire.
Replace the 2 batteries with new ones of same type.
• Using an old battery together with a new one may result in heat generation, leakage or an explosion.
If liquid from the batteries gets onto your skin or clothes, wash it well with clean water.
• If liquid from the batteries gets into your eyes, wash them well with clean water and consult a doctor at
once.
Ventilate well in using the unit with a stove, etc.
• An oxygen shortage may occur.
Do not operate switches with wet hands.
• This may cause an electric shock.
Do not clean the air conditioner with water.
• Water may enter the unit and degrade the insulation. This may cause an electric shock.
Do not step or put anything on the indoor/outdoor unit.
• This may cause an injury, etc. if you or something falls down.
For installation
WARNING
• Consult your dealer for installation of the air conditioner.
CAUTION
Do not install the unit where flammable gas could leak.
• If gas leaks and collects around the unit, it may cause an explosion.
Earth the unit.
• Do not connect the earth to a gas pipe, water pipe, lightning rod or the earth of a telephone. If the
earthing is incorrect, it may cause an electric shock.
Install an earth leakage breaker depending on the place where the air conditioner is to be installed
(humid places, etc.).
• If the earth leakage breaker is not installed, it may cause an electric shock.
Drain should be fully drained.
• If the drainage route is incomplete, water may drop from the unit. This may wet and damage the furniture.
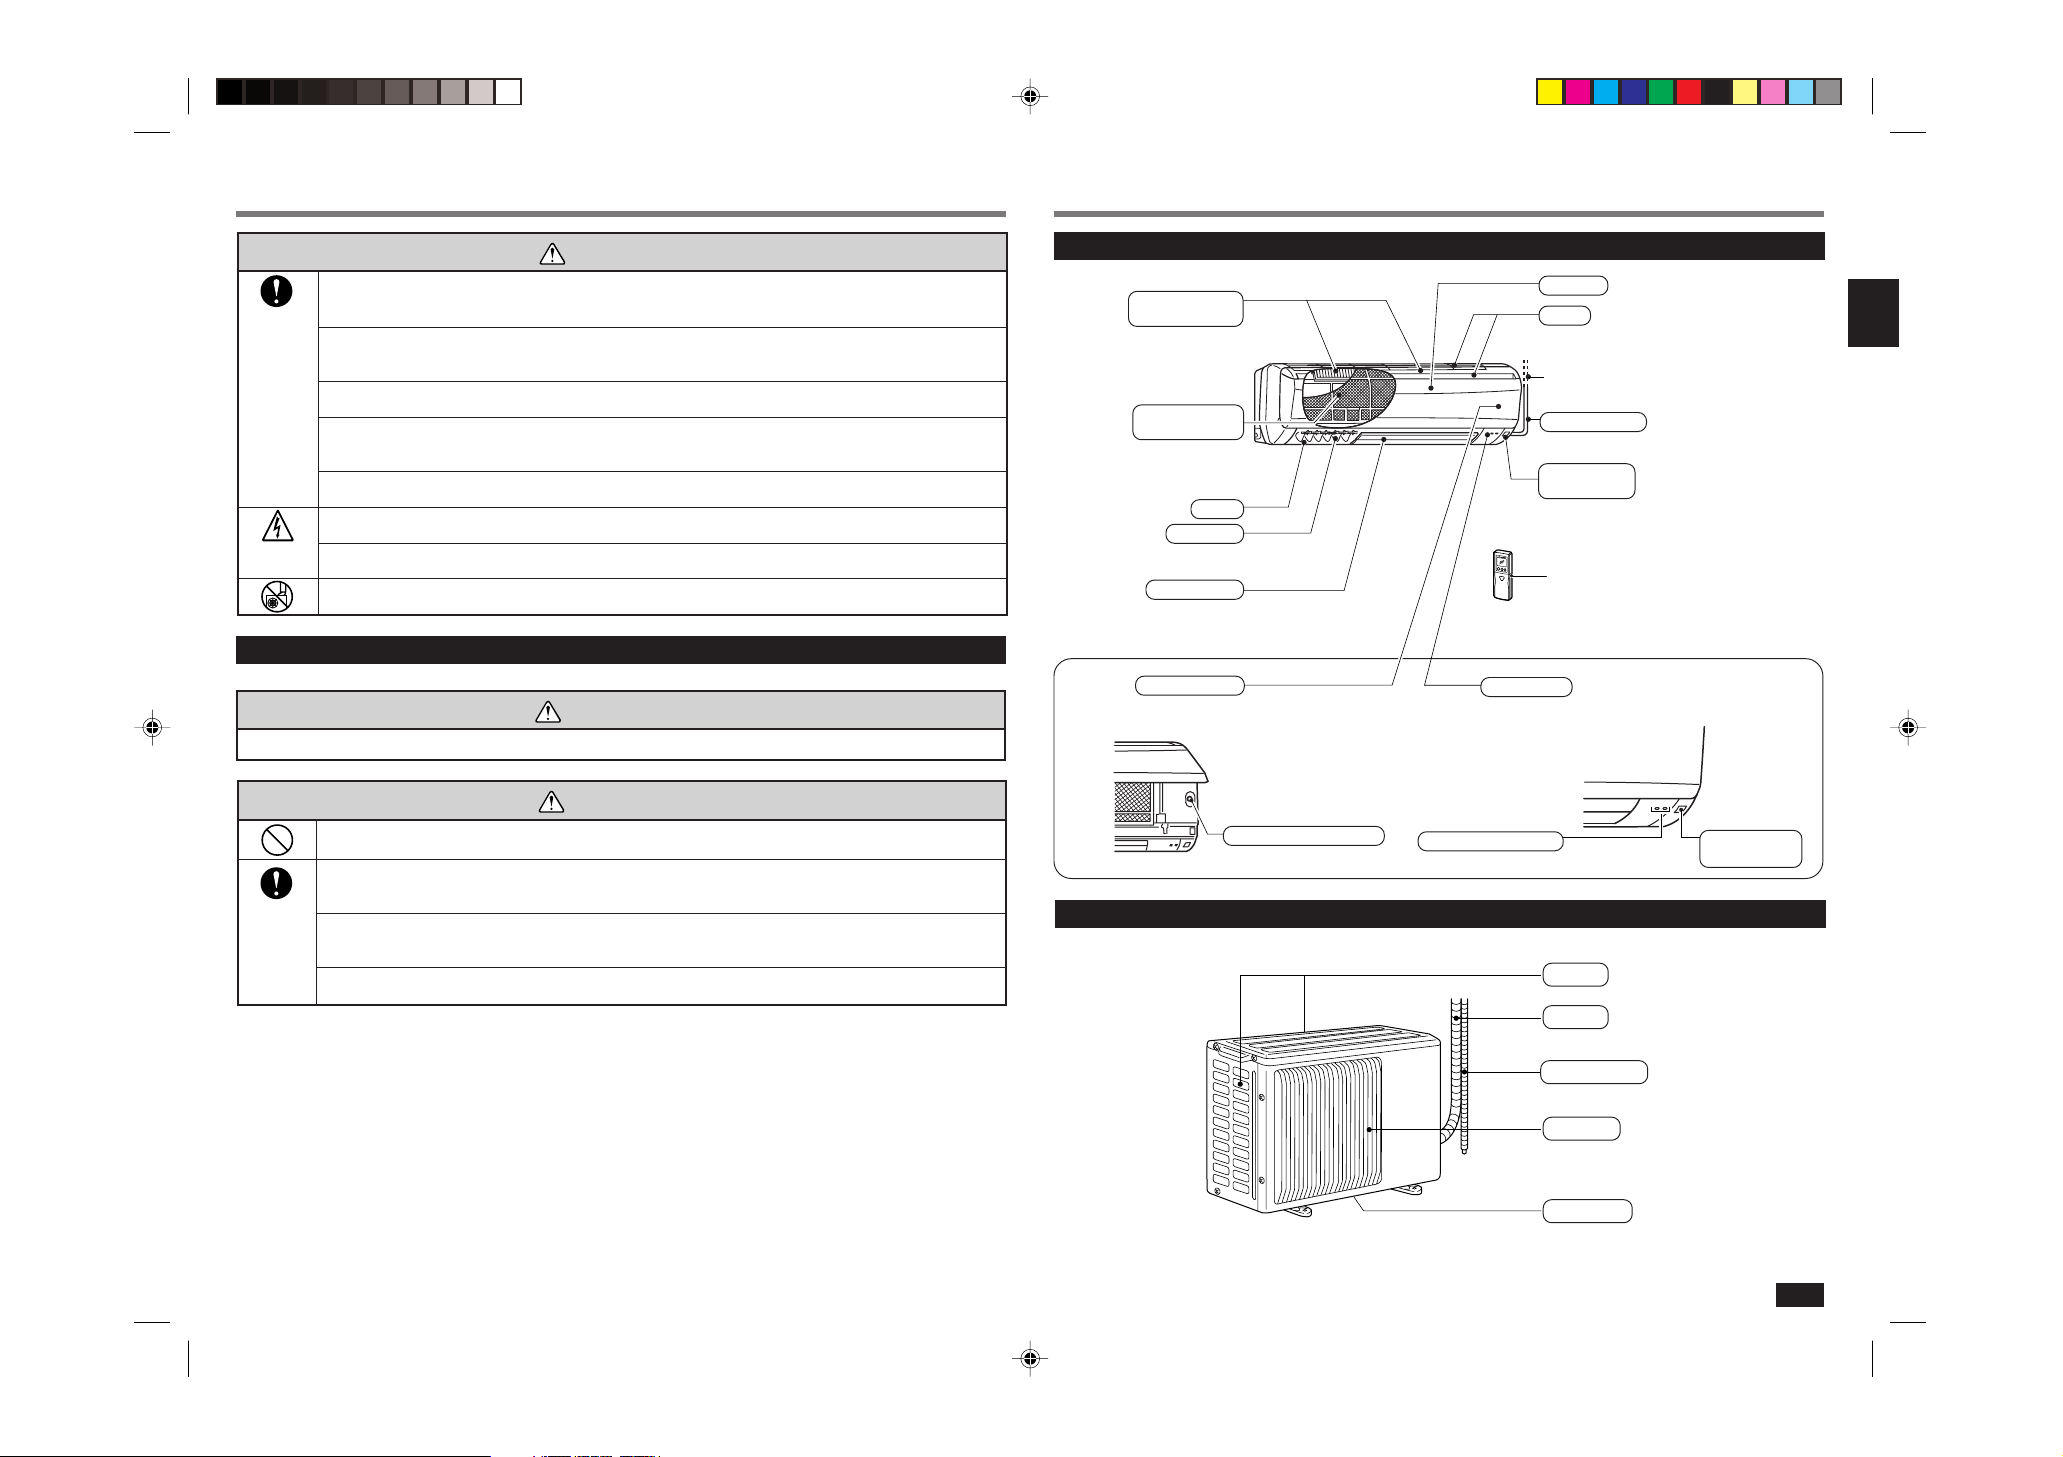
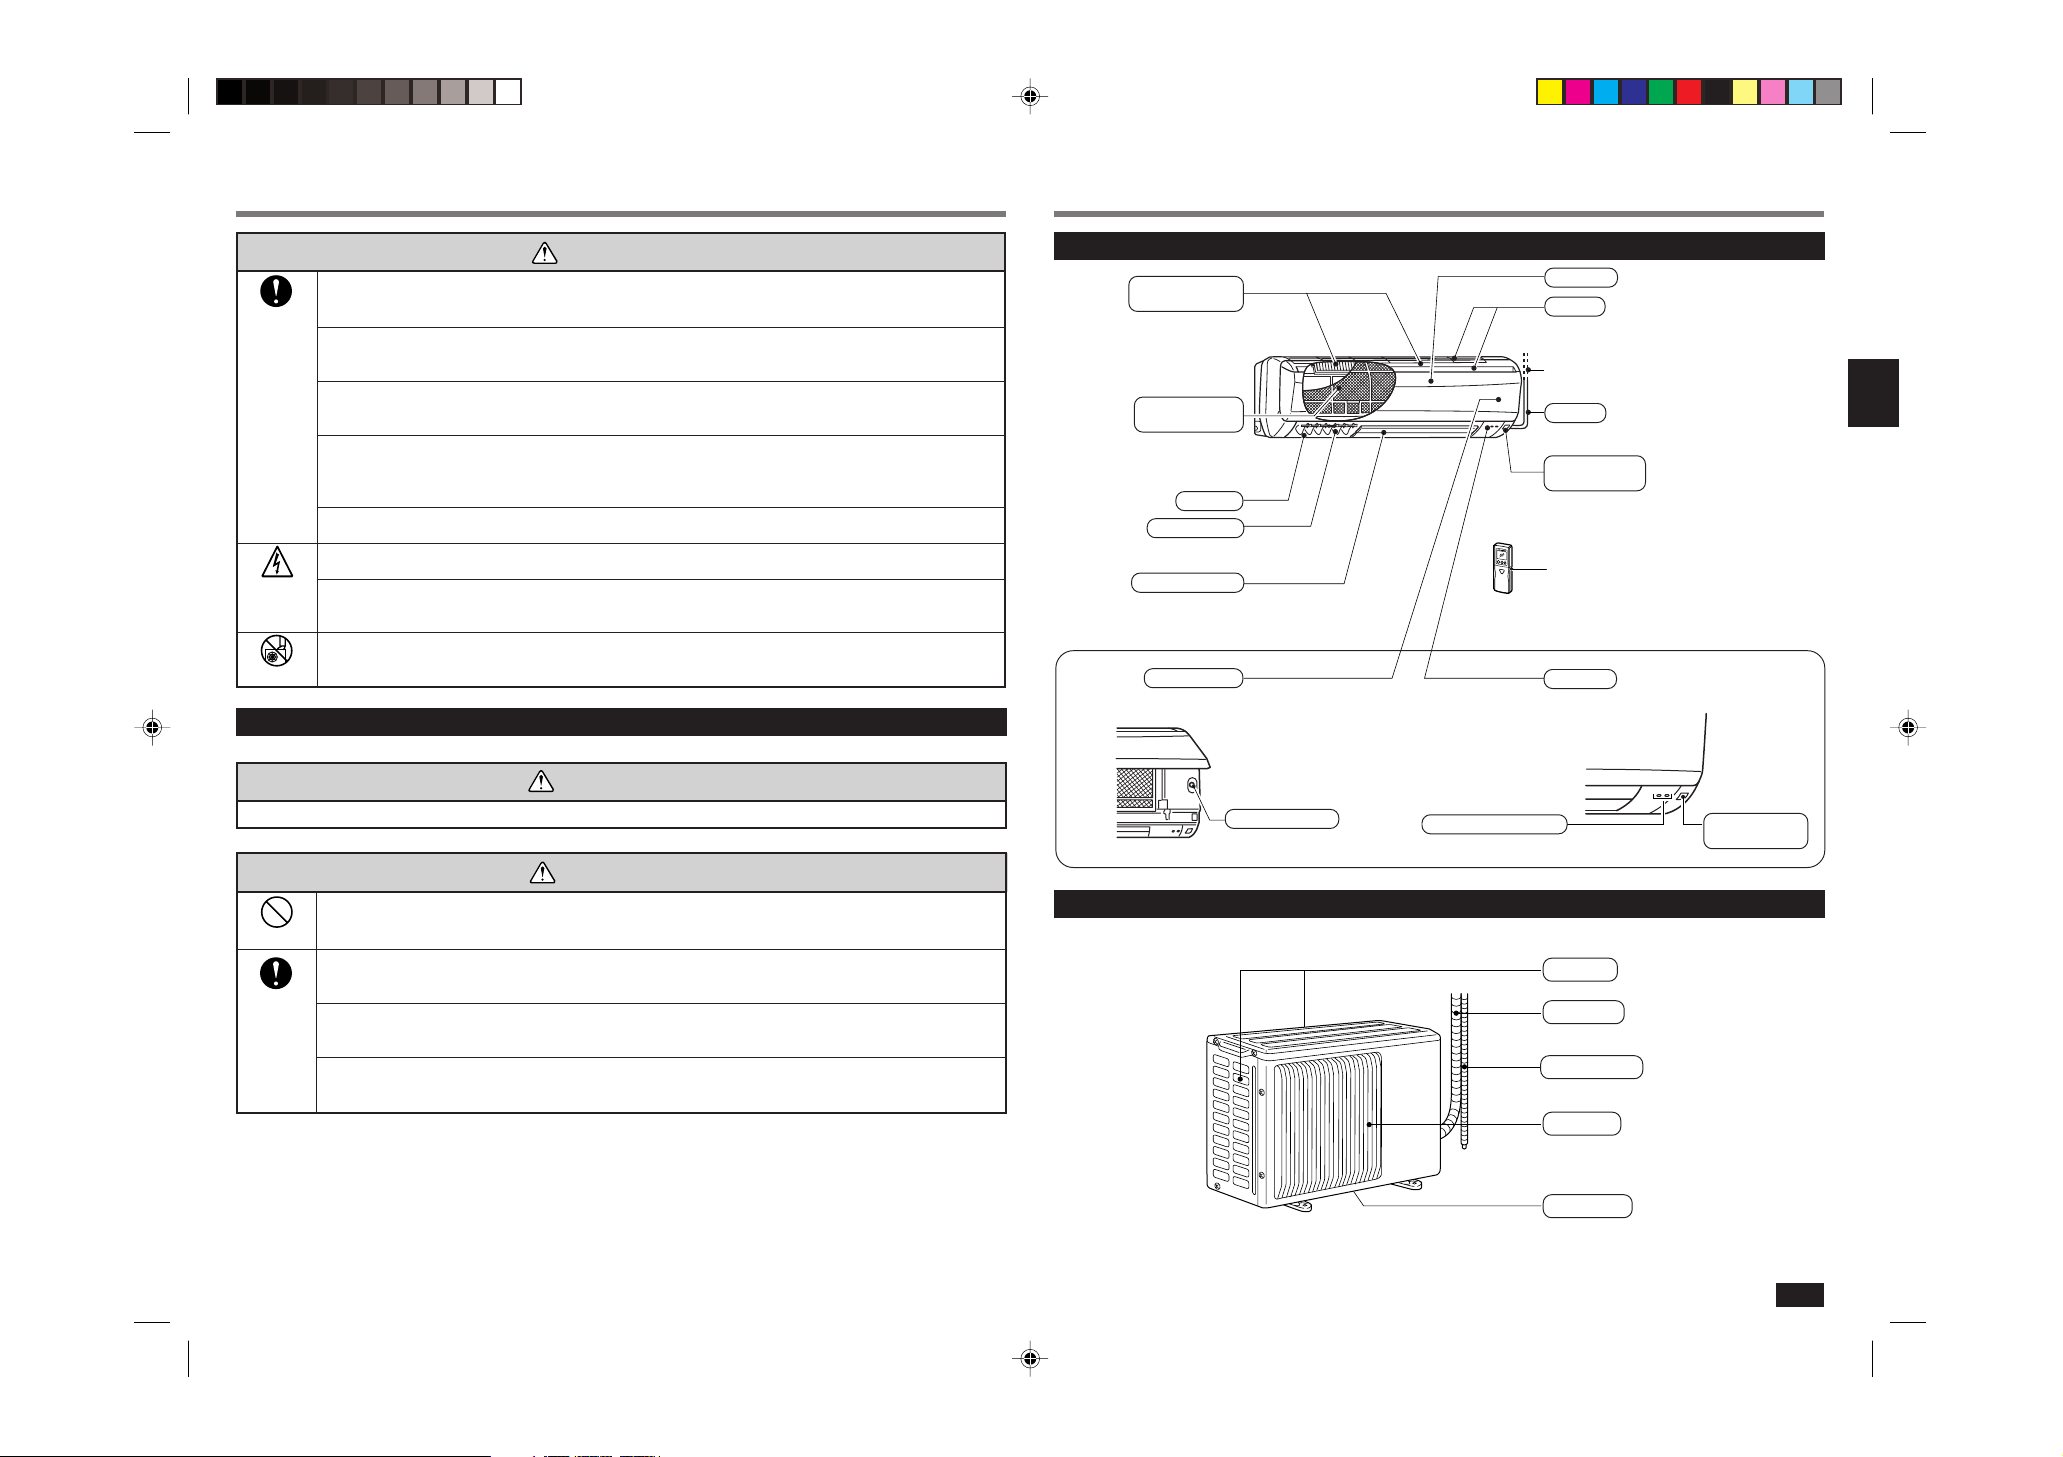
Indoor unit
Air cleaning filter
(White bellows type)
Catechin air filter
(With deodorizer)
Vertical vane
Horizontal vane
Operation section
(When the front panel is opened)
Outdoor unit
Air outlet
Emergency operation switch
Display section
Operation Indicator lamp
Front panel
Air inlet
to Breaker
Power supply cord
Remote control
receiving section
Remote controller
Air inlet (back and side)
Piping
Remote control
receiving section
Drainage hose
Air outlet
Drain outlet
3
Page 4

ON/OFF
FAN
TOO
WARM
TOO
COOL
VANE
MODE
ECONO COOL
STOP
START
HR.
MIN.
I FEEL
COOL
DRY
AMPM
AMPM
RESET CLOCK
HEAT
/FAN
NAME OF EACH PART
ON/OFF
TOO
COOL
AMPM
CLOCK
˚C
AMPM
TOO
WARM
PREPARATION BEFORE OPERATION
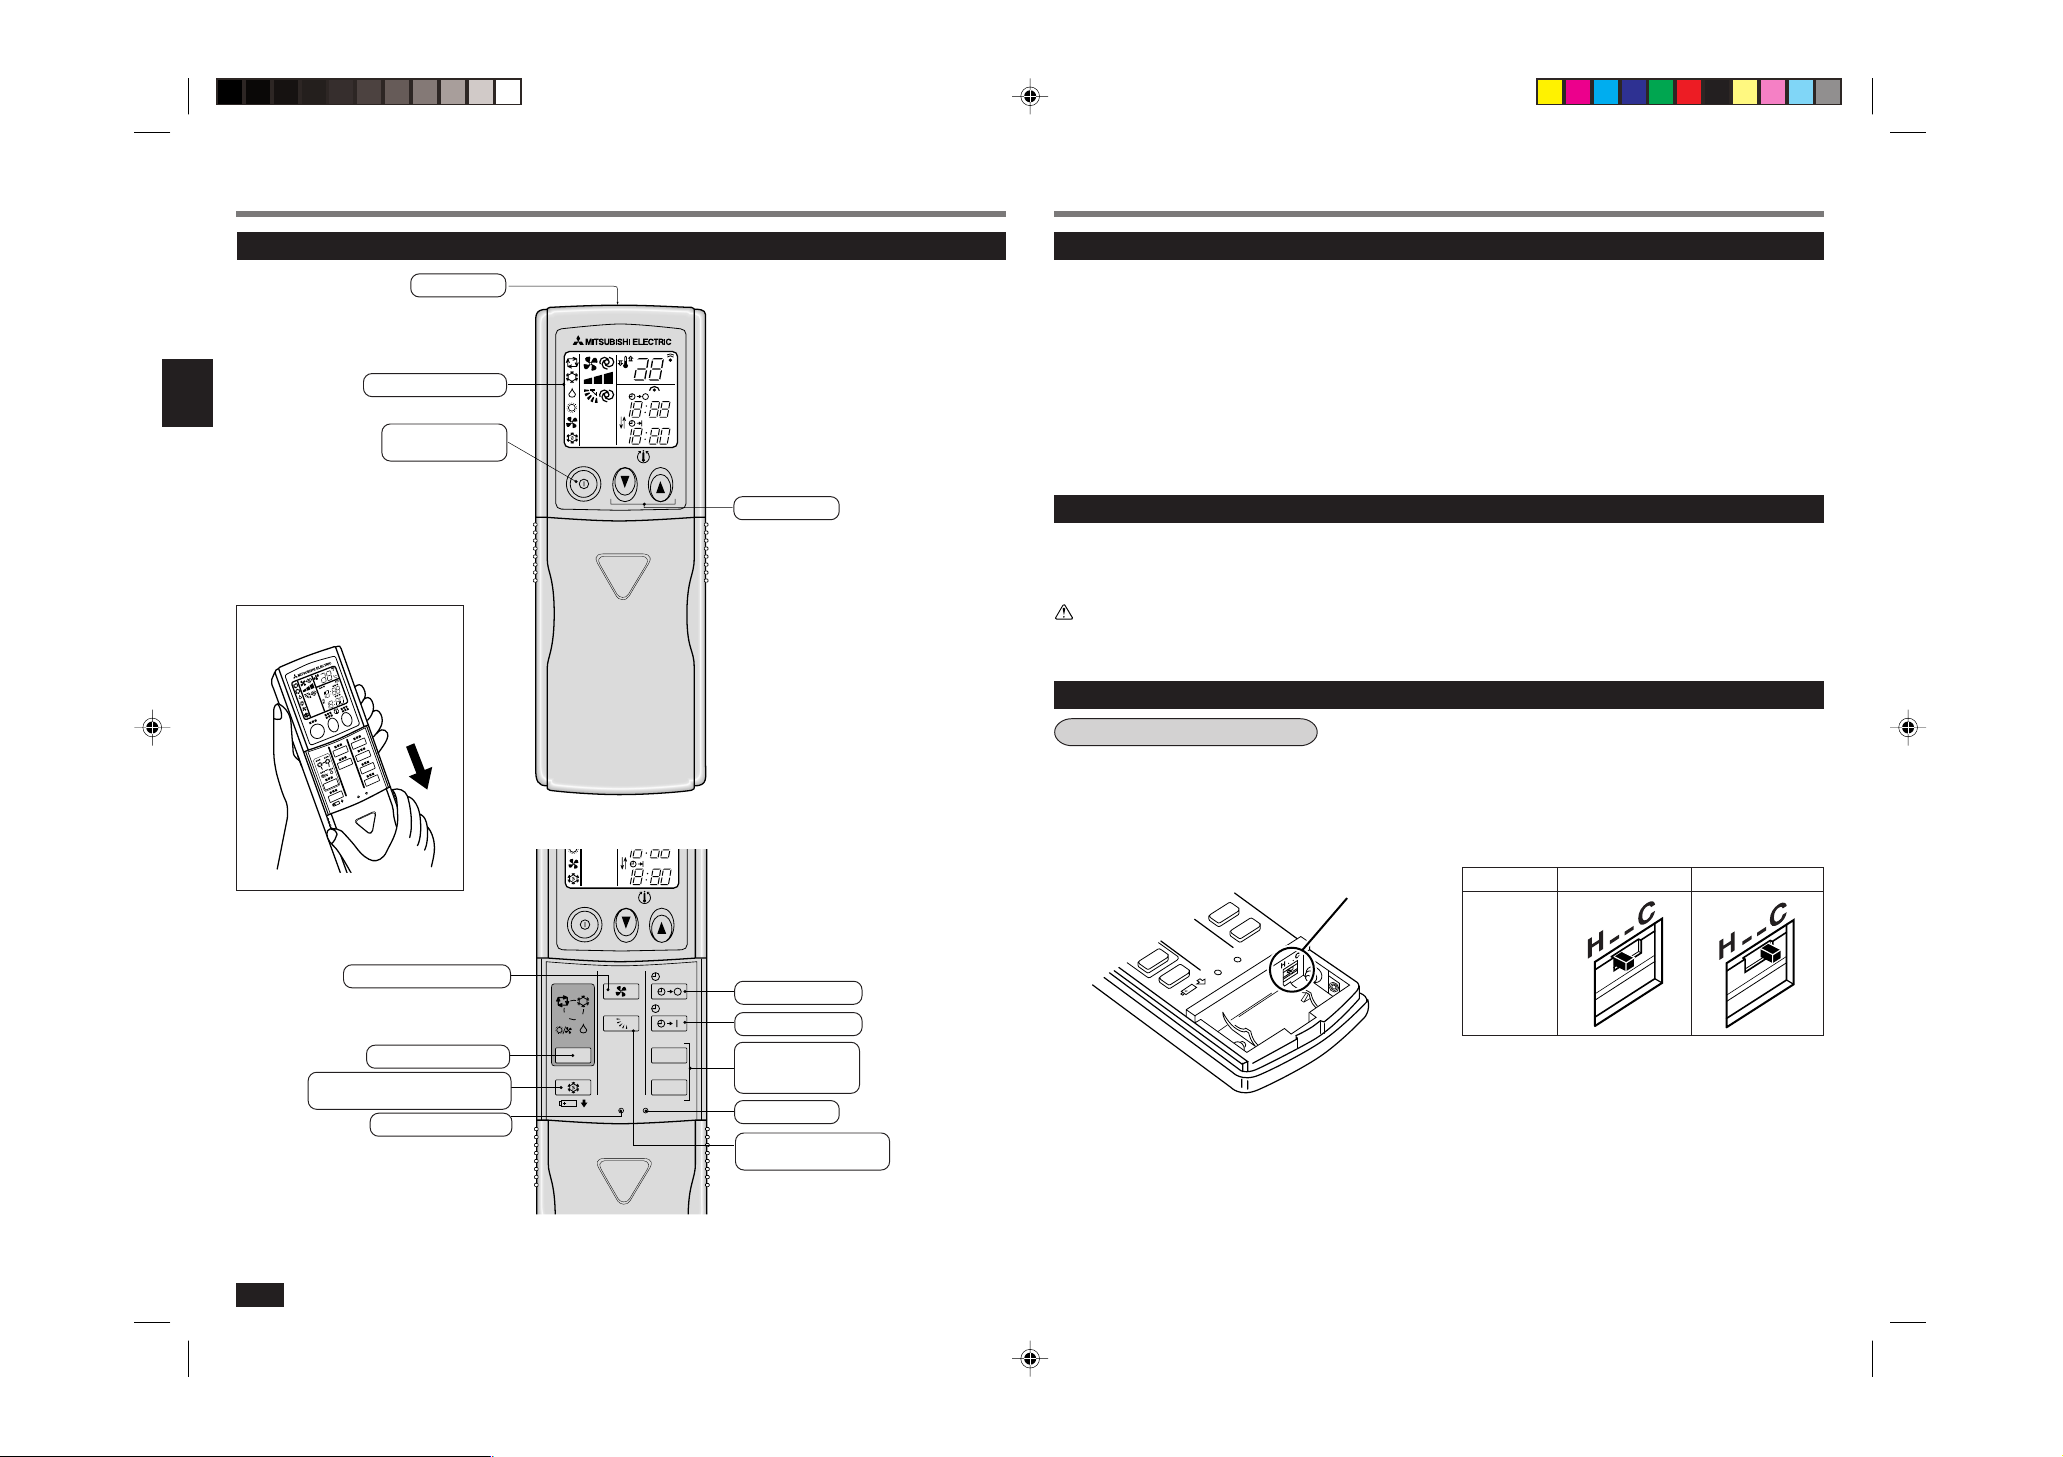
Remote controller
Signal transmitting section
Operation display section
ON/OFF (operate/
Open the front lid.
stop) button
(This diagram shows an overall view.)
Temperature buttons
Auto restart function
These models are equipped with an auto restart function. If you do not want to use this function,
■
please consult the service representative because the setting of the unit needs to be changed.
Auto restart function is ...
When the indoor unit is controlled with the remote controller, the operation mode, the set temperature and the fan speed are
stored in the memory. If a power failure occurs or the main power is turned off during operation, “Auto restart function” sets
automatically to start operating in the same mode as the one set with the remote controller just before the shutoff of the main
power. (Refer to page 6 for details.)
Indoor unit
Insert the power supply plug into the power outlet and/or turn the breaker on.
■
WARNING:
Remove dirt from the power supply plug and insert the plug securely.
If dirt adheres to the plug or insertion is incomplete, it may cause a fire or an electric shock.
Remote controller
How to set the type
This remote controller setting needs to be switched according to the type of air conditioner (COOL
■
& HEAT or COOL ONLY).
If the setting is incorrect, the air conditioner does not operate normally. Therefore, check if the
setting corresponds to the type of your air conditioner. If it does not, correct the setting as shown
below.
Slide switch
Type COOL & HEAT COOL ONLY
Position of the
slide switch
Fan speed control button
Operation select button
ECONO COOL button
RESET button
Off-timer button
On-timer button
HR.button
MIN.button
(Time set buttons)
CLOCK set button
Vane control button
4
Page 5
HR.
MIN.
HR.
MIN.
FAN
VANE
MODE
ECONO COOL
STOP
START
HR.
MIN.
I FEEL
COOL
DRY
RESET CLOCK
HEAT
/FAN
Operation Indicator
Operation Indicator
Operation Indicator
Operation Indicator
Operation Indicator
ON/OFF
PREPARATION BEFORE OPERATION
Remote controller
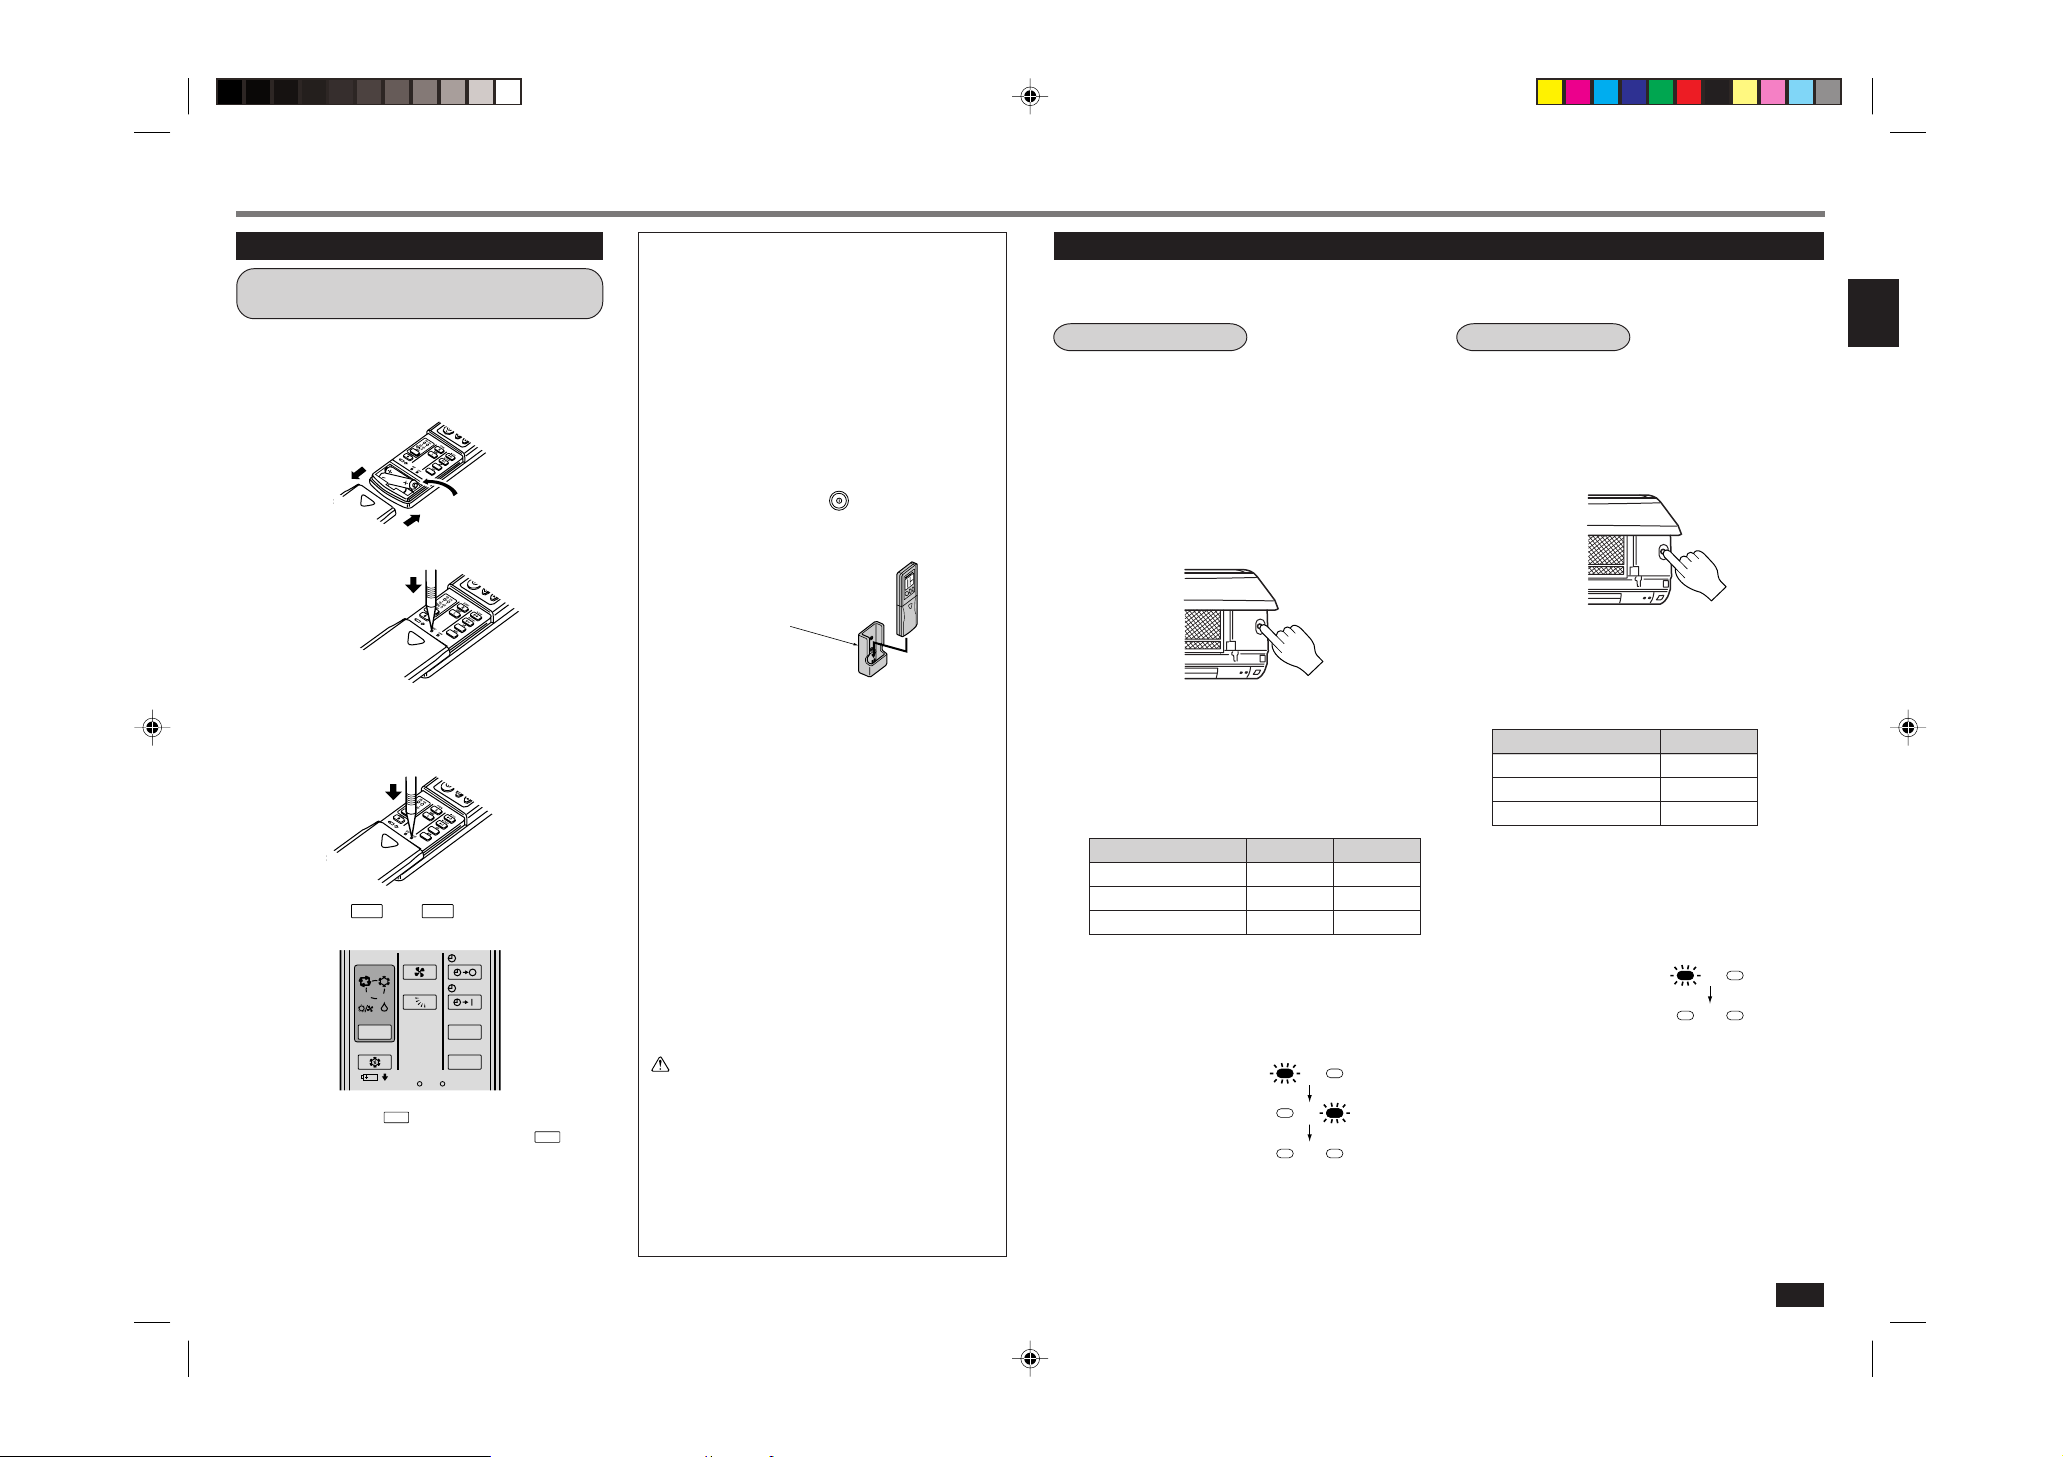
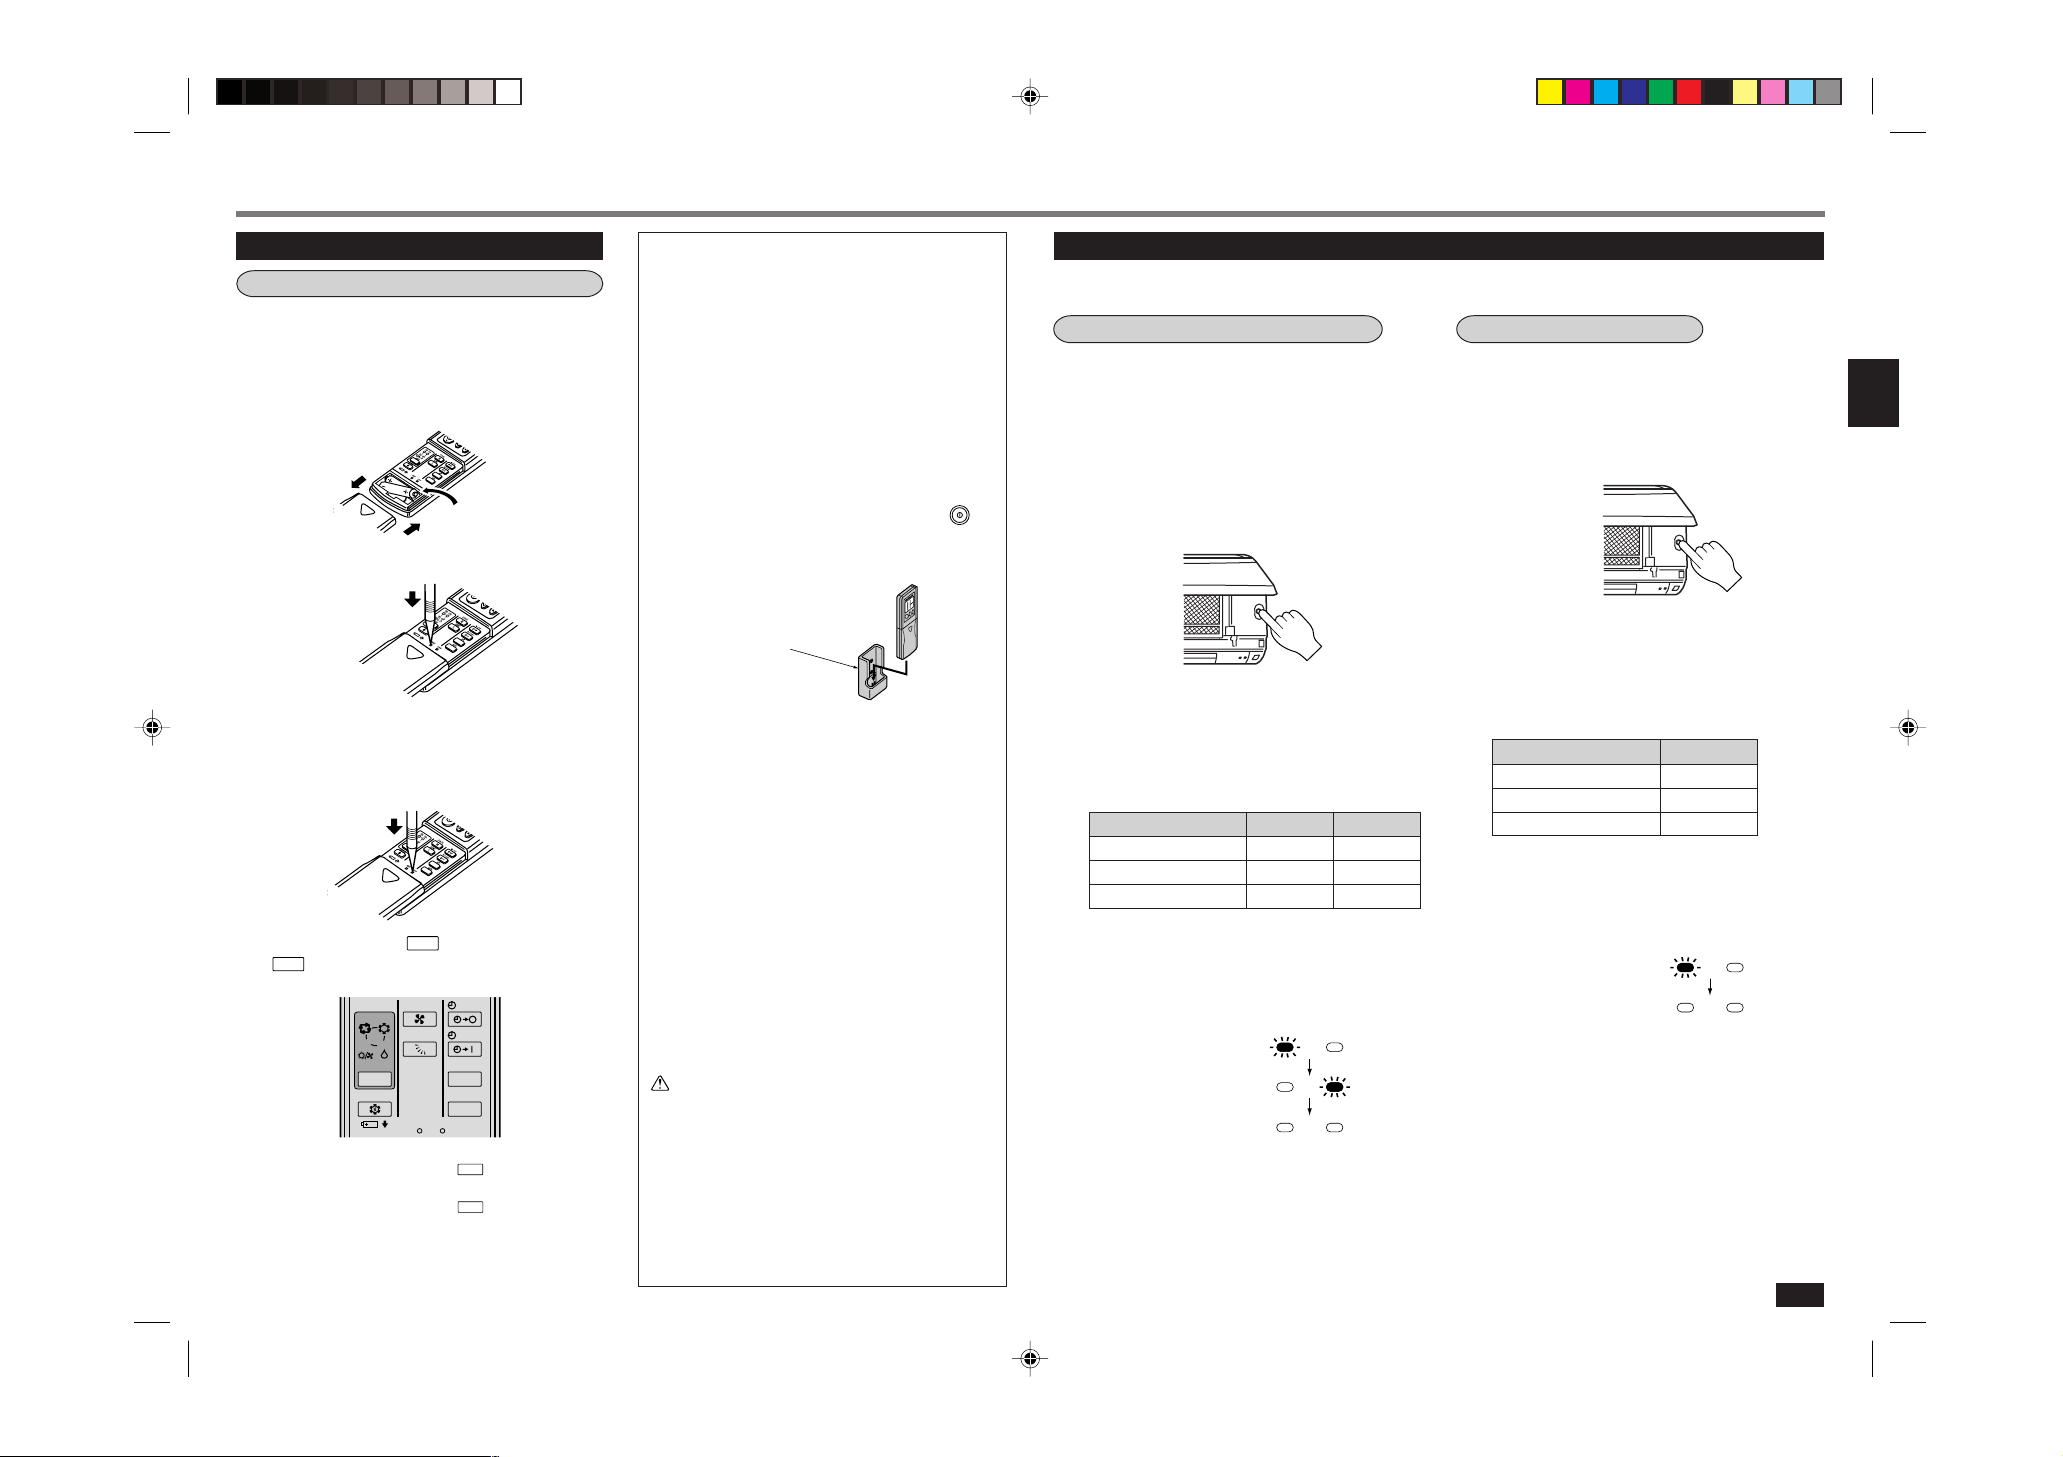
How to set the batteries and the current
time
1 Remove the front lid and insert batteries.
Then reattach the front lid.
Insert the minus pole of the batteries first.
Check if the polarity of the batteries is correct.
Insert the minus pole
of the batteries first.
2 Press the RESET button.
Press using a
thin stick.
• If the RESET button is not pressed, the remote controller may not operate correctly.
3 Press the CLOCK set button.
Press using a
thin stick.
4 Press the
and
buttons (TIME SET
buttons) to set the current time.
• Each time the
increases by 1 hour, and each time the
is pressed, the set time increases by 1 minute.
button is pressed, the set time
button
5 Press the CLOCK set button again and close
the front lid.
Handling of the remote controller
• The range that the signal can reach is about 6 m when
the remote controller is pointed at the front of the indoor unit.
• When a button is pressed, one or two beeps will be
heard from the indoor unit. If no sound is heard, operate again.
• Use the remote controller carefully.
If it is dropped, thrown or it gets wet, the remote controller may not operate.
When installing on a wall, etc.
• Install the remote controller holder in a position where
the signal reception sound (beep) can be heard from
the indoor unit when the
How to install/remove the remote controller
Installing :Insert the remote controller downward.
Removing :Pull it up.
Remote controller holder
Dry-cell batteries
■ Reference for replacing batteries
Replace the batteries with new AAA alkaline batteries
in the following cases:
button is pressed.
· When the indoor unit does not respond to the remote
control signal.
· When the display on the remote controller becomes
dim.
· When a button of the remote controller is pressed, all
displays appear on the screen, and then disappear
immediately.
Do not use manganese batteries. The remote controller
could malfunction.
• The service life of an alkaline battery is about 1 year.
However, a battery whose time limit is approaching
may be exhausted soon. The recommended usable
time limit is indicated (month/year) on the bottom of
the battery.
• To prevent liquid leakage, take out all batteries when
the remote controller is not going to be used for a
long time.
CAUTION:
If liquid from the batteries gets onto your skin or
clothes, wash it well with clean water.
If liquid from the batteries gets into your eyes, wash
them well with clean water and consult a doctor at
once.
• Do not use rechargeable batteries.
• Replace the 2 batteries with new ones of the same
type.
• Dispose of exhausted batteries in the correct manner.
When the remote controller cannot be used (emergency operation)
When the batteries of the remote controller run out or the remote controller malfunctions, the emergency operation
can be done using the EMERGENCY OPERATION switch.
COOL & HEAT type
1 Press the EMERGENCY OPERATION switch.
• Each time the EMERGENCY OPERATION switch is
pressed, the unit will operate in order of EMERGENCY COOL MODE, EMERGENCY HEAT MODE
and STOP MODE.
However, when the EMERGENCY OPERATION
switch is once pressed, the unit will operate in test
run for 30 minutes and then the operation mode
shifts to EMERGENCY MODE.
• Details of EMERGENCY MODE are as shown below. However, the temperature control does not
work for 30 minutes in test run and the unit is set
to continuous operation. The fan speed is set to
High in test run and shifts to Medium after 30 minutes.
Operation mode COOL HEAT
Set temperature 24°C24°C
Fan speed Medium Medium
Horizontal vane Auto Auto
• The operation mode is indicated by the Operation
Indicator lamp on the indoor unit as following figure.
Operation Indicator lamp
EMERGENCY COOL
EMERGENCY HEAT
STOP
To stop the emergency operation, press the
■
EMERGENCY OPERATION switch once (in
case of EMERGENCY HEAT MODE) or twice
(in case of EMERGENCY COOL MODE).
COOL ONLY type
1 Press the EMERGENCY OPERATION switch.
• When the EMERGENCY OPERATION switch is
pressed, the unit will operate in test run for 30 minutes at first and then the operation mode shifts to
EMERGENCY COOL MODE.
• Details of EMERGENCY COOL MODE are as shown
below. However, the temperature control does not
work for 30 minutes in test run and the unit is set to
continuous operation. The fan speed is set to High
in test run and shifts to Medium after 30 minutes.
Operation mode COOL
Set temperature 24°C
Fan speed Medium
Horizontal vane Auto
• The operation mode is indicated by the Operation
Indicator lamp on the indoor unit as following figure.
Operation Indicator lamp
EMERGENCY COOL
STOP
To stop the EMERGENCY COOL MODE, press
■
the EMERGENCY OPERATION switch again.
Each time the switch is pressed, the operation mode
alternates between the EMERGENCY COOL MODE
and STOP MODE.
5
Page 6

ON/OFF
ON/OFF
TOO
WARM
TOO
COOL
FAN
VANE
MODE
STOP
START
HR.
I FEEL
COOL
DRY
HEAT
/FAN
I FEEL... AUTO OPERATION
MODE
Operation Indicator
MODE
ON/OFF
FAN
TOO
WARM
TOO
COOL
VANE
MODE
ECONO COOL
STOP
START
HR.
MIN.
I FEEL
COOL
DRY
AMPM
CLOCK
˚C
AMPM
HEAT
/FAN
RESET CLOCK
With the “ (I FEEL...)” auto operation mode, the optimum room condition can be set automatically
with a one-touch operation.
To start operation:
Press the
■
When the “ (I FEEL...)” mode is selected, the air conditioner is automatically
controlled at the optimum temperature.
button.
To stop operation:
Press the
■
○○○○○○○○○○○○○○○○○○○○○○○○○○○○○○○○○
If you feel slightly warm:
Press the
■
One press lowers the temperature by about 1°C.
If you feel slightly cool:
Press the
■
One press raises the temperature by about 1°C.
When “ (I FEEL...)” is not selected, press the
button until it is set.
Each time the button is pressed, the operation mode is changed
in sequence:
(I FEEL...) → (COOL) → (DRY) →
(HEAT/FAN)
button.
button to lower the temperature.
button to raise the temperature.
Description of “I FEEL...” mode
Details of operation
According to the room temperature when the operation starts, the operation mode is automatically set to COOL, DRY or
HEAT. However, when operation is started again within 2 hours after it is stopped, the same operation mode before the
operation is stopped is selected. The operation mode selected first is not changed even if the room temperature changes.
If the operation mode does not match the room condition, select the appropriate operation mode by pressing the
button.
Details of auto operation
COOL & HEAT type COOL ONLY type
Room temperature
when started
About 25°C or higher COOL About 24°C COOL About 24°C
About 25°C - 23°CDRY — DRY —
About 23°C or lower HEAT About 26°CDRY —
NOTE:
COOL: When the room temperature is 2°C higher than the set temperature, the set temperature may not be
changed since the air conditioner is operating to reach the target (set) temperature. In this case, please
wait until the room temperature drops to within 2°C of the set temperature and then change the set
temperature.
HEAT: When the room temperature is 2°C lower than the set temperature, the set temperature may not be
changed since the air conditioner is operating to reach the target (set) temperature. In this case, please
wait until the room temperature rises to within 2°C of the set temperature and then change the set
temperature.
Details of display on the indoor unit
The operation indicator at the right side of the indoor unit indicates the operation state.
Operation indicator lamp
Operation mode Target temperature Operation mode Target temperature
(initial state) (initial state)
Lighted
Blinking
Not lighted
Description of “AUTO RESTART FUNCTION”
• These units are equipped with an auto restart function. When the main power is turned on, the air conditioner will start
operation automatically in the same mode as the one set with the remote controller before the shutoff of the main
power.
• If the unit was set to off with the remote controller before the shutoff of the main power, it will remain stopped even after
the main power is turned on.
• If the unit was in the emergency operation before the shutoff of the main power, it will start operation, when main power
comes on, in the same mode as the one set with the remote controller before the emergency operation.
• If the unit is operated in “I FEEL...” mode before power failure, the operation mode (COOL, DRY or HEAT) is not stored
in the memory. When the main power is turned on, the unit decides the operation mode by the initial room temperature
at restart and starts operation again.
6
Indication
Operation state
This shows that the air conditioner is operating to reach the
target temperature. Please wait until the target temperature
is obtained.
This shows that the room temperature is approaching the
target temperature.
(In case of outdoor unit MXZ series only)
Please refer to Information for multi system air conditioner.
(Page 7)
Difference between target
temperature and room temperature
About 2°C or more
About 2°C or less
—
Page 7
1
2
3
4
5
ON/OFF
MODE
ON/OFF
ON/OFF
MANUAL OPERATION (COOL, DRY, HEAT/FAN)
TOO
WARM
TOO
COOL
FAN
VANE
ON/OFF
FAN
TOO
WARM
TOO
COOL
VANE
MODE
ECONO COOL
STOP
START
HR.
MIN.
I FEEL
COOL
DRY
AMPM
CLOCK
˚C
AMPM
HEAT
/FAN
RESET CLOCK
ON/OFF
FAN
TOO
WARM
TOO
COOL
VANE
MODE
ECONO COOL
STOP
START
HR.
MIN.
I FEEL
COOL
DRY
AMPM
CLOCK
˚C
AMPM
HEAT
/FAN
RESET CLOCK
VANE
AIR FLOW VELOCITY AND DIRECTION ADJUSTMENT
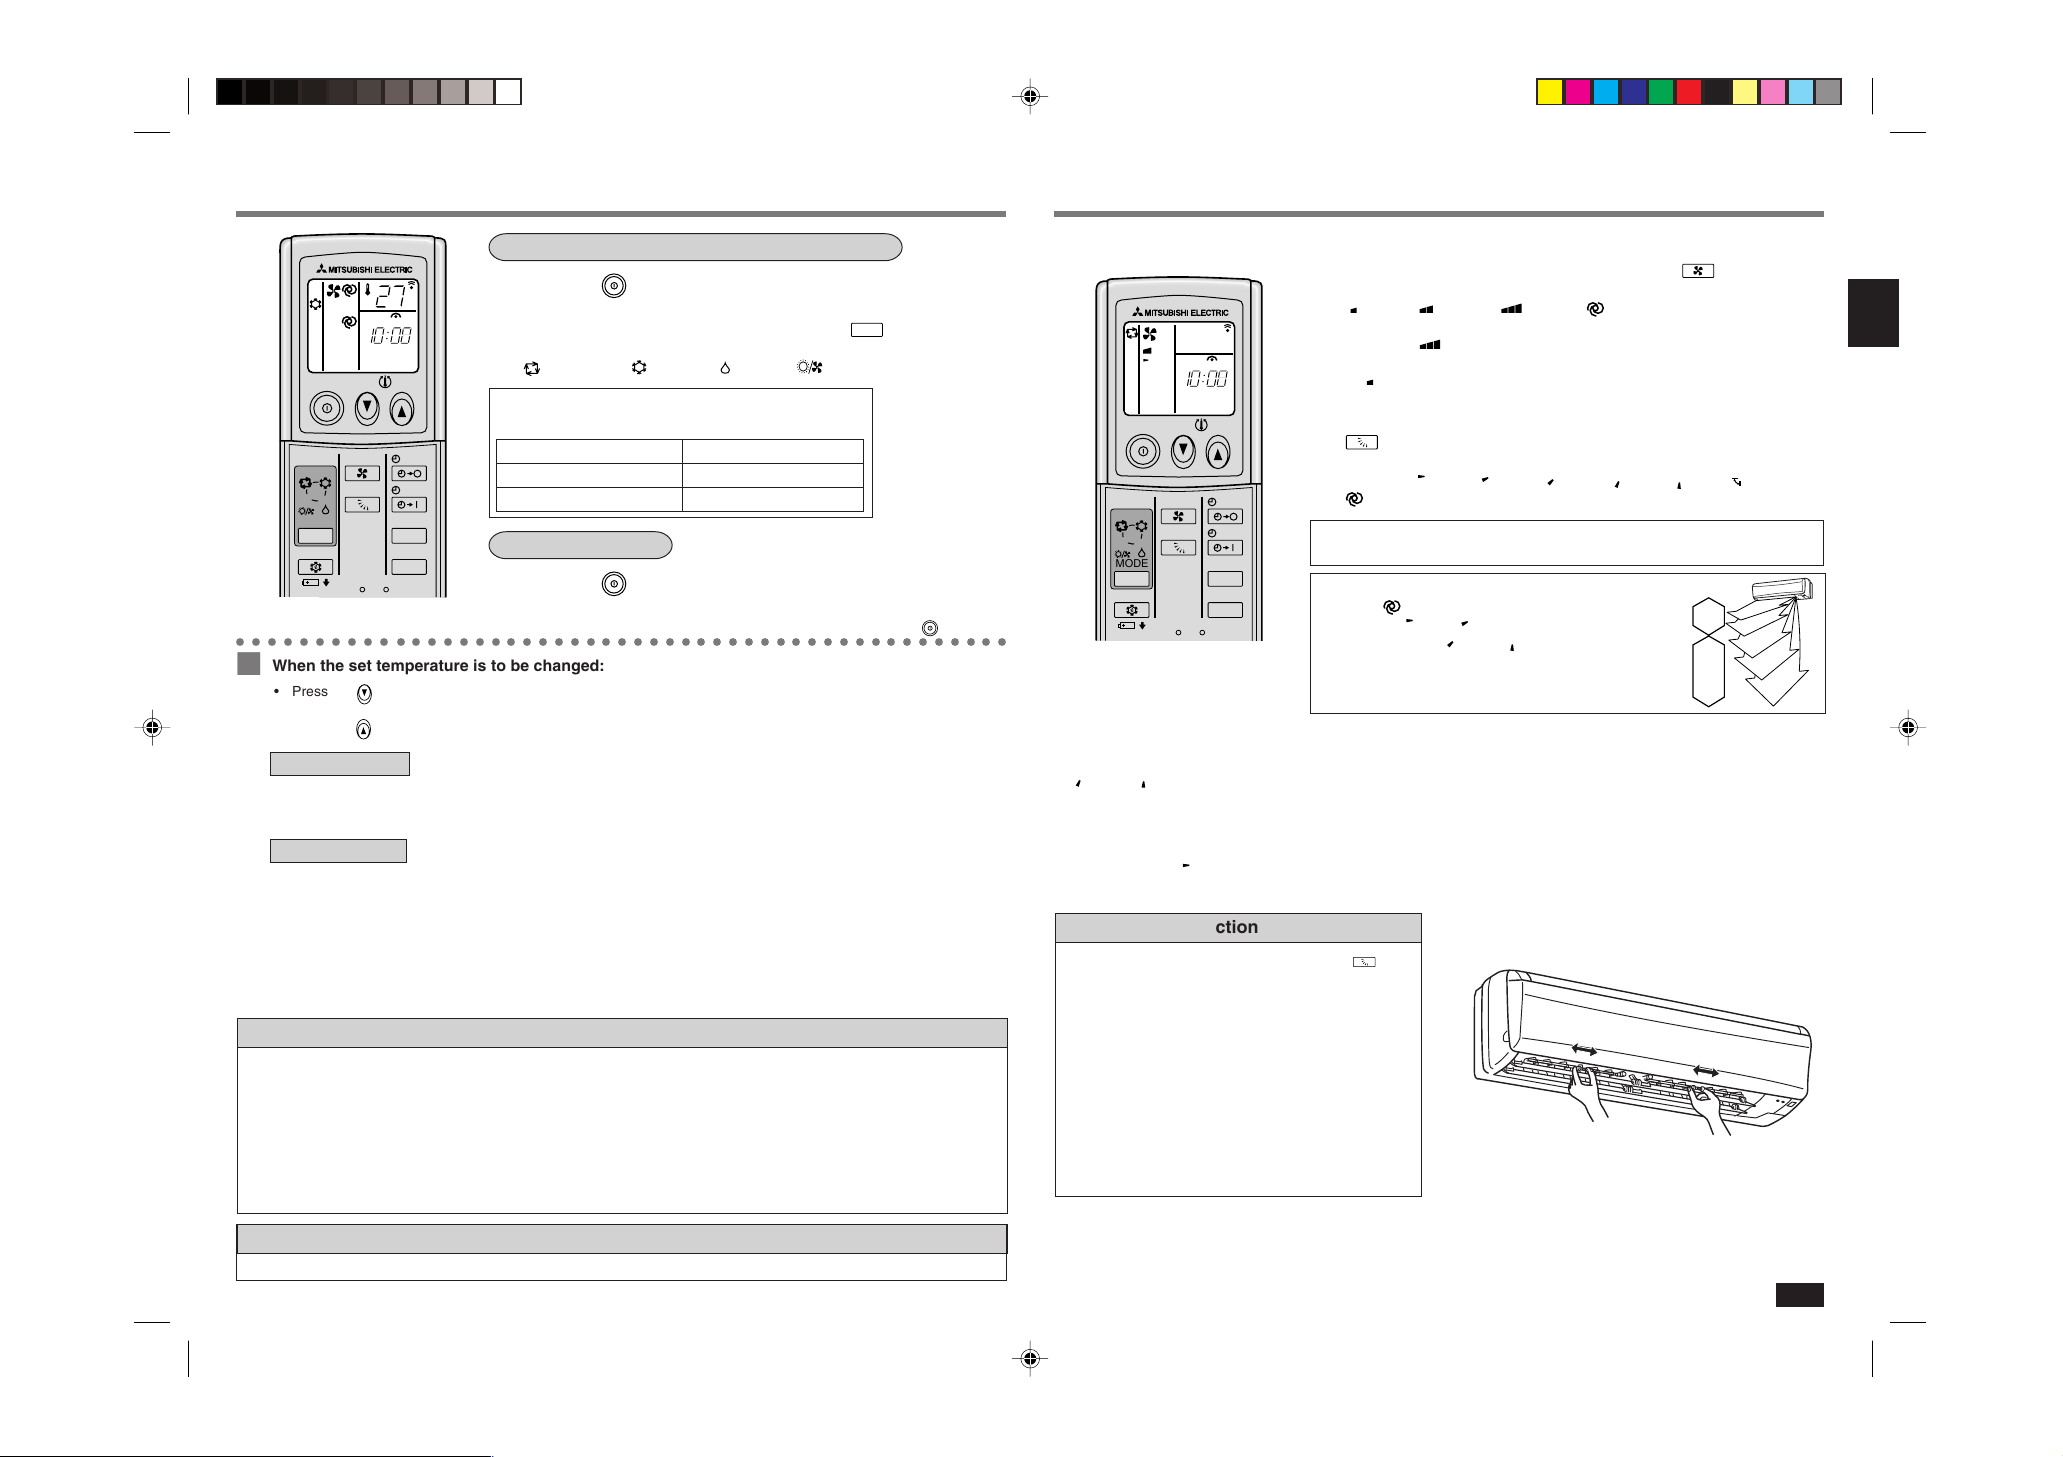
To select the COOL, DRY or HEAT/FAN mode:
1 Press the
2 Select the operation mode by pressing the
Each time this button is pressed, the operation mode is changed in sequence:
(I FEEL...) → (COOL) → (DRY) → (HEAT/FAN)
HEAT/FAN mode
Check the type of the air conditioner.
COOL & HEAT HEAT
COOL ONLY FAN
button.
button.
Type Operation mode
To stop operation:
Press the
■
After the operation mode is set once, the operation starts in the same mode as
○○○○○○○○○○○○○○○○○○○○○○○○○○○○○○○○○○○○○○○○○○○○○○○○○
When the set temperature is to be changed:
■
• Press the
• Press the
button to lower the temperature. One press lowers the temperature by about 1°C.
button to raise the temperature. One press raises the temperature by about 1°C.
the one set previously from the next time by simply pressing the
In HEAT operation
• If the air conditioner absorbs too much heat from the air, it may be overloaded. Following a judgement made by the
microprocessor, the fan in the outdoor unit is automatically stopped to protect the air conditioner.
When the outdoor unit’s fan is stopped, frost may form on the outdoor unit, but this is not a problem.
In DRY operation
• The temperature control (temperature setting) cannot be done.
• The room temperature is slightly lowered in this operation mode.
button.
button.
AIR FLOW velocity and direction can be selected as required.
To change the AIR FLOW velocity, press the
■
Each time the button is pressed, the fan speed is changed in sequence:
(Low) → (Med.) → (High) → (AUTO)
• Use the
(High) notch to cool/heat the room more.
• If the operating sound of the air conditioner disturbs your sleep, use the
(Low) notch.
To change the AIR FLOW blowing direction vertically, press the
■
button.
Each time the button is pressed, the angle of the horizontal vane is changed in
sequence:
(1) → (2) → (3) → (4) → (5) → (SWING) →
(AUTO)
SWING OPERATION
Use the swing operation for the air flow to reach all corners of the room.
Recommended horizontal vane range
Use the
Use position
and use positions
(AUTO) position usually.
(1) or (2) in the COOL or DRY mode
(3) to (5) in the HEAT mode
when adjusting to your requirements.
NOTE:
• In the cooling operation, when the air conditioner is operated with setting the horizontal vane to
(4) or (5) for 1 hour, the AIR FLOW direction is automatically set to horizontal to prevent condensed water
from dropping.
• Adjust the vertical AIR FLOW direction using the remote controller. If the horizontal vane is moved manually, it may
cause trouble.
• In the heating operation, if the air flow temperature is too low or when defrosting is being done, the horizontal vane
position is set to
(1).
button.
COOL
DRY
HEAT
The details of the display on the indoor unit are explained on page 6.
■
NOTE:
When the ambient temperature is too high, the room temperature may not reach the set temperature since the unit
operates to cool the room under a high load.
Information for multi system air conditioner (Outdoor unit: MXZ series)
Multi system air conditioner (Outdoor unit: MXZ series) can connect two or more indoor units with one outdoor
unit. According to the capacity, two or more units can operate simultaneously.
• When you try to operate two or more indoor units with one outdoor unit simultaneously, one for the cooling and the other
for heating, the operation mode of the indoor unit that operates earlier is selected. The other indoor units that will start the
operation later cannot operate, indicating an operation state. (Refer to the table of Operation Indicator lamp on page 6.)
In this case, please set all the indoor units to the same operation mode.
• When indoor unit starts the operation while the defrosting of outdoor unit is being done, it takes a few minutes (max. 10
minutes) to blow out the warm air.
• In the heating operation, the indoor unit that does not operate may get warm or the sound of refrigerant flowing may be
heard. This is not a malfunction since the refrigerant continuously flows into the indoor unit that does not operate.
Description of “AUTO RESTART FUNCTION”
Refer to page 6.
Auto air flow direction control operation
When the AUTO mode is selected with the
ton, the position of the horizontal vane is automatically set to correspond to the operation mode for
effective operation.
(1) HEAT
• When the air flow temperature is too low, the air is
blown out horizontally.
• When the air flow temperature rises, the air is blown
out downwards.
(2) COOL, DRY
The air is blown out horizontally.
(3) FAN
The air is blown out downwards.
but-
To change the horizontal direction of the air
■
flow, move the vertical vane manually.
Adjust the vane before operation starts.
Since the horizontal vane moves automatically, your
fingers may be caught.
7
Page 8

ECONO COOL OPERATION
ON/OFF
FAN
TOO
WARM
TOO
COOL
VANE
MODE
ECONO COOL
STOP
START
HR.
MIN.
I FEEL
COOL
DRY
AMPM
CLOCK
˚C
AMPM
HEAT
/FAN
RESET CLOCK
START
HR.
MIN.
HR.
MIN.
START
STOP
HR.
MIN.
HR.
MIN.
STOP
ECONO COOL
ECONO COOL
VANE
FAN
TOO
WARM
TOO
COOL
WHEN THE AIR CONDITIONER IS NOT GOING TO BE
Use this operation when you want to be comfortable in COOL mode even with energy saved.
Perform the following operations while the unit is operating in the MANUAL COOL mode.
Press the
■
When the (ECONO COOL) operation is selected in COOL mode, the air
conditioner performs swing operation in various cycle according to the temperature of air conditioner.
Also SET TEMPERATURE is automatically set 2°C higher than in COOL mode.
button.
To release the ECONO COOL operation:
Press the
■
○○○○○○○○○○○○○○○○○○○○○○○○○○○○○○○○○
• When the
the ECONO COOL operation, ECONO COOL operation is released.
• The
are available.
What is “ECONO COOL”?
Swing air flow (change of air flow) makes you feel cooler than constant air flow. So, even though the set temperature is
automatically set 2°C higher, it is possible to perform cooling operation with keeping comfort. As a result, energy can be saved.
button again.
button is pressed or the operation mode is changed during
button, the
or
button and ON/OFF timer (explained below)
TIMER OPERATION (ON/OFF TIMER)
It is convenient to set the timer when you go to bed, when you get home, when you get up, etc.
How to set the ON timer
1 Press the
Each time the button is pressed, the ON timer mode
alternates between ON and OFF.
2 Set the time of the timer using the
buttons.
Each time the
creases by 1 hour; each time the
the set time increases by 10 minutes.
button during operation.
and
button is pressed, the set time in-
button is pressed,
To release the ON timer:
Press the
■
Programming timer operation
The ON timer and the OFF timer can be used in combination. The timer of the set time that is reached first will operate first.
(“ ” mark indicates the order of timer operations.)
• If the current time has not been set, the timer operation cannot be used.
NOTE:
If the main power is turned off or a power failure occurs while AUTO START/STOP timer is active, the timer setting is
cancelled. As these models are equipped with an auto restart function, the air conditioner starts operating with timer
cancelled at the same time that power is restored.
button.
How to set the OFF timer
1 Press the
Each time the button is pressed, the OFF timer mode
alternates between ON and OFF.
button during operation.
2 Set the time of the timer using the
buttons.
Each time the
creases by 1 hour; each time the
the set time increases by 10 minutes.
To release the OFF timer:
Press the
■
button is pressed, the set time in-
button is pressed,
button.
and
USED FOR A LONG TIME
When it is not going to be used for a long
time:
1 Perform the FAN operation for 3 or 4 hours
to dry the inside of the air conditioner.
COOL & HEAT type:
• To perform FAN operation, set the remote controller to the highest temperature in the MANUAL COOL
mode. (Refer to page 7.)
COOL ONLY type:
• Select the FAN mode. (Refer to page 7.)
2 Turn off the breaker and/or disconnect the
power supply plug.
CAUTION:
Turn off the breaker or disconnect the power supply plug
when the air conditioner is not going to be used for a
long time.
Dirt may collect and this may cause a fire.
3 Remove the batteries from the remote con-
troller.
CAUTION:
To prevent liquid leakage, take out all batteries when the
remote controller is not going to be used for a long time.
MAINTENANCE
Before starting maintenance
Turn off the breaker and/or disconnect the
■
power supply plug.
CAUTION:
When the unit is to be cleaned, switch it off and disconnect the power supply plug or turn off the breaker. Since
the fan rotates at high speed during operation, it may
cause an injury.
When the air conditioner is to be used
again:
1 Clean the air filter and install it in the indoor
unit.
(Refer to page 9 for cleaning instructions.)
2 Check that the air inlet and outlet of the in-
door/outdoor units are not blocked with any
obstacles.
3 Check that the earth is connected correctly.
CAUTION:
Earth the unit.
Do not connect the earth to a gas pipe, water pipe, lightning rod or the earth of a telephone. If the earthing is
incorrect, it may cause an electric shock.
Cleaning the indoor unit
Clean the unit using a soft dry cloth.
■
• If the dirt is noticeable, wipe the unit with a cloth
soaked in a solution of mild detergent diluted in lukewarm water.
• Do not use gasoline, benzine, polishing powder, or
insecticide. The unit may be damaged.
8
Page 9
CLEANING THE CATECHIN AIR FILTER
REPLACEMENT OF THE AIR CLEANING FILTER
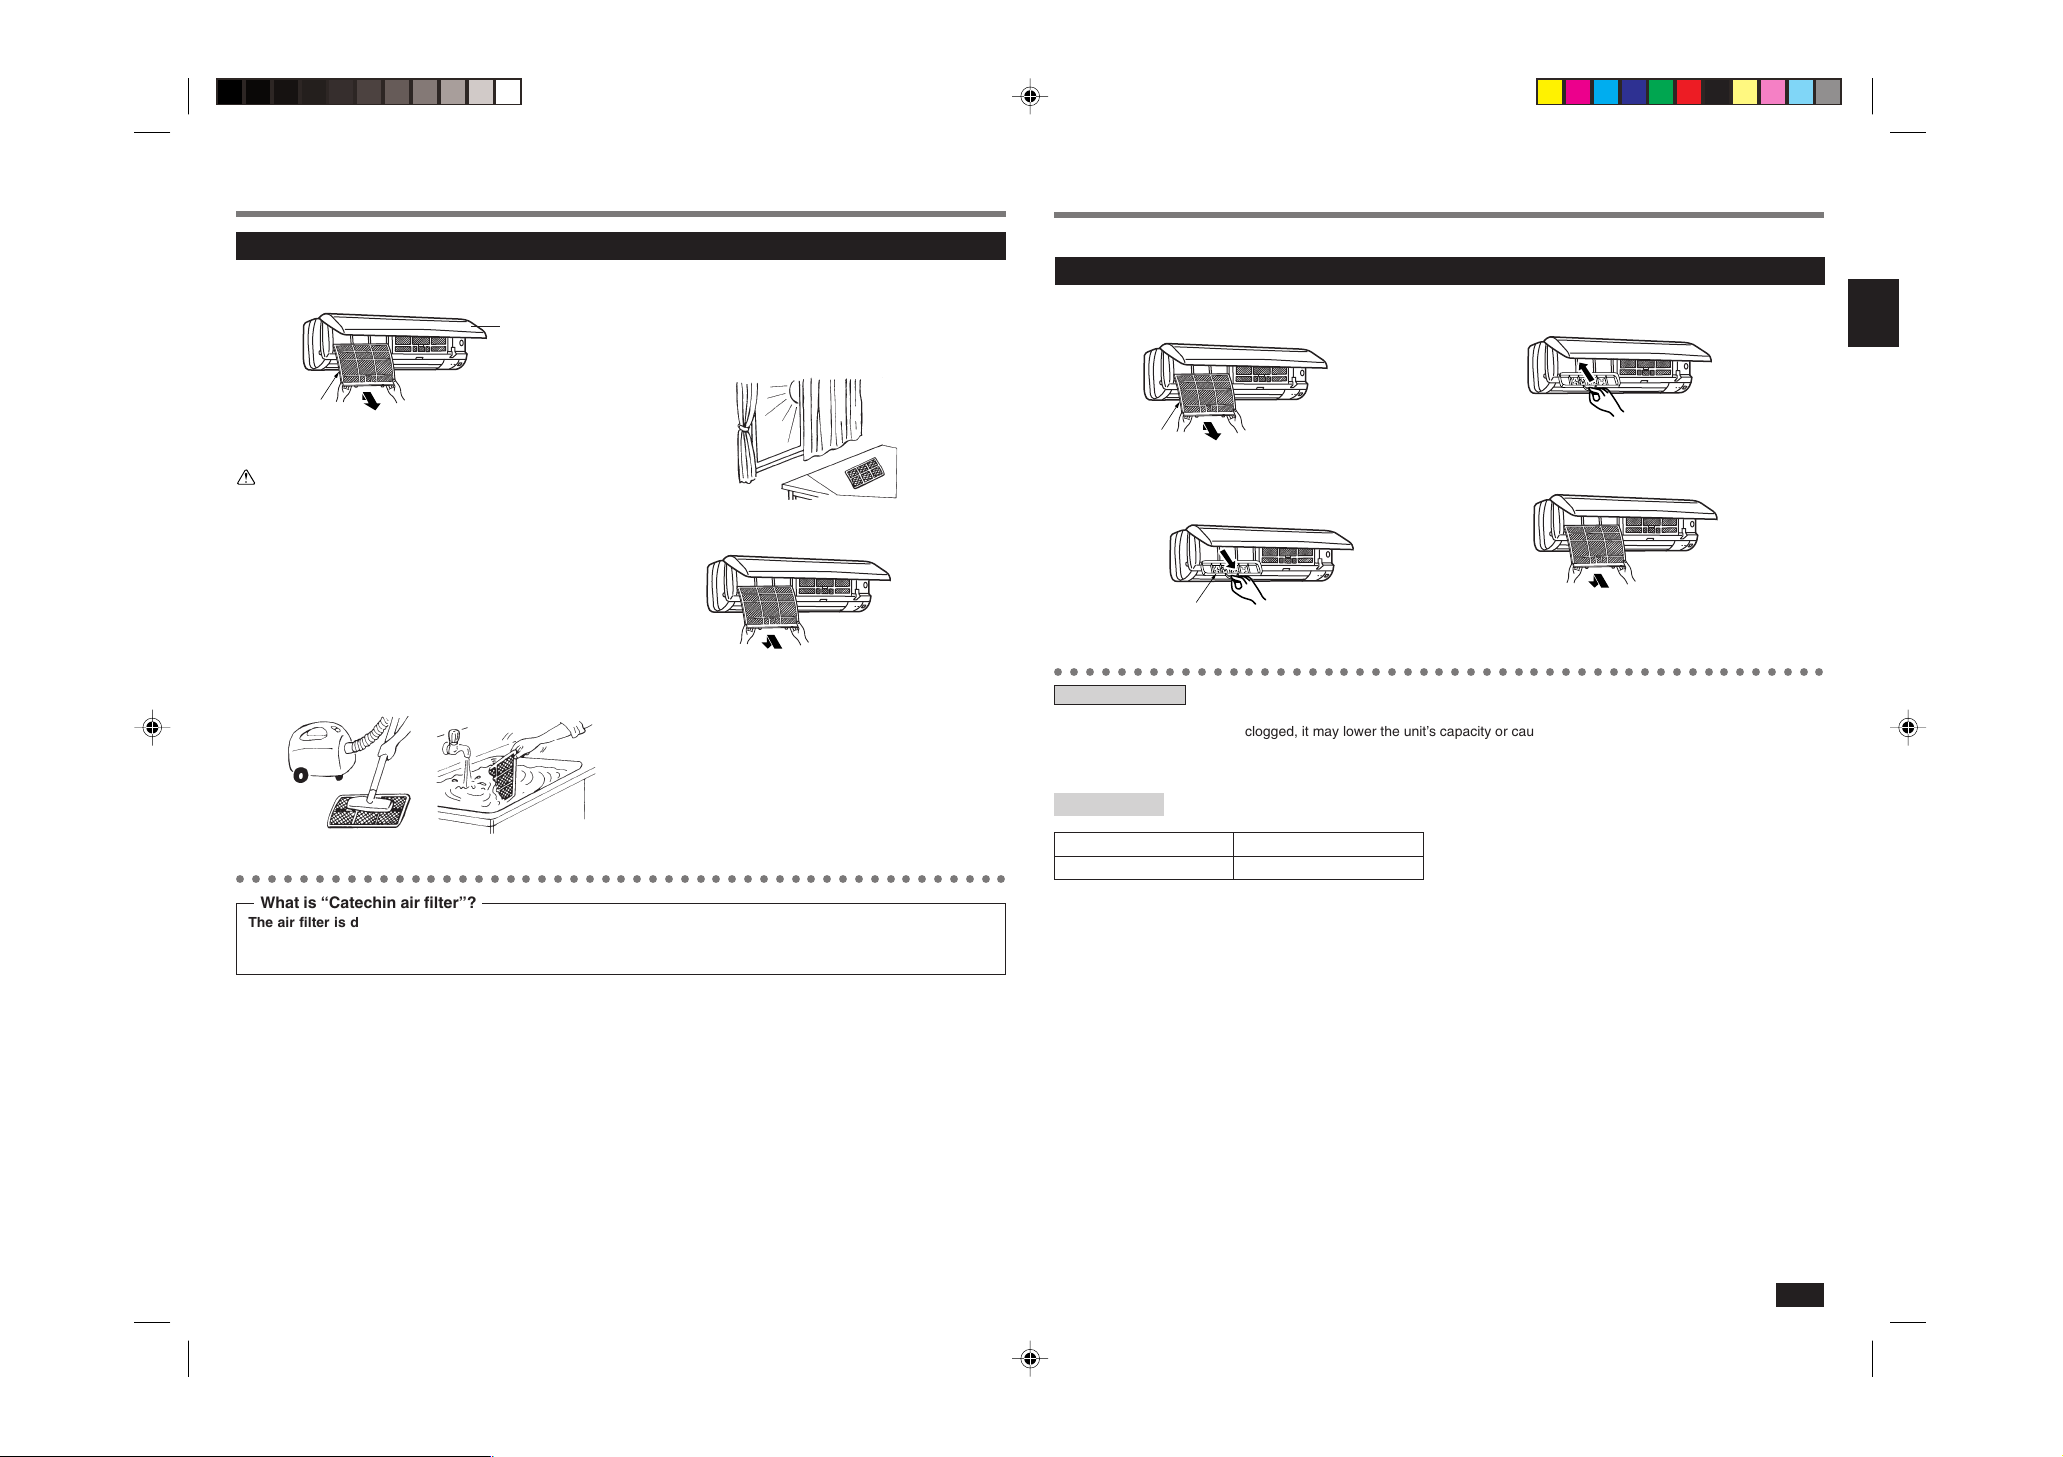
Cleaning the catechin air filter (about once every 2 weeks)
1 Remove the catechin air filter.
Open the front
panel, then
remove/replace
the filter.
Catechin air filter
CAUTION
When the catechin air filter is to be removed, do not touch
the metal parts of the indoor unit.
This may cause an injury.
Remove.
3 After washing with water/lukewarm water, dry
the catechin air filter well in the shade.
• Do not expose the catechin air filter to direct sunlight or heat from a fire when drying it.
4 Install the catechin air filter.
2 Remove dirt from the catechin air filter us-
ing a vacuum cleaner or by washing the filter with water.
• If the dirt is noticeable, wash the filter with a solution of mild detergent diluted in lukewarm water.
• If hot water (50 °C or more) is used, the filter may
be deformed.
Install.
When the capacity is lowered because of dirt, etc., it is necessary to replace the air cleaning filter.
Air cleaning filter replacement (about once every 4 months)
1 Remove the catechin air filter.
Catechin air filter
3 Install a new air cleaning filter.
4 Install the catechin air filter and securely
close the front panel.
2 Remove the air cleaning filter (White bellows
type).
Air cleaning filter
○○○○○○○○○○○○○○○○○○○○○○○○○○○○○○○○○○○○○○○○○○○○○○○○○
Air cleaning filter
• If the air cleaning filter is clogged, it may lower the unit’s capacity or cause condensation at the air outlet.
• The air cleaning filter is disposable. The standard usable term is about 4 months. However, if the colour of the filter turns
to dark brown, replace the filter at once.
Optional parts Optional parts are available from your local dealer.
○○○○○○○○○○○○○○○○○○○○○○○○○○○○○○○○○○○○○○○○○○○○○○○○○
What is “Catechin air filter”?
The air filter is dyed with a natural material, catechin, that is contained in tea. The catechin air filter deodorizes
odor and noxious gases such as formaldehyde, ammonia, and acetaldehyde. Moreover, it restraints the activity of
the viruses adhering to the filter.
Name of parts AIR CLEANING FILTER
Parts number MAC-1300FT
9
Page 10
BEFORE CONTACTING THE SERVICE REPRE-
WHEN YOU THINK THAT TROUBLE HAS OCCURRED
SENTATIVE, CHECK THE FOLLOWING AGAIN
Question
The air conditioner cannot
be operated.
The room cannot be cooled
or heated sufficiently.
The air from the indoor unit
smells strange.
The display on the remote
controller does not appear
or it is dim. The indoor unit
does not respond to the remote control signal.
When a power failure occurs.
Even if the above items are checked, when the air conditioner does not
recover from the trouble, stop using the air conditioner and consult your
dealer.
In the following cases, stop using the air conditioner and consult your dealer.
• When water leaks from the indoor unit.
• When the left operation indicator lamp blinks.
• When the breaker trips frequently.
• The remote control signal may not be received in a room where an electronic
ON/OFF type fluorescent lamp (inverter-type fluorescent lamp, etc.) is used.
• Operation of the air conditioner may interfere with radio or TV reception in
areas where the reception is weak. An amplifier may be required for the affected device.
• When thunder is heard, stop operation and disconnect the power supply plug
or turn off the breaker. Otherwise, the electrical parts may be damaged.
• Is the breaker turned on?
• Is the fuse blown?
• Is the ON timer set? (Page 8)
• Is the temperature setting correct? (Page 7)
• Is the filter clean? (Page 9)
• Are there any obstacles blocking the air inlet or
• Is a window or door open?
• Is the filter clean? (Page 9)
• Are the batteries exhausted? (Page 5)
• Is the polarity (+, -) of the batteries correct?
• Are any buttons on the remote controller of other
• Does the air conditioner start operating again?
Check points or Remedy
outlet of the indoor or outdoor unit?
(Page 5)
electric appliances being pressed?
If the air conditioner had operated before the
power failure, as these models are equipped with
an auto restart function, the air conditioner
should start operating again. (Refer to Description of “AUTO RESTART FUNCTION” on page
6.)
Question
The air conditioner cannot
be operated for about 3 minutes when restarted.
Cracking sound is heard.
The air from the indoor unit
smells strange.
The fan stops during the
DRY operation.
The sound of water flowing
is heard.
The sound as burbling is
heard.
The room cannot be cooled
sufficiently.
Mist is discharged from the
air outlet of the indoor unit.
Answer (not a malfunction)
• This protects the air conditioner according to instructions from the microprocessor. Please wait.
• This sound is generated by the expansion/contraction of the front panel, etc. due to change in
temperature.
• The air conditioner may suck in an odor adhering to the wall, carpet, furniture, cloth, etc. and
blow it out with the air.
• In DRY operation, the unit operates using the
same refrigerant circuit as in COOL operation.
DRY operation time has to be reduced in order
to lower humidity without much room temperature decreasing. So the compressor sometimes
stops, and at the same time the indoor fan stops.
This prevents water condensed on the heat exchanger from evaporating again.
• This is the sound of refrigerant flowing inside the
air conditioner.
• This is the sound of condensed water flowing in
the heat exchanger.
• This is the sound of the heat exchanger defrosting.
• This sound is heard when the outside air is absorbed from the drain hose in turning on the
range hood or the ventilation fan and that makes
water flowing in the drain hose spout out.
This sound is also heard when the outside air
blows into the drain hose in case the outside wind
is strong.
• When a ventilation fan or a gas cooker is used
in a room, the cooling load increases, resulting
in an insufficient cooling effect.
• When the outside air temperature is high, the
cooling effect may not be sufficient.
• The cool air from the air conditioner rapidly cools
moisture in the air inside the room, and it turns
into mist.
Question
The air flow direction
changes during operation.
The direction of the horizontal vane cannot be adjusted with the remote controller.
Water leaks from the outdoor unit.
White smoke is discharged
from the outdoor unit.
Air does not blow out soon
in the heating operation.
The operation is stopped
for about 10 minutes in the
heating operation.
Hissing sound is sometimes heard.
The room cannot be heated
sufficiently.
In a multi-unit system, the
indoor unit which is not operating becomes warm and
a sound, similar to water
flowing, is heard from the
unit.
The air conditioner starts
the operation only with the
main power turned on,
though you do not operate
the unit with the remote
controller.
Answer (not a malfunction)
• When the air conditioner is operated in COOL
or DRY mode, if the operation continues with air
blowing down for 1 hour, the direction of the air
flow is automatically set to horizontal to prevent
condensed water from dropping.
• In the heating operation, if the air flow temperature is too low or when defrosting is being done,
the horizontal vane position is automatically set
to horizontal.
• During COOL and DRY operations, pipe or pipe
connecting sections are cooled and this causes
water to condense.
• In the heating operation, the defrosting operation makes water frozen on the outdoor unit melt
and drip down.
• In the heating operation, water condensed on
the heat exchanger drips down.
• In the heating operation, vapor generated by the
defrosting operation looks like white smoke.
• Please wait as the air conditioner is preparing
to blow out warm air.
• Defrosting of the outdoor unit is being done (Defrosting operation).
Since this is completed in 10 minutes, please
wait. (When the external temperature is too low
and humidity is too high, frost is formed.)
• This is the sound when the flow of refrigerant
inside the air conditioner is switched.
• When the outside air temperature is low, the
heating effect may not be sufficient.
• A small amount of refrigerant continues to flow
into the indoor unit even though it is not operating.
• These models are equipped with an auto restart
function. When the main power is turned off without stopping the air conditioner with the remote
controller and is turned on again, the air conditioner will start operation automatically in the
same mode as the one set with the remote controller just before the shutoff of the main power.
10
Page 11
INSTALLATION, RELOCATION AND INSPECTION
Installation place
Avoid installing the air conditioner in the following places.
• Where flammable gas could leak.
CAUTION:
Do not install the unit where flammable gas could leak.
If gas leaks and collects around the unit, it may cause
an explosion.
• Where there is much machine oil.
• Salty places such as the seaside.
• Where sulfide gas is generated such as a hot spring.
• Where oil is splashed or where the area is filled with
oily smoke.
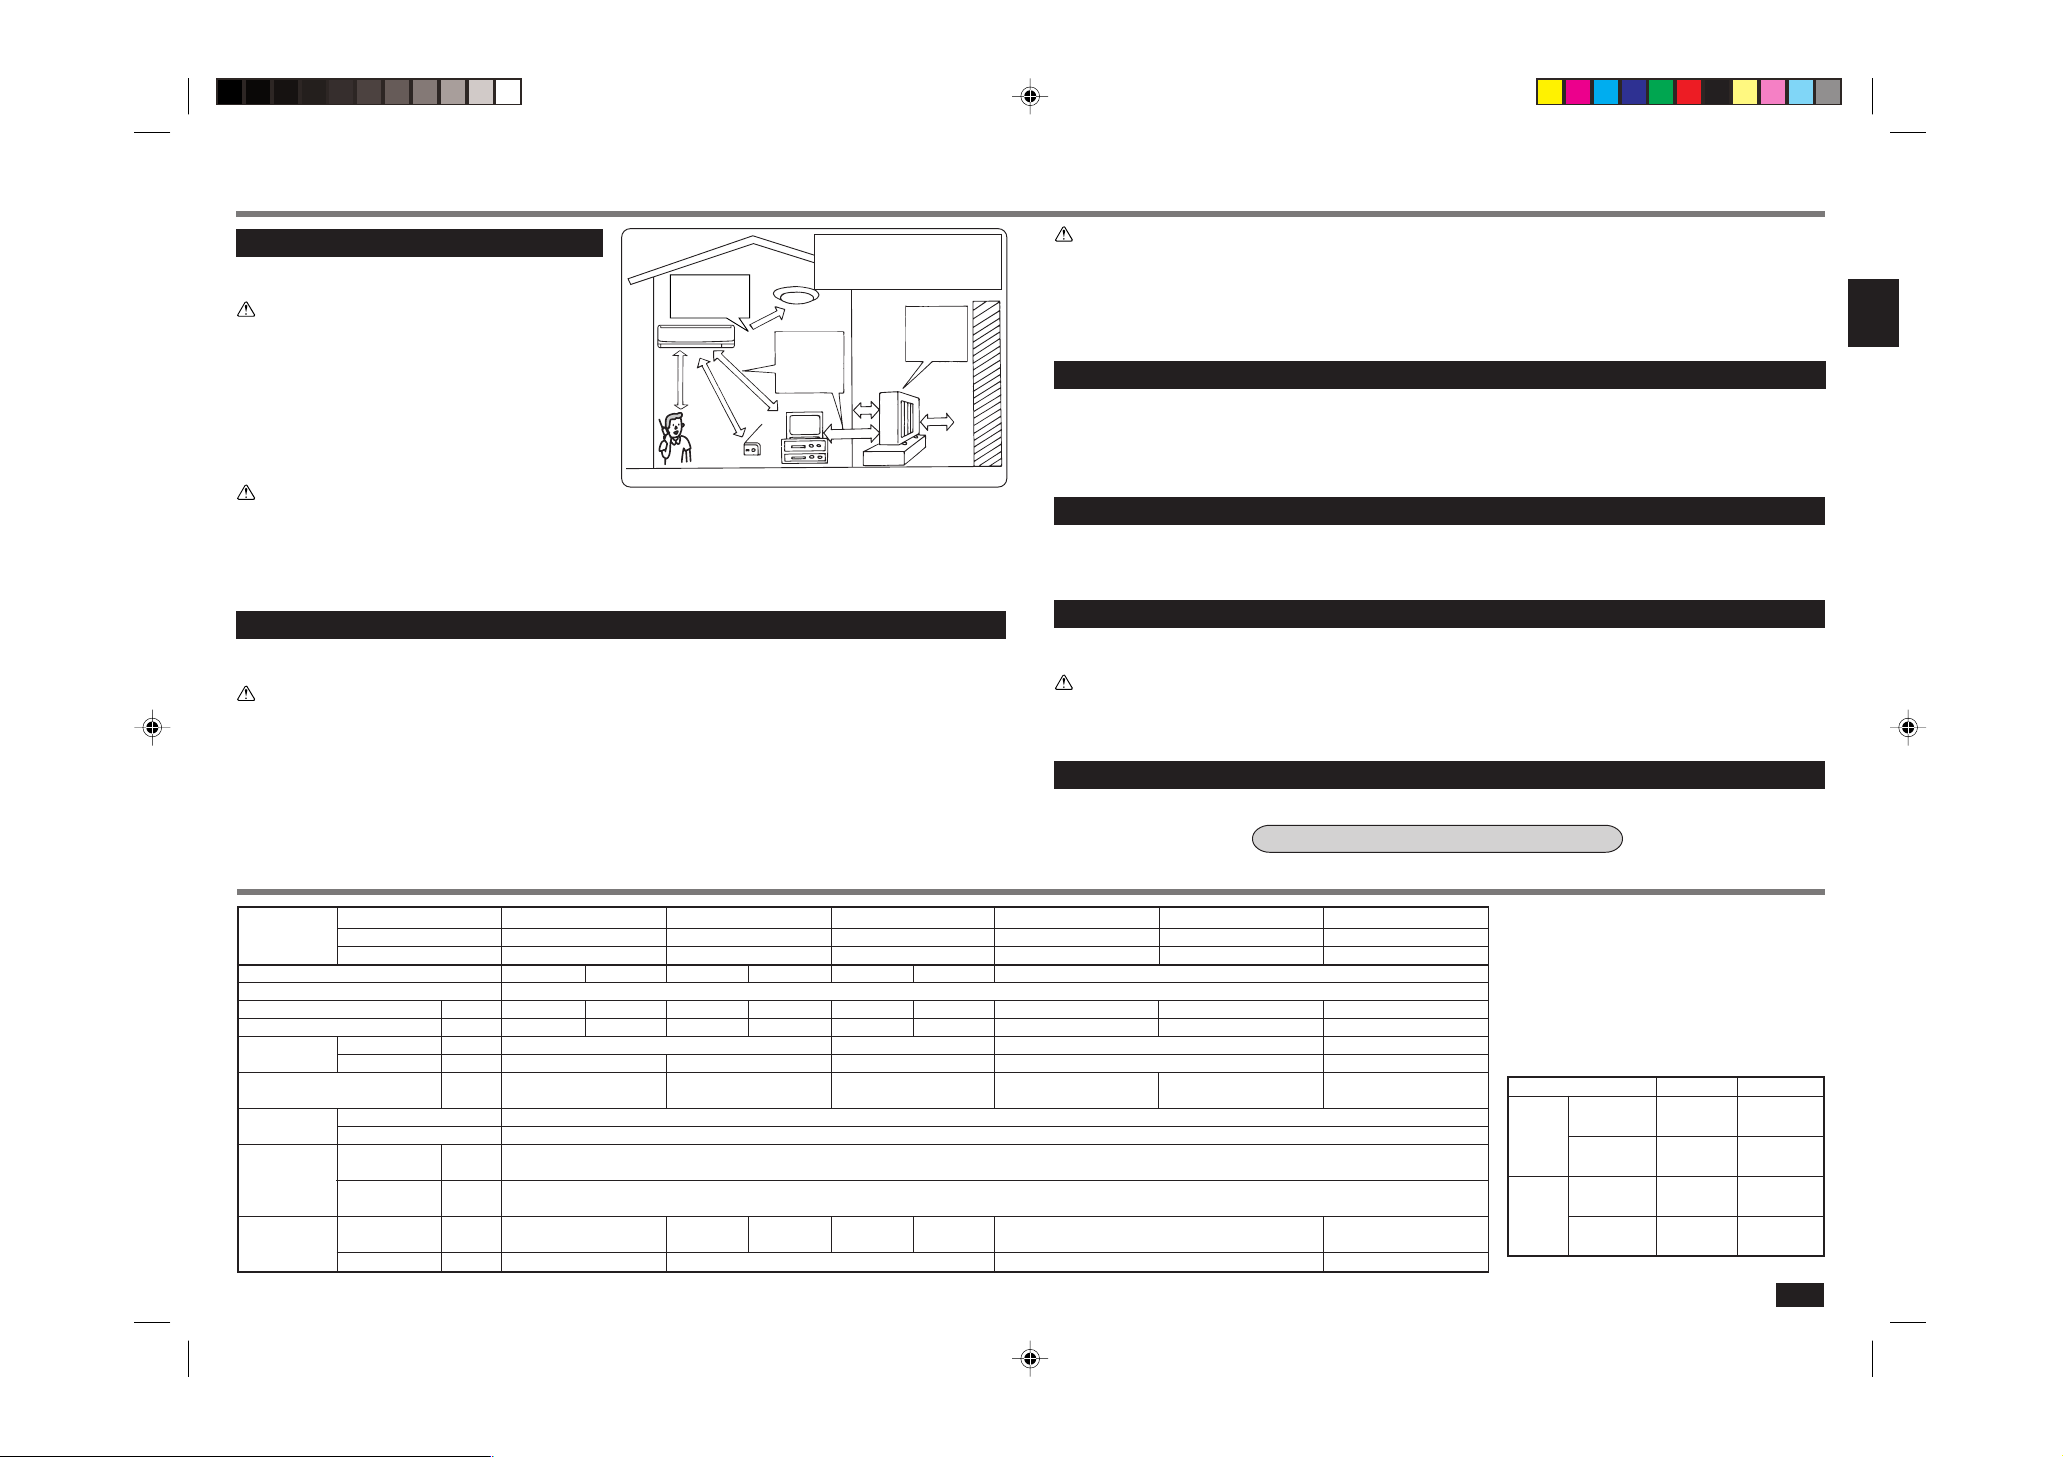
• Where there is high-frequency or wireless equipment.
To prevent the effects
of a fluorescent lamp,
keep as far apart as
possible.
1 m
or more
Cordless
phone or
Portable
Radio
phone
1 m
or more
The installation location of the outdoor unit should be
at least 3 m away from the antennas for TV sets,
radios, etc. In areas where the reception is weak, pro-
Inverter-type
vide greater space between the outdoor unit and the
antenna of the affected device if operation of the air
fluorescent lamp
conditioner interferes with radio or TV reception.
Keep a space
to prevent the
picture
distortion or
the noise.
100 mm or
more
TV
3 m
or more
Wellventilated
dry place
500 mm or
more
wall, etc.
WARNING :
If the air conditioner operates but does not cool or heat (depending on model) the room, consult your dealer since
there may be a refrigerant leak. Be sure to ask the service representative whether there is refrigerant leakage or not
when repairs are carried out.
The refrigerant charged in the air conditioner is safe. Refrigerant normally does not leak, however, if refrigerant gas
leaks indoors, and comes into contact with the fire of a fan heater, space heater, stove, etc., harmful substances will be
generated.
Electrical work
• Provide an exclusive circuit for the power supply of the air conditioner.
• Be sure to observe the breaker capacity.
WARNING :
• The customer should not install this unit.
If installation is done incorrectly, it may cause a fire, an electric shock, or injury from the unit falling, water leaking,
etc.
• Do not use intermediate connection of the power supply cord or the extension cord and do not connect many
devices to one AC outlet.
A fire or an electric shock may result from poor contact, poor insulation, exceeding the permissible current, etc.
Consult your dealer.
CAUTION:
• Earth the unit.
Do not connect the earth to a gas pipe, water pipe, lightning rod or the earth of a telephone. If the earthing is
incorrect, it may cause an electric shock.
• Install an earth leakage breaker depending on the place where the air conditioner is to be installed (humid places,
etc.).
If the earth leakage breaker is not installed, it may cause an electric shock.
Inspection and maintenance
• When the air conditioner is used for several seasons, the capacity may be lowered due to dirt inside the unit.
• Depending on the condition, an odor may be generated or dehumidified water may not drain out smoothly due to dirt,
dust, etc.
• It is recommended that the unit be inspected and maintained (charged) by specialist in addition to normal maintenance.
Consult your dealer.
Operating sound considerations
• Do not put an object around the air outlet of the outdoor unit. This may lower the capacity or increase the volume of the
operating sound.
• If an abnormal sound is heard during operation, consult your dealer.
Relocation
• When the air conditioner is to be removed or re-installed because of rebuilding, moving, etc., special techniques and work
are required.
WARNING :
Repairs or relocation should not be done by the customer.
If this is done incorrectly, it may cause a fire, an electric shock, or an injury from the unit falling, water leaking, etc.
Consult your dealer.
Disposal
To dispose of this product, consult your dealer.
If you have any questions, consult your dealer.
SPECIFICATIONS
Model Indoor
Function
Power supply
Capacity kW
Input kW
Weight
Refrigerant filling
capacity (R410A)
IP code
Permissible
excessive
operating
pressure
Noise level
Set name
Outdoor
Indoor kg
Outdoor kg
kg
Indoor
Outdoor
LP ps MPa
HP ps MPa
Indoor
(High/Med./Low)
dB(A)
Outdoor dB(A)
MSH-A07YV MSH-A09YV MSH-A12YV
MSC-A07YV MSC-A09YV MSC-A12YV
MUH-A07YV MUH-A09YV MUH-A12YV
Cooling Heating Cooling Heating Cooling Heating
~ /N, 230V, 50Hz
2.3 2.5 2.55 3.05 3.5 3.9
0.715 0.69 0.795 0.84 1.09 1.08
910
35 38 40
0.62 1.00 1.00
36/31/25 36/31/25 39/32/25 40/33/26 39/33/26
47 49
MS-A07YV MS-A09YV MS-A12YV
MSC-A07YV MSC-A09YV MSC-A12YV
MU-A07YV MU-A09YV MU-A12YV
Cooling
2.3 2.55 3.5
0.715 0.795 1.14
910
34 36
0.60 0.60 0.75
IP20
IP24
1.64
4.15
36/31/25 40/33/26
45 49
NOTE:
1. Rating condition
Cooling — Indoor: 27°C DB, 19°C WB
Heating — Indoor: 20°C DB
Outdoor: 35°C DB
Outdoor: 7°C DB, 6°C WB
2. Guaranteed operating range
Indoor Outdoor
Upper limit
Cooling
Lower limit
Upper limit
Heating
Lower limit
32°C DB 43°C DB
23°C WB —
21°C DB 21°C DB
15°C WB —
27°C DB 24°C DB
— 18°C WB
20°C DB -10°C DB
— -11°C WB
11
Page 12
INHALT
VORSICHTSMASSNAHMEN ................................................................................................................................................ 12
BEZEICHNUNG DER TEILE ................................................................................................................................................. 13
VORBEREITUNGEN VOR DEM BETRIEB ........................................................................................................................... 14
AUTOMATISCHER “I FEEL ...”-BETRIEB ............................................................................................................................. 16
MANUELLER BETRIEB (KÜHLUNG, LUFTTROCKNUNG, HEIZUNG/VENTILATOR) ........................................................ 17
EINSTELLEN DER VENTILATORDREHZAHL UND DER LUFTABBLASRICHTUNG .......................................................... 17
BETRIEBSART KÜHLEN IM SPARBETRIEB (ECONO COOL) ............................................................................................ 18
BETRIEB MITTELS ZEITSCHALTUHR (EIN/AUS-TIMER)................................................................................................... 18
LÄNGERE STILLSETZUNG .................................................................................................................................................. 18
WARTUNG............................................................................................................................................................................. 18
REINIGEN DES CATECHIN-LUFTFILTERS .......................................................................................................................... 19
AUSWECHSELN DES LUFTREINIGUNGSFILTERS ............................................................................................................ 19
FOLGENDE PUNKTE NOCHMALS ÜBERPRÜFEN BEVOR SIE SICH AN DEN KUNDENDIENST WENDEN.................. 20
WENN SIE EINE STÖRUNG VERMUTEN ............................................................................................................................ 20
INSTALLATION, NEUAUFSTELLUNG UND PRÜFUNG ....................................................................................................... 21
TECHNISCHE DATEN........................................................................................................................................................... 21
VORSICHTSMASSNAHMEN
• Da in diesem Produkt drehende Teile und Teile und Komponenten verwendet werden, die elektrische Schläge
verursachen können, unbedingt die “Vorsichtsmaßnahmen” vor der Verwendung durchlesen.
• Da die hier aufgeführten Punkte wichtig für die Sicherheit sind, diese Punkte unbedingt einhalten.
Markierungen und ihre Bedeutungen
WARNUNG: Falsche Handhabung kann zu ernsthafter Gefahr mit Todesfolge, Verletzungen usw. führen.
VORSICHT: Falsche Handhabung kann in Abhängigkeit von den Bedingungen zu ernsthafter Gefahr führen.
Die Bedeutung der in dieser Anleitung verwendeten Symbole
• Die Farbe des an der Anlage angebrachten Aufklebers ist in Klammern gesetzt.
: Nicht ausführen.
: Die Instruktion unbedingt befolgen.
(Schwarz) : Nicht die Finger oder Stäbe usw. hineinstecken.
(Schwarz) : Nicht auf die Innen-/Außeneinheit steigen und auch nichts darauf ablegen.
(Gelb) : Stromschlaggefahr. Seien Sie vorsichtig.
(Blau) : Unbedingt den Netzstecker von der Netzsteckdose abziehen.
(Blau) : Unbedingt die Stromversorgung ausschalten.
• Nachdem Sie diese Anleitung durchgelesen haben, diese Anleitung gemeinsam mit der Installationsanleitung
für spätere Nachschlagzwecke sorgfältig aufbewahren.
Anordnung des Warnschildes und der Sicherheitsvorrichtung
FRONTBLENDE
GEHÄUSE
GEHÄUSE
LUFTAUSLASS
Diese Klimaanlage darf NICHT von Kindern oder unsicheren Personen ohne Aufsicht benutzt werden.
•
WARNUNG
Keinen provisorischen Anschluß des Netzkabels vornehmen, keine Kabelverlängerung verwenden
und unbedingt vermeiden, mehrere Geräte an einen Wechselstromanschluß anzuschließen.
• Schlechte Kontakte, schlechte Isolierung Überschreiten der zulässigen Stromstärke usw. können zu
Bränden oder Stromschlägen führen.
Das Netzkabel weder verkratzen noch bearbeiten, reparieren usw.
• Das Netzkabel nicht mit schweren Gegenständen belasten und weder verkratzen noch bearbeiten oder reparieren. Das Kabel kann dadurch beschädigt werden, so daß ein Brand oder ein Stromschlag ausgelöst wird.
Während des Betriebs nicht den Trennschalter ein-/ausschalten oder den Netzstecker herausziehen/hineinstecken.
• Anderenfalls kann es aufgrund von Funken usw. zu einem Feuer kommen.
• Dafür sorgen, daß der Trennschalter nach Ausschalten der Inneneinheit mit der Fernbedienung vollständig ausgeschaltet und der Netzstecker aus der Steckdose herausgezogen wurde.
Niemals für längere Zeit direkt im Luftstrom der Kühlluft verweilen.
• Anderenfalls kann Ihre Gesundheit darunter leiden.
Der Kunde sollte diese Klimaanlage nicht selbst installieren.
• Falls die Installation falsch ausgeführt wird, kann es zu Feuer, elektrischen Schlägen, Verletzungen durch
Herabfallen der Einheit, Austritt von Wasser usw. kommen. Wenden Sie sich dafür an Ihren Fachhändler.
Niemals Ihre Finger oder Gegenstände usw. in den Lufteinlaß/Luftauslaß stecken.
• Da der Ventilator mit hoher Drehzahl dreht, kann es anderenfalls zu Verletzungen kommen.
•
Kleine Kinder müssen beaufsichtigt werden, um sicherzustellen, daß sie nicht an der Klimaanlage herumspielen.
Falls es zu Geruchsbelästigung, Feuer usw. kommt, die Klimaanlage abschalten und den Netzstekker ziehen oder den Trennschalter abschalten.
• Falls die Klimaanlage unter ungewöhnlichen Bedingungen betrieben wird, kann es zu Feuer, Störungen
usw. kommen. In einem solchen Fall wenden Sie sich bitte an Ihren Fachhändler.
Reparaturen oder Neuaufstellungen dürfen nicht vom Kunden selbst ausgeführt werden.
•
Falls Reparaturen oder Neuaufstellungen falsch ausgeführt werden, kann es zu Feuer, elektrischen Schlägen, Verletzungen durch Herabfallen der Einheit, Austritt von Wasser usw. kommen. Wenden Sie sich dafür an Ihren Fachhändler.
• Falls das Netzkabel beschädigt ist, muß es vom Hersteller oder Kundendienst ersetzt werden, um Gefahren zu verhindern.
VORSICHT
Wenn der Luftfilter enfernt werden muß, niemals die Metallteile der Inneneinheit berühren.
• Anderenfalls kann es zu Verletzungen kommen.
Niemals Insektenvertilgungsmittel oder brennbare Sprays auf die Klimaanlage sprühen.
• Anderenfalls kann es zu Feuer oder Verfärbung des Gehäuses kommen.
Niemals ein Haustier oder Zierpflanzen dem direkten Luftstrom aussetzen.
•
Anderenfalls kann es zu gesundheitlichen Schäden des Haustieres oder zur Vernichtung der Zierpflanzen kommen.
Die Außeneinheit niemals auf einem defekten Ständer installieren.
• Die Einheit könnte herunterfallen und Verletzungen verursachen.
Bei Wartungsarbeiten an der Anlage usw. niemals auf eine unstabile Unterlage (Bank, Stuhl, Tisch usw.) steigen.
• Bei Nichtbeachtung könnten Sie Verletzungen erleiden, wenn Sie herunterfallen.
Nicht am Netzkabel ziehen.
•
Bei Nichtbeachtung kann die Leitungsader des Netzkabels getrennt werden, wodurch ein Brand ausbrechen kann.
Die Batterien nicht laden oder auseinandernehmen und sie nicht ins Feuer werfen.
• Dadurch kann Flüssigkeit austreten, ein Brand entstehen oder eine Explosion verursacht werden.
Die Klimaanlage niemals für längere Zeit bei hoher Luftfeuchtigkeit, z.B. bei geöffneter Tür oder geöffnetem Fenster, betreiben.
•
Falls die Klimaanlage für längere Zeit im Kühlbetrief in einem Raum mit hoher Luftfeuchtigkeit (80% oder mehr) betrieben wird, kann in der Klimaanlage kondensiertes Wasser abtropfen und Möbel usw. naß machen oder beschädigen.
Die Klimaanlage nicht für Sonderzwecke verwenden.
• Diese Klimaanlage nicht für die Erhaltung von Präzisionsgeräten, Eßwaren, Tieren, Pflanzen und Kunstgegenständen verwenden. Anderenfalls kann es zu einer Beeinträchtigung der Qualität usw. kommen.
Niemals einen Ofen usw. dem direkten Luftstrom der Klimaanlage aussetzen.
• Anderenfalls kann es zu unvollständiger Verbrennung kommen.
12
Page 13
VORSICHTSMASSNAHMEN
BEZEICHNUNG DER TEILE
VORSICHT
Wenn die Klimaanlage gereinigt werden soll, muß sie ausgeschaltet werden. Dazu den Netzstecker
herausziehen oder den Trennschalter ausschalten.
•
Da der Ventilator während des Betriebs mit hoher Drehzahl dreht, kann es anderenfalls zu Verletzungen kommen.
Wenn die Klimaanlage für längere Zeit nicht verwendet werden soll, den Netzstecker ziehen und den
Trennschalter ausschalten.
• Anderenfalls kann sich Schmutz ansammeln und ein Feuer verursachen.
Die 2 Batterien durch neue des gleichen Typs ersetzen.
• Wird eine gebrauchte Batterie zusammen mit einer neuen verwendet, kann sich Hitze entwickeln, Flüssigkeit austreten oder eine Explosion verursacht werden.
Wenn Flüssigkeit von den Batterien auf Ihre Haut oder Ihre Kleidung gelangt, diese gründlich mit
sauberem Wasser auswaschen.
• Wenn Flüssigkeit von den Batterien in Ihre Augen gelangt, diese gründlich mit sauberem Wasser auswaschen und einen Arzt zu Rate ziehen.
Auf gute Belüftung achten, wenn die Klimaanlage gemeinsam mit einem Ofen usw. verwendet wird.
• Anderenfalls kann es zu Sauerstoffmangel kommen.
Niemals Schalter mit naßen Händen bedienen.
• Anderenfalls kann es zu elektrischen Schlägen kommen.
Niemals die Klimaanlage mit Wasser reinigen.
• Wasser könnte in die Klimaanlage eindringen und die Isolierung beschädigen. Dadurch könnte es zu
elektrischen Schlägen kommen.
Niemals auf die Inneneinheit/Außeneinheit steigen und auch keine Gegenstände darauf ablegen.
• Falls Sie oder ein Gegenstand von der Klimaanalge fallen, kann dies zu einem Unfall oder ähnlichem
führen.
Für den Einbau
WARNUNG
• Für die Installation der Klimaanlage wenden Sie sich bitte an Ihren Fachhändler.
Inneneinheit
Luftreinigungsfilter
(Weißer Balg-Typ)
Catechin-Luftfilter
(Mit Desodorierer)
Vertikale Klappe
Horizontale Klappe
Bedienungsfeld
(Wenn die Frontblende geöffnet ist)
Luftauslaß
Notbetriebsschalter
Betriebsanzeigeleuchten
Frontblende
Lufteinlaß
An den Leistungsschalter anschließen
Netzkabel
Fernbedienungssignalempfänger
Fernbedienung
Anzeigefeld
Fernbedienungssignalempfänger
VORSICHT
Niemals die Klimaanlage an einem Ort installieren, an dem brennbare Gase austreten können.
• Falls brennbare Gase austreten und sich in der Nähe der Klimaanlage ansammeln, kann es zu einer
Explosion kommen.
Unbedingt die Klimaanlage erden.
• Niemals den Erdungsdraht an ein Gasrohr, Wasserrohr, an einen Blitzableiter oder an den Erdungsdraht eines
Telefons anschließen. Falls die Erdung falsch ausgeführt ist, kann es zu elektrischen Schlägen kommen.
Einen Erdschlußschalter abhängig von dem Installationsort (feuchter Ort uws.) der Klimaanlage
installieren.
• Falls kein Erschlußschalter installiert wird, kann es zu elektrischen Schlägen kommen.
Abwasser muß vollständig abgelassen werden.
• Falls der Ablaßschlauch nicht richtig verlegt wird, kann kondensiertes Wasser von der Einheit abtropfen,
so daß Möbel naß oder beschädigt werden.
Außeneinheit
Lufteinlaß (Rückseite und Seite)
Verrohrung
Ablaßschlauch
Luftauslaß
Ablaßauslaß
13
Page 14
ON/OFF
FAN
TOO
WARM
TOO
COOL
VANE
MODE
ECONO COOL
STOP
START
HR.
MIN.
I FEEL
COOL
DRY
AMPM
AMPM
RESET CLOCK
HEAT
/FAN
BEZEICHNUNG DER TEILE
ON/OFF
TOO
COOL
AMPM
CLOCK
˚C
AMPM
TOO
WARM
VORBEREITUNGEN VOR DEM BETRIEB
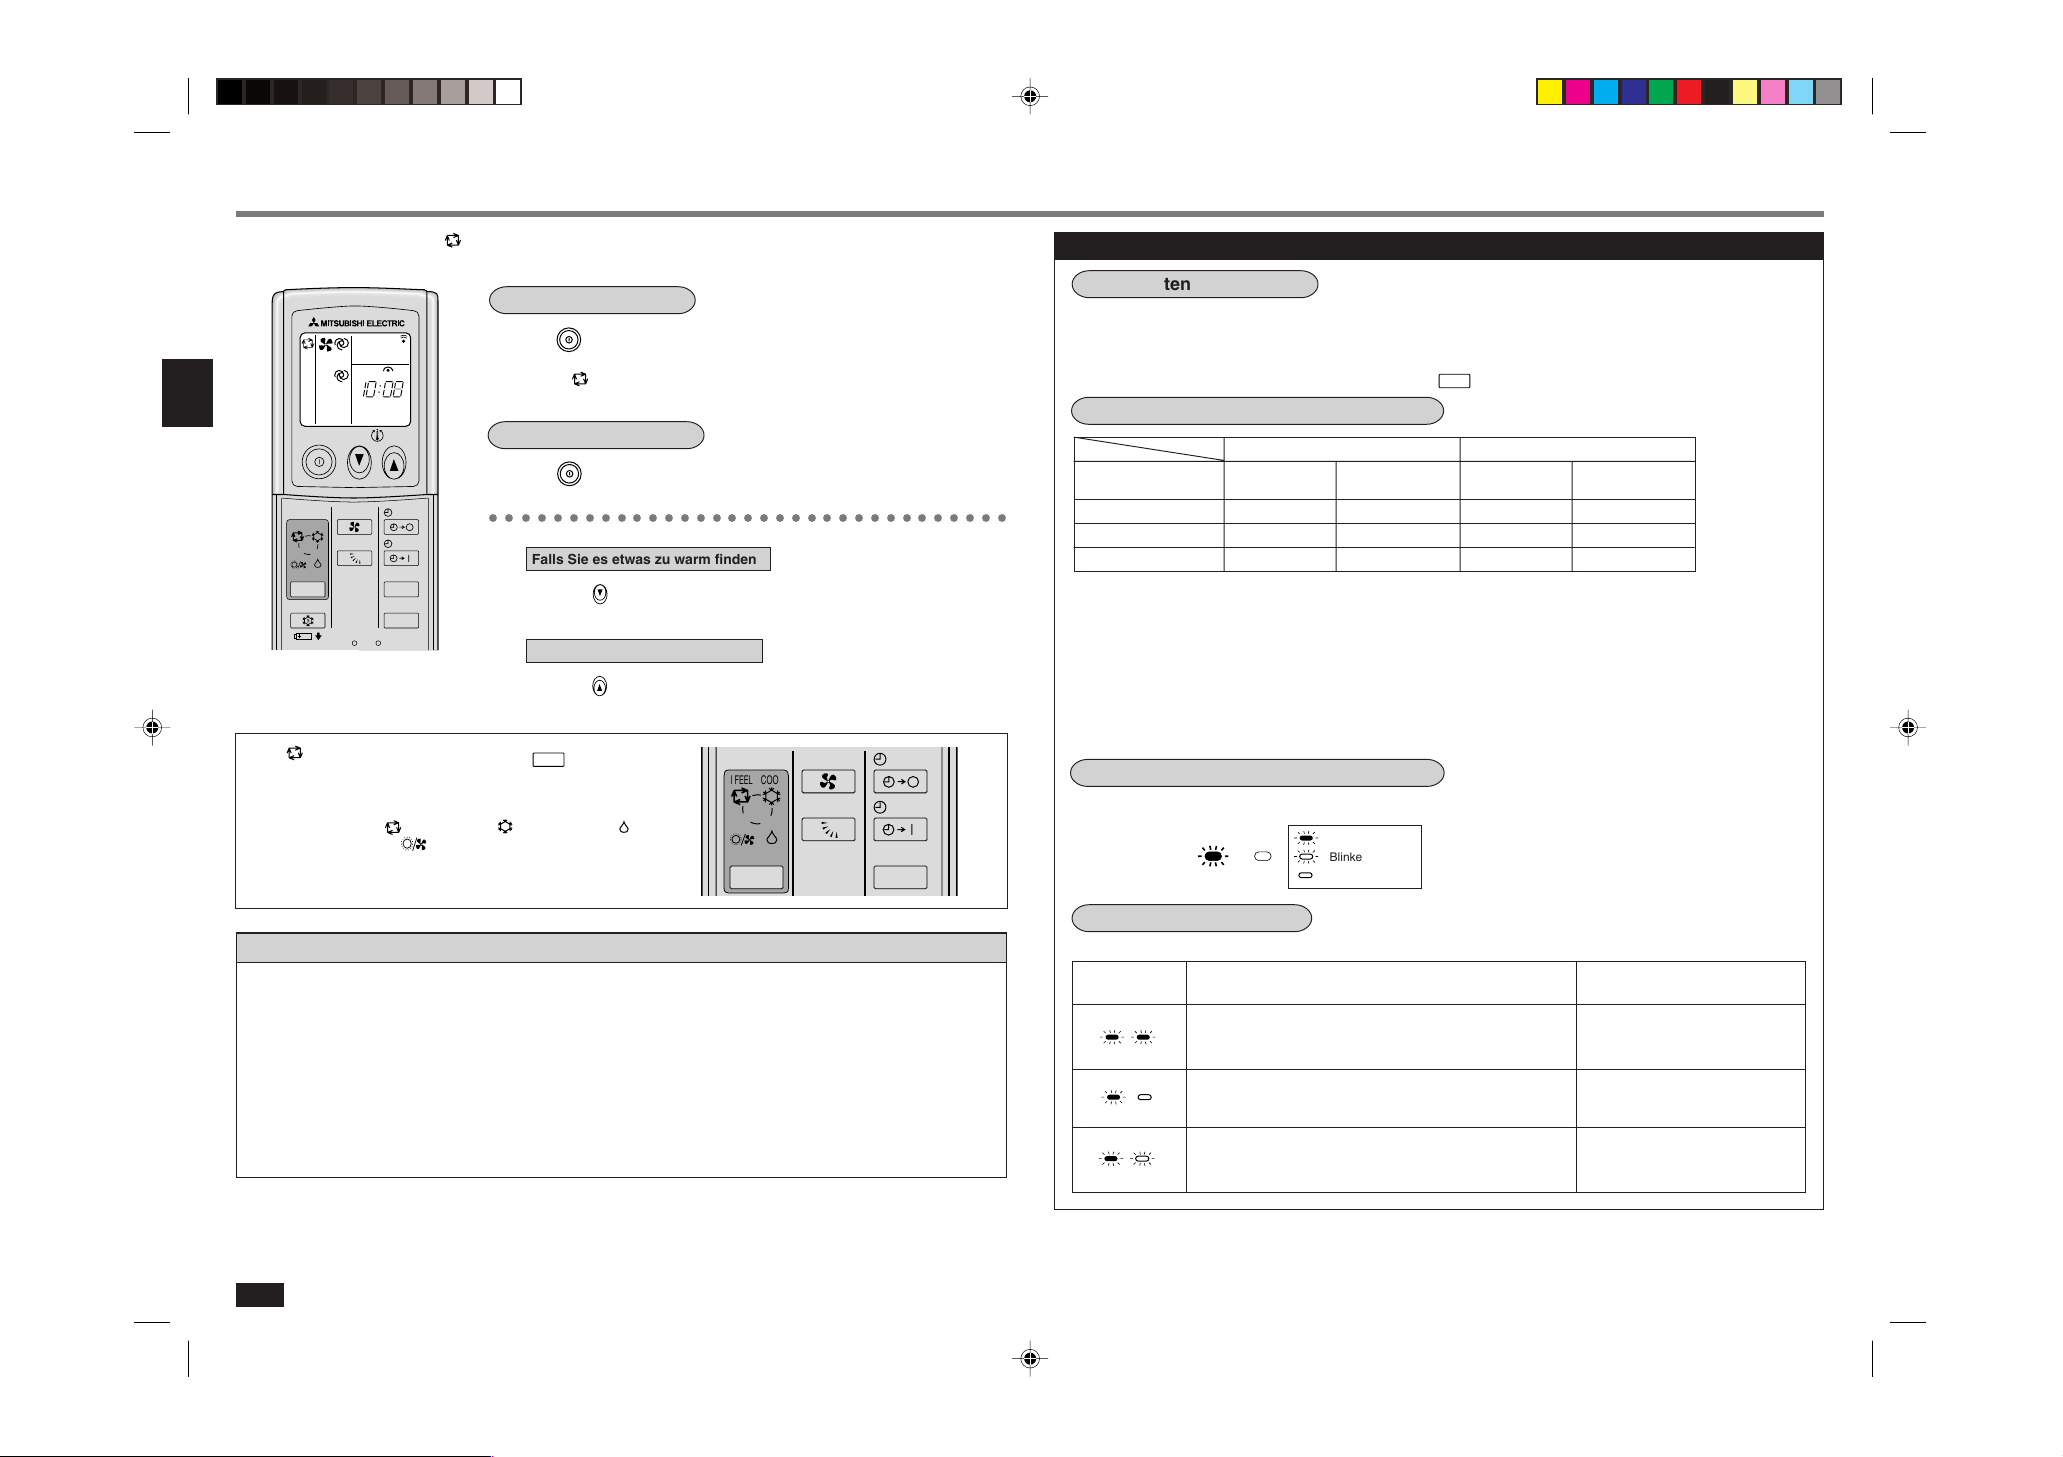
Fernbedienung
Betriebsanzeigefeld
Betriebs/Stop-Taste
(ON/OFF)
Den Deckel auf der Vorderseite öffnen.
Signalgeber
(Gesamtansicht.)
Temperaturtasten
Automatische Startwiederholungsfunktion
Diese Modelle sind mit einer automatischen Startwiederholungsfunktion ausgestattet. Wenn Sie
■
diese Funktion nicht benutzen möchten, wenden Sie sich bitte an den Kundendienst, da die Einstellung der Anlage geändert werden muß.
Automatische Startwiederholungsfunktion bedeutet ...
Wenn die Inneneinheit durch die Fernbedienung gesteuert wird, werden die Betriebsart, die eingestellte Temperatur und die
Ventilatordrehzahl im Speicher abgespeichert. Bei einem Stromausfall oder wenn die Stromversorgung während des Betriebs
ausgeschaltet wird, sorgt die “automatische Startwiederholungsfunktion” automatisch dafür, daß das Gerät in der gleichen
Betriebsart wieder gestartet wird, die mit der Fernbedienung unmittelbar vor dem Stromausfall eingestellt war. (Einzelheiten
dazu siehe Seite 16.)
Inneneinheit
Den Netzkabelstecker an eine Netzsteckdose anschließen und/oder den Trennschalter einschal-
■
ten.
WARNUNG:
Schmutz vom Netzkabelstecker entfernen und diesen richtig einstecken. Falls Schmutz an dem Stecker haftet oder
dieser nicht richtig eingesteckt wird, besteht Brand- oder Stromschlaggefahr.
Fernbedienung
Wie der Typ eingestellt wird
Die Einstellung der Fernbedienung muß je nach Typ der Klimaanlage (KÜHLUNG und HEIZUNG
■
oder NUR KÜHLUNG) geschaltet werden.
Bei falscher Einstellung arbeitet die Klimaanlage nicht normal. Daher prüfen, ob die Einstellung
dem Typ Ihrer Klimaanlage entspricht. Wenn nicht, die Einstellung wie nachstehend dargestellt,
korrigieren.
Schiebeschalter
Typ
KÜHLUNG und HEIZUNG
NUR KÜHLUNG
14
Ventilatordrehzahl-Regeltaste
Betriebsart-Wahltaste
Taste KÜHLEN IM SPARBETRIEB
(ECONO COOL)
Rückstelltaste RESET
Ausschalttimertaste
Einschalttimertaste
Stunden- und
Minutentaste
(Zeiteinstelltasten)
Uhreinstelltaste
Taste zum Schwenken
der horizontalen Klappe
Die stellung
des Schiebeschalters
Page 15
HR.
MIN.
HR.
MIN.
FAN
VANE
MODE
ECONO COOL
STOP
START
HR.
MIN.
I FEEL
COOL
DRY
RESET CLOCK
HEAT
/FAN
Operation Indicator
Operation Indicator
Operation Indicator
Operation Indicator
Operation Indicator
ON/OFF
VORBEREITUNGEN VOR DEM BETRIEB
Fernbedienung
Einstellen der Batterien und der Uhrzeit
1 Den Deckel an der Vorderseite abnehmen und
die Batterien einlegen. Dann den Deckel an
der Vorderseite wieder anbringen.
Den Minuspol der Batterien zuerst einlegen.
Überprüfen, daß die Pole der Batterien in der richtigen Richtung eingelegt sind.
Den Minuspol der Batterien zuerst einlegen.
2 Die Rückstelltaste (RESET) eindrücken.
Mit dünnem
Gegenstand
eindrücken.
• Falls die Rückstelltaste RESET nicht eingedrückt
wird, kann die Fernbedienung nicht richtig arbeiten.
3 Die Uhreinstelltaste eindrücken.
Mit dünnem
Gegenstand
eindrücken.
4 Die Stundentaste
und die Minutentaste
(Zeiteinstelltasten) eindrücken um die
derzeitige Zeit einzustellen.
• Mit jedem Eindrücken der
gestellte Zeit um eine Stunde vorausgestellt, und
mit jedem Eindrücken der
gestellte Zeit um 1 Minute vorausgestellt.
Taste wird die ein-
Taste wird die ein-
5 Die Uhreinstelltaste erneut drücken und den
Deckel an der Vorderseite schließen.
Handhabung der Fernbedienung
• Die Fernbedienung kann in einer Entfernung von bis
zu 6 m verwendet werden, wenn sie auf die Vorderseite der Inneneinheit gerichtet wird.
• Wenn eine Taste gedrückt wirdt, werden von der
Inneneinheit ein oder zwei Pfeiftöne abgegeben. Falls
kein Pfeifton vernommen werden kann, die entsprechende Taste nochmals betätigen.
• Die Fernbedienung vorsichtig verwenden.
Die Fernbedienung arbeitet unter Umständen nicht,
wenn sie hinfällt, hingeworfen oder naß wird.
Anbringen an einer Wand usw
• Die Fernbedienung unter Verwendung des Einbaugehäuses in einer Position anbringen, von der aus
der Signalempfangston (Pfeifton) von der Inneneinheit vernommen werden kann, wenn die
ste gedrückt wird.
Einsetzen/Entfernen der Fernbedienung
Einsetzen :Die Fernbedienung nach unten einsetzen.
Entfernen :Nach oben ziehen.
Fernbedienungseinbaugehäuse
Trockenbatterien
■ Hinweise für das Austauschen der Batterien
In folgenden Fällen die Batterien durch neue AlkalineBatterien des Typs AAA ersetzen:
· Wenn die Inneneinheit nicht auf das Signal der Fern-
bedienung reagiert.
· Wenn die Anzeige der Fernbedienung in der Hellig-
keit abnimmt.
· Wenn nach Drücken einer Taste der Fernbedienung
alle Anzeigen auf dem Bildschirm erscheinen und danach sofort wieder ausgeblendet werden.
Keine Mangan-Batterien verwenden. Dies könnte zu
Fehlfunktionen der Fernbedienung führen.
• Die Lebensdauer einer Alkalibatterie beträgt etwa ein
Jahr.
Da jedoch die Begrenzung der empfohlenen Nutzungsdauer (Monat/Jahr) am Bodem des Akkus angegeben ist, sollte mann daran denken, daß ein Akku,
der sich nah am Zeitlimit befindet, schnell leer wird.
• Damit keine Flüssigkeit austritt, alle Akkus herausnehmen, wenn die Fernbedienung für längere Zeit
nicht benutzt wird.
VORSICHT:
Wenn Flüssigkeit von den Batterien auf Ihre Haut oder
Ihre Kleidung gelangt, diese gründlich mit sauberem
Wasser auswaschen.
Wenn Flüssigkeit von den Batterien in Ihre Augen gelangt, diese gründlich mit sauberem Wasser auswaschen und einen Arzt zu Rate ziehen.
• Niemals aufladbare Batterien verwenden.
• Die beiden Batterien durch neue des gleichen Typs
ersetzen.
• Die verbrauchten Batterien an einer Sammelstelle
oder am Sondermüllplatz abgeben.
Ta-
Wenn die Fernbedienung nicht verwendet werden kann (Notbetrieb)
Wenn die Batterien der Fernbedienung verbraucht sind oder die Fernbedienung nicht richtig arbeitet, ist Notbetrieb
unter Verwendung des Notbetriebsschalters möglich.
Baureihe: KÜHLUNG und HEIZUNG
1 Den Notbetriebsschalter eindrücken.
• Bei jedem Druck auf den Notbetriebsschalter wird
die Anlage in der Reihenfolge NOTKÜHLUNG, NOTHEIZUNG und STOP MODE in die jeweilige Betriebsart geschaltet.
Wenn der NOTBETRIEBS-Schalter jedoch einmal
gedrückt wird, arbeitet die Anlage 30 Minuten lang
im Testlauf und schaltet danach in den NOTBETRIEB.
• Einzelheiten über den NOTBETRIEB sind nachstehend dargestellt. Die Temperaturregelung arbeitet
jedoch 30 Minuten lang nicht im Testlauf und die
Anlage ist auf Dauerbetrieb eingestellt.
Die Gebläsedrehzahl ist im Testlauf auf hoch eingestellt und schaltet nach 30 Minuten auf mittel um.
In Betrieb KÜHLUNG HEIZUNG
Eingestellte Temperatur
Ventilatordrehzahl Mittel Mittel
Horizontale Klappe Automatisch Automatisch
• Die Betriebsart wird von der Betriebsanzeige der
Inneneinheit gemäß folgender Abbildung angezeigt.
Betriebsanzeigeleuchten
Notkühlbetrieb
Notheizbetrieb
Stop
Um den Notbetrieb zu stoppen, den NOT-
■
BETRIEBS-Schalter (im NOTHEIZ-Betrieb)
einmal oder (im NOTKÜHL-Betrieb) zweimal
drücken.
24°C24°C
Baureihe: NUR KÜHLUNG
1 Den Notbetriebsschalter eindrücken.
• Wenn der NOTBETRIEBS-Schalter gedrückt wird,
arbeitet die Anlage zunächst 30 Minuten lang im
Testlauf und schaltet danach in den NOTKÜHLBETRIEB.
• Einzelheiten über den NOTKÜHLBETRIEB sind
nachstehend dargestellt. Die Temperaturregelung
arbeitet jedoch 30 Minuten lang nicht im Testlauf
und die Anlage ist auf Dauerbetrieb eingestellt.
Die Gebläsedrehzahl ist im Testlauf auf hoch eingestellt und schaltet nach 30 Minuten auf mittel um.
In Betrieb KÜHLUNG
Eingestellte Temperatur 24°C
Ventilatordrehzahl Mittel
Horizontale Klappe Automatisch
• Die Betriebsart wird von der Betriebsanzeige der
Inneneinheit gemäß folgender Abbildung angezeigt.
Betriebsanzeigeleuchten
Notkühlbetrieb
Stop
Um den NOTKÜHLBETRIEB zu stoppen, den
■
NOTBETRIEBS-Schalter erneut drücken.
Bei jedem Drücken des Schalters schaltet die Betriebsart zwischen NOTKÜHLBETRIEB und STOPPBETRIEB hin und her.
15
Page 16
AUTOMATISCHER “I FEEL ...”-BETRIEB
ON/OFF
ON/OFF
TOO
WARM
TOO
COOL
FAN
VANE
MODE
STOP
START
HR.
I FEEL
COOL
DRY
HEAT
/FAN
MODE
Operation Indicator
MODE
ON/OFF
FAN
TOO
WARM
TOO
COOL
VANE
MODE
ECONO COOL
STOP
START
HR.
MIN.
I FEEL
COOL
DRY
AMPM
CLOCK
˚C
AMPM
HEAT
/FAN
RESET CLOCK
Mit dem Automatikbetrieb “ (I FEEL...)” kann die optimale Raumbedingung automatisch auf Tastendruck eingestellt werden.
Starten des Betriebs:
Die
■
Taste eindrücken.
Wenn “ (I FEEL...)” eingestellt wird, wird die Klimaanlage automatisch mit
der optimalen Temperatur gesteuert.
Stoppen des Betriebs:
Die
■
○○○○○○○○○○○○○○○○○○○○○○○○○○○○○○○○○
Wenn “ (I FEEL...)” nicht angezeigt wird, die
drücken, um den Modus einzustellen.
Mit jedem Druck auf die Taste ändert sich die Betriebsart der
Reihenfolge nach von
(LUFTTROCKNUNG) → (HEIZUNG/VENTILATOR)
(I FEEL...) → (KÜHLUNG) →
Taste eindrücken.
Falls Sie es etwas zu warm finden:
Die
■
Falls Sie es etwas zu kühl finden:
■
Taste eindrücken um die Temperatur herabzusetzen.
Mit jedem Druck auf diese Taste wird die Temperatur um etwa 1°C herabgesetzt.
Die
Taste eindrücken um die Temperatur zu erhöhen.
Mit jedem Druck auf diese Taste wird die Temperatur um etwa 1°C erhöht.
Taste ein-
Beschreibung des “I FEEL...” Modus
Einzelheiten des Betriebs
Beim Betriebsstart wird je nach Raumtemperatur automatisch die Betriebsart KÜHLUNG, LUFTTROCKNUNG oder
HEIZUNG eingestellt. Wenn jedoch der Betrieb innerhalb von 2 Stunden nach Betriebsstopp erneut gestartet wird, wird
die gleiche Betriebsart wie vor dem Betriebsstopp gewählt. Falls der Betriebsmodus nicht den Raumbedingungen entspricht, den geeigneten Betriebsmodus durch Drücken der
Einzelheiten des automatischen Betriebs
Baureihe: KÜHLUNG und HEIZUNG Baureihe: NUR KÜHLUNG
Raumtemperatur Betriebsmodus Solltemperatur Betriebsmodus Solltemperatur
am Start
Etwa 25°C oder höher
Kühlung Etwa 24°CKühlung Etwa 24°C
(anfänglicher Status) (anfänglicher Status)
Etwa 25°C - 23°C Lufttrocknung — Lufttrocknung —
Etwa 23°C oder weniger
Heizung Etwa 26°C Lufttrocknung —
HINWEIS:
KÜHLUNG: Wenn die Raumtemperatur 2°C höher ist als die eingestellte Raumtemperatur, kann die eingestellte
Temperatur unter Umständen nicht geändert werden, da die Klimaanlage arbeitet, um die (eingestellte) Zieltemperatur zu erreichen. In diesem Falle bitte warten, bis die Raumtemperatur um bis zu
2 °C von der eingestellten Temperatur ausgehend abfällt, und dann die Bedienung vornehmen.
HEIZUNG: Wenn die Raumtemperatur 2°C unter der eingestellten Temperatur liegt, wird die eingestellte Tempe-
ratur unter Umständen nicht erhöht, da die Anlage im Hochleistungsbereich arbeitet. In diesem Fall
ist zu warten, bis die Raumtemperatur um bis zu 2°C von der eingestellten Temperatur ausgehend
ansteigt, und dann die Bedienung vornehmen.
Anzeigeeinzelheiten an der Inneneinheit
Die Betriebsanzeige an der rechten Seite der Inneneinheit zeigt den Betriebsstatus an.
Leuchtend
Blinkend
Nicht leuchtend
-Taste wählen.
Beschreibung der “AUTOMATISCHEN STARTWIEDERHOLUNGSFUNKTION”
• Diese Anlagen sind mit einer automatischen Startwiederholungsfunktion ausgestattet. Wenn der Netzstrom eingeschaltet ist, startet die Klimaanlage den Betrieb automatisch in der gleichen Betriebsart wie der, die mit der Fernbedienung vor dem Stromausfall eingestellt wurde.
• Wenn die Anlage mit der Fernbedienung vor dem Abschalten des Netzstroms ausgeschaltet war, bleibt sie auch nach
Einschalten des Netzstroms ausgeschaltet.
• Wenn sich die Anlage vor dem Abschalten des Netzstroms im Notbetrieb befand, startet sie nach Wiederherstellung
des Netzstroms in der gleichen Betriebsart wie der, die mit der Fernbedienung vor dem Notbetrieb eingestellt war.
• Wenn die Anlage vor einem Netzausfall im Modus “I FEEL...” betrieben wurde, wird der Betriebsmodus (KÜHLEN
(COOL), TROCKNEN (DRY) oder HEIZEN (HEAT)) nicht im Speicher gesichert. Bei Einschalten der Stromversorgung
bestimmt die Anlage den zu verwendenden Betriebsmodus anhand der Raumtemperatur beim Neustart und nimmt
dann den Betrieb wieder auf.
16
Betriebsanzeigeleuchten
Anzeige
Zeigt an, daß die Klimaanlage arbeitet, um die Solltemperatur
zu erreichen. Warten Sie bitte einige Zeit, bis die Solltemperatur erreicht ist.
Zeigt an, daß sich die Raumtemperatur der Solltemperatur
nähert.
(Nur bei Außeneinheit der MXZ-Serie.)
Bitte beachten Sie die Informationen über Multisystem-Kli-
maanlagen. (Seite 17)
Betriebsstatus
Unterschied zwischen Soll-
temperatur und Raumtemperatur
Etwa 2°C oder mehr
Etwa 2°C oder weniger
—
Page 17
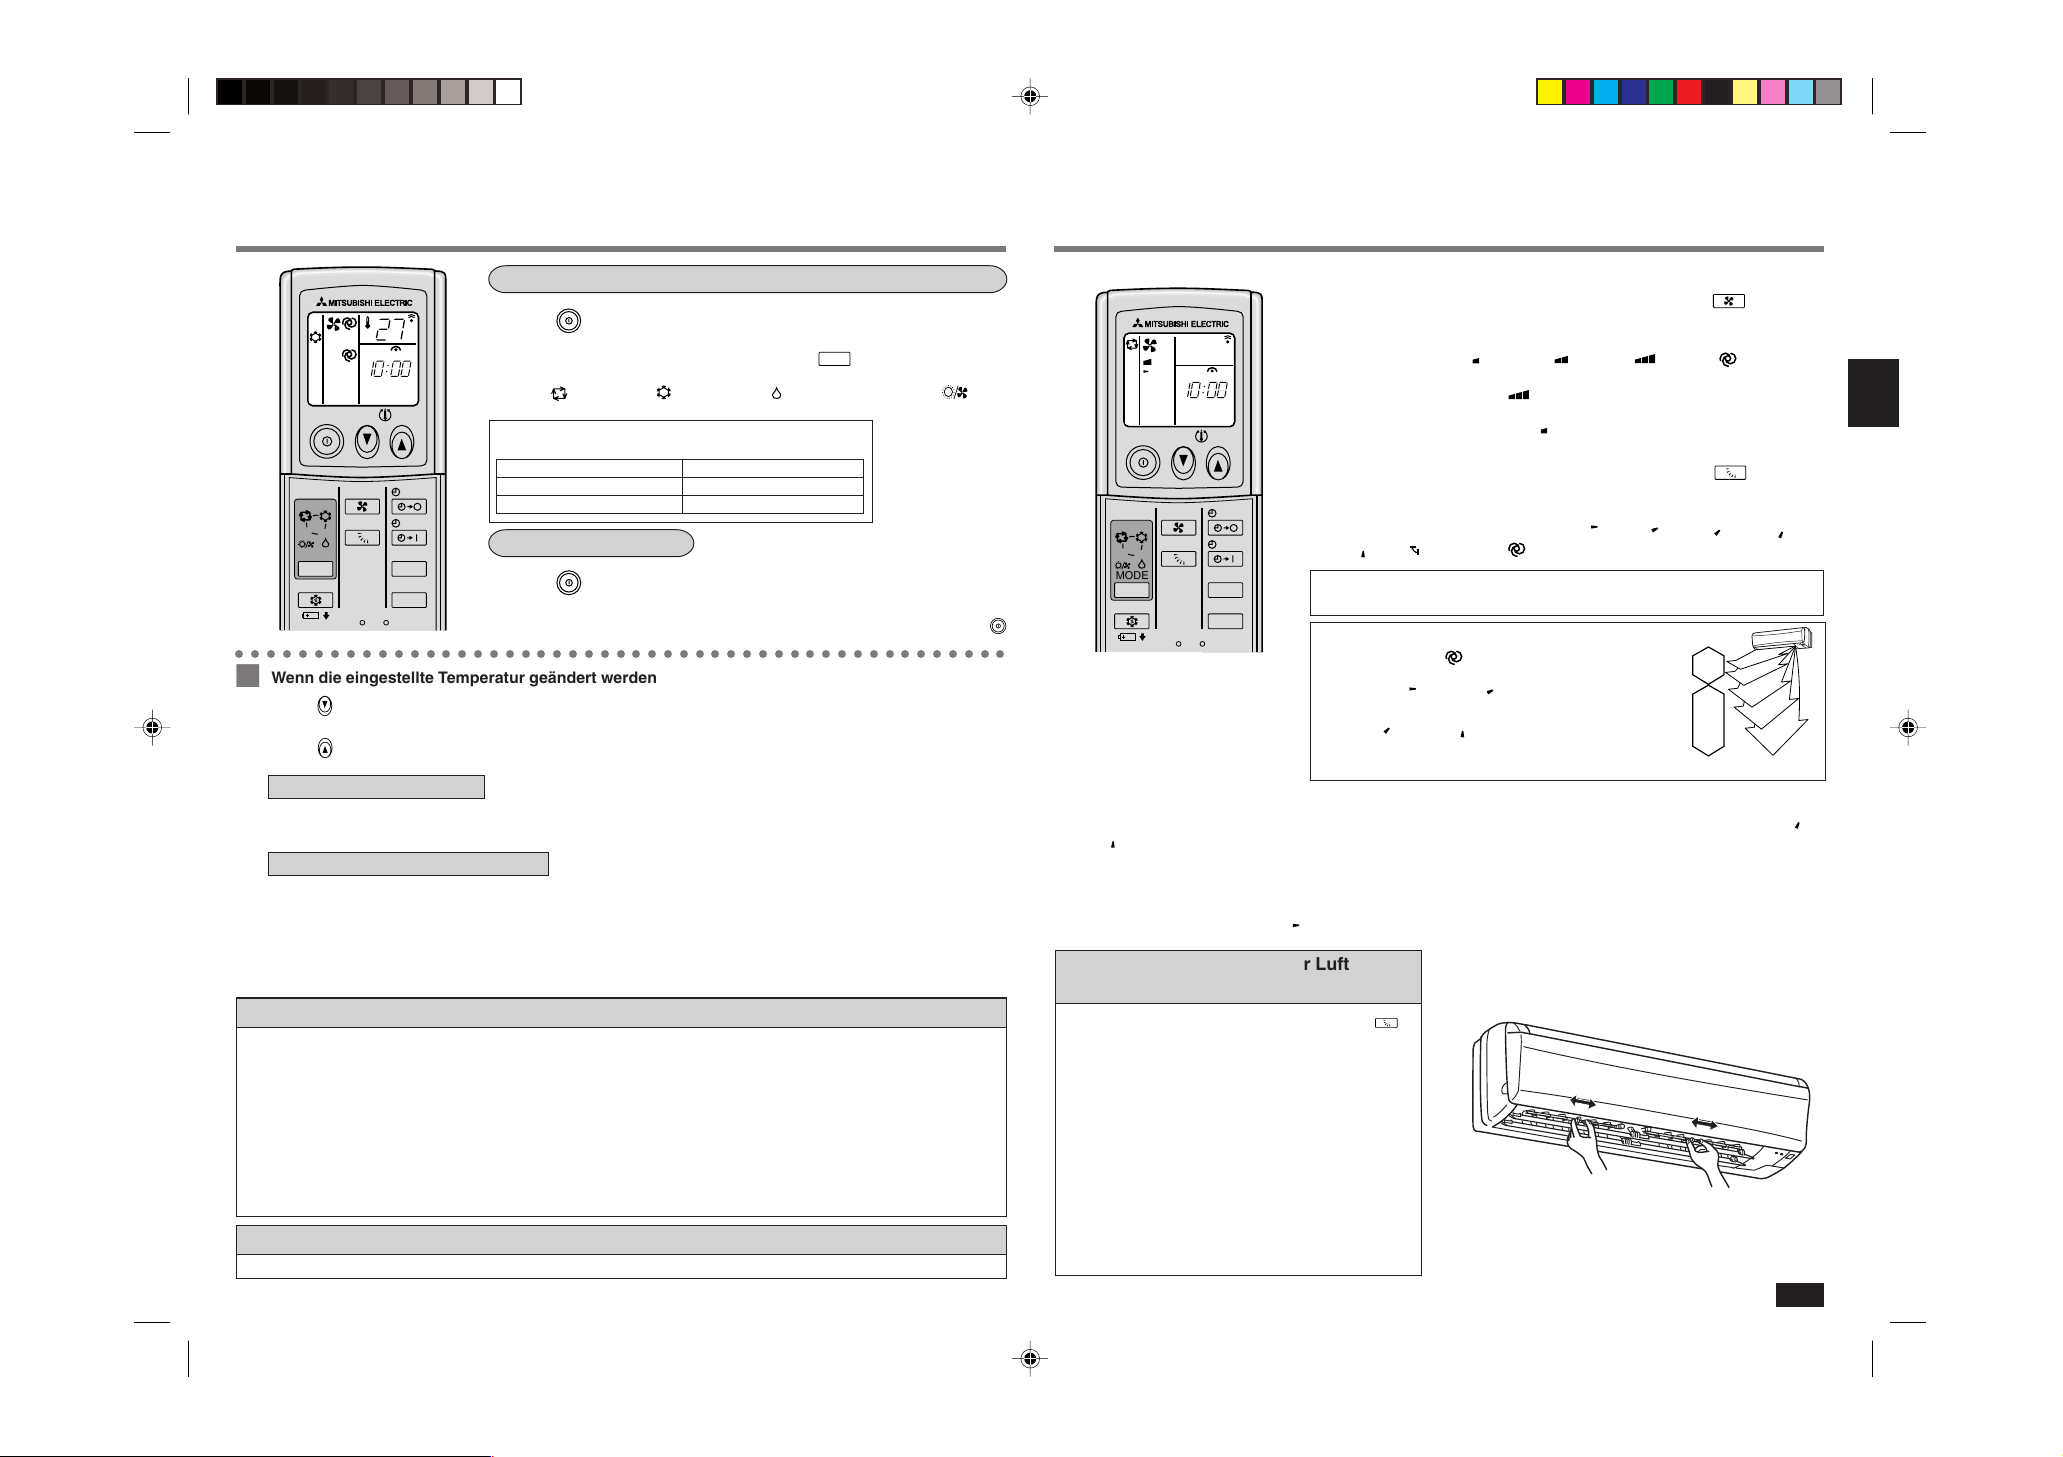
ON/OFF
MODE
ON/OFF
ON/OFF
MANUELLER BETRIEB (KÜHLUNG, LUFTTROCKNUNG,
TOO
WARM
TOO
COOL
FAN
VANE
ON/OFF
FAN
TOO
WARM
TOO
COOL
VANE
MODE
ECONO COOL
STOP
START
HR.
MIN.
I FEEL
COOL
DRY
AMPM
CLOCK
˚C
AMPM
HEAT
/FAN
RESET CLOCK
ON/OFF
FAN
TOO
WARM
TOO
COOL
VANE
MODE
ECONO COOL
STOP
START
HR.
MIN.
I FEEL
COOL
DRY
AMPM
CLOCK
˚C
AMPM
HEAT
/FAN
RESET CLOCK
VANE
1
2
3
4
5
EINSTELLEN DER VENTILATORDREHZAHL UND DER
HEIZUNG/VENTILATOR)
Zum Einstellen der Betriebsarten KÜHLUNG, LUFTTROCKNUNG, HEIZUNG/VENTILATOR
1 Die
2 Den Betriebsmodus wählen, indem die
HEIZUNGS-/VENTILATOR-Betrieb
Die Bauart der Klimaanlage überprüfen.
KÜHLUNG und HEIZUNG HEIZUNG
Den Betrieb stoppen:
■
○○○○○○○○○○○○○○○○○○○○○○○○○○○○○○○○○○○○○○○○○○○○○○○○○
Wenn die eingestellte Temperatur geändert werden soll:
■
• Die
• Die
•
• Temperaturregelung ist nicht möglich.
• In diesem Betriebsmodus wird die Raumtemperatur etwas heruntergesetzt.
Die Einzelheiten der Anzeige auf der Inneneinheit sind auf Seite 16 erläutert.
■
HINWEIS:
Wenn die Umgebungstemperatur zu hoch ist, kann die Raumtemperatur vielleicht nicht die eingestellte Temperatur
erreichen, da das Gerät zum Kühlen des Raums mit hoher Leistung arbeitet.
Informationen über Multisystem-Klimaanlagen (Ausseneinheit: Baureihe MXZ)
Multiystem-Klimaanlagen (Außeneinheit: Baureihe MXZ) können zwei oder mehr Inneneinheiten mit einer Außeneinheit
verbinden. Je nach Leistungsvermögen können mehr als zwei Anlagen gleichzeitig betrieben werden.
• Wenn Sie versuchen, zwei oder mehr Inneneinheiten mit einer Außeneinheit gleichzeitig zu betreiben - eine zum Kühlen und
die andere zum Heizen - wird die Betriebsart der Inneneinheit, die zuerst arbeitet, gewählt. Die anderen Inneneinheiten, die
später mit dem Betrieb beginnen, können nicht arbeiten und zeigen einen Betriebszustand an. (Siehe Tabelle der Betriebsanzeigeleuchten auf Seite 16).
In diesem Falle bitte alle Inneneinheiten auf die gleiche Betriebsart einstellen.
• Wenn die Inneneinheit während der Enteisung der Außeneinheit ihren Betrieb beginnt, dauert es einige Minuten (max. 10
Minuten) bis die Warmluft ausgeblasen wird.
• Im Heizbetrieb liegt keine Fehlfunktion vor, wenn sich möglicherweise die Inneneinheit, obgleich sie nicht arbeitet, erwärmt
oder das Geräusch von strömendem Kältemittel hörbar wird. Die Ursache liegt darin, daß das Kältemittel kontinuierlich in die
Anlage fließt, die nicht arbeitet.
Beschreibung der “AUTOMATISCHEN STARTWIEDERHOLUNGSFUNKTION”
Siehe Seite 16.
Taste drücken, um die Temperatur herunterzusetzen. Mit jedem Druck auf diese Taste wirdt die Temperatur um
etwa 1°C heruntergesetzt.
Taste eindrücken um die Temperatur zu erhöhen. Mit jedem Druck auf diese Taste wird die Temperatur um
etwa 1°C erhöht.
In der Betriebsart “HEIZUNG”
Wenn die Klimaanlage zuviel Wärme aus der Luft aufnimmt, kann eine Überlastung der Maschine eintreten. Ein Mikroprozessor schaltet dann zum Schutz der Klimaanlage das Gebläse der Außeneinheit automatisch ab.
Wenn das Gebläse der Außeneinheit gestoppt wird, kann sich an der Außeneinheit Eis bilden. Dies stellt aber kein Problem dar.
In der Betriebsart “LUFTTROCKNUNG”
Taste eindrücken.
Taste gedrückt wird.
Mit jedem Druck auf diese Taste wird der Betriebsmodus in der Reihenfolge
von
(I FEEL...) → (KÜHLUNG) → (LUFTTROCKNUNG) → (HEI-
ZUNG/VENTILATOR) umgeschaltet
Baureihe Betriebsart
NUR KÜHLUNG VENTILATOR
Die
Taste eindrücken.
Nachdem der Betriebsmodus einmal eingestellt wurde, startet der Betrieb ab
dem nächsten Mal ab dem vorher eingestellten Modus, wenn einfach die
Taste eingedrückt wird.
LUFTABBLASRICHTUNG
Die Ventilatordrehzahl und die Luftabblasrichtung können wie gewünscht eingestellt werden.
Um die VENTILATORDREHZAHL zu ändern, die
■
drücken.
Mit jedem Druck auf diese Taste wird die Ventilatordrehzahl der folgenden Reihenfolge nach geändert:
• Mit der Kontaktstellung
• Wenn die Betriebsgeräusche der Klimaanlage Ihren Schlaf beeinträchti-
gen, die Ventilatordrehzahl
Um die Luftstromrichtung vertikal zu ändern die
■
drücken.
Mit jedem Druck auf diese Taste wird der Winkel der horizontalen Klappe der
folgenden Reihenfolge nach geändert:
(5) → (schwenk) → (automatisch)
SCHWENK-Betrieb
SCHWENK-Betrieb benutzen, damit der Luftstrom alle Ecken des Raums erreicht.
Empfohlener Bereich der horizontalen Klappe
Normalerweise die
den.
Mit Position
KÜHLUNG oder LUFTTROCKNUNG und mit den Positionen
(3) oder (5) in der Betriebsart HEIZUNG
können Sie Einstellungen nach eigenen Wünschen
vornehmen.
HINWEIS:
• Falls bei Kühlbetrieb die Klimaanlage 1 Stunde lang mit einer Einstellung der horizontalen Klappen auf
oder
(5) betrieben wird, wird die LUFTSTROMRICHTUNG automatisch auf eine Stufe eingestellt, durch die das
Abtropfen von kondensiertem Wasser vermieden wird.
• Die vertikale LUFTSTROMRICHTUNG mit der Fernbedienung einstellen. Falls die horizontalen Klappen manuell
bewegt werden, kann es zu Störungen kommen.
• Wenn im Heizbetrieb die Temperatur des Luftstroms zu niedrig ist oder wenn der Enteisungsvorgang läuft, ist die
horizontale Klappenposition - auf
(1) eingestellt.
Automatische Steuerung der Luftabblas-
richtung
Wenn die Betriebsart AUTOMATISCH mit der
Taste gewählt wird, wird die Position der horizontalen Klappe automatisch so eingestellt, daß sie
einem Betriebsmodus entspricht, der effizienten
Betrieb ermöglicht.
(1) HEIZUNG
• Wenn die Temperatur des Luftstroms zu niedrig ist,
wird die Luft horizontal ausgeblasen.
• Wenn die Temperatur des Luftstroms ansteigt, wird
die Luft nach unten ausgeblasen.
(2) KÜHLUNG, LUFTTROCKNUNG
Die Luft wird horizontal ausgeblasen.
(3) VENTILATOR
Die Luft wird nach unten ausgeblasen.
-
(niedrig) → (mittel) → (hoch) → (automatisch)
(hoch) läßt sich der Raum stärker kühlen/heizen.
(niedrig) einstellen.
(1) → (2) → (3) → (4) →
(automatisch)-Position verwen-
(1) oder (2) in den Betriebsarten
Um die horizontale Richtung des Luftstroms
■
zu ändern, die vertikalen Klappen von Hand
verstellen.
Die Klappen voor Betriebsbeginn einstellen.
Da sich die horizontalen Klappen automatisch bewegen,
ist Vorsicht geboten, damit Ihre Finger nicht eingeklemmt
werden.
Kühlung
Lufttrock-
nung
Heizung
Taste ein-
Taste ein-
(4)
17
Page 18
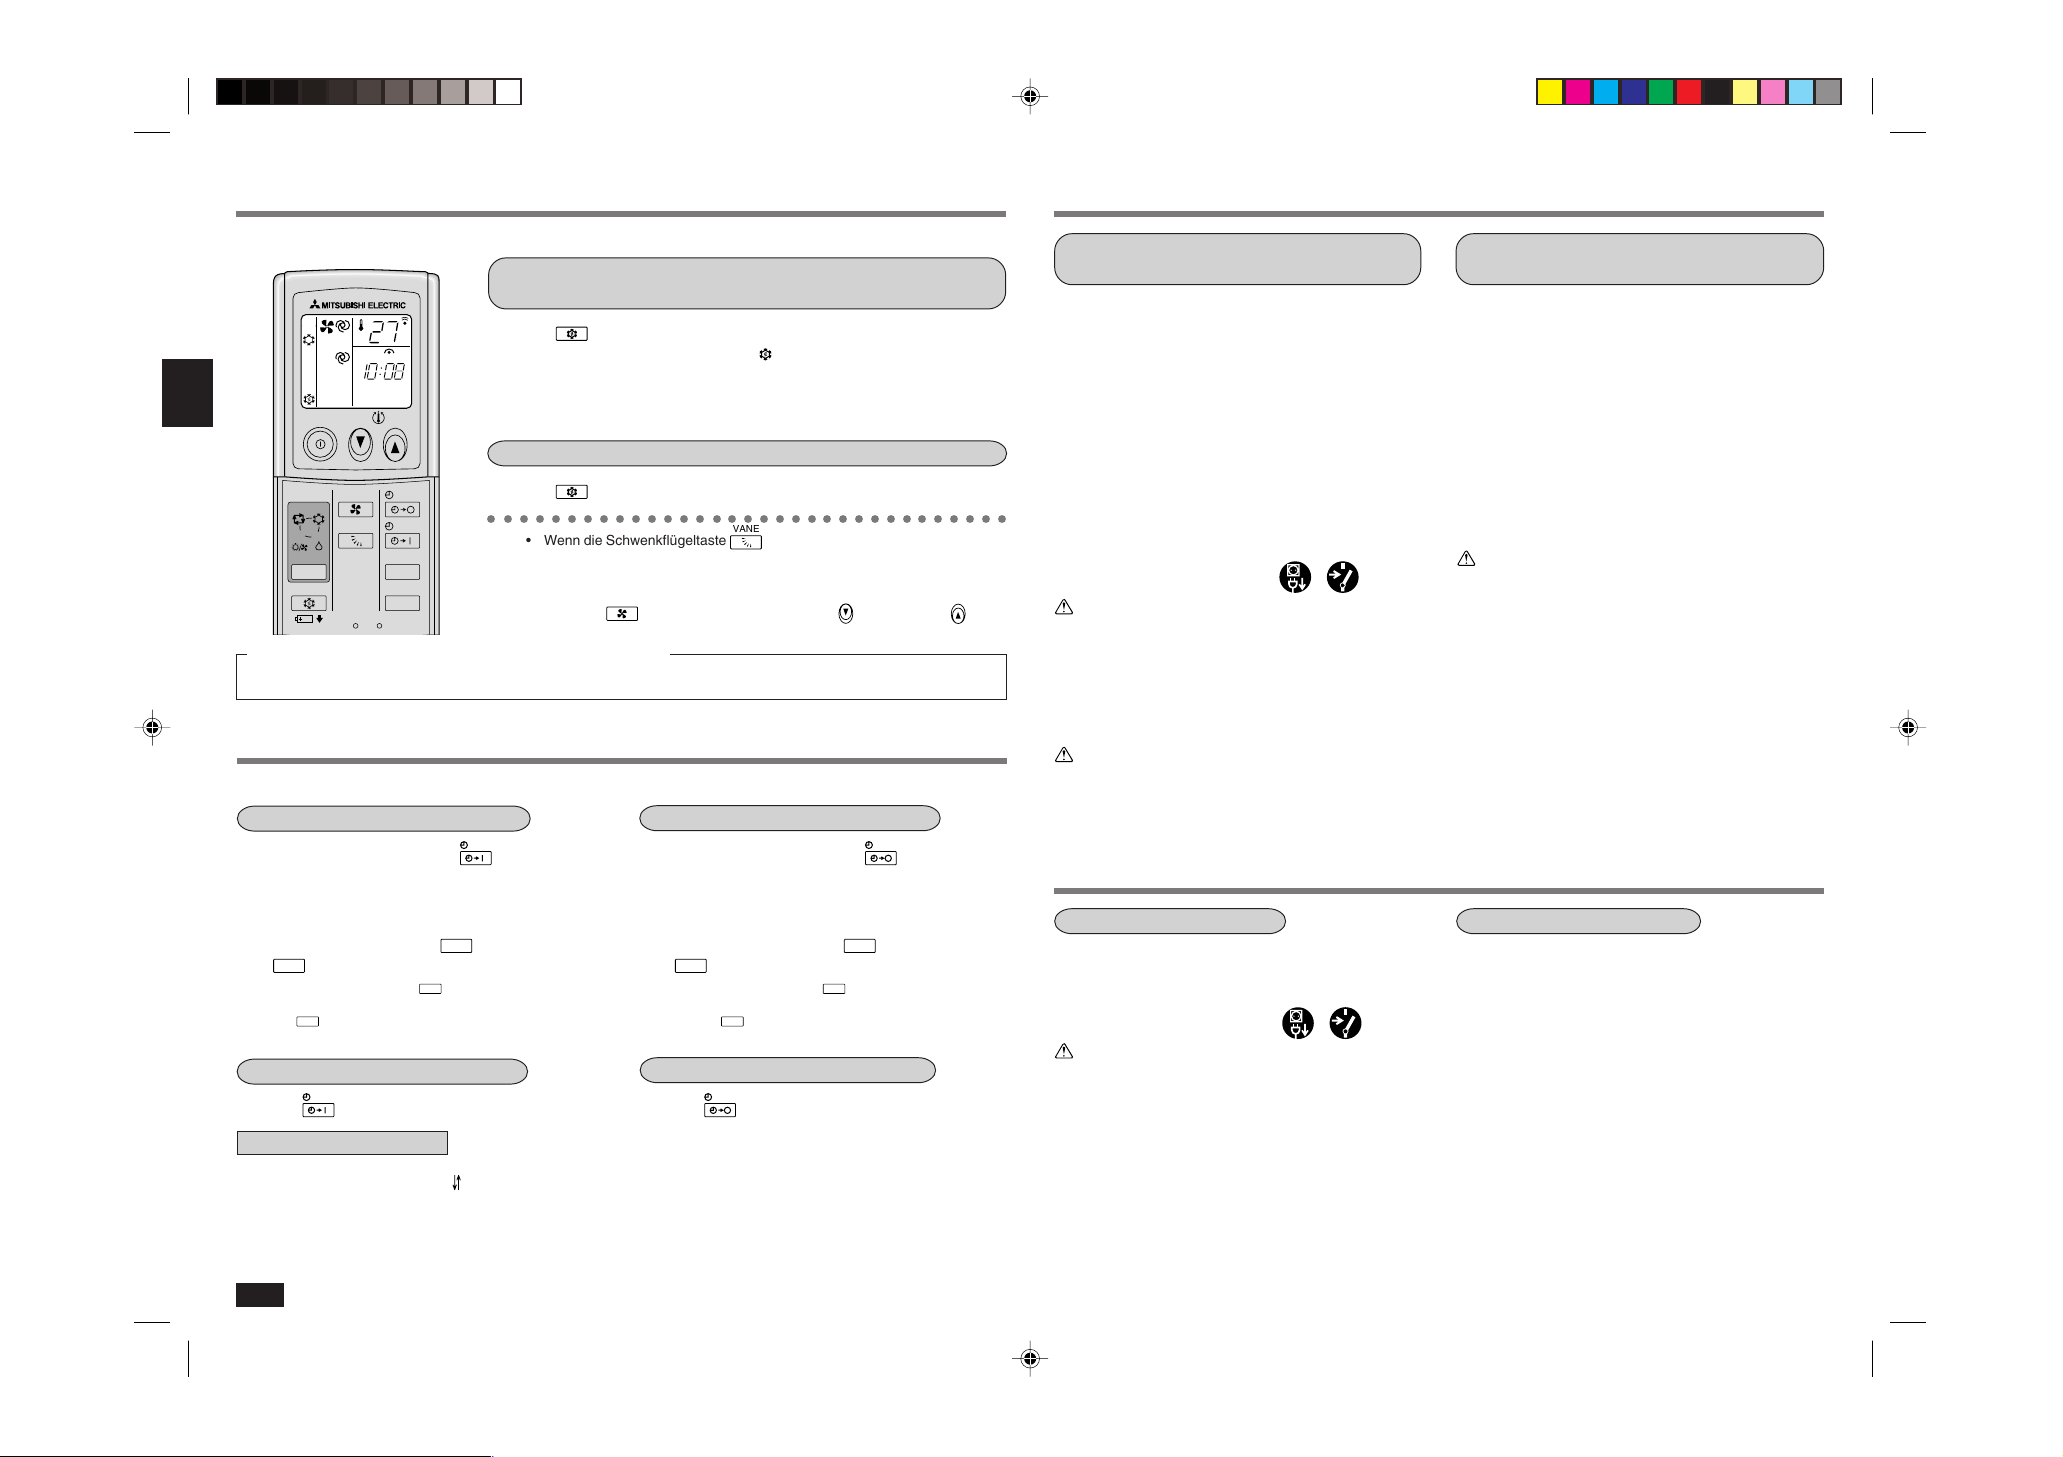
BETRIEBSART KÜHLEN IM SPARBETRIEB (ECONO COOL)
ON/OFF
FAN
TOO
WARM
TOO
COOL
VANE
MODE
ECONO COOL
STOP
START
HR.
MIN.
I FEEL
COOL
DRY
AMPM
CLOCK
˚C
AMPM
HEAT
/FAN
RESET CLOCK
START
HR.
MIN.
HR.
MIN.
START
STOP
HR.
MIN.
HR.
MIN.
STOP
ECONO COOL
ECONO COOL
VANE
FAN
TOO
WARM
TOO
COOL
LÄNGERE STILLSETZUNG
Diese Betriebsart benutzen, wenn Sie sich auch bei sparsamem Energieverbrauch im KÜHL-Betrieb wohlfühlen möchten.
Die folgenden Arbeitsgänge ausführen, wenn die Klimaanlage im MANUELLE KÜHLUNG arbeitet.
Die
■
Wenn im KÜHL-Betrieb die Betriebsart KÜHLEN IM SPARBETRIEB (ECONO
COOL) gewählt wird, führt die Klimaanlage in verschiedenen Arbeitsgängen je
nach Temperatur der Klimaanlage Schwenkbewegungen aus.
Auch wird TEMPERATUR EINSTELLEN (SET TEMPERATURE) automatisch
um 2°C höher als im KÜHL-Betrieb eingestellt.
Taste eindrücken.
Um die Betriebsart KÜHLEN IM SPARBETRIEB (ECONO COOL) freizugeben:
Die
■
○○○○○○○○○○○○○○○○○○○○○○○○○○○○○○○○○
• Wenn die Schwenkflügeltaste
• Die Taste
Was bedeutet “KÜHLEN IM SPARBETRIEB (ECONO COOL)”?
Ein fächelnder Luftstrom ist subjektiv kühler als ein konstanter. Dies ist der Grund, warum beim Kühlen eine angenehme Umgebungstemperatur
erzielt wird, obwohl die gewählte Temperatur automatisch 2°C höher als im KÜHL-Betrieb eingestellt wird. So wird Energie gespart.
Taste erneut eindrücken.
rend der Betriebsart KÜHLEN IM SPARBETRIEB (ECONO COOL) geän-
dert wird, wird die Betriebsart KÜHLEN IM SPARBETRIEB (ECONO COOL)
freigegeben.
der Timer EIN/AUS (ON/OFF) (unten erläutert) stehen zur Verfügung.
VENTILATOR (FAN), die Taste
gedrückt wird oder die Betriebsart wäh-
oder die Taste
sowie
BETRIEB MITTELS ZEITSCHALTUHR (EIN/AUS-TIMER)
Sie können den Timer für die Zeit, wenn Sie zu Bett gehen, wenn Sie nach Hause kommen, wenn Sie aufstehen usw. einstellen.
Einstellen des Einschalt-Timers
1 Während des Betriebs die
Mit jedem Druck auf diese Taste wird der EinschaltTimermodus zwischen EIN und AUS umgeschaltet.
Taste drücken.
2 Die gewünschte Einschaltzeit am Timer ein-
stellen, indem die
Taste verwendet werden.
Mit jedem Druck auf die
Zeit um eine Stunde vorausgestellt; mit jedem Druck
Taste wird die eingestellte Zeit um 10 Minuten
der
vorausgestellt.
Freigabe des Einschalt-Timers:
Die
■
Programmierter Timerbetrieb
Die Einschaltzeit und die Ausschaltzeit können in Kombination verwendet werden. Der Timer, dessen eingestellte Zeit zuerst
erreicht wird, arbeitet zuerst. (Die “ ” Markierung zeigt die Reihenfolge des Timerbetriebs an.)
• Falls die momentane Zeit nicht eingestellt wurde, ist Timerbetrieb nicht möglich.
HINWEIS:
Wenn ein Netzausfall auftritt oder die Stromversorgung bei aktivierter AUTO-START/STOPP-Zeitsteuerung ausgeschaltet
wird, wird die Timer-Einstellung annulliert. Da diese Modelle mit einer automatischen Neustartfunktion ausgestattet sind,
beginnt der Betrieb der Klimaanlage mit zurückgesetzter Zeitsteuerung bei erneutem Einschalten der Stromversorgung.
Taste drücken.
Taste und die
Taste wird die eingestellte
Einstellen des Ausschalt-Timers
1 Während des Betriebs die
Mit jedem Druck auf diese Taste wird der AusschaltTimermodus zwischen EIN und AUS umgeschaltet.
Taste drücken.
2 Die gewünschte Ausschaltzeit am Timer ein-
stellen, indem die
Taste verwendet werden.
Mit jedem Druck auf die
Zeit um eine Stunde vorausgestellt; mit jedem Druck
auf die
nuten vorausgestellt.
Taste wirdt die eingestellte Zeit um 10 Mi-
Freigabe des Ausschalt-Timers:
■
Die
Taste drücken.
Taste und die
Taste wird die eingestellte
Wenn die Klimaanlage für längere Zeit
nicht verwendet werden soll:
1 Die Klimaanlage für drei oder vier Stunden
im Ventilatorbetrieb laufen lassen, um die
Innenseite der Klimaanlage zu trocknen.
Baureihe: KÜHLUNG und HEIZUNG:
• Zur Ausführung der Betriebsart VENTILATOR (FAN)
in der Betriebsart MANUELLE KÜHLUNG die Einstellung mit der Fernbedienung auf die Höchsttem-
peratur vornehmen. (Siehe Seite 17.)
Baureihe: NUR KÜHLUNG:
• Den VENTILATOR-Betrieb wählen. (Siehe Seite 17.)
2 Den Trennschalter ausschalten und/oder den
Netzstecker aus der Netzsteckdose herausziehen.
VORSICHT:
Wenn die Klimaanlage für längere Zeit nicht benutzt
werden soll, den Trennschalter ausschalten oder den
Netzstecker aus der Netzsteckdose herausziehen.
Schmutz könnte sich an der Klimaanlage ansammeln und
ein Feuer verursachen.
3 Die Batterien aus der Fernbedienung entfernen.
VORSICHT:
Damit keine Flüssigkeit austritt, alle Akkus herausnehmen, wenn die Fernbedienung für längere Zeit nicht benutzt wird.
WARTUNG
Vor Beginn der Wartung
Den Trennschalter ausschalten und/oder den
■
Netzstecker aus dem Netzanschluß herausziehen.
VORSICHT:
Wenn die Anlage gereinigt werden soll, muß sie ausgeschaltet werden. Dazu den Netzstecker aus der Netzsteckdose herausziehen oder den Trennschalter ausschalten. Da der Ventilator während des Betriebs mit
hoher Drehzahl dreht, kann es zu Verletzungen kommen.
18
Wenn die Klimaanlage wieder verwendet
werden soll:
1 Den Luftfilter reinigen und danach wieder in
die Inneneinheit einsetzen.
(Für das Reinigen des Luftfilters siehe Seite 19.)
2 Darauf achten, daß der Lufteinlaß und der
Luftauslaß der Innen- und Außeneinheiten
nicht durch etwaige Objekte blockiert werden.
3 Darauf achten, daß der Erdungsdraht richtig
angeschlossen ist.
VORSICHT:
Unbedingt die Klimaanlage erden.
Niemals den Erdungsdraht an ein Gasrohr, Wasserrohr,
an einen Blitzableiter oder an den Erdungsdraht eines
Telefons anschließen. Falls die Erdung falsch ausgeführt
ist, kann es zu elektrischen Schlägen kommen.
Reinigen der Inneneinheit
Die Anlage mit einem weichen, trockenen
■
Tuch reinigen.
• Bei starker Verschmutzung wischen Sie die Anlage
mit einem Tuch, das in einer Lösung aus Waschmittel und lauwarmem Wasser befeuchtet worden
ist.
• Niemals Benzin, Benzol, Polierpulver und Insektenvertilgungsmittel verwenden. Die Einheit könnte
beschädigt werden.
Page 19
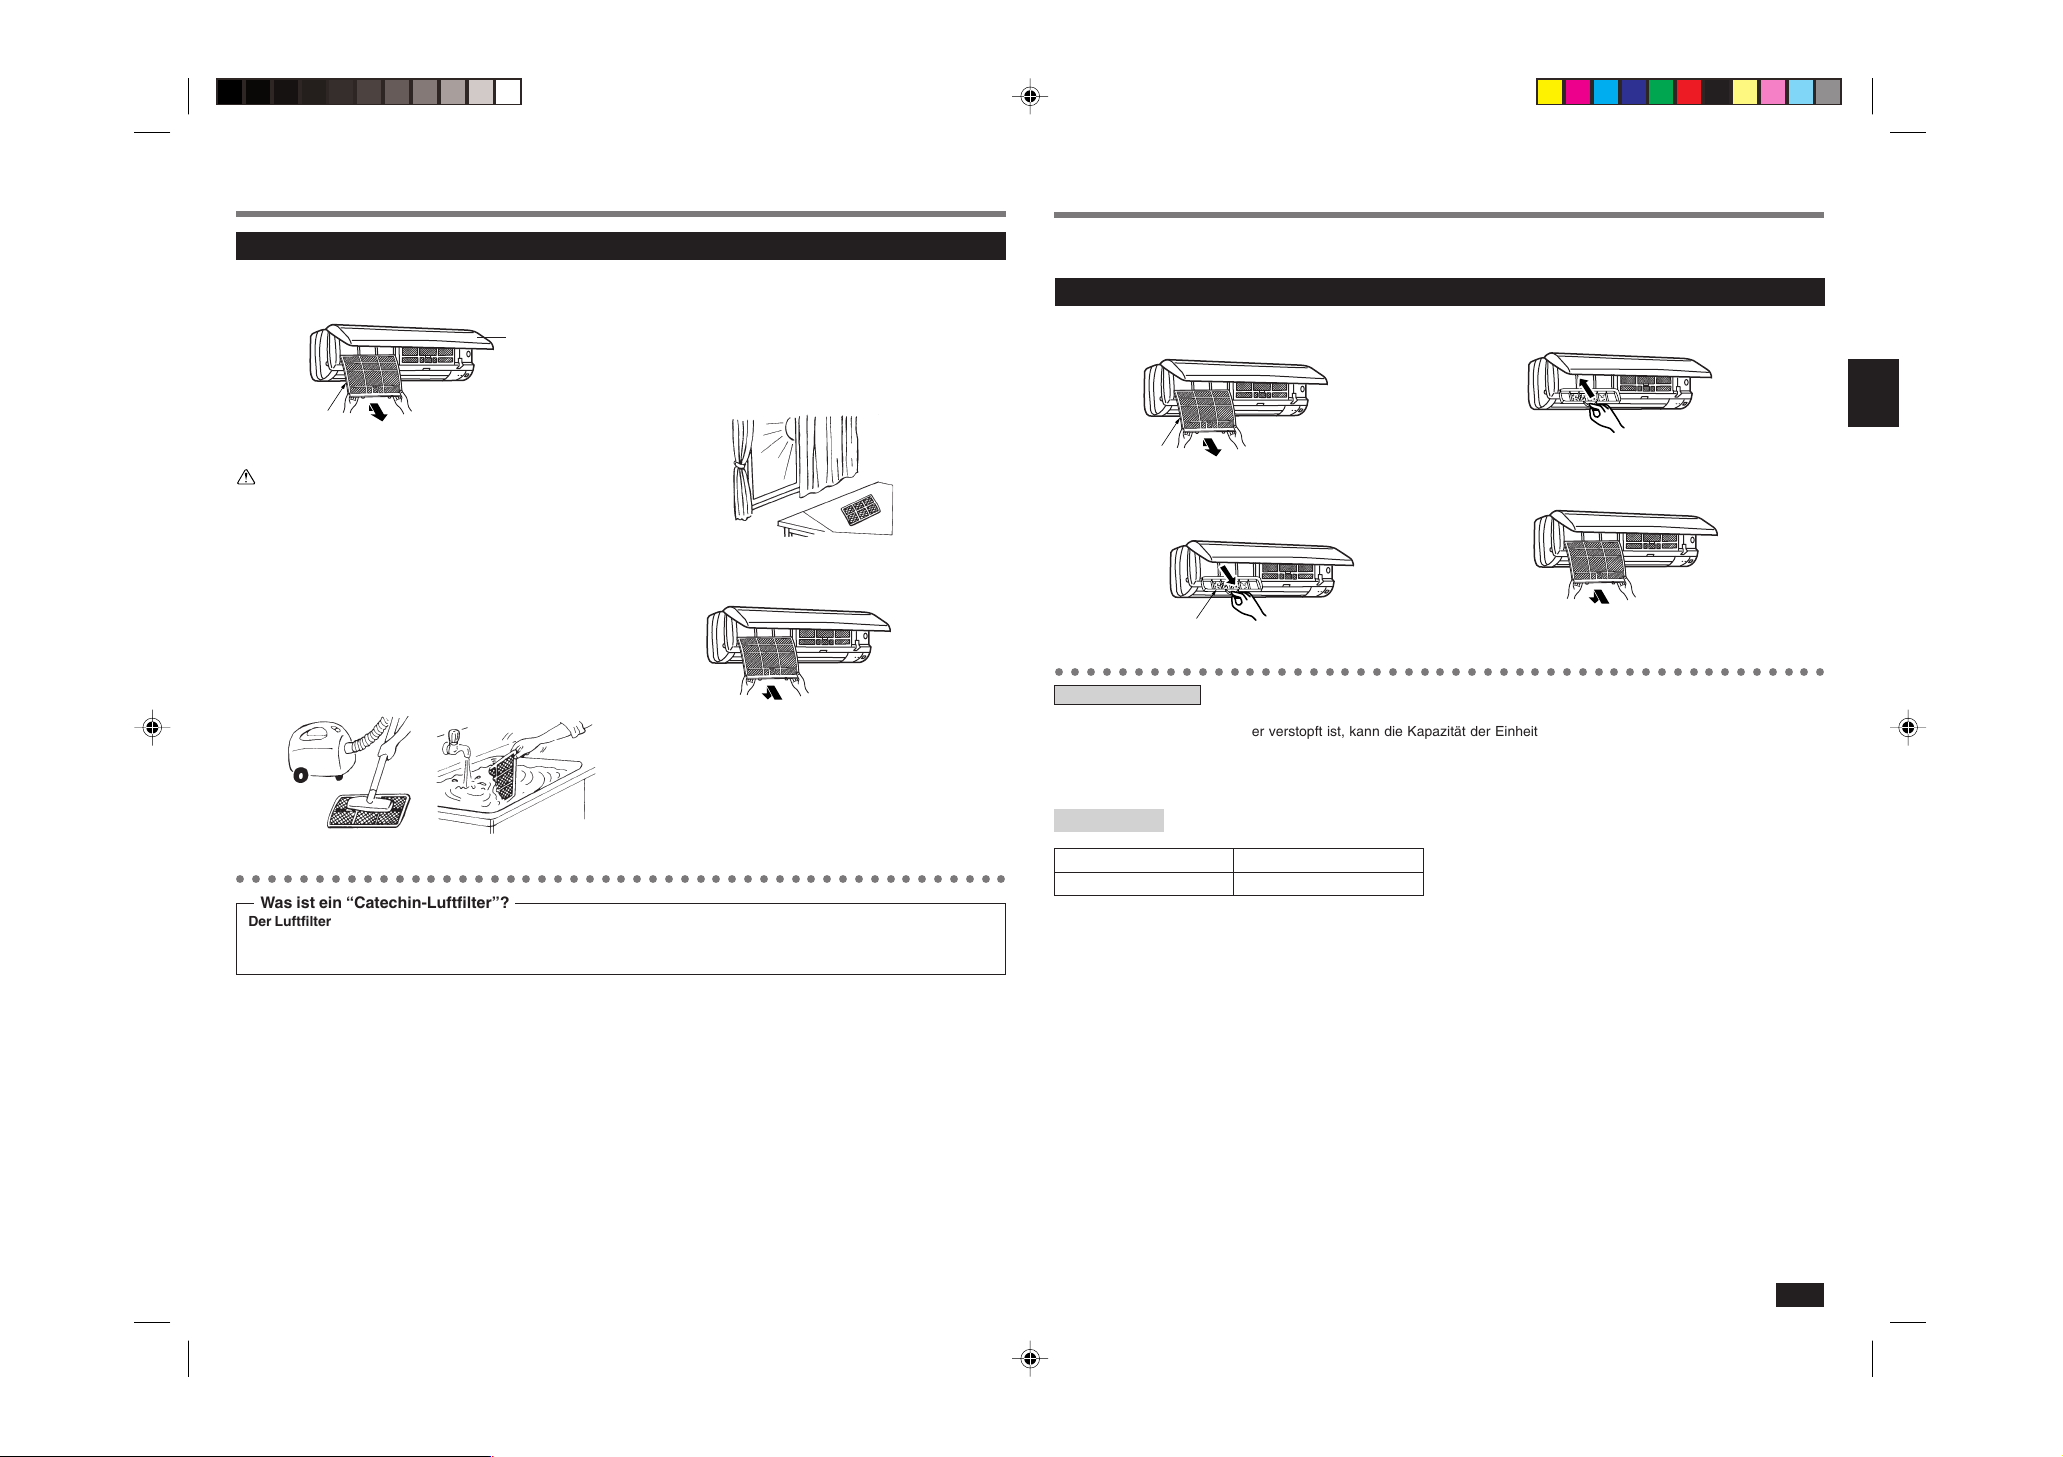
REINIGEN DES CATECHIN-LUFTFILTERS
AUSWECHSELN DES LUFTREINIGUNGSFILTERS
Reinigen des Catechin-Luftfilters (etwa alle zwei Wochen)
1 Den Catechin-Luftfilter entfernen.
Frontblende
öffnen. Filter
entfernen/austauschen.
Catechin-Luftfilter
VORSICHT:
Fassen Sie beim Entfernen des Catechin-Luftfilters nicht
die Metallteile der Inneneinheit an.
Anderenfalls können Sie sich Verletzungen zuziehen.
Entfernen.
2 Den Catechin-Luftfilter mit einem Staubsau-
ger reinigen oder mit Wasser auswaschen.
• Bei starker Verschmutzung in einer Lösung aus
Waschmittel und lauwarmem Wasser waschen.
• Niemals heißes Wasser (50°C oder höher) verwenden, da der Filter sonst verformt werden kann.
3 Nach Auswaschen mit lauwarmem Wasser
den Luftfilter an einem schattigen Platz
gründlich trocknen lassen.
• Setzen Sie den Catechin-Luftfilter keiner direkten
Sonneneinstrahlung aus und trocknen Sie ihn nicht
in der Nähe von offenem Feuer.
4 Den Catechin-Luftfilter wieder einsetzen.
Einbauen.
Wenn sich das Aufnahmevermögen des Filters aufgrund von Schmutz usw. verringert, muss der Luftreinigungsfilter ausgewechselt werden.
Austauschen des Luftreinigungsfilters (etwa alle vier monate)
1 Den Catechin-Luftfilter entfernen.
Catechin-Luftfilter
2 Den Luftreinigungsfilter (Weißer Balg-Typ)
entfernen.
Luftreinigungsfilter
○○○○○○○○○○○○○○○○○○○○○○○○○○○○○○○○○○○○○○○○○○○○○○○○○
Luftreinigungsfilter
• Falls der Luftreinigungsfilter verstopft ist, kann die Kapazität der Einheit reduziert werden oder Wasser am Luftauslaß
kondensieren.
• Der Luftreinigungsfilter ist als Einwegfilter ausgeführt. Er sollte etwa alle vier Monate ausgetauscht werden. Falls jedoch
der Filter dunkelbraun verfärbt ist, den Filter häufiger erneuern.
3 Einen neuen Luftreinigungsfilter einbauen.
4 Den Catechin-Luftfilter installieren und dann
die Frontabdeckung fest verschließen.
○○○○○○○○○○○○○○○○○○○○○○○○○○○○○○○○○○○○○○○○○○○○○○○○○
Was ist ein “Catechin-Luftfilter”?
Der Luftfilter ist mit Catechin, einem natürlichen Stoff, der im Tee enthalten ist, beschichtet. Der Catechin-Luftfilter
deodoriert Geruchspartikel und schädliche Gase wie Formaldehyd, Ammoniak und Acetaldehyd. Außerdem unterbindet Catechin die Aktivität der am Filter haftenden Viren.
Optionale Teile Optionale Teile sind bei Ihrem Fachhändler erhältlich.
Teilebezeichnung Luftreinigungsfilter
Teile-Nummer MAC-1300FT
19
Page 20
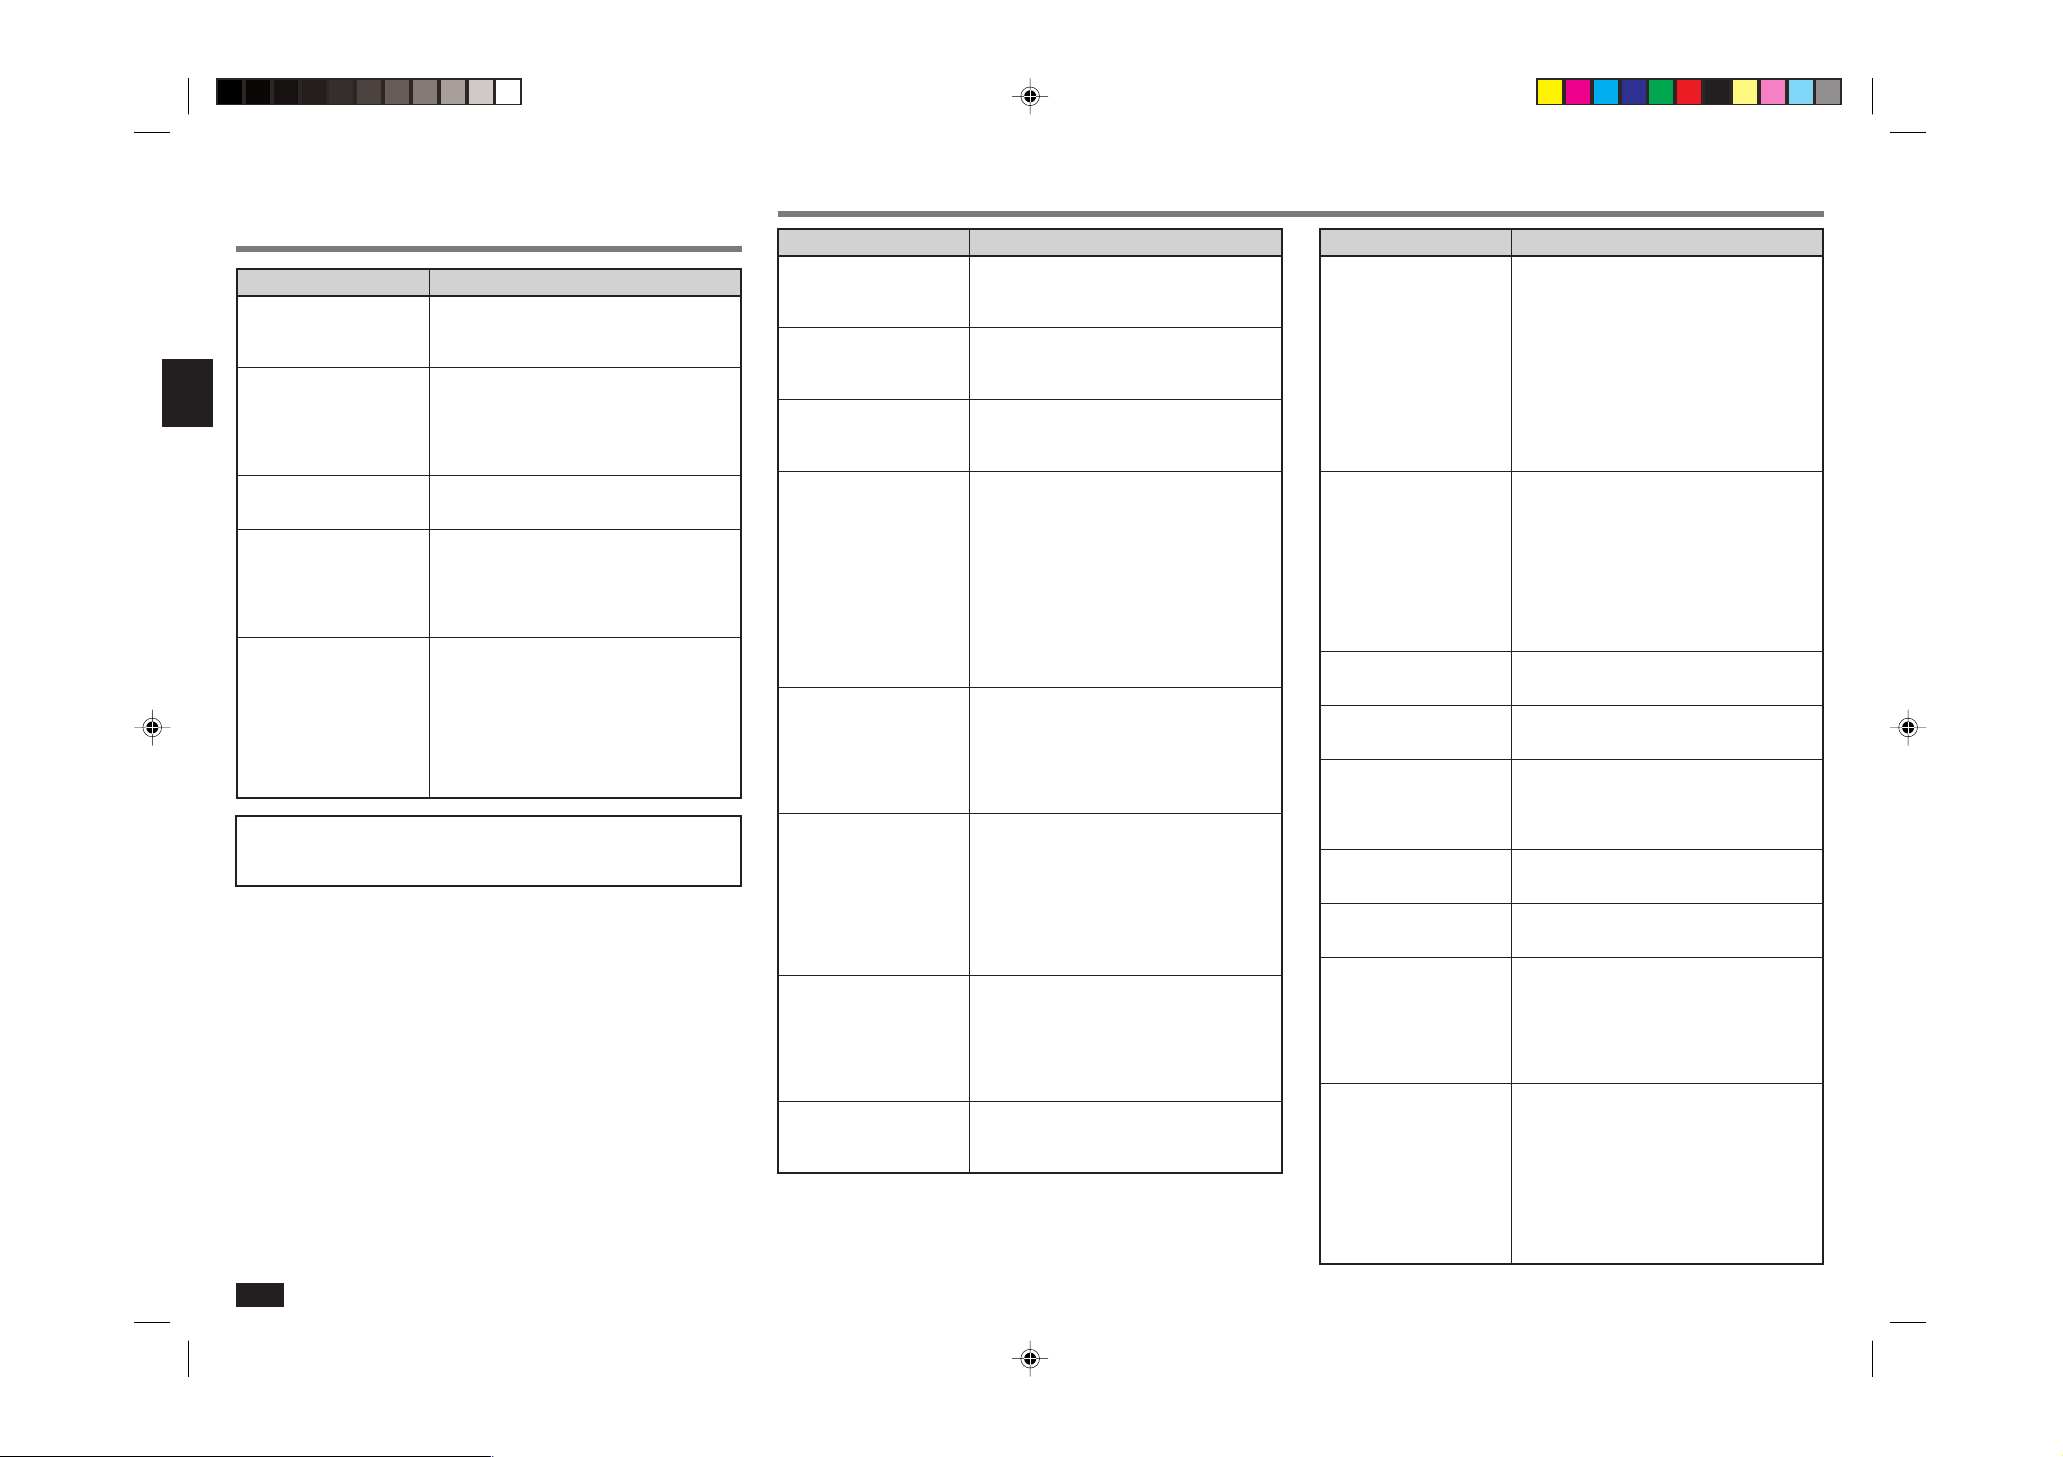
FOLGENDE PUNKTE NOCHMALS ÜBERPRÜFEN
WENN SIE EINE STÖRUNG VERMUTEN
BEVOR SIE SICH AN DEN KUNDENDIENST WENDEN
Frage
Die Klimaanlage arbeitet
nicht.
Effektive Beheizung oder
Kühlung nicht möglich.
Die Luft von der Inneneinheit riecht ungewöhnlich.
Die Anzeige der Fernbedienung erscheint gar nicht
oder ist dunkel. Die Inneneinheit reagiert nicht auf das
Signal der Fernbedienung.
Wenn es zu Stromausfall
kommt.
Falls nach Überprüfung der obigen Punkte die Störung der Klimaanlage
nicht behoben werden kann, die Klimaanlage nicht weiterverwenden und
Ihren Fachhändler benachrichtigen.
In den folgenden Fällen, den Betrieb stoppen und Ihren Fachhändler benachrichtigen.
• Wenn Wasser aus der Inneneinheit läuft.
• Wenn die linke Betriebsanzeigeleuchte blinkt.
• Wenn der Leistungsschalter häufig herausspringt.
• Das Signal der Fernbedienung kann in einem Raum mit bestimmten Leucht-
stofflampen (Hochspannungszündungen usw.) nicht empfangen werden.
• In Regionen mit schwachem Empfangssignal kann der Betrieb der Klimaan-
lage den Rundfunk- oder Fernsehempfang stören. In diesem Fall ist mögli-
cherweise ein Verstärker für das betroffene Gerät erforderlich.
• Wenn ein Gewitter naht (Donner usw.), den Betrieb stoppen und den Netzstecker ziehen oder den Trennschalter ausschalten. Bei Nichtbeachtung kön-
nen die elektrischen Teile beschädigt werden.
Zu prüfende Punkte oder Mittel
• Ist der Leistungsschalter eingeschaltet?
• Ist die Sicherung durchgebrannt?
• Ist der Einschalt-Timer eingestellt? (Seite 18)
• Ist die Temperatureinstellung richtig? (Seite 17)
• Ist der Filter sauber? (Seite 19)
• Sind Lufteinlaß und Luftauslaß von Innen- oder
Außeneinheit blockiert?
• Ist ein Fenster oder eine Tür geöffnet?
• Ist der Filter sauber? (Seite 19)
• Sind die Akkus leer? (Seite 15)
• Ist die Polarität (+,-) der Akkus richtig? (Seite
15)
• Werden Tasten auf der Fernbedienung eines
anderen elektrischen Geräts gedrückt?
• Startet die Klimaanlage den Betrieb wieder?
Wenn die Klimaanlage vor dem Stromausfall gearbeitet hat, muß die Klimaanlage wieder zu arbeiten beginnen, da diese Modelle mit einer automatischen Startwiederholungsfunktion ausgestattet sind. (Siehe dazu Beschreibung der “AUTOMATISCHEN STARTWIEDERHOLUNGSFUNKTION”, Seite 16).
Die Klimaanlage arbeitet etwa
drei Minuten nicht, wenn sie
wieder eingeschaltet wird.
Krachgeräusche können
vernommen werden.
Die Luft von der Inneneinheit riecht ungewöhn-
lich.
Ventilator stoppt während
LUFTTROCKNUNG-Betrieb.
Geräusch von fließendem
Wasser kann vernommen
werden.
Ein Brummen ist zu vernehmen.
Der Raum kann nicht ausreichend gekühlt werden.
Aus dem Luftauslaß der
Inneneinheit kommt Dunst.
Frage
Antwort (keine Störung)
• Dadurch wird die Klimaanlage auf Befehl von
dem Mikroprozessor geschützt. Etwas warten.
• Diese Geräusche werden durch Expansion/Kontraktion der Frontblende usw. aufgrund von
Temperaturänderungen verursacht.
• Die Klimaanlage saugt den Geruch einer Wand,
eines Teppichs, von Möbelstücken, Kleidern usw.
auf und bläst ihn mit der Luft ab.
• In der Betriebsart LUFTTROCKNUNG arbeitet
die Anlage mit dem gleichen Kältemittelkreislauf
wie in der Betriebsart KÜHLUNG. Die Betriebszeit LUFTTROCKNUNG muß verringert werden,
um die Luftfeuchtigkeit zu senken, ohne daß die
Raumtemperatur zu sehr absinkt. Daher unterbricht der Kompressor gelegentlich den Betrieb
und das Gebläse der Innenanlage schaltet ebenfalls zum gleichen Zeitpunkt ab. Dadurch wird
verhindert, daß sich am Wärmetauscher Kondenswasser erneut verdämpft.
• Dieses Geräusch wird durch das in der Klimaanlage fließende Kältemittel verursacht.
• Dieses Geräusch wird durch das im Wärmetauscher fließende Kondenswasser verursacht.
• Dieses Geräusch wird durch das Abtauen des
Wärmetauschers verursacht.
• Dieser Ton wird hörbar, wenn vom Ablaß-
schlauch Frischluft angesaugt wird und dadurch
Wasser, daß in den Ablaßschlauch gelangt war,
wiederum auf die Ablaßhaube oder das
Lüftungsgebläse gespritzt wird.
Dieser Ton ist auch vernehmbar, wenn bei starkem Wind Luft in den Ablaßschlauch geblasen
wird.
• Wenn in einem Raum ein Belüftungsgebläse
oder ein Gaskocher benutzt wird, erhöht sich die
Belastung der Kühlung, so daß die Kühlwirkung
nicht ausreicht.
• Wenn die Außenlufttemperatur hoch ist, ist die
Kühlwirkung möglicherweise nicht ausreichend.
• Die kalte Luft aus der Klimaanlage kühlt die in
der Raumluft enthaltene Feuchtigkeit schnell
herab, und diese ist dann als Nebel sichtbar.
Frage
Luftabblasrichtung verändert während des Betriebs.
Der Winkel der horizontalen Klappe kann nicht mit
der Fernbedienung eingestellt werden.
Wasser tritt an der Außen-
einheit aus.
Aus der Außeneinheit kommt
weißer Rauch.
Beim Heizen erfolgt kurzfristig kein Ausblasen der Luft.
In der Betriebsart Heizung
wird der Betrieb etwa 10 Minuten lang unterbrochen.
Manchmal ist ein Zischen
vernehmbar.
Der Raum kann nicht ausreichend beheizt werden.
In einem System mit mehreren Anlagen wird die nicht in
Betrieb befindliche Innenanlage warm und in der Anlage
entsteht ein Geräusch, das
fließendem Wasser ähnelt.
Die Klimaanlage startet den
Betrieb nur bei eingeschaltetem Netzstrom, auch
wenn Sie die Anlage nicht
mit der Fernbedienung betätigen.
Answer (not a malfunction)
• Wenn die Klimaanlage in den Betriebsarten KÜHLUNG oder LUFTTROCKNUNG arbeitet und bei
abwärts gerichtetem Luftstrom 1 Stunde lang läuft,
wird die Richtung des Luftstroms automatisch auf
horizontal eingestellt, damit das Heruntertropfen
von kondensiertem Wasser vermieden wird.
• Wenn in der Betriebsart HEIZUNG die Temperatur des Luftstroms zu niedrig ist oder wenn der
Enteisungsvorgang läuft, wird die horizontale
Klappenposition automatisch auf horizontal eingestellt.
• Während der Betriebsarten KÜHLUNG und
LUFTTROCKNUNG sind die Rohrleitung oder
die Anschlußbereiche der Rohrleitung gekühlt,
wodurch sich Kondenswasser bilden kann.
• Während des Heizbetriebs schmilzt am Außeneinheit entstandenes Eis beim Abtauvorgang
und tropft ab.
• Während des Heizbetriebs tropft am Wärmetauscher entstehendes Kondensat ab.
• Im Heizbetrieb wird beim Defrosten Dampf erzeugt, der wie weißer Rauch aussieht.
• Bitte warten, da die Klimaanlage das Ausblasen
von Warmluft vorbereitet.
• Die Außeneinheit wird enteist (Enteisungsbetrieb).
Bitte warten, da dies 10 Minuten dauert. (Wenn
die Außentemperatur zu niedrig und die Luftfeuchtigkeit zu hoch sind, bildet sich Reif.)
• Dieses Geräusch entsteht, wenn der Kältemittelstrom innerhalb der Klimaanlage geschaltet wird.
• Wenn die Außentemperatur niedrig ist, ist die
Heizwirkung möglicherweise nicht ausreichend.
• Auch wenn die Innenanlage nicht arbeitet, fließt
weiterhin eine geringe Menge Kältemittel hinein.
• Diese Modelle sind mit einer automatischen
Startwiederholungsfunktion ausgestattet. Wenn
der Netzstrom ausgeschaltet wird ohne, daß die
Klimaanlage mit der Fernbedienung gestoppt
wurde und wieder eingeschaltet wird, startet die
Klimaanlage den Betrieb automatisch in der gleichen Betriebsart wie der, die mit der Fernbedienung unmittelbar vor Abschalten des Netzstroms
eingestellt wurde.
20
Page 21
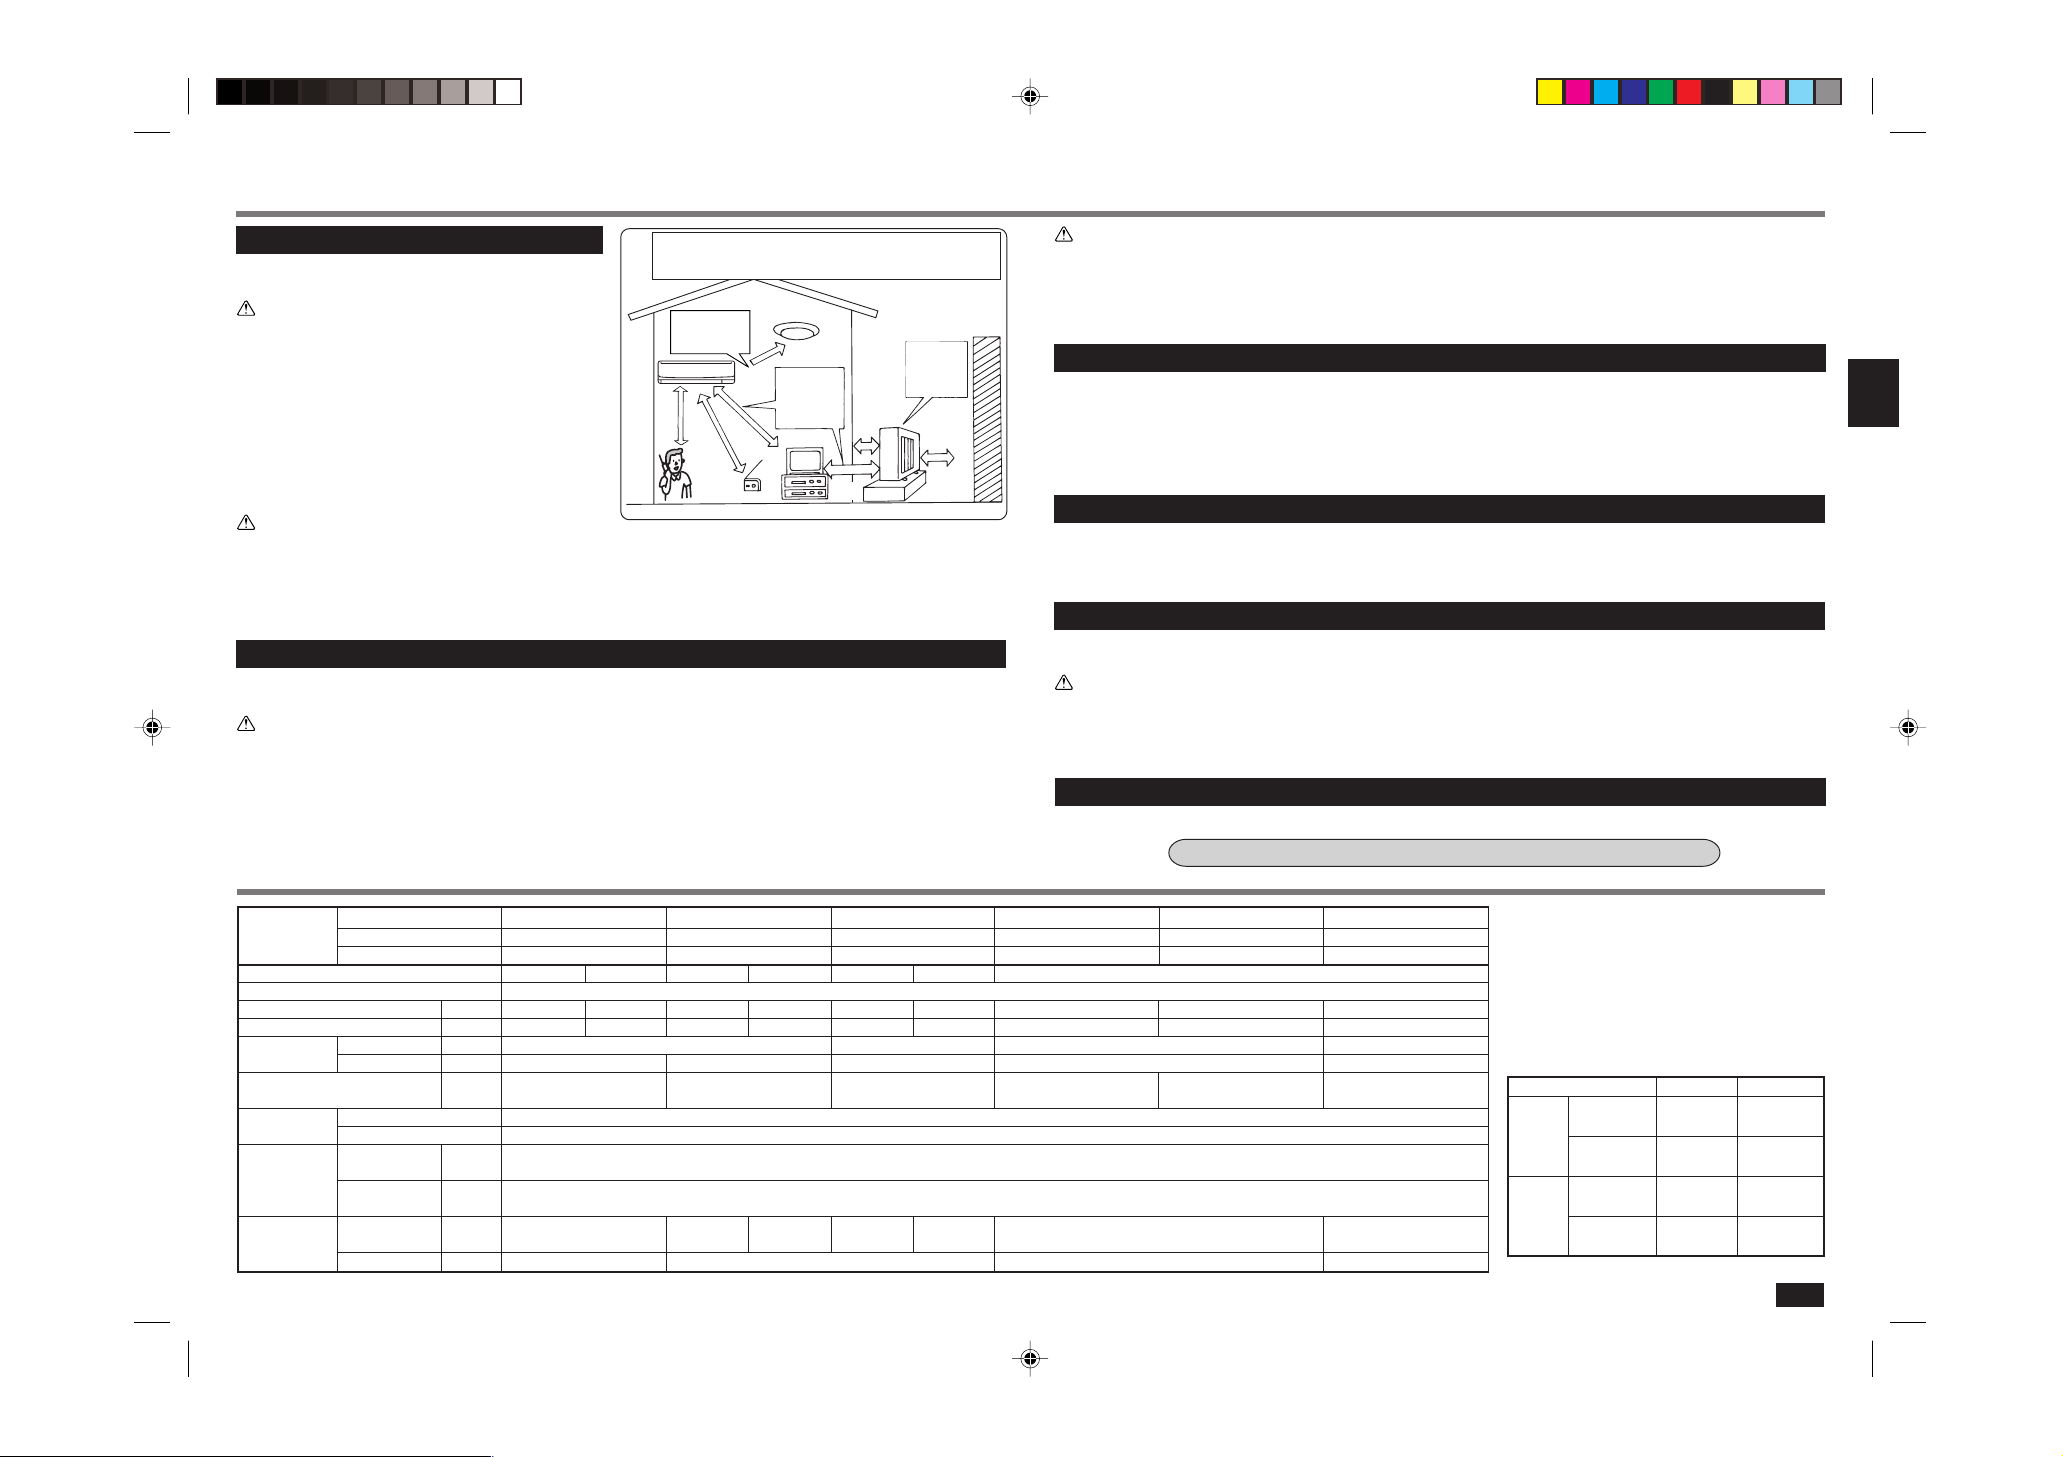
INSTALLATION, NEUAUFSTELLUNG UND PRÜFUNG
Installationsort
Vermeiden Sie ein Installieren der Klimaanlage an den folgende Orten.
Der Installationsort der Außeneinheit sollte mindestens 3 m von den Antennen für Fernseh-,
Rundfunkgeräte usw. entfernt sein. Halten Sie in Regionen mit schwachem Empfangssignal einen größeren Abstand zwischen der Außeneinheit und den Antennen des betroffenen Geräts
ein, wenn der Betrieb der Klimaanlage den Rundfunk- oder Fernsehempfang stört.
• Orte mit brennenden Gasen.
Schnurloses
Telefon
order
Mobiltelefon
Leuchtstofflampe mit
Hochspannungszündung
1 m
oder mehr
Radio
Zur Verhinderung
von Bildverzerrungen
oder Rauschen einen
Abstand einhalten.
Fernseher
3 m oder
mehr
100 mm
oder mehr
Gut
belüfteter,
trockener
Ort
500 mm
oder mehr
Wand usw.
VORSICHT:
Niemals die Klimaanlage an einem Ort installieren, an dem
brennbare Gase austreten können.
Falls brennbare Gase austreten und sich in der Nähe der Klimaanlage ansammeln, kann es zu einer Explosion kommen.
• Orte mit Maschinenöl.
• Orte mit salzhaltiger Luft (Meeresnähe).
• Orte an welchen schwefelhaltige Gase auftreten, wie
z.B. in Thermalbädern.
• Orte, an welchen Ölspritzer oder ölhaltiger Rauch auf-
treten.
• Wo Hochfrequenz- oder Wireless-Geräte betrieben
werden.
Um den Einfluß einer
Leuchtstofflampe zu
vermeiden, die
Klimaanlage möglichst weit
davon entfernt installieren.
1 m
oder mehr
WARNUNG:
Wenn die Klimaanlage zwar läuft, aber den Raum (je nach Modell) nicht kühlt oder heizt, ziehen Sie bitte Ihren Fachhändler zu Rate, da möglicherweise Kältemittel austritt. Bei der Ausführung von Reparaturarbeiten darauf achten,
den Kundendiensttechniker zu fragen, ob Kältemittel austritt oder nicht.
Das Kältemittel, das in die Klimaanlage gefüllt wurde, ist sicher. Kältemittel tritt normalerweise nicht aus. Wenn Kälte-
mittel aber in Innenräumen austritt und mit den Flammen eines Heizgebläses, einer Raumheizung, eines Ofens etc in
Kontakt kommt, entstehen schädliche Substanzen.
Elektrische Arbeiten
• Einen separaten Schaltkreis für die Stromversorgung der Klimaanlage verwenden.
• Unbedingt die Kapazität des Leistungsschalters beachten.
WARNUNG:
• Der Kunde sollte diese Klimaanlage nicht selbst installieren, da es anderenfalls zu Feuer- und Stromschlaggefahr,
Verletzungen durch ein Herabfallen der Einheit, Wasseraustritt usw. kommen kann.
• Keinen provisorischen Anschluß des Netzkabels vornehmen, keine Kabelverlängerung verwenden und unbedingt
vermeiden, mehrere Geräte an einen Wechselstromanschluß anzuschließen. Schlechte Kontakte, schlechte Isolierung Überschreiten der zulässigen Stromstärke usw. können zu Bränden oder Stromschlägen führen.
Wenden Sie sich dafür an Ihren Fachhändler.
TECHNISCHE DATEN
VORSICHT:
• Unbedingt die Klimaanlage erden.
Niemals den Erdungsdraht an ein Gasrohr, Wasserrohr, an einen Blitzableiter oder an den Erdungsdraht eines
Telefons anschließen. Falls die Erdung falsch ausgeführt ist, kann es zu elektrischen Schlägen kommen.
• Einen Erdschlußschalter abhängig von dem Installationsort (feuchter Ort uws.) der Klimaanlage installieren.
Falls kein Erdschlußschalter installiert wird, kann es zu elektrischen Schlägen kommen.
Prüfung und Wartung
• Wenn die Klimaanlage für einige Jahreszeiten verwendet wird, kann die Kapazität aufgrund von Schmutzansammlungen
im Inneren der Einheit nachlassen.
• Abhängig von den Betriebsbedingungen, kann es aufgrund von Schmutz, Staub usw. zu Geruchbelästigung oder schlechtem Abfließen des bei der Lufttrocknung anfallenden Wassers kommen.
• Zusätzlich zu der normalen Wartung wird empfohlen, die Prüfung und Wartung von einem Fachmann ausführen zu
lassen (gegen eine Gebühr). Wenden Sie sich dafür an Ihren Fachhändler.
Betriebsgeräusche beachten
• Keine Gegenstände in der Nähe des Luftauslasses der Außeneinheit anordnen. Anderenfalls kann die Kapazität nach-
lassen und die Betriebsgeräusche können zunehmen.
• Falls ungewöhnliche Betriebsgeräusche vernommen werden, wenden Sie sich bitte an Ihren Fachhändler.
Neuaufstellung
• Wenn die Klimaanlage aufgrund von Umbauten, Umzügen usw. an einem anderen Ort neu aufgestellt werden muß, sind
spezielle Techniken und Arbeiten erforderlich.
WARNUNG:
Reparaturen von Neuaufstellungen dürfen nicht vom Kunden selbst ausgeführt werden.
Falls diese Arbeiten falsch ausgeführt werden, kann es zu einem Feuer, zu elektrischen Schlägen, zu Verletzungen
aufgrund eines Herabfallens der Einheit, zu Austritt von Wasser usw. kommen. Wenden Sie sich dafür an Ihren Fachhändler.
Verschrottung
Um dieses Produkt zu verschrotten, wenden Sie sich bitte an Ihren Fachhändler.
Falls Sie Fragen haben sollten, wenden Sie sich bitte an Ihren Fachhändler.
Modell Innen
Namen einstellen
Außen
Funktion
MSH-A07YV MSH-A09YV MSH-A12YV
MSC-A07YV MSC-A09YV MSC-A12YV
MUH-A07YV MUH-A09YV MUH-A12YV
Kühlung Heizung Kühlung Heizung Kühlung Heizung
Stromversorgung
KapazitätkW
Leistungsaufnahme kW
Gewicht
Kältemittel-
Füllkapazität (R410A)
IP-code
Zul.
Innen kg
Außen kg
kg
Innen
Außen
Ansaugseite MPa
2,3 2,5 2,55 3,05 3,5 3,9
0,715 0,69 0,795 0,84 1,09 1,08
35 38 40
0,62 1,00 1,00
Betriebsdruck
Störpegel
Auslaßseite MPa
Innen
(Hoch/Mittel/Niedrig)
dB(A)
Außen dB(A)
36/31/25 36/31/25 39/32/25 40/33/26 39/33/26
47 49
MS-A07YV MS-A09YV MS-A12YV
MSC-A07YV MSC-A09YV MSC-A12YV
MU-A07YV MU-A09YV MU-A12YV
~ /N, 230V, 50Hz
2,3 2,55 3,5
0,715 0,795 1,14
910
0,60 0,60 0,75
IP20
IP24
1,64
4,15
36/31/25 40/33/26
HINWEISE:
1. Nennbedingungen
Kühlung
910
34 36
45 49
Kühlung — Innen: 27°C DB, 19°C WB
Außen: 35°C DB
Heizung — Innen: 20°C DB
Außen: 7°C DB, 6°C WB
2. Garantierter Betriebsbereich
Obere Grenze
Kühlung
Untere Grenze
Obere Grenze
Heizung
Untere Grenze
Innen Außen
32°C DB 43°C DB
23°C WB —
21°C DB 21°C DB
15°C WB —
27°C DB 24°C DB
— 18°C WB
20°C DB -10°C DB
— -11°C WB
21
Page 22
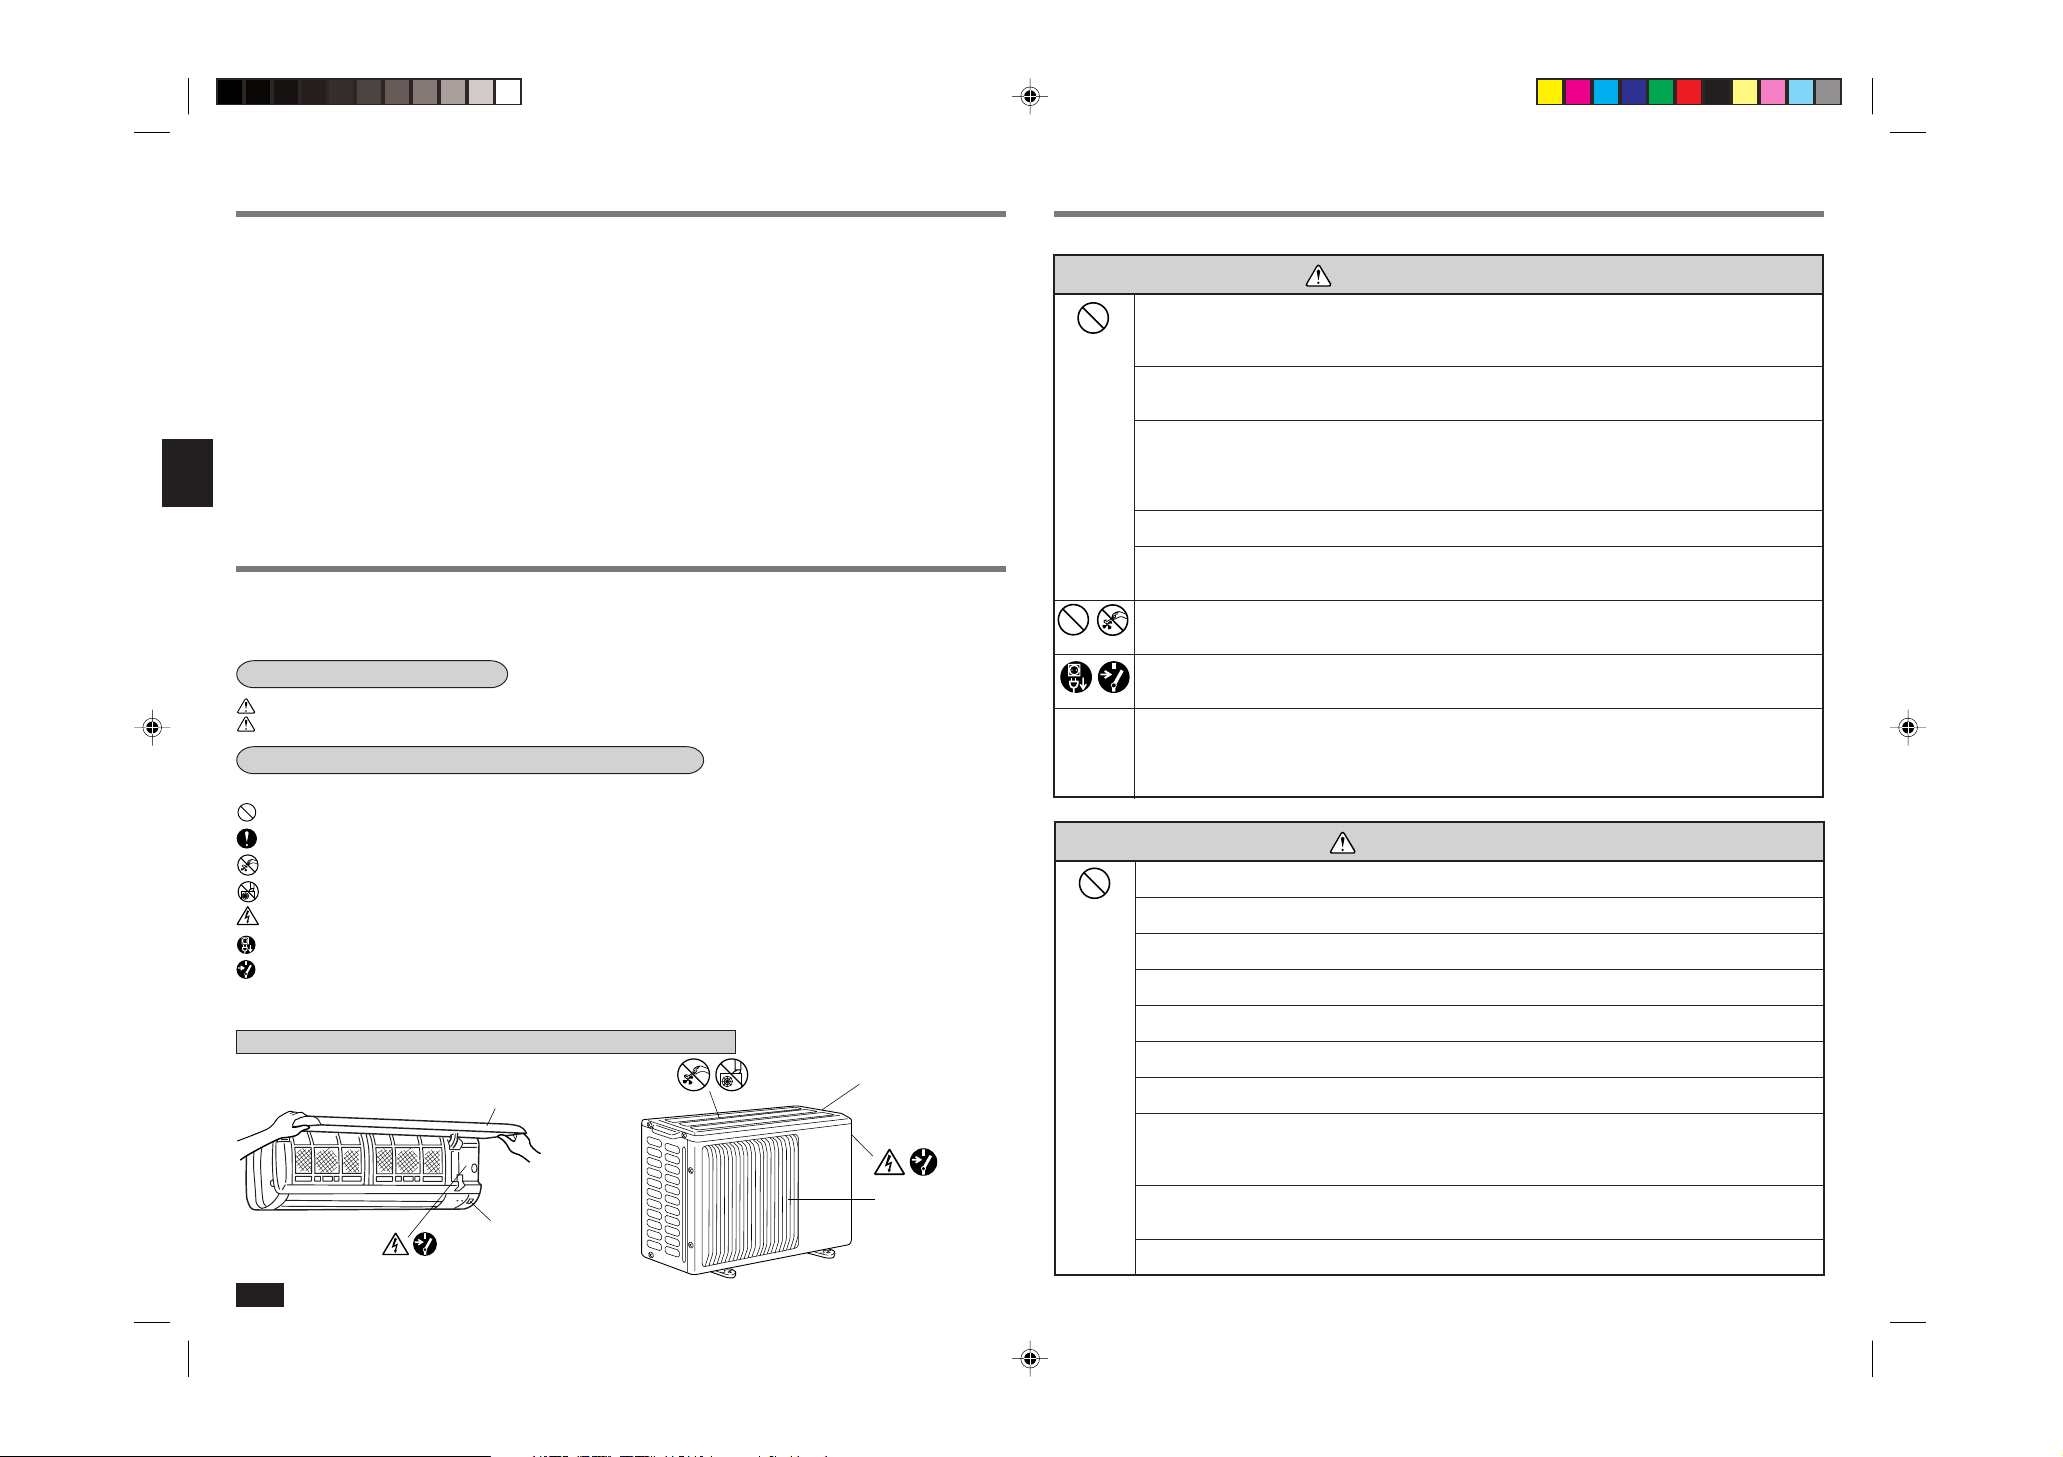
TABLE DES MATIERES
MESURES DE PRECAUTION ............................................................................................................................................... 22
NOM DES COMPOSANTS .................................................................................................................................................... 23
PREPARATIFS D’UTILISATION ............................................................................................................................................ 24
FONCTIONNEMENT AUTOMATIQUE EN MODE PAR SENSATION “I FEEL...” ................................................................. 26
REGLAGE MANUEL DES FONCTIONS (REFROIDISSEMENT, DESHUMIDIFICATION, CHAUFFAGE/VENTILATEUR) ... 27
REGLAGE DE PUISSANCE DE L’AIR PULSE ET DE L’ORIENTATION .............................................................................. 27
FONCTIONNEMENT EN MODE DE REFROIDISSEMENT ECONOMIQUE (ECONO COOL) ............................................ 28
FONCTIONNEMENT EN MINUTERIE (MINUTERIE MARCHE / ARRÊT) ........................................................................... 28
SI L’APPAREIL DOIT RESTER LONGTEMPS INUTILISE .................................................................................................... 28
ENTRETIEN ........................................................................................................................................................................... 28
NETTOYAGE DU FILTRE A AIR CATECHINE....................................................................................................................... 29
REMPLACEMENT DU FILTRE D’EPURATION D’AIR ........................................................................................................... 29
AVANT DE CONTACTER LE SERVICE D’ENTRETIEN, PROCEDER AUX VERIFICATIONS SUIVANTES ....................... 30
EN PRESENCE D’UNE PANNE POTENTIELLE................................................................................................................... 30
INSTALLATION, DEPLACEMENT ET VERIFICATION.......................................................................................................... 31
CARACTERISTIQUES TECHNIQUES .................................................................................................................................. 31
MESURES DE PRECAUTION
• Avant de vous servir de cet appareil, veuillez lire les “mesures de précautions” dans la mesure où l’unité contient des pièces rotatives et des pièces entraînant des risques d’électrocution.
• Les précautions spécifiées dans cette section sont importantes pour la sécurité et doivent donc impérativement
être respectées.
Marques et leur signification
AVERTISSEMENT:
PRÉCAUTION:
Signification des symboles utilisés dans ce manuel
• La couleur de l’adhésif apposé sur l’appareil est indiquée entre parenthèses.
(Noir) : N’insérez jamais le doigt, ni un autre objet long, etc.
(Noir) : Ne montez jamais sur l’unité interne ou externe et ne posez rien dessus.
(Jaune) : Attention ! Risque d’électrocution !
(Bleu) : Prenez soin de débrancher la fiche d’alimentation de la prise secteur.
(Bleu) : Coupez l’alimentation au préalable.
• Après avoir lu cette notice, conservez-la avec le manuel d’installation à portée de la main pour pouvoir vous y
référer facilement.
Position des marques d’avertissement et des mécanismes de sécurité
22
Toute manipulation incorrecte risque d’entraîner un accident grave voire fatal, des blessures corporelles, etc.
Toute manipulation incorrecte risque d’entraîner un accident grave, selon les conditions du moment.
: A éviter absolument.
: Suivez rigoureusement les instructions.
BOITIER
PANNEAU FRONTAL
GRILLE DE REFOU-
BOITIER
LEMENT D’AIR
Ne JAMAIS laisser des enfants ou des personnes handicapées utiliser le climatiseur sans surveillance.
•
AVERTISSEMENT
Ne pas utiliser de raccord intermédiaire pour brancher le cordon d’alimentation, etc., ni de railonge
ni même brancher plusieurs appareils à la même prise secteur.
• Un mauvais contact, une isolation insuffisante, un courant trop fort, etc., provoque des risques d’incendie ou d’électrocution.
Ne jamais placer d’objets lourds sur le cordon d’alimentation ni le couper ou le modifier.
• Ne jamais placer d’objets lourds sur le cordon d’alimentation ni l’endommager ou le modifier. Cela risquerait de l’endommager et vous risqueriez de provoquer un incendie ou un court-circuit.
Ne jamais activer ou désactiver le disjoncteur ni brancher ou débrancher la prise d’alimentation
pendant le fonctionnement de l’appareil.
• Evitez tout risque d’incendie dû à des étincelles, etc.
• Toujours couper le disjoncteur ou débrancher la prise d’alimentation lors de l’extinction de l’unité interne
à partir de la télécommande.
Ne projetez pas directement l’air froid sur la peau pendant des périodes prolongées.
• Evitez tout risque pour la santé.
L’installation de l’appareil ne doit pas être faite par le client.
• Si cette opération n’est pas effectuée correctement, elle entraîne des risques d’incendie, d’électrocution,
de blessure par une chute de l’unité, une fuite d’eau, etc. Prenez conseil auprès du revendeur.
Ne jamais introduire le doigt ni d’objet long, etc. dans les admissions/refoulements d’air de l’appareil.
• Le ventilateur tourne à grande vitesse et risque de provoquer un accident.
• Toujours surveiller que les jeunes enfants ne jouent pas avec le climatiseur.
En cas d’anomalie (odeur de brûlé, etc.) arrêtez le climatiseur et débranchez la prise de courant ou coupez le disjoncteur .
• Si l’unité continue à fonctionner dans des circonstances anormales, elle risque de provoquer un incendie, une panne, etc. Dans ce cas, contactez le revendeur.
L’appareil ne doit pas être réparé ni déplacé par le client.
• Si ces travaux ne sont pas effectués correctement, ils entraînent des risques d’incendie, d’électrocution,
de blessure par une chute de l’unité, une fuite d’eau, etc. Prenez conseil auprès du revendeur.
• Afin d’éviter tout risque d’accident, le cordon d’alimentation doit être remplacé par le constructeur ou le
revendeur lorsqu’il est endommagé.
PRÉCAUTION
Lorsque le filtre à air doit être retiré, ne touchez pas les parties métalliques de l’unité interne.
• Un accident risque d’en résulter.
N’utilisez pas d’insecticide ni de produit inflammable à proximité de l’appareil.
• L’appareil risque de prendre feu ou le boîtier d’être déformé.
N’exposez pas directement une plante d’intérieur ni un animal domestique au coourant d’air de climatisation.
• L’animal comme la plante risque d’en souffrir.
Ne laissez jamais l’unité posée sur un support endommagé.
• L’unité risque de tomber et de provoquer un accident.
Ne montez pas sur un support instable pour nettoyer l’appareil, etc.
• Vous pourriez tomber et par conséquent vous blesser.
Ne jamais tirer sur le cordon d’alimentation.
• Le fil central du cordon d’alimentation pourrait se détacher et provoquer un incendie dû à un court-circuit.
Ne jamais recharger ou démonter les piles ni les jeter dans un feu.
• Vous pourriez provoquer une fuite, un incendie ou une explosion.
Ne laissez pas l’appareil fonctionner pendant une période prolongée dans des conditions humides,
par ex. avec une porte ou une fenêtre ouverte.
• En mode de refroidissement, si l’appareil fonctionne longtemps dans une pièce humide (RH de 80 % ou
plus), l’eau condensée à l’intérieur du climatiseur risque de tacher ou d’abîmer les meubles, etc.
N’utilisez pas l’appareil à des fins spéciales.
• Le climatiseur ne doit pas être utilisé pour conserver certains appareils de précision, des produits alimentaires, des animaux, des plantes et des objets d’art. Leur qualité risque de se détériorer.
N’exposez jamais directement d’appareil de chauffage, etc., à la sortie d’air de climatisation.
• La combustion risque d’en souffir.
Page 23
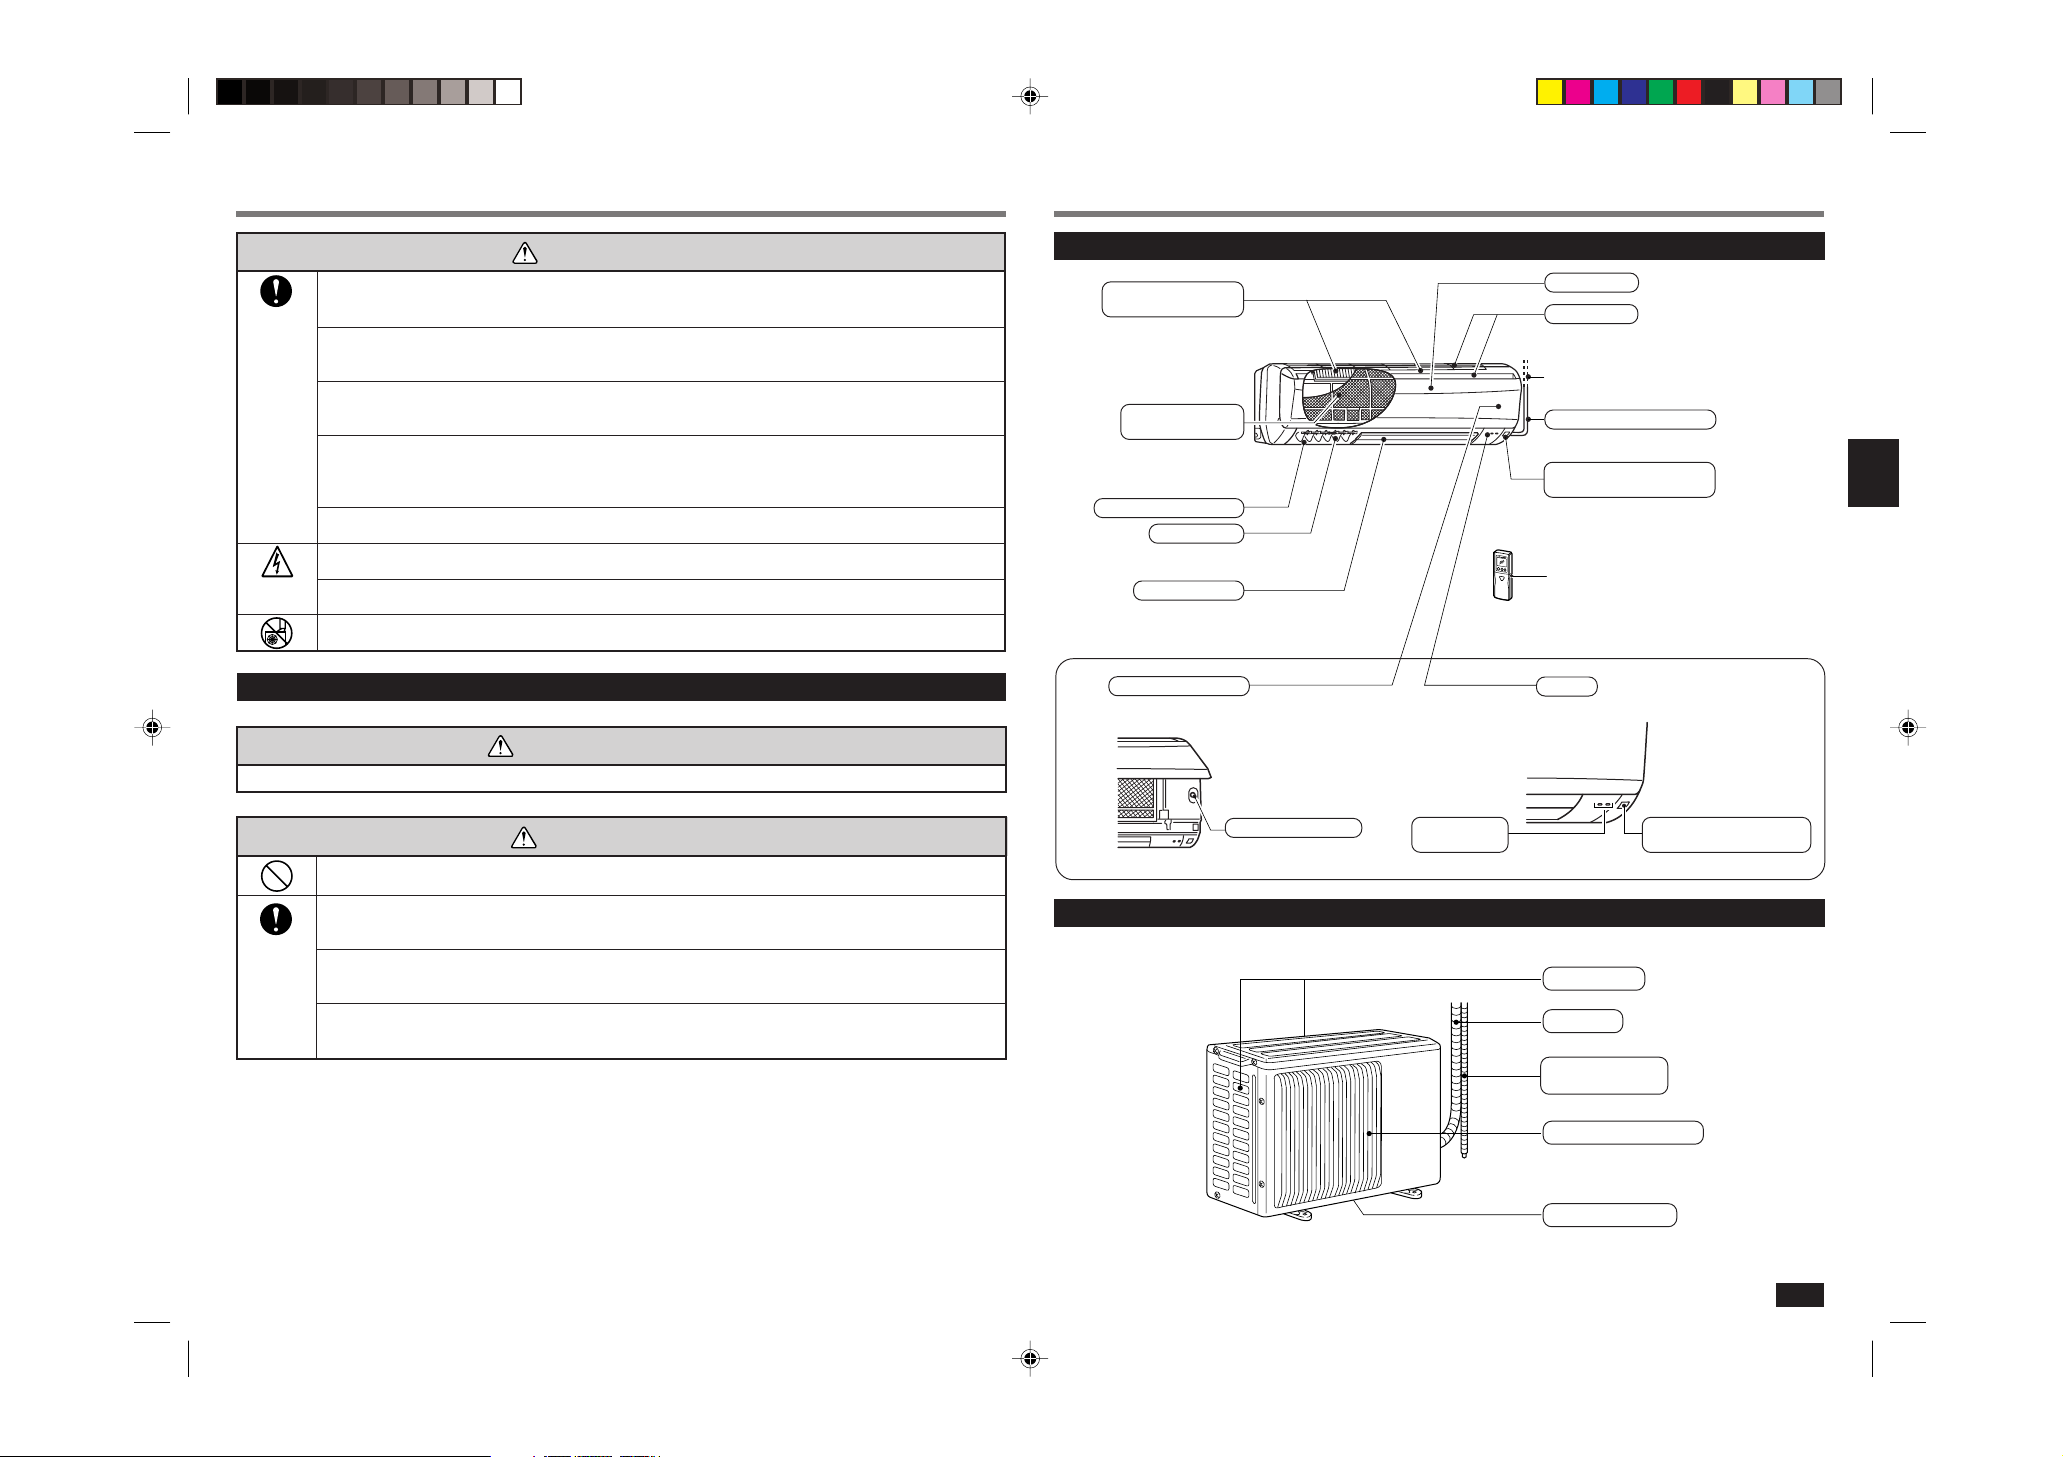
MESURES DE PRECAUTION
NOM DES COMPOSANTS
PRÉCAUTION
Lorsque l’appareil doit être nettoyé, éteignez-le et débranchez le câble d’alimentation ou coupez le
disjoncteur.
• Le ventilateur tourne à grande vitesse et risque de provoquez un accident.
Si l’appareil reste inutilisé pendant une période prolongée, débranchez le câble d’alimentation ou
coupez le disjoncteur.
• Dans le cas contraire, il risque de s’encrasser, causant des risques d’incendie.
Remplacez les 2 piles par des piles neuves du même type.
• Ne jamais utiliser une pile usagée avec une nouvelle pile ; vous pourriez provoquer une surchauffe, une
fuite ou une explosion.
Si du liquide des piles devait se répandre sur la peau ou sur les vêtements, rincer à grande eau avec
de l’eau claire.
• Si du liquide des piles devait atteindre les yeux, laver à grande eau avec de l’eau claire et contacter
immédiatement un médecin.
Prévoyez une aération suffisante si un appareil de chauffage, etc., est utilisé.
• L’oxygène s’appauvrit dans ces conditions d’utilisation.
N’actionnez pas les commandes avec les mains mouillées.
• Risque d’électrocution.
Ne nettoyez pas le climatiseur à grande eau.
• L’eau risque de s’infiltrer dans l’appareil et d’affecter l’isolation, provoquant ainsi un risque d’électrocution.
Ne marchez jamais sur l’unité interne ou externe et ne posez rien dessus.
• Si vous ou quelquechose tombe, vous pourriez vous blesser.
A propos de l’installation
AVERTISSEMENT
• Pour installer le climatiseur, prenez conseil auprès du revendeur.
PRÉCAUTION
N’installez pas l’appareil dans un endroit susceptible d’être exposé à des fuites de gaz inflammable.
• L’accumulation de gaz autour de l’appareil entraîne des risques d’explosion.
Mise à la terre.
• Ne connectez pas le fil de terre aux tuyaux de gaz, aux tuyaux d’eau, à une tige de paratonnerre ou au
fil de terre du téléphone. Une mise à la terre incorrecte entraîne des risques d’électrocution.
Installez un disjoncteur de fuite à la terre, selon l’endroit où le climatiseur est installé (pièce humide,
etc.).
• L’absence du disjoncteur de fuite à la terre entraîne des risques d’électrocution.
Les tuyaux d’écoulement doivent être complètement vidés.
• Si le circuit d’évacuation des condensateurs n’est pas réalisé correctement, l’eau risque de s’égoutter de
l’appareil et de tacher ou d’endommager le mobilier.
Unité interne
Filtre d’épuration d’air
(Type à soufflets blancs)
Filtre à air catéchine
(Avec désodorisant)
Grille de refoulement d’air
Ailette verticale
Ailette horizontale
Section de commande
(Lorsque le panneau frontal est ouvert)
Unité externe
Interrupteur de secours
Témoin de
fonctionnement
Panneau frontal
Admission d’air
Vers le disjoncteur
Cordon d’alimentation secteur
Microrécepteur de rayons
infrarouges de télécommande
Boîtier de
télécommande
Affichage
Microrécepteur de rayons
infrarouges de télécommande
Admission d’air (arrière et latérale)
Tuyauterie
Tuyau d’évacuation
de condensats
Grille de refoulement d’air
Sortie de condensats
23
Page 24
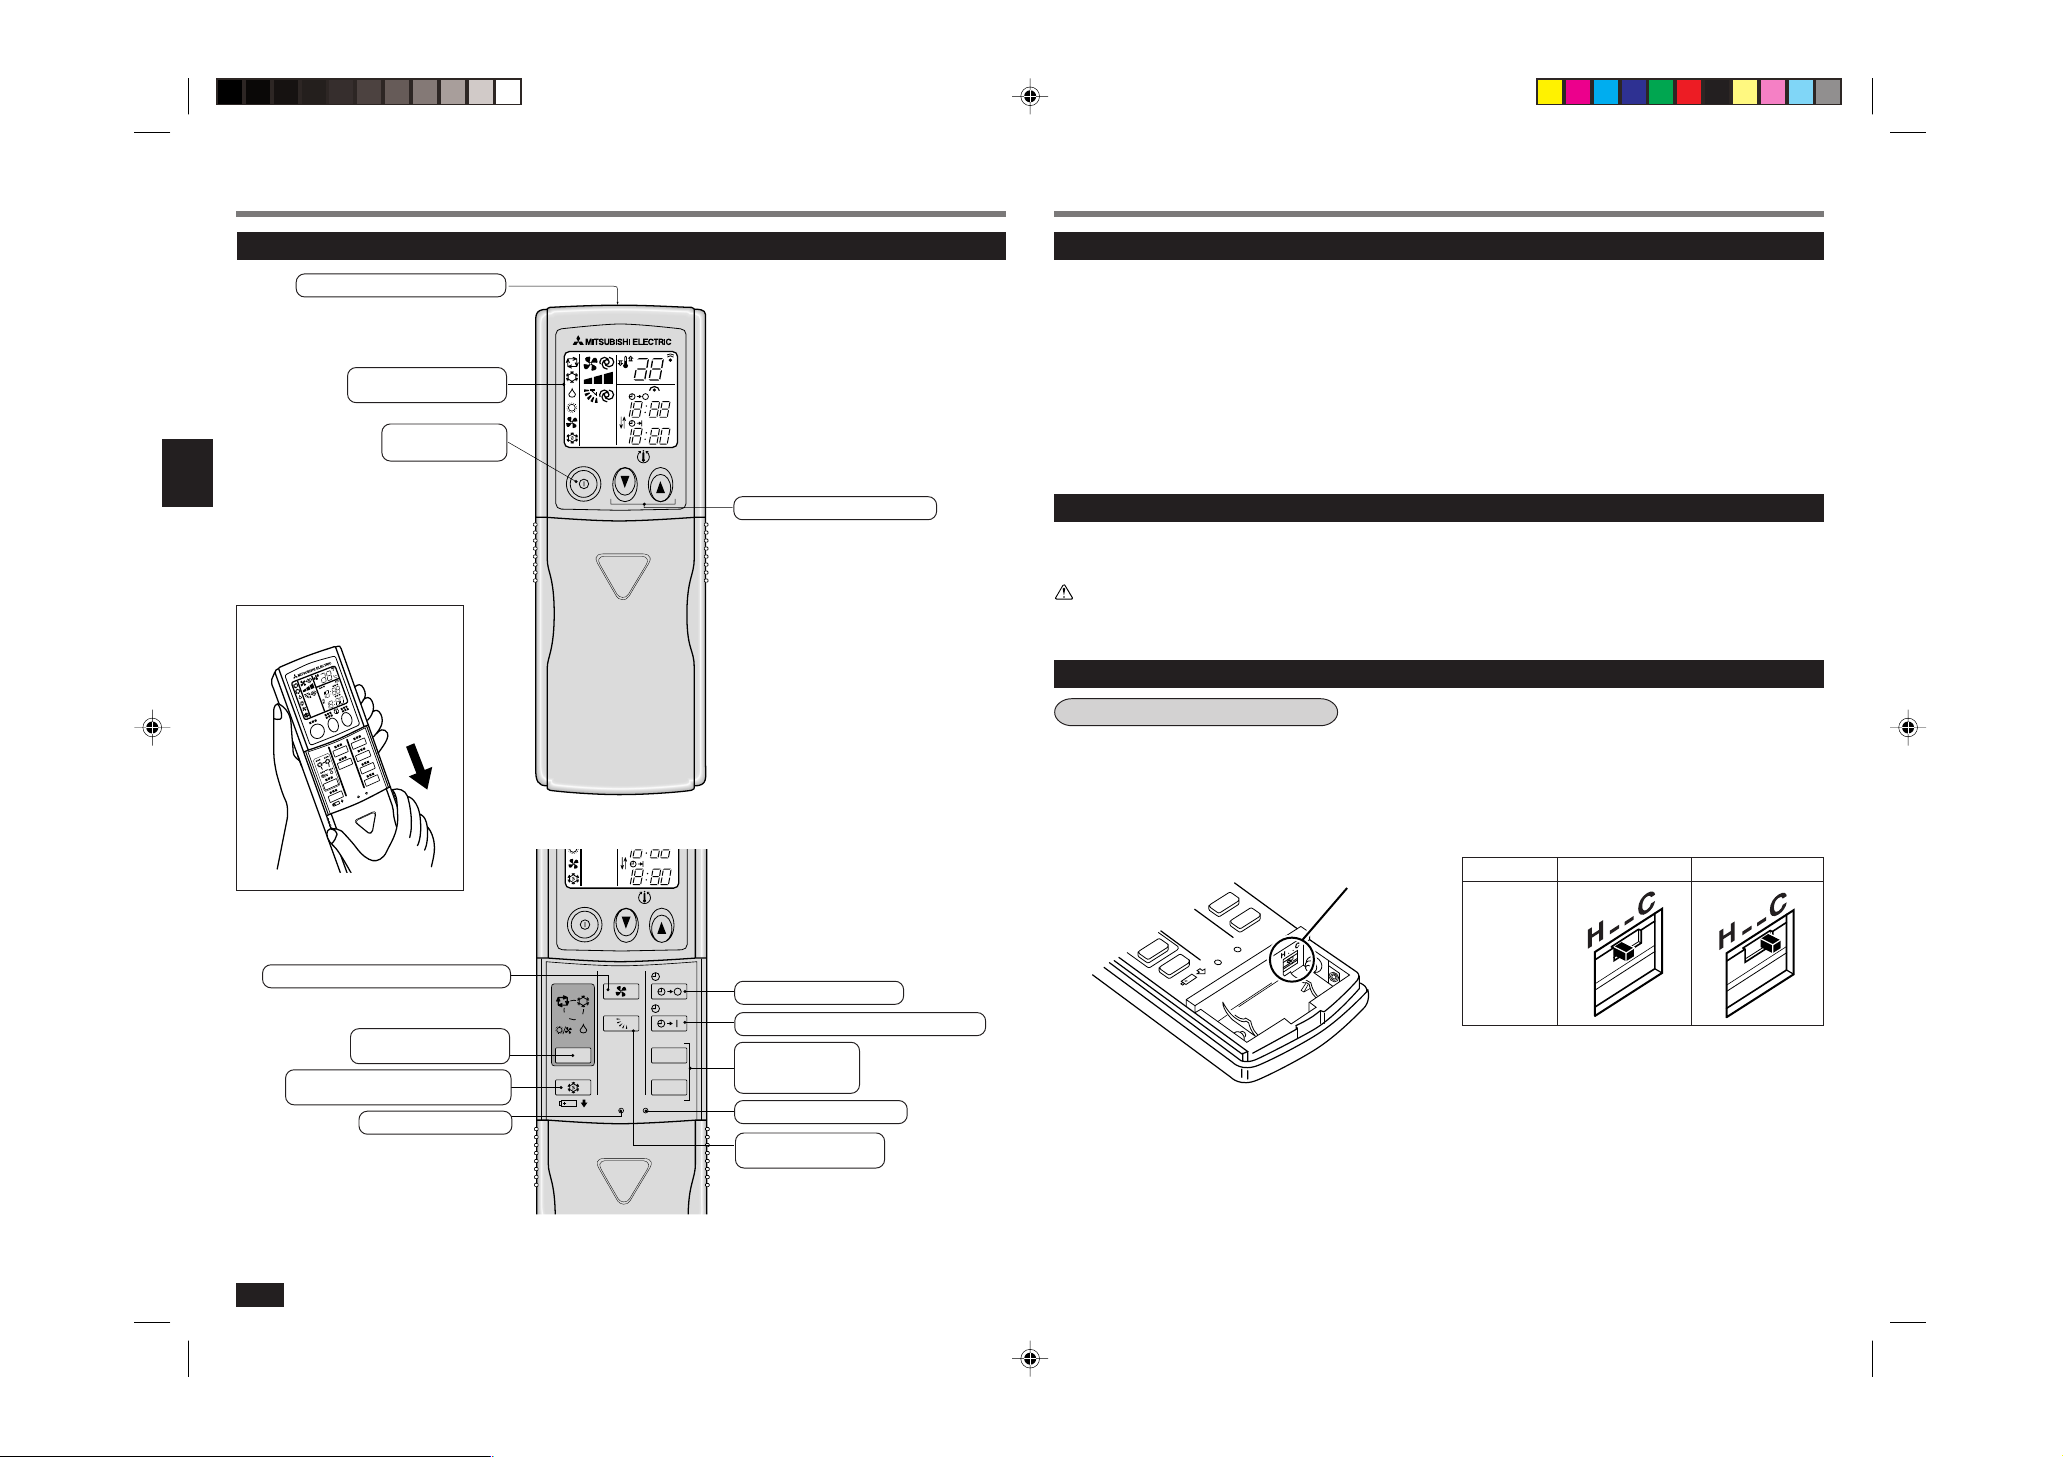
ON/OFF
FAN
TOO
WARM
TOO
COOL
VANE
MODE
ECONO COOL
STOP
START
HR.
MIN.
I FEEL
COOL
DRY
AMPM
AMPM
RESET CLOCK
HEAT
/FAN
NOM DES COMPOSANTS
ON/OFF
TOO
COOL
AMPM
CLOCK
˚C
AMPM
TOO
WARM
PREPARATIFS D’UTILISATION
Boîtier de télécommande
Section de transmission de signaux
Section d’affichage du mode
de fonctionnement
Bouton marche/arrêt
(ON/OFF)
Ouvrez le couvercle avant.
(Vue générale du boîtier de télécommande.)
Touches de réglage de température
Fonction de redémarrage automatique
Ces modèles sont équipés d’une fonction de redémarrage automatique. Si vous ne souhaitez pas
■
utiliser cette fonction, veuillez vous adresser au représentant du service technique afin qu’il modifie le réglage de l’unité.
La fonction de redémarrage automatique signifie…
Lorsque l’unité interne est contrôlé par la télécommande, le mode de fonctionnement, la température programmée et la vitesse
de ventilation sont mis en mémoire. En cas de panne de courant ou de coupure de l’alimentation pendant le fonctionnement de
l’appareil, la “fonction de redémarrage automatique” agit de manière à remettre automatiquement l’appareil en marche dans le
mode de fonctionnement activé par la télécommande avant la coupure de l’alimentation principale. (Voir page 26 pour plus de
détails.)
Unité interne
Branchez la prise d’alimentation sur la prise secteur et/ou enclenchez le disjoncteur.
■
AVERTISSEMENT:
Nettoyez la prise d’alimentation et branchez-la fermement.
Une prise encrassée ou mal branchée provoque des risques d’incendie ou d’électrocution.
Boîtier de télécommande
Comment programmer le type
Ce réglage de la télécommande doit correspondre au type de climatiseur (REFROIDISSEMENT et
■
CHAUFFAGE ou REFROIDISSEMENT UNIQUEMENT).
Si le réglage n’est pas correct, le climatiseur ne fonctionnera pas normalement. Par conséquent,
vérifiez que le réglage correspond bien à votre type de climatiseur. Dans le cas contraire, modifiez
le réglage comme indiqué ci-dessous.
Touche de réglage de vitesse de ventilateur
Touche de sélection du
mode de fonctionnement
Bouton de refroidissement économique
(ECONO COOL)
Touche de réinitialisation
24
Touche de minuterie d’arrêt
Touche de mise en fonction de la minuterie
Touches HR. MIN.
(touches de réglage
horaire)
Touche de réglage d’horloge
Touche de commande
des ailettes d’orientation
Interrupteur
Type
Position de
l’interrupteur
REFROIDISSEMENT et CHAUFFAGE REFROIDISSEMENT UNIQUEMENT
Page 25
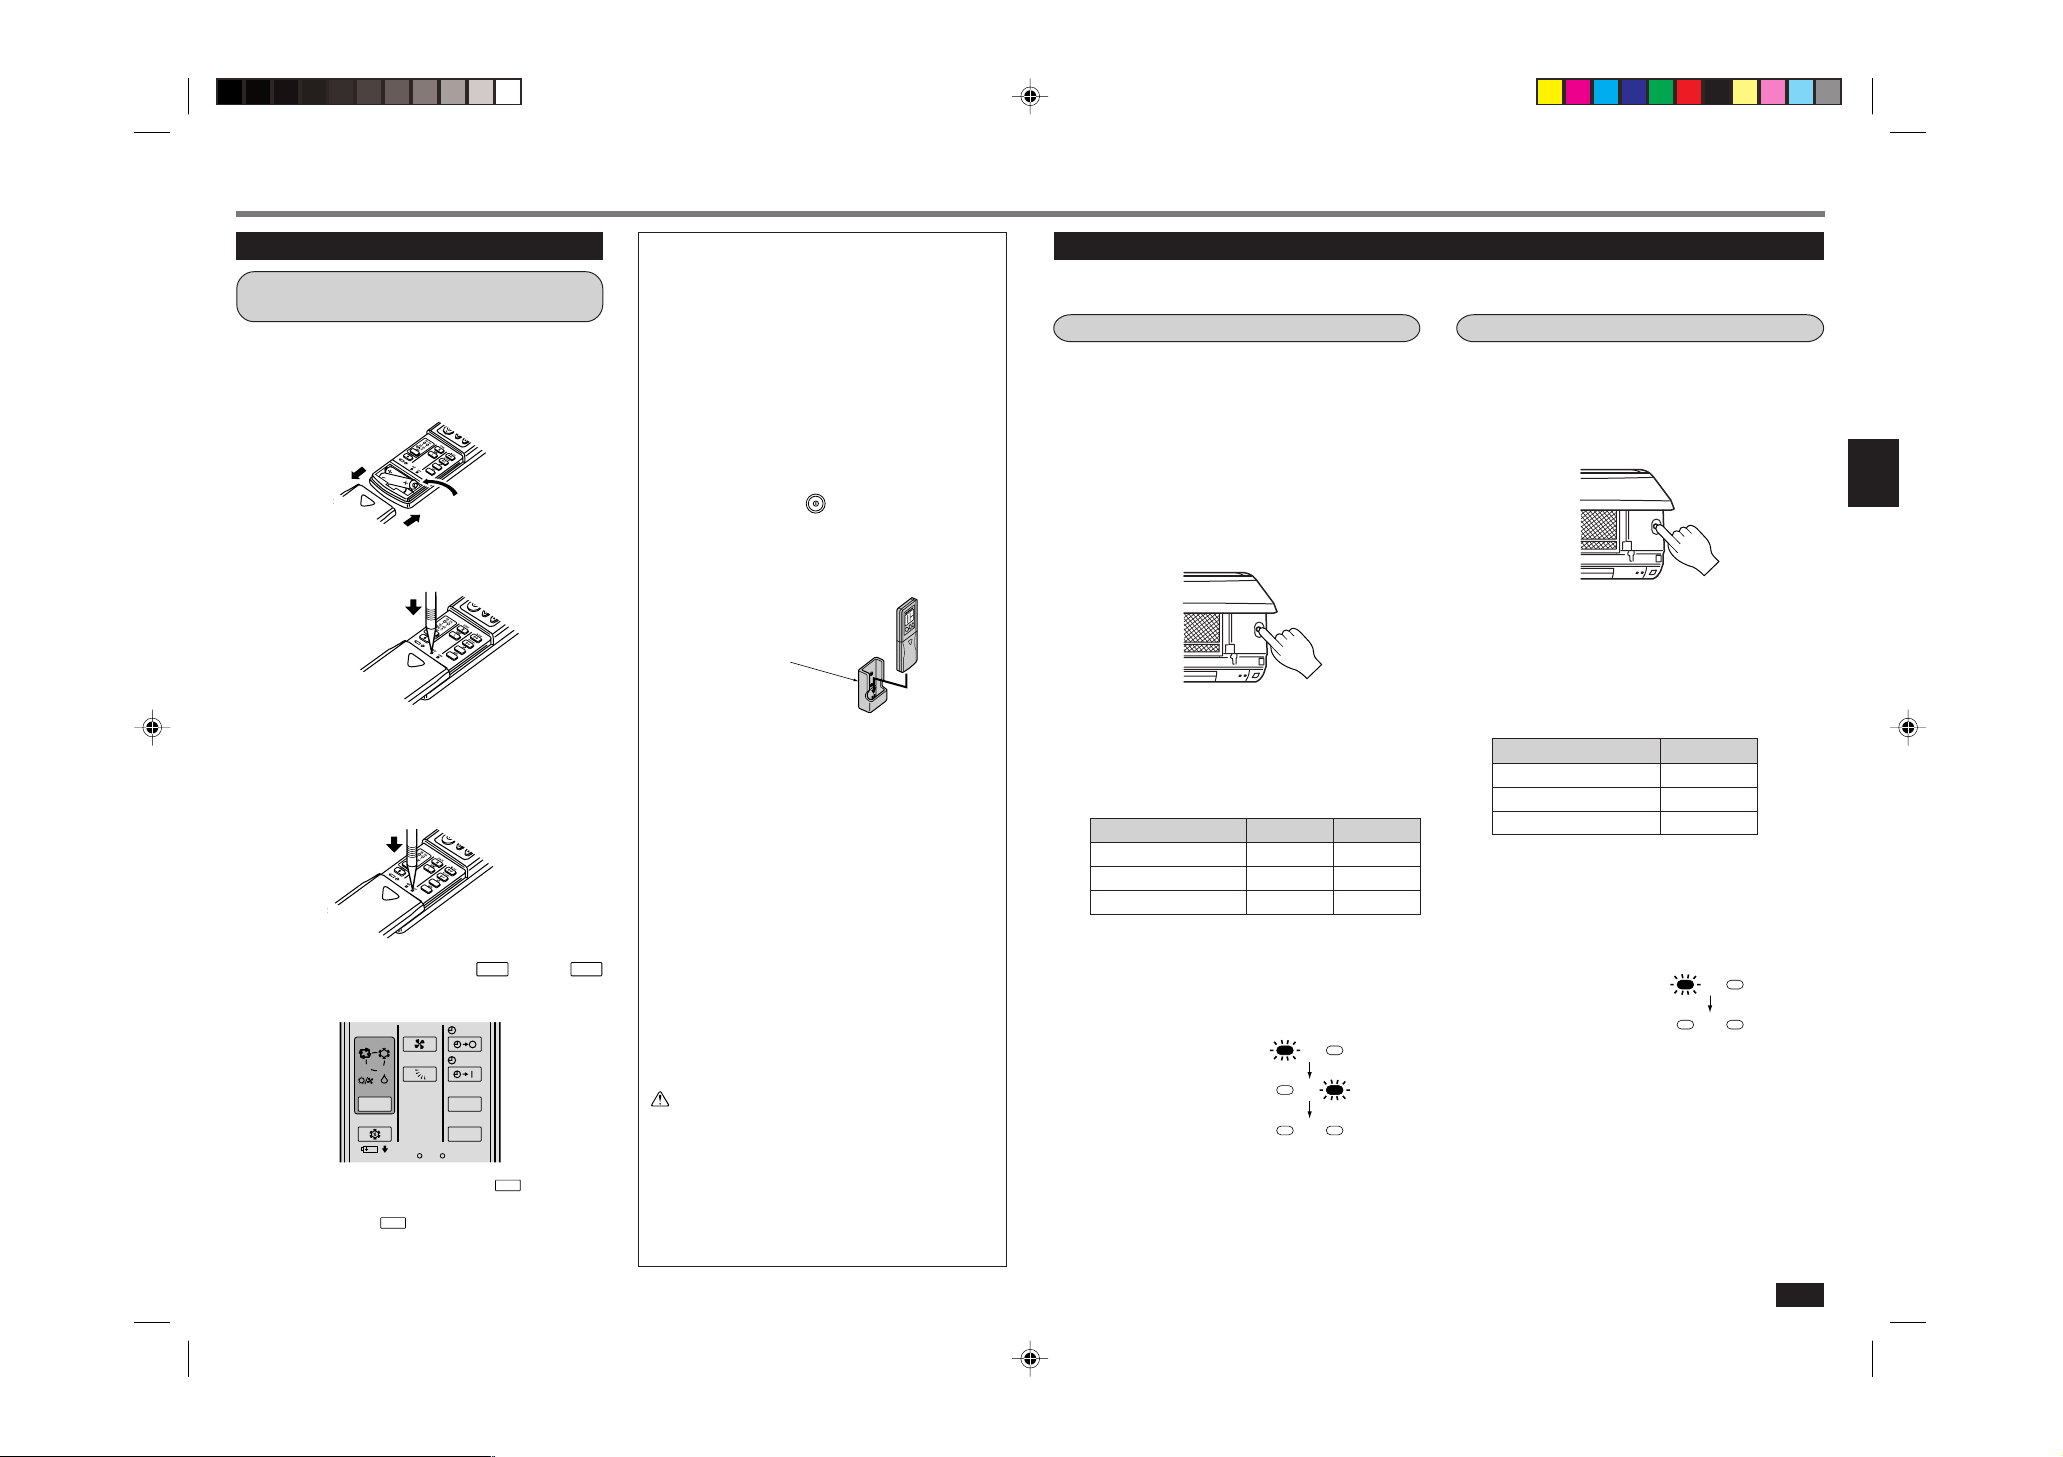
HR.
MIN.
HR.
MIN.
FAN
VANE
MODE
ECONO COOL
STOP
START
HR.
MIN.
I FEEL
COOL
DRY
RESET CLOCK
HEAT
/FAN
Operation Indicator
Operation Indicator
Operation Indicator
Operation Indicator
Operation Indicator
ON/OFF
PREPARATIFS D’UTILISATION
Boîtier de télécommande
Mise en place des batteries et réglage de
l’heure actuelle
1 Retirez le couvercle avant et mettez les piles
en place. Puis remettez le couvercle en place.
Introduisez en premier le pôle négatif des piles.
Vérifier si la polarité des piles est correcte.
Introduisez en premier le
pôle négatif des piles.
2 Appuyez sur la touche de réinitialisation
(RESET).
Appuyez avec
une pointe fine.
• Si la touche de réinitialisation n’est pas actionnée,
le boîtier de télécommande risque de ne pas fonctionner correctement.
3 Appuyez sur la touche de réglage de l’hor-
loge (CLOCK set).
Appuyez avec
une pointe fine.
4 Utilisez les touches
et
(touches de réglage d’horloge) pour définir
l’heure actuelle.
• A chaque pression sur la touche
quée augmente d’une heure et, à chaque pression
sur la touche
, d’une minute.
, l’heure indi-
5 Appuyez de nouveau sur la touche CLOCK
set et refermez le couvercle avant.
Manipulation du boîtier de télécommande
• La portée des signaux du boîtier de télécommande
est d’environ 6 mètres quand celui-ci est dirigé vers
l’avant de l’unité interne.
• Lorsqu’une touche est activée, l’unité interne émet
un ou deux signaux sonores. Si aucun signal sonore
ne retentit, recommencez.
• Utilisez délicatement le boîtier de télécommande.
En cas de heurt, de chute ou d’éclaboussures, la té-
lécommande risque de ne pas fonctionner.
Installation du boîtier de télécommande au mur
• Installez le support de la télécommande dans un emplacement où le son du signal de réception (bip) peut
être entendu par l’unité interne chaque fois que l’on
appuie sur la touche
Insérer/retirer le boîtier de télécommande.
Insertion : Insérez le boîtier de télécommande vers
le bas dans son support.
Retrait : Retirez le boîtier de télécommande de son
support en le soulevant.
Support de la télécommande
Piles d’alimentation
■ Référence: changement des piles d’alimentation
Remplacer les piles par de nouvelles piles alcalines de
format AAA dans les circonstances suivantes:
.
· Lorsque l’unité interne ne répond pas au signal du
boîtier de télécommande.
· Lorsque l’affichage du boîtier de télécommande s’as-
sombrit.
· Lorsque tous les affichages apparaissent à l’écran
puis disparaissent immédiatement dès qu’on appuie
sur une touche du boîtier de télécommande.
Ne jamais utiliser de piles au manganèse. Elles risqueraient de provoquer un dysfonctionnement du boîtier de
télécommande.
• La durée d’exploitation d’un jeu de piles alcaline neuves est d’environ un an.
Une pile dont la durée de validité arrive à échéance
risque de s’épuiser plus rapidement; consulter la date
de validité (mois/année) dans le bas de la pile.
• Pour éviter toute fuite de liquide, retirer toutes les
piles lorsque vous ne comptez pas utiliser la télé-
commande pendant un longtemps.
PRÉCAUTION:
Si du liquide des piles devait se répandre sur la peau
ou sur les vêtements, rincer à grande eau avec de
l’eau claire. Si du liquide des piles devait atteindre
les yeux, laver à grande eau avec de l’eau claire et
contacter immédiatement un médecin.
• N’utilisez pas de piles rechargeables.
• Remplacez les 2 piles par des piles neuves du même type.
• Jetez les piles usées en respectant les consignes
fournies.
Lorsqu’il est impossible d’utiliser le boitier de telecommande (interrupteur de secours)
Lorsque les piles du boîtier de télécommande sont affaiblies ou que la télécommande ne fonctionne pas correctement, vous pouvez opérer l’unité interne au moyen de l’interrupteur de secours.
TYPE avec REFROIDISSEMENT et CHAUFFAGE
1 Appuyez sur l’interrupteur de secours.
• Chaque fois que vous appuyez sur la touche FONC-
TIONNEMENT D’URGENCE, l’appareil fonctionne
dans l’ordre suivant : MODE DE REFROIDISSEMENT D’URGENCE, MODE DE CHAUFFAGE D’UR-
GENCE et MODE D’ARRÊT.
Lorsque vous appuyez sur la touche FONCTIONNEMENT D’URGENCE, l’appareil effectue d’abord
un essai de fonctionnement pendant 30 minutes
avant de passer en MODE D’URGENCE.
• Les détails du mode de MODE D’URGENCE sont
décrits ci-dessous. Cependant, le réglage de température est inopérationnel durant les 30 minutes
d’essai et l’appareil fonctionne en mode continu.
Le ventilateur est réglé au grande durant l’essai puis
passe en vitesse moyenne au bout de 30 minutes.
Mode de fonctionnement
Réglage de température
Vitesse du ventilateur Moyen Moyen
Ailette horizontale Automatique Automatique
• Le mode de fonctionnement est indiqué par le témoin de fonctionnement sur l’unité interne selon
les chiffres suivants.
Témoin de fonctionnement
REFROIDISSEMENT
D’URGENCE
CHAUFFAGE
D’URGENCE
ARRET
Pour arrêter le fonctionnement d’urgence,
■
appuyer une fois sur la touche FONCTIONNEMENT D’URGENCE (en cas de mode de
CHAUFFAGE D’URGENCE) ou deux fois (en
cas de mode de REFROIDISSEMENT D’UR-
GENCE).
REFROIDISSEMENT
24°C24°C
CHAUFFAGE
TYPE à REFROIDISSEMENT UNIQUEMENT
1 Appuyez sur l’interrupteur de secours.
• Lorsque l’interrupteur de secours est activé, l’ap-
pareil fait un essai de 30 minutes puis passe en
mode de REFROIDISSEMENT D’URGENCE.
• Les détails du mode de REFROIDISSEMENT D’URGENCE sont décrits ci-dessous. Cependant, le ré-
glage de température est inopérationnel durant les
30 minutes d’essai et l’appareil fonctionne en mode
continu.
Le ventilateur est réglé au grande durant l’essai puis
passe en vitesse moyenne au bout de 30 minutes.
Mode de fonctionnement
Réglage de température 24°C
Vitesse du ventilateur Moyen
Ailette horizontale Automatique
• Le mode de fonctionnement est indiqué par le témoin de fonctionnement sur l’unité interne selon
les chiffres suivants.
Témoin de fonctionnement
REFROIDISSEMENT
D’URGENCE
ARRET
Pour interrompre le mode de REFROIDISSE-
■
MENT D’URGENCE, appuyer de nouveau sur
l’interrupteur de secours.
A chaque pression sur l’interrupteur de secours, l’ap-
pareil alterne entre le mode de REFROIDISSEMENT
D’URGENCE et l’ARRET.
REFROIDISSEMENT
25
Page 26

ON/OFF
ON/OFF
TOO
WARM
TOO
COOL
FAN
VANE
MODE
STOP
START
HR.
I FEEL
COOL
DRY
HEAT
/FAN
FONCTIONNEMENT AUTOMATIQUE EN MODE PAR SENSATION “I FEEL...”
MODE
Operation Indicator
MODE
ON/OFF
FAN
TOO
WARM
TOO
COOL
VANE
MODE
ECONO COOL
STOP
START
HR.
MIN.
I FEEL
COOL
DRY
AMPM
CLOCK
˚C
AMPM
HEAT
/FAN
RESET CLOCK
En mode de fonctionnement automatique “ (I FEEL...)”, vous obtenez les conditions optimales pour
la pièce automatiquement, d’une simple pression sur une touche.
Démarrage:
Appuyez sur la touche
■
Dès que le mode “ (I FEEL...)” est sélectionné, le climatiseur est automatiquement réglé à la température optimale.
.
Interruption:
Appuyez sur la touche
■
○○○○○○○○○○○○○○○○○○○○○○○○○○○○○○○○○
Si vous avez un peu trop chaud:
Appuyez sur la touche
■
Une pression réduit la température d’environ 1°C.
Si vous avez un peu trop froid:
Appuyez sur la touche
■
Chaque pression augmente la température d’environ 1°C.
Lorsque le mode “ (I FEEL...)” n’est pas sélectionné, appuyer sur la touche
pour le sélectionner.
A chaque pression sur la touche, le mode de fonctionnement
change dans l’ordre:
(I FEEL...) → (refroidissement) →
(déshumidification) → (chauffage/ventilateur)
.
pour réduire la température.
pour augmenter la température.
Description du mode de fonctionnement par sensation “I FEEL...”
Détails de fonctionnement
En fonction de la température de la pièce lors de la mise en fonctionnement, le mode REFROIDISSEMENT, DESHUMIDIFICATION ou CHAUFFAGE est automatiquement sélectionné. Notez toutefois qu’un redémarrage dans les deux heures qui suivent l’interruption sélectionne le mode en vigueur avant l’interruption. Le mode sélectionné en premier ne
change pas, même si la température interne de la pièce varie. Si le mode de fonctionnement ne correspond pas aux
conditions actuelles de la pièce, choisir un mode approprié avec la touche de sélection
Détails du fonctionnement en mode automatique
TYPE avec REFROIDISSEMENT
et CHAUFFAGE
Température interne de la
pièce au démarrage
Environ 25°C ou plus
Environ 25°C - 23°C
Environ 23°C ou moinsl
Mode de Température cible Mode de Température cible
fonctionnement (état initial) fonctionnement (état initial)
Refroidissement
Déshumidification
Environ 24°C
—
Chauffage Environ 26°C
REMARQUE:
REFROIDISSEMENT
: Lorsque la température de la pièce est supéreure de 2°C par rapport à la température program-
mée, il n’est pas possible de modifier cette température programmée ; le climatiseur fonctionne
en effet pour atteindre la température cible (programmée). Dans ce cas, attendre que la tempéra-
ture de la pièce diminue jusqu’à ce qu’elle se situe dans la plage des 2
ture programmée, avant de modifier celle-ci comme souhaité.
CHAUFFAGE: Lorsque la température de la pièce est inférieure de 2°C par rapport à la température programmée,
il n’est pas possible de modifier cette température programmée ; le climatiseur fonctionne en effet
pour atteindre la température cible (programmée). Dans ce cas, attendre que la température de la
pièce augmente jusqu’à ce qu’elle se situe dans la plage des 2
programmée, avant de modifier celle-ci comme souhaité.
TYPE à REFROIDISSEMENT UNIQUEMENT
Refroidissement
Déshumidification
Déshumidification
Détails d’affichage sur l’unité interne
Le témoin de fonctionnement à droite de l’unité interne indique son état opérationnel.
Allumé
Clignotant
Eteint
.
Environ 24°C
—
—
°C par rapport à la tempéra-
°C par rapport à la température
Description de la “FONCTION DE REDÉMARRAGE AUTOMATIQUE”
• Ces unités sont équipées d’une fonction de redémarrage automatique. Lorsque l’alimentation est activée, le climatiseur démarre automatiquement dans le même mode que celui réglé avec la télécommande avant que l’alimentation
soit coupée.
• Si l’unité a été réglée sur OFF (arrêt) à l’aide de la télécommande avant de couper l’alimentation, elle restera inactive
même après avoir activé l’alimentation.
• Si l’unité était en mode de fonctionnement d’urgence avant de couper l’alimentation, elle démarrera - lorsque l’alimentation sera activée - dans le même mode que celui réglé avec la télécommande avant le fonctionnement en mode
d’urgence.
• Si l’unité fonctionnait en mode “I FEEL…” avant la panne de courant, le mode de fonctionnement (REFROIDISSEMENT, DESHUMIDIFICATION ou CHAUFFAGE) n’est pas enregistré dans la mémoire. Lorsque l’alimentation principale est activée, l’unité détermine le mode de fonctionnement en fonction de la température ambiante au redémarrage
et redémarre.
26
Témoin de fonctionnement
Témoin
Le climatiseur cherche à atteindre la température cible. Attendez jusqu’à ce que la température cible soit atteinte.
La température ambiante approche de la température cible.
(uniquement pour les unité externe de la série MXZ)
Se reporter aux Informations concernant les climatiseurs
multi-systèmes. (Voir page 27)
Etat opérationnel
Différence entre la température
cible et la température de la pièce
Environ 2°C ou plus
Environ 2°C ou moins
—
Page 27
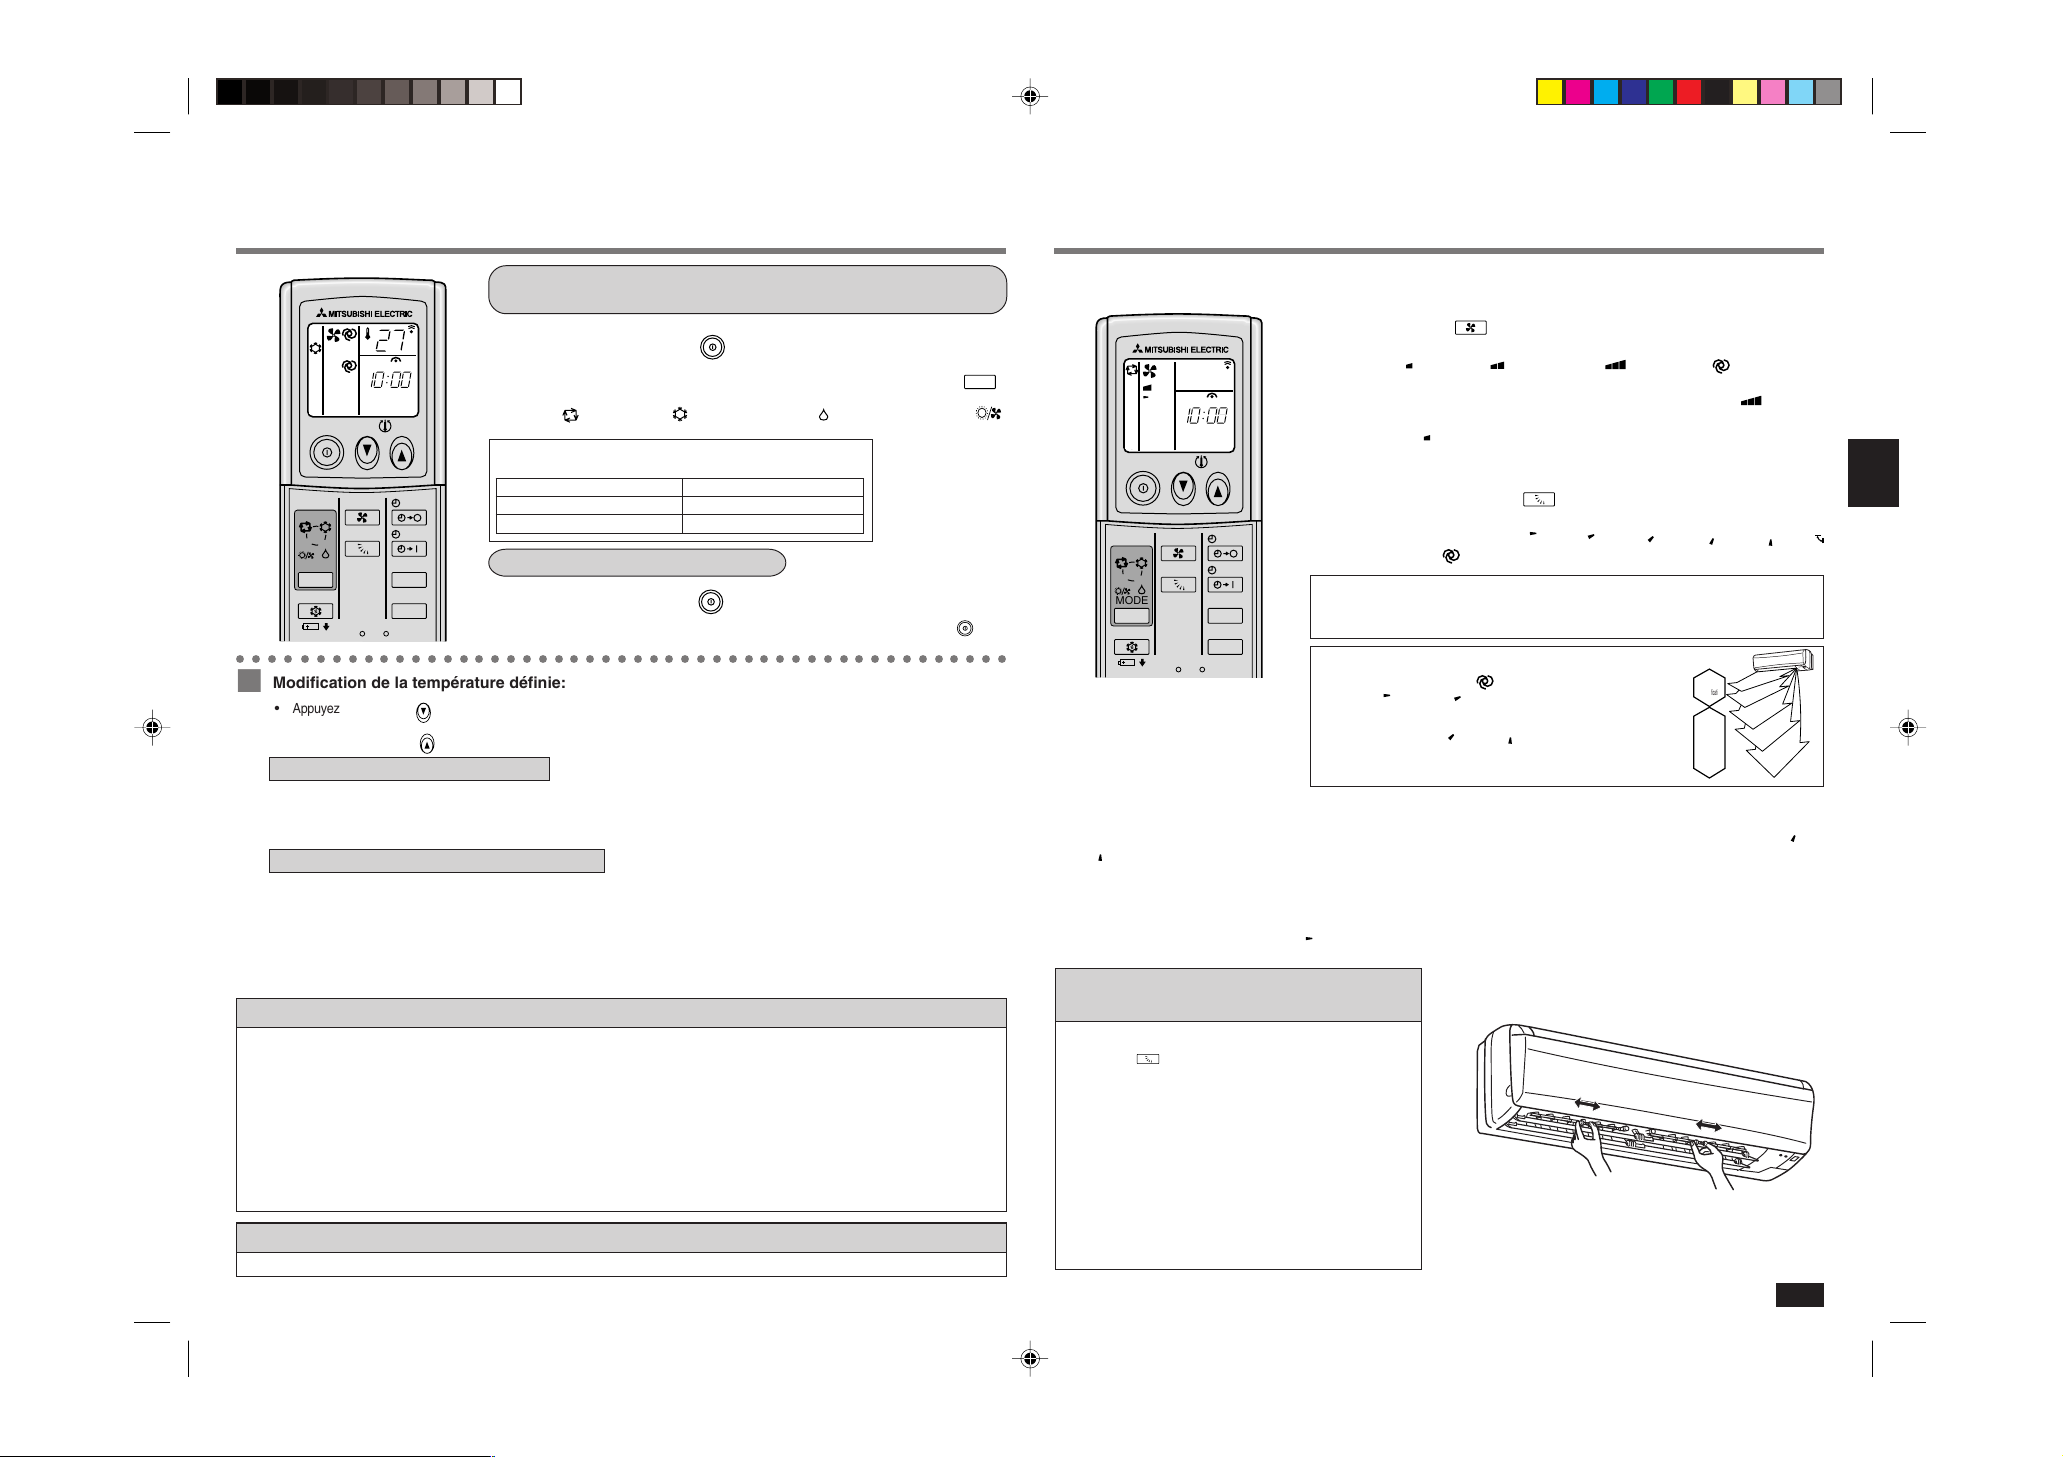
ON/OFF
MODE
ON/OFF
ON/OFF
REGLAGE MANUEL DES FONCTIONS (REFROIDISSE-
TOO
WARM
TOO
COOL
FAN
VANE
ON/OFF
FAN
TOO
WARM
TOO
COOL
VANE
MODE
ECONO COOL
STOP
START
HR.
MIN.
I FEEL
COOL
DRY
AMPM
CLOCK
˚C
AMPM
HEAT
/FAN
RESET CLOCK
ON/OFF
FAN
TOO
WARM
TOO
COOL
VANE
MODE
ECONO COOL
STOP
START
HR.
MIN.
I FEEL
COOL
DRY
AMPM
CLOCK
˚C
AMPM
HEAT
/FAN
RESET CLOCK
VANE
1
2
3
4
5
REGLAGE DE PUISSANCE DE L’AIR PULSE ET DE
MENT, DESHUMIDIFICATION, CHAUFFAGE/VENTILATEUR)
Pour sélectionner les modes de REFROIDISSEMENT, de
DESHUMIDIFICATION ou de CHAUFFAGE/VENTILATEUR
1 Appuyez sur la touche
2
Sélectionnez le mode de fonctionnement en appuyant sur la touche
A chaque pression sur la touche, le mode sélectionné change dans l’ordre suivant :
(I FEEL...) → (refroidissement) → (déshumidification) →
(chauffage/ventilateur)
Mode CHAUFFAGE / VENTILATEUR
Vérifiez le type de climatiseur utilisé.
REFROIDISSEMENT et CHAUFFAGE
REFROIDISSEMENT UNIQUEMENT
Interruption du fonctionnement:
■
○○○○○○○○○○○○○○○○○○○○○○○○○○○○○○○○○○○○○○○○○○○○○○○○○
Modification de la température définie:
■
•
Appuyez sur la touche
•
Appuyez sur la touche
Fonctionnement en mode CHAUFFAGE
• Si le climatiseur absorbe trop de chaleur de l’air, l’appareil risque la surcharge. En vertu de données transmises par le
microprocesseur, le ventilateur de l’unité externe peut s’arrêter automatiquement pour protéger le climatiseur.
Lorsque le ventilateur de l’unité externe est arrêté, du givre peut se former sur l’unité externe sans que cela constitue
un problème pour le fonctionnement du système.
Fonctionnement en mode DESHUMIDIFICATION
• Aucune modification de température (réglage de température) n’est possible.
• La température interne de la pièce est diminue légèrement dans ce mode.
Les détails d’affichage sur l’unité interne se trouvent expliqués à la page 26.
■
REMARQUE:
Si la température ambiante est trop élevée, l’appareil fonctionne alors en mode plein régime pour rafraîchir la pièce. Il
est donc possible qu’il ne puisse atteindre la température que vous avez définie.
Informations concernant les climatiseurs multi-systèmes (Unité externe de la serie MXZ)
Les climatiseurs multi-systèmes (avec un unité externe de la série MXZ) permettent de raccorder deux ou davantage d’unités
internes à un unité externe. En fonction de la capacité, plusieurs unités internes peuvent ainsi fonctionner simultanément.
•
Lorsque vous essayez de faire fonctionner simultanément deux ou davantage d’unités internes reliés à un seul unité externe, un
pour le refroidissement et l’autre pour le chauffage, le mode de fonctionnement sélectionné sera celui de l’unité interne qui a été
mis en fonctionnement en premier. Les autres unités internes qui seraient mis en fonctionnement par la suite ne peuvent pas
s’activer bien qu’ils indiquent un état de fonctionnement. (Consulter le tableau des témoin de fonctionnement à la page 26.)
Dans ce cas, régler tous les unités internes sur le même mode de fonctionnement.
•
Lorsque l’unité interne se met en fonctionnement alors que le dégivrage de l’unité externe est en cours, il faut laisser passer
quelques minutes (10 minutes maximum) avant que l’appareil ne souffle de l’air chaud.
•
Lorsque l’appareil fonctionne en mode chauffage, si le dessus de l’appareil chauffe ou que vous entendez le flux de gaz à l’intérieur, cette
situation n’a rien d’anormal. Le gaz réfrigérant circule en effet de manière continue dans l’unité interne même si celui-ci ne fonctionne pas.
Description de la “FONCTION DE REDÉMARRAGE AUTOMATIQUE”
Voir à la page 26.
pour réduire la température. Une pression sur cette touche diminue la température d’environ 1°C.
pour augmenter la température. Une pression sur cette touche augmente la température d’environ 1°C.
Type Mode de fonctionnement
Appuyer sur la touche
Lorsqu’un mode de fonctionnement a été choisi, appuyez sur la touche
le réutiliser au prochain démarrage.
.
CHAUFFAGE
VENTILATEUR
.
pour
L’ORIENTATION
Vous pouvez sélectionner selon vos besoins la puissance de l’air pulsé et l’orientation.
Pour modifier le réglage de puissance de l’air pulsé, appuyez
■
sur la touche
A chaque pression sur la touche, la vitesse du ventilateur change dans l’ordre
.
suivant :
(petite) → (moyenne) → (grande) → (automatique)
• Pour refroidir/réchauffer davantage une pièce, utiliser le mode
• Si le bruit du fonctionnement du climatiseur gêne le sommeil, utilisez la
fonction
Pour modifier le réglage d’orientation verticale du débit d’air,
■
appuyez sur la touche
A chaque pression sur la touche, l’angle de l’ailette d’orientation horizontale
change dans l’ordre suivant :
(oscillation) → (automatique)
FONCTIONNEMENT AVEC OSCILLATION
Utilisez le mode d’oscillation pour que l’air ventilé puisse atteindre toutes les
parties de la pièce.
Limites de réglage d’orientation de l’ailette horizontale
Utilisez habituellement
position
(1) ou (2) en mode REFROIDISSEMENT ou en mode de DESHUMIDIFICATION et utiliser les positions
FAGE pour régler l’appareil à votre meilleure convenance.
REMARQUE:
• En mode de refroidissement, lorsque le climatiseur fonctionne avec un réglage de l’ailette horizontale sur
ou
(5) pendant une heure, le sens de la soufflerie est automatiquement ramené à l’horizontale pour empêcher la
formation de gouttes de condensation.
• Réglez l’orientation verticale du débit d’air par télécommande. L’appareil risque de ne pas fonctionner normalement
si l’ailette d’orientation horizontale est manipulée manuellement.
• En mode de chauffage, si la température de l’air soufflé est trop basse ou pendant l’opération de dégivrage, l’ailette
horizontale est mise sur la position
(1).
Fonctionnement automatique
d’orientation du debit d’air
Lorsque le mode automatique est sélectionné avec
la touche
tation horizontale est déterminé automatiquement
en vue d’assurer un fonctionnement efficace.
(1) CHAUFFAGE
• Lorsque la température de l’air soufflé est trop basse,
l’air est soufflé à l’horizontale.
• Lorsque la température de l’air soufflé augmente,
l’air est soufflé vers le bas.
(2) REFROIDISSEMENT, DESHUMIDIFICATION
L’air souffle à l’horizontale.
(3) VENTILATEUR
L’air est soufflé vers le bas.
, le positionnement de l’ailette d’orien-
.
(petite).
.
(1) → (2) → (3) → (4) → (5) →
(automatique). Utiliser la
(3) à (5) en mode CHAUF-
Pour modifier l’orientation horizontale du dé-
■
bit d’air, dirigez manuellement l’ailette verticale.
Ajustez l’ailette avant de mettre l’appareil en marche.
Comme l’ailette d’orientation horizontale est commandée automatiquement, prenez garde à ne pas vous coincer les doigts.
Refroidissement,
Deshumidification
CHAUFFAGE
(grande).
(4)
27
Page 28
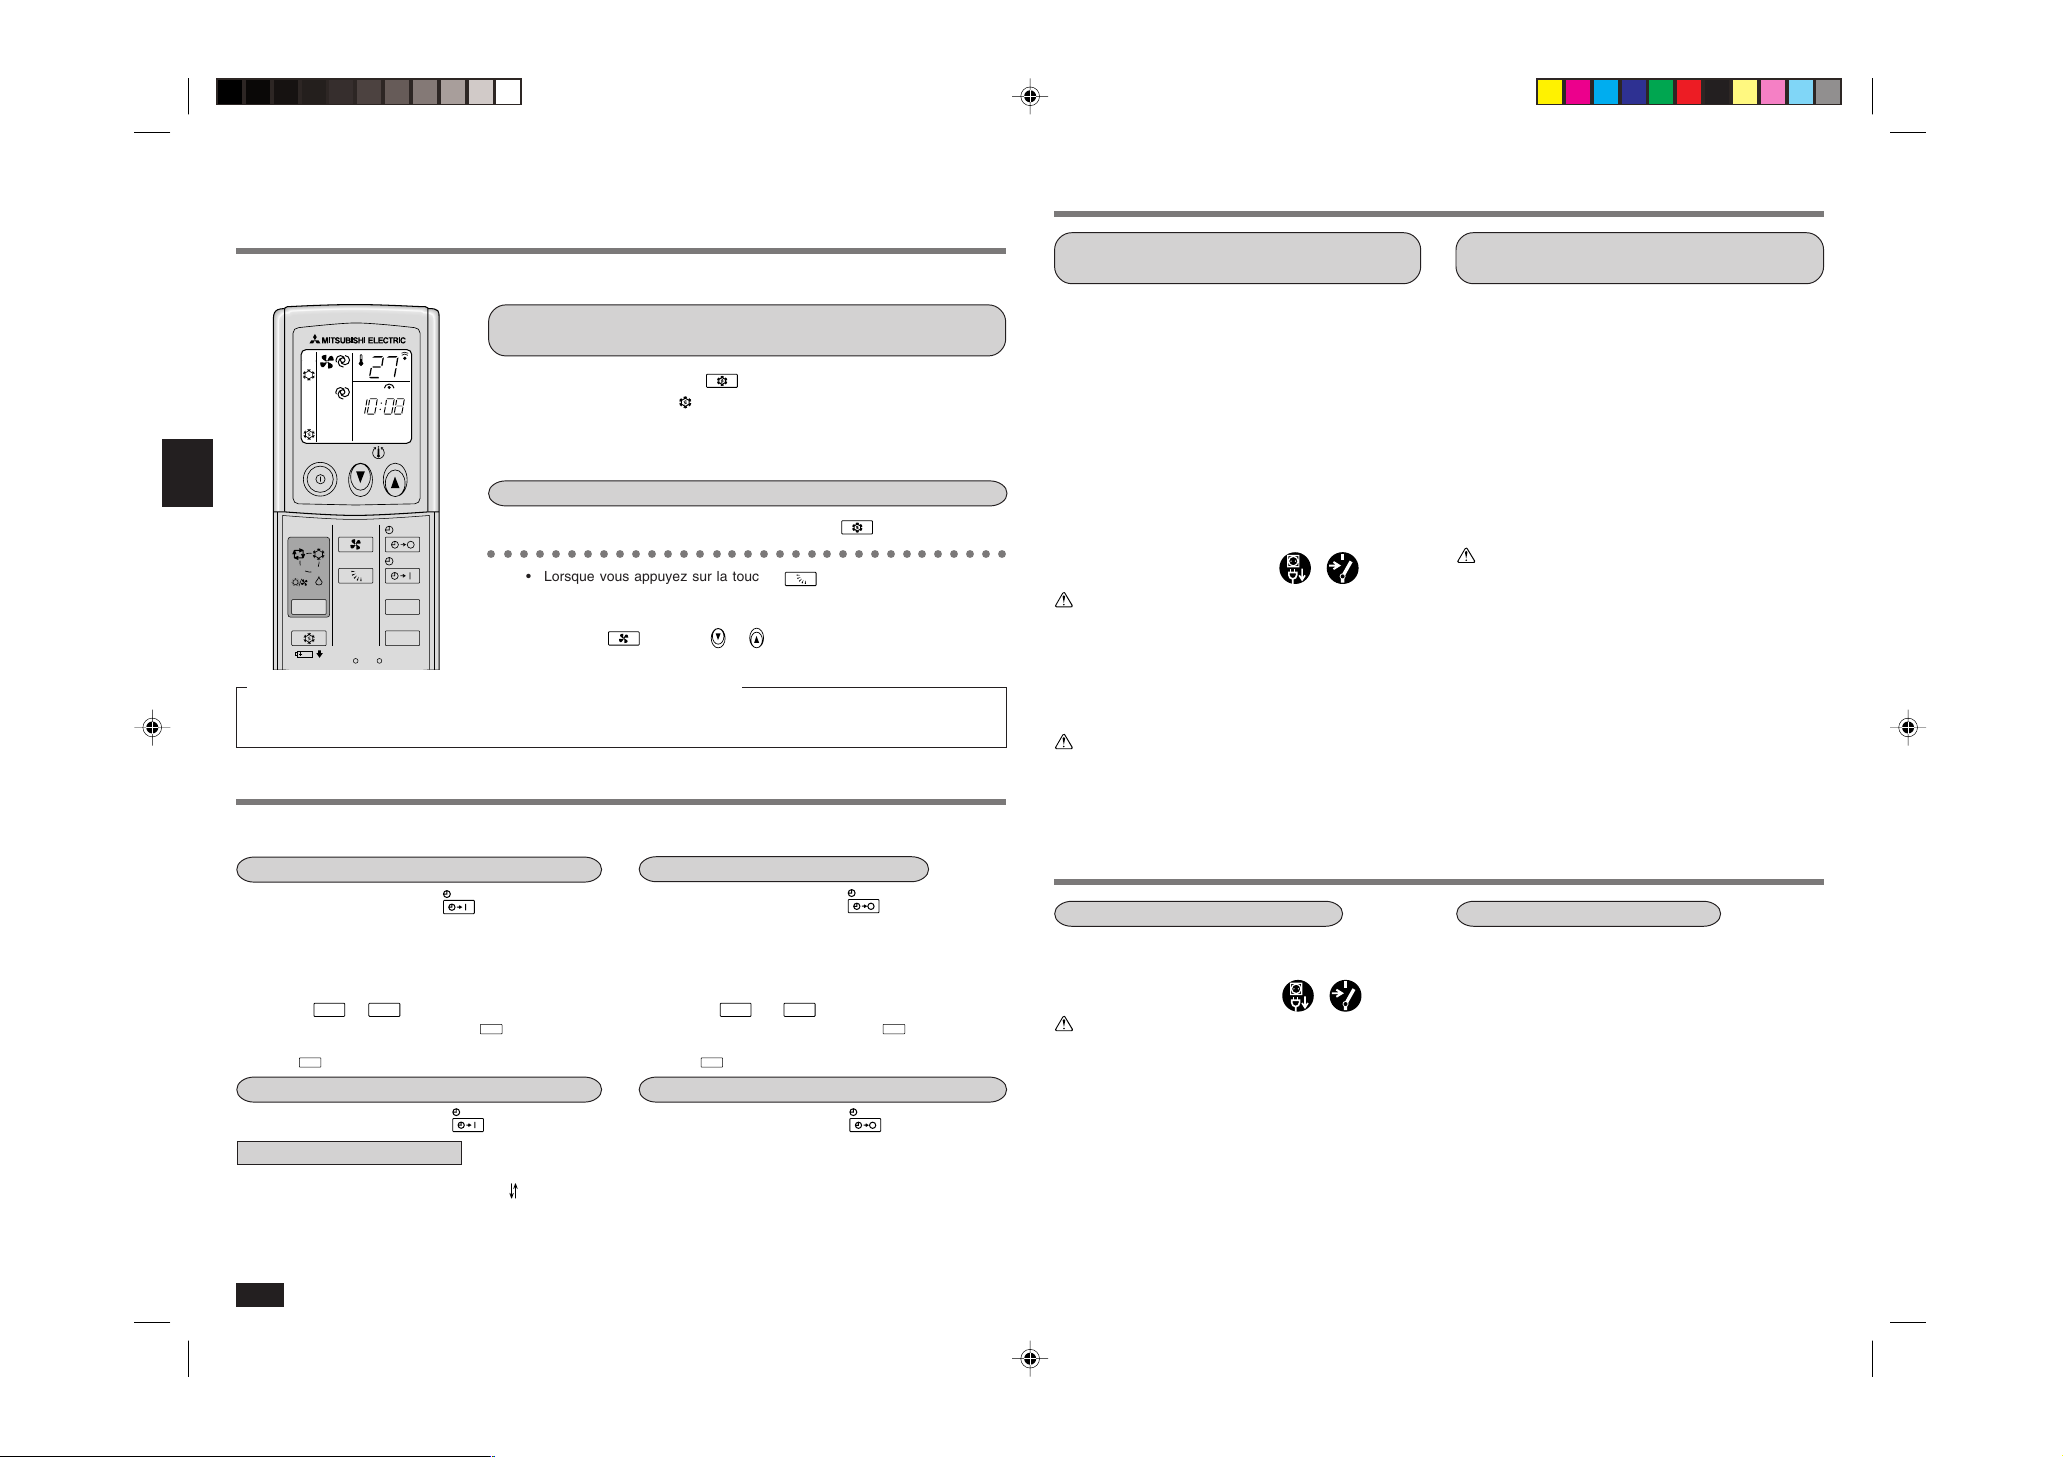
FONCTIONNEMENT EN MODE DE REFROIDISSEMENT
ON/OFF
FAN
TOO
WARM
TOO
COOL
VANE
MODE
ECONO COOL
STOP
START
HR.
MIN.
I FEEL
COOL
DRY
AMPM
CLOCK
˚C
AMPM
HEAT
/FAN
RESET CLOCK
START
HR.
MIN.
HR.
MIN.
START
STOP
HR.
MIN.
HR.
MIN.
STOP
ECONO COOL
ECONO COOL
VANE
FAN
TOO
WARM
TOO
COOL
SI L’APPAREIL DOIT RESTER LONGTEMPS INUTILISE
ECONOMIQUE (ECONO COOL)
Utilisez ce mode de fonctionnement lorsque vous souhaitez obtenir un certain confort en mode de
REFROIDISSEMENT tout en réalisant des économies d’énergie.
Exécutez les opérations suivantes lorsque l’appareil fonctionne en mode de REFROIDISSEMENT MANUEL.
Appuyez sur la touche
■
Lorsque le fonctionnement REFROIDISSEMENT ECONOMIQUE (ECONO COOL)
est sélectionné en mode de REFROIDISSEMENT, le climatiseur fonctionne avec oscillation selon différents cycles, en fonction de la température programmée pour le climatiseur.
De même, la TEMPERATURE PROGRAMMEE est automatiquement réglée 2°C plus
haut qu’en mode de REFROIDISSEMENT normal.
.
Pour sortir du mode de REFROIDISSEMENT ECONOMIQUE (ECONO COOL):
Appuyez une seconde fois sur la touche
■
○○○○○○○○○○○○○○○○○○○○○○○○○○○○○○○○○
• Lorsque vous appuyez sur la touche
mode de fonctionnement alors que le REFROIDISSEMENT ECONOMIQUE
(ECONO COOL) est activé, ce dernier mode est désactivé.
• La touche
(explications ci-dessous) sont disponibles.
Qu’est-ce que le “REFROIDISSEMENT ECONOMIQUE (ECONO COOL)”?
Une soufflerie d’air pivotante (avec oscillation du sens de la soufflerie) rafraîchit davantage qu’un flux d’air constant. Ainsi, même
si la température programmée est automatiquement réglée 2°C plus haut qu’en mode de refroidissement normal, il est possible
de faire fonctionner le système de refroidissement tout en conservant un certain confort et, de ce fait, en économisant de l’énergie.
, la touche
ou
ou lorsque vous changez de
et la minuterie de mise en marche/arrêt
.
FONCTIONNEMENT EN MINUTERIE (MINUTERIE MARCHE / ARRÊT)
La minuterie présente un avantage certain lorsqu’elle est réglée pour le moment où vous vous mettez
au lit, où vous rentrez à la maison, où vous vous levez, etc.
Réglage de mise en fonction de la minuterie
1 Appuyez sur la touche
tionnement de l’appareil.
A chaque pression sur la touche, le mode de minuterie alterne entre le mode de mise en marche et le mode d’arrêt.
pendant le fonc-
2 Réglez l’heure de la minuterie avec les tou-
ches
A chaque pression sur la touche
augmente d’une heure ; à chaque pression sur la touche
Pour sortir du mode de minuterie de mise en marche:
Appuyez sur la touche
■
Programmation de la minuterie
Vous pouvez combiner les modes de minuterie de mise en marche et d’arrêt. L’heure indiquée en premier correspond à la
fonction appliquée en premier. (La marque “ ” indique l’ordre d’application des modes de fonctionnement par la minuterie.)
• La minuterie ne peut être utilisée que si l’heure actuelle a été réglée au préalable.
REMARQUE :
Si l’alimentation principale est coupée ou si une panne de courant se produit pendant que la MINUTERIE MARCHE/ARRET
est active, le réglage de la minuterie est annulé. Etant donné que ces modèles sont équipés d’une fonction de redémarrage
automatique, le climatiseur devrait redémarrer avec le réglage de la minuterie annulé dès que le courant est rétabli.
28
et
.
, de dix minutes.
, l’heure définie
.
Réglage de la minuterie d’arrêt
1 Appuyez sur la touche
tionnement de l’appareil.
A chaque pression sur la touche, le mode de réglage
alterne entre le mode de mise en marche et d’arrêt.
pendant le fonc-
2 Réglez l’heure de la minuterie avec les tou-
ches
A chaque pression sur la touche
augmente d’une heure ; à chaque pression sur la touche
Pour sortir du mode de minuterie d’arrêt:
Appuyez sur la touche
■
et
, de dix minutes.
.
, l’heure définie
.
Si l’appareil doit rester longtemps inutilisé:
1 Faites tourner l’appareil en mode FAN (ven-
tilateur) pendant 3 ou 4 heures pour faire
sécher l’intérieur du climatiseur.
TYPE avec REFROIDISSEMENT et CHAUFFAGE:
• Pour activer le FAN (ventilateur), réglez la télécom-
mande sur la température la plus élevée en mode de
REFROIDISSEMENT MANUEL. (Voir à la page 27.)
TYPE à REFROIDISSEMENT UNIQUEMENT:
• Sélectionnez le mode VENTILATEUR. (Voir à la
page 27.)
2 Coupez le disjoncteur et/ou débranchez la
prise d’alimentation.
PRÉCAUTION:
Si l’appareil doit rester longtemps inutilisé, coupez le
disjoncteur ou débranchez le cordon d’alimentation.
Il risque de s’encrasser et de provoquer un incendie.
3 Retirez les piles d’alimentation du boîtier de
télécommande.
PRÉCAUTION:
Pour éviter toute fuite de liquide, retirer toutes les piles
lorsque vous ne comptez pas utiliser la télécommande
pendant un longtemps.
ENTRETIEN
Avant de procéder à l’entretien
Coupez le disjoncteur et/ou débranchez la
■
prise d’alimentation.
PRÉCAUTION:
Lorsque l’appareil doit être nettoyé, coupez l’alimenta-
tion et débranchez la prise d’alimentation ou coupez le
disjoncteur. Le ventilateur de refroidissement tourne à
grande vitesse et risque de provoquer un accident.
Lorsque le climatiseur doit être remis en
service:
1 Nettoyez le filtre à air et remontez-le dans
l’unité interne.
(Pour plus de détails sur le nettoyage, voir à la page
29.)
2 Vérifiez que l’entrée et la sortie d’air des uni-
tés externe et interne ne sont pas entravées
par un obstacle quelconque.
3 Vérifiez que la mise à la terre a été correcte-
ment effectuée.
PRÉCAUTION:
Mise à la terre.
Ne connectez pas le fil de terre aux tuyaux de gaz, aux
tuyaux d’eau, à une tige de paratonnerre ou au fil de terre
du téléphone. Une mise à la terre incorrecte entraîne des
risques d’électrocution.
Nettoyage de l’unité interne
Nettoyez le climatiseur avec un chiffon doux
■
et sec.
• Si l’unité est fortement encrassée, nettoyez-la avec
un chiffon imbibé dans une solution de détergent
doux et eau tiède.
• N’utilisez pas d’essence, de benzène, de poudre
de nettoyage ou des insecticides. L’unité pourrait
s’endommager.
Page 29
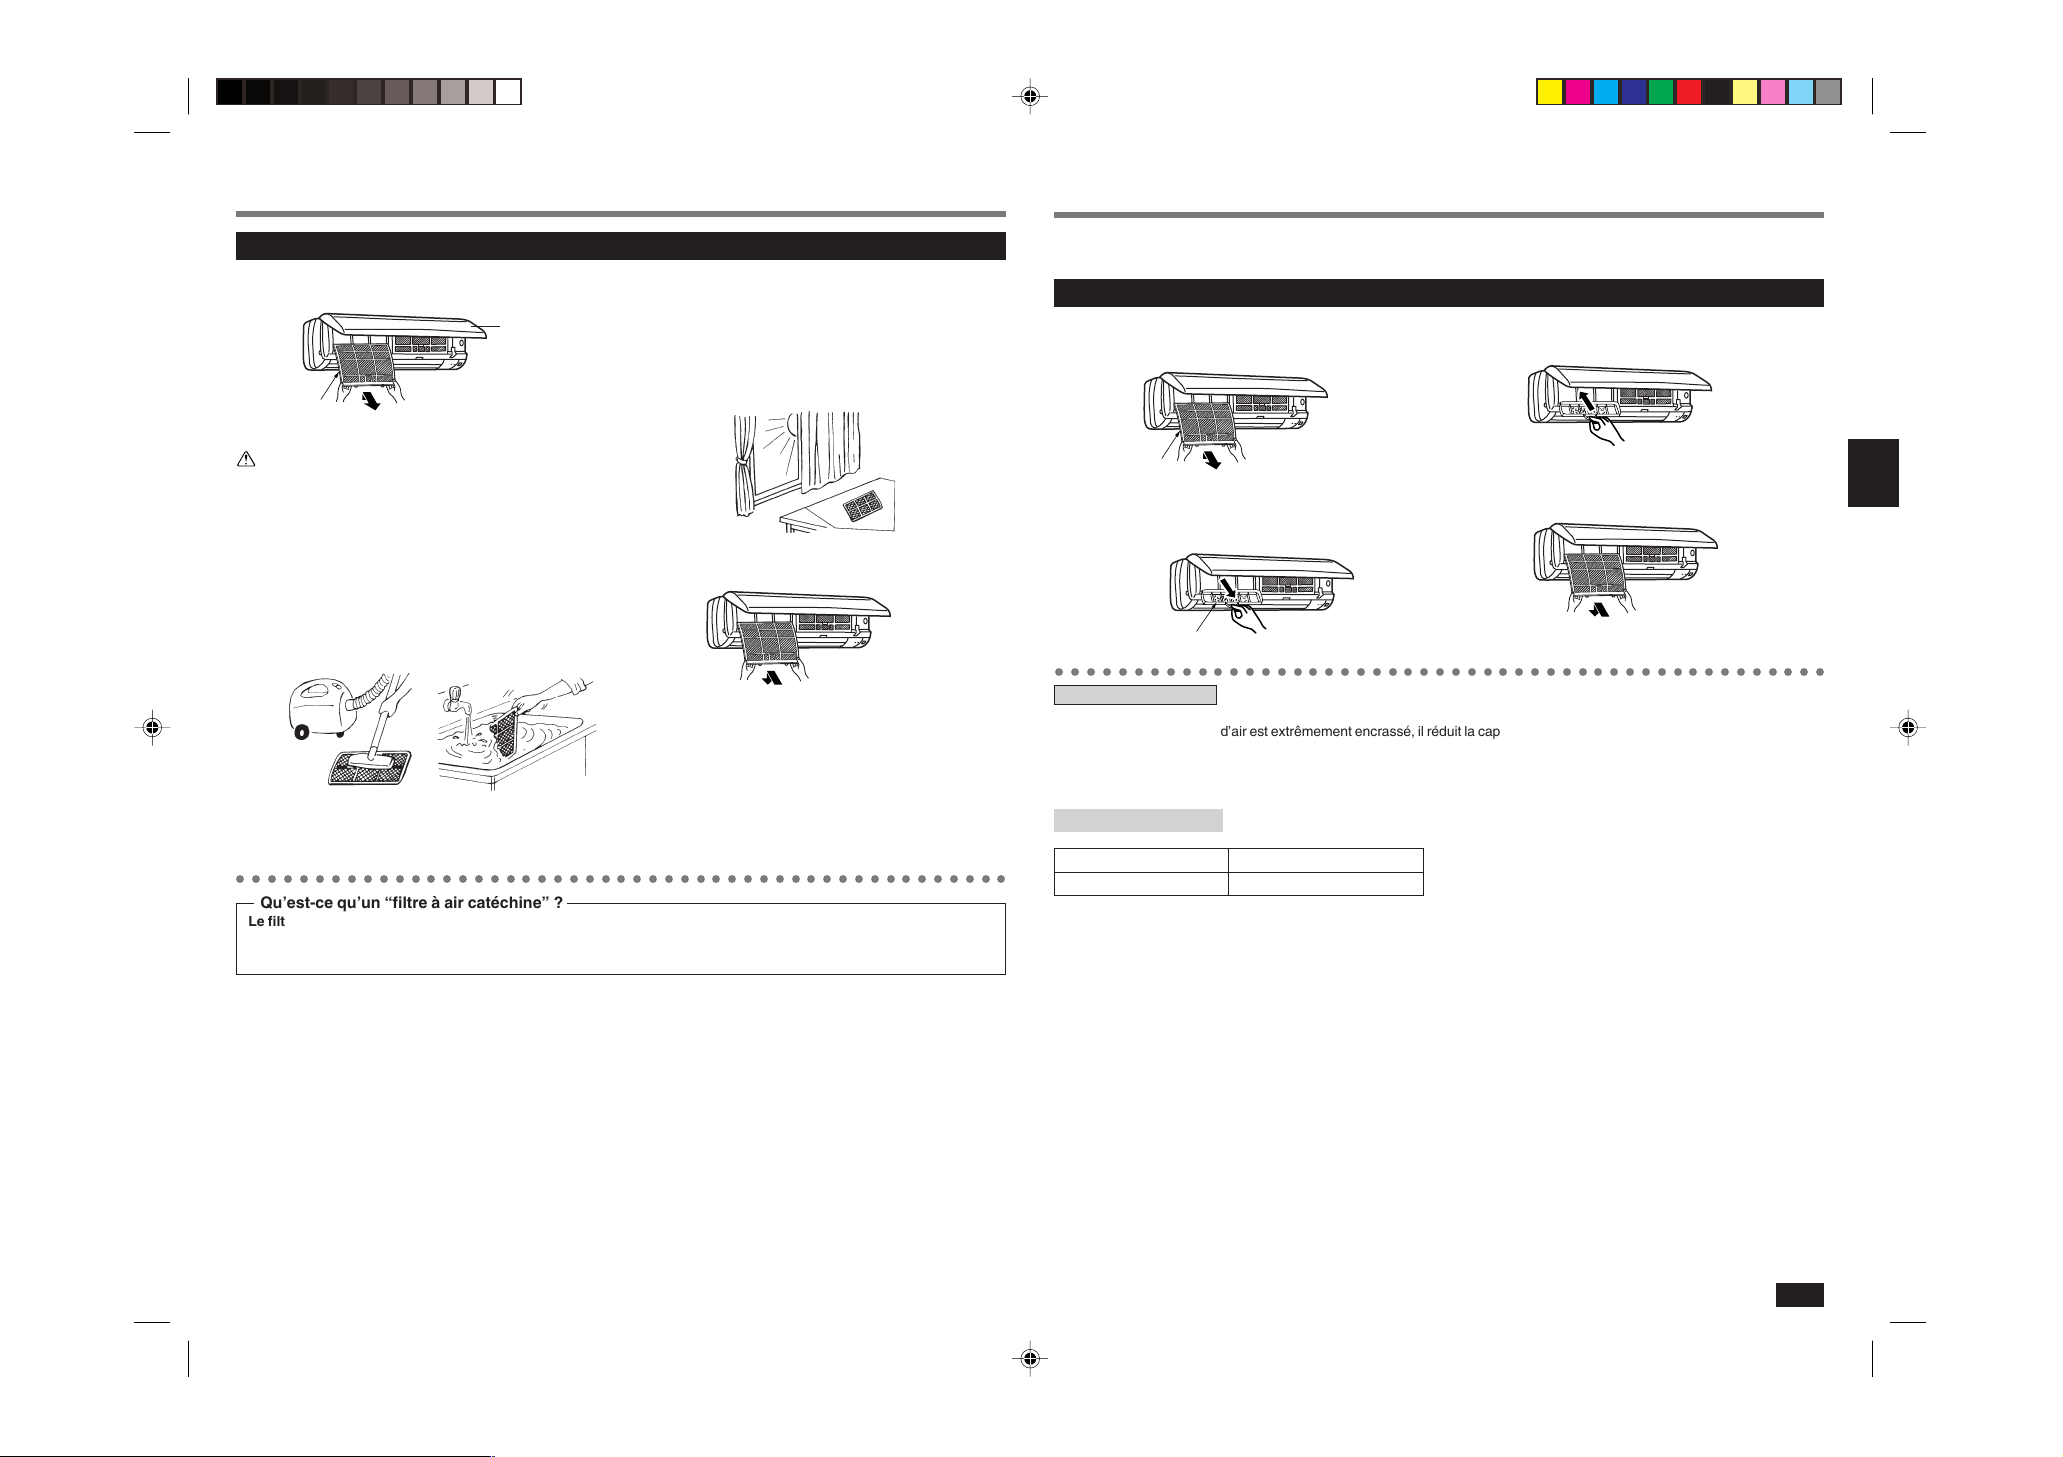
NETTOYAGE DU FILTRE A AIR CATECHINE
REMPLACEMENT DU FILTRE D’EPURATION D’AIR
Nettoyage du filtre à air catéchine (environ une fois toutes les 2 semaines)
1 Retirer le filtre à air catéchine.
Ouvrir le panneau
frontal pour retirer/remplacer le
filtre.
Filtre à air catéchine
PRÉCAUTION:
Lors du retrait du filtre à air catéchine, ne pas toucher
les parties métalliques de l’unité interne.
Vous risquez de vous blesser.
Retirer.
3 Après avoir lavé le filtre à air catéchine dans
de l’eau froide ou tiède, le faire sécher complètement à l’ombre.
• Ne pas exposer directement le filtre à air catéchine
à la lumière du soleil ni à une source de chaleur
pour le faire sécher.
2 Enlever les saletés du filtre à air catéchine à
l’aide d’un aspirateur ou en le lavant à l’eau.
• Si la saleté est très évidente, nettoyez le filtre à air
avec une solution de détergent doux et eau tiède.
• Avec de l’eau chaude (50°C ou plus), le filtre à air
risque de se déformer.
4 Remettre le filtre à air catéchine en place.
Réinstaller.
Si la capacité de filtrage diminue en raison de l’accumulation de saletés, etc., il est nécessaire de
remplacer le filtre d’épuration d’air.
Remplacement du filtre d’épuration d’air (environ tous les 4 mois)
1 Retirer le filtre à air catéchine.
Filtre à air catéchine
3 Installez un nouveau filtre d’épuration d’air.
4 Installer le filtre à air catéchine et rabattre
fermement le panneau frontal.
2 Retirez le filtre d’épuration d’air (Type à souf-
flets blancs).
Filtre d’épuration d’air
○○○○○○○○○○○○○○○○○○○○○○○○○○○○○○○○○○○○○○○○○○○○○○○○○
Filtre d’épuration d’air
• Si le filtre d’épuration d’air est extrêmement encrassé, il réduit la capacité de filtrage et favorise la formation de condensats
sur la grille de refoulement d’air.
• Le filtre d’épuration d’air est jetable. La durée de service standard d’un filtre est de 4 mois environ. Cependant, si la
couleur du filtre vire au marron foncé, le remplacer au plus tôt.
○○○○○○○○○○○○○○○○○○○○○○○○○○○○○○○○○○○○○○○○○○○○○○○○○
Qu’est-ce qu’un “filtre à air catéchine” ?
Le filtre à air est enduit d’un matériau naturel, la catéchine, présente dans le thé. Le filtre à air catéchine supprime
les odeurs et les gaz nocifs tels que le formaldéhyde, l’ammoniac et l’acétaldéhyde. Il restreint également l’activité
des virus qui adhèrent au filtre.
Accessoires optionnels Les accessoires optionnels sont disponibles auprès de votre distributeur local.
Désignation de pièce FILTRE D’EPURATION D’AIR
Numéro de pièce MAC-1300FT
29
Page 30
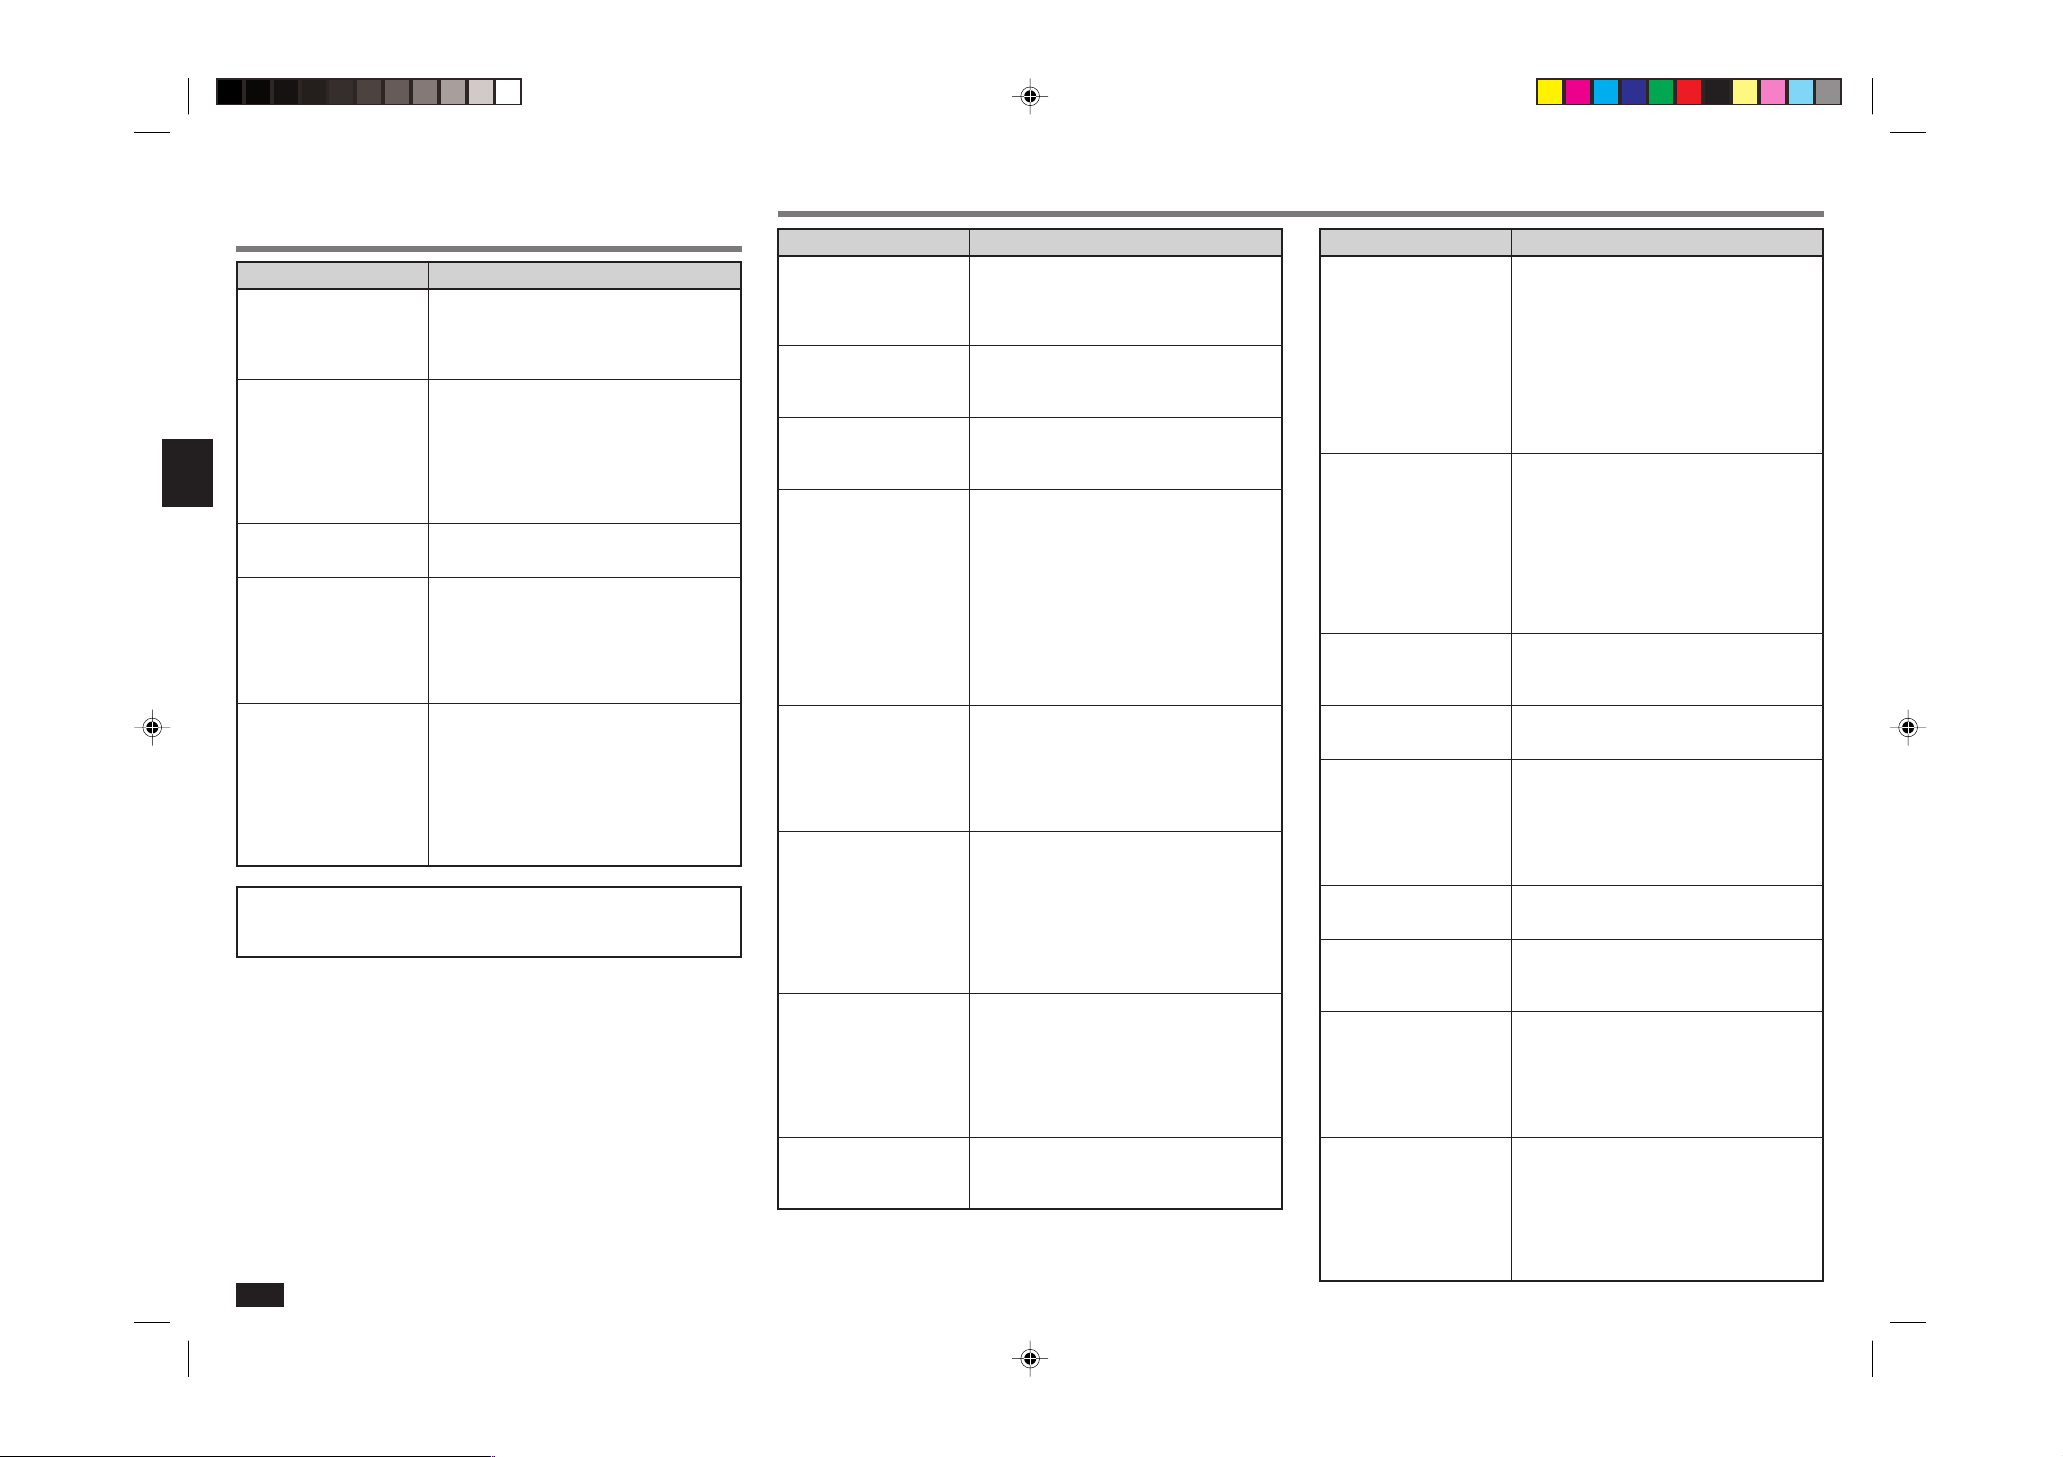
AVANT DE CONTACTER LE SERVICE D’ENTRETIEN,
EN PRESENCE D’UNE PANNE POTENTIELLE
PROCEDER AUX VERIFICATIONS SUIVANTES
Question
Le climatiseur ne fonctionne pas.
Impossible de refroidir ou
de chauffer suffisamment la
pièce.
L’air de l’unité interne a une
odeur étrange.
Pas d’affichage sur la télé-
commande ou affichage
trop sombre. L’unité interne
ne répond pas au signal de
la télécommande.
En cas de panne de courant.
Si les point mentionnés ci-dessus ne permettent pas de rétablir le fonctionnement normal de l’appareil après constat de l’anomalie, arrêtez le
climatiseur et consultez le revendeur.
Dans les cas suivants, arrêtez le climatiseur et consultez votre revendeur.
• Lorsque l’unité interne présente des fuites d’eau.
• Lorsque le témoin de fonctionnement de gauche clignote.
• Lorsque le disjoncteur s’enclenche régulièrement.
• Les signaux de télécommande ne sont pas toujours reçus normalement par
l’unité interne lorsqu’elle est installée dans une pièce dont le dispositif d’éclairage est à lampes fluorescentes (à oscillateur intermittent, etc.).
• Le fonctionnement du climatiseur peut empêcher la bonne réception des signaux radio ou TV dans les régions où l’onde électrique est faible. Il est alors
parfois nécessaire de brancher un amplificateur à l’appareil affecté.
• En cas d’orage, arrêtez le climatiseur, débranchez la prise d’alimentation secteur ou coupez le disjoncteur pour éviter l’endommagement des éléments
électriques par la foudre.
30
Points à vérifier ou remèdes
• Le disjoncteur est-il activé?
• Le fusible a-t-il sauté?
• La mise en fonction de la minuterie est-elle pro-
grammée? (Voir page 28)
• Est-ce que la température est définie correcte-
ment? (Voir page 27)
• Le filtre est-il propre? (Voir page 29)
• Des obstacles obstruent-ils l’admission d’air ou
la grille de refoulement d’air de l’unité interne
ou externe?
• Y a-t-il une porte ou une fenêtre ouverte?
• Le filtre est-il propre? (Voir page 29)
• Les piles ne sont-elles pas épuisées? (Voir page
25)
• La polarité (+,-) des piles est-elle correcte? (Voir
page 25)
• Les touches de télécommandes d’autres appareils électriques sont-elles sollicitées?
• Le climatiseur redémarre ?
Si le climatiseur était en cours de fonctionnement avant la panne de courant, étant donné
que ces modèles sont équipés d’une fonction
de redémarrage automatique, le climatiseur devrait redémarrer. (Se reporter à la Description
de la “FONCTION DE REDÉMARRAGE AUTOMATIQUE”, page 26.)
Question
Le climatiseur refuse de se
remettre en marche dans
les trois minutes qui suivent sa mise à l’arrêt.
Un bruit de craquement se
produit.
L’air de l’unité interne a une
odeur étrange.
Le ventilateur s’arrête
pendant le cycle de
déshumidification.
Un bruit d’écoulement
d’eau se manifeste.
Vous entendez un son de
bouillonnement.
La pièce ne se refroidit pas
suffisamment.
De la buée s’échappe de la
grille de refoulement d’air
de l’unité interne.
Réponse (il ne s’agit pas d’une panne)
• Cette disposition a été prise pour protéger le
climatiseur placé sous la gestion du microprocesseur. Attendez.
• Ce bruit provient de l’expansion/la contraction
du panneau frontal soumis aux variations de
température.
• Le climatiseur a aspiré l ’odeur d’un tapis, un mur,
un meuble, des vêtements, etc., et la projette
avec l’air de climatisation.
• En mode de fonctionnement DESHUMIDIFICATION, l’appareil utilise le même circuit de réfri-
gérant que lors du fonctionnement en mode REFROIDISSEMENT. Réduire le temps de fonctionnement en mode DÉSHUMIDIFICATION afin
d’abaisser le taux d’humidité sans diminuer trop
la température de la pièce. Dans ce cas, le compresseur s’arrête parfois, en même temps que
le ventilateur intérieur. Cette mesure sert à évi-
ter l’évaporation de l’eau condensée sur l’échan-
geur de chaleur.
• Ce bruit peut provenir de la circulation du réfrigérant dans le climatiseur.
• Ce bruit peut provenir de l’eau de condensation
circulant dans l’échangeur de chaleur.
• Ce bruit peur provenir du dégivrage de l’échangeur de chaleur.
• Vous entendez ce son lorsque de l’air frais pénètre dans le tuyau d’écoulement; il provient de
l’évacuation de l’eau présente dans le tuyau lors
de l’ouverture du capuchon ou de l’activation du
ventilateur.
Vous entendez également ce son en cas de pé-
nétration d’air frais dans le tuyau par vents violents.
• Lors de l’utilisation d’un ventilateur ou d’une
gazinière dans une pièce, la température est
plus élevée et le refroidissement ne peut se faire
de manière satisfaisante.
• Lorsque la température à l’extérieur est élevée,
le refroidissement ne peut se faire de manière
satisfaisante.
• L’air frais du climatiseur refroidit rapidement l’humidité présente dans l’air de la pièce et la transforme en buée.
Question
La direction d’orientation
de l’air change en cours de
fonctionnement.
La télécommande ne permet pas d’ajuster le sens de
l’ailette horizontale.
De l’eau s’écoule de l’unité
externe.
De la fumée blanche sort de
l’unité externe.
L’air ne souffle pas rapidement en mode chauffage.
Le fonctionnement s’arrête
pendant environ 10 minutes
en mode chauffage.
Vous entendez parfois un
sifflement.
La pièce ne se réchauffe
pas suffisamment.
Dans un système à appareils multiples, l’appareil intérieur qui n’est pas activé
est chaud et vous entendrez
un bruit, semblable à l’écou-
lement de l’eau.
Le climatiseur ne démarre
que lorsque l’alimentation
est activée, alors que vous
n’utilisez pas l’unité avec la
télécommande.
Réponse (il ne s’agit pas d’une panne)
• Lorsque le climatiseur fonctionne continuellement
en mode de refroidissement ou de déshumidification
pendant une heure avec l’orientation de la soufflerie vers le bas, celle-ci est automatiquement ramenée à l’horizontale pour empêcher la formation de
gouttes de condensation sur l’appareil.
•
En mode de chauffage, si la température de l’air soufflé est trop basse ou lorsque le dégivrage est activé,
la position de l’ailette d’orientation horizontale est
automatiquement placée en position horizontale.
• Pendant le fonctionnement en mode de REFROIDISSEMENT ou de DESHUMIDIFICATION, les
tuyauteries et leurs raccords sont refroidis et une
certaine condensation de l’eau peut se produire.
• En mode chauffage, l’opération de dégivrage fait
fondre l’eau gelée se trouvant sur l’unité externe
et celle-ci se met à goutter.
• En mode chauffage, l’eau condensée sur
l’échangeur de chaleur se met à goutter.
• Lors de l’opération de chauffage, la vapeur générée par l’opération de dégivrage ressemble à
de la fumée blanche.
• Attendre que le climatiseur soit prêt à souffler
de l’air chaud.
• Le dégivrage de l’unité externe est en cours
(fonctionnement pour le dégivrage).
Comme cette opération dure environ 10 minutes, attendre qu’elle se termine. (Lorsque la température externe est trop basse et que le taux
d’humidité est trop élevé, du givre se forme.)
• Il s’agit du son du changement de flux de réfrigérant à l’intérieur du climatiseur.
• Lorsque la température extérieure est faible, il
est possible que le climatiseur ne fonctionne pas
de manière suffisante pour réchauffer la pièce.
• Une petite quantité de réfrigérant continue de
couler dans l’appareil intérieur même s’il n’est
pas en marche.
• Ces modèles sont équipés d’une fonction de
redémarrage automatique. Lorsque l’alimentation est coupée, que le climatiseur n’est pas arrêté avec la télécommande et que l’alimentation
est réactivée, le climatiseur démarre dans le
même mode que celui réglé avec la télécommande juste avant de couper l’alimentation.
Page 31

INSTALLATION, DEPLACEMENT ET VERIFICATION
Lieu d’installation
Evitez d’installer le climatiseur dans les emplacements suivants.
• En présence de fuites de gaz inflammable.
PRÉCAUTION:
N’installez pas l’appareil dans un endroit susceptible
d’être exposé à des fuites de gaz inflammable.
L’accumulation de gaz autour de l’appareil entraîne des
risques d’explosion.
•
En présence d’une grande quantité d’huile de machine.
•
Dans les régions où l’air est très salin, comme en bord de mer.
•
En présence de gaz sulfurique, comme dans les stations thermales.
•
Dans les endroits risquant une aspersion d’huile ou dans
une atmosphère chargée d’huile.
•
Dans des lieux où se trouvent des équipements à haute fré-
L’appareil extérieur doit être installé à 3 m au moins des antennes de téléviseurs,
radios, etc. Dans les régions où l’onde électrique est faible, éloigner davantage
l’unité externe et l’antenne de l’appareil affecté si le fonctionnement du climatiseur empêche la bonne réception des signaux radio ou TV.
Tubes fluorescents
Téléphone
sans fil
ou
Téléphone
portable
1 m ou
plus
Radio
à oscillateur
Laissez un
espace pour
éviter toutes
distorsions des
images et tous
parasites.
Télévision
3 m ou
plus
100 mm ou
plus
Eloignez-le le plus
possible des tubes
fluorescents, pour
éviter toute influence.
1 m ou
plus
Emplacement
sec et bien
aéré
500 mm
ou plus
Mur, etc.
quence ou sans fil.
AVERTISSEMENT:
Si le climatiseur fonctionne sans refroidir ou sans chauffer la pièce (en fonction du modèle), contacter le revendeur
car il pourrait alors y avoir une fuite de gaz réfrigérant. Toujours demander au représentant du service technique s’il
n’y a pas de fuite de réfrigérant après une intervention technique.
Le réfrigérant présent dans le climatiseur est sûr et normalement il ne doit pas y avoir de fuite. Néanmoins, en cas de
fuite à l’intérieur, si le gaz réfrigérant entre en contact avec la partie chauffante d’un chauffage à ventilation, d’un
chauffage d’appoint, d’un poêle, etc., il dégagera des substances toxiques.
Travaux électriques
• Prévoyez un circuit exclusif pour l’alimentation du climatiseur.
• Respectez la capacité requise pour le disjoncteur.
AVERTISSEMENT:
Les travaux d’installation de l’appareil ne doivent pas être effectués par le client. Si ces travaux ne sont pas effectués correc-
•
tement, ils sont entraînent des risques d’incendie, d’électrocution, de blessure par une chute de l’unité, une fuite d’eau, etc.
•
Ne pas utiliser de raccord intermédiaire pour brancher le cordon d’alimentation, etc., ni de railonge ni même brancher plusieurs appareils à la même prise secteur. Un mauvais contact, une isolation insuffisante, un courant trop fort, etc., provoque
des risques d’incendie ou d’électrocution. Dans le doute, prenez systématiquement conseil auprès du revendeur.
PRÉCAUTION:
• Mise à la terre.
Ne connectez pas le fil de terre aux tuyaux de gaz, aux tuyaux d’eau, à une tige de paratonnerre ou au fil de terre du
téléphone. Une mise à la terre incorrecte entraîne des risques d’électrocution.
• Installez un disjoncteur de fuite à la terre en fonction de l’emplacement d’installation du climatiseur (lieu humide, par
exemple, etc.). L’absence de disjoncteur de fuite à la terre dans ces conditions provoque des risques d’électrocution.
Vérification et entretien
• Lorsque le climatiseur est utilisé pendant plusieurs saisons, sa capacité risque de diminuer à la suite d’un encrassement
intérieur.
• Suivant la façon dont le climatiseur est utilisé, il risque de dégager une odeur. L’eau de déshumidification risque aussi de
ne plus s’égoutter correctement à la suite de l’ encrassement.
• Il est recommandé de faire vérifier et réviser les appareils (service facturé) par le personnel d’entretien spécialisé, en
plus des opérations d’entretien habituelles. Prenez conseil auprès du revendeur.
Prenez également en considération le bruit de fonctionnement de l’appareil
• Ne laissez rien aux environs des ouvertures de refoulement d’air de l’unité externe, sous peine de réduire la capacité de
l’appareil et de voir augmenter son bruit de fonctionnement.
• Si un bruit anormal se manifeste pendant le fonctionnement du climatiseur, prenez conseil auprès du revendeur.
Déplacement de l’appareil
• Le déplacement ou la réinstallation du climatiseur en raison de travaux de reconstruction, d’un déménagement, etc., est
un travail de spécialiste.
AVERTISSEMENT:
La réparation ou le déplacement de l’appareil ne doit pas être effectué par le client. Si ces travaux ne sont pas effectués correctement, ils entraînent des risques d’incendie, d’électrocution, de blessure par une chute de l’unité, une
fuite d’eau, etc. Prenez conseil auprès du revendeur.
Mise au rebut
Prenez conseil auprès du revendeur habituel pour mettre cet appareil au rebut.
Dans le doute, prenez toujours conseil auprès du revendeur.
CARACTERISTIQUES TECHNIQUES
Modèle Interne
Nom du modèle
Externe
Mode de fonctionnement
Alimentation
Capacité kW
EntréekW
Poids
Capacité de remplissage
de réfrigérant (R410A)
Code IP
Pression de
erégime
excessive
tolérée
Niveau de
bruit
Interne kg
Externe kg
kg
Interne
Externe
Côté aspiration
Côté refoulement
Interne
(Eléve/Moyen/Bas)
MPa
MPa
dB(A)
Externe dB(A)
MSH-A07YV MSH-A09YV MSH-A12YV
MSC-A07YV MSC-A09YV MSC-A12YV
MUH-A07YV MUH-A09YV MUH-A12YV
Refroidissement
Chauffage
Refroidissement
2,3 2,5 2,55 3,05 3,5 3,9
0,715 0,69 0,795 0,84 1,09 1,08
910
35 38 40
0,62 1,00 1,00
36/31/25 36/31/25 39/32/25 40/33/26 39/33/26
47 49
Chauffage
Refroidissement
Chauffage
~ /N, 230V, 50Hz
IP20
IP24
1,64
4,15
MS-A07YV MS-A09YV MS-A12YV
MSC-A07YV MSC-A09YV MSC-A12YV
MU-A07YV MU-A09YV MU-A12YV
Refroidissement
2,3 2,55 3,5
0,715 0,795 1,14
910
34 36
0,60 0,60 0,75
36/31/25 40/33/26
45 49
REMARQUE:
1. Rendement
Refroidissement
Chauffage — Interne: 20
— Interne: 27°C DB, 19°C WB
Externe: 35
°C DB
°C DB
Externe: 7
°C DB, 6°C WB
2. Gamme opérationelle garantie
Interne Externe
Refroidissement
Chauffage
Limite 32°C DB 43°C DB
supérieure 23°C WB —
Limite 21°C DB 21°C DB
intérieure 15°C WB —
Limite 27°C DB 24°C DB
supérieure — 18°C WB
Limite 20°C DB -10°C DB
intérieure — -11°C WB
31
Page 32

INHOUDSOPGAVE
VEILIGHEIDSVOORSCHRIFTEN ......................................................................................................................................... 32
NAMEN VAN ONDERDELEN ................................................................................................................................................ 33
VOOR U HET APPARAAT IN GEBRUIK NEEMT .................................................................................................................. 34
“I FEEL...” AUTOMATISCHE BEDIENING ............................................................................................................................. 36
HANDMATIGE BEDIENING (KOELEN, DROGEN, VERWARMEN/VENTILEREN) ............................................................. 37
INSTELLEN VAN DE VENTILATORSNELHEID EN LUCHTSTROOMRICHTING ................................................................ 37
KOELSPAARFUNCTIE (ECONO COOL) .............................................................................................................................. 38
TIMER-BEDIENING (ON/OFF TIMER) .................................................................................................................................. 38
ALS U DE AIRCONDITIONER VOOR LANGERE TIJD NIET GEBRUIKT............................................................................ 38
ONDERHOUD ....................................................................................................................................................................... 38
REINIGEN VAN HET CATECHINE-LUCHTFILTER ............................................................................................................... 39
HET LUCHTREINIGINGSFILTER VERVANGEN................................................................................................................... 39
CONTROLEER NOGMAALS HET VOLGENDE ALVORENS EEN ONDERHOUDSMONTEUR TE RAADPLEGEN ........... 40
OPLOSSEN VAN PROBLEMEN ........................................................................................................................................... 40
INSTALLEREN, VERPLAATSEN EN CONTROLEREN ........................................................................................................ 41
TECHNISCHE GEGEVENS .................................................................................................................................................. 41
VEILIGHEIDSVOORSCHRIFTEN
• In dit apparaat zitten draaiende onderdelen en onderdelen die mogelijk een elektrische schok opleveren. Lees
derhalve deze “Veiligheidsvoorschriften” voor gebruik goed door.
• Het is van belang dat u de veiligheidsvoorschriften voor uw eigen veiligheid in acht neemt.
De waarschuwingssymbolen en hun betekenis
WAARSCHUWING: Onjuiste bediening kan ernstige gevaren opleveren, met zelfs kans op de dood of ernstig letsel.
VOORZICHTIG: Onjuiste bediening kan afhankelijk van de omstandigheden ernstige gevaren opleveren.
De betekenis van de in deze gebruiksaanwijzing vermelde symbolen
• De kleur van de sticker die op de unit is bevestigd wordt tussen haken vermeld.
: Beslist niet doen.
: Volg de aanwijzingen altijd op.
(Zwart) : Nooit uw vingers of andere voorwerpen in het apparaat steken.
(Zwart) : Ga niet op de binnen- of buitenunit staan en zet er geen voorwerpen op.
(Geel) : Gevaar voor elektrische schokken. Pas op.
(Blauw) : Trek de stekker van het netsnoer altijd uit het stopcontact.
(Blauw) : Schakel de spanning uit.
• Bewaar deze gebruiksaanwijzing tezamen met de installatie-aanwijzingen ter referentie op een geschikte plaats.
Plaats van waarschuwingssymbolen en veiligheidsvoorzieningen
OMBOUW
VOORPANEEL
LUCHTUITLAAT
OMBOUW
32
Deze airconditioner is NIET bedoeld voor gebruik door kinderen of onbekwame personen die niet onder toezicht staan.
•
WAARSCHUWING
Tap het netsnoer niet af, maak geen tussenverbindingen in het netsnoer of in een verlengsnoer en
sluit nooit teveel apparaten aan op hetzelfde stopcontact.
• Een slecht contact, slechte isolatie, overschrijding van het toelaatbare vermogen, etc. kan brand of een
elektrische schok veroorzaken. Raadpleeg uw dealer voor meer informatie.
Beschadig de isolatie van het netsnoer niet en breng geen aanpassingen in het netsnoer aan.
•
Plaats nooit zware voorwerpen op het netsnoer, zorg dat de isolatie niet beschadigd raakt en breng zelf geen veranderingen aan in het netsnoer. Een beschadigd of aangepast netsnoer kan leiden tot kortsluiting, elektrische schokken of brand.
Schakel de stroomonderbreker nooit uit en verbreek nooit de aansluiting van het netsnoer als het
apparaat in werking is.
• Dit kan brand door vonken tot gevolg hebben.
• Als u het apparaat heeft uitgeschakeld met de afstandsbediening, zorg dan dat u hierna de stroomonderbreker uitschakelt of de stroomtoevoer volledig afsluit door de stekker uit het stopcontact te trekken.
Stel personen niet langdurig aan de directe koude luchtstroom bloot.
• Dit kan de gezondheid schaden.
Installatie dient niet door de klant zelf te worden uitgevoerd.
• Het verkeerd installeren kan brand, elektrische schokken of letsel veroorzaken door het vallen van de
airconditioner, waterlekkage, etc. Raadpleeg uw handelaar.
Steek geen vingers of andere voorwerpen in de luchtinlaat/-uitlaat.
• Aangezien de ventilator op hoge snelheid draait kan dit letsel veroorzaken.
• Jonge kinderen moeten onder toezicht staan om te voorkomen dat ze met de airconditioning gaan spelen.
Schakel de airconditioner direct uit en trek vervolgens de stekker uit het stopcontact of schakel de
stroom uit indien er iets niet in orde is (brandgeur, etc).
• Gebruik van de airconditioner wanneer er iets mis mee is, zou tot brand of andere ernstige problemen
kunnen leiden. Raadpleeg uw handelaar in dit geval.
Reparatie of verplaatsen dient niet door de klant zelf te worden uitgevoerd.
• Het verkeerd uitvoeren van reparatie of verplaatsen kan brand, elektrische schokken of letsel veroorzaken door het vallen van de airconditioner, waterlekkage, etc. Raadpleeg uw handelaar.
• Als het netsnoer beschadigd is, moet deze worden vervangen door de fabrikant of diens onderhoudservice ten einde gevaren te voorkomen.
VOORZICHTIG
Raak de metalen onderdelen van de binnenunit niet aan wanneer u het luchtfilter verwijdert.
• Dit kan letsel veroorzaken.
Gebruik geen insekticide of ontvlambare spray op de airconditioner.
• Dit zou brand of vervorming van de behuizing kunnen veroorzaken.
Stel huisdieren en planten niet aan de directe luchtstroom bloot.
• Dit zou het dier of de plant kunnen schaden.
Zet de airconditioner niet op een beschadigde standaard.
• De airconditioner zou kunnen vallen en letsel veroorzaken.
Gebruik geen wankele trap of tafel wanneer u het voorpaneel bevestigt of verwijdert.
• U zou kunnen vallen, met ernstige verwondingen als gevolg.
Trek nooit aan het netsnoer zelf.
• De kerndraad van het netsnoer zou beschadigd kunnen raken en dit kan leiden tot kortsluiting of brand.
Probeer de batterijen niet op te laden, haal deze niet uit elkaar en gooi ze nooit in een vuur.
• Dit kan leiden tot batterijlekkage, brand of een explosie.
Gebruik de airconditioner niet langdurig in een omgeving met een hoge vochtigheidsgraad of een open deur of raam.
• Bij langdurig gebruik in de koelfunctie in een kamer met een hoge vochtigheidsgraad (80% of hoger) zou
condens van de airconditioner kunnen druppelen en het tapijt of meubelen kunnen beschadigen.
Gebruik de airconditioner niet voor andere doeleinden.
• Gebruik deze airconditioner niet voor het conserveren van precisie-instrumenten, voedsel, dieren, planten of kunstvoorwerpen. De kwaliteit ervan zou kunnen worden aangetast.
Plaats geen kachel, e.d. in de directe luchtstroom.
• Dit zou een onvolledige verbranding van de brandstof kunnen veroorzaken.
Page 33

VEILIGHEIDSVOORSCHRIFTEN
NAMEN VAN ONDERDELEN
VOORZICHTIG
Als u het apparaat wilt schoonmaken, schakel de stroomonderbreker dan uit of trek de stekker van
het netsnoer uit het stopcontact.
• De ventilator draait namelijk tijdens werking op hoge snelheid en zou mogelijk letsel kunnen veroorzaken.
Trek de stekker uit het stopcontact of schakel de stroom uit wanneer u de airconditioner voor langere tijd niet denkt te gaan gebruiken.
• Vuil zou zich kunnen ophopen en brand veroorzaken.
Vervang de 2 batterijen door nieuwe van hetzelfde type.
• Gebruik van een oude en een nieuwe batterij naast elkaar kan leiden tot warmteontwikkeling, lekkage of
een explosie.
Als er batterijvloeistof op uw huid of kleding terechtkomt, was dit dan weg met water.
• Als er batterijvloeistof in uw ogen terechtkomt, spoel uw ogen dan met veel water en raadpleeg onmiddellijk een arts.
Zorg voor een goede ventilatie indien u tevens een kachel, e.d. gebruikt.
• Let op dat er voldoende zuurstof is.
Bedien de airconditioner niet met natte handen.
• Dit kan een elektrische schok veroorzaken.
Reinig de airconditioner niet met water.
• Water zou in de airconditioner terecht kunnen komen en de isolatie aantasten, met mogelijk een elektrische schok tot gevolg.
Ga niet op de binnen- of buitenunit staan en zet er ook geen voorwerpen op.
• Indien u of een voorwerp van het apparaat valt, kan dit verwondingen tot gevolg hebben.
Voor het installeren
WAARSCHUWING
• Raadpleeg uw handelaar voor de installatie van de airconditioner.
VOORZICHTIG
Installeer de airconditioner niet op plaatsen waar mogelijk ontvlambaar gas weg kan lekken.
• Weggelekt gas dat zich rond de airconditioner ophoopt, kan een ontploffing veroorzaken.
Aard de airconditioner.
• Sluit geen aardedraad op een gasleiding, waterleiding, bliksemafleider of aardedraad van een telefoon
aan. Een onjuiste aarding veroorzaakt mogelijk een elektrische schok.
Installeer een aardlekschakelaar afhankelijk van de plaats waar u de airconditioner installeert (bijv.
in vochtige ruimten).
• Het ontbreken van een aardlekschakelaar kan een elektrische schok veroorzaken.
Afvoerwater dient volledig te worden afgevoerd.
• Indien de afvoerleiding niet juist is, zal het water mogelijk van de airconditioner druppelen en het tapijt of
meubilair beschadigen.
Binnenunit
Luchtzuiveringsfilter
(Wit golvend)
Catechine-luchtfilter
(Met deodorisator)
Verticale schoep
Horizontale schoep
Bedieningsgedeelte
(Met het voorpaneel geopend)
Buitenunit
Luchtuitlaat
Noodbedieningsschakelaar
Display-gedeelte
Bedieningsindicator
Voorpaneel
Luchtinlaat
Richting onderbreker
Netsnoer
Ontvangstsensor voor signaal
van afstandsbediening
Afstandsbediening
Ontvangstsensor
voor signaal van
afstandsbediening
Luchtinlaat (achter- en zijkant)
Leidingen
Aftapslang
Luchtuitlaat
Aftapuitlaat
33
Page 34

ON/OFF
FAN
TOO
WARM
TOO
COOL
VANE
MODE
ECONO COOL
STOP
START
HR.
MIN.
I FEEL
COOL
DRY
AMPM
AMPM
RESET CLOCK
HEAT
/FAN
NAMEN VAN ONDERDELEN
ON/OFF
TOO
COOL
AMPM
CLOCK
˚C
AMPM
TOO
WARM
VOOR U HET APPARAAT IN GEBRUIK NEEMT
Afstandsbediening
Zendgedeelte
Bedienings-display
In- en uitschakeltoets
Open de voorklep.
(ON/OFF)
(Deze afbeelding laat de gehele afstandsbediening zien.)
Temperatuurtoetsen
Functie Auto Restart
Deze modellen zijn uitgerust met de functie Auto Restart (automatisch opnieuw starten). Neem
■
contact op met de onderhoudsvertegenwoordiger als u geen gebruik wilt maken van deze functie,
aangezien de instellingen van het apparaat in dat geval moeten worden gewijzigd.
“Auto restart” functie is…
Als het binnenunit wordt bediend met de afstandsbediening, worden de instellingen voor de bedieningsmodus, de ingestelde
temperatuur en de ventilatorsnelheid opgeslagen in het geheugen. Als er zich een stroomstoring voordoet of de netvoeding wordt
uitgeschakeld terwijl het apparaat in werking is, stelt de “Auto restart”-functie het apparaat automatisch weer in om de werking te
hervatten in dezelfde stand als was ingesteld met de afstandsbediening voordat de stroomtoevoer werd onderbroken. (Zie ook
pagina 36 voor meer details hierover.)
Binnenunit
Steek de stekker van het netsnoer in het stopcontact en/of schakel de stroomonderbreker weer in.
■
WAARSCHUWING:
Maak de netstekker goed schoon en steek deze stevig in het stopcontact.
Een vuile stekker of een niet goed aangesloten stekker kan leiden tot kortsluiting of brand.
Afstandsbediening
Instellen van het type
De instelling van deze afstandsbediening moet worden aangepast aan het type airconditioning dat
■
wordt gebruikt (KOELEN en VERWARMEN of ALLEEN KOELEN).
Als de instelling niet goed is gemaakt, zal de airconditioning niet goed functioneren. Controleer
dus altijd of de instelling overeenkomt met het type airconditioning. Als dit niet het geval is, maak
de instelling dan aan de hand van de gegevens in de onderstaande tabel.
34
Ventilatorsnelheidstoets
(FAN SPEED CONTROL)
Functiekeuzetoets
(OPERATION SELECT)
Koelspaartoets(ECONO COOL)
RESET toets
Timer-uitschakeltoets (OFF-TIMER)
Timer-inschakeltoets (ON-TIMER)
Uur-toets (HR.)
Minuut-toets (MIN.)
(Tijdinsteltoetsen (TIME SET))
Klokinsteltoets (CLOCK SET)
Schoepenregeltoets
(VANE CONTROL)
Schuifschakelaar
Type
Positie van
de schuifschakelaar
KOELEN en VERWARMEN
ALLEEN KOELEN
Page 35

HR.
MIN.
HR.
MIN.
FAN
VANE
MODE
ECONO COOL
STOP
START
HR.
MIN.
I FEEL
COOL
DRY
RESET CLOCK
HEAT
/FAN
Operation Indicator
Operation Indicator
Operation Indicator
Operation Indicator
Operation Indicator
ON/OFF
VOOR U HET APPARAAT IN GEBRUIK NEEMT
Afstandsbediening
Plaatsen van de batterijen en instellen
van de juiste tijd
1 Verwijder de voorklep en plaats de batterijen.
Sluit hierna de voorklep weer.
Steek de batterijen met de min-pool als eerste in
het batterijvak.
Controleer of de batterijen in de juiste richting zijn
ingebracht.
Steek de batterijen met
de min-pool als eerste in
het batterijvak.
2 Druk op de RESET toets.
Druk met een
dun, puntig
voorwerp op
de toets.
• Indien u niet op de RESET toets drukt, zal de afstandsbediening mogelijk niet juist werken.
3 Druk op de CLOCK set toets.
Druk met een dun,
puntig voorwerp op
de toets.
4 Druk op de
en
toetsen om
de huidige tijd in te stellen.
• Door iedere druk op de
1 verhoogd. Door iedere druk op de
den de minuten met 1 minuut verhoogd.
toets wordt het uur met
toets wor-
5 Druk de CLOCK-insteltoets nogmaals in en
sluit de voorklep.
Gebruik van de afstandsbediening
• Het maximale bereik van de afstandsbediening is
circa 6 meter als de afstandsbediening recht op de
voorkant van de airconditioning wordt gericht.
• De binnenunit geeft een of twee pieptonen als een
signaal van de afstandsbediening wordt ontvangen.
Druk nogmaals op de toets wanneer u geen pieptoon hoort.
• Behandel de afstandsbediening voorzichtig. Wanneer
u hem laat vallen, gooit of nat laat worden is het mogelijk dat de afstandsbediening niet meer functioneert.
Bevestigen aan een muur, etc.
• Bevestig de houder voor de afstandsbediening op een
plaats waar het signaal (pieptoon) van de binnenunit
hoorbaar is wanneer u op de
Plaatsen/verwijderen van de afstandsbediening
Plaatsen :Steek de afstandsbediening omlaag in
Verwijderen : Trek de afstandsbediening omhoog.
Droge cel batterijen
■ Vervangen van de batterijen
Vervang in de volgende gevallen de batterijen door
nieuwe AAA alkalinebatterijen:
de houder.
Houder voor
afstandsbediening
toets ON/OFF drukt.
· Waneer de binnenunit niet reageert op het signaal
van de afstandsbediening.
· Wanneer het display op de afstandsbediening vaag
wordt.
· Wanneer tijdens het indrukken van een knop op de
afstandsbediening alle displays op het scherm verschijnen en meteen weer verdwijnen.
Gebruik geen mangaanbatterijen. Hierdoor kan de afstandsbediening defect raken.
• De gebruiksduur van alkaline batterijen is ongeveer
1 jaar.
Een batterij waarvan de houdbaarheidsduur wordt benaderd kan spoedig leeg zijn. Echter, de aangeraden houdbaarheidsduur is aangegeven (maand/jaar)
op de onderkant van de batterij.
• Wanneer u de afstandsbediening voor lange tijd niet
gebruikt, dient u de batterijen te verwijderen om lekkage van vloeistof te voorkomen.
VOORZICHTIG:
Als er batterijvloeistof op uw huid of kleding terechtkomt, was dit dan weg met water.
Als er batterijvloeistof in uw ogen terechtkomt, spoel
uw ogen dan met veel water en raadpleeg onmiddellijk een arts.
• Gebruik geen oplaadbare batterijen.
• Vervang de 2 batterijen door nieuwe van hetzelfde type.
• Breng lege batterijen naar de daarvoor bestemde
inzamelpunten.
Wanneer de afstandsbediening niet kan worden gebruikt (Noodbediening)
Indien de batterijen van de afstandsbediening op zijn of de afstandsbediening niet juist functioneert, kunt u de airconditioner toch bedienen met de Noodbedieningsschakelaar.
KOELEN en VERWARMEN -TYPE
1 Druk op de Noodbedieningsschakelaar.
• Elke keer dat u op de knop noodbedieningsschakelaar drukt, wisselt de werkstand van het
apparaat tussen de functie noodkoeling, noodvarming en Stop.
Wanneer er echter eenmaal op de noodbedieningsschakelaar is gedrukt, zal het apparaat een 30 minuten durende zelftest doorlopen, waarna het apparaat overschakelt op de noodstand.
• Hieronder vindt u meer informatie over de noodstand. De temperatuurregelaar werkt echter niet gedurende de 30 minuten durende zelftest. Tijdens
de zelftest staat het apparaat ingesteld op continu
bediening.
De ventilatorsnelheid is tijdens de testrun ingesteld
op snel en schakelt na 30 minuten over op Medium.
Werkstand KOELEN
Temperatuur 24°C24°C
Ventilatorsnelheid Medium Medium
Horizontale schoep Automatisch Automatisch
• De werkingsmodus wordt als volgt aangegeven
door de bedieningsindicator op het binnenunit.
Bedieningsindicator
NOODKOELING
NOODVARMING
STOP
Om de noodbediening te stoppen, drukt u
■
eenmaal (in de noodvarmingstand) of tweemaal (in de noodkoelingstand) op de noodbedieningsschakelaar.
VERWARMEN
ALLEEN KOELEN -TYPE
1 Druk op de Noodbedieningsschakelaar.
• Wanneer er op de noodbedieningsschakelaar is gedrukt, zal het apparaat een 30 minuten durende zelftest doorlopen, waarna het apparaat overschakelt
op de noodkoelingstand.
• Hieronder vindt u meer informatie over de noodkoelingstand. De temperatuurregelaar werkt echter niet gedurende de 30 minuten durende zelftest.
Tijdens de zelftest staat het apparaat ingesteld op
continu bediening.
De ventilatorsnelheid is tijdens de testrun ingesteld
op snel en schakelt na 30 minuten over op Medium.
WerkstandK OELEN
Temperatuur 24°C
Ventilatorsnelheid Medium
Horizontale schoep Automatisch
• De werkingsmodus wordt als volgt aangegeven
door de bedieningsindicator op het binnenunit.
Bedieningsindicator
NOODKOELING
STOP
Om de noodkoelingstand te stoppen, drukt u
■
nogmaals op de noodbedieningsschakelaar.
Elke keer dat de schakelaar wordt ingedrukt, wiselt de
stand tussen noodkoeling en STOP.
35
Page 36

ON/OFF
ON/OFF
TOO
WARM
TOO
COOL
FAN
VANE
MODE
STOP
START
HR.
I FEEL
COOL
DRY
HEAT
/FAN
“I FEEL...” AUTOMATISCHE BEDIENING
MODE
Operation Indicator
MODE
ON/OFF
FAN
TOO
WARM
TOO
COOL
VANE
MODE
ECONO COOL
STOP
START
HR.
MIN.
I FEEL
COOL
DRY
AMPM
CLOCK
˚C
AMPM
HEAT
/FAN
RESET CLOCK
Bij de automatische werkstand “ (I FEEL...)” kunnen de optimale instellingen automatisch met een
druk op de toets worden gemaakt.
Starten:
Druk op de
■
Als er is ingesteld op “ (I FEEL...)” wordt de airconditioning automatisch op
de optimale temperatuur ingesteld.
toets.
Stoppen:
Druk nogmaals op de
■
○○○○○○○○○○○○○○○○○○○○○○○○○○○○○○○○○
Als u het warm heeft:
Druk op de
■
Bij iedere druk op de toets wordt de temperatuur met ongeveer 1°C verlaagd.
Als u het koud heeft:
Druk op de
■
Bij iedere druk op de toets wordt de temperatuur met ongeveer 1°C verhoogd.
Als de “ (I FEEL...)” niet geselecteerd is, moet u op de
toets drukken om de functie in te schakelen.
Bijiedere druk op de toets schakelt de bedieningsfunctie over
van
(I FEEL...) → (Koelen) → (Drogen) → (Ver-
warmen/Ventileren)
toets.
toets om de temperatuur te verlagen.
toets om de temperatuur te verhogen.
Meer over de “I FEEL...” functie
Details van de werking
Afhankelijk van de kamertemperatuur bij het starten wordt automatisch ingesteld op de werkstand KOELEN, DROGEN of
VERWARMEN. Als het apparaat echter binnen 2 uur na het stoppen weer wordt gestart, zal dezelfde werkstand als die
voor het stoppen was ingesteld weer worden geactiveerd. De functie die was ingesteld wordt in dit geval ook niet veranderd indien de temperatuur in de kamer is veranderd. Druk op een van de
niet geschikt is voor de huidige omstandigheden.
Details van de automatische bedieningsfunctie
KOELEN en VERWARMEN -TYPE ALLEEN KOELEN -TYPE
Kamertemperatuur
bij het starten
Ongeveer 25°C of hoger
Ongeveer 25°C - 23°C
Ongeveer 23°C of lager
Bedieningsfunctie Ingestelde temperatuur Bedieningsfunctie Ingestelde temperatuur
(basisstand) (basisstand)
Koelen Ongeveer 24°C Koelen Ongeveer 24°C
Drogen — Drogen —
Verwarmen Ongeveer 26°C Drogen —
OPMERKING:
KOELEN: Wanneer de kamertemperatuur 2
°C hoger is dan de ingestelde temperatuur, mag de ingestelde
temperatuur niet worden gewijzigd aangezien het apparaat dan werkt om de (ingestelde) temperatuur te bereiken. Wacht tot de kamertemperatuur daalt tot minder dan 2
temperatuur en bedien dan het apparaat.
VERWARMEN:Wanneer de kamertemperatuur 2
°C lager is dan de ingestelde temperatuur, mag de (ingestelde)
temperatuur niet worden gewijzigd aangezien het apparaat dan werkt om de ingestelde temperatuur te bereiken. Wacht tot de kamertemperatuur stijgt tot minder dan 2
temperatuur en bedien dan het apparaat.
Aanduidingen op het display van de binnenunit
De bedieningsindicator aan de rechterkant van de binnenunit toont de ingestelde functie.
Licht op
Knippert
Licht niet op
toetsen indien de geactiveerde functie
°C boven de ingestelde
°C onder de ingestelde
Beschrijving van de “FUNCTIE AUTO RESTART”
• Deze apparaten zijn uitgerust met de functie Auto Restart (automatisch opnieuw starten). Wanneer de netvoeding
wordt ingeschakeld, start de airconditioner automatisch in de werkstand die was ingesteld met de afstandsbediening
voordat de stroomtoevoer werd onderbroken.
• Als de airconditioner was uitgeschakeld met de afstandsbediening voordat de stroomtoevoer werd onderbroken, blijft
het apparaat uitgeschakeld, ook nadat de netvoeding wordt ingeschakeld.
• Als de airconditioner in de noodbediening stond voordat de stroomtoevoer werd onderbroken, start het apparaat,
wanneer de netvoeding wordt ingeschakeld, in de werkstand die was ingesteld met de afstandsbediening vóór de
noodbediening.
• Als het apparaat voor de spanningsonderbreking in “I FEEL…” stond, wordt de werkstand (COOL, DRY of HEAT) niet
in het geheugen opgeslagen. Als de netspanning weer wordt ingeschakeld, komt het apparaat weer in bedrijf, waarbij
de werkstand door de temperatuur van de ruimte op dat moment wordt bepaald.
36
Bedieningsindicator
Aanduiding
De airconditioner werkt om de ingestelde temperatuur te bereiken. Wacht even totdat deze temperatuur is bereikt.
De kamertemperatuur is bijna gelijk aan de ingestelde temperatuur.
(alleen voor buitenuniten uit de MXZ-lijn)
Raadpleeg Informatie over de Multi System-airconditioner.
(Pagina 37)
Bedieningsfunctie
Verschil tussen de ingestelde
temperatuur en kamertemperatuur
Ongeveer 2°C of meer
Ongeveer 2°C of minder
—
Page 37

ON/OFF
MODE
ON/OFF
ON/OFF
HANDMATIGE BEDIENING (KOELEN, DROGEN,
TOO
WARM
TOO
COOL
FAN
VANE
ON/OFF
FAN
TOO
WARM
TOO
COOL
VANE
MODE
ECONO COOL
STOP
START
HR.
MIN.
I FEEL
COOL
DRY
AMPM
CLOCK
˚C
AMPM
HEAT
/FAN
RESET CLOCK
ON/OFF
FAN
TOO
WARM
TOO
COOL
VANE
MODE
ECONO COOL
STOP
START
HR.
MIN.
I FEEL
COOL
DRY
AMPM
CLOCK
˚C
AMPM
HEAT
/FAN
RESET CLOCK
VANE
1
2
3
4
5
INSTELLEN VAN DE VENTILATORSNELHEID EN
VERWARMEN/VENTILEREN)
Om de werkstand KOELEN, DROGEN of VERWARMEN/VENTILEREN te kiezen
1 Druk op de
2 Kies de gewenste functie door op 1 van de toetsen
Bij iedere druk op de toets schakelt de bedieningsfunctie van (I FEEL...) →
(Koelen) → (Drogen) → (Verwarmen/Ventileren)
Bedieningsfunctie VERWARMEN/VENTILEREN
Controleer welk type air-conditioning u heeft.
KOELEN en VERWARMEN VERWARMEN
Stoppen:
■
○○○○○○○○○○○○○○○○○○○○○○○○○○○○○○○○○○○○○○○○○○○○○○○○○
Veranderen van de ingestelde temperatuur:
■
•
Druk op de
•
Druk op de
In de werkstand “VERWARMEN”
• Indien de airconditioner teveel warmte uit de lucht absorbeert, kan het apparaat overbelast raken. Op grond van een beoordeling van de microprocessor, kan de ventilator van het buitenunit worden gestopt om de airconditioner te beschermen.
Als de ventilator van het buitenunit wordt stopgezet, kan er ijsafzetting plaatsvinden op het buitenunit. Dit is geen probleem.
In de werkstand “DROGEN”
• U kunt de temperatuur niet instellen.
• De kamertemperatuur wordt met deze functie iets verlaagd.
De details op het weergavegedeelte van de binnenunit, worden toegelicht op pagina 36.
■
OPMERKING:
Als de omgevingstemperatuur te hoog is, is het mogelijk dat de kamertemperatuur de ingestelde temperatuur niet
bereikt omdat het apparaat onder zware belasting werkt.
Informatie over de Multi System-airconditioner (Buitenunit: MXZ-lijn)
Bij de Multi-System-airconditioner (buitenunit: MXZ-lijn) kunt u twee of meer binnenuniten op één buitenunit
aansluiten. Afhankelijk van de capaciteit kunt u meer dan twee binnenuniten tegelijk in werking hebben.
• Wanneer u probeert meer dan twee binnenuniten, aangesloten op één buitenunit, te gelijk te gebruiken, een voor
koelen en een andere voor te verwarmen, wordt de werkstand gekozen van het binnenunit dat als eerste in werking
werd gesteld. De overige binnenuniten die later in werking zouden worden gesteld, stellen zichzelf buiten gebruik en
geven een indicatie weer. (Raadpleeg de tabel met bedieningsindicator op pagina 36.)
In dit geval dient u alle binnenuniten op dezelfde werkstand in te stellen.
• Wanneer het binnenunit in werking treedt terwijl het buitenunit bezig is met ontdooien, duurt het enkele minuten
(maximaal 10) voordat het warme lucht begint uit te blazen.
• In de verwarmingsstand kan de bovenkant van het binnenunit warm worden of kunt u het geluid van stromend gas
horen, maar in geen van beide gevallen is er sprake van een storing. De oorzaak ligt in het feit dat het koelgas
voortdurend door het binnenunit stroomt.
Beschrijving van de “FUNCTIE AUTO RESTART”
Zie biz 36.
toets om de temperatuur te verlagen. Bij iedere druk op de toets wordt de temperatuur met ongeveer 1°C verlaagd.
toets om de temperatuur te verhogen. Bij iedere druk op de toets wordt de temperatuur met ongeveer 1°C verhoogd.
Type Bedieningsfunctie
ALLEEN KOELEN VENTILEREN
Druk op de
Als u een functie heeft gekozen, zal deze functie automatisch weer van kracht
zijn wanneer u de volgende keer de airconditioner inschakelt met een druk op
de
toets.
toets.
te drukken.
toets.
LUCHTSTROOMRICHTING
De ventilatorsnelheid en luchtstroomrichting kunnen naar wens worden ingesteld.
Druk op de
■
Bij iedere druk op de toets verandert de ventilatorsnelheid van langzaam
(Langzaam) → (Medium) → (Snel) → (Automatisch)
• Gebruik de
• Gebruik de stand
uit de slaap houdt.
Druk op de
■
anderen.
Bij iedere druk op de toets verandert de hoek van de horizontale schoep van
(1) → (2) → (3) → (4) → (5) → (Zwenken) → (Automa-
tisch)
Zwenkfunctie
Gebruik zwenken als u de luchtstroom alle hoeken van de kamer wilt laten bereiken.
Aanbevolen richting van de horizontale schoep
Gebruik normaliter de
Gebruik de standen
KOELEN of DROGEN en gebruik de standen
tot
(5) in de werkstand VERWARMEN wanneer u
de instellingen aan uw wensen aanpast.
OPMERKING:
• Wanneer tijdens het koelen de horizontale schoep op
automatisch in de horizontale stand worden gesteld waarbij wordt voorkomen dat condens van de airconditioning
druppelt.
• Stel de verticale luchtstroomrichting met de afstandsbediening in. Druk de horizontale schoepen nooit met de hand
in een andere stand.
• Als de temperatuur in de werkstand verwarmen te laag is of als er wordt ontdooid, wordt de stand van de horizontale
schoep ingesteld op
(1).
Automatische regeling van de luchtstroom
Indien u met de
bedieningsfunctie heeft gekozen, zal de stand van
de horizontale schoep automatisch voor een effectieve werking van de ingestelde functie worden bepaald.
(1) Verwarmen
• Wanneer de temperatuur van de uitstromende lucht
te laag is, wordt de lucht in horizontale richting uitgeblazen.
• Wanneer de temperatuur van de uitstromende lucht
hoger wordt, wordt de lucht naar beneden toe uitgeblazen.
(2) KOELEN, DROGEN
De lucht wordt in horizontale richting uitgeblazen.
(3) VENTILEREN
De lucht wordt naar beneden toe uitgeblazen.
toets de automatische
toets om de ventilatorsnelheid te veranderen.
(Snel) toets om de ruimte meer te koelen/warmen.
(Langzaam) indien het geluid van de airconditioner u
toets om de verticale luchstroomrichting te ver-
(Automatisch) stand.
(1) of (2) in de werkstanden
(4) of (5) is ingesteld, zal de luchtstroom na 1 uur
Om de horizontale richting van de lucht-
■
(3)
Koelen
Drogen
Verwarmen
stroom te veranderen, dient u de verticale
schoep handmatig te verzetten.
Stel de schoep in de juiste stand voordat u het apparaat
inschakelt.
De horizontale schoepen bewegen namelijk automatisch
en uw vingers zouden in het mechanisme verstrikt kunnen raken.
37
Page 38

KOELSPAARFUNCTIE (ECONO COOL)
ON/OFF
FAN
TOO
WARM
TOO
COOL
VANE
MODE
ECONO COOL
STOP
START
HR.
MIN.
I FEEL
COOL
DRY
AMPM
CLOCK
˚C
AMPM
HEAT
/FAN
RESET CLOCK
START
HR.
MIN.
HR.
MIN.
START
STOP
HR.
MIN.
HR.
MIN.
STOP
ECONO COOL
ECONO COOL
VANE
FAN
TOO
WARM
TOO
COOL
ALS U DE AIRCONDITIONER VOOR LANGERE TIJD
Gebruik deze functie als u een comfortabele omgeving in KOELEN-modus wilt hebben èn energie wilt besparen.
Stel de modus in op HANDBEDIENING VAN KOELEN en
NIET GEBRUIKT
Voor langere tijd niet in gebruik:
verricht de volgende handelingen.
1 Activeer de FAN functie (ventilatie) gedu-
Druk op de
■
Als u KOELSPAARFUNCTIE (ECONO COOL) hebt geselecteerd in de
COOL-modus, zwenkt de airconditioner in een cyclus die wisselt, afhankelijk
van de airconditioningstemperatuur.
SET TEMPERATURE wordt automatisch 2°C hoger ingesteld dan in de COOL-
modus.
Stoppen van de KOELSPAARFUNCTIE (ECONO COOL):
Druk nogmaals op de
■
○○○○○○○○○○○○○○○○○○○○○○○○○○○○○○○○○
• Als de knop
gedurende de KOELSPAARFUNCTIE (ECONO COOL), wordt de KOELSPAARFUNCTIE (ECONO COOL) uitgeschakeld.
• De knop
zijn beschikbaar.
Wat is de “koelspaarfunctie (ECONO COOL)”?
Een zwenkende luchstroom (een luchtstroom die van richting wisselt) voelt koeler aan dan een luchtstroom met een
constante richting. Zodoende is het dus mogelijk dat, zelfs wanneer de ingestelde temperatuur automatisch 2°C hoger is,
de koelingsfunctie gebruikt kan worden met behoud van comfort. Als resultaat wordt energie bespaard.
TIMER-BEDIENING (ON/OFF TIMER)
Gebruik de timer bijvoorbeeld voor een aangename temperatuur gedurende uw nachtrust, bij het thuiskomen of opstaan, etc.
Instellen van de starttijd (ON timer)
1 Druk tijdens de werking op de knop
Bij iedere druk op de toets wordt de ON timer afwisselend geactiveerd en geannuleerd.
.
toets.
toets.
is ingedrukt of als de werkingsmodus wordt gewijzigd
, de knop
of
en de aan/uit-timer (onder weergegeven)
Instellen van de stoptijd (OFF timer)
1 Druk tijdens de werking op de knop
Bij iedere druk op de toets wordt de OFF timer afwisselend geactiveerd en geannuleerd.
rende 3 tot 4 uur zodat de airconditioner van
binnen geheel droogt.
KOELEN en VERWARMEN -TYPE:
• Wanneer u de unit in de werkstand FAN (Ventileren) wilt zetten, stelt u de unit met de afstandsbediening in op de hoogste temperatuur in de modus
HANDBEDIENING VAN KOELEN. (Zie blz. 37.)
ALLEEN KOELEN -TYPE:
• Stel in op de functie VENTILEREN. (Zie blz. 37.)
2 Schakel de stroomonderbreker uit en/of trek
de stekker van het netsnoer uit het stopcontact.
VOORZICHTIG:
Als u denkt de airconditioning gedurende langere tijd niet
te gebruiken, schakel de stroomonderbreker dan uit en/
of trek de stekker van het netsnoer uit het stopcontact.
Vuil zou zich kunnen ophopen en brand veroorzaken.
3 Verwijder de batterijen uit de afstandsbedie-
ning.
VOORZICHTIG:
Wanneer u de afstandsbediening voor lange tijd niet
gebruikt, dient u de batterijen te verwijderen om lekkage
van vloeistof te voorkomen.
.
ONDERHOUD
Weer in gebruik nemen van de
airconditioner:
1 Reinig het luchtfilter en plaats het in de
binnenunit.
(Zie blz. 39 voor het reinigen.)
2 Controleer of de luchtinlaat en luchtuitlaat
van de binnen- en buitenunits niet worden
geblokkeerd.
3 Controleer of de aardedraad juist is aange-
sloten.
VOORZICHTIG:
Aard de airconditioner.
Sluit geen aardedraad op een gasleiding, waterleiding,
bliksemafleider of aardedraad van een telefoon aan. Een
onjuiste aarding veroorzaakt mogelijk een elektrische
schok.
2 Stel de timertijd in met de toetsen
en
.
Bij iedere druk op de
met 1 uur verhoogd. Bij iedere druk op de
wordt de ingestelde tijd met 10 minuten verhoogd.
Uitschakelen van de ON timer:
Druk op de knop
■
Programmeren van de timer
De ON en OFF timers kunnen in combinatie worden gebruikt. De timer waarvan de ingestelde tijd het eerst wordt bereikt, zal
het eerst in werking treden. (Het “ ” teken toont de volgorde.)
• Timer-bediening is niet mogelijk indien de huidige tijd niet juist is ingesteld.
OPMERKING:
Als de netspanning wordt uitgeschakeld of er vindt een stroomstoring plaats terwijl de AUTO START/STOP-timer is
geactiveerd, wordt de instelling van de timer geannuleerd. Deze modellen zijn uitgerust met de functie Auto Restart,
en de airconditioner zal dan ook starten zodra de netvoeding weer wordt ingeschakeld.
toets wordt de ingestelde tijd
toets
.
2 Stel de timertijd in met de toetsen
.
Bij iedere druk op de
met 1 uur verhoogd. Bij iedere druk op de
wordt de ingestelde tijd met 10 minuten verhoogd.
Uitschakelen van de OFF timer:
Druk op de knop
■
toets wordt de ingestelde tijd
.
en
toets
38
Voor het uitvoeren van onderhoud
Schakel de stroomonderbreker uit en/of trek
■
de stekker van het netsnoer uit het stopcontact.
VOORZICHTIG:
Als u het apparaat wilt schoonmaken, schakel de stroomonderbreker dan uit en/of trek de stekker van het netsnoer uit het stopcontact. De ventilator draait namelijk
tijdens werking op hoge snelheid en zou mogelijk letsel
kunnen veroorzaken.
Reinigen van de binnenunit
Maak het apparaat schoon met een zachte,
■
droge doek.
• Indien het apparaat zeer vuil is, moet u het met een
oplossing van lauw water en milde zeep reinigen.
• Gebruik nooit (was) benzine, een poetsmiddel of
insecticide. De airconditioner kan hierdoor beschadigd raken.
Page 39

REINIGEN VAN HET CATECHINE-LUCHTFILTER
HET LUCHTREINIGINGSFILTER VERVANGEN
Reinigen van het catechine-luchtfilter (ongeveer om de veertien dagen)
1 Verwijder het catechine-luchtfilter.
Open het
voorpaneel
voor het
verwijderen/
terugplaatsen
Catechine-luchtfilter
VOORZICHTIG:
Bij het verwijderen van het catechine-luchtfilter dient u
de metalen delen van de binnenunit niet aan te aanraken.
Dit om letsel te voorkomen.
Verwijderen.
van het filter.
3 Nadat u het filter met koud of lauw water
hebt gespoeld, laat u het goed in de schaduw drogen.
• Stel het catechine-luchtfilter bij het drogen niet bloot
aan directe zonnestraling of warmtebronnen, zoals een kachel.
4 Breng het catechine-filter weer aan.
2 Verwijder met een stofzuiger eventueel vuil
van het catechine-luchtfilter of spoel het met
water.
• Indien het zeer vuil is, moet u het filter in een oplossing van lauw water en milde zeep reinigen.
• Gebruik geen heet water (50°C of meer) want het
filter kan hierdoor vervormen.
Terugplaatsen.
Als door vuil en dergelijke de capaciteit is afgenomen, kan het nodig zijn het luchtreinigingsfilter te
vervangen.
Vervangen van het luchtzuiveringsfilter (circa eens in de vier maanden)
1 Verwijder het catechine-luchtfilter.
Catechine-luchtfilter
2 Verwijder het luchtzuiveringsfilter (Wit gol-
vend).
Luchtzuiveringsfilter
○○○○○○○○○○○○○○○○○○○○○○○○○○○○○○○○○○○○○○○○○○○○○○○○○
Luchtzuiveringsfilter
• Indien het luchtzuiveringsfilter verstopt is, zal de capaciteit van de airconditioner verminderen of kondens bij de luchtuitlaat worden gevormd.
• Het luchtzuiveringsfilter kan na gebruik worden weggegooid. Normaliter kunt u het filter ongeveer 4 maanden gebruiken.
Vervang echter zodra het filter donkerbruin kleurt.
Optionele onderdelen De optionele onderdelen zijn bij uw handelaar te koop.
3 Plaats een nieuw luchtzuiveringsfilter.
4 Breng het catechine-luchtfilter aan en sluit
het voorpaneel goed.
○○○○○○○○○○○○○○○○○○○○○○○○○○○○○○○○○○○○○○○○○○○○○○○○○
Wat is een “catechine-luchtfilter”?
Op het luchtfilter is een natuurlijk materiaal aangebracht, catechine, een stof die zich in thee bevindt. Het catechineluchtfilter verdrijft geurtjes en schadelijke gassen zoals formaldehyde, ammoniak en acetaldehyde. Ook beperkt
deze stof de activiteit van virussen die zich op het filter vast kunnen zetten.
Onderdeelnaam LUCHTZUIVERINGSFILTER
Onderdelennummer MAC-1300FT
39
Page 40

CONTROLEER NOGMAALS HET VOL-
OPLOSSEN VAN PROBLEMEN
GENDE ALVORENS EEN ONDERHOUDSMONTEUR TE RAADPLEGEN
Probleem
De airconditioner werkt niet.
De airconditioner koelt of
verwarmt niet voldoende.
De lucht uit de binnenunit
ruikt vreemd.
Het display van de afstandsbediening wordt niet getoond of is vaag. De binnenunit reageert niet op het signaal van de afstandsbediening.
Als er een spanningsonderbreking optreedt.
Stop gebruik van de airconditioner en raadpleeg uw handelaar indien u
de bovenstaande punten heeft gecontroleerd maar de airconditioner nog
niet juist functioneert.
Zet in de volgende gevallen de airconditioner uit en raadpleeg uw handelaar.
• Wanneer er water uit de binnenunit lekt.
• Wanneer de linkerbedieningsindicator knippert.
• Wanneer de stroomonderbreker regelmatig wordt ingeschakeld.
• De signalen van de afstandsbediening worden mogelijk niet goed ontvangen
in een kamer waar neonlampen (invertertype neonverlichting, etc.) worden
gebruikt.
• Op plaatsen met slechte ontvangst kan de airconditioner de ontvangst van
radio en/of televisie storen. Eventueel kan voor het desbetreffende apparaat
een antenneversterker nodig zijn.
• Bij onweer moet u de airconditioning direct uitschakelen en de stekker van
het netsnoer uit het stopcontact trekken of de stroomonderbreker uitschakelen. Als u dit niet doet, kunnen de elektrische onderdelen van de airconditioning worden beschadigd.
40
Controlepunten of oplossing
• Is de stroomonderbreker ingeschakeld?
• Is de zekering gesprongen?
• Is de ON-timer ingesteld? (Pagina 38)
• Is de temperatuur juist ingesteld? (Pagina 37)
• Is het filter schoon? (Pagina 39)
• Wordt de luchtinlaat of luchtuitlaat van de bin-
nen- of buitenunit geblokkeerd?
• Staat er een raam of deur open?
• Is het filter schoon? (Pagina 39)
• Zijn de batterijen leeg? (Pagina 35)
• Zijn de polen (+, -) van de batterijen verwisseld?
(Pagina 35)
• Worden een of meer knoppen op de afstandsbediening van andere elektrische apparaten ingedrukt?
• Start de airconditioner opnieuw?
Als de airconditioner in werking was voor de
stroomstoring, zal het apparaat opnieuw starten aangezien deze modellen zijn uitgerust met
de functie Auto Restart. (Zie Beschrijving van
de “FUNCTIE AUTO RESTART” op pagina 36.)
De airconditioner kan bij
het weer inschakelen ongeveer 3 minuten niet worden
gebruikt.
Er komt een krakend geluid
uit het apparaat.
De lucht uit de binnenunit
ruikt vreemd.
De ventilator stopt tijdens
de DROGEN functie.
Ik hoor water stromen.
U hoort een borrelend geluid.
De ruimte wordt niet voldoende gekoeld.
Er komt damp uit de luchtuitlaat van de binnenunit.
Probleem
Oplossing (geen defect)
• Dit dient ter bescherming van de airconditioner.
U moet even wachten.
• Dit geluid wordt veroorzaakt door het uitzetten/
inkrimpen van het voorpaneel of andere onderdelen vanwege temperatuursveranderingen.
• De airconditioner kan geuren opnemen van de
muur, het vloerkleed, meubilair, kleding, enzovoort en deze samen met de lucht uitblazen.
• In de werkstand DROGEN, gebruikt het apparaat hetzelfde koelcircuit als in de werkstand
KOELEN. De werkstand DROGEN moet korter
worden gebruikt om de luchtvochtigheid te verlagen terwijl de kamertemperatuur zo min mogelijk wordt verlaagd.
Zodoende houdt de compressor af en toe op met
werken en stopt tegelijkertijd de ventilator van
het binnenapparaat. Dit voorkomt dat het op de
warmtewisselaar gecondenseerde water weer
verdampt.
• Dit is het geluid van de koelvloeistof in de airconditioner.
• Dit is het geluid van condens in de warmtewisselaar.
• Dit is het geluid van het ontwasemen van de
warmtewisselaar.
• U hoort dit geluid wanneer bij het inschakelen
van de afzuigkap of de ventilator buitenlucht
wordt ingezogen via de aftapslang, waardoor
water dat zich in de aftapslang bevindt naar buiten spuit.
U hoort dit geluid ook wanneer lucht in de aftapslang wordt geblazen door sterke wind.
• Als er in de ruimte een ventilator of een gasfornuis wordt gebruikt, wordt er meer gevergd van
het koelapparaat, waardoor het kan gebeuren
dat de airconditioning niet genoeg vermogen
heeft om de gehele ruimte te koelen.
• Als de buitentemperatuur te hoog is, kan het gebeuren dat de airconditioning niet genoeg vermogen heeft om de gehele ruimte te koelen.
• De koele lucht uit de airconditioner zorgt ervoor
dat vocht in de lucht binnen in de kamer snel
afkoelt en wordt omgezet in damp.
Probleem
Tijdens de werking verandert de luchtstroomrichting.
De richting van de horizontale schoep kan niet worden
aangepast met de afstandsbediening.
Water lekt uit de buitenunit.
Er komt witte rook uit de
buitenunit.
In de werkstand Verwarmen
stroomt de lucht niet snel
genoeg uit.
De werking wordt gedurende ongeveer 10 minuten
gestopt in de werkstand
verwarmen.
Soms kunt u een sissend
geluid horen.
De ruimte kan niet voldoende worden verwarmd.
In een systeem met meerdere
eenheden wordt de binneneenheid, ook als deze niet in
bedrijf is, warm en is het geluid
van stromend water hoorbaar.
De airconditioner start vanzelf als de netvoeding wordt
ingeschakeld, ook al bedient u het apparaat niet
met de afstandsbediening.
Oplossing (geen defect)
• Als de airconditioning in de stand voor KOELEN
of DROGEN staat, en de luchtstroom langer dan
1 uur omlaag word gericht, zal de richting van de
luchtstroom automatisch worden veranderd naar
de horizontale stand zodat wordt voorkomen dat
condens van de airconditioning druppelt.
• Indien tijdens verwarmen de temperatuur van
de lucht die wordt uitgeblazen te laag is of als
het apparaat aan het ontdooien is, zal de horizontale schoep automatisch in de horizontale
stand worden gesteld.
• Tijdens KOELEN of DROGEN worden leidingen
of koppelingen van de leidingen ook afgekoeld.
Hierdoor kan er condens ontstaan, die van de
leidingen afdruppelt.
• In de verwarmingsstand zorgt de gebruiksinstelling
Ontdooien ervoor dat ijs dat zich heeft afgezet op
het buitenunit smelt en naar beneden druppelt.
• In de verwarmingsstand druppelt water, dat op de
warmtewisselaar gecondenseerd is, naar beneden.
• Tijdens het verwarmen lijkt de stoom die ontstaat door het ontdooien op witte rook.
• Wacht tot de airconditioner gereed is om warme
lucht uit te blazen.
•
Het buitenunit wordt ontdooid (Werkstand ontdooien).
Aangezien dit na 10 minuten is voltooid, dient u te
wachten. (Wanneer de buitentemperatuur te laag en
de luchtvochtigheid te hoog is, zal er zich ijs vormen.)
• Dit is het geluid dat ontstaat wanneer de stroming van de koelvloeistof in de airconditioner
wordt gewijzigd.
• Als de buitentemperatuur laag is, dan kan het
gebeuren dat de airconditioning niet voldoende
verwarmt.
• Door de binneneenheid blijft een kleine hoeveelheid koelvloeistof stromen, ook als deze niet in
bedrijf is.
• Deze modellen zijn uitgerust met de functie Auto
Restart (automatisch opnieuw starten). Wanneer de netvoeding wordt uitgeschakeld en weer
wordt ingeschakeld zonder dat de airconditioner wordt uitgeschakeld met de afstandsbediening, start het apparaat automatisch in de stand
die was ingesteld met de afstandsbediening
voordat de stroomtoevoer werd onderbroken.
Page 41

INSTALLEREN, VERPLAATSEN EN CONTROLEREN
Installatieplaats
Vermijd installatie van de airconditioner op de volgende plaatsen:
• Waar ontvlambaar gas kan lekken.
VOORZICHTIG:
Installeer de airconditioner niet op plaatsen waar mogelijk ontvlambaar gas lekt.
Gelekt gas rond de airconditioner veroorzaakt mogelijk
een ontploffing.
• In de buurt van machineolie.
• In zoute gebieden, bijvoorbeeld aan de kust.
• In de buurt van sulfidegas, bijvoorbeeld bij hete bronnen.
• Waar olie spat of veel vettige rook is.
•
Waar hoogfrequentie- of draadloze apparatuur aanwezig is.
De installatielocatie van de buitenunit dient tenminste 3 meter te zijn verwijderd van antennes
van bijvoorbeeld radio en televisie. Op plaatsen met slechte ontvangst en als de airconditioner
de ontvangst van radio- en/of televisiesignalen daadwerkelijk stoort, dient de afstand tussen
de airconditioner en de antenne van het desbetreffende apparaat te worden vergroot.
Invertertype
1 meter
of meer
Radio
neonlamp
Zorg voor
voldoende
afstand om
storing in beeld
of geluid te
voorkomen.
TV
3 meter of
meer
100 mm of
meer
Goed
geventileerde
droge plaats
500 mm of
meer
Vermijd invloed van
neonlampen en houd
derhalve uit de buurt
van neonlampen
1 meter
of meer
Draadloze
telefoon
of
Mobiele
telefoon
Muur, etc.
WAARSCHUWING:
Indien de airconditioner draait maar de ruimte niet koelt of verwarmt (afhankelijk van het model), neem dan contact op
met uw dealer aangezien er mogelijk koelstof lekt. Vraag de monteur of er koelstoflekkage is wanneer er reparaties
worden uitgevoerd.
De in de airconditioner gebruikte koelstof is veilig. Normaal gesproken treedt er geen koelstoflekkage op. Indien er
binnen echter koelgas lekt en dit in aanraking komt met de warmtebron van een ventilatorkachel, straalkachel, fornuis, etc., zullen schadelijke stoffen worden gevormd.
Elektrische voorzieningen
• Zorg voor een apart, gescheiden spanningscircuit voor de airconditioner.
• Neem de capaciteit van het circuit in acht.
WAARSCHUWING:
• De klant dient de airconditioner niet zelf te installeren.
Indien de installatie niet juist wordt uitgevoerd, bestaat er kans op brand, een elektrische schok of letsel omdat de
het apparaat valt, lekken van water, etc.
• Tap het netsnoer niet af, maak geen tussenverbindingen in het netsnoer of in een verlengsnoer en sluit nooit teveel
apparaten aan op hetzelfde stopcontact. Een slecht contact, slechte isolatie, overschrijding van het toelaatbare
vermogen, etc. kan brand of een elektrische schok veroorzaken. Raadpleeg uw dealer voor meer informatie.
Raadpleeg uw handelaar.
TECHNISCHE GEGEVENS
VOORZICHTIG:
• Aard de airconditioner.
Sluit geen aardedraad op een gasleiding, waterleiding, bliksemafleider of aardedraad van een telefoon aan. Een
onjuiste aarding veroorzaakt mogelijk een elektrische schok.
• Installeer, afhankelijk van de installatieplaats, een aardelekschakelaar (bijvoorbeeld bij installatie op een vochtige
plaats).
Indien er in dit geval geen aardelekschakelaar is geplaatst, kan dit een elektrische schok veroorzaken.
Inspecteren en onderhoud
• Als u de airconditioner gedurende enkele seizoenen heeft gebruikt, is het mogelijk dat de capaciteit vermindert wegens
stof of vuil binnenin de airconditioner.
• Afhankelijk van de omstandigheden, wordt er mogelijk een geur opgewekt of condens vanwege stof of vuil niet goed
afgetapt.
• Behalve het normale onderhoud bevelen wij aan dat u de airconditioner bij voorkeur door een erkend technicus laat
inspecteren en onderhouden. Raadpleeg uw handelaar.
Let op geluidsoverlast
• Plaats geen voorwerpen rond de luchtuitlaat van de buitenunit. Dit zou namelijk de capaciteit kunnen verlagen of het
geluid laten toenemen.
• Raadpleeg uw handelaar indien de airconditioner tijdens gebruik abnormaal veel lawaai maakt.
Verplaatsen
• Wanneer de airconditioner vanwege renovatie, verhuizing of dergelijke moet worden verplaatst, moet u dit door een
erkend installateur laten uitvoeren omdat er namelijk speciale kennis en werkzaamheden voor zijn vereist.
WAARSCHUWING:
Reparatie of het verplaatsen dient niet door de klant zelf te worden uitgevoerd.
Een onjuiste reparatie of verplaatsing resulteert mogelijk in brand, een elektrische schok of letsel, doordat de
airconditioner valt, waterlekkage of andere problemen. Raadpleeg uw handelaar.
Weggooien
Raadpleeg uw handelaar wanneer u dit toestel wilt weggooien.
Raadpleeg uw handelaar indien u verdere vragen heeft.
Model Binnen
Setnaam
Buiten
Functie
Stroomtoevoer
Capaciteit kW
Invoer kW
Gewicht
Binnen kg
Buiten kg
Koelstofcapaciteit
(R410A)
IP-Code
Toelaatbare
Binnen
Buiten
Inlaatzijde MPa
overmatige druk
tijdens werking
Geluidsniveau
Uitlaatzijde MPa
Binnen
(Hoog/Mid./Laag)
Buiten dB(A)
kg
dB(A)
MSH-A07YV MSH-A09YV MSH-A12YV
MSC-A07YV MSC-A09YV MSC-A12YV
MUH-A07YV MUH-A09YV MUH-A12YV
Koelen
Verwarmen
Koelen
Verwarmen
Koelen
Verwarmen
~ /N, 230V, 50Hz
2,3 2,5 2,55 3,05 3,5 3,9
0,715 0,69 0,795 0,84 1,09 1,08
910
35 38 40
0,62 1,00 1,00
36/31/25 36/31/25 39/32/25 40/33/26 39/33/26
47 49
MS-A07YV MS-A09YV MS-A12YV
MSC-A07YV MSC-A09YV MSC-A12YV
MU-A07YV MU-A09YV MU-A12YV
Koelen
2,3 2,55 3,5
0,715 0,795 1,14
910
34 36
0,60 0,60 0,75
IP20
IP24
1,64
4,15
36/31/25 40/33/26
45 49
OPMERKING:
1. Vermogenscondities
Koelen — Binnen: 27°C DB, 19°C WB
Verwarmen — Binnen: 20
Buiten: 35
Buiten: 7
°C DB
°C DB
°C DB, 6°C WB
2. Gegarandeerd gebruiksbereid
Binnen Buiten
Hoogste limiet
Koelen
Laagste limiet
Hoogste limiet
Verwarmen
Laagste limiet
32°C DB 43°C DB
23°C WB —
21°C DB 21°C DB
15°C WB —
27°C DB 24°C DB
— 18° C WB
20°C DB -10°C DB
— -11°C WB
41
Page 42

ÍNDICE
MEDIDAS DE SEGURIDAD .................................................................................................................................................. 42
NOMBRE DE LAS PARTES .................................................................................................................................................. 43
PREPARACIÓN ANTES DE PONERLO EN FUNCIONAMIENTO ........................................................................................ 44
ACCIONAMIENTO AUTOMÁTICO “I FEEL...”....................................................................................................................... 46
ACCIONAMIENTO MANUAL (REFRIGERACIÓN, DESHUMIDIFICACIÓN, CALEFACCIÓN/VENTILACIÓN) .................... 47
AJUSTE DE LA VELOCIDAD Y DE LA DIRECCIÓN DEL FLUJO DE AIRE ......................................................................... 47
FUNCION DE DESCONEXIÓN AUTOMÁTICA (ECONO COOL) ......................................................................................... 48
ACCIONAMIENTO POR EL TEMPORIZADOR (TEMPORIZADOR DE CONEXIÓN/DESCONEXIÓN) .............................. 48
CUANDO EL ACONDICIONADOR DE AIRE NO SE VAYA A UTILIZAR DURANTE MUCHO TIEMPO ............................... 48
MANTENIMIENTO ................................................................................................................................................................. 48
LIMPIEZA DEL FILTRO DE AIRE DE TANINOS ................................................................................................................... 49
SUSTITUCIÓN DEL FILTRO DE LIMPIEZA DEL AIRE ........................................................................................................ 49
ANTES DE SOLICITAR EL SERVICIO TECNICO COMPRUEBE DE NUEVO LO SIGUIENTE........................................... 50
SI CREE QUE SE HA PRODUCIDO UN PROBLEMA .......................................................................................................... 50
INSTALACIÓN, CAMBIO DE SITIO Y INSPECCIÓN ............................................................................................................ 51
CARACTERÍSTICAS TÉCNICAS .......................................................................................................................................... 51
MEDIDAS DE SEGURIDAD
• Puesto que este producto tiene piezas rotatorias y piezas que pueden provocar descargas eléctricas, lea atentamente las “Medidas de seguridad” antes de usarlo.
• Tome las precauciones aconsejadas en este manual, ya que son importantes para una utilización segura del producto.
Indicaciones y sus significados
ATENCIÓN: Una manipulación incorrecta podría conllevar con toda probabilidad un peligro grave, por ejemplo,
CUIDADO: Una manipulación incorrecta podría conllevar, según las condiciones, un peligro grave.
Símbolos utilizados en este manual y su significado
• El color de la etiqueta adherida a la unidad está escrito entre paréntesis.
(Negro) : No introduzca nunca los dedos ni objetos, etc.
(Negro) : No se suba a la unidad interior/exterior ni ponga nada encima.
(Amarillo): Cuidado, peligro de descarga eléctrica.
(Azul) : Asegúrese de desconectar el enchufe de alimentación de la toma de corriente.
(Azul) : Asegúrese de desconectar la corriente.
• Después de leer este manual, guárdelo a mano junto con el manual de instalación para poder recurrir a él con
facilidad.
Posición de la indicación de advertencia y dispositivo de seguridad
42
de muerte o de heridas graves.
: Asegúrese de no hacerlo.
: Siga las instrucciones estrictamente.
CAJA EXTERIOR
PANEL FRONTAL
SALIDA DE AIRE
CAJA EXTERIOR
Este aparato de aire acondicionado NO debe ser utilizado por niños ni por personas inválidas sin el control de una persona adulta.
•
ATENCIÓN
No emplee conexiones intermedias del cable de alimentación ni tampoco un cable de extensión;
evite también conectar demasiados aparatos a una sola toma de corriente alterna (CA).
• Un mal contacto, un aislamiento incorrecto, un exceso de la corriente permitida, etc. podrían provocar
un incendio o descargas eléctricas.
No rasgue ni transforme el cable de alimentación.
• No coloque ningún objeto pesado sobre el cable de alimentación ni raspe o transforme dicho cable ya
que podría dañarse y generar un incendio o sacudida eléctrica.
No active/desactive el interruptor ni desconecte/conecte el enchufe de alimentación durante el funcionamiento.
• Esto podría provocar un incendio a causa de las chispas.
• Asegúrese de desactivar el interruptor o desenchufar el cable de alimentación inmediatamente después
de apagar la unidad interior con el controlador remoto.
Evite exponer la piel al aire frío durante un periodo de tiempo prolongado.
• Podría ser nocivo para su salud.
El cliente no debe instalar la unidad.
• Si estas operaciones se realizan incorrectamente, podría producirse un incendio, una descarga eléctrica,
podría caerse la unidad y causar heridas, o podría haber escapes de agua, etc. Consulte con su distribuidor.
No introduzca los dedos, palos, etc. en las entradas / salidas de aire.
• Podría hacerse daño, ya que el ventilador gira a alta velocidad.
•
Los niños pequeños deben estar vigilados por personas adultas para impedir que jueguen con el equipo de aire acondicionado.
Cuando se produzca una anormalidad (por ejemplo, olor a quemado), pare el acondicionador de
aire y desenchufe el cable de alimentación o desactive el interruptor.
• Si la unidad sigue funcionando en condiciones anómalas podría producirse un incendio u otro tipo de
problemas. En tal caso, consúlteselo a su distribuidor.
El cliente no debe reparar ni cambiar de sitio la unidad.
• Si estas operaciones se realizan incorrectamente, podría producirse un incendio, una descarga eléctrica,
podría caerse la unidad y causar heridas, o podría haber escapes de agua, etc. Consulte con su distribuidor.
• Si se daña el cable de alimentación, el fabricante o el técnico de mantenimiento debe reemplazar dicho
cable para evitar posibles peligros.
CUIDADO
Para quitar el filtro de aire, no toque las partes metálicas de la unidad interior.
• Podría hacerse daño.
No aplique directamente insecticida u otros productos inflamables a la unidad.
• Podría producirse un incendio o deformarse la caja.
No deje un animal doméstico ni una planta en un lugar que quede expuesto directamente al flujo de aire.
• Podría ser nocivo para el animal o la planta.
No instale la unidad en un soporte roto.
• La unidad podría caerse y provocar daños.
No se pare sobre un banquito inestable para sostener la unidad.
• Si se cae podría hacerse daño.
No tire del cable de alimentación.
• El núcleo del cable de alimentación puede desconectarse y provocar así un incendio.
No cargue ni desarme las pilas y no las arroje al fuego.
• Esto puede provocar una fuga, un incendio o una explosión.
No deje que la unidad funcione durante mucho rato en un ambiente muy húmedo, p. ej., con una
puerta o una ventana abiertas.
• En el modo de refrigeración, funcionando en una habitación con mucha humedad (del 80 % o más) durante mucho tiempo, el agua condensada de la unidad podría gotear y mojar o estropear los muebles, etc.
No utilice la unidad para fines que no sean los indicados.
• No lo utilice para conservar instrumentos de precisión, comida, animales, plantas u objetos de aire.
Un uso no indicado podría deteriorar la calidad, etc. del producto.
No coloque una estufa, etc. donde quede expuesta al flujo de aire directo.
• Esto podría causar una combustión imperfecta.
Page 43

MEDIDAS DE SEGURIDAD
NOMBRE DE LAS PARTES
CUIDADO
Cuando tenga que limpiar la unidad, apáguela y desenchufe el cable de alimentación o desactive el
interruptor.
• Podría hacerse daño, ya que el ventilador gira a alta velocidad.
Si no va a utilizar la unidad durante un periodo de tiempo prolongado, desenchufe el cable de
alimentación o desactive el interruptor.
• Si no lo hace, podría acumularse suciedad y producirse un incendio.
Sustituya las dos pilas viejas por otras nuevas de la misma clase.
• La utilización de una pila usada junto con una nueva puede generar calor, provocar una fuga o producir
una explosión.
Si el líquido de las pilas entra en contacto con su piel o con su ropa, lave inmediatamente la zona
afectada con agua limpia.
• Si el líquido de las pilas penetra en sus ojos, lávelos bien con agua limpia y consulte con su médico
inmediatamente.
Cuando utilice la unidad junto con una estufa o aparato similar, ventile bien la habitación.
• No utilice la unidad para fines que no sean los indicados.
No manipule los interruptores con las manos mojadas.
• Podría recibir una descarga eléctrica.
No limpie el equipo de aire acondicionado con agua.
• Podría entrarle agua a la unidad y deteriorar el aislamiento. Esto podría provocar una descarga eléctrica.
No se suba a la unidad interior/exterior ni ponga nada encima.
• Podría producirse algún daño o lesión si usted o cualquier objeto cayera.
Para la instalación
ATENCIÓN
• Para instalar el aire acondicionado, consúltele a su distribuidor.
CUIDADO
No instale la unidad donde pueda haber fugas de gas inflamable.
• Si hay una fuga de gas y éste se acumula cerca de la unidad, podría producirse una explosión.
Haga una toma de tierra.
• No conecte el cable de tierra a una tubería de gas, tubería de agua, pararrayos o cable de tierra de un
teléfono. Si la conexión de tierra es defectuosa podría producirse una descarga eléctrica.
Según donde instale el equipo de aire acondicionado (lugar húmedo, etc.), deberá colocar un interruptor de fuga a tierra.
• Si no se coloca cuando sea necesario, podría producirse una descarga eléctrica.
Hay que drenar completamente el agua de condensación.
• Si no se drena del todo, el agua podría gotear desde la unidad y mojar y causar desperfectos en el
mobiliario.
Unidad interior
Filtro de limpieza del aire
(Tipo fuelle blanco)
Filtro de aire de taninos
(Con desodorizante)
Salida de aire
Aleta vertical
Aleta horizontal
Sección de accionamiento
(Cuando el panel frontal está abierto)
Unidad exterior
Interruptor de accionamiento
de emergencia
Sección de pantalla
Luz de indicación
del funcionamiento
Panel frontal
Entrada de aire
Hacia el interruptor
Cable de alimentación
Sección de recepción
del controlador remoto
Controlador remoto
Sección de recepción
del controlador remoto
Entrada de aire (lados posterior y lateral)
Tubería
Manguera de drenaje
Salida de aire
Salida de drenaje
43
Page 44

ON/OFF
FAN
TOO
WARM
TOO
COOL
VANE
MODE
ECONO COOL
STOP
START
HR.
MIN.
I FEEL
COOL
DRY
AMPM
AMPM
RESET CLOCK
HEAT
/FAN
NOMBRE DE LAS PARTES
ON/OFF
TOO
COOL
AMPM
CLOCK
˚C
AMPM
TOO
WARM
PREPARACIÓN ANTES DE PONERLO EN FUNCIONA-
Controlador remoto
Sección de transmisión de señales
Sección de pantalla de accionamiento
Botón ON / OFF (activación /
desactivación del funcionamiento)
Abra la tapa frontal.
(Esta ilustración muestra un esquema general.)
Botones de la temperatura
MIENTO
Función de reinicio automático
Estos modelos están equipados con la función de reinicio automático. Si no desea utilizar esta
■
función, póngase en contacto con el servicio técnico ya que tendrá que modificar los ajustes de la
unidad.
¿En qué consiste la función de reinicio automático?
Cuando se controla la unidad interior con el controlador remoto a distancia, el modo de funcionamiento, la temperatura seleccionada y la velocidad del ventilador se almacenan en la memoria. En caso de que se produzca un corte en el suministro
eléctrico o se apague la unidad mientras esté funcionando, la función de reinicio automático se activará automáticamente en
el mismo modo seleccionado con el controlador remoto antes de que se interrumpiese el funcionamiento. (Consulte la página
46 para obtener más información.)
Unidad interior
Inserte el enchufe de alimentación en la toma de corriente y conecte el interruptor.
■
ATENCIÓN:
Quite la suciedad del enchufe de alimentación e insértelo firmemente.
Si el enchufe está sucio o no es introducido completamente, podría producirse un incendio o una descarga eléctrica.
Controlador remoto
Cómo ajustar el tipo
Este ajuste del controlador remoto tiene que activarse de acuerdo con el tipo de acondicionador
■
de aire (REFRIGERACIÓN y CALEFACCIÓN o SÓLO REFRIGERACIÓN).
Si el ajuste es incorrecto, el acondicionador de aire no funcionará con normalidad. Por consiguiente, compruebe que el ajuste corresponda al tipo de acondicionador de aire que posee. Si no
correspondiera, corrija el ajuste tal y como se indica a continuación.
44
Botón de control de
velocidad del ventilador
Botón de selección del
modo de funcionamiento
Botón de desconexión
automática (ECONO COOL)
Botón de reinicialización (RESET)
Botón de desactivación del temporizador
Botón de activación del temporizador
Botón de las horas (HR.)
Botón de los minutos (MIN.)
(Botones de ajuste de la hora)
Botón de ajuste del reloj (CLOCK)
Botón de control de las lamas
Interruptor deslizante
Tipo
Posición del
interruptor
deslizante
REFRIGERACIÓN y CALEFACCIÓN
SÓLO REFRIGERACIÓN
Page 45

HR.
MIN.
HR.
MIN.
FAN
VANE
MODE
ECONO COOL
STOP
START
HR.
MIN.
I FEEL
COOL
DRY
RESET CLOCK
HEAT
/FAN
Operation Indicator
Operation Indicator
Operation Indicator
Operation Indicator
Operation Indicator
ON/OFF
PREPARACIÓN ANTES DE PONERLO EN FUNCIONAMIENTO
Controlador remoto
Cómo colocar las pilas y ponerlo en hora
1 Extraiga la tapa frontal e inserte las pilas.
Luego vuelva a colocar la tapa frontal.
Inserte primero el polo negativo de las pilas.
Compruebe que la polaridad de las pilas sea la correcta.
Inserte primero el polo
negativo de las pilas.
2 Pulse el botón de reinicialización RESET.
Púlselo usando un
objeto puntiagudo.
• Si no se pulsa, el controlador remoto no funcionará
correctamente.
3 Pulse el botón de ajuste del reloj CLOCK set.
Púlselo usando un
objeto puntiagudo.
4 Pulse los botones
y
(botones de
ajuste de la hora) para poner el reloj en hora.
• Cada vez que se pulsa el botón
una hora más en la hora de la pantalla y cada vez
que se pulsa el botón
más.
, se aumenta un minuto
, se aumenta
5 Pulse el botón de ajuste del reloj CLOCK
nuevamente y cierre la tapa frontal.
Manejo del controlador remoto
• El alcance de la señal es de unos 6 m cuando se
dirige el controlador remoto a la parte delantera de
la unidad interior.
• Cuando se pulsa un botón, la unidad interior emitirá
uno o dos pitidos. Si no se oyen los pitidos, vuelva a
pulsar el botón.
• Utilice el controlador remoto con cuidado. Si el controlador remoto se cae, se lanza o se moja, es probable que no funcione.
Si se instala en una pared, etc.
• Instale el soporte del controlador remoto en una posición desde la cual se pueda oír el sonido de recepción de las señales (pitido) procedentes de la unidad
interior, cuando se pulse el botón
Cómo instalar / retirar el controlador remoto
Instalación:
Retirada : Tire de él hacia arriba.
Pilas secas
■ Cambio de las pilas
Reemplace las pilas por pilas alcalinas nuevas del tipo
AAA en los siguientes casos:
Introduzca el controlador remoto hacia abajo.
Soporte del
controlador remoto
.
· Cuando la unidad interior no responda a la señal del
controlador remoto.
· Cuando se oscurezca la pantalla del controlador re-
moto.
· Cuando al pulsar un botón del controlador remoto
aparezcan en la pantalla todas las indicaciones pero
desaparezcan inmediatamente.
No utilice pilas de manganeso. El controlador remoto podría funcionar inadecuadamente.
• La vida útil de una pila alcalina es de un año aproximadamente.
No obstante, una pila cuyo periodo de duración está
próximo, es probable que se agote muy pronto. La
fecha límite del uso recomendado (mes/año) se indica en la parte inferior de las pilas.
• Para evitar la fuga de líquido, saque todas las pilas
cuando no se vaya a utilizar el controlador remoto
durante un largo periodo de tiempo.
CUIDADO:
Si el líquido de las pilas entra en contacto con su
piel o con su ropa, lave inmediatamente la zona afectada con agua limpia. Si el líquido de las pilas penetra en sus ojos, lávelos bien con agua limpia y consulte con su médico inmediatamente.
• No utilice pilas recargables.
• Sustituya las dos pilas viejas por otras nuevas de la
misma clase.
• Deseche las pilas gastadas de la forma correcta.
Si no se puede utilizar el controlador remoto (accionamiento de emergencia)
Si el controlador remoto está estropeado o se le han agotado las pilas, se puede efectuar un accionamiento de
emergencia con el interruptor destinado a este fin.
Tipo REFRIGERACIÓN y CALEFACCIÓN
1 Pulse el interruptor de accionamiento de
emergencia.
• Cada vez que pulse el interruptor de accionamiento
de emergencia el modo de funcionamiento de la unidad cambiará siguiendo este orden: modo de REFRIGERACIÓN DE EMERGENCIA, modo de CALEFACCIÓN DE EMERGENCIA y modo de PARADA.
Cuando se pulsa el interruptor de ACCIONAMIENTO DE EMERGENCIA una vez, la unidad funciona
en modo de prueba durante 30 minutos y luego se
pasa al MODO DE EMERGENCIA.
• A continuación aparecen los detalles del MODO DE
EMERGENCIA. De todos modos, el control de temperatura no funciona durante 30 minutos en el
modo de prueba y la unidad se pone en funcionamiento continuo.
Durante la prueba, la velocidad del ventilador es alta
y luego, transcurridos 30 minutos, pasa a media.
Modo de funcionamiento
Temperatura seleccionada
Velocidad del ventilador
Aleta horizontal Automáticas Automáticas
• El modo de funcionamiento se indica mediante la luz
del indicador de funcionamiento de la unidad interior
tal y como se indica en las siguientes ilustraciones.
Luz de indicación del funcionamiento
REFRIGERACIÓN
DE EMERGENCIA
CALEFACCIÓN DE
EMERGENCIA
PARADA
Para detener el funcionamiento de emergen-
■
cia pulse el interruptor de ACCIONAMIENTO DE EMERGENCIA una vez (en caso de
modo de CALEFACCIÓN DE EMERGENCIA)
o dos veces (en caso de REFRIGERACIÓN
DE EMERGENCIA).
Refrigeración Calefacción
24°C24°C
Media Media
Tipo SÓLO REFRIGERACIÓN
1 Pulse el interruptor de accionamiento de
emergencia.
• Cuando pulse el interruptor de ACCIONAMIENTO
DE EMERGENCIA la unidad funcionará en modo
de prueba durante 30 minutos primero y luego cambiará a MODO REFRIGERACIÓN DE EMERGENCIA.
• A continuación aparecen los detalles del MODO REFRIGERACIÓN DE EMERGENCIA. De todos modos,
el control de temperatura no funciona durante 30
minutos en el modo de prueba y la unidad se pone
en funcionamiento continuo.
Durante la prueba, la velocidad del ventilador es alta
y luego, transcurridos 30 minutos, pasa a media.
Modo de funcionamiento Refrigeración
Temperatura seleccionada
Velocidad del ventilador Media
Aleta horizontal Automáticas
• El modo de funcionamiento se indica mediante la
luz del indicador de funcionamiento de la unidad
interior tal y como se indica en las siguientes ilustraciones.
Luz de indicación del funcionamiento
REFRIGERACIÓN
DE EMERGENCIA
PARADA
Para detener el MODO REFRIGERACIÓN DE
■
EMERGENCIA, vuelva a pulsar el interruptor
de ACCIONAMIENTO DE EMERGENCIA otra
vez.
Cada vez que se pulsa el interruptor, el modo de operación cambia entre MODO REFRIGERACIÓN DE
EMERGENCIA y MODO PARADA.
24°C
45
Page 46

ON/OFF
ON/OFF
TOO
WARM
TOO
COOL
FAN
VANE
MODE
STOP
START
HR.
I FEEL
COOL
DRY
HEAT
/FAN
ACCIONAMIENTO AUTOMÁTICO “I FEEL...”
MODE
Operation Indicator
MODE
ON/OFF
FAN
TOO
WARM
TOO
COOL
VANE
MODE
ECONO COOL
STOP
START
HR.
MIN.
I FEEL
COOL
DRY
AMPM
CLOCK
˚C
AMPM
HEAT
/FAN
RESET CLOCK
Con el modo de funcionamiento automático “ (I FEEL...)”, se pueden seleccionar automáticamente
las condiciones idóneas para la habitación con sólo pulsar un botón.
Para activar dicho accionamiento:
Pulse el botón
■
Al seleccionar el modo “ (I FEEL...)”, el equipo de aire acondicionado se
regula automáticamente a la temperatura óptima.
.
Para desactivar dicho accionamiento:
Pulse el botón
■
○○○○○○○○○○○○○○○○○○○○○○○○○○○○○○○○○
Si tiene un poco de calor:
Pulse el botón
■
Cada vez que pulse el botón la temperatura descenderá aproximadamente 1°C.
Si tiene un poco de frío:
Pulse el botón
■
Cada vez que pulse el botón la temperatura aumentará aproximadamente 1°C.
Si “ (I FEEL...)” no está seleccionado en la pantalla, pulse el
botón
hasta que aparezca señalado.
Cada vez que pulse el botón, el modo de funcionamiento cambiará siguiendo este orden:
RACIÓN) →
(DESHUMIDIFICACIÓN) → (CALEFAC-
(I FEEL...) → (REFRIGE-
CIÓN/VENTILACIÓN)
.
para bajar la temperatura.
para subir la temperatura.
Descripción de la “FUNCIÓN DE REINICIO AUTOMÁTICO”
• Estos modelos están equipados con la función de reinicio automático. Cuando se enciende la unidad, el acondicionador de aire comienza automáticamente a funcionar en el mismo modo seleccionado con el controlador remoto antes
de que se interrumpiese el funcionamiento.
• Si apagó la unidad con el controlador remoto antes de desactivar la alimentación, ésta permanecerá detenida incluso
después de encender la unidad.
• Si la unidad se encontraba en el modo de emergencia antes de desactivar la alimentación, al encender la unidad se
iniciará el funcionamiento en el mismo modo seleccionado con el controlador remoto antes del funcionamiento de
emergencia.
• Si se utiliza la unidad en el modo de funcionamiento “I FEEL…” antes de producirse un corte en el suministro eléctrico,
el modo de funcionamiento (COOL, DRY o HEAT) [FRIO, SECO, o CALOR] no quedará almacenado en la memoria.
Cuando se reanude el suministro eléctrico, la unidad decide el modo de funcionamiento de acuerdo con la temperatura inicial de la sala en el momento del reinicio y se pone de nuevo en marcha.
Descripción del modo de accionamiento automático “I FEEL...”
Detalles del funcionamiento
Según sea la temperatura de la sala cuando comienza a funcionar el equipo, se seleccionará automáticamente el modo
de REFRIGERACIÓN, el de DESHUMIDIFICACIÓN o el de CALEFACCIÓN. No obstante, si se vuelve a poner en
marcha en el plazo de las dos horas posteriores a la desactivación de la unidad, ésta se activará en el último modo
seleccionado. El modo de funcionamiento no se modifica aunque cambie la temperatura de la habitación. Si el modo de
funcionamiento no es el adecuado para las condiciones de la habitación, seleccione el modo apropiado pulsando el
botón
Temperatura de la habitación
al empezar el funcionamiento
Aprox. 25°C o más REFRIGERACIÓN Aprox. 24°C REFRIGERACIÓN Aprox. 24°C
Aprox. 25°C - 23°C
Aprox. 23°C o menos CALEFACCIÓN Aprox. 26°C
NOTA:
REFRIGERACIÓN: Cuando la temperatura de la habitación sea 2
CALEFACCIÓN: Cuando la temperatura de la sala sea 2°C inferior a la temperatura seleccionada, es probable
El indicador de funcionamiento situado en el lado derecho de la unidad interior muestra el estado de funcionamiento.
.
Detalles del accionamiento automático
Tipo REFRIGERACIÓN y CALEFACCIÓN Tipo SÓLO REFRIGERACIÓN
Modo de funcionamiento Temperatura seleccionada Modo de funcionamiento Temperatura seleccionada
(estado inicial) (estado inicial)
DESHUMIDIFICACIÓN
probable que no pueda cambiar la temperatura establecida ya que el aire acondicionado
está en funcionamiento para alcanzar la temperatura esperada (establecida). En este caso,
espere hasta que la temperatura de la habitación descienda hasta 2
establecida y después cambie la temperatura establecida.
que no pueda cambiar la temperatura establecida ya que el aire acondicionado está en funcionamiento para alcanzar la temperatura esperada (establecida). En este caso, espere hasta que la temperatura de la habitación aumente hasta 2
después cambie la temperatura establecida.
Detalles de pantalla de la unidad interior
Luz encendida
Luz parpadeante
Luz apagada
Luz de indicación del funcionamiento
Indicación
Indica que el equipo de aire acondicionado está configurado
para conseguir la temperatura deseada. Espere hasta entonces.
Indica que la temperatura de la habitación se acerca a la
temperatura deseada.
(Sólo en la serie MXZ de unidades exteriores.)
Por favor, consulte el apartado “Información sobre los equipos de aire acondicionado multisistema”. (Página 47)
Estado de funcionamiento
—
DESHUMIDIFICACIÓN
DESHUMIDIFICACIÓN
—
—
°C superior a la temperatura establecida, es
°C de la temperatura
°C de la temperatura establecida y
Diferencia entre la temperatura
seleccionada y la de la habitación
Unos 2°C o más
Unos 2°C o menos
—
46
Page 47

ON/OFF
MODE
ON/OFF
ON/OFF
ACCIONAMIENTO MANUAL (REFRIGERACIÓN, DES-
TOO
WARM
TOO
COOL
FAN
VANE
ON/OFF
FAN
TOO
WARM
TOO
COOL
VANE
MODE
ECONO COOL
STOP
START
HR.
MIN.
I FEEL
COOL
DRY
AMPM
CLOCK
˚C
AMPM
HEAT
/FAN
RESET CLOCK
ON/OFF
FAN
TOO
WARM
TOO
COOL
VANE
MODE
ECONO COOL
STOP
START
HR.
MIN.
I FEEL
COOL
DRY
AMPM
CLOCK
˚C
AMPM
HEAT
/FAN
RESET CLOCK
VANE
1
2
3
4
5
AJUSTE DE LA VELOCIDAD Y DE LA DIRECCIÓN DEL
HUMIDIFICACIÓN, CALEFACCIÓN/VENTILACIÓN)
Para seleccionar los modos REFRIGERACIÓN, DESHUMIDIFICACIÓN o CALEFACCIÓN/VENTILACIÓN
1 Pulse el botón
2 Seleccione el modo de operación pulsando el botón
Cada vez que se pulsa este botón, el modo de funcionamiento cambiará siguiendo este orden:
(DESHUMIDIFICACIÓN) → (CALEFACCIÓN/VENTILACIÓN)
Modo CALEFACCIÓN/VENTILACIÓN
Compruebe a qué tipo pertenece su aparato de aire acondicionado.
REFRIGERACIÓN y CALEFACCIÓN
SÓLO REFRIGERACIÓN VENTILACIÓN
Para desactivarlos:
■
○○○○○○○○○○○○○○○○○○○○○○○○○○○○○○○○○○○○○○○○○○○○○○○○○
Para cambiar la temperatura:
■
•
Para bajar la temperatura pulse el botón
•
Para subir la temperatura pulse el botón
Durante el funcionamiento en modo CALEFACCIÓN
Si el acondicionador de aire absorbe demasiado calor ambiental es posible que sufra una sobrecarga. En este caso, el microprocesador enviará una señal
•
que hará que se detenga el ventilador de la unidad exterior para proteger así el acondicionador de aire.
Cuando el ventilador de la unidad exterior se detiene, es probable que se forme escarcha en la unidad exterior, pero este hecho no supone problema alguno.
Durante el funcionamiento en modo DESHUMIDIFICACIÓN
• La temperatura (selección de temperatura) no puede modificarse.
• En este modo de funcionamiento la temperatura desciende ligeramente.
Los detalles indicados en la pantalla de la unidad interior se explican en la página 46.
■
NOTA:
Cuando la temperatura ambiental es demasiado alta, puede que la temperatura de la habitación no alcance la temperatura seleccionada ya que la unidad estará funcionando en modo de refrigeración a máxima potencia.
Información sobre los equipos de aire acondicionado multisistema (Unidad exterior: serie MXZ)
Los equipos de aire acondicionado multisistema (unidad exterior de la serie MXZ) permiten conectar dos o más unidades interiores a una
sola unidad exterior. Estas unidades interiores (dos o más) podrán funcionar simultáneamente, dependiendo de la capacidad del equipo.
•
Si intenta poner en funcionamiento de manera simultánea dos o más unidades interiores conectadas a una sola unidad exterior, una para
la refrigeración y otra para la calefacción, el equipo selecciona el modo de funcionamiento de la unidad interior que ha de funcionar en
primer término. Las demás unidades interiores que tendrán que ponerse en funcionamiento posteriormente no pueden activarse, indicando un estado de funcionamiento (consulte la tabla referente a la luz de indicación del funcionamiento de la página 46).
En este caso, seleccione el mismo modo de funcionamiento en todas las unidades interiores.
•
Si la unidad interior empieza a funcionar al mismo tiempo que la unidad exterior está eliminando la escarcha, tardará unos minutos (10
minutos como máximo) en generar aire caliente.
•
En el modo de calefacción, es probable que la unidad interior que no está en funcionamiento se caliente o se oiga el ruido del refrigerante,
pero esto no supone ninguna anomalía. Lo que sucede es que el refrigerante circula continuamente dentro de la unidad interior aunque
ésta no esté en funcionamiento.
Descripción de la “FUNCIÓN DE REINICIO AUTOMÁTICO”
Véase la página 46.
Tipo Modo de funcionamiento
Pulse el botón
Cuando se ponga en marcha la unidad, ésta se activará en el último modo de
accionamiento seleccionado la última vez que se utilizó, pulsando el botón
. Cada vez que se pulsa el botón la temperatura desciende aproximadamente 1°C.
. Cada vez que se pulsa el botón la temperatura aumenta aproximadamente 1°C.
.
.
(I FEEL...) → (REFRIGERACIÓN) →
CALEFACCIÓN
.
FLUJO DE AIRE
La velocidad y la dirección del flujo de aire pueden configurarse según se desee.
Para cambiar la velocidad del flujo de aire pulse el botón
■
Cada vez que pulse el botón, la velocidad del ventilador cambiará siguiendo
este orden:
• Utilice la muesca
• Si el ruido del equipo de aire acondicionado no le deja dormir, utilice la
muesca
Para cambiar la dirección vertical del flujo de aire, pulse el bo-
■
tón
Cada vez que pulse el botón, el ángulo de la aleta horizontal cambiará siguiendo este orden:
DE GIRO) →
FUNCIÓN DE GIRO
Utilice la función de giro para que el flujo de aire llegue a todos los rincones de
la habitación.
.
Amplitud recomendada de la aleta horizontal
Utilice normalmente la posición
Utilice las posiciones
REFRIGERACIÓN o DESHUMIDIFICACIÓN y utilice
las posiciones
CIÓN cuando ajuste la temperatura a su gusto.
NOTA:
• En el modo de refrigeración, cuando el acondicionador de aire está funcionando con el ajuste de la aleta horizontal
en la posición
(4) o (5) durante una hora, la dirección del FLUJO DE AIRE se ajusta automáticamente en la
posición horizontal para evitar que gotee el agua condensada.
• Para ajustar la dirección vertical del flujo de aire, sírvase del controlador remoto. Si la aleta horizontal se mueve de
forma manual, pueden producirse problemas.
• En el modo de calefacción, si la temperatura del flujo de aire es demasiado baja o se está eliminando la escarcha, la
posición de la aleta horizontal se establece en
Cómo ajustar automáticamente la
dirección del flujo de aire
Cuando se selecciona el modo AUTOMÁTICO con el
botón
ta automáticamente según el modo de funcionamiento, para que la unidad funcione de forma eficaz.
(1) CALEFACCIÓN
• Cuando la temperatura de la corriente de aire es de-
• Cuando la temperatura de la corriente de aire au-
(2) REFRIGERACIÓN, DESHUMIDIFICACIÓN
(3) VENTILACIÓN
, la posición de la aleta horizontal se ajus-
masiado baja, el aire es expulsado horizontalmente.
menta, el aire es expulsado hacia abajo.
El aire es expulsado horizontalmente.
El aire es expulsado hacia abajo.
(Baja) → (Media) → (Alta) → (AUTOMÁTICA)
(Alta) para enfriar/calentar más la sala.
(Baja).
.
(1) → (2) → (3) → (4) → (5) → (ÁNGULO
(AUTOMÁTICA)
(AUTOMÁTICA).
(1) o (2) en los modos
REFRIGERACIÓN
DESHUMIDIFICACIÓN
(3) a (5) en el modo CALEFAC-
(1).
Para cambiar la dirección horizontal del flu-
■
jo de aire, mueva las aletas verticales manualmente.
Ajuste la aleta antes de poner en marcha el equipo, ya
que la aleta horizontal se mueve de forma automática y
podría pillarse los dedos.
.
CALEFACCIÓN
47
Page 48

FUNCION DE DESCONEXIÓN AUTOMÁTICA (ECONO COOL)
ON/OFF
FAN
TOO
WARM
TOO
COOL
VANE
MODE
ECONO COOL
STOP
START
HR.
MIN.
I FEEL
COOL
DRY
AMPM
CLOCK
˚C
AMPM
HEAT
/FAN
RESET CLOCK
START
HR.
MIN.
HR.
MIN.
START
STOP
HR.
MIN.
HR.
MIN.
STOP
ECONO COOL
ECONO COOL
VANE
FAN
TOO
WARM
TOO
COOL
CUANDO EL ACONDICIONADOR DE AIRE NO SE VAYA
Utilice esta función cuando desee sentirse cómodo en el modo de refrigeración, además de ahorrar energía.
Lleve a cabo los siguientes pasos mientras la unidad funcione en el modo de refrigeración manual.
Pulse el botón
■
Cuando seleccione la función de desconexión automática (ECONO COOL)
en el modo de refrigeración, el equipo de aire acondicionado activa la función
de giro en varios ciclos de acuerdo con la temperatura del aire acondicionado.
La temperatura establecida asciende automáticamente 2°C por encima de la
temperatura existente en el modo de refrigeración.
.
Para desactivar la función de desconexión automática (ECONO COOL):
Vuelva a pulsar el botón
■
○○○○○○○○○○○○○○○○○○○○○○○○○○○○○○○○○
• Cuando se pulsa el botón
durante la activación de la desconexión automática (ECONO COOL), ésta
última se desactivará.
• El equipo dispone del botón
de conexión y desconexión (que se explica a continuación).
¿En qué consiste la función de “desconexión automática (ECONO COOL)”?
Si la dirección del aire cambia cada cierto tiempo (vaivén del aire), el ambiente se refresca más que si la dirección se
mantiene siempre fija. Así pues, aunque la temperatura establecida aumente automáticamente en 2°C, puede utilizar
esta función cuando el aparato esté en modo de refrigeración y así sentirse cómodo y ahorrar energía.
.
o se cambia el modo de funcionamiento
, el botón
o
y del temporizador
ACCIONAMIENTO POR EL TEMPORIZADOR (TEMPORIZADOR DE CONEXIÓN/DESCONEXIÓN)
Resulta muy cómodo configurar el temporizador para la hora de irse a dormir, de llegar a casa o de levantarse.
Cómo configurar el temporizador de conexión
1 Pulse el botón
miento del equipo.
Cada vez que se pulsa el botón, el modo del temporizador
de conexión se activa y se desactiva de forma alternada.
durante el funciona-
2 Seleccione la hora del temporizador con los
botones
Cada vez que se pulsa el botón
hora más en la hora de la pantalla y cada vez que se
pulsa el botón
Para desactivar el temporizador de conexión:
Pulse el botón
■
Cómo programar el funcionamiento del temporizador
Los temporizadores de conexión y de desconexión pueden utilizarse de forma combinada. El primer temporizador en activarse
será el que esté configurado a la hora más próxima (la marca “ ” muestra el orden en el que se activarán los temporizadores).
• Si no se pone en hora el reloj, no se puede activar el temporizador.
NOTA:
Si el suministro principal está desactivado o se produce un fallo en la alimentación mientras está activo el temporizador de
inicio/parada automático, se cancelarán los ajustes del temporizador, Como estos modelos están equipados con una función
de reinicio automático, el acondicionador de aire comenzará a funcionar en el momento en que se restablezca la energía.
48
y
.
, se aumenta una
, se aumenta un minuto más.
.
Cómo configurar el temporizador de desconexión
1 Pulse el botón
to del equipo.
Cada vez que se pulsa el botón, el modo del temporizador
de desconexión se activa y se desactiva de forma alternada.
durante el funcionamien-
2 Seleccione la hora del temporizador con los
botones
Cada vez que se pulsa el botón
hora más en la hora de la pantalla y cada vez que se
pulsa el botón
Para desactivar el temporizador de desconexión:
Pulse el botón
■
y
.
, se aumenta una
, se aumenta un minuto más.
.
A UTILIZAR DURANTE MUCHO TIEMPO
Si no va a utilizar el equipo durante un
periodo de tiempo prolongado:
1 Ponga en marcha el equipo en el modo de
ventilación durante 3 o 4 horas para
deshumidificar el interior del aparato.
Tipo REFRIGERACIÓN y CALEFACCIÓN:
• Para activar la función de ventilación, seleccione
con el controlador remoto la temperatura más alta
en el modo de funcionamiento de refrigeración
manual. (Véase la página 47.)
Tipo SÓLO REFRIGERACIÓN:
• Seleccione el modo VENTILACIÓN. (Véase la página 47.)
2 Desactive el interruptor y desenchufe el ca-
ble de alimentación.
CUIDADO:
Desconecte el interruptor o desenchufe el cable de alimentación cuando no vaya a utilizar el equipo durante
un periodo de tiempo prolongado.
Podría acumularse suciedad y producirse un incendio.
3 Quite las pilas del controlador remoto.
CUIDADO:
Para evitar la fuga de líquido, saque todas las pilas cuando no se vaya a utilizar el controlador remoto durante
un largo periodo de tiempo.
Cuando se vaya a volver a utilizar el equipo de aire acondicionado:
1 Limpie el filtro de aire e instálelo en la uni-
dad interior.
(Encontrará las instrucciones de limpieza en la página
49.)
2 Compruebe que no haya ningún obstaculo
obstruyendo las entradas y salidas de aire
de las unidades interior/exterior.
3 Compruebe que el cable de tierra esté co-
nectado correctamente.
CUIDADO:
Haga una toma de tierra.
No conecte el cable de tierra a una tubería de gas, tubería de agua, pararrayos o cable de tierra de un teléfono.
Si la conexión de tierra es defectuosa podría producirse
una descarga eléctrica.
MANTENIMIENTO
Antes de realizar las tareas de mantenimiento
Desconecte el interruptor y desenchufe el
■
cable de alimentación.
CUIDADO:
Cuando haya que limpiar la unidad, apáguela y
desenchufe el cable de alimentación o desactive el interruptor, ya que el ventilador gira a gran velocidad y podría hacerse daño.
Cómo limpiar la unidad interior
Limpie la unidad con un paño suave y seco.
■
• Si el aparato está muy sucio, limpie la unidad con
un paño mojado en una solución de detergente suave disuelto en agua templada.
• No utilice gasolina, bencina, polvo de pulimentación,
ni insecticida, ya que estos productos pueden deteriorar la unidad.
Page 49

LIMPIEZA DEL FILTRO DE AIRE DE TANINOS
SUSTITUCIÓN DEL FILTRO DE LIMPIEZA DEL AIRE
Limpieza del filtro de aire de taninos (una vez cada 2 semanas aproximadamente)
1 Retire el filtro de aire de taninos.
Abra el panel
frontal y retire /
vuelva a colocar el filtro de
aire.
Filtro de aire de taninos
CUIDADO:
Para retirar el filtro de aire de taninos, no toque las partes metálicas de la unidad interior.
Podría hacerse daño.
Retírelo.
3 Después de lavar el filtro de aire de taninos
con agua, preferiblemente templada, déjelo
secar completamente a la sombra.
• No exponga el filtro de aire de taninos a la luz solar directa ni al calor de una llama mientras se seca.
4 Coloque el filtro de aire de taninos.
2 Limpie la suciedad del filtro de aire de
taninos con un aspirador o lavándolo con
agua.
• Si está muy sucio, lave el filtro en un una solución
de detergente suave disuelto en agua templada.
• Si utiliza agua caliente (a 50°C o más), el filtro puede
llegar a deformarse.
Colóquelo.
Cuando haya disminuido la capacidad de filtración a causa de la suciedad, etc., deberá sustituir el filtro
de limpieza del aire.
Cómo sustituir el filtro de limpieza del aire (una vez cada cuatro meses)
1 Retire el filtro de aire de taninos.
Filtro de aire de taninos
2 Retire el filtro de limpieza del aire (Tipo fue-
lle blanco).
Filtro de limpieza del aire
○○○○○○○○○○○○○○○○○○○○○○○○○○○○○○○○○○○○○○○○○○○○○○○○○
Filtro de limpieza del aire
• Si el filtro de limpieza del aire está obstruido, disminuirá la capacidad de la unidad o se producirá condensación en la
salida de aire.
• El filtro de limpieza del aire es desechable. El periodo de duración normal de un filtro es aproximadamente de cuatro
meses. Sin embargo, si se vuelve de color marrón oscuro, cámbielo inmediatamente.
Piezas opcionales Podrá adquirir las piezas opcionales en su distribuidor.
3 Coloque un nuevo filtro de limpieza del aire.
4 Coloque el filtro de aire de taninos y cierre
bien el panel frontal.
○○○○○○○○○○○○○○○○○○○○○○○○○○○○○○○○○○○○○○○○○○○○○○○○○
¿Qué es el “filtro de aire de taninos”?
Es un filtro impregnado con taninos naturales extraídos de la planta del té. El filtro de aire de taninos desodoriza
los gases malolientes y nocivos, como el formol, el amoníaco o el acetaldehído. Además, frena la actividad de los
virus que se adhieren al filtro.
Nombre de la pieza
Número de pieza MAC-1300FT
FILTRO DE LIMPIEZA DEL AIRE
49
Page 50

ANTES DE SOLICITAR EL SERVICIO TECNI-
SI CREE QUE SE HA PRODUCIDO UN PROBLEMA
CO COMPRUEBE DE NUEVO LO SIGUIENTE
Pregunta
El equipo de aire acondicionado no funciona.
El equipo no refrigera ni
calefacciona de forma ópti-
ma.
El aire de la unidad interior
tiene un olor raro.
La pantalla del controlador
remoto no aparece o se oscurece. La unidad interior
no responde a la señal del
controlador remoto.
Si se produce un corte del
suministro.
Si después de comprobar estas cuestiones el equipo de aire acondicionado sigue sin funcionar bien, póngase en contacto con su distribuidor.
En los casos siguientes pare el equipo y póngase en contacto con su distribuidor:
• Cuando hay una fuga de agua en la unidad interior.
• Cuando la luz de indicación del funcionamieto izquierda parpadea.
• Cuando el interruptor se desconecta con frecuencia.
• Es posible que la señal del controlador remoto no se reciba en habitaciones
en las que se utilicen fluorescentes de accionamiento electrónico (de tipo
inversor, etc.).
• En las zonas con mala recepción, el funcionamiento del acondicionador de
aire puede provocar interferencias en los aparatos de radio o televisión. Puede ser necesario conectar el receptor afectado a un amplificador.
• Cuando se oigan truenos, apague el equipo y desenchufe el cable de alimentación o desconecte el interruptor, ya que podría estropearse la instalación.
Puntos de comprobación o Remedios
•¿Está activado el interruptor?
•¿Está fundido el fusible?
•¿Está configurado el temporizador de conexión?
(Página 48)
•¿Es correcta la selección de la temperatura?
(Página 47)
•¿Está limpio el filtro? (Página 49)
•¿Hay algún obstáculo que bloquee la entrada o
salida de aire de las unidades interior o exterior?
•¿Se ha abierto una ventana o puerta?
•¿Está limpio el filtro? (Página 49)
•¿Están agotadas las pilas? (Página 45)
•¿Es correcta la polaridad (+, -) de las pilas? (Pá-
gina 45)
•¿Se ha pulsado algún botón del controlador re-
moto de otros aparatos eléctricos?
•¿El acondicionador de aire comienza su funcionamiento nuevamente?
Si el acondicionador de aire estaba en funcionamiento antes de producirse el corte del suministro y como estos modelos están equipados
con una función de reinicio automático, el acondicionador de aire deberá comenzar a funcionar nuevamente. (Consulte Descripción de la
“FUNCIÓN DE REINICIO AUTOMÁTICO” de la
página 46).
Pregunta
Cuando se vuelve a poner
en marcha, el equipo de aire
acondicionado tarda unos
tres minutos en funcionar.
Se oye un ruido de rotura.
El aire de la unidad interior
tiene un olor raro.
En el modo de deshumidificación el ventilador se para.
Se oye correr agua.
Se oye un ruido burbujeante.
La habitación no se refrigera lo suficiente.
El vapor se descarga a través de la salida de aire de
la unidad interior.
50
Respuesta (no se trata de ninguna avería)
• Se trata de una instrucción del microprocesador
para proteger el equipo. Espere.
• Se trata de un sonido provocado por la dilatación / contracción del panel frontal, etc. a causa
de los cambios de temperatura.
• El acondicionador de aire puede absorber el olor
adherido a las paredes, alfombras, muebles,
prendas, etc. y expulsarlo junto con el aire.
• El equipo utiliza el mismo circuito de refrigerante
tanto en modo de deshumidificación como en
modo de refrigeración. Se debe reducir el tiempo
de funcionamiento en modo de deshumidificación
para que la humedad descienda sin que la temperatura de la sala baje excesivamente. Por ello,
a veces se detienen a la vez el compresor y el
ventilador interior. Es el modo de evitar que el
agua condensada en el intercambiador térmico
vuelva a evaporarse.
• Se trata del ruido que hace el refrigerante al circular en el interior del equipo.
• Se trata del ruido que hace el agua condensada
al fluir por el intercambiador de calor.
• Se trata del ruido que hace el intercambiador
de calor cuando descongela.
• Este ruido se oye cuando, al encenderse la campana o el ventilador, la manguera de drenaje
absorbe aire del exterior y el agua que fluye por
la manguera sale expulsada.
Este ruido también se oye cuando hace mucho
viento y entra aire en la manguera de drenaje.
• Cuando se utiliza un ventilador de aire o una
cocina de gas en la habitación, aumenta la carga de refrigeración con lo cuál el efecto de refrigeración resulta insuficiente.
• Cuando la temperatura de aire exterior es alta,
el efecto de refrigeración puede resultar insuficiente.
• El aire refrigerado del acondicionador de aire
enfría rápidamente la humedad del interior de
la habitación y la convierte en vapor.
Pregunta
La dirección del flujo de aire
cambia en pleno funcionamiento.
La dirección de la aleta horizontal no puede ajustarse
con el controlador remoto.
En la unidad exterior hay
una fuga de agua.
El humo blanco se descarga de la unidad exterior.
Durante el funcionamiento
en modo calefacción el aire
no circula rápidamente.
El funcionamiento se detiene durante unos 10 minutos
en modo calefacción.
A veces se oye un silbido.
La habiatación no se calienta lo suficiente.
En un sistema con múltiples unidades, la unidad interior que no está en funcionamiento se calienta y emite un sonido parecido al
agua que corre.
El acondicionador de aire
comienza a funcionar únicamente al activar la alimentación, aunque no se
maneje la unidad mediante
el controlador remoto.
Respuesta (no se trata de ninguna avería)
• En el modo de refrigeración o deshumidificación,
cuando el aire lleva 1 hora fluyendo hacia abajo, la unidad cambia automáticamente la dirección del aire a horizontal para evitar que se derrame el agua condensada.
• En el modo de calefacción, si la temperatura de
la corriente de aire es demasiado baja o se está
eliminando la escarcha, la aleta horizontal se ajusta automáticamente en la posición horizontal.
• Durante la refrigeración o deshumidificación, el
enfriamiento de los tubos y de las conexiones
de los tubos hace que se condense el agua.
• En el modo de calefacción, la función de
desescarchado derrite el hielo adherido a la unidad exterior y el agua empieza a gotear.
• En el modo de calefacción, el agua se condensa
en el intercambiador térmico y empieza a gotear.
• En el modo de calefacción, el vapor que se genera debido al funcionamiento de desescarchado
tiene el aspecto de humo blanco.
• Espere unos instantes. El acondicionador de aire
se prepara para poder producir aire caliente.
• Se está eliminando la escarcha de la unidad exterior (funcionamiento de desescarchado).
Espere hasta que acabe el proceso, que dura
unos 10 minutos. (La escarcha se forma cuando la temperatura exterior es demasiado baja y
la humedad demasiado alta.)
• Se trata del ruido que hace el refrigerante al cambiar la dirección de la circulación en el interior
del equipo.
•
Cuando la temperatura de aire exterior es baja, el
efecto de calentamiento puede resultar insuficiente.
• En la unidad interior continua circulando una
pequeña cantidad de líquido refrigerante aunque esta unidad no esté en funcionamiento.
• Estos modelos están equipados con la función de
reinicio automático. Cuando se apaga la unidad
sin detener el acondicionador de aire mediante el
controlador remoto y se vuelve a encender, el funcionamiento del acondicionador de aire se iniciará automáticamente en el mismo modo seleccionado con el controlador remoto justo antes de que
se interrumpiese el funcionamiento.
Page 51

INSTALACIÓN, CAMBIO DE SITIO Y INSPECCIÓN
Lugar de instalación
Procure no instalar el equipo de aire acondicionado en los siguientes lugares.
• Donde pueda haber una fuga de gas inflamable.
CUIDADO:
No instale la unidad donde pueda haber fugas de gas
inflamable.
Si hay una fuga de gas y éste se acumula cerca de la
unidad, podría producirse una explosión.
• Donde haya demasiado aceite para maquinaria.
• En ambientes salobres, como las zonas costeras.
Donde haya gas sulfúrico como en zonas de baños termales.
•
• Donde se haya derramado aceite o haya mucho humo
aceitoso en el ambiente.
• Donde existe equipo inalámbrico o de alta frecuencia.
La unidad exterior debe instalarse por lo menos a 3 m de las antenas de los equipos de
televisión, radio, etc. En zonas de mala recepción, si el funcionamiento del acondicionador
de aire interfiere en la recepción de emisoras de radio o de televisión, aumente la
separación entre el lugar de la instalación y la antena del aparato afectado.
Fluorescentes
1 m o
más
Radio
de tipo inversor
Mantenga una
distancia para
evitar
interferencias
en la imagen o
el sonido.
Televisor
3 m o
más
100 mm o
más
Lugar seco
y bien
ventilado
500 mm o
más
Pared, etc.
Para evitar los efectos de
los fluorescentes,
mantenga la unidad lo más
alejada posible de ellos.
1 m o
más
Teléfono
inalámbrico
o
Teléfono portátil
ATENCIÓN:
Si el acondicionador de aire funciona pero no genera fresco ni calefacción en la habitación (dependiendo del modelo), consulte con su distribuidor ya que puede tratarse de una fuga de refrigerante. Debe preguntar al responsable del
mantenimiento si existe o no una fuga de refrigerante cuando se lleve a cabo la reparación.
El refrigerante cargado en el acondicionador de aire es seguro y normalmente no tiene fugas. No obstante, si existe
pérdida de gas refrigerante en el interior y entra en contacto con las llamas del calentador de un ventilador, calentador, horno o aparato similar, se generarán sustancias nocivas.
Instalación eléctrica
• Procure que el equipo de aire acondicionado disponga de un circuito de alimentación exclusivo.
• Procure que la capacidad del interruptor sea la adecuada.
ATENCIÓN:
• El cliente no debe instalar el equipo de aire acondicionado.
Una instalación defectuosa podría conllevar lesiones a causa de incendios, descargas eléctricas, caída de la unidad o escapes de agua, etc.
• No emplee conexiones intermedias del cable de alimentación ni tampoco un cable de extensión; evite también
conectar demasiados aparatos a una sola toma de corriente alterna (CA).
Un mal contacto, un aislamiento incorrecto, un exceso de la corriente permitida, etc. podrían provocar un incendio
o descargas eléctricas.
CARACTERÍSTICAS TÉCNICAS
CUIDADO:
• Haga una toma de tierra.
No conecte el cable de tierra a una tubería de gas, tubería de agua, pararrayos o cable de tierra de un teléfono. Si la
conexión de tierra es defectuosa podría producirse una descarga eléctrica.
• Instale un interruptor de toma de tierra en una zona de instalación con humedad, etc.
Si no se instala el interruptor de toma de tierra, podría producirse una descarga eléctrica.
Inspección y mantenimiento
• Cuando se lleve utilizando el equipo de aire acondicionado durante varias temporadas, su capacidad puede verse
disminuida porque el interior de la unidad estará sucio.
• Según las condiciones de utilización, se puede producir mal olor o el agua condensada puede que no se drene bien a
causa de la suciedad, el polvo, etc.
• Además del mantenimiento normal, se recomienda que un técnico efectúe una inspección y un mantenimiento de la
unidad (a su cargo). Consulte a su distribuidor.
Consideraciones sobre el ruido de funcionamiento
• No coloque ningún objeto alrededor de la salida de aire de la unidad exterior. Esto podría disminuir la capacidad y
aumentar el ruido emitido durante el funcionamiento.
• Si se oye un ruido anormal durante el funcionamiento, consulte a su distribuidor.
Cambio de sitio
• Cuando se retira o reinstala el equipo de aire acondicionado con motivo de reconstrucciones, mudanzas, etc., es preciso
emplear técnicas y métodos especiales.
ATENCIÓN:
El cliente no debe reparar la unidad ni cambiarla de sitio, ya que si estas operaciones no se realizan correctamente,
podría producirse un incendio, descargas eléctricas, daños personales por caída de la unidad, o escapes de agua,
etc. Consulte a su distribuidor.
Cómo desechar el equipo
Cuando desee desechar este producto, consulte a su distribuidor.
Si tiene alguna pregunta, consulte a su distribuidor.
Modelo Interior
Nombre del equipo
Exterior
Función
Alimentación
Capacidad kW
Entrada kW
Peso
Capacidad de depósito
de refrigerante (R410A)
Código IP
Máxima presión de funcionamiento
permitida
Nivel de
ruido
Interior kg
Exterior kg
kg
Interior
Exterior
Lado de succión
Lado de descarga
Interior
(Alto/Medio/Bajo)
MPa
MPa
dB(A)
Exterior dB(A)
MSH-A07YV MSH-A09YV MSH-A12YV
MSC-A07YV MSC-A09YV MSC-A12YV
MUH-A07YV MUH-A09YV MUH-A12YV
Refrigeración
Calefacción
Refrigeración
Calefacción
Refrigeración
2,3 2,5 2,55 3,05 3,5 3,9
0,715 0,69 0,795 0,84 1,09 1,08
910
35 38 40
0,62 1,00 1,00
36/31/25 36/31/25 39/32/25 40/33/26 39/33/26
47 49
Calefacción
~ /N, 230V, 50Hz
IP20
IP24
1,64
4,15
MS-A07YV MS-A09YV MS-A12YV
MSC-A07YV MSC-A09YV MSC-A12YV
MU-A07YV MU-A09YV MU-A12YV
Refrigeración
2,3 2,55 3,5
0,715 0,795 1,14
910
34 36
0,60 0,60 0,75
36/31/25 40/33/26
45 49
NOTA:
1. Condiciones nominales
Refrigeración — Interior: 27°C TS, 19°C TH
Calefacción — Interior: 20
Exterior: 35
Exterior: 7
°C TS
°C TS
°C TS, 6°C TH
2. Intervalo garantizado de funcionamiento
Interior Exterior
Margen superior
Refrigeración
Margen inferior
Margen superior
Calefacción
Margen inferior
32°C TS 43°C TS
23°C TH —
21°C TS 21°C TS
15°C TH —
27°C TS 24°C TS
— 18° C TH
20°C TS -10°C TS
— -11°C TH
51
Page 52

INDICE
NORME DI SICUREZZA ........................................................................................................................................................ 52
NOMI DELLE VARIE PARTI .................................................................................................................................................. 53
PREPARATIVI PER L’USO .................................................................................................................................................... 54
FUNZIONAMENTO AUTOMATICO (MODO “I FEEL...”) ....................................................................................................... 56
FUNZIONAMENTO MANUALE (RAFFREDDAMENTO, DEUMIDIFICAZIONE E RISCALDAMENTO/VENTILAZIONE) ..... 57
REGOLAZIONE VELOCITÀ VENTOLA E DIREZIONE ARIA ............................................................................................... 57
FUNZIONE ECONO COOL (REFRIGERAMENTO ECONOMICO) ...................................................................................... 58
FUNZIONAMENTO VIA TIMER (TIMER ON/OFF)................................................................................................................ 58
SE IL CLIMATIZZATORE NON VERRÀ USATO PER MOLTO TEMPO ................................................................................ 58
MANUTENZIONE .................................................................................................................................................................. 58
PULIZIA DEL FILTRO DELL’ARIA ALLA CATECHINA .......................................................................................................... 59
SOSTITUZIONE DEL FILTRO DI PULIZIA DELL’ARIA ......................................................................................................... 59
PRIMA DI RICHIEDERE ASSISTENZA TECNICA ................................................................................................................ 60
IN CASO DI PROBLEMI... ..................................................................................................................................................... 60
INSTALLAZIONE, TRASFERIMENTO E ISPEZIONE ........................................................................................................... 61
DATI TECNICI........................................................................................................................................................................ 61
NORME DI SICUREZZA
• Dato che il prodotto contiene parti in movimento e parti attraversate da tensione di livello pericoloso, leggere
attentamente le seguenti “Norme di sicurezza” prima dell’uso.
• Le seguenti norme sono importanti per la vostra sicurezza ed è quindi imperativo seguirle.
Simboli precauzionali ed i loro significati
AVVERTENZA: L’uso scorretto può facilmente causare lesioni gravi o morte.
CAUTELA: L’uso scorretto può causare lesioni gravi in determinate circostanze.
Significati dei simboli usati in questo manuale
• Il colore dell’etichetta attaccata all’unità è scritto tra parentesi.
: Da non fare.
: Seguire le istruzioni.
(Nero) : Non inserire le dita o oggetti appuntiti.
(Nero) : Non salire sull’unità interna o esterna e non caricarvi sopra alcun oggetto.
(Giallo) : Pericolo di scosse elettriche. Fare attenzione.
(Blu) : Ricordarsi di scollegare la spina d’alimentazione dalla presa di corrente.
(Blu) : Ricordarsi di togliere la corrente.
• Letto questo manuale, conservarlo a portata di mano insieme al manuale di installazione così da poterlo consultare nuovamente in caso di necessità.
Posizione simboli precauzionali e dispositivi di sicurezza
PANNELLO ANTERIORE
ALLOGGIAMENTO
52
ALLOGGIAMENTO
USCITA D’ARIA
Il climatizzatore NON può essere usato da bambini o persone inferme senza la sorveglianza appropriata.
•
AVVERTENZA
Non utilizzare collegamenti internedi del cavo di alimentazione, ecc., o una prolunga e non collegare molti apparecchi ad una sola presa di CA.
• Un contatto debole, un isolamento inefficace, il superamento dell’amperaggio consentito ecc., possono
causare incendi o folgorazioni.
Non scorticare o effettuare un intervento sul cavo di alimentazione.
• Non posare oggetti pesanti sul cavo di alimentazione, né scorticare o effettuare un intervento sullo
stesso. Il cavo potrebbe infatti danneggiarsi, con un conseguente rischio di incendio o scosse elettriche.
Non disattivare/attivare l’interruttore di circuito o scollegare/collegare la spina d’alimentazione durante il funzionamento.
• Ciò potrebbe causare un incendio dovuto a scintille, ecc.
• Accertarsi assolutamente di spegnere l’interruttore o staccare la spina d’alimentazione dopo aver disattivato
la unità interna mediante il telecomando.
Non esporre la pelle all’aria fresca per molto tempo.
• Ciò può danneggiare la vostra salute.
L’installazione non va effettuata dal cliente.
• Se effettuato scorrettamente può causare incendi, folgorazioni, lesioni causate dalla precipitazione dell’unità, perdite d’acqua, ecc. Rivolgersi al proprio rivenditore.
Non inserire le dita, oggetti appuntiti ecc. nella presa/uscita d’aria del climatizzatore.
• La ventola gira ad alta velocità e può causare lesioni.
• È opportuno sorvegliare i bambini piccoli affinché non giochino con il climatizzatore.
Se si presenta un’anomalia (odore di bruciato, ecc.), spegnere il condizionatore d’aria e scollegare
la spina d’alimentazione oppure disattivare l’interruttore di circuito.
• Se l’unità viene continuamente usata in condizioni anomale può causare incendi o altri danni. In tal caso
rivolgersi al proprio rivenditore.
Riparazioni o trasferimenti del climatizzatore non vanno effettuate dal cliente.
• Se effettuati scorettamente possono causare incendi, folgorazioni, lesioni causate dalla precipitazione
dell’unità, perdite d’acqua, ecc. Rivolgersi al proprio rivenditore.
• Se la spina d’alimentazione è danneggiata, è necessario farla sostituire dal fabbricante o da un agente
del servizio tecnico per evitare qualsiasi rischio.
CAUTELA
Nel rimuovere il filtro dell’aria, non toccare le parti in metallo dell’ unità interna.
• Ciò può causare lesioni.
Non esporre il climatizzatore ad insetticidi o spray infiammabili.
• Ciò può causare un incendio o deformare le finiture del climatizzatore stesso.
Non esporre animali domestici o piante al flusso diretto dell’aria.
• Ciò può nuocere la salute dell’animale domestico o danneggiare la pianta.
Non collocare l’unità su un supporto instabile.
• Essa potrebbe cadere e causare incidenti.
Nell’eseguire la manutenzione, non salire su un tavolo in posizione instabile.
• Se cade giù, rischia di ferirsi.
Non tirare il cavo di alimentazione.
• Il filo centrale del cavo di alimentazione potrebbe infatti scollegarsi e causare un incendio.
Evitare di caricare o smontare le batterie e non gettarle nel fuoco.
• Ciò può provocare una perdita di liquido, un incendio o un’esplosione.
Non usare il climatizzatore per molto tempo in condizioni di alta umidità, ad esempio lasciando una
porta o finestra aperta.
• Nel modo di refrigeramento, se il climatizzatore viene usato in una stanza molto umida (80% di u.r. o
più), l’acqua che si condensa in esso può cadere per terra e bagnare mobili o tappeti.
Non usare il climatizzatore per altri scopi.
• Non usare il climatizzatore per proteggere strumenti di precisione, cibi, animali, piante, oggetti d’arte,
ecc. Ciò può influire negativamente sulla loro qualità.
Non installare una stufa o simile in una posizione esposta al getto d’aria del climatizzatore.
• Ciò potrebbe causare una combustione imperfetta.
Page 53

NORME DI SICUREZZA
NOMI DELLE VARIE PARTI
CAUTELA
Prima di pulire l’unità, spegnerla e scollegare il cavo dell’alimentazione oppure disattivare l’inter-
ruttore di circuito.
• Dato che durante il funzionamento la ventola ruota ad alta velocità, essa potrebbe causare lesioni.
Quando si prevede di non utilizzare questa unità per un lungo periodo di tempo, scollegare il cavo
di alimentazione oppure disattivare l’interruttore di circuito.
• Questo per evitare l’accumulo di sporcizia, il che può causare un incendio.
Sostituire le due batterie con altre di tipo identico.
• L’uso di una vecchia batteria assieme ad una nuova può causare una generazione di calore, una perdita
di liquido o un’esplosione.
In caso di fuoriuscita del liquido delle batterie sulla pelle o sugli indumenti, lavare bene con acqua
fresca.
• In caso di fuoriuscita del liquido delle batterie negli occhi, lavarli bene con acqua fresca e consultare
immediatamente un medico.
Se si usa il climatizzatore in combinazione con una stufa, ventilare bene la stanza.
• Può verificarsi una mancanza di ossigeno.
Non azionare i comandi a mani bagnate.
• Ciò può causare folgorazioni.
Non pulire il climatizzatore con acqua.
• L’acqua può entrare nell’unità e danneggiare il materiale isolante. Ciò può causare una folgorazione.
Non salire sull’unità interna o esterna e non posarvi oggetti di alcun tipo.
• Se si cade dall’unità o se un oggetto cade dalla stessa, ciò può causare lesioni.
Per l’installazione
AVVERTENZA
• Rivolgersi al proprio rivenditore per l’installazione del climatizzatore.
CAUTELA
Non installare il climatizzatore in luoghi dove si possono verificare perdite di gas infiammabile.
• Se attorno al climatizzatore si dovesse raccogliere gas, potrebbe causare esplosioni.
Mettere a terra il climatizzatore.
• Non collegare il filo di messa a terra con una tubazione dell’acqua, del gas, un parafulmine o un filo del
telefono. Se la messa a terra non è buona, si possono verificare folgorazioni.
Installare un interruttore di perdita a terra in funzione del luogo dove il climatizzatore verrà intallato
(luogo umido o altro).
• Se esso non viene installato, si possono verificare folgorazioni.
Assicurarsi di uno scarico completo.
• Se lo scarico non è completo, l’acqua può cadere dal climatizzatore e danneggiare l’arredamento.
Unità interna
Filtro di pulizia dell’aria
(Tipo bianco a soffietto)
Filtro dell’aria alla catechina
(Con filtro antiodori)
Uscita d’aria
Alette verticali
Alette orizzontali
Sezione comandi
(A pannello anteriore aperto)
Unità esterna
Interruttore del funzionamento di emergenza
Pannello anteriore
Presa d’aria
Per il collegamento con un interruttore di circuito
Cavo di alimentazione
Sensore di
telecomando
Telecomando
Visualizzatore
Indicatori di funzionamento
Presa d’aria (posteriore e laterale)
Tubazioni
Sensore di
telecomando
Tubazione di scarico
Uscita d’aria
Scarico acqua
53
Page 54

ON/OFF
FAN
TOO
WARM
TOO
COOL
VANE
MODE
ECONO COOL
STOP
START
HR.
MIN.
I FEEL
COOL
DRY
AMPM
AMPM
RESET CLOCK
HEAT
/FAN
NOMI DELLE VARIE PARTI
ON/OFF
TOO
COOL
AMPM
CLOCK
˚C
AMPM
TOO
WARM
PREPARATIVI PER L’USO
Telecomando
Sezione emissione segnale
Visualizzatore di funzione
Tasto di accensione/
spegnimento (ON/OFF)
Aprire lo sportello anteriore.
Tasti di regolazione della temperatura
(Questo diagramma mostra il telecomando fornito con il climatizzatore.)
Funzione di riavvio automatico
Questi modelli sono dotati della funzione di riavvio automatico. Se non si desidera usare questa
■
funzione, consultare il servizio tecnico locale in quanto è necessario modificare l’impostazione
dell’unità.
La funzione di riavvio automatico...
Quando l’unità interna è controllata dal telecomando, il modo di funzionamento, la temperatura impostata e la velocità della
ventola sono mantenuti in memoria. Se si verifica un’interruzione di corrente o se si spegne l’alimentazione principale durante
il funzionamento, questa funzione riavvia automaticamente l’apparecchio come era stato impostato con il telecomando immediatamente prima dell’interruzione dell’alimentazione. (Vedere a pagina 56 per i dettagli.)
Unità interna
Inserire la spina d’alimentazione nella presa di corrente e/o attivare l’interruttore di circuito.
■
AVVERTENZA:
Togliere eventuale sporcizia dalla spina d’alimentazione ed inserirla a fondo.
Altrimenti, essa potrebbe causare folgorazioni o incendi.
Telecomando
Impostazione del tipo di climatizzatore
L’impostazione del telecomando deve essere commutata in funzione del tipo di climatizzatore
■
(RAFFREDDAMENTO e RISCALDAMENTO o SOLO RAFFREDDAMENTO).
Se l’impostazione è sbagliata, il climatizzatore non funziona normalmente. Di conseguenza, verificare che l’ impostazione corrisponda al modello del vostro climatizzatore. Altrimenti, correggere
l’ impostazione come indicato qui sotto.
Interruttore laterale
Tipo
RAFFREDDAMENTO e RISCALDAMENTO
SOLO RAFFREDDAMENTO
54
Tasto di controllo della ventola
Selettore di funzione
Tasto ECONO COOL
(refrigeramento economico)
Tasto RESET
Tasto dello spegnimento via timer
Tasto di accensione via timer
Tasto HR. Tasto MIN.
(tasti di impostazione
del tempo)
Tasto di regolazione orario
Tasto di controllo delle alette
Posizione dell’interruttore
laterale
Page 55

HR.
MIN.
HR.
MIN.
FAN
VANE
MODE
ECONO COOL
STOP
START
HR.
MIN.
I FEEL
COOL
DRY
RESET CLOCK
HEAT
/FAN
Operation Indicator
Operation Indicator
Operation Indicator
Operation Indicator
Operation Indicator
ON/OFF
PREPARATIVI PER L’USO
Telecomando
Installazione delle batterie e regolazione
dell’ ora esatta
1 Rimuovere lo sportello anteriore e inserire
le batterie. Quindi ricollocare lo sportello.
Inserire per prima l’estremità con il polo negativo.
Controllare se la polarità delle batterie è corretta.
Inserire per prima l’estre-
mità con il polo negativo.
2 Premere il tasto RESET.
Premerlo con un
oggetto appuntito.
• Se esso non viene premuto, il telecomando può non
funzionare correttamente.
3 Premere il tasto CLOCK set.
Premerlo con un
oggetto appuntito.
4 Premere i tasti
e quello
(tasti di
impostazione del tempo) per regolare l’ora-
rio.
• Ad ogni pressione del tasto
sale di un’ora, mentre ad ogni pressione del tasto
, esso sale di 1minuto.
, l’orario impostato
5 Premere di nuovo il tasto CLOCK set e chiu-
dere lo sportello anteriore.
Uso del telecomando
• Quando il telecomando viene diretto sulla parte anteriore dell’unità interna, la distanza alla quale può
arrivare il segnale è di circa 6 m.
• Quando un tasto viene premuto, l’unità interna produce uno o due bip. Se non si percepisce questo
suono, premere di nuovo il tasto.
• Trattare il telecomando con cura. Se si lascia cadere, o se viene lanciato o bagnato, il telecomando rischia di non funzionare.
Installazione del telecomando su di un muro
• Installare il supporto del telecomando in una posizione dalla quale sia possibile udire il bip proveniente
dall’unità interna quando viene premuto il pulsante
.
Installazione e rimozione del telecomando
Installazione :
Rimozione : Tirarlo verso l’alto.
Batterie a secco
■ Sostituzione delle batterie
Sostituire le batterie con nuove batterie alcaline di tipo
AAA nei seguenti casi:
Inserire il telecomando nella sua custodia.
Supporto del
telecomando
· Quando l’unità interna non risponde al segnale del
telecomando.
· Quando il display del telecomando si oscura.
· Quando si preme un tasto del telecomando ed appa-
iono sullo schermo tutti i display, quindi scompaiono
immediatamente.
Non utilizzare batterie al manganese. Il telecomando potrebbe non funzionare correttamente.
• La durata di una batteria è di circa un anno. Tuttavia,
una batteria la cui data limite di utilizzo è assai vicina, rischia di scaricarsi molto presto il limite di tempo
raccomandato per l’uso viene indicato sulla parte inferiore della batteria (mes/anno).
• Per evitare la fuoriuscita di liquido, rimuovere tutte le
batterie se il telecomando non verrà utilizzato per un
lungo periodo di tempo.
CAUTELA:
In caso di fuoriuscita del liquido delle batterie sulla
pelle o sugli indumenti, lavare bene con acqua fresca. In caso di fuoriuscita del liquido delle batterie
negli occhi, lavarli bene con acqua fresca e consultare immediatamente un medico.
• Non usare batterie ricaricabili.
• Sostituire le due batterie con altre di tipo identico.
• Rimuovere le batterie esaurite in modo da rispettare
l’ambiente.
Se il telecomando non é utilizzabile (procedura d’emergenza)
Se le batterie del telecomando sono esaurite o il telecomando stesso non funziona bene, si possono usare delle
procedure di emergenza premendo l’interruttore del FUNZIONAMENTO DI EMERGENZA.
Tipo RAFFREDDAMENTO e RISCALDAMENTO
1 Premere l’interruttore del FUNZIONAMENTO
DI EMERGENZA.
• Ogni volta che viene premuto l’interruttore del FUNZIONAMENTO DI EMERGENZA, l’unità sarà attivata successivamente in modo raffreddamento di
emergenza, modo riscaldamento di emergenza e
modo arresto.
Tuttavia, premendo una volta l’interruttore del FUNZIONAMENTO DI EMERGENZA, il climatizzatore
funzionerà in modo prova per 30 minuti e quindi
passerà in MODO EMERGENZA.
• La seguente tabella mostra i dettagli del MODO
EMERGENZA. Tuttavia, il controllo della temperatura non funziona per i primi 30 minuti in modo
funzionamento di prova e l’unità è impostata nel
modo di funzionamento continuo.
La velocità della ventola è impostata su Alta durante il funzionamento di prova e passa su Media
dopo 30 minuti.
Modo funzionamento
Temperatura termostato
Velocità ventola Media Media
Alette orizzontali Auto Auto
• Il modo di funzionamento è indicato dalla indicatori di funzionamento della unità interna come indicato nelle seguenti figure.
Indicatori di funzionamento
RAFFREDDAMENTO
DI EMERGENZA
RISCALDAMENTO
DI EMERGENZA
ARRESTO
Per interrompere la procedura di emergen-
■
Raffreddamento
24°C24°C
za, premere una volta l’interruttore del FUNZIONAMENTO DI EMERGENZA (se il
climatizzatore è impostato in modo RISCALDAMENTO DI EMERGENZA) o due volte (se
il climatizzatore è impostato in modo RAFFREDDAMENTO DI EMERGENZA).
Riscaldamento
Tipo SOLO RAFFREDDAMENTO
1 Premere l’interruttore del FUNZIONAMENTO
DI EMERGENZA.
• Se si preme l’interruttore del FUNZIONAMENTO DI
EMERGENZA, l’unità funziona dapprima in modalità di prova per 30 minuti, quindi passa al MODO
RAFFREDDAMENTO DI EMERGENZA.
• La seguente tabella mostra i dettagli del MODO
RAFFREDDAMENTO DI EMERGENZA. Tuttavia, il
controllo della temperatura non funziona per i primi 30 minuti in modo funzionamento di prova e
l’unità è impostata nel modo di funzionamento con-
tinuo.
La velocità della ventola è impostata su Alta durante il funzionamento di prova e passa su Media
dopo 30 minuti.
Modo funzionamento
Temperatura termostato 24°C
Velocità ventola Media
Alette orizzontali Auto
• Il modo di funzionamento è indicato dalla indicatori di funzionamento della unità interna come indicato nelle seguenti figure.
Indicatori di funzionamento
RAFFREDDAMENTO
DI EMERGENZA
ARRESTO
Per interrompere il MODO RAFFREDDAMEN-
■
TO DI EMERGENZA, premere nuovamente
l’interruttore del FUNZIONAMENTO DI EMERGENZA.
Ad ogni pressione del tasto, l’unità passa dal MODO
RAFFREDDAMENTO DI EMERGENZA al MODO ARRESTO.
Raffreddamento
55
Page 56

ON/OFF
ON/OFF
TOO
WARM
TOO
COOL
FAN
VANE
MODE
STOP
START
HR.
I FEEL
COOL
DRY
HEAT
/FAN
FUNZIONAMENTO AUTOMATICO (MODO “I FEEL...”)
MODE
Operation Indicator
MODE
ON/OFF
FAN
TOO
WARM
TOO
COOL
VANE
MODE
ECONO COOL
STOP
START
HR.
MIN.
I FEEL
COOL
DRY
AMPM
CLOCK
˚C
AMPM
HEAT
/FAN
RESET CLOCK
Con il modo di funzionamento automatico “ (I FEEL...)”, le condizioni ottimali per l’ambiente si
possono determinare automaticamente al tocco di un solo tasto.
Attivazione:
Premere il tasto
■
Quando viene visualizzata l’indicazione “ (I FEEL...)”, il climatizzatore mantiene automaticamente la temperatura ottimale.
.
Arresto:
Premere di nuovo il tasto
■
○○○○○○○○○○○○○○○○○○○○○○○○○○○○○○○○○
Se si ha un poco caldo:
Per abbassare la temperatura, premere il tasto
■
Un tocco abbassa la temperatura di circa 1°C.
Se si ha un poco freddo:
Per alzare la temperatura, premere il tasto
■
Un tocco alza la temperatura di circa 1°C.
Se l’indicatore “ (I FEEL...)” non è visualizzato, premere il
tasto
per impostarlo.
Ad ogni pressione del pulsante, il modo di funzionamento cambia in sequenza da quello
MENTO) →
(DEUMIDIFICAZIONE) → (RISCALDAMEN-
(I FEEL...) → (RAFFREDDA-
TO/VENTILAZIONE)
.
.
.
Descrizione del modo “I FEEL...”
Fasi del modo “I FEEL...”
In funzione della temperatura della stanza al momento dell’avvio del funzionamento dell’unità, il modo funzionamento
sarà automaticamente selezionato fra RAFFREDDAMENTO, DEUMIDIFICAZIONE o RISCALDAMENTO. Tuttavia, se il
climatizzatore viene riavviato entro due ore dal suo arresto, viene scelto lo stesso modo di funzionamento attivo al
momento dello spegnimento. Il primo modo di funzionamento scelto non cambia, nonostante eventuali cambiamenti
della temperatura ambiente.
Se il modo di funzionamento non è adatto alla temperatura ambiente, scegliere quello appropriato premendo il tasto
.
Dettagli del funzionamento automatico
Tipo RAFFREDDAMENTO e RISCALDAMENTO
Temperatura Modo di Temperatura obiettivo Modo di Temperatura obiettivo
ambiente iniziale funzionamento (condizione iniziale) funzionamento (condizione iniziale)
Circa 25°C o più RAFFREDDAMENTO Circa 24°C RAFFREDDAMENTO Circa 24°C
Circa 25°C - 23°C DEUMIDIFICAZIONE — DEUMIDIFICAZIONE —
Circa 23°C o meno RISCALDAMENTO Circa 26°C DEUMIDIFICAZIONE —
NOTA:
RAFFREDDAMENTO:
Quando la temperatura della stanza è superiore di 2°C rispetto a quella impostata, non sarà possibile modificare la temperatura impostata in quanto l’unità sta funzionando per raggiungere la temperatura obiettivo (impostata). In questo caso, attendere che la temperatura della stanza scenda sino a
portare questa differenza ad un valore inferiore a 2
RISCALDAMENTO:
Quando la temperatura della stanza è inferiore di 2°C rispetto a quella impostata, non sarà possibile
modificare la temperatura impostata in quanto l’unità sta funzionando per raggiungere la temperatura obiettivo (impostata). In questo caso, attendere che la temperatura della stanza salga sino a
portare questa differenza ad un valore inferiore a 2
Visualizzazione di dati sull’unità interna
L’indicatore di funzionamento sul lato destro dell’unità interna indica il modo di funzionamento dell’unità stessa.
Tipo SOLO RAFFREDDAMENTO
°
C e procedere quindi alla regolazione.
°
C e procedere quindi alla regolazione.
Descrizione della “FUNZIONE DI RIAVVIO AUTOMATICO”
• Queste unità sono dotate della funzione di riavvio automatico. Quando si accende l’alimentazione, il condizionatore
inizia automaticamente a funzionare nel modo impostato con il telecomando prima dello spegnimento dell’alimenta-
zione.
• Se l’unità era stata spenta con il telecomando prima dello spegnimento dell’alimentazione, essa rimane spenta anche
quando si accende l’alimentazione.
• Se l’unità prima dello spegnimento dell’alimentazione funzionava nel modo emergenza, quando si accende l’alimentazione l’unità riprende a funzionare nel modo impostato con il telecomando prima del funzionamento d’emergenza.
• Se prima dell’interruzione dell’alimentazione l’unità funzionava nel modo “I FEEL…”, il modo di funzionamento (RAFFREDDAMENTO, DEUMIDIFICAZIONE o RISCALDAMENTO) non viene mantenuto in memoria. Il funzionamento
viene stabilito in base alla temperatura ambiente iniziale al momento dell’avvio o del riavvio.
56
Spia spenta
Indicatori di funzionamento
Indicatore
Indica che il climatizzatore sta raggiungendo la temperatura
obiettivo. Attendere qualche tempo finché la temperatura é
raggiunta.
Indica che la temperatura ambiente sta raggiungendo la temperatura obiettivo.
(Solo per le unità esterna serie MXZ)
Si prega di fare riferimento alla sezione Informazioni relative
al condizionatore dell’aria Multi System. (Pagina 57)
Spia accesa
Spia lampeggiante
Modo di funzionamento
Differenza fra temperatura
obiettivo e temperatura ambiente
Circa 2°C o più
Circa 2°C o meno
—
Page 57

ON/OFF
MODE
ON/OFF
ON/OFF
FUNZIONAMENTO MANUALE (RAFFREDDAMENTO,
TOO
WARM
TOO
COOL
FAN
VANE
ON/OFF
FAN
TOO
WARM
TOO
COOL
VANE
MODE
ECONO COOL
STOP
START
HR.
MIN.
I FEEL
COOL
DRY
AMPM
CLOCK
˚C
AMPM
HEAT
/FAN
RESET CLOCK
ON/OFF
FAN
TOO
WARM
TOO
COOL
VANE
MODE
ECONO COOL
STOP
START
HR.
MIN.
I FEEL
COOL
DRY
AMPM
CLOCK
˚C
AMPM
HEAT
/FAN
RESET CLOCK
VANE
1
2
3
4
5
REGOLAZIONE VELOCITÀ VENTOLA E DIREZIONE ARIA
DEUMIDIFICAZIONE E RISCALDAMENTO/VENTILAZIONE)
Per selezionare i modi RAFFREDDAMENTO, DEUMIDIFICAZIONE e RISCALDAMENTO/VENTILAZIONE
1 Premere il tasto
2 Scegliere il modo di funzionamento premendo il tasto
Ogni volta che il tasto viene premuto, il modo di funzionamento cambia sempre
nelle stessa sequenza:
(DEUMIDIFICAZIONE) → (RISCALDAMENTO/VENTILAZIONE)
Modo RISCALDAMENTO/VENTILAZIONE
Verificare il tipo di condizionatore.
RAFFREDDAMENTO e RISCALDAMENTO
SOLO RAFFREDDAMENTO VENTILAZIONE
Per arrestare il funzionamento:
■
○○○○○○○○○○○○○○○○○○○○○○○○○○○○○○○○○○○○○○○○○○○○○○○○○
Per cambiare la temperatura obiettivo:
■
• Premere il tasto
• Premere il tasto
In funzionamento RISCALDAMENTO
•
Se il condizionatore d’aria assorbe troppo calore dall’aria, l’unità può trovarsi in una situazione di sovraccarico. A seguito di un rilevamen-
to effettuato dal microprocessore, il ventilatore della unità esterna verrà automaticamente arrestato per proteggere il condizionatore.
Con l’arresto del ventilatore esterno, può verificarsi la formazione di brina sulla unità esterna. Questo è un fatto perfettamente normale.
In funzionamento DEUMIDIFICAZIONE
• Il controllo della temperatura in questo modo di funzionamento non è possibile.
• La temperatura ambiente in questo modo di funzionamento si abbassa leggermente.
I dettagli della sezione di visualizzazione della unità interna sono spiegati a pagina 56.
■
NOTA:
Se la temperatura ambiente è troppo alta, la temperatura della stanza non può raggiungere la temperatura impostata
in quanto il climatizzatore funziona a carico elevato nella funzione di raffreddamento della stanza stessa.
Informazioni relative al condizionatore dell’aria Multi System (Unità esterna: serie MXZ)
Il condizionatore dell’aria Multi System (unità esterna: serie MXZ) può collegare più di due unità ad una singola
unità esterna. Conformemente alla capacità, è possibile far funzionare simultaneamente più di due unità interne.
• Quando si cerca di far funzionare più di due unità interne simultaneamente ad una singola unità esterna, una per il
raffreddamento e l’altra per il riscaldamento, viene selezionata la modalità di funzionamento della unità interna che
funziona per prima. L’altra unità interna che inizierà a funzionare successivamente, arresterà il suo funzionamento e
verrà indicato il messaggio. (Fare riferimento alla tabella degli indicatori di funzionamento a pagina 56.)
In questo caso, si prega di impostare tutte le unità interne nella stessa modalità di funzionamento.
• Quando la unità interna inizia a funzionare una volta completata la fase di sbrinamento della unità esterna, ci vorranno
alcuni minuti (max 10 minuti) prima che venga soffiata aria calda.
• Nella modalità di riscaldamento, la unità interna che non sta funzionando può riscaldarsi oppure si può avvertire il
rumore del refrigerante che scorre. Nei due casi non si tratta di un malfunzionamento. Il motivo è da ricercarsi nel fatto
che il refrigerante scorre continuamente all’interno della unità interna che non sta funzionando.
Descrizione della “FUNZIONE DI RIAVVIO AUTOMATICO”
Consultare pag. 56.
per abbasare la temperatura. Un tocco abbassa la temperatura di un grado.
per alzare la temperatura. Un tocco aumenta la temperatura di un grado.
Tipo Funzionamento
Premere il tasto
Dopo che il modo di funzionamento è stato impostato, il climatizzatore inizia a
funzionare nel modo stabilito prima mediante il tocco del tasto
.
.
(I FEEL...) → (RAFFREDDAMENTO) →
RISCALDAMENTO
.
.
La velocità della ventola e la direzione dell’aria si possono alterare a piacere.
Per cambiare la velocità della ventola, premere il tasto
■
Ad ogni pressione del tasto, la velocità della ventola cambia in sequenza:
(Bassa) → (Media) → (Alta) → (Automatica)
• Utilizzare l’indicatore
(Alta) per raffreddare/riscaldare ulteriormente l’am-
biente.
• Se il rumore prodotto dal climatizzatore dovesse disturbare il sonno dell’utente, utilizzare l’indicatore
Per alterare la direzione dell’aria verticalmente, premere il tasto
■
.
(Bassa).
Ad ogni pressione, l’angolo delle alette orizzontali cambia in sequenza: (1)
→
(2) → (3) → (4) → (5) → (Oscillazione) → (Automatica)
FUNZIONE DI OSCILLAZIONE
Usare la funzione di oscillazione in modo che il flusso d’aria raggiunga tutti gli
angoli della stanza.
Gamma di regolazione delle alette orizzontali
Usare normalmente la posizione
Usare le posizioni
(1) o (2) in modo RAFFRED-
DAMENTO o DEUMIDIFICAZIONE e le posizioni da
(3) a (5) in modo RISCALDAMENTO per adat-
tare la temperatura della stanza alle proprie esigenze.
(Automatica).
raffreddamento
deumidificazione
RISCALDAMEN-
TO
NOTA:
• Nel modo di raffreddamento, se il climatizzatore viene azionato con le alette orizzontali impostate su
per un’ora, la direzione orizzontale del flusso d’ aria viene impostata automaticamente per evitare che la condensa
cada a terra.
• Regolare la direzione verticale del flusso d’aria col telecomando. Se le alette orizzontali vengono mosse manualmente, si possono guastare.
• In modo riscaldamento, se la temperatura del flusso dell’aria è troppo bassa o viene effettuato lo sbrinamento, le
alette orizzontali deve trovarsi in posizione
Funzione di controllo automatico della
direzione del flusso d’aria
Se si sceglie il modo Automatica col tasto
(1).
, la
Per cambiare la direzione orizzontale del flus-
■
so d’aria, muovere manualmente le alette
verticali.
posizione delle alette orizzontali viene automaticamente fissata sul modo di funzionamento più
efficace.
(1) RISCALDAMENTO
• Quando la temperatura del flusso dell’aria è troppo
bassa, l’aria viene soffiata orizzontalmente.
• Quando la temperatura del flusso dell’aria aumenta, l’aria viene soffiata verso il basso.
(2) RAFFREDDAMENTO, DEUMIDIFICAZIONE
L’aria viene soffiata orizzontalmente.
(3) VENTILAZIONE
L’aria viene soffiata verso il basso.
Regolare le alette prima di accendere il climatizzatore.
Dato che le alette orizzontali si muovono automaticamente, se l’unità fosse in moto potrebbe ferirvi le dita.
.
(4) o (5)
57
Page 58

FUNZIONE ECONO COOL (REFRIGERAMENTO ECONOMICO)
ON/OFF
FAN
TOO
WARM
TOO
COOL
VANE
MODE
ECONO COOL
STOP
START
HR.
MIN.
I FEEL
COOL
DRY
AMPM
CLOCK
˚C
AMPM
HEAT
/FAN
RESET CLOCK
START
HR.
MIN.
HR.
MIN.
START
STOP
HR.
MIN.
HR.
MIN.
STOP
ECONO COOL
ECONO COOL
VANE
FAN
TOO
WARM
TOO
COOL
SE IL CLIMATIZZATORE NON VERRÀ USATO PER MOL-
Utilizzare questa funzione quando si desidera godere di un ambiente confortevole in modo raffredda-
TO TEMPO
mento e nello stesso tempo avere un risparmio energetico.
Le seguenti operazioni vanno eseguite quando l’unità sta
funzionando in modalità RAFFREDDAMENTO MANUALE.
Premere il tasto
■
Quando viene attivata la funzione ECONO COOL (refrigeramento economico) in modo RAFFREDDAMENTO, il climatizzatore attiverà la funzione di oscillazione in vari cicli, conformemente alla temperatura del climatizzatore.
La TEMPERATURA IMPOSTATA è automaticamente superiore di 2°C a quella
del modo RAFFREDDAMENTO.
.
Per abbandonare la funzione ECONO COOL (refrigeramento economico):
Premere di nuovo il tasto
■
○○○○○○○○○○○○○○○○○○○○○○○○○○○○○○○○○
• Premendo il tasto
tivazione della funzione ECONO COOL (refrigeramento economico), questa viene abbandonata.
• Il tasto
(spiegati sotto) sono disponibili.
Che cos’è la funzione “ECONO COOL (REFRIGERAMENTO ECONOMICO)”?
L’oscillazione della portata d’aria (modifica della portata d’aria) dà una sensazione di maggiore freschezza rispetto a quan-
do la portata d’aria è costante. Così, anche se la temperatura impostata è automaticamente superiore di 2°C, è possibile
beneficiare di un comfort costante in modalità raffreddamento. Ciò consente di beneficiare di un risparmio energetico.
, i tasti
o cambiando il modo di funzionamento durante l’at-
o
.
ed il timer di ACCENSIONE/SPEGNIMENTO
Se si prevede di non dover usare il
climatizzatore per molto tempo:
1 Attivare il funzionamento di ventilazione FAN
per 3 o 4 ore in modo da asciugare l’interno
del climatizzatore.
Tipo RAFFREDDAMENTO e RISCALDAMENTO:
• Per attivare il modo FAN (ventilazione), impostare
con il telecomando la temperatura massima in modo
MANUAL COOL (Raffreddamento manuale). (Consultare pag. 57.)
Tipo SOLO RAFFREDDAMENTO:
• Selezionare il modo FAN (ventilazione). (Consultare pag. 57.)
2 Disattivare l’interruttore di circuito e/o
scollegare la spina d’alimentazione.
CAUTELA:
Se si prevede di non utilizzare il climatizzatore per molto tempo, scollegare la spina di alimentazione o
disattivare l’interruttore di circuito.
Questo per evitare possibili guasti o incendi.
3 Togliere le batterie dal telecomando.
FUNZIONAMENTO VIA TIMER (TIMER ON/OFF)
Il timer è conveniente per programmare una funzione del climatizzatore per quando si va a letto, si torna a casa, ci si alza, ecc.
Come regolare l’accensione via timer
1
Premere il tasto
Ad ogni pressione del tasto, il modo di accensione via
timer viene alternatamente attivato e disattivato.
durante il funzionamento.
2 Impostare l’orario di accensione via timer
con i tasti
Ad ogni pressione del tasto
aumenta di un’ora. Ad ogni pressione del tasto
minuti impostati aumentano di 10 minuti.
Per disattivare la funzione di accensione via timer:
Premere il tasto
■
Programmazione del timer
I modi di accensione e spegnimento via timer si possono usare anche in combinazione. L’ora impostata col timer che viene
raggiunta per prima aziona il modo del timer corrispondente. (L’ordine delle operazioni del timer viene indicato dall’indicatore “ ”.)
• Se l’orario esatto del telecomando non è stato impostato, il funzionamento via timer non è possibile.
NOTA:
Se viene tolta l’alimentazione principale o si verifica un’interruzione di corrente quando è attivo il timer AUTO START/
STOP, l’impostazione del timer viene annullata. Poiché questi modelli sono dotati della funzione di riavvio automatico,
il condizionatore avvia il funzionamento con il timer annullato non appena l’alimentazione viene ripristinata.
e
.
, l’orario impostato
, i
.
Come regolare lo spegnimento via timer
1
Premere il tasto
Ad ogni pressione del tasto, il modo di spegnimento
via timer viene alternatamente attivato e disattivato.
durante il funzionamento.
2 Impostare l’orario di spegnimento via timer
con i tasti
Ad ogni pressione del tasto
aumenta di un’ora. Ad ogni pressione del tasto
minuti impostati aumentano di 10 minuti.
Per disattivare la funzione di spegnimento via timer:
Premere il tasto
■
e
.
, l’orario impostato
, i
.
58
CAUTELA:
Per evitare la fuoriuscita di liquido, rimuovere tutte le
batterie se il telecomando non verrà utilizzato per un
lungo periodo di tempo.
MANUTENZIONE
Prima di iniziare la manutenzione
Disattivare l’interruttore di circuito e/o
■
scollegare la spina d’alimentazione.
CAUTELA:
Prima di pulire l’unità, spegnerla e scollegare la spina
d’alimentazione o disattivare l’interruttore di circuito.
La ventola, che gira ad alta velocità, potrebbe altrimenti
causare danni.
Per il riuso del climatizzatore:
1 Pulire il filtro dell’aria ed installarlo nell’uni-
tà interna.
(Per la procedura in questione, consultare pag. 59.)
2 Controllare che la presa d’aria e l’uscita del-
l’aria delle unità interna ed esterna non vengano bloccate da ostacoli.
3 Controllare che il filo di messa a terra sia
collegato correttamente.
CAUTELA:
Mettere a terra il climatizzatore.
Non collegare il filo di messa a terra con una tubazione
dell’acqua, del gas, un parafulmine o un filo del telefono. Se la messa a terra non è buona, si possono verificare folgorazioni.
Pulizia dell’unità interna
Pulire l’unità con un panno morbido e asciut-
■
to.
• Se la sporcizia è tenace, lavare l’unità con un panno imbevuto di una soluzione di detergente delicato ed acqua tiepida.
• Non usare gasolina, benzina, detersivo in polvere o
insetticida. L’unità potrebbe altrimenti subire danni.
Page 59

PULIZIA DEL FILTRO DELL’ARIA ALLA CATECHINA
SOSTITUZIONE DEL FILTRO DI PULIZIA DELL’ARIA
Pulizia del filtro dell’aria alla catechina (circa ogni 2 settimane)
1 Rimuovere il filtro dell’aria alla catechina.
Aprire il pannello anteriore
per rimuovere/
sostituire il filtro.
Filtro dell’aria alla
catechina
CAUTELA:
Quando si procede alla rimozione del filtro dell’aria alla
catechina, non toccare le parti in metallo dell’unità interna.
Ciò può causare lesioni.
Rimozione.
3 Dopo aver lavato in acqua a temperature
ambiente o tiepida, lasciare asciugare bene
il filtro in un locale oscurato.
• Non esporre il filtro dell’aria alla catechina a luce
solare diretta o a calore da fiamma per asciugarlo.
4 Installare il filtro dell’aria alla catechina.
2 Rimuovere eventuale sporco dal filtro del-
l’aria alla catechina mediante un aspirapolvere o tramite lavaggio in acqua.
• Se la sporcizia è tenace, lavare il filtro in una soluzione di detergente delicato ed acqua tiepida.
• Non usare acqua riscaldata a 50°C o oltre.
Installare il filtro.
Quando le prestazioni risultano inferiori a causa dello sporco, è necessario sostituire il filtro di pulizia
dell’aria.
Sostituzione del filtro di pulizia dell’aria (ogni quattro mesi circa)
1 Rimuovere il filtro dell’aria alla catechina.
Filtro dell’aria alla catechina
2 Togliere il filtro di pulizia dell’aria (Tipo bian-
co a soffietto).
Filtro di pulizia dell’aria
○○○○○○○○○○○○○○○○○○○○○○○○○○○○○○○○○○○○○○○○○○○○○○○○○
Filtro di pulizia dell’aria
• Se il filtro di pulizia dell’aria è intasato, può ridurre l’efficienza dell’unità o causare la formazione di condensa presso le
uscita d’aria.
• Il filtro di pulizia dell’aria è del tipo uso e getta. La sua durata media è di quattro mesi. Comunque, se il filtro si abbrunisce,
sostituirlo al più presto.
3 Installare un filtro di pulizia dell’aria nuovo.
4 Installare il filtro dell’aria alla catechina e
chiudere saldamente il pannello anteriore.
○○○○○○○○○○○○○○○○○○○○○○○○○○○○○○○○○○○○○○○○○○○○○○○○○
Cosa si intende per “filtro dell’aria alla catechina”?
Il filtro dell’aria viene tinto con un materiale naturale contenuto nel tè, la catechina. Il filtro dell’aria alla catechina
deodora e combatte i gas nocivi quali la formaldeide, l’ammoniaca e l’acetaldeide. Inoltre, limita l’attività dei virus
che aderiscono al filtro.
Pezzi opzionali I pezzi opzionali sono in vendita presso il vostro rivenditore.
Nome pezzo FILTRO DI PULIZIA DELL’ARIA
Numero pezzo MAC-1300FT
59
Page 60

PRIMA DI RICHIEDERE ASSISTEN-
IN CASO DI PROBLEMI...
ZA TECNICA
Problema
Il climatizzatore non funziona.
Refrigeramento e riscaldamento insufficienti.
L’aria proveniente dall’unità interna ha un odore sgradevole.
Il display del telecomando
non appare o è oscurato.
L’unità interna non risponde al segnale del telecomando.
Se la corrente viene a mancare.
Se il climatizzatore non funziona a dovere, nonostante i controlli elencati
sopra, terminare l’uso del climatizzatore e rivolgersi al proprio rivenditore.
Nei seguenti casi, terminare l’uso del climatizzatore e rivolgersi al proprio
rivenditore.
• L’unità interna perde acqua.
• La spia dell’indicatore di funzionamento sul lato sinistro lampeggia.
• L’interruttore di circuito scatta spesso.
• Il telecomando non funziona in una stanza dove è accesa una lampadina a
fluorescenza del tipo elettronico ON/OFF (lampadina fluorescente del tipo a
inversione).
• Nelle zone in cui la ricezione è debole, il funzionamento del condizionatore
può interferire con la ricezione radiofonica o televisiva. È possibile che risulti
necessario dotare di un amplificatore l’apparecchio disturbato.
• Quando si preannuncia un temporale, arrestare il funzionamento e scollegare
la spina di alimentazione oppure disattivare l’ interruttore di circuito. Altrimenti, si rischia di danneggiare i componenti elettrici.
60
Controllare quanto segue/Rimedio
• L’interruttore di circuito è attivato?
• Il fusibile è saltato?
• Il timer di ACCENSIONE è impostato? (Pagina
58)
• La temperatura del termostato é stata regolata
correttamente? (Pagina 57)
• Il filtro è pulito? (Pagina 59)
• Vi sono elementi che bloccano la presa o l’usci-
ta d’aria delle unità interna ed esterna?
• Vi sono finestre o porte aperte?
• Il filtro è pulito? (Pagina 59)
• Le batterie sono scariche? (Pagina 55)
• La polarità (+, -) delle batterie é corretta? (Pagi-
na 55)
• Vengono premuti i tasti del telecomando di altre
apparecchiature elettriche?
• Il condizionatore riprende a funzionare?
Se il condizionatore funzionava prima dell’interruzione di corrente, poiché questi modelli sono
dotati della funzione di riavvio automatico, il condizionatore dovrebbe riprendere a funzionare.
(Consultare la sezione Descrizione della “FUNZIONE DI RIAVVIO AUTOMATICO” a pagina 56.)
Problema
Il climatizzatore non funziona per circa 3 minuti dopo
l’accensione.
Si avvertono sricchiollii.
L’aria proveniente dall’unità interna ha un odore sgradevole.
La ventola si arresta durante la DEUMIDIFICAZIONE.
Si ode il rumore di un flusso d’acqua all’interno del
climatizzatore.
Si sente un gorgoglio.
Non è possibile raffreddare
a sufficienza la stanza.
Dall’uscita d’aria dell’unità
interna fuoriesce foschia.
Soluzione (non è un guasto)
• Ciò é dovuto all’intervento del microprocessore
per proteggere il climatizzatore. Attendere.
• Questi rumori sono causati dall’espansione o
dalla contrazione del pannello anteriore e di altre parti a seguito di un cambiamento di temperatura.
• Il climatizzatore potrebbe aspirare odori sgradevoli provenienti da pareti, moquette, mobili, stoffa
e altro e disperderli nell’aria.
• In modo DEUMIDIFICAZIONE, l’unità funziona
usando lo stesso circuito del refrigerante della
modalità RAFFREDDAMENTO.
Il tempo di DEUMIDIFICAZIONE deve essere
ridotto in modo da abbassare l’umidità senza
dover ridurre troppo la temperatura della stanza. Per questo, il compressore si arresterà alcune volte, facendo arrestare il ventilatore interno.
Questo impedirà l’evaporazione della conden-
sa presente sullo scambiatore di calore.
• Questo è il rumore del refrigerante che scorre
nel climatizzatore.
• Questo è il rumore dell’acqua che si condensa
all’interno della pompa di calore.
• Questo é il rumore prodotto dallo sbrinamento
della pompa d’aria.
• Questo suono si produce quando viene assorbita aria fresca dal tubo di scarico: questo fa sì
che l’acqua contenuta nel tubo di scarico venga
espulsa quando si accende l’aspiratore o la
ventola.
Questo suono si sente anche quando l’aria entra violentemente nel tubo di scarico, in caso di
forte vento.
• Quando si utilizza un ventilatore o un fornello a
gas nella stanza, il carico di raffreddamento aumenta, con un effetto di raffreddamento insufficiente.
• Se la temperatura dell’aria esterna è elevata, l’
effetto di raffreddamento potrebbe non essere
sufficiente.
• L’aria fresca prodotta dal climatizzatore fa aumentare rapidamente l’umidità dell’aria nella
stanza trasformandola in foschia.
Problema
La direzione del flusso
d’aria cambia.
La direzione delle alette
orizzontali non può essere
regolata con il telecomando.
L’unità esterna perde acqua.
Dall’unità esterna fuoriesce
fumo bianco.
L’aria non viene soffiata rapidamente in modo riscaldamento.
Il funzionamento viene interrotto durante 10 minuti
circa in modo riscaldamento.
Talvolta viene udito sibilo.
Non è possible riscaldare a
sufficienza la stanza.
In un sistema comprendente più apparecchi, l’apparecchio interno non funzionante diventa caldo ed emette
un suono simile al rumore
dell’acqua che scorre.
Il condizionatore entra in
funzione solo quando l’ali-
mentazione è accesa, anche
se non si utilizza il telecomando.
Soluzione (non è un guasto)
• Se il climatizzatore dell’aria è impostato nel modo
RAFFREDDAMENTO o DEUMIDIFICAZIONE e
se l’aria è diretta verso il basso per un’ora, la
direzione del flusso d’aria viene automaticamente impostata orizzontalmente per evitare che la
condensa cada per terra.
• Nel modo di riscaldamento, se la temperatura
del flusso dell’aria è troppo bassa o se é stato
effettuato lo sbrinamento, l’aria viene automaticamente emessa orizzontalmente.
•
Durante il funzionamento in RAFFREDDAMENTO
e DEUMIDIFICAZIONE, i tubi o le sezioni di collegamento si raffreddano, con formazione di condensa.
• In modalità riscaldamento, l’attivazione della funzione di sbrinamento fa sì che il ghiaccio formatosi sulla unità esterna si trasformi in gocce che
cadono verso il basso.
• In modalità riscaldamento, l’acqua bloccatasi sullo scambiatore di calore si trasforma in gocce
che cadono quindi verso il basso.
• Durante il funzionamento in modo riscaldamento, il vapore generato dallo sbrinamento sembra fumo bianco.
• Attendere in quanto il condizionatore si sta preparando a soffiare aria calda.
• Viene attivato il modo sbrinamento della unità
esterna. (Funzionamento in modo sbrinamento)
Poiché questa viene completata in 10 minuti, attendere. (Quando la temperatura esterna è troppo
bassa e l’umidità troppo elevata, si forma la brina.)
• Questo rumore viene percepito quando il flusso
del refrigerante all’interno del condizionatore viene deviato.
•
Se la temperatura dell’aria esterna è bassa, l’effetto
di riscaldamento potrebbe non essere sufficiente.
• Una piccola quantità di refrigerante continua a
scorrere nell’apparecchio interno anche se questo non è funzionante.
• Questi modelli sono dotati della funzione di riavvio
automatico. Quando l’alimentazione viene spenta
senza spegnere il condizionatore con il telecomando, e viene in seguito accesa di nuovo, il condizionatore inizia automaticamente a funzionare nello
modo impostato con il telecomando immediatamente prima dello spegnimento dell’alimentazione.
Page 61

INSTALLAZIONE, TRASFERIMENTO E ISPEZIONE
Posizione di installazione
Evitare di installare il climatizzatore d’aria nei seguenti luoghi.
•
Luoghi dove si possono verificare perdite di gas infiammabile.
CAUTELA:
Non installare il climatizzatore in luoghi dove si possono verificare perdite di gas infiammabile.
Se attorno al climatizzatore dovesse raccogliersi gas,
ciò potrebbe causare un’esplosione.
• Luoghi in cui sono depositate grandi quantità di olio
lubrificante.
• In presenza di aria salmastra.
• In presenza di gas solforosi, ad esempio vicino ad una
fonte calda.
• Luoghi ricchi di olio o di fumo.
• In presenza di dispositivi ad alta frequenza o senza fili.
L’unità esterna deve essere collocate ad almeno 3 metri di distanza dalle antenne
televisive, radiofoniche, ecc. Nelle zone in cui la ricezione è debole, se il
condizionatore d’aria interferisce con la ricezione radiofonica o televisiva, allontanare
ulteriormente l’unità esterna dall’antenna dell’apparecchio disturbato.
Luce a
1 m
o più
Radio
fluorescenza
Lasciare un certo
spazio per evitare la
distorsione dell’ immagine o rumori.
TV
3 m o
più
100 mm
o più
Luogo
asciutto o
ventilato
500 mm
o più
Parete o altro
Tenere le luci a fluorescenza il più lontano possibile dal climatizzatore e
dal telecomando.
1 m
o più
Telefono
senza filo
o
Telefono
portatile
AVVERTENZA:
Se il condizionatore è acceso ma non raffredda o riscalda la stanza (in funzione del modello), occorre contattare il
tecnico dell’assistenza in quanto può esservi una perdita di refrigerante.
Chiedere quindi al tecnico, al momento della riparazione, di verificare la presenza di eventuali perdite di refrigerante.
Il refrigerante caricato nel condizionatore è sicuro. Di solito, non vi sono perdite. Tuttavia, qualora vi siano delle
perdite di refrigerante all’interno e questo venga a contatto con la fiamma di un riscaldatore del ventilatore, un apparecchio di riscaldamento, un fornello, ecc., verranno generate delle sostanze pericolose.
Collegamenti elettrici
• Riservare un circuito elettrico esclusivamente per l’alimentazione del climatizzatore.
• Tener conto dell’amperaggio massimo dell’interruttore di circuito, e non superarlo.
AVVERTENZA:
• L’installazione non va effetuata dal cliente. Se effettuata in modo scorretto, possono verificarsi incendi, folgorazioni,
lesioni, perdite d’ acqua ed altri problemi.
• Non utilizzare collegamenti internedi del cavo di alimentazione, ecc., o una prolunga e non collegare molti apparec-
chi ad una sola presa di CA. Un contatto debole, un isolamento inefficace, il superamento dell’amperaggio consentito ecc., possono causare incendi o folgorazioni.
Rivolgersi al proprio rivenditore.
CAUTELA:
• Mettere a terra il climatizzatore.
Non collegare il filo di messa a terra con una tubazione dell’acqua, del gas, un parafulmine o un filo del telefono. Se
la messa a terra non è buona, si possono verificare folgorazioni.
• In certi casi, ad esempio in luoghi umidi, può essere necessario installare un interruttore di messa a terra.
Se l’interruttore di messa a terra non é installato in tali condizioni, si possono verificare folgorazioni.
Controllo e manutenzione
• Se il climatizzatore viene usato nel corso di diverse stagioni, la sua efficienza può ridursi a causa dell’accumulazione di
sporcizia all’interno dell’unità.
• Il climatizzatore può emmetere odori sgradevoli e la condensa può non scaricarsi bene a causa di sporcizia, polvere, ecc.
accumulatesi all’interno dell’unità.
• Si consiglia di far controllare e di far effettuare la manutenzione da una persona qualificata oltre alla manutenzione
regolare. Rivolgersi al proprio rivenditore.
Considerazioni sui rumori emessi dall’unità
• Non appoggiare oggetti vicino allo uscita dell’aria dell’unità esterna. Ciò può diminuirne l’efficienza e renderla più rumorosa.
• Se il climatizzatore produce rumori insoliti, rivolgersi al proprio rivenditore.
Spostamento del climatizzatore
• Se il climatizzatore dev’essere traseferito o nuovamente installato a causa di una ristrutturazione, un trasferimento ecc.,
sono richieste particolari tecniche e lavori.
AVVERTENZA:
Riparazioni o ricollocazioni non vanno effettuate dal cliente.
Se effettuate scorrettamente si potrebbero verificare guasti, folgorazioni, perdite di acqua ed altro. Rivolgersi al proprio rivenditore.
Per disfarsi del prodotto
Per disfarsi del prodotto, rivolgersi al proprio rivenditore.
Per qualsiasi altro problema, rivolgersi al rivenditore.
DATI TECNICI
Modello Interno
Funzioni
Alimentazione
Capacità kW
Ingresso kW
Peso
Capacità fluido kg
refrigerante (R410A)
Codice IP
Pressione in
eccesso
permissibile
Livello di rumore
Nome modello
Esterno
Interno kg
Esterno kg
Interno
Esterno
Lato
aspirazione
Lato
scarico
Interno
(Alto/Medio/Basso)
Esterno dB(A)
MPa
MPa
dB(A)
MSH-A07YV MSH-A09YV MSH-A12YV
MSC-A07YV MSC-A09YV MSC-A12YV
MUH-A07YV MUH-A09YV MUH-A12YV
Raffreddamento
Riscaldamento
Raffreddamento
Riscaldamento
Raffreddamento
2,3 2,5 2,55 3,05 3,5 3,9
0,715 0,69 0,795 0,84 1,09 1,08
910
35 38 40
0,62 1,00 1,00
36/31/25 36/31/25 39/32/25 40/33/26 39/33/26
47 49
Riscaldamento
~ /N, 230V, 50Hz
IP20
IP24
1,64
4,15
MS-A07YV MS-A09YV MS-A12YV
MSC-A07YV MSC-A09YV MSC-A12YV
MU-A07YV MU-A09YV MU-A12YV
Raffreddamento
2,3 2,55 3,5
0,715 0,795 1,14
910
34 36
0,60 0,60 0,75
36/31/25 40/33/26
45 49
NOTA:
1. Temperatura di funzionamento
Raffreddamento — interno: 27°C con termometro a secco (TS), 19
gnato (TB)
esterno: 35
Riscaldamento — interno: 20
metro a secco (TS)
esterno: 7
6
°C con termometro bagnato (TB)
°C con termometro a secco (TS)
°C con termometro a secco (TS),
°C con termometro ba-
°C con termo-
2. Raggio d’azione garantito
Interno Esterno
Raffredda-
mento
Riscalda-
mento
Limite 32°C TS 43°C TS
superiore 23°C TB —
Limite 21°C TS 21°C TS
inferiore 15°C TB —
Limite 27°C TS 24°C TS
superiore — 18°C TB
Limite 20°C TS -10°C TS
inferiore — -11°C TB
61
Page 62

¶∂ƒπ∂Ã√ª∂¡∞
ª∂∆ƒ∞ ∞™º∞§∂π∞™ .............................................................................................................................................................. 62
√¡√ª∞™π∞ ∆√À ∫∞£∂ ∂•∞ƒ∆∏ª∞∆√™ ........................................................................................................................... 63
¶ƒ√∂∆√πª∞™π∞ ¶ƒπ¡ ∞¶√ ∆∏¡ §∂π∆√Àƒ°π∞ ................................................................................................................. 64
∞À∆√ª∞∆∏ §∂π∆√Àƒ°π∞ ∞π™£∞¡√ª∞π “I FEEL...” ......................................................................................................... 66
Ã∂πƒ√∫π¡∏∆∏ §∂π∆√Àƒ°π∞ (æÀ•∏, ∞ºÀ°ƒ∞¡™∏, £∂ƒª∞¡™∏/∞¡∂ªπ™∆∏ƒ∞™) ...................................................... 67
∆∞ÃÀ∆∏∆∞ ƒ√∏™ ∞∂ƒ∞ ∫∞π ƒÀ£ªπ™∏ ∫∞∆∂À£À¡™∏™ ............................................................................................... 67
§∂π∆√Àƒ°π∞ æÀ•∏™ ∂C√NO (ECONO COOL) ................................................................................................................ 68
§∂π∆√Àƒ°π∞ ∆√À Ã√¡√¢π∞∫√¶∆∏ (∂¡∆√™/∂∫∆√™) (∆πª∂R √¡/√FF) .................................................................... 68
√∆∞¡ ∆√ ∫§πª∞∆π™∆π∫√ ¢∂¡ ¶ƒ√∫∂π∆∞π ¡∞ §∂π∆√Àƒ°∏™∂π °π∞ ¶√§À ∫∞πƒ√ .................................................... 68
™À¡∆∏ƒ∏™∏ ......................................................................................................................................................................... 68
∫∞£∞ƒπ™ª√™ ∆√À ºπ§∆ƒ√À ∞∂ƒ∞ ∫∞∆∂Ãπ¡∏™ ............................................................................................................ 69
∞¡∆π∫∞∆∞™∆∞™∏ ∆√À ºπ§∆ƒ√À ∫∞£∞ƒπ™ª√À ∞∂ƒ∞ ................................................................................................... 69
¶ƒ√∆√À ∂¶π∫√π¡ø¡∏™∂∆∂ ª∂ ∆√¡ ∆∂áπ∫√ •∞¡∞∂§∂°•∆∂ ∆∞ ¶∞ƒ∞∫∞∆ø ..................................................... 70
√∆∞¡ ¡√ªπ∑∂∆∂ √∆π À¶∞ƒÃ∂π ∫∞¶√π√ ¶ƒ√µ§∏ª∞ ................................................................................................... 70
∂°∫∞∆∞™∆∞™∏, ª∂∆∞∫√ªπ™∏ ∫∞π ∂¶π£∂øƒ∏™∏ .......................................................................................................... 71
¶ƒ√¢π∞°ƒ∞º∂™ .................................................................................................................................................................... 71
ª∂∆ƒ∞ ∞™º∞§∂π∞™
• ∂ВИ‰‹ Ы’ ·˘Щfi ЩФ ЪФ˚fiУ ¯ЪЛЫИМФФИФ‡УЩ·И ВЪИЫЩЪВКfiМВУ· ВН·ЪЩ‹М·Щ· О·И ·УЩ·ПП·ОЩИО¿ Ф˘ МФЪВ› У·
ЪФО·П¤ЫФ˘У ЛПВОЩЪФПЛН›·, ‚В‚·ИˆıВ›ЩВ fiЩИ ‰И·‚¿Ы·ЩВ ·˘Щ¿ Щ· “ª¤ЩЪ· ∞ЫК·ПВ›·˜” ЪИУ ·fi ЩЛУ ¯Ъ‹ЫЛ.
• ∫·ıТ˜ ·˘Щ¿ Щ· ЪФВИ‰ФФИЛЩИО¿ ¿ЪıЪ· В›У·И ЫФ˘‰·›· БИ· ЩЛУ ·ЫК¿ПВИ·, ‚В‚·ИˆıВ›ЩВ fiЩИ Щ· ЩЛЪВ›ЩВ.
™‡М‚ФП· О·И ВЪМЛУВ›·
¶ƒ√∂π¢√¶√π∏™∏: §·Уı·ЫМ¤УФ˜ ¯ВИЪИЫМfi˜ ›Ыˆ˜ ЪФО·П¤ЫВИ МВ МВБ¿ПЛ Иı·УfiЩЛЩ· ЫФ‚·Ъfi О›У‰˘УФ, fiˆ˜ ı¿У·ЩФ,
¶ƒ√™√Ã∏: §·Уı·ЫМ¤УФ˜ ¯ВИЪИЫМfi˜ ›Ыˆ˜ ЪФО·П¤ЫВИ ЫФ‚·Ъfi О›У‰˘УФ ВН·ЪЩТМВУФ ·fi ЩИ˜ Ы˘Уı‹ОВ˜.
∂ЪМЛУВ›· ЩˆУ Ы˘М‚fiПˆУ Ф˘ ¯ЪЛЫИМФФИФ‡УЩ·И ЫВ ·˘Щfi ЩФ ВБ¯ВИЪ›‰ИФ
• ∆Ф ¯ЪТМ· ЩФ˘ ·˘ЩФОfiППЛЩФ˘ Ф˘ В›У·И ОФППЛМ¤УФ ЫЩЛ МФУ¿‰· В›У·И БЪ·ММ¤УФ ВУЩfi˜ ЩˆУ ·ЪВУı¤ЫВˆУ.
(ª·‡ÚÔ):ªËÓ ÂÈÛ¯ˆÚ›Ù ÙÔ ‰¿¯Ù˘Ïfi Û·˜ ‹ ͇ÏÔ ÎÏ.
(ª·‡ÚÔ):ªЛУ ·Щ¿ЩВ ¿Уˆ ЫЩЛУ ВЫˆЩВЪИО‹/ВНˆЩВЪИО‹ МФУ¿‰· О·И МЛУ ЩФФıВЩВ›ЩВ Щ›ФЩ· ¿Уˆ ЩЛ˜.
(∫›ЩЪИУФ): ∫›У‰˘УФ˜ ЛПВОЩЪФПЛН›·˜. ¶ЪФЫФ¯‹!
(ªÏ¤):µВ‚·ИˆıВ›ЩВ fiЩИ ·ФЫ˘У‰¤Ы·ЩВ ЩФ О·ПТ‰ИФ ЩЪФКФ‰ФЫ›·˜ ·fi ЩЛУ Ъ›˙·.
(ªÏ¤):µÂ‚·Èˆı›Ù fiÙÈ ÎÏ›ÓÂÙ ÙÔ Ú‡̷.
• ∞КФ‡ ‰И·‚¿ЫВЩВ ·˘Щfi ЩФ ВБ¯ВИЪ›‰ИФ, ОЪ·Щ‹ЫЩВ ЩФ М·˙› МВ ЩФ ВБ¯ВИЪ›‰ИФ ЩЛ˜ ВБО·Щ¿ЫЩ·ЫЛ˜ ЫВ ¤У· ЪФЫИЩfi М¤ЪФ˜ БИ·
‡ÎÔÏË ·Ó·ÊÔÚ¿.
£¤ЫВИ˜ ЪФВИ‰ФФИЛЩИОТУ ЫЛМВ›ˆУ О·И Ы˘ЫОВ˘‹ ЪФЫЩ·Ы›·˜
62
ÛÔ‚·Úfi ÙÚ·˘Ì·ÙÈÛÌfi, ÎÏ.
: µÂ‚·Èˆı›Ù fiÙÈ ‰ÂÓ ÙÔ Î¿ÓÂÙÂ.
: µÂ‚·Èˆı›Ù fiÙÈ ·ÎÔÏÔ˘ı›Ù ÙȘ Ô‰ËÁ›Â˜.
ª¶ƒ√™∆π¡√ º∞∆¡øª∞
¶∂ƒπµ§∏ª∞
¶∂ƒπµ§∏ª∞
™∆√ªπ√ ∂•√¢√À
∞∂ƒ√™
∆Ф Ы˘БОВОЪИМ¤УФ ОПИМ·ЩИЫЩИОfi ¢∂¡ ЪФФЪ›˙ВЩ·И БИ· У· ¯ЪЛЫИМФФИВ›Щ·И ¯ˆЪ›˜ В›‚ПВ„Л ·fi ·И‰И¿ ‹ ¿ЩФМ· МВ ВИ‰ИО¤˜ ·У¿БОВ˜.
•
¶ƒ√∂π¢√¶√π∏™∏
ªЛУ О¿УВЩВ ВУ‰И¿МВЫВ˜ Ы˘У‰¤ЫВИ˜ ЩФ˘ О·Пˆ‰›Ф˘ ЩЪФКФ‰ФЫ›·˜ ‹ ЩЛ˜ ЪФ¤ОЩ·ЫЛ˜ О·И МЛ Ы˘У‰¤ВЩВ
ФПП¤˜ Ы˘ЫОВ˘¤˜ ЫВ М›· Ъ›˙· ВУ·ПП·ЫЫfiМВУФ˘ ЪВ‡М·ЩФ˜ (∞C).
• ¶˘ЪО·БИ¿ ‹ ЛПВОЩЪФПЛН›· МФЪВ› У· ЪФО‡„Ф˘У ·fi О·О‹ В·К‹, О·О‹ МfiУˆЫЛ ‹ ˘¤Ъ‚·ЫЛ ЩЛ˜
ÂÈÙÚÂfiÌÂÓ˘ ¤ÓÙ·Û˘, ÎÏ.
ªЛУ Б‰¤ЪУВЩВ ‹ МВЩ·‚¿ПВЩВ ЩФ О·ПТ‰ИФ ЩЪФКФ‰ФЫ›·˜, О.П..
• ªЛУ ЩФФıВЩВ›ЩВ ‚·ЪИ¿ ·УЩИОВ›МВУ· В¿Уˆ ЫЩФ О·ПТ‰ИФ ЩЪФКФ‰ФЫ›·˜ О·И МЛУ ЩФ Б‰¤ЪУВЩВ ‹ ЩФ
МВЩ·‚¿ПВЩВ. ∆Ф О·ПТ‰ИФ МФЪВ› У· Кı·ЪВ› О·И ·˘Щfi В›У·И Иı·Уfi У· ЪФО·П¤ЫВИ КˆЩИ¿ ‹ ЛПВОЩЪФПЛН›·.
ªЛУ ·УФИБФОПВ›УВЩВ ЩФ ‰И·ОfiЩЛ ЩФ˘ О˘ОПТМ·ЩФ˜ О·И МЛ Ы˘У‰¤ВЩВ/·ФЫ˘У‰¤ВЩВ ЩФ О·ПТ‰ИФ
ЩЪФКФ‰ФЫ›·˜ О·Щ¿ ЩЛ ‰И¿ЪОВИ· ПВИЩФ˘ЪБ›·˜.
• ∞˘Ùfi ›Ûˆ˜ ÚÔηϤÛÂÈ ˘ÚηÁÈ¿ ÏfiÁˆ ÛÈÓı‹ÚˆÓ, ÎÏ.
• ŸЩ·У ОПВ›ЫВЩВ ЩЛУ ВЫˆЩВЪИО‹ МФУ¿‰· МВ ЩФ ЩЛПВ¯ВИЪИЫЩ‹ЪИФ, ‚В‚·ИˆıВ›ЩВ fiЩИ ¤¯ВЩВ ОПВ›ЫВИ ЩФ
‰И·ОfiЩЛ ‹ fiЩИ ‚Б¿П·ЩВ ЩФ О·ПТ‰ИФ ЩЪФКФ‰ФЫ›·˜.
ªЛУ ВОı¤ЩВЩВ ЩЛУ ВИ‰ВЪМ›‰· Ы·˜ ЫВ О·Щ’ В˘ıВ›·У „˘¯Ъfi ·¤Ъ·, БИ· МВБ¿ПФ ¯ЪФУИОfi ‰И¿ЫЩЛМ·.
• ∫¿ÙÈ Ù¤ÙÔÈÔ Â›Ó·È ÂÈΛӉ˘ÓÔ ÁÈ· ÙËÓ ˘Á›· Û·˜.
√ ÂÏ¿Ù˘ ‰ÂÓ Ú¤ÂÈ Ó· ÙÔÔıÂÙ‹ÛÂÈ ÌfiÓÔ˜ ÙÔ˘ ÙËÓ ÌÔÓ¿‰·.
• ∂¿У О¿ЩИ Щ¤ЩФИФ Б›УВИ П¿ıФ˜, ›Ыˆ˜ ЪФНВУ‹ЫВИ КˆЩИ¿, ЛПВОЩЪФПЛН›·, ЩЪ·˘М·ЩИЫМfi ·fi ЩТЫЛ ЩЛ˜
ÌÔÓ¿‰·˜, ‰È·ÚÚÔ‹ ÓÂÚÔ‡, ÎÏ. ™˘Ì‚Ô˘Ï¢Ù›Ù ÙÔÓ ·ÓÙÈÚfiÛˆfi Û·˜.
ªЛУ ВИЫ·Б¿БВЩВ ЩФ ‰¿ОЩ˘Пfi Ы·˜, Н‡П· ‹ ¿ПП· ·УЩИОВ›МВУ· ЫЩФ ЫЩfiМИФ ВИЫfi‰Ф˘/ВНfi‰Ф˘ ·¤ЪФ˜.
• ∫·ıТ˜ Ф ·УВМИЫЩ‹Ъ·˜ ВЪИЫЩЪ¤КВЩ·И МВ МВБ¿ПЛ Щ·¯‡ЩЛЩ·, МФЪВ› У· ЪФОПЛıВ› ЩЪ·˘М·ЩИЫМfi˜.
• ªИОЪ¿ ·И‰И¿ Ъ¤ВИ У· ВИ‚П¤ФУЩ·И ТЫЩВ У· МЛУ ·›˙Ф˘У МВ ЩФ ОПИМ·ЩИЫЩИОfi.
ŸЩ·У ·ЪФ˘ЫИ·ЫЩВ› О¿ФИ· ·УˆМ·П›· (М˘Ъˆ‰И¿ О·ММ¤УФ˘, О.П..) ЫЩ·М·Щ‹ЫЩВ ЩФ ОПИМ·ЩИЫЩИОfi О·И ‚Б¿ПЩВ
ЩФ О·ПТ‰ИФ ЩЪФКФ‰ФЫ›·˜ ‹ ОПВ›ЫЩВ ЩФ ‰И·ОfiЩЛ.
• ŸЩ·У ВН·ОФПФ˘ıВ›ЩВ У· ПВИЩФ˘ЪБВ›ЩВ ЩЛУ МФУ¿‰· ЫВ МИ¿ ·УТМ·ПЛ О·Щ¿ЫЩ·ЫЛ, ·˘Щfi МФЪВ› У·
ЪФНВУ‹ЫВИ КˆЩИ¿, ˙ЛМИ¿, ОП. ™В ·˘Щ‹ ЩЛУ ВЪ›ЩˆЫЛ, Ы˘М‚Ф˘ПВ˘ЩВ›ЩВ ЩФУ ·УЩИЪfiЫˆfi Ы·˜.
∂ÈÛ΢‹ ‹ ÌÂÙ·ÎfiÌÈÛË ‰ÂÓ Ú¤ÂÈ Ó· Á›ÓÔÓÙ·È ·fi ÙÔÓ ÂÏ¿ÙË.
• ∂¿У О¿ЩИ Щ¤ЩФИФ Б›УВИ П¿ıФ˜, ›Ыˆ˜ ЪФНВУ‹ЫВИ КˆЩИ¿, ЛПВОЩЪФПЛН›·, ЩЪ·˘М·ЩИЫМfi ·fi ЩТЫЛ ЩЛ˜
ÌÔÓ¿‰·˜, ‰È·ÚÚÔ‹ ÓÂÚÔ‡, ÎÏ. ™˘Ì‚Ô˘Ï¢Ù›Ù ÙÔÓ ·ÓÙÈÚfiÛˆfi Û·˜.
• ∂¿У О·Щ·ЫЩЪ·КВ› ЩФ О·ПТ‰ИФ ЩЪФКФ‰ФЫ›·˜, Л ·УЩИО·Щ¿ЫЩ·Ы‹ ЩФ˘ Ъ¤ВИ У· Б›УВИ ·fi ЩФУ
ηٷÛ΢·ÛÙ‹ ‹ ÙÔÓ ˘Â‡ı˘ÓÔ Û˘ÓÙ‹ÚËÛ˘ ÁÈ· Ó· ·ÔÊ¢¯ı› Ù˘¯fiÓ Î›Ó‰˘ÓÔ˜.
¶ƒ√™√Ã∏
ŸЩ·У ЪfiОВИЩ·И У· ‚Б¿ПВЩВ ЩФ К›ПЩЪФ ЩФ˘ ·¤Ъ·, МЛУ ·ББ›˙ВЩВ Щ· МВЩ·ППИО¿ М¤ЪЛ ЩЛ˜ ВЫˆЩВЪИО‹˜ МФУ¿‰·˜.
• ∞˘Ùfi ÌÔÚ› Ó· ÚÔηϤÛÂÈ ÙÚ·˘Ì·ÙÈÛÌfi.
ªЛУ „ВО¿˙ВЩВ ВУЩФМФОЩfiУ· ‹ В‡КПВОЩ· ·¤ЪИ· ОФУЩ¿ ЫЩФ ОПИМ·ЩИЫЩИОfi.
• ∞˘Щfi МФЪВ› У· ЪФНВУ‹ЫВИ КˆЩИ¿ ‹ ·Ъ·МfiЪКˆЫЛ ЩФ˘ ОИ‚ТЩИФ˘ ЩЛ˜ Ы˘ЫОВ˘‹˜.
ªËÓ ÙÔÔıÂÙ›Ù ηÙÔÈΛ‰È· ˙Ò· ‹ Ê˘Ù¿ ηÙ¢ı›·Ó ¿Óˆ ÛÙÔ Ú‡̷ ÙÔ˘ ·¤Ú·.
• ∫¿ÙÈ Ù¤ÙÔÈÔ ÌÔÚ› Ó· ÙÚ·˘Ì·Ù›ÛÂÈ Ù· ˙Ò· ‹ Ù· Ê˘Ù¿.
ªЛУ ·К‹УВЩВ ЩЛУ МФУ¿‰· ЫВ О·ЩВЫЩЪ·ММ¤УФ ‚¿ıЪФ.
• ∏ МФУ¿‰· МФЪВ› У· ¤ЫВИ О¿Щˆ МВ ·ФЩ¤ПВЫМ· У· ЪФОПЛıВ› ЩЪ·˘М·ЩИЫМfi˜.
ªËÓ ·Ù¿Ù ¿Óˆ Û ·ÛÙ·ı‹ ¿ÁÎÔ fiÙ·Ó Î¿ÓÂÙÂ Û˘ÓÙ‹ÚËÛË ÙË ÌÔÓ¿‰·, Î.Ï..
• ªФЪВ› У· ЪФОПЛıВ› ЩЪ·˘М·ЩИЫМfi˜, О.П.. В¿У ¤ЫВЩВ О¿Щˆ.
ªЛУ ЩЪ·‚¿ЩВ ЩФ О·ПТ‰ИФ ЩЪФКФ‰ФЫ›·˜.
•
∆Ф ВЫˆЩВЪИОfi Ы‡ЪМ· ЩФ˘ О·Пˆ‰›Ф˘ ЩЪФКФ‰ФЫ›·˜ МФЪВ› У· ·ФЫ˘У‰ВıВ› О·И ·˘Щfi МФЪВ› У· ЪФО·П¤ЫВИ ˘ЪО·БИ¿.
ªË ÊÔÚÙ›˙ÂÙ ‹ ·ÓÔ›ÁÂÙ ÙȘ ̷ٷڛ˜ Î·È ÌËÓ ÙȘ Âٿ٠ÛÙË ÊˆÙÈ¿.
• ∞˘Щfi МФЪВ› У· ЪФО·ПВЫВИ ‰И·ЪЪФ‹, КˆЩИ¿ ‹ О·И ¤ОЪЛНЛ.
ªЛУ ПВИЩФ˘ЪБВ›ЩВ БИ· МВБ¿ПФ ‰И¿ЫЩЛМ· ЫВ ˘„ЛП‹ ˘БЪ·Ы›·, .¯. ·К‹УФУЩ·˜ fiЪЩ· ‹ ·Ъ¿ı˘ЪФ ·УФИОЩfi.
•
∫·Щ¿ ЩЛУ „‡НЛ, В¿У Л ПВИЩФ˘ЪБ›· Б›УВЩ·И ЫВ ¯ТЪФ МВ МВБ¿ПЛ ˘БЪ·Ы›· (80% ‹ ВЪИЫЫfiЩВЪФ) БИ· МВБ¿ПФ ‰И¿ЫЩЛМ·,
ЩФ Ы˘М˘ОУˆМ¤УФ УВЪfi ЫЩФ ОПИМ·ЩИЫЩИОfi МФЪВ› У· ЫЩ¿˙ВИ О·И У· МФ˘ЫО¤„ВИ О·И У· О·Щ·ЫЩЪ¤„ВИ ¤ИП·, ОП.
ªЛ ¯ЪЛЫИМФФИВ›ЩВ ЩЛ МФУ¿‰· БИ· ВИ‰ИОФ‡˜ ЫОФФ‡˜.
• ªЛУ ¯ЪЛЫИМФФИ‹ЩВ ЩФ ОПИМ·ЩИЫЩИОfi БИ· У· Ы˘УЩЛЪ‹ЫВЩВ ВНФПИЫМФ‡˜ ·ОЪИ‚В›·˜, ЩЪФК¤˜, ˙Т·,
К˘Щ¿ О·И ¤ЪБ· Щ¤¯УЛ˜. ∏ ФИfiЩЛЩ· ЩˆУ ·ФıЛОВ˘М¤УˆУ ВИ‰ТУ МФЪВ› У· ¯ВИЪФЩВЪ¤„ВИ.
ªËÓ ÙÔÔıÂÙ›Ù ıÂÚÌ¿ÛÙÚ·, ÎÏ. Ô˘ ÂÎÙ›ıÂÙ·È Î·Ù¢ı›·Ó ¿Óˆ ÛÙÔ Ú‡̷ ÙÔ˘ ·¤Ú·.
• ªФЪВ› У· ЪФОПЛıВ› ·ЩВП‹˜ О·‡ЫЛ.
Page 63

ª∂∆ƒ∞ ∞™º∞§∂π∞™
√¡√ª∞™π∞ ∆√À ∫∞£∂ ∂•∞ƒ∆∏ª∞∆√™
¶ƒ√™√Ã∏
ŸЩ·У Л МФУ¿‰· ЪfiОВИЩ·И У· О·ı·ЪИЫЩВ›, ‰И·Оfi„ЩВ ЩЛ ПВИЩФ˘ЪБ›· О·И ·ФЫ˘У‰¤ЫЩВ ЩФ О·ПТ‰ИФ
ЩЪФКФ‰ФЫ›·˜ ‹ ОПВ›ЫЩВ ЩФ ‰И·ОfiЩЛ.
• §fiБˆ ЩФ˘ fiЩИ Ф ·УВМИЫЩ‹Ъ·˜ ВЪИЫЩЪ¤КВЩ·И МВ МВБ¿ПЛ Щ·¯‡ЩЛЩ·, МФЪВ› У· ЪФО·П¤ЫВИ ЩЪ·˘М·ЩИЫМfi.
ŸЩ·У Л МФУ¿‰· ‰ВУ ЪfiОВИЩ·И У· ¯ЪЛЫИМФФИЛıВ› БИ· ФП‡ О·ИЪfi, ‚Б¿ПЩВ ЩФ О·ПТ‰ИФ ЩЪФКФ‰ФЫ›·˜ ‹
ОПВ›ЫЩВ ЩФ ‰И·ОfiЩЛ.
• ™ЩЛУ ·УЩ›ıВЩЛ ВЪ›ЩˆЫЛ, Л Ы˘БОВУЩЪˆУfiМВУЛ ЫОfiУЛ ›Ыˆ˜ Б›УВИ ·ИЩ›· ˘ЪО·БИ¿˜.
∞ÓÙÈηٷÛÙ‹ÛÙ ÙȘ 2 ̷ٷڛ˜ Ì ηÈÓÔ‡ÚȘ ÙÔ˘ ȉ›Ô˘ Ù‡Ô˘.
• ∏ ¯Ú‹ÛË ÌÈ·˜ ·ÏÈ¿˜ Ì·Ù·Ú›·˜ Ì·˙› Ì ̛· ηÈÓÔ‡ÚÁÈ· ÌÔÚ› Ó· ÚÔηϤÛÂÈ ÙËÓ ·‡ÍËÛË Ù˘
ıВЪМФОЪ·Ы›·˜, ‰И·ЪЪФ‹ ‹ О·И ¤ОЪЛНЛ.
∂¿Ó ÙÔ ˘ÁÚfi ÙˆÓ Ì·Ù·ÚÈÒÓ ¤ÚıÂÈ Û ·ʋ Ì ÙÔ ‰¤ÚÌ· ‹ Ù· ÚÔ‡¯· Û·˜, ÍÂχÓÂÙ ηϿ Ì ηı·Úfi
ÓÂÚfi.
• ∂¿Ó ÙÔ ˘ÁÚfi ÙˆÓ Ì·Ù·ÚÈÒÓ ¤ÚıÂÈ Û ·ʋ Ì ٷ Ì¿ÙÈ· Û·˜, ÍÂχÓÂÙ¤ Ù· ηϿ Ì ηı·Úfi ÓÂÚfi
Î·È Û˘Ì‚Ô˘Ï¢Ù›Ù ¤Ó· ÁÈ·ÙÚfi.
∞ВЪ›˙ВЩВ О·П¿ Ф ¯ТЪФ fiЩ·У ¯ЪЛЫИМФФИВ›ЩВ ЩЛ МФУ¿‰· ЫВ Ы˘У‰˘·ЫМfi МВ ЫfiМ·, ОП.
• ªÔÚ› Ó· ÚÔ·„ÂÈ ¤ÏÏÂÈ„Ë Ô͢ÁfiÓÔ˘.
ªЛУ ПВИЩФ˘ЪБВ›ЩВ ЩФ˘˜ ‰И·ОfiЩВ˜ МВ ‚ЪВБМ¤У· ¯¤ЪИ·.
• ∞˘Щfi МФЪВ› У· ЪФО·П¤ЫВИ ЛПВОЩЪФПЛН›·.
ªЛУ О·ı·Ъ›˙ВЩВ ЩФ ОПИМ·ЩИЫЩИОfi МВ УВЪfi.
• ¡ÂÚfi ›Ûˆ˜ ÂÈÛ¯ˆÚ‹ÛÂÈ ÛÙËÓ ÌÔÓ¿‰· Î·È Êı›ÚÂÈ ÙË ÌfiÓˆÛË. ∞˘Ùfi ÌÔÚ› Ó· ÚÔηϤÛÂÈ
ЛПВОЩЪФПЛН›·.
ªЛУ ·Щ¿ЩВ ¿Уˆ ЫЩЛУ ВЫˆЩВЪИО‹ ‹ ВНˆЩВЪИО‹ МФУ¿‰· О·И МЛУ ЩФФıВЩВ›ЩВ Щ›ФЩ· ¿Уˆ ЫЩФ
ОПИМ·ЩИЫЩИОfi.
• ªФЪВ› У· ЪФОПЛıВ› ЩЪ·˘М·ЩИЫМfi˜ О.П. В¿У ¤ЫВЩВ ‹ О¿ФИФ ·УЩИОВ›МВУФ ¤ЫВИ ¿Уˆ Ы·˜.
°È· ÂÁηٿÛÙ·ÛË
¶ƒ√∂π¢√¶√π∏™∏
• ™˘М‚Ф˘ПВ˘ЩВ›ЩВ ЩФУ ·УЩИЪfiЫˆfi Ы·˜ БИ· ЩЛУ ВБО·Щ¿ЫЩ·ЫЛ ЩФ˘ ОПИМ·ЩИЫЩИОФ‡.
¶ƒ√™√Ã∏
ªЛУ ЩФФıВЩВ›ЩВ ЩЛУ МФУ¿‰· ЫВ М¤ЪФ˜ fiФ˘ МФЪВ› У· ‰И·К‡БВИ В‡КПВОЩФ ·¤ЪИФ.
• ∂¿У ‰И·К‡БВИ ·¤ЪИФ О·И Ы˘БОВУЩЪˆıВ› Б‡Ъˆ ·fi ЩЛУ МФУ¿‰·, МФЪВ› У· ЪФО·П¤ЫВИ ¤ОЪЛНЛ.
°ВИТЫЩВ ЩЛ МФУ¿‰·.
• ªЛ Ы˘У‰¤ВЩВ ЩЛ БВ›ˆЫЛ ЫВ ЫˆП‹У· ·ВЪ›Ф˘ ‹ УВЪФ‡, ·ПВНИО¤Ъ·˘УФ ‹ ЫЩЛ БВ›ˆЫЛ ЩФ˘ ЩЛПВКТУФ˘.
∂¿У Л БВ›ˆЫЛ ‰ВУ ¤¯ВИ Б›УВИ ЫˆЫЩ¿ В›У·И Иı·Уfi У· ЪФОПЛıВ› ЛПВОЩЪФПЛН›·.
∂БО·Щ·ЫЩ‹ЫЩВ ¤У·У ‰И·ОfiЩЛ ‰И·К˘Б‹˜ БВ›ˆЫЛ˜ ·У¿ПФБ· МВ ЩФ М¤ЪФ˜ Ф˘ ЪfiОВИЩ·И У· ЩФФıВЩЛıВ›
ЩФ ОПИМ·ЩИЫЩИОfi (˘БЪfi М¤ЪФ˜, ОП.).
• ∂¿У ‰ВУ ВБО·Щ·ЫЩ·ıВ› Ф ‰И·ОfiЩЛ˜ ‰И·К˘Б‹˜ БВ›ˆЫЛ˜, МФЪВ› У· ЪФО·П¤ЫВИ ЛПВОЩЪФПЛН›·.
∆Ô ·ÔÛÙÚ·ÁÁÈ˙fiÌÂÓÔ ÓÂÚfi Ú¤ÂÈ Ó· ·ÔÛÙÚ·ÁÁ›˙ÂÙ·È Ï‹Úˆ˜.
• ∂¿У Л ‰И·‰ЪФМ‹ В›У·И МИЫФЩВПВИˆМ¤УЛ , МФЪВ› У· ЫЩ¿˙ВИ УВЪfi ·fi ЩЛУ МФУ¿‰·. ŒЩЫИ МФЪВ› У·
ÌÔ˘ÛΤ„Ô˘Ó Î·È Ó· ηٷÛÙÚ·ÊÔ‡Ó Ù· ¤ÈÏ·.
∂ЫˆЩВЪИО‹ МФУ¿‰·
º›ПЩЪФ О·ı·ЪИЫМФ‡
·¤ÚÔ˜ (∆‡Ô˘ ÌÂ
Ï¢΋ Ê˘ÛÔ‡Ó·)
º›ПЩЪФ ·¤Ъ· О·ЩВ¯›УЛ˜
(ªВ ПВИЩФ˘ЪБ›· О·Щ·ФП¤МЛЫЛ˜
ЩˆУ ФЫМТУ)
™ÙfiÌÈÔ ÂÍfi‰Ô˘ ·¤ÚÔ˜
∫¿ıÂÙ˜ ÂÚÛ›‰Â˜
√ÚÈ˙fiÓÙÈ· ÂÚÛ›‰·
¶›У·О·˜ ВП¤Б¯Ф˘ ПВИЩФ˘ЪБ›·˜
(ŸЩ·У ЩФ МЪФЫЩИУfi К¿ЩУˆМ· В›У·И ·УФИ¯Щfi)
¢И·ОfiЩЛ˜ ПВИЩФ˘ЪБ›·˜
¤ОЩ·ОЩЛ˜ ·У¿БОЛ˜
∂НˆЩВЪИО‹ МФУ¿‰·
ªЪФЫЩИУfi К¿ЩУˆМ·
™ÙfiÌÈÔ ÂÈÛfi‰Ô˘ ·¤ÚÔ˜
Ó· Û˘Ó‰Âı› Ì ÙÔÓ °ÂÓÈÎfi ¢È·ÎfiÙË
∫·ПТ‰ИФ ЩЪФКФ‰ФЫ›·˜
¢¤ОЩЛ˜ Ы‹М·ЩФ˜
ЩЛПВ¯ВИЪИЫЩЛЪ›Ф˘
∆ЛПВ¯ВИЪИЫЩ‹ЪИФ
√ıfiУЛ ВП¤Б¯Ф˘ ПВИЩФ˘ЪБ›·˜
∂У‰ВИОЩИО¤˜ П˘¯У›В˜
ПВИЩФ˘ЪБ›·˜
™ÙfiÌÈÔ ÂÈÛfi‰Ô˘ ·¤ÚÔ˜ (Ô›ÛıÈ· Î·È Ï¢ÚÈ΋)
™ˆПЛУТЫВИ˜
™ˆП‹У·˜ ·ФЫЩЪ¿ББИЫЛ˜
¢¤ОЩЛ˜
Ы‹М·ЩФ˜
ЩЛПВ¯ВИЪИЫЩЛЪ›Ф˘
™ÙfiÌÈÔ ÂÍfi‰Ô˘ ·¤ÚÔ˜
√‹ ·ФЫЩЪ¿ББИЫЛ˜
63
Page 64

ON/OFF
FAN
TOO
WARM
TOO
COOL
VANE
MODE
ECONO COOL
STOP
START
HR.
MIN.
I FEEL
COOL
DRY
AMPM
AMPM
RESET CLOCK
HEAT
/FAN
√¡√ª∞™π∞ ∆√À ∫∞£∂ ∂•∞ƒ∆∏ª∞∆√™
ON/OFF
TOO
COOL
AMPM
CLOCK
˚C
AMPM
TOO
WARM
¶ƒ√∂∆√πª∞™π∞ ¶ƒπ¡ ∞¶√ ∆∏¡ §∂π∆√Àƒ°π∞
∆ЛПВ¯ВИЪИЫЩ‹ЪИФ
∆Ì‹Ì· ÂÎÔÌ‹˜ Û‹Ì·ÙÔ˜
√ıfiУЛ ВУ‰В›НВˆ˜ ПВИЩФ˘ЪБ›·˜
∫Ф˘М› ∞ƒГ∏™/∆∂§√А™
ПВИЩФ˘ЪБ›·˜ (√¡/√FF)
∞УФ›НЩВ ЩФ МЪФЫЩИУfi О·¿ОИ.
(∆Ô ‰È¿ÁÚ·ÌÌ· ·˘Ùfi, ‰Â›¯ÓÂÈ ÙËÓ ÔÏÈ΋ fi„Ë.)
∫Ф˘МИ¿ Ъ˘ıМ›ЫВˆ˜
ıВЪМФОЪ·Ы›·˜
∞˘ЩfiМ·ЩЛ В·У·ПВИЩФ˘ЪБ›·
∆· МФУЩ¤П· ·˘Щ¿ В›У·И ВКФ‰И·ЫМ¤У· МВ ПВИЩФ˘ЪБ›· ·˘ЩfiМ·ЩЛ˜ В·УВОО›УЛЫЛ˜. ∂¿У ‰ВУ ВИı˘МВ›ЩВ У·
■
¯ЪЛЫИМФФИ‹ЫВЩВ ·˘Щ‹ ЩЛ ПВИЩФ˘ЪБ›·, ·Ъ·О·ПФ‡МВ ВИОФИУˆУ‹ЫЩВ МВ ЩЛУ ·УЩИЪФЫˆВ›· ‰ИfiЩИ ı·
Ъ¤ВИ У· ·ПП¿НВИ Л Ъ‡ıМИЫЛ ЩЛ˜ МФУ¿‰·˜.
∏ ПВИЩФ˘ЪБ›· ·˘ЩfiМ·ЩЛ˜ В·УВОО›УЛЫЛ˜ В›У·И ...
ŸЩ·У Л ВЫˆЩВЪИО‹ МФУ¿‰· ВП¤Б¯ВЩ·И ·fi ЩФ ЩЛПВ¯ВИЪИЫЩ‹ЪИФ, Ф ЩЪfiФ˜ ПВИЩФ˘ЪБ›·˜, Л ЪФВИПВБМ¤УЛ ıВЪМФОЪ·Ы›· О·И
Л Щ·¯‡ЩЛЩ· ЩФ˘ ·УВМИЫЩ‹Ъ· О·Щ·БЪ¿КФУЩ·И ЫЩЛ МУ‹МЛ. ªВЩ¿ ·fi ‰И·ОФ‹ ЪВ‡М·ЩФ˜ ‹ В¿У ОПВ›ЫВИ Ф ОВУЩЪИОfi˜
‰И·ОfiЩЛ˜ ·ЪФ¯‹˜ ЪВ‡М·ЩФ˜ О·Щ¿ ЩЛ ‰И¿ЪОВИ· ПВИЩФ˘ЪБ›·˜, Л “§ВИЩФ˘ЪБ›· ·˘ЩfiМ·ЩЛ˜ В·УВОО›УЛЫЛ˜” Ъ˘ıМ›˙ВЩ·И
·˘ЩfiМ·Щ· ТЫЩВ У· В·У·ПВИЩФ˘ЪБ‹ЫВИ МВ ЩФУ ›‰ИФ ЩЪfiФ ПВИЩФ˘ЪБ›·˜ ЫЩФУ ФФ›Ф В›¯В Ъ˘ıМИЫЩВ› МВ ЩФ ЩЛПВ¯ВИЪИЫЩ‹ЪИФ
ЪИУ ·fi ЩЛ ‰И·ОФ‹ ЪВ‡М·ЩФ˜. (∞У·ЩЪ¤НЩВ ЫЩЛ ЫВП›‰· 66 БИ· ВЪИЫЫfiЩВЪВ˜ ПВЩФМ¤ЪВИВ˜.)
∂ЫˆЩВЪИО‹ МФУ¿‰·
µ¿ПЩВ ЩФ О·ПТ‰ИФ ЩЪФКФ‰ФЫ›·˜ ЫЩЛУ Ъ›˙· О·И/‹ ·УФ›НЩВ ЩФ ‰И·ОfiЩЛ.
■
¶ƒ√∂π¢√¶√π∏™∏:
∞К·ИЪ¤ЫЩВ ЩИ˜ ·О·ı·ЪЫ›В˜ ·fi ЩФ КИ˜ ЩФ˘ О·Пˆ‰›Ф˘ ЩЪФКФ‰ФЫ›·˜ О·И ‚¿ПЩВ ЩФ МВ ·ЫК¿ПВИ· ЫЩЛУ Ъ›˙·.
∂¿У ФИ ·О·ı·ЪЫ›В˜ ОФПП‹ЫФ˘У ЫЩФ КИ˜ Л ВИЫ·БˆБ‹ ЫЩЛУ ЪИ˙· В›У·И ·ЩВП‹˜ О·И МФЪВ› У· ЪФОПЛıВ› КˆЩИ¿ ‹ ЛПВОЩЪФПЛН›·.
∆ЛПВ¯ВИЪИЫЩ‹ЪИФ
¶Ò˜ ı· Ú˘ıÌ›ÛÂÙ ÙÔÓ Ù‡Ô
∞˘Щ‹ Л Ъ‡ıМИЫЛ ЩФ˘ ЩЛПВ¯ВИЪИЫЩЛЪ›Ф˘ Ъ¤ВИ У· Б›УВИ ·У¿ПФБ· МВ ЩФУ Щ‡Ф ЩФ˘ ОПИМ·ЩИЫЩИОФ‡ (COOL
■
О·И HEAT ‹ COOL ONLY) (жА•∏ О·И £∂ƒª∞¡™∏ ‹ ª√¡√ жА•∏).
∂¿У Л Ъ‡ıМИЫЛ В›У·И П·Уı·ЫМ¤УЛ, ЩФ ОПИМ·ЩИЫЩИОfi ‰ВУ ПВИЩФ˘ЪБВ› О·УФУИО¿. О·Щ¿ Ы˘У¤ВИ·, Ъ¤ВИ У·
ВП¤БНВЩВ В¿У Л Ъ‡ıМИЫЛ В›У·И Л О·Щ¿ППЛПЛ БИ· ЩФУ Щ‡Ф˘ ЩФ˘ ОПИМ·ЩИЫЩИОФ‡ Ы·˜. ™В ·УЩ›ıВЩЛ ВЪ›ЩˆЫЛ
‰ИФЪıТЫЩВ ЩЛ Ъ‡ıМИЫЛ fiˆ˜ ˘Ф‰ВИОУ‡ВЩ·И ·Ъ·¿Уˆ.
¢È·ÎfiÙ˘ ÔÏ›ÛıËÛ˘
∆‡Ô˜
æÀ•∏ Î·È £∂ƒª∞¡™∏
ª√¡√ æÀ•∏
∫Ô˘Ì› ÂϤÁ¯Ô˘ Ù·¯‡ÙËÙ·˜
·УВМИЫЩ‹Ъ· (FAN SPEED CONTROL)
∫Ф˘М› ВИПФБ‹˜ ПВИЩФ˘ЪБ›·˜
(OPERATION SELECT)
∫Ф˘М› ПВИЩФ˘ЪБ›·˜ ∂cФnФ „‡НЛ˜
(ECONO COOL)
∫Ô˘Ì› ∂¶∞¡∞ƒÀ£ªπ™∏™ (RESET)
64
∫Ф˘М› ГЪФУФ‰И·ОfiЩЛ˜ EОЩfi˜
(TIMER OFF)
∫Ô˘Ì› ¯ÚÔÓԉȷÎfiÙ˘
ÂÓÙfi˜ (TIMER ON)
∫Ô˘Ì› øÚÒÓ, ÎÔ˘Ì›
§ÂÙÒÓ (∫Ô˘ÌÈ¿
Ú˘ı̛ۈ˜ ¯ÚfiÓÔ˘)
∫Ф˘М› Ъ‡ıМИЫЛ˜ ЪФПФБИФ‡ (CLOCK SET)
∫Ô˘Ì› ÂϤÁ¯Ô˘ ÂÚÛ›‰ˆÓ
£¤ÛË ÙÔ˘
‰È·ÎfiÙË
ÔÏ›ÛıËÛ˘
Page 65

HR.
MIN.
HR.
MIN.
FAN
VANE
MODE
ECONO COOL
STOP
START
HR.
MIN.
I FEEL
COOL
DRY
RESET CLOCK
HEAT
/FAN
Operation Indicator
Operation Indicator
Operation Indicator
Operation Indicator
Operation Indicator
ON/OFF
¶ƒ√∂∆√πª∞™π∞ ¶ƒπ¡ ∞¶√ ∆∏¡ §∂π∆√Àƒ°π∞
∆ЛПВ¯ВИЪИЫЩ‹ЪИФ
∆ÔÔı¤ÙËÛË Ì·Ù·ÚÈÒÓ Î·È Ú‡ıÌÈÛË Ù˘
ÒÚ·˜
1 µБ¿ПЩВ ЩФ МЪФЫЩИУfi О·¿ОИ О·И ‚¿ПЩВ ЩИ˜
̷ٷڛ˜. ™ÙË Û˘Ó¤¯ÂÈ· Í·Ó·‚¿ÏÙ ÛÙË ı¤ÛË
ÙÔ˘ ÙÔ Î·¿ÎÈ.
µ¿ПЩВ ЪТЩ· ЩФУ ·ЪУЛЩИОfi fiПФ ЩЛ˜ М·Щ·Ъ›·˜.
∂П¤БНЩВ ·У В›У·И ЫˆЫЩ‹ Л ФПИОfiЩЛЩ· ЩˆУ
М·Щ·ЪИТУ.
µ¿ÏÙ ÚÒÙ· ÙÔÓ
·ЪУЛЩИОfi fiПФ ЩЛ˜
М·Щ·Ъ›·˜.
2 ¶È¤ÛÙ ÙÔ ÎÔ˘Ì› ∂·Ó·Ú‡ıÌÈÛ˘ (RESET).
¶И¤ЫЩВ ЩФ
¯ЪЛЫИМФФИТУЩ·˜
¤У· ПВЩfi
Н˘П·Ъ¿ОИ.
• ∂¿Ó ‰ÂÓ ·ÙËı› ÙÔ ÎÔ˘Ì› ∂·Ó·Ú‡ıÌÈÛ˘, ÙÔ
ЩЛПВ¯ВИЪИЫЩ‹ЪИФ ВУ‰В¯ФМ¤Уˆ˜ У· МЛУ ‰Ф˘П¤„ВИ
ЫˆЫЩ¿.
3 ¶И¤ЫЩВ ЩФ ∫Ф˘М› Ъ‡ıМИЫЛ˜ ЪФПФБИФ‡ (CLOCK)
Î·È ‚¿ÏÙ ÙÔ ›Ûˆ η¿ÎÈ.
¶И¤ЫЩВ ЩФ
¯ЪЛЫИМФФИТУЩ·˜
¤У· ПВЩfi
Н˘П·Ъ¿ОИ.
4 ¶È¤ÛÙ ٷ ÎÔ˘ÌÈ¿
ηÈ
Î·È (∫Ô˘ÌÈ¿
Ú˘ı̛ۈ˜ ¯ÚfiÓÔ˘) Î·È Ú˘ıÌ›ÛÙ ÙËÓ
ÙÚ¤¯Ô˘Û· ÒÚ·.
• ∫¿ı ÊÔÚ¿ Ô˘ ÙÔ ÎÔ˘Ì›
Ú˘ıÌÈṲ̂ÓË ÒÚ· ·˘Í¿ÓÂÈ Î·Ù¿ Ì›· ÒÚ· Î·È Î¿ıÂ
ÊÔÚ¿ Ô˘ ÙÔ ÎÔ˘Ì›
ÒÚ· ·˘Í¿ÓÂÈ Î·Ù¿ 1 ÏÂÙfi.
·ÙȤٷÈ, Ë Ú˘ıÌÈṲ̂ÓË
·ÙȤٷÈ, Ë
5 •·У·И¤ЫЩВ ЩФ ОФ˘М› ƒ‡ıМИЫЛ˜ ЪФПФБИФ‡
(CLOCK) О·И ОПВ›ЫЩВ ЩФ МЪФЫЩИУfi О·¿ОИ.
ГВИЪИЫМfi˜ ЩФ˘ ЩЛПВ¯ВИЪИЫЩЛЪ›Ф˘
• ∏ ·ÎÙ›Ó· Ô˘ ÌÔÚ› Ó· ÊÙ¿ÛÂÈ ÙÔ Û‹Ì· Â›Ó·È ÂÚ›Ô˘
6 М¤ЩЪ· fiЩ·У ЩФ ЩЛПВ¯ВИЪИЫЩ‹ЪИФ В›У·И ЫЩЪ·ММ¤УФ
Ъfi˜ ЩЛУ ЪfiЫФ„Л ЩЛ˜ ВЫˆЩВЪИО‹˜ МФУ¿‰·˜.
• ŸÙ·Ó ·ÙÈ¤Ù·È ÙÔ ÎÔ˘Ì›, ¤Ó·˜ - ‰‡Ô ‹¯ÔÈ “ÌÈ”
ı· ·ОФ˘ЫЩФ‡У ·fi ЩЛУ ВЫˆЩВЪИО‹ МФУ¿‰·. ∂¿У
‰ВУ ·ОФ˘ЫЩВ› ‹¯Ф˜, Н·У·И¤ЫЩВ.
• ГЪЛЫИМФФИ‹ЩВ ЩФ ЩЛПВ¯ВИЪИЫЩ‹ЪИФ ЪФЫВОЩИО¿. ∂¿У
ВЩИ¤Щ·И, ¤ЫВИ О¿Щˆ ‹ ‚Ъ·¯В›, ЩФ ЩЛПВ¯ВИЪИЫЩ‹ЪИФ
›Ыˆ˜ У· МЛУ ПВИЩФ˘ЪБ‹ЫВИ.
ŸЩ·У ЩФ ЫЩВЪВТУВЩВ ЫЩФУ ЩФ›¯Ф, ОП
• ∆ФФıВЩ‹ЫЩВ ЩЛ ‚¿ЫЛ ЩФ˘ ЩЛПВ¯ВИЪИЫЩЛЪ›Ф˘ ЫВ
¤У· ЫЛМВ›Ф ·fi fiФ˘ У· МФЪВ› У· ·ОФ˘ЫЩВ› ·fi
ЩЛУ ВЫˆЩВЪИО‹ МФУ¿‰· Ф ‹¯Ф˜ П‹„Л˜ (МИ) ЩФ˘
Ы‹М·ЩФ˜ fiЩ·У ·Щ¿ЩВ ЩФ ОФ˘М› ПВИЩФ˘ЪБ›·˜
¶Т˜ У· ЩФФıВЩ‹ЫВЩВ/·К·ИЪ¤ЫВЩВ ЩФ ЩЛПВ¯ВИЪИЫЩ‹ЪИФ
∆ФФı¤ЩЛЫЛ : µ¿ПЩВ ЩФ ЩЛПВ¯ВИЪИЫЩ‹ЪИФ МВ ЩЛУ
∞Ê·›ÚÂÛË : ∆Ú·‚‹ÍÙ ÙÔ Â¿Óˆ.
ª·Щ·Ъ›В˜ НЛЪТУ ЫЩФИ¯В›ˆУ
■ ∞У·КФЪИО¿ ˆ˜ ЪФ˜ ЩЛУ ·УЩИО·Щ¿ЫЩ·ЫЛ ЩˆУ М·Щ·ЪИТУ
∞УЩИО·Щ·ЫЩ‹ЫЩВ ЩИ˜ М·Щ·Ъ›В˜ МВ О·ИУФ‡ЪБИВ˜ ·ПО·ПИО¤˜
М·Щ·Ъ›В˜ Щ‡Ф˘ ∞∞∞ ЫЩИ˜ ·Ъ·О¿Щˆ ВЪИЩТЫВИ˜:
‚¿ÛË ÚÔ˜ Ù· οو.
µ¿ЫЛ ЩФ˘
ЩЛПВ¯ВИЪИЫЩЛЪ›Ф˘
· ŸЩ·У Л ВЫˆЩВЪИО‹ МФУ¿‰· ‰ВУ ·УЩИ‰Ъ¿ ЫЩФ Ы‹М·
ЩФ˘ ЩЛПВ¯ВИЪИЫЩЛЪ›Ф˘.
· ŸЩ·У МВИТУВЩ·И Ф КˆЩИЫМfi˜ ЩЛ˜ ФıfiУЛ˜ ЩФ˘
ЩЛПВ¯ВИЪИЫЩЛЪ›Ф˘.
· ŸÙ·Ó ·Ù¿Ù ¤Ó· ÎÔ˘Ì› Î·È ÛÙËÓ ÔıfiÓË ÙÔ˘
ЩЛПВ¯ВИЪИЫЩЛЪ›Ф˘ ВМК·У›˙ФУЩ·И fiПВ˜ ФИ ВУ‰В›НВИ˜
ФИ ФФ›В˜ ·М¤Ыˆ˜ МВЩ¿ ВН·К·У›˙ФУЩ·И.
ªЛУ ¯ЪЛЫИМФФИВ›ЩВ М·Щ·Ъ›В˜ М·ББ·У›Ф˘. ∆Ф
ЩЛПВ¯ВИЪИЫЩ‹ЪИФ МФЪВ› У· МЛУ ПВИЩФ˘ЪБВ› ЫˆЫЩ¿.
• ∏ ‰И¿ЪОВИ· ˙ˆ‹˜ ЩˆУ ·ПО·ПИОТУ М·Щ·ЪИТУ В›У·И
¤Ó·˜ ¯ÚfiÓÔ˜ ÂÚ›Ô˘.
¶·Ú’fiÏ· ·˘Ù¿, Ì›· Ì·Ù·Ú›· Ô˘ ÏËÛÈ¿˙ÂÈ ÛÙÔ
¯ЪФУИОfi fiЪИФ ¯Ъ‹ЫЛ˜ МФЪВ› У· ВН·УЩПЛıВ› Ы‡УЩФМ·.
∆Ф Ы˘УИЫЩТМВУФ ¯ЪФУИОfi fiЪИФ ¯Ъ‹ЫЛ˜ ·У·БЪ¿КВЩ·И
(Ì‹Ó·˜/¤ÙÔ˜) ÛÙÔ Î¿Ùˆ ÙÌ‹Ì· Ù˘ Ì·Ù·Ú›·˜.
• °È· Ó· ·ÔʇÁÂÙ ÙË ‰È·ÚÚÔ‹ ˘ÁÚÒÓ, ‚Á¿ÏÙ ÙȘ
М·Щ·Ъ›В˜ fiЩ·У ЩФ ЩЛПВ¯ВИЪИЫЩ‹ЪИФ ‰ВУ ЪfiОВИЩ·И
У· ¯ЪЛЫИМФФИЛıВ› БИ· МВБ¿ПФ ¯ЪФУИОfi ‰И¿ЫЩЛМ·.
¶ƒ√™√Ã∏:
∂¿Ó ÙÔ ˘ÁÚfi ÙˆÓ Ì·Ù·ÚÈÒÓ ¤ÚıÂÈ Û ·ʋ Ì ÙÔ
‰¤ÚÌ· ‹ Ù· ÚÔ‡¯· Û·˜, ÍÂχÓÂÙ ηϿ Ì ηı·Úfi ÓÂÚfi.
∂¿Ó ÙÔ ˘ÁÚfi ÙˆÓ Ì·Ù·ÚÈÒÓ ¤ÚıÂÈ Û ·ʋ Ì ٷ Ì¿ÙÈ·
Û·˜, ÍÂχÓÂÙ¤ Ù· ηϿ Ì ηı·Úfi ÓÂÚfi ηÈ
Û˘Ì‚Ô˘Ï¢Ù›Ù ¤Ó· ÁÈ·ÙÚfi.
• ªЛУ ¯ЪЛЫИМФФИ‹ЩВ В·У·КФЪЩИ˙fiМВУВ˜ М·Щ·Ъ›В˜.
• ∞ÓÙÈηٷÛÙ‹ÛÙ ÙȘ 2 ̷ٷڛ˜ Ì ηÈÓÔ‡ÚȘ ÙÔ˘
ȉ›Ô˘ Ù‡Ô˘.
• ¶ВЩ¿НЩВ ЩИ˜ ¿‰ВИВ˜ М·Щ·Ъ›В˜ МВ ЩФУ О·Щ¿ППЛПФ
ÙÚfiÔ.
ŸЩ·У ЩФ ЩЛПВ¯ВИЪИЫЩ‹ЪИФ ‰ВУ МФЪВ› У· ¯ЪЛЫИМФФИЛıВ› (ПВИЩФ˘ЪБ›· ¿МВЫЛ˜ ·У¿БОЛ˜)
ŸЩ·У ВН·УЩПЛıФ‡У ФИ М·Щ·Ъ›В˜ ЩФ˘ ЩЛПВ¯ВИЪИЫЩЛЪ›Ф˘ ‹ ЩФ ЩЛПВ¯ВИЪИЫЩ‹ЪИФ ‰ВУ ПВИЩФ˘ЪБВ› ЫˆЫЩ¿, Л ПВИЩФ˘ЪБ›· ¤ОЩ·ОЩЛ˜
·У¿БОЛ˜ МФЪВ› У· Ъ·БМ·ЩФФИЛıВ› ¯ЪЛЫИМФФИТУЩ·˜ ЩФУ ‰И·ОfiЩЛ §∂π∆√Аƒ°π∞™ ∂∫∆∞∫∆∏™ ∞¡∞°∫∏™.
∆‡Ô˜ æÀ•∏ Î·È £∂ƒª∞¡™∏
1 ¶È¤ÛÙ ÙÔÓ ‰È·ÎfiÙË §∂π∆√Àƒ°π∞™
∂∫∆∞∫∆∏™ ∞¡∞°∫∏™.
•
∫¿ıВ КФЪ¿ Ф˘ И¤˙ВЩ·И Ф ‰И·ОfiЩЛ˜ §∂π∆√Аƒ°π∞™
∂∫∆∞∫∆∏™ ∞¡∞°∫∏™, Л МФУ¿‰· ı· ПВИЩФ˘ЪБ‹ЫВИ
ВЪУТУЩ·˜ ‰И·‰Ф¯ИО¿ ·fi ЩФУ ∆ƒ√¶√ §∂π∆√Аƒ°π∞™
∂∫∆∞∫∆∏™ ∞¡∞°∫∏™ жА•∏™, ЫЩФУ ∆ƒ√¶√
.
§∂π∆√Аƒ°π∞™ ∂∫∆∞∫∆∏™ ∞¡∞°∫∏™ £∂ƒª∞¡™∏™
О·И ЫЩФУ ∆ƒ√¶√ §∂π∆√Аƒ°π∞™ ¢π∞∫√¶∏™.
∂У ЩФ‡ЩФИ˜, ·fi ЩЛ ЫЩИБМ‹ Ф˘ Ф ‰И·ОfiЩЛ˜
§∂π∆√Аƒ°π∞™ ∂∫∆∞∫∆∏™ ∞¡∞°∫∏™ ¤¯ВИ ·ЩЛıВ› М›·
КФЪ¿, Л МФУ¿‰· ı· ПВИЩФ˘ЪБ‹ЫВИ ЫЩЛУ ‰ФОИМ·ЫЩИО‹
ПВИЩФ˘ЪБ›· БИ· 30 ПВЩ¿ ОИ ¤ВИЩ· Ф ЩЪfiФ˜ ПВИЩФ˘ЪБ›·˜
·ÏÏ¿˙ÂÈ, ÌÂÙ·‚·›ÓÔÓÙ·˜ ÛÙÔÓ ∆ƒ√¶√ §∂π∆√Àƒ°π∞™
∂∫∆∞∫∆∏™ ∞¡∞°∫∏™.
•
√И ПВЩФМ¤ЪВИВ˜ ЩФ˘ ∆ƒ√¶√А §∂π∆√Аƒ°π∞™
∂∫∆∞∫∆∏™ ∞¡∞°∫∏™ В›У·И fiˆ˜ К·›УФУЩ·И ·Ъ·О¿Щˆ.
∂У ЩФ‡ЩФИ˜, Ф ¤ПВБ¯Ф˜ ıВЪМФОЪ·Ы›·˜ ‰ВУ ‰Ф˘ПВ‡ВИ БИ·
30 ПВЩ¿ ЫЩЛУ ‰ФОИМ·ЫЩИО‹ ПВИЩФ˘ЪБ›· О·И Л МФУ¿‰· В›У·И
Ъ˘ıМИЫМ¤УЛ ТЫЩВ У· Ы˘УВ¯›ЫВИ ЩЛУ ПВИЩФ˘ЪБ›·.
∏ Щ·¯‡ЩЛЩ· ЩФ˘ ·УВМИЫЩ‹Ъ· В›У·И Ъ˘ıМИЫМ¤УЛ ЫЩФ А„ЛП‹
О·Щ¿ ЩЛУ ‰ФОИМ·ЫЩИО‹ ПВИЩФ˘ЪБ›· О·И ·ПП¿˙ВИ
МВЩ·‚·›УФУЩ·˜ ЫЩФ ª¤ЫЛ ‡ЫЩВЪ· ·fi 30 ПВЩ¿.
∆ЪfiФ˜ ПВИЩФ˘ЪБ›·˜ æÀ•∏
ƒ˘ıМИЫМ¤УЛ £ВЪМФОЪ·Ы›·
∆·¯‡ЩЛЩ· ·УВМИЫЩ‹Ъ· ª¤ÛË ª¤ÛË
√ÚÈ˙fiÓÙÈ· ÂÚÛ›‰· ∞˘ÙfiÌ·ÙË ∞˘ÙfiÌ·ÙË
•
√ ЩЪfiФ˜ ПВИЩФ˘ЪБ›·˜ К·›УВЩ·И ·fi ЩЛУ ∂У‰ВИОЩИО‹
§˘¯У›· §ВИЩФ˘ЪБ›·˜ ЩЛ˜ ВЫˆЩВЪИО‹˜ МФУ¿‰·˜, fiˆ˜
ВМК·У›˙ВЩ·И ЫЩ· ·Ъ·О¿Щˆ Ы¯‹М·Щ·.
∂У‰ВИОЩИО¤˜ П˘¯У›В˜ ПВИЩФ˘ЪБ›·˜
∂∫∆∞∫∆∏ ∞¡∞°∫∏
æÀ•∏™
∂∫∆∞∫∆∏ ∞¡∞°∫∏
£∂ƒª∞¡™∏™
¢π∞∫√¶∏
°И· У· ЫЩ·М·Щ‹ЫВЩВ ЩЛУ ПВИЩФ˘ЪБ›· ¤ОЩ·ОЩЛ˜ ·У¿БОЛ˜,
■
ȤÛÙ ̛· ÊÔÚ¿ ÙÔÓ ‰È·ÎfiÙË §∂π∆√Àƒ°π∞™
24Æ∫ 24Æ∫
£∂ƒª∞¡™∏
∂∫∆∞∫∆∏™ ∞¡∞°∫∏™ (fiЩ·У ЪfiОВИЩ·И БИ· ЩФУ ЩЪfiФ
ПВИЩФ˘ЪБ›·˜ ∂∫∆∞∫∆∏™ ∞¡∞°∫∏™ £∂ƒª∞¡™∏™) ‹
‰‡Ф КФЪ¤˜ (fiЩ·У ЪfiОВИЩ·И БИ· ЩФУ ЩЪfiФ ПВИЩФ˘ЪБ›·˜
∂∫∆∞∫∆∏™ ∞¡∞°∫∏™ жА•∏™).
∆‡Ô˜ ª√¡√ æÀ•∏
1 ¶È¤ÛÙ ÙÔÓ ‰È·ÎfiÙË §∂π∆√Àƒ°π∞™
∂∫∆∞∫∆∏™ ∞¡∞°∫∏™.
• ŸЩ·У ¤¯ВИ ·ЩЛıВ› Ф ‰И·ОfiЩЛ˜ §∂π∆√Аƒ°π∞™
∂∫∆∞∫∆∏™ ∞¡∞°∫∏™, Л МФУ¿‰· ı· ПВИЩФ˘ЪБ‹ЫВИ
ЪТЩ· ЫЩЛУ ‰ФОИМ·ЫЩИО‹ ПВИЩФ˘ЪБ›· БИ· 30 ПВЩ¿ ОИ
¤ВИЩ· Ф ЩЪfiФ˜ ПВИЩФ˘ЪБ›·˜ ·ПП¿˙ВИ МВЩ·‚·›УФУЩ·˜
ЫЩФУ ∆ƒ√¶√ §∂π∆√Аƒ°π∞™ ∂∫∆∞∫∆∏™ ∞¡∞°∫∏™
жА•∏™.
• √И ПВЩФМ¤ЪВИВ˜ ЩФ˘ ∆ƒ√¶√А §∂π∆√Аƒ°π∞™
∂∫∆∞∫∆∏™ ∞¡∞°∫∏™ жА•∏™ В›У·И fiˆ˜
К·›УФУЩ·И ·Ъ·О¿Щˆ. ∂У ЩФ‡ЩФИ˜, Ф ¤ПВБ¯Ф˜
ıВЪМФОЪ·Ы›·˜ ‰ВУ ‰Ф˘ПВ‡ВИ БИ· 30 ПВЩ¿ ЫЩЛУ
‰ФОИМ·ЫЩИО‹ ПВИЩФ˘ЪБ›· О·И Л МФУ¿‰· В›У·И
Ъ˘ıМИЫМ¤УЛ ТЫЩВ У· Ы˘УВ¯›ЫВИ ЩЛУ ПВИЩФ˘ЪБ›·.
∏ Щ·¯‡ЩЛЩ· ЩФ˘ ·УВМИЫЩ‹Ъ· В›У·И Ъ˘ıМИЫМ¤УЛ ЫЩФ
А„ЛП‹ О·Щ¿ ЩЛУ ‰ФОИМ·ЫЩИО‹ ПВИЩФ˘ЪБ›· О·И ·ПП¿˙ВИ
МВЩ·‚·›УФУЩ·˜ ЫЩФ ª¤ЫЛ ‡ЫЩВЪ· ·fi 30 ПВЩ¿.
∆ЪfiФ˜ ПВИЩФ˘ЪБ›·˜ æÀ•∏
ƒ˘ıМИЫМ¤УЛ £ВЪМФОЪ·Ы›·
∆·¯‡ЩЛЩ· ·УВМИЫЩ‹Ъ· ª¤ÛË
√ÚÈ˙fiÓÙÈ· ÂÚÛ›‰· ∞˘ÙfiÌ·ÙË
• √ ЩЪfiФ˜ ПВИЩФ˘ЪБ›·˜ К·›УВЩ·И ·fi ЩЛУ ∂У‰ВИОЩИО‹
§˘¯У›· §ВИЩФ˘ЪБ›·˜ ЩЛ˜ ВЫˆЩВЪИО‹˜ МФУ¿‰·˜, fiˆ˜
ВМК·У›˙ВЩ·И ЫЩ· ·Ъ·О¿Щˆ Ы¯‹М·Щ·.
∂У‰ВИОЩИО¤˜ П˘¯У›В˜ ПВИЩФ˘ЪБ›·˜
∂∫∆∞∫∆∏ ∞¡∞°∫∏
æÀ•∏™
¢π∞∫√¶∏
°È· Ó· ÛÙ·Ì·Ù‹ÛÂÙ ÙÔÓ ∆ƒ√¶√
■
§∂π∆√Àƒ°π∞™ ∂∫∆∞∫∆∏™ ∞¡∞°∫∏™
æÀ•∏™, ȤÛÙ ¿ÏÈ ÙÔÓ ‰È·ÎfiÙË
§∂π∆√Àƒ°π∞™ ∂∫∆∞∫∆∏™ ∞¡∞°∫∏™.
∫¿ıВ КФЪ¿ Ф˘ ·ЩИ¤Щ·И Ф ‰И·ОfiЩЛ˜, Ф ЩЪfiФ˜
ПВИЩФ˘ЪБ›·˜ ВУ·П¿ЫЫВЩ·И ·У¿МВЫ· ЫЩФУ ∆ƒ√¶√
§∂π∆√Àƒ°π∞™ ∂∫∆∞∫∆∏™ ∞¡∞°∫∏™ æÀ•∏™ ηÈ
ÛÙÔÓ ∆ƒ√¶√ §∂π∆√Àƒ°π∞™ ¢π∞∫√¶∏™.
24Æ∫
65
Page 66

ON/OFF
ON/OFF
TOO
WARM
TOO
COOL
FAN
VANE
MODE
STOP
START
HR.
I FEEL
COOL
DRY
HEAT
/FAN
∞À∆√ª∞∆∏ §∂π∆√Àƒ°π∞ ∞π™£∞¡√ª∞π “I FEEL...”
MODE
Operation Indicator
MODE
ON/OFF
FAN
TOO
WARM
TOO
COOL
VANE
MODE
ECONO COOL
STOP
START
HR.
MIN.
I FEEL
COOL
DRY
AMPM
CLOCK
˚C
AMPM
HEAT
/FAN
RESET CLOCK
ªВ ЩФУ ·˘ЩfiМ·ЩФ ЩЪfiФ ПВИЩФ˘ЪБ›·˜ ∞ИЫı¿УФМ·И “ (I FEEL...)”, МФЪФ‡У ·˘ЩfiМ·Щ· У· Ъ˘ıМИЫЩФ‡У ФИ
И‰·УИО¤˜ Ы˘Уı‹ОВ˜ ¯ТЪФ˘ МВ ¤У· МfiУФ ¿ЩЛМ· ЩФ˘ ОФ˘МИФ‡.
°И· У· ·Ъ¯›ЫВЩВ ЩЛУ ПВИЩФ˘ЪБ›·:
¶È¤ÛÙ ÙÔÓ ‰È·ÎfiÙË
■
ŸЩ·У ВИП¤БВЩВ ЩЛ “ ПВИЩФ˘ЪБ›· ∞ИЫı¿УФМ·И (I FEEL...)”, Ъ˘ıМ›˙ФУЩ·И
·˘ЩfiМ·Щ· ФИ И‰·УИО¤˜ Ы˘Уı‹ОВ˜ ıВЪМФОЪ·Ы›·˜.
.
°И· У· ЫЩ·М·Щ‹ЫВЩВ ЩЛУ ПВИЩФ˘ЪБ›·:
¶È¤ÛÙ ÙÔÓ ‰È·ÎfiÙË
■
○○○○○○○○○○○○○○○○○○○○○○○○○○○○○○○○○
∞Ó ÓÔÈÒıÂÙÂ ÂÏ·ÊÚ¿ ˙¤ÛÙË:
¶È¤ÛÙ ÙÔ ÎÔ˘Ì›
■
ŒУ· ¿ЩЛМ· ¯·МЛПТУВИ ЩЛ ıВЪМФОЪ·Ы›· О·Щ¿ ¤У· ‚·ıМfi ВЪ›Ф˘.
∞Ó ÓÔÈÒıÂÙ ÂÏ·ÊÚ¿ „‡¯Ú·:
¶È¤ÛÙ ÙÔ ÎÔ˘Ì›
■
ŒУ· ¿ЩЛМ· ·˘Н¿УВИ ЩЛ ıВЪМФОЪ·Ы›· О·Щ¿ ¤У· ‚·ıМfi ВЪ›Ф˘.
ŸÙ·Ó Ë ¤Ó‰ÂÈÍË “ (I FEEL...)” ‰ÂÓ ÂÌÊ·Ó›˙ÂÙ·È, ȤÛÙ ÙÔ
ÎÔ˘Ì›
ÁÈ· Ó· Ú˘ıÌ›ÛÂÙ ÙÔÓ ·˘ÙfiÌ·ÙÔ ÙÚfiÔ
ПВИЩФ˘ЪБ›·˜.
∫¿ıВ КФЪ¿ Ф˘ ЩФ ОФ˘М› И¤˘ВЩ·И, Ф ЩЪfiФ˜ ПВИЩФ˘ЪБ›·˜
·ÏÏ¿˙ÂÈ Ì ÙËÓ ·ÎfiÏÔ˘ıË ÛÂÈÚ¿:
→
(∞ºÀ°ƒ∞¡™∏) → (£∂ƒª∞¡™∏/∞¡∂ªπ™∆∏ƒ∞™)
(I FEEL...) → (æÀ•∏)
.
БИ· У· ¯·МЛПТЫВЩВ ЩЛ ıВЪМФОЪ·Ы›·.
БИ· У· ·˘Н‹ЫВЩВ ЩЛ ıВЪМФОЪ·Ы›·.
¶ВЪИБЪ·К‹ ЩФ˘ ЩЪfiФ˘ ПВИЩФ˘ЪБ›·˜ ∞π™£∞¡√ª∞π “I FEEL...”
§ВЩФМ¤ЪВИВ˜ЩЛ˜ ПВИЩФ˘ЪБ›·˜
∞У¿ПФБ· МВ ЩЛ ıВЪМФОЪ·Ы›· ЩФ˘ ¯ТЪФ˘, fiЩ·У ·Ъ¯›˙ВИ Л ПВИЩФ˘ЪБ›· ВИП¤БВЩ·И ·˘ЩfiМ·Щ· М›· ·fi ЩИ˜ ПВИЩФ˘ЪБ›В˜
жА•∏, ∞ºА°ƒ∞¡™∏ ‹ £∂ƒª∞¡™∏. шЫЩfiЫФ, В¿У Л ПВИЩФ˘ЪБ›· ·Ъ¯›ЫВИ 2 ТЪВ˜ МВЩ¿ ЩФ ЫЩ·М¿ЩЛМ·, Н·У·ВИП¤БВЩ·И
Ф ›‰ИФ˜ ЩЪfiФ˜ ПВИЩФ˘ЪБ›·˜ МВ ЩФУ ФФ›Ф ПВИЩФ˘ЪБФ‡ЫВ ЩФ ОПИМ·ЩИЫЩИОfi ЪИУ ЫЩ·М·Щ‹ЫВИ. √ ›‰ИФ˜ЩЪfiФ˜ Ф˘
ВИП¤¯ЩЛОВ ·Ъ¯ИО¿, ·Ъ·М¤УВИ ··Ъ¿ПП·ОЩФ˜ ·ОfiМЛ ОИ ·У Л ıВЪМФОЪ·Ы›· ЩФ˘ ¯ТЪФ˘ ·ПП¿НВИ. ∂¿У Л Ъ‡ıМИЫЛ ‰ВУ
Щ·ИЪИ¿˙ВИ МВ ЩЛ ıВЪМФОЪ·Ы›· ЩФ˘ ¯ТЪФ˘, ‰И·П¤НЩВ ЩЛУ О·Щ¿ППЛПЛ Ъ‡ıМИЫЛ И¤˙ФУЩ·˜ ЩФ ОФ˘М› ЩЪfiФ˘ ПВИЩФ˘ЪБ›·˜
.
§ВЩФМ¤ЪВИВ˜ ЩЛ˜ ·˘ЩfiМ·ЩЛ˜ ПВИЩФ˘ЪБ›·˜
£ВЪМФОЪ·Ы›· ЩФ˘ ¯ТЪФ˘ О·Щ¿
ЩЛУ ·Ъ¯‹ ЩЛ˜ ПВИЩФ˘ЪБ›·˜
¶ÂÚ›Ô˘ 25Æ ∫ÂÏÛ›Ô˘ ‹ ˘„ËÏfiÙÂÚË
¶ÂÚ›Ô˘ 25Æ - 23Æ ∫ÂÏÛ›Ô˘ ∞ºÀ°ƒ∞¡™∏ — ∞ºÀ°ƒ∞¡™∏ —
¶ÂÚ›Ô˘ 23Æ ∫ÂÏÛ›Ô˘ ‹ ¯·ÌËÏfiÙÂÚË
™∏ª∂πø™∏:
æÀ•∏:
ŸЩ·У Л ıВЪМФОЪ·Ы›· ЩФ˘ ¯ТЪФ˘ В›У·И 2ЖK ˘„ЛПfiЩВЪЛ ·fi ЩЛУ ВИПВБМ¤УЛ ıВЪМФОЪ·Ы›·, Л ЩВПВ˘Щ·›· ‰ВУ ı¿ЪВВ
У· МВЩ·‚ПЛıВ› ‰В‰ФМ¤УФ˘ fiЩИ ЩФ ОПИМ·ЩИЫЩИОfi ПВИЩФ˘ЪБВ› МВ ЫОФfi У· КЩ¿ЫВИ ЫЩЛ ıВЪМФОЪ·Ы›· ЫЩfi¯Ф
(ЪФВИПВБМ¤УЛ). ™’·˘Щ‹У ЩЛУ ВЪ›ЩˆЫЛ, ·Ъ·О·ПФ‡МВ ВЪИМ¤УВЩВ М¤¯ЪИ У· ¤ЫВИ Л ıВЪМФОЪ·Ы›· ЩФ˘ ¯ТЪФ˘
О·Щ¿ 2ЖK О¿Щˆ ·fi ЩЛУ ЪФВИПВБМ¤УЛ ıВЪМФОЪ·Ы›· О·И ЫЩЛ Ы˘У¤¯ВИ· ·ПП¿НЩВ ЩЛУ ЪФВИПВБМ¤УЛ ıВЪМФОЪ·Ы›·.
£∂ƒª∞¡™∏:
ŸЩ·У Л ıВЪМФОЪ·Ы›· ЩФ˘ ¯ТЪФ˘ В›У·И 2ЖK ¯·МЛПfiЩВЪЛ ·fi ЩЛУ ВИПВБМ¤УЛ ıВЪМФОЪ·Ы›·, Л ЩВПВ˘Щ·›· ‰ВУ ı¿ЪВВ У·
МВЩ·‚ПЛıВ› ‰В‰ФМ¤УФ˘ fiЩИ ЩФ ОПИМ·ЩИЫЩИОfi ПВИЩФ˘ЪБВ› МВ ЫОФfi У· КЩ¿ЫВИ ЫЩЛ ıВЪМФОЪ·Ы›· ЫЩfi¯Ф (ЪФВИПВБМ¤УЛ).
™’·˘Щ‹У ЩЛУ ВЪ›ЩˆЫЛ, ·Ъ·О·ПФ‡МВ ВЪИМ¤УВЩВ М¤¯ЪИ У· ·У‚› Л ıВЪМФОЪ·Ы›· ЩФ˘ ¯ТЪФ˘ ВЪ›Ф˘ 2ЖK ¿Уˆ ·fi
ЩЛУ ЪФВИПВБМ¤УЛ ıВЪМФОЪ·Ы›· О·И ЫЩЛ Ы˘У¤¯ВИ· ·ПП¿НЩВ ЩЛУ ЪФВИПВБМ¤УЛ ıВЪМФОЪ·Ы›·.
§ВЩФМ¤ЪВИВ˜ ЩˆУ ВУ‰В›НВˆУ ЩЛ˜ ВЫˆЩВЪИО‹˜ МФУ¿‰·˜
∏ П˘¯У›· ¤У‰ВИНЛ˜ ПВИЩФ˘ЪБ›·˜ ЫЩЛУ ‰ВНИ¿ ПВ˘Ъ¿ ЩЛ˜ ВЫˆЩВЪИО‹˜ МФУ¿‰·˜ ‰В›¯УВИ ЩЛУ О·Щ¿ЫЩ·ЫЛ ПВИЩФ˘ЪБ›·˜.
∆‡Ô˜ æÀ•∏ Î·È £∂ƒª∞¡™∏ ∆‡Ô˜ ª√¡√ æÀ•∏
∆ЪfiФ˜ ПВИЩФ˘ЪБ›·˜
∂Иı˘МЛЩ‹ ıВЪМФОЪ·Ы›·
∆ЪfiФ˜ ПВИЩФ˘ЪБ›·˜
∂Иı˘МЛЩ‹ ıВЪМФОЪ·Ы›·
(·Ú¯ÈÎfi ÛÙ¿‰ÈÔ) (·Ú¯ÈÎfi ÛÙ¿‰ÈÔ)
æÀ•∏
£∂ƒª∞¡™∏
∞Ó¿‚ÂÈ
∞Ó·‚ÔÛ‚‹ÓÂÈ
¢ÂÓ ·Ó¿‚ÂÈ
¶ÂÚ›Ô˘ 24Æ ∫ÂÏÛ›Ô˘
¶ÂÚ›Ô˘ 26Æ ∫ÂÏÛ›Ô˘
æÀ•∏
¶ÂÚ›Ô˘ 24Æ ∫ÂÏÛ›Ô˘
∞ºÀ°ƒ∞¡™∏ —
¶ВЪИБЪ·К‹ ЩЛ˜ “§∂π∆√Аƒ°π∞™ ∞А∆√ª∞∆∏™ ∂¶∞¡∂∫∫π¡∏™∏™”
• √И МФУ¿‰В˜ ·˘Щ¤˜ В›У·И ВКФ‰И·ЫМ¤УВ˜ МВ ПВИЩФ˘ЪБ›· ·˘ЩfiМ·ЩЛ˜ В·УВОО›УЛЫЛ˜. ŸЩ·У ·ФО·Щ·ЫЩ·ıВ› Л ·ЪФ¯‹
ЪВ‡М·ЩФ˜, ЩФ ОПИМ·ЩИЫЩИОfi ·Ъ¯›˙ВИ У· ПВИЩФ˘ЪБВ› ·˘ЩfiМ·Щ· fiˆ˜ В›¯В Ъ˘ıМИЫЩВ› МВ ЩФ ЩЛПВ¯ВИЪИЫЩ‹ЪИФ ЪИУ ЩЛ
‰И·ОФ‹ ЩФ˘ ЪВ‡М·ЩФ˜.
• ∞У В›¯·ЩВ ЫЩ·М·Щ‹ЫВИ ЩЛ ПВИЩФ˘ЪБ›· ЩЛ˜ МФУ¿‰·˜ МВ ЩФ ЩЛПВ¯ВИЪИЫЩ‹ЪИФ ЪИУ ЩЛ ‰И·ОФ‹ ЩФ˘ ЪВ‡М·ЩФ˜, ‰ВУ ı·
ЩВıВ› ЫВ ПВИЩФ˘ЪБ›· МВЩ¿ ЩЛУ ·ФО·Щ¿ЫЩ·ЫЛ ЩЛ˜ ЩЪФКФ‰ФЫ›·˜.
• ∞У Л МФУ¿‰· ‚ЪИЫОfiЩ·У ЫВ О·Щ¿ЫЩ·ЫЛ ПВИЩФ˘ЪБ›·˜ ¤ОЩ·ОЩЛ˜ ·У¿БОЛ˜ ЪИУ ЩЛ ‰И·ОФ‹ ЩЛ˜ ЩЪФКФ‰ФЫ›·˜, ı·
ЩВıВ› О·И ¿ПИ ЫВ ПВИЩФ˘ЪБ›· fiЩ·У ·ФО·Щ·ЫЩ·ıВ› ЩФ ЪВ‡М· fiˆ˜ В›¯В Ъ˘ıМИЫЩВ› МВ ЩФ ЩЛПВ¯ВИЪИЫЩ‹ЪИФ ЪИУ ЩЛ
ПВИЩФ˘ЪБ›· ¤ОЩ·ОЩЛ˜ ·У¿БОЛ˜.
• ∞Ó ÚÈÓ ·fi ÙË ‰È·ÎÔ‹ Ú‡̷ÙÔ˜ Ë Ú‡ıÌÈÛË Ù˘ ÌÔÓ¿‰·˜ ‚ÚÈÛÎfiÙ·Ó Û ڇıÌÈÛË “∞π™£∞¡√ª∞π” (“I FEEL...”),
Ф ЩЪfiФ˜ ПВИЩФ˘ЪБ›·˜ (жА•∏, ∞ºА°ƒ∞¡™∏ ‹ £∂ƒª∞¡™∏) ‰ВУ ·ФıЛОВ‡ВЩ·И ЫЩЛ МУ‹МЛ. ŸЩ·У ·ФО·Щ·ЫЩ·ıВ›
Л ·ЪФ¯‹ ЪВ‡М·ЩФ˜, Л МФУ¿‰· ВИП¤БВИ ЩЪfiФ ПВИЩФ˘ЪБ›·˜, О·Щ¿ ЩЛУ В·УВОО›УЛЫЛ, ·У¿ПФБ· МВ ЩЛ ıВЪМФОЪ·Ы›·
ЩФ˘ ‰ˆМ·Щ›Ф˘ О·И НВОИУ¿ У· ПВИЩФ˘ЪБВ› О·И ¿ПИ.
66
∂У‰ВИОЩИО¤˜ П˘¯У›В˜ ПВИЩФ˘ЪБ›·˜
¤Ó‰ÂÈÍË
∞˘Щfi ‰В›¯УВИ fiЩИ ЩФ ОПИМ·ЩИЫЩИОfi ПВИЩФ˘ЪБВ› БИ· У· ПЛЫИ¿ЫВИ
ЩЛУ ıВЪМФОЪ·Ы›·-ЫЩfi¯Ф. ¶·Ъ·О·ПФ‡МВ ВЪИМ¤УВЩВ БИ· П›БФ,
ТЫЩВ Л ıВЪМФОЪ·Ы›·-ЫЩfi¯Ф˜ У· ВИЩВ˘¯ıВ›.
∞˘Щfi ‰В›¯УВИ fiЩИ Л ıВЪМФОЪ·Ы›· ЩФ˘ ¯ТЪФ˘ ПЛЫИ¿˙ВИ ЩЛУ
ıВЪМФОЪ·Ы›·-ЫЩfi¯Ф.
(ªfiУФ ЫВ ВЪ›ЩˆЫЛ Ф˘ Л ВНˆЩВЪИО‹ МФУ¿‰· В›У·И ЩЛ˜ ЫВИЪ¿˜ ªГ∑)
¶·Ъ·О·ПФ‡МВ ·У·КВЪıВ›ЩВ ЫЩИ˜ ¶ПЛЪФКФЪИВЫ БИ·
ОПИМ·ЩИЫЩИОfi ФПП·ПФ‡ Ы˘ЫЩ‹М·ЩФ˜. (™ВП›‰· 67)
∫·Щ¿ЫЩ·ЫЛ ПВИЩФ˘ЪБ›·˜
¢И·КФЪ¿ МВЩ·Н‡ ВИı˘МЛЩ‹˜ ıВЪМФОЪ·Ы›·˜
(ıВЪМФОЪ·Ы›·-ЫЩfi¯Ф˜) О·И ıВЪМФОЪ·Ы›·˜ ¯ТЪФ˘
¶ВЪ›Ф˘ 2Ж ∫ВПЫ›Ф˘ ‹ ВЪИЫЫfiЩВЪФ
¶ÂÚ›Ô˘ 2Æ ∫ÂÏÛ›Ô˘ ‹ ÏÈÁfiÙÂÚÔ
—
Page 67

ON/OFF
MODE
ON/OFF
ON/OFF
Ã∂πƒ√∫π¡∏∆∏ §∂π∆√Àƒ°π∞ (æÀ•∏, ∞ºÀ°ƒ∞¡™∏,
TOO
WARM
TOO
COOL
FAN
VANE
ON/OFF
FAN
TOO
WARM
TOO
COOL
VANE
MODE
ECONO COOL
STOP
START
HR.
MIN.
I FEEL
COOL
DRY
AMPM
CLOCK
˚C
AMPM
HEAT
/FAN
RESET CLOCK
ON/OFF
FAN
TOO
WARM
TOO
COOL
VANE
MODE
ECONO COOL
STOP
START
HR.
MIN.
I FEEL
COOL
DRY
AMPM
CLOCK
˚C
AMPM
HEAT
/FAN
RESET CLOCK
VANE
1
2
3
4
5
∆∞ÃÀ∆∏∆∞ ƒ√∏™ ∞∂ƒ∞ ∫∞π ƒÀ£ªπ™∏ ∫∞∆∂À£À¡™∏™
£∂ƒª∞¡™∏/∞¡∂ªπ™∆∏ƒ∞™)
°И· У· ВИП¤НВЩВ ЩИ˜ ПВИЩФ˘ЪБ›В˜ жА•∏, ∞ºА°ƒ∞¡™∏ ‹ £∂ƒª∞¡™∏/∞¡∂ªπ™∆∏ƒ∞™
1 ¶È¤ÛÙ ÙÔÓ ‰È·ÎfiÙË
.
∏ Щ·¯‡ЩЛЩ· ЩЛ˜ ƒ√∏™ ∆√А ∞∂ƒ∞ О·И Л О·ЩВ‡ı˘УЫЛ МФЪФ‡У У· ВИПВБФ‡У fiˆ˜ ··ИЩВ›Щ·И.
°È· Ó· ·ÏÏ¿ÍÂÙ ÙËÓ Ù·¯‡ÙËÙ· Ù˘ ÚÔ‹˜ ÙÔ˘ ·¤Ú·, ȤÛÙ ÙÔ ÎÔ˘Ì›
■
.
∫¿ı ÊÔÚ¿ Ô˘ ÙÔ ÎÔ˘Ì› ·ÙȤٷÈ, Ë Ù·¯‡ÙËÙ· ·ÏÏ¿˙ÂÈ Ì ÙËÓ ÛÂÈÚ¿, ·fi
(÷ÌËÏ‹) → (ª¤ÛË) → (À„ËÏ‹) → (∞˘ÙfiÌ·ÙË)
2 ¢И·П¤НЩВ ЩФУ ЩЪfiФ ПВИЩФ˘ЪБ›·˜ И¤˙ФУЩ·˜ ЩФ ОФ˘М›
∫¿ıВ КФЪ¿ Ф˘ ·ЩИ¤Щ·И ЩФ ОФ˘М›, Ф ЩЪfiФ˜ ПВИЩФ˘ЪБ›·˜ ·ПП¿˙ВИ МВ ЩЛ
Ы˘¯УfiЩЛЩ·:
→
(∞π™£∞¡√ª∞π (π FEEL...)) → (æÀ•∏) → (∞ºÀ°ƒ∞¡™∏)
(£∂ƒª∞¡™∏/∞¡∂ªπ™∆∏ƒ∞™)
.
• ГЪЛЫИМФФИ‹ЫЩВ ЩЛ ‚·ıМ›‰·
(À„ËÏ‹) ÁÈ· Ó· „‡ÍÂÙÂ/ıÂÚÌ¿ÓÂÙÂ
ВЪИЫЫfiЩВЪФ ЩФ ¯ТЪФ.
• ∂¿У Ф ıfiЪ˘‚Ф˜ ПВИЩФ˘ЪБ›·˜ ЩФ˘ ОПИМ·ЩИЫЩИОФ‡ Ы·˜ ВУФ¯ПВ› О·Щ¿ ЩЛУ
‰И¿ЪОВИ· ЩФ˘ ‡УФ˘, ¯ЪЛЫИМФФИ‹ЫЩВ ЩЛУ ВБОФ‹
(÷ÌËÏ‹).
∆ЪfiФ˜ ПВИЩФ˘ЪБ›·˜ £∂ƒª∞¡™∏ / ∞¡∂ªπ™∆∏ƒ∞™
∂П¤БНЩВ ЩФУ Щ‡Ф ЩФ˘ ОПИМ·ЩИЫЩИОФ‡.
T‡Ô˜ ∆ЪfiФ˜ ПВИЩФ˘ЪБ›·˜
æÀ•∏ Î·È £∂ƒª∞¡™∏ £∂ƒª∞¡™∏
ª√¡√ æÀ•∏ ∞¡∂ªπ™∆∏ƒ∞™
°È· Ó· ·ÏÏ¿ÍÂÙ ÙËÓ Î·Ù‡ı˘ÓÛË ÂÍ·ÁˆÁ‹˜ Ù˘ ƒ√∏™ ∆√À ∞∂ƒ∞
■
ηٷÎfiÚ˘Ê·, ȤÛÙ ÙÔ ÎÔ˘Ì›
.
∫¿ı ÊÔÚ¿ Ô˘ ÙÔ ÎÔ˘Ì› ·ÙȤٷÈ, Ë ÁˆÓ›· ÙÔ˘ √ÚÈ˙fiÓÙÈ· ÂÚÛ›‰· ·ÏÏ¿˙ÂÈ
ÌÂ ÙËÓ ÛÂÈÚ¿, ·fi
(1) → (2) → (3) → (4) → (5) →
(¶∂ƒπ™∆ƒ√º∏) → (∞˘ÙfiÌ·ÙË)
°И· У· ЫЩ·М·Щ‹ЫВЩВ ЩЛУ ПВИЩФ˘ЪБ›·:
¶È¤ÛÙ ÙÔÓ ‰È·ÎfiÙË
■
.
Х·Н О·И ¤¯ВИ Ъ˘ıМИЫЩВ› Ф ЩЪfiФ˜ ПВИЩФ˘ЪБ›·˜, Л ПВИЩФ˘ЪБ›· ·Ъ¯›˙ВИ ЫЩФУ
○○○○○○○○○○○○○○○○○○○○○○○○○○○○○○○○○○○○○○○○○○○○○○○○○
ЩЪfiФ Ф˘ В›¯В Ъ˘ıМИЫЩВ› ЪФЛБФ˘М¤Уˆ˜, И¤˙ФУЩ·˜ ·ПТ˜ ЩФУ ‰И·ОfiЩЛ
ŸЩ·У Ъ¤ВИ У· ·ПП·¯ıВ› Л Ъ˘ıМИЫМ¤УЛ ıВЪМФОЪ·Ы›·:
■
•
¶È¤ÛÙ ÙÔ ÎÔ˘Ì›
•
¶È¤ÛÙ ÙÔ ÎÔ˘Ì›
БИ· У· ¯·МЛПТЫВЩВ ЩЛ ıВЪМФОЪ·Ы›·. ¶И¤˙ФУЩ·˜ М›· КФЪ¿ Л ıВЪМФОЪ·Ы›· ¯·МЛПТУВИ О·Щ¿ 1Ж ∫ВПЫ›Ф˘ ВЪ›Ф˘.
БИ· У· ·˘Н‹ЫВЩВ ЩЛ ıВЪМФОЪ·Ы›·. ¶И¤˙ФУЩ·˜ М›· КФЪ¿ Л ıВЪМФОЪ·Ы›· ·˘Н¿УВИ О·Щ¿ 1Ж ∫ВПЫ›Ф˘ ВЪ›Ф˘.
.
™ЩЛУ ПВИЩФ˘ЪБ›· ЩЛ˜ £∂ƒª∞¡™∏™
• ∂¿У ЩФ ОПИМ·ЩИЫЩИОfi ·ФЪЪФК¿ ˘ВЪ‚ФПИО‹ ˙¤ЫЩЛ ·fi ЩФУ ·¤Ъ·, ЩФ МФЩ¤Ъ ›Ыˆ˜ ˘ВЪКФЪЩˆıВ›. ™‡МКˆУ· МВ
ЩЛУ ·УЩ›ПЛ„Л ВУfi˜ МИОЪФ¸ФПФБИЫЩ‹, Ф ·УВМИЫЩ‹Ъ·˜ ЩЛ˜ ВНˆЩВЪИО‹˜ МФУ¿‰·˜ ЫЩ·М·Щ¿ ·˘ЩfiМ·Щ· ЩЛ ПВИЩФ˘ЪБ›·
ЩФ˘, ¤ЩЫИ ТЫЩВ У· ЪФЫЩ·ЩВ‡ЫВИ ЩФ ОПИМ·ЩИЫЩИОfi.
ŸЩ·У Ф ·УВМИЫЩ‹Ъ·˜ ЩЛ˜ ВНˆЩВЪИО‹˜ МФУ¿‰·˜ В›У·И ЫЩ·М·ЩЛМ¤УФ˜, МФЪВ› У· ‰ЛМИФ˘ЪБЛıВ› ¿БФ˜ ЫЩЛУ
ВНˆЩВЪИО‹ МФУ¿‰·, ·ПП¿ ·˘Щfi ‰ВУ ·ФЩВПВ› Ъfi‚ПЛМ·.
™ЩЛУ ПВИЩФ˘ЪБ›· ЩЛ˜ ∞ºА°ƒ∞¡™∏™
• ¢ВУ МФЪВ› У· Б›УВИ ¤ПВБ¯Ф˜ ЩЛ˜ ıВЪМФОЪ·Ы›·˜ (Ъ‡ıМИЫЛ ıВЪМФОЪ·Ы›·˜).
™∏ª∂πø™∏:
• ∫·Щ¿ ЩЛ ПВИЩФ˘ЪБ›· ж‡НЛ˜, fiЩ·У ЩФ ОПИМ·ЩИЫЩИОfi ПВИЩФ˘ЪБВ› МВ Ъ˘ıМИЫМ¤УФ ЩФ √ЪИ˙fiУЩИ· ВЪЫ›‰· ЫЩИ˜ ı¤ЫВИ˜
(5) ÁÈ· Ì›· ÒÚ·, Ë Î·Ù‡ı˘ÓÛË Ù˘ ƒ√∏™ ∆√À ∞∂ƒ∞ Ú˘ıÌ›˙ÂÙ·È ·˘ÙfiÌ·Ù· Û ٤ÙÔÈÔ Â›Â‰Ô Ô˘ Ó· ÂÌÔ‰›˙ÂÈ ÙÔ
ηÈ
ÛÙ¿ÍÈÌÔ ÙÔ˘ Û˘Ì˘Îӈ̤ÓÔ˘ ÓÂÚÔ‡.
• ƒ˘ıМ›ЫЩВ ЩЛУ О·Щ·ОfiЪ˘КЛ О·ЩВ‡ı˘УЫЛ ¯ЪЛЫИМФФИТУЩ·˜ ЩФ ЩЛПВ¯ВИЪИЫЩ‹ЪИФ. ∂¿У Щ· √ЪИ˙fiУЩИ· ВЪЫ›‰· МВЩ·ОИУЛıФ‡У
¯ВИЪФО›УЛЩ·, МФЪВ› У· ·ЪФ˘ЫИ·ЫЩВ› ‚П¿‚Л.
• ∫·Щ¿ ЩЛ ПВИЩФ˘ЪБ›· ı¤ЪМ·УЫЛ˜, В¿У Л ıВЪМФОЪ·Ы›· ЪФ‹˜ ЩФ˘ ·¤Ъ· В›У·И ФП‡ ¯·МЛП‹ ‹ fiЩ·У ¤¯ВИ Б›УВИ ·fi„˘НЛ, Л ı¤ЫЛ
ÙÔ˘ √ÚÈ˙fiÓÙÈ· ÂÚÛ›‰· Ú˘ıÌ›˙ÂÙ·È ÛÙÔ
• ∏ ıВЪМФОЪ·Ы›· ЩФ˘ ¯ТЪФ˘ В›У·И ВП·КЪ¿ ¯·МЛПfiЩВЪЛ ·fi ·˘Щ‹У ЩФ˘ ЩЪfiФ˘ ПВИЩФ˘ЪБ›·˜.
√И ПВЩФМ¤ЪВИВ˜ ЩˆУ ВУ‰В›НВˆУ ЩЛ˜ ФıfiУЛ˜ ЩЛ˜ ВЫˆЩВЪИО‹˜ МФУ¿‰·˜ ВНЛБФ‡УЩ·И ЫЩЛ ЫВП›‰· 66.
■
™∏ª∂πш™∏:
ŸЩ·У Л ıВЪМФОЪ·Ы›· ВЪИ‚¿ППФУЩФ˜ В›У·И ФП‡ ˘„ЛП‹, Л ıВЪМФОЪ·Ы›· ЩФ˘ ‰ˆМ·Щ›Ф˘ ВУ‰¤¯ВЩ·И У· МЛУ Кı¿ЫВИ ЩЛУ
О·ıФЪИЫМ¤УЛ ıВЪМФОЪ·Ы›·, ·КФ‡ Л МФУ¿‰· ПВИЩФ˘ЪБВ› БИ· У· „‡НВИ ЩФ ‰ˆМ¿ЩИФ ˘fi МВБ¿ПФ КФЪЩ›Ф.
¶ПЛЪФКФЪИВЫ БИ· ОПИМ·ЩИЫЩИОfi ФПП·ПФ‡ Ы˘ЫЩ‹М·ЩФ˜ (∂НˆЩВЪИО‹ МФУ¿‰·: ЫВИЪ¿ ªГ∑)
∆Ф ОПИМ·ЩИЫЩИОfi ФПП·ПФ‡ Ы˘ЫЩ‹М·ЩФ˜ (∂НˆЩВЪИО‹ МФУ¿‰·: ЫВИЪ¿ ªГ∑), МФЪВ› У· Ы˘У‰¤ЫВИ ВЪИЫЫfiЩВЪВ˜ ·fi ‰‡Ф МФУ¿‰В˜ МВ М›· ВНˆЩВЪИО‹ МФУ¿‰·.
∞У¿ПФБ· МВ ЩЛ ¯ˆЪЛЩИОfiЩЛЩ·, МФЪФ‡У У· ЩВıФ‡У Щ·˘Щfi¯ЪФУ· ЫВ ПВИЩФ˘ЪБ›· ‰‡Ф ‹ О·И ВЪИЫЫfiЩВЪВ˜ ВЫˆЩВЪИО¤˜ МФУ¿‰В˜.
•
ŸЩ·У ЪФЫ·ıВ›ЩВ У· ı¤ЫВЩВ Щ·˘Щfi¯ЪФУ· ЫВ ПВИЩФ˘ЪБ›· ВЪИЫЫfiЩВЪВ˜ ·fi М›· ВЫˆЩВЪИО¤˜ МФУ¿‰В˜, ЩЛ М›· БИ· ЩЛУ „‡НЛ О·И ЩЛУ ¿ППЛ БИ·
ЩЛ ı¤ЪМ·УЫЛ, ПВИЩФ˘ЪБВ› Ф ЩЪfiФ˜ ПВИЩФ˘ЪБ›·˜ ЩЛ˜ ВЫˆЩВЪИО‹˜ МФУ¿‰·˜ Ф˘ ¤¯ВИ ВИПВ¯ıВ› УˆЪ›ЩВЪ·. √И ¿ППВ˜ ВЫˆЩВЪИО¤˜ МФУ¿‰В˜ Ф˘
ı· ·Ъ¯›ЫФ˘У У· ПВИЩФ˘ЪБФ‡У ·ЪБfiЩВЪ· ‰ВУ МФЪФ‡У У· ПВИЩФ˘ЪБ‹ЫФ˘У ВУТ ЫЩЛУ ФıfiУЛ ЩФ˘˜ ВМК·У›˙ВЩ·И Л ı¤ЫЛ ПВИЩФ˘ЪБ›·˜. (µП. ›У·О·
∂У‰ВИОЩИО‹˜ §˘¯У›·˜ §ВИЩФ˘ЪБ›·˜ ЫЩЛ ЫВП›‰· 66.)
™ЩЛУ ВЪ›ЩˆЫЛ ·˘Щ‹ ·Ъ·О·ПФ‡МВ Ъ˘ıМ›ЫЩВ fiПВ˜ ЩИ˜ ВЫˆЩВЪИО¤˜ МФУ¿‰В˜ ЫЩФУ ›‰ИФ ЩЪfiФ ПВИЩФ˘ЪБ›·˜.
•
ŸЩ·У Л ВЫˆЩВЪИО‹ МФУ¿‰· ·Ъ¯›˙ВИ ЩЛ ПВИЩФ˘ЪБ›· ЩЛ˜ О·Щ¿ ЩЛУ ‰И¿ЪОВИ· Ф˘ Л ВНˆЩВЪИО‹ МФУ¿‰· О¿УВИ ·fi„˘НЛ, О·ı˘ЫЩВЪВ› МВЪИО¿ ПВЩ¿
(ЩФ ФП‡ 10 ПВЩ¿) М¤¯ЪИ У· ‚Б¿ПВИ ıВЪМfi ·¤Ъ·.
•
™ЩЛ ПВИЩФ˘ЪБ›· ı¤ЪМ·УЫЛ˜, МФЪВ› У· ˙ВЫЩ·ıВ› Л ВЫˆЩВЪИО‹ МФУ¿‰· Л ФФ›· ‰ВУ ПВИЩФ˘ЪБВ› ‹ МФЪВ› У· ·ОФ˘ЫЩВ› Ф ‹¯Ф˜ ЩФ˘ „˘ОЩИОФ‡ Ф˘ Ъ¤ВИ.
∞˘Щfi ‰ВУ ·ФЩВПВ› ¤У‰ВИНЛ ‚П¿‚Л˜ О·И ФКВ›ПВЩ·И ЫЩФ fiЩИ ЩФ „˘ОЩИОfi Ъ¤ВИ Ы˘УВ¯Т˜ М¤Ы· ЫЩЛУ ВЫˆЩВЪИО‹ МФУ¿‰· Л ФФ›· ‰ВУ ПВИЩФ˘ЪБВ›.
¶ВЪИБЪ·К‹ ЩЛ˜ “§∂π∆√Аƒ°π∞™ ∞А∆√ª∞∆∏™ ∂¶∞¡∂∫∫π¡∏™∏™”
§∂π∆√Àƒ°π∞ ∂§∂°Ã√À ∞À∆√ª∞∆∏™
ƒ√∏™ ∆√À ∞∂ƒ∞
ŸЩ·У ВИП¤БВЩ·И Ф ∞А∆√ª∞∆√™ ЩЪfiФ˜ ПВИЩФ˘ЪБ›·˜
МВ ЩФ ОФ˘М› ¶ЩВЪ‡БИФ
ВЪЫ›‰· Ъ˘ıМ›˙ВЩ·И ·˘ЩfiМ·Щ· ТЫЩВ У· ·УЩИЫЩФИ¯В›
ЫЩФУ ЩЪfiФ ПВИЩФ˘ЪБ›·˜, БИ· ·ФЩВПВЫМ·ЩИОfiЩВЪЛ
ПВИЩФ˘ЪБ›·.
(1) £∂ƒª∞¡™∏
• ŸЩ·У Л ıВЪМФОЪ·Ы›· ЪФ‹˜ ЩФ˘ ·¤Ъ· В›У·И ФП‡
¯·ÌËÏ‹, Ô ·¤Ú·˜ ‚Á·›ÓÂÈ ÚÔ˜ Ù· ¤Íˆ ÔÚÈ˙ÔÓÙ›ˆ˜.
• ŸЩ·У ·˘Н¿УВЩ·И Л ıВЪМФОЪ·Ы›· ЪФ‹˜
ÙÔ˘ ·¤Ú·, Ô ·¤Ú·˜ ‚Á·›ÓÂÈ ÚÔ˜ Ù· οو.
(2) æÀ•∏, ∞ºÀ°ƒ∞¡™∏
√ ·¤Ú·˜ ‚Á·›ÓÂÈ ÚÔ˜ Ù· ¤Íˆ ÔÚÈ˙ÔÓÙ›ˆ˜.
(3) ∞¡∂ªπ™∆∏ƒ∞™
√ ·¤Ú·˜ ‚Á·›ÓÂÈ ÚÔ˜ Ù· οو.
, Ë ı¤ÛË ÙˆÓ √ÚÈ˙fiÓÙÈ·
∞Ó·ÊÂÚı›Ù ÛÙËÓ ÛÂÏ. 66.
¶∂ƒπ™∆ƒ√ºπ∫∏ §∂π∆√Àƒ°π∞
°И· ЩЛУ ‰И¿¯˘ЩЛ ЪФ‹ ЩФ˘ ·¤Ъ· ЫЩФ ¯ТЪФ ·’ ¿ОЪЛ Ы’ ¿ОЪЛ, ¯ЪЛЫИМФФИ‹ЫЩВ
ЩЛУ ВЪИЫЩЪФКИО‹ ПВИЩФ˘ЪБ›·.
™˘УИЫЩТМВУЛ ‰И¿Щ·НЛ ЩФ˘ √ЪИ˙fiУЩИ· ВЪЫ›‰·
™˘У‹ıˆ˜ ¯ЪЛЫИМФФИ‹ЩВ ЩЛУ
ГЪЛЫИМФФИ‹ЫЩВ ЩЛ ı¤ЫЛ
(∞˘ÙfiÌ·ÙË).
(1) ‹
æÀ•∏
∞ºÀ°ƒ∞¡™∏
(2) ЫЩФУ ЩЪfiФ ПВИЩФ˘ЪБ›·˜ жА•∏ ‹
∞ºА°ƒ∞¡™∏ О·И ¯ЪЛЫИМФФИ‹ЫЩВ ЩИ˜ ı¤ЫВИ˜
¤ˆ˜
(5) ЫЩФУ ЩЪfiФ ПВИЩФ˘ЪБ›·˜ £∂ƒª∞¡™∏™,
fiÙ·Ó Ú˘ıÌ›˙ÂÙ ·Ó¿ÏÔÁ· Ì ÙȘ ··ÈÙ‹ÛÂȘ Û·˜.
(3)
£∂ƒª∞¡™∏
(1).
°È· Ó· ·ÏÏ¿ÍÂÙ ÙËÓ ÔÚÈ˙fiÓÙÈ· ηÙ‡ı˘ÓÛË
■
ÚÔ‹˜ ÙÔ˘ ·¤Ú·, ÌÂÙ·ÎÈÓ‹ÛÙ ÙÔ Î¿ıÂÙ˜
ÙÂÚ‡ÁÈÔ Ì ٷ ¯¤ÚÈ·.
ƒ˘ıМ›ЫЩВ ЩФ ЩВЪ‡БИФ ЪИУ ·fi ЩЛУ ¤У·ЪНЛ ПВИЩФ˘ЪБ›·˜.
∂КfiЫФУ Щ· √ЪИ˙fiУЩИ· ВЪЫ›‰· МВЩ·ОИУФ‡УЩ·И ·˘ЩФМ¿Щˆ˜,
Щ· ‰¿¯Щ˘П¿ Ы·˜ МФЪВ› У· И·ЫЩФ‡У.
(4)
67
Page 68

§∂π∆√Àƒ°π∞ æÀ•∏™ ∂C√NO (ECONO COOL)
ON/OFF
FAN
TOO
WARM
TOO
COOL
VANE
MODE
ECONO COOL
STOP
START
HR.
MIN.
I FEEL
COOL
DRY
AMPM
CLOCK
˚C
AMPM
HEAT
/FAN
RESET CLOCK
START
HR.
MIN.
HR.
MIN.
START
STOP
HR.
MIN.
HR.
MIN.
STOP
ECONO COOL
ECONO COOL
VANE
FAN
TOO
WARM
TOO
COOL
√∆∞¡ ∆√ ∫§πª∞∆π™∆π∫√ ¢∂¡ ¶ƒ√∫∂π∆∞π ¡∞
ГЪЛЫИМФФИ‹ЫЩВ ·˘Щ‹ ЩЛ ПВИЩФ˘ЪБ›· fiЩ·У ВИı˘МВ›ЩВ У· УФИТıВЩВ ¿УВЩ· ЫЩФУ ЩЪfiФ ПВИЩФ˘ЪБ›·˜ жА•∏™ О·И ·Ъ¿ППЛП· У· О¿УВЩВ ФИОФУФМ›· ЫВ ВУ¤ЪБВИ·.
¡· Ъ·БМ·ЩФФИВ›ЩВ ЩФ˘˜ ·Ъ·О¿Щˆ ¯ВИЪИЫМФ‡˜ fiЩ·У Л МФУ¿‰·
ПВИЩФ˘ЪБВ› ЫЩФУ Г∂πƒ√∫π¡∏∆√ ЩЪfiФ ПВИЩФ˘ЪБ›·˜ жА•∏™.
¶È¤ÛÙ ÙÔ ÎÔ˘Ì›
■
ŸЩ·У ЫЩФУ ЩЪfiФ ПВИЩФ˘ЪБ›·˜ жА•∏™ ¤¯ВИ ВИПВ¯ıВ› Л ПВИЩФ˘ЪБ›·
(жА•∏™ ∂C√NO (ECONO COOL)) ЩФ ОПИМ·ЩИЫЩИОfi Ъ·БМ·ЩФФИВ›
ВЪИЫЩЪФКИО‹ ПВИЩФ˘ЪБ›· О¿УФУЩ·˜ ·ППВ¿ППЛПФ˘˜ О‡ОПФ˘˜, Ы‡МКˆУ· МВ
ЩЛ ıВЪМФОЪ·Ы›· ЩФ˘ ОПИМ·ЩИЫЩИОФ‡.
∂›ЫЛ˜ Л ƒА£ªπ™∏ £∂ƒª√∫ƒ∞™π∞™ Ъ˘ıМ›˙ВЩ·И ·˘ЩФМ¿Щˆ˜ О·Щ¿ 2Ж ∫ВПЫ›Ф˘
˘„ЛПfiЩВЪ· ·’ fiЩИ ЫЩФУ ЩЪfiФ ПВИЩФ˘ЪБ›·˜ жА•∏™.
.
°И· У· ·О˘ЪТЫВЩВ ЩЛ ПВИЩФ˘ЪБ›· жА•∏™ ∂C√NO (ECONO COOL):
•·Ó·È¤ÛÙ ÙÔ ÎÔ˘Ì›
■
○○○○○○○○○○○○○○○○○○○○○○○○○○○○○○○○○
• ŸÙ·Ó Â›Ó·È ·ÙË̤ÓÔ ÙÔ ÎÔ˘Ì›
ПВИЩФ˘ЪБ›·˜ жА•∏™ ∂C√NO (ECONO COOL) ·ПП¿˙ВИ Ф ЩЪfiФ˜ ПВИЩФ˘ЪБ›·˜,
Ф ЩЪfiФ˜ ПВИЩФ˘ЪБ›·˜ жА•∏ ∂C√NO (ECONO COOL) ·О˘ЪТУВЩ·И.
• ∆Ô ÎÔ˘Ì›
√¡/√FF (ВВНЛБВ›Щ·И ·Ъ·О¿Щˆ) В›У·И ‰И·ı¤ЫИМ·.
∆И ЫЛМ·›УВИ Л ПВИЩФ˘ЪБ›· “жА•∏ ECONO (ECONO COOL)”;
¶ВЪИЫЩЪВКfiМВУЛ ЪФ‹ ЩФ˘ ·¤Ъ· (·ПП·Б‹ ЪФ‹˜ ЩФ˘ ·¤Ъ·) ‰›УВИ ЩЛУ ·›ЫıЛЫЛ ВП·КЪИ¿˜ „‡¯Ъ·˜ ЫВ Ы‡БОЪИЫЛ МВ ЩЛ ПВИЩФ˘ЪБ›· ЩЛ˜
ЫЩ·ıВЪ‹˜ ЪФ‹˜ ЩФ˘ ·¤Ъ·. ŒЩЫИ ·Ъ’ fiПФ Ф˘ Л ·˘ЩfiМ·Щ· Ъ˘ıМИ˙fiМВУЛ ıВЪМФОЪ·Ы›· В›У·И 2Ж ∫ВПЫ›Ф˘ ˘„ЛПfiЩВЪЛ В›У·И ‰˘У·ЩfiУ
¯ˆЪ›˜ О·У¤У· Ъfi‚ПЛМ· У· ‚Ъ›ЫОВЩ·И ЫВ ВУ¤ЪБВИ· Л ПВИЩФ˘ЪБ›· ЩЛ˜ „‡НЛ˜. ∆Ф ·ФЩ¤ПВЫМ· В›У·И, fiЩИ ¤ЩЫИ ВНФИОФУФМВ›Щ·И ВУ¤ЪБВИ·.
, ÙÔ ÎÔ˘Ì›
.
‹ ÙÔ ÎÔ˘Ì›
‹ fiÙ·Ó Î·Ù¿ ÙËÓ ‰È¿ÚÎÂÈ· Ù˘
Î·È Ô ¯ÚÔÓԉȷÎfiÙ˘
§∂π∆√Àƒ°π∞ ∆√À Ã√¡√¢π∞∫√¶∆∏ (∂¡∆√™/∂∫∆√™) (∆πª∂R √¡/√FF)
∂›Ó·È ‚ÔÏÈÎfi Ó· ‚¿ÏÂÙ ÙÔÓ ¯ÚÔÓԉȷÎfiÙË ÁÈ· ÙËÓ ÒÚ· Ô˘ ¿Ù ÁÈ· ‡ÓÔ, fiÙ·Ó Á˘ÚÓ¿Ù ۛÙÈ, fiÙ·Ó Í˘Ó¿ÙÂ, ÎÏ.
¶Ò˜ Ó· Ú˘ıÌ›ÛÂÙ ÙÔÓ ¯ÚÔÓԉȷÎfiÙË ∂¡∆√™ (∆πª∂R √¡)
1 ¶È¤ÛÙ ÙÔ ÎÔ˘Ì›
ПВИЩФ˘ЪБ›·˜.
∫¿ıВ КФЪ¿ Ф˘ ЩФ ОФ˘М› ·ЩИ¤Щ·И, Л ПВИЩФ˘ЪБ›·
ВУ·ПП¿ЫВЩ·И МВЩ·Н‡ ∂¡∆√™ О·И ∂∫∆√™ (√¡/√FF).
ηٿ ÙËÓ ‰È¿ÚÎÂÈ· Ù˘
2 ƒ˘ıÌ›ÛÙ ÙËÓ ÒÚ· ÙÔ˘ ¯ÚÔÓԉȷÎfiÙË
¯ЪЛЫИМФФИТУЩ·˜ Щ· ОФ˘МИ¿
∫¿ı ÊÔÚ¿ Ô˘ ÙÔ ÎÔ˘Ì›
¯ÚfiÓÔ˜ ·˘Í¿ÓÂÙ·È Î·Ù¿ Ì›· ÒÚ·Ø Î¿ı ÊÔÚ¿ Ô˘ ÙÔ ÎÔ˘Ì›
·ÙȤٷÈ, Ô Ú˘ıÌÈṲ̂ÓÔ˜ ¯ÚfiÓÔ˜ ·˘Í¿ÓÂÙ·È Î·Ù¿ 10 ÏÂÙ¿.
·ÙȤٷÈ, Ô Ú˘ıÌÈṲ̂ÓÔ˜
°È· Ó· ·Ô‰ÂÛ̇ÛÂÙ ÙÔÓ ¯ÚÔÓԉȷÎfiÙË ∂¡∆√™:
¶È¤ÛÙ ÙÔ ÎÔ˘Ì›
■
¶ЪФБЪ·ММ·ЩИЫМfi˜ ПВИЩФ˘ЪБ›·˜ ЩФ˘ ¯ЪФУФ‰И·ОfiЩЛ
√ ¯ЪФУФ‰И·ОfiЩЛ˜ ∂¡∆√™ О·И ∂∫∆√™, МФЪВ› У· ¯ЪЛЫИМФФИЛıВ› ЫВ Ы˘У‰˘·ЫМfi М·˙›. √ ¯ЪФУФ‰И·ОfiЩЛ˜ ı· ВОЩВП¤ЫВИ
ЩЛУ ПВИЩФ˘ЪБ›· Ф˘ В›У·И ¯ЪФУИО¿ ПЛЫИ¤ЫЩВЪЛ. (∆Ф ЫЛМ¿‰И “ ” ‰В›¯УВИ ЩЛ ЫВИЪ¿ ЩˆУ ПВИЩФ˘ЪБИТУ ЩФ˘ ¯ЪФУФ‰И·ОfiЩЛ.)
• ∂¿У ‰ВУ ¤¯ВИ Ъ˘ıМИЫЩВ› Л ЩЪ¤¯Ф˘Ы· ТЪ·, Ф ¯ЪФУФ‰И·ОfiЩЛ˜ ‰ВУ МФЪВ› У· ПВИЩФ˘ЪБ‹ЫВИ.
™∏ª∂πш™∏:
™В ВЪ›ЩˆЫЛ Ф˘ ЩФ ОПИМ·ЩИЫЩИОfi ·ФЫ˘У‰ВıВ› ·fi ЩЛУ Ъ›˙· ‹ Ы˘М‚В› ‰И·ОФ‹ ЪВ‡М·ЩФ˜ ВУТ В›У·И ВУВЪБФФИЛМ¤УФ˜ Ф ¯ЪФУФ‰И·ОfiЩЛ˜ ·˘ЩfiМ·ЩЛ˜
ВОО›УЛЫЛ˜/ЩВЪМ·ЩИЫМФ‡ ПВИЩФ˘ЪБ›·˜ (AUTO START/STOP), Л Ъ‡ıМИЫЛ ЩФ˘ ¯ЪФУФ‰И·ОfiЩЛ ·О˘ЪТУВЩ·И. ∫·ıТ˜ ·˘Щ¿ Щ· МФУЩ¤П· ‰И·ı¤ЩФ˘У ПВИЩФ˘ЪБ›· ·˘ЩfiМ·ЩЛ˜
В·УВОО›УЛЫЛ˜, ЩФ ОПИМ·ЩИЫЩИОfi ı· НВОИУ‹ЫВИ ЩЛ ПВИЩФ˘ЪБ›· ЩФ˘, МВ ЩФ ¯ЪФУФ‰И·ОfiЩЛ ·ВУВЪБФФИЛМ¤УФ, ·М¤Ыˆ˜ МfiПИ˜ ·ФО·Щ·ЫЩ·ıВ› Л ·ЪФ¯‹ ЪВ‡М·ЩФ˜.
.
ηÈ
.
¶Ò˜ Ó· Ú˘ıÌ›ÛÂÙ ÙÔÓ ¯ÚÔÓԉȷÎfiÙË ∂∫∆√™ (∆πª∂R √FF)
1 ¶È¤ÛÙ ÙÔ ÎÔ˘Ì›
ПВИЩФ˘ЪБ›·˜.
∫¿ıВ КФЪ¿ Ф˘ ЩФ ОФ˘М› ·ЩИ¤Щ·И Л ПВИЩФ˘ЪБ›·
ВУ·ПП¿ЫЫВЩ·И МВЩ·Н‡ ∂¡∆√™ О·И ∂∫∆√™ (√¡/√FF).
ηٿ ÙËÓ ‰È¿ÚÎÂÈ· Ù˘
2 ƒ˘ıÌ›ÛÙ ÙËÓ ÒÚ· ÙÔ˘ ¯ÚÔÓԉȷÎfiÙË
¯ЪЛЫИМФФИТУЩ·˜ Щ· ОФ˘МИ¿
∫¿ı ÊÔÚ¿ Ô˘ ÙÔ ÎÔ˘Ì›
·˘Í¿ÓÂÙ·È Î·Ù¿ Ì›· ÒÚ·Ø Î¿ı ÊÔÚ¿ Ô˘ ÙÔ ÎÔ˘Ì›
·ÙȤٷÈ, Ô Ú˘ıÌÈṲ̂ÓÔ˜ ¯ÚfiÓÔ˜ ·˘Í¿ÓÂÙ·È Î·Ù¿ 10 ÏÂÙ¿.
·ÙȤٷÈ, Ô Ú˘ıÈṲ̂ÓÔ˜ ¯ÚfiÓÔ˜
°È· Ó· ·Ô‰ÂÛ̇ÛÂÙ ÙÔÓ ¯ÚÔÓԉȷÎfiÙË ∂∫∆√™:
¶È¤ÛÙ ÙÔ ÎÔ˘Ì›
■
.
ηÈ
.
§∂π∆√Àƒ°∏™∂π °π∞ ¶√§À ∫∞πƒ√
ŸЩ·У ЩФ ОПИМ·ЩИЫЩИОfi ‰ВУ ЪfiОВИЩ·И У·
ПВИЩФ˘ЪБ‹ЫВИ БИ· ФП‡ О·ИЪfi:
1 §ÂÈÙÔ˘ÚÁ‹ÛÙ ÛÙÔÓ ∞¡∂ªπ™∆∏ƒ∞ ÁÈ· 3 ‹ 4
ТЪВ˜ БИ· У· ЫЩВБУТЫВЩВ ЩФ ВЫˆЩВЪИОfi ЩФ˘
ОПИМ·ЩИЫЩИОФ‡.
∆‡Ô˜ æÀ•∏ Î·È £∂ƒª∞¡™∏:
• °И· У· ¯ЪЛЫИМФФИ‹ЫВЩВ ЩЛ ПВИЩФ˘ЪБ›·
∞¡∂ªπ™∆∏ƒ∞™, Ъ˘ıМ›ЫЩВ ЫЩФ ЩЛПВ¯ВИЪИЫЩ‹ЪИФ
ЩЛУ ˘„ЛПfiЩВЪЛ ıВЪМФОЪ·Ы›· ЫЩФУ ЩЪfiФ
ПВИЩФ˘ЪБ›·˜ Г∂πƒ√∫π¡∏∆∏ жА•∏. (∞У·КВЪıВ›ЩВ
ЫЩЛУ ЫВП. 67.)
∆‡Ô˜ ª√¡√ æÀ•∏:
• ∂ИП¤НЩВ ЩФУ ЩЪfiФ ПВИЩФ˘ЪБ›·˜ ∞¡∂ªπ™∆∏ƒ∞.
(∞Ó·ÊÂÚı›Ù ÛÙËÓ ÛÂÏ. 67.)
2 ∫Ï›ÛÙ ÙÔÓ ‰È·ÎfiÙË Î·È / ‹ ‚Á¿ÏÙ ÙËÓ Ú›˙·.
¶ƒ√™√Г∏:
ŸЩ·У ЩФ ОПИМ·ЩИЫЩИОfi ‰ВУ ЪfiОВИЩ·И У· ПВИЩФ˘ЪБ‹ЫВИ БИ·
МВБ¿ПФ ¯ЪФУИОfi ‰И¿ЫЩЛМ·, ОПВ›ЫЩВ ЩФ ‰И·ОfiЩЛ ‹ ‚Б¿ПЩВ
ЩФ О·ПТ‰ИФ ЩЪФКФ‰ФЫ›·˜.
™ЩЛУ ·УЩ›ıВЩЛ ВЪ›ЩˆЫЛ МФЪВ› У· Ы˘БОВУЩЪˆıВ› ЫОfiУЛ
О·И У· ЪФО·П¤ЫВИ ˘ЪО·БИ¿.
3 ∞К·ИЪ¤ЫЩВ ЩИ˜ М·Щ·Ъ›В˜ ·fi ЩФ ЩЛПВ¯ВИЪИЫЩ‹ЪИФ.
¶ƒ√™√Г∏:
°И· У· ·ФК‡БВЩВ ЩЛ ‰И·ЪЪФ‹ ˘БЪТУ, ‚Б¿ПЩВ ЩИ˜ М·Щ·Ъ›В˜
fiЩ·У ЩФ ЩЛПВ¯ВИЪИЫЩ‹ЪИФ ‰ВУ ЪfiОВИЩ·И У· ¯ЪЛЫИМФФИЛıВ›
БИ· МВБ¿ПФ ¯ЪФУИОfi ‰И¿ЫЩЛМ·.
™À¡∆∏ƒ∏™∏
¶ÚÈÓ ·Ú¯›ÛÂÙ ÙË Û˘ÓÙ‹ÚËÛË
∫Ï›ÛÙ ÙÔ ‰È·ÎfiÙË Î·È ‚Á¿ÏÙ ÙÔ Î·ÏÒ‰ÈÔ
■
ЩЪФКФ‰ФЫ›·˜ ·fi ЩЛУ Ъ›˙·.
¶ƒ√™√Г∏:
ŸЩ·У ЪfiОВИЩ·И У· О·ı·ЪИЫЩВ› Л МФУ¿‰·, ОПВ›ЫЩВ ЩЛУ О·И
‚Б¿ПЩВ ЩФ О·ПТ‰ИФ ЩЪФКФ‰ФЫ›·˜ ·fi ЩЛУ Ъ›˙· ‹ ОПВ›ЫЩВ
ЩФ ‰И·ОfiЩЛ ЩФ˘ О˘ОПТМ·ЩФ˜.
§fiБˆ ЩФ˘ fiЩИ Ф ·УВМИЫЩ‹Ъ·˜ ВЪИЫЩЪ¤КВЩ·И МВ МВБ¿ПЛ
Щ·¯‡ЩЛЩ·, МФЪВ› У· ЪФО·П¤ЫВИ ЩЪ·˘М·ЩИЫМfi.
68
ŸЩ·У ЩФ ОПИМ·ЩИЫЩИОfi ЪfiОВИЩ·И У·
Н·У·¯ЪЛЫИМФФИЛıВ›:
1 ∫·ı·Ú›ÛÙ ÙÔ Ê›ÏÙÚÔ ·¤ÚÔ˜ Î·È ÙÔÔıÂÙ‹ÛÙÂ
ЩФ ЫЩЛУ ВЫˆЩВЪИО‹ МФУ¿‰·.
(∞У·КВЪıВ›ЩВ ЫЩЛУ ЫВП. 69 БИ· Ф‰ЛБ›В˜ О·ı·ЪИЫМФ‡.)
2 ∂ϤÁÍÙ fiÙÈ Ù· ÛÙfiÌÈ· ÂÈÛfi‰Ô˘ Î·È ÂÍfi‰Ô˘ ÙÔ˘
·¤Ъ· ЩЛ˜ ВЫˆЩВЪИО‹˜/ВНˆЩВЪИО‹˜ МФУ¿‰·˜ ‰ВУ
В›У·И КЪ·БМ¤У· ·fi О¿ФИФ ·УЩИОВ›МВУФ.
3 ∂ϤÁÍÙ ·Ó Ë Á›ˆÛË Â›Ó·È Û˘Ó‰Â‰Â̤ÓË
ÛˆÛÙ¿.
¶ƒ√™√Г∏:
°ВИТЫЩВ ЩЛ МФУ¿‰·.
ªЛ Ы˘У‰¤ВЩВ ЩЛ БВ›ˆЫЛ ЫВ ЫˆП‹У· ·ВЪ›Ф˘ ‹ УВЪФ‡,
·ПВНИО¤Ъ·˘УФ ‹ ЫЩЛ БВ›ˆЫЛ ЩФ˘ ЩЛПВКТУФ˘. ∂¿У Л БВ›ˆЫЛ
‰ВУ ¤¯ВИ Б›УВИ ЫˆЫЩ¿ В›У·И Иı·Уfi У· ЪФОПЛıВ›
ЛПВОЩЪФПЛН›·.
∫·ı·ЪИЫМfi˜ ЩЛ˜ ВЫˆЩВЪИО‹˜ МФУ¿‰·˜
∫·ı·Ú›ÛÙ ÙË ÌÔÓ¿‰· ÛÎÔ˘›˙ÔÓÙ·˜ Ì ¤Ó·
■
М·П·Оfi, ЫЩВБУfi ·У›.
• ∂¿Ó Ë ‚ÚˆÌÈ¿ Â›Ó·È ÂÌÊ·Ó‹˜, ÛÎÔ˘›ÛÙ ÙË ÌÔÓ¿‰·
Ì ¤Ó· ‡Ê·ÛÌ· ÌÔ˘ÛÎÂ̤ÓÔ Û ¤Ó· ‰È¿Ï˘Ì· ‹ÈÔ˘
·ФЪЪ˘·УЩИОФ‡ ЫВ ¯ПИ·Ъfi УВЪfi.
• ªЛ ¯ЪЛЫИМФФИВ›ЩВ ‚ВУ˙›УЛ, ‚ВУ˙›УЛ О·ı·ЪИЫМФ‡,
ЫОfiУВ˜ Б˘·П›ЫМ·ЩФ˜ О·И ВУЩФМФОЩfiУ·. ∏ МФУ¿‰·
МФЪВ› У· ˘ФЫЩВ› ˙ЛМИ¿.
Page 69

∫∞£∞ƒπ™ª√™ ∆√À ºπ§∆ƒ√À ∞∂ƒ∞ ∫∞∆∂Ãπ¡∏™
∞¡∆π∫∞∆∞™∆∞™∏ ∆√À ºπ§∆ƒ√À ∫∞£∞ƒπ™ª√À ∞∂ƒ∞
∫·ı·ÚÈÛÌfi˜ ÙÔ˘ Ê›ÏÙÚÔ˘ ·¤Ú· ηÙ¯›Ó˘ (ÂÚ›Ô˘ Ì›· ÊÔÚ¿ οı 2 ‚‰ÔÌ¿‰Â˜)
1 ∞Ê·ÈÚ¤ÛÙ ÙÔ Ê›ÏÙÚÔ ·¤Ú· ηÙ¯›Ó˘.
∞УФ›НЩВ ЩФ
МЪФЫЩИУfi
К¿ЩУˆМ· О·И
·Ê·ÈÚ¤ÛÙÂ/
·ÓÙÈηٷÛÙ‹ÛÙÂ
º›ÏÙÚÔ ·¤Ú·
ηÙ¯›Ó˘
¶ƒ√™√Ã∏:
∫·Ù¿ ÙËÓ ·Ê·›ÚÂÛË ÙÔ˘ Ê›ÏÙÚÔ˘ ·¤Ú· ηÙ¯›Ó˘, ÌËÓ
·ББ›˙ВЩВ Щ· МВЩ·ППИО¿ М¤ЪЛ ЩЛ˜ ВЫˆЩВЪИО‹˜ МФУ¿‰·˜.
∂У‰¤¯ВЩ·И У· ЪФОПЛıВ› ЩЪ·˘М·ЩИЫМfi˜.
∞Ê·ÈÚ¤ÛÙÂ.
ÙÔ Ê›ÏÙÚÔ.
3 ªÂÙ¿ ÙÔ Ï‡ÛÈÌÔ Ì ÎÚ‡Ô ‹ ¯ÏÈ·Úfi ÓÂÚfi,
ЩФФıВЩ‹ЫЩВ ЩФ К›ПЩЪФ ·¤Ъ· О·ЩВ¯›УЛ˜ ЫВ
ЫОИВЪfi М¤ЪФ˜ О·И ·К‹ЫЩВ ЩФ У· ЫЩВБУТЫВИ
О·П¿.
• ªЛУ ЫЩВБУТУВЩВ ЩФ К›ПЩЪФ ·¤Ъ· О·ЩВ¯›УЛ˜
ÂÎı¤ÙÔÓÙ¿˜ ÙÔ Û ¿ÌÂÛÔ ËÏÈ·Îfi ʈ˜ ‹ ÛÂ
ıÂÚÌfiÙËÙ· ·fi ʈÙÈ¿.
2 ∞Ê·ÈÚ¤ÛÙ ÙÔ˘˜ Ú‡Ô˘˜ ·fi ÙÔ Ê›ÏÙÚÔ ·¤Ú·
О·ЩВ¯›УЛ˜, ¯ЪЛЫИМФФИТУЩ·˜ ЛПВОЩЪИО‹
ЫОФ‡· ‹ П¤УФУ¿˜ ЩФ МВ УВЪfi.
• ∞Ó Ë ‚ÚˆÌÈ¿ Â›Ó·È ÂÌÊ·Ó‹˜, χÓÙ ÙÔ Ê›ÏÙÚÔ
ЫВ ¯ПИ·Ъfi УВЪfi МВ ¤У· ‰И¿П˘М· ·ФЪЪ˘·УЩИОФ‡.
• ∆Ô Ê›ÏÙÚÔ ·¤Ú· ÌÔÚ› Ó· ·Ú·ÌÔÚʈı›, ·Ó
Ï˘ı› Û η˘Ùfi ÓÂÚfi (¿Óˆ ·fi 50 ‚·ıÌÔ‡˜).
4 ∆ÔÔıÂÙ‹ÛÙ ÙÔ Ê›ÏÙÚÔ ·¤Ú· ηÙ¯›Ó˘
∆ÔÔıÂÙ‹ÛÙÂ.
ŸЩ·У Л ·fi‰ФЫЛ МВИˆıВ› ПfiБˆ Ы˘ЫЫТЪВ˘ЫЛ˜ Ъ‡ˆУ О.П., ЩfiЩВ В›У·И ··Ъ·›ЩЛЩФ У· ·УЩИО·Щ·ЫЩ‹ЫВЩВ ЩФ
К›ПЩЪФ О·ı·ЪИЫМФ‡ ·¤Ъ·.
∞УЩИО·Щ¿ЫЩ·ЫЛ ЩФ˘ К›ПЩЪФ˘ О·ı·ЪИЫМФ‡ ·¤Ъ· (ВЪ›Ф˘ М›· КФЪ¿ О¿ıВ 4 М‹УВ˜)
1 ∞Ê·ÈÚ¤ÛÙ ÙÔ Ê›ÏÙÚÔ ·¤Ú· ηÙ¯›Ó˘.
º›ÏÙÚÔ ·¤Ú· ηÙ¯›Ó˘
2 ∞К·ИЪ¤ЫЩВ ЩФ К›ПЩЪФ О·ı·ЪИЫМФ‡ ·¤Ъ· (∆‡Ф˘
̠Ϣ΋ Ê˘ÛÔ‡Ó·).
º›ПЩЪФ О·ı·ЪИЫМФ‡·¤Ъ·
○○○○○○○○○○○○○○○○○○○○○○○○○○○○○○○○○○○○○○○○○○○○○○○○○
º›ПЩЪФ О·ı·ЪИЫМФ‡ ·¤Ъ·
• ∞У ЩФ К›ПЩЪФ О·ı·ЪИЫМФ‡ ·¤Ъ· В›У·И ‚Ф˘ПˆМ¤УФ, ВУ‰¤¯ВЩ·И У· МВИˆıВ› Л ·fi‰ФЫЛ ЩЛ˜ МФУ¿‰·˜ ‹ У· ВМК·УИЫЩВ›
Û˘Ì‡ÎÓˆÛË ÛÙÔ ÛÙfiÌÈÔ ÂÍfi‰Ô˘ ·¤ÚÔ˜.
• ∆Ф К›ПЩЪФ О·ı·ЪИЫМФ‡ ·¤Ъ· В›У·И ·ФЪЪИЩfiМВУФ.√ К˘ЫИФПФБИОfi˜ ¯ЪfiУФ˜ ПВИЩФ˘ЪБ›·˜, В›У·И ВЪ›Ф˘ 4 М‹УВ˜. ∂У
ÙÔ‡ÙÔȘ, ·ÓÙÈηٷÛÙ‹ÛÙ ÙÔ Ê›ÏÙÚÔ ·Ì¤Ûˆ˜ ·Ó ÙÔ ¯ÚÒÌ· ÙÔ˘ Á›ÓÂÈ ‚·ı‡ ηʤ.
¶ЪФ·ИЪВЩИО¿ М¤ЪЛ ∆· ЪФ·ИЪВЩИО¿ М¤ЪЛ В›У·И ‰И·ı¤ЫИМ· ·fi ЩФУ ЩФИОfi Ы·˜ ·УЩИЪfiЫˆФ.
3 ∆ФФıВЩ‹ЫЩВ ЩФ О·ИУФ‡ЪИФ К›ПЩЪФ О·ı·ЪИЫМФ‡
·¤Ú·.
4 ∆ÔÔıÂÙ‹ÛÙ ÙÔ Ê›ÏÙÚÔ ·¤Ú· ηÙ¯›Ó˘ ηÈ
ОПВ›ЫЩВ ·ЫК·ПТ˜ ЩФ МЪФЫЩИУfi К¿ЩУˆМ·.
○○○○○○○○○○○○○○○○○○○○○○○○○○○○○○○○○○○○○○○○○○○○○○○○○
∆È Â›Ó·È ÙÔ “Ê›ÏÙÚÔ ·¤Ú· ηÙ¯›Ó˘”;
∆Ф К›ПЩЪФ ·¤Ъ· В›У·И ‚·ММ¤УФ МВ ¤У· К˘ЫИОfi ˘ПИОfi, ЩЛУ О·ЩВ¯›УЛ, Л ФФ›· ВЪИ¤¯ВЩ·И ЫЩФ ЩЫ¿И. ∆Ф К›ПЩЪФ ·¤Ъ·
О·ЩВ¯›УЛ˜ ВНФ˘‰ВЩВЪТУВИ ЩЛУ О·ОФЫМ›· О·И Щ· ‚П·‚ВЪ¿ ·¤ЪИ·, fiˆ˜ В›У·И Л КФЪМ·П‰В˛‰Л, Л ·ММˆУ›· О·И Л ·ОВЩ·П‰В˛‰Л.
∂ИП¤ФУ, ·‰Ъ·УФФИВ› ЩФ˘˜ ИФ‡˜ Ф˘ ЪФЫОФППТУЩ·И ЫЩФ К›ПЩЪФ.
√ÓÔÌ·Û›· ÂÍ·ÚÙËÌ¿ÙˆÓ º›ПЩЪФ О·ı·ЪИЫМФ‡ ·¤Ъ·
∞ЪИıМfi˜ ·УЩ·ПП·ОЩИОФ‡ MAC-1300FT
69
Page 70

¶ƒ√∆√À ∂¶π∫√π¡ø¡∏™∂∆∂ ª∂ ∆√¡
√∆∞¡ ¡√ªπ∑∂∆∂ √∆π À¶∞ƒÃ∂π ∫∞¶√π√ ¶ƒ√µ§∏ª∞
∆∂áπ∫√ •∞¡∞∂§∂°•∆∂ ∆∞ ¶∞ƒ∞∫∞∆ø
∂ЪТЩЛЫЛ
∆Ф ОПИМ·ЩИЫЩИОfi ‰ВУ
ВУВЪБФФИВ›Щ·И.
¢ВУ МФЪВ› У· ıВЪМ·УıВ› ‹
У· „˘¯ıВ› ИО·УФФИЛЩИО¿.
√ ·¤Ъ·˜ ·fi ЩЛУ ВЫˆЩВЪИО‹
МФУ¿‰· ¤¯ВИ ·Ъ¿НВУЛ ФЫМ‹.
¢ВУ ВМК·У›˙ВЩ·И Л ¤У‰ВИНЛ
ЫЩФ ЩЛПВ¯ВИЪИЫЩ‹ЪИФ ‹ ¤¯ВИ
МВИˆıВ› Ф КˆЩИЫМfi˜ ЩЛ˜. ∏
ВЫˆЩВЪИО‹ МФУ¿‰· ‰ВУ
·ФОЪ›УВЩ·И ЫЩФ Ы‹М· ЩФ˘
ЩЛПВ¯ВИЪИЫЩЛЪ›Ф˘.
ŸÙ·Ó Û˘Ì‚Â› Ì›· ‰È·ÎÔ‹
Ú‡̷ÙÔ˜.
∞ОfiМЛ ОИ ·У Щ· ·Ъ·¿Уˆ ВПВБ¯ЩФ‡У, fiЩ·У ЩФ ОПИМ·ЩИЫЩИОfi ВН·ОФПФ˘ıВ› У·
МЛУ ПВИЩФ˘ЪБВ›, ЫЩ·М·Щ‹ЫЩВ ЩЛ ¯Ъ‹ЫЛ ЩФ˘ О·И Ы˘М‚Ф˘ПВ˘ЩВ›ЩВ ЩФУ
·ÓÙÈÚfiÛˆÔ.
™ЩИ˜ ·Ъ·О¿Щˆ ВЪИЩТЫВИ˜, ЫЩ·М·Щ‹ЫЩВ ЩЛ ПВИЩФ˘ЪБ›· ЩФ˘ ОПИМ·ЩИЫЩИОФ‡ О·И
Ы˘М‚Ф˘ПВ˘ЩВ›ЩВ ЩФУ ·УЩИЪfiЫˆФ.
• ŸЩ·У ˘¿Ъ¯ВИ ‰И·ЪЪФ‹ УВЪФ‡ ·fi ЩЛУ ВЫˆЩВЪИО‹ МФУ¿‰·.
• ŸЩ·У ·У·‚ФЫ‚‹УВИ Л ·ЪИЫЩВЪ‹ ВУ‰ВИОЩИО‹ П˘¯У›· ПВИЩФ˘ЪБ›·˜.
• ŸЩ·У Ф БВУИОfi˜ ‰И·ОfiЩЛ˜ ¤КЩВИ Ы˘¯У¿.
• ∆Ф Ы‹М· ЩФ˘ ЩЛПВ¯ВИЪИЫЩЛЪ›Ф˘ ›Ыˆ˜ ‰ВУ МФЪВ› У· ПЛКıВ› ЫВ ¤У· ‰ˆМ¿ЩИФ
fiФ˘ ¯ЪЛЫИМФФИФ‡УЩ·И ЛПВОЩЪФУИОФ‡ Щ‡Ф˘ √¡/√FF П¿МВ˜ КıФЪИЫМФ‡
(П¿МВ˜ КıФЪИЫМФ‡ МВ МВЩ·Ы¯ЛМ·ЩИЫЩ‹, ОП.).
• ∏ ПВИЩФ˘ЪБ›· ЩФ˘ ОПИМ·ЩИЫЩИОФ‡ МФЪВ› У· ЪФО·ПВ› ·ЪВМ‚ФП¤˜ ЫЩЛ
Ъ·‰ИФКˆУИО‹ ‹ ЩЛУ ЩЛПВФЩИО‹ П‹„Л ЫВ ВЪИФ¯¤˜ fiФ˘ ЩФ Ы‹М· В›У·И
·ÛıÂÓ¤˜. °È· ÙËÓ Î·Ï‡ÙÂÚË Ï‹„Ë Ù˘ Û˘Û΢‹˜ Ë ÔÔ›· ÂËÚ¿˙ÂÙ·È,
Û˘ÓÈÛÙ¿Ù·È Ë ÂÁηٿÛÙ·ÛË ÂÓÈÛ¯˘Ù‹.
• ŸЩ·У ·ОФ˘ЫЩВ› ОВЪ·˘Уfi˜, ЫЩ·М·Щ‹ЫЩВ ЩЛ ПВИЩФ˘ЪБ›· О·И ‚Б¿ПЩВ ЩФ О·ПТ‰ИФ
ЩЪФКФ‰ФЫ›·˜ ·fi ЩЛУ Ъ›˙· ‹ ОПВ›ЫЩВ ЩФ ‰И·ОfiЩЛ ЩФ˘ О˘ОПТМ·ЩФ˜,
‰И·КФЪВЩИО¿ Щ· ЛПВОЩЪФУИО¿ ВН·ЪЩ‹М·Щ· МФЪВ› У· ¿ıФ˘У ˙ЛМИ¿.
70
™ËÌ›· ÂϤÁ¯Ô˘ ‹ ÙÚfiÔÈ Â›Ï˘Û˘ ÚÔ‚Ï‹Ì·ÙÔ˜
• ∂›У·И ·УФИОЩfi˜ Ф ОВУЩЪИОfi˜ ‰И·ОfiЩЛ˜;
• ª‹ˆ˜ ¤¯ÂÈ Î·Â› Ë ·ÛÊ¿ÏÂÈ·;
• ª‹ˆ˜ ¤¯ВИ Ъ˘ıМИЫЩВ› Ф ¯ЪФУФ‰И·ОfiЩЛ˜
∂¡∆√™/√¡; (™ÂÏ›‰· 68)
• ∂›У·И ЫˆЫЩ‹ Л Ъ‡ıМИЫЛ ЩЛ˜ ıВЪМФОЪ·Ы›·˜;
(™ÂÏ›‰· 67)
• ∂›Ó·È ÙÔ Ê›ÏÙÚÔ Î·ı·Úfi; (™ÂÏ›‰· 69)
• ª‹ˆ˜ ˘¿Ú¯Ô˘Ó ÂÌfi‰È· Ô˘ ÊÚ¿˙Ô˘Ó ÙÔ
ЫЩfiМИФ ВИЫfi‰Ф˘ ‹ ЩФ ЫЩfiМИФ ВНfi‰Ф˘ ·¤ЪФ˜
ЩЛ˜ ВЫˆЩВЪИО‹˜ ‹ ЩЛ˜ ВНˆЩВЪИО‹˜ МФУ¿‰·˜;
• ª‹ˆ˜ οÔÈÔ ·Ú¿ı˘ÚÔ ‹ Â›Ó·È fiÚÙ·
·УФИОЩ‹;
• ∂›Ó·È ÙÔ Ê›ÏÙÚÔ Î·ı·Úfi; (™ÂÏ›‰· 69)
• ª‹ˆ˜ ¤¯Ô˘Ó ÂÍ·ÓÙÏËı› ÔÈ Ì·Ù·Ú›Â˜;
(™ÂÏ›‰· 65)
• ∂›Ó·È ÛˆÛÙ‹ Ë ÔÏÈÎfiÙËÙ· (+/-) ÙˆÓ Ì·Ù·ÚÈÒÓ;
(™ÂÏ›‰· 65)
• ª‹ˆ˜ Ȥ˙ÂÙ οÔÈ· ÎÔ˘ÌÈ¿ ÛÙÔ
ЩЛПВ¯ВИЪИЫЩ‹ЪИФ ‹ ЫВ О¿ФИ· ¿ППЛ ЛПВОЩЪИО‹
Ы˘ЫОВ˘‹;
• £· ·Ъ¯›ЫВИ ЩФ ОПИМ·ЩИЫЩИОfi У· ПВИЩФ˘ЪБВ› Н·У¿;
∞У ЩФ ОПИМ·ЩИЫЩИОfi ПВИЩФ˘ЪБФ‡ЫВ ЪИУ ЩЛ
‰И·ОФ‹ ЩЛ˜ ЩЪФКФ‰ФЫ›·˜, ВВИ‰‹ ·˘Щ¿ Щ·
МФУЩ¤П· В›У·И ВКФ‰И·ЫМ¤У· МВ ПВИЩФ˘ЪБ›·
·˘ЩfiМ·ЩЛ˜ В·УВОО›УЛЫЛ˜, Ъ¤ВИ У· ·Ъ¯›ЫВИ
У· ПВИЩФ˘ЪБВ› Н·У¿. (∞У·ЩЪ¤НЩВ ЫЩЛУ
ВЪИБЪ·К‹ ЩЛ˜ “§∂π∆√Аƒ°π∞™ ∞А∆√ª∞∆∏™
∂¶∞¡∂∫∫π¡∏™∏™” ЫЩЛ ЫВП›‰· 66.)
∂ЪТЩЛЫЛ
∆Ф ОПИМ·ЩИЫЩИОfi ‰ВУ МФЪВ›
У· ПВИЩФ˘ЪБ‹ЫВИ БИ· ВЪ›Ф˘
3 ПВЩ¿ fiЩ·У Н·У·НВОИУ¿.
ŒÓ·˜ ÍÂÚfi˜ ÎÚfiÙÔ˜
·ÎÔ‡ÁÂÙ·È.
√ ·¤Ъ·˜ ·fi ЩЛУ ВЫˆЩВЪИО‹
МФУ¿‰· ¤¯ВИ ·Ъ¿НВУЛ ФЫМ‹.
√ ·УВМИЫЩ‹Ъ·˜ ЫЩ·М·Щ¿
О·Щ¿ ЩЛУ ‰И¿ЪОВИ· ЩЛ˜
∞ºА°ƒ∞¡™∏™.
∞ÎÔ‡ÁÂÙ·È Ô ‹¯Ô˜ ÙÔ˘ ÓÂÚÔ‡
Ô˘ Î˘Ï¿.
∞ÎÔ‡ÁÂÙ·È ¤Ó·˜ ‹¯Ô˜ Û·Ó
ÎÂÏ¿Ú˘ÛÌ·.
¢ÂÓ Á›ÓÂÙ·È Â·Ú΋˜ „‡ÍË
ÙÔ˘ ¯ÒÚÔ˘.
∞fi ЩФ ЫЩfiМИФ ВНfi‰Ф˘ ·¤ЪФ˜
ЩЛ˜ ВЫˆЩВЪИО‹˜ МФУ¿‰Ф˜
ВН¤Ъ¯ФУЩ·И ˘‰Ъ·ЩМФ›.
∞¿УЩЛЫЛ (fi¯И ‚П¿‚Л)
• ∞˘Щfi ЪФЫЩ·ЩВ‡ВИ ЩФ ОПИМ·ЩИЫЩИОfi Ы‡МКˆУ·
МВ ВУЩФП‹ ЩФ˘ МИОЪФ¸ФПФБИЫЩ‹. ¶ВЪИМ¤УВЩВ.
• ∞˘Ùfi˜ Ô ‹¯Ô˜ ‰ËÌÈÔ˘ÚÁÂ›Ù·È ·fi ÙËÓ ‰È·ÛÙÔÏ‹
О·И ЩЛ Ы˘ЫЩФП‹ ЩФ˘ МЪФЫЩИУfi К¿ЩУˆМ·, ОП.
Ф˘ ФКВ›ПВЩ·И ЫЩЛУ ·ПП·Б‹ ЩЛ˜ ıВЪМФОЪ·Ы›·˜.
• ∆Ф ОПИМ·ЩИЫЩИОfi ·ФЪЪФК¿ МИ¿ М˘Ъˆ‰И¿ Ф˘
ЪФЫОФПП¿Щ·И ЫЩФУ ЩФ›¯Ф, ЫЩФ ¯·П›, ЫЩ·
¤ИП·, ЫЩ· ЪФ‡¯·, ОП. О·И ЩЛУ ‚Б¿˙ВИ МВ
ЩФУ ·¤Ъ·.
• ™Â ÎÏÈÌ·ÙÈÛÌfi Ì ∞ºÀ°ƒ∞¡™∏ ·¤Ú·, Ë
МФУ¿‰· ПВИЩФ˘ЪБВ› ¯ЪЛЫИМФФИТУЩ·˜ ЩФ ›‰ИФ
О‡ОПˆМ· „˘ОЩИОФ‡ Ф˘ ¯ЪЛЫИМФФИВ› БИ·
ОПИМ·ЩИЫМfi МВ жА•∏ ·¤Ъ·. ∏ ‰И¿ЪОВИ· ЩФ˘
¯ЪfiУФ˘ ОПИМ·ЩИЫМФ‡ МВ ∞ºА°ƒ∞¡™∏ ·¤Ъ·
Ъ¤ВИ У· ВП·ЩЩТУВЩ·И БИ· У· ВЪИФЪ›˙ВЩ·И Л
˘БЪ·Ы›· ¯ˆЪ›˜ У· ¤КЩВИ Л ıВЪМФОЪ·Ы›·
‰ˆМ·Щ›Ф˘. ∂ФМ¤Уˆ˜ Ф Ы˘МИВЫЩ‹˜ ЫЩ·М·Щ¿
О·МИ¿ КФЪ¿, О·И Ы˘У¿М· ЫЩ·М·Щ¿ О·И Ф
·УВМИЫЩ‹Ъ·˜ ЩЛ˜ ВЫˆЩВЪИО‹˜ МФУ¿‰·˜. ªВ
·˘Щfi ЩФУ ЩЪfiФ ·ЪВМФ‰›˙ВЩ·И ЩФ
Ы˘М˘ОУˆМ¤УФ УВЪfi ЫЩФУ ВУ·ПП·ОЩ‹Ъ·
ıВЪМФОЪ·Ы›·˜ У· ВН·ЩМ›˙ВЩ·И ¿ПИ.
• ∞˘Щfi˜ В›У·И Ф ‹¯Ф˜ ЩФ˘ „˘ОЩИОФ‡ ˘БЪФ‡, Ф˘
О˘П¿ М¤Ы· ЫЩФ ОПИМ·ЩИЫЩИОfi.
• ∞˘Ùfi˜ Â›Ó·È Ô ‹¯Ô˜ ÚÔ‹˜ ÙÔ˘ ÓÂÚÔ‡, Ô˘
Ы˘М˘ОУТУВЩ·И ЫЩФУ ВУ·ПП¿ОЩЛ ıВЪМfiЩЛЩ·˜.
• ∞˘Ùfi˜ Â›Ó·È Ô ‹¯Ô˜ ÙÔ˘ ÂÓ·ÏÏ¿ÎÙË ıÂÚÌfiÙËÙ·˜
Ô˘ ·Ô„‡¯ÂÙ·È.
• √ ‹¯Ф˜ ·˘Щfi˜ ·ОФ‡БВЩ·И fiЩ·У Ф ВНˆЩВЪИОfi˜
·¤Ъ·˜ Ф˘ ·ФЪЪФК¿Щ·И ·fi ЩЛ ЫˆП‹У·
·ФЫЩЪ¿ББИЫЛ˜ ·УФ›БВИ ЩЛУ ВЪИФ¯‹
Ы˘ПП¤НВˆ˜ ‹ ЩФУ ·УВМИЫЩ‹Ъ· ВН·ВЪИЫМФ‡ МВ
·ФЩ¤ПВЫМ· У· ·ФЪЪ¤ВИ ЩФ УВЪfi Ф˘ О˘П¿ВИ
М¤Ы· ЫЩЛ ЫˆП‹У· ·ФЫЩЪ¿ББИЫЛ˜.
√ ‹¯Ф˜ ·˘Щfi˜ ·ОФ‡БВЩ·И В›ЫЛ˜, fiЩ·У К˘Ы¿ВИ
Ф ВНˆЩВЪИОfi˜ ·¤Ъ·˜ М¤Ы· ЫЩЛ ЫˆП‹У·
·ФЫЩЪ¿ББИЫЛ˜ ЫЩЛУ ВЪ›ЩˆЫЛ Ф˘ ¤Нˆ
К˘ЫФ‡У ИЫ¯˘ЪФ› ¿УВМФИ.
• ŸÙ·Ó ÛÙÔ ¯ÒÚÔ Á›ÓÂÙ·È ¯Ú‹ÛË ÂÓfi˜
·УВМИЫЩ‹Ъ· ‹ МИ·˜ ОФ˘˙›У·˜ ·ВЪ›Ф˘, ЩФ КФЪЩ›Ф
„‡НЛ˜ ·˘Н¿УВЩ·И МВ ·ФЩ¤ПВЫМ· ЩЛУ ·УВ·ЪО‹
„‡НЛ.
• ŸЩ·У Л ВНˆЩВЪИО‹ ıВЪМФОЪ·Ы›· В›У·И ˘„ЛП‹,
Ë „‡ÍË ÌÔÚ› Ó· ÌËÓ Â›Ó·È Â·Ú΋˜.
• √ „˘¯Ъfi˜ ·¤Ъ·˜ ·fi ЩФ ОПИМ·ЩИЫЩИОfi
„˘¯Ú·›ÓÂÈ ÁÚ‹ÁÔÚ· ÙËÓ ˘ÁÚ·Û›· ÙÔ˘ ·¤Ú· ̤۷
ÛÙÔ ‰ˆÌ¿ÙÈÔ, Ë ÔÔ›· ÌÂÙ·ÙÚ¤ÂÙ·È Û ӤÊÔ˜.
∂ЪТЩЛЫЛ
∞ПП¿˙ВИ Л ‰ИВ‡ı˘УЫЛ ЪФ‹˜
ЩФ˘ ·¤Ъ· О·Щ¿ ЩЛУ ‰И¿ЪОВИ·
ЩЛ˜ ПВИЩФ˘ЪБ›·˜.
∏ О·ЩВ‡ı˘УЫЛ ЩФ˘
ФЪИ˙fiУЩИ· ВЪЫ›‰· ‰ВУ
МФЪВ› У· Ъ˘ıМИЫЩВ› ·fi ЩФ
ЩЛПВ¯ВИЪИЫЩ‹ЪИФ.
∆Ъ¤¯ВИ УВЪfi ·fi ЩЛУ
ВНˆЩВЪИО‹ МФУ¿‰·.
∞fi ЩЛУ ВНˆЩВЪИО‹ МФУ¿‰·
ВН¤Ъ¯ВЩ·И ПВ˘Оfi˜ О·Уfi˜.
∫·Щ¿ ЩЛ ПВИЩФ˘ЪБ›· ı¤ЪМ·УЫЛ˜
Ф ·¤Ъ·˜ ‰ВУ ‚Б·›УВИ ЪФ˜ Щ·
¤Нˆ ·М¤Ыˆ˜.
∫·Щ¿ ЩЛУ ПВИЩФ˘ЪБ›· ЩЛ˜
ı¤ЪМ·УЫЛ˜, ¤¯ВИ ЫЩ·М·Щ‹ЫВИ
Л ПВИЩФ˘ЪБ›· БИ· 10 ВЪ›Ф˘
ПВЩ¿.
ªÂÚÈΤ˜ ÊÔÚ¤˜ ·ÎÔ‡ÁÂÙ·È
¤Ó·˜ ÛÊ˘ÚȯÙfi˜ ‹¯Ô˜.
¢ÂÓ Á›ÓÂÙ·È Â·Ú΋˜
ı¤ÚÌ·ÓÛË ÙÔ˘ ¯ÒÚÔ˘.
™В Ы‡ЫЩЛМ· ФПП·ПТУ
МФУ¿‰ˆУ, Л ВЫˆЩВЪИО‹
МФУ¿‰· Ф˘ ‰ВУ ПВИЩФ˘ЪБВ›
˙ВЫЩ·›УВЩ·И ВУТ ·ОФ‡БВЩ·И
¤У·˜ ‹¯Ф˜, fiМФИФ˜ МВ ЩФУ
‹¯Ф УВЪФ‡ Ф˘ ЩЪ¤¯ВИ, У·
‚Б·›УВИ ·fi ЩЛ МФУ¿‰·.
∆Ф ОПИМ·ЩИЫЩИОfi ·Ъ¯›˙ВИ У·
ПВИЩФ˘ЪБВ› МfiПИ˜
ЩЪФКФ‰ФЩЛıВ› МВ ЪВ‡М·,
·ЪfiПФ Ф˘ ‰ВУ ЩФ ¤¯ВЩВ
·УФ›НВИ МВ ЩФ
ЩЛПВ¯ВИЪИЫЩ‹ЪИФ.
∞¿УЩЛЫЛ (fi¯И ‚П¿‚Л)
• ŸЩ·У ЩФ ОПИМ·ЩИЫЩИОfi ПВИЩФ˘ЪБВ› ЫЩЛУ жА•∏
‹ ЫЩЛУ ∞ºА°ƒ∞¡™∏™, В¿У Л ПВИЩФ˘ЪБ›·
Ы˘УВ¯›˙ВИ ‚Б¿˙ФУЩ·˜ ЩФУ ·¤Ъ· ЪФ˜ Щ· О¿Щˆ
БИ· 1 ТЪ·, Л О·ЩВ‡ı˘УЫЛ ЪФ‹˜ ЩФ˘ ·¤Ъ·
Ъ˘ıМ›˙ВЩ·И ·˘ЩfiМ·Щ· ФЪИ˙fiУЩИ· БИ· У· ВМФ‰И˙ВИ
ЩФ ЫЩ¿НИМФ ЩФ˘ Ы˘М˘ОУˆМ¤УФ˘ УВЪФ‡.
• ∫·Щ¿ ЩЛ ПВИЩФ˘ЪБ›· ı¤ЪМ·УЫЛ˜, В¿У Л
ıВЪМФОЪ·Ы›· ЪФ‹˜ ЩФ˘ ·¤Ъ· В›У·И ФП‡ ¯·МЛП‹
‹ fiЩ·У ¤¯ВИ Б›УВИ ·fi„˘НЛ, ЩФ √ЪИ˙fiУЩИ· ВЪЫ›‰·
Ъ˘ıМ›˙ВЩ·И ·˘ЩfiМ·Щ· ЫВ ФЪИ˙fiУЩИ· ı¤ЫЛ.
• ∫·Щ¿ ЩИ˜ ПВИЩФ˘ЪБ›В˜ жА•∏™ О·И
∞ºÀ°ƒ∞¡™∏™, ÔÈ ÛˆÏ‹Ó˜ ‹ Ù· ÙÌ‹Ì·Ù·
Û‡Ó‰ÂÛ˘ ÙˆÓ ÛˆÏ‹ÓˆÓ „˘¯Ú·›ÓÔÓÙ·È ÌÂ
·ÔÙ¤ÏÂÛÌ· ÙË ‰ËÌÈÔ˘ÚÁ›· Û˘Ì˘ÎÓÒÌ·ÙÔ˜.
• ∫·Щ¿ ЩЛ ПВИЩФ˘ЪБ›· ı¤ЪМ·УЫЛ˜, Л ПВИЩФ˘ЪБ›·
·fi„˘НЛ˜ ·БТУВИ ЩФ УВЪfi В¿Уˆ ЫЩЛУ
ВНˆЩВЪИО‹ МФУ¿‰· МВ ·ФЩ¤ПВЫМ· У· ПВИТУВИ
О·И У· ЫЩ¿˙ВИ.
• ∫·Щ¿ ЩЛ ПВИЩФ˘ЪБ›· ı¤ЪМ·УЫЛ˜ ЩФ УВЪfi Ф˘
Ы˘М˘ОУТУВЩ·И ЫЩФУ ВУ·ПП·ОЩ‹Ъ· ЫЩ¿˙ВИ.
• ™ЩЛ ПВИЩФ˘ЪБ›· ı¤ЪМ·УЫЛ˜, Ф ·ЩМfi˜ Ф˘
‰ЛМИФ˘ЪБВ›Щ·И ·fi ЩЛ ПВИЩФ˘ЪБ›· ·fi„˘НЛ˜
МФИ¿˙ВИ МВ ПВ˘Оfi О·Уfi.
• ¶·Ú·Î·Ïԇ̠ÂÚÈ̤ÓÂÙÂ, ·ÊÔ‡ ÙÔ
ОПИМ·ЩИЫЩИОfi ВЩФИМ¿˙ВЩ·И У· ‚Б¿ПВИ ıВЪМfi ·¤Ъ·.
• °›УВЩ·И ·fi„˘НЛ ЩЛ˜ ВНˆЩВЪИО‹˜ МФУ¿‰·˜
(§ВИЩФ˘ЪБ›· ∞fi„˘НЛ˜).
∂К’ fiЫФУ Л ‰И·‰ИО·Ы›· ·˘Щ‹ ФПФОПЛЪТУВЩ·И
ЫВ 10 ПВЩ¿, ВЪИМ¤УВЩВ. (ŸЩ·У Л ВНˆЩВЪИО‹
ıВЪМФОЪ·Ы›· В›У·И ФП‡ ¯·МЛП‹ О·И Л ˘БЪ·Ы›·
ФП‡ ˘„ЛП‹, Ы¯ЛМ·Щ›˙ВЩ·И ¿БФ˜.)
• ∞˘Щfi˜ В›У·И Ф ‹¯Ф˜, Ф˘ О¿УВИ fiЩ·У НВОИУ¿ Л
ЪФ‹ ЩФ˘ „˘ОЩИОФ‡ ˘БЪФ‡ М¤Ы· ЫЩФ ОПИМ·ЩИЫЩИОfi.
• ŸЩ·У Л ВНˆЩВЪИО‹ ıВЪМФОЪ·Ы›· В›У·И ¯·МЛП‹,
Ë ı¤ÚÌ·ÓÛË ÌÔÚ› Ó· ÌËÓ Â›Ó·È Â·Ú΋˜.
• ªИ· МИОЪ‹ ФЫfiЩЛЩ· „˘ОЩИОФ‡ Ы˘УВ¯›˙ВИ У·
О˘ОПФКФЪВ› ЫЩЛУ ВЫˆЩВЪИО‹ МФУ¿‰· ·ЪfiПФ
Ф˘ ‰ВУ ПВИЩФ˘ЪБВ›.
• ∆· ÌÔÓ٤Ϸ ·˘Ù¿ Â›Ó·È ÂÊԉȷṲ̂ӷ ÌÂ
ПВИЩФ˘ЪБ›· ·˘ЩfiМ·ЩЛ˜ В·УВОО›УЛЫЛ˜. ŸЩ·У
‰И·ОФВ› Л ЩЪФКФ‰ФЫ›· ЩФ˘ ОПИМ·ЩИЫЩИОФ‡ ¯ˆЪ›˜
У· ЩФ ОПВ›ЫВЩВ МВ ЩФ ЩЛПВ¯ВИЪИЫЩ‹ЪИФ, fiЩ·У
В·У·ЩЪФКФ‰ФЩЛıВ›, ЩФ ОПИМ·ЩИЫЩИОfi ı· ЩВıВ›
·˘ЩfiМ·Щ· ЫВ ПВИЩФ˘ЪБ›· Ы‡МКˆУ· МВ ЩИ˜
Ъ˘ıМ›ЫВИ˜ Ф˘ В›¯·ЩВ О¿УВИ МВ ЩФ ЩЛПВ¯ВИЪИЫЩ‹ЪИФ
ЪИУ ЩЛ ‰И·ОФ‹ ЩЛ˜ ЩЪФКФ‰ФЫ›·˜.
Page 71

∂°∫∞∆∞™∆∞™∏, ª∂∆∞∫√ªπ™∏ ∫∞π ∂¶π£∂øƒ∏™∏
ÃÒÚÔ˜ ÂÁηٿÛÙ·Û˘
∞ФК‡БВЩВ ЩЛУ ЩФФı¤ЩЛЫЛ ЩФ˘ ОПИМ·ЩИЫЩИОФ‡ ЩЫ· ·Ъ·О¿Щˆ М¤ЪЛ.
• ŸФ˘ МФЪВ› У· ‰И·ЪЪ¤Ф˘У В‡КПВОЩ· ·¤ЪИ·.
¶ƒ√™√Г∏:
ªЛУ ЩФФıВЩВ›ЩВ ЩЛУ МФУ¿‰· ЫВ М¤ЪФ˜ fiФ˘ МФЪВ› У·
‰И·К‡БВИ В‡КПВОЩФ ·¤ЪИФ.
∂¿У ‰И·К‡БВИ ·¤ЪИФ О·И Ы˘БОВУЩЪˆıВ› Б‡Ъˆ ·fi ЩЛУ
МФУ¿‰·, МФЪВ› У· ЪФО·П¤ЫВИ ¤ОЪЛНЛ.
• ŸÔ˘ ˘¿Ú¯Ô˘Ó ÔÏÏ¿ ÏÈ·ÓÙÈο Ì˯·ÓÈο ¤Ï·È·.
• ŸÔ˘ ˘¿Ú¯ÂÈ Ôχ ·Ï¿ÙÈ, ÁÈ· ·Ú¿‰ÂÈÁÌ· Û ·ÎÙ¤˜.
• ŸÔ˘ ·Ú¿ÁÔÓÙ·È ıÂÈÔ‡¯· ·¤ÚÈ·, ÁÈ· ·Ú¿‰ÂÈÁÌ·
Û ıÂṲ́˜ ËÁ¤˜.
• ŸФ˘ ИЩЫИПИ¤Щ·И П¿‰И ‹ fiФ˘ Ф ¯ТЪФ˜ В›У·И БВМ¿ЩФ˜
ηÓÔ‡˜ Ï·‰ÈÔ‡.
• ŸÔ˘ ˘¿Ú¯ÂÈ ÂÍÔÏÈÛÌfi˜ ˘„ËÏÒÓ Û˘¯ÓÔÙ‹ÙˆÓ ‹
·Û‡ÚÌ·ÙÔ˜ ÂÍÔÏÈÛÌfi˜.
¶POEI¢O¶OIH™H:
∏ ı¤ЫЛ ВБО·Щ¿ЫЩ·ЫЛ˜ ЩЛ˜ ВНˆЩВЪИО‹˜ МФУ¿‰·˜ Ъ¤ВИ У· ·¤¯ВИ ЩФ˘П¿¯ИЫЩФУ 3
М¤ЩЪ· ·fi ЩИ˜ ОВЪ·›В˜ ЩЛПВfiЪ·ЫЛ˜, Ъ·‰ИФКТУФ˘ О.П. ™В ВЪИФ¯¤˜ fiФ˘ ЩФ Ы‹М·
В›У·И ·ЫıВУ¤˜, ·К‹ЫЩВ МВБ·П‡ЩВЪЛ ·fiЫЩ·ЫЛ ·У¿МВЫ· ЫЩЛ ı¤ЫЛ ВБО·Щ¿ЫЩ·ЫЛ˜ О·И
ЫЩЛУ ОВЪ·›· ЩЛ˜ Ы˘ЫОВ˘‹˜ Ф˘ ВЛЪВ¿˙ВЩ·И, ЪФОВИМ¤УФ˘ У· ·ФКВ˘¯ıФ‡У Щ˘¯fiУ
·ЪВМ‚ФП¤˜ ЫЩЛ Ъ·‰ИФКˆУИО‹ ‹ ЩЛПВФЩИО‹ П‹„Л ·fi ЩЛ ПВИЩФ˘ЪБ›· ЩФ˘ ОПИМ·ЩИЫЩИОФ‡.
°И· У· ·ФК‡БВЩВ
ЩЛУ В›‰Ъ·ЫЛ ЩˆУ
П˘¯У›ˆУ КıФЪИЫМФ‡,
ОЪ·Щ¿ЩВ ЩФ fiЫФ ЩФ
‰˘У·ЩfiУ ИФ М·ОЪ˘¿.
1 М¤ЩЪФ ‹
ВЪИЫЫfiЩВЪФ
∞Û‡ÚÌ·ÙÔ
ÙËϤʈÓÔ
‹
∫ÈÓËÙfi
ÙËϤʈÓÔ
§¿МВ˜ КıФЪИЫМФ‡
МВ МВЩ·Ы¯ЛМ·ЩИЫЩ‹
1 М¤ЩЪФ ‹
ВЪИЫЫfiЩВЪФ
ƒ·‰ÈfiʈÓÔ
°È· Ó· ·ÔʇÁÂÙÂ
·Ú·ÌfiÚʈÛË
Ù˘ ÂÈÎfiÓ·˜ ‹
ıfiÚ˘‚Ô, ·Ê‹ÛÙÂ
ÌÈ· Û¯ÂÙÈ΋
·fiÛÙ·ÛË.
∆ËÏÂfiÚ·ÛË
3 М¤ЩЪ· ‹
ВЪИЫЫfiЩВЪФ
100 mm ‹
ВЪИЫЫfiЩВЪФ
∫·Ï¿
·ВЪИ˙fiМВУФ
ЫЩВБУfi
М¤ЪФ˜
500 mm ‹
ВЪИЫЫfiЩВЪФ
∆Ô›¯Ô˜, ÎÏ.
∂¿У ЩФ ОПИМ·ЩИЫЩИОfi ПВИЩФ˘ЪБВ› ·ПП¿ ‰ВУ „‡¯ВИ Ф‡ЩВ ıВЪМ·›УВИ (·У¿ПФБ· МВ ЩФ МФУЩ¤ПФ) ЩФ ¯ТЪФ, ·В˘ı˘УıВ›ЩВ ЫЩФУ
·УЩИЪfiЫˆfi Ы·˜ ВВИ‰‹ МФЪВ› У· ˘¿Ъ¯ВИ ‰И·К˘Б‹ „˘ОЩИОФ‡ ·ВЪ›Ф˘. ªЛУ НВ¯У¿ЩВ У· ЪˆЩ¿ЩВ ЩФУ ЩВ¯УИОfi Ы˘УЩ‹ЪЛЫЛ˜
В¿У ˘¿Ъ¯ВИ ‰И·К˘Б‹ „˘ОЩИОФ‡ fiЩ·У ВОЩВПФ‡УЩ·И ВЪБ·Ы›В˜ ВИЫОВ˘‹˜.
∆Ф „˘ОЩИОfi ·¤ЪИФ ЩФ˘ ОПИМ·ЩИЫЩИОФ‡ В›У·И ·ЫК·П¤˜. ™˘У‹ıˆ˜, ЩФ „˘ОЩИОfi ·¤ЪИФ ‰ВУ ‰И·КВ‡БВИ. ™В ·УЩ›ıВЩЛ fiМˆ˜ ВЪ›ЩˆЫЛ,
В¿У ЩФ ·¤ЪИФ Ф˘ ‰И·КВ‡БВИ ¤ЪıВИ ЫВ В·К‹ МВ ЩЛ КПfiБ· МИ·˜ ıВЪМ¿ЫЩЪ·˜ ˘БЪ·ВЪ›Ф˘, ВЩЪВП·›Ф˘ ОЩП., МФЪВ› У·
‰ЛМИФ˘ЪБЛıФ‡У ‚П·‚ВЪ¤˜ Ф˘Ы›В˜.
∏ПВОЩЪФПФБИО‹ ВБО·Щ¿ЫЩ·ЫЛ
• ∆Ъ·‚‹НЩВ М›· ·ФОПВИЫЩИО‹ БЪ·ММ‹ БИ· ЩЛУ ЩЪФКФ‰ФЫ›· ЩФ˘ ОПИМ·ЩИЫЩИОФ‡.
• µВ‚·ИˆıВ›ЩВ fiЩИ ЩЛЪ‹ЩВ ЩЛУ ВИЩЪВfiМВУЛ ¤УЩ·ЫЛ ЩФ˘ ‰И·ОfiЩЛ ЩЪФКФ‰ФЫ›·˜.
¶POEI¢O¶OIH™H:
• √ ВП¿ЩЛ˜ ‰ВУ Ъ¤ВИ У· ВБО·ıИЫЩ¿ МfiУФ˜ ЩФ˘ ЩЛУ МФУ¿‰·. ∂¿У Л ВБО·Щ¿ЫЩ·ЫЛ Б›УВИ П¿ıФ˜, ›Ыˆ˜ ЪФОПЛıВ› ˘ЪО·БИ¿,
ЛПВОЩЪФПЛН›· ‹ ЩЪ·˘М·ЩИЫМfi˜ ·fi ЩТЫЛ ЩЛ˜ МФУ¿‰·˜, ‰И·ЪЪФ‹ УВЪФ‡, ОП.
• ªЛУ О¿УВЩВ ВУ‰И¿МВЫВ˜ Ы˘У‰¤ЫВИ˜ ЩФ˘ О·Пˆ‰›Ф˘ ЩЪФКФ‰ФЫ›·˜ ‹ ЩЛ˜ ЪФ¤ОЩ·ЫЛ˜ О·И МЛ Ы˘У‰¤ВЩВ ФПП¤˜ Ы˘ЫОВ˘¤˜ ЫВ
М›· Ъ›˙· ВУ·ПП·ЫЫfiМВУФ˘ ЪВ‡М·ЩФ˜ (∞C).
¶˘ЪО·БИ¿ ‹ ЛПВОЩЪФПЛН›· МФЪВ› У· ЪФО‡„Ф˘У ·fi О·О‹ В·К‹, О·О‹ МfiУˆЫЛ ‹ ˘¤Ъ‚·ЫЛ ЩЛ˜ ВИЩЪВfiМВУЛ˜
¤УЩ·ЫЛ˜, ОП.™˘М‚Ф˘ПВ˘ЩВ›ЩВ ЩФУ ·УЩИЪfiЫˆfi Ы·˜.
¶ƒ√¢π∞°ƒ∞º∂™
¶ƒ√™√Ã∏:
• °ВИТЫЩВ ЩЛ МФУ¿‰·.
ªЛ Ы˘У‰¤ВЩВ ЩЛ БВ›ˆЫЛ ЫВ ЫˆП‹У· ·ВЪ›Ф˘ ‹ УВЪФ‡, ·ПВНИО¤Ъ·˘УФ ‹ ЫЩЛ БВ›ˆЫЛ ЩФ˘ ЩЛПВКТУФ˘. ∂¿У Л БВ›ˆЫЛ ‰ВУ ¤¯ВИ
Б›УВИ ЫˆЫЩ¿ В›У·И Иı·Уfi У· ЪФОПЛıВ› ЛПВОЩЪФПЛН›·.
• ∂БО·Щ·ЫЩ‹ЫЩВ ¤У· ‰И·ОfiЩЛ ‰И·К˘Б‹˜ БВ›ˆЫЛ˜, ·У¿ПФБ· МВ ЩФ М¤ЪФ˜ fiФ˘ ЪfiОВИЩ·И У· ЩФФıВЩЛıВ› ЩФ ОПИМ·ЩИЫЩИОfi
(˘БЪfi М¤ЪФ˜, ОП.).
∂¿У ‰ВУ ВБО·Щ·ЫЩ·ıВ› Ф ‰И·ОfiЩЛ˜ ‰И·К˘Б‹˜ БВ›ˆЫЛ˜, МФЪВ› У· ЪФОПЛıВ› ЛПВОЩЪФПЛН›·.
∂ИıВТЪЛЫЛ О·И Ы˘УЩ‹ЪЛЫЛ
• ŸЩ·У ЩФ ОПИМ·ЩИЫЩИОfi ¯ЪЛЫИМФФИВ›Щ·И БИ· ·ЪОВЩ¤˜ Ы·И˙fiУ, Л ·fi‰ФЫЛ МФЪВ› У· ВПП·ЩЩˆıВ› ПfiБˆ ЩЛ˜ ‚ЪˆМИ¿˜
ЫЩФ ВЫˆЩВЪИОfi ЩЛ˜ МФУ¿‰·˜.
• ∞Ó¿ÏÔÁ· Ì ÙË ¯Ú‹ÛË, ÌÈ¿ Ì˘Úˆ‰È¿ ÌÔÚ› Ó· ‰ËÌÈÔ˘ÚÁËı› ‹ ÙÔ Û˘Ì˘Îӈ̤ÓÔ ÓÂÚfi Ó· ÌËÓ ·ÔÛÙÚ·ÁÁ›˙ÂÙ·È
ÛˆÛÙ¿ ÏfiÁˆ ÛÎfiÓ˘, ‚ÚˆÌÈ¿˜, ÎÏ.
• ™˘УИЫЩ¿Щ·И, Л МФУ¿‰· У· ВИıВˆЪВ›Щ·И О·И У· Ы˘УЩЛЪВ›Щ·И (В› ПЛЪˆМ‹) ·fi ¤У·У ВИ‰ИОfi, ВИЪfiЫıВЩ· ЫЩЛ
К˘ЫИФПФБИО‹ Ы˘УЩ‹ЪЛЫЛ. ™˘М‚Ф˘ПВ˘ЩВ›ЩВ ЩФУ ·УЩИЪfiЫˆfi Ы·˜.
¶·Ъ·ЩЛЪ‹ЫВИ˜ Ы¯ВЩИО¿ МВ ЩФ ıfiЪ˘‚Ф ПВИЩФ˘ЪБ›·˜
• ªЛУ ЩФФıВЩВ›ЩВ ·УЩИОВ›МВУ· ОФУЩ¿ ЫЩЛУ ¤НФ‰Ф ·¤ЪФ˜ ЩЛ˜ ВНˆЩВЪИО‹˜ МФУ¿‰·˜. ªФЪВ› У· ¯·МЛПТЫФ˘У ЩЛУ
·fi‰ÔÛË Î·È Ó· ·˘Í‹ÛÔ˘Ó ÙÔÓ ıfiÚ˘‚Ô.
• ∂¿У ·ОФ˘ЫЩВ› ·К‡ЫИОФ˜ ıfiЪ˘‚Ф˜ О·Щ¿ ЩЛУ ПВИЩФ˘ЪБ›· Ы˘М‚Ф˘ПВ˘ЩВ›ЩВ ЩФУ ·УЩИЪfiЫˆfi Ы·˜.
ªÂÙ·ÎfiÌÈÛË
• ŸЩ·У ЩФ ОПИМ·ЩИЫЩИОfi ЪfiОВИЩ·И У· МВЩ·ОИУЛıВ› ‹ У· Н·У·ЩФФıВЩЛıВ› ПfiБˆ ·У·О·Щ·ЫОВ˘‹˜, МВЩ·ОfiМИЫЛ˜, ОП.
··ÈÙÔ‡ÓÙ·È ÂȉÈΤ˜ Ù¯ÓÈΤ˜ Î·È ÂÚÁ·Û›Â˜.
¶ƒ√∂π¢√¶√π∏™∏:
∂ИЫОВ˘¤˜ ‹ МВЩ·О›УЛЫЛ ‰ВУ Ъ¤ВИ У· Б›УФУЩ·И ·fi ЩФУ ВП¿ЩЛ.
∂¿У ·˘Щfi Б›УВИ П¿ıФ˜, МФЪВ› У· ЪФО·П¤ЫВИ КˆЩИ¿, ЛПВОЩЪФПЛН›·, ЩЪ·˘М·ЩИЫЩМfi ·fi ЩТЫЛ ЩЛ˜ МФУ¿‰·˜, ‰И·ЪЪФ‹
УВЪФ‡, ОП. ™˘М‚Ф˘ПВ˘ЩВ›ЩВ ЩФУ ·УЩИЪfiЫˆfi Ы·˜.
∞fiÚÚÈ„Ë
°È· Ó· ·ÔÚÚ›„ÂÙ ·˘Ùfi ÙÔ ÚÔïfiÓ, Û˘Ì‚Ô˘Ï¢Ù›Ù ÙÔÓ ·ÓÙÈÚfiÛˆfi Û·˜.
∞У ¤¯ВЩВ ФФИ·‰‹ФЩВ ВЪТЩЛЫЛ, Ы˘М‚Ф˘ПВ˘ЩВ›ЩВ ЩФУ ·УЩИЪfiЫˆfi Ы·˜.
ªÔÓÙ¤ÏÔ
∂ЫˆЩВЪИО‹
∂НˆЩВЪИО‹
§ÂÈÙÔ˘ÚÁ›·
∆ÚÔÊÔ‰ÔÛ›·
∞fi‰ÔÛË kW
πÛ¯‡˜ ∂ÈÛfi‰Ô˘ kW
√ÚÈṲ̂ÓË ÔÓÔÌ·Û›·
µ¿ÚÔ˜
∞fi‰ФЫЛ ж˘ОЩИОФ‡
(R410A)
∫ˆ‰ÈÎfi˜ πƒ
∂ИЩЪВfiМВУЛ
ВИП¤ФУ
›ВЫЛ
ПВИЩФ˘ЪБ›·˜
™Ù¿ıÌË
ıÔÚ‡‚Ô˘
∂ЫˆЩВЪИО‹ kg
∂НˆЩВЪИО‹ kg
kg
∂ЫˆЩВЪИО‹
∂НˆЩВЪИО‹
∆М‹М·
·Ó·ÚÚfiÊËÛ˘
∆Ì‹Ì·
ВОКfiЪЩИЫЛ˜
∂ЫˆЩВЪИО‹
(А„ЛП‹/ª¤ЩЪИ·/Г·МЛП‹)
MPa
MPa
dB(A)
∂НˆЩВЪИО‹ dB(A)
MSH-A07YV MSH-A09YV MSH-A12YV
MSC-A07YV MSC-A09YV MSC-A12YV
MUH-A07YV MUH-A09YV MUH-A12YV
æ‡ÍË £¤ÚÌ·ÓÛË æ‡ÍË £¤ÚÌ·ÓÛË æ‡ÍË £¤ÚÌ·ÓÛË
~ /N, 230V, 50Hz
2,3 2,5 2,55 3,05 3,5 3,9
0,715 0,69 0,795 0,84 1,09 1,08
910
35 38 40
0,62 1,00 1,00
36/31/25 36/31/25 39/32/25 40/33/26 39/33/26
47 49
MS-A07YV MS-A09YV MS-A12YV
MSC-A07YV MSC-A09YV MSC-A12YV
MU-A07YV MU-A09YV MU-A12YV
æ‡ÍË
2,3 2,55 3,5
0,715 0,795 1,14
910
34 36
0,60 0,60 0,75
IP20
IP24
1,64
4,15
36/31/25 40/33/26
45 49
™∏ª∂πø™∏:
1. ™˘Óı‹Î˜ ‰È·‚·ı̛ۈ˜
æ‡ÍË — ∂ЫˆЩВЪИО‹: 27Ж ∫ВПЫ›Ф˘ Dµ,
∂НˆЩВЪИО‹: 35Ж ∫ВПЫ›Ф˘ Dµ
£¤ÚÌ·ÓÛË — ∂ЫˆЩВЪИО‹: 20Ж ∫ВПЫ›Ф˘ Dµ
∂НˆЩВЪИО‹ :7Ж ∫ВПЫ›Ф˘ Dµ,
19Æ ∫ÂÏÛ›Ô˘ Wµ
6Æ ∫ÂÏÛ›Ô˘ Wµ
2. ∂ББ˘ЛМ¤УЛ ОП›М·О· ПВИЩФ˘ЪБ›·˜
∂ЫˆЩВЪИО‹ ∂НˆЩВЪИО‹
∞УТЩВЪФ fiЪИФ
æ‡ÍË
∫·ЩТЩВЪФ fiЪИФ
∞УТЩВЪФ fiЪИФ
£¤ÚÌ·ÓÛË
∫·ЩТЩВЪФ fiЪИФ
32Æ ∫ÂÏÛ›Ô˘ Dµ 43Æ ∫ÂÏÛ›Ô˘ Dµ
23Æ ∫ÂÏÛ›Ô˘ Wµ
21Æ ∫ÂÏÛ›Ô˘ Dµ 21Æ ∫ÂÏÛ›Ô˘ Dµ
15Æ ∫ÂÏÛ›Ô˘ Wµ
27Æ ∫ÂÏÛ›Ô˘ Dµ 24Æ ∫ÂÏÛ›Ô˘ Dµ
—
20Æ ∫ÂÏÛ›Ô˘ Dµ -10Æ ∫ÂÏÛ›Ô˘ Dµ
—
—
—
18Æ ∫ÂÏÛ›Ô˘ Wµ
-11Æ ∫ÂÏÛ›Ô˘ Wµ
71
Page 72

SUMÁRIO
PRECAUÇÕES DE SEGURANÇA ........................................................................................................................................ 72
NOMES DAS PEÇAS ............................................................................................................................................................ 73
PREPARAÇÃO ANTES DA OPERAÇÃO .............................................................................................................................. 74
OPERAÇÃO AUTOMÁTICA “I FEEL...” ................................................................................................................................. 76
OPERAÇÃO MANUAL (ARREFECIMENTO, DESUMIDIFICAÇÃO, QUENTE/VENTILAÇÃO) ............................................ 77
AJUSTE DA VELOCIDADE E DIRECÇÃO DO FLUXO DE AR ............................................................................................. 77
OPERAÇÃO DE ARREFECIMENTO ECONO (ECONO COOL)........................................................................................... 78
OPERAÇÃO DO TEMPORIZADOR (TEMPORIZADOR PARA LIGAR/DESLIGAR) ............................................................. 78
QUANDO NÃO FOR UTILIZAR O APARELHO DURANTE UM LONGO PERÍODO DE TEMPO......................................... 78
MANUTENÇÃO ..................................................................................................................................................................... 78
LIMPEZA DO FILTRO DE AR CATECHIN ............................................................................................................................. 79
SUBSTITUIÇÃO DO FILTRO DE LIMPEZA DO AR .............................................................................................................. 79
ANTES DE PEDIR ASSISTÊNCIA TÉCNICA, VERIFIQUE NOVAMENTE O SEGUINTE .................................................... 80
QUANDO ACHAR QUE OCORREU UM PROBLEMA .......................................................................................................... 80
INSTALAÇÃO, REINSTALAÇÃO E VERIFICAÇÃO .............................................................................................................. 81
ESPECIFICAÇÕES ............................................................................................................................................................... 81
PRECAUÇÕES DE SEGURANÇA
• Como se utilizam peças giratórias e peças que podem causar choque eléctrico neste produto, certifique-se de
ler estas “Precauções de Segurança” antes de o utilizar.
• Como as precauções mencionadas aqui são importantes para a segurança, cumpra-as.
Marcas e respectivos significados
AVISO: O manuseamento incorrecto pode causar um sério perigo, tal como a morte, ferimentos graves, etc.
CUIDADO: O manuseamento incorrecto pode causar um sério perigo dependendo das condições.
Significado dos símbolos utilizados neste manual
• A cor do autocolante afixado à unidade está escrita entre parênteses.
(Preto) : Nunca insira os dedos, varetas, etc.
(Preto) : Nunca pise a unidade interior/exterior e não coloque nada sobre elas.
(Amarelo): Cuidado! Perigo de choque eléctrico.
(Azul) : Certifique-se de que desliga a ficha de alimentação da tomada.
(Azul) : Desligue a unidade.
• Depois de ler este manual, guarde-o com o manual de instalação num lugar conveniente para uma fácil referência.
Posição de marca de advertência e dispositivos de segurança
com uma alta probabilidade.
: Não faça isso de maneira alguma.
: Siga a instrução.
INVÓLUCRO
PAINEL FRONTAL
SAÍDA DE AR
INVÓLUCRO
Este aparelho de ar condicionado NÃO se destina a ser utilizado por crianças ou pessoas enfermas sem supervisão.
•
AVISO
Não utilize uma ligação intermediária do cabo de alimentação ou um cabo de prolongamento e não
ligue muitos dispositivos à mesma tomada do aparelho de ar condicionado.
• Um incêndio ou choque eléctrico pode resultar de um contacto insuficiente, isolamento deficiente, excesso de corrente permissível, etc.
Não raspe nem faça transformações no cabo de alimentação, etc.
• Não coloque objectos pesados nem raspe ou faça transformações no cabo de alimentação. Este poderá
danificar-se o que poderá provocar um incêndio ou choque eléctrico.
Não ligue/desligue o disjuntor ou a ficha de alimentação durante a operação.
• Isto pode provocar um incêndio devido a faíscas, etc.
• Certifique-se de que desliga o disjuntor ou a ficha de alimentação completamente depois de desligar a
unidade interior com o controlo remoto.
Não exponha a sua pele ao ar frio directamente durante um longo período de tempo.
• Isto pode causar danos à sua saúde.
O cliente não deve instalar a unidade.
• Uma instalação incorrecta pode provocar um incêndio, choque eléctrico, ferimentos devido à queda da
unidade, fuga de água, etc. Consulte o seu revendedor.
Nunca insira os seus dedos ou objectos na entrada/saída de ar.
• Como o ventilador gira em alta velocidade, isso pode provocar ferimentos.
• Deve ser prestada especial atenção às crianças, para que não brinquem com o aparelho de ar condicionado.
Quando acontecer uma anomalia (cheiro a queimado, etc.) pare o aparelho de ar condicionado e
desligue a ficha de alimentação ou o disjuntor.
• Se a unidade continuar a funcionar em condição anormal, pode provocar um incêndio, problema, etc.
Neste caso, consulte o seu revendedor.
O cliente não deve fazer qualquer reparação ou reinstalação.
• Se isto for feito de forma incorrecta, poderá resultar em incêndio, choque eléctrico, ferimentos devido à
queda da unidade, fuga de água, etc. Consulte o seu revendedor.
• Se o cabo de alimentação estiver danificado, este deve ser substituído pelo fabricante ou pelo representante de assistência de modo a evitar um perigo.
CUIDADO
Quando tiver que retirar o filtro de ar, não toque nas peças metálicas da unidade interior.
• Isso pode provocar ferimentos.
Não aplique insecticidas ou spray inflamável.
• Isso pode provocar um incêndio ou deformação na caixa do aparelho.
Não coloque animais de estimação ou plantas onde fiquem directamente expostos ao fluxo de ar.
• Isso poderia causar danos aos animais e plantas.
Não deixe a unidade num suporte de instalação danificado.
• A unidade pode cair e provocar ferimentos.
Quando efectuar manutenção, não se ponha em cima de um banco instável, etc.
• Se cair, isto pode provocar ferimentos, etc.
Não puxe o cabo de alimentação.
• O fio do meio do cabo de alimentação pode estar desligado e isto poderá provocar um incêndio.
Não carregue nem desmonte as pilhas e não as deite numa fogueira.
• Isto poderá resultar em derrame, incêndio ou explosão.
Não utilize o aparelho durante um longo período de tempo em alta humidade como, por exemplo,
quando deixar uma porta ou janela aberta.
•
No modo de arrefecimento, se o aparelho for utilizado num quarto com alto grau de humidade (humidade relativa de 80% ou mais) durante
um longo período de tempo, a água condensada no aparelho de ar condicionado pode gotejar, podendo molhar e estragar os móveis, etc.
Não utilize a unidade para propósitos especiais.
• Não utilize este aparelho de ar condicionado para preservar dispositivos de precisão, alimentos, animais, plantas e objectos de arte. Isso pode causar a deterioração da qualidade, etc.
Não coloque um fogão, etc., onde fique directamente exposto ao fluxo de ar.
• Isso poderia provocar uma combustão imperfeita.
72
Page 73

PRECAUÇÕES DE SEGURANÇA
NOMES DAS PEÇAS
CUIDADO
Quando for preciso limpar a unidade, desligue-a e retire a ficha de alimentação da tomada ou desligue o disjuntor.
• Como o ventilador gira em alta velocidade durante o funcionamento, poderá provocar ferimentos.
Quando a unidade não for utilizada durante um longo período de tempo, desligue a ficha de alimentação ou o disjuntor.
• Caso contrário, pode acumular-se sujidade e provocar um incêndio.
Substitua as 2 pilhas por pilhas novas do mesmo tipo.
• A utilização de uma pilha usada com uma nova poderá resultar na formação de calor, derrame do
respectivo líquido ou explosão.
Caso o líquido das pilhas entre em contacto com a sua pele ou peça de vestuário, lave-as bem com
água limpa.
• Caso o líquido das pilhas entre em contacto com o seus olhos, lave-os bem com água limpa e consulte
imediatamente um médico.
Ventile bem a divisão se utilizar a unidade em conjunto com um fogão, etc.
• Pode ocorrer uma falta de oxigénio.
Não mexa nos interruptores com as mãos húmidas.
• Isso pode provocar um choque eléctrico.
Não limpe o aparelho de ar condicionado com água.
• A água pode penetrar na unidade e degradar o isolamento. Pode também provocar um choque eléctrico.
Não pise na unidade interior/exterior ou não coloque nada sobre ela.
• Se cair, isto pode provocar ferimentos, etc.
Para instalação
AVISO
• Consulte o seu revendedor sobre a instalação do aparelho de ar condicionado.
CUIDADO
Não instale a unidade onde haja a possibilidade de fugas de gás inflamável.
• Uma fuga de gás ao redor da unidade pode provocar uma explosão.
Ligação da unidade à terra.
• Não ligue o fio de terra a um tubo de gás, tubo de água, haste de pára-raios ou fio de terra de um
telefone. Se a ligação à terra for feita incorrectamente, pode provocar um choque eléctrico.
Instale um disjuntor de fuga para terra dependendo do lugar onde o aparelho de ar condicionado for
instalado (lugar húmido, etc.)
• Deixar de instalar um disjuntor de fuga para terra pode provocar um choque eléctrico.
O dreno deve ser completamente drenado.
• Se o percurso para a drenagem estiver incompleto, a água pode gotejar da unidade. Isso pode molhar e
estragar os móveis.
Unidade Interior
Filtro de limpeza de ar
(Tipo de fole branco)
Filtro de ar Catechin
(Com desodorizador)
Saída de ar
Palheta vertical
Palheta horizontal
Secção de operação
(Quando o painel frontal está aberto)
Unidade exterior
Interruptor de operação de
emergência
Lâmpada indicadora
de operação
Painel frontal
Entrada de ar
Ao disjuntor
Cabo de alimentação
Secção de recepção
do controlo remoto
Controlo remoto
Secção de exibição
Secção de recepção
do controlo remoto
Entrada de ar (Parte posterior e lateral)
Tubagem
Mangueira de drenagem
Saída de ar
Saída de drenagem
73
Page 74

ON/OFF
FAN
TOO
WARM
TOO
COOL
VANE
MODE
ECONO COOL
STOP
START
HR.
MIN.
I FEEL
COOL
DRY
AMPM
AMPM
RESET CLOCK
HEAT
/FAN
NOMES DAS PEÇAS
ON/OFF
TOO
COOL
AMPM
CLOCK
˚C
AMPM
TOO
WARM
PREPARAÇÃO ANTES DA OPERAÇÃO
Controlo Remoto
Secção de transmissão do sinal
Secção de exibição de operação
Abra a tampa da frente.
Botão (ON/OFF)
(ligar/desligar)
(Esta ilustração apresenta uma visão geral.)
Botões de temperatura
Função de reinício automático
Estes modelos estão equipados com a função de reinício automático. Caso não pretenda usar
■
esta função, deverá consultar o representante, porque será necessário alterar a configuração da
unidade.
A função de reinício automático é …
Quando a unidade interior é controlada por controlo remoto, o modo de funcionamento, a temperatura regulada e a velocidade
do ventilador são memorizados. Se a corrente falhar ou for cortada durante o funcionamento da unidade “a função de reinício
automático” activa-se automaticamente para iniciar o funcionamento no mesmo modo em que foi regulada com o controlo
remoto imediatamente antes do corte da energia. (Para mais detalhes, veja a página 76.)
Unidade interior
Insira a ficha de alimentação na tomada eléctrica e/ou ligue o disjuntor.
■
AVISO:
Retire a sujidade da ficha de alimentação e introduza-a firmemente.
Se estiver sujidade agarrada à ficha ou se esta não for completamente introduzida, isto poderá provocar um incêndio
ou choque eléctrico.
Controlo remoto
Como ajustar o tipo
A regulação deste controlo remoto necessita de ser ligado de acordo com o tipo de aparelho de ar
■
condicionado (ARREFECIMENTO e QUENTE ou APENAS ARREFECIMENTO).
Se a regulação estiver incorrecta, o aparelho de ar condicionado não funciona normalmente. Por
isso, verifique se a regulação corresponde ao tipo do seu aparelho de ar condicionado. Caso
contrário, corrija a regulação como mostrado abaixo.
Interruptor de deslize
Tipo
ARREFECIMENTO e QUENTE
APENAS ARREFECIMENTO
74
Botão controlo de velocidade
do ventilador
Botão de selecção de operação
Botão Arrefecimento Econo
(ECONO COOL)
Botão reposição
Botão do temporizador de desligar
Botão do temporizador de ligar
Botões HR./MIN. (horas/
minutos)
(Botões de ajuste de horas)
Botão ajuste do relógio
Botão de controlo de palhetas
Posição do Interruptor de
deslize
Page 75

HR.
MIN.
HR.
MIN.
FAN
VANE
MODE
ECONO COOL
STOP
START
HR.
MIN.
I FEEL
COOL
DRY
RESET CLOCK
HEAT
/FAN
Operation Indicator
Operation Indicator
Operation Indicator
Operation Indicator
Operation Indicator
ON/OFF
PREPARAÇÃO ANTES DA OPERAÇÃO
Controlo remoto
Como ajustar as pilhas e a hora actual
1 Retire a tampa da frente e coloque as pilhas.
Depois volte a colocar a tampa da frente.
Primeiro introduza o polo negativo da pilha.
Verifique se a polaridade das baterias está correcta.
Primeiro introduza o
polo negativo da pilha.
2 Prima o botão RESET (reposição).
Prima-o usando
um objecto fino.
• Se o botão de reposição não for premido, o controlo remoto pode funcionar incorrectamente.
3 Prima o botão CLOCK set (ajuste do reló-
gio).
Prima-o usando
um objecto fino.
4 Utilize os botões
e
(botões de
AJUSTE DE HORAS) para ajustar a hora actual.
• Sempre que premir o botão
hora, e sempre que premir o botão
1 minuto.
, aumenta uma
aumenta
5 Volte a premir o botão de ajuste CLOCK e
feche a tampa da frente.
Manuseamento do controlo remoto
• O limite que o sinal pode alcançar é de aproximadamente 6 m quando o controlo remoto é apontado para
a frente da unidade interior.
• Quando se prime um botão, ouve-se um ou dois
“bipes” provenientes da unidade interior. Se não ou-
vir nenhum som, tente novamente.
• Utilize o controlo remoto com cuidado. Se deixar cair,
atirar ou molhar o controlo remoto, este pode deixar
de funcionar.
Ao instalar o controlo remoto numa parede, etc.
• Instale a caixa de instalação do controlo remoto numa
posição onde o som (bipe) de recepção do sinal possa ser ouvido da unidade interna quando é premido
o botão
Como instalar/retirar o controlo remoto
Instalação : Insira o controlo remoto para baixo.
Remoção : Puxe-o para cima.
Pilhas sem carga
■ Referência para a substituição das pilhas
Substitua as pilhas por umas pilhas alcalinas AAA novas nos seguintes casos:
.
Caixa de instalação do
controlo remoto
· Quando a unidade interior não responder ao sinal do
controlo remoto.
· Quando o mostrador no controlo remoto ficar escuro.
· Quando um botão do controlo remoto for premido,
todas as visualizações aparecem no ecrã, e depois
desaparecem imediatamente.
Não utilize baterias de manganês. O controlo remoto
pode funcionar mal.
• A vida útil de uma pilha alcalina é de aproximadamente 1 ano.
No entanto, uma pilha cujo limite de validade se está
a aproximar pode brevemente ficar gasta. O prazo
de validade recomendado está indicado (mês/ano)
na parte de baixo das pilhas.
• Para evitar derrame de líquido, retire todas as pilhas
quando o controlo remoto não for utilizado durante
muito tempo.
CUIDADO:
Caso o líquido das pilhas entre em contacto com a
sua pele ou peça de vestuário, lave-as bem com água
limpa. Caso o líquido das pilhas entre em contacto
com o seus olhos, lave-os bem com água limpa e
consulte imediatamente um médico.
• Não utilize pilhas recarregáveis.
• Substitua as 2 pilhas por pilhas novas do mesmo tipo.
• Descarte as pilhas em local apropriado.
Quando o controlo remoto não puder ser utilizado (operação de emergência)
Quando a carga das pilhas do controlo remoto acabar ou o controlo remoto não estiver a funcionar correctamente,
pode utilizar-se a operação de emergência com o interruptor de OPERAÇÃO DE EMERGÊNCIA.
Tipo de ARREFECIMENTO e QUENTE
1 Prima o interruptor de OPERAÇÃO DE
EMERGÊNCIA.
• Por cada toque na OPERAÇÃO DE EMERGÊNCIA,
a unidade muda pela ordem: MODO ARREFECIMENTO DE EMERGÊNCIA, MODO QUENTE DE
EMERGÊNCIA e MODO DE PARAGEM.
Todavia, premindo uma vez o interruptor de OPERAÇÃO DE EMERGÊNCIA, a unidade funciona em
teste de funcionamento durante 30 minutos; em
seguida, o modo de funcionamento comuta para
MODO DE EMERGÊNCIA.
• Os detalhes do MODO DE EMERGÊNCIA são indicados abaixo. No entanto, o controlo da temperatura não funciona durante 30 minutos em teste de
funcionamento e a unidade é ajustada para operação contínua.
A velocidade do ventilador é ajustada para Alta no
teste de funcionamento e comuta para Média após
30 minutos.
Modo de funcionamento
Temperatura ajustada 24°C24°C
Velocidade do ventilador
Palheta horizontal Automático Automático
• A lâmpada do Indicador de Operação (Operation
Indicator) indica o modo de operação na unidade
interior, tal como ilustram as figuras que se seguem.
Lâmpada indicadora de operação
ARREFECIMENTO
DE EMERGÊNCIA
QUENTE DE EMERGÊNCIA
PARAGEM
Para interromper a operação de emergência,
■
prima novamente uma vez o interruptor de
OPERAÇÃO DE EMERGÊNCIA (em caso de
modo QUENTE DE EMERGÊNCIA) ou duas
vezes (em caso de modo ARREFECIMENTO
DE EMERGÊNCIA).
Arrefecimento
Média Média
Quente
Tipo APENAS de ARREFECIMENTO
1 Prima o interruptor de OPERAÇÃO DE
EMERGÊNCIA.
• Premindo o interruptor de OPERAÇÃO DE EMER-
GÊNCIA, a unidade funciona inicialmente em teste
de funcionamento durante 30 minutos; em seguida, o modo de funcionamento comuta para MODO
ARREFECIMENTO DE EMERGÊNCIA.
• Os detalhes do MODO ARREFECIMENTO DE EMERGÊNCIA são indicados abaixo. No entanto, o controlo da temperatura não funciona durante 30 minutos em teste de funcionamento e a unidade é
ajustada para operação contínua.
A velocidade do ventilador é ajustada para Alta no
teste de funcionamento e comuta para Média após
30 minutos.
Modo de funcionamento Arrefecimento
Temperatura ajustada 24°C
Velocidade do ventilador Média
Palheta horizontal Automático
• A lâmpada do Indicador de Operação (Operation
Indicator) indica o modo de operação na unidade
interior, tal como ilustram as figuras que se seguem.
Lâmpada indicadora de operação
ARREFECIMENTO
DE EMERGÊNCIA
PARAGEM
Para interromper o MODO ARREFECIMEN-
■
TO DE EMERGÊNCIA, prima novamente o interruptor de OPERAÇÃO DE EMERGÊNCIA.
Sempre que premir o interruptor, o modo de operação
alterna entre o modo ARREFECIMENTO DE EMERGÊNCIA e o MODO DE PARAGEM.
75
Page 76

ON/OFF
ON/OFF
TOO
WARM
TOO
COOL
FAN
VANE
MODE
STOP
START
HR.
I FEEL
COOL
DRY
HEAT
/FAN
OPERAÇÃO AUTOMÁTICA “I FEEL...”
MODE
Operation Indicator
MODE
ON/OFF
FAN
TOO
WARM
TOO
COOL
VANE
MODE
ECONO COOL
STOP
START
HR.
MIN.
I FEEL
COOL
DRY
AMPM
CLOCK
˚C
AMPM
HEAT
/FAN
RESET CLOCK
Com o modo de operação automática “ (I FEEL...)”, a condição de ambiente óptimo pode ser ajustada automaticamente por um toque.
Para iniciar a operação:
Prima o botão
■
Quando o modo “ (I FEEL...)” for seleccionado, o aparelho de ar condicionado é automaticamente controlado na temperatura óptima.
.
Para interromper a operação:
Prima o botão
■
○○○○○○○○○○○○○○○○○○○○○○○○○○○○○○○○○
Se você sentir que está um pouco quente:
Prima o botão
■
Premindo uma vez, diminui a temperatura em aproximadamente 1°C.
Se você sentir que está um pouco frio:
Prima o botão
■
Premindo uma vez, eleva a temperatura em aproximadamente 1°C.
Quando a “ (I FEEL...)” não estiver seleccionada, prima o
botão
até que fique ajustado.
Sempre que premir o botão, o modo de operação muda em
sequência:
(I FEEL...) → (ARREFECIMENTO) →
(DESUMIDIFICAÇÃO) → (QUENTE/VENTILAÇÃO)
.
para diminuir a temperatura.
para elevar a temperatura.
Descrição do modo “I FEEL...”
Detalhes da operação
De acordo com a temperatura ambiente, quando se inicia a operação, o modo de operação é automaticamente regulado
para ARREFECIMENTO, DESUMIDIFICAÇÃO ou QUENTE. No entanto, quando a operação é novamente reiniciada
dentro de 2 horas depois de ter sido interrompida, é seleccionado o mesmo modo de operação antes de a operação ter
sido interrompida. O modo de operação seleccionado primeiro não é mudado mesmo que a temperatura do quarto
mudar. Se o modo de operação não se ajustar às condições da temperatura ambiente, seleccione o modo de operação
apropriado, premindo o botão
Detalhes da operação automática
Temperatura Modo de operação Temperatura desejada Modo de operação Temperatura desejada
ambiente no início (estado inicial) (estado inicial)
Aproximadamente
25°C ou superior 24°C24°C
Aproximadamente
25°C - 23°C
DESUMIDIFICAÇÃO — DESUMIDIFICAÇÃO —
Aproximadamente
23°C ou inferior 26°C
OBSERVAÇÃO:
ARREFECIMENTO:
Quando a temperatura ambiente estiver 2°C acima da temperatura programada, a temperatura programada não pode ser alterada visto que o aparelho de ar condicionado está a funcionar para atingir a
temperatura alvo (programada). Neste caso, espere até que a temperatura ambiente baixe até dentro do
limite de 2°C da temperatura programada e então pode alterar a temperatura programada.
QUENTE:
Quando a temperatura ambiente for de 2°C inferior à temperatura programada, a temperatura programada não pode ser alterada visto que o aparelho de ar condicionado está a funcionar para atingir a temperatura alvo (programada). Neste caso, espere até que a temperatura ambiente aumente até dentro do
limite de 2°C da temperatura programada e então pode alterar a temperatura programada.
Detalhes do mostrador na unidade interior
O indicador de operação no lado direito da unidade interior indica o estado de operação.
.
Tipo de ARREFECIMENTO e QUENTE Tipo APENAS de ARREFECIMENTO
ARREFECIMENTO
QUENTE
Acesa
Intermitente
Desligada
Aproximadamente
Aproximadamente
ARREFECIMENTO
DESUMIDIFICAÇÃO —
Aproximadamente
Descrição da “FUNÇÃO DE REINÍCIO AUTOMÁTICO”
• Estas unidades estão equipadas com uma função de reinício automático. Assim que a energia é restaurada, o aparelho de ar condicionado activa-se automaticamente no mesmo modo para o qual foi regulado com o controlo remoto
antes do corte da energia.
• Se a unidade foi desactivada com o controlo remoto antes do corte de energia, permanecerá nesse estado depois de
restaurada a energia.
• Se tiver sido regulada para a operação de emergência antes do corte da energia, a unidade retomará o funcionamento logo que a energia seja restaurada, no mesmo modo para o qual foi regulada com o controlo remoto antes da
operação de emergência.
• Se a unidade estiver no modo “I FEEL...” antes da falha de energia, o modo de operação (ARREFECIMENTO,
DESUMIDIFICAÇÃO ou QUENTE) não é guardado na memória. Quando a electricidade é restabelecida, a unidade
decide o modo de operação através da temperatura inicial ambiente no reinício e inicia novamente a operação.
76
Lâmpada indicadora de operação
Indicação
Isto mostra que o aparelho de ar condicionado está a funcionar para atingir a temperatura desejada. Espere até atingir
a temperatura.
Isto mostra que a temperatura ambiente está próxima da
temperatura desejada.
(Somente na unidade exterior da série MXZ)
Por favor consulte a secção Informações para o aparelho
de ar condicionado multi-sistema. (Página 77)
Estado de Operação
Diferença entre a temperatura
desejada e a temperatura ambiente
Aproximadamente 2°C ou mais
Aproximadamente 2°C ou menos
—
Page 77

ON/OFF
MODE
ON/OFF
ON/OFF
OPERAÇÃO MANUAL (ARREFECIMENTO, DESUMIDI-
TOO
WARM
TOO
COOL
FAN
VANE
ON/OFF
FAN
TOO
WARM
TOO
COOL
VANE
MODE
ECONO COOL
STOP
START
HR.
MIN.
I FEEL
COOL
DRY
AMPM
CLOCK
˚C
AMPM
HEAT
/FAN
RESET CLOCK
ON/OFF
FAN
TOO
WARM
TOO
COOL
VANE
MODE
ECONO COOL
STOP
START
HR.
MIN.
I FEEL
COOL
DRY
AMPM
CLOCK
˚C
AMPM
HEAT
/FAN
RESET CLOCK
VANE
1
2
3
4
5
AJUSTE DA VELOCIDADE E DIRECÇÃO DO FLUXO DE AR
FICAÇÃO, QUENTE/VENTILAÇÃO)
Para seleccionar o modo ARREFECIMENTO, DESUMIDIFICAÇÃO ou QUENTE/VENTILAÇÃO
1 Prima o botão
2 Seleccione o modo de operação, premindo o botão
Sempre que premir o botão, o modo de operação muda em sequência:
(FEEL...) → (ARREFECIMENTO) → (DESUMIDIFICAÇÃO) →
(QUENTE/VENTILAÇÃO)
Modo QUENTE/VENTILAÇÃO
Verifique qual o tipo de aparelho de ar condicionado.
ARREFECIMENTO e QUENTE
APENAS ARREFECIMENTO
Para interromper a operação:
■
○○○○○○○○○○○○○○○○○○○○○○○○○○○○○○○○○○○○○○○○○○○○○○○○○
Quando for preciso mudar a temperatura ajustada:
■
• Prima o botão
• Prima o botão
Na operação de QUENTE
•
Se o ar condicionado absorver demasiado calor do ar, a máquina pode ficar sobrecarregada. Na sequência de um juízo emitido pelo
microprocessador, a ventoinha da unidade exterior pára automaticamente para proteger o ar condicionado.
Quando a ventoinha da unidade exterior pára, pode formar-se embaciamento na unidade exterior, o que não constitui qualquer problema.
Na operação de DESUMIDIFICAÇÃO
• O controlo de temperatura (ajuste de temperatura) não pode ser feito.
• A temperatura ambiente é ligeiramente reduzida neste modo de operação.
Os detalhes do mostrador da unidade interior são explicados na página 76.
■
OBSERVAÇÃO:
Quando a temperatura ambiente for muito alta, pode não atingir a temperatura ajustada, já que a unidade funciona
para arrefecer com muita carga.
Informações para o aparelho de ar condicionado multi-sistema (Unidade exterior: série MXZ)
O aparelho de ar condicionado multi-sistema (unidade exterior: série MXZ) pode ligar duas ou mais unidades a
uma unidade exterior. Dependendo da capacidade, podem funcionar simultaneamente duas ou mais unidades.
• Quando tenta utilizar simultaneamente duas ou mais unidades interior com uma unidade exterior, uma para refrigera-
ção e outra para aquecimento, é seleccionado o modo de funcionamento da unidade interior que foi colocada em
funcionamento primeiro. As restantes unidades interior que começam a funcionar mais tarde não podem funcionar,
surgindo uma indicação do estado de funcionamento. (Consulte a tabela sobre a lâmpada indicadora de operaçao na
página 76.) Neste caso, configure todas as unidades interior para o mesmo modo de funcionamento.
• Quando a unidade interior é colocada em funcionamento durante a descongelação da unidade exterior, a expulsão
do ar quente demora alguns minutos (10 minutos no máximo).
• Na operação de aquecimento, a unidade interior que não funciona pode aquecer ou pode-se ouvir o som do fluxo do
refrigerante, mas não quer dizer que seja uma avaria. Isto acontece porque o refrigerante flui continuamente para
dentro da unidade interior que não funciona.
Descrição da “FUNÇÃO DE REINÍCIO AUTOMÁTICO”
Consulte a página 76.
para baixar a temperatura. Premindo uma vez, diminui a temperatura em aproximadamente 1°C.
para elevar a temperatura. Premindo uma vez, eleva a temperatura em aproximadamente 1°C.
Tipo Modo deoperação
Prima o botão
Assim que o modo de operação for ajustado uma vez, a operação começará no
modo ajustado anteriormente, premindo simplesmente o botão
.
.
QUENTE
VENTILAÇÃO
.
.
A velocidade e direcção do FLUXO DE AR podem ser seleccionadas conforme desejado.
Para mudar a velocidade do FLUXO DE AR, prima o botão
■
Sempre que premir o botão, a velocidade do ventilador muda em sequência:
(Baixo) → (Médio) → (Alto) → (Automático)
• Para arrefecer/aquecer mais a divisão, regule pela marca
(Alto).
• Se o som do aparelho de ar condicionado em funcionamento perturbar o
seu sono, utilize o entalhe
Para mudar a direcção do FLUXO DE AR verticalmente, prima o
■
botão
.
(Baixo).
Sempre que premir o botão, o ângulo da palheta horizontal muda em sequên-
cia:
(1) → (2) → (3) → (4) → (5) → (Oscilação) → (Automá-
tico)
OPERAÇÃO DE OSCILAÇÃO
Utilize a operação de oscilação para que o fluxo de ar chegue a todos os
cantos da divisão.
Amplitude recomendada para a palheta horizontal
Utilize normalmente a posição
Utilize a posição
(1) ou (2) em modo de ARRE-
(Automático).
Arrefecimento
Desumidificação
FECIMENTO ou DESUMIDIFICAÇÃO e as posições
(3) a (5) no modo QUENTE quando ajustar se-
gundo as suas necessidades.
Quente
OBSERVAÇÃO:
• Na operação de arrefecimento, quando o aparelho de ar condicionado funcionar com a palheta horizontal ajustada
para
(4) ou (5) durante 1 hora, a direcção do FLUXO DE AR é automaticamente ajustada para evitar a queda de
gotas de água condensada.
• Ajuste a direcção de FLUXO DE AR vertical usando o controlo remoto. Pode ocorrer um problema se a palheta
vertical for movida manualmente.
• Se, na operação de aquecimento, a temperatura do fluxo de ar for demasiado baixa, ou quando terminar a
descongelação, a posição da palheta horizontal é regulada para
Operação do controlo automática da
direcção do fluxo de ar
Quando se selecciona o modo AUTOMÁTICO com
o botão
, a posição da palheta horizontal é ajus-
(1).
Para mudar a direcção horizontal do FLUXO
■
DE AR, mova as palhetas verticals manualmente.
tada automaticamente para corresponder ao modo
de operação para um funcionamento eficaz.
(1) QUENTE
• Quando a temperatura do fluxo de ar é demasiado
baixa, o ar é expelido horizontalmente.
• Quando a temperatura do fluxo de ar sobe,
o ar é expelido para baixo.
(2) ARREFECIMENTO, DESUMIDIFICAÇÃO
O ar é expelido horizontalmente.
(3) VENTILAÇÃO
O ar é expelido para baixo.
Ajuste as palhetas antes de iniciar a operação.
Como a palheta horizontal se move automaticamente,
tenha cuidado, pois os seus dedos podem ficar presos.
77
.
Page 78

OPERAÇÃO DE ARREFECIMENTO ECONO (ECONO COOL)
ON/OFF
FAN
TOO
WARM
TOO
COOL
VANE
MODE
ECONO COOL
STOP
START
HR.
MIN.
I FEEL
COOL
DRY
AMPM
CLOCK
˚C
AMPM
HEAT
/FAN
RESET CLOCK
START
HR.
MIN.
HR.
MIN.
START
STOP
HR.
MIN.
HR.
MIN.
STOP
ECONO COOL
ECONO COOL
VANE
FAN
TOO
WARM
TOO
COOL
QUANDO NÃO FOR UTILIZAR O APARELHO DURAN-
Utilize esta operação quando desejar sentir-se confortável no modo de ARREFECIMENTO (COOL),
ainda com poupança de energia.
Siga os seguintes procedimentos enquanto a unidade estiver a funcionar no modo de ARREFECIMENTO MANUAL.
Prima o botão
■
Ao seleccionar a operação (ARREFECIMENTO ECONO (ECONO COOL))
no modo de ARREFECIMENTO (COOL), o aparelho de ar condicionado executa a operação de oscilação em vários ciclos, de acordo com a temperatura
do aparelho de ar condicionado.
A TEMPERATURA REGULADA é também automaticamente regulada para mais
2°C do que no modo ARREFECIMENTO (COOL).
.
Para cancelar a operação de ARREFECIMENTO ECONO (ECONO COOL):
Prima novamente o botão
■
○○○○○○○○○○○○○○○○○○○○○○○○○○○○○○○○○
• Sempre que o botão
durante a operação de ARREFECIMENTO ECONO (ECONO COOL), a
operação de ARREFECIMENTO ECONO (ECONO COOL) é cancelada.
• Existem à disposição os botões
DESLIGAR (ON/OFF) (explicação apresentada em seguida).
O que é o “ARREFECIMENTO ECONO (ECONO COOL)”?
O fluxo de ar oscilante (mudança do fluxo de ar) fá-lo sentir mais fresco do que o fluxo de ar constante. Por isso, ainda que a temperatura
regulada seja automaticamente elevada em mais 2°C, é possível sentir-se confortável no modo de arrefecimento e ainda poupar energia.
.
for premido ou o modo de operação alterado,
,
ou
e o temporizador LIGAR/
OPERAÇÃO DO TEMPORIZADOR (TEMPORIZADOR
PARA LIGAR/DESLIGAR)
É conveniente ajustar o temporizador para a hora de dormir, hora de voltar para casa, hora de despertar, etc.
Como ajustar o temporizador para LIGAR
1 Prima o botão
Sempre que premir o botão, o modo do temporizador
para LIGAR alterna entre LIGAR e DESLIGAR.
durante a operação.
2 Ajuste a hora do temporizador, utilizando os
botões
Sempre que premir o botão
quanto que sempre que premir o botão
10 minutos.
Para cancelar o temporizador para LIGAR:
Prima o botão
■
Programação da operação do temporizador
Os temporizadores para LIGAR e DESLIGAR podem ser utilizados em combinação. O temporizador cuja hora ajustada for
atingida primeiro funcionará primeiro. (A marca “ ” indica a ordem das operações dos temporizadores.)
• Se a hora actual não tiver sido ajustada, a operação dos temporizadores não poderá ser feita.
OBSERVAÇÃO:
Se a alimentação principal for desligada ou se ocorrer uma falha de energia com o temporizador REINICIAR/PARAR AUTO
activo, a definição do temporizador é cancelada. Como estes modelos estão equipados com uma função de reinício automá-
tico, o aparelho de ar condicionado inicia a operação com o temporizador cancelado quando a energia é restabelecida.
78
e
.
, aumenta 1 hora, en-
, aumenta
.
Como ajustar o temporizador para DESLIGAR
1 Prima o botão
Sempre que premir o botão, o modo do temporizador
para DESLIGAR alterna entre LIGAR e DESLIGAR.
durante a operação.
2 Ajuste a hora do temporizador, utilizando os
botões
Sempre que premir o botão
quanto que sempre que premir o botão
10 minutos.
Para cancelar o temporizador para DESLIGAR:
Prima o botão
■
e
.
, aumenta 1 hora, en-
, aumenta
.
TE UM LONGO PERÍODO DE TEMPO
Quando não for utilizar o aparelho durante um longo período de tempo:
1 Realize a operação FAN (ventilação) duran-
te 3 ou 4 horas para secar o interior do aparelho de ar condicionado.
Tipo de ARREFECIMENTO e QUENTE:
• Para efectuar a operação FAN (ventilação), regule
o controlo remoto para a temperatura mais elevada no modo de OPERAÇÃO DE ARREFECIMENTO MANUAL. (Consulte a página 77.)
Tipo APENAS de ARREFECIMENTO:
• Seleccione o modo VENTILAÇÃO. (Consulte a
página 77.)
2 Desligue o disjuntor e/ou a ficha.
CUIDADO:
Desligue o disjuntor ou a ficha de alimentação quando
não for utilizar o aparelho de ar condicionado durante
um longo período de tempo.
Caso contrário, a sujidade pode acumular-se e provocar um incêndio.
3 Retire as pilhas do controlo remoto.
CUIDADO:
Para evitar derrame de líquido, retire todas as pilhas
quando o controlo remoto não for utilizado durante muito
tempo.
Quando for utilizar novamente o aparelho:
1 Limpe o filtro de ar e instale-o na unidade
interior.
(Consulte a página 79 para a limpeza.)
2 Verifique se a entrada ou a saída do ar das
unidades interiores/exteriores está bloqueada por quaisquer obstáculos.
3 Verifique se o fio de terra está devidamente
ligado.
CUIDADO:
Ligação da unidade à terra.
Não ligue o fio de terra a um tubo de gás, tubo de água,
haste de pára-raios ou fio de terra de um telefone. Se a
ligação à terra for feita incorrectamente, pode provocar
um choque eléctrico.
MANUTENÇÃO
Antes de iniciar a manutenção
Desligue o disjuntor e/ou a ficha de alimen-
■
tação.
CUIDADO:
Quando for preciso limpar a unidade, desligue a unidade e retire a ficha de alimentação da tomada ou desligue o disjuntor de circuito.
Como o ventilador gira em alta velocidade durante a operação, pode provocar ferimentos.
Limpeza da unidade interior
Limpe a unidade com um pano macio e seco.
■
• Se se notar sujidade, limpe a unidade com um pano
embebido numa solução de detergente suave dilu-
ído em água morna.
• Não utilize gasolina, benzina, pó de polimento, nem
insecticidas. A unidade pode ficar danificada.
Page 79

LIMPEZA DO FILTRO DE AR CATECHIN
SUBSTITUIÇÃO DO FILTRO DE LIMPEZA DO AR
Limpeza do filtro de ar Catechin (aproximadamente uma vez cada 2 semanas)
1 Retire o filtro de ar Catechin.
Abra o painel
frontal, depois
retire/substitua
o filtro.
Filtro de ar Catechin
CUIDADO:
Quando retirar o filtro de ar Catechin, não toque nas
partes metálicas da unidade interior.
Isto pode provocar ferimentos.
Retire.
2 Limpe a sujidade do filtro de ar Catechin,
utilizando um aspirador de pó ou lavando-o
com água.
• Se se notar sujidade, lave o filtro numa solução de
detergente suave diluído em água morna.
• O filtro pode deformar-se se for utilizada água quente (50°C ou mais).
3 Depois de lavar com água/água morna, dei-
xe o filtro de ar Catechin secar completamente à sombra.
• Não exponha o filtro de ar Catechin à luz directa
do sol nem ao calor de um fogo quando estiver a
secá-lo.
4 Instale o filtro de ar Catechin.
Instale-o.
Quando a capacidade do filtro é reduzida devido a sujidade, etc., é necessário substituir o filtro de
limpeza do ar.
Substituição do filtro de limpeza de ar (substitua aproximadamente uma vez em cada 4 meses)
1 Retire o filtro de ar Catechin.
Filtro de ar Catechin
2 Retire o filtro de limpeza de ar (Tipo de fole
branco).
Filtro de limpeza de ar
○○○○○○○○○○○○○○○○○○○○○○○○○○○○○○○○○○○○○○○○○○○○○○○○○
Filtro de limpeza de ar
• Se o filtro de limpeza de ar ficar obstruído, poderá diminuir a capacidade da unidade ou produzir condensação na saída
de ar.
• O filtro de limpeza de ar é descartável. O período de uso normal é de aproximadamente 4 meses. No entanto, se a cor
do filtro ficar marrom escura, substitua-o antes.
3 Instale um novo filtro de limpeza de ar.
4 Instale o filtro de ar Catechin e feche bem o
painel dianteiro.
○○○○○○○○○○○○○○○○○○○○○○○○○○○○○○○○○○○○○○○○○○○○○○○○○
O que é o “Filtro de ar Catechin”?
É um filtro de ar embebido num produto natural, Catechin, que se encontra contido no chá. O filtro de ar Catechin
desodoriza cheiro e gases nocivos como formaldeído, amónio e acetaldeído. Além disso, contém a acção dos
vírus que se aderem ao filtro.
Peças opcionais As peças opcionais encontram-se disponíveis no seu revendedor local.
Nome da peça FILTRO DE LIMPEZA DE AR
Número da peça MAC-1300FT
79
Page 80

ANTES DE PEDIR ASSISTÊNCIA TÉCNICA,
QUANDO ACHAR QUE OCORREU UM PROBLEMA
VERIFIQUE NOVAMENTE O SEGUINTE
Pergunta
O aparelho de ar condicionado não funciona.
O arrefecimento ou aquecimento não é suficiente.
O ar da unidade interior tem
um cheiro estranho.
O mostrador do controlo
remoto não aparece ou está
escuro. A unidade interior
não responde ao sinal do
controlo remoto.
Quando ocorrer uma falha
de energia.
Mesmo se os itens acima forem verificados, quando o aparelho de ar condicionado não recuperar do problema, pare de utilizá-lo e consulte o seu
revendedor.
Nos seguintes casos, deixe de utilizar o aparelho de ar condicionado e consulte o seu revendedor.
• Quando verter água da unidade interior.
• Quando a lâmpada indicadora de operação esquerda piscar.
• Quando o disjuntor de circuito disparar frequentemente.
• O sinal do controlo remoto pode não ser recebido numa divisão com uma
lâmpada fluorescente electrónica (lâmpada fluorescente tipo inversora, etc.).
• A operação do ar condicionado interfere com a recepção de rádio ou TV em
regiões onde a recepção é fraca. Pode ser necessário um amplificador para o
aparelho afectado.
• Quando estiver a trovejar, interrompa a operação e retire a ficha de alimenta-
ção da tomada eléctrica ou desligue o disjuntor de circuito. Caso contrário,
as peças eléctricas podem sofrer danos.
80
Pontos de Verificação ou Solução
• O disjuntor do circuito está ligado?
• O fusível está queimado?
• O temporizador para LIGAR está ajustado? (Pá-
gina 78)
• O ajuste da temperatura está correcto? (Página 77)
• O filtro está limpo? (Página 79)
• Existem quaisquer obstáculos a bloquear a en-
trada ou saída do ar das unidades interior ou
exterior?
• Há uma janela ou porta aberta?
• O filtro está limpo? (Página 79)
• As pilhas estão gastas? (Página 75)
• A polaridade (+, -) das pilhas está correcta? (Pá-
gina 75)
• Estão a ser premidos quaisquer botões no controlo remoto de outros aparelhos eléctricos?
• O aparelho de ar condicionado retoma o funcionamento?
Se estava a funcionar antes da falha de energia, o aparelho de ar condicionado deverá retomar o funcionamento, uma vez que estes modelos estão equipados com uma função de
reinício automático. (Consulte a secção Descrição da “FUNÇÃO DE REINÍCIO AUTOMÁTICO”, na página 76.)
Pergunta
O aparelho de ar condicionado não funciona durante
aproximadamente 3 minutos depois de reiniciado.
Ouve-se um som de estalido.
O ar da unidade interior tem
um cheiro estranho.
O ventilador pára durante
a operação de
DESUMIDIFICAÇÃO.
Ouve-se um som de fluxo
de água.
Ouve-se um som
gorgolejante.
Não se consegue arrefecer
suficientemente o compartimento.
Sai uma névoa na saída de
ar da unidade interior.
Resposta (não é um defeito)
• O microprocessador impede a operação para
proteger o aparelho de ar condicionado. Espere.
• Este som é gerado pela contracção/expansão
do painel frontal, etc., devido a mudanças na
temperatura.
• O aparelho de ar condicionado pode aspirar um
odor das paredes, carpetes, mobília, roupas, etc.
e pode soprá-lo com o ar.
• Quando se encontra a funcionar no modo
DESUMIDIFICAÇÃO, a unidade funciona utilizando o mesmo circuito refrigerante que no
modo ARREFECIMENTO. O tempo de funcionamento no modo DESUMIDIFICAÇÃO tem de
ser reduzido de modo a diminuir a humidade
sem a temperatura da sala descer muito. Por
isso, o compressor por vezes pára, e ao mesmo tempo pára o ventilador interior. Isto evita
que a água condensada no permutador térmico
evapore novamente.
• Este som é do refrigerante que flui no interior
do aparelho de ar condicionado.
• Este som é da água condensada a fluir no
permutador de calor.
• Este é o som de descongelação do permutador
de calor.
• Ouve-se este som quando o ar do exterior é aspirado da mangueira de drenagem, ao rodar o
gancho ou por efeito da ventoinha, o que faz
com que a água retida na mangueira saia.
Também se ouve este som quando entra ar do
exterior para a mangueira devido a vento forte.
• Quando se usa um ventilador ou um forno a gás
no compartimento, a necessidade de
arrefecimento aumenta, resultando num efeito
de arrefecimento insuficiente.
• Quando a temperatura do ar exterior é elevada,
o efeito de arrefecimento pode ser insuficiente.
• O ar fresco do aparelho de ar condicionado arrefece rapidamente a humidade no ar no interior da divisão, e esta transforma-se numa né-
voa.
Pergunta
A direcção do fluxo de ar
muda durante a operação.
A direcção da palheta horizontal não pode ser ajustada com o controlo remoto.
Cai água da unidade exterior.
É descarregado fumo branco da unidade exterior.
O ar não sai rapidamente na
operação quente.
A operação pára cerca de 10
minutos na operação de
quente.
Às vezes, ouve-se um sibilo.
Não se consegue aquecer
suficientemente o compartimento.
Num sistema de várias unidades, a unidade interior que
não estiver a funcionar fica
quente e produz um som
idêntico ao de água corrente.
O aparelho de ar condicionado começa a funcionar
quando a energia é ligada,
embora não utilize o controlo remoto para o colocar em
funcionamento.
Resposta (não é um defeito)
• Se, quando o aparelho de ar condicionado estiver no modo de ARREFECIMENTO ou de DESUMIDIFICAÇÃO, a operação continuar com o
ar a soprar para baixo durante 1 hora, a direcção do fluxo de ar é automaticamente ajustada
para uma posição para evitar a queda de gotas
de água condensada.
• Se, na operação de quente, a temperatura do fluxo de ar for demasiado baixa, ou quando terminar
a descongelação, a posição da palheta horizontal
é automaticamente regulada para horizontal.
• Durante a operação de ARREFECIMENTO e
DESUMIDIFICAÇÃO, o tubo ou as secções de
ligação do mesmo são arrefecidas, o que provoca a condensação da água.
• Durante a operação de quente, a operação de
descongelação faz com que o gelo acumulado
na unidade exterior derreta e pingue.
• Durante a operação de quente, a água
condensada no permutador de calor pinga.
• Na operação de aquecimento, o vapor gerado
pela operação de descongelação assemelhase a fumo branco.
• Aguarde, pois a unidade de ar condicionado está
a preparar a saída de ar quente.
• O descongelação da unidade exterior está em
curso (Operação de descongelação).
Desde que esta fique concluída em 10 minutos,
espere. (Quando a temperatura externa é demasiado baixa e a humidade demasiado alta,
forma-se o embaciamento.)
• Este é o som produzido pelo fluxo do refrigerante quando se liga o ar condicionado.
• Quando a temperatura do ar exterior é baixa, o
efeito de aquecimento poderá ser insuficiente.
• Continua a fluir uma pequena quantidade de
refrigerante para dentro da unidade interior, ainda que esta não esteja a funcionar.
• Estes modelos estão equipados com uma função
de reinício automático. Sempre que a energia for
cortada, sem desactivar o aparelho de ar condicionado com o controlo remoto, e novamente restaurada, o aparelho activa-se automaticamente no
mesmo modo para o qual foi regulado com o controlo remoto antes do corte da energia.
Page 81

INSTALAÇÃO, REINSTALAÇÃO E VERIFICAÇÃO
Lugar de instalação
Evite instalar o aparelho de ar condicionado nos seguintes lugares.
• Locais onde exista gases inflamáveis.
CUIDADO:
Não instale a unidade onde haja a possibilidade de fugas de gás inflamável.
Uma fuga de gás ao redor da unidade pode provocar
uma explosão.
• Onde haja muito óleo de máquina.
• Lugares salgados, tal como à beira-mar.
• Onde se produza gás sulfuroso, tal como numa estân-
cia térmica.
Onde haja salpicos de óleo ou lugares com fumos oleosos.
•
•
Quando existir alta frequência ou equipamento sem fio.
O local para a instalação da unidade externa deverá estar pelo menos a 3 metros de
distância de antenas de TV, rádios, etc. Em regiões onde a recepção é fraca, deixe
maior espaço entre o local de instalação e a antena do aparelho afectado se o
aparelho de ar condicionado interferir com a recepção de rádio ou de TV.
Para evitar o efeito
de uma lâmpada
fluorescente,
mantenha-a o mais
afastado possível.
1 m ou
mais
Telefone
sem fio
ou
Telefone
portátil
Lâmpada fluorescente
tipo inversora
Mantenha um
espaço para
evitar
distorção de
imagem ou
ruído.
1 m ou
mais
Rádio
Televisor
3 m ou
mais
100 mm ou
mais
Lugar bem
seco e
ventilado
500 mm
ou mais
Parede, etc.
AVISO:
Se o aparelho de ar condicionado funcionar mas (conforme o modelo) não arrefecer nem aquecer o compartimento,
entre em contacto com o seu revendedor porque pode haver uma fuga de gás refrigerante. Quando for feita a reparação, tenha o cuidado de perguntar ao técnico de assistência se há ou não alguma fuga de gás refrigerante.
O gás refrigerante introduzido no aparelho de ar condicionado é seguro. Normalmente não há fuga de refrigerante, no
entanto, se houver uma fuga de gás no interior e o gás entrar em contacto com o fogo, aquecedor com ventilador,
aquecedor de interior, fogão, etc., o gás será transformado em substâncias perigosas.
Instalação eléctrica
• Utilize um circuito exclusivo para a alimentação do aparelho de ar condicionado.
• Tenha em atenção a capacidade do disjuntor de circuito.
AVISO:
• O cliente não deve instalar esta unidade. Uma instalação incorrecta pode provocar um incêndio, choque eléctrico,
ferimentos causados pela queda da unidade, fuga de água, etc.
• Não utilize uma ligação intermediária do cabo de alimentação ou um cabo de prolongamento e não ligue muitos
dispositivos à mesma tomada do aparelho de ar condicionado.
Um incêndio ou choque eléctrico pode resultar de um contacto insuficiente, isolamento deficiente, excesso de
corrente permissível, etc.
Contacte o seu revendedor.
CUIDADO:
• Ligação da unidade à terra.
Não ligue o fio de terra a um tubo de gás, tubo de água, haste de pára-raios ou fio de terra de um telefone. Se a
ligação à terra for feita incorrectamente, pode provocar um choque eléctrico.
• Instale um disjuntor de fuga à terra dependendo do lugar onde o aparelho de ar condicionado for instalado (lugar
húmido, etc.).
A não instalação de um disjuntor de fuga à terra pode provocar um choque eléctrico.
Verificação e manutenção
• Quando o aparelho de ar condicionado for utilizado durante várias estações, a sua capacidade pode diminuir devido a
sujidade no interior da unidade.
• Dependendo das condições de uso, pode produzir-se um odor ou água desumidificada pode não drenar fluentemente
devido a sujidade, poeira, etc.
• Recomenda-se uma verificação e manutenção (paga) à unidade por um especialista para além da manutenção normal.
Consulte o seu revendedor.
Considerações do som da operação
• Não coloque objectos à volta da saída de ar da unidade exterior. Isto pode diminuir a capacidade da unidade e aumentar
o som da operação.
• Se ouvir um som anormal durante a operação, consulte o seu revendedor.
Reinstalação
• Quando tiver que retirar ou reinstalar o aparelho de ar condicionado devido a uma reconstrução, mudança, etc., serão
necessárias técnicas e trabalho especiais.
AVISO:
A reparação ou reinstalação do aparelho não deve ser feita pelo utilizador.
Uma reparação ou reinstalação incorrecta pode provocar um incêndio, choque eléctrico, ferimentos causados pela
queda da unidade, fuga de água, etc. Consulte o seu revendedor.
Disposição
Para se desfazer do produto, consulte o distribuidor.
Em caso de dúvidas, consulte o seu revendedor.
ESPECIFICAÇÕES
Modelo Interior
Função
Alimentação
Capacidade kW
Consumo kW
Peso
Capacidade de enchimento
do refrigerante (R410A)
Código IP
Pressão de Lado de
operação sucção
máxima
permissível
Nível de
ruído
Nome do aparelho
Exterior
Interior kg
Exterior kg
kg
Interior
Exterior
MPa
Lado de
descarga
Interior
(Alto/Medio/Baixo)
MPa
dB(A)
Exterior dB(A)
MSH-A07YV MSH-A09YV MSH-A12YV
MSC-A07YV MSC-A09YV MSC-A12YV
MUH-A07YV MUH-A09YV MUH-A12YV
Arrefecimento
Quente
Arrefecimento
Quente
Arrefecimento
2,3 2,5 2,55 3,05 3,5 3,9
0,715 0,69 0,795 0,84 1,09 1,08
910
35 38 40
0,62 1,00 1,00
36/31/25 36/31/25 39/32/25 40/33/26 39/33/26
47 49
Quente
~ /N, 230V, 50Hz
IP20
IP24
1,64
4,15
MS-A07YV MS-A09YV MS-A12YV
MSC-A07YV MSC-A09YV MSC-A12YV
MU-A07YV MU-A09YV MU-A12YV
Arrefecimento
2,3 2,55 3,5
0,715 0,795 1,14
910
34 36
0,60 0,60 0,75
36/31/25 40/33/26
45 49
OBSERVAÇÃO:
1. Condição nominal
Arrefecimento
Quente — Interior: 20°C DB
— Interior: 27°C DB, 19°C WB
Exterior:35°C DB
Exterior:7°C DB, 6°C WB
2. Amplitude de operação garantida
Interior Exterior
Limite 32°C DB 43°C DB
Arrefecimento
Quente
superior 23°C WB —
Limite 21°C DB 21°C DB
inferior 15°C WB —
Limite 27°C DB 24°C DB
superior — 18°C WB
Limite 20°C DB -10°C DB
inferior — -11°C WB
81
Page 82

INDHOLDSFORTEGNELSE
SIKKERHEDSFORSKRIFTER .............................................................................................................................................. 82
DELENES BETEGNELSE ..................................................................................................................................................... 83
KLARGØRING FØR ANVENDELSEN ................................................................................................................................... 84
“I FEEL...” AUTOMATISK DRIFT ........................................................................................................................................... 86
MANUEL DRIFT (AFKØLING, TØR, OPVARMNING/VENTILATOR) .................................................................................... 87
INDSTILLING AF LUFTSTRØMMENS STYRKE OG RETNING ........................................................................................... 87
ØKONOMIAFKØLINGSDRIFT (ECONO COOL) ................................................................................................................... 88
TIMERSTYRET ANVENDELSE (ON/OFF TIMER) ................................................................................................................ 88
HVIS KLIMAANLÆGGET IKKE SKAL ANVENDES I LÆNGERE TID .................................................................................. 88
VEDLIGEHOLDELSE ............................................................................................................................................................ 88
RENGØRING AF CATECHIN LUFTFILTERET ...................................................................................................................... 89
UDSKIFTNING AF LUFTRENSNINGSFILTERET ................................................................................................................. 89
KONTROLLER FØLGENDE IGEN, FØR DE KONTAKTER REPARATØREN ...................................................................... 90
HVIS DER ER TEGN PÅ, AT DER ER OPSTÅET PROBLEMER ......................................................................................... 90
INSTALLATION, FLYTNING OG INSPEKTION ..................................................................................................................... 91
SPECIFIKATIONER ............................................................................................................................................................... 91
SIKKERHEDSFORSKRIFTER
• Da dette produkt indeholder roterende dele og dele der kan give elektrisk stød, skal man læse “Sikkerhedsforkrifter” før produktet tages i brug.
• Da nedenstående sikkerhedsforskrifter har stor betydning for sikkerheden, er det vigtigt at de overholdes.
Mærker og deres betydning
ADVARSEL: Forkert anvendelse kan medføre stor risiko for ulykker som f.eks. død, alvorlig personskade osv.
FORSIGTIG: Forkert anvendelse kan, afhængig af omstændighederne, medføre risiko for alvorlige uheld.
Betydningen af symboler, der anvendes i denne vejledning
• Farven på klæbemærket, der er anbragt på enheden, er skrevet i parenteserne.
: Må ikke gøres.
: Følg vejledningen.
(Sort) : Stik ikke figre, pinde eller lignende ind.
(Sort) : Stå ikke på indendørs/undendørsenheden og anbring ikke noget ovenpå dem.
(Gul) : Risiko for stød. Vær forsigtig.
(Blå) : Husk at tage netstikkket ud af stikkontakten.
(Blå) : Sørg for at afbryde strømmen.
• Læs først brugsanvisningen, og opbevar den derefter sammen med installationsmanualen på et tilgængeligt
sted, så De altid kan konsultere den.
Placering af advarselsskilte og sikkerhedsudstyr
FRONTPANEL
KABINET
82
KABINET
LUFTUDLEDNING
Dette klimaanlæg bør IKKE benyttes af børn eller svagelige personer uden opsyn.
•
ADVARSEL
Brug ikke indirekte tilslutning af netledningen eller forlængerlednin, og undlad at tilslutte mange
anordninger til det samme vekselstrømudtag (vægkontakt).
• Dette kan medføre risiko for brand og/eller elektrisk stød pga. defekt kontakt, defekt isolation, overskridelse af den tilladte spænding etc.
Skær ikke i og foretag ikke ændringer på strømledning etc.
• Sæt ikke tunge ting på strømledningen, skær ikke i den og foretag ikke ændringer på strømledningen.
Ledningen kan blive beskadiget, hvilket kan forårsage brand eller elektrisk stød.
Undgå at tænde og slukke på afbryderen eller tage stikket ud af stikkontakten eller sætte det i igen,
mens anlægget er kører.
• Dette kan medføre brand p.g.a gnist etc.
• Sørg for at slukke på afbryderen eller tage stikket helt ud af kontakten, når indendørsenheden er slukket
med fjernbetjeningen.
Undgå køligt luft direkte på huden i længere tid.
• Dette kan være sundhedsfarligt.
Klimaanlægget bør ikke installeres af kunden selv.
• Hvis dette gøres forkert, er der risiko for brand, elektrisk stød og/eller personskade forårsaget af, at
klimaanlægget falder ned, vandudsivning etc. Henvend Dem til forhandleren.
Stik ikke fingre, pinde eller lignende ind i luftindsugningen/-udledningen.
• Dette kan føre til personskade, da ventilatoren roterer med stor hastighed.
• Hold øje med små børn for at sikre, at de ikke leger med klimaanlægget.
I tilfælde af uregelmæssigheder (brandlugt el.lign.) skal der slukkes for klimaanlægget, og stikket
skal tages ud af stikkontakten, eller anlægget skal afbrydes med afbryderen.
• Hvis klimaanlægget anvendes i unormal tilstand, er der risiko for brand, problemer etc. Henvend Dem i
et sådant tilfælde til forhandleren.
Reparation eller flytning bør ikke udføres af kunden selv.
• Hvis dette gøres forkert, er der risiko for brand, elektrisk stød og/eller personskade forårsaget af, at
klimaanlægget falder ned, vandudsivning etc. Henvend Dem til forhandleren.
• Hvis den strømførende ledning beskadiges, skal den af sikkerhedsmæssige grunde erstattes af forhandleren eller dennes servicerepræsentant.
FORSIGTIG
Rør ikke ved indendørsenhedens metaldele, når luftfilteret fjernes.
• Der er risiko for personskade.
Sprøjt ikke insektmidler eller brændbar spray på klimaanlægget.
• Dette indebærer risiko for brand og/eller at kabinettet deformeres.
Udsæt ikke kæledyr og potteplanter for direkte luftstrøm.
• Dette kan skade dyret eller planten.
Lad ikke klimaanlægget stå på et stativ, der er beskadigt.
• Klimaanlægget kan falde ned og forårsage personskade.
Stå ikke på et ustabilt bord eller lignende, når du foretager vedligeholdelsesarbejde eller lignende på anlægget.
• Du kan komme til skade eller forårsage andre skader, hvis du falder ned.
Træk ikke i strømforsyningskablet.
• Tråden i strømforsyningskablet kan løsnes, og det kan medføre brand.
Batterierne må hverken oplades, demonteres eller kastes på åben ild.
• Dette kan medføre lækage, brand eller eksplosion.
Lad ikke klimaanlægget være igang i længere tid, hvis luftfugtigheden er høj, dvs. med en dør eller et vindue åbent.
• Hvis klimaanlægget anvendes i afkølingsmodus i et værelse med høj luftfugtighed (80% relativ luftfugtighed eller mere) i længere tid, kan kondensvand i klimaanlægget sive ud og ødelægge møbler etc.
Anvend kun klimaanlægget til det, det er beregnet til.
• Anvend ikke klimaanlægget til klimaregulering for præcisionsanordninger, madvarer, dyr, planter og kunstgenstande. Det kan medføre kvalitetsforringelse etc.
Anbring ikke en ovn etc., hvor den er udsat for direkte luftstrøm.
• Dette kan medføre ufuldstænding forbrænding.
Page 83

SIKKERHEDSFORSKRIFTER
DELENES BETEGNELSE
FORSIGTIG
Sluk for klimaanlægget, tag netledningen ud af stikkontakten, og sæt afbryderen i deaktiveret position, når anlægget skal rengøres.
• Da ventilatoren roterer med stor hastighed, er der risiko for personskade.
Tag nedledningen ud af stikkontakten, og sluk vha. afbryderen, hvis klimaanlægget ikks skal anvendes i længere tid.
• I modsat fald kan støv samles og forårsage brand.
Udskift de to batterier med nye af samme type.
• Brug af et gammelt batteri sammen med et nyt kan medføre varmeudvikling, lækage eller eksplosion.
Hvis væske fra batterierne kommer i kontakt med hud eller tøj, skal de berørte steder vaskes grundigt med rent vand.
• Hvis væske fra batterierne kommer i kontakt med øjnene, skal de vaskes grundigt med rent vand og man
skal omgående søge læge.
Sørg for god ventilation, hvis klimaanlægget anvendes sammen med en ovn etc.
• I modsat fald kan der opstå iltmangel.
Betjen ikke kontrollerne med våde hænder.
• Dette indebærer risiko for elektrisk stød.
Rengør ikke klimaanlægget med vand.
• Vand kan trænge ind i klimaanlægget og beskadige isoleringen, hviket indebærer risiko for elektrisk
stød.
Lad være med at stå på indendørs/udendørsenheden og stil ikke noget på dem.
• Det kan forårsage skade etc., hvis du eller et objekt falder ned.
Installation
ADVARSEL
• Henvend Dem til forhandleren angående installation af klimaanlægget.
Indendørsenhed
Luftrensningsfilter
(Hvid bælg type)
Catechin luftfilter (Med
lugtfjerner)
Luftudledning
Lodrette vinger
Vandret vinge
Betjeningssektion
(Når frontpanelen er åbent)
Frontpanel
Luftindsugning
til afbryder
Netledning
Fjernbetjeningssensor
Fjernbetjening
Displaysektion
FORSIGTIG
Installer ikke klimaanlægget på et sted, hvor der kan forekomme udsivning af brændbar gas.
• Hvis der siver gas ud i nærheden af klimaanlægget, er der fare for eksplosion.
Foretag jordforbindelse.
• Forbind aldrig en jordledning til et gasrør, et vandrør, en lynafleder eller en telefons jordledning. Forkert
jordforbindelse kan medføre elektrisk stød.
Installer en fejlstrømsafbryder afhængig af det sted, hvor klimaanlægget skal installeres (fugtigt
sted etc.).
• Hvis der ikke installeres nogen fejlstrømafbryder, vil der være risiko for elektriske stød.
Spildevand bør fjernes helt.
• Hvis afløbsruten er ufuldstænding, kan der sive vand ud fra klimaanlægget, hvilket kan ødelægge møb-
ler etc.
Udendørsenhed
Knap til nøddrift
Driftsindikator
Luftindsugning (bagside og side)
Rørføring
Afløbsslange
Luftudledning
Afløb
Fjernbetjeningssensor
83
Page 84

ON/OFF
FAN
TOO
WARM
TOO
COOL
VANE
MODE
ECONO COOL
STOP
START
HR.
MIN.
I FEEL
COOL
DRY
AMPM
AMPM
RESET CLOCK
HEAT
/FAN
DELENES BETEGNELSE
ON/OFF
TOO
COOL
AMPM
CLOCK
˚C
AMPM
TOO
WARM
KLARGØRING FØR ANVENDELSEN
Fjernbetjening
Åbn låget.
Signalsendesektion
Betjeningsdisplay
Tænd/sluk knap
(ON/OFF)
(Dette diagram viser et generelt billede.)
Temperaturknapper
Automatisk genstartsfunktion
Disse modeller er udstyret med en automatisk genstartsfunktion. Hvis du ikke ønsker at bruge
■
denne funktion, spørg da servicerepræsenstanten, idet enhedens indstillinger skal ændres.
Den automatisk genstartsfunktion ...
Når indendørsenheden styres med fjernbetjeningen, gemmes driftsmåden, den indstillede temperatur og ventilatorens hastighed i hukommelsen. Hvis der sker et strømsvigt, eller strømmen slås fra under drift, sørger den automatiske genstartsfunktion
for, at driften genoptages som indstillet med fjernbetjeningen før strømafbrydelsen. (De kan få yderligere oplysninger på side
86.)
Indendørsenhed
Sæt netledningsstikket i kontakten og/eller slå afbryderen til.
■
ADVARSEL:
Fjern al snavs fra strømforsyningsstikket, og tryk det helt ind i stikkontakten. Hvis der sidder snavs på stikket, eller
hvis det ikke er trykket helt ind i stikkontakten, kan det forårsage brand eller elektrisk stød.
Fjernbetjening
Sådan vælges der type
Denne fjernbetjening skal stemme overens med typen af klimaanlæg (AFKØLING og OPVARM-
■
NING eller KUN AFKØLING).
Hvis indstillingen ikke er korrket, virker klimaanlægget ikke korrekt. Kontrollér derfor, om indstillingen svarer til klimaanlægstypen. Hvis ikke, ændres indstillingen som vist nedunder.
Skydekontakt
Type
AFKØLING og OPVARMNING
KUN AFKØLING
84
Ventilatorhastigheds-knap
Operationsvælger
Økonomiafkølingsknappen
(ECONO COOL)
Nulstillingsknap
OFF-timer knap
ON-timer knap
Time-knap (HR.)
Minutknap (MIN.)
(Tidsindstillingsknapper)
Urindstillingsknap
Vinge-kontrolknap
Stilling af
skydekontakt
Page 85

HR.
MIN.
HR.
MIN.
FAN
VANE
MODE
ECONO COOL
STOP
START
HR.
MIN.
I FEEL
COOL
DRY
RESET CLOCK
HEAT
/FAN
Operation Indicator
Operation Indicator
Operation Indicator
Operation Indicator
Operation Indicator
ON/OFF
KLARGØRING FØR ANVENDELSEN
Fjernbetjening
Montering af batterier og indstilling af
klokkeslæt
1 Fjern låget, og sæt batterierne i. Sæt deref-
ter låget på igen.
Sæt batterierne i med minuspolen først.
Kontroller, om batterierne vender rigtigt.
Sæt batterierne i med
minuspolen først.
2 Tryk på RESET-knappen.
Tryk ind ved hjælp
af et spidst instrument.
• Hvis nulstillingsknappen (RESET) ikke trykes ind,
er det ikke sikkert, at fjernbetjeningen fungerer som
den skal.
3 Tryk på CLOCK set (urindstillings) knappen.
Tryk ind ved hjælp
af et spidst
instrument.
4 Indstill klokkeslættet ved at trykke på
og
knapperne (Tidsinstillingsknapperne).
• Ved hvert tryk på
lede tidspunkt op med 1 time, og ved hvert tryk på
knappen, tæller det indstillede tidspunkt op med
1 minut.
knappen, tæller det indstil-
5 Tryk på CLOCK-knappen igen og luk låget.
Korrekt anvendelse af fjernbetjeningen
• Fjernbetjeningens virkeafstand er omkring 6 m, hvis
den er rettet direkte mod forsiden af indendørsenheden.
• Når knappen trykkes ind, vil der lyde et eller to bip fra
indendørsenheden. Tryk igen, hvis der ikke lyder noget bip.
• Brug fjernbetjeningen med forsigtighed. Hvis fjernbetjeningen tabes, smides eller bliver våd, virker den
muligvis ikke.
Installering på en væg etc.
• Installer fjernbetjeningen på et sted, hvor signalmodtagelyden (bip) kan høres fra indendørsenheden,
når
knappen trykkes ind.
Hvordan fjernbetjeningen sættes i/tages ud af holderen
Isætning : Sæt fjernbetjeningen ned i holderen.
Udtagning : Træk den op.
Holder til fjernbetjeningen
Tørbatterier
■ Hvorden batterierne skiftes ud
Udskift batterierne med nye alkaliske batterier af stør-
relse AAA i følgende tilfælde:
· Når indendørsenheden ikke reagerer på fjernbetjenings-
signalet.
· Når displayet på fjernbetjeningen bliver svagt.
· Hvis alle skærmbilleder fremkommer på displayet og
straks forsvinder igen, når der trykkes på en knap på
fjernbetjeningen.
Brug ikke mangan-batterier. Derved kan fjernbetjeningen
fungere forkert.
• Et alkalibatteris levetid er omkring 1 år.
Da udløbsdatoen er angivet (måned/år) i bunden af
batteriet, kan et batteri, hvis udløbsdato nærmer sig,
hurtigt løbe tør.
• Hvis fjernbetjeningen ikke anvendes i lang tid, skal
batterierne tages ud for at forhindre lækage.
FORSIGTIG:
Hvis væske fra batterierne kommer i kontakt med hud
eller tøj, skal de berørte steder vaskes grundigt med
rent vand.
Hvis væske fra batterierne kommer i kontakt med øj-
nene, skal de vaskes grundigt med rent vand og man
skal omgående søge læge.
• Brug ikke genopladelige batterier.
• Udskift de to batterier med nye af samme type.
• Kasser brugte batterier i overenstemmelse med de
lokale forskrifter.
Hvis fjernbetjeningen ikke kan anvendes (nøddrift)
Hvis fjernbetjeningens batterier brænder ud eller hvis fjernbetjeningen ikke fungerer efter hensigten, kan nøddrift
udføres ved hjælp af knappen til nøddrift.
Type AFKØLING og OPVARMNING
1 Tryk på knappen til NØDDRIFT.
• Hver gang der trykkes på NØDDRIFT, arbejder en-
heden i følgende rækkefølge:
NØDKØLING, NØDOPVARMNING og STOP.
Når der først er trykket en gang på knappen NØDDRIFT, kører enheden i testkørsel i 30 minutter og
driftstilstanden skifter til NØDDRIFT.
• Detaljerne om NØDDRIFT som vist nedenfor. Dog
virker temperaturkontrollen ikke i 30 minutter, mens
der testkøres og enheden indstilles på kontinuerlig drift.
Ventilatorhastigheden indstilles til “høj” under test-
kørslen og skifter til Medium efter 30 minutter.
Driftstilstand Afkøling Opvarmning
Indstillet temperatur 24°C24°C
Ventilatorhastighed Medium Medium
Vandret vinge Auto Auto
• Driftstilstand angives med driftsindikatorlampen på
indendørsenheden som vist på nedenstående figurer.
Driftsindikator
NØDKØLING
NØDOPVARMNING
STOP
For at stoppe NØDDRIFT skal knappen til
■
NØDDRIFT trykkes ind igen. Hvis den står
på NØDOPVARMNING, skal der trykkes en
gang på knappen. Hvis den står på NØD-
KØLING, skal der trykkes to gange på knappen.
Type KUN AFKØLING
1 Tryk på knappen til NØDDRIFT.
• Når knappen NØDDRIFT er trykket ind, arbejder
enheden først på testkørsel i 30 minutter, derefter
skifter den over til NØDKØLING.
• Detaljerne om NØDKØLING som vist nedenfor. Dog
virker temperaturkontrollen ikke i 30 minutter, mens
der testkøres og enheden indstilles på kontinuerlig drift.
Ventilatorhastigheden indstilles til “høj” under test-
kørslen og skifter til Medium efter 30 minutter.
Driftstilstand Afkøling
Indstillet temperatur 24°C
Ventilatorhastighed Medium
Vandret vinge Auto
• Driftstilstand angives med driftsindikatorlampen på
indendørsenheden som vist på nedenstående figurer.
Driftsindikator
NØDKØLING
STOP
Tryk på knappen NØDDRIFT igen for at
■
stoppe NØDKØLING.
Hver gang der trykkes på knappen, skiftes der mellem
NØDKØLING og STOP.
85
Page 86

ON/OFF
ON/OFF
TOO
WARM
TOO
COOL
FAN
VANE
MODE
STOP
START
HR.
I FEEL
COOL
DRY
HEAT
/FAN
“I FEEL...” AUTOMATISK DRIFT
MODE
Operation Indicator
MODE
ON/OFF
FAN
TOO
WARM
TOO
COOL
VANE
MODE
ECONO COOL
STOP
START
HR.
MIN.
I FEEL
COOL
DRY
AMPM
CLOCK
˚C
AMPM
HEAT
/FAN
RESET CLOCK
Med “ (I FEEL...)”auto-driftstilstand, kan den optimale stuetilstand automatisk indstilles med et enkelt tryk på knappen.
Hvordan driften startes:
Tryk på
■
Når “ (I FEEL...)” vælges, indstilles klimaanlægget automatisk til den optimale stuetemperatur.
knappen.
Hvordan driften annulleres:
Tryck på
■
○○○○○○○○○○○○○○○○○○○○○○○○○○○○○○○○○
Hvis De føler Dem en smule varm:
■
Hvis De føler Dem en smule kold:
■
Hvis “ (I FEEL...)” ikke angives: tryk på
indstille den.
Ved hvert tryk på knappen skifter driftsmåden i rækkefølge fra
(I FEEL...) → (AFKØLING) → (TØR) → (OP-
VARMNING/VENTILATOR)
knappen for at
knappen.
Tryck på
Hvert tryk sænker temperaturen med. ca. 1°C.
Tryk på
Hvert tryk hæver temperaturen med ca. 1°C.
knappen, hvis temperaturen skal sænkes.
knappen, hvis temperaturen skal øges.
Beskrivelse af “I FEEL...” modus
Driftsdetaljer
Afhængigt af rumtemperaturen ved starten af betjeningen, startes enten AFKØLING, TØR eller OPVARMNING. Hvis
driften imidlertid startes indenfor 2 timer efter driften er stoppet, vil den samme driftsmodus som den, der var indstillet, da
driften stoppedes, blive valgt. Den valgte driftsmodus ændres ikke, uanset om stuetemperaturen ændrer sig. Hvis driftsmodus ikke stemmer overens med stuetemperaturen, skal De vælge den riktige driftsmodus ved at trykke på
knappen.
Detaljer for auto-drift
Type AFKØLING og OPVARMNING Type KUN AFKØLING
Stuetemperaturen Driftsmodus Måltemperatur Driftsmodus Måltemperatur
ved start (indledende tilstand) (indledende tilstand)
Ca. 25°C eller højere AFKØLING ca. 24°C AFKØLING ca. 24°C
Ca. 25°C - 23°CTØR — TØR —
Ca. 23°C eller lavere OPVARMNING ca. 26°CTØR —
BEMÆRKNING:
AFKØLING: Hvis rumtemperaturen er 2°C højere end den indstillede temperatur, kan den indstillede tempe-
ratur ikke ændres, da enheden arbejder på fuld kraft for at opnå måltemperaturen. Vent i dette
tilfælde med at ændre temperaturindstillingen indtil rumtemperaturen er faldet til mindre end
2°C fra den indstillede temperatur.
OPVARMNING:Hvis rumtemperaturen er 2°C lavere end den indstillede temperatur, kan den indstillede tempe-
ratur ikke forhøjes, da enheden arbejder på fuld kraft. Vent i dette tilfælde med at ændre temperatur-
indstillingen indtil rumtemperaturen er steget til indenfor 2°C af den indstillede temperatur.
Displaydetaljer på indendørsenheden
Driftindikatoren på højre side af indendørsenheden angiver driftstilstand.
Lyser
Blinker
Lyser ikke
Driftsindikator
Beskrivelse af “AUTOMATISK GENSTARTSFUNKTION”
• Disse enheder er udstyret med en automatisk genstartsfunktion. Når hovedstrømforsyningen er koblet til, vil klimaanlægget automatisk starte i den samme modus, som var indstillet med fjernbetjeningen, inden hovedafbryderen blev
slukket.
• Hvis enheden var sat til “off” med fjernbetjeningen, inden hovedafbryderen blev slukket, vil den forblive stoppet, når
hovedafbryderen tændes igen.
• Hvis enheden befandt sig i nøddrift, inden hovedafbryderen blev slukket, vil den, når hovedafbryderen tændes, starte
igen i den samme modus, som var indstillet med fjernbetjeningen før nøddriften.
• Hvis enheden befinder sig i “I FEEL...” modus inden strømsvigt, gemmes driftstilstanden (KØLE, TØR eller VARME)
ikke i hukommelsen. Når hovedafbryderen tændes, bestemmer enheden driftstilstanden ved hjælp af rummets temperatur ved genstart, og starter driften igen.
86
Indikation
Driftstilstand
Viser at klimaanlægget arbejder på at nå op på mål-
temperaturen. Vent venligst et stykke tid, indtil måltemperaturen er opnået.
Viser at stuetemperaturen er ved at nærme sig måltemperaturen.
(For udendørsenheden gælder dette kun MXZ serien)
Se Information for multi system air-condition. (Side 87)
Forskel mellem måltemperatur
og stuetemperatur
ca. 2°C eller mere
ca. 2°C eller mindre
—
Page 87

ON/OFF
MODE
ON/OFF
ON/OFF
MANUEL DRIFT (AFKØLING, TØR, OPVARMNING/VENTILATOR)
TOO
WARM
TOO
COOL
FAN
VANE
ON/OFF
FAN
TOO
WARM
TOO
COOL
VANE
MODE
ECONO COOL
STOP
START
HR.
MIN.
I FEEL
COOL
DRY
AMPM
CLOCK
˚C
AMPM
HEAT
/FAN
RESET CLOCK
ON/OFF
FAN
TOO
WARM
TOO
COOL
VANE
MODE
ECONO COOL
STOP
START
HR.
MIN.
I FEEL
COOL
DRY
AMPM
CLOCK
˚C
AMPM
HEAT
/FAN
RESET CLOCK
VANE
1
2
3
4
5
INDSTILLING AF LUFTSTRØMMENS STYRKE OG RETNING
Gør følgende for at vælge funktionen AFKØLING, TØR eller OPVARMNING/VENTILATOR
1 Tryk på
2 Vælg driftsmodus ved at trykke på
Ved hvert tryk på knappen ændres driftsmodus i rækkefølge, fra (I FEEL...)
→
OPVARMNING/VENTILATOR-funktion
Kontroller hvilken type airconditioner, der er tale om.
AFKØLING og OPVARMNING
KUN AFKØLING VENTILATOR
knappen.
knappen.
(AFKØLING) → (TØR) → (OPVARMNING/VENTILATOR)
Type Driftsfunktion
OPVARMNING
Annullering af driften:
Tryk på
■
Når driftsmodus først er indstillet, vil driften begynde i den tidligere indstillede
modus fra næste gang. De behøver blot at trykke på
○○○○○○○○○○○○○○○○○○○○○○○○○○○○○○○○○○○○○○○○○○○○○○○○○
Hvis den indstillede temperatur skal ændres:
■
• Tryk på
• Tryk på
knappen, hvis temperaturen skal sænkes. Ved hvert tryk sænkes temperaturen med ca. 1°C.
knappen, hvis temperaturen skal hæves. Ved hvert tryk hæves temperaturen med ca. 1°C.
Under funktionen “OPVARMNING”
• Hvis klimaanlægget absorberer for megen varme fra luften, kan maskinen blive overbelasted. Efterfulgt af
mikroprocessorens vurdering, stopper blæseren i udendørsenheden automatisk for at beskytte klimaanlægget.
Når udendørsenhedens blæsere er stoppet, kan der opstå frost på udendørsenheden. Dette er ikke noget problem.
Under funktionen “TØR”
knappen.
knappen.
Luftstrømmens styrke og retning kan vælges efter ønske.
Ændring af lufstrømmens styrke: Tryk på
■
Ved hvert tryk på knappen, ændres ventilatorhastigheden i rækkefølge (Langsam) →
(Medium) → (Høj) → (Automatisk)
• For at afkøle/opvarme et rum mere anvendes
• Brug indstillingen
(Langsam), hvis lyden fra klimaanlægget forstyrrer Dem,
når De sover.
Ændring af luftstrømmens retning i lodret retning: Tryk på
■
knappen.
Ved hvert tryck på knappen ændres vinklen af den vandrette vinge (1) →
(2) → (3) → (4) → (5) → (Sving) → (Automatisk)
DRIFT MED SWING (Sving)
Brug svingfunktion, således at luftstrømmen kan nå ud i alle hjørner af rummet.
Anbefalet indstilling af den vandrette vinge
Brug normalt
Anvend indstilling
ler TØRRING og indstilling
(Automatisk) stillingen.
(1) eller (2) til AFKØLING el-
(3) til (5) i
OPVARMININGS-tilstand, når der skal justeres efter
behov.
BEMÆRKNING:
• Under afkøling, når klimaanlægget anvendes med de vandrette vinger indstillet på
(4) eller (5) i 1 time, justeres
luftstrømmens retning automatisk til “lige ud” for at forhindre kondensvand i at dryppe ned.
• Juster den lodrette luftstrøm med fjernbetjeningen. Hvis den vandrette vinge flyttes manuelt, kan der opstå problemer.
• Hvis luftgennemstrømningstemperaturen er for lav eller når der udføres afrimning under varmefunktionen, stilles
den vandrette vinge på indstillingen
(1).
knappen.
(Høj) tilstanden.
AFKØLING
TØR
OPVARMNING
• Temperaturkontrol (temperaturinstilling) kan ikke foretages.
• Stuetemperaturen sænkes en smule i denne driftsmodus.
Displaydetaljerne på indendørsenheden, er forklaret på side 86.
■
BEMÆRKNING:
Hvis den omgivende temperatur er for høj, er det ikke sikkert, at rumtemperaturen når ned på den indstillede temperatur, da enheden allerede arbejder på at afkøle rummet med høj effekt.
Information for multi system air-condition (Udendørsenhed: MXZ serien)
Multi system air-condition (udendørsenhed: MXZ serien) kan tilslutte to eller flere indendørsenheden med en
udendørsenhed. I henhold til kapaciteten kan to eller flere enheder arbejde samtidigt.
• Når du samtidigt prøver at bruge to eller flere indendørsenheden med en udendørsenhed, en til køling og den anden
til varme, vælges driftstilstanden på den indendørsenhed, der starter først. De andre indendørsenheder, der vil starte
senere, vil stoppe funktionen med en indikation. (Se tabel over driftsindikator på side 86.)
I dette tilfælde indstilles alle indendørsenheden til samme driftstilstand.
• Når indendørsenheden starter funktionen, mens udendørsenheden er ved at afrime, tager det nogle få minutter (maks.
10 minutter) at blæse den varme luft ud.
• Under opvarmning kan den indendørsenhed, som ikke er i drift, blive varm, eller lyden af flydende kølevæske kan
høres. Dette er ikke en fejl, da kølevæsken kontinuerligt flyder ind i den indendørsenhed, som ikke er i drift.
Automatisk styring af luftstrømmens
retning
Når der er valgt Automatisk-modus med
pen, indstilles den vandrette vinge automatisk til
at modsvare driftsmåden, så effektiviteten bliver
optimal.
(1) OPVARMNING
• Når luftstrømmens temperatur er for lav, blæses luften ud vandret.
• Når luftstrømmens temperatur stiger, blæses luften
ud nedad.
(2) AFKØLING, TØR
Luften blæses vandret ud i rummet.
(3) VENTILATOR
Luften blæses ud nedad.
knap-
Flyt de lodrette vinger manuelt for at ændre
■
luftstrømmens vandrette retning.
Juster vingerne, inden klimaanlægget startes.
Pas på ikke at få fingrene i klemme, da den vandrette
vinge bevæger sig automatisk.
Beskrivelse af “AUTOMATISK GENSTARTSFUNKTION”
Se side 86.
87
Page 88

ØKONOMIAFKØLINGSDRIFT (ECONO COOL)
ON/OFF
FAN
TOO
WARM
TOO
COOL
VANE
MODE
ECONO COOL
STOP
START
HR.
MIN.
I FEEL
COOL
DRY
AMPM
CLOCK
˚C
AMPM
HEAT
/FAN
RESET CLOCK
START
HR.
MIN.
HR.
MIN.
START
STOP
HR.
MIN.
HR.
MIN.
STOP
ECONO COOL
ECONO COOL
VANE
FAN
TOO
WARM
TOO
COOL
HVIS KLIMAANLÆGGET IKKE SKAL ANVENDES I LÆN-
Brug denne funktion, når De vil have det behageligt i COOL-funktion, selv om der spares energi.
Gør følgende, mens klimaanlægget er i gang og arbejder i
MANUEL AFKØLINGS modus.
Tryk på
■
Når ØKONOMIAFKØLING (ECONO COOL) er valgt i COOL-tilstand, udfører klimaanlægget svingfunktionen i forskellige cyklusser alt efter klimaanlæggets
temperatur.
SET TEMPERATURE sættes også automatisk til 2°C højere end i COOL-tilstand.
knappen.
Sådan annulleres ØKONOMIAFKØLINGSDRIFT (ECONO COOL):
Tryk på
■
○○○○○○○○○○○○○○○○○○○○○○○○○○○○○○○○○
• Når der trykkes på
ØKONOMIAFKØLINGSDRIFT (ECONO COOL), annulleres ØKONOMI-
AFKØLINGSDRIFT (ECONO COOL).
• Knappen
tilgængelige.
Hvad er “ØKONOMIAFKØLING (ECONO COOL)”?
Skiftende luftstrøm (ændringer i luftstrømmen) får dig til at føle det køligere end ved en konstant luftstrøm. Så selvom
SET TEMPERATURE automatisk indstilles 2°C højere, kan man styre kølefunktionen uden at det går ud over komforten.
Det betyder, at der kan spares energi.
knappen igen.
-knappen, eller driftstilstand ændres under
,
eller
og ON/OFF-timeren (forklaret nedenfor) er
TIMERSTYRET ANVENDELSE (ON/OFF TIMER)
Det er praktiskt at indstille timeren for det tidspunkt, hvor De går i seng, hvor De kommer hjem, hvor De står op etc.
Hvordan ON-timeren indstilles
1 Tryk på
Ved hvert tryk på knappen skifter ON-timer modus
mellen ON og OFF.
-knappen under drift.
2 Indstill tiden på timeren med
knapperne.
Ved hvert tryk på
tid op med 1 time; ver hvert tryk på
den indstillede tid op med 10 minutter.
Annullering af ON-timeren:
Tryk på
■
knappen tæller den indstillede
knappen tæller
-knappen.
og
Hvordan OFF-timeren indstilledes
1 Tryk på
Ved hvert tryk på knappen skifter OFF-timer modus
mellem ON og OFF.
-knappen under drift.
2 Indstill tiden på timeren med
knapperne.
Ved hvert tryk på
op med 1 time; ved hvert tryk på
den indstillede tid op med 10 minutter.
Annulllering af OFF-timeren:
Tryk på
■
knappen tæller den indstillede tid
knappen tæller
-knappen.
og
GERE TID
Hvis det ikke skal anvendes i længere tid:
1 Lad ventilatoren køre i 3 eller 4 timer, så
klimaanlæggets indre tørres.
Type AFKØLING og OPVARMNING:
• Udfør VENTILATOR-funktionen ved at vælge den
højeste temperatur i MANUEL AFKØLINGS modus
på fjernbetjeningen. (Se side 87.)
Type KUN AFKØLING:
• Vælg VENTILATOR-funktionen. (Se side 87.)
2 Sluk på afbryderen, og/eller tag stikket ud af
stikkontakten.
FORSIGTIG:
Sluk på afbryderen, eller tag strømforsyningskablet ud
af kontakten, hvis klimaanlægget isk skal bruges i læn-
gere tid.
Støv kan sammles og forårsage brand.
3 Tag batterierne ud af fjernbetjeningen.
FORSIGTIG:
Hvis fjernbetjeningen ikke anvendes i lang tid, skal batterierne tages ud for at forhindre lækage.
VEDLIGEHOLDELSE
Inden vedligeholdelsearbejde påbegyn-
des
Sluk på afbryderen, og/eller tag stikket ud af
■
stikkontakten.
FORSIGTIG:
Sluk for klimaanlægget og tag netledningen ud af stikkontakten eller sluk med afbryderen, når klimaanlægget
skal rengøres.
Da ventilatoren roterer med stor hastighed, er der risiko
for personskade.
Når klimaanlægget skal anvendes igen:
1 Rengør luftfilteret og installer det i indendørs-
enheden.
(Se side 89 angående rengøring af luftfilteret.)
2 Kontrollér at indendørs/udendørsenhedens
luftindsugning og luftudledning ikke er blokerede.
3 Kontroller, at jordledningen er korrekt forbun-
det.
FORSIGTIG:
Foretag jordforbindelse.
Forbind aldrig en jordledning til et gasrør, et vandrør, en
lynafleder eller en telefons jordledning. Forkert jordforbindelse kan medføre elektrisk stød.
Rengøring af indendørsenheden
Rengør anlægget med en blød, tør klud.
■
• Hvis der er meget snavs, rengør anlægget med en
klud af rensemiddel opløst i lunkent vand.
• Bruk ikke benzin, rensebenzin, skurepulver eller
insektmidler. Anvendelse af disse ting kan beskadige klimaanlægget.
Timerprogrammering
ON- og OFF-timeren kan anvendes i kombination. Den timer, hvis indstillede tid først nås, vil først blive aktiveret. (“
viser rækkefølgen af timeroperationerne.)
• Hvis klokkeslættet ikke er indstillet, kan timeren ikke anvendes.
BEMÆRKNING:
Hvis hovedafbryderen slukkes eller der opstår strømsvigt, mens AUTO START/STOP timeren er aktiv, annulleres timerindstillingen. Da disse modeller er udstyret med en automatisk genstatsfunktion, starter klimaanlægget med timeren
annulleret, så snart strømforsyningen er genoprettet.
” mærket
88
Page 89

RENGØRING AF CATECHIN LUFTFILTERET
UDSKIFTNING AF LUFTRENSNINGSFILTERET
Rengøring af catechin luftfilteret (ca. en gang hver 2. uge)
1 Fjern catechin luftfilteret.
Åbn frontpanelet og
fjern/udskift
filteret.
Catechin luftfilter
FORSIGTIG:
Rør ikke ved indendørsenhedens metaldele, når catechin
luftfilteret tages ud.
Det give risiko for personskade.
Fjern.
3 Efter at catechin luftfilteret er vasket i vand/
lunkent vand, lægges det til tørre i skyggen,
indtil det er helt tørt.
• Udsæt ikke catechin luftfilteret for direkte sollys eller
varme fra åben ild, når det tørres.
4 Installer catechin luftfilteret.
2 Fjern snavs fra catechin luftfilteret med en
støvsuger eller ved at vaske det af med vand.
• Hvis der er meget snavs, vaskes filteret med et opløsningsmiddel eller rensemiddel opløst i lunkent
vand.
• Hvis der bruges varmt vand (50°C eller varmere),
kan filteret blive deformt.
Installer.
Når kapaciteten er blevet mindre på grund af snavs etc. er det nødvendigt at udskifte luftrensningsfilteret.
Udskiftning af luftrensningsfilteret (ca. én gang hver 4. Måned)
1 Fjern catechin luftfilteret.
Catechin luftfilter
2 Fjern luftrensningsfilteret (Hvid bælg type).
Luftrensningsfilter
○○○○○○○○○○○○○○○○○○○○○○○○○○○○○○○○○○○○○○○○○○○○○○○○○
Luftrensningsfilter
• Hvis luftrensningsfilteret er tilstoppet, kan det føre til, at klimaanlæggets kapacitet nedsættes eller at der opstår kondens
ved luftudledningen.
• Luftrensningsfilteret er af enganstype. Dets normale brugstid er omkring 4 måneder, men hvis filteret bliver brunt, skal det
skiftes ud direkte.
3 Installer et nyt luftrensningsfilter.
4 Installer catechin luftfilteret, og luk front-
panelet helt.
○○○○○○○○○○○○○○○○○○○○○○○○○○○○○○○○○○○○○○○○○○○○○○○○○
Hvad er “Catechin luftfilter”?
Luftfilteret er indfarvet med et naturligt materiale, catechin, som findes i the. Catechin luftfilteret fjerner lugt og
skadelige gasser som f.eks. formaldehyd, ammoniak og acetaldehyd. Desuden forhindrer det aktiviteten af de
viruser, der sætter sig fast på filteret.
Ekstratilbehør Ekstratilbehør kan fås hos forhandleren.
Delens navn LUFTRENSNINGSFILTER
Delnummer MAC-1300FT
89
Page 90

KONTROLLER FØLGENDE IGEN, FØR
HVIS DER ER TEGN PÅ, AT DER ER OPSTÅET PROBLEMER
DE KONTAKTER REPARATØREN
Spørgsmål
Klimaanlægget kan ikke anvendes.
Kan ikke køle eller varme tilstrækkeligt.
Luften fra indendørsenheden
lugter mærkeligt.
Displayet på fjernbetjeningen
fremkommer ikke eller er
svagt. Indendørsenheden reagerer ikke på fjernbetjeningssignalet.
Når et strømsvigt indtræffer.
Hvis klimaanlægget stadig ikke fungerer, selv efter at ovenstående er kontrolleret, skal De ophøre med at anvende klimaanlægget og henvende Dem
til forhandleren.
I de følgende tilfælde skal De slukke for klimaanlægget og henvende Dem til
forhandleren.
• Hvis der siver vand ud fra indendørsenheden.
• Hvis venstre driftsindikator blinker.
• Hvis afbryderen udløses ofte.
• Det er ikke sikkert, at signalet fra fjernbetjeningen kan modtages i et værelse,
hvor et lysstofrør af elektronisk tænd/sluk type (lysstofrør af invertertypen)
anvendes.
• Betjeningen af klimaanlægget kan påvirke radio- og TV-modtagelsen i områder, hvor modtagelsen er svag. Det kan være nødvendigt at installere en forstærker til påvirkede apparat.
• Når der høres torden, standses anlægget og stikket tages ud af stikkontakten
eller afbryderen slukkes. Ellers er der risiko for beskadigelse af de elektriske
porte.
• Er afbryderen aktiveret?
• Er sikringen sprunget?
• Er On-timeren indstillet? (Side 88)
• Er temperaturindstillingen korrekt? (Side 87)
• Er filteret rent? (Side 89)
• Er der nogen genstande, der blokerer luft-
• Er der et vindue eller en dør åben?
• Er filteret rent? (Side 89)
• Er batterierne brugt op? (Side 85)
• Er polariteten (+, -) på batterierne korrekt? (Side
• Er der blevet trykket på en knap på fjernbetje-
• Starter klimaanlægget driften igen?
Kontrolpunkter og hjælp
indsugning eller luftudledning på indendørs- eller udendørsenheden?
85)
ningen til et andet elektrisk apparat?
Da disse modeller er udstyret med en automatisk genstartsfunktion, skal klimaanlægget gå i
gang igen, hvis klimaanlægget var i drift inden
strømsvigtet. (Se beskrivelsen af “AUTOMATISK
GENSTARTSFUNKTION” på side 86.)
Spørgsmål
Klimaanlægget kan ikke
bruges i ca.
3 minutter, efter at det er
startet igen.
En knasende lyd høres.
Luften fra indendørsenheden lugter mærkeligt.
Ventilatoren stopper i TØR
funktionen.
En lyd af rindende vand
høres.
En boblende lyd høres.
Rummet afkøles ikke tilstrækkeligt.
Der udsendes tåge fra udblæsningen på indendørsenheden.
Svar (ikke nogen fejl)
• Dette beskytter klimaanlægget via instruktioner
fra mikroprocessoren. Vent.
• Denne lyd frembringes af udvidelse/sammentrækning af frontpanelet etc. på grund af ændringer i temperaturen.
• Klimaanlægget kan indsuge lugten af vægge,
tæpper, møbler, stoffer osv. og blæse den ud
med luften.
• I TØR funktion, virker enheden ved at anvende
samme kølende kredsløb som i AFKØLING funktion. TØR funktionstiden skal reduceres for at
kunne sænke fugtigheden uden at rumtemperaturen falder. Nogle gange stopper kompressoren, og indendørsblæseren stopper på samme
tid. Dette forhindrer kondensvandet på varmeudveksleren i at fordampe igen.
• Dette er lyden af kølevæske indeni klimaanlægget.
• Dette er lyden af kondensvand i varmeveksleren.
• Dette er lyden af varmeveksleren, der afrimer.
• Denne lyd høres når udeluften trækkes ind fra
drænslangen når hætten eller ventilatoren startes og det får vandet i afløbsslangen til at sprøjte
ud.
Denne lyd høres også når udeluften blæser ind
i afløbsslangen i stærk blæst.
• Når der anvendes en ventilator eller et gaskomfur i et rum, øges afkølingsbehovet, og dette
medfører utilstrækkelig afkølingseffekt.
• Når temperaturen uden for er høj, kan afkølingseffekten være utilstrækkelig.
• Den kølige luft fra klimaanlægget nedkøler hurtigt fugtigheden i rummets luft, hvorved der dannes tåge.
Spørgsmål
Luftstrømmens retning ændres under anvendelsen.
Retningen af de vandrette
vinge kan ikke indstilles
med fjernbetjeningen.
Der siver vand ud af
udendørsenheden.
Der komme hvid røg fra
udendørsenheden.
Luftstrømmen blæses ikke
hurtigt ud i opvarmningsfunktionen.
Funktionen stoppes i ca.
10 minutter i opvarmningsfunktionen.
Nogle gange kan man høre
hvæsselyde.
Rummet kan ikke opvarmes
tilstrækkeligt.
I et multi-enheds system bliver indendørs enheden,
som ikke er i drift, varm, og
en lyd, der lyder som strømmende vand, høres fra enheden.
Klimaanlægget starter kun
driften, hvis hovedafbryderen er tændt, selv om du
ikke betjener enheden med
fjernbetjeningen.
Svar (ikke nogen fejl)
• Nå klimaanlægget anvendes i funktionerne AFKØLING eller TØR, og hvis anvendelsen fortsætter med nedadrettet luftstrøm i 1 time, vil retningen af luftstrømmen automatisk blive ændret
til “lige ud” for at forhindre kondensvand i at
dryppe ned.
• Hvis luftstrømmens temperatur er for lav, eller
når der udføres afrimning under opvarmningsfunktionen, indstilles den vandrette vinge automatisk til vandret.
• Under funktionerne AFKØLING og TØR er rør
eller rørforbindelsessektionerne kolde, hvorfor
der dannes kondens.
• Under optøningsfunktionen tør det frosne vand
på udendørsenheden, så det drypper ned.
• Under opvarmningsfunktionen drypper der kondensvand fra varmeveksleren.
• I opvarmningsdrift opstår der ved optøningsfunktionen fugt, som ligner hvid røg.
• Vent mens klimaanlægget forbereder at blæse
varm luft ud.
• Optøning af udendørsenheden foretages
(Optøningsfunktion).
Da dette er udført inden for 10 minutter, skal De
vente. (Når udendørstemperaturen er for lav eller luftfugtigheden er for høj, dannes der frost.)
• Dette er lyden der høres, når afkølingsvæsken i
klimaanlægget skiftes.
• Når temperaturen uden for er lav, kan
opvarmningseffekten være utilstrækkelig.
• Der løber konstant en lille smule kølevæske
ind i indendørs enheden, selvom den ikke er i
drift.
• Disse modeller er udstyret med en automatisk
genstartsfunktion. Når hovedafbryderen slukkes,
uden at klimaanlægget er stoppet med fjernbetjeningen, og derefter tændes igen, vil klimaanlægget automatisk starte i den samme modus, som var indstillet med fjernbetjeningen, lige
inden hovedafbryderen blev slukket.
90
Page 91

INSTALLATION, FLYTNING OG INSPEKTION
Installationssted
Installer ikke klimaanlægget på følgende steder:
• Hvor der er risiko for uvsidning af brændbar gas.
FORSIGTIG:
Installer ikke klimaanlægget på et sted, hvor der kan forekomme udsivning af brændbar gas.
Hvis der siver gas ud i nærheden af klimaanlægget, er
der fare for eksplosion.
• Hvor der er meget maskinolie.
• Hvor salt forekommer, f.eks, i kystområder.
• Hvor der frembringes sulfidgas som f.eks. i områder
med varme kilder.
• Hvor der forekommer oliestænk eller olieholdig røg.
• Hvor der er højfrekvensapparater eller trådløse appa-
Installationsstedet for udendørs enheden skal være mindst 3 m væk fra antenner til
TV-apparater, radioer mm. I områder med svage radio- og TV-signaler skal der være
større afstand mellem udendørs enheden og antennen til det pågældende apparat,
hvis betjeningen af klimaanlægget påvirker radio- og TV-modtagelsen.
Lysstofrør af
1 m
ellere
mere
Radio
inverter-typen
Hold afstand for
at forebygge
billedforstyrrelser
eller støj.
Tørt, vel
ventileret
sted
100 mm
ellere mere
TV
3 m
ellere mere
500 mm
ellere mere
Hold lysstofrør på så
lang afstand som muligt
fra klimaanlægget, for
at forhindre indvirking
på driften.
1 m
ellere
mere
Trådløs
telefon
eller
Bærbar
telefon
Væg etc.
rater.
ADVARSEL:
Hvis klimaanlægget kører, men (afhængig af model) hverken opvarmer eller afkøler rummet, skal De kontakte forhandleren, da der kan være en gaslækage. Husk at spørge serviceteknikeren, om der er gaslækage ved reparation.
Den påfyldte kølegas i klimaanlægget udgør ingen risiko. Kølegas lækker som regel ikke, men hvis gassen siver ud
indendørs og kommer i kontakt med varmen fra varmeblæser, varmeapparat, brændeovn el. lign., kan der opstå
skadelige dampe.
Elektrisk installation
• Sørg for et specielt kredsløb til strømforsyning af klimaanlægget.
• Sørg for at afbryderens kapacitet er korrekt.
ADVARSEL:
• Klimaanlægget bør ikke installeres af kunden selv. Hvis installeringen udføres forkert, er der risiko for brand, elek-
trisk stød og/eller personskade ved at klimaanlægget falder ned, vandlækage etc.
• Brug ikke indirekte tilslutning af netledningen eller forlængerlednin, og undlad at tilslutte mange anordninger til det
samme vekselstrømudtag (vægkontakt). Dette kan medføre risiko for brand og/eller elektrisk stød pga. defekt kontakt, defekt isolation, overskridelse af den tilladte spænding etc. Rådfør Dem med forhandleren.
SPECIFIKATIONER
FORSIGTIG:
• Foretag jordforbindelse.
Forbind aldrig en jordledning til et gasrør, et vandrør, en lynafleder eller en telefons jordledning.
Forkert jordforbindelse kan medføre elektrisk stød.
• Installer en fejlstrømsafbrydner, afhængigt af det sted, hvor klimaanlægget skal installeres (fugtigt sted etc.).
Hvis der ikke installeres fejlstrømsafbryder, vil der være risiko for elektrisk stød.
Inspektion og vedligeholdelse
• Hvis klimaanlægget anvendes i mange år, kan dets kapacitet forrings på grund af snavs indeni enheden.
• Afhængigt af anvendelsen kan der frembringes en lugt, eller affugtningsvand kan have svært ved at løbe ud pga. snavs,
støv etc.
• Det anbefales, at der udover den almindelige vedligeholdelse, udføres inspektion og vedligeholdelse (betales) af en
specialist. Henvend Dem til forhandleren.
Driftslyd
• Anbring ikke genstande omkring luftudledningen på udendørsenheden. Dette kan bevirke, at kapaciteten nedsættes og/
eller driftslyden øges.
• Henvend dem til forhandleren, hvis De hører unormale lyde under driften.
Flytning
• Hvis klimaanlægget skal flyttes eller geninstalleres på grund af ombygning, flytning etc. kræver dette faglig ekspertise.
ADVARSEL:
Reparation eller flytning bør ikke foretages af kunden selv.
Hvis dette gøres forkert, er der risiko for brand, elektrisk stød og/eller personskada forårsaget af, at klimaanlægget
falder ned, vandudsivning etc. Henvend Dem til forhandleren.
Bortskaffelse
Henvend Dem til forhandleren for råd vedrørende bortskaffelse af produktet.
Henvend Dem til forhandleren, hvis De har nogen spørgsmål.
Model Indendørs
Indstil navn
Udendørs
Funktion
Strømforsyning
Kapacitet kW
Indgang kW
Vægt
Kølevæske
kapacitet (R410A)
IP kode
Tilladt
operationstryk
Støjniveau
Indendørs kg
Udendørs kg
kg
Indendørs
Udendørs
Indsugningsside
Udblæsningsside
Indendørs
(Høj/Mid./Lav)
MPa
MPa
dB(A)
Udendørs dB(A)
MSH-A07YV MSH-A09YV MSH-A12YV
MSC-A07YV MSC-A09YV MSC-A12YV
MUH-A07YV MUH-A09YV MUH-A12YV
Afkøling Opvarmning Afkøling Opvarmning Afkøling Opvarmning
~ /N, 230V, 50Hz
2,3 2,5 2,55 3,05 3,5 3,9
0,715 0,69 0,795 0,84 1,09 1,08
910
35 38 40
0,62 1,00 1,00
36/31/25 36/31/25 39/32/25 40/33/26 39/33/26
47 49
MS-A07YV MS-A09YV MS-A12YV
MSC-A07YV MSC-A09YV MSC-A12YV
MU-A07YV MU-A09YV MU-A12YV
Afkøling
2,3 2,55 3,5
0,715 0,795 1,14
910
34 36
0,60 0,60 0,75
IP20
IP24
1,64
4,15
36/31/25 40/33/26
45 49
BEMÆRKNING:
1. Nominel effekt
Afkøling — Indendørs: 27°C DB, 19°C WB
Udendørs: 35°C DB
Opvarmning
— Indendørs: 20°C DB
Udendørs: 7°C DB, 6°C WB
2. Garanteret operationsområde
Indendørs Udendørs
Afkøling
Opvarmning
Øvre 32°C DB 43°C DB
grænse 23°C WB —
Nedre 21°C DB 21°C DB
grænse 15°C WB —
Øvre 27°C DB 24°C DB
grænse — 18°C WB
Nedre 20°C DB -10°C DB
grænse — -11°C WB
91
Page 92

INNEHÅLL
SÄKERHETSFÖRESKRIFTER ............................................................................................................................................. 92
DELARNAS NAMN ................................................................................................................................................................ 93
FÖRBEREDELSER INNAN DU TAR APPARATEN I BRUK .................................................................................................. 94
“I FEEL...” AUTOMATISK DRIFT ........................................................................................................................................... 96
MANUELL FUNKTION (SVALT, TORRT, VARMT/FLÄKT) ..................................................................................................... 97
LUFTFLÖDESSTYRKA OCH RIKTNINGSINSTÄLLNING .................................................................................................... 97
EKONOMIKYLFUNKTIONEN (ECONO COOL) .................................................................................................................... 98
TIMERFUNKTION (ON/OFF TIMER) .................................................................................................................................... 98
NÄR LUFTKONDITIONERINGSAPPARATEN INTE SKA ANVÄNDAS UNDER EN LÄNGRE TID ...................................... 98
UNDERHÅLL ......................................................................................................................................................................... 98
RENGÖRING AV DEODORANTFILTRET ............................................................................................................................. 99
BYTE AV LUFTRENINGSFILTRET ....................................................................................................................................... 99
KONTROLLERA FÖLJANDE ÄNNU EN GÅNG INNAN DU RINGER EFTER SERVICE ................................................... 100
NÄR DU TROR ATT PROBLEM UPPSTÅTT ...................................................................................................................... 100
INSTALLATION, FLYTTNING OCH INSPEKTION .............................................................................................................. 101
TEKNISKA DATA ................................................................................................................................................................. 101
SÄKERHETSFÖRESKRIFTER
• Eftersom denna produkt innehåller rörliga delar och delar som kan förorsaka elstötar ska du läsa “Säkerhetsföreskrifter” innan du tar den i bruk.
• Eftersom punkterna som behandlas här är viktiga för säkerheten, se till att du följer dem till punkt och pricka.
Varningsmärken och deras betydelse
VARNING: Felaktig hantering kan mycket lätt förorsaka allvarlig fara såsom dödsfall, allvarlig kroppskada etc.
FÖRSIKTIGHET: Felaktig hantering kan, beroende på omständigheterna, förorsaka allvarlig fara.
Symbolerna som används i denna handbok och deras betydelse
• Färgen på dekalen som är fastsatt på enheten anges inom parentes.
: Gör ej.
: Följ instruktionerna.
(Svart) : Stick inte in fingrar, pinnar etc.
(Svart) : Stå inte på inomhus/utomhusenheterna och ställ inget på dem.
(Gul) : Fara för elstöt, var försiktig.
(Blå) : Se till att du drar ut nätsladden ur vägguttaget.
(Blå) : Se till att strömmen stängts av.
• När du läst igenom denna handbok bevara den lätt tillgänglig, tillsammans med installationshandboken, så att
du kan titta i den igen när du vill.
Varningsmärkenas placering och säkerhetsutrustning
FRAMPANEL
RAM
92
RAM
LUFTUTBLÅS
Detta luftkonditioneringsaggregat är INTE avsett att användas av barn eller handikappade utan övervakning.
•
VARNING
Använd inga mellankontakter vid anslutning till vägguttaget, förlängningssladdar eller flera
anslutningar till samma vägguttag.
• Dålig kontakt, dålig isolering, överstigande av den tillåtna spänningen etc. kan förorsaka brand eller
elstöt.
Du får inte repa eller bearbeta nätsladden, etc.
• Placera inga tunga föremål på nätsladden och repa eller modifiera inte den. Sladden kan ta skada, vilket
kan leda till brand eller elstötar.
Slå inte från strömbrytaren och dra inte ut nätsladden ur vägguttaget medan aggregatet är i drift.
• Detta kan förorsaka brand p.g.a. gnista etc.
• Slå alltid från strömbrytaren eller dra ut nätsladden ur vägguttaget sedan inomhusenheten har stängts av
med fjärrkontrollen.
Utsätt inte huden för kallt, direkt luftdrag under lång tid.
• Detta kan skada din hälsa.
Installation av enheten bör inte utföras av kunden.
• Om detta görs felaktig kan det förorsaka brand eller elstöt och, om du tappar enheten, kroppskada samt
vattenläckage etc. I dessa fall ska du istället kontakta din återförsäljare.
Stick inte in fingrar, pinnar etc. i Luftintag/Luftutblås.
• Eftersom fläkten roterar i hög hastighet kan detta förorsaka kroppskada.
• Se till att små barn inte leker med luftkonditioneringsaggregatet.
Om något ovanligt sker (lukt av bränt etc.), stäng omedelbart av luftkonditioneringsapparaten och
ta ur kontakten ur vägguttaget eller stäng av huvudströmmen.
• Om du fortsätter driften under onormala omständigheter kan det förorsaka brand, driftsproblem etc. I
dessa fall ska du istället kontakta din återförsäljare.
Reparation eller flyttning av enheten bör inte utföras av kunden.
• Om detta görs felaktig kan det förorsaka brand eller elstöt och, om du tappar enheten, kroppskada samt
vattenläckage etc. I dessa fall ska du istället kontakta din återförsäljare.
• För att förhindra att fara uppstår bör en skadad nätsladd alltid bytas ut av producenten eller återförsäljaren.
FÖRSIKTIGHET
Rör inte vid metalldelarna i inomhusenheten när luftfiltret avlägsnas.
• Det kan förorsaka kroppskada.
Använd inte insektmedel eller brandfarlig spray på luftkonditioneringsapparaten.
• Det kan förorsaka brand eller deformering av höljet.
Ställ inte husdjur eller växter så att de utsätts för direkt luftdrag.
• Detta kan skada husdjuret eller växten.
Låt inte enheten stå på ett skadat installationsställ.
• Enheten kan falla ner och förorsaka kroppskada.
Stå inte på ett ostadigt bord eller liknande när enheten underhålls.
• Det kan förorsaka personskador etc. om enheten faller ned.
Drag inte i nätsladden.
• Ledaren inuti nätsladden kan slitas av, och därmed orsaka en brandrisk.
Försök aldrig att ladda eller ta isär ett batteri och kasta det aldrig på elden.
• Detta kan resultera i läckage, brand eller explosion.
Använd inte under lång tid i hög luftfuktighet, dvs med dörr eller fönster öppet.
• Om kylningsfunktionen används i ett rum med hög luftfuktighet (80% eller mer) under lång tid kommer
vatten att kondensera i luftkonditioneringsapparaten och kanske droppa, vilket kan blöta ner och förstöra
möbler etc.
Ej avsedd för specialändamål.
• Använd inte denna luftkonditioneringsapparat till att bevara precisionsutrustning, mat, djur, växter eller
konstföremål. Dessa kan förstöras.
Ställ inte en kamin el.dyl. där den utsätts för direkt luftdrag.
• Det kan förorsaka nedsatt förbränning.
Page 93

SÄKERHETSFÖRESKRIFTER
DELARNAS NAMN
FÖRSIKTIGHET
Stäng av huvudströmbrytaren och dra ut näsladden ur vägguttaget när apparaten ska rengöras.
• Eftersom fläkten roterar med hög hastighet kan den förorsaka kroppskada.
Dra ut nätsladden ur vägguttaget eller stäng av huvudströmmen om enheten inte ska användas
under längre tid.
• Om detta inte görs kan smuts ansamlas och förorsaka brand.
Byt ut de båda batterierna mot nya av samma typ.
• Användning av ett gammalt batteri tillsammans med ett nytt kan resultera i överhettning, läckage eller
explosion.
Om du får vätska från ett batteri på huden eller kläderna, måste du tvätta bort den grundligt med
rent vatten.
• Om du får vätska från batterierna i ögonen, ska de sköljas med stora mängder rent vatten och en läkare
kontaktas omedelbart.
Ventilera noggrant om du använder enheten i närheten av en ugn el dyl.
• Syrebrist kan uppstå.
Manövrera inte kontrollerna med våta händer.
• Detta kan förorsaka elstöt.
Rengör inte luftkonditioneringsapparaten med vatten.
• Vatten kan komma in i enheten och förstöra isoleringen. Detta kan förorsaka elstöt.
Stå inte på inom/utomhusenheterna och ställ inget på dem.
• Det kan förorsaka skada etc. om du eller något föremål faller ned.
För installation
VARNING
• Kontakta din återsförsäljare för installation av enheten.
FÖRSIKTIGHET
Installera inte enheten på platser där brandfarlig gas kan läcka ut.
• Om gasläcakage uppstår och gas samlas kring enheten kan det förorsaka explosion.
Jorda.
• Anslut inte jordledningen till ett gasrör, vattenrör, åskledare eller en telefons jordledning. Felaktig jordningen
kan förorsaka elstöt.
Beroende på den plats där du installerar enheten (fuktig plats el.dyl) bör du installera en jordläckagebrytare.
• Om en jordläckagebrytare inte installeras kan det förorsaka elstöt.
Avloppsvatten ska ledas bort helt.
• Om avloppet är ofullständigt kan vatten droppa från enheten vilket kan blöta ner och förstöra möbler etc.
Inomhusenheten
Luftrengöringsfilter
(Vit bälgtyp)
Deodorantfilter
(Med luktborttagare)
Luftutblås
Vertikal fläns
Horisontal fläns
Funktionsdel
(När frampanelen är öppen)
Utomhusenheten
Nödfallsdrift knappen
Frampanel
Luftintag
För att ansluta till brytaren
Nätsladd
Fjärrkontrollens
mottagarfönster
Fjärrkontrollen
Kontrolldel
Funktionsindikatorlampa
Luftintag (baktill och på sidan)
Rör
Fjärrkontrollens
mottagarfönster
Avloppslang
Luftutblås
Avlopp
93
Page 94

ON/OFF
FAN
TOO
WARM
TOO
COOL
VANE
MODE
ECONO COOL
STOP
START
HR.
MIN.
I FEEL
COOL
DRY
AMPM
AMPM
RESET CLOCK
HEAT
/FAN
DELARNAS NAMN
ON/OFF
TOO
COOL
AMPM
CLOCK
˚C
AMPM
TOO
WARM
FÖRBEREDELSER INNAN DU TAR APPARATEN I BRUK
Fjärrkontrollen
Öppna frontluckan.
Signalsändningsdel
Teckenruta
PÅ/AV (ON/OFF)
knapp
(Detta diagram är en översikt.)
Temperatur knappar
Automatisk omstartningsfunktion
Dessa modeller har en automatisk omstartningsfunktion. Om du inte vill använda denna funktion,
■
bör du kontakta en servicerepresentant eftersom enhetens inställning måste ändras.
Den automatiska omstartningsfunktionen är ...
När inomhusenheten styrs av fjärrkontrollen, lagras driftsläget, den inställda temperaturen och fläkthastigheten i minnet. Om
ett strömavbrott inträffar eller nätströmmen stängs av under drift, ställs den automatiska omstartningsfunktionen in att automatiskt starta enheten i samma läge som ställts in med fjärrkontrollen innan nätströmmen bröts. (Se sid 96 för detaljer.)
Inomhusenheten
Sätt in kontakten i vägguttaget och/eller slå på brytaren.
■
VARNING:
Avlägsna all smuts från kontakten och sätt in den ordentligt.
Om kontakten är smutsig eller om den inte är helt intryckt kan det förorsaka brand eller elstöt.
Fjärrkontrollen
Inställning av typ
Denna fjärrkontrolls inställning måste ändras beroende på luftkonditioneringens typ (SVALT och
■
VARMT eller ENDAST SVALT).
Luftkonditioneringen fungerar inte korrekt om inställningen är felaktig. Kontrollera därför att inställningen motsvarar din typ av luftkonditionering. Om inte, ändra inställningen såsom visas
nedan.
Skjutomkopplare
Typ SVALT och VARMT ENDAST SVALT
94
Fläkthastighetsknapp
Knapp för funktionsval
Ekonomikyl-knapp (ECONO COOL)
Nollställningsknapp
OFF TIMER knapp
ON TIMER knapp
HR. knapp, MIN. knapp
(Tidsinställningsknappar)
Knapp för inställning av ur
Flänsinställningsknapp
Skjutomkopplarensläge
Page 95

HR.
MIN.
HR.
MIN.
FAN
VANE
MODE
ECONO COOL
STOP
START
HR.
MIN.
I FEEL
COOL
DRY
RESET CLOCK
HEAT
/FAN
Operation Indicator
Operation Indicator
Operation Indicator
Operation Indicator
Operation Indicator
ON/OFF
FÖRBEREDELSER INNAN DU TAR APPARATEN I BRUK
Fjärrkontrollen
Att sätta in batterierna samt ställa in
klockan
1 Ta bort frontluckan och sätt in batterierna.
Sätt sedan tillbaks frontluckan.
För in minuspolerna på batterierna först.
Kontrollera att batterierna är rätt polariserade.
För in minuspolerna
på batterierna först.
2 Tryck på RESET knappen.
Tryck med ett
smalt don.
• Om nollställningsknappen inte trycks in kommer
fjärrkontrollen inte att fungera som den ska.
3 Tryck på CLOCK set knappen.
Tryck med ett
smalt don.
4 Tryck på
och
(Tidsinställnings-
knapparna) för att ställa in innevarande tid.
• För varje gång som
tiden framåt 1 timme och för varje gång som
knappen trycks in räknas tiden framåt med 1 minut.
knappen trycks in räknas
5 Tryck på knappen CLOCK igen och stäng
frontluckan.
Hantering av fjärrkontrollen
• Signalens räckvidd är ca. 6 meter om fjärrkontrollen
hålls framför och riktas mot inomhusenheten.
• När knappen trycks in kommer ett pipljud att höras
från inomhusenheten. Om inget ljud hörs, tryck igen.
• Använd fjärrkontrollen försiktigt.
Om fjärrkontrollen tappas, kastas eller blöts ned kan
det hända att den inte fungerar.
Vid installation på en vägg etc.
• Installera fjärrkontrollen genom att fästa hållaren på
en plats där mottagningsljudet (pip) kan höras från
inomhusenheten när
Hur du sätter in fjärrkontrollen i hållaren.
Isättning : Sätt ner den.
Urtagning : Dra uppåt.
Fjärrkontrollens
hållare
Torrcellsbatterier
■ Att tänka på vid byte av batterier
Byt ut batterierna till nya alkaliska AAA-batterier i föl-
jande fall:
-knappen trycks in.
· När inomhusenheten inte reagerar på fjärrkontroll-
ens signal.
· När displayen på fjärrkontrollen börjar mörkna.
· När en knapp på fjärrkontrollen trycks in, visas alla
displayer på skärmen och försvinner sedan omedelbart.
Använd inte manganbatterier. Det kan leda till fel på
fjärrkontrollen.
• Alkalbatteriernas livstid vid normal användning är ungefär ett år.
Det rekommenderade bäst-före-datumet (månad/år)
anges på batteriernas undersida, det kan hända att
ett batteri vars förbrukningsdatum närmar sig tar slut
fortare.
• För att förhindra vätskeläckage ska alla batterier tas
bort när fjärrkontrollen inte kommer att användas på
en längre tid.
FÖRSIKTIGHET:
Om du får vätska från ett batteri på huden eller klä-
derna, måste du tvätta bort den grundligt med rent
vatten.
Om du får vätska från batterierna i ögonen, ska de
sköljas med stora mängder rent vatten och en läkare
kontaktas omedelbart.
• Använd inte uppladningsbara batterier.
• Byt ut de båda batterierna mot nya av samma typ.
• Släng bort tomma batterier på ett ansvarsfullt sätt.
När fjärrkontrollen inte kan användas (Nöddrift)
Om batterierna i fjärrkontrollen är slut eller det är fel på fjärrkontrollen, kan nöddrift tas i bruk genom att trycka in
NÖDFALLSDRIFT knappen.
Typ SVALT och VARMT
1 Tryck på NÖDFALLSDRIFT knappen.
• Varje gång NÖDFALLSDRIFT trycks in, ändras
driftsläget i följden NÖDFALLSKYLNING,
NÖDFALLSUPPVÄRMNING och STOPP.
När nöddrift trycks in en gång kommer enheten att
drivas i testkörningsläget i 30 minuter, sedan änd-
ras driftsläget till NÖDLÄGE.
• Detaljer om NÖDLÄGE visas nedan. Temperaturkontrollen fungerar dock inte under de första 30
minuterna i testkörningsläget och enheten är inställd på att fortsätta driften. Fläkthastigheten är
inställd på högt under testkörningen och växlar till
medium efter 30 minuter.
Driftsläge SVALT VARMT
Inställd temperatur 24°C24°C
Fläkthastighet Medium Medium
Horisontal fläns Auto Auto
• Driftsinställningen visas av funktionsindikatorlampan på inomhusenheten enligt nedanstående
bilder.
Funktionsindikatorlampa
NÖDFALLSKYLNING
NÖDFALLSUPPVÄRMNING
STOPP
För att stoppa nöddriften, tryck på knappen
■
nöddrift en gång (i läget nödfallsuppvärmning) eller två gånger (i läget
nödfallskylning).
Typ ENDAST SVALT
1 Tryck på NÖDFALLSDRIFT knappen.
• När nöddrift trycks in kommer enheten att drivas i
testkörningsläget i 30 minuter, sedan ändras driftsläget till NÖDFALLSKYLNING.
• Detaljer om NÖDFALLSKYLNING visas nedan.
Temperaturkontrollen fungerar dock inte under de
första 30 minuterna i testkörningsläget och enheten är inställd på att fortsätta driften. Fläkthastigheten är inställd på högt under testkörningen
och växlar till medium efter 30 minuter.
Driftsläge SVALT
Inställd temperatur 24°C
Fläkthastighet Medium
Horisontal fläns Auto
• Driftsinställningen visas av funktionsindikatorlampan på inomhusenheten enligt nedanstående
bilder.
Funktionsindikatorlampa
NÖDFALLSKYLNING
STOPP
För att stoppa nödfallskylning, tryck på knap-
■
pen nöddrift igen.
Varje gång knappen trycks in växlas driftsläget mellan
nödfallskylning och stoppläge.
95
Page 96

ON/OFF
ON/OFF
TOO
WARM
TOO
COOL
FAN
VANE
MODE
STOP
START
HR.
I FEEL
COOL
DRY
HEAT
/FAN
“I FEEL...” AUTOMATISK DRIFT
MODE
Operation Indicator
MODE
ON/OFF
FAN
TOO
WARM
TOO
COOL
VANE
MODE
ECONO COOL
STOP
START
HR.
MIN.
I FEEL
COOL
DRY
AMPM
CLOCK
˚C
AMPM
HEAT
/FAN
RESET CLOCK
I det automatiska driftsläget “ (I FEEL...)”, kan den optimala temperaturen i rummet ställas in med en
enkel manöver.
Att starta driften:
Tryck på
■
När läget “ (I FEEL...)” väljs regleras luftkonditioneringsapparaten automatiskt till den optimala temperaturen.
knappen.
Att stoppa driften:
Tryck på
■
○○○○○○○○○○○○○○○○○○○○○○○○○○○○○○○○○
Om du känner dig en aning varm:
■
Om du känner dig en aning kall:
■
Om “ (I FEEL...)” inte visas, tryck på
är inställd.
För varje gång knappen trycks in växlar funktionen i sekvens
enligt följande;
(I FEEL...) → (SVALT) → (TORRT) →
(VARMT/FLÄKT)
knappen tills den
knappen.
Tryck på
En intryckning sänker temperaturen med omkring 1°C.
Tryck på
En intryckning höjer temperaturen med omkring 1°C.
knappen för att sänka temperaturen.
knappen för att höja temperaturen.
Beskrivning av “I FEEL...” funktionen
Driftsdetaljer
Beroende på rumstemperaturen när driften startar, väljs driftsläget SVALT, TORRT eller VARMT automatiskt. Om enheten startas igen inom 2 timmar efter att den stängdes av kommer dock det föregående driftsläget att väljas. Funktionen
ändras inte även om rumstemperaturen ändras. Om inställningen inte stämmer överens med rumstemperaturen, välj
önskad funktion genom att trycka på
Detaljer om autofunktionen
Rumstemperatur vid Funktion Måltemperatur Funktion Måltemperatur
start (initialstadie) (initialstadie)
Omkring 25°C eller högre
Omkring 25°C - 23°C
Omkring 23°C eller lägre
SVALT Omkring 24°C SVALT Omkring 24°C
TORRT — TORRT —
VARMT Omkring 26°C TORRT —
NOTERA:
SVALT: Om rumstemperaturen är 2°C högre än den inställda temperaturen, kan den inställda temperaturen
inte ändras eftersom enheten körs för att uppnå måltemperaturen (inställd temperatur). I detta fall skall
man vänta tills rumstemperaturen sjunkits till inom 2°C av den inställda temperaturen och sedan ändra
värdet.
VARMT: Om rumstemperaturen är 2°C lägre än den inställda temperaturen, kan den inställda temperaturen inte
ändras eftersom enheten körs för att uppnå måltemperaturen (inställd temperatur). I detta fall skall
man vänta tills rumstemperaturen stigits till inom 2°C av den inställda temperaturen och sedan ändra
värdet.
Visningsdetaljer på inomhusenheten
Funktionsindikatorn till höger på inomhusenheten visar inställd funktion.
knappen.
Typ SVALT och VARMT Typ ENDAST SVALT
Lyser
Blinkar
Släckt
Beskrivning av den “AUTOMATISKA OMSTARTNINGSFUNKTIONEN”
• Dessa enheter har en automatisk omstartningsfunktion. När huvudströmbrytaren sätts på kommer luftkonditioneringen att automatiskt starta i samma läge som det läge som var inställt med fjärrkontrollen innan luftkonditioneringen
stängdes av med huvudströmbrytaren.
• Om enheten var med fjärrkontrollen inställd i läge av (off) innan luftkonditioneringen stängdes av, kommer den att vara
avstängd när huvudströmbrytaren sätts på igen.
• Om enheten var i läge nöddrift när huvudströmbrytaren stängdes av, kommer den, när huvudströmbrytaren sätts på
igen, att återgå till samma driftsläge som den hade innan nöddriften togs i bruk.
• Om enheten var i läge ”I FEEL…” före strömavbrottet, kommer inställningarna för driftsläget (KYLA, TORR, eller
VÄRME) ej att sparas i minnet. När huvudströmmen slås på, kommer enheten att avgöra driftläget beroende på den
rumstemperatur som råder vid omstart och åter gå i drift.
96
Funktionsindikatorlampa
Indikation
Detta visar att luftkonditioneringsapparaten försöker att uppnå
måltemperaturen, vänta vänligen tills måltemperaturen är
uppnådd.
Detta visar att rumstemperaturen närmar sig måltemperaturen.
(Gäller endast för utomhusenheten ur MXZ-serien)
Se Information för luftkonditioneringssystem av multi-typ.
(Sidan 97)
Funktion
Skillnaden mellan måltemperatur
och rumstemperatur
Omkring 2°C eller mer
Omkring 2°C eller mindre
—
Page 97

ON/OFF
MODE
ON/OFF
ON/OFF
MANUELL FUNKTION (SVALT, TORRT, VARMT/FLÄKT)
TOO
WARM
TOO
COOL
FAN
VANE
ON/OFF
FAN
TOO
WARM
TOO
COOL
VANE
MODE
ECONO COOL
STOP
START
HR.
MIN.
I FEEL
COOL
DRY
AMPM
CLOCK
˚C
AMPM
HEAT
/FAN
RESET CLOCK
ON/OFF
FAN
TOO
WARM
TOO
COOL
VANE
MODE
ECONO COOL
STOP
START
HR.
MIN.
I FEEL
COOL
DRY
AMPM
CLOCK
˚C
AMPM
HEAT
/FAN
RESET CLOCK
VANE
1
2
3
4
5
LUFTFLÖDESSTYRKA OCH RIKTNINGSINSTÄLLNING
Att välja driftsläget SVALT, TORRT eller VARMT/FLÄKT
1 Tryck på
2 Välj driftsfunktion genom att trycka på
För varje gång knappen trycks in växlar funktionen i fölgande sekvens;
(I FEEL...) → (SVALT) → (TORRT) → (VARMT/FLÄKT)
knappen.
knappen.
Luftflödesstyrkan och riktningen kan ställas in efter behov.
För att ändra luftflödesstyrkan, tryck på
■
För varje gång som knappen trycks in ändras fläkthastigheten från (lågt) →
(medium) → (högt) → (automatiskt)
• Använd
• Om du störs av luftkonditioneringsapoparatens driftsljud när du sover, an-
vänd
(högt) för att kyla ned/värma upp rummet mer.
(lågt) inställningen.
knappen.
Funktionen VARMT/FLÄKT
Se efter vilken typ av luftkonditioneringsapparat det gäller.
Typ Driftsfunktion
SVALT och VARMT VARMT
ENDAST SVALT FLÄKT
Att stoppa driften:
Tryck på
■
Efter att driftsfunktionen ställts in en gång, startar driften fortsättningsvis med
dessa tidigare inställningar. Du behöver endast att trycka på
○○○○○○○○○○○○○○○○○○○○○○○○○○○○○○○○○○○○○○○○○○○○○○○○○
När den inställda temperaturen ska ändras:
■
• Tryck på
• Tryck på
för att sänka temperaturen. En intryckning sänker temperaturen med omkring 1°C.
för att höja temperaturen. En intryckning höjer temperaturen med omkring 1°C.
I läget VARMT
• Om luftkonditioneringen absorberar för mycket värme från luften kan maskinen överbelastas. Om mikroprocessorn
avkänner detta stoppas fläkten i utomhusenheten automatiskt för att skydda luftkonditioneringen.
När utomhusenhetens fläkt stoppas kan frost bildas på utomhusenheten. Detta tyder inte på ett fel.
I läget TORRT
• Temperaturkontroll (temperaturinställning) kan inte utföras.
• Med denna funktion sjunker rumstemperaturen en aning.
Visningsdetaljerna på inomhusenheten beskrivs på sidan 96.
■
NOTERA:
Om omgivningstemperaturen är för hög kanske rumstemperaturen inte når den inställda temperaturen eftersom enheten redan arbetar för högtryck med att kyla rummet.
Information för luftkonditioneringssystem av multi-typ (Utomhusenhet: MXZ-serien)
Detta är en luftkonditioneringsanläggning (utomhusenhet: MXZ-serien) för flera system, vilket innebär att två
eller fler inomhusenheter kan anslutas till en utomhusenhet. Beroende på anläggningens kapacitet kan två eller
fler enheter vara aktiva samtidigt.
• Om du samtidigt försöker driva två eller fler inomhusenheter via en utomhusenhet - en för avkylning och en för uppvärmning - väljs driftsläget hos den inomhusenhet som går igång först. Den andra inomhusenheten, med senarelagd start,
fungerar då inte och indikatorn anger driftstillståndet (se tabellen med funktionsindikatorlampa på sidan 96).
Du ställer då in samtliga inomhusenheter för samma driftsläge.
• Om en inomhusenhet går igång samtidigt som utomhusenheten avfrostas, tar det några minuter (max 10 minuter) att
blåsa ut den varma luften.
• Vid uppvärmning kan även en inomhusenhet som inte är igång bli varm och ljudet av kylmedlets cirkulation hörs: detta
knappen.
knappen.
NOTERA:
• Om kylningsfunktionen drivits under 1 timme med den horisontala flänsen inställd på
luftströmmens riktning automatiskt uppåt för att förhindra att kondensvatten börjar droppa.
• Ställ in den vertikala riktningen med fjärrkontrollen. Om den horisontala flänsen flyttas manuellt kan det förorsaka
problem.
• Om luftströmmens temperatur är för låg vid uppvärmning eller om avfrostning utförs, ställs den horisontala flänsen
i läge
(1).
Automatiskt kontrollerad luftflödesriktning
När AUTOMATISKT funktionen väljs med
pen kommer positionen på den horisontala flänsen
automatiskt att ställas in i överensstämmelse med
driftsfunktionen för att driften ska bli effektiv.
(1) VARMT
• Om luftströmmens temperatur är låg blåses luften
ut horisontellt.
• När luftströmmens temperatur stiger riktas luftströmmen nedåt.
(2) SVALT, TORRT
Luften blåses ut horisontellt.
(3) FLÄKT
Luftströmmen riktas nedåt.
För att ändra luftflödesriktning verikalt, tryck på
■
För varje gång som knappen trycks in ändras vinkeln på den horisontala flänsen
i sekvens enligt följande;
(1) → (2) → (3) → (4) → (5) →
(svängning) → (automatiskt)
SVÄNGNINGSFUNKTION
Använd svängningsfunktionen för att sprida luftflödet över hela rummet.
Rekomenderad inställning av den horisontala flänsen
Använd i vanliga fall
Använd läge
funktion och lägena
(automatiskt) positionen.
(1) eller (2) vid SVALT- eller TORRT-
(3) till (5) vid VARMT-funk-
tion för inställning efter dina personliga önskemål.
(4) eller (5) ändras
Flytta de vertikala flänsarna manuellt för att
■
knap-
ändra luftflödets horisontala riktning.
Ställ in flänsarna innan du startar enheten.
Eftersom den horisontala flänsen rör sig automatiskt kan
din fingrar annars fastna.
är helt normalt. Orsaken är att kylmedlet ständigt cirkulerar, även då inomhusenheten inte är igång.
SVALT
TORRT
VARMT
knappen.
Beskrivning av den “AUTOMATISKA OMSTARTNINGSFUNKTIONEN”
Se sidan 96.
97
Page 98

EKONOMIKYLFUNKTIONEN (ECONO COOL)
ON/OFF
FAN
TOO
WARM
TOO
COOL
VANE
MODE
ECONO COOL
STOP
START
HR.
MIN.
I FEEL
COOL
DRY
AMPM
CLOCK
˚C
AMPM
HEAT
/FAN
RESET CLOCK
START
HR.
MIN.
HR.
MIN.
START
STOP
HR.
MIN.
HR.
MIN.
STOP
ECONO COOL
ECONO COOL
VANE
FAN
TOO
WARM
TOO
COOL
NÄR LUFTKONDITIONERINGSAPPARATEN INTE SKA
Använd denna funktion när du vill förena behaglig svalka med låg energiförbrukning.
Utför följande operationer när enheten drivs i läget MANUAL
COOL.
Tryck på
■
Vid val av läge ekonomikyla (ECONO COOL) i läge SVALT arbetar
luftkonditioneringsaggregatet med svängfunktion i varierande cykler beroende
av aggregatets temperatur.
SET TEMPERATURE ställs automatiskt in 2°C högre än i läge SVALT.
knappen.
För att koppla från ekonomikylfunktionen (ECONO COOL):
Tryck på
■
○○○○○○○○○○○○○○○○○○○○○○○○○○○○○○○○○
• När knappen
kyla (ECONO COOL), kopplas denna från.
• Knapparna
kan användas.
Vad är “ekonomikyla (ECONO COOL)”?
Svängflöde (luftflödesväxling) gör att du känner dig mer avsvalkad än vid ett konstant luftflöde.
Även om temperaturen automatiskt ställs in 2°C högre, är det möjligt att kyla ned på ett komfortabelt sätt. Tack vare detta
sparas energi.
knappen igen.
trycks in eller driftsläget ändras under drift med ekonomi-
,
och
samt timern för TILL/FRÅN (förklaras nedan)
TIMERFUNKTION (ON/OFF TIMER)
Det är praktiskt att ställa in start eller stopp till när du går och lägger dig, när du kommer hem, när du
stiger upp etc.
Hur du ställer in ON timer
1 Tryck på
För varje gång som knappen trycks in växlar ON timerfunktionen mellan på och av (ON och OFF).
2 Ställ in tid för timern med
knapparna.
För varje gång som
den framåt 1 timme och för varje gång som
pen trycks in räknas tiden framåt med 10 minuter.
knappen under drift.
och
knappen trycks in räknas ti-
knap-
Att stänga av ON timern:
Tryck på
■
Programmering av timerfunktion
ON timer och OFF timer kan användas i kombination. Den timerinställda tid som nås först kommer att aktivera enheten först.
(“ ” markeringen indikerar ordningen för timerfunktionerna.)
• Om innevarande tid inte ställts in kan timerfunktionen inte användas.
NOTERA:
Om huvudströmbrytaren stängs av, eller om ett strömavbrott uppstår medan timern AUTO START/STOPP är aktiv,
kommer timerinställningen att nollställas. Eftersom dessa modeller är utrustade med en automatisk omstartningsfunktion, startar luftkonditioneringen, med tidsinställningen upphävd, så snart strömmen åter slås på.
knappen.
98
Hur du ställer in OFF timer
1 Tryck på
För varje gång som knappen trycks in växlar OFF timerfunktionen mellan på och av (ON och OFF).
2 Ställ in tid för timern med
parna.
För varje gång som
framåt 1 timme och för varje gång som
trycks in räknas tiden framåt med 10 minuter.
knappen under drift.
och
knappen trycks in räknas tiden
Att stänga av OFF timern:
■
Tryck på
knappen.
knap-
knappen
ANVÄNDAS UNDER EN LÄNGRE TID
När luftkonditioneringsapparaten inte ska
användas under en längre tid:
1 Låt FLÄKT funktionen driva enheten under 3
till 4 timmar för att torka ur luftkonditioneringens inre.
Typ SVALT och VARMT:
• För användning av fläkten ställer du in fjärrkontrollen på den högsta temperaturen i läget MANUAL
COOL. (Se sidan 97.)
Typ ENDAST SVALT:
• Välj FLÄKT-funktionen. (Se sidan 97.)
2 Stäng av huvudströmbrytaren och/eller dra
ut nätsladden ur vägguttaget.
FÖRSIKTIGHET:
Om enheten inte ska användas under en längre tid, stäng
av huvudströmbrytaren eller dra ut nätsladden ur vägg-
uttaget.
Om du inte gör det kan smuts samlas och förorsaka
brand.
3 Ta ut batterierna ur fjärrkontrollen.
FÖRSIKTIGHET:
För att förhindra vätskeläckage ska alla batterier tas bort
när fjärrkontrollen inte kommer att användas på en längre
tid.
När du ska börja använda
luftkonditioneringsapparaten igen:
1 Rengör luftfiltret och installera det i inomhus-
enheten.
(Se sidan 99 för hur du rengör det.)
2 Kontrollera att luftintag och luftutblås på
inom- och utomhusenheterna inte är blockerade.
3 Kontrollera att jordledningen är rätt ansluten.
FÖRSIKTIGHET:
Jorda.
Anslut inte jordledningen till ett gasrör, vattenrör, åskle-
dare eller en telefons jordledning. Felaktig jordningen
kan förorsaka elstöt.
UNDERHÅLL
Innan du utför underhåll
Stäng av huvudströmbrytaren och/eller dra
■
ut nätsladden ur vägguttaget.
FÖRSIKTIGHET:
När enheten ska rengöras, stäng av den och dra ut nätsladden ur vägguttaget eller stäng av huvudströmbrytaren.
Eftersom fläkten roterar i hög hastighet under drift kan
den förorsaka kroppskada.
Rengöring av inomhusenheten
Rengör med en mjuk, torr trasa.
■
• Om smutsen är svår att få bort rengör enheten med
en trasa som blötas i en lösning av diskmedel och
ljummet vatten.
• Använd aldrig bensin, benzen, skurpulver eller insektmedel på enheten, då den kan förstöras av
detta.
Page 99

RENGÖRING AV DEODORANTFILTRET
BYTE AV LUFTRENINGSFILTRET
Rengöring av deodorantfiltret (ca. en gång varannan vecka)
1 Avlägsna deodorantfiltret.
Öppna frampanelen för att
ta bort/byta ut
filtret.
Deodorantfilter
FÖRSIKTIGHET:
När deodorantfiltret skall avlägsnas, var noga med att ej
beröra metalldelarna på inomhusenheten.
Detta kan orsaka personskador.
Ta bort.
3 Om filtret tvättats i varmt/ljummet vatten, låt
det därefter torka ordentligt i skuggan.
• Exponera ej deodorantfiltret för direkt solljus eller
för värme från en öppen eld då det torkas.
4 Installera deodorantfiltret.
2 Avlägsna smuts från deodorantfiltret med
hjälp av en dammsugare eller genom att
tvätta filtret i vatten.
• Om smutsen är svår att få bort tvätt filtret i en lösning av diskmedel och ljummet vatten.
• Om du använder för varmt vatten (50°C eller mer)
kan filtret deformeras.
Installera.
När kapaciteten försämras p.g.a. smuts osv., är det nödvändigt att byta ut luftreningsfiltret.
Byte av luftrengöringsfilter (ungefär en gång var fjärde månad)
1 Avlägsna deodorantfiltret.
Deodorantfilter
2 Ta bort luftrengöringsfiltret (Vit bälgtyp).
Luftrengöringsfilter
○○○○○○○○○○○○○○○○○○○○○○○○○○○○○○○○○○○○○○○○○○○○○○○○○
Luftrengöringsfilter
• Om luftrengöringsfiltret är tilltäppt kan det sänka enhetens kapacitet eller förorsaka kondensation vid luftutblåset.
• Luftrengöringsfiltret är av engångstyp. I vanliga fall kan de användas i omkring 4 månader, men om filtret blir mörkbrunt,
ska det bytas ut tidigare.
Extra tillbehör Extra tillbehör finns hos din lokala återförsäljare.
3 Installera ett nytt luftrengöringsfilter.
4 Installera deodorantfiltret och stäng front-
panelen ordentligt.
○○○○○○○○○○○○○○○○○○○○○○○○○○○○○○○○○○○○○○○○○○○○○○○○○
Vad är ett ”Deodorantfilter”?
Luftfiltret är infärgat med ett naturligt ämne, catechin, som finns i te. Deodorantfiltret tar bort dålig lukt och
ohälsosamma gaser som t.ex. formaldehyd, ammoniak och acetaldehyd. Dessutom förhindrar det aktiviteten av de
virus som fastnar i filtret.
Delens namn LUFTRENGÖRINGSFILTER
Detaljnummer MAC-1300FT
99
Page 100

KONTROLLERA FÖLJANDE ÄNNU EN
NÄR DU TROR ATT PROBLEM UPPSTÅTT
GÅNG INNAN DU RINGER EFTER SERVICE
Fråga
Luftkonditioneringsapparaten kan inte startas.
Kan inte kyla eller värma tillräckligt.
Luften från inomhusenheten
luktar konstigt.
Skärmen på fjärrkontrollen
visas inte eller är mörk.
Inomhusenheten reagerar
inte på fjärrkontrollssignalen.
Vid ett strömavbrott.
Om luftkonditioneringsapparaten inte återgår i normal drift efter att ovanstående kontrollerats ska du sluta använda luftkonditioneringsapparaten
och kontakta din återförsäljare.
I följande fall skall du stoppa driften och kontakta din återförsäljare.
• När vatten läcker från inomhusenheten.
• När den vänstra funktionsindikatorlampa blinkar.
• När brytaren utlöses ofta.
• Fjärrkontrollsignalen kan inte tas emot i ett rum med en lysrörsbelysning av
elektronisk ON/OFF typ (inverterad lysrörslampa etc.).
• Luftkonditioneraren kan vid drift störa radio- eller TV-mottagningen i områden
med dåliga mottagningsförhållanden. En signalförstärkare kan komma att
behövas för den utrustning som störs.
• Vid åskväder, stäng av luftkonditioneringen och drag ut nätkontakten eller
stäng av med huvudströmbrytaren. Om du inte gör det, riskerar aggregatets
elektriska komponenter att skadas.
•Är brytaren på?
• Har säkringen gått?
•Är ON-timern inställd? (Sidan 98)
•Är temperaturinställningen korrekt? (Sidan 97)
•Är filtret rent? (Sidan 99)
• Finns det något som blockerar luftintag eller
•Är ett fönster eller en dörr öppen?
•Är filtret rent? (Sidan 99)
• Har batterierna tagit slut? (Sidan 95)
• Har batterierna rätt polaritet? (Sidan 95)
• Trycks några knappar för andra elektriska ap-
• Startar luftkonditioneringen igen?
Kontrollpunkter eller hjälp
luftutblås på inomhus- eller utomhusenheterna?
parater in på fjärrkontrollen?
Om luftkonditioneringen var igång innan strömmen
stängdes av, bör den starta igen eftersom dessa
modeller är utrustade med en automatisk
omstartningsfunktion. (Se Beskrivning av den “AUTOMATISKA OMSTARTNINGSFUNKTIONEN” på
sidan 96.)
Fråga
Luftkonditioneringsapparaten kan inte
användas under tre minuter
efter att den omstartas.
Ett knakande ljud hörs.
Luften från inomhusenheten
luktar konstigt.
Fläktet stannar under drift
med TORRT funktionen.
Ett porlande ljud hörs.
Gurglande ljud hörs.
Rummet kyls inte ned tillräckligt.
Imma kommer från
luftutblås på inomhusenheten.
Svar (inte felfunktion)
• Detta skyddar luftkonditioneringsapparaten genom signaler från mikroprocessorn. Vänta ett
ögonblick.
• Detta ljud genereras av utvidning/sammandrag-
ning av frampanelen etc. beroende på
temperaturförändringar.
• Luftkonditioneringen suger in lukt från väggar,
mattor, möbler, tyger osv. och blåser ut den med
luften.
• I läget TORRT använder enheten samma
kylmedelskrets som i läget SVALT. Driftsiden i
läget TORRT måste minskas för att sänka
fuktigheten utan att sänka rumstemperaturen för
mycket. Därför stannar kompressorn ibland och
samtidigt stannar inomhusfläkten. Detta förhin-
drar att vatten som kondenserat på värmeväx-
laren evaporerar igen.
• Detta är ljudet från kylmedlet som rinner inuti
luftkonditioneringsapparaten.
• Detta är ljudet från kondenserat vatten som rinner i värmeväxlaren.
• Detta ljud kommer sig av att värmeväxlaren
avfrostas.
• Detta ljud hörs när frisk luft absorberas från dräneringsslangen och det gör att vatten i dräne-
ringsslangen sprutar ut när huven eller
ventilationsfläkten slås på.
Detta ljud hörs också om luft blåser in i dräne-
ringsslangen när vinden är kraftig.
• När en ventilationsfläkt eller gaskylare används
i rummet ökas kylbelastningen vilket resulterar i
otillräcklig nedkylning.
• När utomhustemperaturen är hög kanske kyleffekten inte är tillräcklig.
• Den svala luften från luftkonditioneringen kyler
snabbt ned fukten i rumsluften och omvandlar
den till imma.
Fråga
Luftflödets riktning ändras
under drift. Det horisontal
fläns riktning kan inte justeras med fjärrkontrollen.
Vatten läcker ur utomhusenheten.
Vit rök kommer från
utomhusenheten.
Luften strömmar inte ut tillräckligt snabbt under uppvärmning.
Driften stoppas i ca. 10 minuter under uppvärmning.
Ibland hörs ett väsande ljud.
Rummet värms inte upp tillräckligt.
I ett system med flera enheter blir inomhusenheten
som inte drivs varm och ett
ljud som låter ungefär som
rinnande vatten hörs från
enheten.
Luftkonditioneringen startar så fort huvudströmbrytaren sätts på,
trots att du inte sätter på
den med fjärrkontrollen.
Svar (inte felfunktion)
• Om luftkonditioneringen drivs i läget SVALT eller TORRT med luftflödet riktat nedåt i 1 timme
kommer luftflödet automatiskt att riktas horisontalt för att förhindra att kondensvatten droppar.
• Om luftströmmens temperatur är för låg vid uppvärmning, eller om avfrostning utförs, ställs den
horisontala flänsen automatiskt in på horisontal.
• Vid drift i lägena SVALT och TORRT, kyls rör
och röranslutningar ned vilket gör att vattnet kondenserar.
• Vid uppvärmning medför avfrostningsfunktionen
att eventuell is på utomhusenheten smälter och
vatten börjar droppa.
• Vid uppvärmning kommer kondens att droppa
från värmeväxlaren.
• I värmeläge ser ångan som alstras under
avfrostningen ut som vit rök.
• Vänta, luftkonditioneringen förbereder sig att
blåsa ut varmluft.
• Utomhusenheten avfrostas (avfrostningsläge).
Vänta, avfrostningen avslutas inom 10 minuter.
(När utomhustemperaturen är för låg och
fuktigheten är hög bildas frost.)
• Ljudet uppstår när kylmedlets flödesriktning ändras.
• När utomhustemperaturen är låg kanske värmeeffekten inte är tillräcklig.
• En liten mängd kylmedel fortsätter att flöda in i
inomhusenheten även om den inte drivs.
• Dessa modeller har en automatisk omstartningsfunktion. När huvudströmbrytaren stängs av utan
att stoppa luftkonditioneringen med hjälp av
fjärrkontrollen och sedan sätts på igen, kommer
luftkonditioneringen att automatiskt starta i
samma läge som det läge som var inställt med
fjärrkontrollen innan luftkonditioneringen stängdes av med huvudströmbrytaren.
100
 Loading...