

Page 1

USER GUIDE (3300 ICP)
Page 2

NOTICE
The information contained in this document is believed to be accurate in all respects but is
not warranted by Mitel Networks Corpor ation (MITEL®). T he information is subject to change
without notice and should not be construed in any way as a commitment by Mitel or any of its
affiliates or subsidiaries. Mitel and its affiliates and subsidiaries assume no responsibility for
any errors or omissions in this document. Revisions of this document or new editions of it
may be issued to incorporate such changes.
Mitel is a registered trademark of Mitel Networks Corporation.
Internet Explorer is a trademark of Microsoft Corporation.
Netscape Navigator is a trademark of Netscape Communications Corporation.
Other product names mentioned in this document may be trademarks of their respective
companies and are hereby acknowledged.
Navigator User Guide (3300 ICP)
Release 1.2
March 2007
© Mitel Networks Corporation and its Licensors, 2006, 2007. All rights reserved.
This documentation and associated software is protected by copyright law and international
treaties. No part of this documentation or associated software may be reproduced or
distributed without the prior written permission of Mitel Networks Corporation and its
Licensors.
ii
Page 3

About Your Phone
TABLE OF CONTENTS
ABOUT YOUR PHONE............................................................................................. 5
Elements of Your Phone......................................................................................................6
Ring/Message Indicator...................................................................................................................8
Accessories for Your Phone................................................................................................8
Important Note for Headset Users ..................................................................................................8
PC Accessories...............................................................................................................................8
About Feature Access Codes..............................................................................................9
For Users on Resilient 3300 ICP Systems ..........................................................................9
TIPS FOR YOUR COMFORT AND SAFETY......................................................................9
Don't cradle the handset! ................................................................................................................9
Protect your hearing........................................................................................................................ 9
ABOUT THE NAVIGATOR TASK BAR.................................................................. 10
Connect to the Navigator Task Bar....................................................................................10
Elements of Your Navigator Task Bar ...............................................................................10
Use the Navigator Task Bar...............................................................................................11
Display the Task Bar.....................................................................................................................11
Hide the Navigator Task Bar.........................................................................................................12
Scroll through Task Bar Pages .....................................................................................................12
Close the Task Bar........................................................................................................................12
Use the Task Bar Personal Keys..................................................................................................12
Use the Task Bar Tray Icon Menu ................................................................................................12
Customize the Task Bar Appearance................................................................................13
Program Task Bar Personal Keys .....................................................................................13
View Task Bar Key Programming.................................................................................................14
Program a Speed Dial Key............................................................................................................14
Program a Feature Key.................................................................................................................14
Program a PC Application Key......................................................................................................16
Program an Open Document Key................................................................................................. 16
Program an Open URL Key ..........................................................................................................16
Program a Hide/Display Task Bar Key..........................................................................................17
Program a Navigator Keys Help Key ............................................................................................17
Clear Task Bar Key Programming ................................................................................................17
Copy Task Bar Key Programming.................................................................................................17
Edit Task Bar Key Programming...................................................................................................17
Task Bar Shortcuts............................................................................................................18
ABOUT THE INTEGRATED OFFICE NAVIGATOR............................................... 19
Connect to the Integrated Office Navigator .......................................................................19
1
Page 4

Display the Telephony Toolbar .....................................................................................................20
Hide the Telephony Toolbar..........................................................................................................20
Elements of Your Integrated Office Navigator Telephony Toolbar ....................................20
Using the Telephony Toolbar.............................................................................................21
Outgoing Calls...............................................................................................................................21
Search Contacts............................................................................................................................22
Dialing a Call.................................................................................................................................23
Speed Dials................................................................................................................................... 23
Presence .......................................................................................................................................24
Missed Calls..................................................................................................................................25
Incoming Calls...............................................................................................................................25
Telephony Toolbar Menu ..............................................................................................................26
Settings Dialog..............................................................................................................................27
Popup Notification of Incoming Calls ............................................................................................28
Long Distance and International Calls .......................................................................................... 29
CUSTOMIZING YOUR PHONE............................................................................... 31
Ringer Volume Control ......................................................................................................31
Handset Volume Control....................................................................................................31
Speaker Volume Control....................................................................................................31
Display Contrast Control....................................................................................................31
Personal Feature Keys......................................................................................................31
Display Key Programming............................................................................................................. 32
Program a Personal Key...............................................................................................................32
Language Change.............................................................................................................32
Use PC Accessories..........................................................................................................32
MAKING AND ANSWERING CALLS ..................................................................... 34
Make a Call........................................................................................................................34
Answer a Call.....................................................................................................................34
Phonebook.........................................................................................................................34
Redial.................................................................................................................................35
Redial - Saved Number .....................................................................................................35
Speed Dial Keys................................................................................................................35
Speed Dial - Personal........................................................................................................36
Handsfree Operation .........................................................................................................36
PC Headset Operation.......................................................................................................37
Mitel Headset Operation (with or without Feature Control Switch)....................................38
Auto Answer ......................................................................................................................39
2
Page 5

About Your Phone
CALL HANDLING ................................................................................................... 40
Hold ...................................................................................................................................40
Mute...................................................................................................................................40
Transfer .............................................................................................................................40
Conference........................................................................................................................41
Conference Split................................................................................................................41
Add Held............................................................................................................................41
Swap..................................................................................................................................42
Call Forward ......................................................................................................................42
Call Forward – Remote......................................................................................................43
Call Forward – End Chaining.............................................................................................43
Call Forward – Forced.......................................................................................................44
Call Forward – Override.....................................................................................................44
Messages – Advisory.........................................................................................................44
Messaging – Callback........................................................................................................44
Messaging – Cancel Callback ...........................................................................................45
Messaging – Cancel All Callbacks.....................................................................................46
USING ADVANCED FEATURES............................................................................ 47
Account Codes ..................................................................................................................47
Call Park............................................................................................................................47
Call Pickup.........................................................................................................................47
Call History ........................................................................................................................48
Campon.............................................................................................................................48
Do Not Disturb...................................................................................................................49
Group Paging / Meet Me Answer.......................................................................................49
Hot Desking.......................................................................................................................50
Hot Desk Remote Logout ..................................................................................................50
Mobile Extension ...............................................................................................................50
Music .................................................................................................................................51
Night Answer .....................................................................................................................51
Override (Intrude) ..............................................................................................................51
Paging................................................................................................................................51
Paging – Direct..................................................................................................................52
Direct Paging – Handsfree Answerback Enabled......................................................................... 52
3
Page 6

Direct Paging – Handsfree Answerback Disabled........................................................................53
Record a Call.....................................................................................................................54
Release..............................................................................................................................55
Reminder...........................................................................................................................55
Tag Call .............................................................................................................................56
Trunk Flash........................................................................................................................56
APPENDIX – OPEN SOURCE SOFTWARE........................................................... 57
APPENDIX – FOR YOUR INFORMATION ............................................................. 58
Upgrading Integrated Office Navigator ..............................................................................58
Integrated Office Navigator and Microsoft Framework 2.0 ................................................58
APPENDIX – LIST OF LIMITATIONS..................................................................... 59
Integrated Office Navigator Limitations..............................................................................59
4
Page 7

About Your Phone
About Your Phone
Mitel 3300® Integrated Communications Platform
The Mitel Navigator is a full-feature, dual port, dual mode telephone that provides voice
communication over an IP network. It features a back-lit liquid crystal display (LCD) screen,
three softkeys for display-assisted access to features, on-hook dialing and off-ho ok voice
announce with handsfree answerback, and a large ring/message indicator. It also offers 24
programmable keys for Speed Dials and one-touch feature access. Ten fixed feature keys
provide convenient access to features such as Conferencing, Redial, and many customizable
user settings. The Navigator also features a Task Bar or application that allows you to
configure your phone and make calls directly from your Personal Computer (PC). The
Navigator can be used as an ACD Agent Phone.
The Navigator supports Mitel Call Control (MiNET) protocols and session initiated protocols
(SIP).
Note: The Navigator Task Bar application is a necessary part of your Navigator phone.
You must have the Navigator Task Bar application installed on your PC. The Navigator
Task Bar is supported on Microsoft™ Windows 2000, 2000 Professional and XP
operating systems. For more information about installing the Task Bar, refer to the
Navigator Installation Guide shipped with your phone.
Note: There is also a feature enriched extension to the Navigator Task Bar application
called the Integrated Office Navigator. The Integrated Office Navigator (ION) is
designed to enhance the use of telephony features in the office environment by providing
quick and easy access to them from the computer desktop. Integrated Office Navigator
also allows automation of telephony, instant messaging, and multimedia features,
allowing the user to be immediately attentive to incoming communications. This set of
features will be provided via a tray icon and Telephony Toolbar application that will
communicate with the Navigator. Additionally, with the Integrated Office Navigator, the
Navigator Task Bar (NTB) is extended to display presence icons, as well have upgrades
to the tray icon. The Intergrated Office Navigator is supported on Microsoft™ Windows
XP operating systems and is compatible with a Navigator running in MiNET protocol. For
more information about installing the ION, refer to the Navigator Installation Guide
shipped with your phone.
For more key and feature information, see
Elements of Your Phone on page 6.
5
Page 8

Figure 1: Navigator
Elements of Your Phone
Each element is numbered according to the call-outs (e.g. ) in Figure 1 on page 6.
Element Function
Volume and Contrast
Controls
Fixed-Function Keys
Programmable Personal
Keys
(UP) and (DOWN) arrow keys control display contrast and volume levels for
the ringer, handset, and handsfree speakers.
Arrows keys also allow you to change character (letter) input from upper or lower
case and vice versa.
•
• (TRANS/CONF): initiates a call transfer or establishes a three-party
•
•
•
•
•
• (REDIAL): calls the last manually-dialed number.
Provides 24 keys (8 physical phone keys that correspond to 3 pages of eight
programmable keys each on the Navigator Task Bar).
Personal keys can be programmed as Speed Dial keys, feature keys, or line
appearance keys. They can also be programmed to launch PC applications, open
PC documents, or open your browser and navigate to URLs. See “Using the
Navigator Task Bar”
In this guide, “Speed Dial key”, “feature key”, and “line key” refer to either the
physical Personal Key on your phone, OR the corresponding key on the Task Bar
(MESSAGE): accesses your voice mailbox.
conference call.
(HOLD): places the current call on hold.
(SUPERKEY): provides access to the phone's menus.
(SPEAKER) puts the phone in Handsfree operation.
(CANCEL): ends a call, and eliminates any input and returns to the
previous menu level during phone programming.
(MUTE) toggles the microphone off and on. When it is ON, the
microphone is OFF and your party cannot hear you.
6
Page 9

Keypad
Speakers
Handset
Ring and Message
Indicator
Softkeys
Display
About Your Phone
on your PC screen.
Your Prime Line key is the first Personal Key (counting from right to left) on Page
1 of the Task Bar.
Personal Feature Keys on page 31 for more details on key programming.
See
Used for dialing.
Transmits audio during a Handsfree call or while you are listening to music.
Used for handset calls.
Flashes to signal incoming calls and to indicate a message waiting in your voice
mailbox.
Context-sensitive softkeys enable you to easily view and select features.
Provides a two-line, 20-character liquid crystal display (LCD) viewing area that
assists you in selecting and using phone features, accessing your voice mail, an d
identifying callers.
When you are using the Superkey menu interface, prompts and feature
information appear on the display screen.
The face of the phone adjusts to give you a better view of the display. To adjust
the height of the phone, refer to the Installation Guide shipped with your phone.
7
Page 10

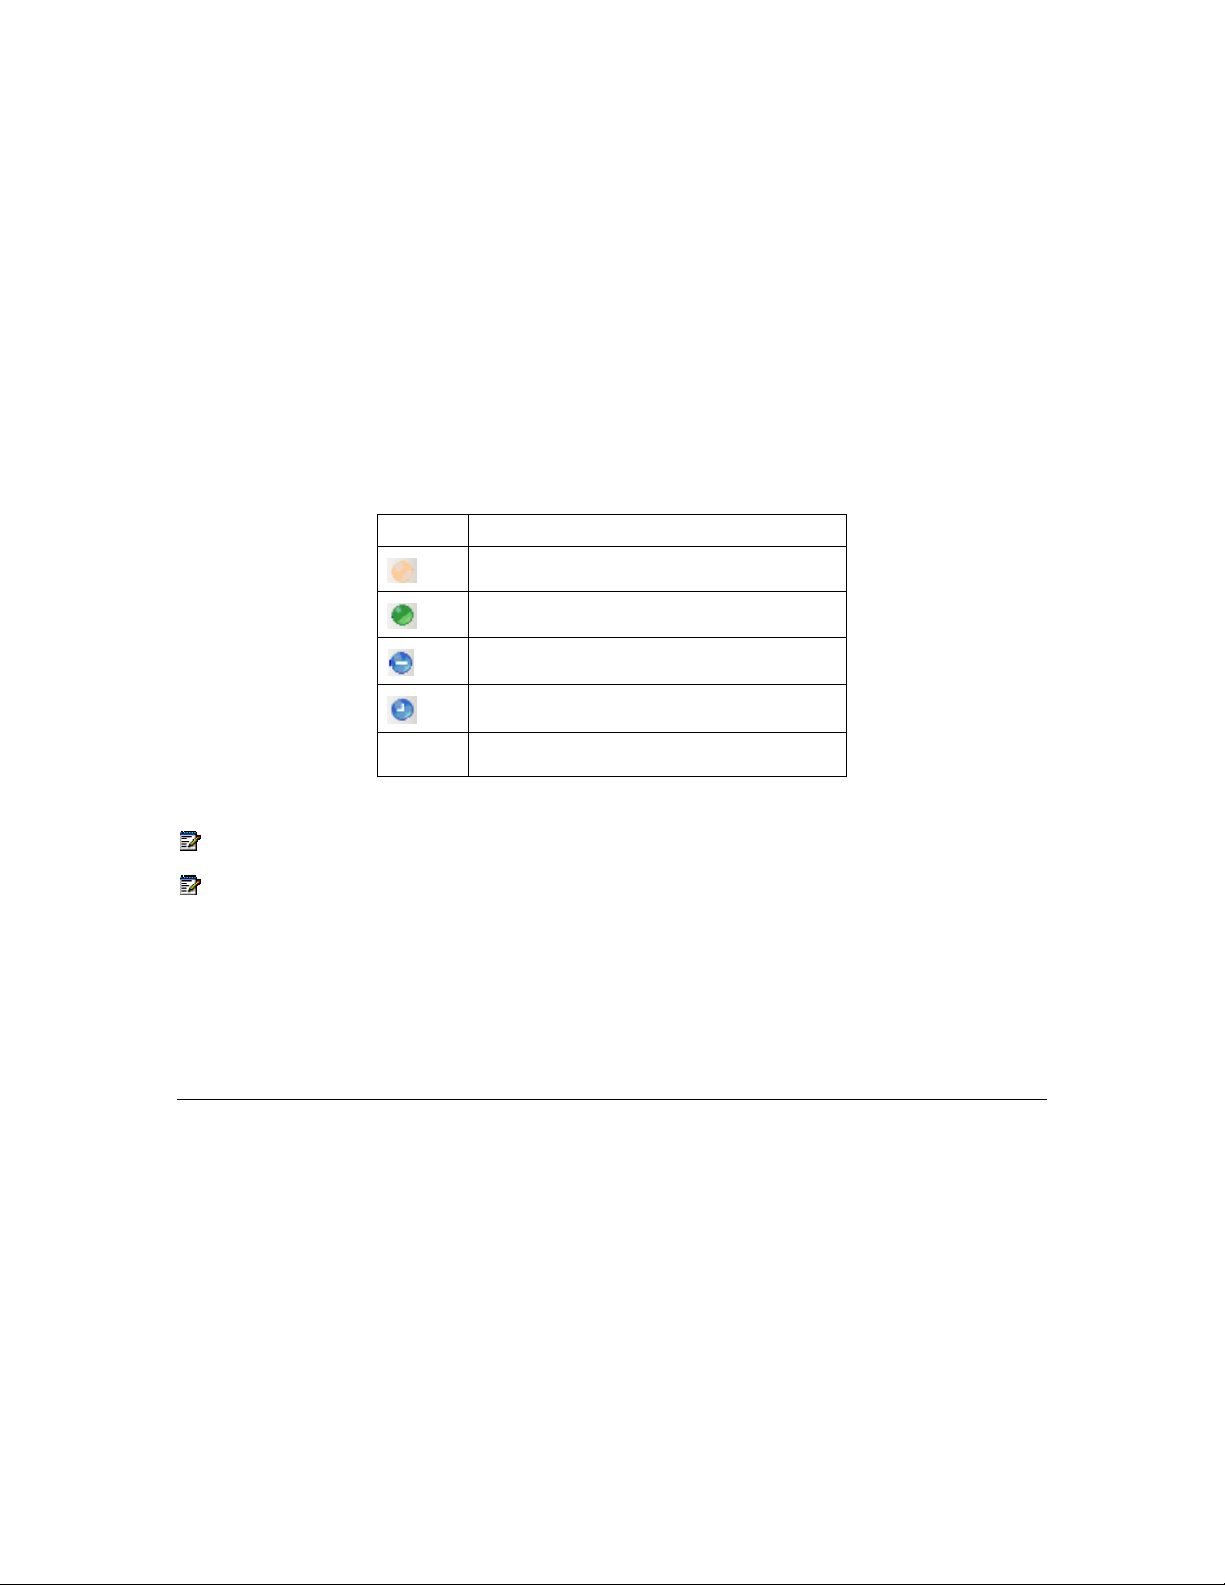
Ring/Message Indicator
When the light is… it indicates that…
Flashing rapidly Your phone is ringing
Flashing slowly A Message or Callback Message is waiting at your phone
On solid Your phone is ringing another phone
Off Your phone is idle, or you are on a call
Accessories for Your Phone
Important Note for Headset Users
Mitel recommends Plantronics headsets. You can connect two different kinds of headsets to
your Navigator:
• Commercial telephony headset with Feature Control Switch – referred to as a “Mitel
Headset” in this guide. Mitel Headsets must be installed in the dedicated headset jack
(the jack on the back of the phone).
OR
• Stereo (PC) headset with or without microphone – referred to as a “PC headset” in this
guide. PC headsets (with or without microphone) connect to the PC headset jack (and
PC microphone jack) on the right side of the phone. Installing a PC headset with
microphone disables your Handsfree microphone. Disconnecting the PC headset with
microphone at the jack restores Handsfree operation.
Note: Procedures that do not specify “PC” or “Mitel” apply to both kinds of headset.
PC Accessories
Connect PC accessories — including PC headsets (with or without micro phone) and PC
speakers — to your Navigator to do the following:
• Play music from your PC on the Navigator Handsfree speakers.
• Listen to music from your PC through a PC headset that is connected to the Navigator
and be ready to receive or make a call in Headset mode.
• Listen to music from your PC through your PC speakers (normal PC speaker operation).
When connected to the Navigator, PC speakers play music only when the phone is idle.
Use PC Accessories on page 32 for more information about how to handle calls and pl ay
See
music using your PC accessories.
To connect your PC headset to the Navigator:
1. Plug your PC headset cable into the PC headset port on the right side of the phone.
2. If you are connecting a PC headset with microphone, plug the microphone cable into the
PC microphone port on the right side of the phone.
To connect PC speakers to your Navigator:
• Plug the PC speaker cable into the speaker port on the back of the phone.
8
Page 11

About Your Phone
To play music from your PC on your Navigator Handsfree speakers:
• Plug the Navigator audio cable into the appropriate port on your PC.
For more detailed information on connecting PC accessories to the Navigator, refer to the
Navigator Installation Guide shipped with the phone.
About Feature Access Codes
To use some features, you must dial access codes. The codes are flexible and may be
different than those in this guide. Ask your Administrator for a list of codes you should use.
For Users on Resilient 3300 ICP Systems
If during a call, you hear two beeps repeated every 20 seconds it means that your phone is
switching to a secondary 3300 ICP system. The call continues but some of the keys and
features on your phone function differently. The keys and most features begin working
normally again after you hang up. If your phone switches to the secondary system while your
speaker or handset is muted (that is, while the
until you hang up. Normal operation resumes when your phone switches back to the primary
system. If your phone is idle and switched to the secondary system, you'll see a flashing
rectangle on the display. The rectangle remains until the switch to the primary system is
complete.
key light is on), the call remains muted
TIPS FOR YOUR COMFORT AND SAFETY
Don't cradle the handset!
Prolonged use of the handset can lead to neck, shoulder, or back discomfort, especially if you
cradle the handset between your ear and shoulder. If you use your phone a lot, you may find
it more comfortable to use a headset. See the section on headset usage elsewhere in this
guide for more information.
Protect your hearing
Your phone has a control for adjusting the volume of the handset receiver or headset.
Because continuous exposure to loud sounds can con t ribute to hearing loss, keep the
volume at a moderate level.
9
Page 12

About the Navigator Task Bar
Use the Navigator Task Bar to make calls and invoke features. You can program Task Bar
Personal Keys to Speed Dial your contacts, launch PC applications, open PC documents like
a Microsoft® Word document, or navigate to a URL directly using your browser.
Note: To install and connect to the Navigator Task Bar application, refer to the Navigator
Installation Guide shipped with the phone. Your installer or administrator may have
completed all installation procedures for you.
Note: It is recommended that it you install the Integrated Office Navigator version of the NTB,
you first uninstall the Standalone NTB (if previously installed)
Connect to the Navigator Task Bar
Your installer or administrator usually completes the association between the Navigator Task
Bar application and the Navigator phone upon installation of the Task Bar. If your Task Bar
application is not connecting to your phone (for example, if your programmed Personal Keys
are disabled or you receive an error message upon start-up), contact your administrator.
Figure 2: Navigator Task Bar
Standalone NTB (top)
Integrated Office Navigator NTB (bottom)
Elements of Your Navigator Task Bar
Element Function
Button Page Number Key
Programmable Personal Keys
Scrolls between Button Page 1, 2, and 3. The left-most Personal Key is
always the Button Page # key. Press this key to navigate to the next page of
Personal Keys.
Provides 24 keys (8 physical phone keys that correspond to 3 pages of eight
programmable keys each on the Task Bar).
Task Bar Personal Keys correspond to the physical Personal Keys on your
phone. Each key has a status indicator and a programmable label. In this
guide, “Speed Dial key”, “feature key”, and “line key” refer to either the
physical Personal Key on your phone OR the corresponding key on the Task
10
Page 13

Main Menu
Button Page View Control
Task Bar Minimize
Task Bar Hide
About the Navigator Task Bar
Bar.
Your Prime Line key is the first Personal Key (counting from right to left) on
Button Page 1 of the Task Bar. Line 2 is usually the second Personal Key on
Button Page 1 of the Task Bar (counting from right to left). All other line
appearances may be programmed to any key.
The left-most Personal Key is always the Button Page # key. Press this key
to navigate to the next page of Personal Keys.
• Click the button to access Main Menu options including
• View – specify how you want your Navigator Task Bar to display when
you launch it. Select from Normal, Always On Top, or Pop to Front.
You can also set the Task Bar to display Full Width to the full width of
your PC screen.
• Button Page – select from Page 1, Page 2, or Page 3 of your Personal
Keys. The page currently displayed on the Task Bar has a checkmark
() beside it.
• Find Phone… – administrators or support personnel may ask you to
select this option for resolving phone connectivity issues (for example, reassociating the Task Bar with the phone).
• Show Keys Help… – displays a legend to help you use the Fixed
Function (icon) keys on the left keypad on the phone.
• About… – displays application version information. Support personnel
might ask you to access this information during troubleshooting.
• Hide – hides the Task Bar. (Hide makes the Task Bar invisible and
removes the Task Bar from the Windows tool bar, but it does not close
the application.)
• or toggles between the All-Page view and the single-Page view
• minimizes the Task Bar (hides the Task Bar but leaves it visible on
your Windows tool bar).
• hides the Task Bar (hides and removes the Task Bar from the
Windows tool bar, but does not close the application).
Note: To close (or exit) the Task Bar application, right-click the Task
Bar tray icon (
) on your Windows tool bar and select Exit.
Use the Navigator Task Bar
By default, the Task Bar automatically displays in single-Page view on your screen when you
start up your PC.
between the all-Page view and the single-Page view.
Note: To ensure that the Navigator Task Bar displays properly, verify that your screen meets
the minimum VGA screen requirements documented in the Navigator Installation Guide.
Display the Task Bar
To display the Task Bar if it is hidden or minimized it on your screen, do one of the following:
• Double-click the Task Bar application tray icon (
• Right-click the Task Bar application tray icon (
• If running the Integrated Office Navigator, right-click the tray icon (
Navigator Task Bar
Figure 2 shows the Navigator Task Bar single-Page view. You can toggle
) or desktop icon .
) and select Restore.
) and select Show
11
Page 14

Hide the Navigator Task Bar
To hide the Task Bar, do one of the following:
• Click
tool bar.
• Click
• Click the
• Right-click the Task Bar application tray icon (
• Press ALT + F on your PC keyboard.
• Press ESC on your PC keyboard.
• If running the Integrated Office Navigator, right-click the tray icon (
Navigator Task Bar
on the Task Bar to hide the Task Bar but leave it accessible via your Windows
on the Task Bar to hide the Task Bar and remove it from the Windows tool bar.
button to access Main Menu, then select Hide.
) and select Hide.
) and select Hide
Scroll through Task Bar Pages
To scroll through the Task Bar pages, display the Task Bar and do one of the following:
• Click the Button Page # Personal Key on the Task Bar.
• Press the left-most physical Personal Key on the Navigator phone. The left-most key
scrolls between Task Bar Pages 1, 2 and 3.
• Press F1 on the PC keyboard to display Button Page 1, F2 to display Button Page 2, or
F3 to display Button Page 3.
Close the Task Bar
To close (or exit) the Task Bar application
• Right-click the Task Bar tray icon (
) on your Windows tool bar, then select Exit.
Use the Task Bar Personal Keys
To use the feature or function assigned to a Task Bar Personal Key, do one of the following:
• Click the key once.
• Right-click the key and select Launch from the pop-up menu.
• Press the corresponding physical Personal Key on the Navigator phone. The Navigator
Personal Keys are context-sensitive — they change to correspond to the Task Bar key
page that is currently displayed on your PC screen.
Note: If a key is not programmed, pressing it produces no result. See Program Task Bar
Personal Keys
on page 13.
Use the Task Bar Tray Icon Menu
The Task Bar tray icon ( ) is located on your Windows tool bar. The tray icon menu
provides the following options:
12
Page 15

About the Navigator Task Bar
• Restore – restores the Task Bar when it is hidden. Enabled only when the Task Bar is
hidden or minimized.
• About – displays detailed information about the Navigator application.
• Hide – hides the Task Bar. Enabled only when the Task Bar is visible on your PC screen
or Windows tool bar.
• Exit – closes the Task Bar application.
To select options from the Tray Icon menu:
• Right-click the Task Bar tray icon (
menu.
), then select the desired option from the pop-up
Customize the Task Bar Appearance
You can customize your Task Bar view and move the Task Bar to the desired location on
your PC screen.
To customize your Task Bar view:
1. Click the
2. Select View, and then select one of the following options:
• Normal – displays directly adjacent to the Windows tool bar (for example, at the
• Always on Top – always displays in front of other open applications.
• Full Width – expands to the full width of your PC display screen.\
To move the Navigator Task Bar:
1. Move your mouse cursor anywhere on the Task Bar except over a key or functional icon.
button to access Main Menu.
bottom or top of the PC screen, depending where the Windows tool bar is located).
Note: When the Task Bar view is Full Width, you cannot move (drag and drop
the Task Bar). If you wish to move the Task Bar, ensure Full Width is not
selected.
2. Click and hold, and then drag your cursor to the desired position on the screen.
3. Release.
Note: If you minimize, hide, or move the Task Bar, it reopens in the position it was last in.
Program Task Bar Personal Keys
You can program any Task Bar Personal Key (except the Prime Line and Button Page #
keys) to do any of the following:
• Speed Dial a number
• Invoke a phone feature
• Launch a PC application
• Open a document
• Open a URL
• Hide or display the Navigator Task Bar
13
Page 16

• Display Navigator Keys Help legend.
Your administrator may also program Personal Keys as line appearances.
You can also delete key programming or copy and paste programmed information from one
Personal Key to another.
Note: The left-most Personal Key is always your Button Page # key. Your Prime Line key is
always the first Personal Key (counting from right to left) on Button Page 1.
Note: If your administrator has programmed the Task Bar keys using an external program,
then you may not be able to modify the Task Bar key programming. If the Clear option is not
available on the pop-up menu when you right-click a Task Bar key, or if the Save button is
disabled in the Edit… dialog, contact your administrator to see if you have the option to
program your Task Bar keys.
Note: With the Integrated Office Navigator NTB, you can display presence information for
programmable buttons programmed to speed dial. Please see the Presence section under
Using the Telephony Toolbar.
View Task Bar Key Programming
The Task Bar key labels provide key programming information at a glance. A pop-up tool tip
also shows you more detailed key programming (for example, Home – Speed Dial –
5551234).
To view the key programming for a Task Bar key:
1. Click once anywhere on the Task Bar (not on a key or functional icon) to bring your
mouse focus to the Task Bar application.
2. Move your mouse over the key.
3. Review the key programming information in the pop-up that appears.
Program a Speed Dial Key
1. Right-click the Task Bar key.
2. Select Edit…
3. Select Telephone Function from the Feature menu.
4. Select Speed Dial from the Select a telephone feature… drop-down menu.
5. Type the desired label for the key in the Label field.
Note: If you do not enter a label, the Label field displays Speed Dial # (for example, if
this is the first Speed Dial you have programmed, the default label is Speed Dial 1).
6. Type the phone or extension number in the Number field.
7. Click Save.
Program a Feature Key
You can program any number of telephony Feature Task Bar keys, but you cannot program a
Feature key more than once on the same Button Page. For example, you cannot program
two Call Logs keys or two Headset keys on the same Button Page.
14
Page 17

About the Navigator Task Bar
You can program the features listed in
Table 1: Programmable Features for Task Bar Keys
Key Function Default Key Label
Account Code Non Verified A. Non Verified
Account Code Verified Accnt Verified
ACD ACD
Advisory Message Advisory Msg
Auto Answer Auto Answer
Call Back Call Back
Call Log Call Log
Call Pickup Call Pickup
Campon Camp On
Cancel Cancel
Direct Page Page
Do Not Disturb DND
Double Flash Double Flash
Emergency Call Emergency Call
Headset Headset
Hold Hold
Hot Desk Hot Desk
Make Busy Make Busy
Meet Me Answer Meet Me Answer
Message Message
Message Waiting Indicator Message Waiting 1
Music Music
Night Answer Night Answer
Override Override
Paging Paging
Phone Book Phone Book
Redial Redial
Release Release
Single Flash Single Flash
Speak @ Ease Speak @ Ease
Speaker Speaker
Speed Dial Speed Dial 1
Superkey Superkey
Swap Swap
Tag Call Tag Call
Transfer/Conference Transfer/Conf
Table 1 to the Personal Keys on the Task Bar.
To program a Task Bar Feature key:
1. Right-click the Task Bar key.
2. Select Edit…
3. Select Telephone Function from the Feature menu
15
Page 18

4. Select the desired feature from the Select a telephone feature… drop-down menu (for
example, Do Not Disturb).
5. Enter the required information in the fields provided.
6. Click Save.
Note: You can program any number of telephony Feature Task Bar keys, but you cannot
program the same Feature key more than once on the same Button Page. For example, you
cannot program two Headset keys on the same Button Page.
Tip: To program a Call Forwarding feature key, you must use the SUPERKEY menu. See
Call Forward on page 42 and Call Forward – Remote on page 43 for call forwarding
programming instructions.
Program a PC Application Key
1. Right-click the Task Bar key.
2. Select Edit…
3. Select Launch Application from the Feature menu.
4. Do one of the following:
• Select an application from the drop down list of common applications (including
Microsoft® Notepad, Outlook, Outlook Express, Word, Excel, and PowerPoint).
• Click Browse…, navigate to the executable file on your PC and click Open.
The Application field display text similar to the following: C:\Program
Files\WINword.exe.
5. Type the desired label for the key in the Label field.
Note: If you do not enter a label, the Label field displays the name of the application.
6. Click Save.
Program an Open Document Key
1. Right-click the Task Bar key.
2. Select Edit…
3. Select Open Document from the Feature menu.
4. Click Browse…, navigate to the document and click Open.
5. Type the desired label for the key in the Label field.
Note: If you do not enter a label, the Label field displays the name of the document.
6. Click Save.
Program an Open URL Key
1. Right-click the Task Bar key.
2. Select Edit…
3. Select Open URL from the Feature menu.
4. Type or paste the URL in the URL field.
Tip: Copy and paste the complete URL from your browser to avoid typing errors.
16
Page 19

About the Navigator Task Bar
5. Type the desired label for the key in the Label field.
Note: If you do not enter a label, the Label field displays the name of the URL.
6. Click Save.
Tip: To ensure that the Open URL feature key launches in a new window (instead of
launching in an already open window), you may need to configure your Internet browser
settings not to reuse open browser windows. For example, in Microsoft Internet Explorer, you
select Tools followed by Internet Options, click the Advanced tab, and then ensure that the
Reuse windows for launching shortcuts option is not selected. Refer to your browser help
files for detailed procedures.
Program a Hide/Display Task Bar Key
1. Right-click the Task Bar key.
2. Select Edit…
3. Select Hide/Display Navigator from the Feature menu.
4. Type the desired label for the key in the Label field.
Note: If you do not enter a label, the Label field displays Hide.
5. Click Save.
Program a Navigator Keys Help Key
1. Right-click the Task Bar key.
2. Select Edit…
3. Select Navigator Keys Help from the Feature menu.
4. Type the desired label for the key in the Label field.
Note: If you do not enter a label, the Label field displays Show Keys Help.
5. Click Save.
Clear Task Bar Key Programming
1. Right-click the key you wish to program.
2. Select Clear.
3. Re-program the key, if desired.
Copy Task Bar Key Programming
To copy and paste programming information from one Task Bar key to another
1. Right-click the key you wish to copy programming information from.
2. Select Copy.
3. Right-click the key you wish to paste programming information to.
4. Select Paste.
Edit Task Bar Key Programming
To change key programming
17
Page 20

1. Right-click the Task Bar key.
2. Select Edit…
3. Select the desired feature from the Feature menu.
4. Type the new label for the key in the Label field.
Note: You must enter a new label when changing Task Bar key programming. If you do
not enter a new label, the Label field displays the label that applied to the previous
programmed key.
5. Click Save.
Task Bar Shortcuts
For detailed information about using the Task Bar buttons, keys, and controls, see Use the
Navigator Task Bar
You can use the shortcuts in Table 2 to navigate through and use some Task Bar menu s and
features.
To use these shortcuts, be sure that the Task Bar application is active. The Task Bar is active
when it is displayed and you have clicked on the Task Bar or just used the Task Bar (to bring
the mouse “focus” to the Task Bar).
on page 11.
Table 2: Task Bar Shortcuts
Action Shortcut Description
Display Button Page
Change Button Page View Press CTRL+A
Hide Task Bar Press ALT+F4
Launch Last-Active Key
Display Main Menu
Press F1 Displays Button Page 1 on the Task Bar.
Press F2 Displays Button Page 2 on the Task Bar.
Press F3 Displays Button Page 3 on the Task Bar.
Toggles between all-Page view and single-Page
view.
If you press F1, F2, or F3 when the Task Bar is in
all-Page view, then the corresponding Button
Page becomes “active” and moves to the lowest
position on the Task Bar, closest to the physical
keys on the Navigator phone.
Note: A Button Page is shaded light gray when
it is active.
Hides the Task Bar (does not exit or close it).
Press SPACE
or
CTRL+SPACE
Press ALT+SPACE
or
ALT+F
Launches the last-active key function (as if you
had just clicked the key or selected Launch).
For example, if you had just used a Speed Dial
key, hitting (CTRL +) SPACE re-dials the number.
Displays the Task Bar Main Menu.
18
Page 21

About the Integrated Office Navigator
About the Integrated Office Navigator
The Integrated Office Navigator (ION) enhances the use of telephony features in the office
environment by providing quick and easy access to them from the computer desktop.
Integrated Office Navigator also allows automation of telephony, instant messaging, and
multimedia features, allowing the user to be immediately attentive to incoming
communications. The ION works with a standard Navigator phone and well as with
Teleworker.
The Navigator Task Bar Tray Icon (
Navigator set of features. Likewise, a Telephony Toolbar application has been added that will
communicate with the Navigator Task Bar.
Additionally, the Navigator Task Bar (NTB) has been extended to display presence icons.
) has been extended to include the Integrated Office
Connect to the Integrated Office Navigator
Your installer or administrator usually completes the association between the Integrated
Office Navigator application and the Navigator phone upon installation of the ION.
If your ION application is not connecting to your phone, you can connect it by doing the
following:
• Enable NTB on the Phone:
• On your phone, enter the configuration menu
• Hold down the scroll up and scroll down keys on the phone
• Release the scroll down key
• While still holding the scroll up key, press 2 3 4.
• Network Parameters: select No
• Hardware Config: select No
• Phone Mode: select No
• Tools and Features: select Yes
• Erase PIN: select No
• Edit 8021X Settings: select No
• Edit LLDP Settings: select No
• Task Bar Setup: select Yes
• Enabled: select Yes
• Password: leave blank (press scroll down)
• Save Changes: select Yes
• Reboot Now: select Yes
• The phone should now reboot
19
Page 22

• Press the first Programmable Key (PK1) and verify it displays the phone’s IP address
and NTB Enabled
• Start up the Integrated Office Navigator
• When the NTB starts, a Find Phone dialog will appear. Enter the phone’s IP address
and leave the password blank. Click Save.
• The Integrated Office Navigator will now connect to the phone via the NTB
Display the Telephony Toolbar
To display the Telephony Toolbar if it is hidden, do the following:
• Right-click on the Task Bar and check Telephony Toolbar in the Toolbars menu.
Hide the Telephony Toolbar
To hide the Telephony Toolbar if it is visible, do the following:
• Right-click on the Task Bar and uncheck Telephony Toolbar in the Toolbars menu.
Elements of Your Integrated Office Navigator Telephony Toolbar
Figure 3: Integrated Office Navigator – Telephony Toolbar
The ION Telephony Toolbar application runs as a toolbar in your Windows Task Bar. The
Telephony Toolbar allows enhanced integration between the Navigator, the NTB, and various
Microsoft Office applications.
Element Function
Search Options
Number/Text Entry Field
Telephony Button
The icons at the left of the Telephony Toolbar indicate the currently selected
search options.
To change the search options, left click on the search options icons. A menu
will appear which will allow you to narrow the search to Corporate Directory
), or Microsoft Outlook ( ), or to search both.
(
Note: If Corporate directory is not configured, the option is greyed out. If
Microsoft Outlook is not present, the option is greyed out.
When an incoming call occurs, the Caller Identification (CLID) is displayed in
this field in two rows of text, with the name portion highlighted in bold.
The CLID is displayed until another call is received, am outgoing call occurs
or you edit the contents of the text box.
The button is divided into two areas:
• The larger portion will cause the default action to occur (which will
change based on the telephony state). This is the same action as the
bottom Item on the popup menu.
20
Page 23

PC Links Button
Telephony Toolbar Menu
About the Integrated Office Navigator
• The smaller portion will cause a pop-up menu to appear showing all
options available.
Right-click on either portion of the button to cause the pop-up menu to
appear.
• Microphone Mute – Mutes the navigator microphone while on a call
• Speed Dials – Lists programmed Speed Dial buttons (Programmed
either via this menu or the NTB). Allows you to program Speed Dial
buttons. Also allows you to add a speed cal button for the current caller.
• Missed Calls – Lists missed calls.
• Redial – Redials current number
• Call/Answer/Hold/Retrieve – Dials an outgoing call, answers an
incoming call or puts current call on hold. (Menu Item changes with
phone state)
The button is divided into two areas:
• The larger portion will cause the default action to occur. This is the same
action as the bottom Item on the popup menu.
• The smaller portion will cause a pop-up menu to appear showing all
options available.
Right-click on either portion of the button to cause the pop-up menu to
appear.
• Create Task Associated with Caller… - Creates a Microsoft Outlook
task for the current caller
• Create Outlook Contact for Caller… - Creates a Microsoft Outlook
Contact for the current caller.
• Send Email to Caller… - Creates an outgoing Microsoft Email for current
caller (If current caller has an email address already in Outlook Contacts,
the email is populated accordingly)
• Search Outlook Contacts For Caller… - Searches for a Microsoft
Outlook Contact for the current caller.
• Desktop Search for Caller… - Executes a Microsoft Desktop Search for
the current caller.
Note: Microsoft Outlook and Microsoft Desktop Search must be
installed for these respective options to be available.
Click this button to bring up the Telephony Toolbar menu.
• Extra Phone Features… - Allows you to configure additional features to
NTB Programmable buttons.
• Settings… - Brings up the Settings Dialog Window. Here you can
configure a number of Telephony Toolbar settings.
• About… - Brings up the About Dialog Window.
• Help… - Brings up a help website.
• Show/Hide Navigator Task Bar – Hides or restores the NTB.
• Exit – Closes the Integrated Office Navigator including the Telephony
Toolbar, the Tray Icon, and the NTB).
Using the Telephony Toolbar
By default, the Telephony Toolbar is not visible - Only the NTB and Tray Icon will be visible
when the application begins.
Outgoing Calls
There are a number of ways to make an outgoing call via the Telephony Toolbar:
• Search though your contacts
21
Page 24

• Manually dial a number
• Dial via Speed Dials or Missed Calls Menu
Search Contacts
Search Options:
The Telephony Toolbar has the ability to search your Microsoft Outlook Contacts or
Corporate Directory.
The icons on the left side the Telephony Toolbar indicate the currently selected search
options.
Figure 4: Telephony Toolbar - Search Options
Note: For these search options to be available, you must have Microsoft Outlook and/or
Microsoft Active Directory installed and configured. Contact your system administrator to
install these products for you.
To change the search options, do the following:
• Left-click on the Search Options Icons
Performing an Outlook and/or Corporate Directory Search:
To perform a search using the selected search options, do the following:
• Enter text characters such as a name, or portion of a name into the Text Field. The
characters entered is matched against the First Name, Last Name, and Company in the
Contact and Corporate Directory records and a search results menu will popup.
• Selecting a name from the Search Results will result in a menu showing all the numbers
and their associated labels.
• You are then able to select a number by clicking with a mouse or pressing the enter key.
• When a number is selected, it will either appear in the Text Field (If Number Preview is
enabled) or dial the number.
22
Page 25

About the Integrated Office Navigator
Figure 5: Telephony Toolbar - Performing a Search
Note: If you have Microsoft Active Directory configured but unavailable at the time, a
message will be reported as part of the search list.
Performing a Desktop Search:
To perform a desktop search, do the following:
• Enter text characters such as a name, or portion of a name into the Text Field.
• Left-click the large portion of the PC Links Button
Note: For Desktop Search to be available, you must have Microsoft Windows Desktop
Search installed. Contact your system administrator to install this product for you. Windows
Desktop Search can be downloaded from the following site:
http://www.ingeniussoftware.com/mitel/integratedofficenavigator/registration/redirect.aspx
Dialing a Call
To dial a call, do the following:
• Enter the phone number into the Text Field. Long distance and international numbers
must be in canonical form to be understood by the telephony equipment. See
Distance and International Calls
• Left-click the large portion of the Telephony Button.
.
Long
Speed Dials
Speed Dials Menu:
To Display the Speed Dials Menu, do one of the following:
• Right-click on the large portion of the Telephony Button. Select Speed Dials from
the popup menu.
• Right or left-click on the small portion of the Telephony Button. Select Speed Dials
from the popup menu.
23
Page 26

• Left-click on the Navigator Tray Icon. Select Speed Dials from the popup menu.
Figure 6: Telephony Toolbar - Speed Dials Menu
The Speed Dials Menu displays a list of all Speed Dial entries programmed on the phone.
Selecting a name from the menu will dial the number on the phone.
Add a new Speed Dial / Edit an existing Speed Dial:
To add a new the Speed Dial (or edit an existing one), do the following:
• Select Add/Edit Speed Dial …
• Select a phone button to program
• Specify a label for the button
• Specify a number to dial
• Specify presence information (optional)
• Specify an alternative number to dial (optional)
Note: For Presence Information you need to have Windows Messenger, MSN
Messenger, Windows Live, or Office Communicator running on your PC.
Presence
With the Integrated Office Navigator NTB, you can display presence information for Speed
Dial Buttons. The presence information will also be set for the respective entry in the
Telephony Toolbar Speed Dial menu.
Adding presence to an existing Speed Dial:
Note: For Presence Information you need to have Windows Messenger, MSN Messenger,
Windows Live, or Office Communicator running on your PC.
To add presence to an existing the Speed Dial, do the following:
• In the Telephony Toolbar select Add/Edit Speed Dial …
24
Page 27

• Select a phone button to program
• The dialog will then populate with the Speed Dial Button’s current setting
• Check the “Display Presence” check box
• Select the contact from the drop down
• Click Save
Missed Calls
Missed Calls Menu:
To Display the Missed Calls Menu, do one of the following:
• Right-click on the large portion of the Telephony Button. Select Missed Calls from
the popup menu.
• Right or left-click on the small portion of the Telephony Button. Select Missed Calls
from the popup menu.
• Left-click on the Navigator Tray Icon. Select Missed Calls from the popup menu.
About the Integrated Office Navigator
Figure 7: Telephony Toolbar – Missed Calls Menu
The Missed Calls Menu displays a list containing up to 20 of the last missed calls. Clicking a
missed call dials the number of the caller.
Note: If you are on the phone and receive a second call that goes to voicemail, it will NOT be
added to the missed call list.
If the phone is idle, an incoming call occurs and then goes to voicemail, the call is added to
the missed call list.
If call forward is enabled, no calls will be added to the missed call list.
Incoming Calls
When an incoming call occurs, the CLID is displayed in this field in two rows of text, with the
name portion highlighted in bold.
Note: The CLID is displayed until the user clicks in this field, or another call is received.
Once an incoming call has occurred, there are a number of functions available:
• Answer call – Left-click the large portion of the Telephony Button
25
Page 28

• Create a Speed Dial for Caller –
o Right-click the small portion of the Telephony Button
o Select Speed Dial
o Select Add Speed Dial for Caller
• Search Outlook Contacts for Caller –
o Right-click the small portion of the PC Links Button
o Select Search Outlook Contacts for Caller
• Create Outlook Contact for Caller –
o Right-click the small portion of the PC Links Button
o Select Create Outlook Contact for Caller
• Create Outlook Task for Caller –
o Right-click the small portion of the PC Links Button
o Select Create Task Contact for Caller
• Send Email to Caller –
o Right-click the small portion of the PC Links Button
o Select Send Email to Caller
• Desktop Search for Caller –
o Right-click the small portion of the PC Links Button
o Select Desktop Search for Caller
Note: For the respective PC Links options to function you must have Microsoft Outlook and
Microsoft Windows Desktop Search installed. Contact your system administrator to install
these products for you.
Telephony Toolbar Menu
Clicking on the small button at the right of the Telephony Toolbar (see Figure 3) causes the
Telephony Toolbar menu to appear, with the following menu choices:
26
Page 29

About the Integrated Office Navigator
Figure 8: Telephony Toolbar – Telephony Toolbar Menu
Settings Dialog
To open the Settings Dialog window, select Settings from the Telephony Toolbar Menu or
the Tray Icon.
General:
Pause Music When Phone is in Use – With this setting enabled, the Telephony Toolbar will
cause Microsoft’s Windows Media Player or Apple’s iTunes, to pause the music on an
incoming or outgoing call.
Note: iTunes: Only works with the latest (7.0.2.16). Older versions continue playing.
Note: iTunes: Note that iTunes does not conform to the Microsoft Application Programming
Interface (API) and treats the PAUSE message as a PLAY/PAUSE message. Meaning that if
it is in a paused state it will start playing when it gets the PAUSE message again.
Note: Stand-alone Windows Media Player does work correctly. Microsoft’s embedded
Windows Media Player does not pause.
Use Windows Telephony Location – If the feature is turned on the Telephony Toolbar will
apply dialing rules as specified in the telephony location information.
Note: The Telephony Toolbar applies the Windows Telephony Lo cation to a dialed number
based on the following rules:
1) If the number is less than 7 digits, dial it as is (it is considered an extension).
2) If the number is 7 or more digits, dial outside line access (if available), area code (if
available) then the number.
3) If the number is 10 or more digits, dial outside line access (if available), then the
number.
Number Preview – If enabled, and you select a number from Active Directory or Outlook
search, the number will be displayed in the Text Field. You will have a chance to edit the
number before it is dialled.
Directory Lookup:
This is the same as the Search Options.
Incoming Call Actions:
27
Page 30
Display Toast Popup With Caller ID – This setting controls whether the toast will pop-up on
an incoming call.
Lookup Caller in Outlook Contacts – If this setting is on, Telephony Toolbar will
automatically do a lookup on Outlook Contacts of the Caller ID of an incoming call.
Perform Windows Desktop Search with Caller ID – If this setting is on, Telephony Toolbar
will automatically do a Desktop Search of the Caller ID of an incoming call.
Presence:
Change my IM status to “On the Phone” when I use my phone – This setting will cause
your presence in IM to change if your phone is off the hook. The IM status will return to its
appropriate state once the phone is hung up.
Table 3: Presence Icons
Icon Description
Offline
No icon
Note: Your IM status will remain unchanged if it is set to “Appear Offline”
Note: This function only supports Windows Messenger, MSN Messenge r and Windows Live.
(This feature does not work with Office Communicator.)
Directory Lookup:
This section allows you to configure the Telephony Toolbar to use Active Directory for
Corporate Search.
Online
Busy, On The Phone
Away, Be Right Back, Out to Lunch
Denotes no presence information reported
Popup Notification of Incoming Calls
When an incoming call occurs, a popup toast is presented and displays the CLID.
The toast pop-up can be controlled via the settings menu. You can turn the toast pop-up on
or off.
28
Page 31

About the Integrated Office Navigator
Figure 9: Telephony Toolbar – Pop-up Notification
From the pop-up, you can:
• Answer the incoming call
• Do an Outlook Contacts Search based on the CLID
• Do a Desktop Search based on the CLID
Long Distance and International Calls
When storing long distance and international numbers in Outlook or typing them on the telephony
toolbar certain formatting must be remembered or they become invalid when dialled. These
numbers must be in canonical form to be understood by the telephony equipment.
There are four parts to such a number:
• The international dialling prefix
o The Microsoft Operating System software stores the international prefix in the
Phone and Modem Options under the Control Panel. After the user enters the
location he or she is dialling from, the proper international prefix is saved, so the
user does not need to enter it for any international calls made from the computer.
o It is not used if the user dials a number within his or her country.
• The international or country code
o Prefix this number with + so the telephony equipment understands this is not a
local call.
o This number determines whether the international dialling prefix should be
appended to the number before it is dialled.
• The area code
o Enclose this number with () so the telephony equipment understands this is the
area code portion of the number.
• The subscriber number
o this last sequence of digits may contain periods or dashes such as 765-4321 or
765.4321
For example, in North America the number:
• 1.613.765.4321 must be entered as +1 (613) 7654321
• 011.45.75.123456 must be entered as +45 (75) 123456
29
Page 32

In the United Kingdom, this would be:
• 0.29.123456 must be entered as +0 (29) 123456
• 00.966.1.123456 must be entered as +966 (1) 123456
30
Page 33

Customizing Your Phone
Ringer Volume Control
To adjust the ringer volume while your phone is ringing:
Customizing Your Phone
• Press
To adjust the ringer volume on your phone while your phone is idle:
1. Press
2. Press the No softkey until “Ringer Adjust?” appears.
3. Press the Yes softkey.
4. Press the Yes softkey.
5. Press
6. Press
(UP) or (DOWN).
(SUPERKEY).
(UP) or (DOWN).
(SUPERKEY).
Handset Volume Control
To adjust the handset volume when you are using the handset:
• Press
(UP) or (DOWN).
Speaker Volume Control
To adjust the handsfree Speaker Volume when making a handsfree (on-hook) call or when
listening to background music:
• Press
(UP) or (DOWN).
Display Contrast Control
To adjust the display contrast of your phone while your phone is idle:
• Press
(UP) or (DOWN).
Personal Feature Keys
You can use (SUPERKEY) on your phone, the Navigator Task Bar, or the Desktop Tool
to program the Personal Keys as feature keys.
For details about programming feature keys using the Navigator Task Bar, see
Bar Personal Keys
For more information on using the Desktop Tool, contact your System Administrator.
on page 13.
31
Program Task
Page 34

Tip: To dial or launch features using your mouse or Personal Keys, see Use the Navigator
Task Bar
on page 11.
Display Key Programming
Note: You can also view and program Personal Keys using your Navigator Task Bar. See
Use the Navigator Task Bar on page 11.
To display information about a key:
1. Press
2. Press a Personal Key.
3. Press
(SUPERKEY).
(SUPERKEY).
Program a Personal Key
Note: You can also view and program Personal Keys using your Navigator Task Bar. See
Use the Navigator Task Bar on page 11.
To program a Personal Key using the Superkey menu interface:
1. Press
2. Press the No softkey until "Personal Keys?" appears.
3. Press the Yes softkey.
4. Press a Personal Key that isn't a line key.
5. Press the Change softkey.
6. Press the No softkey until the desired feature appears.
7. Press the Yes softkey.
8. Press
feature.
(SUPERKEY).
(SUPERKEY), or press another Personal Key and proceed to program another
Language Change
To change the display language:
1. Press
2. Press the No softkey until "Language?" appears.
3. Press the Yes softkey.
4. Press the Change softkey.
5. Press the No until the desired language appears.
6. Press the Yes softkey.
(SUPERKEY).
Use PC Accessories
You can connect PC accessories to your Navigator to
32
Page 35

Customizing Your Phone
• Play music from your PC on the Navigator Handsfree speakers.
• Listen to music from your PC through a PC headset that is connected to the Navigator
and be ready to receive or make a call in Headset mode.
• Listen to music from your PC through your PC speakers (normal PC speaker operation).
When connected to the Navigator, PC speakers play music only when the phone is idle.
Note: For your privacy, audio from handset, handsfree, or headset calls does not play on
your PC speakers.
Table 4 shows how PC accessories interact with your Navigator.
Table 4: PC Accessory Interaction with the Navigator Phone
Phone
Status
Idle ON No PC music from Navigator Handsfree speakers.
Idle ON Yes PC music from PC Headset earphones.
PC
Music
PC Headset
Connected?
You hear …
If PC speakers are also connected to your Navigator, you
hear music from your PC speakers too.
Note: If you disconnect your PC headset, you hear
music from your Handsfree speakers.
Ringing ON No Ring tone from Navigator Handsfree speakers.
Note: Ring tone interrupts PC music. Your PC
music continues to play, but you cannot hear it
while the phone is ringing.
Ringing ON Yes
An interruption in your PC headset music, and
simultaneous ring tone from Navigator Handsfree
speakers.
Note: Ringtone does not play on your PC headset,
however your PC headset audio is temporarily
muted so that you can hear the ringtone from your
Navigator Handsfree speakers.
On a call ON No
On a call OFF Yes Audio from the party you are speaking with.
Audio from the party you are speaking with.
Music does not play on any speaker while you are on a
call.
33
Page 36

Making and Answering Calls
Make a Call
1. Lift the handset (optional).
2. If you want to use a Non-Prime Line, press a Line Appearance key.
3. Do one of the following:
• Dial the number.
• Press a Speed Dial Personal Key.
• Press (REDIAL).
Answer a Call
Do one of the following:
• Lift the handset.
• Press
• Press the flashing Line appearance key, then lift the handset, or press
or press the Headset feature key.
(SPEAKER).
Phonebook
To use Phonebook:
1. Press
2. Press the Yes softkey when Phonebook? appears.
3. Enter the name of the person you wish to call, as follows:
• For each letter in the name, press the appropriate key on the keypad until the letter is
• Use the <−−− softkey to correct errors.
• If the next letter in the name is on the same digit key as the previous letter, press the
• If required, use the −−−> softkey to add a space between the first and last name.
4. Press the Lookup softkey.
5. If no match exists, edit the original entry.
(SUPERKEY).
shown in the display. For example, if the letter C is required, press the digit 2 three
times.
−−−> softkey before proceeding.
(SPEAKER),
6. If more than one match is found, press the Next softkey.
7. Do one of the following:
• To make the call, press the Call softkey.
• To edit the entry, press the Retry softkey.
34
Page 37

Making and Answering Calls
• To exit, press
(SUPERKEY).
Redial
To redial the last number that you manually dialed:
1. Lift the handset (optional).
2. Press (REDIAL).
Redial - Saved Number
To save the last number that you manually dialed:
1. Lift the handset (optional).
2. Dial **79.
To Redial a saved number:
1. Lift the handset.
2. Dial *6*.
Speed Dial Keys
You may use Speed Dial keys to make a call or to send a string of digits during a call.
You can program Speed Dials via the Superkey Menu interface (see the procedure below), or
using your Navigator Task Bar. See
Feature Keys
Tip: Use your Navigator Task Bar to dial Speed Dial contacts quickly using your mouse or
your Personal Keys. See
Note: Do not program Speed Dial keys with personal information that you wish to keep
secure, such as passwords or card numbers.
To dial a stored Speed Dial number:
1. Lift the handset (optional).
2. Press a Speed Dial key.
To store a Speed Dial number:
1. Press
2. Press the No softkey until "Personal Keys?" appears.
3. Press the Yes softkey.
4. Press a Personal Key that isn’t a line key.
5. Press the Change softkey.
for more information.
Use the Navigator Task Bar on page 11.
(SUPERKEY).
Program Task Bar Personal Keys and/or Personal
6. Press the Yes softkey.
7. Do one of the following:
35
Page 38

• To enter a new number, dial the number.
Press
(HOLD) more than once to lengthen the pause.
(HOLD) between digits to create a pause during dialing—press
• To enter a trunk flash, press
(See "Trunk Flash" for more information about the use of this feature.)
• To enter the last number dialed, press (REDIAL).
8. If you want the number to be private, press the Priv softkey.
9. Press the Save softkey.
10. Press (SUPERKEY).
(TRANS/CONF).
Speed Dial - Personal
To dial a stored personal Speed Dial number:
1. Lift the handset.
2. Dial *58.
3. Enter an index number between 00 and 09.
To store a personal Speed Dial number:
1. Lift the handset.
2. Dial *67.
3. Enter an index number between 00 and 09.
4. Dial the number to be stored
Press
(HOLD) more than once to lengthen the pause.
(HOLD) between digits to create a pause during dialing—press
5. Hang up.
Handsfree Operation
To use Handsfree operation, ensure that your PC headset is disconnected.
To make a Handsfree call:
1. If you want to use a Non-Prime Line, press a Line Appearance key.
Note: Your administrator must program Line Appearances to your phone.
2. Dial the number.
3. Begin speaking when the called party answers. Your phone’s Handsfree microphone and
Handsfree speaker transmit and receive audio.
To use Handsfree Operation to answer calls:
1. Press the flashing line key.
2. Begin speaking. Your phone’s Handsfree microphone and Handsfree speaker tran smit
and receive audio.
To hang up while using Handsfree Operation:
36
Page 39

Making and Answering Calls
• Press
To turn Mute on during Handsfree Operation:
• Press
To turn Mute off and return to the conversation:
• Press
To disable Handsfree Operation, do one of the following:
• Lift the handset.
• Connect your PC headset.
To return to Handsfree Operation from handset operation:
1. Press (SPEAKER).
2. Hang up the handset.
To return to Handsfree Operation from headset operation:
• Disconnect your PC headset.
(SPEAKER).
(MUTE). The Mute key light turns ON.
(MUTE). The Mute key light turns OFF.
PC Headset Operation
Connect your PC headset (with microphone) to the jacks on the right side of the Navigator
phone.
Note: Connecting a PC headset disables your Handsfree speaker.
To make a PC headset call:
1. If you want to use a Non-Prime Line, press a Line Appearance key.
Note: Your administrator must program Line Appearances to your phone.
2. Dial the number.
3. Begin speaking when the called party answers. Your PC headset microphone and
earphones transmit and receive audio.
To answer calls using your PC headset:
1. Press the flashing line key.
2. Begin speaking when the called party answers. Your PC headset microphone and
earphones transmit and receive audio.
To hang up while using your PC headset:
• Press
To Mute your PC headset, do one of the following:
(CANCEL).
• Press
(MUTE). The key light turns ON.
37
Page 40

• Press and hold the PC headset mute feature switch (if available).
To turn Mute off and return to the conversation, do one of the following:
• Press the lit
• Release the PC headset mute feature switch (if available).
To disable PC headset operation while on a PC headset call:
1. Disconnect your PC headset.
2. Continue speaking in Handsfree operation. The Handsfree microphone and Handsfree
speaker transmit and receive audio.
3. Lift the handset if you wish to continue the call in handset mode.
To return to PC headset operation from Handsfree or handset operation:
1. Connect your PC headset.
2. Hang up the handset (if you were on a handset call).
(MUTE) key. The key light turns OFF.
Mitel Headset Operation (with or without Feature Control Switch)
IMPORTANT NOTE: Mitel-approved headsets (with or without a Feature Control Switch)
must be installed in the dedicated headset jack (the jack on the back of the phone).
Installation of a Mitel headset will disable your handset microphone. Disconnecting the
headset at the jack or at the quick-disconnect plug restores handset operation. If handset
operation is required for an extended period of time, you should press the Headset feature
key to return the phone to handset mode.
To enable Mitel Headset operation:
• Press the Headset feature key.
To answer a call with a Mitel Headset:
• Press flashing Line Appearance key
or
• Quickly press and release the headset's feature control switch (if available).
Note: If Auto-Answer is enabled on your phone, see the “Auto-Answer” section elsewhere in
this guide for call-anwering procedures.
To mute the headset microphone, do one of the following:
• Press
• Press and hold the headset's feature control switch.
To turn Mute off and return to the conversation, do one of the following:
(MUTE). The key light turns ON.
38
Page 41

Making and Answering Calls
• Press the lit
• Release the headset mute feature switch (if available).
To hang up, do one of the following:
• Press
• Quickly press and release the headset's feature control switch.
To disable Mitel Headset operation:
• Press the Headset feature key.
(MUTE) key. The key light turns OFF.
(CANCEL)
Auto Answer
To enable or disable Auto Answer:
1. Press
2. Press the No softkey until "Auto Answer?" appears.
3. Do one of the following:
• To enable Auto-Answer, press the TurnOn softkey.
• To disable Auto-Answer, press the TurnOff softkey.
(SUPERKEY).
To answer a call when you hear ringback:
• Begin speaking.
If your PC headset is connected, your PC headset earphones and microhone transmit
and receive audio.
If your PC headset is not connected, your phone’s Handsfree microphone and Handsfree
speaker transmit and receive audio.
To end a call, do one of the following:
• Press the HangUp softkey.
• Press
• Wait for the caller to hang up.
(CANCEL).
39
Page 42

Hold
The Navigator allows a maximum of four calls on Hold at one time.
To place a call on Hold:
Call Handling
1. Press
2. Hang up the handset, if desired.
To retrieve a call from Hold:
1. Lift the handset, if desired.
2. Press the associated flashing
To retrieve a call from Hold at another phone, do one of the following:
• Press the flashing line key.
• Dial **1 and the number of the station that placed the call on Hold.
(HOLD). The associated Line key flashes.
Line key.
Mute
Mute lets you temporarily turn your phone’s handset, headset, or handsfree microphone off
during a call.
To turn Mute on during a call:
• Press
To turn Mute off and return to the conversation:
(MUTE). The key light turns ON.
• Press
NOTE FOR USERS ON RESILIENT 3300 ICP SYSTEMS: If your phone switches to the
secondary system while your speaker or handset is muted (that is, while the
call remains muted until you hang up.
(MUTE). The key light turns OFF.
key is lit), the
Transfer
To Transfer an active call:
1. Press
2. Dial the number of the third party.
3. Do one of the following:
• To complete the Transfer, hang up.
(TRANS/CONF).
40
Page 43

• To announce the Transfer, wait for an answer, consult, and hang up.
Call Handling
• To cancel the Transfer, press
To transfer an active call during headset operation:
1. Press
2. Dial the number of the third party.
3. To complete the Transfer, press the Release feature key.
(TRANS/CONF).
(CANCEL).
Conference
To form a Conference when a two-party call is already in place, or to add another party to an
existing Conference:
1. Press
2. Dial the number of the next party.
3. Wait for an answer.
Note: If the party does not answer, press (CANCEL) twice to return to the call in
progress.
4. Press
To leave a Conference, do one of the following:
(TRANS/CONF).
(TRANS/CONF).
• Hang up
• Press
• Press the HangUp softkey.
(CANCEL).
Conference Split
To Split a Conference and speak privately with the original party:
• Press the Split softkey.
Add Held
To move a call on Hold to another line appearance:
1. Press the available line key.
2. Press the Addheld softkey.
3. Press the flashing line key.
To add a call on Hold to an existing conversation or conference:
1. Press the Addheld softkey.
2. Press the flashing line key.
41
Page 44

Swap
To call another party when you are in an established two-party call:
1. Press
2. Dial the number.
To alternate between the two parties:
• Press the Trade softkey.
(TRANS/CONF).
Call Forward
Call Forward lets you redirect incoming calls to an alternate number. You can select one of
the following forwarding options:
• Always redirects all incoming calls regardless of the state of your telephone.
• B-Int redirects internal calls when your telephone is busy.
• B-Ext redirects external calls when your telephone is busy.
• NA-Int redirects internal calls after several rings if you don't answer.
• NA-Ext redirects external calls after several rings if you don't answer.
Note: For information about "I Am Here?", see Call Forward – Remote.
To program Call Forward:
1. Press
(SUPERKEY).
2. Press the No softkey until "Call Forwarding?" appears.
3. Press the Yes softkey.
4. Press the Next softkey until the type of Call Forward appears (see above).
5. Press the Review softkey.
6. If a number is already programmed, press the Change softkey.
7. Press the Program softkey.
8. Dial the destination number.
9. If you make an error while dialing, use the <−−− softkey to backspace and correct the
number.
10. Press the Save softkey.
To turn Call Forward on and off (once it has been programmed):
1. Press
2. Press the No softkey until "Call Forwarding?" appears.
3. Press the Yes softkey.
4. Press the Next softkey until the type of Call Forward appears.
5. Press the Review softkey.
6. Press the Change softkey.
(SUPERKEY).
42
Page 45

7. Do one of the following:
• To turn Call Forward on, press the TurnOn softkey.
• To turn Call Forward off, press the TurnOff softkey.
Call Forward – Remote
To forward calls from a remote phone to your current location:
Call Handling
1. Press
2. Press the No softkey until "Call Forwarding?" appears.
3. Press the Yes softkey.
4. Press the Next softkey until "I Am Here" appears.
5. Press the Yes softkey.
6. Dial the extension of the remote station.
7. If you make an error while dialing, use the <−−− softkey to backspace and correct the
number.
8. Press the Save softkey.
To cancel Call Forward - Remote from the phone that set the remote forwarding:
1. Lift the handset.
2. Dial **77.
3. Dial the extension of the remote station.
4. Hang up.
To cancel Call Forward - Remote from the phone that was forwarded:
1. Press
2. Press the No softkey until "Call Forwarding?" appears.
(SUPERKEY).
(SUPERKEY).
3. Press the Yes softkey.
4. Press the Review softkey.
5. Press the Change softkey.
6. Press the TurnOff softkey.
7. Press
(SUPERKEY).
Call Forward – End Chaining
To ensure that calls do not get forwarded again by the destination number:
1. Lift the handset.
2. Dial *64.
3. Hang up.
To again allow calls to be forwarded by the destination number:
1. Lift the handset.
43
Page 46

2. Dial **73.
3. Hang up.
Call Forward – Forced
To force an incoming call to be forwarded:
• Press the Forward softkey.
Call Forward – Override
To override Call Forward and ring a station:
1. Lift the handset.
2. Dial *1*.
3. Dial the extension number.
Messages – Advisory
Advisory Messaging enables you to select a notice that appears on your phone display to
inform people visiting your desk of your whereabouts. Select from a variety of advisory
messages, including “On vacation”, “In a meeting”, or “Out to Lunch”.
To turn Messaging – Advisory on:
1. Press
2. Press the No softkey until "Advisory Msgs?" appears.
3. Press the Yes softkey.
4. Press the Next softkey until the desired message appears.
5. Press the TurnOn softkey.
To turn Messaging – Advisory off:
1. Press
2. Press the No softkey until "Advisory Msgs?" appears.
3. Press the Yes softkey.
4. Press the TurnOff softkey.
(SUPERKEY).
(SUPERKEY).
Messaging – Callback
To leave a message waiting indication on a phone when you hear busy or ringba ck tone:
• Press (MESSAGE) or the Callback softkey.
To respond to a message waiting condition on your phone:
1. Press
2. If a password is required, dial your password and press the Enter softkey.
(MESSAGE).
44
Page 47

3. Press the Yes softkey.
4. Do one or all of the following (if required):
• To display the time the message was sent, press the More softkey.
• To display the number of the caller, press the More softkey twice.
5. Do one of the following:
• To call the message sender, press the Call softkey.
• To delete the message, press the Erase softkey.
Call Handling
• To view the next message, press
To check for messages from a remote station:
1. Press
2. Press the No softkey until "Remote Msging?" appears.
3. Press the Yes softkey.
4. Dial your extension number.
5. Press the Enter softkey.
6. If a password is required, enter your password and press the Enter softkey.
7. Press the Yes softkey.
To set, change, or clear a password (up to 7 digits, not including 0):
1. Press
2. Press the No softkey until "Set Password?" appears.
3. Press the Yes softkey.
4. Do one of the following:
• To enter a new password, enter your password.
• To change or clear your password, enter your current password.
5. Press the Enter softkey.
(SUPERKEY).
(SUPERKEY).
(MESSAGE).
6. If you are changing or clearing your password, do one of the following:
• To change your password, enter your new password and pres s the Enter softkey.
• To clear your password, enter 0.
7. Enter your new password again.
8. If you are setting up or changing a password, press the Enter softkey.
9. Press
(SUPERKEY).
Messaging – Cancel Callback
To cancel a Callback:
1. Lift the handset.
2. Dial *1#.
45
Page 48

3. Dial the number of the called station.
4. Hang up.
Messaging – Cancel All Callbacks
To cancel all Callbacks:
1. Lift the handset.
2. Dial #1.
3. Hang up.
46
Page 49

Using Advanced Features
Account Codes
To use Forced Account Codes:
1. Lift the handset.
2. Dial the Account Code digits.
3. Press #.
To enter an Account Code during a call:
1. Press (SUPERKEY).
2. Press the Yes softkey.
3. Dial the Account Code digits.
4. Press the Save softkey.
Using Advanced Features
5. Do one of the following:
• For a verified account code, press the Yes softkey.
• For a non-verified account code, press the No softkey.
Call Park
To retrieve a call parked by the attendant:
1. Lift the handset.
2. Dial *23.
3. Dial the console ID and the Hold Slot number.
Call Pickup
To answer a call that is ringing at another station in your Pickup Group:
1. Lift the handset.
2. Press the Pickup softkey.
To answer a call that is ringing at a station not in your Pickup Group:
1. Lift the handset.
2. Dial **6.
3. Dial the number of the ringing station.
47
Page 50

Call History
Call History keeps track of the names (if available) and telephone numbers of missed calls,
answered incoming external calls, and outgoing external calls. Once enabled on your phone
by your system administrator, it functions automatically.
To display the call history, and view call details:
1. Press the Call History feature key. The total number of missed calls is displayed in
brackets ( ). The number of new missed calls is indicated with a *.
2. To browse though the list of missed calls, press the Yes softkey, followed by the
(DOWN) keys to scroll through the list.
and
3. To view answered or outgoing calls, press the No softkey (once for Answered, twice for
Outgoing). Use the
outgoing calls.
4. To view the number of the call, press the Details softkey while the call is displayed.
Pressing the Next softkey displays the call time and date.
To return a call:
1. Display the call you want to return.
2. Do one of the following:
• If the call is internal, and the caller name is known, press the Call softkey. For
unknown numbers, the Call softkey is not displayed.
• If the call is external, and you normally need to precede external calls with a digit
such as 9, it is likely that your system administrator has programmed your system to
insert the 9 for you. In this case, pressing the Call softkey initiates the call
immediately. Sometimes the system will be unable to complete the dialing
automatically. When this happens, you can edit the dialed digits manually by pressing
the <−−− softkey. Use the <−−− softkey to delete the left-most digit, and then type
the digits to insert them. When you have the dial string edited to suit your needs,
press the Call softkey to dial the number.
(UP) and (DOWN) keys to scroll through the list of answered or
(UP)
To delete all missed, answered, or outgoing call logs:
1. After selecting the type of logs you wish to delete, press the Delete All softkey.
2. Confirm that you do want to delete all items by pressing the Yes softkey.
To delete a particular call from the call log:
• With the call log that you want to delete displayed, press the Delete softkey.
Campon
To Campon to a busy station:
• Press the Wait softkey.
To retrieve a call when you hear Campon tone:
• Press the Trade softkey.
48
Page 51

Do Not Disturb
To activate or deactivate Do Not Disturb:
• Press the Do Not Disturb feature key.
To activate Do Not Disturb from a remote station:
1. Lift handset.
2. Dial **5.
3. Dial the number of the station to which Do Not Disturb is to apply.
4. Hang up.
To deactivate Do Not Disturb from a remote station:
1. Lift handset.
2. Dial ##5.
3. Dial the number of the station with Do Not Disturb activated.
4. Hang up.
Using Advanced Features
Group Paging / Meet Me Answer
Group Paging allows you to page a group of phones through their built-in speakers. You can
belong to as many as three paging groups with one group designated as your "prime" group.
When you need to respond to a Group Page but don't know the identity or extension number
of the paging party, use the Meet Me Answer feature. You have up to 15 minutes after
receiving the page to use Meet Me Answer.
To make a Group Page:
1. Lift the handset.
2. Press Direct Page or dial *37.
3. Do one of the following:
• To page your prime page group, press #.
• To page a specific page group, dial the page group directory number.
4. Speak to the dialed party after the tone.
To respond to a Group Page by using Meet Me Answer:
1. Lift handset.
2. Dial *88.
3. Do one of the following:
• To respond to a page from your prime page group, press #.
• To respond to a page from a specific page group, dial the page group directory
number.
49
Page 52

Hot Desking
Hot Desking allows you to log into the telephone system from any phone designated as a Hot
Desk phone. Simply log in at the phone using your assigned Hot Desk User Extension
Number and the phone immediately assumes all your speed dials, features keys, call
forwarding setup, and line appearances – even your language preference for the display. Any
changes you make to the phone while you are logged in—for example, adding a speed dial—
are saved to your personal profile. Logging in activates your profile on any phone that
supports Hot Desking.
Note: All Navigator Hot Desking profiles have seven programmable keys. If you log into a
phone that has a fewer number of keys, the extra ones are "hidden". Only the use of the extra
keys is lost, not the features assigned to them.
To log into a Hot Desking phone (the phone must be idle):
1. Press the HotDesk softkey.
2. Press the Login softkey.
3. Enter your Hot Desk User Extension Number
4. Press the OK softkey.
To log out of Hot Desking phone (the phone must be idle):
1. Press the HotDesk softkey.
2. Press the Logout softkey.
3. Press the Confirm softkey.
Note: Your profile can only be active on one phone at a time. If you log in from another phone
without logging out from the first one, the system will automatically deactivate your profile on
the first phone.
Hot Desk Remote Logout
A user who has forgotten to log out of a Hot Desking phone can be logged out using any
phone that supports Hot Desk Remote Logout.
To remotely log out a Hot Desking phone:
1. Dial 111.
2. Dial the Hot Desk User Extension Number that you want to log out.
Mobile Extension
Mitel Mobile Extension is a software solution that enables you to twin your desk phone with
an external PSTN-connected phone (your cell phone, for example). Calls arriving at the desk
phone ring the cell phone simultaneously, until one or the other is answered, or if
unanswered, are forwarded to voice mail.
For information about configuring Mobile Extension on your Mitel IP device, refer to the
Mobile Extension Quick Reference Guide available at www.mitel.com or contact your
Administrator.
50
Page 53

Music
To turn Music on and off when the phone is idle:
Using Advanced Features
1. Press
2. Press the No softkey until "Music?" appears.
3. Do one of the following:
• To turn the music on, press the TurnOn softkey.
• To turn the music off, press the TurnOff softkey.
4. Press
Note: This feature overrides music from your PC.
(SUPERKEY).
(SUPERKEY).
Night Answer
Office telephone systems are often placed into Night Answer after regular hours. Calls then
ring alternate answer points—either designated extensions or a night bell. You can dial the
Trunk Answer From Any Station (TAFAS) code to answer calls ringing the night bell. If
permitted by system programming, you can put your phone into one of two night answer
modes, Night1 or Night2.
To switch your phone to Night Answer or Day service, or to view which service your phone is
currently in:
1. Press
2. Press No softkey until "Night Answer?" appears.
(SUPERKEY).
3. Press Yes softkey.
4. Do one of the following:
• To exit without making any changes, press
• To change the mode of service, press Change, press No until the desired alternative
appears, and then press Yes.
(SUPERKEY).
Override (Intrude)
To use Override when you encounter a busy or Do Not Disturb tone:
• Press the Intrude feature key.
Paging
To use Paging:
1. Lift handset.
2. Press the Pager feature key.
3. Dial the Paging zone number (if required).
4. Make the announcement.
51
Page 54

Paging – Direct
Direct Paging allows you to page a party through the party’s handsfree speaker. If the paged
party has Off-Hook Voice Announce enabled, the page will be heard even when the party is
on a handset or headset call. If the paged party has Handsfree Answerback enabled and
turned on on the phone, your page automatically establishes a handsfree call with the paged
party.
To page a party:
1. Lift the handset.
2. Press the Direct Paging feature key.
3. Dial the extension number.
4. Speak to the party you dialed after the tone.
How you answer a Direct Page depends on whether Handsfree Answerback is e nabled and
turned on at your phone. See one of the following procedures in this guide:
•
Direct Paging – Handsfree Answerback Enabled
Direct Paging – Handsfree Answerback Disabled.
•
Direct Paging – Handsfree Answerback Enabled
When you receive a Direct Page, Handsfree Answerback automatically establishes a
Handsfree call on your phone after a single burst of tone. If your PC headset is plugged in,
the Direct Page tone sounds in your headset easrphones and you can answer handsfree
using your headset.
Your administrator enables or disables Handsfree Answerback. After your administrator
enables Handsfree Answerback, you can choose to turn it on or off directly from your phone.
To turn Handsfree Answerback on:
• When your phone is idle, press
The MUTE key light flashes to indicate that Handsfree Answerback is ON.
• When a Direct Page arrives, the MUTE key light turns OFF and a Handsfree call is
automatically established.
To turn Handsfree Answerback off:
• Press the flashing
The MUTE key light turns OFF.
• To respond to a Direct Page when Handsfree Answerback is OFF, see
Handsfree Answerback Disabled
(MUTE) key once.
(MUTE) once.
Direct Paging –
.
Note: By default, Handsfree Answerback is turned OFF at your phone. If the (MUTE) key
is OFF when your set is idle, Handsfree Answerback is OFF.
To answer a call using Handsfree Answerback, see
Table 5:
Table 5: Answering a Direct Paging Using Handsfree Answerback
52
Page 55
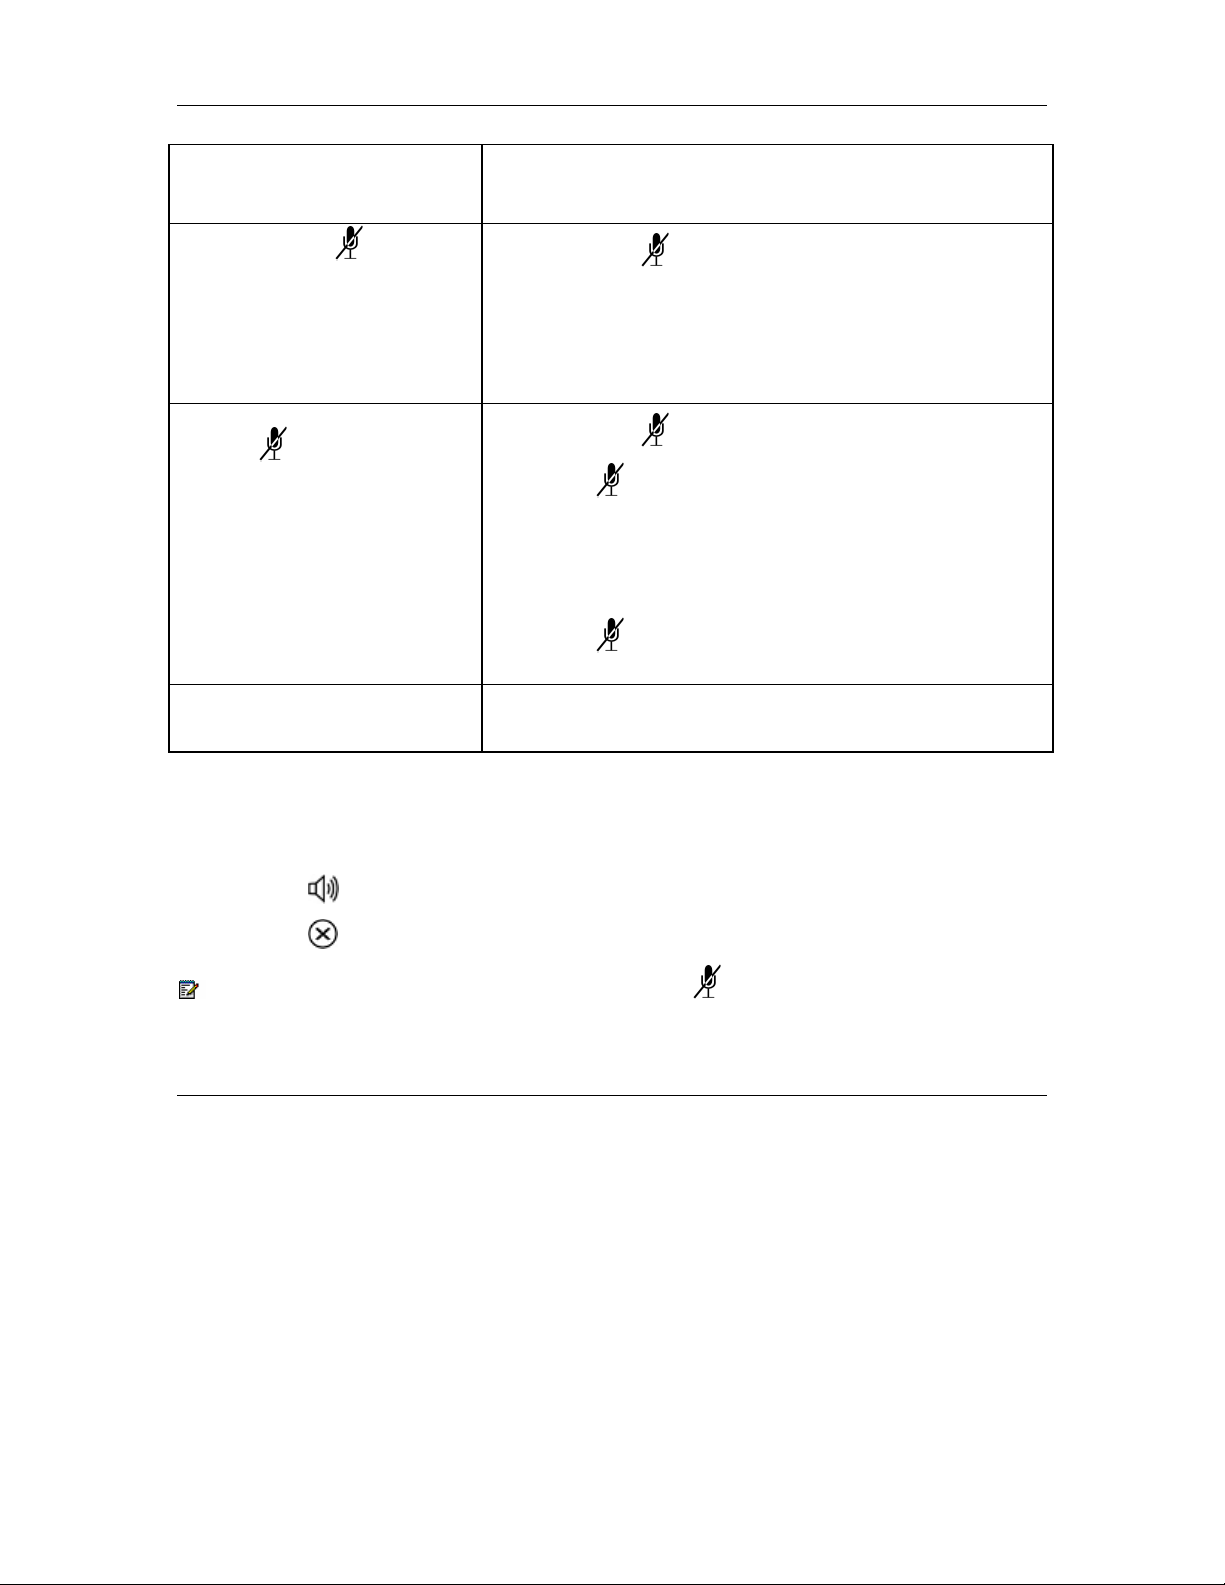
Using Advanced Features
Phone state before the
Direct Page arrives
Phone is idle, and (MUTE) is
flashing
You are on a handset or headset
call, and (MUTE) is OFF
You are on a MUTED
handset/headset call, OR, you are
on a Handsfree call
To answer the Direct Page
1. Check that (MUTE) is OFF.
2. Listen for the paging party.
3. Speak to the paging party.
4. Lift the handset if you wish to switch from a Handsfree
call to a handset call.
1. Check that (MUTE) is flashing.
2. Press
(MUTE).
The light turns ON solid, and you are now speaking to
the paging party and have muted your handset/headset
call.
3. Speak to the paging party.
4. Press
(MUTE) to alternate between handset/headset
and handsfree calls.
• The party paging you receives a busy tone. Handsfree
Answerback does not interrupt your call.
To end a Handsfree Answerback call, do one of the following:
• Hang up the handset, if you switched to a handset call.
• Press
• Press
(SPEAKER).
(CANCEL).
Note: When the Handsfree Direct Page call ends, the (MUTE) key light returns to the
state it was in before the call was established.
Direct Paging – Handsfree Answerback Disabled
Your administrator enables or disables Handsfree Answerback on your phone. You may also
turn Handsfree Answerback off on your phone, even after your administrator has enabled it.
To turn Handsfree Answerback off, see
When Handsfree Answerback is disabled or turned off on your phone and you receive a
Direct Page, the Direct Page is indicated by a single burst of tone. If your PC headset is
plugged in, the Direct Page tone sounds in your headset earphones and you can answer
using your headset.
To answer a Direct Page when Handsfree Answerback is disabl ed, see
Direct Paging – Handsfree Answerback Enabled.
Table 6.
Table 6: Answering a Direct Page with Handsfree Answerback Disabled
53
Page 56

Phone state before the
Direct Page arrives
Phone is idle, and (MUTE) is
OFF
You are on a handset or headset
call, and (MUTE) is OFF
You are on a MUTED
handset/headset call, OR, you
are on a Handsfree call
To answer the Direct Page (indicated by a single burst of tone)
1. Check that (MUTE) is ON solid.
2. Lift the handset
or
3. Press
(MUTE) to answer in Handsfree mode.
(The light turns OFF.)
4. Speak to the paging party.
1. Check that (MUTE) is flashing.
2. Press
(MUTE).
The light turns ON solid, and you are now speaking to the
paging party and have MUTED your handset/headset call.
3. Speak to the paging party.
4. Press
(MUTE) to alternate between handset and handsfree
calls.
• The party paging you receives a busy tone.
Handsfree Answerback does not interrupt your call.
To end a Direct Page call, do one of the following:
• Hang up the handset to end a handset call.
• Press
• Press
(SPEAKER) to end a handsfree call.
(CANCEL).
Note: When the Handsfree Direct Page call ends, the (MUTE) key light returns to the
state it was in before the call was established.
Record a Call
This feature uses your voice mail system to record your phone conversations.
Note: You may be required by law to inform the other party that you are recording the
conversation. For specific instructions, consult your system administrator.
To start recording while on a two-party call:
• Press the Record Call key.
Personal Feature Keys on page 31 for instructions on programming a Record Call
See
feature key to your phone.
Note: Your system may be programmed to automatically begin recording external calls when
you or the other answers.
54
Page 57

Using Advanced Features
To pause recording:
• Press the Pause softkey.
To resume recording after pausing:
• Press the Resume softkey.
To stop a recording without saving it:
• Press the Stop&Erase softkey.
To stop and save a recording:
• Press the Stop&Save softkey.
Putting the call on hold saves the recording; taking the call off hold starts a new recording.
Depending on system programming, hanging up, or pressing
DSS key may also save the recording.
To listen to a recording:
(TRANS/CONF) or a
1. Lift the handset.
2. Access your voice mailbox.
3. Follow the prompts to retrieve the recording.
Release
Release lets you disconnect from an attempted Call Transfer or Conference Call without
hanging up the handset. Release is useful when you encounter a busy or unavailable party
and wish to make another call immediately.
To release from an attempted transfer or conference call:
• Press the Release softkey
or
• Press the Release feature key.
Reminder
To program a Reminder:
1. Press
2. Press the No softkey until "Timed Reminder?" appears.
(SUPERKEY).
3. Press the Yes softkey.
4. Enter the time in 24-hour format.
5. Press the Save softkey.
To view, change, and/or cancel a pending Reminder:
55
Page 58

1. Press
2. Press the No softkey until "Timed Reminder?" appears.
3. Press the Yes softkey.
4. Do one of the following:
• To change the Reminder, press the Change softkey, enter the new time, and press
• To cancel the Reminder, press the Clear softkey.
• To exit without canceling the Reminder, press
To acknowledge a Reminder when your phone rings once:
• Press the Confirm softkey.
(SUPERKEY).
the Save softkey.
(SUPERKEY).
Tag Call
Tag Call allows you to signal that you are the victim of a threatening or malicious call. Using
the tag, your system administrator or telephone company can identify the source of the call
and provide this information to appropriate personnel or authorities.
CAUTION: Tagging a non-malicious call may result in fines or other penalties.
To tag a malicious call, do one of the following:
• Press the Tag Call feature key while the call is in progress.
Personal Feature Keys on page 31 for instructions on programming a Tag Call key
See
to your phone.
• Press
If the call was successfully tagged, the display shows "Thank You"; otherwise, the display
shows "Not Allowed".
Note: Tag Call can be used on active two-party calls only. Calls on hold and conference calls
cannot be tagged.
(TRANS/CONF), then dial *55.
Trunk Flash
The Trunk Flash feature allows you to access Centrex features (if available) while you are
talking on an outside call.
To flash a trunk while talking on an outside call:
1. Press
2. Dial *57 for a single flash or *56 for a double flash.
3. Wait for dial tone.
4. Dial the Centrex feature access code.
(TRANS/CONF).
56
Page 59

Appendix – Open Source Software
Appendix – Open Source Software
The following open source software, or portions thereof, have been used in creating the
Integrated Office Navigator software product.
1. Microsoft Visual Studio 2005 C# Version Shareware Starter Kit,
http://msdn2.microsoft.com/en-us/vstudio/aa718342.aspx.
2. 7-Zip, Copyright 1999-2007 Igor Pavlov,
http://www.7-zip.org/license.txt
57
Page 60

Appendix – For Your Information
Upgrading Integrated Office Navigator
If upgrading from a Standalone NTB to the Integrated Office Navigator, it is recommended
that you first uninstall the Standalone NTB.
Integrated Office Navigator and Microsoft Framework 2.0
In order to run the Integrated Office Navigator, your PC will also need to have the Microsoft
.NET Framework 2.0 installed.
• If the Microsoft .NET Framework 2.0 is not installed when you install the Integrated
Office Navigator, the ION install will download and install the Framework at that
time.
• The Microsoft .NET Framework 2.0 must also be present if you uninstall the
Integrated Office Navigator.
58
Page 61

Appendix – List of Limitations
Appendix – List of Limitations
Integrated Office Navigator Limitations
Integrated Office Navigator is designed to tie together functionality from various other
applications. There are some cases of incompatible versions of these other applications that
may result in limitations to certain Integrated Office Navigator features.
Microsoft Windows Messenger and Outlook
Integrated Office Navigator “Presence” Feature: Due to an incompatibility between
Microsoft Windows Messenger version 5.1 and Microsoft Outlook 2002, presence
information may not be passed on to the Integrated Office Navigator correctly. If you have
this combination of Microsoft tools, it is recommended that you upgrade either one or both.
Integrated Office Navigator “On the Phone” Feature: There a re certain combinations of
Microsoft Windows Messenger and Outlook that will interfere with the functionality of the
Integrated Office Navigator “On the Phone” feature. The following is a list of combinations
that work, and those that do not:
• Windows Messenger 4.7 with Outlook 2002 – works
• Windows Messenger 4.7 with Outlook 2003 – works
• Windows Messenger 5.1.0639 with Outlook 2002 - DOESN'T WORK
• Windows Messenger 5.1.0639 with Outlook 2003 – works
• Windows Messenger 5.1.0701 with Outlook 2002 – works
• Windows Messenger 5.1.0701 with Outlook 2003 – works
• MSN Messenger 7.0 with Windows Messenger 4.7 & Outlook 2002 – works
• MSN Messenger 7.0 with Windows Messenger 4.7 & Outlook 2003 – works
• MSN Messenger 7.0 with Windows Messenger 5.1.0701 & Outlook 2003 – works
• Windows Live Messenger 8.0 with Windows Messenger 4.7 & Outlook 2003
(11.8010.8036) – works
• Windows Live Messenger 8.1 with Windows Messenger 4.7 & Outlook 2003
(11.5608.5606) - WORKS & DOESN'T WORK (SEE BELOW)
• Windows Live Messenger 8.1 with Windows Messenger 5.1.0701 & Outlook 2003
(11.5608.5606) - WORKS & DOESN'T WORK (SEE BELOW)
For Windows Live Messenger 8.1:
Case 1:
•
1) Win Messeneger 4.7 installed / Outlook 2003 installed
2) Install Windows Live Messenger 8.1
3) Install IOC
RESULT: ON THE PHONE WORKS
Case 2:
•
1) Win Messeneger 4.7 installed / Outlook 2003 installed
2) Install and run IOC
3) Install Windows Live Messenger 8.1
RESULT: ON THE PHONE DOESN'T WORK (even if you stop and start IOC)
59
Page 62

Microsoft Windows Messenger and Office Communicator
Integrated Office Navigator “Presence” and “Alternate Number” Feature: The
combination of certain versions of Microsoft Windows Messenger and Microsoft Office
Communicator can cause the Integrated Office Navigator to fail to call an alternate phone
number when the presence is set to “Away”. One valid combination that functions correctly is
Microsoft Windows Messenger version 4.7.3001 and Microsoft Office Communicator 1.0.559
iTunes
Integrated Office Navigator “Pause Music” Feature: iTunes 7.0.2.16 does not conform to
the Microsoft Application Programming Interface (API) and treats the PAUSE message as a
PLAY/PAUSE message. Meaning that if it is in a paused state it will start playing when it gets
the PAUSE message again.
Most other versions of iTunes do not respond to the command at all and therefore, will not
pause when requested from Integrated Office Navigator.
.
60
 Loading...