

Page 1
MA-101ACTWirelessRemote-ControlledLectureAmplifier
MA-101ACTWirelessRemote-ControlledLectureAmplifier
InstructionManual
ElectronicsCo.,Ltd.
Headoffice:814,Pei-KangRoad,Chiayi,600,Taiwan.
Taipeioffice:5,Lane118,Sung-tehRoad,100,Taipei,Taiwan.
Web-http://www.mipro.com.tw
E-mail:@mipro.com.twmipro
Page 2
WirelessRemote-ControlledLectureAmplifier
ThanksforchoosingMIPRO'swirelessremoteamplifier.Careful
andthoroughreadingofthisinstructionbeforeusingwillassistyouto
understandcorrectoperatingofthesystemandobtainthemostoptima
performanceofthesystem.
MA-101ACTwirelessremoteamplifierequipswiththemost
innovativedesignsthatdeliversclearsoundandpowerfulvolume.Its
user-friendlydesignandinexpensivepricemakeMA-101ACTthebest
amplifiersystemineducationalinstitutesorsimilarfacilitieswhere
lecturesorlessonsaregiven.Itfeaturescompactspeakercabinet,builtin30watts (RMS)high-efficiencyamplifier,high-sensitivityfull-range
speaker,detachableACswitchingpowersupplyanditiswall-mountable.
Whentheamplifiersareunderthesamecarrierfrequencyband,no
matterwhichreceivingchanneltheamplifierhas,eachtransmittercan
remote-controlamplifier'spowerandvolume.Furthermore,otherthan
holdingthetransmitterinhands,anexternallavalieremicrophone,
headsetmicrophoneorotheraudiosourcescanalsoconnecttothe
transmitter.Thetransmitterhasbuilt-inrechargeablebatteriesthatallow
userssimplyputthetransmitterbacktodesignatedchargerafteruse.
Built-inrechargeablebatterysimplysavesyoumoneytobuybatteries
andsavesyoutroublestoreplacebatteries.
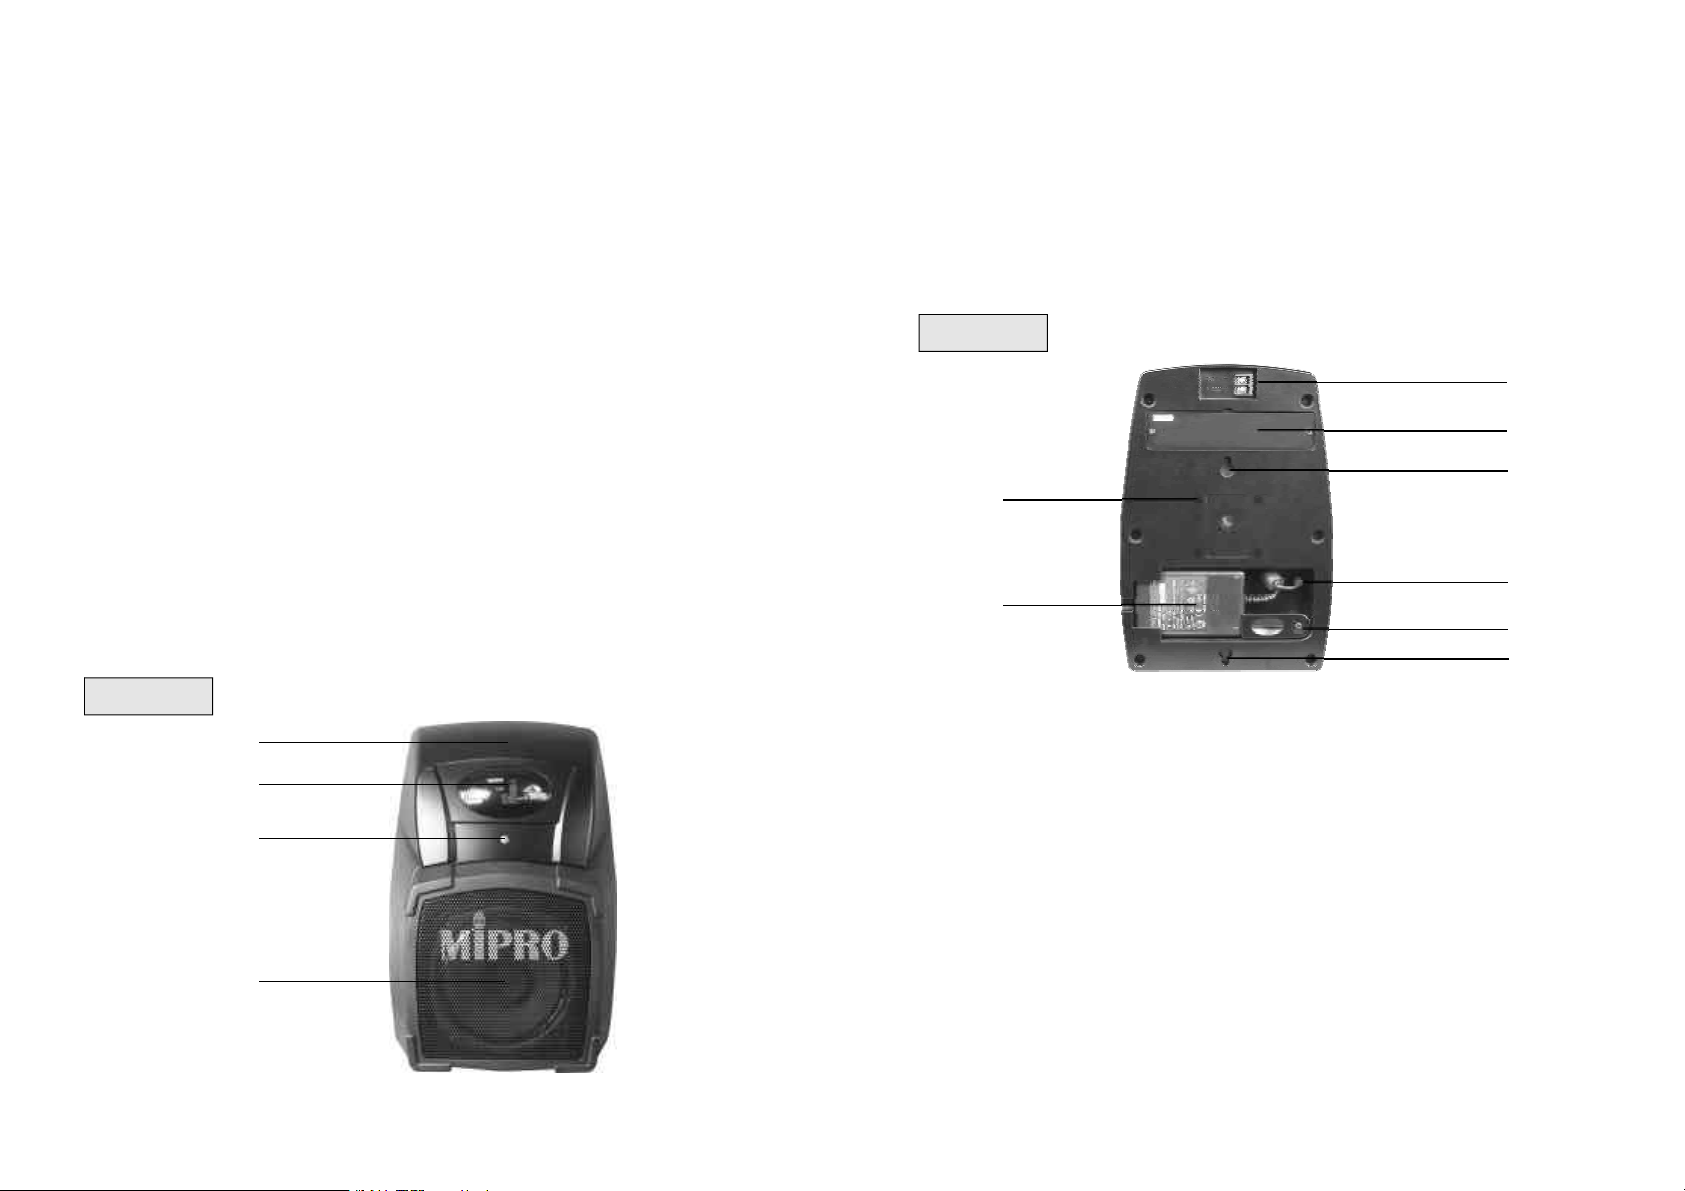
1. FunctionsofEachPart:
(1)Mainbody:thespeakercabinet.
(2)Infraredreceptorandtransmitter:Toreceivepower-onsignaland
transmitfrequencyinformationtotransmitter.
(3)Powerindicator:RedLEDindicatesthepowerisonandgreen
LEDindicatesthesystemreceivessignalsfromthetransmitter.
(4)Speaker:5-inchfullrangespeaker.
RearPanel:
(5)
(6)
(7)
(11)
(8)
(10)
(9)
(7)
FrontPanel:
(1)
(2)
(3)
(4)
(5)Externalspeakerconnector:Forconnecttoa4~16external
speaker.
(6)Receivermodule:Swappablereceivermodulewithdifferent
frequencyband.
(7)Hangertrough:Forhangingthesystemonthewallwithany
nailsorhooksinuprightorupside-down.
(8)18VDCinputjack:Thecenterpoleispositivevoltageand
consumptioncurrentmustbeatleast2.5A.
(9)Switchingpowersupplyholder:Holderpinmustbereleased
beforechangingthepowersupply.
(10)Switchingpowersupply:Input90V~264VAC,Output18Volt/
2.5ADC.
(11)Wall-mountingrackfixedscrewhole:Specialadjustablehanging
rackcanbefixedtothecabinet.
-1- -2-
Ω
Page 3
3.SpecialNotes:2.Operating:
(1)Toturnonwirelessamplifier:
(a)Pointthebottomoftransmittertothefrontofamplifierandpress
theACTbuttonlocatedonthetransmitter.Holdthetransmitter
steadyforabout3secondswheretheamplifierpowerindicator's
(3)redLEDwilllightup.IftheredLEDremainslightupafter
morethan3seconds,theamplifierpower-oniscomplete.
However,iftheredLEDlightgoesoutafter3seconds,the
power-onprocessisnotcompletedandrepeatsabovesequence.
(b)Turnonthetransmitterpowerswitch(3)andpowerindicatorLED
(3)ontheamplifierwillturngreen.Itindicatestheamplifier
receivingsignalsfromthetransmitterandreadyforuse.
(c)Volumeadjustmentonthetransmitter:Adjusttodesiredvolume
levelbyfollowingthedirectionsindicateonthevolumecontrol.
(2)Toturnoffwirelessamplifier:
Pointthebottomoftransmittertothefrontofamplifierandpress
theACTbuttonlocatedonthetransmitter.Theamplifierpower
indicator's(3)redlightwillgoout.
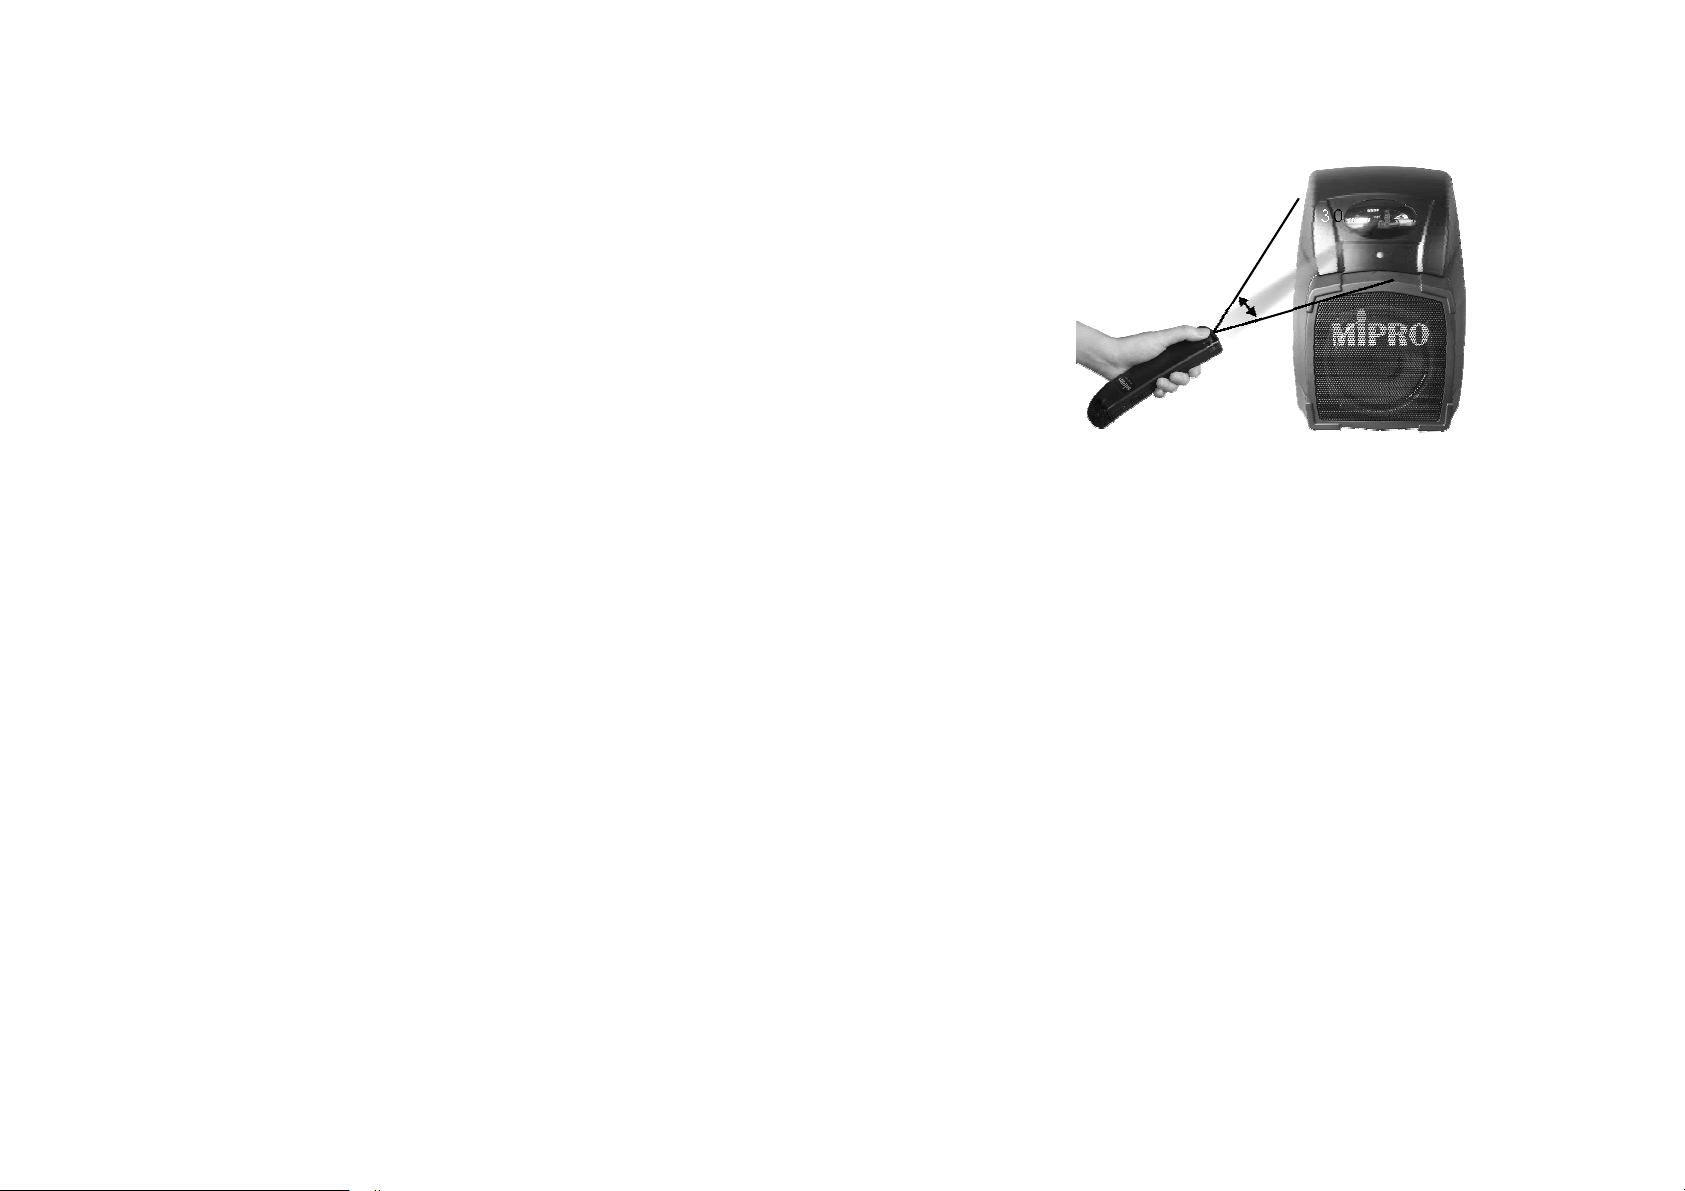
(1)OperationofInfraredControl:
30°
30°
(a)Operatingangelisabout30-degreeradius(toptobottom).
(b)Operatingdistancerangeofinfraredisaround10meters.
(c)WhenACTbutton(2)onthetransmitterispressed,pleasehold
microphonesteadyforatleastonesecondbeforemoving
transmitteraway.
(d)WhenACTbutton(2)onthetransmitterispressed,theLED(3)
ontherightofthebuttonwilllightupforabout3second.ACT
buttonwillnotworkagainuntilLEDgoesout.
(2)Allowingthetransmittertoworkatanyfrequencyunderthesame
frequencybandisMIPRO'suniqueinnovativefeature.Iftransmitter
andreceiverareunderdifferentfrequencyband,powerindicatoron
thetransmitterflashes.Whentheindicatorflashes,pleasecheckif
receiverandtransmitterareunderthesamefrequencyband.
(3)Useofexternalaudiosources:ConnectinganoutputsignalfromCD
orcassetteplayertothe3.5inputjackonthetransmittertopend
forwirelesstransmission.MakesureMIC/LINEswitchisatLINE
position.Volumeofamplifierisproperlyadjustedbythevolume
controlonthetransmitter.However,ifthesoundoccursoverloaded
distortion,pleaselowertheoutputlevelontheCDorcassetteplayer.
(4)WhenthetransmitteraimsattheamplifierandpushtheACTbutton
(2)onthetransmitter,ifLEDindicator(3)ontheamplifierturnonred
anddiminish,itisverypossiblethatthetransmitterisrunninglow
onpowerandunabletotransmitRFsignal.Ifthebatteriesare
totallydrained,thentheACTbuttonwillnotfunctionatall.
φ
-3-
-4-
Page 4
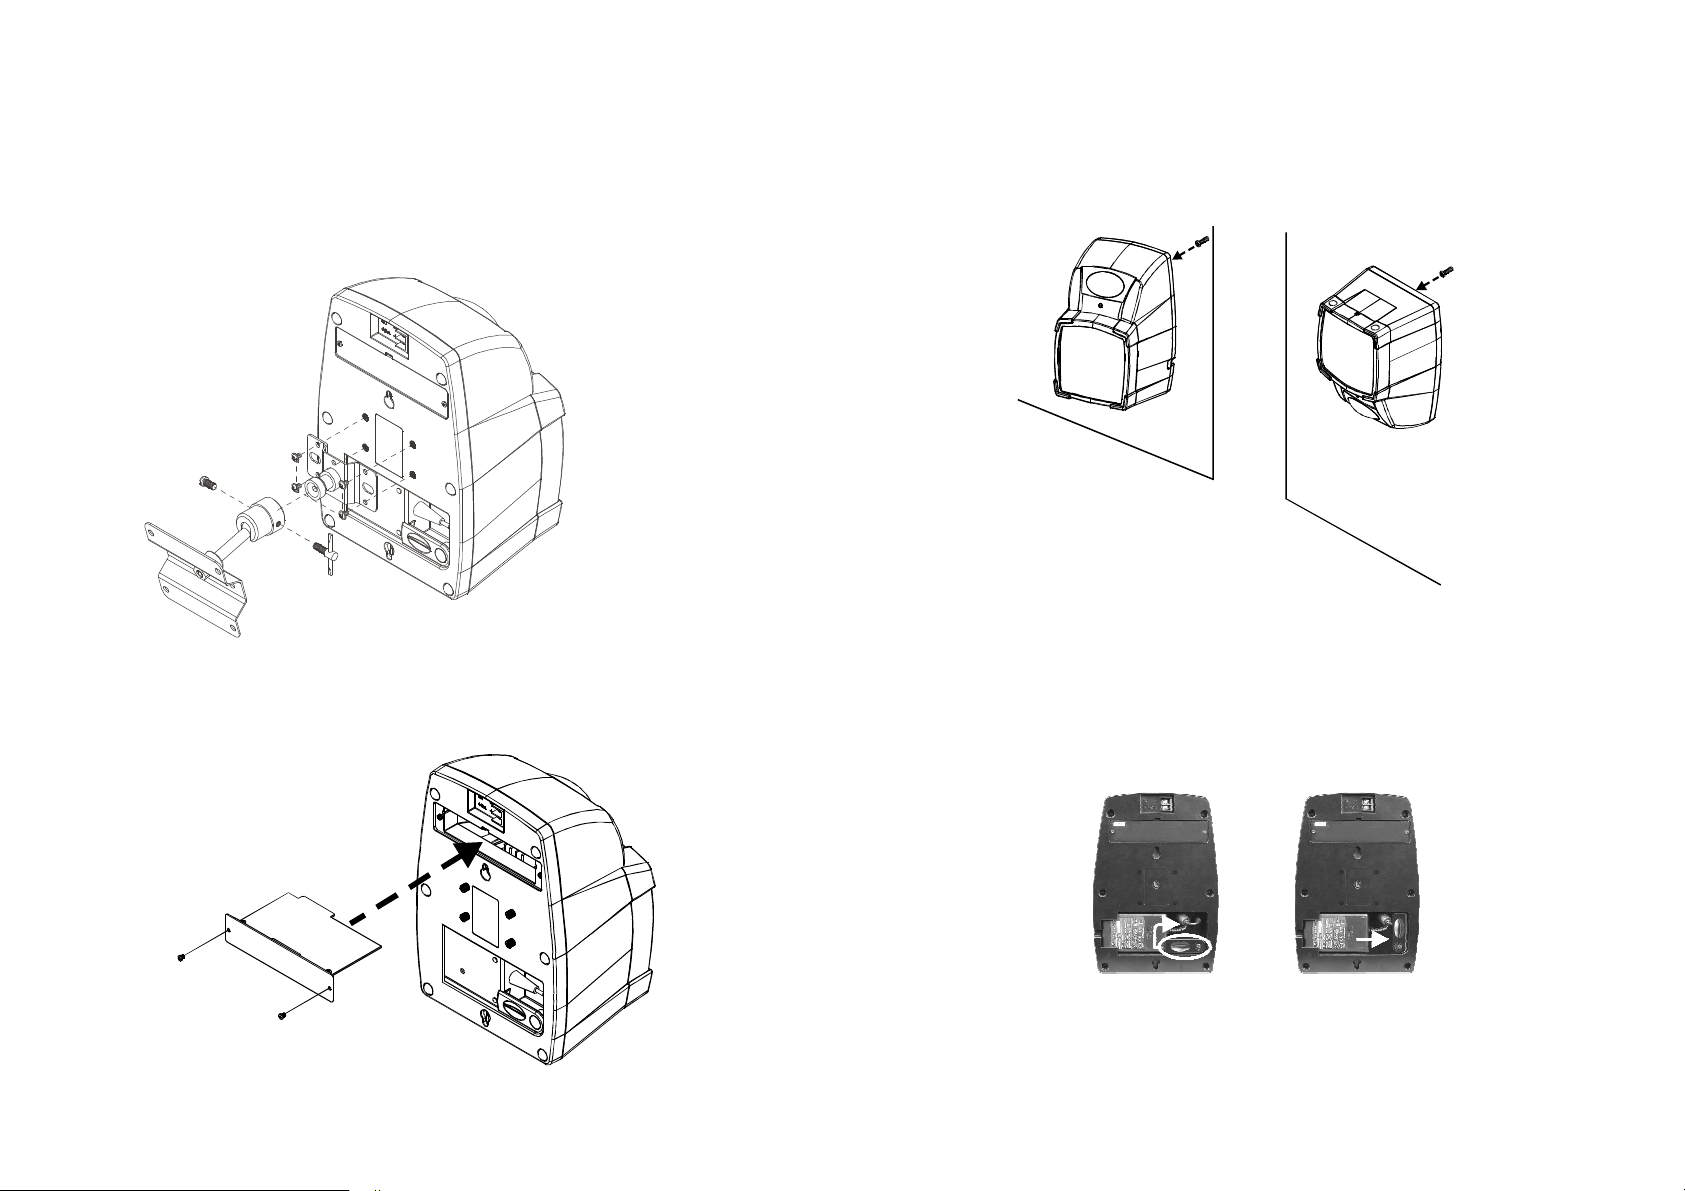
(4)HowToMounttheSystemontheWall:
(a)Therearetwoopeningstoadapthangersontherearofthe
speakercabinetallowsthesystemtobehangedatuser'schoice.
(b)Ontherearofthespeakercabinet,userscanuseadjustable
wall-mountingaccessoriesfromMIPRO.Pleaseseebelow
illustrationforcorrectassembling.
(6)UseofConventionalHangingNail:
Hanginginuprightposition
(7)HowtoChangethePowerSupply:
Hanginginupsidedownposition
(5)HowtochangetheReceiverModule:
-5- -6-
(a)Pushtheholder(9)ofswitchingpowersupplyupward.
(b)Pushthepowersupplytotherightsidetodismountit.
(c)Toassemble,simplyreversetheabovesequence.
Page 5

RechargeableMulti-FunctionWirelessMicrophone
SideView:
1. FunctionsofEachPart:
Front&RearView:
(1) (2) (3)
(4) (5)
(1)Grilleandcapsulemodule:Toeliminate"POP"noiseandprotect
thecapsulemodulethatconvertsvoiceintoaudiosignal.
(2)ACTbutton:Toturnon/offtheamplifierandsetupmicrophone
frequencytomatchamplifier'sreceivingfrequency.
(3)ACTindicator:WhenpressACTbutton(2),ACTindicator(3)
turnsintored.TheACTindicatorwillgooutafter3seconds
thenACTbutton(2)canbeactivatedagain.
(4)Hanger:Tocouplewithanyexternalstripewithhooksothat
userscanwearthemicrophoneinfrontoftheirchests.
(5)Chargingspring:Forexternalchargingpurpose.
(6) (7)
(8) (9)
(6)Powerindicator:Itindicatesstatusofbatteries.Themoment
whenthemicrophoneswitcheson,indicatorwillflashonce
showingthebatterystatusisnormal.Whenindicatorisnot
flashing,itmeansthebatteryisoutornotbeinginstalled
properly.Iftheindicatorflashescontinuously,itindicateswrong
frequencybandandpleasecheckiftransmitter'sfrequencyband
matchesamplifier's.Iftheindicatordoesnotgooffafter
switchingon,itindicatesthebatterylevelislowandbattery
requiresimmediatecharge.
(7)Powerswitch:Touse,makesuretheswitchisat"ON"position
and"OFF"positionwhennotinuse.
(8)MIC/LINEswitch:WhenusingLINEINoranelectricguitar,make
suretheswitchisat"LINE"position.Whenconnectingtoa
condensermicrophoneorcablemicrophone,theswitchshould
beat"MIC"position.allowsuserstoadjustinput
sensitivityateitherMICorLINEposition.
(9)Volumecontrol:Toadjustinputvolume.
Volumecontrol
-7- -8-
Page 6

2.HowtoOperate:
(2)ToAdaptACDPlayer:
(1)ToAdaptAnExternalMicrophone
Theheadsetorlavalieremicrophonewithphoneplugcanbe
connectedtothemicrophoneanduseasabeltpacktransmitter.
HeadsetMicrophone
PhoneTypeInputJack
CDorotheraudiosignalscanbeconnectedtothemicrophone
anduseasawirelesstransmitter.SimplyslidetheMIC/LINEswitch
toLINEpositionandadjustthevolumecontroltotheproperoutput
volume.
CDPLAYER
PhoneTypeInputJack
(3)ToUseANeckStripe:
Whentheuserisnotfreetoholdthetransmitterbyhands,one
canusetheneckstripethatcomeswiththepackagesothatthey
cansimplyputtingthetransmitteranywhereonthem.But,please
notethatthevolumedecreasesasthedistancebetweenmicrophone
andmouthincreases.Therefore,re-adjustthevolumecarefully.The
howlingfeedbackwilloccurwhenvolumeissettoohigh.
LavaliereMicrophone
-9- -10-
Page 7

3.HowToChargeBatteriesIntheMicrophones:
4.SpecialNotesforCharging
1.ConnectthechargertoACpowersupply.
2.Followingtheindicationofbatteriespolarityshowsontherearofthe
microphoneandinsertthemicrophoneintothechargertostart
charging.Pleaseseeillustrationbelow.
3.StatusofIndicator:
(a)Flashingindicator:Themicrophoneisunderquick-charging
mode.
(a)Pleaseusedesignatedpoweradaptertoavoidinsufficient
voltageorcurrent.However,iftheinputpoweristoohigh,
seriousdamagetothecharger,rechargeablebatteriesoreven
themicrophonewilloccur.DesignatedDCadaptorprovides12
Volt/500mA.
(b)Pleasemakesurethemicrophoneispower-offbeforecharging.
(c)Tominimizepossiblerisksanddangers,pleaseDONOTuse
unauthorizedchargertochargeMIPROmicrophone.
(b)GreenIndicator:Themicrophoneisfullycharged.Chargingtime
isapproximately2hoursthenchargercontinuestochargewith
lowcurrent.
(c)NoIndicator:Nomicrophoneisinsertedforcharging.
Chargingindicator
-11- -12-
 Loading...