

Page 1
Quick Reference Guide
V
V
V
Page 2

Note: The V-Series Quick Reference Guide is not
intended as a replacement to the Operating Instructions.
Prior to operating equipment, the user must be familiar
with the Operating Instructions Manual contents. This
document is a guideline only to be used as an aid to
comprehensive Inservice Training.
Page 3

P/N: 0002-08-50038-00 Rev A
3
V12 and V21 Quick Functions Options ............................ 6
Navigation Area Overview ....................................... 7
Navigation Area Tabs ............................................. 8
Patient Info .......................................................9
Enter Demographics ............................................9
Adjust Patient Size .............................................. 9
Discharge A Patient ............................................10
Standby .........................................................10
Enter Standby .................................................10
Resume Monitoring ............................................10
Privacy Mode ....................................................11
Print .............................................................11
Real-Time Waveforms ..........................................11
Adjust Print Location ...........................................12
Adjust Waveforms Printing .....................................12
ECG .............................................................13
Adjust ECG Lead ...............................................13
Enable Pacemaker Detection ...................................13
Adjust Arrhythmia and Beat Classification Leads ................14
Adjust QRS Threshold ..........................................14
Initiate Relearn ................................................15
Initiate QT Monitoring .........................................15
Enable QTC Limit ..............................................15
Initiate ST Analysis .............................................16
12 Lead ECG .....................................................16
Enable 12 Lead ECG ............................................16
View 12 Lead ECG ..............................................16
Print 12 Lead ECG ..............................................16
Table of Contents
Page 4

P/N: 0002-08-50038-00 Rev A
4
NIBP .............................................................17
Initiate A Non-Invasive Blood Pressure Measurement (NIBP) .....17
Set A Non-Invasive Blood Pressure Measurement Interval .......18
Invasive Blood Pressures ........................................19
Adjust Invasive Blood Pressure Label ...........................19
Zero Invasive Blood Pressure ...................................19
Overlapping Invasive Blood Pressure Waveforms ................20
Temperature ....................................................20
Adjust Temperature Label ......................................20
Adjust Temperature Units ......................................21
Alarms ..........................................................21
Adjust Alarm Limits ............................................21
Adjust Alarm Responses .......................................22
Adjust Arrhythmia Alarms ......................................23
Adjust Arrhythmia Alarm Responses ............................24
Disable Non-Lethal Arrhythmias ................................24
Reset Alarms (Version 2.5 or greater) ......................................25
Pause All Alarms (Version 2.5 or greater) ..................................25
Silence Alarms (Version 2.4 or earlier) .....................................26
Silence All Alarms (Version 2.4 or earlier) ..................................26
Transfer .........................................................26
Hemodynamic Monitoring ......................................27
Initiate A Cardiac Output Measurement ........................27
Initiate Pulmonary Artery Wedge Pressure (PAWP) ..............28
Initiate Hemodynamic Calculations .............................29
Table of Contents (cont'd)
Page 5

P/N: 0002-08-50038-00 Rev A
5
Screen Display ..................................................29
Display Selection ..............................................29
Adjust Display Selection .......................................29
History ..........................................................30
List Trends .....................................................30
Alarm Events ..................................................31
Full Disclosure .................................................31
Volumes .........................................................32
Beat Tone ......................................................32
Date and Time ...................................................33
Parameter Colors ................................................33
Default (Preset) Settings ........................................33
Lock/Unlocking Touchscreen Display ............................34
Table of Contents (cont'd)
Page 6

P/N: 0002-08-50038-00 Rev A
6
Quick Functions Options
V
V
V
Alarm LimitsAlarm Limits
Alarm
Responses
Alarm Watch
Arrhythmia C.O. Run Demographics
Drug
Calculator
Events ECG Menu
Full Disclosure Graphic Trends Hemodynamics
Lead/Size List Trends NIBP Stat
PA Insertion Parameters PAWP
Print
12 Lead
Privacy Mode Quick Trends
Relearn
Arrhythmia
Relearn ST Remote View
Standby Start NIBP ST Review
Transfer/
Discharge
View
All ECG
Zero
All NIBP
Quick Functions Keys (Configurable)
Up to 6 keys may be used in Quick Functions tab
Page 7
P/N: 0002-08-50038-00 Rev A
7
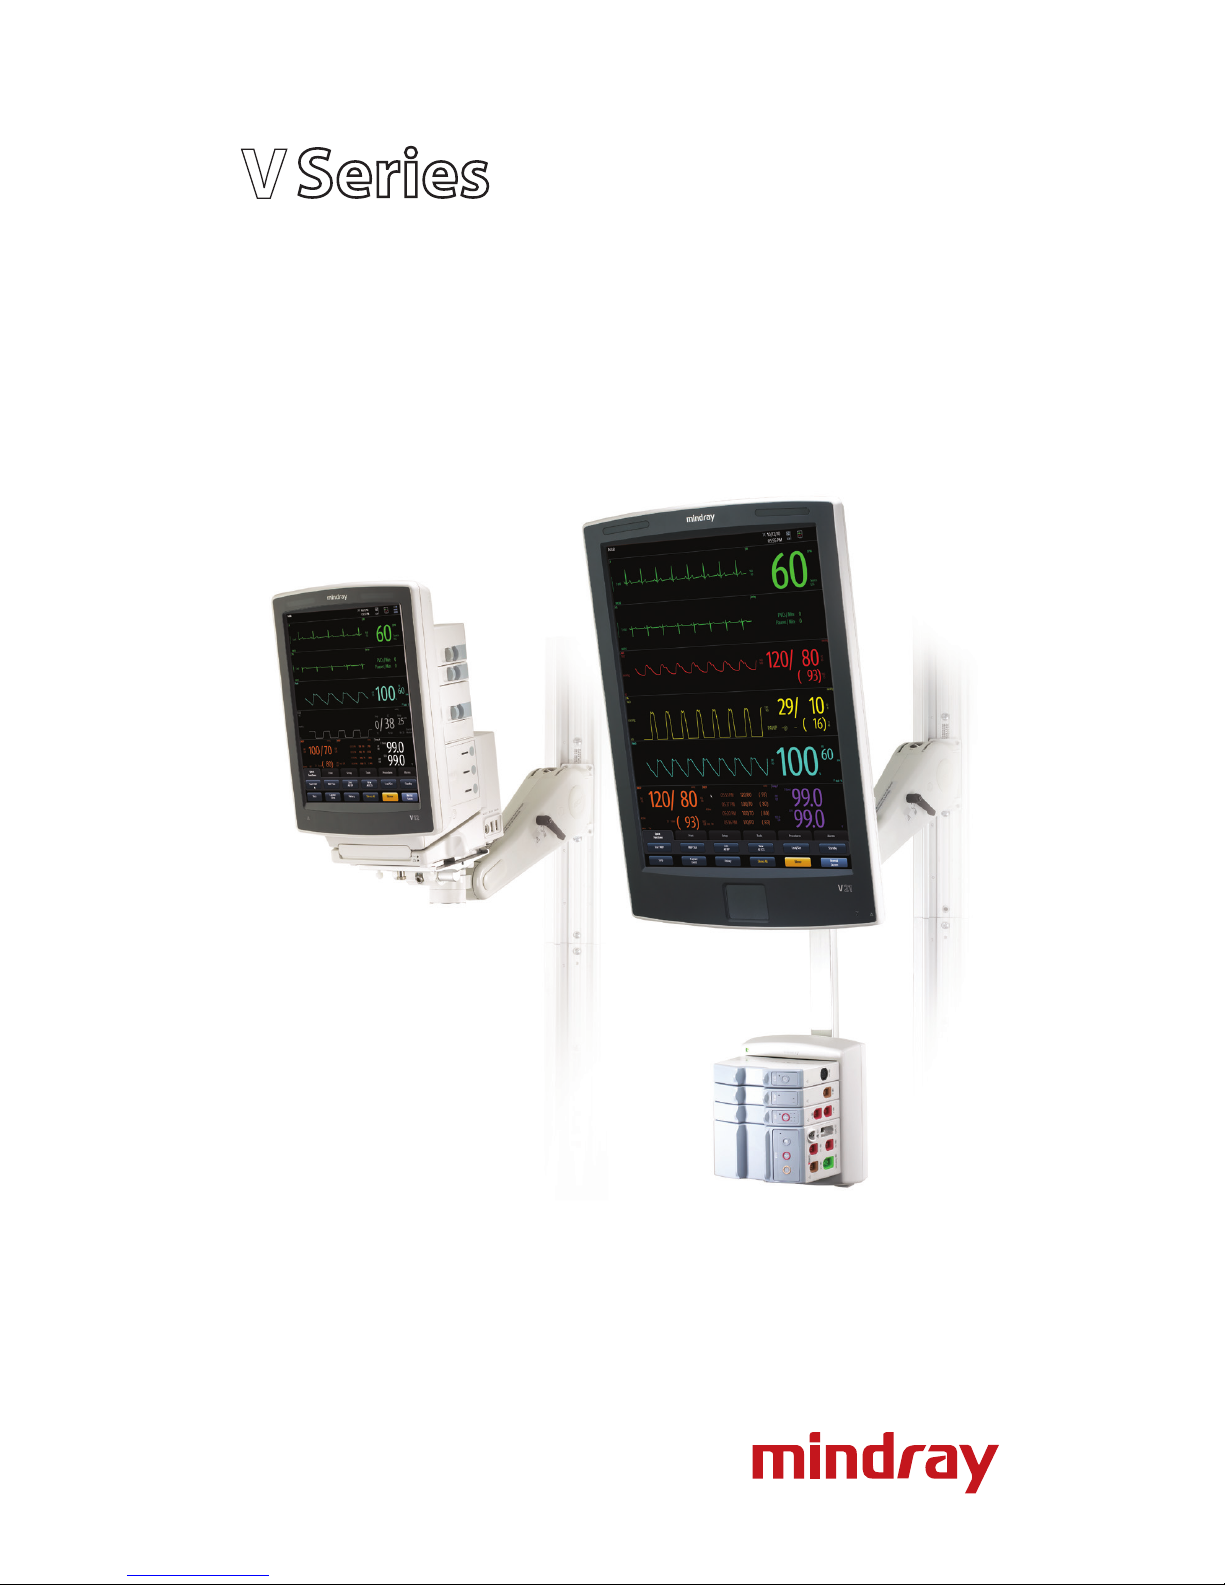
Buttons (2.5 Software)
Strip Initiates a single strip or a continuous strip print request
Capture Event Saves an event to the event database
History Accesses the Trends, Events, and Full Disclosure dialogs
Audio Pause/O Silences all current and future alarms for the congured time
period. If the congured period is set to Permanent, the
button reads Audio O.
Alarm Acknowledge/Reset Silences the current alarms for the congured time period. If
the congured period is set to Permanent, the button reads
Alarm Reset.
Normal Screen Closes all dialogs and returns to the Main Screen
Navigation Area Overview
V
V
V
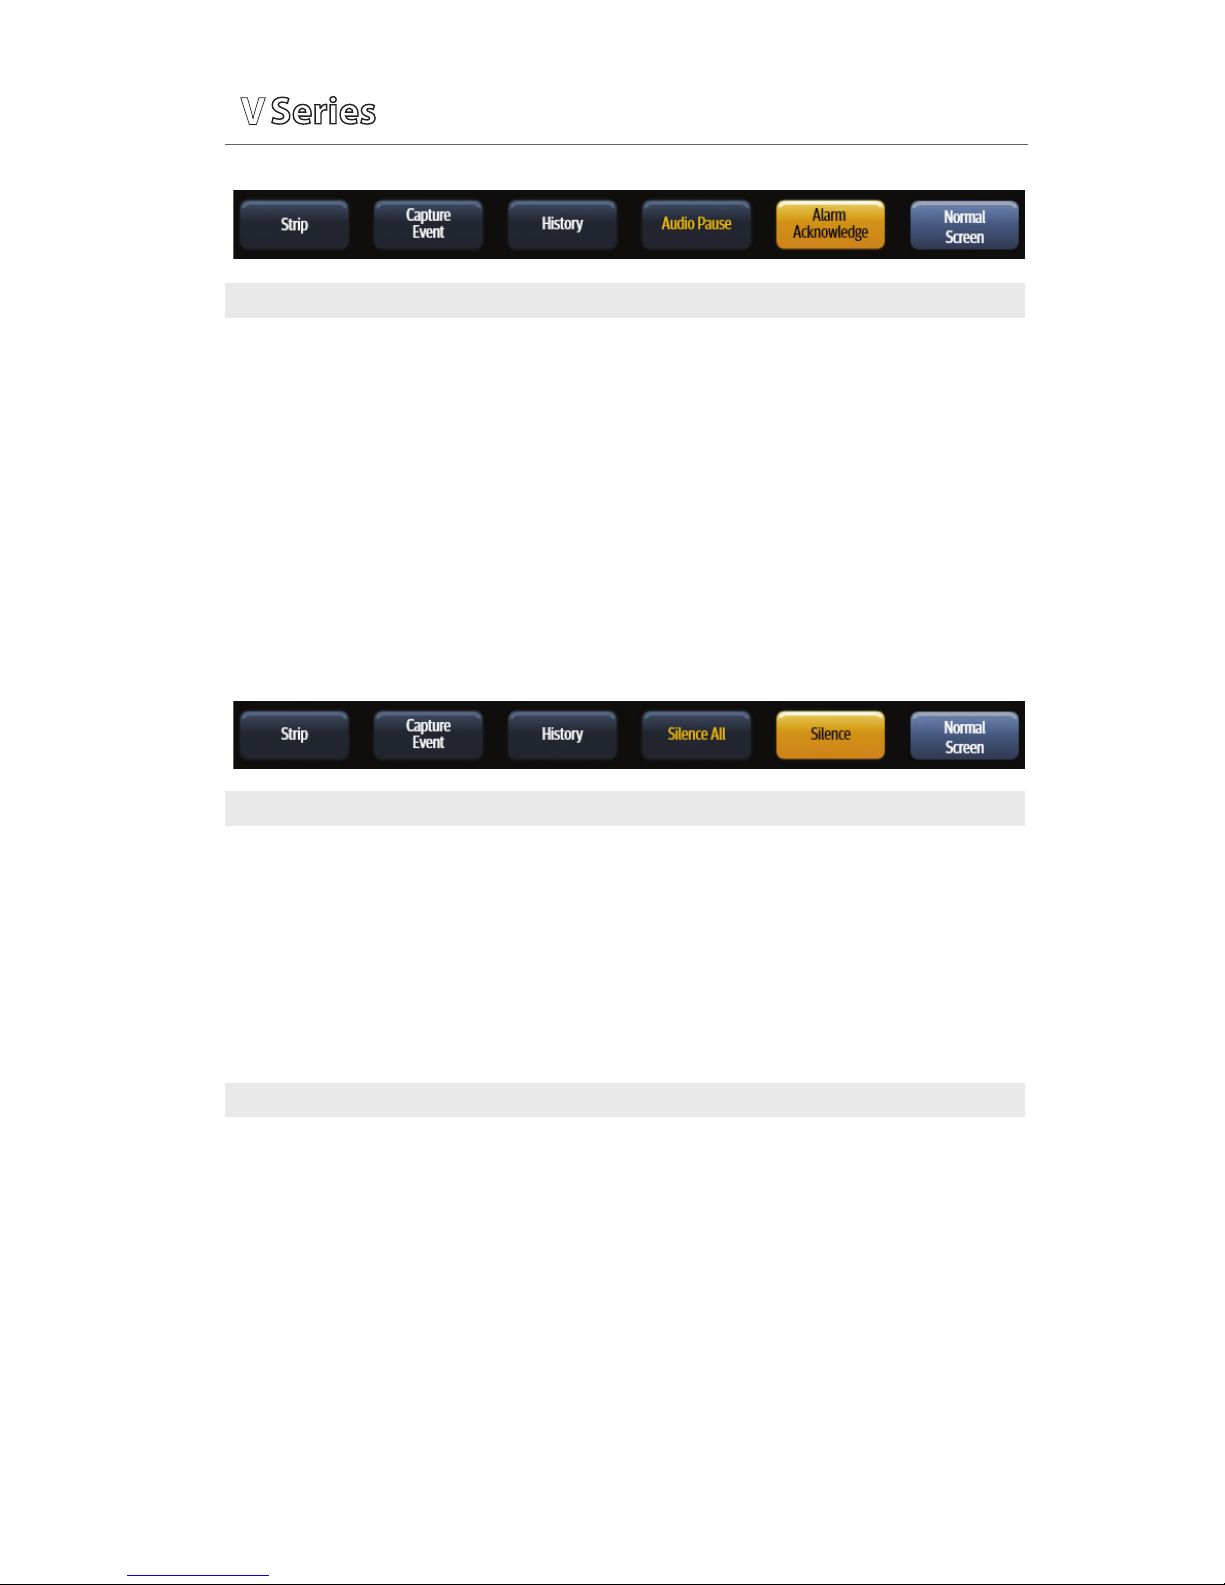
Buttons (2.4 Software)
Strip Initiates a single strip or a continuous strip print request
Capture Event Saves an event to the event database
History Accesses the Trends, Events, and Full Disclosure dialogs
Silence All Silences all current and future alarms for the congured time
period
Silence Silences the current alarms for the congured time period
Normal Screen Closes all dialogs and returns to the Main Screen
Quick Functions Tab (Configurable)
Start/Stop NIBP Starts/Stops a NIBP measurement in progress – If there is no
measurement in progress, the button reads Start NIBP
If there is a measurement progress, the button reads Stop NIBP
NIBP Stat Starts an immediate NIBP measurement
Zero All IBP Sets the current pressure for all invasive pressure channels to zero
View All ECG Displays all the ECG waveforms available based on the lead set
currently in use
Lead/Size Accesses the Lead/Size dialog used to change the ECG waveform
height or wave gain
Standby Places the monitor in the standby mode
Page 8

P/N: 0002-08-50038-00 Rev A
8
Print Tab
Continuous/Abort Begins/ends strips from printing to the thermal printer
Print 12 Lead Prints a 12 Lead Report to the default printer
Print Setup Accesses the Print Setup dialog where the clinician can congure
which waveforms to print and where to print them
Print Queue Accesses the Print Queue dialog
Setup Tab
Patient Info Accesses the Patient Info dialog
Audio Levels Accesses the Audio Levels dialog
Display Accesses the Display Setup dialog
Parameters Accesses the Parameter dialog
System Accesses the System Setup dialog
Tools Tab
Calculators Accesses the Calculators dialog
Alarm Watch Accesses the Alarm Watch dialog
Remote View Accesses the Remote View dialog
System Information Accesses the System Information dialog
VAccess Accesses the VAccess dialog*
Procedures Tab
Note: These buttons are only available when using the Adult or Pediatric patient size
C.O. Run Accesses the Cardiac Output Runs dialog
PAWP Accesses the PAWP dialog
PA Insertion Accesses the PA Insertion dialog.
Hemo Calculations Accesses the Hemodynamic Calculations dialog
12 Lead Accesses the 12 Lead dialog*
Alarms Tab
Limits Accesses the Alarm Limits dialog
Responses Accesses the Responses dialog
Arrhythmia Accesses the Arrhythmia Alarm dialog
Alarm Setup Accesses the Alarm Setup dialog
Navigation Area Tabs
V
V
V
*Only if enabled
Page 9

Quick Reference Guide
V
V
V
P/N: 0002-08-50038-00 Rev A
9
PATIENT INFO
Enter Demographics
The Patient Info menu allows the clinician to enter and modify patient
demographics.
To enter demographics on V12 or V21 bedside monitor:
a. Select Demographics* (Quick Function tab)
or select Patient Info (Setup tab) to enter Demographics tab
b. Select applicable button to open field and enter patient information
using on screen keyboard
c. Select Accept to accept information on patient name and ID
d. Select Enter to accept information on height, weight, DOB, and age
e. Select Accept to save settings and return to the main screen
Panorama® Central Station Interface: Entering demographic information on
the Panorama Central Station or WorkStation automatically enters it on the
V12 or V21 bedside monitor. Entering demographic information on the V12 or
V21 bedside monitor automatically enters it on the Panorama Central Station,
ViewStation, and WorkStation. Entering Demographics is not required for
patient information to be displayed or stored.
Adjust Patient Size
The Patient Info menu allows the clinician to adjust patient size. To adjust
patient size on the V12 or V21 bedside monitor:
a. Select Demographics* (Quick Function tab)
or select Patient Info (Setup tab) to enter Demographics tab
b. Select Patient Size
c. Select Adult, Pediatric, or Neonate
d. Select Accept to save settings and return to the main screen
Note: Adjusting patient size restores the default (preconfigured) settings
but does not clear patient information or data. Patient size is retained upon
discharge.
Panorama® Central Station: Patient size cannot be changed from the
Panorama Central Station.
*Configurable
Page 10

P/N: 0002-08-50038-00 Rev A
10
Quick Reference Guide
V
V
V
Discharge A Patient
The Discharge function clears all patient information and restores default
(preconfigured) settings.
To Discharge a patient from the V12 or V21 bedside monitor:
a. Select Discharge* (Quick Function tab)
or select Patient Info (Setup tab) and select Transfer/Discharge tab
b. Select Discharge
c. Select Yes to confirm
Note: After the patient is discharged, default (preconfigured) settings are
restored and Discharged is displayed on the V12 or V21 bedside monitor.
Panorama® Central Station Interface: Discharging a patient on the V12 or
V21 bedside monitor automatically discharges the patient on the Panorama
Central Station, WorkStation, and ViewStation. Discharging the patient on
the Panorama Central Station discharges the patient on the WorkStation,
ViewStation, and V12 or V21 bedside monitor (optional).
STANDBY
Enter Standby
The Standby function allows the clinician to suspend monitoring on a patient.
While in standby, the patient is not monitored; however, all data and settings
are preserved.
To place a patient into Standby on the V12 or V21 bedside monitor:
a. Select Standby* (Quick Function tab)
Or
a. Select Patient Info (Setup tab) and select Standby
Resume Monitoring
Touch anywhere on the screen to remove a patient from Standby and resume
monitoring on the V12 or V21 bedside monitor
*Configurable
Page 11

Quick Reference Guide
V
V
V
P/N: 0002-08-50038-00 Rev A
11
Panorama® Central Station Interface: Placing a patient in standby on the V12
or V21 bedside monitor automatically places the Panorama Central Station,
WorkStation, and ViewStation in standby. Selecting Bedside and Panorama
Standby on the Panorama Central Station or WorkStation automatically places
the bedside monitor and ViewStation in standby. Touch anywhere on the
screen on the V12 or V21 bedside monitor to remove a patient from standby
as a patient cannot be removed from Standby on the Panorama Central
Station.
PRIVACY MODE
To suspend alarm notification and turn off the display on the V12 or V21
bedside monitor when admitted to the Panorama Central Station:
a. Select Privacy Mode* (Quick Function tab)
Or
a. Select Display (Setup tab) and select Privacy Mode
To remove a patient from Privacy Mode and resume monitoring on the V12 or
V21 bedside monitor touch anywhere on the screen.
Note: If communication is interrupted between the V12 or V21 bedside
monitor and the Panorama Central Station, Privacy Mode is automatically
disabled.
Note: A patient cannot be removed from Privacy Mode from the Panorama
Central Station. The patient must be removed from Privacy Mode on the V12
or V21 bedside monitor.
PRINT
Real-Time Waveforms
To print a strip on a patient on the V12 or V21 bedside monitor:
a. Select Strip in the Navigational Area
b. Select Waveform (modular recorder enabled)
*Configurable
Page 12

P/N: 0002-08-50038-00 Rev A
12
Quick Reference Guide
V
V
V
Adjust Print Location
To adjust the print location for a patient on the V12 or V21 bedside monitor:
a. Select Print Setup (Print tab)
b. Select Destination tab
c. Select
1) Real Time to set the Strip location
2) Print on Alarm to set the automatic alarm printing location
(Refer to Alarm Responses tab)
3) Others to set the historical and other reports’ location
d. Select
1) Thermal to print to the modular recorder
2) Laser to print to a predetermined laser printer
3) Laser, Thermal to simultaneously print to the modular recorder and a
predetermined laser printer
e. Select Accept to save settings and return to the main screen
Adjust Waveforms Printing
To adjust printed waveforms on a patient on the V12 or V21 bedside monitor:
a. Select Print Setup (Print tab)
b. Select Setup
c. Select Configuration Waveform
1) Select waveform and select Add to add waveform to the selected list
Or
2) Select waveform from the selected list and select Remove to remove
the waveform from the selected List
d. Select Accept to save settings and return to the Setup tab
e. Select Accept to return to the main screen
Page 13

Quick Reference Guide
V
V
V
P/N: 0002-08-50038-00 Rev A
13
ECG
Adjust ECG Lead
The V12 or V21 bedside monitor allows the clinician to adjust the leads being
viewed on the main screen.
To adjust an ECG Lead on the V12 or V21 bedside monitor:
a. Select ECG waveform to enter ECG Setup tab
b. Select ECG Leads
c. Scroll and select lead from drop down menu
d. Select Accept to save settings and return to the main screen
Panorama® Central Station Interface: Adjusting ECG leads on the V12 or V21
bedside monitor, Panorama® Central Station, WorkStation, and ViewStation are
independent.
Enable Pacemaker Detection
The V12 or V21 bedside monitor allows the clinician to enable pacemaker
enhancement.
To enable the pacemaker enhancement on the V12 or V21 bedside monitor:
a. Select ECG waveform to enter ECG Setup tab
Or
a. Select Parameters (Setup tab) and select ECG to enter ECG Setup tab
b. Select Pacer tab
c. Select Pacer Enhancement and select On
d. Select Accept to save settings and select Done (as needed) to return to
the main screen
Panorama® Central Station Interface: Pacemaker enhancement on the V12 or
V21 bedside monitor, Panorama Central Station, WorkStation, and ViewStation
are independent.
Page 14

P/N: 0002-08-50038-00 Rev A
14
Quick Reference Guide
V
V
V
Adjust Arrhythmia and Beat Classification Leads (Version 2.5 or greater)
The V12 or V21 bedside monitor allows the clinician to select the primary and
secondary leads used for arrhythmia analysis as well as a third lead for beat
classification. To adjust these leads on the V12 or V21 bedside monitor:
a. Select ECG waveform to enter ECG Setup tab
Or
a. Select Parameters (Setup tab) and select ECG to enter ECG Setup tab
b. Select Advanced Arrhy Setup tab
c. Select Primary Analysis Lead
d. Scroll and select lead from drop down menu
e. Select Secondary Analysis Lead
f. Scroll and select lead from drop down menu
g. Select Beat Classification Lead
h. Scroll and select lead from drop down menu
i. Select Accept to save settings and select Done (as needed) to return to
the main screen
Adjust QRS Threshold ( Version 2.5 or greater)
The V12 or V21 bedside monitor allows the clinician to manually adjust the
QRS threshold on (detection) to avoid noise spikes or P-waves as valid beats.
To adjust the QRS threshold on the Primary and Secondary Analysis leads on
the V12 or V21 bedside monitor:
a. Select HR tile to enter HR Alarms tab
b. Select Setup tab
c. Select QRS threshold to enter Minimum QRS Threshold dialog
d. Adjust threshold line using Ç or
È
e. Select Accept Threshold
f. Select Done to save settings and select Accept to return to the main
screen
Page 15

Quick Reference Guide
V
V
V
P/N: 0002-08-50038-00 Rev A
15
Initiate ECG Relearn
To initiate arrhythmia and ST learning manually on the V12 or V21 bedside
monitor:
a. Select ECG waveform to enter ECG Setup tab
Or
a. Select Parameters (Setup tab) and select ECG to enter ECG Setup tab
b. Select Relearn Both to update arrhythmia and ST templates
c. Select Accept to save settings and select Done (as needed) to return to
the main screen
Initiate QT Monitoring (Version 2.5 or greater)
a. Select ECG waveform to enter ECG Setup tab
Or
a. Select Parameters (Setup tab) and select ECG to enter ECG Setup tab
b. Select Advanced Arrhy Setup tab
c. Select QT Monitoring and select On
d. Select Accept to save settings and select Done (as needed) to return to
the main screen
Enable QTC Limit (Version 2.5 or greater)
a. Select ECG waveform to enter ECG Setup tab
Or
a. Select Parameters (Setup tab) and select ECG to enter ECG Setup tab
b. Select Advanced Arrhy Setup tab
c. Select QTC Limit
d. Select QTC High Range
e. Select Accept to save settings and return to the Advanced Arrhy Setup tab
f. Select Accept to save settings and select Done (as needed) to return to
the main screen
Page 16

P/N: 0002-08-50038-00 Rev A
16
Quick Reference Guide
V
V
V
Initiate ST Analysis
To initiate ST analysis on the V12 or V21 bedside monitor:
a. Select ST tile and select Setup tab
Or
a. Select Parameters (Setup tab) and Select ST to enter the ST Setup tab
b. Select Analysis and select On
c. Select Accept to save settings and select Done (as needed) to return to
the main screen
12 Lead ECG
Enable 12 Lead ECG
The V12 or V21 bedside monitor allows the clinician to monitor 12 Leads of
ECG and provide a 12 Lead Interpretive Report.
To enable 12 Lead ECG on V12 or V21 bedside monitor:
a. Prep patient’s skin in accordance with hospital policy
b. Attach electrode to lead wire before placing on patient
c. Place electrodes on patient in accordance with hospital policy
d. Insert 12 Lead ECG Module into V-Patient Server (VPS)
e. Select ECG waveform to enter ECG Setup tab
f. Select ECG Cable Type
g. Scroll and select 12 Lead from drop down menu
h. Select Accept to save settings and return to the main screen
View 12 Lead ECG
To view 12 Lead ECG on V12 or V21 bedside monitor:
a. Select View All ECG* (Quick Function tab)
Or
a. Select ECG waveform to enter ECG Setup tab and select View All ECG
b. Select View All ECG a 2nd time to remove viewing of 12 Lead ECG
*Configurable
Page 17

Quick Reference Guide
V
V
V
P/N: 0002-08-50038-00 Rev A
17
Note: If viewing on V12 monitor selecting View All ECG a second time will
display the next 6 leads and selecting View All ECG a third time will remove
viewing of 12 Lead ECG
Print 12 Lead ECG
To print a 12 Lead ECG Interpretive Report on V12 or V21 bedside monitor:
a. Select Print tab in Navigation Area
b. Select Print 12 Lead to print to the configured location
Or
a. Select Procedures tab in Navigation Area
b. Select 12 Lead
c. Select Print 12 Lead to print to the configured location
d. Select Accept to return to the main screen
NIBP
Initiate a Non-Invasive Blood Pressure Measurement (NIBP)
To initiate a NIBP measurement on a patient on the V12 or V21 bedside
monitor
a. Select on the VPS module
Or
a. Select Start NIBP* (Quick Function tab)
Or
a. Select NIBP tile to enter the Alarms tab and Select Start NIBP
b. Select Accept to return to the main screen
*Configurable
Page 18

P/N: 0002-08-50038-00 Rev A
18
Quick Reference Guide
V
V
V
Set A Non-Invasive Blood Pressure Measurement Interval
The V12 or V21 bedside monitor allows the clinician to set an interval for a
NIBP measurement to be obtained automatically.
To set an automatic interval on the V12 or V21 bedside monitor:
a. Select NIBP Interval* (Quick Function tab) repeatedly to the preferred
interval
Or
a. Select NIBP tile
b. Select Setup tab
c. Select Interval
d. Scroll and select interval
e. Select Accept to save settings and to return to the main screen
Note: When a NIBP interval is first selected, Start NIBP must be selected. If
the NIBP interval is adjusted, Start NIBP is not required. Start NIBP must be
re-selected if the NIBP interval is interrupted (i.e. Standby, NIBP Stop, etc).
During NIBP cuff inflation, to stop all NIBP measurements on a patient on the
V12 or V21 bedside monitor:
a. Select on the VPS module
Or
a. Select Stop NIBP* (Quick Function tab)
Or
a. Select NIBP tile
b. Select Stop NIBP
c. Select Accept to return to the main screen
Note: NIBP Start must be selected to resume interval.
*Configurable
Page 19

Quick Reference Guide
V
V
V
P/N: 0002-08-50038-00 Rev A
19
INVASIVE BLOOD PRESSURES
The V12 or V21 bedside monitors allow a clinician to monitor up to 8 invasive
blood pressures (IBP) simultaneously.
Adjust Invasive Blood Pressure Label
To adjust the label on an invasive blood pressure on the V12 or V21 bedside
monitor:
a. Insert IBP Module as needed
b. Select the invasive blood pressure waveform to enter IBP Waveform and
select Setup tab
Or
b. Select Parameters (Setup tab) and select the Invasive Blood Pressure
(ART, CVP, etc.) to enter the Invasive Blood Pressure’s Setup tab
c. Select Label
d. Select label
e. Select Accept to save settings and select Done (as needed) to return to
the main screen
Note: If the label is assigned to another IBP port, even if the IBP is not being
displayed or utilized, the label will not be included in the list selection.
Zero Invasive Blood Pressure
To zero one or more invasive blood pressure transducers on the V12 or V21
monitor:
a. Insert IBP Module as needed
b. Connect the invasive blood pressure cable to the invasive blood pressure
transducer set
c. Position transducer and open the invasive line in accordance with
hospital policy
d. Select
0
on the VPS module
Or
d. Select Zero All* (Quick Functions tab)
Or
*Configurable
Page 20

P/N: 0002-08-50038-00 Rev A
20
Quick Reference Guide
V
V
V
d. Select the invasive blood pressure waveform to enter IBP Waveform and
select Zero
Note: Zero and flush the pressure line at regular intervals per standard
hospital procedure.
Overlapping Invasive Blood Pressure Waveforms
The V12 or V21 bedside monitor allows overlapping of two invasive blood
pressures on the main screen. To overlap two invasive blood pressures on the
V12 or V21 bedside monitor:
a. Select in upper, right corner of main screen
b. Select preset’s name from Display Preset list
c. Select Temporary Edit
d. Select 1st invasive blood pressure to overlap
e. Select Overlap
f. Select 2nd invasive blood pressure to overlap from drop down list
g. Select Accept to save settings and return to the Display Setup tab
h. Select Accept to return to the main screen
TEMPERATURE
The V12 or V21 bedside monitors allow a clinician to monitor up to three
temperatures simultaneously.
Adjust Temperature Label
To adjust the temperature label on the V12 or V21 bedside monitor:
a. Select the temperature tile to enter Alarms tab
b. Select Setup tab
c. Select T(1–3) Label
d. Select label
e. Select Accept to return to the main screen
Or
Page 21

Quick Reference Guide
V
V
V
P/N: 0002-08-50038-00 Rev A
21
a. Select Parameters (Setup tab) and select Temperature to enter the
Temperatures Setup tab
b. Select T(1–3) Label
c. Select label
d. Select Accept to save settings and select Done (as needed) to return to
the main screen
Adjust Temperature Units
To adjust the temperature’s units on the V12 or V21 bedside monitor:
a. Select the temperature tile to enter Alarms tab
b. Select Setup tab
c. Select Units
d. Select °C or °F
e. Select Accept to return to the main screen
Or
a. Select Parameters (Setup tab) and select Temperature to enter the
Temperatures Setup tab
b. Select Units
c. Select °C or °F
d. Select Accept to save settings and select Done (as needed) to return to
the main screen
ALARMS
Adjust Alarm Limits
The Alarms tab allows the clinician to configure alarm limit and alarm
responses on the V12 or V21 bedside monitor.
To adjust a patient’s alarm limit on the V12 or V21 bedside monitor:
a. Select parameter’s numeric tile to open parameter’s Alarms tab
b. Select High or Low limit value
c. Adjust value using on screen keypad or select Off to disable the
parameter’s alarm limit(s)
d. Select Enter
e. Select Accept to save settings and return to the main screen
Page 22

P/N: 0002-08-50038-00 Rev A
22
Quick Reference Guide
V
V
V
Or
a. Select Alarms tab from Navigation Area
b. Select Limits
c. Select alarm limit group's tab (i.e. ECG/Resp, Oximetry, etc.)
d. Select parameter
e. Select High or Low limit value
f. Adjust value using on screen keypad or select Off to disable the
parameter’s alarm limit(s)
g. Select Enter
h. Select Accept to save settings and return to the Alarm Limits tab
i. Select Accept to return to the main screen
Panorama® Central Station interface: Changing alarm limits on the Panorama
Central Station or WorkStation will automatically change alarm limits on the
V12 or V21 bedside monitor. Changing alarm limits at the V12 or V21 bedside
monitor will automatically change alarm limits on the Panorama Central
Station and WorkStation.
Adjust Alarm Responses
To adjust a patient’s alarm responses on the V12 or V21 bedside monitor:
a. Select Alarms tab from Navigation Area
b. Select Responses
c. Select applicable alarm limit group's tab (i.e. ECG/Resp, Oximetry, etc.)
d. Select parameter
e. Select
• Alarm Level – to adjust the audio and visual alarm indicators.
Level options include High (Red), Medium (Yellow), and Low (Blue)*
• Print on Alarm – to activate an automatic printing when the alarm
occurs
• Save to Event – to save a 20 second event in the Events tab
(History menu)
(A in the box indicates selected)
f. Select Accept to save settings and return to the main screen
Page 23

Quick Reference Guide
V
V
V
P/N: 0002-08-50038-00 Rev A
23
Panorama® Central Station interface: Changing alarm responses at the
Panorama Central Station or WorkStation will not change alarm responses on
the V12 or V21 bedside monitor. Changing alarm responses at the V12 or V21
bedside monitor will not change alarm responses on the Panorama Central
Station and WorkStation.
Adjust Arrhythmia Alarms
To adjust a patient’s arrhythmia alarm on the V12 or V21 bedside monitor:
a. Select ECG waveform to enter ECG Setup tab
b. Select Arrhythmia tab
c. Select individual arrhythmia
d. Select
• On/Off: to enable or disable arrhythmia alarm notification
(A in the box indicates selected)
• High (Red), Medium (Yellow), or Low (Blue) – to adjust the audio and
visual alarm indicators
e. Select Accept to save settings and return to the main screen
Or
a. Select Alarms tab from Navigation Area
b. Select Arrhythmia to enter the Arrhythmia tab
c. Select individual arrhythmia
d. Select
• On/Off: to enable or disable arrhythmia alarm notification
(A in the box indicates selected)
• High (Red), Medium (Yellow), or Low (Blue) – to adjust the audio and
visual alarm indicators
e. Select Accept to save settings and return to the main screen
Page 24

P/N: 0002-08-50038-00 Rev A
24
Quick Reference Guide
V
V
V
Adjust Arrhythmia Alarm Responses
To adjust a patient’s alarm responses on the V12 or V21 bedside monitor:
a. Select Alarms tab from Navigation Area
b. Select Arrhythmia to enter the Arrhythmia tab
c. Select Responses tab
d. Select arrhythmia
e. Select
• Audio On – to enable the audio notification.
• Print on Alarm – to activate an automatic printing when the alarm
occurs
• Save to Event – to save a 20 second event in the Events tab
(History menu)
(A in the box indicates selected)
f. Select Accept to save settings and return to the main screen
Panorama® Central Station interface: Adjusting arrhythmia alarms at the
Panorama Central Station or WorkStation will not change arrhythmia alarms
on the V12 or V21 bedside monitor. Adjusting arrhythmia alarms at the V12 or
V21 bedside monitor will affect the arrhythmia alarm on the Panorama Central
Station, ViewStation, and WorkStation.
Disable Non-Lethal Arrhythmias
To disable all arrhythmia alarms except lethal arrhythmias on the V12 or V21
bedside monitor:
a. Select ECG waveform to enter ECG Setup tab
b. Select Arrhythmia tab
c. Select Lethals Only On
d. Select Accept to save settings and return to the main screen
Or
a. Select Alarms tab from Navigation Area
b. Select Arrhythmia to enter the Arrhythmia tab
c. Select Lethals Only On
d. Select Accept to save settings and return to the main screen
Page 25

Quick Reference Guide
V
V
V
P/N: 0002-08-50038-00 Rev A
25
To adjust a patient’s arrhythmia threshold setting on the V12 or V21 bedside
monitor:
a. Select ECG waveform to enter ECG Setup tab
b. Select Arrhy Setup tab
c. Select individual arrhythmia threshold
d. Scroll and select value or enter value using on screen keypad
e. Select Accept to save settings and return to the main screen
Or
a. Select Alarms tab from Navigation Area
b. Select Arrhythmia to enter the Arrhythmia tab
c. Select Setup
d. Select individual arrhythmia threshold
e. Scroll and select value or enter value using on screen keypad
f. Select Accept to save settings and return to the main screen
RESET ALARMS (Version 2.5 or greater)
Select Alarm Acknowledge in the Navigation Area on the V12 or V21 bedside
monitor to silence all current alarms for a preconfigured time interval or until
the alarm condition is resolved.
Panorama® Central Station interface: Selecting Alarm Acknowledge on the
V12 or V21 bedside monitor will silence an alarm on the Panorama Central
Station, WorkStation, and ViewStation for a preconfigured amount of time.
Selecting Mute at the Panorama Central Station will not silence an alarm at the
V12 or V21 bedside monitor.
PAUSE ALL ALARMS (Version 2.5 or greater)
Select Audio Pause in the Navigation area on the V12 or V21 bedside monitor
to silence all current and future alarms for a preconfigured time interval.
Panorama® Central Station interface: Selecting Audio Pause on the V12
or V21 bedside monitor will pause active alarms on the Panorama Central
Station, WorkStation, and ViewStation for a preconfigured amount of time.
Selecting Mute at the Panorama Central Station will not pause alarms on the
V12 or V21 bedside monitor.
Page 26

P/N: 0002-08-50038-00 Rev A
26
Quick Reference Guide
V
V
V
SILENCE ALARMS (Version 2.4 or earlier)
Select Silence in the Navigation Area on the V12 or V21 bedside monitor to
silence all current alarms for a preconfigured time interval or until the alarm
condition is resolved.
Panorama® Central Station interface: Selecting Silence on the V12 or V21
bedside monitor will silence an alarm on the Panorama Central Station,
WorkStation, and ViewStation for a preconfigured amount of time. Selecting
Mute at the Panorama Central Station will not silence an alarm on the V12 or
V21 bedside monitor.
SILENCE ALL ALARMS (Version 2.4 or earlier)
Select Silence All in Navigation Area on the V12 or V21 bedside monitor to
silence all current and future alarms for a preconfigured time interval.
Panorama® Central Station interface: Selecting Silence All on the V12 or V21
bedside monitor will silence active alarms on the Panorama Central Station,
WorkStation, and ViewStation for a preconfigured amount of time. Selecting
Mute at the Panorama Central Station will not silence alarms on the V12 or V21
bedside monitor.
TRANSFER
The V12 or V21 bedside monitor has the ability to transfer patient data
through the VPS (V-Patient Server).
To transfer patient data from one V12 or V21 bedside monitor to another V12
or V21 bedside monitor:
a. Remove VPS from original V12 or V21 bedside monitor
b. Insert VPS into new V12 or V21 bedside monitor
c. Select from the Patient ID Mismatch menu
1. Monitor to continue with the patient data and settings in the new
monitor and delete all patient data and setting on the original VPS.
2. VPS to transfer 12 hours of patient data and settings on the original
VPS to the new monitor and delete all previous patient data on the
new monitor.
Page 27

Quick Reference Guide
V
V
V
P/N: 0002-08-50038-00 Rev A
27
3. New Patient to delete all patient data on the original VPS and all
patient data on the new monitor. Default settings for the patient
category are applied to the new patient. All patient data on the VPS
and on the new monitor will be deleted.
Panorama® Central Station Interface: Transferring patient data from one V12
or V21 bedside monitor to another V12 or V21 bedside monitor will not transfer
data within the Panorama Central Station. Transferring data within a Panorama
Central Station or to a different Panorama Central Station may affect the V12 or
V21 bedside monitor.
HEMODYNAMIC MONITORING
Initiate A Cardiac Output Measurement
Cardiac Output (C.O.) is the amount of blood ejected from the left ventricle
each minute, expressed in liters per minute (l/min). Cardiac Index (CI) is the
Cardiac Output divided by the patient's body surface area.
To initiate a Cardiac Output measurement on the V12 or V21 bedside monitor:
a. Insert C.O. Module
b. Connect the C.O. cable to the C.O. connector on the monitor
interconnecting the C.O. Module, PA Catheter, and injectate.
c. Select C.O. tile to enter C.O. Alarms tab and select C.O. Run
Or
c. Select Procedures tab from the Navigation Area and select C.O. Run
d. Verify the computation constant or adjust the computation constant in
the Setup tab
e. Enter height/weight in the Setup tab to obtain calculated Cardiac Index
f. Select Accept to return to Cardiac Output dialog
g. Inject solution when “Inject When Ready” message is displayed
(Auto start is enabled in Setup tab)
Or
g. Select Start C.O. and inject solution within 4 seconds to perform a
Cardiac Output measurement when “Ready” message is displayed
(Auto Start is disabled in Setup tab)
Page 28

P/N: 0002-08-50038-00 Rev A
28
Quick Reference Guide
V
V
V
h. Wait 1 minute between injections to allow baseline stabilization
i. Perform additional Cardiac Output measurements as needed
j. Select measurement to include/exclude in the Cardiac Output average
(A in the box indicates cardiac output measurement is selected.
An in the box indicates the cardiac output measurement is rejected)
k. Select Print Runs to print C.O. Run(s) to thermal printer modular recorder
l. Select Hemo Calculations to access the Hemodynamic Calculations
dialog
Or
l. Select Done to return to the main screen
Initiate Pulmonary Artery Wedge Pressure (PAWP)
Pulmonary Artery Wedge Pressure (PAWP) is a pressure measurement derived
from a PA catheter when the PA distal balloon is inflated and the catheter
advances and occludes a distal pulmonary artery. PAWP pressure is a reflection
of the pressure in the left ventricle at end-diastole.
To initiate a PAWP measurement on the V12 or V21 bedside monitor:
a. Select PA waveform or numeric tile and select PAWP
Or
a. Select Procedures tab from the Navigation Area and select PAWP
b. Select Setup to adjust PA sweep speed, PA scale, or display Art line
c. Select Accept to return to PAW P dialog
d. Inflate balloon and watch PA waveform for wedge waveform
e. Select Measure to freeze the waveform once a satisfactory wedge
waveform is detected
f. Adjust PAWP reference line to the desired position using Ç or È
g. Select Accept PAWP to enter the PAWP measurement and Done to return
to the main screen
Or
g. Resume to repeat measurement
Note: Follow manufacturer’s suggested procedures and hospital policy for
PAWP balloon inflation.
Page 29

Quick Reference Guide
V
V
V
P/N: 0002-08-50038-00 Rev A
29
INITIATE HEMODYNAMIC CALCULATIONS
Hemodynamic calculations are a set of values that are used to determine the
hemodynamic status of the patient.
To initiate hemodynamic calculations on the V12 or V21 bedside monitor:
a. Select Hemo Calculations from C.O. dialog
Or
a. Select Procedures tab from the Navigation Area and select Hemo
Calculations.
Note: HR, Art (Mean and Diastolic), PA (Mean), CVP, PAWP, and average
C.O. measurements are automatically entered from current or accepted
values along with height and weight if previously entered.
b. Select remaining parameter and manually enter (*indicates manual entry)
c. Select Calculate to complete calculation
d. Select Print to print the currently displayed Hemodynamic Calculations
e. Select Done to return to the main screen
SCREEN DISPLAY
The V12 and V21 allow the clinician to adjust the main display based on patient
acuity.
Display Selection
To enter the display selection menu and adjust the main screen’s layout on the
V12 or V21 bedside monitor:
a. Select in upper, right corner of main screen
b. Select preset’s name from Display Preset list
c. Select Accept to return to the main screen
Note: The presets' names are determined at installation.
Adjust Display Selection
To temporarily adjust the display selection on a patient on the V12 or V21
bedside monitor:
a. Select in upper, right corner of main screen
b. Select preset’s name from Display Preset list
Page 30

P/N: 0002-08-50038-00 Rev A
30
Quick Reference Guide
V
V
V
c. Select Temporary Edit
d. Select waveform area to adjust waveform
e. Select new waveform parameter from list or select Off to remove
waveform
f. Select tile to adjust numeric parameter
g. Select new numeric parameter from list or select Off to remove numeric
parameter
h. Select Accept to save settings and return to the Display Setup tab
i. Select Accept to return to the main screen
Note: The first waveform is always ECG lead and HR is always located in the first
digital tile in the display selection.
Panorama® Central Station Interface: Digital and waveform display
selections on the Panorama Central Station, WorkStation, and ViewStation are
independent of the V12 or V21 bedside monitor.
HISTORY
List Trends
The List tab stores 3000 trend sets on a patient.
To display and adjust List trends on a patient on the V12 or V21 bedside
monitor:
a. Select History in the Navigation Area
b. Select List Trends tab
c. Select Display Group to specify trend category or select Custom
Configuration for user defined parameters to be displayed
d. Select Accept to save settings
e. Select Display Interval to specify the time interval list trends are to be
displayed
f. Select Accept to save settings
g. Select Done to return to the main screen
To print List trends on a patient at the V12 or V21 bedside monitor:
a. Select History in the Navigation Area
Page 31

Quick Reference Guide
V
V
V
P/N: 0002-08-50038-00 Rev A
31
b. Select List Trends tab
c. Select Print and confirm specified time period to print to the configured
location
d. Select Accept to print to the configured location
e. Select Done to return to the main screen
Panorama® Central Station Interface: Trend storage, display interval, and
printing length on V12 or V21 bedside monitor and Panorama Central Station
are independent.
Alarm Events
The Events tab stores 1000 physiological and technical events on a patient
based on the Alarm and Arrhythmia Responses tab.
To view and print an alarm event on a patient on the V12 or V21 bedside
monitor:
a. Select History in the Navigation Area
b. Select Events tab
e. Scroll and select event
f. Select View and Detail to view the 20 second event
g. Select Print to print to the configured location
h. Select Done to return to the main screen
Note: The waveforms printed are determined by Setup in the Event or
Disclosure tab on the V12 or V21 bedside monitor.
Panorama® Central Station Interface: Event storage and printing on the V12 or
V21 bedside monitor and Panorama Central Station are independent.
Full Disclosure
The V12 or V21 has the ability to store configured waveforms and associated
numeric information collected for 48 hours.
To view and print the patient's waveforms on the V12 or V21 bedside monitor:
Page 32

P/N: 0002-08-50038-00 Rev A
32
Quick Reference Guide
V
V
V
a. Select History in the Navigation Area
b. Select Full Disclosure tab
c. Scroll and highlight waveform
d. Select View and Detail to expand waveform
e. Select Print to print to the configured location
f. Select Done to return to the main screen
Panorama® Central Station Interface: Full disclosure storage and printing
on the V12 or V21 bedside monitor and Panorama Central Station are
independent.
VOLUMES
The alarm volume and QRS volume can be adjusted on the V12 or V21 bedside
monitors.
To adjust the alarm volume on the V12 or V21 bedside monitor:
a. Select Setup tab from Navigation area
b. Select Audio Levels
c. Select volume ranging from X*10 (X=minimum, 10=max)
using arrows on Alarm Volume
d. Select Accept to return to the main screen
*Note: The minimum volume range is predetermined during installation (Version 2.5 or greater)
BEAT TONE
To adjust the beat tone (QRS tone) volume on the V12 or V21 bedside monitor:
a. Select Setup tab from Navigation area
b. Select Audio Levels
c. Select volume ranging from 010 (0=Off, 10=Max)
using arrows on Beep Volume
d. Select Accept to return to the main screen
Note: The QRS tone is derived from the HR source (ECG, SPO2, or IBP). When
monitoring SpO2, there is a variable pitch tone which changes as the patient’s
saturation level changes. The pitch of the tone rises as the saturation level
increases and falls as the saturation level decreases.
Page 33

Quick Reference Guide
V
V
V
P/N: 0002-08-50038-00 Rev A
33
DATE AND TIME
To adjust the date and time on the V12 or V21 bedside monitor:
a. Select in the upper, right corner on the main screen
b. Select Year, Month and/or Day to adjust the date
c. Scroll and select the value or enter value using on screen keypad
d. Select Hour, Minute and/or AM/PM* to adjust the time
e. Scroll and select the value or enter value using on screen keypad
f. Enter value using on screen keypad
g. Select Accept to save settings and return to the main screen
Panorama® Central Station Interface: Adjusting the date and time on the
Panorama Central Station will adjust the date and time at the V12 or V21
bedside monitor. The date and time cannot be adjusted at the V12 or V21
bedside monitor when interfacing with the Panorama Central Station.
PARAMETER COLORS
The V12 or V21 bedside monitor provides the ability to adjust the parameter’s
numeric and waveform (if applicable) color.
To adjust a parameter’s color on the V12 or V21 bedside monitor:
a. Select parameter’s waveform or numeric tile
b. Select parameter’s Setup tab
c. Select Color
d. Scroll and select color
e. Select Accept to save settings and return to the main screen
Panorama® Central Station Interface: Parameter color on the V12 or V21
bedside monitor, Panorama Central Station, ViewStation, and WorkStation are
independent.
DEFAULT (PRESET) SETTINGS
The V12 or V21 bedside monitor’s settings are automatically restored either
when the patient size is adjusted or when Discharge is performed.
*Configurable
Page 34

P/N: 0002-08-50038-00 Rev A
34
Quick Reference Guide
V
V
V
LOCK/UNLOCKING TOUCHSCREEN DISPLAY
The V12 or V21 bedside monitor provides the ability to lock the touch screen
display temporarily for cleaning purposes. To temporarily lock the display on
the V12 or V21 bedside monitor:
a. Select Setup tab in Navigation area
b. Select Display to enter Display Options tab
c. Select Screen Lock
d. A 10 second screen lock is displayed allowing for cleaning of the screen
e. Select Accept to return to the main screen
Page 35

Mindray DS USA, Inc.
800 MacArthur Blvd., Mahwah, NJ 07430
Tel: 800.288.2121 or 201.995.8000
www.mindray.com
P/N: 0002-08-50038-00 Rev A
 Loading...