

Page 1

PM-9000 Express
Patient Monitor
Service Manual
Page 2

Page 3

Service Manual (V 1.0)
Copyright
Statement
SHENZHEN MINDRAY BIO-MEDICAL ELECTRONICS CO., LTD. (hereinafter called Mindray)
owns all rights to this unpublished work and intends to maintain this work as confidential.
Mindray may also seek to maintain this work as an unpublished copyright. This publication is to
be used solely for the purposes of reference, operation, maintenance, or repair of Mindray
equipment. No part of this can be disseminated for other purposes.
In the event of inadvertent or deliberate publication, Mindray intends to enforce its rights to this
work under copyright laws as a published work. Those having access to this work may not
copy, use, or disclose the information in this work unless expressly authorized by Mindray to
do so.
All information contained in this publication is believed to be correct. Mindray shall not be liable
for errors contained herein nor for incidental or consequential damages in connection with the
furnishing, performance, or use of this material. This publication may refer to information and
protected by copyrights or patents and does not convey any license under the patent rights of
Mindray, nor the rights of others. Mindray does not assume any liability arising out of any
infringements of patents or other rights of third parties.
Content of this manual is subject to changes without prior notice.
PROPERTY OF SHENZHEN MINDRAY BIO-MEDICAL ELECTRONICS CO., LTD.
ALL RIGHTS RESERVED
Responsibility on the manufacturer party
Mindray is responsible for safety, reliability and performance of this equipment only in the
condition that:
• all installation, expansion, change, modification and repair of this equipment are conducted
by Mindray qualified personnel;
• applied electrical appliance is in compliance with relevant National Standards;
• the monitor is operated under strict observance of this manual.
Warning
For continued safe use of this equipment, it is necessary that the listed instructions are
followed. However, instructions listed in this manual in no way supersede established medical
practices concerning patient care.
Do not rely only on audible alarm system to monitor patient. When monitoring
I
Page 4

Service Manual (V 1.0)
adjusting the volume to very low or completely muting the sound may result in the
disaster to the patient. The most reliable way of monitoring the patient is at the
same time of using monitoring equipment correctly, manual monitoring should be
carried out.
This multi-parameter patient monitor is intended for use only by medical
professionals in health care institutions.
To avoid electrical shock, you shall not open any cover by yourself. Service must be
carried out by qualified personnel.
Use of this device may affect ultrasonic imaging system in the presence of the
interfering signal on the screen of ultrasonic imaging system. Keep the distance
between the monitor and the ultrasonic imaging system as far as possible.
It is dangerous to expose electrical contact or applicant coupler to normal saline,
other liquid or conductive adhesive. Electrical contact and coupler such as cable
connector, power supply and parameter module socket-inlet and frame must be
kept clean and dry. Once being polluted by liquid, they must be thoroughly dried. If
to further remove the pollution, please contact your biomedical department or
Mindray.
It is important for the hospital or organization that employs this equipment to carry out a
reasonable maintenance schedule. Neglect of this may result in machine breakdown or injury
of human health.
II
Page 5

Service Manual (V 1.0)
Warranty
THIS WARRANTY IS EXCLUSIVE AND IS IN LIEU OF ALL OTHER WARRANTIES,
EXPRESSED OR IMPLIED, INCLUDING WARRANTIES OF MERCHANT ABILITY OR
FITNESS FOR ANY PARTICULAR PURPOSE.
Exemptions
Mindray's obligation or liability under this warranty does not include any transportation or other
charges or liability for direct, indirect or consequential damages or delay resulting from the
improper use or application of the product or the substitution upon it of parts or accessories not
approved by Mindray or repaired by anyone other than a Mindray authorized representative.
This warranty shall not extend to any instrument which has been subjected to misuse,
negligence or accident; any instrument from which Mindray's original serial number tag or
product identification markings have been altered or removed, or any product of any other
manufacturer.
Safety, Reliability and Performance
Mindray is not responsible for the effects on safety, reliability and performance of the
PM-9000 Express Patient Monitor if:
■ assembly operations, extensions, re-adjusts, modifications or repairs are carried out
by persons other than those authorized by Mindray.
■ the PM-9000 is not used in accordance with the instructions for use, or the electrical
installation of the relevant room does not comply with NFPA 70: National Electric
Code or NFPA 99: Standard for Health Care Facilities (Outside the United States, the
relevant room must comply with all electrical installation regulations mandated by the
local and regional bodies of government).
III
Page 6

Service Manual (V 1.0)
Return Policy
Return Procedure
In the event that it becomes necessary to return a unit to Mindray, the following procedure
should be followed:
1. Obtain return authorization. Contact the Mindray Service Department and obtain a
Customer Service Authorization (Mindray) number. The Mindray number must appear on
the outside of the shipping container. Return shipments will not be accepted if the Mindray
number is not clearly visible. Please provide the model number, serial number, and a brief
description of the reason for return.
2. Freight policy. The customer is responsible for freight charges when equipment is shipped
to Mindray for service (this includes customs charges).
Company Contact
Manufacture: Shenzhen Mindray Bio-Medical Electronics Co., Ltd.
Address:
Phone:
Fax:
Mindray Building, Keji 12th Road South, Hi-tech Industrial
Park, Nanshan, Shenzhen, P.R.China,518057
+86 755 26582479 26582888
+86 755 26582500 26582501
IV
Page 7
Service Manual (V 1.0)
Safety Precautions
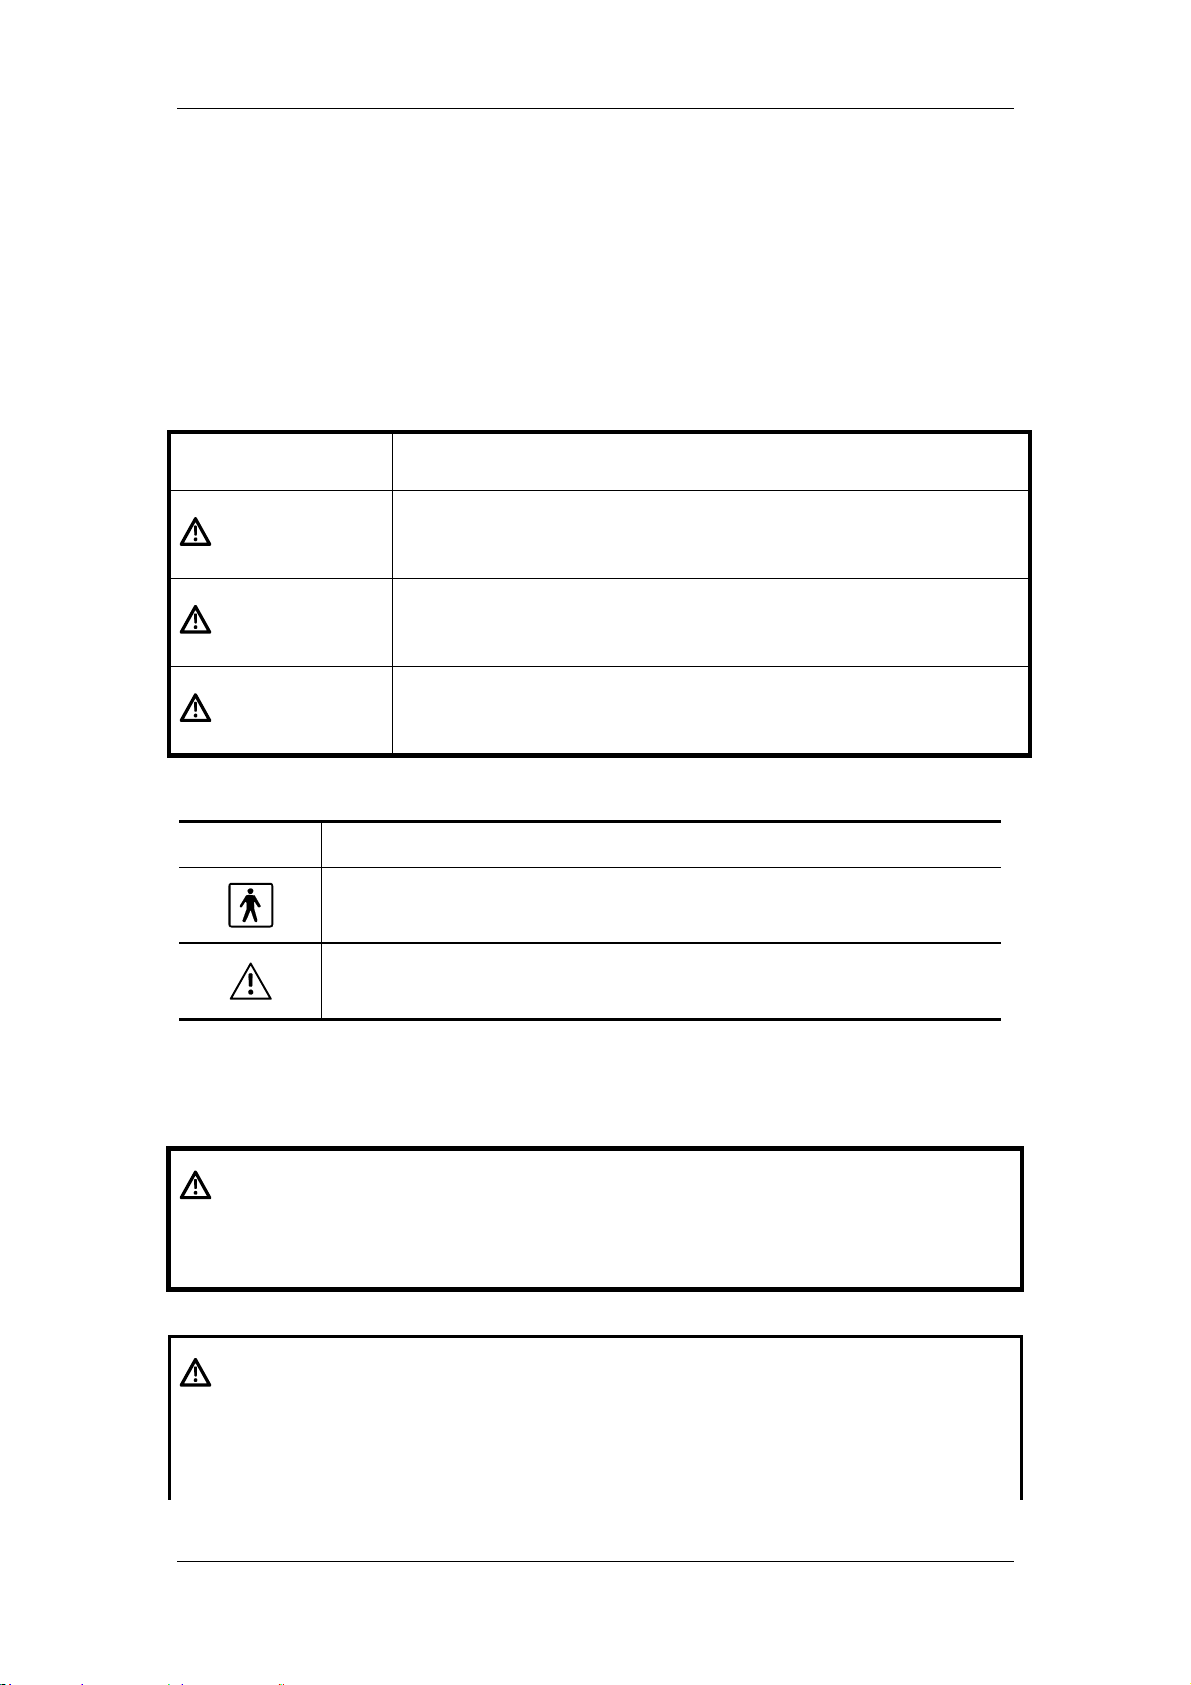
1. Meaning of Signal Words
In this manual, the signal words DANGER, WARNING, and CAUTION are used
regarding safety and other important instructions. The signal words and their meanings are
defined as follows. Please understand their meanings clearly before reading this manual.
Signal word Meaning
DANGER
WARNING
CAUTION
Indicates an imminently hazardous situation which, if not
avoided, will result in death or serious injury .
Indicates a potentially hazardous situation which, if not avoided,
could result in death or serious injury.
Indicates a potentially hazardous situation which, if not avoided,
may result in minor or moderate injury.
2. Meaning of Safety Symbols
Symbol Description
Type-BF applied part
"Attention" (Refer to the operation manual.)
Safety Precautions
Please observe the following precautions to ensure the safety of service engineers as well as
operators when using this system.
DANGER: Do not use flammable gases such as anesthetics, or flammable
liquids such as ethanol, near this product, because there is danger of
explosion.
WARNING: Do not connect this system to outlets with the same circuit
breakers and fuses that control current to devices such as
life-support systems. If this system malfunctions and
generates an over current, or when there is an instantaneous
V
Page 8

Service Manual (V 1.0)
current at power ON, the circuit breakers and fuses of the
building’s supply circuit may be tripped.
CAUTION: 1. Malfunctions due to radio waves
(1) Use of radio-wave-emitting devices in the proximity of this kind
of medical electronic system may interfere with its operation.
Do not bring or use devices which generate radio waves, such
as cellular telephones, transceivers, and radio controlled toys,
in the room where the system is installed.
(2) If a user brings a device which generates radio waves near the
system, they must be instructed to immediately turn OFF the
device. This is necessary to ensure the proper operation of
the system.
2. Do not allow fluids such as water to contact the system or
peripheral devices. Electric shock may result.
VI
Page 9

Symbols
Service Manual (V 1.0)
displaying this symbol contains an F-Type isolated (floating) patient applied part providing
a high degree of protection against shock, and is suitable for use during defibrillation.
Equipotential grounding terminal CE mark 93/42/EEC a directive
of the European Economic
Community
@ Mark Event 》 Next menu
*** Highest level alarm ** Middle level alarm
* Lowest level alarm
Trend graph cursor u SYS pressure(NIBP trend graph)
t DIA pressure(NIBP trend graph) * MEAN pressure (NIBP trend
graph)
Right moving indicator Left moving indicator
Be Careful Protective earth ground
Indicates that the instrument is IEC-60601-1 Type CF equipment. The unit
Silence Symbol ! Close all alarm volume
Alarm pause
Heart beat
× Gain magnify √ Confirm
SN Series Number
VII
Pace signal
Page 10

Page 11

Service Manual (V 1.0)
Contents
CHAPTER 1 ABOUT THE PRODUCT ...........................................................................................1
1.1 INTRODUCTION ........................................................................................................................ 1
1.2 APPLICATION............................................................................................................................ 1
1.3 ENVIRONMENT .........................................................................................................................3
CHAPTER 2 PRINCIPLES................................................................................................................4
2.1 GENERAL.................................................................................................................................. 4
2.2 HARDWARE DESCRIPTION.........................................................................................................5
2.3 SOFTWARE DESCRIPTION ........................................................................................................17
2.4 SYSTEM PARAMETER ..............................................................................................................19
CHAPTER 3 PRODUCT SPECIFICATIONS................................................................................25
3.1 SAFETY CLASSIFICATIONS .......................................................................................................25
3.2 ENVIRONMENTAL SPECIFICATIONS........................................................................................... 26
3.3 POWER SOURCE SPECIFICATIONS.............................................................................................27
3.4 HARDWARE SPECIFICATIONS....................................................................................................28
3.5 WIRELESS NETWORK ...............................................................................................................29
3.6 DATA STORAGE........................................................................................................................ 30
3.7 SIGNAL OUTPUT SPECIFICATIONS ...........................................................................................31
3.8 ECG SPECIFICATIONS .............................................................................................................32
3.9 RESP SPECIFICATIONS............................................................................................................. 34
3.10 SPO
3.11 IBP SPECIFICATIONS............................................................................................................... 37
3.12 TEMP SPECIFICATIONS........................................................................................................... 38
3.13 IBP SPECIFICATIONS................................................................................................................39
3.14 CO SPECIFICATIONS................................................................................................................ 40
3.15 CO
3.16 AG SPECIFICATIONS................................................................................................................44
SPECIFICATIONS .............................................................................................................35
2
SPECIFICATIONS............................................................................................................... 41
2
CHAPTER 4 DISASSEMBLING/ASSEMBLING & TROUBLESHOOTING..............................47
4.1 PM-9000 EXPRESS DISASSEMBLING/ASSEMBLING ................................................................ 47
4.2 TROUBLESHOOTING...............................................................................................................52
CHAPTER 5 TEST AND MATERIAL LIST...................................................................................55
5.1 TEST PROCEDURE ................................................................................................................. 55
5.2 NIBP CALIBRATION................................................................................................................59
5.3 IBP CALIBRATE.................................................................................................................. 59
5.4 CO2 CHECK......................................................................................................................... 62
5.5 AG CALIBRATE.................................................................................................................. 63
5.6 PM-9000 EXPRESS MATE R I A L LIST........................................................................................65
I
Page 12

Service Manual (V 1.0)
CHAPTER 6 MAINTENANCE AND CLEANING..........................................................................66
6.1 MAINTENANCE .......................................................................................................................66
6.2 CLEANING ..............................................................................................................................66
6.3 CLEANING REAGENT ..............................................................................................................66
6.4 STERILIZATION ....................................................................................................................... 67
6.5 DISINFECTION......................................................................................................................... 67
II
Page 13

Chapter 1 About the Product
Chapter 1 About the Product
1.1 Introduction
The PM-9000 Express Patient Monitor, a portable and accessible patient monitor, is supplied
by rechargeable batteries or external AC power, which applies to adults, pediatric and
neonates. You can select different configurations as required. Besides, the PM-9000 Express
can be connected with the central monitoring system whereby a monitoring network will be
formed. Parameters that the PM-9000 Express can monitor include: ECG, RESP, SpO
2-channel TEMP, 2-channel IBP, CO and CO
measurement, waveform monitoring, freezing and recording, is a compact and lightweight
patient monitor. Its color TFT LCD is able to show patient parameters and 8 waveforms clearly.
The compact control panel and knob control, and the easy-to-use menu system enable you to
freeze, record, or perform other operations conveniently.
The PM-9000 Express Patient Monitor measures patient’s ECG, NIBP, SpO
IBP, CO and CO
temperature sensor and pressure transducer. During the measurement, the patient monitor
does not get energy or any substance from the human body, and does not release any
substance to the human body. However, it releases sine wave signals to the patient when
measuring the respiration rate. The patient monitor converts the measured physiological
signals to the digital signals, waveforms and values, and then displays them on the screen.
You can control the patient monitor through the control panel. For example, you can set
different alarm limits for different patients. Thus, when the patient monitor detects any
physiological parameter exceeding the preset alarm limit, it will enable the audio and visual
alarm.
physiological signals through the ECG electrode, SpO2 sensor, cuff,
2
. It, integrating the functions of parameter
2
, TEMP, RESP,
2
, NIBP,
2
1.2 Application
1.2.1 General
In the treatment processes, it is necessary to monitor important physiological information of
patients. Therefore, the patient monitor has been playing an outstanding role among medical
devices. The development of technology does not only help medical staff get the important
physiological information, but also simplifies the procedures and makes it more effective. For
patients in hospital, the basic and important physiological information is required, including
ECG, SpO
technology helping measure and get important physiological information of patients has made
the patient monitor more comprehensive in performance and better in quality. Today,
multi-parameter patient monitors are widely used.
1.2.2 Usage
Parameters that the PM-9000 Express can monitor include: ECG, RESP, SpO2, NIBP, TEMP,
IBP, CO AGand CO
, RESP, IBP, CO, CO2, TEMP, etc. In recent years, the development of science and
2
. PM-9000 Express converts these physiological signals to digital signals,
2
1
Page 14

Chapter 1 About the Product
processes them and displays them on the screen. You can set the alarm limit as required.
When the monitored parameter exceeds the preset alarm limit, the patient monitor will start the
alarm function. In addition, you can control the patient monitor through the control panel.
Usually, patient monitors are seen in some clinical areas in hospital, such as ICU, CCU,
intensive care units for heart disease patients, operating rooms, emergency departments and
observation wards. They can also be used in clinics. The PM-9000 Express patient monitor
should be run under the control of clinical staff.
PM-9000 Express patient monitor has the following functions:
ECG
Heart Rate (HR)
2-channel ECG waveform
Arrhythmia analysis and S-T analysis (optional)
Respiration Rate (RR) RESP
Respiration waveform
2
Pulse Oxygen Saturation(SpO
), Pulse Rate (PR) SpO
2
SpO2 Plethysmogram
NIBP Systolic pressure (NS), diastolic pressure (ND), mean pressure
(NM)
TEMP T1, T2, TD
IBP CH1: SYS, DIA
CH2: SYS, DIA
IBP waveform
CO Temperature of blood (TB)
Cardiac Output (CO)
CO
2
End-tidal carbon dioxide (EtCO2)
Inspired minimum CO
(InsCO2)
2
Airway Respiration Rate (AwRR)
AG
Inhaled and exhaled CO
Inhaled and exhaled N
Inhaled and exhaled O
(FiCO2, EtCO2)
2
O (FiN2O, EtN2O)
2
(FiO2, EtO2)
2
Inhaled and exhaled anesthetic agent (FiAA, EtAA, where AA
refers to any of the following anesthetic agents.)
HAL (Halothane)
2
Page 15

Chapter 1 About the Product
ISO (Isoflurane)
ENF (Enflurane)
SEV (Sevoflurane)
DES (desflurane)
Airway Respiration Rate (rpm: Respiration Per Minute): AwRR
Minimum Alveolar Concentration (MAC)
4 AG waveforms (CO
, N2O, O2, AA)
2
The PM-9000 Express provides the functions of audio/visual alarm, trend graphic storage and
output, NIBP measurement, alarm event identification, large font screen, defibrillator
synchronization, oxyCRG recall, drug calculation, etc.
1.3 Environment
1.3.1 Temperature
Work mode 0 – 40℃
MINDRAY CO
Welch Allyn mainstream CO
Microstream CO
Artema AION AG module +10 – +35℃
Transportation & Storage -20 – 60℃
1.3.2 Humidity
Work mode 15% – 95 % (non-condensing)
Transportation & Storage 10% – 95 % (non-condensing)
Atmospheric pressure 70.0kPa – 106.0kPa
module +5 – +35℃
2
module +10 – +40℃
2
module +5 – +35℃
2
1.3.3 Electrical specification
100 – 240 V AC, 50/60 Hz,
Maximum input power: 140VA; fuse: T 3A
2.3 Ah 12V lead-acid rechargeable battery
Working time of fully-charged batteries in normal status: 120 minutes (2 batteries).
From the first low-battery alarm, the batteries can supply power to the patient monitor for 5
more minutes.
Maximum charging time: ≤12h
4.4Ah 11.1V lithium battery
Working time of fully-charged batteries in normal status: 300 minutes (2 batteries).
From the first low-battery alarm, the batteries can supply power to the patient monitor for 5
more minutes.
Maximum charging time: ≤ 6.5h
3
Page 16
Chapter 2 Principles
Chapter 2 Principles
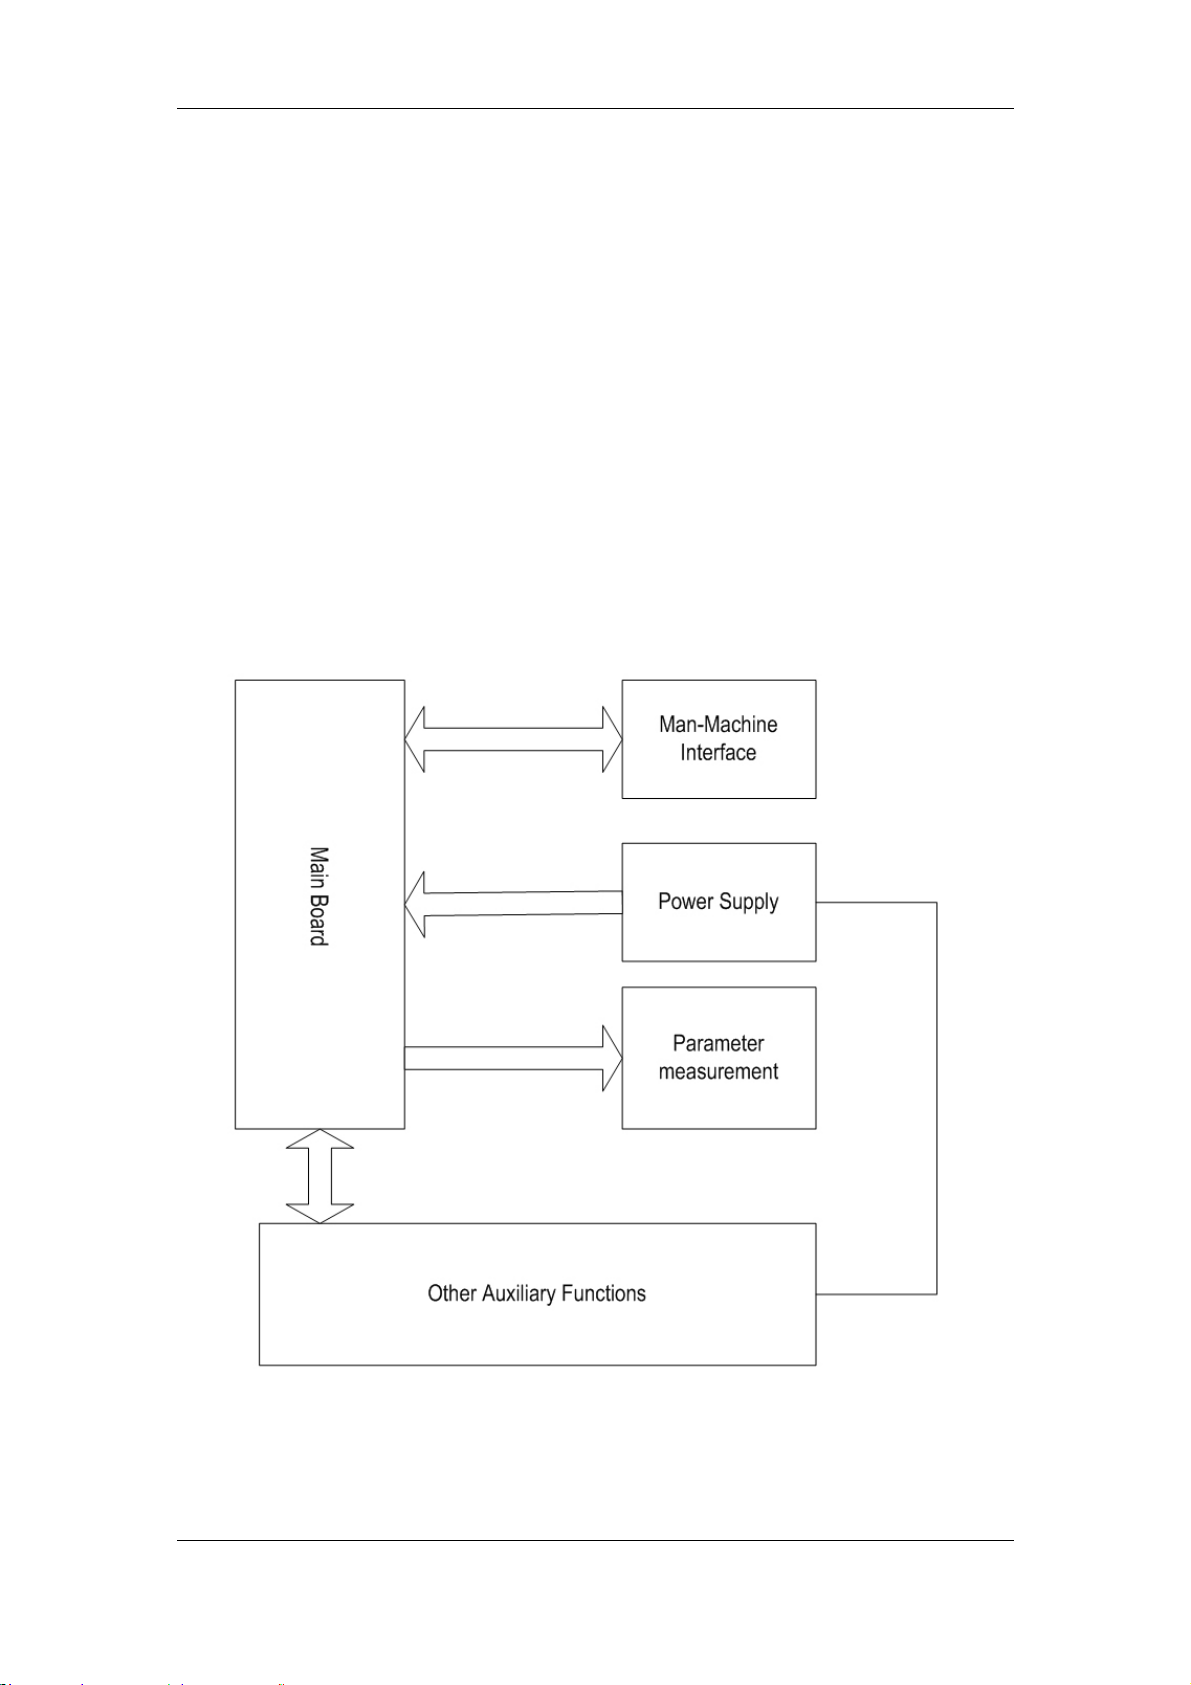
2.1 General
The intended use of the PM-9000 patient monitor is to monitor a fixed set of parameters
including ECG, RESP, SpO
consists of the following functional parts:
Parameter measurement;
Main control part;
Man-machine interface;
Power supply;
Other auxiliary functions;
These functional units are respectively detailed below.
, NIBP, TEMP, IBP, CO and CO2 (IBP, CO and CO2 are optional). It
2
Figure 2-1 Structure of the PM-9000 Express
2.1.1 Parameter Measurement
The parameter measurement and monitoring are the core functions of the patient monitor. The
4
Page 17

Chapter 2 Principles
parameter measurement part of the PM-9000 Express patient monitor consists of the
measurement probe, parameter input socket assembly, NIBP assembly and the main control
board.
This part converts the physiological signals to electric signals, processes the those signals and
conducts the calculation by the preset program or command delivered from the main control
board, and then sends the values, waveforms and alarm information (which will be displayed
by using the man-machine interface) to the main control board.
2.1.2 Main Control Part
In the PM-9000 Express patient monitor, the main control part refers to the main control part of
the main control board. It drives the man-machine interface, manages the parameter
measurement and provides users with other special functions, such as storage, recall of
waveforms and data. (See Figure 2-1)
2.1.3 Man-Machine Interface
The man-machine interface of the PM-9000 Express patient monitor includes the TFT display,
recorder, speaker, indicator, buttons and control knob.
The TFT display is the main output interface. It, with the high resolution, provides users with
abundant real-time and history data and waveforms as well as various information and alarm
information.
The recorder is a subsidiary of the display, which is used for the user to print data.
The speaker provides the auditory alarm function.
The indicator provides additional information about the power supply, batteries, alarms and so
on.
The buttons and control knob are the input interface, which are used for the user to input the
information and commands to the patient monitor.
2.1.4 Power Supply
The power supply part is an important part of the patient monitor. It includes the main power
PCB, backlight board, batteries and fan.
The main power PCB converts the external AC current respectively to the 5V DC and 12V DC
current, which are supplied for the whole system. For the TFT display, there is a special
requirement on the power supply, so a backlight board is used. The batteries supply power for
the system for a short time when there is no external AC current. The fan is used for the heat
sink of the system.
2.1.5 Other Auxiliary Functions
The PM-9000 Express patient monitor also provides the network upgrade function for the
service engineers to upgrade the system software without disassembling the enclosure.
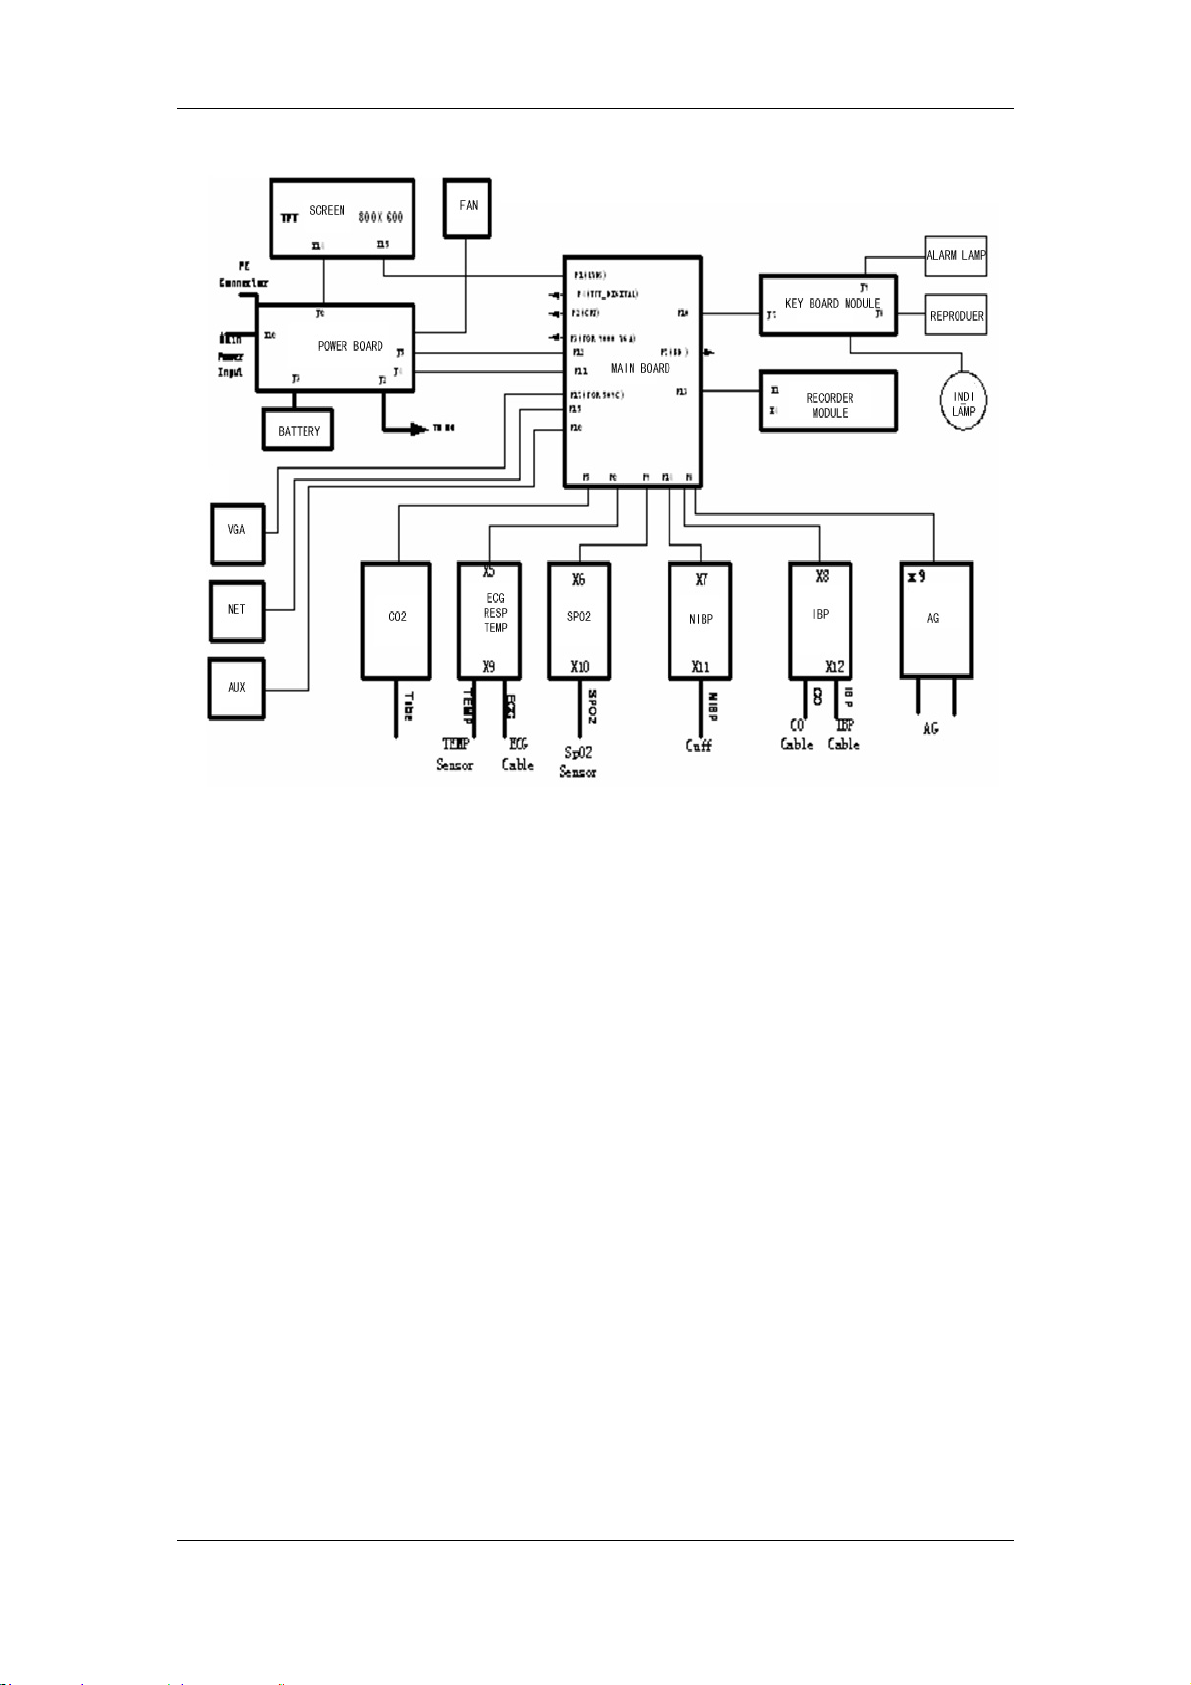
2.2 Hardware Description
The structure of the PM-9000 Express patient monitor is shown in the following figure.
5
Page 18
Chapter 2 Principles
Figure 2-2 Functional structure of the PM-9000 Express
6
Page 19
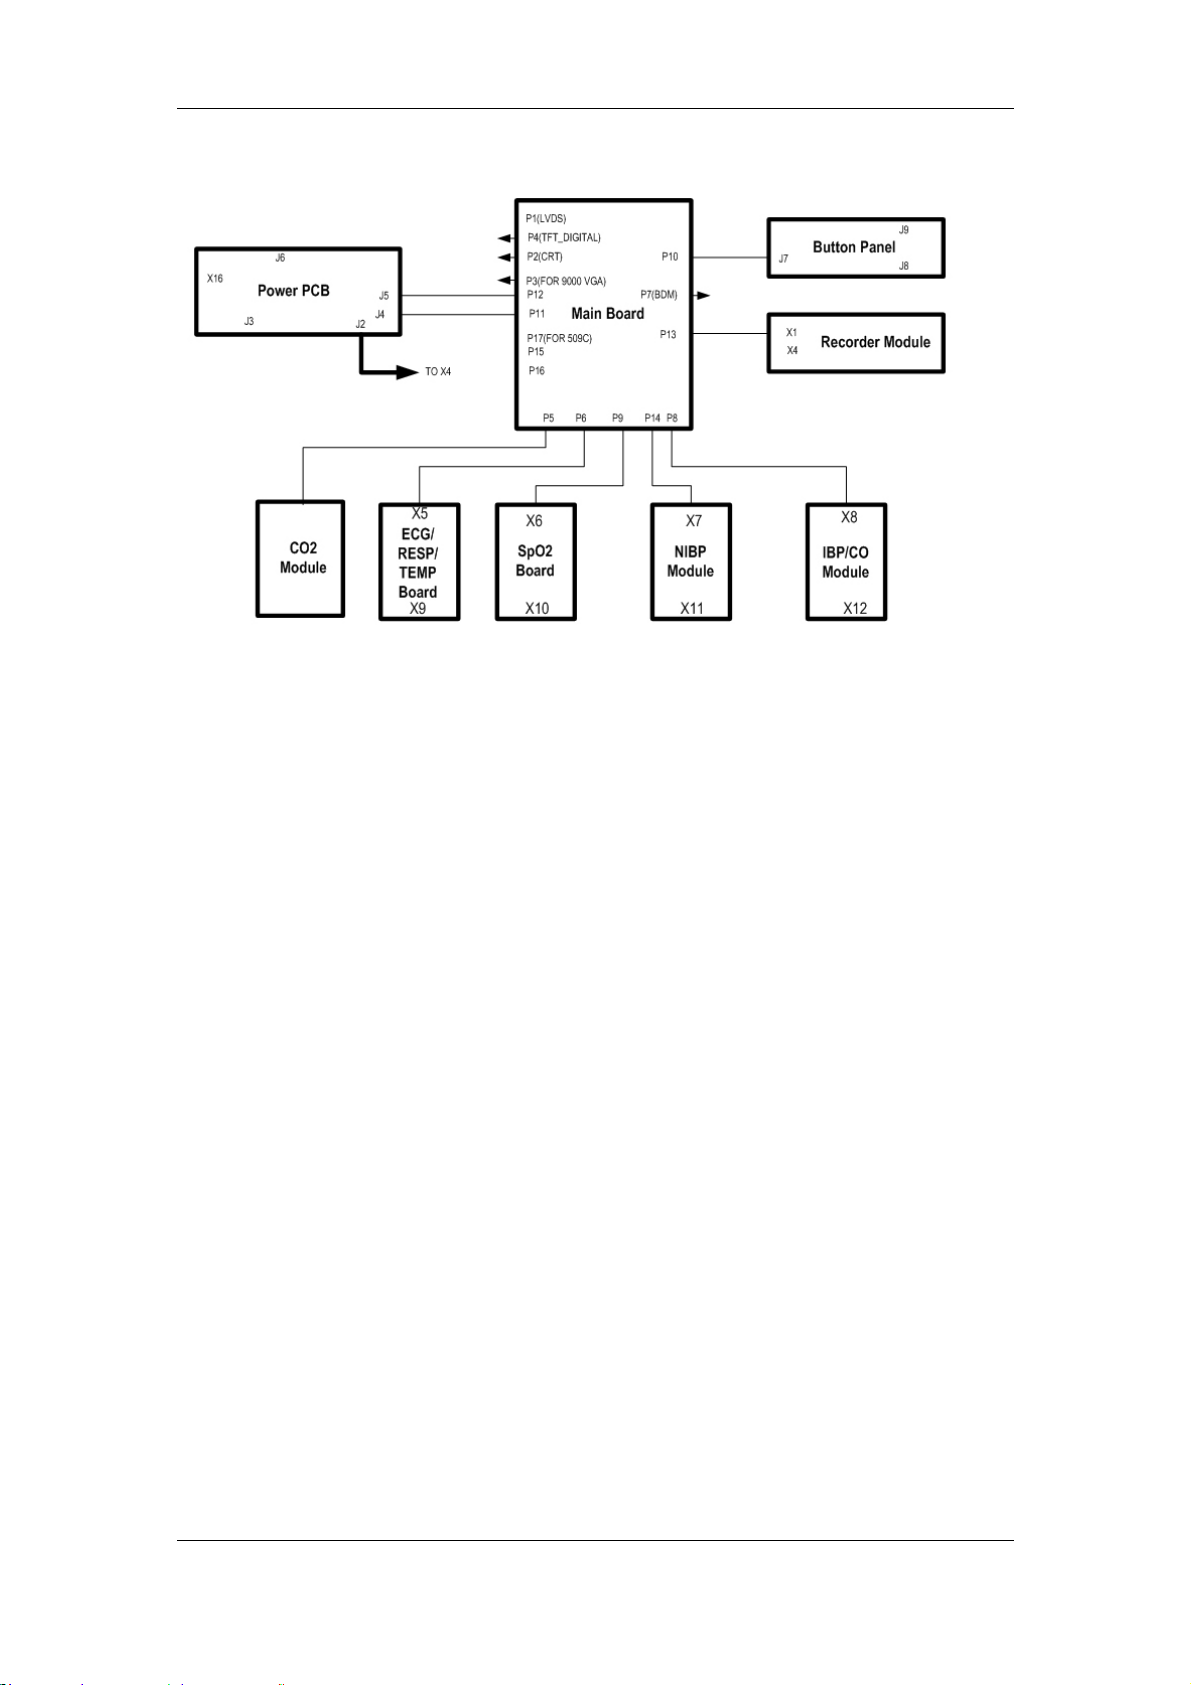
Chapter 2 Principles
The PM-9000 Express PCB connection is shown in the following figure.
Figure 2-3 PCB connection
Basic functions and working principles of modules are described in the following sections.
2.2.1 Main Board
2.2.1.1 General
The main board is the heart of the patient monitor. It implements a series of tasks, including the
system control, system scheduling, system management, data processing, file management,
display processing, printing management, data storage, system diagnosis and alarm.
7
Page 20
Chapter 2 Principles
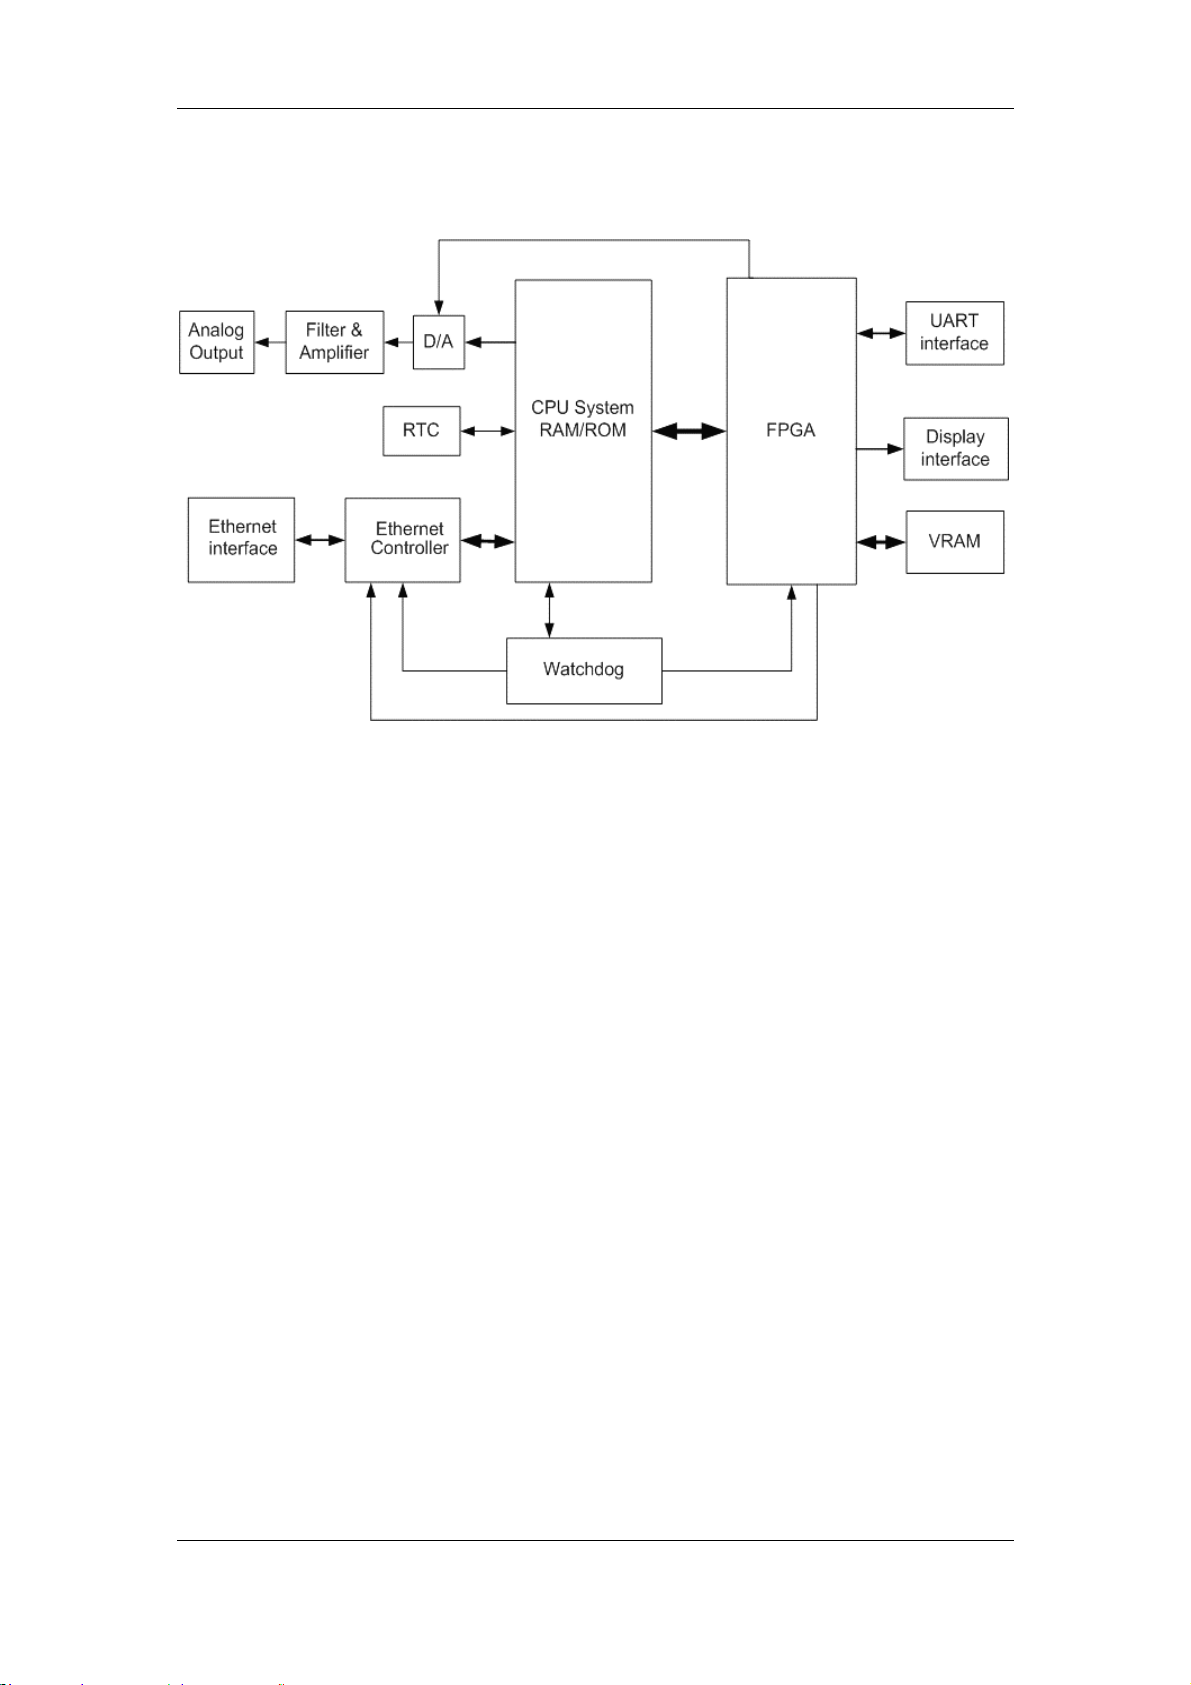
2.2.1.2 Principle diagram
Figure 2-4 Working principle of the main board
2.2.1.3 Principle
The main board is connected with external ports, including the power input port, multi-way
serial port, TFT display interface, analog VGA interface, network port and analog output port.
Besides, on the main board is also a BDM interface reserved for the software debugging and
software downloading.
CPU System
CPU is the core part of the main board. It, connected with other peripheral modules
through the bus and I/O cable, implements the data communication, data processing,
logical control and other functions.
RTC
RTC provides the calendar information (such as second, minute, hour, day, month and
year). CPU can read and modify the calendar information from RTC.
Ethernet Controller
Ethernet Controller supports the IEEE802.3/IEEE802.3u LAN standard, and supports two
data transmission rate: 10Mbps and 100Mbps. CPU exchanges data with the Ethernet
through the Ethernet Controller.
Analog Output
The D/A converter converts the digital ECG/IBP signals sent from CPU to the analog
signals, which are provided for the external after low-pass filtered by the filter and
amplified by the amplifier.
FPGA and VRAM
VRAM stores the displayed data. CPU stores the displayed data to VRAM through FPGA.
FPGA gets data from VRAM, processes them, and then sends them to the relevant
graphic display device.
8
Page 21
Chapter 2 Principles
In addition, FPGA also extends multiple serial ports, which communicate with peripheral
modules. FPGA transfers the received data to CPU through the bus; CPU delivers data to
FPGA through the bus, and then the FPGA transfers those data to the peripheral
modules.
Watchdog
When powered on, watchdog provides reset signals for CPU, FPGA and Ethernet
Controller.
The patient monitor provides the watchdog timer output and voltage detection functions.
2.2.2 ECG/RESP/TEMP Module
2.2.2.1 General
This module provides the function of measuring three parameters: electrocardiograph (ECG),
respiration (RESP) and temperature (TEMP).
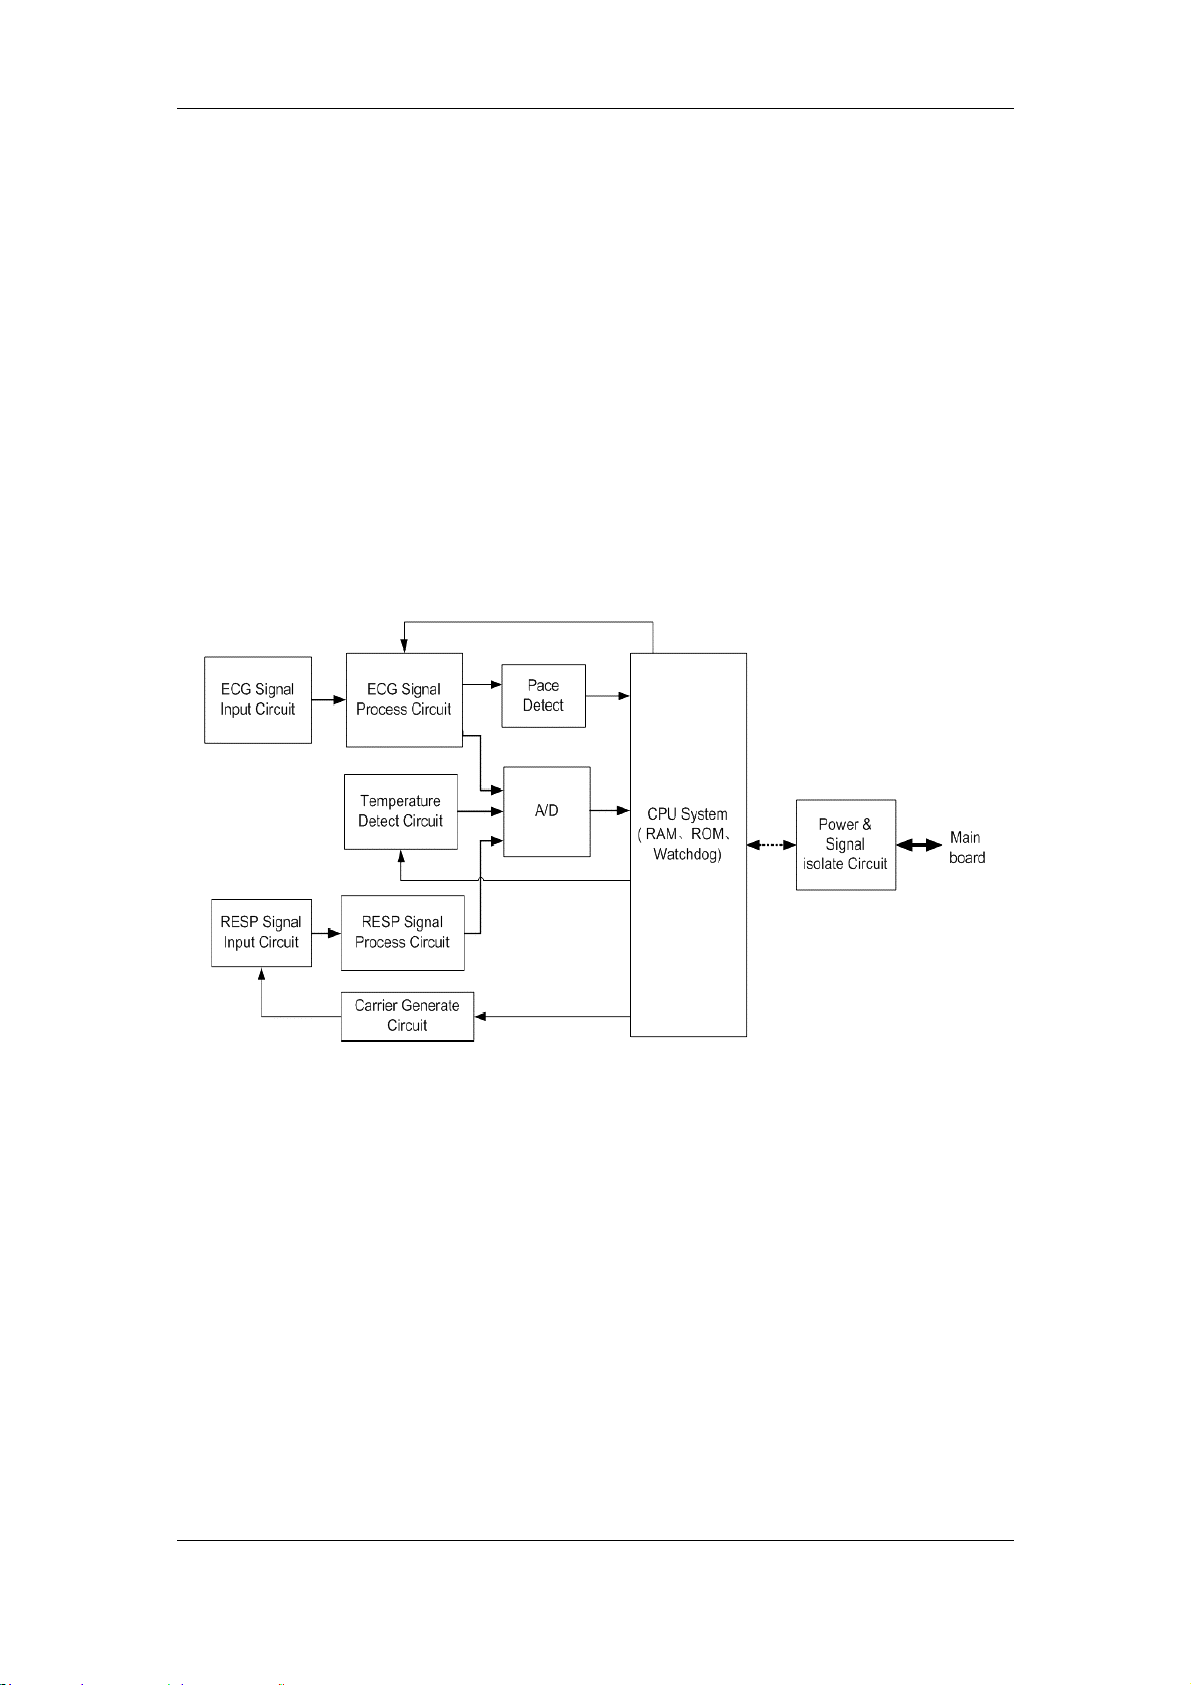
2.2.2.2 Principle diagram
Figure 2-5 Working principle of the ECG/RESP/TEMP module
2.2.2.3 Principle
This module collects the ECG, RESP and TEMP signals through the transducer, processes the
signals, and sends the data to the main board through the serial port.
ECG Signal Input Circuit
The input protection and filtering circuits receive the ECG signal from the transducer, and filter
the high-frequency interference signal to protect the circuit against the damage by defibrillator
high-voltage and ESD.
The right-leg drive circuit gets the 50/60Hz power common-mode signal from the lead cable,
and sends the negative feedback signal to the human body to reject the common-mode
interference signal on the lead cable, which helps the detection of the ECG signal.
The lead-off detecting circuit checks whether the ECG lead is off, and sends the information to
CPU.
ECG Signal Process Circuit
The difference amplifying circuit conducts the primary amplification of the ECG signal and
9
Page 22

Chapter 2 Principles
rejects the common-mode interference signal.
The low-pas filtering circuit filters the high-frequency interference signal beyond the frequency
band of the ECG signal.
The PACE signal refers to the ECG pace signal. It has significant interference to the ECG
signal detection. The PACE rejection circuit can rejects the PACE signal, which helps the ECG
signal detection.
The main amplifying/filtering circuit conducts the secondary amplification of the ECG signal,
filters the signal, and then sends the ECG signal to the A/D conversion part.
Pace Detect
This part detects the PACE signal from the ECG signal and sends it to CPU.
Temperature Detect Circuit
This circuit receives the signal from the temperature transducer, amplifies and filters it, and
then sends it to the A/D conversion part.
Carrier Generate Circuit
The RESP measurement is based on the impedance method. While a man is breathing, the
action of the breast leads to changes of the thoracic impedance, which modulates the
amplitude of the high-frequency carrier signal. Finally, the modulated signal is sent to the
measurement circuit. The purpose of this module is generating the high-frequency carrier.
RESP Signal Input Circuit
This circuit couples the RESP signal to the detecting circuit.
RESP Signal Process Circuit
The pre-amplifying circuit conducts the primary amplification of the RESP signal and filters it.
The detecting circuit detects the RESP wave that has been modulated on the actuating signal.
The level shifting circuit removes the DC component from the RESP signal.
The main amplifying/filtering circuit conducts the secondary amplification of the RESP signal,
filters the signal, and then sends it to the A/D conversion part.
A/D
The A/D conversion part converts the analog signal to the digital signal, and sends the signal
to CPU for further processing.
CPU System
Implementing the logical control of all parameter parts and A/D conversion parts;
Implementing the data processing for all parameters;
Implementing the communication with the main board.
Power & Signal isolate Circuit
Isolating the external circuits to ensure the safety of human body;
Supplying power for all circuits;
Implementing the isolation communication between the CPU System and the main board.
10
Page 23
Chapter 2 Principles
2.2.3 CO/IBP Module
2.2.3.1 General
This module provides the function of measuring two parameters: Cardiac Output (CO) and
Invasive Blood Pressure (IBP).
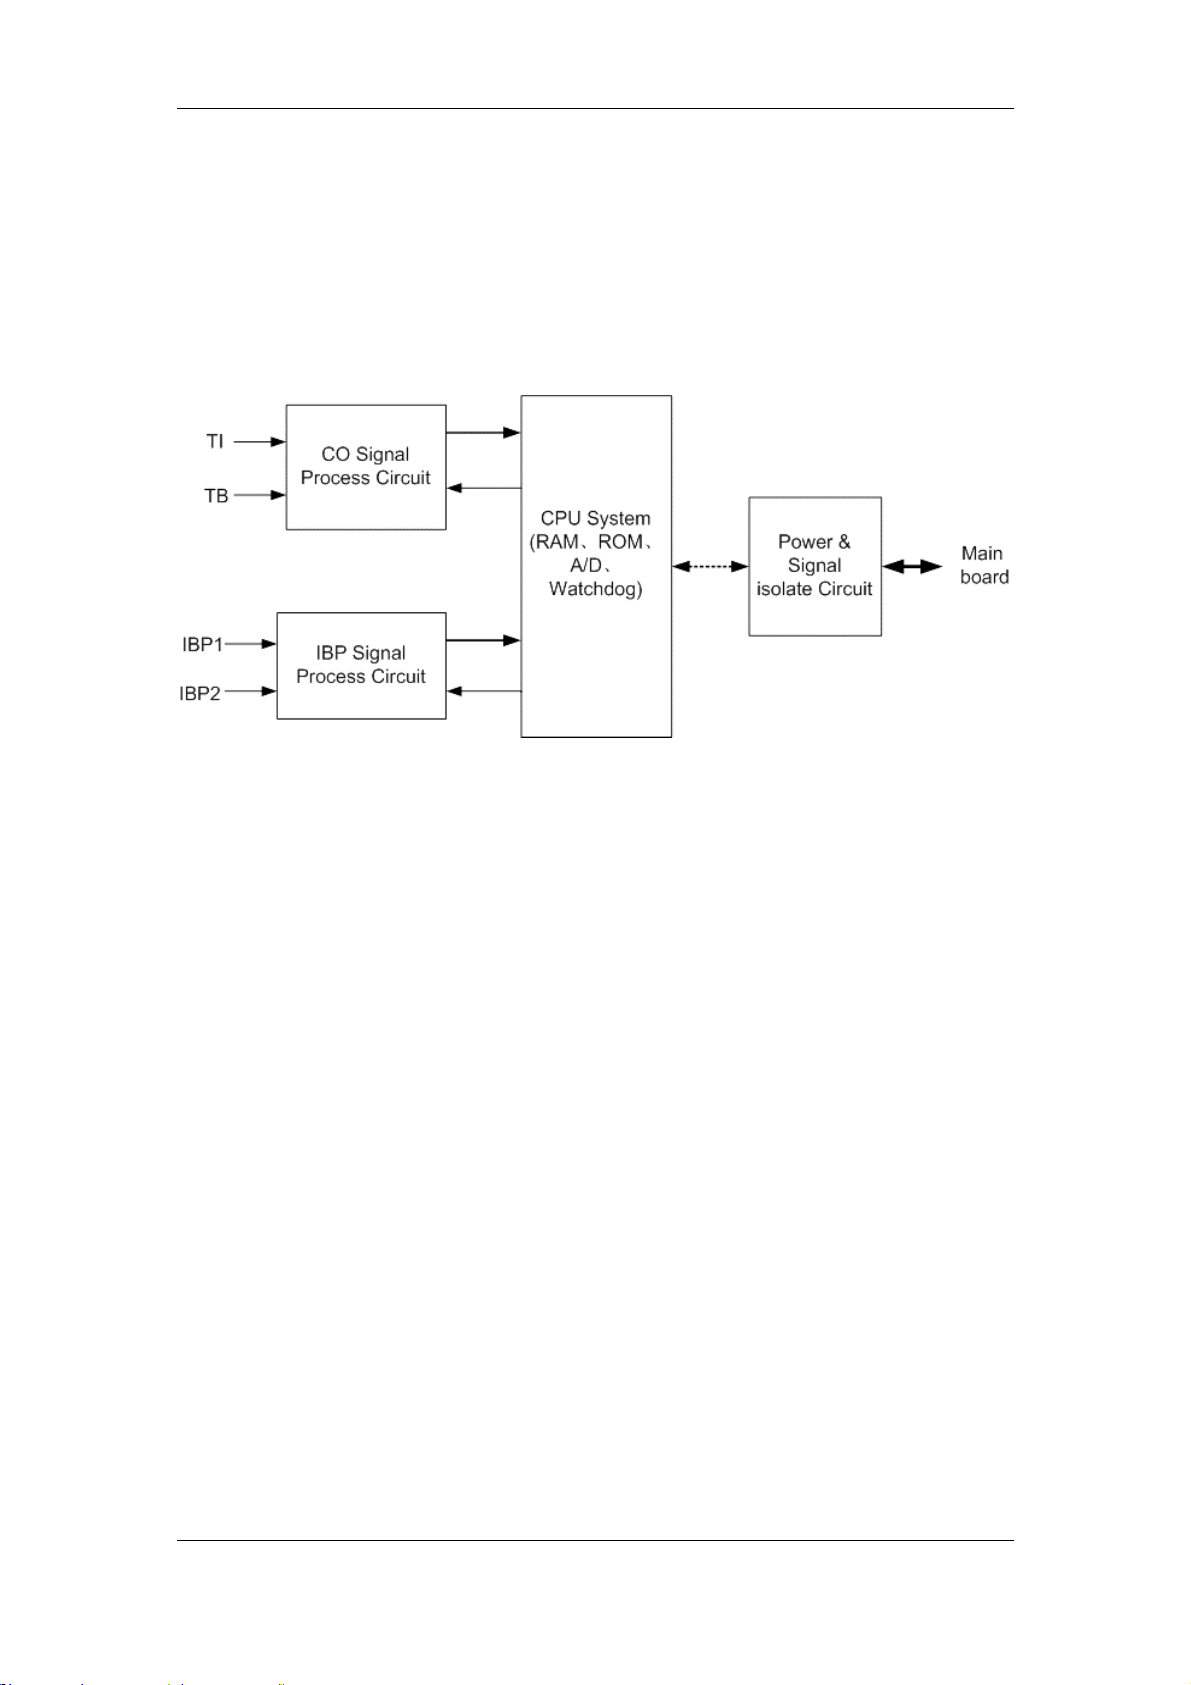
2.2.3.2 Principle diagram
Figure 2-6 Working principle of the CO/IBP module
2.2.3.3 Principle
This module collects the CO/IBP signal through the transducers, processes it and sends it
to the main board throgh the serial port.
CO Signal Process Network
The CO parameter is measured with the thermal dilution method. The transducer
sends two signals (TI: Temperature of Injectate; TB: Temperature of Blood) to the CO
Signal Process Network. After that, the signals are amplified and low-pass filtered, and
then sent to the CPU System for processing.
IBP Signal Process Network
The IBP signal is the differential signal. After the common-mode filtering, the difference
signal is amplified by the difference amplifying circuit which changes the dual-end signal
to the single-end signal. After the low-pass filtering, the IBP signal is sent to the CPU
System for processing.
CPU System
Converting the analog signal obtained by the circuit to the digital signal;
Implementing the logical control of all parameter parts;
Implementing the data processing for the two parameters;
Implementing the communication with the main board.
Power & Signal isolate Circuit
Isolating the external circuits to ensure the safety of human body;
Supplying power for all circuits;
Implementing the isolation communication between the CPU System and the main
board.
11
Page 24
Chapter 2 Principles
2.2.4 SpO2 Module
2.2.4.1 General
This module provides the function of measuring the Pulse Oxygen Saturation (SPO2).
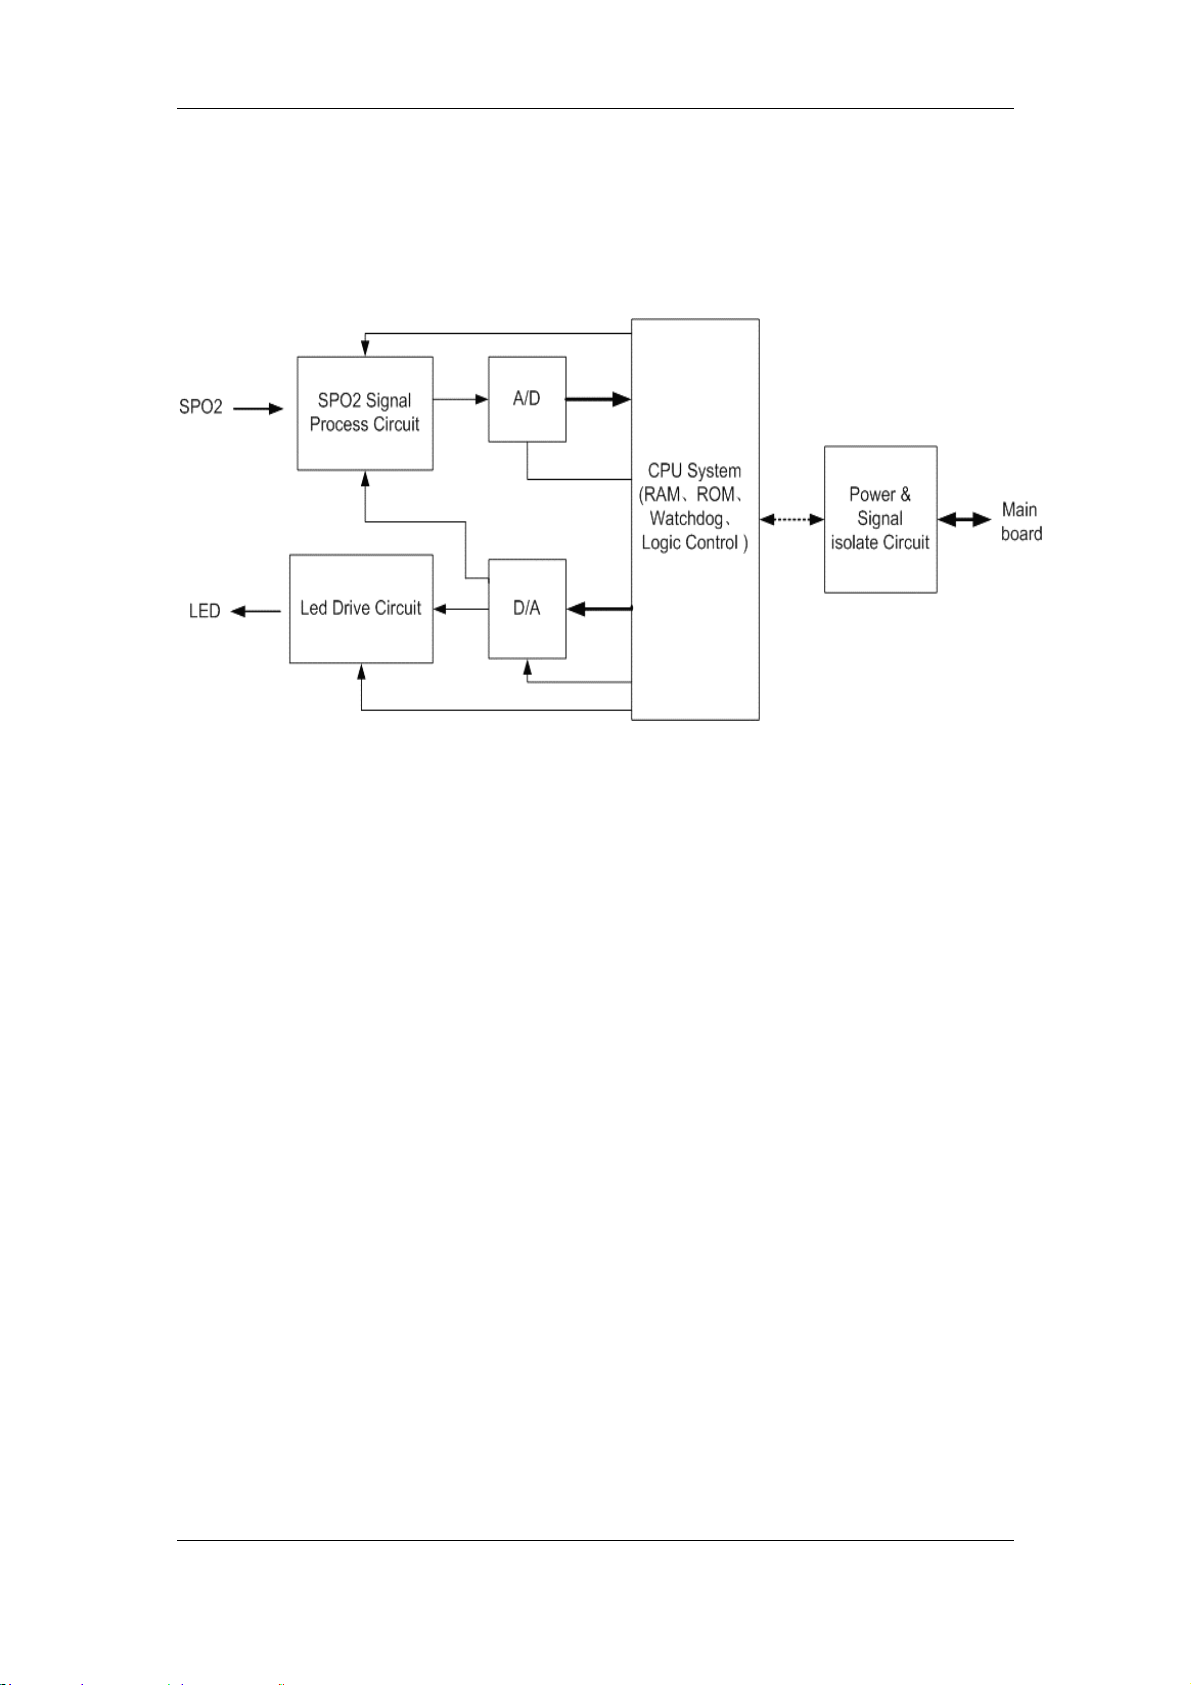
2.2.4.2 Principle diagram
Figure2-7 Working principle of the SpO2 module
2.2.4.3 Principle
The SpO
measurement principle
2
1. Collecting the light signal of the red light and infrared transmitting through the finger
or toe which is pulsing;
2. Processing the collected signal to get the measured result.
The drive circuit of the LED and the gain of the amplifying circuit should be controlled
according to the different perfusions and transmittances of the tested object.
Led Drive Circuit
This circuit supplies the LED with the drive current, which can be regulated.
SPO2 Signal Process Network
The pre-amplifying circuit converts the photoelectric signal to the voltage signal and conducts
the primary amplification.
The gain adjusting and amplifying circuit conducts the secondary signal amplification and
adjusts the gain.
The biasing circuit adjusts the dynamic range of the signal, and sends it to the A/D conversion
part.
A/D
The A/D conversion part converts the analog signal to the digital signal, and then sends it to
CPU for further processing.
D/A
The D/A conversion part converts the digital signal received from CPU to the analog signal,
and provides the control signal for the Led Drive Circuit and SPO2 Signal Process Network.
CPU System
12
Page 25

Chapter 2 Principles
Implementing the logical control of all the circuits;
Implementing the data processing for the SpO
parameter;
2
Implementing the communication with the main board.
Power & Signal isolate Circuit
Isolating the external circuits to ensure the safety of human body;
Supplying power for all circuits;
Implementing the isolation communication between the CPU System and the main
board.
2.2.5 NIBP Module
2.2.5.1 General
This module provides the function of measuring the Non-Invasive Blood Pressure (NIBP)
parameter.
2.2.5.2 Principle diagram
Figure 2-8 Working principle of the NIBP module
2.2.5.3 Principle
The NIBP is measured based on the pulse vibration principle. Inflate the cuff which is on the
forearm till the cuff pressure blocks the arterial blood, and then deflate the cuff according to a
specified algorithm. While the cuff pressure is decreasing, the arterial blood has pulses, which
are sensed by the pressure transducer in the cuff. Consequently, the pressure transducer,
connected with the windpipe of the cuff, generates a pulsation signal, which is then processed
by the NIBP module to get the NIBP value.
Valve Drive Circuit
This circuit controls the status (ON/OFF) of valves. It, together with the Motor Drive Circuit,
implements the inflation and deflation of the cuff.
13
Page 26

Chapter 2 Principles
Motor Drive Circuit
This circuit controls the action of the air pump. It, together with the Valve Drive Circuit,
implements the inflation and deflation of the cuff. Besides, it provides the status signal of the
motor for the A/D conversion part.
NIBP Signal Process Network
The NIBP signal is the differential input signal. The difference amplifying circuit amplifies the
dual-end difference signal and converts it to the single-end signal; meanwhile, this circuit
sends a channel of signal to the A/D conversion part, and the other to the DC isolating and
amplifying circuit.
The DC isolating and amplifying circuit removes DC components from the signal, amplifies the
signal, and then sends it to the A/D conversion part.
A/D
The A/D conversion part converts the analog signal to the digital signal, and sends it to the
CPU System for further processing.
Over Pressure Detect
The circuit detects the NIBP pressure signal. Once the pressure value exceeds the protected
pressure value, it will send a message to the CPU System, which asks the Valve Drive Circuit
to open the valve to deflate the cuff.
CPU System
Implementing the logical control of all the circuits;
Implementing the data processing for the NIBP parameter;
Implementing the communication with the main board.
2.2.6 Recorder Module
2.2.6.1 General
This module is used to drive the heat-sensitive printer.
2.2.6.2 Principle diagram
Figure 2-9 Working principle of the recorder module
2.2.6.3 Principle
This module receives the to-be-printed data from the main board, converts them to the dot
14
Page 27

Chapter 2 Principles
matrix data, sends them to the heat-sensitive printer, and drives the printer.
Step Motor Drive Circuit
There is a step motor on the heat-sensitive printer. The step motor drives the paper. This
circuit is used to drive the step motor.
Printer Status Detect Circuit
This circuit detects the status of the heat-sensitive printer, and sends the status information to
the CPU system. The status information includes the position of the paper roller, status of the
heat-sensitive recorder paper and the temperature of the heat-sensitive head.
CPU System
Processing the data to be printed;
Controlling the heat-sensitive printer and step motor;
Collecting data about the status of the heat-sensitive printer, and controlling the
printer;
Implementing the communication with the main board.
2.2.7 Button Panel
2.2.7.1 General
This module provides a man-machine interactive interface.
2.2.7.2 Principle diagram
Figure 2-10 Working principle of the button panel
2.2.7.3 Principle
This module detects the input signals of the button panel and control knob, converts the
detected input signals to codes and then sends to the main board. The main board sends
commands to the button panel, which, according to the commands, controls the status of the
LED and the audio process circuit to give auditory/visual alarms.
CPU
Detecting the input signal of the button panel and control knob;
15
Page 28

Chapter 2 Principles
Controlling the status of LED;
Controlling the audio process circuit;
Regularly resetting the Watchdog timer;
Communicating with the main board.
Audio Process Circuit
This circuit generates audio signals and drives the speaker.
Watchdog
When powered on, the Watchdog provides the reset signal for CPU.
The patient monitor provides the watchdog timer output and voltage detection functions.
2.2.8 Power PCB
2.2.8.1 General
This module provides DC working current for other boards.
2.2.8.2 Principle diagram
Figure 2-11 Working principle of the power PCB
2.2.8.3 Principle
This module can convert 220V AC or the battery voltage to 5V DC and 12V DC voltages, which
are supplied for other boards. When the AC voltage and batteries coexist, the AC voltage is
supplied for the system and used to charge the batteries.
AC/DC
This part converts the AC voltage to the low DC voltage for the subsequent circuits; besides, it
supplies the power for charging the batteries.
Battery Control Circuit
When the AC voltage and batteries coexist, this circuit controls the process of charging the
batteries with the DC voltage converted by the AC/DC part. When the AC voltage is
unavailable, this circuit controls the batteries to supply power for the subsequent circuits.
5V DC/DC
This part converts the DC voltage to the stable 5V DC voltage and supplies it for the external
16
Page 29

Chapter 2 Principles
boards.
12V DC/DC
This part converts the DC voltage to the stable 12V DC voltage and supplies it for the external
boards.
Power Switch Circuit
This circuit controls the status of the 5V DC/DC part and the 12V DC/DC part, thus to control
the switch of the patient monitor.
Voltage Detect Circuit
This circuit detects the output voltages of the circuits, converts the analog signal to the digital
signal, and sends the digital signal to the main board for processing.
2.3 Software Description
2.3.1 General
Figure 2-12 System function
As shown in Figure 2-12, in the red frame is the software system, on the left to the red
frame are the inputs of the software system, and on the right to the red frame are the
outputs. The parameter measurement module exchanges data with the software through
the serial port, while the user interacts with the system through the button panel. Among
the output devices, the recorder and alarm device receive data through the serial ports,
the analog output component is an MBUS component, and the LCD and network
controller are controlled directly by CPU.
17
Page 30

Chapter 2 Principles
2.3.2 System Task
NO Task Function Period
System initialization Initializing the system
1
Data processing Analyzing and saving the data 1 second
2
Display of timer
3
information
Switchover of modules
5
and screens
Processing of user
commands and
6
screens
System monitoring
7
Network connection Implementing the network connection 1 second
8
Network data sending Sending the network data 1 second
9
Network data receiving Receiving the network data (viewbed) 1 second
10
ECG analysis
11
Record output Outputting records
12
NIBP processing Implementing NIBP-related processing 1 second
13
WATCHDOG task Managing the system watchdog 1 second
14
Implementing the timed refreshing 1 second
Switching over between waveforms and
parameters on the screen
Processing the user inputs by buttons and
displaying them on the screen.
System monitoring, voltage monitoring and
battery management
Analyzing ECG signal, calculating ECG values
(HR, ARR and ST), and saving the analysis
results.
In case of a
startup
In case of a
screen change
event
In case of a
button event
1 second
1 second
In case of a
record event
18
Page 31

Chapter 2 Principles
2.3.3 System Function
The system tasks can be classified as follows.
Figure 2-13 System task
2.4 System Parameter
2.4.1 General
For the PM-9000 Express patient monitor, signals are collected by modules, and the results
19
Page 32

Chapter 2 Principles
are transferred to the main board through the adapter board, thus to process and display the
data and waveforms. Commands from the main board, as well as the status information of
modules, are transferred through the adapter board. In addition, the adapter board adapts and
changes the power supply. The structure of the whole system is shown in the following figure.
---
As shown in Figure 2-14, the five modules and measurement cables monitor and measure
NIBP, SpO
, ECG/RESP/TEMP, IBP/CO and CO2 in real time, and send the results to the main
2
board for processing and displaying. If necessary, the results are sent to the recorder for
printing.
The parameter monitoring functions are described respectively in the following sections.
2.1.1 ECG/RESP
■ ECG
The PM-9000 Express patient monitor has the following ECG functions:
1) Lead type: 3-lead, 5-lead, 12-lead
2) Lead way:
3-lead (1 channel):
5-lead (2 channels):
12-lead (8 channels):
I, II, III
I, II, III, aVR, aVL, aVF, V
I, II, III, aVR, aVL, aVF, V1-V6, CAL
3) Floating input
4) Right-foot drive
5) Lead-off detection
6) 2-channel ECG waveform amplification; processing ECG signals of any two leads
■ The ECG circuit processes the ECG signals. It consists of the following parts:
20
Page 33

Chapter 2 Principles
1) Input circuit: The input circuit protects the ECG input level, and filters the ECG signals
and external interference. The ECG electrode is connected to the input circuit through the
cable.
2) Buffer amplifying circuit: This circuit ensures extremely high input impedance and low
output resistance for ECG.
3) Right-foot drive circuit: The output midpoint of the buffer amplifying circuit is fed to the
RL end of the 5-lead after the inverse amplification, so as to ensure that the human body
is in the equipotential state, decrease the interference, and increase the common-mode
rejection ratio of the circuit.
4) Lead-off detection: The lead-off causes changes in the output level of the buffer
amplifying circuit. Therefore, the lead-off can be detected with a comparator, and the state
of lead-off can be converted TTL level for the Micro Controller Unit (MCU) to detect it.
5) Lead circuit: Under the control of MCU, the lead electrodes should be connected to the
main amplification circuit.
6) Main amplification circuit: The measurement amplifier is composed of 3 standard
operation amplifiers.
7) Subsequent processing circuit: This circuit couples the ECG signals, remotely controls
the gains, filters the waves, shifts the level, amplifies the signal to the specified amplitude,
and sends the signal to the A/D converter.
■ RESP
The PM-9000 Express patient monitor measures the RESP based on the impedance
principle. While a man is breathing, the action of the breast leads to impedance changes
between RL and LL. Change the high-frequency signal passing the RL and LL to
amplitude-modulation high-frequency signal (AM high-frequency signal), which is
converted to the electric signal after being detected and amplified and then sent to the A/D
converter. The RESP module consists of the RESP circuit board and coupling transformer.
The circuit has several functions: vibration, coupling, wave-detection, primary
amplification and high-gain amplification.
2.4.3 NIBP
The NIBP is measured based on the pulse vibration principle. Inflate the cuff which is
on the forearm till the cuff pressure blocks the arterial blood, and then deflate the cuff
according to a specified algorithm. While the cuff pressure is decreasing, the arterial
blood has pulses, which are sensed by the pressure transducer in the cuff.
Consequently, the pressure transducer, connected with the windpipe of the cuff,
generates a pulsation signal. Then, the pulsation signal is filtered by a high-pass filter
(about 1Hz), amplified, converted to the digital signal by the A/D converter, and finally
processed by the MCU. After that, the systolic pressure, diastolic pressure and mean
pressure can be obtained. For neonates, pediatric and adults, it is necessary to select
the cuffs of a proper size to avoid possible measurement errors. In the NIBP
measurement, there is a protection circuit used to protect patient from over-high
pressure.
The NIBP measurement modes include:
1) Adult/pediatric/neonate mode: To be selected according to the build, weight and age
21
Page 34

Chapter 2 Principles
of the patient;
2) Manual/Auto/Continuous mode: The manual measurement is also called single
measurement; in this mode, only one measurement is done after being started. In the
auto measurement mode, the measurement can be done once within the selected
period, with the interval being 1, 2, 3, 4, 5, 10, 15, 30, 60, 90, 120, 180, 240 or 480
minutes. In the continuous measurement mode, quick continuous measurement will be
done within 5 minutes after being started; it detects the changes in blood pressure
effectively.
2.4.4 SpO2
The SpO2 value is obtained through the pulse waves of the finger tips based on specific
algorithm and clinical data. The SpO
probe is the measurement transducer. It has two
2
inbuilt LEDs and an inbuilt light receiver. The two LEDs include one red-light diode and
one infrared diode, which emit light in turns. When the capillaries in the finger tip are
iteratively congested with blood pumped by the heart, the light emitted by the LEDs, after
absorbed by the capillaries and tissue, casts on the light receiver, which can sense, in the
form of electric signal, the light strength changing with the pulsated blood. The DC/AC
ratio of the two photoelectric signals corresponds to the content of the oxygen in the blood.
Therefore, the correct pulse oxygen saturation can be obtained with specific algorithm.
Moreover, the pulse rate can be obtained according to the pulse waveform.
The circuit of the SpO
module is involved in four parts: SpO2 probe, signal processing
2
unit, LED-driven sequencing control part and the MCU.
2.4.5 TEMP
Temperature measurement principle:
1. The transducer converts the body temperature to the electric signal;
2. The amplifier amplifies the electric signal;
3. The CPU processes the data.
The circuit is a proportional amplifier consisting of operation amplifiers. When the
temperature reaches the heat-sensitive probe, the heat-sensitive probe generates the
voltage signal, which is sent to the A/D converter after being amplified. The probe
detecting circuit is a voltage comparator consisting of operation amplifiers. When the
probe is disconnected, the voltage input is lower than the comparing voltage, so the
voltage comparator outputs the low level; when the probe is connected, the voltage input
is higher than the comparing voltage, so the voltage comparator outputs the high level.
2.4.6 IBP
The IBP module can monitor the arterial pressure, central venous pressure and
pulmonary arterial pressure.
Measurement principle: Introduce a catheter, of which the external end is connected to
the pressure transducer, into the blood vessel under test, inject the physiological saline.
Since the liquid can be transferred by pressure, the pressure inside the blood pressure is
transferred by liquid to the pressure transducer, and the dynamic waveform of the
pressure inside the blood pressure is obtained in real time. Thus, the arterial pressure,
central venous pressure and pulmonary arterial pressure are obtained based on specific
22
Page 35

Chapter 2 Principles
algorithm.
2.4.7 CO
CO measurement principle: The thermal dilution method is widely used in the clinical CO
monitoring. Introduce a floating catheter into the pulmonary artery through the right atrium,
and inject the physiological saline into the right atrium through the catheter whose front
end is connected to the temperature transducer. When the cold liquid mixes with the
blood, there will be a change of temperature. Thus, when the blood mixed with the
physiological saline flows into the pulmonary artery, its temperature will be sensed by the
temperature transducer. According to the injection time and temperature change, the
patient monitor can analyze the CO, and calculate the Cardiac Index (CI), Stroke Volume
Index (SVI), SVIs of the left atrium and right atrium, Pulmonary Vascular Resistance (PVR)
and so on.
2.4.8 CO2
The CO2 module works based on the infrared spectrum absorption principle. According to
different connection methods, the infrared light transducer is classified as the mainstream
infrared light transducer and sidestream infrared light transducer. The sidestream CO
module is composed of the circuit board, inbuilt sidestream infrared light transducer,
deflation pump and control. When used, this module requires the external water trap,
drying pipe and sampling tube. The mainstream CO
module is composed of the circuit
2
board and external mainstream infrared light transducer. The infrared light transducer
needs to be preheated. In the sidestream mode, the deflation rate can be set to
100ml/min, 150ml/min or 200ml/min according to the patient situation. In the AG
monitoring, multiple compensations can be set, such as hydrosphere, oxygen,
temperature and desflurane (Des). When the CO
measurement is not being conducted,
2
the sidestream deflation pump, the transducer of the mainstream module, and the infrared
source are expected to be shut down, thus to extend the service life and reduce the power
consumption of the module. In the mainstream mode, the infrared light transducer takes a
longer time to be preheated, and there is no windpipe which is available in the sidestream
mode.
2
2.4.9 AG
The Anesthesia Gas (AG) can be used to measure the AG and respiration gas of the
anesthetized patient. The AG concentration is measured based on the principle that the
AG has the property of absorbing the infrared. All gases that the AG module can measure
have the property of absorbing the infrared, and every gas has their own specific
absorption peculiarity.
AG measurement procedure:
1. Send the gas to be measured to a sampling chamber;
2. Use an optical infrared filter, select a specific band of infrared, and transmit it
through the gas;
3. Measure the infrared that gets through the gas to obtain the gas concentration.
For a given volume, the higher the gas concentration is, the more absorbed infrared is,
and the less the infrared that gets through the gas is. For the measurement of multiple
23
Page 36

Chapter 2 Principles
gases, multiple infrared filters are required in the AG module.
The oxygen does not absorb the infrared within the above-mentioned wave band.
Therefore, the oxygen is measured based on its paramagnetism. Inside the transducer of
the O
module, there are two crystal balls full of nitrogen. They are suspended in the
2
symmetrical magnetic field, and designed to point to the strongest outgoing part of the
magnetic field. Outside the balls is the paramagnetic oxygen. Therefore, the balls are
forced, by the relatively stronger paramagnetic oxygen, out of the magnetic field. The
moment of the force acting on the balls is proportional to the paramagnetic strength as
well as to the concentration of the paramagnetic oxygen.
24
Page 37

Chapter 3 Product Specifications
Chapter 3 Product Specifications
3.1 Safety Classifications
Class I with internal electric power supply.
Type of protection against
electric shock
Degree of protection
against electric shock
Where the integrity of the external protective earth (ground) in
the installation or its conductors is in doubt, the equipment shall
be operated from its internal electric power supply (batteries)
Monitor:
Sidestream CO2/AG:
ECG/RESP/TEMP/SpO
CO/mainstream CO
:
2
/NIBP/IBP/
2
B
BF (defibrillation proof)
CF (defibrillation proof)
Degree of protection
against hazards of ignition
of flammable anesthetic
mixtures
Degree of protection
against harmful ingress of
water
Mode of operation Continuous
Equipment type Portable
Not protected (ordinary)
Not protected (ordinary)
25
Page 38

Chapter 3 Product Specifications
3.2 Environmental Specifications
0 to 40℃
5 to 35℃ (With Mindray CO2 module)
Operating temperature
10 to 40℃ (With Welch Allyn CO2 module)
5 to 35℃ (With Oridion CO2 module)
10 to 35℃ (With AION AG module)
Operating humidity 15 to 95%, noncondensing
-500 to 4600m (-1640 to 15092 feet)
Altitude
-305 to 3014m (-1000 to 9889 feet) (with CO
Nellcor SpO
module)
2
Storage temperature –20 to 60℃
Storage humidity 10 to 95%, noncondensing
, AG, Masimo or
2
26
Page 39

Chapter 3 Product Specifications
3.3 Power Source Specifications
AC mains
Input voltage 100 to 240V
Frequency 50/60Hz
Power 140VA
Fuse T 3A
Internal battery
Number of batteries 2
Type Sealed lead-acid battery or lithium-ion battery
Time to shutdown 5 to 15min (after the first low-power alarm)
Sealed lead-acid battery
Nominal voltage 12VDC
Capacity 2.3Ah
48 minutes or 120 minutes typical when powered by one or two
Operating time
Charge time
Lithium battery
Rated voltage 11.1VDC
Capacity 4.4Ah
Operating time
new fully-charged batteries respectively (25℃, ECG, SpO2,
NIBP measurement per 15 minutes).
A maximum of 6 h for each battery, and a maximum of 12h for
both (in the running status or standby mode)
120 minutes or 300 minutes typical when powered by one or two
new fully-charged batteries respectively (25℃, ECG, SpO2,
NIBP measurement per 15 minutes).
Charge time A maximum of 6.5h (in the running status or standby mode)
27
Page 40

Chapter 3 Product Specifications
3.4 Hardware Specifications
Physical
Size 318 × 270 × 137mm (width×height×depth)
Different due to different configurations
Weight
Display
Type Color TFT LCD
Size 12.1 inches (diagonal)
Resolution 800×600 pixels
Recorder
Type Thermal dot array
Horizontal resolution 160 dots/cm (at 25 mm/s recording rate)
Vertical resolution 80 dots/cm
Width of the recorder paper 50 mm
Length of the recorder paper 30 m
Recording rate 25 mm/s, 50 mm/s
Recorded waveforms 2
Standard configuration: 4.7kg
Maximum weight: ≤ 7.5kg
LED indicator
Alarm indicator 1 (yellow and red)
Running status indicator 1 (green)
AC power indicator 1 (green)
Battery indicator 1 (green)
Audio indicator
Giving audio alarms, keypad tones, and heartbeat/pulse tone.
Speaker
Control
Control knob
Supporting PITCH TONE and multi-level volume.
Audio alarms comply with EN475 and IEC60601-1-8.
1 knob, which can be rotated clockwise/counterclockwise or
28
Page 41

Chapter 3 Product Specifications
pressed.
Button
Connectors
Power supply 1 AC power connector
Parameter ECG, RESP, TEMP, SPO2, NIBP, IBP, CO, CO2, AG
Network 1 standard RJ45 network connector, 100 BASE-TX
VGA 1 standard color VGA monitor connector, 15-PIN D-sub
Auxiliary output 1 BNC connector
Equipotentiality 1 equipotential grounding connector
7 buttons: POWER, MAIN, FREEZE, PAUSE, RECORD,
NIBP, MENU
3.5 Wireless network
Standards IEEE 802.11b, Wi-Fi compatible
Frequenct range 2.412 to 2.462GHz
China America Canada Europe Spain France Japan
Operating channel
For other country, please refer to your local law.
Safe distance 10m (a circle centering AP with the diameter of 10m)
Maximum data rate 11Mbps
1 to 11 10, 11 2
29
Page 42

Chapter 3 Product Specifications
3.6 Data Storage
Trend data
Alarm events
ARR events 80 ARR events and associated waveforms with 8s wavelength.
NIBP measurements
Long trend: 96 hours, resolution 1min, 5 min or 10 min.
Short trend: 1 hour, resolution 1 s or 5 s.
70 alarm events and associated waveforms (with user
selectable waveform length 8s, 16 or 32).
800 NIBP groups, including systolic pressures, mean pressures,
diastolic pressures and measurement time.
30
Page 43

Chapter 3 Product Specifications
3.7 Signal Output Specifications
Standards
Output impedance 50Ω
ECG analog output
Bandwidth
(-3dB; reference
frequency: 10Hz)
Signal delay ≤ 25ms
Maximum propagation delay 25ms (In DIAGNOSTIC mode, NOTCH is OFF)
Sensitivity 1V/mV±5%
PACE rejection/enhancement No pace rejection or enhancement
IBP analog output
Bandwidth 0 to 12.5 Hz (-3dB, reference frequency: 1Hz)
Meets the requirements of EC60601-1 for short-circuit
protection and leakage current
Diagnostic mode:
Monitor mode:
Surgery mode:
0.05 to 100Hz(12-lead: 0.05 to
150Hz)
0.5 to 40Hz
1 to 20Hz
Maximum propagation Delay 55ms (the filter function is disabled)
Sensitivity 1 V/100mmHg±5%
Nurse call output
Driver Relay
Electrical specifications ≤60W, ≤2A, ≤36VDC, ≤25VAC
Isolation voltage > 1500 VAC
Signal type Normally open or normally closed, selectable
Defibrillator synchronization pulse
Maximum time delay 35ms (R-wave peak to leading edge of the pulse)
Amplitude 3.5 V (min) at 3 mA sourcing; 0.8 V (max) at 1 mA sinking
Pulse width 100 ms ±10%
Rising and falling time < 3ms
VGA
Signal
RGB: 0.7 Vp-p/75Ω;
Horizontal/vertical synchronization: TTL level
31
Page 44

Chapter 3 Product Specifications
3.8 ECG Specifications
3-lead (1 channel):
Lead type
Lead naming style AHA, EURO
Sensitivity selection
Sweep speed 12.5mm/s, 25mm/s, 50mm/s
Bandwidth (– 3dB)
Common mode rejection
Differential input
impedance
5-lead (2 channels):
12-lead (8 channels):
1.25mm/mV (×0.125), 2.5mm/mV (×0.25), 5mm/mV (×0.5),
10mm/mV (×1), 20mm/mV (×2) and auto
Diagnostic mode:
Monitor mode:
Surgery mode:
Diagnostic mode:
Monitor mode:
Surgery mode:
(The notch filter is turned off.)
≥ 5MΩ
I, II, III
I, II, III, aVR, aVL, aVF and V
I, II, III, avR, avL, avF, V1-V6
0.05 to 100Hz (12-lead: 0.05 to 150Hz)
0.5 to 40Hz
1 to 20Hz
≥90 dB (12-lead: >95 dB)
≥105 dB
≥105 dB
Input signal range ±8mV (peak-to-peak value)
DC offset voltage ±300mV (12-lead: ±500mV)
Patient leakage current < 10uA
Recovery time after
defibrillation
Calibration signal
HR
Measurement range
Resolution 1 BPM
Precision ±1BPM or ±1%, whichever is greater.
Sensitivity 200µV (lead II)
< 3s
1mV (peak-to-peak value), precision: ±5%
Neonate:
Pediatric:
Adult:
15 to 350 BPM
15 to 350 BPM
15 to 300 BPM
32
Page 45

Chapter 3 Product Specifications
Meets the requirement of ANSI/AAMI EC13-2002: Section
Response time to heart rate
changes
4.1.2.1 f).
Less than 11 sec for a step increase from 80 to 120 BPM
Less than 11 sec for a step decrease from 80 to 40 BPM
When tested in accordance with ANSI/AAMI EC13-2002 Section
4.1.2.1 g, the response time is as follows.
Response time of
tachycardia alarm
Pace pulse
Pulse indicator
Pulse rejection
Figure 4ah – range:
4a – range:
4ad – range:
Figure 4bh – range:
4b – range:
4bd – range:
15.7 to 19.2s, average: 17.4s
5.7 to 8.5s, average: 7.5s
3.6 to 5.1s, average: 4.2s
11.5 to 14.7s, average: 12.9s
4 to 14s, average: 7.2s
6.6 to 14.5s, average: 10.5s
Pace pulses meeting the following conditions are marked by the
PACE indicator.
Amplitude:
Width:
Rise time:
±4 to ±700mV
0.1ms to 2ms
10us to 100µs
When tested in accordance with the ANSI/AAMI EC13-2002:
Sections 4.1.4.1 and 4.1.4.3, the heart rate meter rejects all pulses
meeting the following conditions.
Amplitude:
±2 to ±700mV
Width:
Rise time:
Min. input slew rate:
ST segment measurement
Measurement range – 2.0 to +2.0 mV
– 0.8 to +0.8mV:
Precision
Beyond this range:
Update period 10s
Arrhythmia analysis
ASYSTOLE, VFIB/VTAC, PVC, COUPLET, VT>2,
Type
BIGEMINY, TRIGEMINY, R ON T, MISSED BEATS, TACHY,
BRADY, PNC and PNP
0.1ms to 2ms
10us to 100µs
50V/s RTI
±0.02mV or ±10%, whichever is
greater.
Undefined.
33
Page 46

Chapter 3 Product Specifications
3.9 RESP Specifications
Measurement technique Thoracic impedance
Lead Optional: lead I and lead II; default lead II
Differential input
impedance
Respiration impedance test
range
Excitation current < 300µA
Baseline impedance range 200 to 2500Ω (using an ECG cable with 1kΩ resistance)
Bandwidth 0.2 to 2Hz (-3 dB)
Sweep speed 6.25 mm/s, 12.5 mm/s, 25 mm/s
RR
Measurement range
Resolution 1 BrPM
Precision
> 2.5MΩ
0.3 to 3Ω
Adult:
Pediatric/neonate:
7 to 150 BrPM:
0 to 6 BrPM:
0 to 120 BrPM
0 to 150 BrPM
±2 BrPM or ±2%, whichever is greater.
Undefined.
Apnea alarm delay 10 to 40s
34
Page 47

Chapter 3 Product Specifications
3.10 SpO2 Specifications
Mindray SpO
Module
2
SpO
2
Measurement range 0 to 100%
Resolution 1%
70 to 100%:
70 to 100%:
Precision
70 to 100%:
0% to 69%:
±2 % (adult/pediatric, non-motion conditions)
±3 % (neonate, non-motion conditions)
±3 % (in motion conditions)
Undefined.
Refreshing rate 1s
PR
Measurement range 20 to 254bpm
Resolution 1bpm
±3 bpm (non-motion conditions)
Precision
±5 bpm (in motion conditions)
Refreshing rate 1s
Masimo SpO
Specifications
2
SpO
2
Measurement range 1 to 100%
Resolution 1%
70 to 100%:
70 to 100%:
Precision
70 to 100%:
0% to 69%:
Refreshing rate 1s
35
±2% (adult/pediatric, non-motion conditions)
±3% (neonate, non-motion conditions)
±3% (in motion conditions)
Undefined.
Page 48

Chapter 3 Product Specifications
PR
Measurement range 25 to 240bpm
Resolution 1bpm
Precision
Refreshing rate 1s
Nellcor SpO
Specifications
2
SpO2 measurement range
and precision
±3bpm (non-motion conditions)
±5bpm (in motion conditions)
Sensor Range Precision*
MAX-A, MAX-AL, MAX-N,
MAX-P, MAX-I and MAX-FAST
OxiCliq A, OxiCliq N, OxiCliq P,
OxiCliq I
D-YS, DS-100A, OXI-A/N and
OXI-P/I
70 to 100%
0% to 69%
70 to 100%
0% to 69%
70 to 100%
0% to 69%
±2%
Undefined
±2.5%
Undefined
±3%
Undefined
70 to 100%
±3.5%
MAX-R, D-YSE and D-YSPD
PR measurement range and
precision
0% to 69%
20 to 250bpm: ±3bpm
251 to 300bpm: Undefined
Undefined
Refreshing rate 1s
*: When sensors are used on neonatal subjects as recommended, the specified precision range is
increased by ±1%, to account for the theoretical effect on oximeter measurements of fetal
hemoglobin in neonatal blood.
36
Page 49

Chapter 3 Product Specifications
3.11 IBP Specifications
Measurement technique Auto oscillation
Displayed parameters Systolic pressure, diastolic pressure and mean pressure
Mode of operation Manual, auto and continuous
Measurement interval in
auto mode
Measurement time in
continuous mode
Measurement range in
normal mode
Measurement precision
Resolution 1mmHg
Over-pressure protection
1/2/3/4/5/10/15/30/60/90/120/180/240/480 minutes
5 minutes
mmHg Adult Pediatric Neonate
Systolic
pressure
Diastolic
pressure
Mean pressure 20 to 230 20 to 165 20 to 110
Maximum average error: ±5mmHg
Maximum standard deviation: 8mmHg
Adult:
Pediatric:
40 to 270 40 to 200 40 to 135
10 to 210 10 to 150 10 to 100
297±3 mmHg
240±3 mmHg
Neonate:
147±3 mmHg
37
Page 50

Chapter 3 Product Specifications
3.12 TEMP Specifications
Number of channels 2
Displayed parameters T1, T2 and TD
Measurement range
Resolution
Precision
Update period 1s
Minimum time for
accurate measurement
0 to 50°C (32 to 122°F)
0.1°C
0.1°C (excluding the sensor)
±0.2°C (including the YSI 400 series sensor)
Body surface: < 100s
Body cavity: < 80s
(YSI 400 series sensor)
38
Page 51

Chapter 3 Product Specifications
3.13 IBP Specifications
Number of channels 2
Pressure labels ART, PA, CVP, RAP, LAP, ICP, P1 and P2
ART 0 to 300 mmHg
PA – 6 to 120 mmHg
Measurement range
CVP/RAP/LAP/ICP – 10 to 40 mmHg
P1/P2 – 50 to 300 mmHg
Resolution 1 mmHg
Precision ±2% or ±1mmHg, whichever is greater
Update period 1s
Pressure transducer
Sensitivity 5 uV/V/mmHg
Impedance range 300 to 3000Ω
39
Page 52

Chapter 3 Product Specifications
3.14 CO Specifications
Measurement technique Thermal dilution
Calculated parameter CO, hemodynamics
CO 0.1 to 20l/min
Measurement range
Resolution
Precision
Alarm range
TB
TI
CO:
TB, TI:
CO:
TB, TI:
TB
:
23 to 43°C
0 to 27°C
0.1 l /min
0.1°C
±5% or ± 0.1 l /min
0.1°C
23 to 43°C
40
Page 53

Chapter 3 Product Specifications
3.15 CO2 Specifications
Measurement technique Infrared absorption technique
Measurement mode Sidestream, microstream or mainstream (optional)
Displayed parameter EtCO2, FiCO2, Respiration Rate
CO2 function Meet the requirements of EN864 and ISO9918.
Mindray CO
Specifications
2
CO2 measurement range 0 to 99mmHg
0 to 40 mmHg:
Precision*
41 to 76 mmHg:
77 to 99 mmHg:
Deflation rate 100, 150ml/min
Precision of deflation rate 15%
< 1min.
Start-up time of CO2
module
The module enters the warming up status after the startup. Ten
minutes later, it enters the ready-to-measure status.
AwRR measurement range 0 to 120 BrPM
0 to 70 BrPM:
Precision
> 70 BrPM:
Response time < 240 ms (10 to 90%)
±2mmHg
±5%
±10%
±2 BrPM
±5 BrPM
Delay time
< 2s (Length of sampling tube: 7 feet; inner diameter: 0.055
inches; sampling flow: 150ml/min)
Apnea alarm delay AwRR: 10 to 40 s
41
Page 54

Chapter 3 Product Specifications
* Conditions for measurements in typical precision:
The measurement is started after the preheating mode of the module;
Ambient pressure: 750mmHg to 760mmHg; room temperature: 22 to 28 ;℃℃
The gas under test is dry, and the balance gas is N2;
The deflation rate is 150ml/min, the respiration rate is no greater than 30BrPM, with a
fluctuation less than ±3BrPM, and the inhale interval/exhale interval is 1:2;
In other conditions, the measurement precision should meet the requirements of EN864 or
ISO9918: ±4mmHg (0 to 40mmHg) or ±12% of the reading (41 to 99mmHg)
Oridion CO
Specifications
2
measurement range 0 to 99mmHg
CO
2
0 to 38 mmHg:
Precision*
39 to 99 mmHg:
Waveform:
Resolution
Val u e :
7.5
−
50
Flow rate
15
+
ml/min
Initialization time 30s (typical)
Response time 2.9s (typical)
Delay time 2.7s (typical)
AwRR measurement range 0 to 150 BrPM
0 to 70BrPM:
AwRR measurement
precision
70 to 120BrPM:
121 to 150BrPM:
±2mmHg
±5% + 0.08%× (reading - 38mmHg)
0.1mmHg
1mmHg
±1BrPM
±2BrPM
±3BrPM
Apnea alarm delay AwRR: 10 to 40s
* Precision applies for breath rates of up to 80 bpm. For breath rates above 80 bpm, accuracy
complies with EN 864/ISO 9918 (4 mmHg or ±12% of reading whichever is greater) for EtCO
values exceeding 18 mmHg. To achieve the specified accuracies for breath rates above 60
breaths/minute, the Microstream® FilterLine H Set for Infant/Neonatal (p/n 006324) must be
used.
The accuracy specification is maintained to within 4% of the values indicated in the above table
in the presence of interfering gases according to EN864 Section Eleven, Part 101.
42
2
Page 55

Chapter 3 Product Specifications
Welch Allyn CO
Specifications
2
CO2 measurement range 0 to 99mmHg
Precision*
0 to 40 mmHg:
41 to 76 mmHg:
77 to 99 mmHg:
±2mmHg
±5%
±10%
Resolution 1mmHg
Refreshing rate 1s
Start-up time
< 80s (ambient temperature: 25 ; preheating power of ℃
transducer: 5W)
Response time 100ms (10% to 90 %)
Calibration Daily calibration is unnecessary
Calibration stability
There is a difference (< 1%) from the precison criteria after a
12-month continuous service time
Alarm range 0 to 99 mmHg
AwRR measurement range 0 to 150 BrPM
AwRR alarm range 0 to 150 BrPM
Apnea alarm delay AwRR: 10 to 40 s
* Precision specification is based upon the following standard airway conditions: sensor 42 ; ℃
airway adapter temperature 33 ; water vapor pressure 38 mmHg; standard gas mixture equals ℃
CO2 in balance air; fully hydrated at 33 ; atmospheric pressure 760 mmHg; airway flow rate ℃
60 cc/min.
43
Page 56

Chapter 3 Product Specifications
3.16 AG Specifications
Measurement technique Infrared absorption
Measurement mode Side stream
AG functions
Meets requirements of ISO9918, ISO11196, EN12598 and
ISO7767
45 seconds (warming-up status)
Warm-up time
10 minutes
(ready-to-measure status)
Sampling flow
(sidestream)
Adult/Pediatric 120, 150, 200 ml/minute (user-selectable)
Neonatal 70, 90, 120 ml/minute (user-selectable)
Gas type CO2, N2O, O2 (optional), Des, Iso, Enf, Sev, Hal
CO
Measurement range
:
2
O:
N
2
Des:
Sev:
Enf, Iso, Hal:
O
:
2
AwRR:
0 to 30%
0 to 105%
0 to 30%
0 to 30%
0 to 30%
0 to 105%
2 to 100 BrPM
Resolution
Precision
:
CO
2
AwRR:
1 mmHg
1 BrPM
Gas Range (%REL) Precision (%ABS)
CO2
0 to 1
1 to 5
5 to 7
7 to 10
±0.1
±0.2
±0.3
±0.5
> 10 Not specified
0 to 20
±2
N2O
Des
20 to 100
0 to 1
1to 5
44
±3
±0.15
±0.2
Page 57

Chapter 3 Product Specifications
p
Sev
Enf, Iso, Hal
O2 (Optional)
5 to 10
10 to 15
15 to 18
±0.4
±0.6
±1
>18 Not specified
0 to 1
1 to 5
5 to 8
±0.15
±0.2
±0.4
> 8 Not specified
0 to 1
1 to 5
±0.15
±0.2
> 5 Not specified
0 to 25
25 to 80
80 to 100
±1
±2
±3
2 to 60 BrPM
AwRR
> 60 BrPM Not specified
Alarm range
Apnea alarm delay
CO2:
AwRR:
AwRR
:
0 to 10 % (0 - 76 mmHg)
2 to 100 BrPM
20 - 40 s
Refreshing rate 1s
Calibration Yearly calibration requested.
Calibration stability
Rise time (10 % to 90 %)
Sampling flow 120ml/min,
using the DRYLINE™
water trap and neonatal
DRYLINE™ sampling
line (2.5m)
After module being used for 12 consective months, the error is <
1%
CO2 250 ms (fall time 200 ms)
N2O 250 ms
O
2
HAL, ISO, SEV, DES 300 ms
ENF 350 ms
±1 BrPM
600ms
Rise time (10 % to 90 %)
Sampling flow 200ml/min,
CO2 250 ms (fall time 200 ms)
N2O 250 ms
using the DRYLINE™
water tra
and adult
O
2
45
500ms
Page 58

Chapter 3 Product Specifications
water trap and adult
HAL, ISO, SEV, DES 300 ms
DRYLINE™ sampling
line (2.5m)
ENF 350 ms
Delay time < 4s
46
Page 59

Chapter 4 Disassembling/Assembling & Troubleshooting
Chapter 4 Disassembling/Assembling & Troubleshooting
4.1 PM-9000 Express Disassembling/Assembling
4.1.1 Exploded View of PM-9000 Express
Figure 4-1 Exploded view of PM-9000 Express
NO Material code Part & Specification Quantity
1 9201-30-35947 Front cover assembly 1
2 9210-30-30181 Back plate assembly 1
3 M04-000305--- Cross-head self-tapping screw 3*12 5
4 M02-000802--- Flat washer GB97.13 4
5 9201-30-35944 Support assembly (Lithium battery) 1
6 9201-20-35971- Battery door 1
7 M04-003105--- Cross-head self-tapping screw M3*8 3
8 9201-30-35948 6pin parameter socket 1
9 9201-30-35992 Back cover assembly (microstream CO2) 1
10 TR6C-30-19654 TR6D-C recorder 1
11 M04-004012--- Gasketed cross-head screw M3*6 2
12 M04-004014--- Gasketed cross-head screw M4*10 4
13 M04-004017--- Gasketed cross-head screw M3*12 2
14 M04-051140--- Screw assembly M3*8 2
47
Page 60

Chapter 4 Disassembling/Assembling & Troubleshooting
4.1.2 PM-9000 Express Display (TFT Display) Assembly
Figure 4-2 PM-9000 Express display (TFT display) assembly
NO Standard Name & Specification Quantity
1
2
3
4
5
6
7
8
M04-004015---
0010-10-12271 LG display LB121S02 1
9210-20-30180 12.1`back plate-LG 1
9210-30-30169 LVDS-TTL adapter board 1
M04-002505--- Cross-head screw M3*6 2
9000E-10-04913 INVERTOR-TDK 2
M04-002405--- Cross-head screw M2*6 4
M90-000002-01 Insulating washer Ф2.5 4
Cross-head screw M3×8
4
48
Page 61

Chapter 4 Disassembling/Assembling & Troubleshooting
4.1.3 PM-9000 Express Support Assembly (Lithium Battery) (9201-30-35944)
Figure 4-3 PM-9000 Express support assembly
NO Material Code Part & Specification Quantity
1 M04-004012--- Gasketed cross-head screw M3*6 24
2 9200-20-10689 Recorder regulating panel 1
3 9200-20-10485 Printer mounting plate 1
4 M04-005005--- Cross-head sunk screw M3*6 14
5 9201-20-35965 Support 1
6 M04-002505--- Cross-head screw M3*6 10
7 9201-30-35954 CF wireless network adapter assembly 1
8 9210-30-30150 9210 main control board 1
9 9201-30-35922 Battery compartment assembly (Lithium
1
battery)
10 0010-10-12329 Lithium battery 2
11 9200-20-10516 Insulating plate of ECG board 1
12 812A-30-08557 812A ECG board 1
13 M04-060009--- Stud M3*14 1
14 9200-20-10677 Insulating plate of mounting plate 3 1
15 9200-20-10676 SPO2/IBP mounting plate 1
16 9200-20-10678 Insulating plate of mounting plate 4 1
17 M03A-30-90293 IBP/CO module 1
18 630D-30-09121 630D blood pressure pump 1
19 0010-10-12274 MASIMO SpO2 module 1
49
Page 62

Chapter 4 Disassembling/Assembling & Troubleshooting
20 9201-20-36012 Power PCB insulating plate 1
21 9201-30-35901 Lithium battery power PCB 1
22 9210-30-30163 Socket assembly 1
23 9201-30-35908 Microstream CO2 adapter board 1
24 9201-30-35955 Microstream CO2 module 1
25 9201-20-35928 Mounting plate of microstream CO2
module
1
4.1.4 Front Cover Assembly
Figure 4-4 Front cover assembly
NO Material Code Part & Specification
1
2
3
4
5
6
7
8
9
10
9200-20-10513 Dust washer 1
9200-20-10514 Dust washer 2
M04-003105--- Cross-head self-tapping screw 3*8
9200-30-10701 Alarm indicator panel (red-yellow indicator)
9200-30-10470 Encoder plate
9201-20-35966 Front screen
9200-20-35968 Alarm indicator cover
9200-20-10548 12.1 TFT panel
9201-20-35972 Rotary knob
9200-20-10512 Foot plate 2
50
Page 63

Chapter 4 Disassembling/Assembling & Troubleshooting
11
12
13
14
15
9200-20-10472 Button
9200-20-10473 Button backer
9201-20-36031 Connector
M04-051004--- Cross-head self-tapping screw 2.6*6
9201-30-35912 9201 button panel
4.1.5 Back Cover Assembly
Figure 4-5 Back cover assembly (microstream CO2) (9201-30-35992)
NO Material Code Part & Specification Remark
1
2
3
4
5
6
7
8
9
10
11
M04-003105--- Cross-head self-tapping screw 3*8
9200-20-10620 Speaker press plate
9200-21-10633 Speaker
9200-20-10622 Hook mounting plate
9201-21-35974 Back cover (microstream CO2 module)
9201-20-35970 Handle
9201-20-35969 Gland
M04-000802--- Flat washer GB9713
M04-000305--- Cross-head self-tapping screw 3*12
9201-30-35923 Mounting assembly of microstream CO2
connector
6200-20-11614 CO2 nozzle
51
Page 64

Chapter 4 Disassembling/Assembling & Troubleshooting
12
13
14
9200-20-10511 Foot plate 1
M04-000501--- Stainless steel nut GB6170MS
9201-30-35978 Fan assembly
4.1.6 Microstream CO
Assembly
2
Figure 4-6 Microstream CO
assembly
2
NO Material Code Part & Specification
1
2
3
4
5
9201-30-35959 Microstream CO2 connector
M04-003105--- Cross-head self-tapping screw 3*8
9201-20-36010 Baffle of torsional spring
9201-20-35961 Retaining torsional spring of microstream CO2
connector
9201-20-35915 Mounting plate of CO2 connector
6 9201-20-35914 Baffle of CO2 connector
4.2 Troubleshooting
52
Page 65

Chapter 4 Disassembling/Assembling & Troubleshooting
Y
4.2.1 Black Screen, Startup Failure
Figure 4-7 Location flow of faults causing black screen
53
Page 66

Chapter 4 Disassembling/Assembling & Troubleshooting
4.2.2 White Screen & Other Abnormal Screen
In case of faults causing white screen or other abnormal screens,
■ Check whether the LCD connection wires are in good contact;
■ Replace the LCD connection wires, or replace the LCD if necessary;
■ Replace the main control board if the fault still exists.
4.2.3 Encoder Faults
1. If all other functions (indicator, alarm, buttons) of the button panel are normal,
proceed to step 2; otherwise, replace the button panel;
2. Check whether short-circuit or abnormal open-circuit occurs in the encoder pad;
3. Replace the encoder.
4.2.4 No Audio Alarm
1. Check whether the audio alarm function is disabled in the software settings;
2. Replace the speaker;
3. Replace the button panel.
4.2.5 Printing Failure
1. Check whether there is any alarm about the recorder. If any, eliminate it;
2. Check whether the recorder indictor is on;
3. If not, check the connection wire for inputting signals to the recorder;
4. Check whether the recorder module is enabled in the maintenance menu;
5. Check the power cord of the recorder (including the recorder power PCB);
6. Replace the recorder module.
4.2.6 Abnormal Paper Drive
1. Check whether there are blocks on the paper roller of the recorder;
2. Check whether there are blocks in the gear cluster of thermal assembly of the
recorder;
3. Check whether the voltage input of the recorder is larger than 17.6V.
54
Page 67

Chapter 5 Test and Material List
Chapter 5 Test and Material List
5.1 Test Procedure
5.1.1 Connection and Checking
Connect the simulators, power supply and test fixture properly to the PM-9000 Express
patient monitor, and power it on. Then, the patient monitor displays the start-up screen on
the TFT screen and enters the system screen.
5.1.2 Functions of Buttons
Press every button on the button panel to check their functions as specified in PM-9000
Express Operation Manual. Rotate the control knob to check its functions.
5.1.3 ECG/RESP
The TFT screen displays the standard ECG waveform, and the error between the heart
rate and the set value of the simulator is no more than ±1, namely 60±1; the RESP
waveform is smooth, and the respiration rate is 20±1.
1. Select all leads in order, including Cal, select all the four gains and AUTO, ensure
the waveforms are displayed properly, and check whether the 50Hz/60Hz
interference can be filtered.
2. Check, in all the above-mentioned cases, the consistency between the
heartbeats, the flashes of the red heart-like indicator, and the R-wave.
3. The gain has no impact on the message “ECG signal over weak” in the HR
calculation.
4. Verify the range and precision: Suppose that the amplitude of the GCG signal of
the simulator is 1mV, the heart rates are respectively 30, 60, 120, 200, 240 and
300. Check leads I, II and III. The results should meet 29-31, 59-61, 119-121,
198-202, 238-242, and 297-303.
5. PACE pulse test: Set the simulator to PACE. You should be able to view the pace.
Change PACE amplitude to ±8 – 700mv, and pulse width to 0.1ms – 2ms. The
PACE should be legible, and LEAD OFF is displayed properly.
6. RESP measurement: Set the baseline impedance to 1K, the respiration
impedance to 0.5Ω and 3Ω, and the respiration rate to 30 and 120. The
respiration rate should be 29 – 31, 118 –122.
7. PVC test: Set the simulator to the PVC mode, and set the occurrence times. The
relevant PVCS should be obtained.
8. Set the simulator as follows: RR: 40, baseline impedance: 2KΩ, RESP waveform:
3:1. Open the apnea alarm, set the respiration resistance to 0Ω, and set various
alarm time. Alarms should be given.
5.1.4 Temperature
1.
YSI probe
Select YSI probe from the manufacturer menu, select YSI temperature probe as
the test fixture, set the analog resistance to 1.471K, 1.355K and 1.249K. Then
55
Page 68

Chapter 5 Test and Material List
the TEMP parameter should be 35±0.1 , 37±0.1 and 39±0.1 .℃℃ ℃
2. CY-F1 probe
Select CY-F1 probe from the manufacturer menu, select CY-F1 temperature
probe as the test fixture, set the analog resistance to 6.534K, 6.018K and
5.548K. Then the TEMP parameter should be 35±0.1 , 37±0.1 and ℃℃
39±0.1 .℃
5.1.5 NIBP
Connect the NIBP simulator, adult cuff and accessories, and then connect the module
CUFF and clockwise screw it tightly.
1. After the simulator self-test, press <ENT> to enter the ADULT analog blood
pressure mode. Set the blood pressure to the 255/195/215 mmHg level, SHIFT
to +15, and the HR to 80BPM. Set PM-9000 Express to the adult mode. Press
<START>. Then the results will be obtained in about 30s. The measured results
should be respectively 270±8mmHg, 210±8mmHg and 230±8mmHg.
2. Press <ESC> and <↓> on the simulator to enter the NEONATE mode. Set the
blood pressure to the 120/80/90 mmHg level, HR to 120bmp, and PM-9000
Express to the pediatric mode. Press <START>. Then the results will be
obtained in about 30s. The measured results should be respectively
120±8mmHg, 80±8mmHg and 90±8mmHg.
3. Press <ESC> and <↓> on the simulator to enter the NEONATE mode. Set the
blood pressure to the 60/30/40 mmHg level, SHIFT to -20, HR to 120bmp, and
PM-9000 Express to the neonate mode. Change the simulator accessory to the
neonatal cuff. Press <START>. Then the results will be obtained in about 30s.
The measured results should be respectively 40±8mmHg, 10±8mmHg and
20±8mmHg.
5.1.6 SpO2
Select PLETH as the HR source of PM-9000 Express, and put the finger into the SpO2
sensor. The screen should display the PR and SpO
values normally. The normal SpO2
2
value is above 97%.
5.1.7 IBP
1.
Test fixture
Physiological signal simulator
2. Test procedure
IBP1 test:①
Set the BP sensitivity of the ECG simulator to 5uv/v/mmHg, BP to 0mmHG, and the
IBP channel 1 to ART. Enter the IBP PRESSURE ZERO menu of the PM-9000
Express, zero Channel 1, and then return to the main screen. Set the BP of the
simulator to 200mmHg. Enter the IBP PRESSURE CALIBRATE menu of the
PM-9000 Express, conduct calibration, and then exit the IBP PRESSURE
CALIBRATE menu.
Set the BP value of the simulator respectively to 40mmHg, 100mmHg and
200mmHg. Then the screen of the PM-9000 Express should display 40±1mmHg,
100±2mmHg and 200±4mmHg.
56
Page 69

Chapter 5 Test and Material List
Set the simulator output to ART wave. Then the screen of the PM-9000 Express
should display relevant waveform properly.
Unplug the IBP probe. Then the screen should prompt “IBP: Transducer 1 OFF!”
and “IBP: Transducer 2 OFF!”
Plug the OHMEDA cable to the IBP1 channel. Then the prompting message “IBP:
Transducer 1 OFF!” disappears.
IBP2 test:②
Plug the IBP cable to the IBP2 channel, and repeat the procedure in Section .①
5.1.8 CO
1.
Test fixture
Physiological signal simulator
2. Test procedure
Injectate and blood temperature test: Assemble the TB and TI test fixture, output
three TB temperature values: 36 , 37 and 38 . Then TB should ℃℃ ℃ be respectively
36.0±0.1 , 37.0±0.1 and 38.0±0.1 . Set the injectate switch to ON, output two ℃℃ ℃
TI temperature values: 0 and 2 . Then the screen should display 0±0.1 and ℃℃ ℃
2.0±0.1 .℃
CO measurement: Set the CO.CONST and T
to the default values: 0.542 and 0℃,
I
set the injectate switch to OFF, and then press START. Then the simulator will
output 0 , 2.5L/M and 0 , 5L/M within 2s. The CO values should be 2.5±0.25L/M ℃℃
and 5±0.5L/M.
5.1.9 CO
2
1. Test fixture
CO
steel bottle (containing 10% CO2)
2
2. Test procedure
Mainstream CO①
measurement: Set the calculation compensation of PM-9000
2
Express to COMMON.
Plug the mainstream transducer to the CO
with the CO
the interval of 3s. The CO
steel bottle, and open/close the valve of the CO2 steel bottle based on
2
value should be the calibration gas pressure value:
2
socket, connect the windpipe connector
2
76±5%mmHg. When the valve is opened permanently, the patient monitor prompts
“APNEA ALARM”.
Unplug the transducer. The patient monitor prompts “CO
transducer OFF” on
2
the main screen. Plug the transducer again. The patient monitor prompts “CO
transducer pre-heated”.
Sidestream CO②
measurement: Set the calculation compensation of PM-9000
2
Express to COMMON.
Plug the water trap to the water trap socket, connect the sampling tube with the CO
steel bottle, and open//close the valve of the CO
3s. The CO
value should be the calibration gas pressure value: 76±5%mmHg. When
2
steel bottle based on the interval of
2
the valve is opened permanently, the patient monitor prompts “APNEA ALARM”.
Unplug the water trap. The patient monitor prompts “CO
water trap OFF”. Plug the
2
water trap again. The prompting message disappears.
When the measured value exceeds the high limit of CO③
57
, the patient monitor
2
2
2
Page 70

Chapter 5 Test and Material List
prompts “CO2 too high” on the main screen. When the measured value is lower
than the low limit, the patient monitor prompts “CO
5.1.10 Recorder
1. Print the ECG waveform. The recorder should print it normally and clearly. Set
the recorder to the fault of lack of paper and abnormal clip. There should be relevant
prompting messages on the main screen. When the fault is cleared, the patient
monitor should become normal.
2. Print the alarm messages of all parameters. Set the alarm print switch to ON for
all parameters, and set different alarm limits. Then the recorder should print the
alarm message in case of an alarm
.
5.1.12 Power Supply
When the patient monitor is supplied with the external AC power, the CHARGE
indicator becomes ON. When it is disconnected from the external AC power, the
CHARGE indicator becomes OFF. After the patient monitor is started without
assembling the batteries, “x” is displayed in the battery indication frame on the main
screen. After the batteries are assembled, the battery electricity is displayed in the
battery indication frame on the main screen. The patient monitor can work normally
with or without batteries. It, however, should give an alarm when the batteries are
exhausted.
too low”.
2
5.1.13 Clock
Verify the correctness of the clock in the system test, and then set the clock to the current time.
5.1.14 System Test
Load all parameters, and conduct operations respectively on the loaded parameters.
During the synchronization, no exceptions (for example, mutual interference) occur.
Set all parameter setups in menus to the default values which are those at the time of
software loading, and conduct operations on the menus, for example, managing the
patient information, recalling data, and so on. All the operations should be done
normally, and the corresponding functions should be correct and meet the product
requirements.
58
Page 71

Chapter 5 Test and Material List
5.2 NIBP Calibration
Figure 5-1 NIBP Calibration
Calibration method:
Based on the precision of 50mmHg (6.7kPa), increase the pressure step by step. The
maximum error at any pressure point within the NIBP measurement range of the patient
monitor should be no more than ±3mmHg (±0.4kPa). Decrease the pressure step by step.
The maximum error at any pressure point within the NIBP measurement range of the patient
monitor should be no more than ±3mmHg (±0.4kPa).
5.3 IBP CALIBRATE
5.3.1 IBP Transducer Zero
Press the ZERO button on the IBP module to call up IBP PRESSURE ZERO menu as
shown below:
59
Page 72

Chapter 5 Test and Material List
Figure 5-2 IBP PRESSURE ZERO
Zero Calibration of Transducer
Select CH1, the system will zero IBP1. Select CH2, the system will zero IBP2.
Cautions:( Use the PM-6000 IBP module as a example)
Turn off patient stopcock before you start the zero procedure.
The transducer must be vented to atmospheric pressure before the zero procedure.
The transducer should be placed at the same height level with the heart, approximately
mid-axially line.
Zero procedure should be performed before starting the monitoring and at least once a
day after each disconnect-and-connect of the cable.
Figure 5-3 IBP Zero
5.3.2 IBP Calibration
Press CAL button on the IBP module to call up the IBP PRESSURE CALIBRATE menu as
shown below:
60
Page 73

Chapter 5 Test and Material List
Figure 5-4 IBP Calibration Menu
Calibrate the transducer:
Turn the knob to select the item CH1 CAL VALUE, press and turn the knob to select the
pressure value to be calibrated for channel 1. Then turn the knob to select the item
CALIBRATE to start calibrating channel 1.
Turn the knob to select the item CH2 CAL VALUE, press and turn the knob to select the
pressure value to be calibrated for channel 2. Then turn the knob to select the item
CALIBRATE to start calibrating channel 2.
The pressure calibration of PM-9000 Express:
Figure 5-5 IBP Calibration
You will need the following pieces of equipment:
• Standard sphygmomanometer
• 3-way stopcock
• Tubing approximately 25 cm long
61
Page 74

Chapter 5 Test and Material List
The Calibration Procedure:
1. Close the stopcock that was open to atmospheric pressure for the zero calibration.
2. Attach the tubing to the sphygmomanometer.
3. Ensure that connection that would lead to patient is off.
4. Connect the 3-way connector to the 3-way stopcock that is not connected to the patient
catheter.
5. Open the port of the 3-way stopcock to the sphygmomanometer. .
6. Select the channel to be calibrated in the menu and select the pressure value to which the
IBP is to be adjusted.
7. Inflate to make the mercury bar rise to the setup pressure value.
8. Adjust repeatedly until the value in the menu is equal to the pressure value shown by the
mercury calibration.
9. Press the Start button, the device will begin calibrating.
10. Wait for the calibrated result. You should take corresponding measures based on the
prompt information.
11. After calibration, disassemble the blood pressure tubing and the attached 3-way valve.
Calibration completion message:
“SUCCESSFUL CALIBRATE”
5.4 CO2 CHECK
Check procedure for sidestream module only
Via the PM-9000’s system and maintain menus you are prompted for a password for entering
the factory key. After entering the password “332888” you get access to the pump rate settings
and to check the accuracy of the CO2 measurement. Using the below test set up to verify the
accuracy of the CO2 module.
Figure 5-6 Sidestream test set up
62
Page 75

Chapter 5 Test and Material List
Note Neither the mainstream nor the sidestream module can be calibrated. Only the
overall performance and accuracy is checked. If the Co2 module fails the tests it should be
replaced.
Figure 5-7 Factory Maintain Menu Figure 5-8 CO2 check menu
5.5 AG CALIBRATE
5.5.1 AG Check
1、Using T-piece to connect the watertrap and Agent steel bottle well. One of the T-piece ports
must be vented to atmospheric pressure.
2、Select ‘MEASURE’ from work mode item in “AG SETUP” menu, then set pump rate ‘low’
and wait for 10 minutes after the warm up information disappears.
3、Enter ‘CALIBRATE’ menu, then open AG bottle and press the ‘VERIFY ACCURACY’ item.
Figure 5-9 AG Check Menu
4、Observe the display value after 1 minute. The agent concentration accurate should be less than
±5%.
63
Page 76

Chapter 5 Test and Material List
5、Choose other pump rate ‘middle’ or ‘high’,and repeat the previous procedures.
(pump rate definition: three pump rate under adult mode: 100/150/200ml/min; neonate:
70/90/110 ml/min)
6、If the accurate over range, please press ‘START CAL’.
5.5.2 AG CALIBRATE
(Agent>1.5%, CO2>1.5%, N2O>40%, O2>40% )
1、Press ‘START CAL’, then input password ‘MINDRAY’ entering ‘CALIBRATE’ menu.
Note: Make sure the AG in ‘Measure’ mode not ‘Standby’ mode before you do calibrate.
Figure 5-10
Figure 5-11
2、Input each gas concentration value according to the label on the AG bottle label.
Note: If your monitor do not have O2 module, input ‘0.0’ in O2 item.
3、Open AG cover, wait for the display value stabilization.
4、If the display value does not accord with the input value, please press ‘CALIBRATE’ item
and exit.
AG concentration must fit the following requirements:
Agent>1.5%, CO2>1.5%, N2O>40%, O2>40%
64
Page 77

Chapter 5 Test and Material List
5.6 PM-9000 Express Material List
NO Material Code` Name & Specification Quantity
1 M04-004012--- Gasketed cross-head screw M3*6 24
2 9200-20-10689 Recorder regulating panel 1
3 9200-20-10485 Printer mounting plate 1
4 M04-005005--- Cross-head sunk screw M3*6 14
5 9201-20-35965 Support 1
6 M04-002505--- Cross-head screw M3*6 10
7 9201-30-35954 CF wireless network adapter assembly 1
8 9210-30-30150 9210 main control board 1
9 9201-30-35922 Battery compartment assembly (Lithium
battery)
10 0010-10-12329 Lithium battery 2
11 9200-20-10516 Insulating plate of ECG board 1
12 812A-30-08557 812A ECG board 1
13 M04-060009--- Stud M3*14 1
14 9200-20-10677 Insulating plate of mounting plate 3 1
15 9200-20-10676 SPO2/IBP mounting plate 1
16 9200-20-10678 Insulating plate of mounting plate 4 1
17 M03A-30-90293 IBP/CO module 1
18 630D-30-09121 630D blood pressure pump 1
19 0010-10-12274 MASIMO SpO2 module 1
20 9201-20-36012 Power PCB insulating plate 1
21 9201-30-35901 Lithium battery power PCB 1
22 9210-30-30163 Pinboard assembly 1
23 9201-30-35908 Microstream CO2 adapter board 1
24 9201-30-35955 Microstream CO2 module 1
25 9201-20-35928 Mounting plate of microstream CO2
module
1
1
65
Page 78

Chapter 6 Maintenance and Cleaning
Chapter 6 Maintenance and Cleaning
6.1 Maintenance
6.1.1Checking Before Using
■ Check the patient monitor for mechanical damages;
■ Check all exposed conductors, connectors and accessories;
■ Check all functions that are possibly enabled for the monitored patient, and
ensure the device is in good working status.
In case of any damage, stop using this patient monitor, and contact biomedical
engineers of the hospital or Mindray maintenance engineers.
6.1.2 Regular Checking
An all-around check, including the safety check, should be done by qualified personnel
every 6-12 months or after maintenance each time.
All checks in which the patient monitor should be disassembled should be done by
qualified maintenance personnel. The safety and maintenance checks can be done by
Mindray engineers. The local office of Mindray at your region will be pleased to provide
you with the information about the maintenance contract.
6.2 Cleaning
Do switch off the patient monitor and disconnect the AC power supply before
cleaning it or the probes.
The PM-9000 Express patient monitor should be dust free. To clean the surface of its
enclosure and screen, use the cleaning agent that is not corrosive, for example, soap
and water.
1. Do not use strong solvent, such as acetone;
2. Most cleaning agents must be diluted before being used, so conduct dilution under
the instruction of manufacturers;
3. Do not use any erosive material (such as steel wool or polishing agent);
4. Prevent the ingress of any liquid to the enclosure and any part of the device;
5. Ensure no residue of cleaning liquid on the surface of the device.
6.3 Cleaning Reagent
1. Diluted aqua ammonia
2. Diluted sodium hypochlorite (bleaching powder for washing)
3. Diluted formaldehyde 35 – 37%
4. Hydrogen peroxide 3%
66
Page 79

Chapter 6 Maintenance and Cleaning
5. Ethanol
6. Isopropyl alcohol
6.4 Sterilization
To avoid the long-time damage to the patient monitor, we recommend you
To conduct only sterilization which is considered necessary in your maintenance
plan;
To clean the patient monitor before the sterilization;
To sterilize the patient monitor with specified sterilization agent: Ethylate, and
Acetaldehyde.
For the sterilization agents of the ECG leads and blood pressure cuffs, refer to relevant
chapters in Operation Manual.
Caution
Conduct dilution or use the liquid of the possibly-lowest concentration
under the instructions by the manufacturer.
Prevent the ingress of liquid to the enclosure.
Prevent any part of the system from being dipped.
In sterilization, do not spill the liquid to the patient monitor.
Ensure no residue of sterilization agent on the surface of the patient
monitor. Clean it if any.
6.5 Disinfection
To avoid the long-time damage to the patient monitor, we recommend you
To conduct only disinfection which is considered necessary in your maintenance
plan;
To clean the patient monitor before the disinfection;
For the disinfections of ECG leads, SpO
sensor, refer to relevant chapters in Operation Manual.
Gas (EtO) or formaldehyde are forbidden for the disinfection of the patient
monitor.
sensor, blood pressure cuffs and temperature
2
67
Page 80

P/N:
9201-20-35991
 Loading...