

Operating and Installation instructions
Wet Clean System
W 6071
To prevent accidents
and machine damage
read these instructions
before
installation or use.
en - US, CA
M.-Nr. 06 018 402

Contents
IMPORTANT SAFETY INSTRUCTIONS . . . . . . . . . . . . . . . . . . . . . . . . . . . . . . . . . . . . . . . . . . . 3
Guide to the washer . . . . . . . . . . . . . . . . . . . . . . . . . . . . . . . . . . . . . . . . . . . . . . . . . . . . . . . . . . 6
Before using the washer . . . . . . . . . . . . . . . . . . . . . . . . . . . . . . . . . . . . . . . . . . . . . . . . . . . . . 14
Language selection . . . . . . . . . . . . . . . . . . . . . . . . . . . . . . . . . . . . . . . . . . . . . . . . . . . . . . . . . . 14
Setting current time and date. . . . . . . . . . . . . . . . . . . . . . . . . . . . . . . . . . . . . . . . . . . . . . . . . . . 14
Operation . . . . . . . . . . . . . . . . . . . . . . . . . . . . . . . . . . . . . . . . . . . . . . . . . . . . . . . . . . . . . . . . .15
Before the first wash. . . . . . . . . . . . . . . . . . . . . . . . . . . . . . . . . . . . . . . . . . . . . . . . . . . . . . . . . . 15
Prepare and sort the laundry . . . . . . . . . . . . . . . . . . . . . . . . . . . . . . . . . . . . . . . . . . . . . . . . . . .15
Load the laundry . . . . . . . . . . . . . . . . . . . . . . . . . . . . . . . . . . . . . . . . . . . . . . . . . . . . . . . . . . . . 16
Select a program . . . . . . . . . . . . . . . . . . . . . . . . . . . . . . . . . . . . . . . . . . . . . . . . . . . . . . . . . . . . 17
Add detergent . . . . . . . . . . . . . . . . . . . . . . . . . . . . . . . . . . . . . . . . . . . . . . . . . . . . . . . . . . . . . . 18
Changing temperature and spin speed. . . . . . . . . . . . . . . . . . . . . . . . . . . . . . . . . . . . . . . . . . . 19
Program sequence display . . . . . . . . . . . . . . . . . . . . . . . . . . . . . . . . . . . . . . . . . . . . . . . . . . . . 19
Program end - opening the drum door . . . . . . . . . . . . . . . . . . . . . . . . . . . . . . . . . . . . . . . . . . . 20
Special options. . . . . . . . . . . . . . . . . . . . . . . . . . . . . . . . . . . . . . . . . . . . . . . . . . . . . . . . . . . . . 21
Prewash . . . . . . . . . . . . . . . . . . . . . . . . . . . . . . . . . . . . . . . . . . . . . . . . . . . . . . . . . . . . . . . . . . . 21
Starch . . . . . . . . . . . . . . . . . . . . . . . . . . . . . . . . . . . . . . . . . . . . . . . . . . . . . . . . . . . . . . . . . . . . . 21
Without final spin . . . . . . . . . . . . . . . . . . . . . . . . . . . . . . . . . . . . . . . . . . . . . . . . . . . . . . . . . . . . 22
Skipping program cycles . . . . . . . . . . . . . . . . . . . . . . . . . . . . . . . . . . . . . . . . . . . . . . . . . . . . . . 23
Interrupting a program . . . . . . . . . . . . . . . . . . . . . . . . . . . . . . . . . . . . . . . . . . . . . . . . . . . . . . . . 23
Cancelling a program. . . . . . . . . . . . . . . . . . . . . . . . . . . . . . . . . . . . . . . . . . . . . . . . . . . . . . . . . 23
Delay start . . . . . . . . . . . . . . . . . . . . . . . . . . . . . . . . . . . . . . . . . . . . . . . . . . . . . . . . . . . . . . . . . 24
Washer care . . . . . . . . . . . . . . . . . . . . . . . . . . . . . . . . . . . . . . . . . . . . . . . . . . . . . . . . . . . . . . . 26
Cleaning the washer . . . . . . . . . . . . . . . . . . . . . . . . . . . . . . . . . . . . . . . . . . . . . . . . . . . . . . . . . 26
Cleaning the drain pump and lint trap . . . . . . . . . . . . . . . . . . . . . . . . . . . . . . . . . . . . . . . . . . . . 26
Cleaning the water inlet filters . . . . . . . . . . . . . . . . . . . . . . . . . . . . . . . . . . . . . . . . . . . . . . . . . . 28
Cleaning the detergent drawer . . . . . . . . . . . . . . . . . . . . . . . . . . . . . . . . . . . . . . . . . . . . . . . . . 29
Frequently asked questions . . . . . . . . . . . . . . . . . . . . . . . . . . . . . . . . . . . . . . . . . . . . . . . . . . 30
Power failure . . . . . . . . . . . . . . . . . . . . . . . . . . . . . . . . . . . . . . . . . . . . . . . . . . . . . . . . . . . . . . . 30
Fault messages . . . . . . . . . . . . . . . . . . . . . . . . . . . . . . . . . . . . . . . . . . . . . . . . . . . . . . . . . . . . . 31
Technical Service . . . . . . . . . . . . . . . . . . . . . . . . . . . . . . . . . . . . . . . . . . . . . . . . . . . . . . . . . . . 33
Guide to the data plate symbols . . . . . . . . . . . . . . . . . . . . . . . . . . . . . . . . . . . . . . . . . . . . . . . 34
Installation Instructions. . . . . . . . . . . . . . . . . . . . . . . . . . . . . . . . . . . . . . . . . . . . . . . . . . . . . . 35
Help to protect the environment . . . . . . . . . . . . . . . . . . . . . . . . . . . . . . . . . . . . . . . . . . . . . . . 36
Installation Instructions. . . . . . . . . . . . . . . . . . . . . . . . . . . . . . . . . . . . . . . . . . . . . . . . . . . . . . 37
Shipping struts . . . . . . . . . . . . . . . . . . . . . . . . . . . . . . . . . . . . . . . . . . . . . . . . . . . . . . . . . . . . . . 37
Level the washer . . . . . . . . . . . . . . . . . . . . . . . . . . . . . . . . . . . . . . . . . . . . . . . . . . . . . . . . . . . . 38
Plumbing . . . . . . . . . . . . . . . . . . . . . . . . . . . . . . . . . . . . . . . . . . . . . . . . . . . . . . . . . . . . . . . . . . 39
Electrical Connection. . . . . . . . . . . . . . . . . . . . . . . . . . . . . . . . . . . . . . . . . . . . . . . . . . . . . . . . 40
2

IMPORTANT SAFETY INSTRUCTIONS
WARNING
Read all instructions before installation or
use to prevent injury and machine
damage.
This washer-extractor is only intended for
laundry which has not come in contact
with flammable substances.
Dry cleaning solvents must not be used
in this machine. Such solvents could
cause a fire or explosion.
This appliance conforms to all uniform
safety codes and regulations. The
manufacturer cannot be held responsible
for damage or injury caused by improper
use of this appliance.
All personnel working with this machine
must be fully trained in its use and safety.
SAVE THESE INSTRUCTIONS AND
REVIEW THEM PERIODICALLY
Correct usage of the washer
Do not wash articles that have been previously
~
cleaned, washed, soaked or spotted with gasoline,
dry-cleaning solvents, organic oils or other flammable
substances. These articles give off vapors that could
ignite or explode. Do not add these items to the wash
load.
CAUTION: Fire hazard!
~
Do not store or use gasoline, gasoline-based
substances or any easily flammable materials near
the machine. Do not use the top of the washer as a
storage area.
Do not store any chemicals (liquid detergents,
~
wash aids) on the top of the washer. The chemicals
could damage the surface. Spilled chemicals must
be immediately washed off with a wet sponge.
Under certain conditions, hydrogen gas may be
~
produced in a hot water system that has not been
used for 2 weeks or more. HYDROGEN GAS IS
EXPLOSIVE. If the hot water system has not been
used for such a period, turn on all hot water faucets
and let the water flow from each for several minutes
before using the washing machine. This will release
any built-up hydrogen gas. Do not smoke or use an
open flame during this time, the gas is flammable.
Check the wash results when the laundry was
~
soiled with biological oils or grease. If the laundry is
not sufficiently cleaned, a spontaneous combustion
might occur when the laundry is dried in a dryer.
Use special detergents or wash programs.
3

IMPORTANT SAFETY INSTRUCTIONS
Electrical Safety
Be certain your appliance is properly installed and
~
grounded by a qualified technician.
To guarantee the electrical safety of this appliance,
continuity must exist between the appliance and an
effective grounding system. It is imperative that this
basic safety requirement be met. If there is any
doubt, have the electrical system of the house
checked by a qualified electrician. The manufacturer
cannot be held responsible for damages caused by
the lack, or inadequacy of, an effective grounding
system.
Before installation make sure that the voltage and
~
frequency listed on the data plate correspond with
the site electrical supply. This data must correspond
to prevent injury and machine damage. Consult a
qualified electrician if in doubt.
Installation, repair and maintenance work should
~
only be carried out by a Miele authorized technician
in accordance with local and national safety
regulations. Unauthorized repairs could cause injury
or machine damage. The manufacturer cannot be
held responsible for unauthorized work.
Do not repair of replace any part of the appliance
~
or attempt any servicing unless specifically
recommended in these operating instructions.
Contact Miele’s Technical Service Department for
assistance.
Do not damage, remove or bypass the safety
~
features and controls of the machine.
Do not operate a machine with an electrical fault
~
until repaired.
Only use the washer if all panels are properly in
~
place.
The appliance is only completely isolated from the
~
electrical supply when the fuse is withdrawn, the
circuit breaker has been tripped, or the unit has been
unplugged.
Check the packaging, the washer and
~
accessories for any signs of damage. Do not use a
damaged appliance.
Any removable outer panels must be in place, and
~
all moving or electrical parts shielded before the
machine is operated.
Use
Do not let children play in, on or near the washer.
~
Do not let them play with the controls or operate the
unit. Close supervision of children is necessary when
the appliance is used near children.
The drum door glass will be hot when washing at
~
very high temperatures. Do not touch the glass.
Persons who lack physical, sensory or mental
~
abilities, or experience with the machine should not
use it without supervision or instruction by a
responsible person.
Do not reach into the appliance if the drum is
~
moving.
Do not drink washer water! Harmful residues could
~
be present.
The machine should only be operated
~
unsupervised if there is a floor drain (gully) in the
direct vicinity of the machine.
Always follow the instructions of the chemical
~
manufacturer when using cleaning agents and
special application chemicals. Only use such
chemicals for the purpose and in the situation
specified by the manufacturer. This will prevent the
danger of adverse chemical reactions and material
damage.
If in doubt, check with the manufacturer to be sure
that the product is suitable for use in this machine.
Dyes, dye removers and descaling agents may
~
only be used in this machine if the manufacturer
states they are suitable for use in a washing machine.
Always observe the manufacturer’s instructions
carefully.
Fabric softeners may be used with this machine.
~
Follow the manufacturers instructions.
Do not use high pressure cleaners to hose down
~
the machine.
Check the hoses regularly for leaks to prevent
~
water damage.
Do not tamper with
~
the controls.
Do not use force to open the washer drum door.
~
The door handle is equipped with an extra safety
mechanism to guarantee that the door remains
locked.
Faulty components must only be replaced with
~
genuine Miele spare parts to guarantee the safe
operation of this machine.
4

IMPORTANT SAFETY INSTRUCTIONS
Additional information
Disinfecting and cleaning agents often contain
~
chlorides (salts) which can cause steel surfaces to
rust. To protect the machine from rust damage, only
use chloride free disinfecting and cleaning agents for
washing/disinfecting and for cleaning the machine. If
you are not sure about an agent contact Miele’s
Professional Department. If you accidentally spill an
agent containing chloride on the machine it should be
rinsed off with water and dried with a soft cloth.
The manufacturer of the washer does not take
~
responsibility for the effect of the chemical on the
laundry or the machine when a chemical cleaning
agent is recommended on technical application
grounds. Please be aware that changes in formula
tion, storage conditions etc., which may not be
published by the chemical producer, can have a
negative effect on the cleaning result.
Keep the area around the machine clean and free
~
of debris.
Before the appliance is removed for service or
~
discarded, remove the door.
The interior of the machine should be cleaned
~
periodically by a qualified service agent.
-
Chlorine damage to components
How to handle chlorine bleach and
perchloroethylene (PCE)
Heavy use of chlorine products increases
the risk of damage to appliance
components.
Depending on the chlorine concentration,
the exposure time, and the temperature, the
use of liquid and powdered chlorine-based
bleaches can erode the stainless steel
protective layer and lead to corrosion of the
appliance components. Therefore, it is
recommended that these products not be
used. Instead you can use oxygen-based
bleaches.
If you still need to use chlorine-based
bleaches in special cases, you will need to
perform a neutralizing step each time.
Failure to do so can result in permanent and
irreversible damage to the washing machine
and the laundered items.
Using accessories
Only use genuine Miele accessories. If other parts
~
are used, guarantee, performance and product
liability claims may become void.
Ensure that any one operating this machine is
~
familiar with these important safety instructions.
Chlorine neutralization
Chlorine neutralization must be done
immediately following the use of a
chlorine-based bleach. For best results, use
hydrogen peroxide or an oxygen-based laundry
soap or bleach, without draining the tub.
If thiosulfate is used (especially with hard
water), lime deposits can form, leading to
residue on the laundered items or a build-up
in the washing machine. The preferable
alternative is to use hydrogen peroxide,
because it helps promote the neutralization
of chlorine.
The exact amounts to be used, and at what
temperature(s), should be selected based
on the recommendations of the neutralizer
manufacturer, then checked for efficacy. The
laundry will need to be tested to ensure that
no active chlorine remains behind after
neutralization.
SAVE THESE
INSTRUCTIONS
5
Guide to the washer
Front view
1 Detergent dispenser
2 Control panel
3 Drum door
4 Outer casing
5 Drain pump door
6 4 Height adjustable feet
6
Rear view
Guide to the washer
1 Cold water connection
2 Warm water connection
3 Drain hose (for drain pump)
4 Drain (for drain valve)*
5 Back panel
6 Liquid dispenser drawer
Liquid dispensing system
* not available in W 6071
7 Air vent
8 Cable entry for electrical connection
9 Cold water connection for the
liquid dispensing system
10 Printer Interface
11 Cable connection for
3 dispenser pumps
12 Cable connection for the liquid
dispensing system
7
Guide to the washer
Facia panel
6 Display
7 Program selector
8 Door open
9 Y Power on button
10 Z Power off button
11 Access lock
12 Special options buttons
13 Cursor and input buttons
14 Delay Start button
15 X Start
16 7 End
17 Optic interface
8
Display
The display content will appear once the
machine is turned on. It is up to four lines
and 40 digits long, showing which program
has been selected.
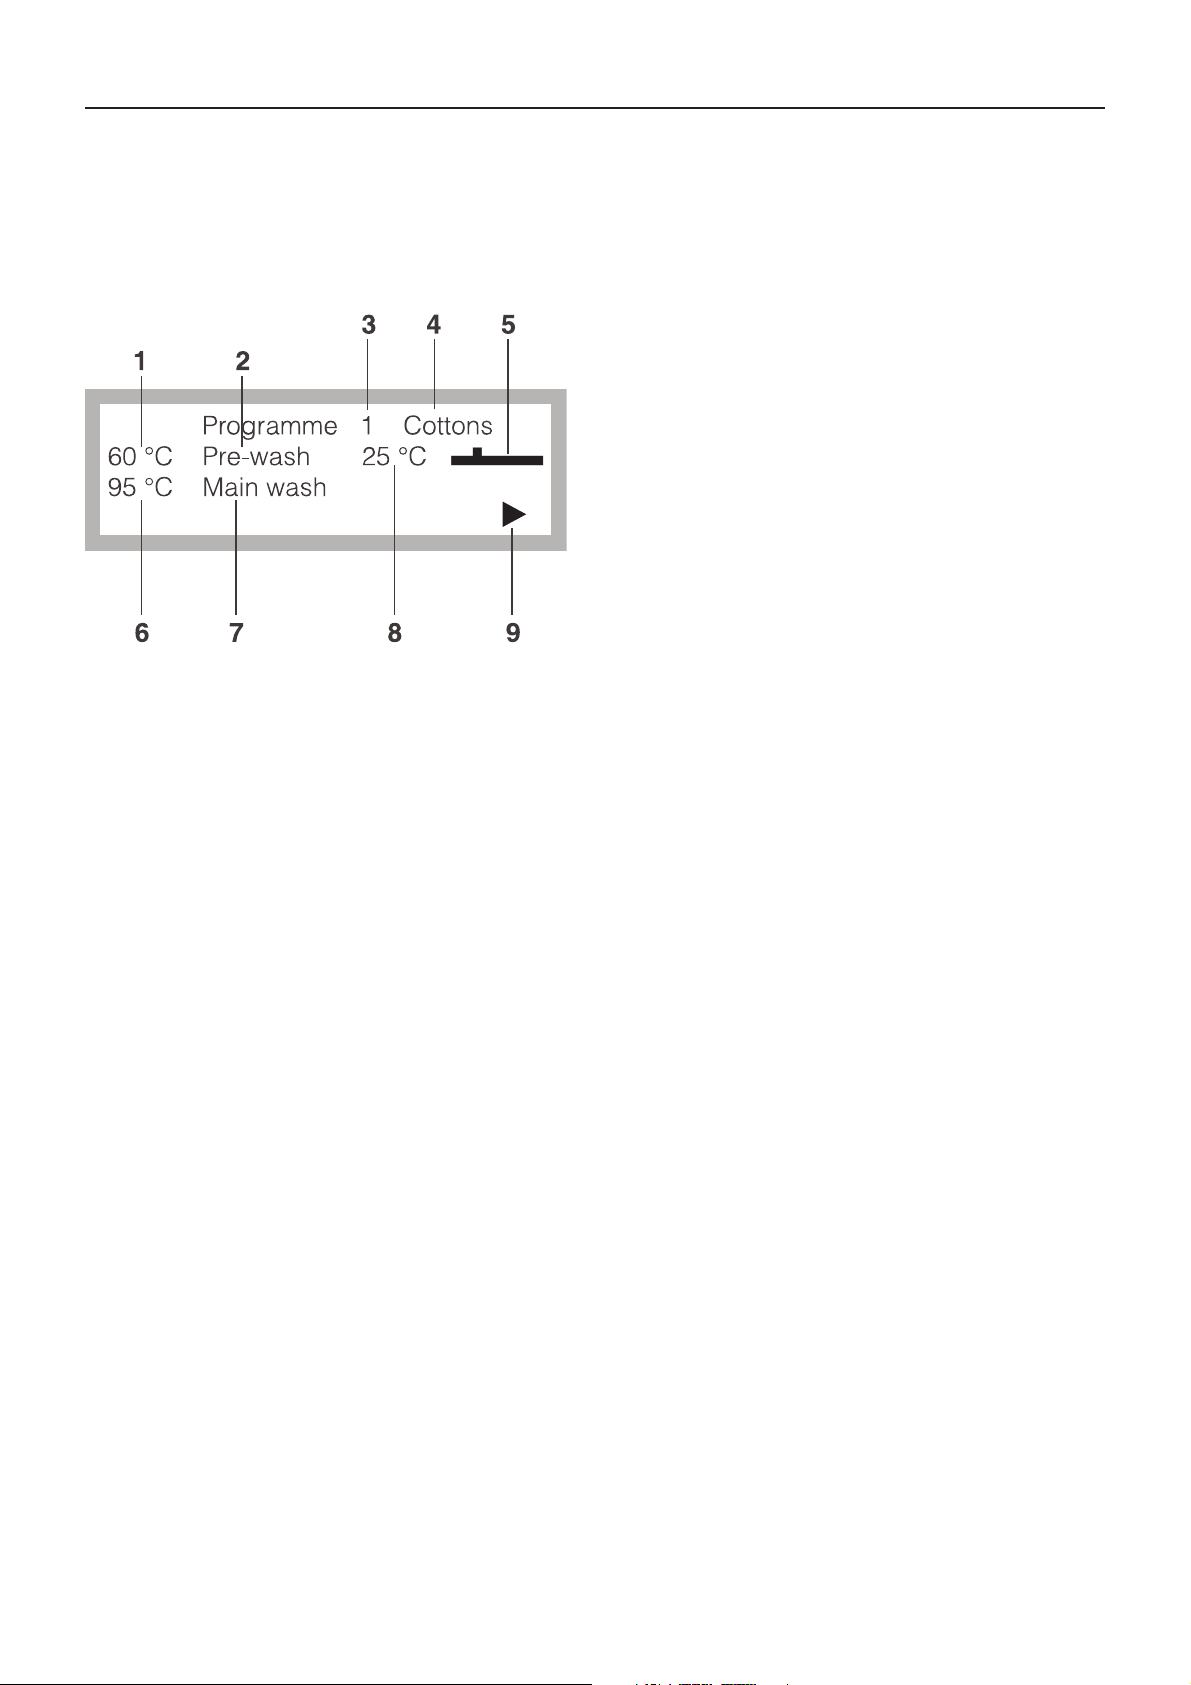
Guide to the washer
Display during a program
1 Planned temperature for the current cycle
2 Name of the current cycle
3 Program number
4 Program name
5 Time line for the current cycle
6 Planned temperature of the next cycle
7 Name of the next cycle
8 Actual temperature
9 Points to a further display line Access
lock
9
Guide to the washer
Program selector
Program numbers 1 - 24 can be selected
directly. Program numbers 25 - 99 can be
selected using selector position 24 and the
4 "Plus" button.
The name of the selected program and its
corresponding number appear in the
display. Program positions 1 - 21 are
standard programs.
The subsequent program positions are listed
in the Programming Instructions. If the
program selector is turned to another
position after the start of the program, the
first line of the display flashes. The program
however does not change.
Standard programs:
Selector
Position
1
2
3
4
5
6
7
8
9
Program
WC
Sensitive
WC
Regular
WC Silks/
Rayons
Machine
Wash
High
Machine
Wash
Low
Outer
wear
Down
Outerwear
Comforter
Regular
Comforter
Down
-
Selector
Position
12
13
14
15
16
17
18
19
20
Program
Colored
Shirts
Starch
Only
Leather
Sensitive
Leather
Regular
Proofing
Soaking
30 mins
Soaking
60 mins
Separate
Drain
Separate
Spin
10
11
Table
cloths
White
Shirts
21
Separate
Rinse &
Spin
10

Guide to the washer
Access lock
Position A - Free access
Programs which have been allocated free
access can be run.
See Programming Instructions for allocation
of free access.
Position B - Operation
All programs can be started in this position.
The display will show the selected program
information.
Access keys
Key 1 (2 supplied) for operating levels
A and B.
Key 2 for operating levels A, B, C.
Key 3 for operating levels A, B, C, D.
Position C - Programming
At this position, programming, copying,
deleting, printing, altering, giving or barring
free access, and creating new program
sequences can be done. See Programming
Instructions.
Position D - Unlocking
At this position barred programs can be
unlocked. Locked Programs can not be
cancelled once they have started. If the key
switch is turned to position D in such a
program, the program running is unlocked
and can be cancelled. See "Programming
Instructions".
11

Guide to the washer
Buttons
X Start
Press this button to start the selected
program.
7 End
Press this button to stop a program. Press
once more to terminate a program. A
stopped program can be restarted by
pressing the Start button.
Special options
T Prewash with indicator
A Prewash cycle is added to the program.
U Starch with indicator
Press this button for starched laundry.
V Without spin with indicator
Press this button if a final spin is not required
after the final rinse.
12
Guide to the washer
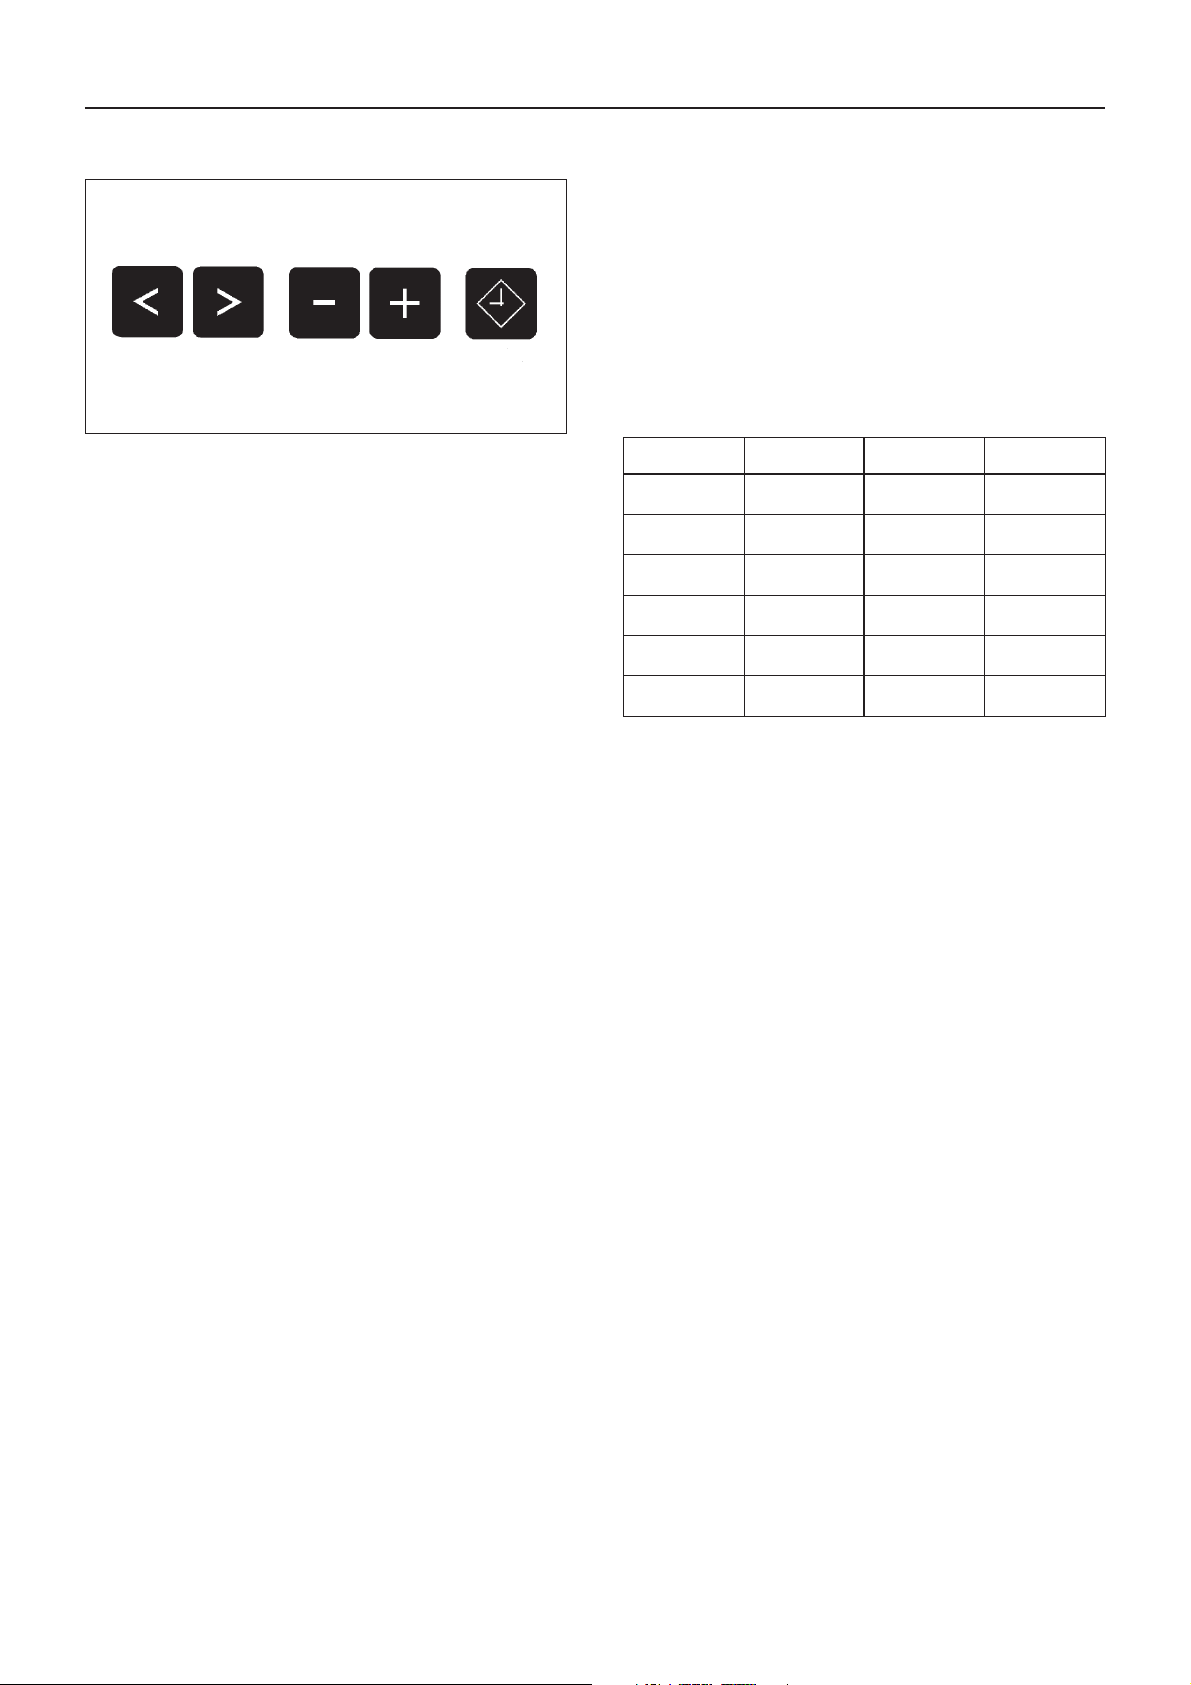
Cursor, input and Delay Start buttons
1 2 Cursor
The cursor buttons are used to pass
backwards or forwards into the input fields
or into the next display, (this appears as > <
flashing in the display).
Once the program begins, you can move
forward or backward in the display to view
the cycles. Press and hold on the button to
run quickly through the display screens.
Optical interface
Data transfer to and from the machine’s
controls and a PC can take place using the
proper software. The optic interface 9 on
the machine’s control panel provides the
connection point.
Conversion of °C to °F
°C °F °C °F
10 50 70 158
20 68 80 176
30 86 90 194
40 104 100 212
50 122 110 230
60 140 120 248
3 4 Minus / Plus
The "Minus / Plus" buttons allow you to
modify an input field. Press continuously on
the button runs quickly through the display
screens.
W Delay start
The display indicates that a start time should
be selected. If the button is pressed again
the "Delay start" option is cancelled.
If the button is pressed after the start of a
program the current time of day and date
are shown.
13
Before using the washer
If pauses between programming steps
lasts longer than 25 seconds, the display
will return to the basic stage and the
changes will be lost.
Language selection
(if necessary)
Turn on the main power to the washer.
^
Turn the key to position B "Operation".
^
Press the Z "Off" button to turn off the
machine.
Press the X "Start" button and the Y "ON"
^
button at the same time and hold pressed
in, until the display shows the following:
SETTING LOCAL LANGUAGE
DEUTSCH >ENGLISH<
After selection press Start button.
Setting current time and date
Turn off the machine with the Z "Power off"
^
button.
Turn the key to position B "Operation".
^
Press the W "Delay start" button and the Y
^
"ON " button at the same time and hold
pressed in, until the display shows the
following:
SETTING TIME AND DATE
Time of the day >14< : 30 hrs
Date 23. 03. 1995
After selection press Start.
Use the 2 "Cursor" to position the cursor
^
on the input field to be changed and set
the change with the 3 4 "Minus or Plus"
buttons.
^ Position the cursor on the hours and set
the hours.
^ Select the desired language with the 1 2
"Cursor" buttons.
The display content is automatically
converted to the local language.
^ Confirm the selected local language by
pressing the X "Start" button.
^ Position the cursor on the minutes and set
the minutes.
^ Position the cursor on Day and set the day.
^ Position the cursor on Month and set the
month.
^ Position the cursor on Year and set the
year.
^
Store the changes by pressing the X
"Start" button.
14

Operation
Before the first wash
Important: This machine must be properly
installed before using. The first run of the
washer must be performed by a Miele
authorized service technician.
Open the water valves to the washer.
^
Turn the main power on at the wall switch.
^
Turn the key to position B "Operation".
^
Run a wash program without laundry to
^
flush out any water from the factory testing.
Add detergent to compartment j of the
^
detergent dispenser.
Turn the program selector to “11
^
COTTONS 60°C”
^ Press the X "Start" button.
Prepare and sort the laundry
Empty all pockets.
^
Foreign objects left in pockets (e.g.
,
nails, coins, paper clips, etc.) can cause
damage to clothes and the machine.
^ Sort the laundry by color and fabric.
Only wash items that are labeled machine
washable by the manufacturer. Most
garments have a fabric care label in the
collar or side seam. Sort the laundry by care
label and color.
Wool and wool blends can be cleaned in the
Woolens program if they have a care label
stating they are machine washable.
15

Operation
Load the laundry
Maximum load size (dry) 17 lbs (7,5 kg).
Additional load size information for each
program are available in the "Programming
Instructions".
^ Load the laundry into the drum.
For best results, wash mixed loads of small
and large items. This will improve washing
effectiveness and help distribute the load
evenly.
Note: Overloading the washer will affect
wash results and cause wrinkling.
Close the drum door with a firm swing.
^
To prevent damage to the door seal and
clothing, make sure that there are no
clothes caught between the drum door
and the seal.
16

Select a program
Turn the access key to position B
^
"Operation".
Operation
?
?
Press the Y "Power on" button.
^
Select a program (e.g. Program 11
^
Cottons).
Use the T "Prewash" button to select a
^
"Prewash" if required. The indicator above
the T button will light.
When "Prewash" is selected the following
appears in the display:
PROGRAMME 11 COTTONS
40° C Prewash 1
90 °C Main wash1
Rinse 3 1200 RPM
The following will appear in the display:
PROGRAMME 11 COTTONS
>95 °C< Main wash 1
Rinses 3 1000 RPM
17

Operation
Add detergent
Detergent for:
– Main wash in compartment j
– Prewash in compartment i
– Fabric softener in compartment p
– Bleach in compartment x
Water hardness
Water
hardness
levels
I soft 0 - 130 0 - 7
II middle 130 - 250 7 - 14
III hard 250 - 380 14 - 21
IV very
If you do not know the local water level
hardness contact the local water authority.
Water
quality
hard
ppm grains per
gallon
over 380 over 21
Bleaching agents
Only use bleaching agents on textiles with
the symbol x on the wash care label. Liquid
bleaching agents must only be added to the
compartment without a symbol. The agent
will then be dispensed automatically during
the 2nd rinse (cold bleaching). Liquid
bleaching agents should only be used with
colored fabrics if the textile manufacturer’s
wash care label states that the material is
color fast and suitable for bleaching.
Amount of detergent to be dispensed
– Only use low sudsing detergent.
–
Follow the recommendations of the
chemical manufacturer when using
cleaning agents and special application
chemicals.
The amount of detergent used depends on:
–
the load size,
–
the water hardness,
–
the level of soiling on the laundry.
For cold bleaching the 4th rinse must be
programmed, (see "Programming
Instructions").
^
Do not fill fabric softener or bleaching
agent higher than the level marker in the
relevant dispenser compartment. Other
wise they will be siphoned into the suds
container.
-
18

Operation
Changing temperature and spin
speed
The following parameters can be changed
before the start of a program:
the temperature in 1 °C steps from cold,
–
15 °C to maximum 95 °C .
the spin speed in 100 rpm steps from 0,
–
300 - 1200 rpm maximum.
PROGRAMME 11 COTTONS
>60°< Prewash 1
95 °C Main wash 1
Rinse 3 1200 RPM
Use the 2 "Cursor" to position the cursor
^
on the input field for the Prewash temp
erature, and set the temperature required
(here 60 °C) with the 3 4 "Minus or Plus".
^ Position the cursor on the input field for the
Main wash temperature, and set the
temperature required with 3 4 "Minus or
Plus".
^ Position the cursor on the input field for the
spin speed, and set the spin speed with
the 3 4 "Minus or Plus".
^ Press the X "Start" button to begin the
program.
-
Program sequence display
The program sequence is shown in the
display after the start of the program.
PROGRAMME 11 COTTONS
60° C Prewash 20 °C ^^^^^^^^
90° C Main wash
~
In the second display line, here Prewash, the
actual suds temperature is shown, and the
time line extending off to the right, underneath the next cycle of the program is
shown, here Main wash.
PROGRAMME 11 COTTONS
90 °C Main wash 20 °C
^^^^^^^^
Rinse 1PROGRAMME STOP
~
When the Prewash cycle has finished, the
Main wash appears in the display, with the
actual suds temperature, and the time line
extending off to the right. Underneath the
next cycle of the program is shown, here
Rinse 1.
When an arrow appears at the right of the
last line (~), this indicates that there is a
following display line.
Press the 2 "Cursor", and further information
on the program appears in the lower lines.
Program end display
After water from the last heating phase has
drained away, or after the last "Cool Down"
the program end time is shown in hours and
minutes.
PROGRAMME 11 COTTONS
Rinse 1
Rinse 2
Programme end 11:25 hrs ~
^^^^^^^^^
19

Operation
Program end - opening the drum
door
At the end of the program, with a stationary
drum and no more water in the machine the
following display is shown (for example):
PROGRAMME 11 COTTONS
PROGRAMME END
DOOR IS UNLOCKED
Press the 5 "Door open" button to open
^
the door.
Remove the laundry.
^
If the program is interrupted during a cycle,
the following display messages will appear:
PROGRAMME 11 COTTONS
PROGRAMME END
DOOR IS LOCKED
THERE IS WATER IN THE MACHINE
If this was the last load of wash for the day,
or longer:
Leave the drum door open.
^
Turn off the machine.
^
Turn the unit off at the main power switch.
^
Close the water valves to the washer.
^
or:
PROGRAMME 11 COTTONS
PROGRAMME END
DOOR IS LOCKED
DRUM NOT YET STATIONARY
^
Run the separate drain or separate spin
program. At the end of the program open
the door.
20

Special options
Prewash
Select a Prewash for heavily soiled laundry.
?
The prewash can selected by pressing the
T "Prewash" button. The Prewash indicator
above the button will light.
Press the button a second time to deselect
the feature.
Starch
Starch can be added before the program
?
begins by pressing the U "Starch" button.
The indicator above the button will light.
PROGRAMME 11 COTTONS
Rinse 3
STARCH HOLD
Press the Starch and the Starch Hold button.
"Starch hold" flashes in the display when it is
time to add starch to the laundry.
^ Add starch prepared according to
manufacturer’s instructions to
compartment i. The wash time is
automatically extended by 4 minutes.
Press U "Starch" to continue the program
21

Special options
Without final spin
?
Without spin can selected before the
program starts by pressing the V "Without
spin" button. The indicator above the button
will light.
PROGRAMME 11 COTTONS
Rinse 3
WITHOUT SPIN
Press Without spin or End button.
Rinsing with hot water
Standard programs
10 Cottons 200 °F (95°C) and
11 Cottons 140 °F (60°C)
are programmed to rinse with hot water.
If a hot water supply is available it is
advantageous to run the final rinse with hot
water. This reduces the residual moisture
content of the laundry after spinning.
If the laundry is dried or ironed immediately
after washing, drying times will be shortened
and ironing easier.
"Without spin" flashes in the display when the
spin cycle is reached. Press the V "Without
spin" button again to continue the program
with a spin. Press the 7 "End" button for the
program to finish with water in the machine.
Select the drain program and press the X
"Start" button. The door can be opened once
the water is drained.
22

Special options
Skipping program cycles
Cycles of a program in progress can be
skipped or repeated.
Press the 7 "End" button to stop the
program.
PROGRAMME 11 COTTONS
Main wash
PROGRAMME STOP
PROGRAMME STOP blinks in the display.
Use the 2 "Cursor" to skip ahead to a cycle
in the program.
Use the 1 "Cursor" to move back to a cycle
in the program.
At the position required press X "Start" to
continue the program again.
Cancelling a program
To cancel a program, press 7 "End" twice.
If the program is interrupted during a cycle,
the following display messages will appear:
PROGRAMME 11 COTTONS
PROGRAMME END
DOOR IS LOCKED
THERE IS WATER IN THE MACHINE
or
PROGRAMME 11 COTTONS
PROGRAMME END
DOOR IS LOCKED
DRUM NOT YET STATIONARY
Select the Drain or Spin program and
^
press the X "Start" button. The door can
be opened once the water is drained.
Interrupting a program
Press 7 "End" to stop the program.
Press X "Start" to restart the program.
23

Special options
Delay start
Use the W "Delay start" button to program
the unit to start automatically at a later time.
Turn the key to position B "Operation".
^
Turn on the machine and select a program
^
with the program selector.
The display shows the following (example):
PROGRAMME 11 COTTONS
>90°C> Main wash 1
Rinse 3 1200 RPM
Press W "Delay Start".
^
Here the display shows the following:
?
Press X "Start" to confirm the delayed
^
start. The following will appear in the
display:
PROGRAMME 11 COTTONS
90°C Main wash1
Start time 18 : 30 hrs
PROGRAMME 11 COTTONS
Start time >14< : 30 hrs
After the time has been set
press the Start button
The current time of day (military time) is
displayed first.
The cursor points to the input field for
‘hours’.
^ Select the start time with 34"Minus or
Plus" buttons.
^
Position the cursor on the input field for
minutes and select the minutes with 34
"Minus / Plus".
When the start time is reached the program
begins and the display shows the program
sequence. If W "Delay start" is pressed
during the program, the actual time of day
and date are shown.
?
If 7 "End" is pressed the delay start function
will be cancelled.
24

PC- Printer connection:
The machine can be connected to a PC or
printer using an SD kit.
PC-Operation:
Program changes can be made via a PC, or
a new program can be downloaded. This
requires a special Editor Program which is
available from the Miele Professional
Department.
Printer-Operation:
It is possible to print out whole programs or
parts of programs. See "Programming
Instructions".
Special options
25

Washer care
Before cleaning the appliance,
,
disconnect the power supply by
unplugging the unit or manually "tripping"
the circuit breaker.
Cleaning the washer
Clean the exterior of the washer with a mild
^
solution of non-abrasive detergent or soap
and water, and wipe dry with a soft cloth.
Wipe away any deposits from the drum
^
door seal with a damp cloth.
Clean the drum with a stainless steel
^
cleaner specially formulated for use in a
washer, available from Miele’s Technical
Service Department
Cleaning the drain pump and lint
trap
Occasionally small objects (buttons, coins,
etc.) may find their way into the lint trap. If
the machine does not drain completely, the
lint trap should be checked to ensure that it
is free of foreign objects.
To clean the lint trap, remove the tool from
^
behind the detergent dispenser drawer.
^ Open the lint trap door.
26

Place a 2 qt (2 l) capacity container under
^
the drain tube.
^ Turn the lint trap lid counterclockwise 2- 3
times.
About 2 quarts of water will drain out of the
hose.
If the main drain hose is clogged, more
water will be retained in the machine (max.
7.5 gal [30l]). In this case, tighten the lint
trap lid and empty the container before
repeating the procedure as often as
necessary.
Washer care
Check that the drain pump impeller (in the
^
back of the chamber) rotates freely by
spinning with your hand. If not: remove
foreign bodies.
^ Clean the inside of the lint trap housing.
Remove any detergent deposits or foreign
objects from the threads of the filter
housing and filter unit before replacing the
drain filter.
^
To interrupt the water drainage: Tighten the
drain filter lid.
,
Caution: If laundry has been washed
at a high temperature, the water draining
out of the machine will still be hot! Stop
and allow it to cool before proceeding.
^
If no more water drains: Remove the lint
trap and clean.
^
Remove any foreign objects (buttons,
coins, etc.) from the lint trap.
27

Washer care
Cleaning the water inlet filters
The washer has two water inlet filters to
protect each inlet valve. These filters should
be checked and cleaned if necessary every
6 months. This may have to be done more
frequently with some water supplies.
Cleaning the inlet hose filters
Cleaning the filter in the inlet valve
Using a wrench, carefully loosen and
^
remove the plastic hose connector on the
inlet valve.
Using needle nose pliers, withdraw the
^
plastic filter by pulling on the bar (see
illustration). Rinse under running water.
^ Turn off the water valve.
^ Unscrew the inlet hose from the water
valve.
^ Remove the rubber seal,1, from the
connector.
^
Using needle nose pliers, grasp the plastic
filter, 2, and pull it out of the hose
connector and clean.
^
Reassemble the filter and seal.
The inlet hose filters should be cleaned
every 6 months.
Inspect the hose regularly. The hose must
be in good condition to withstand high water
pressure. The hose must be replaced if there
are small cracks in the surface or if it has
been damaged or cut.
Only use hose that can withstand a minimum
pressure of 70 bar. Original Miele hoses fulfill
this requirement.
^ Reassemble the filter and seal.
Both filters must be put back in place
after cleaning.
28

Cleaning the detergent drawer
The detergent dispenser should be
^
cleaned after each use to remove any
detergent residue.
The siphon tubes in the § and x
^
compartments should also be cleaned.
Washer care
^ Unscrew the siphon tubes.
^ Clean the siphon tubes with warm water.
Return the siphon tubes checking that the
are hooked in correctly.
29

Frequently asked questions
Power failure
During a short power failure
The program remains in the last position.
When power is restored the following
message appears in the display:
PROGRAMME 11 COTTONS
PROGRAMME STOP
THROUGH POWER CUT
Press X "Start" to continue the program.
Press the “Start” X button to continue the
^
program.
Emergency door release during a
prolonged power failure
,Make sure the machine is off and the
drum has stopped turning. A moving
drum is dangerous.
Turn off the water to the washer.
^
Open the lint trap door as described in
^
"Cleaning the drain pump and lint trap".
Drain the water from the washer as
^
described in "Washer care / Cleaning the
drain pump and lint trap."
^
To open the door, pull down on the ring in
the upper right corner of the access area.
^
Remove the laundry.
30

Fault messages
,Repairs should only be carried out by a
qualified and trained person in accord
ance with local and national safety
regulations. Unauthorized repairs could
cause an injury or machine damage.
Frequently asked questions
PROGRAMME 11 COTTONS
PROGRAMME STOP
-
Contact Technical Service.
^
HEATING SYSTEM FAULT
Faults that occur before or after the start of a
program flash in the display.
PROGRAMME 11 COTTONS
PROGRAMME STOP
THROUGH POWER CUT
Press "Start" to continue the program.
Once power is restored, press X "Start".
^
This fault message can also indicate: The
overload cut-out of the drive motors has over
heated. Allow the motor to cool down.
PROGRAMME 11 COTTONS
PROGRAMME STOP
WATER INLET FAULT
Open water stopcock and press Start button.
^ Open the water valve (stopcock) and
press X "Start".
PROGRAMME 11 COTTONS
PROGRAMME STOP
DRAIN FAULT
Check drain system and press Start button.
PROGRAMME 11 COTTONS
PROGRAMME STOP
DRIVE SYSTEM FAULT
Multiplug drive variants failure.
Contact Technical Service.
^
PROGRAMME 11 COTTONS
90 °C Main wash 20 °C
Rinse 1
DRIVE SYSTEM FAULT
^ Contact Technical Service. if there is no
drum movement after this message.
PROGRAMME 11 COTTONS
PROGRAMME STOP
IMBALANCE SWITCH
Press the On-Off switch.
^ Press Z "Power off" and Y "Power on".
PROGRAMME 11 COTTONS
PROGRAMME STOP
PRESSURE MONITOR FAULT
^
Check and clean the drain system and
press X "Start".
PROGRAMME 11 COTTONS
PROGRAMME STOP
HEATING SYSTEM FAULT
Short circuit on heat sensor 1.
^
Contact Technical Service.
PROGRAMME 11 COTTONS
PROGRAMME STOP
HEATING SYSTEM FAULT
Cut-out on heat sensor 1.
^
Contact Technical Service.
^
Contact Technical Service.
PROGRAMME 11 COTTONS
PROGRAMME STOP
DISPENSING SYSTEM FAULT
Dispensing container 1 empty
^
Change the dispensing container.
31

Frequently asked questions
Why is the washer over sudsing?
Possible Cause Fix
Only use detergent formulated for use in
Detergent type
Too much detergent
commercial washers. Domestic detergents
are not suitable.
Follow the detergent manufacturer’s
instructions and adjust amount to the local
water hardness.
High sudsing detergent
Very soft water In areas with soft water, use less detergent.
Soiling level of laundry For lightly soiled laundry use less detergent.
Residues, (undissolved detergent spots)
Small loads
Drum speed too high during a wash Reduce the drum speed and wash rhythm.
Use a low sudsing detergent or contact
Miele’s application specialists.
Run a prewash without detergent and without
selecting a temperature.
Laundry soaked before washing must be
thoroughly rinsed before being washed.
Reduce the amount of detergent dispensed
accordingly.
32

In the event of any fault which you cannot fix
yourself, please contact:
The Miele Technical Service
–
Department
USA 1-800-999-1360
techserv@mieleusa.com
CDN 1-800-565-6435
service@miele.ca
When contacting Technical Service please
quote the model (M.-Nr.) and serial number
(Fabr.-Nr.) of the machine. These can be
found on the silver data plate:
by opening the drum door, or:
Technical Service
on the back panel of the machine.
Only use original Miele spare parts when
performing maintenance or repairs on this
machine.
33

Guide to the data plate symbols
1 Machine type
2 Serial number / Year of production *
3 Voltage / Frequency
4 Fuse rating
5 Drive motor
6 Plate diameter / Plate quantity *
7 Drum data
8 Drum diameter / Drum depth
9 Spin speed
10 Drum volume / Laundry dry weight
11 Kinetic Energy
* Not valid for this machine
12 Expected time to top speed
13 Breaking time
14 Heating
15 Electric heating
16 Fusing (on site)
17 Steam heating indirect *
18 Steam heating direct *
19 Gas heating*
20 Commissioning date
21 Water-registration test
DVGW-test cert (Water)
22 Field for CE test symbol/
(Product ID-No./Gas)
Noise level
Wash cycle Spin cycle
58.5 dB 74.3 dB
34

Installation Instructions

Help to protect the environment
Disposal of the packing materials
The packing materials protect the appliance
during shipping. They have been designed
to be biodegradable and recyclable.
To prevent suffocation, ensure that any
plastic wrappings, bags, etc. are disposed
of safely and kept out of the reach of
children.
Disposal of an old appliance
Old appliances may contain materials that
can be recycled. Please contact your local
recycling center about the possibility of
recycling these materials.
Ensure that the appliance presents no
danger to children while being stored for
disposal. Before discarding an old
appliance, unplug it from the outlet, cut off
its power cord and remove any doors to
prevent hazards.
36

The washer must only be installed a Miele
authorized service technician.
Refer to the enclosed installation diagram.
Installation Instructions
Shipping struts
Once the machine is in its final position the
red-marked shipping struts "A", "B" and "C"
must be removed.
Installation site
Horizontal access washers should be
installed on the ground floor or basement of
the construction for best results.
A concrete floor is the most suitable surface
for the washer. Concrete floors are less
prone to vibration during the spin cycle than
other floors.
The corner of a room where the stability of
the floor is at its greatest is the best place to
install the washer.
Note:
– The machine must be levelled and
securely positioned.
– To avoid vibration while spinning, the
machine should not be installed on soft
floor coverings.
Save the shipping struts for future use. They
must be refitted if the machine is moved.
Removing the front shipping strut
To remove the front shipping strut, unscrew
the 13 screws and the 2 lower torx screws
from the front panel.
“A”
– Do not install the washer on carpeting.
Carpeting will block the washer’s air vents.
– When installing the toe kick, the machine
must be secured with clamps.
–
To prevent damage, do not install this
machine in a room exposed to frost or
freezing temperatures.
37

Installation Instructions
Removing the rear shipping struts
To remove the rear shipping struts, unscrew
the 13 screws and loosen the 15 lower torx
screws from the back panel.
“B” “C”
Level the washer
The machine must be level to ensure proper
operation.
The machine can be leveled by turning the
legs clockwise or counterclockwise as
necessary.
Do not transport the washer without
,
these shipping struts in place.
^ the washer is levelled by adjusting the four
screw feet.
^ Use a multiple slip-joint gripping pliers to
hold the foot.
^ Unscrew each of the four feet as much as
necessary by turning both the foot and the
locking ring to the left using a screw driver.
,
The machine must not be moved
without all of the outer panels in place.
38

Please read the installation diagram and
instructions supplied. They are important
for the proper connection of supplies.
Water connection
The water hook up is by a water valve, which
conforms with local and national regulations.
This work must be carried out by a Miele
authorized service technician.
The inlet pressure hoses supplied with the
machine must be used for connection to the
water supply.
To ensure the hot water inlet hose (marked
194°F/90°C) lasts for many years, do not
hook the hose up to a hot water connection
supplying water hotter than 158°F (70°C).
Plumbing
Drainage system
Possible connections:
1. Directly into a sink: hook the hose over
the edge of the sink and secure it firmly
(e.g. by tying the hose to the water
faucet.)
2. To a stand pipe: place the drain hose into
½
" stand pipe and firmly secure it.
a 1
3. To a floor drain: The machine is
equipped with an air gap/anti-siphoning
system so that no minimum drain height
is required.
The machine drains using a pump with a
–
maximum delivery height of 3 ft.
The elbow on the end of the drain hose
–
can be turned or removed if necessary.
This hose should only be replaced with a
genuine Miele spare parts.
A water pressure flow rate of 30 psi - 145 psi
(2 -10 bar) is required.
Water taken into the machine must not
exceed a temperature of 158°F (70°C).
Connection to cold water only:
see, the supplied installation diagram.
– Make sure there are no kinks in the drain
hose.
– If desired, the drain hose may be
extended to run 16 ft maximum as long as
the 3 ft height is not exceeded. Hose
extensions are available from your dealer
or Miele’s Technical Service Department.
39

Electrical Connection
Electrical connection
All electrical work must be performed
,
by a qualified technician in accordance
with applicable codes and standards.
The machine must only be connected to the
voltage and frequency shown on the data
plate.
The machine is supplied as standard for
connection to a 208 V, 60 Hz, 3 x 20 A,
three-phase electrical supply. Each leg of
power must be 104 - 110 V.
There are further notes on electrical
connection in the installation diagram.
The electric heater rating is factory preset to
15 kW.
The minimum suds level required to activate
heating is 2" (50 mm) column of water.
The motor has an overload protection
switch.
Connection should be made via a suitable,
approved isolator, with an easily accessible
on-off switch to be as an emergency off
switch or for servicing.
WARNING
THIS APPLIANCE MUST BE
GROUNDED
!
404142


43

Alterations rights reserved / 2008 M.-Nr. 06 018 402 / 00
 Loading...