

Page 1
Operating Instructions
Commercial Dishwasher
PG 8083 SCVi
To prevent accidents
and machine damage
read these instructions
before
installation or use.
en-US
M.-Nr. 09 501 401
Page 2

Contents
Guide to the manual . . . . . . . . . . . . . . . . . . . . . . . . . . . . . . . . . . . . . . . . . . . . . . . 5
IMPORTANT SAFETY INSTRUCTIONS. . . . . . . . . . . . . . . . . . . . . . . . . . . . . . . . . 6
Guide to the commercial dishwasher . . . . . . . . . . . . . . . . . . . . . . . . . . . . . . . . 11
Overview ........................................................11
Control panel .....................................................12
Help to protect the environment. . . . . . . . . . . . . . . . . . . . . . . . . . . . . . . . . . . . . 13
Before using for the first time. . . . . . . . . . . . . . . . . . . . . . . . . . . . . . . . . . . . . . . 15
Opening the door..................................................15
Closing the door ..................................................15
Display ..........................................................16
Basic settings ....................................................17
Language .....................................................17
Water hardness.................................................17
Filling the salt container .............................................18
Refill salt indicator .................................................20
Rinse aid ........................................................21
Adding rinse aid ..................................................21
Rinse aid indicator .................................................21
Loading the dishwasher . . . . . . . . . . . . . . . . . . . . . . . . . . . . . . . . . . . . . . . . . . . 22
Items not recommended for dishwashing: ..............................23
Typical load for 10 place settings with cutlery tray ........................24
Typical load for 16 place settings with cutlery tray ........................25
Upper basket .....................................................26
Foldable spikes.................................................26
Jumbo cup rack ................................................27
Universal support bar ............................................27
Adjusting the upper basket .......................................28
Lower basket .....................................................29
Removable MultiComfort insert.....................................30
Glass rack.....................................................30
Glass rack.....................................................31
Foldable spikes.................................................31
Bottle holder ...................................................31
Cutlery ..........................................................32
Split cutlery tray ................................................32
Optional accessories. . . . . . . . . . . . . . . . . . . . . . . . . . . . . . . . . . . . . . . . . . . . . . 33
2
Page 3

Contents
Use . . . . . . . . . . . . . . . . . . . . . . . . . . . . . . . . . . . . . . . . . . . . . . . . . . . . . . . . . . . . 34
Detergent ........................................................34
Adding detergent..................................................35
Turning the dishwasher on ..........................................36
Selecting a program ...............................................36
Starting a program.................................................36
Time display......................................................37
Standby .........................................................37
End of program ...................................................38
Turning the dishwasher off ..........................................38
Unloading the dishwasher ...........................................38
Preparing your appliance for an extended vacation .......................38
Interrupting a program..............................................39
Changing a program ...............................................39
Program guide . . . . . . . . . . . . . . . . . . . . . . . . . . . . . . . . . . . . . . . . . . . . . . . . . . . 40
Additional options . . . . . . . . . . . . . . . . . . . . . . . . . . . . . . . . . . . . . . . . . . . . . . . . 45
Extra drying ......................................................45
Delay start .......................................................46
BrilliantLight ......................................................47
Settings. . . . . . . . . . . . . . . . . . . . . . . . . . . . . . . . . . . . . . . . . . . . . . . . . . . . . . . . . 48
Opening the Settings menu ..........................................48
Language
Water hardness ...................................................49
Rinse aid ........................................................50
Buzzer ..........................................................50
AutoOpen........................................................51
Optimize Standby .................................................51
Refill messages ...................................................52
Brightness .......................................................52
Contrast .........................................................52
Filter check ......................................................52
Detergent dosage .................................................53
Venting the DOS system ............................................53
High temp rinse ...................................................54
Water plus .......................................................54
!.......................................................48
3
Page 4

Contents
Factory default ....................................................55
Select last program ................................................55
Temp. display ....................................................55
To close the Settings menu ..........................................55
Cleaning and care . . . . . . . . . . . . . . . . . . . . . . . . . . . . . . . . . . . . . . . . . . . . . . . . 56
Cleaning the wash cabinet ..........................................56
Cleaning the door and the door seal ...................................56
Cleaning the light guide.............................................56
Cleaning the control panel and exterior ................................57
Triple filter system .................................................58
Cleaning the filters .................................................58
Cleaning the spray arms ............................................60
Frequently asked questions . . . . . . . . . . . . . . . . . . . . . . . . . . . . . . . . . . . . . . . . 61
Technical faults ...................................................61
Faults in the water intake or water drain ................................63
General problems with the dishwasher .................................65
Noises ..........................................................67
Poor cleaning results ...............................................68
User maintenance instructions . . . . . . . . . . . . . . . . . . . . . . . . . . . . . . . . . . . . . 71
Cleaning the water supply screen .....................................71
Cleaning the drain pump and non-return valve...........................72
After sales service . . . . . . . . . . . . . . . . . . . . . . . . . . . . . . . . . . . . . . . . . . . . . . . . 73
Electrical connection. . . . . . . . . . . . . . . . . . . . . . . . . . . . . . . . . . . . . . . . . . . . . . 74
Plumbing. . . . . . . . . . . . . . . . . . . . . . . . . . . . . . . . . . . . . . . . . . . . . . . . . . . . . . . . 76
The Miele waterproof system.........................................76
Connection to the water inlet .........................................76
Water drainage ...................................................77
Technical data . . . . . . . . . . . . . . . . . . . . . . . . . . . . . . . . . . . . . . . . . . . . . . . . . . . 78
Noise measurement. . . . . . . . . . . . . . . . . . . . . . . . . . . . . . . . . . . . . . . . . . . . . . . 79
General requirements for measuring noise ..............................79
Installation requirements for measuring noise............................79
4
Page 5

Warnings and notes
Warnings
Warnings marked like this contain safety information
,
concerning potential injury and damage.
!Read the warnings carefully and follow the instructions
and directions.
Notes
Notes contain information that is particularly important to
follow.
Additional information and comments
Additional information and comments are contained in a
simple frame. They are not imperative.
Operating steps
Specially marked instructions indicate the steps for operating
the dishwasher. They explain the procedure step by step.
Operating steps are identified by a black square.
Guide to the manual
Display
Example:
^
Select the desired setting and press the centre button to
confirm.
The information is displayed in a special character font like
that in the display.
Example:
When the display shows the message
....
O End or AutoOpen
5
Page 6
IMPORTANT SAFETY INSTRUCTIONS
WARNING When using your dishwasher
follow basic precautions,
including the following:
This dishwasher is intended for
household and commercial
applications.
Only use the machine for its
intended purpose. Any other use,
conversion or modification is
dangerous.
This dishwasher complies with
current safety requirements.
Improper use of the machine can
lead to personal injury and material
damage.
Read all instructions before installing
or using this machine.
Keep these operating instructions in
a safe place and pass them on to
any future user.
Intended use
This dishwasher has short runtimes
~
with heavy duty cleaning power and is
intended for use in offices, lunch
rooms, clubhouses, workshops, large
kitchens and similar commercial
environments.
This dishwasher can also be used in
households and similar environments
such as agricultural estates, hotels,
motels, B&Bs and other typical
domestic environments.
This dishwasher is not intended for
~
constant use.
This dishwasher is not suitable for
~
processing medical products.
Use this commercial dishwasher
~
only for dishwashing as defined in the
Operating instructions, i.e. for cleaning
dishes and cutlery. Any other use,
conversion or modification is not
permissible and possibly hazardous.
This dishwasher is intended for
~
stationary indoor use.
The special inserts are to be used
~
for their specific purpose only.
Persons who lack physical, sensory
~
or mental abilities, or experience with
the machine should not use it without
supervision or instruction by a
responsible person.
6
Page 7

IMPORTANT SAFETY INSTRUCTIONS
Proper installation
Do not use the machine until
~
properly installed.
Do not install the machine in an area
~
where a danger of explosion or of
freezing temperatures may be present.
To ensure the stability of
~
undercounter dishwashers, they must
only be installed beneath a continuous
countertop that is bolted to the adjacent
cabinetry.
In order to reduce the risk of
~
damage from condensation, the
furniture in the area around the
appliance should be designed for
commercial use.
Technical safety
Installation and repair work should
~
be performed by a qualified and trained
service technician in accordance with
local and national safety regulations.
Work by unqualified persons could be
dangerous and may void the warranty.
Before installation or service,
~
disconnect the power supply to the
work area by unplugging the unit,
"tripping" the circuit breaker or
removing the fuse.
When work has been performed on
~
the supply plumbing, the supply line to
the commercial dishwasher must be
bled.
Otherwise, the water softening system
may be damaged.
Untrained personnel must not be
~
permitted to operate the commercial
dishwasher. Operating personnel must
receive regular training.
Before using the appliance, check
~
for visible external damage. Never
operate a damaged dishwasher. A
damaged dishwasher can jeopardize
your safety!
Do not install or use a damaged
~
dishwasher. A damaged machine is
dangerous. Unplug the machine and
call your Miele dealer or the Miele
Technical Service Department.
The appliance should only be
~
repaired by Miele Customer Service, an
authorized Miele dealer or an
appropriately qualified technician.
Otherwise the warranty becomes null
and void.
Defective components must be
~
replaced with genuine Miele spare
parts only. Only these parts are
guaranteed by Miele to comply with
safety requirements.
Do not connect the appliance to the
~
electrical power supply until all the
installation work has been completed,
including adjustment of the door spring.
Be certain this machine is properly
~
installed and grounded by an
authorized technician. To guarantee the
electrical safety of this machine,
continuity must exist between the
machine and an effective grounding
system. It is imperative that this basic
safety requirement be met. If there is
any doubt, have the electrical system
checked by a qualified technician.
7
Page 8

IMPORTANT SAFETY INSTRUCTIONS
Be sure to follow the installation
~
instructions in this manual and in the
installation diagram.
Before connecting the appliance,
~
ensure that the connection data on the
data plate (voltage, frequency and fuse
rating) match the building's electrical
supply.
WARNING - Fire hazard! Do not
~
cover or crush the plug of the
appliance. Ensure that the cabinet
opening for the dishwasher provides
ample space for the plug and cord.
Installing the dishwasher in a tight
space may crimp the power cord or put
pressure on the plug which could
cause overheating.
Do not use an extension cord to
~
connect this machine to electricity.
Extension cords do not guarantee the
required safety of the machine (e.g.
danger of overheating).
If the power cord is damaged it
~
must only be replaced by a qualified
Service technician with a genuine Miele
power cord.
The plastic housing of the water
~
connection contains an electric valve.
The housing must not be immersed in
water.
The intake hose contains electrical
~
wires. Therefore, do not shorten the
hose.
The built-in waterproof system offers
~
reliable protection against water
damage if the following conditions are
met:
– proper installation,
– repair the appliance or replace parts
when damaged,
– close the water supply during longer
absences (e.g. vacation).
The waterproof system also works
~
when the commercial dishwasher is
turned off. But it must not be
disconnected from the power supply.
Do not install this dishwasher
~
beneath a cooking surface, oven or any
appliance that radiates heat. High
temperatures from these units may
damage the dishwasher
Do not open the appliance housing.
~
Any interference with connections
carrying voltage or changes in the
electrical or mechanical set up, will
endanger you and may impair the
functioning of the appliance.
Before servicing the appliance,
~
disconnect it from the power supply.
8
Page 9

IMPORTANT SAFETY INSTRUCTIONS
Proper use
The dishwasher is designed only for
~
operation with water and the
appropriate cleaning agents. Organic
solvents must not be used in the
machine. An explosion or machine
corrosion could occur with the use of
organic solvents.
Follow the instructions and relevant
safety procedures carefully.
Only use standard household
~
mechanical dishwasher detergents in
this unit. Keep all cleaning agents out
of the reach of children. Use of
unsuitable cleaning agents could
adversely affect the components of the
machine.
To avoid corrosion damage ensure
~
that solutions or steam containing
hydrochloric acid do not come into
contact with the steel outer casing of
the machine.
BURN AND SCALD HAZARD
~
This dishwasher reaches very high
temperatures. Take care when
unloading the unit. Let baskets and
inserts cool before touching them. Any
water which may remain in containers
will be very hot and should be emptied
into the wash cabinet.
Under certain conditions, hydrogen
~
gas may be produced in a hot water
system that has not been used for two
weeks or more. HYDROGEN GAS IS
EXPLOSIVE. If the hot water system has
not been used for such a period, turn
on all hot water faucets and let water
flow from each for several minutes
before using the dishwasher. This will
release any accumulated hydrogen
gas. Do not smoke or use an open
flame during this time.
The water in the machine must not
~
be used as drinking water.
Pre-treatments with detergents can
~
create suds, as can certain rinsing
agents. For pre-treatment and / or
cleaning only, use low-sudsing
detergents. Suds can have an adverse
effect on the cleaning process.
Suds escaping from the wash
~
cabinet can damage the appliance. If
any suds are escaping, cancel the
program immediately!
Always follow the instructions of the
~
chemical manufacturer when using
detergents and special application
chemicals. Only use such chemicals for
the purpose and in the situation
specified to avoid such dangers as
chemical reactions and material
damage.
Do not sit or lean on the open door.
~
This could cause the machine to be
damaged.
Do not leave the dishwasher door
~
open when the machine is not in use.
You could hurt yourself on the open
door.
9
Page 10

IMPORTANT SAFETY INSTRUCTIONS
Avoid inhaling detergent. If
~
swallowed, it can cause burning in the
mouth and throat or inhibit breathing.
Observe the detergent
~
manufacturer's directions for storage,
use and dosage of cleaning agents.
Never clean the machine or near its
~
vicinity with a water or high pressure
hose.
Be aware of the potential for injury
~
when utensils with sharp, pointed ends
are placed upright. Position them so
they cannot cause injury.
Remove all large food and liquid
~
residues from the tableware before
loading.
Children
Always supervise any children in the
~
vicinity of the appliance. Never allow
children to play with the appliance.
Among other hazards, children run the
risk of locking themselves in the
dishwasher!
Do not allow children to play in or
~
around the dishwasher, or to operate it.
Keep detergents away from
~
children! If detergents are ingested,
they can cause chemical burns in the
mouth and throat, or even suffocation.
Therefore, keep children away from the
dishwasher when open. There may still
be detergent residues in the appliance.
Seek medical help immediately if a
child has ingested any detergent.
Accessories
Only specific additional equipment,
~
made by Miele or approved by Miele,
should be used with this machine.
Consult Miele on the type and
application of such equipment.
Disposal of the old machine
When disposing of your old
~
dishwasher first make it unusable.
Disconnect it from the mains power
supply, cut off the cable and plug from
the cable.
For environmental and safety
~
reasons ensure the machine is
completely drained of any residual
water and detergent. (Observe safety
regulations and wear safety goggles
and gloves).
Remove the door to the washing
~
compartment, so that children cannot
accidentally shut themselves in. Make
appropriate arrangements for the safe
and environmentally responsible
disposal of the machine.
For tank system machines ensure that
all water is emptied out the tank.
SAVE THESE
INSTRUCTIONS
10
Page 11
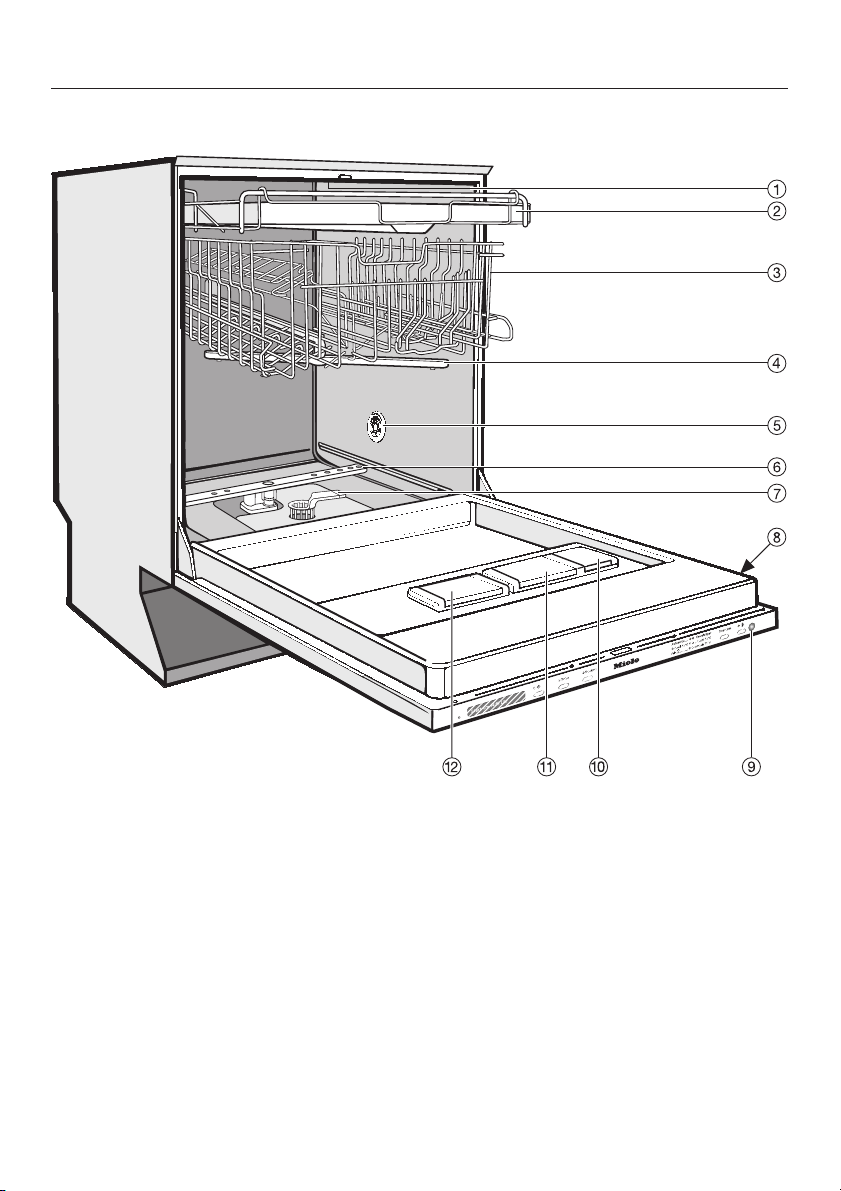
Overview
Guide to the commercial dishwasher
a Upper spray arm (not visible)
b Cutlery tray
c Upper basket
d Middle spray arm
e Air inlet for drying
f Lower spray arm
g Filter combination
h Data plate
i Optical interface
j Rinse aid reservoir
k Dual-compartment detergent
dispenser
l Reservoir for regenerating salt
11
Page 12
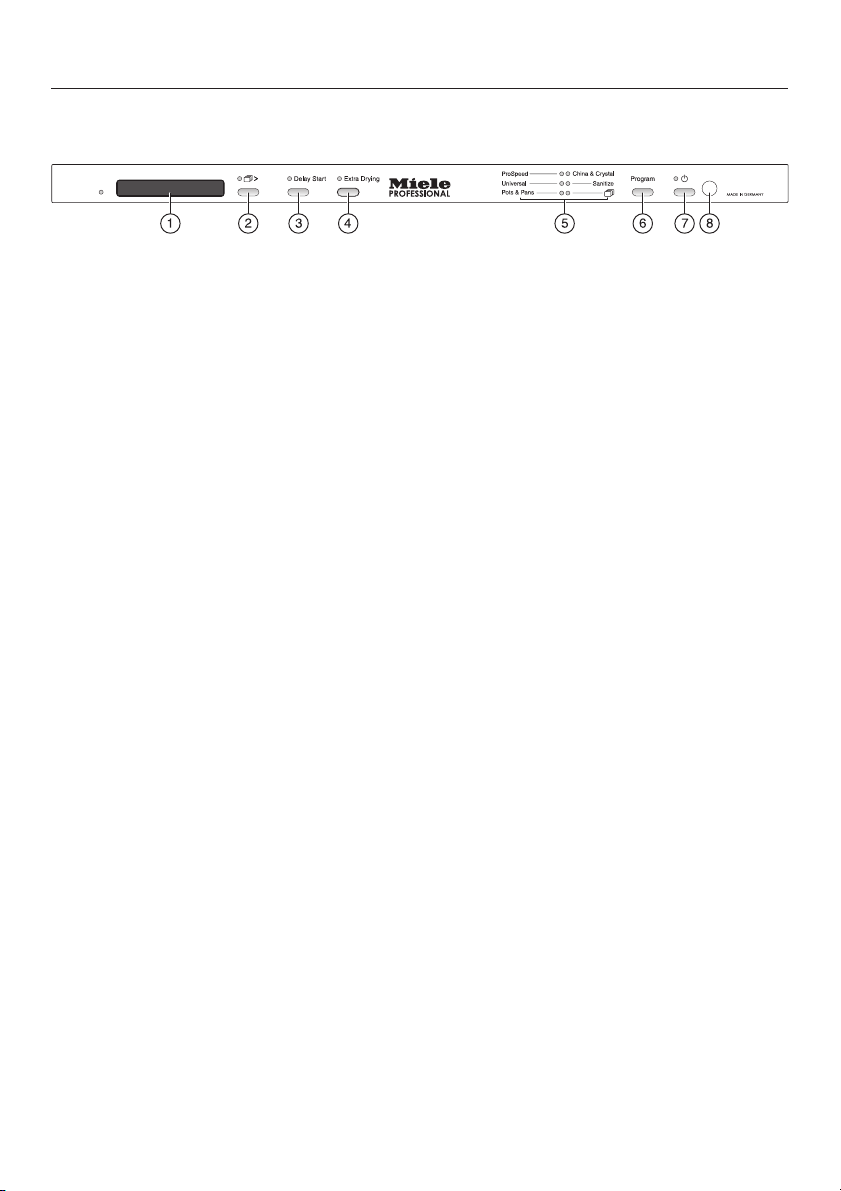
Guide to the commercial dishwasher
Control panel
a Display
b 4 ü button, (other programs)
with indicator light
c Delay start button
with indicator light
d Extra drying button
with indicator light
e Program selection
f Program button for program
selection
g - button (On/Off) with indicator light
h Optical interface
12
Page 13

Help to protect the environment
Disposal of the packing
material
The cardboard box and packaging
protect the appliance during shipping.
These materials are biodegradable and
recyclable. Please recycle.
Ensure that any plastic wrappings,
bags etc. are disposed of safely and
kept out of the reach of children.
Danger of suffocation!
Disposal of an old machine
Old appliances may contain materials
that can be recycled. Please contact
your local recycling authority about the
possibility of recycling these materials.
Ensure that the appliance presents no
danger to children while being stored
for disposal. Before discarding an old
appliance, unplug it from the outlet, cut
off its power cord and remove any
doors to prevent hazards. See
"IMPORTANT SAFETY
INSTRUCTIONS".
13
Page 14

Help to protect the environment
Energy saving washing
This dishwasher is exceptionally
economical in the use of water and
electricity. For best results follow these
tips:
You may connect the commercial
^
dishwasher to a hot water line. This is
particularly suitable with
energy-saving water heating sources
such as solar energy systems.
If the hot water system is electrically
heated and if loads comprise
primarily glassware we recommend
connecting the appliance to the cold
water line.
^ For fastest possible wash times, with
slightly higher energy consumption,
connect the dishwasher to a hot
water source.
^ Make full use of the baskets without
overloading for the most economical
washing.
^ Choose a program that best suits the
degree of soiling and the type of
dishes being washed.
^
Use the Normal program for energy
saving dishwashing.
From the aspect of combined energy
and water consumption, this program
is the most efficient for washing
normally soiled dishes.
^
Observe the detergent
manufacturer's recommendations for
detergent dosage.
^
When using powder or gel detergent,
reduce the amount to
normal amount when washing a small
load.
14
1
/3of the
Page 15
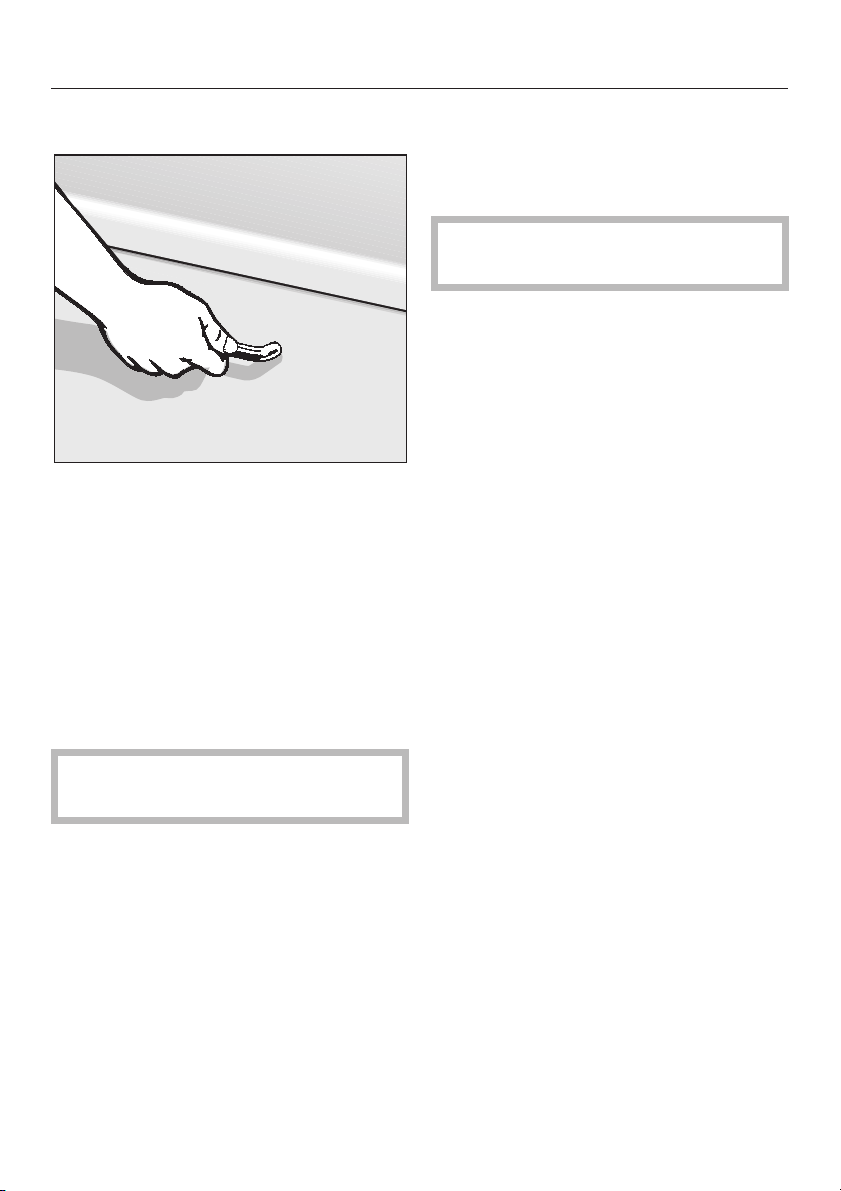
Before using for the first time
Opening the door
At the end of programs with a drying
cycle (see Program guide) the door will
automatically open a little in order to
improve the drying.
You can cancel this function (see
Settings menu - AutoOpen drying).
^ Pull the handle to open the door.
If the door is opened during operation
the dishwasher will automatically stop
running.
Closing the door
Push the baskets in.
^
Push the door until it clicks shut.
^
Keep your fingers off the door
,
frame. Risk of injury!
,
Do not block the area in which
the door opens.
15
Page 16

Before using for the first time
Display
General
The following functions can be selected
or set with the display:
the wash program
–
the Delay start time
–
the settings
–
The following appears in the display
while a program is running:
– the present program step
– the remaining runtime
– any faults or other messages
In order to save energy, the display
will turn off within a few minutes if no
program is running and no button is
pressed. After several more minutes
it switches off completely (see Use Standby).
To turn the dishwasher back on,
press the - button.
Settings menu
The Settings menu allows you to set the
dishwasher to suit your requirements.
See "Settings" for more information.
The normal functions of the buttons
next to the display are not active with
the Settings menu, allowing you to
select and confirm menu items using
these buttons.
The left and right arrows in the display
indicate that additional selections are
available. You can choose these
selections with the left or right button
below the display.
Use the center button below the display
to confirm messages or settings and to
switch to the next menu or submenu.
The currently selected setting is
marked with a check
(.
16
Page 17

Before using for the first time
Basic settings
Press the - button to turn the
^
dishwasher on.
If the dishwasher is being turned on for
the first time, the welcome screen will
appear.
Language
The display automatically switches to
the language setting.
See "Display" for details.
^ Select the desired language and
press the center button to confirm.
The selected language is marked with a
(.
Water hardness
The display changes to the water
hardness setting.
– The dishwasher must be
programmed to exactly match the
hardness of your water.
–
Your local water authority can tell you
the water hardness level in your area.
–
Where the water hardness fluctuates
[e.g. 18 - 26 gr/gal (17 - 25 °d)],
always program the dishwasher to
the higher value [(in this example
26 gr/gal (25 °d)].
It is useful to know your water hardness
so that you can provide the service
technician with this information in the
event of any service calls.
Please note your water hardness below:
°d (gr/gal)
The water hardness factory setting is
15 °d (16 gr/gal).
Select the hardness of your water
^
supply and confirm with the center
button.
See "Settings menu - Water
hardness" for more information.
If the display now shows
aid
or F Add salt, press any button to
( Add rinse
confirm. The display changes to the
main menu.
These basic settings are saved after
the first full program cycle is
completed.
The Welcome screen is no longer
displayed after the first full program
cycle is completed.
17
Page 18

Before using for the first time
Every dishwasher is tested before
leaving the factory. Any water
remaining in the machine is from the
final factory test and does not
indicate that the machine has been
used.
Filling the salt container
To achieve good cleaning results, the
dishwasher needs soft water (water that
is low in minerals). Hard water results in
calcium deposits on dishware and in
the dishwasher.
Therefore, tap water with a hardness of
4 °d (4 gr/gal) or more must be
softened. This takes place
automatically in the integrated water
softener. The water softener requires
reactivation salt. The water softener is
suitable for a water hardness of up to
36 °d (37 gr/gal).
See "Settings - Water hardness" for
setting the water softener.
If the hardness of your water is
always below 4 °d (4 gr/gal), you do
not need any salt.
However, you must still program
your dishwasher for your water
hardness.
Inadvertently filling the salt
,
container with dishwashing
detergent (including liquid
detergent) will damage the water
softener.
Only use water softener salt
,
specially formulated for
dishwashers. Other salts may
contain insoluble additives which
can impair the water softener.
18
Page 19
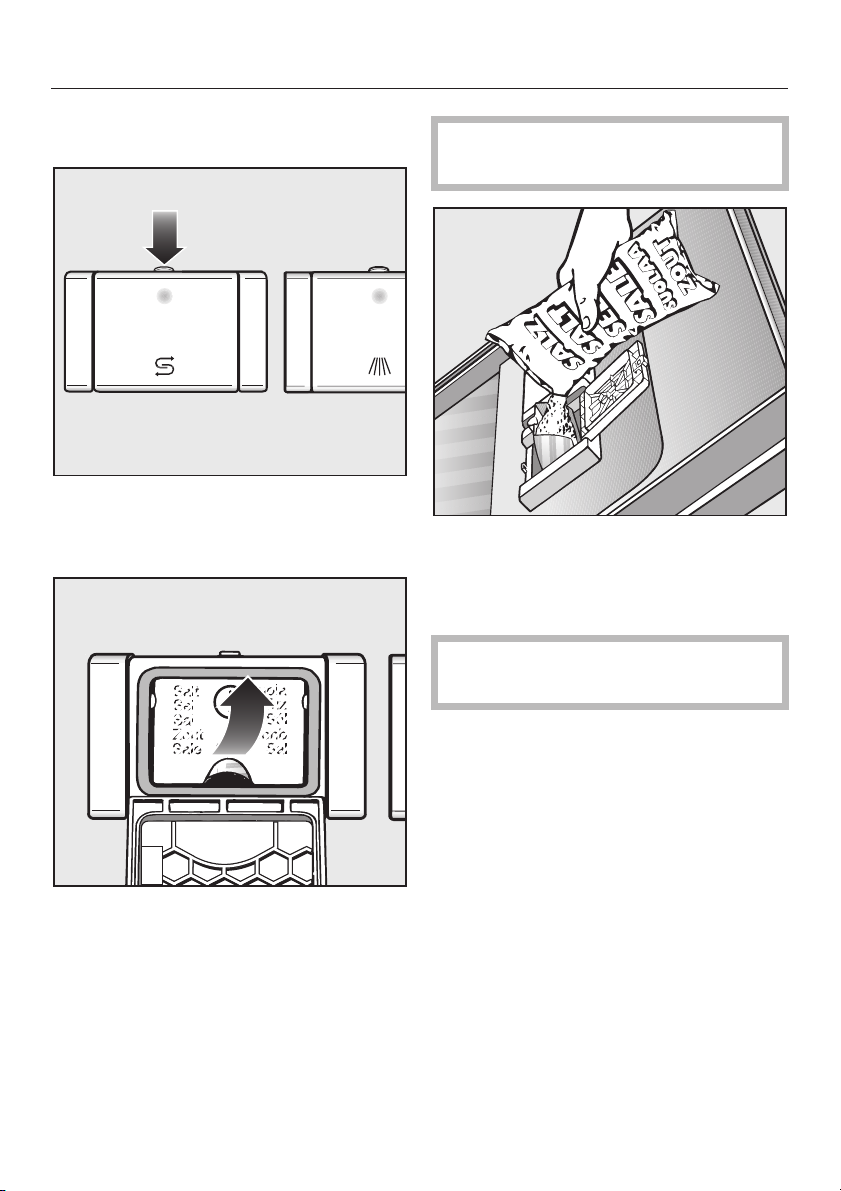
Only open the door half way when
^
adding salt to avoid spilling it.
^ Press the button on the top of the salt
reservoir in the direction of the arrow.
The cover will pop open.
Before using for the first time
Do not fill water into the salt
reservoir!
^ Only add just enough salt to fill the
reservoir. Depending on the type of
salt, the reservoir will hold up to
approx. 2.2 lbs (1 kg).
^
Open the funnel.
Never fill with more than 2.2 lbs
(1 kg) of salt.
Displaced water may run out as the
reservoir is being filled.
^
Clean any excess salt from the filling
area and close the cover of the
reservoir.
^
Immediately run the Pre-wash
program without a load in order to
remove any traces of salt from the
chamber.
19
Page 20

Before using for the first time
Refill salt indicator
Refill the salt reservoir as soon as the
^
Refill salt message is displayed.
F
Press the center button to confirm.
^
The Refill salt indicator goes out.
If a sufficiently high concentration of
salt has not yet formed, Refill salt may
continue to be displayed after adding
the salt.
In this case, confirm again with the
center button.
The Refill salt message is turned off if
you have programmed the dishwasher
to a water hardness below 4 °d
(4 gr/gal).
Immediately after each refill run
,
the Pre-wash or Short program
without a load in order to remove
any traces of salt from the cabinet.
20
Page 21
Rinse aid
Rinse aid helps to prevent spotting on
dishes and glassware and speeds up
the drying process.
The rinse aid is filled into the reservoir
and the set amount will be
automatically dispensed.
Use rinse aid only. Never fill the
,
rinse aid reservoir with regular
dishwashing detergent or cleaning
agent. This will damage the rinse aid
reservoir.
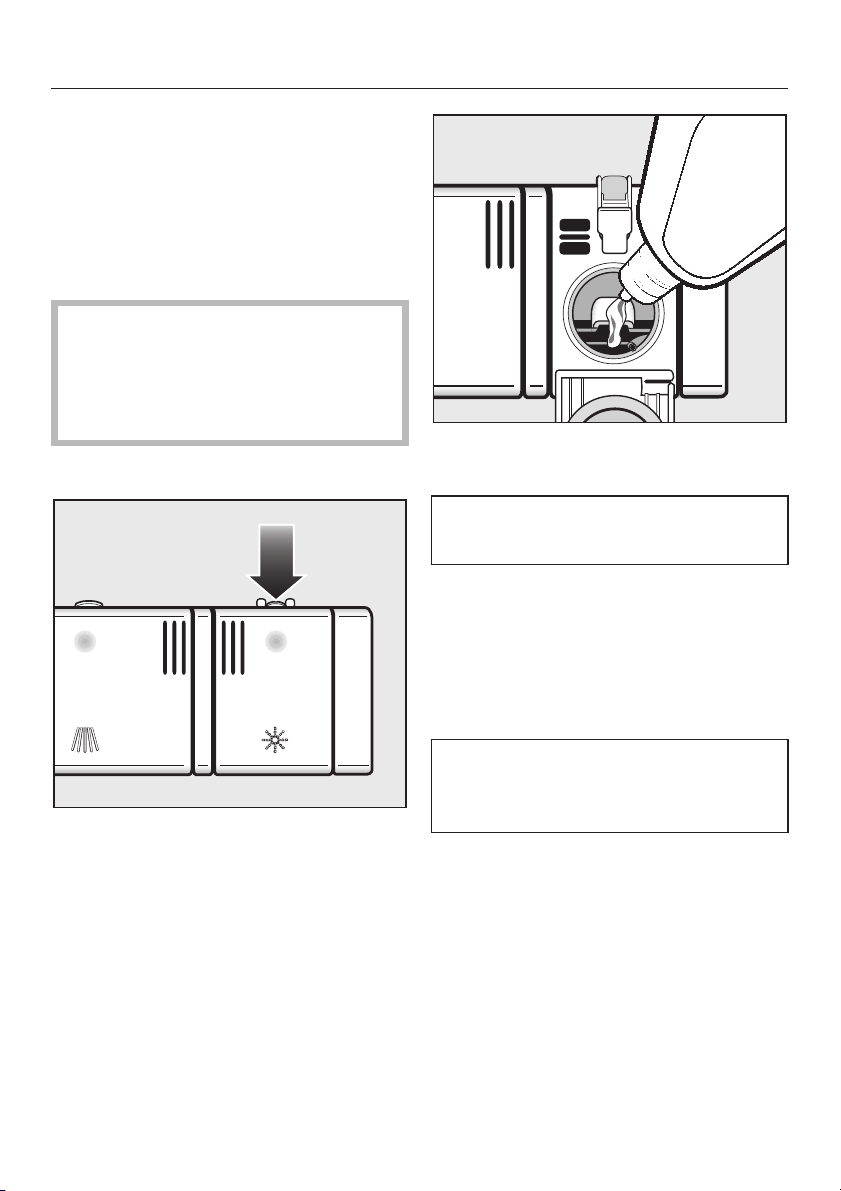
Adding rinse aid
Before using for the first time
Pour rinse aid into the reservoir until it
^
is visible in the opening.
The rinse aid reservoir holds
approximately 3.7 fl. oz. (110 ml).
^ Close the cover until you hear it click
shut, otherwise water might enter the
reservoir during the wash program.
^
Press the button on top of the rinse
aid reservoir in the direction of the
arrow. The cover will pop open.
^ Wipe up any spilled rinse aid to
prevent over-foaming during the next
wash program.
You can adjust the rinse aid dosage
to optimize the results (see "Settings
- Rinse aid").
Rinse aid indicator
When the ( Refill rinse aid message
appears, the reservoir only contains
enough rinse aid for2-3wash
programs.
^
Add rinse aid soon.
^
Press the center button to confirm.
The Refill rinse aid message goes out.
21
Page 22

Loading the dishwasher
Tips:
Remove coarse food residues from the
dishware.
There is no need to rinse items before
loading into the dishwasher.
Do not wash items soiled with
,
ash, sand, wax, grease or paint in
the dishwasher.
These materials damage the
dishwasher.
All items can be placed anywhere in
the baskets. However, note the
following:
– Do not place dishes or cutlery inside
other pieces. They will cover each
other.
– Load dishes so that water can reach
all the surfaces. This ensures that the
items will be properly cleaned!
– Make sure that all items are securely
positioned.
Concave items such as mugs or
–
bowls should be placed at an angle
so that the water can run off.
Ensure that the spray arms are not
–
blocked by items that are too tall or
that hang through the baskets.
Check clearance by manually
rotating the spray arms.
Place very small items such as lids in
–
the cutlery tray or basket (depending
on the model) so they do not fall to
the bottom of the wash cabinet.
Some foods, e.g. carrots, tomatoes
and ketchup, may contain natural
dyes. Plastic items may discolor
permanently if they come in contact
with food dyes. This discoloration
does not affect the stability of the
plastic items.
–
Hollow items such as cups, glasses
and pots should be placed upside
down in the baskets.
–
Place tall, narrow, hollow items, e.g.
champagne glasses, in the center of
the basket rather than in the corners.
This ensures good water coverage.
22
Page 23

Loading the dishwasher
Items not recommended for
dishwashing:
Wooden cutlery and dishes or items
–
with wooden parts: they discolor and
fade. In addition, the glue used in
these items is not dishwasher-proof.
Result: wooden handles may come
loose.
Hand-crafted items, antiques,
–
valuable vases and decorative
glassware: these items are not
dishwasher-proof.
Plastic items which are not heat
–
resistant: these items may become
deformed.
– Copper, brass, tin and aluminium
items: these may discolor or become
dull.
– Colors painted over a glaze: these
may fade after a number of washes.
– Fine glassware and crystal: they may
become cloudy over time.
We recommend:
When purchasing dishes and cutlery,
–
make sure they are dishwasher-safe.
Drinking glasses may become
–
cloudy over time. Fine glassware
should only be washed at low
temperatures (see "Program guide")
This reduces the risk of clouding.
Silver and aluminum:
Silver or aluminum items may tarnish.
–
Silverware previously cleaned with a
–
silver polish may be damp or spotted
at the end of a program where water
has adhered to the polish. This can
be rubbed off with a soft, dry cloth.
Silver that has been cleaned in an
immersion dip is usually dry at the
end of a program, but may tarnish.
– If left to dry, foods containing sulfur
can discolor silver. These include
egg yolk, onions, mayonnaise,
mustard, fish and marinades.
–
Silverware may tarnish or pit if
washed next to stainless steel.
Leave space between these metals
,
Aluminum components
(e.g. grease filters) must not be
washed with caustic alkaline
commercial or industrial cleaning
agents in the dishwasher. These
may damage the material. In
extreme cases they can cause a
severe chemical reaction.
23
Page 24
Loading the dishwasher
Typical load for 10 place settings with cutlery tray
Upper basket Lower basket
Cutlery tray
24
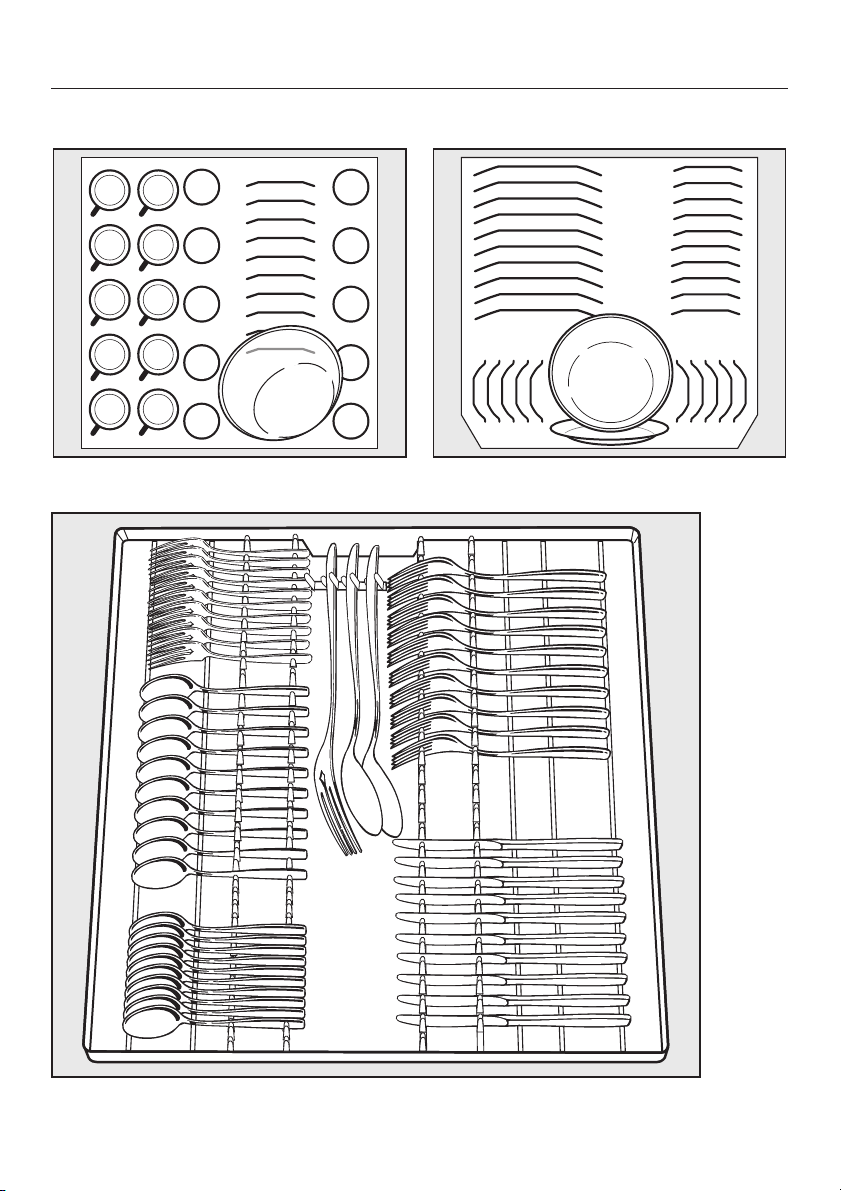
Page 25

Loading the dishwasher
Typical load for 16 place settings with cutlery tray
Upper basket Lower basket
Cutlery tray
25
Page 26

Loading the dishwasher
Upper basket
Always use the dishwasher with
,
the upper and lower basket inserted.
^ Load the upper basket with small,
lightweight, or delicate items such as
cups, saucers, glasses, dessert
bowls, etc.
Shallow pans can also be placed in
the upper basket.
^
Long items such as soup ladles,
mixing spoons and long knives
should be placed lying down across
the front of the upper basket.
Foldable spikes
The rows of spikes can be lowered to
make more room for larger items, such
as casserole dishes.
^ Press the yellow lever down a and
fold the spikes down b.
Hinged cup rack
^ To make room for tall items, raise the
rack upwards.
Glasses can be arranged along the cup
rack to give them some support during
the program.
^
Lower the cup rack and lean the
glasses against it.
26
Page 27

Loading the dishwasher
Jumbo cup rack
The cup rack can be set to two different
widths so that it can also accommodate
large cups.
^ Pull the cup rack upwards and click it
back into position at the required
width.
Universal support bar
The support bar will hold tall glasses
and stemware securely.
If necessary, move one of the side
^
inserts in the cutlery tray to make
room for tall glasses.
Adjusting the height:
You can set the support bar to two
different heights.
^ Pull the support bar upwards and
click it back into position at the
required height.
Use the low setting for small glasses
and tumblers.
^
Fold the support bar down and lean
the glasses against it.
Use the high setting for tall glasses and
stemware.
27
Page 28

Loading the dishwasher
Adjusting the upper basket
In order to gain more space for taller
items in the lower or upper basket, the
upper basket can be adjusted to three
levels of about 2 cm height difference
between each level.
The upper basket can also be set at an
angle with one side high and the other
side low to improve water drainage.
However, make sure that the basket
can slide smoothly in and out of the
cabinet.
Pull the upper basket out.
^
Depending on the setting of the upper
basket, the following plate dimensions
can be accommodated.
Dishwasher with a cutlery tray
Upper
basket
level
Top
Middle
Bottom
Plate dimension
Upper
basket
7 1/2"
(19 cm)
8 1/4"
(21 cm)
9 1/16"
(23 cm)
Lower
basket
12 1/4"
(31 cm)
11 7/16"
(29 cm)
10 5/8"
(27 cm)
To adjust the upper basket upwards:
^
Lift the basket up until it clicks into
place.
To adjust the upper basket downwards:
^
Pull upwards on the levers at the
sides the basket.
^
Adjust the basket to the desired
height and then push the levers
securely back down into position.
28
Page 29

Lower basket
Place larger and heavier items such
^
as plates, serving platters,
saucepans, bowls, etc. in the lower
basket.
It can also be used for glasses, cups,
small plates and saucers.
Loading the dishwasher
Heavily soiled items
Commercial dishwasher with cutlery
tray
^
Place very large plates in the center
of the lower basket.
When tilted, plates up to 13 3/4"
(35 cm) in diameter can be
accommodated.
29
Page 30

Loading the dishwasher
Removable MultiComfort insert
The rear section of the lower basket is
used for cups, glasses, plates, pots
and pans.
You can remove the MultiComfort insert
to make more space for larger items
such as pots and pans.
To remove the insert a
^ Press the yellow handle forwards and
remove the insert.
To replace the insert b
^
Slide the hooks of the insert under
the cross wire of the lower basket.
Glass rack
The glass rack can be folded up to
^
make more room for tall items.
Stemware, e.g. wine, champagne
^
and beer glasses, can be leaned
against the glass rack or suspended
from it.
The height of the glass rack is
adjustable.
^ Slide the glass rack to the desired
height until the catches click into
place at the top and rest on the
bottom.
^
Push down on the insert to snap it
into position.
30
Page 31

Glass rack
The glass rack can hold tall glasses
and stemware securely.
Loading the dishwasher
Press the yellow lever down a and
^
fold the spikes down b.
^ Fold the support bar down and lean
the glasses against it.
Foldable spikes
The spikes at the front are used for
plates, soup bowls, platters, desert
bowls, and saucers.
Both rows of spikes can be folded
down to create more room for larger
dishware, e.g. pots, pans and bowls.
Bottle holder
The bottle holder is for washing narrow
items e.g. for milk bottles or baby
bottles.
^
Pull the bottle holder up a and fold it
sideways b when it is not in use.
31
Page 32

Loading the dishwasher
Cutlery
Split cutlery tray
^ Arrange the cutlery in the tray as
shown.
To make unloading much easier,
cutlery can be grouped in zones, one
for knives, one for forks, one for
spoons, etc.
If spoon handles do not fit between the
holders, put them the other way round.
Spoon heads should be placed in
contact with at least one of the serrated
retainers on the base of the cutlery tray
to ensure that the water runs off them.
Make sure that large items (e.g.
cake servers, etc.) do not block the
upper spray arm!
The side inserts of the tray can be
moved into the middle to accommodate
tall items in the upper basket.
32
To make more room for larger items of
cutlery, you can use the yellow slider to
adjust the height of the middle section
of the cutlery tray.
Page 33

Optional accessories
Optional dishwasher accessories are available from your Miele dealer, Miele or
Mieleusa.com (depending on your model some may already be supplied with your
machine as standard).
If you would like to... the following accessory will need
to be ordered...
...wash a Miele Cappuccinatore ... a Cappuccinatore insert for the
upper basket.
...wash additional items of cutlery ... a cutlery basket for the lower
basket.
...wash long-stemmed glassware ... a glassware rack for the lower
basket.
MieleCare Collection
Miele branded cleaning and care products, including dishwasher salt, detergent
and rinse aid, are available to order from your Miele dealer, Miele or the on-line
Miele store www.mieleusa.com
33
Page 34

Use
Detergent
Avoid inhaling powder
,
detergents. Avoid swallowing
dishwasher detergent! Detergents
can cause chemical burns to nose,
mouth and throat. Consult a doctor
immediately if detergent has been
swallowed or inhaled.
Always keep detergent out of the
,
reach of children. Keep children
away from the dishwasher when the
door is open. There could still be
detergent residues in the cabinet.
Fill the detergent dispenser just
before starting the program and lock
the door with the child safety lock.
Dishwasher detergents contain
irritant and corrosive ingredients.
Use only the recommended amount
of detergent. Continued use of too
much detergent may cause machine
damage.
Powder detergents
Use only powder detergent in the
dispenser in the door.
Pour powder detergent into the
^
compartments of the detergent
dispenser.
Detergent dosage
Unless otherwise specified,
^
depending on the degree of soiling,
pour approximately 1 ¼ and 2
tablespoons (20 and 30 ml) of
powder detergent into compartment
II.
For heavily soiled dishware, pour a
small amount of detergent into
compartment I (see Program guide).
Never use detergent tablets. The
tabs do not dissolve completely
during the short program runtimes.
Whether you use powder or liquid
detergent, always observe the
manufacturer's instructions.
34
Page 35

Use
Adding detergent
^ Press the button on top of the
detergent dispenser. The cover will
pop open.
The cover is always open at the end of
a program.
Detergent dosing aid
Compartment I holds a maximum of 2
teaspoons (10 ml),
compartment II holds a maximum of 3.5
tablespoons (50 ml) of detergent.
The horizontal marks in compartment II
indicate the levels of approximately 1 ¼
and 2 tablespoons (20 and 30 ml)
respectively. The marks indicate the
approximate fill level in ml when the
door is open in a horizontal position.
^
Add detergent to the compartments
and close the cover.
^
Do not forget to close the detergent
container. Otherwise, the detergent
might clump.
35
Page 36

Use
Turning the dishwasher on
Open the water supply if it is closed.
^
Open the door.
^
Make sure the spray arms can rotate
^
freely.
Press the - button to turn the
^
dishwasher on.
The factory-set ECO program will
appear in the display and the matching
indicator light will come on.
After a short while, the estimated time
for the selected program will appear in
the display.
You can also change the setting to the
program you last used (see "Settings Program preselection").
Selecting a program
Choose the program according to the
type of dishware and soiling.
See the Program guide for a
description of the programs and their
applications.
Starting a program
Close the door to start the program.
^
The optical interface lights up to
confirm the start of a program
sequence.
If additional functions are selected, the
corresponding indicator lights will also
come on.
Cancel a program only in the first
few minutes.
Otherwise important program steps
(e.g. water softening) may be
canceled.
^
Use the X button to select the
desired program.
The indicator light for the selected
program comes on.
When the indicator light next to 4
lights up, you can select additional
programs using the 4 ü button.
You can now select additional
options (see Additional options).
36
Page 37

Use
Time display
Before the program starts, the time
display shows the runtime of the
selected program in hours and minutes.
The remaining time is displayed during
the program.
Symbols will appear to indicate the
stage of the program:
1 Pre-wash
8 Main wash
% Interim rinse
( Final rinse
G Drying
O End
The time that is displayed may vary for
the same program. It depends on the
temperature of the incoming water, the
reactivation cycle and the quantity of
dishes.
When a program is selected for the first
time, the display shows an average
program time for warm water.
Standby
A few minutes after the last button is
pressed or a few minutes after the end
of the program the dishwasher will
switch to Standby mode to save
energy. The display and the indicator
lights are turned off and only the indicator light flashes slowly.
Press the - button to turn the
^
indicator lights back on.
If you do not turn off the dishwasher
after the program ends, it it will
automatically turn off completely after a
few minutes in Standby mode (see
"Settings - Optimize Standby").
If Refill salt, Refill rinse aid or a fault
is displayed during a program, the
dishwasher will not switch to
Standby mode.
The refill messages can be turned
off to let the dishwasher go into
Standby mode without first refilling
(see "Settings - Refill messages").
However, fault messages cannot be
turned off.
37
Page 38

Use
End of program
At the end of a program, the optical
interface flashes with the door closed.
The program has finished when
or AutoOpen is displayed and the door
is slightly ajar.
If Extra drying was selected and
AutoOpen is active, the drying fan
will run for a few minutes after the
program has ended.
Open the door all the way to reset the
^
door latch.
^ Unload the dishwasher.
If the door is closed, the optical
interface goes out 10 minutes after the
program has ended.
,
If if the AutoOpen function is
deactivated (see Settings menu AutoOpen) and you want to open
the door after the program has
ended, open the door all the way.
Otherwise steam from the
dishwasher could damage the edge
of the countertop because the fan is
no longer running.
O End
Turning the dishwasher off
At the end of a program:
Open the door.
^
Press the - button to turn the
^
dishwasher off.
The dishwasher will continue to use
electricity until it is turned off with the
- button.
Unloading the dishwasher
Dishes tend to break and chip more
easily when they are hot.
Leave the dishes in the dishwasher until
they are cool enough to handle before
unloading them.
The dishes will cool much faster if you
open the door when the program has
ended.
Unload the lower basket first, then the
upper basket and then the cutlery tray
(depending on model).
This will prevent water from the upper
basket and cutlery tray from dripping
onto dishes in the lower basket.
Preparing your appliance for
an extended vacation
38
If you elect to turn off the water to your
home for an extended period of time,
please note that this may not be
enough to reduce the risk of a leak.
To be completely safe, you must
turn off the water supply to each
individual appliance. This means
under the sink for a dishwasher, at
the laundry bib for your washer, etc.
Page 39

Use
Interrupting a program
A program will be interrupted as soon
as the door is opened.
When the door is closed again, the
program will continue from where it was
interrupted.
Water in the dishwasher is hot.
,
Danger of scalding.
Only open the door if absolutely
necessary and exercise extreme
caution when doing so. Before
closing the door again, leave it ajar
for approx. 20 seconds. This will
enable the temperature in the wash
cabinet to settle. Close the door
firmly until it clicks into place.
Changing a program
If the detergent dispenser cover has
already opened, powder detergent
must be added for the new program
unless liquid detergent is being
dispensed.
If a program has already started and
you wish to change it:
Open the door.
^
Press the - button to turn the
^
dishwasher off.
^ Press the - button to turn the
dishwasher back on.
^ Use the program button to select the
desired program.
^ Close the door to start the program.
The optical interface lights up to
confirm the start of a program
sequence.
39
Page 40

Program guide
Program Application Detergent
ProSpeed
Follow the detergent manufacturer's
Compartment I
For fresh, non-sticky food residues
instructions
1)
Compartment II
1)
1oz
Universal
Pots & Pans
China &
Crystal
Sanitize
Plastics
1)
see "Use - Detergent"
For normal, slightly dried food residues
For burned-on, very adherent, very dry,
starchy or albuminous
Special glassware program
Special hygiene program for dishware
requiring a high degree of hygiene.
Special plastics program
1)
food residues.
1oz
1/3 oz 1 oz
1oz
1oz
1oz
40
Page 41

Program sequence
Program guide
Pre-
rinse
X
8 min
X
8 min
Main
wash
X
149°F
(65°C)
1 min
X
149°F
(65°C)
10 min
X
167°F
(75°C)
10 min
X
122°F
(50°C)
1 min
X
167°F
(75°C)
10 min
Interim
rinse I
X
10 s
X
3 min
X
3 min
X
3 min
X
3 min
Interim
2)
rinse II
(X) X
(X) X
(X) X
(X) X
(X) X
Final rinse Drying Extra
drying
(X)
149°F
(65°C)
3)
30 s
(X) (X) (X)
149°F
(65°C)
3)
1.5 min
(X) (X) (X)
149°F
(65°C)
3)
1.5 min
(X) (X) (X)
122°F
(50°C)
1 min
X
158°F
(70°C)
3)
30 min
3 min
Auto
Open
4)
Water
(X) (X)
plus
(X)
X
10 min
X = part of the program
(X) = additional, optional program steps
2)
Interim rinse II, must be programmed by a Miele service technician.
3)
Optional temperature increase to 167°F (75°C).
4)
No AutoOpen at the program end because of the short program runtime.
5)
Without rinse aid and with cold water.
X
122°F
(50°C)
1 min
X
5 min
X
140°F
(60°C)
30 s
X
45 min
(X)
41
Page 42

Program guide
Program When to use Detergent
Glass no
rinse aid
(beer
glasses)
Normal *)
Follow the detergent manufacturer's
Compartment I
Special program without rinse aid,
recommended for beer glasses.
(The glasses do not dry through their own
heat after the program has ended and
might have to be dried by hand).
Program for completely washing a full load
of normally soiled dishware.
Standard program for washing normally
soiled dishes.
instructions
1)
Compartment II
1)
1oz
1oz
Pre-rinse
*) From the combined aspect of energy and water consumption, this program is the most efficient
for this type of dishes. (this program sequence cannot be changed)
1)
see "Use - Detergent"
For rinsing off very soiled dishware, e.g. to
remove soiling in advance or to prevent
residues from drying on the dishware when
it is not worth running an entire program.
42
Page 43

Program sequence
Program guide
Pre-
rinse
Main
wash
X
122°F
(50°C)
Interim
rinse I
X
3 min
Interim
rinse II
Final rinse Drying Extra
2)
X
5)
—
1 min
1 min
X
108.4°F
(48°C)
47 min
X
125.6°F
(52°C)
5 min
X
45 min
X
Cold
8 min
X = part of the program
(X) = additional, optional program steps
2)
Interim rinse II, must be programmed by a Miele service technician.
3)
Optional temperature increase to 167°F (75°C).
4)
No AutoOpen at the program end because of the short program runtime.
5)
Without rinse aid and with cold water.
drying
Auto
Open
(X)
Water
plus
43
Page 44

Additional options
Extra drying
For better drying results and to reduce
the amount of steam that escapes when
the door is opened, the Extra drying
function extends the fan runtime at the
end of the program.
This function is not available for all
programs.
When Extra drying is selected, the total
program runtime will increase
by approx. 20-30 minutes, depending
on the program.
Open the door.
^
^ Press the - button to turn the
dishwasher on.
The - indicator light comes on.
^ Select the desired program.
^ Press the Extra Drying button.
Extra Drying indicator lights up if this
function is available for the selected
program.
^
Close the door to start the program.
44
Page 45

Additional options
Delay start
The start time of a program can be
delayed from 30 minutes to 24 hours.
The delay is set in 30 minute
increments.
When using the Delay start function,
make sure that the detergent
compartment is dry before adding
detergent. Wipe dry if necessary.
Otherwise the detergent could
clump and not rinse out completely.
Open the door.
^
^ Press the - button to turn the
dishwasher on.
The - indicator light comes on.
^ Use the Program button to select the
desired program.
^ Press the Delay start button.
The last Delay start time will appear in
the display. The Delay Start indicator
light comes on.
^
Set the desired Delay start time using
the Delay Start button.
If you press and hold the Delay Start
button, the time will increase
automatically to
the Delay Start button twice to start at
30 minutes again.
24:00 h. Then press
If you don't close the door within a few
seconds after you have set the Delay
start time, the program runtime will
again appear in the display. You will
have to set the Delay start time again.
The time starts counting down in
minutes until the program start time.
When the set time is reached, the
selected program will start
automatically. The optical interface
lights up.
Starting a program before Delay start
has elapsed:
A program can be started before the
Delay start time has elapsed. Just do
the following:
^ Open the door.
^ Press the - button to turn the
dishwasher off.
^ Press the - button to turn the
dishwasher back on.
^
Use the Program button to select the
desired program.
^
Close the door to start the program.
The optical interface lights up to
confirm the start of a program
sequence.
^
Close the door.
45
Page 46

Additional options
BrilliantLight
The commercial dishwasher is
equipped with interior lighting.
The lighting switches off automatically
when the door is open for longer than
15 minutes.
You can permanently switch off the
interior lighting.
Swing the door of the dishwasher
^
halfway open and closed quickly
three times. Move the door far
enough that the interior lighting goes
on and off.
This permanently switches off the
interior lighting.
^ Do the same again to reactivate the
lighting.
46
Page 47

Settings
Settings menu for changing
standard settings
Opening the Settings menu
If the dishwasher is on, press the -
^
button to turn it off.
Press and hold the Program button.
^
Press the - button to turn the
^
dishwasher on, and hold the Program
button down for at least 4 more
seconds.
The first option of the Settings menu
appears in the display and all the
indicator lights comes on.
See the "Display functions" section for
details.
^ Select the menu setting you wish to
change.
The selected options in the submenu
are marked with a check
(.
Language!
The display can be set to different
languages.
The displayed language can be
changed in the
Select the desired language and
^
press the center button to confirm.
The flag after the word Language
serves as a guide if an unfamiliar
language is set.
In this case, select the menu option
with a flag until the
submenu is displayed.
Language ! submenu.
Language !
47
Page 48

Settings
Water hardness
Your dishwasher comes with with a
water softener.
You must set the system to the water
hardness level of your water supply.
The dishwasher must be
–
programmed to exactly match the
hardness of your water.
Your local waterworks can tell you
–
the water hardness level in your area.
Where the water hardness fluctuates
–
always program the dishwasher to
the higher value.
The set water hardness is marked
with a check
^ Select the hardness of your water
and press the center button to
confirm.
(.
°d gr/gal Setting in display
1
2
3
4
5
6
7
8
9
10
11
12
13
14
15
16
17
18
19
20
21
22
23
24
25
26
27
28
29
30
31
32
33
34
35
36
10
11
12
13
14
15
16
17
18
19
20
21
22
23
24
25
26
27
28
29
30
31
32
33
34
35
36
1
2
3
4
5
6
7
8
9
1
2
3
4
5
6
7
8
9
10
11
12
13
14
15
16
17
18
19
20
21
22
23
25
26
27
28
29
30
31
32
33
34
35
36
37
48
Page 49

Settings
Rinse aid
For best results the rinse aid dosage
can be adjusted.
The dosage can be set between 0-6 ml.
The factory setting is 3 ml of rinse aid.
Use a higher setting if spots appear
–
on dry glassware.
Use a lower setting if streaking
–
appears on dishes or glasses.
Select the desired amount of rinse
^
aid and press the center button to
confirm.
Buzzer
If activated, the buzzer sounds at the
end of a program and when a fault
occurs.
Buzzer at the end of a program
The buzzer at the end of a program
sounds at intervals of four times with a
brief break in between. The buzzer
sounds if you do not turn off the
dishwasher beforehand.
Buzzer sounds for a fault
The fault buzzer sounds at intervals of
four times without pausing.
The buzzer for a fault cannot be
turned off.
Setting the buzzer volume
There are seven different volume
settings for the buzzer. The buzzer is
deactivated if no volume setting is
selected.
^
Select the desired volume and press
the center button to confirm.
49
Page 50

Settings
AutoOpen
To improve drying, the door
automatically opens a little at the end of
a program, except for Pre-rinse, Short
and Beer glasses (see Program guide).
With the Universal, Intensive and
Glassware programs, AutoOpen can
only be activated by selecting Extra
drying (see "Additional options - Extra
drying").
You can also deactivate this function.
Select the desired setting and press
^
the center button to confirm.
If you have deactivated the
,
AutoOpen function but would still
like to open the door at the end of a
program, make sure that you open
the door completely. Otherwise
steam from the dishwasher could
damage the edge of the countertop
because the fan is no longer
running.
Optimize Standby
A few minutes after the last button is
pressed or a few minutes after the end
of the program the dishwasher will
switch to Standby mode to save
energy. The display and the indicator
lights are turned off and only - flashes
slowly.
If you do not turn the dishwasher off
when the program has ended, it will
switch off automatically after several
minutes in Standby.
You can also deactivate the Optimize
Standby function. The display and the
indicator lights do not go out, and the
dishwasher turns off 6 hours after the
end of the program.
This results in higher energy
consumption.
^ Select the desired setting and press
the center button to confirm.
If Refill salt, Refill rinse aid or a fault
is displayed during a program, the
dishwasher will not switch to
Standby mode.
50
Page 51

The refill messages can be turned
off without first refilling to let the
dishwasher go into Standby mode.
But the fault messages cannot be
turned off.
Refill messages
If you want the dishwasher to switch to
Standby mode in spite of a refill
message, you can switch both indicator
lights off together.
Select the desired setting and press
^
the center button to confirm.
Brightness
There are seven different brightness
levels for the display.
^ Select the desired brightness and
press the center button to confirm.
Settings
Filter check
You can set the length of the interval
between filter checks as a reminder.
You can set an interval between 30 and
60 wash cycles.
The factory setting is an interval of 50
wash cycles.
You can also deactivate this function.
Select the desired setting and press
^
the center button to confirm.
Contrast
There are seven different contrast
levels for the display.
^
Select the desired contrast and press
the center button to confirm.
51
Page 52

Settings
Detergent dosage
You can set the detergent dosage in
milliliters or percent according to the
manufacturer's instructions for liquid
detergent.
Unit of measurement in ml
–
The factory setting is 30 ml.
The dosage can be set from
10 - 100 ml in 2 ml increments.
Unit of measurement in percent
–
The factory setting is 0.50%.
The dosage can be set from 0.17 -
1.67% in increments of 0.03 - 0.04%.
Setting the dosage:
Set the dosage according to the
detergent manufacturer's
recommendations.
The dishwasher uses approx. 6.5 l of
water for the main wash cycle.
Example:
The detergent manufacturer
recommends 4 ml (or 0.07%) of
detergent per litre of water.
6.5lx4ml/l = 26 ml.
(6.5 l x 0.07 %/l = 0.455%).
Venting the DOS system
The DOS system will not dispense
reliably if there is air in the system.
The DOS system must be vented
if it is being used for the first time,
–
if the liquid detergent reservoir was
–
not refilled on time and the DOS
system was sucked empty.
To ensure that the DOS system
,
functions properly, prior to venting
make sure that the detergent
container is full enough and that the
dispensing lances are firmly
attached to the containers.
^ Select
center button to confirm.
The venting process begins. The
remaining time appears in the display.
The Pre-rinse program is offered
directly after the venting process is
finished. Start the program in order to
dilute and drain any detergent that
escaped into the wash cabinet.
Start venting and press the
^
Select the desired amount of
detergent or the dosage
concentration and press the center
button to confirm.
52
Page 53

High temp rinse
For better drying, the rinse temperature
can be increased. This function is not
available for all programs (see
"Program guide").
Select the desired setting and press
^
the center button to confirm.
Water plus
When selected, more water will be used
for the wash cycle. This function is not
available for all programs (see
"Program guide").
^ Select the desired setting and press
the center button to confirm.
Settings
53
Page 54

Settings
Factory default
You can reset all settings back to the
factory default settings.
Select
^
button to confirm.
Reset and press the center
Select last program
You can chose whether to preset the
Normal program or the last selected
program.
Select the desired setting and press
^
the center button to confirm.
Temp. display
During a program the current
temperature is displayed as factory
default setting.
If the temperature display is turned off
the remaining run time is being
displayed during a program.
Select the desired setting and press
^
the centre button to confirm.
To close the Settings menu
You can close the Settings menu with
Finish.
^ Select
button to confirm.
The last selected program is displayed
briefly and the respective indicator light
comes on.
After a short while, the estimated
program runtime is displayed.
Finish and press the center
54
Page 55

Check the overall condition of your
dishwasher regularly (approx. every
4 - 6 months). This will help to
prevent problems.
The outer surfaces of the
,
dishwasher are susceptible to
scratching.
Contact with unsuitable cleaning
agents can alter or discolor the outer
surfaces.
Cleaning the wash cabinet
The wash cabinet is largely
self-cleaning, provided that the correct
amount of detergent is used.
If, however, there are limescale or
grease deposits in the cabinet, these
can be removed with a special
dishwasher cleaner (available from
Miele).
Cleaning and care
Cleaning the door and the door
seal
Wipe the door seals regularly with a
^
damp cloth to remove food deposits.
Wipe food and drink residues off the
^
dishwasher door.
These surfaces are outside the wash
cabinet and are not reached by water
from the spray arms.
Cleaning the light guide
The light guide for the optical interface
is located in the cover plate under the
counter.
^ If necessary, clean the light guide
with a moist cloth or a household
cleaner that is safe for plastics.
Washing at low temperatures can allow
germs and odors to build up inside the
appliance. To prevent this, run an
intensive program with detergent after
approx. 20 program cycles with low
temperatures.
55
Page 56

Cleaning and care
Cleaning the control panel and
exterior
Remove any soiling immediately.
,
Otherwise it might become
impossible to remove and could
cause an alteration or discoloration
of the surfaces.
Clean the control panel with a moist
^
cloth only.
Clean the front of the appliance with
^
a clean sponge, liquid dish soap and
warm water. Then wipe dry with a soft
cloth.
To clean, you can also use a clean,
damp microfiber cloth without
detergent.
Glass cleaners may be used to
clean the exterior. However do not
allow them to sit or "puddle", this can
cause damage to the surface.
Remove the cleaner promptly.
To better maintain your appliance
avoid the following:
cleaners containing soda, ammonia,
–
thinners, or chlorides
cleaners containing descaling
–
agents or lime removers,
– abrasive cleaners,
– stainless steel cleaners,
– dishwasher soap (powder),
– caustic (oven) cleaners,
– scouring pads, steel wool, hard
brushes,
56
– metal scrapers,
– steam cleaning products.
Page 57

Cleaning and care
Triple filter system
The triple filter system in the base of the
wash cabinet retains coarse dirt from
the suds solution, preventing it from
reaching the circulation system and
re-entering the cabinet through the
spray arms.
The dishwasher must not be
,
used without all the filters in place.
Collection of coarse dirt may cause the
filters to clog. The level of soiling and
time it takes before the filters need
cleaning will vary depending on your
household use.
The message
in the display after every 50 program
cycles (factory default setting).
The filter check frequency can be set
from 30 and 60 program cycles (see
"Settings, filter check").
^
Check the triple filter system.
^
Clean the triple filter, if necessary.
^
Confirm the message with the center
button.
Check filters will appear
Cleaning the filters
Turn the dishwasher off.
^
^ Turn the handle counter-clockwise to
release the triple filter system a.
^ Take the filter combination out b,
remove any coarse particles and
rinse the filter well under running
water. Use a brush if necessary.
,
Make sure that when cleaning
the filters, no coarse dirt falls into the
circulation system, causing a
blockage.
The last selected program is displayed
briefly and the respective indicator light
comes on.
After a short while, the estimated
program time is displayed.
57
Page 58

Cleaning and care
The cover must be opened to clean the
inside of the filter:
^ Push the clips together in the
direction of the arrows as shown a,
and open the cover b.
^ Clean all parts under running water.
^ Close the cover so that the lock
engages.
Replace the triple filter so it lies flat in
^
the base of the wash cabinet.
^ Lock the filter by turning the handle
clockwise, until the arrows point to
each other.
,
The triple filter system must be
inserted correctly and locked.
Otherwise large particles could get
into the circulation system and
cause a blockage.
58
Page 59

Cleaning and care
Cleaning the spray arms
Particles of food can get stuck in the
spray arm jets and bearings. The spray
arms should therefore be checked
regularly (approx. every4-6months).
Turn the dishwasher off.
^
Remove the spray arms as follows:
Pull out the cutlery tray (if present).
^
Remove the lower basket.
^
^ Pull the lower spray arm firmly
upwards to remove.
^ Push the upper spray arm up to
engage the inner ratchet and
unscrew the spray arm.
^
Lift the middle spray arm up a to
engage the ratchet and unscrew the
spray arm b.
^
Use a pointed object to push the
food particles that are stuck in the
spray arm jets into the spray arm.
^
Rinse the spray arms thoroughly
under running water.
^
Replace the spray arms and check
that they rotate freely.
59
Page 60

Frequently asked questions
Repairs should only be carried out by a qualified and trained person in
,
accordance with local and national safety regulations. Unauthorized repairs
could cause personal injury or machine damage.
Technical faults
Problem Possible fault Solution
The dishwasher does
not start.
The dishwasher stops
during a program.
The optical interface
does not light up after
program start.
The door is not properly
closed.
The dishwasher is not
plugged in.
The circuit breaker has
tripped.
The dishwasher is not
turned on.
The circuit breaker has
tripped.
The light guide was not
installed correctly.
Push the door firmly closed.
Insert the plug.
Reset the circuit breaker.
–
See the data plate for
minimum amperage.
– If the circuit breaker trips
again. Contact Miele.
Press the - button and
select a program.
– Reset the circuit breaker
(see data plate for the
correct fuse rating).
–
If the circuit breaker trips
again, contact Miele.
Install the light guide
correctly (see the installation
diagram).
60
Page 61

Frequently asked questions
Problem Possible fault Solution
The optical interface
flashes fast.
The buzzer sounds.
One of the following
fault messages is
displayed:
; Fault FXX
L Waterproof
There may be a
technical fault.
The waterproof system
has activated.
Before fixing the fault:
Press the - button to turn
–
the dishwasher off.
After a few seconds:
Turn the dishwasher on.
–
Select the desired
–
program.
Close the door.
–
If the error message is
displayed again, there is a
technical fault.
– Contact Miele.
– Turn off the water supply.
– Contact Miele.
61
Page 62

Frequently asked questions
Faults in the water intake or water drain
Problem Possible fault Solution
The optical interface
flashes fast.
The buzzer sounds.
One of the following
fault messages is
displayed:
2 Open the water supply
2 Water intake
The water supply is
closed.
There is a problem with
the water intake.
Open the water supply all
the way.
Before fixing the fault:
Press the - button to turn
–
the dishwasher off.
– Open the water supply all
the way.
– Check the screen in the
water supply valve and
clean it if necessary (see
"User maintenance
instructions").
– The water pressure at the
water connection is less
than 30 kPa (0.3 bar).
Consult a plumber.
62
Page 63

Frequently asked questions
Problem Possible fault Solution
The optical interface
flashes fast.
The buzzer sounds.
One of the following
fault messages is
displayed:
2 Water drain
Fault in the water
drainage.
There might be water in
the wash cabinet.
Before fixing the fault:
Press the - button to turn
–
the dishwasher off.
Clean the triple filter system
–
(see "Cleaning and care").
Clean the drain pump (see
–
"User maintenance
instructions").
Clean the non-return valve
–
(see "User maintenance
instructions").
Remove any kinks or high
–
loops in the drain hose.
63
Page 64

Frequently asked questions
General problems with the dishwasher
Problem Possible fault Solution
The indicator lights
and the display are
dark. Only the
indicator light flashes slowly.
The interior lighting
does not come on
when the door is
opened.
The following fault
message is
displayed:
F Salt reservoir cover
The buzzer sounds
and the optical
interface flashes
during the program
sequence.
The buzzer sounds
during the program.
The following fault
message is
displayed:
: Spray arm blocked
The indicators and the
display turn off
automatically to save
energy (Standby).
The interior lighting was
permanently turned off.
The salt reservoir cover
is not properly closed.
The middle spray arm is
blocked by dishware.
The spray arm jets of the
middle arm are clogged.
Press the - button to come
out of Standby mode.
Turn the interior lighting back
on (see "Additional options BrilliantLight").
Close the salt reservoir
–
cover.
If the salt reservoir cover
opened during a program:
– Push the - button to turn
the dishwasher off (even if it
appears to be off) and on
again.
– Re-start the program.
Open the dishwasher door
and rearrange items blocking
the spray arms.
–
Press the - button to turn
the dishwasher off.
Then:
–
Clean the spray arm (see
"Cleaning and care").
64
Page 65

Frequently asked questions
Problem Possible fault Solution
There are detergent
residues in the
dispenser at the end of
a program.
The detergent dispenser
cover will not close.
The inside of the door
and/or the interior walls
are wet after a program
has finished.
There is water in the
wash cabinet at the end
of a program.
Some programs run for
a long time.
Although AutoOpen is
selected, the door
remains closed at the
end of the Short
program.
Therefore the dishware
is still moist.
The dispenser was wet
when detergent was
added.
Detergent residue is
blocking the latch.
This is normal! None.
The filter combination in
the wash cabinet is
clogged.
The drain pump or
non-return valve is
blocked.
There is a kink in the drain
hose.
No fault!
Certain programs have a
long runtime.
No fault!
Because of the
program's short runtime,
the AutoOpen function is
not available for the Short
program.
Make sure the dispenser
is dry before adding
detergent.
Remove the detergent
residue.
The moisture evaporates
after some time.
Before fixing the fault:
Press the - button to
–
turn the dishwasher off.
Clean the filter
combination (see
"Cleaning and car"e).
Clean the drain pump or
the non-return valve (see
"User maintenance
instructions").
Remove the kink.
Select a different program
(see "Program guide").
To improve the drying,
raise the rinse
temperature (see
"Settings - High temp
rinse").
65
Page 66

Frequently asked questions
Noises
Problem Possible fault Solution
There is a knocking
noise in the wash
cabinet.
There is a rattling
noise in the wash
cabinet.
There is a knocking
noise from the water
pipe
A spray arm is hitting the
dishware.
Dishware is moving
around in the wash
cabinet.
A foreign object has
become lodged in the
drain pump.
This may be caused by
the installation or the
diameter of the water pipe.
Interrupt the program and
rearrange items blocking
the spray arms.
Interrupt the program and
rearrange loose pieces.
Remove the foreign object
from the drain pump (see:
"Cleaning the drain pump
and non-return valve")
This has no effect on the
functioning of the
dishwasher. If in doubt,
contact a plumber.
66
Page 67

Frequently asked questions
Poor cleaning results
Problem Possible fault Solution
The dishes are not
clean.
There are streaks
on the glasses and
cutlery. The
glasses take on a
bluish sheen; the
deposits can be
wiped off.
The dishes were not loaded
correctly.
The program was not suitable
for the requirements.
Not enough detergent was
dispensed.
The spray arms are blocked
by dishware.
The filter combination in the
wash cabinet is clogged or
not correctly inserted.
The spray arm jets might be
clogged as a result.
The non-return valve is stuck
in the open position. Dirty
wash water will run back into
the wash cabinet.
The rinse aid dosage is set
too high.
See "Loading the
dishwasher".
Select a more suitable
program (see "Program
guide").
Use more detergent, or
switch to another detergent.
Check by turning the spray
arms and rearrange the
dishes if necessary.
Clean the filter combination
or insert it correctly.
Clean the spray arm jets, if
necessary (see "Cleaning
and care").
Clean the drain pump and
the non-return valve (see
"User maintenance
instructions").
Reduce the dosage (see
"Settings - Rinse aid").
67
Page 68

Frequently asked questions
Problem Possible fault Solution
Dishes are not dry,
or glasses and
cutlery are spotty.
White residue is
visible on the
dishware.
Clouding occurs
on glassware and
cutlery; the
deposit can be
wiped off.
The rinse aid dosage is set
too low or the rinse aid
reservoir is empty.
The dishes were taken out
too soon.
The rinse aid dosage is too
low.
The salt reservoir is empty. Refill the salt reservoir (see:
The water softener setting is
too low.
Refill the reservoir, increase
the dosage, or switch the
rinse aid product when
refilling (see "Rinse aid").
Leave the dishes in longer
(see "Use").
Increase the dosage (see
"Settings - Rinse aid").
"Before using for the first time
- Filling the salt reservoir").
Increase the water softener
setting (see "Settings - Water
softener").
68
Page 69

Frequently asked questions
Problem Possible fault Solution
Glasses have a
brownish-blue
discoloration; the
deposit cannot be
wiped off.
Glasses are dull and
discolored; the
deposit cannot be
wiped off.
Tea or lipstick stains
have not been
completely removed.
Plastic parts are
discolored.
There are rust stains
on the cutlery.
Detergent deposits. Switch to another detergent
right away.
The glasses are not
dishwasher-safe. Surface
changes occur.
The wash temperature of
the selected program was
too low.
The bleaching effect of the
detergent is too low.
Natural dyes, e.g. from
carrots, tomatoes or
ketchup, may be the cause.
Not enough detergent was
used or the bleaching effect
of the detergent is too low.
The affected items are not
corrosion resistant.
No program was started
after refilling salt. Salt
residues entered the wash
cycle.
There is no remedy.
Use only dishwasher-safe
glasses.
Select a program with a
higher wash temperature.
Switch to another detergent.
Use more detergent (see
"Use - Detergent").
This discoloration is
permanent.
There is no remedy.
Use only dishwasher-safe
cutlery.
Always start the "Pre-rinse"
program without a load after
refilling salt.
69
Page 70

User maintenance instructions
Cleaning the water supply
screen
There is a screen in the screw
connection of the water inlet hose to
protect the water inlet valve. The screen
must be cleaned when dirty, otherwise
insufficient water will flow into the wash
cabinet.
The plastic housing of the water
,
connection contains an electric
valve. The housing must not be
immersed in water.
Recommendation
If the water supply contains a large
amount of insoluble substances, we
recommend fitting a large-area filter
between the tap and the water inlet
hose.
This filter is available from Miele.
To clean the screen:
^
Disconnect the dishwasher from the
electric power supply. Always switch
the appliance off before unplugging
it.
^
Turn off the water supply.
^
Unscrew the water supply valve.
^
^ Use needlenose pliers to pull out the
^ When removing the screen, take care
^ Replace the screen and seal. Make
^
^
Take the seal ring out of the screw
connection.
screen, then clean it.
not to pull out or displace the flow
regulator behind it.
sure they are positioned correctly.
Reconnect the water supply valve to
the tap. Make sure not to
cross-thread the connection.
Turn the water supply back on.
If the connection leaks it might be too
loose or cross-threaded.
Unscrew and reconnect the water
supply valve correctly.
70
Page 71

User maintenance instructions
Cleaning the drain pump and
non-return valve
If there is still some water in the wash
cabinet at the end of a program, the
water was not pumped out properly.
The drain pump or the non-return valve
might be clogged. However, they are
easy to clean.
Disconnect the dishwasher from the
^
electrical power supply. Always turn
the appliance off before unplugging
it.
Remove the triple filter system from
^
the wash cabinet (see "Cleaning and
care - Cleaning the filters").
^ Scoop the water out of the cabinet
using a small container.
The drain pump is located beneath the
non-return valve (arrow).
^ Remove all foreign objects from the
drain pump (glass splinters are
particularly difficult to see). Turn the
drain pump impeller by hand to
check for objects. It is normal that the
rotation of the impeller feels jerky.
^ Carefully replace the non-return
valve.
^
Press the catch for the non-return
valve inwards a.
^
Pull the non-return valve out b and
rinse it thoroughly under running
water.
^
Remove all foreign objects from the
non-return valve.
,
Make sure the catch engages
correctly!
Be careful not to damage any
components when cleaning the
drain pump and the non-return
valve.
71
Page 72

After sales service
Repairs
In the event of a fault which you cannot
correct yourself please contact the
Miele Service Department at the phone
number on the back of this booklet.
Please quote the model type and
^
number of your appliance.
These can be found on the data plate
along the right edge of the door.
PC Update
The Program Correction (PC) allows a
technician to update the dishwasher to
make use of new technology.
When, for example, technological
developments offer advanced
modifications to your existing program
cycles a service technician will be able
to input these into your machine
controls via the indicator light marked
PC. Miele will provide information when
such possibilities become available.
72
Page 73

All electrical work must be
,
performed by a qualified service
technician in accordance with local
and national safety regulations.
The electrical connection is made
–
through a plug and outlet according
to national requirements. The outlet
has to be easily accessible after
installation. This facilitates access for
electrical safety checks, for example
when the appliance is being repaired
or serviced.
– If the appliance is hard wired, a
multiple-pole circuit breaker must be
installed. The contact opening at the
main breaker must be at least 3 mm
wide and lockable in the open
position.
Electrical connection
The data plates are at the back of the
appliance and along the right edge of
the open door.
The wiring diagram comes with the
appliance.
The conversion diagram is attached to
the base panel behind the plastic base
cover.
Removing the base cover
The electrical terminal is located behind
the front cover in the middle of the
dishwasher base.
Disconnect the dishwasher from
,
the electrical power supply.
^ Unscrew the 2 screws (left and right)
and remove the base panel.
– If necessary, an equalization of the
potentials must be carried out.
– A damaged power cord must only be
replaced with a genuine Miele cord
by a Miele service technician..
–
For technical data, see the data plate
or the attached wiring diagram.
The appliance must only be operated
with the voltage, frequency and fuse
rating shown on the data plate.
A conversion may only be performed
according to the attached conversion
diagram and wiring diagram.
Subsequent conversions may result
in longer program runtimes and
higher energy consumption.
The specified label values are only
met with the factory settings.
^ Screw the base panel back on when
work on the connection is finished.
Follow the installation diagram
included with the dishwasher!
Grounding connection
The ground lead must be connected to
the screw connection point (marked
with the ground symbol 8) at the back
of the machine.
WARNING
THIS APPLIANCE MUST
BE GROUNDED
73
Page 74

Electrical connection
The PG 8083 SCVi comes equipped
with a 14/3 AWG cord for connection to
a standard AC 120 V, 60 Hz power
outlet with a NEMA 5-15P plug or with a
10/4 AWG cord for connection to a 2N
AC 208/240 V, 60 Hz power supply with
a NEMA Type 14-30P plug.
120V 208-240V
Rated Load (kW) 1.3 5.0
Fuse Rating 15A 30A
74
Page 75

Connection to the water inlet
This machine must be connected to
the water supply in accordance with
all national and local plumbing
codes.
Water in the machine is not
,
suitable for drinking.
The machine must be connected to
–
the water supply in accordance with
local and national regulations.
Plumbing
Valves with 3/4" male thread are to
–
be provided on site. Faucets and
drain connections should be situated
as close to the machine as possible,
and be easily accessible.
The water inlet hose is a pressure
–
hose (DN 10) approx. 4' 11" (1.5 m)
long with a
extension hose is available (flexible
metal hose certified for a pressure of
2030 psi). The dirt screen and the
flow regulator in the threaded water
connection must not be removed.
3
/4" thread. A 1.5 m
– The water being used should have
drinking water quality.
A high iron content can lead to rust
at the items to be cleaned and at the
machine.
– The water pressure (flow pressure at
the water connection) must be
between 4.35 and 145 psi.
If the water pressure is lower, the
message Water intake is displayed
(see "Frequently asked questions").
If the water pressure is higher, a
pressure reducer must be installed.
To prevent damage to the
,
dishwasher, make sure all air has
been bled from the supply line.
,
The inlet hose must not be
shortened or damaged in any way
because it contains electrical wires
(see illustration).
75
Page 76

Plumbing
Water drainage
The drain is equipped with a
–
non-return valve which prevents
waste water from flowing back into
the dishwasher through the drain
hose.
The dishwasher drain hose should
–
be connected to a separate drain for
the dishwasher only.
If no separate drain is available, we
recommend connecting it to a
dual-chamber siphon.
The flexible drain hose is 4’ 7" (1.4 m)
–
long and has an internal diameter of
7
/8" (22 mm). Do not cut the drain
hose.
Hose clamps are supplied for
securing it into position.
– The on-site drain connection point
should be located between 1 ft.
(0.3 m) and 3’ 3". (1 m) above the
lower edge of the machine.
If it is lower than 1 ft. (0.3 m), bend
the hose in a curve to a height of at
least 1 ft. (0.3 m).
The drainage system must be able to
take a minimum drainage flow of
4.5 gal/min (16 l/min).
–
The drain hose must not be
shortened.
Venting the drainage system
The drain must be vented if the
connection to the building' s drainage
system is lower than the roller guides
for the lower basket in the door.
Otherwise the water inside the
dishwasher may siphon out during the
wash program.
For venting:
Open the dishwasher door
^
completely.
Pull the lower spray arm up to
^
remove.
^
Cut off the cover of the vent valve in
the wash cabinet.
,
Make sure the hose is not kinked
or pulled too tight.
See also the installation diagram
supplied.
76
Page 77

Technical data
Model
Commercial dishwasher
Height 33 1/4" (84.5 cm)
Installation height min. 33 1/4" (84.5 cm) [+2 9/16"
Width 23 3/16" (59.8 cm)
Installation width 23 5/8" (60 cm)
Depth 22 7/16" (57 cm)
Weight 127 lbs (57.5 kg)
Voltage
Connected load see data plate
Fuse rating
Power consumption when off 0.30 W
Power consumption when not off 2.00 W
Water pressure (flow pressure) 4.35 - 145 psi
Cold or hot water supply max. 140°F (60°C)
Water hardness max. 37.5 gr/gal (36°d)
Drainage pumping height max. 3' 3" (1 m)
Drain hose length max. 13' 1 1/2" (4 m)
Power cord approx. 6' (1.7 m)
Capacity 16 standard table settings
Noise emissions
Sound power level LwA
Sound pressure level LpA
Manufacturer's address Miele & Cie. KG, Carl-Miele-Str. 29,
PG 8083 SCVi
[adjustable +2 9/16" (6.5 cm]
(6.5 cm)]
49 dB (A)
38 dB (A)
33332 Gütersloh, Germany
77
Page 78

Noise measurement
General requirements for measuring noise
The dishwasher must be loaded with 16 place settings and the Normal program
must be used.
Installation requirements for measuring noise
The dishwasher must be installed as follows:.
^
Install the dishwasher into an appropriate housing unit.
^
Secure the front panel.
78
Page 79

Noise measurement
^ Push the insulation mat supplied (depending on model) under the plinth until it
is up against the appliance feet a.
^ Attach the toe-kick so that it is flush with the door front b.
79
Page 80

Alteration rights reserved / 08/19/2015
INFORMATION IS SUBJECT TO CHANGE. PLEASE REFER TO OUR WEBSITE TO OBTAIN THE MOST
CURRENT PRODUCT SPECIFICATIONS, TECHNICAL & WARRANTY INFORMATION.
M.-Nr. 09 501 401 / 00
 Loading...