


Operating instructions
Commercial dishwasher
PG 8067
To avoid the risk of accidents or
damage to the machine it is
essential to read these instructions
before it is installed, commissioned and used
for the first time.
en-GB
M.-Nr. 07 122 771

Contents
Description of the machine..........................................4
Guide to the machine ..............................................5
Control panel ......................................................5
Machine overview ..................................................6
Warning and safety instructions .....................................8
Caring for the environment.........................................14
Before using for the first time.......................................15
Opening and closing the door ......................................16
Adding rinsing agent ..............................................17
Rinsing agent level indicator ......................................17
External rinsing agent container (optional extra)..........................18
Add rinsing agent indicator .......................................18
Adding rinsing agent and venting the dispensing system ................19
Areas of application...............................................20
Loading the machine ...............................................20
Items that are not suitable for dishwashers ..............................21
Adding cleaning agent ............................................24
Adding liquid cleaning agent: ........................................24
Add cleaning agent indicator ......................................24
External cleaning agent container (optional extra) ........................25
Add cleaning agent indicator ......................................25
Maintenance of the dispensing system .................................26
Operation .......................................................27
Preparing the machine .............................................27
Selecting a programme .............................................28
Starting a programme ..............................................28
At the end of a programme ..........................................28
Changing a programme ..............................................28
Cancelling a programme ..............................................28
Switching off.......................................................28
Programmable functions...........................................29
Calling up programming levels .......................................29
Saving changes to memory ..........................................29
To come out of a programming level...................................29
Programming the cleaning agent dosage (DOS 1) ........................30
Setting the cleaning agent dispensing method ........................30
Setting the cleaning agent concentration level ........................30
2

Contents
Venting the cleaning agent dispensing system ........................31
Programming the rinsing agent dosage (DOS 2) .........................31
Setting the rinsing agent dispensing method..........................31
Setting the rinsing agent concentration level .........................32
Venting the rinsing agent dispensing system..........................32
Programming the temperatures and duration ............................33
Altering the wash temperature .....................................33
Altering the offset final rinse temperature.............................33
Setting the final rinse duration .....................................34
Programming the buzzer ............................................35
Setting the buzzer...............................................35
Deactivating the buzzer ..........................................35
Altering the programme duration......................................36
Altering the programme duration for the INTENSIVE programme ..........36
Altering the programme duration for the STANDARD programme .........37
Altering the programme duration for the SHORT programme .............37
Resetting the factory default settings ..................................38
Cleaning and care ................................................39
Cleaning the wash cabinet, tank and filter ..............................39
Cleaning the optional filter combination set .............................40
Cleaning the control panel...........................................41
Cleaning the front of the machine .....................................41
Cleaning the rinse arm and the spray arms .............................41
Problem solving guide ............................................42
Other problems ..................................................47
Cleaning the drain pump and non-return valve...........................47
Cleaning the filters in the water inlet ...................................48
After sales service ................................................49
Installation ......................................................50
Electrical connection UK...........................................51
Plumbing........................................................52
Programme overview..............................................54
Technical data ...................................................56
3

Description of the machine
This Miele machine is a commercial
dishwasher with a tank system which is
specially designed for processing
glassware. With its short programme
times and large cleaning capacity, it is
ideally suited for restaurants, pubs,
cafés, guest houses and other
commercial catering establishments.
The dishwasher is fitted as standard
with two built-in dispensing pumps for
cleaning agent and rinsing agent. The
respective containers for the chemicals
are integrated into the machine behind
the service panel. A funnel is supplied
with the dishwasher to help fill the
containers.
Where the water hardness level is ü 0.7
mmol/l (4 °d - German scale) an
external water softener unit, e.g. the
G 7897 Aqua-soft system, will need to
be fitted.
Optional conversion kits
The following conversion kits are
available from the Miele Spare Parts
Dept.:
A conversion kit to connect an
–
external cleaning agent container to
the built-in cleaning agent
dispensing pump.
A conversion kit to connect an
–
external rinsing agent container to
the built-in rinsing agent dispensing
pump.
A conversion kit for connecting the
–
built-in cleaning agent tank to the
built-in rinsing agent pump if an
external cleaning agent container is
being used.
– A filter combination set is available
for use where soiling levels are very
high. See "Cleaning and care" for
further details.
All of the above conversion kits must be
fitted by a Miele service technician.
4

Control panel
Guide to the machine
a On button g
b Off button o
c DRAIN / SELF CLEANING button 6
d SHORT programme button \
e STANDARD programme button ]
f INTENSIVE programme button ^
g Start button h.
h "Add liquid cleaning agent"
indicator light v *)
i "Add rinsing agent"
indicator light H *)
j "Drain fault" indicator light 6
k "Inlet fault" indicator light p
l "Boiler heating" indicator light Y
m Display
n "Time values" showing in the display
indicator light j
o "Temperature values" showing in the
display indicator light
*) Indicator light for retrospectively
fitted external DOS modules
5

Guide to the machine
Machine overview
a Filter
b Cleaning arm combination (spray arm on top, and rinse arm underneath)
c Control panel
6
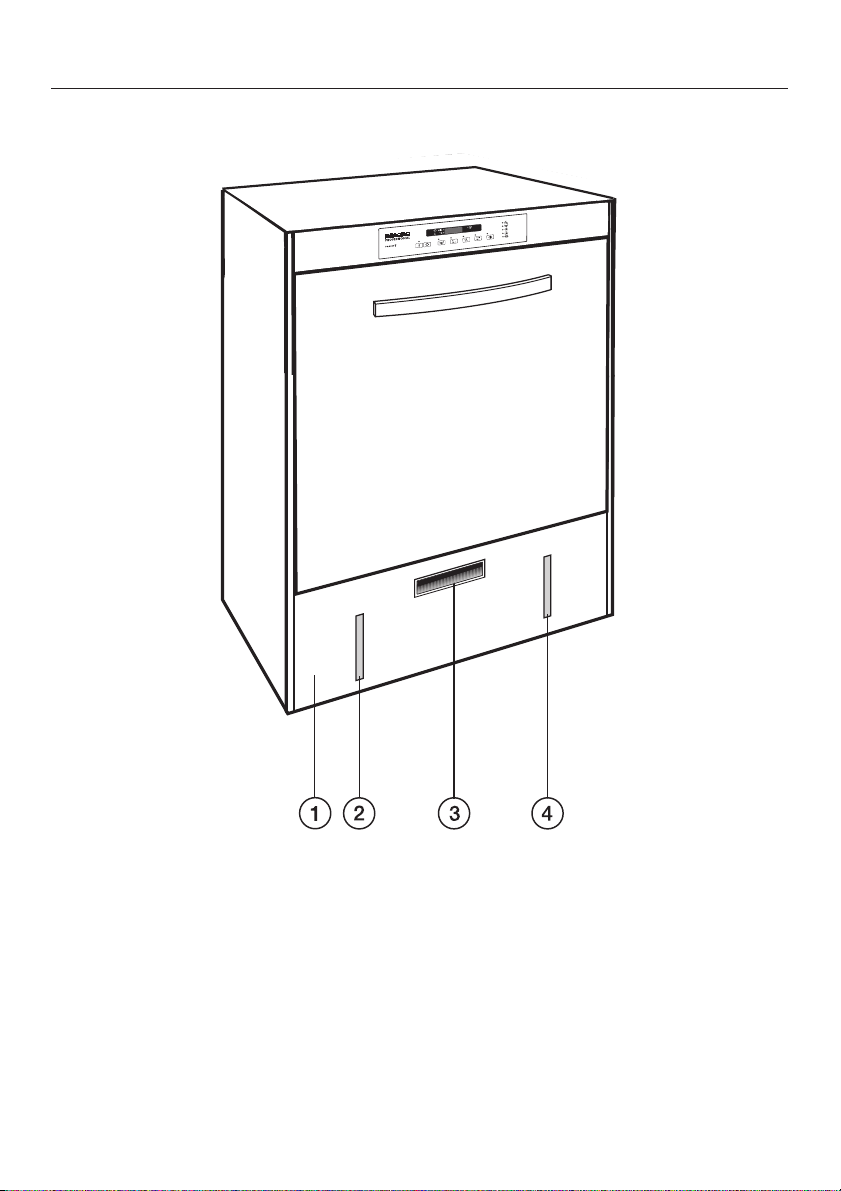
PG 8067
Guide to the machine
a Service panel
b Cleaning agent level indicator
c Handle for opening the service panel
d Rinsing agent level indicator
7

Warning and safety instructions
Personnel operating the machine
This machine complies with all
relevant legal safety requirements.
Incorrect use can, however, lead to
personal injury and damage to
property.
To avoid the risk of accidents and
damage to the machine please read
these instructions carefully before
starting to use it.
They contain important notes on the
installation, safety, operation and
care of the machine.
Keep these instructions in a safe
place and pass them on to any
future user.
Correct application
This machine is designed for
~
cleaning glassware only, as described
in these instructions. Alterations to the
machine, or using it for purposes other
than those for which it is designed, are
unauthorised and could be dangerous.
The manufacturer cannot be held liable
for damage caused by improper or
incorrect use of the machine.
~
should be trained regularly. Untrained
personnel should not be allowed
access to the machine or its controls.
The special inserts should only be
~
used for their specific application.
Technical safety
Before setting up the machine
~
check it for any externally visible
damage. Under no circumstances
should you use a damaged
dishwasher. A damaged dishwasher
may be dangerous.
The electrical safety of this machine
~
can only be guaranteed if connected to
a correctly installed earthing system on
site. It is most important that this basic
safety requirement is present and
regularly tested, and where there is any
doubt the on-site wiring system should
be inspected by a qualified electrician.
The manufacturer cannot be held liable
for damage or injury caused by the lack
of or inadequacy of an effective
earthing system (e.g. electric shock).
This machine is not intended for use
~
by persons (including children) with
reduced physical, sensory or mental
capabilities, or lack of experience and
knowledge, unless they have been
given supervision or instruction
concerning use of the machine by a
person responsible for their safety.
8

Warning and safety instructions
Please follow the advice on
~
installation in these instructions and the
separate Installation drawing.
Before connecting the machine to
~
the mains supply, make sure the rating
on the data plate corresponds to the
voltage and frequency of the on-site
supply. Consult a qualified electrician if
in any doubt.
A damaged machine is dangerous.
~
Switch off at the mains immediately and
call the Miele Service Department or an
authorised Miele Service Dealer.
Installation, maintenance and
~
repairs should only be carried out by a
suitably qualified and competent
person in accordance with local and
national safety regulations.
Repairs and other work by unqualified
persons could be dangerous and the
manufacturer will not be held liable.
Ensure current is not supplied to the
machine until after installation,
maintenance or repair work has been
carried out.
If the connection cable is damaged,
~
the new cable must be fitted by a Miele
approved service technician.
This machine should be
~
commissioned and then maintained by
a Miele authorised and trained service
technician or other suitably qualified
and competent approved person.
Repairs and other work by unqualified
persons could be dangerous.
The machine must be disconnected
~
from the mains electricity supply before
any maintenance or repair work is
carried out. Do not reconnect it until the
maintenance or repair work has been
successfully completed.
For safety reasons, this machine
~
may only be used when it has been
fully installed.
Never open the housing of the
~
machine. Tampering with electrical
connections or components and
mechanical parts is highly dangerous
to the user and can cause operational
faults.
Faulty components must only be
~
replaced by genuine Miele original
parts. The manufacturer can only
guarantee the safety of the appliance
when Miele replacement parts are
used.
Do not connect the machine to the
~
mains electricity supply by a
multi-socket unit or an extension lead.
These do not guarantee the required
safety of the machine (e.g. danger of
overheating).
In countries where there are areas
~
which may be subject to infestation by
cockroaches or other vermin, pay
particular attention to keeping the
appliance and its surroundings in a
clean condition at all times. Any
damage which may be caused by
cockroaches or other vermin will not be
covered by the guarantee.
9

Warning and safety instructions
During installation, maintenance and
~
repair work, the machine must be
disconnected from the mains electricity
supply. It is only completely isolated
from the electricity supply when:
the mains fuse is disconnected,
–
the screw-out fuse is removed (in
–
countries where this is applicable),
or it is switched off at the isolator.
–
Ensure that current is not supplied to
the appliance until after maintenance
or repair work has been carried out.
Correct use
Take great care when handling
~
liquid agents and additives. These may
contain irritant or corrosive ingredients.
Do not use organic solvents as these
could cause an explosion.
Follow all relevant safety procedures
carefully. Wear protective gloves and
goggles. With all chemical agents, the
manufacturer's safety instructions must
be observed.
The water in the machine must not
~
be used as drinking water.
Only use detergents formulated for
~
commercial dishwashers. Do not use
washing up liquid. The use of
unsuitable cleaning agents could
adversely affect the components of the
machine, as well as items being
cleaned.
Only use low-foaming cleaning
~
agents. Incorrect cleaning agents, as
well as some types of soiling can cause
a build-up of foam in the machine.
Foam can have an adverse effect on
the cleaning process.
Please be aware that changes in
~
formulation, storage conditions etc,
which may not be publicised by the
chemical producer, can have a
negative effect on the cleaning result.
When using cleaning agents and
~
specialised products, it is essential that
the manufacturer's instructions are
followed. Only use such chemicals for
the purpose and in the situation
specifed, to the exclusion of other
chemicals, to avoid such dangers as
chemical reactions and material
damage.
10

Warning and safety instructions
The machine is designed for
~
operation with water and additive
cleaning agents only. Organic solvents
must not be used in this machine, as
there is the danger under certain
circumstances of explosion. (Although
this is not the case with all organic
solvents, other problems could arise
with their use, for example damage to
rubber and synthetic materials).
Do not allow any remains of acids or
~
solvents, and in particular hydrochloric
acid or chloride solutions, to get into
the wash cabinet. Similarly avoid any
materials with a corrosive effect.
The presence in compounds of any
solvents should be minimal (especially
those in hazard class A1).
Never clean the machine or near
~
vicinity with a water hose or pressure
washer.
To avoid any corrosion damage,
~
ensure that solutions or steam
containing hydrochloric acid do not
come into contact with the steel outer
casing of the machine.
After any plumbing work, the water
~
pipework to the machine will need to be
vented.
If this is not done, the softener system
could suffer damage.
While the appliance is under
~
guarantee, repairs should only be
undertaken by a service technician
authorised by the manufacturer.
Otherwise the guarantee will be
invalidated.
Do not sit or lean on the opened
~
door. This could cause the machine to
tip up and be damaged or cause an
injury.
Be careful when sorting items with
~
sharp pointed ends and positioning
them in the machine that you do not
hurt yourself or create a danger for
others. Sharp knives, forks etc. should
be placed in baskets with the pointed
ends facing downwards.
When using this machine in the
~
higher temperature ranges be
especially careful not to scald or burn
yourself when opening the door.
Baskets and inserts must be allowed to
cool down before they are unloaded.
Any water remaining in containers
could still be very hot. Empty them into
the wash cabinet before taking them
out.
Do not touch the heating elements
~
or the heated surfaces on the wash
cabinet floor during or directly after the
end of a programme. You could burn
yourself. They remain hot for some time
after the end of the programme.
Empty any containers or utensils
~
before arranging them in the machine.
11

Warning and safety instructions
Installation
This machine may only be used in
~
mobile installations such as ships,
caravans, aircraft etc. if a risk
assessment of the installation has been
carried out by a suitably qualified
engineer.
Do not install the machine in an area
~
where there is any danger of explosion
or of freezing conditions.
Safety with children
This machine is not a toy! Keep
~
children away from it at all times and
supervise them whilst you are using it.
They will not understand the potential
dangers posed by it. For instance,
whilst playing they could inadvertently
shut themselves inside it.
Older children should only be
~
allowed to use it unsupervised if its
operation has been clearly explained to
them and they are able to use it safely,
recognising the dangers of misuse.
Accessories
Only use genuine Miele spare parts
~
and accessories with this machine. If
spare parts or accessories from other
manufacturers are used, this will
invalidate the guarantee, and Miele
cannot accept liability.
They must be suitable for the
~
purpose they are being used for.
Consult Miele for advice.
12

Warning and safety instructions
Disposing of an old
dishwasher
For environmental and safety
~
reasons ensure the machine is
completely drained of any residual
water and cleaning agent. (Observe
safety regulations and wear safety
goggles and gloves).
Make the door lock inoperable, so that
children cannot accidentally shut
themselves in. Then make appropriate
arrangements for the safe disposal of
the machine.
For tank system machines ensure that
any water is emptied out of the tank.
The manufacturer cannot be held
liable for damage caused by
non-compliance with these Warning
and safety instructions.
13
Caring for the environment
Disposal of the packing
material
The transport and protective packing
has been selected from materials which
are environmentally friendly for
disposal, and can normally be
recycled.
Ensure that any plastic wrappings,
bags, etc. are disposed of safely and
kept out of the reach of babies and
young children. Danger of suffocation!
Rather than just throwing these
materials away, please ensure that they
are offered for recycling.
Disposal of your old machine
Electrical and electronic appliances /
machines often contain materials
which, if handled or disposed of
incorrectly, could be potentially
hazardous to human health and to the
environment. They are, however,
essential for the correct functioning of
your appliance or machine. Please do
not therefore dispose of your old
machine or appliance with your
household waste.
Please dispose of it at your local
community waste collection / recycling
centre and ensure that it presents no
danger to children while being stored
for disposal.
14
It should be unplugged or disconnected
from the mains electricity supply by a
competent person.

Before using the machine for the first
time, the following steps must be
carrried out.
Each step is described in more
detail in the appropriate section
further on in the booklet.
Before using for the first time
Only use detergents formulated for
commercial dishwashers
Do not use washing up liquid or
detergents formulated for domestic
dishwashers.
Adding cleaning agent
Load the machine carefully
Arrange the load so that water will
come into contact with all surfaces.
Concealed surfaces will not be
cleaned.
The rinse and spray arms must not be
blocked by any items.
Follow the cleaning agent
manufacturer's recommendations on
dosage.
The amount required will depend on the
type of cleaning agent used and the
programme selected.
Cleaning results may vary from brand
to brand. If you are not satisfied with
the results from one brand, try another
quality glass cleaner for commercial
dishwashers before contacting Miele
for advice.
The filter combination in the floor of
the wash cabinet and also the rinse
and spray arms must be kept clean.
It is therefore absolutely essential to
check and clean them regularly.
15

Opening and closing the door
To open the door
Grasp the handle and open the door.
^
The door should only be opened during
operation for emergencies, e.g. if
articles are knocking together or if a
programme fault is indicated in the
display (see "Cancelling a
programme").
Do not touch the inside of the
,
cabinet or the heated surfaces
during or directly after the end of a
programme. You could burn
yourself. They remain hot for some
time after the end of the programme.
To close the door
Lift the door upwards and push until
^
it clicks shut.
16
Adding rinsing agent
Rinsing agent is necessary to ensure
water does not cling and leave marks
on items during the drying phase, and
to help items dry faster after they have
been washed.
Rinsing agent is poured into the
storage container, and the amount set
is dispensed automatically in the final
rinse.
Preferably, use rinsing agent for
commercial dishwashers that is
specially formulated for glassware.
This dishwasher is fitted as standard
with a built-in dispensing pump and
rinsing agent container.
The container is located inside the right
hand side of the service panel. It holds
approx. 250 ml.
The rinsing agent level indicator is in
the right-hand viewing window on the
outside of the service panel.
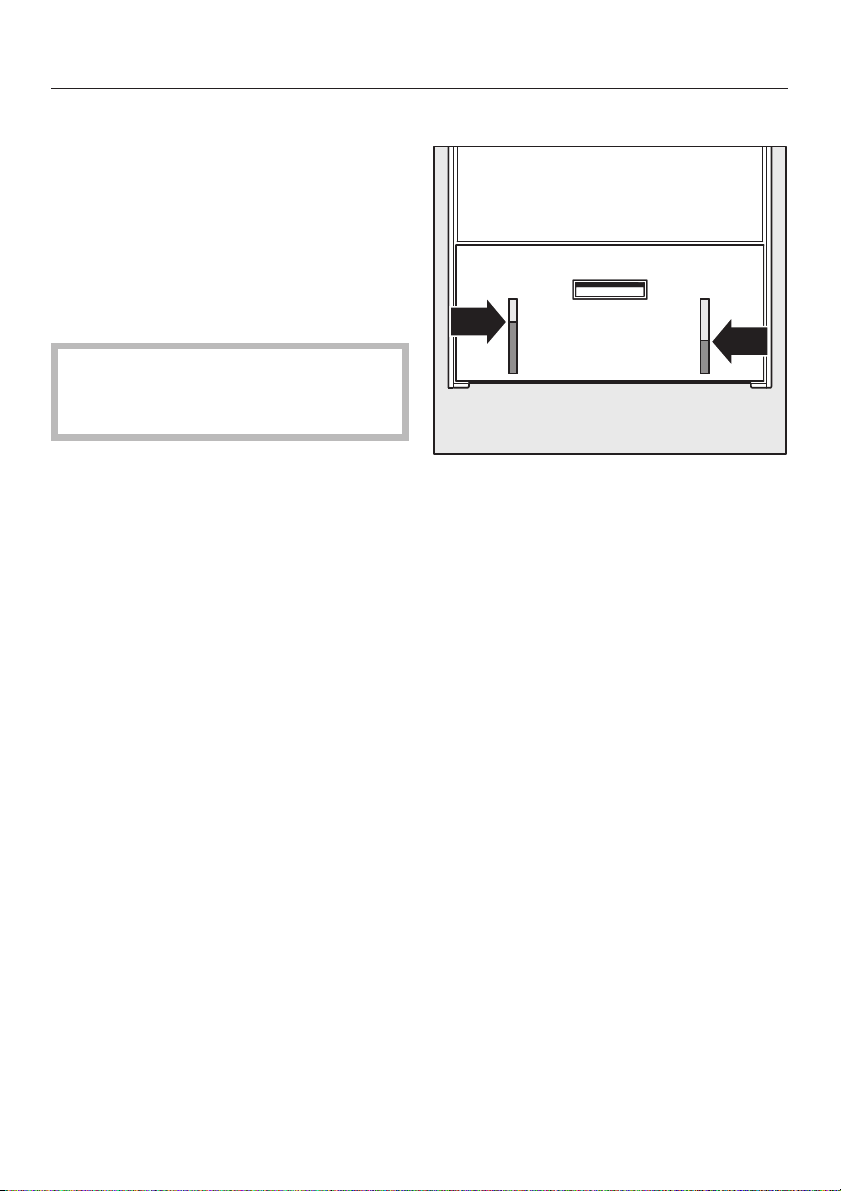
Rinsing agent level indicator
Fill the rinsing agent container when the
indicator on the right of the service
panel shows there is insufficient rinsing
agent.
17
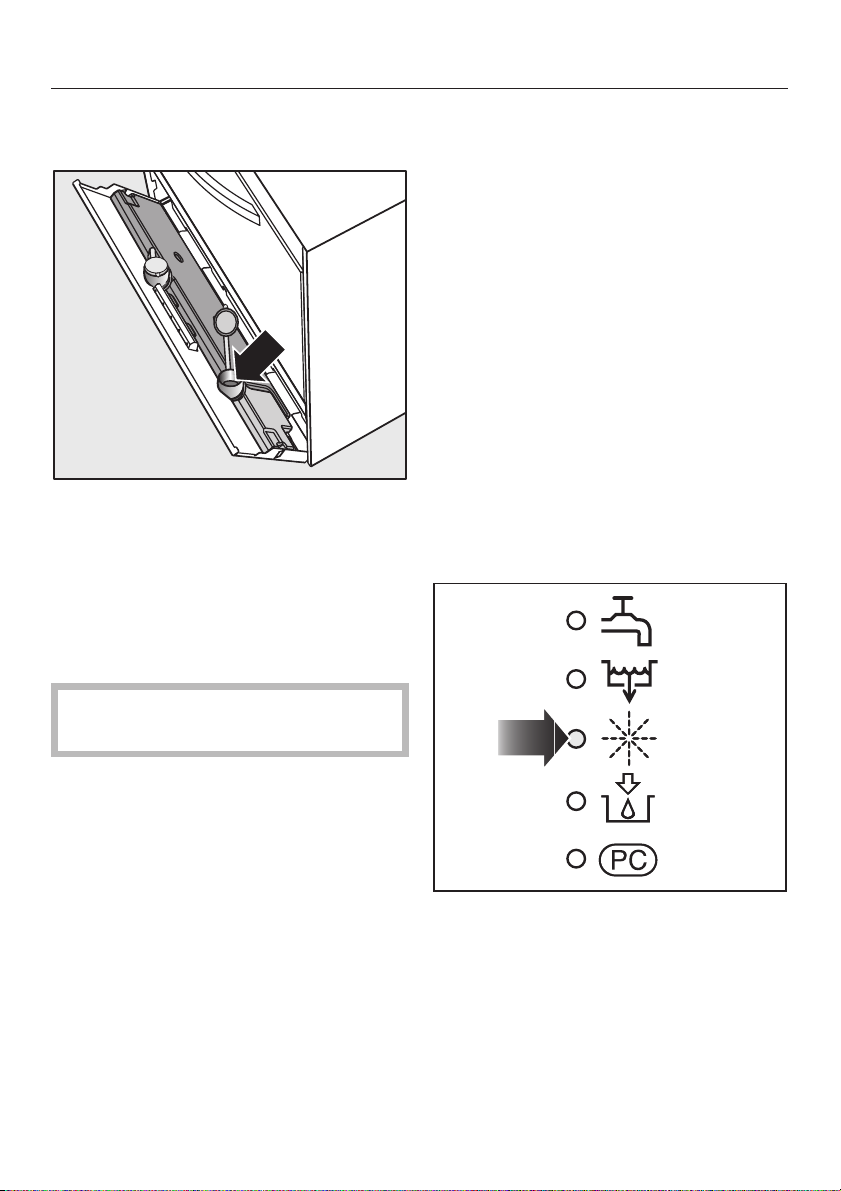
Adding rinsing agent
Grasp the service panel handle and
^
open the panel.
^ Take the red cap off the filler spout.
^ Fill the container with rinsing agent,
using the funnel supplied.
^ Replace the red cap and close the
service panel.
^ Rinse out the funnel.
External rinsing agent
container (optional extra)
A Miele service technician can
retrospectively fit an external rinsing
agent container to this dishwasher by
means of a siphon tube.
The rinsing agent level indicator for the
external container is on the control
panel.
Place the rinsing agent container on
^
the floor next to the commercial
dishwasher, or in a nearby cupboard
or on a wall bracket.
The wall bracket is available from the
Miele Spare Parts Department.
Add rinsing agent indicator
On no account must cleaning agent
and rinsing agent be mixed.
18
The rinsing agent container must be
refilled when the Add rinsing agent
indicator light H on the control panel
comes on.

Adding rinsing agent
Fill the container with rinsing agent or
^
replace it with a new one.
^ Insert the siphon tube in the opening
at the top of the container and push it
down until it touches the bottom of
the container. Then screw it on
securely. Make sure you follow the
colour code.
Replenish the container in good
time. It should never be allowed to
get completely empty.
Adding rinsing agent and venting the
dispensing system
See "Programming functions" for setting
the dosage amount and venting the
dispensing system.
You should not start a programme
until after the dispensing system has
been vented.
19

Areas of application
Loading the machine
Preparing the load
Remove coarse residues and empty all
containers before loading into the
machine.
Please note:
Load items so that water will come
–
into contact with all surfaces. This
ensures that they will be properly
cleaned.
Do not place items to be cleaned
–
inside other pieces where they may
be concealed.
– Hollow vessels such as cups,
glasses, jugs etc. should be inverted
and placed in the correct inserts.
The water must be able to access
them unhindered.
– Deep-sided items should be placed
at an angle to make sure water runs
off them freely.
–
Tall, narrow, hollow items should be
placed in the centre of the baskets to
ensure better water coverage.
–
The rinse and spray arms must not
be blocked by items which are too
tall or which hang down in their path.
If in doubt, test for free movement by
manually rotating the arms.
Select baskets and inserts which are
appropriate for the application.
20

Items that are not suitable for
dishwashers
Cutlery with wooden or horn handles.
–
Wooden or plastic cutting boards.
–
Heat sensitive plastic items (see
–
"Programmes with reduced final rinse
temperature").
Items such as old knives with
–
handles which have been glued on.
Hand-made craft items.
–
Copper or tin items.
–
Please note:
– Silver and aluminium items can
become discoloured.
– Clouding may occur on glasses after
frequent washing.
Areas of application
21

Areas of application
Loading examples
The commercial dishwasher can be
loaded with one basket per cycle. The
basket used depends on the size and
shape of the glasses to be washed.
For information about the range of
baskets available, please contact your
supplier.
The following illustrations show the
most popular baskets with examples of
loading different types of glassware.
U 545 plastic basket divided 5x5 for
glasses
In this example, the plastic basket is
connected to the top frame with
extension pieces. It is designed to hold
25x 200 to 230 mm tall glasses. The
base dimensions for each section are
90x90mm.
U 525 mesh basket with five sections
The mesh basket is for glassware up to
80 mm in diameter.
22

To assemble the plastic basket
The height of basket d can be
modified using frame a together with
either long extension pieces b or short
extension pieces c.
^ Insert all four extension pieces into
basket d.
Areas of application
^ Fit frame a securely onto the
extension pieces.
23

Adding cleaning agent
Only use a specialist glass
,
cleaning agent formulated for
commercial dishwashers. Do not
use washing up liquid or detergents
formulated for domestic
dishwashers.
Some types of soiling may require
different combinations of cleaning
agents and other additives. Please
contact Miele should you require advice.
Liquid cleaning agent can be
dispensed via the built-in container
inside the service panel.
Adding liquid cleaning agent:
The commercial dishwasher is fitted as
standard with a built-in dispensing
pump and cleaning agent container.
The container is located inside the left
hand side of the service panel. It holds
approx. 1300 ml.
Add cleaning agent indicator
Fill the cleaning agent container when
the indicator on the left of the service
panel shows there is insufficient
cleaning agent.
The cleaning agent level indicator is in
the left-hand viewing window on the
outside of the service panel.
24

Adding cleaning agent
Grasp the service panel handle and
^
open the panel.
^ Take the blue cap off the filler spout.
^ Fill the container with cleaning agent,
using the funnel supplied.
^ Replace the blue cap and close the
service panel.
^ Rinse out the funnel.
External cleaning agent
container (optional extra)
A Miele service technician can
retrospectively fit an external cleaning
agent container to this dishwasher by
means of a siphon tube.
The cleaning agent level indicator for
the external container is on the control
panel.
Place the cleaning agent container
^
on the floor next to the commercial
dishwasher, or in a nearby cupboard
or on a wall bracket.
The wall bracket is available from the
Miele Spare Parts Department.
Add cleaning agent indicator
On no account must cleaning agent
and rinsing agent be mixed.
The container must be refilled with
liquid cleaning agent when the Add
cleaning agent indicator light v on the
control panel comes on.
25

Adding cleaning agent
Fill the container with cleaning agent
^
or replace it with a new one.
^ Insert the siphon tube in the opening
at the top of the container and push it
down until it touches the bottom of
the container. Then screw it on
securely. Make sure you follow the
colour code.
Replenish the container in good
time. It should never be allowed to
get completely empty.
Maintenance of the dispensing
system
To ensure trouble-free operation,
regular maintenance should be carried
out at specified intervals by a Miele
approved service technician.
Every 1 to 1½ years
Replace the hoses on the commercial
dishwasher.
Take great care when handling
,
liquid agents and additives. These
may contain irritant or corrosive
ingredients.
Please follow the manufacturer's
safety instructions.
Wear protective gloves and
goggles.
26

Operation
Preparing the machine
Close the door.
^
Open the stopcock.
^
Press the On button g to switch the
^
dishwasher on.
All the programme button indicator
lights will light up.
^ Press the programme button for the
programme you want.
(See "Programme chart").
The boiler and tank will now fill with
water, and the water will start to heat
up. This takes approx. 15-20 mins.
The time remaining will show in the
display.
The Boiler heating indicator { lights up
whilst the water is heating up.
If the door is opened during this
heating up phase, an audible tone
(buzzer) will sound after five
minutes. The tone will not stop until
the door is closed.
When the boiler and tank are full and
the operating temperature has been
reached, the indicator light next to the
Start button h will flash, and the
duration for the programme selected
will appear in the display in minutes.
The dishwasher is now ready to use.
^ Open the door.
Caution - the water or steam in
,
the wash cabinet will be hot. Danger
of burning or scalding.
^ Push the basket with the items to be
washed into the dishwasher.
^
Close the door.
27

Operation
Selecting a programme
Choose your programme according to
the type of load and the degree of
soiling.
The different programmes and their
uses are described in the programme
chart at the end of this booklet.
The programme selected will remain in
memory for the duration of the
operating session.
Starting a programme
^ Press the Start button h.
The indicator lights next to the Start
button and the relevant programme
button will light up.
During the programme, the time left
until the end of the programme is
displayed. The j indicator light will
come on.
At the end of a programme
0 will appear in the display when the
programme has finished.
See "Programmable functions" for
instructions on how to activate the
buzzer function so that the buzzer will
sound at the end of a programme.
^
Open the door and unload the
machine.
Changing a programme
Provided the Start button has not yet been
pressed, a wrongly selected programme
may be changed as described below (if it
has been pressed, see "Cancelling a
programme"):
Press the programme button for the
^
programme you want.
Press the Start button h.
^
Cancelling a programme
Once a programme is running it should only
be cancelled in extreme cases, e.g. when
articles in the machine rattle or jostle against
each other and have to be rearranged.
^ Press the Start button h for approx. 3
seconds.
The programme will be cancelled.
^ Open the door.
,
Caution. Water and items in the
machine may be hot. Danger of burning
or scalding.
^
Rearrange the load.
^
Close the door.
^
Press the Start button h again.
The programme will start again.
Switching off
28
^
Press the DRAIN 6 button.
^
Press the Start button h.
The water will drain away.
When the DRAIN programme has finished:
^
Press the Off button o.

For future servicing work, please
document any alterations to the stan
dard factory settings.
Enter any alterations in the relevant
Value set: box.
Programmable functions
Saving changes to memory
All changes carried out in a
programming level, need to be saved
to memory. To do so:
Press the Start button h.
^
Altering programmable function
settings or venting the dispensing
system causes the machine to drain
automatically. In order to save energy
and time, these tasks should be carried
out when the tank is empty.
Calling up programming levels
The individual programmable functions
are called up via various programming
levels. Calling up a programming level
always happens in the following way:
^ Switch the dishwasher off by
pressing the Off button o.
^ Press and hold in the ^ and h
buttons, and at the same time switch
the dishwasher on using the On
button g.
The current programme status P... will
show up in the display.
The p indicator light will come on.
^
Press the programme button \
repeatedly until the programming
level you want appears.
SP will appear in the display.
Press the Start button h again.
^
The new values will then be saved to
memory.
Switch the dishwasher off by
^
pressing the Off button o.
To come out of a programming
level
To come out of a programming level
without saving changes to memory:
^ Press the Off button o.
The changes will be discarded.
2, 3, 4, 5, 6 or 7 will show up in the
display (representing programming
levels 2, 3, 4, 5, 6 or 7).
29

Programmable functions
Programming the cleaning
agent dosage (DOS 1)
The cleaning agent dosage is set using
Programming level 2.
Setting the cleaning agent
dispensing method
The cleaning agent dispensing method
is set via Options 0, 1, 2 or 3. The
Options are as follows:
0 = powder cleaning agent (not for
glasses), placed on the inside of the
door,
1 = liquid cleaning agent dispensed via
the built-in dispensing pump,
2 = this Option is not available on this
dishwasher,
3 = liquid cleaning agent dispensed via
the built-in dispensing pump from an
external container,
^ Press the SHORT programme button
\ twice.
2 will appear in the display
(Programming level 2).
^
Press the STANDARD programme
button ] once.
2.01 will appear in the display.
^
Press the INTENSIVE programme
button ^ once.
Setting the cleaning agent
concentration level
If the dispensing method in the
dishwasher has been programmed for
liquid cleaning agent, the concentration
can then be set.
Set the concentration level
according to the manufacturer's
recommendations.
Press the SHORT programme button
^
\ twice.
2 will appear in the display
(Programming level 2).
^ Press the STANDARD button ]
repeatedly until 2.02 appears in the
display.
^ Press the INTENSIVE button ^.
The liquid cleaning agent dosage
concentration will appear, displayed as
a%:
0.00 - 1.00 =0.0%-1%
Dosage concentration ex works is:
0.20 = 0.2 %).
^
Press the INTENSIVE button ^
repeatedly or hold pressed in until
the required value appears in the
display.
The dosage concentration level has
now been set.
Option 0, 1, 2, or 3 will appear in the
display
^
Press the INTENSIVE programme
button ^ repeatedly until the
cleaning agent dispensing method
you want appears.
30
Value set:
Example: If the cleaning agent
manufacturer recommends a cleaning
agent concentration of 0.5%, a value of
0.50 should be set.

Programmable functions
Venting the cleaning agent
dispensing system
The cleaning agent dispensing system
is vented as follows:
Press the SHORT programme button
^
\ twice.
2 will appear in the display
(Programming level 2).
Press the STANDARD button ] until
^
2.03 appears in the display.
Press the INTENSIVE button ^.
^
do1 will appear in the display.
^ Press the INTENSIVE button ^
again.
The dispensing system will be vented
automatically. 0 will appear in the
display when the venting process has
finished.
Programming the rinsing agent
dosage (DOS 2)
The rinsing agent dosage is set using
Programming level 3.
Setting the rinsing agent dispensing
method
The rinsing agent dispensing method is
set via Options 0 or 1. The Options are
as follows:
0 = Built-in pump with external
container,
1 = Built-in pump and container.
^ Press the SHORT programme button
\ 3 times.
3 will appear in the display
(Programming level 3).
^ Press the STANDARD programme
button ] once.
3.01 will appear in the display.
^ Press the INTENSIVE button ^.
Either 0 or 1 will appear in the display.
^
Press the INTENSIVE programme
button ^ repeatedly until the rinsing
agent dispensing method you want
appears.
31

Programmable functions
Setting the rinsing agent
concentration level
Set the concentration level
according to the manufacturer's
recommendations.
Press the SHORT programme button
^
\ 3 times.
3 will appear in the display
(Programming level 3).
Press the STANDARD button ] until
^
3.02 appears in the display.
^ Press the INTENSIVE button ^.
The liquid cleaning agent dosage
concentration will appear, displayed as
a%:
000 - 100 = 0.0 % - 0.1 %
Dosage concentration ex works is:
030 = 0.03 %.
^ Press the INTENSIVE button ^
repeatedly or hold pressed in until
the required value appears in the
display.
Venting the rinsing agent dispensing
system
Press the SHORT programme button
^
\ 3 times.
3 will appear in the display
(Programming level 3).
Venting the rinsing agent dispensing
system:
Press the STANDARD button ] until
^
3.03 appears in the display.
Press the INTENSIVE button ^.
^
do2 will appear in the display.
^ Press the INTENSIVE button ^
again.
The dispensing system will be vented
automatically. 0 will appear in the
display when the venting process has
finished.
The dosage concentration has now
been set.
Value set:
Example: If the manufacturer
recommends a concentration level of
0.03 %, a value of 030 should be set.
32

Programmable functions
Programming the
temperatures and duration
The main wash temperature, final rinse
temperature and final rinse duration are
set in Programming level 4.
Please make a note of any changes
to the main wash and final rinse
temperatures and/or the final rinse
duration in the appropriate column of
the programme chart.
The factory default settings for the main
wash and final rinse temperatures and
for the final rinse duration are given in
the programme chart.
Altering the wash temperature
A main wash temperature of
20 °C - 65 °C can be set in
Programming level 4.
^ Press the SHORT programme button
\ 4 times.
4 will appear in the display
(Programming level 4).
^
Press the STANDARD programme
button ] until 4.01 appears in the
display.
^
Press the INTENSIVE programme
button ^ once.
Altering the offset final rinse
temperature
The final rinse temperature is linked to
the main wash temperature. It is set as
standard at 5°C above the main wash
temperature (offset). The offset range
for the final rinse temperature is from
5°C to 25°C.
Press the SHORT programme button
^
\ 4 times.
4 will appear in the display
(Programming level 4).
Press the STANDARD programme
^
button ] until 4.02 appears in the
display.
^ Press the INTENSIVE button ^.
The current offset final rinse
temperature will show in the display,
e. g. 5 The factory default setting for
the offset final rinse temperature is
5 °C.
^ Press the INTENSIVE programme
button ^ repeatedly until the
temperature you want appears.
Example:
Main wash temperature = 60°C
Offset final rinse temperature = 5°C
Final rinse temperature = 65°C.
The current wash temperature will show
in the display, e. g. 60. The factory
default setting is 60 °C.
^
Press the INTENSIVE programme
button ^ repeatedly or hold pressed
in until the required temperature
appears in the display.
33

Programmable functions
Setting the final rinse duration
The final rinse duration for all wash
programmes can be set between 3 and
10 seconds.
Press the SHORT programme button
^
\ 4 times.
4 will appear in the display
(Programming level 4).
Press the STANDARD programme
^
button ] until 4.03 appears in the
display.
Press the INTENSIVE programme
^
button ^.
The current final rinse temperature will
show in the display, e. g. 6.0. The
setting will appear in tenths of a second
steps. The factory default setting is 6
seconds (6.0).
^ Press the INTENSIVE programme
button ^ repeatedly or hold pressed
in until the required final rinse
duration appears in the display.
34

Programming the buzzer
Programming level 5 allows you to
activate a buzzer to sound when:
a programme has finished = a
–
reminder tone
a fault has occurred = an alarm tone
–
the door is opened = an alarm tone
–
It is not possible to deactivate the
buzzer when the door is open.
Programmable functions
Press the STANDARD programme
^
button ] until 5.01 appears in the
display.
Press the INTENSIVE programme
^
button ^ once.
The current function will show in the
display, e. g. 0 (the factory default
setting).
Press INTENSIVE programme button
^
^ repeatedly until opton 0, 1, 2,or3
appears in the display.
Setting the buzzer
The buzzer is set in Programming level
5 using Options 0, 1, 2 or 3. The
Options are as follows:
0 = Buzzer is switched off
(factory default setting)
1 = Buzzer will sound at the end of a
programme
2 = Buzzer will sound when a fault
has occurred
3 = Buzzer will sound when a fault
has occurred and at the end of a
programme
^
Press the SHORT programme button
\ 5 times.
5 will appear in the display
(Programming level 5).
Value set:
Deactivating the buzzer
The buzzer at the end of a programme
can be switched off as follows:
^ Press the Off button o (disconnect
power supply), or
^ Open door at the end of the
programme.
The alarm tone denoting that there is a
fault can be switched off as follows:
^
Press the Start button h (Fault
confirmation for F0E, F2E), or
^
Press the Off button o (disconnect
the power supply).
If the fault has not been rectified, the
buzzer will start again after power
has been restored.
35

Programmable functions
Altering the programme
duration
The duration of the main wash can be
altered in Programming level 6.
You can set the programme duration in
a range from 60 seconds to 480
seconds.
The SHORT programme will always be
shorter than the STANDARD
programme, and the INTENSIVE
programme longer than the STANDARD
programme.
If you wish to lengthen the programme
duration of every programme, then start
with the INTENSIVE programme.
Altering the programme duration for
the INTENSIVE programme
Press the SHORT programme button
^
\ 6 times.
6 will appear in the display
(Programming level 6).
Press the STANDARD programme
^
button ] until 6.03 appears in the
display.
Press the INTENSIVE programme
^
button ^ once.
The current programme duration will
show in the display, e. g. 120. The
factory default setting is 120 seconds.
^ Press the INTENSIVE programme
button ^ repeatedly or hold pressed
in until the required programme
duration appears in the display. The
duration is set in 5 second stages.
36

Programmable functions
Altering the programme duration for
the STANDARD programme
Press the SHORT programme button
^
\ 6 times.
6 will appear in the display
(Programming level 6).
Press the STANDARD programme
^
button ] until 6.02 appears in the
display.
Press the INTENSIVE programme
^
button ^ once.
The current programme duration will
show in the display, e. g. 90. The
factory default setting is 90 seconds.
^ Press the INTENSIVE programme
button ^ repeatedly or hold pressed
in until the required programme
duration appears in the display. The
duration is set in 5 second stages.
Altering the programme duration for
the SHORT programme
Press the SHORT programme button
^
\ 6 times.
6 will appear in the display
(Programming level 6).
Press the STANDARD programme
^
button ] until 6.01 appears in the
display.
Press the INTENSIVE programme
^
button ^ once.
The current programme duration will
show in the display, e. g. 60. The
factory default setting is 60 seconds.
^ Press the INTENSIVE programme
button ^ repeatedly or hold pressed
in until the required programme
duration appears in the display. The
duration is set in 5 second stages.
37

Programmable functions
Resetting the factory default
settings
You can reset all parameters back to
the factory default settings in
Programming level 7 as follows:
call up the factory default setting,
–
then confirm the factory default
–
setting.
Press the SHORT programme button
^
\ 7 times.
7 will appear in the display
(Programming level 7).
To call up the factory default setting:
^ Press the STANDARD programme
button ] until 7.01 appears in the
display.
^ Press the INTENSIVE programme
button ^.
If you select the 00 setting by
mistake, you can still call up your
own customised settings again by
selecting the PP setting.
Press the INTENSIVE programme
^
button ^ to switch between the 00
and pp settings.
To confirm the factory default
setting:
Press the Start button 6. SP will
^
appear in the display.
^ Press the Start button h again.
All values which had been changed
have now been reset to the factory
default settings.
^ Switch the dishwasher off by
pressing the Off button o.
The current setting will appear in the
display:
–
00 Factory default setting, or
–
PP Programmed value.
^
Press the INTENSIVE programme
button ^ repeatedly until 00 (factory
default setting) appears in the
display.
The factory default settings have now
been called up.
38

Cleaning and care
Cleaning the wash cabinet,
tank and filter
This dishwasher must not be
,
used without the filter in place.
The tank and the filter should be
inspected regularly and cleaned if
necessary. How often they need to be
cleaned will depend on the degree of
soiling and the number of times the
dishwasher is used. However, they
should be cleaned at the end of every
operating session.
Caution:
,
Watch out for glass splinters which
could cause injury.
Cleaning the tank and wash cabinet,
and draining the machine
^ Press the DRAIN/SELF CLEANING
programme button 6.
^
Press the Start button h.
Cleaning the filter
The water in the tank can be hot.
,
The tank must be drained before
removing the filter.
^ Lift the filter out.
^ Clean the filter thoroughly under
running water.
^ Replace the clean filter. Ensure that
the filter sits flat in the base of the
wash cabinet.
The DRAIN programme with integrated
SELF CLEANING will start.
If the cleaning result is not
satisfactory, you can start the
programme again. It will run again
but for a shorter duration.
^
Press the Start button h to start the
DRAIN/SELF CLEANING programme
again.
39

Cleaning and care
Cleaning the optional filter
combination set
Cleaning the flat filters
The water in the tank can be hot.
,
The tank must be drained before
removing the filters.
^ First remove the flat filter at the front.
To do this lift it up a little at the front.
^
Then remove the flat filter at the rear.
To do this lift it up a little at the back.
^
Clean the filters thoroughly under
running water.
^
Replace the filters by carrying out the
above steps in the reverse order.
Make sure that you place the filters
correctly in position. Ensure that the
filters sit flat in the base of the wash
cabinet.
Cleaning the fine filter
The water in the tank can be hot.
,
The tank must be drained before
removing the filters.
Remove the flat filters.
^
^ Turn the fine filter anti-clockwise to
remove it from the sump.
^ Clean the fine filter thoroughly under
running water.
^
Replace the fine filter in the sump
and turn it clockwise to secure it.
Replace the filters by carrying out the
above steps in the reverse order.
Ensure that the filters sit flat in the base
of the wash cabinet.
40

Cleaning and care
Cleaning the control panel
This should only be cleaned with a
^
damp cloth or a suitable cleaner for
use on plastic materials, or with a
disinfectant tested and recognised
as suitable for this use.
Do not use abrasive cleaners,
,
glass cleaners or all-purpose
cleaners.
Because of their chemical
composition they could cause
serious damage to plastic
components.
Cleaning the front of the
machine
^ Clean using a proprietary cleaning
agent designed for the type of front
the machine is fitted with.
,
Do not use cleaning agents
containing ammonia or thinners.
Cleaning the rinse arm and the
spray arms
Waste particles can lodge in the rinse
and spray arm jets.
It is therefore important to inspect the
rinse and spray arms regularly.
Use a sharp pointed object to push
^
particles into the rinse and spray arm
jets, and rinse well under running
water.
Remove the rinse and spray arms as
follows:
^ Unscrew the upper spray arm in the
top of the wash cabinet.
^ Remove the lower basket.
^ First unscrew the lower spray arm,
and then remove the lower rinse arm
from the bottom of the wash cabinet.
Food residues in the lower rinse arm
are easier to rinse out if the caps are
opened first of all.
^
Open the caps in the direction of the
arrow. After cleaning screw them in
again securely.
Important:
After replacing the rinse and spray
arms, check that they rotate freely.
41

Problem solving guide
With the aid of the following guide, minor problems can be easily corrected
without calling in a Miele service technician, saving you both time and money.
The following guide may help you to find the reason for a fault, and to correct it.
You should, however, note the following:
Repairs should only be carried out by a suitably qualified and trained
,
person in strict accordance with current local and national safety regulations.
Unauthorised or incorrect repairs could cause personal injury or damage to the
machine.
Fault Possible cause Remedy
The dishwasher does
not start.
The dishwasher stops
during a programme.
A few minutes after
starting the programme,
the p indicator light
flashes (fault code F..E
appears in the display).
The door is not properly
closed.
The machine is not
switched on at the mains.
The fuse is defective or
has tripped.
The fuse is defective or
has tripped.
The door is not properly
closed.
The stopcock is closed. Open the stopcock fully.
The water inlet filter is
blocked.
The Waterproof system
has reacted.
The water pressure at the
intake is lower than 100
kPa (0.5 bar).
Close the door firmly.
Switch on at the mains.
Reset the fuse.
(Minimum fuse rating see data plate).
Reset the fuse.
(Minimum fuse rating see data plate).
Close the door firmly.
Before rectifying the
problem you must:
–
Switch the dishwasher
off by pressing the Off
button o.
Then:
–
Clean the water inlet
filter. See "Cleaning the
water inlet filter".
Call the Miele Service
Department.
Seek professional advice.
42

Problem solving guide
Problem Possible cause Remedy
The wash cycle finishes
early and the 6
indicator light flashes
(fault code F..A appears
in the display).
Before rectifying the
problem you must:
Switch the dishwasher
–
off by pressing the Off
button o.
The filter in the wash
cabinet is blocked.
The drain pump or
non-return valve may be
blocked.
The drain hose is kinked. Remove any kink in the
Knocking noise in the
wash cabinet.
Rattling noise. Glasses are unstable
Knocking noise in water
pipe.
There are rust stains on
cutlery.
The rinse arm or spray
arm is knocking against a
glass.
inside the wash cabinet.
This may be caused by
the on-site installation or
the cross-section of the
piping.
The affected items are not
corrosion resistant.
Clean the filter. See
"Cleaning and Care".
Clean the drain pump and
the non-return valve. See
"Cleaning the drain pump
and non-return valve".
drain hose.
Interrupt the programme,
and rearrange glasses
that are obstructing the
rinse or spray arms.
Interrupt the programme
and rearrange the glasses
securely.
This has no influence on
dishwasher function. If in
doubt contact a suitably
qualified plumber.
There is no remedy.
Purchase cutlery which is
dishwasher-proof.
43

Problem solving guide
Fault Possible cause Remedy
The glasses are not
clean.
The glasses are not dry
or are flecked.
The glasses were not
loaded correctly. Glasses
were placed inside other
glasses, water could not
access all surfaces.
The programme selected
was not suitable.
Not enough detergent
was dispensed.
Tall glasses are blocking
the path of the rinse or
spray arms.
The jets on the rinse or
spray arms are blocked.
The filter in the wash
cabinet is not clean or is
not correctly fitted.
This may cause the spray
arm jets to get blocked.
The non-return valve is
open and blocked. Dirty
water has flowed back
into the wash cabinet.
The amount of rinsing
agent may be insufficient,
or the rinsing agent
container empty.
See "Loading the
machine".
Select a suitable
programme. See
"Programme chart".
Use more detergent, see
"Programming functions".
Check the rinse and spray
arms by turning them, and
rearrange the load as
required.
Clean the rinse or spray
arm jets. See "Cleaning
and Care".
Clean and/or replace the
filter correctly. Clean the
spray arm jets. See
"Cleaning and Care".
Clean the drain pump and
the non-return valve, see
"Cleaning the drain pump
and non-return valve".
Increase the dosage or
replenish the rinsing
agent container. See
"Programmable functions".
44

Problem solving guide
Fault Possible cause Remedy
The glasses are cloudy
or have a white residue
which can be wiped off.
The glasses are smeary.
Glasses have a blue
tinge. Residues can be
wiped off.
Glasses are dull and
discoloured. Residues
cannot be wiped off.
Tea or lipstick stains
have not been
completely removed.
Plastic items are
discoloured.
Not enough rinse aid was
used.
The rinsing agent dosage
is set too high.
The glasses are not
dishwasher-proof. The
surfaces are affected.
The wash temperature of
the programme selected
was too low.
The bleaching effect of
the detergent used is too
low.
Natural dyes e.g. from
carrots, tomatoes or
ketchup may be the
cause. The amount of
cleaning agent used or its
bleaching effect was not
sufficient to deal with
natural dyes.
Increase the rinsing agent
dosage. See
"Programmable functions".
Increase the rinsing agent
dosage. See
"Programmable functions".
There is no remedy.
Purchase glasses which
are dishwasher-proof.
Select a programme with
a higher wash
temperature.
Use a different type of
cleaning agent.
Use more cleaning agent.
See "Programming
functions".
Discolouration is irreversible.
45

Problem solving guide
Other fault codes
If a fault code, which is not referred to
in the previous pages, appears in the
display, proceed as follows:
Switch the dishwasher off by
^
pressing the Off button o.
Switch the dishwasher on again by
^
pressing the On button g.
Start the DRAIN/SELF CLEANING
^
programme 6.
Select a wash programme so that the
^
boiler and tank will fill with water.
If the DRAIN/SELF CLEANING
programme 6 will not start or the fault
code appears again, call the Miele
Service Department.
46

Other problems
Cleaning the drain pump and
non-return valve
If water has not been pumped away at
the end of a programme, the drain
pump or the non-return valve might be
blocked. They are easy to clean.
The water in the tank can be hot.
,
Allow the residual water to cool
down.
Take the filter out of the wash
^
cabinet.
The drain pump a is situated under the
non-return valve.
^ Before replacing the non-return
valve, check that the drain pump a
and the filter b are free of
obstructions.
^ Any foreign object causing an
obstruction must be removed.
^ Replace the non-return valve
carefully in the reverse order.
^
Tilt the non-return valve forwards and
then lift it upwards.
^
Rinse thoroughly under running
water.
^
The vent hole must not be blocked.
^
If it is blocked, use a pointed tool to
unblock it.
^
Replace the filter. Ensure that the
filter sits flat in the base of the wash
cabinet.
47

Other problems
Cleaning the filters in the water
inlet
Filters are incorporated in the screw
connection of the water inlet hose to
protect the water inlet valve. If these
filters get dirty they need to be cleaned,
otherwise insufficient water flows into
the wash cabinet.
The plastic housing of the water
,
connection contains an electrical
component. It must not be dipped in
water.
To clean the filter
^ Disconnect the machine from the
mains supply (switch off at the mains
and pull out the plug, switch off the
appropriate circuit in the fuse box or
withdraw the mains fuse).
^ Turn off the stopcock and unscrew
the water inlet hose.
Clean the large area filter (1) and fine
^
filter (2), and replace with new filters
if necessary.
^ Replace filters and the seal. Make
sure they are sitting correctly.
^ Reconnect the hose to the water inlet,
making sure that it goes back on
straight.
^ Open the stopcock carefully.
If there is a leak, screw the
connections on more tightly.
48

Should you still have any difficulties or if
a fault code "F..." appears in the display
again, please contact:
your authorised Miele Service Dealer,
–
or
the Miele Customer Contact Centre
–
(see back cover for contact details).
When contacting the your Dealer or
^
the Miele Customer Contact Centre,
please quote the model and serial
number of your machine both of
which are shown on the data plate.
Please note that telephone calls may
be monitored and recorded for
training purposes.
After sales service
49

Installation
Please refer to the installation
diagram supplied with the machine.
Furniture and fittings installed
,
near the machine must be of a
commercial standard (e.g. stainless
steel) able to withstand the effects of
steam and condensation.
The machine must be installed correctly
and levelled.
Any unevenness in the floor level can
be compensated for and the height of
the machine raised or lowered by
adjusting the four screw feet.
The machine can be installed in the
following ways:
– Built-under (standard):
The machine can be installed under a
continuous worktop or sink drainer.
The recess must be at least 60 cm
wide, 60 cm deep and 82 cm high.
– Free-standing (optional)
Cover plate (protects the worktop)
The underside of the worktop must be
protected against water damage by a
stainless steel plate.
(A "Lid" conversion kit is required)
–
Slot-in or at the end of a row
(optional):
The machine can be installed next to
other machines or furniture, or in a
suitable niche. The niche must be at
least 60 cm wide and 60 cm deep. (A
"Lid" conversion kit is required)
50

All electrical work must be
,
carried out by a suitably qualified
and competent person in
accordance with local and national
safety regulations.
Electrical connection UK
The machine must only be operated
with the voltage, frequency and fusing
shown on the data plate.
This machine can be converted in
accordance with the conversion
diagram and wiring diagram supplied.
Connection should be made via a
–
suitable isolator, with an on-off switch
which should easily accessible for
servicing work.
For extra safety it is advisable to
–
install a suitable residual current
device (RCD).
Please contact a qualified electrician for
advice.
WARNING
THIS MACHINE
MUST BE EARTHED
– Equipotential bonding should be
carried out.
– The mains connection cable may
only be replaced by an original Miele
spare part or an appropriate cable
with wire end ferrule.
–
For technical data see data plate
and wiring diagram supplied.
The data plate is located at the back of
the machine and at the bottom of the
wash cabinet behind the service panel
on the left hand side.
See also the installation diagram
supplied.
Bonding connection
There is a screw connection point
marked with the earth symbol (
the back of the machine, to which the
earth lead must be connected.
8)at
51

Plumbing
Connection to the water inlet
Water in the machine must not
,
be used as drinking water.
The machine must be connected to
–
the water supply in accordance with
local and national water authority
regulations.
If the iron content in the water is too
–
high, there is a risk of corrosion
damage to the machine and its load.
If the chloride content of the water
exceeds 100mg/l, the risk of
corrosion damage to the load will
increase considerably.
– This machine is constructed to
comply with German water
regulations (DVGW), and may be
connected to a suitable supply
without an extra non-return valve if
national regulations permit.
– The water pressure (flow rate) must
be a minimum of 1 bar (100 kPa).
If the water pressure (flow rate) is
below 1 bar (100 kPa), the filling time
is automatically extended.
The max. permitted static pressure is
10 bar (1000 kPa).
If the water pressure is not in the
range of 1 to 10 bar (100-1000 kPa)
the p / 6 indicator light may come
on and the fault code "F2E" show in
the display. Please contact the Miele
Service Department.
–
The machine is supplied as standard
for connection to a cold or a hot
water supply up to a max.
temperature of 65 °C.
A stopcock with 3/4 inch male thread
–
must be provided on site. It should
be easily accessible so that the
water supply can be turned off when
the machine is not in use.
The DN 10 inlet hose is approx. 1.7
–
m long terminating in a 3/4 inch
female thread. A 1.5 metre long
flexible metal extension hose,
pressure tested to 140 bar, is
available as an optional accessory if
required. On no account may the
inlet filter be removed.
A water inlet filter is enclosed in the
–
kit supplied with the machine for
installing between the stopcock and
the inlet hose (see the illustration in
"Cleaning the water inlet filter".
,
The inlet hose must not be
shortened or damaged in any way
(see illustration).
See also the installation diagram
supplied.
52

Drainage
The drainage system is fitted with a
–
non-return valve which prevents dirty
water from flowing back into the
machine via the drain hose.
The machine should preferably be
–
connected to a separate drainage
system on-site.
If separate drainage is not available
contact your Miele application
specialist for professional advice.
The on-site drain connection point
should be sited between 0.3 m and
1mabove the lower edge of the
machine.
If it is lower than 0.3 m, lay the hose
in a curve at a height of at least
0.3 m.
The drainage system must be able to
take a minimum drainage flow of
16 l/min.
Plumbing
– The drain hose is approx. 1.4 m long,
is flexible and has an internal
diameter of 22 mm. It must not be
shortened.
Hose clips are supplied for securing
it in position.
–
A longer drain hose (up to 4 m long)
is available to order from the Miele
Spare Parts Dept.
–
The drainage system must not
exceed 4 metres.
See also the installation diagram
supplied.
53

Programme overview
Programme
1)
^
For heavily soiled crockery with dried on soiling.
When to use
INTENSIVE
2 min
]
For normally soiled loads.
STANDARD
1.5 min
\
Quick programme for lightly soiled crockery.
SHORT
1 min
6
DRAIN/
To drain the dirty water and also for cleaning the inside of the
cabinet. (e.g. at the end of a programme).
SELF
CLEANING
1)
The short programme durations are only possible when the machine is
connected to a hot water supply and the heater rating is 9.25 kW.
54

Programme sequence
Programme overview
Main wash
2) 3)
Run-off Final rinse
2) 4)
60°C/100 sec 5 sec 65°C/15 sec
60°C/70 sec 5 sec 65°C/15 sec
60°C/40 sec 5 sec 65°C/15 sec
2 min 45 sec
2)
To alter the main wash and final rinse temperature and the final rinse duration,
see "Programmable functions".
3)
Durations may vary.
4)
Times will depend on drainage and final rinse durations.
55

Technical data
Height: 82 (85) cm
Width: 60 cm
Depth: 60 cm
Voltage: see data plate
Connected load: see data plate
Fuse rating: see data plate
Mains connection cable: approx. 1.5 m
Water pressure (flow rate): 1 - 10 bar (100 - 1000 kPa)
Cold or hot water connection: up to max. 65 °C
Delivery head: min. 0.55 m, max. 1 m
Drainage length: max. 4 m
Inlet hose: approx. 1.5 m
Drain hose: approx. 1.4 m
Noise level in dB (A):
Sound level LpA Free standing: <70
Built under: <70
Test marks: VDE, interference suppression, DVGW
565758


59

Alteration rights reserved/3008
M.-Nr. 07 122 771 / 01
 Loading...