

Page 1
Operating and Installation instructions
Ceramic Cooktop with induction
KM 6310
KM 6344
To prevent accidents and
appliance damage,
read these instructions
before
installation or use.
en-CA
M.-Nr. 09 166 590
Page 2

Safety instructions for installation
Ensure that the electrical supply
The appliance must be installed by
a qualified professional and
connected to the electric power
supply by a qualified electrician.
The cabinet and the hood above the
cooktop must be installed before the
cooktop to avoid damaging it.
The countertop must be
~
heat-resistant (up to 100°C), so that it
does not become deformed or the
veneer detached.
The wall strips must be heat-resistant
as well.
The cooktop must not be installed
~
above refrigerators/freezers,
dishwashers or washer/dryers.
This cooktop must not be installed
~
above a stove or oven unless they have
a built-in cooling fan.
~
cable for the cooktop cannot touch the
floor panel after installation nor be
subject to any mechanical strain.
Be sure to observe the safety
~
clearances listed on the following
pages.
All measurements are given in mm.
60
Page 3

Safety instructions for installation
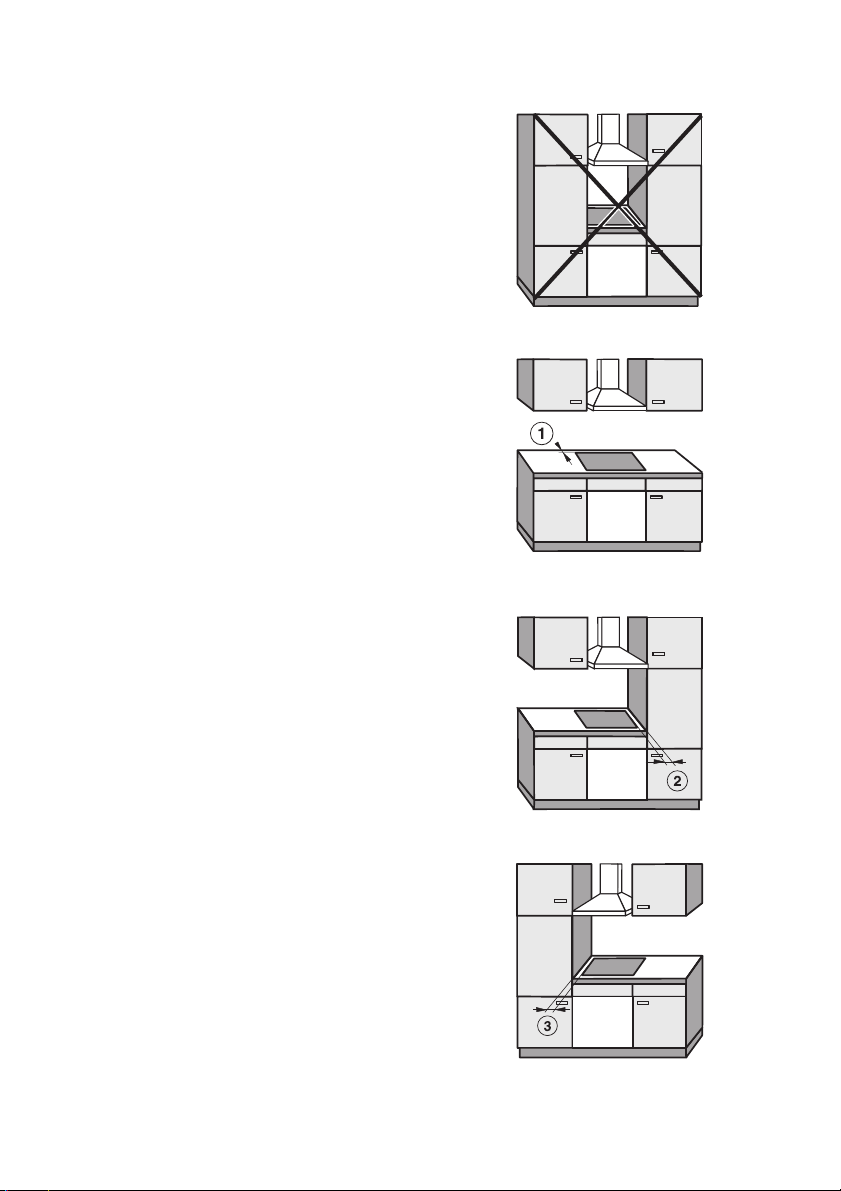
Clearance above the cooktop
For an exhaust hood above the
cooktop, always use the clearance
specified by the hood manufacturer.
If there are no specifications from the
hood manufacturer or if flammable
materials (e.g. a utensil rail) are
installed above the cooktop, the
clearance must be at least 760 mm.
If there is more than one appliance
installed below the exhaust hood,
each with a different safety
clearance, the largest clearance
must be used.
61
Page 4
62
Page 5

Safety instructions for installation
Minimum clearance underneath the
cooktop
To ensure proper ventilation of the
cooktop, a minimum clearance is
required between the appliance and an
oven, protective base, or drawer.
The minimum clearance from the
bottom of the cooktop to
the top of the oven must be 15 mm.
–
the top of the protective base must
–
be 15 mm.
bottom of the drawer must be 75
–
mm.
Protective base
Installation of a protective base under
the cooktop is allowed but not required.
A gap of 10 mm at the back is required
for the power supply cable.
For better cooling of the cooktop, we
recommend a gap of 20 mm at the
front.
63
Page 6

Safety instructions for installation
Safety clearance to a wall covering
A safety clearance must be maintained between the countertop cut-out and any
wall covering to protect it from heat damage.
If the covering is made of a combustible material (e.g. wood), a safety clearance
e of 50 mm must be maintained between the cut-out and the covering.
If the covering is made of a non-combustible material (e.g. metal, natural stone,
ceramic tiles), a minimum safety clearance e of 50 mm less the thickness of the
covering must be maintained between the cut-out and the covering.
Example: 15 mm wall covering
50 mm - 15 mm = 35 mm minimum clearance
Flush-fitted cooktops Cooktops with frame or bevelled edges
a Masonry
b Wall covering
Dimension X = thickness of wall covering
c Countertop
d Cut-out in the countertop
d Minimum safety clearance
for combustible materials is 50 mm
for non-combustible materials is 50 mm less dimension X
64
Page 7

Safety instructions for installation
Cooktops with frame or
bevelled edges
Seal between cooktop and
countertop
The sealing strip under the edge of the
upper part of the cooktop provides an
adequate seal against the countertop.
Tiled countertop
The grouting a and the hatched area
below the cooktop frame must be
smooth and flat, so that the frame will
be level and the sealing strip under the
edge of the upper part of the cooktop
can provide an adequate seal against
the countertop.
The cooktop must not be sealed with
joint sealant (e.g. silicone).
Cooktop and countertop could get
damaged if the cooktop needs to be
removed.
65
Page 8

Installation dimensions
KM 6310
a Front
b Cooktop height
c Connection for Miele|home
d Electrical box
The connection cable (1440 mm long) comes with the cooktop.
66
Page 9

KM 6344
Installation dimensions
a Front
b Cooktop height
c Connection for Miele|home
d Electrical box
The connection cable (1440 mm long) comes with the cooktop.
67
Page 10

Installation
Preparing the countertop
For the countertop cut-out use the
^
dimensions given in the illustration.
Observe the safety clearances (see
Safety instructions for installation).
Seal the cut surfaces with a suitable
^
heat-resistant sealant to avoid
swelling caused by moisture.
Ensure that the sealant does not get
on the top surface of the countertop.
This cooktop has a seal underneath
to keep it securely in position. Spring
clips are not required.
The gap between the frame and the
countertop will get smaller over time.
^ Follow the instructions in the wiring
diagram (see Electrical connection).
Inserting the cooktop
Feed the power supply cable down
^
through the countertop cut-out.
Center the cooktop in the cut-out.
^
Make sure that the seal under the
cooktop sits flush with the countertop
on all sides. This is important to
ensure an effective seal.
NEVER apply an additional sealant
such as silicone!
If the seal at the corners does not lie
flush on the worktop, the corner radii
ß R4 should be re-worked with a
jigsaw.
^ Connect the cooktop to the electrical
power supply.
^ Check that the cooktop is working
properly.
68
Page 11

CAUTION: Before installation or
,
servicing, disconnect the power
supply by either removing the fuses,
shutting off the power main or
manually "tripping" the circuit
breakers.
Installation work and repairs should
only be performed by a qualified
technician in accordance with all
applicable codes and standards.
Repairs and service by unqualified
persons could be dangerous and
the manufacturer will not be held
responsible.
Before connecting the appliance to
the power supply, make sure that
the voltage and frequency listed on
the data plate correspond with the
household electrical supply. This
data must correspond to prevent
appliance damage. Consult an
electrician if in doubt.
Only operate the cooktop after it has
been installed into the countertop.
Electrical connection
Connection
The cooktop is ready for connection to
a grounded power supply.
208/240 V, 60 Hz, 40 A fuse rating.
Connect as following:
Black wire: connect to L1 (hot)
Red wire: connect to L2 (hot)
Green wire: connect to GND (ground)
A dedicated line and junction box
should be used to connect the cooktop
to a 40 A circuit.
For further information, see the wiring
diagram provided with the appliance.
, WARNING:
THIS APPLIANCE MUST BE
GROUNDED!
Installer:
Please leave these instructions with
the consumer.
Power supply
^
Make sure your electrical supply
matches the data plate.
Connecting the electrical supply
cable
The electric power supply cable
must be connected to the cooktop
by a qualified electrician.
69
Page 12

Technical Service, Data plate
In the event of a fault which you cannot easily fix yourself, please contact the
Miele Technical Service Department at the address on the back of this booklet.
When contacting Technical Service please quote the serial number and model of
the appliance. This information is visible on the silver data plate supplied with the
appliance.
Adhere the included data plate and make sure the model designation matches up
details on the cover page of this manual.
70
Page 13

71
Page 14

Alteration rights reserved / 3313
For the most updated manual, visit the Miele web site.
M.-Nr. 09 166 590 / 03
 Loading...