

Page 1
Operating instructions
Ceramic hobs
KM 420
KM 423
To avoid the risk of accidents
or damage to the machine
it is essential to read these
Operating instructions before
it is installed or used for the first time. M.-Nr. 04 996 260
WGiOZ
Page 2

2
Page 3

Contents
Description of the appliance. . . . . . . . . . . . . . . . . . . . . . . . . . . . . . . . . . . . . . . . . 4
Caring for the environment . . . . . . . . . . . . . . . . . . . . . . . . . . . . . . . . . . . . . . . . . . 6
Warning and Safety instructions . . . . . . . . . . . . . . . . . . . . . . . . . . . . . . . . . . . . . 7
Operation . . . . . . . . . . . . . . . . . . . . . . . . . . . . . . . . . . . . . . . . . . . . . . . . . . . . . . . 13
Preparation for use. . . . . . . . . . . . . . . . . . . . . . . . . . . . . . . . . . . . . . . . . . . . . . . . . 13
Cooking zone diameters . . . . . . . . . . . . . . . . . . . . . . . . . . . . . . . . . . . . . . . . . . . . 13
Extended area . . . . . . . . . . . . . . . . . . . . . . . . . . . . . . . . . . . . . . . . . . . . . . . . . . . . 13
Residual heat indicators . . . . . . . . . . . . . . . . . . . . . . . . . . . . . . . . . . . . . . . . . . . . 14
Temperature limiter . . . . . . . . . . . . . . . . . . . . . . . . . . . . . . . . . . . . . . . . . . . . . . . . 14
Cooking zone controls . . . . . . . . . . . . . . . . . . . . . . . . . . . . . . . . . . . . . . . . . . . . . . 15
Using the hob . . . . . . . . . . . . . . . . . . . . . . . . . . . . . . . . . . . . . . . . . . . . . . . . . . . . 15
Tips on saving energy . . . . . . . . . . . . . . . . . . . . . . . . . . . . . . . . . . . . . . . . . . . . . . 16
Important notes . . . . . . . . . . . . . . . . . . . . . . . . . . . . . . . . . . . . . . . . . . . . . . . . . . . 17
Cleaning and care . . . . . . . . . . . . . . . . . . . . . . . . . . . . . . . . . . . . . . . . . . . . . . . . 18
Problem solving guide. . . . . . . . . . . . . . . . . . . . . . . . . . . . . . . . . . . . . . . . . . . . . 20
After sales service . . . . . . . . . . . . . . . . . . . . . . . . . . . . . . . . . . . . . . . . . . . . . . . . 21
Data Plate . . . . . . . . . . . . . . . . . . . . . . . . . . . . . . . . . . . . . . . . . . . . . . . . . . . . . . . 21
Installation . . . . . . . . . . . . . . . . . . . . . . . . . . . . . . . . . . . . . . . . . . . . . . . . . . . . . . 22
Electrical connection U.K.. . . . . . . . . . . . . . . . . . . . . . . . . . . . . . . . . . . . . . . . . . 25
3
Page 4
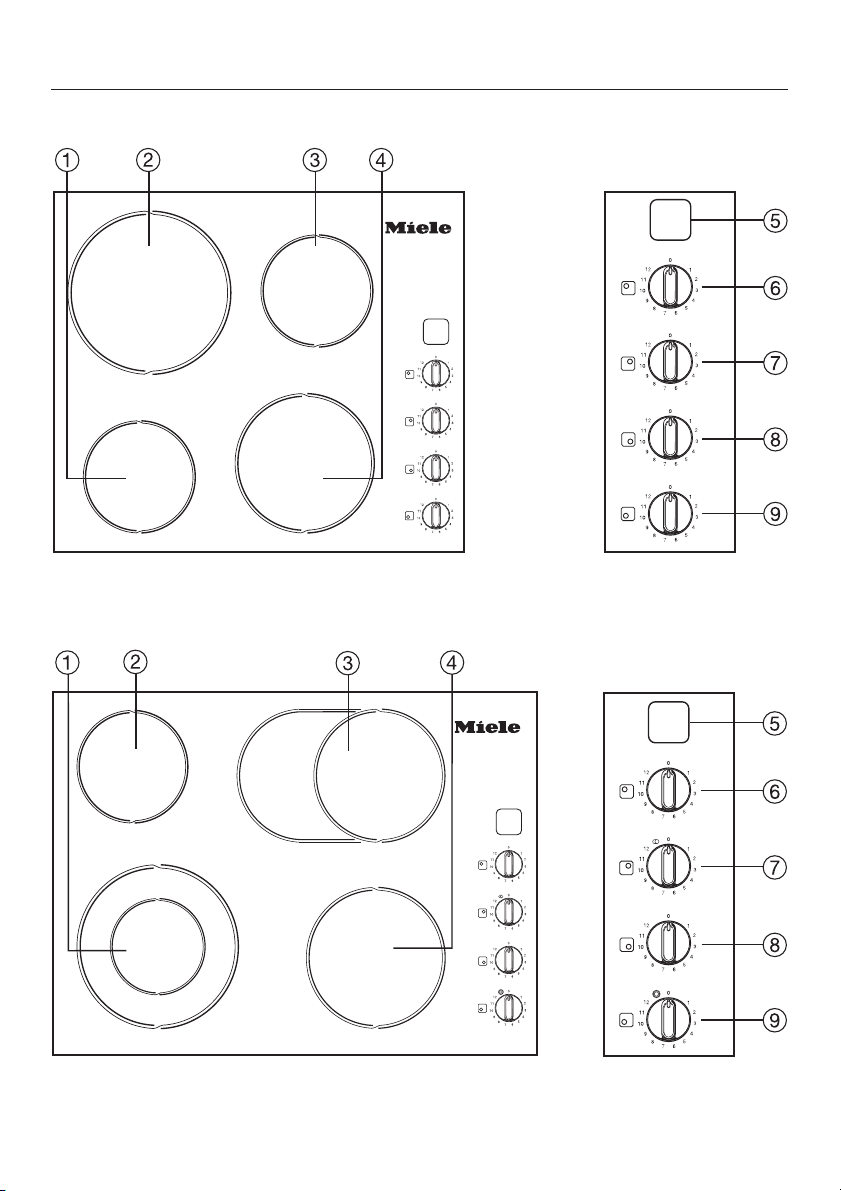
Description of the appliance
KM 420
KM 423
4
Page 5

Description of the appliance
KM 420
a Cooking zone: 14.5 cm Ø
b Cooking zone: 21 cm Ø
c Cooking zone: 14.5 cm Ø
d Cooking zone: 18 cm Ø
KM 423
a Vario cooking zone: 12 cm / 21 cm Ø
b Cooking zone: 14.5 cm Ø
c Cooking zone / Extended cooking zone:
17 cm Ø / 17 cm x 26.5 cm
d Cooking zone: 18 cm Ø
Control panel
e Residual heat indicators
f Rear left cooking zone control
g Rear right cooking zone control
h Front right cooking zone control
i Front left cooking zone control
5
Page 6

Caring for the environment
Disposal of the packing
material
The transport and protective packing
has been selected from materials which
are environmentally friendly for disposal
and can normally be recycled.
Ensure that any plastic wrappings,
bags etc. are disposed of safely and
kept out of the reach of babies and
young children. Danger of suffocation!
Rather than just throwing these materi
als away, please ensure that they are
offered for recycling.
-
Disposal of your old appliance
Old appliances contain materials which
can be reclaimed or recycled. Please
contact your dealer, your local waste
collection centre or scrap merchant
about potential recycling schemes.
Ensure that the appliance presents no
danger to children while being stored
for disposal.
Data Plate
When the appliance has been built in
the data plate is no longer visible. A
second data plate label is supplied with
the appliance.
Please stick the label into this booklet
under "After sales service". When con
tacting the Service Department, please
quote model number and serial number
of your appliance which you will find on
the data plate.
-
6
Page 7

Warning and Safety instructions
This appliance conforms to current
safety requirements. Improper use of
the appliance can, however, present
a risk of both personal injury and
material damage.
Before installation and before using
the appliance for the first time, read
the operating instructions carefully.
They contain important notes on in
stallation, safety, operation and care
of the appliance. This way you will
avoid the risk of accidents and dam
age to the appliance.
Keep these operating instructions in
a safe place and ensure that new
users are familiar with the content.
Pass them on to any future owner of
the appliance.
-
Correct usage
This appliance is intended for do
mestic use only and is not to be
used for commercial purposes.
Only use the appliance to prepare
food in the home. Any other usage
is at the owner’s risk and could be dan
gerous. The manufacturer cannot be
held responsible for damage caused
by incorrect or improper use of the ap
pliance.
-
-
-
-
7
Page 8

Warning and Safety instructions
Technical safety
To avoid the risk of damage to the
appliance, make sure that the rat
ing on the data plate corresponds to
the voltage and frequency of the house
hold supply, before connecting the ap
pliance to the mains supply. Consult a
competent person if in doubt.
The electrical safety of this appli
ance can only be guaranteed when
continuity is complete between the ap
pliance and an effective earthing sys
tem, which complies with local and na
tional safety regulations. It is most im
portant that this basic safety requirement is tested by a qualified electrician.
and where there is any doubt the electrical system in the house is checked
by a qualified electrician.
The manufacturer cannot be held responsible for the consequences of an
inadequate earthing system (e.g. electric shock).
For safety reasons this appliance
must only be operated as a built-in
appliance. This is necessary to ensure
that all electrical components are
shielded.
-
-
-
-
-
-
-
Installation work and repairs may
only be carried out by suitably
qualified and competent persons to en
sure safety.
Repairs and other work by unqualified
persons could be dangerous and the
manufacturer will not be held responsi
ble.
The appliance is only completely
isolated from the electricity supply
when:
the mains fuse is withdrawn
–
or the screw-out fuse is removed (in
–
countries where this is applicable)
– it is switched off at the isolator or at
the wall socket and the plug removed.
Do not pull on the cable, only on the
plug.
Do not connect the appliance to
the mains electricity supply by an
extension lead. Extension leads do not
guarantee the required safety of the appliance, (e.g. danger of overheating).
-
-
Never open the casing of the appli
ance.
Tampering with electrical connections
or components is highly dangerous to
the user and can cause operational
faults.
8
-
Page 9

Warning and Safety instructions
This appliance must not be in
stalled over a dishwasher, washing
machine, tumble dryer, refrigerator,
freezer or fridge-freezer. The high tem
peratures radiated by hobs could dam
age the appliance below.
If the hob is built in above an oven,
the connection cable for the hob
must not come into contact with the
oven housing.
Due to the high temperatures radi
ated it is not advisable to fit a
drawer directly underneath the hob.
The hob may only be fitted above
kitchen units with fixed front panels. An
additional interim shelf should be fitted
underneath the hob.
This equipment is not designed for
maritime use or for use in mobile
installations such as caravans, aircraft
etc. However it may be suitable for
such usage subject to a risk assessment of the installation being carried
out by a suitably qualified engineer.
-
Use
Caution, danger of burning. High
temperatures are produced by the
hob cooking zones.
-
Keep children away from the appli
ance. The cooking zones are hot
when is use. Supervise use of the hob
by the elderly or infirm.
-
There is a danger of burning until
the residual heat indicator goes
out.
Do not store anything which might
arouse a child’s interest in storage
areas above or next to the appliance.
Otherwise they could be tempted into
climbing onto the appliance with the
risk of burning themselves.
Use heat-resistant pot holders or
gloves when handling hot pots and
pans. Do not let them get damp or wet,
as this causes heat to transfer through
the material more quickly with the risk
of burning yourself.
-
Keep all pans out of reach of chil
dren. Turn pan handles inwards
away from the edge of the hob. Danger
of burning and scalding.
Special hob guards are available from
good retail outlets.
-
9
Page 10

Warning and Safety instructions
Do not heat up unopened tins of
food on the hob as pressure will
build up in the tin and it can explode.
This could result in injury and scalding
or damage.
Do not use the hob as a resting
place for anything else. This could
lead to a danger of the article begin
ning to melt or catching fire, if residual
heat were still present or if the hob were
to be switched on inadvertently.
Do not cover the hob with a cloth,
household foils or other similar ob
jects. There is a danger of this catching
fire if the appliance is switched on.
Do not leave the appliance unat-
tended when cooking with oils and
fats as these are a fire hazard if allowed
to overheat.
If oil or fat does catch fire despite
this do not attempt to put out the
flames with water. Use a suitable fire
blanket or fire extinguisher.
Do not flambé under a cooker
hood. The flames could set the
cooker hood on fire.
-
Do not use the appliance to heat
up the room. Due to the high tem
peratures radiated, objects left near the
hob could catch fire.
In the event of any breakages or
cracks occurring in the ceramic
hob it must be switched off immediately
and disconnected from the electricity
supply. Contact the Service Depart
ment. Continued use would be danger
ous as liquids etc. boiling over could
penetrate to the electrical components
through any crack and cause a short
circuit. Contact the Service Depart
ment.
Do not drop anything on the ce-
ramic hob. Even a light object such
as an egg cup, could cause damage in
certain circumstances.
Do not use plastic or aluminium foil
containers. These melt at higher
temperatures and could damage the
appliance.
Never heat up empty pans as they
could get damaged.
-
-
-
-
10
Page 11

Warning and Safety instructions
Do not allow either solid or liquid
sugar or pieces of plastic or
alumium foil to get on to the ceramic
hob when it is hot. If this is allowed to
cool before the hob has been cleaned,
the ceramic surface will be susceptible
to pitting or even cracking. If this
should occur, switch off the hob and
carefully scrape the sugar or other resi
due thoroughly from the cooking zone
while it is still hot, using a shielded
scraper blade. Take care not to burn
yourself.
To prevent the risk of spillages etc.
burning on, remove any soiling as
quickly as possible and ensure that pan
bases are clean, dry and free of
grease.
Do not use any pots or pans on the
ceramic hob with bases with pronounced edges or ridges, or which are
poorly enamelled.
These could scratch or scour the hob
surface permanently. Copper based
pans can be used without any risk of
abrasion. However, heat transmission
may be reduced if, after heating, the
pan doesn’t sit flatly on the ceramic sur
face.
When using kitchen appliances
connected to sockets near the hob,
ensure that the cable cannot come into
contact with hot cooking zones. This
could melt the cable insulation and be
dangerous. Danger of electric shock.
Always ensure that food is suffi
ciently cooked or reheated. Many
factors will affect the overall cooking
time, including the size and amount of
food, its initial temperature, changes to
recipe and the shape and size of cook
ing container.
Some foods may contain micro organ
isms which are only destroyed by thor
ough cooking, therefore when cooking
or reheating foods, e.g. poultry, it is
particularly important that food is fully
cooked through (at more than 70 °C for
more than 10 minutes). If in doubt se
lect a longer cooking or re-heating time.
It is essential to ensure that food has
been evenly and sufficiently heated and
to check that it is thoroughly cooked.
This can be achieved by stirring and/or
turning the food during cooking.
Under no circumstances use a
steam-cleaning appliance to clean
the ceramic hob. Pressurised steam
could cause permanent damage to the
surface and to components, for which
the manufacturer cannot accept
responsiblitity.
-
There is a seal between the hob
frame and worktop and between
the frame and the ceramic plate. Do not
use any sharp pointed object, such as
a knife, to clean these seals as they
could become damaged.
-
-
-
-
-
11
Page 12

Warning and Safety instructions
Disposal of your old appliance
In countries where there are areas
which may be subject to infestation
by cockroaches or other vermin, pay
particular attention to keeping the
appliance and its surroundings in a
clean condition at all times. Any
damage which may be caused by
cockroaches or other vermin will not
be covered by the appliance guar
antee.
Accessories
If you have used the shielded razor
blade for cleaning make sure the
blade is retracted after use. Danger of
injury.
from the power supply. Cut off and ren
der any plug useless. Cut off the cable
directly behind the appliance to prevent
misuse. This should be done by a com
petent person.
-
The manufacturer cannot be held lia
ble for damage caused by non-com
pliance with these Warning and
Safety instructions.
Before throwing an old appliance
away, switch off and disconnect it
-
-
-
-
12
Page 13

Operation
Preparation for use
Before using for the first time
Before using for the first time, clean the
appliance with a damp cloth only and
then wipe dry.
Do not use washing up liquid on the
ceramic surface as it can leave a
blue sheen on the surface which
may be difficult to remove.
Cooking zone diameters
The cooking zones are clearly marked
on the hob. Only the area of the zone
that is switched on heats up. The rest of
the hob surface remains relatively cool.
Extended area
(only for KM 423)
Some cooking zones can be enlarged.
These are the extended cooking zone
x (rear right) and the vario cooking
zone n (front left).
The relevant cooking zone control is
used to switch on the vario / extended
area.
Turn the control in a clockwise direc
tion only until you feel a resistance.
Then turn it back. Do not force it
past this point as the control will be
damaged.
^ To switch on the extended or vario
cooking zone, turn the relevant control beyond setting 12.
^ Then turn the control back to the set-
ting required.
-
Turning the control back to "0" switches
off:
–
the cooking zone, and
–
the extended / vario area.
13
Page 14

Operation
Residual heat indicators
Each cooking zone has a residual heat
indicator.
After switching off, the residual heat in
dicator light (a dot in the display) stays
on as long as the cooking zone remains
hot.
If residual heat indicators are on, do
not touch the cooking zones or
place any heat sensitive object on
them. Danger of burning. N.B. If
there is a power cut the indicator
light will go out, even if the cooking
zone is still hot.
Temperature limiter
The cooking zones have a temperature
limiter which switches off the cooking
zones before the ceramic surface over
heats.
The temperature limiter switches the el
ements back on again when the tem
perature has cooled to a level which
cannot damage the ceramic surface.
The temperature limiter is activated for
example when pans are unsuitable,
e.g. those with an uneven base, pans
that are too small, or when a cooking
zone is switched on but there is no pan
on it.
-
-
-
14
Page 15

Operation
Cooking zone controls
The controls for the cooking zones reg
ulate the heat output and are used to
select the heat setting.
Turn the control in a clockwise direc
tion only until you feel a resistance,
and then turn it back. Do not force it
past this point as this will damage
the control.
Using the hob
^ Place the pan containing the food to
be cooked on the cooking zone. Use
a lid.
^ Choose a high setting for boiling/fry-
ing.
^ Switch to a lower setting to continue
cooking, when steam is visible at the
rim of the lid.
Switching to a lower setting at the right
time:
–
avoids food boiling over,
–
food sticking, or burning,
–
and saves electricity.
Suggested cooking zone settings
-
Cooking process Setting
Melting butter,
Chocolate
Dissolving gelatine
Preparing yoghurt
-
Keeping food warm
Warming small quantities of
food/liquid
Thickening of sauces containing
egg yolk, butter
Omelettes
Defrosting
Cooking rice, pasta, porridge,
Steaming fruit, vegetables, fish
Cooking broths, pulse soups
Braising meat, fish, vegetables
Cooking dumplings, potatoes,
soups
Preparing jams, jellies, stewed
fruit
Cooking large quantities of stew
and dumplings
Frying fish,
Frying cutlets 8
Frying pancakes,
liver, sausages, fried eggs 8 - 10
Searing large quantities
of meat
Frying steaks, potato or
fish cakes
Bringing to the boil 12
1 - 2
2 - 3
3 - 5
4 - 6
7
10 - 12
These figures, which evisage appprox. 4 help
ings, should only be taken as a guide. With deep
pans, large quantities, or without the lid on, a
higher setting is needed. With smaller quantities
select a lower setting.
-
15
Page 16

Operation
Tips on saving energy
For optimum energy consumption
–
during cooking, only pans which
have flat or very slightly concave
bases when they are cold, should be
used. When the pan is hot, the base
should rest evenly on the ceramic
surface.
Uneven bases will lengthen cooking
time. Check for suitability when pur
chasing new pans.
– Check that the diameter of the pan
base is as wide or slightly wider than
the cooking zone so that heat is not
lost unnecessarily.
Often the maximum diameter quoted
by manufacturers refers to the diameter of the top rim of the pot or pan.
The diameter of the base (generally
smaller) is more important.
Use a pan lid whenever possible to
–
minimise heat loss.
-
When cooking for a long time, switch
the cooking zone off a short while
before the end of the cooking time.
In this way, use is make of the residual heat.
16
Page 17

Important notes
Always place a pan centrally on the
cooking zone before switching on the
appliance to save energy.
The cooking zone and the pan base
should be should be clean and dry.
This saves extra cleaning later on.
Take care before starting to cook
that there is no grit or sand on the
surface of the hob.
This would scratch the surface, espe
cially if a pan was pushed across the
hob.
Do not use any pots or pans where
the base has ridges, a pronounced
edge or is poorly enamelled.
These could also cause scratches.
Operation
Aluminium or stainless steel pans
with aluminium bases can leave
marks with a metallic sheen on the
ceramic surface.
Clean these away at the earliest oppor
tunity using a special proprietary clean
ing agent, (see Section on Cleaning
and Care).
-
Do not allow either solid or liquid
sugar or pieces of plastic or
alumium foil to get on to the cooking
zones when they are hot.
If this should occur, switch off the hob
and carefully scrape the sugar or other
residue thoroughly from the cooking
zone while it is still hot, using a shielded
scraper blade. Take care not to burn
yourself.
-
-
Do not push any enamelled objects,
such as baking trays or roasting
trays around on the hob surface.
These could scratch the surface.
If this is allowed to cool before the hob
has been cleaned, the ceramic surface
will be susceptible to pitting or even
cracking.
17
Page 18

Cleaning and care
Ceramic hobs
Treat the surface of your ceramic hob
with the same care as any other glass
surface.
Never use scouring agents, pads,
abrasive cleaning agents, or strong
cleaners e.g. oven sprays, stain or
rust removers, as these could dam
age the surface of the appliance.
There is a seal between the hob
frame and worktop and between the
frame and the ceramic surface. Do
not use any sharp pointed object,
such as a knife, to clean these seals
as they could become damaged. After cleaning the hob must be thoroughly dried with a soft cloth. This
will prevent a build-up of limescale
deposits.
To prevent the risk of spillages etc.
burning on, remove any soiling as
quickly as possible and ensure that
pan bases are clean, dry and free of
grease.
Clean after each use
Any minor spills which have not
dried on can be wiped off with a damp
cloth or sponge. Non-abrasive liquid
cleaners can also be used.
If washing up liquid or a similar cleaner
is used, light blue staining might occur.
These stains can be removed with a
proprietary ceramic hob cleaning
agent, although it may take several ap
plications.
Hardened spills should be carefully
scraped off using a shielded scraper
blade.
The hob surface should then be
cleaned with a damp cloth or sponge.
-
E-cloth
A microfibre "E-Cloth" is available from
the Miele UK Spare Parts Department,
Part Number 98013530, which is suit
able for cleaning surfaces such as
stainless steel, glass, plastic and
chrome without the use of chemicals.
18
-
Page 19

Cleaning and care
Removing marks
Light marks with a metallic sheen
(aluminium deposits) on the hob sur
face can be removed once the hob has
cooled down by using a suitable propri
etary cleaner.
Limescale deposits (caused for exam
ple by water boiling over, or damp pan
bases) can be removed with vinegar or
a proprietary hob cleaner.
-
Removal of sugar, or syrups,
plastic or aluminium foil
Switch off the hob and carefully
scrape the sugar or other residue
thoroughly from the cooking zone
while it is still hot, using a shielded
scraper blade. Take care not to burn
yourself.
When the hob is cool, clean with a proprietary cleaner.
Cleaning and conditioning
agents
There are proprietary cleaners on the
market for cleaning ceramic hobs.
Follow the manufacturer’s instruc
tions. Do not use on hot cooking
zones. Remove every trace of
cleaner from the hob with a damp
cloth. It could have an adverse ef
fect on the hob when heated up.
Conditioning agents
Some cleaners incorporate a silicone
ingredient which acts as a protective
film on the hob. It makes the hob surface smoother and prevents water and
soiling adhering to the surface.
However, cooking at high temperatures
reduces the effect and the cleaner
needs to be reapplied for renewed effect.
By always cleaning the ceramic surface
with one of these special cleaners you
will help to avoid the damage caused
by sugar and syrups and aluminium foil
deposits.
-
-
19
Page 20

Problem solving guide
Installation work and repairs may
only be carried out by suitably quali
fied and competent persons to en
sure safety.
Repairs and other work by unquali
fied persons could be dangerous
and the manufacturer will not be
held responsible.
The following minor problems can be
corrected without contacting the Miele
Service Department:
What to do if ... . .
. . . there is a slight smell when the
hob is heated for the very first time.
This is not a fault. Residual moisture in
the insulation is drying out.
. . . the cooking zones do not heat up
after being switched on.
-
-
. . . the food in the pan hardly heats
up or does not heat up at all.
Check whether
a pan with a heat retaining base is
–
being used.
The warmth from this type of base
only transfers slowly to the food.
the pan is too large in relation to the
–
cooking zone and an extended zone
has not been switched on.
Check whether the mains fuse has
blown (call a qualified electrician or the
Service Department if it has. See "After
Sales Service").
20
Page 21

After sales service
In the event of any faults which you cannot remedy yourself, please contact
Your Miele Dealer
–
or
The nearest Miele Service Department (see back cover for address).
–
When contacting the Service Department, please quote the model and serial num
ber of your appliance both of which are given on the data plate.
Please note that telephone calls may be monitored and recorded to improve
our service.
Data Plate
Space in which to stick the extra data plate supplied with the appliance. Ensure
that the model number is the same as the one on the front of these operating instructions.
-
21
Page 22

Installation
Fitting instructions
The necessary connection data and
model name are located on the hob
data plate.
Ensure that these match the household
mains supply.
When contacting the Service Depart
ment, please quote the voltage, model
and serial numbers given on the data
plate.
Fit wall units and extractor hood be
fore fitting the hob, to avoid damag
ing the ceramic surface.
The veneer or laminate coatings of
worktops (or adjacent kitchen
units) must be treated with 100°C
heat-resistant adhesive which will not
dissolve or distort.
This appliance must not be in-
stalled over a dishwasher, washing
machine, tumble dryer, refrigerator,
freezer or fridge-freezer. The high tem
peratures radiated by hobs could dam
age the appliance below.
If the hob is built in above an oven,
the connection cable for the hob
must be positioned in such a way that it
cannot come into contact with the oven
housing.
-
-
-
Due to the high temperatures radi
ated it is not advisable to fit a
drawer directly underneath the hob.
The hob may only be fitted above
kitchen units with fixed front panels. An
additional interim shelf should be fitted
underneath the hob.
When installing a hob there may be
a wall at the back and a wall or tall
unit at one side. On the other side there
must not be a unit or wall which stands
higher than the hob.
-
Due to the high temperatures radi
ated by the hob, it is essential that a
minimum distance of 50 mm is main
tained between the worktop cut-out
and
- adjacent kitchen units
(e.g. tall unit)
- the rear wall.
-
-
-
22
Page 23

Installation
Worktop cut-out
KM 420
KM 423
Cut the worktop according to the di
^
mensions in the relevent diagram,
keeping within the tolerances given.
Ensure that there is a clearance
^
depth of 54 mm over a width of
73 mm beneath the switching unit.
A minimum safety distance of 50 mm
^
must be maintained between the hob
and the back wall and a side wall or
tall unit to the right or left of the hob.
Seal the cut surfaces with a suitable
^
sealant to avoid swelling caused by
moisture. The materials used must be
heat resistant.
-
23
Page 24

Installation
Installation
a Sealing strip
b Hob
c Worktop
d Clamp
e Screw
^ Loosen the screws e.
^
Set the hob b in the cut-out and cen
tre it.
^
Turn the clamps d outwards and
tighten the screws e.
^
Check that the hob unit b fits tightly
in the worktop.
Under no circumstances should
sealant find its way between the
frame of the top part of the hob and
the worktop.
This could cause difficulties if the
hob ever needs to be taken out for
servicing and possibly damage the
hob frame or the worktop.
The sealing strip under the edge of the
-
top part of the hob provides a sufficient
seal for the worktop.
24
Page 25

All electrical work should be carried
out by a suitably qualified and com
petent person, in strict accordance
with national and local safety regula
tions.
Electrical connection U.K.
When switched off there must be an
all-pole gap of at least 3 mm in the iso
-
lator switch (including switch, fuses and
relays according to EN 60 335).
-
Important U.K.
-
Installation, repairs and other work
by unqualified persons could be
dangerous. The manufacturer can
not be held responsible for un
authorised work.
Ensure power is not supplied to the
appliance while installation work is
being carried out.
The appliance must only be operated when built-in. This is to ensure
that all electrical parts are shielded.
Live parts must not be exposed.
The voltage,rated load and fusing are
given on the data plate. Ensure that
these match the household mains sup
ply.
Connection should be made via a suit
able isolator which complies with na
tional and local safety regulations, and
the On/Off switch should be easily ac
cessible after the appliance has been
built in.
For extra safety it is advisable to install
a residual current device (RCD), with a
trip current of 30 mA (in accordance
with DIN VDE 0664, VDE 0100 Section
739).
-
-
-
The appliance is supplied for connec
tion to an a.c. single phase 230-240 V,
50 Hz supply with a 3-core cable.
The wires in the mains lead are col
oured in accordance with the following
code:
Green/yellow = earth
Blue = neutral
Brown = live
WARNING
THIS APPLIANCE MUST BE
EARTHED
Important
The electrical safety of this appliance
can only be guaranteed when continu
ity is complete between the appliance
and an effective earthing system, which
complies with local and national regula
tions. It is most important that this basic
safety requirement is tested by a quali
fied electrician. The manufacturer can
not be held responsible for the conse
quences of an inadequate earthing
system such as an electric shock.
The manufacturer can assume no re
sponsibility for damage which is the di
rect or indirect result of incorrect instal
lation or connection.
-
-
-
-
-
-
-
-
-
-
252627
Page 26

Page 27

Page 28

Alteration rights reserved 04/4701
This paper consists of cellulose which has been bleached without the use of chlorine.
 Loading...