

Page 1
Operating and Installation
Instructions
Ovens
H 4744 B, H 4746 B
To prevent accidents
and machine damage,
read these instructions
before
installation or use.
en-CA
M.-Nr. 07 964 051
Page 2

Contents
IMPORTANT SAFETY INSTRUCTIONS. . . . . . . . . . . . . . . . . . . . . . . . . . . . . . . . . 4
Guide to the oven. . . . . . . . . . . . . . . . . . . . . . . . . . . . . . . . . . . . . . . . . . . . . . . . . . 8
Guide to the display. . . . . . . . . . . . . . . . . . . . . . . . . . . . . . . . . . . . . . . . . . . . . . . . 9
Function selector ...................................................9
Temperature selector ...............................................9
Touch controls ....................................................10
Display ..........................................................11
Triangle V in the display .........................................11
Oven accessories . . . . . . . . . . . . . . . . . . . . . . . . . . . . . . . . . . . . . . . . . . . . . . . . 12
Roasting pan, wire rack ..........................................12
Slide opener ...................................................12
Locking the oven . . . . . . . . . . . . . . . . . . . . . . . . . . . . . . . . . . . . . . . . . . . . . . . . . 13
% Settings . . . . . . . . . . . . . . . . . . . . . . . . . . . . . . . . . . . . . . . . . . . . . . . . . . . . . . 14
Changing the status of a setting ......................................15
Before using the oven . . . . . . . . . . . . . . . . . . . . . . . . . . . . . . . . . . . . . . . . . . . . . 16
To set the time of day for the first time..................................16
Heat the oven.....................................................17
Operation . . . . . . . . . . . . . . . . . . . . . . . . . . . . . . . . . . . . . . . . . . . . . . . . . . . . . . . 18
Selecting a function ................................................18
Cooling system .................................................18
Adjusting the oven temperature .......................................19
Temperature indicator ...........................................19
Pre-heating, "Rapid Heat" function ....................................20
Delay Start T / S.................................................21
Duration ......................................................21
End time ......................................................22
At the end of cooking ............................................23
To check and change an entered time...............................24
To delete an entered time.........................................24
Setting the timer. . . . . . . . . . . . . . . . . . . . . . . . . . . . . . . . . . . . . . . . . . . . . . . . . . 25
Setting the clock . . . . . . . . . . . . . . . . . . . . . . . . . . . . . . . . . . . . . . . . . . . . . . . . . 26
Guide to the functions. . . . . . . . . . . . . . . . . . . . . . . . . . . . . . . . . . . . . . . . . . . . . 27
2
Page 3

Contents
Baking . . . . . . . . . . . . . . . . . . . . . . . . . . . . . . . . . . . . . . . . . . . . . . . . . . . . . . . . . . 28
Baking functions ..................................................28
Baking tips .......................................................28
Roasting . . . . . . . . . . . . . . . . . . . . . . . . . . . . . . . . . . . . . . . . . . . . . . . . . . . . . . . . 33
Roasting functions .................................................33
Roasting tips .....................................................33
Broiling . . . . . . . . . . . . . . . . . . . . . . . . . . . . . . . . . . . . . . . . . . . . . . . . . . . . . . . . . 36
Broiling functions ..................................................36
Broiling tips ......................................................36
Dehydrate . . . . . . . . . . . . . . . . . . . . . . . . . . . . . . . . . . . . . . . . . . . . . . . . . . . . . . . 40
Proof . . . . . . . . . . . . . . . . . . . . . . . . . . . . . . . . . . . . . . . . . . . . . . . . . . . . . . . . . . . 41
Defrost . . . . . . . . . . . . . . . . . . . . . . . . . . . . . . . . . . . . . . . . . . . . . . . . . . . . . . . . . 42
Defrosting tips ....................................................42
Cleaning . . . . . . . . . . . . . . . . . . . . . . . . . . . . . . . . . . . . . . . . . . . . . . . . . . . . . . . . 43
Front of appliance .................................................43
PerfectClean .....................................................44
Removing the oven door..........................................46
Removing the runners............................................48
Removing the back panel.........................................49
Lowering the upper heating element ................................49
Catalytic liners ....................................................50
Changing the light bulb. . . . . . . . . . . . . . . . . . . . . . . . . . . . . . . . . . . . . . . . . . . . 51
Frequently asked questions . . . . . . . . . . . . . . . . . . . . . . . . . . . . . . . . . . . . . . . . 52
Technical Service. . . . . . . . . . . . . . . . . . . . . . . . . . . . . . . . . . . . . . . . . . . . . . . . . 53
Optional accessories. . . . . . . . . . . . . . . . . . . . . . . . . . . . . . . . . . . . . . . . . . . . . . 54
Installation instructions . . . . . . . . . . . . . . . . . . . . . . . . . . . . . . . . . . . . . . . . . . . 57
Caring for the environment. . . . . . . . . . . . . . . . . . . . . . . . . . . . . . . . . . . . . . . . . 58
Disposal of the packing materials .....................................58
Disposal of an old appliance .........................................58
Electrical connection. . . . . . . . . . . . . . . . . . . . . . . . . . . . . . . . . . . . . . . . . . . . . . 59
Appliance and Cut-out Dimensions . . . . . . . . . . . . . . . . . . . . . . . . . . . . . . . . . . 60
Installing the oven . . . . . . . . . . . . . . . . . . . . . . . . . . . . . . . . . . . . . . . . . . . . . . . . 62
3
Page 4
IMPORTANT SAFETY INSTRUCTIONS
Use
This appliance is intended for
residential use only.
Only use the appliance for its
intended purpose.
This appliance complies with current
safety requirements. Improper use
of the appliance can lead to
personal injury and material
damage.
Read all instructions before installing
or using the oven for the first time.
Keep these operating instructions in
a safe place and pass them on to
any future user.
The appliance is intended for
~
domestic use only: cooking, baking,
roasting, broiling, defrosting and
heating of food.
It is not designed for industrial or
laboratory use.
Do not use the appliance to store or
~
dehydrate flammable materials. This is
a fire hazard.
Persons who lack physical, sensory
~
or mental abilities, or experience with
the appliance should not use it without
supervision or instruction by a
responsible person.
Children
Children should not be left
~
unattended in an area where the
appliance is in use. Never allow
children to hang or lean on any part of
the appliance.
Children should not use the unit
~
without supervision unless its operation
has been sufficiently explained so they
can run it safely. Children must be able
to recognize potential hazards or
improper operation.
Do not allow children to touch or
~
play in, on or near the oven when it is in
operation. The oven gets hot at the
oven door glass, the vapor vent, the
handle and the operating controls.
Danger of burns.
4
Page 5

IMPORTANT SAFETY INSTRUCTIONS
Installation
Before installation, make sure that
~
the voltage and frequency listed on the
data plate correspond with the
household electrical supply. This data
must correspond to prevent injury and
machine damage. Consult a qualified
electrician if in doubt.
Be certain your appliance is
~
properly installed and grounded by a
qualified technician.
To guarantee the electrical safety of this
appliance, continuity must exist
between the appliance and an effective
grounding system. It is imperative that
this basic safety requirement be met. If
there is any doubt, have the electrical
system of the house checked by a
qualified electrician.
The oven is not to be operated until
~
it has been properly installed within
cabinetry.
Oven use
WARNING: Ovens can produce
,
high temperatures that can cause
burns.
Prevent children from touching the
~
appliance while in use.
Use heat-resistant potholders when
~
placing items in the oven, turning them,
or removing them from the oven. The
upper heating element and oven racks
can become very hot and cause burns.
To prevent burns, always place
~
oven racks at their desired height while
the oven is cool.
Open the door carefully to allow hot
~
air or steam to escape before placing
or removing food.
To prevent burns, allow the heating
~
element to cool before cleaning by
hand.
Installation, maintenance and repair
~
work should be performed by an
authorized service technician. Work by
unqualified persons could be
dangerous and may void the warranty.
Before installation or service,
~
disconnect the power supply to the
work area by removing the fuse,
"tripping" the circuit breaker, or shutting
off the power main.
The door gasket is essential for a
~
good seal. Care should be taken not to
rub, damage or move the gasket. The
door gasket should only be cleaned
with a solution of warm water and soap.
Only clean parts listed in this
~
manual.
5
Page 6

IMPORTANT SAFETY INSTRUCTIONS
Caution: Heating elements may be
~
hot even though they are not glowing.
During and after use, do not let clothing
or other flammable materials come in
contact with heating elements or interior
surfaces of the oven until they have had
sufficient time to cool. External parts of
the oven such as the door glass, vents,
and the control panel can become hot.
Do not block any vent
~
openings.
Aluminum foil should not be used to
~
line the oven floor. To avoid damage,
do not place pots, pans or baking
sheets directly on the oven floor.
Do not let metal objects (aluminum
~
foil, pans) come in contact with the
heating element.
Do not slide pots or pans on the
~
oven floor. This could scratch and
damage the surface.
Do not lean, sit, or place heavy
~
items on the open oven door.
Do not heat unopened containers of
~
food in the oven, pressure may build up
and cause them to explode.
Never add water to food on a hot
~
tray or pan or directly onto food in a hot
oven. The steam created could cause
serious burns or scalds.
This oven must only be used for
~
cooking. Do not use it as a dryer, kiln,
dehumidifier, etc. Fumes or vapors
given off by glues, plastics or
flammable liquids and materials could
be hazardous.
Never store flammable liquids and
~
materials in, above or under an oven, or
near cooking surfaces.
When baking frozen pizzas or pies,
~
place them on the rack lined with
parchment paper. Do not use the
baking tray or the roasting pan for
frozen foods with a large surface area.
The tray or pan could become warped
and difficult to remove from the oven
when hot. Frozen food like french fries,
fish sticks, chicken fingers etc. can be
baked on the baking tray.
Always check that food is sufficiently
~
heated. The time required varies
depending on a number of factors,
such as initial temperature, quantity,
type and consistency of the food, and
changes in the recipe. Germs present
in the food are killed off only at a
sufficiently high temperature (> 158° F /
70 °C) and after a sufficiently long time
(> 10 Min.). Select a longer cook time if
you are unsure if food is thoroughly
heated. To ensure temperature is
distributed evenly, stir and rotate food
occasionally before serving.
6
Page 7

IMPORTANT SAFETY INSTRUCTIONS
General notes
Do not use a steam cleaner to clean
~
the oven. Steam could penetrate
electrical components and cause a
short circuit.
Children should not be left alone or
~
unattended in an area where an oven is
in use. Never allow children to sit or
stand on any part of the oven.
Caution: Do not store items of interest
to children in cabinets above an oven.
Children climbing on the oven to reach
these items could be injured.
Do not leave the oven unattended
~
when cooking with oils or fats, they are
a fire hazard if overheated.
Do not use water on grease fires!
~
Smother the fire with a properly rated
dry chemical or foam fire extinguisher.
Be aware of loose fitting or hanging
~
garments while operating the cooktop,
they present a fire hazard.
It is recommended to cover all
~
cooked food that is left in the oven to
be kept warm. This will prevent
moisture from condensing on the
interior of the oven.
Be careful when using alcoholic
~
beverages like rum, whiskey, wine etc.
for baking or roasting. The alcohol
evaporates at high temperatures but
may in rare circumstances combust on
the hot heating elements.
SAVE THESE INSTRUCTIONS
AND REVIEW THEM
PERIODICALLY
Do not use the oven to heat the
~
room.
Make certain that the power cords of
~
small appliances do not come in
contact with or get caught in the oven
door.
Use only dry, heat resistant
~
potholders. Moist or damp potholders
used on hot surfaces may result in
steam burns. Do not let potholders
come in contact with oils. Do not
substitute towels or other bulky items
for potholders.
7
Page 8
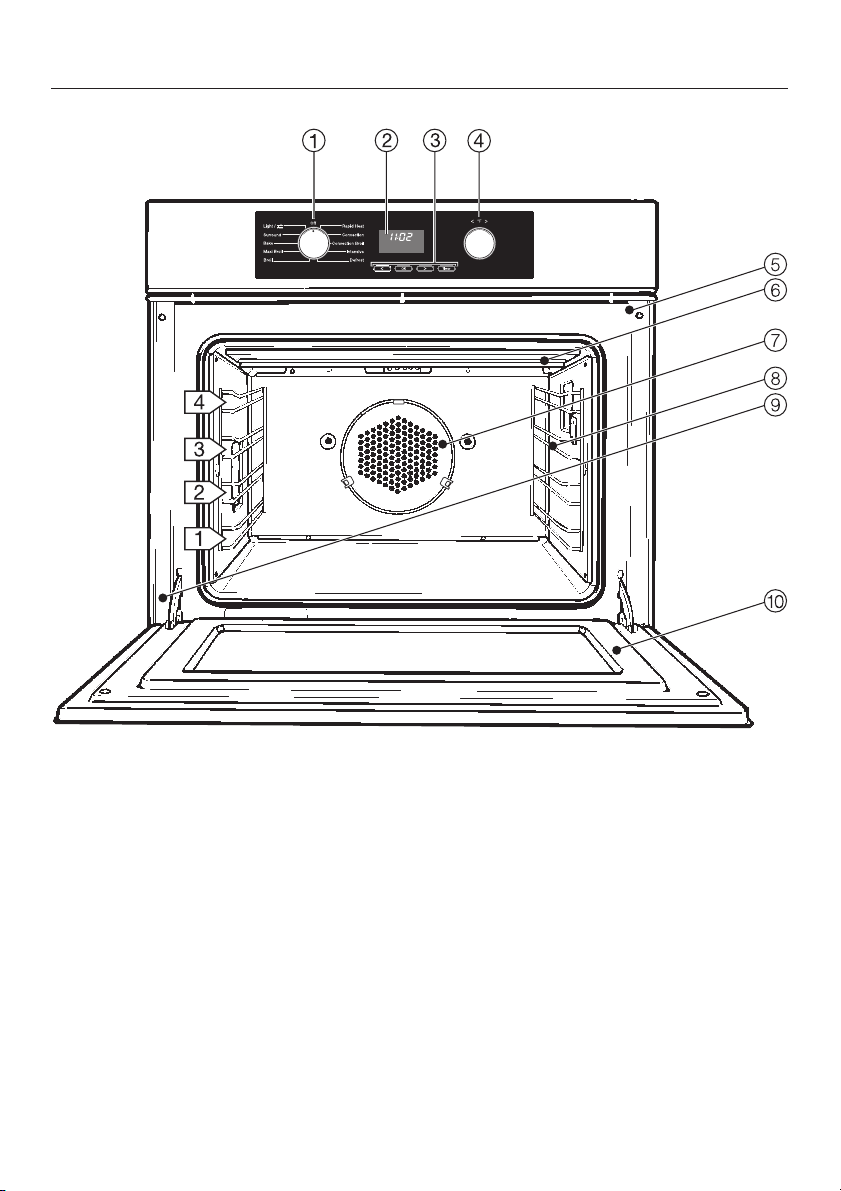
Guide to the oven
a Function selector
b Display
c Touch controls "V", "OK", "W", "Timer"
d Temperature selector
e Door contact switch *
f Upper heating element
g Convection fan
h Non-tip, four level runners
i Data plate
j Oven door
* This switch shuts off the heating element and convection fan when the door is
opened during use.
8
Page 9
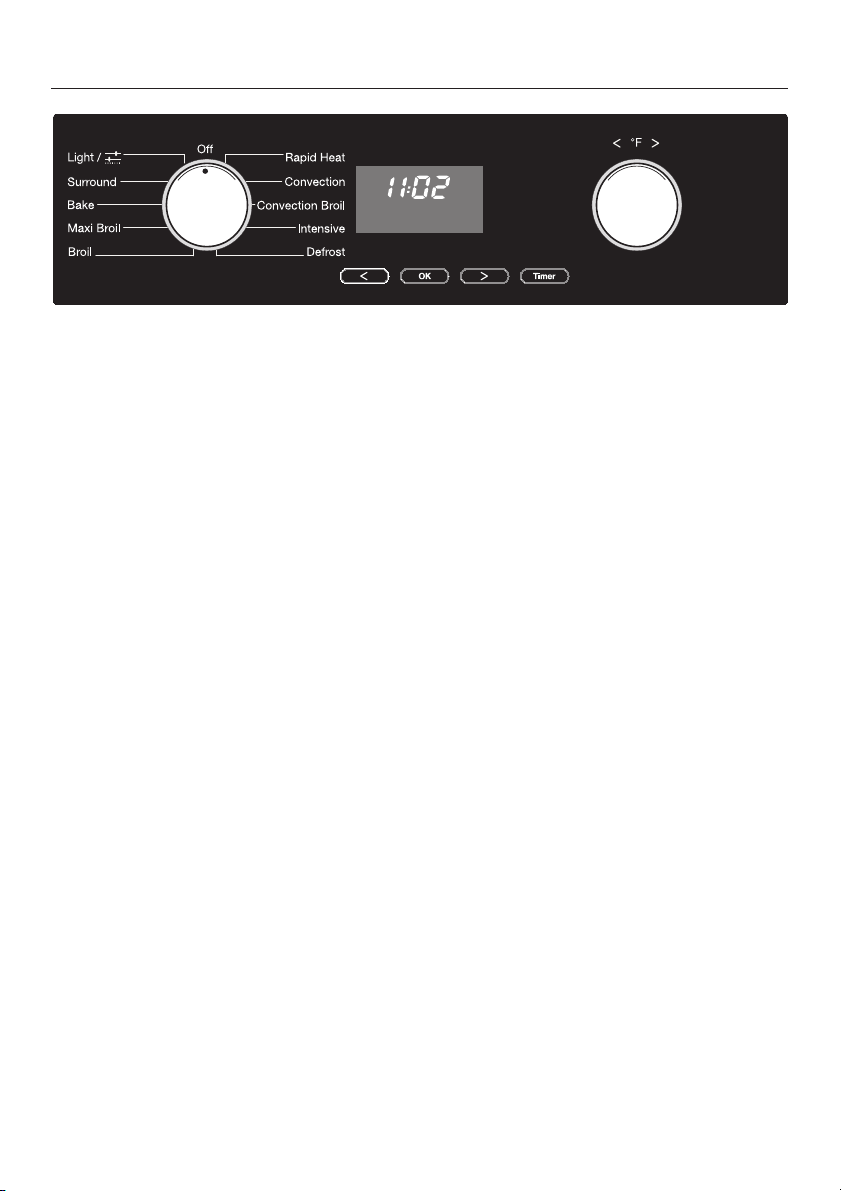
Guide to the display
Function selector
The left-hand selector is used to select
the function.
It can be turned clockwise or counter
clockwise.
– Rapid Heat
– Convection Bake
– Convection Broil
– Intensive
– Defrost
– Surround
– Bake
–
Maxi Broil
–
Broil
–
Light
For switching on the oven light
independently. This can be useful
when cleaning the oven.
–
Settings
For altering the settings of the
appliance.
Temperature selector
The right-hand selector V °F W is used
to
select the temperature.
–
– enter times (as an alternative to using
the V or W touch controls).
It can be turned clockwise to increase
the value or counter clockwise to
reduce the value.
The temperature can be displayed in °F
or °C, see "Settings - P7".
9
Page 10
Guide to the display
Touch controls
The oven is operated by electronic
touch controls. Every touch of the
controls is confirmed by a tone.
The tone can be turned off.
See "Settings - P4".
Use
OK
W
V – For moving triangle V in the
Timer – For setting a timer
The following will change each time "V"
or "W" is touched
For calling up the functions in
–
the display. Triangle V will
appear in the display.
For confirming an entry.
–
For moving triangle V in the
–
display to the right.
– For increasing time entries.
display to the left.
– For decreasing time entries.
independent of an oven
function, e.g. for boiling
eggs.
–
Duration "T" and End time "S"in
increments of one minute,
–
the Timer "N" at first in increments of
5 seconds and then in increments of
one minute.
Touching and holding down the control
longer speeds up the change in the
display.
10
Page 11

Display
Depending on the position of the
function selector and/or touching of a
control, the following symbols appear:
Guide to the display
6 Temperature
u Time of day
T Duration
S End time
0 System lock
3 Temperature indicator
N Timer
h Hours
min Minutes
Triangle V in the display
When a control is touched, the
symbols of functions which can be
altered will light up in the display.
These will vary depending on program.
Touch the "V"or"W" control repeatedly
until triangle V is underneath the
symbol of the required function.
3
N
I2:00
6 m TS 0
V
325
6 m TS
V
h
min
Then select the function using the "OK"
control.
Triangle V will flash for approx.
15 seconds.
You can only make entries with the
"V"or"W" controls while the triangle
V is flashing.
If the triangle has stopped flashing,
you will need to select the function
again with the "OK" control.
11
Page 12
Oven accessories
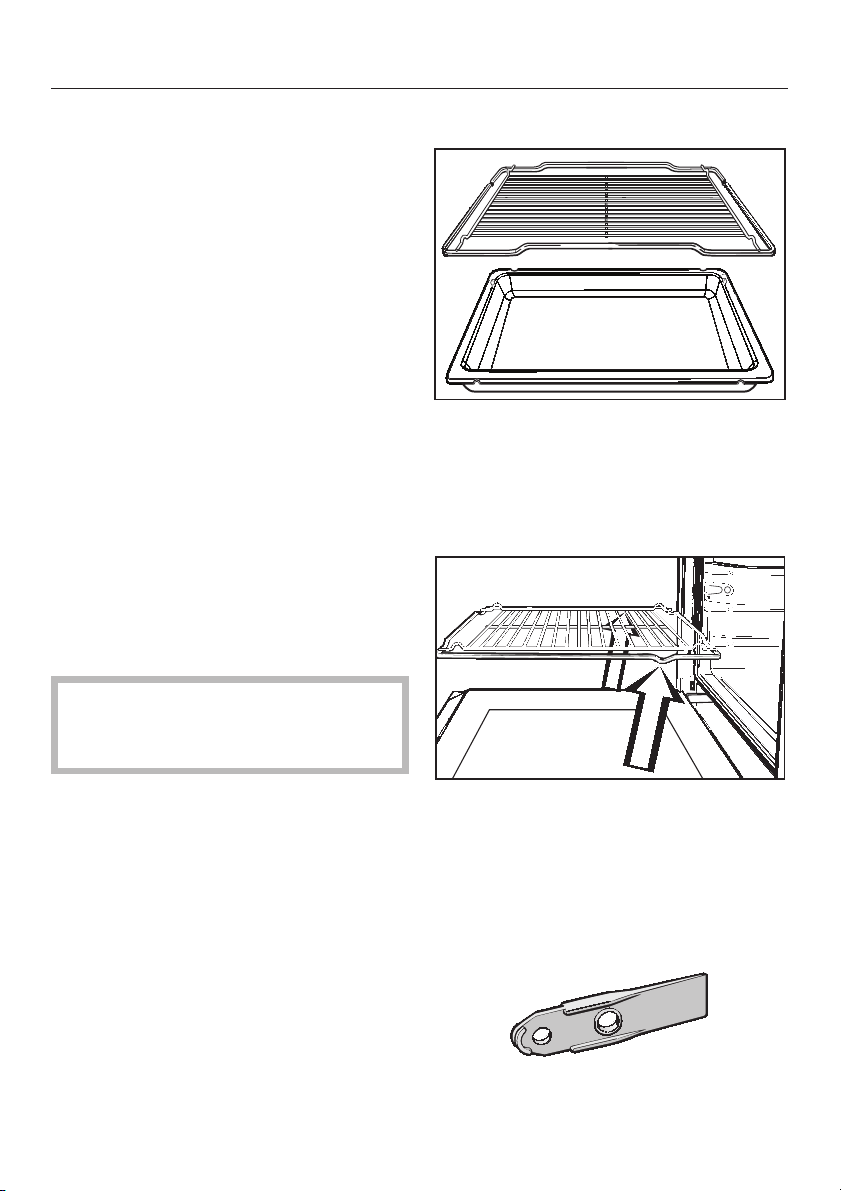
Roasting pan, wire rack
The oven comes equipped with a
roasting pan and wire racks. These
pieces are to be slid into the runners on
either side of the oven.
The roasting pan is ideal for catching
drippings from meat or poultry roasted
or broiled directly on the rack.
It can also be used as a baking tray.
Roasting pan and wire racks are
coated with PerfectClean and can be
easily cleaned with a sponge and dish
soap.
Non-tip safety notches
Wire racks and roasting pan are
equipped with non-tip safety notches
(see arrows) which prevent them from
being pulled out completely while the
oven is in use.
When inserting a rack or pan always
check that the safety notches are at
the rear of the oven.
Once inserted into the oven these
pieces can only be removed by raising
the piece upwards and then pulling it
out.
Slide opener
The slide opener is used to remove the
light cover when changing a light bulb.
The flat end of the slide opener is
wedged beneath the light cover to pry it
off.
12
Page 13

System lock
The oven is supplied with this setting
deactivated as standard.
To use it you first have to activate it.
The system lock can be activated to
prevent children from operating the
oven or to conserve standby power
when the oven will not be used for
some time (e.g. vacation).
Turn the function selector to "Off".
^
^ Continue touching the "W" control until
the triangle V is below the "0"
symbol.
^ Touch the "OK" control.
^ As long as the triangle V below the
"0" symbol is flashing, you can use
the "V"or"W" control to toggle
between "I" and "0".
Locking the oven
0
m 0
V
"0" The system lock is deactivated.
"I" The system lock is activated.
^
Touch the "OK" control to confirm.
The symbol "0" acts as a reminder that
the lock is activated.
The oven will remain locked after a
power failure.
i
0
V
I2:07
m 0
V
13
Page 14
% Settings
The default oven settings can be changed in the function "Settings".
In this function you can customize the oven to suit your preferences.
Setting Status (* Factory setting)
PI
Time
display
S0 The time display is turned off.
The display is dark when the function selector is
in the "0ff" position. The time runs in the
background.
SI* The time display is turned on and visible.
P2
Duration
signal tone
P3
Timer
signal tone
P4
Key tone
P5
Volume
signal tones
P6
Time format
P7
Temperature
unit
S0 When a set duration time expires, no signal
sounds.
SI* (long) When a set duration time expires, a signal
S2(short)
S0 When the timed period ends, no signal sounds.
SI* (long) When the timed period ends, a signal sounds.
S2(short)
S0 The key tone is turned off.
SI* The key tone is turned on.
S0*–S30 If the settings "P2– S2" and "P3– S2" are
i2 * The current time appears as a 12 hour display.
24 The current time appears as a 24 hour display.
°F * Temperature is displayed in °F.
°C Temperature is displayed in °C.
sounds.
You can choose between two signal sounds.
You can choose between two signal sounds.
selected the volume of the short signal tones can
be adjusted using S0*–S30.
If the settings "P2– SI" and "P3– SI" are
selected the volume of the long signal tone
cannot be changed.
14
Page 15

Changing the status of a
setting
Select "Settings %".
^
Touch the "OK" control.
^
"PI" appears in the display.
The settings "PI"to"P7" can be
changed individually (see table).
Continue touching the "V"or"W"
^
control until the desired setting
number appears in the display.
^ Touch the "OK" control.
The current status of the setting "S"
(example) appears in the display.
% Settings
PI
S0
^
Use the "V"or"W" control to change
the setting status (see table).
^
Touch the "OK" control to confirm.
The status change is stored in memory.
"P" and the number of the setting
appear again in the display.
Other settings can also be changed at
this time as long as the function
selector is not turned to "Off".
The settings will remain saved in the
case of a power failure.
15
Page 16

Before using the oven
To set the time of day for the
first time
Before the oven can be used, you
will need to set the time of day.
The time can only be entered when
the function selector is at "Off".
In the display:
the clock symbol "m" will light up,
–
the time and the triangle V
–
underneath the "m" symbol will start
flashing.
^ Use the temperature selector or the
"V"or"W" controls to enter the hour
first.
^ Touch the "OK" control to confirm the
hour.
I2:00
m
V
Next the minutes will begin to flash.
^ Now use the temperature selector or
the "V"or"W" controls to enter the
minutes.
^
Touch the "OK" control to confirm the
minutes.
The time of day you have selected has
now been entered.
16
Page 17

Heat the oven
New ovens may have a slight odor
during the first few uses. To eliminate
the odor quickly, the oven should be
operated at a high temperature for
2 hours.
Before heating the oven for the first
time remove (if present)
– any stickers from the baking
tray, roasting pan or interior
floor.
– foil from the appliance front.
Make sure the room is well
ventilated during this process.
^ Remove all accessories from the
oven.
^ Turn the function selector to
"Convection Bake".
Before using the oven
The recommended temperature of
325 °F (160 °C) will appear.
^
Use the temperature selector to set the
highest temperature (500 °F/250 °C).
The oven will start heating up as soon
as this entry has been accepted.
^
Heat the empty oven for 2 hours.
The timer can be used to set the
duration, see "Operation - Duration".
^
Once the oven has cooled, wipe out
the oven with hot water and a mild
detergent and then dry it thoroughly
with a soft clean cloth.
Leave the oven door open until the
oven interior is completely dry.
500
6 m TS
V
17
Page 18

Operation
Selecting a function
Place the food in the oven.
^
Select the function you want (e.g.
^
Convection Bake) with function
selector.
The following will appear in the display:
"325" ("160") - the recommended
–
temperature,
the temperature indicator light 3,
–
the triangle V under the 6 symbol.
–
At the same time the oven compartment
heating, lighting and cooling fan will
switch on.
You can follow the temperature rising in
the display. A buzzer will sound when
the set temperature is reached for the
first time.
^ At the end of the programme turn the
function selector to "Off" and remove
the food from the oven.
Cooling system
The cooling fan will continue to run for a
while after the oven has been switched
off to prevent any humidity building up
in the oven, on the control panel or on
the oven housing unit.
3
325
6
V
When the temperature in the oven has
fallen sufficiently the cooling fan will
switch off automatically.
18
Page 19
Operation
Adjusting the oven temperature
As soon as a cooking function is
selected, the recommended
temperature will appear in the display.
If your recipe requires a temperature
which is different from the recommended
temperature you can use the temperature
selector to change it within the given
range. The temperature can be changed
in increments of 5 °.
Function °F °C
default range default range
Rapid Heat 325 °F 125-500 °F 160 °C 50-260 °C
Convection 325 °F 125-500 °F 160 °C 50-260 °C
Intensive 325 °F 200-500 °F 160 °C 100-260 °C
Surround 375 °F 125-550 °F 190 °C 50-290 °C
Bake 375 °F 200-500 °F 190 °C 100-260 °C
Broil 500 °F 400-575 °F 260 °C 200-300 °C
Maxi Broil 500 °F 400-575 °F 260 °C 200-300 °C
Convection Broil 400 °F 200-500 °F 200 °C 100-260 °C
Defrost Time of day –– Time of day ––
Temperature indicator
The temperature indicator 3 will
appear next to the temperature in the
display. The indicator light is always on
when the heating is on.
When the set temperature is reached,
–
the temperature indicator light goes
out.
–
a buzzer will sound.
However, if the temperature falls below
the set temperature, the oven heating
and the temperature indicator light will
switch on again.
19
Page 20

Operation
Pre-heating, "Rapid Heat"
function
For proper cooking results, most
recipes call for a preheated oven.
After a temperature has been selected,
the rising temperature can be viewed in
the display.
To pre-heat the oven:
Select "Rapid Heat" and set a
^
temperature.
When the temperature indicator light
^
3 goes out for the first time, set the
oven function you require for
continued cooking or baking, and
place the food in the oven.
Do not use "Rapid Heat" to pre-heat
the oven when baking pizzas or
biscuits and small cakes. They will
brown too quickly.
20
Page 21

Delay Start T / S
This options allow you to turn cooking
processes automatically off or on and
off.
The maximum duration which can be
set is 12 hours.
Duration
Place the food in the oven.
^
Select the required function and set
^
the temperature.
The oven heating, lighting and cooling
fan will switch on.
^ Touch the "W" control repeatedly until
triangle V is underneath the "T"
(Duration) symbol.
"0:00" appears in the display.
3
0:00
6 m TS
Operation
h
V
^ Touch the "OK" control.
^ Whilst triangle V is flashing, enter
the required duration in hours and
minutes with the temperature selector
or the "W" control.
If no other symbol is selected, the
cooking duration will be seen counting
down in the display.
21
Page 22

Operation
End time
The desired end time allows you to set
the actual time you would like cooking
to complete.
For example:
The time now is 10:45;
you want a dish with a cooking duration
of 90 minutes to be ready at 13:30.
Place the food in the oven.
^
Select the required function and set
^
the temperature.
The oven heating, lighting and cooling
fan will switch on.
First enter the cooking duration:
^ Touch the "W" control repeatedly until
triangle V is underneath the "T"
(Duration) symbol.
"0:00" appears in the display.
3
0:00
6 m TS
h
V
^ Touch the "OK" control.
^
Whilst triangle V is flashing, enter
the required duration in hours and
minutes (1:30) with the temperature
selector or the "W" control.
Now set the end time:
^
Touch the "W" control repeatedly until
triangle V is underneath the "S"
(End time) symbol.
The time of day plus the cooking
duration entered appear in the display
(10:45 + 1:30 = 12:15).
22
3
I:30
3
I2:I5
6 m TS
h
T
V
V
Page 23

The oven heating, lighting and cooling
fan will switch off.
The End time will now show in the
display as long as the triangle is not
moved to under another symbol.
Use the temperature selector or the
^
"W" control to set the end time to
13:30.
As soon as the start time (13:30 - 1:30
= 12:00) is reached, the oven heating,
lighting and cooling fan will switch on.
At the end of cooking
– the oven heating switches off
automatically.
– the cooling fan will continue to run for
a while.
Operation
I3:30
6 m TS
V
– the "S" symbol (End time) will start
flashing.
–
a buzzer will sound, if the buzzer is
switched on (see "Settings % - P2").
The tone will sound again twice at
5 second intervals.
^
Turn the function selector to "0ff".
The buzzer will stop and the symbols in
the display will go out.
^
Remove the food from the oven.
23
Page 24

Operation
To check and change an entered time
It is possible to check or change times
entered for a cooking programme at
any time by calling up the relevant
symbol with the "V"or"W" controls.
To change the time, touch the "OK"
control and whilst triangle V is
flashing, change the entry with the
temperature selector or the "V"or"W"
control.
To delete an entered time
Set the duration to "0:00" or turn the
^
function selector to "0ff".
If there is a power cut, all data entered
will be deleted.
24
Page 25

Setting the timer
The timer can be used to time any
activity in the kitchen and can be set
independently of a cooking function.
A maximum time of 99 minutes and
59 seconds can be selected.
To set a timer:
Touch the "Timer" control.
^
"0:00" appears in the display and the
"N" symbol flashes.
^ Use the temperature selector or the
"W" control to enter the desired time in
minutes and seconds.
^ Confirm with the "OK" control.
The count down of the timer is shown in
the display, as long as no other function
is chosen.
N
0:00
Setting the timer
min
At the end of the timed period
– the "N" symbol will flash.
–
a buzzer will sound, if the buzzer is
switched on (see "Settings % - P3").
The buzzer will sound again twice
more at 5 second intervals.
–
at the end of the timed period, the
display will show the timer counting
upwards.
^
Touch the "OK" control.
To cancel the timer
^
Touch the "Timer" control.
^
Use the temperature selector or the
"V" control to set the timer to "0:00".
25
Page 26

Setting the clock
Turn the function selector to "Off".
^
Touch the "OK" control twice.
^
Use the temperature selector or the
^
"V"or"W" control to enter the hour first
of all.
Touch the "OK" control.
^
Now use the temperature selector or
^
the "V"or"W" control to enter the
minutes.
Touch the "OK" control.
^
The time of day has been changed.
If there is a power cut, the current time
of day will reappear flashing once
power has been restored. Touch the
"OK" control to confirm.
The appliance will store this data for
approx. 24 hours. After 24 hours it will
show "I2:00" and will need to be re-set.
26
Page 27

Guide to the functions
27
Page 28

Baking
Baking functions
For baking you can use:
Surround
–
Bake
–
Convention
–
Intensive
–
Baking tips
The roasting pan does not need to be
greased or covered with parchment
paper. The PerfectClean enamel finish
prevents spillovers from baking onto
and into the surface. Baked food can
be easily removed.
Use baking parchment only for dough
with a high egg white content, i.e. for
biscuit, meringue or macaroons.
Do not use "Rapid Heat" to pre-heat
the oven when baking pizzas or
biscuits and small cakes. They will
brown too quickly.
28
Page 29

Surround
Default temperature. . . 375 °F (190 °C)
The "Surround" function is a premium
conventional baking mode. The oven
heats with both the upper and lower
heating elements without the
convection fan.
Use this function for:
souffles, meringues,
–
angel food cakes,
–
cream puffs,
–
– cookies, cakes,
– cheesecakes,
– pies, quiche,
– baked potatoes.
The recommended positions are the 1
or 2ndrunners from the bottom.
st
Baking
29
Page 30

Baking
Bake
Default temperature . . . 375 °F (190 °C)
The "Bake" function works by heating
food from below. This is similar to the
"bake mode" of a conventional oven.
Use this function for:
boxed cake mixes,
–
baked apples,
–
frozen dinners.
–
The recommended positions are the 1
or 2ndrunners from the bottom.
st
30
Page 31

Convection
Default temperature . . . 325 °F (160 °C)
This function actively circulates heated
air throughout the oven cavity for a
consistent baking temperature.
Use this function for:
cookies, cakes,
–
quick breads,
–
yeast breads,
–
cheesecakes,
–
pies, quiche,
–
– baked potatoes,
– casseroles.
When using the convection function,
several runner levels can be used at
the same time.
Baking
The recommended positions are:
1 tray = 1
2 trays = 1
st
runner from the bottom
st
and 3rdrunners
from the bottom
3 trays = 1
st,2nd
and 4thrunners
from the bottom
When baking 3 trays of cookies or small
cakes at the same time, remove the
respective tray when the desired
browning is reached.
As a general rule, the temperature of
a recipe not designed for baking in
a convection oven should be
lowered by 25 °F (15 °C.)
31
Page 32

Baking
Intensive
Default temperature . . . 325 °F (160 °C)
The "Intensive" function generates heat
from the lower heating element. The
oven’s fan gently circulates the heated
air to create a brick oven (convection)
environment.
Use this function for:
pizza,
–
focaccia,
–
stromboli.
–
Use the 1
Should the bottom of the food burn,
raise the rack to a higher runner.
When using "Intensive", recipe
temperatures should be lowered by
25 °F (15 °C).
st
runner from the bottom.
Intensive is not recommended for
roasting or shallow baking.
Do not bake on the oven floor.
32
Page 33

Roasting functions
For baking you can use:
Convention Bake
–
Surround
–
Roasting tips
The larger the cut of meat to be
–
roasted, the lower the temperature
that should be used.
The roasting process will take a little
longer, but the meat will be cooked
evenly and the outside will become
crisp.
– Use the roast probe for accurate
cooking temperatures and best
results.
Roasting in a covered pot
When roasting in a covered pot,
increase the recipe temperature by
70 °F (20 °C).
Roasting
Season the meat and place it in the pot.
Add some butter, margarine or a little
oil and about ½ cup of water when
roasting a large piece of meat or
roasting poultry with a high fat content.
Roasting on the rack
Use the rack with the roasting pan
inserted below. Add a little oil to very
lean meat or place a few strips of
bacon on top to help retain moisture.
Place a little water in the roasting pan
below the meat to catch drippings.
Roasting poultry
For crispy skin, baste the poultry ten
minutes before the end of cooking with
salt water.
33
Page 34

Roasting
Convection
Default temperature . . . 325 °F (160 °C)
This function can also be used for
rosating.
It actively circulates heated air
throughout the oven cavity for a
consistent baking temperature.
Use this function for:
poultry (whole birds),
–
roasts, e.g. prime rib, pork loin, beef
–
tenderloin, leg of lamb, etc.
chicken pieces,
–
– small cuts of meat,
– fish,
– salmon, lobster tails,
– meat loaf.
The recommended position is the 1
runner from the bottom.
st
34
Page 35

Surround
Default temperature . . . 375 °F (190 °C)
"Surround" is a conventional roasting
program for traditional recipes.
Use this function for:
pot roast,
–
brisket,
–
stew.
–
The recommended position is the 2
runner from the bottom.
nd
Roasting
35
Page 36

Broiling
Broiling functions
For broiling you can use:
Broil
–
Maxi Broil
–
Convection Broil
–
Broiling tips
To ensure even cooking, it is best to
–
broil foods of a similar thickness at
the same time. Most items should be
turned halfway through broiling.
– To determine how far through a thick
piece of meat has been cooked,
press down on its surface with a
spoon.
If the surface presses down easily
and with little resistance to the
spoon, it is "rare".
If there is some resistance, it is
"medium".
If there is great resistance, it is
"well done".
36
Page 37

Broil
Default temperature . . . 500 °F (260 °C)
Only the inner part of the upper heating
element is used for a smaller area of
intense heat from above. This function
is excellent for broiling or searing small
quantities.
Use this function for:
chops, ribs,
–
small quantities of meat,
–
browning small dishes.
–
The recommended position is the 3
runner from the bottom.
rd
Broiling
37
Page 38

Broiling
Maxi Broil
Default temperature . . . 500 °F (260 °C)
The entire upper heating element is
used for intense heating from above.
This function gives excellent browning
and searing results.
Use this function for:
chops, ribs,
–
large quantities of meat,
–
browning large dishes.
–
The recommended position is the 3
runner from the bottom.
rd
38
Page 39

Convection Broil
Default temperature . . . 400 °F (200 °C)
Hot air from the upper heating element
is distributed over the food by the fan.
This enables a lower temperature than
conventional broiling to be used.
Use this function for:
thick pieces of meat,
–
London broil.
–
The recommended position is the 1
runner from the bottom.
st
Broiling
39
Page 40

Dehydrate
You can use "Convection Bake" with a
temperature of 175 °F (80 °C) for
dehydrating fruits, vegetables and
herbs.
A consistent low temperature and the
fan maintain the ideal conditions for the
long dehydration process.
For best results, blot food with a paper
towel before dehydrating.
Foods to be dehydrated should be
placed directly on the oven racks or on
a drying screen (not supplied with
oven).
40
Page 41

You can use "Convection Bake" with a
temperature of 125 °F (50 °C)
The warm environment will allow you to
effectively proof dough. The low
temperature is perfect for yeast to rise.
Place the dough in a large bowl on the
oven rack positioned at the lowest
runner level. Keep the oven door
closed during this process.
Proof
41
Page 42

Defrost
You can use this function to defrost
food at room temperature.
With selecting this function, the time of
day appears in the display.
Defrosting times depend on the type
and weight of the food, and at what
temperature it was deep-frozen.
Defrosting tips
Remove the frozen food from the
–
packaging and place it in the
roasting pan or into an appropriate
dish.
– Meat and poultry should be fully
thawed before cooking. Do not use
the liquids from defrosting.
– Fish does not need to be fully
defrosted before cooking. Defrost so
that the surface is soft enough to
absorb herbs and seasoning.
– Cook all food immediately after
defrosting.
42
Page 43

Front of appliance
It is best to clean spills from the front
of the appliance immediately. Spills
that remain longer may cause the
surface to become discolored or
changed.
Clean the exterior with a solution of
warm water and liquid soap applied
with a soft sponge. Dry with a soft cloth.
All surfaces are vulnerable to
scratching. Scratches can lead to
shattering of the glass surface.
All surfaces can become discolored
or changed if they come into contact
with unsuitable cleaning agents.
Cleaning
Glass cleaners may be used to
clean the exterior. However do not
allow them to sit or "puddle", this can
cause damage to the surface.
Remove the cleaner promptly.
To better maintain your appliance
avoid the following:
cleaners containing soda, ammonia,
–
thinners, or chlorides
cleaners containing descaling
–
agents or lime removers,
– abrasive cleaners,
– stainless steel cleaners,
– dishwasher soap (powder),
– caustic (oven) cleaners,
– scouring pads, steel wool, hard
brushes,
– metal scrapers.
43
Page 44

Cleaning
PerfectClean
The revolutionary PerfectClean enamel
is a smooth, nonstick surface that
cleans easily with a sponge.
The following have been treated with
"PerfectClean":
oven walls,
–
roasting pan,
–
wire rack,
–
runners.
–
Do not clean items with PerfectClean
^
in a dishwasher. Dishwasher
detergents may damage the enamel.
^ Clean after each use with a sponge
and a solution of hot water and liquid
dish soap.
^ Do not use abrasive cleaners,
ceramic cleaners, metal scourers, or
oven cleaners on PerfectClean
surfaces.
^
After cleaning, rinse thoroughly with
water. The water should run off the
surface easily, any residue will hinder
this effect.
^
Stubborn baked on grease may need
to be soaked first to loosen deposits.
^
Clean spills on PerfectClean surfaces
as soon as possible to prevent stains.
^
Spilled fruit juices may permanently
discolor surfaces. This discoloration
is permanent but will not affect the
efficiency of the enamel.
44
Page 45

Cleaning the oven cavity by
hand
Danger of burns! Allow the oven
,
to cool before cleaning.
To make cleaning easier
remove the oven door,
–
remove the runners,
–
remove the back panel,
–
lower the upper heating element.
–
Clean the oven surfaces with a
^
solution of hot water, liquid dish soap
and a sponge or soft nylon brush.
Do not use abrasive cleaning
agents, hard brushes, metal
scouring pads, steel wool, knives or
other abrasive materials.
Cleaning
Do not use oven sprays on any part
of this oven.
^
Dry surfaces before reassembly.
45
Page 46

Cleaning
Removing the oven door
Please note: The oven door is quite
heavy. It should be gripped firmly at
the sides when being removed or
refitted.
Open the door fully.
^
Flip up the locking clamps on each
^
door hinge.
^
Slowly shut the door until the
protruding clamps stop the
movement. Pull the door upward.
See illustration.
46
Page 47

Refitting the oven door
Insert the door onto the hinges and
^
open the door completely.
^ Flip the locking clamps down.
Cleaning
Be sure that the locking clamps are
flipped down when the door is
reinstalled. Otherwise, on closing
the door, the hinges could work
loose from the guide holes and
cause damage.
47
Page 48

Cleaning
Removing the runners
Pull the runner out of the front fixing
^
to release it.
^ Remove the runners by pulling them
out of the rear of the oven.
Reassemble in the reverse order,
ensuring all parts are correctly in place.
48
Page 49

Removing the back panel
First remove the runners.
^
Loosen the screws in the rear panel
^
and remove the panel.
The oven must not be used without
the back panel fitted. This could
lead to injuries.
Reassemble in the reverse order,
ensuring all parts are correctly in place.
Lowering the upper heating element
^ First remove the runners.
^ Loosen the wing nut.
Cleaning
^
Gently lower the upper heating
element.
Do not use force to lower it, as this
could cause damage.
^
Reassemble in the reverse order,
ensuring all parts are correctly in
place.
49
Page 50

Cleaning
Catalytic liners
Circulating air in the oven deposits oil
and fat on the back of the oven. These
deposits are burnt off from the catalytic
liner when the temperature of the oven
reaches over 500 °F/260 °C.
Cleaning at high temperatures:
Place the food in the oven.
^
Select "Convection".
^
Use the temperature selector to set the
^
highest temperature (500 °F/260 °C).
The oven will start heating up as soon
as this entry has been accepted.
^ Touch the "W" control repeatedly until
triangle V is underneath the "T"
(Duration) symbol.
"0:00" appears in the display.
3
0:00
6 m TS
h
V
^ Touch the "OK" control.
^
Whilst triangle V is flashing, enter a
duration of 2 hours with the
temperature selector or the "W"
control.
If no other symbol is selected, the
cooking duration will be seen counting
down in the display.
If the catalytic liner is damaged, a
replacement may be purchased
from your local Miele dealer or from
Miele.
50
3
2:00
6 m TS
h
V
Page 51

To reduce the risk of electric
,
shock, disconnect this appliance
from the power supply by shutting
off the power main or tripping the
circuit breaker.
Changing the light bulb
Remove the runners.
^
Spread a dishtowel on the oven floor
^
to protect the enamel, in case the
light cover falls.
Remove the lamp cover.
^
Use the supplied slide opener to pry
the lamp out of the side panel.
^ Replace the halogen bulb.
Changing the light bulb
Only use the following light bulb:
12 V, 10 W, 572 °F (300 °C) heat
resistant, socket G4, type 64418
made by Osram.
Do not touch the new light bulb with
your fingers; touching the bulb will
reduce its life. Follow the bulb
manufacturer’s instructions.
^
Press the lamp back into the sidewall
of the oven and reinsert the cover.
Reassemble in the reverse order,
making sure that all the parts are in
place.
^
Reassemble the runners.
51
Page 52

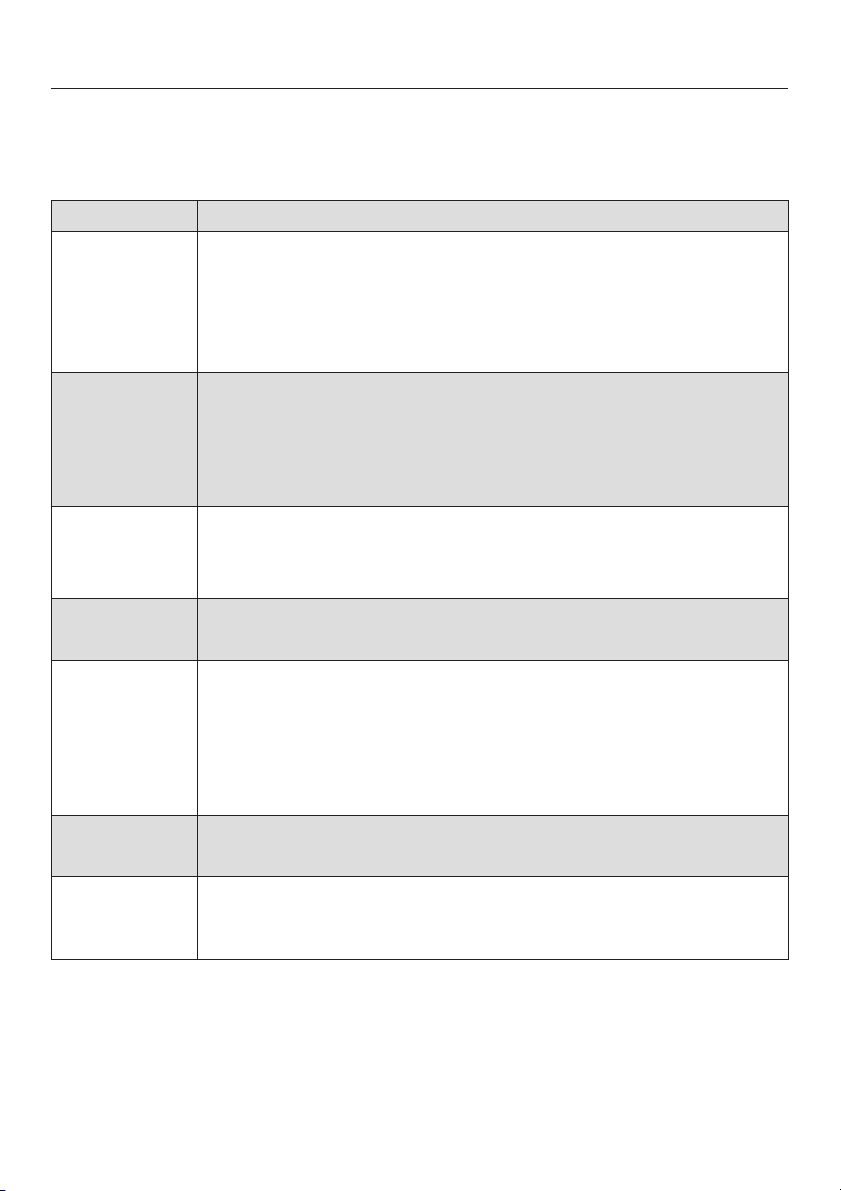
Frequently asked questions
Repairs should only be carried out by a qualified and trained person in
accordance with local and national safety regulations. Unauthorized repairs
could cause personal injury or machine damage.
What if the oven does not heat?
Possible fault Solution
The system lock is activated. Deactivate the system lock.
The circuit breaker has tripped. Check the breaker.
The delay start has been set. Cancel the delay start.
The door is not fully closed. Close the door firmly.
Why is there no noise when the oven door is opened during operation?
This is normal. If the door is opened during operation, a safety contact switch
causes the heating elements and the fan to shut off.
Why is a noise heard after turning the oven off?
This is normal. The fan will continue to run for a short time to cool the oven. When
the oven has cooled sufficiently, the fan will turn off automatically.
Why is the display dark when the oven is first turned on?
Possible fault Solution
The clock display has been turned off. Turn the display on:
Select "Settings" - "Pi"-"Si".
What if the time of day cannot be entered after a power failure?
Possible fault Solution
The system lock is activated. Deactivate the system lock.
Why is there uneven browning?
Possible fault Solution
Oven not preheated. Allow the oven to preheat.
Oven temperature too high. Lower the oven temperature.
Shiny or thin pans were used. Use dark, matte finish pans.
What if "Fault" followed by two numbers appears in the display?
Possible fault Solution
An electronic fault has occurred. Call Technical Service for assistance.
"Fault 55": the oven has shut down. Turn off the oven to reset it to normal
operation.
52
Page 53

Technical Service
In the event of a fault which you cannot
easily fix yourself, please contact the
Miele Technical Service Department:
U 1-800-999-1360
techserv@mieleusa.com
V 1-800-565-6435
service@miele.ca
When contacting Technical Service
please quote the serial number and
model of your oven. This information is
visible on the silver data plate.
MieleCare
(USA only)
MieleCare, our Extended Service
Contract program, gives you the
assurance of knowing that your
appliance investment is covered by
5 years of worry free ownership.
MieleCare is the only Extended Service
Contract in the industry that guarantees
repairs by a Miele Authorized Service
Provider using genuine Miele parts.
Only genuine Miele parts installed by
factory trained professionals can
guarantee the safety, reliability, and
longevity of your Miele appliance.
Please note that unless expressly
approved in writing by Miele’s Service
department, Extended Service
Contracts offered by other providers for
Miele products will not be recognized
by Miele. Our goal here is to prevent
unauthorized (and untrained) service
personnel from working on your Miele
products, possibly doing further
damage to them, you and/or your
home.
To learn more about MieleCare
Extended Service Contracts, please
contact your appliance dealer or visit
us online at:
http://mieleusa.com/mielecare
53
Page 54

Optional accessories
The following accessories are available
for purchase from your Local Miele
Dealer or from Miele.
Gourmet Pizza form
This circular form is suitable for cooking
fresh or frozen pizzas, flat cakes, tarts,
and baked desserts.
Gourmet Baking stone
The Baking stone is ideal for baking
dishes with a crisp bottom like pizza
and bread.
Gourmet Casserole Dish
The Gourmet Casserole can be set on
the wire rack.
The casserole has a special non-stick
coating and is available in two sizes
(large: HUB 61-35, small HUB 61-22).
A lid is also available separately.
54
Page 55

Gourmet Casserole Dish Lid
The lid is available in two sizes
(large: HBD 60-35, small HBD 60-22).
Anti-splash insert
The anti-splash insert may be placed in
the roasting pan to reduce splattering
of drippings from meat or poultry.
The anti-splash insert is coated with
PerfectClean enamel and can be easily
cleaned with a sponge and dish soap.
Optional accessories
55
Page 56

56
Page 57

Installation Instructions
Information is subject to change. Please refer to our website to obtain the most
current product specification, technical & warranty information.
57
Page 58

Caring for the environment
Disposal of the packing
materials
The cardboard box and packing
materials protect the appliance during
shipping. They have been designed to
be biodegradable and recyclable.
Ensure that any plastic wrappings,
bags, etc. are disposed of safely and
kept out of the reach of children.
Danger of suffocation!
Disposal of an old appliance
Old appliances may contain materials
that can be recycled. Please contact
your local recycling authority about the
possibility of recycling these materials.
Ensure the appliance presents no
danger to children while being stored
for disposal. Before discarding an old
appliance, unplug it from the outlet and
cut off its power cord. Remove any
doors to prevent trapping hazards.
58
Page 59

CAUTION: Before servicing,
,
disconnect the power supply by
either removing the fuse, shutting off
the power main or manually
"tripping" the circuit breaker.
Installation work and repairs should
only be performed by a qualified
technician in accordance with all
applicable codes and standards.
Repairs and service by unqualified
persons could be dangerous.
Electrical connection
Data plate
The silver data plate is located along
the front side of the oven (door open).
Before connecting the appliance to
the power supply, make sure that
the voltage and frequency listed on
the data plate correspond with the
household electrical supply. This
data must correspond to prevent
machine damage. Consult an
electrician if in doubt.
Only operate the appliance after it
has been installed into cabinetry.
The plug must be plugged into an
appropriate outlet that is installed
and grounded in accordance with all
local codes and ordinances.
Power supply
The oven comes equipped with a
7.2 ft. (2.2 m) power cord with a
NEMA 14-30 P molded plug ready
for connection to a:
120/240 V, 20 A, 60 Hz power supply.
or
120/208 V, 20 A, 60 Hz power supply.
WARNING: THIS APPLIANCE
MUST BE GROUNDED
Installer:
Please leave these instructions with
the consumer.
59
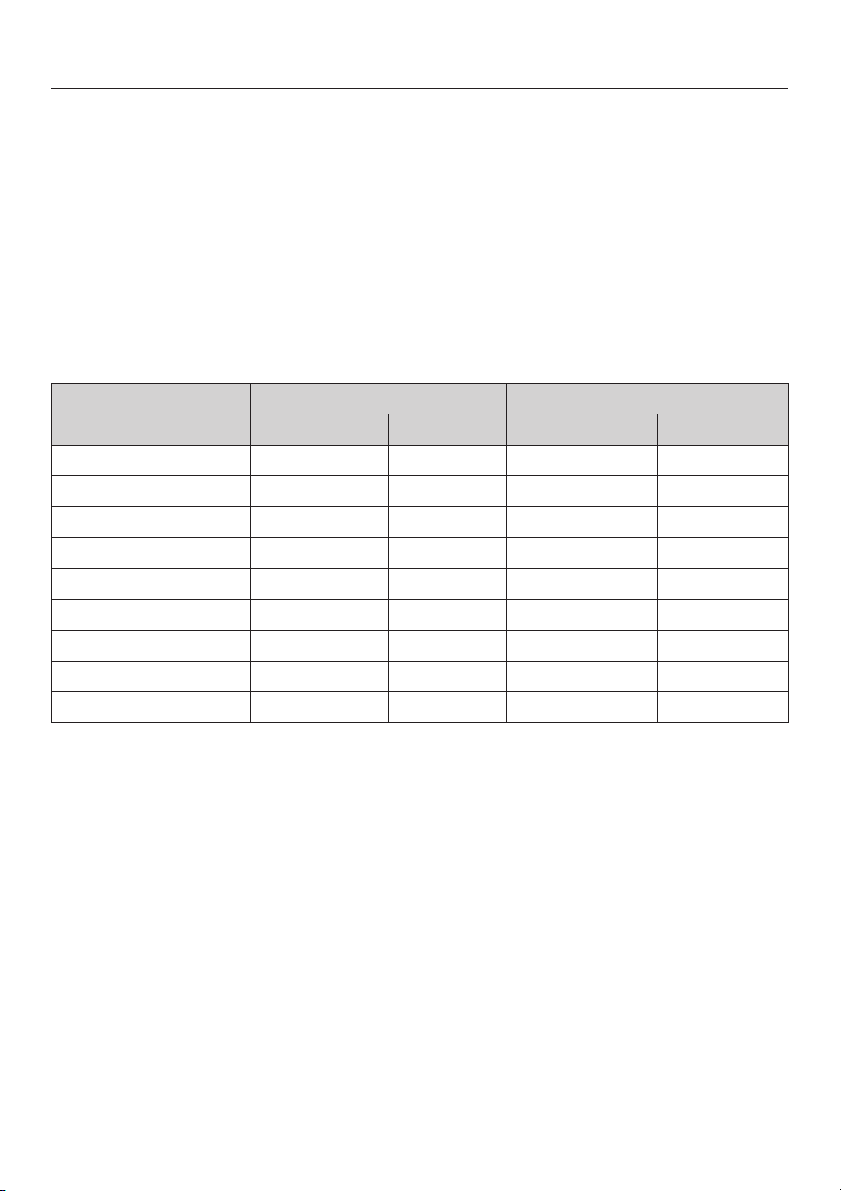
Page 60

Appliance and Cut-out Dimensions
Miele appliances can be installed flush or proud. Discuss your installation
requirements with your architect, designer and installer.
60
Page 61

Appliance and Cut-out Dimensions
a Vent cut-out (min. 24"2/ 150 cm2) possible at rear of cabinet
b Cut-out for power cord (min. 4"
2
/10cm2)
c Power cord
For the most current specifications see the Miele web site.
61
Page 62

Installing the oven
The oven must be installed into
cabinetry before use.
o not insulate the cabinet. This will
prevent proper ventilation.
IMPORTANT INFORMATION
,
Certain cabinet materials and
finishes are very sensitive to high
temperatures. To eliminate the risk
of damage to surrounding cabinets,
a 24 square inch (2"x12") [150 cm
minimum opening must exist in the
cabinet to allow air to flow into and
around the appliance. In addition,
the oven vent at the bottom of the
door must not be obstructed.
^ Connect the oven to the electrical
supply.
2]
The oven must be supported from
underneath.
^
Place the oven into the cabinet as far
as the oven trim and align.
^
Open the oven door and locate the
two mounting screw holes in the oven
frame. Mark and drill 6 mm pilot
holes. Secure the oven to the
cabinetry by inserting screws through
the frame and into the cabinetry.
Only operate the appliance after it
has been installed into the cabinetry.
62
Page 63

Set the time
Before the oven can be used, you
will need to set the time of day.
The time can only be entered when
the function selector is at "Off".
In the display:
the clock symbol "m" will light up,
–
and the time and the triangle V
–
underneath the "m" symbol will start
flashing.
^ Use the temperature selector or the
"V"or"W" control to enter the hour
first.
^ Touch the "OK" control to confirm the
hour.
Next the minutes will begin to flash.
Installing the oven
I2:00
m
V
^ Now use the temperature selector or
the "V"or"W" control to enter the
minutes.
^
Touch the "OK" control to confirm the
minutes.
The time of day you have selected has
now been entered.
63
Page 64

Alteration rights reserved / 4811
(H 4744 B, H 4746 B)
INFORMATION IS SUBJECT TO CHANGE. PLEASE REFER TO OUR WEBSITE TO OBTAIN THE MOST
CURRENT PRODUCT SPECIFICATIONS, TECHNICAL & WARRANTY INFORMATION.
M.-Nr. 07 964 051 / 00
 Loading...