

Page 1

Operating instructions for
G 7781 DENTAL
Thermal Disinfector
To prevent accidents and
reduce the risk of damaging
the machine, read these
instructions before installing
or using the machine. M.-Nr. 04 701 092
ö]
Page 2

Contents
Contents
Guide to the machine. . . . . . . . . . . . . . . . . . . . . . . . . . . . . . . . . . . . . . . . . . . . . . . 3
Help to protect our environment. . . . . . . . . . . . . . . . . . . . . . . . . . . . . . . . . . . . . . 5
IMPORTANT SAFETY INSTRUCTIONS. . . . . . . . . . . . . . . . . . . . . . . . . . . . . . . . . 6
IMPORTANT SAFETY INSTRUCTIONS (detachable) . . . . . . . . . . . . Centre pages
Indications for use . . . . . . . . . . . . . . . . . . . . . . . . . . . . . . . . . . . . . . . . . . . . . . . . 10
Setting the water softener. . . . . . . . . . . . . . . . . . . . . . . . . . . . . . . . . . . . . . . . . . 12
Opening and closing the door . . . . . . . . . . . . . . . . . . . . . . . . . . . . . . . . . . . . . . 14
Loading and unloading the machine . . . . . . . . . . . . . . . . . . . . . . . . . . . . . . . . . 15
Adding rinsing agent . . . . . . . . . . . . . . . . . . . . . . . . . . . . . . . . . . . . . . . . . . . . . . 19
Setting the dosage. . . . . . . . . . . . . . . . . . . . . . . . . . . . . . . . . . . . . . . . . . . . . . . . . 19
Adding neutralizing agent. . . . . . . . . . . . . . . . . . . . . . . . . . . . . . . . . . . . . . . . . . 20
Adding detergent . . . . . . . . . . . . . . . . . . . . . . . . . . . . . . . . . . . . . . . . . . . . . . . . . 22
Program Chart G7781 . . . . . . . . . . . . . . . . . . . . . . . . . . . . . . . . . . . . . . . . . . . . . 24
Turning the machine on and off . . . . . . . . . . . . . . . . . . . . . . . . . . . . . . . . . . . . . 26
Selecting a program. . . . . . . . . . . . . . . . . . . . . . . . . . . . . . . . . . . . . . . . . . . . . . . . 26
Selecting an additional program . . . . . . . . . . . . . . . . . . . . . . . . . . . . . . . . . . . . . . 26
Program sequence indicator . . . . . . . . . . . . . . . . . . . . . . . . . . . . . . . . . . . . . . . . . 28
Interrupting a program . . . . . . . . . . . . . . . . . . . . . . . . . . . . . . . . . . . . . . . . . . . . . . 28
Programming special functions . . . . . . . . . . . . . . . . . . . . . . . . . . . . . . . . . . . . . 29
Reactivating the water softener . . . . . . . . . . . . . . . . . . . . . . . . . . . . . . . . . . . . . 31
Cleaning an care . . . . . . . . . . . . . . . . . . . . . . . . . . . . . . . . . . . . . . . . . . . . . . . . . 33
Correcting minor problems. . . . . . . . . . . . . . . . . . . . . . . . . . . . . . . . . . . . . . . . . 35
Installation . . . . . . . . . . . . . . . . . . . . . . . . . . . . . . . . . . . . . . . . . . . . . . . . . . . . . . 37
Electrical connection. . . . . . . . . . . . . . . . . . . . . . . . . . . . . . . . . . . . . . . . . . . . . . 39
Plumbing. . . . . . . . . . . . . . . . . . . . . . . . . . . . . . . . . . . . . . . . . . . . . . . . . . . . . . . . 40
2
Page 3
Guide to the machine
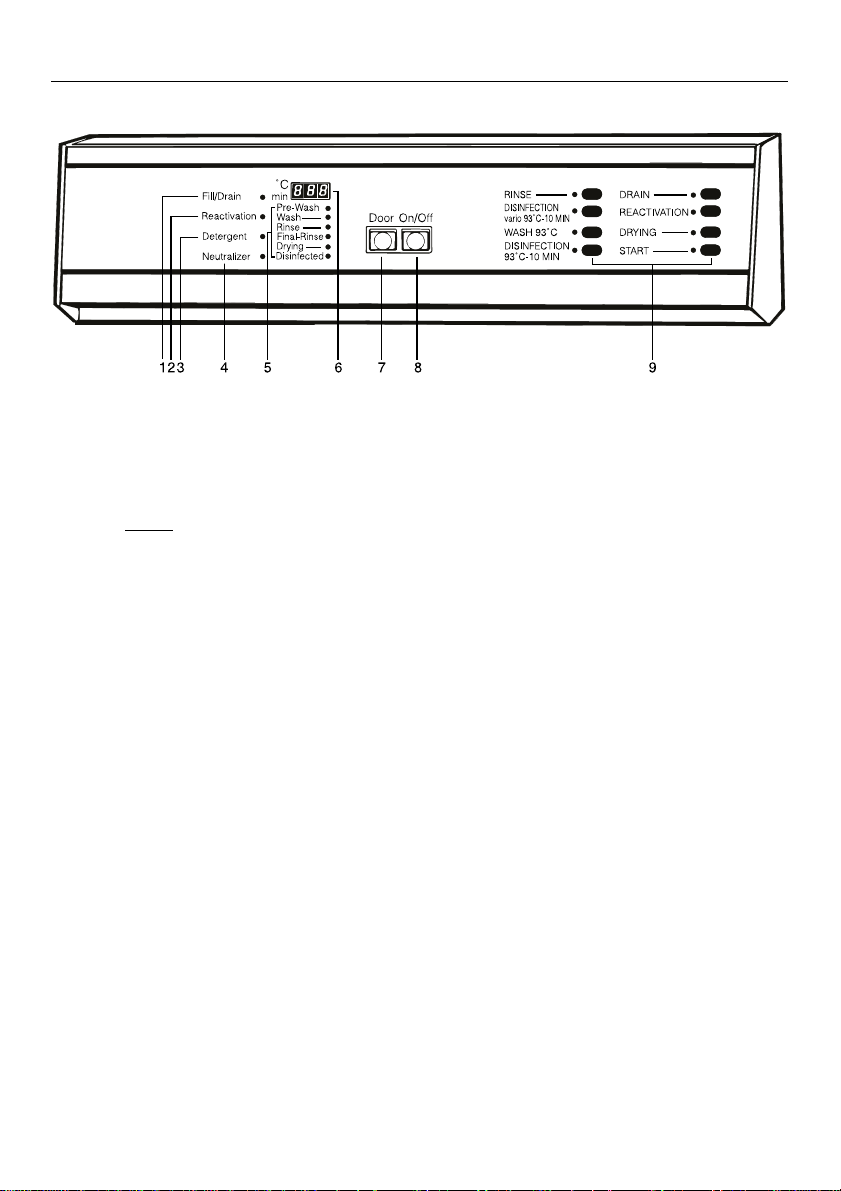
Guide to the machine
1 ”Check water inlet/drain”
indicator light
2 ”Reactivate water softener”
indicator light
3 ”Add
liquid detergent”
indicator light
(only where special DOS module is
connected externally)
4 ”Add neutralizing agent”
indicator light
5 Program sequence indicator light
6 Indicator display field
7 Door release
8 On-Off button
9 Program selectors
3
Page 4
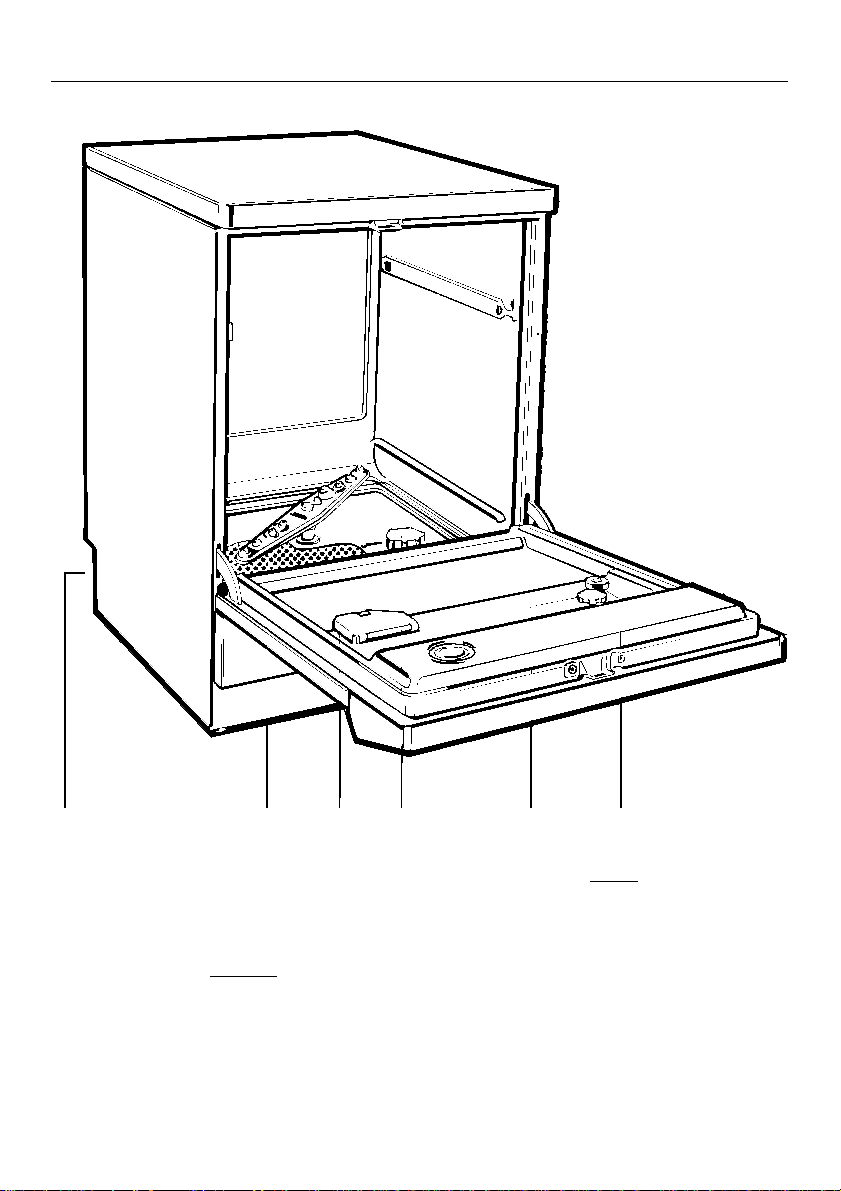
Guide to the machine
10 11 12 13 14 15
10 Connection for despenser pump
DOS C 60 (rear)
11 Filter combination
12 Dispenser for
13 Salt reservoir (water softener)
4
powder detergent
14 Dispenser for
with dosage selector
15 Rinsing agent level indicator
liquid rinsing agent
Page 5

Help to protect our environment
Help to protect our environment
Disposal of the packaging material
The transport and protective packaging is mostly manufactured from the
following reusable materials:
corrugated paper/cardboard
polystyrene (CFC-free)
polyethylene foil (transparent)
untreated wood
Rather than throwing these materials
away, please take them to the nearest
recyclables collection point.
Disposal of your old machine
Old machines contain materials which
can be recycled. Please contact your
local scrap merchant about potential recycling options before disposal.
When disposing of an old machine,
make sure the door catch is removed.
This will prevent children at play from
being accidentally locked in.
5
Page 6

IMPORTANT SAFETY INSTRUCTIONS
IMPORTANT SAFETY INSTRUCTIONS
When using an electrical appliance, basic precautions should always be followed
including the following:
READ ALL INSTRUCTIONS BEFORE
USING THE APPLIANCE
WARNING –
The manufacturer cannot accept
responsibility for damage caused
when the appliance is not used
according to the instructions, or for
uses other than those for which it
was intended.
This special commercial machine
is suitable for the applications mentioned in the operating instructions. Do
not use for purposes other than those
for which it was designed, as these
may be dangerous. The manufacturer
cannot be held responsible for damage
caused by improper use.
Do not allow small children or un-
authorized personnel access to
the machine or its controls.
If thermal disinfection is required
(93ºC/200ºF/10min.), the process
needs to be checked and documented
regularly. This can be done by checking the disinfection control diode on the
machine. Alternatively, a chemical indicator may be used (e.g. the Disinfection Control Tubes by A. Browne Ltd.,
supplied by Miele). These disinfection
control tubes should be placed in the
filter combination. After the disinfection
cycle, they may be inspected by removing the coarse filter.
The disinfection program should
not be interrupted, as this would
affect the disinfection result. If interruption is necessary, the program should
be repeated.
Do not install the machine in areas
where there is a risk of explosion.
6
Page 7

IMPORTANT SAFETY INSTRUCTIONS
The machine is built in accordance
with current safety requirements.
Any repair work should only be carried
out by a suitably qualified and competent engineer. Repairs by unqualified
persons could be dangerous.
The electrical safety of this ma-
chine can only be guaranteed if
connected to an electrical system that
complies with all local and national
regulations. It should be checked by an
expert if necessary. The manufacturer
cannot be held responsible for damage
caused by incorrect wiring.
The machine should only be in-
stalled by a suitably qualified and
competent contractor. Before connecting the machine, the installer should
check that the voltage and frequency
of the electrical supply correspond with
the details on the data plate of the machine.
Only genuine Miele parts or acces-
sories should be used with the
G 7781 Dental Thermal Disinfector. The
performance and safety of non-genuine
parts or accessories cannot be guaranteed, and use of such parts or items
may void the machine warranty. If you
have specific questions about machine
options or accessories, please call
Miele.
The use of Neodisher cleaning,
neutralizing, and rinsing agents is
strongly recommended. The use of any
other products may invalidate the disinfection results and the manufacturer’s
warranty.
The machine is completely isolated
from the electricity supply only
when it is unplugged or the circuit
breaker is turned off. This must be
done before any repair work is carried
out.
The water in this machine must not
be used as drinking water.
Only use detergents which have
been approved of by Miele. Do not
use solvents in your machine as there
may be a danger of explosion.
7
Page 8

IMPORTANT SAFETY INSTRUCTIONS
Take care when handling liquids
such as detergents, rinsing or neutralizing agents. These may contain
acids or alkalis. Follow the instructions
and safety procedures on the packaging carefully and wear protective
gloves and goggles. Read the Material
Safety Data Sheets.
Avoid inhalation of powder
cleaners.
Empty any containers or glassware
before placing it in the machine.
Do not allow any acids or solvents,
especially hydrochloric acid and
chlorides, to get into the wash cabinet.
Be careful when sorting instru-
ments with sharp pointed ends. If
possible, place the pointed end downwards.
Install special inserts in accord-
ance with the instructions provided.
When using the machine be care-
ful not to scald or burn yourself.
Baskets and inserts must first be
allowed to cool down. Any water which
may have collected in incorrectly
loaded items will be very hot and
should be emptied into the wash
cabinet.
Do not touch the heating elements
after the end of a program. You
could burn yourself.
Do not hose the machine down to
clean it.
Do not sit or lean on the open door.
This could cause the machine to
tip and be damaged.
When disposing of an old ma-
chine, make sure the door catch is
removed. This will prevent children at
play from being accidentally locked in.
8
Page 9

IMPORTANT SAFETY INSTRUCTIONS
All relevant safety procedures
should be obeyed. Relevant safety
procedures include, but are not limited
to, the Centers for Disease Control’s
Recommended Infection Control Practices for Dentistry and the OSHA Bloodborne Pathogens Standard.
The manufacturer cannot be held
responsible for damage caused by
failure to heed the warning and
safety instructions.
SAVE THESE
INSTRUCTIONS
9
Page 10

Indications for use
Indications for use
High-level disinfection
The G 7781 Dental Thermal Disinfector
is suitable for automatic treatment of
dental instruments and accessories. It
cleans and when using the disinfection
programs simultaneously thermally disinfects at 200ºF/93ºC instruments and
accessories.
Areas of effectiveness are physical
removal or thermal inactivation of vegetative bacteria including mycobacteria,
fungi, fungal spores, and viruses.
These categories include the Mycobacterium tuberculosis and the Enterococcus faecium.
Important: Only the programs labeled
‘DISINFECTION’ disinfect! Only use
these programs when handling contaminated items. All other programs are
designed to clean items without disinfecting them!
All relevant safety procedures should
be obeyed. Relevant safety procedures
include, but are not limited to, the
Centers for Disease Control’s Recommended Infection Control Practices for
Dentistry and the OSHA Bloodborne
Pathogens Standard.
The G 7781 Dental Thermal Disinfector
achieves high-level disinfection as
defined by the Spaulding categorization.
The Spaulding category high-level disinfection is the same type of means as
in the sterilant category except that the
use pattern is different. The sterilant is
used as a high-level disinfectant by
e.g. reducing the exposure time within
its effective range of tuberculocidal,
virucidal, and bactericidal action.
According to the Centers for Disease
Control’s Recommended Infection
Control Practices for Dentistry,
instruments should be classified in one
of the following categories and be
treated accordingly:
All critical instruments must be sterilized after treatment in the G 7781
Dental Thermal Disinfector. Critical instruments are used to penetrate soft
tissue or bone, e.g. forceps, scalpels,
bone chisels, scalers, or burs.
Semicritical instruments should be
sterilized after treatment in the G 7781
Dental Thermal Disinfector. If, however,
sterilization is not feasible because the
instrument will be damaged by higher
heat exposure, the instruments may be
treated terminally in the G 7781 Dental
Thermal Disinfector. Semicritical instruments do not penetrate soft tissues or
bone but contact oral tissues, e.g. mirrors and amalgam placement instruments.
Noncritical instruments may be
treated terminally in the G 7781 Dental
Thermal Disinfector. Noncritical instruments or devices come into contact
only with intact skin, e.g. external components of x-ray heads.
10
Page 11

Indications for use
Instruments suitable for
processing in the thermal
disinfector
All instruments, accessories, and other
items to be cleaned and disinfected in
the G 7781 Dental Thermal Disinfector
should have the following properties:
heat resistance to a temperature of
up to 95°C/203°F
corrosion resistance in the presence
of heat and alkalinity.
The high heat retention capacity of
stainless steel allows for fast drying.
Plastic has a lower heat retention capacity, thus needing a longer drying
time. In this case, a slightly extended
waiting period after the disinfection
cycle of 5 - 15 min. may be necessary.
Aluminum discolors using the program
DISINFECTION 93°C-10’. It may discolor using the program DISINFECTION VARIO 93°C-10’. Aluminum only
has a limited suitability for processing
in this system.
Do not clean fiberoptics or electrical
equipment or components in the thermal disinfector.
Rhodium coated specula must be arranged so that their surfaces do not suffer any mechanical damage. Not all
specula with glass are suitable for machine treatment.
In case you have any questions regarding the suitability of instruments for
being processed in the G 7781 Dental
Thermal Disinfector, please ask the instrument manufacturer’s advise.
Cleaning without disinfection
All other programs are designed to
clean goods without disinfecting them.
These programs are:
Rinse
Wash 93°C
Please refer to ”Program selection” for
detailed information.
Carbon steel may corrode in the process. Please try the corrosion resistance of carbon steel instruments with
initially one instrument, or do not process carbon steel items at all. If you do
process carbon steel items, the program DISINFECTION VARIO 93°C-10’
should be used.
Handpieces, drill bits, grinders, root
canal instruments or other rotating instruments only have a limited suitability
for the thermal disinfector. Please ask
the manufacturer’s advice on the suitability for processing in this system.
11
Page 12

Setting the water softener
Setting the water softener
To avoid the build-up of calcium deposits on items being cleaned and in
the machine, the water may need to be
softened (where the supply hardness
exceeds 107 ppm CaCO
To ensure a steady supply of soft water
the water softener must always be:
1. correctly set
2. regenerated with salt as soon as the
”Reactivation” indicator light comes on.
The water softener should be set to
correspond with the water hardness
upon installation of the machine.
Your local water authority can advise
you on the water hardness in your area.
Setting the water softener
The hardness range is divided into 18
units and a zero position. The machine
is set at the factory for a water hardness setting of 8, corresponding to 339
ppm CaCO
der or softer than this, the setting of the
controls should be changed. Find the
”Display Field” number corresponding
to your local water hardness in the
table.
. If your water supply is har-
3
).
3
Dis-
gr/gal mmol/l ° fH °eH ppm
play
Field
18
17
16
15
14
13
12
11
10
9
8
7
6
5
4
3
2
1
0
6
7
8
9
10
11
12
13
15
17
19
22
24
28
32
38
48
71
1.07
1.25
1.42
1.60
1.78
1.96
2.14
2.31
2.67
3.03
3.38
3.92
4.27
4.98
5.70
6.76
8.54
12.64
10.7
12.5
14.3
16.0
17.9
19.6
21.4
23.2
26.8
30.4
33.9
39.3
42.8
50.0
57.1
67.8
85.7
126.7
7.5
8.8
10.0
11.3
12.5
13.8
15.0
16.3
18.8
21.3
23.8
27.5
30.0
35.0
40.0
47.6
60.1
88.9
CaCO
107
125
143
160
179
196
214
232
268
304
339
393
428
500
571
678
857
1267
Press the ”Drain” and ”Drying” touch
pads simultaneously and, while depressed, turn the machine on, using
the main ”On/Off” switch.
”P…” will appear in the indicator
panel.
Press the ”Reactivation” touch pad.
The ”P…” will disappear and setting
”0” will appear in the display field.
This setting ”0” can now be changed
if necessary. To do this:
Press the ”DRYING” touch pad as
many times as necessary for the
desired value to appear in the display field.
Press the ”START” touch ad. ”SP” appears in the display field.
Press ”START” once more. The setting will now be stored. The display
field clears.
The machine is now ready for operation.
3
12
Page 13

If the water hardness in your area is
permanently below 107 ppm CaCO
you do not need to soften the water.
Please deactivate the water softener by:
Selecting the setting ”0” in the display field according to above instructions. The ”REACTIVATION” control
light will not come on and the water
softener will not need to be reactivated.
For instructions on reactivating the
water softener, see page 30.
,
3
Setting the water softener
13
Page 14

Opening and closing the door
Opening and closing the door
To open the door
press the ”DOOR” button on the control panel and open the door.
The door should only be opened during operation for emergencies, e.g. if
articles are knocking together. If this occurs in the disinfection program, restart
the complete program.
To close the door
lift the door upwards and push until it
clicks into position. Do not press the
”DOOR” button.
14
Page 15
Loading and unloading the machine
Loading and unloading the machine
The disinfector normally uses an upper
and a lower basket.
Depending on the type and shape of
the items being cleaned, inserts can be
supplied.
The diversity of the inserts is so great
that it is not possible to illustrate them
all or give detailed instructions on their
use here.
E.g. the thermal disinfector will allow
hollow instruments to be internally
cleaned and disinfected using the
upper basket O 177.
Removing excess soils
Empty all items to be cleaned before
loading into the machine.
Ensure that no acid or solvent
residues, especially hydrochloric
acid or chlorides, get into the wash
cabinet.
Notes
Load the items to be cleaned so the
water will come into contact with all
surfaces. This ensures that they will
be properly cleaned and disinfected.
Hand instruments should be processed in cassettes like the
E 146, E 363, or E 373.
Hinged instruments should be
placed into the universal mesh tray E
378 or E 379 with the hinge opened
at an angle of about 90° (right angle).
Hollow instruments should be
treated in the upper basket O 177,
and be positioned on jets or funnels.
Do not place items to be cleaned inside other pieces where they may be
concealed.
Vessels should be inverted and
placed in the correct inserts.
Deep based items should be placed
at enough of an angle for water to
run off them freely.
Tall and narrow pieces should be
placed in the center of the basket to
ensure good coverage with water.
Hollow instruments may only be processed correctly, i.e. cleaned and
disinfected inside and outside, in the
appropriate upper basket O 177.
The spray arms must not be blocked
by items which are too high for the
basket or which hang down in its
path. If necessary, manually rotate
the arm to test it.
The flap of the powder detergent dispenser on the door must not be obstructed and be prevented from
opening when the door is closed.
In order to avoid corrosion, it is recommended that only heat and corrosion resistant items be cleaned in
the machine. For the suitability of
instruments, please refer to ”Indications for use”.
Care should be taken that as little
dental cement or amalgam remains
on the instruments as possible. However, where necessary, the instruments can be cleaned manually after
thermal disinfection (following health
and safety regulations) with minimized danger of infection.
15
Page 16

Loading and unloading the machine
Use thermally stable plastic items
only.
Immediately after the program
finishes, partially open the door
(about 4 inches or 10 cm) for 10 to
15 minutes. This allows the goods to
cool down to avoid burning or scalding. Additionally, good drying results
are achieved using the residual heat,
which will help prevent the instruments from corroding. Aluminium
trays are usually not suitable for thermal disinfection.
Handpieces, drill bits, grinders, root
canal instruments or other rotating instruments only have a limited suitability for the thermal disinfector.
Please ask the manufacturer’s advice on the suitability for processing
in this system.
Do not clean fiberoptics or electrical
equipment or components in the
thermal disinfector.
Important
Make sure the spring loaded coupling
engages correctly when the upper basket is inserted into the machine. There
should be a tight fit between the coupling and the water inlet connector at the
top of the chamber. If there is not, adjust the adapter as follows:
Loosen the holding ring on the upper
basket.
Push up the adapter so it is 1/4’’
higher than the water inlet connector,
and tighten the holding ring.
Select baskets and inserts which are
appropriate for the application.
Disinfection monitors
Although the adhesion to the thermal
disinfection parameters (93°C/200°F/
10 min. +/-2°C) is monitored by the
electronic control, we advise to independently check the unit once a day
with the first run.
16
The Disinfection Control Tubes by A.
Browne Ltd., distributed by Miele, are
designed to monitor the time temperature combination of 93°C/200°F/ 9min.
They may be placed in the filter combination. These indicators change color
when the parameters are met. Although
this indicator does not indicate the
exact disinfection parameters, they will
alert the user to large discrepancies
from them.
Page 17

Loading and unloading the machine
Loading and unloading the machine
Loading examples
Upper basket O 177
The upper basket O 177 features 28
jets/funnels for direct injection of hollow
instruments like syringe tips or evacuation tips. The left side is free for alternative inserts.
Bottom basket U 165
Left hand side: insert E 131 for 5 mesh
trays (E146) and holders (E 328) for
double sided instruments. Right hand
side: E 130 insert for 10 trays.
Place hollow instruments directly onto
the jets. Where the inner diameter of
the hollow instruments does not allow
for positioning onto the jets, the jets
may be replace by funnels.
Bottom basket U 174 insert
Left hand side: E 130 for 10 trays.
Right hand side: E 379 universal mesh
tray for various instruments.
17
Page 18

Loading and unloading the machine
Unloading the machine
When the cycle is finished the indicator
light next to the ”START” touch pad will
go out.
If one of the ”DISINFECTION” programs was chosen, check the ”DISINFECTED” indicator light. If it is not
lighted, the load is not disinfected! In
this case please call technical assistance.
Check, if any warning lights (left
hand side of the control panel) are
on, or if the digital display shows two
dashes. If so, refer to the section
”Correcting minor faults”, or call technical assistance.
In case you used a disinfection monitor (disinfection control tubes),
check for the accuracy of the process. We advise to document the results.
Open the door partially (about 4’’ /
10 cm). Let the load cool down for
about 10-15 min. During this time the
load will usually dry out.
Adjusting the top basket
Adjustable top baskets can be used in
this machine. They can be raised or lowered by 3/4’’/2 cm from the initial setting.
In the middle position the basket will
accommodate:
instruments, utensils, accessories and
inserts up to 7 1/2’’ / 19 cm in height
while the lower basket can accommodate:
instruments, utensils, accessories
and inserts up to 9 3/4’’ / 19 cm in
height.
For further details regarding container height combinations, see table
below.
To p
basket
position
top 6 5/8" (17 cm) 10 5/8" (27 cm)
middle 7 1/2" /19 cm) 9 3/4" (25 cm)
Top basket
height cm
Bottom basket
height cm
In case you use powder detergent
check, if the dispenser lid has opened. If not, the instruments might
not be clean!
In case you use rinse aid check the
small bulls eye on the right hand
side of the inner side of the door. It
has to be black. If not, replenish the
liquid door dispenser with rinse aid.
Now you can safely unload the machine.
18
bottom 8 1/4" (21 cm) 9" (23 cm)
To adjust the top basket
Pull out the upper basket until a resistance is felt, lift from the runners
and remove.
Unscrew the knurled nuts on both
sides of the basket and reposition as
necessary.
Page 19

Adding rinsing agent
Adding rinsing agent
A storage container incorporated in the
door has a capacity of approximately
7.8 fl.oz. / 200 ml. The required amount
of appropriate liquid rinsing agent
(Neodisher MielClear) is dispensed
automatically from this container.
Adding rinsing agent
Pour rinsing agent into the storage container until the level indicator is dark
(see arrow in illustration). Use funnel if
necessary.
Firmly tighten the screw cap. Clean
up any spillage.
Refilling with rinsing agent
The level indicator shows how much
rinsing agent is left in the container.
When there is no dark coloring visible
in the level indicator, the container
needs to be refilled.
Setting the dosage
Unscrew the cap
The dosage adjustment in the opening
has settings from 1-6 (0.035-0.2 fl.oz. /
1-6 ml). It is set to ”3” (o.1 fl.oz. / 3 ml)
at the factory.
Use a higher setting if spots are left
on the cleaning goods after drying.
If smearing appears, use a lower setting.
19
Page 20

Adding neutralizing agent
Adding neutralizing agent
To reduce the pH level of the wash solution after the alkaline phase, special
neutralizing acids will be used in the
first interim rinse.
Place the container with neutralizing
agent on the floor close to the machine.
When the ”NEUTRALIZER” indicator
light on the control panel lights up
fill the container with neutralizing
agent, or change container, and then:
20
place the siphon tube firmly in the
opening of the free-standing container (pay attention to the color coding).
The container should never be allowed
to empty.
Page 21

Adding neutralizing agent
Venting the liquid dispensing system
Before using the machine for the first
time, or if the container has been
allowed to empty, the dispensing system must be vented. Please proceed
as follows:
Press the ”ON/OFF’ button.
Adding neutralizing agent
Use a sharp object to press in switch
”A” and/or ”B” at the left hand side
end of the control panel for three and
a half minutes.
Switch ”A” Dispensing system for
neutralizing agent.
Switch ”B” Dispensing system for
cleaning agent.
Each time the system is vented any
liquid which runs into the wash
cabinet must be washed out as follows:
Select the ”RINSE” program.
After this has run the dispensing system is filled and ready for use.
21
Page 22

Adding detergent
Adding detergent
Pour powder detergent into the powder
dispenser on the door before each program (see next page for ”DISINFECTION’ program).
Pull the opening catch on the container flap forward (see arrow). The
flap will spring open (the flap will remain open at the end of a program).
Fill the dispenser with the detergent
manufacturers recommended dosage. When calculating the dilution
ratio of the detergent, 10.5 liters is
the amount of water that is used the
main wash cycle (For example, if
3g/l dilution is required use about
30 grams of detergent).
Close the dispenser lid.
Use only specially formulated clean-
ing agents which are approved of by
Miele.
Under certain circumstances, different additives may be necessary.
Miele Customer Service will be
please to advise you.
Note
Take care when handling liquids such
as detergents, neutralizing agents or
rinse aids. These may contain acids or
alkalis. Follow the manufacturer’s safety
procedures and the instructions on the
packaging carefully. Wear protective
gloves and goggles if necessary.
22
Page 23

IMPORTANT SAFETY INSTRUCTIONS
IMPORTANT SAFETY INSTRUCTIONS
G 7781
To the person responsible for the machine:
Make this pull-out with the Warning and Safety Instructions available to any
operators of the machine. Place it near the machine, where it can be seen.
Ensure that operators know and understand these Warning and Safety Instructions, and observe them in use.
When using an electrical appliance, basic precautions should always be followed
including the following:
READ ALL INSTRUCTIONS BEFORE
USING THE APPLIANCE
WARNING –
The manufacturer cannot accept
responsibility for damage caused
when the appliance is not used
according to the instructions, or for
uses other than those for which it
was intended.
This special commercial machine
is suitable for the applications mentioned in the operating instructions. Do
not use for purposes other than those
for which it was designed, as these
may be dangerous. The manufacturer
cannot be held responsible for damage
caused by improper use.
Do not allow small children or un-
authorized personnel access to
the machine or its controls.
If thermal disinfection is required
(93°C/200°F/10min.), the process
needs to be checked and documented
regularly. This can be done by checking the disinfection control diode on the
machine. Alternatively, a chemical indicator may be used (e.g. the Disinfection Control Tubes by A. Browne Ltd.,
supplied by Miele). These disinfection
control tubes should be placed in the
filter combination. After the disinfection
cycle, they may be inspected by removing the coarse filter.
The disinfection program should
not be interrupted, as this would
affect the disinfection result. If interruption is necessary, the program should
be repeated.
Do not install the machine in areas
where there is a risk of explosion.
1
Page 24

IMPORTANT SAFETY INSTRUCTIONS
The machine is built in accordance
with current safety requirements.
Any repair work should only be carried
out by a suitably qualified and competent engineer. Repairs by unqualified
persons could be dangerous.
The electrical safety of this ma-
chine can only be guaranteed if
connected to an electrical system that
complies with all local and national
regulations. It should be checked by an
expert if necessary. The manufacturer
cannot be held responsible for damage
caused by incorrect wiring.
The machine should only be in-
stalled by a suitably qualified and
competent contractor. Before connecting the machine, the installer should
check that the voltage and frequency
of the electrical supply correspond with
the details on the data plate of the machine.
Only genuine Miele parts or acces-
sories should be used with the
G 7781 Dental Thermal Disinfector. The
performance and safety of non-genuine
parts or accessories cannot be guaranteed, and use of such parts or items
may void the machine warranty. If you
have specific questions about machine
options or accessories, please call
Miele.
The use of Neodisher cleaning,
neutralizing, and rinsing agents is
strongly recommended. The use of any
other products may invalidate the disinfection resus and the manufacturer’s
warranty.
The machine is completely isolated
from the electricity supply only
when it is unplugged or the circuit
breaker is turned off. This must be
done before any repair work is carried
out.
The water in this machine must not
be used as drinking water.
Only use detergents which have
been approved of by Miele. Do not
use solvents in your machine as there
may be a danger of explosion.
2
Page 25

IMPORTANT SAFETY INSTRUCTIONS
Take care when handling liquids
such as detergents, rinsing or neutralizing agents. These may contain
acids or alkalis. Follow the instructions
and safety procedures on the packaging carefully and wear protective
gloves and goggles. Read the Material
Safety Data Sheets.
Avoid inhalation of powder
cleaners.
Empty any containers or glassware
before placing it in the machine.
Do not allow any acids or solvents,
especially hydrochloric acid and
chlorides, to get into the wash cabinet.
Be careful when sorting instru-
ments with sharp pointed ends. If
possible, place the pointed end downwards.
Install special inserts in accord-
ance with the instructions provided.
When using the machine be care-
ful not to scald or burn yourself.
Baskets and inserts must first be
allowed to cool down. Any water which
may have collected in incorrectly
loaded items will be very hot and
should be emptied into the wash
cabinet.
Do not touch the heating elements
after the end of a program. You
could burn yourself.
Do not hose the machine down to
clean it.
Do not sit or lean on the open door.
This could cause the machine to
tip and be damaged.
When disposing of an old ma-
chine, make sure the door catch is
removed. This will prevent children at
play from being accidentally locked in.
3
Page 26

IMPORTANT SAFETY INSTRUCTIONS
All relevant safety procedures
should be obeyed. Relevant safety
procedures include, but are not limited
to, the Centers for Disease Control’s
Recommended Infection Control Practices for Dentistry and the OSHA Bloodborne Pathogens Standard.
The manufacturer cannot be held
responsible for damage caused by
failure to heed the warning and
safety instructions.
SAVE THESE
INSTRUCTIONS
4
Page 27

Adding detergent Program selection
The different programs and their applications are described in the following
program chart.
Powder detergent may be placed directly on the door in the ”WASH 93°C”
and ”DISINFECTION 93°C - 10’” programs.
As an optional extra, this machine can
be equipped with a
an automatic dosing pump for liquid
detergent. This is connected externally
by plugging into the rear of the machine.
DOS module C 60,
The DOS module is supplied with separate instructions for installation and
use.
23
Page 28

Program Chart G7781
Program Chart G7781
Program When to use
Detergent
(when not using liquid
detergent)
Please follow
manufacturer’s
instructions.
RINSE
(COLD)
DISINFECTION
VARIO
93°C-10’
WASH
93°C
DISINFECTION
93°C-10’
To rinse heavily soiled instruments, e.g. after
soaking them in a disinfecting agent. This
avoids the build-up of foam in the machine.
For protein soils (such as blood and secretions)
– for cleaning and thermal disinfection with
90-93°C and 10 minutes holding time for
instuments which are susceptible to chemicals
and changes in temperature.
Cleaning of instruments at 93°C with 3 mins
holding time.
For thermal disinfection and cleaning of
instruments at 93°C with 10 mins holding time.
Preferably a neutral liquid
detergent should be
dispensed
30 grammes on the righthand side
30 grammes on the righthand side
of the door interior
of the door interior
24
Page 29

Program Chart G7781
Program cycle Miscellaneous
1.
Pre-
wash
2.
Cleaning
and/or
thermal
disin.
X
XX
45°C**)
X
93°C
X
93°C
3.
Interim
rinse I
with neu-
tralization
*)
4.
Interim
rinse
II
5.
Final
rinse
and/or
disin.
XXX
93°C**)
XXX
80°C
XXX
80°C
6.
Drying
(extra
program)
(X)
(X)
(X)
see ”Programming
*)
special functions”
**)
To change temperature,
see ”Programming
special functions”
25
Page 30

Turning the machine on and off
Turning the machine on and off
1. Turning on
Press ”ON/OFF’ button.
2. Selecting a program
After turning on the machine, the indicators next to the available selections will
light up.
Press the selector for the required
program. The wash temperature of
the selected program will show in
the display.
Select the option ”DRYING” if
desired (see ”Selecting an additional
program”).
Press the ”START” touch pad. The
display panel will now show the running time in minutes for the selected
program.
During the heating stage in ”WASH”
and ”FINAL RINSE” the end temperature will be alternately displayed in the
panel. All other programs are blocked
and only the lights for the selected program stay on.
Program change
Provided the ”START” touch pad has
not yet been pushed, a mistakenly selected program may be changed as follows:
Press the appropriate touch pad to
select the correct program.
Press the ”START” touch pad.
Otherwise, see ”Interrupting a pro-
gram” on the next page.
3.Selecting an additional
program
The following additional programs are
available:
”DRYING”
This may be selected immediately
after choosing a wash program (exception: Rinse program). The heater
elements switches on intermittently
during the drying process for 10
minutes. The total running time of the
program will be lengthened accordingly.
The instrument will not be absolutely
dry. Please contact the sterilizer
manufacturer regarding the drying
stage required for your sterilization
device. Instead of selecting the
drying cycle you can also perform
the following steps:
26
Page 31

Turning the machine on and off
Immediately after the program
finishes, partially open the door
(about 4 inches or 10 cm) for 10 to
15 minutes. This allows the goods to
cool down to avoid burning or scalding. Additionally, good drying results
are achieved using the residual heat,
which will help prevent the instruments from corroding. Aluminium
trays are usually not suitable for thermal disinfection.
”REACTIVATION”
(see ”Reactivating the water softener”)
”DRAIN”
– Press the ”ON/OFF” button.
– Press the ”DRAIN” touch pad.
– Press the ”START” touch pad.
27
Page 32

Turning the machine on and off
Program sequence indicator
When a wash or disinfection program
has been selected, the indicator lights
in the display will show the program sequence.
PRE-WASH
WASH
RINSE
FINAL RINSE
DRYING (optional)
DISINFECTED (only valid with the ”DIS-
INFECTION 93°C - 10’” and the ”DISINFECTION VARIO 93°C-10’” programs)
When part of the program is completed, the corresponding indicator
light goes out. The wash cycle is completed when the ”START” light goes out.
The display panel will show the total
running time of the program.
Turning off
Press the ”ON/OFF” switch and let it
spring out. The machine can now be
opened and unloaded.
Interrupting a program
Once a program is running, it should
only be interrupted in extreme cases,
such as when articles in the machine
rattle or bump against each other and
have to be rearranged.
The machine must be turned off, the
water drained and the program restarted:
Turn the machine off by pressing the
”ON/OFF” switch and letting it spring
out.
Select the ”DRAIN” program.
On completion, open the door and
rearrange the articles securely and
correctly (wear protective wear if
necessary).
Replenish the powder detergent dispenser in the door if necessary.
Close the door. Reselect the program.
Important:
Make sure that the ”DISINFECTED”
light is lit at the end of a ”DISINFECTION” program, if the door was opened
before its completion.
the disinfection parameters were not
met and the entire program should be
repeated.
If the light is out,
28
Page 33

Programming special functions
Programming special functions
The following special functions can be
programmed where appropriate,
1. Extending the water inlet from 60’’
to 120’’ with level control
If the inlet water pressure is lower than
35 psi / 2.5 bar, too little water will flow
into the wash cabinet. By selecting the
extended water inlet, more water will
flow into the wash cabinet if there is low
water pressure (between 15 and 35 psi /
1.0 and 2.5 bar).
Turn off the machine.
Press ”DRAIN” and ”DRYING” at the
same time, while turning on the machine. ”P3” appears in the display.
Press ”DISINFECTION 93°C-10’”.
”10” or ”11” will appear in the display.
10 = 60’’ water intake
11 = 120’’ water intake with level
control
Press ”DRYING” to change the display to ”11”.
Press ”START”. ”SP” appears in the
display.
Press ”START” again. The change
has been stored and the display
field clears.
2. Deactivating of neutralizer dispensing
The G 7781 is programmed from the
factory to dispense neutralizer during
the first interim rinse. It is strongly
recommended to use this option to
avoid discoloration or corrosion. However, dispensing of neutralizer might
not be necessary if a pH neutral detergent is being used.
To deactivate the neutralizer setting perform the following.
Turn off the machine.
Press ”DRAIN” and ”DRYING” at the
same time, while turning on the machine. ”P3” appears in the display.
Press "WASH 93°C-3’": ”20” or ”21”
will appear in the display.
20 = without interim rinse I
21 = with neutralizing agent
dispensed in interim rinse I
Press ”DRYING” to change from 21
to 20 or vice versa.
Press ”START”. ”SP” appears in the
display.
Press ”START” again. The change
has been stored and the display
field clears.
29
Page 34

Programming special functions
3. Altering temperatures T1 (wash
temperature) and T2 (rinse temperature) in the ”DISINFECTION VARIO
93°C-10’” program
The wash and final rinse temperatures
are set as standard at 45°C/113°F and
93°C/200°F. If a wash temperature of
60°C/140°F is required, this can be set
in the following manner:
Turn off the machine.
Press ”DRAIN” and ”DRYING” at the
same time, while turning on the machine. ”P3” appears in the display.
When DISINFECTION VARIO
93°C-10’ is pressed, ”30” appears in
the display. Press ”DRYING” to
change ”30” to ”31” or vice versa.
When ”RINSE” is pressed, ”40” appears in the display. Do not change
this setting as it would be insufficient
for disinfection!
The following options are possible:
Main
Wash
30 – 40 45°C
113°F
30 – 41 45°C
113°F
31 – 40 60°C
140°F
31 – 41 60°C
140°F
To store the setting, press ”START”
twice.
30
Rinse
93°C
200°F
80°C
176°F
93°C
200°C
80°C
176°F
Page 35

Reactivating the water softener
Reactivating the water softener
When the ”REACTIVATION” indicator
light on the left hand side of the control
panel comes on during a program, the
built-in water softener is depleted and
cannot supply any more soft water.
Filling the salt container
It should be reactivated with salt
soon as the wash program has finished. If this cannot be done, and further loads have been washed, then the
reactivation process should be carried
twice in succession.
out
Each reactivation cycle requires:
2 kg / 4.4 lb. of water softener salt.
A granule size of 1 to 4 mm is recommended by Miele. Do not use any
other type of salt, it may damage the
water softener.
The plastic salt container which is
supplied with the machine.
Important
If the only reactivation salt available is
fine grain, please consult Miele Customer Service.
Water softener salt with granules larger
than 4 mm cannot be used.
as
Unscrew the filter insert from the salt
container and remove.
WARNING: PERSONAL INJURY/
EQUIPMENT DAMAGE HAZARD
Do not fill container with cleaning
detergent! Fill with reactivation salt
only! Detergents can be corrosive,
causing potential personal injury
and damage to the water softener.
Fill the salt container with approx.
4.4 lbs (2 kg) of granular salt and
screw the filter insert back in place.
31
Page 36

Reactivating the water softener
Position the salt container as follows:
Remove the lower basket from the
machine.
Unscrew the plastic cap in the base
of the wash cabinet.
Close the door.
Turn on the machine.
Press the ”REACTIVATION” touch
pad.
Press the ”START” touch pad.
The reactivation program proceeds
automatically and finishes when the
”Reactivation” light at the left hand side
of the control panel and the ”Start” indicator light have gone out.
Then:
Turn off the machine.
Remove salt container slowly,
allowing pressure to be released.
Do not open by force, If you cannot
unscrew it by hand, contact the
Miele Service Department.
Screw the plastic lid back on the
socket.
Reposition the lower basket.
Place the salt container on the reactivation socket and screw firmly into
place.
32
Rinse the salt container and filter insert thoroughly.
Important
If the water pressure is below 35 psi /
2.5 bar of if it fluctuates, the water softener cannot be reactivated in the normal way. After reactivation, salt may still
be found in the salt container.
To use up the salt and to wash out the
water softener, the ”Reactivation” program must be run again.
Page 37

Cleaning an care
Cleaning the filters in the
wash cabinet
The filter combination in the base of the
cabinet should be inspected regularly
and cleaned if necessary.
Cleaning the coarse filter
Cleaning an care
To unscrew the micro-fine filter, take
hold of the two tabs and turn twice in
a counter clockwise direction.
Press the 2 tabs together, remove
and clean the filter.
Put the clean filter back in position
and press until it clicks in place.
Cleaning the fine, flat and micro-fine
filters
Remove the coarse filter.
Remove the fine filter from between
the flat and the micro-fine filters.
Pull up and remove the two filters.
Clean the filters.
The filter combination is then re-
placed in the reverse order in which
it was removed.
The machine must not be used without
all filters in place.
33
Page 38

Cleaning an care
Cleaning the water inlet filters
Filters are incorporated into the stainless steel housing located between the
valve and the hose.
The filters must be cleaned when dirty,
otherwise insufficient water will flow into
the wash cabinet,
Turn off the valves.
Unscrew the water inlet hoses.
1
2
Clean the large area filter (1) and the
fine filter (2) or replace if necessary.
After reconnection, turn on the
valves and test for leaks.
34
Page 39

Correcting minor problems
With the aid of the following explanatory notes, minor problems can be corrected without contacting the Miele Service Dept.
Any work on the electrical components
of the machine should only be carried
out by a suitably qualified and trained
person.
Warning lights
Correcting minor problems
The ”REACTIVATION” light is on
The water softener needs to be replenished. Please refer to ”Reactivating the water softener”.
The ”DETERGENT” light is on
You are using the optional DOS module C 60. The liquid detergent container has to be refilled.
The ”DRAIN/FILL” warning light
flashes
Check that both water intake hoses
are connected to the water supply
and that the faucets are turned on.
Check the drain hoses. They should
not be higher than 3 feet / 1 m from
the base level of the machine. The
inner diameter of the hoses should in
no point be less then 3/4’’ / 2 cm.
Check if any hoses are kinked. If so,
please straighten them out.
The water in the machine must then
be pumped out by choosing the
”Drain” program. Then please restart
the program you would like to run.
The ”NEUTRALIZER” light is on
The neutralizer container has to be
refilled.
The display shows two dashes
Please call technical assistance. The
machine is stalled and cannot be
operated until it is reset by a trained
technician.
35
Page 40

Correcting minor problems
Unsatisfactory cleaning results
Unsatisfactory cleaning results may
occur as drying spots, or as spots that
look like corrosion. Presumably corrosive spots often are bio-debris. They
have the shape of drying spots, blurry
edges, and the color of rust. Bio-debris
may also appear on surfaces that were
not contaminated before processing.
Please observe:
Have the instruments been stored in
the machine for more than 6 hours?
If so, please run the machine, even
partially loaded, within 6 hours of
loading.
Was enough detergent used? Please
check the dosage of the detergent
and adjust, if necessary. Too little as
well as too much detergent may
deteriorate the cleaning results.
Can both spray arms rotate easily,
even with the machine loaded? If
not, please rearrange the goods to
be cleaned in a way so that the
spray arms can rotate freely.
The water in the wash cabinet is not
heated; the program sequence lasts
too long
This machine has a resettable temperature limiter which will shut off the heating elements in the case of over-heating. This could be caused if large
articles cover the heating elements or if
the filters in the wash cabinet are
blocked.
Remove the cause of overheating.
Take off the service panel (see next
page).
Press in the blue reset button on the
temperature limiter.
If this switch trips repeatedly, the Miele
Service Dept. must be contacted.
In the event any problems cannot be
corrected, please contact the Miele
Service Department.
Does the flap of the powder detergent dispenser open? If not, check if
anything obstructs the flap and prevents it from opening. Otherwise,
please call technical assistance.
36
Page 41

Installation
Installation
The machine should only be installed by a competent contractor.
The contractor should be experienced in installing machines that
require electrical hook-up as well as
plumbing.
The machine must be installed and
leveled correctly. Any unevenness in
the floor can be compensated for by
screwing the adjustable feet in or out
as necessary.
The machine can be installed in the following ways:
Free-standing
Under counter.
The recess should be at least 23
3/4’’ / 60 cm wide, 23 3/4’’ / 60 cm
deep, and 33 1/4’’ / 85 cm high.
If necessary the machine top can be
removed as follows:
Open the door.
Remove the screws on the left and
right, using a Philips screw driver.
Pull the top forward, lift and remove.
By removing the lid, the machine can
be built into a recess 32 1/4’’ / 83 cm
high.
37
Page 42

Installation
To remove the service panel and
plinth
b
b
a
a
b
b
Remove the two 8 mm bolts ”a” from
the service panel.
Take hold of the service panel at
both sides and pull forward.
Remove all four plinth screws ”b”.
Do not us silicone sealant to seal the
gaps between the machine and any
neighboring units as this will hinder
ventilation to the circulation pump.
Depending on the installation requirements, the following kits are available:
34 1/4’’ / 87 cm high recess
This kit consists of longer machine feet
and a base plate.
(Part # 1107961)
Steam deflector
for use where the machine will be installed under a wooden countertop.
The underside of the work surface is
protected from steam damage by a
plate of niro-steel.
(Part # 1156150)
Disconnect grounding lead if necessary.
Remove plastic protective cap.
To re-assemble:
Replace plastic protective cap,
plinth facing and service panel in the
reverse order in which they were
removed.
Make sure the grounding lead is reconnected.
38
Page 43

Electrical connection
All electrical work must be carried
out by a qualified electrician and in
compliance with all local and national electrical codes.
Before making any connections, check
that the voltage shown on the data
plate corresponds to your power supply.
The machine is supplied as standard
for connection to a 208 V 60 Hz single
phase power supply and is fitted with a
power supply cord 6 ft / 1.8 m long with
a cross-section of AWG 10-4. It should
be connected to the main power supply according to the opposite chart.
Voltage: 208 V, single phase
Frequency: 60 Hz
Rated load: 6.0 kW
Circuit breaker: 30 A per phase
The machine can be converted for connection to a 3 phase power supply.
Electrical connection
WARNING
THIS APPLIANCE MUST BE
CORRECTLY GROUNDED!
The manufacturer cannot be held
responsible for damage or injury
caused by incorrect or missing
grounding.
wiring diagram can be found be-
The
hind the plinth on the left hand side, attached to the floor of the machine.
data plate with serial and model
The
numbers is on the rear of the machine
and on the plinth behind the service
panel.
39
Page 44

Plumbing
Plumbing
Connection to the water inlet
The machine must be connected to
the water supply in accordance with
all local and national plumbing
codes.
Drainage
The drain system is equipped with a
non-return valve which prevents dirty
water from flowing back into the machine.
The machine is constructed with an
air gap/anti-siphoning device on
both the intake and the drain sides.
No such additional devices are
necessary or recommended, as they
will impede the water inflow into and
out of the washer.
The water pressure must be between 35 and 145 psi (2.5 - 10.0
bar). If the water pressure is not
within this range, the Miele Service
Dept. can advise you of the
measures to be taken (see also ”Programming special functions”).
This machine is designed for cold
water connection only, in view of its
technical application.
Both inlet hoses (water supply and
steam condenser) should be connected to the valves for cold water.
Valves with 3/4’’ male hose thread
should be provided on-site, and
should be easily accessible.
The machine is supplied with two
5 ft. / 1.5 m long flexible drain hoses
with an inner diameter of 3/4’’ / 2 cm.
They should not be shortened or attached to any fittings that would
cause a reduction in water flow.
Longer drain hoses up to a length of
13 ft / 3.3 m are available if required.
Both hoses can be attached to existing drain lines through the use of a 1
1/2’’ / 3.5 cm or larger stand pipe / Ptrap combination. Alternately, the
hoses can be connected directly to
existing drain lines, provided any fittings or adapters used do not reduce the water flow.
The drain hoses should not exceed
13 ft / 3.3 m in length, or be attached
to the main drain at a point higher
than 3 ft. / 1m above the floor.
A floor drain is permissible.
For additional protection of the
valves against impurities in the water
supply, large surface area filters are
enclosed in the kit supplied with the
machine (see diagram in ”Cleaning
and care, water inlet”).
The water in the machine in not suitable for drinking.
404142
Page 45

Page 46

Page 47

43
Page 48

Copyright by 1996 Miele Appliances, Inc. / 000 0999
All rights reserved
 Loading...