

Page 1
Operating instructions
Steam oven
DG 4064 / DG 4164
DG4064L/DG4164 L
To avoid the risk of accidents or
damage to the appliance it is
essential to read these
instructions before it is installed
and used for the first time.
en-GB
M.-Nr. 06 786 680
Page 2

Contents
Description of the appliance. . . . . . . . . . . . . . . . . . . . . . . . . . . . . . . . . . . . . . . . . 4
Front view.........................................................4
Controls and displays ...............................................5
Accessories supplied ...............................................6
Warning and Safety instructions . . . . . . . . . . . . . . . . . . . . . . . . . . . . . . . . . . . . . 7
Caring for the environment. . . . . . . . . . . . . . . . . . . . . . . . . . . . . . . . . . . . . . . . . 12
Before using for the first time. . . . . . . . . . . . . . . . . . . . . . . . . . . . . . . . . . . . . . . 13
Setting the water hardness level ......................................13
Location .........................................................13
Opening and closing the door........................................14
Cleaning and heating up for the first time ...............................15
Operation . . . . . . . . . . . . . . . . . . . . . . . . . . . . . . . . . . . . . . . . . . . . . . . . . . . . . . . 16
Before each use...................................................16
Programming steps in brief ..........................................16
Programme chart ..................................................17
Switching on and selecting a programme...............................18
Altering the recommended temperature ................................18
Setting a cooking duration...........................................19
Starting the programme.............................................19
Interrupting operation ..............................................20
Changing a programme ............................................21
At the end of the cooking duration ....................................22
After use.........................................................23
Practical tips. . . . . . . . . . . . . . . . . . . . . . . . . . . . . . . . . . . . . . . . . . . . . . . . . . . . . 24
Suitable containers ................................................24
Steaming ........................................................25
Reheating........................................................29
Defrosting .......................................................30
Cooking whole meals...............................................32
Blanching........................................................32
Bottling..........................................................33
2
Page 3

Contents
Extracting juice with steam ..........................................34
Disinfecting containers .............................................35
Preparing yoghurt .................................................35
Safety features . . . . . . . . . . . . . . . . . . . . . . . . . . . . . . . . . . . . . . . . . . . . . . . . . . . 36
Pressure release / Safety valve .......................................36
Overheating protection .............................................38
Safety lock .......................................................39
Cleaning and care . . . . . . . . . . . . . . . . . . . . . . . . . . . . . . . . . . . . . . . . . . . . . . . . 40
Appliance front ...................................................41
Cooking containers and drain filter ....................................42
Door seal / Safety valve .............................................42
Cooking compartment and pull-out shelf ...............................43
Shelf runners .....................................................44
Water nozzle .....................................................45
Descaling........................................................46
Programming . . . . . . . . . . . . . . . . . . . . . . . . . . . . . . . . . . . . . . . . . . . . . . . . . . . . 49
Problem solving guide . . . . . . . . . . . . . . . . . . . . . . . . . . . . . . . . . . . . . . . . . . . . 51
Optional accessories. . . . . . . . . . . . . . . . . . . . . . . . . . . . . . . . . . . . . . . . . . . . . . 55
Cooking containers ................................................55
Cleaning and care products .........................................56
Miscellaneous ....................................................57
Services . . . . . . . . . . . . . . . . . . . . . . . . . . . . . . . . . . . . . . . . . . . . . . . . . . . . . . . . 58
Technical data ....................................................58
Plumbing ........................................................58
Electrical connection ...............................................58
After sales service, data plate . . . . . . . . . . . . . . . . . . . . . . . . . . . . . . . . . . . . . . 60
3
Page 4
Description of the appliance
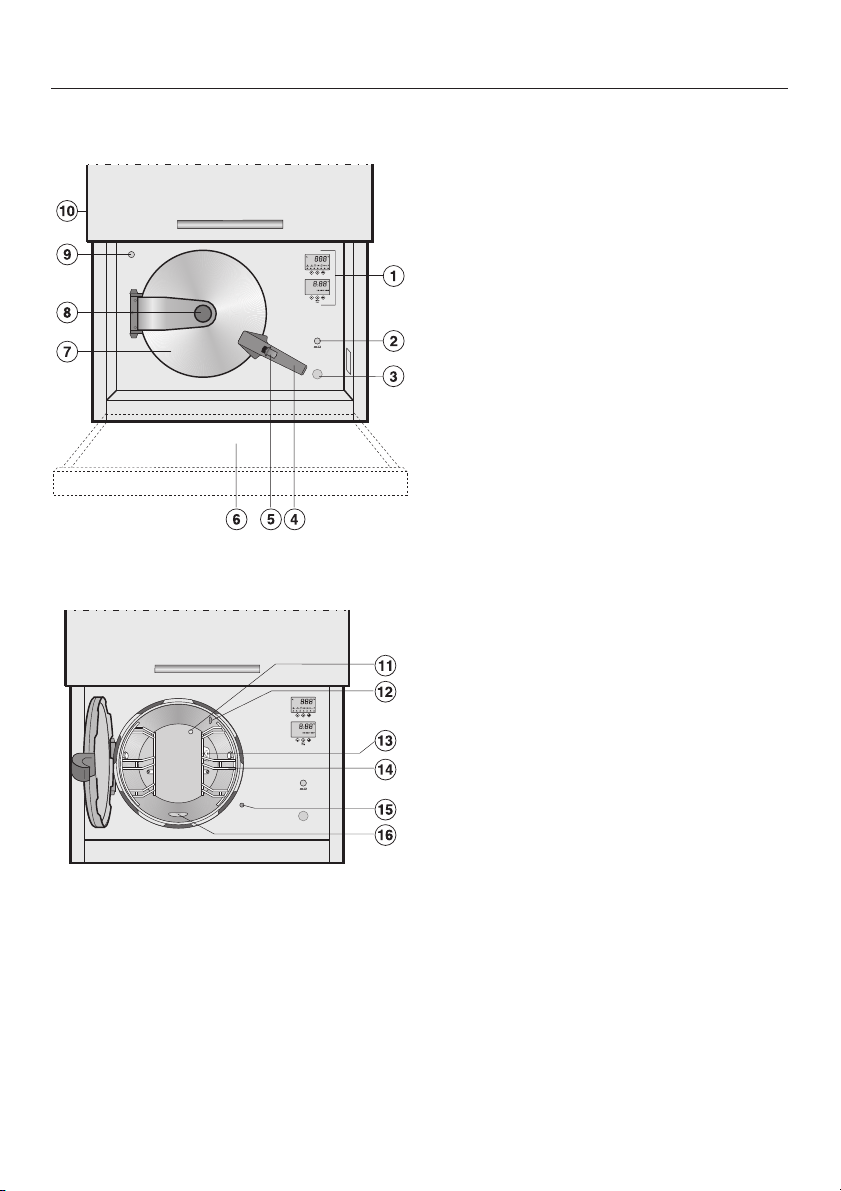
Front view
a Controls and displays
b On/Off button
c Overheating protection device cover
cap
d Door handle
e Door release
f Pull-out shelf
g Appliance door
h Door button
i Opening for adding descaling agent
j Lift-up door (only on appliances with
an "L" in the model number)
k Temperature sensor
l Steam vent
m Deflector plate for water nozzle
n Shelf runners
o Door contact switch
p Drain filter
4
Page 5
Controls and displays
Description of the appliance
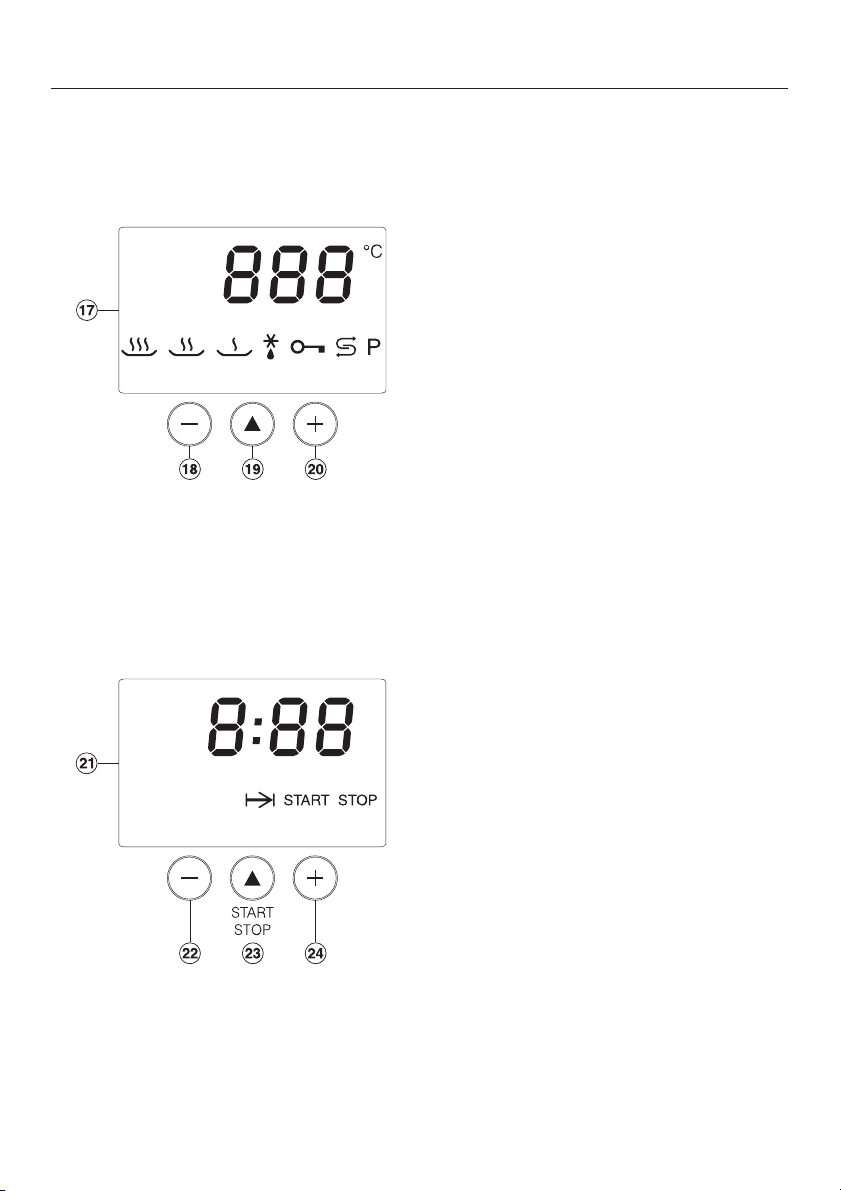
q Programme/temperature display with
symbols for the following
programmes:
°Steam with pressure
P Steam without pressure
Ä Reheat
N Defrost
a Safety lock
k Descale
P Programming
r Temperature button -
s Programme button -
t Temperature button +
u Time display with symbol for:
g Duration of programme
v Time button -
w Start/Stop button -
x Time button +
5
Page 6
Description of the appliance
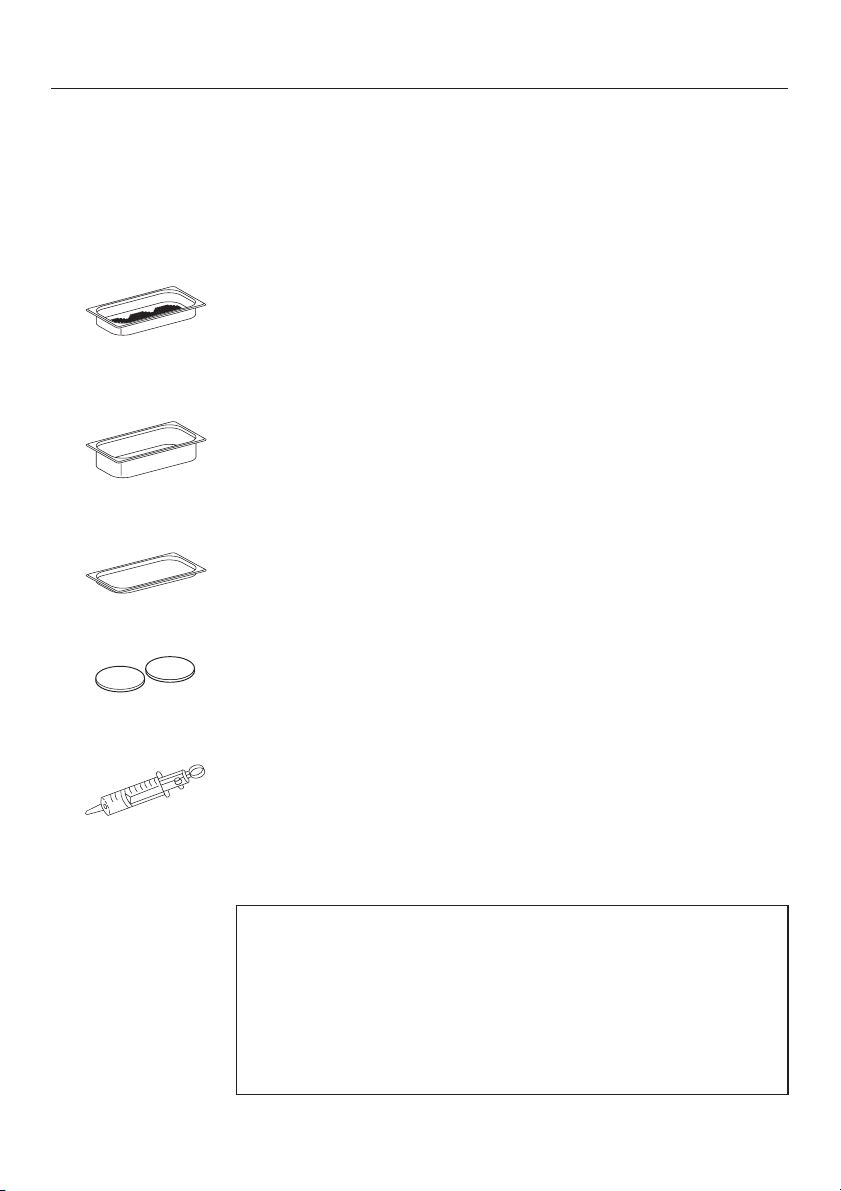
Accessories supplied
The accessories supplied with your appliance as well as a
range of optional ones are available to order from Miele (see
"Optional accessories").
DGGL 1
2 perforated cooking containers for steaming
gross capacity 1.5 l / useable capacity 0.9 l
Gastronorm size GN 1/3
325x175x40 mm (WxDxH)
DGG 2
1 solid cooking container for steaming
gross capacity 2.5 l / useable capacity 2.0 l
Gastronorm size GN 1/3
325x175x65mm (WxDxH)
1 tray
For placing your own dishes on
Silicone washers
For pressure release
Dispensing syringe for descaling agent
Miele steam oven cookbook
A selection of the best recipes from the Miele test kitchen.
Order card for Miele system descaling agent
To avoid damaging the appliance, only use Miele system
descaling agent, which has been especially formulated for
the steam pressure oven, to descale your steam pressure
oven.
To receive a free 1000 ml bottle of the system descaling
agent, please complete and return the enclosed card.
6
Page 7

Warning and Safety instructions
This appliance conforms to current
safety requirements. Please note
that improper use can cause both
personal injury and damage to
property.
To avoid the risk of accidents and
damage to the appliance, please
read these instructions carefully
before installation and before using
it for the first time.
They contain important notes on its
installation, safety, use and
maintenance.
Keep these instructions in a safe
place and ensure that new users are
familiar with the content. Pass them
on to any future owner.
Correct application
This appliance is not designed for
~
commercial use. It is intended for use in
domestic households and for use in
similar working and residential
environments such as:
Shops,
–
Offices and showrooms,
–
and by residents in establishments
such as:
Hostels and guest houses.
–
The steam oven is intended for
~
domestic use only as described in the
operating and installation instructions
and the user instructions.
Any other use is not supported by the
manufacturer and could be dangerous.
Miele cannot be held liable for damage
resulting from incorrect or improper use
or operation of the appliance.
This appliance is not intended for
~
use by persons (including children)
with reduced physical, sensory or
mental capabilities, or lack of
experience and knowledge, unless they
are supervised while using it or have
been shown how to use it correctly by a
person responsible for their safety.
7
Page 8

Warning and Safety instructions
Safety with children
The appliance must be installed at
~
such a height that small children cannot
reach the appliance door, which gets
hot during use.
Use the system lock to ensure that
~
children cannot switch the appliance on
by mistake.
The appliance is only intended for
~
use by adults who have read these
instructions.
It is not a toy! Children may not fully
~
understand the potential dangers of
using it. To avoid the risk of injury, keep
children away from the steam oven at
all times, do not allow them to play with
it or to play with the controls. They
should be supervised whenever you
are working in the kitchen.
The appliance gets hot when in use
~
and remains hot for quite a while after
being switched off. To safeguard
against burning, keep children well
away from the appliance at all times.
Warning: Take care in the area
~
around the door hinges. Danger of
injury. Keep children well away.
Packaging, e.g. cling film,
~
polystyrene and plastic wrappings,
must be kept out of the reach of babies
and young children. Danger of
suffocation. Dispose of or recycle all
packaging safely as soon as possible.
Technical safety
Before installation, check the
~
appliance for visible signs of damage.
Do not use a damaged appliance. It
could be dangerous.
Before installation, check the water
~
hoses for visible signs of damage.
The stopcock for the water inlet
~
must be located so that it is easily
accessible after the appliance has
been built in.
The appliance must be installed and
~
connected to all services by a suitably
qualified and competent person in strict
accordance with current local and
national electrical and plumbing safety
regulations. The manufacturer cannot
be held liable for damage caused by
incorrect installation or connection.
The electrical safety of this
~
appliance can only be guaranteed
when continuity is complete between it
and an effective earthing system which
complies with current local and national
safety regulations. It is most important
that this basic safety requirement is
present and regularly tested, and
where there is any doubt, the on-site
wiring system should be inspected by a
qualified electrician. Miele cannot be
held liable for the consequences of an
inadequate earthing system (e.g.
electric shock).
8
Page 9

Warning and Safety instructions
Before connecting the appliance,
~
make sure that the connection data on
the data plate (voltage, frequency and
connected load) match the mains
electricity supply.
This data must correspond in order to
avoid the risk of damage to the
appliance. Consult a qualified
electrician if in any doubt.
For safety reasons, this appliance
~
may only be used when it has been
built in. This is necessary to ensure that
all electrical components are shielded.
Never open the casing of the
~
appliance.
Tampering with electrical connections
or components and mechanical parts is
highly dangerous to the user and can
cause operational faults.
Installation, maintenance and
~
repairs may only be carried out by a
suitably qualified and competent
person in strict accordance with current
national and local safety regulations.
Repairs and other work by unqualified
persons could be dangerous. Miele
cannot be held liable for unauthorised
work.
If the connection cable is damaged,
~
it must be replaced by a suitably
qualified electrician with a special
connection cable of type H 05 V V-F
(pvc insulated), available from the Miele
Spare Parts Department.
Faulty components must only be
~
replaced by genuine Miele original
spare parts. The manufacturer can only
guarantee the safety of the appliance
when Miele replacement parts are
used.
During installation, maintenance and
~
repair work, the appliance must be
disconnected from the mains electricity
supply.
While the appliance is under
~
guarantee, repairs should only be
undertaken by a service technician
authorised by Miele. Otherwise the
guarantee is invalidated.
Do not connect the appliance to the
~
mains electricity supply by a
multi-socket unit or an extension lead.
These do not guarantee the required
safety of the appliance (e.g. danger of
overheating).
In areas which may be subject to
~
infestation by cockroaches or other
vermin, pay particular attention to
keeping the appliance and its
surroundings in a clean condition at all
times. Any damage caused by
cockroaches or other vermin will not be
covered by the guarantee.
9
Page 10

Warning and Safety instructions
Correct use
The appliance, especially the door,
~
becomes extremely hot during use, and
remains hot for some time after
switching off. Be careful only to touch
the door button and door handle when
the oven door is hot.
For added protection, it is advisable
~
to use heat-resistant pot holders or
gloves when using the appliance. Do
not let them get damp or wet, as this
causes heat to transfer through the
material more quickly with the risk of
scalding or burning yourself.
When putting dishes into the oven or
~
taking them out, take care not to spill
the contents. Do not come into contact
with hot steam. Danger of burning and
scalding.
Do not attempt to force the door
~
open during a programme. Danger of
burning and scalding. The door may
only be opened when:
- the cooling down phase is
finished,
- the beep has stopped,
- the g symbol is flashing in the
time display.
Attempts to open the door before a
programme has run its course will
cause an alarm to sound, and the word
door to appear in the time display.
If bottling, do not use temperatures
~
higher than 95 °C (90 °C if the
appliance is installed higher than
1000 m above sea level). Higher
temperatures can cause the jars to
shatter. Danger of inury.
When using an electrical appliance,
~
e.g. a hand-held food blender, near the
steam oven, ensure that the cable of
the electrical appliance does not come
into contact with the hot appliance. The
insulation on the cable could become
damaged, giving rise to an electric
shock hazard.
Do not use the appliance to heat up
~
food in sealed jars and tins. Pressure
will build up inside them and they can
explode causing damage to the
appliance, as well as the risk of injury
and scalding.
Descaling must only be carried out
~
on a cold appliance. Otherwise harmful
vapours can form. See "Descaling".
Do not use the appliance without the
~
filter in the bottom of the cooking
compartment in place. Otherwise
coarse soiling could get into the
drainage system and pump, causing a
blockage.
Do not use plastic containers. These
~
melt at high temperatures and if used
with any other function,
Always ensure that food is
~
sufficiently cooked or reheated. Some
foods may contain micro-organisms
which are only destroyed by thorough
cooking at a sufficiently high
temperature for long enough.
Therefore, when cooking or reheating
food such as poultry, it is particularly
important that the food is completely
cooked through. If in doubt, select a
longer cooking or reheating time.
10
Page 11

Warning and Safety instructions
Do not leave cooked food in the
~
oven and do not use any cooking
containers which are susceptible to
corrosion as this could lead to
corrosion in the appliance.
The appliance is designed to detect
~
and then self-correct certain
operational faults. If a fault is detected,
the fault messages F06 to F95 will
appear in the display. The door of the
appliance can only be opened when
the fault message is flashing in the
display. If the fault message is not
flashing, the appliance is still
processing the fault. See "Problem
solving guide" for further information.
Appliances with lift-up door:
~
Leave the lift-up door open whenever
the appliance is being used.
If the appliance is installed behind a
~
kitchen furniture door, it may only be
used with the furniture door open.
Only close the door when the appliance
is switched off and the residual heat
indicators have gone out.
Miele cannot be held liable for
damage caused by non-compliance
with these Warning and Safety
instructions.
11
Page 12

Caring for the environment
Disposal of the packing
material
The transport and protective packing
has been selected from materials which
are environmentally friendly for disposal
and should be recycled.
Packaging, e.g. cling film, polystyrene
and plastic wrappings, must be kept
out of the reach of babies and young
children. Danger of suffocation.
Disposal of your old appliance
Electrical and electronic appliances
often contain materials which, if
handled or disposed of incorrectly,
could be potentially hazardous to
human health and to the environment.
They are, however, essential for the
correct functioning of your appliance.
Please do not therefore dispose of it
with your household waste.
Please dispose of it at your local
community waste collection / recycling
centre and ensure that it presents no
danger to children while being stored
for disposal.
It should be unplugged or disconnected
from the mains electricity supply by a
competent person.
12
Page 13

Before using for the first time
Setting the water hardness
level
The steam oven is set at the factory to
water hardness range IV (04) .
If your water hardness level differs from
this you will need to re-programme the
appliance. Proceed as described in
"Programming".
You can use the test strip supplied to
check the water hardness level, or your
local water supplier will be able to
advise you on the water hardness of
your area.
The water hardness is shown as
settings I to IV equivalent to the
German scale 1 to >21 °dH
(0.2 >3.8 mmol/l).
Hardness
level
I 01 1-7 °dH
Display Hardness
range
(0.2-1.3 mmol/l)
Location
If the steam oven is installed at an
altitude higher than 1000 m above sea
level, the boiling point for water will be
lower than the boiling point for water at
sea level. To cater for this, the boiling
point for water in the appliance can be
altered. Proceed as described in
"Programming".
II 02 8-14 °dH
(1.4-2.5 mmol/l)
III 03 15-21 °dH
(2.7-3.8 mmol/l)
IV 04 > 21 °dH (above
3.8 mmol/l)
13
Page 14
Before using for the first time
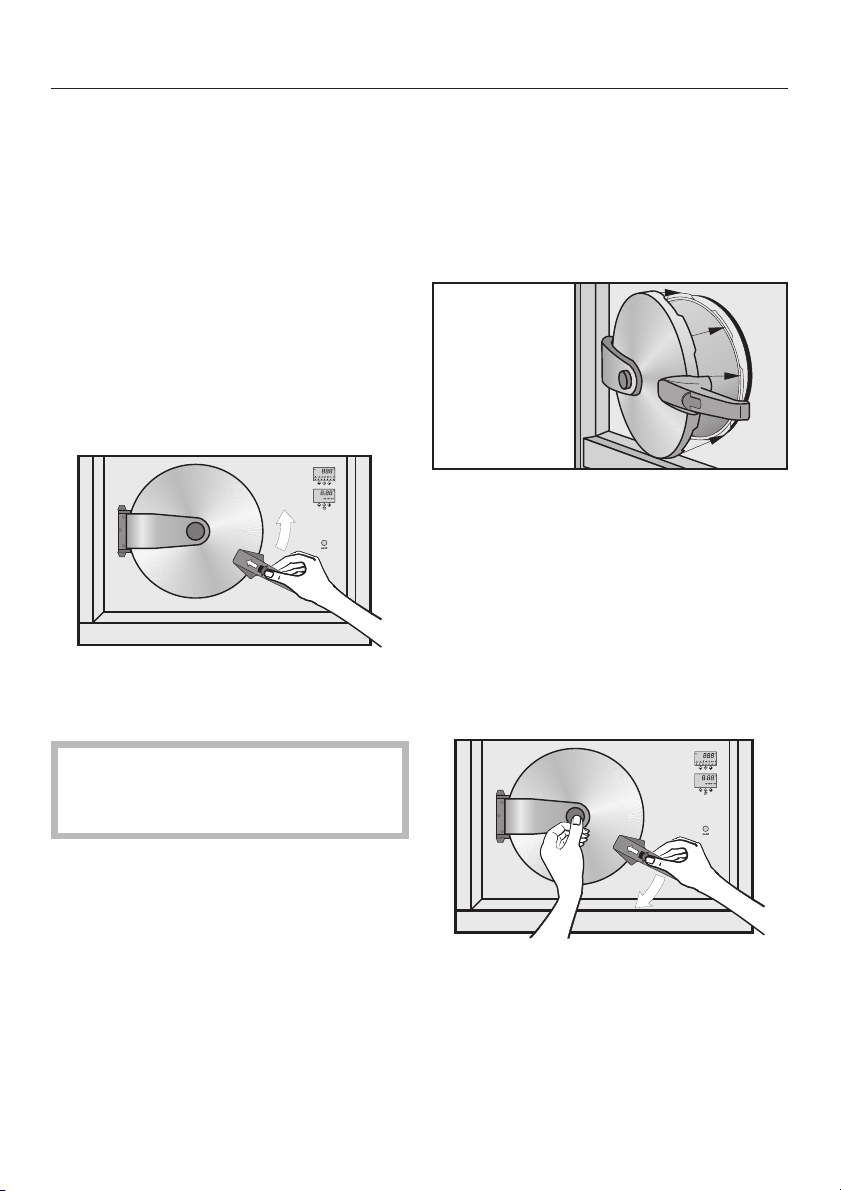
Opening and closing the door
Pull out the shelf underneath the
appliance before opening the door. You
can place hot containers on the shelf
and it will also collect any drops of hot
water.
To open the door
Using the thumb of your right hand,
^
push the door release forwards and
turn the handle upwards until the
handle is in a horizontal position.
The oven door is now unlocked and
can be opened.
To close the door
Turn the handle to the horizontal
^
position.
This ensures that the door lugs are
lined up with those on the cooking
compartment opening (see arrows).
^ Using your left hand, press firmly on
the door button.
^ Using your right hand, turn the
handle downwards until you hear it
engage. While doing so, also push
the door release forwards with your
thumb. This vents the cooking
compartment and makes it easier to
close the door.
Do not attempt to force the door
open during a programme. Danger
of burning and scalding.
If you attempt to open the door during a
programme or before the cooling down
phase has finished, an alarm will sound
and the word door will appear in the
time display.
14
The steam oven cannot be used until
the door has been closed properly.
^
Push the shelf back in again.
Page 15

Please stick the extra data plate for
^
the appliance supplied with this
documentation in the space provided
in the "After sales service, data plate"
section of this booklet.
Cleaning and heating up for
the first time
Remove any protective foil.
^
Take all accessories out of the oven.
^
Wash them in a mild solution of
washing-up liquid and hot water or in
the dishwasher.
The appliance has been treated at the
factory with a conditioning agent.
^ To remove this, clean the oven
interior with a mild solution of
washing-up liquid and hot water and
then dry thoroughly with a soft cloth.
^ You should then run the 120 °C
Steam with pressure °
programme for 10 minutes to flush
out the waterways. Proceed as
described in "Operation".
Before using for the first time
15
Page 16

Operation
Before each use
Check that
- the stopcock is open.
- the filter at the bottom of the
appliance is correctly
positioned to prevent pieces of
food blocking the drain.
- the door is properly shut.
The steam oven is then ready for
use.
Programming steps in brief
A Close the steam oven door.
B Switch the appliance on.
C Select a programme.
D Adjust the recommended
temperature if required.
E Set the duration.
F Start the programme.
These steps are described in more
detail on the following pages.
16
Page 17

Programme chart
Operation
Symbol Function Recommended
° Steam with
temperature*
in °C
120 105 - 120 101 - 120
Temperature range which
can be set**
in °C
Factory default
setting
Available range
pressure
P Steam cooking 100 40 - 100 40 - 100
Ä Reheat 95 - -
N Defrost 60 50 - 60 50 - 60
* The recommended temperatures were established by our test kitchen as being
the optimum temperatures for the different programmes.
** The recommended temperature can be altered in 5 °C increments within the
range quoted. Should you wish to adjust the temperature in 1 °C steps, you will
need to alter the factory default setting (see "Programming").
17
Page 18
Operation
Switching on and selecting a
programme
You will hear a humming sound when
the appliance is switched on, during
operation or after the appliance has
been switched off.
This sound does not indicate a
malfunction or fault with the
appliance. It happens when the water
is pumped in and out.
Close the appliance door.
^
Switch the appliance on with the
^
On/Off button.
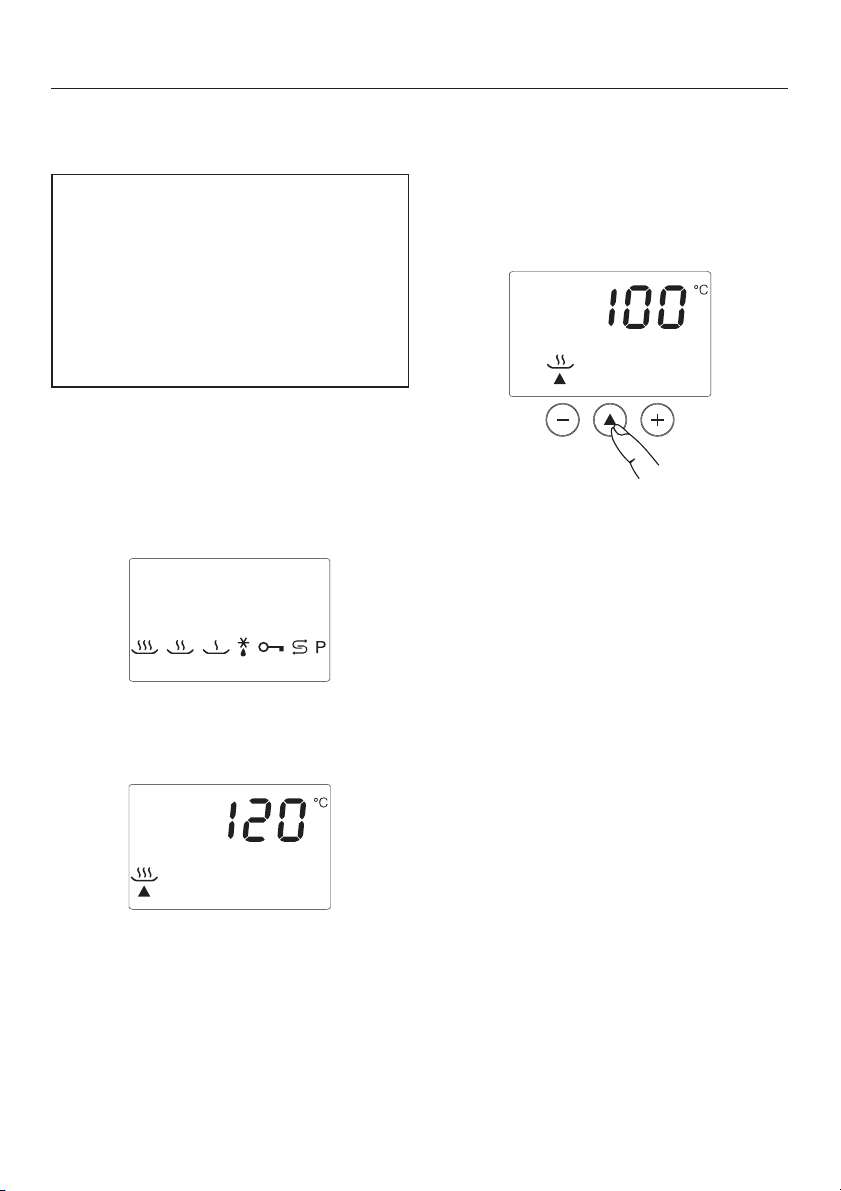
The following will show in the
programme and temperature display:
After a few seconds, the display will
change automatically to the Steam with
pressure programme °.
If you want to use a different
programme, press the programme
button - repeatedly until the
programme you want shows in the
display, e.g. Steam without pressure
P.
Altering the recommended
temperature
The recommended temperature can be
altered in 5 °C increments within a
certain range. See Programme chart for
details. Should you wish to adjust the
temperature in 1 °C steps, you will need
to alter the factory default setting (see
"Programming").
18
^
Use the + or - temperature buttons to
set the required temperature.
You can adjust the temperature at any
time, even if a programme has already
started.
Page 19
Operation
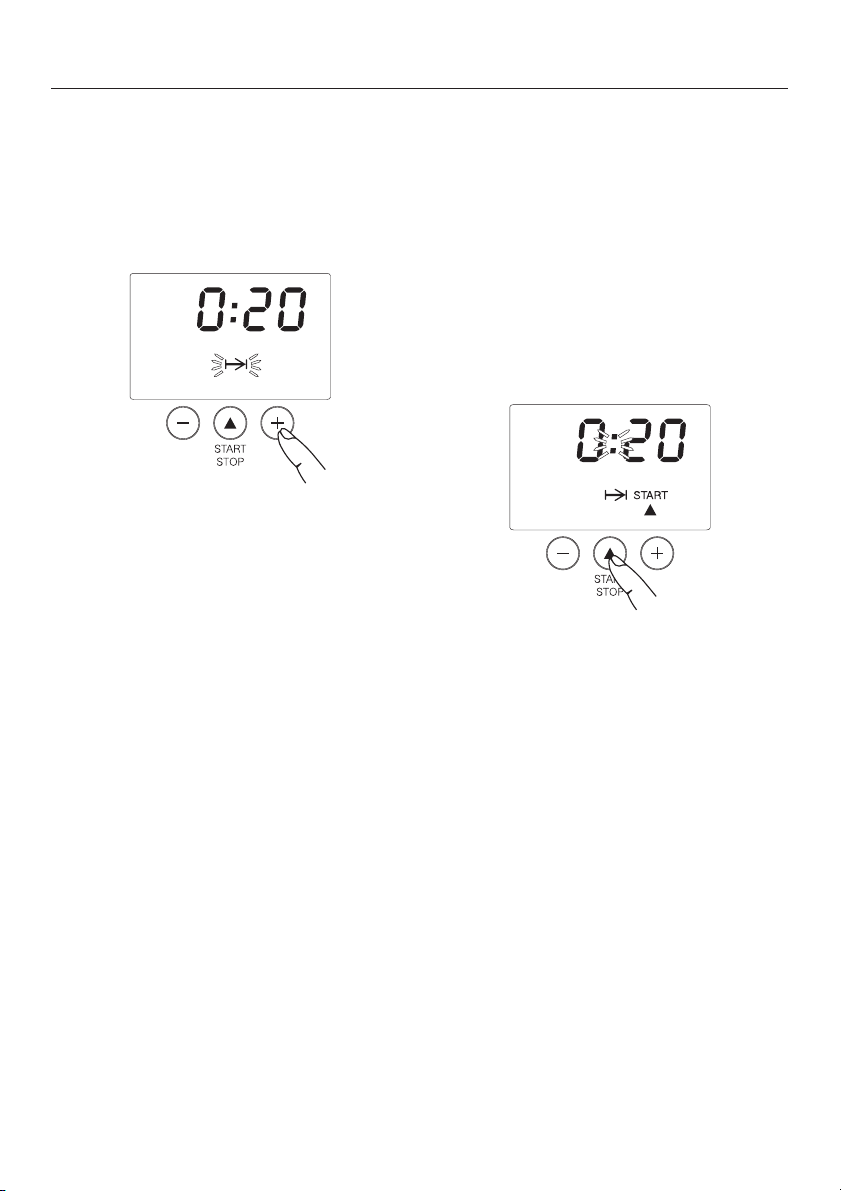
Setting a cooking duration
In the time display, you will see 3 zeros
and the flashing g symbol.
Use the + or - time buttons to set the
^
required duration, e.g. 20 minutes.
A cooking duration of between 1 minute
(0:01) and 9 hours 59 minutes (09:59)
can be set.
You can adjust the duration at any time,
even if a programme has already
started.
The charts later in these operating
instructions and the cookery book give
suggested cooking durations for
various types of food. Remember that
the cooking duration is not dependent
on the amount of food, but on the size
of the food. For example, large
potatoes will take longer to cook than
smaller potatoes.
Starting the programme
A cooking programme can only be
started when
the appliance door is closed.
–
a cooking duration has been set.
–
If the door is not properly shut, an alarm
will sound and the word door will
appear in the time display.
Press the Start/Stop button -.
^
"Start" will appear in the time display,
the g symbol will stop flashing, and
the colon will begin to flash.
The programme/temperature display
will then change to show the actual
temperature in the oven as it rises.
19
Page 20
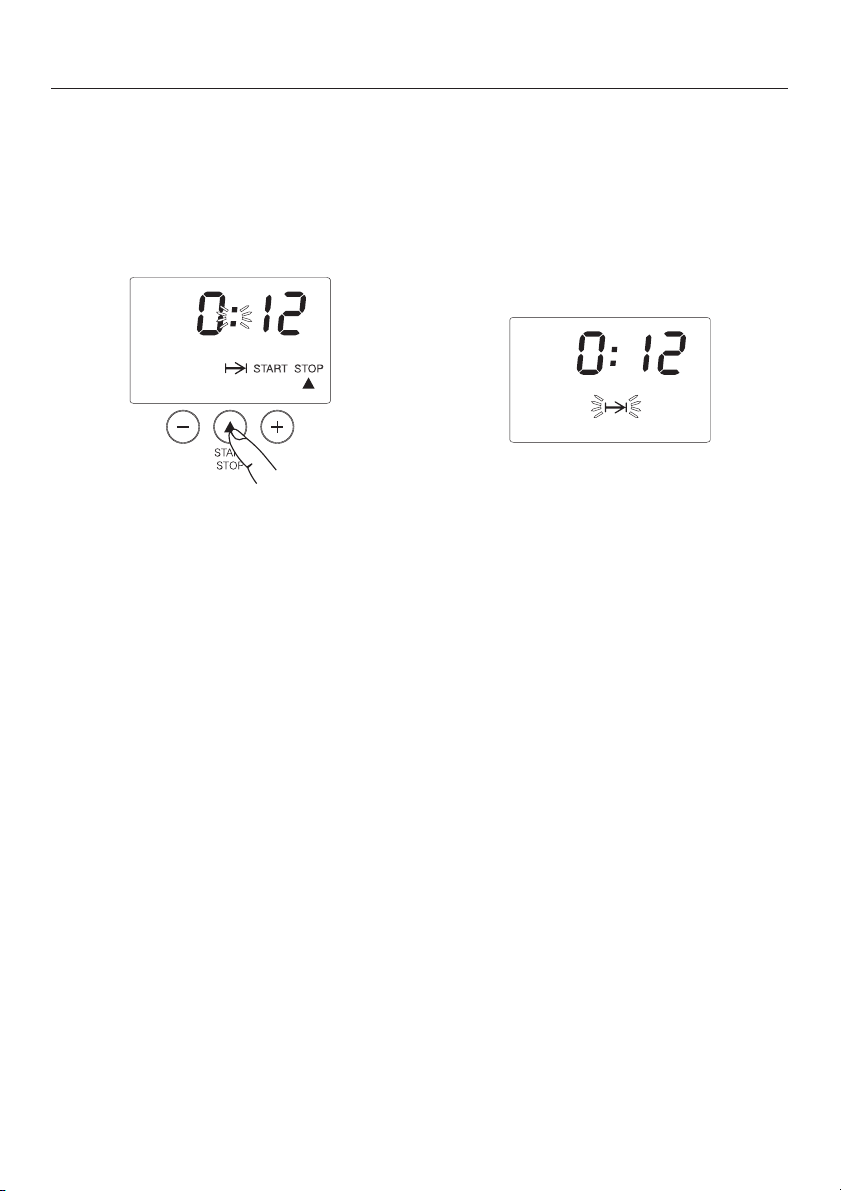
Operation
Interrupting operation
You can interrupt a programme at any
time, for example, to place another
container in the cooking compartment.
Press the Start/Stop button -.
^
"Stop" will appear in the time display.
The cooling down phase will begin.
In the time display, the g symbol and
"Start" will go out, and the colon will
stop flashing.
A scrolling bar will appear in the
programme/temperature display during
the cooling down phase.
The cooling down phase lasts approx.
one minute. The last temperature set
will reappear in the
programme/temperature display.
Wait until you hear several beeps,
^
and the g symbol is flashing in the
time display.
^ Pull out the shelf.
^ Open the door.
20
Page 21

Operation
To continue the programme
Close the door.
^
Push the shelf back in again.
^
Press the Start/Stop button -.
^
The oven will start heating up again and
the display will show the temperature in
the cooking compartment rising.
Do not attempt to force the door
open during a programme. Danger
of burning and scalding. Keep
children away.
The door may only be opened when:
- the cooling phase is finished
- the audible tone has sounded
- the g symbol in the time display
flashes.
Attempts to open the door before a
programme has run its course will
cause an alarm to sound, and the
word "door" to appear in the time
display.
Changing a programme
Press the Start/Stop button -.
^
Wait until the cooling down phase
^
has been completed.
Select the programme required and
^
proceed as before.
21
Page 22

Operation
At the end of the cooking
duration
There is a cooling down phase at the
end of the cooking duration.
"Stop" will appear in the time display.
The g symbol and "Start" will go out,
and the colon will stop flashing.
A scrolling bar will appear in the
programme/temperature display during
the cooling down phase.
The cooling down phase lasts approx.
one minute. It may last longer than this
when cooking larger quantities.
^ Wait until you hear several beeps, 3
zeros appear in the time display, and
the g symbol flashes.
The appliance will now drain. Three
horizontal lines ---will appear in the
programme/temperature display. Then
°C will appear in the display for as long
as the temperature remains over 45 °C.
Please note that the appliance does not
switch off until the °C symbol has gone
out.
Take care. The cooking
compartment and door may still be
hot even after the cooling down
phase. When removing dishes from
the oven, use dry oven gloves.
Be careful not to spill any of the
contents.
^
Pull out the shelf.
^
Open the door.
^
Switch the appliance off.
22
Page 23

Operation
After use
As soon as the °C in the
^
programme/temperature display
goes out, wipe the oven out with a
solution of warm water and
washing-up liquid or vinegar. Then
dry it with a cloth.
Leave the door open to allow the
^
compartment to dry out thoroughly.
Close the stopcock to avoid any risk
^
of water damage.
Push the shelf back in again.
^
23
Page 24

Practical tips
Suitable containers
Some stainless steel cooking
containers are supplied with the
appliance.
Other containers, in a variety of sizes,
both perforated and solid, are available
as optional extras (see "Optional
accessories").
When choosing the most suitable
container for the particular food you are
cooking, please note:
Use perforated cooking containers
–
whenever possible so long as the
food is suitable, e.g. for vegetables.
The steam can reach the food from
all sides and the food is cooked
evenly.
– With large items of food, such as
whole potatoes, the steam can work
more effectively because there are
spaces between the individual
pieces into which the steam can
penetrate. This way a large quantity
will take the same time to cook as a
smaller amount and large, deep
containers can be used. Where
possible, space the food out to allow
the steam more room.
More compact dishes such as
–
casseroles or bakes, or food such as
peas or asparagus spears, which
have little or no space between them
will take longer to cook because the
steam has less space to work in. The
fuller the container, the longer it will
take to cook. It is best to use 2 or 3
flat containers rather than one deep
one for these types of foods, and
then fill them only3-5cmdeep.
Cooking durations quoted are
calculated on this principle. Deeper
dishes will take longer to cook.
Heat-resistant glass, ceramic,
porcelain, stainless steel and enamel
dishes are all suitable. Important:
– The container must be heat resistant
to 120 °C.
– Food will take considerably longer to
cook than the time quoted if the dish
has thick sides.
– Place the dish on the tray supplied.
–
Ensure that the dish does not touch
the walls of the cooking compartment
so that steam can reach the food
from all sides.
24
Page 25

Steaming
Practical tips
Food Programme Temperature
in °C
Vegetables
Beans, green ° Steam with pressure 120 3 - 5
Brussels sprouts " 120 6 - 8
Cabbage, red or green, chopped " 120 4 - 6
Cauliflower, florets " 120 3 - 5
Kohlrabi, batons " 120 3 - 5
Leeks, sliced " 120 2 - 3
Potatoes, in their skins " 120 12 - 14
Potatoes, peeled and quartered " 120 6 - 8
Sliced carrots " 120 3 - 4
Broccoli, florets P Steam without pressure 100 4 - 6
Asparagus " 100 8 - 10
Peas " 100 3 - 5
Zucchini " 100 2 - 4
Meat
Beef goulash ° Steam with pressure 120 20 - 25
Gammon, sliced " 120 3 - 4
Chicken breast P Steam without pressure 100 6 - 8
Turkey roulade " 100 12 - 15
Fish and shellfish
Cod, steaks P Steam without pressure 100 4 - 8
Monkfish " 85* 8 - 10
Mussels " 90* 10 - 12
Plaice " 85* 8 - 10
Salmon, fillet " 100 4 - 6
Sea trout " 100 12 - 14
Trout, whole " 100 10 - 12
Tuna steak " 100 3 - 4
Duration
in minutes
* This temperature is not the same as the recommended temperature.
25
Page 26

Practical tips
Food Programme Temperature
Pulses
Brown lentils ° Steam with pressure 120 8 - 10
Dried peas (pre-soaked) " 120 10 - 15
Kidney beans (pre-soaked) " 120 10 - 15
Rice
Cracked wheat ° Steam with pressure 120 5
Pearl barley " 120 8 - 15
Brown rice P Steam without pressure 100 35
White rice " 100 20 - 25
Wild rice " 100 30 - 35
Eggs
Soft boiled P Steam without pressure 100 3 - 4
Medium boiled " 100 5 - 6
Hard boiled " 100 8 - 10
Fruit
Apples/Pears, in pieces P Steam without pressure 100 3 - 5
Cherries " 100 2 - 4
Gooseberries " 100 2 - 4
Plums " 100 2 - 4
Rhubarb " 100 2 - 4
Desserts
Flummery P Steam without pressure 100 10 - 12
Soufflé, portions
Sweet dumplings " 100 12 - 15
"
in °C
90* 15 - 20
Duration
in minutes
* This temperature is not the same as the recommended temperature.
26
Page 27

Practical tips
Tips on steaming
We recommend using:
Steam with pressure ° 120 °C for
–
rapidly cooking robust foods.
Steam without pressure P 100 °C
–
for gently cooking delicate foods.
You can select any shelf level. You
–
can also cook on several levels at
the same time. This will not alter the
cooking duration.
When cooking frozen food, e.g.
–
vegetables, ensure that any large
clumps frozen together are broken
up first so that they cook evenly. The
cooking duration is approximately
the same as for fresh vegetables.
– Frozen and fresh vegetables which
take the same length of time to cook
can be cooked together.
– Frozen fish should be partially
defrosted before cooking. We
recommend using the "Defrost"
function (see "Defrosting" for more
information).
–
Cooking with steam retains the true
taste of the food better than
conventional cooking. Therefore food
should not be seasoned until after it
has been cooked.
–
Only fill solid containers
3
/4full with
liquid.
Soak pulses and grains in cold water
–
before cooking.
Pulses and grains swell during
cooking and so need to be cooked in
liquid. The ratio of pre-soaked pulses
and grains to water is 1:1.
Rice also swells when cooked and
–
should be cooked in liquid. The
proportion of food to liquid will vary
depending on the type of rice and
how it has been pre-treated. With
parboiled rice, basmati rice and wild
rice, the proportion of food to liquid
should be 1:1, with brown rice 1:1.5
and risotto rice 1:2.
– Dry pasta and noodles should be
well covered with liquid. Reduce the
cooking time recommended on the
packaging by about
1/
as the pasta
3
will start to swell during the heating
up time.
– Cooking liquids do not boil away.
They are either absorbed by the
food, as with rice and pasta, or they
remain in the dish as with casseroles.
The liquid can then be used for
making a sauce, e.g. by adding
crème fraîche.
27
Page 28

Practical tips
You can thicken sauces in the steam
–
oven by adding flour and butter to
liquid (40 g flour and 40 g butter to
0.5 litres liquid).
Grease perforated containers
–
beforehand if used for cooking fish,
and solid containers if used for
cooking dishes containing eggs.
When cooking meat without adding
–
any additional liquid to the
container, the meat juices can be
used to for making gravy and
sauces. Put the meat and other
ingredients, e.g. vegetables, in a
perforated container. Place a solid
container underneath to catch the
juice.
– If you wish to add additional liquid
when cooking meat using Steam with
pressure °, it is very important not
to add too much liquid as this can
cause the container to boil over. If
necessary add liquid, e.g. stock,
after cooking.
With the Steam with pressure
–
°120 °C programme, during the
cooling down phase air will be
circulated around the cooking
compartment. This air can dislodge
food from the cooking container and
soil the cooking compartment. This
mostly occurs when food is being
cooked in liquid (soup, casseroles
etc) and also when the food has a
pulpy consistency, e.g. apple sauce.
When cooking these types of food,
cover the cooking container with the
tray or lid (see "Optional
accessories"). Place the covered
cooking container between the two
runners of the shelf level; do not
place it on top of the upper runner.
– When cooking fish or food with a
distinctive colour (e.g. spinach) in a
perforated container, place the
container on the lowest shelf level to
avoid any transfer of tastes or colour
to other food.
–
When using Steam with pressure
°, cooking will only take approx.
half the time it would take with
conventional cooking.
28
–
Yeast dough can be put in the oven
to prove.
Select Steam without pressure P,
and reduce the recommended
temperature to 40 °C. Cover the
dough.
Page 29

Practical tips
Reheating
Ä Reheat
Food to be reheated Duration in
Vegetables
Cauliflower, runner beans 2
Carrots, kohlrabi 2
Side dishes
Dumplings, potatoes
(halved)
Pasta, rice 2 - 3
Meat and poultry
Sliced meat
1.5 cm thick
Stew 3 - 5
Chicken schnitzel 3 - 5
Meatballs in sauce 3 - 5
Sliced roulade 3 - 5
Fish
Fish fillet 2 - 3
Fish roulade, halved 2 - 3
Plated meals
Chicken fricassee with rice 3 - 5
Roast pork with potatoes
and vegetables
Spaghetti with tomato sauce 2 - 3
Soups/casseroles
Casseroles 4 - 5
Soup 2 - 3
minutes
3-4
3-5
3-4
The Reheat programme Ä is very
effective at reheating food which has
been prepared previously. The dish will
heat up as well. Because the appliance
does not use water to cool down,
condensation does not build up in the
appliance or on the food.
Proceed as follows:
Place the food on a plate.
^
Then place the plate on the tray and
^
push it into the oven.
Select the Reheat programme Ä.
^
^ Set the duration (see chart).
^ Press the Start/Stop button.
29
Page 30

Practical tips
Defrosting
N Defrost
Food to be defrosted Weight in g Temperature
in °C
Meat
Stew 500 60 30 - 40 10 - 15
Minced meat 250 50* 15 - 20 10 - 15
Cutlets, chops, sausages 800 60 25 - 35 15 - 20
Poultry
Chicken 1000 60 40 15 - 20
Chicken drumsticks 150 60 20 - 25 10 - 15
Chicken schnitzel 500 60 25 - 30 10 - 15
Fish, seafood
Fish fillets 400 60 15 10 - 15
Prawns 300 60 4 - 6 5
Vegetables
Frozen in a block 300 60 20 - 25 10 - 15
Frozen in small portions 350 60 15 8 - 10
Fruit
Apple sauce/stewed apples 250 60 20 - 25 10 - 15
Strawberries/raspberries 300 60 8 - 10 10 - 12
Dairy products
Cheese 100 60 15 10 - 15
Cream 250 60 20 - 25 10 - 15
Baking
Puff pastries - 60 10 - 12 10 - 15
Yeast buns - 60 10 - 12 10 - 15
P Steam without pressure
Bread 250 100 10 - 15 10 - 15
Bread rolls - 100 6 - 7 1 - 2
Defrosting duration
in minutes
Standing time
in minutes
* This temperature is not the same as the recommended temperature.
30
Page 31

Frozen food can be defrosted in this
appliance in much less time than when
defrosting at room temperature.
Place the food to be defrosted in the
^
appliance.
Select the Defrost programme N.
^
Change the pre-set recommended
^
temperature if necessary (see chart) .
Set the duration (see chart).
^
Press the Start/Stop button.
^
Tips on defrosting
– All meat and poultry should be fully
defrosted before cooking. When
defrosting meat or poultry, place the
food in a perforated container and
place the solid container underneath
to catch the defrosted liquid, so that
the meat is not lying in this liquid. It is
particularly important to observe food
hygiene rules when defrosting
poultry. Do not use the liquid from
defrosted poultry. Pour it away and
wash the tray, the sink and your
hands.
Danger of salmonella!
Practical tips
Fish does not need to be fully
–
defrosted before cooking. Defrost so
that the surface is sufficiently thawed
to take herbs and seasoning.
Depending on the thickness of the
fish, 2-3 minutes should be enough.
When defrosting food which has
–
frozen together, e.g. berries, chops,
fish fillets etc separate or break it up
about half-way through the defrosting
time.
Allow food to stand at room
–
temperature at the end of defrosting.
This standing time (see chart) is
necessary to ensure that the food is
fully defrosted right through to the
core.
– Do not refreeze food once it has
thawed.
– Defrost frozen pre-cooked meals
according to the manufacturer's
instructions.
– Defrost baked goods in a sealed
freezer bag.
–
Food which will not drip can be
placed in a perforated container
once the wrapping has been
removed.
31
Page 32

Practical tips
Cooking whole meals
It is very economical and practical to
cook a whole meal at the same time in
the steam oven.
In general, cooking durations will vary
according to the type of food. This
means that you will need to open the
steam oven at different times to add a
particular dish. Our test kitchen
recommends the following procedure,
as shown in this example using Steam
with pressure °:
Lamb stew 8 minutes
Potatoes 8 minutes
Carrots 4 minutes
Proceed as follows:
^ First place the food with the longest
cooking duration (the lamb stew and
the potatoes) in the steam oven.
^ Select Steam with pressure °
120 °C.
At the end of the cooking duration you
can remove all three dishes at the same
time.
Blanching
You can use your steam oven to blanch
vegetables and fruit for freezing.
Put the prepared fruit or vegetables
^
into a perforated container and place
it in the oven.
Select Steam without pressure P
^
100 °C.
^ Set a time of 1-2 minutes.
^ Press the Start/Stop button.
^ Once blanched, plunge the
vegetables/fruit into ice cold water to
cool them down quickly. Drain them
well.
The vegetables/fruit can now be frozen.
^
Calculate the initial cooking duration
by subtracting the duration for the
carrots from the duration for lamb
stew / potatoes, i.e. 8 minutes less 4
minutes = 4 minutes.
^
Set a duration of 4 minutes and press
the Start/Stop button.
^
Once the 4 minutes and also the
cooling down phase has elapsed,
place the second dish (carrots) in the
oven.
^
Set the cooking duration for the
second dish, i. e. 4 minutes.
^
Press the Start/Stop button.
32
Page 33

Practical tips
Bottling
When bottling, do not use
temperatures higher than 95 °C (or
90 °C if the appliance is installed at
altitudes higher than 1000 m above
sea level). Higher temperatures can
cause the jars to shatter. Danger of
injury.
Select Steam without pressure P for
bottling.
P Steam without pressure
Produce Temp.
Fruit
Apples 90* 50
Apple
sauce/stewed
apples
Red /
Blackcurrants
Gooseberries 80* 55
Fruit with stones 85* 55
Vegetables
Beans 95* 120
Gherkins 90* 55
in °C
90* 65
80* 50
Duration
in minutes**
Proceed as follows:
Place the prepared jars (all the same
^
size) in a perforated container,
ensuring that they do not touch one
another.
^ Select Steam without pressure P
100 °C.
^ Change the recommended
temperature if necessary (see chart) .
^ Set the duration (see chart).
^ Press the Start/Stop button.
^ Make use of residual heat by leaving
the jars in the oven for 30 minutes
after it has switched off.
^
Cover the jars with a cloth and allow
to cool for approx. 24 hours.
* This temperature is not the same as
the recommended temperature.
** The times quoted are for 1.0 litre jars.
If using 0.5 litre jars reduce the
duration by about 15 minutes. If
using 0.25 litre jars reduce the
duration by about 20 minutes.
33
Page 34

Practical tips
Extracting juice with steam
You can use the Steam with pressure
° programme to extract juice from
fruit and vegetables. It is best to use
very ripe fruit, as the riper the fruit the
greater the quantity of juice produced.
Very ripe fruit will also produce a more
intense flavour.
° Steam with pressure
Food to be juiced Duration
in minutes
Soft fruit, e.g. berries 20 - 35
Medium hard fruit,
e.g. apples, pears
Hard fruit
e.g. rhubarb, quinces
Proceed as follows:
^ Put the prepared fruit or vegetables
into a perforated container and place
it in the steam oven.
^
Place a solid container underneath to
catch the juice.
^
Select Steam with pressure °
120 °C.
^
Set the duration (see chart).
^
Press the Start/Stop button.
30-45
40-50
Useful tips
Wash the fruit or vegetables to be
–
juiced and cut away any bruised or
damaged parts.
There is no need to remove pips from
–
fruit.
Remove the stalks from grapes and
–
morello cherries as these are bitter.
The stalks do not need to be
removed from strawberries,
raspberries etc.
Dice large fruit such as apples into
–
2 cm thick cubes. The firmer the fruit
or vegetables, the smaller it should
be diced.
– Try experimenting with mild and tart
flavours, for example, mix apples
with elderberries.
– Adding sugar will increase the
quantity of juice produced and
improve the flavour. Sprinkle the fruit
with sugar and leave to soak in for a
few hours before juicing. For sweet
fruit add 100 - 150 g of sugar and
more tart fruit, 150 - 200 g of sugar.
–
Adding herbs will produce a more
intensely flavoured vegetable juice.
–
If you wish to bottle the juice rather
than consume it straight away, pour it
whilst hot into hot, sterilised bottles
up to the rim and then seal immedi
ately with sterilised rubber tops.
-
34
Page 35

Practical tips
Disinfecting containers
The steam oven will disinfect baby
bottles and other containers so that at
the end of the programme they are as
germ free as they would have been had
they been boiled. Check beforehand
that all parts, teats etc. are declared by
the manufacturer to be heat resistant to
100 °C and also that they can withstand
hot steam.
Dismantle, clean and thoroughly
^
rinse baby bottles. Place the
individual parts in a perforated
cooking container, ensuring that they
do not touch one another. Cover the
cooking container with the tray or the
lid.
^ Select Steam without pressure
P100 °C.
^ Set and confirm a duration of
15 minutes.
All parts of the bottles must be
completely dry before they are
reassembled to keep them germ free.
Preparing yoghurt
To prepare yoghurt you will need
^
100 g yoghurt (with live culture) and
1 litre of milk. The yoghurt and milk
should have the same percentage fat
content.
You can either use unchilled long-life
milk or fresh milk. Fresh milk will,
however, give a better set. If using
fresh milk it should first be heated up to
90°C (do not boil it), and then left to
cool.
Mix the yoghurt and the milk together
^
and then pour the mixture into 6 or 7
portion sized glass jars or special
yoghurt jars. Seal the jars.
^ Place the jars in a perforated
container, ensuring that they do not
touch one another.
^ Select Steam without pressure P
and reduce the recommended
temperature to 40 °C.
^
Set a duration of 5 hours.
Allow the yoghurt to cool and then
place in the refrigerator. It will not
achieve its maximum set until it has
been thoroughly chilled.
35
Page 36

Safety features
Normally, steam pressure and
temperature will be regulated
automatically by the appliance.
However, if a fault should occur, the
appliance is fitted with an overheating
protection device which protects
against the temperature rising too high.
The safety valve should be replaced
every 1-2 years, depending upon
frequency of use.
Safety devices must not be altered
or tampered with.
Pressure release / Safety valve
The safety valve and the pressure
release can operate individually,
simultaneously or one after the other.
If they are triggered, steam will be
released through the openings above
and below the door hinge.
^ Press the Start/Stop button.
^ Wait until the cooling down phase
has been completed (see
"Interrupting a programme").
^ Pull out the shelf.
36
^
Open the door.
Page 37

Safety features
The pressure release mechanism
^
contains a small silicone washer
which rests in a holder. First check if
this washer has been forced out of its
holder. If this has happened, fit a
new washer into the holder inside the
appliance door (see "Accessories
supplied").
The steam oven can now be used
again in the normal way.
If the pressure release mechanism
^
has not been activated (i.e. the
silicone washer is still in its holder),
remove the safety valve from the
inside of the appliance door.
Press the metal pin of the safety
^
valve back in.
^ Insert the safety valve back into the
inside of the door. Make sure that the
seal fits correctly.
The steam oven can now be used
again in the normal way.
If the pressure release mechanism or
the safety valve trips again, contact the
Service department.
37
Page 38

Safety features
Overheating protection
The overheating protection device is
located on the right-hand side of the
appliance underneath the On/Off
button. This switches the heating off
automatically if the temperature in the
steam generator gets too high. F27 will
appear in the programme/temperature
display and the cooling down phase
will begin.
The cooling down phase will be
completed in approx. 1 minute and
several beeps will sound. F27 will flash
in the programme/temperature display
for a short while and then three
horizontal bars ---will appear. After a
while F20 will appear in the display.
Proceed as follows:
^ Switch the appliance off and open
the door.
Remove the overheating protection
^
device cover cap (see arrow). Use a
screwdriver or similar to press the
button underneath in again.
Replace the cover cap.
^
The steam oven can now be used
again in the normal way.
If the overheating protection device
trips again, contact the Service
department.
^ Allow the appliance to cool down for
approx. 30 minutes.
F20 will disappear from the display
during this time.
38
Page 39

Safety features
Safety lock
The appliance is equipped with a safety
lock which can be used to prevent it
from being switched on by accident
and also to prevent certain settings
from being altered when the steam
oven is operating.
If you wish to use the safety lock you
will need to alter the setting (see
"Programming").
If the lock is activated while the steam
oven is ready for use but not
operating, you will be able to switch
the appliance on and off but not
operate it.
If the safety lock is activated when the
oven is in operation then the
appliance can only be used as
follows:
– The recommended temperature can
be decreased but not increased.
– The duration which has been set can
only be shortened.
To activate the safety lock:
Press the programme button -
^
repeatedly until 3 bars and the lock
symbol a appear in the
programme/temperature display.
Press the + temperature button.
^
Now if you attempt to enter a setting,
"0-§" will appear in the
programme/temperature display to
show that the safety lock is activated.
–
The steam oven can be switched off
and back on again but a programme
cannot be selected.
To deactivate the safety lock:
^
Press the programme button repeatedly until 0-§ and the a
symbol appear in the display.
^
Press the - temperature button.
The lock is now deactivated.
39
Page 40

Cleaning and care
Miele offer a range of branded cleaning
and conditioning products. See
"Optional accessories".
Do not use a steam cleaning
,
appliance to clean this appliance.
The steam could reach the electrical
components and cause a short
circuit.
Switch the appliance off and allow it to
cool down to a safe temperature before
cleaning. It should be cleaned after
each use.
Make sure the appliance is completely
dry before closing the door.
If the appliance is not going to be used
for a long period of time, e.g. whilst on
holiday, it should be thoroughly
cleaned beforehand to prevent the
build-up of odours etc. Leave the door
open afterwards.
Do not use commercial cleaning
agents. Only use agents designed
for domestic use.
Do not use cleaning agents or
washing-up liquids containing
aliphatic hydrocarbons as these
could cause the seals to swell.
40
Page 41

Cleaning and care
Appliance front
Remove any soiling immediately.
If not, it might become impossible to
remove and could cause the surface
to alter or discolour.
Clean the front using a damp Miele
microfibre E-cloth or with a clean
sponge and a solution of hot water and
washing-up liquid. After cleaning dry
with a soft cloth.
All external surfaces are susceptible
to scratching.
Contact with unsuitable cleaning
agents can alter or discolour the
external surfaces.
To avoid damaging the surface of
your appliance, do not use:
cleaning agents containing soda,
–
ammonia, acids or chlorides,
cleaning agents containing
–
descaling agents,
abrasive cleaning agents, e.g.
–
powder cleaners and cream
cleaners,
solvent-based cleaning agents,
–
stainless steel cleaning agents,
–
dishwasher cleaner,
–
– oven sprays,
– glass cleaning agents,
– hard, abrasive sponges and
brushes, e.g. pot scourers,
– melamine eraser blocks,
– sharp metal scrapers.
41
Page 42

Cleaning and care
Cooking containers and drain
filter
The cooking containers and drain filter
should be washed and dried each time
they are used. They are all dishwasher
safe.
Bluish discolouration of the cooking
containers and discolouration and
limescale deposits on the drain filter
can be removed easily with the Miele
ceramic and stainless steel hob cleaner
(see "Optional accessories"). Rinse the
containers and drain filter thoroughly
with clean water to remove any residual
cleaning agent.
You can also use vinegar to remove
discolouration and limescale deposits.
Finally, rinse the containers and drain
filter with clear water.
Door seal / Safety valve
The door seal and the safety valve
should be replaced every 1-2 years,
depending upon frequency of use.
The door seal and the safety valve are
available as a set (see "Optional
accessories").
Safety valve
Open the door.
^
Remove the old safety valve from the
^
inside of the door.
Fit the new safety valve. Make sure
^
that the seal fits correctly.
Door seal
Clean and dry the door seal by hand
after each use using a mild solution of
hot water with a little washing-up liquid
applied with a damp cloth. Do not clean
the seal in a dishwasher. Wipe dry
using a soft cloth.
42
Page 43

Cleaning and care
Cooking compartment and
pull-out shelf
The cooking compartment, the inside of
the appliance door and the pull-out
shelf should be cleaned and dried after
each use. Allow the appliance to cool
down to a safe temperature before
cleaning.
Most cooking residues can be removed
easily with a damp cloth and a mild
solution of hot water and washing-up
liquid.
In hard water areas, limescale deposits
can build up inside the oven cavity and
on the pull-out shelf.
Limescale can also lead to
discolouration inside the oven cavity.
This can be removed easily with the
Miele ceramic and stainless steel hob
cleaner (see "Optional accessories").
Wipe the oven cavity with a damp cloth
after using the cleaner, and run the
oven for five minutes on the Steam
without pressure function P at
100 °C.
Wipe the pull-out shelf with clean water
after using the cleaner, and dry with a
soft cloth.
If necessary, the pull-out shelf can be
removed completely for cleaning.
To remove the pull-out shelf
Pull the shelf out as far as possible.
^
Unscrew the two thumb nuts a.
^
^ Take the pull-out shelf off its runners
and then clean and dry it.
To replace the pull-out shelf
^ Pull the two runners out as far as
possible.
^ Push the shelf under the two holders
b located at the back of the runners.
^ Place the shelf on the two screws at
the front of the runners.
^
Then tighten the thumb nuts.
Limescale deposits can also be
removed using vinegar, and
discolouration with citric acid
descalant. Finally, wipe surfaces with
clean water, and dry with a soft cloth.
43
Page 44

Cleaning and care
Shelf runners
The runners inside the oven can be
washed by hand or in the dishwasher.
Any discolouration or limescale
deposits can be removed easily with
the Miele ceramic and stainless steel
hob cleaner (see "Optional
accessories"). Rinse the runners
thoroughly with clean water to remove
any residual cleaning agent.
To remove the runners
Loosen fixing screws a just as much
^
as required to be able to remove the
runners.
It is not possible to remove the
screws completely.
To replace the runners
^ After cleaning, re-fit the runners by
placing the runner with the guide b
(at the front of the middle runner)
onto the loosened fixing screw.
44
^
Fit the eyelet, located at the rear of
the middle runner, over the protuding
pin c in the rear wall of the cooking
compartment.
^
Tighten the screws again.
Page 45

Cleaning and care
Water nozzle
During the cooling down phase, water
is sprayed into the cooking
compartment from a water nozzle which
is located behind the deflector plate at
the back of the runners on the right
hand side. With prolonged use, this
nozzle can become dirty and will
require descaling.
The nozzle must be descaled if the fault
message F13 appears in the display.
^ Wait until several beeps sound. Now
open the door and remove the food
which is cooking.
Take care as a large amount of
extremely hot steam may escape
when the door is opened. The food
will also be very hot.
Descale the nozzle using the Miele
^
system descaling agent or with a
suitable proprietary descaling agent
following the instructions on the
packaging.
After descaling rinse the nozzle under
fresh running water.
Before replacing the nozzle, all parts of
the appliance which carry water must
be flushed through.
Close the door and switch the
^
appliance on. Select Steam without
pressure P.
^ Set a duration of 1 minute, and press
the Start/Stop button.
^ Wait until the cooling down phase
has been completed (see "At the end
of the cooking duration").
^ Then open the door and replace the
water nozzle and the shelf runners.
The steam oven can now be used
again in the normal way.
If the fault message F13 reappears after
the nozzle has been descaled, contact
the Service Department.
^
Leave the appliance to cool down
with the door open.
^
Remove the runners on the
right-hand side (see "Shelf runners").
^
Pull out the nozzle.
45
Page 46

Cleaning and care
Descaling
To prevent the risk of damage
,
only use the Miele system descaling
agent (see "Accessories supplied").
Descaling must be carried out on a
cold appliance to prevent harmful
vapours forming.
The descaling agent is caustic.
Avoid contact with the skin and do
not inhale the vapours.
If you do come into contact with
descaling agent it should be rinsed
off immediately with plenty of fresh
water. In the event of an adverse
reaction or if it has been inhaled or
ingested, seek medical help.
Replace the lid securely after use
and keep out of the reach of
children.
Do not spill descaling agent on
metal surfaces. This could cause
marks. However, should any
descaling agent get onto these
surfaces, wipe it away immediately.
The appliance will alert you after a
certain number of operating hours that
the steam generator needs to be
descaled. When the appliance is
switched on the k symbol, the Descale
programme symbol k and the number
10 will appear in the
programme/temperature display.
The number indicates that the
appliance can be used a further 10
times before it locks out. If the
appliance is not descaled immediately,
a 9 will appear in the display the next
time the appliance is switched on, and
so on.
The appliance will then lock and it must
be descaled before it can be used
again. We recommend that you descale
the appliance before it locks out.
The descaling process can only be
stopped by switching off the appliance.
If the appliance is switched back on,
after interrupting it, a rinse cycle will be
carried out automatically (see "Problem
solving guide").
46
Page 47

Cleaning and care
Wait until the appliance has cooled
^
down.
Press the nozzle out of the plunger
^
on the syringe supplied and attach it
to the spout of the syringe as shown.
^ Close the door and switch on the
empty appliance.
The k symbol, the Descale programme
symbol k and a number will appear in
the programme/temperature display.
^ Press the Start/Stop button.
E00 will appear in the
programme/temperature display, the k
symbol will appear on the left hand side
and the Descale programme symbol k
will also appear.
The appliance will start to drain. Once
the draining process is complete, E01
will appear in the
programme/temperature display.
Fill the syringe with water. Press the
^
nozzle into the opening on the top left
of the front of the appliance (see
arrow) and inject one syringe of water
slowly and evenly. Make sure you
keep the nozzle horizontal.
^ Pour 300 ml of the descaling agent
supplied into a suitable acid-proof,
e.g. glass or china, container.
^ Now fill the syringe with descaling
agent from the container, and inject
the contents of one syringe into the
opening.
^ Then fill the syringe with water and
inject the water into the opening. This
needs to be done twice.
You will then hear a beep and E02 will
appear in the programme/temperature
display. The machine is preparing itself
for the descaling procedure.
If you do not hear the beep, do not
inject any more water into the
system.
Wait for five minutes. If the beep still
does not sound you should switch
the machine off and then back on
again (see "Problem solving guide").
47
Page 48

Cleaning and care
When the appliance is ready to begin
the descaling process, a beep will
sound and E03 will appear in the
programme/temperature display.
Now fill the syringe with descaling
^
agent from the container, and inject
the contents of two syringes into the
opening.
Then fill the syringe with water and
^
inject the water into the opening. This
needs to be done twice.
You will then hear a beep and E04 will
appear in the programme/temperature
display. A descaling duration of 30
minutes will appear in the time display.
This time cannot be altered.
The descaling process will now begin.
A beep will sound when the descaling
process reaches the draining and
rinsing stages and E05 to E07 will
appear in the display.
When the descaling process has
finished a beep will sound and E08 will
appear in the programme/temperature
display. 3 zeros and a flashing g
symbol will appear in the time display.
After descaling:
Pull out the shelf.
^
Open the door.
^
Switch the appliance off.
^
Wipe out the cooking compartment
^
with a mild solution of hot water and
washing-up liquid or a little vinegar
and water and then dry it with a cloth.
Dry the descaling agent opening to
^
avoid a build-up of encrustations.
Leave the door open to allow the
^
compartment to dry out thoroughly.
^ Close the stopcock to avoid any risk
of water damage.
^ Push the shelf back in again.
If there is any descaling agent left in the
container, use the syringe to put it back
into the bottle.
Wash the container thoroughly.
48
Page 49

Programming
Programme option* Status** Setting
P1 Buzzer volume S 00 Very quiet
S 01 Quiet
S 02 Medium
S03Loud
P2 Audible tone at end of
programme
P3 Safety lock S00Not possible
P4 Programme in display after
switching on
P5 Water hardness S 01 Soft
P6 Location (altitude) S00Below 1000 m
P7 Altering the temperature S00In 5° increments
P8 Demonstration mode and
factory default settings
* Programmes not shown here have no allocation.
** The factory default settings are shown in bold.
S 00 Single beep
S01Beeps for a short time
S 02 Beeps for 5 minutes
S 01 Possible
S00Steam with pressure
S 01 Steam without pressure
S 02 Reheat
S 03 Defrost
S 04 Last programme selected
S 02 Medium
S 03 Hard
S04Very hard
S 01 Above 1000 m
S 01 In 1° increments (note that
when warming up, the
temperature of the appliance
will continue to be shown in
5° increments)
S 00 Demonstration mode on
S01Demonstration mode off
S 09 Factory default settings
reinstated
49
Page 50

Programming
You can change the default settings of
the programme options (see chart).
Proceed as follows:
Use the programme button - to
^
select programme P.
Press the + temperature button
^
repeatedly until the programme
option you want appears in the
programme/temperature display
(1 for P1, 2 for P2, etc).
^ Press the + or - time button
repeatedly until the status you want
appears in the time display, e.g. 02.
The appliance can now be switched off
or used as required.
^
Press the programme button -.
The setting you have selected is now
stored in the memory.
50
Page 51

Installation work and repairs to
electrical and plumbing components
of this appliance must only be
carried out by a suitably qualified
and competent person in strict
accordance with current local and
national safety regulations. Repairs
and other work by unqualified
persons could be dangerous. The
manufacturer cannot be held liable
for unauthorised work.
What to do if ...
Problem solving guide
... the appliance does not heat up.
Check whether the Demonstation mode
has been set (see "Programming").
... condensation collects on the
outside of the oven door.
This is not a fault. With a certain
temperature range, steam released by
the pressure regulator condenses
inside the double-walled door of the
appliance, and trickles out near the
door hinges.
... you hear a humming sound when
the appliance is switched on, during
operation or after the appliance has
been switched off.
This sound does not indicate a
malfunction or fault with the appliance.
It happens when the water is pumped
in and out.
... the appliance beeps after the start
of a programme, and the word "door"
appears in the time display.
The door has not been closed properly.
... the mains fuse has tripped.
Reset the trip switch in the mains fuse
box, and switch the appliance back on.
If it still cannot be operated, contact a
qualified electrician or the Miele Service
Department.
... the appliance is locked during a
prolonged power cut and you want to
remove the food from it.
Caution: the appliance will still be hot
and under pressure.
Pull out the shelf. Then using the thumb
of your right hand, push the door lock
forwards slowly a little bit at a time.
Caution! Steam will escape from above
and below the door hinge.
Open the door very carefully. Danger of
scalding with hot steam.
51
Page 52

Problem solving guide
... steam suddenly escapes from the
appliance door.
Check whether
the safety valve has tripped. Proceed
–
as described in "Pressure
release/Safety valve".
the pressure release has tripped.
–
Proceed as described in "Pressure
release/Safety valve".
the rubber door seal is not fitting
–
correctly or is damaged, e.g. cracks
are visible. Fit the seal correctly or, if
necessary, replace it.
... after switching on, the descaling
programme symbol k and 00 appear
in the programme/temperature
display, the k symbol also appears
on the left of the display, and the
appliance beeps.
– The appliance needs to be
descaled. Proceed as described in
"Cleaning and care - Descaling".
... k and E04 appear in the
programme/temperature display and
0:06 appears in the time display.
The descaling process was interrupted
by a power cut or by being
inadvertently switched off.
The appliance will automatically carry
out a rinsing programme after being
switched on again to flush out any
descaling fluid. This process cannot be
aborted. Wait until you hear several
beeps, and the g symbol is flashing in
the time display. Now you can either
re-start the descaling process, or select
another programme.
... the following fault messages
appear in the
programme/temperature display.
For all fault messages:
The door can only be opened when:
- the fault message is flashing
alternately with the set temperature,
- the g symbol is flashing in the
time display,
- the alarm has stopped.
If the display is not flashing, the
appliance is still processing the
fault.
52
F06 The temperature thermostat is
faulty.
–
Switch the appliance off and call the
Service Department.
Page 53

Problem solving guide
F12 p Water is not getting into the
appliance.
Check whether
the stopcock is open. If necessary
–
open it and start the programme
again.
the water inlet hose is faulty.
–
the filter in the water inlet is blocked.
–
If you cannot remedy the fault yourself,
switch the appliance off and call a
plumber or the Service Department.
F13 The temperature in the cooking
compartment is too high.
The appliance has not cooled down
sufficiently during the cooling down
phase.
Check whether
– the stopcock is open. If necessary
open it and start the programme
again.
–
the water nozzle on the rear wall of
the cooking compartment needs
descaling. Proceed as described in
"Water nozzle" in "Cleaning and
care".
F14 p Too little water is running into
the steam generator.
Switch the appliance off and then back
on again. If the fault message appears
again, switch the appliance off and call
the Service department.
F20 The overheating protection
mechanism has been activated.
Proceed as described in "Overheating
protection".
F27 The power supply was
interrupted while a programme was
running.
Check the cooking status and if
necessary, set a new cooking duration
and then press the Start/Stop button to
start the programme again.
F40 The electronics are carrying out a
self test.
F83 The temperature regulator is faulty
and the temperature in the cooking
compartment has risen above 125 °C.
If neither of the above is the problem, it
could be that the quantity of food being
cooked was too high. Very large
quantities of food, e.g. potatoes, will
affect the cooling down of the
appliance.
The programme will be interrupted and
the cooling down phase will begin.
Switch the appliance off after the
cooling down phase and call the Ser
vice Department.
-
53
Page 54

Problem solving guide
F94 The water inlet valve is not
providing a tight seal.
Switch the appliance off, turn off the
water supply at the stopcock and call
the Service Department.
F95 A defect has occurred within the
system which carries water in the
appliance.
Wait until F95 flashes alternately with
the set temperature in the display.
Press the Start/Stop button.
If F95 appears repeatedly, switch the
appliance off, turn off the stopcock and
call the Service Department.
54
Page 55

Miele offers a range of useful accessories as well as cleaning
and conditioning products for your appliance.
These can be ordered via the internet at
www.miele-shop.com
or from Miele (see back cover for contact details) or from your
Miele dealer.
Cooking containers
Each stainless steel cooking container has a Gastro-Norm
(GN) size (Example GN 1/3). 1/3 is the width and depth of the
cooking containers as shown below.
DGGL 1
Perforated cooking container, GN 1/3
Gross capacity 1.5 litres / Usable capacity 0.9 litres
325x175x40 mm (WxDxH)
DGG 2
Solid cooking container, GN 1/3
Gross capacity 2.5 litres / Usable capacity 2.0 litres
325x175x65 mm (WxDxH)
Optional accessories
DGGL 5
DGGL 6
DGG 7
Perforated cooking container, GN 1/3
Gross capacity 2.5 litres / Usable capacity 2.0 litres
325x175x65 mm (WxDxH))
Perforated cooking container, GN 1/3
Gross capacity 4.0 litres / Usable capacity 2.8 litres
325x175x100 mm (WxDxH)
Solid cooking container, GN 1/3
Gross capacity 4.0 litres / Usable capacity 2.8 litres
325x175x100 mm (WxDxH)
55
Page 56

Optional accessories
DGG 9
Solid cooking container, GN 1/3
Gross capacity 5.7 l / Usable capacity 4.2 l
325x175x150 mm (WxDxH)
DGGL 10
Perforated cooking container, GN 1/3
Gross capacity 5.7 l / Usable capacity 4.2 l
325x175x150 mm (WxDxH)
DGD 1/3
Lid for GN 1/3 cooking containers
Tray
For placing your own dishes on
Cleaning and care products
System descaling agent
1000 ml
Product specifically designed for descaling this steam oven
Dispensing syringe for descaling agent
56
Page 57

Ceramic and stainless steel hob cleaner
250 ml
For cleaning the cooking compartment, the pull-out shelf and
the shelf runners
Removes discolouration from cooking containers.
E-Cloth (microfibre cloth)
Removes finger marks and light soiling.
Miscellaneous
Silicone washers
Optional accessories
For pressure release
Door seal / Safety valve set
Depending upon frequency of use, the door seal a and the
safety valve b should be replaced every 1-2 years. Replace
both parts at the same time.
57
Page 58

Services
Technical data
Total connected load: see data plate
Plumbing
The steam oven needs to be connected
to the mains water supply and to the
drainage system by a fully qualified
person in accordance with national and
local safety regulations.
The machine is constructed to comply
with German water regulations (DVGW),
and may be connected to a suitable
supply without an extra non-return valve
if national regulations permit.
The plumbing installation must be
made in such a way that the stopcock
is easily accessible after the appliance
has been built in.
The installer is responsible for ensuring
that the appliance functions correctly
when installed.
The manufacturer cannot accept
liability for damage which is a direct or
indirect result of incorrect installation or
connection.
Electrical connection
See Installation Instruction Booklet
before making electrical connection.
All electrical work should be carried
out by a suitably qualified and
competent person, in strict
accordance with current national
and local safety regulations
(BS 7671 in the UK).
Installation, repairs and other work
by unqualified persons could be
dangerous. The manufacturer
cannot be held liable for
unauthorised work.
Ensure power is not supplied to the
appliance until after any installation
or repair work has been carried out.
The appliance must only be
operated when built in. This is to
ensure that all electrical parts are
shielded. Live parts must not be
exposed.
Important
Refer to the steam oven installation
booklet for more information.
58
The voltage and connected load are
given on the data plate. Ensure that
these match the household mains
supply.
Page 59

Services
Connection should be made via a
suitable isolator which complies with
national and local safety regulations,
and the On/Off switch should be easily
accessible after the appliance has
been built in.
If the switch is not accessible after
installation (depending on country) an
additional means of disconnection must
be provided for all poles.
For extra safety it is advisable to install
a suitable residual current device
(RCD).
When switched off there must be an
all-pole contact gap of at least 3 mm in
the isolator switch (including switch,
fuses and relays).
Important U.K.
This appliance is supplied for
connection to a single phase 230-240 V
50 Hz supply with a 3-core cable.
Important
The electrical safety of this appliance
can only be guaranteed when
continuity is complete between the
appliance and an effective earthing
system, which complies with local and
national regulations. It is most important
that this basic safety requirement is
regularly tested and if there is any
doubt, the electrical wiring in the home
should be inspected by a qualified
electrician. The manufacturer cannot be
held liable for the consequences of an
inadequate earthing system such as an
electric shock.
The manufacturer cannot be held
liable for damage which is the direct
or indirect result of incorrect
installation or connection.
The wires in the mains lead are
coloured in accordance with the
following code:
Green/yellow = earth
Blue = neutral
Brown = live
In other countries check these details
with your supplier.
WARNING
THIS APPLIANCE MUST BE
EARTHED
59
Page 60

After sales service, data plate
In the event of any faults which you cannot remedy yourself, or if the appliance is
under guarantee, please contact:
Your Miele dealer, or
–
the Miele Customer Contact Centre (see back cover for address).
–
Please note that telephone calls may be monitored and recorded to improve
our service.
When contacting Miele, please quote the model and serial number of your
appliance, which are given on the data plate.
N.B. A call-out charge will be applied for service visits where the problem
could have been rectified as described in these instructions.
Space in which to stick the extra data plate supplied with the appliance. Ensure
that the model number is the same as the one on the front of these instructions.
606162
Page 61

Page 62

Page 63

63
Page 64

Alteration rights reserved / 2810
M.-Nr. 06 786 680 / 09
 Loading...