

Page 1
Microtek Scanner
Version
Installation Guide
for the ScanMaker
This document provides information on how to install the ScanMaker V6USL on a PC or Mac using the
scanner’s Universal Serial Bus (USB) interface. For PC USB installation, see pages 1 to 5. For Mac USB
installation, see pages 6 to 8.
USB Installation on the PC
®
V6USL
for PC (Windows 98)
& Mac (Apple iMac / G3
with built-in USB ports)
1. Unpack scanner
Open your scanner package and check the
components as stated in your packing list. Do not
install any of the software until the hardware has
been installed. Before proceeding any further, check
that you have the items listed on the packing list. If
any item is missing, call Customer Service at 800654-4160.
Your Microtek ScanMaker V6USL comes with two
built-in interfaces: SCSI and USB. See the graphic
below to locate the different ports on the back of
the scanner, including the scanner accessory port.
3
2
4
1
5
6
0
7
9
8
Power
Adapter
SCSI
Port 1
SCSI
ID Dial
SCSI
Port 2
USB
Port
Accessory
Port
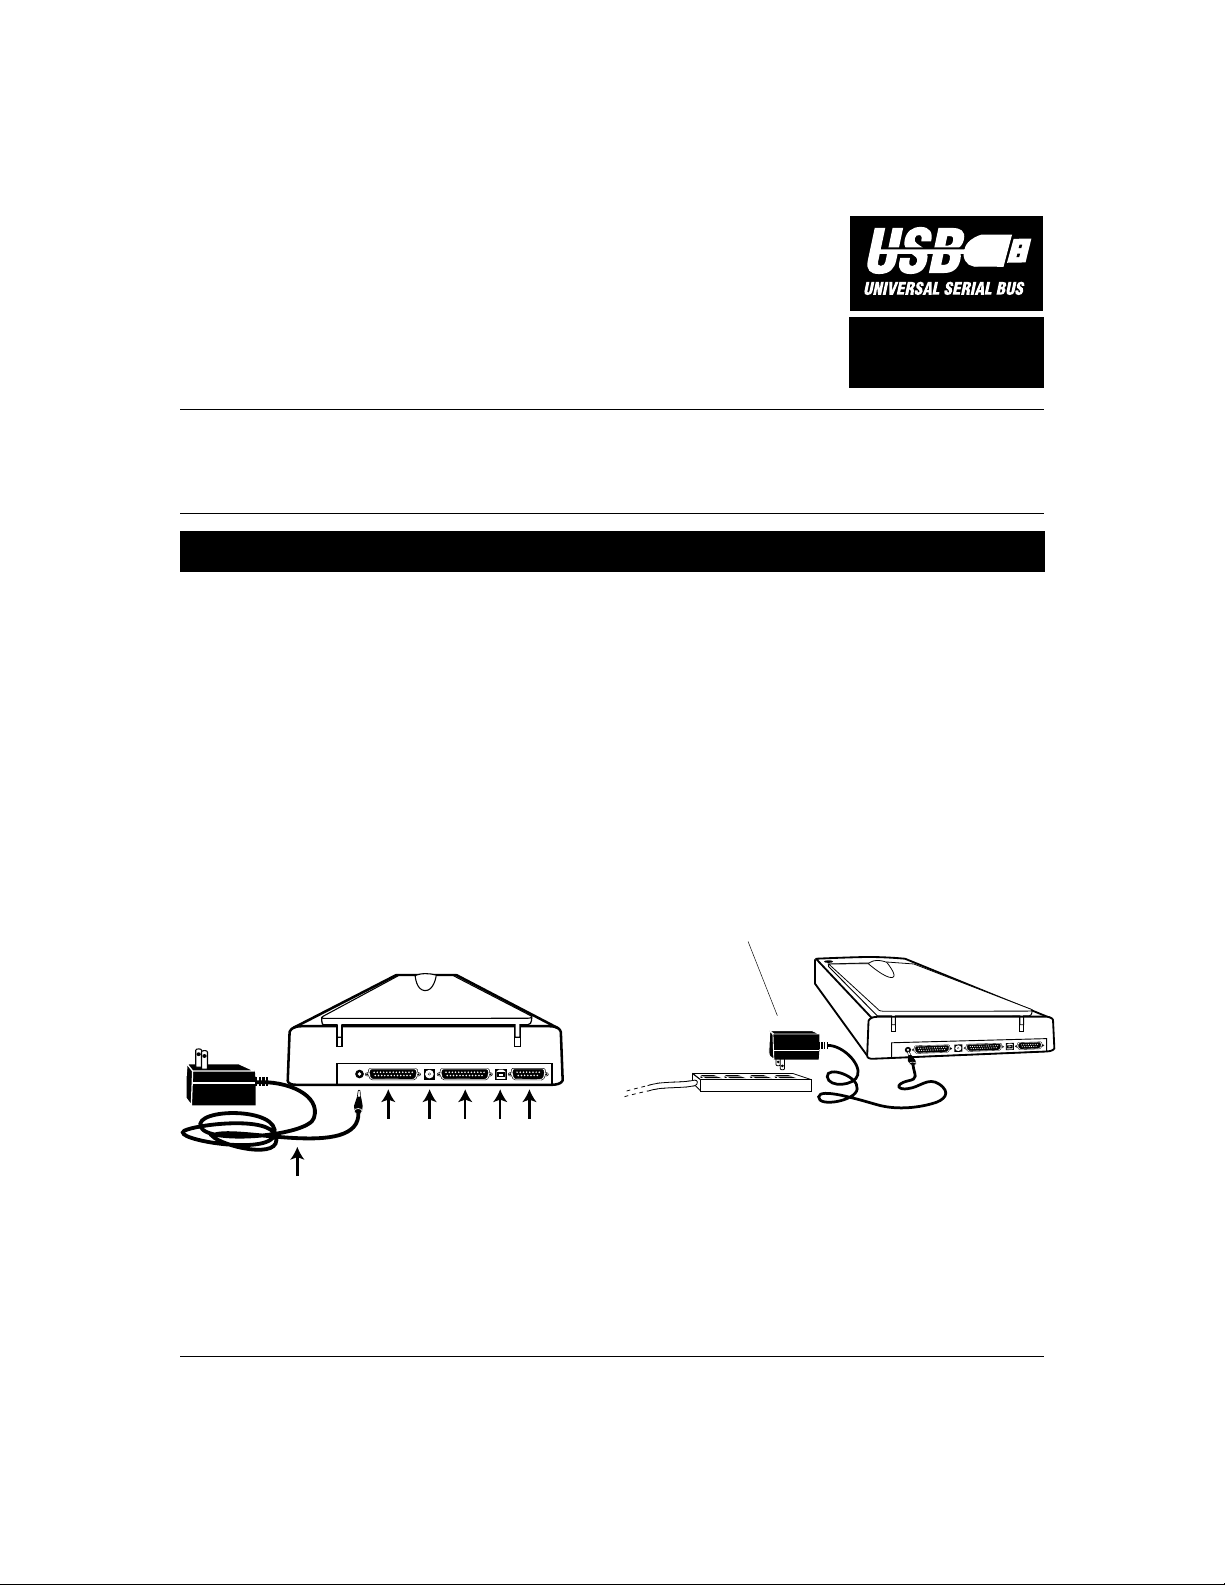
2. Connect power
1. Connect the power adapter to your scanner, and
plug the other end into a wall outlet or power
source. This will turn on the scanner. The green
light on the front of the scanner will blink for a
few seconds and then stay on solid. Make sure
no other cable is connected to the scanner
except the power adapter at this point.
Power adapter
3
4
2
5
1
6
0
7
9
8
Copyright © 1999 Microtek Lab, Inc. Internet: http://www.microtekusa.com
QI V6USL-USB r1 January 1999
Page 2
USB Installation on the PC
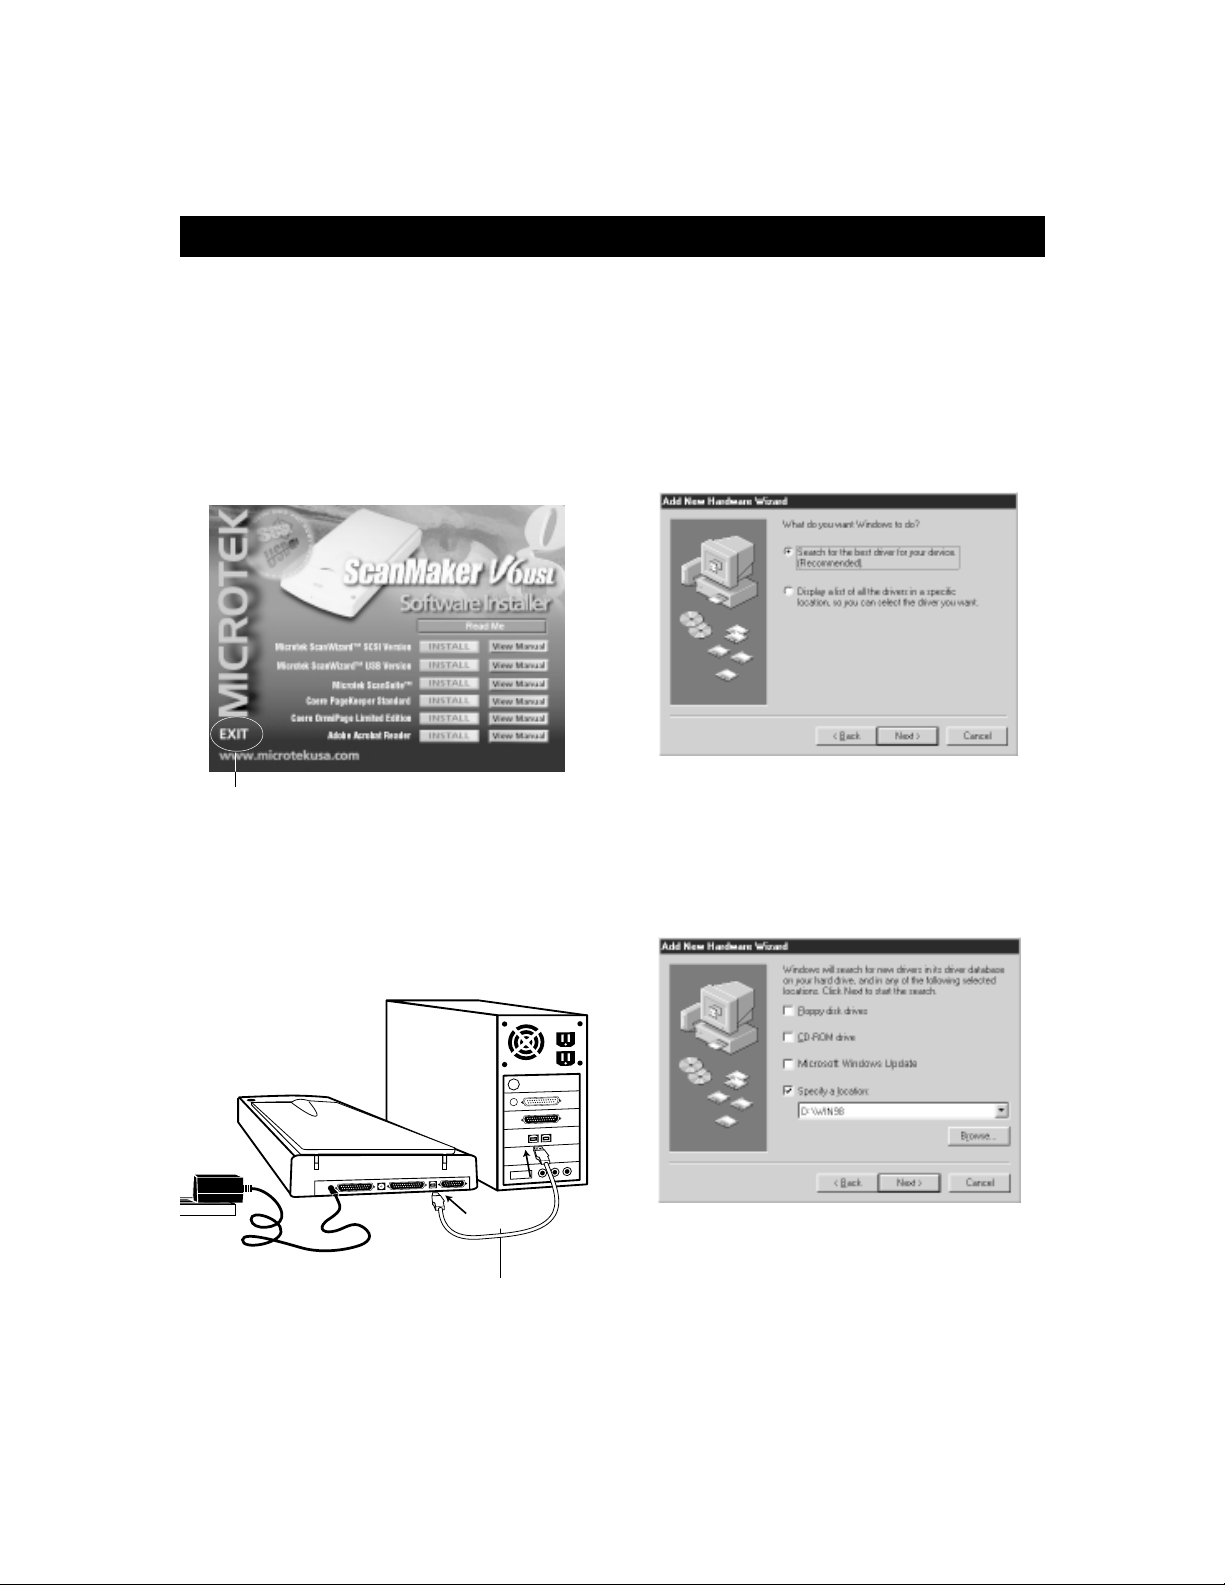
2. Turn on your computer. Then insert the
Microtek CD-ROM into your CD-ROM drive.
When the Microtek Software Installer screen
comes up on your screen, click Exit at the lower
left corner of the screen, but let the CD-ROM
remain in your computer because Windows
needs the CD-ROM in your computer to
perform a specific step.
Click Exit here
3.Connect scanner
1. Connect one end of the USB cable to your PC,
and connect the other end of the cable to the
USB port on the scanner.
2. Once the USB cable is connected, the message
"Unknown Device" appears, asking you to
search for a new device. Click "Next" to
continue.
3. To start the search, select Search for the best
driver for your device (Recommended). Click
"Next" to continue.
4. When the screen below appears, select the
Specify Location option, and deselect all other
options. In the command box, type D:\WIN98
(Where "D" is your CD-ROM drive). Then click
"Next" to continue.
3
4
2
5
1
0
6
9
7
8
5. Your scanner is automatically detected. Click
"Next" to continue.
USB cable
2
Page 3

USB Installation on the PC
6. When Windows asks if you want to install
ScanWizard for USB, click "Cancel". This is
needed because you should go back to the
ScanWizard Installer screen to facilitate
installation of ScanWizard and other software
programs. Two messages will appear after you
click "Cancel": a reminder that ScanWizard for
USB needs to be installed correctly; and a dialog
box to finish up the driver installation. Click
"Finish" in the dialog box to continue to the
next step.
4.Install software
1. Eject the Microtek CD-ROM, then re-insert it
into your CD-ROM drive. The Microtek
Software Installer screen will appear.
Note: If the Microtek Software Installer screen does
not come up automatically, double-click "My
Computer" on your Windows desktop, then doubleclick the CD-ROM icon to start the installer
program.
Click the "Install" button for each
software on the list.
2. When the Microtek Software Installer screen
appears, click the Install button for each item
on the screen in the order of the programs
listed. (Note: For USB users, do not install the
first item on the screen, which is the SCSI
version of your scanner controller program.)
For each software, follow the on-screen
instructions during installation. Default values
are specified at every point during installation;
simply accept these values to continue
installation until you finish.
In some applications, auxiliary information
(such as the Readme file) may be displayed
after that particular program finishes installing.
Simply click the "X" close box at the upper
right corner of the displayed window to return
to the Microtek Software Installer. Do not
restart your computer until all the software has
been installed. See additional notes below
where applicable pertaining to each software
application.
a) Microtek ScanWizard USB version. This is
your scanner controller program for capturing
images from your scanner and delivering them
to your image-editing application (in this case,
Adobe Photoshop LE). Follow the on-screen
instructions during installation. After
ScanWizard finishes installing, you will be
prompted to restart your computer. Select No to
continue installing the rest of the software.
b) Microtek ScanSuite. This is your scanner
utility program for scanning, copying, faxing,
OCR, and email from within the program.
c) Caere PageKeeper Standard. This is your
document management program.
3
Page 4

A
USB Installation on the PC
d) Caere OmniPage Limited Edition, your OCR
text-scanning software: During installation of
OmniPage Limited Edition, you will be asked
to select your “Source”. Make sure Microtek
ScanWizard for USB is selected. At the end of
installing OmniPage Limited Edition, select
“Return to Windows” (not “Restart your
computer”).
e) Adobe Acrobat Reader. This is your
documentation reader for reading and printing
the manuals on the CD-ROM.
3. After all the software has been installed, click
Exit at the bottom left of the Microtek Software
Installer screen.
4. Install Adobe Photoshop LE. Insert the Adobe
Photoshop LE CD-ROM into your CD-ROM
drive. Double-click the following in successive
order: “My Computer” in your Windows
desktop, the "Photosle" CD-ROM icon, the folder
named “English”, the folder called “Photosle”, the
folder called “Disk 1”, and finally the “Setup.exe”
icon to start installation. Follow screen
instructions until Photoshop LE is installed.
5. Restar t your computer at the end of all softwar e
installation.
5. T est your scanner
1. Click Start, Settings, and select Control Panel.
Double-click the System icon in Control Panel,
then select Device Manager from the top.
2. Double-click Imaging Device. Verify that your
scanner is listed here. Click “OK” to close all
dialog boxes.
3. In Windows, go to “Start, Programs, Microtek
ScanWizard for USB”, and select Scanner Test.
When started successfully, the screen below
appears. Click the Flatbed button.
Detected
scanner
Detected
Interface
Click the
"Flatbed"
button
4. Place your document face down on the scanner
glass, and click OK in the dialog box.
Top of document faces
front of the scanner.
6. A preview of your image will be displayed in the
Microtek ScanTest window. Click OK, and exit
Microtek ScanTest; you are now ready to scan.
4
Page 5

USB Installation on the PC
6. Scanning an Image
1. Go to "Start, Programs, Adobe Photoshop 4.0
LE", then choose Adobe Photoshop 4.01 LE.
2. When the program starts, go to the "File"
menu, choose Import, then choose Select
Twain_32 Source from the submenu. When a
dialog box comes up, select the option
Microtek ScanWizard for USB, then click
Select.
3. Go back to the "File" menu, choose the Import
command again, and this time choose
Twain_32 from the submenu. This will launch
the Microtek ScanWizard program, and you
will see the "Preview" and "Settings" (Untitled
Job1) windows.
4. Place the image to be scanned on your scanner,
then click the Preview button. When the
preview image appears, you can resize the
floating dotted line around the image to
determine the final size of the actual scan.
5. To scan the image, confirm the settings in the
"Settings" (Untitled Job1) window, then click
the Scan button. The image is then scanned
and delivered to Adobe Photoshop LE, where
the image can be edited further or saved as a
file. To see the image in Adobe Photoshop LE,
exit ScanWizard by clicking the"X" on the top
right corner of the Preview window.
Preview button
Scan
button
7. Scanning text
1. Place a page of text on the scanner.
2. To start OmniPage, click "Start, Programs,
Caere Applications", and select OmniPage
Limited Edition.
3. To start scanning and reading the text page,
select "File, New Job", then click the Scan
button in the dialog box that comes up.
4. After the text is scanned and OCR’d, you will
be prompted to save it as a file. Select *.rtf as
your format, and give your document a name.
Change folders to where you want to save the
file, then click Save.
5. To open the file, open "My Computer" on your
desktop, then open your C:\ drive, then open
the folder where you saved the file. Look for
the file, and double-click the file to open it.
8. Reading the documentation
1. Insert the Microtek CD-ROM into your CDROM drive.
2. When the Microtek Software Installer comes
up on your screen, click the View Manual
check box that corresponds to the manual you
wish to read. This will launch Adobe Acrobat
Reader, and you can then read or print the
manual.
Resize
dotted line
for size of
final scan
Click the
"View
Manual"
button to see
the manuals
5
Page 6

USB Installation on the Macintosh
1. Unpack scanner
Open your scanner package and check the
components as stated in your packing list. Do not
install any of the software until the hardware has
been installed. Before proceeding any further, check
that you have the items listed on the packing list. If
any item is missing, call Customer Service at 800654-4160.
Your Microtek ScanMaker V6
built-in interfaces: SCSI and USB. See the graphic
below to locate the different ports on the back of
the scanner, including the scanner accessory port.
Power
Adapter
USL comes with two
3
2
4
1
5
6
0
7
9
8
SCSI
Port 1
SCSI
ID Dial
SCSI
Port 2
USB
Port
Accessory
Port
2. Connect power
Connect the power adapter to your scanner, and
plug the other end into a wall outlet or power
source. This will turn on the scanner, and the green
light on the front of the scanner will blink for a few
seconds and then stay on solid. Make sure no
other cable is connected to the scanner except
the power adapter at this point.
Power adapter
3
4
2
5
1
6
0
7
9
8
3. Connect scanner
Connect one end of the USB cable to your
computer, and connect the other end of the cable to
the USB port on the scanner.
A. Connecting to an Apple iMac
4
3
5
2
6
1
0
7
9
8
6
Page 7

USB Installation on the Macintosh
B. Connecting to a Power Mac G3 (like
the model indicated) with built-in
USB ports
3
4
2
5
1
0
6
9
7
8
4. Install software
1. Install Adobe Photoshop LE, your imageediting software. To do this, insert the Adobe
Photoshop LE CD-ROM into your CD-ROM
drive. Double-click the CD-ROM icon when it
appears on your Macintosh desktop to open it,
then double-click the "Installer" icon to install
the program. Follow screen instructions until
installation finishes.
3. Next, install the software on your Microtek CDROM, including the following:
• Microtek ScanWizard USB version. This is
your scanner controller program for
capturing images from your scanner and
delivering it to your image-editing
application (in this case, Adobe Photoshop
LE).
• Microtek ScanSuite USB version. This is
your scanner utility program for scanning,
copying, faxing, OCR, and email from within
the program.
• Caere OmniPage Limited Edition. This is
your OCR text-scanning software.
• Adobe Acrobat Reader. This is your
documentation reader for reading and
printing the manuals on the CD-ROM.
To install each software, open the software
program's folder and then click the "Installer"
icon in that program's folder. Follow screen
instructions until installation is completed.
2. Insert the Microtek CD-ROM into your CDROM drive, and double-click the CD-ROM
when it appears on your Macintosh desktop to
open it.
Note: If you are using an Apple iMac with System
8.1: Install the iMac update driver. To do this, open
the iMac update folder, then double-click the
Installer icon. When the software license agreement
dialog box appears, click the “Agree” button.
Another dialog box (Install iMac Update) will
appear; click the “Install” button.
7
Page 8

USB Installation on the Macintosh
5. Scanning an Image
1. Launch Adobe Photoshop LE. From the File
menu, choose Import, then select ScanWizard
from the submenu. This will bring up the
ScanWizard interface.
2. When ScanWizard starts up and appears on
your screen, you will see the "Settings" and
"Preview" windows. Place the image to be
scanned on your scanner, then click the yellow
Preview button.
3. ScanWizard now performs a quick preview of
the image on your scanner. When the preview
image appears, you can resize the floating
dotted line around the image by clicking and
dragging on the edges or corners of the frame
to determine the final size of the actual scan.
4. To scan the image, confirm the settings in the
Settings window, then click the green Scan
button. The image is then scanned and
delivered to your image-editing program,
where the image can be edited further or saved
as a file and printed.
6. Scanning text
1. Place a page of text on the scanner.
2. Double-click the OmniPage Limited Edition
icon located in the OPLE folder.
3. Go to the "Settings" menu and choose Select
Scanner. From the list of available scanners,
select your scanner model. Next, click the
Verify button to verify that your scanner is
responding. Click the OK button, and then the
second OK button.
4. Click the Auto button.
5. After the text is scanned, choose Save As under
the File menu, and give your document a file
name. Select the folder where you want to save
the file, then click the "Save" button. Quit
OmniPage Limited Edition.
6. To open the scanned text, launch your word
processing software (e.g., Claris, Microsoft
Word). Choose Open under the File menu,
select the file you just saved, and double-click
the file. Your text file is now open in your word
processor, ready to be edited and printed.
Click here to get a
preliminary view of your
image
Click here to start
scanning
Drag the
corner of the
floating dotted
line to crop for
the actual
scan
7. Reading the documentation
1. Insert the Microtek CD-ROM into your CDROM drive.
2. To open the manuals, do either of the
following:
• Launch the Adobe Acrobat Reader
program. From the File menu, choose the
Open command, and open the manual file
you wish to view; manuals have a .pdf
extension to their file name. The manual is
then ready to be viewed or printed.
• Alternatively, you can double-click the
manual to be viewed on the Microtek CDROM directly, which will then launch
Adobe Acrobat Reader and display the
manual. This method may not work for
certain Macintosh models, so the first
procedure above is given.
8
 Loading...