

Page 1

ScanWizard Pro
Q u i c k R e f e r e n c e G u i d e
The Main Windows
Preview window
displays the images
on your scan bed,
provides the tools for
image cropping/
selection, and
includes commands
for controllling
ScanWizard Pro
for Mac OS X
ScanWizard Pro for the Mac OS X has
an interface consistent with the
specifications of the new Apple Mac
OS X system. This Quick Reference
guide shows you at a glance the new
interface and windows of ScanWizard
Pro. For other documentation
(including ScanWizard Pro for OS
8.6x-9x), refer to your Microtek
scanner CD-ROM.
Scan Job Queue window lists the scan jobs to
be scanned
Info window
shows a
magnified view
of image pixels
and their
corresponding
color values
Copyright © 2002 Microtek International, Inc.
I49-003347 A, March 2002
Part No. 219-20-520049
Settings window contains
parameters for the scan
image and provides the
advanced image
correction (AIC) tools for
image editing
Settings window under
LCH Color Space Mode
Settings window under
Native Color Space Mode
http://www.microtek.com
Page 2
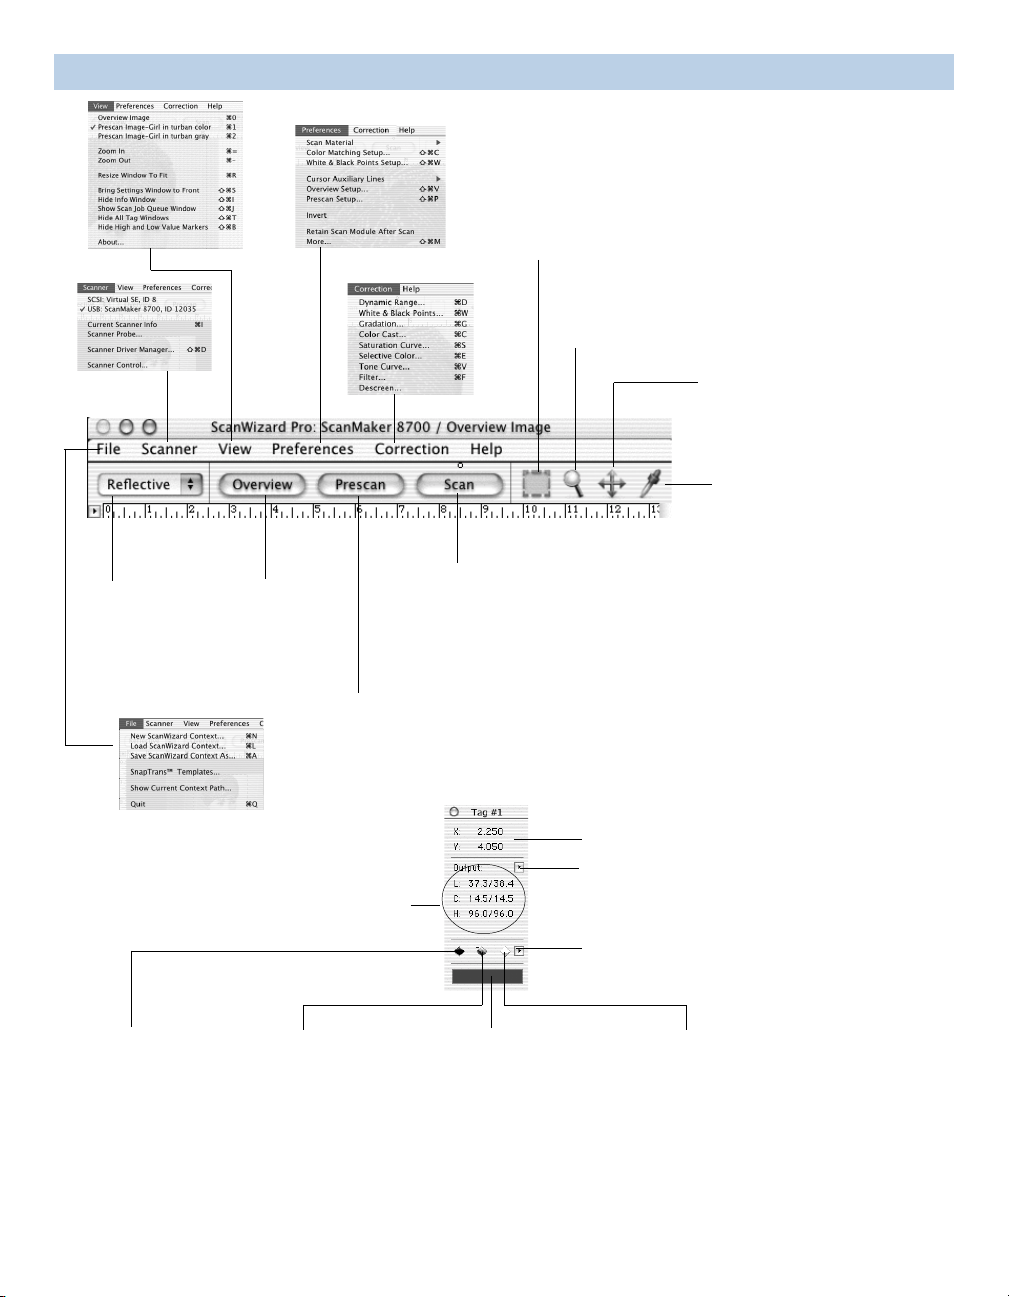
Preview Window Toolbar and Menu
Scan Frame tool
defines the area
of the image to
be scanned
Zoom tool magnifies
or reduces your view
of the image
Move tool moves hidden
parts of a zoomed-in
image into view
Tag Windows tool sets
black (shadow) & white
(highlight) points, and
adds/removes color cast
Selects the
scan material
(reflective,
positive, or
negative)
Click here to
set the
“Before” value
as Black point
Performs a draft
preview of the
entire scan bed
Performs a detailed
preview of the area
within the scan frame
“Before” and
“After” values
Click to remove or add
color cast. “Minus” sign
(-) is remove. “Plus” (+)
sign is add. Default is
“Minus”. Press Alt key to
switch sign to “Plus”
Performs a scan
Color strip
showing the
color of the
selected pixel
Pixel position at x/y axis of the preview image
Click to switch between LCH or Native
color space display mode
Click to reset White & Black or
Color Cast setting
Click here to
set the
“Before” value
as White point
Page 3

Click to change
the unit of
measurement for
the ruler and
ruler colors.
Default is “inch”
Resolution info
(in pixels per
inch) for
overview and
prescan image
Current image
zoom size (100%)
Preview Window Ruler, Markers, Status Bar
Click to zoom out (-) Click to zoom in (+)
Click to flash High/Low value markers
Settings Window
High/Low value markers
Tips relating to the tool
(Scan Frame; Zoom;
Move; & Tag Windows)
currently in use
Output resolution
(in ppi or lpi)
Image orientation;
i.e., rotated,
mirrored, etc.
Image
Category
Selections
LCH Color Space Mode
Current selected
Scan Job (same job
highlighted in Scan
Job window)
Scanner profile info
Image type of
current Scan
Job
Parameters for
controlling scan
frame size,
output size,
scaling
AIC Tools
See next page for
details
Output resolution
(in ppi or lpi)
Image orientation; i.e.,
rotated, mirrored, etc.
Image Category is
not available in
Native mode
Native Color Space Mode
Page 4

Settings Window (AIC Tools)
Color Cast
Adjusts gray balance
by removing color
cast or adjust
desired cast by
adding color cast
Selective
Color
Manipulates a
specific color
range without
affecting
other colors
Gradation Curve
Manually or autoadjusts midtones of the
Lightness channel “L”
LCH Mode AIC Tools
Dynamic Range
Manually or auto
determines image
density range (darkest
tone to lightest tone)
White & Black Points
Manually or auto-
adjusts shadow and
highlight points
Default
Resets any or all of
the AIC settings to
default values
Descreen
Removes moiré patterns
from scans of previously
printed material (books,
magazines, etc.)
Brightness &
Contrast
Manually adjusts
brightness &
contrast of the
entire image
Native Mode AIC Tools
Color
Correction
Adjusts hue
& saturation
and removes
color cast
Saturation Curve
Adjusts image
saturation by
manipulating the
saturation curve
Filter
Applies special
effects (e.g., blur,
sharpen) to images
Tone Curve
Adjusts tonal
distribution of each
channel of a CMYK/
RGB image
Page 5

Highlighted job title indicates the selected scan job in the Preview window. To rename,
double-click the title and enter a new name.
Multiple selection is supported for the Duplicate, Delete, and Check buttons. To select a
single scan job, click on the scan job. To select multiple scan jobs, click and drag on the
jobs or hold down the Shift key and click on a job.
Current scan job is
indicated by green dot in
front of the job title. The
current scan job has a
flashing marquee around it
in the Preview window
Check marks indicate the
jobs to be scanned when
you click the Scan button in
the Preview window
Scan Job Queue Window
Image type
Thumbnails for prescanned
images. Clicking once on the
thumbnail will show the selected
area (scan frame) in the Preview
window. Double-clicking the
thumbnail will display the
corresponding Prescan image in
the Preview window
Selects all the scan
Select All
jobs in the window
Check
Checks (or
unchecks) the scan
jobs to be included in
the final scan
New
Adds a new
default scan job
Sample scan jobs
Sample folder
Duplicate
Creates a copy of a
selected scan job
Scan Job Manager
dialog box
Delete
Deletes the selected
scan jobs
Scan Job Manager
Used to facilitate the adding,
removing, or saving of scan
jobs in folders
Function buttons
• New Folder creates a new
folder to save scan jobs
• Add/Add All adds scan
jobs from the selected
folder to the scan job queue
• Save lets you save a copy
of the scan job to the
selected folder
• Remove/Remove All lets
you remove scan jobs from
the scan job queue
Page 6

Information Window
displays the x,y position
Pixel Position
of the pixel on the
current preview image
Color Input Meter Display
shows a pixel’s input (in
density) & output (in pixel)
values at a specific x,y
position on the previw image
Pixel Sampling Display Area
shows a pixelized display of a
pixel’s specific x,y position on
the preview image. The size of
the sampling area depends on
the selection made in the
Color Meter Options (top right)
Tool selection (in Preview window)
M Selects Scan Frame tool
Z Selects Zoom tool
H Selects Move tool
D Selects Tag Windows tool
File menu and Scanner menu
Q Exit ScanWizard Pro
R Resize Preview window
N New Context
L Load Context
A Save Context As
I Scanner Info dialog box
D Scanner Driver Manager dialog box
Show/hide window
S Bring Settings window to the front
J Show/hide Scan Job Queue window
I Show/hide Info window
T Show/hide Tag windows
B Show/hide High and Low Value Markers
= Zoom in
– Zoom out
Color Output Meter Options
switch display modes
(between LCH & Native) and
let you choose how color
information is displayed (in
numbers or percentages)
Color Output Meter Display
shows a pixel’s output values
at a specific x,y position on
the preview image. Output
values will differ from input
values after image correction
Quick Keys
Preferences menu
C CMS Setup dialog box
W White/black Point setup dialog box
V Overview Setup dialog box
P Prescan Setup dialog box
M More Preferences dialog box
AIC screen (If unspecified, Native mode is assumed)
D Dynamic Range
W White/black Points
V Tone Curve
B Brightness and Contrast
C Color Correction or Color Cast (LCH)
F Filter
G Gradation (LCH only)
S Saturation Curve (LCH only)
E Selective Color (LCH)
Overview/Prescan selection
0 Go to Overview image
1 Go to 1st Prescan image
2 Go to 2nd Prescan image
n Go to nth Prescan image
 Loading...