

Page 1

Trademarks
Microtek®, ScanMaker®, and
ScanWizardTM Pro are
trademarks or registered
trademarks of Microtek
International, Inc.
Macintosh® and Apple® are
registered trademarks of
Apple Computer, Inc.
Windows® is a registered
trademark of Microsoft
Corporation. All other
products or name brands
are trademarks of their
respective holders.
Important
Documents you scan may
be protected under
copyright law. The
unauthorized use of such
documents could be a
violation of the rights of the
copyright holder. Microtek
bears no responsibility for
the unauthorized use of
copyrighted materials.
ScanMaker 9800XL
Installing and Getting Started
Contents
Introduction ............................................................................................................... 2
System Requirements............................................................................................... 2
Unpacking the Scanner............................................................................................. 3
Taking a Closer Look ................................................................................................. 3
Unlocking the Scanner.............................................................................................. 4
Shipping scanner ............................................................................................... 4
Installing the Scanner Software ............................................................................... 5
Connecting the Scanner to Your Computer ............................................................. 6
Using the FireWire cable ................................................................................... 6
Using the SCSI cable ......................................................................................... 8
Using the USB cable .........................................................................................11
Positioning Reflective Originals ............................................................................. 13
Your First Scan ........................................................................................................ 14
Performing Color Calibration ................................................................................. 16
The color calibration target ............................................................................. 16
Before you calibrate ......................................................................................... 16
Calibrating your target .................................................................................... 17
Loading a profile .............................................................................................. 18
Specifications .......................................................................................................... 20
Additional Documentation in the CD-ROM ........................................................... 20
Copyright © 2001 Microtek International, Inc. http://www.microtek.com
I49-003275 A, December 2001
Page 2
This document provides information on how to install the
ScanMaker 9800XL flatbed color scanner and perform basic
image scanning procedures.
Introduction
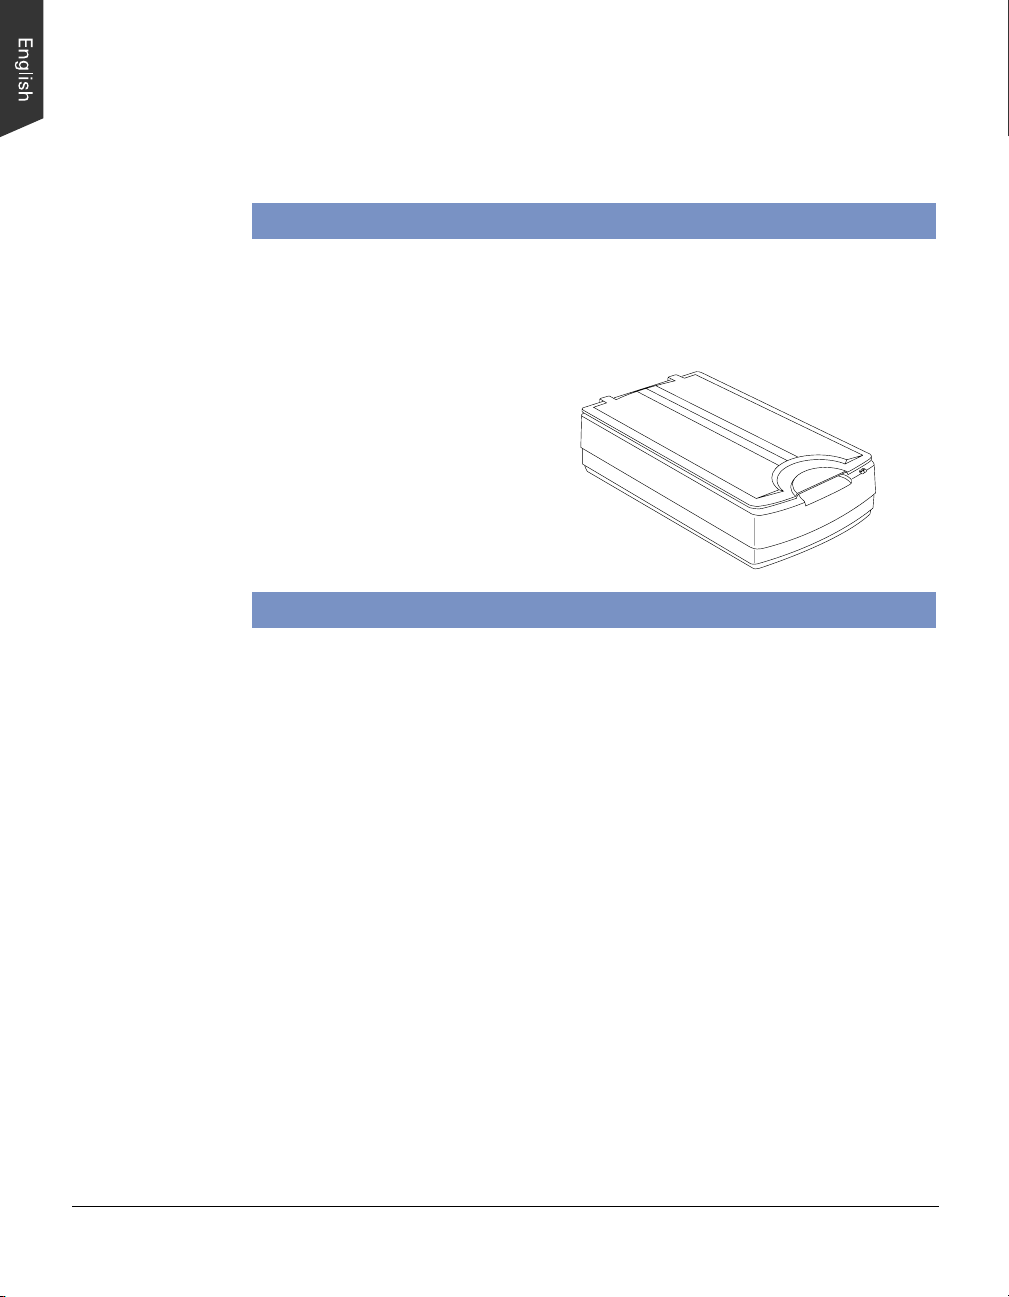
The ScanMaker 9800XL is a 48-bit color flatbed scanner that supports tabloid-sized
(A3 or B-size) scanning for corporate users or designers. This scanner scans images
up to 12" x 17" at an optical resolution of 1600 x 3200 dpi (12800 x 12800 dpi
interpolated).
The ScanMaker 9800XL
provides three built-in interfaces
(FireWire, USB, and SCSI), and
allows you to choose any of the
three interfaces to digitize image
originals.
System Requirements
• 128MB RAM or more recommended
• CD-ROM drive (for installing software)
• Color display with 24-bit color output capability
FireWire
• PC - Pentium II or later with built-in FireWire port
- Windows 98 SE, 2000, Me, or XP
• Mac - iMac DV or new G3/G4 with built-in FireWire support
- Mac OS 9.x
USB
• PC - Pentium PC or later with USB port
- Windows 98, 2000, Me, or XP
• Mac - iMac or G3/G4 with built-in USB port
- Mac OS 8.6 through 9.x
SCSI
• PC - Pentium PC or later
- Windows 95, 98, 2000, Me, XP, or NT 4.0
• Mac - Power PC class or later with ASPI compliant SCSI port
- Mac OS 8.5 through 9.x
2 ScanMaker 9800XL Installing and Getting Started
Page 3
Unpacking the Scanner
Open your scanner package and check the components as stated in your packing list.
If any component is missing, call Microtek Customer Service.
• ScanMaker 9800XL unit
• FireWire card
• FireWire cable
• USB cable
• Kodak Q-60R1 color target (Reflective)
• Documentation- includes ScanMaker 9800XL Installing and Getting Started,
ScanWizard Pro User's Guide, ScanW izard Pro Quick Reference, Unlock card,
and other inserts.
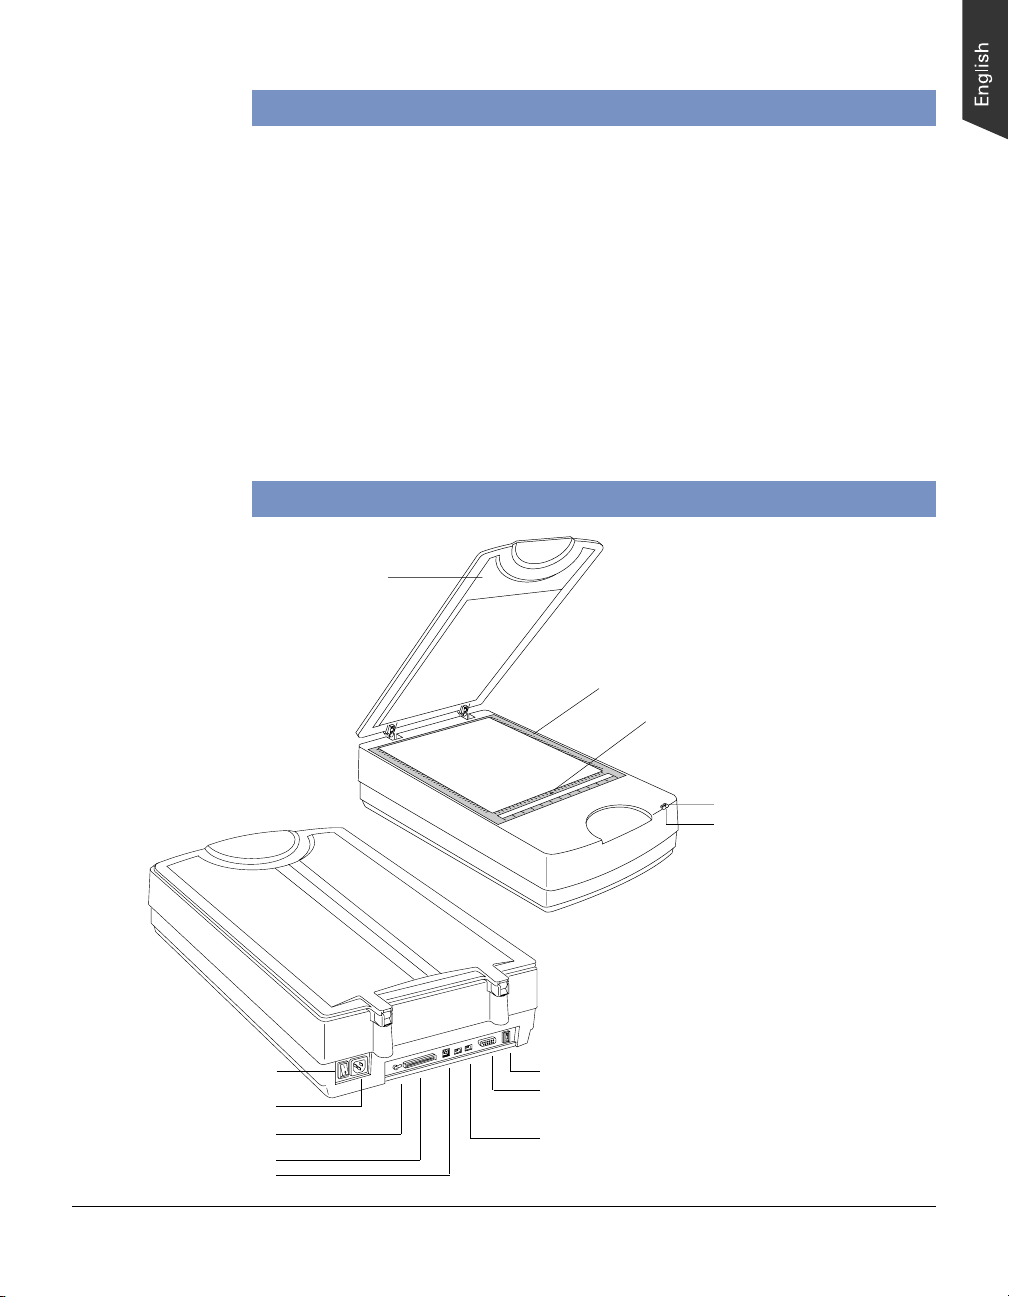
Taking a Closer Look
Scanner lid
Vertical ruler
Power switch
Power port
Terminator switch
SCSI port (1)
USB port (1)
Horizontal ruler
6
5
4
3
2
1
0
1
2
3
4
5
6
READY indicator (Green)
POWER indicator (Orange)
SCSI ID switch
Accessory port
FireWire ports (2)
ScanMaker 9800XL Installing and Getting Started 3
Page 4
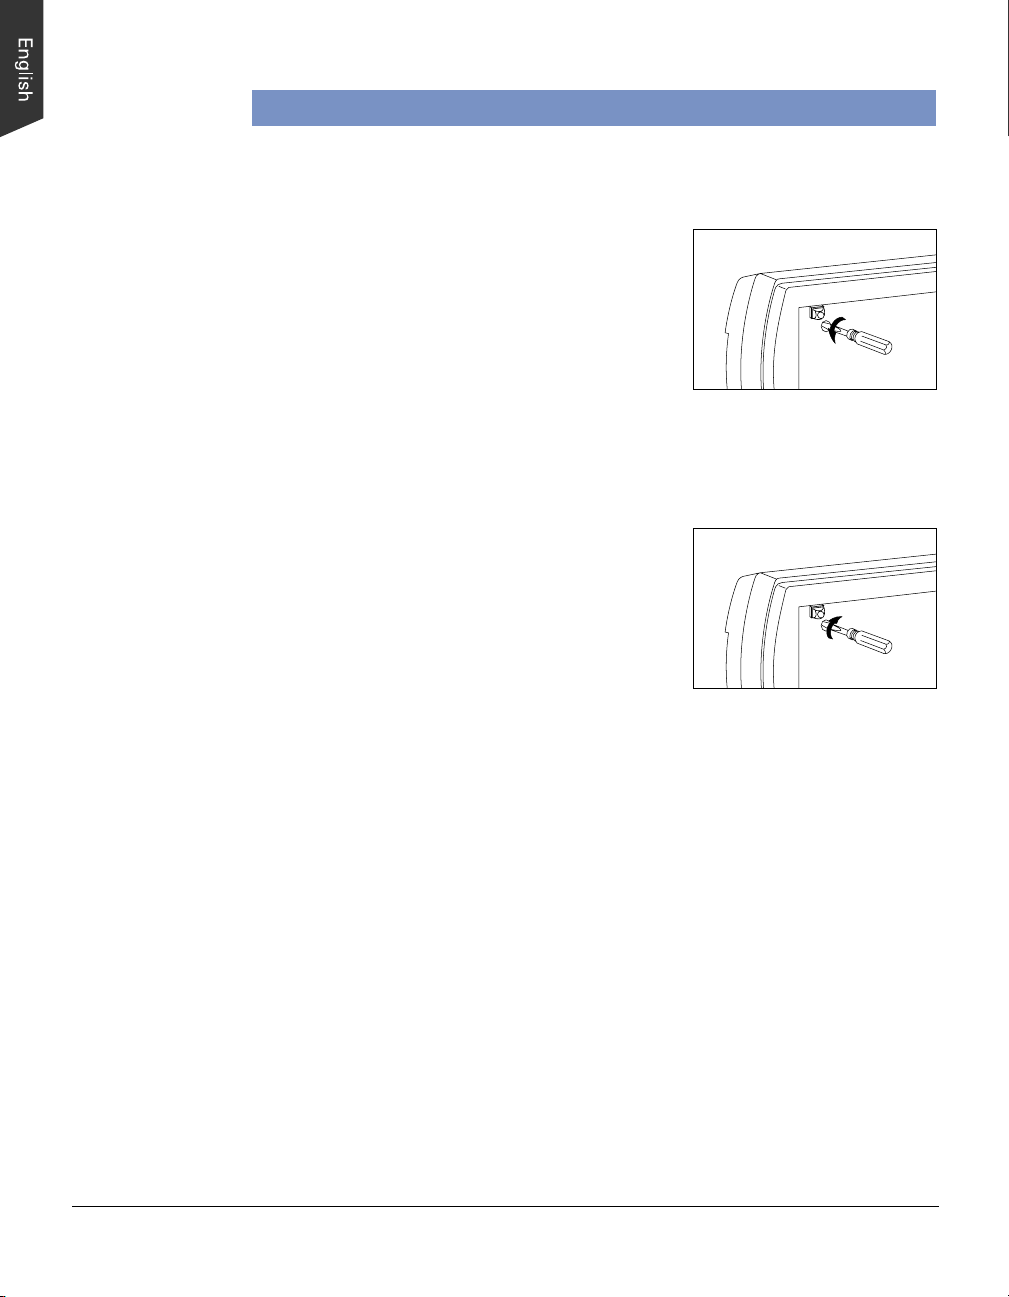
Unlocking the Scanner
Your scanner has a locking screw to protect the scanner carriage mechanism during
shipping. Before you operate the scanner, you need to disengage the locking screw.
1. Turn the scanner on its side and locate the
locking screw at the bottom of the scanner.
2. Using a flathead screwdriver, turn the locking
screw counterclockwise until the screw pushes
out and is flush with the bottom of the scanner
base.
Unlock
Shipping scanner
If you have to transport the scanner, the scanner must be locked. To lock the scanner,
follow the steps below:
1. Turn off the scanner if your scanner is on.
2. Set the SCSI ID number to “9”.
3. Turn on your scanner. The scanner's carriage
will move to standby position in 5 minutes.
4. When the indicators on the front of your scanner
stop blinking, turn the locking screw clockwise
one-fourth turn while pushing it in
simultaneously. The screw should stay in and not
pop back out.
5. Turn off your scanner. The scanner is now ready for transport.
Lock
Note:
To use the scanner again at a future time, be sure to reset the SCSI ID to its
original number prior to step #2. Otherwise, the scanner ID will be left at SCSI ID 9
and will not work.
4 ScanMaker 9800XL Installing and Getting Started
Page 5

Installing the Scanner Software
Before connecting the scanner to your computer, follow the steps below to install the
scanner software:
1. Turn on your computer.
2. Insert the Microtek CD-ROM into your CD-ROM drive.
For Macintosh users:*
When the Microtek CD-ROM icon appears on your Macintosh desktop, doubleclick on this icon to open it. The software installer screen should appear, and click
each software program on the screen to install all the software components.
Double-click the “Install” icon on each folder to install the respective programs
one at a time.
For PC users:
The Microtek Scanner Softwar e installer screen should automatically come up.
When the software installer screen appears, click each software program in the
order that it appears on the screen to install all the software components.
When you install ScanWizard Pro, the installer program will install the Color
Matching driver program and ask you to perform Color Matching for your
monitor and printer. The Color Matching feature ensures color consistency from
the initial input phase when an image is captured by the scanner, to the final
output process when the image is output to your monitor or printer.
Note:
If the software installer screen does not come up automatically, doubleclick the following in succession: “My Computer” on your Windows desktop; the
CD-ROM icon; and then cdsetup.exe to start the installer program.
3. Restart your computer when the software installation is complete.
*Caution:
For Macintosh users,
1. Make sure the additional software you have is already installed in your
computer before installing the scanner software.
2. Make sure that all virus protection software is turned off before installing the
scanner software. Once the scanner software installation is finished, remember
to re-enable the virus protection software.
3. For iMac users, please visit Apple's website at http://www.apple.com/imac/
to download and install any iMac updates you may require.
ScanMaker 9800XL Installing and Getting Started 5
Page 6
Connecting the Scanner to Your Computer
The ScanMaker 9800XL comes with three built-in interfaces: FireWire, USB, and
SCSI. You may choose any of the three interfaces to make the connection between
the scanner and computer. (You should use only one interface at a time.)
Using the FireWire cable
Before connecting the scanner, check to see if your computer system is FireW ireready. FireWire-ready means you can connect the scanner to your computer using a
provided FireWire cable.
System is FireWire-ready
• For Macintosh users, your computer should have been equipped with a built-in
FireWire port. This port should be designated with the FireWire symbol shown to
the left.
• For PC users, the FireWire card should be installed and work properly in your
computer.
System is Not FireWire-ready
If your system is not FireWire-ready, you will need to install a FireWire card. For
more details on how to install the FireWire card, please refer to the “FireWire
Installation Guide” on a separate documentation included with your scanner
package. Alternatively, you can use the USB or SCSI interface to connect your
scanner.
For FireWire-ready systems:
Follow the steps below to make the FireWire connection.
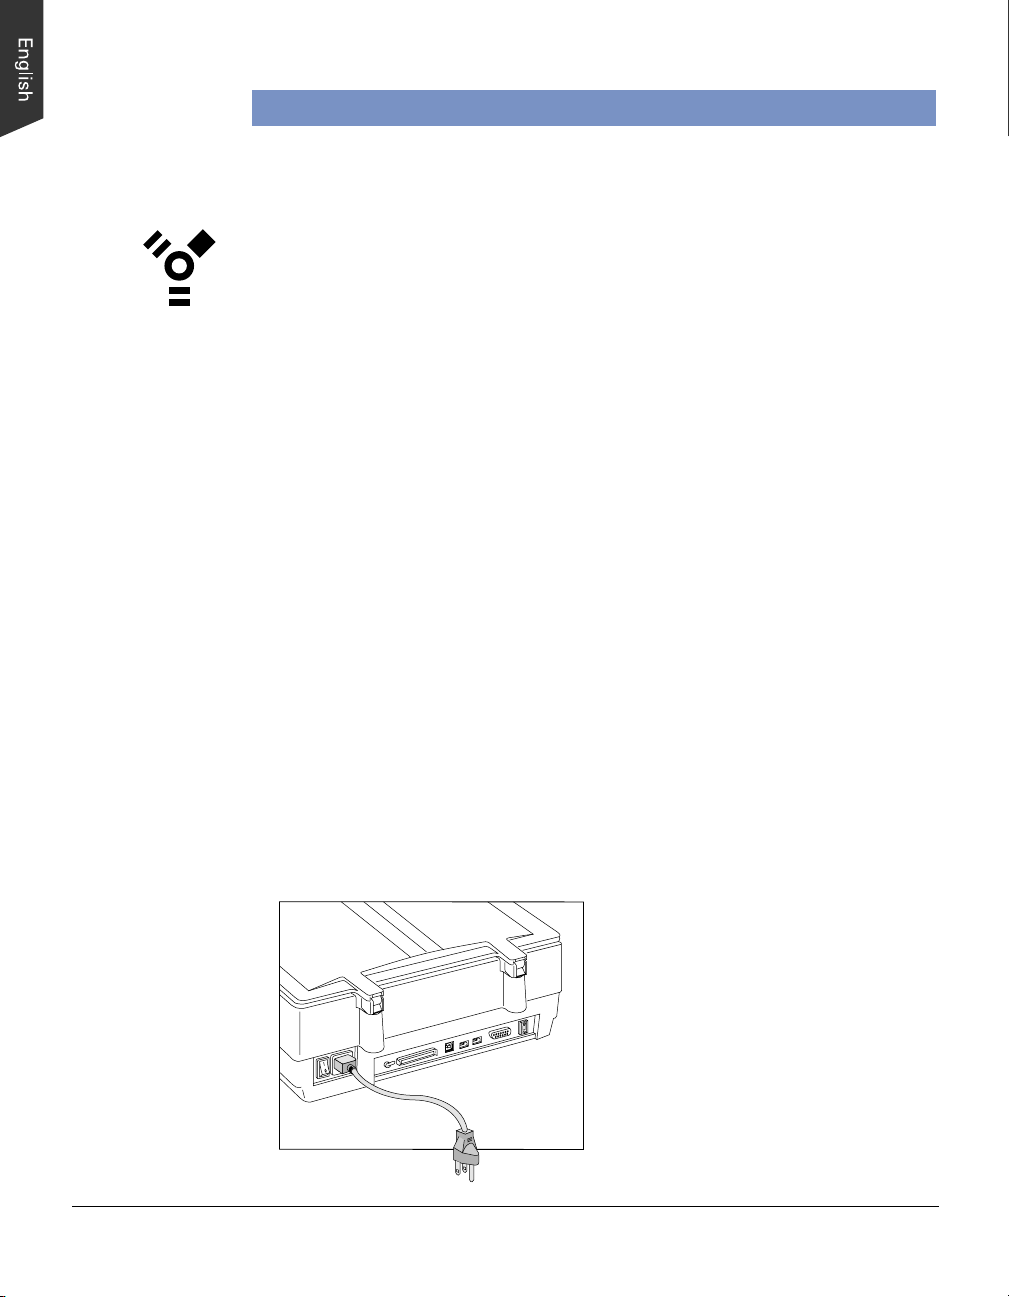
1. Connect the power cord to your scanner.
Plug the power cord into the back of the scanner, and plug the other end into a
power source (power surge protector highly recommended). Make sure no other
cable is connected to the scanner except the power cord at this point.
6 ScanMaker 9800XL Installing and Getting Started
Page 7
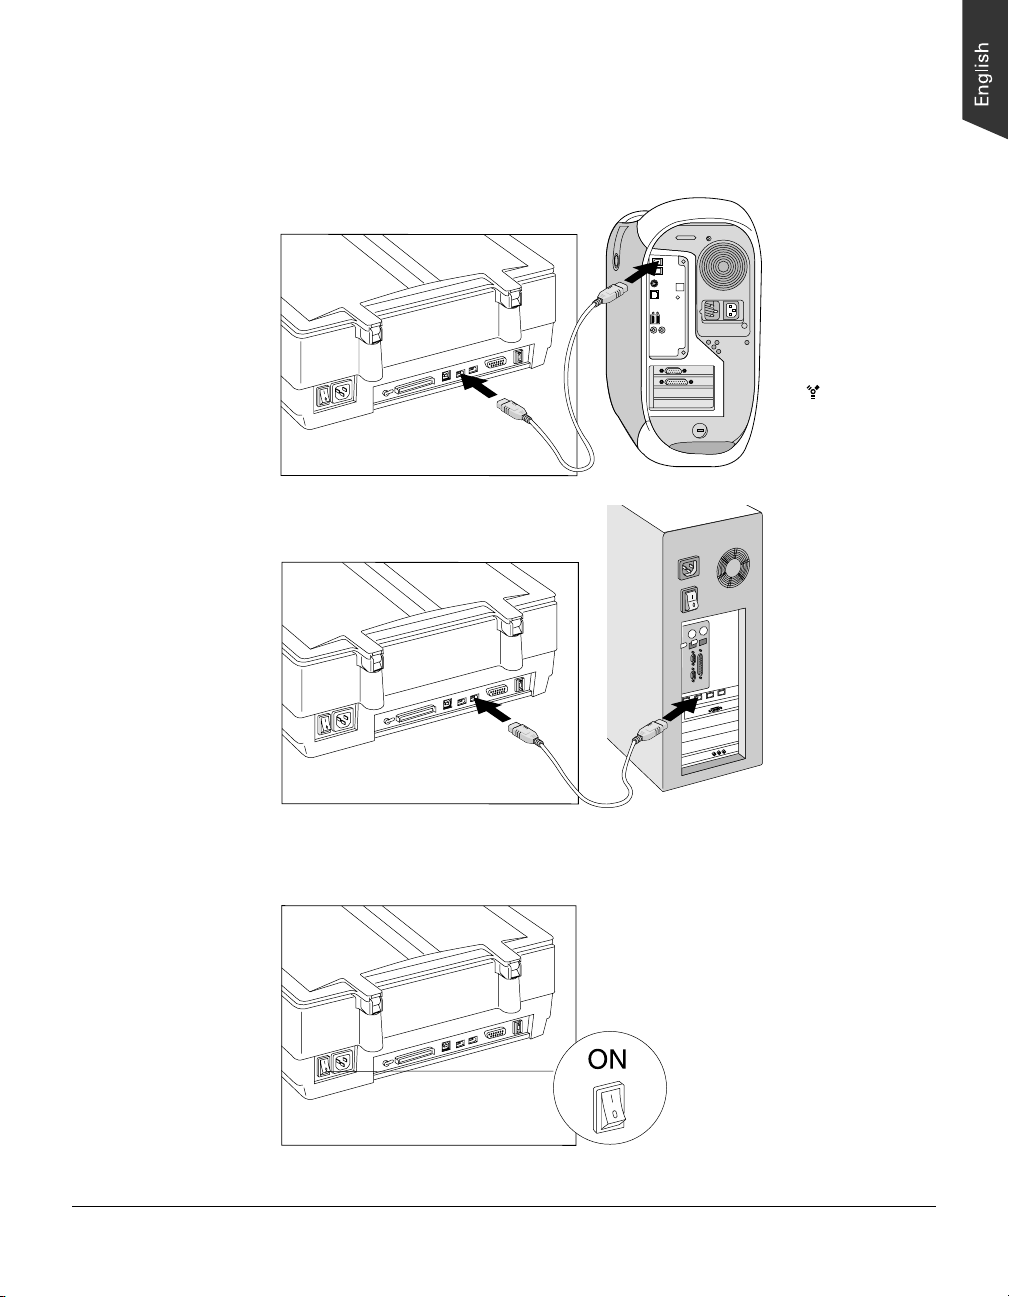
2. Connect the scanner to your computer, using the provided FireWire cable.
Connect one end of the FireWire cable to your computer’s FireWire port, and
connect the other end of the cable to the scanner’s FireWire port.
For Macintosh users
The latest Macintosh
computers (i.e., G3,
G4, etc.) are
equipped with a
built-in FireWire port,
usually labeled with
the “ ” logo.
For PC users
3. Turn the scanner's power switch to “On”, and wait for the green light on the
scanner's front panel to stop blinking and stay on steady.
4. Your system will detect the scanner automatically .
ScanMaker 9800XL Installing and Getting Started 7
Page 8

Using the SCSI cable
Before connecting the scanner, check to see if your computer system has a built-in
SCSI interface or an installed SCSI card. If you need help on installing the SCSI
card, please refer to the “SCSI Installation Guide” on a separate documentation
included with your scanner package, or refer to the documentation that came with the
SCSI card.
Follow the steps below to make a SCSI connection.
1. Shut down your computer.
2. Set the SCSI ID number to 6. If the SCSI ID number 6 is used by another SCSI
device, check which SCSI ID is free, and set the number to a free SCSI ID.
Push the minus button (-)
above the SCSI ID number
to decrease the number;
push the plus button (+) to
increase the number.
3. Connect the scanner to your computer, using the SCSI cable.
Connect one end of the SCSI cable to your computer’s SCSI port, and connect the
other end of the cable to the scanner’s SCSI port.
For Macintosh users
8 ScanMaker 9800XL Installing and Getting Started
Page 9

For PC users
4. Set the scanner’s terminator switch to the “ON” position.
Note:
If you have multiple devices on your SCSI chain, make sure the scanner
is the last device on the chain and that the scanner is terminated (i.e., scanner's
terminator switch is set to ON).
ScanMaker 9800XL Installing and Getting Started 9
Page 10
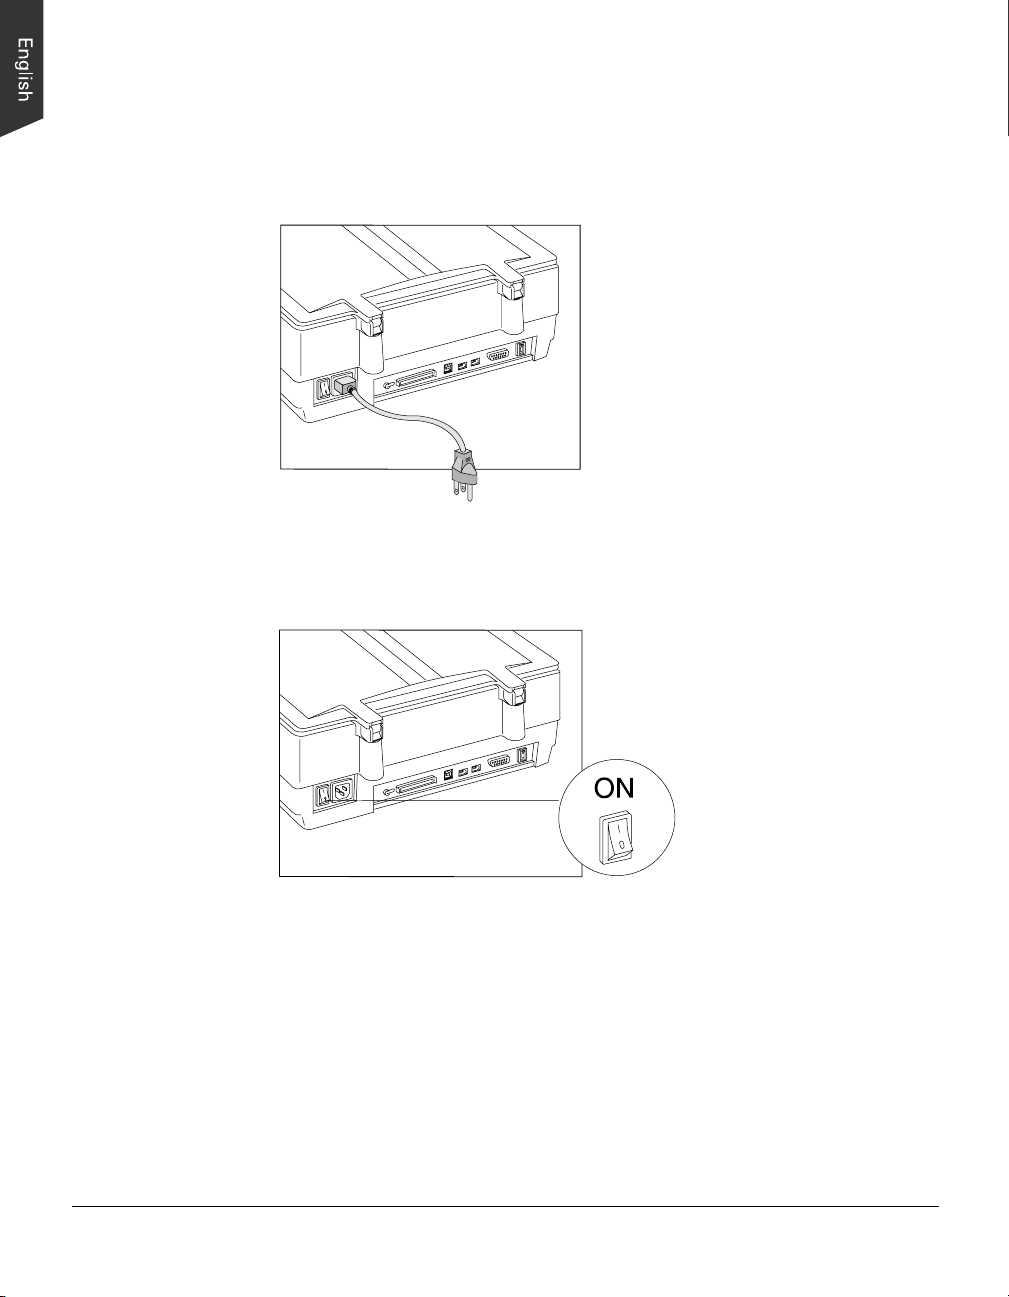
5. Connect the power cord to your scanner.
Plug the power cord into the back of the scanner, and plug the other end into a
power source (power surge protector highly recommended).
6. Turn the scanner's power switch to “On”, and wait for the green light on the
scanner's front panel to stop blinking and stay on steady.
7. Turn on your computer; the system will detect the scanner automatically.
10 ScanMaker 9800XL Installing and Getting Started
Page 11
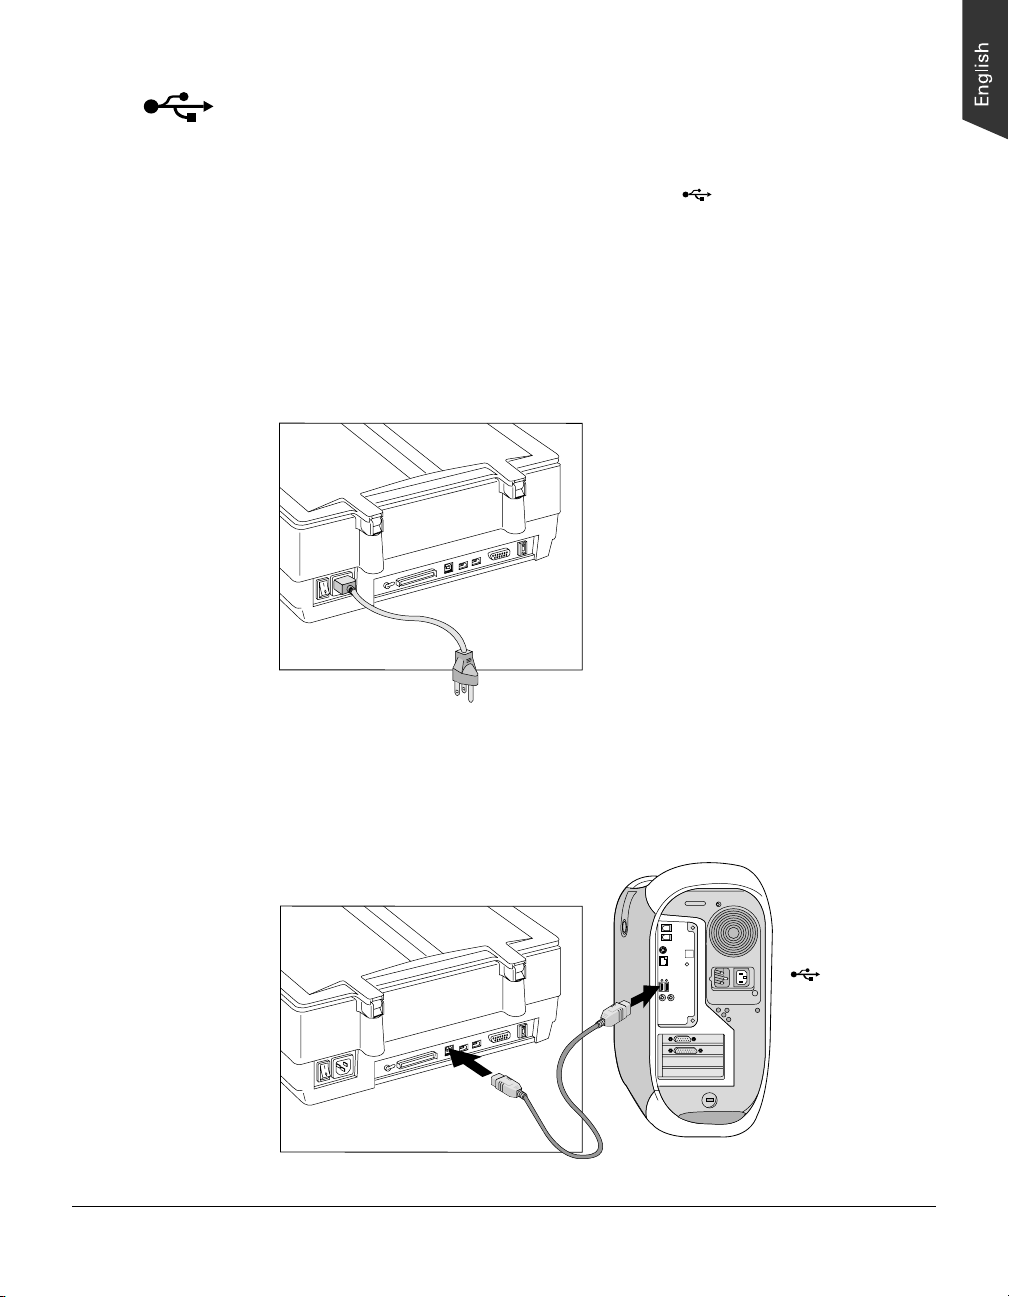
Using the USB cable
Before connecting the scanner, check to see if your computer system has a built-in
USB port. The latest Macintosh computers (i.e., G3, G4, etc.) are equipped with a
built-in USB port, and usually labeled with the USB “ ” logo.
Follow the steps below to make the USB connection.
1. Connect the power cord to your scanner.
Plug the power cord into the back of the scanner, and plug the other end into a
power source (power surge protector highly recommended). Make sure no other
cable is connected to the scanner except the power cord at this point.
2. Connect the scanner to your computer, using the provided USB cable.
Connect one end of the USB cable to your computer’s USB port, and connect the
other end of the cable to the scanner’s USB port.
For Macintosh users
USB port usually
labeled with the
“ ” logo.
ScanMaker 9800XL Installing and Getting Started 11
Page 12

For PC users
3. Turn the scanner's power switch to “On”, and wait for the lights on the scanner's
front panel to stop blinking and stay on steady.
4. Your system will detect the scanner automatically .
12 ScanMaker 9800XL Installing and Getting Started
Page 13

Positioning Reflective Originals
1. Lift the scanner lid.
2. Place the original to be scanned face down on the scanner’s glass surface. Center
the top of the original along the horizontal ruler on the scanner.
If you are scanning a book or thick materials/documents, lift the scanner lid out
of its hinge sockets high enough to create room between the originals and the lid.
Please note that the
calibration window on the
glass surface should be kept
clear and free from any
6
5
4
3
2
1
0
1
2
3
4
5
obstruction during scanning.
3. Lower the scanner lid.
Note:
To scan transparency materials (positive or negative films) with the
ScanMaker 9800XL, you should have an optional Transparent Media Adapter
(TMA1600). For more details on the TMA1600, contact Microtek Customer Service.
ScanMaker 9800XL Installing and Getting Started 13
Page 14

Monitor selection
shown here is set
in the ColorSync
Control Panel.
Color Matching
features
Your First Scan
1. Launch ScanWizard Pro from your image editing application. To do this, choose
the Import or Acquire command from the File menu of your image editing
application, then select ScanWizard Pro.
T o operate ScanWizard Pro in the stand-alone "batch" mode in Macintosh
systems, go to the Apple menu, and choose the Batch Scan command. In
Windows, launch ScanWizard Pro from the Start menu in Windows.
The first time you launch ScanWizard Pro, you will be asked to perform Color
Matching for your monitor and printer.
Immediately updates the Preview window image
when a new setting is selected. This will reflect
colors consistent with the newly selected profile.
2. Once ScanWizard Pro is launched, go to the Preview window and click the Scan
Material icon. From the submenu that appears, choose Reflective.
3. Click the Overview button to start an overview, and you will see the image appear
in your Preview window .
14 ScanMaker 9800XL Installing and Getting Started
Page 15
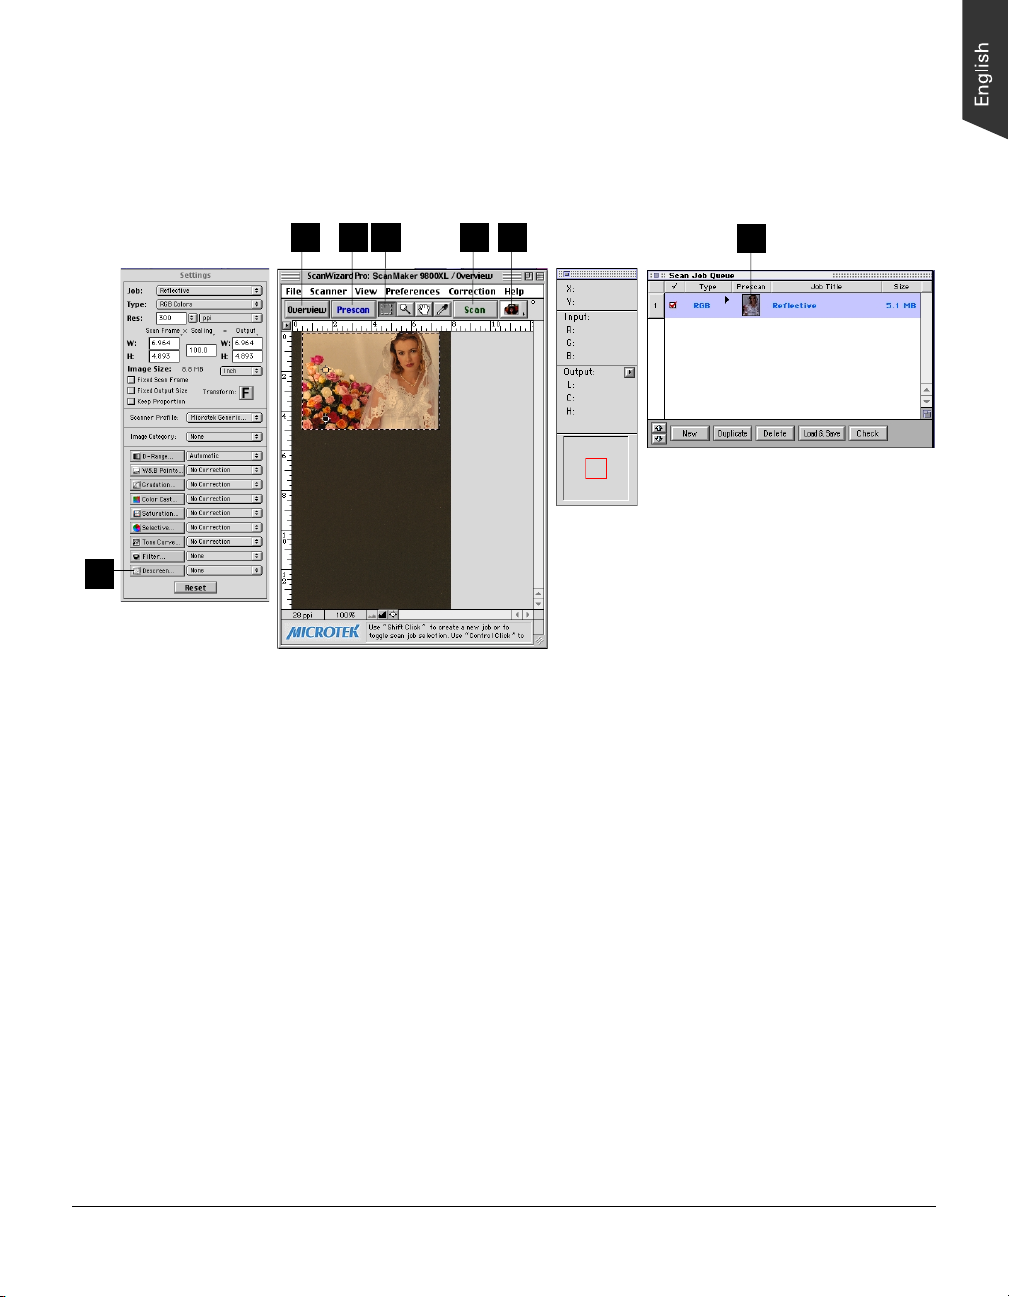
4. Select the Scan Frame tool from the Toolbar in the Preview window, and choose
the area to be scanned by dragging a rectangle around it. You will see a flashing
frame (marquee) around the selected area.
6
Settings Window
5
Preview window
2743
5
Scan Job Queue window
Info window
5. Click the Prescan button to start an overview, and you will see the thumbnail
image appear in your Scan Job Queue window.
6. To scan a photographic original, bring up the Settings Window, and select “None”
on the Descreen options menu. To scan printed material, on the Descreen options
menu select the suitable descreen level (Newspaper, Art Magazine, etc.).
7. If you like what you see in the Preview window , click the Scan button to start
scanning. The image is then delivered to your image editing application program,
where the image can be saved, printed, or modified further.
If you launch ScanWizard Pro in “batch” mode, you may be asked to input a file
name for the scanned image.
For more details on various scanning scenarios, refer to the ScanWizard Pro
User's Guide included in your scanner package.
ScanMaker 9800XL Installing and Getting Started 15
Page 16

Performing Color Calibration
The Microtek Scanner ICC Profiler (MSP) is a scanner calibration and profiling
utility program exclusively designed for Microtek scanners. Used together with the
color calibration target, the ICC Profiler determines the color attributes of your
scanner accurately, then generates an ICC profile tailored exclusively for the scanner
you are using under ScanWizard Pro.
The Microtek Scanner ICC Profiler utility is included in the CD-ROM that contains
ScanWizard Pro. Select the Microtek Scanner ICC Profiler option to install.
The color calibration target
Included in your scanner package is an industry-standard Reflective Kodak color
target (Kodak Q-60R1, size 5" x 7").
The calibration target is very delicate and must be handed carefully, as follows:
• Gently remove the target from its protective sleeve and avoid touching the target
image surface.
• When not in use, keep the target in its sleeve and away from light and heat.
Note:
To keep the colors in your scanner consistent, you should perform color
calibration on a regular basis. Professional photographers, graphic designers or
others who require extremely precise color may wish to calibrate the scanner every
time it is used.
Before you calibrate
Before calibration, make sure that the Scanner ICC Profiler program is successfully
installed, and that the calibration target is placed on your scanner correctly.
Proper positioning of the reflective target on the scanner is important for successful
calibration. Incorrect positioning of the target will result in an unsuccessful
calibration.
1. Place the target face down on the glass surface of the scanner , making sure that
the up side of the target is positioned toward the scanner's front panel and has its
edge firmly aligned against the scanner top ruler.
16 ScanMaker 9800XL Installing and Getting Started
Page 17

2. Using the scanner's top ruler as a reference point, adjust the target position so that
it is horizontally in the center of the glass surface.
6
5
4
3
2
1
0
1
2
3
4
5
6
Make sure the woman's
portrait lies towards the
right side of the scanner.
Please note that the
calibration window on the
glass surface should be kept
clear and free of any
obstruction during scanning.
Calibrating your target
1. With the target properly positioned in the scanner, turn on your scanner and let it
warm up for about five minutes.
2. Launch the Microtek Scanner ICC Profiler calibration program.
In Macintosh, locate the Microtek ICC Profile folder and double-click the ICC
Profile icon. In W indows, select the Start menu, Programs, Microtek ScanWizard
Pro for Windows, then Microtek Scanner ICC Profiler.
3. The main dialog box appears. Set the appropriate parameters, click the Start
Profiling button, then follow the screen instructions to generate your ICC profile.
Choose the scanner model
you are currently using.
Select "Reflective"
Select the date code and
target type to match your
target
ScanMaker 9800XL Installing and Getting Started 17
Page 18
4. Give a file name to save the created ICC profile. For details, refer to the help file
of your Scanner ICC Profiler program.
5. When done, click the Close button to exit Scanner ICC Profiler program.
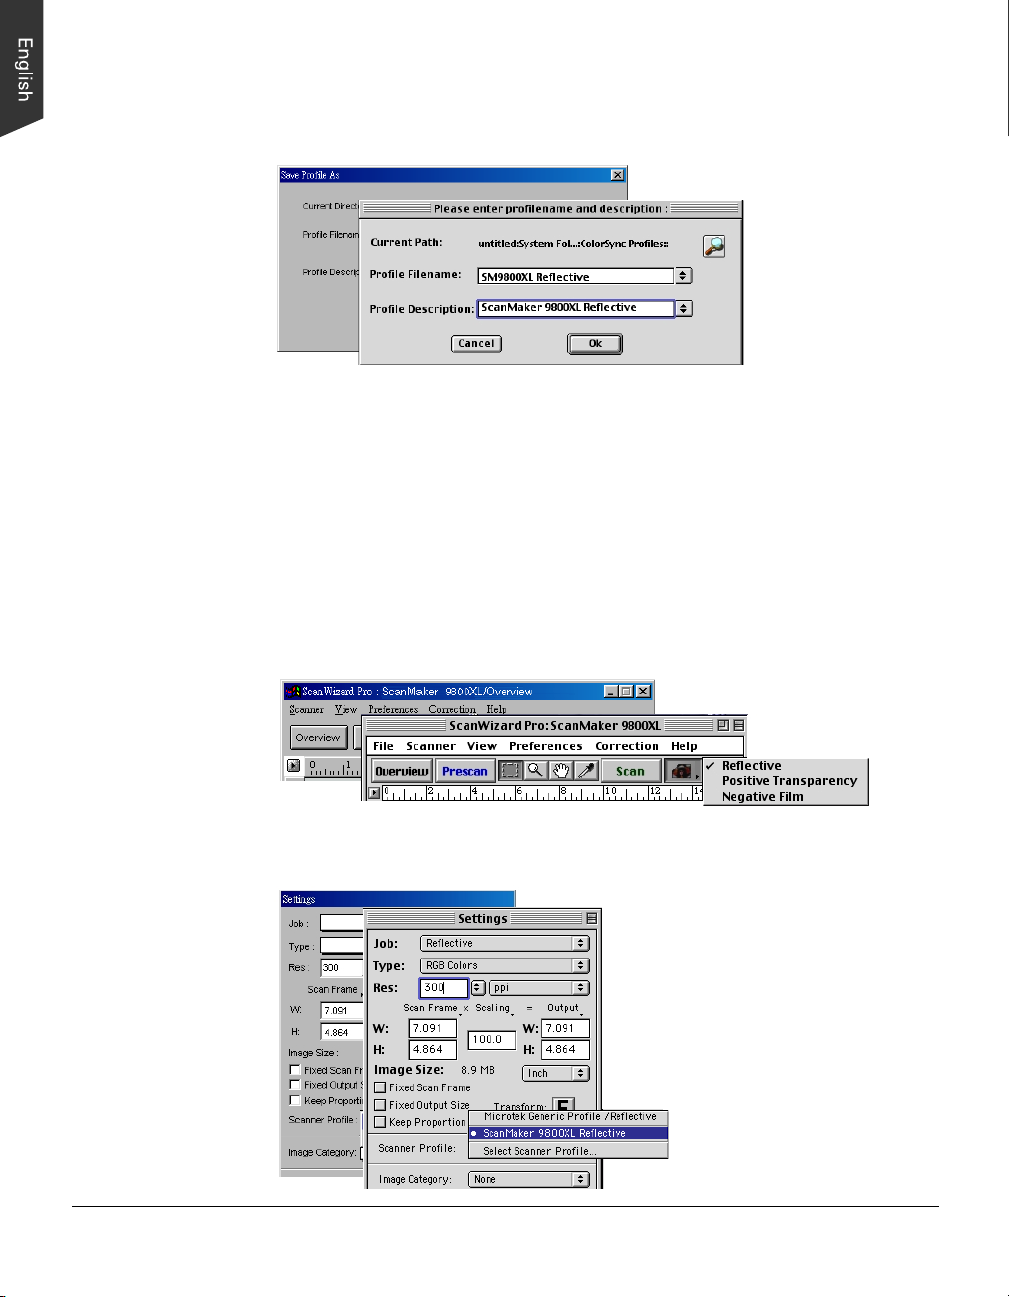
Loading a profile
Once the profile has been produced, follow the steps below to load the profile you
just created.
1. Launch ScanWizard Pro .
2. From the Preview window , click the Scan Material icon, and select the
“Reflective” icon.
3. From the Settings window, click on the Scanner Profile list box and select the
profile you have just created.
18 ScanMaker 9800XL Installing and Getting Started
Page 19

Specifications
Scanning Modes Color, grayscale, and black & white in a single
scanning pass
48-bit color input and output
(approx. 281 billion colors)
16-bit grayscale
(approx. 65,536 shades of gray)
Scanning area Reflective: 12" x 17" (305 x 431.8 mm)
Resolution Optical: 1600 dpi x 3200 dpi
Interpolated: 12800 dpi x 12800 dpi
Dimensions (L x W x H) 24.7" x 14.8" x 5.1" (627.38 x 375.92 x 129.54 mm)
Weight 26.4 lbs (12 kg)
Voltage AC 100V to 240V, 47-63 Hz
Environment Operating temperature: 50° to 104°F (10° to 40°C)
Relative humidity: 20% to 85%
Additional Documentation in the CD-ROM
Additional documentation is provided in the Microtek CD-ROM that contains
ScanWizard Pro, Scanner ICC Profiler, troubleshooting, etc. If you encounter
problems with hardware or software, you can open the file that you wish to view with
Acrobat Reader or your browser, then read or print the information.
ScanMaker 9800XL Installing and Getting Started 19
Page 20

Federal Communications Commission Interference Statement
This equipment has been tested and found to comply with the limits for a Class B digital device, pursuant
to Part 15 of the FCC rules. These limits are designed to provide reasonable protection against harmful
interference in a residential installation. This equipment generates, uses and can radiate radio frequency
energy and, if not installed and used in accordance with the instructions, may cause harmful interference
to radio communications. However, there is no guarantee that interference will not occur in a particular
installation. If this equipment does cause harmful interference to radio or television reception, which can
be determined by turning the equipment off and on, the user is encouraged to try to correct the
interference by one or more of the following measures:
• Reorient or relocate the receiving antenna.
• Increase the separation between the equipment and receiver.
• Connect the equipment into an outlet on a circuit different from that to which the receiver is
connected.
• Consult the dealer or an experienced radio/TV technician for help.
FCC Caution: To assure continued compliance, (example - use only shielded interface cables when
connecting to computer or peripheral devices). Any changes or modifications not expressly approved by
the party responsible for compliance could void the user’s authority to operate this equipment.
This device complies with Part 15 of the FCC Rules. Operation is subject to the following two conditions:
(1) This device may not cause harmful interference, and (2) this device must accept any interference
received, including interference that may cause undesired operation.
Responsible Party: Loi Han
Telephone No: 1-310-297-5000
3715 Doolittle Drive
Redondo Beach, CA 90278-1226
USA
Trade Name Model Number
ScanMaker 9800XL MRS-3200A3
FOR HOME OR OFFICE USE
Tested to Comply
With FCC Standards
Federal Communications Commission Interference Statement
This equipment (Model: MRS-3200A3) has been tested and found to comply with the limits for a Class B
digital device, pursuant to Part 15 of the FCC Rules. These limits are designed to provide reasonable
protection against harmful interference in a residential installation. This equipment generates, uses and
can radiate radio frequency energy and, if not installed and used in accordance with the instructions, may
cause harmful interference to radio communications. However, there is no guarantee that interference will
not occur in a particular installation. If this equipment does cause harmful interference to radio or
television reception, which can be determined by turning the equipment off and on, the user is
encouraged to try to correct the interference by one or more of the following measures:
• Reorient or relocate the receiving antenna.
• Increase the separation between the equipment and receiver.
• Connect the equipment into an outlet on a circuit different from that to which the receiver is
connected.
• Consult the dealer or an experienced radio/TV technician for help.
Note: A shielded interface cable with ferrite core installed on the scanner connector end must be used
with this equipment.
Caution: Changes or modifications not expressly approved by the manufacturer responsible for
compliance could void the user's authority to operate the equipment.
20 ScanMaker 9800XL Installing and Getting Started
 Loading...