

Page 1
Application Bulletin 318 e
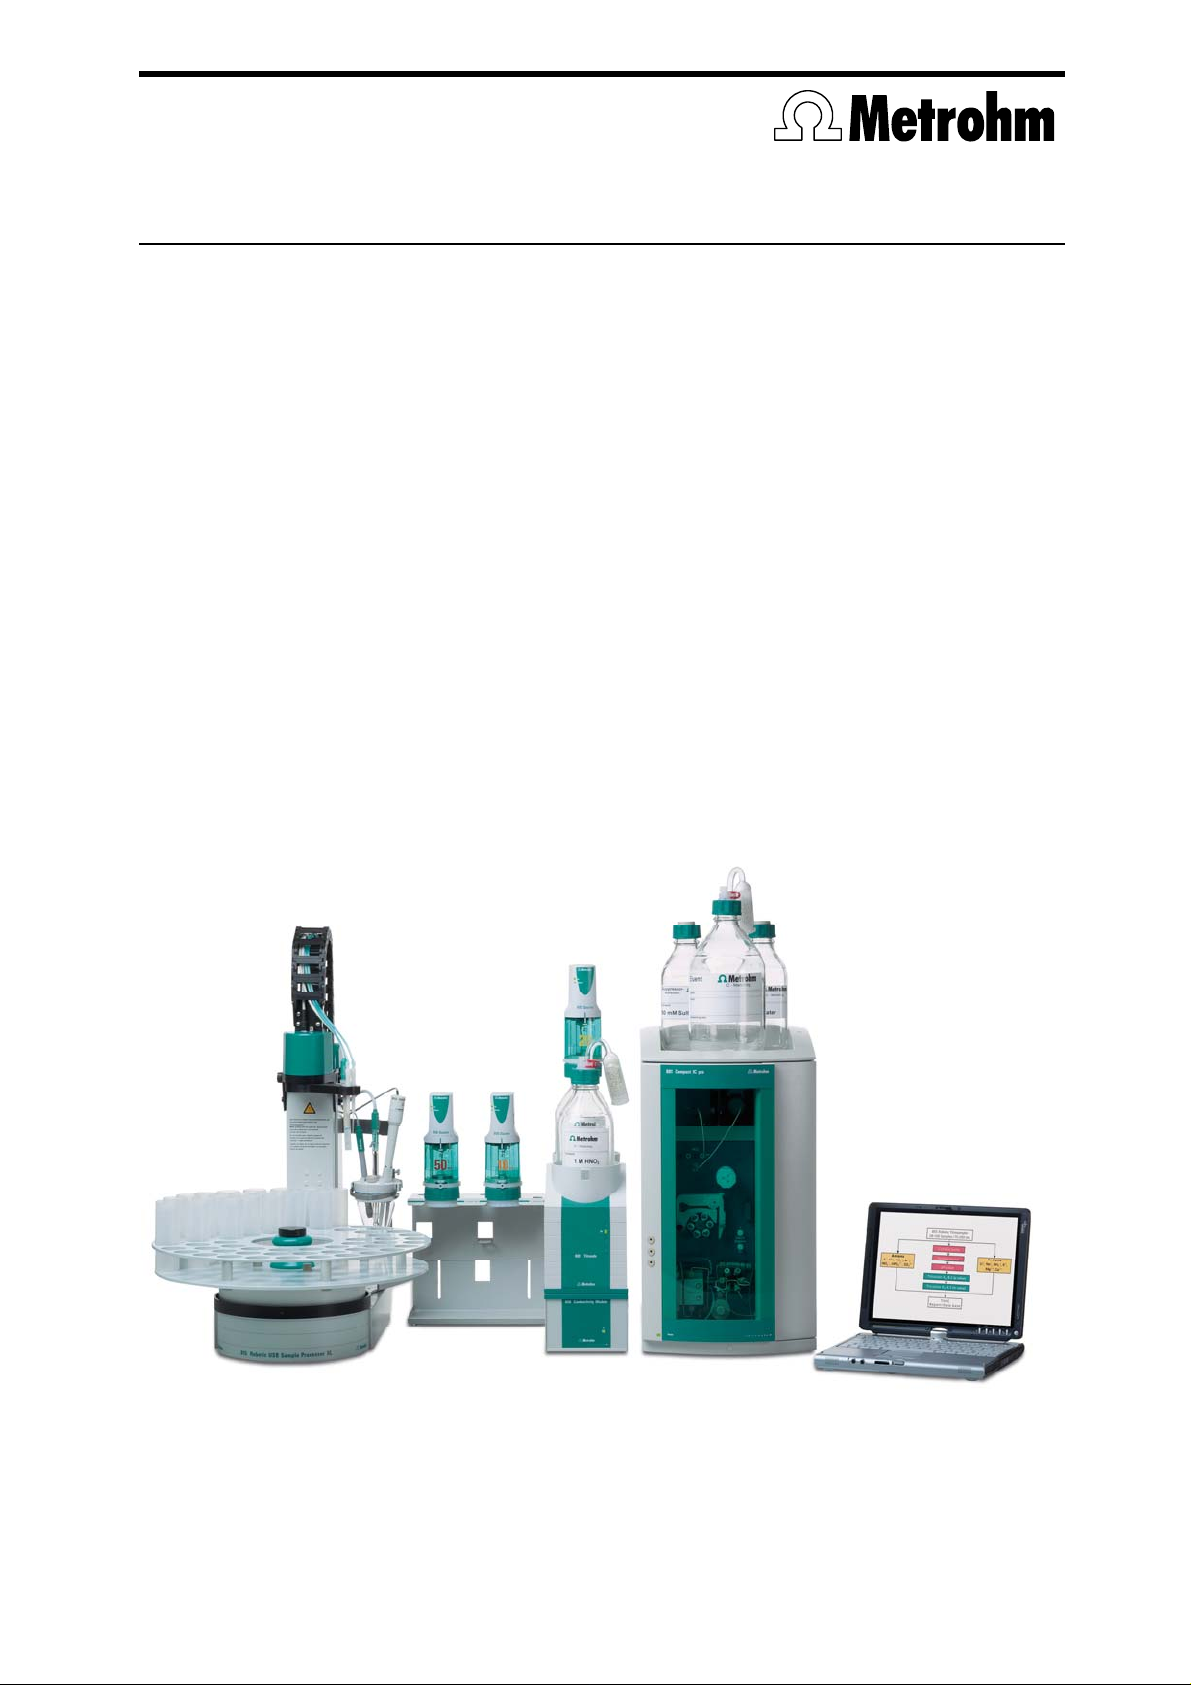
Installation Instructions of TitrIC 4
The TitrIC 4 System is used for the fully automatic analysis of water samples using direct measurement,
titration and ion chromatography. The following parameters are determined in a very short time:
temperature, conductivity, pH, acid capacity, calcium, magnesium, total hardness and, in parallel, the
concentrations of the individual anions. Further Metrohm instruments can be incorporated in the existing
system at any time and used to measure additional parameters.
Analytical sequence
1. Conductivity is measured in the sample vessel on the sample processor.
2. First sample transfer to the 881 Compact IC pro.
3. The IC anion determination is started automatically.
4. Second sample transfer to the external titration cell of the 815 Robotic USB Sample
Processor XL.
5. Temperature, pH and acid capacity (p and m values) calcium, magnesium and total hardness
are determined.
The whole procedure is controlled by the TitrIC software: The user enters the sample position and
sample identification, IC system and tiamo
information to tiamo
automatically generates a joint report containing all results. This report can be printed out or exported
as an Excel file.
TM
TM
and MagIC Net. When the measurement has been concluded, TitrIC
method, after which TitrIC transfers all the relevant
Page 2

Application Bulletin 318 e
Installation Instructions of TitrIC 4
Page 2/16
Table of contents
1 Delivery package.................................................................................................................................. 3
2 Installation ............................................................................................................................................ 5
2.1 815 Robotic USB Sample Processor XL ....................................................................................... 5
2.2 856 Conductometer (2.7856.0010) ............................................................................................... 5
2.3 Titrando (2.905.0020) .................................................................................................................... 5
2.4 Dosino holder (6.2055.100) ........................................................................................................... 5
2.5 Compact IC pro – Anion – MCS (2.881.0030) .............................................................................. 5
3 Cable connections ............................................................................................................................... 6
4 Tubing connections .............................................................................................................................. 7
4.1 External cell ................................................................................................................................... 7
4.2 Installation of the 50 mL Dosing Unit ............................................................................................. 8
4.3 Overview of all the tubing connections .......................................................................................... 9
5 Miscellaneous .................................................................................................................................... 10
5.1 Stirrer ........................................................................................................................................... 10
5.2 Electrodes .................................................................................................................................... 10
6 Software ............................................................................................................................................. 10
6.1 Installation of the software ........................................................................................................... 10
6.2 Configuration of tiamoTM .............................................................................................................. 11
6.2.1 Devices ................................................................................................................................. 11
6.2.2 Swing Head configuration ..................................................................................................... 11
6.2.3 Special beaker definition ....................................................................................................... 11
6.2.4 Lift positions .......................................................................................................................... 11
6.2.5 Solutions ............................................................................................................................... 12
6.2.6 Electrodes ............................................................................................................................. 12
6.2.7 Methods ................................................................................................................................ 12
6.2.8 Configuration of the export template ..................................................................................... 13
6.3 Configuration of MagIC Net ......................................................................................................... 14
6.4 Configuration of TitrIC ................................................................................................................. 16
Page 3

Application Bulletin 318 e
1
Installation Instructions of TitrIC 4
Page 3/16
1 Delivery package
- delivered with TitrIC 4 package:
Number Article no. Article designation
IC
1 2.881.0030 881Compact IC pro – Anion - MCS
Sample processor
1 2.815.0020 815 Robotic USB Sample Processor XL with 2 pumps
1 2.786.0040 Swing Head
1 6.1462.050 Titration head
Conductometry
1 2.856.0010 856 Conductometer
1 6.0915.100 Five-ring conductivity measuring cell, c = 0.7 cm
1 6.2151.000 Cable USB A – mini-DIN 8 pins
Titrations / pH measurement
1 2.905.0020 Titrando (incl. 854 iConnect, 2 meas. interfaces)
1 6.0257.000 Aquatrode; combined pH glass electrode (with temperature measurement)
1 6.0508.110 Polymer membrane electrode Ca
1 6.2151.000 Cable USB A - mini-DIN 8P
1 6.2106.020 Electrode cable with 2 x plug B (4 mm, 1m)
1 6.2104.020 Electrode cable 1 m, F
1 62307100 Pufferlösung pH=4 (500 mL)
1 62307110 Pufferlösung pH=7 (500 mL)
1 62307120 Pufferlösung pH=9 (500 mL)
1 62325000 Phit kit
Liquid Handling
4 2.800.0010 800 Dosino
1 6.3032.250 807 Dosing Unit, glass, 50 mL
2 6.3032.220 807 Dosing Unit, glass, 20 mL
1 6.3032.210 807 Dosing Unit, glass, 10 mL
1 6.2055.100 Dosino holder
3 6.1608.030 Glass bottle GL45 1L (round)
1 6.5620.000 Connecting set for Dosing Unit: Dosino port 4
1 6.2744.080 Coupling M6-UNF 10/32 (Dosing Unit – IC screw)
1 6.2744.070 Pressure screw made of PEEK, short
1 6.1543.080 Aspiration tip 1.5 / 240 mm
External cell
1 2.802.0020 802 Rod Stirrer
1 6.2001.070 Stand support for 804
1 6.1414.060 Titration vessel lid micro
1 6.1415.220 Titration vessel
6 6.2730.030 Stopper with nipple and O-ring
1 6.1543.210 3-way stopper with antidiffusion valve
1 6.2730.080 Screw nipple
1 6.2730.020 Septum stopper
3 6.2730.060 Screw nipple for electrodes
Connection tubings
1 6.1805.060 Connection tubing FEP, L = 60 cm, 2 x M6 thread, i.d. = 2 mm
4 6.1805.030 Connection tubing FEP, L = 150 cm, 2 x M6 thread, i.d.= 2 mm
1 6.1803.020 PTFE capillary, L = 5 m, i.d.= 0.97 mm
Software
1 6.6056.212 TiamoTM 2.1 full
1 6.6059.201 MagIC Net 2.0 Compact CD: 1 Licencse
1 6.6062.000 TitrIC 2.0
-
, with integrated Pt 1000
Page 4

Application Bulletin 318 e
Installation Instructions of TitrIC 4
Page 4/16
- optional accessories:
1 6.2041.xxx Sample rack made of PVC
1 6.1432.xxx Sample beaker made of glass
1 6.1030.xxx Anion column Metrosep A Supp 15
1 6.1030.xxx Guard column Metrosep A Supp 15
1 6.1050.xxx Cation column Metrosep C 4
1 6.1050.xxx Guard column Metrosep C 4
1 6.2323.000 Storage solution
1 6.2308.020 Electrolyte solution (3 mol/L KCl)
1 6.2301.060 Conductivity standard (100 µS/cm)
1 6.2301.060 Conductivity standard (12.88 mS)
1 6.2307.100/110/120 Buffer solutions 500 mL, pH 4 / 7 / 9
1 6.2065.000 Stacking frame for 846 Dosing Interface, 856 Conductivity Module,867 pH Module
Page 5

Application Bulletin 318 e
Installation Instructions of TitrIC 4
Page 5/16
2 Installation
The following is a detailed description of the TitrIC 4 System's installation.
We strongly recommend that the individual steps are carried out in the order given below!
2.1 815 Robotic USB Sample Processor XL
The sample processor is placed at the side at which it is most easily accessible. Please note that the
following procedure refers exclusively to the version in which the sample processor is located at the lefthand side of the system.
On the right-hand side of the 815 Robotic USB Sample Processor XL, attach the stand
support (6.2001.070) without the horizontal brace to the tower of the 815 (hexagon screw
beneath membrane pump 1). The brace will be installed later.
Do not screw the swing arm (6.1462.050) onto the Swing Head!
The Sample Rack supplied is screwed onto the 815.
In the vicinity of the 815 the two canisters (standard equipment of 815) are placed on the floor:
One 10 L canister is used as a waste container, the second as a reservoir for deionized (DI)
water used for rinsing the external cell.
From the smaller opening of the canisters containing DI water, an M8 PTFE tubing connection
of suitable length is led to the connection box made of white plastic of membrane pump 1 and
connected.
From the front opening of the waste canister an M8 PTFE tubing connection of suitable length
is led directly to membrane pump 2 (black plastic) and connected.
A more detailed description is given in the Instructions for Use of the 815 Robotic USB Sample
Processor XL.
2.2 856 Conductometer (2.7856.0010)
The 856 Conductometer is placed directly at the right of the sample processor. For detailed information
about the usage check the Instructions of Use of the 856.
It is recommended to carry out the calibration of the cell constant in tiamo
further information consult the installation instructions of the 856 Conductometer.
TM
before measurements. For
2.3 Titrando (2.905.0020)
Directly to the right of the 856 Conductometer, place the Titrando with the titration solution
(0.05 mol/L EDTA, at the front, with 10 mL Dosing Unit and 800 Dosino) and the auxiliary complexing
solution (0.2 mol/L TRIS / 0.1 M Acetylacetone, at the rear, with 20 mL Dosing Unit and 800 Dosino).
2.4 Dosino holder (6.2055.100)
The Dosino holder (6.2055.100) is placed at the back of the Titrando and the 856 Conductometer; the
50 mL (6.3032.250) Dosing Unit is screwed and the 20 mL (6.3032.220) Dosing Unit is placed with its
0.1 mol/L HCl titration solution onto this holder at a later stage.
2.5 Compact IC pro – Anion – MCS (2.881.0030)
Place the 881 Compact IC pro for anions (2.881.0030) to the right of the bottle holder. The instrument
can already be installed. Please consult the Instructions for Use for the Compact IC pro instrument.
Page 6

Application Bulletin 318 e
Installation Instructions of TitrIC 4
Page 6/16
3 Cable connections
First all the power cables are connected to the instruments. Both the instruments and the PC remain
switched off.
Cable USB A - mini-DIN 8P (6.2151.000) from 856 Conductometer to PC, do not connect!
USB cable (6.2151.020) from Compact IC pro 2.881.0030 IC to PC .
USB cable (6.2151.000) from PC to 905 Controller, do not connect!
MSB cable from Dosino 800, 50 mL (Liquid Handling) to 905 MSB 1, do not connect!
MSB cable from Dosino 800, 20 mL (0.1M HCl) to 905 MSB 2, do not connect!
MSB cable from Dosino 800, 10 mL (EDTA solution) to 905 MSB 3, do not connect!
MSB cable from Dosino 800, 20 mL (Auxiliary complexing solution) to 905 MSB 4, do not
connect!
USB cable (6.2151.000) from controller of 815 to USB of 905.
Page 7

Application Bulletin 318 e
Installation Instructions of TitrIC 4
Page 7/16
4 Tubing connections
4.1 External cell
The numbers given here (
In the next step the external cell is prepared. The following components are inserted in the titration
vessel lid (6.1414.060):
The small 6.2730.030 stoppers (with the black rubber ring) are screwed loosely into openings 1, 2, 3, 5
and 7 and fixed in position when the buret tips, etc. are inserted.
The large 6.2730.080 stopper will be screwed into opening 9, the septum stopper (6.2730.020) without
the upper part into opening 6 and the screw nipples (6.2730.060) into openings 4, 6 and 8.
The titration vessel lid is attached to the stand support (6.2001.070) using opening 10. It is fixed at the
required height with the clamping ring and the horizontal brace of the stand support is mounted on the
815 with the socket head screw.
) and «opening 1,...» refer to the drawing below.
,…
Numbers and connections on the titration vessel lid (6.1414.060)
The M8 PTFE aspiration tip (6.1543.170, supplied with 815) is inserted in opening 1 and
connected to membrane pump 2 of the 815 with the M8-PTFE-tubing (6.1805.510).
The rinsing nozzle (6.2740.020, supplied with 815) is inserted into opening 2, which is
connected to membrane pump 1 of the 815 with the FEP-tubing (6.1805.060, supp. with 815).
The buret tip (6.1543.200, supplied with 807) is inserted through opening 3 and will be
connected to the connection set (6.5620.000, see next page), port 4 of the 50 mL Dosing Unit
(LQH) with the 60 cm FEP-tubing connection (6.1805.060, supplied with 815).
This is where the pH electrode will later be inserted.
The rinsing nozzle (6.2740.020, supplied with 815) is inserted into opening 5, which is
connected to membrane pump 1 of the 815 with the FEP-tubing connection (6.1805.060).
The septum stopper (6.2730.020) (without upper screw and septum) and the screw nipple
(6.2730.070) are pushed/screwed into opening 6. Then the 3-way stopper (6.1543.210) is
inserted. The 3 connectors are connected to port 1 of the three Dosing Units 10 mL (EDTA), 20
mL (Auxiliary complexing solution) and 20 mL (0.1 mol/L HCl) with three 40 cm FEP-tubing
connections (6.1805.100, supplied with 807 Dosing Units).
The rinsing nozzle (6.2740.020, supplied with 815) is inserted into opening 7, which is
connected to membrane pump 1 of the 815 with the FEP-tubing connection (6.1805.060).
This is where the Ca-ISE (6.0508.110) will be inserted.
This is where the 802 Rod Stirrer will be inserted.
Page 8

Application Bulletin 318 e
Installation Instructions of TitrIC 4
Page 8/16
4.2 Installation of the 50 mL Dosing Unit
Luer: Port 4
6.1805.030
6.5620.000
Port 3
6.2744.070
Port 1
M6: Port 2
6.2744.080
6.1803.020
6.1805.110
Connections on the bottoms of the 50 mL Dosing Unit
Port 1 is used for emptying the Dosing Unit into the waste canister.
Port 2 is used by the 50 mL Dosing Unit for aspirating the sample via the titration arm.
Port 3 is used for sample transfer to the IC system. The transition from M6 to the IC screw size
(1/16 in.) is achieved with the 6.2744.080 adapter.
Port 4 is used for the 50 mL Dosing Unit. This requires a coupling between Luer and M6: The
PEEK connection (6.5620.000) is attached to the Luer connection on the bottom of the Dosing
Unit. The 60 cm M6 FEP-tubing can be directly connected to the Luer/M6 adapter to realize
«liquid handling» to the external cell.
Once the tubing connections have been made, the Dosing Units are attached to the Dosino holder
(6.2055.100) with the screw attachment and the distance ring of the Connecting Set for Dosing Unit
(6.5620.000).
Page 9

Application Bulletin 318 e
Installation Instructions of TitrIC 4
Page 9/16
4.3 Overview of all the tubing connections
The three 60-cm-FEP-tubing connections (6.1850.060, supplied with 815) are used to connect
membrane pump 1 of the 815 and the three rinsing nozzles (6.2740.020, supplied with 815) to
openings 2, 5 and 7 of the external cell (see page 7).
The 60-cm-M8-PTFE-tubing connection (6.1805.510, supplied with 815) is used to connect
membrane pump 2 of the 815 and the M8 PTFE aspiration tip (6.1543.170, supplied with 815) to
opening 1 of the external cell (see page 7).
The aspiration tip (6.1543.080) is attached by a stopper (6.2730.030) to the titration head
(6.1462.050).
The 80-cm-FEP-tubing connection (6.1850.110, supplied with 815) is used to connect the
aspiration tip (6.1543.080) at the titration head (6.1462.050) and port 2 of the 50 mL Dosing Unit.
The three 40-cm-FEP-tubing connection (6.1850.100, supplied with 807) are used to connect port
1 of the 10 mL (EDTA) and the two 20 mL Dosing Units (HCl / Auxiliary complexing solution) with
the three connectors of the 3-way stopper at opening 6 of the external cell (see page 7).
The 60-cm-FEP-tubing connection (6.1850.060) is used to connect port 4 of the 50 mL Dosing Unit
and the buret tip (6.1543.200, supplied with 807) in opening 3 of the external cell (see page 7).
A suitable length of the 0.97 mm PTFE capillary (6.1803.020, supplied with 881) is used to connect
port 3 of the 50 mL Dosing Units (using the screws 6.2744.080 and 6.2744.070) and the injection
valve of the 881 Compact IC pro.
The four 150-cm-FEP-tubing connections (6.1805.030) are connected to port 1 of the 50 mL
Dosing Units, as well as port 3 of the two 20 mL and the 10 mL Dosing Units; all four tubing
connections are then connected to the 10 L PE waste canister (6.1621.000).
Page 10

Application Bulletin 318 e
Installation Instructions of TitrIC 4
Page 10/16
5 Miscellaneous
5.1 Stirrer
The 802 Rod Stirrer is inserted through opening 9 of the external cell (see page 7) and connected to the
tower of the 815. The propeller (6.1909.020) is pushed on from below.
Length of the aspiration tips in the external cell
Clamp the titration vessel (6.1415.220) to the titration vessel lid (6.1414.060).
The M8 aspiration tip in opening 1 must reach right to the base of the titration vessel as this is
the only way to ensure that the external cell is cleaned properly.
The buret tips of the 3-way stopper in opening 6 and the buret tip of opening 3 should reach the
middle of the titration vessel. The three tubings of the 3-way stopper have to be mounted with
antidiffusion micro valves to ensure a precise titration.
5.2 Electrodes
The pH electrode (Aquatrode Plus with Pt 1000; 6.0257.000) is inserted into opening 4. The
cable is connected to the Titrando at
opening marked
in the openings marked
Ind.. The red plugs with the adapters 6.2103.140 and 6.2103.130 are inserted
Temp.
Input 2. The plug of the gray cable is connected to the
If the electrode is not used for some time then it should be returned to its holder and kept in the
storage solution (6.2323.000).
The Ca-ISE (Polymer membrane electrode Ca, 6.0508.110) is connected to the electrode cable
(6.2104.020) and inserted into opening 8. The cable is connected to the Titrando at
plug of the gray cable is connected to the opening marked
Ind..
Input 1. The
To have a reference electrode for the Ca-ISE one can short-circuit the reference channel of the
Ca-ISE with the one of the Aquatrode. Thereto connect
Ref. of Input 1 with Ref. of Input 2 with the
electrode cable 2x plug B (6.2106.020).
Conductivity cell (6.0915.100): The measuring cell cable is led through the guide chain of the
815 and the plug is inserted into the opening marked
Cond. Cell of the 856 Conductometer. Later
(as soon as the titration head has been mounted) the measuring cell with the SGJ sleeve
(6.1236.050) will be inserted in the SGJ 14 opening of the titration head.
6 Software
6.1 Installation of the software
tiamoTM 2.1 – installation (tiamoTM CD): All the standard directories proposed by the program
should be accepted.
MagIC Net 2.0 – installation (MagIC Net CD): All the standard directories proposed by the
program should be accepted. Restart windows.
TitrIC 2.0 – installation (TitrIC CD): TitrIC 2.0 must only be installed after tiamo
MagIC Net 2.0 have already been installed. After installation the standard TitrIC directory can
be found under
files\Metrohm\tiamo\bin
Users\ApplicationData\TitrIC.
C:\Program files\ Metrohm\TitrIC, the TitrIC.exe file under C:\Program
. The TitrIC database and reports are found on C:\Documents and Settings\All
TM
2.1 and
Æ All programs should be closed!
Page 11

Application Bulletin 318 e
Installation Instructions of TitrIC 4
Page 11/16
6.2 Configuration of tiamoTM
Æ The controller cable (6.2151.000), which is already connected to the 905, is now connected to an
USB interface on the PC. Wait a few seconds. The driver installation for 905 and 815 follows. It’s not
necessary to start windows update, click on
Æ The controller cable (6.2151.000), which is already connected to the 856 conductivity module, is now
connected to an USB interface on the PC
automatic installation of the software for both.
Æ tiamo
TM
2.1 is started
6.2.1 Devices
Connected USB devices are automatically recognized when tiamoTM is started. After confirmation of the
automatically generated request the devices are stored in the configuration. Keep the proposed device
names.
6.2.2 Swing Head configuration
Under Configuration at the top left, double-click on 815_1 under Devices, click on the entry Tower 1, set the
Axial distance to 196.0 mm and in the middle of the window under Swing Head click on Configuration and Yes
and then enter the following values:
Configuration of the Swing Head for Titration head 6.1462.050
Confirm the entries twice with <
OK> and then mark 815_1 under Devices and click on Edit / Initialize. Wait
until the initialization has been finished. The titration head (6.1462.050) can now be mounted on the
Swing Head.
6.2.3 Special beaker definition
Under Configuration mark 815_1, select Edit / Properties / Rack / Rack data / Special beaker, Special beaker 1, click
Edit and define the position to be used for rinsing as Rack position. The last position on the rack is
on
normally used as the rinsing position. A sample vessel containing DI water should always stand in this
position. Confirm by clicking on
<OK> twice.
6.2.4 Lift positions
Under Configuration / Tools / Manual operation click on 815 Sample Changer / Tower 1 in the left-hand column
and use the entries
values (click on
Shift position for changing the rack position (approx. 53 mm)
Work position for aspirating of the sample (approx. 173 mm)
Special position for dipping for the conductivity measurement (approx. 130 mm)
For the special position, you must define the work position again, then at the right beside
click on
Tower and select Special position 1. Confirm these settings with a click on close.
Move and Assign position (See 815 Instructions for Use, page 47) to define suitable
<Assign> each time) for:
Work position
Page 12

Application Bulletin 318 e
Installation Instructions of TitrIC 4
Page 12/16
6.2.5 Solutions
The solutions to be used must, as usual, be defined in tiamoTM. Connect the Dosino of the 50 mL
Dosing Unit to MSB 1 of the 905, the Dosino of the 20 mL Dosing Unit (HCl) to MSB 2 of the 905, the
Dosino of the 10 mL Dosing Unit (EDTA) to MSB 3 of the 905 and the Dosino of the 20 mL Dosing Unit
(Auxiliary complexing solution) to MSB 4 of the 905. The user is automatically requested to save the
solutions – click on
named as described below.
<Yes>. In order to ensure compatibility with the methods provided, they must be
At the left click on
appropriate (empty) entries and enter the following under
Configuration, then at the top right under Titrants / Solutions double-click on the
Solution name and Concentration:
Configuration table for titrants / solutions
Now the tubing lengths and ports are defined for each Dosing Unit under
Edit / Properties…/ Dosing unit as
follows:
Anion HCl EDTA
Dosing Port Prep/
Empty
Dosing Port 1 Port 4 60 cm Port 1 40 cm Port 1 40 cm Port 1 40 cm
Dosing Port 2 Port 3 0 cm Port 3 0 cm Port 3 0 cm Port 3 0 cm
Fill Port Port 2 80 cm Port 2 25cm Port 2 25 cm Port 2 25 cm
Special Port Port 1 0 cm Port 4 0 cm Port 4 0 cm Port 4 0 cm
Port Length Port Length Port Length Port Length
Special
Port - Dosing Port 1 - Dosing Port 1 - Dosing Port 1 -
Auxiliary complexing sol
Configuration table of the four Dosing Units
6.2.6 Electrodes
pH electrode: Under Configuration/Sensors click on Edit / New / pH electrode and enter under Sensor
name Aquatrode Plus
<Ok>.
Ca-ISE: Under
sensor information (e.g. serial number) and click on
Conductivity sensor: Under
Sensor name Conductivity sensor type in the desired sensor information and click on <Ok>.
, type in the desired sensor information (e.g. serial number) and click on
Configuration/Sensors double click on the entry ISE electrode and type in the desired
<Ok>.
Configuration / Sensors click on Edit / New / other sensor and enter under
6.2.7 Methods
The following methods are provided for tiamoTM:
TitrIC 4 - complete run: With this method all the available parameters are measured and the IC
measurement is initiated.
Page 13

Application Bulletin 318 e
Installation Instructions of TitrIC 4
Page 13/16
TitrIC 4 - preparation of titration equipment: This method is used for preparing all titration instruments,
i.e., rinsing the tubing connections of the Dosing Units with reagents or deionized water and
rinsing the external cell. Start this method only from tiamo
TitrIC 4 - IC calibration: This method is used for calibrating the IC measurement with standard
TM
– not from TitrIC!
solutions without the titration part of a typical TitrIC measurement; this means that a lot of
standard solution can be saved.
TitrIC 4 – semi automated pH calibration: With this method the pH electrode is calibrated semi-
automatically; the buffer solutions are flushed into the titration vessel. Start this method only
from tiamo
TitrIC 4 - pH calibration: Here the Aquatrode is taken out of the titration vessel and placed into the
buffer solutions. Start this method only from tiamo
TitrIC 4 - titer determination of EDTA: This method is used for the titer determination. Start this
method only from tiamo
TitrIC 4 - titer determination of HCl: This method is used for the titer determination. Start this method
only from tiamo
TitrIC Calibrate 856 conductivity module This method is used for calibration of the conductivity
module. Start this method only from tiamo
TM
– not from TitrIC!
TM
TM
!
TM
!
!
TM
!
Import: Click on
following directory on the CD you will find all methods:
Method at the left, then select under File / Method manager… / Edit / Import… in the
\Methods\Titration.
Note!
Alterations of these methods should only be carried out by a person at the administrator level
and who is thoroughly familiar with tiamoTM. Never forget that in TitrIC this new method must
be selected in the sample table under Methods tiamo.
6.2.8 Configuration of the export template
Export template: tiamoTM must transfer its results to TitrIC in a particular way, which means that the
export template must be generated exactly in the following form:
Under
The target directory for the report is as following:
Windows 2000, Windows XP:
Vista, Windows 7:
In Windows Vista and Windows 7 hidden folders need to be made visible in the explorer to get access.
Then click on
Database / Tools/ Templates / Export templates / New enter the following:
Configuration of the export template in TitrIC
C:\Dokumente und Einstellungen\All Users\Application Data\Titric\reports
C:\ProgramData\Titric\reports
Select fields and enter the following:
Page 14

Application Bulletin 318 e
Installation Instructions of TitrIC 4
Page 14/16
Input window for the export template
The entry
ID1.value are obtained at the left by clicking on Sample / Identifications, RS0x by clicking on Results / RS0xxx.
Start counter is obtained at the left by clicking on Determination / Identification, ID1.Name and
By clicking on the upper double arrow in the center, the entries can be moved to the right. Of course
another number of results than nine is possible.
Æ Shut down tiamoTM 2.1 !
6.3 Configuration of MagIC Net
Æ Start MagIC Net 2.0
Configuration of the export template
Export template: MagIC Net must transfer its results to TitrIC in a particular way, which means that the
export template must be generated exactly in the following form:
Under
Database / Tools / Templates / Export templates / New enter the following:
Configuration of the export template in MagIC Net
Page 15

Application Bulletin 318 e
Installation Instructions of TitrIC 4
Page 15/16
The target directory for the report is as following:
Windows 2000, Windows XP:
Vista, Windows 7:
C:\Dokumente und Einstellungen\All Users\Application Data\Titric\reports
C:\ProgramData\Titric\reports
In Windows Vista and Windows 7 hidden folders need to be made visible in the explorer to get access.
Then click on
Select fields and enter the following:
Input window for the export template
The entry
the left by clicking on
obtained at the left by clicking on
Start counter is obtained at the left by clicking on Determination/Identification, Info 1 is obtained at
Sample / Identifications and Ident by clicking on Sample / Sample Data. Results are
Results. By clicking on the upper double arrow in the center, the entries
can be moved to the right. Of course another number of results is possible.
On the CD under
\Methods\IC the TitrIC software contains predefined IC methods. Import the
TitrIC 4 method into MagIC Net. Herefore, go to the Method section on the left and follow the
path File/Method manager to choose Edit and Import.
The suppressor step is not made at the start of the measurement in the usual way, but with
<Fill> directly after the end of the chromatogram. This means that after long pauses between
measurements the suppression may no longer function. This is why after longer pauses you
should carry out a suppressor step manually and ensure that the injection valve is in the <Fill>
position.
Depending on the application and column it may be necessary to adapt the time program in the
IC system: <Inject> should always be carried out right at the start of the time program, <Fill>
right at the end. In this way you can start to measure with a stable baseline immediately after
the sample loop has been filled by the Dosinos.
If a calibration is carried out later and the new calibration data are to be applied to a sample that
has already been measured, then please refer to the online help of the TitrIC software under
Database / Recalculate / Recalculate for the results of several samples.
Æ Shut down MagIC Net 2.0
Page 16

Application Bulletin 318 e
Installation Instructions of TitrIC 4
Page 16/16
6.4 Configuration of TitrIC
Æ TitrIC is started (MagIC Net and tiamoTM are started automatically after each other)
All paths have already been entered as defaults and the system is ready for work. If other paths
are used instead of the default paths, then this must be altered in the corresponding dialog
Workplace / Settings / ….
under
TitrIC starts MagIC Net first and after the tiamo
If TitrIC is shut down then tiamo
TM
and MagIC Net will also be shut down. MagIC Net will ask
you if you want to shut down all devices. Always shut down TitrIC as the first program!
TM
software is started.
For further information please consult the TitrIC online help (
Metrohm agency. You can also report your problems to the following support email:
titric@metrohm.com.
Always start and shut down TitrIC first!
? / Show Help) or contact your local
 Loading...