

Page 1
Spectrosense
Manual
8.109.1498ML
Page 2

Page 3

CH-9101 Herisau/Switzerland
E-Mail info@metrohm.com
Internet www.metrohm.com
Gebrauchsanweisung – Deutsch .............................. 1
Instructions for Use – English................................. 23
Spectrosense
Mode d'emploi – Français........................................ 45
Instrucciones para el uso – Español ...................... 67
8.109.1498 08.2005 / ars
Page 4

Page 5

Inhalt
Inhalt
1 Einleitung ..............................................................2
1.1 Übersicht................................................................................... 3
2 Arbeiten mit der Spectrosense.............................4
2.1 Inbetriebnahme ........................................................................4
2.2 Praktische Tipps....................................................................... 6
3 Auswertung photometrischer Titrationen............7
4 Pflege und Wartung...............................................8
4.1 Aufbewahrung ..........................................................................8
4.2 Troubleshooting .......................................................................8
5 Anhang.................................................................10
5.1 Technische Daten................................................................... 10
5.2 Spannungs-Abgleich.............................................................. 13
5.3 Lieferumfang........................................................................... 17
5.4 Optionales Zubehör................................................................ 19
5.5 Gewährleistung und Konformität........................................... 20
Spectrosense, Gebrauchsanweisung 1
Page 6

1 Einleitung
1 Einleitung
Die Titration mit photometrischer Endpunktserkennung ist ein integraler Bestandteil vieler offizieller und normierter Titrationsmethoden. Sie wird vor allem überall dort eingesetzt, wo
• eine potentiometrische Endpunktsbestimmung nicht möglich ist
• keine geeigneten potentiometrischen Elektroden zur Verfügung stehen
• das Ausgangssignal der Elektrode durch Matrixeffekte der Probe ver-
fälscht wird
• eine Konventionsmethode die photometrische Indikation vorschreibt
• die Preisvorteile der Titration gegenüber aufwendigeren Verfahren ge-
nutzt werden
• auf die einfache und schnelle Durchführung der Messungen Wert gelegt wird.
Die Spectrosense eignet sich für alle photometrischen Titrationen. Sie ist in
folgenden Varianten erhältlich:
• 6.5501.100 Spectrosense 523 nm zu Titrino
• 6.5501.110 Spectrosense 610 nm zu Titrino
• 6.5501.200 Spectrosense 523 nm zu Titrando
• 6.5501.210 Spectrosense 610 nm zu Titrando
2 Spectrosense, Gebrauchsanweisung
Page 7
1 Einleitung
1.1 Übersicht
1
2
3
4
5
6
7
8
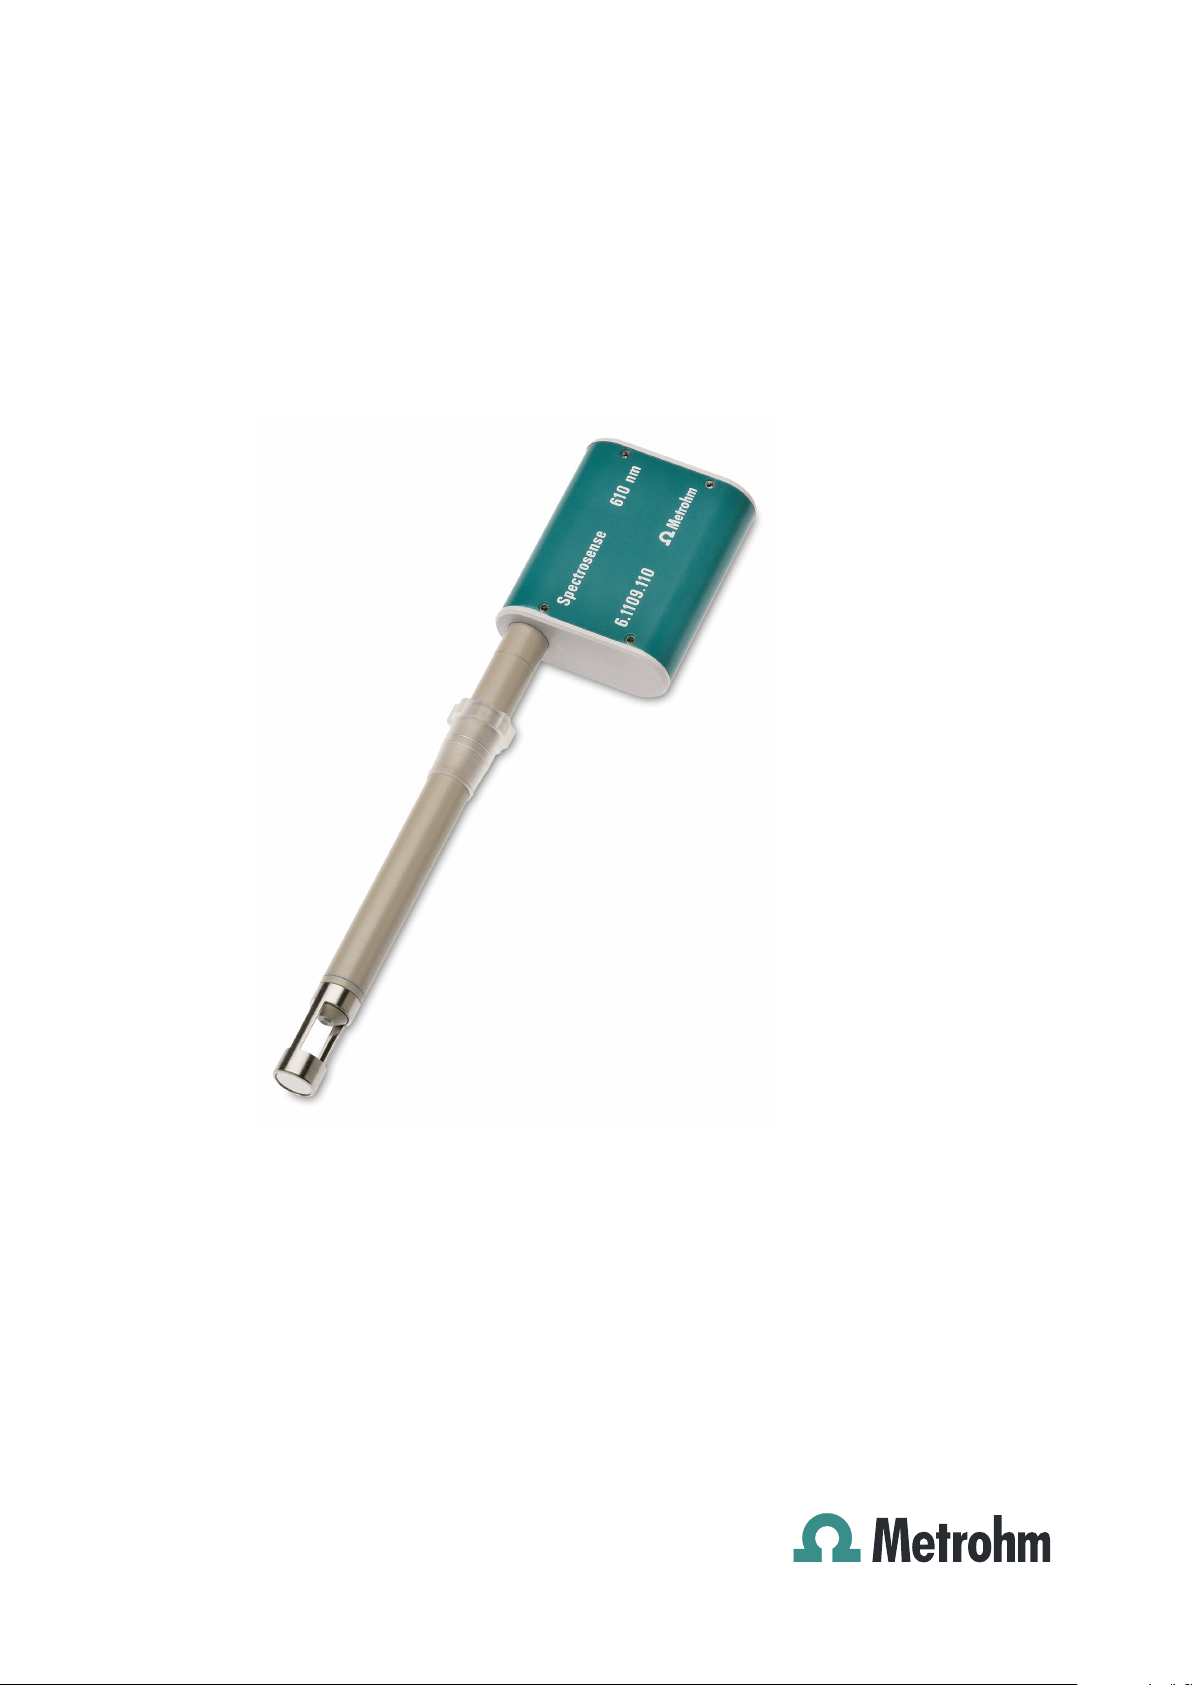
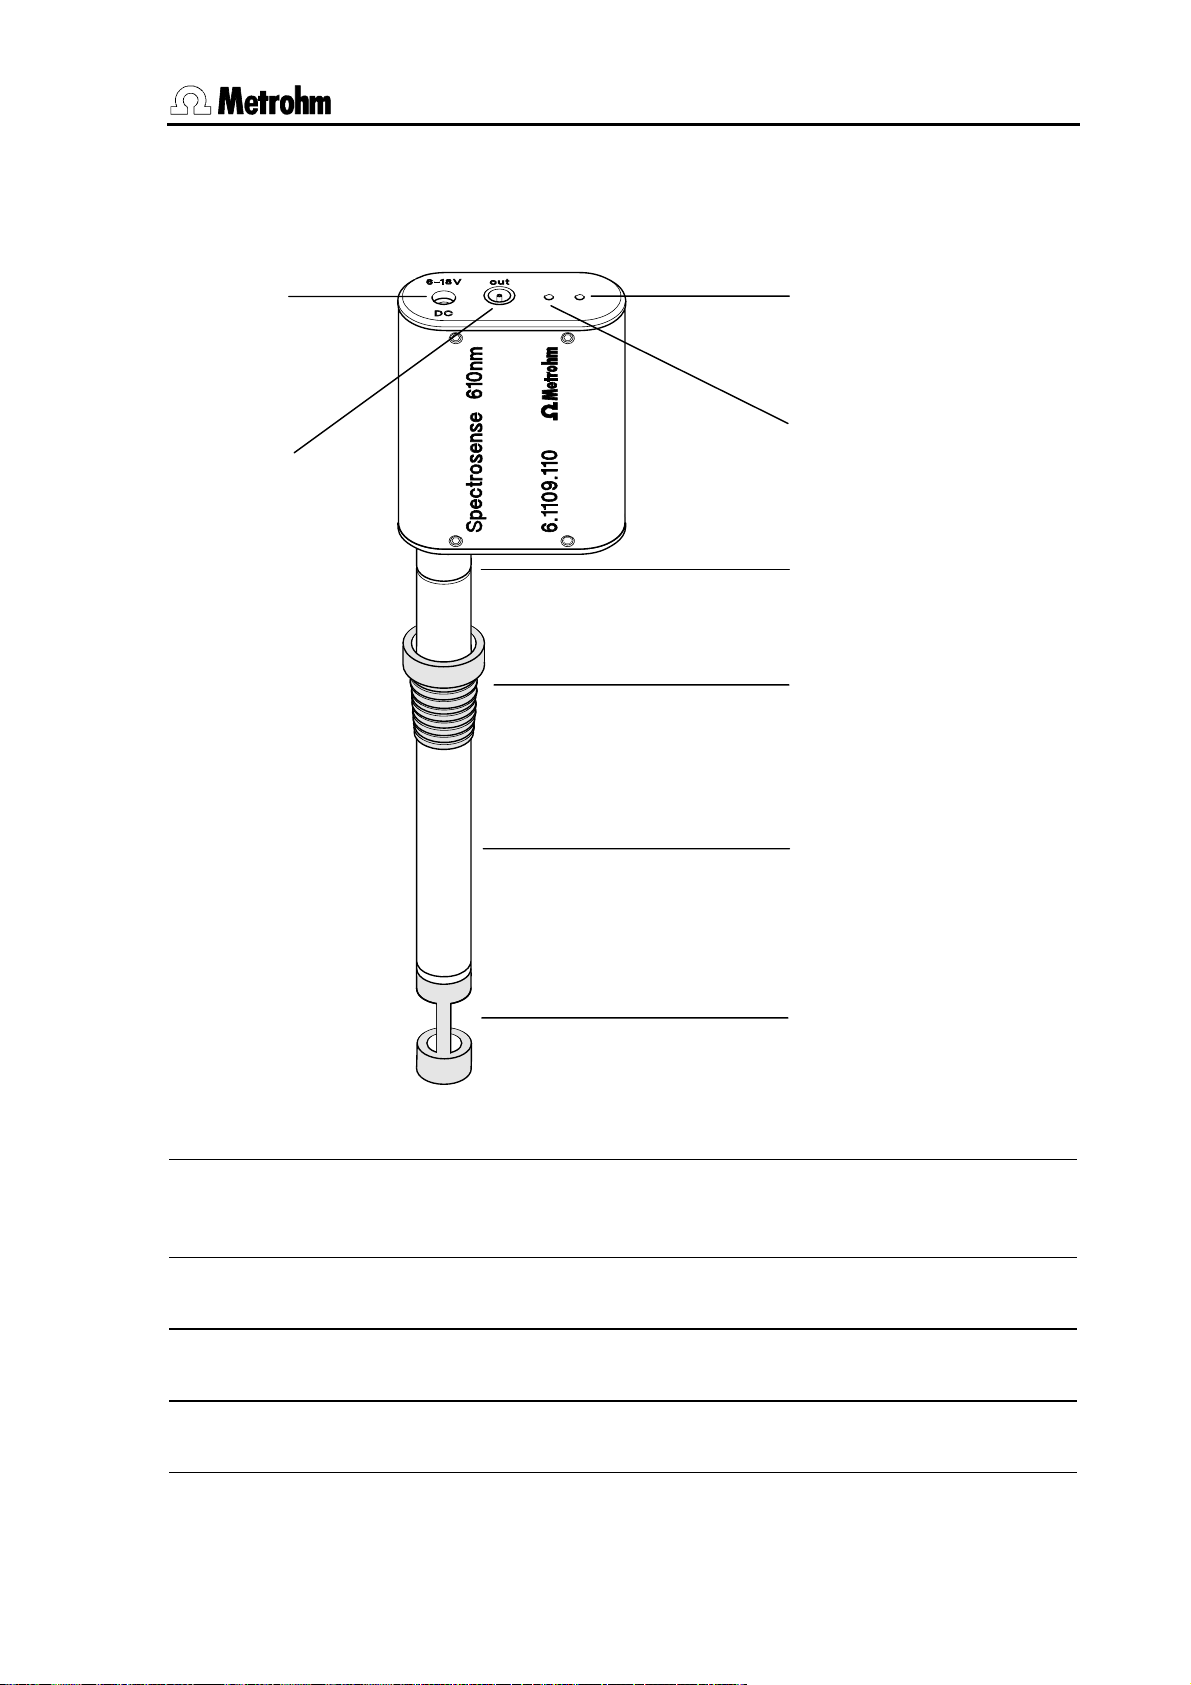
Abb. 1 Spectrosense 610 nm
1 Stromanschluss 5 obere Rille zur Positionierung der
Schliffhülse für Probenwechsleranwendungen
2 Messausgang 'out' 6 Schliffhülse 6.1236.020 zur Fixierung
der Spectrosense am Elektrodenhalter
3 Einsteller für Hellspannung
(siehe Kap. 5.2)
4 Einsteller für Dunkelspannung
(siehe Kap. 5.2)
Spectrosense, Gebrauchsanweisung 3
7 Elektrodenschaft
8 Spiegel 6.1250.010
Page 8
2 Arbeiten mit der Spectrosense
2 Arbeiten mit der Spectrosense
2.1 Inbetriebnahme
1 Schliffhülse anbringen
Stecken Sie die Schliffhülse (6) über den Elektrodenschaft (7), bis
sie in der unteren Rille einrastet. Die Schliffhülse lässt sich leichter
über den Schaft ziehen, wenn Sie den O-Ring vorher befeuchten. Für
Probenwechsleranwendungen kann die Schliffhülse bis zur oberen
Rille geschoben werden. Der Schaft ragt dann weiter in das Titriergefäss hinein.
2 Spiegel montieren
Schrauben Sie den beiliegenden Spiegel (8) an das Ende des
Elektrodenschafts (7).
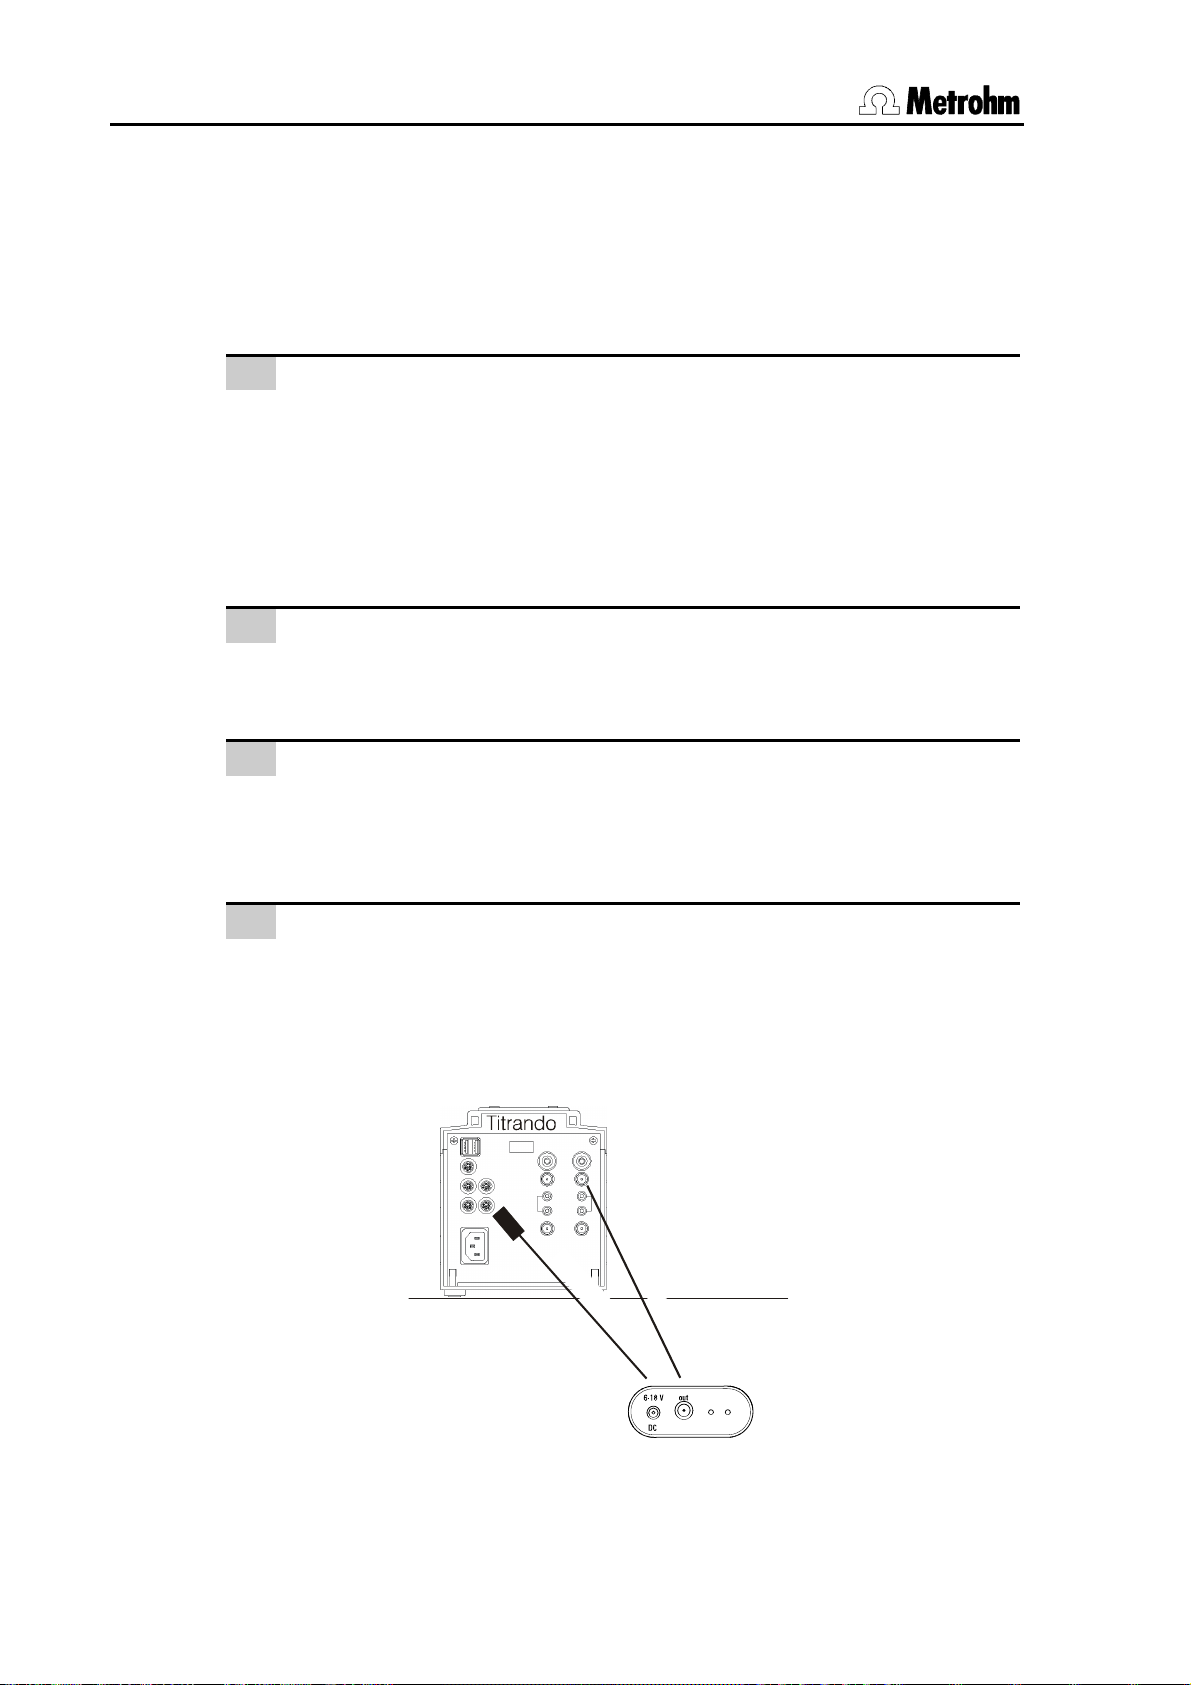
3 Spectrosense mit Titriergerät verbinden
Verbinden Sie den Messausgang 'out' (2) mittels mitgeliefertem
Elektrodenkabel 6.2116.020 mit dem Messeingang 'Ind.' Ihres
Titrinos oder Titrandos.
4 Stromanschluss
• Stromversorgung via Titrando
Verbinden Sie den Stromanschluss (1) der Spectrosense mit
einer MSB-Schnittstelle Ihres Titrandos. Verwenden Sie dazu
das mitgelieferte Kabel 6.2151.070.
6
.
2
1
1
6
.
2
1
6
.
0
5
2
1
0
.
0
7
0
21
Spectrosense
Abb. 2 Titrando – Spectrosense
4 Spectrosense, Gebrauchsanweisung
Page 9
2 Arbeiten mit der Spectrosense
• Stromversorgung via Titrino
Verbinden Sie den Stromanschluss (1) der Spectrosense mit der
Rührerschnittstelle ( ) Ihres Titrinos. Verwenden Sie dazu das
mitgelieferte Kabel 6.2108.130. Der Rührer kann an die zusätzli-
che Buchse dieses Kabels angeschlossen werden:
Titrino
0
3
1
.
8
0
1
2
.
6
Rührer
1
6.2116.020
2
Spectrosense
Abb. 3 Titrino – Spectrosense
• Stromversorgung mit separatem Netzgerät
Wenn Sie die Spectrosense am Titrino mit einem separaten Netzgerät speisen wollen, können Sie dazu das Metrohm-Netzgerät
6.2117.020 (EU) bzw. 6.2119.020 (USA) verwenden.
Netzgerät
6.2108.130
Titrino
6.2116.020
Rührer
21
2. Rührer
Spectrosense
Abb. 4 Titrino – Spectrosense, mit separatem Netzgerät
Spectrosense, Gebrauchsanweisung 5
Page 10
2 Arbeiten mit der Spectrosense
2.2 Praktische Tipps
• Der letzte Wassertropfen, der auf dem Spiegel liegt, fliesst ab, wenn
man die Spectrosense an die Wand des Titriergefässes hält.
• Wahl der Wellenlänge: Die Wellenlänge sollte so gewählt werden, dass
zu Beginn der Titration wenig und am Schluss stark absorbiert wird.
Folgende Wellenlängen stehen zur Verfügung: 523 nm (blaugrün),
610 nm (orange)
• Achten Sie darauf, dass sich auf dem Spiegel und im optischen Pfad
keine Luftblasen befinden.
Achtung!
Beachten Sie, dass der Lichtleiter der Spectrosense aus PMMA
besteht und deshalb gegen einige Lösungsmittel nicht beständig
ist!
Vermeiden Sie möglichst den Kontakt des Lichtleiters mit folgenden
Lösungsmitteln: Aldehyde, Alkohole, Amine, Basen/Laugen, Ester,
Ether, Glykole, Ketone, Kohlenwasserstoff (aliphatisch, aromatisch,
halogeniert), Mineralöle, Oxidationsmittel (stark), Pflanzenöle,
Säuren anorganisch.
6 Spectrosense, Gebrauchsanweisung
Page 11
3 Auswertung photometrischer Titrationen
3 Auswertung photometrischer
Titrationen
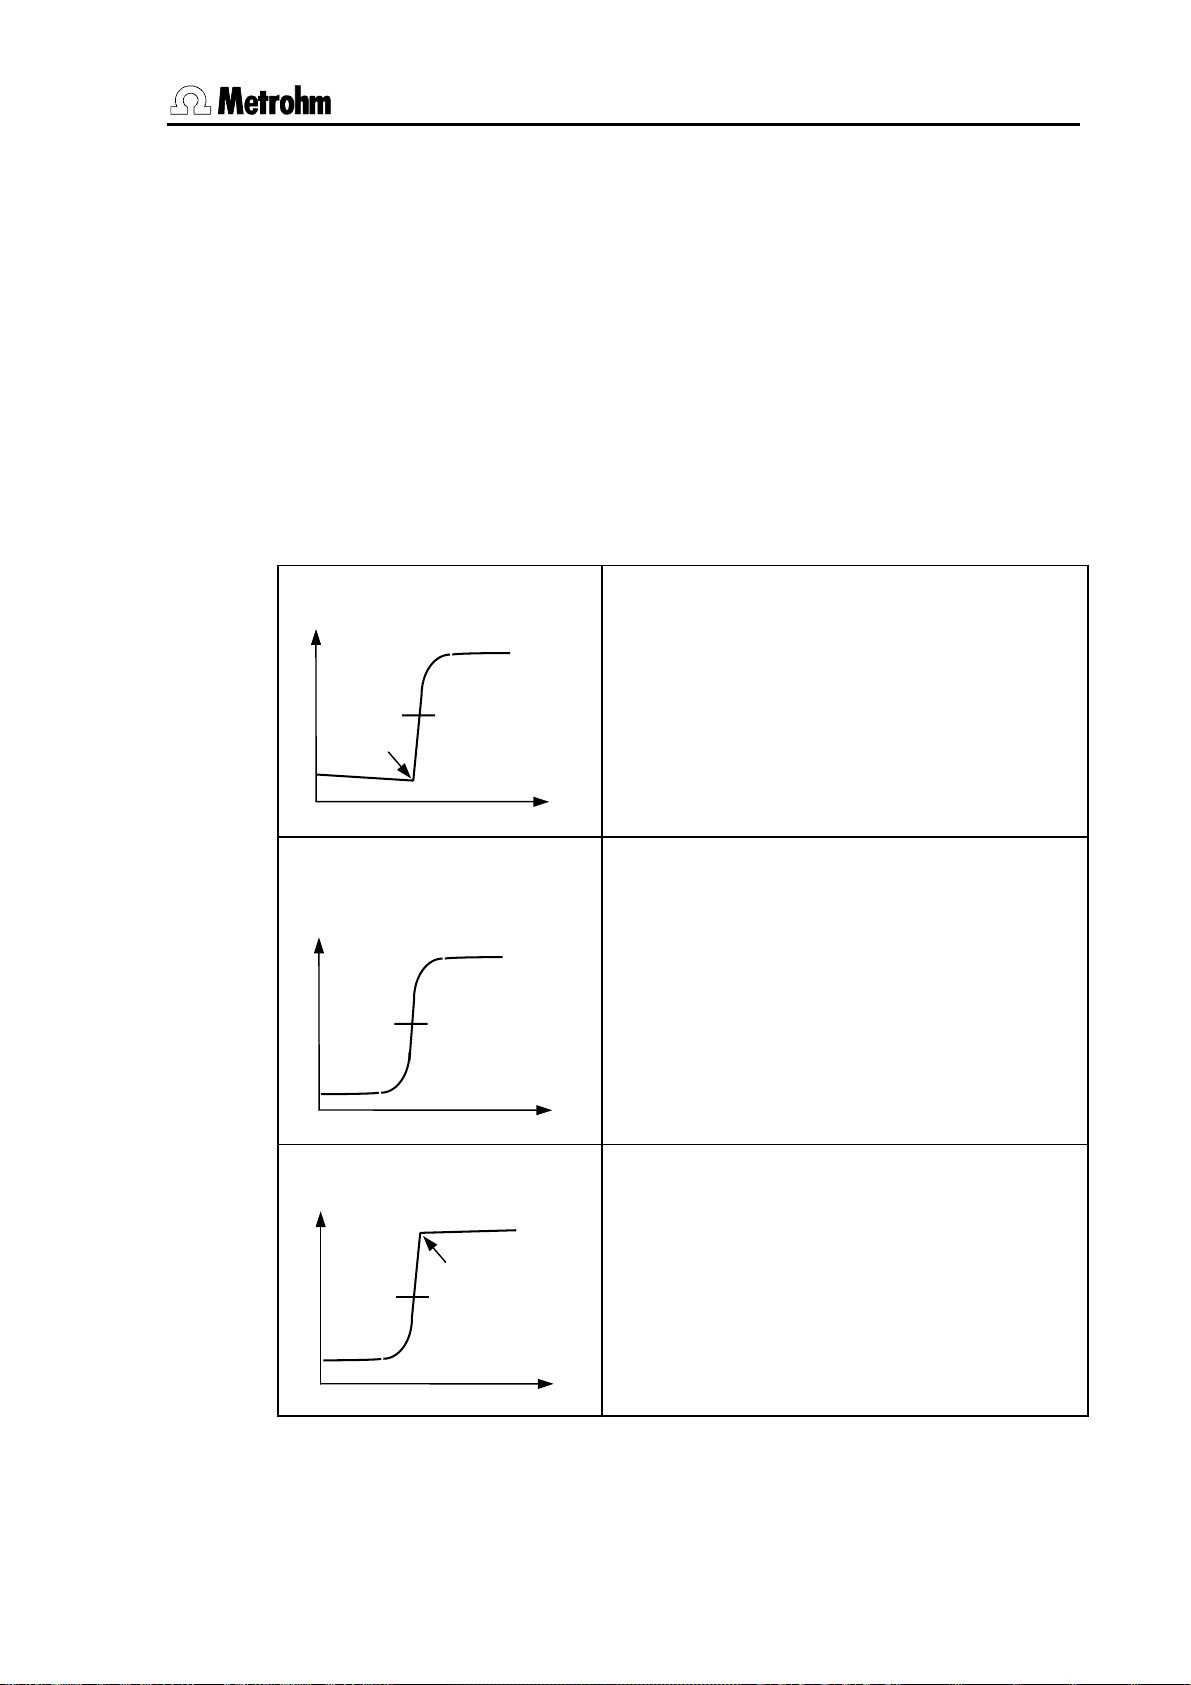
Die Titrationskurven von photometrischen Titrationen können sehr verschiedene Formen haben. Die Form der Kurve und damit auch deren
Auswertung hängen von verschiedenen Faktoren ab:
• Art der Indikation: Selbstindizierende Titrationsreaktion oder Indikation mit zugesetztem Indikator
• Absorptions- oder Transmissionskurve
U/mV
U/mV
U/mV
EP
IP
V/ml
IP=EP
EP
IP
V/ml
Der Indikator wechselt die Farbe, nachdem
der Endpunkt (EP) der Titrationsreaktion
erreicht wurde.
IP: Umschlagpunkt des Indikators.
Auswertung: Schnittpunkt der Tangenten
Der Indikator wechselt die Farbe in der
Region des Wendepunktes der Titration.
IP: Umschlagpunkt des Indikators.
Dies gilt auch für die meisten selbstindizierenden Titrationen.
Auswertung: Potentiometrische Wendepunkt-Auswertung.
Der Indikator wechselt die Farbe, bevor der
Endpunkt (EP) der Titrationsreaktion
erreicht wurde.
IP: Umschlagpunkt des Indikators.
V/ml
Spectrosense, Gebrauchsanweisung 7
Auswertung: Schnittpunkt der Tangenten.
Page 12

4 Pflege und Wartung
4 Pflege und Wartung
4.1 Aufbewahrung
• Zwischen den einzelnen Titrationen sollten Sie die Spectrosense jeweils mit dest. Wasser spülen.
• Zum Aufbewahren wird die Spectrosense mit dest. Wasser gespült
und anschliessend getrocknet.
• Zum Abreiben der Spiegelfläche sollten Sie nur weiche Reinigungstücher verwenden. Achten Sie darauf, dass sich auf dem Spiegel keine
Fremdkörper befinden. Das Spiegelglas könnte sonst zerkratzt werden.
4.2 Troubleshooting
Problem Massnahmen
Die Spectrosense liefert kein
Ausgangssignal.
Das Ausgangssignal ist stark
verrauscht oder
instabil.
• Verbinden Sie die Spectrosense mit dem MSBAnschluss des Titrandos bzw. mit dem Rühreranschluss des Titrinos.
• Verbinden Sie die Spectrosense mit dem Messeingang 'Ind.' des Titrandos oder Titrinos.
• Nehmen Sie die Spectrosense aus der Lösung
und überprüfen Sie, ob an der Spitze Licht zu sehen ist. Wenn nicht, muss die Spectrosense ersetzt werden. Ein Wechsel der LED ist nicht möglich.
• Prüfen Sie, ob der Spiegel korrekt auf den Schaft
aufgeschraubt ist.
• Prüfen Sie, ob sich keine Fremdkörper oder
Luftblasen im optischen Pfad befinden.
• Prüfen Sie, ob die Verbindung zur Stromversorgung hergestellt ist. Die Steckverbindung sollte
nicht auf Zug beansprucht sein.
8 Spectrosense, Gebrauchsanweisung
Page 13

4 Pflege und Wartung
Das Ausgangssignal ist zu
schwach.
Das Ausgangssignal ist zu
stark.
(> 1200 mV)
• Prüfen Sie, ob der Spiegel korrekt auf den Schaft
aufgeschraubt ist.
• Prüfen Sie, ob sich keine Fremdkörper oder
Luftblasen im optischen Pfad befinden.
• Prüfen Sie die Oberfläche des Spiegels. Wenn
diese Oberfläche zerkratzt ist, muss der Spiegel
ersetzt werden; Bestellnummer 6.1250.010.
• Eventuell muss ein Spannungsabgleich an der
Spectrosense durchgeführt werden, siehe dazu
Kap. 5.2.
• Eventuell muss ein Spannungsabgleich an der
Spectrosense durchgeführt werden, siehe dazu
Kap. 5.2.
Spectrosense, Gebrauchsanweisung 9
Page 14

5 Anhang
5 Anhang
5.1 Technische Daten
Falls nicht ausdrücklich anders erwähnt, gelten die technischen Daten sowohl für die Spectrosense 523 nm (6.1109.100) als auch für Spectrosense
610 nm (6.1109.110).
5.1.1 Abmessungen und Material
Gehäuse
Breite 50.3 mm
Höhe 63 mm (ohne Schaft und Kabel)
Tiefe 20.3 mm
Gewicht 120 g
Material Aluminium
Schaft
Durchmesser 12 mm
Länge ohne Spiegel 129.1 mm
Gesamtlänge 145 mm
Material Schaft PEEK
Material Spiegelfassung Edelstahl
Material Lichtleiter PMMA
5.1.2 Messbereich
Photometrisch 50...1000 mV
Dunkelspannung max. 50 mV
Hellspannung max. 1200 mV (in dest. Wasser), Wert nicht überschreiten!
5.1.3 Fremdlichtdämpfung
Unterhalb 400 Hz > 60 dB
Oberhalb 2 kHz >= 40 dB / Dekade
5.1.4 Wellenlänge
6.1109.100 523 nm, grün-blau
6.1109.110 610 nm, orange
10 Spectrosense, Gebrauchsanweisung
Page 15

5 Anhang
5.1.5 Modulationsfrequenz
1 kHz
5.1.6 Lichtweg
22 mm
5.1.7 Signal-Grundfrequenz
12 Hz
5.1.8 Sicherheitsspezifikationen
Konstruktion und
Prüfung
Sicherheitshinweise Die Gebrauchsanweisung enthält Sicherheitshinweise, die
Gemäss EN/IEC/UL 61010-1, CSA-C22.2 No. 61010-1,
Schutzgrad IP40, Schutzklasse III
vom Benutzer befolgt werden müssen, um den sicheren
Betrieb des Gerätes zu gewährleisten.
5.1.9 Elektromagnetische Verträglichkeit (EMV)
Störaussendung EN/IEC 61326, EN 55022 / CISPR 22
Störfestigkeit Erfüllte Normen:
- EN/IEC 61326
- EN/IEC 61000-4-2
- EN/IEC 61000-4-3
- EN/IEC 61000-4-4
- EN/IEC 61000-4-5
- EN/IEC 61000-4-6
- EN/IEC 61000-4-11
- EN/IEC 61000-4-14
- NAMUR
5.1.10 Umgebungsbedingungen
Gehäuse 0...45 °C
Spiegel / Schaft 0...80 °C
Relative Feuchtigkeit < 80 %
pH-Bereich 0...14
5.1.11 Stromversorgung
Spannung 7...18 V DC
Strom max. 20 mA DC
Spectrosense, Gebrauchsanweisung 11
Page 16

5 Anhang
5.1.12 Referenzbedingungen
Umgebungstemperatur + 25 °C (± 3 °C)
Relative Feuchtigkeit <= 80 %
Betriebswarmer
Zustand
Abgleichintervall nicht definiert
Elektrode mindestens 3 min in Betrieb
12 Spectrosense, Gebrauchsanweisung
Page 17

5 Anhang
5.2 Spannungsabgleich
Ein Spannungsabgleich ist dann notwendig, wenn Sie entweder ein zu starkes (> 1200 mV) oder ein zu schwaches Ausgangssignal bei Messungen
mit der Spectrosense erhalten.
Für den Abgleich benötigen Sie folgende Ausrüstung:
• Uhrmacher-Schraubendreher, z.B. 1.5 x 0.2 mm
• Becherglas mit dest. Wasser
• Titrando oder Titrino mit angeschlossener Spectrosense (siehe dazu
auch Kap. 2.1).
Gehen Sie nun wie folgt vor:
• Titriergerät vorbereiten: siehe Kapitel 5.2.1
• Spectrosense abgleichen: siehe Kapitel 5.2.2
5.2.1 Titriergerät vorbereiten
Der Abgleich der Spectrosense wird mit dem Titrino und Titrando unterschiedlich durchgeführt.
Titrando mit PC Control oder Touch Control
Schliessen Sie die Spectrosense an den Titrando an (siehe Kap. 2.1) und
starten Sie die PC Control Software oder schalten Sie den Touch Control ein.
• Spectrosense in Sensorliste einfügen
Falls die Spectrosense noch nicht in die Sensorliste eingetragen wurde, können Sie dies nun unter System / Sensoren tun.
Wählen Sie [Neu] und dann [Anderer Sensor]. Im angezeigten Dialogfenster können Sie einen Namen für den Sensor eintragen und
den Messeingang wählen. Kehren Sie mit [Home] zum Hauptdialog
zurück.
• Manuelle Bedienung öffnen
Öffnen Sie mit [Manual] die Manuelle Bedienung und wählen Sie
[Messen]. Wählen Sie im angezeigten Dialogfenster unter Sensor die
vorher zur Sensorliste hinzugefügte Spectrosense und wählen Sie den
entsprechenden Messeingang. Mit [Start] wird die Messung begonnen und der aktuelle Messwert angezeigt. Mit [Stopp] kann die Messung wieder abgebrochen werden.
Spectrosense, Gebrauchsanweisung 13
Page 18

5 Anhang
• Abgleich durchführen
Führen Sie nun den Spannungsabgleich, wie in Kapitel 5.2.2 beschrieben, durch.
Titrando mit tiamo
Schliessen Sie die Spectrosense an den Titrando an (siehe Kap. 2.1) und
starten Sie die tiamo Software.
• Spectrosense in Sensorliste einfügen
Falls die Spectrosense noch nicht in die Sensorliste eingetragen wurde, können Sie dies nun im Programmteil Konfiguration unter Sen-
soren tun.
Klicken Sie auf Bearbeiten, Neu und wählen Sie Anderer Sensor....
Tragen Sie einen Sensornamen ein und wählen Sie das Gerät und
den Messeingang. Bestätigen Sie die Eingabe mit [OK].
• Methode erstellen
Wechseln Sie in den Programmteil Methode. Hier können Sie mit Datei, Neu eine Leere Methode erzeugen und die Auswahl mit [OK]
bestätigen.
Mit Einfügen, Neuer Befehl fügen Sie einen Messbefehl MEAS U
ein. Bestätigen Sie mit [OK]. Mit einem Doppelklick auf den Messbefehl öffnet sich das Eigenschaftsfenster.
Passen Sie in der Registerkarte Allgemein/Hardware folgende Parameter an:
Gerätenamen angeschlossener Titrando
Messeingang 1 bzw. 2
Sensor die zuvor eingetragene Spectrosense
Rührer aus
Ändern Sie in der Registerkarte Messparameter diese Parameter:
Messung ohne Driftkontrolle aktivieren
Messdauer 999'999 s
Messintervall 0.5 s
Um die Methode nachher starten zu können, müssen Sie diese zuerst
mit Datei, Speichern sichern. Wählen Sie die Methodengruppe, in
der sie die Methode ablegen wollen, geben Sie einen Methodenna-
men an und klicken Sie auf [Speichern].
14 Spectrosense, Gebrauchsanweisung
Page 19

5 Anhang
• Messung starten
Wechseln Sie nun in die Ansicht Arbeitsplatz. Wählen Sie im Unterfenster Ablauf unter Probedaten diejenige Methode, die Sie vorher
erstellt haben. Mit [Start] beginnen Sie die Messung.
• Live-Anzeige anpassen
Sollte in der Live-Anzeige der Messwert nicht angezeigt werden, öffnen Sie mit einem Rechtsklick in das Unterfenster Live-Anzeige den
Dialog Eigenschaften – Live-Anzeige. Hier müssen folgende Parameter angepasst werden:
Befehlstyp MEAS
Messanzeige aktiv
Messwert 1 Messwert
• Abgleich durchführen
Führen Sie nun den Spannungsabgleich, wie in Kapitel 5.2.2 beschrieben, durch.
Titrino
Schliessen Sie die Spectrosense an den Titrino an (siehe Kap. 2.1) und
schalten Sie ihn ein.
• Mode auswählen
Drücken Sie die Taste <MODE> und anschliessend mehrmals die
Pfeiltaste [Î] bis MEAS erscheint. Bestätigen Sie die Auswahl mit
<ENTER>. In der nächsten Dialogzeile wählen Sie, ebenfalls durch
Drücken der Taste [Î], die Messgrösse U und bestätigen Sie wiederum
mit <ENTER>.
• Messung starten
Mit der Taste <MEAS/HOLD> starten Sie die Messung. Der Messwert wird angezeigt. Um die Messung zu stoppen, drücken Sie erneut
auf die Taste <MEAS/HOLD>.
• Abgleich durchführen
Führen Sie nun den Spannungsabgleich, wie in Kapitel 5.2.2 beschrieben, durch.
Spectrosense, Gebrauchsanweisung 15
Page 20
5 Anhang
5.2.2 Abgleich durchführen
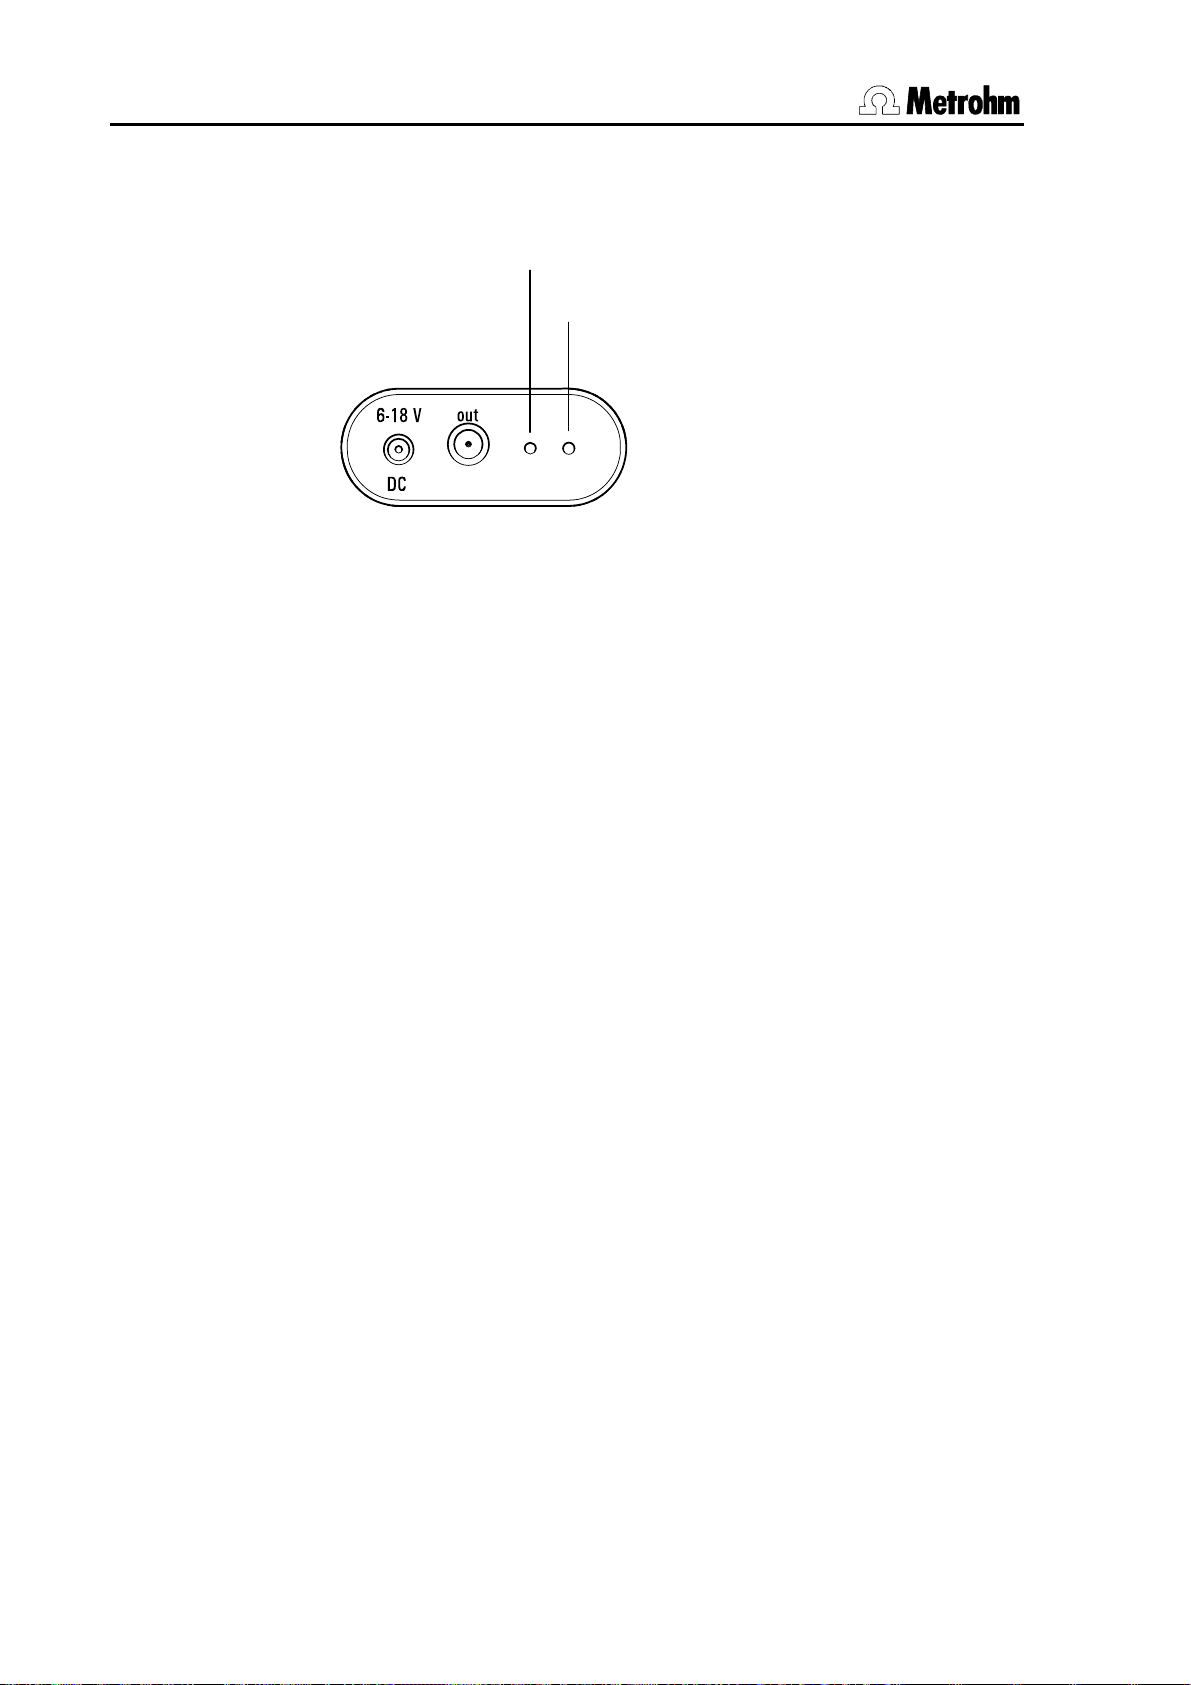
Abb. 5 Spectrosense Anschlüsse
• Dunkelspannung Abgleich
Schrauben Sie zuerst den Spiegel ab.
Halten Sie nun die Spitze der Spectrosense in der Luft an einen abge-
dunkelten Ort. Achten Sie darauf, dass die Spitze nicht gegen eine
glänzende Oberfläche gehalten wird. Drehen Sie nun ganz leicht an
der versenkten Schraube des Einstellers für Dunkelspannung (4)
und versuchen Sie möglichst nahe an den Wert 50 mV heranzukommen (ideal: 30 mV bis 50 mV).
4 Einsteller für Dunkelspannung
3 Einsteller für Hellspannung
• Hellspannung Abgleich
Schrauben Sie den Spiegel wieder an den Schaft der Spectrosense.
Tauchen Sie die Spectrosense in dest. Wasser ein und drehen Sie
ganz leicht an der versenkten Schraube des Einstellers für Hell-
spannung (3). Versuchen Sie möglichst nahe an den Wert 1000 mV
heranzukommen, überschreiten Sie jedoch keinesfalls den Wert 1200
mV (ideal: 980 mV bis 1020 mV).
16 Spectrosense, Gebrauchsanweisung
Page 21
5 Anhang
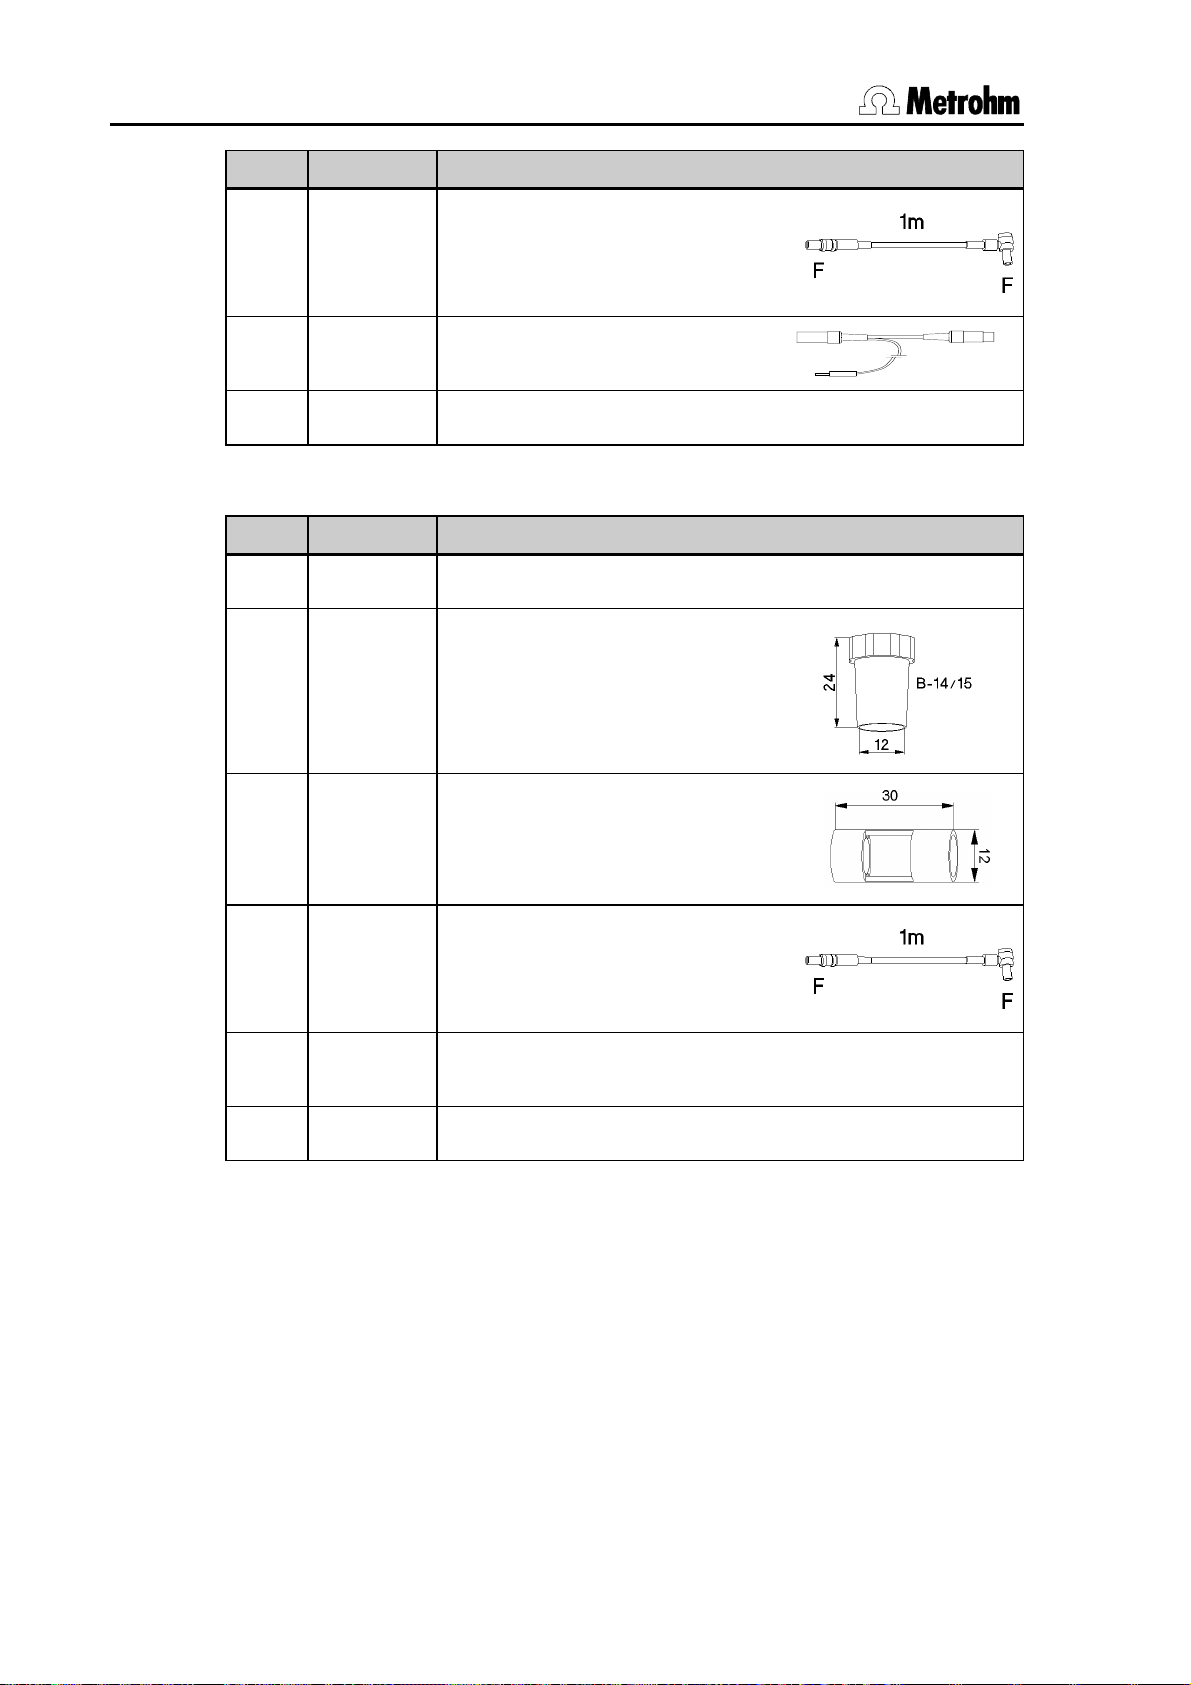
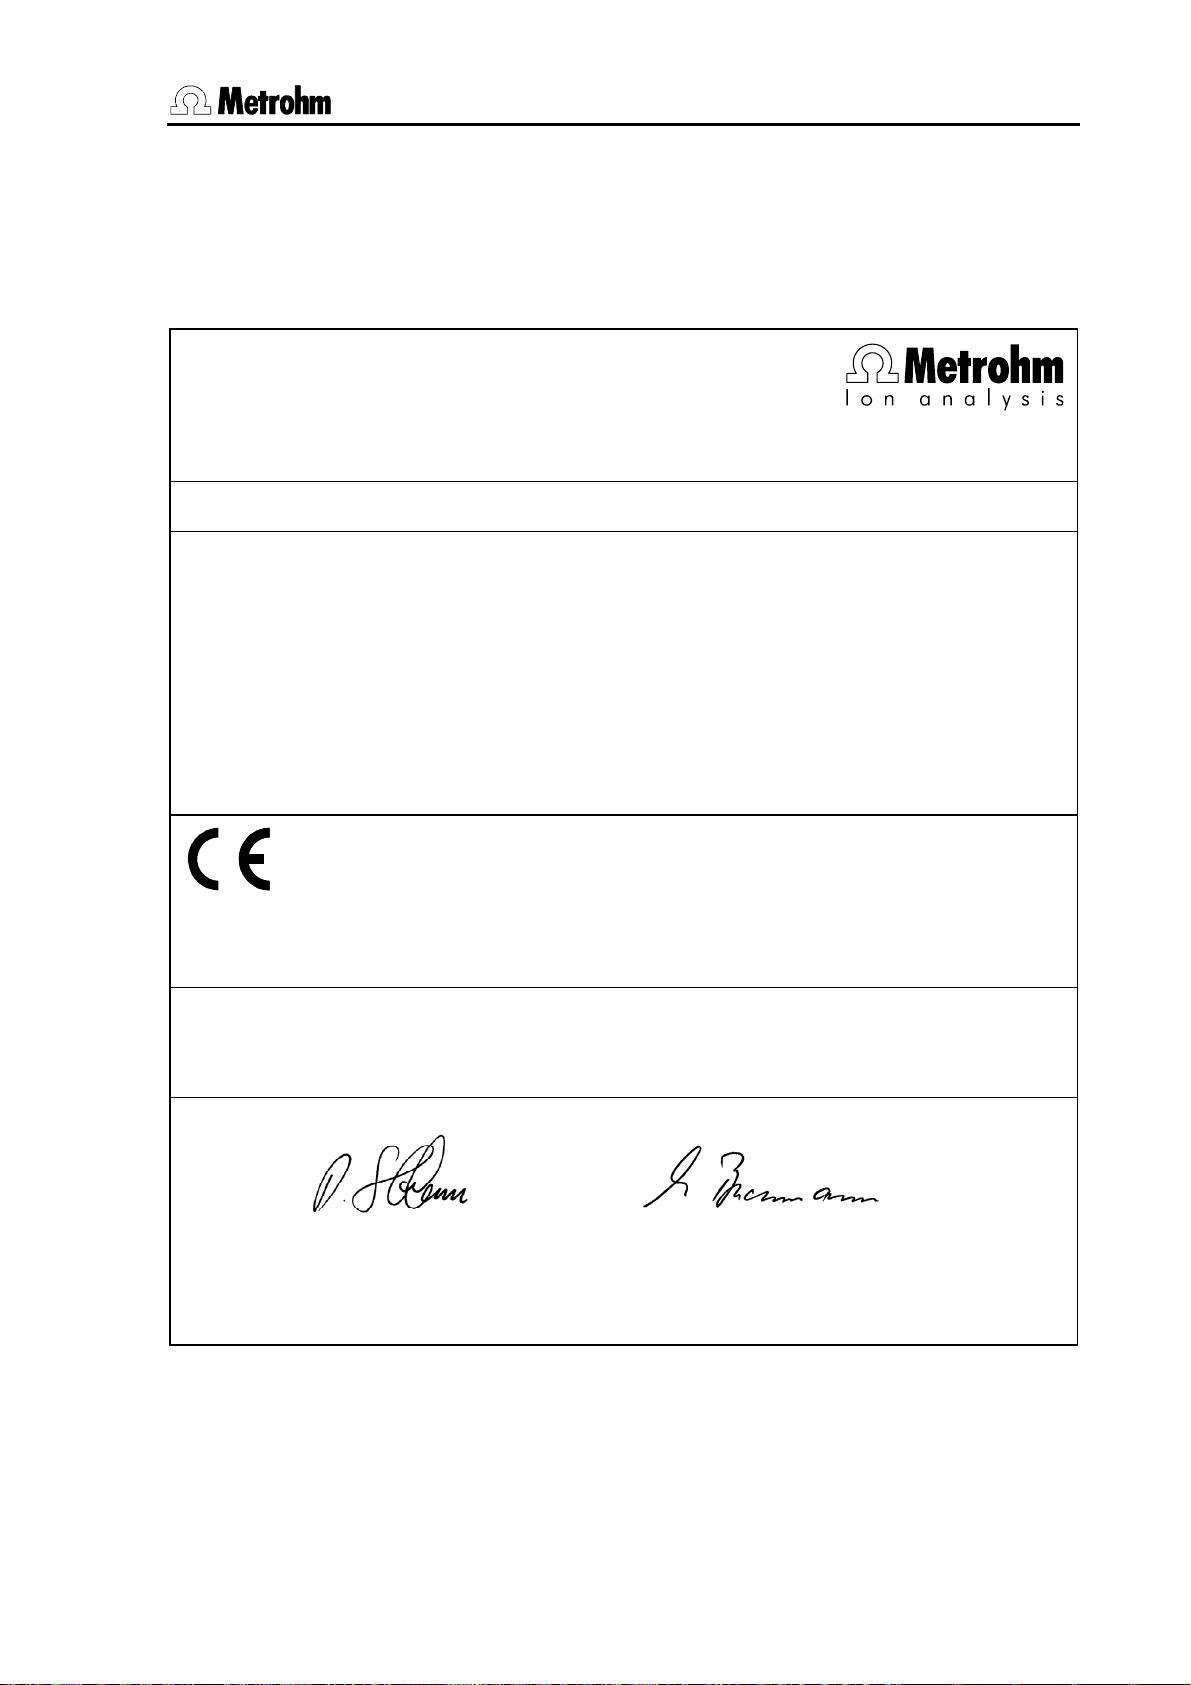
5.3 Lieferumfang
Überprüfen Sie nach Erhalt des Gerätes die Vollständigkeit der Lieferung.
Die Abbildungen in den Zubehörlisten haben nicht alle den gleichen Massstab.
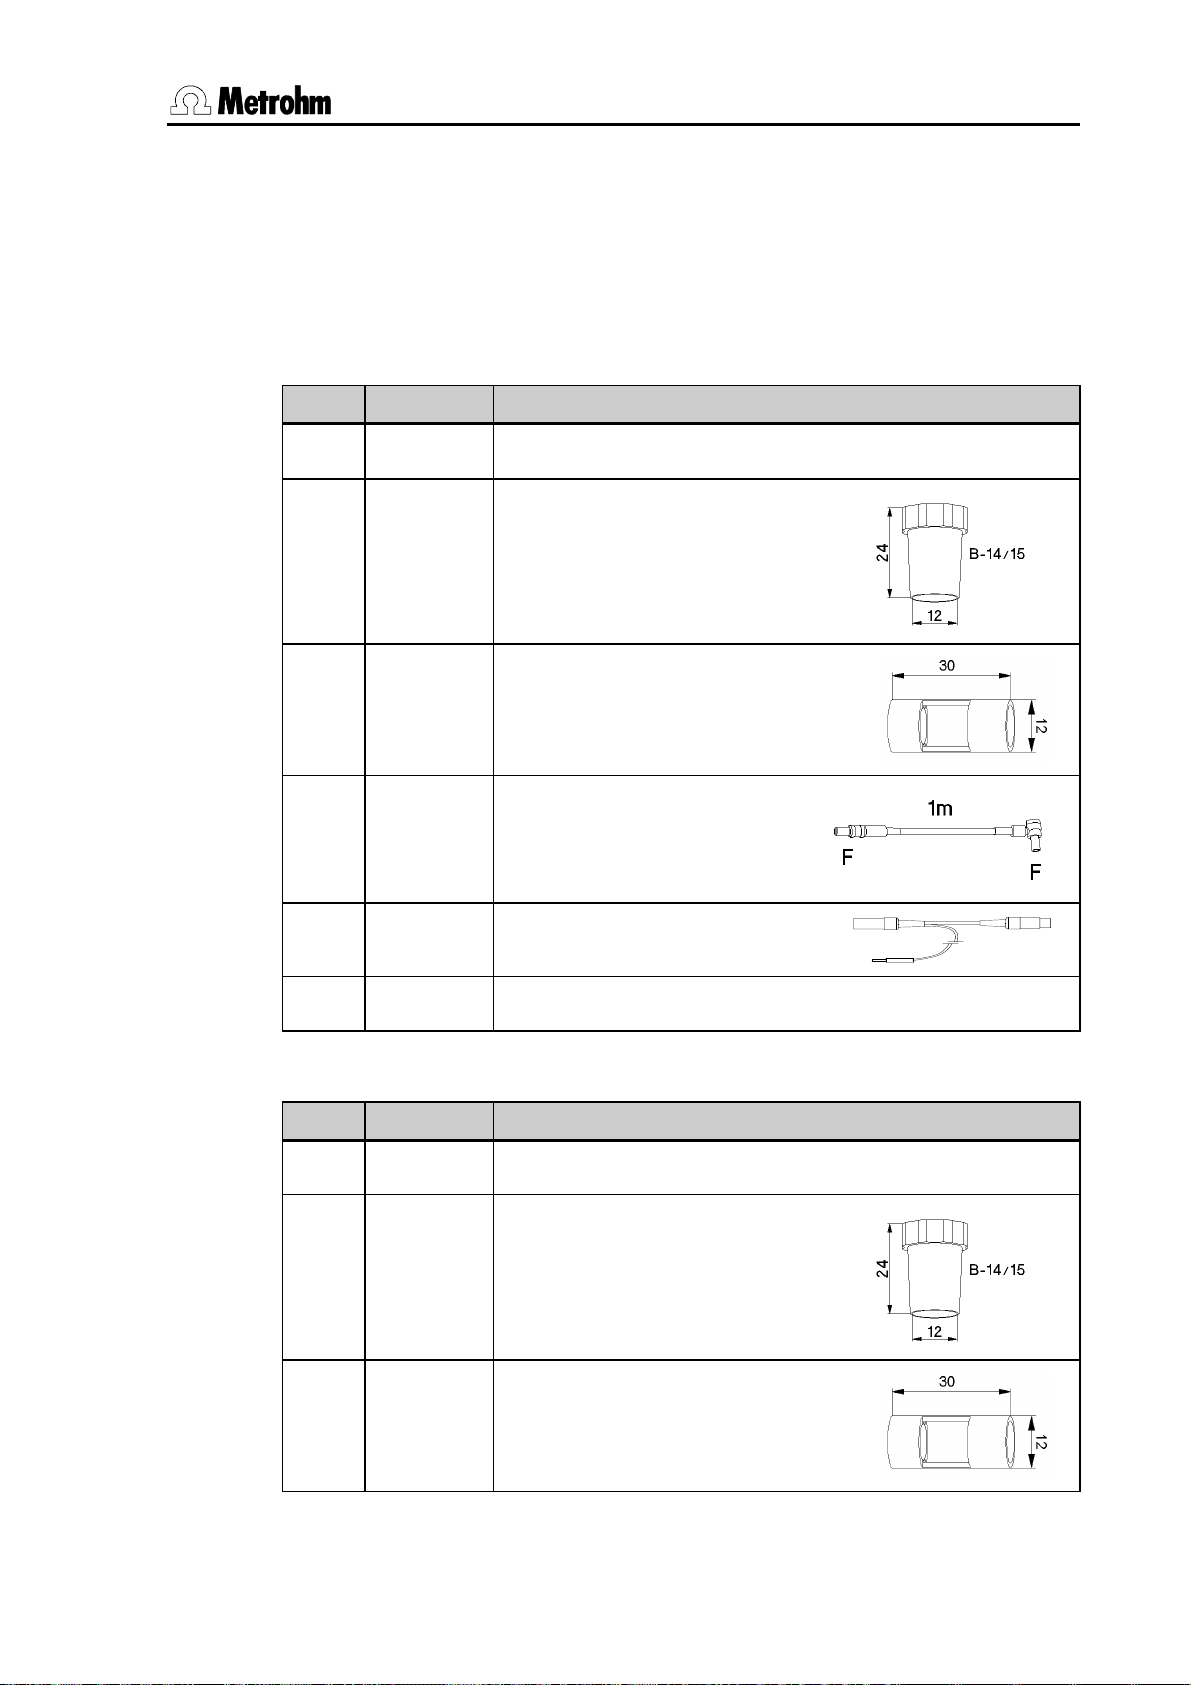
6.5501.100 Spectrosense 523 nm zu Titrino umfasst die folgenden Zubehörteile:
Anzahl Best.-Nr. Beschreibung
1 6.1109.100
1 6.1236.020
1 6.1250.010 Spiegel, Lichtweg 22 mm
1 6.2116.020 Elektrodenkabel
1 6.2108.130 Kabel Titrino – Spectrosense
1 8.109.1488 Gebrauchsanweisung Spectrosense
Spectrosense Messmodul, Wellenlänge 523 nm
Schliffhülse NS 14/15
Länge 1.2 m
6.5501.110 Spectrosense 610 nm zu Titrino umfasst die folgenden Zubehörteile:
Anzahl Best.-Nr. Beschreibung
1 6.1109.110 Spectrosense Messmodul, Wellenlänge 610 nm
1 6.1236.020
1 6.1250.010 Spiegel, Lichtweg 22 mm
Spectrosense, Gebrauchsanweisung 17
Schliffhülse NS 14/15
Page 22
5 Anhang
Anzahl Best.-Nr. Beschreibung
1 6.2116.020 Elektrodenkabel
1 6.2108.130 Kabel Titrino – Spectrosense
Länge 1.2 m
1 8.109.1488 Gebrauchsanweisung Spectrosense
6.5501.200 Spectrosense 523 nm zu Titrando umfasst die folgenden Zubehörteile:
Anzahl Best.-Nr. Beschreibung
1 6.1109.100 Spectrosense Messmodul, Wellenlänge 523 nm
1 6.1236.020
Schliffhülse NS 14/15
1 6.1250.010 Spiegel, Lichtweg 22 mm
1 6.2116.020 Elektrodenkabel
1 6.2151.070 Kabel Titrando – Spectrosense
Länge 1.2 m
1 8.109.1488 Gebrauchsanweisung Spectrosense
18 Spectrosense, Gebrauchsanweisung
Page 23

5 Anhang
6.5501.210 Spectrosense 610 nm zu Titrando umfasst die folgenden Zubehörteile:
Anzahl Best.-Nr. Beschreibung
1 6.1109.110 Spectrosense Messmodul, Wellenlänge 610 nm
1 6.1236.020
1 6.1250.010 Spiegel, Lichtweg 22 mm
1 6.2116.020 Elektrodenkabel
1 6.2151.070 Kabel Titrando – Spectrosense
1 8.109.1488 Gebrauchsanweisung Spectrosense
Schliffhülse NS 14/15
Länge 1.2 m
5.4 Optionales Zubehör
Best.-Nr. Beschreibung
6.2117.020
6.2119.020
Netzgerät EU 220 V / 9 V DC
Netzgerät USA 110 V / 9 V DC
Spectrosense, Gebrauchsanweisung 19
Page 24

5 Anhang
5.5 Gewährleistung und Konformität
5.5.1 Gewährleistung
Die Gewährleistung auf unseren Erzeugnissen beschränkt sich darauf, dass
Defekte, die nachweisbar auf Material-, Konstruktions- oder Fabrikationsfehler zurückzuführen sind und innerhalb von 12 Monaten, vom Tage der Lieferung an gerechnet, auftreten, in unseren Werkstätten kostenlos behoben
werden. Transportkosten gehen zu Lasten des Bestellers.
Bei Tag- und Nachtbetrieb beträgt die Gewährleistung 6 Monate.
Glasbruch bei Elektroden oder anderen Glasteilen ist von der Gewährleis-
tung ausgenommen. Kontrollen, die nicht durch Material- oder Fabrikationsfehler bedingt sind, werden auch während der Gewährleistungszeit verrechnet. Für Fremdfabrikate, soweit diese einen wesentlichen Teil unseres Gerätes ausmachen, gelten die Gewährleistungsbestimmungen des Herstellers.
Für die Genauigkeitsgewährleistung sind die in der Gebrauchsanweisung
genannten technischen Daten massgebend.
Wegen Mängeln in Material, Konstruktion oder Ausführung, sowie wegen
Fehlens zugesicherter Eigenschaften hat der Besteller keine Rechte und Ansprüche ausser den oben genannten.
Sind beim Empfang einer Sendung an der Verpackung Beschädigungen
sichtbar, oder zeigen sich nach dem Auspacken Transportschäden an der
Ware, so ist der Frachtführer unverzüglich zu benachrichtigen und die Aufnahme eines Schadenprotokolls zu verlangen. Das Fehlen eines offiziellen
Schadenprotokolls entbindet die Firma Metrohm von jeder Ersatzpflicht.
Bei Rücksendungen irgendwelcher Geräte und Teile ist nach Möglichkeit die
Originalverpackung zu verwenden. Dies gilt vor allem für Geräte, Elektroden,
Bürettenzylinder und PTFE-Kolben. Vor dem Einbetten in Holzwolle oder
ähnliches Material sind die Teile staubdicht einzupacken (für Apparate unbedingt Plastiksack verwenden). Sind im Lieferumfang offene Baugruppen
beigepackt, die gegen elektrostatische Spannungen empfindlich sind (z.B.
Datenschnittstellen usw.), so sind diese in der zugehörigen OriginalSchutzverpackung, z.B. im leitenden Schutzbeutel, zurückzusenden. (Ausnahme: Baugruppen mit eingebauter Spannungsquelle gehören in nicht leitende Schutzverpackung.)
Für Schäden, die durch Nichtbeachtung dieser Vorschriften entstehen, lehnt
die Firma Metrohm eine Gewährleistungspflicht ab.
20 Spectrosense, Gebrauchsanweisung
Page 25
5 Anhang
5.5.2 Declaration of Conformity
This is to certify the conformity to the standard specifications for electrical
appliances and accessories, as well as to the standard specifications for security and to system validation issued by the manufacturing company.
Name of commodity
Spectrosense
Description A compact sensor for photometric titrations.
This instrument has been built and has undergone final type testing according to the standards:
Electromagnetic compatibility: Emission
IEC 61326, EN 55022/CISPR 22
Electromagnetic compatibility: Immunity
IEC 61326, IEC 61000-4-2, IEC 61000-4-3, IEC 61000-4-4, IEC 61000-4-5, IEC 61000-4-6,
IEC 61000-4-11, IEC 61000-4-14, NAMUR
CH-9101 Herisau/Switzerland
E-Mail info@metrohm.com
www.metrohm.com
Safety specifications
EN/IEC/UL 61010-1
It has also been certified by ElectroSuisse, a member of the International Certification Body (CB/IEC).
The instrument meets the requirements of the CE mark as contained in the EU directives 89/336/EEC and 73/23/EEC and fulfils the following specifications:
EN 61326 Electrical equipment for measurement, control and laboratory use – EMC requirements
EN 61010-1 Safety requirements for electrical equipment for measurement, control and laboratory
use
Metrohm Ltd. is holder of the SQS-certificate of the quality system ISO 9001 for quality assurance in
design/development, production, installation and servicing.
Herisau, January 17, 2005
D. Strohm Ch. Buchmann
Vice President Vice President
Head of R&D Head of Production
Responsible for Quality Assurance
Spectrosense, Gebrauchsanweisung 21
Page 26

5 Anhang
5.5.3 Quality Management Principles
Metrohm AG, CH-9101 Herisau, Switzerland
CH-9101 Herisau/Switzerland
E-Mail info@metrohm.com
Internet www.metrohm.com
Metrohm Ltd. holds the ISO 9001 Certificate, registration number 10872-02, issued by
SQS (Swiss Association for Quality and Management Systems). Internal and external audits are carried out periodically to assure that the standards defined by Metrohm’s QM
Manual are maintained.
The steps involved in the design, manufacture and servicing of instruments are fully
documented and the resulting reports are archived for ten years. The development of
software for PCs and instruments is also duly documented and the documents and
source codes are archived. Both remain the possession of Metrohm. A non-disclosure
agreement may be asked to be provided by those requiring access to them.
The implementation of the ISO 9001
quality system is described in Metrohm’s
QM Manual, which comprises detailed
instructions on the following fields of
activity:
Instrument development
The organisation of the instrument
design, its planning and the intermediate
controls are fully documented and
traceable. Laboratory testing accompanies all phases of instrument development.
Software development
Software development occurs in terms of
the software life cycle. Tests are
performed to detect programming errors
and to assess the program’s functionality in a laboratory environment.
Components
All components used in the Metrohm
instruments have to satisfy the quality
standards that are defined and implemented for our products. Suppliers of
components are audited by Metrohm as
the need arises.
Manufacture
The measures put into practice in the
production of our instruments guarantee
a constant quality standard. Production
planning and manufacturing procedures,
maintenance of production means and
testing of components, intermediate and
finished products are prescribed.
Customer support and service
Customer support involves all phases of
instrument acquisition and use by the
customer, i.e. consulting to define the
adequate equipment for the analytical
problem at hand, delivery of the equipment, user manuals, training, after-sales
service and processing of customer
complaints. The Metrohm service organisation is equipped to support customers in implementing standards such
as GLP, GMP, ISO 900X, in performing
Operational Qualification and Performance Verification of the system components or in carrying out the System
Validation for the quantitative determination of a substance in a given matrix.
22 Spectrosense, Gebrauchsanweisung
Page 27

Contents
Contents
1 Introduction.........................................................24
1.1 Overview ................................................................................. 25
2 Working with the Spectrosense .........................26
2.1 Preparing the Spectrosense .................................................. 26
2.2 Practical hints for titrations.................................................... 28
3 Evaluation of photometric titrations ..................29
4 Maintenance........................................................30
4.1 Storage ................................................................................... 30
4.2 Troubleshooting .....................................................................30
5 Appendix..............................................................32
5.1 Technical data ........................................................................ 32
5.2 Voltage adjustment................................................................. 35
5.3 Standard equipment............................................................... 39
5.4 Optional accessories .............................................................41
5.5 Warranty and conformity........................................................ 42
Spectrosense, Instructions for Use 23
Page 28

1 Introduction
1 Introduction
Titration with photometric endpoint recognition is applied in a large number
of official standardized titration methods. It is used when
• potentiometric endpoint indication is impossible
• no suitable potentiometric electrodes are available
• an official method prescribes photometric indication
• the electrode signals are disturbed by sample matrix effects
• an economical but reliable method is preferred
• easy handling and a quick and precise measurement are required.
The Spectrosense is ideal for all photometric titrations. The following model
variants of the Spectrosense are available:
• 6.5501.100 Spectrosense 523 nm for Titrino
• 6.5501.110 Spectrosense 610 nm for Titrino
• 6.5501.200 Spectrosense 523 nm for Titrando
• 6.5501.210 Spectrosense 610 nm for Titrando
24 Spectrosense, Instructions for Use
Page 29

1 Introduction
1.1 Overview
1
2
3
4
5
6
7
8
Fig. 1 Spectrosense 610 nm
1
Power supply 5 Upper groove for positioning the
sleeve for sample changer applications
2 Measuring output 'out' 6 6.1236.020 sleeve for fixing the Spec-
trosense to the electrode holder
3 Bright voltage adjuster
(see Section 5.2)
4 Dark voltage adjuster
(see Section 5.2)
7 Electrode shaft
8 6.1250.010 mirror
Spectrosense, Instructions for Use 25
Page 30

2 Working with the Spectrosense
2 Working with the Spectrosense
2.1 Preparing the Spectrosense
1 Attach sleeve
Insert the electrode shaft (7) into the sleeve (6) until its O-ring
snaps into the lower groove. This might be easier if you first moisten
the O-ring of the sleeve. For sample changer applications move the
sleeve to the upper groove. This way the electrode shaft protrudes
farther into the titration vessel.
2 Attach mirror
Screw the enclosed mirror (8) onto the end of the electrode
shaft (7).
3 Connect Spectrosense to titration device
Connect the measuring output 'out' (2) with the enclosed electrode cable 6.2116.020 with the measuring input 'Ind.' of your
Titrino or Titrando.
4 Power supply
• Power supply via Titrando
Connect the power supply (1) of the Spectrosense with an
MSB connection of your Titrando. Use the enclosed cable
6.2151.070.
6
.
2
1
1
6
.
2
1
6
.
0
5
2
1
0
.
0
7
0
21
Spectrosense
Fig. 2 Titrando – Spectrosense
26 Spectrosense, Instructions for Use
Page 31

2 Working with the Spectrosense
• Power supply via Titrino
Connect the power supply (1) of the Spectrosense with the stirrer
connection ( ) of your Titrino. Use the enclosed cable
6.2108.130. The stirrer can be connected to the additional socket
of this cable.
Titrino
0
3
1
.
8
0
1
2
.
6
Stirrer
6.2116.020
2
1
Spectrosense
Fig. 3 Titrino – Spectrosense
• Power supply with separate power adapter
If you want to supply current to the Spectrosense at your Titrino
with a separate power adapter, use the 6.2117.020 (EU) or
6.2119.020 (USA) power adapter, respectively.
Power
adapter
6.2108.130
Titrino
6.2116.020
Stirrer
21
2. Stirrer
Spectrosense
Fig. 4 Titrino – Spectrosense, with separate power adapter
Spectrosense, Instructions for Use 27
Page 32

2 Working with the Spectrosense
2.2 Practical hints for titrations
• You can remove the last water drop on the mirror if you hold the Spectrosense against the wall of the titration vessel.
• Selection of the wavelength: Select the wavelength such that you have
a small absorption at the beginning and large absorption at the end of
the titration. The following wavelengths are available: 523 nm (bluegreen), 610 nm (orange)
• Take care not to have air bubbles on the mirror and in the optical path.
Attention!
Please note that the light guide of the Spectrosense is made of
PMMA and therefore is not resistant to some solvents!
Avoid the contact of the light guide with the following solvents:
aldehydes, alcohols, amines, bases/leaches, esters, ethers, glycols,
ketones, hydrocarbons (aliphatic, aromatic, halogenated), mineral
oils, oxidants (strong), vegetable oils, inorganic acids.
28 Spectrosense, Instructions for Use
Page 33

3 Evaluation of photometric titrations
3 Evaluation of photometric
titrations
The forms of photometric titration curves may vary widely. These forms
and subsequently the evaluation of the titrations depend on various
factors:
• the type of the indication: self-indicating titrations or titrations with
added indicator
• absorption or transmission curves
U/mV
U/mV
U/mV
EP
IP
V/ml
IP=EP
EP
IP
V/ml
The indicator changes its color after the
endpoint (EP) of the titration has been
reached.
IP: Changing point of the indicator.
Evaluation: Intercept of tangents.
The indicator changes its color in the
region of the endpoint of the titration.
IP: Changing point of the indicator.
This applies for most self-indicating titrations.
Evaluation: Potentiometric inflection point
evaluation.
The indicator changes its color before the
endpoint (EP) of the titration has been
reached.
IP: Changing point of the indicator.
V/ml
Spectrosense, Instructions for Use 29
Evaluation: Intercept of tangents.
Page 34

4 Maintenance
4 Maintenance
4.1 Storage
• Rinse the Spectrosense with dist. water between the titrations.
• Rinse the Spectrosense thoroughly with dist. water and dry it before
storing it.
• Use only soft tissues to wipe the mirror surface and make sure no foreign material is on it, as this would involve the danger of the surface
getting scratched.
4.2 Troubleshooting
Problem Remedy
There is no
output signal.
The output signal
is noisy or
unstable.
• Connect the Spectrosense to the MSB connection
of your Titrando or to the stirrer connection of your
Titrino.
• Connect the Spectrosense to the measuring input
'Ind.' of your Titrando or Titrino.
• Remove the Spectrosense from the solution and
check whether there is light at the tip. If you cannot
see any light you have to replace the Spectrosense. The LED cannot be exchanged.
• Check if the mirror is tightly screwed onto the
Spectrosense.
• Check if there are any foreign materials or air
bubbles in the optical path.
• Check whether the connection to the power supply
exists. The connection must not be under mechanical stress.
30 Spectrosense, Instructions for Use
Page 35

4 Maintenance
The output signal
is too low.
The output signal
is too high
(> 1200 mV).
• Check if the mirror is tightly screwed onto the
Spectrosense.
• Check if there are any foreign materials or air
bubbles in the optical path.
• Check the mirror surface. If it is scratched, replace
the mirror; order number 6.1250.010.
• Maybe a voltage adjustment of the Spectrosense
has to be done, see Section 5.2.
• Maybe a voltage adjustment of the Spectrosense
has to be done, see Section 5.2.
Spectrosense, Instructions for Use 31
Page 36

5 Appendix
5 Appendix
5.1 Technical specifications
Provided that nothing to the contrary is mentioned, the values mentioned below represent the typical specifications of the Spectrosense 523 nm
(6.1109.100) and the Spectrosense 610 nm (6.1109.110).
5.1.1 Dimensions and material
Housing
Width 50.3 mm
Height 63 mm (without shaft and cable)
Depth 20.3 mm
Weight 120 g
Material Aluminum
Shaft
Diameter 12 mm
Length without mirror 129.1 mm
Total length 145 mm
Material shaft PEEK
Material mirror frame Stainless steel
Material light guide PMMA
5.1.2 Operational ranges
Photometric 50...1000 mV
Dark voltage max. 50 mV
Bright voltage max. 1200 mV (in dist. water), do not exceed this value!
5.1.3 Absorbability on external light
Below 400 Hz > 60 dB
Above 2 kHz >= 40 dB / decade
5.1.4 Wavelength
6.1109.100 523 nm, green-blue
6.1109.110 610 nm, orange
32 Spectrosense, Instructions for Use
Page 37

5 Appendix
5.1.5 Modulation frequency
1 kHz
5.1.6 Optical path length
22 mm
5.1.7 Signal – fundamental frequency
12 Hz
5.1.8 Safety specifications
Construction and
testing
Safety information These Instructions for use contain safety information that
According to EN/IEC/UL 61010-1, CSA-C22.2 No. 610101, degree of protection IP40, protection class III
must be observed by the user in order to ensure the safe
operation of the instrument.
5.1.9 Electromagnetic compatibility (EMC)
Emission EN/IEC 61326, EN 55022 / CISPR 22
Immunity Standards complied with:
145 EN/IEC 61326
145 EN/IEC 61000-4-2
145 EN/IEC 61000-4-3
145 EN/IEC 61000-4-4
145 EN/IEC 61000-4-5
145 EN/IEC 61000-4-6
145 EN/IEC 61000-4-11
145 EN/IEC 61000-4-14
- NAMUR
5.1.10 Ambient conditions
Housing 0...45 °C
Mirror / Shaft 0…80 °C
Relative humidity < 80 %
pH range 0...14
5.1.11 Power supply
Voltage 7…18 V DC
Current max. 20 mA DC
Spectrosense, Instructions for Use 33
Page 38

5 Appendix
5.1.12 Reference conditions
Ambient temperature + 25 °C (± 3 °C)
Relative humidity <= 80 %
Warmed-up condition Electrode in operation for at least 3 min
Adjustment interval not defined
34 Spectrosense, Instructions for Use
Page 39

5 Appendix
5.2 Voltage adjustment
A voltage adjustment has to be done when either the output signal, during
your measurements with the Spectrosense, is too high (> 1200 mV) or too
low.
In order to carry out the voltage adjustment you will need the following
equipment:
• Watchmaker's screwdriver, e.g. 1.5 x 0.2 mm
• Vessel with dist. water
• Titrando or Titrino with Spectrosense connected (see also Sec-
tion 2.1).
Proceed as follows:
• Prepare titrator: see Section 5.2.1
• Adjust Spectrosense: see Section 5.2.2
5.2.1 Prepare titrator
The procedure of adjusting the Spectrosense is different for the Titrino and
the Titrando.
Titrando with PC Control or Touch Control
Connect the Spectrosense to your Titrando (see Section 2.1) and start the
PC Control software or turn on the Touch Control.
• Enter Spectrosense into sensor list
If the Spectrosense has not yet been inserted into the sensor list you
can do this now under System / Sensors.
Choose [New] and then [Other sensor]. In the shown dialogue window you can enter a name for the Sensor and select the Measuring
input. Return to the main dialogue with [Home].
• Open manual control
Open the Manual control by pressing [Manual] and choose [Measure]. In the currently shown dialogue window under Sensor choose
the Spectrosense you have previously added to the sensor list and select the corresponding Measuring input. With [Start] the measurement is started and the current measured value is shown. With [Stop]
you can terminate the measurement.
Spectrosense, Instructions for Use 35
Page 40

5 Appendix
• Carry out adjustment
Carry out the voltage adjustment as described in Section 5.2.2.
Titrando with tiamo
Connect the Spectrosense to your Titrando (see Section 2.1) and start the
tiamo software.
• Enter Spectrosense into sensor list
If the Spectrosense has not yet been inserted into the sensor list you
can do this now in the program part Configuration under Sensors.
Click Edit, New and choose Other sensor.... Enter a Sensor name
and choose the Device and the Measuring input. Confirm the entry
with [OK].
• Create method
Switch to the program part Method. With File, New you can create a
Blank method and confirm your selection with [OK].
With Insert, New command enter a new measuring command
MEAS U and confirm with [OK]. Doubleclick the measuring com-
mand in order to open the corresponding properties window.
Adapt the following parameters in the tab General/Hardware:
Device name connected Titrando
Measuring input 1 or 2
Sensor previously entered Spectrosense
Stirrer off
In the tab Measuring parameters change these parameters:
Measurement without drift control activate
Measuring time 999'999 s
Measuring interval 0.5 s
In order to be able to start the method you first have to save it with
File, Save. Choose the Method group in which you want to store the
method, enter a Method name and click [Save].
• Start measurement
Switch to the program part Workplace. In the sub window Run under
Sample data select the method you previously created. The meas-
urement can now be started with [Start].
36 Spectrosense, Instructions for Use
Page 41

5 Appendix
• Adapt live display
If in the live display the measured value is not shown open with a right
click into the sub window Live display the dialogue window Proper-
ties – Live display. Change the following parameters:
Command type MEAS
Measured value display active
Measured value 1 Measured value
• Carry out adjustment
Carry out the voltage adjustment as described in Section 5.2.2.
Titrino
Connect the Spectrosense to your Titrino (see Section 2.1) and turn it on.
• Select Mode
Press the <MODE> key and then press several times the arrow key
[Î] until MEAS appears. Confirm this selection with <ENTER>. In the
following dialogue line choose, also by pressing the key [Î] several
times, the measured quantity U and confirm again with <ENTER>.
• Start measurement
With the <MEAS/HOLD> key you can start the measurement. The
measured value is now shown on the display. To stop the measurement press once more the <MEAS/HOLD> key.
• Carry out adjustment
Carry out the voltage adjustment as described in Section 5.2.2.
Spectrosense, Instructions for Use 37
Page 42

5 Appendix
5.2.2 Carry out adjustment
Fig. 5 Spectrosense connections
• Dark voltage adjustment
Screw off the mirror.
Hold the tip of the Spectrosense in the air in a dark place. Pay atten-
tion not to hold the tip against a shiny surface. Now turn the countersunk screw of the Dark voltage adjuster (4) very gently and try to
come as near as possible to 50 mV (ideal: 30 mV to 50 mV).
• Bright voltage adjustment
4 Dark voltage adjuster
3 Bright voltage adjuster
Screw the mirror back on the Spectrosense.
Immerse the Spectrosense into dest. water and turn the countersunk
screw of the Bright voltage adjuster (3) very gently. Try to come as
near as possible to 1000 mV but do not exceed the value 1200 mV
(ideal: 980 mV to 1020 mV).
38 Spectrosense, Instructions for Use
Page 43

5 Appendix
5.3 Standard equipment
Immediately upon receipt of the sensor please check whether the delivery is
complete. The illustrations in the lists of accessories are not to the same
scale.
6.5501.100 Spectrosense 523 nm for Titrino includes the following accessories:
No. Order no. Description
1 6.1109.100
1 6.1236.020
1 6.1250.010 Mirror, light path 22 mm
1 6.2116.020 Cable
1 6.2108.130 Cable Titrino – Spectrosense
1 8.109.1488 Instructions for use for Spectrosense
Spectrosense measuring module,
wavelength 523 nm
Sleeve SGJ 14/15
length 1.2 m
6.5501.110 Spectrosense 610 nm for Titrino includes the following accessories:
No. Order no. Description
1 6.1109.110 Spectrosense measuring module,
wavelength 610 nm
1 6.1236.020
Spectrosense, Instructions for Use 39
Sleeve SGJ 14/15
Page 44

5 Appendix
No. Order no. Description
1 6.1250.010 Mirror, light path 22 mm
1 6.2116.020 Cable
1 6.2108.130 Cable Titrino – Spectrosense
length 1.2 m
1 8.109.1488 Instructions for use for Spectrosense
6.5501.200 Spectrosense 523 nm for Titrando includes the following accessories:
No. Order no. Description
1 6.1109.100 Spectrosense measuring module,
wavelength 523 nm
1 6.1236.020
Sleeve SGJ 14/15
1 6.1250.010 Mirror, light path 22 mm
1 6.2116.020 Cable
1 6.2151.070 Cable Titrando – Spectrosense
length 1.2 m
1 8.109.1488 Instructions for use for Spectrosense
40 Spectrosense, Instructions for Use
Page 45

5 Appendix
6.5501.210 Spectrosense 610 nm for Titrando includes the following accessories:
No. Order no. Description
1 6.1109.110 Spectrosense measuring module,
wavelength 610 nm
1 6.1236.020
1 6.1250.010 Mirror, light path 22 mm
1 6.2116.020 Cable
1 6.2151.070 Cable Titrando – Spectrosense
1 8.109.1488 Instructions for use for the Spectrosense
Sleeve SGJ 14/15
length 1.2 m
5.4 Optional accessories
Order no. Description
6.2117.020
6.2119.020
Power adapter EU 220 V / 9 V DC
Power adapter USA 110 V / 9 V DC
Spectrosense, Instructions for Use 41
Page 46

5 Appendix
5.5 Warranty and conformity
5.5.1 Warranty
The warranty on our products is limited to defects that are traceable to material, construction or manufacturing error which occur within 12 months from
the day of delivery. In this case the defects will be rectified in our workshops
free of charge. Transport costs are to be paid by the customer.
For day and night operation the warranty is limited to 6 months.
Glass breakage in the case of electrodes or other parts is not covered by the
warranty. Checks which are not a result of material or manufacturing faults
are also charged during the warranty period. For parts from outside manufacturers, insofar as these constitute an appreciable part of our instrument,
the warranty stipulations of the manufacturer in question apply.
With the regard to the guarantee of accuracy the technical specifications in
the instruction manual are authoritative.
Concerning defects in materials, construction or design as well as the absence of guaranteed features the purchaser has no rights or claims except
those mentioned above.
If damage of the packaging is evident on receipt of a consignment or if the
goods show signs of transport damage after unpacking, the carrier must be
informed immediately and a written damage report demanded. Lack of an
official damage report releases Metrohm from any liability to pay compensation.
If any instruments and parts have to be returned then the original packaging
should be used if at all possible. This applies above all to instruments, electrodes, buret cylinders and PTFE pistons. Before embedment in wood shavings or similar material the parts must be packed in a dustproof package (for
instruments the use of a plastic bag is essential). If open assemblies are included that are sensitive to electromagnetic voltages (e.g. data interfaces,
etc.) then these must be returned in the associated original protective packaging (e.g. conductive protective bag). (Exception: assemblies with a built-in
voltage source belong in non-conductive protective packaging).
For damage which arises as a result of non-compliance with these instructions no warranty responsibility whatsoever will be accepted by Metrohm.
42 Spectrosense, Instructions for Use
Page 47

5 Appendix
5.5.2 Declaration of Conformity
This is to certify the conformity to the standard specifications for electrical
appliances and accessories, as well as to the standard specifications for security and to system validation issued by the manufacturing company.
Name of commodity
Spectrosense
Description A compact sensor for photometric titrations.
This instrument has been built and has undergone final type testing according to the standards:
Electromagnetic compatibility: Emission
IEC 61326, EN 55022/CISPR 22
Electromagnetic compatibility: Immunity
IEC 61326, IEC 61000-4-2, IEC 61000-4-3, IEC 61000-4-4, IEC 61000-4-5, IEC 61000-4-6,
IEC 61000-4-11, IEC 61000-4-14, NAMUR
CH-9101 Herisau/Switzerland
E-Mail info@metrohm
www.metrohm
.com
.com
Safety specifications
EN/IEC/UL 61010-1
It has also been certified by ElectroSuisse, a member of the International Certification Body (CB/IEC).
The instrument meets the requirements of the CE mark as contained in the EU directives 89/336/EEC and 73/23/EEC and fulfils the following specifications:
EN 61326 Electrical equipment for measurement, control and laboratory use – EMC requirements
EN 61010-1 Safety requirements for electrical equipment for measurement, control and laboratory
use
Metrohm Ltd. is holder of the SQS-certificate of the quality system ISO 9001 for quality assurance in
design/development, production, installation and servicing.
Herisau, January 17, 2005
D. Strohm Ch. Buchmann
Vice President Vice President
Head of R&D Head of Production
Responsible for Quality Assurance
Spectrosense, Instructions for Use 43
Page 48

5 Appendix
d
5.5.3 Quality Management Principles
Metrohm AG, CH-9101 Herisau, Switzerland
CH-9101Herisau/Switzerlan
E-Mail info@metrohm.com
Internet www.metrohm.com
Metrohm Ltd. holds the ISO 9001 Certificate, registration number 10872-02, issued by
SQS (Swiss Association for Quality and Management Systems). Internal and external audits are carried out periodically to assure that the standards defined by Metrohm’s QM
Manual are maintained.
The steps involved in the design, manufacture and servicing of instruments are fully
documented and the resulting reports are archived for ten years. The development of
software for PCs and instruments is also duly documented and the documents and
source codes are archived. Both remain the possession of Metrohm. A non-disclosure
agreement may be asked to be provided by those requiring access to them.
The implementation of the ISO 9001
quality system is described in Metrohm’s
QM Manual, which comprises detailed
instructions on the following fields of
activity:
Instrument development
The organization of the instrument
design, its planning and the intermediate
controls are fully documented and
traceable. Laboratory testing accompanies all phases of instrument development.
Software development
Software development occurs in terms of
the software life cycle. Tests are
performed to detect programming errors
and to assess the program’s functionality in a laboratory environment.
Components
All components used in the Metrohm
instruments have to satisfy the quality
standards that are defined and implemented for our products. Suppliers of
components are audited by Metrohm as
the need arises.
Manufacture
The measures put into practice in the
production of our instruments guarantee
a constant quality standard. Production
planning and manufacturing procedures,
maintenance of production means and
testing of components, intermediate and
finished products are prescribed.
Customer support and service
Customer support involves all phases of
instrument acquisition and use by the
customer, i.e. consulting to define the
adequate equipment for the analytical
problem at hand, delivery of the equipment, user manuals, training, after-sales
service and processing of customer
complaints. The Metrohm service organization is equipped to support customers in implementing standards such
as GLP, GMP, ISO 900X, in performing
Operational Qualification and Performance Verification of the system components or in carrying out the System
Validation for the quantitative determination of a substance in a given matrix.
44 Spectrosense, Instructions for Use
Page 49

Table des matières
Table des matières
1 Introduction.........................................................46
1.1 Vue d'ensemble ...................................................................... 47
2 Travailler avec la Spectrosense.........................48
2.1 Mise en service....................................................................... 48
2.2 Notes pratiques pour les titrages.......................................... 50
3 Evaluation des titrages photométriques............51
4 Entretien..............................................................52
4.1 Stockage................................................................................. 52
4.2 Traitement de problèmes....................................................... 52
5 Annexe .................................................................54
5.1 Caractéristiques techniques.................................................. 54
5.2 Ajustage de tension................................................................ 57
5.3 Matériel livré ........................................................................... 61
5.4 Accessoires optionnels.......................................................... 63
5.5 Garantie et conformité ...........................................................64
Spectrosense, Mode d'emploi 45
Page 50

1 Introduction
1 Introduction
Le titrage à indication photométrique du point final est un élément de nombreuses méthodes de titrage normalisées. On l'emploie surtout quand
• une détermination potentiométrique du point final n'est pas possible
• aucune électrode potentiométrique appropriée n'est disponible
• la méthode normalisée prescrit la détermination photométrique
• le signal de l'électrode est perturbé par l'effet matrice de l'échantillon
• une méthode d'un prix modéré mais fiable est désirée
• un maniement des mesures simple, rapide et précis est souhaité
La Spectrosense convient pour tous les titrages photométriques. Les modèles suivants sont disponibles:
• 6.5501.100 Spectrosense 523 nm pour Titrino
• 6.5501.110 Spectrosense 610 nm pour Titrino
• 6.5501.200 Spectrosense 523 nm pour Titrando
• 6.5501.210 Spectrosense 610 nm pour Titrando
46 Spectrosense, Mode d'emploi
Page 51

1 Introduction
1.1 Vue d'ensemble
1
2
3
4
5
6
7
8
Fig. 1 Spectrosense 610 nm
1 Alimentation en courant 5 Rainure supérieure pour positionne-
ment de la douille à RN lors des applications avec passeur d'échantillons
2 Sortie de mesure 'out' 6 Douille à RN 6.1236.020 pour la
fixation de la Spectrosense au support
d'électrode
3 Régulateur de tension en pleine
lumière (voir chap. 5.2)
4 Régulateur de tension en obscuri-
té (voir chap. 5.2)
7 Tige d'électrode
8 Miroir 6.1250.010
Spectrosense, Mode d'emploi 47
Page 52

2 Travailler avec la Spectrosense
2 Travailler avec la Spectrosense
2.1 Mise en service
1 Monter la douille
Tirez la douille à RN (6) sur la tige d'électrode (7) jusqu'à ce qu'elle
s'enclenche dans la rainure inférieure. Cela sera plus facile si vous
mouillez le joint torique. Pour les applications avec un passeur
d'échantillons la douille peut être tirée jusqu'à la rainure supérieure.
De cette manière la tige d'électrode pénètre plus profondément dans
le bécher de titrage.
2 Monter le miroir
Visser le miroir (8) ci-inclus à la tige d'électrode (7).
3 Connecter la Spectrosense avec l'appareil de titrage
Connectez la sortie de mesure 'out' (2) à l'aide du câble
6.2116.020 ci-inclus avec l'entrée de mesure 'Ind.' de votre Titrino ou
Titrando.
4 Connecter au courant
• Alimentation en courant via Titrando
Connectez l'alimentation en courant (1) de la Spectrosense
avec une interface MSB de votre Titrando. Utilisez pour cela le
câble 6.2151.070 ci-inclus.
6
.
2
1
1
6
.
2
1
6
.
0
5
2
1
0
.
0
7
0
21
Spectrosense
Fig. 2 Titrando – Spectrosense
48 Spectrosense, Mode d'emploi
Page 53

2 Travailler avec la Spectrosense
• Alimentation en courant via Titrino
Connectez l'alimentation en courant (1) de la Spectrosense
avec la connexion de l'agitateur ( ) de votre Titrino. Utilisez pour
cela le câble 6.2108.130 ci-inclus. L'agitateur peut être connecté
à la douille supplémentaire de ce câble:
Titrino
0
3
1
.
8
0
1
2
.
6
Agitateur
6.2116.020
2
1
Spectrosense
Fig. 3 Titrino – Spectrosense
• Alimentation en courant avec un bloc d'alimentation séparé
Si vous voulez alimenter la Spectrosense au Titrino avec un bloc
d'alimentation séparé vous pouvez utiliser le bloc d'alimentation
6.2117.020 (EU) ou 6.2119.020 (USA) de Metrohm.
Bloc
alimentation
6.2108.130
Titrino
6.2116.020
Agitateur
21
Agitateur 2
Spectrosense
Fig. 4 Titrino – Spectrosense, bloc d'alimentation séparé
Spectrosense, Mode d'emploi 49
Page 54

2 Travailler avec la Spectrosense
2.2 Notes pratiques pour les titrages
• Enlevez la dernière goutte d'eau sur le miroir en appuyant la Spectrosense contre la paroi du récipient de titrage.
• Choix de la longueur d'onde: choisissez la longueur d'onde de manière à obtenir une absorption faible au début du titrage et une absorption élevée à la fin. Les longueurs d'onde suivantes sont disponibles: 523 nm (bleu-vert), 610 nm (orange)
• Chassez les bulles d'air qui se trouvent sur le miroir et dans le chemin
optique.
Attention!
Veuillez prendre en considération que le conduit de lumière
consiste en PMMA. C'est pourquoi il n'est pas résistant contre
certains solvants!
Evitez le contact du conduit de lumière avec les solvants suivants:
aldéhydes, alcools, amines, bases/lessives, esters, éthers, glycols,
cétones, hydrocarbures (aliphatiques, aromatiques, halogénés),
huiles minérales, oxydants (forts), huiles végétales, acides inorganiques.
50 Spectrosense, Mode d'emploi
Page 55

3 Evaluation des titrages photométriques
3 Evaluation des titrages
photométriques
Les formes des courbes des titrages photométriques varient beaucoup. La forme et le type d'évaluation du titrage dépendent des différents facteurs:
• type de l'indication: réactions de titrages avec des substances colorées (titrage à auto-indication) ou indication par un indicateur ajouté.
• courbes d'absorption ou de transmission
U/mV
U/mV
U/mV
EP
IP
V/ml
IP=EP
EP
IP
V/ml
V/ml
L'indicateur change de couleur après le
point final (EP).
IP: Point de transition de l'indicateur.
Evaluation: Point d'intersection des
tangentes
L'indicateur change de couleur dans la
région du point final (EP) du titrage.
IP: Point de transition de l'indicateur.
Cas normal pour les titrages à autoindication.
Evaluation: Evaluation potentiométrique
du point d'inflexion.
L'indicateur change de couleur avant le
point final (EP).
IP: Point de transition de l'indicateur.
Evaluation: Point d'intersection des
tangentes.
Spectrosense, Mode d'emploi 51
Page 56

4 Entretien
4 Entretien
4.1 Stockage
• Rincez la Spectrosense avec de l'eau dist. après chaque titrage.
• Avant de stocker la Spectrosense, rincez-la avec de l'eau dist. et sé-
chez-la.
• Essuyez la surface du miroir seulement avec des chiffons mous. Enlever d'abord les substances étrangères afin de ne pas rayer le miroir.
4.2 Traitement de problèmes
Problème Remèdes
La Spectrosense
n'émet pas de
signal.
Le signal de
sortie est très
bruyant ou
instable.
• Branchez la Spectrosense sur la connexion MSB
• Branchez la Spectrosense sur l'entrée de mesure
• Retirez la Spectrosense de la solution et vérifiez s'il
• Tester si le miroir est vissé correctement sur la
• Tester s'il n'y a pas de substances étrangères ou
• Tester s'il y a du contact entre l'alimentation et la
du Titrando ou sur la connexion agitateur du Titrino.
'Ind.' du Titrando ou Titrino.
y a de la lumière à la pointe de la Spectrosense. Si
ce n'est pas le cas, remplacez la Spectrosense.
Un changement de la diode n'est pas possible.
tige.
des bulles d'air dans le chemin optique.
Spectrosense. Vérifier qu'il n'y ait pas de tension
mécanique sur la connexion électrique.
52 Spectrosense, Mode d'emploi
Page 57

4 Entretien
Le signal de
sortie est trop
bas.
Le signal de
sortie est trop
élevé
(> 1200 mV).
• Tester si le miroir est vissé correctement sur la
tige.
• Tester s'il n'y a pas de substances étrangères ou
des bulles d'air dans le chemin optique.
• Examiner la surface du miroir. Si elle est rayée
remplacez le miroir, numéro de commande
6.1250.010.
• Eventuellement, il faudra effectuer un ajustage de
tension de la Spectrosense, voir chap. 5.2.
• Eventuellement, il faudra effectuer un ajustage de
tension de la Spectrosense, voir chap. 5.2.
Spectrosense, Mode d'emploi 53
Page 58

5 Annexe
5 Annexe
5.1 Caractéristiques techniques
Si rien d’autre n’est indiqué, les valeurs ci-dessous sont des données typiques pour la Spectrosense 523 nm (6.1109.100) et la Spectrosense 610 nm
(6.1109.110).
5.1.1 Dimensions et matériau
Boitier
Largeur 50,3 mm
Hauteur 63 mm (sans tige et câble)
Profondeur 20,3 mm
Poids 120 g
Matériau aluminium
Tige d'électrode
Diamètre 12 mm
Longueur sans miroir 129,1 mm
Longueur totale 145 mm
Matériau tige PEEK
Matériau douille miroir Acier inoxydable
Matériau conduit de
lumière
PMMA
5.1.2 Gamme de mesure
Photométrique 50…1000 mV
Tension en obscurité 50 mV max.
Tension en pleine
lumière
1200 mV max. (dans eau dist.), ne pas excéder cette
valeur!
5.1.3 Affaiblissement de la lumière extérieure
Au-dessous de 400 Hz > 60 dB
Au-dessus de 2 kHz >= 40 dB / décade
5.1.4 Longueur d'onde
6.1109.100 523 nm, bleu-vert
6.1109.110 610 nm, orange
54 Spectrosense, Mode d'emploi
Page 59

5 Annexe
5.1.5 Fréquence de modulation
1 kHz
5.1.6 Chemin optique
22 mm
5.1.7 Signal – fréquence fondamentale
12 Hz
5.1.8 Spécifications de sécurité
Construction et contrôle Conforme à EN/IEC/UL 61010-1, CSA-C22.2 No. 61010-1,
degré de protection IP40, classe de protection III
Conseils de sécurité Ce mode d’emploi contient des conseils de sécurité,
devant absolument être respectés par l’utilisateur, afin de
garantir une utilisation sure de l’appareil.
5.1.9 Compatibilité électromagnétique (CEM)
Emissions parasitaires EN/IEC 61326, EN 55022 / CISPR 22
Résistance au brouillage
Normes remplies:
145 EN/IEC 61326
145 EN/IEC 61000-4-2
145 EN/IEC 61000-4-3
145 EN/IEC 61000-4-4
145 EN/IEC 61000-4-5
145 EN/IEC 61000-4-6
145 EN/IEC 61000-4-11
145 EN/IEC 61000-4-14
- NAMUR
5.1.10 Conditions ambiantes
Boitier 0…45 °C
Miroir / Tige 0…80 °C
Humidité relative < 80 %
Gamme pH 0…14
5.1.11 Alimentation en courant
Tension 7…18 V DC
Courant max. 20 mA DC
Spectrosense, Mode d'emploi 55
Page 60

5 Annexe
5.1.12 Conditions de référence
Température ambiante + 25 °C (± 3 °C)
Humidité relative <= 80 %
Temps de réchauffage Appareil utilisé pendant 3 min minimum
Intervalle d'ajustage pas défini
56 Spectrosense, Mode d'emploi
Page 61

5 Annexe
5.2 Ajustage de tension
Un ajustage de tension de la Spectrosense peut être nécessaire si pendant
les mesures le signal de mesure est trop élevé (> 1200 mV) ou trop bas.
Afin d'effectuer cet ajustage vous avez besoin de l'équipement suivant:
• Tournevis de précision, par ex. 1.5 x 0.2 mm
• Bécher avec de l'eau dist.
• Titrando ou Titrino avec une Spectrosense connectée (voir aussi
chap. 2.1).
Procédez comme suit:
• Préparer l'appareil de titrage: voir chapitre 5.2.1
• Effectuer l'ajustage: voir chapitre 5.2.2
5.2.1 Préparer l'appareil de titrage
L'ajustage de la Spectrosense est réalisé différemment avec le Titrino ou le
Titrando.
Titrando avec PC Control ou Touch Control
Connectez la Spectrosense au Titrando (voir chap. 2.1) et démarrez le logiciel PC Control Software ou allumez le Touch Control.
• Insérer la Spectrosense dans la liste des capteurs
Si la Spectrosense n'est pas encore inscrite dans la liste des capteurs
vous le pouvez faire maintenant sous Système / Capteurs.
Appuyer sur [Nouveau] et puis sur [Autre capteur]. Entrez dans le
dialogue affiché une désignation pour le Capteur et choisissez l'En-
trée de mesure. Retournez avec [Home] au dialogue principal.
• Ouvrir le contrôle manuel
Ouvrez avec [Manual] le contrôle manuel et appuyez sur [Mesurer].
Choisissez dans la fenêtre affichée sous Capteur la Spectrosense
étant inscrite antérieurement dans la liste des capteurs et sélectionnez
l'Entrée de mesure correspondant. Avec [Start] vous pouvez démarrer la mesure et la valeur mesurée est affichée. En appuyant sur
[Stop] la mesure peut être arrêtée.
Spectrosense, Mode d'emploi 57
Page 62

5 Annexe
• Réaliser l'ajustage
Réalisez maintenant l'ajustage de tension comme décrit dans le chapitre 5.2.2.
Titrando avec tiamo
Connectez la Spectrosense au Titrando (voir chap. 2.1) et démarrez le logiciel tiamo.
• Insérer la Spectrosense dans la liste des capteurs
Si la Spectrosense n'est pas encore inscrite dans la liste des capteurs
vous le pouvez faire maintenant dans le menu Configuration sous
Sensors.
Cliquez sur Edit, New et sélectionnez Other sensor…. Entrez sous
Sensor name une désignation pour le capteur et sélectionnez le Titrando connecté sous Device et l'entrée de mesure sous Measuring
input. Confirmez les modifications avec [OK].
• Créer une méthode
Changez au menu Method. Ici, vous pouvez avec File, New créer
une nouvelle méthode vide: Blank method. Confirmez la sélection
avec [OK].
Avec Insert, New command vous ajoutez la fonction de mesure
MEAS U. Confirmez avec [OK]. En double-cliquant sur cette fonction
de mesure la fenêtre des propriétés s'ouvre.
Adaptez dans l'onglet General/Hardware les paramètres:
Device name le Titrando connecté
Measuring input 1 ou 2
Sensor la Spectrosense configurée auparavant
Stirrer off
Adaptez dans l'onglet Measuring parameters les paramètres:
Measurement without drift control activer
Measuring time 999'999 s
Measuring interval 0.5 s
Afin de pouvoir démarrer la méthode vous devez tout d'abord la sauvegarder avec File, Save. Choisissez un groupe de méthode sous
Method group, dans lequel vous voulez sauvegarder la méthode.
Puis entrez sous Method name une désignation pour la méthode et
cliquez sur [Save].
58 Spectrosense, Mode d'emploi
Page 63

5 Annexe
• Démarrer la mesure
Changez à l'affichage Workplace. Dans la sous fenêtre Run sous
Sample data choisissez la méthode crée auparavant. Avec [Start]
vous démarrez la mesure.
• Adapter l'affichage en direct
Si dans l'affichage en direct la valeur mensurée n'est pas affichée ouvrez, avec un clic droit dans la sous fenêtre Live display, le dialogue
Properties – Live display. Ici vous devez alors modifier les paramètres suivants:
Command type MEAS
Measured value display activer
Measured value 1 Measured value
• Réaliser l'ajustage
Réalisez maintenant l'ajustage de tension comme décrit dans le chapitre 5.2.2.
Titrino
Connectez la Spectrosense au Titrino (voir chap. 2.1) et le mettez sous tension.
• Choisir le mode
Appuyez sur la touche <MODE> et puis appuyez plusieurs fois sur la
touche flèche [Î] jusqu'à ce que la valeur MEAS apparaisse. Confirmez
la sélection avec <ENTER>. Dans la ligne de dialogue suivante choisissez, aussi en appuyant plusieurs fois sur la touche [Î], la quantité
. Puis appuyez sur <ENTER>.
mes U
• Démarrer la mesure
Avec la touche <MEAS/HOLD> vous démarrez la mesure. La valeur
mesurée est maintenant affichée. Pour arrêter la mesure appuyez de
nouveau sur <MEAS/HOLD>.
• Réaliser l'ajustage
Réalisez maintenant l'ajustage de tension comme décrit dans le chapitre 5.2.2.
Spectrosense, Mode d'emploi 59
Page 64

5 Annexe
5.2.2 Réaliser l'ajustage
Fig. 5 Connexions Spectrosense
4 Régulateur de tension en obscurité
3 Régulateur de tension en pleine lumière
• Ajustage de la tension en obscurité
Dévisser tout d'abord le miroir.
Dirigez la Spectrosense en l'air vers un coin obscure. Faites attention à
ce que l'électrode ne pointe pas vers une surface brillante. Tournez
très doucement la vis noyée du Régulateur de tension en obscurité
(4) et essayez d'approcher de la valeur 50 mV (idéal: 30 mV à 50 mV).
• Ajustage de la tension en pleine lumière
Visser tout d'abord le miroir a la Spectrosense.
Plongez la Spectrosense dans l'eau dist. et tournez très doucement la
vis noyée du Régulateur de tension en pleine lumière (3). Essayez
d'approcher de la valeur 1000 mV mais ne pas dépassez la valeur
1200 mV (idéal: 980 mV à 1020 mV).
60 Spectrosense, Mode d'emploi
Page 65

5 Annexe
m
5.3 Matériel livré
Dès réception de l’appareillage, veuillez contrôler si la livraison est bien
complète. Les schémas des pièces représentées dans les listes des accessoires ne sont pas à la même échelle.
6.5501.100 Spectrosense 523 nm pour Titrino contient les accessoires suivants:
Quantité N° de réf. Description
1 6.1109.100
1 6.1236.020
1 6.1250.010 Miroir, chemin optique 22 m
1 6.2116.020 Câble
1 6.2108.130 Câble Titrino – Spectrosense
1 8.109.1488 Mode d'emploi pour la Spectrosense
Spectrosense module de mesure,
longueur d'onde 523 nm
Douille à RN 14/15
longueur 1,2 m
6.5501.110 Spectrosense 610 nm pour Titrino contient les accessoires suivants:
Quantité N° de réf. Description
1 6.1109.110 Spectrosense module de mesure,
longueur d'onde 610 nm
1 6.1236.020
Spectrosense, Mode d'emploi 61
Douille à RN 14/15
Page 66

5 Annexe
Quantité N° de réf. Description
1 6.1250.010 Miroir, chemin optique 22 mm
1 6.2116.020 Câble
1 6.2108.130 Câble Titrino – Spectro-
sense
longueur 1,2 m
1 8.109.1488 Mode d'emploi pour la Spectrosense
6.5501.200 Spectrosense 523 nm pour Titrando contient les accessoires suivants:
Quantité N° de réf. Description
1 6.1109.100 Spectrosense module de mesure
longueur d'onde 523 nm
1 6.1236.020
Douille à RN 14/15
1 6.1250.010 Miroir, chemin optique 22 mm
1 6.2116.020 Câble
1 6.2151.070 Câble Titrando – Spectrosense
longueur 1,2 m
1 8.109.1488 Mode d'emploi pour la Spectrosense
62 Spectrosense, Mode d'emploi
Page 67

5 Annexe
6.5501.210 Spectrosense 610 nm pour Titrando contient les accessoires suivants:
Quantité N° de réf. Description
1 6.1109.110 Spectrosense module de mesure
longueur d'onde 610 nm
1 6.1236.020
1 6.1250.010 Miroir, chemin optique 22 mm
1 6.2116.020 Câble
1 6.2151.070 Câble Titrando – Spectrosense
1 8.109.1488 Mode d'emploi pour la Spectrosense
Douille à RN 14/15
longueur 1,2 m
5.4 Accessoires optionnels
N° de réf. Description
6.2117.020
6.2119.020
Bloc d'alimentation
EU 220 V / 9 V DC
Bloc d'alimentation
USA 110 V / 9 V DC
Spectrosense, Mode d'emploi 63
Page 68

5 Annexe
5.5 Garantie et conformité
5.5.1 Garantie
La garantie sur nos produits est limitée au remplacement gratuit dans nos
ateliers des défectuosités dont il peut être fait la preuve qu’elles sont dues à
des défauts de matériau, de conception ou de fabrication et qui se manifestent dans les 12 mois suivant la date de livraison. Les frais de transport sont
à la charge de l’acheteur.
Le délai de garantie est réduit à 6 mois en cas d’exploitation de l’appareil
jour et nuit.
Le bris de glace des électrodes ou de toutes autres parties en verre est exclu de la garantie. Les contrôles ne résultant pas de défauts de matériau ou
de fabrication sont facturés, même pendant la durée de garantie. Dans la
mesure où elles constituent une partie essentielle de nos appareils, les pièces de fabricants tiers sont soumises aux dispositions de garantie du fabricant.
En ce qui concerne la garantie de précision, les caractéristiques techniques
stipulées dans le présent mode d’emploi sont déterminantes.
En cas de défauts affectant le matériel, la conception ou l’exécution, ainsi
qu’en cas d’absence de qualités assurées par Metrohm, l’acheteur n’a
d’autres droits et prétentions que ceux mentionnés ci-dessus.
Si l’endommagement de l’emballage est visible à la réception d’un envoi, ou
bien si l’on observe des dommages dus au transport sur la marchandise
après l’avoir déballée, il convient d’informer immédiatement le transporteur
et d’exiger l’établissement d’un procès-verbal de dommage. En l’absence
d’un procès-verbal de dommage officiel, Metrohm est dégagé de toute obligation de remplacement.
Utiliser si possible l’emballage original lors de tout retour d’appareils ou de
pièces, en particulier pour les appareils, les électrodes, les cylindres de burette et les pistons en PTFE. Avant d’insérer les pièces dans de la laine de
bois ou un matériel identique, il faut les emballer de façon étanche à la
poussière (utiliser absolument un sac plastique pour les appareils). Si le
contenu de la livraison contient des éléments ouverts sensibles aux tensions
électrostatiques (par exemple interfaces de données, etc.), il convient de les
retourner dans leur emballage protecteur d’origine, par exemple dans des
sacs de protection conducteurs. (Exception : Les éléments ayant une source
de tension intégrée ne doivent pas être conditionnés dans un emballage de
protection conducteur.)
La société Metrohm rejette toute responsabilité pour les dommages résultant du non-respect de ces consignes.
64 Spectrosense, Mode d'emploi
Page 69

5 Annexe
5.5.2 Declaration of Conformity
This is to certify the conformity to the standard specifications for electrical
appliances and accessories, as well as to the standard specifications for security and to system validation issued by the manufacturing company.
Name of commodity
Spectrosense
Description A compact sensor for photometric titrations.
This instrument has been built and has undergone final type testing according to the standards:
Electromagnetic compatibility: Emission
IEC 61326, EN 55022/CISPR 22
Electromagnetic compatibility: Immunity
IEC 61326, IEC 61000-4-2, IEC 61000-4-3, IEC 61000-4-4, IEC 61000-4-5, IEC 61000-4-6,
IEC 61000-4-11, IEC 61000-4-14, NAMUR
CH-9101 Herisau/Switzerland
E-Mail info@metrohm
www.metrohm
.com
.com
Safety specifications
EN/IEC/UL 61010-1
It has also been certified by ElectroSuisse, a member of the International Certification Body (CB/IEC).
The instrument meets the requirements of the CE mark as contained in the EU directives 89/336/EEC and 73/23/EEC and fulfils the following specifications:
EN 61326 Electrical equipment for measurement, control and laboratory use – EMC requirements
EN 61010-1 Safety requirements for electrical equipment for measurement, control and laboratory
use
Metrohm Ltd. is holder of the SQS-certificate of the quality system ISO 9001 for quality assurance in
design/development, production, installation and servicing.
Herisau, January 17, 2005
D. Strohm Ch. Buchmann
Vice President Vice President
Head of R&D Head of Production
Responsible for Quality Assurance
Spectrosense, Mode d'emploi 65
Page 70

5 Annexe
d
5.5.3 Quality Management Principles
Metrohm AG, CH-9101 Herisau, Switzerland
CH-9101Herisau/Switzerlan
E-Mail info@metrohm.com
Internet www.metrohm.com
Metrohm Ltd. holds the ISO 9001 Certificate, registration number 10872-02, issued by
SQS (Swiss Association for Quality and Management Systems). Internal and external audits are carried out periodically to assure that the standards defined by Metrohm’s QM
Manual are maintained.
The steps involved in the design, manufacture and servicing of instruments are fully
documented and the resulting reports are archived for ten years. The development of
software for PCs and instruments is also duly documented and the documents and
source codes are archived. Both remain the possession of Metrohm. A non-disclosure
agreement may be asked to be provided by those requiring access to them.
The implementation of the ISO 9001
quality system is described in Metrohm’s
QM Manual, which comprises detailed
instructions on the following fields of
activity:
Instrument development
The organisation of the instrument
design, its planning and the intermediate
controls are fully documented and
traceable. Laboratory testing accompanies all phases of instrument development.
Software development
Software development occurs in terms of
the software life cycle. Tests are
performed to detect programming errors
and to assess the program’s functionality in a laboratory environment.
Components
All components used in the Metrohm
instruments have to satisfy the quality
standards that are defined and implemented for our products. Suppliers of
components are audited by Metrohm as
the need arises.
Manufacture
The measures put into practice in the
production of our instruments guarantee
a constant quality standard. Production
planning and manufacturing procedures,
maintenance of production means and
testing of components, intermediate and
finished products are prescribed.
Customer support and service
Customer support involves all phases of
instrument acquisition and use by the
customer, i.e. consulting to define the
adequate equipment for the analytical
problem at hand, delivery of the equipment, user manuals, training, after-sales
service and processing of customer
complaints. The Metrohm service organisation is equipped to support customers in implementing standards such
as GLP, GMP, ISO 900X, in performing
Operational Qualification and Performance Verification of the system components or in carrying out the System
Validation for the quantitative determination of a substance in a given matrix.
66 Spectrosense, Mode d'emploi
Page 71

Índice
Índice
1 Introducción ........................................................68
1.1 Vista de conjunto.................................................................... 69
2 Trabajar con la Spectrosense ............................70
2.1 Preparar la Spectrosense ......................................................70
2.2 Consejos prácticos para las valoraciones............................ 72
3 Evaluación de las valoraciones fotométricas....73
4 Mantenimiento ....................................................74
4.1 Conservación.......................................................................... 74
4.2 Solución de problemas .......................................................... 74
5 Apéndice..............................................................76
5.1 Características técnicas......................................................... 76
5.2 Ajuste de tensión.................................................................... 79
5.3 Alcance del suministro........................................................... 83
5.4 Opciones................................................................................. 85
5.5 Garantía y conformidad ......................................................... 86
Spectrosense, Instrucciones para el uso 67
Page 72

1 Introducción
1 Introducción
La valoración con indicación fotométrica del punto final forma parte de unmerosos métodos estándares y oficiales. Se utilice está forma de valoración
sobre todo cuando
• una determinación potenciométrica del punto final no es posible
• no hay ningún electrodo potenciométrico que es adecuado
• el método estándar prescribe la determinación fotométrica
• el efecto matriz de la muestra interfiere el señal del electrodo
• se prefieren métodos económicos pero fiables
• se requieren un manejo simple y una medida rápida y precias.
La Spectrosense es apta para todas valoraciones fotométricas. Esta disponible en los siguientes modelos:
• 6.5501.100 Spectrosense 523 nm para Titrino
• 6.5501.110 Spectrosense 610 nm para Titrino
• 6.5501.200 Spectrosense 523 nm para Titrando
• 6.5501.210 Spectrosense 610 nm para Titrando
68 Spectrosense, Instrucciones para el uso
Page 73

1 Introducción
1.1 Vista de conjunto
1
2
3
4
5
6
7
8
Fig. 1 Spectrosense 610 nm
1
Toma de corriente 5 Ranura superior para posicionar el
manguito EN durante aplicaciones con
cambiador de muestras
2 Salida de medida 'out' 6 Manguito EN 6.1236.020 para colocar
la Spectrosense al soporte de electrodo
3 Ajustador de tensión en luz
(véase cap. 5.2)
4 Ajustador de tensión en oscuridad
(véase cap. 5.2)
7 Varilla de electrodo
8 Espejo 6.1250.010
Spectrosense, Instrucciones para el uso 69
Page 74

2 Trabajar con la Spectrosense
2 Trabajar con la Spectrosense
2.1 Preparar la Spectrosense
1 Montar el manguito
Meta la varilla de electrodo (7) en el manguito EN (6) hasta que el
manguito encaje en la ranura inferior. Esto es más fácil si el anillo O
está húmedo. Para aplicaciones con un cambiador de muestras el
maguito puede ser empujado hasta la ranura superior. De esta
manera, la varilla se alza más abajo en el vaso de valoración.
2 Montar el espejo
Atornille el espejo (8) adjunto al final del varilla de electrodo (7).
3 Conectar la Spectrosense con el valorador
Conecte la salida de medida 'out' (2) mediante el cable
6.2116.020 adjunto con la entrada de medida 'Ind.' de su Titrino o
Titrando.
4 Toma de corriente
• Suministro de corriente por Titrando
Conecte la toma de corriente (1) de la Spectrosense con una
conexión MSB de su Titrando. Para esto utilice el cable
6.2151.070 adjunto.
6
.
2
1
1
6
.
2
1
6
.
0
5
2
1
0
.
0
7
0
21
Spectrosense
Fig. 2 Titrando – Spectrosense
70 Spectrosense, Instrucciones para el uso
Page 75

2 Trabajar con la Spectrosense
• Suministro de corriente por Titrino
Conecte el toma de corriente (1) de la Spectrosense con la co-
nexión de agitador ( ) de su Titrino. Para esto utilice el cable
6.2108.130 adjunto. El agitador se puede conectar a la toma adicional de este cable:
Titrino
0
3
1
.
8
0
1
2
.
6
Agitador
6.2116.020
2
1
Spectrosense
Fig. 3 Titrino – Spectrosense
• Suministro de corriente con un bloque de alimentación
Si quiere alimentar la Spectrosense en el Titrino con un bloque de
alimentación separado puede utilizar el bloque de alimentación
6.2117.020 (EU) o 6.2119.020 (USA) de Metrohm.
Bloque de
alimentación
6.2108.130
Titrino
6.2116.020
Agitador
21
Agitador 2
Spectrosense
Fig. 4 Titrino – Spectrosense, con bloque de alimentación separado
Spectrosense, Instrucciones para el uso 71
Page 76

2 Trabajar con la Spectrosense
2.2 Consejos prácticos para las valoraciones
• La última gota de agua en el espejo se sale, si se pone la Spectrosense contra la pared del vaso de valoración.
• Selección de la longitud de onda: la absorción debería ser baja al
principio de la valoración y elevada al final. Las siguientes longitudes
de onda están disponibles: 523 nm (azul-verde), 610 nm (naranja)
• Fíjese que no haya burbujas de aire en el espejo y en el camino de
luz.
Atención
Tenga en cuenta que el conductor de luz consiste de PMMA y por
eso no es resistente a algunos disolventes!
Evite el contacto de la Spectrosense con los disolventes siguientes:
aldehídos, alcoholes, aminas, bases / lejías, ésteres, éteres, glicoles, cetonas, hidrocarburos (alifáticos, aromáticos, halogenados),
aceites minerales, oxidantes (fuertes), aceite vegetal, ácidos inorgánicos.
72 Spectrosense, Instrucciones para el uso
Page 77

3 Evaluación de las valoraciones fotométricas
3 Evaluación de las valoraciones
fotométricas
Las formas de las curvas de valoración pueden variar considerablemente. La forma de la curva y con eso su evaluación depende de diferentes factores:
• Tipo de indicación: Autoindicación de la reacción de valoración o
indicación con indicador
• Curva de absorción o transmisión
U/mV
U/mV
U/mV
EP
IP
V/ml
IP=EP
EP
IP
V/ml
V/ml
El indicador cambia su color después del
punto final (EP) de la valoración.
IP: Punto de reversión del indicador.
Evaluación: Intersección de las tangentes
El indicador cambia su color en la región
del punto final (EP) de la valoración.
IP: Punto de reversión del indicador.
Es lo normal para valoraciones con autoindicación.
Evaluación: Punto de inversión potentiométrico.
El indicador cambia su color antes del
punto final (EP) de la valoración.
IP: Punto de reversión del indicador.
Evaluación: Intersección de las tangentes.
Spectrosense, Instrucciones para el uso 73
Page 78

4 Mantenimiento
4 Mantenimiento
4.1 Conservación
• Lave la Spectrosense con agua dest. entre las valoraciones.
• Antes de la conservación, lave la Spectrosense con agua dest. y sé-
quela.
• Utilice sólo telas blandas para secar el espejo y asegurase que no
haya substancias sólidas en el espejo (para no rasgarlo).
4.2 Solución de problemas
Problema Remedios
No hay señal de
salida.
El señal de salida
es ruidoso o
inestable.
• Conectar la Spectrosense con la conexión MSB
del Titrando o con la conexión agitador del Titrino.
• Conectar la Spectrosense con la entrada de
medida 'Ind.' del Titrando o Titrino.
• Saque la Spectrosense de la solución y compruebe si hay luz en la punta. Si no hay luz, remplace
la Spectrosense. No es posible recambiar el diodo.
• Compruebe si el espejo está correctamente
atornillado en la varilla.
• Compruebe si no hay substancias sólidas o
burbujas de aire en el camino de luz.
• Compruebe si existe el contacto a la alimentación.
No deje la conexión bajo tensión mecánica.
74 Spectrosense, Instrucciones para el uso
Page 79

4 Mantenimiento
El señal de salida
no es bastante
fuerte.
El señal de salida
es demasiado
fuerte
(> 1200 mV).
• Compruebe si el espejo está correctamente
atornillado en la varilla.
• Compruebe si no hay substancias sólidas o
burbujas de aire en el camino de luz.
• Examine la superficie del espejo. Si está rasgada,
remplace el espejo, número de pedido
6.1250.010.
• Eventualmente se debe efectuar un ajuste de
tensión en la Spectrosense, véase cap. 5.2.
• Eventualmente se debe efectuar un ajuste de
tensión en la Spectrosense, véase cap. 5.2.
Spectrosense, Instrucciones para el uso 75
Page 80

5 Apéndice
5 Apéndice
5.1 Características técnicas
Si no se indica lo contrario, los valores que aparecen abajo son válidos para
la Spectrosense 523 nm (6.1109.100) y la Spectrosense 610 nm
(6.1109.110).
5.1.1 Dimensiones y materiales
Caja
Anchura 50,3 mm
Altura 63 mm (sin varilla y sin cable)
Profundidad 20,3 mm
Peso 120 g
Material Aluminio
Varilla
Diámetro 12 mm
Longitud sin espejo 129,1 mm
Longitud total 145 mm
Material varilla PEEK
Material engarce del
espejo
Material conductor de
luz
Acero inoxidable
PMMA
5.1.2 Gama de medida
Gama fotométrica 50...1000 mV
Tensión en oscuridad 50 mV máx.
Tensión en luz 1200 mV máx. (en agua dest.), ¡No exceder este valor!
5.1.3 Atenuación de la luz externa
Más arriba de 400 Hz > 60 dB
Debajo de 2 kHz >= 40 dB / década
5.1.4 Longitud de onda
6.1109.100 523 nm, azul-verde
6.1109.110 610 nm,
naranja
76 Spectrosense, Instrucciones para el uso
Page 81

5 Apéndice
5.1.5 Frecuencia de modulación
1 kHz
5.1.6 Camino de luz
22 mm
5.1.7 Señal – frecuencia básica
12 Hz
5.1.8 Especificaciones de seguridad
Diseño constructivo y
comprobación
Observaciones sobre la
seguridad
Conforme a EN/IEC/UL 61010-1, CSA-C22.2 No. 61010-1,
grado de protección IP40, clase de protección III
Las instrucciones de uso incluyen información y advertencias que el usuario debe observar a fin de garantizar el
servicio fiable y seguro del equipo.
5.1.9 Compatibilidad electromagnética (CEM)
Parasitaje transmitido EN/IEC 61326, EN 55022 / CISPR 22
Resistencia al parasitaje Normas cumplidas:
- EN/IEC 61326
- EN/IEC 61000-4-2
- EN/IEC 61000-4-3
- EN/IEC 61000-4-4
- EN/IEC 61000-4-5
- EN/IEC 61000-4-6
- EN/IEC 61000-4-11
- EN/IEC 61000-4-14
- NAMUR
5.1.10 Condiciones ambientales
Caja 0...45 °C
Espejo / Varilla 0...80 °C
Humedad relativa < 80 %
Gama pH 0...14
5.1.11 Toma de corriente
Tensión 7...18 V DC
Corriente máx. 20 mA DC
Spectrosense, Instrucciones para el uso 77
Page 82

5 Apéndice
5.1.12 Condiciones de referencia
Temperatura ambiental + 25 °C (± 3 °C)
Humedad relativa <= 80 %
Tiempo de calentado electrodo conectado durante al menos 3 min
Intervalo de ajuste no definido
78 Spectrosense, Instrucciones para el uso
Page 83

5 Apéndice
5.2 Ajuste de tensión
El ajuste de tensión puede ser necesario cuando durante la medida el señal
de la Spectrosense es demasiado fuerte (> 1200 mV) o demasiado bajo.
Para efectuar el ajuste necesita el equipo siguiente:
• Destornillador de relojero, por ej. 1.5 x 0.2 mm
• Vaso con agua destilada
• Titrando o Titrino con la Spectrosense conectada (véase cap. 2.1).
Procede como sigue:
• Preparar el valorador: véase capítulo 5.2.1
• Efectuar el ajuste de tensión de la Spectrosense: véase capítulo 5.2.2
5.2.1 Preparar el valorador
El ajuste de la Spectrosense se realiza de manera distinta con un Titrino o
Titrando.
Titrando con PC Control o Touch Control
Conecte la Spectrosense al Titrando (véase cap. 2.1) y inicie el programa
PC Control o enciende el Touch Control.
• Insertar la Spectrosense en la liste de sensores
Si la Spectrosense ya no está en la lista de sensores usted puede realizarlo ahora en Sistema / Sensores.
Seleccione [Nuevo] y pues [Otro sensor]. En el diálogo actual puede introducir una designación para el Sensor y escoger la Entrada
de medida. Vuelve al diálogo principal con [Home].
• Abrir el control manual
Abra con [Manual] el control manual y haga clic en [Medir]. Selec-
cione en el diálogo actual en Sensor la Spectrosense que insertó en
la lista de sensores y seleccione la Entrada de medida correspondiente. Con [Start] se inicia la medida y el valor medido actualmente
se visualiza. Con [Stop] se termina la medida.
Spectrosense, Instrucciones para el uso 79
Page 84

5 Apéndice
• Realizar ajuste
Realice ahora el ajuste de la tensión come se describe en el capítulo 5.2.2.
Titrando con tiamo
Conecte la Spectrosense al Titrando (véase cap. 2.1) y inicie el programa
tiamo.
• Insertar la Spectrosense en la liste de sensores
Si la Spectrosense ya no está en la lista de sensores usted puede realizarlo ahora en el parte del programa Configuration en Sensors.
Haga clic en Edit, New y seleccione Other sensor.... Introduzca una
designación para el sensor en Sensor name y seleccione el Titrando
conectado en Device y la entrada de medida en Measuring input.
Confirme con [OK].
• Crear un método
Cambie al parte de programa Method. Aquí puede crear con File,
New un método vacío Blank method. Confirme la selección con
[OK].
Inserte con Insert, New command una nueva instrucción de medida
MEAS U. Confírmelo con [OK]. Haga doble clic en la instrucción de
medida para abrir el diálogo de propiedades.
Adapte en la pestaña General/Hardware los parámetros siguientes:
Device name el Titrando conectado
Measuring input 1 o 2
Sensor la Spectrosense conectada
Stirrer off
Adapte en la pestaña Measuring parameters los parámetros siguientes:
Measurement without drift control activar
Measuring time 999'999 s
Measuring interval 0.5 s
Para iniciar el método es necesario que se la guarde primero con File,
Save. Seleccione un grupo de métodos en Method group en lo que
desea guardar el método. Introduzca en Method name una designación para el método y haga clic en [Save].
80 Spectrosense, Instrucciones para el uso
Page 85

5 Apéndice
• Iniciar la medida
Cambie al parte del programa Workplace. Seleccione en el diálogo
Run en Sample data el método creado antes. Con [Start] puede ini-
ciar la medida.
• Adaptar la visualización en vivo
Si en la visualización en vivo no se ve el valor medido haga clic con la
tecla derecha del ratón en la ventana Live display para abrir el diálogo Properties – Live display. Aquí debe ajustar los parámetros siguientes:
Command type MEAS
Measured value display activar
Measured value 1 Measured value
• Realizar ajuste
Realice ahora el ajuste de la tensión come se describe en el capítulo 5.2.2.
Titrino
Conecte la Spectrosense al Titrino (véase cap. 2.1) y lo encienda.
• Seleccionar el modo
Pulse la tecla <MODE> y después pulse varias veces la tecla de flecha [Î] hasta que aparezca MEAS. Confirme la selección con <EN-
TER>. En la próxima línea de diálogo seleccione la cantidad medida U
pulsando varias veces la tecla [Î]. Termine con <ENTER>.
• Iniciar la medida
Mediante la tecla <MEAS/HOLD> se inicia la medida y el valor medido se visualiza en la pantalla. Para terminar la medida pulse de nuevo la tecla <MEAS/HOLD>.
• Realizar ajuste
Realice ahora el ajuste de la tensión come se describe en el capítulo 5.2.2.
Spectrosense, Instrucciones para el uso 81
Page 86

5 Apéndice
5.2.2 Efectuar el ajuste
Fig. 5 Conexiones de la Spectrosense
4 Ajustador de tensión en oscuridad
3 Ajustador de tensión en luz
• Ajuste de la tensión en oscuridad
Primero destornille el espejo.
Lleva la punta de la Spectrosense en el aire a un lugar oscuro. Preste
atención a que la punta no se dirija contra una superficie brillante. Enrosque suavemente la tornilla embutida del Ajustador de tensión en
oscuridad (4) e intente acercarse lo mejor posible al valor 50 mV
(ideal: 30 mV a 50 mV).
• Ajuste de la tensión en luz
Atornille de nuevo el espejo a la Spectrosense.
Sumerja la Spectrosense en agua destilada y enrosque suavemente la
tornilla embutida del Ajustador de tensión en luz (3). Intente acercarse lo mejor posible al valor 1000 mV pero no exceda el valor
1200 mV (ideal: 980 mV a 1020 mV).
82 Spectrosense, Instrucciones para el uso
Page 87

5 Apéndice
5.3 Alcance del suministro
Verifique la integridad del suministro directamente después de recibir el
equipo. Los dibujos en las listas de accesorios no tienen todas la misma
escala.
6.5501.100 Spectrosense 523 nm para Titrino incluye los siguientes accesorios:
Cantidad N° de ref. Descripción
1 6.1109.100
1 6.1236.020
1 6.1250.010 Espejo, camino de luz 22 mm
1 6.2116.020 Cable
1 6.2108.130 Cable Titrino – Spectro-
Spectrosense módulo de medida,
longitud de onda 523 nm
Manguito EN 14/15
sense
longitud 1,2 m
1 8.109.1488
6.5501.110 Spectrosense 610 nm para Titrino incluye los siguientes accesorios:
Cantidad N° de ref. Descripción
1 6.1109.110 Spectrosense módulo de medida,
1 6.1236.020
Spectrosense, Instrucciones para el uso 83
Instrucciones para el uso de la Spectrosense
longitud de onda 610 nm
Manguito EN 14/15
Page 88

5 Apéndice
Cantidad N° de ref. Descripción
1 6.1250.010 Espejo, camino de luz 22 mm
1 6.2116.020 Cable
1 6.2108.130 Cable Titrino – Spectro-
sense
longitud 1,2 m
1 8.109.1488
Instrucciones para el uso de la Spectrosense
6.5501.200 Spectrosense 523 nm para Titrando incluye los siguientes accesorios:
Cantidad N° de ref. Descripción
1 6.1109.100 Spectrosense módulo de medida,
longitud de onda 523 nm
1 6.1236.020
Manguito EN 14/15
1 6.1250.010 Espejo, camino de luz 22 mm
1 6.2116.020 Cable
1 6.2151.070 Cable Titrando – Spectrosense
longitud 1,2 m
1 8.109.1488
Instrucciones para el uso de la Spectrosense
84 Spectrosense, Instrucciones para el uso
Page 89

5 Apéndice
6.5501.210 Spectrosense 610 nm para Titrando incluye los siguientes accesorios:
Cantidad N° de ref. Descripción
1 6.1109.110 Spectrosense módulo de medida,
longitud de onda 610 nm
1 6.1236.020
1 6.1250.010 Espejo, camino de luz 22 mm
1 6.2116.020 Cable
1 6.2151.070 Cable Titrando – Spectrosense
1 8.109.1488
5.4 Opciones
Manguito EN 14/15
longitud 1,2 m
Instrucciones para el uso de la Spectrosense
N° de ref. Descripción
6.2117.020
6.2119.020
Bloque de alimentación
EU 220 V / 9 V DC
Bloque de alimentación
USA 110 V / 9 V DC
Spectrosense, Instrucciones para el uso 85
Page 90

5 Apéndice
5.5 Garantía y conformidad
5.5.1 Garantía
La garantía METROHM cubre cualquier defecto de fabricación o
material que pueda tener el aparato durante 12 meses, a partir de la
fecha de entrega y se reparará gratuitamente en nuestro taller. Sólo
el transporte correrá a cargo del cliente. En el caso de un servicio
diurno y nocturno la garantía sólo es válida hasta los 6 meses.
Cualquier control que no sea debido a defecto de material o fabricación deberá ser abonado, incluso durante el período de vigencia
de la garantía. En productos con componentes de fabricación externa, si dichos componentes constituyen la mayor parte del aparato, las condiciones de garantía dependen del fabricante exterior.
Para la garantía de la exactitud son válidos los datos técnicos dados en las instrucciones para el uso.
Con respecto a vicios en el material, construcción o diseño, el cliente no tiene derecho a una garantía, excepto en los casos mencionados arriba.
Si en el momento de la entrega el paquete está visiblemente dañado o si al desempaquetar el aparato se observan anomalías debidas al transporte, se debe informar inmediatamente a la agencia de
transportes o la oficina de correos responsable y redactar un acta
de los daños. En ausencia de un informe oficial de los daños no
nos hacemos responsables del pago de una indemnización.
Cuando se devuelvan equipos y sus accesorios, se deberá utilizar
el embalaje original siempre que sea posible.
Eso es particularmente importante cuando se trate de aparatos,
electrodos, cilindros de bureta y pistones de PTFE.
Antes de ser colocado entre virutas u otro material semejante, hay
que envolver cada una de las partes para protegerlas del polvo (para aparatos es necesario utilizar una bolsa de plástico). Si con el
pedido se recibe algún grupo constructivo abierto que sea sensible
a tensiones electrostáticas (p. ej.: interfase de datos, etc.) éstos se
deben devolver en su embalaje original de protección (p. ej.: bolsa
conductora de protección). (Excepción: los grupos constructivos
con fuente de tensión incorporada han de tener un embalaje de
protección no conductor.)
La garantía no cubre los daños ocasionados por un embalaje inadecuado o descuidado.
86 Spectrosense, Instrucciones para el uso
Page 91

5 Apéndice
5.5.2 Declaration of Conformity
This is to certify the conformity to the standard specifications for electrical
appliances and accessories, as well as to the standard specifications for security and to system validation issued by the manufacturing company.
Name of commodity
Spectrosense
Description A compact sensor for photometric titrations.
This instrument has been built and has undergone final type testing according to the standards:
Electromagnetic compatibility: Emission
IEC 61326, EN 55022/CISPR 22
Electromagnetic compatibility: Immunity
IEC 61326, IEC 61000-4-2, IEC 61000-4-3, IEC 61000-4-4, IEC 61000-4-5, IEC 61000-4-6,
IEC 61000-4-11, IEC 61000-4-14, NAMUR
CH-9101 Herisau/Switzerland
E-Mail info@metrohm.com
www.metrohm.com
Safety specifications
EN/IEC/UL 61010-1
It has also been certified by ElectroSuisse, a member of the International Certification Body (CB/IEC).
The instrument meets the requirements of the CE mark as contained in the EU directives 89/336/EEC and 73/23/EEC and fulfils the following specifications:
EN 61326 Electrical equipment for measurement, control and laboratory use – EMC requirements
EN 61010-1 Safety requirements for electrical equipment for measurement, control and laboratory
use
Metrohm Ltd. is holder of the SQS-certificate of the quality system ISO 9001 for quality assurance in
design/development, production, installation and servicing.
Herisau, January 17, 2005
D. Strohm Ch. Buchmann
Vice President Vice President
Head of R&D Head of Production
Responsible for Quality Assurance
Spectrosense, Instrucciones para el uso 87
Page 92

5 Apéndice
d
5.5.3 Quality Management Principles
Metrohm AG, CH-9101 Herisau, Switzerland
CH-9101Herisau/Switzerlan
E-Mail info@metrohm.com
Internet www.metrohm.com
Metrohm Ltd. holds the ISO 9001 Certificate, registration number 10872-02, issued by
SQS (Swiss Association for Quality and Management Systems). Internal and external audits are carried out periodically to assure that the standards defined by Metrohm’s QM
Manual are maintained.
The steps involved in the design, manufacture and servicing of instruments are fully
documented and the resulting reports are archived for ten years. The development of
software for PCs and instruments is also duly documented and the documents and
source codes are archived. Both remain the possession of Metrohm. A non-disclosure
agreement may be asked to be provided by those requiring access to them.
The implementation of the ISO 9001
quality system is described in Metrohm’s
QM Manual, which comprises detailed
instructions on the following fields of
activity:
Instrument development
The organisation of the instrument
design, its planning and the intermediate
controls are fully documented and
traceable. Laboratory testing accompanies all phases of instrument development.
Software development
Software development occurs in terms of
the software life cycle. Tests are
performed to detect programming errors
and to assess the program’s functionality in a laboratory environment.
Components
All components used in the Metrohm
instruments have to satisfy the quality
standards that are defined and implemented for our products. Suppliers of
components are audited by Metrohm as
the need arises.
Manufacture
The measures put into practice in the
production of our instruments guarantee
a constant quality standard. Production
planning and manufacturing procedures,
maintenance of production means and
testing of components, intermediate and
finished products are prescribed.
Customer support and service
Customer support involves all phases of
instrument acquisition and use by the
customer, i.e. consulting to define the
adequate equipment for the analytical
problem at hand, delivery of the equipment, user manuals, training, after-sales
service and processing of customer
complaints. The Metrohm service organisation is equipped to support customers in implementing standards such
as GLP, GMP, ISO 900X, in performing
Operational Qualification and Performance Verification of the system components or in carrying out the System
Validation for the quantitative determination of a substance in a given matrix.
88 Spectrosense, Instrucciones para el uso
 Loading...