

Page 1

CH-9101 Herisau/Switzerland
Phone +41 71 353 85 85
Fax +41 71 353 89 01
CompuServe 100031,3703
http://www.metrohm.com
Metrodata
726 TP Backup
Data Backup for the 726 Titroprocessor
6.6026.000 Version 1.0
for MS-Windows
TM
Instructions for Use
8.726.8007 01/97 dm
Page 2

Contents
1. Introduction ............................................................................................... 2
2. Installation and setup ............................................................................... 3
2.1 System requirements ................................................................................... 3
2.2 Installation of the program ........................................................................... 4
2.3 Configuration of the 726 TP Backup program ............................................. 4
3. Data transfer 726 Titroprocessor – PC .................................................... 8
3.1 Backing up the 726 Titroprocessor files ...................................................... 8
3.2 File names.......................................................................................................8
3.3 The file backup................................................................................................9
3.4 Automated data transfer ............................................................................ 10
3.5 Copying files from the PC to the 726 Titroprocessor ............................... 11
3.6 Receiving reports......................................................................................... 13
726 TP Backup
4. Viewing ASCII files .................................................................................. 15
4.1 Viewing files (View) .................................................................................... 15
4.2 Printing files (Print)...................................................................................... 15
4.3 Use screen fonts ........................................................................................ 15
5. Details regarding operation .................................................................... 16
5.1 Saving files ................................................................................................. 16
5.2 The session list .......................................................................................... 16
5.3 TP Backup status ....................................................................................... 19
5.4 The interface .............................................................................................. 19
5.5 Default settings .......................................................................................... 20
6. Troubleshooting ...................................................................................... 22
7. License terms .......................................................................................... 25
8. Index ........................................................................................................ 26
8.726.8007 Instructions for Use 1
Page 3

726 TP Backup
1 Introduction
The program offers the following possibilities:
Ÿ Methods, determinations, sample silos and access control files can be saved
on the PC and reloaded on the 726 Titroprocessor or the data card. These binary files can be sent back to the Titroprocessor to be viewed and edited.
Ÿ Determinations can also be saved automatically to the computer right after
completion, by using the ‘auto save’ function (Destination ‘RS232 x’).
Ÿ The built-in terminal program can be used for receipt and storage of individual
reports on the PC.
The files of the 726 Titroprocessor are transferred to the PC in the background,
work with the computer can continue normally. A small control box informs you
of the status of the transfer.
The 726 TP Backup version 1.0 is designed for the transfer (sending and receipt)
of data with the 726 Titroprocessor and the 5.726.0010 (or higher) program version.
Switch to the dialog page Configuration of the 726 Titroprocessor to view the
program version.
Please refer to the 8.726.1003 Instructions for Use for operation of the 726 Titroprocessor.
2 8.726.8007 Instructions for Use
Page 4

2 Installation and setup
2.1 System requirements
Computer IBM-compatible PC
Operating system DOS with Windows 3.1x, Windows 95 or NT 4.0
Mouse required
Memory min. 4 MB RAM
RS232 interface for the connection to the 726 Titroprocessor
Connecting cable 6.2125.060
726 TP Backup
min. 2 MB free storage on the hard disk,
disk drive 3½"
possibly 6.2125.010 Adapter
(adapter cable 25-pin to 9-pin)
726 Titroprocessor Program version 5.726.0010 or higher
Warning:
Before the RS connecting cable is plugged in or disconnected, both the
PC and the 726 Titroprocessor must be switched off. Connection with
instruments switched on could lead to damage!
8.726.8007 Instructions for Use 3
Page 5
726 TP Backup
2.2 Installation of the program
Windows 3.1x
Insert the installation disk of 726 TP Backup in the 3½“disk drive.
Start Windows 3.1x if you have not already done so.
Ÿ In the Windows Program Manager, choose the Run command from the File
menu.
Windows shows the dialog box Run.
Ÿ Enter a:setup in the Command Line box, press the Enter key.
Ÿ The ‘InstallShield Wizard’ will then guide you through the setup process.
Just follow the instructions on the screen.
Windows 95 / NT 4.0
Insert the installation disk of 726 TP Backup in the 3½“disk drive.
Start Win95/NT if you have not already done so.
Ÿ Click the Start button on the task bar and chose the Run option in the Start
menu.
Windows shows the dialog box Run.
Ÿ Enter a:setup in the Command Line box, press the Enter key.
Ÿ The ‘InstallShield Wizard’ will then guide you through the setup process.
Just follow the instructions on the screen.
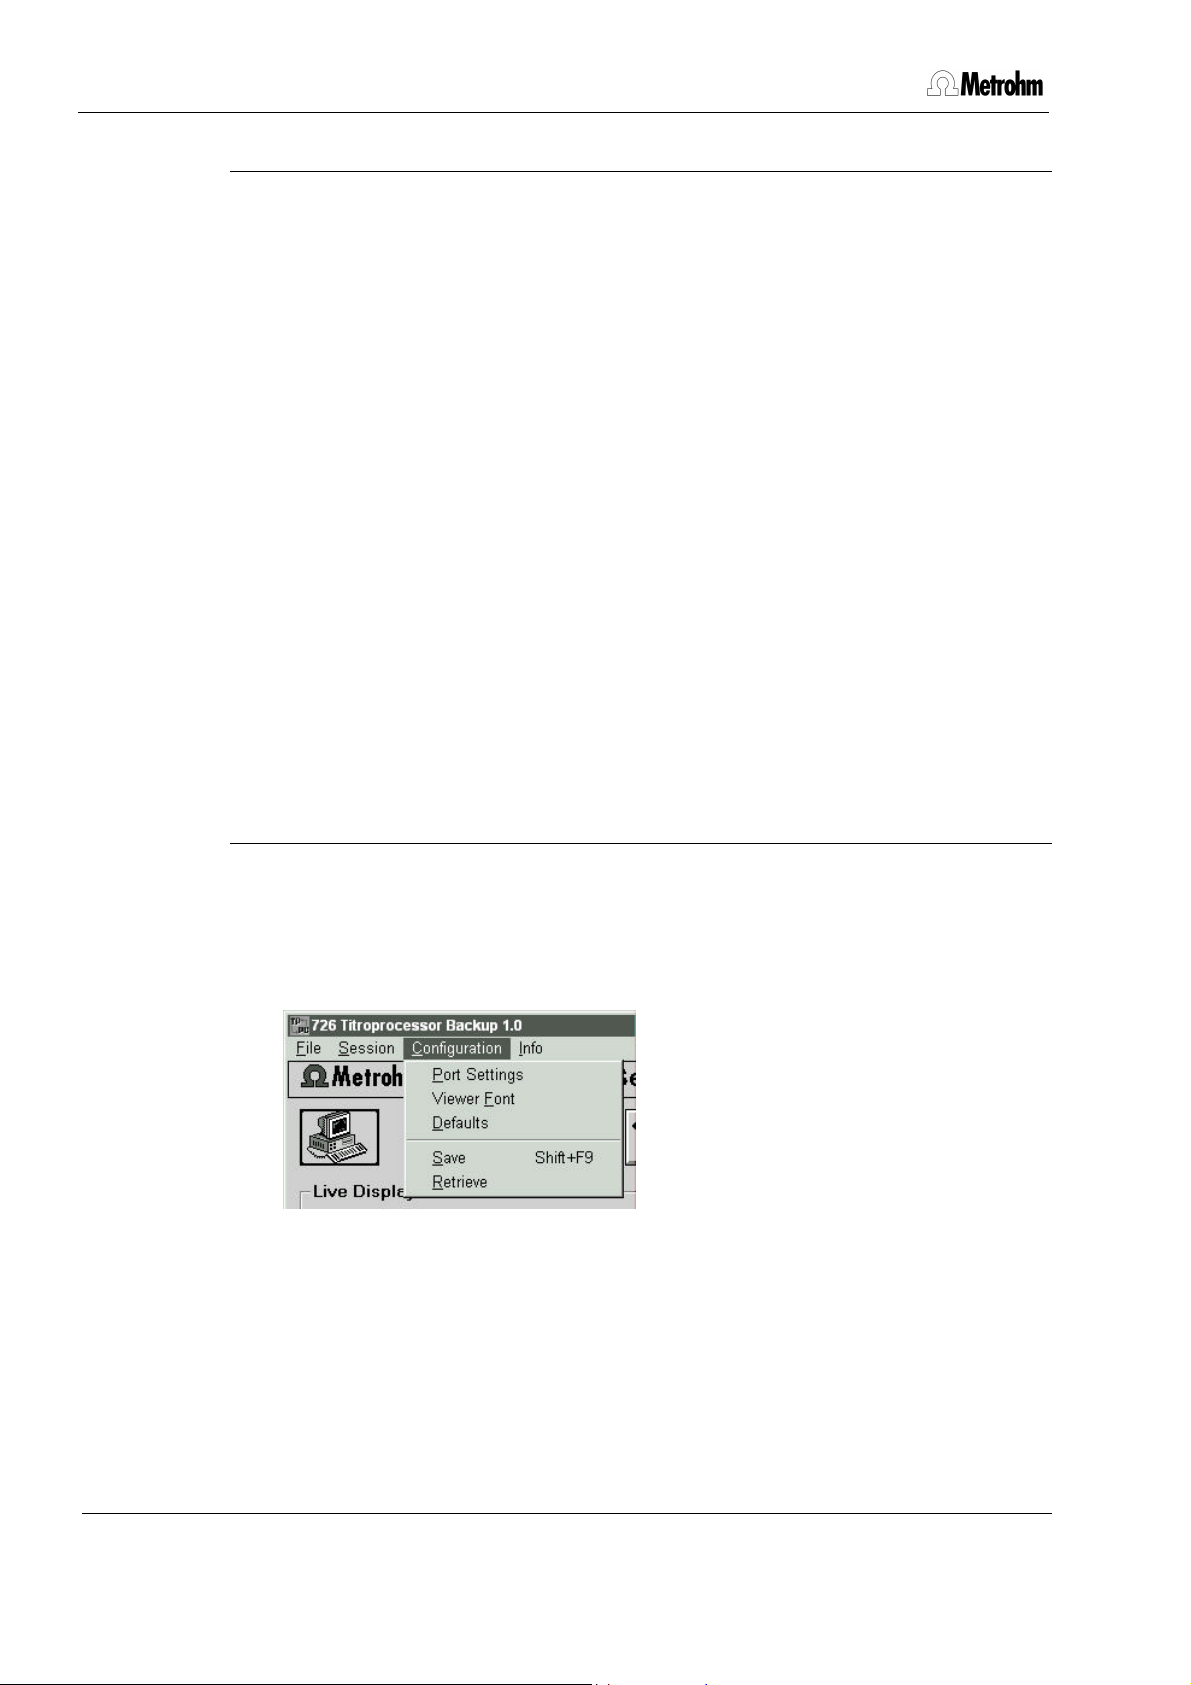
2.3 Configuration of the 726 TP Backup program
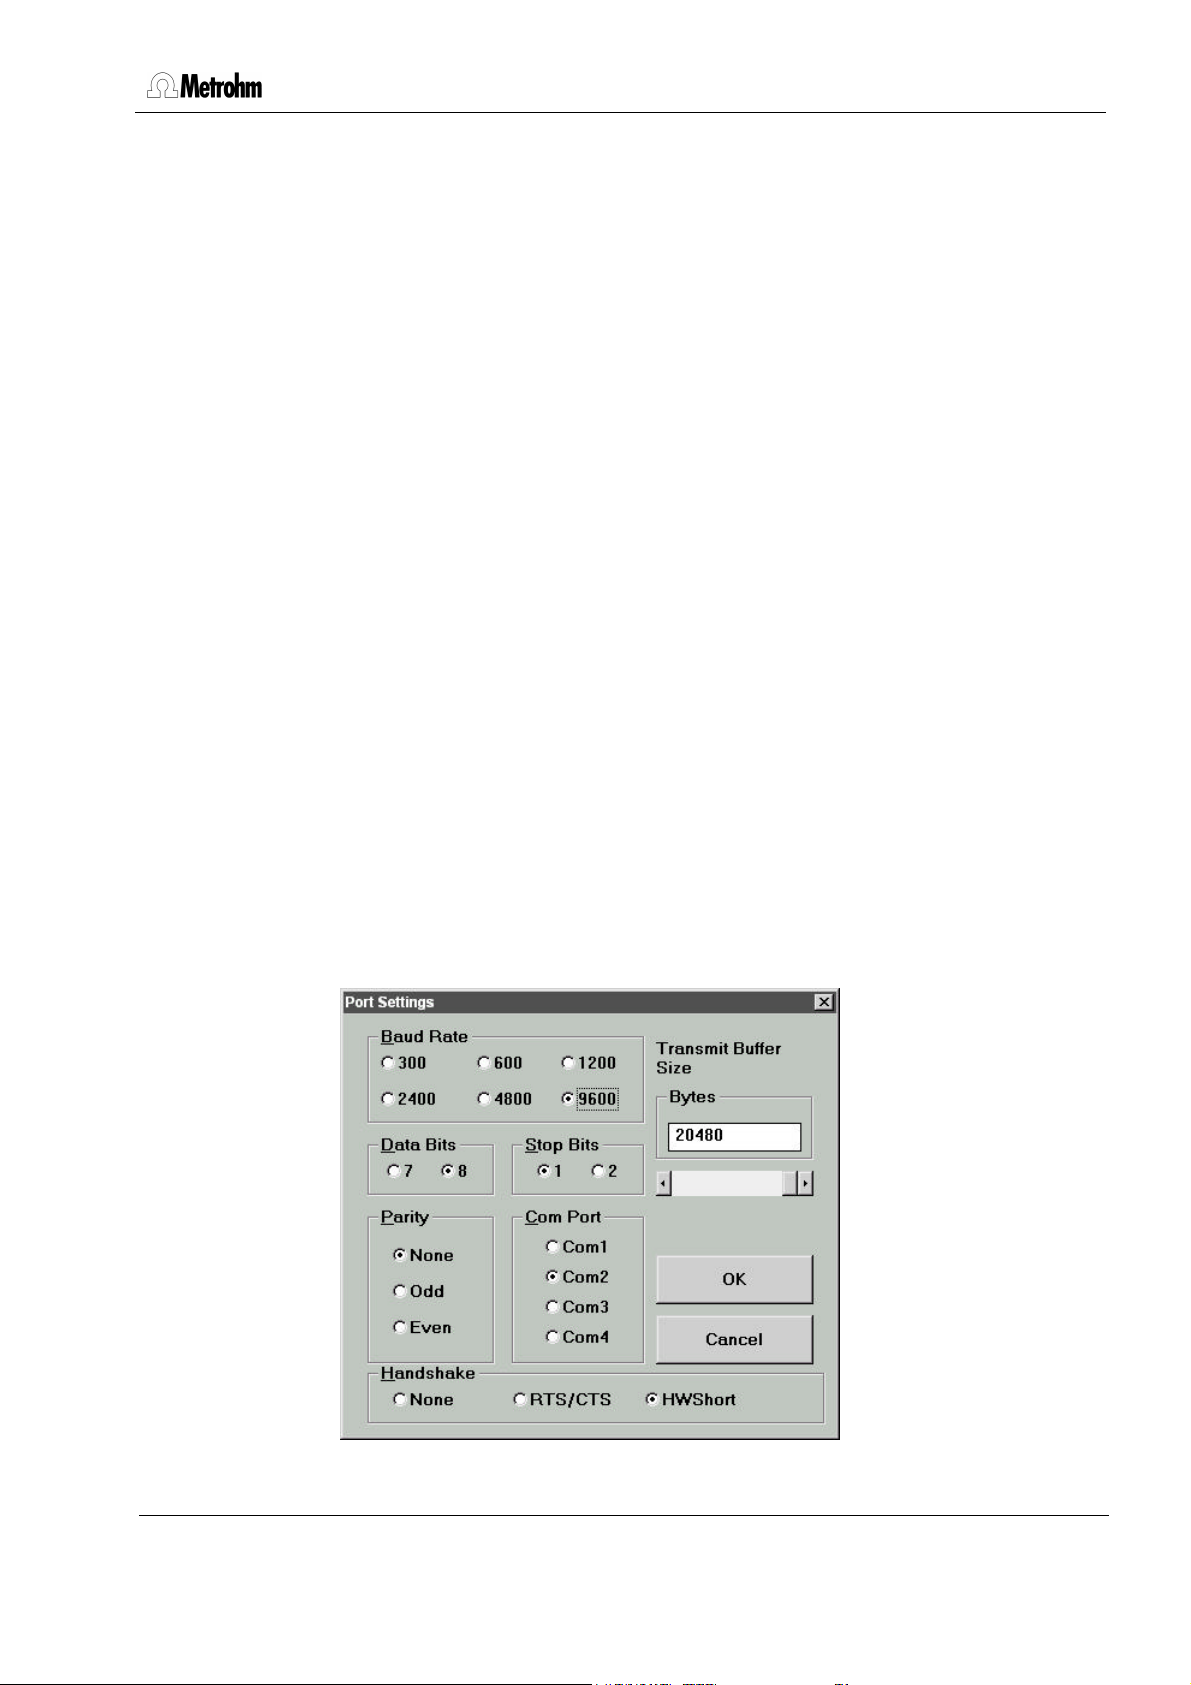
Port settings
Start the 726 TP Backup program and open the Port Settings menu option in
the Configuration menu.
Switch on the 726 Titroprocessor. Switch to the dialog page Config. and then
Interfaces.
Warning:
The RS232 interface of the 726 Titroprocessor (RS232 Interface.1 or Interface.2) and the current RS232 interface of the computer must have the
same configuration.
4 8.726.8007 Instructions for Use
Page 6
726 TP Backup
The following are suggested values:
Baud rate 9600
Data bits 8
Stop bit(s) 1
Parity none
Handshake HWshort
Set the following parameters on the Titroprocessor if you have the PC connected to the 726’s RS232 Interface 1.
ЪДДД Configuration: Interfaces ДДДДД¿
³ ³
³ RS232 Ifc.1 Ifc.2 ³
³ ДДДДДДДДДДДДДДДДДДДДДДДДДДДДДДДДД ³
³ Baud rate 9600 9600 ³ <— Data transfer parameter
³ Data bit 8 8 ³ <— "
³ Stop bit 1 1 ³ <— "
³ Parity none none ³ <— "
³ Handshake HWshort HWshort ³ <— "
³ Receive mode off off ³ <— must be set off for file backup
³ ³
³ Balance none none ³
³ Printer none none ³
³ ³
³ Communication Int. 1 ³ <— RS232 interface
³ Commun. mode keyCTRL ³ <— Communication mode
³ ³
³ Internal printer on ³
³ ДДДДДДДДДДДДДДДДДДДДДДДДДДДДДДДДД ³
³ Auto form feed off ³
³ ³
АДДДДДДДДДДДДДДДДДДДДДДДДДДДД Quit ДЩ
Set the following parameters on the TP Backup program if you have the 726
connected to the PC’s COM2 interface.
8.726.8007 Instructions for Use 5
Page 7

726 TP Backup
To save the selected settings in the 726 TP Backup program, first confirm the
settings of the dialog box Port settings by clicking OK. Finally, either the key
combination Shift + F9 can be pressed or the Save command chosen from the
Configuration menu.
Important Note
File transfer from PC to Titroprocessor may cause problems with some Personal
Computers that are equipped with high speed serial interfaces. If you experience
problems with file transfer set the PC’s transmit buffer to minimal size or switch
off the interface’s FIFO buffer.
Switch off the FIFO buffer of the serial interface with Windows 3.x as follows:
Start Sysedit.exe or Notepad.exe from the accessories window and open the
System.ini file (must be present in the C:\Windows directory). Search the
[386Enh] section and modify the COMxFIFO entry to ‘COMxFIFO=0’ (x=1 or
2). Save the system.ini file, close the editor application and restart Windows.
Modify the transmit buffer for Windows 95 as follows:
Click Start on the task bar and then – Settings – Control panel – System –
Device Manager – Ports – COMx – Properties – Port settings – Advanced
(COMx=COM1 or COM2)
Put the transmit buffer to minimal size. Quit the Control panel and restart Windows.
6 8.726.8007 Instructions for Use
Page 8
726 TP Backup
Viewer font
You may choose your own font for the data display in the terminal window by
clicking the Viewer font command in the configuration menu.
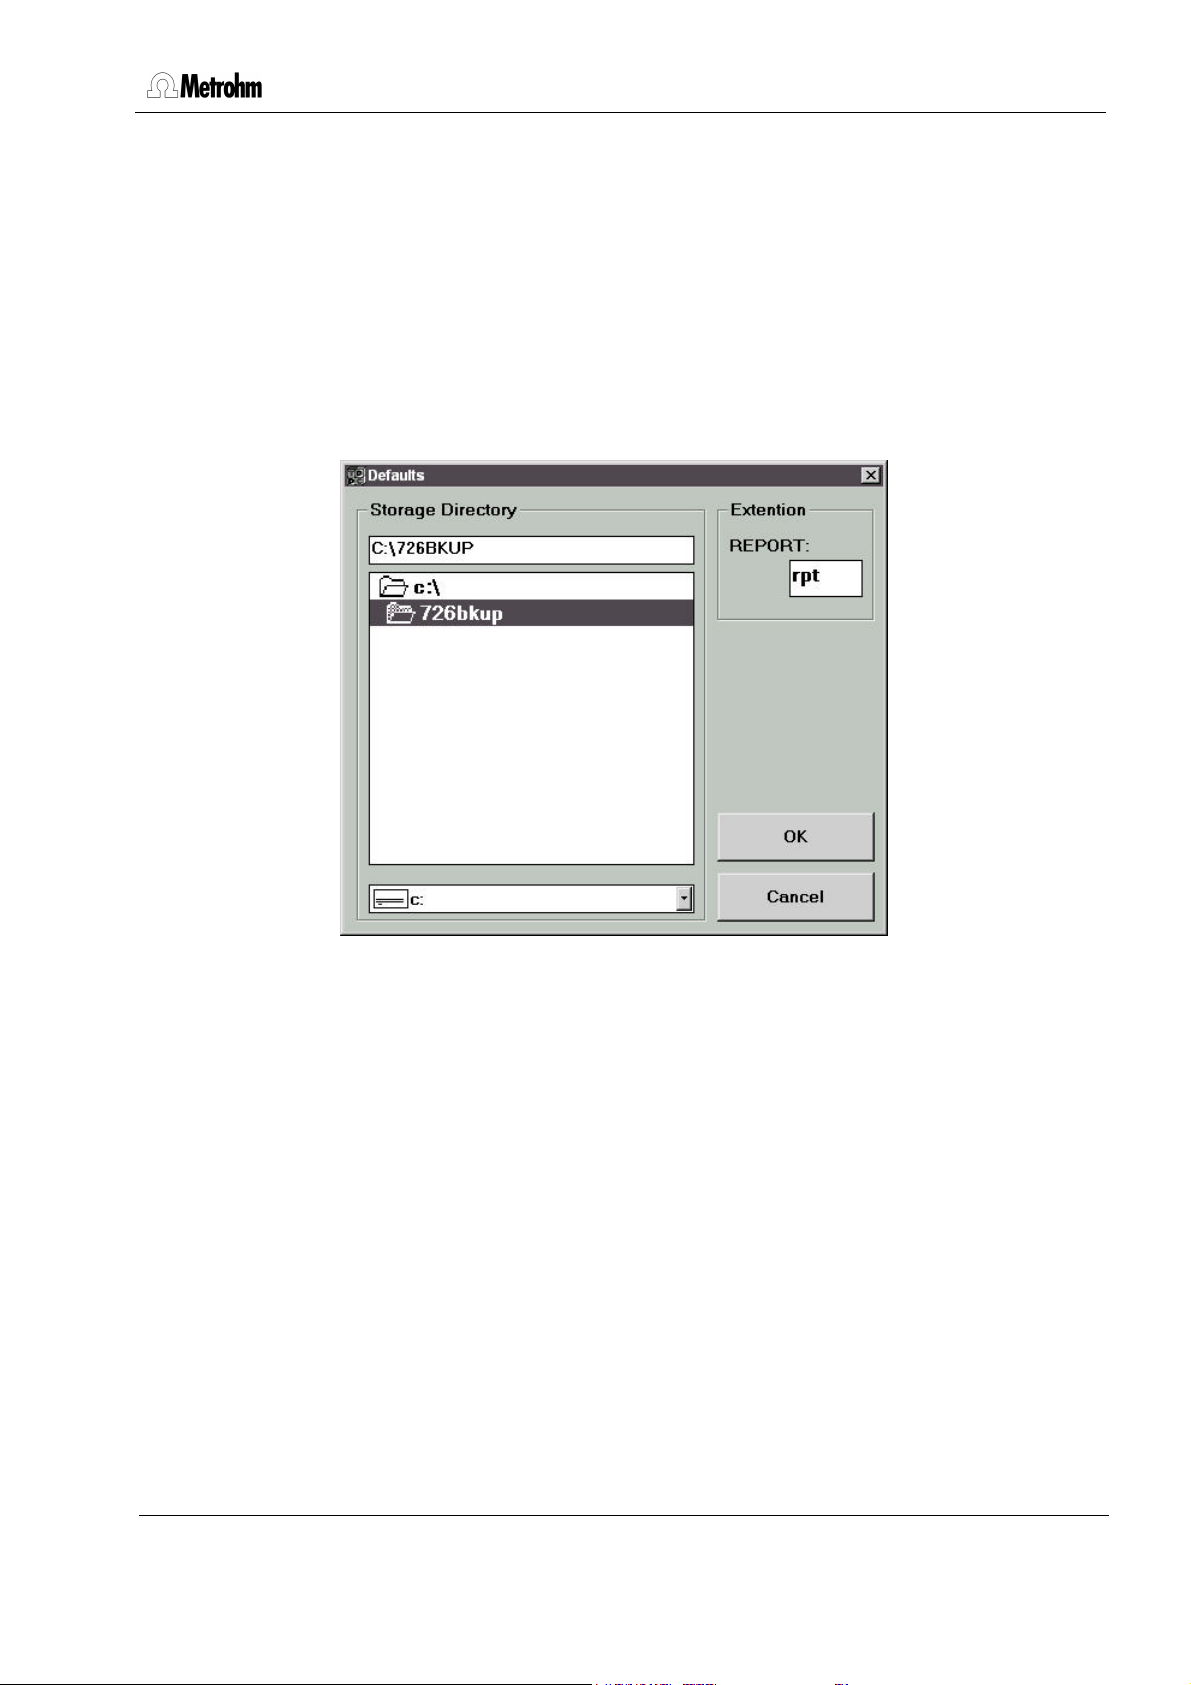
Defaults
By clicking on the Defaults command in the configuration menu you may define the directory to store the Titroprocessor’s binary files in. It is also possible to
define a default file name extension for report files.
Save / Retrieve
The configuration settings can be saved and retrieved. The 726bkup.ini file
contains these settings and must not be deleted or modified manually.
8.726.8007 Instructions for Use 7
Page 9

726 TP Backup
3 Data transfer 726 Titroprocessor – PC
3.1 Backing up the 726 Titroprocessor files
It is good practice to save the contents of the 726 Titroprocessor on a PC from
time to time using the 726’s File manager. The following files can be transferred:
• Determinations ( ∗.dtm or any file name )
• Methods ( ∗.mth )
• Sample silos ( ∗.slo )
• Access configuration ( ∗.acf )
Either single, several or all files of a storage location can be backed up.
3.2 File names
In contrast to DOS computers, the files on the 726 Titroprocessor can be freely
named. In particular, characters such as ?, ∗ or + and others can be used.
Moreover, the instrument distinguishes between uppercase and lowercase letters.
However, when working with 726 TP Backup, these options should not be used
for the following reasons:
• If the 726 Titroprocessor file name contains characters that are not permitted
by DOS, the file will not be transferred correctly and an error message will be
displayed.
• If files of the 726 Titroprocessor whose names differ only by uppercase or
lowercase notation (e.g. TEST.mth and Test.mth) are transferred to the PC,
only the file last sent will be stored. DOS does not distinguish between uppercase and lowercase notation. The TEST.mth and Test.mth files are therefore regarded as identical and will be overwritten without warning.
Caution:
With the 726 Titroprocessor always use file designations that are valid
under DOS and unambiguous. Do not use special characters.
8 8.726.8007 Instructions for Use
Page 10

726 TP Backup
3.3 The file backup
With the RS232 cable attached to both the PC and the 726 Titroprocessor, start
726 TP Backup and click the Receive arrow or choose the Receive command
from the File menu.
Instead of the "Receive" and "Send" arrows, the "Stop" icon appears.
In the 726 Titroprocessor switch to the File manager (softkey [File manager] on
the Main Page) and choose a storage location (softkey [Change storage]).
Here, the desired files can be marked for file operations. Use the softkeys
[Un/Mark] or [Un/Mark all] to mark the files you wish to backup. You may either
use the [Select] softkey of the second softkey list (softkey [ >> >> ]) to apply
specific file selection filters.
ЪДДДДДДДВДДДДДДДВДДДДДДД¿ ЪДДДДДДДВДДДДДДДВДДДДДДД¿ ЪДДДДДДДВДДДДДДДВДДДДДДД¿
³Change ³Change ³Un/Lock³ ³ Load ³ Copy ³Delete ³ ³Un/Mark³Un/Mark³ >> ³
³view ³storage³ file ³ ³ from ³ to ³ ³ ³ ³all ³ >> ³
АДДДДДДДБДДДДДДДБДДДДДДДЩ АДДДДДДДБДДДДДДДБДДДДДДДЩ АДДДДДДДБДДДДДДДБДДДДДДДЩ
ЪДДДДДДДВДДДДДДДВДДДДДДД¿ ЪДДДДДДДВДДДДДДДВДДДДДДД¿ ЪДДДДДДДВДДДДДДДВДДДДДДД¿
³Send ³Receive³ ³ ³ Sort ³Select ³ ³ ³ ³ ³ >> ³
³to RS ³from RS³ ³ ³ ³ ³ ³ ³ ³ ³ >> ³
АДДДДДДДБДДДДДДДБДДДДДДДЩ АДДДДДДДБДДДДДДДБДДДДДДДЩ АДДДДДДДБДДДДДДДБДДДДДДДЩ
The transfer is started with the softkey [Send to RS] and RS232 Intface 1 (or
RS232 Intface 2).
If the transfer is at an end or if you wish to terminate the connection, either click
the "Stop" icon or choose Stop from the File menu.
All transferred files with the necessary additional information are listed below the
live display in a table ( → Session List).
8.726.8007 Instructions for Use 9
Page 11

726 TP Backup
3.4 Automated data transfer
Determinations can be sent to the computer automatically.
As the 726 TP Backup program works completely in the background, determinations can be saved continuously without blocking the computer for other applications.
Connect the PC and 726 Titroprocessor, switch on both instruments and start
the 726 TP Backup program.
To set up the connection, click Receive (or choose the Receive command
from the File menu).
On the Main page of the 726 Titroprocessor, modify the following settings:
Auto save Auto save 'on''on'
Destination Destination 'RS232 1' or 'RS232 2''RS232 1' or 'RS232 2'
The determination data are now sent to the PC after completion of the determination.
10 8.726.8007 Instructions for Use
Page 12

726 TP Backup
3.5 Copying files from the PC to the 726 Titroprocessor
The 726 Titroprocessor can send both binary and pure text files (ASCII). However, it can receive only binary data in the special format of the 726 Titroprocessor.
Warning:
Never try to edit binary files on the PC. Each of these files is checked
exhaustively for integrity during transfer. If a file is changed, an error
message is displayed as soon as you try to transfer it and the file cannot
be transferred correctly to the 726 Titroprocessor!
Switch off both PC and 726 Titroprocessor and connect them with the RS232
cable. Switch on both instruments. Switch to the File manager of the 726 Titroprocessor and choose the desired storage location. Start Windows and 726 TP
Backup on the PC.
The files to be transferred must first be added to the Session List. This is done
either
• by clicking Select (choose the Select command from the Files menu). Se-
lect the files you wish to transfer by clicking with the mouse and confirm the
selection with OK,
or
• by opening the dialog box "Select File(s)" as described above and then fill-
ing in the "File Name" box accordingly. For example, to select all methods in
a directory, enter ∗∗.mth and confirm with OK,
or
• by opening an existing Session List (call up the Open option from the Ses-
sion menu). Use the mouse to select a file in the Session List that you wish to
transfer and choose the Put in queue command from the File menu or use
the key combination Ctrl + P. The file so selected will be appended to the
end of the Session List.
The selected files are not prepared for transfer until the program has checked
whether they have the correct format for the 726 Titroprocessor. If the file is acceptable, "In queue" appears in the Status column of the Session List. If the file is
unacceptable, "Rejected" appears. These files are not transferred.
You can remove wrongly selected files from the Session List by selecting the
file in question with the mouse and clicking Remove (or choose the Remove
command from the File menu).
8.726.8007 Instructions for Use 11
Page 13

726 TP Backup
Copying files
In the 726 Titroprocessor switch to the File manager and choose a storage location (softkey [Change storage]). Press the softkey [Receive from RS] and
select an interface (RS232 intface1 or RS232 intface 2).
On the PC click the Send icon (or choose the Send command from the
File menu).
The program now prompts you to ensure that the 726 Titroprocessor is ready to
receive. Confirm the readiness to receive with OK. The files are now transferred.
Every correctly transferred file is given the status "Sent OK".
12 8.726.8007 Instructions for Use
Page 14

726 TP Backup
3.6 Receiving reports
With the 726 TP Backup program it is possible to receive all reports (but not
curves) of a determination. In contrast to binary files, reports – actually pure
printer reports – must be received with the terminal program as they have neither
checksums nor special headers that allow a check on correct transfer.
Start 726 TP Backup and choose the Terminal command from the Session
menu. The following window appears on your screen.
In contrast to the normal Receive command, in the terminal mode the file is first
received and then saved, automatic file naming is not possible.
Click Receive to set up the connection to the 726 Titroprocessor. Stop ap-
pears instead of the Receive icon.
The communication mode of the 726 Titroprocessor must be set to ‘keyCTRL’
or ‘LIMS’ to enable transmission of reports. Switch to the dialog page Config. /
Interfaces to modify the corresponding setting.
Reports that you wish to be sent from the 726 Titroprocessor to the PC must be
set up as follows:
ЪДДД * Report ДДДДДДДДДДДДДДДДДДДДДДДДДДДДДДДДДДДДДД¿
³ ³
³ for Type Specification print send ³
³ ДДДДДДДД ДДДДДДДДДДДДД ДДД ДДД ³
³ Mode *ShrtRes no yes ³
³ SmplData no yes ³
³ no no ³
8.726.8007 Instructions for Use 13
Page 15

726 TP Backup
If a report has to be reproduced manually and saved on a PC, press the
<PRINT> key on the Titroprocessor’s keyboard, select the desired report type
and press the [Send] softkey.
ЪДДДДДДДВДДДДДДДВДДДДДДД¿
³ ³ Send ³ Print ³
³ ³ ³ ³
АДДДДДДДБДДДДДДДБДДДДДДДЩ
Reports are sent with a leading report label, such as ‘fdr (‘full determination
results’) or ‘sd (‘sample data’) to identify the report type. The end of a single
report is easy to recognize by the 'end tag.
Multiple reports may be transferred and saved in a single file after termination of
the data transmission (click STOP)). Click Save, select the appropriate directory
and assign a file name. Reports that are received may be printed directly.
14 8.726.8007 Instructions for Use
Page 16

4 Viewing ASCII files
4.1 Viewing files (View)
The reports generated by the 726 Titroprocessor can be opened for viewing,
saved under different file names and printed out.
Choose the Open command from the File menu.
The entire ASCII file can be viewed using the scroll bars. It is not possible to edit
the file.
4.2 Printing files (Print)
It is also possible to print out entire files or selected blocks directly from the 726
TP Backup program.
726 TP Backup
If a file is loaded in the Terminal window, click Print (or choose the Print com-
mand from the File menu).
The following dialog window appears:
4.3 Use screen font
If this box is inactive, the reports are printed out using the standard font of the
printer.
Activate this box if you wish the printer to print with the screen font.
To change the font, choose the Viewer font command from the Configuration
menu. Select the desired font and font size and confirm with OK. If required,
save the font in the Configuration menu with the Save command.
8.726.8007 Instructions for Use 15
Page 17

726 TP Backup
5 Details regarding operation
5.1 Saving files
Except in terminal operation, the received files are automatically stored in the
defined directory (→ Configuration).
Reports (ASCII files) can be saved in a freely selectable directory.
5.2 The Session List
The Session List provides information on the transferred files. While it is not
necessary to save such a list, this may be helpful for managing files.
Example of a Session List
Files with the format designation "Binary" can be sent back to the 726
Titroprocessor. Use the scroll bar to view the directory of the individual files.
Saving the Session List
If necessary, the Session List can be saved. To do this, choose either Save or
Save as from the Session menu. With the Save command, the Session List is
saved under the automatically generated file name ("Current Session: "). If you
wish to assign a name yourself, choose Save as.
16 8.726.8007 Instructions for Use
Page 18

726 TP Backup
Each time 726 TP Backup is started, a new Session List is opened. The file
name comprises:
the date (for example, 14jan97.) and the extension .s0 to .s99
to be able to distinguish different Session Lists during a day in a particular
directory.
Opening a Session List
To open a new Session List, you can choose the New command from the
Session menu. If the previous Session List in the current directory has already
been saved, the number of the extension is automatically incremented by 1.
With the Open command from the Session menu, existing Session Lists can be
opened for editing.
Editing a Session List
Files can be added to or removed from a Session List or the status can be
changed (received files can be prepared for transfer).
To include stored files in the Session List, click Select, select the desired files
by clicking them and confirm with OK. The files are now listed in the Session
List. The status is "In queue", the file is ready for transfer.
To remove a file from the Session List, select it and click the Remove icon or
press Ctrl + M (from the File menu: Remove). Files removed by mistake can
be reinserted using Select.
8.726.8007 Instructions for Use 17
Page 19

726 TP Backup
Status messages and their meaning
Received OK The file has been correctly transferred from the 726 Titroprocessor
and saved on the PC.
Not received Although the file has been sent by the 726 Titroprocessor, it could
not be received or saved properly on the PC, e.g. because of an
inadmissible file name.
In queue File in the binary format of the 726 Titroprocessor, ready to be
transferred.
Sent OK The file has been correctly transferred from the PC to the 726
Titroprocessor.
Rejected A file format has been detected that cannot be sent to the 726
Titroprocessor, e.g. an ASCII file.
Format
Binary File in the format of the 726 Titroprocessor, can be reloaded.
ASCII Designation for a report, cannot be reloaded. It can be viewed in
726 TP Backup or edited with other programs (e.g. word
processors).
– File that cannot be assigned to any of the formats described above.
18 8.726.8007 Instructions for Use
Page 20

5.3 TP Backup status
The 726 TP Backup program is able to work in the background. The small
window TP Backup Status remains in the foreground and informs you of the
status of the Backup program. As soon as a file is being transferred, the Usage
line shows the file name and the percentage occupancy of the transmit buffer.
"Idle" tells you that the program is ready to receive.
If "Error" appears instead, the connection in the Backup program must be
terminated (Stop). Ensure that the 726 Titroprocessor is no longer sending data
(if you abort the transfer, it may be necessary to press the softkey [Reset
RS232 1] (possibly RS232 2) on the Configuration / Interfaces page.
Reset the Backup program to the receive mode and start the transfer from the
726 Titroprocessor.
726 TP Backup
5.4 The interface
This window is used to set the configuration for the RS232 interface. Open the
window by choosing the Port Settings command from the Configuration
menu.
8.726.8007 Instructions for Use 19
Page 21

726 TP Backup
Transmit Buffer
Size
Determines the size of the transmit buffer. Any value between
1024 and 20480 bytes can be entered. Select a relatively large
buffer if computer-bound operations are being performed in
parallel to the 726 TP Backup program. If the buffer size is too
small and the other program requires too much computing
power, the 726 Titroprocessor may output the error message
"Send timeout". In such a case, wait until the PC is again "free"
and then press r r for "retry" on the 726 Titroprocessor. The
transfer will be continued.
Handshake With the 6.2125.060 Connecting cable, work should be
performed only with HWshort.
If you wish to accept the changes, click OK. To return to the program without
saving the changes, click Cancel.
Select Save from the Configuration menu to save the changes.
5.5 Default settings
In this window, the storage directory and the file name extensions for the ASCII
files (Reports) are defined. Open the window by selecting the Defaults
command from the Configuration menu.
20 8.726.8007 Instructions for Use
Page 22

726 TP Backup
Storage Directory Storage directory for the 726 Titroprocessor binary files. If you wish to
store the Session List file in the same directory, a new Session List must
be opened after the modified directory has been confirmed with OK.
Report File name extension for the ASCII files.
If you wish to accept the settings, click OK. To return to the program without
changes, click Cancel.
Choose Save from the Configuration menu to save the changes.
To access the stored settings after changing the default settings, choose the
Retrieve command from the Configuration menu.
8.726.8007 Instructions for Use 21
Page 23

726 TP Backup
6 Troubleshooting
Should problems arise during operation of the 726 TP Backup program, please
first check whether
• the correct cable is used (see section 2.1)
• the cable is plugged into the correct socket (see section 2.3)
• the RS232 interface configurations on the computer and the
726 Titroprocessor match exactly.
If the connection is terminated during a transfer, ensure that both the PC and the
726 Titroprocessor can no longer send. In the case of the 726 Titroprocessor,
switch to the dialog page Config. / Interfaces and press – possibly several
times – the softkey [Reset RS232 1] or [Reset RS232 2].
In what follows, several of the most important error messages and warnings are
described.
On starting
It is not possible to start the program twice. Confirm the message with OK.
This message appears if the 726bkup.ini file does not exist. Confirm this
message with OK, the program starts with the default settings. Set the
configuration to suit your requirements (see section 2.3) and save the settings
using the Save command in the Configuration menu.
22 8.726.8007 Instructions for Use
Page 24

726 TP Backup
This message appears if the 726bkup.ini file has been found, but the entries
are faulty. The program starts with the default settings. Set the configuration to
suit your requirements (see section 2.3) and save the settings with the Save
command in the Configuration menu.
Start of the transfer (receive)
This message appears if the COM interface of the PC is either already in use
(e.g. mouse) or a connection cannot be established. Ensure that the connecting
cable is plugged into the correct socket or change the settings in the
Configuration menu in the dialog box Port Settings.
Do not forget to save the altered settings (Save command from the
Configuration menu).
Start of the transfer (send)
This message appears if the serial interface of the PC is either already in use
(e.g. mouse) or a connection cannot be established. Ensure that the connecting
cable is plugged into the proper socket or change the settings in the
Configuration menu in the dialogue box Port Settings.
Do not forget to save the altered settings (Save command from the
Configuration menu).
8.726.8007 Instructions for Use 23
Page 25

726 TP Backup
During the transfer (receive)
This message appears if no handshake is used and the transmit buffer is too
small, for example because the PC cannot process (save) the incoming data at
the present time. Confirm the message with OK, the transfer will be terminated.
The transfer must also be aborted on the 726 Titroprocessor. To do this, switch
to the dialog page Config. / Interfaces and press – possibly several times – the
softkey [Reset RS232 1] or [Reset RS232 2].
It is preferable to work with a handshake. If this is not possible for some reason
or other, you should increase the size of the transmit buffer and ensure that the
PC is free to receive the data during the transfer.
This message can have two causes: either the transfer was started at the
726 Titroprocessor before the PC was set to receive or inadmissible reports were
sent.
Terminate the transfer (Stop) and reset the RS232 interface of the
726 Titroprocessor. To do this, switch to the dialog page Config. / Interfaces
and press – possibly several times – the softkey [Reset RS232 1] or [Reset
RS232 2].
• In a transfer from the 726 Titroprocessor to the PC, ensure that you do not
send data from the 726 Titroprocessor before you have clicked Receive.
24 8.726.8007 Instructions for Use
Page 26

7 License terms
This software is licensed to the purchaser for use on only one computer at a
time. You may transfer the software to another computer provided the use of the
software on the original computer is terminated. The use of the software in a
computer network, file server or virtual disk is a violation of the license granted.
We authorize you to make one backup or archive copy of the software for the
sole purpose of protecting your investment from loss. You may not make copies
of the manual nor alter or modify the software. The license and your right to use
this software automatically terminate if you violate any part of the license.
Return the enclosed registration card to us as soon as possible so that we can
register you as an official purchaser of the software. Only registered purchaser
will receive any program updates at a special price.
If you have any questions concerning this license, please write to:
726 TP Backup
Metrohm Ltd.
Oberdorfstrasse 68
CH-9101 Herisau
Switzerland
8.726.8007 Instructions for Use 25
Page 27

726 TP Backup
8 Index
– ....................................................................... 18
*.acf ................................................................... 8
*.cnf ..................................................................... 8
*.dtm .................................................................. 8
*.mth .................................................................. 8
*.rck ..................................................................... 8
*.slo .................................................................... 8
<PRINT> ......................................................... 14
726 Titroprocessor ............................... 2, 4, 8, 11
726bkup.ini ............................................ 7, 22, 23
A
Access configuration ......................................... 8
ASCII .................................................... 11, 15, 18
ASCII files ............................................. 15, 16, 20
Auto save ..................................................... 2, 10
Automated data transfer .................................. 10
B
Backing up ......................................................... 8
Backup status .................................................. 19
Bad statement .................................................. 23
Baud rate ........................................................... 5
Binary ......................................................... 16, 18
Binary data ....................................................... 11
Binary files ................................................ 2, 7, 11
Buffer size ........................................................ 20
C
Change storage ........................................... 9, 12
COM ............................................................... 5, 6
Commun. mode ................................................. 5
Communication Int. ............................................ 5
Communication mode ....................................... 5
Configuration ..................................... 2, 4, 15, 19
Configuration file ................................................ 8
Connecting cable ............................................... 3
Connection ............................................. 9, 10, 13
Contents ............................................................. 1
Copying files .............................................. 11, 12
Ctrl + M ........................................................... 17
DOS ............................................................... 3, 8
E
Editing a Session List ....................................... 17
Error ........................................................... 19, 24
F
FIFO ................................................................... 6
File backup ........................................................ 9
File Format ....................................................... 18
File name ........................................... 7, 8, 11, 15
File name extension ......................................... 17
Format .............................................................. 18
Framing error ................................................... 23
H
Handshake ............................................. 5, 20, 24
Hard disk ............................................................ 3
HWshort ....................................................... 5, 20
I
Idle ................................................................... 19
In queue ..................................................... 17, 18
Installation .......................................................... 3
Installation of the program ................................. 4
InstallShield ........................................................ 4
Interface ......................................... 4, 5, 6, 12, 19
Introduction ........................................................ 2
K
keyCTRL ....................................................... 5, 13
L
License ............................................................. 25
LIMS ................................................................. 13
M
Main Page .................................................... 9, 10
Managing files .................................................. 16
Methods ................................................... 2, 8, 11
Mouse ................................................................ 3
D
Damage ............................................................. 3
Data bits ............................................................. 5
Data transfer ............................................ 5, 8, 10
Default settings .......................................... 20, 23
Defaults .............................................................. 7
Destination ................................................... 2, 10
Determinations ......................................... 2, 8, 10
Device unavailable ........................................... 23
N
New .................................................................. 17
Not received ..................................................... 18
O
Open .................................................... 11, 15, 17
Opening a Session List .................................... 17
Operating system .............................................. 3
Overflow ........................................................... 24
26 Instructions for Use
Page 28

726 TP Backup
P
Parity ................................................................... 5
Port Settings ................................................. 4, 19
Previous instance ............................................. 22
Print ............................................................ 14, 15
Printing files ...................................................... 15
Problems .......................................................... 22
Program version ............................................. 2, 3
Put in queue .....................................................11
Q
Queue ......................................................... 11, 17
R
Rack data file........................................................ 8
RAM .................................................................... 3
Receive ............................................. 9, 10, 12, 13
Receive buffer .................................................. 24
Receive mode .................................................... 5
Received OK .................................................... 18
Receiving reports ............................................. 13
Registration card .............................................. 25
Rejected ...........................................................18
Remove ............................................................17
Remove selected files ...................................... 11
Report ............................................................... 21
Report files ......................................................... 7
Report label ...................................................... 14
Report type ....................................................... 14
Reports ....................................................... 16, 20
Reset RS232 ....................................................19
Retrieve ..............................................................7
RS232 ..................................... 2, 3, 4, 5, 9, 10, 12
RS232 cable ................................................. 9, 11
RS232 Intface ..................................................... 9
T
Terminal .................................................. 7, 13, 15
Terminate the connection ..................................9
Text file .............................................................11
Transmit buffer ................................. 6, 19, 20, 24
Troubleshooting ............................................... 22
U
Updates ............................................................ 25
Usage ............................................................... 19
V
View .................................................................. 15
Viewer font .................................................... 7, 15
Viewing files ...................................................... 15
W
Windows 3.1x .................................................3, 4
Windows 95 .................................................... 3, 4
Windows NT 4.0 .............................................3, 4
S
Sample silos ................................................... 2, 8
Save .............................................6, 7, 14, 15, 16
Saving files .......................................................16
Saving the Session List .................................... 16
Screen font ....................................................... 15
Select ...........................................................9, 11
Send ....................................................... 9, 12, 14
Send timeout .................................................... 20
Sent OK ............................................................ 18
Session list ................................................. 11, 16
Setup .............................................................. 3, 4
Special characters .............................................8
Status .....................................................2, 11, 12
Status messages .............................................18
Stop bit ............................................................... 5
Storage Directory .............................................21
Storage location .....................................9, 11, 12
System requirements ......................................... 3
Instructions for Use 27
 Loading...