

Page 1

IC Metrodata
for Win95
6.6027.153
METROHM Ltd.
CH-9101 Herisau
Switzerland
Phone ++41 71 353 85 85
Fax ++41 71 353 89 01
8.714.8053
Short Operating Guide
Page 2

Page 3

CH-9101 Herisau/Switzerland
Phone ++41 71 353 85 85
Fax ++41 71 353 89 01
CompuServe 100031,3703
Internet http://www.metrohm.com
E-Mail sales@metrohm.ch
6.6027.153
IC Metrodata for Win95
Version 1.44
Help!
This Short Operating Guide has been kept
very short. You will find only a brief
introduction to the operation in section 3.
For all details, please refer to the on-line
Help in the program. This will provide you
with the necessary information anywhere in
the program quickly and conveniently.
8.714.8053 Short Operating Guide
26.11.97 / dö
Page 4

All Rights Reserved.
Printed in Switzerland by Metrohm AG, CH-9101 Herisau 1997
Page 5

Table of contents
Table of contents
1 Introduction .................................................................. 1
1.1 General information .........................................................1
1.2 System requirements.......................................................1
2 Installation..................................................................... 2
2.1 Hardware installation.......................................................2
2.2 Software installation ........................................................ 5
2.3 First program start ........................................................... 6
2.4 Security system ................................................................ 7
2.5 Interface configuration .................................................... 8
3 Learning by doing................................................. 9
3.1 General remarks ...............................................................9
3.2 Developing a new method ............................................10
3.3 Use of existing methods ...............................................22
3.4 Multipoint calibration.....................................................29
3.5 Modify several chromatograms ...................................36
3.6 Use of sample tables .....................................................38
3.7 Export data ......................................................................35
3.8 Method associated remote control .............................46
3.9 Manual remote control ..................................................53
4 Appendix........................................................................ 57
IC Metrodata for Win95
4.1 Software license .............................................................57
4.2 Standard equipment ......................................................57
4.3 Optional accessories .....................................................57
4.4 Index .................................................................................58
I
Page 6

IC Metrodata for Win95
II
Page 7

1.1 General information
1 Introduction
1.1 General information
«IC Metrodata for Win95», the new evaluation tool consisting of the
1.714.0310 PC Board, the 6.2145.010 Dongle and the 6.6027.153
Software, is a versatile integrator system for all chromatographic methods, especially ion chromatography. The evaluation software is based
on Windows 95
multitasking and easy export of data to other Windows applications.
«IC Metrodata for Win95» offers the following possibilities:
Hardware
• 1.714.0310 PC Board for analog/digital conversion with a resolution
of 24 bit and a voltage range of ± 2.5 V, data acquisition rate up to
60 points/s.
• Two entry channels that can be used simultaneously or independently from each other.
®
and supports the corresponding functions such as
Software
• Data acquisition via methods that contain the corresponding acquisition and evaluation parameters, either with the 1.714.0310 PC
Board or with the 1.714.0010 CSI interface.
• Real time monitoring of chromatograms during recording.
• Diverse possibilities for graphical representation and manual re-
processing of chromatograms.
• Calibration with internal or external standard method, multipoint calibrations with linear, quadratic or cubic regression.
• Free formatting of result printouts.
• Automatic reprocessing of evaluated chromatograms ("Queue").
• Export and import possibilities for chromatograms and reports.
• Remote control of IC instruments.
1.2 System requirements
Computer recommended min. 486 processor running
at 33 MHz or faster, 1 free slot
IC Metrodata for Win95
Operating system Windows 95
Disk space min. 4 MB on hard disk
RAM min. 8 MB, recommended 16 MB
1
Page 8
2 Installation
2 Installation
Protection against static charges
Electronic components are sensitive to static charging and can be
destroyed by discharges. Before you touch the PC board or any of
the components inside the PC, you should earth yourself and any
tools you are using by touching an earthed object (e.g. housing of
the instrument or a radiator) to eliminate any static charges which
exist.
2.1 Hardware installation
The hardware installation comprises the installation of 1 or 2 PC boards
in a free PC slot, the installation of the dongle in a LPT port and the
connection of the PC board to 732 IC Detector and 733 IC Separation
Center. Proceed as follows:
Installation of 1
st
PC Board (1.714.0310)
1) Switch off PC and disconnect power cable from the power socket.
2) Disconnect all other cables to computer peripherals (keyboard,
display, printer, etc.).
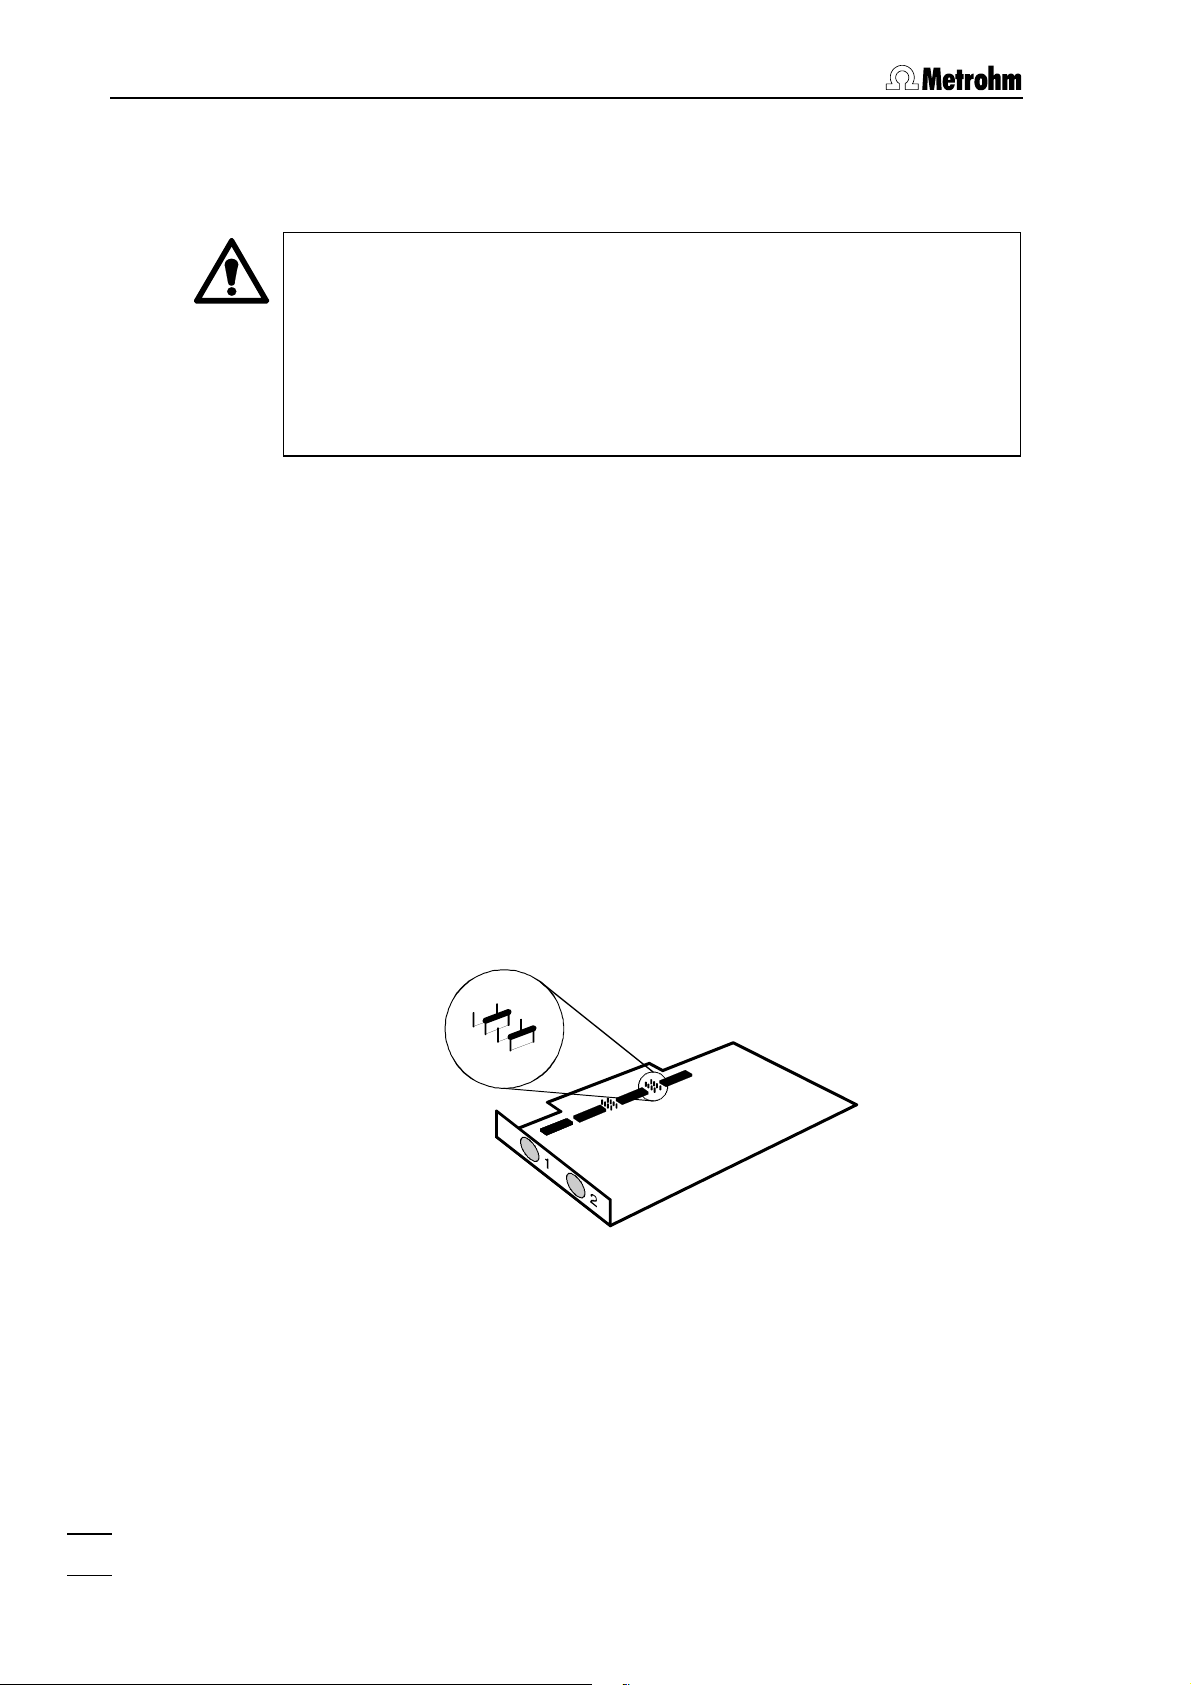
3) Check 1.714.0310 PC Board: the two jumpers at position 4 and 6
have to be installed.
8
6
5
4
4) Disassemble PC and install 1.714.0310 PC Board in a free slot
(see instruction manual of the PC).
5) Reassemble PC.
IC Metrodata for Win95
2
Page 9
2.1 Hardware installation
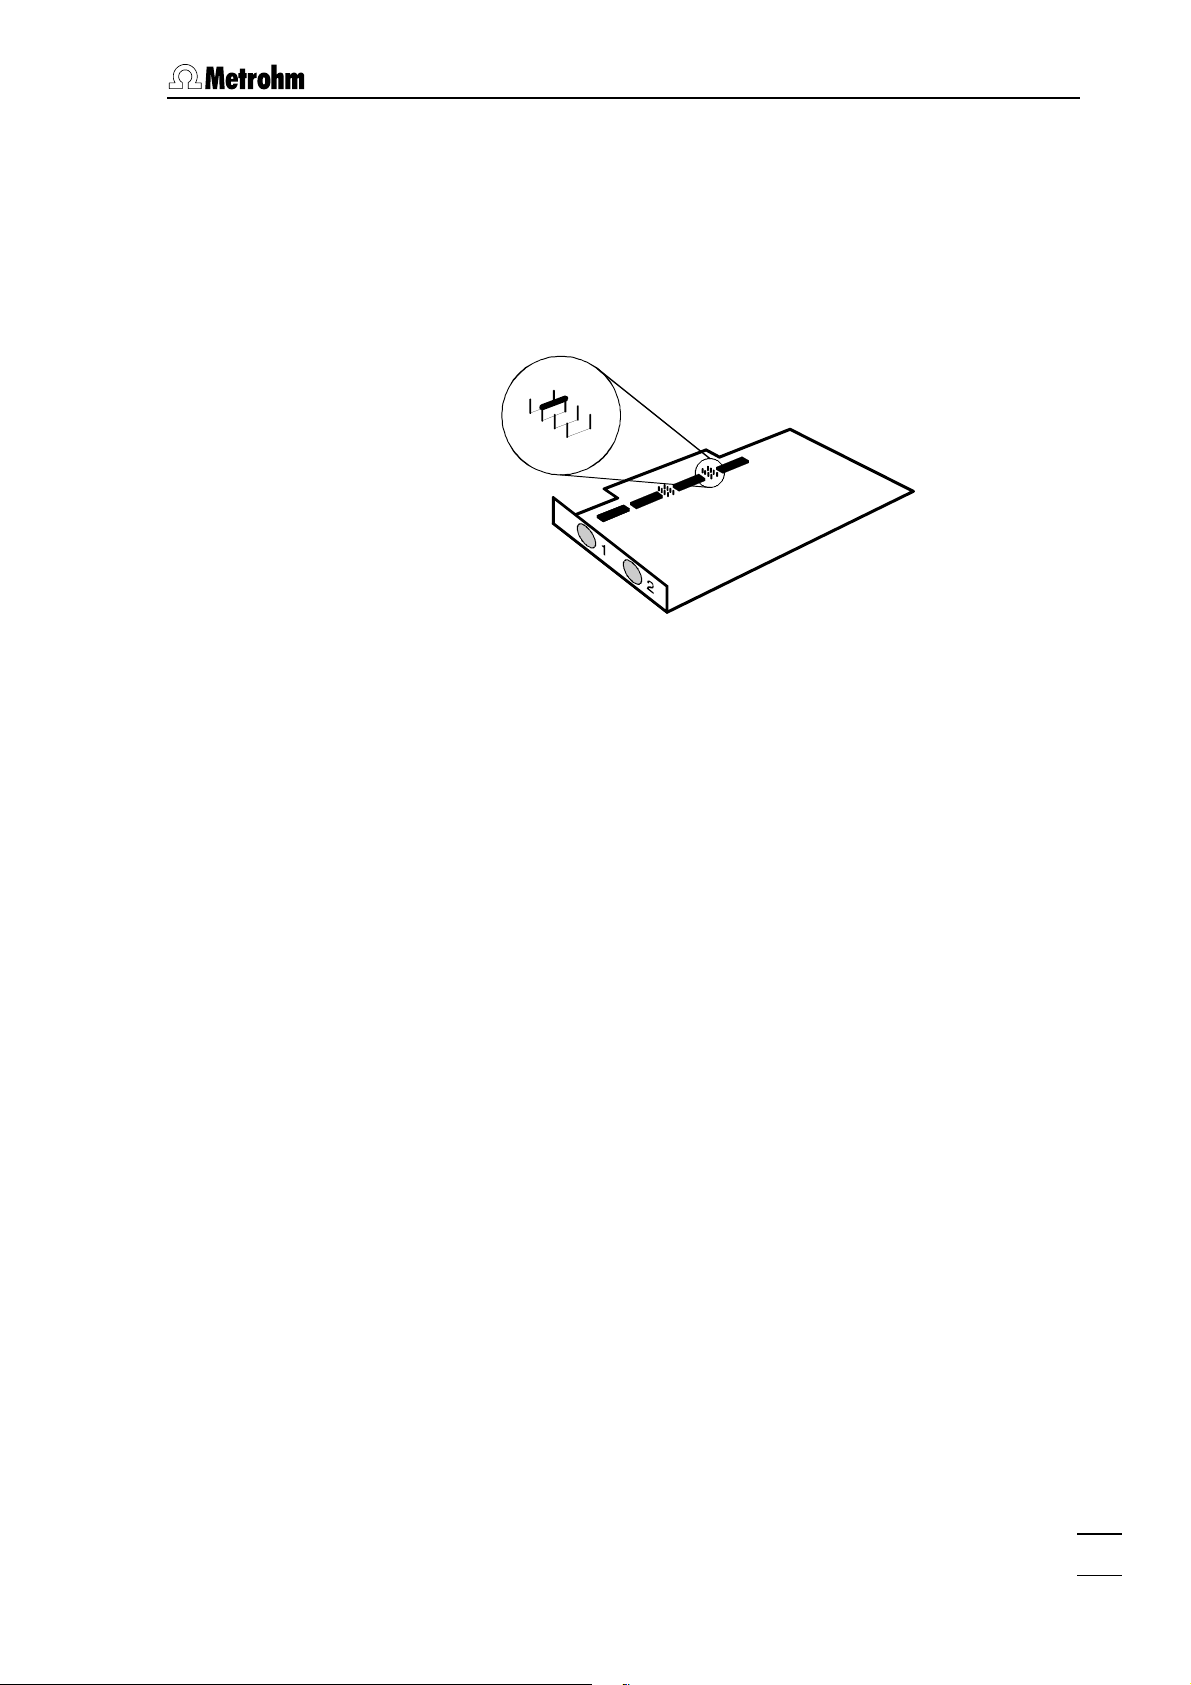
Installation of 2nd PC Board (1.714.0310)
1) Switch off PC and disconnect power cable from power socket.
2) Disconnect all other cables to computer peripherals (keyboard,
display, printer, etc.).
3) Change jumper settings on board 2: only jumper at position 6
must be installed.
8
6
5
4
4) Disassemble PC and install 1.714.0310 PC Board in a free slot
(see instruction manual of the PC).
5) Reassemble PC.
Installation of the 6.2145.010 Dongle
1) PC with 1 LPT port
Install 6.2145.010 Dongle into the LPT1 printer port. Insert printer
cable into the dongle.
2) PC with 2 LPT ports
Install 6.2145.010 Dongle into the LPT2 printer port. Insert printer
cable into the LPT1 printer port.
Check PC
1) Plug in all cables of the peripheral units at the PC.
2) Connect power cable to the power socket.
3) Switch on PC.
4) Check if the PC boots normally and all PC components and peripherals run properly.
5) Switch off PC.
IC Metrodata for Win95
3
Page 10
2 Installation
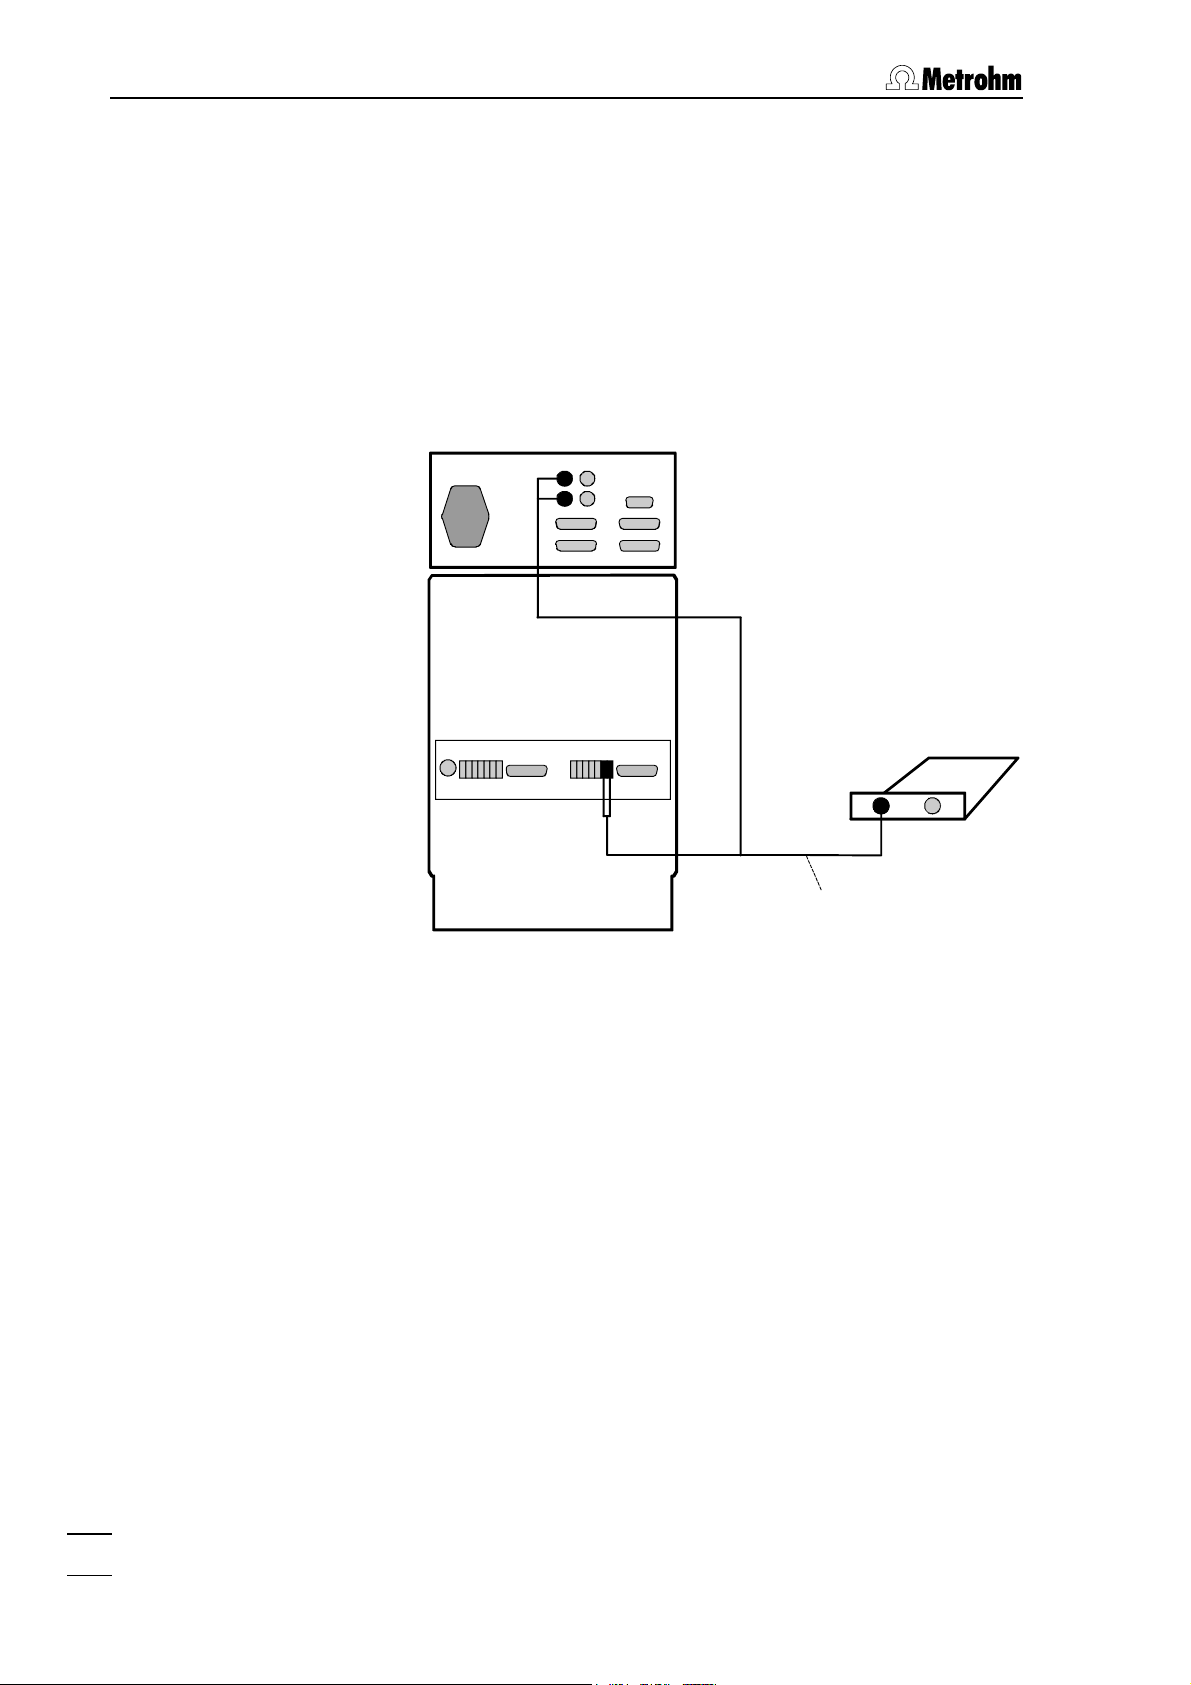
Connect IC system 1
1) Connect 6.2128.140 cable to socket 1 (channel 1) of the PC board.
2) Connect the two open cable endings to the sockets "Integr. Start"
on the right terminal block 38 of the 733 IC Separation Center so
that the two connections "COM" and "RUN" are connected with
each other.
3) Connect the black banana plug to the black socket and the red
banana plug to the red socket of the analog output 11 (0…1 V) of
the 732 IC Detector.
732
733
RUN
COM
12
Kabel 6.2128.140
Connection of the PC board to the 732/733 IC System
Connect IC system 2
1) Connect the second 6.2128.150 cable to socket 2 (channel 2) of
the PC board.
2) Connect the two open cable endings to the sockets "Integr. Start"
on the left terminal block 45 of the 733 IC Separation Center (two
channel system) or the right terminal block 38 of the 733 IC Separation Center (one channel system) so that the two connections
"COM" and "RUN" are connected with each other.
3) Connect the black banana plug to the black socket and the red
banana plug to the red socket of the analog output 11 (0…1 V) of
the 732 IC Detector.
IC Metrodata for Win95
4
Page 11

2.2 Software installation
2.2 Software installation
The installation program copies the files from the installation diskettes
to the drive and directory you specify and creates the following subdirectories:
Data Directory for data files (*.chw)
Methods Directory for method files (
Reports Directory for report files (without extension)
and graphic files (
*.wmf)
Installation with Windows 95
1) Start Windows 95. Find a drive that has at least 4 MB free storage
space.
2) Insert installation disk into drive A.
3) In the Start menu, select the menu item Run and enter a:setup. Follow the instructions of the setup program.
4) Make a backup copy of your installation diskettes.
*.mtw)
Update from version 1.38 and 1.38a
1) During the installation (see above), specify a new directory for the
program.
2) Copy the old data and method files into the subdirectories
Methods in the new program directory.
and
Data
3) Delete the old program directory.
Full program version and demo version
The 6.2145.010 Dongle is part of the standard equipment of the
6.6027.153 full program version. Install this dongle into LPT port 1 or 2
(see section 1.3).
The 6.6027.158 demonstration version of "IC Metrodata for Win95" contains only the software without dongle. With this version no chromatograms can be acquired, but all other functions are identical with the
full program version. You can upgrade your demo version at any time if
you install a 6.2145.010 Dongle into the LPT port.
Registration
Please send us your 8.714.8067 Registration card as soon as possible
so we can register you as an official user. Only registered users will get
updated program versions at a special price.
IC Metrodata for Win95
The data files *.chw and the method files *.mtw are not writeprotected. To prevent these files from being deleted by mistake,
switch on the write-protection or make a backup copy in another
directory.
5
Page 12
2 Installation
2.3 First program start
Double-click the software icon to start the program. The program
window with the opening picture is opened and the Log In window
appears on the screen:
Do not enter any password here, just click the
Log In button. The follow-
ing window appears:
Enter company, division and name and click the
OK button. This win-
dow appears only one time after software installation.
Afterwards a window appears with the message
Serial port [COM#]
Click the
IC Metrodata for Win95
6
OK button.
specifying the next free serial port for remote control.
New hardware found:
Page 13
2.4 Security system
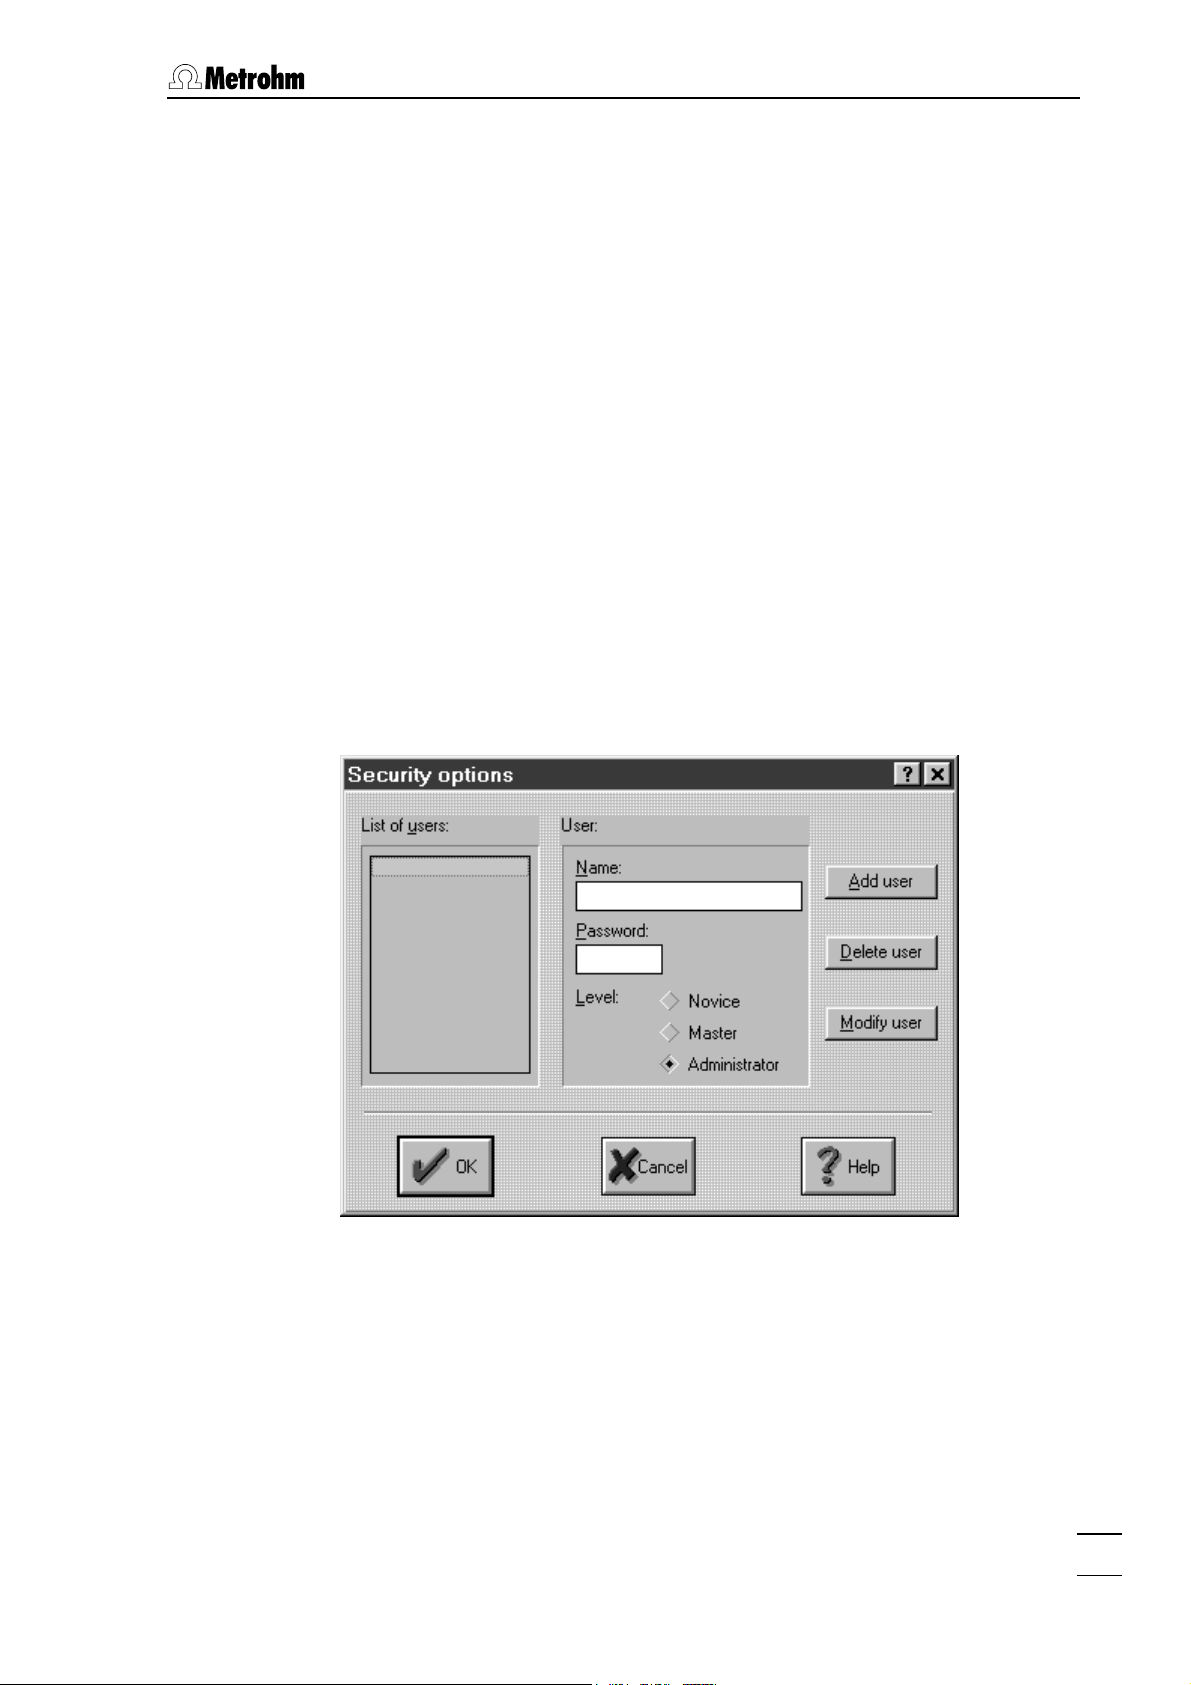
2.4 Security system
The «IC Metrodata for Win95» program has a security system based on
the list of users. Every user has his unique password and one of the following access levels:
Novice Only most commonly used parameters can be
modified by the user. Recommended for routine
users. Existing data files cannot be overwritten, they
are saved under a new name (8
creased by +1).
Master Most parameters are available for modification with
exception of hardware configuration parameters.
Recommended for method development.
Administrator Access to all parameters. Recommended for soft-
ware installation and modification of user lists.
It is recommended to make user lists and enter passwords as a first
action after system installation. So, select the menu item Op-
tions / Security
entering a password. The
and click the Log In button in the Log In window without
Security options window appears, where us-
ers and passwords can be entered:
th
character is in-
IC Metrodata for Win95
Enter user name, password and access level for all users. Don't forget
to make one of the user an Administrator, otherwise this menu will never
be opened again. At the end, click the
OK button.
After the security system is successfully configured the program
prompts for the password every time the system starts and installs the
user name that corresponds to the password. This user name stamps
all methods, chromatograms and reports created during the working
session. It is possible at any time to change the user with the menu
Options / Lock system.
item
7
Page 14
2 Installation
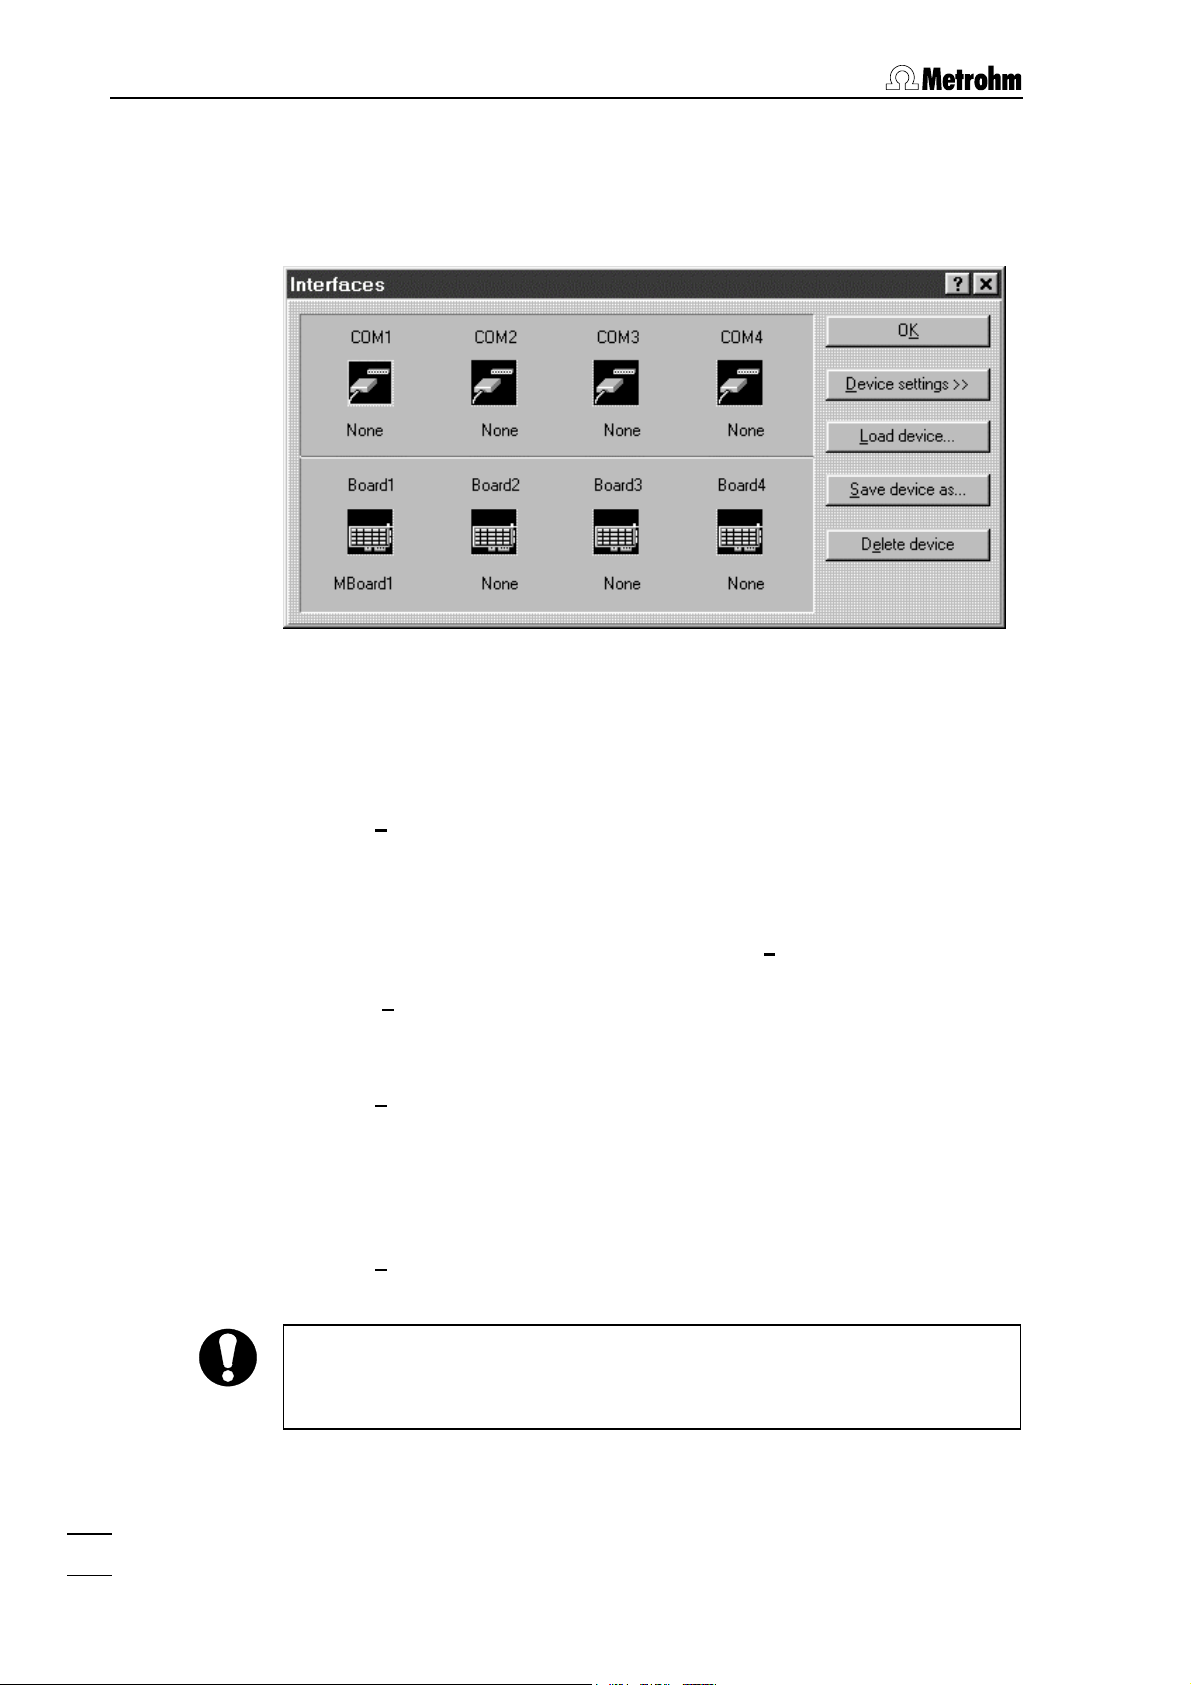
2.5 Interface configuration
Open the menu item Options / Interfaces for configuration of the interfaces to the IC system.
1.714.0310 PC Board
MBoard1 driver for operation of the first PC board Board1 with 2
The
channels is installed automatically during the software setup.
If a second PC board is installed, select
click the
Load device button. Select the file MBoard2.dew for operation of
second PC board with 2 channels and click the
Board2 with the mouse and
OK button.
1.714.0210 PC Board
Select Board1 with the mouse and click the Delete device button. Confirm the question
Click the
Load device button, select the m732b1.dew file for operation of
the first PC board with 2 channels and click the
If a second PC board is installed, select
click the
Load device button. Select the file m732b2.dew for operation of
second PC board with 2 channels and click the
Do you really mean do delete device Mboard1? with Yes.
OK button.
Board2 with the mouse and
OK button.
1.714.0010 CSI Interface
Select one of the serial interfaces
click the
Load device button. Select the csi.dew file for operation of the
COM1…COM4 with the mouse and
CSI interface with 1 channel.
The csi*.mtw methods are configured for the COM2 interface. If you
use a different serial interface, the
/ Acquisition Setup
has to be changed accordingly.
Acquisition parameter under Method
IC Metrodata for Win95
8
Page 15

3.1 General remarks
3 Learning by doing
3.1 General remarks
Main menu
After starting the "IC Metrodata for Win95" program and entering the
password, an empty window with the following menu items appears:
File Open, save, close, import and delete chroma-
tograms, methods, sample data tables
(Queue/Batch), print, page layout
View Display settings for chromatograms
Acquire Load and run methods
Process Reports, re-integration, peak editor, calibration
Method Develop and modify methods
Options Settings for interfaces, remote control of instru-
ments, fonts, colors, security system, change of
user
Window Arrange and select windows
Help On-Line Help
Window
All chromatograms and reports appear in its own windows which can
be tiled horizontally or vertically or displayed on the full screen.
Help
By selecting the menu item
Help / Index or by using the <F1> key you
can get help on the current topic anywhere in the program.
Green texts can be clicked to jump to a different Help topic.
Magenta texts identify the dialog item, parameter or button in the
corresponding window.
Blue texts identify important information.
IC Metrodata for Win95
Backup
You should back up your data in the directories "Data", "Methods" and
"Reports" at regular intervals using an appropriate backup tool.
9
Page 16
3 Learning by doing
3.2 Developing a new method
This section describes the procedure how to develop a new, userspecific method based on a standard method.
Preparation
• Insert separating column in IC system and condition it.
• Prepare standards and sample.
Load standard method and run
• Click on
• Select the file
or select Load method and run from the Acquire menu.
1m732b1.mtw in the File Open window and click the OK
button.
• In the
Start Run window, enter a sample name as Ident to character-
ize the chromatogram (max. 14 characters, e.g. "standard").
• Enter the estimated analysis time as
• Select the tabs
Sample, Eluent, Measure and Processing to enter
Duration.
more parameters to characterize sample and acquirement conditions if required.
• Click the
OK button.
The window for the on-line display of the chromatogram opens.
The window title line contains sample name, method and run number (e.g. standard (1m732b1.mtw)01.run). The status display below
shows the message
IC Metrodata for Win95
10
Waiting.
Page 17
3.2 Developing a new method
• Set injection valve at 733 IC Separation Center to "FILL" (manually
or by program) and fill sample loop with standard.
• Set injection valve at 733 IC Separation Center to "INJECT" (manu-
ally or by program). The data acquisition is started automatically.
The status display shows
Measure, beside it running time, analysis
time and measuring signal (in mV) are displayed. As soon as the
analysis time has passed, the data acquisition is stopped automatically and the chromatogram is integrated.
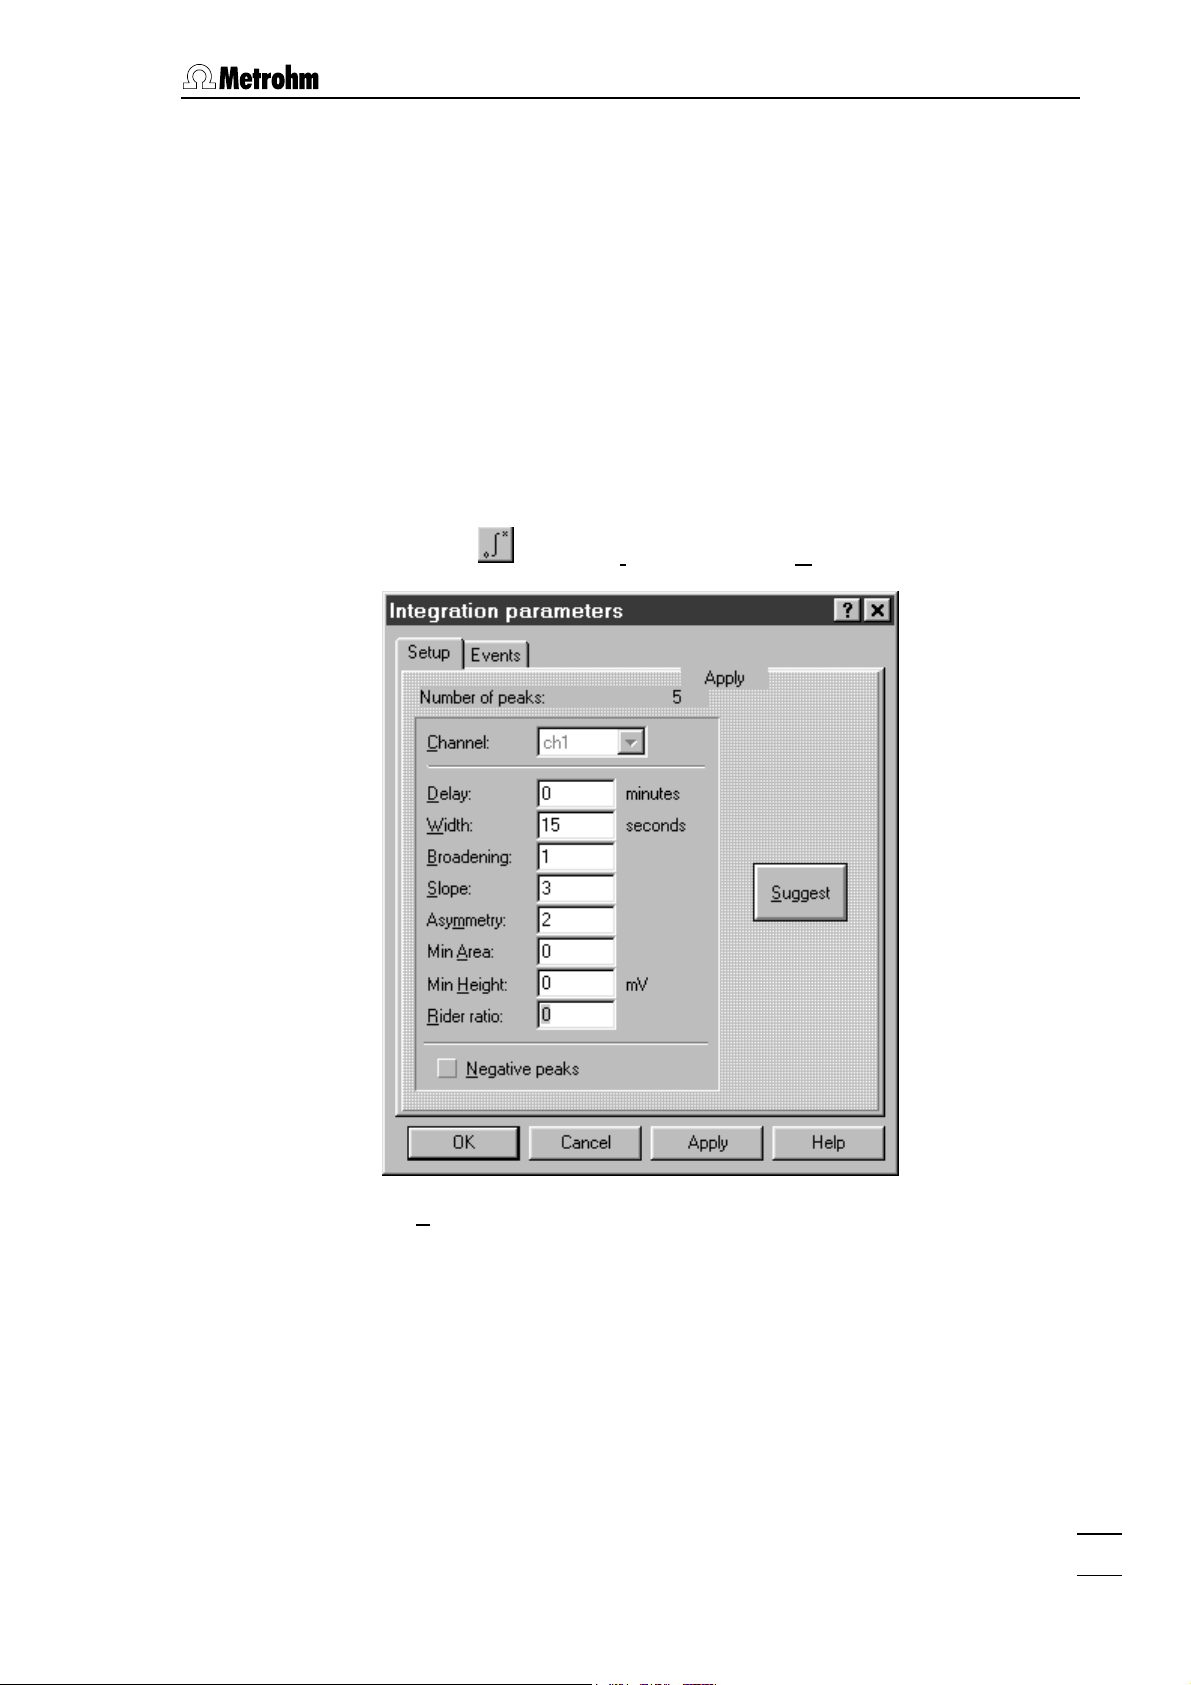
Modify integration parameters
• Click on
or select Integration of the Method menu.
IC Metrodata for Win95
• As
Delay, enter the time delay before starting peak integration at
the first peak to be detected.
• Click the
Apply button. The chromatogram is reintegrated.
• Repeat this procedure for all other integration parameters until the
result satisfies your expectations. Click
Apply after each parameter
changing.
• Close the
Integration Parameters window with OK.
11
Page 18
3 Learning by doing
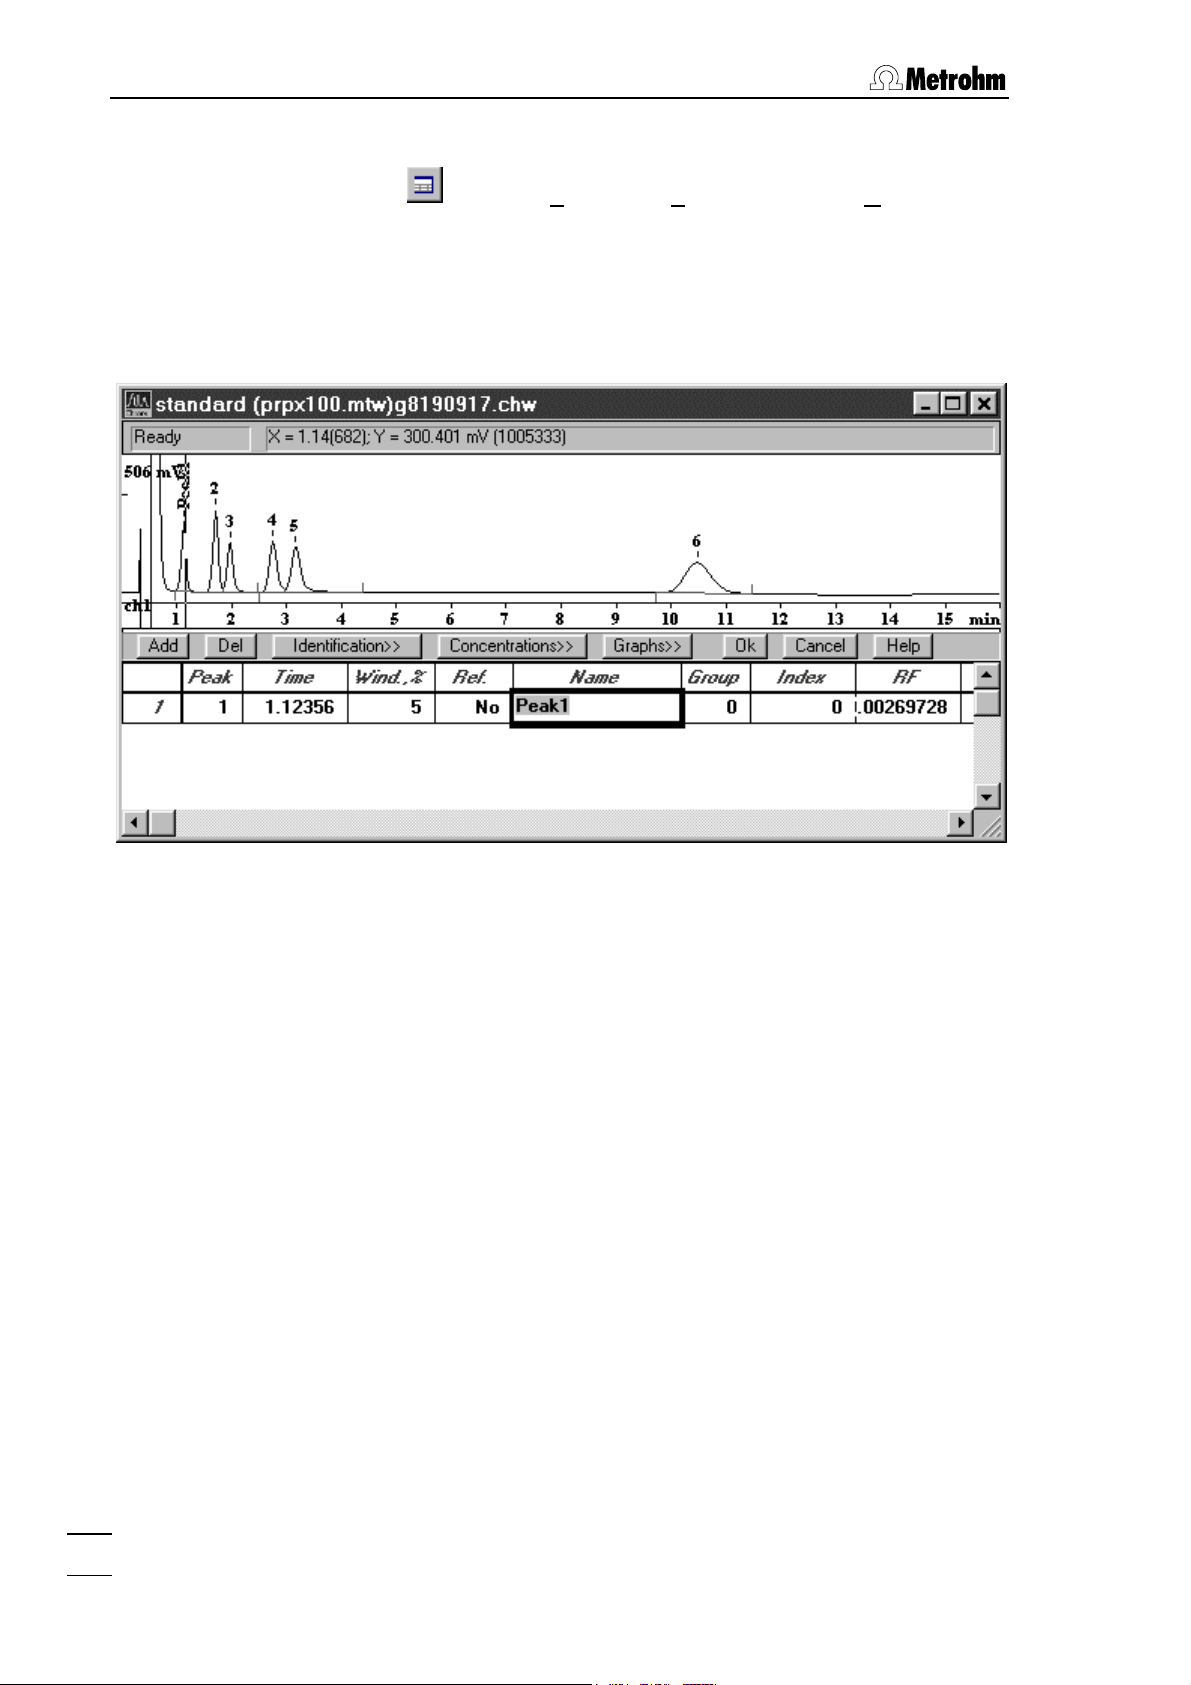
Enter components for calibration
• Click on or select Calibration / Components of the Method
menu. An empty table for components is displayed below the
chromatogram.
• Click the Add button in the components window. A first line is
added to the table containing peak number, retention time and a
standard name.
• Replace the name
Peak1 in the column Name by the component
name of the first peak. The values of the other columns can be left
unchanged.
• Enter data for all other components by clicking first the Add button
and then entering the component names in the
Name column in the
new line.
IC Metrodata for Win95
12
Page 19
3.2 Developing a new method
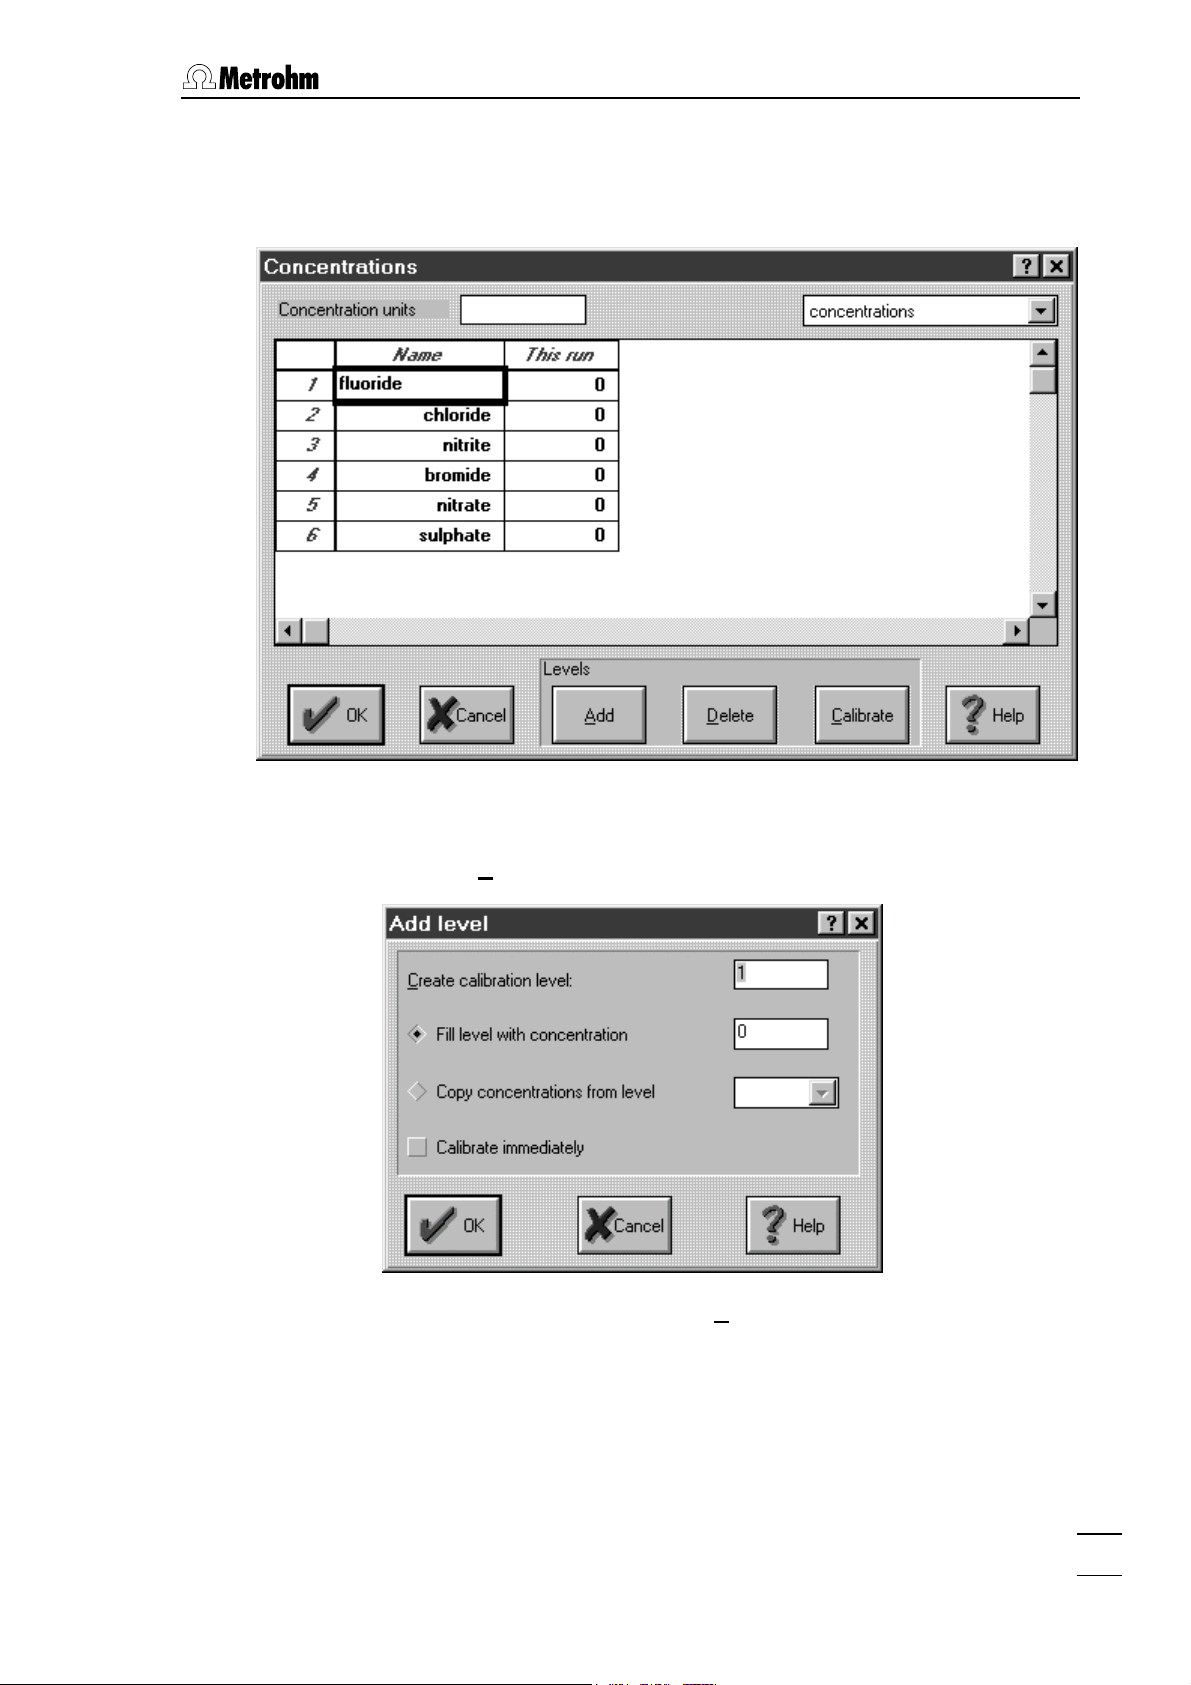
Enter concentrations for calibration
• When all components have been entered click the Concentrations>>
button.
• Enter the desired concentration unit (e.g. ppm) in the
tion units
• Click the
field.
Add button. The Add level window appears.
• Enter the desired number in the
clicking
OK a new column is added in the Concentrations window.
Create calibration level field. After
Concentra-
IC Metrodata for Win95
• Enter the concentrations of all components in the new
umn.
Level col-
13
Page 20
3 Learning by doing
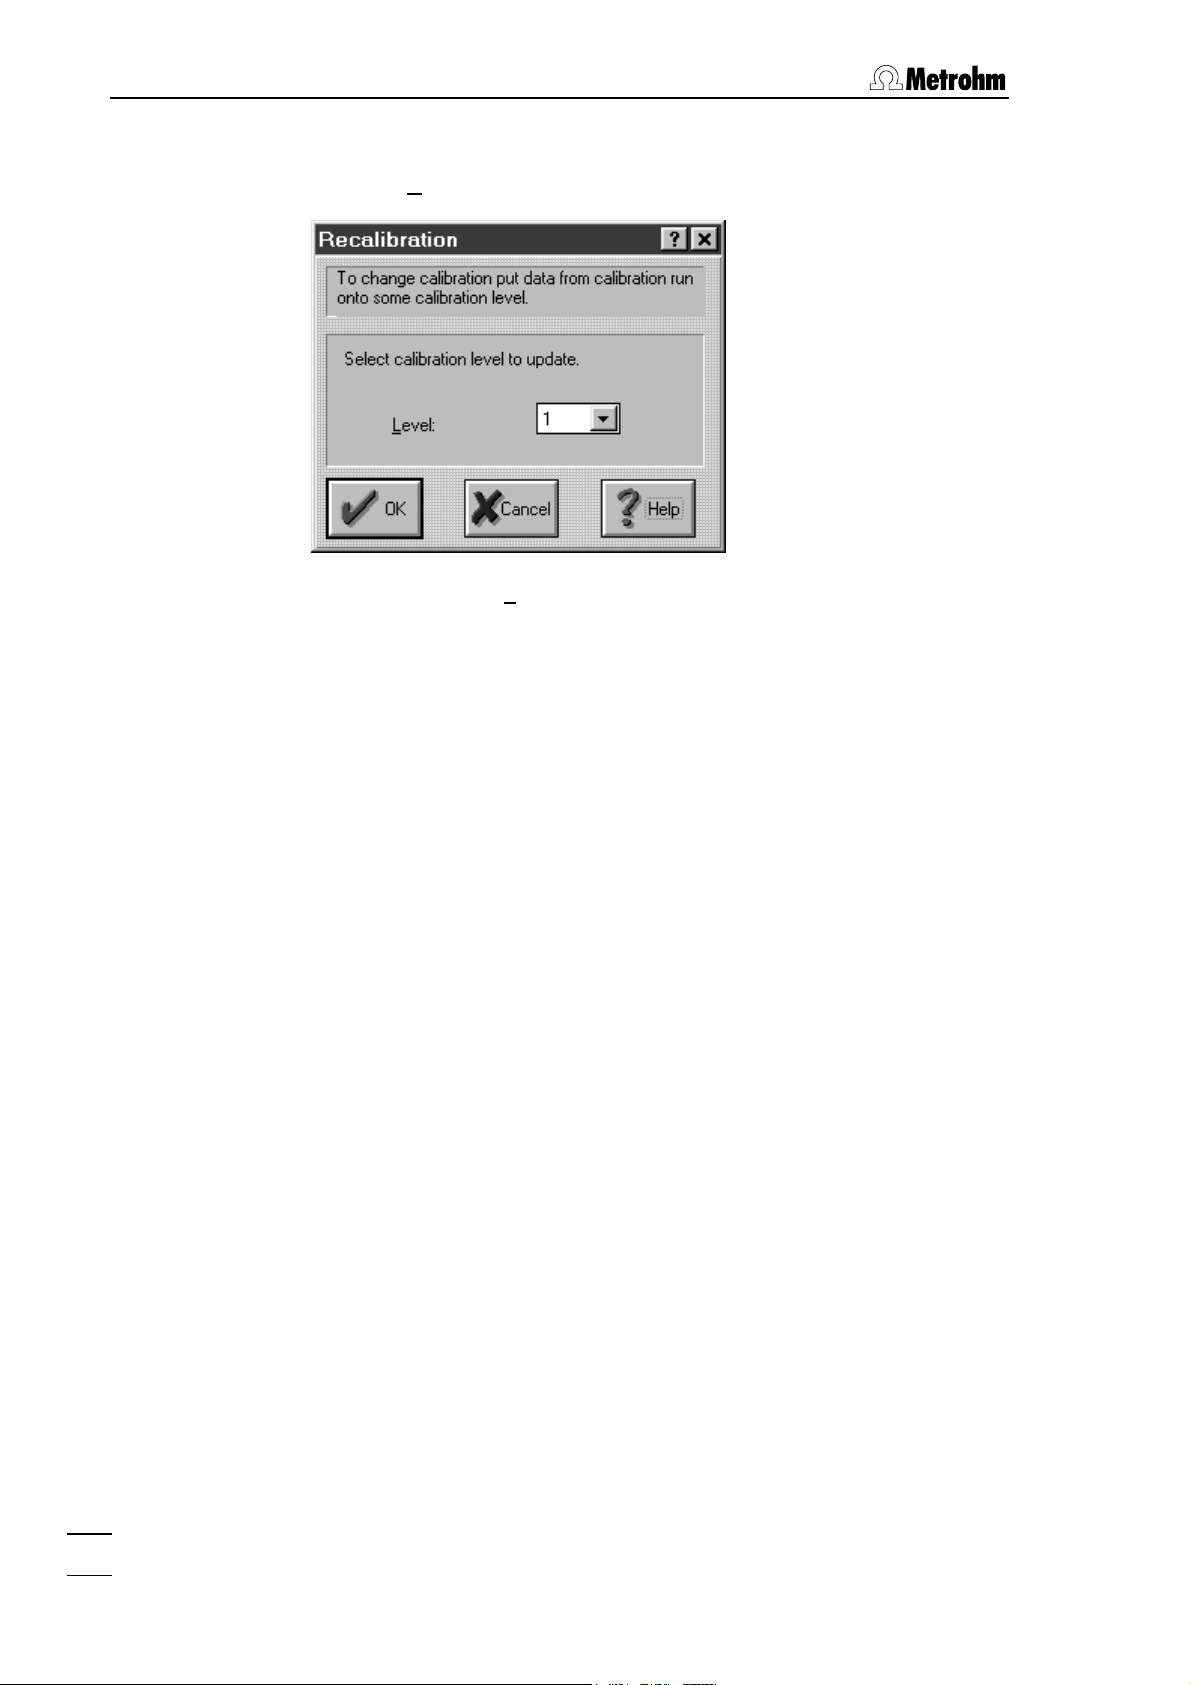
Start calibration
• Click the Calibrate button. The Recalibration window appears.
• Select the desired
• Click the
OK button in the Concentrations window.
Level and click on OK.
Display calibration curves
• Click the
Graphs>> button in the Components window.
• Select the desired component in the
calibration curve should be displayed.
• Close the
• Close the
OK.
Component window by clicking OK.
Components window below the chromatogram by clicking
Component field for which the
IC Metrodata for Win95
14
Page 21

3.2 Developing a new method
Set processing options
• Click on or select Method setup of the Method menu. Select the
Processing
tab in the Method Setup window.
• The options
Switch to chromatography (return to «IC Metrodata for
Win95» after finishing of the chromatogram if the program runs in
background),
Show A
ll (automatic scaling of axes) are selected by default.
• If you click the
Options
will be printed out automatically after finishing of the chro-
Save chromatogram (automatic saving) and Automatic
Make Report option, the report defined under Report
matogram.
• Click the
Restart method option. This option opens automatically a
window for acquiring a new chromatogram after finishing the old
one.
• If you click the option Close window in addition, the data acquisition
window is closed automatically after finishing of the method.
• In the Chromatograms directory window, a directory path for saving
the chromatogram can be entered.
• Close the window by clicking OK.
IC Metrodata for Win95
Save new method
• Select Save method as of the File menu.
• Enter a name
and click the
1m732b1.mtw method is not write-protected!
The
*.mtw for the new method in the File Save As window
OK button.
15
Page 22

3 Learning by doing
Report output to screen
• Click on or select Make report of the Process menu. The Report
Options
window appears.
• In the
metro.rtt
• Click the
Template field, select the preset standard template eng-
instead of english.rtt.
Report button. A new window appears on the screen
which displays the results (without chromatograms).
Print report
• Click on or select Print of the Report menu while the report
window is open. The standard printing window of Windows 95 is
opened where printer, printing range and number of copies can be
selected. After confirmation with OK the results including the chromatogram are printed out.
• Close the report window.
IC Metrodata for Win95
16
Page 23

3.2 Developing a new method
A report can also be printed out without preceding screen output:
• Click on
• Under
Report Destination, switch off Screen and switch on Printer.
• Click the
or select Make report of the Process menu.
Report button. The standard printing window of Windows
95 is opened where printer, printing range and number of copies
can be selected. After confirmation with
OK the results including
the chromatogram are printed out.
• Close the report window.
Set chromatogram view
• Click on
or select Appearance of the View menu.
IC Metrodata for Win95
• Enter the desired limits for the x and y axis in the
Axes
tab and click Apply. The selected range is displayed immedi-
Chromatogram
ately in the chromatogram window. The chosen axes settings
apply also for the printout of chromatograms, but they are only
preserved if the chromatogram is saved by clicking on or with
File / Save before closing the chromatogram window.
17
Page 24

3 Learning by doing
• Open the Peak Label tab.
• Select the desired peak label. The
of peak start and peak end is enabled by default. Enable the
always Visible option in addition, if the peak label should be always
displayed even with zooming. Afterwards, close the
window with
• Click on
OK.
or select View all from the View menu or double-click
Baseline Marker option for display
Label
Appearance
on the chromatogram to return to the initial display of all peaks.
Then the chromatogram view is immediately optimized for the
highest peak after the delay time.
Zoom by mouse
• Select the desired region in the chromatogram by clicking the left
mouse button at one corner of the region and dragging the mouse
cursor to the other corner of the region. The region of interest is
displayed immediately in the chromatogram window. The zoom
settings apply also for the printout of chromatograms and are preserved on saving the chromatogram with
File / Save.
• Click on
or select View all from the View menu or double-click
on the chromatogram to return to the initial display of all peaks.
Then the chromatogram view is immediately optimized for the
highest peak after the delay time.
IC Metrodata for Win95
18
Page 25

3.2 Developing a new method
Change report options
• Click on or select Report options of the Method menu.
• Under
Items to report and More items to report, click all desired ele-
ments for the report.
• Select
• Click the
Custom in the Quantification Method field.
<<Customize button.
• Click all desired elements for printout in the report table.
• Click the <<Customize button to close the element selection win-
dow.
• Click the
Accept button to save the report options for the next
screen or printer output.
IC Metrodata for Win95
19
Page 26

3 Learning by doing
Close chromatogram window
• Close the chromatogram window. A window appears with the mes-
sage
Changes in *.chw. Modified: Calibration, Integration, Peaks, Re-
port. Save changes?
• Click the
ready exists. Overwrite?
• Click the
*.mtw
• Click the
• Click the
ready exists. Overwrite?
• Click the
Yes button. A window appears with the message *.chw al-
Yes button. A window appears with the message Method
was modified. Save changes?
Yes button. The File Save As window appears.
OK button. A window appears with the message c:\..... al-
OK button. Method and chromatogram are saved under
the selected name.
Record a sample chromatogram
• Click on
• Select the previously saved method
and click
or select Load method and run of the Acquire menu.
*.mtw in the File Open window
OK.
• Enter a sample name (max. 14 characters, e.g. "drinking water") as
Ident in the Start Run window.
• If required, enter more parameters to characterize sample and ac-
quirement conditions.
• Click the OK button.
The window for the on-line display of the chromatogram opens.
The status display in the upper left corner shows the message
Waiting.
• Set the injection valve at the 733 IC Separation Center to "FILL"
(manually or by program) and fill the sample loop with sample.
• Set the injection valve at the 733 IC Separation Center to "INJECT"
(manually or by program). The data acquisition is started automatically. The status display shows
Measure, beside it running time,
analysis time and measuring signal (in mV) are displayed. As soon
as the analysis time has passed, the data acquisition is stopped
automatically and the chromatogram is integrated. The status display in the upper left corner shows the message
Waiting again.
Now more samples can be recorded with the same method.
• The name of the saved chromatogram is generated automatically
and contains date and time in a coded form:
st
1
numeral: Alphabetical code for year
(e.g. h = 1997, i = 1998, k = 1999, etc.)
IC Metrodata for Win95
20
Page 27

3.2 Developing a new method
2nd numeral: Code for month
(1…9 = Jan. … Sept., a…c = Oct. … Dec.)
rd
th
+ 4
3
th…8th
5
numeral: Day (01 … 31)
numeral: Time (hh:mm)
• Close the empty chromatogram window. The message
sition is active! Standby?
• Click the
Yes button.
appears.
Data acqui-
Open recorded chromatogram
• Click on or select Open of the File menu.
• Select the desired file
*.chw in the Chromatogram open window. The
lower part of the window shows the information entered at the recording of the chromatogram.
IC Metrodata for Win95
• Click the
OK button. The chromatogram window is opened.
21
Page 28

3 Learning by doing
3.3 Use of existing methods
This section describes the procedure how to record, integrate and
calibrate chromatograms using existing methods. The
method is used as an illustrative example.
Available methods
In addition to the standard methods, the
Methods sub-directory con-
tains several methods configured for the most important separating
columns supplied by Metrohm. You will find detailed information concerning these columns in the Application Bulletins (AB) mentioned. All
these methods are not write-protected. If you make any change on
one of these methods, you should save the method as a new file with
a new name.
The csi*****.mtw methods are dedicated for use with the 1.714.0010
CSI interface and can be deleted, if you work only with the 1.714.210
or 1.714.310 PC Board.
Method Column Eluent Loop Full Scale Standards AB
dual1sup.mtw
cation12.mtw
(csicat12.mtw)
dual1pht.mtw
(csid1pht.mtw)
dual1sup.mtw
(csid1sup.mtw)
dual2pht.mtw
(csid2pht.mtw)
dual2sup.mtw
(csid2sup.mtw)
prpx100.mtw
(csiprpx.mtw)
mpoint.mtw Metrosep Dual 1
1m732b1.mtw Standard method for PC board 1 and channel 1
Metrosep Cation
1-2 6.1010.000
Metrosep Dual 1
6.1006.020
Metrosep Dual 1
6.1006.020 with
suppressor
Metrosep Dual 2
6.1006.100
Metrosep Dual 2
6.1006.100 with
suppressor
PRP-X100
6.1005.000
6.1006.020 with
suppressor; multipoint calibration
4 mmol/L Tartaric acid
1 mmol/L Dipicolinic acid
8 mmol/L Phthalic acid
2 % Acetonitrile
pH 4.0 (TRIS)
2.4 mmol/L NaHCO3
2.5 mmol/L Na
5 mmol/L Phthalic acid
5 % Acetonitrile
pH 4.6 (NaOH)
2.0 mmol/L NaHCO3
1.3 mmol/L Na
2 mmol/L Phthalic acid
10 % Acetone
pH 5.0 (NaOH)
2.4 mmol/L NaHCO3
2.5 mmol/L Na
2CO3
2CO3
2CO3
10 µL 5 µS/cm 1…10 ppm 257
100 µL 10 µS/cm 5…10 ppm 260
20 µL 10 µS/cm 2…10 ppm 260
100 µL 5 µS/cm 5…10 ppm 261
20 µL 5 µS/cm 2…10 ppm 261
100 µL 4 µS/cm 5…10 ppm 265
20 µL 10 µS/cm 0.4…50 ppm 260
2m732b1.mtw Standard method for PC board 1 and channel 2
1m732b2.mtw Standard method for PC board 2 and channel 1
2m732b2.mtw Standard method for PC board 2 and channel 2
csi.mtw Standard method for CSI interface
importrd.mtw Standard method for import of chromatograms
recorded with the DOS program IC Metrodata 714
IC Metrodata for Win95
22
Page 29

3.3 Use of existing methods
Preparations
• Insert separating column in IC system and condition it.
• Prepare standards and sample.
Load standard method and run
• Click on
or select Load method and run from the Acquire menu.
• Select the desired method (e.g.
dow and click the
• Enter a name as
OK button. The window Start Run appears.
Ident to characterize the standard (max. 14 char-
acters, e.g. "standard").
dual1sup.mtw) in the File Open win-
IC Metrodata for Win95
• Change the analysis time
Duration if required.
• Enter more parameters to characterize sample and acquirement
conditions if required.
• Click the
OK button.
The window for the on-line display of the chromatogram opens.
The window title line contains sample name, method and run number (e.g. standard (dual1sup.mtw)01.run). The status display below
shows the message
Waiting.
• Set injection valve at 733 IC Separation Center to "FILL" (manually
or by program) and fill sample loop with standard.
• Set injection valve at 733 IC Separation Center to "INJECT" (manu-
ally or by program). The data acquisition is started automatically
and stopped as soon as the analysis time has passed. As the Re-
start method
option is switched on in the method, the chromatogram is saved automatically and deleted in the chromatogram
window.
23
Page 30

3 Learning by doing
• Before starting the sample determination, you have to calibrate and
perhaps modify the method. Therefore close the empty chromatogram window. The message
Data acquisition is active! Standby?
appears.
• Click the
Yes button.
Open the standard chromatogram
• Click on
• Select the chromatogram
open
window. The lower part of the window shows the information
or select Open from the File menu.
*.chw just recorded in the Chromatogram
entered at the recording of the chromatogram.
• Click the OK button. The chromatogram window is opened.
Modify integration parameters
• Click on
or select Integration from the Method menu.
IC Metrodata for Win95
24
Page 31

3.3 Use of existing methods
• If required, enter the time delay as Delay before starting peak inte-
gration at the first peak to be detected.
• Click the
Apply button. The Integration Parameters window remains
open and the chromatogram is reintegrated.
• Repeat this procedure for all other integration parameters until the
result satisfies your expectations. Click Apply after each parameter
changing.
• Close the
Integration Parameters window with OK.
Modify peak allocation
• Click on
or select Calibration / Components of the Method
menu. For all peaks which could be allocated unambiguously to a
component this table contains the peak number in the
and the corresponding retention time in the
Time column.
Peak column
IC Metrodata for Win95
25
Page 32

3 Learning by doing
• If the Peak column contains a 0 the peak must be manually
allocated to a component. In this case, insert the peak number
from the chromatogram into the
Peak column and click the Time
field with the mouse. The corresponding retention time is then
inserted automatically as the new time for this component.
Start calibration
• Click the
Concentrations>> button.
• If necessary, change the concentrations of the components in the
Level 1 column.
• Click the
Calibrate button. The Recalibration window appears.
IC Metrodata for Win95
26
Page 33

3.3 Use of existing methods
• Select the Level and click on the OK button.
• Click the
OK button in the Concentrations window.
Display calibration curves
• Click the
• Select the desired component in the
Graphs>> button in the Components window.
Component field for which the
calibration curve should be displayed.
• Close the
• Close the
OK.
Component window by clicking OK.
Components window below the chromatogram by clicking
Save chromatogram and method
• Close the chromatogram window. A window appears with the mes-
Changes in *.chw. Modified: Calibration, Integration, Peaks, Re-
sage
port. Save changes?
• Click the
ready exists. Overwrite?
Yes button. A window appears with the message *.chw al-
• Click the
*.mtw
• Click the
• Since the initially loaded method (e.g. dual1sup.mtw) is not write-
Yes button. A window appears with the message Method
was modified. Save changes?
Yes button. The File Save As window appears.
protected, the modified method should be saved with a new name.
Therefore enter a new name in the
Filename field and click OK.
Recording of a sample chromatogram
• Click on or select Load method and run from the Acquire menu.
• Select the previously saved method
and click
OK.
*.mtw in the File Open window
• Enter a sample name (max. 14 characters, e.g. "drinking water") as
Ident in the Start Run window.
• If required, enter more parameters (e.g.
Dilution) to characterize
sample and acquirement conditions.
• Click the
OK button.
The window for the on-line display of the chromatogram opens.
The status display below shows the message
Waiting.
IC Metrodata for Win95
• Set the injection valve at the 733 IC Separation Center to "FILL"
(manually or by program) and fill the sample loop with sample.
27
Page 34

3 Learning by doing
• Set the injection valve at the 733 IC Separation Center to "INJECT"
(manually or by program). The data acquisition is started automatically. The status display shows
Measure, beside it running time,
analysis time and measuring signal (in mV) are displayed. As soon
as the analysis time has passed, the data acquisition is stopped
automatically and the chromatogram is integrated. The status display in the upper left corner shows the message
Waiting again.
Now more samples can be recorded with the same method.
• Close the empty chromatogram window. The message
sition is active! Standby?
• Click the
Yes button.
appears.
Data acqui-
IC Metrodata for Win95
28
Page 35

3.4 Multipoint calibration
3.4 Multipoint calibration
This section describes the procedure how to perform a calibration
with multiple standards using either an existing or an user-developed
method and to save this multipoint calibration as a new method.
Preparations
• Insert separating column in IC system and condition it.
• Select the full scale range at the 732 IC Detector so that all peaks
of the standard with the highest concentration will be inside the
measuring range.
• Prepare standards and sample.
Record first standard chromatogram
• If you wish to develop a new method based on a standard method
proceed according to section 3.1 (without sample recording).
• If you wish to use an existing example method proceed according
to section 3.2 (without sample recording).
• In both cases, you receive the new method
standard chromatogram
*.chw.
*.mtw and the first
Record second standard chromatogram
• Click on or select Load method and run from the Acquire menu.
• Select the method saved on recording the first standard chroma-
togram in the
• In the
Start Run window, enter a name as Ident to characterize the
File Open window and click the OK button.
standard (max. 14 characters, e.g. "standard #").
• Click the
OK button.
The window for the on-line display of the chromatogram opens.
The status display shows the message
Waiting.
• Set injection valve at 733 IC Separation Center to "FILL" (manually
or by program) and fill sample loop with standard.
IC Metrodata for Win95
• Set injection valve at 733 IC Separation Center to "INJECT" (manu-
ally or by program). The data acquisition is started automatically
and stopped as soon as the analysis time has passed. The chromatogram is saved and deleted in the chromatogram window. The
status display shows the message Waiting again.
29
Page 36

3 Learning by doing
Record third to xth standard chromatogram
• Click on or select Passport of the Method menu.
• In the
standard (e.g. "standard #") and click
General tab, enter a new name as Ident characterizing the
OK.
• Set injection valve at 733 IC Separation Center to "FILL" (manually
or by program) and fill sample loop with standard.
• Set injection valve at 733 IC Separation Center to "INJECT" (manu-
ally or by program). The data acquisition is started automatically
and stopped as soon as the analysis time has passed. The chromatogram is saved and deleted in the chromatogram window. The
status display shows the message
Waiting again.
• Repeat this procedure until the last standard has been recorded.
• Close the empty chromatogram window. The message
sition is active! Standby?
• Click the Yes button.
appears.
Data acqui-
IC Metrodata for Win95
30
Page 37

3.4 Multipoint calibration
Enter concentrations for calibration
• Select Open method of the File menu.
• Select the previously saved method in the
click
OK.
• Select
Calibration / Concentrations of the Method menu.
File Open window and
• Click the
Level in the Add level window by clicking OK.
Add button and confirm the suggested number 2 for the
• Enter the concentrations of all components of the second standard
in the new
Level 2 column.
• Repeat this procedure for every further standard.
• If all standards have been entered, close the Concentrations win-
dow by clicking
• Close the empty chromatogram window. The message
*.mtw was modified. Save changes?
• Click the
• Click the
ready exists. Overwrite?
• Click the OK button.
Yes button. The File Save As window appears.
OK button. A window appears with the message c:\..... al-
OK.
Method
appears.
IC Metrodata for Win95
31
Page 38

3 Learning by doing
Start calibration
• Click on or select Open of the File menu.
• Select all previously recorded standard chromatograms in the
Chromatogram open window by clicking them with the mouse.
• Click the
• Enter a name for the new queue and click
To Queue button. The Set to Queue window appears.
OK. The chromatograms
are loaded into the queue and a window with the list of all chromatograms added to the queue appears.
IC Metrodata for Win95
32
Page 39

3.4 Multipoint calibration
th
• Because the second up to the x
standard have been recorded as
samples (0) the levels belonging to the standard have to be entered into the
already defined in the
Level column. For each level enter the level numbers
Concentrations window into this column
(standard 1 = Level 1, standard 2 = Level 2, etc.).
• Afterwards click the
ReProcess button. In the Reprocessing window,
switch on the options as shown below.
IC Metrodata for Win95
• Click the
Start button.
33
Page 40

3 Learning by doing
Modify calibration
• Select Open method of the File menu.
• Select the method used for calibration in the
OK. An empty chromatogram window appears.
click
• Select
Calibration / Graphs of the Method menu. The Component win-
File Open window and
dow appears in which the calibration curves and the corresponding
data are displayed.
• Check with the aid of the graphic representation and the displayed
percentage residual mean standard deviation
RSD whether the
calibration curve fits optimally the calibration points. Select another
function in the
• If you select a new function the message
GLOBAL parameter! Recalculate all components?
Formula field if this is not the case.
You attempt to change
appears.
Click either Yes, if all components should be recalculated with this
new function or
No, if only the displayed component should be re-
calculated.
• Select one component after the other in the
Component field and
repeat the procedure to modify the calibration curves.
• Close the
Component window by clicking OK.
IC Metrodata for Win95
34
Page 41

3.4 Multipoint calibration
Save method
• Select Save method as of the File menu. The File Save As window
appears.
• Click the OK button. A window appears with the message c:\..... al-
ready exists. Overwrite?
• Click the OK button.
Record a sample chromatogram
• Click on
or select Restart method of the Acquire menu.
• Enter a sample name (max. 14 characters, e.g. "drinking water") as
Ident in the Start Run window.
• If required, enter more parameters (e.g.
Dilution) to characterize
sample and acquirement conditions.
• Click the
OK button.
The window for the on-line display of the chromatogram opens.
The status display below shows the message
Waiting.
• Set the injection valve at the 733 IC Separation Center to "FILL"
(manually or by program) and fill the sample loop with sample.
• Set the injection valve at the 733 IC Separation Center to "INJECT"
(manually or by program). The data acquisition is started automatically and stopped as the analysis time has passed.
IC Metrodata for Win95
35
Page 42

3 Learning by doing
3.5 Modify several chromatograms
This section describes the procedure for reintegrating, recalculating
and reprinting of several already recorded chromatograms with the
aid of a queue.
Load chromatograms into queue
• Click on
or select Open of the File menu.
• Select all chromatograms to be modified in the
Chromatogram open
window by clicking them with the mouse.
• Click the
• Enter a name for the new queue and click
To Queue button. The Set to Queue window appears.
OK. The chromatograms
are loaded into the queue and a window appears with the list of all
chromatograms added to the queue.
Start recalculation
• Click the
cording of the first chromatogram appears in the
acquired by method
ReProcess button. The name of the method used for re-
Chromatograms
field. If the queue contains other chromatograms recorded with different methods these could be selected
in this list field with the mouse.
IC Metrodata for Win95
36
Page 43

3.5 Modify several chromatograms
• Select the desired method for recalculation of all chromatograms
recorded with this method in the Chromatograms acquired by method
field.
• If the sample chromatograms (Level = 0) should be recalculated
switch on the Sample runs option.
• If the standard chromatograms (Level ≥ 1) should be recalculated
switch on the
• If the chromatograms should be reintegrated switch on the
grate
option (if the queue contains standards, the Recalibrate option
Calibration runs option.
Reinte-
is switched on automatically). When the reprocessing is started the
Integration parameters window appears (procedure see section 3.2
– Modify integration parameters).
• If a new calibration should be performed switch on the
option. In this case, select the desired options in the
Recalibrate
Recalibration
part of the window.
• If a report should be printed out automatically for all recalculated
chromatograms switch on the
essing is started the
Report options window appears (procedure
Print report option. When the reproc-
see section 3.2 – Change report options).
IC Metrodata for Win95
• Click the
Start button.
37
Page 44

3 Learning by doing
3.6 Use of sample tables
This section describes how to construct sample data tables with the
aid of a queue. These tables can be processed automatically and are
suited for operation with an Autosampler.
Create new queue
• Select
Queue/Batch of the File menu.
• Enter a name for the new queue in the
• In the
File open window, select the method to be used in the queue.
Filename field and click OK.
A window with a sample table appears, which contains a row for
sample data entry.
• Enter a sample name in the
Ident field.
• Enter the vial number on the Autosampler in the
• Enter the volume of the sample loop in the
Vial field.
Volume field (only if the
volume is changed).
• Enter the dilution factor for the sample in the
• Enter the folowing numbers in the
Level field:
Dilution field.
0 for samples
≥ 1 for standards (the level concentrations have
to be defined in advance in the method)
• Enter the name
the
Method field (the method name has to be defined in advance).
• The
File field needs no input (the name of the saved file is entered
*.mtw of the method for processing the sample in
automatically in this field at the end of the data acquisition).
• When all data are filled in in the first line, click the
Add Row button
to insert a second line for entering sample data. At the same moment the data of the first line are copied into the second line.
IC Metrodata for Win95
38
Page 45

3.6 Use of sample tables
• Overwrite the fields of the second line with the data for the second
sample.
• Repeat this procedure until all sample data have been entered.
Start queue
• Click the
The window
Start button to start the processing of the sample table.
Do you really wish to start the queue? appears.
• Click the
Yes button. The window for the on-line display of the
chromatogram opens. The status display shows the message
Waiting. Now the program waits for a start command which is
normally triggered by an Autosampler.
With methods with automatic report output (Make Report option in
Method / Method setup / Processing switched on), pay attention that
the start command by the Autosampler is not triggered before the
report output has been finished.
Open queue during data acquisition
• Select Batch of the View menu. The sample data table is displayed,
where all the samples worked off have an entry in the
File field.
These rows and the first row without file entry (current sample)
cannot be changed during data acquisition.
• All other rows with samples not worked off can be changed at any
time. For changing the method, select the menu point
method
and select the new method from the list of all existing
File / Change
methods.
IC Metrodata for Win95
• New rows can be added with Add Row, existing rows can be de-
leted with
• When you have finished the changes, click the
Del Row.
OK button. The win-
dow is closed again.
39
Page 46

3 Learning by doing
Start reprocessing
• For reprocessing of the recorded chromatograms proceed accord-
ing to section 3.5.
Start existing queue
• Select
Queue/Batch of the File menu.
• Select the desired queue
OK.
• Select
File column recorded at the last start of the queue.
• Click the
Clear file names of the File menu to delete all files *.chw in the
Start button or select Run the queue... to start the proc-
essing of the sample table. The message
start the queue?
• Click the
Yes button. The window for the on-line display of the
appears.
*.que in the File open window and click
Do you really wish to
chromatogram opens. The status display shows the message
Waiting. Now the program waits for a start command which is
normally triggered by an Autosampler.
With methods with automatic report output (Make Report option in
Method / Method setup / Processing switched on), pay attention that
the start command by the Autosampler is not triggered before the
report output has been finished.
IC Metrodata for Win95
40
Page 47

3.7 Export data
3.7 Export data
This section describes how to export data via clipboard or report output for further processing with other programs.
Export chromatogram via clipboard
• Click on
• Select the desired chromatogram in the
dow and click
or select Open of the File menu.
Chromatogram open win-
OK. The recorded chromatogram is displayed in a
window.
• Select the desired view of the chromatogram in the
View menu or
by zooming with the mouse (see section 3.2).
• Select
Copy to Clipboard of the Edit menu. The chromatogram is
copied into the Windows clipboard from where it can be inserted
into another program.
Export report via clipboard
• Click on
• Select the desired chromatogram in the
dow and click
or select Open of the File menu.
Chromatogram open win-
OK. The recorded chromatogram is displayed in a
window.
• Click on
Options
or select Make report of the Process menu. The Report
window appears.
• Switch on the
Screen option under Report Destination.
• If required, change the report options (see section 3.2).
• Click the
Report button. A window appears in which the results
(without chromatograms) are displayed.
• Select
Copy to Clipboard of the Edit menu. The report is copied into
the Windows clipboard from where it can be inserted into another
program.
IC Metrodata for Win95
41
Page 48

3 Learning by doing
Export via file report
• Click on or select Open of the File menu.
• Select the desired chromatogram in the
dow and click
OK. The recorded chromatogram is displayed in a
window.
• Click on
dow
Report Options appears.
• Switch on the
or select Make report of the Process menu. The win-
File option under Report Destination.
Chromatogram open win-
• Enter a name for the file to be saved in the
output options
.
• Reports and chromatogram plots are saved into the
rectory. Click the
Directory button if you wish to change the stan-
Name field under File
.../reports di-
dard directory for saving chromatogram plots or reports. The new
directory must have been defined in advance.
• For Mode, click one of the options Overwrite (overwrite data) or Ap-
pend
(append data in file).
• For
IC Metrodata for Win95
42
Character Set, click one of the options Windows or DOS.
Page 49

3.7 Export data
• If required, change the other report options (see section 3.2).
Switch on the
Chromatogram Plot option if also the chromatogram
plot should be exported in addition to the report.
• Click the
Report button. The two files * (text file) and *.wmf (graphic
file) are saved in the specified report directory with the desired file
names and can be inserted from there into other programs.
Export to Excel
• Click on
• In the
Chromatogram open window, select all chromatograms to be
or select Open of the File menu.
exported (see section 3.5).
• Click the
• Enter a name for the new queue and click
To Queue button. The Set to Queue window appears.
OK. The selected chro-
matograms are loaded into the queue. A window appears where all
the chromatograms added to the queue are listed.
• Click the
ReProcess button.
IC Metrodata for Win95
43
Page 50

3 Learning by doing
• In the Chromatograms acquired by method window, select the de-
sired method for export of all the chromatograms recorded with
this method (chromatograms recorded with different methods cannot be exported at the same time).
• If the chromatograms should not be reintegrated or recalibrated,
switch off the
Reintegrate and Recalibrate options.
• Switch on the
Calibration runs for export of calibration run data.
• Switch on the
• Click on the
Sample runs option for export of sample run data and
Print Report option.
Start button. The Report Options window appears.
• Switch on the
Peaks table option in the Items to report field and
switch off all other options.
• Switch on the
File option in the Report destination field and switch
off all other options.
• Select
• Click on
• Select
• Select
IC Metrodata for Win95
44
Custom in the Quantification method field.
<<Customize and select all data elements to be exported.
excele.rtt in the Template field.
Semicolon in the Separator field.
Page 51

3.7 Export data
• Enter the directory for storage of the exported files in the Directory
field.
• Enter the name of the exported file
• Select the
or the
• Select the
• Click on
• Open the exported file
files *.prn; *.txt; *.csv
Overwrite option (existing data in the file are overwritten)
Append option (data are added to the file) for Mode.
Windows option for Character Set.
Report. The data are saved in the *.csv file.
*.csv in Microsoft Excel (select file type Text
).
*.csv in the Name field.
• Mark all columns containing data.
• Select
• Select the desired column(s) for sorting (e.g.
click the
Sort... of the Data menu.
Name or Ident) and
My list has header row option. Start the sorting with OK.
• Delete all unnecessary rows containing horizontal lines, sums and
units.
IC Metrodata for Win95
45
Page 52

3 Learning by doing
3.8 Method associated remote control
This section describes the procedure how to associate a time program for the 732 IC Detector with a method. In order to do this, a
COM port of the PC and the serial interface of the 732 IC Detector
must have been connected by a 6.2125.060 (25 pin/25 pin) or a
6.2125.110 (25 pin/9 pin) cable. For remote control of the 709 IC
Pump, the pump must have been connected to the 732 IC Detector
by a 6.2125.060 cable (see 732/733 Instruction Manual).
Set RS232 parameters at 732 IC Detector
• Set the parameters for the RS232 interface of the 732 IC Detector
as follows:
>CONFIG/RS settings
baud rate: 9600
data bit: 8
stop bit: 1
parity : none
handshake: HWs
RS control: on
Load driver for 732 IC Detector
• Select
• Click on
Equipment setup of the Options menu.
Load device... and open the ic732.equ file in the File Open
window.
• In the
double-click the desired
Select driver for use with 732 IC Detector window just opened,
Serial Port to which the 732 IC Detector is
connected.
• Close the Configured equipment control drivers window. Confirm the
question
Yes.
Equipment configuration is modified. Save changes? with
Associate time program with existing method
• Select Open method of the File menu.
• Select the method with whom a time program should be associ-
ated and click OK.
• Select
• Click the
• Double-click
Equipment of the Method menu.
Connect button in the Equipment window.
732 IC Detector[ COM# ] in the Select driver for use with *
window.
• 732 IC Detector[ COM# ] is entered into the Start with method field in
the
Equipment window. This corresponds to a "cycle program" in
the 732 IC Detector. If the program should be started by an "Inject"
at valve A, this row must be moved into the lower
Start with inject
field by clicking the Ð button.
IC Metrodata for Win95
46
Page 53

3.8 Method associated remote control
• First click to
732 IC Detector[ COM# ] an then click the Setup button.
IC Metrodata for Win95
47
Page 54

3 Learning by doing
• Select the IC system type in the Initial tab. With Anion and Cation
temperature coefficient and polarity are set automatically, with
User
these values can be combined independently.
• Change the parameters for 732 IC Detector, 733 IC Separation
Center and 709 IC Pump to the values to be set for these instruments at the start of the method.
• First open the
Program tab, then open the Text tab. Click the Add
button to add a new program line.
• Enter the time x.x in min into the first field of the program line.
• Select the desired program point in the second field.
• Select the parameter belonging to the program point in the third
field. For
1, 0 or * must be entered. A certain remote line position can be
Flow, Pmax and Pmin values must be entered, for Remote
changed by moving the cursor in front of this position and then entering
• Click the
1, 0 or *.
Add button to add new program lines or click the Delete
button to delete program lines. Faulty program points are displayed in the lower part of the program field.
• If you wish to use predefined remote instructions, open the Remote
configuration
• Click the
tab.
Add button to add a new remote instruction.
• Enter any name you like for the remote instruction (max. 19 charac-
ters, e.g. Ext. Valve Fill) in the first field.
• Enter
1, 0 or * for the corresponding remote instruction for remote
control lines 1...8 in the second field. A certain remote line position
can be changed by moving the cursor in front of this position and
then entering 1, 0 or *.
• Click the
Delete button to delete remote instructions.
• Click the
Add button to add more remote instructions or click the
Activate button. The entered remote instruction are added
to the standard program points and can also be selected.
• Open the Text tab and add the predefined remote instructions into
the time program.
• After finishing the programming, click the Apply button. The pro-
gram and the parameters are tested for consistency.
• Switch on the
• Close the
• Select
Save method as of the File menu and save the changed
ENABLED option and close the window with OK.
Equipment window with Close.
method under the same or a new name.
IC Metrodata for Win95
48
Page 55

3.8 Method associated remote control
Example for remote instructions and time program
In the Remote configuration tab, three instructions for control of an external valve with contact closure at the remote lines 3 and 4 are defined. These instructions are then used in the
Text tab in the time pro-
gram.
IC Metrodata for Win95
49
Page 56

3 Learning by doing
Start cycle program and data acquisition
• Click on or select Restart method of the Acquire menu.
• Update the parameters in the
OK.
with
Start Run window and start method
• The parameters stored in the method and the time program are
sent to the 732 IC Detector.
* in the lower left part of the window
shows that the PC is sending data.
• As soon as the program at the 732 IC Detector is ready, it will be
started automatically. This is indicated by the blinking LED in the
<PROG R/S> key at the 732 IC Detector. Depending on the configuration in the
Measure tab, the data acquisition proceeds as fol-
lows:
Start mode = Extern → Data acquisition is started with the Inject
instruction in the time program.
Start mode = Manual → Data acquisition is started as soon as
the time program at the 732 IC Detector is running.
• If the
Restart Method option is selected in the Method / Method Setup /
Processing
program. If the
M
ethod Setup / Processing menu, only one cycle of this program is
menu, the time program is restarted at the end of the
Restart Method option is not selected in the Method /
performed. If the method is started from a queue, the program is
stopped as soon as all rows of method X are worked off.
• The time program is stored as program type cycle with number of
cycles = 1
. The time program and the parameters are sent again to
the 732 IC Detector at the end of the chromatogram. Therefore,
program and parameters can be changed during a running
method, but the changes are not effective until the next cycle.
IC Metrodata for Win95
50
Page 57

3.8 Method associated remote control
Start inject programm and data acquisition
• Select Equipment of the Method menu.
• Click on
732 IC Detector[ COM# ] in the Start with method field. After-
wards, click the Ð button to move this entry into the lower
inject
field.
Start with
• Click on
• Update the parameters in the
tab and select the
with
OK.
or select Restart method of the Acquire menu.
Start Run window. Open the Measure
Extern option for Start mode. Start the method
• The parameters stored in the method and the time program are
sent to the 732 IC Detector.
* in the lower left part of the window
shows that the PC is sending data.
• As soon as the program at the 732 IC Detector is ready, the LED in
the <PROG R/S> key at the 732 IC Detector lights up. The program is now waiting for an
Inject at the valve A of the 733 IC Sepa-
ration Center.
• If the
Restart Method option is selected in the Method / Method Setup /
Processing
program. If the
M
ethod Setup / Processing menu, the program is performed only
menu, the time program is restarted at the end of the
Restart Method option is not selected in the Method /
once. If the method is started from a queue, the program is
stopped as soon as all rows of method X are worked off.
IC Metrodata for Win95
• A time program of the Inject type is also stored as program type
cycle with number of cycles = 1. The time program and the parame-
ters are sent again to the 732 IC Detector at the end of the chroma-
51
Page 58

3 Learning by doing
togram. Therefore, program and parameters can be changed during a running method, but the changes are not effective until the
next data acquisition.
Stop a running program
During the program run (green LED in the <PROG> key of the 732 IC
Detector is blinking) the <PROG> key is blocked. A running program
can be stopped as follows:
• Stop data acquisition, reject chromatogram,
stop and restart program
Click on
or select Acquire / Suspend chromatogram to stop data
acquisition.
Click on
Available data will be lost. Continue? with Yes. The Start Run win-
tion
or select Acquire / Restart method. Confirm the ques-
dow appears. Send the program to the 732 IC Detector by clicking
OK.
• Stop data acquisition, save chromatogram, stop program
Close the data acquisition window. Confirm the question
sition is activ! Standby?
saved, confirm the question
confirm the question
with Yes. If the chromatogram should be
01.run not saved. Save? with Yes. Also
Method x modified. Save changes? with Yes.
Data aqui-
• Stop data acquisition, save chromatogram,
continue program
Click on
data acquisition. The program continues until the
Restart method is set before the program at the 732 IC Detector
If a
or select Acquire / Finish chromatogram to stop the
End flag is set.
has been finished, the following messages appear:
•
Can’t use 732 IC Detector while time program running! Confirm this
message with
•
Detection of hardware failed on 732 IC Detector. The program at the
OK.
732 IC Detector is stopped. This is shown in the upper left part of
the field with
method
.
TempStop. Restart the program with Acquire / Restart
IC Metrodata for Win95
52
Page 59

3.9 Manual remote control
3.9 Manual remote control
This section describes the procedure how to send parameters and
time programs to the 732 IC Detector and trigger manually certain
functions. In order to do this, a COM port of the PC and the serial interface of the 732 IC Detector must have been connected by a
6.2125.060 (25 pin/25 pin) or a 6.2125.110 (25 pin/9 pin) cable. For
remote control of the 709 IC Pump, the pump must have been connected to the 732 IC Detector by a 6.2125.060 cable (see 732/733 Instruction Manual).
Set RS232 parameters at 732 IC Detector
• Set the parameters for the RS232 interface of the 732 IC Detector
as follows:
>CONFIG/RS settings
baud rate: 9600
data bit: 8
stop bit: 1
parity : none
handshake: HWs
RS control: on
Load driver for 732 IC Detector
• Select Equipment setup of the Options menu.
• Click on
Load device... and open the ic732.equ file in the File Open
window.
• In the
double-click the desired
Select driver for use with 732 IC Detector window just opened,
Serial Port to which the 732 IC Detector is
connected.
• Close the Configured equipment control drivers window. Confirm the
question
Yes.
Equipment configuration is modified. Save changes? with
Send and receive parameters
• Select Equipment setup of the Options menu.
• Click on
drivers
Detector[ COM# ]
• Click on
tered into the
732 IC Detector[ COM# ] in the Configured equipment control
window. Click the Setup button. The INITIAL tab in the 732 IC
window is opened.
Ask. The current parameters of the 732 IC Detector are en-
Actual value fields. * in the lower left part of the win-
dow shows that the PC is receiving data.
IC Metrodata for Win95
• Click on > . The parameters are now entered into the fields at the
right side of the
• Select the IC system type in the
temperature coefficient and polarity are set automatically, with
Initial tab.
Initial tab. With Anion and Cation
User
these values can be combined independently.
53
Page 60

3 Bedienungslehrgang
• Change the parameters for 732 IC Detector, 733 IC Separation
Center and 709 IC Pump on the right side to the desired values to
be set for these instruments.
• Click on
* in the lower left part of the window shows that the PC is sending
< . The parameters are now sent to the 732 IC Detector.
data.
IC Metrodata for Win95
54
Page 61

3.9 Manual remote control
Write, send and activate a program
• Select Equipment setup of the Options menu.
• In the
Detector[ COM# ]
IC Detector[ COM# ]
• First open the
Configured equipment control drivers window, click on 732 IC
and afterwards on Setup. The INITIAL tab in the 732
window is opened.
Program tab, then open the Text tab. Click the Add
button to add a new program line.
• Enter the time x.x in min into the first field of the program line.
• Select the desired program point in the second field (examples see
section 3.8).
• Select the parameter belonging to the program point in the third
field. For
1, 0 or * must be entered. A certain remote line position can be
Flow, Pmax and Pmin values must be entered, for Remote
changed by moving the cursor in front of this position and then entering
• Click the
1, 0 or *.
Add button to add new program lines or click the Delete
button to delete program lines. Faulty program points are displayed in the lower part of the program field.
• If you wish to use predefined remote instructions, open the Remote
configuration
• Click the
tab.
Add button to add a new remote instruction.
• Enter any name you like for the remote instruction (max. 19 charac-
ters, e.g. Ext. Valve Fill) in the first field.
• Enter
1, 0 or * for the corresponding remote instruction for remote
control lines 1...8 in the second field. A certain remote line position
can be changed by moving the cursor in front of this position and
then entering
• Click the
Delete button to delete remote instructions.
• Click the
1, 0 or *.
Add button to add more remote instructions or click the
Activate button. The entered remote instruction are added
to the standard program points and can also be selected.
• Open the Text tab and add the predefined remote instructions into
the time program.
• After finishing the programming, click the Apply button. The pro-
gram and the parameters are tested for consistency.
• Switch on the ENABLED option.
• Open the
• Click on
the 732 IC Detector.
Initial tab.
< . The parameters and the time program are now sent to
* in the lower left part of the window shows
that the PC is sending data. The time program is stored in the 732
IC Detector as program type
cycle with number of cycles = 1.
IC Metrodata for Win95
Manual triggering of actions via PC
55
Page 62

3 Bedienungslehrgang
• Select Equipment setup of the Options menu.
• In the
Detector[ COM# ]
IC Detector[ COM# ]
• Open the
Program RUN/STOP: The program at the 732 IC Detector is
•
Configured equipment control drivers window, click on 732 IC
and afterwards on Setup. The INITIAL tab in the 732
window is opened.
Manual Control tab.
started or stopped.
• Valve A FILL/INJECT: Valve A at the 733 IC Separation Center is
switched to the
Valve B FILL/INJECT: Valve B at the 733 IC Separation Center is
•
switched to the
Fill or Inject position.
Fill or Inject position (only
possible with the 733.0020 IC Separation
Center).
•
Suppressor STEP: The suppressor is switched to the next
position (only possible with the 733.0030
IC Separation Center).
•
Zero ON/OFF: The auto-zero is switched on or off.
Pump RUN/STOP: The 709 IC Pump is started or stopped.
•
Log data transmission
The data transmission logging is used for error diagnosis if the communication between PC and 732 IC Detector is faulty. Normally, it
should not be used because the data transmission rate is lowered.
• Select Equipment setup of the Options menu.
• In the
Detector[ COM# ]
IC Detector[ COM# ]
• Open the
Configured equipment control drivers window, click on 732 IC
and afterwards on Setup. The INITIAL tab in the 732
window is opened.
Serial port[ COM# ] tab.
• Select the log type:
Formatted I/O: The data transmission between PC and 732 IC
Detector 732 is logged line by line.
Byte stream: The data transmission between PC and 732 IC
Detector 732 is logged character by character
(1 character per line).
File: The data transmission logging is saved into the
MemDump.log file in the program directory.
IC Metrodata for Win95
56
Page 63

4.1 Software license
4 Appendix
4.1 Software license
The «IC Metrodata for Win95» program is installed as a full program
package together with the 6.2145.010 Dongle. Installations without
dongle are demo versions which are unable to acquire chromatograms. If a demo version is equipped with a dongle, it runs as a full
version. Methods generated during the demonstration time are retained in full in such a case.
Please send us your 8.714.8067 Registration card as soon as possible so we can register you as an official user. Only registered users
will get updated program versions at a special price.
4.2 Standard equipment
IC Metrodata for Win95 ..................................................2.714.0310
including the following accessories:
PC Board with 2 channels.................................................1.714.0310
Cable 714/732/733, length = 3 m.....................................6.2128.140
Cable 714/732/733, length = 5 m.....................................6.2128.150
Dongle...............................................................................6.2145.010
Software «IC Metrodata for Win95» ..................................6.6027.153
4.3 Optional accessories
Extension kit for 4 channels..........................................2.714.0320
including the following accessories:
PC Board with 2 channels.................................................1.714.0310
Cable 714/732/733, length = 3 m.....................................6.2128.140
Cable 714/732/733, length = 5 m.....................................6.2128.150
IC Metrodata for Win95
RS232 Cable ...................................................................6.2125.060
25 pin neg. / 25 pin neg., length = 3 m
RS232 Cable ...................................................................6.2125.110
25 pin neg. / 9 pin neg., length = 3 m
57
Page 64

4 Appendix
IC Metrodata for Win95
58
Page 65

4.4 Index
4.4 Index
Excel ........................................................43
A
Access levels.............................................7
Analysis time ......................................10,23
Appendix .................................................57
Application Bulletins................................22
Associate time program with
existing method ...................................46
Autosampler ............................................ 38
Available methods...................................22
Axes settings ........................................... 17
Export chromatogram via clipboard........41
Export data ..............................................41
Export report via clipboard ......................41
Export to Excel.........................................43
Export via file report.................................42
Extension kit for 4 channels.....................57
F
First program start .....................................6
Full program version..................................5
B
Backup ......................................................9
C
Cable 6.2125.060 ...............................46,53
Cable 6.2125.110 ...............................46,53
Cable 6.2128.1X0 ....................................57
Calibration ..........................................12,31
Calibration curves...............................14,27
Calibration points ....................................34
Change report options ............................19
Chromatogram view................................17
Clipboard............................................35,41
Close chromatogram window .................20
Code for filenames ..................................20
Columns .................................................. 22
Concentration unit ...................................13
Connect IC system 1.................................4
Connect IC system 2.................................4
Create new queue ................................... 38
CSI Interface.........................................8,22
Cycle program.................................... 46,50
D
Data transmission logging ......................56
Demo version .......................................5,57
Developing a new method ......................10
Display calibration curves ..................14,27
Dongle 6.2145.010 ............................... 5,57
Dongle installation.....................................3
E
Earthing .....................................................2
Eluents.....................................................22
Enter components for calibration............12
Enter concentrations for calibration ...13,31
Example for remote instructions
and time program................................49
G
Graphic file ..............................................43
H
Hardware ...................................................1
Hardware installation .................................2
Help ...........................................................9
I
Inject program ....................................46,51
Integration parameters .......................11,24
Interfaces ...................................................8
Introduction................................................1
L
Learning by doing......................................9
Levels.......................................................33
List of users ...............................................7
Load chromatograms into queue............36
Load driver for 732 IC Detector ..........46,53
Load standard method.......................10,23
Log data transmission.............................56
Log In window ...........................................6
M
Main menu.................................................9
Manual remote control.............................53
Manual triggering of actions via PC ........56
Method associated remote control .........46
Method directory .....................................22
Modify calibration ....................................34
Modify integration parameters............11,24
Modify peak allocation.............................25
Modify several chromatograms...............36
Multipoint calibration ...............................29
N
New method ............................................10
IC Metrodata for Win95
59
Page 66

4 Appendix
O
On-Line display ...................10,23,29,39,40
Open queue during data acquisition.......39
Open recorded chromatogram ...............21
Open standard chromatogram ...............24
Operating system......................................1
Operation with Autosampler....................38
Optional accessories...............................57
P
Password...................................................7
PC Board......................................2,8,22,57
Peak allocation ........................................25
Peak number ......................................12,25
Print report...............................................16
Processing options..................................15
Program icon.............................................6
Program start.............................................6
Q
Queue............................................ 32,36,38
R
Receive parameters ................................53
Record sample chromatogram .....20,27,35
Record standard chromatogram.............29
Registration ...............................................5
Registration card 8.714.8067 ...............5,57
Remote control...................................46,53
Remote instructions.......................48,49,55
Report options.........................................19
Report output to screen ..........................16
Report template.......................................16
Retention time ....................................12,25
RS232 parameters fo 732...................46,53
Run standard method .............................23
Software update ....................................... 5
Standard chromatograms .............24,29,32
Standard equipment............................... 57
Start calibration..............................14,26,32
Start existing queue ................................ 40
Start queue ............................................. 39
Start reprocessing ..............................36,40
Start standard method............................ 10
Static charges........................................... 2
Stop a running program ......................... 52
System requirements................................ 1
T
Template................................................. 16
Text file.................................................... 43
Time program ...........................46,49,53,55
Use of existing methods......................... 22
Use of sample data tables ..................... 38
W
Window ..................................................... 9
WMF file.................................................. 43
Write, send and activate a program ....... 55
Z
Zoom by mouse ..................................... 18
S
Sample chromatogram .................20,27,35
Sample data tables .................................38
Sample name ..........................................10
Save chromatogram................................27
Save method ......................................27,35
Save new method....................................15
Security system .........................................7
Send and receive parameters .................53
Set chromatogram view ..........................17
Set processing options ...........................15
Set RS232 parameters fo 732 ............46,53
Software ....................................................1
Software installation ..................................5
Software license ......................................57
IC Metrodata for Win95
60
 Loading...