


ZA audio 20 NTG4.0 BR207/212 ECE ÄJ 2010/1a; 1; 2, en-GB
sabbaeu Version: 3.0.2.13
2010-02-09T14:36:10+01:00 - Seite 1
Supplement
Audio 20

ZA audio 20 NTG4.0 BR207/212 ECE ÄJ 2010/1a; 1; 2, en-GB
sabbaeu Version: 3.0.2.13
2010-02-09T14:36:10+01:00 - Seite 2
Symbols
$
%
!
+
X
YY
(Y page)
Display
Warning
Environmental note
Possible damage to the vehicle
Tip
Instruction
Continuation symbol
Page reference
Image in the display

ZA audio 20 NTG4.0 BR207/212 ECE ÄJ 2010/1a; 1; 2, en-GB
sabbaeu Version: 3.0.2.13
2010-02-09T14:36:10+01:00 - Seite 1
Welcome to the world of Mercedes-Benz.
First of all, familiarise yourself with your audio
equipment and read these Operating Instructions. This will help you to obtain the maximum pleasure from your vehicle and avoid
endangering yourself and others.
Depending on the model and equipment level,
the functions and equipment of your audio
equipment may deviate from certain descriptions and illustrations.
Mercedes-Benz is constantly updating its
audio equipment to the state of the art and
therefore reserves the right to introduce
changes in design, equipment and technical
features at any time.
You cannot, therefore, base any claims on the
data, illustrations or descriptions in these
Operating Instructions.
Please consult a Mercedes-Benz Service Centre if you have any questions.
This manual is an integral part of the vehicle.
You should always keep it in the vehicle and
pass it on to the new owner if you sell the
vehicle.
The technical documentation team at Daimler AG wishes you safe and pleasant motoring.
2125846381Z102
É2125846381Z102XËÍ

ZA audio 20 NTG4.0 BR207/212 ECE ÄJ 2010/1a; 1; 2, en-GB
sabbaeu Version: 3.0.2.13
2010-02-09T14:36:10+01:00 - Seite 2

ZA audio 20 NTG4.0 BR207/212 ECE ÄJ 2010/1a; 1; 2, en-GB
sabbaeu Version: 3.0.2.13
2010-02-09T14:36:10+01:00 - Seite 3
Index ....................................................... 4
Introduction ........................................... 8
Contents
At a glance ........................................... 11
System settings .................................. 29
Telephone ............................................ 33
Audio .................................................... 55
Rear Seat Entertainment System ...... 79
3

ZA audio 20 NTG4.0 BR207/212 ECE ÄJ 2010/1a; 1; 2, en-GB
sabbaeu Version: 3.0.2.13
Index
4
2010-02-09T14:36:10+01:00 - Seite 4
A
Active partition (USB mass storage
devices only)
Selecting .......................................... 76
Alphabetical track selection .............. 76
Audio AUX jack .................................... 77
Audio DVD
Pause function ................................. 86
Stop function ................................... 86
Audio format
Setting (audio DVD mode) ............... 86
Autostore ............................................. 60
AUX (Rear Seat Entertainment System)
Connecting ...................................... 94
Switching on .................................... 95
AUX jacks
CD/DVD drive ................................. 27
AUX mode
Setting the brightness/contrast/
colour .............................................. 95
Switching picture format ................. 95
B
Back button
Controller ......................................... 15
Basic functions .................................... 21
Basic menu
Calling up ......................................... 18
Bluetooth/convenience telephony*
Switching between .......................... 41
Bluetooth
®
Activating/deactivating ................... 31
Authorising (registering) a device .... 37
Connecting another mobile phone ... 38
Settings ........................................... 30
Bluetooth® interface
Telephony ........................................ 35
Bluetooth® interface telephony
Conditions ....................................... 35
C
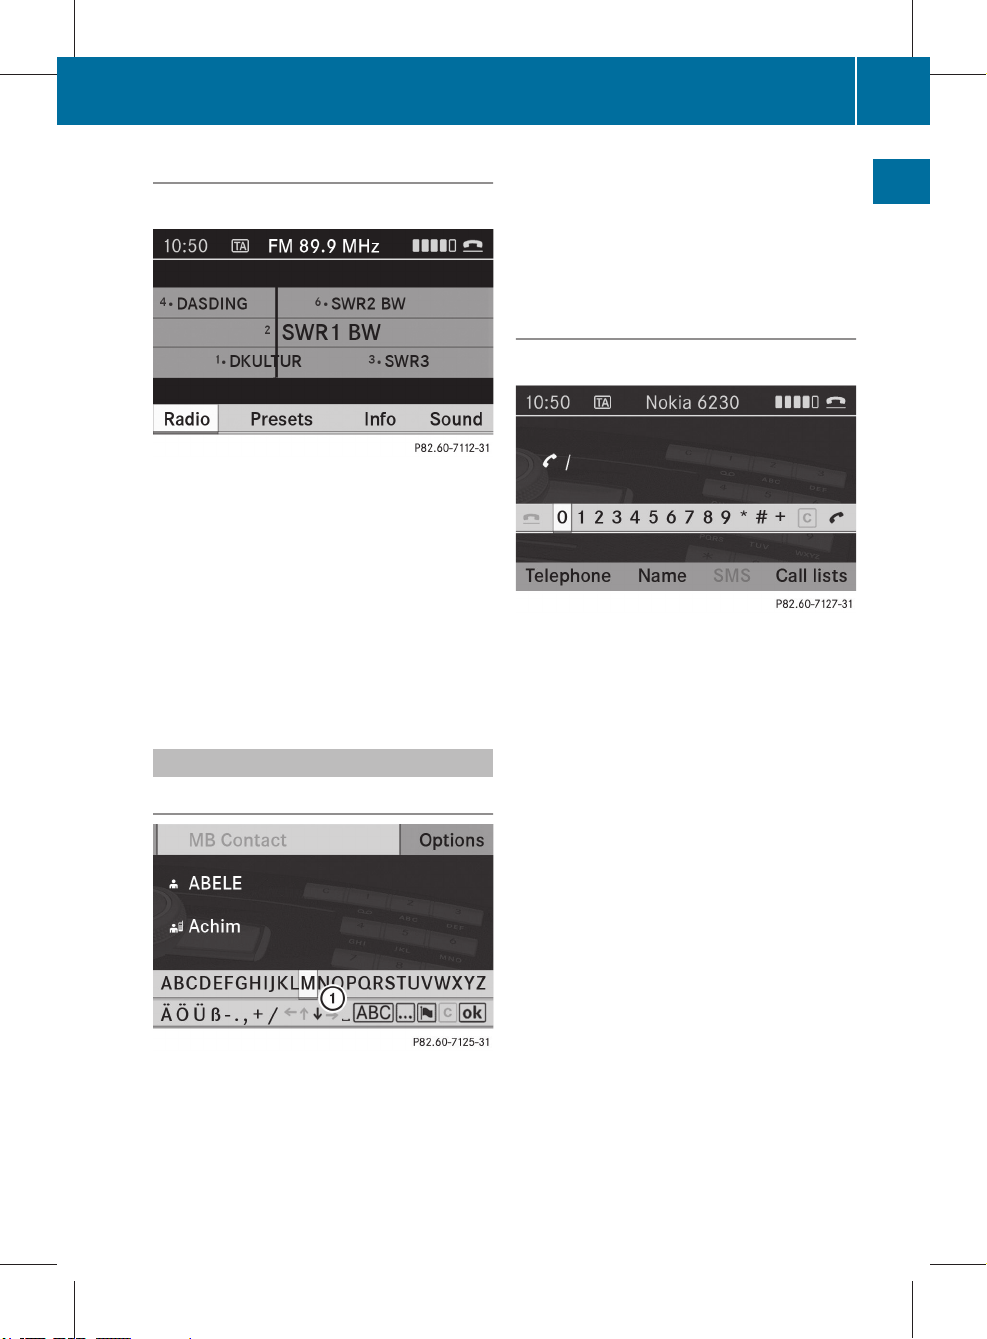
Call lists ................................................ 48
Displaying details ............................. 49
Opening ........................................... 49
CD
Copy protection ............................... 71
Disc ................................................. 71
Ejecting ............................................ 64
General information ......................... 71
Inserting .......................................... 62
Inserting/loading (DVD single
drive) ............................................... 63
Multisession .................................... 69
Notes on handling ............................ 71
Removing/ejecting (DVD single
drive) ............................................... 64
Risk of injury .................................... 62
Switching on .................................... 65
CD/audio DVD or MP3 mode
Switching on (Rear Seat Entertain-
ment System) .................................. 84
CD/DVD
Ejecting (Rear Seat Entertainment
System) ........................................... 84
Inserting (Rear Seat Entertain-
ment System) .................................. 83
CD changer
Loading CDs .................................... 63
CD mode ............................................... 62
Fast forward/rewind ........................ 68
Pause function ................................. 66
Playback options .............................. 69
Selecting a medium ......................... 67
Selecting tracks ............................... 67
Character entry ................................... 19
Components
Audio 20 .......................................... 12
Controller ............................................. 14
Control panel ....................................... 12
Convenience telephony ...................... 40
Copy protection
CD ................................................... 71

ZA audio 20 NTG4.0 BR207/212 ECE ÄJ 2010/1a; 1; 2, en-GB
sabbaeu Version: 3.0.2.13
2010-02-09T14:36:10+01:00 - Seite 5
D
DAB ....................................................... 56
Ensemble ......................................... 57
Data carrier
Video DVD ....................................... 90
Delete button
Controller ......................................... 15
Deleting
Call lists ........................................... 50
Disc
MP3 ................................................. 69
Display .................................................. 16
Adjusting the brightness .................. 30
Selecting the design ........................ 30
E
Emergency call 999 or 112 ................ 35
F
Fast forward/rewind .......................... 85
Frequency entry
Manual ............................................. 59
Function restrictions
Video DVD mode ............................. 82
Index
Selecting playlists ............................ 74
USB mass storage device ................ 75
Menu
Horizontal ........................................ 19
Showing/hiding ............................... 91
Vertical ............................................ 18
Menu system ....................................... 18
Mercedes-Benz Contact ...................... 52
Mobile phone
Connecting (Bluetooth® interface) ... 36
Connecting (convenience teleph-
ony) .................................................. 40
De-authorisation .............................. 39
External authorisation ...................... 38
MP3
Bit and sampling rates ..................... 70
Copyright ......................................... 70
Disc ................................................. 69
File systems ..................................... 69
Formats ........................................... 70
Selecting a folder ............................. 68
Selecting a medium ......................... 67
MP3 mode
Selecting a folder ............................. 85
Multifunction steering wheel ............. 16
Multisession CDs ................................. 69
5
H
Hands-free microphone, switching
on/off ................................................... 44
Headphones ......................................... 27
M
Media Interface
Active partition ................................ 76
Connection options .......................... 71
iPod® ............................................... 71
Mode ............................................... 71
Playback options .............................. 76
Selecting categories ........................ 74
Selecting folders .............................. 74
Selecting music files ........................ 74
N
Navigation menu
Showing/hiding ............................... 90
Number pad ......................................... 19
O
Operating safety .................................... 8
Operating system
Audio 20 .......................................... 12
Operation
Examples ......................................... 20
P
Pause function ..................................... 66
Phone book .......................................... 44
Calling up ......................................... 46
Deleting an entry ............................. 48
Importing external data ................... 45
Receiving vCards ............................. 45

ZA audio 20 NTG4.0 BR207/212 ECE ÄJ 2010/1a; 1; 2, en-GB
sabbaeu Version: 3.0.2.13
Index
6
2010-02-09T14:36:10+01:00 - Seite 6
Phone book entry
Searching ......................................... 46
PIN
Entering ........................................... 40
Playback options ................................. 87
Proper use .............................................. 8
R
Radio mode
Radio Data System .......................... 61
Radio mode and DAB radio mode
Switching on .................................... 56
RDS
Adjusting the volume ....................... 21
Switching off .................................... 21
RDS (Radio Data System) ............. 60, 61
Interrupting an announcement ........ 61
Switching on/off .............................. 60
Rear-compartment screens ................ 25
Rear Seat Entertainment System
Adjusting the sound settings ........... 81
Audio CD/DVD and MP3 mode ....... 83
AUX mode ........................................ 94
Changing the batteries .................... 80
Components .................................... 24
Hiding/showing the picture ............. 83
Remote control ................................ 26
Safety notes ..................................... 83
Selecting the display language ........ 82
Setting the brightness ..................... 83
Several users ................................... 81
System settings ............................... 82
Toggling the display design .............. 82
Using headphones ........................... 81
Video DVD mode ............................. 87
Redials .................................................. 43
Remote control
Changing batteries ........................... 27
Remote operation
Switching the button lighting on/
off .................................................... 26
S
Screen
Selecting for remote operation
(Rear Seat Entertainment System) ... 26
Switching on/off (Rear Seat
Entertainment System) .................... 26
Setting the bass .................................. 22
Single call
Functions ......................................... 43
Sound
Setting balance ................................ 22
Setting fader .................................... 22
Switching on/off .............................. 21
Sound settings ..................................... 22
Station fix ............................................. 58
Station list ............................................ 58
Station pre-sets ................................... 59
Stations
Saving .............................................. 59
Tuning in .......................................... 58
Station search ..................................... 58
Sub-programmes (DAB) ...................... 62
Surround sound ................................... 22
Surround sound (harman/kardon® surround sound system)
Notes ............................................... 22
Switching on/off .............................. 23
Switching on/off ................................. 21
System settings
Display ............................................. 30
Language ......................................... 31
Reset ............................................... 31
T
Telephone
Accepting/ending call ..................... 42
Accepting or rejecting a waiting
call ................................................... 44
Adjusting the volume ....................... 22
Ending an active call ........................ 44
Entering phone numbers .................. 43
Function restrictions ........................ 35
General notes .................................. 34
Incoming call ................................... 42

ZA audio 20 NTG4.0 BR207/212 ECE ÄJ 2010/1a; 1; 2, en-GB
sabbaeu Version: 3.0.2.13
2010-02-09T14:36:10+01:00 - Seite 7
Outgoing call .................................... 42
Sending DTMF tones ........................ 44
Telephone basic menu
Bluetooth® interface ........................ 39
Convenience telephony ................... 41
Telephone mode
Call disconnected while the vehi-
cle is in motion ................................ 34
Operating options ............................ 35
Redialling ......................................... 43
Telephone number
Entering ........................................... 42
Text message
Inbox ................................................ 51
Text message (SMS) ............................ 51
Text messages
Calling the sender ............................ 52
Deleting ........................................... 52
Reading ............................................ 51
Track
Selecting .......................................... 85
Traffic announcements on .................. 61
Traffic Programme
Switching traffic announcements
on/off .............................................. 61
Treble
Setting ............................................. 22
Stop function ................................... 91
Subtitles .......................................... 94
Video DVD mode
DVD playback restrictions ............... 90
Switching on .................................... 90
Volume
Adjusting ......................................... 21
Adjusting (multifunction steering
wheel) .............................................. 16
W
Waveband
Switching (radio) .............................. 57
Index
7
U
USB mass storage device ................... 75
Using the telephone ............................ 42
V
Video DVD
DVD menu ....................................... 92
Fast forward/rewind ........................ 91
Function restrictions ........................ 90
Interactive content .......................... 94
Pause function ................................. 91
Picture settings ................................ 92
Safety notes ..................................... 88
Selecting a film/title ........................ 92
Selecting a scene/chapter .............. 91
Setting the language ........................ 93

ZA audio 20 NTG4.0 BR207/212 ECE ÄJ 2010/1a; 1; 2, en-GB
sabbaeu Version: 3.0.2.13
Introduction
8
2010-02-09T14:36:10+01:00 - Seite 8
Operating safety
Risk of accident
G
Your attention must always be focused on the
traffic conditions. Only use Audio 20 or the
telephone when the road and traffic conditions permit. Operating Audio 20 or the telephone will distract you from the traffic conditions. This could cause you to lose control of
your vehicle, thereby causing an accident.
Bear in mind that, at a speed of only
50 km/h, your vehicle covers a distance of
nearly 14 m per second.
Proper use
Always observe the following when using the
audio equipment:
R
all safety information contained in these
operating instructions
R
national road traffic regulations
i
If work on electronic equipment or systems (e.g. the radio or CD changer) and its
software is carried out incorrectly, this
equipment could stop functioning. Even
systems that have not been modified could
be affected because the electronic systems are connected.
Electronic malfunctions can seriously jeopardise the operational safety of your vehicle.
i
Only have work or changes to electronic
components carried out at a qualified specialist workshop which has the necessary
specialist knowledge and tools to carry out
the work required.
Daimler recommends that you use a Mercedes-Benz Service Centre for this purpose.
In particular, work relevant to safety or on
safety-related systems must be carried out
at a qualified specialist workshop.
Dear radio user,
This radio receiver is suitable for operation by
all persons in accordance with valid EU directives.
The device conforms to currently applicable
European and/or harmonised national standards.
Therefore, adherence to the relevant specifications for electromagnetic compatibility is
guaranteed for this device.
As a result, interference caused by your
equipment to other electrical/electronic
equipment and interference to your equipment caused by other electrical/electronic
equipment can be largely prevented.
The equipment is approved by the vehicle
manufacturer in accordance with European
Automotive EMC Directive 95/54/EC. Therefore, operation according to its intended purpose is approved for your vehicle. As a result,
no component designation is necessary.
It complies with device-specific EMC requirements according to the following European
standards:
R
EN 55013
R
EN 55020
Vehicle equipment
These operating instructions describe all the
standard and optional equipment for your
vehicle, as available at the time of going to
press. Country-specific deviations are possible. Note that your vehicle may not be fitted
with all the functions described. This also
applies to safety-relevant systems and functions. Therefore, the equipment on your vehicle may differ from that in the descriptions
and illustrations. The original purchase contract documentation for your vehicle contains
a list of all of the systems in your vehicle.
Contact a Mercedes-Benz Service Centre if
you have any questions about equipment or
operation.

ZA audio 20 NTG4.0 BR207/212 ECE ÄJ 2010/1a; 1; 2, en-GB
sabbaeu Version: 3.0.2.13
2010-02-09T14:36:10+01:00 - Seite 9
Function restrictions
For safety reasons, some Audio 20 functions
are restricted or unavailable while the vehicle
is in motion. You will notice this, for example,
because you will either not be able to select
certain menu items or because Audio 20 will
display a message to that effect.
Introduction
9
Z

ZA audio 20 NTG4.0 BR207/212 ECE ÄJ 2010/1a; 1; 2, en-GB
sabbaeu Version: 3.0.2.13
2010-02-09T14:36:10+01:00 - Seite 10
10

ZA audio 20 NTG4.0 BR207/212 ECE ÄJ 2010/1a; 1; 2, en-GB
sabbaeu Version: 3.0.2.13
2010-02-09T14:36:10+01:00 - Seite 11
Audio 20 operating system ................ 12
Multifunction steering wheel ............. 16
Operating Audio 20 ............................. 18
Basic functions of Audio 20 ............... 21
Rear Seat Entertainment System ...... 24
11
At a glance
ZA audio 20 NTG4.0 BR207/212 ECE ÄJ 2010/1a; 1; 2, en-GB
sabbaeu Version: 3.0.2.13
Audio 20 operating system
12
2010-02-09T14:36:10+01:00 - Seite 12
Audio 20 operating system
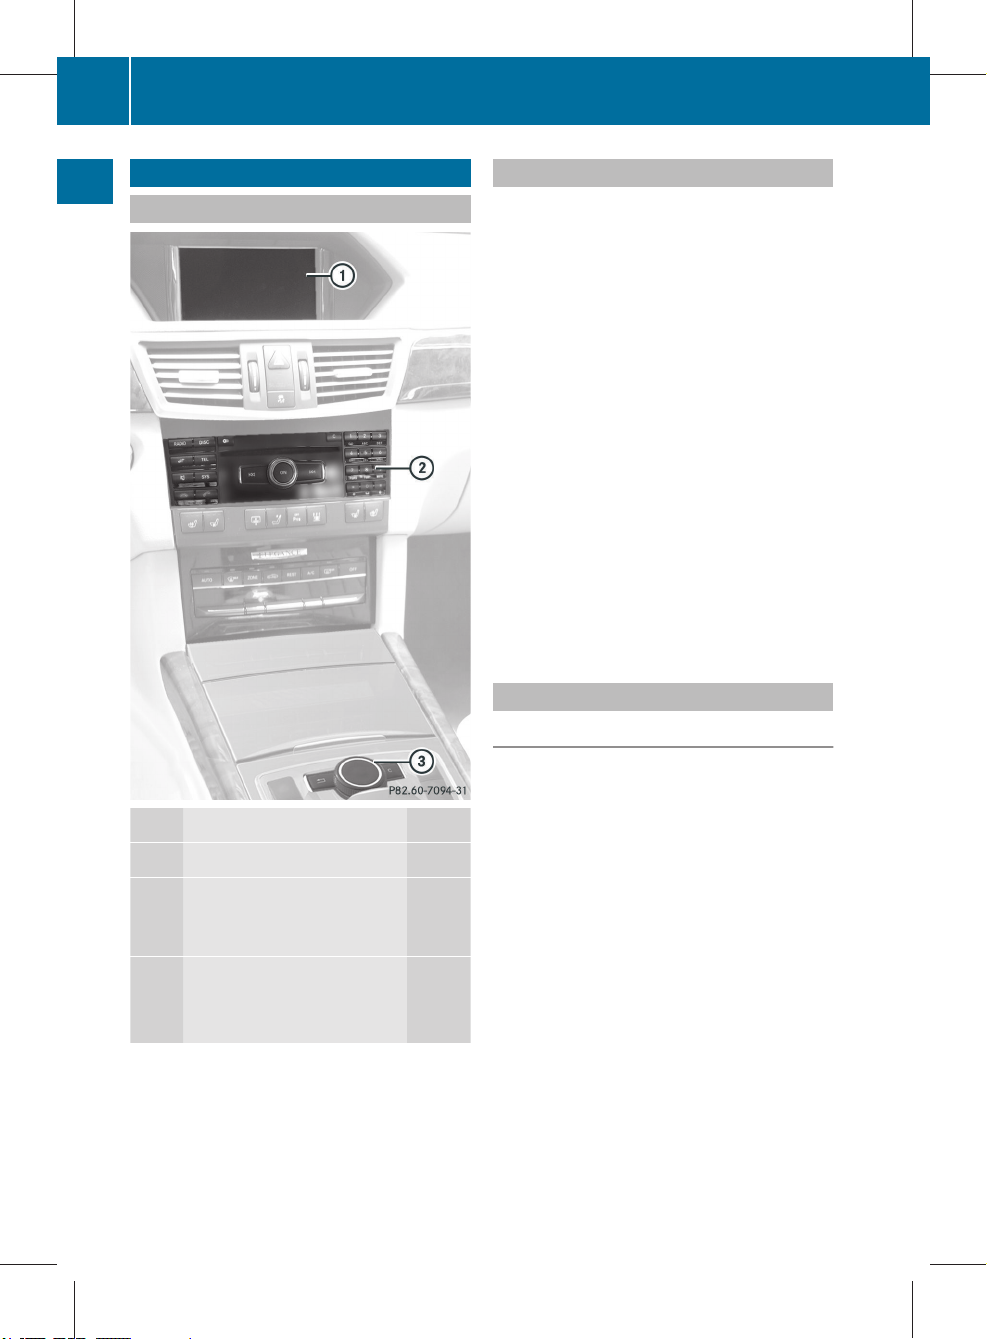
Overview
At a glance
Function Page
:
Audio 20 display 16
;
Audio 20 control panel with
a single CD drive or a CD
changer 12
=
Audio 20 controller 14
Back button (on left) 15
Delete button (on right) 15
Audio 20 components
Audio 20 consists of:
R
the Audio 20 display
R
the Audio 20 control panel with a single CD
drive or a CD changer
R
the Audio 20 controller with the back and
delete buttons
You can operate the following main functions
with Audio 20:
R
the audio functions in the radio, DAB, disc
(audio CD or MP3 mode), Media Interface
and audio Aux operating modes
R
the telephone with the text message (SMS)
function
R
the system settings
You can call up the main functions:
R
using the corresponding buttons
R
in the Audio 20 display via the menu items
with main functions
Audio 20 control panel
Introduction
You can use the Audio 20 control panel for
the following:
R
switching Audio 20 on/off
R
setting the volume
R
selecting main functions/modes directly
R
entering phone numbers, accepting, rejecting, making and ending a call
R
inserting and ejecting CDs

ZA audio 20 NTG4.0 BR207/212 ECE ÄJ 2010/1a; 1; 2, en-GB
sabbaeu Version: 3.0.2.13
2010-02-09T14:36:10+01:00 - Seite 13
Overview
Function Page
:
Switches to radio mode 56
Switches wavebands 57
Switches to DAB radio
mode 56
;
Switches to audio CD or
MP3 mode 65
=
Load/eject button 63
?
Disc slot
Loads CDs 62
Ejects CDs 64
A
Selects a station using the
station search function 58
Fast rewind 68
Selects the previous track 85
B
Switches Audio 20 on/off 21
Sets the volume 21
C
Selects a station using the
station search function 58
Fast forward 68
Selects the next track 85
Audio 20 operating system
Function Page
D
Delete button
Deletes individual charac-
ters
Deletes an entire entry
E
Selects stations via the station presets 59
Stores stations manually 59
PIN entry 40
Telephone number entry 42
Sends DTMF tones 44
F
Accepts a call 42
Dials a number 42
Accepts a waiting call 44
Redials 43
G
Rejects a call 42
Ends an active call 44
Rejects a waiting call 44
H
Calls up the system menu 30
13
At a glance
ZA audio 20 NTG4.0 BR207/212 ECE ÄJ 2010/1a; 1; 2, en-GB
sabbaeu Version: 3.0.2.13
Audio 20 operating system
14
2010-02-09T14:36:10+01:00 - Seite 14
Function Page
I
Mute 21
Switches the hands-free
system on/off 21
Switches the traffic
announcements on/off
At a glance
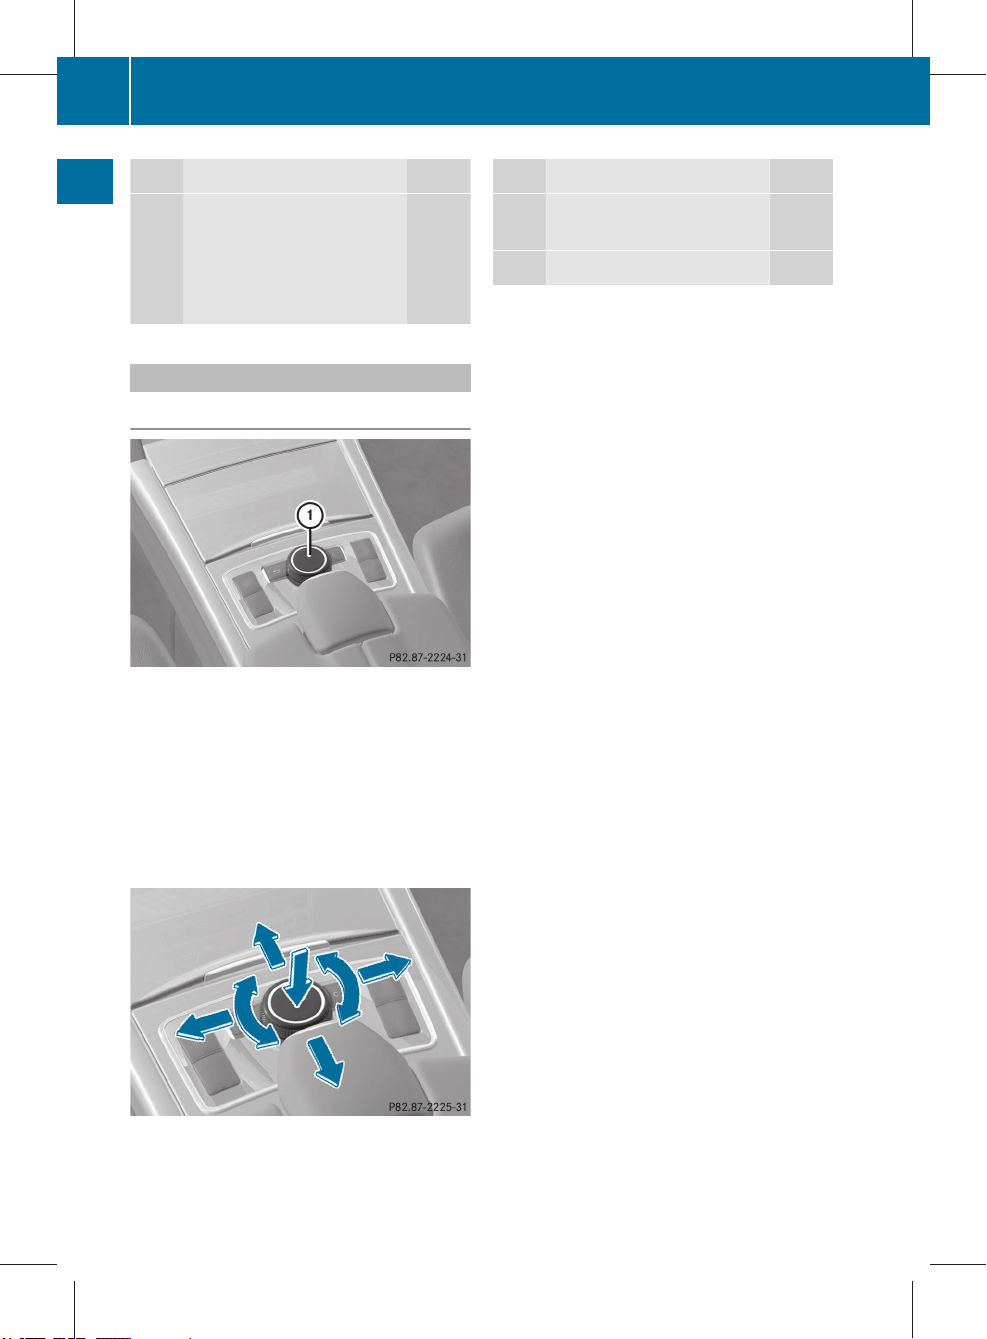
Audio 20 controller
Introduction
:
Audio 20 controller
You can use the Audio 20 controller to select
menu items on the Audio 20 display by moving the selection bar.
In this way you can:
R
call up menus or lists
R
scroll within menus or lists
R
exit menus or lists
Function Page
J
Switches to telephone
mode
K
Calls up the sound menu 22
21
The Audio 20 controller can be:
R
pressed briefly or pressed and held W
R
turned clockwise or anti-clockwise cVd
R
slid left or right XVY
R
slid forwards or backwards ZVÆ
R
slid diagonally aVb
This allows you to navigate within a menu, to
select a menu item or to exit a menu.
Instructions are described in the manual as
follows:
X
Select Station list.
which is a short form for:
X
Turn cVd or slide ZVÆ.
This moves the selection bar to the Sta‐
tion list menu item in the menu.
X
Press W.
This confirms your selection. The TV channel list appears.
Using the Audio 20 controller
ZA audio 20 NTG4.0 BR207/212 ECE ÄJ 2010/1a; 1; 2, en-GB
sabbaeu Version: 3.0.2.13
2010-02-09T14:36:10+01:00 - Seite 15
Audio 20 operating system
Overview
Symbol Controller operation Function
W
Press briefly
Press and hold until the selected
action is carried out
cVd
Turn
ZVÆ Slide
XVY
Slide
Slide and hold
R
Selects a menu item
R
Stores stations
R
Scrolls through vertical or horizontal menus
R
Scrolls through text
R
Makes settings
R
Scrolls through a vertical menu
R
Exits a horizontal menu
R
Scrolls through a horizontal
menu
R
Exits a vertical menu
R
fast forward and rewind during
CD playback
R
Scrolls through lists
15
At a glance
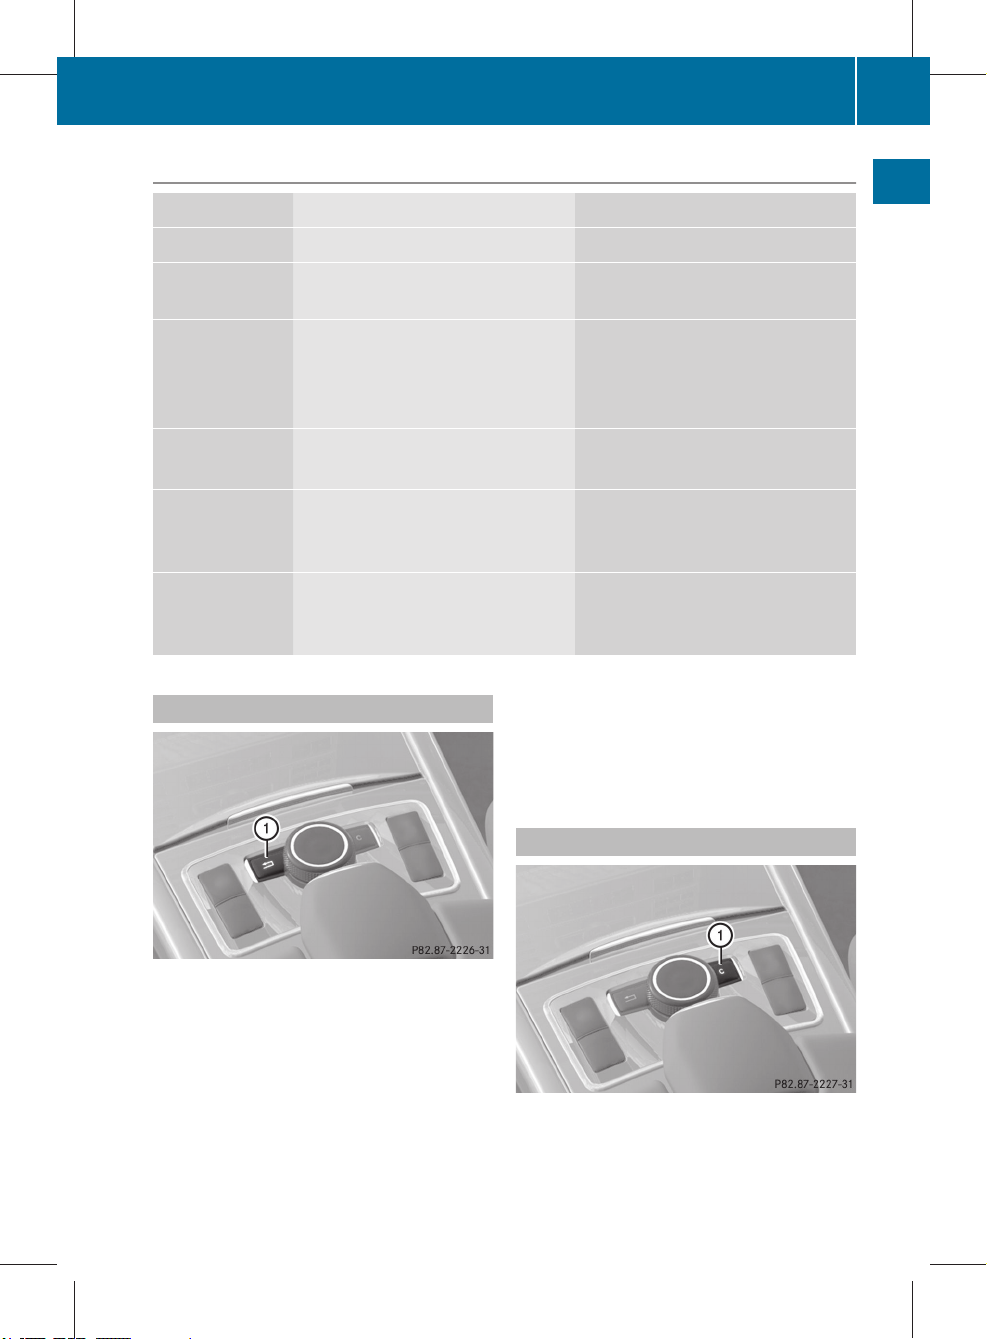
Back button
:
Back button
X
To exit the menu: press the % back
button briefly.
Audio 20 changes to the next higher menu
level in the current operating mode.
i
You can also leave a menu by sliding
XVY or ZVÆ on the Audio 20 controller.
X
To switch to the basic display: press and
hold the % back button.
Audio 20 changes to the basic display of
the current operating mode.
Delete button
:
Delete button
ZA audio 20 NTG4.0 BR207/212 ECE ÄJ 2010/1a; 1; 2, en-GB
sabbaeu Version: 3.0.2.13
Multifunction steering wheel
16
X
To delete individual characters: briefly
2010-02-09T14:36:10+01:00 - Seite 16
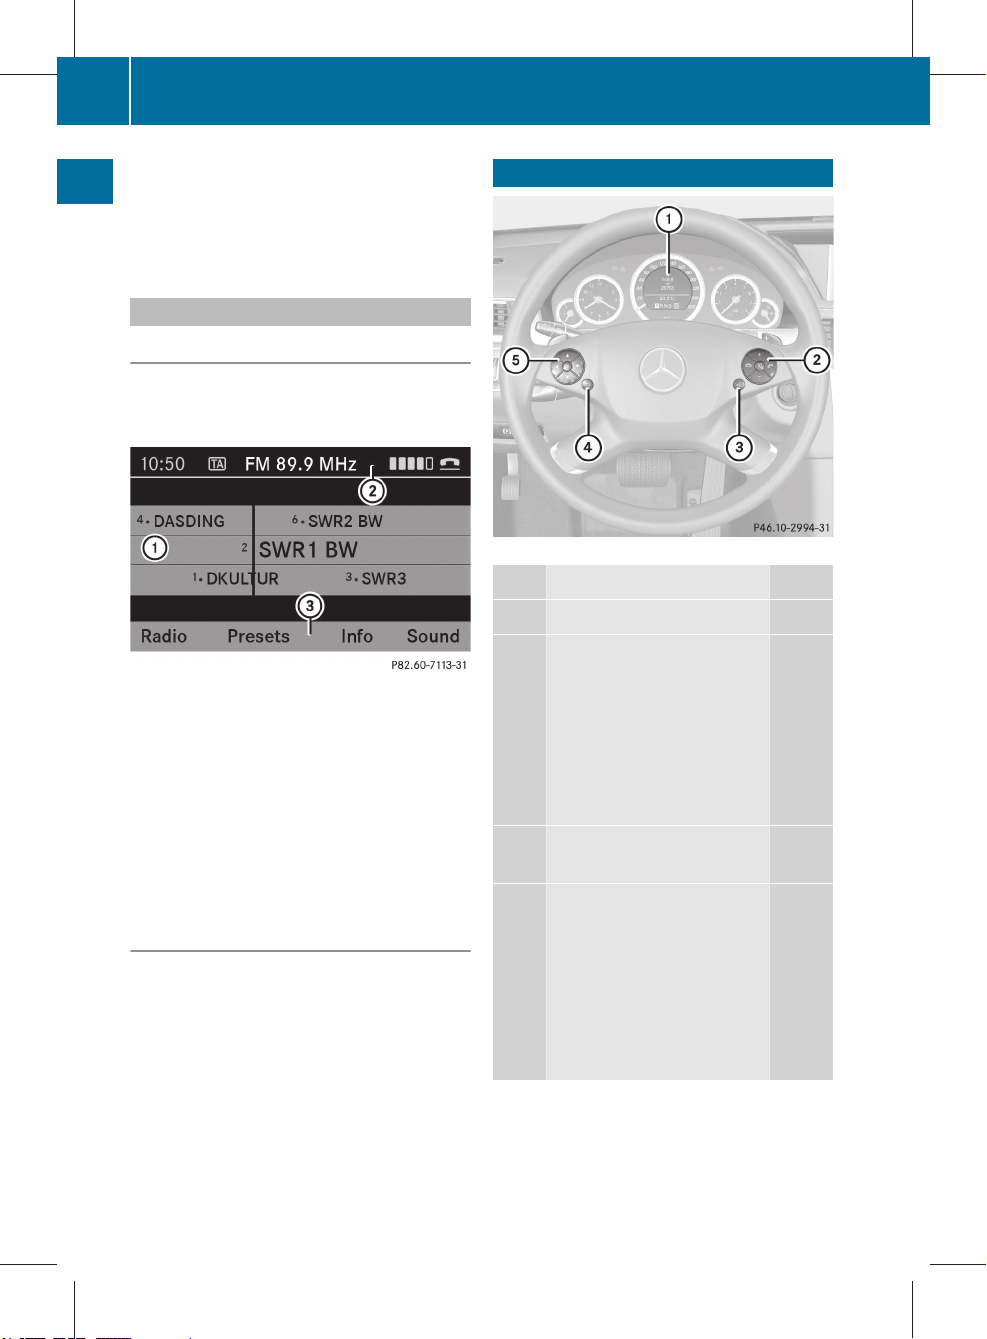
Multifunction steering wheel
press the j delete button.
X
To delete an entire entry: press and hold
the j delete button.
Audio 20 display
At a glance
Display overview
The Audio 20 display shows the function currently selected and its associated menus. The
Audio 20 display is divided into several areas.
Example illustration
Function Page
:
Multifunction display
;
W Increases the volume
Radio display (example)
:
Display/selection window
;
Status bar
=
Menu item with main functions
X Decreases the volume
6 Answers a call
~ Ends a call
x Switches RDS traffic
i
The layout of the menus may vary depending on the equipment in the vehicle. The
menus for a fully-equipped vehicle are
shown in these operating instructions
(Y page 18).
Notes on cleaning
!
Avoid touching the Audio 20 display. The
display has a very sensitive, high-gloss surface; there is a risk of scratching. However,
if you need to clean the screen, then use a
mild cleaning agent and a soft, lint-free
announcements on/off 21
=
? Voice control system
- not fitted
?
%Press briefly: returns
to the previous menu and
fades out display messages.
%Press and hold:
selects the standard display, see vehicle Owner's
Manual.
cloth.
21
21
42
42

ZA audio 20 NTG4.0 BR207/212 ECE ÄJ 2010/1a; 1; 2, en-GB
sabbaeu Version: 3.0.2.13
2010-02-09T14:36:10+01:00 - Seite 17
Function Page
A
=; Calls up the
menu bar and selects
menus
9:Press briefly:
selects a submenu or
scrolls through lists. In the
Audio menu, this selects a
stored station or an audio
track. In the Tel menu, this
switches to the phone book
and selects a name or
phone number.
9:Press and
hold: in the Audio menu,
this selects the next/previous station or selects an
audio track using rapid
scrolling. In the Tel menu,
this starts rapid scrolling in
the phone book.
a Confirms selections
and fades out messages. In
the Tel menu, this switches
to the phone book and
starts dialling.
Multifunction steering wheel
17
At a glance

ZA audio 20 NTG4.0 BR207/212 ECE ÄJ 2010/1a; 1; 2, en-GB
sabbaeu Version: 3.0.2.13
Operating Audio 20
18
2010-02-09T14:36:10+01:00 - Seite 18
Operating Audio 20
Menu overview
Structure of the main functions and the corresponding basic menus
Radio Tel Disc
Radio/DAB Telephone CD/MP3/AUX/Media Int.
At a glance
Presets Name Track list (audio CD)
Folders (MP3)
Music (media interface)
Info
<< (DAB only)
Text message (convenience
telephone only)
CD changer
Media
>> (DAB only) Call lists Sound
Sound
Each main function has a basic menu. Each item in the basic menu has several submenu items.
Selecting menus
Calling up the basic menu
X
Press the $, h, %, u or
i function button.
The corresponding basic menu appears.
Vertical menus
Overview
Navigating within a menu
X
Turn cVd or slide ZVÆ.
Selecting a menu item
X
Press W.
Exiting a menu without making a selection
X
Slide XVY in the opposite direction to the
direction of the list.
or
X
Press the % button.
Example: station list as a vertical menu
ZA audio 20 NTG4.0 BR207/212 ECE ÄJ 2010/1a; 1; 2, en-GB
sabbaeu Version: 3.0.2.13
2010-02-09T14:36:10+01:00 - Seite 19
Horizontal menus
Overview
Example: radio menu bar as a horizontal menu
Navigating within a menu
X
Turn cVd or slide XVY.
Selecting a menu item
X
Press W.
Exiting a menu without making a selection
X
Press the % button.
Entering characters
General information
Example: phone book list with input speller
:
Input speller with upper and lower line
i
With input speller :, you can only select
the characters that are currently available.
These depend on the current input string
and the data contained on the digital map.
Operating Audio 20
If you enter characters into the phone book,
the top list entry is always one that most
closely matches the current input string.
Audio 20 then automatically adds plausible
characters to those already entered by the
user.
Entering characters
Using the input speller
Example: entering a phone number
X
To select a character: turn cVd or slide
XVY.
X
Slide ZVÆ to switch between the lines of
the speller.
X
To confirm the character selection:
press W.
X
To delete individual characters: select
F in the lower right of the speller and
press W.
or
X
Press the j button next to the Audio 20
controller.
X
To delete a complete entry: select F and
press W until the entire entry has been
deleted.
or
X
Press and hold j next to the Audio 20
controller until the entry is deleted.
19
At a glance
ZA audio 20 NTG4.0 BR207/212 ECE ÄJ 2010/1a; 1; 2, en-GB
sabbaeu Version: 3.0.2.13
Operating Audio 20
20
2010-02-09T14:36:10+01:00 - Seite 20
Using the number pad
You can also enter digits using the number
pad (direct entry).
Example:
X
Press one of the number keys, e.g. 2,
once or several times in quick succession.
The character appears on the lower edge of
At a glance
the display when the key is pressed. The
first available letter is highlighted.
X
To select a digit: turn cVd or slide XVY.
X
To confirm your selection: press W.
or
X
Enter digits directly via the number pad.
X
To delete a digit: select F and press the
W button.
or
X
Press the j button.
X
To delete an entire entry: press and hold
the j button until the entire entry has
been deleted.
or
X
Select F and press the W button.
X
To conclude digit entry and dial the
number: select ö and press the W but-
ton.
or
X
Press the 6 button.
Selecting list entries
X
To select an entry: turn cVd or slide
ZVÆ.
X
To confirm your selection: press W.
Operating example
The paths to the individual menu items are
always described starting from the main function.
Example:
$QRadioQStation list
If one of the submenus is already shown on
the screen (e.g. the Radio submenu), the first
steps are not required.
The individual steps are described in the following.
X
Press the $ function button.
The radio basic menu appears.
X
To switch to the menu bar: slide VÆ.
The active menu item is highlighted white.
X
To select a menu item: turn cVd or slide
XVY until Radio is highlighted.
X
To confirm your selection: press W.
The radio menu appears.
X
To select an option: turn cVd or slide
ZVÆ until Station list is highlighted.
X
To confirm your selection: press W.
The station list appears.
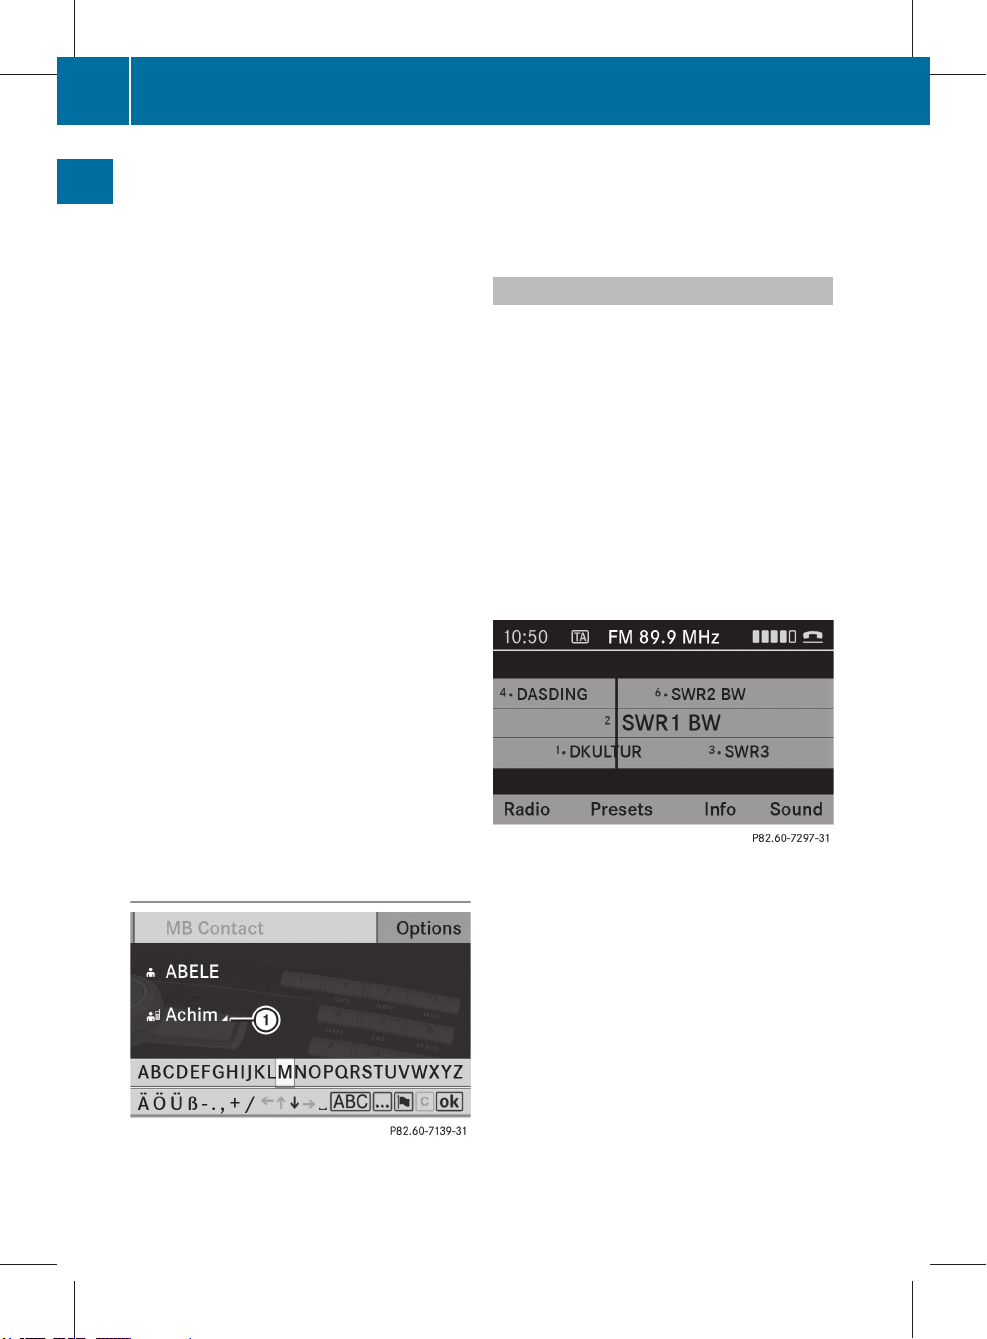
Name list in the phone book
:
G symbol for additional entries under
this name
ZA audio 20 NTG4.0 BR207/212 ECE ÄJ 2010/1a; 1; 2, en-GB
sabbaeu Version: 3.0.2.13
2010-02-09T14:36:10+01:00 - Seite 21
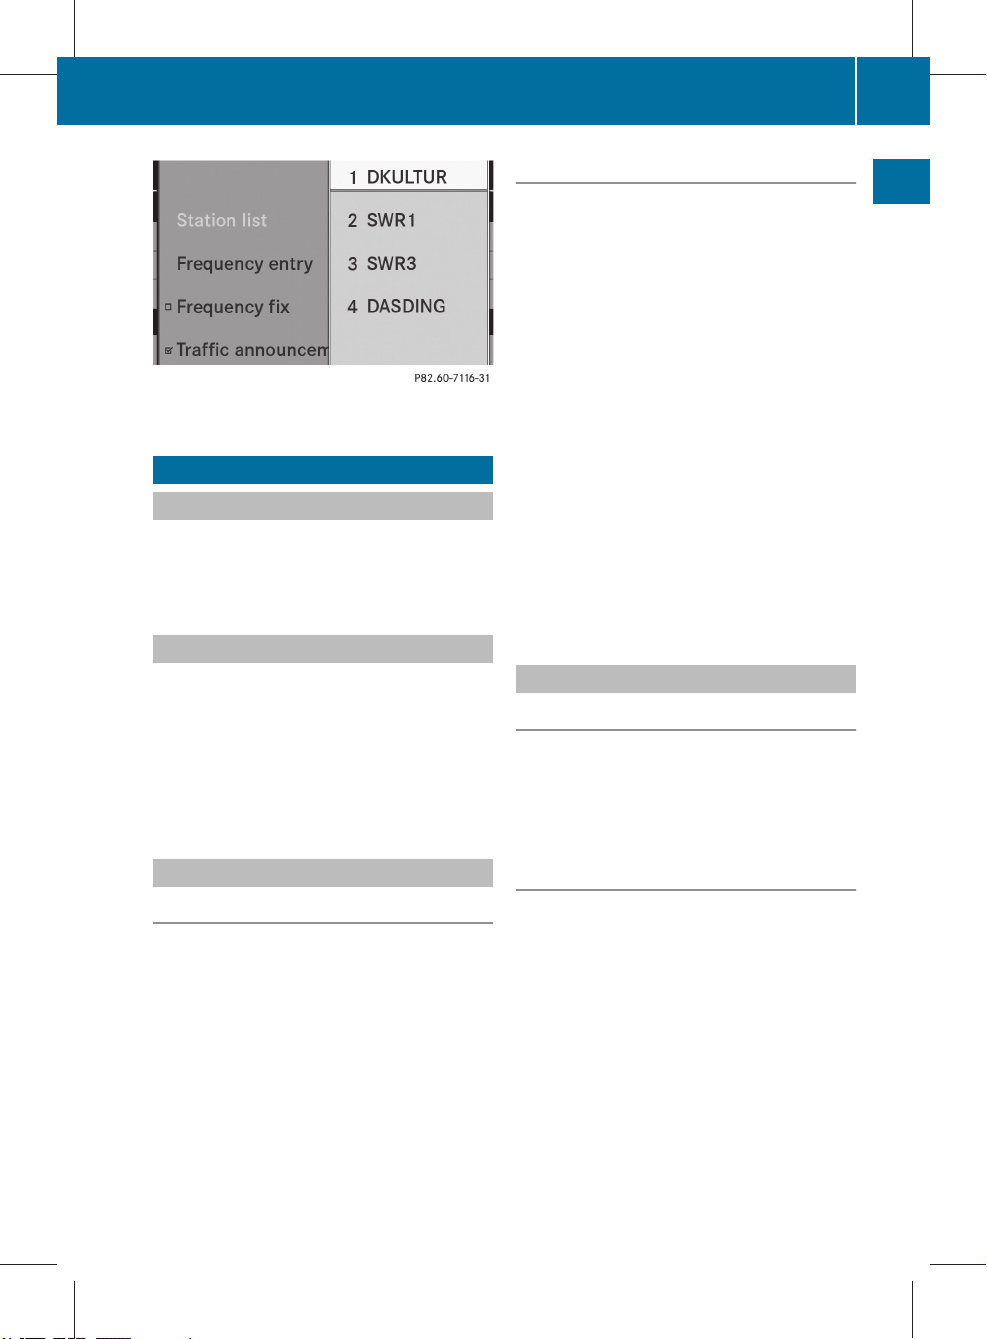
Station list
Basic functions of Audio 20
Notes
i
Information about the controls and operating principles of Audio 20 can be found
on (Y page 12) and on (Y page 18).
Switching Audio 20 on/off
X
Press the q button.
Audio 20 calls up the previously selected
menu.
i
If you switch off Audio 20, playback of the
current audio source will also be switched
off.
Basic functions of Audio 20
Switching off Traffic Programme
To mute the current traffic announcement:
X
During an announcement, briefly press the
8 button on the Audio 20 control panel.
or
X
During an announcement, briefly press the
x button on the multifunction steering
wheel.
X
The current report/message is muted.
Permanently muting the traffic announcements:
X
Press and hold the 8 button on the
Audio 20 control panel until . disappears
from the display.
or
X
Press and hold the x button on multifunction steering wheel until . disappears from the display.
Setting the volume
Setting the volume for the audio source
X
To adjust: turn the o control knob.
or
X
Press W or X on the multifunction
steering wheel.
21
At a glance
Mute
Switching the audio source on/off
X
To switch on or off: press the 8 button
on the Audio 20 control panel or on the
multifunction steering wheel.
The sound from the audio source is
switched on or off.
i
When the sound is switched off, you will
see the x icon in the status bar.
If you change the audio source, the sound
is automatically switched on.
Traffic announcements will be heard even
if the audio source is muted.
Volume for traffic announcements
i
You can adjust the volume of traffic
announcements independently of the volume of the audio source.
X
During a traffic announcement, turn the
o control knob.
or
X
Press the W or X button on the multifunction steering wheel during a traffic
announcement.
ZA audio 20 NTG4.0 BR207/212 ECE ÄJ 2010/1a; 1; 2, en-GB
sabbaeu Version: 3.0.2.13
Basic functions of Audio 20
22
Setting the volume for phone calls
i
You can adjust the volume for hands-free
mode during a phone call.
X
During a telephone call, turn the o control
X
X
knob.
2010-02-09T14:36:10+01:00 - Seite 22
To change the setting: turn cVd or slide
ZVÆ until the desired treble and bass lev-
els are set.
To save the setting: press W.
The setting is stored, and you exit the
menu.
or
X
Press W or X on the multifunction
At a glance
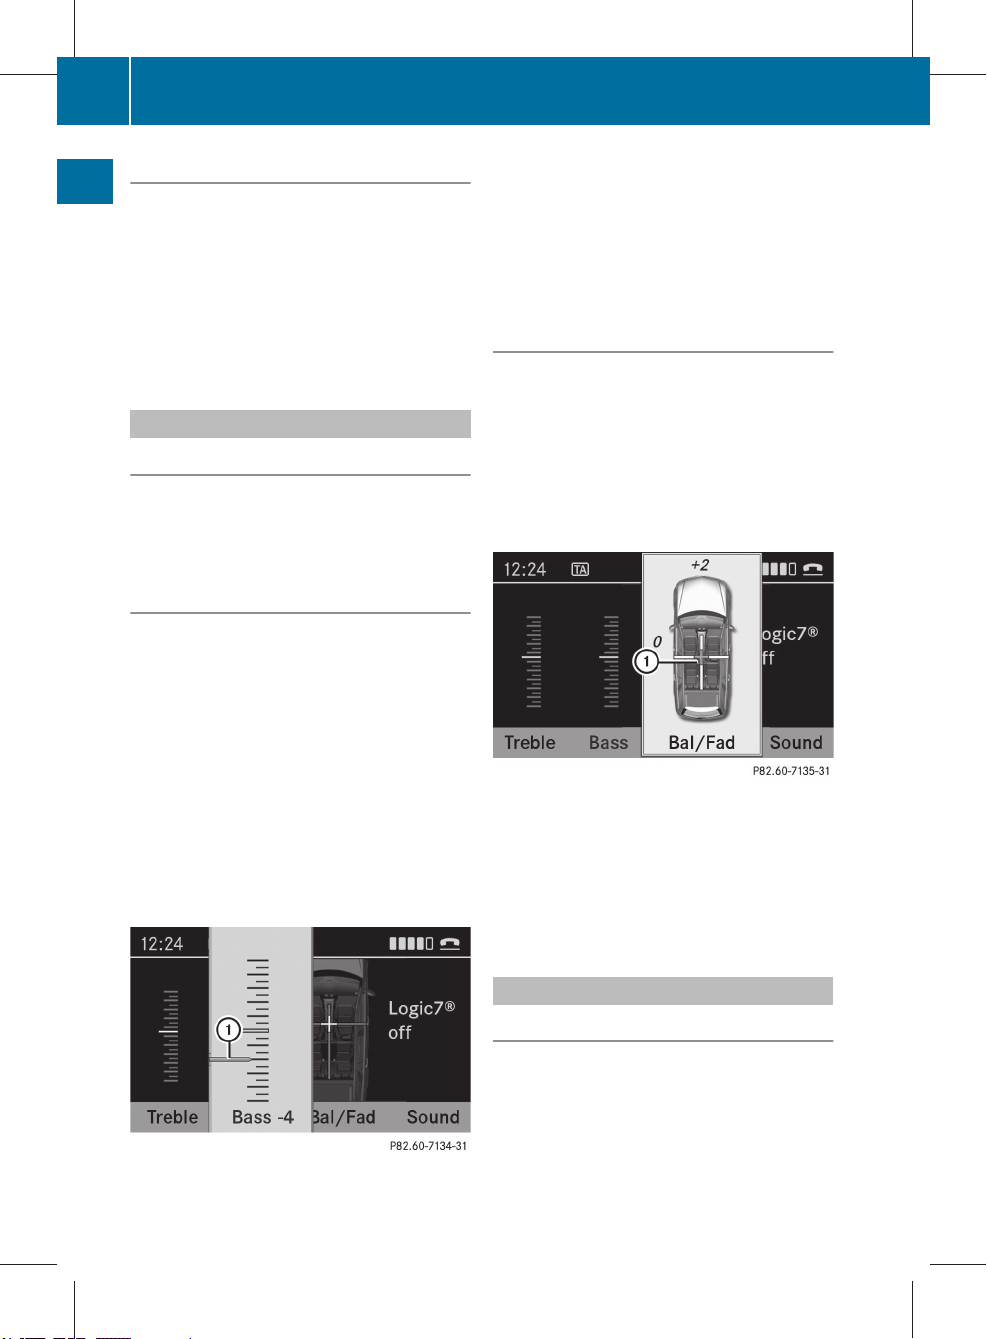
Adjusting the balance or fader settings
steering wheel during a telephone call.
Balance and fader settings apply for all audio
sources.
Adjusting the sound settings
Balance determines whether the sound is
louder on the right or left of the vehicle.
Selecting the sound menu
X
Press the u function button
or
X
$QSound.
i
The fader cannot be set on Roadster vehi-
cles.
X
Select SoundQBal/Fad.
Adjusting treble and bass
Notes
You can adjust the treble and bass separately
for the following audio sources:
R
FM radio
R
AM radio
R
DAB radio
R
audio CD
R
MP3
R
Media Interface
R
AUX
X
Select SoundQTreble or Bass.
X
To change the setting: slide ZVÆ or
XVY until balance and fader are set as
desired.
X
To save the setting: press W.
The setting is stored, and you exit the
menu.
Surround sound
General notes
If your vehicle is equipped with the harman/
kardon® Logic 7® surround sound system,
you can activate and deactivate the surround
sound function in the sound menu.

ZA audio 20 NTG4.0 BR207/212 ECE ÄJ 2010/1a; 1; 2, en-GB
sabbaeu Version: 3.0.2.13
2010-02-09T14:36:10+01:00 - Seite 23
The harman/kardon® Logic 7® surround
sound system is available for the following
operating modes:
R
radio (FM only)
R
DAB radio
R
audio CD
R
MP3
R
Media Interface
R
AUX
i
The LOGIC®on function of the harman/
kardon® Logic 7® surround sound system
allows playback of stereo recordings to
provide an optimum surround sound experience for each passenger. Music on CDs
with high definition surround sound formats can be played back optimally.
For ideal sound perception from all seats,
LOGIC7® distributes the music information
over the multi-channel system architecture. This results in sound characteristics
like those intended by the sound engineer
when the original was recorded.
The harman/kardon® Logic 7® surround
sound system converts each two-channel
stereo sound source into multi-channel surround sound. LOGIC7® reads the surround
information stored during the original
recording and distributes it over the available channels. There are no special effects
generated; you can simply hear what was
always there.
In addition, the harman/kardon® Logic 7
surround sound system moves the perceived sound source away from the loudspeakers and generates a natural 360°
sound experience for every passenger.
i
If you select LOGIC®off, playback of all
playable formats is as it is on the medium.
Due to the design of the passenger compartment, an optimum audio experience
cannot be guaranteed for all passengers.
Basic functions of Audio 20
Switching surround sound on/off
You can select between LOGIC7®on and
LOGIC7®off in the sound settings.
X
Select SoundQSound.
X
To change the setting: turn cVd or slide
ZVÆ to select LOGIC7® on or
LOGIC7® off.
X
To save the setting: press W.
The setting is stored and the menu is exited.
X
To exit the menu without saving: slide
XVY or press the % button next to the
Audio 20 controller.
i
Please bear the following in mind:
R
for an optimum audio experience on all
seats when LOGIC7® is switched on, balance and fader should be set to the centre of the passenger compartment.
R
you will achieve the best sound results
by playing high-quality audio CDs.
R
MP3 tracks should have a bit rate of at
least 128 kbit/s.
R
surround-sound playback does not work
for mono signal sources, such as the AM
waveband in radio mode.
R
if radio reception is poor, e.g. in a tunnel,
you should switch off LOGIC7® because
it may otherwise switch automatically
between stereo and mono and therefore
®
distort the sound temporarily.
R
on some stereo recordings, the sound
characteristics may differ from conventional stereo playback.
23
At a glance

ZA audio 20 NTG4.0 BR207/212 ECE ÄJ 2010/1a; 1; 2, en-GB
sabbaeu Version: 3.0.2.13
Rear Seat Entertainment System
24
2010-02-09T14:36:10+01:00 - Seite 24
Rear Seat Entertainment System
Components
Overview
The Rear Seat Entertainment System* comprises:
R
two screens for the rear behind the front-
At a glance
seat head restraints
R
a remote control
R
a CD/DVD drive
R
AUX jacks on both screens (AUX display)
and on the CD/DVD drive (AUX drive)
R
two sets of wired headphones
ZA audio 20 NTG4.0 BR207/212 ECE ÄJ 2010/1a; 1; 2, en-GB
sabbaeu Version: 3.0.2.13
2010-02-09T14:36:10+01:00 - Seite 25
Rear Seat Entertainment System
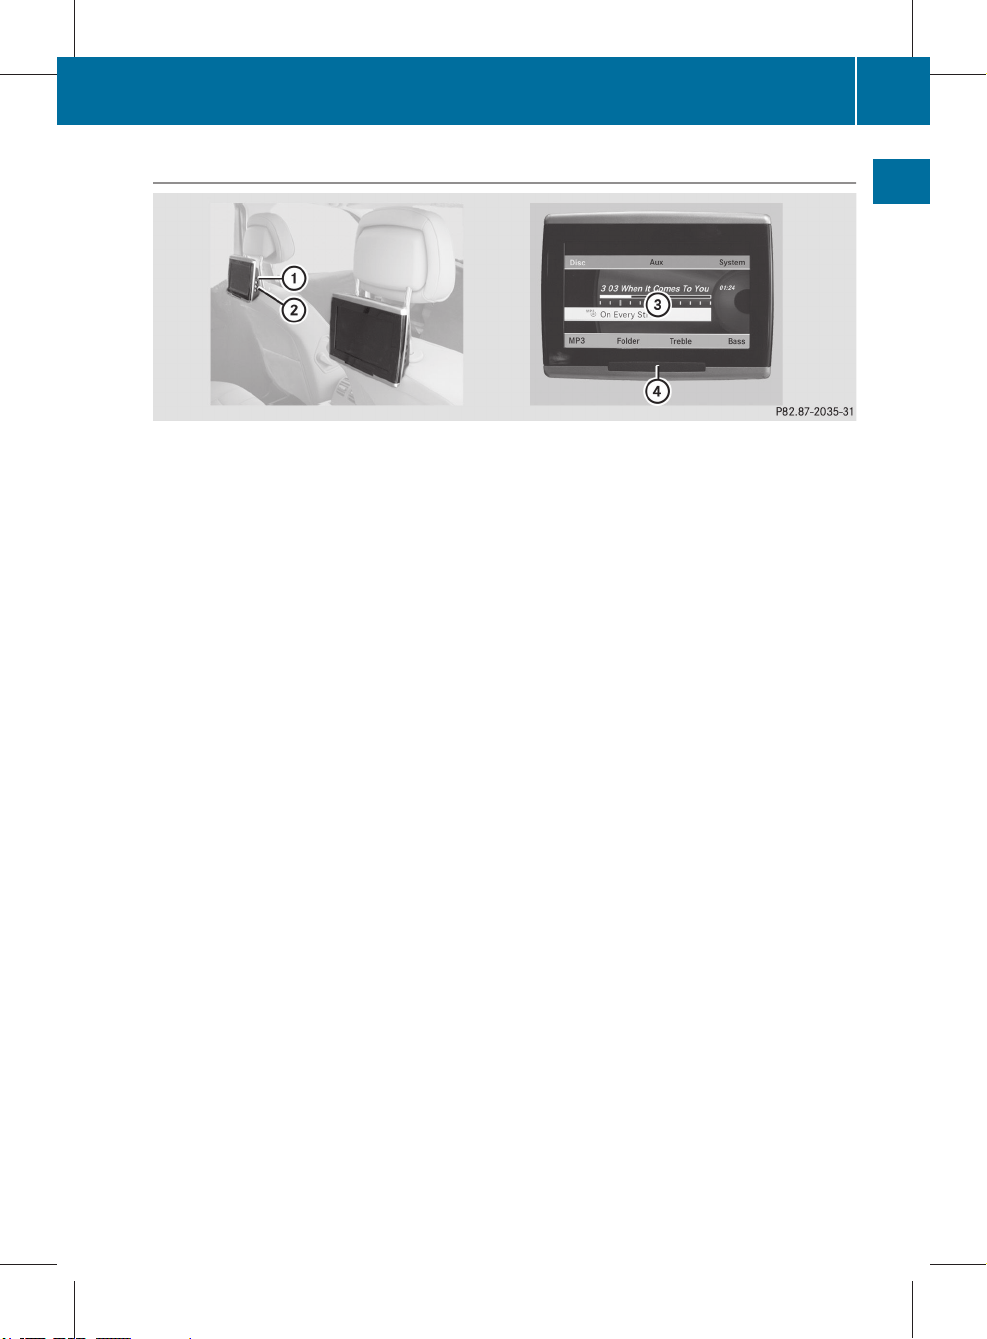
Rear screens
:
Jacks for headphones with a cable
;
AUX jacks; for a detailed view see CD/DVD drive (Y page 27)
=
Display
?
Infrared reception diodes
25
At a glance

ZA audio 20 NTG4.0 BR207/212 ECE ÄJ 2010/1a; 1; 2, en-GB
sabbaeu Version: 3.0.2.13
Rear Seat Entertainment System
26
2010-02-09T14:36:10+01:00 - Seite 26
Remote control
Overview
At a glance
:
To switch the screen on/off
;
To switch key illumination on/off
=
To select the screen for the remote control
?
To select a menu or menu item
A
To confirm a selection or setting
B
Mute
C
To set the volume
D
To skip, fast-forward/fast-rewind
E
To select a track, enter directly
F
To leave the menu (back)
Selecting the screen for remote control
You can use the remote control to operate
one of the two rear screens at a time. To do
so, you must switch the remote control to the
desired screen.
X
To select the left-hand screen: move
thumbwheel = until "REAR L" is highlighted in the window.
X
To select the right-hand screen: move
thumbwheel = until "REAR R" is highlighted in the window.
Switching the screen on/off
i
If the key is in position 0 or 1 in the ignition lock (see vehicle Owner's Manual), or
if it is not in the ignition lock, the rear
screens switch off after 30 minutes if they
are switched on.
Before they switch off, a message to this
effect appears on the screens.
You can switch the screens back on, but
remember that this discharges the starter
battery.
X
Direct the remote control towards the rear
screen which you have selected for remote
control operation.
X
Press button : on the remote control.
The respective rear screen switches on or
off.
i
You can only switch the screens on using
the remote control if the ignition is
switched on.
Switching key illumination on/off
X
Press button ; on the remote control.
Depending on the previous status, the key
illumination is switched on or off.
i
If you do not use the remote control for
about 15 seconds, the key illumination
switches off automatically.
Mute
X
Press button B on the remote control.
The sound is on or off.
ZA audio 20 NTG4.0 BR207/212 ECE ÄJ 2010/1a; 1; 2, en-GB
sabbaeu Version: 3.0.2.13
2010-02-09T14:36:10+01:00 - Seite 27
Selecting a menu/menu item and confirming your selection
X
To select a menu or menu item: press
arrow buttons ?.
To confirm your selection: press button
A.
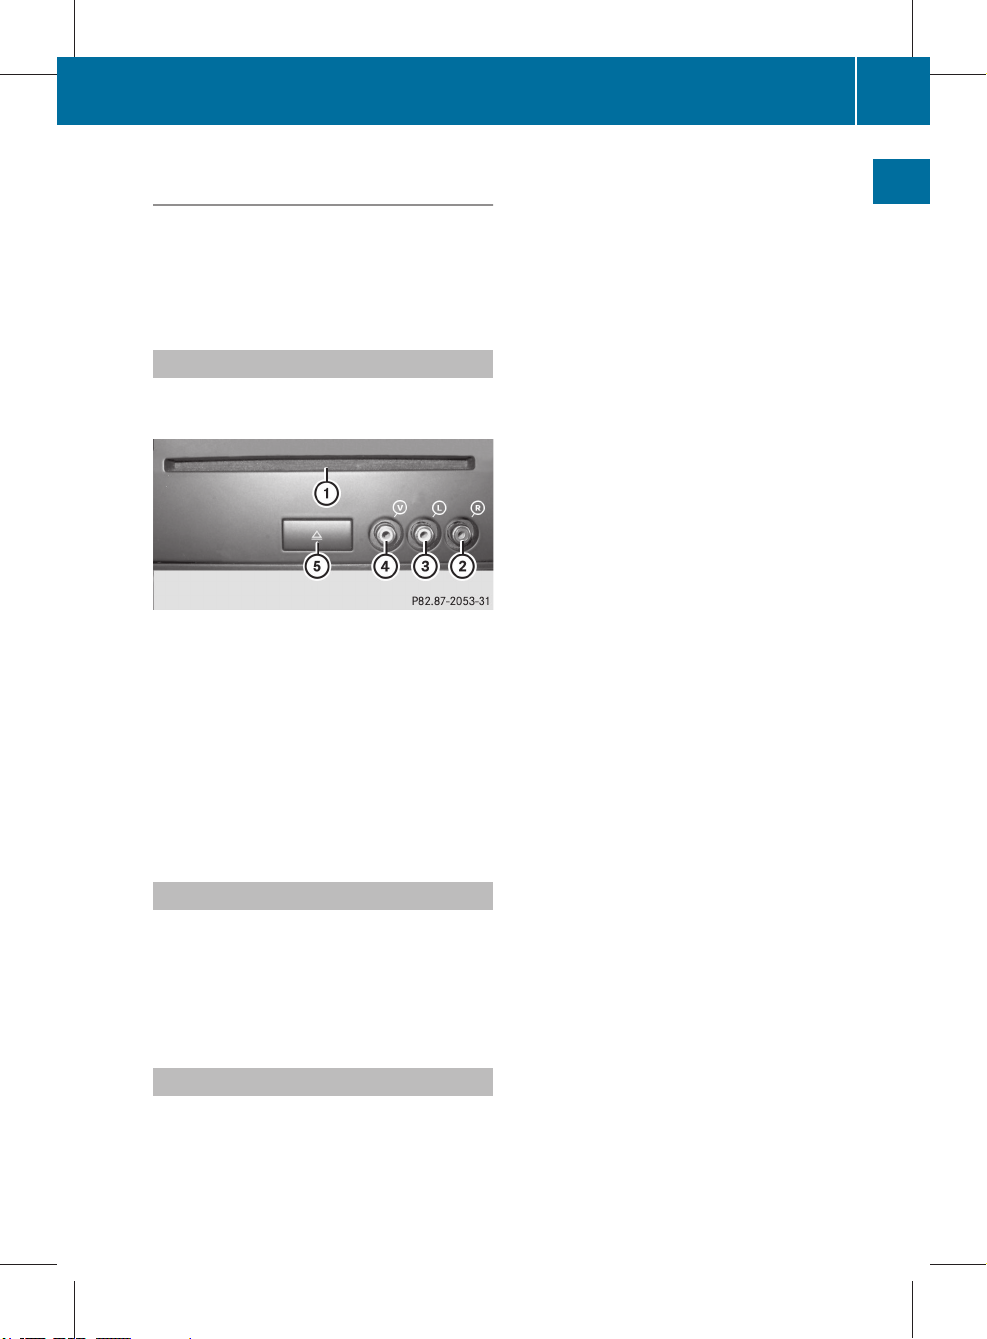
CD/DVD drive and AUX jacks
The CD/DVD drive is in the centre behind the
front seats.
:
CD/DVD slot
;
AUX, right-hand (R) jack for audio signal
=
AUX, left-hand (L) jack for audio signal
?
AUX, jack for video signal (V)
A
CD/DVD eject button
The AUX jacks shown are for the AUX drive.
The same connection options can be found
on the right-hand side of the rear screens
(AUX display) (Y page 25).
Rear Seat Entertainment System
27
At a glance
Wired headphones
You can connect one additional set of wired
headphones to each of the two rear screens
(Y page 25). The connection socket is for
headphones with 3.5 mm stereo jack plugs
and an impedance of 32 ohms.
Changing the batteries
Batteries are required for the remote control.
Change the batteries (Y page 80).

ZA audio 20 NTG4.0 BR207/212 ECE ÄJ 2010/1a; 1; 2, en-GB
sabbaeu Version: 3.0.2.13
2010-02-09T14:36:10+01:00 - Seite 28
28
 Loading...