


MD 80555 Autoradio BDA_D.FH11 Thu Feb 24 11:05:31 2005 Seite 3
C M Y CM MY CY CMY K
FUNKTIONEN
1. POWER: Ein-/Ausschalter
2. RELEASE: Bedienteil Abnahme
3. AUDIO: Drehregler für Audioeinstellungen
4. CD-Fach: Zum Einschieben der CD
5. DISPLAY
6. DSP/0: Abfrage für Programm-, Uhrzeit-, Frequenz- und
PTY-Einstellungen/Nummerntaste 0.
7. EJECT: CD-Auswurf
8. PTY: Programm Type Code
Beinhaltet Programme wie Nachrichten, Musik, Sport usw., abhängig
von der Sendeanstalt.
9. TA: Traffic Announcement Identification Identifizierungsdaten über
Verkehrsinformationen, die übertragen werden können.
10. EQ: Equalizer
11. SEL: Einstellung wählen für Lautstärke, Bass, Höhen, Balance und Fader
12. AMS/MP3: Automatische Senderspeicherung/Umschaltung
Frequenzanzeige/Sendername
13. PAU: Pausetaste (bei CD/MP3)
14. SCN: Scanntaste (ca. 10 sek. Anspielen der CD-Titel/MP3)
15. RPT: Wiederholung eines Titels (CD/MP3)
16. SHF: Zufallswiedergabe (CD/MP3)
17. Stationstasten 1-6
18. MODE: Umschaltung Radio/CD/MP3/Nummerntaste 7
19. -<< : Tune/Sendersuchlauf
rückwärts/Nummerntaste 8
20. BAND/LOUD/ENTER: Bandbereichs Auswahl/Loudness
21. +>>: Tune/Sendersuchlauf
vorwärts/Nummerntaste 9
22. AF/REG: Einschalten des RBDS-Modus und/oder des Regionalprogramm-
Modus
D
Hinter der Frontblende:
23. RESET: Zurückstellung in den Auslieferzustand
D 3

MD 80555 Autoradio BDA_D.FH11 Thu Feb 24 11:05:31 2005 Seite 4
C M Y CM MY CY CMY K
SICHERHEITSHINWEIS
Setzen Sie das Gerät in den dafür vorgesehenen Schacht ein, oder wählen Sie einen Platz für die
Montage des Gerätes, an dem es die normalen Fahraufgaben des Fahrers nicht behindert.
Schließen Sie kurz die Kabel an, bevor Sie das Gerät endgültig einbauen. Stellen Sie sicher, dass
diese richtig eingebaut sind und dass das System richtig funktioniert.
Falls Änderungen am Fahrzeug erforderlich sind, wenden Sie sich an Ihren Fahrzeughändler/
-fachwerkstatt.
Bauen Sie das Gerät so ein, dass keine Verletzungen bei starkem Bremsen entstehen können.
Wenn das Gerät mehr als 30° aus der Waagerechten eingebaut wird, kann es seine optimale
Leistung verlieren.
Vermeiden Sie den Einbau des Gerätes in der Nähe hoher Temperaturen (z.B. direkte
Sonneneinstrahlung oder Heizungsluft), Staub, Schmutz oder übermäßige Erschütterungen.
30°
D 4

MD 80555 Autoradio BDA_D.FH11 Thu Feb 24 11:05:31 2005 Seite 5
C M Y CM MY CY CMY K
INHALTSANGABE
VOR INBETRIEBNAHME .....................................................................................................................6
MONTAGE.............................................................................................................................................6
EINBAU DES RADIOS IN DEN ISO SCHACHT IHRES FAHRZEUGES.............................................6
Abnehmen und Einsetzen des Bedienteils .........................................................................................7
ISO ADAPTERSTECKER .....................................................................................................................7
Antennen-Relais Kabel .......................................................................................................................7
Stereo-Cinch- Ausgang.......................................................................................................................7
KABELVERBINDUNGEN .....................................................................................................................8
GRUNDBEDIENUNG ............................................................................................................................9
Ein-/Ausschalten.................................................................................................................................9
Lautstärke ...........................................................................................................................................9
Bass....................................................................................................................................................9
Höhen .................................................................................................................................................9
Balance...............................................................................................................................................9
Fader ..................................................................................................................................................9
Loudness ............................................................................................................................................9
Display ................................................................................................................................................9
Mode...................................................................................................................................................9
Equalizer.............................................................................................................................................9
Reset ..................................................................................................................................................9
RADIO .................................................................................................................................................10
Bandbereich wählen .........................................................................................................................10
Sender auswählen ............................................................................................................................10
Vorprogrammierte Sender ................................................................................................................10
Sender speichern .............................................................................................................................10
Sender wiederfinden.........................................................................................................................10
Automatisches Speichern (AMS)......................................................................................................10
Vorprogrammierung durchlaufen......................................................................................................10
Regional Programm Modus..............................................................................................................11
PTY (Programme-Type/Art)..............................................................................................................11
TA Verkehrsfunk ...............................................................................................................................11
EON TA ortlicher Modus ...................................................................................................................11
EON DX Modus ................................................................................................................................11
RBDS (Radio Data System) .............................................................................................................12
CD-PLAYER ........................................................................................................................................13
Einlegen und Herausnehmen von CDs ...........................................................................................13
Titel überspringen .............................................................................................................................13
CD unterbrechen ..............................................................................................................................13
Vorlauf und Rücklauf ........................................................................................................................13
Abspielen aller Titel ..........................................................................................................................13
Wiederholen eines Titels ..................................................................................................................13
Zufallswiedergabe ............................................................................................................................13
MP3 WIEDERGABE............................................................................................................................14
Suche nach Titeln (Nummern)..........................................................................................................14
Suche nach Interpreten ....................................................................................................................14
Tasten Belegtabelle ..........................................................................................................................15
ID3-TAG FUNKTION...........................................................................................................................15
FEHLERSUCHE..................................................................................................................................16
TECHNISCHE DATEN ........................................................................................................................17
D
D 5
MD 80555 Autoradio BDA_D.FH11 Thu Feb 24 11:05:31 2005 Seite 6
C M Y CM MY CY CMY K
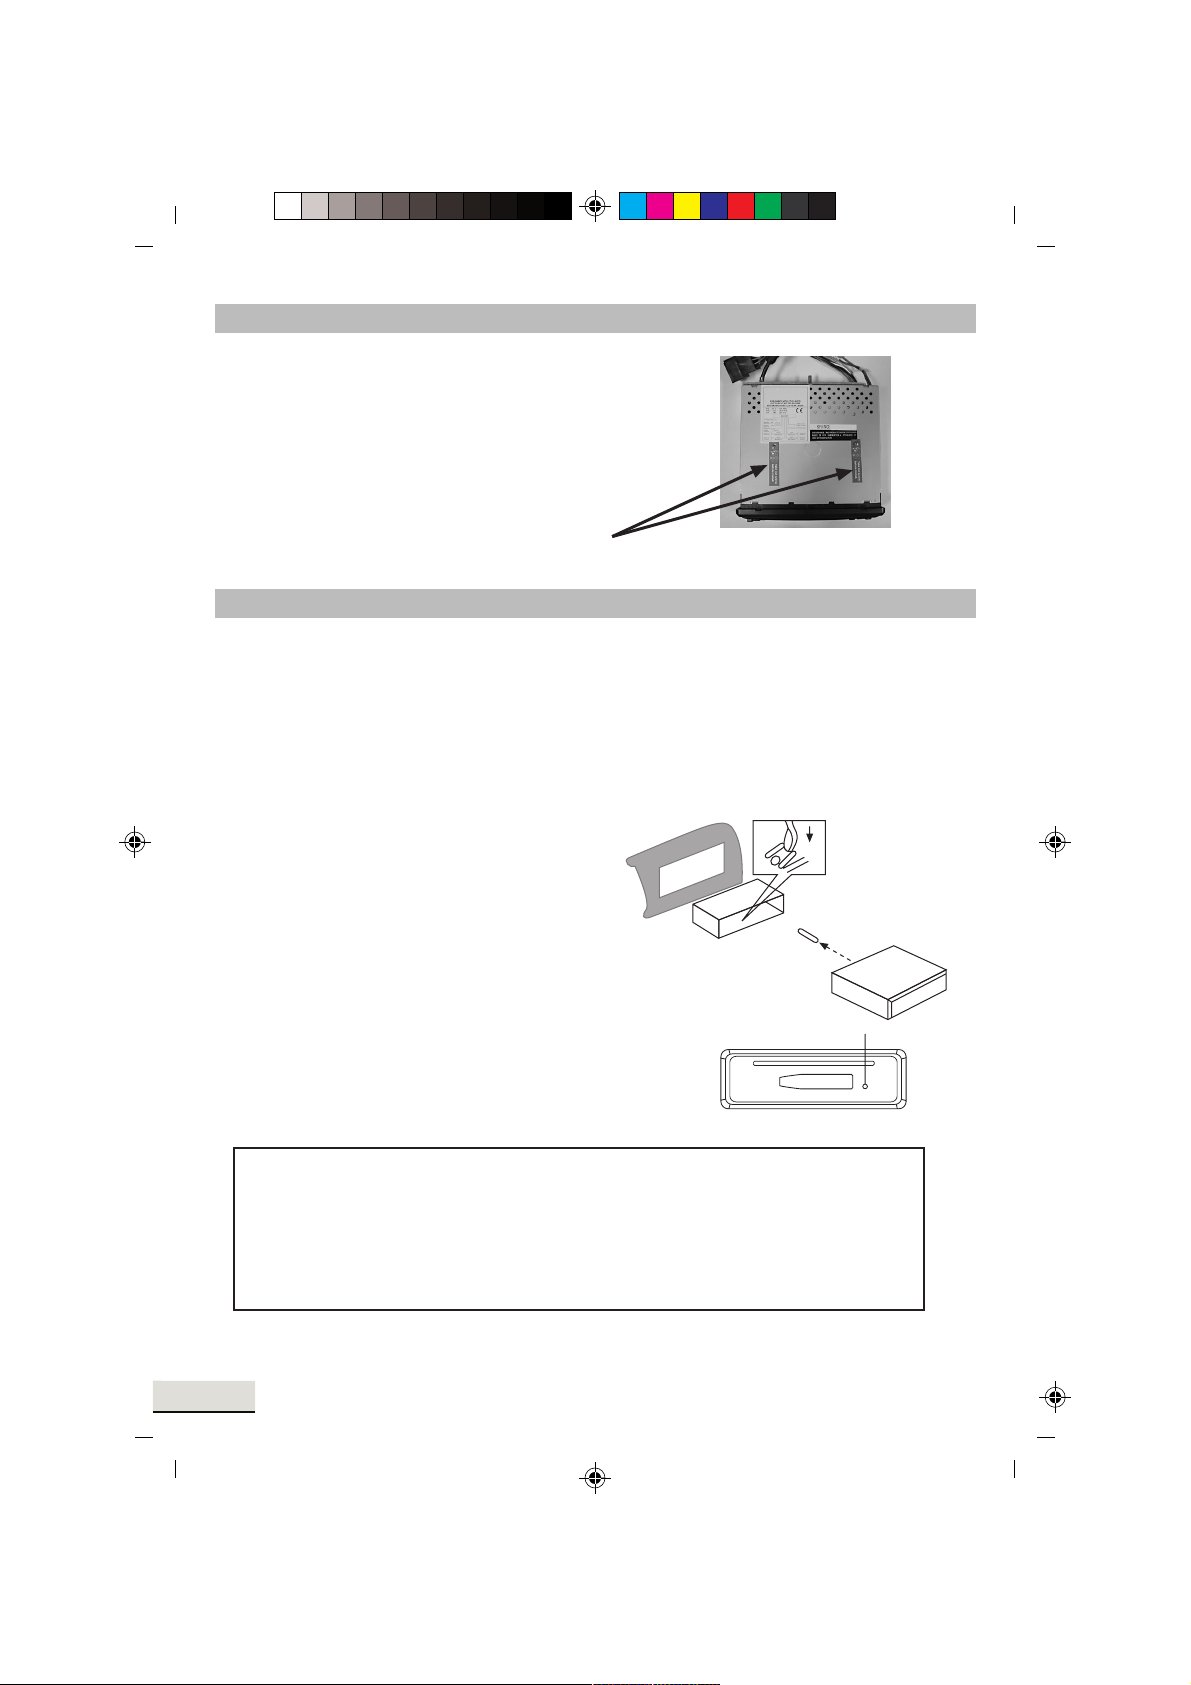
VOR INBETRIEBNAHME
Entfernen Sie unbedingt vor der Montage die beiden
Transportsicherungsschrauben im oberen Radiogehäuse
(durch rote Fahnen erkennbar)!
Transportsicherung
MONTAGE
Dieses Autoradio kann ganz einfach in jeden Standard ISO Radioausschnitt eingebaut werden.
Sollte Ihr Fahrzeug keinen Standard ISO Radioausschnitt haben, wenden Sie sich an Ihren
Fahrzeughändler.
Einbau des Radios in den ISO Schacht Ihres Fahrzeuges.
Ziehen Sie den Einbaurahmen vom Radio ab.
Stecken Sie den Einbaurahmen in den Radioausschnitt des Armaturenbretts Ihres Fahrzeugs.
Biegen Sie die Laschen im Einbaurahmen mit einem Schraubendreher um, so dass dieser in
dem Fahrzeug fest fixiert ist.
Überprüfen Sie den Rahmen auf festen Halt.
Verbinden Sie den ISO Buchsenblock mit den
ISO Steckern Ihres Fahrzeugs.
Verbinden Sie das Antennenkabel des Fahrzeugs
mit dem Antennenstecker des Autoradios.
Schieben Sie mit Vorsicht das Radio in den
Einbaurahmen. Beachten Sie, dass Sie die Kabel nicht
einklemmen! Betätigen Sie die RESET-Taste (23) mit einem
Kugelschreiber. Setzen Sie das Bedienteil ein.
23
D 6
ACHTUNG!
Bitte benutzen Sie beim Einbau zum Anschließen des Autoradios die ISO Buchsen des
Autoradios. Die passenden ISO Adapterstecker (Autogegenstücke) können Sie je nach
Fahrzeugtyp im Handel erwerben.
Sollten Sie die Adapterbuchse von dem Kabel trennen oder die Kabel abschneiden, so
erlischt Ihr Garantieanspruch!

MD 80555 Autoradio BDA_D.FH11 Thu Feb 24 11:05:31 2005 Seite 7
C M Y CM MY CY CMY K
ABNEHMEN UND EINSETZEN DES BEDIENTEILS
Drücken Sie die RELEASE-Taste (2) und entfernen Sie das Bedienteil. Bewahren Sie das
Bedienteil stets in der dafür vorgesehenen Transporttasche auf.
Setzen Sie das Bedienteil zum Einbauen zuerst mit der rechten Seite in den Rahmen. Drücken
Sie dann die linke Seite fest, bis es einrastet. Überprüfen Sie, dass das Bedienteil richtig und
fest auf seinem Platz sitzt. Ist das Bedienteil nicht richtig eingebaut, erscheinen im Display,
Fehlinformationen und/oder einige Tasten haben Fehlfunktionen.
D
Frontblende
ISO Adapterstecker
Achtung!
Nutzen Sie den ISO Adapterstecker des Autoradios, um eine sichere elektrische Verbindung herzustellen.
Wichtig!
Achten Sie darauf, dass das rosafarbene Backupkabel an Dauerplus anliegen muss (für Senderspeicher).
Nachdem alle Verbindungen hergestellt sind, drücken Sie die RESET-Taste (26).
Antennen-Relais Kabel
Das gelbe Kabel ist für eine Relais-gesteuerte Antenne zur Verfügung gestellt worden.
Das Relais wird die Antenne automatisch ausfahren, wenn das Gerät angeschaltet wird und beim
Abschalten fährt die Antenne wieder ein.
Vorsicht:
Das gelbe Kabel nicht mit dem Motorkabel verbinden, sonst können Schäden am Gerät
verursacht werden.
Stereo-Cinch- Ausgang
An diesen Anschlüssen (roter und weisser Cinchanschluss) können Sie externe Geräte (z.B. Verstärker)
anschließen.
D 7
MD 80555 Autoradio BDA_D.FH11 Thu Feb 24 11:05:31 2005 Seite 8
C M Y CM MY CY CMY K
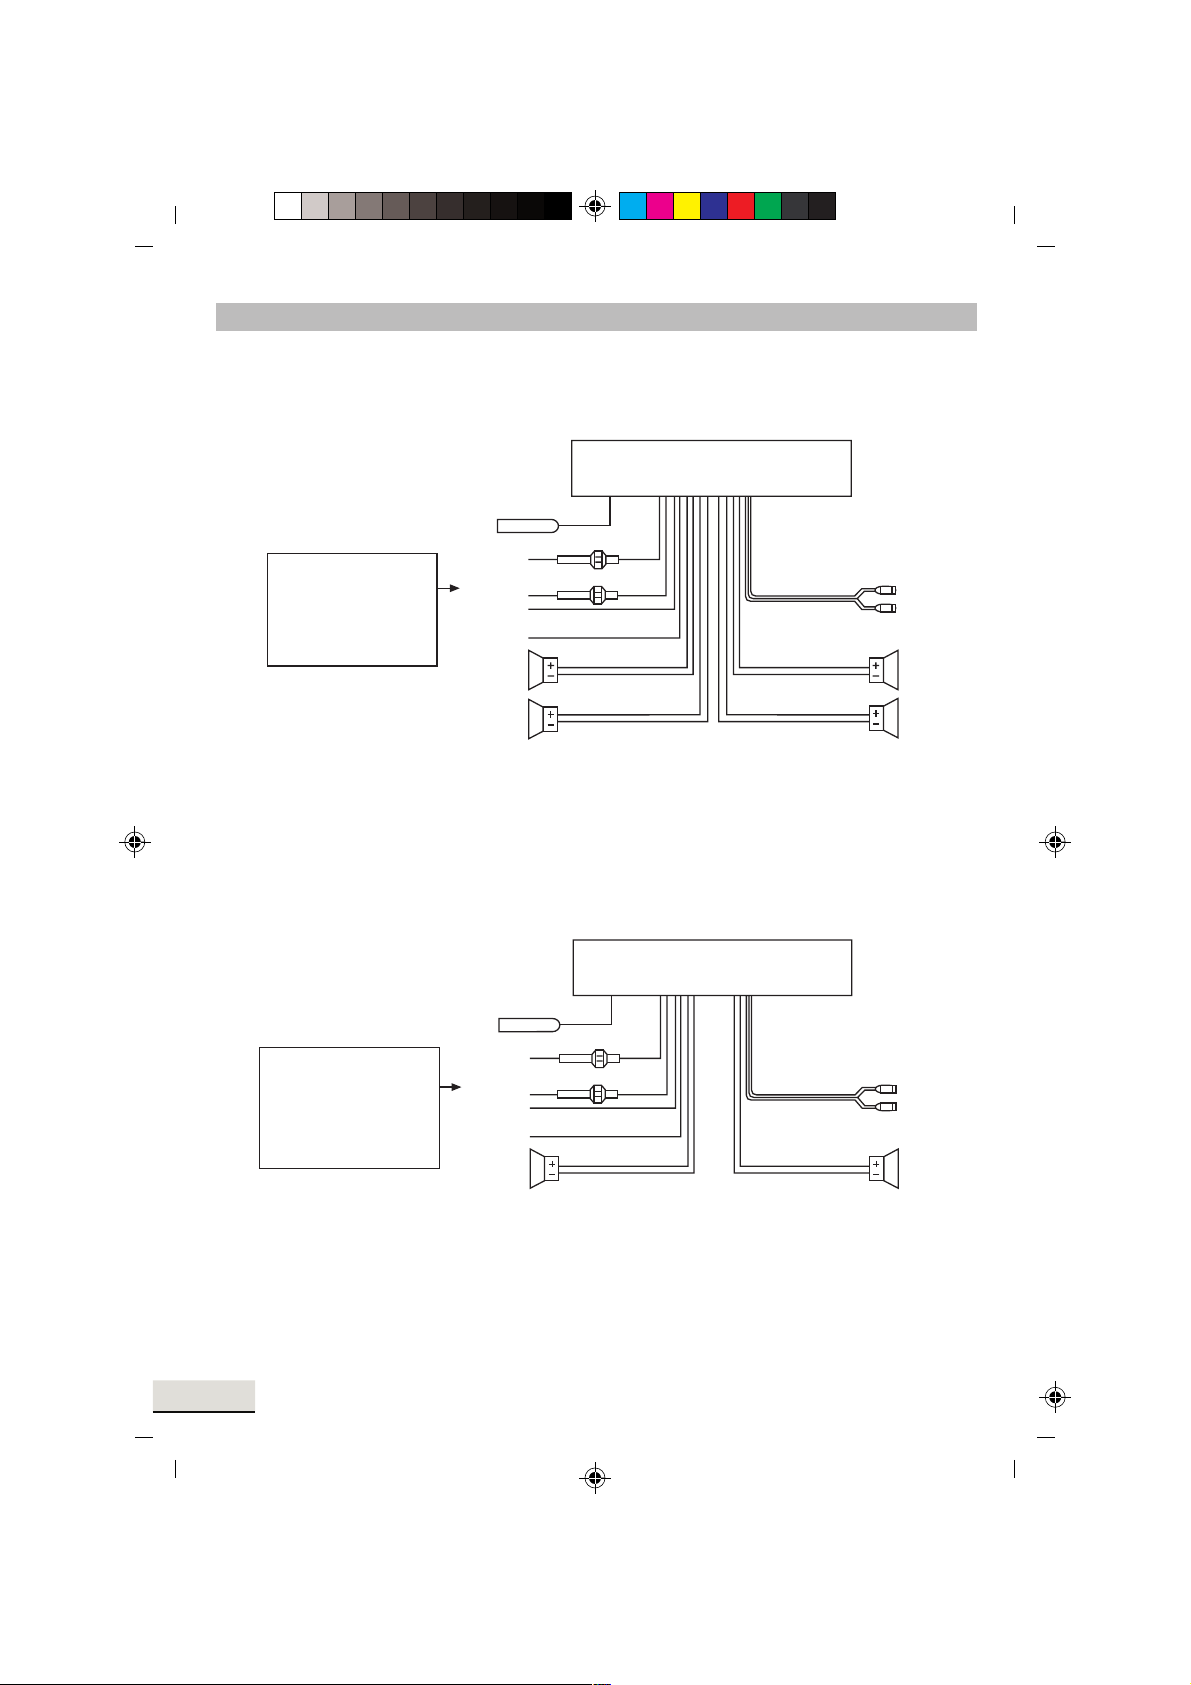
KABELVERBINDUNGEN
für Vier-Lautsprecher (Quadro) System
AUTORADIO RÜCKSEITE
Antennen Verbindung
Wichtig!
Speicher Back-up
muss an Dauerplus
angeschlossen sein,
für Senderspeicher.
Zündschlossschalter (B+)
Speicher
Back-up
Erdanschluss
(B-)(Masse)
Stromantenne
vorne links
Lautsprecher
hinten links
Lautsprecher
rot
rosa
schwarz
für Zwei-Lautsprecher (Dual) System
Antennen Verbindung
WICHTIG!
Speicher Back-up
muss an Dauerplus
angeschlossen sein,
für Senderspeicher.
Zündschlossschalter (B+)
Speicher
Back-up
Erdanschluss
(B-)(Masse)
Stromantenne
linker
Lautsprecher
rot
rosa
schwarz
gelb
grün
grün/schwarz
blau
blau/schwarz
AUTORADIO RÜCKSEITE
gelb
grün
blau/schwarz
RCA Kabel
grau
grau/schwarz
weiss
weiss/schwarz
RCA Kabel
grau
weiss/schwarz
rechts rot
links weiss
vorne rechts
Lautsprecher
hinten rechts
Lautsprecher
rechts rot
links weiss
rechter
Lautsprecher
D 8

MD 80555 Autoradio BDA_D.FH11 Thu Feb 24 11:05:31 2005 Seite 9
C M Y CM MY CY CMY K
GRUNDBEDIENUNG
Ein- /Ausschalten
Drücken Sie die PWR-Taste (1), zum Ein-/Ausschalten des Gerätes.
Lautstärke
Drücken Sie die SEL-Taste (11) einmal, um die Lautstärke einzustellen.
Mit dem Drehregler AUDIO (3) erhöhen oder verringern Sie die Lautstärke.
Stellen Sie die Lautstärke nur so ein, dass Sie die akustischen Signale evtl. herannahender
Rettungs-/Feuerwehr-/Polizeiwagen noch hören können!
Bass
Drücken Sie die SEL-Taste (11) zweimal, um den Bass einzustellen. Mit dem Drehregler AUDIO (3)
erhöhen oder senken Sie den Bass.
Höhen
Drücken Sie die SEL-Taste (11) dreimal, um die Höhen einzustellen. Mit dem Drehregler AUDIO (3)
erhöhen oder senken Sie die Höhen.
Balance
Drücken Sie die SEL-Taste (11) viermal, um die Balance einzustellen. Mit dem Drehregler AUDIO (3)
können Sie die Balance zwischen dem rechten und linken Lautsprecher einstellen.
Fader
Drücken Sie die SEL-Taste (11) fünfmal, um den Fader einzustellen. Mit dem Drehregler AUDIO (3) können
Sie den Fader der vorderen und hinteren Lautsprecher einstellen.
Loudness
Halten Sie die BAND/LOUD/ENTER-Taste (20) gedrückt, bis ein Signalton ertönt. Im Display erscheint
LOUD ON bzw. LOUD OFF. So erreichen Sie die psychoakustisch gehörrichtige Anhebung der tiefen
Frequenzen bei geringer Lautstärke.
Display
Durch Drücken der DSP/0-Taste (6) können Sie folgende Informationen abfragen:
Programmname
Frequenz
Uhrzeit (wird bei RBDS Empfang automatisch eingestellt)
PTY Einstellungen
(Diese RBDS Funktionen werden von den Sendeanstalten in unterschiedlicher Qualität und Umfang
gesendet. Nähere Informationen finden Sie im Kapitel RADIO unter RDS).
Mode
Mit der MOD-Taste (18) können Sie zwischen Radio und CD wechseln.
Equalizer
D
FLAT CLASSICS POP M ROCK M DSP OFF
Reset
Um Ihr Autoradio in den Auslieferungszustand zurück zu stellen, betätigen Sie die RESET-Taste (28)
mit einem Kugelschreiber. Diese Taste finden Sie hinter dem Bedienteil!
Bitte betätigen Sie die RESET-Taste bei
der ersten Inbetriebnahme, nach Abschluss der Kabelverbindungen,
wenn nicht alle Funktionstasten funktionieren,
bei Erscheinen einer Fehlermeldung im Display.
D 9

MD 80555 Autoradio BDA_D.FH11 Thu Feb 24 11:05:31 2005 Seite 10
C M Y CM MY CY CMY K
RADIO
Bandbereich wählen
Drücken Sie die BAND/LOUD/ENTER-Taste (20), um zwischen UKW F1, F2 und F3 zu wechseln.
In jedem Bereich können Sie sechs Sender speichern.
Sender auswählen
Drücken Sie die Sendersuchlauftasten (Tune-Tasten) I<< (19) oder Taste >>I (21) für kurze Zeit, das
Gerät sucht automatisch den nächsten Sender. Wenn Sie die eine der TUNE-Tasten für zwei
Sekunden gedrückt halten, schalten Sie auf manuelle Sendersuche um. Es erscheint MANUAL im
Display.
Jetzt können Sie mit der Tune-Taste den Sender auswählen und abspeichern. Das Gerät schaltet
nach kurzer Wartezeit wieder in die automatische Sendersuchfunktion um.
Vorprogrammierte Sender
In jedem Sendebereich können Sie sechs Sender fest speichern und über die Stationstasten
1-6 (17) wieder aufrufen.
Sender speichern
1. Wählen Sie den Bandbereich mit der BAND/LOUD/ENTER-Taste (20) aus.
2. Wählen Sie mit der TUNE-Taste I<< (19) oder Taste I>> (21) einen Sender aus.
3. Drücken Sie eine der Stationstasten 1-6 (17) für ca. 3 Sekunden. Ein Signalton bestätigt die
Senderspeicherung.
Sender wiederfinden
1. Wählen Sie den Bandbereich mit der BAND/LOUD/ENTER-Taste (20) aus.
2. Drücken Sie die Stationstaste (17), um den vorprogrammierte Sender aufrufen.
Automatisches Speichern (AMS)
Halten Sie die AMS/MP3-Taste (12) gedrückt, bis ein Signalton erklingt. Im Display erscheint
SEARCH. Der Suchlauf hält bei jedem gefundenen Sender ca. 5 sek. an. Die im Display blinkende
Zahl zeigt die Nummer der Stationstasten an, auf welche der jeweilige Sender abgespeichert wird.
Bei schwachen Sendern läuft der Suchlauf automatisch weiter.
Vorprogrammierung durchlaufen
Automatisches durchsuchen Ihrer im Sendebereich gespeicherten Sender.
1. Wählen Sie den Bandbereich mit der BAND/LOUD/ENTER-Taste (20) aus.
2. Drücken Sie kurz die AMS/MP3-Taste (12). Alle Sender werden jetzt kurz angewählt.
Bei erreichen des gesuchten Senders, drücken Sie kurz die AMS/MP3-Taste (12).
D 10
MD 80555 Autoradio BDA_D.FH11 Thu Feb 24 11:05:31 2005 Seite 11
C M Y CM MY CY CMY K
Regional Programm Modus
Einige Programme strahlen verschiedene Regionalprogramme aus. Damit nur die Alternativfrequrenzen des gewünschten Regionalprogramms gewählt werden;
halten Sie die AF/REG-Taste (22) etwas länger gedrückt bis ein Signalton ertönt, um den Modus einoder auszuschalten. Im Display steht REG ON/REG OFF.
PTY (Programme-Type/Art)
Um das Menü zu aktivieren, drücken Sie die PTY-Taste (8).
Sie können jetzt nach folgenden Kategorien Ihre Sender auswählen:
MUSIK SPRACHE
1 POP M, ROCK M NEWS (Nachrichten), AFFAIRS
(Angelegenheiten), INFO (Infos)
2 EASY M, LIGHT M SPORT, EDUCATE (Bildung), DRAMA
3 CLASSICS (Klassik), CULTURE (Kultur), SCIENCE (Wissenschaft),
OTHER M (Andere M) VARIED (Verschiedenes)
4 JAZZ, COUNTRY WEATHER (Wetter), FINANCE (Finanzen),
CHILDREN (Kinder)
5 NATION M, OLDIES SOCIAL (Soziales), RELIGION, PHONE IN
(Telefoneingang)
6 FOLK M Travel (Reisen), Leisure (Freizeit), Document
(Dokumente)
(Die Informationen sind abhängig von der Sendeanstalt)
TA Verkehrsfunk
Halten Sie die TA-Taste (9) für kurze Zeit gedrückt, um den TA-Modus ein- oder auszuschalten.
Wenn der TA-Modus eingeschaltet ist und der Verkehrsfunk übertragen wird während Sie die CD
oder AUX eingestellt haben, wird automatisch auf Radio umgeschaltet. Zeitweise findet eine
Umschaltung auf die EON Verbindungsstation statt, wenn EON einen Verkehrsfunk auf einem
anderen Programm findet. Wenn sich der Lautstärkepegel unter der Schwelle befindet, wird er sich
erheben. Die TA-Funktion des laufenden Verkehrsfunks wird durch drücken der TA-Taste (9)
unterbrochen. Der TA-Modus wird dadurch nicht ausgeschaltet. Wird die TA-Taste (9) längere Zeit
gedrückt gehalten, wird der EON TA LOCAL/EON TA DISTANCE Modus gewählt.
Mit diesem Modus können EON TA Informationen zugeordnet werden, z. B. Sie hören eine
Nicht-Verkehrsfunksender, aber auf einer anderen Senderfrequenz gibt es eine Verkehrsmeldung,
so schaltet das Gerät automatisch für diese Zeit um. Sobald diese Meldung beendet ist, wird wieder
auf den vorherigen Senderplatz umgeschaltet.
D
EON TA örtlicher Modus
Wenn der EON TA LOCAL Modus Gewählt wurde, blinkt EON TA LO einige Sekunden auf dem
Display. Der Modus für das lokale Gebiet wurde gewählt.
EON DX Modus
Wenn der EON DX Modus gewählt wurde, blinkt EON TA DX einige Sekunden auf dem Display.
Der Modus für das weiter entfernte Gebiet wurde gewählt.
D 11

MD 80555 Autoradio BDA_D.FH11 Thu Feb 24 11:05:31 2005 Seite 12
C M Y CM MY CY CMY K
RBDS (Radio Broadcast Data System)
RBDS ist ein Service der Rundfunkanstalten. Neben den herkömmlichen Musik- und Sprachbeiträgen
werden Zusatzinformationen in Form verschlüsselter Digitalsignale ausgesendet, welche vom
Autoradio ausgewertet werden können.
Drücken Sie kurz die AF/REG-Taste (22), um den RBDS-Modus ein- oder auszuschalten. Bei
Aktivierung des RBDS-Modus erscheint im Display das Symbol AF. Jetzt wird bei Empfang eines
Senders der Programmname und andere Informationen im Display (5) angezeigt.
Diese Informationen sind abhängig von der Sendeanstalt.
Es werden unterschiedliche RBDS-Dienste angeboten:
PI: Program Identification Code
Mit Hilfe des PI-Codes kann das Radio den empfangenden Sender identifizieren.
PS: Program Service Name
Die Funktion Program Service ermöglicht die Anzeige des Sendernamens.
AF: Alternative Frequencies
Das Radio wählt automatisch die am besten zu empfangende Alternativ-Frequenz des gleichen
Programms.
TP/TA: Traffic-Program/Traffic-Annoucement
EON: Enhanced Other Networks Information
Im Falle einer Verkehrsdurchsage wird auch beim Hören eines Nicht-Verkehrsfunksenders
innerhalb einer Senderkette auf einem Verkehrsfunksender umgeschaltet.
PTY: Program Type Code
Mit Program Type kann das Radio nach Sendern mit vorwählbaren Programminhalten
suchen. Z. B. Sport, Nachrichten, Rock, Pop,.....
D 12

MD 80555 Autoradio BDA_D.FH11 Thu Feb 24 11:05:31 2005 Seite 13
C M Y CM MY CY CMY K
CD-PLAYER
Einlegen und Herausnehmen von CDs
Zum Einlegen die CD in den Schlitz (4) schieben. Die Wiedergabe der CD beginnt.
Im Display erscheint S--CDP (d.h. suche Titel). Zum Herausnehmen der CD drücken Sie die EJECTTaste (7).
Die Wiedergabe bricht ab und die CD wird herausgefahren. Das Gerät schaltet auf den Radio Modus
um.
Titel überspringen
TUNE-Taste |<< (19) oder Taste >>| (21) drücken, um zum nächsten Titel zu springen.
Die Titelnummer wird im Display (5) angezeigt.
CD unterbrechen
Während der Wiedergabe die PAU-Taste (13) drücken, die CD-Wiedergabe wird unterbrochen.
Nochmaliges Drücken der PAU-Taste (13) und die CD spielt weiter.
Vorlauf und Rücklauf mit hoher Geschwindigkeit
TUNE-Taste |<< (19) oder Taste >>| (21) bei der Wiedergabe länger drücken um den schnellen
Vorlauf/Rücklauf zu starten.
Abspielen aller Titel
Die SCN-Taste (14) drücken und die ersten 10 Sekunden jedes Titels werden angespielt.
Erneutes Drücken der SCN-Taste (14) und die normale Wiedergabe wird gestartet.
D
Wiederholen eines Titels
Drücken Sie die RPT-Taste (15) um den gleichen Titel ständig zu hören. Erneutes Drücken der RPTTaste (15) deaktiviert die Funktion.
Zufallswiedergabe
SHF-Taste (16) drücken, um alle Titel der CD in Zufallsreihenfolge abzuspielen.
Hinweis:
Das Fahren auf unebenen Straßen könnte ein Überspringen auf der CD verursachen. Eine kurze
Einspielzeit wird die Leistung verbessern.
Überspringen schadet der CD keineswegs.
Feuchtigkeit und hohe Luftfeuchtigkeit können Fehlfunktionen des CD-Spieler verursachen.
Fahrzeug-Heizung anschalten und Feuchtigkeit vor Gebrauch verdunsten lassen.
Setzen Sie den CD-Spieler keinen extrem hohen oder niedrigen Temperaturen aus.
Fahren Sie nicht mit einer herausgefahrenen CD in dem Schlitz.
D 13

MD 80555 Autoradio BDA_D.FH11 Thu Feb 24 11:05:31 2005 Seite 14
C M Y CM MY CY CMY K
MP3-WIEDERGABE
Die Wiedergabe startet automatisch bei Einlegen einer MP3-CD-ROM. Die Tastenfunktionen entnehmen
Sie bitte dem Kapitel CD-Player.
Sie können die Titel oder die Interpreten direkt anwählen. Beachten Sie, dass die MP3-Funktionen
größtenteils von der Erstellung der MP3-CD abhängig sind.
Suche nach Titeln (Nummern)
Drücken Sie AMS/MP3-Taste (12) einmal. Im Display erscheint MP3T ..... .
Geben Sie mit den in der Tabelle angegebenen Tasten die Nummern des gewünschten Titels ein.
Bestätigen Sie die Eingabe mit der BAND/LOUD/ENTER-Taste (20) oder warten Sie ca. 5 sek. bis
das Gerät automatisch auf den gewählten Titel springt.
Suche nach Interpreten
Drücken Sie AMS/MP3-Taste (12) zweimal. Im Display erscheint ein blinkender ....... .
Geben Sie den in der Tabelle angegebenen Tasten den Namen des gewünschten Interpreten ein.
Beachten Sie, dass nach jedem Buchstaben die SEL-Taste (11) gedrückt werden muss, damit der
nächste Buchstabe eingegeben werden kann (Zeichenverschiebung).
Bestätigen Sie die Eingabe mit der BAND/LOUD/ENTER-Taste (20).
Das Gerät sucht nun den entsprechenden Titel.
Drücken Sie noch einmal die BND/LOU-Taste, wenn das Gerät den gewünschten Interpreten
gefunden hat. Der Titel wird jetzt abgespielt.
D 14
Hinweis:
Die Suchfunktion ist abhängig von der erstellten MP3-CD.

MD 80555 Autoradio BDA_D.FH11 Thu Feb 24 11:05:31 2005 Seite 15
C M Y CM MY CY CMY K
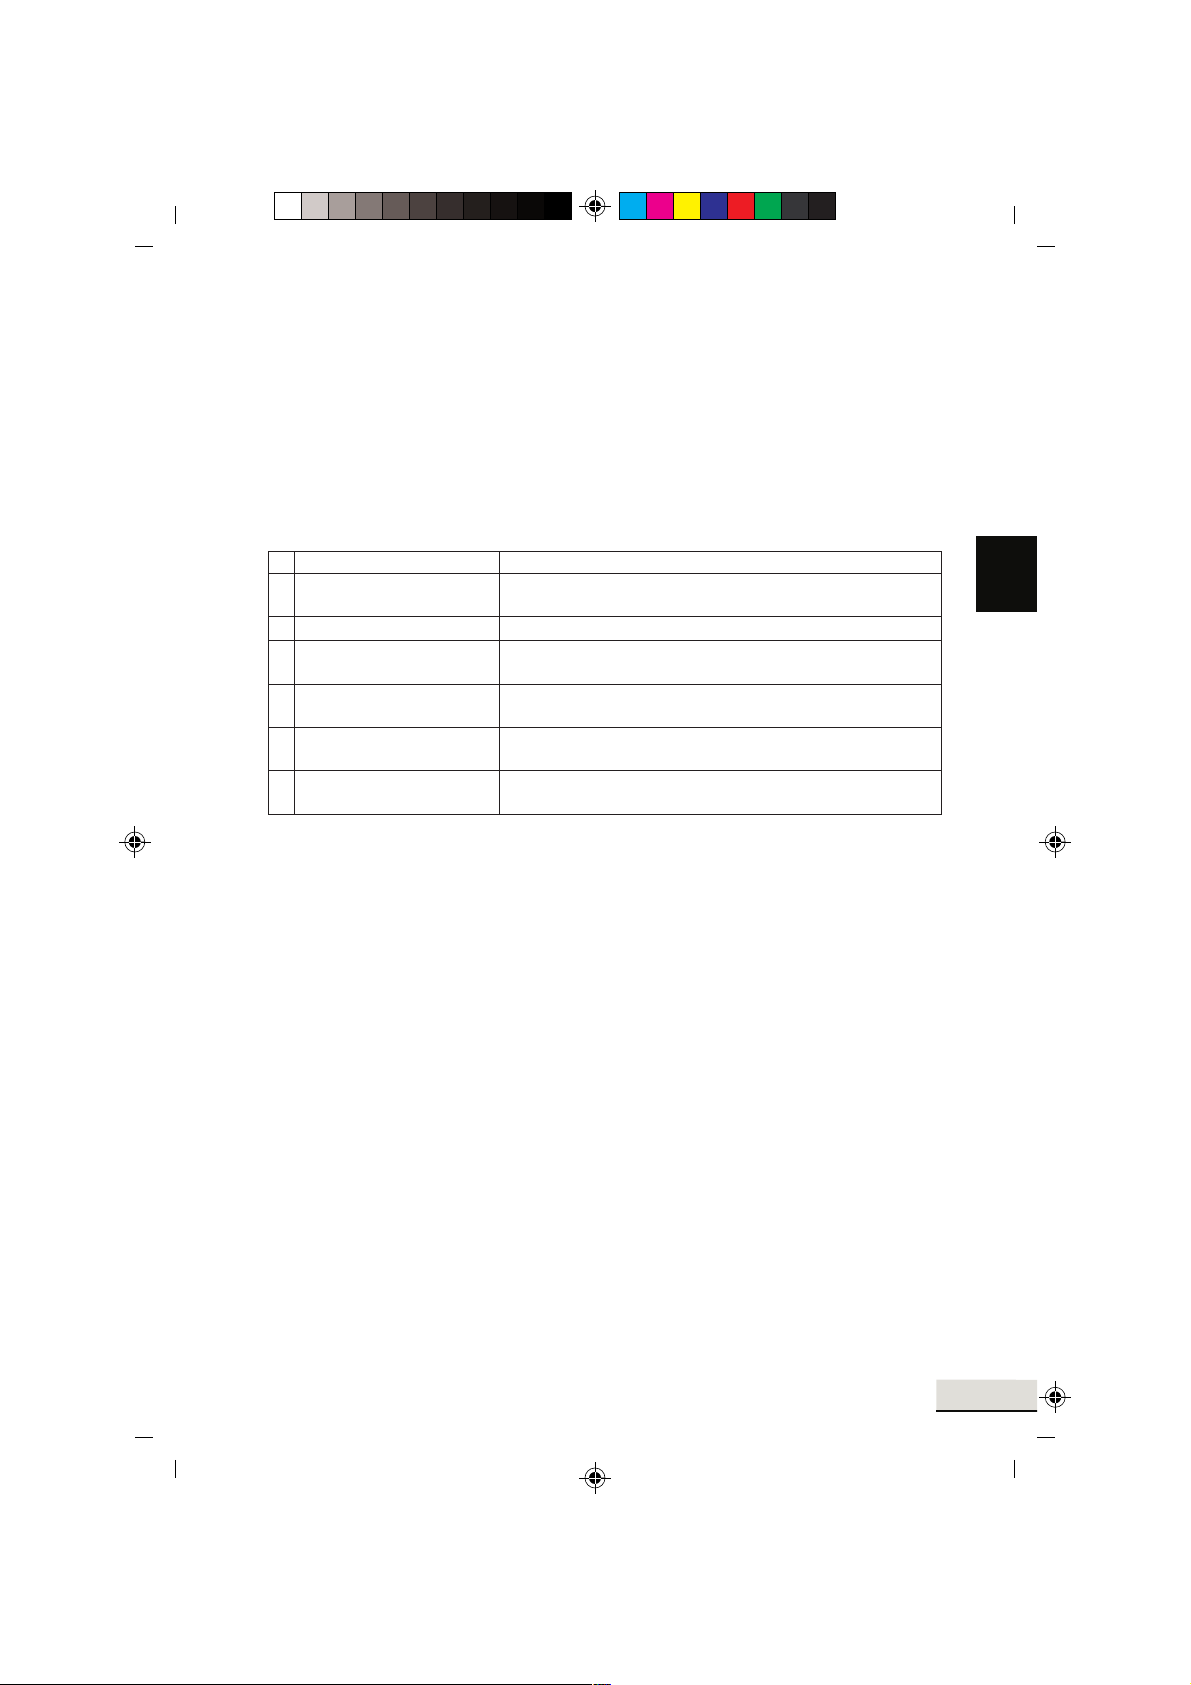
Tasten Belegtabelle
AMS/MP3 (12) Einstellung wählen
BAND/LOUD/ENTER (20) Bestätigen
1 (17) A, B, C, 1
2 (17) D, E, F, 2
3 (17) G, H, I, 3
4 (17) J, K, L, 4
5 (17) M, N, O, 5
6 (17) P, Q, R, 6
MODE (18) S, T, U, 7
|<< (19) V, W, X, 8
>>| (21) Y, Z, Leerstelle, 9
SEL (11) Zeichenverschieben nach rechts
DISP/0 (6) 0,_, -, +,
AUDIO (3) Scrollfunktion A-Z / 0-9
D
Hinweis:
Bei der Erstellung einer MP3-CD-ROM beachten Sie bitte, dass sich die Titel einzeln oder in
Verzeichnissen befinden. Mixen Sie niemals Titel und Verzeichnisse, es könnte zu Problemen
beim Abspielen führen. Alle gängigen Codierungen können abgespielt werden.
ID 3-TAG FUNKTION
Beim Erstellen einer MP3-CD können Sie zusätzliche Informationen abspeichern. Dies können
Informationen über den Interpret, Titel, Albumname und Erscheinungsjahr des Musikstücks, sowie ein
kurzer Kommentar sein. Zur Eingabe empfehlen wir einen ID3-Tag Editor.
Diese Informationen werden nach Abfrage während der Wiedergabe über das Display angezeigt.
Beim Abspielen von MP3-CD's können so, ausser Titelnummer, auch der Titelname oder der Interpret
angezeigt werden (abhängig von den gespeicherten Informationen auf der MP3-CD).
Zur Abfrage betätigen Sie die DSP/0-Taste (6). Nach jedem Tastendruck erscheint ein ID3-Tag Eintrag
der aktuellen Wiedergabe:
TITEL - INTERPRET - ALBUMNAME - ERSCHEINUNGSJAHR - KOMMENTAR
D 15

MD 80555 Autoradio BDA_D.FH11 Thu Feb 24 11:05:31 2005 Seite 16
C M Y CM MY CY CMY K
FEHLERSUCHE
Problem Ursache Abhilfe
Das Gerät lässt sich nicht
einschalten.
Die Zündung ist nicht
eingeschaltet.
Die Sicherung ist defekt.
Zündung durch drehen
des Schlüssel einschalten.
Sicherung erneuern.
Die CD kann nicht geladen
oder ausgeschoben
werden.
Kein Ton
Funktionstasten
funktionieren nicht.
CD springt.
Radio funktioniert nicht.
Automatische SenderAuswahl funktioniert nicht.
Senderspeicher funktioniert
nicht.
Es befindet sich bereits eine
CD im Gerät.
CD ist verkehrt herum
eingelegt worden.
CD ist sehr schmutzig oder
defekt.
Temperaturen im Auto sind
zu hoch.
Kondesation.
Lautstärke auf Minimum.
Kabel sind nicht richtig
angeschlossen.
Der eingebaute
Microcomputer kann wegen
Rauschen nicht funktionieren.
Bedienteil sitzt nicht korrekt.
Der Einbauwinkel übersteigt
30°.
CD ist sehr schmutzig oder
defekt.
Fehler bei selbstgebrannten CDs
Antennenkabel ist nicht
angeschlossen.
Die Sendesignale sind zu
schwach.
Rosa Kabel ist nicht am
Dauerplus angeschlossen.
CD aus dem Spieler entfernen,
dann neue CD einlegen.
CD immer mit der Beschriftung
nach oben legen.
CD säubern oder versuchen
eine andere abzuspielen.
Abkühlen, bis die
Umgebungstemperatur
wieder auf
Normalzustand ist.
Das Gerät ein paar
Stunden ausgeschaltet
lassen und dann erneut
versuchen.
Lautstärke zur gewünschten
Stärke einstellen.
Kabelverbindungen
überprüfen.
RESET-Taste drücken.
Überprüfen, dass das
Bedienteil richtig und
fest auf seinem Platz sitzt.
Einbauwinkel auf weniger
als 30° verstellen.
CD säubern oder versuchen
eine andere abzuspielen.
CD in einem anderen Gerät
überprüfen
Antennekabel fest einstecken.
Sender manuell
anwählen.
Kabelverbindungen
überprüfen.
D 16

MD 80555 Autoradio BDA_D.FH11 Thu Feb 24 11:05:31 2005 Seite 17
C M Y CM MY CY CMY K
TECHNISCHE DATEN
Allgemein
Betriebsspannung: DC 12 V, negative Masseverbindung
Gestell-Abmessungen: 178 x 155 x 50 mm (BxTxH)
Leistung: Musikspitzenausgangsleistung 4 x 4W R.M.S.
Sicherung: 0,5 Ampere (rot), 15 Ampere (rosa)
MP3/CD-Player
MPEG Rate 64-320 K
Frequenzbereich 20 Hz ~20 kHz
MP3 Playback ISO 9660 & Joliet format of MP3
FM Radio
Frequenzumfang 87.5 bis 108MHz
IF 10.7 MHz
Empfindlichkeit 3 µV
(Rauschabstand = 30 dB)
Stereo Trennung > 30 dBu
D
CD-Player
Verwenden Sie ausschließlich CDs, die wie folgt gekennzeichnet sind:
Laserklasse 1
Technische Änderungen vorbehalten.
COMPACT
DIGITAL AUDIO
D 17

MD 80555 Autoradio BDA_UK.FH11 Thu Feb 24 11:05:03 2005 Seite 1
C M Y CM MY CY CMY K
FUNCTIONS
1. POWER: On/Off switch
2. RELEASE: Removal of operating panel
3. AUDIO Turning knob to change audio settings
4. CD tray: To load the CD
5. DISPLAY
6. DSP/0: To scan settings of programme, time, frequency and PTY/number
key 0.
7. EJECT: CD eject
8. PTY: Programme Type Code
Includes programmes such as news, music, sport, etc., dependent
on the radio station.
9. TA: Traffic Announcement Identification. Identification data on traffic
announcements that can be broadcast.
10. EQ: Equalizer
11. SEL: Settings of volume, bass, trebles, balance and fader
12. AMS/MP3: Automatic station memory/switch-over
frequency display/station name
13. PAU: Pause button (for CD/MP3)
14. SCN: Scan button (plays the CD track/MP3 for approx. 10 sec.)
15. RPT: Repeats a track (CD/MP3)
16. SHF: Random Playback (CD/MP3)
17. Station keys 1-6
18. MODE: Switch-over radio/CD/MP3/number key 7
19. -<< : Tune/station search
backwards/number key 8
20. BAND/LOUD/ENTER: Selection frequency range/loudness
21. +>>: Tune/station search
forwards/number key 9
22. AF/REG: To switch on the RBDS mode and/or the regional programme mode
Behind the front panel:
23. RESET: Reset to the works settings
GB 2

MD 80555 Autoradio BDA_UK.FH11 Thu Feb 24 11:05:03 2005 Seite 2
C M Y CM MY CY CMY K
SAFETY PRECAUTION
Place the unit into the corresponding slot or choose a place where it can be installed without impeding
the driver in his usual driving job.
Shortly connect the cables before finally installing the unit. Make sure that they are correctly connected
and that the system works properly.
If any changes at the car are necessary, contact your car dealer / service shop.
Install the unit in a way that nobody will by injured when the car is suddenly stopped.
If the unit is installed at an angle of more than 30° from horizontal it may no longer give an optimum
performance.
Avoid installing the unit in the vicinity of high temperatures (e.g. caused by direct sunlight or hot air
from the heating system), dust, dirt or excessive vibrations.
30°
GB
GB 3

MD 80555 Autoradio BDA_UK.FH11 Thu Feb 24 11:05:03 2005 Seite 3
C M Y CM MY CY CMY K
CONTENTS
BEFORE SWITCHING ON.............................................................................................................5
INSTALLATION ..............................................................................................................................5
INSTALLATION OF THE RADIO IN THE ISO SLOT OF YOUR CAR ..........................................5
Detaching and attaching the operating panel ..............................................................................6
ISO ADAPTER PLUG ....................................................................................................................6
Aerial relay cable .........................................................................................................................6
Stereo Cinch output .....................................................................................................................6
CABLE CONNECTIONS................................................................................................................7
BASIC OPERATION ......................................................................................................................8
Switching on/off ...........................................................................................................................8
Volume.........................................................................................................................................8
Bass.............................................................................................................................................8
Trebles.........................................................................................................................................8
Balance........................................................................................................................................8
Fader ...........................................................................................................................................8
Loudness .....................................................................................................................................8
Display .........................................................................................................................................8
Mode............................................................................................................................................8
Equalizer......................................................................................................................................8
Reset ...........................................................................................................................................8
RADIO ............................................................................................................................................9
Selecting the frequency range .....................................................................................................9
Selecting a station .......................................................................................................................9
Preset stations .............................................................................................................................9
Pre-setting stations ......................................................................................................................9
Recall preset station ....................................................................................................................9
Automatic memory system (AMS) ...............................................................................................9
Scanning of preset stations .........................................................................................................9
Regional Programme Mode.......................................................................................................10
PTY (Programme Type).............................................................................................................10
TA Traffic announcements.........................................................................................................10
EON TA local mode ...................................................................................................................10
EON DX Mode ...........................................................................................................................10
RBDS (Radio Broadcast Data System) .....................................................................................11
CD PLAYER .................................................................................................................................12
Inserting and removing of CDs ..................................................................................................12
Skipping tracks ..........................................................................................................................12
Pause CD ..................................................................................................................................12
Fast forward and reverse...........................................................................................................12
Playback of all tracks .................................................................................................................12
Repeating a track ......................................................................................................................12
Random Playback .....................................................................................................................12
MP3 PLAYBACK..........................................................................................................................13
Search for tracks (numbers) ......................................................................................................13
Search for interpreters ...............................................................................................................13
Keys table of allocations ............................................................................................................14
ID3-TAG FUNCTION ....................................................................................................................14
TROUBLESHOOTING .................................................................................................................15
SPECIFICATIONS........................................................................................................................16
GB 4

MD 80555 Autoradio BDA_UK.FH11 Thu Feb 24 11:05:03 2005 Seite 4
C M Y CM MY CY CMY K
BEFORE SWITCHING ON
Remove in any case both transport securing screws at
the upper radio housing before starting with the installation
(marked by red flags)!
transport secuting device
INSTALLATION
This car radio is simple to install in every standard ISO radio slot.
If your car has no standard ISO radio slot please contact you car dealer.
Installation of the radio in the ISO slot of your car.
Remove the installation frame from the radio.
Push the installation frame into the radio slot in the dashboard of your car.
Bend the lugs in the installation frame using a screw driver to firmly fix the frame in the vehicle.
Check that the frame is firmly seated.
Connect the ISO socket block to the ISO plugs of your vehicle.
Connect the aerial cable of the vehicle with the aerial
plug of the car radio.
Carefully push the radio into the installation frame.
Make sure that you do not pinch the cables! Push the
RESET button (23) with a ball-point pen. Attach the
operating panel.
GB
23
ATTENTION!
Please use the ISO connections of the car radio for the connection. Depending on the
car model, the matching ISO adapter plugs (counter-pieces in the car) are commercially
available.
If the adapter connections are removed from or cut off the cable, then your warranty
claim is no longer valid!
GB 5

MD 80555 Autoradio BDA_UK.FH11 Thu Feb 24 11:05:03 2005 Seite 5
C M Y CM MY CY CMY K
DETACHING AND ATTACHING THE OPERATING PANEL
Press the RELEASE button (2) and remove the operating panel. Always keep the operating panel
in the transport bag supplied with the unit.
When the operating panel has been removed, a red LED (26) flashes.
To install the operating panel place it with the right side first into the frame. Then firmly press the
left side until it snaps into place. Check that the operating panel is seated correctly and firmly. If
the operating panel is not installed properly the display shows wrong information and/or some
keys show malfunctions.
Front panel
ISO Adapter plug
Caution!
Use the ISO adapter plug of the car radio to ensure a safe electrical connection.
Important notes!
Ensure that the pink backup cable is attached to the permanent plus pole (for the station memory).
After all connections have been made, press the RESET button (23).
Aerial relay cable
The yellow cable is supplied for a relay-controlled aerial.
The relay will automatically extend the aerial when the unit is switched on and retracts it when it is
switched off.
Caution:
Do not connect the yellow cable to the motor cable, this may damage the unit.
Stereo Cinch output
External units (e.g. amplifier) can be connected to these terminals (red and white chinch output).
GB 6

MD 80555 Autoradio BDA_UK.FH11 Thu Feb 24 11:05:03 2005 Seite 6
C M Y CM MY CY CMY K
CABLE CONNECTIONS
for a four-speaker (quadro) system
REAR OF CAR RADIO
Aerial connection
Ignition switch
Important notes!
Memory back-up
must be connected
to the permanent
plus pole for the
station memory.
(B+)
Memory
Back-up
Earth
connection
(B-)(earth)
Powered
aerial
front left
speaker
rear left
speaker
for a two-speaker (dual) system
Aerial connection
Ignition switch
Important notes!
Memory back-up
must be connected
to the permanent
plus pole for the
station memory.
(B+)
Memory
Back-up
Earth
connection
(B-)(earth)
Powered
aerial
left
speaker
red
pink
black
red
pink
black
yellow
green
green/black
blue
blue/black
REAR OF CAR RADIO
yellow
green
blue/black
RCA cable
grey
grey/black
white
white/black
RCA cable
grey
white/black
right red
left white
front right
speaker
rear right
speaker
right red
left white
right
speaker
GB
GB 7

MD 80555 Autoradio BDA_UK.FH11 Thu Feb 24 11:05:03 2005 Seite 7
C M Y CM MY CY CMY K
BASIC OPERATION
Switching on /off
Press the POWER button (1) to switch on/off the unit.
Volume
Press SEL button (11) once to set the volume.
By turning the AUDIO knob (3) you increase or decrease the volume.
Control the volume only to a level that you are still able to hear the acoustic signals of approaching
ambulances/fire service/police cars!
Bass
Press SEL button (11) twice to set the bass. By turning the AUDIO knob (3) you increase or lower the bass.
Trebles
Press SEL button (11) three times to set the trebles. By turning the AUDIO knob (3) you increase or lower
the trebles.
Balance
Press SEL button (11) four times to set the balance. By turning the AUDIO knob (3) you set the balance
of the right and left speakers.
Fader
Press SEL button (11) five times to set the fader. By turning the AUDIO knob (3) you set the fader of the
front and rear speakers.
Loudness
Keep the BAND/LOUD/ENTER button (20) pressed until you hear a signal sound. The display shows
LOUD ON or LOUD OFF. This increases the deep frequencies at low volume to a psychoacoustically
correct listening level.
Display
Press the DSP/0 button (6) to scan the following information:
Programme name
Frequency
Time (is set automatically with RDS reception)
PTY settings
(These RBDS functions are broadcast by the radio stations in differing quality and contents. You find more
information in the chapter RADIO under RBDS).
Mode
You can switch between radio and CD by pressing the MOD button (18).
Equalizer
FLAT CLASSICS POP M ROCK M DSP OFF
Reset
To reset your car radio to the works settings, press the RESET button (23) using a ball-point pen. You find
this button behind the operating panel!
Press the RESET button
before using the unit for the first time after connecting all the cables,
if all the function buttons are not working correctly,
if an error message appears in the display.
GB 8

MD 80555 Autoradio BDA_UK.FH11 Thu Feb 24 11:05:03 2005 Seite 8
C M Y CM MY CY CMY K
RADIO
Selecting the frequency range
Press the BAND/LOUD/ENTER button (20) to change between VHF F1, F2 and F3. You can memorise
six radio stations in each band.
Selecting a station
Give the Tune buttons I<< (19) or >>I (21) a short press, and the unit will automatically search for
the next station. If you press one of the TUNE button for two seconds, it switches to a manual search
for stations. The display shows MANUAL.
Now you can select and save the station by pressing the TUNE button. After a short waiting period,
the unit switches back into the automatic station-search mode.
Preset stations
In each wave band up to six stations can be memorised and recalled using the station
buttons 1-6 (17).
Pre-setting stations
1. Press the BAND/LOUD/ENTER button (20) to select the frequency range.
2. Press the TUNE button I<< (19) or I>> (21) to select a station.
3. Keep one of the station buttons 1-6 (17) pressed for approx. 3 seconds. A signal sound confirms
the storage of the station.
GB
Recall preset station
1. Press the BAND/LOUD/ENTER button (20) to select the frequency range.
2. Press the station button (17) to recall the preset station.
Automatic memory system (AMS)
Keep the AMS/MP3 button (12) pressed until you hear a signal sound. The display shows SEARCH.
The station search stops for approx. 5 sec. at each found station. The number flashing in the display
shows the number of the station key where the corresponding station is to be stored.
The tuner automatically scans past stations with a weak reception.
Scan of preset stations
Automatic scanning of the preset stations in the wave band.
1. Press the BAND/LOUD/ENTER button (20) to select the frequency range.
2. Give the the AMS/MP3 button (12) a short press. Now all stations are played for some seconds.
When the desired station is reached, give the AMS/MP3 button (12) a short press.
GB 9

MD 80555 Autoradio BDA_UK.FH11 Thu Feb 24 11:05:03 2005 Seite 9
C M Y CM MY CY CMY K
Regional Programme Mode
Some stations broadcast different regional programmes. To select only the alternative frequencies
of the desired regional programme keep the AF/REG button (22) pressed for some time until a
signal sound will be audible to switch the mode on or off. The display shows REG ON/REG OFF.
PTY (Programme Type)
To activate the menu, press the PTY button (8).
You can now choose the type of programme your station is to broadcast from the following
categories:
MUSIC LANGUAGE
1 POP M, ROCK M NEWS, AFFAIRS, INFO
2 EASY M, LIGHT M SPORT, EDUCATE, DRAMA
3 CLASSICS, CULTURE, SCIENCE,
OTHER M VARIED
4 JAZZ, COUNTRY WEATHER, FINANCE,
CHILDREN
5 NATION M, OLDIES SOCIAL, RELIGION, PHONE IN
6 FOLK M Travel, Leisure, Document
(The information given depends on the radio station)
TA Traffic announcements
Press the TA button (9) for a short time to switch the TA mode on or off.
When the TA mode is switched on and traffic announcements are broadcast, and the unit has been
switched to CD or AUX, the unit is automatically switched to radio reception. The unit temporarily
switches to the EON network station, if EON finds a traffic announcement on a different programme.
If the volume has been reduced to below the threshold, it will be increased. The TA function during
the traffic announcements is interrupted by pressing the TA button (9). This does not switch off the
TA mode. If the TA button (9) is pressed for longer, the EON TA LOCAL / EON TA DISTANCE mode
is selected.
With this mode it is possible to allocate information to EON TA when you listen for instance to a
station without traffic announcements. If there is a traffic announcement on another station frequency
the unit automatically switches to this station for this period of time. As soon as the announcement
is finished the unit switches back to the previous station.
EON TA local mode
When the EON TA LOCAL mode has been selected, the EON TA LO flashes for a few seconds in
the display. The mode for the local region has been selected.
EON DX mode
If the EON DX mode was selected EON TA DX flashes in the display for a few seconds. The mode
for distant regions has been selected.
GB 10

MD 80555 Autoradio BDA_UK.FH11 Thu Feb 24 11:05:03 2005 Seite 10
C M Y CM MY CY CMY K
RBDS (Radio Broadcast Data System)
RBDS is a service of the radio stations. Besides the usual music and text pieces, additional information
is broadcast in form of encoded digital signals which can be evaluated by the car radio.
Press the AF/REG button (22) to switch the RBDS mode on and off. When the RBDS mode is active,
the symbol AF appears in the display. When a station is received, the name of the programme and
other information is shown on the display (5).
This information given depends on the radio station.
Different RBDS services are offered:
PI: Program Identification Code
The radio can identify the received station using the PI code.
PS: Program Service Name
With the feature Program Service the station name can be displayed.
AF: Alternative Frequencies
The radio automatically selects the alternative frequency of the same programme with the
best reception.
TP/TA: Traffic Program/Traffic Announcement
EON: Enhanced Other Networks Information
If there is any traffic announcement it is switched over to a station with traffic announcements
within the station chain when you listen to a non-traffic announcement station.
PTY: Program Type Code
Using Program Type the radio can look for stations with programme contents which can be
preselected, e.g. sport, news, rock, pop,.....
GB
GB 11

MD 80555 Autoradio BDA_UK.FH11 Thu Feb 24 11:05:03 2005 Seite 11
C M Y CM MY CY CMY K
CD-PLAYER
Inserting and removing of CDs
Insert the CD in the slit (5). CD playback starts.
The display shows S--CDP (i.e. "search track"). To remove the CD, press the EJECT button (7).
Playback stops and the CD is ejected. The unit switches to radio mode.
Skip tracks
Press the TUNE button |<< (19) or button >>| (21) to skip to the next track.
The number of the track is shown in the display (5).
CD pause
During playback, press the PAU button (13) and the CD playback is paused. When the
PAU button (13) is pressed again, the CD restarts.
Fast forward and fast backward
Press the TUNE button |<< (19) or button >>| (21) during playback for longer to start fast
forward/ backward .
Playback of all tracks
Press the SCN button (14) and the first 10 seconds of every track are played. Press the SCN button
(14) again to restart normal playback.
Repeating a track
Press the RPT button (15) to continuously repeat the track. Press the RPT button (15) again to
deactivate this function.
Random Playback
Press the SHF button (16) to shuffle between all tracks on the CD in a random order.
Note:
Driving on bumpy roads could cause the CD to skip. A short play time improves the performance.
Skipping does not cause damage to the CD.
Moisture and high humidity can cause malfunctions of the CD player. Switch on the car heating,
and allow moisture to evaporate before operating.
Do not subject the CD player to any extremely high or low temperatures.
Do not drive with an ejected CD in the slit.
GB 12

MD 80555 Autoradio BDA_UK.FH11 Thu Feb 24 11:05:03 2005 Seite 12
C M Y CM MY CY CMY K
MP3 PLAYBACK
The playback starts automatically when a MP3 CD-ROM is inserted. You find the individual key functions
in the chapter CD Player.
You can directly select the track or interpreter. Please take into account that most of the MP3 functions
are dependent on the type of creation of the MP3 CD.
Search for tracks (numbers)
Press the AMS/MP3 button (12) once. The display shows MP3T ..... .
Enter the number of the desired track by pressing the keys given in the table.
Press the BAND/LOUD/ENTER button (20) to confirm the input or wait for approx. 5 sec. until the unit
automatically skips to the selected track.
Search for interpreters
Press the AMS/MP3 button (12) twice.The display shows a flashing ....... .
Enter the name of the desired interpreter by pressing the keys given in the table.
Observe that the SEL button (11) must be pressed after the input of every character before the next
one can be entered (character shift).
Press the BAND/LOUD/ENTER button (20) to confirm the input.
Now, the unit searches for the corresponding track.
Press the BAND/LOUD/ENTER button (20) button once again if the unit has found the desired
interpreter. The track is played now.
GB
Note:
The search function depends on the created MP3 CD.
GB 13

MD 80555 Autoradio BDA_UK.FH11 Thu Feb 24 11:05:03 2005 Seite 13
C M Y CM MY CY CMY K
Table keys of allocations
AMS/MP3 (12) Select settings
BAND/LOUD/ENTER (20) Confirm
1 (17) A, B, C, 1
2 (17) D, E, F, 2
3 (17) G, H, I, 3
4 (17) J, K, L, 4
5 (17) M, N, O, 5
6 (17) P, Q, R, 6
MODE (18) S, T, U, 7
|<< (19) V, W, X, 8
>>| (21) Y, Z, space, 9
SEL (11) Character shift to the right
DISP/0 (6) 0,_, -, +,
AUDIO (3) Scroll function A-Z / 0-9
Note:
If you create MP3 CD-ROM please make sure that the tracks are stored individually or in
directories. Never mix tracks or directories since it could lead to problems during the playback.
All standard codings are suitable for playback.
ID 3-TAG FUNCTION
You can store additional information when creating a MP3 CD. This can be information on the interpreter,
track, album name or year of publication of the piece of music or a short comment. We recommend
an ID3-tag editor to enter this information.
This information is shown in the display after the scanning during the playback.
So it is possible to display, besides the track number, the name of the track or interpreter during the
playback of MP3 CDs (dependent on the stored information on the MP3 CD).
To scan it press the DSP/0 button (6). The ID3-tag entry of the current playback is shown after each
keypress:
TRACK - INTERPRETER - ALBUM NAME - YEAR OF PUBLICATION - COMMENT
GB 14

MD 80555 Autoradio BDA_UK.FH11 Thu Feb 24 11:05:03 2005 Seite 14
C M Y CM MY CY CMY K
TROUBLESHOOTING
Problem Cause Solution
The unit cannot be switched on.
The CD cannot be loaded or
ejected.
The ignition is not switched on.
The fuse is defect.
There is already a CD in the unit.
The CD has been inserted
upside-down.
The CD is very dirty or defect.
Temperature in the car is too
high.
Switch on the ignition by turning
the key.
Change the fuse.
Remove the CD from the player,
then insert a new CD.
Always insert the CD with the
writing facing upwards.
Clean the CD or try to play
another one.
Allow to cool until the ambient
temperature is back to normal.
No sound
Function buttons do not work.
CD skips.
Radio not functioning.
Automatic station selector not
functioning.
Station memory not functioning.
Condensation.
Volume set to minimum.
The cables are not correctly
connected.
The built-in microcomputer
cannot function due to noise.
The operating panel is not seated
correctly.
The installation angle of the unit
is greater than 30°.
The CD is very dirty or defect.
Defective self-burned CDs
The aerial cable is not correctly
connected.
The broadcast signals are too
weak.
The pink cable is not connected
to the permanent plus pole.
Switch off the unit for a few hours
and then try again.
GB
Turn up the volume to the
desired level.
Check the cable connections.
Press RESET button.
Check that the operating panel
is seated correctly and firmly.
Adjust the installation angle to
less than 30°.
Clean the CD or try to play
another one.
Check the CD in another unit
Firmly plug in the aerial cable.
Select the transmitter manually.
Check the cable connections.
GB 15

MD 80555 Autoradio BDA_UK.FH11 Thu Feb 24 11:05:03 2005 Seite 15
C M Y CM MY CY CMY K
SPECIFICATIONS
General
Operating voltage: DC 12 V, negative earth connection
Housing dimensions: 178 x 155 x 50 mm (WxDxH)
Power: Peak music power output 4 x 4 W R.M.S.
Fuse: 0.5 Ampere (red), 15 Ampere (pink)
MP3/CD-Player
MPEG Rate 64-320 K
Frequency range 20 Hz~20 kHz
MP3 Playback ISO 9660 & Joliet format of MP3
FM Radio
Frequency range 87.5 to 108 MHz
IF 10.7 MHz
Sensitivity 3 µV
(Signal-to-noise ratio = 30 dB)
Stereo separation > 30 dBu
CD-Player
Use only CDs labelled as follows:
Laser class 1
Subject to technical modifications.
GB 16
COMPACT
DIGITAL AUDIO
 Loading...