


Table of contents:
Safety Cautions ...........................................................1
Data Security ...........................................................1
Safe Usage Guidelines ............................................... 2
Electromagnetic Compatibility ..................................3
Battery Handling .......................................................3
Cleaning ..................................................................4
Legal caution: ..........................................................4
WMA Audio Format....................................................5
Mediaplayer Settings: .............................................5
System requirements ................................................4
What’s in the Box? ....................................................... 6
Product Overview ........................................................7
Getting Started ...........................................................9
Charging the MP3 Jukebox ......................................... 9
Operation .................................................................11
Switching On/Off .................................................... 11
Start the Menu .......................................................11
Connecting the Earphones........................................ 12
Reproduction .......................................................... 12
Recording .............................................................. 13
Resetting the MP3 Jukebox (Reset) ...........................13
Menu Structure....................................................... 14
Setting Preferences ..............................................15
Connecting to a PC.................................................. 16
Installing the Driver and Application ....................... 17

Using Audiophile ..................................................... 18
To download files to your MP3 player:..................... 18
To upload files to your PC system........................... 18
To update firmware .............................................. 19
To change startup picture ..................................... 19
To rebuild your database....................................... 19
Playing & Organizing Music....................................... 22
Play Lists and List Manager ................................... 22
Search Songs ...................................................... 23
Segment Repeat ..................................................24
Equalizer Settings ................................................24
Playback Options.................................................. 24
Playlists ..............................................................25
Dragging and Dropping Music Files ......................... 26
Recording Music and Voice .................................... 26
External Storage Device ........................................ 28
FAQ, Tips and Troubleshooting ....................................29
Is Further Assistance Necessary? ........................... 32
ii

SAFETY CAUTIONS
We recommend that you read this chapter completely and
with care and follow the instructions detailed. In doing this,
the correct functioning and the long duration of the MP3
Jukebox are ensured. Please keep these instructions
somewhere safe in order to be able to hand them to a new
owner in any eventual case of sale.
In case of any problems, address exclusively to your local
authorised service centre.
Data Security
You must guard against the loss of your
important data by making backup copies. You can backup your data onto
CDR, CDRW, floppy disk, USB memory
drive or other media such as ZIP
drives. It depends upon how much
data you want to backup. IF you do
this and something happens to the hard
drive in your computer, you have another copy of your data. We do not
assume liability for any data loss or
damage to data storage units, and no
claims can be accepted for damages
resulting from the loss of data or any
consequential losses.

Safe Usage Guidelines
Keep the product away from damp, protect it from
jolts, dust and heat and do not expose it to direct
sunlight, in order to avoid any operational problems.
Attention: The MP3 Jukebox has a built-in hard disk.
Do not allow the device to be dropped and avoid
vibrations, in order to avoid damage.
Do not open the product casing: this would cause the
forfeit of the guarantee and the eventual damage/destruction of the product.
Do not allow children to play with electrical products
without the supervision of an adult: children are not
able to evaluate any possible and real dangers.
After transportation of the product, wait until there is a
suitable environmental temperature before putting it
into operation. In case of significant thermal variations
or damp, it is possible that the forming of condensation
can occur which can cause short circuits. Before transportation, replace the cover of the USB socket.
Use only the USB Cable supplied with the product.
The product suppied is intended to be used only with
computers equipped with power surge protection. (Limited Power Source according to EN60950).
Attention! There is a chargeable battery in the device.
Batteries and accumulators should not be put into the domestic waste. They will be taken back free of charge by
the manufacturer, the dealer or another responsible
agency, to conduct them to recycling or disposal.
2

Electromagnetic Compatibility
When you use the product, follow the directives on
electromagnetic compatibility (EMV). To avoid the risk
of damage and the loss of onboard data, position the
device at least one meter from high frequency and
magnetic sources of interference (TV, stereo loudspeakers, mobile phones, etc.)
Battery Handling
Batteries may contain combustible materials. Misusing them
may cause battery leakage, heat, explosion or ignition, bringing
about injury or damage to the product or YOU. Please observe
strictly the following:
KEEP CHILDREN AWAY from batteries.
If by any chance, batteries are swallowed, consult a
medical doctor immediately.
DO NOT CHARGE batteries (except rechargeable
batteries).
DO NOT FORCIBLY DISCHARGE batteries.
DO NOT SHORT-CIRCUIT batteries.
DO NOT HEAT or DISPOSE OF IN FIRE.
DO NOT DISASSEMBLE or DEFORM batteries. Your hands
and fingers may be injured, or the liquid of the battery
may get into your eyes or adhere to your skin. If this
happens, rinse with a large quantity of water immediately and consult a medical doctor.
DO NOT expose batteries to strong impacts by dropping
or throwing the batteries.
DO NOT reverse the positive (+) and negative (-) termi-
nals to avoid short-circuit.
REMOVE PROMPTLY any used battery from the device.
REPLACE THE BATTERY with a new battery of the same
type.
3

INSULATE THE TERMINAL parts with tape or the like
when storing or at disposal of the batteries.
DO NOT throw drained batteries in with the domestic rubbish!
Respect the environment and dispose of them in the specific containers for separate collection. If necessary, turn to your reseller or
to our service centre. Thank you!
Cleaning
Generally, the equipment does not need to be cleaned.
Caution! The product does not contain compo-
nents that need to be maintained or cleaned.
Be careful that the product does not get dirty. Do not use any
solvents or spray corrosive cleansers. If absolutely necessary, clean the product casing with a damp cloth.
System requirements
Connection USB 1.1 / 2.0 (recommended)
CD-ROM (for installation)
Operating
System
Driver
Microsoft Windows
Microsoft Windows
Only required for Windows
®
98SE / ME
®
2000 / XP
®
98SE
Legal caution:
The MP3 Jukebox can only be used to copy or encode music tracks of which the user owns the copyright(s) or for
which he has purchased or has been given the right of use
from the holder of the copyright.
Any user who violates these rights is prosecutable according
to the laws and/or subject to claims from the holder of the
rights.
4
WMA Audio Format
Your MP3 Jukebox can also play back files in the WMA
format. Some WMA encoders can use DRM (Digital Rights
Management) and thus prevent playback on portable devices.
Use the Windows Media Player from Version 7.0, because it
contains a function for rerecording music files on portable
devices. Then, it will be possible to reproduce the WMA
files created in this way on your MP3 Jukebox.
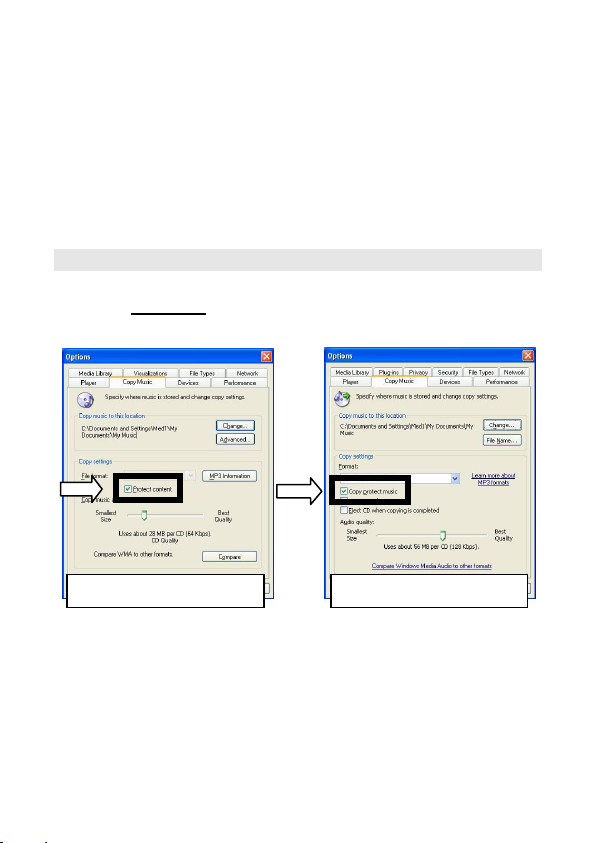
Mediaplayer Settings:
When using the Windows® Mediaplayer® make sure this
option is disabled
files on your MP3-Player:
Mediaplayer 8 Mediaplayer 9/10
in order to play back the converted
5

WHAT’S IN THE BOX?
Please check the below listed parts and accessories are in
the box when you first unpack your product. In the case of
any missing item(s) please contact your local service centre accordingly. Any claim for missing parts will only be
accepted within 7 days from date of purchase.
your product box is the following:
MP3 Player
USB computer connection cable
Stereo Earphones
Application CD-ROM with Windows® 98SE Driver
AC Adapter DSA-0101F-05 UK
Line-in cable
This user manual
Included in
6
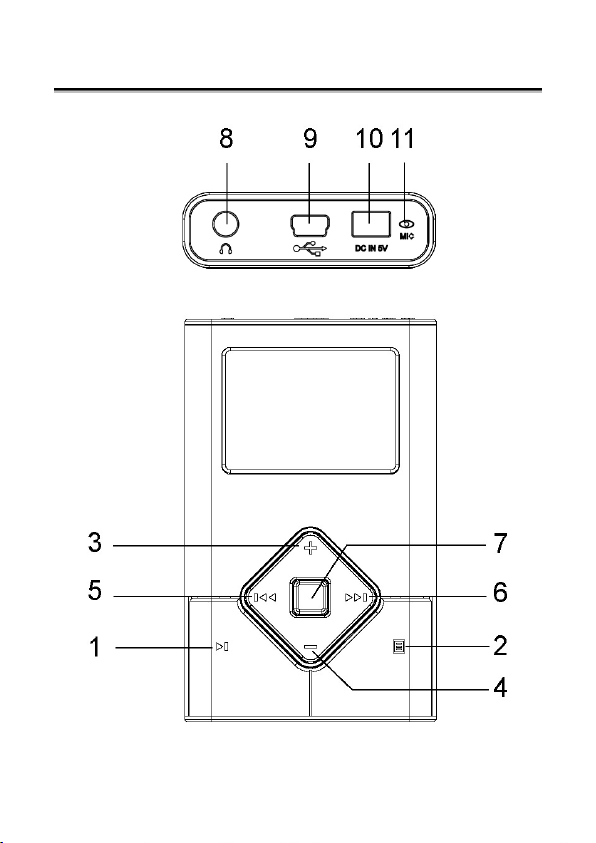
PRODUCT OVERVIEW
7

No.
1
ON/OFF, Start, Pause, Stop [ ]
2 Menu key []
Page up /
3
Volume up key [«]
Page down /
4
Volume down key [–]
5 Previous Track [] / FRW
6 Next Track [] / FFW
7 Confirmation key (OK)
Stereo Earphones- [] / Audio Out
8
(Stereo) / LINE-IN
9 USB 1.1/2.0 Socket
10 AC-Adapter Connector
11 Microphone
Description
8
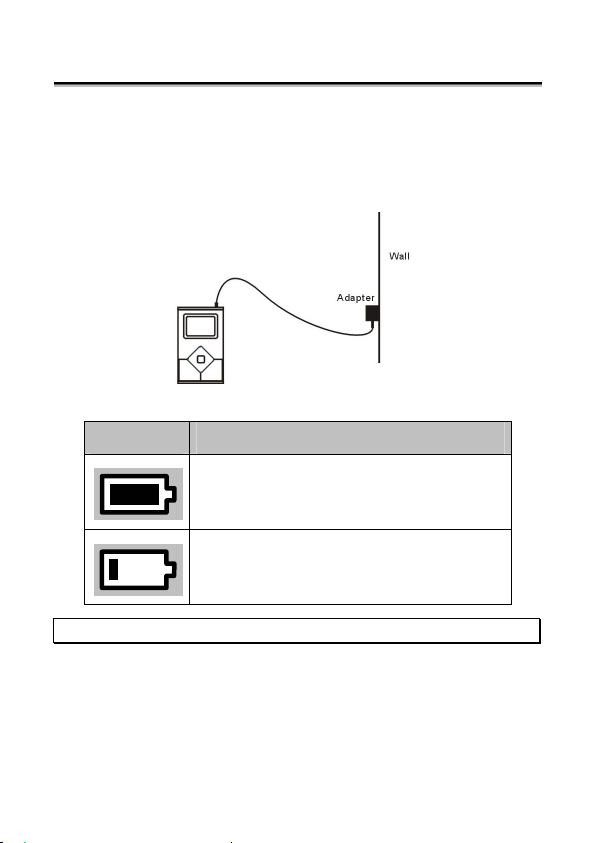
GETTING STARTED
Charging the MP3 Jukebox
Connect the MP3 Jukebox to the supplied AC adapter. The
Li-polymer battery is 80% charged in 2 hours and fully
charged in 4 hours:
The battery symbol on the display shows the battery state:
Display Remark
Battery is fully loaded.
Battery is almost empty.
Note: You can use the MP3 Jukebox during the charging process.
9

10

OPERATION
Switching On/Off
Press the Playback/Pause button [1] for two seconds, to
switch the MP3 Jukebox on.
Select the
switch the MP3 Jukebox off again. The device will switch
itself off if you stop playback and press the Playback/Pause
button for 3 seconds.
The device will then switch itself off automatically.
(Switch Off) option in the Main Menu, to
Start the Menu
You start the Menu to change the operating mode and the
basic settings in this way: The Menu is displayed when you
switch the MP3 Jukebox on. The Menu is faded out when
you start playback. Proceed in this way to display the Menu
during playback:
1. Press the
Menu will be faded out again if you do not make any
further selection for longer than three seconds.
2. Operate the buttons [3,4,5,6], to select a Menu Point.
The Menu Point selected will be shown at the lower
edge of the display.
3. Confirm the selection by pressing the selection button
(OK) [7].
4. Press the Menu button to leave a submenu. You reach
a higher level of the Menu in this way.
button [2], to reach the Menu mode. The
11

Connecting the Earphones
Stereo earphones are included.
Insert the earphone plug into one of the appropriate sockets [8] of your MP3 Player. Either socket can be used.
* Caution: Listening to music at a very high volume
can cause permanent damage to your hearing. Before starting playback, adjust the volume to the lowest level, then start the playback and adjust the volume to the desired level.
Reproduction
You will read how you can transfer files to your MP3 Jukebox from Page ...
Playback
Press the Playback/Pause button [ , 1] briefly, to play a
number back when the MP3 Jukebox is switched on.
Pause
Press the button [ ,1] briefly, to stop playback at the
position that has just played back. Press the button again
to continue playback.
Stop
Press the button [ ,1] for longer than 1 second, to end the
playback of the number completely. The number will start from
the beginning if you operate the Playback button again.
Select a Number
You will select the previous or the next number with the
help of the replay [,6] and forward [,5] buttons. The
number will be wound forwards or backwards quickly, if
you press the button down longer.
12

Recording
You can record from any audio source with this function.
1. Connect the music source with the headphones connection of your MP3 Jukebox [8], to record from an external source.
You can use a recording cable complying with your audio source (optional, e.g. 3.5 mm stereo to Cinch) to
do this. The input of the MP3 Jukebox is designed to
accept external sources such as CD or DVD players.
2. Select the Recording option
Now, decide whether you want to record with the installed microphone or the connected cable:
3. Confirm the start of recording with OK. Press the button again to stop or terminate the process, or to adjust the volume.
4. Now, you will be able to start a new recording, play
the recording back or delete it:
(Microphone) (Line In)
in the Main Menu.
Resetting the MP3 Jukebox (Reset)
It can happen that it is no longer possible to operate the
MP3 Player because of unforeseeable operating combinations or defective data exchange. Then, proceed as follows.
1. Remove all connection cables, if necessary.
2. Press the buttons [1,2,7] at the same time.
13

Menu Structure
You will see an overview of the Menu functions of the MP3
Jukebox on the following pages. From the main menu, you
can choose among the following options:
- Play Music – find your digital music files
- Record – voice and line-in record
- Settings – EQ, playback, language, and other settings
- Information – Status of player
14

Setting Preferences
You can customize the MP3 JUKEBOX’s settings to fit your
individual style.
EQ Setting
Utility
From the Menu, you may choose from the following options:
- Preset EQ and custom defined EQ
- Change LCD contrast
- Playback options
- Display language (both menu and song language)
- Set date and time
- Define various timer events
- Define Bookmark (excellent for Audio books)
- Other utilities
- Record quality (64kbps – 192kbps).
- CD Sync (0-5s) “Preferences” and the setting you
wish to customize
*Note: The Language setting includes options for both
Music Information and Menu language.
15

Connecting to a PC
The MP3 Jukebox must be connected to your computer in
order to install the driver and application software, and to
transfer songs. Use the supplied USB 2.0 cable to connect
the MP3 Jukebox to your computer’s USB port.
*Note: Do not disconnect the MP3 Jukebox while music is
being transferred. When the progress indicator on the MP3
Jukebox disappears, then it is safe to disconnect.
* Caution! During the installation of the software it is
possible that some important files are overwritten
or modified. To have access to the original files in
case of problems that arise after installation, it is
advisable to create a back-up of the hard disk contents.
16

Installing the Driver and Application
The driver CD comes with drivers and plug-ins to ensure a
smooth experience. Depending on your computer’s operating
system, the CD will install the driver and/or plug-in for Microsoft’s Windows Media Device Management platform.
1. Click HDD Jukebox to install.
2. The Jukebox Management Tool Setup welcome
screen will appear, click on Next to begin. Follow
the instructions to continue installation. After
Windows is done installing the drivers and/or
plug-ins, the Jukebox Management Tool dialog
box appears on your desktop.
The Jukebox Management Tool (Audiophile) is a program
that enables you to easily upload/download music to the
MP3 JUKEBOX, as well as edit ID3 tag information, and run
other maintenance utilities.
The computer will detect the Jukebox as a new device. If
the computer does not detect the MP3 JUKEBOX as a new
device, reboot your computer.
17

Using Audiophile
Make sure the MP3 JUKEBOX is properly connected to the USB
port using the supplied USB cable, then double-click the audiophile.exe icon to launch the music management functions window:
Click on the Transfer tab to access the following features:
- Transfer songs to/from player
- Upgrade firmware
- Change the startup picture
- Rebuild database (only if instructed to do so)
To download files to your MP3 player:
1. Select the directory with your MP3 or WMA files
2. Select the files to be transferred
3. Click Send to Player
To upload files to your PC system
1. Select the music file(s) stored in the Music tab
2. Click the Back to PC button
18

To update firmware
1. Click the F/W Update button
2. Select the directory containing the updated firmware file
3. Select the firmware file
4. Click OK
*Note: After upgrading the firmware, disconnect the MP3
JUKEBOX from your computer and power on. The unit will
then upgrade itself. It is very important that you do not
interrupt this process. When the process is done, the
player will shut off. Power on again to return to normal
operations.
To change startup picture
1. Click the Startup Picture button
2. Select the picture you want to import (Please
makes sure it is in black and white 160 X 160 pixels .bmp format)
3. Click OK
To rebuild your database
1. Click on “Rebuild Database”
*Note: Rebuilding the database will case all music file(s)
located in the My Collections box to be removed. You
should only rebuild the database if necessary, and as infrequently as possible.
19

Click on the My Collection tab to do the following:
- Easily manage or reorganize your music files
- Search for specific songs
- Create/remove/rename playlists
Music list 1
Music list 2
Click on the Sorting box to access the following functions:
- Click the TAG button to edit the ID3 Tag information, including title, album, artist and genre for
the selected song.
- Click the Delete button to delete the specified
song.
- Click the Add to Collection button to add your favourite song to your appointed folder listed in the
My Collection box.
- Click the Send to PC button to upload the selected
song to your computer
20

Click the Search For button to fill in title, artist or album to
search and then the desired songs will be shown in the
music list 1, next to sorting box.
*Note: you also can use “Conditional search” to search.
That is, Selecting“*” as the character can replace any other
ones while searching.
In the Sorting Box, each item only has one folder. However,
the item Artist might have multiple layers if the artist has
more than one Album.
Choose the item shown in the My Collections box
- Click the TAG button to edit the ID3 Tag information, including the title, album, artist, and genre
for the selected song.
- Click the Remove button to delete the selected
song from the music list
- Click the Add button to add a new playlist folder
- Click Delete button to remove a playlist folder
- Click the Rename button to change the folder
name
21

Playing & Organizing Music
The MP3 JUKEBOX allows you to create your own listening
experience by allowing you to categorize songs by Artist,
Album, Year, or Genre. You can also search songs by title
and compile playlists of your favourite songs.
Play Lists and List Manager
You can play individual songs from your predefined playlists, or play an entire playlist. Just select Play List and
choose the list you want to play.
To manage your list, select List Manager and add/delete
songs to each playlist.
22

Search Songs
You can search for songs by Title under the “Songs” submenu.
After locating the first character of the song, press OK.
Then use the Up/Down keys to find the desired song.
Press OK to play.
While playing a song, the MP3 JUKEBOX displays the following:
Utility
From the Now Playing menu, you can access the submenu
by pressing OK. This allows you to define segment repeat,
EQ, playback mode, or adjust playback speed.
23

Segment Repeat
To repeat a segment, press OK twice to define the starting
point in the song. Then press OK again to define the end
point. Press OK again to return to normal operations.
Equalizer Settings
To adjust the built-in Equalizer, press OK to enter the Utilities menu. You may choose from several preset Equalizer
settings, or define your own custom EQ. To define the
custom EQ, select Genre.
Press Up/Down to define each band and then FF/REW to
move to different frequency bands. Press MENU to return
to previous menu.
Playback Options
To change playback options, press OK to enter the Utility
menu. You can change the playback format to sequential,
repeat, repeat all, random, or random-repeat.
To change the playback speed, press OK to enter Utilities
menu. You can then change the speed by pressing OK. A
higher number represents a slower playback setting.
24

Playlists
With the MP3 JUKEBOX, you can import playlists using Audiophile (see Using Audiophile) or dynamically create playlists on
the go.
To select a playlist, simply choose Play My Music and then
select Play Lists.
To create, delete, edit, or rename a playlist on the player,
simply select List Manager.
25

Dragging and Dropping Music Files
With the MP3 JUKEBOX, you can import your entire music
library using Windows drag and drop functionality without
the need for any 3rd party software.
However, this method is not recommended for all users
because it prevents indexing songs by Artist, Album, etc.
You can import any number of folders to the MP3 JUKEBOX,
but the subdirectory is limited to 5 levels deep.
Recording Music and Voice
The MP3 JUKEBOX can be used to make voice recordings
and record music from a secondary source such as a CD
player or stereo.
Voice Recording
Your MP3 JUKEBOX comes equipped with a built-in microphone. To start, simply select Record and then Voice Recording.
26

Press OK to start the recording.
After selecting Do Record, you can pause and resume recording at any time. When you are done, press Stop Record. Press MENU to return to previous menu.
Line-in Recording (Encoding)
To record audio from external source, plug the supplied line-in
cable into both the MP3 JUKEBOX and the audio source (CD).
You can pause and resume recording at any time. When
you are done, press Stop Record. Press MENU to return to
previous menu.
*Note: In the Preferences menu, you can select the recording quality.
27

External Storage Device
The MP3 JUKEBOX can be used as an external storage
device for easily transporting or backing up important files.
First, connect the MP3 JUKEBOX to your PC’s USB port with
the supplied USB cable. Then click on the My Computer icon
and locate the new removable drive labeled as “ E “ or “ F “,
etc.
You can now drag and drop any file to or from the MP3
JUKEBOX.
*Note: If you are using windows 98SE and don’t see the
new icon, please remove Audiophile from your system and
reinstall the driver again.
While connected to the computer, the MP3 JUKEBOX’s
buttons are inactive. If you are using a notebook PC without A/C power, please plug the A/C adapter into the MP3
JUKEBOX to ensure the smoothest operations.
28

FAQ, TIPS AND TROUBLESHOOTING
1. What are the differences between MP3 and WMA?
¾ MP3 / WMA format files are both compressed
digital audio files, which consumers can listen to
with near CD quality. WMA format offer nearly
CD quality music in a smaller file size than
MP3.That mean you can increase the number of
music files in WMA format compared to MP3
format.
2. How to solve the compatibility issue between
Windows OS in English version and filename in nonEnglish.
¾ If the language versions between your Windows
OS and filename are different, you may get
some abnormal character display.
If the above happen under Win2000 or Win XP,
you need to adopt the following steps to solve
this problem.
Click My Computer/Control panel/Regional options to go into the Regional options setting.
Click the “General” tag and hit the “Set default…” button to choose language.
The Windows OS will pop up a “Select System
Locale” window. Click the drop-down list to select the language version which your filename is
made in and then press “OK” button to finish the
whole setting.
The windows OS will pop up “General window”
information box and just hit “yes” to pass it.
29

3. Why can’t the PC detect the player as a removal
device after connecting player to PC?
¾ Make sure you have turned the player on.
Make sure USB cable has been connected properly between PC and Player.
You have to install driver under Win98/ME.
4. How to upgrade firmware
¾ Open Audiophile.exe and then click the “F/W up-
date” button. Look up the folder in which your
firmware upgrade file is located, select and open
the specified file.
Once the update is complete, remove the MP3
JUKEBOX from the USB port and power on.
The firmware upgrade progress bar will show up,
and then show the progress status of firmware
upgrade.
The player will automatically power off when the
firmware upgrade is finished.
Restart the player to enjoy your music.
5. What operating systems work with the Player?
¾ The player support Win98SE/ME/2000/XP. It will
not work on Win95 or NT
6. Does the player support Mac OS?
¾ If you use the player as the removable drive, the
player will work well with Mac OS 9.04 or above.
If you play music with the player, please note
the following limits:
The audiophile, music management software,
can’t work with Mac system. Only under Mac OS
9.2 system, you can drag and drop your music
files from/to the MYMUSIC folder of the player.
30

7. Why can’t Audiophile recognize the player after I
format the player?
¾ After you finish formatting, be sure to turn the
player on, connect it to the PC and then click the
Audiophile.exe.
8. How to download music to the MP3 JUKEBOX?
¾ You can use Audiophile or just drag and drop
music file to the default folder, MY MUSIC, or
any folder you make under MY MUSIC directory.
9. What kind of files does the player support?
¾ If you use it as a removable device, it works like
any hard drive and you can store any files to it.
If you use it as a digital audio player, it supports
MP3, WMA, and OGG.
10. How to reset / The MP3 Jukebox does not respond to my commands.
¾ Please press the ’’Sel’’,’’Menu’’, and ‘’Play’’ but-
tons at the same time. Do not use unless the
player freezes.
11. Files that have been copied through my file
manager or my desktop , multimedia program (Musicmatch, Windows Media Player) can’t be found on
the MP3 Jukebox.
¾ Copy the files to the directory MY MUSIC. Re-
build the database afterwards. Only files copied
through AudioPhile are inserted into the database automatically.
31

12. In the MP3 Player, the files are not shown correctly:
¾ The MP3 Player does not display the name of
the file but its own coded information with an ID
tag. This information can be modified with special programs (not included).
Is Further Assistance Necessary?
If the suggestions listed above are not enough to resolve
the problem, then contact us. The following information will
help us to help you resolve your problem:
Configuration of the computer
Any additional peripherals you may have connected
Any messages that appear on the MP3 Player display
Any Windows programs that were being used when the prob-
lem arose
Solutions you have tried to resolve the problem
If you have a customer code, please have it ready before
you call.
32

Warranty
PLEASE READ THIS LIMITED WARRANTY CAREFULLY TO UNDERSTAND
YOUR RIGHTS AND OBLIGATIONS.
The sales receipt is considered valid proof of purchase and should be
kept in a safe place. This receipt will be required for receiving any
warranty service. This warranty is transferable. When transferring ownership to a third party, please provide the receipt and warranty information. Our company warrants to the end user that each product, including
related software, accessories, media and supplies, shall be free from
defects in materials and workmanship for thirty six months from date of
purchase. This warranty covers only those defects that arise as a result
of normal use of the product. This warranty does not cover any other
problems, including problems that arise as a result of improper maintenance or modification; software, accessories, media or supplies not
provided or supported by the supplier; or operation outside the manufacturer’s specifications.
Any part of this device repaired or exchanged by a valid service representative will be covered under the original warranty period. Back up all
programs and data before shipping this device for repair under the
warranty agreement. Do not leave any media in the disk drives. Products
shipped without accessories will be returned without accessories. Any
replacement product or component may be either new or like new,
provided that it’s functionality is at least equal to that of the product
being replaced.
Limitation of Warranty
To the extent allowed by local law, no other warranties are made with
respect to this personal computer or the warranty services by any person, including but not limited to our company and it’s suppliers. The
express warranty stated above is the only express warranty made to you
and is provided in lieu of all other express or implied warranties and
conditions (if any) including any created by any other documentation or
packaging. For additional warranty information, please refer to the
included warranty card.
Limits of Liability
To the extent allowed by local law, except for the obligations specifically
set forth in this warranty statement, in no event shall the company or its
third party suppliers be liable for direct, indirect, special, incidental, or
consequential damage, whether based on contract or any other legal
theory and whether advised of the possibility of such damages. This
includes loss or damage of personal data on your computer.
33

Local Law
This warranty statement gives you legal rights. You may also have other
rights that vary from jurisdiction to jurisdiction. To the extent this warranty
statement is inconsistent with local law, certain disclaimers and limitations of
this statement may not apply to the customer.
Making Copies of This Manual
This manual contains information protected by law. All rights are reserved. Copyright law prohibits duplicating this information in mechanical, electronic, or any other form, without the written approval of the
manufacturer.
© 2005, all rights reserved.
The copyright is kept c/o the company MEDION
Trademark:
®
MS-DOS
All the other trademarks are of the property of their respective owners.
and Windows® are Microsoft
®
.
®
registered trademarks.
Except the rights for making technical and aesthetic
modifications and any possible typing errors.
34
 Loading...