


41123_ProjectionClock_multilingual_DINA5.FH10 Fri Aug 06 10:44:19 2004 Seite 1
C M Y CM MY CY CMY K
Bedienungsanleitung
User's Guide
Mode d'Emploi
Handleiding
Instrucciones
Instruções
Istruzioni
Betjeningsvejledning
Bruksanvising
Bruksanvising
Käyttöohjeista
DGBFNLEPIDKSNFIN
3 4

41123_ProjectionClock_multilingual_DINA5.FH10 Fri Aug 06 10:44:19 2004 Seite 2
C M Y CM MY CY CMY K
ÜBERSICHT/OVERVIEW/VUE D'ENSEMBLE
1
10
2
3
4
5
6
11
12
13
14
15
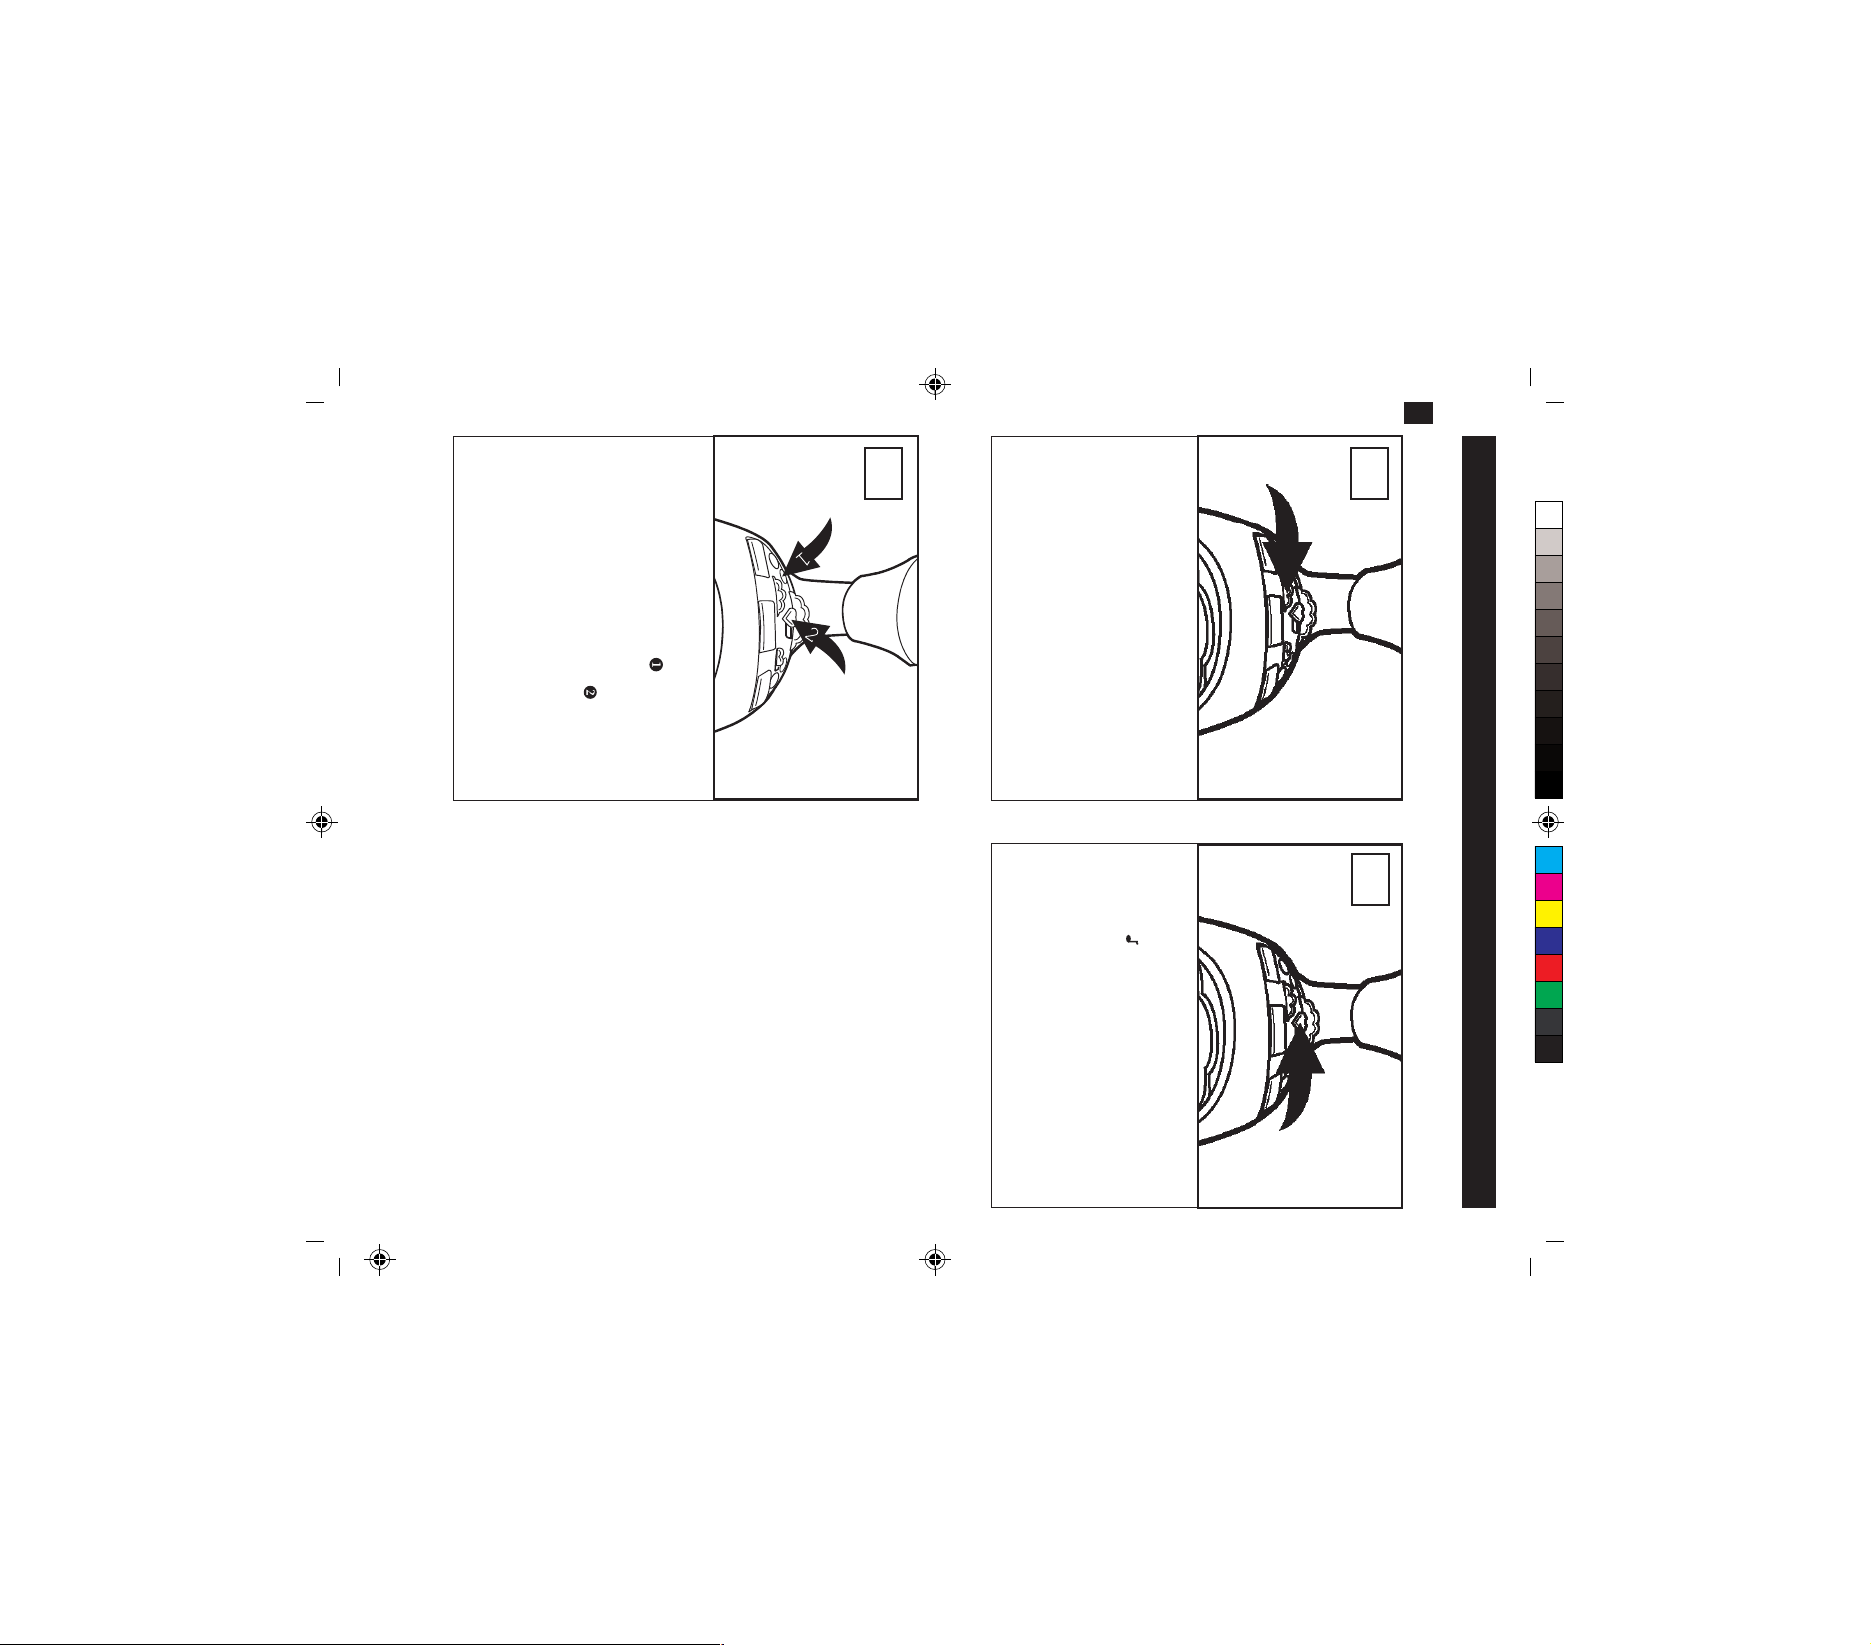
BEDIENELEMENTE
1. Sternenlicht
2. Drehregler für Sendersuche
3. ALARM SET: Weckzeit einstellen
4. TIME SET: Uhr stellen
5. SLEEP: Automatische Ausschaltung einstellen
6. VOLUME-Regler: Lautstärke einstellen
7. Display
8. Netzkabel (Rückseite)
9. Batteriefach (Geräteunterseite)
10. FUNCTION: Einstellen der Funktionen
11. Bandwahltaste AM/FM
12. HOUR: Stunde einstellen
13. MIN: Minuten einstellen
14. STERNENLICHT-Taste: ein- und ausschalten
15. SNOOZE: Weckunterbrechung
16. FM Wurfantenne (Rückseite)
7
8
9
16
A SLEEP-Anzeige
B SNOOZE-Anzeige
C Radiowecker-Anzeige
D Uhrzeit
E Disney-Klang-Anzeige
F Uhrzeit einstellen
G Radio-Anzeige
H AM/FM Anzeige
5
6

41123_ProjectionClock_multilingual_DINA5.FH10 Fri Aug 06 10:44:19 2004 Seite 3
- Das Spielzeug ist nicht für Kinder unter 3 Jahren vorgesehen.
- Das Spielzeug darf nur mit dem empfohlenen Transformator betrieben werden
- Der Transformator ist kein Spielzeug
- Spielzeuge, die üblicherweise mit Flüssigkeit gereinigt werden können, sind vor der Reinigung
vom Transformator zu trennen.
Leere Batterien gehören nicht in den Hausmüll.
Entsorgen Sie die Batterien gemäß der Bestimmungen Ihres Landes, z. B. bei einer
Sammelstelle für Altbatterien.
BATTERIEENTSORGUNG
Lassen Sie den Netzadapter zugänglich
Verbinden Sie den Netzadapter mit einer Steckdose (230 V ~ 50 Hz) in der Nähe des Geräts.
Falls das Gerät schnell vom Netz genommen werden muss, muss der Netzadapter leicht zugänglich
sein. Verwenden Sie keine Verlängerungskabel, um Stolperfallen zu vermeiden.
REPARIEREN SIE DAS GERÄT NICHT SELBST.
Versuchen Sie niemals, das Gerät zu öffnen oder zu reparieren. Es besteht die Gefahr
des elektrischen Schocks!
Wenden Sie sich im Störungsfall an unser Service Center oder eine geeignete
Fachwerkstatt.
LASSEN SIE KLEINE KINDER MIT ELEKTRISCHEN GERÄTEN NICHT OHNE AUFSICHT
Batterien/Akkus können bei Verschlucken lebensgefährlich sein. Bewahren Sie deshalb die
Batterien für Kleinkinder unerreichbar auf. Wurde eine Batterie verschluckt, muss sofort
medizinische Hilfe in Anspruch genommen werden.
Halten Sie auch die Plastik-Verpackungen von Kindern fern. Es besteht Erstickungsgefahr!
FOLGENDE UMWELTBEDINGUNGEN KÖNNEN DEM GERÄT SCHADEN:
- Feuchtigkeit und Nässe;
- direktes Sonnenlicht oder direkte Hitze (z. B. von Heizungen oder anderen Elektro-Geräten);
- dauerhafte Vibration;
- starker Staub oder mangelnde Belüftung.
Bewahren Sie die Bedienungsanleitung immer in Reichweite auf. Wenn Sie das Gerät
verkaufen oder weitergeben, händigen Sie unbedingt auch diese Anleitung aus.
ÜBER DIESE ANLEITUNG
Lesen Sie vor Inbetriebnahme die Sicherheitshinweise aufmerksam durch. Beachten
Sie die Warnungen auf dem Gerät und in der Bedienungsanleitung.
SICHERHEITSHINWEISE
7
C M Y CM MY CY CMY K
D
41123_ProjectionClock_multilingual_DINA5.FH10 Fri Aug 06 10:44:19 2004 Seite 4
- Verwenden Sie nur Batteriepaare desselben Typs.
- Mischen Sie keine alten und neuen Batterien.
- Wenn Sie das Gerät für längere Zeit nicht brauchen, nehmen Sie die Batterien heraus. Batterien
können auslaufen.
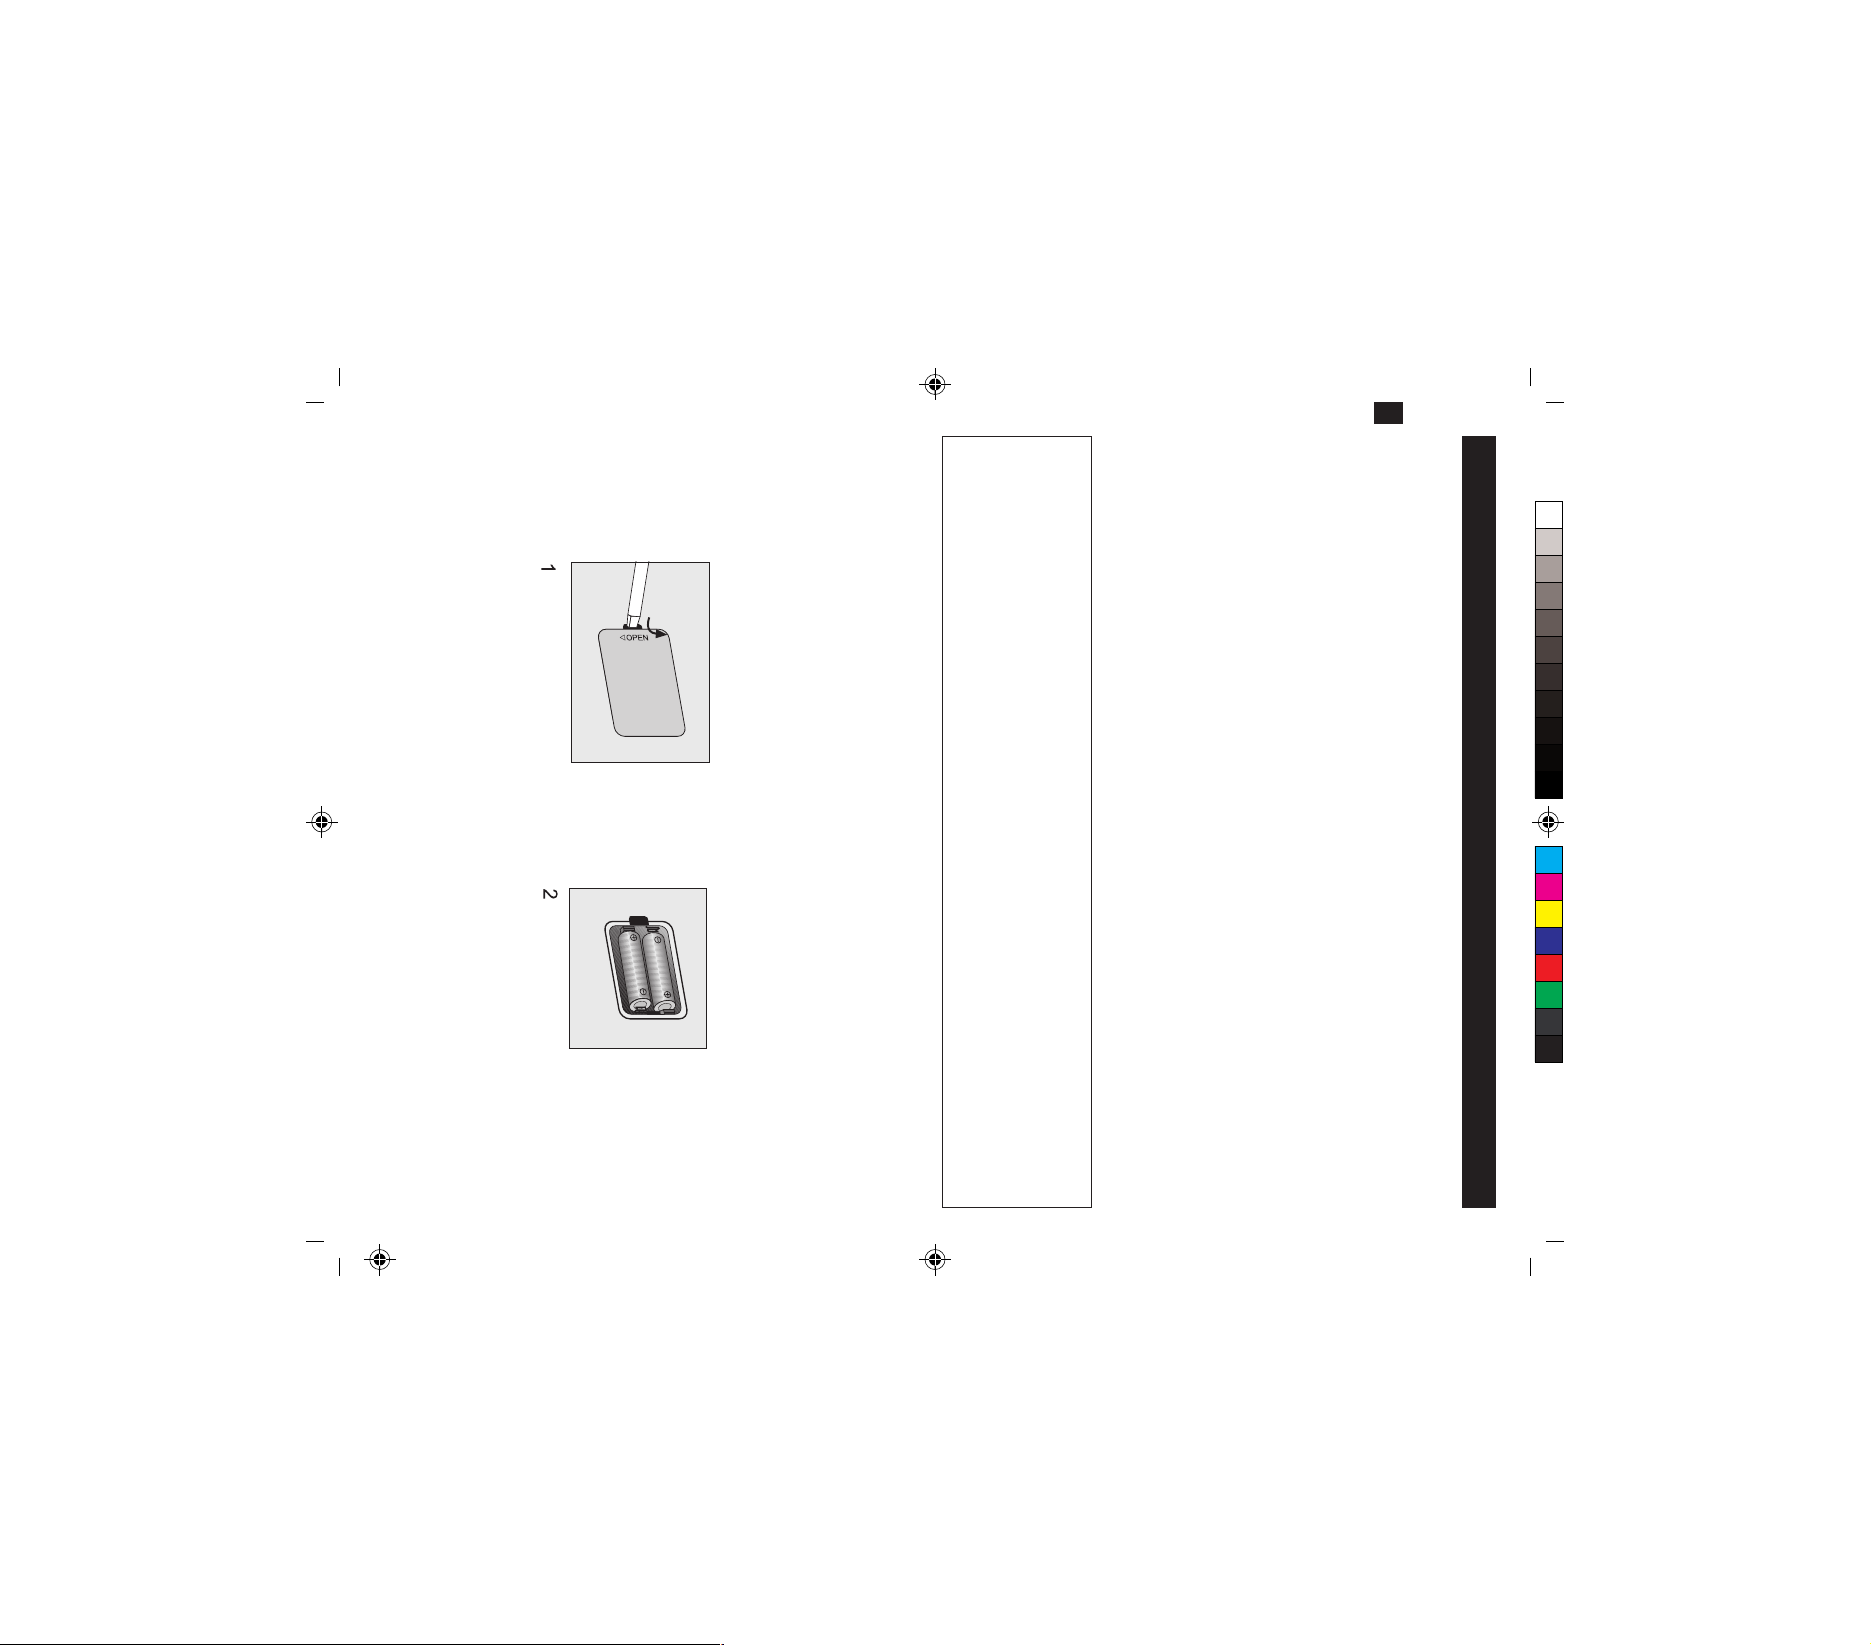
Schließen Sie das Batteriefach.
BATTERIEN EINLEGEN
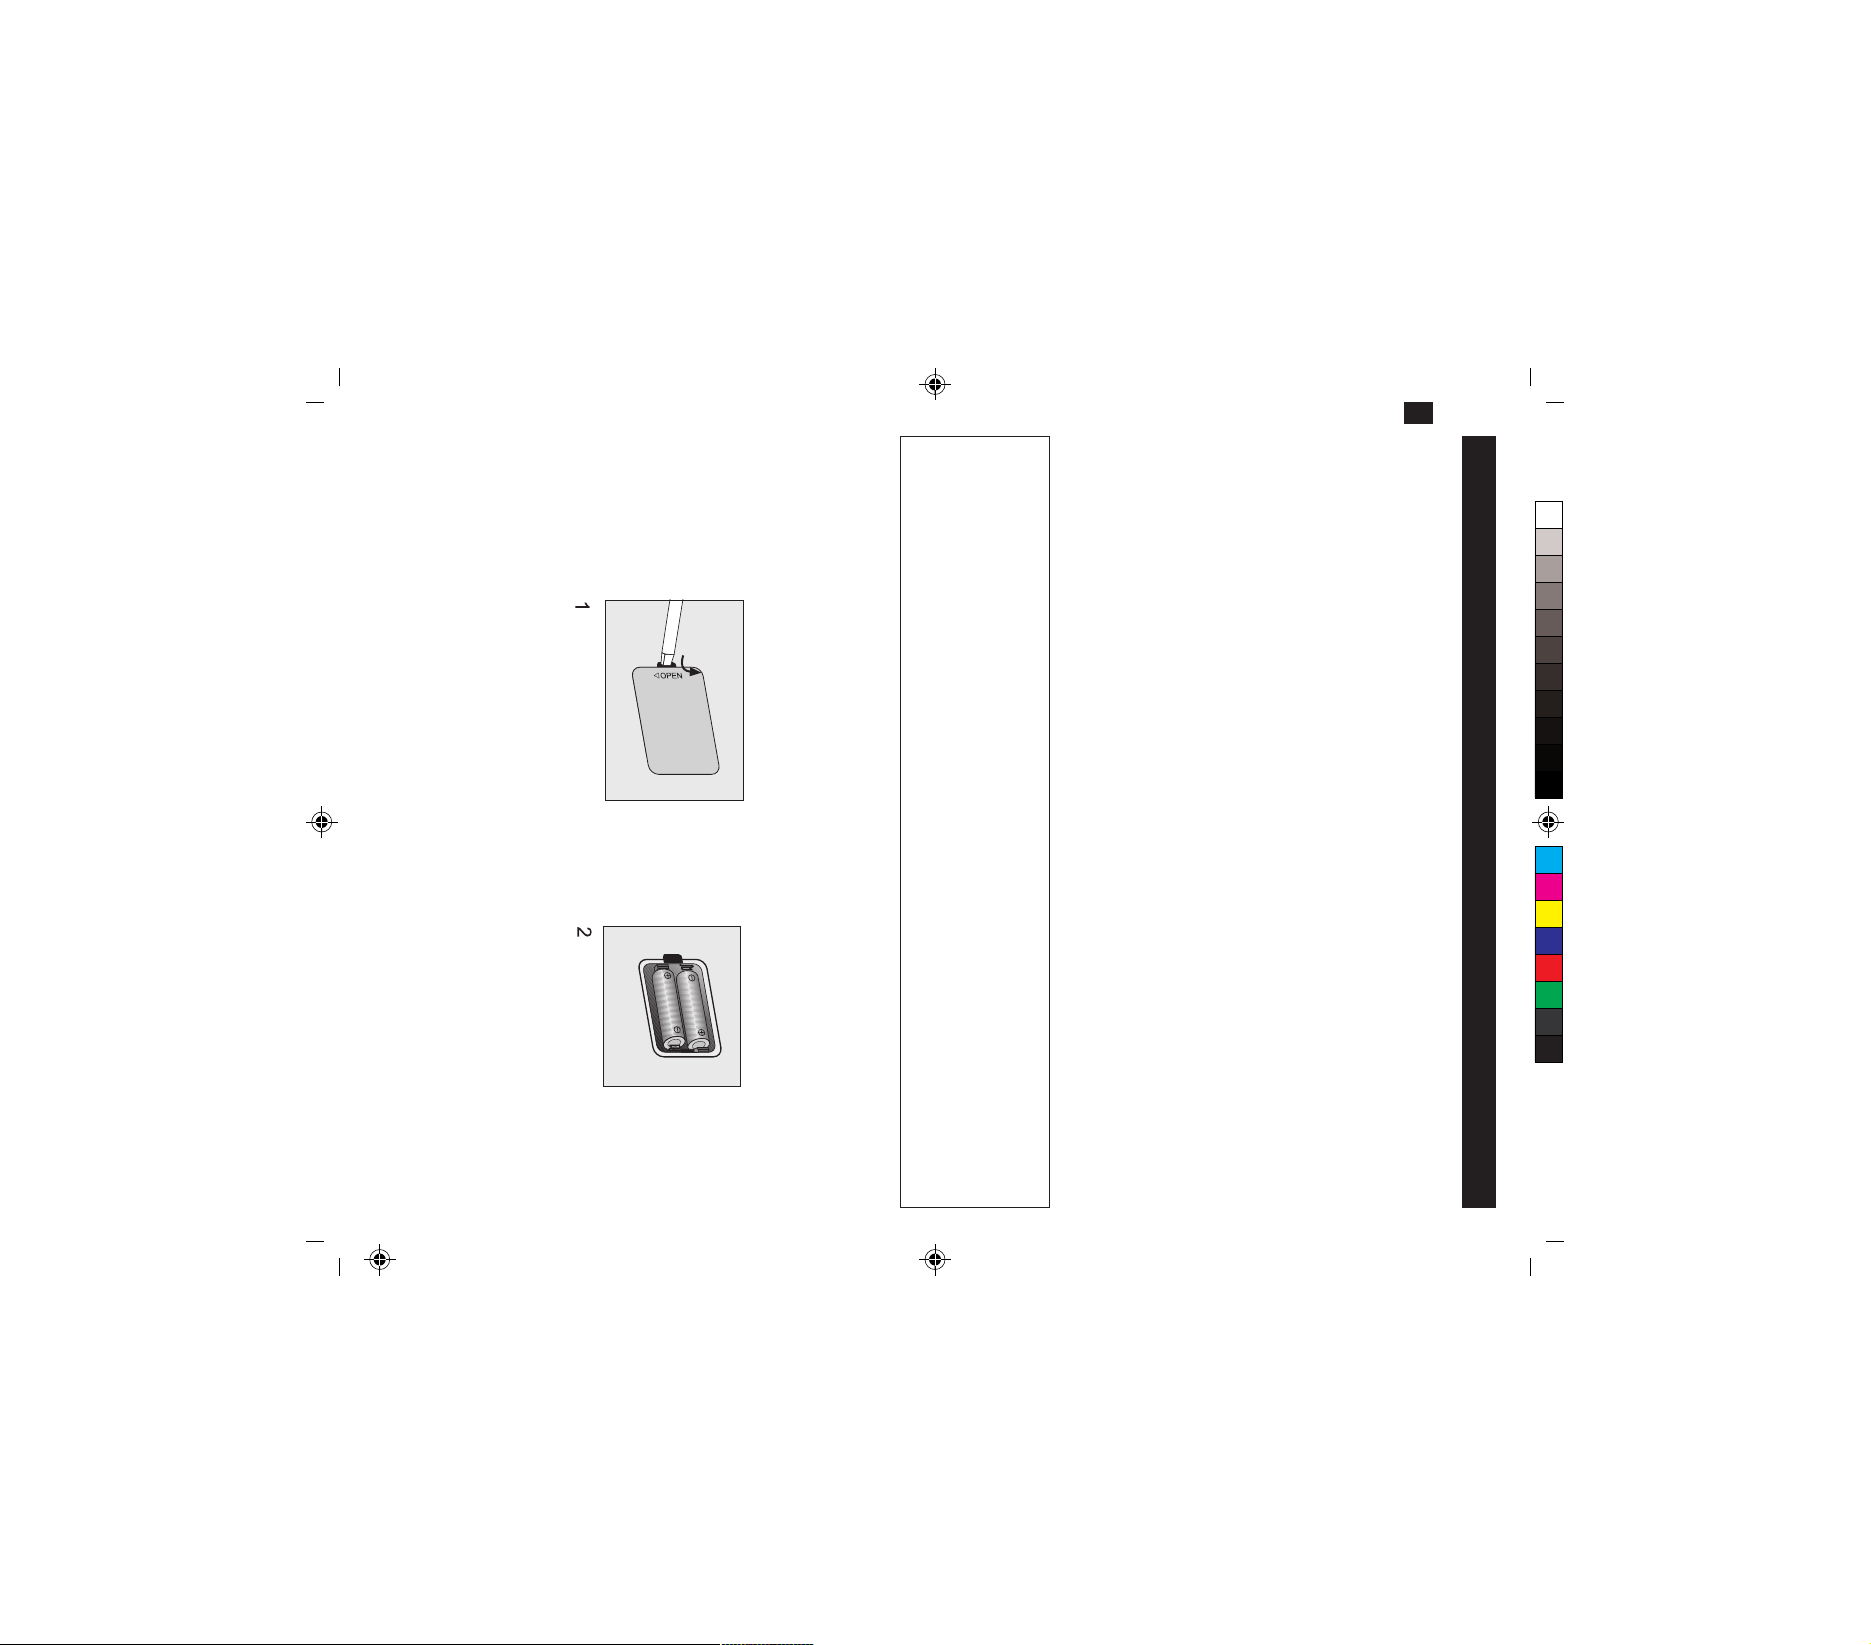
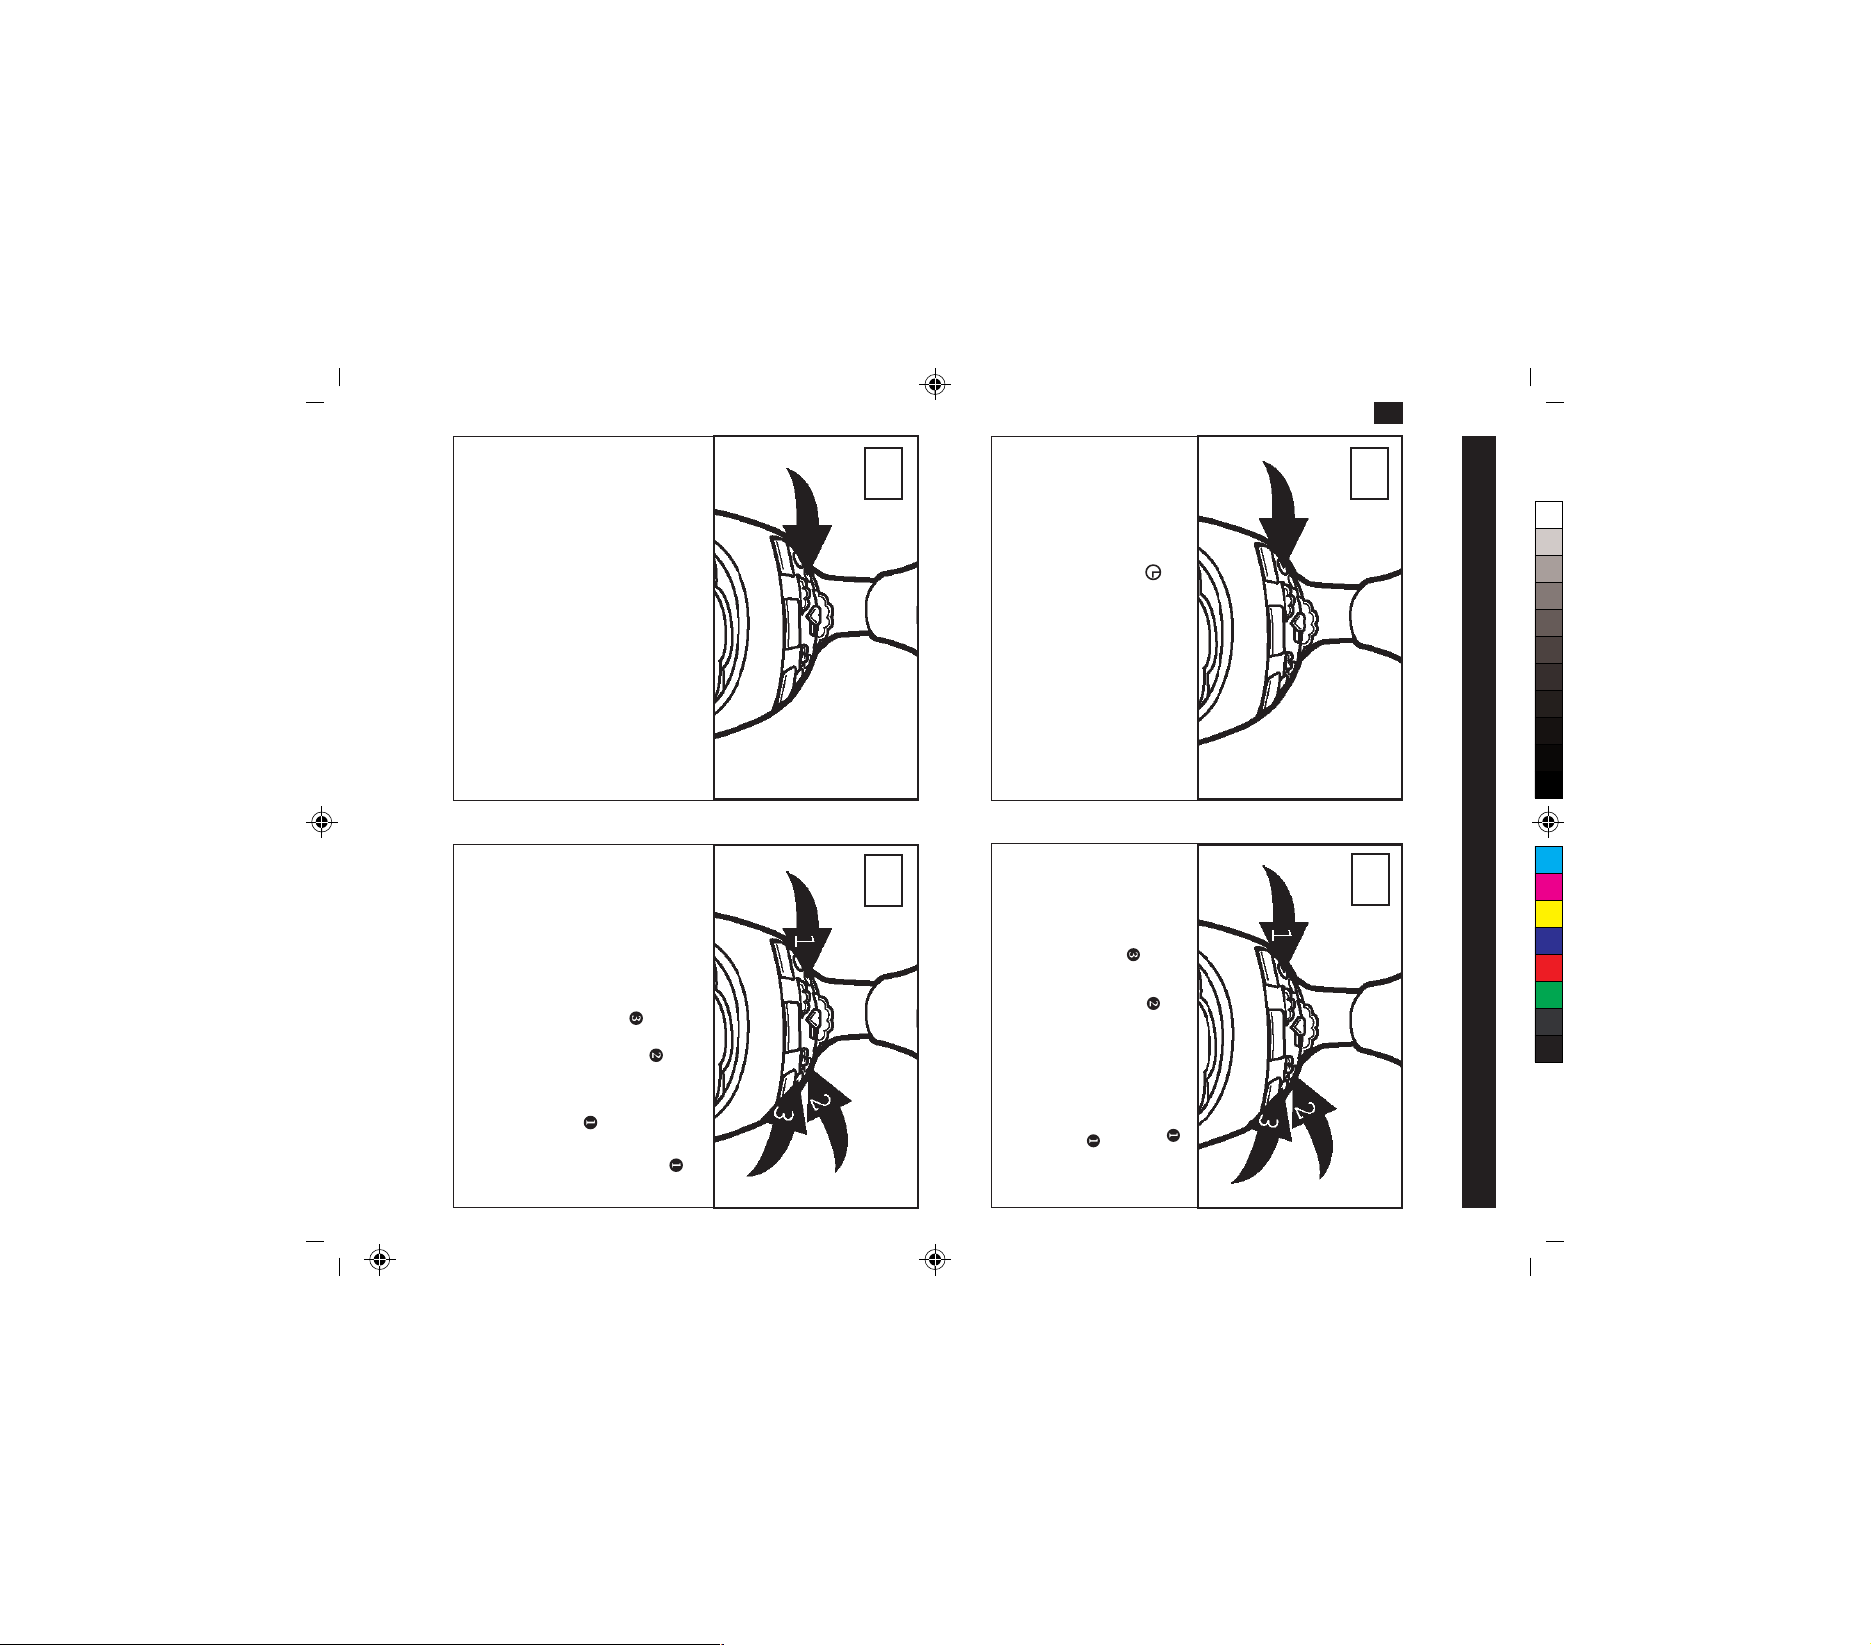
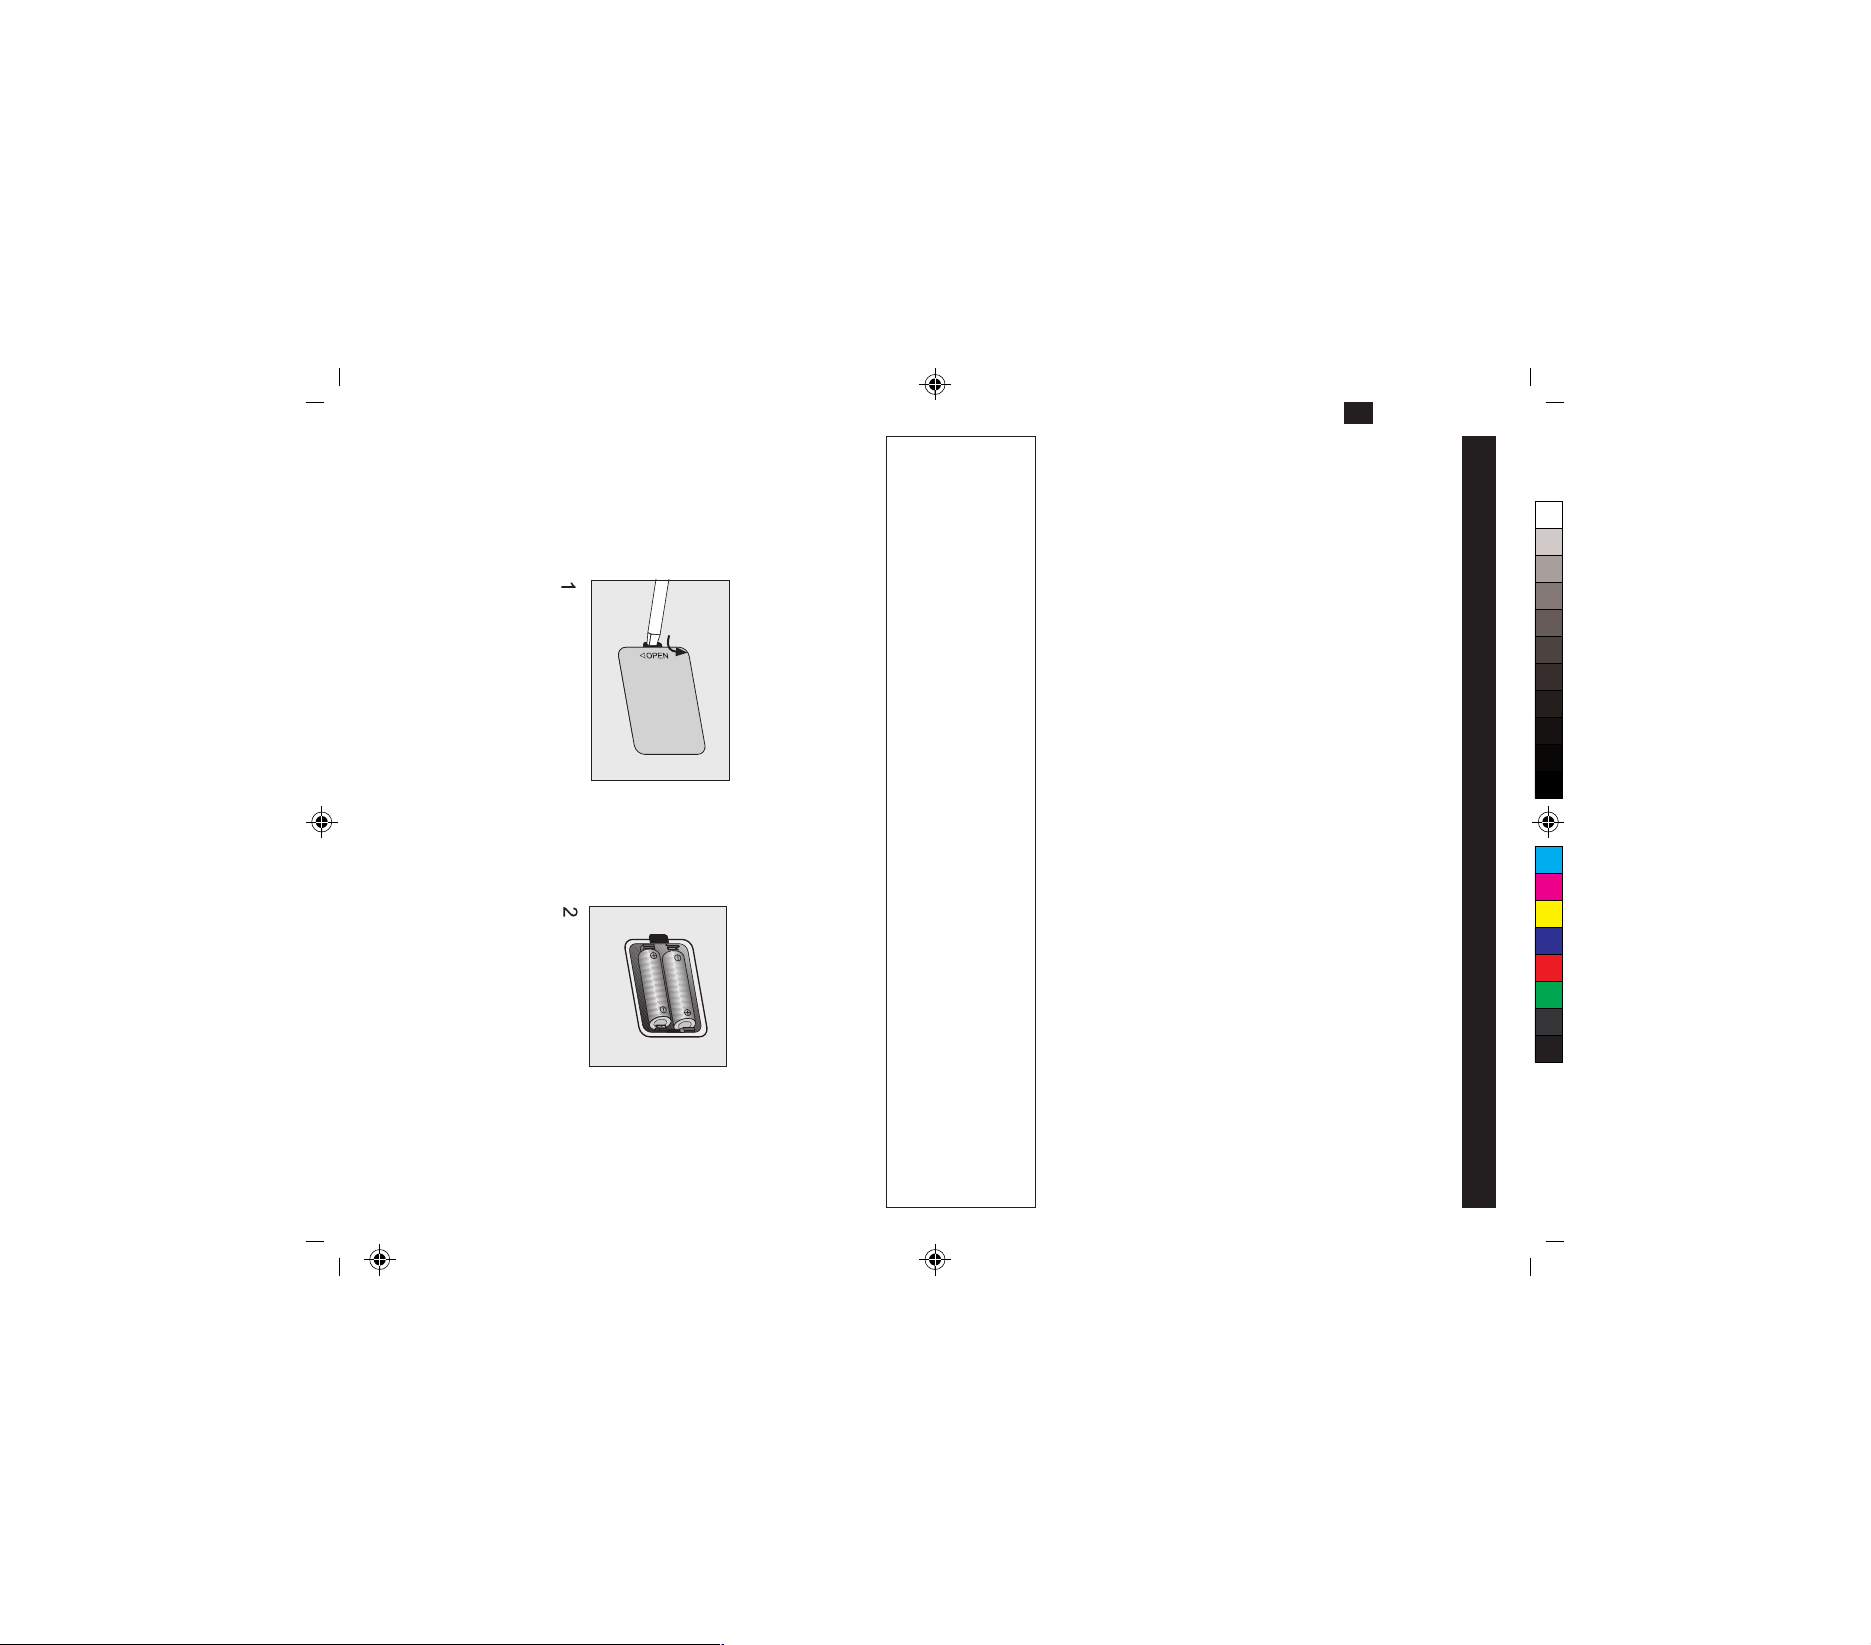
Nehmen Sie den Deckel des Batteriefachs auf der Geräteunterseite ab, indem Sie einen kleinen
Schraubendreher oder eine Büroklammer in die Vertiefung einsetzen und leicht drücken
(Abbildung 1).
Legen Sie 2 Batterien Typ AAA 1,5 V ein. Beachten Sie die Polarität, wie in Abbildung 2 und im
Batteriefach gezeigt.
D
NETZANSCHLUSS
Verbinden Sie den Stecker des mitgelieferten Netzadapters mit einer gut erreichbaren Steckdose
230 V ~ 50 Hz. Falls Batterien eingelegt sind, schalten sich diese beim Netzbetrieb automatisch
ab. Im Display blinkt nun die Anzeige "00:00" und die Hintergrundbeleuchtung ist eingeschaltet.
BACKUP-BATTERIE
Für den Fall, dass der Netzadapter aus der Steckdose gezogen wird oder es zu einem Stromausfall
kommt, wird diese Uhr mit zwei Batterien (Grösse AAA) versorgt. Die Uhr läuft im Batteriebetrieb
intern weiter, es wird jedoch keine Uhrzeit im Display angezeigt.
INBETRIEBNAHME
ACHTUNG!
8
C M Y CM MY CY CMY K
41123_ProjectionClock_multilingual_DINA5.FH10 Fri Aug 06 10:44:19 2004 Seite 5
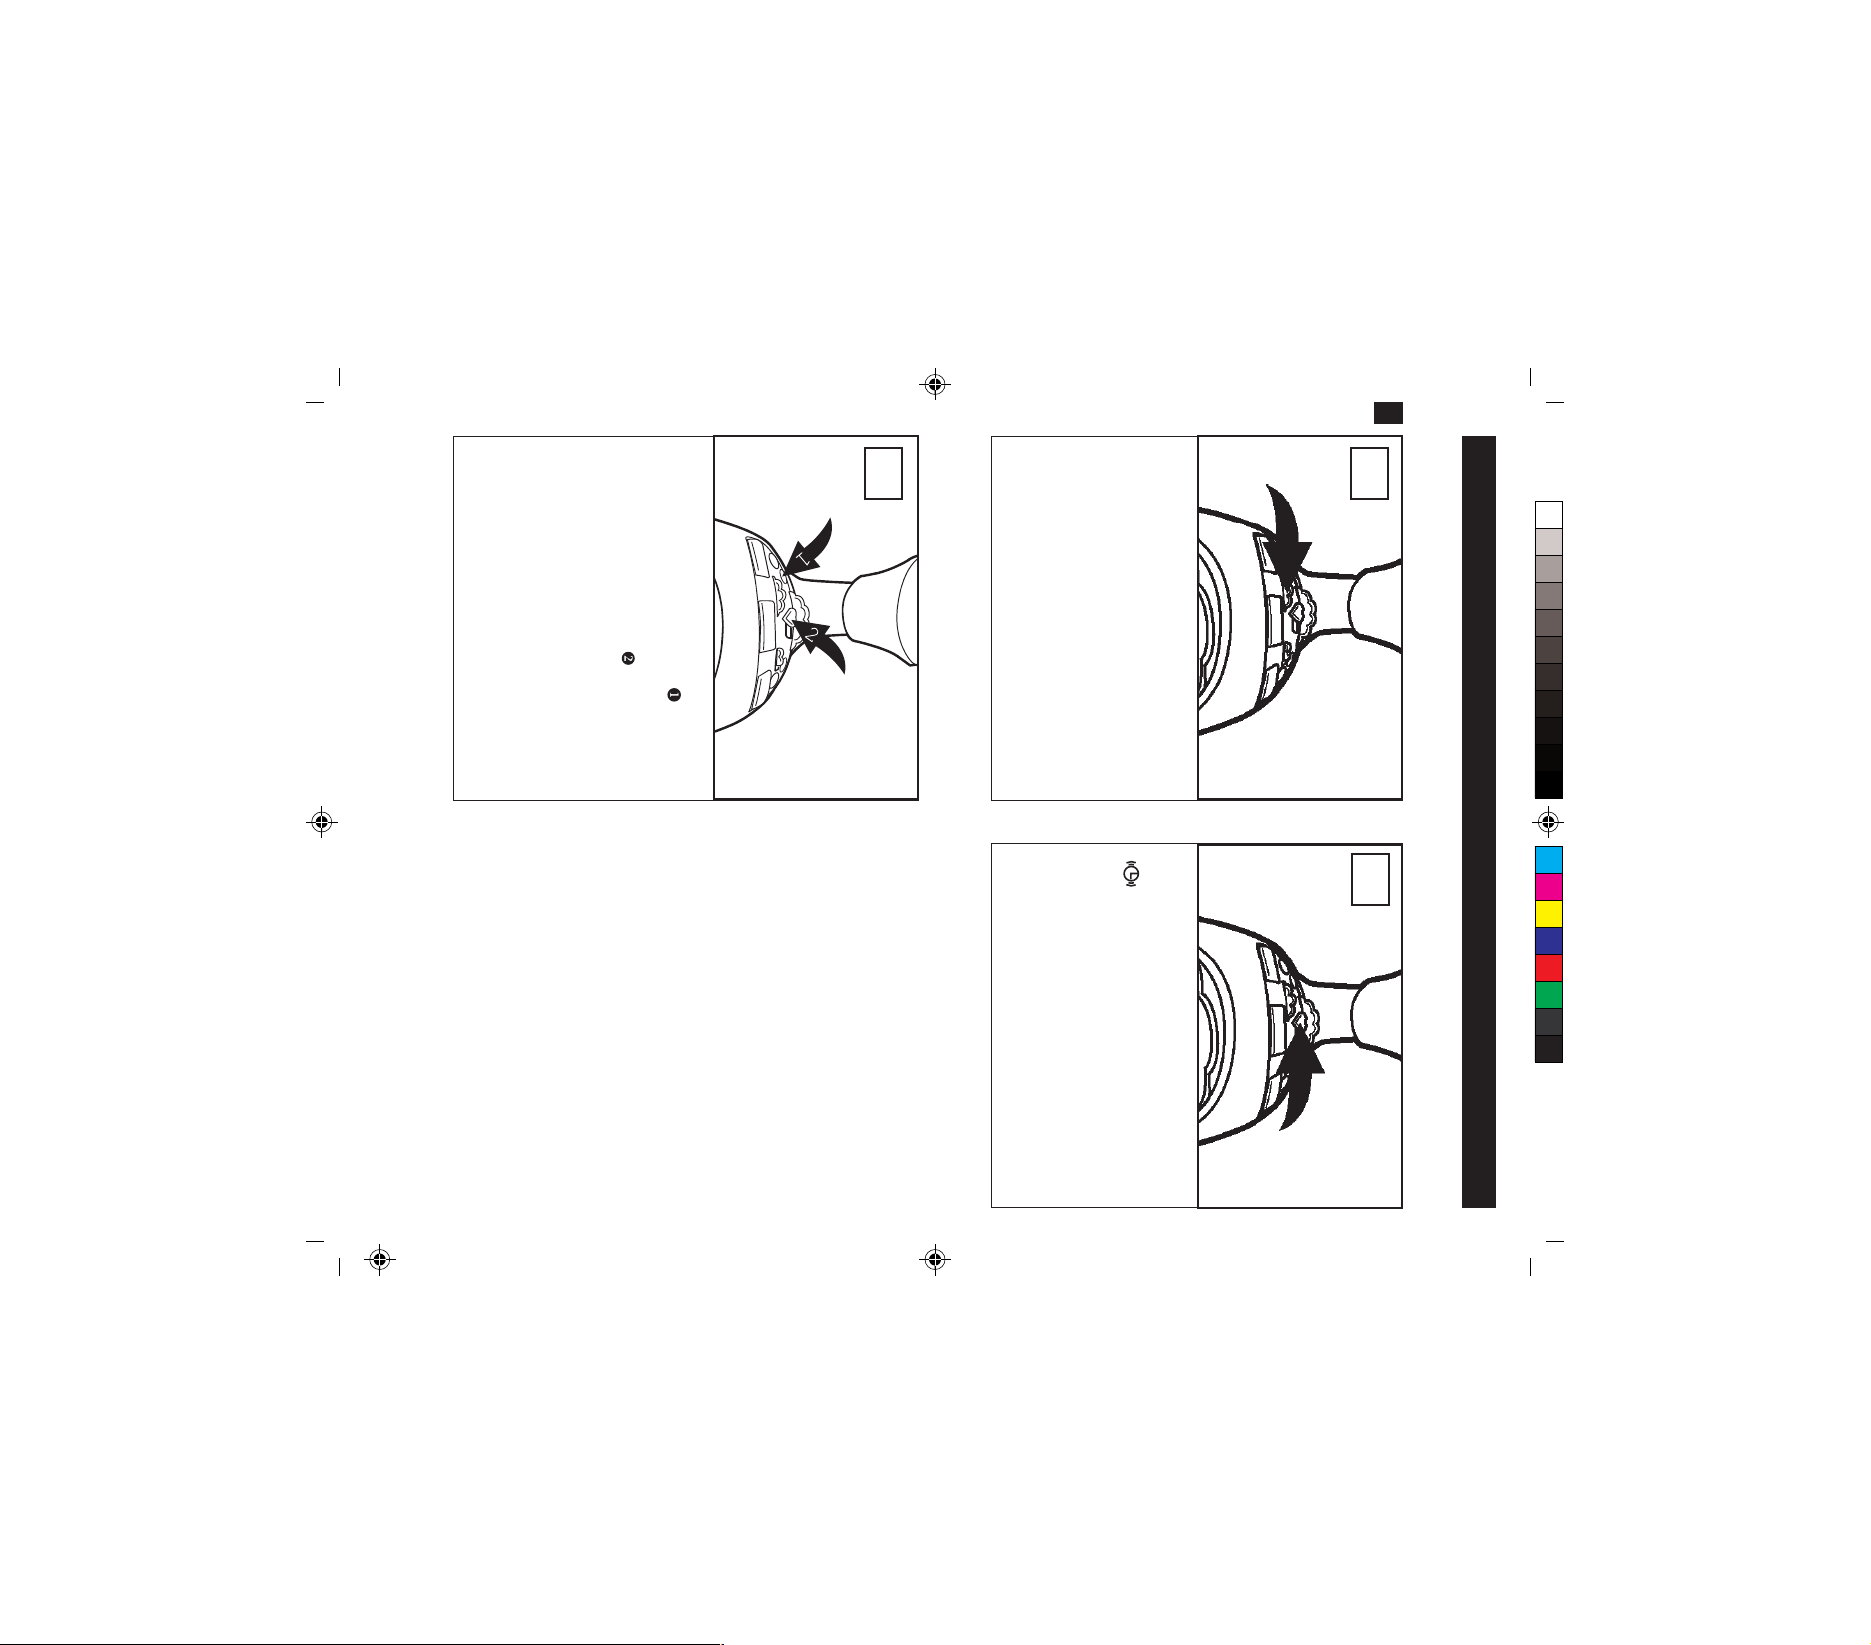
ANTENNEN:
FM: Ziehen Sie die Wurfantenne heraus und richten Sie sie für einen optimalen Empfang aus.
AM: Richten Sie ggf. das Gerät für den besten Empfang aus.
HINTERGRUNDBELEUCHTUNG
Die Hintergrundbeleuchtung ist immer eingeschaltet, wenn das Gerät über das Netzkabel an
den Strom angeschlossen ist.
Regeln Sie die Lautstärke mit dem
VOLUME-Regler u. Stellen Sie den
FUNCTION-Schalter
um das Gerät auszuschalten
in die Position OFF,
Stellen Sie den FUNCTION-Schalter u in
die Position ON, um die Projektionsuhr
einzuschalten; im Display leuchtet die
Bandanzeige für AM oder FM.
Wählen Sie mit der Radio-Bandwahltaste
v das gewünschte Frequenzband (AM oder
FM).
3 1
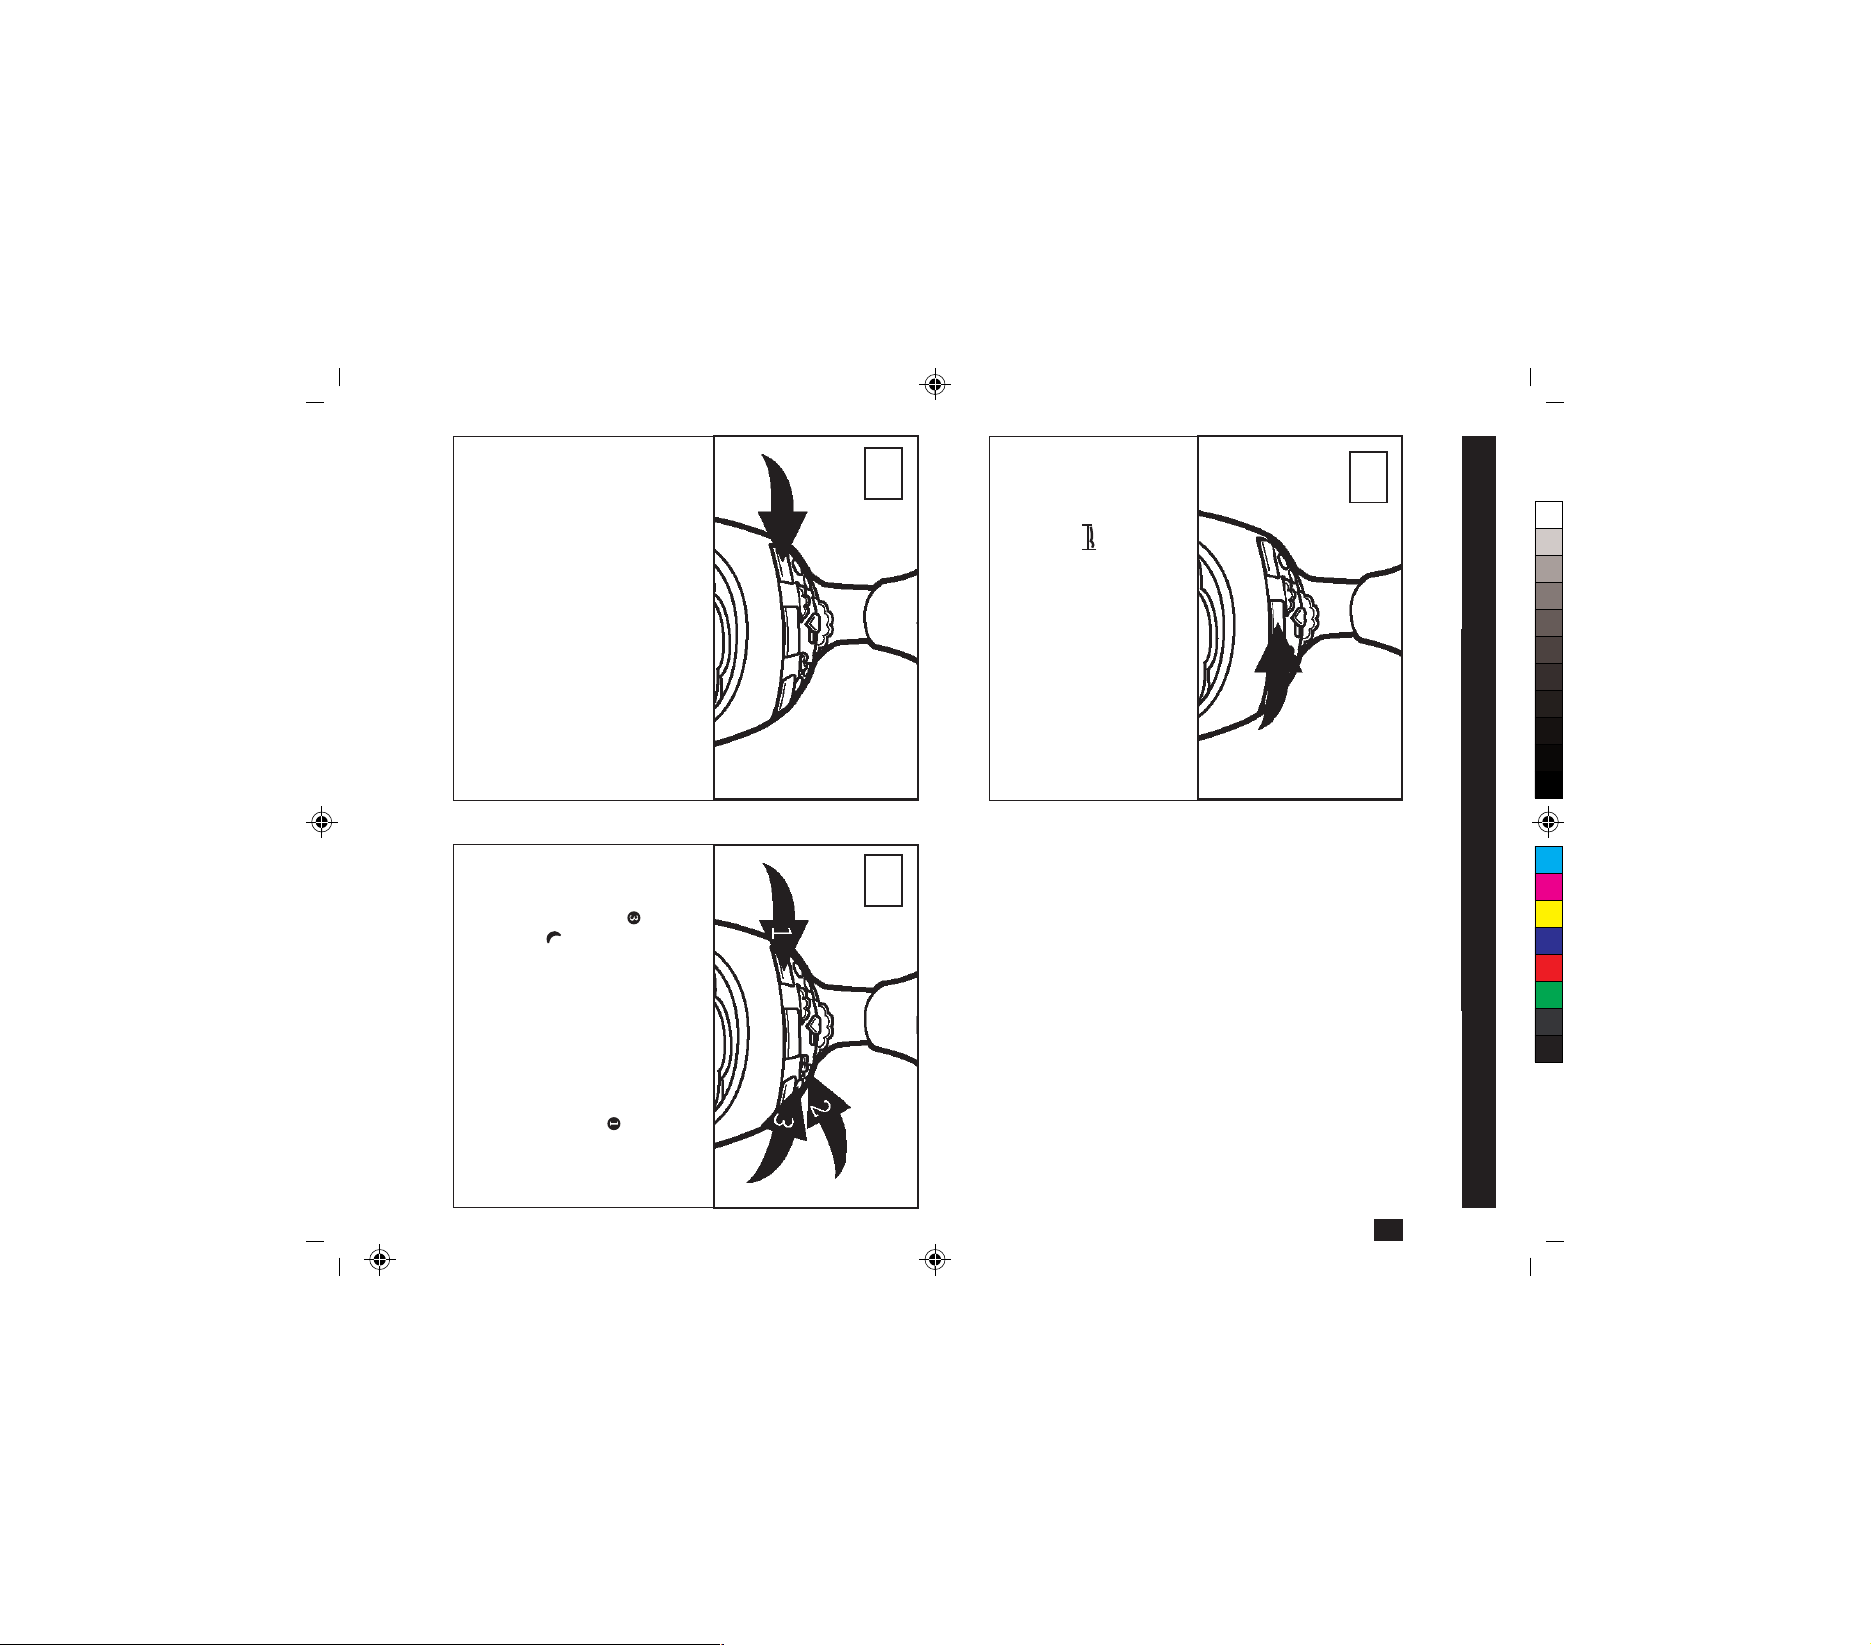
RADIO HÖREN
1
BETRIEB
9
Sternenbeleuchtung einzuschalten. Die
Turmspitze leuchtet nun abwechselnd
dunkel und hell.
Drücken Sie die Sternenlicht Taste erneut,
um die Beleuchtung wieder auszuschalten.
Drücken Sie die Sternenlicht-Taste, um die
STERNENLICHT EIN-/AUSSCHALTEN
Um einen Sender einzustellen, drehen Sie
den TUNING-Regler, bis Ihre gewünschte
Frequenz oben auf dem Rad zu sehen ist.
2
2
C M Y CM MY CY CMY K
D
10
Während sich der FUNCTION-Schalter in
der Position ON, AUTO oder BUZZ befindet,
drücken Sie die Taste ALARM SET. Die
Anzeige im Display blinkt.
HINWEIS: Sie können keine Weckzeit
einstellen, wenn der FUNCTION-Schalter
sich in der Position OFF befindet.
die Taste HOUR
Während Sie die Taste ALARM SET
gedrückt halten
einzustellen und die Taste MIN
Minuten Ihrer gewünschten Weckzeit
einzustellen.
Wenn Sie die Taste ALARM SET
loslassen, ist Ihre Weckzeit gespeichert.
D
DIE WECKZEIT EINSTELLEN
Anzeige blinken.
Halten Sie die Taste TIME SET gedrückt;
das Uhrzeit Symbol (
1 2
) und die Display
DIE UHRZEIT EINSTELLEN
1
41123_ProjectionClock_multilingual_DINA5.FH10 Fri Aug 06 10:44:19 2004 Seite 6
BETRIEB (FORTS.)
Während Sie die Taste TIME SET gedrückt
einzustellen. Wenn Sie die Taste TIME SET
4 Sekunden gespeichert. Im Display wird
die Uhrzeit angezeigt.
wieder loslassen, wird Ihre Uhrzeit nach
halten
HOUR
die Taste MIN
, um die Stunden einzustellen und
, drücken Sie mehrmals die Taste
2
2
C M Y CM MY CY CMY K
wieder
, drücken Sie mehrmals
, um die Stunden
, um die
, um die Minuten
41123_ProjectionClock_multilingual_DINA5.FH10 Fri Aug 06 10:44:19 2004 Seite 7
11
Um den Wecker auszuschalten, drücken
Sie die Taste ALARM SET
bleibt für den nächsten Tag aktiviert.
Um den Wecker ganz auszuschalten, stellen
Sie den FUNCTION-Schalter
. Der Wecker
auf OFF.
Stellen Sie die Weckzeit ein wie oben
beschrieben. Wählen Sie einen Radio-
sender aus wie oben beschrieben und
stellen Sie mit dem VOLUME-Regler die
gewünschte Lautstärke ein.
HINWEIS: Wenn Sie die Lautstärke auf das
Minimum einstellen, ertönt zur Weckzeit
kein Ton.
3
WECKEN DURCH RADIO EINSTELLEN
1
BETRIEB (FORTS.)
Stellen Sie den FUNCTION-Schalter auf
die Position AUTO. Die Anzeige für den
Radiowecker (
Uhrzeit die eingestellte Weckzeit erreicht,
schaltet sich das Radio für eine Stunde ein
und danach wieder ab.
) leuchtet. Wenn die
2
2
C M Y CM MY CY CMY K
D
Um den Wecker auszuschalten, drücken
Sie die Taste ALARM SET
bleibt für den nächsten Tag aktiviert.
Um den Wecker ganz auszuschalten, stellen
Sie den FUNCTION-Schalter
D
Stellen Sie die Weckzeit ein wie oben
beschrieben.
3
WECKEN DURCH DISNEY KLANG EINSTELLEN
1
41123_ProjectionClock_multilingual_DINA5.FH10 Fri Aug 06 10:44:19 2004 Seite 8
12
. Der Wecker
auf OFF.
Stellen Sie den FUNCTION-Schalter auf
die Position BUZZ. Die Anzeige für den
Summer (
eingestellte Weckzeit erreicht, schaltet sich
der Summer für eine Stunde ein und
danach wieder ab.
) leuchtet. Wenn die Uhrzeit die
2
2
BETRIEB (FORTS.)
C M Y CM MY CY CMY K

41123_ProjectionClock_multilingual_DINA5.FH10 Fri Aug 06 10:44:19 2004 Seite 9
HINWEIS: Um den Sleep Timer auszuschalten, schieben Sie den Schalter FUNCTION auf die
Position AUS.
13
Im Display blinkt die Anzeige "0:00".
Ihre Einstellung gespeichert. Das Gerät
schaltet sich nun für die eingestellte Dauer
ein. Im Display leuchtet die Zeit und das
Symbol für die SLEEP-Funktion
der gewünschten Betriebszeit einzustellen.
Wenn Sie die Taste SLEEP
Stellen Sie einen Radiosender ein. Stellen
Sie den Schalter FUNCTION auf die Position
AUTO und halten Sie die Sleep-Taste
gedrückt.
Während Sie die Taste SLEEP gedrückt
halten u, drücken Sie mehrmals die Taste
HOUR v, um die Stunden einzustellen
und/oder die Taste MIN
DIE SLEEP-FUNKTION EINSCHALTEN
Minuten wieder ein.
Wenn die Snooze Funktion eingeschaltet
ist, leuchtet im Display die Anzeige
1 2
Um den Wecker kurzzeitig auszuschalten,
drücken Sie die Taste SNOOZE.
Der Alarm schaltet sich nun nach acht
1
SNOOZE
BETRIEB (FORTS.)
.
C M Y CM MY CY CMY K
, um die Minuten
loslassen, wird
.
D

14
Sekundär: 230 V ~ 50 Hz 12 W
Technische Änderungen vorbehalten!
Radiofrequenz Mittelwelle 522 -1629kHz
Batterien (nicht mitgeliefert): 2 x 1,5 V, LR03/R03 (Alkaline empfohlen), Größe AAA
RADIO
Radiofrequenz UKW 87,5 108 MHZ
Primär: 9 V
700 mA
STROMVERSORGUNG
Netzadapter: AD-0970-VDS
TECHNISCHE DATEN
D
Ziehen Sie den Netzadapter vor der Reinigung ab!
Benutzen Sie für die Reinigung nur ein feuchtes, weiches Tuch. Verwenden Sie keine scharfen
Reinigungsmittel, weil diese die Oberfläche oder die Beschriftung des Geräts beschädigen können.
41123_ProjectionClock_multilingual_DINA5.FH10 Fri Aug 06 10:44:19 2004 Seite 10
REINIGUNG
C M Y CM MY CY CMY K

15
41123_ProjectionClock_multilingual_DINA5.FH10 Fri Aug 06 10:44:19 2004 Seite 11
C M Y CM MY CY CMY K
D

16
D Time
E Disney-Sound indicator
F Clock setting
G Radio
H AM/FM indicator
DISPLAY
A SLEEP indicator
B SNOOZE indicator
C Radio alarm indicator
14. Star Light button: Turn the Star Light on/off
15. SNOOZE: Turn off the alarm
16. FM Antenna wire (rear of unit)
7. Display
8. AC cord (rear of unit)
9. Battery compartment (bottom of unit)
10. FUNCTION switch: Set the modes
11. Band switch AM/FM
12. HOUR: Set the hours
13. MIN: Set the minutes
GB
1. Star Light
2. Tuning Control
3. ALARM SET: Set the alarm time
4. TIME SET: Set the clock
5. SLEEP: Set automatic turn off
6. VOLUME Control: Set the volume
41123_ProjectionClock_multilingual_DINA5.FH10 Fri Aug 06 10:44:19 2004 Seite 12
LOCATION OF CONTROLS
C M Y CM MY CY CMY K
41123_ProjectionClock_multilingual_DINA5.FH10 Fri Aug 06 10:44:19 2004 Seite 13
17
- The toy may only be operated using the recommended transformer.
- The transformer is not a toy.
- Toys that are usually cleaned using liquids must be separated from the transformer before
cleaning.
- The toy is not designed for children under three years of age.
BATTERY DISPOSAL
Empty alkaline and NiCd batteries do not belong in the household refuse. The batteries
must be disposed of at a designated disposal/recycle point.
MAKE SURE THAT THE UNIT IS NOT EXPOSED TO:
- humidity or moisture;
- direct sunlight or other direct heat (e. g. from radiators or other Stereo equipment);
- constant Vibration;
- strong dust or places without Ventilation.
ENSURE THAT THE POWER UNIT IS ACCESSIBLE
Connect the mains adapter to a power socket (230 V ~ 50 Hz) that is near to the device.
The mains adapter must be easily accessible in case the device has to be disconnected from
the mains power supply quickly. To avoid tripping hazards, please avoid using an extension cable.
DO NOT REPAIR THE UNIT YOURSELF.
In case the power supply cord or the unit is damaged, pull out the AC mains plug
immediately. Under no circumstances attempt to open or repair the unit yourself.
There is danger of electric shock! Refer all servicing to our Service Center or to another
qualifed workshop.
Swallowing batteries may be fatal. Therefore always keep batteries inaccessible to young children.
If a battery has been swallowed, consult a doctor immediately.
Also keep the plastic packaging away from children. There is danger of suffocation!
DO NOT LET YOUNG CHILDREN USE ELECTRICAL DEVICES UNATTENDED.
Always keep the instruction manual near at hand. If you seil or pass on the pro-duct,
make sure to include this manual together with the unit.
ABOUT THIS MANUAL
Please observe the following safety instructions carefully before putting the unit I
into Operation. Take note of the warnings on the unit and in this manual.
SAFETY PRECAUTIONS
C M Y CM MY CY CMY K
GB
- Do not mix different types of batteries together.
- If the device is not to be used for a long period of time, remove the batteries to prevent
damage or injury from possible battery leakage.
GB
CONNECTING THE UNIT TO THE MAINS
Only connect the mains adapter supplied to an easily accessible 230 V ~ 50 Hz power socket.
Batteries will disconnect automatical, if the AC cord is plugged in. Now in the display the digits
"00:00" are flashing and the background illumination is on.
BACKUP-BATTERY
If the mains adapter is pulled from the power socket or there is a power failure this clock runs on
two batteries (AAA size).
TO INSTALL THE BATTERIES
Remove the battery compartment door by inserting a small screwdriver, paper clip or similar item
into the tab while gently pushing to remove.
Insert two batteries (size AAA/1,5 V) into the battery compartment. Be sure to observe the polarity
markings which are engraved inside the battery compartment. If the batteries are inserted
- Use only the size and type of batteries specified.
incorrectly, the unit will not operate. Replace the battery compartment door.
41123_ProjectionClock_multilingual_DINA5.FH10 Fri Aug 06 10:44:19 2004 Seite 14
INSTALLATION
18
CAUTION !
C M Y CM MY CY CMY K
41123_ProjectionClock_multilingual_DINA5.FH10 Fri Aug 06 10:44:19 2004 Seite 15
19
ANTENNAS:
FM: Extend the FM antenna wire for best reception.
AM: Turn the unit for better AM reception.
Backlight:
The display`s blacklight will always be on when the unit is plugged in.
OFF position to turn the unit off.
Adjust the volume using the volume
controlu. Slide the function switch
3 1
to the
To turn the star light on, press the star light
button; the star light will then light from dim
to bright repeatedly on the castle top.To
turn the star light off, press the star light
button again.
TURNING THE STAR LIGHT ON/OFF
Slide the function switch uto the ON
position to turn the unit on; the AM or FM
indicator will light. Slide the Band switch
vto select AM or FM.
1
Tune a station by rotating the Tuning control
until the desired frequency is shown at the
top of the dial.
2
2
TO LISTEN TO THE RADIO
OPERATION
C M Y CM MY CY CMY K
GB
20
With the function switch in the ON, AUTO
or BUZZ position, press and hold the
ALARM SET button; the display will blink.
NOTE: You cannot set the alarm time when
the function switch is set to the OFF
position.
GB
TO SET OR RESET THE ALARM TIME
1 2
Press and hold the TIME SET button; the
time indicator(
1
) and the display will blink.
TO SET OR RESET THE ACTUAL TIME
41123_ProjectionClock_multilingual_DINA5.FH10 Fri Aug 06 10:44:19 2004 Seite 16
OPERATION(CONTINUED)
the alarm time.
Release the ALARM SET button
and/or MIN button
While holding the ALARM SET button
seconds, the alarm time will be set and the
display will show the actual time again.
;after 4
press the HOUR button
, to set the minute of
, to set the hour
,
the display will show the actual time again.
; after
While holding the TIME SET button , press
, to set the minute of the time.
, to set the hour and/or
the HOUR button
MIN button
Make sure the appropriate AM/PM indicator
is lit. Release the TIME SET button
4 seconds, the alarm time will be set and
2
2
C M Y CM MY CY CMY K
21
Press the ALARM SET button
the alarm and set it again for the next day.
Slide the function switch
position to turn off the alarm and not set
for the next day.
See page 23 for the Snooze feature.
to the OFF
to turn off
GB
Set the alarm time as previously instructed.
Select a radio station as described on page
19 and make sure the VOLUME control is
set as desired.
NOTE: If the volume is set to Minimum,
there will be no sound when the alarm time
is reached.
3
TO SET THE ALARM TIME TO WAKE TO RADIO
1
41123_ProjectionClock_multilingual_DINA5.FH10 Fri Aug 06 10:44:19 2004 Seite 17
OPERATION (CONTINUED)
Slide the function switch to the AUTO
position and the radio alarm indicator
(
the selected preset alarm time, the radio
will automatically turn on for nearly one
hour then turn off again.
)will light. When the actual time matches
2
2
C M Y CM MY CY CMY K

22
the alarm and set it again for the next day.
Slide the function switch
position to turn off the alarm and not set
for the next day.
See page 23 for the Snooze feature.
to the OFF
GB
Press the ALARM SET button to turn off
3
Set the alarm time as previously instructed. Slide the function switch to the BUZZ
1
TO SET THE ALARM TIME TO WAKE TO DISNEY SOUND
41123_ProjectionClock_multilingual_DINA5.FH10 Fri Aug 06 10:44:19 2004 Seite 18
OPERATION (CONTINUED)
position and the Buzzer alarm indicator (
lwill light. When the actual time matches
the selected preset alarm time, the buzzer
will automatically turn on for nearly one
hour then turn off again.
2
2
C M Y CM MY CY CMY K
)
41123_ProjectionClock_multilingual_DINA5.FH10 Fri Aug 06 10:44:19 2004 Seite 19
23
NOTE: To cancel sleep timer, slide the function switch to the off position.
Select a radio station as desired on page
18. With the function switch set to the AUTO
position, press and hold the Sleep button
("0:00" will blink on the clock display).
While holding the sleep button u, press the
HOUR buttonv, to set the hour and/or MIN
button
time. Release the sleep function
time will be set. The unit will then turn on
for the selected amount of time. The sleep
indicator
the actual time will appear in the display
again..
will appear in the display and
, to set minute of the desired sleep
TO ACTIVATE THE SLEEP FUNCTION
1 2
activated.
indicator(
) will light when Snooze is
The alarm can be temporarily turnde off
manually by pressing the Snooze button;
the alarm will turn backl on automatically
eight minutes later. The snooze
SNOOZE
1
OPERATION (CONTINUED)
C M Y CM MY CY CMY K
and the
GB

24
Subject to technical changes !
Radiofrequency AM 522 -1629kHz
Batteries (not supplied): 2 x 1,5 V, LR03/R03 (Alkaline recommended), Size AAA
RADIO
Radiofrequency FM 87,5 108 MHZ
Primary: 9 V
700 mA
POWER REQUIREMENTS
Mains adapter:
Secondary: 230 V ~ 50 Hz 12 W
GB
Disconnect the mains adapter before cleaning!
To clean the unit, only use a moistened, soft cloth. Do not apply chemical solvents or cleaning
agents, as they may damage the surface and/or labelling of the unit.
SPECIFICATIONS
CLEANING
41123_ProjectionClock_multilingual_DINA5.FH10 Fri Aug 06 10:44:19 2004 Seite 20
C M Y CM MY CY CMY K

25
41123_ProjectionClock_multilingual_DINA5.FH10 Fri Aug 06 10:44:19 2004 Seite 21
C M Y CM MY CY CMY K
GB

26
D Heure
E Symbole mélodie Disney
F Réglage de l'heure
G Symbole radio
H Symbole AM/FM
DISPLAY
A Symbole SLEEP
B Symbole SNOOZE
C Symbole radio-réveil
6. Bouton VOLUME : réglage du volume
7. Affichage
8. Câble d'alimentation secteur (au dos)
9. Compartiment à piles (sous l'appareil)
10. FUNCTION : réglage des fonctions
11. Sélection de la gamme d'onde AM/FM
12. HOUR : réglage des heures
13. MIN : réglage des minutes
14. Touche ÉTOILES : pour allumer et éteindre la lumière étoilée
15. SNOOZE : interruption de la sonnerie
16. Antenne-fil FM (au dos)
F
1. Lumière étoilée
2. Bouton rotatif de recherche des stations
3. ALARM SET : réglage de l'heure de réveil
4. TIME SET : réglage de l'heure
5. SLEEP : réglage de l'extinction automatique
41123_ProjectionClock_multilingual_DINA5.FH10 Fri Aug 06 10:44:19 2004 Seite 22
BEDIENELEMENTE
C M Y CM MY CY CMY K
41123_ProjectionClock_multilingual_DINA5.FH10 Fri Aug 06 10:44:19 2004 Seite 23
27
- Ce jouet ne convient pas aux enfants de moins de 3 ans.
- Ce jouet doit être utilisé uniquement avec le transformateur recommandé.
- Le transformateur n'est pas un jouet.
- Avant de procéder au nettoyage, le transformateur doit être séparé des jouets pouvant être
généralement nettoyés avec un liquide.
en les déposant dans une borne de collecte de piles usagées.
ÉLIMINATION DES PILES
Les piles usées ne doivent pas être placées dans les ordures ménagères.
Éliminez-les conformément à la législation en vigueur dans votre pays, par exemple
NE RÉPAREZ PAS L'APPAREIL VOUS-MÊME.
N'essayez jamais d'ouvrir ou de réparer l'appareil et la ligne de raccordement. Risque
de choc électrique !
En cas de problème, adressez-vous à notre centre de service après-vente ou à un
atelier spécialisé.
LAISSEZ L'ADAPTATEUR SECTEUR ACCESSIBLE.
Reliez l'adaptateur secteur à une prise de courant (230 V ~ 50 Hz) à proximité de l'appareil.
L'adaptateur secteur doit être facile d'accès dans le cas où l'appareil devrait être débranché
rapidement du secteur. N'utilisez pas de rallonge afin d'éviter tout risque de trébuchement.
- humidité ;
- exposition directe aux rayons du soleil ou à une source de chaleur (par ex. chauffage ou autres
appareils électriques) ;
- vibrations continues ;
- poussière importante ou mauvaise aération.
LES CONDITIONS EXTÉRIEURES SUIVANTES PEUVENT ENDOMMAGER L'APPAREIL :
s'étouffer.
Conservez également les emballages en plastique hors de portée des enfants. Ils pourraient
NE LAISSEZ PAS LES JEUNES ENFANTS JOUER AVEC DES APPAREILS ÉLECTRIQUES
SANS SURVEILLANCE.
Les piles/accus peuvent présenter un risque mortel en cas d'ingestion. Conservez toujours les
piles hors de portée des jeunes enfants. Si quelqu'un avale une pile, consultez immédiatement
un médecin.
d'emploi.
Conservez le mode d'emploi à un endroit accessible. Lorsque vous vendez ou donnez
l'appareil, pensez à remettre également ce mode d'emploi.
À PROPOS DE CE MODE D'EMPLOI
Avant de mettre en service l'appareil, lisez soigneusement les consignes de sécurité.
Tenez compte des mises en garde qui se trouvent sur l'appareil et dans le mode
CONSIGNES DE SÉCURITÉ
C M Y CM MY CY CMY K
F
- Utilisez toujours des piles du même type.
- Ne mélangez pas des piles neuves et des piles usagées.
- Si vous ne vous servez pas de l'appareil durant une période prolongée, retirez les piles. Elles
risqueraient de couler.
Refermez le compartiment à piles.
La mention « 00:00 » clignote dans l'affichage et l'éclairage du fonds est allumé.
PILES DE SECOURS
La montre est alimentée par deux piles (taille AAA) en prévention d'un débranchement de
l'adaptateur secteur de la prise de courant ou d'une éventuelle panne de secteur. Lorsque le réveil
fonctionne sur piles, l'heure continue à avancer, mais elle ne s'affiche pas.
INSERTION DES PILES
Retirez le couvercle du compartiment à piles sous l'appareil en insérant un petit tournevis ou un
trombone dans le creux et en appuyant légèrement (figure 1).
Insérez 2 piles de type AAA 1,5 V. Faites attention aux indications de polarité figurant sur l'illustration
2 et dans le compartiment à piles.
F
RACCORDEMENT SECTEUR
Reliez la fiche de l'adaptateur secteur fourni à une prise 230 V ~ 50 Hz facile d'accès. Si vous avez
inséré des piles dans l'appareil, elles sont désactivées dès que l'appareil est utilisé sur secteur.
41123_ProjectionClock_multilingual_DINA5.FH10 Fri Aug 06 10:44:19 2004 Seite 24
MISE EN SERVICE
28
ATTENTION !
C M Y CM MY CY CMY K

41123_ProjectionClock_multilingual_DINA5.FH10 Fri Aug 06 10:44:19 2004 Seite 25
29
ANTENNES :
FM : sortez l'antenne-fil complètement et orientez-la pour avoir une qualité de réception
optimale.
AM : si la réception est mauvaise, changez l'orientation de l'appareil.
ECLAIRAGE DU FONDS
L'éclairage du fonds est toujours allumé lorsque l'appareil est relié au secteur.
position OFF.
sombre et claire.
Appuyez à nouveau sur la touche pour
éteindre l'éclairage.
Réglez le volume à l'aide du bouton
VOLUME u. Pour éteindre l'appareil,
amenez l'interrupteur FUNCTION
en
Appuyez sur la touche ÉTOILES pour
allumer la lumière étoilée. La pointe de la
tour brille alternativement d'une lumière
3
fréquence de votre choix (AM ou FM).
1
Amenez l'interrupteur FUNCTION u en
position ON pour allumer le réveil projecteur
; la fréquence (AM ou FM) s'affiche.
À l'aide de la touche de sélection de la
gamme d'onde v , sélectionnez la
ÉCOUTER LA RADIO
UTILISATION
ALLUMER ET ÉTEINDRE LA LUMIÈRE ÉTOILÉE
1
Pour régler une station, tournez le bouton
TUNING jusqu'à ce que la fréquence de
votre choix apparaisse en haut sur la
molette.
2
2
C M Y CM MY CY CMY K
F

30
en position ON, AUTO ou BUZZ et appuyez
sur la touche ALARM SET. L'affichage se
met à clignoter.
REMARQUE : vous ne pouvez pas régler
l'heure de réveil lorsque l'interrupteur
FUNCTION est en position OFF.
choix en appuyant plusieurs fois sur la
touche HOUR
minutes.
Lorsque vous relâchez la touche ALARM
SET
mise en mémoire.
, l'heure de réveil programmée est
sur la touche MIN
enfoncée, réglez l'heure de réveil de votre
Vérifiez que l'interrupteur FUNCTION est
RÉGLAGE DE L'HEURE DE RÉVEIL
1 2
Tout en maintenant la touche ALARM SET
l'écran.
4 secondes. L'heure réglée s'affiche à
, l'heure est mise en mémoire au bout de
manière prolongée ; le symbole de l'horloge
(
) et l'affichage se mettent à clignoter.
sur la touche MIN
enfoncée, appuyez plusieurs fois sur la
touche HOUR
Lorsque vous relâchez la touche TIME SET
F
Appuyez sur la touche TIME SET de
RÉGLAGE DE L'HEURE
1
Tout en maintenant la touche TIME SET
2
2
41123_ProjectionClock_multilingual_DINA5.FH10 Fri Aug 06 10:44:19 2004 Seite 26
UTILISATION (SUITE)
C M Y CM MY CY CMY K
pour régler les heures et
pour régler les
pour régler les heures et
pour régler les minutes.
,

41123_ProjectionClock_multilingual_DINA5.FH10 Fri Aug 06 10:44:19 2004 Seite 27
31
OFF.
pour les prochains jours.
Pour éteindre complètement le réveil,
amenez l'interrupteur FUNCTION
sur
Pour éteindre le réveil, appuyez sur la
touche ALARM SET
. Le réveil reste activé
3
l'heure de réveil programmée.
1
Programmez l'heure de réveil en procédant
comme indiqué ci-dessus. Sélectionnez
une station radio en procédant comme
indiqué et réglez le volume à l'aide du
bouton de commande VOLUME.
REMARQUE : si vous réglez le volume sur
le niveau minimal, vous n'entendrez rien à
SE FAIRE RÉVEILLER PAR LA RADIO
UTILISATION (SUITE)
Amenez l'interrupteur FUNCTION en
position AUTO. Le symbole du radio-réveil
(
programmée, la radio se mettra en marche
durant une heure, puis s'éteindra.
) s'allume. À l'heure de réveil
2
2
C M Y CM MY CY CMY K
F

32
OFF.
Pour éteindre complètement le réveil,
amenez l'interrupteur FUNCTION
sur
Pour éteindre le réveil, appuyez sur la
touche ALARM SET
pour les prochains jours.
. Le réveil reste activé
F
Programmez l'heure de réveil en procédant
3
comme indiqué ci-dessus.
1
SE FAIRE RÉVEILLER PAR LA MÉLODIE DISNEY
41123_ProjectionClock_multilingual_DINA5.FH10 Fri Aug 06 10:44:19 2004 Seite 28
UTILISATION (SUITE)
Amenez l'interrupteur FUNCTION en
position BUZZ. Le symbole de la sonnerie
(
programmée, la sonnerie se mettra en
marche durant une heure, puis s'éteindra.
) s'allume. À l'heure de réveil
2
2
C M Y CM MY CY CMY K

REMARQUE : pour désactiver l'extinction programmée, amenez l'interrupteur FUNCTION en
33
position OFF.
programmation reste en mémoire.
L'appareil se met alors en marche pour la
durée programmée. L'heure et le symbole
SLEEP
sont allumés dans l'affichage.
relâchez la touche SLEEP
pour régler les minutes. Lorsque vous
l'interrupteur FUNCTION en position AUTO
et maintenez la touche SLEEP enfoncée.
La mention « 0:00 » se met à clignoter.
enfoncée, réglez la durée de
fonctionnement souhaitée en appuyant
plusieurs fois sur la touche HOUR v pour
régler les heures et/ou sur la touche MIN
Sélectionnez une station radio. Amenez
Tout en maintenant la touche SLEEP u,
41123_ProjectionClock_multilingual_DINA5.FH10 Fri Aug 06 10:44:19 2004 Seite 29
UTILISER LA FONCTION SLEEP
huit minutes.
Lorsque la fonction Snooze est allumée, le
symbole
1
apparaît dans l'affichage.
Pour interrompre brièvement le réveil,
appuyez sur la touche SNOOZE.
L'alarme se remettra en marche au bout de
1
SNOOZE
UTILISATION (SUITE)
2
C M Y CM MY CY CMY K
, la
F

RADIO
Modulation de fréquence : 87,5 108 MHZ
Sous réserve de modifications techniques !
Ondes moyennes : 522 -1629kHz
Piles (non fournies) : 2 x 1,5 V, LR03/R03 (piles alcalines recommandées),
Primaire: 9 V
ALIMENTATION
Adaptateur secteur: AD-0970-VDS
Secondaire: 230 V ~ 50 Hz 12 W
F
Retirez l'adaptateur secteur avant de procéder au nettoyage !
Prenez un chiffon doux et humide. N'utilisez pas de produits d'entretien détergents, car ils
pourraient abîmer la surface ou les inscriptions figurant sur l'appareil.
41123_ProjectionClock_multilingual_DINA5.FH10 Fri Aug 06 10:44:19 2004 Seite 30
DONNÉES TECHNIQUES
34
taille AAA
NETTOYAGE
700 mA
C M Y CM MY CY CMY K

35
41123_ProjectionClock_multilingual_DINA5.FH10 Fri Aug 06 10:44:19 2004 Seite 31
C M Y CM MY CY CMY K
F

36
D Tijd
E Alarmsymbool
F Tijd instellen
G Radiosymbool
H AM/FM-symbool
DISPLAY
A SLEEP-symbool
B SNOOZE-symbool
C Radiowekkersymbool
7. Display
8. Netsnoer (achterzijde)
9. Batterijvak (onderzijde apparaat)
10. FUNCTION: Instellen van de functies
11. Bandkeuzetoets AM/FM
12. HOUR: Instellen uur
13. MIN: Instellen minuten
14. Sterrenlicht in- en uitschakelen
15. SNOOZE: Wekonderbreking
16. FM-binnenantenne (achterzijde)
NL
1. Sterrenlicht
2. Draaiknop voor zenderzoekfunctie
3. ALARM SET: Wektijd instellen
4. TIME SET: Tijd instellen
5. SLEEP: Automatisch uitschakelen instellen
6. VOLUME-regelaar: Geluidsvolume instellen
41123_ProjectionClock_multilingual_DINA5.FH10 Fri Aug 06 10:44:19 2004 Seite 32
BEDIENING
C M Y CM MY CY CMY K

41123_ProjectionClock_multilingual_DINA5.FH10 Fri Aug 06 10:44:19 2004 Seite 33
37
- Het speelgoed is niet bedoeld voor kinderen die jonger zijn dan 3 jaar.
- Het speelgoed mag alleen worden gebruikt in combinatie met de aanbevolen transformator.
- De transformator is geen speelgoed
- Speelgoed, dat gewoonlijk met vloeistoffen kan worden schoongemaakt, moet vóór het
schoonmaken worden gescheiden van de transformator.
voor oude batterijen.
GEBRUIKTE BATTERIJEN
Lege batterijen horen niet bij het huisvuil.
Behandel batterijen volgens de bepalingen van uw land, lever ze bijv. in bij een verzamelpunt
Neem bij storingen contact op met ons Service Center of een deskundig reparatiebedrijf.
Zorg ook dat kinderen niet bij plastic verpakkingen kunnen komen. Gevaar voor verstikking!
HET APPARAAT KAN BESCHADIGD RAKEN DOOR DE VOLGENDE OMSTANDIGHEDEN:
- Vochtigheid en nat worden;
- Direct zonlicht of rechtstreekse hitte (bijv. van verwarmingen of andere elektrische apparatuur);
- Langdurige trillingen;
- Veel stof of te weinig ventilatie.
ZORG DAT DE NETADAPTER TOEGANKELIJK IS
Sluit de netadapter aan op een stopcontact (230V ~ 50Hz) in de buurt van het apparaat.
De netadapter moet gemakkelijk bereikbaar zijn voor het geval dat de netspanning snel moet
worden uitgeschakeld op het apparaat. Gebruik geen verlengsnoer om struikelen te voorkomen.
REPAREER HET APPARAAT NIET ZELF.
Probeer nooit het apparaat of de aansluitkabel te openen of te repareren. Daardoor
bestaat kans op elektrische schokken!
Batterijen/accu's kunnen bij inslikken levensgevaarlijk zijn. Bewaar batterijen daarom buiten
bereik van kleine kinderen. Als een batterij is ingeslikt moet direct medische hulp worden
ingeroepen.
LAAT KLEINE KINDEREN IN DE BUURT VAN ELEKTRISCHE APPARATUUR NIET ZONDER
TOEZICHT.
Bewaar de handleiding zo dat u hem bij de hand hebt. Geef deze handleiding erbij als
u het apparaat aan iemand anders overdoet.
OVER DEZE HANDLEIDING
Lees de veiligheidsinstructies goed door voordat u het apparaat in gebruik neemt. Houd
u aan de waarschuwingen op het apparaat en in de handleiding.
VEILIGHEIDSINSTRUCTIES
C M Y CM MY CY CMY K
NL

38
NL
BACKUP-BATTERIJ
Als de netadapter uit de contactdoos wordt getrokken of als de stroom uitvalt, zorgen twee
batterijen (type AAA) voor de voeding. De klok loopt verder op de batterijen maar er wordt geen
tijd meer op het display weergegeven.
BATTERIJEN INZETTEN
Verwijder het deksel van het batterijvak aan de onderzijde apparaat door een kleine
schroevendraaier of een paperclip in de verdieping te steken en zachtjes te drukken.
Zet 2 batterijen type AAA 1,5 V in het vak. Let op de polariteit zoals aangegeven in afbeelding 2
en in het batterijvak. Sluit het batterijvak.
LET OP!
- Gebruik alleen dezelfde soorten batterijen.
- Gebruik geen oude en nieuwe batterijen door elkaar.
- Verwijder de batterijen als u het apparaat langere tijd niet gebruikt. Batterijen kunnen gaan
lekken.
41123_ProjectionClock_multilingual_DINA5.FH10 Fri Aug 06 10:44:19 2004 Seite 34
NETAANSLUITING
Steek de stekker van de meegeleverde netadapter in een goed bereikbare contactdoos 230 V
~ 50 Hz. Als er batterijen zijn geplaatst, worden deze bij netvoeding automatisch uitgeschakeld.
In het display knippert nu "00:00" en de achtergrondverlichting is ingeschakeld.
INGEBRUIKNEMING
C M Y CM MY CY CMY K

39
3. Schuif de FUNCTION-schakelaar (10) op de stand BUZZ om de wekker uit te schakelen en
aan. Als de klok de ingestelde wektijd bereikt gaat de zoemer een uur lang aan en vervolgens
weer uit.
klaar te zetten voor de volgende dag. Schuif de FUNCTION-schakelaar (10) op de stand OFF
om de wekker uit te schakelen en niet klaar te zetten de volgende dag.
WEKKEN MET DISNEY SOUND INSTELLEN
1. Stel de wektijd in zoals hiervoor beschreven.
2. Zet de FUNCTION-schakelaar (10) op de stand BUZZ. Het symbool voor de zoemer (
3. Schuif de FUNCTION-schakelaar (10) op de stand AUTO om de wekker uit te schakelen en
klaar te zetten voor de volgende dag. Schuif de FUNCTION-schakelaar (10) op de stand OFF
om de wekker uit te schakelen en niet klaar te zetten voor de volgende dag.
2. Zet de FUNCTION-schakelaar (10) op de stand AUTO. Het symbool voor de radiowekker
regelaar (6) het gewenste geluidsvolume in.
(
vervolgens weer uit.
ALARM SET (3). Het symbool in het display knippert.
(12) om de uren in te stellen en/of de toets MIN (13) om de minuten in te stellen.
display wordt de tijd weergegeven.
3. Als u de toets TIME SET (4) weer loslaat, wordt de tijd na 4 seconden opgeslagen. In het
DE WEKTIJD INSTELLEN/TERUGZETTEN
1. Als de FUNCTION-schakelaar (10) op de stand ON, AUTO of BUZZ staat, drukt u op de toets
2. Terwijl u de toets ALARM SET (3) ingedrukt houdt, drukt u meerdere malen op de toets HOUR
3. Als u de toets ALARM SET (3) weer loslaat, wordt de wektijd opgeslagen.
INSTELLEN VAN WEKKEN DOOR DE RADIO
1. Stel de wektijd in zoals hiervoor beschreven. Kies een radiozender en stel met de VOLUME-
) gaat aan. Als de klok de ingestelde wektijd bereikt, gaat de radio een uur lang aan en
2. Terwijl u de toets TIME SET (4) ingedrukt houdt, drukt u meerdere malen op de toets HOUR
DE TIJD INSTELLEN/TERUGZETTEN
1. DE TIJD INSTELLEN/TERUGZETTEN (
(12) om de uren in te stellen en/of de toets MIN (13) om de minuten in te stellen.
1. Druk op de Sterrenlichttoets (1) om het sterrenlicht in te schakelen. De top van de toren wordt
2. Druk opnieuw op de Sterrenlicht-toets (1) om de verlichting weer uit te schakelen.
nu afwisselend donker en licht.
4. Regel het geluidsvolume met de VOLUME-regelaar (6).
5. Het apparaat wordt uitgeschakeld door de FUNCTION-schakelaar (10) op OFF te zetten.
STERNENLICHT IN/UITSCHAKELEN
bovenop het wiel te zien is.
) en de display-weergave knipperen.
41123_ProjectionClock_multilingual_DINA5.FH10 Fri Aug 06 10:44:19 2004 Seite 35
RADIO LUISTEREN
1. De projectieklok wordt ingeschakeld door de FUNCTION-schakelaar (10) op ON te zetten; In
2. Kies met de radiobandkeuzetoets (11) de gewenste frequentieband (AM of FM).
3. Stel een zender in door aan de TUNING-regelaar te draaien totdat de gewenste frequentie
het display gaat de bandaanduiding voor AM of FM aan.
KORTE HANDLEIDING
C M Y CM MY CY CMY K
) gaat
NL

40
Technische wijzigingen voorbehouden!
Radiofrequentie middengolf 522 -1629kHz
700 mA
Secundair: 230 V ~ 50 Hz 12 W
Primair: 9 V
Batterijen (niet inbegrepen) 2 x 1,5 V LR03/R03 (bij voorkeur alkaline), type AAA
Radio
Radiofrequentie FM 87,5 - 108 MHZ
Voeding
Netadapter: AD-0970-VDS
NL
TECHNISCHE GEGEVENS
41123_ProjectionClock_multilingual_DINA5.FH10 Fri Aug 06 10:44:19 2004 Seite 36
Verwijder de netadapter voor het schoonmaken uit de contactdoos!
Gebruik voor het schoonmaken uitsluitend een vochtig zacht doekje. Gebruik geen agressieve
schoonmaakmiddelen omdat deze het oppervlak of de tekst op het apparaat kunnen beschadigen.
SCHOONMAKEN
C M Y CM MY CY CMY K

41
41123_ProjectionClock_multilingual_DINA5.FH10 Fri Aug 06 10:44:19 2004 Seite 37
C M Y CM MY CY CMY K
NL

42
A Indicación SLEEP
B Indicación SNOOZE
C Indicación despertador con radio
D Hora
E Indicación de sonido Disney
F Ajustar el reloj
H Indicación AM/FM
E
1. Proyección de estrellas
2. Búsqueda de emisoras
3. ALARM SET: Ajustar la hora de la alarma
4. TIME SET: Ajustar el reloj
5. SLEEP: Ajustar la desconexión automática
6. Regulador VOLUME: Ajustar el volumen
7. Pantalla
8. Cable de red (parte posterior)
9. Compartimiento para las pilas (parte inferior del aparato)
10. FUNCTION: Ajustar las funciones
11. Botón de selección de banda AM/FM
12. HOUR: Ajustar la hora
13. MIN: Ajustar los minutos
14. Proyección de estrellas: activar o desactivarla
15. SNOOZE: Repetición de la alarma
DISPLAY
16. Antena de cable para FM (parte posterior)
41123_ProjectionClock_multilingual_DINA5.FH10 Fri Aug 06 10:44:19 2004 Seite 38
ELEMENTOS DE CONTROL
C M Y CM MY CY CMY K

41123_ProjectionClock_multilingual_DINA5.FH10 Fri Aug 06 10:44:19 2004 Seite 39
43
- Este juguete no es apropiado para niños de una edad inferior a 3 años.
- Este juguete sólo debe ser utilizado con el transformador recomendado.
- El transformador no es ningún juguete.
- Antes de limpiarlos, hay que desconectar aquellos juguetes que normalmente se limpian con
líquido.
en un contenedor de pilas usadas.
DEPÓSITO DE LAS PILAS
No tire las pilas usadas a la basura doméstica.
Elimine las pilas de acuerdo con las regulaciones de su país; por ejemplo, depositándolas
En caso de malfuncionamiento del aparato, diríjase a nuestro servicio de reparación
o a un taller especializado.
NUNCA REPARE USTED MISMO EL APARATO.
No intente nunca reparar o abrir usted mismo el aparato o los cables de conexión.
Existe el peligro de recibir una descarga eléctrica.
NO DEJE LOS APARATOS ELÉCTRICOS AL ALCANCE DE NIÑOS PEQUEÑOS SI NO LOS
ESTÁ VIGILANDO.
Las pilas y los acumuladores pueden representar un peligro de muerte si se tragan. Mantenga
por ello las pilas fuera del alcance de los niños pequeños. En caso de ingestión accidental hay
que avisar inmediatamente a un médico.
Mantenga también alejados de los niños los embalajes de plástico. Existe el peligro de asfixia.
LAS SIGUIENTES CONDICIONES AMBIENTALES PUEDEN PERJUDICAR EL APARATO:
- el agua y la humedad;
- los rayos directos de sol o una fuente directa de calor (como, por ejemplo, la calefacción u
otros aparatos eléctricos);
- las vibraciones permanentes;
- un exceso de polvo o la falta de ventilación.
MANTENGA EL ENCHUFE ACCESIBLE.
Enchufe el adaptador a la red en un enchufe (230 V ~ 50 Hz) que esté cerca del aparato.
En caso de que se tenga que desconectar el aparato de la red, el adaptador de red debe resultar
fácilmente accesible. Para evitar que alguien tropiece, no utilice cables de prolongación.
Antes de la puesta en marcha del aparato, lea atentamente las presentes advertencias
de seguridad. Preste atención a las advertencias en el aparato y en las instrucciones
de funcionamiento.
Si vende o cede el aparato a otra persona, entréguele sin falta también las presentes
indicaciones.
ACERCA DE LAS PRESENTES INSTRUCCIONES
ADVERTENCIAS DE SEGURIDAD
C M Y CM MY CY CMY K
E

44
Quite la tapa del compartimiento de pilas que hay en la parte inferior del aparato; para ello utilice
un destornillador pequeño o un clip: colóquelo en la hendidura y presione ligeramente.
Coloque 2 pilas del tipo AAA 1,5 V. Observe la polaridad, tal como se indica en la imagen 2 y en
el compartimiento de pilas. Cierre el compartimiento de pilas.
¡ATENCIÓN!
- Utilice siempre pilas del mismo tipo juntas.
- No mezcle pilas nuevas y viejas.
- Si no va a utilizar el aparato durante más tiempo, extraiga las pilas.
Las pilas pueden dañarse y soltar líquidos tóxicos.
E
CONEXIÓN A LA RED
Conecte el enchufe del cable de corriente del adaptador de red, incluido en el volumen de
suministro, a una toma de corriente cercana de 230 V ~ 50 Hz. En caso de que haya pilas puestas,
éstas se desactivan automáticamente si hay alimentación por la red. En pantalla parpadea ahora
la indicación "00:00" y la retroiluminación está encendida.
PILAS DE SEGURIDAD
Si se desenchufa el adaptador de red de la toma de corriente o se produce un apagón, este reloj
sigue funcionando con dos pilas (de tamaño AAA). El reloj sigue funcionando internamente con
las pilas, pero no se indica la hora en pantalla.
COLOCACIÓN DE LAS PILAS
PUESTA EN FUNCIONAMIENTO
41123_ProjectionClock_multilingual_DINA5.FH10 Fri Aug 06 10:44:19 2004 Seite 40
C M Y CM MY CY CMY K

45
1. Ajuste la hora de la alarma tal y como se ha descrito más arriba.
3. Ponga el interruptor FUNCTION (10) en la posición BUZZ para apagar el despertador activándolo
de nuevo para el día siguiente. Ponga el interruptor FUNCTION (10) en la posición OFF para
apagar el despertador sin activarlo para el día siguiente.v
2. Ponga el interruptor FUNCTION (10) en la posición BUZZ. La indicación de sonido Disney
(
Disney; cuando haya transcurrido una hora, se apagará automáticamente.
) se iluminará. A la hora que haya indicado como hora de la alarma, se escuchará el sonido
AJUSTAR EL DESPERTADOR CON SONIDO DISNEY
3. Ponga el interruptor FUNCTION (10) en la posición AUTO para apagar el despertador activándolo
cuando haya transcurrido una hora, se apagará automáticamente.
de nuevo para el día siguiente. Ponga el interruptor FUNCTION (10) en la posición OFF para
apagar el despertador sin activarlo para el día siguiente.
3. Cuando suelte el botón ALARM SET (3), la hora de la alarma quedará almacenada.
AJUSTAR LA FUNCIÓN DESPERTADOR CON RADIO
1. Ajuste la hora de la alarma tal y como se ha descrito más arriba. Elija una emisora de radio y
2. Ponga el interruptor FUNCTION (10) en la posición AUTO. La indicación despertador con radio
ajuste el volumen deseado con el regulador VOLUME (6).
(
) se ilumina. A la hora que haya indicado como hora de la alarma, la radio se encenderá;
2. Mientras mantiene presionado el botón ALARM SET (3), pulse varias veces el botón HOUR
el botón ALARM SET (3). La indicación en pantalla parpadeará.
(12) para ajustar la hora y/o el botón MIN (13) para ajustar los minutos.
aparece la hora.
pantalla parpadearán.
para ajustar la horas y/o el botón MIN (13) para ajustar los minutos.
superior de la torre se iluminará y apagará alternativamente.
en la parte superior de la rueda.
en la pantalla se ilumina la indicación de banda de frecuencia AM o FM.
1. Ponga el interruptor FUNCTION (10) en la posición ON para encender el reloj de proyección;
2. Con el botón de selección de banda (11) elija la banda de frecuencia deseada (AM o FM).
3. Para ajustar una emisora, gire el regulador TUNING hasta que la frecuencia deseada aparezca
4. Regule el volumen con el regulador VOLUME (6).
5. Ponga el interruptor FUNCTION (10) en la posición OFF para apagar el aparato.
ENCENDER/APAGAR LA PROYECCIÓN DE ESTRELLAS
1. Presione el botón Proyección de estrellas (1) para activar la proyección de estrellas. El extremo
2. Vuelva a presionar el botón Proyección de estrellas (1) para apagar la iluminación.
AJUSTAR/RESTABLECER LA HORA
1. Mantenga presionado el botón TIME SET (4); el símbolo de la hora (
2. Mientras mantiene presionado el botón TIME SET (4), pulse varias veces el botón HOUR (12)
3. 4 segundos después de soltar el botón TIME SET (4) la hora quedará almacenada. En pantalla
AJUSTAR/RESTABLECER LA HORA DE LA ALARMA
1. Cuando el interruptor FUNCTION (10) se encuentre en la posición ON, AUTO o BUZZ, presione
41123_ProjectionClock_multilingual_DINA5.FH10 Fri Aug 06 10:44:19 2004 Seite 41
ESCUCHAR LA RADIO
GUÍA RÁPIDA
C M Y CM MY CY CMY K
) y la indicación en la
E

46
¡Las especificaciones técnicas están sujetas a cambios sin previo aviso!
Radio
Radiofrecuencia FM 87,5 - 108 MHZ
Radiofrecuencia Onda Media 522 -1629kHz
Pilas (no incluidas): 2 x 1,5 V, LR03/R03 (se recomiendan las alcalinas),
tamaño AAA
Primario: 9 V
700 mA
Secundario: 230 V ~ 50 Hz 12 W
Adaptador de red: AD-0970-VDS
Alimentación
E
Antes de limpiar el aparato, desenchúfelo de la corriente.
Para limpiarlo utilice únicamente un paño húmedo y suave. No utilice productos de limpieza
agresivos, puesto que pueden dañar la superficie o las inscripciones del aparato.
41123_ProjectionClock_multilingual_DINA5.FH10 Fri Aug 06 10:44:19 2004 Seite 42
ESPECIFICACIONES TÉCNICAS
LIMPIEZA
C M Y CM MY CY CMY K

47
41123_ProjectionClock_multilingual_DINA5.FH10 Fri Aug 06 10:44:19 2004 Seite 43
C M Y CM MY CY CMY K
E

48
D Horário
E Indicador de horário de verão
F Ajustar horário
G Indicador de rádio
H Indicador AM/FM
com rádio
DISPLAY
A Indicador SLEEP
B Indicador SNOOZE
C Indicador de despertador
13. MIN: Ajustar minutos
14. Luz das estrelas: ligar e desligar
15. SNOOZE: Interrupção do despertar
16. Antena de fio da FM (lado traseiro)
P
5. SLEEP: Ajustar desligamento automático
6. Regulador de volume VOLUME: Ajustar o volume
7. Display
8. Cabo de rede (lado traseiro)
9. Compartimento da bateria (lado inferior do aparelho)
10. FUNCTION: Ajuste das funções
11. Selector de faixas AM / FM
12. HOUR: Ajustar as horas
1. Luz das estrelas
2. Regulador giratório para localização de emissoras
3. ALARM SET: Ajustar horário de alarme
4. TIME SET: Ajustar o relógio
41123_ProjectionClock_multilingual_DINA5.FH10 Fri Aug 06 10:44:19 2004 Seite 44
ELEMENTOS DE COMANDO
C M Y CM MY CY CMY K

41123_ProjectionClock_multilingual_DINA5.FH10 Fri Aug 06 10:44:19 2004 Seite 45
49
- Este brinquedo não é apropriado para crianças com menos de 3 anos.
- Este brinquedo só deve ser utilizado com o transformador recomendado
- O transformador não é um brinquedo
- Os brinquedos que podem ser normalmente limpo com líquidos, devem ser desligados do
transformador antes da limpeza.
usadas.
ELIMINAÇÃO DAS BATERIAS
As baterias descarregadas não podem ser atiradas ao lixo doméstico. Eliminar as baterias
de acordo com os regulamentos do país, por exemplo, num posto de colecta para baterias
uma oficina especializada adequada.
NUNCA CONSERTAR O APARELHO POR SI PRÓPRIO.
Nuca tentar abrir ou reparar o aparelho. Existiria o risco de choques eléctricos!
No caso de defeitos, favor dirigir-se ao nosso serviço de assistência aos clientes ou
Sempre guardar estas instruções de operação ao alcance do utente. Quando vender
ou presentear o aparelho, entregar obrigatoriamente estas instruções junto com o
aparelho.
NUNCA DEIXAR CRIANÇAS SEM VIGILÂNCIA JUNTO A APARELHOS ELÉCTRICOS.
Baterias/baterias recarregáveis podem colocar em risco de vida ao serem ingeridas. Por isso
guardar as baterias fora do alcance de crianças. Caso uma bateria seja ingerida, procurar
imediatamente ajuda de um médico.
Manter embalagens plásticas também fora do alcance de crianças. Existe risco de asfixiamento.
AS SEGUINTES CONDIÇÕES AMBIENTAIS PODEM CAUSAR DANOS AO APARELHO:
- Humidade;
- luz solar directa ou calor directo (por exemplo: de aquecedores ou outros aparelhos eléctricos);
- vibrações contínuas;
- pó em excesso ou ventilação insuficiente.
DEIXE A O ADAPTADOR DE REDE ACESSÍVEL
Ligue o adaptador de rede a uma tomada (230 V ~ 50 Hz) próxima do aparelho.
Caso o aparelho tenha de ser desligado da rede rapidamente, o adaptador de rede deverá ser
facilmente acessível. Não utilize extensões para evitar que se tropece nelas.
SOBRE ESTAS INSTRUÇÕES
Ler estas indicações de segurança com bastante atenção antes de colocar em operação.
Observar as advertências no aparelho e das instruções de operação.
INDICAÇÕES DE SEGURANÇA
C M Y CM MY CY CMY K
P

50
Colocar duas baterias do tipo AAA, 1,5 volts. ?Observar a polaridade, como mostarda na ilustração
2 e no compartimento das baterias. Fechar o compartimento das baterias.
ATENÇÃO!
- Utilizar apenas pares de baterias do mesmo tipo.
- Nunca misturar baterias novas e usadas.
- Quando não se for utilizar o aparelho por um longo período, retirar as baterias.
As baterias podem romper-se.
P
BATERIA DE BACKUP
Caso o adaptador de rede seja retirado da tomada ou haja uma falha de energia, este relógio é
alimentado por duas pilhas (tamanho AAA). O relógio continua a funcionar internamente com
as baterias, porém as horas não são mostradas no display.
COLOCAR BATERIAS
Retirar a tampa do compartimento de baterias na parte inferior do aparelho ao se colocar uma
pequena chave de fendas ou grampo de escritório no rebaixo e apertar um pouco
41123_ProjectionClock_multilingual_DINA5.FH10 Fri Aug 06 10:44:19 2004 Seite 46
CONEXÃO DE REDE
Ligue a ficha do adaptador de rede fornecido a uma tomada bem acessível de 230 V ~ 50 Hz.
Caso estejam colocadas baterias, as mesmas desligam-se automaticamente ao se operar com
a rede eléctrica. Agora pisca no display a indicação "00:00" e a iluminação de fundo está ligada.
COLOCAÇÃO EM OPERAÇÃO
C M Y CM MY CY CMY K

3. Colocar o interruptor de FUNCTION (10) na posição BUZZ, para desligar o despertador
durante uma hora e depois é desligado novamente.
e activar para o próximo dia. Colocar o interruptor FUNCTION (10) na posição OFF, para
desligar o despertador e para não activar para o próximo dia.
AJUSTAR PARA DESPERTAR COM O SOM DISNEY
1. Ajustar a hora de despertar como descrito anteriormente.
2. Colocar o interruptor FUNCTION (10) na posição BUZZ. O indicador para o despertador com
zumbidor
3. Colocar o interruptor de FUNCTION (10) na posição AUTO, para desligar o despertador
e activar para o próximo dia. Colocar o interruptor FUNCTION (10) na posição OFF, para
desligar o despertador e para não activar para o próximo dia.
2. Colocar o interruptor FUNCTION (10) na posição AUTO. O indicador para o despertador com
rádio (
uma hora e depois é desligado novamente.
1. Ajustar a hora de despertar como descrito anteriormente. Seleccionar uma emissora de rádio
e ajustar com o regulador de VOLUME (6) o volume desejado.
(12), para ajustar as horas e / ou na tecla MIN (13), para poder ajustar os minutos.
No display será mostrado o horário.
piscam.
(12), para ajustar as horas e / ou na tecla MIN (13), para poder ajustar os minutos.
AJUSTAR / REPOR A ZERO O HORÁRIO
1. Manter carregada a tecla TIME SET (4), o símbolo de horário (
2. Enquanto se mantém carregada a tecla TIME SET (4), carregar várias vezes na tecla HOUR
3. Quando se soltar novamente a tecla TIME SET (4), o horário será salvado após 4 segundos.
AJUSTAR / REPOR A ZERO O DESPERTADOR
1. Quando o interruptor FUNCTION (10) se encontrar na posição ON, AUTO ou BUZZ, carregar
na tecla ALARM SET (3). A indicação no display pisca.
2. Enquanto se mantém carregada a tecla TIME SET (3), carregar várias vezes na tecla HOUR
3. Quando soltar novamente a tecla ALARM SET (3), a hora de despertar está salvada.
AJUSTAR O DEPERTADOR COM RÁDIO
2. Carregar na tecla de luz de estrelas (1) novamente, para desligar mais uma vez a iluminação
acende agora mais clara e mais escura alternadamente.
de estrelas.
ser vista em cima da rodilha.
no display acende a indicação de faixa para AM ou FM.
ou FM).
2. Seleccionar com a tecla selectora de faixa de rádio (11) a faixa de frequência desejada (AM
3. Para ajustar uma emissora, girar o regulador de TUNING até a frequência desejada possa
4. Ajustar o volume com o regulador de VOLUME (6).
5. Colocar o interruptor de FUNCTION (10) na posição OFF, para desligar o aparelho;
LIGAR / DESLIGAR A LUZ DE ESTRELAS
1. Carregar na tecla de luz de estrelas (1), para ligar a iluminação de estrelas. A ponta da torre
OUVIR O RÁDIO
1. Colocar o interruptor de FUNCTION (10) na posição ON, para ligar o relógio de projecção;
41123_ProjectionClock_multilingual_DINA5.FH10 Fri Aug 06 10:44:19 2004 Seite 47
51
) acende. Quando o horário alcançar o horário de despertar, o zumbidor é ligado
) acende. Quando o horário alcançar o horário de despertar, o rádio é ligado durante
INSTRUÇÕES RESUMIDAS
C M Y CM MY CY CMY K
) e a indicação de display
P

52
Radiofrequência FM 87,5 - 108 MHZ
Reservamos os direitos de alterações técnicas!
Radiofrequência AM 522 -1629kHz
Baterias (não fornecidas): 2 unidades de 1,5 V, LR03/R03 (alcalinas recomendadas),
RÁDIO
tamanho AAA
Secundário: 230 V ~ 50 Hz 12 W
Primário: 9 V
700 mA
CONSUMO DE CORRENTE
Adaptador de rede: AD-0970-VDS
P
Desligue o adaptador de rede antes da limpeza!
Utilizar para a limpeza apenas um trapo macio e húmido. Não utilizar nenhum produto de limpeza
agressivo, pois os mesmos podem danificar a superfície ou as inscrições do aparelho.
DADOS TÉCNICOS
LIMPEZA
41123_ProjectionClock_multilingual_DINA5.FH10 Fri Aug 06 10:44:19 2004 Seite 48
C M Y CM MY CY CMY K

53
41123_ProjectionClock_multilingual_DINA5.FH10 Fri Aug 06 10:44:19 2004 Seite 49
C M Y CM MY CY CMY K
P

54
D Orario
E Simbolo motivo Disney
F Impostazione orario
G Simbolo radio
H Simbolo AM/FM
DISPLAY
A Display SLEEP
B Simbolo SNOOZE
C Simbolo radiosveglia
I
6. Regolatore VOLUME: Impostazione volume
7. Display
8. Cavo di alimentazione (lato posteriore)
9. Vano batteria (lato inferiore apparecchio)
10. FUNCTION: Impostazione delle funzioni
11. Tasto di selezione ampiezza di banda AM/FM
12. HOUR: Impostazione ora
13. MIN: Impostazione minuti
14. Cielo stellato: accensione e spegnimento
15. SNOOZE: Interruzione sveglia
16. Antenna FM (lato posteriore)
41123_ProjectionClock_multilingual_DINA5.FH10 Fri Aug 06 10:44:19 2004 Seite 50
1. Luce stellare
2. Manopola per la ricerca delle stazioni
3. ALARM SET: Impostazione orario di sveglia
4. TIME SET: Impostazione orario
5. SLEEP: Impostazione spegnimento automatico
COMANDI
C M Y CM MY CY CMY K

41123_ProjectionClock_multilingual_DINA5.FH10 Fri Aug 06 10:44:19 2004 Seite 51
55
- Questo giocattolo non è adatto a bambini di età inferiore ai 3 anni.
- Utilizzare questo giocattolo solo con il trasformatore consigliato
- Il trasformatore non è un giocattolo
- I giocattoli che vengono puliti abitualmente con acqua devono essere scollegati dal trasformatore
prima di eseguire la pulizia.
SMALTIMENTO BATTERIE
Le batterie usate non devono essere gettate nei rifiuti domestici.
Smaltire le batterie usate secondo le disposizioni nazionali vigenti, ad esempio attraverso
un apposito raccoglitore per batterie usate.
In caso di guasti rivolgersi al nostro Centro di assistenza o a un'officina specializzata.
NON RIPARARE L'APPARECCHIO DA SOLI.
Non tentare mai di aprire o riparare l'apparecchio oppure la linea di allacciamento.
Pericolo di shock elettrici!
Collegare l'adattatore di corrente a una presa (da 230 V ~ 50 Hz) vicina all'apparecchio.
L'adattatore deve essere facilmente raggiungibile per i casi in cui sia necessario scollegare
rapidamente l'apparecchio dalla corrente. Onde evitare il pericolo di inciampare si consiglia di
evitare l'uso di cavi prolunga.
elettriche).
- Vibrazioni continue.
- Molta polvere o scarsa ventilazione.
GARANTIRE IL LIBERO ACCESSO ALL'ADATTATORE DI CORRENTE.
richiedere immediatamente soccorso medico.
Tenere anche le confezioni di plastica lontano dalla portata di bambini. Pericolo di soffocamento.
LE SEGUENTI CONDIZIONI AMBIENTALI POSSONO DANNEGGIARE L'APPARECCHIO:
- Umidità e acqua.
- Esposizione a raggi solari diretti o calore diretto (per es. di riscaldamenti o altre apparecchiature
NON LASCIARE DA SOLI BAMBINI IN PRESENZA DI APPARECCHIATURE ELETTRICHE.
L'ingestione di batterie/accumulatori può comportare un pericolo per la vita. Conservare quindi
le batterie lontano dalla portata di bambini. In caso di ingestione di una batteria è necessario
di istruzioni per l'uso.
Tenere le istruzioni per l'uso sempre a portata di mano. In caso di vendita o consegna
ad altra persona dell'apparecchio è assolutamente necessario consegnare altresì le
presenti istruzioni.
INFORMAZIONI SULLE PRESENTI ISTRUZIONI
Leggere attentamente le indicazioni di sicurezza prima di procedere alla messa in
funzione. Osservare in particolare le avvertenze riportate sull'apparecchio e nel manuale
INDICAZIONI DI SICUREZZA
C M Y CM MY CY CMY K
I

56
I
INSERIMENTO DELLE BATTERIE
Sollevare il coperchio del vano batterie sul lato inferiore dell'apparecchio inserendo un piccolo
cacciavite o una graffetta nell'apposita cavità e premendo leggermente.
Inserire quindi due batterie del tipo AAA da 1,5 V. Fare attenzione alla polarità, seguire le indicazioni
della figura 2 e all'interno dello stesso vano batterie. Chiudere il vano batterie.
ATTENZIONE!
- Utilizzare solo batterie dello stesso tipo.
- Evitare di mischiare batterie usate con batterie nuove.
- Rimuovere le batterie se l'apparecchio non viene utilizzato per un periodo di tempo prolungato.
Le batterie potrebbero esaurirsi.
l'orologio è alimentato con due batterie (tipo AAA). L'orologio continua internamente a funzionare,
sul display non viene comunque visualizzato alcun orario.
retroilluminazione.
BATTERIE DI RIPRISTINO
Nel caso di scollegamento dell'adattatore di corrente dalla presa o in mancanza di corrente,
41123_ProjectionClock_multilingual_DINA5.FH10 Fri Aug 06 10:44:19 2004 Seite 52
COLLEGAMENTO ALLA RETE
Collegare la spina dell'adattatore di rete fornito in dotazione ad una presa ben accessibile da
230 V ~ 50 Hz. In presenza di batterie, queste vengono disattivate automaticamente in caso di
alimentazione dalla rete. A questo punto sul display lampeggia "00:00" ed è attivata la
MESSA IN FUNZIONE
C M Y CM MY CY CMY K

57
3. Se si rilascia infine il tasto ALARM SET (3), l'orario di sveglia risulterà memorizzato.
IMPOSTARE LA SVEGLIA CON RADIO
3. Posizionare l'interruttore FUNCTION (10) su BUZZ per spegnere la sveglia e per attivare la
sveglia impostato, il segnale acustico si accende per un'ora e infine si spegne.
sveglia per il giorno successivo. Spostare l'interruttore FUNCTION in posizione di OFF per
spegnere la sveglia senza attivarla per il giorno successivo.
per la sveglia con segnale acustico (
IMPOSTARE LA SVEGLIA CON MOTIVI ACUSTICI DISNEY
1. Impostare l'orario di sveglia come indicato sopra.
2. Spostare l'interruttore FUNCTION (10) in posizione BUZZ. Sul display lampeggia il simbolo
3. Posizionare l'interruttore FUNCTION (10) su AUTO per spegnere la sveglia e per attivare la
la radio si accende per un'ora e infine si spegne.
sveglia per il giorno successivo. Spostare l'interruttore FUNCTION (10) in posizione di OFF
per spegnere la sveglia senza attivarla per il giorno successivo.
per la radiosveglia (
1. Impostare l'orario di sveglia come indicato sopra. Selezionare una stazione radio e impostare
2. Spostare l'interruttore FUNCTION (10) in posizione di AUTO. Sul display lampeggia il simbolo
con il regolatore VOLUME (6) il volume desiderato.
) Nel momento in cui l'orologio raggiunge l'orario di sveglia impostato,
). Nel momento in cui l'orologio raggiunge l'orario di
2. Tenendo abbassato il tasto ALARM SET (3), premere più volte il tasto HOUR (12) per impostare
posizione di ON, AUTO oppure BUZZ. Le cifre lampeggiano sul display.
le ore e/o il tasto MIN (13) per impostare i minuti.
1.Premere il tasto ALARM SET (3) nel momento in cui l'interruttore FUNCTION (10) si trova in
Sul display viene quindi visualizzato l'orario.
le ore e/o il tasto MIN (13) per impostare i minuti.
2. Premere nuovamente il tasto Cielo stellato (1) per spegnere l'illuminazione.
IMPOSTARE/ARRETRARE L'ORARIO
1. Se si tiene premuto il tasto TIME SET (4), il simbolo Orario (
2. Tenendo abbassato il tasto TIME SET (4), premere più volte il tasto HOUR (12) per impostare
3. Se si rilascia il tasto TIME SET (4), l'orario impostato sarà infine memorizzato dopo 4 secondi.
IMPOSTARE/ARRETRARE L'ORARIO DI SVEGLIA
) e le cifre lampeggiano.
1. Premere il tasto Cielo stellato (1) per accendere l'illuminazione a stelle. La punta della torre
si illumina alternando buio e luce.
desiderata appare in alto sulla visualizzazione della sintonia.
display è visualizzata l'ampiezza della banda AM o FM.
FM).
1. Posizionare l'interruttore FUNCTION (10) su ON per attivare l'orologio da proiezione. Sul
2. Selezionare con il tasto per l'ampiezza di banda (11) la frequenza di banda desiderata (AM o
3. Girare la manopola TUNING per impostare la stazione ovvero fino a quando la frequenza
4. Regolare il volume con il regolatore VOLUME (6).
5. Posizionare l'interruttore FUNCTION (10) su OFF per spegnere l'apparecchio.
ACCENSIONE/SPEGNIMENTO CIELO STELLATO
41123_ProjectionClock_multilingual_DINA5.FH10 Fri Aug 06 10:44:19 2004 Seite 53
ASCOLTO DELLA RADIO
ISTRUZIONI RAPIDE
C M Y CM MY CY CMY K
I

58
Con riserva di modifiche tecniche!
Frequenza radio OM 522 -1629kHz
tipo AAA
Batterie (non in dotazione): 2 x 1,5 V, LR03/R03 (si consiglia l'uso di batterie alcaline),
RADIO
Frequenza radio VHF 87,5 - 108 MHZ
Secondario: 230 V ~ 50 Hz 12 W
Primario: 9 V
700 mA
I
ALIMENTAZIONE
Adattatore di corrente: AD-0970-VDS
SPECIFICHE TECNICHE
Utilizzare per la pulizia un panno umido e morbido. Non impiegare detergenti aggressivi, in
quanto potrebbero danneggiare la superficie o le iscrizioni riportate sull'apparecchio.
41123_ProjectionClock_multilingual_DINA5.FH10 Fri Aug 06 10:44:19 2004 Seite 54
Scollegare l'adattatore di corrente prima di eseguire la pulizia.
PULIZIA
C M Y CM MY CY CMY K

59
41123_ProjectionClock_multilingual_DINA5.FH10 Fri Aug 06 10:44:19 2004 Seite 55
C M Y CM MY CY CMY K
I

60
D Klokkeslæt
E Disneylyd-symbol
F Indstille ur
G Radio-symbol
H AM/FM-symbol
A SLEEP-symbol
B SNOOZE-symbol
C Clockradio-symbol
DK
1. Stjernelys
2. Drejeknap til kanalindstilling
3. ALARM SET: Indstille vækketid
4. TIME SET: Stille ur
5. SLEEP: Indstille automatisk frakobling
6. VOLUME-knap: Justere lydstyrken
7. Display
8. Netkabel (bagside)
9. Batterirum (undersiden af apparatet)
10. FUNCTION: Indstille funktionerne
11. Knap til valg af frekvensbånd AM/FM
12. HOUR: Indstille timetal
13. MIN: Indstille minuttal
14. Stjernelys: Slå til/fra
15. SNOOZE: Slumreknap
DISPLAY
16. FM-antenne (bagside)
41123_ProjectionClock_multilingual_DINA5.FH10 Fri Aug 06 10:44:19 2004 Seite 56
FUNKTIONER
C M Y CM MY CY CMY K

41123_ProjectionClock_multilingual_DINA5.FH10 Fri Aug 06 10:44:19 2004 Seite 57
61
- Legetøjet er ikke beregnet til børn under 3 år.
- Legetøjet må kun bruges med den anbefalede transformer.
- Transformeren er ikke legetøj.
Legetøj, der normalt kan rengøres med væske, skal adskilles fra transformeren før rengøring.
indsamlingssted for brugte batterier.
Batterierne skal affaldsbehandles i henhold til gældende regler, f.eks. indleveres på et
BEHANDLING AF TOMME BATTERIER
Tomme batterier må ikke smides i husholdningsaffaldet.
Ved fejl på apparatet bør du henvende dig til vores Service Center eller til et fagværksted.
Forsøg aldrig at åbne eller reparere apparatet eller strømledningen selv. Man kan blive
udsat for elektrisk stød!
at undgå at man falder over ledningerne, bør der ikke anvendes forlængerledning.
REPARATIONER MÅ KUN FORETAGES AF KVALIFICEREDE TEKNIKERE
- langvarige vibrationer
- store mængder støv eller dårlig ventilation
SØRG FOR AT NETADAPTEREN ER TILGÆNGELIG.
Forbind netadapteren med en stikkontakt (230 V ~ 50 Hz) i nærheden af apparatet.
Hvis apparatet skal kunne adskilles fra nettet hurtigt, skal netadapteren være lettilgængelig. For
- fugtighed
- direkte sollys eller direkte varme (f.eks. fra varmeapparater eller andre elektriske apparater)
kvælningsfare.
FØLGENDE MILJØBETINGELSER KAN SKADE APPARATET:
BØRN MÅ ALDRIG VÆRE ALENE MED ELEKTRISKE APPARATER
Det kan være livsfarligt at sluge batterier. Batterierne skal derfor opbevares utilgængelige for
børn. Hvis nogen alligevel skulle komme til at sluge et batteri, skal der straks søges lægehjælp.
Plastemballage skal også altid holdes uden for børns rækkevidde. Plastemballage kan medføre
Gem brugsanvisningen, så at du altid har den ved hånden. Hvis du sælger apparatet
eller forærer det væk, skal du huske at brugsanvisningen skal følge med.
OM DENNE BRUGSANVISNING
Læs sikkerhedsoplysningene grundigt igennem før apparatet tages i brug. Tag hensyn
til advarslerne på apparatet og i brugsanvisningen.
SIKKERHEDSOPLYSNINGER
C M Y CM MY CY CMY K
DK

62
DK
er uret udstyret med to batterier (størrelse AAA). Uret er fortsat tændt i en intern batterifunktion,
dog uden at klokkeslættet vises på displayet.
ISÆTNING AF BATTERIER
Tag batterirummets dæksel på undersiden af apparatet af ved at anbringe en lille skruetrækker
eller en clips i fordybningen og trykke forsigtigt.
Isæt 2 batterier type AAA 1,5 V. Vær opmærksom på polariteten som vist på fig. 2 og i batterirummet.
Luk batterirummet.
BEMÆRK!
- Brug kun batteripar af samme type.
- Bland aldrig gamle og nye batterier.
- Tag batterierne ud, hvis du ikke skal bruge apparatet i længere tid.
Væsken i batterierne kan løbe ud.
41123_ProjectionClock_multilingual_DINA5.FH10 Fri Aug 06 10:44:19 2004 Seite 58
NETTILSLUTNING
Sæt den medfølgende netadapters stik i en lettilgængelig stikkontakt 230 V ~ 50 Hz. På displayet
blinker nu visningen "00:00", og displaybelysningen er tændt.
BACKUPBATTERIR
Som sikkerhed ved strømsvigt eller for det tilfælde, at netadapteren trækkes ud af stikkontakten,
IBRUGTAGNING
C M Y CM MY CY CMY K

41123_ProjectionClock_multilingual_DINA5.FH10 Fri Aug 06 10:44:19 2004 Seite 59
63
3. Sæt FUNCTION-afbryderen (10) i stillingen BUZZ for at slå vækkeuret fra og aktivere det til
næste dag. Sæt FUNCTION-afbryderen (10) på OFF for at slå vækkeuret fra uden at aktivere
det til næste dag.
2. Sæt FUNCTION-afbryderen (10) i stillingen BUZZ. Symbolet for disneylyd (
klokkeslættet er det samme som den indstillede vækketid, slås disneylyden til i en time og
slås så fra igen.
INDSTILLE VÆKNING DISNEYLYD
1. Indstil vækketiden som beskrevet ovenfor.
næste dag. Sæt FUNCTION-afbryderen (10) på OFF for at slå vækkeuret fra uden at aktivere
det til næste dag.
3. Sæt FUNCTION-afbryderen (10) i stillingen AUTO for at slå vækkeuret fra og aktivere det til
klokkeslættet er det samme som den indstillede vækketid, tændes radioen i en time og slukkes
så igen.
2. Sæt FUNCTION-afbryderen (10) i stillingen AUTO. Symbolet for clockradio (
ALARM SET (3). Tallene i displayet blinker.
lydstyrke med VOLUME-knappen (6).
(12) for at indstille timer og/eller knappen MIN (13) for at indstille minutter.
vises klokkeslættet.
3. Når du slipper knappen TIME SET (4) igen, gemmes klokkeslættet efter 4 sekunder. På displayet
INDSTILLE VÆKKETID
1. Når FUNCTION-afbryderen (10) står i stillingen ON, AUTO eller BUZZ, trykker du på knappen
2. Mens du holder knappen ALARM SET (3) inde, skal du nu trykke flere gange på knappen HOUR
3. Når du slipper knappen ALARM SET (3) igen, er din vækketid gemt.
INDSTILLE VÆKNING MED RADIO
1. Indstil vækketiden som beskrevet ovenfor. Vælg en radiostation, og indstil den ønskede
2. Mens du holder knappen TIME SET (4) inde, skal du trykke flere gange på knappen HOUR
(12) for at indstille timer og/eller på knappen MIN (13) for at indstille minutter.
og lys.
på knappen.
lyser frekvensbånd AM eller FM.
HØRE RADIO
1. Sæt FUNCTION-afbryderen (10) i stillingen ON for at tænde projektionsuret. På displayet
2. Vælg det ønskede frekvensbånd (AM eller FM) med frekvensbåndsknappen (11).
3. For at indstille en station skal du dreje TUNING-knappen, til den ønskede frekvens ses øverst
4. Indstil lydstyrken med VOLUME-knappen (6).
5. Sæt FUNCTION-afbryderen (10) i stillingen OFF for at slukke apparatet.
TÆNDE/SLUKKE STJERNELYSET
1. Tryk på stjernelysknappen (1) for at tænde stjernelyset. Toppen af tårnet er nu skiftevis mørk
2. Tryk på stjernelysknappen (1) en gang til for at slukke stjernelyset igen.
INDSTILLE KLOKKESLÆT
1. Hold knappen TIME SET (4) inde. Symbolet for klokkeslæt (
KORT BRUGSANVISNING
) og tallene i displayet blinker.
C M Y CM MY CY CMY K
) lyser. Når
) lyser. Når
DK

Producenten forbeholder sig ret til at foretage tekniske ændringer af produktet.
Frekvensområde FM 87,5-108 MHz
Frekvensområde AM: 522 -1629kHz
DK
STRØMFORSYNING
Netadapter: AD-0970-VDS
Sekundær: 230 V ~ 50 Hz 12 W
Batterier (medfølger ikke): 2 x 1,5 V, LR03/R03 (alkaliske batterier anbefales),
RADIO
Primær: 9 V
Anvend kun en blød, fugtig klud til rengøringen. Brug aldrig stærke rengøringsmidler, da disse
kan beskadige overfladen eller påskriften på apparatet.
41123_ProjectionClock_multilingual_DINA5.FH10 Fri Aug 06 10:44:19 2004 Seite 60
Træk netadapteren ud af stikkontakten før rengøring!
64
størrelse AAA
TEKNISKE DATA
RENGØRING
700 mA
C M Y CM MY CY CMY K

65
41123_ProjectionClock_multilingual_DINA5.FH10 Fri Aug 06 10:44:19 2004 Seite 61
C M Y CM MY CY CMY K
DK

66
DTid
E Disney-melodi-symbol
F Ställa in tiden
G Radio-symbol
H AM/FM-symbol
DISPLAY
A SLEEP-symbol
B SNOOZE-symbol
C Radioväcknings-symbol
S
8. Nätsladd (baksidan)
9. Batterifack (på apparatens undersida)
10. FUNCTION: Ställa in funktionerna
11. Omkopplare för frekvensområde AM/FM
12. HOUR: Ställa in timme
13. MIN: Ställa in minuter
14. Stjärnljus: Slå till och ifrån
15. SNOOZE: Repetitionsväckning
16. FM-kastantenn (baksida)
1. Stjärnljus
2. Ratt för inställning av stationer
3. ALARM SET: Ställa in väckningstid
4. TIME SET: Ställa in klockan
5. SLEEP: Ställa in automatisk frånkoppling
6. VOLUME-reglering: Ställa in volymen
7. Display
41123_ProjectionClock_multilingual_DINA5.FH10 Fri Aug 06 10:44:19 2004 Seite 62
KONTROLLER
C M Y CM MY CY CMY K

41123_ProjectionClock_multilingual_DINA5.FH10 Fri Aug 06 10:44:19 2004 Seite 63
67
- Leksaken är inte lämpad för barn under 3 år.
- Leksaken får endast drivas av den rekommenderade transformatorn.
- Transformatorn är ingen leksak
- Leksaker som i normalfall kan rengöras med vätska, måste åtskiljas från transformatorn innan
de rengörs.
Avfallshantera batterierna enligt gällande bestämmelser och föreskrifter, t ex genom att
lämna in dem till ett insamlingsställe i din kommun.
AVFALLSHANTERING AV BATTERIER
Kasta inte förbrukade batterier i hushållssoporna.
Om en störning eller defekt föreligger, kontakta vår serviceavdelning eller en kompetent
reparationsverkstad.
REPARERA ALDRIG UTRUSTNINGEN PÅ EGEN HAND.
Försök aldrig att öppna eller reparera apparaten eller dess anslutningsledning. Det finns
risk för elektriska slag!
- Fukt och väta
- Direkt solljus eller värme (t ex från radiatorer eller annan elektrisk utrustning)
- Permanenta vibrationer
- Kraftig dammbildning eller bristfällig ventilation.
SE TILL ATT NÄTADAPTERN ÄR ÅTKOMLIG
Anslut nätadaptern till ett vägguttag (230 V ~ 50 Hz) i närheten av apparaten.
Nätadaptern måste vara lättåtkomlig för att apparaten snabbt ska kunna åtskiljas från nätet.
Undvik risk för att snava och använd inga förlängningssladdar.
LÄMNA ALDRIG BARN UTAN UPPSIKT MED ELEKTRISK UTRUSTNING.
Batterier som har svalts, oavsett om de kan laddas upp eller ej, kan vara livsfarliga. Förvara därför
alltid batterier utom räckhåll för småbarn. Uppsök genast läkare om ett batteri har svalts.
Se alltid till att förpackningar av plast är oåtkomliga för barn. Det finns risk för kvävning.
FÖLJANDE OMGIVNINGSVILLKOR KAN VARA SKADLIGA FÖR APPARATEN:
Förvara alltid bruksanvisningen inom räckhåll. För det fall att du ska sälja eller överlåta
apparaten till en annan person, måste denna bruksanvisning alltid medfölja.
OM DENNA BRUKSANVISNING
Läs igenom säkerhetsanvisningarna noggrant innan du använder apparaten. Var
uppmärksam på de varningar som finns på apparaten och i bruksanvisningen.
SÄKERHETSANVISNINGAR
C M Y CM MY CY CMY K
S

68
Det finns risk för att batterierna läcker.
S
gem i fördjupningen och tryck in en aning.
Sätt i två batterier av typ AAA 1,5 V. Kontrollera att batterierna ligger på rätt håll, enl. bild 2 och
markeringen i batterifacket. Stäng batterifacket.
OBS!
- Använd endast två batterier av samma typ.
- Blanda inga gamla och nya batterier.
- Ta ut batterierna om du inte ska använda apparaten under längre tid.
ANSLUTA TILL NÄTET
Anslut stickkontakten på den medföljande nätadaptern till ett lättillgängligt vägguttag med 230
V ~ 50 Hz. Om batterier finns i apparaten kommer strömförsörjningen från dessa att kopplas ifrån
automatiskt när apparaten ansluts till nätet. På displayen blinkar "00:00" samtidigt som
bakgrundsbelysningen är tänd.
BACKUP-BATTERI
Om nätadaptern dras ut ur vägguttaget eller om ett strömavbrott uppstår, kommer
strömförsörjningen till klockan att upprätthållas av två batterier (storlek AAA). Klockan fortsätter
i batteridrift, dock visas ingen tid på displayen.
LÄGGA I BATTERIER
Ta av locket från batterifacket på apparatens undersida. Sätt en liten skruvmejsel eller ett litet
ANVÄNDNING
41123_ProjectionClock_multilingual_DINA5.FH10 Fri Aug 06 10:44:19 2004 Seite 64
C M Y CM MY CY CMY K

69
funktionen är därefter avaktiverad för nästa dag.
) är tänd. När tiden når den inställda väckningstiden kopplas Disney-melodin in för en timmes
dvs. funktionen är därefter avaktiverad för nästa dag.
STÄLLA IN VÄCKNING MED DISNEY-MELODI
1. Ställ in väckningstiden enligt beskrivningen ovan.
2. Ställ FUNCTION-omkopplaren (10) på läge BUZZ. Symbolen för väckning med Disney-melodi
(
tid och kopplas därefter ifrån på nytt.
3. Ställ FUNCTION-omkopplaren (10) på läge BUZZ för att slå ifrån väckarklockan och aktivera
för nästa dag. Ställ FUNCTION-omkopplaren på OFF för att slå ifrån väckarklockan helt, dvs.
3. Skjut FUNCTION-omkopplaren (10) till läge AUTO för att slå ifrån väckarklockan och aktivera
för nästa dag. Ställ FUNCTION-omkopplaren (10) på OFF för att slå ifrån väckarklockan helt,
2. Ställ FUNCTION-omkopplaren (10) på läge AUTO. Symbolen för väckning med radio (
tänd. När tiden når den inställda väckningstiden kopplas radion in för en timmes tid och kopplas
därefter ifrån på nytt.
STÄLLA IN VÄCKNING MED RADIO
1. Ställ in väckningstiden enligt beskrivningen ovan. Välj en radiostation och ställ in önskad volym
med VOLUME-regleringen (6).
3. När du släpper knappen ALARM SET (3) på nytt har väckningstiden sparats.
SET (3). Tecknen på displayen blinkar.
för att ställa in timmarna och/eller knappen MIN (13) för att ställa in minuterna.
att ställa in timmarna och/eller knappen MIN (13) för att ställa in minuterna.
visas tiden på displayen.
3. Om du släpper knappen TIME SET (4) kommer tiden att sparas inom fyra sekunder. Därefter
STÄLLA IN / ÅTERSTÄLLA VÄCKNINGSTIDEN
1. Om FUNCTION-omkopplaren (10) står på ON, AUTO eller BUZZ, tryck på knappen ALARM
2. Medan du håller knappen ALARM SET (3) intryckt, tryck flera gånger på knappen HOUR (12)
STÄLLA IN / ÅTERSTÄLLA TIDEN
1. Håll knappen TIME SET (4) intryckt. Tidssymbolen (
2. Medan du håller knappen TIME SET (4) intryckt, tryck flera gånger på knappen HOUR (12) för
) och klockans siffror blinkar.
2. Tryck på stjärnljus- knappen (1) en gång till för att slå ifrån stjärnljuset.
och släckt läge.
visas frekvensband AM eller FM.
2. Välj avsett frekvensområde (AM eller FM) med omkopplaren för frekvensområde (11).
3. För att ställa in en frekvens, vrid på TUNING-ratten tills önskad frekvens visas upptill på ratten.
4. Ställ in volymen med VOLUME-regleringen (6).
5. Ställ FUNCTION-omkopplaren (10) i läge OFF för att slå ifrån apparaten.
SLÅ TILL / IFRÅN STJÄRNLJUS
1. Tryck på stjärnljus- knappen (1) för att slå till stjärnljuset. Tornets spets skiftar nu mellan tänt
LYSSNA PÅ RADIO
1. Ställ FUNCTION-omkopplaren (10) i läge ON för att slå till projektionsklockan. På displayen
41123_ProjectionClock_multilingual_DINA5.FH10 Fri Aug 06 10:44:19 2004 Seite 65
KORTFATTAD BESKRIVNING
C M Y CM MY CY CMY K
) är
S

Med reservation för tekniska ändringar!
Frekvensområde mellanvåg 522 -1629kHz
RADIO
Frekvensområde FM 87,5 - 108 MHz
Batterier (ingår ej): 2 st 1,5 V, LR03/R03 (Alkaline rekommenderas),
Primär: 9 V
Sekundär: 230 V ~ 50 Hz 12 W
S
STRÖMFÖRSÖRJNING
Nätadapter: AD-0970-VDS
Dra ut nätadaptern före rengöring!
Rengör endast med en fuktig, mjuk duk. Använd inga aggressiva rengöringsmedel, eftersom det
finns risk för att ytan eller texten på apparaten kan skadas.
41123_ProjectionClock_multilingual_DINA5.FH10 Fri Aug 06 10:44:19 2004 Seite 66
70
strl. AAA
TEKNISKA DATA
RENGÖRING
700 mA
C M Y CM MY CY CMY K

71
41123_ProjectionClock_multilingual_DINA5.FH10 Fri Aug 06 10:44:19 2004 Seite 67
C M Y CM MY CY CMY K
S

72
D Klokkeslett
E Disney-tone-symbol
F Innstilling av klokka
G Radio-symbol
H AM/FM-symbol
DISPLAY
A SLEEP-symbol
B SNOOZE-symbol
C Radiovekkingssymbol
12. HOUR: Stille inn timer
13. MIN: Stille inn minutter
14. Stjernelys: slå av og på
15. SNOOZE: Slumreknapp
16. FM-antenne (bak)
N
2. Dreieknapp for kanalinnstilling
3. ALARM SET: Stille vekketid
4. TIME SET: Stille klokka
5. SLEEP: Stille inn automatisk utkopling
6. VOLUME-knapp: Justere lydstyrke
7. Display
8. Nettkabel (bak)
9. Batterirom (undersiden av apparatet)
10. FUNCTION: Stille inn funksjonene
11. Knapp for valg av frekvensbånd AM/FM
41123_ProjectionClock_multilingual_DINA5.FH10 Fri Aug 06 10:44:19 2004 Seite 68
1. Stjernelys
BETJENINGSELEMENTER
C M Y CM MY CY CMY K

41123_ProjectionClock_multilingual_DINA5.FH10 Fri Aug 06 10:44:19 2004 Seite 69
73
- Leketøyet må bare brukes med anbefalt transformator.
- Transformatoren er ikke et leketøy.
- Leketøy som vanligvis kan rengjøres med væske, må kobles fra transformatoren før rengjøring.
- Leketøyet er ikke beregnet på barn under 3 år.
BEHANDLING AV TOMME BATTERIER
Tomme batterier skal ikke kastes i husholdningsavfallet.
Batteriene må avfallsbehandles i henhold til bestemmelsene der du bor, f.eks. leveres
inn på et innsamlingssted for brukte batterier.
Prøv aldri å åpne eller reparere apparatet eller strømledningen selv. Det er fare for
elektrisk støt!
Ved feil på apparatet bør du henvende deg til vårt Service Center eller til et fagverksted.
å unngå snubling bør du ikke bruke skjøteledning.
IKKE REPARER APPARATET SELV.
Ta vare på bruksanvisningen slik at du alltid har den tilgjengelig. Dersom du selger
eller gir bort apparatet, må du også la denne bruksanvisningen følge med.
IKKE LA SMÅ BARN VÆRE ALENE MED ELEKTRISKE APPARATER.
Svelging av batterier kan medføre livsfare. Batteriene må derfor oppbevares utilgjengelig for
småbarn. Hvis noen likevel skulle svelge et batteri, må du oppsøke medisinsk hjelp med en gang.
Hold også plastemballasjen utenfor barns rekkevidde. Den kan medføre kvelningsfare.
FØLGENDE MILJØBETINGELSER KAN SKADE APPARATET:
- fuktighet
- direkte sollys eller direkte varme (f.eks. fra varmeovner eller andre elektriske apparater)
- varig vibrasjon
- store mengder støv eller dårlig ventilasjon
LA NETTADAPTEREN VÆRE TILGJENGELIG
Koble nettadapteren til en stikkontakt (230 V~ 50 Hz) i nærheten av apparatet.
Nettadapteren må være lett tilgjengelig, i tilfelle apparatet må kobles raskt fra strømnettet. For
OM DENNE BRUKSANVISNINGEN
Les nøye igjennom sikkerhetsopplysningene før apparatet tas i bruk. Ta hensyn til
advarslene på apparatet og i bruksanvisningen.
SIKKERHETSOPPLYSNINGER
C M Y CM MY CY CMY K
N

74
N
HJELPEBATTERIER
Som en sikkerhet ved strømbrudd eller dersom nettadapteren blir trukket ut av stikkontakten,
leveres denne klokka med to batterier (størrelse AAA). Klokka fortsetter å gå på strømmen fra
batteriene, men det vises ikke noe klokkeslett på displayet.
SETTE INN BATTERIER
Fjern dekslet til batterirommet på undersiden av klokka ved å skyve en liten skrutrekker eller en
binders inn i fordypningen og trykke lett.
Legg inn 2 batterier av type AAA 1,5 V. Ta hensyn til polariteten (+ og -). Følg anvisningene i figur
2 og i selve batterirommet. Lukk batterirommet.
FARE!
- Bruk bare batteripar av samme type.
- Ikke bruk nye og gamle batterier om hverandre.
- Hvis du ikke kommer til å trenge batteriene på en stund, bør du ta dem ut.
Ellers kan batteriene lekke.
41123_ProjectionClock_multilingual_DINA5.FH10 Fri Aug 06 10:44:19 2004 Seite 70
TILKOPLING TIL STRØMNETTET
Koble den medfølgende nettadapteren til en lett tilgjengelig 230 V~ 50 Hz stikkontakt. På displayet
blinker det nå "00:00" og displaybelysningen er på.
TA APPARATET I BRUK
C M Y CM MY CY CMY K

41123_ProjectionClock_multilingual_DINA5.FH10 Fri Aug 06 10:44:19 2004 Seite 71
75
3. Still FUNCTION-bryteren (10) på BUZZ hvis du vil slå av vekkerklokken og aktivere den for
av igjen.
neste dag. Still FUNCTION-bryteren (10) på OFF hvis du vil slå av vekkerklokken uten å aktivere
den for neste dag.
1. Still inn vekkeklokkeslettet som beskrevet ovenfor.
2. Still FUNCTION-bryteren (10) på BUZZ. Symbolet for Disney-tone (
når det innstilte vekketidspunktet, slås Disney-tonen automatisk på. Etter en time slår den seg
) lyser. Når klokkeslettet
STILLE INN VEKKING MED DISNEY-TONE
3. Still FUNCTION-bryteren (10) på AUTO hvis du vil slå av vekkerklokken og aktivere den for
igjen.
neste dag. Still FUNCTION-bryteren (10) på OFF hvis du vil slå av vekkerklokken uten å aktivere
den for neste dag.
STILLE KLOKKA
1. Trykk på knappen TIME SET (4) og hold den inne. Symbolet for klokkeslett (
2. Mens du holder knappen TIME SET (4) inne, trykker du på HOUR (12) for å stille timer og/eller
3. Når du slipper knappen TIME SET (4), går det 4 sekunder, så lagres klokkeslettet. Klokkeslettet
STILLE VEKKETID
1. Med FUNCTION-bryteren (10) på ON, AUTO eller BUZZ trykker du på knappen ALARM SET
2. Mens du holder knappen ALARM SET (3) inne, trykker du på HOUR (12) for å stille timer
3. Når du slipper knappen ALARM SET (3), lagres vekkeklokkeslettet.
STILLE INN VEKKING MED RADIO
1. Still inn vekkeklokkeslettet som beskrevet ovenfor. Velg en radiostasjon og still inn lydstyrke
2. Still FUNCTION-bryteren (10) på AUTO. Symbolet for radiovekking (
når det innstilte vekketidspunktet, slås radioen automatisk på. Etter en time slår den seg av
med VOLUME-knappen (6).
(3). Tallene i displayet blinker.
og/eller MIN (13) for å stille minutter.
vises nå i displayet.
displayet blinker.
MIN (13) for å stille minutter.
) lyser. Når klokkeslettet
2. Trykk på stjernelysknappen (1) en gang til hvis du vil slå av stjernelyset igjen.
knappen.
vises frekvensbånd AM eller FM.
HØRE PÅ RADIO
1. Sett FUNCTION-bryteren (10) i ON-posisjon. Projeksjonsklokka blir nå slått på. På displayet
2. Velg frekvensbånd med AM/FM-knappen (11).
3. Still inn en stasjon ved å dreie på TUNING-knappen til ønsket frekvens vises på toppen av
4. Still inn lydstyrke med VOLUME-knappen (6).
5. Hvis du vil slå av radioen, setter du FUNCTION-bryteren (10) i OFF-posisjon.
SLÅ STJERNELYSET AV/PÅ
1. Trykk på stjernelysknappen (1) hvis du vil slå på stjernelyset. Toppen av tårnet vil nå veksle
mellom lyst og mørkt.
KORT BRUKSANVISNING
C M Y CM MY CY CMY K
) og tallene i
N

Produsenten forbeholder seg retten til å foreta tekniske endringer ved produktet.
Frekvensområde FM 87,5-108 MHz
Frekvensområde AM 522 -1629kHz
RADIO
N
STRØMFORSYNING
Nettadapter: AD-0970-VDS
Sekundær: 230 V ~ 50 Hz 12 W
Primær: 9 V
Batterier (følger ikke med): 2 x 1,5 V, LR03/R03 (alkaliske batterier anbefales),
Trekk støpselet til nettadapteren ut av stikkontakten før du rengjør apparatet!
Bruk en myk, fuktig klut til rengjøringen. Ikke bruk sterke rengjøringsmidler, da disse kan skade
overflaten og skriften på apparatet.
41123_ProjectionClock_multilingual_DINA5.FH10 Fri Aug 06 10:44:19 2004 Seite 72
76
størrelse AAA
TEKNISKE DATA
RENGJØRING
700 mA
C M Y CM MY CY CMY K

77
41123_ProjectionClock_multilingual_DINA5.FH10 Fri Aug 06 10:44:19 2004 Seite 73
C M Y CM MY CY CMY K
N

78
D Kellonaika
E Disney-äänen symboli
F Kellon asetukset
G Radio-symboli
H AM/FM-symboli
NÄYTTÖ
A SLEEP-symboli
B SNOOZE-symboli
C Radioherätyksen symboli
FIN
11. Taajuusalueen AM/FM valintanuppi
12. HOUR: tuntien asetus
13. MIN: minuuttien asetus
14. Tähtivalo: päälle ja pois
15. SNOOZE: torkkukytkin
16. FM-antenni (takana)
1. Tähtivalo
2. Kanavanvalitsimen kiertonuppi
3. ALARM SET: herätysajan asetus
4. TIME SET: kellonajan asetus
5. SLEEP: automaattisen sammutuksen asetus
6. VOLUME-nuppi: äänenvoimakkuuden säätö
7. Näyttö
8. Verkkojohto (takana)
9. Paristokotelo (laitteen alla)
10. FUNCTION: toimintojen asetukset
41123_ProjectionClock_multilingual_DINA5.FH10 Fri Aug 06 10:44:19 2004 Seite 74
SÄÄTIMET
C M Y CM MY CY CMY K

41123_ProjectionClock_multilingual_DINA5.FH10 Fri Aug 06 10:44:19 2004 Seite 75
79
- Lelu ei sovellu alle 3-vuotiaille lapsille.
- Lelua saa käyttää ainoastaan suositellun muuntajan kanssa.
- Muuntaja ei ole lelu.
- Lelut, jotka saa puhdistaa veden tai muiden nesteiden avulla, on irrotettava muuntajasta ennen
- puhdistamista.
Paristot tulee hävittää asuinalueesi määräysten mukaisesti, esim. toimittaa käytettyjen
paristojen keräyspisteeseen.
Pidä myös muovikelmupakkaus poissa lasten ulottumattomista. Se voi aiheuttaa tukehtumisvaaran.
SEURAAVAT YMPÄRISTÖOLOSUHTEET VOIVAT VAURIOITTAA LAITETTA:
- kosteus
- suora auringonpaahde tai suora lämpö (esim. lämmittimet tai muut sähkölaitteet)
- jatkuva tärinä
- suuri määrä pölyä tai huono ilmanvaihto
ASETA VERKKOSOVITIN SITEN, ETTÄ SIIHEN PÄÄSEE HELPOSTI KÄSIKSI.
Yhdistä verkkosovitin pistorasiaan (230 V ~ 50 Hz) laitteen lähellä.
Verkkosovittimen on oltava helposti käsillä, jotta laite voidaan tarvittaessa irrottaa verkkovirrasta
nopeasti. Jatkojohdon käyttämistä ei suositella, jotta ei aiheudu kompastumisvaaraa.
LOPPUUN KÄYTETTYJEN PARISTOJEN KÄSITTELY
Vanhoja paristoja ei saa heittää kotitalousjätteen sekaan.
Laitteen vioittuessa ota yhteys huoltopisteeseemme tai alan ammattihuoltoon.
ÄLÄ KORJAA LAITETTA ITSE.
Älä koskaan yritä avata tai korjata laitetta tai verkkojohtoa itse. Se aiheuttaa sähköiskun
vaaran!
ÄLÄ JÄTÄ PIENIÄ LAPSIA YKSIN SÄHKÖLATTEIDEN KANSSA.
Paristojen nieleminen voi aiheuttaa hengenvaaran. Siksi paristot tulee säilyttää pienten lasten
ulottumattomissa. Jos joku kuitenkin sattuisi nielemään pariston, hanki lääkärin apua välittömästi.
Pidä käyttöohjeet tallessa niin, että ne ovat aina saatavilla. Kun myyt laitteen tai annat
sen pois, anna myös tämä käyttöohje laitteen mukaan.
TIETOJA NÄISTÄ KÄYTTÖOHJEISTA
Lue käyttöturvallisuustiedot läpi tarkasti ennen laitteen käyttöönottoa. Ota huomioon
varoitukset laitteessa ja käyttöohjeissa.
KÄYTTÖTURVALLISUUSTIETOJA
C M Y CM MY CY CMY K
FIN

80
FIN
LIITÄNTÄ VERKKOVIRTAAN
Liitä mukana tulevan verkkosovittimen pistoke esteettä esillä olevaan 230 V ~ 50 Hz pistorasiaan.
Jos laitteeseen on laitettu paristot, ne kytkeytyvät automaattisesti pois käytöstä verkkovirtaa
käytettäessä. Näytössä vilkkuu nyt "00:00" ja näytön valaistus on päällä.
VARAPARISTOT
Kellon mukana toimitetaan kaksi varaparistoa (kokoa AAA) siltä varalta, että verkkovirta katkeaa
tai verkkosovitin vedetään irti pistorasiasta. Kello jatkaa käyntiään paristovirralla, mutta näytössä
ei esitetä kellonaikaa.
PARISTOJEN LAITTO SISÄÄN
Irrota paristokotelon kansi kellon pohjasta vipuamalla ruuviavaimella tai paperiliittimellä
syvennyksestä ja painamalla kevyesti.
Laita koteloon 2 paristoa tyyppiä AAA 1,5 V. Huomioi napaisuus (+ja -). Noudata ohjeita kuvassa
2 ja paristokotelossa. Sulje paristokotelo.
VAARA!
- Käytä ainoastaan samantyyppisiä paristoja.
- Älä käytä uusia ja vanhoja paristoja sekaisin.
- Jos et aio käyttää paristoja pitkään aikaan, ne täytyy poistaa laitteesta.
Muuten paristot voivat vuotaa.
41123_ProjectionClock_multilingual_DINA5.FH10 Fri Aug 06 10:44:19 2004 Seite 76
LAITTEEN KÄYTTÖÖNOTTO
C M Y CM MY CY CMY K

41123_ProjectionClock_multilingual_DINA5.FH10 Fri Aug 06 10:44:19 2004 Seite 77
81
3. Jos haluat sammuttaa herätyskellon ja käynnistää sen seuraavaa päivää varten, aseta
se sammuu itsekseen.
FUNCTION-katkaisija (10) asentoon BUZZ. Jos haluat sammuttaa herätyskellon käynnistämättä
sitä seuraavaa päivää varten, aseta FUNCTION-katkaisija (10) asentoon OFF.
HERÄTYKSEN ASETUS DISNEY-ÄÄNELLE
1. Aseta herätysaika edellä selostetulla tavalla.
2. Aseta FUNCTION-katkaisija (10) asentoon BUZZ. Disney-äänen symboli (
tulee asetettuun herätyshetkeen, Disney-ääni kytkeytyy automaattisesti päälle. Tunnin kuluttua
3. Jos haluat sammuttaa herätyskellon ja käynnistää sen seuraavaa päivää varten, aseta
se sammuu itsekseen.
FUNCTION-katkaisija (10) asentoon AUTO. Jos haluat sammuttaa herätyskellon käynnistämättä
sitä seuraavaa päivää varten, aseta FUNCTION-katkaisija (10) asentoon OFF.
RADIOHERÄTYKSEN ASETUS
1. Aseta herätysaika edellä selostetulla tavalla. Valitse radioasema ja säädä äänenvoimakkuus
2. Aseta FUNCTION-katkaisija (10) asentoon AUTO. Radioherätyksen symboli (
kello tulee asetettuun herätyshetkeen, radio kytkeytyy automaattisesti päälle. Tunnin kuluttua
VOLUME-nupilla (6).
3. Kun päästät nupin ALARM SET (3), herätysaika tallentuu.
HERÄTYSAJAN ASETUS
1. FUNCTION-katkaisija (10) asennossa ON, AUTO tai BUZZ paina nuppia ALARM SET (3).
2. Samalla kun pidät nupin ALARM SET (3) painettuna aseta tunnit painamalla HOUR (12) ja/tai
Numerot näytössä vilkkuvat.
minuutit painamalla MIN (13).
3. Kun päästät nupin TIME SET (4), kuluu kellonajan tallennukseen 4 sekuntia. Kellonaika näkyy
(4) ja pidä se painettuna. Kellonajan symboli (
minuutit painamalla MIN (13).
nyt näytössä.
nyt vuorotellen.
näkyy taajuusalue, joko AM tai FM.
RADION KUUNTELU
1. Aseta FUNCTION-katkaisija (10) asentoon ON. Silloin projektiokello käynnistyy. Näytössä
2. Valitse taajuusalue AM/FM valintanupilla (11).
3. Viritä asema kiertämällä TUNING-nuppia, kunnes haluttu taajuus näkyy nupin päällä.
4. Säädä äänenvoimakkuus VOLUME-nupilla (6).
5. Kun haluat sammuttaa radion, aseta FUNCTION-katkaisija (10) asentoon OFF.
TÄHTIVALO POIS/PÄÄLLE
1. Jos haluat tähtivalon päälle, paina tähtivalonuppia (1). Valo tornin huipussa palaa ja sammuu
2. Kun haluat sammuttaa tähtivalon, paina tähtivalonuppia (1) kerran uudelleen.
KELLON ASETUKSET
1. Paina nuppia TIME SET (4) ja pidä se painettuna. Kellonajan symboliPaina nuppia TIME SET
2. Samalla kun pidät nupin TIME SET (4) painettuna aseta tunnit painamalla HOUR (12) ja/tai
) ja numerot näytössä vilkkuvat.
PIKAOPAS
C M Y CM MY CY CMY K
) palaa. Kun kello
) palaa. Kun
FIN

82
Taajuusalue FM 87,5-108 MHz
Taajuusalue AM 522 -1629kHz
FIN
RADIO
Primäärinen: 9 V
Paristot (eivät mukana): 2 x 1,5 V, LR03/R03 (alkaliparistoja suositellaan), koko AAA
TEHOLÄHTEET
Verkkosovitin: AD-0970-VDS
Sekundaarinen: 230 V ~ 50 Hz 12 W
TEKNISET TIEDOT
700 mA
41123_ProjectionClock_multilingual_DINA5.FH10 Fri Aug 06 10:44:19 2004 Seite 78
Irrota verkkosovitin pistorasiasta, ennen kuin puhdistat laitetta.
Käytä puhdistukseen pehmeää, kosteaa kangaspalaa. Älä käytä vahvoja puhdistusaineita, koska
ne voivat vaurioittaa laitteen pintaa ja tekstejä.
PUHDISTUS
C M Y CM MY CY CMY K

83
41123_ProjectionClock_multilingual_DINA5.FH10 Fri Aug 06 10:44:19 2004 Seite 79
C M Y CM MY CY CMY K
FIN
 Loading...