

Page 1

Table of Contents:
SAFETY AND MAINTENANCE ........................................... 2
WHAT’S IN THE BOX? .................................................... 4
TECHNICAL DATA.......................................................... 4
SYSTEM REQUIREMENTS................................................ 4
IDENTIFYING PARTS...................................................... 5
SETTING UP ................................................................. 6
Step 1: Fitting batteries in the keyboard ........................ 6
Step 2: Fitting batteries in the mouse ............................ 6
Step 3: Connecting the receiver.................................... 6
Step 4: Frequency adjustment...................................... 7
Step 5: Installing the software...................................... 7
Uninstalling the driver software .................................. 9
Setting a different channel ......................................... 10
OPERATING THE KEYBOARD AND MOUSE ....................... 11
Mouse wheel ............................................................ 11
The Keyboard........................................................... 11
Special keys and functions ....................................... 12
CUSTOMER SERVICE ................................................... 14
Troubleshooting........................................................ 14
Technical Support ..................................................... 15
If you need further assistance ……............................. 15
Battery treatment ..................................................... 16
WARRANTY ................................................................ 17
Limitation of Warranty............................................. 17
Limits of Liability .................................................... 18
Local Law .............................................................. 18
Making Copies of This Manual ..................................... 18
Page 2

S
AAFFEETTYY AANNDD
S
Keep these instructions with your wireless Keyboard and mouse
set at all times. The proper set up, use and care can help extend
the life of your product. In the event that you transfer ownership
of these devices, please provide these instructions to the new
owner.
Ö Whenever you edit your data, it is advisable to make backup
copies on an external data medium (disks, CD). We are not liable for any loss of data and consequential damages.
Ö This product is designed to run on a PC/AT (IBM-compatible)
computer with PS/2 ports or USB port.
Ö Follow the safety instructions for the computer to which you
are connecting the devices.
Ö Never open up the component housings. This might lead to a
short circuit or even to a fire.
Ö Never allow children to use electronic devices unsupervised.
Children may not always correctly identify potential hazards.
Ö Arrange cables so that no-one can tread on or trip over them.
Ö This device should only be repaired by an authorised service
centre. Please contact customer care if you have any technical
problems.
Ö Remove all power cables before installation. If the computer is
not disconnected from the power outlet damage may result.
Unless expressly instructed otherwise, only remove and
change the connections in the powered down state.
Ö Keep devices away from moisture and avoid dust, heat and
direct sunlight. Ensure an ambient temperature that is suitable
for office equipment.
Ö Before cleaning the devices, remove the cable connection with
the computer. Clean the devices and other components with a
damp cloth. Do not use any solvents, corrosives or gaseous
detergents.
Ö Position and operate these devices only on a stable, even and
vibration-free surface.
M
AAIINNTTEENNAANNCCE
M
E
2
AFETY AND MAINTENANCE
S
Page 3

Ö Allow a clearance of at least 50 cm (19.7”) from sources of
high-frequency and magnetic interference (TV, mobile telephone, infrared devices, loudspeaker cabinets, etc), in order
to avoid malfunctions and loss of data. The distance between
the transmitter and the receiver should be greater than 50 cm
(19.7”).
Ö These devices are not intended for use in a heavy industrial
environment.
Medical studies have shown that certain physical ailments and
injuries are linked to prolonged and repetitive movements in an
unsuitable working environment and to unsafe working habits.
Take frequent breaks when using a computer. If you experience
pain, numbness or tingling in your arms, wrists, hands or fingers,
consult a medical doctor.
Remove the power plug of your computer from the mains and
contact customer care:
• if the connections are cut or otherwise damaged;
• if liquid has entered the device housing;
• if a device does not operate correctly;
• if a device is dropped or the housing damaged.
This set has been tested and meets the European directives for
radio systems and telecommunications technical equipment
(R&TTE 1999/5/EG).
CE 0470 !
Device
At the end of its life, the appliance must not be disposed of in
household rubbish. Enquire about the options for environmentallyfriendly disposal.
AFETY AND MAINTENANCE
S
3
Page 4

W
W
Please check on the below-mentioned parts and accessories to be
in the box. In case of any missing item please contact your local
service centre accordingly. Any claim for missing parts will only be
accepted within 7 days from date of purchase.
ery is the following:
T
T
T
’
HHAAT
SS IINN TTHHEE
’
1 - Wireless receiver with cable set
(1 x PS/2 connector, 1 x USB connector)
1 - Wireless keyboard
1 - Wireless mouse
1 - Adapter USB Ö PS/2
1 - Palm rest
4 - Batteries (AA, 1.5 V)
1 - Installation software
1 - User manual
EECCHHNNIICCAALL DDAATTA
• Radio mouse 5 keys with control wheel
• Keyboard with multi media keys
• Connections 2 x PS/2 connector or
1 x USB connector
• Battery operated mouse 2 x AA, 1.5 V batteries
• Battery operated keyboard 2 x AA, 1.5V batteries
• Standard compliance CE, R&TTE 1999/5/EG
X
A
B
B
OOX
??
Included in deliv-
S
YYSSTTEEMM RREEQQUUIIRREEMMEENNTTS
S
• Computer PC/AT-compatible computer
• Processor power Pentium 100 MHz or higher
• Operating system Windows® 98SE/ME/2000/XP
• RAM 16 MB, 32 MB or more recommended
• Hard disk drive min. 10 MB free space
• Installation CD-ROM drive
• Connections 2 PS/2 port or 1 USB port
4
W
S
HAT’S IN THE BOX?
Page 5
r s
v w
I
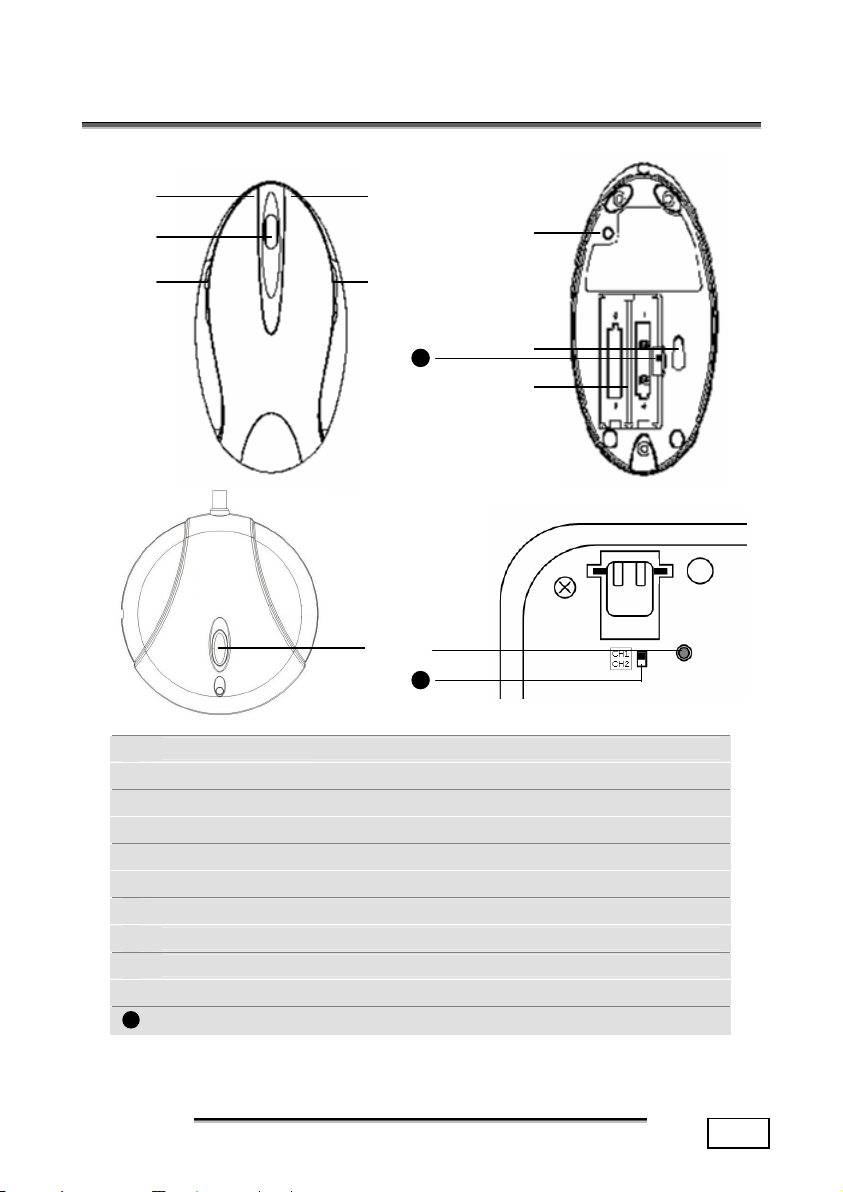
DDEENNTTIIFFYYIINNGG PPAARRTTS
I
n
o
p
n
Left mouse button
o
Mouse wheel and button
p
Additional left mouse button
q
Right mouse button
r
Additional right mouse button
s
Mouse frequency connection button
t
Optical sensor
u
Mouse battery compartment
v
Keyboard frequency connection button
w
Slave station frequency connection button
11
Channel setting keyboard / mouse
S
q
11
t
u
11
DENTIFYING PARTS
I
5
Page 6

S
EETTTTIINNGG UUP
S
P
STEP 1: FITTING BATTERIES IN THE KEYBOARD
1. Turn the keyboard upside down.
2. Remove the battery compartment cover by pushing down on
the cover and pulling it in the direction of the arrow.
3. Insert the 2 x AA batteries supplied in the battery compartment of the keyboard. Ensure that the battery poles correspond to the “+” and “-” markings.
4. Slide the cover back on until it locks into place.
STEP 2: FITTING BATTERIES IN THE MOUSE
1. Turn the mouse upside down and remove the battery compartment cover by pushing your fingernail into the recess and
carefully pushing the cover upwards.
2. Insert the batteries supplied (2 x batteries, type AA) in the
battery compartment of the mouse. Ensure that the battery
poles correspond to the “+” and “-” markings.
3. Slide the battery compartment cover back on until it locks
into place.
STEP 3: CONNECTING THE RECEIVER
1. Please refer to the notes in the “Safety and maintenance”
section.
2. Shutdown the computer and disconnect it from the power
outlet.
3. Insert the PS/2 plugs in the corresponding PS/2 sockets of
your PC.
OR
4. Push the USB connector into the relevant free USB socket of
your PC.
Note: Please use the supplied adaptor if you prefer to
**
connect the Keyboard to a PS/2 socket.
5. Now position the receiver, the keyboard and the mouse at
your workplace so that they are comfortable to use (minimum distance between receiver and transmitter of 50 cm /
19.7”).
6
ETTING UP
S
Page 7

STEP 4: FREQUENCY ADJUSTMENT
1. Start the PC.
2. Press the automatic frequency adjustment (w) in order to
tune the units to one another.
3. Turn the mouse and keyboard over and press the frequency
adjustment (s) with a pointed object (e.g., the tip of a ballpoint pen).
4. The tuning is now complete. Turn the mouse and keyboard
back over.
5. If the connection-LED of the slave station is lit when you
move the mouse the tuning was successful. Otherwise repeat
step 2 and three.
STEP 5: INSTALLING THE SOFTWARE
The following installation instructions are applicable to the Win-
®
dows
essentially the same with all of these operating systems. Any differences are minimal and are dependent on the current configuration of your PC. Here are some guidelines to help you complete
the installation successfully.
operating system (98SE/ME/2000/XP). The installation is
• Make sure you have the Installation-CD of your computer’s operating system to hand, in case it is needed.
®
• If you use Windows
2000 or XP, login with administrator
rights.
During the installation procedure important files
can be changed or even deleted. To avoid problems
in using older files after installation, make sure you
backup your hard disk and important files.
ETTING UP
S
7
Page 8

Note: If your operating system is configured so that the
installation procedure accepts only signed drivers and
software (the default) this information screen will appear:
Although the software lacks the digital signature it
will still work properly. Click on “Tell me why this
testing is important” to get detailed information.
Confirm by clicking on “Continue Anyway”.
To use or adjust the special functions, you must install the driver:
®
1. Turn on you PC and wait until Windows
has fully loaded.
2. Insert the installation CD in your CD-ROM drive.
3. Follow the instructions on the screen.
4. Restart your PC.
Once installation is complete, double-click the “Mouse” icon in the
your Windows Control Panel to configure the mouse to your needs.
8
ETTING UP
S
Page 9

Note: If the CD automatic start does not work, it is likely
that the CD Autorun function has been deactivated.
Read the respective chapter in Windows Help on how to
activate this function. What follows is an example of a
manual installation without the CD Autorun function:
1. Click on and select the item
2. Now enter the letter of the CD-ROM drive followed by a
colon and the program name setup:
f:menu
3. Click on “OK“ and follow the instructions given by the
setup program.
UNINSTALLING THE DRIVER SOFTWARE
In order to remove the device driver from your PC, use “Add or
Remove Programs” option underin your Windows Control Panel.
ETTING UP
S
9
Page 10

SETTING A DIFFERENT CHANNEL
Other radio devices may interfere with your wireless keyboard
and mouse. You can change the channels of your keyboard and
mouse to avoid interference. However, the mouse and keyboard
must have the same channel. As long as they are on the same
channel, you can reinstall the receiver and it will automatically
recognize both devices. You can change the radio channels easily
as shown below. Please perform a frequency adjustment afterwards as outlined in Step 4 on page 7.
Frequency adjustment
10
Frequency adjustment
Channel setting
PERATING THE KEYBOARD AND MOUSE
O
Page 11

O
PPEERRAATTIINNGG TTHHEE KKEEYYBBOOAARRDD AANNDD MMOOUUSSE
O
E
MOUSE WHEEL
To scroll, move
the wheel.
You can configure the mouse by double-clicking the symbol in
the taskbar in the bottom right corner of your screen.
To use the wheel as a button,
click as shown in the graphic
below.
THE KEYBOARD
On the base of the keyboard are two folding feet that let you adjust the angle of the keyboard.
PERATING THE KEYBOARD AND MOUSE
O
11
Page 12

SPECIAL KEYS AND FUNCTIONS
Make sure to install the driver (see page 7) in order to use these
special functions.
SYMBOL FUNCTION
OLUME UP – Increases the volume.
V
OLUME DOWN – Lowers the volume.
V
P
LAYBACK / PAUSE – Starts the audio or video playback.
S
TOP – Stops the audio or video playback.
P
REVIOUS TITLE – Returns to the previous song or scene.
N
EXT TITLE – Skips to the next song or scene.
Pressing the button a second time pauses playback. Press the button again to resume playback
M
UTE – Switches the volume on/off.
M
EDIA PLAYER – Opens Windows
SYMBOL FUNCTION
STANDBY –Switches your PC to Standby mode (not available
for Windows
D
12
ESKTOP – Displays your desktop.
C
OMPUTER – Displays the contents of “My Computer”.
PERATING THE KEYBOARD AND MOUSE
O
®
98SE).
®
Media Player
Page 13

SYMBOL FUNCTION
*
START PAGE – Calls up a homepage provided by the manu-
*
FAVORITES – Displays your list of favorite web pages (see
EMAIL – Opens your default email program.
*
SEARCH – Opens a panel for searching the Internet.
*
END – Stops a web page from loading.
*
RENEW – Re-loads the currently displayed web page.
*
BACK – Displays the previously viewed web page, just like
the back button on your browser.
*
FORWARD – Works just like the forward button on your
facturer of your computer or an Internet site
that you have specified.
the help menu for your browser to set up your
favorites).
browser.
NOTES ON THE SPECIAL KEYS
Correct operation of the special keys is dependent upon a number
of factors, particularly the operating system and configuration.
The special keys call up certain functions of the operating system.
Unfortunately, different versions of the Windows® operating system will produce different results. This is particularly noticeable in
the media player, control keys and sleep functions.
The control keys only operate if the media player has started for
some operating systems, and in others it works only if it has not
been started. Please check this in your system, as it is impossible
to give instructions which will apply throughout all operating systems.
PERATING THE KEYBOARD AND MOUSE
O
13
Page 14

C
UUSSTTOOMMEERR SSEERRVVIICCE
C
E
TROUBLESHOOTING
¾ Switch the computer off and check all cable connections, you
may have connected the mouse and the keyboard the wrong
way around. Once you have ascertained that the power supply is not at fault and all connections are intact, switch on the
computer again.
¾ Check that the PS/2 ports are active and correctly configured
and that there are no resource conflicts with other devices.
Please refer to your PC user manual on this point.
¾ Have the batteries been inserted incorrectly or are they
spent? Check the polarity (+/-) and exchange them for
new ones as necessary.
¾ If you are working on a metal surface, use a screening
base. Position the receiver in such a way that a good radio
connection is ensured (minimum distance between master
and charging/slave station approx. 50 cm / 19.7”).
¾ Other radio devices may interfere with your wireless key-
board and mouse. You can change the channels of your
keyboard and mouse to avoid interference. However, the
mouse and keyboard must have the same channel. As long
as they are on the same channel, you can reinstall the receiver and it will automatically recognize both devices.
Please refer to page 10.
¾ The Standby key can usually only be used if the driver
(Windows
tem (ATX) supports them. Have the power options under
Windows
Options” in the Windows Control Panel.
¾ If the media keys do not work, try starting the Media
player first. This can be done by pressing the Media key.
14
®
98SE/2000) has been loaded and the PC sys-
®
been correctly set? You can check this in “Power
USTOMER SERVICE
C
Page 15

¾ If the audio CD plays but nothing can be heard, this may
be due to a number of causes:
- The volume for CD playback may be set too low. Double-click the loudspeaker symbol in the taskbar to
check the volume setting for CD audio.
- If you have more than one CD or DVD drive try inserting CD in another CD drive.
¾ The Windows calculator cannot be started. The program
may have been uninstalled. Reinstall the program.
¾ Instead of Internet Explorer, the Internet connection wiz-
ard is started. You must have a fully functional Internet
connection before you can use this function.
¾ An Internet or e-mail program other than the one normally
used is started. The keyboard starts the programs that are
defined as the “defaults”. Check these in “Internet Options” in the Windows Control Panel.
TECHNICAL SUPPORT
This product has been extensively and successfully tested in our
test laboratory with a number of different devices. However, it is
normal for the drivers to be updated periodically. If you are having difficulty using your device, you may need to update the
driver. Driver updates and the most up-to-date information on
this product can be found at the following Internet address:
Internet: www.medion.com
IF YOU NEED FURTHER ASSISTANCE ……
If the suggestions in the above sections have not solved your
problem, please contact us. It will help us to help you if you can
have the following information available:
- What is your computer configuration?
- What additional peripherals are you using?
- What messages are appearing on the screen?
- What software was running when the fault occurred?
- What steps have you already taken to solve the problem?
- If you already have a customer number, please state this.
USTOMER SERVICE
C
15
Page 16

BATTERY TREATMENT
Batteries may contain combustible materials. By
misuse, this may cause battery leakage, heat,
explosion or ignition, bringing about injury or
damage to the device.
Please observe strictly the following matters:
- KEEP CHILDREN AWAY from batteries.
If by any chance, the batteries are swallowed, consult a doctor
immediately.
- DO NOT CHARGE batteries (except rechargeable batteries).
- DO NOT FORCIBLY DISCHARGE batteries.
- DO NOT SHORT-CIRCUIT batteries.
- DO NOT HEAT or DISPOSE OF IN FIRE.
- DO NOT ATTEMPT TO DISASSEMBLE or DEFORM batteries.
This may lead to injury, or the liquid of the battery may get into
your eyes or adhere to your skin. If this happens, rinse with a
large quantity of water immediately and consult a doctor.
- DO NOT allow batteries to be exposed to heavy impact by
dropping or throwing the batteries.
- DO NOT reverse the positive (+) and negative (-) terminals.
This will help avoid short-circuits.
- DO NOT MIX used and new or different types of batteries together.
Your equipment may not operate properly. In addition, the battery exhausted first may be excessively drained (overdischarged).
- REMOVE PROMPTLY the used batteries from the device.
- REPLACE ALL BATTERIES with new batteries of the same type
at the same time.
- INSULATE THE TERMINAL parts with tape or the like at the
time of storage or disposal of the batteries.
- DO NOT throw used batteries into your household waste! Respect the environment and throw them in the specific containers
for separate collection. If necessary and where possible, return to
your reseller or to our service organisation. Thank you!
16
USTOMER SERVICE
C
Page 17

W
AARRRRAANNTTY
W
PLEASE READ THIS LIMITED WARRANTY CAREFULLY TO
UNDERSTAND YOUR RIGHTS AND OBLIGATIONS.
Your receipt is considered valid proof of purchase and should be kept
in a safe place. This receipt will be required for receiving any warranty service. This limited warranty is extended only to Medion products purchased from Medion or from a Medion authorized dealer. It is
extended only to the original purchaser of Medion products, and is not
transferable to anyone who subsequently purchases the hardware
from the original purchaser.
We warrant to the end user that each product, including related software, accessories, media and supplies, shall be free from defects in
materials and workmanship for the warranty time from date of purchase. This warranty covers only those defects that arise as a result
of normal use of the product. This warranty does not cover any other
problems, including problems that arise as a result of improper maintenance or modification; software, accessories, media or supplies not
provided or supported by us; or operation outside the manufacturer’s
specifications.
Any parts in this device repaired or exchanged by a valid service representative will be covered under the original warranty period. Products shipped without accessories will be returned without accessories.
Any replacement product or component may be either new or like
new, provided that its functionality is at least equal to that of the
product being replaced.
Y
LIMITATION OF WARRANTY
In accordance to the extent allowed by local law, no other warranties or are made with respect to this personal computer or the
warranty services by any person, including but not limited to us
and our suppliers. The express warranty stated above is the only
express warranty made to you and is provided in lieu of all other
express or implied warranties and conditions (if any) including
any created by any other documentation or packaging. For additional warranty information, please refer to the enclosed warranty
card.
ARRANTY
W
17
Page 18

LIMITS OF LIABILITY
In accordance to the extent allowed by local law, except for the
obligations specifically set forth in this warranty statement, in no
event shall we or our third party suppliers are liable for direct,
indirect, special, incidental, or consequential damage, whether
based on contract or any other legal theory and whether advised
of the possibility of such damages. This includes loss or damage
of personal data on your PC.
LOCAL LAW
This warranty statement gives you legal rights. You may also
have other rights which vary from jurisdiction to jurisdiction. To
the extent this warranty statement is inconsistent with local law,
certain disclaimers and limitations of this statement may not apply to the customer.
MAKING COPIES OF THIS MANUAL
This manual contains information protected by law. All rights reserved. Duplicating this information in mechanical, electronic, or
any other form, without the written approval by the manufacturer, is
prohibited by copyright law.
Copyright © 2005 Medion®. All rights reserved. Microsoft®, MS-DOS®, and
Windows are registered trademarks of Microsoft Corporation in the U.S.
and other countries. Pentium
tion. The names of actual companies and products mentioned herein may
be the trademarks of their respective owners. Information in this document
is subject to change without notice.
18
®
is a registered trademark of Intel Corpora-
ARRANTY
W
Page 19

ARRANTY
W
19
 Loading...