

Page 1
Music Server
MS300
User’s Manual
McIntosh Laboratory, Inc. 2 Chambers Street Binghamton, New York 13903-2699 Phone: 607-723-3512 FAX: 607-724-0549
Page 2

The lightning flash with arrowhead, within
an equilateral triangle, is intended to alert
the user to the presence of uninsulated
“dangerous voltage” within the product’s
enclosure that may be of sufficient
magnitude to constitute a risk of electric
shock to persons.
The exclamation point within an equilateral
triangle is intended to alert the user to
the presence of important operating and
maintenance (servicing) instructions in the
literature accompanying the appliance.
WARNING - TO REDUCE RISK OF FIRE OR
ELECTRICAL SHOCK, DO NOT EXPOSE
THIS EQUIPMENT TO RAIN OR MOISTURE.
CAUTION -
Invisible Laser Radiation when open.
DO NOT stare into the beam or view
directly with optical instruments.
Use of controls or adjustments or
performance of procedures other than
those specified in the Owners Manual
may result in Hazardous Radiation
Exposure.
This product incorporates an embedded CLASS 3B Laser (IEC60825-1).
NO USER-SERVICEABLE PARTS INSIDE.
REFER SERVICING TO QUALIFIED
PERSONNEL.
To prevent the risk of electric shock, do not remove cover or
back. No user serviceable parts inside.
Page 3

Page 4

IMPORTANT SAFETY
INSTRUCTIONS!
PLEASE READ THEM BEFORE
OPERATING THIS EQUIPMENT.
1. Read these instructions.
2. Keep these instructions.
3. Heed all warnings.
4. Follow all instructions.
5. Do not use this apparatus near water.
6. Clean only with a dry cloth.
7. Do not block any ventilation openings. Install in accordance with the
manufacturer’s instructions.
8. Do not install near any heat sources such as radiators, heat registers, stoves, or
other apparatus (including amplifiers) that produce heat.
9. Do not defeat the safety purpose of the polarized or grounding-type plug. A
polarized plug has two blades with one wider than the other. A grounding type
plug has two blades and a third grounding prong. The wide blade or the third
prong are provided for your safety. If the provided plug does not fit into your
outlet, consult an electrician for replacement of the obsolete outlet.
Page 5

10. Protect the power cord from being walked on or pinched particularly at plugs,
convenience receptacles, and the point where they exit from the apparatus.
11. Only use attachments/accessories specified by the manufacturer.
12. Use only with the cart, stand, tripod, bracket, or table specified by the
manufacturer, or sold with the apparatus. When a cart is used, use caution when
moving the cart/apparatus combination to avoid injury from tip-over.
13. Unplug this apparatus during lightning storms or when unused for long periods
of time.
14. Refer all servicing to qualified service personnel. Servicing is required when
the apparatus has been damaged in any way, such as power-supply cord or plug
is damaged, liquid has been spilled or objects have fallen into the apparatus,
the apparatus has been exposed to rain or moisture, does not operate normally,
or has been dropped.
15. Do not expose this equipment to dripping or splashing and ensure that no
objects filled with liquids, such as vases, are placed on the equipment.
16. To completely disconnect this equipment from the a.c. mains, disconnect the
power supply cord plug from the a.c. receptacle.
17. The mains plug of the power supply cord shall remain readily operable.
18. Do not expose batteries to excessive heat such as sunshine, fire or the like.
Page 6

THANK YOU
The team at McIntosh
would like to take this
opportunity to thank
you for purchasing
a McIntosh MS300
product. McIntosh is
committed to providing
our customers the
most technologically
advanced, yet easierthan-ever to use products
that converge the power
of the Internet with
home entertainment.
To maximize your
enjoyment, please take
a few minutes to review
this User’s Manual. It
will guide you through
all the features and
benefits of your new
MS300.
If you should need
assistance please call our
Customer Support Staff
at 866.458.6910
The McIntosh Team
MS300 User’s Manual
PAGE 2
TABLE OF CONTENTS
MS300 USER MANUAL 1
SAFETY INSTRUCTIONS 1B -1C
TABLE OF CONTENTS 2
PRODUCT INTRODUCTION 7
TRADEMARKS & SERVICE MARKS 7
ABOUT THIS MANUAL 8
RECORD YOUR SERIAL NUMBER
MANUAL DISCLAIMERS
WARNINGS AND PRECAUTIONS 8
WARRANTY INFORMATION
CONTACT INFORMATION
COPYRIGHT 9
TERMS AND DEFINITIONS
8
9
8
8
10
SETUP 11
QUICK SETUP GUIDE 11
POWER STATES
FRONT PANEL OVERVIEW
REAR PANEL OVERVIEW
REMOTE CONTROL OVERVIEW
ENTERING TEXT WITH THE REMOTE CONTROL 16
Entering Numeric Entry Mode 16
Typing Characters with the Remote
12
13
14
15
16
GETTING MUSIC INTO MS300 18
RECORDING FROM THE INTERNAL CD 19
RECORDING FROM AN EXTERNAL CHANGER
Supported External CD Changers 20
Connecting Sony DVP-CX777ES CD/DVD Changers 21
Connecting Sony Changers 22
20
Page 7
MS300 User’s Manual
PAGE 3
Connecting Kenwood CD/DVD Changers 23
Connecting Pioneer CD/DVD Changers 24
Loading Discs Into Changers 25
Quick Lookup 25
Automatic Bulk Recording 26
Select Tracks to Record
IMPORTING MUSIC FILES 27
System Requirements 28
Audio File Requirements 28
Cover Art Image Requirements
Importing from a PC 29
Importing from a Mac 30
RECORDING FROM OTHER EXTERNAL SOURCES 32
ERASING CD-RW DISC 33
LISTENING TO MUSIC 34
BROWSING YOUR MUSIC LIBRARY 34
SHOW AND HIDE TRACKS
PLAYING THE CURRENT TITLE
SELECTING A DIFFERENT SONG 35
CHANGING THE GUIDE VIEW 36
View By Artist 36
View By Title
View By Song
TABLE OF CONTENTS
View By Cover 37
CHANGING THE CURRENT PLAY MODE 37
VIEWING BY GENRE 38
LISTENING TO INTERNET RADIO 39
BROWSING INTERNET RADIO STATIONS 39
PLAYING THE CURRENT STATION
26
28
34
35
36
37
40
Page 8

MANAGING YOUR MEDIA 41
CREATING PLAYLISTS 41
CREATING GROUPS
ADDING INTERNET RADIO STATIONS
UPDATING THE INTERNET RADIO STATIONS LIST
EDITING MUSIC INFORMATION 47
Editing Disc Info 47
Automatically Lookup Information for This Disc 48
Searching for the Original Cover 49
Tips for Searching for Covers
Selecting an Existing Cover 50
Editing Track Names
EDITING RADIO INFORMATION
EDITING PLAYLISTS
EDITING GROUPS 54
DELETING MUSIC 55
DELETING PLAYLISTS
DELETING GROUPS 57
43
45
46
49
51
52
53
56
CREATING CDS 58
CREATING A CUSTOM MIX CD 58
DUPLICATING A CD
RECORDING FROM AN EXTERNAL SOURCE 61
60
MS300 User’s Manual
PAGE 4
TABLE OF CONTENTS
SETTING USER PREFERENCES 62
SETTING THE SCREEN SAVER PREFERENCES 62
Activation Idle Time
Mode 62
PHOTO SCREEN SAVER MODE
SETTING YOUR TIME ZONE 64
SETTING YOUR ZIP CODE
ENABLING PASSWORD PROTECTION
CHOOSING YOUR NETWORK CONNECTION 6
62
63
65
66
7
Page 9

MS300 User’s Manual
PAGE 5
Testing the Your Connection 68
Ethernet Settings 69
Dialup Settings 70
SETTING THE MS300 SERVER SETTINGS 71
CONFIGURING A MS300 SERVER 72
CONFIGURING A MS300 CLIENT
PEER TO PEER MUSIC SHARING 73
SELECTING THE AUDIO ENCODER TYPE 74
SETTING THE DISC INSERT PREFERENCES 75
VIDEO OUTPUT PREFERENCES 76
Centering the MS300 Screen 77
Adjusting your TV’s Brightness 78
Adjusting your TV’s Contrast 79
Adjusting your TV’s Sharpness 80
Adjusting your TV’s Color and Tint
LOOKING UP DISC INFORMATION
Automatically Getting Disc Information 83
Getting Disc Information for a Range of Discs 84
Getting Disc Information for All Discs 85
RECORDING FROM EXTERNAL CHANGERS
Automatically Recording CDs 87
Recording a Range of CDs 88
Recording All CDs 89
TABLE OF CONTENTS
CONTROLLING MS300 FROM OTHER DEVICES 90
MS300 UTILITIES 91
Restarting the System 92
Updating the Software 93
CONTROLLING MS300 FROM A WEB BROWSER 94
SETTING UP THE MS300 WEB SERVER 94
USING THE WEB USER INTERFACE 94
72
81
82
86
Page 10
CONNECTING TO YOUR MS300 USING A WEB BROWSER 95
USING THE WEB USER INTERFACE 95
USING THE WEB BROWSER AS A MUSIC CLIENT 96
BACKUP AND RESTORE 97
MS300 MUSIC BACKUP 97
MS300 MUSIC RESTORE
TROUBLESHOOTING 98
NETWORK PROBLEMS 98
SOFTWARE UPDATE PROBLEMS 98
RECORDING PROBLEMS 98
ADDITIONAL INFORMATION 99
McINTOSH PRODUCT SUPPORT 99
SPECIFICATIONS
Audio Specifications
Video Specifications 100
General Specifications 100
FCC Part 15, Subpart B 101
GRACENOTE® END-USER LICENSE AGREEMENT 102
PACKING INSTRUCTIONS 104
TABLE OF CONTENTS
97
100
100
MS300 User’s Manual
PAGE 6
Page 11
TRADEMARKS & SERVICE MARKS
The McIntosh logo is a trademark of McIntosh Laboratory, Inc..
Other product names mentioned herein are used for identification purposes only and may be trademarks of their
respective companies.
Music recognition technology and related data are provided by Gracenote®. Gracenote is the industry standard in
music recognition technology and related content delivery. For more information visit www. gracenote.com.
CD and music-related data from Gracenote, Inc., copyright © 2000-2005 Gracenote.
Gracenote CDDB® Client Software, copyright 2000-2005 Gracenote. This product and service may practice one
or more of the following U.S. Patents: #5,987,525; #6,061,680; #6,154,773, #6,161,132, #6,230,192, #6,230,207,
#6,240,459, #6,330,593, and other patents issued or pending. Services supplied and/or device manufactured under
license for following Open Globe, Inc. United States Patent #6,304,523.
Gracenote and CDDB are registered trademarks of Gracenote. The Gracenote logo and
logotype, and the “Powered by Gracenote” logo are trademarks of Gracenote.
INTRODUCTION
MS300 User’s Manual
PAGE 7
Page 12

Thank you for purchasing the MS300 Music Server from McIntosh.
ABOUT THIS MANUAL
This MS300 User’s Manual is intended to provide the reader with an overview of the main features and benefits of the
McIntosh MS300 Music Server. For more technical information, please refer to the MS300 Advanced User’s Guide
available on the McIntosh web site www.mcintoshlabs.com or from your McIntosh Dealer.
RECORD YOUR SERIAL NUMBER
The serial number for this unit is located at the rear of the device. Please record the serial number in the space
provided below. Refer to it whenever you call McIntosh Tech Support regarding this product.
MS300 Serial Number: _______________________________________
MANUAL DISCLAIMERS
INTRODUCTION
At the time of printing, the MS300 screen shot images in this manual matched the MS300 interface screens. However,
since MS300 has the capability of downloading software updates and enhancements on a regular basis, the resulting
screen updates may no longer match the images in this manual. Check the McIntosh website for more information on
software updates.
MS300 User’s Manual
PAGE 8
FOR WARRANTY INFORMATION, PLEASE REFER TO THE SUPPLIED M
ELECTRONICS THREE YEAR LIMITED WARRANTY” CERTIFICATE.
WARNINGS AND PRECAUTIONS
cINTOSH “HOME
Page 13

McIntosh shall not be liable for damage or loss of data including but not limited to music recorded to storage devices.
It is the customer’s responsibility to maintain the original media and/or appropriate backup copies within the specific
rights of the media’s copyright holder.
CONTACT INFORMATION
McIntosh may be contacted by using the following information. Once you have worked with your local McIntosh
Dealer, we encourage you to contact us if you are in need of any further assistance.
Office and Factory: Technical Support:
McIntosh Laboratory Hours: 9:00am - 6:00pm EST, M-F
2 Chambers Street Toll Free: (866) 458-6910
Binghamton, NY 13903
Hours: 8:30 am - 5:00 pm EST, M - F Repair Authorization:
Toll Free: (800) 538-6576 Hours: 8:00am - 4:30pm EST, M-F
Phone: (607) 723-3512 Toll Free: (800) 538-6576
Fax: (607) 724-0549 Phone: (607) 723-3515
E-mail: feedback@mcintoshlabs.com Fax: (607) 723-1917
INTRODUCTION
MS300 User’s Manual
PAGE 9
Page 14

COPYRIGHT
This manual is copyright ©2005, 2006 by McIntosh Laboratory, Inc.. All rights reserved.
TERMS AND DEFINITIONS
Following are terms used throughout this manual:
• Button - refers to a graphic item on the display screen.
• Group - a collection of similar music titles. Standard genre groups are provided and custom groups can be
created by the user.
• Highlight - highlighting is used to indicate the user’s selection on screen. When the selection moves up, down,
left, or right, the highlight moves to the next nearest item. No action is taken (except that more information may
be displayed on the screen) until the Select key is pressed.
• Info Text Area - the portion of the guide screen used to display information about the highlighted title.
• Playlist - a collection of one or more music tracks or songs.
• Title - a collection of music tracks commonly referred to as a CD, Album or Playlist.
• Key - refers to one of the buttons on your remote or keyboard.
• MP3 - a compressed digital audio format. MP3 files are smaller than the original CD tracks and sound almost
identical.
• FLAC - a lossless compressed digital audio format. FLAC files are smaller than the original CD tracks and are bit
INTRODUCTION
MS300 User’s Manual
PAGE 10
Page 15

5. POWER UP!
• Plug each changer into an AC outlet.
• Plug the MS300 into an AC outlet.
• The Standby LED on the front of the MS300 will begin to flash RED during
the power on cycle. When the LED turns solid RED, the MS300 is ready
for use.
• Press the power button on the front panel or on the remote control. The
LED will turn Off and video will be displayed on the TV when the
unit is on.
Note: You may have to press the "MS1" button on the remote to configure it to control the MS300.
Also be sure the TV and receiver are turned on and set to the correct the MS300 input.
6. QUICK START
• Use the remote control and follow the on-screen instructions.
• If you have more than one changer, repeat these steps to connect the
additional changers to communications ports and audio jacks 2 and 3
respectively.
• For the best audio quality, you should also connect digital optical audio
cables between your changers and the MS300.
4. CONNECT THE MS300 TO THE INTERNET
MS300 requires an Internet connection to identify the discs in connected changers, to provide
additional entertainment services, and for general system maintenance.
• If you do not have an ethernet network connected to the internet and you
would like to use Dialup Internet Access, you will need to connect an
external modem (not included) to COM port 4 and connect the modem to a
working phone line. Contact your McIntosh Dealer for details.
• If you have a broadband (cable, DSL, ISDN) Internet Service Provider
,
connect an ethernet cable from the MS300's ethernet jack to your
ethernet network.
NOTE: You may need to purchase additional network hardware such as a "router". Please
contact your McIntosh Dealer for more information.
1. UNPACK YOUR NEW MS300
• Unpack the MS300 and accessories (save the box).
• Install the included batteries into the remote and keyboard.
• Make note of the serial number (located on the back).
SERIAL NUMBER: _________________________________________
2. CONNECT THE MS300 T
O YOUR AUDIO SYSTEM
A) Obtain the proper connecting cables from your McIntosh Dealer.
B)
Connect the MS300 to any available A/V input on your receiver or TV.
Note: You may use optional s-video or component video cables and optional digital
audio cables for the best picture and sound quality. This is also applicable to the next
step, connecting changers to your MS300. Contact your McIntosh Dealer for more
information.
3. CONNECT OPTIONAL CHANGERS TO YOUR MS300
SONY CD CHANGERS
The MS300 requires that you connect each Sony CD changer to the back panel using
audio and S-Link control cables.
Follow these steps to connect your Sony CD changers to your MS300:
1. Locate the S-Link cable, with 1/8” male plugs on each end.
2.
Connect one end of the S-Link cable into the S-Link/IR Out jack number 1
on the back of your MS300.
3.
Connect the other end of the S-Link cable into the Control A1 jack on the
back of your changer.
4.
Locate a stereo RCA audio patch cable. .
5.
Connect one end of the RCA audio cable into the Analog In jacks number
1 on the back of your MS300.
6.
Connect the other end of the RCA audio cable into the Analog Line Out
jacks on the back of your changer.
• If you have more than one changer, repeat these steps to connect the
additional changer to S-Link and audio jack 2.
• For the best audio quality, you should also connect digital optical audio
cables between your changers and the MS300.
• Make sure that all changers are set to COMMAND MODE 1.
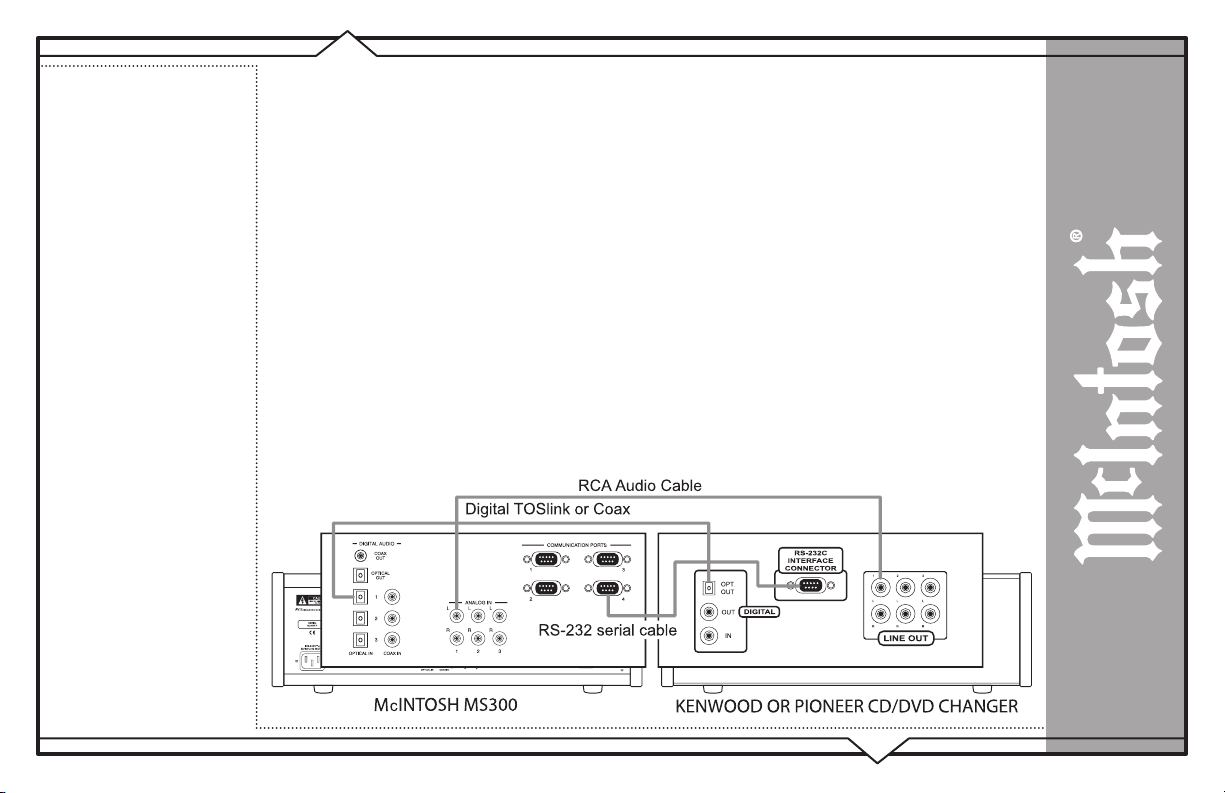
SONY, KENWOOD, OR PIONEER CD/DVD CHANGERS
The MS300 requires that you connect each CD/DVD changer to the back panel using
audio and RS-232 control cables. NOTE: The MS300 supports only CDs in these
changers. Do not install DVDs.
Follow these steps to connect your CD/DVD changers to your MS300:
1.
Locate the proper RS-232 serial cable for your changer.
2.
Connect one end of the RS-232 serial cable into Communication Port
number 1, on the back of your MS300.
3.
Connect the other end of the RS-232 serial cable into the “RS-232C” port
on the back of your changer.
4.
5.
Connect one end of the RCA audio cable into the Analog In jacks number
1 on the back of your MS300.
6.
Connect the other end of the RCA audio cable into the Analog Line Out
jacks on the back of your changer.
BACK PANEL OVERVIEW
:
Power
to electrical outlet
IR In for IR external
control
S-Link
to control CD
Analog Out to the
receiver for analog audio
Component Video Out
to the TV or other display
device
Ethernet Network Jack
connects the MS300 to
your broadband Ethernet
network.
Coax Out and Optical
Out to the receiver for
digital audio
Optical In and Coax In
from CD changers 1/2/3
for digital audio
RS-232 for external
control, touch screen, or
modem
RS-232 to control CD
changers 1/2/3
Composite or S-Video
Video Out to the TV or
other display device
CHANGER CONNECTION
RECEIVER CONNECTION
DISPLA
Y CONNECTION
GENERAL CONNECTION
Analog audio In from the
CD changers 1/2/3
Quick Setup
SUPPORTED CHANGERS
Sony CD Changers (CDP-CX 200,
300, 400 series with S-Link support)
Sony DVP-CX777ES CD/DVD
Changer
(CDs only)
Pioneer DV-F07 CD/DVD changer
(CDs only)
Kenwood DV-5900M and DV-5050M
DVD/CD Changers
(CDs only)
Locate a stereo RCA audio patch cable.
McIntosh Part No. 040944
changers 1 and 2
Data In / Power Control In
from
McIntosh Preamplifiers/Receivers
MS300 User’s Manual
PAGE 11
SETUP
for bit duplicates of the original.
• Guide - a grid or list of information, used to browse your media library.
• Player - the screen used to display the currently playing media.
Page 16

SETUP
Off
= unit on
This manual assumes that you followed the printed “Quick Setup Guide” that came with your MS300. If you have
not properly connected your MS300 to your audio/video system, please go back and follow the “Quick Setup Guide”
before continuing with this User Manual.
POWER STATES
After the MS300 unit is plugged in, the Standby LED located next to the power button will flash red until the startup
process is complete. Please wait. This may take several minutes.
MS300 User’s Manual
PAGE 12
SETUP
When the Standby LED is solid RED, the MS300 is now in a standby or “sleep” mode. There is no video output when
the MS300 is in standby mode. Press the Power button (on the front panel or on the remote) once and the video output
is displayed on your TV. The unit is now ON and the LED will be Off.
To change from the ON mode back to the standby or “sleep” mode, press the Power button on the front panel or on the
remote once. The video output will go blank and the LED will be solid red.
If power is removed from the MS300 for any reason, including a power outage or if the unit is unplugged, the MS300
will automatically return to the Standby state as soon as power is restored. When the MS300 is turned on again, the
MS300 will return to the same source mode that it was in when power was lost.
To force the MS300 to restart, PRESS and HOLD the Power button for 4 seconds, and release it when the standby
LED starts blinking. When the Standby LED is RED and the MS300 has completed its startup process, press the
Page 17
Power button once to turn on the MS300.
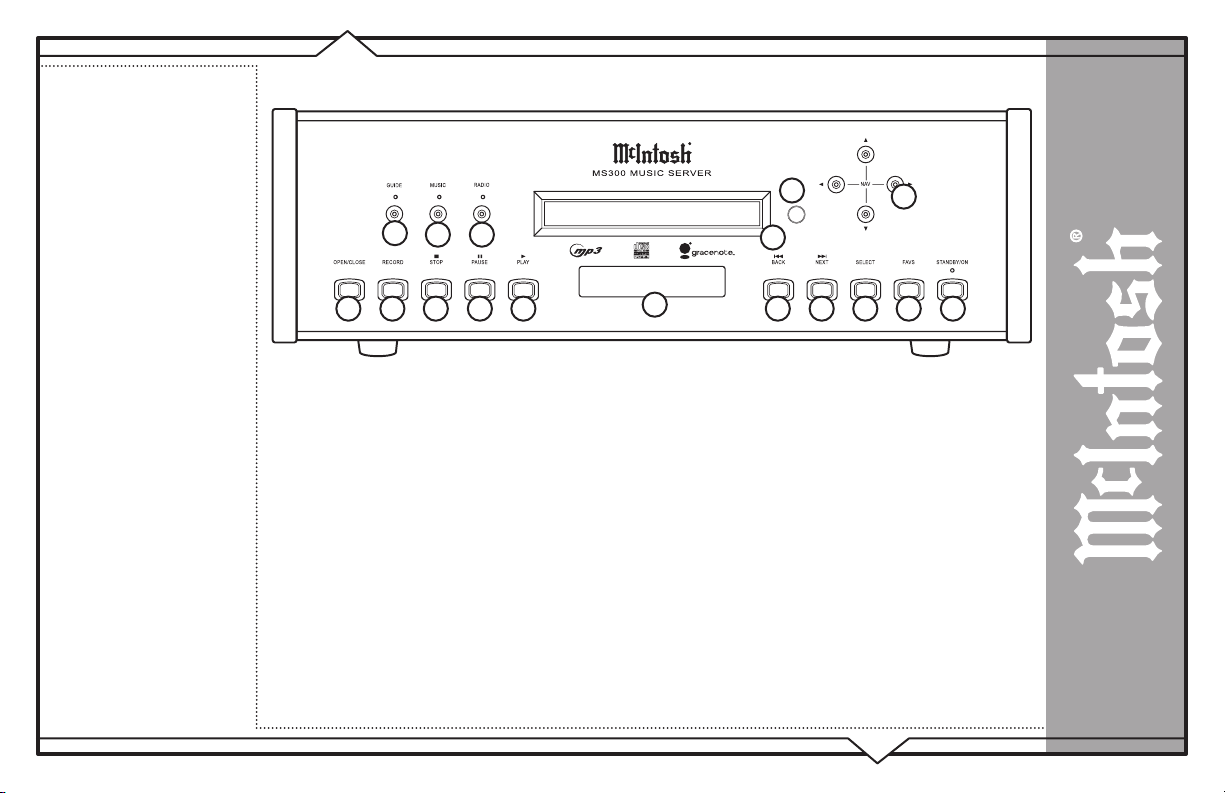
FRONT PANEL OVERVIEW
1
2 3
17
9
MS300 User’s Manual
PAGE 13
SETUP
4 5 6
1 - GUIDE
2 - MUSIC SOURCE
3
- RADIO SOURCE
4
- OPEN/CLOSE DRIVE
5 - TRANSPORT:
RECORD
6 - TRANSPORT: STOP
7 - TRANSPORT: PAUSE
8 - TRANSPORT: PLAY
9 - CDRW DRIVE
10 - TEXT DISPLAY
11 - TRANSPORT: BACK
12 - TRANSPORT: NEXT
13 - SELECT
14 - FAVORITES
10
11 127 8 131514 16
Page 18

SETUP
15 - NAVIGATION
16 - POWER: STANDBY/ON
3
4
1
17 - IR RECEIVER
2
5 6
REAR PANEL OVERVIEW
1 - POWER
2
- IR IN / S-LINK / DATE IN / POWER CONTROL IN
3 - DIGITAL AUDIO COAX OUT
4 - DIGITAL AUDIO OPTICAL OUT
5 - DIGITAL AUDIO OPTICAL IN
6 - DIGITAL AUDIO COAX IN
7 - ANALOG AUDIO OUT
8 - VIDEO OUT
9 - ANALOG AUDIO IN
10
8
9
7
11
MS300 User’s Manual
PAGE 14
Page 19

SETUP
MS300 modes.
10 - COMMUNICATION PORTS
1
1 - ETHERNET
MS300 User’s Manual
PAGE 15
Page 20

MS300 User’s Manual
PAGE 16
SETUP
REMOTE CONTROL OVERVIEW
ENTERING TEXT WITH THE REMOTE CONTROL
The remote control can be used to enter text in all text fields. This
text entry capability is provided to allow you to fill out short text
fields – such as those that occur in the setup and edit screens. The
MS300’s wireless keyboard should be used when extended typing is
required.
Entering Numeric Entry Mode
In fields where the MS300 expects only numeric characters to be
entered (such as phone number fields), an indicator will appear on the
screen that displays the letters “123” indicating that only numbers can
be entered.
Typing Characters with the Remote
The remote control based text entry capability is similar to that
provided on standard telephones and cell phones. Each numeric key
has characters associated with it that can be accessed by pressing the
key one or more times. You have .5 seconds after a key is pressed to
enter a second character from the same key. If you press the same
key within .5 seconds, the second character associated with that key
replaces the initial character. If you do not press the same key within
.5 seconds, the text cursor moves to the next location so that the same
key can be pressed again to enter a second character.
The “2”, “3”, “4”, “5”, “6”, and “8” keys each support three letters
and one number and can be pressed from one to seven times to display
upper case, lower case, and numeric characters. The “7” and “9” keys
both support four letters and one number and can be pressed from
one to nine times. The “1” and “0” keys support all of the special
Page 21

MS300 User’s Manual
PAGE 17
SETUP
characters and will cycle through each character for every key press.
The text characters follow the same convention used by a standard telephone – except in the case of the “1” and “0”
keys which contain additional characters.
When entering characters at the beginning of a field or characters that follow a space, the MS300 assumes that upper
case characters are preferred. Therefore, characters are entered in the following cycle – uppercase, lowercase, and
numeric. For example, the first key press enters an uppercase letter corresponding to the first letter associated with the
key. Pressing the “2” key once displays an “A” in the text field, pressing the “2” key twice displays a “B”, pressing it
again will display a “C”. The fourth key press displays a lower case “a”, the fifth key press displays a lower case “b”,
and the sixth key press displays a lower case “c”. Lastly, pressing the “2” key a seventh time displays the number “2”.
When entering the second character in a text field or the second character following a space, the MS300 assumes that
lower case is preferred and the character entry cycles in the following pattern – lowercase, uppercase, and numeric.
The following text entry table describes the sequence of characters that appear when specific keys are pressed
on the remote:
nd
Key
1
2
3
4
5
6
7
Alpha Mode
st
1
character or 1st character after a
space
1. / , ? ‘ : ; &~! 1. / , ? ‘ : ; &~!
ABCabc2 abcABC2
DEFdef3 defDEF3
GHIghi4 ghiGHI4
JKLjkl5 jklJKL5
MNOmno6 mnoMNO6
PQRSpqrs7 pqrsPQRS7
Alpha Mode 2
character or 2nd
character after a
space
Page 22
8
9
0
TUVtuv8 tuvTUV8
WXYZwxyz9 wxyzWXYZ9
0@ _ - * # [ ] ( )+= 0@ _ - * # [ ] ( )+=
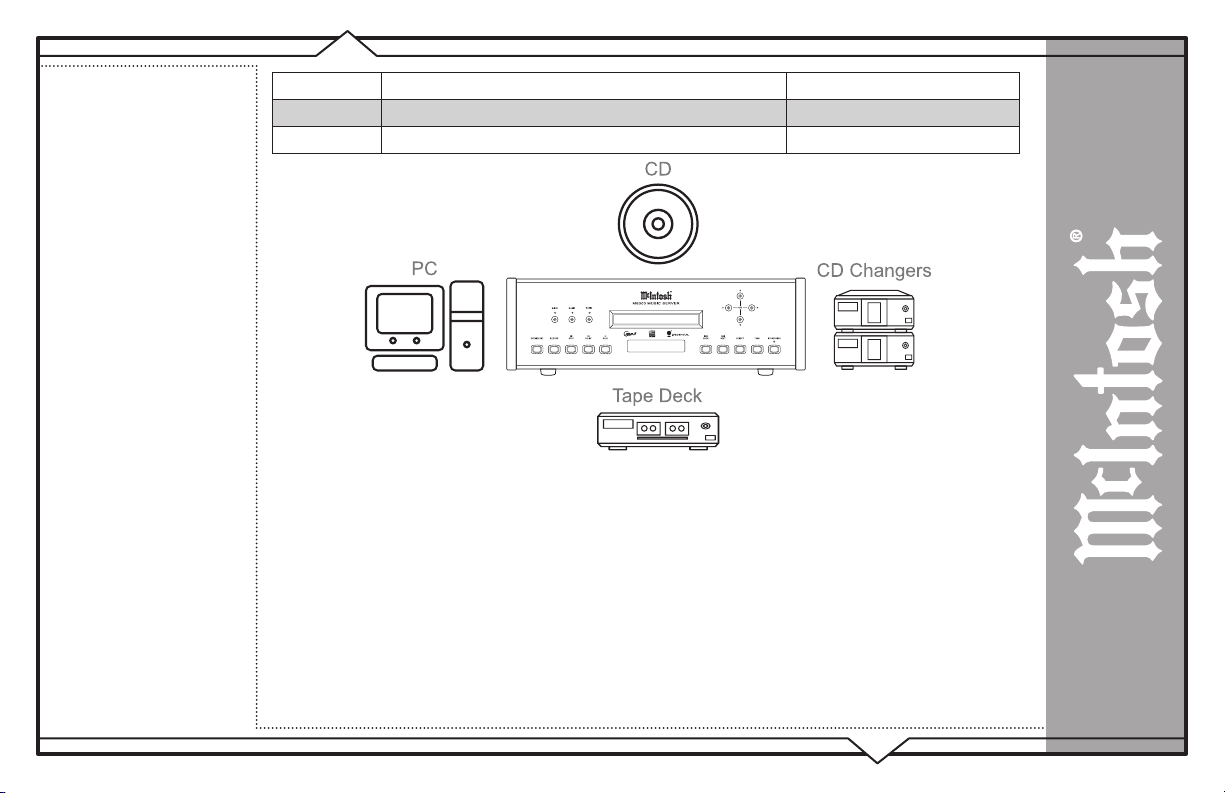
GETTING MUSIC INTO THE MS300
Before you can enjoy the many benefits of your MS300 Music Server, you will want to get your music collection into
MUSIC ON THE MS300
the MS300. The process of getting music into the MS300 is called “Recording” or sometimes “Ripping”.
There are several ways to get your music into the MS300:
• Record CDs using the internal CD Drive
• Record CDs using optional external CD changers
MS300 User’s Manual
PAGE 18
Page 23

• Record from an external source (such as a tape, LP, or other realtime source)
• Transfer Music files from your PC using a network
You may choose to use any or all of these methods at any time. Each
is described on the following pages.
RECORDING FROM THE INTERNAL CD
The easiest way to get music into your MS300 is to record CDs using
the built-in internal CD-RW drive. This method requires no additional
equipment and is very fast, as the internal CD drive can rip audio at
several times the speed of normal playback. This is known as “fastripping”.
Follow these steps to record using the internal CD-RW drive:
1. Press the EJECT key on the front panel.
2. Insert an audio CD (label side up) into the CD-RW tray.
3. Press the EJECT key again to close the CD-RW tray.
4. The CD’s artist, album, and track names are automatically
retrieved from the Gracenote® Music Recognition Service and
are displayed on your TV.
5. Press the RECORD key on the remote control to display the
Recording Options Menu.
MUSIC ON THE MS300
6. Press the RECORD key a second time to choose the default
recording option “Record to Internal Hard Drive”.
7. The Record Select Guide will be displayed showing the
current CD with checkmarks to the right of each track name.
8. Press the RECORD key a third time to begin recording the
entire CD to the internal hard drive.
MS300 User’s Manual
PAGE 19
• When recording is complete, the MS300 will return to the Music
Guide.
Page 24

• Repeat steps 1-8 for each disc in your music collection.
• Highlight and Unselect tracks you do not wish to record before pressing RECORD for the third time.
Note: It is also possible to set the MS300 to automatically record the CD when inserted. Refer to the section “Setting User
Preferences” for setting Recording Preferences and Disc Insert Preferences.
RECORDING FROM AN EXTERNAL CHANGER
The MS300 can manage up to three - 400 disc CD changers in addition to any music recorded onto the internal hard
drive.
Recording from an external changer (of course) requires at least one supported external CD changer properly
connected to the MS300. Recording from an external changer is much slower than recording from the internal CD
drive because each CD must be played and recorded in real-time compared to the fast ripping speed of recording from
the internal CD drive. However, it is possible to set up the external changer record and let it record for several weeks
with no interaction.
All changer based CDs are seamlessly integrated into the same easy to use Music Guide as your recorded CDs.
Supported External CD Changers
The following changers are currently supported. This list may change from time to time as new changers are released
by third party manufacturers. Please check the McIntosh web site for a list of any new supported changers.
• Sony CD Changers (CDP-CX 200, 300, 400 series with S-Link support)
• Sony DVP-CX777ES CD/DVD changer (CDs only)
MUSIC ON THE MS300
MS300 User’s Manual
PAGE 20
Page 25

• Kenwood DV-5900M and DV-5050M CD/DVD Changers (CDs only)
• Pioneer DV-F07 CD/DVD changer (CDs only)
Note: All three changers must be from the same manufacturer. For example, you can not use 1 Sony and 2 Kenwood
changers at the same time. Also, you can not mix Sony CD and Sony CD/DVD changers.
Connecting Sony DVP-CX777ES CD/DVD Changers (CDs Only)
The MS300 requires that you connect each changer to the back panel using audio and control cables.
Follow these steps to connect your Sony CD/DVD changers to your MS300:
1. An RS-232 serial null modem cable with female DB-9 connectors on each end is required for connecting a
Sony CD/DVD Changer.
2. Connect one end of the RS-232 serial cable into Communication Port number 1, on the back of your MS300.
3. Connect the other end of the RS-232 serial cable into the “RS-232C” port on the back of your changer.
4. Locate the stereo RCA audio patch cable.
5. Connect one end of the RCA audio cable into the Analog In jacks number 1 on the back of your MS300
6. Connect the other end of the RCA audio cable into the Analog Line Out jacks on the back of your changer.
MUSIC ON THE MS300
MS300 User’s Manual
PAGE 21
Page 26

• If you have more than one changer, repeat these steps to connect the additional changers to communications
ports and audio jacks 2 and 3 respectively.
• For the best audio quality, you should also connect digital optical or coax audio cables (not included) between
your changers and the MS300.
Connecting Sony CD Changers
The MS300 requires that you connect each changer to the back panel using audio and control cables.
Follow these steps to connect your Sony CD changers to your MS300:
1. Locate the S-Link cable, with 1/8” male plugs on each end.
2. Connect one end of the S-Link cable into the S-Link/IR Out jack number 1 on the back of your MS300.
3. Connect the other end of the S-Link cable into the Control A1 jack on the back of your changer.
4. Locate the stereo RCA audio patch cable.
5. Connect one end of the RCA audio cable into the Analog In jacks number 1 on the back of your MS300
6. Connect the other end of the RCA audio cable into the Analog Line Out jacks on the back of your changer.
7. If your changers has a “Command Mode” switch on the rear panel, make sure the is set to 1 for all changers.
If no rear switch, use the changers menu to set it to CD1 for all changers.
MUSIC ON THE MS300
MS300 User’s Manual
PAGE 22
Page 27
• If you have more than one changer, repeat these steps to connect the additional changers to S-Link and audio
jack 2.
• For the best audio quality, you should also connect digital optical or coax audio cables between your changers
and the MS300.
Connecting Kenwood CD/DVD Changers (CDs Only)
The MS300 requires that you connect each changer to the back panel using audio and control cables.
Follow these steps to connect your Kenwood DVD/CD changers to your MS300:
1. Locate the RS-232 serial cable that came with your Kenwood changer. This is the black cable with female
DB-9 connectors on each end.
2. Connect one end of the RS-232 serial cable into Communication Port number 1, on the back of your MS300.
3. Connect the other end of the RS-232 serial cable into the “RS-232C” port on the back of your changer.
4. Locate the stereo RCA audio patch cable.
5. Connect one end of the RCA audio cable into the Analog In jacks number 1 on the back of your MS300
6. Connect the other end of the RCA audio cable into the Analog Line Out jacks on the back of your changer.
• If you have more than one changer, repeat these steps to connect the additional changers to communications
ports and audio jacks 2 and 3 respectively.
• For the best audio quality, you should also connect digital optical audio or coax cables between your changers
MUSIC ON THE MS300
MS300 User’s Manual
PAGE 23
Page 28
and the MS300.
• To control power on and power off for the Kenwood changer you must connect the 1/8” male to male cable
between the “S-Link/IR Out” jack on the MS300 and the “DVD CONTROL” jack on the Kenwood changer.
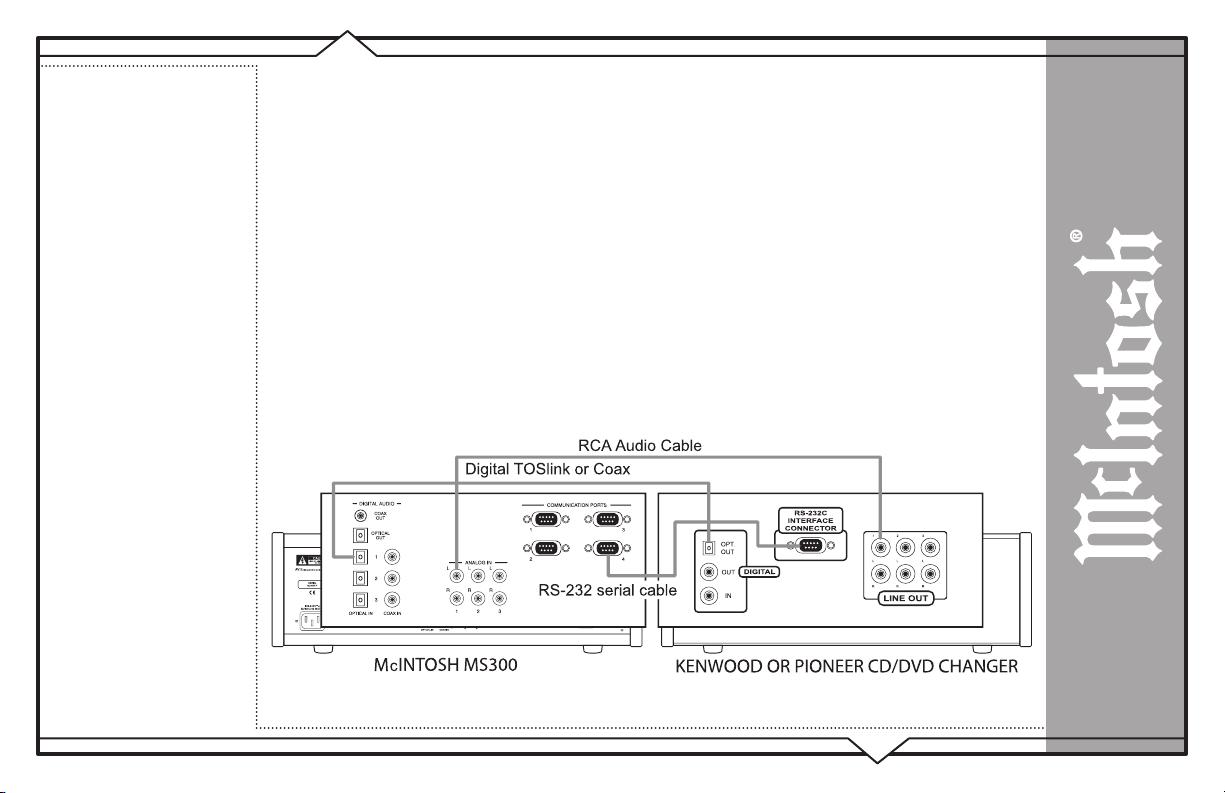
Connecting Pioneer CD/DVD Changers (CDs Only)
The MS300 requires that you connect each changer to the back panel using audio and control cables.
Follow these steps to connect your Pioneer DV-F07 changers to your MS300:
1. A custom RS-232 serial cable with 9 pin and 15 pin connectors is required to connect the DV-F07 changer to
the MS300. These can be purchased from your McIntosh Dealer.
2. Connect one end of the RS-232 serial cable into Communication Port number 1, on the back of your MS300.
3. Connect the other end of the RS-232 serial cable into the “Interface Connector” port on the back of your
changer.
4. Locate the stereo RCA audio patch cable.
5. Connect one end of the RCA audio cable into the Analog In jacks number 1 on the back of your MS300
6. Connect the other end of the RCA audio cable into the Analog Audio Out jacks on the back of your changer.
• If you have more than one changer, repeat these steps to connect the additional changers to communications
MUSIC ON THE MS300
MS300 User’s Manual
PAGE 24
Page 29

ports and audio jacks 2 and 3 respectively.
• For the best audio quality, you should also connect digital optical or coax audio cables between your changers
and the MS300.
Loading Discs Into Changers
Insert CDs into your changers, following the changer manufacturer’s
instructions and close the changer door. Quick Lookup will
automatically start in a few seconds.
Quick Lookup
Before recording any CDs from an external changer, CDs should be
looked up using the Quick Lookup feature. The Quick Lookup process
automatically retrieves the artist, album, and track names form the
Gracenote® Music Recognition Service. The Quick Lookup feature
will automatically start whenever you close the changer door and will
automatically determine how many and which discs have been added or removed from the changer.
You can manually run Quick Lookup by following these steps:
1. Press the
2. Select the
3. Select the LOOKUP DISCS
4. Select the
MUSIC ON THE MS300
When Quick Lookup is complete, the MS300 will return to the Music Guide where changer based CDs are listed
alphabetically by Artist Name – Album Title. CDs have a little CD icon on each row of the Guide to indicate that the
Title is a physical CD located in an eternal changer. Music Titles with a MUSIC NOTE icon are stored on the internal
SETUP key on the remote control to display the Setup Menu.
CHANGER MANAGEMENT menu item.
QUICK LOOKUP menu item.
menu item.
MS300 User’s Manual
PAGE 25
Page 30
MS300 User’s Manual
PAGE 26
hard drive.
Note: The MS300 needs to be connected, via the Ethernet
Jack, to an active computer network with access
to the Internet for the Quick Lookup Feature to
retrive the Album Title and Track Names.
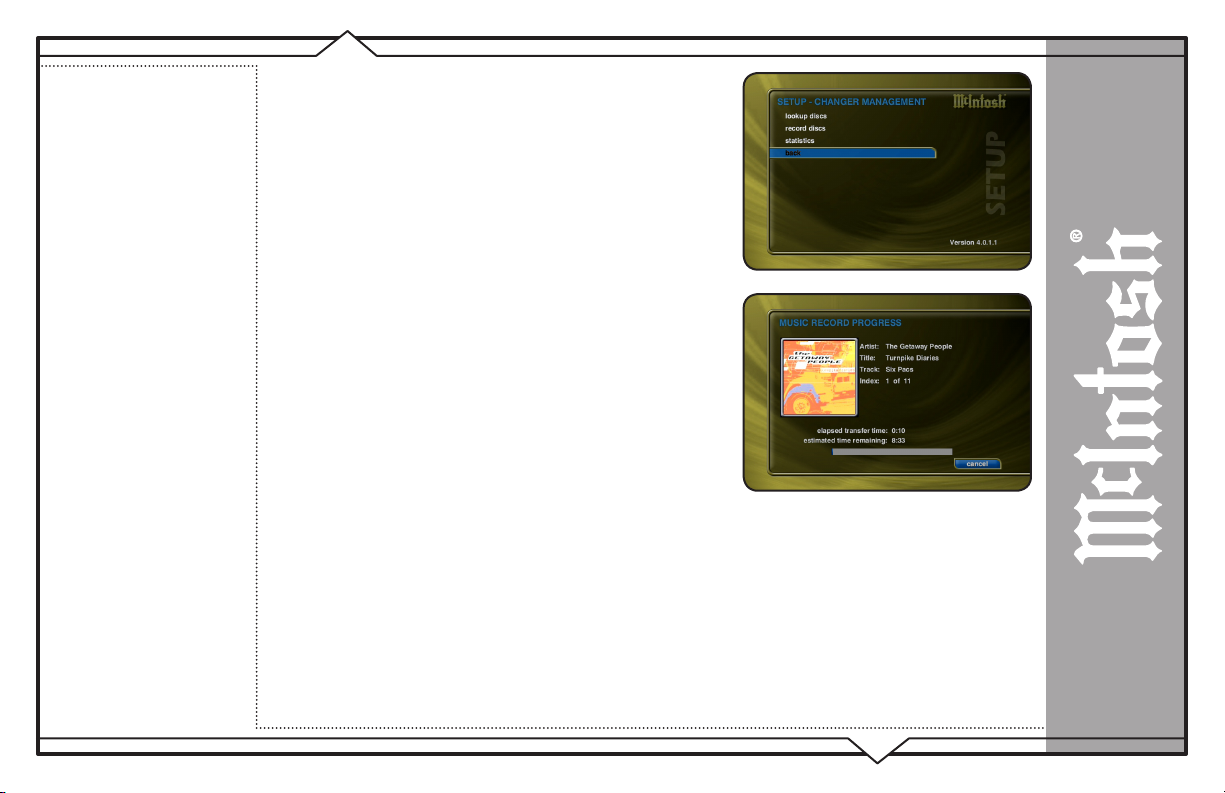
Automatic Bulk Recording
The MS300 can automatically record every single CD from an
external changer, one by one (in real time) using the Record Discs
feature.
Follow these steps once your changer is loaded with CDs and they
have been identified by Quick Lookup:
1. Press the
Setup Menu.
2. Select the
3. Select the
4. Select the
SETUP key on the remote control to display the
CHANGER MANAGEMENT menu item.
RECORD DISCS menu item.
QUICK RECORD menu item.
Quick Record will first determine which discs have been added to
the changer and then figure out which ones have NOT already been
recorded and proceed with recording these discs to the internal hard
drive.
MUSIC ON THE MS300
Quick Record will record all tracks from each CD. If you only want to record select tracks from one or more CDs,
refer to the section “Select Tracks to Record” below.
• When recording is complete, the MS300 will return to the Music Guide.
• Refer to the section “Setting User Preferences” for setting Recording Preferences and Disc Insert Preferences.
Select Tracks to Record
You can select which CDs and which tracks you want to record by following these steps:
1. Press the RECORD key on the remote control to display the Recording Options Menu.
Page 31

2. Press the RECORD key a second time to choose the default recording option “Record to Internal Hard
Drive”.
3. The Record Select Guide will be displayed showing the currently highlighted CD with checkmarks to the
right of each track name.
4. Navigate Up and Down the Record Select Guide and press the TOGGLE and SELECT key to check or
uncheck a Title or individual Tracks. Checked tracks are marked for recording.
5. When you are finished selecting tracks, press the RECORD key again to start recording the selected tracks
to the hard drive.
• When recording is complete, the MS300 will return to the Music Guide.
• Refer to the section “Setting User Preferences” for setting Recording Preferences and Disc Insert Preferences.
IMPORTING MUSIC FILES
If you have MP3 or FLAC files already recorded on your PC or Mac, you can transfer the files directly to your MS300
using an Ethernet network. This is a fast and convenient way to load up your MS300 with your favorite Music without
MUSIC ON THE MS300
having to re-record everything.
MS300 User’s Manual
PAGE 27
The MS300 will import each audio file, extract the song information, and add it to your Music Library.
Page 32

There are some rules to follow to make sure your files are transferred correctly. Please make sure your audio files
follow these guidelines before importing them into your MS300.
System Requirements
• 10/100 Ethernet network
• PC or Mac connected to the same local ethernet network as the MS300
• Windows XP or Mac OS X
Audio File Requirements
• MP3 audio files recorded at 96k, 120k, 160k, 192k, 320k, or VBR encoding.
• FLAC audio files
• ID3 tags are supported for both MP3 and FLAC audio files.
Cover Art Image Requirements
• JPEG image format
• No larger than 200 pixels wide by 200 pixels high
• No larger than 30K in size
• The cover art file must be embedded in the MP3 or FLAC file using ID3v2 tags.
MUSIC ON THE MS300
MS300 User’s Manual
PAGE 28
Page 33

Importing from a PC
Make sure your PC is connected to the same network as your MS300 and follow these steps to mount, transfer, and
import music files from your PC to your MS300.
On the MS300 (Note: This step only needs to be done once.)
1. Press the SETUP key on the remote control to display the Setup menu.
2. Select the NETWORK menu item.
3. Select the SERVER SETTINGS menu item.
4. Enter a name for your MS300.
On the PC
1. Go to the START menu and select RUN.
2. Enter two backslashes “\\” and the name of your MS300 (the name you entered into the Server Settings) and
click the OK button.
MS300 User’s Manual
PAGE 29
MUSIC ON THE MS300
3. You should see the following in a new window on your computer:
4. Drag and drop your MP3 or FLAC files onto the Import folder. The MS300 will automatically import, add, and
catalog each file into your Music Guide.
Page 34

Importing from a Mac
The MS300’s File Server acts like a Windows File Server on your network, therefore you will need to connect using
the MacOS X’s built-in Windows networking client. Make sure your Mac is connected to the same network as your
MS300 and follow these steps to mount, transfer, and import music files from your PC to your MS300.
1. Go to the Finder and select “Connect to Server…” from the Go Menu.
2. Type “smb://” and the name of your MS300 (the name you entered into the Server Settings) and click the
MUSIC ON THE MS300
Connect button
MS300 User’s Manual
PAGE 30
3. You should see the SMB Mount dialog appear on your computer:
4. Click on the Content pop-up menu and select the Import directory.
Page 35

5. Next, an authentication dialog will appear. You can ignore this dialog and just click the OK button.
6. You will then have a new drive mounted on your desktop called “Import”.
7. Drag and drop your MP3 or FLAC files onto the Import folder. The MS300 will automatically import, add, and
catalog each file into your Music Guide.
MUSIC ON THE MS300
MS300 User’s Manual
PAGE 31
Page 36

RECORDING FROM OTHER EXTERNAL SOURCES
In addition to recording from external changers, the MS300 allows
you to record directly from its analog inputs to the internal hard drive.
Follow these steps to record from an external source:
1. Press the RECORD key on the remote control to display the
Recording Options Menu.
2. Highlight and select the recording option “Record from Ext
Inputs to the Internal Hard Drive”.
3. External Record Options screen will be displayed showing the
default information for the recording you are about to make.
You can use these default settings or edit them. The default
recording length is 30 minutes. Enter a different number to increase or decrease the recording time.
4. When you are finished editing the default settings, press the RECORD key again to start recording from the
external analog inputs to the hard drive.
• When recording is complete, the MS300 will return to the Music Guide.
• Recording from the External Inputs creates one Title with one Track and adds the Title to the Music Guide.
• You can edit the data later, just like any other Title. Please refer to the “Managing Your Media” section for
more details.
MUSIC ON THE MS300
MS300 User’s Manual
PAGE 32
Page 37

ERASING A CD-RW DISC
You can use the MS300’s built-in CD burner to erase the contents of a
re-writable CD.
Follow these steps to erase a re-writeable CD:
1. Press the RECORD key on the remote to display the Record
menu.
2. Select the ERASE CD-RW DISC
3. Confirm that you want to proceed with completely erasing the
disc by selecting the ERASE button on screen.
• You will not be able to interrupt the erase function.
• When the MS300 completes erase disc function, it will be
ejected. Remove the now blank CD-RW disc and close the CD
tray.
MUSIC ON THE MS300
menu.
MS300 User’s Manual
PAGE 33
Page 38

LISTENING TO MUSIC
BROWSING YOUR MUSIC LIBRARY
Now that you have gotten your music into
your MS300, it’s time to enjoy it! The
Music Guide allows you to browse, locate,
and play all of your music in one easy to use
on-screen guide.
The Music Guide displays a scrolling list
of all your Music Titles. Using the remote
control, you can navigate up and down
the list. As each Title is highlighted, you
will notice that the Information Area and
Cover Art changes to reflect the currently
highlighted Title.
SHOW AND HIDE TRACKS
If you press the SELECT key on the remote control, you will expand the current Title to reveal a list of the Title’s
Tracks.
MS300 User’s Manual
PAGE 34
LISTENING TO MUSIC
Press the SELECT key again (when a Title is highlighted) to collapse the current Title and hide the track names.
Page 39

LISTENING TO MUSIC
PLAYING THE CURRENT TITLE
Playing the currently highlighted Title is the same as playing a CD in a conventional CD player. Simply press the
PLAY key
Note: If you press SELECT with a Track highlighted, you will start playback from the selected Track.
You’ll notice that a new screen appears with a list of the songs (or tracks) on the current Title, this is the Music Player
screen. The Music Player displays the artist name, album name, album cover art, and track list for the current Title.
SELECTING A DIFFERENT SONG
In the Music Player you can navigate up and
down the track list using the remote control.
Highlight a different song and press SELECT
to play the song.
on the remote control and it begins to play from track 1.
MS300 User’s Manual
PAGE 35
Page 40

LISTENING TO MUSIC
CHANGING THE GUIDE VIEW
The GUIDE button on the remote control is used to switch between
the Music Guide and Music Player screens. When you are viewing
the Music Player screen, press the GUIDE button to return to the
Music Guide.
The Music Guide provides you with several ways to view the
contents of your Music Library. One of the easiest ways to browse
and sort your Music Library is by using the Music “Views”. There
are four Views that you can switch between using the “MENU/
VIEW” key on the remote control:
• View By Artist
• View By Title
• View By Song
• View By Cover
View By Artist
View By Artist is the default View and displays your Music Library
alphabetically from A to Z using according to the Artist Name then
the Album Name.
View By Title
View By Title will order the list of Titles alphabetically from A to Z,
according to the Album Name then the Artist Name.
MS300 User’s Manual
PAGE 36
Page 41

LISTENING TO MUSIC
View By Song
View By Song will order the list of Titles alphabetically from A to Z,
according to the Song Name.
View By Cover
View By Cover displays a graphical 4x2 grid of album cover art,
sorted alphabetically from A to Z, according to the Artist Name then
Album Name.
CHANGING THE CURRENT PLAY MODE
The default Play Mode will play the current Title from Track 1 to the
last track in order, then stop. If you want to change the order of how
tracks are played, there are six different Play Modes to choose from:
• Normal - play each track in order in the current Title, then stop.
• Repeat Track - repeat the same track over and over until you
press stop.
• Repeat Title - play each track in the current Title in order then
repeat the entire disc until you press stop.
• Repeat Group - play each track in each title in the current group
and then repeat them until you press stop.
• Random Title - randomly select and play a track from within the
current title. Continue until you press stop or every track in the current title is played.
• Random Group - randomly select and play a track from any title in the current group. Continue until you press
stop or every track in the current group is played.
To change the current Play Mode, press the MODE key on the remote control. Each press of the MODE key will
switch to the next Play Mode. Stop pressing the MODE key when you see the desired Play Mode appear on the
screen. You can also directly select a Play Mode using the OPTIONS key and the Play Mode menu item.
MS300 User’s Manual
PAGE 37
Page 42

LISTENING TO MUSIC
VIEWING BY GENRE
In addition to the current Guide View, the Music Guide automatically organizes your Music into default “Genres”
also called “Groups”. The Group Bar displays a horizontal scrolling list of Genres corresponding to the music in your
library. Five Genres or Groups are visible at one time. The “All” genre is the default, which displays all Titles in your
Music Library.
Using the LEFT and RIGHT arrow keys on the remote, you can select a different Genre. Notice that the list of Titles
updates to show only Titles in the selected Genre.
• Scroll all the way to the left to return to the All Genre.
• Genre list will scroll to the right to reveal more Genres.
• Refer to the section “Managing Your Media” for instructions on creating your own Genres to create custom
groupings of your favorite music titles
MS300 User’s Manual
PAGE 38
Page 43

LISTENING TO iRADIO
LISTENING TO INTERNET RADIO
BROWSING INTERNET RADIO STATIONS
The Radio Guide displays a scrolling list of Internet Radio Stations. Using the remote control, you can navigate up
and down the list. As each Station is highlighted, you will notice that the Information Area and Cover Art changes to
reflect the currently highlighted Station.
• Press the iRADIO key on the remote control to display the Radio Guide.
• Press the MUSIC key to return to the Music Guide.
MS300 User’s Manual
PAGE 39
Page 44

LISTENING TO iRADIO
PLAYING THE CURRENT STATION
Playing the currently highlighted Radio Station is the same as selecting and playing an off air radio station on a typical
audio receiver. Simply press the SELECT key on the remote control and the currently highlighted station will be
located, buffered, and then played.
You’ll notice that a new screen appears displaying information about the selected station. This is the Radio Player
screen. The Radio Player displays the station name, location, genre, genre cover art, and status about the current
Internet Radio station stream.
• Playing Internet Radio requires a valid Internet connection.
• Although some stations will work over a Dialup Internet Connection, a broadband Internet connection is
recommended.
• Due to the dynamic nature of the Internet, you may experience periodic audio drop-outs which could be due to
many factors such as Internet access problems, busy networks, etc...
• Internet Radio Stations are not hosted by McIntosh and may not be available at all times. You can update your
Internet Radio Stations list by running Tune Stations. Please refer to the “Managing Your Media” section for
more information.
MS300 User’s Manual
PAGE 40
Page 45

MS300 User’s Manual
PAGE 41
MANAGING YOUR MEDIA
CREATING PLAYLISTS
The MS300 allows you to organize your favorite songs into custom
“Playlists”. A Playlist is simply a group of songs that you choose from
your Music Library. Common uses for Playlists are:
• Collections of your favorite songs
• Songs that have a similar tempo or feel (mellow mix)
• Custom albums from one or more of your favorite artists
• Party mixes
• Workout mixes
Follow these steps to create your own custom Playlist:
1. Press the MUSIC key to make sure you are in the Music
source mode.
2. Press the OPTIONS key to display the Music Options Menu
3. Select the NEW PLAYLIST
4. Using the remote control or keyboard, enter a name for your
Playlist.
5. Select the CONTINUE button on screen to advance to the Edit
Playlist Select Guide. The Edit Playlist Select Guide works
just like the Music Guide. Navigate up and down to highlight,
expand, or collapse music titles.
6. For each song you want to add to the Playlist, highlight
MANAGING YOUR MEDIA
the song name and press the SELECT key on the remote.
A checkmark appears to the right of each selected song
indicating that it will be added to the Playlist. Press SELECT
again to remove the checkmark.
7. When you have selected all of the songs you want to include
in the playlist, press the RECORD button on the remote
control to save the Playlist.
menu item.
Page 46

• When you are finished creating your Playlist, the Music Guide is displayed highlighting the newly created
Playlist.
• You can play any Playlist the same way you play a music title or CD. Just press the PLAY key on the remote
control.
• Notice that a Playlist genre is added to the Group Bar. The Playlist genre will always be available as long as you
have at least one playlist in your Music Library.
MANAGING YOUR MEDIA
MS300 User’s Manual
PAGE 42
Page 47

MS300 User’s Manual
PAGE 43
CREATING GROUPS
In addition to Playlists, the MS300 allows you to create custom
“Groups” of Music Titles or Radio Stations. User created Groups
appear in the Group Bar along with the automatically created Genre
Groups and System Groups (All, CDs, Internal, and Playlists). Some
uses for custom Group are:
• Organize music titles or radio stations into custom genres, like
“Funk”, 80’s, “Hits’, etc…
• Group all of the albums for a favorite artists together for quick
access.
• Create an easily accessible collection of your favorite albums.
To create a custom Group, follow these steps:
1. Press the MUSIC key to make sure you are in the Music
source mode or press the RADIO key if you want to create a
custom Radio Group.
2. Press the OPTIONS key to display the Options Menu.
3. Select the
4. Using the remote control or keyboard, enter a name for your
Group.
5. Select the CONTINUE button on screen to advance to the Edit
Group Select Guide. The Edit Group Select Guide works just
like the Music or Radio Guide.
6. For each Music Title or Radio Station you want to add to
MANAGING YOUR MEDIA
the Group, highlight the Title or Station name and press the
SELECT key on the remote. A checkmark appears to the right
of each selected Title or Station indicating that it will be added
to the Group. Press SELECT again to remove the checkmark.
7. When you have selected all of the Titles or Stations you want
to include in the group, press the RECORD button on the
remote control to save the Group.
NEW GROUP menu item.
Page 48

• When you are finished creating your Group, the Guide is displayed highlighting the newly created Group.
• Notice that a custom Group is added to the Group Bar along with the System Groups.
• The custom Group will always be sorted alphabetically within the Group Bar and appear to the right of the All
and Playlist Groups.
MANAGING YOUR MEDIA
MS300 User’s Manual
PAGE 44
Page 49

ADDING INTERNET RADIO STATIONS
The MS300 comes preloaded with several high quality streaming
Internet Radio Stations from around the world, but that may not be
enough for you, so the MS300 also let’s you add your own Internet
Radio Stations.
Internet Radio stations must conform to these specifications:
• Windows Media WMA streams only. (MPEG, RealAudio, and
other’s won’t work)
• Windows Media 9 or earlier.
To add your own Internet Radio Stations, you will need to obtain the
URL or Internet Link to the stream using your PC and Microsoft’s
Windows Media Player. Please refer to the Microsoft web site for
information on WMA and Windows Media Player.
Assuming you have a valid URL for a station, follow these steps
to add your own Internet Radio Station to the Radio Guide:
1. Make sure you are in the Radio source mode by pressing the
RADIO key on the remote.
2. Press the OPTIONS key to display the Options Menu.
3. Select the NEW STATION
4. Using the remote or keyboard, enter information for the new
station including: station name, location, URL, the bit rate of the stream, the genre, and the number of
MANAGING YOUR MEDIA
channels (mono or stereo). The cover art will be set according to which genre you select.
5. Select the SAVE button to save the new station.
• When you are finished creating your new station, the Radio Guide is displayed highlighting the newly created
Station.
• You can play the station just like any other Internet Radio station.
menu item.
MS300 User’s Manual
PAGE 45
Page 50

UPDATING THE INTERNET RADIO STATIONS LIST
McIntosh makes every attempt to insure that the preloaded Internet
Radio Stations are alive and well, but due to the dynamic nature of
the Internet and the third parties who actually serve up these radio
streams, sometimes you will not be able to play a station. The “Tune
Stations” feature allows you to download a list of the most recent
Internet Radio Stations.
Note: Tune Stations WILL NOT erase any custom stations you may have
added, from your Radio Guide. It WILL replace the McIntosh supplied
stations with a fresh new list.
If you want to replace the current Internet Radio Stations with a
new list of stations, follow these steps:
1. Make sure you are in the Radio source mode by pressing the
RADIO key on the remote.
2. Press the OPTIONS key to display the Options Menu.
3. Select the TUNE STATIONS
4. Read the WARNING screen and select OK to proceed.
5. The MS300 will connect to a server and download the latest
Internet Radio Stations.
When you are finished Tuning the Stations, the Radio Guide is
MANAGING YOUR MEDIA
displayed showing the new Internet Radio Stations and any user added
stations.
menu item.
MS300 User’s Manual
PAGE 46
Page 51

EDITING MUSIC INFORMATION
The MS300 has access to over 2.5 million CD titles,
but you may still encounter a CD that does not return a
custom cover or the correct disc information. You can
edit the disc information for any Music Title using the
Edit Disc and Edit Tracks screens.
Editing Disc Info
Follow these steps to edit the disc information for
the current Music Title:
1. Highlight the Music Title you want to edit in the
Music Guide.
2. Press the OPTIONS key on the remote control.
3. Select the EDIT DISC menu item to display the
Edit Disc Information screen.
4. Using the remote control or wireless keyboard,
change the artist name, album title, label, year of
release, or genre.
5. Select the SAVE button to save your changes and
return to the previous screen.
Selecting the PREVIOUS or NEXT buttons will save any
edits you have made to the current disc and display the
information for the previous or next disc.
MANAGING YOUR MEDIA
MS300 User’s Manual
PAGE 47
Page 52

Automatically Lookup Information for This
Disc
The “Lookup This Disc” button will initiate a disc
lookup for only this disc. The MS300 will connect to
the Gracenote® Music Recognition Service to locate
and download the disc information.
Follow these steps to lookup information for the
current disc:
1. Highlight the Music Title you want to edit in
the Music Guide.
2. Press the OPTIONS key on the remote control.
3. Select the EDIT DISC menu item to display the
Edit Disc Information screen.
4. Select the LOOKUP THIS DISC BUTTON
The Get Music Info screen will be displayed
as the MS300 attempts to lookup the disc
information from the Gracenote® Music
Recognition Service for you.
5. When the lookup is complete, you will return
to the Edit Disc Information screen where you
can verify or edit the results.
6. Select the SAVE button to save your changes
and return to the previous screen.
MANAGING YOUR MEDIA
.
MS300 User’s Manual
PAGE 48
Page 53

MS300 User’s Manual
PAGE 49
Searching for the Original Cover
Occasionally the wrong cover or the default cover will be displayed for a
Music Title. You can manually search for the original cover art by using the
“Search for Cover” feature. This is a powerful tool that allows you to search
the McIntosh servers for an exact or partial match using the artist name and/or
album name.
Follow these steps to search for a cover:
1. Highlight the Music Title you want to edit in the Music Guide.
2. Press the OPTIONS key on the remote control.
3. Select the EDIT DISC menu item to display the Edit Disc Information
screen.
4. Select the
screen.
5. The current Artist Name and Album Title are entered as the default
search strings. You can change either one of these to modify the
search. Note that editing the Artist Name or Title WILL NOT change
them in the Music Library. These edits are ONLY used to search for a
new cover.
6. Select the SEARCH button to start the search.
7. The Get Music Info screen will be displayed as the MS300 attempts to
search for the cover using the Artist Name and Title you entered.
8. When the search is complete, you will return to the Edit Disc
Information screen where you can verify or edit the results.
MANAGING YOUR MEDIA
9. Select the SAVE button to save your changes and return to the previous
screen.
Tips for Searching for Covers
The McIntosh MS300 Music Server uses a fuzzy-match algorithm to locate a
matching cover using the Artist Name and Title you enter. There are a few tips
to try when searching for covers:
• Remove any punctuation marks from the Artist Name and Title.
SEARCH FOR COVER button to display the Search for Cover
Page 54

MS300 User’s Manual
PAGE 50
• Remove Disc Numbers from the Titles.
• Try different spellings in the Title.
• Try removing part of the Artist Name (if it is
more than 2 words).
Selecting an Existing Cover
If for some reason you can not download the
original cover, you can choose one of the existing
covers for the current Title.
Follow these steps to select an existing cover
to assign to the current Title:
1. Highlight the Music Title you want to edit in
the Music Guide.
2. Press the OPTIONS key on the remote
control.
3. Select the EDIT DISC menu item to display
the Edit Disc Information screen.
4. Select the SELECT A COVER
display the Select Cover Art screen.
5. Using the arrow and page keys on the
remote control, locate the name of the Title
corresponding to the cover you wish to use
for the current Title. Notice that a preview of
MANAGING YOUR MEDIA
the selected cover appears on the right of
the list as you highlight each name.
6. Press the SELECT key on the remote
control when you have located the cover of
your choice.
7. Select the SAVE button to save your
selection and return to the previous screen.
button to
Page 55

Editing Track Names
You can also manually edit the Track/Song names
of the currently highlighted Title in the Music
Guide.
Follow these steps to edit the track
information for the current Music Title:
1. Highlight the Music Title you want to edit in
the Music Guide.
2. Press the OPTIONS key on the remote
control.
3. Select the EDIT DISC INFO menu item to
display the Edit Tracks screen.
4. Select the EDIT TRACKs button to display
the Edit Tracks screen.
5. Using the remote control or wireless
keyboard, change the name of each track.
6. Press the SELECT button to advance to the
next track.
7. Select the SAVE button to save your
changes and return to the previous screen.
MANAGING YOUR MEDIA
MS300 User’s Manual
PAGE 51
Page 56

EDITING RADIO INFORMATION
Similar to editing Music Information, you can also Edit the Radio
Information.
Follow these steps to edit the station information for the
currently highlighted Internet Radio Station:
1. Make sure you are in the Radio source mode by pressing the
RADIO key on the remote.
2. Press the OPTIONS key to display the Options Menu.
3. Select the EDIT STATION
screen.
4. Using the remote or keyboard, edit the information for the new
station including: station name, location, URL, the bit rate of
the stream, the genre, and the number of channels (mono or
stereo). The cover art will be set according to which genre you
select.
5. Select the SAVE button to save the changes.
MANAGING YOUR MEDIA
menu item to display the Edit Station
MS300 User’s Manual
PAGE 52
Page 57

MS300 User’s Manual
PAGE 53
EDITING PLAYLISTS
You can change the name and add or remove tracks from any Playlist
you created.
Follow these steps to edit a Playlist:
1. Press the MUSIC key to make sure you are in the Music
source mode.
2. Highlight the Playlist Name you want to edit. Note: The Playlist
group will list all of your Playlists.
3. Press the OPTIONS key to display the Music Options Menu.
4. Select the Edit Playlist menu item.
5. Using the remote control or keyboard, change the name of
your Playlist or select the CONTINUE button on screen to
keep the current name and advance to the Edit Playlist Select
Guide.
6. For each song you want to add to the Playlist, highlight
the song name and press the SELECT key on the remote.
A checkmark appears to the right of each selected song
indicating that it will be added to the Playlist.
7. For each song you want to remove from the Playlist, highlight
the song name and press the SELECT key on the remote. The
checkmark to the right of the song will be removed, indicating
MANAGING YOUR MEDIA
that the song should be removed from the Playlist.
8. When you have added or removed all of the songs you want
to include in the playlist, press the RECORD button on the
remote control to save the Playlist.
• If you remove all songs from a Playlist, the Playlist is
automatically deleted.
• You can not reorder songs within a current Playlist.
Page 58

MS300 User’s Manual
PAGE 54
EDITING GROUPS
As with Playlists, you can also edit the name of a Group, add Music
Titles or Radio Stations to the Group, or remove Music Titles or Radio
Stations from the Group.
Follow these steps to edit a Group:
1. Press the MUSIC key if you want to edit the Music Groups or
press the RADIO key if you want to edit the Radio Groups.
2. Highlight the Group you want to edit within the Group Bar.
3. Press the OPTIONS key to display the Music Options Menu.
4. Select the Edit Group menu item.
5. Using the remote control or keyboard, change the name of your
Group or select the CONTINUE button on screen to keep the
current name and advance to the Edit Group Select Guide.
6. For each Music Title or Radio Station you want to add to the
Group, highlight the Music Title or Radio Station and press the
SELECT key on the remote. A checkmark appears to the right of
each selected Music Title or Radio Station indicating that it will
be added to the Group.
7. For each Music Title or Radio Station you want to remove from
the Group, highlight the Music Title or Radio Station and press
the SELECT key on the remote. The checkmark to the right of the
MANAGING YOUR MEDIA
Music Title or Radio Station will be removed, indicating that the
Music Title or Radio Station should be removed from the Group.
8. When you have added or removed all of the Music Titles or
Radio Stations you want to include in the playlist, press the
RECORD button on the remote control to save the Group.
You can not edit the System Groups (All, CDs, Internal, or Playlists).
• If you remove all Titles or Stations from a Group, the Group is
automatically deleted.
• You can not reorder Titles and Stations within a Group. They are
Page 59

always sorted alphabetically.
DELETING MUSIC
You can remove any music you have recorded to the MS300 by using
the Delete Music feature. You may want to do this if you have filled
up your MS300 and you can not record any more music or if you want
to remove songs that you just don’t listen to.
Follow these steps to delete music from your MS300:
1. Press the MUSIC key to make sure you are in the Music
source mode.
2. Press the OPTIONS key to display the Options Menu.
3. Select the
Music Info screen.
4. Press the CONTINUE button to proceed to the Delete Music
Guide.
5. For each Track you want to delete, highlight the Track and
press the SELECT key on the remote. A checkmark appears
to the right of each selected Track indicating that it will
be deleted. Press the SELECT key again to remove the
checkmark. Pressing the TOGGLE key on the remote when a
Title is highlighted will toggle all or none of the Title’s tracks
for deletion.
6. When you have selected all of the Titles you want to delete in the group, press the RECORD button on the
MANAGING YOUR MEDIA
remote control to permanently remove and delete the checked tracks.
You can not “delete” physical CDs from the Music Library. You must remove the discs from your changers if you
want the CDs to be removed from the Music Guide.
DELETE MUSIC menu item to display the Delete
MS300 User’s Manual
PAGE 55
Page 60

DELETING PLAYLISTS
You may delete entire Playlists from the Music Guide.
Follow these steps to permanently delete one or more Playlists
from the Music Guide:
1. Press the MUSIC key to make sure you are in the Music
source mode.
2. Press the OPTIONS key to display the Options Menu.
3. Select the DELETE PLAYLISTS
Delete Playlists screen.
4. For each Playlist you want to delete, highlight the Playlist
and press the SELECT key on the remote. A checkmark
appears to the right of each selected Playlist indicating that
it will be deleted. Press the SELECT key again to remove the
checkmark.
5. When you have selected all of the Playlists you want to delete,
select the DELETE button to permanently remove and delete
the checked Playlists.
MANAGING YOUR MEDIA
menu item to display the
MS300 User’s Manual
PAGE 56
Page 61

DELETING GROUPS
Deleting Groups from the Group Bar is very similar to deleting
Playlists. The contents of the Group (the Music Titles or Radio
Stations) are not deleted. They are still available in any other Groups
they may be assigned to and in the All Group.
Follow these steps to delete Groups.
1. Press the MUSIC key if you want to edit the Music Groups or
press the RADIO key if you want to edit the Radio Groups.
2. Press the OPTIONS key to display the Options Menu.
3. Select the
Playlists screen.
4. For each Playlist you want to delete, highlight the Playlist
and press the SELECT key on the remote. A checkmark
appears to the right of each selected Playlist indicating that
it will be deleted. Press the SELECT key again to remove the
checkmark.
5. When you have selected all of the Playlists you want to delete,
select the delete button to permanently remove and delete the
checked Playlists.
6. You can not delete the System Groups (All, CDs, Internal, or
Playlists).
MANAGING YOUR MEDIA
DELETE GROUPS menu item to display the Delete
MS300 User’s Manual
PAGE 57
Page 62

MS300 User’s Manual
PAGE 58
CREATING CDs
CREATING CDS
The MS300 is a complete media solution for storing, managing, and
listening to your music, but what if you want to get your music out
of your MS300 and take it with you? The MS300 has that covered as
well. You can easily create custom mix CDs, backups copies of any
physical CD, and record from the external analog inputs to a CD.
CREATING A CUSTOM MIX CD
A Custom Mix CD is a collection of songs that you record or “burn”
to a blank CD. The new CD can then be played in your car stereo,
computer, or any CD player which supports CD-R or CD-RW discs.
Follow these steps to create a custom Mix CD:
1. Press the MUSIC key to make sure you are in the Music
source mode.
2. Press the RECORD key to display the Music Record Options
menu.
3. Select the CREATE AN AUDIO MIX CD
create a standard audio CD which can be played in almost any
CD player or select the CREATE A DATA MIX CD button if you
want to create an data CD that can be played in any computer
or CD player which supports MP3 CDs.
4. When the Music Record Select Guide appears, you can select
one or more songs to include on your Mix CD. Navigation
of the Record Select Guide is the same as the other Guide
screens. Note: You can select up to 80 minutes or 700 MB of
songs because these are the maximum limits of recordable
CDs.
5. Press the RECORD key again to continue the recording
process and display the Music Record Progress – CD Read
screen.
6. The MS300 will read each song you have selected and
button if you want to
Page 63

CREATING CDs
assemble an “image” of all songs on its internal hard drive. Note: If you selected any songs which are from
changer based CDs, this process may take a while to complete as these songs must be read in real-time.
7. After all of the songs have been read, the MS300 will ask if you want to add any more tracks to the CD.
Select ADD MORE if you do want to add more tracks or select DONE to continue creating the CD.
8. When the MS300 has added all of your songs and finished creating the new CD image, it will eject the CD
tray and ask you to insert a blank CD.
9. Insert a blank CD-R or CD-RW disc and close the CD tray by pressing the Eject button on the front panel.
Note: You must use royalty paid blank CDs which are typically marked as “audio” or “music” CDs when
creating and Audio CD. Data CDs typically used for computers can be used for data mix CDs.
10. The Music Record Progress – CD Write screen now appears as the CD image is written to the blank CD.
11. When the CD is complete, the new disc you created will be ejected. Remove the disc and close the CD tray.
MS300 User’s Manual
PAGE 59
Page 64

MS300 User’s Manual
PAGE 60
CREATING CDs
DUPLICATING A CD
You can duplicate any physical disc located in the internal drive or any
external changer. These discs are for backup purposes only.
Follow these steps to duplicate a CD:
1. Press the MUSIC key to make sure you are in the Music source
mode.
2. Press the RECORD key to display the Music Record Options
menu.
3. Select the DUPLICATE A DISC
Record Select Guide.
4. Select a CD from any external changer or select the internal
drive’s CD. A check mark will be placed next to the selected
disc.
5. Press the RECORD key again to continue the recording process
and display the Music Record Progress - CD Read screen.
6. The MS300 will read the selected CD and create an “image” of
the CD on its internal hard drive. Note: If you selected any songs
which are from changer based CDs, this process may take a
while to complete as the CD must be read in realtime.
7. After the entire CD has been read, the MS300 will eject the CD
tray and ask you to insert a blank CD.
8. Insert a blank CD-R or CD-RW disc and close the CD tray by
pressing the Eject button on the front panel. Note: If you are
duplicating an audio CD, you must use royalty paid blank CDs
which are typically marked as “audio” or “music” CDs. Data
CDs typically used in computers can be used for duplicating
MP3 CDs.
9. The Music Record Progress - CD Write screen now appears as
the CD image is written to the blank CD.
10. When the CD is complete, the new disc you created will be
ejected. Remove the disc and close the CD tray.
button to display the Music
Page 65

MS300 User’s Manual
PAGE 61
CREATING CDs
RECORDING FROM AN EXTERNAL SOURCE
The MS300 also allows you to record from the external inputs to a blank CD. This allows you to record live
performances or any other analog source to a blank CD which can then be played on almost any standard CD Player..
Follow these steps to record direct to CD from an external source:
1. Press the MUSIC key to make sure you are in the Music source
mode.
2. Press the RECORD key to display the Music Record Options menu.
3. Select the RECORD EXT INPUTS DIRECT TO CD
4. The External Record Options screen will be displayed showing the
default information for the recording you are about to make. You
can use these default settings or edit them. The default recording
length is 30 minutes. Enter a different number to increase or
decrease the recording time.
5. When you are finished editing the default settings, press the
RECORD key again to start recording from the external analog
inputs to the internal hard drive.
6. The MS300 will record from the external analog inputs to a
temporary “image” recorded on its internal hard drive.
7. When the recording time elapses and the recording is complete,
the MS300 will ask you to insert a blank CD.
8. Insert a blank CD-R or CD-RW disc and close the CD tray by
pressing the Eject button on the front panel.
9. The Music Record Progress – CD Write screen now appears as the
CD image is written to the blank CD.
10. When the CD is complete, the new disc you created will be ejected.
Remove the disc and close the CD tray.
menu item.
If the MS300 detects that no audio was actually recorded, it will return
to the Music Guide without asking you to insert a blank CD. Check your
cables and make sure you have audio connected to the analog inputs on the
back of your MS300.
Page 66

MS300 User’s Manual
PAGE 62
SETTING USER PREFERENCES
User preferences are available to specify global configuration options
and preferred system settings. Press the SETUP key on the remote
control to display the Setup Menu. Use the navigation keys on the
remote control (up, down, left, and right) to highlight and select any
menu item.
SETTING THE SCREEN SAVER PREFERENCES
Screen Savers are provided for each source mode. Screen Savers
provide two important functions, to prevent a static image from being
displayed on the video output device for extended periods of time and
to provide useful information to the user when activated.
Follow these steps to set your screen saver preferences:
1. Press the SETUP key on the remote to display the Setup
menu.
2. Select the
3. Select the SCREEN SAVER
4. Select your Screen Saver Preferences.
Activation Idle Time
You can specify the amount of idle time that the MS300 will wait
before activating the screen saver from 1 to 60 minutes.
USER PREFERENCES
Warning: Some televisions and plasma monitors are more susceptible
to screen burn-in than others, therefore, we recommend using a low
activation time (like 1 minute) to reduce the risk of burn-in.
Mode
Select either the Normal mode or Product Demonstration mode. The
Normal mode displays the current title or station information while
the Product Demonstration mode is intended for retail product demos
during idle time.
GENERAL Menu.
Menu.
Page 67

Photo Screen Saver Mode
The MS300 has a Photo Screen Saver Mode for displaying your
own photos whenever the MS300 is idle for a specified period
of time. You can import your own photos into the Photos shared
directory using Windows Networking. Photos should be 720x480
for 4:3 NTSC TVs and 640x360 for 16:9 widescreen TVs.
Follow these steps to enable the Photo Screen Saver Mode in
your MS300:
1. Press the SETUP key on the remote.
2. Select the General menu.
3. Select the Screen Saver menu.
4. Select the Photo Viewer option and the number of minutes
to wait before displaying the next photo.
5. Select Random or Alphabetical ordering.
6. Select the Save button.
Note: You can set the Photo Interval or how long each photo is
displayed as well as the Photo Order or how you want to display your
photos, in random or alphabetical order.
• The Photos Screen Saver will be activated whenever the
MS300 is idle for the specified period of time.
USER PREFERENCES
• Do not set the idle time too high as the possibility of screen
burn is increased with certain types of displays, particularly
“Plasma” type displays.
MS300 User’s Manual
PAGE 63
Page 68

SETTING YOUR TIME ZONE
Specify which US time zone your MS300 is located in.
Follow these steps to set your Time Zone:
1. Press the SETUP key on the remote to display the Setup
menu.
2. Select the
3. Select the
4. Select your select your Time Zone.
GENERAL Menu.
TIME ZONE Menu.
USER PREFERENCES
MS300 User’s Manual
PAGE 64
Page 69

SETTING YOUR ZIP CODE
Select US Zip Code or Canadian Postal Code. Your Zip Code or Postal
Code is used to tell the Automatic Update Manager when to connect
to McIntosh for product updates.
Follow these steps to set your Zip Code:
1. Press the SETUP key on the remote to display the Setup
Menu.
2. Select the
3. Select the ZIP CODE
4. Enter your Zip or Postal Code.
GENERAL Menu.
Menu.
USER PREFERENCES
MS300 User’s Manual
PAGE 65
Page 70

MS300 User’s Manual
PAGE 66
ENABLING PASSWORD PROTECTION
Optional Password Protection enables you to limit user access to the
Setup Menus. This is useful to lockout the ability to change the global
user settings and preferences.
Setting a System Password – Follow these steps to setup a new
system password:
1. Using the remote control, enter a 4 to 8 digit code into the
password field.
2. Press the SELECT key to highlight the VERIFY field.
3. Re-enter the same password for verification.
4. Press the SELECT key to highlight the SAVE button.
5. Press SELECT again to save your password and enable
Password Protection on the Setup Menus.
• You must exit Setup and re-enter setup to activate the password
protection.
• If a user password is specified, you will be prompted for your
password whenever you press the Setup key on the remote.
• If the password entered matches the stored password, full access
is granted to the user until the next power off cycle.
• If the password does not match, the user will be asked 2 more
times to enter the correct password. If after the third try the
USER PREFERENCES
password still does not match, the system will not allow the user
access to the Setup menus.
• If the user does not specify a System Password, access to the
Setup menus will be allowed whenever you press the Setup key.
Removing a System Password – Follow these steps to remove
the system password:
1. Press the SETUP key and enter your existing system
password.
Page 71

2. Highlight the CLEAR button on screen and press the SELECT
key on your remote.
3. The password and verify fields will be cleared.
4. Highlight the SAVE button and press SELECT.
You will now be able to enter Setup without entering a password.
CHOOSING YOUR NETWORK CONNECTION
MS300 supports two networking methods, Ethernet and Dialup
Modem. Your MS300 must be connected to the Internet in order to
lookup disc information, download software updates, and access
Internet Radio.
Note: An external modem is necessary for Dialup access. External
modems are available from most computer retail stores or contact your
McIntosh dealer for more details.
If you have a broadband Internet connection such as a cable modem,
DSL, or ISDN line, select Ethernet and connect the MS300 to your
Ethernet network. You may need additional networking hardware (like
an Ethernet hub) to join your MS300 to your Ethernet network. See
your McIntosh Dealer for more information about home networking.
MS300 User’s Manual
PAGE 67
USER PREFERENCES
If you have a dialup ISP (Internet Service Provider (such as AOL,
Compuserve, Earthlink, MSN etc…) select the Dialup Modem button.
Follow these steps to select your network connection:
1. Press the SETUP key on the remote to display the Setup
menu.
2. Select the
3. Select the
4. Select either ethernet or dialup modem.
NETWORK Menu.
NETWORK CONNECTIONS Menu.
Page 72

Testing the Connection
It is a good idea to verify that your selected network connection is
functioning properly before exiting the Network Connections screen.
Follow these steps to test your selected network connection:
1. Select the TEST CONNECTION button on the Network
Connections screen.
2. Wait for the tests to complete. A check mark next to each test
indicates that it passed while an “X” indicates that the test
failed.
3. Select the RETURN button to return to the previous screen.
If one or more connection tests receive an X, make sure your cables are properly connected and you have properly
setup for Ethernet Settings or Dialup Modem Settings.
USER PREFERENCES
MS300 User’s Manual
PAGE 68
Page 73

Ethernet Settings
Ethernet is the preferred networking choice which provides you with
the best network performance and allows your MS300 to act as a
“server” to deliver your music collection throughout your home using
other network clients.
Ethernet networks require that you configure each device on
the network with a valid “address”. These addresses are usually
configured automatically by your network hardware. If your PC is
setup using Dynamic or “DHCP” addressing, you should most likely
use the same for your MS300.
Connect the MS300 to your Ethernet network using a standard
Ethernet cable and then follow these steps to specify your
Ethernet settings:
1. Press the SETUP key on the remote to display the Setup
menu.
2. Select the
3. Select the
4. Select Dynamic for automatic address configuration or
Static if you want to manually enter your TCP/IP address
information.
NETWORK Menu.
ETHERNET SETTINGS Menu.
MS300 User’s Manual
PAGE 69
USER PREFERENCES
If you select Static TCP/IP addressing, you will need to obtain a valid
IP address, subnet mask, DNS server, and gateway addresses from
your network administrator.
Page 74

Dialup Settings
If you are going to use a dialup ISP to connect your MS300 to the
Internet, you must provide information for your selected ISP. This
information can be obtained by contacting your ISP or from your PC,
if you already use it to connect to the Internet.
Connect your phone line to a Hayes compatible modem and
connect the modem to COM PORT 4 on the back of your MS300,
then follow these steps to specify your Dialup Modem settings:
1. Press the SETUP key on the remote to display the Setup
menu.
2. Select the
3. Select the DIALUP SETTINGS
4. Enter your login or user name.
5. Enter your password.
6. Enter 1 or 2 dialup access numbers obtained from your ISP.
7. Select your dialing method: Tone or Pulse.
8. Enter any required dialing prefixes you may need for your
phone system such as ‘9’ to get an outside line.
9. If you have Call Waiting service on your phone line, you
should enter “*70,” (or any other code) to temporarily disable
it while using the MS300. This prevents a Call Waiting call
from interrupting any MS300 Internet functions that may be in
USER PREFERENCES
progress, such as updating.
10. Finally select which Provider you are using: AOL,
CompuServe or Other.
NETWORK Menu.
If you want to test the dialup modem connection, select the TEST
CONNECTION button to run the test as described above.
Menu.
MS300 User’s Manual
PAGE 70
Page 75

SETTING THE MS300 SERVER SETTINGS
The MS300’s server also allows you to control it remotely using a
web browser on your PC and allows Network File Sharing for backup
and import features. The MS300 Name allows you to easily locate and
connect to your MS300 by name.
Follow these steps to enter a name for your MS300:
1. Press the SETUP key on the remote to display the Setup
menu.
2. Select the
3. Select the MS300 SERVER
4. Enter a name for your MS300 using the remote control or
wireless keyboard. For example: “Living Room” or “Home
Theater” might be a name which helps identify which MS300
you want to connect to.
Follow these steps to enter a password to be used when
connecting to your MS300 from a web browser:
1. Press the SETUP key on the remote to display the Setup menu.
2. select the NETWORK menu.
3. Select the MS300 SERVER SETTINGS menu.
NETWORK menu.
Enter a password to be used from your PC when connecting from your
USER PREFERENCES
web browser.
Note: There is no User Name when connecting from a web browser.
SETTINGS menu.
MS300 User’s Manual
PAGE 71
Page 76

MS300 User’s Manual
PAGE 72
CONFIGURING A MS300 SERVER
Every MS300 capable of server functions is automatically enabled to serve MP3 and FLAC audio whenever it is
plugged in and properly configured for your network.
It is recommended that you give each of your MS300 servers a unique name that describes it’s location using the
SERVER SETTINGS screen which can be accessed from Setup/Network /Server Settings. Names like “LivingRoom”,
“HomeTheater”, “MyMusicServer” are all good examples.
Note: Do not use spaces in the MS300 Server Name.
Optionally, you can assign a password for web access to the MS300. This password is independent from the Parental
Controls password and is used to limit access to MS300’s web server from any standard web browser on your
network. If a password is entered here, the user will be asked to enter it when connecting to the MS300 from their PC.
This password is provided to protect access to your MS300 through the standard HTTP port 80 on your subnet.
CONFIGURING A MS300 CLIENT
Networking
Each MS300 client must be on the same network as the server. This document will assume that you have properly
connected your MS300 client to the same network as your MS300 server. Please refer to the HomeNetworkingPrimer
support document on the Escient web site for more information about home networking.
Server Selection
MS300 clients will automatically select the first server it sees on the network and connect to it upon startup. If you
USER PREFERENCES
have more than one server on your network, you can manually select a different server using the Server Connection
screen which can be accessed from Setup/Internet Configuration/Server Connection.
The Server Connection screen displays a list of MS300 Servers found on your network by their default or user defined
“MS300 Name”.
Once you select a server and save your selection, press MUSIC to view the Music Guide on the client. In a few
moments, the Music Guide will display the contents of the MS300 server. You can then select and play anything from
the Music Guide just as you would from a single MS300.
Page 77

PEER TO PEER MUSIC SHARING
The MS300 contains a special music sharing feature that allows
two MS300 Music Servers located on the same network to share
their music library into two independent zones. The Music Guide
from the second MS300 is merged into the Music Guide of the
first MS300 to create one seamless Music Guide for browsing and
playing all of your music. This effectively can double the capacity
of your MS300 using one MS300 as the master and one as a second
zone or “slave” server.
You can connect any combination of two MS300 Music Servers that
have been upgraded to the latest MS300 Features Package.
Follow these steps to connect your MS300 to another MS300
Music Server:
1. Press the SETUP key on the remote.
2. Select the Network menu.
3. Select the Remote Server Connection menu.
4. Select one of the available MS300 servers from the server
list.
5. Select the Save button to save your selection.
When you return to the Music Guide you will have access to all
USER PREFERENCES
your music from both MS300s merged into one Music Guide. The
“Location” field in the Music Guide will show you where each
music title is located.
Repeat the above steps using the other MS300 to access the first
MS300’s music from the second MS300.
MS300 User’s Manual
PAGE 73
Page 78

SELECTING THE AUDIO ENCODER TYPE
You can specify which audio encoder (MP3 or FLAC) you want to
use for recording audio in to your MS300. The MP3 format allows the
most flexibility and compatibility for efficiently storing many audio
files while the FLAC format uses considerably more space than MP3
files, but preserves an exact bit-for-bit recording of the original, using
half the space of the original CD.
Follow these steps to select an audio encoder:
1. Press the SETUP key on the remote to display the Setup
menu.
2. Select the
3. Select the
4. Select MP3 or CD Quality (FLAC) as your preferred encoder.
5. If you selected MP3 as your preferred encoder, select a bitrate.
The MP3 bitrate is used to determine the relative quality and
compression level. The higher the bitrate, the better quality and more
space each song will occupy on the hard drive. Selecting a lower
bitrate will provide lesser quality audio and will use less space for
each song, allowing you to store more songs on your MS300.
FLAC audio will always take up approximately 50% of the original
USER PREFERENCES
WAV/AIFF file size. The FLAC compression level has been optimized
to the MS300’s processor speed and is not user adjustable. Creating a
mix CD using FLAC audio files creates a CD which is identical to the
original, thus it is referred to as “CD Quality”.
AUDIO menu.
RECORDING PREFERENCES menu.
MS300 User’s Manual
PAGE 74
Page 79

SETTING THE DISC INSERT PREFERENCES
You can specify what to do with new discs inserted into the MS300’s
front panel CD drive. “Display and Play” will display the information
for the disc and then play the disc. Record and Eject assists in bulk
recording, allowing you to insert disc after disc, automatically
recording then ejecting each one.
Follow these steps to set the Disc Insert Preferences:
1. Press the SETUP key on the remote to display the Setup
menu.
2. Select the
3. Select the
4. Select Display and Play or Record and Eject.
Record and Eject will use the current Recording Preferences to record
each disc to your internal hard drive. The Record Select Guide will
not be displayed as all tracks are automatically selected and recorded
to the internal hard drive. Use the Delete Music feature to delete any
unwanted tracks.
AUDIO menu.
DISC INSERT PREFERENCES menu.
USER PREFERENCES
MS300 User’s Manual
PAGE 75
Page 80

VIDEO OUTPUT PREFERENCES
In addition to screen centering capabilities, the MS300 provides video test images to assist with obtaining the best
possible video display of the MS300 on your TV.
USER PREFERENCES
Video Format
Allows you to select 4:3 or 16:9 aspect ratios on your TV screen.
Follow these steps to center the MS300 screen:
1. Press the SETUP key on the remote to display the Setup menu.
2. Select the
3. Select the
FORMAT
4. Using the Up and Down
keys on the remote,
select your desired
aspect ratio.
5. Press the SELECT
key on the remote to
highlight the SAVE
button.
6. Press SELECT again
to save the
current desired
format.
VIDEO menu.
VIDEO
menu.
4:3 User Interface
16:9 User Interface
MS300 User’s Manual
PAGE 76
Page 81

Centering the MS300 Screen
Allows you to center the MS300 user interface horizontally on your
TV screen.
Follow these steps to center the MS300 screen:
1. Press the SETUP key on the remote to display the Setup
menu.
2. Select the
3. Select the
4. Using the Left and Right keys on the remote, adjust the
screen so that it appears horizontally centered on your TV.
5. Press the SELECT key on the remote to highlight the SAVE
button.
6. Press SELECT again to save the current position.
VIDEO menu.
SCREEN CENTERING menu.
USER PREFERENCES
MS300 User’s Manual
PAGE 77
Page 82

Adjusting your TV’s Brightness
Allows you to adjust the MS300 user interface’s brightness on your
TV screen.
Follow these steps to adjust the brightness on your TV:
1. Press the SETUP key on the remote to display the Setup
menu.
2. Select the
3. Select the
4. Turn your TV’s brightness control all the way up then lower
it to the point where the vertical black bar on the left just
disappears. This will get your brightness control as close
to the proper setting as possible without the use of special
software and hardware.
5. Press SELECT to return to the previous menu
VIDEO menu.
BRIGHTNESS menu.
USER PREFERENCES
.
MS300 User’s Manual
PAGE 78
Page 83

Adjusting your TV’s Contrast
The Contrast or Picture Adjustment control allows you to optimize
the contrast (which is sometimes called Picture) of the TV, using the
TV’s Contrast or Picture controls. This setting helps reduce video
“blooming” and create a clearer, more readable user interface.
Follow these steps to adjust the contrast on your TV:
1. Press the SETUP key on the remote to display the Setup
menu.
2. Select the
3. Select the
4. Turn your TV’s Contrast or Picture control all the way up,
then lower it to the point where the vertical line appears
straight and does not bend. It may not be possible to make
it completely straight on some TV sets. This will get your
Contrast control as close to the proper setting as possible
without the use of special software and hardware.
5. Press SELECT to return to the previous menu.
VIDEO menu.
CONTRAST menu.
USER PREFERENCES
MS300 User’s Manual
PAGE 79
Page 84

Adjusting your TV’s Sharpness
The Sharpness adjustment allows you the set the Sharpness or Detail
control of the TV so that onscreen text is as readable as possible.
Proper adjustment of the Sharpness control (sometimes called the
Detail control) on your TV, allows you to see video and on screen
menus more accurately.
Follow these steps to adjust the sharpness on your TV:
1. Press the SETUP key on the remote to display the Setup
menu.
2. Select the
3. Select the
4. Turn your TV’s Sharpness or Detail control up and down until
the text on the screen is as readable as possible. Be sure
to adjust your Brightness and Contrast before adjusting the
Sharpness control. This will get your Sharpness control as
close to the proper setting as possible without the use of
special software and hardware.
5. Press SELECT to return to the previous menu.
VIDEO menu.
SHARPNESS menu.
USER PREFERENCES
MS300 User’s Manual
PAGE 80
Page 85

Adjusting your TV’s Color and Tint
Color Bars are used to test the TV monitor’s ability to reproduce the
proper color values.
Follow these steps to adjust the Color and Tint on your TV:
1. Press the SETUP key on the remote to display the Setup
menu.
2. Select the
3. Select the
4. Turn your TV’s Color and Tint controls up and down until the
color bars are at the point where they are not appearing to
bleed together and the colors do not appear to be too bright.
This will get your Color and Tint controls as close as possible
without the use of special software and hardware.
5. Press SELECT to return to the previous menu.
VIDEO menu.
COLOR BARS menu.
USER PREFERENCES
MS300 User’s Manual
PAGE 81
Page 86

LOOKING UP DISC INFORMATION
The disc information the MS300 displays on your TV screen is NOT included on the original CDs that you recorded
or loaded into your changers. The artist name, album name, and track list are provided by the Gracenote® Music
Recognition Service. The album cover art is provided by the McIntosh Server. This information is downloaded from
the McIntosh server to your MS300 using your Internet connection. This process is referred to as “Looking up Disc
Information”.
USER PREFERENCES
MS300 User’s Manual
PAGE 82
Page 87

Automatically Getting Disc Information
Once your changers are connected to the MS300 and loaded with CDs,
all you have to do is close the changer door and in a few seconds the
MS300 will begin looking up the disc information from each disc in
each changer.
Quick Lookup checks each previously empty slot in the changers to see
if any new discs were added, and then checks each previously occupied
slot in the changer to see if any discs were removed.
One by one, the Table of Contents is read from each CD and compared
to the local music database or the Gracenote® Music Recognition
Service using your Internet connection, as the MS300 builds your
Music Library. As each disc is accessed and looked up, the Quick
Lookup screen is updated to display the disc’s information and cover
art. When all of the discs are looked up, the Music Guide will be
displayed.
You can manually run Quick Lookup at any time by following
these steps:
1. Press the SETUP key on the remote to display the Setup menu.
2. Select the
3. Select the LOOKUP DISCS
USER PREFERENCES
4. Select the
5. MS300 will perform a Quick Lookup for each new disc.
Warning: Quick Lookup checks for newly added and removed CDs each time it runs.
Do not remove CDs and replace new CDs into the same changer slots without running
Quick Lookup in-between, or the MS300 will not know that these slots have changed.
CHANGER MANAGEMENT menu.
QUICK LOOKUP menu.
menu.
MS300 User’s Manual
PAGE 83
If you want to reuse the same slots, first remove your CDs, let Quick
Lookup run, then add new CDs to the same slots.
Page 88

Getting Disc Information for a Range of Discs
If you want to lookup the disc information for a specific range of slots
in a changer, you can use the Lookup Range feature.
Follow these steps to lookup a range of changer slots:
1. Press the SETUP key on the remote to display the Setup
menu.
2. Select the
3. Select the LOOKUP DISCS
4. Select the LOOKUP RANGE
5. Enter a valid range of slots to lookup. If you have more than 1
changer, select which changer you want to use.
6. Select the CONTINUE button.
7. The Lookup Range screen displays the progress and results
for each disc in the selected range.
CHANGER MANAGEMENT menu.
USER PREFERENCES
menu.
menu.
MS300 User’s Manual
PAGE 84
Page 89

Getting Disc Information for All Discs
If you want to lookup the disc information for all discs in all changers,
you can use the Lookup All feature.
Follow these steps to lookup all discs in all changers:
1. Press the SETUP key on the remote to display the Setup
menu.
2. Select the
3. Select the LOOKUP DISCS
4. Select the LOOKUP ALL
5. The Lookup All screen displays the progress and results as
each disc in each changer is looked up.
CHANGER MANAGEMENT menu.
USER PREFERENCES
menu.
menu.
MS300 User’s Manual
PAGE 85
Page 90

RECORDING FROM EXTERNAL CHANGERS
In addition to manually loading and recording CDs one by one using the front panel CD drive, you can record as many
CD as you want directly from your external changers.
The advantage of recording multiple discs from your changers is that you don’t have to sit there and unload/load each
disc after it’s recorded, however there is the disadvantage that external recording must occur in real-time, at 1x record
speeds, taking up to several weeks to complete for large music collections.
External Changer recording uses the same recording preferences mentioned above in the “Selecting the Audio
Encoder Type” section.
Note: Make sure you have both the digital and analog audio connections from your changers connected to the MS300. The
MS300 will use the digital inputs first, but if there is digital copy protection on a CD, the MS300 will then attempt to use the
analog audio inputs to record the protected CD.
USER PREFERENCES
MS300 User’s Manual
PAGE 86
Page 91

Automatically Recording CDs
You can easily record changer based CDs to your MS300’s internal
hard drive using the Quick Record feature. Quick Record will record
all tracks from newly added CDs which are NOT already record to
your MS300, in one easy step.
Follow these steps to automatically record changer CDs to your
MS300:
1. Press the SETUP key on the remote to display the Setup
menu.
2. Select the
3. Select the
4. Select the
5. The MS300 will determine which changer discs have not
been recorded to the internal hard drive, and proceed with
recording each disc (all tracks) to the internal hard drive.
CHANGER MANAGEMENT menu.
RECORD DISCS menu.
QUICK RECORD menu.
USER PREFERENCES
MS300 User’s Manual
PAGE 87
Page 92

Recording a Range of CDs
If you want to record a specific range of slots in a changer, you can
use the Record Range feature.
Follow these steps to record a range of changer slots:
1. Press the SETUP key on the remote to display the Setup
menu.
2. Select the
3. Select the
4. Select the
5. Enter a valid range of slots to record. If you have more than 1
changer, select which changer you want to use.
6. Select the CONTINUE button.
7. The Record Range screen displays the recording progress for
each disc in the selected range.
CHANGER MANAGEMENT menu.
RECORD DISCS menu.
RECORD RANGE menu.
USER PREFERENCES
MS300 User’s Manual
PAGE 88
Page 93

Recording All CDs
If you want to record all discs in all changers, you can use the Record
All feature.
Follow these steps to record each disc in all changers:
1. Press the SETUP key on the remote to display the Setup
menu.
2. Select the
3. Select the
4. Select the RECORD ALL
5. The Record All screen displays the recording progress for
each disc in each changer.
Note: Any tracks already present on the MS300 hard drive will be
replaced when recording the same CD again.
CHANGER MANAGEMENT menu.
RECORD DISCS menu.
USER PREFERENCES
menu.
MS300 User’s Manual
PAGE 89
Page 94

CONTROLLING THE MS300 FROM OTHER
DEVICES
The MS300 provides the user and custom A/V installer
with many options for control and integration into any
home theater or home automation system using direct IR
codes, two-way RS-232 serial control, two-way Ethernet
control, and wireless web pad control.
The MS300 has built-in support for the following
companies’ control products:
• AMX
• Crestron
• Elan Via
• Home Theater Master
• Lexicon
• Marantz
• Opus
Please check the McIntosh web site or contact your McIntosh Dealer for more information about integrating the
MS300 into your existing or new home theater or home automation system.
USER PREFERENCES
• Xantech
• Sonance
• RTI
• Niles
• Net Streams
• Phillips Pronto
MS300 User’s Manual
PAGE 90
Page 95

MS300 UTILITIES
Getting Information about Your MS300
Information about your MS300 hardware and software is
available under the Utilities menu. This information is useful for
troubleshooting any problems you may encounter with your network
connection or verifying the current software versions.
Follow these steps to view the MS300 system information:
1. Press the SETUP key on the remote to display the Setup
menu.
2. Select the
3. Select the SYSTEM INFORMATION
UTILITIES menu.
USER PREFERENCES
menu.
MS300 User’s Manual
PAGE 91
Page 96

Restarting the System
There are two ways of manually performing a full restart or reboot
of the MS300 system, one using the front panel power button and the
other using the Restart System menu.
Follow these steps to restart the system using the front panel
Power Button:
1. Press and hold the power button for 4 seconds.
2. When the LED on the front panel begins to flash, release the
power button.
3. When the LED on the front panel glows solid RED (standby
mode), the MS300 is ready to use.
4. Press and release the Power button to turn on the MS300.
Follow these steps to restart the system using Utilities menu:
1. Press the SETUP key on the remote to display the Setup
menu.
2. Select the
3. Select the RESTART SYSTEM
4. Confirm that you want to restart the system and select the
RESTART button.
5. When the LED on the front panel glows solid RED (standby
mode), the MS300 is ready to use.
USER PREFERENCES
6. Press and release the Power button to turn on the MS300.
UTILITIES menu.
menu.
MS300 User’s Manual
PAGE 92
Page 97

Updating the Software
The MS300 will automatically check the McIntosh server once a week
for any MS300 software updates, and automatically install them. You
can also manually check for a software update.
Follow these steps to manually update the software:
1. Press the SETUP key on the remote to display the Setup
menu.
2. Select the
3. Select the UPDATE SOFTWARE
4. Confirm that you want to update the current software.
5. The MS300 will connect to McIntosh and compare the current
software version with the latest release. If a newer version
of the MS300 software is available, it will be downloaded and
installed.
UTILITIES menu.
USER PREFERENCES
menu.
MS300 User’s Manual
PAGE 93
Page 98

CONTROLLING MS300 FROM A WEB
BROWSER
MS300 contains a built-in web server which means you
can connect to your MS300 and remotely control it using a
standard web browser from a PC, Mac, or PDA over your
home network.
SETTING UP THE MS300 WEB SERVER
Your MS300 acts as a web server on your network allowing
you to connect and control the MS300 using your PC or Mac
computer. This web server is automatically configured and
started each time the MS300 is plugged in. You connect to
the server from your PC or Mac using Internet Explorer or
Safari (Mac OSX) using TCP/IP addressing over your home
network. You can use a wireless or wired Ethernet network,
as long as you have a DHCP router or if you have assigned
static IP addresses. Please contact your McIntosh Dealer if
you need assistance with setup a home network.
The MS300 Server Name entered on the Server Settings
Menu in the SETUP/NETWORK menus is used for the web
address to access the MS300 web interface.
Fixed 800x600 Web
Interface
MS300 User’s Manual
PAGE 94
USING THE WEB USER INTERFACE
WEB BROWSER CONTROL
Using the Web User Interface displayed in your Web
Browser, you can control almost every aspect of your
MS300. The Web User Interface is setup very similarly to
MS300’s own TV user interface allowing access to each
source (Music and Radio) as well as all major features such
as Setup, Guide/Player, Options and Edit Screens.
Use your keyboard and mouse to navigate the web interface
instead of the IR remote control. Access to all of the major
Resizable PDA Web
Interface
functions is provided by the buttons along the left
and right side of the web interface. These buttons
duplicate those found on the remote control.
Page 99

CONNECTING TO YOUR MS300 USING A WEB BROWSER
Note: Any standard web browser which supports HTML 4.0 standards should work, however McIntosh officially supports
Inernet Explorer on Windows XP and Safari on Mac OS X.
Follow these steps to connect to your MS300 using your Windows XP or Mac OS X computer:
1. Launch Internet Explorer or Safari on your computer.
2. Enter the MS300 Server Name into the browser just as if you were entering a web address to connect to a
web site.
3. Your browser should connect to your MS300 and display the MS300 HTML interface.
USING THE WEB USER INTERFACE
Using the Web User Interface displayed in your Web Browser, you can control almost every aspect of your MS300.
The Web User Interface is setup very similarly to MS300’s own TV user interface allowing access to each source
(Music, Movies, Radio) as well as all major features such as Setup, Guide/Player, Options and Edit Screens.
Use your keyboard and mouse to navigate
the web interface instead of the IR remote
control. Access to all of the major functions
is provided by the buttons along the left
and right side of the web interface. These
buttons duplicate those found on the remote
control.
WEB BROWSER CONTROL
MS300 User’s Manual
PAGE 95
Page 100

USING THE WEB BROWSER AS A MUSIC CLIENT
In addition to remotely controlling your MS300, the built-in web server also functions as a streaming MP3 music File
Server to the web browser, providing an easy way to add multiple streaming music clients to your MS300.
Note: Your web browser and computer must be setup to properly handle streaming .mp3 files. The proper configuration
of these settings is beyond the scope of this document. Please consult with your computer manufacturer or other online
support sources for more information about playing MP3 files on your computer.
Follow these steps to configure the MS300 web interface client mode to either streaming from or remote
controlling your MS300:
1. Make sure your web browser is properly configured and connected to your MS300.
2. Click the SETUP button on the left side of the screen to display the Setup Menu.
3. Click the
4. Select
SYNCHRONIZED Mode to remotely control your MS300.
5. Click the SAVE button to save your selection and exit the Setup Menu.
WEB CLIENT Mode menu item at the top of the page.
STREAMING CLIENT Mode to set the Web Browser as the streaming music client or select
Selecting music from the Web Browser will now cause the music to be played from the computer’s own audio system
rather then from the MS300 itself.
To set the Web Client Mode back to Remote control, follow these same instructions but select Synchronized Mode
instead of Streaming Client Mode.
WEB BROWSER CONTROL
MS300 User’s Manual
PAGE 96
 Loading...