

Page 1
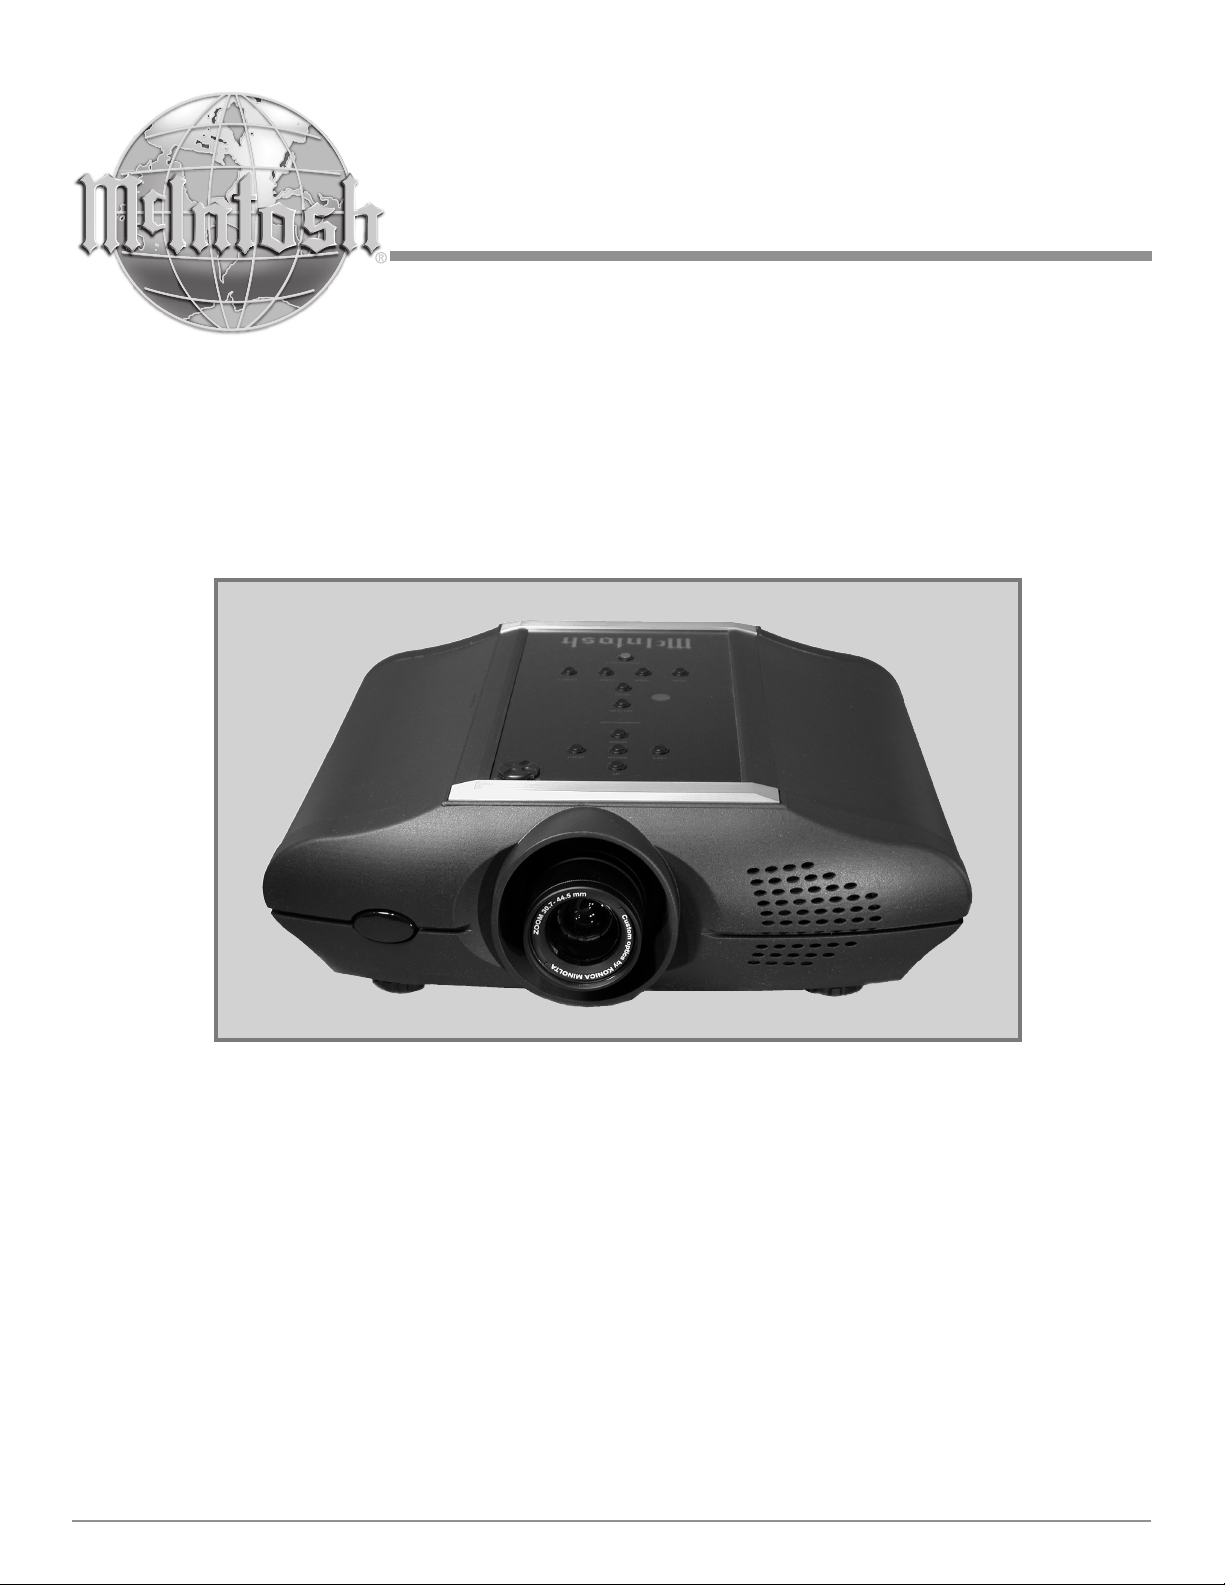
Video Projector
MDLP1
Owner’s Manual
McIntosh Laboratory, Inc. 2 Chambers Street Binghamton, New York 13903-2699 Phone: 607-723-3512 FAX: 607-724-0549
Page 2
The lightning flash with arrowhead,
within an equilateral triangle, is
intended to alert the user to the
presence of uninsulated “dangerous voltage” within the product’s
enclosure that may be of sufficient
magnitude to constitute a risk of
electric shock to persons.
The exclamation point within an
equilateral triangle is intended to
alert the user to the presence of important operating and maintenance
(servicing) instructions in the literature accompanying the appliance.
WARNING - TO REDUCE RISK OF
FIRE OR ELECTRICAL SHOCK, DO
NOT EXPOSE THIS EQUIPMENT TO
RAIN OR MOISTURE.
IMPORTANT SAFETY
INSTRUCTIONS!
PLEASE READ THEM BEFORE
OPERATING THIS EQUIPMENT.
1. Read these instructions.
2. Keep these instructions.
3. Heed all warnings.
4. Follow all instructions.
5. Do not use this apparatus near water.
6. Clean only with a dry cloth.
7. Do not block any ventilation openings. Install in
accordance with the manufacturer’s instructions.
8. Do not install near any heat sources such as radiators, heat registers, stoves, or other apparatus
(including amplifiers) that produce heat.
9. Do not defeat the safety purpose of the polarized
or grounding-type plug. A polarized plug has two
blades with one wider than the other. A grounding type plug has two blades and a third grounding prong. The wide blade or the third prong are
provided for your safety. If the provided plug does
not fit into your outlet, consult an electrician for
replacement of the obsolete outlet.
10. Protect the power cord from being walked on or
pinched particularly at plugs, convenience receptacles, and the point where they exit from the
apparatus.
NO USER-SERVICEABLE PARTS
INSIDE. REFER SERVICING TO
QUALIFIED PERSONNEL.
To prevent the risk of electric shock, do not remove cover or
back. No user-serviceable parts inside.
11. Only use attachments/accessories specified by the
manufacturer.
12. Use only with the cart, stand, tripod, bracket, or
table specified by the manufacturer,
or sold with the apparatus. When a
cart is used, use caution when moving the cart/apparatus combination
to avoid injury from tip-over.
13. Unplug this apparatus during lightning storms or
when unused for long periods of time.
14. Refer all servicing to qualified service personnel. Servicing is required when the apparatus has
been damaged in any way, such as power-supply
cord or plug is damaged, liquid has been spilled or
objects have fallen into the apparatus, the apparatus has been exposed to rain or moisture, does not
operate normally, or has been dropped.
15. Do not expose this equipment to dripping or
splashing and ensure that no objects filled with liquids, such as vases, are placed on the equipment.
16. To completely disconnect this equipment from the
a.c. mains, disconnect the power supply cord plug
from the a.c. receptacle.
17. The mains plug of the power supply cord shall
remain readily operable.
18. Do not expose batteries to excessive heat such as
sunshine, fire or the like.
2
Page 3
ADDITIONAL SAFETY INSTRUCTIONS!
CAUTION:
The MDLP1 Video Projector weight is 40 pounds
(18.14 kilograms). When mounting the projector to a
building structure it is important to follow all of the
local building/constuction codes. Not evaluated for
Wall or Ceiling Mounting.
WARNINGS:
A. Do not remove the cover from the equipment.
B. Do not insert anything into the equipment through
the ventilation holes.
C. Do not handle the mains lead with wet hands.
D. No naked flame sources, such as lighted candles,
should be placed on the equipment.
E. When disposing of used batteries and the projector
lamp, please comply with governmental regula-
tions or environmental public instructions rules
that apply in your country or area.
F. Do not look into the lens when the projector is
turned on. It could damage your eyesight.
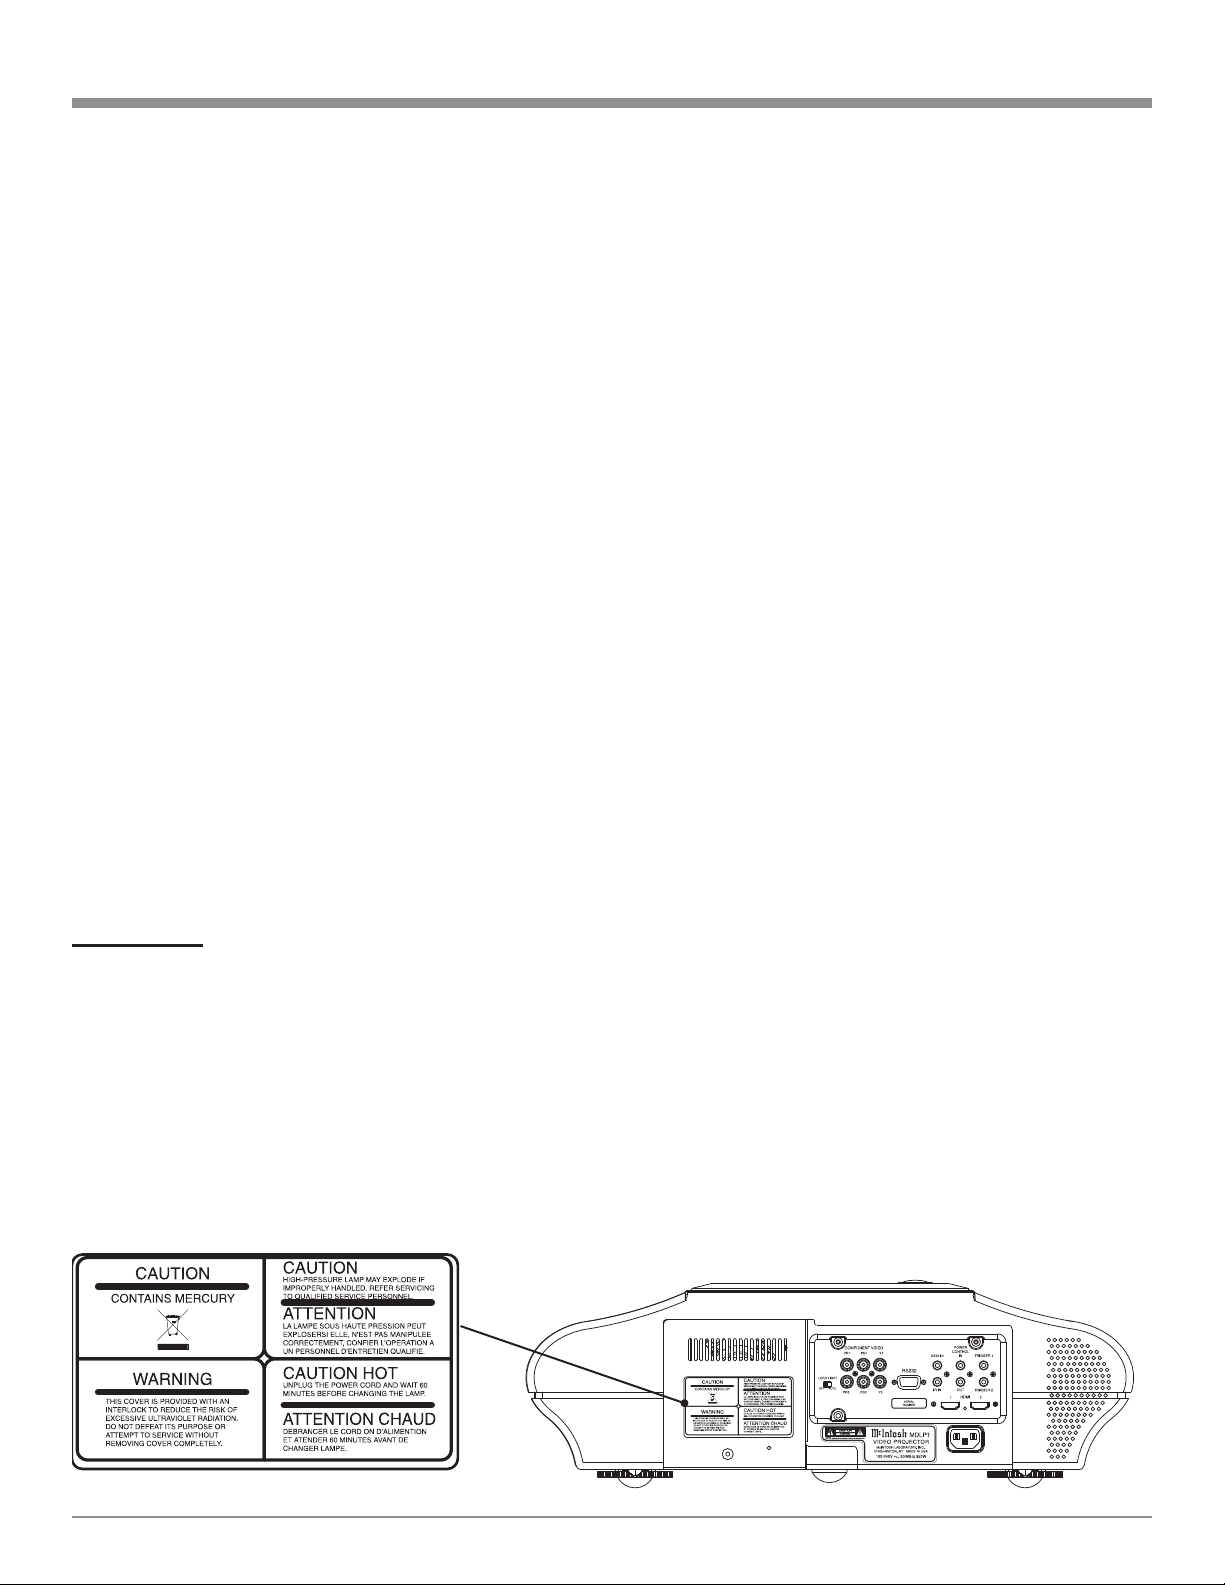
LAMP HANDING PRECAUTIONS:
DANGER
This projector uses a high voltage glass mercury vapor
lamp. The lamp can break or fail to light when improperly handled, operating at abnormal temperatures
or after extended use.
Lamp life also varies, and operating the lamp beyond its intended service life may cause it to break or
fail to light properly, with risk of resulting damage to
the projector or surrounding property or persons. Do
not exceed the stated lamp life, nor attempt to override
Safety Instructions
the projector’s lamp life timing system
vapor gas inside the lamp bulb may be emitted from
the projector’s vent.
Before use, carefully read the projector Owner’s
Manual and the lamp replacement instructions. Remember to handle the lamp with care. In the event of
serious trouble, call a McIntosh Authorized Dealer.
1a. Do not directly expose skin to the light of the lamp
as it can cause inflamation.
2b. Do not drop, impact, subject to excessive force or
otherwise damage the lamp.
3c. Replacing the lamp runs the risk of burns, cuts
and electric shock, unplug the AC power cord
from the AC power outlet and wait at least 60
minutes for the lamp to cool down before attempting to replace it.
4d. If the lamp breaks and the projector is hung from
a ceiling or installed in a high place, unplug the
AC power cord from the AC power outlet and call
a McIntosh Authorized Dealer for assitance.
5e. It is recommended to replace the lamp when near
the end of its designed life. Do not use the lamp
beyond the maximum lighting time.
6f. Replace the defective lamp with a genuine Mc-
Intosh Lamp, matching the information in this
Owner’s Manual.
7g. Before replacing the lamp, carefully read the
Lamp Replacement Instructions in this Owner’s
Manual and the instructions supplied with the
replacement lamp.
8h. If the lamp breaks, leave the area immediately
and stay away for at least 30 minutes. Ventilate the
room, so as not to inhale the mercury vapor. If you
inhale the mercury vapor, see a physician immediately.
. The mercury
3
Page 4
Thank You
Table of Contents
Your decision to own this McIntosh MDLP1 Video Projector ranks you at the very top among discriminating video
viewers. You now have “The Best.” The McIntosh dedication to “Quality,” is assurance that you will receive many
years of viewing enjoyment from this unit.
Please take a short time to read the information in this
manual. We want you to be as familiar as possible with all
the features and functions of your new McIntosh.
Please Take A Moment
The serial number, purchase date and McIntosh Dealer
name are important to you for possible insurance claim or
future service. The spaces below have been provided for
you to record that information:
Serial Number: __________________________________
Purchase Date: __________________________________
Dealer Name: ___________________________________
Technical Assistance
If at any time you have questions about your McIntosh
product, contact your McIntosh Dealer who is familiar
with your McIntosh equipment and any other brands that
may be part of your system. If you or your Dealer wish
additional help concerning a suspected problem, you can
receive technical assistance for all McIntosh products at:
McIntosh Laboratory, Inc.
2 Chambers Street
Binghamton, New York 13903
Phone: 607-723-1545
Fax: 607-724-0549
Safety Instructions ............................................................ 2
Thank You and Please Take a Moment .............................
Technical Assistance and Customer Service ....................4
Table of Contents .............................................................. 4
General Information .........................................................5
Connector and Cable Information ....................................6
Introduction .......................................................................
Performance Features .......................................................7
Dimensions .......................................................................8
Installation:
Overview ........................................................................... 9
Ventilation .........................................................................
Projector and 16:9 Screen Mounting Location ................10
Projector and 4:3 Screen Mounting Location ................. 12
Initial Setup ......................................................................14
Connections:
Rear Panel Connections .................................................. 16
How to Connect the MDLP1 .......................................... 17
Connection Diagrams (Separate Sheet) ........ Mc2A,Mc2B
Remote Control:
Remote Control Push-buttons ......................................... 18
How to Operate by Remote Control ...............................19
Operation:
Front Panel Push-buttons, Indicators and Control .......... 20
Default Settings ...............................................................21
How to Operate the MDLP1 ........................................... 22
Additional Information:
Specifications .................................................................. 30
Packing Instruction .........................................................31
4
7
9
Customer Service
If it is determined that your McIntosh product is in need of
repair, you can return it to your Dealer. You can also return
it to the McIntosh Laboratory Service Department. For
assistance on factory repair return procedure, contact the
McIntosh Service Department at:
McIntosh Laboratory, Inc.
2 Chambers Street
Binghamton, New York 13903
Phone: 607-723-3515
Fax: 607-723-1917
Copyright 2007 © by McIntosh Laboratory, Inc.
4
Page 5
General Information
General Information
CAUTION: To prevent possible damage to the Projec-
tor Lens Assembly, DO NOT at any time
attempt to LIFT, CARRY or RE-ORIENT the Projector using the Lens.
1. The Main AC Power going to the MDLP1 and any other
McIntosh Component(s) should not be applied until all
the system components are connected together. Failure
to do so could result in malfunctioning of some or all of
the system’s normal operations. When the MDLP1 and
other McIntosh Components are in their Standby Power
Off Mode, the Microprocessor’s Circuitry inside each
component is active and communication is occurring
between them.
2. For additional connection information, refer to the
owner’s manual(s) for any component(s) connected to
the MDLP1 Video Projector.
3. To protect the Projector Lens from possible damage it is
advisable to keep the Lens Cover on the Projector during the following:
a. Transporting of the projector.
b. Installation and connection of the projector.
c. During the installation of other items and/or
remodeling of the room where the projector is
located.
4. The Projector Lens is a precision optical device with
special coatings just like you would find on Professional Cameras. In the event the Lens requires cleaning
to remove airborne particles such as dust and dirt from
the Lens, use a safe cleaning product such as a clean
and dry 3MTM Scotch-Brite® Microfiber Lens Cleaning
Cloth. At no time should ordinary household cleaning
products be used to clean the Lens, as damage will occur.
5. A McIntosh Power Controller may be added to the
MDLP1 to provide AC Power Switching to components
without Power Control Connections, such as a motorized projection screen. See your McIntosh Dealer for
additional information.
6. The IR Input, with 1/8 inch mini phone jack, is config-
ured for non-McIntosh IR sensors such as a Xantech
Model 291-80 or equivalent. To avoid possible interaction, the MDLP1 Sensors may be disabled by activating the On-Screen Menu, then select from the menu
Config→Remote Control→Wired. Then deactivate the
On-Screen Menu. Refer to the “How to Operate the
MDLP1” starting on page 23.
7. The On-Screen Menu System for adjustment of settings
is interactive and Video Input type based, make sure to
select the desired Video Input and Picture Mode before
attempting to change the settings.
8. The MDLP1 has two Component Video Inputs for
analog video signals and two HDMI Inputs for Digital
video signals. The On-Screen Menu System has selec
tions for Composite Video, S-Video and RGB Inputs.
Those inputs have no functionality when selected on the
MDLP1.
9. When the symbol illustrated here is located on the product or on its packaging indicates that this product must
not be disposed of with your other household waste. Instead, it is your responsibility to dispose of your waste equipment by
handing it over to a designated collection
point for the recycling of waste electrical
and electronic equipment. The separate
collection and recycling of your waste
equipment at the time of disposal will help to conserve
natural resources and ensure that it is recycled in a
manner that protects human health and the environment. For more information about where you can drop
off your waste equipment for recycling, please contact
your local city office, your household waste disposal
service or the McIntosh Dealer where you purchased
the product.
3MTM is a trademark of the 3M Company and Scotch-Brite® is a registered trademark of the 3M Company.
5
Page 6
Connector and Cable Information
Power
Control
Ground
N/C
Data
Signal
N/C
Data
Ground
IR Data
Control
Ground
N/C
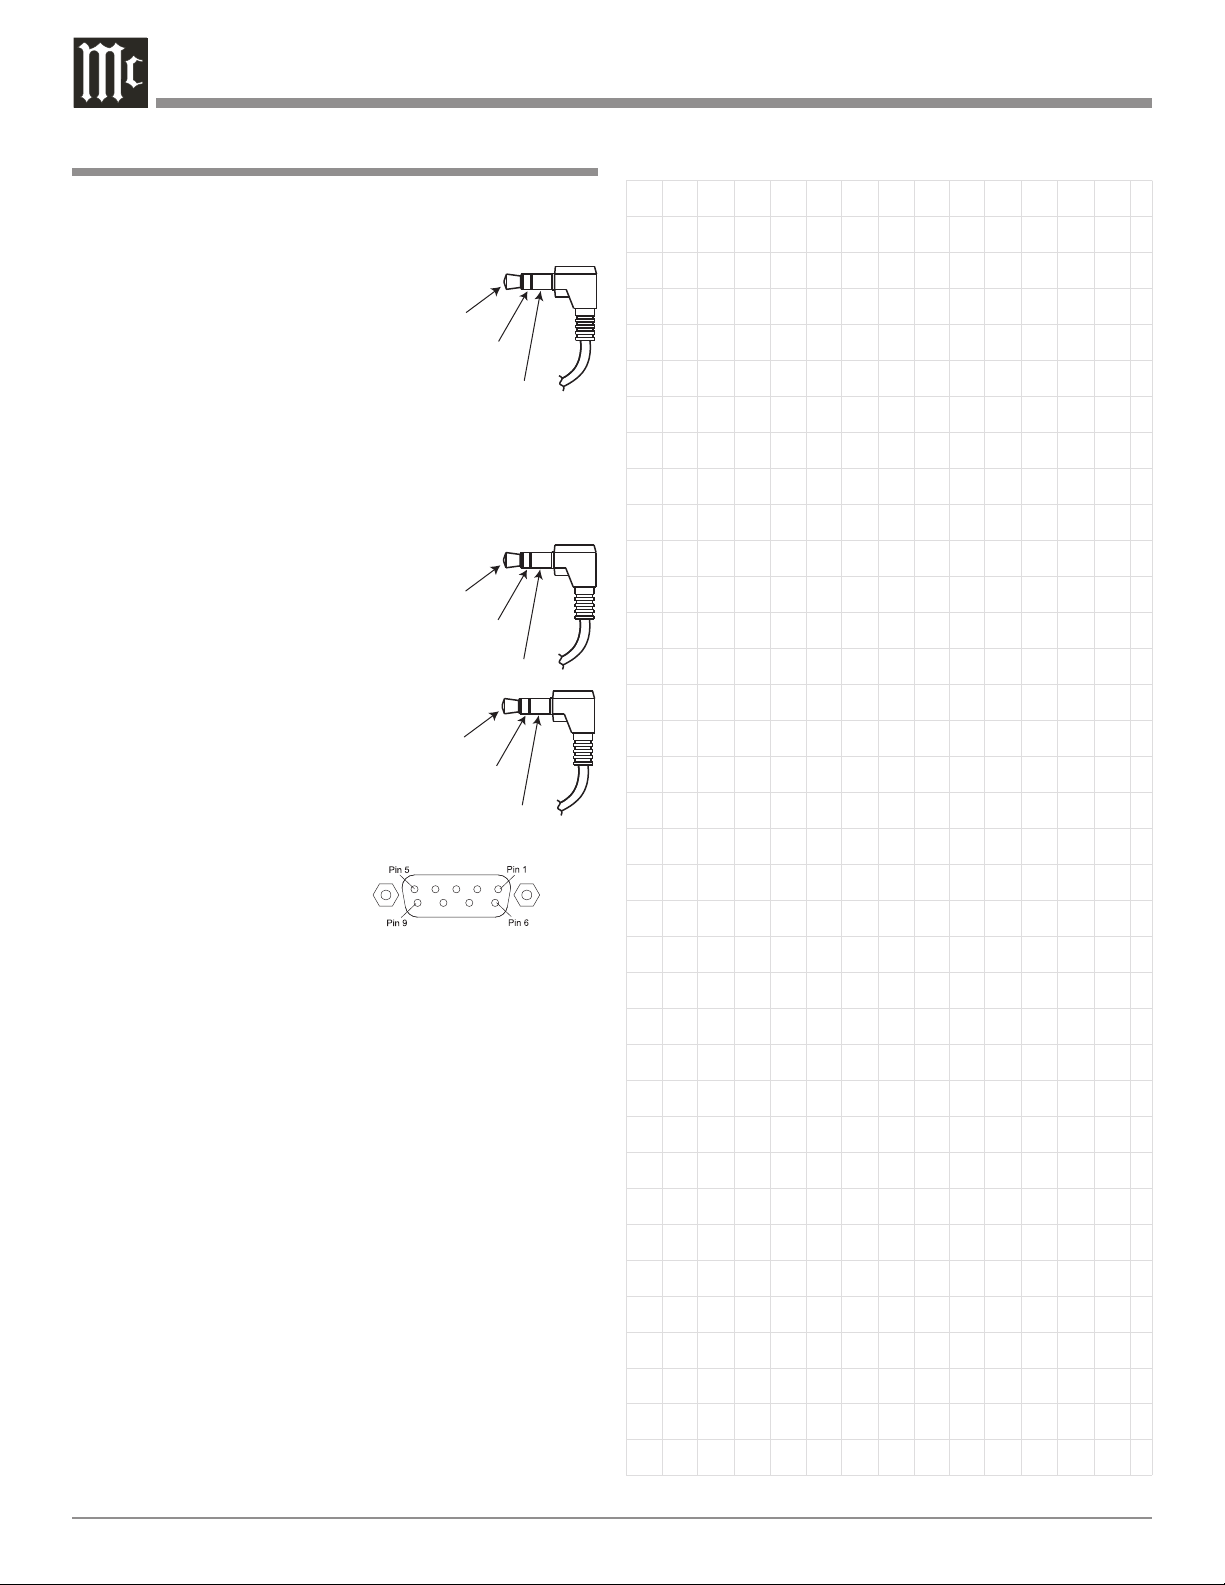
Power Control Connectors
The MDLP1 Power Control Output Jacks send and Power
Control Input Jacks receive Power On/Off Signals when
connected to McIntosh and other nonMcIntosh Components. A 1/8 inch
stereo mini phone plug is used for connection to the Power Control Input and
Outputs on the MDLP1.
Note: The Data and Power Control Connecting Cable is avail-
able from the McIntosh Parts Department:
Data and Power Control Cable Part No. 170-202
Six foot, shielded 2 conductor, with 1/8 inch stereo mini
phone plugs on each end.
Data Port Connectors
The MDLP1 Data In Port receives
Remote Control Signals from other
McIntosh Components. A 1/8 inch
stereo mini phone plug is used for
connection. The IR Ports also use a
1/8 inch stereo mini phone plug and
allow the connection of other brand
IR Receivers to the MDLP1.
RS232 DB9 Connector Pin Layout
1. N/C 6. N/C
2. Data Out (TXD) 7. N/C
3. Data In (RXD) 8. N/C
4. N/C 9. N/C
5. Gnd.
6
Page 7

Connectors and Cable Information, Introduction and Performance Features
Introduction
The McIntosh MDLP1 Video Projector is one of the finest
projectors ever created. It utilizes the latest Digital Micro
mirror DeviceTM containing over 2 million individual pixels
(1080p) and produces images of such high quality, it’s just
like being there.
Performance Features
•DLP Chip
The McIntosh MDLP1 Video Projector incorporates the
latest and largest available Digital Light Processing (DLP)
Dark Chip for use in a Home Theater Projector. The large
chip size is 0.95 inch and produces a High Definition Image of 1920 x 1080 pixels.
• Advanced Optical System
The light source for the projector is the industry’s only 200
Watt DC Super High Pressure lamp assembly. This assures
an image with even illumination, focused from edge to
edge and accurate fully saturated colors. The light is fil
tered by a large 98mm 7-segment color wheel incorporating a Neutral Density Filter Segment which enhances the
black level during dark scenes. After the light is reflected
by the DLP Chip, it is then precisely focused by a KonicaMinolta custom designed zoom lens. This lens is fully
sealed and consists of 13 all-glass elements. The optics allow screen sizes ranging from 70 inches to 250 inches with
a 16:9 wide aspect ratio for the Medium Throw Lens or 80
inches to 300 inches with a 16:9 wide aspect ratio for the
Long Throw Lens.
• Advanced Filter Wheel Design
The color filter wheel spins at 10,800 RPM, making color
breakup (rainbow effect) a thing of the past. The quiet
filter wheel motor uses a Fluid Dynamic Bearing for silent
and reliable operation.
• Placement Compensation
The MDLP1 Projector incorporates numerous adjustments,
compensating for less then ideal projector/screen position
ing. These adjustments include a Lens shift feature for
vertically positioning the projection point, digital correction of vertical keystone distortion and projection modes for
functional, hanging and rear projection.
• Enhanced Video Processing
The Video Circuitry uses the very latest in processing
algorithms to produce an excellent image regardless of the
-
-
video source, from 480i to 1080p. There is a special 1080p
direct pixel pass through mode when the MDLP1 Projector
is used with the McIntosh VP1000 Video Processor.
• Video Adjustments
The MDPL1 allows for complete adjustment of all the im
portant image quality effecting parameters, such as Color
Temperature, Gamma and Black Level. There are also user
adjustments with the ability to store the settings for future
recall, along with three preset modes (Theater, Standard
and Dynamic).
• HDMI Connectivity
The MDLP1 has two HDMI (High-Definition Multimedia
Interface) inputs and accepts 1080p signals.
• Total Component Integration
The MDLP1 is designed to work seamless with the McIn
tosh VP1000 Video Processor and the McIntosh AP1000
Audio Processor.
• On-Screen Information Displays
The On-Screen Display indicates the Source Selection and
Information about the source signal. The Menu Selections
and Adjustments are also displayed on screen.
• Die Cast Internal Chassis
The MDLP1 die cast aluminum internal chassis assures
the precise mechanical alignment of the entire hermetically
sealed optical light path, which is necessary for a sharp,
highly detailed and accurate color image. The die cast
chassis also assures low operating noise and also helps to
dissipate heat away from the sensitive internal components.
• Machined Top and Bottom Panels
The MDLP1 Top and Bottom Panels are machined from
thick aluminum with a smooth black anodized finish.
• Special Power Supply
Fully regulated Power Supplies ensure stable noise free
operation even though the power line varies.
• Fiber Optic Solid State Front Panel Illumination
The even illumination of the Top Panel is accomplished by
the combination of a custom designed Fiber Optic Light
Diffuser and a extra long life Light Emitting Diode (LED).
The glass Top Panel ensures the pristine beauty of the
MDLP1 will be retained for many years.
Digital Micromirror Device, Digital Light Processing, DLP, DLP logo, and DLP
Medallion logo are registered trademarks of Texas Instruments.
7
Page 8
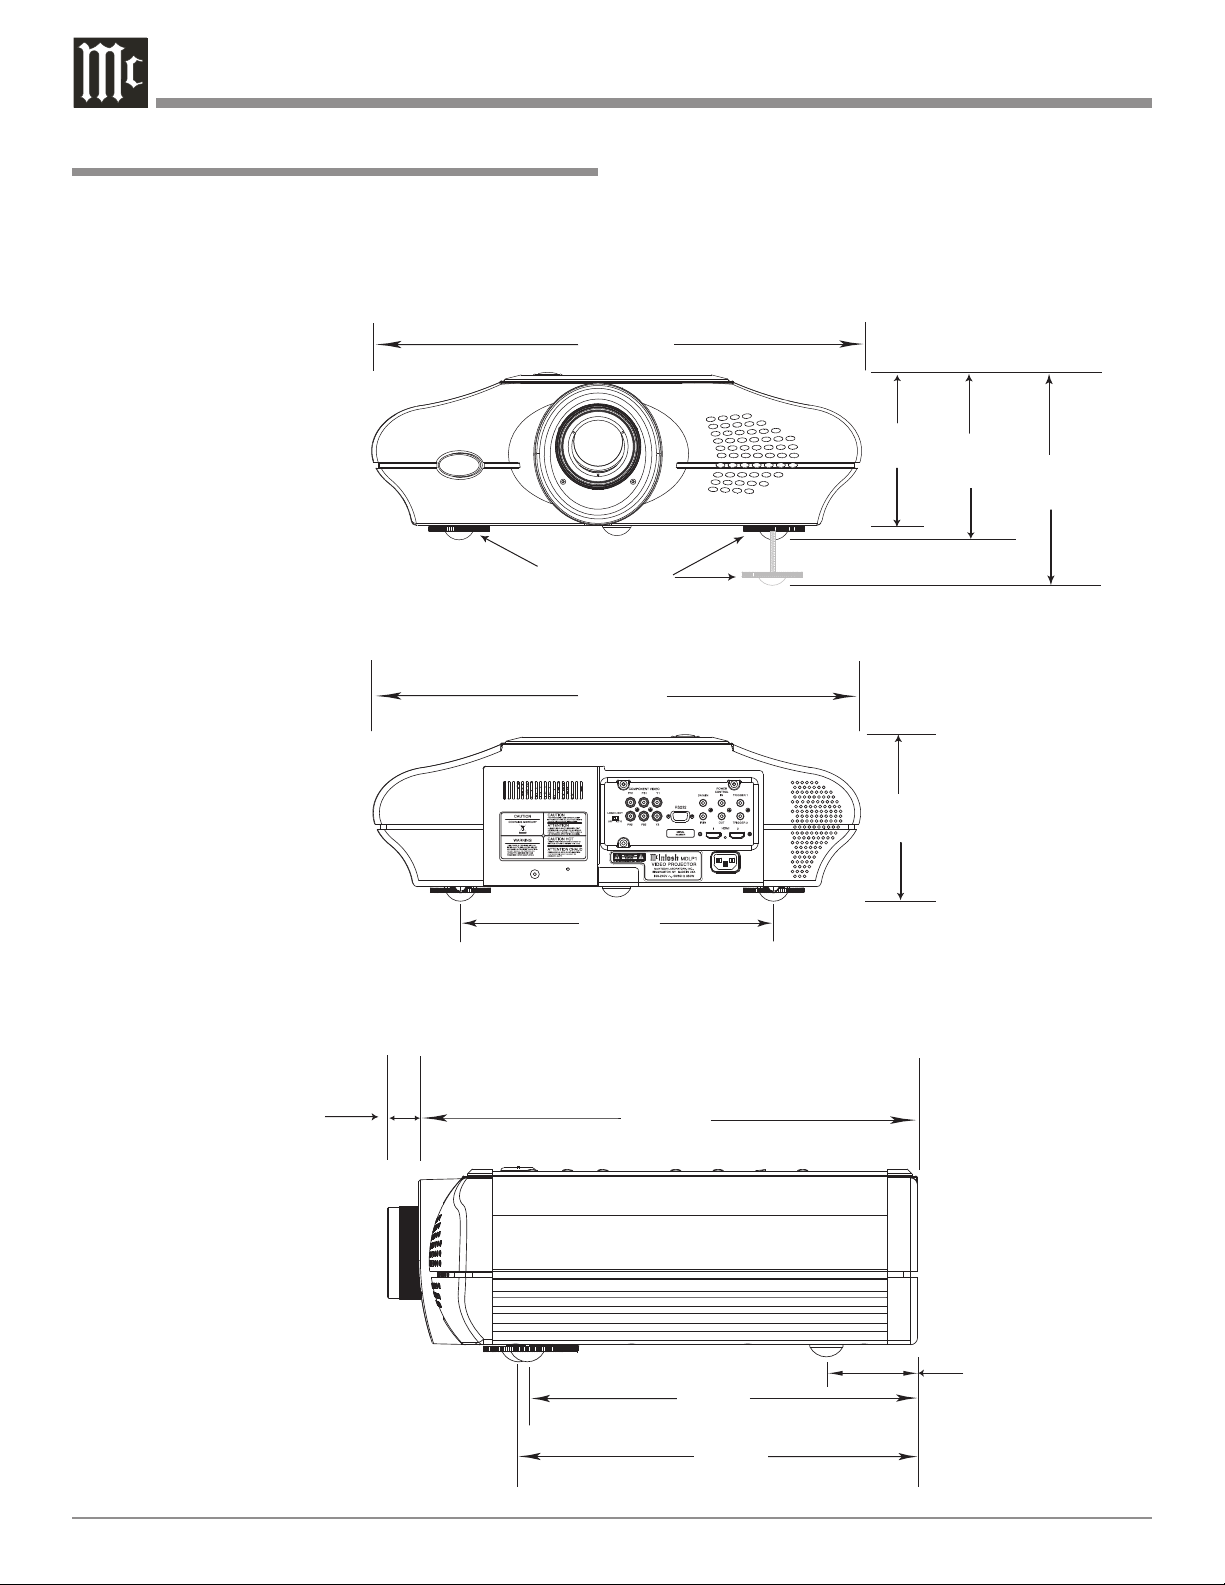
Dimensions
20-1/4"
51.44cm
6-3/4"
17.15cm
Front View of the MDLP1
Rear View of the MDLP1
Side View of the MDLP1
6-1/4"
15.88cm
9-1/2"
24.13cm
Adjustable Height
Front Feet
20-1/4"
51.44cm
6-3/4"
17.15cm
13"
33.02cm
17-11/16"
44.93cm
13-3/4"
34.93cm
1-1/8"
3.18cm
(See Note 1)
3-1/4"
8.26cm
14-1/8"
35.88cm
Note 1: The Long Throw Lens
deminsion is
1- 3/8 (3.49cm)
The following dimensions can assist in determining the
best location for your MDLP1. There is additional information on the next page pertaining to installing the MDLP1
into cabinets.
Dimensions
8
Page 9
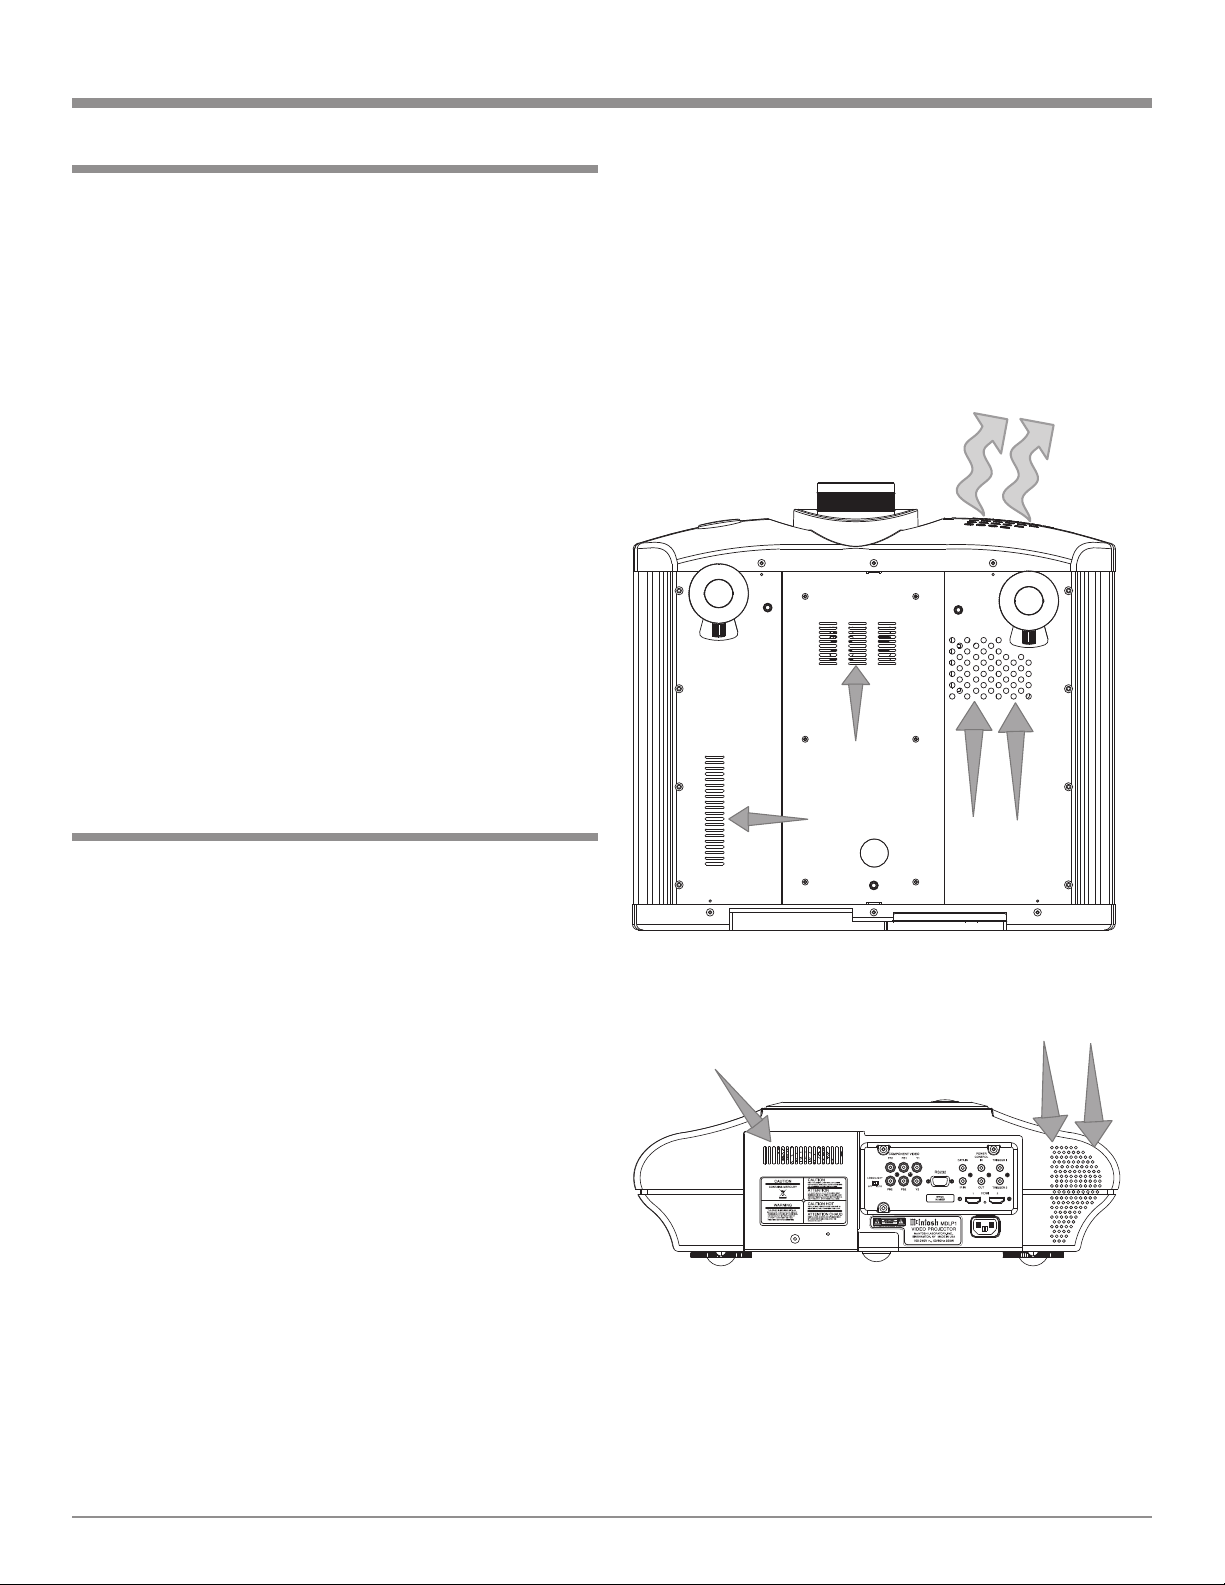
Installation Overview
MDLP1 Bottom View
MDLP1 Rear View
Primary
Cool Air
Input No. 2
Primary
Cool Air
Input No. 1
Secondary Cool Air
Input No. 3
Secondary Cool Air
Input No. 1
Primary
Warm Air
Exit
Secondary Cool Air
Input No. 2
For the best possible image reproduction by the McIntosh
MDLP1 Video Projector, it is important to observe the following:
CAUTION: The MDLP1 Video Projector weight
is 40 pounds (18.14 kilograms). When
mounting the projector to a building
structure it is important to follow all of
the local building/constuction codes.
1. Decide on a viewing area with either subdued and/
or controlled ambient lighting.
2. Choose a projector screen designed specifically to
work with images from a DLP Projector.
3. Locate the position of the MDLP1 Projector relative to the projector screen to maximize image
quality and minimize optical distortions.
4. Provide adequate ventilation.
The information below and on the following pages will assist in the location of the Projector. It is recommended that
the Professionals at your McIntosh Dealer, who are skilled
in all aspects of installation and operation, install the
MDLP1 Video Projector and any associated audio/video
equipment.
Installation
Ventilation
Always provide adequate ventilation for your MDLP1.
Cool operation ensures the longest possible operating life
for any electronic instrument. Do not install the MDLP1
directly above a heat generating component. Refer to figures 1 and 2.
The MDLP1 is designed to be placed upright on a solid
flat surface, resting on its three feet with unrestricted air
flow around it. Allow at least 1 foot (30.48 cm) of space
between the Primary Warm Air Exit ventilation holes and
the nearest wall or obstruction. There should be at least
3 inches (7.62 cm) between the Primary Cool Air Input
ventilation holes and the nearest wall or obstruction. The
ambient air temperature should not exceed 95°F (35°C).
The projector uses two primary and three secondary
cool air input vents together with one primary warm air
exit vent. Refer to the illustration on this page. The air flow
in or out of these vents needs to be unrestricted at all times
during operation.
In the event the MDLP1 is to be placed into an enclosure restricting air flow around the projector, some type of
ducted forced air venting system would need to be implemented for the primary input 1 and 2 vents along with the
primary exit vent.
Figure 1
Figure 2
9
Page 10
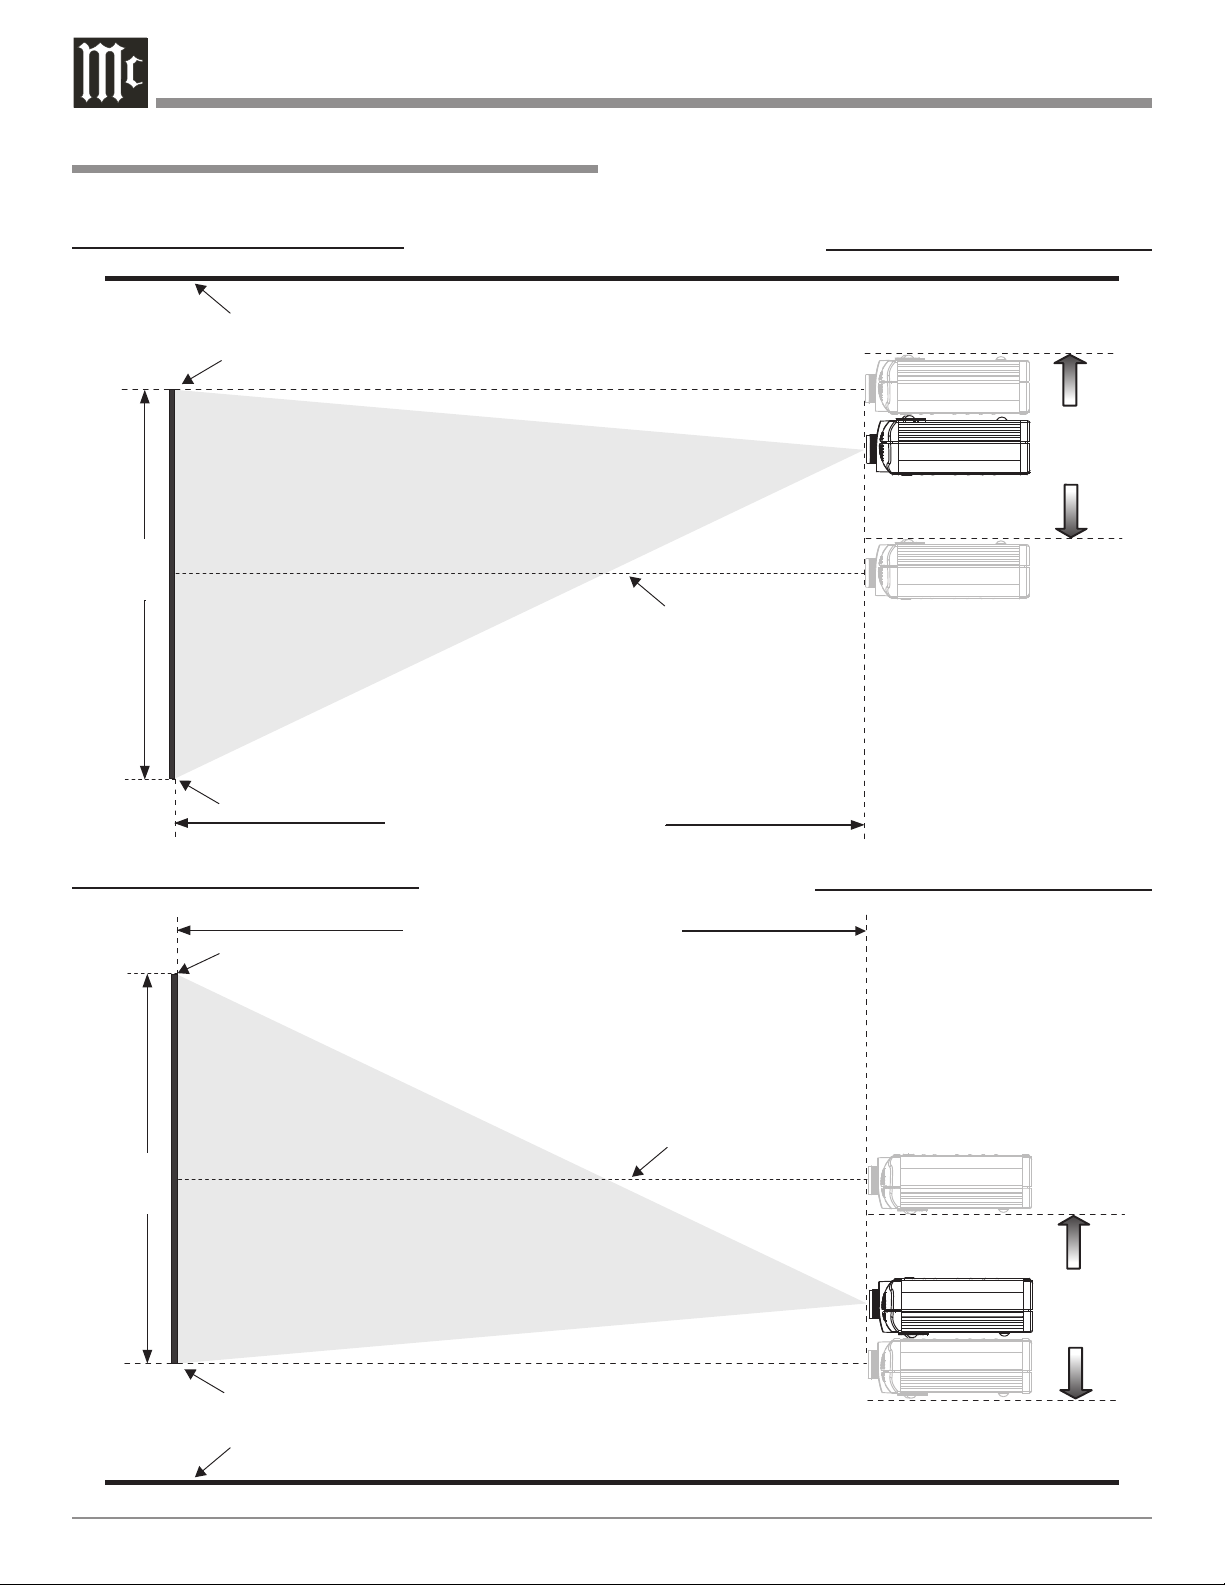
Bottom of Screen
Ceiling
Vertical
Screen
Height
Acceptable
Projector
Mounting
Height
Top of Screen
Vertical Center of Screen
Distance (Minimum-Maximum) between
the Screen and the Projector Lens
Floor
Top of Screen
Vertical
Screen
Height
Vertical Center of Screen
Distance (Minimum-Maximum) between
the Screen and the Projector Lens
Bottom of Screen
Acceptable
Projector
Mounting
Height
Projector and 16:9 Screen Mounting Location
The illustrations below together with the charts on the adjacent page, will help to assure the correct mounting locations
for both the projector and the screen.
Projector mounted from the ceiling
CAUTION:
The MDLP1 Video Projector
weight is 40 pounds (18.14 kilograms). When mounting the
projector to a building structure it is important to follow
all of the local building/constuction codes. Not evaluated
for Wall or Ceiling Mounting.
Projector placed above the floor
10
Page 11

Installation, con’t
MDLP1M (with Medium Throw Lens) - 16:9 Screen Size (1.77:1 Aspect Ratio)
Screen Diagonal Screen Width Screen Height Minimum Distance Maximum Distance
Inches Centimeters Inches Centimeters Inches Centimeters Inches Centimeters Inches Centimeters
70 177.8 61 155.0 34-5/16 87.2 88-6/16 224.3 129-1/16 327.6
72 182.9 62-12/16 159.4 35-5/16 89.7 90-15/16 230.8 132-13/16 337.1
80 203.2 69-12/16 177.1 39-4/16 99.0 101-5/16 257.1 147-13/16 375.1
82 208.3 71-8/16 181.5 40-3/16 102.1 103-14/16 263.6 151-9/16 384.6
84 213.4 73-3/16 186.0 41-3/16 104.6 106-7/16 270.2 155-5/16 394.1
90 228.6 78-7/16 199.2 44-2/16 112.1 114-3/16 289.9 166-8/16 422.6
92 233.7 80-3/16 203.7 45-2/16 114.6 116-13/16 296.4 170-4/16 432.1
100 254.0 87-3/16 221.4 49 124.5 127-2/16 322.7 185-4/16 470.1
106 269.2 92-6/16 234.7 51-15-16 132.0 134-14/16 342.3 196-7/16 498.6
110 279.4 95-14/16 243.5 53-15/16 137.0 140-1/16 355.5 203-15/16 517.6
120 304.8 104-9/16 265.7 58-13/16 149.4 153 388.3 222-11/16 565.1
123 312.42 107-3/16 272.3 60-5/16 153.2 156-14/16 398.1 228-4/16 579.4
133 337.8 115-15/16 294.4 65-3/16 165.6 169-12/16 430.9 247 626.9
135 342.9 117-11/16 298.9 66-3/16 168.1 172-6/16 437.5 250-12/16 636.4
150 381.0 130-12/16 332.1 73-9/16 186.8 191-12/16 486.7 278-13/16 707.6
170 431.8 148-3/16 376.3 83-6/16 211.7 217-9/16 552.3 316-4/16 802.6
200 508.0 174-5/16 442.8 98-1/16 249.1 256-6/16 650.7 372-6/16 945.1
250 635.0 217-14/16 553.5 122-9/16 311.3 321 814.7 465-15/16 1,182.6
MDLP1L (with Long Throw Lens) - 16:9 Screen Size (1.77:1 Aspect Ratio)
Screen Diagonal Screen Width Screen Height Minimum Distance Maximum Distance
Inches Centimeters Inches Centimeters Inches Centimeters Inches Centimeters Inches Centimeters
80 203.2 69-12/16 177.1 39-4/16 99.6 147-3/16 373.5 222-3/16 564.0
82 208.3 71-8/16 181.5 40-3/16 102.1 150-15/16 383.0 227-13/16 578.2
84 213.4 73-3/16 186.0 41-3/16 104.6 154-10/16 392.5 233-7/16 592.5
90 228.6 78-7/16 199.2 44-2/16 112.1 165-14/16 421.0 250-5/16 635.3
92 233.7 80-3/16 203.7 45-2/16 114.6 169-10/16 430.5 255-15/16 649.5
100 254.0 87-3/16 221.4 49 124.5 184-10/16 468.5 278-6/16 706.6
106 269.2 92-6/16 234.7 51-15/16 132.0 195-13/16 497.0 295-4/16 749.3
110 279.4 95-14/16 243.5 53-15/16 137.0 203-5/16 516.0 306-8/16 777.9
120 304.8 104-9/16 265.7 58-13/16 149.4 222 563.5 334-9/16 849.2
123 312.42 107-3/16 272.3 60-5/16 153.2 227-10/16 577.8 343 870.6
133 337.8 115-15/16 294.4 65-3/16 165.6 246-6/16 625.3 371-1/16 941.9
135 342.9 117-11/16 298.9 66-3/16 168.1 250-2/16 634.8 376-11/16 956.1
150 381.0 130-12/16 332.1 73-9/16 186.8 278-3/16 706.0 418-14/16 1,063.1
170 431.8 148-3/16 376.3 83-6/16 211.7 315-10/16 801.0 475 1,205.7
200 508.0 174-5/16 442.8 98-1/16 249.1 371-12/16 943.5 559-5/16 1,419.6
250 635.0 217-14/16 553.5 122-9/16 311.3 465-5/16 1,181.0 699-12/16 1,776.1
300 762.0 261-8/16 664.1 147-1/16 373.6 558-14/16 1,418.5 840-4/16 2,132.6
11
Page 12

Bottom of Screen
Ceiling
Vertical
Screen
Height
Acceptable
Projector
Mounting
Height
Top of Screen
Vertical Center of Screen
Distance (Minimum-Maximum) between
the Screen and the Projector Lens
Floor
Top of Screen
Vertical
Screen
Height
Vertical Center of Screen
Distance (Minimum-Maximum) between
the Screen and the Projector Lens
Bottom of Screen
Acceptable
Projector
Mounting
Height
Projector and 4:3 Screen Mounting Location
The illustrations below together with the charts on the adjacent page, will help to assure the correct mounting locations
for both the projector and the screen.
Projector mounted from the ceiling
CAUTION:
The MDLP1 Video Projector
weight is 40 pounds (18.14 kilograms). When mounting the
projector to a building structure it is important to follow
all of the local building/constuction codes. Not evaluated
for Wall or Ceiling Mounting.
Projector placed above the floor
12
Page 13

Installation, con’t
MDLP1M (with Medium Throw Lens) - 4:3 Screen Size (1.33:1 Aspect Ratio)
Screen Diagonal Screen Width Screen Height Minimum Distance Maximum Distance
Inches Centimeters Inches Centimeters Inches Centimeters Inches Centimeters Inches Centimeters
70 177.8 56 142.2 42 106.7 108-8/16 275.4 158-5/16 401.8
72 182.9 57-10/16 146.3 43-3/16 109.7 111-10/16 283.4 162-14/16 413.4
80 203.2 64 162.6 48 121.9 124-5/16 315.5 181-3/16 459.9
82 208.3 65-10/16 166.6 49-3-16 125.0 127-7/16 323.5 185-13/16 471.5
84 213.4 67-3/16 170.7 50-6/16 128.0 130-10/16 331.5 190-6/16 483.2
90 228.6 72 182.9 54 137.2 140-1/16 355.6 204-2/16 518.0
92 233.7 73-10/16 186.9 55-3/16 140.2 143-4/16 363.6 208-11/16 529.6
100 254.0 80 203.2 60 152.4 155-14/16 395.7 227 576.1
106 269.2 84-13/16 215.4 63-10/16 161.5 165-6/16 419.7 240-12/16 611.0
110 279.4 88 223.5 66 167.6 171-11/16 435.8 249-14/16 634.2
120 304.8 96 243.8 72 182.9 187-8/16 475.9 272-12/16 692.3
123 312.42 98-6-16 249.9 73-13/16 187.5 192-4/16 487.9 279-10/16 709.8
133 337.8 106-6/16 270.3 79-13-16 202.7 208 528.0 302-9/16 767.9
135 342.9 108 274.3 81 205.7 211-3/16 536.0 307-2/16 779.5
150 381.0 120 304.8 90 228.6 234-14/16 596.2 341-7/16 866.6
170 431.8 136 345.4 102 259.1 266-8/16 676.4 387-4/16 982.8
200 508.0 160 406.4 120 304.8 313-14/16 796.7 455-14/16 1,157.1
250 635.0 200 508.0 150 381.0 392-14/16 997.2 570-6/16 1,447.6
MDLP1L (with Long Throw Lens) - 4:3 Screen Size (1.33:1 Aspect Ratio)
Screen Diagonal Screen Width Screen Height Minimum Distance Maximum Distance
Inches Centimeters Inches Centimeters Inches Centimeters Inches Centimeters Inches Centimeters
60 152.4 48 121.9 36 91.4 203-13/16 517.4 203-13/16 517.4
70 177.8 56 142.2 42 106.7 157-11/16 400.2 238-4/16 604.7
72 182.9 57-10/16 146.3 43-3/16 109.7 162-4/16 411.8 245-2/16 622.1
80 203.2 64 162.6 48 121.9 180-9/16 458.3 272-10/16 692.0
82 208.3 65-10/16 166.6 49-3/16 125.0 185-3/16 469.9 279-8/16 709.4
84 213.4 67-3/16 170.7 50-6/16 128.0 189-12/16 481.6 286-6/16 726.9
90 228.6 72 182.9 54 137.2 203-8/16 516.4 307 779.3
92 233.7 73-10/16 186.9 55-3/16 140.2 208-1/16 528.0 313-15/16 796.7
100 254.0 80 203.2 60 152.4 226-6/16 574.5 341-7/16 866.6
106 269.2 84-13/16 215.4 63-10/16 161.5 240-2/16 609.4 362-1/16 918.9
110 279.4 88 223.5 66 167.6 249-4/16 632.6 375-13/16 953.9
120 304.8 96 243.8 72 182.9 272-2/16 690.7 410-3/16 1,041.2
123 312.42 98-6/16 249.9 73-13/16 187.5 279 708.2 420-9/16 1,067.4
133 337.8 106-6/16 270.3 79-13/16 202.7 301-14/16 766.3 454-15/16 1,154.7
135 342.9 108 274.3 81 205.7 306-8/16 777.9 461-13/16 1,172.1
150 381.0 120 304.8 90 228.6 340-13/16 865.0 513-6/16 1,303.1
170 431.8 136 345.4 102 259.1 386-10/16 981.2 582-3/16 1,477.7
200 508.0 160 406.4 120 304.8 455-4/16 1,155.5 685-6/16 1,739.6
250 635.0 200 508.0 150 381.0 569-12/16 1,446.0 857-6/16 2,176.1
300 762.0 240 609.6 180 457.2 684-3/16 1,736.5 1,029-6/16 2,612.6
13
Page 14

Initial Setup
LARGER
SMALLER
IMAGE SIZE
IMAGE FOCUS
The Initial Setup Section is to assist with minimizing
the possible geometric distortions in the projected image
caused by the physical orientation of the MDLP1 Video
Projector relative to the screen. While there are electronic
adjustments to correct for some of these geometric distortions, the best images will be achieved when minimal
electronic adjustments are used.
After the projector and
screen locations have been
established (refer to the four
previous pages), the next step
is to perform the basic optical
and mechanical orientation
adjustments as follows:
Note: Some installations
might require location
positional adjustments
in addition to and/or in
place of the projector’s
built-in adjustments.
1. Connect the projector to a
live AC Outlet.
2. Remove the protective
cover from the projector
lens.
3. The Red LED to the left
of the STANDBY/ON
Figure 3
Push-button lights to
indicate the MDLP1 is in Standby
mode. To Switch ON the MDLP1,
press the STANDBY/ON Push-button
on the Projector Control Panel or the
PROJector ON Push-button using the
Remote Control. The Green LED to
the right of the STANDBY/ON Pushbutton lights to indicate the MDLP1
is ON. Refer to figures 3 and 4.
Note: It is normal for the projector
lamp warm up period to last
about a minute before an image
appears on the screen.
4. Press the PATTERN Push-button on
the Control Panel or the Remote Control. Refer to figures 3 and 4.
The Crosshatch Test Pattern (Horizon-
tal and Vertical White Lines on a Black
Background) will appear on the screen
and will be used during the following
steps. Refer to figures 5 and 6.
Figure 4
5. Rotate clockwise or
counterclockwise the
Knurled Ring surface
on the front section of
the projector lens to
perform an initial focus adjustment. Refer
to figures 5 and 6.
Note: Figure 6 is an
example of an
out of focus image. Do not be
concerned at this
time if the image
doesn’t fill the
screen, is not
centered and/or has geometric distortion.
Figure 5
Figure 6
The next several adjustments will be performed to achieve
the following:
A. Fill the screen with the image.
B. Center the image both horizontally and verti-
cally on the screen.
C. Minimize any horizontal keystone distortion
of the image.
D. Orient the image to be parallel with the top,
bottom and sides of the screen.
6. Rotate clockwise or counterclockwise the Knurled
Ring surface on
the rear section
of the projector
lens to fill the
screen with the
Crosshatch Test
Pattern. Refer to
figures 5 and 7.
7. Move the entire
projector slightly
to the left or
right to center
the image horizontally on the
screen.
Figure 7
8. Using the LENS
SHIFT Control, located on the Top Control Panel, center the image vertically on the screen. Refer to figures
3, 8 and 9.
Note: If the Crosshatch Test Pattern lines change in color
from white to green, the current vertical height of
the projector relative to the screen will not produce
an acceptable image. Reposition either the projector or the screen vertically so when the image is
14
Page 15

Screen
Figure 8
Screen
Figure 9
centered vertically on the screen the Crosshatch
Test Pattern lines are again white in color.
9. Using the Knurled Ring surfaces on the projector lens
adjust the size and focus of the image. Refer to figure
7.
10. Rotate one or both of the projector feet to line up the
top and bottom horizontal lines of the Crosshatch Test
Pattern to be parallel with the top and bottom edges of
the screen. Refer to figures 5 and 10.
Figure 10
Note: If more than several turns are needed there is a
release lever located next to the foot for rapid and
large changes in height. Refer to figure 11.
Initial Setup
11. Using the Knurled Ring surfaces on the projector lens
adjust the size and focus of the image. Refer to figure 7.
12. Rotate the projector clockwise or counterclockwise
about the center horizontal axis to minimize any
horizontal keystone distortion. The top and bottom
horizontal lines of the Crosshatch Test Pattern should
be parallel with the top and bottom edges of the screen.
Refer to figures 5, 12 and 13.
13. Using the knurled
ring surfaces on
the projector lens
to adjust the size
and focus of the
image. Refer to
figure 7.
14. Repeat steps 6 thru
13 until no further
improvements can
be made.
Note: Correction
for any
vertical
keystone
distortion
of the image will be
performed
later during
the electronic setup
adjustments
on page 23.
15. Press the STANDBY/ON Pushbutton on the
Projector Control
Panel or the PROJ
ON Push-button
using the Remote
Control.
16. Temporarily place the previously removed protective
cover onto the projector lens.
17. Remove the AC Power Cord from the projector.
18. Proceed to the “How to connect the MDLP1”
on page 17.
Figure 12
Figure 13
Figure 11
15
Page 16

Rear Panel Connections and Switch
DATA IN Port receives
signals from McIntosh
A/V Control Center for
Remote Control Operation
COMPONENT INPUTS receive Com
ponent Video (Y, PR and PB) Signals
from Component Video Sources
TRIGGER 1 Output
sends a Turn-On signal
to other components
when the MDLP1 is
switched On
-
POWER CONTROL IN
receives turn-on signals
from a McIntosh component and POWER CONTROL OUT sends turn-on
signals on to another
McIntosh Component
TRIGGER 2 Output
sends Turn-On
signals to other components and may be
assigned to activate
when a specific aspect ratio is selected.
16
Switches Off
the illumination to the Top
Control Panel
McIntosh Logo
RS232 connector for
connection to a computer or other control
device
IR INput for
connecting an
IR Receiver
Connect the MDLP1
power cord to a live AC
outlet. Refer to information on the back panel
to determine the correct
voltage
HDMI Inputs receive
digital video signals
from a McIntosh A/V
Control Center and/or
other source compo
nents
-
Page 17

How to Connect the MDLP1
The MDLP1 has the ability to automatically switch power
On/Off to McIntosh Components via the Power Control
and Trigger Connections. The Data Port Connections allow
for the remote operation of the MDLP1 from other McIntosh Components. With an external sensor connected to
the MDLP1, remote control operation is possible when the
MDLP1 is located in an enclosure.
The connection instructions below, together with the
AP1000/MDLP1/VP1000 Input and Control Connection
Diagrams located on the separate folded sheet “Mc2A and
Mc2B”, are an example of a typical audio/video system.
Your system may vary from this; however, the actual components would be connected in a similar manner.
For additional information refer to “Connector and
Cable Information” on page 6.
Note: With the addition of a McIntosh Power Controller
connected to the MDLP1,
be provided to components such as a motorized
projection screen. Contact your McIntosh Dealer for
additional information.
Power Control Connections:
1. Connect a Control Cable from the MDLP1 POWER
CONTROL IN Jack to the Power Control Out A Jack
on the McIntosh VP1000 Video Processor.
If the MDLP1 is connected to a McIntosh Audio/Video
Control Center MX136, MX135, MX120, MX119, MX134
or MX132 (MX Series) add the following connection:
2. Connect a Control Cable from the MDLP1 POWER
CONTROL IN A Jack to the McIntosh MX Series
Power Control Zone A Out Jack.
Data Control Connections:
When the MDLP1 is connected to the McIntosh VP1000
Video Processor no Data Port connection is necessary.
If the MDLP1 is connected to a McIntosh Audio/Video
Control Center MX136, MX135, MX120, MX119, MX134
or MX132 (MX Series) add the following connection:
3. Connect a Control Cable from the MDLP1 DATA IN
Jack to the McIntosh MX Series SUM A Data Port
Jack.
Video Connections:
When the MDLP1 is connected to the McIntosh VP1000
Video Processor add the following connections. If there is
no VP1000 proceed to step 6.
4. Connect a Video Cable from the MDLP1 Y1, PB1 and
PR1 COMPONENT VIDEO Input Jacks to the McIntosh VP1000 Component Video MON A Jacks.
5. Connect a Video Cable from the MDLP1 HDMI 1
Input Jack to the McIntosh VP1000 HDMI MON A
Output Jack.
AC Power Switching can
How to Connect the MDLP1
If the MDLP1 is connected to a McIntosh Audio/Video
Control Center MX136, MX135, MX120, MX119, or
MX134 (MX Series) add the following connection:
6. Connect a Video Cable from the MDLP1 Y1, PB1 and
PR1 COMPONENT VIDEO Input Jacks to the McIntosh MX Series Component Video MON A Jacks.
7. Connect a Video Cable from the MDLP1 HDMI 1
Input Jack to the McIntosh MX Series HDMI MON A
Output Jack.
Note: Only the MX136 and MX120 Audio/Video Con-
trol Centers will have a HDMI MON A Jack.
AC Power Cord Connections:
8. Connect the MDLP1 AC Power Cord to a live AC
outlet.
9. Connect the remaining components’ AC Power Cords.
17
Page 18

Selects which component, either the
VP1000 Processor or the MDLP1
Projector, the remote control com
mands are sent to
-
Remote Control Push-Buttons
LED illuminates during the time
a remote command is sent to the
MDLP1
Used to change the Color
Temperature settings
Press to adjust the
selected function
Used to change the
Gamma settings
Press to recall various
On-Screen Information,
press a second time to
deactivate the Menus
Press to change the Aspect
Ratio of the video image
Press to select one of three
predefined picture settings
or select one of nine user
defined picture settings
Changes the film frame processing from Auto to Off
Activates the OnScreen
Crosshatch Test Pattern
Used to change the Lens Iris
opening size
Press to activate the various OnScreen Menus, press a second time
to deactivate the Menus
Used to navigate up, down, to
the left and to the right through
the various menus. Also used
to select the desired function or
option
Press to select the desired Screen
Blanking Setting from Memory
Locations 1-3 or switch Off the
Blanking Function
Press to Power ON or
OFF the MDLP1
Press to select the desired video
source, Component 1, Component 2, HDMI 1 or HDMI 2
18
Note: Push-buttons whose function is not identified above
are for use with other McIntosh Components
Page 19

How to use the Remote Control
How to use the Remote Control
The supplied Remote Control is capable of directly controlling the functions of the McIntosh MDLP1 Video Projector
and VP1000 Video Processor. For additional information
on the various video adjustments and their purpose, please
refer to the “How to Operate the MDLP1” section of this
manual starting on page 22.
Note: At times it might appear the selected function is not re-
sponding when using the Remote Control. This can be
due to the Input selected, the presence of a video signal
for that input and the Picture Mode selected. Please
refer to page 22 for additional information.
Device Selection
This Remote Control is used to operate the McIntosh
MDLP1 Video Projector and the VP1000 Video Processor.
When using the Remote Control with the MDLP1, first
press the DEVICE PROJector push-button and then press
the push-button for the desired function. It is only required
to press the DEVICE PROJector push-button once, unless the Remote Control is also being used to control the
VP1000 Video Processor.
When the Remote Control is being used to control both
McIntosh Components, either the DEVICE PROCessor
or the DEVICE PROJector push-button would need to
be pressed first, before sending
commands to the desired component.
Note: When any of the Push-but-
tons in the adjacent illustration are pressed, the Remote Control automatically
switches to sending VP1000 Video Processor IR Codes.
Power On
Press PROJector ON to switch the power On to the
MDLP1.
Power Off
Press PROJector OFF to switch the power Off to the
MDLP1.
Color Temperature
Allows for changing on the fly1 the color neutrality of the
image from warm thru cool (six different settings).
Iris
Allows for changing on the fly
1
the overall Image Brightness by varying the opening size of the Lens Iris (two
different settings).
Gamma
Allows for changing on the fly
1
selected narrow segments
of the gray scale, where the selected segment range of
brightness/contrast is expanded (eight different segments).
Note: The term “Gray Scale” refers to the image intensity
range from Black to White with shades of gray in-between.
Aspect Ratio
Allows for presenting the image with different height to
width sizes. The choices available vary according to the
original source material type, projector settings and input
used.
Picture Modes
There are three preset modes THTR (Theater), STD (Stan
dard) and DYN (Dynamic) along with three user group
set selections, G1, G2 or G3. With every press of the G1
push-button a different User Setting will be selected (U1,
U2 or U3). The G2 push-button will select (U4, U5 or U6)
and the G3 push-button selects (U7, U8 or U9). Refer to
“How to Operate the MDLP1” for additional information
on using the User defined image settings.
Note: Changing the Picture Mode using the Remote Control
Picture Mode Push-buttons will not occur if the OnScreen Menu is active. If the Menu is active, the Picture
Mode may be changed using the Picture Mode Menu
functions.
-
Adjust Functions
After menu functions displaying a horizontal adjust
ment bar on the screen have been selected, such as Image
Brightness, the ADJUST+ or ADJUST- push-buttons may
be used to vary the brightness of the image.
1
When some Picture Modes are selected, “the changing on the
fly” feature is not available.
19
Page 20

Front Panel Push-buttons, Indicators and Control
Used to navigate up,
down, to the left and
to the right through
the various menus.
Also used to select the
desired function or
option
Indicates when
the projector
lamp has failed
or if one of the
safety functions
has been acivated
IR Sensor
receives
commands
from a
Remote
Control
Selects one
of four Video
Sources available
and indicates the
selected video
input
Standby Power
On Indicator
Allows the Projector Lens assembly to
be raised or lowered
vertically for centering the image on the
screen
Activates the OnScreen CrossHatch Video Test
Pattern
Activates the
On-Screen
Menus for
changing the
settings
Power ON
Indicator
20
STANDBY/ON
Push-button
switches the
MDLP1 ON or
OFF (Standby)
Page 21

Default Settings
The Default Settings Charts indicate the On-Screen Menu
Name, Function, Default Settings and the page number for
additional information.
Default Settings
MENU FUNCTION SETTING PAGE
Picture Mode Theater Default 24
Standard (Default) Default 24
Dynamic Default 24
User
Picture Adjust Gamma Standard 24
Contrast
Brightness 0 24
Color
Tint 0 24
Color Temp. 3 24
Lamp Mode Normal 25
Iris F6.0 25
Aspect Full 25
Fine Menu 1 Sharpness
Noise Reduction
R Gain
G Gain 0 26
B Gain
R Bias 0 26
G Bias 0 26
B Bias
Fine Menu 2 Cinema Auto 26
VCR Mode Off 26
Black Level Expand 26
FRC Auto 26
CEC Off 26
Picture Shift V
Luminance Gain 0 26
Chroma Delay 0 26
Input Signal Component 1 Auto 27
Component 2 Auto 27
HDMI 1 Auto 27
HDMI 2 Auto 27
CSC-HDMI 1 Auto 27
CSC-HDMI 2 Auto 27
1 24
0 24
0 24
0 26
0 26
0 26
0 26
0 26
0 26
MENU FUNCTION SETTING PAGE
RGB/HD Adjust Mode Auto 27
Readjust ---- 27
Resolution H 0 27
Resolution V 0 27
Position H
Position V 0 27
Phase 0 27
Clamp Position
Clamp Width 0 27
Display Keystone 0 23
Scale 0 27
Width
Position H 0 27
Position V 0 27
Overscan Enable 27
Installation Front 23
OSD/Blanking Menu Position Top-L 28
Language English 28
Status Info Enable 28
Power-Off Confirm Disable 28
Blanking Memory Off 28
Blanking Top
Blanking Bottom
Blanking Left 0 28
Blanking Right 0 28
Config. Auto Power Off Disable 28
Trigger 2 Full On 28
Trigger 2 Normal On 28
Trigger 2 Zoom On 28
Trigger 2 V-stretch On 28
Trigger 2 Through On 28
Remote Control Wireless 23
Reset Lamp Life No 29
Reset All No 29
0 27
0 27
0 27
0 28
0 28
21
Page 22

How to Operate the MDLP1
Power
The Red LED to the left of the STANDBY/ON Push-button lights to indicate the MDLP1 is in Standby mode. To
Switch ON the MDLP1, press the STANDBY/ON Pushbutton on the Projector Control Panel or the Projector ON
Push-button using the Remote Control. The Green LED to
the right of the STANDBY/ON Push-button lights to indicate the MDLP1 is ON. Refer to figures 14 and 15.
Notes: 1. It is normal for the projector lamp warm up period
to last about a minute before an image appears on
the screen.
2. If the Initial Setup for the MDLP1 has not yet been
performed refer to page 14 at this time.
Figure 14
Source Selection
The default Source Select for the MDLP1 Projector is the
COMPonent 1 Input. There is an additional Component
Video Input (COMP 2) along with two HDMI Inputs.
Select the desired source using the push-buttons located on
the Projector Control Panel or on the PROJ INPUT Pushbuttons located on the Remote Control. Refer to figures 14
and 15.
Note: Whenever possible use HDMI connections between
the source device output to the MDLP1 Input. This
will yield better image quality, as the video signal
will go through one less analog to digital conversion process and possibly one less digital to analog
conversion process as well.
Image Adjustments and Setting changes
All of the electronic based image adjustments and processing settings are performed by using the extensive
On-Screen Menuing System. The
On-Screen Menuing System is interactive and the ability to change
a given setting is dependent on
the Input selected, the presence
of a video signal for that input,
the Picture Mode selected and are
automatically saved for the currently selected video input. When
a menu item is “grayed out” it
can not be changed until either
another Input is selected, a signal
is present or a different Picture
mode is selected.
The selection of a menu item
and the available choices/adjustments are performed by using the
Navigation (◄LEFT, ►RIGHT,
▲UP or ▼DOWN) Push-buttons
along with the ENTER/SELECT
Push-buttons located on the Projector Control Panel and/or using
the Remote Control Push-buttons.
The following examples
will illustrate how to use the
On-Screen Menuing System by
performing the Display Installation Orientation, Display Vertical
Keystone Adjustment and Remote
Control Configuration. All of the
remaining menu options are performed in a similar manner.
Figure 15
22
Page 23

How to Operate the MDLP1
Key stone 0
Sta nda rd 1
Key sto ne
Sca le
Wid th
Pos iti on H
Pos iti on V
Ins tal lat ion
0
0
0
0
0
Fro nt
Fin e M enu 1
Fin e M enu 2
Inp ut Sig nal
RGB /HD Ad just
Dis pla y
OSD /Bl ank ing
Con fig .
Ove rsc an
Ena ble
Sta nda rd 1
Key sto ne
Sca le
Wid th
Pos iti on H
Pos iti on V
Ins tal lat ion
0
0
0
0
0
Fro nt
Fin e M enu 1
Fin e M enu 2
Inp ut Sig nal
RGB /HD Ad jus t
Dis pla y
OSD /Bl ank ing
Con fig .
Ove rsc an
Ena ble
Fro nt
Rea r
F+C eil ing
R+C eil ing
Display Installation Orientation:
1. Press the MENU Push-button on either the Projector Control Panel or on the Remote Control. Refer to
figures 14 and 15.
2. Using the Navigation ▲UP or ▼DOWN Push-button,
select DISPLAY from the Main Menu choices. Refer to
figure 16.
Figure 16
3. Using the Navigation ►RIGHT push-button plus the
▲UP or ▼DOWN Push-button, select INSTALLA
TION from the Display Menu choices.
4. Press the Navigation ►RIGHT push-button plus the
▲UP or ▼DOWN Push-button select the correct
orientation of the projector relative to the screen. Refer
to figure 17.
4. Press the Navigation ►RIGHT push-button and the
On-Screen Display changes to show the video image
selected plus a horizontal adjustment bar located near
the bottom of the screen. Refer to figure 18.
Figure 18
5. Press the ◄LEFT or ►RIGHT Navigation push-button
to adjust the image so the left and right vertical sides of
the image are parallel to the sides of the screen. Refer
to figures 19 and 20.
Note: The ADJUST + and - Push-buttons on the Remote
Control may also used.
-
Figure 19
Vertical Keystone Adjustment:
1. Press the MENU Push-button on either the Projector Control Panel or on the Remote Control. Refer to
figures 14 and 15.
2. Using the Navigation ▲UP or ▼DOWN Push-button,
select DISPLAY from the Main Menu choices. Refer to
figure 17.
3. Using the Navigation ►RIGHT push-button plus the
▲UP or ▼DOWN Push-button, select KEYSTONE
from the Display Menu choices.
Figure 17
Figure 20
In order to see the sides of the projected image it might be
necessary to temporarily reduce the size of the image by
using the Lens Mechanical Size Adjustment, refer to page
14. After the Vertical Keystone correction has been performed, the projected image might not fill up the screen.
If necessary, use the Lens Mechanical Size Adjustment to
correct.
Remote Control Configuration:
The MDLP1 has two built-in sensors, one on the front of
the projector and the other sensor located on the Control
23
Page 24

Panel. In certain installations it might be desirable to use
Wireless ?
Sta nda rd 1
Aut o P owe r Off
Trig ger 2 Full
Trig ger 2 Norma l
Trig ger 2 Zoom
Ena ble
On
On
On
Trig ger 2 V-st ret ch On
Trig ger 2 Throu gh On
Res et Lam p Lif e
Res et All
Rem ote Co ntrol
Pic tur e A djust
Fin e M enu 1
Fin e M enu 2
Inp ut Sig nal
RGB /HD Ad just
Dis pla y
OSD /Bl ank ing
Con fig .
The ate r
Sta nda rd
Dyn ami c
Use r
Def aul t
1
Def aul t
1
Sta nda rd 1
Pic tur e A djust
Fin e M enu 1
Fin e M enu 2
Inp ut Sig nal
RGB /HD Ad just
Dis pla y
OSD /Bl ank ing
Con fig .
2
3
1
Def aul t
Use r 1
Gam ma
Con tra st
Bri ght nes s
Col or
Tint
0
0
0
3
0
Lam p M ode
Col or Temp.
Nor mal
A
Iri s
F6. 0
Asp ect
Ful l
C
D
E
B
A
Pic tur e A djust
Fin e M enu 1
Fin e M enu 2
Inp ut Sig nal
RGB /HD Ad just
Dis pla y
OSD /Bl ank ing
Con fig .
The ate r
Sta nda rd
Dyn ami c
an external sensor connected to the IR Jack. If an external
sensor is used, it is advisable to switch Off the built-in sensors to prevent possible interference. To switch Off these
sensors perform the following steps:
1. Press the MENU Push-button on either the Projector Control Panel or on the Remote Control. Refer to
figures 14 and 15.
2. Using the Navigation ▲UP or ▼DOWN Push-button,
select CONFIG. from the Main Menu choices. Refer to
figure 21.
Figure 23
Remote Control. To have the MDLP1 memorize the current
setting perform the following:
1. Select a memory location (U1 thru U9) and then press
the SELECT/ENTER Push-button.
2. Make the changes to the image using the menu system.
3. Reselect the memory location from step one and then
press the SELECT/ENTER Push-button.
Figure 21
3. Using the Navigation ►RIGHT push-button plus the
▲UP or ▼DOWN Push-button, select REMOTE
CONTROL from the Config. Menu choices.
4. Press the Navigation ►RIGHT push-button and the
On-Screen Display changes to show a window. Refer
to figure 22.
5. Press the ◄LEFT or
►RIGHT Navigation
push-button to select
YES to disable the
Figure 22
enternal sensors or NO
to activate the internal sensors.
6. In order to activate the sensor choice, it is necessary to
press the ENTER Push-button on the Control Panel.
Note: The SELECT Push-button on the Remote Control
will not activate the choice.
Picture Mode Selection
The MDLP1 has three predefined Picture Modes; Theater,
Standard, Dynamic. There are also nine User definable
Picture Modes. Refer to figure 23. A Picture Mode is a
Memory Location that remembers the current image settings which are adjustable for the currently selected input.
ing a mode from the On-Screen MENU or pressing the
Picture Mode push-buttons (THTR, STD, DYN) on the
24
There are two ways to select the Picture mode: select-
Picture Adjust Menu
There are various image adjustments available as follows:
Refer to figure 24.
Figure 24
Gamma - There are eight different settings changing a
narrow range of the gray scale.
Color Temp. - The Color Temperature effects to what de
-
gree of neutrality the gray scale is.
Setting - Color Temperature (° Kelvin)
1 5250° K (overall reddish tint)
2 5800° K (slightly overall reddish tint)
3 6500° K (most neutral, default setting)
4 7500° K (slightly overall bluish tint
5 9300° K (overall bluish tint)
HB High Bright (Display brightest image)
Page 25

How to Operate the MDLP1, con’t
Use r 1
Gam ma
Con tra st
Bri ght nes s
Col or
Tint
0
0
0
3
0
Lam p M ode
Col or Temp.
Nor mal
A
Iri s
F6. 0
Asp ect
Ful l
Pic tur e A djust
Fin e M enu 1
Fin e M enu 2
Inp ut Sig nal
RGB /HD Ad just
Dis pla y
OSD /Bl ank ing
Con fig .
Ful l
Nor mal
Zoo m
V-Str etch
Thr oug h
Lamp Mode - The Normal setting provides a brightly il-
luminated image with reasonable projector
lamp life. The Economy setting has slightly
reduced illumination with an increase in
lamp life.
Iris - The Lens “F-Stop” setting effects the overall image
brightness and contast. The F6.0 setting will increase the contrast range of the image. The F3.0 setting will increase the brightness range of the image.
Aspect - Allows for changing the projected image size
height to width ratio to compensate for the differ-
Figure 25
ent image sizes from various sources materials
such as film and TV video. Refer to figure 25 and
the chart below.
ASPECT RATIO OPTIONS
16:9 VIDEO SOURCE 4:3 VIDEO SOURCE
MODE IMAGE DECRIPTION IMAGE DECRIPTION
INPUT
SIGNAL
(HDMI, 1080p signal)
FULL
NORMAL
ZOOM
V-STRETCH
The I m age Sou r c e Aspect
Ratio is 1.78:1
The 16:9 image is displayed
with the correct aspect
The picture in normal ratio
16:9 is displayed
B o th t he v e rt ic al a nd
horizont a l components are
enlarged
The vertical component of the
aspect ratio is enlongated
The I m age Sou rce Aspect
Ratio is 1.33:1
The 4:3 image is enl a rged
horizontally
The picture in nor mal ratio
4:3 is displayed
B o th t he v e rt ic al a nd
horizont al component s are
enlarged
The vertical component of the
aspect ratio is enlongated
THROUGH
Images are actual pixel size Images are actual pixel size
25
Page 26

Fine Menu 1 Adjust
Sta nda rd 1
Sha rpn ess
Noi se Red uctio n
R G ain
G G ain
B G ain
0
�
R B ias
G B ias
B B ias
0
0
0
0
0
0
Pic tur e A djust
Fin e M enu 1
Fin e M enu 2
Inp ut Sig nal
RGB /HD Ad just
Dis pla y
OSD /Bl ank ing
Con fig .
Sta nda rd 1
Cin ema
VCR Mo de
Bla ck Lev el
Aut o
On
0 I RE
FRC Au to
0
0
0
Pic tur e S hift V
Lum ina nce Gain
Chr oma De lay
Pic tur e A djust
Fin e M enu 1
Fin e M enu 2
Inp ut Sig nal
RGB /HD Ad just
Dis pla y
OSD /Bl ank ing
Con fig .
CEC Off
Sta nda rd 1
Com pon ent 1
Com pon ent 2
S-Vi deo
Vide o
Aut o
Aut o
Aut o
Aut o
RGB Auto
HDM I2
CSC HD MI1
CSC HD MI2
HDM I1 Auto
Aut o
Aut o
Aut o
Pic tur e A djust
Fin e M enu 1
Fin e M enu 2
Inp ut Sig nal
RGB /HD Ad just
Dis pla y
OSD /Bl ank ing
Con fig .
In the Fine Menu 1 there are two user type adjustments,
image sharpness and noise reduction. The remaining
adjustments are best performed by a professional with the
necessary video signal generators and optical measurement
equipment. Refer to figure 26.
Figure 26
Sharpness - Effects how soft or sharp the image is.
Noise Reduction - Reduces the amount of electronic noise
present in the video signal.
R Gain - This menu allows setting the gain for red.
G Gain - This menu allows setting the gain for green.
B Gain - This menu allows setting the gain for blue.
R Bias - This menu allows setting the bias for red.
G Bias - This menu allows setting the bias for green.
B Bias - This menu allows setting the bias for blue.
Note : The settings made in Fine Menu 1 are saved in the cur-
rently selected Picture Mode (Default excluded).
Fine Menu 2 Adjust
The following adjustment are intended to be use by a professional installer to compensate for differences in video
signals from various sources. Refer to figure 27.
VCR Mode - On: A projector is forced into the intra-field
only deinterlacing mode.
Off: A projector is used with external field
memories and operates in the full set of
deinterlacing modes, i.e., motion adaptive
video deinterlacing and full frame film
source deinterlacing using 3:2 pulldown
detection (2:2 pulldown for 625/50
sources).
Black level - Select the black level by a video source.
FRC - Auto: Frame Rate Conversion function is basically
off. However FRC turns on automatically de
-
pending on vertical frequency of input signal.
On: Frame Rate Conversion function is On (60Hz
fixed).
CEC - On: Chroma Error Correction reduces CUE (Chro-
ma Up-sampling Error) of 1080i signals.
Off : Normally, use this mode.
Picture Shift V - When Aspect on the Picture Adjust menu
is set to Zoom, this setting allows the
user to move the projected image vertically in order to see parts on the image
not appearing on the screen.
Luminance Gain - This menu allows the users to set the
luminance gain.
Chroma Delay - This menu allows the users to set the chro-
minance delay.
Input Signal Resolution Selection
There are several SD (Standard Definition) and HD (High
Definition) types of video signals the MDLP1 is capable of
displaying. The default setting for the Component Video
and HDMI Inputs of the MDLP1 is AUTO. In the AUTO
Mode, the MDLP1 will automatically switch to the highest
resolution possible for each of the video signals it receives.
Refer to figure 28.
Note: The S-Video,Video and RGB Inputs are not used on the
MDLP1.
Cinema - Auto: Automatically selects the cinema mode
26
when a video signal is input. NTSC: 3-2
pull down, PAL: 2-2 pull down.
Off: Pull-down processing is not performed.
Figure 27
Figure 28
Page 27

How to Operate the MDLP1, con’t
Sta nda rd 1
Mod e
Rea dju st
Res olu tio n H
Res olu tio n V
Pos iti on H
Pos iti on V
Mem ory 1
0
0
0
0
Pha se
Cla mp Pos ition
Cla mp Wid th
0
0
0
Pic tur e A djust
Fin e M enu 1
Fin e M enu 2
Inp ut Sig nal
RGB /HD Ad just
Dis pla y
OSD /Bl ank ing
Con fig .
Sta nda rd 1
Key sto ne
Sca le
Wid th
Pos iti on H
Pos iti on V
Ins tal lat ion
0
0
0
0
0
Fro nt
Fin e M enu 1
Fin e M enu 2
Inp ut Sig nal
RGB /HD Ad just
Dis pla y
OSD /Bl ank ing
Con fig .
Ove rsc an
Ena ble
Item Resolution Selection
Component Auto, 480i/576i, 480p, 540p, 576p, 720p
1 and 2 1035i, 1080i, 1080p
HDMI Auto, 480i/576i, 480p, 576p, 720p, 1035i,
1 and 2 1080i, 1080p
CSC HDMI Auto, RGB, YPBPR 4:4:4, YPBPR 4:2:2,
1 and 2 YCBCR 4:4:4, YCBCR 4:2:2,
Notes: CSC (Color Space Conversion) selection is for HDMI
inputs only. YPBPR mode is suitable for HD TV signals such a 720p, 1080i. YCBCR mode is suitable for
SD TV signals such a 480i, 480p.
RGB/HD Adjust
The RGB/HD allow for fine adjustments to be made to HD
(High Resolution) Video Signals. Refer to figure 29.
Figure 29
Mode - Auto: Automatically adjusts each of the RGB/HD
Menu items.
Memory: Allows for manual adjustments of the
(1-3) RGB/HD Menu items and the adjust
ments can be stored in one of three
memory locations.
Resolution H, V - Adjusts the horizontal and vertical reso-
lution of the RGB/HD input signals.
Position H, V - Adjust the position of the input signal. H
adjusts the horizontal position of the input
signal. V adjusts the vertical position of the
input signal. The remaining adjustments
are for RGB signals and are thus “grayed
out”.
Display Menu Adjust
The Display Menu allows for electronic adjustments to be
made to the image to compensate for orientation of the pro
jector relative to the screen. Refer to figure 30.
Note: Before using the electronic adjustments, make sure all
of the Initial Setup Mechanical Adjustments have been
made first. Refer to pages 14 and 15.
Figure 30
Keystone - Refer to “Vertical Keystone Adjustment” on
page 23.
Scale - Reduces the image size without changing the aspect
ratio. The image can be reduced to about 70% of
the original size.
Width - Reduces the image width without changing the
image height. The width can be reduced to about
75% of the original size.
Position H, V - Adjust the position of the input signal. H
adjusts the horizontal position of the input
signal. V adjusts the vertical position of the
input signal.
Overscan - Selects whether to show or hide picture borders
with SD (Standard Definition) video signals.
Enable: Default mode.
Disable: Reduces the size of the image so the
edges of the video signal can be seen.
Installation - Refer to “Display Installation Orientation” on
page 23.
OSD/Blanking
The OSD (On-Screen Display) and Blanking Adjustments
default settings may be changed for personal preferences.
Refer to figure 31 on the next page.
-
27
Page 28

Sta nda rd 1
Men u P osi tion
Lan gua ge
Sta tus In fo.
Pow er- OFF Conf irm .
Bla nki ng Memor y
Bla nki ng Top
Top-L
Eng lis h
Ena ble
Ena ble
Mem ory 1
0
0
0
0
Bla nki ng Botto m
Bla nki ng Left
Bla nki ng Right
Pic tur e A djust
Fin e M enu 1
Fin e M enu 2
Inp ut Sig nal
RGB /HD Ad just
Dis pla y
OSD /Bl ank ing
Con fig .
Figure 31
Sta nda rd 1
Aut o P owe r Off
Trig ger 2 Full
Trig ger 2 Norma l
Trig ger 2 Zoom
Ena ble
On
On
On
Trig ger 2 V-st ret ch On
Trig ger 2 Throu gh On
Res et Lam p Lif e
Res et All
Rem ote Co ntrol
Pic tur e A djust
Fin e M enu 1
Fin e M enu 2
Inp ut Sig nal
RGB /HD Ad just
Dis pla y
OSD /Bl ank ing
Con fig .
It w ill be standby mode s oon.
Auto Power Off
Menu Position - There are nine different positions On-
Screen to display the menus.
Status Info. - Displays On-Screen information about the
status of the video input signal and when
other operational modes are selected. This
occurs when the INFO push-button or other
push-buttons are pressed on the Remote
Control.
Enable: Displays the current status for a set
amount of time in the upper righthand corner of the screen.
Disable: The information is not displayed.
Power-OFF Confirm - Displays an On-Screen message
requesting confirmation after pressing either the PROJ OFF Push-button on the Remote Control or the
STANDBY/ON push-button on
the Projector Control Panel (as the
push-button may have been pressed
by mistake).
Disable: Switches Off power to
the projector without the
option provided by the
confirmation message.
Enable: The confirmation message
will appear after pressing either push-button to
switch power Off to the
projector.
Blanking Memory - There are three memory locations
capable of storing how much projected
image (top/bottom/sides) will be cut
28
off by black bands (masking) to prevent viewing the undesirable parts of
the image.
Memory 1-3: Each of the three mem-
ory locations will store
and retrieve the desired
masking settings.
Off: Switches Off the blank-
ing mode Off. No masking occurs.
Config. Settings
The items in the configuration menu determine how the
MDLP1 Projector interfaces with other equipment, such
as motorized projection screens. There are also settings
dealing with the MDLP1 Projection Lamp. Refer to figure
32 and your McIntosh Dealer for additional information
and/or assistance.
Figure 32
Auto Power Off - This feature allows for the MDLP1 to be
switched Off automatically 10 minutes
after there is a loss of a video signal on
the currently selected input, thus conserving the projectors lamp life.
Enable: This setting will activate the
feature. Approximately nine
minutes after there is a loss
of the video signal, an
On-Screen message will
appear. If the MDLP1
doesn’t receive a video
Figure 33
signal on the currently
selected input or a new
command is not issued via
the Control Panel or Remote
Control, the MDLP1 will
switch Off about one minute
later. Refer to figure 33.
Disable: The Auto Power Off Feature is
switched Off.
Tigger 2 - Is activated by changing the Aspect Ratio (Full,
Normal, Zoom, V-stretch and Through). This
allows for changing the size of the reflective
area of the projection screen (via motorized
masking) and/or the addition of an external lens
in the light path. With a given Trigger 2 (Full,
Page 29

How to Operate the MDLP1, con’t
Reset All ?
Yes No
Yes No
Reset Lamp Life ?
Lamp Life 5 Hours
Warning
Lamp Life 0 Hours
Warning
Warning
Lamp Life 100 Hours
Inf ormat ion
Video Input HDM I 1 - 1080 p
Pic ture Mode User 1
Gam ma
A
Asp ect Normal
Lam p Mod e Econo my
Iri s F6 .0
Lam p Lif e 921 Hours
Total Time 365 3 Hou rs
Normal, Zoom, V-stretch and Through) set to
ON a 12VDC output will appear at the Trigger
2 Output Jack; when set to OFF, 0V appears at
Trigger 2 Output Jack.
Remote Control - Selection includes the two built in sen-
sors along with any external sensor(s)
connected via the external IR Input Jack
or just external sensor(s). Refer to page
5, General Information Note 6.
Wireless: Selects external sensor(s)
only.
Wired: Selects the two internal sensors
and any external sensor(s) connected to
the MDLP1.
Note: When making a change to the cur-
rent menu setting, the ENTER Pushbutton on the MDLP1 Control Panel
must be used to effect the desired
change.
Reset Lamp Life - The projection lamp used in the MDLP1
has a maximun life expectancy of 2,000
hours.
If at any time you would like to know
how many hours of use are left for the
lamp, press the INFO Push-button on
the Remote Control and the On-Screen
Display will appear indicating the
number of hours remaining. Refer to
figure 34. When there is aproximately
mately 5 hours remaining.
Refer to figure 36. Finally,
the last warning message
will appear On-Screen,
Figure 36
the MDLP1 Projector will
shut Off and the Control
Panel WARNING/LAMP
LED will illuminate red.
Refer to figure 37.
After your McIntosh
Figure 37
Dealer has replaced the
Projector Lamp, check to
make sure the Lamp Life
has been reset by pressing
the INFO Push-button on
the Remote Control. The
On-Screen Display should
Figure 38
indicate 2,000 hours. If it
was not reset please do it
at this time by selecting the Reset Lamp
Life from the On-Screen Menu and then
select YES and press the ENTER Pushbutton. Refer to figure 38.
Reset All - If it becomes necessary to reset all the menu
settings back to factory defaults (except for
the Lamp Life Setting),
select the Reset All from
the On-Screen Menu and
then select YES and press
Figure 39
the ENTER Push-button.
Refer to figure 39.
Figure 34
100 hours of lamp life remaining, an
On-Screen Warning Message will ap
pear briefly. Refer to figure 35. If you
Figure 35
-
have chosen not to replace
the lamp at this time, a
second warning message
will appear with approxi-
Reset of Microprocessors
In the unlikely event the controls of the MDLP1 stop func
tioning, the microprocessors can be reset by disconnecting
the AC Power Cord from the MDLP1, waiting for 5 minutes and then reconnecting the AC Power Cord.
29
-
Page 30

Optical Specifications
Specifications
Digital Micromirror Device
0.95 inch (16:9)
1920 x 1080 pixels
Lamp
Super High Pressure 200W DC
Lens
f: 30.7 – 44.5mm (medium throw lens)
f: 44.5 – 66.75mm (long throw lens)
F: F3.0/F6.0
Projected Image Size
70 to 250 inches (medium throw lens, 1.77:1 aspect ratio)
80 to 300 inches (long throw lens, 1.77:1 aspect ratio)
70 to 250 inches (medium throw lens, 1.33:1 aspect ratio)
60 to 300 inches (long throw lens, 1.33:1 aspect ratio)
Light Output
600/700 ANSI Lumen typical (F6.0/F3.0)
Electrical Specifications
Video Inputs
2 - Component Analog Video (Y, P
2 - HDMI Digital Video (1.1 Compliant)
b, Pr)
Power Requirements
100 Volts, 50/60Hz at 350 watts
110 Volts, 50/60Hz at 350 watts
120 Volts, 50/60Hz at 350 watts
220 Volts, 50/60Hz at 350 watts
230 Volts, 50/60Hz at 350 watts
240 Volts, 50/60Hz at 350 watts
Note: Refer to the rear panel of the MDLP1 for the correct
voltage.
General Specifications
Operating Temperature
41 to 95
5 to 35oC
Operating Humidity
30 to 85%
Overall Dimensions
Width is 20-1/4 inches (51.44cm)
Height is 6- 3/4 inches (17.15cm) feet retracted
Height is 9- 1/2 inches (24.13cm) feet extended
Depth is 18- 13/16 inches (47.78cm) medium throw lens
Depth is 19- 1/16 inches (48.41cm) long throw lens
o
F
McIntosh Data Control Input
1- 1/8 inch Stereo Mini Jack
Power Control In
1 - 1/8” Stereo Mini Jack
Input voltage range 5V – 12V
Power Control Out
1- 1/8” Stereo Mini Jack
Output voltage 5V
Trigger Outputs
2- 1/8” Stereo Mini Jacks
Output Voltage 0V or 12VDC
Data Communications
Standard RS-232C
9pin D-Subminature female receptacle
Weight
40 pounds (18.14 kg) net, 54 pounds (24.5 kg) in shipping
carton
Shipping Carton Dimensions
Width is 32 inches (81.28cm)
Depth is 28 inches (71.12cm)
Height is 13 inches (33.02cm)
30
Page 31

Packing Instructions
Protective
Lens Cover
Shipping
Carton
Top
Shipping
Carton
Bottom
Foam
Pad
Top
Foam
Pad
Bottom
Packing Instructions
In the event it is necessary to repack the equipment for
shipment, the equipment must be packed exactly as shown
on this page, with the protective cover installed on the
projector lens. Failure to do this will result in shipping
damage.
Use the original shipping carton and interior parts only
if they are all in good serviceable condition. If a shipping
carton or any of the interior part(s) are needed, please call
or write the Customer Service Department of McIntosh
Laboratory. Refer to page 4. Please see the Part List for the
correct part numbers.
CAUTION: To prevent possible damage to the Projec
tor Lens Assembly, DO NOT at any time
attempt to LIFT, CARRY or RE-ORIENT the Projector using the Lens.
Quantity Part Number Description
1 034374 Shipping carton complete
-
31
Page 32

McIntosh Laboratory, Inc.
2 Chambers Street
Binghamton, NY 13903
The continuous improvement of its products is the
policy of McIntosh Laboratory Incorporated who
reserve the right to improve design without notice.
Printed in the U.S.A.
McIntosh Part No. 04101000
 Loading...