


Maytag SAV5910EWW, SAV5910AWW, SAV571EEWW, SAV5710AWW, SAV5701AWW Installation Instructions
...®
Installation
Instructions
Top Loading Washer
Keep instructions for future reference.
Be sure manual stays with washer.
Instructions d’installation. . . . . . . . . . . . . . . . . . . . . . . . Page 7
Instructions de Instalación . . . . . . . . . . . . . . . . . . . . . Page 13
You'll Need a Few Things Before You Begin:
Tools
Screwdriver 


Pliers
Wrench
Level
Parts Supplied
2 water fill |
HOT |
|
|
hoses |
COLD |
|
|
2 screened |
|
hose filters |
|
2 flat
rubber washers
4 rubber leveling 
 foot pads
beaded tie-down strap 


CONNECT WATER 2FILL HOSES TO
WASHER
Tightly push one flat rubber washer into one end of each water fill hose and attach this end of hose to washer. HOT and COLD connections are identified by letters H and C stamped into washer cabinet and by HOT and COLD printed on water fill hoses.
In most cases, hoses should cross when attached to correct water temperature faucet.
Tighten hose connections by hand until snug, then another 1/4 turn with pliers. DO NOT cross-thread or over-tighten couplings.
H C
HOT |
COLD |
Push rubber washer |
into end of fill hose. |
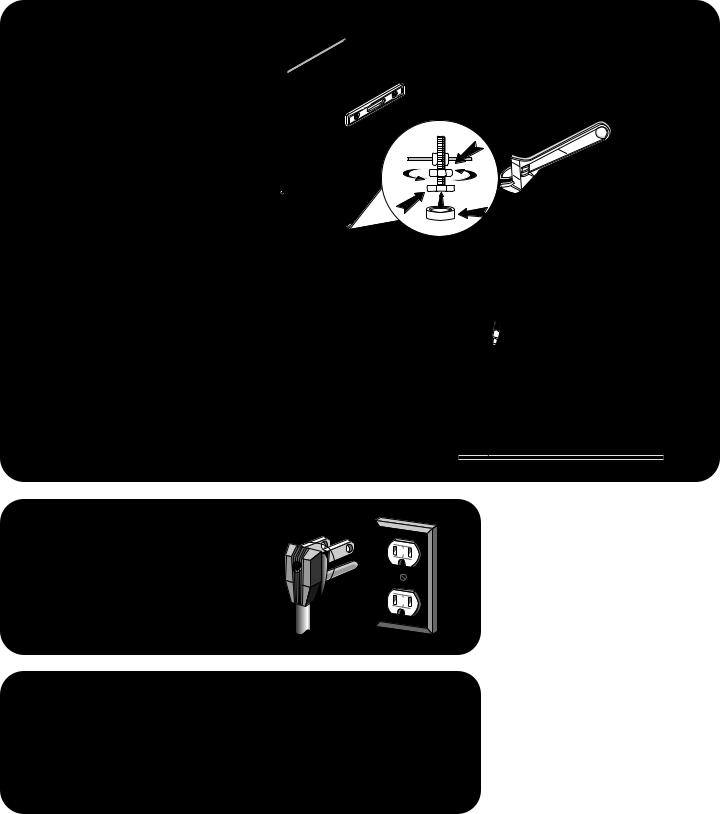
POSITION 5AND LEVEL
WASHER
Position washer in final location on clean, dry, firm, and level floor.
NOTE: To avoid damage to legs and base, do not slide washer across floor if leveling legs have been extended.
Loosen 7/8" locknuts and extend front leveling legs. Place rubber foot pads on all four leveling legs. Adjust front 2 leveling legs until machine is level side-to-side. Be sure machine does not rock. Tighten locknuts up to washer base, or washer will move out of position during operation.
Once front legs are adjusted, gently tilt washer forward on front legs and lower into place to correctly set rear self-leveling legs.
Check that washer is level front-to- back and side-to-side. WASHER
MUST NOT ROCK.
1. Level Front Legs
|
Lock |
|
nut |
|
Rubber |
Leveling |
foot pad |
|
|
foot |
|
2. Level rear legs
CONNECT
6POWER CORD TO ELECTRICITY
See Installation Requirements section. Plug washer into 3-prong grounded outlet only.
CLEAN TUB AND 7RUN THROUGH
ONE WASH CYCLE WITHOUT CLOTHES
Wipe tub with clean rag and soap diluted in warm water to remove any oil used in manufacturing. Use household spray cleaner if necessary.
Add water and detergent to washtub, and run before first use.
Questions?
See the User’s
Guide or call
Maytag Appliances
Sales Company
1-800-688-9900 USA
1-800-688-2002 Canada
1-800-688-2080 TTY USA Only

Installation Summary
Connect |
|
water |
|
fill |
|
hoses |
|
to |
|
faucets |
<![if ! IE]> <![endif]>HOT |
Set to 120° F
HOT
COLD 
<![endif]>COLD
Connect water
fill hoses to washer
|
Run through a |
|
cycle before |
| <![if ! IE]> <![endif]>HOT |
washing clothes |
| <![if ! IE]> <![endif]>COLD |
Connect power cord to electricity
S ecure
ecure  drain hose
Position washer. Level front
and rear legs.
Remove and store 

 shipping plug and brace

Important Safety Information
About Ground Wires
In the event of an electrical short circuit, a ground wire reduces the risk of electric shock by providing an escape wire for the electric current.
Standard accepted color coding for ground wires is green or green with a yellow stripe.
Grounding wires and wires colored like grounding wires are NOT to be used as current carrying conductors.
Save These
Instructions
Grounding Instructions
For safety, washer must be grounded. All washer power supply cords are equipped with 3-prong grounding plug. Plug on cord must be plugged into appropriate outlet that is properly installed and grounded in accordance with all local codes and ordinances. Do not modify plug on washer cord. If plug will not fit outlet, have qualified electrician install proper outlet.
 WARNING
To avoid risk of personal injury or death due to electrical shock:
•Observe all local codes and ordinances.
•Disconnect electrical power to unit before servicing.
•Ground appliance properly.
•Check with a qualified electrician if you are not sure this appliance is properly grounded.
•DO NOT ground to gas line.
•DO NOT ground to cold water pipe if pipe is interrupted by plastic, non-metallic gaskets, or other insulating (non-conducting) materials.
•DO NOT modify plug on power cord. If plug does not fit electrical outlet, have proper outlet installed by qualified electrician.
•DO NOT have a fuse in the neutral or ground circuit. A fuse in the neutral or ground circuit could result in an electrical shock.
•DO NOT use an extension cord with this appliance.
•DO NOT use an adapter plug with this appliance.
•DO NOT pinch power cord.
Washer Dimensions
53.5" (137,1 cm)
| <![if ! IE]> <![endif]>(9336.6"cm) |
<![if ! IE]> <![endif]>cm) |
| <![if ! IE]> <![endif]>43.6"(110,7 |
|
|
H C |
26.9" (68,3 cm) |
28" (71,1 cm) |
2" (5,1 cm)
Optional Kits
Kits are available at extra cost
through your Maytag dealer or
Maytag Customer Assistance at
1-800-688-9900 USA
1-800-688-2002 Canada
1-800-688-2080 TTY USA Only
Siphon Break Kit
For standpipe installation below 36" (91.44 cm), install part #562P3.
Longer Water Inlet Hoses
8’ (2.44 m) inlet hose, part #20617.
10’ (3.05 m) inlet hose, part #20618.
Drain Hose Extension
Order this kit in two parts: the coupler, part #406P3, and 1’ additional drain hose, part #20616.
Anchor Kit
To stop washer from moving on uneven surfaces, install part #155P3.
Adjustable leg Extension Kit
To level washer on extremely uneven surfaces, install part #566P3.
5
Installation Requirements
Before You Install…
Consider |
Description |
|
|
Location |
Use dimensions shown in manual to determine space needed for easy installation |
|
and servicing. |
|
Install washer on a solid floor. Never install washer on a platform or weak support |
|
structure. |
|
Wood floor constructions may sometimes need to be reinforced to minimize vibration |
|
from unbalanced loads. |
|
DO NOT install washer on carpeted floor. Carpet and soft tile surfaces also con- |
|
tribute to vibration and/or tendency for washer to move slightly during spin cycle. |
|
|
Electrical Requirements |
Washer requires 120 volt, 15 amp, 60 Hz power supply and 3-prong grounding |
|
plug. Power cord is approximately 69" long. Refer to serial plate for specific require- |
|
ments. Wiring diagram is located in control hood. |
|
|
Water Supply Faucets |
Water supply faucets must fit standard 3/4" (19.05 mm) female garden hose cou- |
|
plings. Do not use slip-on or clamp-on connections. |
|
NOTE: Water supply faucets should be easily accessible and turned off before |
|
extended periods of non-use. |
|
|
Water Pressure |
Static pressure measured at faucet must be 20–120 pounds per square inch (138 to |
|
827 kPa). Water pressure under 20 pounds per square inch (138kPa) results in |
|
extended washer fill time. |
|
|
Drain |
Drain receptacle must be able to handle hose with at least 1-1/4" (32 cm) outside |
|
diameter. End of drain hose must be 36" (91.44 cm) above floor, or water may run |
|
out of washer before end of cycle. |
|
|
6
 Loading...