


DISHWASHER
USER INSTRUCTIONS
THANK YOU for purchasing this high-quality product. If you should experience a problem not covered in TROUBLESHOOTING, please visit our website at www.maytag.com for additional information. If you still need assistance, call us at 1-800-688-9900. In Canada, visit our website at www.maytag.ca or call us at 1-800-807-6777.
You will need your model and serial number located near the door on the right-hand or left-hand side of the dishwasher interior.
Para obtener acceso a “Instrucciones para el usuario de la lavavajillas” en español, o para información adicional de su producto visite : www.maytag.com
Tenga listo su número de modelo completo. Puede encontrar su número de modelo y de serie en la etiqueta ubicada cerca de la puerta al lado derecho o izquierdo del interior de la lavavajillas.
Dishwasher Safety
Your safety and the safety of others are very important.
We have provided many important safety messages in this manual and on your appliance. Always read and obey all safety messages.
This is the safety alert symbol.
This symbol alerts you to potential hazards that can kill or hurt you and others.
All safety messages will follow the safety alert symbol and either the word “DANGER” or “WARNING.” These words mean:
 DANGER
 WARNING
You can be killed or seriously injured if you don't immediately follow instructions.
You can be killed or seriously injured if you don't follow instructions.
All safety messages will tell you what the potential hazard is, tell you how to reduce the chance of injury, and tell you what can happen if the instructions are not followed.
IMPORTANT SAFETY INSTRUCTIONS
WARNING: When using the dishwasher, follow basic precautions, including the following:
■Read all instructions before using the dishwasher.
■Use the dishwasher only for its intended function.
■Use only detergents or rinse agents recommended for use in a dishwasher, and keep them out of the reach of children.
■When loading items to be washed:
1)Locate sharp items so that they are not likely to damage the door seal; and
2)Load sharp knives with the handles up to reduce the risk of cut-type injuries.
■Do not wash plastic items unless they are marked “dishwasher safe” or the equivalent. For plastic items not so marked, check the manufacturer's recommendations.
■Do not touch the heating element during or immediately after use.
■Do not operate the dishwasher unless all enclosure panels are properly in place.
■Do not tamper with controls.
■Do not abuse, sit on, or stand on the door, lid, or dish racks of the dishwasher.
■To reduce the risk of injury, do not allow children to play in or on the dishwasher.
■Under certain conditions, hydrogen gas may be produced in a hot water system that has not been used for two weeks or more. HYDROGEN GAS IS EXPLOSIVE. If the hot water system has not been used for such a period, before using the dishwasher turn on all hot water faucets and let the water flow from each for several minutes. This will release any accumulated hydrogen gas. As the gas is flammable, do not smoke or use an open flame during this time.
■Remove the door or lid to the washing compartment when removing an old dishwasher from service or discarding it.
SAVE THESE INSTRUCTIONS
W10275148A

GROUNDING INSTRUCTIONS
■For a grounded, cord-connected dishwasher:
The dishwasher must be grounded. In the event of a malfunction or breakdown, grounding will reduce the risk of electric shock by providing a path of least resistance for electric current. The dishwasher is equipped with a cord having an equipment-grounding conductor and a grounding plug. The plug must be plugged into an appropriate outlet that is installed and grounded in accordance with all local codes and ordinances.
WARNING: Improper connection of the equipmentgrounding conductor can result in a risk of electric shock.
Check with a qualified electrician or service representative if you are in doubt whether the dishwasher is properly grounded. Do not modify the plug provided with the dishwasher; if it will not fit the outlet, have a proper outlet installed by a qualified electrician.
■For a permanently connected dishwasher:
The dishwasher must be connected to a grounded metal, permanent wiring system, or an equipment-grounding conductor must be run with the circuit conductors and connected to the equipment-grounding terminal or lead on the dishwasher.
SAVE THESE INSTRUCTIONS
 WARNING
Tip Over Hazard
Do not use dishwasher until completely installed.
Do not push down on open door.
Doing so can result in serious injury or cuts.
|
Quick Steps |
|
Prepare and load |
3 |
Select a cycle and option (vary by model). |
1 dishwasher. |
|
|
Add detergent |
4 |
Start dishwasher. |
2 for cleaning and |
|
rinse aid for drying.
Dishwasher Use
STEP 1
Prepare and Load the Dishwasher
IMPORTANT: Remove leftover food, bones, toothpicks and other hard items from the dishes. Remove labels from containers before washing.
Upper rack |
Lower rack |
■Make sure nothing keeps spray arm from spinning freely. It is important for the water spray to reach all soiled surfaces.
■Make sure that when the dishwasher door is closed no items are blocking the detergent dispenser.
■Items should be loaded with soiled surfaces facing down and inward to the spray as shown. This will improve cleaning and drying results.
■Avoid overlapping items like bowls or plates that may trap food.
■Place plastics, small plates and glasses in the upper rack. Wash only plastic items marked “dishwasher safe.”
■To avoid thumping/clattering noises during operation, load dishes so they do not touch one another. Make sure lightweight load items are secured in the racks.
2
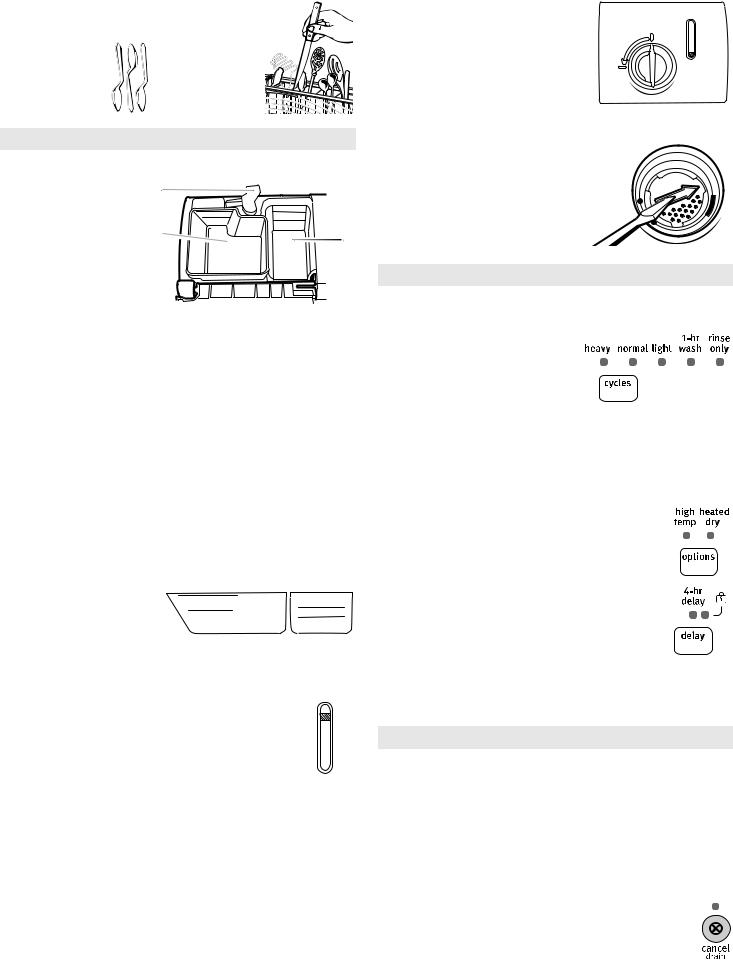
■When loading silverware, always place sharp
items pointing down and avoid “nesting” as shown.
STEP 2
Add Detergent |
|
|
||
NOTE: If you do not plan |
A |
|
||
to run a wash cycle soon, |
|
|||
|
|
|||
run a rinse cycle. Do not |
Hard Water |
Hard Water |
||
Soft Water |
||||
use detergent. |
B |
Soft Water |
||
C |
||||
|
|
|||
■ |
Use automatic |
|
||
MAIN WASH |
PRE- |
|||
|
dishwasher detergent |
WASH |
||
|
|
|
||
|
only. Add powder, |
|
|
|
|
liquid or tablet |
|
|
|
|
detergent just before |
|
|
|
|
starting a cycle. |
A. Cover latch |
|
|
|
Fresh automatic |
|
||
■ |
B. Main Wash section |
|||
|
dishwasher detergent |
C. Pre-Wash section |
||
|
results in better |
|
|
|
cleaning. Store tightly closed detergent container in a cool, dry place.
■The amount of detergent to use depends on:
How much soil remains on the items - Heavily soiled loads require more detergent.
The hardness of the water - If you use too little in hard water, dishes won't be clean. If you use too much in soft water, glassware will etch.
Soft to Medium Water (0-6 grains per U.S. gallon) [typical water softener water and some city water]
Medium to Hard Water (7-12 grains per U.S. gallon) [well water and some city water]
■Depending on your water hardness, fill the Main Wash section of the dispenser as shown. Fill the Pre-Wash section to the level shown, if needed.
NOTE: Fill amounts shown |
Hard Water |
|
|
are for standard powdered |
|
||
Soft Water |
Hard Water |
||
detergent. Follow |
Soft Water |
||
|
|||
instructions on the package |
Main Wash |
Pre-Wash |
|
when using other dishwasher |
|||
detergent. |
|
|
Add Rinse Aid
Your dishwasher is designed to use rinse aid for good
drying performance. Without rinse aid your dishes and Full dishwasher interior will have excessive moisture. The
heat dry option will not perform as well without rinse aid.
■Rinse aid keeps water from forming droplets that can
dry as spots or streaks. It also improves drying by |
Add |
allowing water to drain off of the dishes after the final |
|
rinse. |
|
■Rinse aid helps to reduce excess moisture on the dish racks and interior of your dishwasher.
■Check the rinse aid indicator. Add rinse aid when indicator drops to “Add” level.
■To add rinse aid, turn the dispenser cap counterclockwise and lift off. Pour rinse aid into the opening until the indicator window looks full. Replace the dispenser cap and turn clockwise. Make sure cap is fully locked.
NOTE: For most water conditions, the factory setting of 2 will give good results. If you have hard water or notice rings or spots, try a higher setting. Turn the arrow adjuster inside the dispenser by either using your fingers or inserting a flat-blade screwdriver into the center of the arrow and turning.
USE RINSE AID FOR |
Full |
|
BETTER DRYING |
||
|
||
Lock |
|
|
Open |
Add |
¹⁄ turn to lock
|
- |
- |
6 |
5 |
4 |
|
|
|
- |
|
|
|
|
|
|
|
fill |
|
|
|
|
|
|
max |
|
|
|
|
3 |
||
|
|
|
|
|
|
2 |
|
|
|
|
|
|
|
|
1 |
|
|
|
|
|
|
- |
- |
|
|
|
|
|
|
|
|
|
|
|
|
- |
- |
|
|
|
|
|
|
|
|
|
|
STEP 3
Select a Cycle (cycles vary by model)
Press the Cycles button until the light below the desired cycle is on.
NOTE: Heavier cycles and options affect cycle length.
Heavy – Use for heavy food soil. Normal – Use for normal food soil.
The energy usage label is based on this cycle.
Light – Use for prerinsed or lightly soiled loads.
1-hr Wash – Use for lightly soiled items. For fast results, 1-Hr Wash will clean the dishes using slightly more water and energy. Rinse Only – (no options apply to this cycle) Do not use detergent. A rinse keeps food from drying on your dishes and reduces odor buildup in your dishwasher until you are ready to wash a full load.
Select Options (options vary by model)
Repeatedly press the button until the desired combination of options is selected.
■ A high temperature option boosts the water temperature high enough to enhance cleaning.
■ A delayed start option offers the choice to start the dishwasher automatically at a later time.
■A heated dry option should be used for best
drying of dishes.
■A no heat dry option can be used to save energy.
■A locked option can be used to avoid unintended use of your dishwasher. Press and hold Delay for 3 seconds. Lock On glows. If you press any pad while your dishwasher is locked, the light flashes 3 times.
STEP 4
Start, Resume or Cancel a Cycle
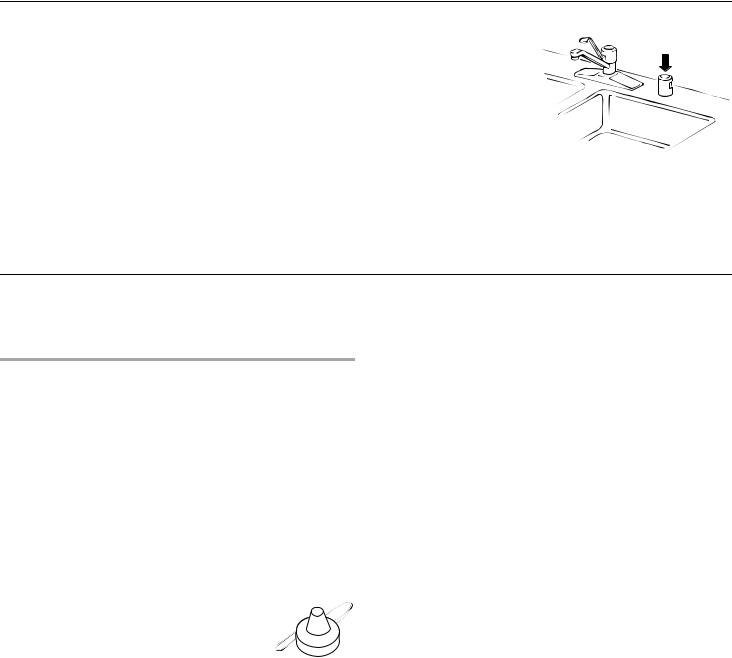
■Run hot water at the sink nearest your dishwasher until the water is hot. Turn off water.
■Push door firmly closed. The door latches automatically. Press Start/Resume.
■You can add an item anytime before the main wash starts. Lift up the door latch to stop the cycle. Open the door slowly and add the item. Close the door firmly until it latches. The dishwasher resumes the cycle.
■ You may cancel a cycle anytime by pressing Cancel/ Drain.
3
Dishwasher Care
Cleaning the Dishwasher
Clean the exterior of the dishwasher with a soft, damp cloth and mild detergent. If your dishwasher has a stainless steel exterior, a stainless steel cleaner is recommended.
NOTE: Do not clean the dishwasher interior until it has cooled.
Clean the interior of the dishwasher, with a paste of powdered dishwasher detergent and water or use liquid dishwasher detergent on a damp sponge.
A white vinegar rinse may remove white spots and film. Vinegar is an acid, and using it too often could damage your dishwasher.
Put 2 cups (500 mL) white vinegar in a glass or dishwasher-safe measuring cup on the bottom rack. Run the dishwasher through a complete washing cycle using an air-dry or an energy-saving dry option. Do not use detergent. Vinegar will mix with the wash water.
If you have a drain air gap, check and clean it if the dishwasher isn't draining well.
Storing the Dishwasher
If you will not be using the dishwasher during the summer, turn off the water and power supply to the dishwasher. In the winter, if the dishwasher could be exposed to near freezing temperatures or is left in a seasonal dwelling such as a second home or vacation home, avoid water damage by having your dishwasher winterized by authorized service personnel.
Troubleshooting
First try the solutions suggested here or visit our website and reference FAQs (Frequently Asked Questions) to possibly avoid the cost of a service call.
In U.S.A., www.maytag.com In Canada, www.maytag.ca
Dishwasher is not operating properly
■Dishwasher does not run or stops during a cycle
Is the door closed tightly and latched? Is the right cycle selected?
Is there power to the dishwasher? Has a household fuse blown, or has a circuit breaker tripped? Replace the fuse or reset the circuit breaker. If the problem continues, call an electrician.
Has the motor stopped due to an overload? The motor automatically resets itself within a few minutes. If it does not restart, call for service.
Is the water shutoff valve (if installed) turned on?
It is normal for certain cycles to repeatedly pause for several seconds during the main wash.
■The Clean light is flashing
The dishwasher has malfunctioned. Call for service.
■ Dishwasher will not fill
Is the overfill protection float able to move up and down freely? Press down to release.
■Water remains in the dishwasher
Is the cycle complete?
■Detergent remains in the covered section of the dispenser
Is the cycle complete?
Is the detergent lump-free? Replace detergent if necessary.
■White residue on the front of the access panel
Was too much detergent used?
Is the brand of detergent making excess foam? Try a different brand to reduce foaming and eliminate buildup.
■Odor in the dishwasher
Are dishes washed only every 2 or 3 days? Run a rinse cycle once or twice a day until you have a full load.
Does the dishwasher have a new plastic smell? Run a vinegar rinse as described in “Dishwasher Care.”
■Condensation on the kitchen counter (built-in models)
Is the dishwasher aligned with the countertop? Moisture from the vent in the dishwasher console can form on the counter. Refer to the Installation Instructions for more information.
■Dishwasher seems to run too long
The dishwasher can run up to 3¹⁄ hours depending on soil level, water temperature, cycles and options.
Is the water supplied to the dishwasher hot enough? The dishwasher runs longer while heating water.
Is the dishwasher cycle time within the cycle times? See cycle sections wash times. A delay automatically occurs in some wash and rinse cycles until the water reaches the proper temperature.
4
 Loading...