


Use & Care Guide
Guide d’utilisation et d’entretien
ELECTRONIC DRYER
SÉCHEUSE ÉLECTRONIQUE
Para obtener acceso al Manual de uso y
cuidado en español, o para obtener información adicional acerca de su producto, visite: www.maytag.com.
If you have any problems or questions, visit us at www.maytag.com
Pour tout problème ou toute question, consulter www.maytag.ca
W10904263A W10904264A – SP

TABLE OF CONTENTS |
|
|
DRYER SAFETY........................................................................................ |
|
2 |
CHECK YOUR VENT SYSTEM FOR GOOD AIR FLOW |
.............4 |
|
CONTROL PANEL AND FEATURES................................................. |
|
5 |
CYCLE GUIDE.......................................................................................... |
|
6 |
USING YOUR DRYER............................................................................ |
|
8 |
DRYER CARE......................................................................................... |
|
10 |
TROUBLESHOOTING........................................................................ |
|
12 |
WARRANTY............................................................................................ |
|
15 |
ASSISTANCE OR SERVICE............................................. |
Back Cover |
|
DRYER SAFETY
TABLE DE MATIÈRES |
|
|
SÉCURITÉ DE LA SÉCHEUSE......................................................... |
|
16 |
VÉRIFICATION D’UNE CIRCULATION D’AIR ADÉQUATE |
|
|
POUR LE SYSTÈME D’ÉVACUATION............................................. |
|
18 |
TABLEAU DE COMMANDE ET CARACTÉRISTIQUES............. |
19 |
|
GUIDE DE PROGRAMMES.............................................................. |
|
20 |
UTILISATION DE LA SÉCHEUSE.................................................... |
|
22 |
ENTRETIEN DE LA SÉCHEUSE...................................................... |
|
24 |
DÉPANNAGE.......................................................................................... |
|
26 |
GARANTIE............................................................................................... |
|
30 |
ASSISTANCE OU SERVICE.................................. |
Couverture arrière |
|
IMPORTANT: When discarding or storing your old clothes dryer, remove the door.
2

3
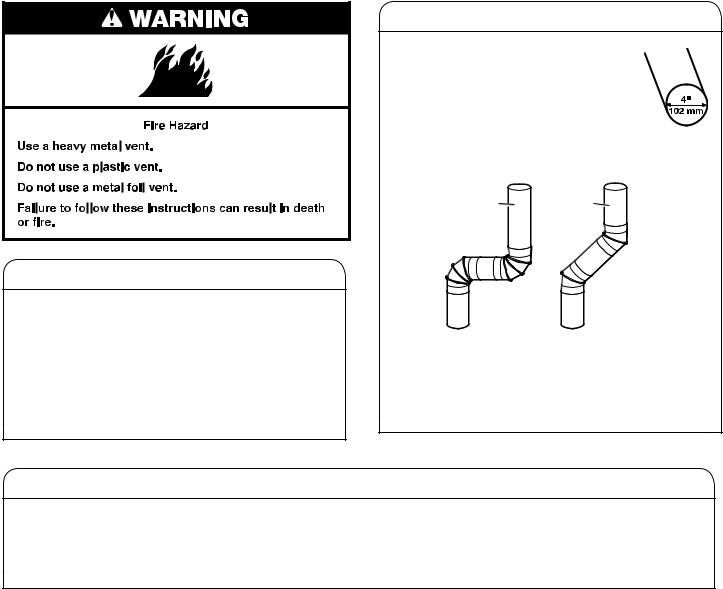
CHECK YOUR VENT SYSTEM FOR GOOD AIR FLOW
Good air flow
Along with heat, dryers require good air flow to efficiently dry laundry. Proper venting will reduce your drying times and improve your energy savings. See Installation Instructions.
The venting system attached to the dryer plays a big role
in good air flow. Blocked or crushed vents as well as improper venting installation will reduce air flow and dryer performance.
Service calls caused by improper venting are not covered by the warranty and will be paid by the customer, regardless of who installed the dryer. To clean or repair venting, contact a venting specialist.
Maintain good air flow by:
nCleaning your lint screen before each load.
nReplace plastic or foil vent material with 4" (102 mm) diameter heavy, rigid vent material.
nUse the shortest length of vent possible.
nUse no more than four 90° elbows in a vent system; each bend and curve reduces air flow.
Good |
Better |
nRemove lint and debris from the exhaust hood.
nRemove lint from the entire length of the vent system at least every 2 years. When cleaning is complete, be sure to follow the Installation Instructions supplied with your dryer for final product check.
nClear away items from the front of the dryer.
Use Sensor cycles for better fabric care and energy savings
Use the Sensor Cycles to provide the most energy savings and enhanced fabric care from the dryer. During Sensor Cycles, drying air temperature and moisture level are sensed in the load. This sensing occurs throughout the drying cycle and the dryer shuts off when the load reaches the selected dryness. Use the NORMAL dryness level to provide optimal energy savings.
With Timed Dry, the dryer runs the amount of time set and sometimes results in shrinkage, wrinkling, and static due to over-drying. Use Timed Dry for the occasional damp load that needs a little more drying time or when using the drying rack.
4
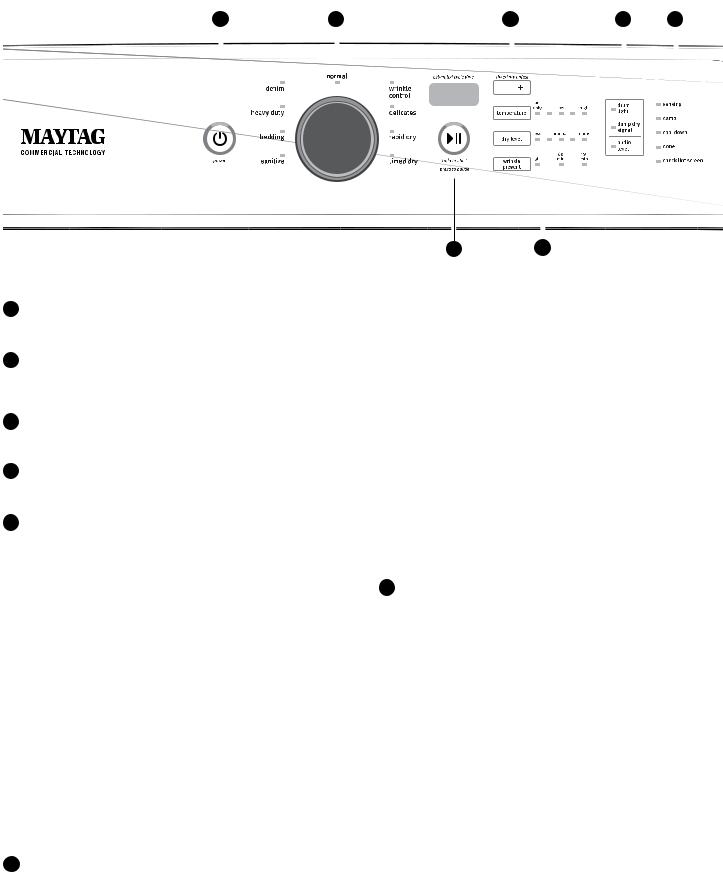
CONTROL PANEL AND FEATURES
Not all features and cycles are available on all models.
1 |
2 |
|
|
4 |
|
6 |
7 |
||||||||
|
|
|
|
|
|
|
|
|
|
|
|
|
|
|
|
|
|
|
|
|
|
|
|
|
|
|
|
|
|
|
|
|
|
|
|
|
|
|
|
|
|
|
|
|
|
|
|
|
|
|
|
|
|
|
|
|
|
|
|
|
|
|
|
|
|
|
|
|
|
|
|
|
|
|
|
|
|
|
|
|
|
|
|
|
|
|
|
|
|
|
|
|
|
|
|
|
|
|
|
|
|
|
|
|
|
|
|
|
|
|
|
|
|
|
|
|
|
|
|
|
|
|
|
|
|
|
|
|
|
|
|
|
|
|
|
|
|
|
|
|
|
|
|
|
|
|
|
|
|
|
|
|
|
|
|
|
|
|
|
3 |
5 |
NOTE: The control panel features a sensitive surface that responds to a light touch of your finger. To ensure your selections are registered, touch the control panel with your finger tip, not your fingernail. When selecting a setting or option, simply touch its name.
1POWER
Touch to turn the dryer on and off. Touch to stop/cancel a cycle at any time.
2CYCLE CONTROL KNOB
Use your dryer’s cycle control knob to select available cycles on your dryer. Turn the knob to select a cycle for your laundry load. See “Cycle Guide” for detailed descriptions of cycles.
3START/PAUSE
Touch and hold to start a cycle, or touch once while a cycle is in process to pause it.
4TIMED DRY ADJUST
Use “+” and “–” with Timed Cycles to increase or decrease the length of a Timed Dry or Rapid Dry cycle.
5LED DISPLAY AND SETTINGS
When you select a cycle, its default settings will light up and the Estimated Time Remaining (for Sensor Cycles) or actual time remaining (for Timed Cycles) will be displayed.
Touch the setting names next to the display to adjust settings. See “Cycle Guide” for available settings on each cycle. Not all settings are available with all cycles.
Temperature
When using Timed Cycles, you may select a dry temperature based on the type of load you are drying. Use the warmest setting safe for the garments in the load. Follow garment label instructions.
NOTE: Sensor Cycles allow temperature adjustment. At most, 3 of available temperatures (not including Air Only) are allowed.
Dry Level
You may adjust the Dry Level on Sensor Cycles (except for the Sanitize cycle), if desired.
NOTE: Dryness level is for use with Sensor Cycles only.
Wrinkle Prevent
If you will be unable to remove a load immediately, touch Wrinkle Prevent to add either 60 or 150 minutes of periodic tumbling to help reduce wrinkling.
6OPTIONS
Use to select available options for your dryer. Not all cycles and options are available on all models.
Drum Light
Select DRUM LIGHT to turn on the light inside the dryer drum. When touched during a cycle, or when the dryer is not running, the Drum Light turns on and will remain on until DRUM LIGHT is touched again, the door is opened and closed, a cycle is started, or the door is left open for 5 minutes.
Touch DRUM LIGHT at any time to turn the drum light on or off.
Damp Dry Signal
Touch to set the Damp Dry Signal to ON or OFF. When selected, a series of beeps will sound when the load is damp but not completely dry. This will allow you to remove clothes that do not need to dry completely. This signal can also be used as a signal to rearrange the load when drying bulky items that do not tumble well, such as comforters. This option is not available on Sanitize or the Timed cycles.
Audio Level
Touch AUDIO LEVEL to change end beep and button sounds simultaneously to Low, High, or Off.
7CYCLE STATUS LIGHTS
The indicator bar on the right side of the control will let you know what stage of the drying cycle is in process.
Sensing
The Sensing indicator will light during Sensor Cycles to indicate that the moisture sensor on the dryer is operating. This indicator will not light during Timed Cycles or options such as Wrinkle Prevent.
Damp
This indicator shows that the load is partially dried and items that you may wish to hang up or iron while still damp may be removed.
Cool Down
The dryer has finished drying with heat and is now tumbling the load without heat to cool it down and reduce wrinkling.
Done
This will indicate that the selected cycle has ended and the load may be removed from the dryer. If Wrinkle Prevent has been selected, the dryer may continue to tumble the load, even if the Done indicator is lit.
Check Lint Screen
The Check Lint Screen indicator light will flash as a reminder to clean the lint screen. It will flash until the door is opened or a cycle is started. It will turn off when the dryer is turned off.
5
 Loading...