


M7dh45b2a
For Future Reference
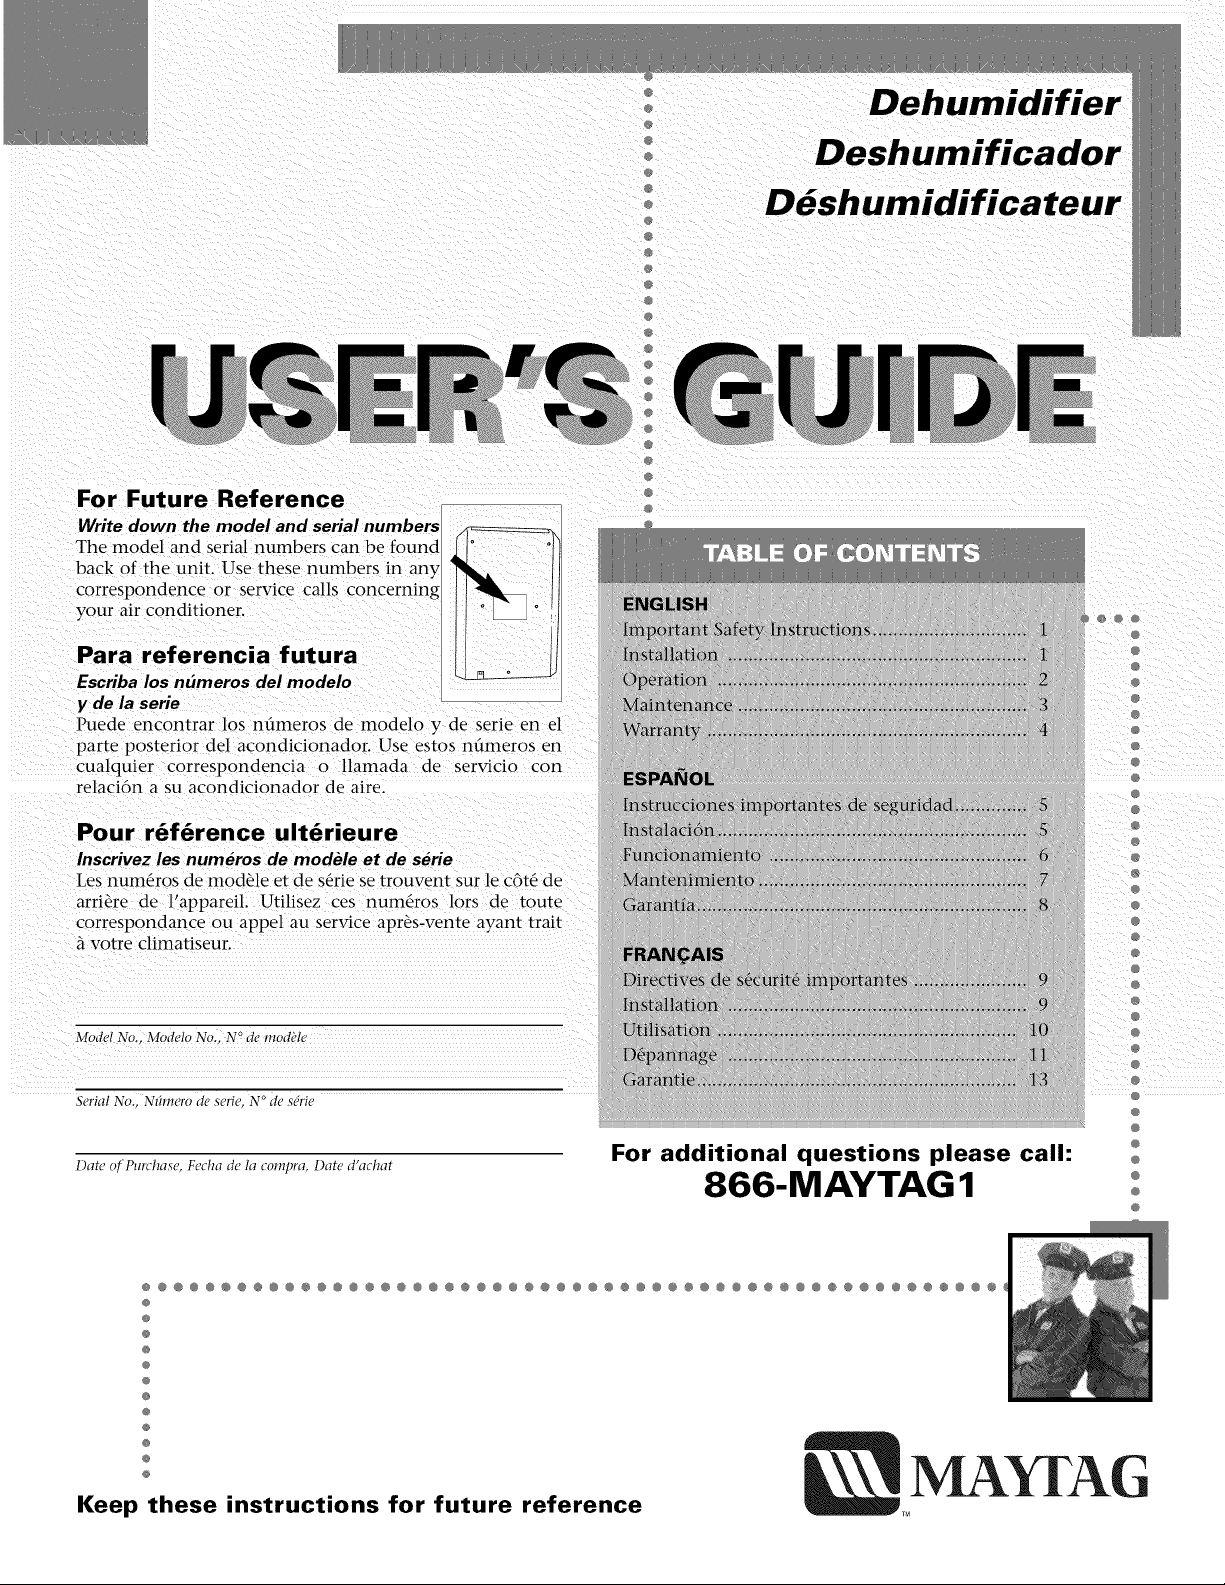
Write down the model and serial numbers
The model and serial numbers can be found
back of the unit. Use these numbers in any
correspondence or service calls concerning
your air conditioner.
Para referencia futura
Escriba los numeros del modelo
y de la serie
Puede encontrar los n_meros de modelo y de serie en el
parte posterior del acondicionador. Use estos numeros en
cualquier correspondencia o llamada de servicio con
relaci6n a su acondicionador de aim.
Dehumidifier
Deshumificador
Ddshumidificateur
Pour r6f6rence ult6rieure
Inscrivez les numeros de modele et de serie
Les numeros de module et de s_rie se trouvent sur le c6t_ de
arri_re de l'appareil. Utilisez ces num_ros lors de toute
correspondance ou appel au service apres-vente ayant trait
votre climatiseur.
Model No.. Modelo No. N ° de modH_
Serial No., NAmero de seri_, N ° de s(rie
Date of Purchase, Fecha de la compra, Date d'achat
@
@@@@@@@@@@@@@@@@@@@@@@@@@@@@@@@@@@@@@@@@@@@@@@@@@@@@@
@
@
@
@
@
@
@
@
@
@
@
@
Keep these instructions for future reference
For additional questions please call:
866-MAYTAG 1
MAYIAG
@
@
@
@
@
@
@
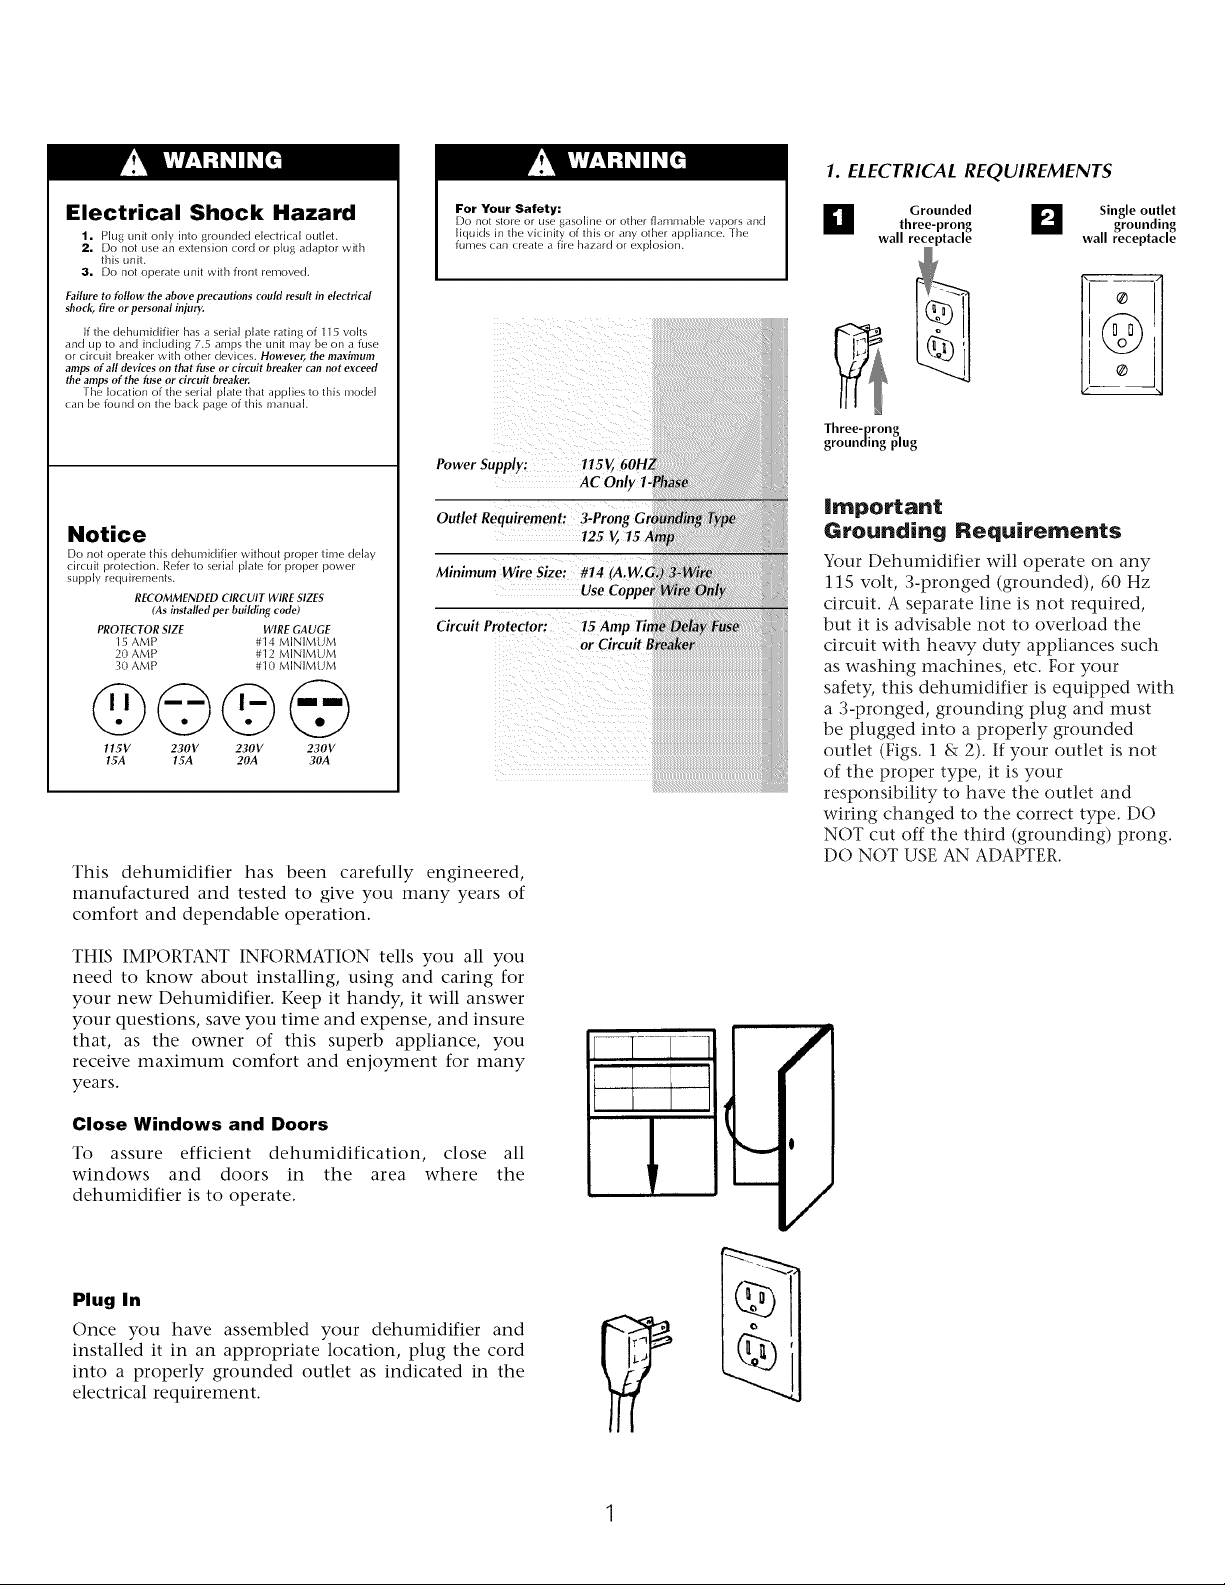
1. ELECTRICAL REQUIREMENTS
Electrical Shock Hazard
1. Plug unit only into grounded de_trical outlet.
2. Do not use an extension cord or pkb{ adaptor with
this uniL
3. Do not operate unit with front renloved.
Failure to follow the above precautions could result in electrical
shock, fire or personal injury.
If the dehumidifier has a serial plate rating of 115 volts
and up to and including 7.5 anlps the unit illay be on a fuse
or drcuit breaker with other devices. However, the maximum
amps of all devices on that fuse orcircuit breaker can not exceed
the amps of the fuse or circuit breaker.
The Io_ation of the serial plate that applies to this model
call be found on the back page of this nlanua[.
For Your Safety:
Do not store or use gasoline or other flanlmable vapors and
liquids in the vicinity of this or any other appliance. The
fumes call create a fire hazard or explosion.
Power Supply: 115
Notice
Do not operate this dehumidifier without proper time delay
circuit protection. Refer to serial plate for proper power
supply requirenlents.
RECOMMENDED CIRCUIT WIRESIZES
(Asinstalledper building code)
PROTECTORSIZE WIRE GAUGE
15 AMP #14 MINIMUM
20 AMP #12 MINIMUM
_0 AMP #10 MINIMUM
Minimum Wire Size: #14 (A.
Circuit Protector
@©©@
l l5V 230V 230V 230V
15A 15A 20A 30A
This dehumidifier has been carefully engineered,
manufactured and tested to give you many years of
comfort and dependable operation.
AC Only I-,
125
or Circuit I
Grounded
three-prong
wall receptacle wall receptacle
Three-prong
grounding plug
ir_1
Single outlet
grounding
|mportant
Grou.di.g Requireme.ts
Your Dehumidifier will operate on any
115 volt, 3-pronged (grounded), 60 Hz
circuit. A separate line is not required,
but it is advisable not to overload the
circuit with heavy duty appliances such
as washing machines, etc. For your
safety, this dehumidifier is equipped with
a 3-pronged, grounding plug and must
be plugged into a properly grounded
outlet (Figs. i & 2). If your outlet is not
of the proper type, it is your
responsibility to have the outlet and
wiring changed to the correct type. DO
NOT cut off the third (grounding) prong.
DO NOT USE AN ADAI_ER.
THIS IMPORTANT INFORMATION tells you all you
need to know about installing, using and caring for
your new Dehumidifier. Keep it handy, it will answer
your questions, save you time and expense, and insure
that, as the owner of this superb appliance, you
receive maximum comfort and enjoyment for many
years.
Close Windows and Doors
To assure efficient dehumidification, close all
windows and doors in the area where the
dehumidifier is to operate,
Plug In
Once you have assembled your dehumidifier and
installed it in an appropriate location, plug the cord
into a properly grounded outlet as indicated in the
electrical requirement.
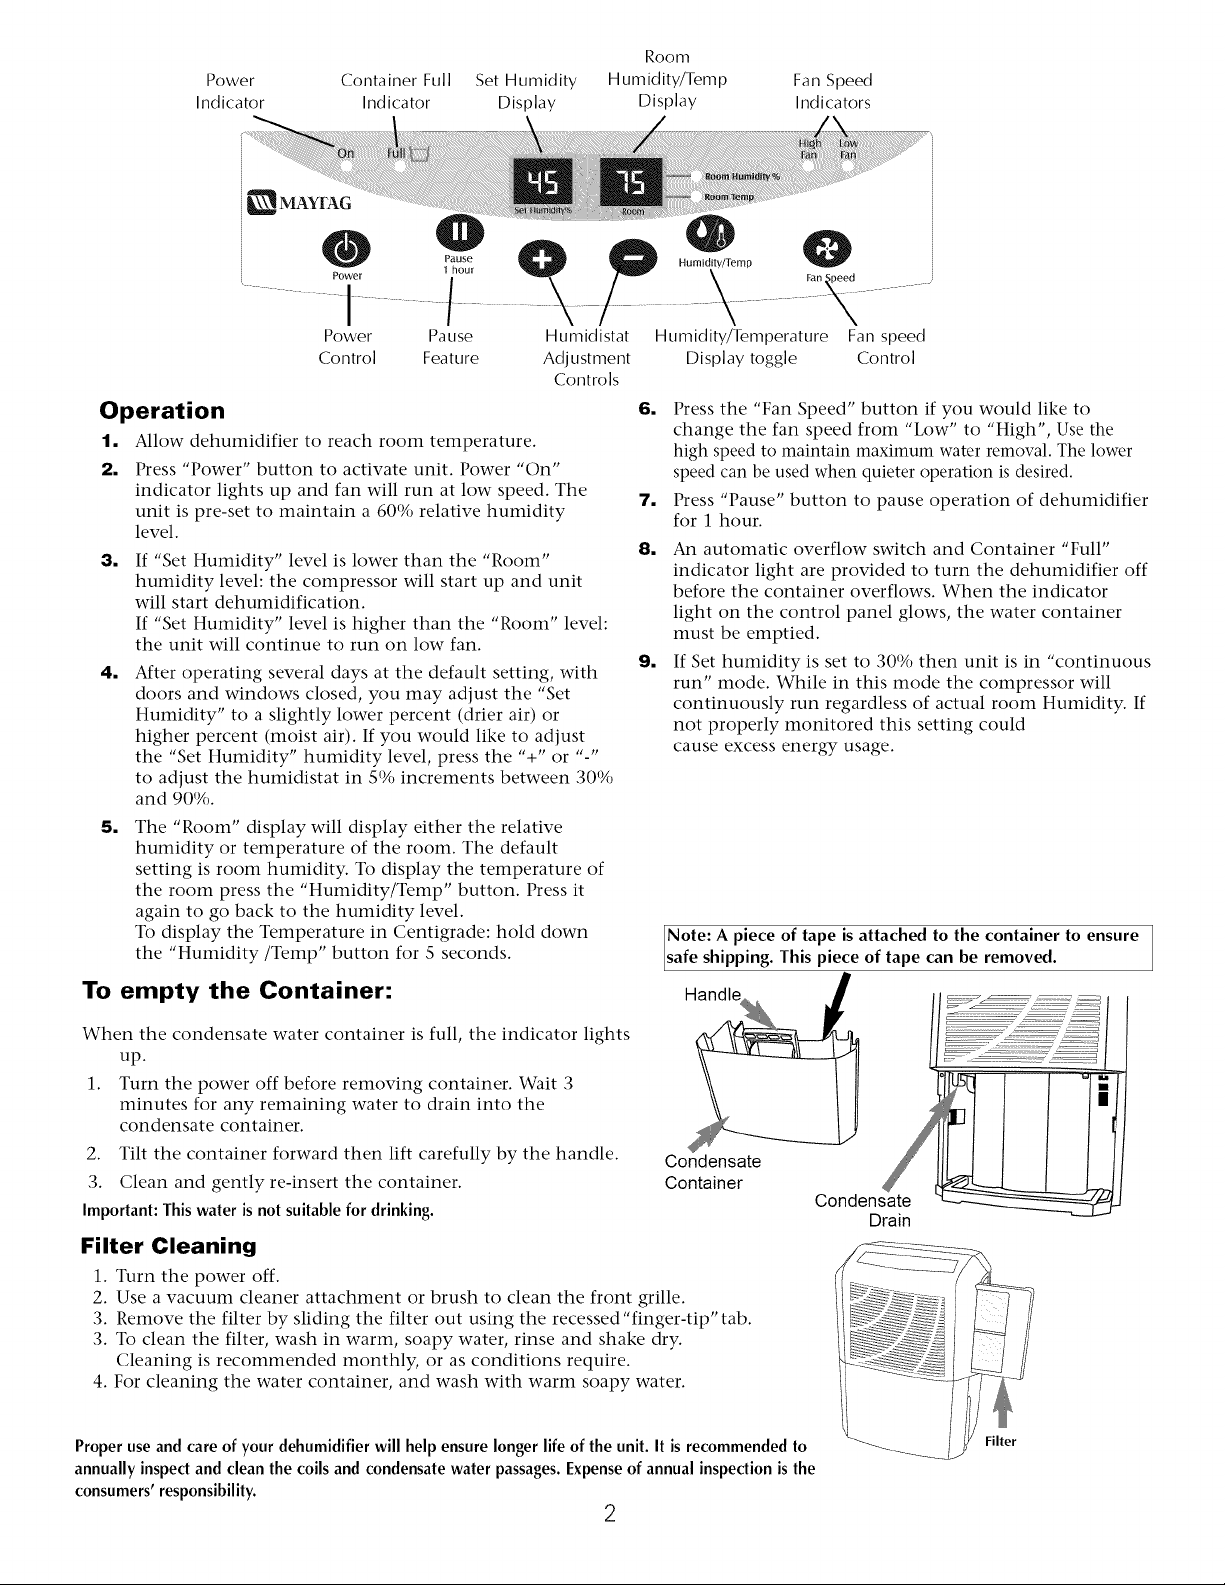
Power
Indicator
_MAY[A G
Container Full Set Humidity
Indicator Display
Room
Humidity/Temp Fan Speed
Display Indicators
Pause
Power
Power Pause Humidistat
Control Feature Adjustment
I houl
Operation
1. Allow dehumidifier to reach room temperature.
2. Press "Power" button to activate unit. Power "On"
indicator lights up and fan will run at low speed. The
unit is pre-set to maintain a 60% relative humidity
level.
3.
If "Set Humidity" level is lower than the "Room"
humidity level: the compressor will start up and unit
will start dehumidification.
If "Set Humidity" level is higher than the "Room" level:
the unit will continue to run on low fan.
4.
After operating several days at the default setting, with
doors and windows closed, you may adjust the "Set
Humidity" to a slightly lower percent (drier air) or
higher percent (moist air). If you would like to adjust
the "Set Humidity" humidity level, press the "+" or "-"
to adjust the humidistat in 5% increments between 30%
and 90%.
5.
The "Room" display will display either the relative
humidity or temperature of the room. The default
setting is room humidity. To display the temperature of
the room press the "Humidity/Temp" button. Press it
again to go back to the humidity level.
To display the Temperature in Centigrade: hold down
the "Humidity/Temp" button for S seconds.
To empty the Container:
Controls
Humidity/Temp
Fan _ ...................
Humidity/Temperature Fan speed
Display toggle Control
6.
Press the "Fan Speed" button if you would like to
change the fan speed from "Low" to "High", Use the
high speed to maintain maximum water removal. The lower
speed can be used when quieter operation is desired.
71
Press "Pause" button to pause operation of dehumidifier
for 1 hour.
8,9.An automatic overflow switch and Container "Full"
indicator light are provided to turn the dehumidifier off
before the container overflows. When the indicator
light on the control panel glows, the water container
must be emptied.
If Set humidity is set to 30% then unit is in "continuous
run" mode. While in this mode the compressor will
continuously run regardless of actual room Humidity. If
not properly monitored this setting could
cause excess energy usage.
Note: A piece of tape is attached to the container to ensure
safe sh pp rig. Th s p ece of tape can be removed.
Handle
When the condensate water container is full, the indicator lights
up.
1. Turn the power off before removing container. Wait 3
minutes for any remaining water to drain into the
condensate container.
2. Tilt the container forward then lift carefully by the handle.
3. Clean and gently re-insert the container.
Condensate
Container
Important: This water is not suitable for drinking.
Filter Cleaning
1. Turn tile power off.
2. Use a vacuum cleaner attachment or brush to clean the front grille.
3. Remove the filter by sliding the filter out using the recessed "finger-tip" tab.
3. To clean the filter, wash in warm, soapy water, rinse and shake dry.
Cleaning is recommended monthly, or as conditions require.
4. For cleaning the water container, and wash with warm soapy water.
Properuseandcare of your dehumidifierwill helpensure longer life of the unit. It is recommended to
annuallyinspectandcleanthe coilsandcondensatewaterpassages.Expenseof annualinspectionisthe
consumers'responsibility.
2
Condensate
Drain
Filter

Permanant Drain Installation (optional):
The condesate water can be removed directly from the unit
to a drain through a garden hose with the included
adapter.
1. Turn the power off before beginning work.
2. Use a screwdriver to remove the knock-out at the back
of the unit. (Fig. 1)
3. Slide the garden hose adapter (supplied) over the
condensate drain through the knock-out hole. (Fig 2)
4. The garden hose should lead to a floor drain or other
appropriate drain source. The garden hose should have
no inclines or sharp bends.(Fig 2)
L
_O
Permanant
drain knock-out
Back of unit
n
o
o ¢
\ (Fig. 1)
Service (Read carefully before calling for service)
If the Dehumidifier Fails to Start
• Make sure the unit is plugged into an operating outlet.
• If the indicator light (most models) is on, empty the full
water container. The indicator light should now go OFF, and
the dehumidifier will begin to operate so be sure to quickly
reinsert the empty water container. If the dehumidifier does
not begin to operate make sure the float is attached to the
water container.
Unit Runs, But Very Little Water is
Collected
• The amount of water removed from the air depends on the
relative humidity of the air and the capacity of the
dehumidifier purchased. When the air feels damp (high
relative humidity), more moisture will be removed and the
container will fill up more rapidly. As the unit continues to
remove moisture and reduce the humidity in the area, less
water will be collected in the container.
• This unit is equipped with a defrost control, which will
automatically activate when needed. When in defrost mode
the compressor will cycle on and off and the unit will make
less water.
Side View
Condensate _ l l
Drain Hose Adapter Garden Hose
(Fig. 2)
To floor drain
I I
Save Electricity
• In general, dehumidification is not usually needed during
conditions of low room temperature (below 6S°F) or low
relative humidity. To save electricity and prevent, it is best to
turn the unit OFF during conditions of low room
temperature.
Sounds
It is reassuring to know that your dehumidifier is functioning
properly. These are some normal sounds which should not be
a cause for concern:
• Air rushing over air drying coils.
• Hissing or thumping - refrigerant is flowing throughout
the sealed system and may generate a "boiling" sound right
after the compressor stops.
• Compressor may "thump" as it cycles on and off.
• Water dripping from coils onto the drain plate.
• The humidistat control, compressor and fan "tick" as
they turn on and off. Metal makes a similar sound when
expanding or contracting.
• Room humidity is low (below 40%).
3
Service and Warrantyooooooooooooooooooooooooooooooooooo
Warranty
For Models Installed in North America -
If Service or Parts are Required
First, make the recommended checks. If it appears that service or
parts are still required, see your room dehumidifier warranty
"How to Obtain Warranty Service or Parts".
For Models Installed Outside North America
For dehumidifiers purchased for use outside North America, the
manufacturer does not extend any warranty either expressed or
implied. Consult your local dealer for any warranty terms
extended by the importer in your country.
Room dehumidifier Warranty
(Within the 48 contiguous United States, state of Hawaii,
the District of Columbia, Puerto Rico and Canada)
Full (FiveYear) Parts and Labor Warranty
During the five years after the date of original purchase, Fedders
North America will, through its authorized servicers and free of
charge to the owner or any subsequent user, repair or replace any
parts which are defective in material or workmanship due to
normal use when the unit is delivered by the owner to and
picked up from one of our authorized servicers. If requested, in-
home service, pick-up, redelivery and reinstallation will be
provided, but are the owner's responsibility.
Note: In the event of any required parts replacement within the
period of this warranty. Fedders North America replacement parts
shall be used and will be warranted only for the period remaining
on the original warranty.
Exceptions
The above warranty does not cover failure to function caused by
damage to the unit while in your possession (other than damage
caused by defect or malfunction), or by its improper installation,
or by unreasonable use of the unit, including without limitation,
failure to provide reasonable and necessary maintenance or to
follow the written Installation and Operating Instructions. If the
unit is put to commercial, business, rental, or other use or
application other than for consumer use, we make no warranties,
express or implied, including but not limited to, any implied
warranty of merchantability or fitness for particular use or
purpose.
THE REMEDIES PROVIDED FOR IN THE ABOVE EXPRESS
WARRANTY ARE THE SOLE AND EXCLUSIVE REMEDIES
THEREFOR, NO OTHER EXPRESS WARRANTIES ARE MADE.
ALL IMPLIED WARRANTIES, INCLUDING BUT NOT LIMITED
TO ANY IMPLIED WARRANTY OF MERCHANTABILITY OR
FITNESS FOR A PARTICULAR USE OR PURPOSE, ARE LIMITED
IN DURATION TO FIVE YEARS FROM THE DATE OF ORIGINAL
PURCHASE. IN NO EVENT SHALL FEDDERS NORTH AMERICA
BE LIABLE FOR INDIRECT, INCIDENTAL, OR
CONSEQUENTIAL DAMAGES, EVEN IF ADVISED IN ADVANCE
OF THE POSSIBILITY OF SUCH DAMAGES. NO WARRANTIES,
EXPRESS OR IMPLIED, ARE MADE TO ANY BUYER UPON
RESALE.
Some states do not allow limitations on how long an implied
warranty lasts or do not allow the exclusion or limitation of
incidental or consequential damages, so the above limitations
or exclusions may not apply to you. This warranty gives you
specific legal rights, and you may also have other rights which
may vary from state to state.
No warranties are made for units sold outside of the above
stated areas. Your distributor or final seller may provide a
warranty on units sold outside of these areas.
How to Obtain Warranty Service or Parts
Service for your dehumidifier will be provided by CareCo, a
division of the manufacturer with authorized independent
CareCo servicers nationwide.
Note: Before calling for service, carefully read the Installation
and Operating Instructions booklet. Then if you need service:
1. Call a CareCo authorized servicer and advise them of model
number, serial number, date of purchase and nature of
complaint. Service will be provided during normal working
hours. Contact your dealer for the name of an authorized
servicer if unknown to you.
2. If your dealer is unable to give you the name of a servicer or
if you need other assistance, call the following toll-free
number for the name of an authorized servicer or authorized
parts distributor:
1-866-MAYTAG 1
or you may write:
CareCo, Service Department
415 W. Wabash Ave., P.O. Box 200
Effingham, IL 62401
Proof of Purchase Date
It is the responsibility of the consumer to establish the original
purchase date for warranty purposes. We recommend that a bill
of sale, cancelled check, or some other appropriate payment
record be kept for that purpose.
4
 Loading...