

Page 1

Model PMD660 User Guide
Portable Solid State Recorder
Page 2
ENGLISH
WARNING
TO REDUCE THE RISK OF FIRE OR ELECTRIC SHOCK,
DO NOT EXPOSE THIS PRODUCT TO RAIN OR MOISTURE.
CAUTION:
USE OF CONTROLS OR ADJUSTMENTS OR PERFORMANCE
OF PROCEDURES OTHER THAN THOSE SPECIFIED HEREIN
MAY RESULT IN HAZARDOUS RADIATION EXPOSURE.
CAUTION
RISK OF ELECTRIC SHOCK
DO NOT OPEN
CAUTION: TO REDUCE THE RISK OF ELECTRIC SHOCK,
DO NOT REMOVE COVER (OR BACK).
NO USER-SERVICEABLE PARTS INSIDE.
REFER SERVICING TO QUALIFIED SERVICE PERSONNEL.
The lightning flash with arrowhead symbol within an
equilateral triangle is intended to alert the user to the
presence of uninsulated "dangerous voltage" within the
product's enclosure. It may be of sufficient magnitude to
constitute a risk of electric shock to persons.
The exclamation point within an equilateral triangle is
intended to alert the user to the presence of important
operating and maintenance (servicing) instructions in the
literature accompanying the product.
WARNINGS
Do not expose the equipment to rain or moisture.
Do not remove the cover from the equipment.
Do not insert anything into the equipment through the ventilation
holes.
Do not cover the ventilation with any items such as tablecloths,
newspapers, curtains, etc.
No naked flame sources, such as lighted candles, should be placed
on the equipment.
When disposing of used batteries, please comply with governmental
regulations or environmental public instruction's rules that apply in
your country or area.
When setting up the recorder ensure that:
• it will not be exposed to interference from external equipment.
• it will not be exposed to electrostatic discharges.
• it will not be exposed to direct sunlight.
• heavy objects are not placed on the recorder.
Copyright
Recording and playback of any material may require consent. For further
information refer to the following US ordinances:
• Copyright act of 1956
• Dramatic and Musical Performance Act 1958
• Performers Protection Acts 1963 and 1972
• any subsequent statutory enactments and orders
Page 3

IMPORTANT SAFETY
INSTRUCTIONS
READ BEFORE OPERATING EQUIPMENT
This product was designed and manufactured to meet strict quality and
safety standards. There are, however, some installation and operation
precautions which you should be particularly aware of.
1. Read Instructions – All the safety and operating instructions should
be read before the product is operated.
2. Retain Instructions – The safety and operating instructions should
be retained for future reference.
3. Heed Warnings – All warnings on the product and in the operating
instructions should be adhered to.
4. Follow Instructions – All operating and use instructions should be
followed.
5. Cleaning – Unplug this product from the wall outlet before cleaning.
Do not use liquid cleaners or aerosol cleaners. Use a damp cloth
for cleaning.
6. Attachments – Do not use attachments not recommended by the
product manufacturer as they may cause hazards.
7. Water and Moisture – Do not use this product near water-for
example, near a bath tub, wash bowl, kitchen sink, laundry tub,
swimming pool, or in a wet basement.
8. Accessories – Do not place this product on an unstable cart, stand,
tripod, bracket, or table. The product may fall, causing serious injury
to a person and damage to the product. Use only with a cart, stand,
tripod, bracket or table recommended by the manufacturer, or sold
with the product. Any mounting of the product should follow the
manufacturer’s instructions, and should use a mounting accessory
recommended by the manufacturer.
9. A product and cart combination should be moved with
care. Quick stops, excessive force, and uneven
surfaces may cause the product and cart combination
to overturn.
10. Ventilation – Slots and openings in the cabinet are provided for
ventilation, to ensure reliable operation of the product, and to
protect it from overheating. These openings must not be blocked or
covered. They should never be blocked by placing the product on a
bed, sofa, rug, or other similar surface. This product should not be
placed in a built-in installation such as a bookcase or rack unless
proper ventilation is provided, or the manufacturer’s instructions
have been adhered to.
11. Power Sources – This product should be operated only from the
type of power source indicated on the marking label. If you are not
sure of the type of power supply to your home, consult your product
dealer or local power company. For products intended to operate
from battery power or other sources, refer to the operating
instructions.
12. Power-Cord Protection – Power-supply cords should be routed so that
they are not likely to be walked on or pinched by items placed upon or
against them. Pay particular attention to cords at plugs, convenience
receptacles, and the point where they exit from the product.
13. Protective Attachment Plug – The product is equipped with an
attachment plug having overload protection. This is a safety feature.
See Instruction Manual for replacement or resetting of protective
device. If replacement of the plug is required, be sure the service
technician has used a replacement plug specified by the manufacturer
that has the same overload protection as the original plug.
14. Lightning – For added protection for this product during a lightning
storm, or when it is left unattended and unused for long periods of
time, unplug it from the wall outlet and disconnect the antenna or
cable system. This will prevent damage to the product due to
lightning and power-line surges.
15. Overloading – Do not overload wall outlets, extension cords, or
integral convenience receptacles as this can result in a risk of fire or
electric shock.
16. Object and Liquid Entry – Never push objects of any kind into this
product through openings. They may touch dangerous voltage
points or short-out parts that could result in a fire or electric shock.
Never spill liquid of any kind on the product.
ENGLISH
Page 4

17. Servicing – Do not attempt to service this product yourself as
ENGLISH
18. Damage Requiring Service – Unplug this product from the wall
a. When the power-supply cord or plug is damaged.
b. If liquid has been spilled, or objects have fallen into the product.
c. If the product has been exposed to rain or water.
d. If the product does not operate normally by following the operating
e. If the product has been dropped or damaged in any way.
f. When the product exhibits a distinct change in performance.
19. Replacement Parts – When replacement parts are required, be
20. Safety Check – Upon completion of any service or repairs to this
21. Wall or Ceiling Mounting – The product should be mounted to a wall
22. Heat – The product should be situated away from heat sources
opening or removing covers may expose you to dangerous voltage
or other hazards. Refer all servicing to qualified service personnel.
outlet and refer servicing to qualified service personnel under the
following conditions:
instructions. Adjust only those controls that are covered by the
operating instructions. Improper adjustment of other controls may
result in damage and often requires extensive work by a qualified
technician to restore the product to its normal operation.
sure the service technician uses replacement parts specified by the
manufacturer or that have the same characteristics as the original
part. Unauthorized substitutions may result in fire, electric shock, or
other hazards.
product, ask the service technician to perform safety checks to
determine that the product is in proper operating condition.
or ceiling only as recommended by the manufacturer.
such as radiators, heat registers, stoves, or other products
(including amplifiers) that produce heat.
NOTE TO CATV SYSTEM INSTALLER:
This reminder is provided to call the CATV (Cable-TV) system installer’s
attention to Section 820-40 of the NEC which provides guidelines for
proper grounding. In particular, it specifies that the cable ground shall be
connected to the grounding system of the building, as close to the point
of cable entry as practical.
NOTE:
This equipment has been tested and found to comply with the limits for a
Class A digital device, pursuant to Part 15 of the FCC Rules.
These limits are designed to provide reasonable protection against
harmful interference when the equipment is operated in a commercial
environment.
This equipment generates, uses, and can radiate radio frequency energy
and, if not installed and used in accordance with the instruction manual,
may cause harmful interference to radio communications.
Operation of this equipment in a residential area is likely to cause harmful
interference in which case the user will be required to correct the
interference at this own expense.
NOTE:
Changes or modifications may cause this unit to fail to comply with Part 15 of
the FCC Rules and may void the user's authority to operate the equipment.
Page 5

CE marking (only EU version)
English
This product is in conformity with the EMC directive and low-voltage directive.
Français
Cet appareil est conforme á la directive EMC et á la de directive sur les basses tensions.
Deutsch
Dieses Gerät entspricht den EMC-Richtlinien und den Richtlinien für Niederspannungsgeräte.
Nederlands
Dit apparaat voldoet aan de EMC-richtlijnene en de richtlijnen voor apparatuur met laag voltage.
Italiano
Quest' unitá è conforme alle direttive EMC ed alla direttiva sulle basse tensioni.
Português
Esta unidade está em conformidade com as directivas EMC e as directivas de baixa voltagem.
Español
Esta unidad estáde acuerdo con las normas EMC y las relacionadas con baja tensión.
Equipment mains working system
This product complies with household power and safety requirements in your area.
ENGLISH
Page 6

ENGLISH
This Class A digital apparatus complies with Canadian ICES-003.
Cet appareil numérique de la Classe A est conforme á la norme NMB-003 du Canada.
SI DICHIARA CHE L'APPARECCHIO SINTO-AMPLIFACATORE SR-39
RISPONDE ALLE PRESCRIZIONI DELL'ART. 2 COMMA 1 DEL D.M. 28
AGOSTO 1995 N° 548.
FATTO A EINDHOVEN, IL 1/1/1997. MARANTZ EUROPE B.V.
5600 EINDHOVEN
THE NETHERLANDS
"Este aparato lleva elementos antiparasitarios necesarios para cumplir con
los limites que se establecen en el Anexo V del Reglamento sobre
Pertubaciones Radioelectricas e Interferencias aprobado en el Real
Decreto 138/1989. (B.O.E. de 9 Febrero 1989)."
Page 7

Table of Contents
Package contents ................................ 3
Introduction .......................................... 4
Features .............................................................. 4
Preparation ........................................... 6
Installing the carry strap ..................................... 6
Installing batteries .............................................. 6
Controls and Connections .................. 7
Top side ............................................................... 7
Front side .......................................................... 12
Left / Right side ................................................. 13
Rear side ........................................................... 14
Display .............................................................. 15
Basic operation .................................. 16
CF cards ............................................. 17
To insert a CF card ............................................ 17
To eject a CF card ............................................. 17
CF card security ................................................ 18
CF card Format ................................................. 18
Recording ........................................... 19
Connection Diagram ......................................... 19
Recording Procedure ........................................ 19
Audio input for recording .................................. 20
Recording Format parameters .......................... 21
Recording time chart ......................................... 21
Recording Level Control .................................... 22
Microphone Attenuator ...................................... 22
Pre Record ........................................................ 22
Silent Skip (Automatic Pause Recording) ......... 22
Add a Track manually ........................................ 22
Add a Track automatically ................................. 23
Playback ............................................. 23
Connection Diagram ......................................... 23
Playback Procedure .......................................... 24
Track Access ..................................................... 24
Search ............................................................... 24
Audible Search .................................................. 25
Audio output for playback ................................. 25
EDL Mark ............................................ 25
Add an EDL mark manually .............................. 25
Search the EDL mark ........................................ 25
Add an EDL mark automatically ........................ 26
Edit ...................................................... 26
1. Trk Erase (How to erase tracks) .................... 27
2. TrkMkErase (How to erase
all EDL marks within one track) ..................... 27
3. AllMkErase (How to erase all EDL marks) .... 28
4. Format (How to format a CF card) ................ 28
ENGLISH
1
Page 8

Virtual Track and Copy Segment ......29
Virtual Track .......................................................29
ENGLISH
Copy Segment ...................................................29
Virtual Track Edit Mode ......................................29
Creating a Virtual Track .....................30
Using Copy Segment to
create a new file ..................................31
Entering Virtual Playback mode ........32
Virtual Track EDIT mode ....................33
Copy SEG?
[How to convert a Virtual Track to a new file] .....33
Copy SEG A?
[How to convert all Virtual Tracks to new files] ...34
VT Erase?
[How to erase a Virtual Track] ............................34
AVT Erase?
[How to erase all Virtual Tracks] .........................35
USB mode .......................................... 36
Computer compatible ........................................ 36
How to connect via the USB port ...................... 36
Diagram of file structure .................................... 37
Machine ID ........................................................ 37
Additional Functions ......................... 38
Battery ............................................................... 38
Auto power off ................................................... 38
Beep Alarm ....................................................... 38
Key lock ............................................................. 39
Set Date and Time ............................................ 39
LED level meter ................................................. 39
Phantom Power ................................................. 39
Display .............................................................. 40
Preset Setup ....................................... 41
Table of Preset defaults (USA) .......................... 42
Table of Preset defaults (Europe) ...................... 43
Troubleshooting ................................ 55
Error Message .................................... 57
Specifications .................................... 58
LIMITED WARRANTY - USA ............................ 59
2
Page 9
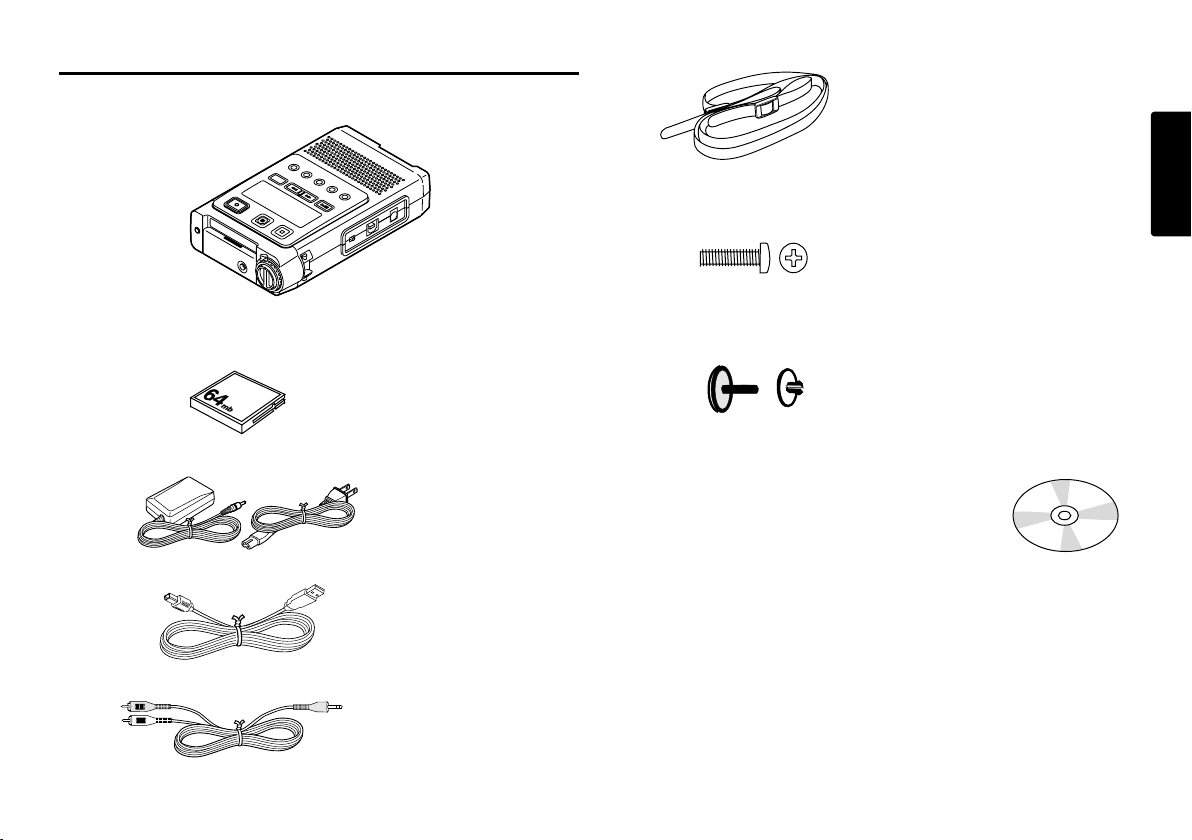
Package contents
• PMD660
• Carry strap
• Security screws (2)
ISO 3x10 (3mm x 10mm long) For CF card door.
ENGLISH
• 64MB CF card (US only)
(shipped formatted and installed)
• AC adapter
• USB cable
• Audio cable
• Plastic pin and retainer
(spare - for Memory compartment door)
• CD-ROM
Contents of the CD may vary.
Contents usually include:
• PDF format manual(s)
Several languages may be included.
• Demonstration copy of PMDEdit software
• Instructions for obtaining full copy of PMDEdit
• This User Guide
• Customer Registration Document
3
Page 10

Introduction
Thank you for selecting the Marantz Professional PMD660
ENGLISH
Portable Solid State Recorder.
The PMD660 is an audio recorder that records in digital
audio formats onto a Compact Flash™ memory card (CF
card) or Microdrive™.
CF cards, also used in digital cameras, are widely available
at consumer electronics retailers and computer resellers.
Features
• Stereo (2 channels) and mono (1 channel) audio
recording and playback.
• Computer compatible
The PMD660 records directly onto CF cards.
Recordings can be transferred to your desktop or laptop
computer by removing the CF card from the PMD660 or
by connecting the PMD660 to your computer via the
USB port. Audio recorded in the popular MP3
compression format is directly available for intranet or
internet file sharing.
• An editing program (Marantz Professional’s PMDEdit
application software, available from Marantz
Professional for PC users) lets you convert and edit
audio files that were recorded on the PMD660.
• MS-DOS™ and Windows compatible file system.
• Audio inputs may be from :
• the built-in microphone(s),
• condenser or dynamic microphone(s) connected to
the MIC IN jacks, or
• line level audio sources connected to the LINE IN jack.
• Audio outputs may be from :
• the built-in speaker,
• headphones connected to the PHONES jack, or
• analog audio devices such as an amplifier or other
devices connected to the LINE OUT jack.
• Records onto various types of CF cards.
(Please refer to the Marantz Professional web site
www.d-mpro.com for what kind of media are
recommended.)
4
• Easy one control recording
Simply push the REC button.
• Automatic recording
The PMD660 can be set to stop recording when there is
silence (Silent Skip) and automatically start when sound
resumes. The PMD660 can be set to automatically add
an EDL mark to the track at each such starting point.
• Manual and automatic record level control (ALC).
• Two different recording formats :
• Compressed recording using MPEG1 Layer III (MP3)
mono and stereo.
• MP3 compressed at 128kbps (stereo) or 64kbps (mono).
• Uncompressed recording using 16-bit linear Pulse
Code Modulation (PCM).
Page 11

• Security – CF cards
For security, the CF card compartment door can be
secured with a screw. Requiring a tool to open the CF
card compartment reduces casual removal of the CF
card.
• Pre-Recording memory buffer records 2 seconds of
audio before recording is started.
• Playback aids
A common problem with lengthy voice or other
recordings is difficulty in locating one or more specific
passages for playback. The PMD660 has several ways
to mark specific record starting points.
• Tracks
• A new track (file) is automatically started each time
you begin a recording.
• It is not possible to record over a previously recorded
track unless it is first erased.
• An Auto Track feature can add tracks every minute or
other selected recording intervals. (Minute track:
Setting the interval to one minute provides a new
track every minute of a recording. This permits
navigation of a large audio recording by time.)
• A new track can be started during recording by
pressing the REC button (if the "Manual Trk" preset is
turned On).
• EDL marks*
EDL (Edit Decision List) marks can be created during
recording manually or automatically. EDL marks help
you find specific points in the recording.
• During playback, you can instantly locate EDL marks.
• Up to 255 EDL marks can be added to a CF card.
EDL marks are numbered consecutively starting at
one. During recording, you can manually add an EDL
mark by pushing the MARK button. EDL marks can
also be added automatically.
* The EDL marking system is proprietary to Marantz Professional
solid state recorders.
• Virtual Track
Virtual Track allows you to set an in point and an out
point within a file for later immediate playback access.
• Copy Segment
Copy Segment works just like the copy and paste
function of your standard word processing program. It
allows you to "highlight" a section of a track(file) by
setting an in point and an out point, and then paste that
section into a new track(file) without destroying the
original track(file).
• Setup
Three menu selectable Presets make it easy to switch
between your commonly used input, recording format
and other menu selections.
• Time / Date stamp
A built-in date and time generator marks (stamps) the
beginning of each track.
• There are three ways to power the PMD660 ;
• Included AC adapter.
• AA Alkaline batteries (~ 4 hours).
• Rechargeable Ni-MH batteries.
• REMOTE jack for optional Marantz Model RC600PMD permits
a wired remote for controlling the recording process.
ENGLISH
5
Page 12
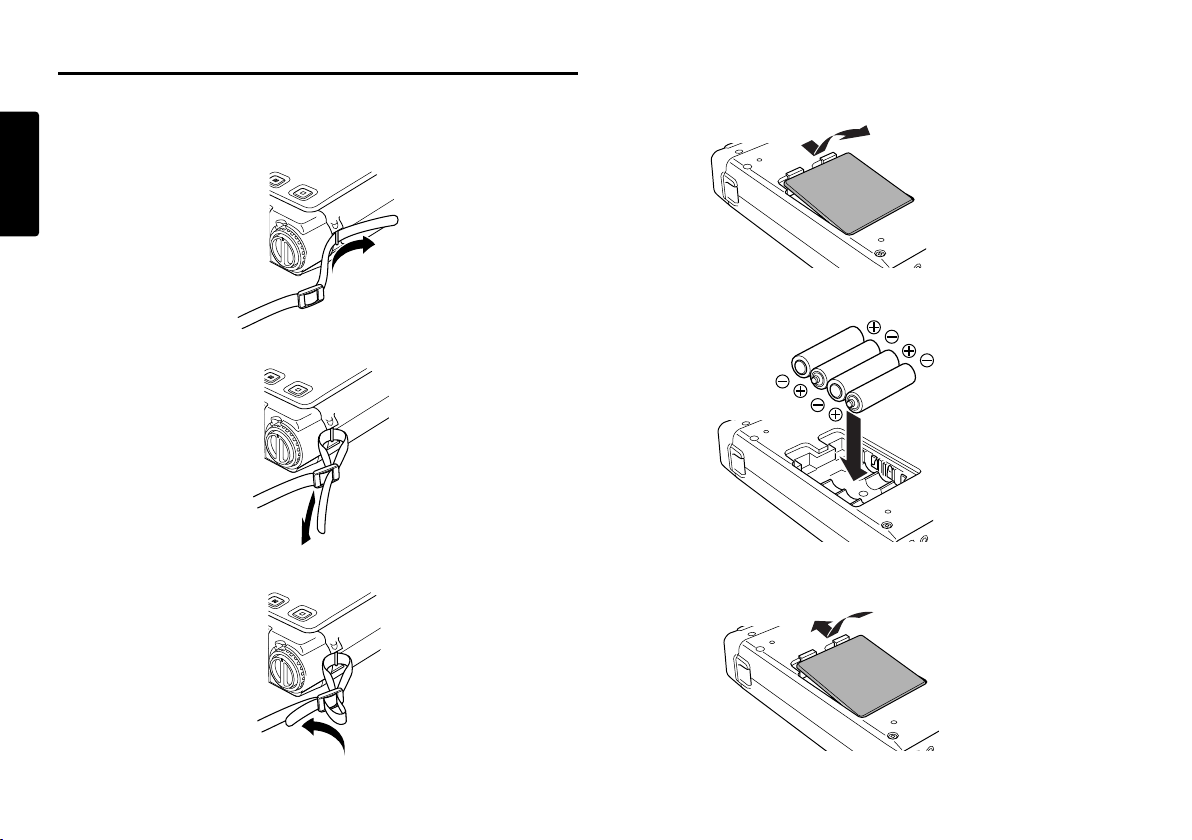
Preparation
Installing batteries
Installing the carry strap
ENGLISH
1. Put the carry strap through the shaft of PMD660.
2. Put the carry strap through the stopper of PMD660.
3.
Secure the carry strap by putting it through the second stopper.
1. Remove the battery compartment.
2.
Insert the new batteries (AA type) with correct +/ -polarity.
3. Close the battery compartment.
6
Page 13
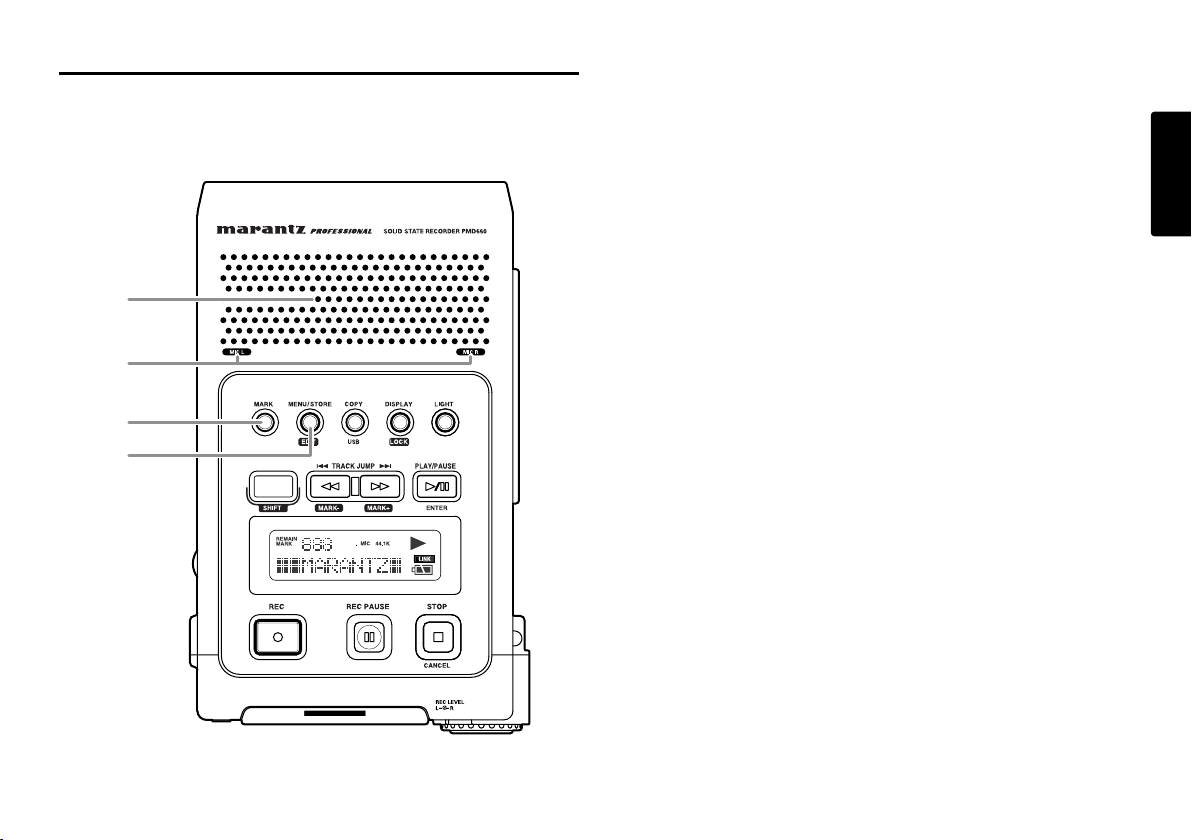
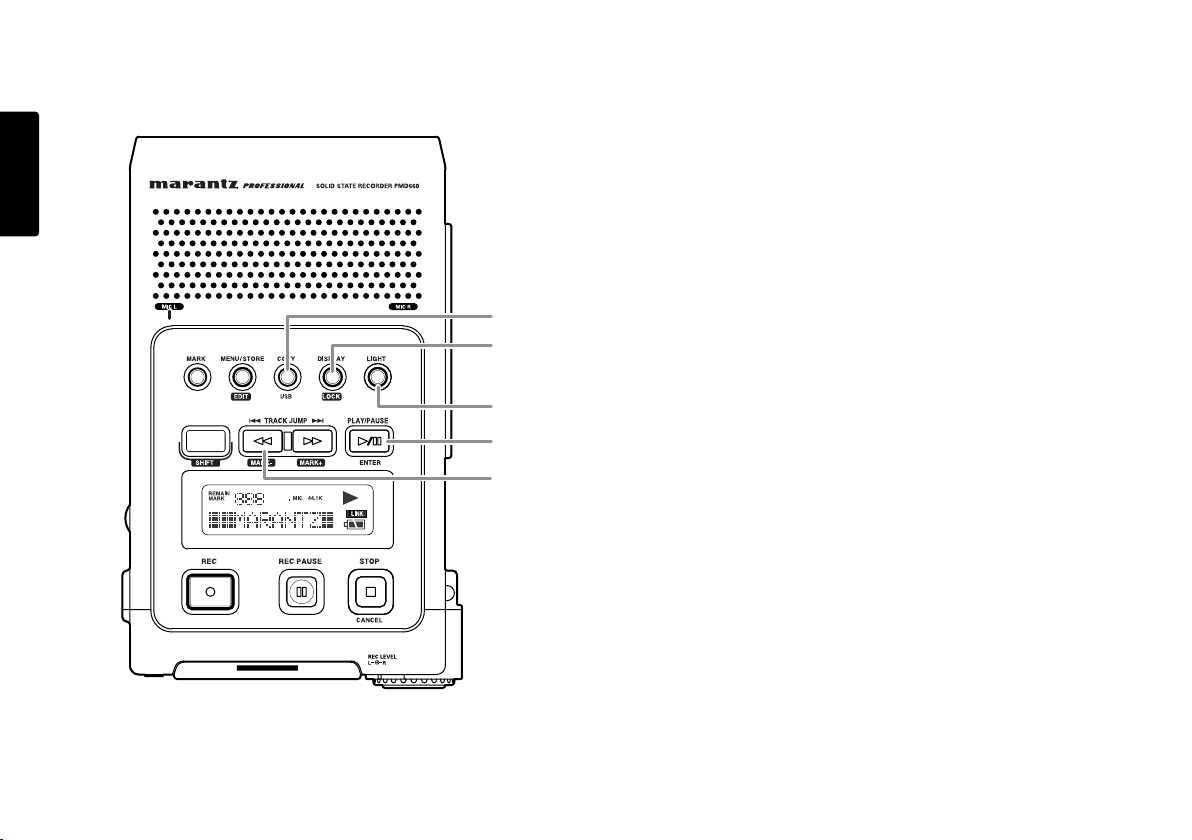
Controls and Connections
Top side
1
2
3
4
1. Speaker
When "Output" in the preset menu is set to SP/HP, the
played back audio signal is output the internal speaker.
Headphones plugged into the PHONES jack mute the
internal speaker. HP/SPK VOL controls the built-in
Speaker and Headphone volume.
See Page 44, How to select an output for playback.
2. MIC (internal microphones)
3. MARK button
Push the MARK button to add an EDL Mark manually
during pause, recording, or playback.
Adding an EDL Mark during recording introduces an
audible click in the recording when using the internal
microphone.
4. MENU / STORE / EDIT button
• MENU
Menu, accessed from stop by pushing the MENU
button, lets you set or change recording and playback
parameters, such as changing inputs and setting the
Date and Time.
• STORE
Push the STORE button while in the preset menu to
write menu changes and return to stop mode.
See page 41, How to set or change the preset
parameters.
• EDIT
Edit menu, accessed from stop by pushing and holding
the SHIFT button then pushing the EDIT button, lets you
erase tracks, erase EDL marks and format the CF card.
ENGLISH
7
Page 14
ENGLISH
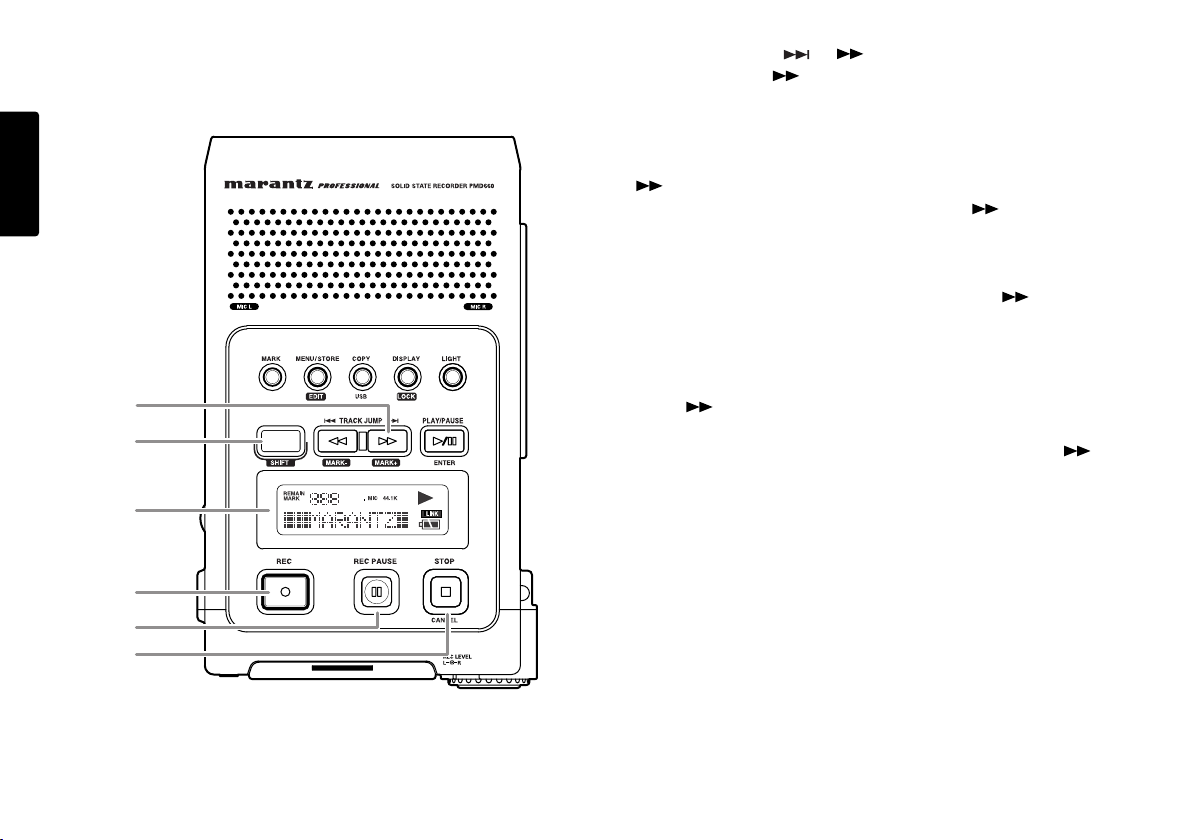
5. COPY / USB button
• Copy (Copy segment)
During playback, push the COPY button to copy mode
and setup the start point and end point.
See page 29, How to Virtual Track and Copy Segment.
• USB
Push and hold the USB button while you turn on the
PMD660's POWER switch.
The CF card in the PMD660 appears as an external
drive on a connected computer. It may also be removed
for data transfer.
5
6
7
8
9
See page 36, How to connect via the USB port.
6. DISPLAY / LOCK button
• DISPLAY
Push to tab through alternate information displays.
Displays are slightly different in Stop, Record and Play.
See Page 40, Display, for more information.
• LOCK
Secures the PMD660 in its present state during Record,
Playback or Stop.
Push and hold the SHIFT button while pushing the
DISPLAY/LOCK button to lock all functions except the
LIGHT button.
8
Page 15

7. LIGHT button
Push the LIGHT button to momentarily turn the Display
light on.
Push and hold for one second to switch the Display light
on. Push to switch the Display light off.
9. TRACK JUMP / / MARK- button
• TRACK JUMP
During playback, push to jump to the previous track.
If pushed while playing, the first track jumps to the last
track on the CF card.
8. PLAY/PAUSE / ENTER button
• PLAY/PAUSE (playback)
From stop, push to begin playback.
During playback, push to pause playback.
During play - pause, push to resume playback.
• ENTER (menu)
During menu functions, push to accept the current
setting and switch to the next menu item to be set.
•
• During playback, push and hold the button to
"rewind" and do a 2X speed audible search in the
reverse direction. Release to return to normal forward
playback.
• During play - pause, push and hold the button to
rewind quickly. The rewind is at 10X speed for three
seconds, then it automatically speeds up to 140x
speed.
Notes:
If the button is held past the beginning of a track,
the rewind will continue into the previous track.
During Edit menu and Menu functions, push the
button to increment a parameter in the - direction.
• MARK-
From Stop push and hold the SHIFT button while
pushing the Mark- button to tab through the EDL marks
on the CF card.
To start playback from the displayed EDL Mark, push
the PLAY/PAUSE button.
ENGLISH
9
Page 16
ENGLISH
10
11
10. TRACK JUMP / / MARK+ button
• TRACK JUMP
During playback, push to jump to the next track.
If pushed while playing, the last track jumps to the first
track on the CF card.
•
• During playback, push and hold the button to
"fast forward" and do a 2X speed audible search in
the forward direction. Release to return to normal
forward playback.
• During play - pause, push and hold the button to
fast forward quickly. The fast forward is at 10X speed
for three seconds, then it automatically speeds up to
140x speed.
Notes:
If the button is held past the end of a track, the fast
forward will continue into the next track.
During Edit menu and Menu functions, push the
button to increment a parameter in the + direction.
10
12
13
14
15
• MARK+
From Stop, push and hold the SHIFT button while
pushing the Mark+ button to tab through the EDL marks
on the CF card.
To start playback from the displayed EDL Mark, push
the PLAY/PAUSE button.
Page 17

11. SHIFT button
Push and hold the SHIFT button while you push other
buttons (white labels) to activate alternate functions.
12. Display
Labels, icons and alphanumeric messages on the
display communicate the status of PMD660.
13. REC button
From Stop, push to start recording.
From Record - pause, push to resume recording.
During recording, push to increment the track (start a
new audio file), if "Manual Trk" is turned on in the Preset
menu.
14. REC PAUSE button
From Stop, push to enter record - pause. This allows
you to check your record level prior to recording.
During recording, push to pause.
The REC indicator will flash when paused.
15. STOP / CANCEL button
• STOP
During recording, push to stop recording and end the
track (file).
During playback, push to stop playback and end the
playback session.
When you resume, playback starts at the beginning of
the current track.
ENGLISH
• CANCEL
During menu operations, push to cancel all entries
made and return to stop mode.
11
Page 18
Front side
ENGLISH
16
17
18
19
20-a
20-b
20-c
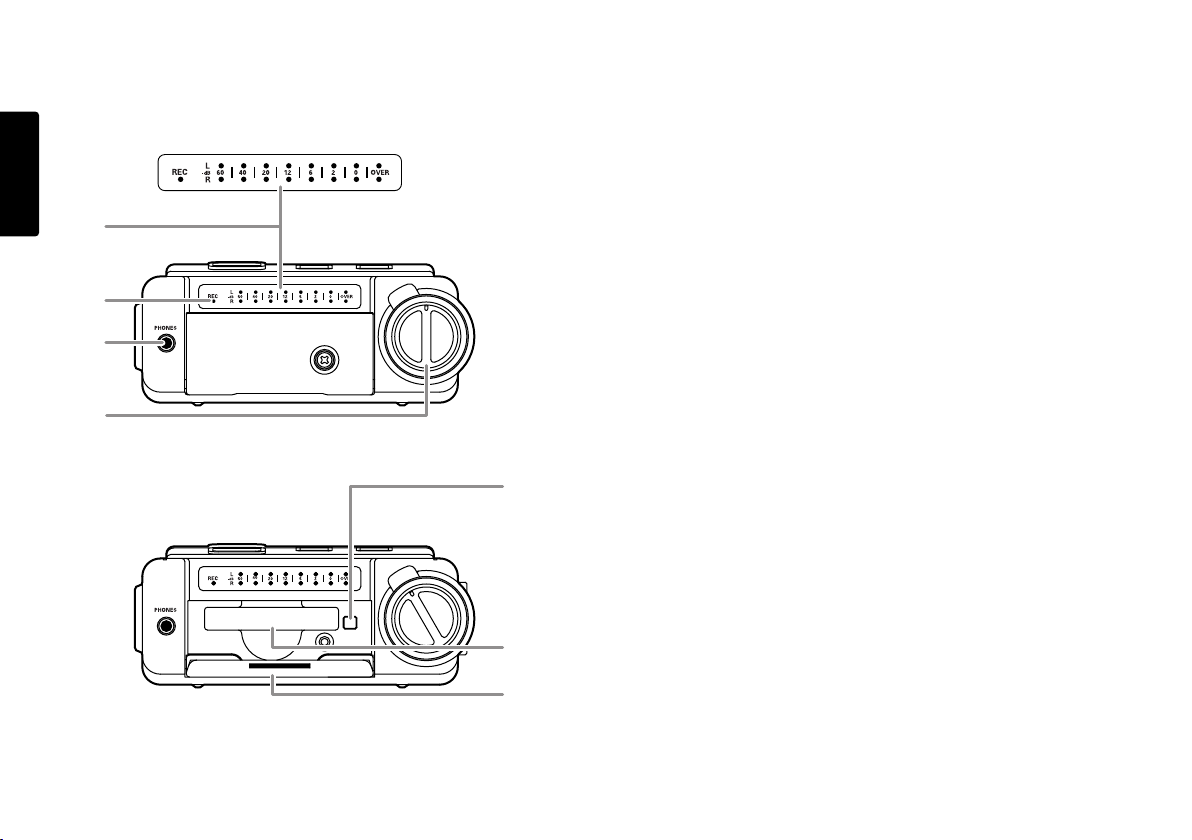
16. Level meter
The louder the sound input to the recorder on the
Left/Right channel, the more LED lights are displayed.
When the "Meter Mode" of preset menu is "Peak Only",
only a peak level is displayed. (page 52)
17. REC indicator
Red indicator light is lit and steady during Record and
flashing during Record pause.
18. PHONES jack
Stereo headphones are plugged into this jack.
Set “Output” of the preset menu to SP/HP (See Page 44).
19. REC LEVEL controls
Turn to adjust the record level when the "LevelCont" of
preset menu is "Manual".
The inside control (Right channel) and outside control
(Left channel) turn together, unless you hold one while
turning the other.
The optimum record level is when the level meter goes
as close to 0dB as possible but does not go OVER.
20. CF card compartment
Pull the card door open to access the CF card.
20-a. Card eject button
20-b. CF card slot
20-c. CF card door
12
Page 19
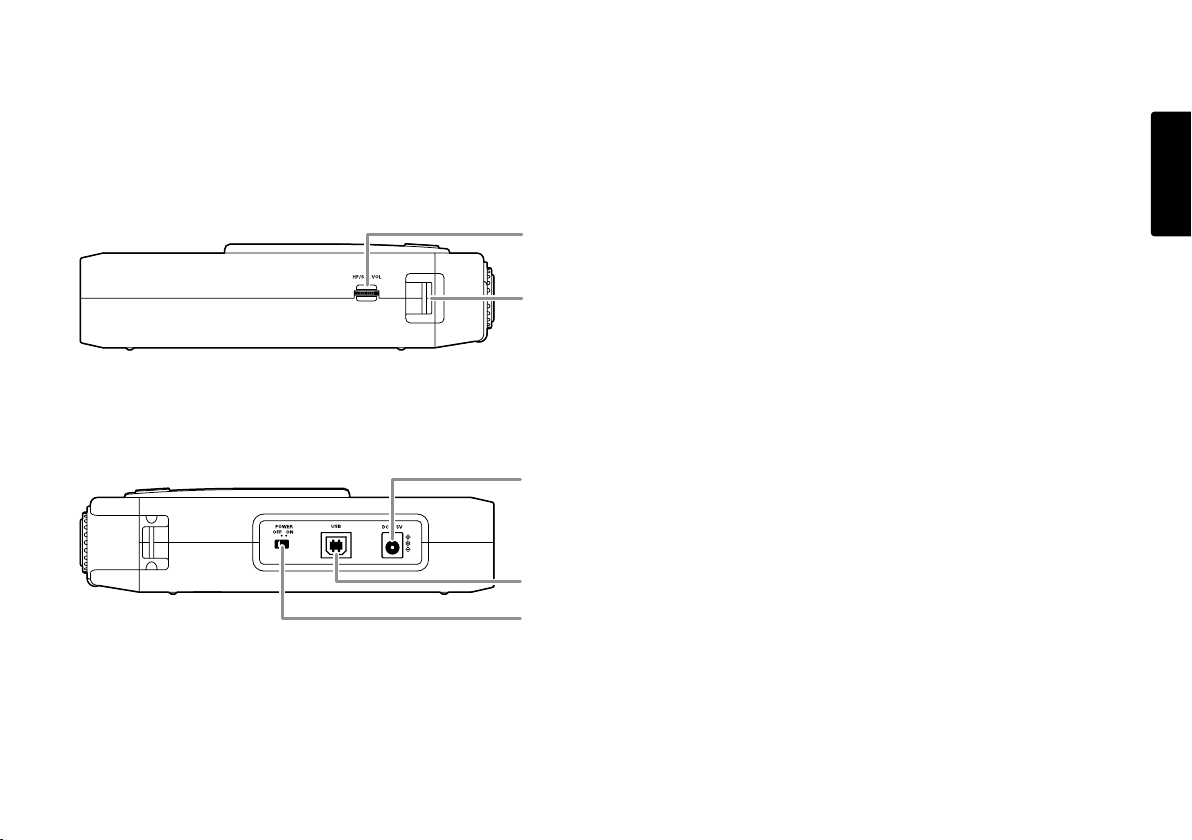
Left / Right side
21
22
23
24
25
21. HP/SPK VOL control
Turn to adjust the volume of headphones plugged into
the PHONE jack or the built-in speaker. Audio on the
built-in speaker is automatically interrupted when
recording with the internal microphone.
22. Carry strap shaft
Attach the supplied carry strap here.
23. DC IN jack
Plug the supplied AC adapter in this jack.
The power supplied is 2.0A at 5V DC.
The PMD660 automatically switches to adapter power if it
was running on battery power. If AC power is interrupted
by a power outage or unplugging the adapter, the
PMD660 automatically switches to battery power.
24. USB port
Plug the supplied USB cable in this port and connect
the other end to your computer.
25. POWER switch
Slide to turn Power on or off.
ENGLISH
13
Page 20
Rear side
ENGLISH
26-a
26-b
27
28
29
26. LINE IN/OUT jack
Plug external line level audio devices in this jack.
a. LINE IN
Plug stereo audio cable in this jack to record from the
output of an external unit.
b. LINE OUT
Plug stereo audio cable in this jack to connect to the
input of an amplifier or other external unit..
Set “Output” of the preset menu to LINE (See Page 44).
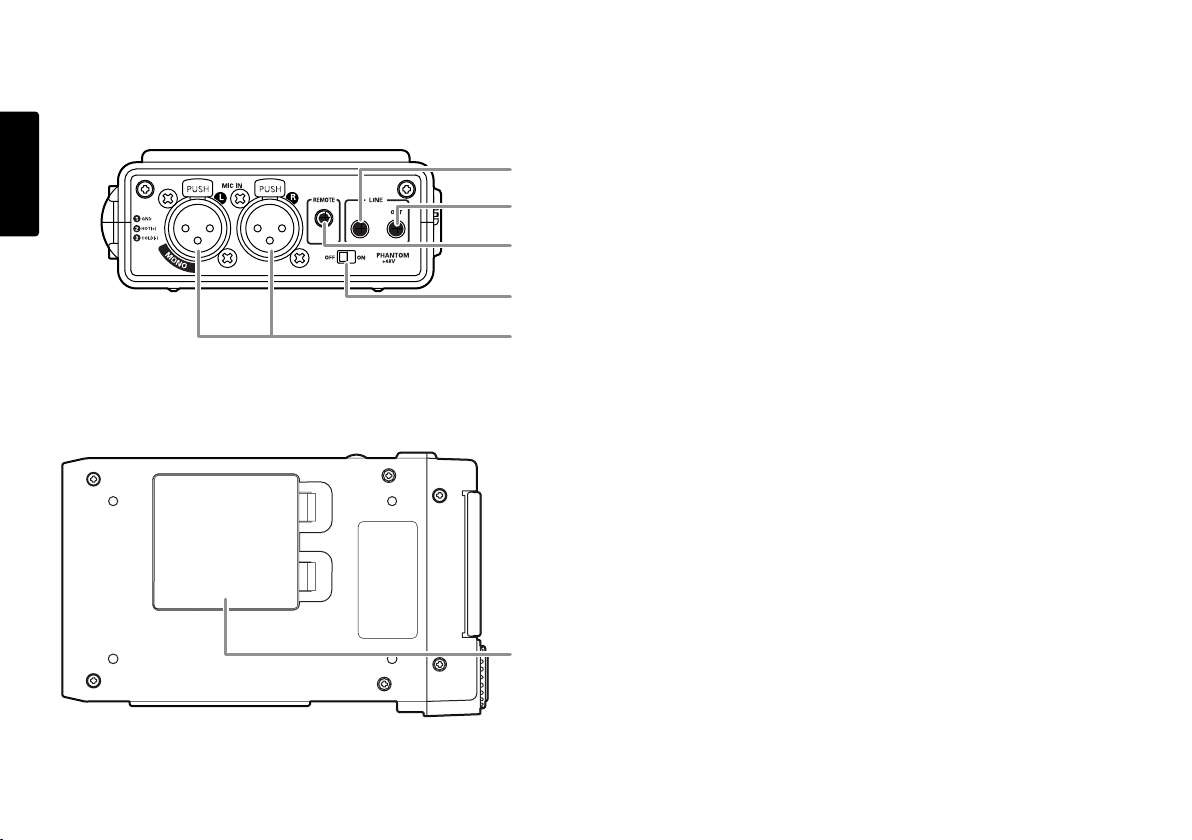
27. REMOTE jack
This jack accepts the optional wired remote Marantz
model RC600PMD. Model RC600PMD connects via a
TRRS (Tip Ring Ring Sleeve) connector.
Model RC600PMD permits:
• Starting recording (Same as the REC button).
• Pausing recording (Same as the REC PAUSE button).
• Adding EDL marks (Same as the MARK button).
28. PHANTOM power switch
Switch to on to provide +48V of power for a condenser
microphone(s).
29. MIC IN jacks
Plug external microphones in the MIC IN jacks.
For mono recording, use the Left jack.
14
30
30. Battery compartment
Pick and pull to open the Battery compartment.
Page 21
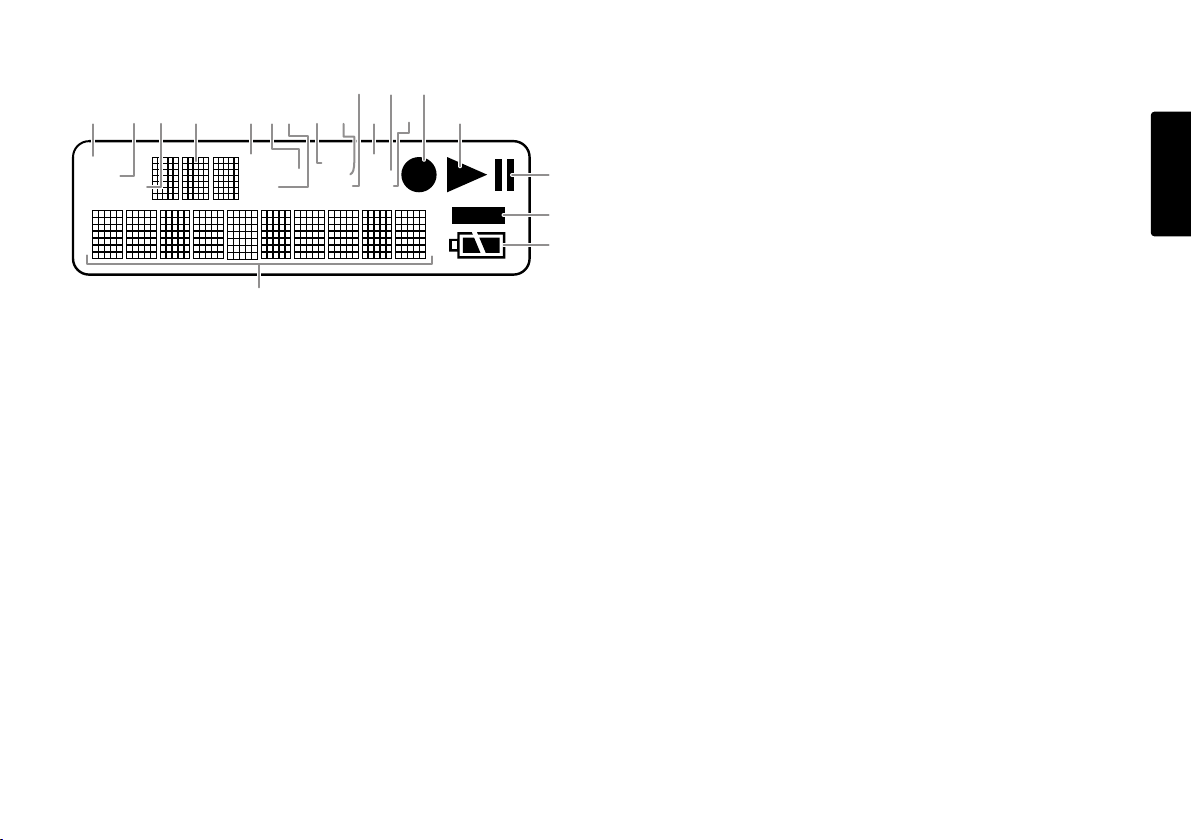
Display
MARK
IN
-
REMAIN
S.SKIP
STEREO
MP3
ATT
I.MIC
LINE
LOCK
ALC
44.1K
48K
ab i
j
m
g
cd e k o
p
q
r
s
l n
h
f
a. MARK
The MARK label appears when the number displayed
on the upper alphanumeric display refers to EDL marks.
b. IN-
The IN- label appears when the beginning (start point)
of Copy segment function has been set.
c. REMAIN
The REMAIN label appears to indicate remaining time.
d. Upper alphanumeric display
Displays track number, number of tracks on CF card,
EDL mark number, number of EDL's on CF card.
e. S.SKIP
The S.SKIP label appears when Silent Skip is enabled.
f. STEREO
The STEREO label appears when the recording channel is
stereo.
g. MP3
The MP3 label appears when the audio file is MP3.
h. ALC
The ALC label appears when the PMD660 automatically
responds to changes in recording input level.
i. 44.1K
The 44.1K label appears when the recording audio
wave(s) is 44,100 samples per second.
j. 48K
The 48K label appears when the recording audio
wave(s) is 48,000 samples per second.
k. ATT
The ATT label appears when input from a microphone(s)
connected to the MIC IN jacks is cut by -20dB.
l. I.MIC/MIC
The I.MIC label appears when input selected for
recording is the internal microphone. The MIC label
appears when external microphone(s) is selected.
m. LINE
The LINE label appears when input selected for
recording is the LINE IN jack.
n. Record
The Record symbol appears when the PMD660 is in
record mode. It appears with the Play symbol when
recording and appears flashing when in record - pause.
o. Play
The Play symbol appears when the PMD660 is in
playback, playback pause, recording, or recording pause.
p. Pause
The Pause symbol appears when the PMD660 is in
playback pause or recording pause.
q. LOCK
The Lock symbol appears when the PMD660 is in key lock.
r. Battery
The Battery symbol appears in most displays to indicate
battery usage.
s. Lower alphanumeric display
Displays a variety of information including remaining
time, clock time, menu settings, etc.
ENGLISH
15
Page 22

Basic operation
OFF
ON
POWER
REMAIN
STEREO
MP3
I.MIC
LOCK
44.1K
001:05:32
000
LOCK
Load i n
g
OFF
ON
POWER
The PMD660 comes factory preset for recording voice
ENGLISH
using its built-in (internal) microphone.
These are settings for recording a meeting, not settings for
recording a vocal performance.
3. Slide the POWER switch to turn on.
1. Unpack the AC adapter and the PMD660.
a. Plug AC adapter into 100 - 240VAC power.
b. Plug the adapter jack into the PMD660 at DC IN.
2. Install a CF card.
See page 17 for installing a CF card.
Note: Outside of the USA, a CF card is not included.
16
a. A full display will appear. Wait for the PMD660 to
initialize.
b. The display will change to this display for a newly
formatted CF card.
Page 23

CF cards
OFF
ON
POWER
The PMD660 records onto various types of CF (Compact
Flash) cards.
Please refer to the Marantz Professional web site at
www.d-mpro.com for what kinds of media are recommended.
To eject a CF card
a. Slide the POWER switch to turn off.
To insert a CF card
a. Open the CF card door.
b. Fully insert the CF card.
c. Close the CF card door.
Note:
If the CF card door won't latch, check that the Card
eject button is in the click in position.
b. Open the CF card door.
c. Push the card eject button so it is in click out position.
in position
out position
d. Push the Card eject button and remove the CF card.
• If the CF card door opens while power is on, "Door
Open" is displayed and the PMD660 turns off.
• If recording is in progress, opening the CF card door
automatically stops recording and writes critical track
information to properly close the file before powering off.
ENGLISH
17
Page 24

CF card security
The supplied CF card compartment security screw
requires using a small Phillips screwdriver to open the CF
card compartment door. This reduces the possibility that
ENGLISH
the CF card will be misplaced or stolen.
CF card Format
Formatting a CF card erases all audio files on the CF
card and prepares it for use in the PMD660.
If the CF card is formatted other than FAT16 or FAT32
(FAT=file allocation table), please format in your computer.
a. Remove the plastic pin and then the retainer.
b. Insert the screw.
c. Tighten the screw with a small Phillips screwdriver tight
enough so the screw cannot be removed with a fingernail.
Setup the "Format" in the Edit menu. (page 28)
18
Page 25

Recording
MIC IN
LINE
IN
LR
STEREO
MP3
I.MIC
LOCK
44.1K
000:01:23
001
OFF
ON
POWER
Recording Procedure
Connection Diagram
1. Slide the POWER switch to turn on.
ENGLISH
2. Push the REC button to begin recording.
The Rec indicator will be lit and steady while recording.
The display will show the information display of recording.
(page 40)
19
Page 26

3. Push the REC PAUSE button to pause recording.
REMAIN
STEREO
MP3
I.MIC
LOCK
44.1K
001:04:09
001
Audio inputs for recording
Audio inputs for recording are selected using the Input Menu.
ENGLISH
4. Push the STOP button to stop recording and end the
track (close the audio file).
The display will show the information display of stop.
Channel : Stereo
Display Input Menu
I. MIC Internal Mic Recording (Stereo, L/R ch)
MIC External Mic Recording (Stereo, L/R ch)
LINE LINE Recording (Stereo, L/R ch)
Channel : Mono
Display Input Menu
I. MIC Internal Mic Recording (Mono, L ch)
MIC External Mic Recording (Mono, L ch)
LINE LINE Recording (Mono, L ch)
Setup the "Input" (page 44) and "RecChannel" (page 46)
of the preset menu.
20
Page 27

Recording Format parameters
The PMD660 can record in several compression algorithms.
• Compressed recording using MPEG1 Layer III (MP3)
mono and stereo.
• Uncompressed recording using 16-bit linear Pulse Code
Modulation (PCM).
Channel : Stereo
RecFormat Sampling Rate Bitrate File Extension
MP3-44.1kHz 44.1kHz 128 kbps .mp3
MP3-48kHz 48kHz 128 kbps .mp3
PCM-44.1kHz 44.1kHz 1412 kbps .wav
PCM-48kHz 48kHz 1536 kbps .wav
Recording time chart
All times are approximated record times.
Different media manufacturers allow more or less space for
error correction and the like on their respective products.
64 kbps 128 kbps
mono stereo
1:06 0:33
2:13 1:06
4:26 2:13
8:52 4:26
11:46 5:53
17:44 8:52
35:28 17:44
70:56 35:28
141:52 70:56
CARD
SIZE
bit rate
.mp3
32 MB
64 MB
128 MB
256 MB
340 MB
512 MB
(1 GB) 1024 MB
(2GB) 2048MB
(4GB) 4096MB
ENGLISH
Channel : Mono
RecFormat Sampling Rate Bitrate File Extension
MP3-44.1kHz 44.1kHz 64 kbps .mp3
MP3-48kHz 48kHz 64 kbps .mp3
PCM-44.1kHz 44.1kHz 705.5 kbps .wav
PCM-48kHz 48kHz 768 kbps .wav
The record file of PCM is BWF (Broadcast Wave Format).
(Europe only)
Setup the "Rec Format" and "RecChannel" of the preset
menu. (page 46)
CARD
SIZE
CARD
SIZE
fs
PCM
32 MB
64 MB
128 MB
256 MB
340 MB
512 MB
(1 GB) 1024 MB
(2GB) 2048MB
(4GB) 4096MB
fs
PCM
32 MB
64 MB
128 MB
256 MB
340 MB
512 MB
(1 GB) 1024 MB
(2GB) 2048MB
(4GB) 4096MB
44.1 kHz
mono stereo
0:06 0:03
0:12 0:06
0:24 0:12
0:48 0:24
1:04 0:32
1:36 0:48
3:13 1:36
6:27 3:13
12:54 6:27
48 kHz
mono stereo
0:05 0:02
0:11 0:05
0:22 0:11
0:44 0:22
0:59 0:29
1:28 0:44
2:57 1:28
5:55 2:57
11:51 5:55
21
Page 28
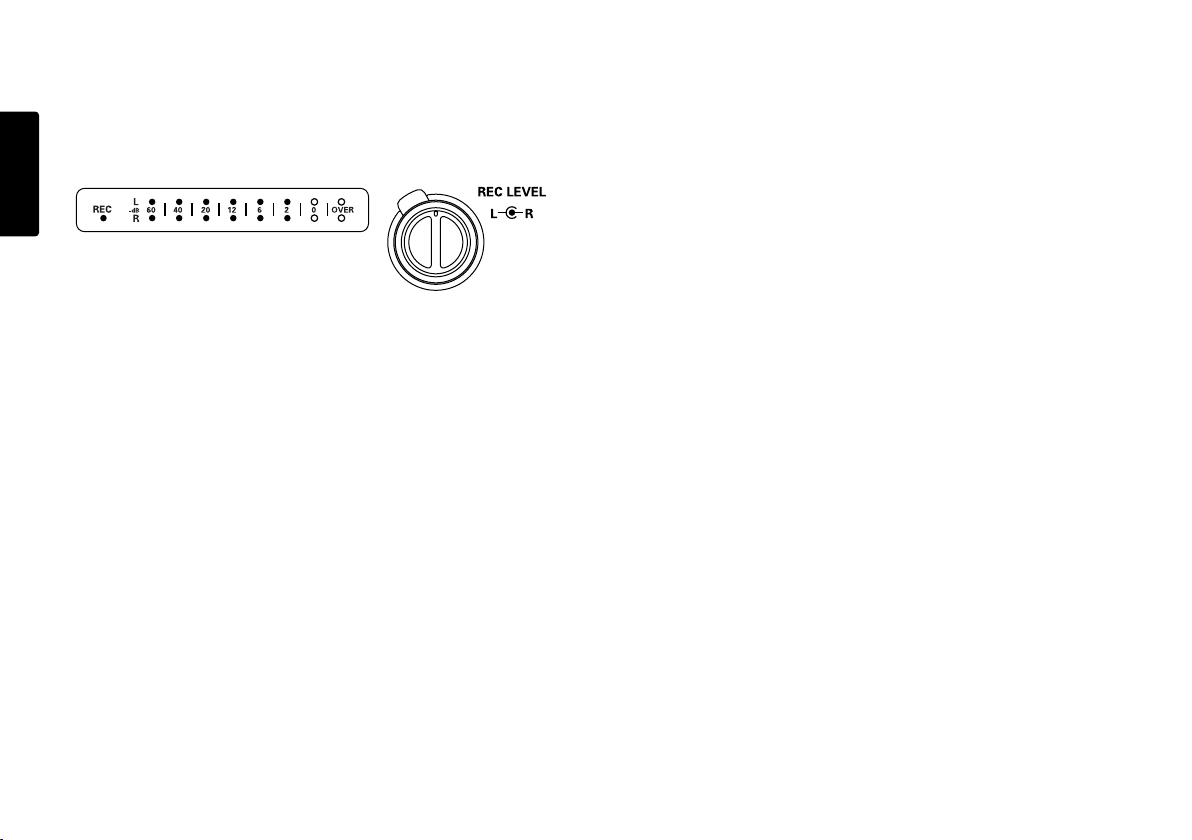
Recording Level Control
The recording level control lets you select the type of input
level control.
ENGLISH
• At Manual, you control the input level with the REC
LEVEL controls.
• The inside control(Right Channel) and outside control
(Left Channel) turn together unless you hold one while
turning the other.
• The optimum record level is when the level meter goes
as close to 0dB as possible but does not go OVER.
• At ALC (Automatic Level Control), the PMD660
automatically responds to changes in input level.
Pre Record
When PreRecord is on and the PMD660 is in record pause,
it 'listens to' the selected audio input(s) and continuously
buffers 2 seconds of audio.
Then, when record is started, the PMD660 writes the
previously buffered 2 seconds of audio to the card &
continues to record from there.
Setup the "PreRecord" of the preset menu. (page 47)
Silent Skip (Automatic Pause Recording)
Silent Skip automatically pauses recording when there is a
period of silence and resumes recording when sound
resumes.
The Silent Skip Menu setting permits:
• Turning Silent Skip On or Off.
• Adjusting the margin sound level that defines silence in
-60dB, -54dB, -38dB or -20dB.
Setup the "LevelCont." of the preset menu. (page 51)
Microphone Attenuator
The microphone attenuation switch permits the direct use
of microphones that differ in sensitivity.
• At 0dB, No microphone attenuation.
• At -20dB, Input from a microphone(s) connected to the
MIC IN jacks is cut by -20dB.
Setup the "Mic Atten." of the preset menu. (page 52)
22
Setup the "Silent Skip" of the preset menu. (page 50)
Add a Track manually
When Manual Trk (Manual Track incrementing) is On during
recording, push the REC button to increment the track.
A new track is created at that point.
The continuity of sound is not guaranteed and depends on
the speed of a card or the file size.
Setup the "Manual Trk" of the preset menu. (page 47)
Page 29

LINE
OUT
Add a Track automatically
With Auto Trk(Automatic Track incrementing) on, a new
track is begun automatically at specified intervals of
recording time.
Automatic Track can be set to increment every 1, 5, 10, 15
or 30 minutes, or every 1, 2, 6, 8, 12 or 24 hours.
Automatic Track makes finding a particular point in a
recording easier. For example, if a new track begins every
minute during playback, the Minute Track makes finding a
particular passage easier because of the relationship
between track numbers and time. During playback, you
can select track 3 to play approximately the 3rd minute of
recording. To go directly to the beginning of the 10th
minute, select track 10, etc.
Track Recording time
# minutes:seconds
1…………………….0:00 – 1:00
2…………………….1:01 – 2:00
3…………………….2:01 – 3:00
The continuity of sound is not guaranteed and depends on
the speed of a card or the file size.
Setup the "Auto Trk" of the preset menu. (page 48)
Playback
Connection Diagram
ENGLISH
23
Page 30

Playback Procedure
STEREO
MP3
I.MIC
LOCK
44.1K
000:00:08
001
OFF
ON
POWER
1. Slide the POWER switch to ON.
ENGLISH
2. Push the PLAY/PAUSE button to begin playback.
The PLAY indicator will be lit and steady while in
playback.
Track Access
• TRACK JUMP
During playback, push to jump to the previous track.
If pushed while playing the first track, it jumps to the last
track on the CF card.
• TRACK JUMP
During playback, push to jump to the next track.
If pushed while playing the last track, it jumps to the first
track on the CF card.
Search
• During play - pause, push and hold the
button to rewind quickly. The rewind is at 10X
speed for three seconds, then it automatically
speeds up to 140X speed.
3. Push the PLAY/PAUSE button again to pause playback.
4. Push the STOP button to stop playback.
24
• During play - pause, push and hold the
button to fast forward quickly. The fast forward
is at 10X speed for three seconds, then it
automatically speeds up to 140X speed.
Notes:
• If the button is held past the end of a track, the
fast forward will continue into the next track.
• If the button is held past the beginning of a track,
the rewind will continue into the previous track.
Page 31

Audible Search
• During playback, push and hold the button
to "rewind" and do a 2X speed audible search
in the reverse direction. Release to return to
normal forward playback.
EDL Mark
EDL (Edit Decision List) marks can be created during
recording manually or automatically. EDL marks help you
find specific points in the recording.
• During playback, push and hold the button
to "fast forward" and do a 2X speed audible
search in the forward direction. Release to
return to normal forward playback.
Audio outputs for playback
Audio outputs for playback are selected using the Output
Menu. Selections are:
• The built-in speaker or headphones connected to the
PHONES jack. (SP/HP)
• Analog audio devices such as an amplifier or other
device connected to the LINE OUT jacks. (LINE)
Setup the "Output" of the preset menu. (page 44)
Note:
Sound cannot be output the LINE OUT and the SP/HP
simultaneously.
• The EDL marking system is proprietary to Marantz.
• During playback, you can instantly locate EDL marks.
• Up to 255 EDL marks can be added to a CF card.
• EDL marks are numbered consecutively starting at one.
• During recording, you can manually add an EDL mark
by pushing the MARK button. EDL marks can also be
added automatically.
Add an EDL mark manually
Push the MARK button to add an EDL Mark manually
during pause, recording or playback.
During recording, adding an EDL Mark introduces an
audible click in the recording when using the internal
microphone.
Search the EDL mark
•
MARK+
From Stop or playback, push and hold the SHIFT button
while pushing the Mark+ button to tab through the EDL
marks on the CF card.
To start playback from the displayed EDL Mark, push
the PLAY/PAUSE button .
ENGLISH
25
Page 32

•
MARK-
ENGLISH
From Stop or playback, push and hold the SHIFT button
while pushing the Mark- button to tab through the EDL
marks on the CF card.
To start playback from the displayed EDL Mark, push
the PLAY/PAUSE button .
Add an EDL mark automatically
The Auto Mark Menu item turns the automatic EDL mark
feature Off or On.
See page 25 to manually add EDL marks.
• If Auto Mark is on and the machine is in record - pause,
when recording is resumed a mark will be added.
• If Auto Mark is on and the PMD660 is recording audio
below the sound threshold for more than three seconds,
audio that crosses the threshold will cause a mark to be
added.
The Auto Mark Menu setting permits:
• Turning Auto Mark On or Off.
• Adjusting the margin sound level that defines silence
in -60dB, -54dB, -38dB or -20dB.
Setup the "Auto Mark" of the preset menu. (page 49)
Edit
Edit menu, accessed from stop by pushing and holding the
SHIFT button then pushing the MENU/STORE EDIT
button, lets you erase tracks, erase EDL marks and format
the CF card.
Edit mode includes:
1. Trk Erase
2. TrkMkErase
3. AllMkErase
4. Format
26
Page 33

1. Trk Erase (How to erase tracks)
TrkErase lets you erase a selected track.
After identifying the track number you want to erase.
1. Select the Trk Erase Edit menu choice:
While in stop, push and hold the SHIFT button then
push the MENU/STORE EDIT button.
"Trk Erase" will appear in the display.
2. Push the ENTER button.
The Display switches to track number flashing.
3. Push the the or button until the track number
you want to erase is flashing.
4. Push the ENTER button.
"Executing" will be displayed until Trk Erase is finished.
Then "Completed" will be displayed.
• Display returns to step 3 so you can erase another track.
5. Push the STOP/CANCEL button to cancel.
Note:
The related virtual track(s) and EDL marks associated
with the erased track will also erase.
2. TrkMkErase
(How to erase all EDL marks within one track)
TrkMkErase lets you erase all of a track's EDL marks.
Decide on which track’s EDL marks you want to erase.
1. Select the TrkMkErase Edit menu choice:
While in stop, push and hold the SHIFT button then
push the MENU/STORE EDIT button.
"Trk Erase" will appear in the display.
2. Push the or button until "TrkMkErase" is
displayed.
3. Push the ENTER button.
The Display switches to track number flashing.
4. Push the or button so the track number whose
EDL marks you want to erase is flashing.
5. Push the ENTER button.
"Executing" will be displayed until TrkMkErase is finished.
Then, "Completed" will be displayed
• Display returns to step 4 so you can erase another
track's EDL marks.
6. Push the STOP/CANCEL button to cancel.
ENGLISH
Note:
EDL marks will automatically be renumbered.
27
Page 34

3. AllMkErase (How to erase all EDL marks)
AllMkErase lets you erase all EDL marks on the CF card.
1. Select the AllMkErase Edit menu choice:
ENGLISH
While in stop, push and hold the SHIFT button then
push the MENU/STORE EDIT button.
"Trk Erase" will appear in the display.
2. Push the or button until "AllMkErase" is
displayed.
4. Format (How to format a CF card)
Format lets you erase all audio files on the CF card and
prepares it for use in the PMD660.
If the CF card is formatted other than FAT16 or FAT32
(FAT=file allocation table), please format in your computer.
1. Select the Format Edit menu choice:
While in stop, push and hold the SHIFT button then
push the MENU/STORE EDIT button.
"Trk Erase" will appear in the display.
3. Push the ENTER button.
The Display switches to "All" flashing.
4. Push the ENTER button.
"Executing" will be displayed until AllMkErase is finished.
Then "Completed" will be displayed.
The PMD660 and display return to stop mode.
5. Push the STOP/CANCEL button to cancel.
28
2. Push the or button until "Format" is displayed.
3. Push the ENTER button.
The Display switches to "OK?" flashing.
4. Push the ENTER button.
"Executing" will be displayed until Format is finished.
Then "Completed" will be displayed.
The PMD660 and display return to stop mode.
5. Push the STOP/CANCEL button to cancel.
Page 35

Virtual Track and Copy Segment
The Marantz Professional PMD660 is the first solid state
recorder to incorporate new file editing features like Virtual
Track and Copy Segment. Designed with the field reporter in
mind, they provide a host of quick and easy to use ways of
locating and accessing segments of audio that everyone can
utilize.
Virtual Track
Virtual Track allows you to set an In point and an Out point
within a file (or across multiple files of the same RecFormat
and RecChannel) for later, immediate access. Files marked
as Virtual Tracks are stored in the PMD660 and can be
accessed quickly by entering the PMD660 in Virtual Playback
mode.
See Page 30, Creating a Virtual Track.
See Page 32, Entering Virtual Track Playback mode.
Note:
Because Virtual Tracks are really just location information
stored on the card, creating Virtual Tracks requires
pratically no memory on your card reserving valuable space
for actual recorded material.
Copy Segment
Copy Segment operates exactly like Virtual Track except,
instead of storing In and Out points for immediate playback
access, Copy Segment physically turns your “highlighted”
section into a new and separate file, without destroying the
original source file(s).
See Page 31, Using Copy Segment to create a new file.
Virtual Track Edit mode
In addition, Virtual Playback mode has an edit menu that
allows you to turn one Virtual Track into a new file, all Virtual
Tracks into new files, erase a Virtual Track, and erase all
Virtual Tracks.
See Page 33, Virtual Track EDIT mode.
ENGLISH
29
Page 36

Creating a Virtual Track
STEREO
MP3
I.MIC
LOCK
44.1K
001
IN
-
STEREO
MP3
I.MIC
LOCK
44.1K
Store
V. T r
?
001
IN
-
STEREO
MP3
I.MIC
LOCK
44.1K
S
etAs OUT
?
001
1. During playback, push the COPY/USB button when the
ENGLISH
audio reaches your desired In Point.
“SetAs IN?” is displayed.
4. When you have reached your desired Out point, push the
COPY/USB button.
“SetAs OUT?” is displayed.
001
S
etAs I
STEREO
MP3
I.MIC44.1K
N?
2. Push the PLAY/PAUSE button to store the In point.
“IN-” will flash in the display to indicate the In point has
been stored and playback of the file resumes.
IN
-
001
STEREO
MP3
44.1K
I.MIC
LOCK
000:00:08
3. Continue to let the PMD660 play to your desired Out point,
or use the standard transport controls like the or
buttons to span greater time lengths.
30
5. Push the PLAY/PAUSE button to store the Out point.
“StoreV. Tr?” is displayed.
Push the PLAY/PAUSE button to store your segment as a
6.
Virtual Track. “Executing” will be displayed momentarily, and
then the display will read “Completed.” To playback your
created Virtual Track, see page 32, Entering Virtual Playback.
Page 37

Using Copy Segment to create a new file
IN
-
STEREO
MP3
I.MIC
LOCK
44.1K
Copy SEG?
001
1. During playback, push the COPY/USB button when the
audio reaches your desired In Point.
4. When you have reached your desired Out point, push the
COPY/USB button.
“SetAs IN?” is displayed.
001
S
etAs I
STEREO
MP3
I.MIC44.1K
N?
2. Push the PLAY/PAUSE button to store the In point.
“IN-” will flash in the display to indicate the In point has
been stored and playback of the file resumes.
IN
-
001
STEREO
MP3
44.1K
I.MIC
LOCK
000:00:08
3. Continue to let the PMD660 play to your desired Out point,
or use the standard transport controls like the or
buttons to span greater time lengths.
“SetAs OUT?” is displayed.
-
IN
S
etAs OUT
001
STEREO
MP3
44.1K
I.MIC
LOCK
?
5. Push the PLAY/PAUSE button to store the Out point.
“StoreV. Tr?” is displayed.
-
IN
001
Store
STEREO
MP3
V. T r
44.1K
I.MIC
LOCK
?
6. Push the or button until the display reads “Copy
SEG?”
ENGLISH
31
Page 38

7. Push the PLAY/PAUSE button to start the Copy process.
STEREO
MP3
I.MIC
LOCK
44.1K
002
STEREO
MP3
I.MIC
LOCK
44.1K
50
%
Entering Virtual Playback mode
ENGLISH
“Executing” will be shown on the display.
When the copy procedure is completed, the display will
show “Completed” for 1 sec. and then returns to stop mode
with your new file as the current track.
Notes:
• When a copy area spans across two or more tracks, a
• When the copy area spans across files of different
• The copy area can not exceed 80 minutes.
• When copying a PCM segment, processing time is real
• When copying an MP3 segment, processing time is at
32
track is connected and copied.
RecFormat or RecChannel, it can not copy.
time.
8X speed.
Now that you have created a Virtual Track, to play it back you
must put the PMD660 into Virtual Track Playback mode.
1. From stop mode, push the COPY/USB button to enter
Virtual Playback mode.
“V. Tr Play” will be shown on the display.
01
LOCK
I.MIC
44.1K
STEREO
MP3
V
2. Push the PLAY/PAUSE button to play the first Virtual
Track. If you have more than one Virtual Track, you can
push the or button until the track you wish to play
is displayed in the upper numeric display. Then push the
PLAY/PAUSE button.
3. To exit Virtual Track Playback mode:
If a Virtual Track is playing press the STOP button twice.
If the PMD660 is in Virtual Track Playback mode and
stopped, simply push the STOP button once.
Page 39
Virtual Track EDIT mode
Just like regular playback mode, Virtual track has its own
EDIT mode. Within this EDIT mode, you have the ability to
turn one of your Virtual tracks into a new file, all Virtual
Tracks into new files, erase a Virtual Track, and erase all
Virtual Tracks.
1. To enter Virtual Track EDIT mode, push and hold the
SHIFT button and then push the MENU/STORE/EDIT
button, while in Virtual Track Playback mode.
See next Frame, How to convert a Virtual Track to a new file.
See Page 34, How to convert all Virtual Tracks to new files.
See Page 34, How to erase a Virtual Track.
See Page 35, How to erase all Virtual Tracks.
Copy SEG?
[How to convert a Virtual Track to a new file]
When in Virtual Track EDIT mode, “Copy SEG?” lets you
copy a single Virtual Track to a new file.
After indetifying the track to copy:
1. Select the “Copy SEG?” Edit menu choice:
While in Virtual Track Play mode, push and hold the SHIFT
button and then push the MENU/STORE/EDIT
button.“Copy SEG?” will appear in the display.
2. Push the ENTER button.
The display switches to the Track number blinking in the
upper numeric display.
3. Push the or button until the Track number you
want to copy is flashing.
4. Push the ENTER button.
“Executing” will be displayed while the copy process works.
Then “Completed” will be displayed for one second.
The display returns to step 3 so you can erase another
track.
5. Push the STOP/CANCEL button to cancel.
ENGLISH
33
Page 40

Copy SEG A?
[How to convert all Virtual Tracks to new
files]
ENGLISH
When in Virtual Track EDIT mode, “Copy SEG A?” lets you
copy all of your Virtual Tracks to new files.
1. Select the “Copy SEG A?” Edit menu choice:
While in Virtual Track Play mode, push and hold the SHIFT
button and then push the MENU/STORE/EDIT button.
“Copy SEG?” will appear in the display.
2. Push the or button until the display reads“Copy
SEG A?”
VT Erase?
[How to erase a Virtual Track]
When in Virtual Track EDIT mode, “VT Erase?” lets you erase
a single Virtual Track.
After indetifying the track to erase:
1. Select the “VT Erase?” Edit menu choice:
While in Virtual Track Play mode, push and hold the SHIFT
button and then push the MENU/STORE/EDIT button.
“Copy SEG?” will appear in the display.
2. Push the or button until “VT Erase?” is displayed.
3. Push the ENTER button.
The display switches “All” blinking in the upper numeric
display.
4. Push the ENTER button.
“Executing” will be displayed while the copy process works.
Then “Completed” will be displayed for one second.
The PMD660 and display returns to stop mode.
5. Push the STOP/CANCEL button to cancel.
34
3. Push the ENTER button.
The display switches to the Track number blinking in the
upper numeric display.
4. Push the or button until the Track number you
want to copy is flashing.
5. Push the ENTER button.
“Executing” will be displayed while the copy process works.
Then “Completed” will be displayed for one second.
The display returns to step 4 so you can erase another
track.
6. Push the STOP/CANCEL button to cancel.
Page 41

AVT Erase?
[How to erase all Virtual Tracks]
When in Virtual Track EDIT mode, “AVT Erase?” lets you
erase all Virtual Tracks from memory.
1. Select the “AVT Erase?” Edit menu choice:
While in Virtual Track Play mode, push and hold the SHIFT
button and then push the MENU/STORE/EDIT button.
“Copy SEG?” will appear in the display.
2. Push the or button until “AVT Erase?” is
displayed.
3. Push the ENTER button.
The display switches to the “All” blinking in the upper
numeric display.
4. Push the ENTER button.
“Executing” will be displayed while the copy process works.
Then “Completed” will be displayed for one second.
The PMD660 and display returns to stop mode.
5. Push the STOP/CANCEL button to cancel.
ENGLISH
35
Page 42

USB mode
USB
USB
COPY
OFF
ON
POWER
The PMD660 records directly onto CF cards.
ENGLISH
Recordings can then be transferred to your desktop or
laptop computer by removing the CF card from the
PMD660, or by connecting the PMD660, to your computer
via the USB port.
Audio recorded in the popular MP3 compression format is
directly available for intranet or internet file sharing.
Computer compatible
On your computer you can then:
• log and archive audio files
• play audio files
Save audio files to:
• your hard drive
• a floppy
• a CD-R disc
• post streaming audio files on your web site
• use software and your computer to transcribe digital
recordings
• An editing program (Marantz Professional’s PMD Edit
application software, available from Marantz
Professional for PC users) lets you convert and edit
audio files that were recorded on the PMD660.
How to connect via the USB port
The CF card in the PMD660 appears as an external drive
on a connected computer.
1. Connect the cable to the PMD660 and your computer.
2. From power off, push and hold the COPY/USB button
while turning on the PMD660's POWER switch.
"USB" is displayed.
36
Page 43

• The PMD660 cannot be used while in USB mode.
• The CF card in the PMD660 appears as a removable
device on your computer.
• The audio files are in a folder that is named MPGLANG1.
• Power off and back on to resume recording or playback
on the PMD660.
Notes:
• If the PMD660 is not connected to the AC adapter,
"Need DC IN" is displayed.
• The USB connection can only be made active when the
PMD660 is off (neither during recording nor playback).
CAUTION:
• Only copy audio files (tracks) to other volumes.
• Do not modify or delete the EDL file.
• If the EDL and Virtual Track file is missing or damaged
PMD660 will not be able to recognize EDL marks and
Virtual Tracks.
• Do not remove a CF card during USB mode. Data and
the CF card can be damaged.
• See the enclosed CD-ROM for PMDEdit demo
software for computer audio file manipulation.
• PMDEdit is a full featured software suite designed for
Marantz Professional digital recorders available for
purchase at www.d-mpro.com.
Diagram of file structure
A file titled PMD660 will appear on your computer.
EDL,Virtual Track and a folder (directory) titled MPGLANG1
will also appear.
Files within the MPGLANG1 folder are numbered from
aaaaa001 through the number of tracks recorded to a
maximum of aaaaa999.
("aaaaa" depends on the Machine ID parameter).
The file extension will be .mp3 or .wav depending on the
"Rec Format" parameter that is set for the recording.
Root-----PMD660.EDL
|-----PMD660.CPY
|-----MPGLANG1
|---aaaaa001.MP3
|---aaaaa002.MP3
|---aaaaa003.MP3
Changes made to file names or structures on your
computer will prevent file recognition and playback in the
PMD660.
Machine ID
An audio track (file) has Machine ID information. This
information is included in a file name. For example, if the
Machine ID is "aaaaa", the first file is numbered
"aaaaa001.wav" or "aaaaa001.mp3".
Default setting is MZ000.
ENGLISH
Setup the "Machine ID" of the preset menu. (page 54)
37
Page 44

Additional Functions
Battery
ENGLISH
Battery setup
The PMD660 operates on 4 standard AA size Alkaline, or
Ni-MH batteries.
Setup the "Battery" of the preset menu.
(page 53)
Battery indicator
The Battery symbol appears in most displays to indicate
battery life.
indicates that the battery is fully charged.
flashing indicates that the battery is very low!
• If Beep is set to On, the PMD660 will beep.
• If the PMD660 continues to operate, it will
automatically shut down.
• If recording, it will write track information,
stop recording and power off.
• If in playback, it will stop playback and
power off.
Auto power off
If the PMD660 is not operated for 15 minutes during stop
or play pause, power can be automatically shut off to
conserve battery life.
Setup the "AutoPowOff" of the preset menu. (page 53)
38
indicates that the battery, is half charged.
Record or playback time is available.
indicates that the battery charge is getting
low. Battery charge is required as there is
little record or playback time available.
Beep Alarm
When battery charge can provide no more Power and Beep
is set to On, the battery indicator will flash and the PMD660
will beep and power off.
Setup the "Beep" of the preset menu. (page 54)
Page 45

Key lock
The key lock secures the PMD660 in the state it is in
during Record, Playback or Stop.
Push and hold the SHIFT button while pushing the
DISPLAY/ LOCK button to turn KEY LOCK on. All buttons
and functions will cease to operate with the exception of
the LIGHT button.
Phantom Power
Switch Phantom to ON to provide +48V of power for a
condenser microphone(s).
ENGLISH
ON: +48V is supplied to power condenser microphone(s).
OFF: No microphone power is supplied.
It takes a few seconds to begin recording audio after
switching ON/OFF.
Set Date and Time
The date and time are written on each audio track (file)
when the track is started. When an audio track is viewed
on a computer, this date and time appears as when the file
was 'created'. (US date form is illustrated.)
Setup the "Date/Time" of the preset menu. (page 45)
LED level meter
The Level LED lets you select the type of level meters.
• At Normal, the level meter(s) display is normal.
• At Peak Only, the level meter(s) displays only a peak
level.
Setup the "Meter Mode" of the preset menu. (page 52)
Microphone recommendations
Professional condenser microphone(s) (which require
additional power from either the PMD660's phantom power
or from another source) are recommended because they
provide greater sensitivity and higher quality audio recording.
Dynamic microphone(s) can be used, but they do not yield
optimum audio quality recordings in some applications.
Consult with your local dealer to select the appropriate
microphone(s) for your specific application. In many cases,
they can demonstrate the various performances and
characteristics of microphones for your use.
39
Page 46

Display
Push the DISPLAY / LOCK button to alternate
information displays.
ENGLISH
Displays are slightly different in Stop, Record and Play.
• During Record:
• Elapsed record time of the current track
(Default display)
↓
• Remaining record time for the CF card
↓
• Recording date information
↓
• Recording time information
↓
• Recording track name (Machine ID) information
↓
• Elapsed record time of the current track
(Default display)
• During Stop:
• Remaining record time for the CF card
(Default display)
↓
• Total EDL marks on CF card.
↓
• Current clock date
↓
• Current clock time
↓
• Remaining record time for the CF card
(Default display)
40
• During Playback:
• Elapsed play time of the current track
(Default display)
↓
• Remaining playing time on the current track
↓
• Recorded date information
↓
• Recorded time information
↓
• Playing track name (Machine ID) information
↓
• Elapsed play time of the current track
(Default display)
Page 47

Preset Setup
Presets lets you set or change recording and playback
parameters, such as changing inputs and setting the Date
and Time.
Three menu selectable Presets make it easy to switch
between your commonly used input, recording format and
other menu selections.
General Menu procedure
1. With the PMD660 at Stop, Push the MENU/STORE
EDIT button.
2. Push the or button to choose the Preset number.
3. When displayed, push the ENTER button to select that
Preset number choice.
4. Push the or button to tab through the sub menu
display.
5. When the desired parameter or value is displayed and
flashing, push the ENTER button to select it.
6. Repeat steps 2-5 as desired.
7. When finished, push the MENU/STORE EDIT button to
store your changes, or push the STOP/CANCEL button
to cancel them.
Preset defaults
The default Menu settings for Preset 1, 2 and 3 can be
restored by the Default Menu choice. (pages 42 and 43.)
ENGLISH
41
Page 48

Table of Preset defaults (USA)
Display Selection range Default Setting
ENGLISH
1. Input INT MIC/ MIC/ LINE INT MIC MIC MIC
2. Output LINE, SP/HP SP/HP SP/HP SP/HP
3. Date/Time 2004 - 2099
Jan - Dec
1 - 31
AM/PM 00:00 - 11:59
4. Rec Format MP3-44.1K/ MP3-48K/ MP3-44.1K MP3-44.1K PCM-48K
PCM-44.1K/ PCM-48K
5. RecChannel Stereo/Mono Stereo Stereo Stereo
6. PreRecord On/Off On On Off
7. Manual Trk On/Off On On On
8. Auto Trk Off/1/5/10/15/30min, 5min Off Off
1/2/6/8/12/24 hrs
9. Auto Mark On/Off Off Off Off
-60/-54/-38/-20dB -38dB -38dB -38dB
10. Silent Skip On/Off Off Off Off
-60/-54/-38/-20dB -38dB -38dB -38dB
11. LevelCont. Manual/ALC ALC Manual Manual
12. Meter Mode Normal/Peak Only Normal Normal Normal
13. Mic Atten. 0/-20dB 0dB 0dB 0dB
14. AutoPowoff On/Off On On On
15. Battery Alkaline/NiMH Alkaline Alkaline Alkaline
16. Beep On/Off On On On
17. Machine ID 5-digit ASCII code MZ000 MZ000 MZ000
18. Default ---
19. Version --Application: Meeting compressed Music compressed Highest Quality
Preset1 Preset2 Preset3
Uncompressed
42
Page 49

Table of Preset defaults (Europe)
Display Selection range Default Setting
Preset1 Preset2 Preset3
1. Input INT MIC/ MIC/ LINE INT MIC MIC INT MIC
2. Output LINE, SP/HP SP/HP SP/HP SP/HP
3. Data/Time 2004 - 2099
Jan - Dec
1 - 31
00:00 - 23:59
4. RecFormat MP3-44.1K/ MP3-48K/ PCM-44.1K PCM-48K MP3-44.1K
PCM-44.1K/ PCM-48K
5. RecChannel Stereo/Mono Stereo Stereo Stereo
6. PreRecord On/Off On On On
7. Manual Trk On/Off On On On
8. Auto Trk Off/1/5/10/15/30min, Off Off Off
1/2/6/8/12/24 hrs
9. Auto Mark On/Off Off Off Off
-60/-54/-38/-20dB -38dB -38dB -38dB
10. Silent Skip On/Off Off Off Off
-60/-54/-38/-20dB -38dB -38dB -38dB
11. LevelCont. Manual/ALC Manual Manual Manual
12. Meter Mode Normat/Peak Only Normal Normal Normal
13. Mic Atten. 0/-20dB 0dB 0dB 0dB
14. AutoPowoff On/Off On On On
15. Battery Alkaline/NiMH Alkaline Alkaline Alkaline
16. Beep On/Off On On On
17. Machine ID 5-digit ASCII code MZ000 MZ000 MZ000
18. Default ---
19. Version --Application: High Quality Highest Quality Music
Uncompressed Uncompressed Compressed
ENGLISH
43
Page 50

1. Input (How to select input(s) for recording)
Audio input(s) for recording are selected using the Input
Menu.
ENGLISH
1. From stop, push the MENU/STORE EDIT button.
2. Push the or button to select Preset 1, 2 or 3.
3. Push the ENTER button to accept the selected Preset.
2. Output (How to select output for playback)
Audio output for playback is selected using the Output
Menu.
1. From stop, push the MENU/STORE EDIT button.
2. Push the or button to select Preset 1, 2 or 3.
3. Push the ENTER button to accept the selected Preset.
4. Push the or button until Input is displayed.
5. Push the ENTER button while Input is displayed.
The input choice( INT MIC, MIC or LINE ) is flashing.
6. Push the or button to tab through the input
choices.
7. When correct, push the ENTER button.
Display returns to Input.
8. Push the or button to select other Menu
choices for editing. When editing the Preset is
complete, push the MENU/STORE EDIT button to
store the changes, or push the STOP/CANCEL button
to exit Menu mode without making any changes.
9. Display returns to stop mode.
Notes:
When you choose the INT MIC input, the I.MIC label is
displayed. When you choose the MIC input, the MIC
label is displayed. When you choose the LINE input,
the LINE label is displayed.
The PMD660 records only from the selected input. For
example, if the input selected is LINE and no input
source is connected to the LINE IN jacks, the PMD660
will record silence. Watch the level meters while in
record pause. If the level stays at one display bar,
check for the proper input selection.
44
4. Push the or button until Output is displayed.
5. Push the ENTER button while Output is displayed.
The output choice( LINE or SP/HP ) is flashing.
6. Push the or button to tab through the output
choices.
7. When correct, push the ENTER button.
Display returns to Output.
8. Push the or button to select other Menu
choices for editing. When editing the Preset is
complete, push the MENU/STORE EDIT button to
store the changes, or push the STOP/CANCEL button
to exit Menu mode without making any changes.
9. Display returns to stop mode.
Notes:
The PMD660 plays back only through the selected
output. For example, if the output selected is LINE, no
sound output is available in the speaker or
headphones (SP/HP) or vice versa.
Page 51

3. Date/Time (How to set or change the Date and Time)
The date and time are written on each audio track(file)
when the track is started. When an audio track is viewed
on a computer, this date and time appears as when the file
was 'created'.(US date form is illustrated.)
1. From stop, push the MENU/STORE EDIT button.
2. Push the or button to select Preset 1, 2 or 3.
3. Push the ENTER button to accept the selected Preset.
4. Push the or button so Date/Time is
displayed.
5. Push the ENTER button while Date/Time is displayed.
The Date and time information will be displayed with
the month flashing. (Europe : the day flashing)
6. Push the or button until the current month is
displayed.
7. Push the ENTER button to confirm the month.
The day will be flashing. (Europe : the month flashing)
8. Push the or button until the current day is
displayed.
9. Push the ENTER button to confirm the day.
The year will be flashing.
10. Push the or button until the current year is
displayed.
11. Push the ENTER button to confirm the year.
The hour will be flashing.
12. Push the or button until the current hour is
displayed.
13. Push the ENTER button to confirm the hour.
The minute will be flashing.
14. Push the or button until the current minute is
displayed.
15. Push the ENTER button to confirm the minute.
16. Date/Time will be displayed.
17. If you are finished making Menu changes to the
Preset, push the MENU/STORE EDIT button to save
your changes.
(or push the STOP/CANCEL button to cancel all changes)
18. Display returns to stop mode.
ENGLISH
Note:
The Date/Time setting will remain for about 5 years if
the PMD660 is not plugged in.
Date/Time setting applies to all three presets.
45
Page 52

4. Rec Format
(How to set or change the Rec Format parameters)
The PMD660 can record in several compression algorithms.
See explanation and chart below.
ENGLISH
• First, determine the input connection you want to record
from; INT MIC, MIC, or LINE.
• Second, set the Preset Menu Input choice to
correspond with the connection.
RecChannel Rec Format bit rate file extensions
in menu in menu
Stereo PCM-44.1K 1412k .wav
PCM-48K 1536k .wav
MP3-44.1K 128k .mp3
MP3-48K 128k .mp3
Mono PCM-44.1K 705.6k .wav
PCM-48K 768k .wav
MP3-44.1K 64k .mp3
MP3-48K 64k .mp3
1. From stop, push the MENU/STORE EDIT button.
2. Push the or button to select Preset 1, 2 or 3.
3. Push the ENTER button to accept the selected Preset.
4. Push the or button so Rec Format is displayed.
5. Push the ENTER button while Rec Format is displayed
and flashing. The Rec Format choice( PCM 44.1K,
PCM-48K, MP3-44.1K or MP3-48K) is flashing.
6. Push the or button to tab through the Rec
Format choices.
7. When correct, push the ENTER button.
Display returns to Rec Format.
8. Push the or button to select other Menu
choices for editing. When editing the Preset is
complete, push the MENU/STORE EDIT button to
store the changes, or push the STOP/CANCEL button
to exit Menu mode without making any changes.
9. Display returns to stop mode.
5. RecChannel
(How to set or change the RecChannel parameters)
1. From stop, push the MENU/STORE EDIT button.
2. Push the or button to select Preset 1, 2 or 3.
3. Push the ENTER button to accept the selected Preset.
4. Push the or button so RecChannel is displayed.
5. Push the ENTER button while RecChannel is
displayed. The RecChannel choice (Stereo or Mono) is
flashing.
6. Push the or button to tab through the
RecChannel choices.
7. When correct, push the ENTER button.
Display returns to RecChannel.
8. Push the or button to select other Menu
choices for editing. When editing the Preset is
complete, push the MENU/STORE EDIT button to
store the changes, or push the STOP/CANCEL button
to exit Menu mode without making any changes.
9. Display returns to stop mode.
46
Page 53

6. PreRecord
When PreRecord is on and the PMD660 is in record
pause, it 'listens to' the selected audio input(s) and
continuously buffers 2 seconds of audio. When recording
begins, the 2 second pre record buffer is written at the
beginning of the new track. The 2 seconds give you time
to start recording without missing the first seconds of
audio.
1. From stop, push the MENU/STORE EDIT button.
2. Push the or button to select Preset1, 2 or 3.
3. Push the ENTER button to accept the selected Preset.
4. Push the or button so PreRecord is displayed.
5. Push the ENTER button while PreRecord is displayed.
The PreRecord choice (On or Off) is flashing.
6. Push the or button to tab through the
PreRecord choices.
7. When correct, push the ENTER button.
Display returns to PreRecord.
8. Push the or button to select other Menu
choices for editing. When editing the Preset is
complete, push the MENU/STORE EDIT button to
store the changes, or push the STOP/CANCEL button
to exit Menu mode without making any changes.
9. Display returns to stop mode.
7. Manual Trk
When Manual Trk incrementing is On during recording,
push the REC button to increment the track. A new track is
created at that point. A slight break might be heard during
playback.
1. From stop, push the MENU/STORE EDIT button.
2. Push the or button to select Preset 1, 2 or 3.
3. Push the ENTER button to accept the selected Preset.
4. Push the or button so Manual Trk is displayed.
5. Push the ENTER button while Manual Trk is displayed.
The Manual Trk choice (On or Off) is flashing.
6. Push the or button to tab through the Manual
Trk choices.
7. When correct, push the ENTER button.
Display returns to Manual Trk.
8. Push the or button to select other Menu
choices for editing. When editing the Preset is
complete, push the MENU/STORE EDIT button to
store the changes, or push the STOP/CANCEL button
to exit Menu mode without making any changes.
9. Display returns to stop mode.
ENGLISH
47
Page 54

8. Auto Trk
With Auto Trk (Automatic Track incrementing) on, a new
track begins automatically at specified intervals of
recording time.
ENGLISH
• Automatic Tracks are silent. Playback across an
Automatic Track does not produce any sound.
• Automatic Track can be set to increment every 1, 5, 10,
15 or 30 minutes, or every 1, 2, 6, 8, 12 or 24 hours.
• Automatic Track makes finding a particular point in a
recording easier.
For example, if a new track begins every minute during
playback :
• The Minute Tracks make finding a particular passage
easier because of the relationship between track
numbers and time.
• You can select track 3 to play approximately the 3rd
minute of recording.
• You can go directly to the beginning of the 10th minute
by selecting track 10, etc.
Track Recording time
# minutes:seconds
1…………………….0:00 – 1:00
2…………………….1:01 – 2:00
3…………………….2:01 – 3:00
1. From stop, push the MENU/STORE EDIT button.
2. Push the or button to select Preset1, 2 or 3.
3. Push the ENTER button to accept the selected Preset.
4. Push the or button so Auto Trk is displayed.
5. Push the ENTER button while Auto Trk is displayed.
The Auto Trk choice (Off, 1, 5, 10, 15 or 30 minutes, or
1, 2, 6, 8, 12 or 24 hours) is flashing.
6. Push the or button to tab through the Auto Trk
choices.
7. When correct, push the ENTER button.
Display returns to Auto Trk.
8. Push the or button to select other Menu
choices for editing. When editing the Preset is
complete, push the MENU/STORE EDIT button to
store the changes, or push the STOP/CANCEL button
to exit Menu mode without making any changes.
9. Display returns to stop mode.
Note:
If you intend to transfer your PMD660 audio recording
to a CD, the Auto Track function makes the CD easily
navigable without requiring any post production to
divide files into tracks.
48
Page 55

9. Auto Mark
The Auto Mark Menu item turns the automatic EDL mark
feature Off or On. See page 25 to manually add EDL marks.
1. From stop, push the MENU/STORE EDIT button.
2. Push the or button to select Preset1, 2 or 3.
3. Push the ENTER button to accept the selected Preset.
• If Auto Mark is on and the machine is in record - pause,
when recording is resumed a mark will be added.
• If Auto Mark is on and the PMD660 is recording audio
below the sound threshold for more than three seconds,
audio that crosses the threshold will cause a mark to be
added.
The Auto Mark Menu setting permits :
• Turning Auto Mark On or Off
• Adjusting the margin sound level that defines silence in
-60dB, -54dB, -38dB, or -20dB.
4. Push the or button so Auto Mark is displayed.
5. Push the ENTER button while Auto Mark is displayed.
The On or Off will be flashing.
6. Push the or button to toggle between On and Off.
7. When correct, push the ENTER button.
The display switches to sound level flashing.
8. Push the or button to change the margin of
sound level choices (-60dB, -54dB, -38dB or -20dB).
9. When correct, push the ENTER button.
Display returns to Auto Mark.
10. Push the or button to select other Menu
choices for editing. When editing the Preset is
complete, push the MENU/STORE EDIT button to
store the changes, or push the STOP/CANCEL button
to exit Menu mode without making any changes.
11. Display returns to stop mode.
Note:
The Auto Mark and Silent Skip features use the same
level setting.
As the level of Auto Mark is changed, that of Silent Skip
also changes automatically.
ENGLISH
49
Page 56

10. Silent Skip
Silent Skip automatically pauses recording when there is a
period of silence and resumes recording when sound resumes.
This feature is often referred to as voice activated
ENGLISH
recording.
Silent Skip looks for sound below a preset level for three
seconds time.
When that occurs, the PMD660 switches to record pause.
When a signal above the preset level is input, recording
resumes.
The Silent Skip Menu setting permits :
• Turning Silent Skip On or Off.
• Adjusting the margin of sound level that defines silence
in -60dB, -54dB, -38dB or -20dB.
When the Auto Mark menu choice is at On, resumption of
recording after a record pause by Silent Skip adds an EDL
mark.
1. From stop, push the MENU/STORE EDIT button.
2. Push the or button to select Preset 1, 2 or 3.
3. Push the ENTER button to accept the selected Preset.
4. Push the or button so Silent Skip is displayed.
5. Push the ENTER button while Silent Skip is displayed.
The On or Off will be flashing.
6. Push the or button to toggle between On and Off.
7. When correct, push the ENTER button.
The display switches to sound level flashing.
8. Push the or button to change the margin
sound level choices (-60dB, -54dB, -38dB or -20dB).
9. When correct, push the ENTER button.
Display returns to Silent Skip.
10. Push the or button to select other Menu
choices for editing. When editing the Preset is
complete, push the MENU/STORE EDIT button to
store the changes, or push the STOP/CANCEL button
to exit Menu mode without making any changes.
11. Display returns to stop mode.
Note:
The Auto Mark and Silent Skip features use the same
level setting.
As the level of Auto Mark is changed, that of Silent Skip
also changes automatically.
50
Page 57

11. LevelCont.
The level control allows you to select the type of input level
control for recording.
1. From stop, push the MENU/STORE EDIT button.
2. Push the or button to select Preset 1, 2 or 3.
3. Push the ENTER button to accept the selected Preset.
• At Manual, you control the input level with the REC
LEVEL controls.
• At ALC, the PMD660 automatically responds to changes
in input level.
(ALC: Automatic Level Control = Automatic Gain Control)
With ALC (Automatic Level Control) on:
If recording is quiet, the input level is increased.
If recording is loud, the input level is decreased.
This is a desirable feature when recording a meeting with
several speakers because a speaker close to the
microphone and/or with a loud voice will be automatically
recorded at a reduced level. A quiet speaker will be
recorded at an increased level and is less likely to have
their input missed.
ALC is usually undesirable when recording music (voice or
instrument) because the transitions in input level may be
audible in the recording. This can make the recording
'hissy' by raising the level during quiet passages and
recording ambient noise.
The REC LEVEL controls do not work when the ALC is
selected.
4. Push the or button so LevelCont is displayed.
5. Push the ENTER button while LevelCont is displayed.
The LevelCont choice (Manual or ALC) is flashing.
6. Push the or button to tab through the
LevelCont choices.
7. When correct, push the ENTER button.
Display returns to LevelCont.
8. Push the or button to select other Menu
choices for editing. When editing the Preset is
complete, push the MENU/STORE EDIT button to
store the changes, or push the STOP/CANCEL button
to exit Menu mode without making any changes.
9. Display returns to stop mode.
ENGLISH
51
Page 58

12. Meter Mode
The Meter Mode lets you select the type of level meters.
• At Normal, all the level meters are displayed.
• At Peak Only, the level meter(s) displays only a peak
ENGLISH
level.
1. From stop, push the MENU/STORE EDIT button.
2. Push the or button to select Preset 1, 2 or 3.
3. Push the ENTER button to accept the selected Preset.
4. Push the or button so Meter Mode is
displayed.
5. Push the ENTER button while Meter Mode is
displayed.
The Meter Mode choice (Normal or Peak only) is
flashing.
6. Push the or button to tab through the Meter
Mode choices.
7. When correct, push the ENTER button.
Display returns to Meter Mode.
8. Push the or button to select other Menu
choices for editing. When editing the Preset is
complete, push the MENU/STORE EDIT button to
store the changes, or push the STOP/CANCEL button
to exit Menu mode without making any changes.
9. Display returns to stop mode.
13. Mic Atten.
The Mic Atten. let you select the direct use of microphones
that differ in sensitivity.
• At 0dB there is no microphone attenuation.
• At -20dB, Input from a microphone(s) connected to the
XLR MIC IN jacks is cut by -20dB.
1. From stop, push the MENU/STORE EDIT button.
2. Push the or button to select Preset 1, 2 or 3.
3. Push the ENTER button to accept the selected Preset.
4. Push the or button so Mic Atten is displayed.
5. Push the ENTER button while Mic Atten is displayed.
The Mic Atten choice (0dB or -20dB) is flashing.
6. Push the or button to tab through the Mic
Atten choices.
7. When correct push the ENTER button.
Display returns to Mic Atten.
8. Push the or button to select other Menu
choices for editing. When editing the Preset is
complete, push the MENU/STORE EDIT button to
store the changes, or push the STOP/CANCEL button
to exit Menu mode without making any changes.
9. Display returns to stop mode.
Note:
When Peak Only is set, the battery life will be
extended.
52
Page 59

ENGLISH
14. AutoPowOff
If the PMD660 is not used for 15 minutes during stop or play
- pause, power can be automatically shut off to conserve
battery life.
1. From stop, push the MENU/STORE EDIT button.
2. Push the or button to select Preset 1, 2 or 3.
3. Push the ENTER button to accept the selected Preset.
4. Push the or button so AutoPowOff is
displayed.
5. Push the ENTER button while AutoPowOff is displayed.
The AutoPowOff choice (On or Off) is flashing.
6. Push the or button to tab through the
AutoPowOff choices.
7. When correct, push the ENTER button.
Display returns to AutoPowOff.
8. Push the or button to select other Menu
choices for editing. When editing the Preset is
complete, push the MENU/STORE EDIT button to
accept the changes, or push the STOP/CANCEL
button to exit Menu mode without making any
changes.
9. Display returns to stop mode.
15. Battery
The PMD660 operates on 4 standard AA size Alkaline, or
Ni-MH batteries.
1. From stop, push the MENU/STORE EDIT button.
2. Push the or button to select Preset 1, 2 or 3.
3. Push the ENTER button to accept the selected Preset.
ENGLISH
4. Push the or button so Battery is displayed.
5. Push the ENTER button while Battery is displayed.
The Battery choice (Alkaline or NiMH) is flashing.
6. Push the or button to tab through the Battery
choices.
7. When correct, push the ENTER button.
Display returns to Battery.
8. Push the or button to select other Menu
choices for editing. When editing the Preset is
complete, push the MENU/STORE EDIT button to
accept the changes, or push the STOP/CANCEL
button to exit Menu mode without making any
changes.
9. Display returns to stop mode.
53
Page 60

16. Beep
When battery charge is depleted and Beep is set to On,
the PMD660 will beep.
If the PMD660 is not used for 15 minutes during stop or
ENGLISH
play - pause, power can be automatically shut off to
conserve battery life. (See AutoPowOff page 53.)
If AutoPowOff and Beep are both set to On, the PMD660
will beep to alert you that the power is shutting off.
1. From stop, push the MENU/STORE EDIT button.
2. Push the or button to select Preset 1, 2 or 3.
3. Push the ENTER button to accept the selected Preset.
4. Push the or button until Beep is displayed.
5. Push the ENTER button while Beep is displayed.
The Beep choice (On or Off) is flashing.
6. Push the or button to tab through the Beep
choices.
7. When correct, push the ENTER button.
Display returns to Beep.
8. Push the or button to select other Menu
choices for editing. When editing the Preset is
complete, push the MENU/STORE EDIT button to
store the changes, or push the STOP/CANCEL button
to exit Menu mode without making any changes.
9. Display returns to stop mode.
17. Machine ID
An audio track (file) has Machine ID information.
This information is included in the file name.
For example, if the Machine ID is "aaaaa", the first file is
numbered "aaaaa001.wav" or "aaaaa001.mp3".
1. From stop, push the MENU/STORE EDIT button.
2. Push the or button to select Preset 1, 2 or 3.
3. Push the ENTER button to accept the selected Preset.
4. Push the or button untill Machine ID is
displayed.
5. Push the ENTER button while Machine ID is displayed.
The first character of the Machine ID will be flashing.
6. Push the or button to select the characters.
7. When correct, push the ENTER button.
The next position will be flashing.
Repeat steps 6 and 7 until all Machine ID characters
are correct.
8. After the last character, push the ENTER button.
The display returns to the Machine ID.
9. Push the or button to select other Menu
choices for editing. When editing the Preset is
complete, push the MENU/STORE EDIT button to
store the changes, or push the STOP/CANCEL button
to exit Menu mode without making any changes.
10. Display returns to stop mode.
54
Note:
The Machine ID setting applies to all three presets.
Page 61

18. Default
The Default menu choice resets all Menu (not Edit menu)
items in the Preset to their default values.
This is convenient if you are setting up a new Preset
configuration because you do not have to check all the
settings - you know they are at the default.
Note:
US defaults are used for illustration.
See page 42, 43 for a table of menu defaults.
Defaults are listed for each menu item.
1. From stop, push the MENU/EDIT button.
2. Push the or button to select Preset 1, 2 or 3.
3. Push the ENTER button to accept the selected Preset.
4. Push the or button until Default is displayed.
5. Push the ENTER button while Default is displayed.
The OK? is flashing.
6. Push the ENTER button.
Display returns to stop mode.
Troubleshooting
Should problems occur, it is often unnecessary to consult
your dealer or technical service department. On the basis
of the following checks, you may be able to rectify a
number of conditions yourself without difficulty. If the
condition cannot be remedied after the following check,
please consult your dealer, or contact Marantz
Professional at 866-405-2154(Toll Free).
The PMD660 does not turn on.
• Install fresh batteries.
• Check AC adapter connections.
The PMD660 turns on then turns itself off.
• Install fresh batteries.
The PMD660 seems to record, but there is no sound
on playback.
• Check input settings.
(For example, if LINE input is selected and no input is
connected to the LINE IN jack, the PMD660 will record
silence. The PMD660 will not playback.)
• Check output settings.
(For example, if the output selected is LINE, no sound
output is available in the speaker or headphones
(SP/HP) or vice versa.)
ENGLISH
There is no audio playback through headphones or
internal speaker.
• Check HP/SPK VOL control setting.
• Check a different track or CF card.
• Check output setting.
55
Page 62

The PMD660 will not record.
• Check that the maximum of 999 tracks have not been
recorded.
• Check that the PMD660 acknowledges the CF card.
ENGLISH
No signal from microphone input.
• Check input selection.
• Check REC level control settings.
• Check if microphone(s) require(s) Phantom power.
There is excessive noise on the PMD660.
• Check cable connections and/or replace cable.
• Check for proper gain levels.
Playback on a PC results in poor sound.
• Check quality of PC sound card and program.
• Check frequency conversion program.*
* The PMD660 records audio files with a sampling
frequency of 48kHz. Some PC programs convert the
files to 44.1kHz (using a sample rate converter). Only
high quality sample rate converters should be used.
PC cannot read files
• Check the capability of the PC program. Some playback
and editing programs do not support MP3 or Broadcast
Wave (.wav) formats.
If the PMD660 exhibits erratic behavior, the
microprocessor can be reset by powering off,
disconnecting AC power and removing batteries.
Care and Maintenance
Use a soft cloth slightly moistened with mild detergent
solution.
Media cards that are heavily used should be occasionally
reformatted to avoid audio problems due to fragmentation.
56
Page 63

Error Message
Display Description
CF Card
No Card No CF card inserted, or card is not detected.
Unformat CF card is formatted other than FAT16 or FAT32.
Full Card Remaining capacity of CF card is less than a few kbytes.
Full 999 The number of tracks on the CF card has reached the 999 maximum.
Full Mark The number of EDL marks on the card has reached the 255 maximum.
No Track Track file is not detected.
VBR VBR file is forwarded or rewinded.
No Mark Mark of track file is not detected.
Can not...
Invalid operation.
LowBattery Battery voltage is low.
Need DC IN AC adapter is not connected to PMD660.
Bad File The menu setting of the file setting is not detected or file error.
Err FS Version up file or file system error.
Full V99 Copy track (Virtual Track) file is 99 track.
No V.Track Copy track (Virtual Track) file is not detected.
Limit 80m Copy track (Virtual Track) time set to over 80 minutes.
Err Format Not supported file format.
Others
Err DSP DSP processing error.
Err Card Card or File error.
Err RTC RTC
processing error.
Err EEPROM EEPROM error.
Err SRAM SRAM error.
Err Flash Flash ROM error.
57
57
ENGLISH
Page 64

Specifications
Digital audio system
ENGLISH
System .............................................. Solid State Recorder
Usable media ........................................ CF memory cards
Recording and media methods
.mp3 .................................. MPEG1 Layer III compression
PCM ...................................................... 16 bit linear PCM
Recording bit rate
MP3 mono ............................................................ 64 kbps
MP3 stereo .......................................................... 128 kbps
Sampling frequency ...................................... 44.1, 48 kHz
Number of channels .......................... 2 (stereo), 1 (mono)
Frequency response ............................ 16,000 Hz (-0.5dB)
Microdrive
Inputs
MIC IN L/R
Type .................................. XLR (1:GND, 2:HOT, 3:COLD)
Input sensitivity (MIC) .................... 1.2 mVrms/6.5 kohms
LINE IN
Type .................................................................... mini jack
Input sensitivity .............................. 300 mVrms/20 kohms
Outputs
LINE OUT
Type .................................................................... mini jack
Standard level ................................ 2 Vrms max./2 kohms
General
Headphone output power ........................ 8 mW/ 16 ohms
Speaker output power.............................. 150 mW/ 8 ohms
Phantom power ................................................ +48V, 5mA
Signal-to-Noise Ratio
IEC-A weighted ................................................ LINE 80 dB
MIC 60 dB
Total harmonic distortion
at 0 VU (PCM) ................................................ LINE 0.06%
MIC 0.15%
Dynamic range ........................................................ 80 dB
58
Power consumption
Recording/Playback ........................................ 4.0 W (DC)
Battery life (Alkaline) ................................ 4 hours (typical)
Dimensions
Width .......................................................... 113 mm (4.5")
Height ............................................................ 47 mm (1.9")
Depth ........................................................ 183.5 mm (7.2")
Weight ...................................................... 0.5 kg (1.1 lbs.)
Page 65

Included accessories
CF card (64MB) (US only) ................................................ 1
AC adapter........................................................................ 1
USB cable ........................................................................ 1
Audio cable ...................................................................... 1
Carry strap ........................................................................ 1
Screws (ISO 3x10 mm) .................................................... 2
Plastic pin and retainer .................................................... 1
CD-ROM .......................................................................... 1
User Guide........................................................................ 1
LIMITED WARRANTY - USA
Your Marantz Professional product is warranted against
manufacturer defects in material and workmanship for a
period of one year parts and labor. Marantz will pay for
labor and material expenses for items covered by this
limited warranty.
Except as specified below, this warranty covers defects in
material and workmanship. The following are not covered
under warranty:
ENGLISH
Optional accessories**
(See www.d-mpro.com for description and/or ordering
information)
Wired remote ....................................................RC600PMD
* Specifications subject to change without notice.
1. Damage, deterioration, malfunction or failure to meet
performance specifications resulting from:
a) Accidents, acts of nature, misuse, abuse, neglect or
unauthorized product modification.
b) Improper installation, removal or maintenance, or
failure to follow supplied instructions.
c) Repair or attempted repair by a non-Marantz
authorized agent.
d) Any shipment (claims must be presented to the
carrier).
e) Any cause other than a defect of manufacturing.
2. Cleaning, check-ups with no fault found or changes
incurred for installation, removal or reinstallation of the
product.
3. Any serialized product on which the serial number has
been defaced, modified or removed.
4. Batteries and battery chargers.
5. Accessories, including but not limited to: cables,
mounting hardware and brackets, cleaning accessories,
power cords and adapters, and carry cases.
6. Products purchased outside of the United States, its
possessions or territories.
59
Page 66

Non-transferable warranty
This Warranty may be enforced only by the original
purchaser.
ENGLISH
Service Information
1. If your unit needs service in the USA, contact our
service referral at the appropriate telephone number
indicated below. We will advise you of the name and
location of one or more authorized service centers from
which service may be obtained. Please do not return
the unit directly to us.
2. You must pay any shipping charges if it is necessary to
ship the product for service. If the necessary repairs are
covered by the warranty, we will pay return shipping
charges to your location anywhere in the United States
or its territories.
3. Whenever warranty service is required, you must
present the original dated sales receipt or other proof of
date purchased.
Limitation of Implied warranties
All implied warranties, including warranties of
merchantability and fitness for a particular purpose, are
limited in duration to the length of this warranty.
Exclusion of Damages
Liability for any defective product is limited to the product's
repair or replacement at manufacturer’s option.
Manufacturer shall not be liable for damage to other
products caused by any defects in Marantz products,
damages based on inconvenience or loss of use of the
product, or any other damages, whether incidental,
consequential, or otherwise.
Some States do not allow limitations on how long an
implied warranty lasts and/or do not allow the exclusion or
limitation of incidental or consequential damages, so the
above limitations and exclusions may not apply to you.
How state law relates to the warranty
This warranty gives you specific legal rights, and you may
have other rights which vary from State to State.
Marantz Professional service number:
Marantz Professional Factory Service (866)405-2154
This warranty is enforcable only in the United States and
its possessions or territories.
60
Page 67

Marantz is a registered trademark.
Printed in Japan 2005/02 00M20BS851310 mzh-g
 Loading...