

Page 1

User Guide
Guía del usuario
Guide d’utilisation
Guida per l’uso
Benutzerhandbuch
Appendix
English (2–38)
Español (39–75)
Français (76–112)
Italiano (113–149)
Deutsch (150–186)
English (187)
Page 2

User Guide (English)
Introduction
Features:
• Record professional-grade audio directly to stable and reliable SD/SDHC flash media
• Selectable stereo/mono/WAV/MP3 recording
• 44.1, 48 and 96kHz sample rates (WAV)
• Selectable 16- and 24-bit recording depths
• Six selectable bit rates from 32 kbps to 320 kbps (MP3)
• S/PDIF digital input for connecting to studio interfaces and more
• (2) Balanced Combo XLR-1/4” (6.35 mm) mic inputs with +48V phantom power
Box Contents
PMD561
Power Adapter
SD Card
RCA-to-1/8” (3.5 mm) Audio Cable
USB Cable
Quickstart Guide
Safety & Warranty Manual
Support
For the latest information about this product (documentation, technical specifications, system
requirements, compatibility information, etc.) and product registration, visit marantzpro.com.
For additional product support, visit marantzpro.com/support.
2
Page 3
Features
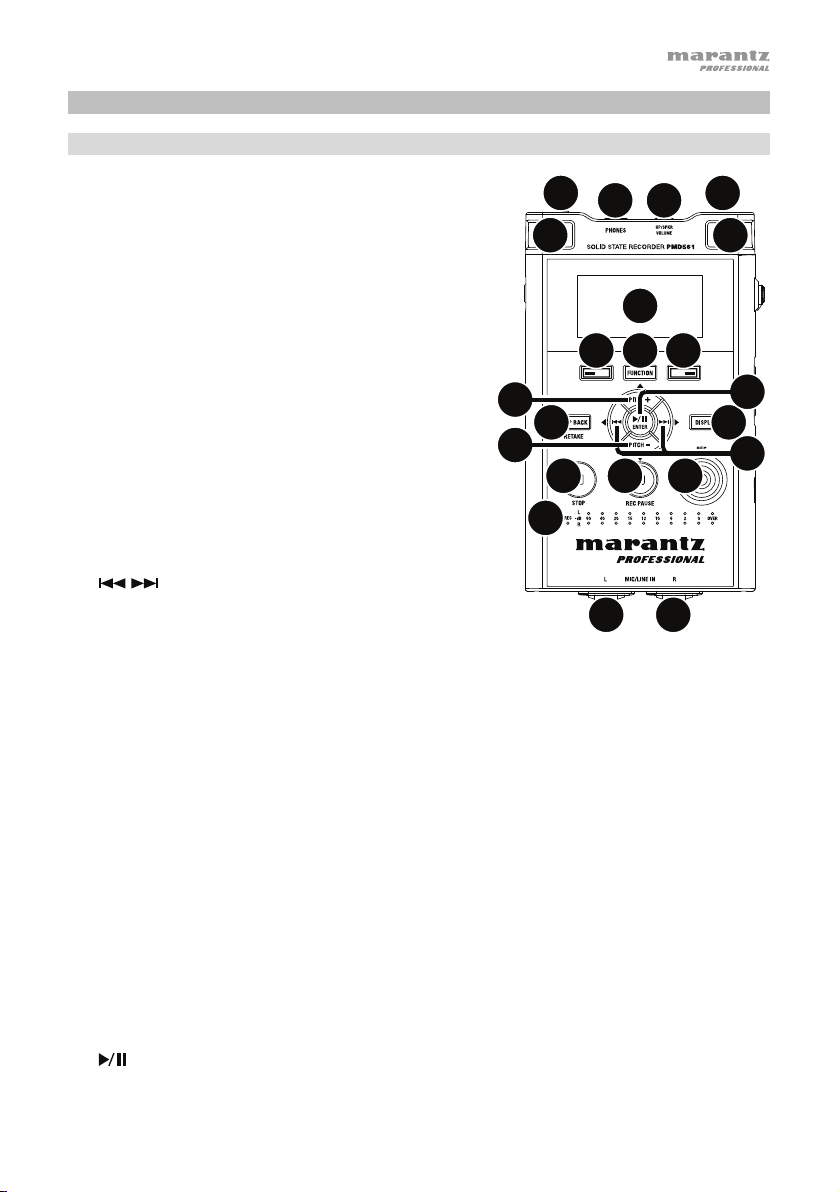
Front Panel
1. Microphones: Internal stereo condenser microphones.
2. Display: The display shows the status and information
of PMD561. See Display below for more information.
3. Function Button: Press the Function button to
change the functions of the F1 and F2 buttons with
toggle operation. The functions are different
depending on each operation mode.
4. F1/F2 Buttons: The functions of the F1 and F2
buttons depend on each operation mode and the
Function button. The function of F1/F2 is indicated on
the bottom corners of the display. The functions
change automatically when the status changes. The
2nd or 3rd function in the same operation mode can
be selected by pressing the Function button.
5. Display Button: Press the Display button to toggle
the display contents such as the time information. The
content is different depending on each operation
mode.
6.
/ Button:
• While in Stop, Playback, or Play-Pause Mode,
press this button to choose the file (jump to
previous or next file).
• In Play-Pause Mode, press and hold this for high speed Reverse/Forward searching
without audio (Search –/+).
• In Playback Mode, press and hold this to “rewind”/”fast forward” and do a 2X speed
search (Audible Search –/+).
7. Pitch– Button: Press this button to slow down playback. During Menu Mode, this button is
used to move down or change an item.
8. Pitch+ Button: Press this button to speed up playback. During Menu Mode, this button is
used to move up or change an item.
9. Rec Button: Press this button to start recording from Stop or Rec-Pause Mode.
10. Rec Pause Button: Press this button to enter the Rec-Pause Mode from Stop or Record Mode.
11. Level LED (green, orange, red): When a sound is input during Record, Rec-Pause or
Playabck Mode, these LED turn on.
12. Skip Back Button: Press the Skip Back button to skip back during Playback or Play-Pause
Modes. Also, the Retake Record Mode is set when this button is pressed during the RecPause Mode.
13.
/Enter Button: Toggles between Playback and Play-Pause Modes. During Menu Mode,
this is used to select an option.
17
18
11
2
44
3
8
12
7
14
11
10
16 16
19
15
13
5
6
9
3
Page 4

14. Stop Button: Press this button to stop the playback or recording (Stop Mode) and to exit the
Play-Pause or Rec-Pause Mode. During Menu Mode, press this button to exit Menu Mode
without storing to memory.
15. Remote Control Jack: This jack is for the optional remote RC600PMD and the external
remote controller.
16. Mic/Line In Jacks: Combo XLR-1/4” for mic/line level inputs.
17. Phantom/Mic Slide Switch: 3-position slide switch: Phantom on, off or line. Phantom
power supplies +48V to external microphones.
18. Phones Jack (1/4” / 6.35 mm): For monitoring and private listening, you can connect your
headphones to this jack.
19. Hp/Spk Vol Control: Use this to adjust the output level of the headphones or internal speakers.
Warning: When using headphones, take care not to turn the volume too high. Listening at
high volumes for extended periods of time may result in permanent hearing damage.
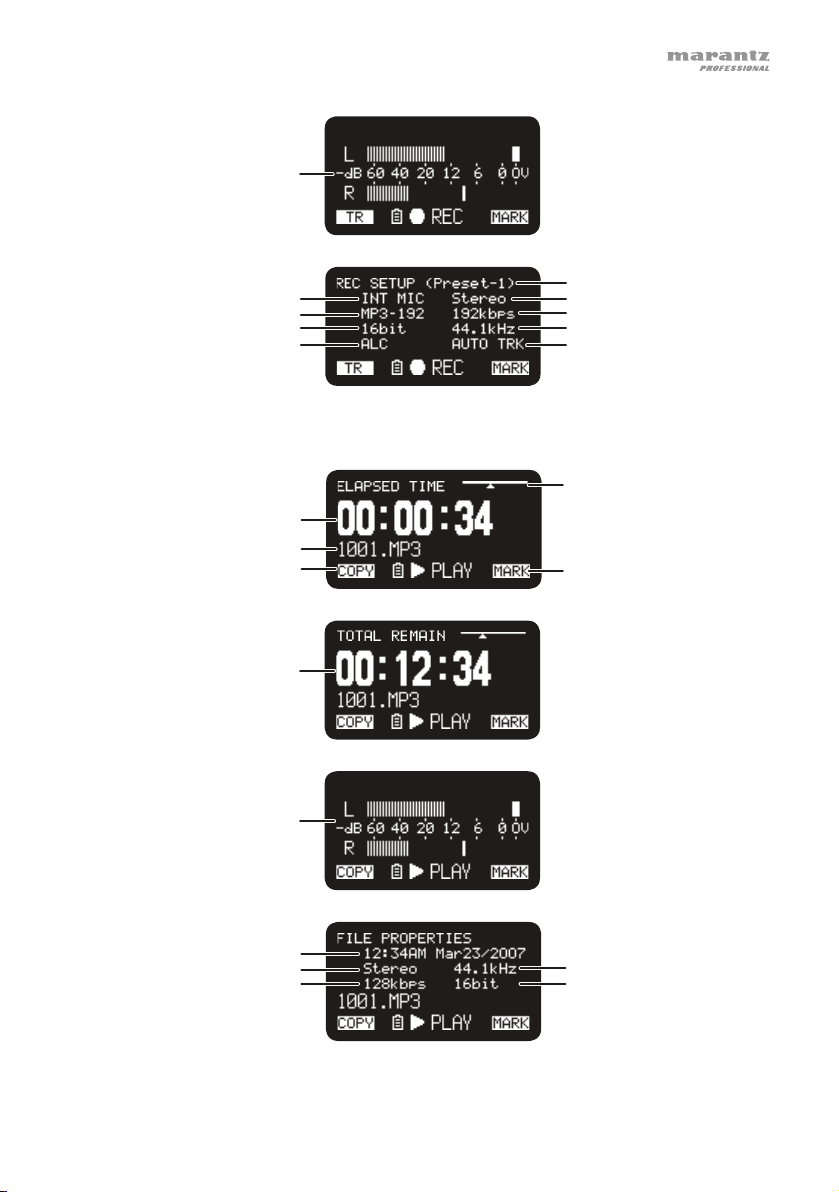
Display
1. Remaining space of the card
2. Input source
3. F2 function
4. Status
5. Battery or AC icon
6. Timer icon
Record/Playback is set. During the Timer
Record/Playback, it blinks.)
7. F1 function
8. Number of files
9. Total remain time
See Operation > Display Control for more information on the various Display screens.
(This icon appears if the Timer
9
8
7
3456
1
2
4
Page 5

Side Panels
Left Right
2
1
4
3
5
6
8
7
10
9
11
Left
1. Digital In Jack: Connect a digital audio cable with an RCA jack from an external device
providing S/PDIF digital output.
2. DC In Jack: Insert the provided AC adapter plug. If the AC adapter plug is inserted while using
the recorder on battery power, the recorder will automatically switch to adapter power. Also, if
the AC adapter plug is removed, the recorder will automatically switch to battery power.
3. USB Port (Mini-B): While playback is stopped, connect the included USB Cable to a
computer from this port to enter USB mode.
4. Card Compartment: Open the lid to access an SD card.
5. Speaker: Internal speaker of L channel.
Right
6. Speaker: Internal speaker of R channel.
7. Power Slide Switch: Slide and hold for a short time to turn power on. Slide to turn power off.
During Record and Rec-Pause Mode, the Power switch is not operational.
8. Key Lock Slide Switch: Slide switch for the Key Lock On and Off control.
9. Line Out Jacks (RCA): Insert an audio cable plug connected to an external audio device into
these jacks to output audio signals to an external device (amp, etc.).
10. Line In 2 Jack (1/8” / 3.5 mm): Insert an audio cable plug connected to an external audio
device into this jack to input the signals from the external device into the recorder.
11. Rec Level Control: Turn to adjust the record level when the Level Cont. in the preset menu
is set to Manual. The inside control (Right channel) and outside control (Left channel) turn
together unless you hold one while turning the other. The optimum recording level is when
the level meter goes as close to 0 dB as possible but does not go over.
5
Page 6
A
A
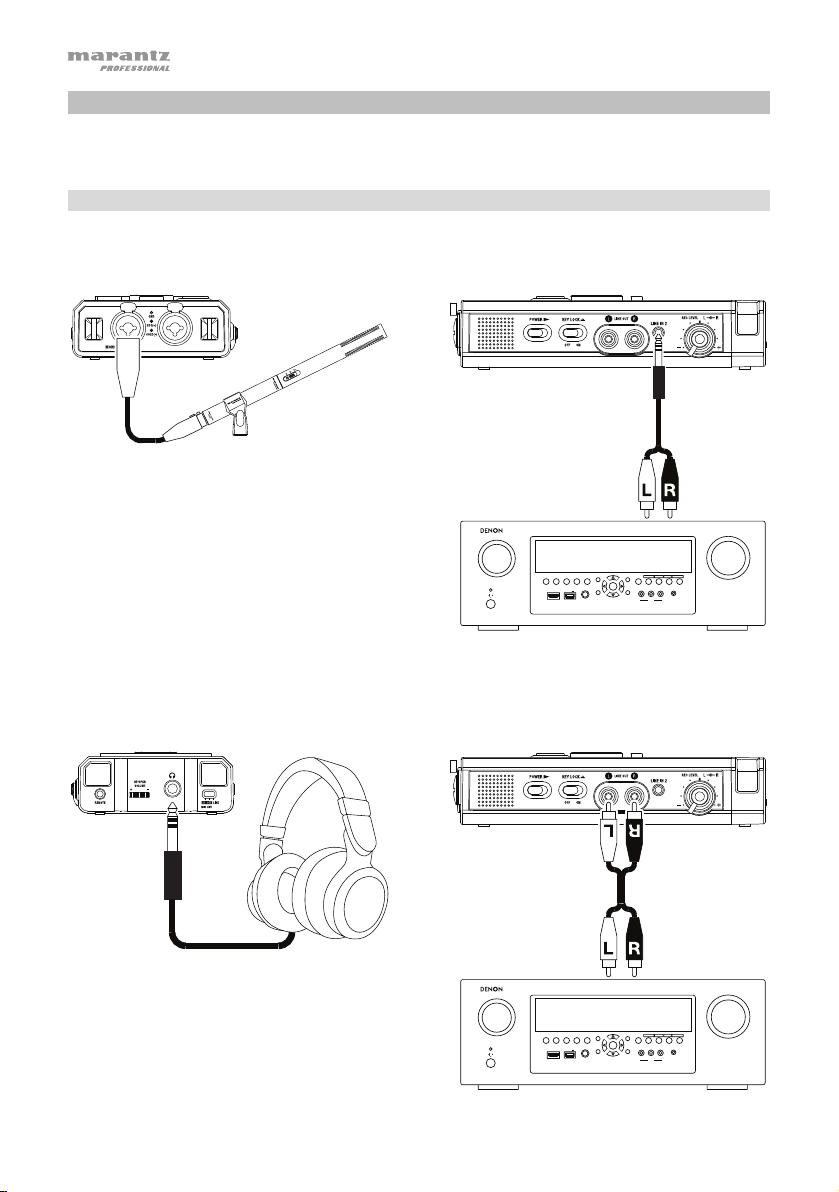
Setup
Items not listed under Introduction > Box Contents are sold separately.
Connection Diagrams
Recording
Example A Example B
Microphone
mplifier,
receiver, etc.
SOURCE SELECT
MASTER VOLUME
Playback
6
ZONE 2
ZONE 2
ZONE 3 ZONE 3
INFO
SOURCE
ON/OFF
ON/OFF
AUX 1
HDMI 7 5V/1A
OPTION
SOURCE STATUS DIMMER
ENTER
PHONES BACK
SETUP
Example A Example B
Headphones
mplifier,
receiver, etc.
SOURCE SELECT
ZONE 2
ON/OFF
ZONE 2
ZONE 3 ZONE 3
SOURCE
SOURCE STATUS DIMMER
ON/OFF
AUX 1
HDMI 7 5V/1A
PHONES BACK
INFO
OPTION
ENTER
SETUP
1 CBL/SAT 3 GAME 4 NETWORK
2 Blu-ray
L - AUDIO - R
VIDEO
AUX 1
1 CBL/SAT 3 GAME 4 NETWORK
2 Blu-ray
L - AUDIO - R
VIDEO
AUX 1
QUICK SELECT
SETUP MIC
IN-Command
SSEERI
INTEGRATED NETWORK AV RECEIVER
AVR-X4000
MASTER VOLUME
QUICK SELECT
SETUP MIC
IN-Command
SSEERI
INTEGRATED NETWORK AV RECEIVER
AVR-X4000
Page 7
Clock Setting
The date and time are written on each audio track (file) when the track is started. When an audio
track is viewed on a computer, this date and time appears as when the file was “modified.”
1. While stopped, press the F1 (Menu) button.
2. Press the Pitch– or Pitch– button to select Time/Date.
3. Press the
• Press the Stop button to cancel.
• Press the
• When the hour is set, press the
• When the year is selected, the
• Press the Pitch+ or Pitch– button to select the value.
4. Press the F1 (Exit) button.
• Store? appears on the display.
• Select Yes and press the
Note: If it happens to be the date which does not exist such as Feb. 31, it will be revised as Feb. 28.
/Enter button to enter the Time/Date setting.
or button to select the item.
button to return to the top menu.
button is invalid.
/Enter button to write on the Real Time Clock.
Language
The Language menu item allows you to choose a display language.
1. While stopped, press the F1 (Menu) button.
2. Press the Pitch+ or Pitch– button to select Language.
3. Press the
• Press the Stop button to cancel.
• Press the Pitch+ or Pitch– button to select the item.
• Press the
4. Press the F1 (Exit) button.
• Store? appears on the display.
• Select Yes and press the
/Enter button to enter the Language setting.
button to return to the top menu.
/Enter button to store the change.
7
Page 8
Operation
Recording
Normal Recording
1. Slide and hold the Power switch to turn on.
2. Press the Rec button to begin recording.
• The Rec indicator will be lit and steady while recording.
• The display will show the information display of recording.
• Press the Rec Pause button to pause recording.
3. Press the Stop button to stop recording and end the file (close the audio file).
You can press the
again to enter the Stop Mode. Then pressing the
the first audio file.
Retake Recording
The PMD561 has a retake recording function for recording over from any position in a file.
Retake recording operation during recording:
1. Press the Rec button to begin normal recording.
2. Press the Rec Pause button to pause recording.
3. Press the Skip Back button to set the Retake Record Mode. The recording position skips
back the amount of time set at Skip Back on the preset menu and playback starts.
4. While monitoring the sound being played, find the position at which you want to start retake
recording.
• Press the
• Press the Skip Back,
• The playing speed can be changed using the Pitch+ and Pitch– buttons.
Press the Rec Pause button to set the retake starting position.
5. Press the Rec button to start retake recording. The unneeded data (Take 1) is deleted and
Take 2 is recorded in its place.
When recording of Take 2 starts, 0.5 seconds or the time set at PreRecord on the preset
menu is prerecorded.
Retake recording operation during playback:
1. Press the
2. Press the
3. While monitoring the sound being played, find the position at which you want to start retake
recording.
• Press the
• Press the Skip Back,
• The playing speed can be changed using the Pitch+ and Pitch– buttons.
Press the Rec Pause button to set the retake starting position.
4. Press the Rec button to start retake recording. The unneeded data (Take 1) is deleted and
Take 2 is recorded in its place.
When recording of Take 2 starts, 0.5 seconds or the time set at PreRecord on the preset
menu is prerecorded.
8
or button to choose the file you wish to play.
/Enter button to begin playback.
/Enter button to play the just recorded file or press the Stop button
/Enter button will play the beginning of
/Enter button to pause playback.
or button to search for the desired playback position.
/Enter button to pause playback.
or button to search for the desired playback position.
Page 9
Audio Input for Recording
The audio input for recording is set from the Input menu.
Set the Rec Channel menu to Stereo to create a stereo (2-channel) sound file. Set it to D.Mono to
create a “dual mono” sound file. In this mode, the left channel input is recorded to both left and right
channels, but the right channel is attenuated by 20dB–useful in situations where an unexpected
increase in sound level may distort the non-attenuated input. Set it to Mono to create a monaural (1channel) sound file. Note that all Mono settings use the left channel input only. The monaural file will be
almost half the size of the stereo file.
Set the Phantom/Mic slide switch to ON to supply +48V phantom power to condenser microphones,
and adjust the level sensitivity. For dynamic microphones, set it to OFF to adjust the microphone level
sensitivity. Set it to Line to select the input sensitivity of line level sources.
# Input Rec
Channel
1 INT MIC Stereo Invalid Left/Right channel stereo recording.
2 D.Mono Left/Left channel stereo recording. The Right channel is
3 Mono Left channel monaural recording.
4 MIC/LINE Stereo On Left/Right channel microphone level stereo redcording.
5 Off Left/Right channel microphone level stereo recording.
6 Line Left/Right channel line level stereo recording.
7 D.Mono On Left/Left channel microphone level stereo recording.
8 Off Left/Left channel stereo recording. The Right channel is
9 Line Left/Left channel line level stereo recording. The Right
10 Mono On Left channel microphone level monaural recording.
11 Off Left channel microphone level stereo recording.
12 Line Left channel line level monaural recording.
13 LINE2 Stereo Invalid Left/Right channel stereo recording.
14 D.Mono Left/Left channel stereo recording. The Right channel is
15 Mono Left channel monaural recording.
16 D.IN Stereo Invalid Left/Right channel stereo recording.
17 D.Mono Left/Left channel stereo recording.
18 Mono Left channel monaural recording.
Phantom/Mic
Switch
Description
attenuated by 20 dB.
+48V phantom power is supplied for XLR inputs.
The Right channel is attenuated by 20 dB.
+48V phantom power is supplied for XLR inputs.
attenuated by 20 dB.
channel is attenuated by 20 dB.
+48 V phantom power is supplied for XLR inputs.
attenuated by 20dB.
9
Page 10
Playback
1. Slide and hold the Power switch to turn on.
2. Press the
3. Press the
Press the
4. Press the Stop button to stop playback.
You can press the
again to enter the Stop Mode. Then pressing the
the first audio file.
Note: The file sort order can be changed using the preset File Sort. When set to Alphabet,
files are sorted in order of symbol, number, and alphabet. When set to Time/Date, audio files
are sorted in the order in which they were created.
There are two ways to select the file you want to play. Either use the
Stop Mode, or select the files from the File List:
1. While stopped, press the F2 (List) button.
The file list appears on the display.
2. Press the Pitch+ or Pitch– button to select the audio file. Then press the
enter the File List Menu.
3. Press the Pitch+ or Pitch– button to select Play. Then press the
playback.
During playback, press the Stop button to return to the File list.
USB Mode
The PMD561 records directly onto SD cards. Recordings can then be transferred to your desktop
or laptop computer by removing the SD card from the PMD561, or by connecting the PMD561 to
your computer via the USB port. Audio recorded in the popular MP3 compression format is
directly available for intranet or internet file sharing. The SD card in the PMD561 appears as an
external drive on a connected computer.
1. Power up the computer.
2. Insert an SD card.
3. Power up the PMD561.
4. While stopped, connect the cable to the PMD561 and your computer.
• The SD card in the PMD561 appears as a removable device on your computer.
Notes:
• USB power activates this function even without the AC adapter or batteries.
• No buttons other than the Power switch will function.
Caution:
• Do not remove the SD card during USB Mode. The data and the SD card may be damaged.
• During recording and playback, do not connect the cable to the PMD561 and your computer.
The PMD561 may turn itself off or stop, by the USB power condition.
or button to choose the file you wish to play.
/Enter button to begin playback.
/Enter button again to pause playback.
/Enter button to play the just played file, or press the Stop button
/Enter button will play the beginning of
or buttons during
/Enter button to
/Enter button to begin
10
Page 11

Advanced Features
Microphone(s)
Attenuator
The microphone attenuation setting permits the direct use of microphones that differ in
sensitivity.
• 0 db: No microphone attenuation.
• -6 dB: Input from a microphone(s) connected to the Mic jack is cut by 6 dB.
• -12 dB: Input from a microphone(s) connected to the Mic jack is cut by 12 dB.
• -18 dB: Input from a microphone(s) connected to the Mic jack is cut by 18 dB.
Setup Mic Atten. in the preset menu.
Phantom Power
Slide the Phantom/Mic switch to On to provide +48V of power for a condenser microphone(s).
• On: +48V is supplied to power condenser microphone(s)
• Off: No microphone power is supplied.
Microhone Recommendations:
Professional condenser microphone(s) (which require additional power from either the PMD561’s
phantom power or from another source) are recommended because they provide greater
sensitivity and higher quality audio recording.
Dynamic microphone(s) can be used, but they do not yield optimum audio quality recordings in
some applications.
Consult with your local dealer to select the appropriate microphone(s) for your specific
application. In many cases, they can demonstrate the various performances and characteristics
of microphones for your use.
Pre Record
When PreRecord is on and the PMD561 is in record pause, it listens to the selected audio
input(s) and continuously buffers 2 seconds of audio. Then, when record is started, the PMD561
writes the previously buffered 2 seconds of audio to the card and continues to record from there.
Setup PreRecord in the preset menu.
Audio Filter
Low Cut Filter
The bass region of the input audio is cut as the audio is recorded. Set to On to reduce noise,
such as the sound of the wind when recording outdoors.
Setup Low Cut in the preset menu.
11
Page 12

High Cut Filter
The treble region of the input audio is cut as the audio is recorded. Set to On to reduce high
frequency noise from the ambient environment.
Setup High Cut in the preset menu.
Silent Skip
The Silent Skip function automatically pauses recording when there is a period of silence and
resumes recording when sound resumes.
Silent Skip menu setting permits adjusting the sound level that defines silence as Off, –60dB,
–54dB, –38dB, –20dB.
Setup the Silent Skip in the preset menu.
Manual Track
When the Manual Track (Manual Track incrementing) is on during recording, press the Function
button until “TR” appears on the display, then press the F1 (TR) button to increment the audio
file.
A new audio file is created at that point. The continuity of sound is not guaranteed and depends
on the speed of a card or the audio file size.
Auto Track
With the Auto Track (Automatic Track incrementing) On, a new audio file is begun automatically
at specified intervals of recording time. The Auto Track can be set to increment every 1, 5, 10, 15
or 30 minutes, or every 1, 2, 6, 8, 12 or 24 hours. The Auto Track makes finding a particular point
in a recording easier. For example, if a new audio file begins every minute during playback, the
Auto Track makes finding a particular passage easier because of the relationship between file
numbers and time. During playback, you can select file number 3 to play approximately the 3rd
minute of recording. To go directly to the beginning of the 10th minute, select file number 10, etc.
The continuity of sound is not guaranteed and depends on the speed of a card or the file size.
Setup Auto Track in the preset menu.
Note: New audio file starts automatically when the recorded file size reaches 4GB.
Copy Segment
Copy Segment physically turns your “highlighted” section into a new and separate file, without
destroying the original source file(s).
1. “COPY” is displayed during playback. Press the F1 (Copy) button when the audio reaches
your desired IN-point. “Set as IN?” is displayed.
2. Press the Enter button to store the IN-point. “IN-” will flash on the display to indicate the INpoint has been stored and playback of the file resumes.
3. Continue to let the PMD561 play to your desired OUT-point, or use the standard transport
controls like the
12
or buttons to span greater time lengths.
Page 13

4. When you have reached your desired OUT-point, press the F1 (Copy) button. “Set as OUT?”
is displayed.
5. Press the Enter button to store the OUT-point. “Copy Segment?” is displayed.
6. Press the Enter button to start the Copy process. “Executing…” will be shown on the
display. When the procedure is completed, the display will show “Completed” for one
second, and then return to stop mode with your new file as the current file.
Notes:
• “_1” is added to the end of the file name of the new file. For example, the original file =
“aaa.mp3”, the new file = “aaa_1.mp3”
• When a copy area spans across two or more files, the files are connected and copied.
• When the copy area spans across files of different Rec Format or Rec Channel settings, it
cannot be copied.
• The copy area cannot exceed 80 minutes.
File Divide
The file divide allows you to divide a file at the position you want to divide.
1. During playback, press the Function button until “DIV” appears on the display. Then press
the F1 (Div) button.
“Divide?” appears on the display. Select No and press the Enter button to pause the
playback.
2. Select Yes and press the Enter button to start the Divide process.
“Executing…” will be shown on the display. When the divide process is completed, the
display will show “Completed” for one second and the unit stops at the beginning of the
second file of the divided files.
Notes:
• “_A” is added to the end of the file name of the first new file. For example, the original file =
“aaa.mp3”, the new file = “aaa_A.mp3”
• “_B” is added to the end of the file name of the second new file.
• If the length of the file name with extension is already 63 characters or more, the Divide
process cannot be executed. LongTitle message appears on the display and the playback is
paused at the position you pressed the Enter button.
Marking
Marks can be added during recording or playback manually or automatically. The marking
information is stored as an ID3 tag (Ver 2) in MP3 file or chunk in WAVE file. Marks help you find
specific points in the recording.
• During playback, you can instantly locate marks.
• Up to 30 marks can be added to a file.
• Marks are numbered consecutively starting at one.
• During recording or playback, you can manually add a mark by pressing the F2 (Mark)
button.
13
Page 14

Add a mark manually
During recording or playback, press the Function button until “MARK” appears on the display.
Then press the F2 (Mark) button to add a mark manually.
Add a mark automatically
The Auto Mark Menu item turns the automatic marking feature off or on.
• If Auto Mark is on and the machine is in Rec–Pause mode, a mark will be added when
recording is resumed.
• If Auto Mark is on and the PMD561 is recording audio below the sound threshold for
more than three seconds, audio that crosses the threshold will cause a mark to be added.
The Auto Mark Menu setting permits:
• Turning Auto Mark on or off.
• Adjusting the sound level that defines silence as –60dB, –54dB, –38dB or –20dB.
Setup Auto Mark in the preset menu.
Search the marks
During play-pause or playback, press the Function button until “MK–” and “MK+” appear on the
display. Then press the F1 (MK–) or F2 (MK+) button to select the mark you wish to access.
The PMD561 is paused at the mark you selected. To start playback, press the Enter button.
Pitch Control
The Pitch Control enables the playback speed (pitch) to be varied over a –40% to +20% range in
5% increments.
During playback, press the Pitch+ button to increase the playback speed by 5%. The playback
speed is increased up to +20%. Or press the Pitch– button to reduce the playback speed by
5%. The playback speed is reduced down to –40%.
Additional Features
Key Lock
Slide the Key Lock switch to lock the keys. The key lock secures the PMD561 in the state it is in
during recording, playback or stop.
During Record and Rec-Pause mode, the Power switch is always invalid.
Notes:
• If Key Lock setting is All, only the optional remote controller RC600PMD is accepted.
• If Key Lock setting is Partial, the Rec, Rec-Pause and Stop buttons on the panel and
RC600PMD are accepted.
• Key Locked is displayed for one second when any key is pressed during key lock.
Setup Key Lock in the preset menu.
14
Page 15
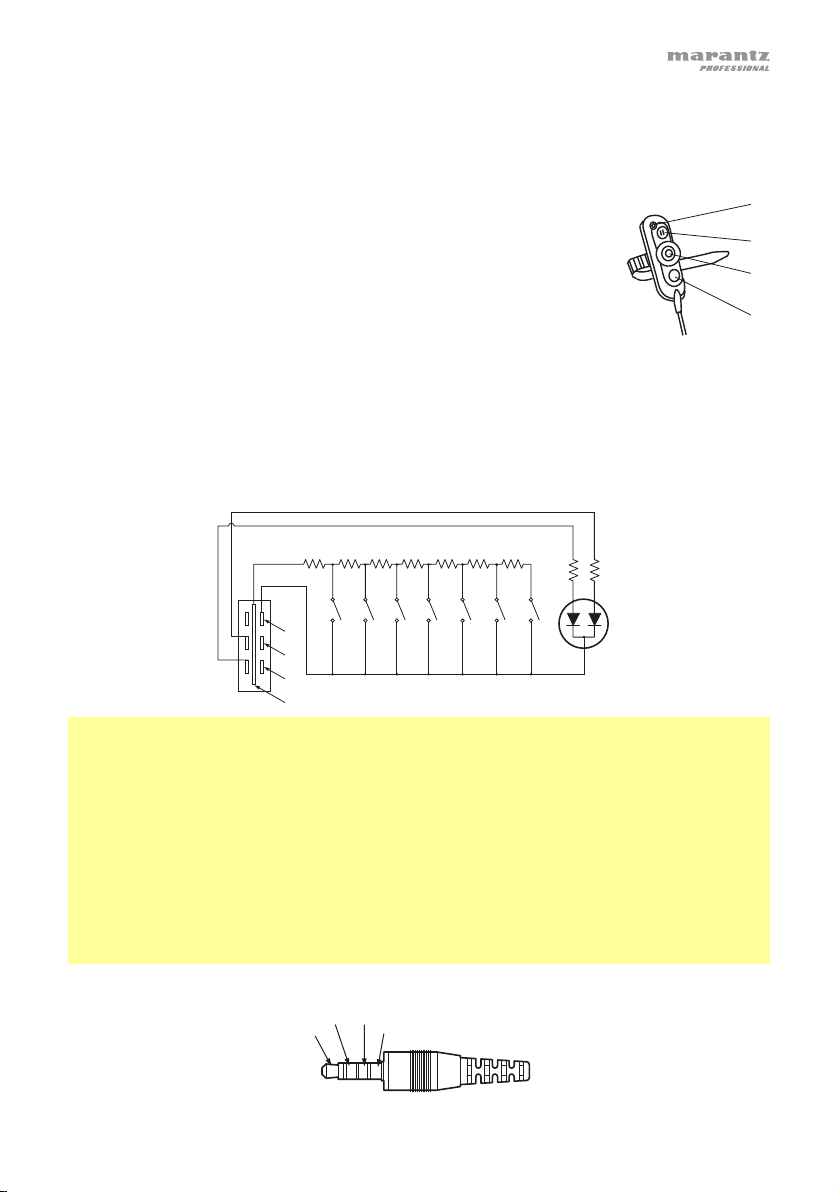
Remote
The PMD561 allows you to use an optional remote controller RC600PMD (sold separately). The RC600PMD is
designed for microphone interviews. It attaches to your microphone.
The remote’s five feet cord with a four contact mini plug connects to the PMD561. The RC600PMD does not
require any menu changes for use.
1
The RC600PMD includes:
1. Indicator Light
• Green: Lit and steady during standby or stop
• Red: Lit and steady while recording
2
3
• Flashing Red: During Rec-Pause mode
• Orange: Flashes for 1/2 second when an over peak signal is input during
Record or Rec-Pause mode, then goes back to Red.
4
2. Press to pause recording
3. Press to start/resume recording and to manually increment files
4. Press to add a marking during Record or Playback
Extended Remote Jack
The Play, FF and Rew keys can be added to the remote control functions by using the equivalent circuit
shown below:
R1
R2
1k
3.9kR36.8kR411kR515kR630k
S1
S2 S3 S4 S5 S6
REC PLAY REW MARK FFREC
PAUSE
Notes:
4
3
2
1
• We recommend using 1% or better resistors when building a remote to ensure correct functionality.
• The PMD561 plays during closing and holding the Play switch, and skips back then pauses at the point
when it is opened.
• Resistance error = within 5%.
• Never apply external voltage. Doing so will result in malfunction.
• Insulate the circuit so that it cannot be touched directly. Use a structure that protects the circuit from static
electricity, which will cause malfunction.
• Do not operate the switches at the same time as the buttons on the unit.
• Marantz Professional accepts no responsibility whatsoever for any damages or infringements of patents or
other rights resulting from the use of the circuits.
• This does not sanction patents or other rights of Marantz Professional or third parties.
• It is strictly forbidden to reprint or reproduce the circuit diagrams in part or in whole.
Plug Type (1/8” T-R-R-S Mini Plug)
ø3.5/4P (TMP-B66)
1. Tip
23
1
4
2. Ring
3. Ring
4. Sleeve
R7
47k
S7
SKIP
BACK
R8
220R9220
15
Page 16
g
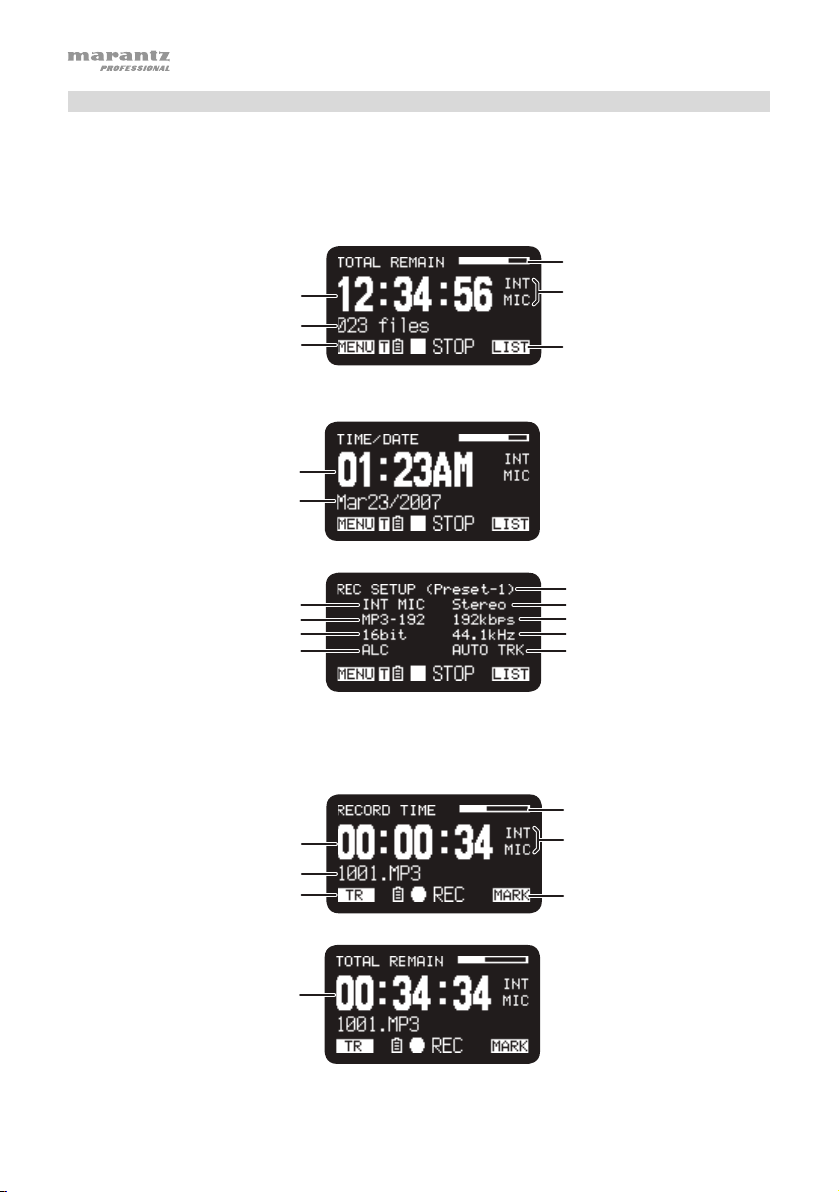
Display Control
Press the Display button to alternate information displays. Displays are slightly different in Stop,
Record, and Playback modes.
Stop Mode
1. Total Remain
Remaining space of the card
Total remain time
Number of files
F1 function
2. Current Time/Date
Current time
Current date
3. Record Setup
Input Source
Rec format
Quantization
ALC icon
Record Mode
1. Record Time
Record time
File name
F1 function
2. Total Remain Time
Input source
F2 function
Preset
Rec Channel
MP3 bitrate
Sample rate
AUTO TRACK icon
Remainin
Input source
F2 function
space of the card
Total remain time
16
Page 17
g
3. Record Level
Input audio level
4. Record Setup
Playback Mode
1. Elapsed Time
2. Remain Time
Input Source
Rec format
Quantization
ALC icon
Elapsed time
File name
F1 function
Preset
Rec Channel
MP3 bitrate
Sample rate
AUTO TRACK icon
Current position on the file
F2 function
3. Output Level
4. File Properties
Remainin
Output audio level
time
Created time
Rec channel
MP3 bitrate
Sample rate
Quantization
17
Page 18
Menu
Top Menu
1. From Stop, press the F1 (Menu) button.
• The menu list appears on the display.
• The selected item is highlighted.
• When the first item is selected, press the Pitch+ button to jump to the last item.
• When the last item is selected, press the Pitch– button to jump to the first item.
2. Press the Pitch+ or Pitch– button to select the item.
3. Press the Enter button to confirm or execute the selected item.
Items and functions
# Display Description
1 Presets Go to the Preset Menu.
2 Display Go to the Display Menu.
3 Time/Date Adjust the date and time.
4 Utility Go to the Utility Menu.
5 Language Choose the display language.
6 F/W Version Display the software version.
Protecting the Menu Settings
When “Menu Lock” on the preset menu is set to On, the passcode is required to select items below
the top menu, thereby protecting the settings.
The passcode is the number from 0000 to 9999 set in Passcode in the preset menu.
Preset Menu
You can store 3 detailed presets on the recorder for such settings as recording input, recording format,
playback mode, etc. There are 20 setting items in the preset menu, and 3 presets can be set with the
desired values.
Preset Select allows you to select a preset number.
1. From Stop, press the F1 (Menu) button.
• The menu list appears on the display.
• The selected item is highlighted.
• When the first item is selected, press the Pitch+ button to jump to the last item.
• When the last item is selected, press the Pitch– button to jump to the first item.
2. Press the Pitch+ or Pitch– button to select Presets. Then press the Enter button.
3. Press the Pitch+ or Pitch– button to select Preset 1, 2, 3, or renamed preset.
4. Press the Enter button to accept the selected Preset.
• Action Menu appears on the display.
• Select “Select” item and press the Enter button to select the preset as the active preset.
• Select “Edit” item and press the Enter button to set or change the selected preset.
• Select “Rename” item and press the Enter button to change the name of the selected preset.
18
Page 19

Action Menu Functions
# Display Description
1 Select Preset is selected as the active preset.
2 Edit Set or change the selected preset.
3 Rename Change the title of the selected preset.
Preset Rename
1. From Stop, press the F1 (Menu) button.
2. Press the Pitch+ or Pitch– button to select Preset Menu. Then press the Enter button to
accept.
3. Press the Pitch+ or Pitch– button to select Preset 1, 2, 3, or a renamed preset. Then press
the Enter button to accept the selected Preset.
4. Press the Pitch+ or Pitch– button to select Rename and press the Enter button to accept.
5. Rename the preset title.
Text can be changed and deleted. Press the
or button to move the cursor to the
place you wish to change text or delete text from.
• To change the letter, press the Pitch+ or Pitch– button to select the character you want
to change.
• To insert a letter, press the F1 (INS) button. A character is inserted into the left of the
highlighted character and then it will be highlighted.
• To delete the letter, press the F2 (DEL) button to delete the selected character.
6. Press the Enter button to store the changes.
Press the
button to go back to the previous page without storing the changes when the
first letter of the preset title is highlighted.
Notes:
• If the last letter of the preset title is a space character, the changed title does not include the
last letter.
• The maximum length of a preset title is limited to 8 letters. When the 9th letter is inserted the
last letter is deleted.
• The characters which you can insert are: A B C D E F G H I J K L M N O P Q R S T U V W X Y
Z a b c d e f g h i j k l m n o p q r s t u v w x y z (space) ! “ # $ % & ’ ( ) + , – . ; = @ [ ] ^ _ ` { } ~
0 1 2 3 4 5 6 7 8 9.
19
Page 20
Preset Menu List
# Display Selectable Value
1 Input INT MIC / MIC/LINE / LINE2 / D.IN
2 Rec Format MP3-320 / MP3-256 / MP3-192 / MP3-128 / MP3-64 / PCM-16 / PCM-
3 Rec Channel Stereo / Mono / D.Mono
4 Sample Rate 44.1k / 48k / 96k
5 PreRecord On / Off
6 Level Cont. Manual / ALC
7 Auto Track Off / 1min / 5min / 10min / 15min / 30min / 1hour / 2hour / 6hour / 8hour /
8 Auto Mark Off / –60dB / –54dB / –38dB / –20dB
9 Silent Skip Off / –60dB / –54dB / –38dB / –20dB
10 Mic Atten. 0dB / –6dB / –12dB / –18dB
11 Low Cut On / Off
12 High Cut On / Off
13 Skip Back 0.5sec / 1sec / 1.5sec / 2sec / 2.5sec / 3sec / 3.5sec / 4sec/ 4.5sec /
14 Key Lock All / Partial
15 Battery Alkaline / Ni-MH
16 Auto Power Off Off / 5m / 15m / 30m / 60m
17 Beep On / Off
18 Menu Lock On / Off
19 Passcode 4-digit number
20 SP Mute On / Off
21 Play Mode Single / Cont.
22 MachineID Max 8 letters
23 Preset Default
General Procedure in Edit Mode
1. In the Preset Action Menu, press the Pitch+ or Pitch– button to select “Edit,” then press the
Enter button.
Action Menu list appears on the display.
2. Press the Pitch+ or Pitch– button to select the menu item. Then press the
to select the input choices.
3. When changing the preset is completed, press the F1 (Exit) button.
4. Select Yes and press the Enter button to store the changes, or select No and press the
Enter button to exit Menu Mode without storing any changes.
20
24
12hour / 24hour
5sec / 5.5sec / 6sec / 6.5sec / 7sec / 7.5sec / 8sec / 8.5sec / 9sec /
9.5sec / 10sec / 15sec / 20sec / 25sec / 30sec / 35sec / 40sec / 45sec /
50sec / 55sec / 60sec
or button
Page 21

1. Input
Use this menu to select the audio input for recording.
Set Value Description
INT MIC Internal stereo microphones
MIC/LINE
LINE2
External microphone(s) (Mic/Line Jack)
Line Level Input (Line 2 Jack)
D.IN Digital Input
2. Rec Format
Rec Format allows you to select the record audio format (MP3 compression or high-fidelity
PCM), the bitrate of the MP3 (320, 256, 192, 128 or 64 kbps) and the quantization of the PCM
(16-bits or 24-bits).
Set Value Description
MP3-320 / MP3-256 /
MP3-192 / MP3-128 /
MP3-64
(MP3)
Mono: 160, 128, 96, 64, 32kbps
Stereo: 320, 256, 192, 128, 64kbps
PCM-16 / PCM-24 (PCM)
Quantization: 16bits, 24bits
3. Rec Channel
Use Rec Channel to select the recording modes from stereo 2-channel, monaural 1-channel, or
monaural 2-channel (dual mono) with the second channel attenuated 20dB.
Set Value Description
Stereo Stereo 2-channel audio file
Mono Monaural 1-channel audio file to left channel only
D. Mono Monaural 2-channel (dual mono) audio file. The left channel input is
recorded to both L & R channels–the right channel is attenuated by
20dB
4. Sample Rate
The Sample Rate allows you to select the sampling frequency of the recording.
Set Value Description
44.1k Sampling frequency for both PCM and MP3.
48k Sampling frequency for both PCM and MP3.
96k Sampling frequency for PCM.
21
Page 22
5. PreRecord
PreRecord allows you to turn on or off the pre-record function.
Set Value Description
On Set the PreRecord on.
Off Set the PreRecord off.
6. Level Cont. (Level Control)
Level Cont. allows you to select the type of recording level control, Manual or ALC (Automatic Level
Control).
Set Value Description
Manual Manual Level Control
ALC Automatic Level Control
7. Auto Track
Auto Track allows you to set the Auto Track function off or on and select the time interval to create a
new track automatically.
Set Value Description
Off Set the Auto Track function off.
1min / 5min / 10min / 15min /
30min / 1hour / 2hour / 6hour /
8hour / 12hour / 24hour
8. Auto Mark
The “Auto Mark” menu item allows you to turn the auto mark function on and set the silent level, or turn
the auto mark feature Off. The Mark is automatically added after the end of the silent period in which
the input level is below the preset value (–60, –54, –38 or –20 dB) for more than 3 seconds.
Set Value Description
Off Auto mark function off.
–60dB / –54dB / –38dB / –20dB Silent Level
9. Silent Skip
The “Silent Skip” menu item allows you to turn the silent skip feature on and set the silent level, or turn
the silent skip feature Off. While the silent skip feature is on, the recording is automatically paused
when the input level is below the preset value (–60, –54, –38 or –20 dB) for more than 3 seconds.
Set Value Description
Off Set the Silent Skip feature off.
–60dB / –54dB / –38dB / –20dB Set the Silent Skip feature on and select the silent level.
22
Set the Auto Track function on and the time interval to create a
new file.
Page 23
10. Mic Atten. (Mic Attenuator)
The “Mic Atten.” menu item allows you to select the level of the Microphone Attenuator.
Set Value Description
0dB Set the Mic Attenuator feature off.
–6dB / –12dB / –18dB Set the Mic Attenuator.
11. Low Cut
The “Low Cut” menu item turns the low cut feature Off or On.
Set Value Description
Off Low cut filter off.
On Low cut filter on.
12. High Cut
The “High Cut” menu item turns the high cut feature Off or On.
Set Value Description
Off High cut filter off.
On High cut filter on.
13. Skip Back
The “Skip Back” menu item allows you to select the skip back time from 0.5 second to 60
seconds.
Set Value
0.5sec / 1sec / 1.5sec / 2sec / 2.5sec / 3sec / 3.5sec / 4sec / 4.5sec / 5sec / 5.5sec / 6sec /
6.5sec / 7sec / 7.5sec / 8sec / 8.5sec / 9sec / 9.5sec / 10sec / 15sec / 20sec / 25sec / 30sec /
35sec / 40sec / 45sec / 50sec / 55sec / 60sec
14. Key Lock
The Key Lock secures the PMD561 in the state it is in during Record, Playback or Stop.
Set Value Description
All All buttons are invalid.
Partial
All buttons are invalid. But the Rec, Rec Pause and Stop/Cancel
buttons are accepted.
23
Page 24
15. Battery
The “Battery” menu item allows you to set the battery type. The PMD561 operates on 4 standard AA
size Alkaline or Ni-MH batteries. The Battery setting is used for the battery remaining indicator in the
display and “Low Battery” warning. If the setting does not match installed batteries the PMD561 will
not show the appropriate battery status.
Set Value Description
Alkaline Set the battery type to Alkaline battery.
Ni-MH Set the battery type to Nickel-Metal Hydride battery.
16. Auto Power Off
If the PMD561 is not operated for a long period of time during Stop or Play-Pause mode, the power can
be automatically shut off to conserve battery life.
Set Value Description
Off Set the auto power off feature off.
5m / 15m / 30m / 60m Set the feature on and select the time until the PMD561 turns power off
17. Beep
The “Beep” menu item allows you to turn the Beep alarm feature On or Off. When the feature is on, the
unit beeps when the battery power becomes low (“Low Battery”) or when there is no more recording
space on the SD card.
Set Value Description
On Set the Beep feature on.
Off Set the Beep feature off.
18. Menu Lock
The “Menu Lock” menu item allows you to protect the settings below the top menu by password.
Set Value Description
On Enables protection by password.
Off Disables protection by password.
19. Passcode
When the Menu Lock is turned on, this is used as the password.
Set Value
4-digit number from 0000 to 9999 (initially set to 0000)
automatically.
24
Page 25
20. SP Mute
The “SP Mute” menu item allows you to set the speaker mute function On or Off. When SP Mute
is set to On, the sound being recorded is not output from the speaker. When set to Off, the
sound is output from the speaker except when the sound is being recorded by the built-in
microphone.
Set Value Description
On Speaker Mute On.
Off Speaker Mute Off.
21. Play Mode
The “Play Mode” menu item allows you to select the single playback mode or continuous
playback mode.
Set Value Description
Single Single playback mode
Cont. Continuous playback mode
22. Machine ID
An audio file created by the PMD561 has Machine ID information. The information is included in
the file name. For example, if the Machine ID is “aaaaa”, the first file is numbered
“aaaaa001.wav” or “aaaaa001.mp3”. The Machine ID setting applies to all three presets.
1. In the preset edit mode, press the Pitch+ or Pitch– button to select the “MachineID” item.
Then press the Enter button to rename.
2. Rename the Machine ID.
Refer to the procedure of the Preset Rename.
3. Press the Enter button to return to the preset select menu then press the F1 (Exit) button to
store the changes.
Notes:
• If the last letter of the Machine ID is a space character, the changed ID does not include the
last letter.
• If number of letter is more than 8, last letter is deleted when a new letter is added.
23. Preset Default
The “Preset Default” menu item allows you to return the settings of the selected preset to default.
1. In the preset edit mode, press the Pitch+ or Pitch– button to select the “Preset Default”
item. Then press the Enter button to initialize.
2. While “Default?” message is displayed, select Yes and then press the Enter button. Preset
values return to the default and the PMD561 starts writing on non-volatile memory.
25
Page 26
Preset Default Value List
# Display Preset-1 Preset-2 Preset-3
1 Input INT MIC INT MIC INT MIC
2 Rec Format MP3-128 MP3-320 PCM-24
3 Rec Channel Stereo Stereo Stereo
4 Sample Rate 44.1k 44.1k 96k
5 PreRecord On Off Off
6 Level Cont. ALC Manual Manual
7 Auto Track Off Off Off
8 Auto Mark Off Off Off
9 Silent Skip Off Off Off
10 Mic Atten. 0dB 0dB 0dB
11 Low Cut On Off Off
12 High Cut On Off Off
13 Skip Back 3sec 3sec 3sec
14 Key Lock All All All
15 Battery Alkaline Alkaline Alkaline
16 Auto Power Off 15m 15m 15m
17 Beep On On On
18 Menu Lock Off Off Off
19 Passcode 0000 0000 0000
20 SP Mute Off Off Off
21 Play Mode Cont. Cont. Cont.
22 MachineID 1 1 1
23 Preset Default Meeting Compressed Music Compressed Highest Quality
Uncompressed
26
Page 27
Display Menu
You can store presets on the Display Menu for such settings as Brightness, Timer, LED, Time
Format, Date Format, and File Sort.
1. From Stop, press the F1 (Menu) button.
• The menu list appears on the display.
• The selected item is highlighted.
• When the first item is selected, press the Pitch+ button to jump to the last item.
• When the last item is selected, press the Pitch– button to jump to the first item.
2. Press the Pitch+ or Pitch– button to select “Display”.
3. Press the Enter button.
• The number of a selected item blinks.
• The choice of the selected item is highlighted.
• During Display menu mode, press the Stop button to return to the Stop mode.
4. Press the Pitch+ or Pitch– button to select an item. Then press the
scroll through the choices.
5. Press the Pitch+ or Pitch– button to select other menu choices. When changing the display
menu is complete, press the F1 (Exit) button to store the changes, or press the Stop button
to exit menu mode without storing any changes.
6. While “Store?” is displayed, select Yes and press the Enter button to store the changes; or,
select No and press the Enter button to return to top menu without storing any changes.
Display Menu Functions
# Display Selection Items Default
1 Brightness 1 to 8 5
2 Timer Off / 30sec / 60sec / 90sec Off
3 LED On / Off On
4 Time Form 12H / 24H 12H
5 Date Form M/D/Y / D/M/Y
M/D/Y *
6 File Sort Alphabet / Time/Date Time/Date
7 Default -- --
or button to
* Factory default of “Date Form” setting for Europe is “D/M/Y”.
1. Brightness
The “Brightness” menu choice allows you to adjust the brightness of the OLED (Organic LightEmitting Diode) display on the PMD561.
Set Value Description
1, 2, 3, 4, 5, 6, 7, 8 (Dark) 1 – 8 (Bright)
27
Page 28
2. Timer
The “Timer” menu item allows you to set the timer function off or on with a selected time. While
the Timer is on, the display will be turned off automatically when no button is pressed for the
selected time (30, 60 or 90 seconds). The battery life will be extended if it is on.
Set Value Description
Off Set the Timer Off.
30sec / 60sec / 90sec Set the Timer On and time.
3. LED
The “LED” menu choice allows you to turn on or off the light of all LEDs.
Set Value Description
On Turn the LED On.
Off Turn the LED Off.
4. Time Form
The “Time Form” item allows you to select the format of the current time, 12-hour format with
AM/PM (12H) or 24-hour format (24H).
Set Value Description
12H 12-hour format (12:00AM – 11:59PM)
24H 24-hour format (00:00 – 23:59)
5. Date Form
The “Date Form” item allows you to set the date order as month/day/year (M/D/Y) or
day/month/year (D/M/Y).
Set Value Description
M/D/Y Month / Day / Year
D/M/Y Day / Month / Year
6. File Sort
The “File Sort” menu choice allows you to select the file order in the list by name (Alphabet) or
time (Time/Date).
Set Value
Alphabet or Time/Date
28
Page 29
7. Default
The “Default” menu item allows you to return the settings of the Display Menu to the default.
1. From Stop, press the F1 (Menu) button.
2. Press the Pitch+ or Pitch– button to select “Display”. Then press the Enter button to
accept.
3. Press the Pitch+ or Pitch– button to select the Default item. Then press the Enter button to
initialize.
4. While Default? message is displayed, select Yes and then press the Enter button, then
preset values return to the default and start writing on non-volatile memory.
Utility Menu
The record and play timer settings, the settings data load and save functions and the SD card
format and card writing performance can be checked on the Utility menu.
1. From Stop, press the F1 (Menu) button.
2. Press the Pitch+ or Pitch– button to select “Utility”.
3. Press the Enter button. During Utility menu mode, press the Stop button to return to the stop
mode.
4. Press the Pitch+ or Pitch– button to select the menu item. Press the Enter button to enter
the menu item.
Utility Functions
# Display Description
1 Record Timer Set a start time and the duration for recording.
2 Play Timer 1 Set a start time of playback 1.
3 Play Timer 2 Set a start time of playback 2.
4 Play Timer 3 Set a start time of playback 3.
5 Load Settings Load setting data from an SD card.
6 Save Settings Save setting data to an SD card.
7 Card Check Check the SD card writing performance.
8 Card Format Delete all files.
1. Record Timer
The “Record Timer” menu allows you to set or change a recording start time and the duration.
1. Select the Record Timer menu.
• When in Stop, press the F1 (Menu) button.
• Press the Pitch+ or Pitch– button until “Utility” appears, then press the Enter button.
• Press the Pitch+ or Pitch– button until “Record Timer” appears, then press the Enter
button.
29
Page 30

2. Set the Record Timer On or Off.
• Press the Pitch+ or Pitch– button until On or Off is highlighted. Then press the or
button until On is highlighted to turn on the Record Timer function. Press the or
button until Off is highlighted to turn off the Record Timer function.
• Press the Pitch+ or Pitch– button to move to the other item. The selected item is highlighted.
3. Set the start time.
• While “Start Time” is highlighted, press the Enter button.
• Press the or button to select the item.
• Press the Pitch+ or Pitch– button to select the value.
• Press the Enter button to finish setting the time.
4. Set the duration.
• While “Duration” is highlighted, press the Enter button.
• Press the or button to select the hour or minute.
• While the hour is highlighted press the Pitch+ or Pitch– button to select the hour from 000 to
999.
• While the minute is highlighted press the Pitch+ or Pitch– button to select the minute from 00
to 59.
5. Store the changes.
• During setting, press the F1 (Exit) button. “Store?” appears on the display. Select Yes to store
the setting and return to Utility menu. Or, select No to return to the Utility menu without storing
any changes.
• During setting, press the Stop button to return to stop mode without storing any changes.
2./3./4. Play Timer (1/2/3)
The “Play Timer” menus allow you to set or change a start time for playback and the filename of the
playback file.
1. Select the Record Timer menu.
• When in Stop, press the F1 (Menu) button.
• Press the Pitch+ or Pitch– button until “Utility” appears, then press the Enter button.
• Press the Pitch+ or Pitch– button until “Play Timer 1” (or 2 or 3) appears, then press the Enter
button.
2. Set the Play Timer.
• Press the Pitch+ or Pitch– button until “Everyday,” “Weekday,” or “Weekend” is highlighted.
• Press the or button until Weekday is highlighted to set the playback from Monday to
Friday.
• Press the or button until Weekend is highlighted to set the playback on Saturday and
Sunday.
• Press the Pitch+ or Pitch– button to move to the other item. The selected item is highlighted.
3. Set the start time.
• While the “Start Time” is highlighted, press the Enter button.
• Press the or button to select AM/PM, hour or minute.
• Press the or button to select the item.
• Press the Pitch+ or Pitch– button to select the value.
• Press the Enter button to finish setting the time.
30
Page 31

4. Select the file.
• While “File Name” is highlighted, press the Enter button.
• The file list appears on the display.
• Press the Pitch+ or Pitch– button to select the file you wish to play. Then press the Enter
button.
5. Store the changes.
• During setting, press the F1 (Exit) button. “Store?” appears on the display. Select Yes to
store the setting and return to Utility menu. Or select No to return to the Utility menu
without storing any changes.
• During setting, press the Stop button to return to the stop mode without storing any
changes.
• While the timer is set, “T” icon appears on the display.
5. Load Settings
The “Load Settings” menu allows you to load all of the preset values from an SD card into the
PMD561.
When performing load settings, use an SD card in which the preset contents from Save Settings
are stored.
This function is particularly useful when setting multiple PMD561s with the same settings.
1. From Stop, press the F1 (Menu) button.
2. Press the Pitch+ or Pitch– button to select “Utility”. Then press the Enter button to accept.
3. Press the Pitch+ or Pitch– button to select “Load Settings.”
4. Press the Enter button. “Load?” message is displayed.
• Press the Stop b
utton to cancel loading items and return to the stop mode.
5. While “Load?” message is displayed, select Yes and press the Enter button to load the
setting values in text format from a file in the root folder on the card. The title of the file load
is “561preset2.txt”. During load settings, it displays “Executing...”. After the file load is
completed, “Completed” is displayed for one second and PMD561 returns to Stop mode.
6. Save Settings
Save Settings saves all of the preset values onto the SD card. To set the saved files onto the
PMD561, perform Load Settings.
1. From Stop, press the F1 (Menu) button.
2. Press the Pitch+ or Pitch– button to select “Utility”. Then press the Enter button to accept.
3. Press the Pitch+ or Pitch– button to select “Save Settings”.
4. Press the Enter button. “Save?” message is displayed.
• Press the Stop button to cancel loading items and return to the stop mode.
5. While “Save?” message is displayed, select Yes and press the Enter button to output preset
values in text format into a file on the root folder of the card. The title of the file output is
“561preset2.txt”. During preset output, “Executing...” is displayed. After the file output is
completed, “Completed” is displayed for one second and PMD561 returns to Stop mode.
31
Page 32

7. Card Check
The “Card Check” checks the writing performance of the SD card being used and displays the
results, as shown below.
Display Description
Good Recording is possible without problems.
Poor Writing problems may occur during recording. It is recommended you
Notes:
• Do not turn the power off or open the SD card compartment’s lid while the card is being
checked. Doing so could damage the card or data. Also, it is recommended you use the AC
adapter when checking the card.
• The check results are for reference purposes only; they do not guarantee operation.
8. Card Format
1. From Stop, press the F1 (Menu) button.
2. Press the Pitch+ or Pitch– button to select “Utility”. Then press the Enter button to accept.
3. Press the Pitch+ or Pitch– button to select “Card Format.”
4. Press the Enter button. “Card Format?” message is displayed.
• Press the Stop button to cancel a Card Format item and return to the stop mode.
5. While “Card Format?” message is displayed, select Yes and press the Enter button to
format the SD card. During formatting, “Executing…” is displayed. After displaying
“Completed” for one second, PMD561 returns to Stop mode.
File List Menu
The file list displays a list of file titles, MP3 and WAV in ‘MPGLANG1’ or other folders. The list can
be used to play, rename or delete the selected file, or check the information of the file.
1. From Stop, press the F2 (List) button.
• The menu list appears on the display.
• The selected item is highlighted.
• When the first item is selected, press the Pitch+ button to jump to the last item.
• When the last item is selected, press the Pitch– button to jump to the first item.
• Press the
2. Press the Pitch+ or Pitch– button to select the file you want to access. Then press the Enter
button to enter the File List Menu.
• During File List Mode, press the Stop button to return to the stop mode.
use a different SD card.
button to enter the Folder List.
32
Page 33

File List Menu Functions
# Display Description
1 Play Play the file.
2 Information Display information of the file.
3 Rename Rename the file title.
4 Delete Delete the file.
5 Copy Make a copy of a file in another folder.
6 Move Move the file from the current folder to another folder.
7 Delete Marks Delete mark(s) in the selected file.
1. Play
The “Play” menu item allows you to play the selected file.
1. In the File List Menu, press the Pitch+ or Pitch– button to select “Play.”
2. Press the Enter button to start playback.
• Press the Stop button to stop playback and return to the File List.
2. Information
The “Information” menu item allows you to display the information of the selected file.
1. In the File List Menu, press the Pitch+ or Pitch– button to select “Information.”
2. Press the Enter button to display the information.
• Press the
button to return to the File List Menu.
• Press the Stop button to return to the stop mode.
3. File Rename
The “Rename” menu item allows you to change the file name of the selected file.
1. In the File List Menu, press the Pitch+ or Pitch– button to select “Rename.”
2. Press the Enter button to access the rename window.
3. Rename the file title. Refer to the procedure of Preset Rename.
Press the
button to go back to the previous page without storing the changes when the
first letter of the preset title is highlighted.
Notes:
• If the last letter of the preset title is a space character, the changed title does not include the
last letter.
• If the number of characters is more than 60, the last letter is deleted when a new letter is
added.
33
Page 34

4. Delete
The “Delete” menu item allows you to delete the selected file.
1. In the File List Menu, press the Pitch+ or Pitch– button to select Delete.
2. Press the Enter button. File Delete? appears on the display.
• Select Yes and press the Enter button to delete the file. Or, select No and press the
Enter button to return to the File List Menu.
• Press the Stop button to return to the stop mode.
5. Copy
The “Copy” menu item allows you to make a copy of a file from the current folder to another
folder.
1. In the File List Menu, press the Pitch+ or Pitch– button to select “Copy.” Then press the
Enter button.
• The folder list appears on the display.
2. Press the Pitch+ or Pitch– button to select the folder you wish to copy to. Then press the
Enter button.
• The copy starts. “Executing…” appears during the copy process.
• Press the Stop button to return to the stop mode.
6. Move
The “Move” menu item allows you to move a file from the current folder to another folder.
1. In the File List Menu, press the Pitch+ or Pitch– button to select “Move.” Then press the
Enter button.
• The folder list appears on the display.
2. Press the Pitch+ or Pitch– button to select the folder you wish to move to. Then press the
Enter button.
• The move starts. “Exe
• Press the Stop button to return to the stop mode.
7. Delete Marks
The “Delete Marks” menu item allows you to delete all marks in the selected file.
1. In the File List Menu, press the Pitch+ or Pitch– button to select “Delete Marks.” Then press
the Enter button.
• “MARK Delete?” message appears on the display.
• Select Yes and press the Enter button to delete marks. Or, select No and press the
Enter button to return to the File List Menu.
• Press the Stop button to return to the stop mode.
cuting…” appears during moving.
34
Page 35

Folder List Menu
The Folder List Menu allows you to display a list of folder titles. You can set the selected folder
as a current directory, change the folder title, delete the folder and create a new folder.
1. While the File List is displayed in the “LIST” status, press the
• The folder list appears on the display.
• The selected item is highlighted.
• When the first item is selected, press the Pitch+ button to jump to the last item.
• When the last item is selected, press the Pitch– button to jump to the first item.
2. Press the Pitch+ or Pitch– button to select the folder you wish to access. Then press the
Enter button or the F1 (Menu) button to enter the Folder List Menu.
• Press the
button or the F1 (Exit) button to return to the Folder list.
• During Folder List Menu mode, press the Stop button to return to the stop mode.
3. Press the Pitch+ or Pitch– button to select the item you wish to access. Then press the
Enter button to jump to the item or execute.
Folder List Menu Functions
# Display Description
1 Select Set the selected folder as the current folder.
2 Make Folder Create a new folder.
3 Rename Change the selected folder title.
4 Delete Delete the selected folder.
1. Select
The “Select” menu item allows you to set the selected folder as the current folder.
1. In the Folder List Menu, press the Pitch+ or Pitch– button to choose “Select.”
2. Press the Enter button to set the selected folder to the current folder.
2. Make Folder
The “Make Folder” menu item allows you to create a new folder.
1. In the Folder List Menu, press the Pitch+ or Pitch– button to choose “Make Folder.”
2. Press the Enter button.
• A new folder titled NewFolder is created.
• The folder list appears and the new folder is highlighted.
Notes:
• If the NewFolder already exists, “Already Exists” message appears for one second.
• If the number of folders is already 32, “Full Folder” message appears for one second.
button.
35
Page 36

3. Rename
1. In the Folder List Menu, press the Pitch+ or Pitch– button to choose “Rename.”
2. Press the Enter button to access the rename window.
3. Rename the file title. Refer to the procedure of Preset Rename.
4. Press the Enter button to return to the Folder List Menu.
Press the
first letter of the preset title is highlighted.
Notes:
• If the last letter of the preset title is a space character, the changed title does not include the
last letter.
• If the number of characters exceeds the limit of 32, the last letter is deleted when a new letter
is added.
4. Delete
The “Delete” menu item allows you to delete the selected file.
1. In the Folder List Menu, press the Pitch+ or Pitch– button to select “Delete.”
2. Press the Enter button. “Delete?” appears on the display.
• Select Yes and press the Enter button to delete the folder. Or, select No and press the
Enter button to return to the Folder List Menu.
• Press the Stop button to return to the stop mode.
Note:
• You cannot delete the last folder remaining on an SD card. When the last folder remains,
“Can not…” appears for one second.
button to go back to the previous page without storing the changes when the
36
Page 37

Troubleshooting
If you encounter a problem, try doing these things first:
• Make sure all cables and other connected devices are properly and securely connected.
• Make sure you are using PMD561 as described in this user guide.
• Make sure your other devices or media are working properly.
• If you believe PMD561 is not working properly, check the following table for your problem
and solution.
• If the PMD561 exhibits erratic behavior, the microprocessor can be reset by powering off,
disconnecting AC power and removing batteries.
Problem Solution
PMD561 does not turn on. Install fresh batteries.
Make sure PMD561’s power input is properly connected
to a power outlet using the included power adapter.
PMD561 turns on then turns itself off. Install fresh batteries.
PMD561 seems to record, but
there is no sound on playback.
There is no audio playback through
headphones or internal speaker.
PMD561 will not record. Check that the maximum of 999 files have not been
No signal from microphone input. Check input selection.
There is excessive noise on
PMD561.
Playback on a computer results in
poor sound.
Computer cannot read files. Check the capability of the playback application. Some
Check input settings. (For example, if the line input is
selected and no input is connected to the line jack, the
PMD561 will record silence. The PMD561 will not
playback.)
Check Hp/Spk Vol control setting.
Check a different audio file or the card.
recorded.
Check that the PMD561 acknowledges the card.
Check Rec Level control settings.
Check if microphone(s) require(s) phantom power.
Check cable connections and/or replace cable.
Check for proper gain levels.
Check quality of computer sound card and application.
Check frequency conversion application. (PMD561
records audio files with a sampling frequency of 48kHz.
Some applications convert the files to 44.1kHz using a
sample rate converter. Only high quality sample rate
converters should be used.)
playback and editing applications do not support MP3 or
Broadcast Wave (.wav) formats.
37
Page 38

Error Message
Display Description
No Card Card cannot be found
Unformat Format other than FAT16/32, or card format error
Full Card Memory is not enough
Full 999 Number of files is already 999 (maximum)
Full MARK Number of marks in the current file is already 30 (maximum)
No File No file found
Key Locked Operation during Key Lock
Card Locked Prohibition of writing into the card
VBR FWD or RWD of VBR file
Can not… Command is invalid
Need DC IN No DC input
Low Battery
(flashing highlighted)
Low Battery Automatic power down in low battery level last time.
No PresetFile No preset setting file is found
ErrPresetFile File contents of preset setting has errors
ErrUpdateFile Version up file or file system does not function normally
Door Open SD card door is open
Err Format Error in file format of MP3 or PCM
Already Exists Same file title is found
Limit 80m Over 80 minutes in copy segment process
Long Title File title exceeds 64 Bytes
Err Card Error is found in the card
Err RTC Error is found in RTC
Err SRAM Error is found in SRAM
Err FlashROM Error is found in Flash ROM
Need Update Update is not completed
Unmatched Setting of the preset is not correct
Passcode Fail Passcode when unlocking the "Menu Lock” is incorrect.
Remaining battery is below set value
38
Page 39

Guía del usuario (Español)
Introducción
Características:
• Grabe audio de calidad profesional directamente a unidades de memoria SD/SDHC estables
y confiables
• Grabación estéreo/mono/WAV/MP3 seleccionable
• Tasas de muestreo de 44,1, 48 y 96 kHz (WAV)
• Profundidades de grabación de 16 y 24 bits
• Seis tasas de bits seleccionables desde 32 a 320 kbps (MP3)
• Entrada digital S/PDIF para conectar interfaces de estudio y más
• (2) Entradas combinadas XLR-6,35 mm (1/4 pulg.) para micrófono con alimentación
fantasma de +48V
Contenido de la caja
PMD561
Adaptador de alimentación
Tarjeta SD
Cable RCA a 3,5 mm (1/8 pulg.)
Cable USB
Guía de inicio rápido
Manual sobre la seguridad y garantía
Soporte
Para obtener la información más reciente acerca de este producto (documentación,
especificaciones técnicas, requisitos de sistema, información de compatibilidad, etc.) y
registrarlo, visite marantzpro.com.
Para obtener soporte adicional del producto, visite marantzpro.com/support.
39
Page 40

Características
Panel frontal
1. Micrófonos: Micrófonos de condensador estéreo.
2. Pantalla: La pantalla muestra información sobre el
PMD561. Consulte Pantalla para más información.
3. Botón Function: Pulse el botón Function para cambiar
las funciones de los botones F1 y F2 con operación de
conmutación. Las funciones son diferentes
dependiendo de cada modo de operación.
4. Botones F1/F2: Las funciones de los botones F1 y F2
dependen de cada modo de operación y del botón
Function. La función F1/F2 se indicará en la esquina
inferior de la pantalla. Las funciones cambian
automáticamente cuando cambia el estado. La
segunda y tercera función en el mismo estado puede
seleccionarse pulsando el botón Function.
5. Botón Display: Pulse el botón Display para y cambiar
el contenido de la pantalla, como la información de tipo
temporal con operación de conmutación. El contenido
que aparece es distinto en función del modo de
operación.
6. Botones
• Durante el modo de parada, reproducción o
reproducción-pausa, pulse este botón para
seleccionar un archivo (ir al archivo anterior/siguiente).
• En modo de reproducción-pausa, mantenga pulsado este botón para realizar una
búsqueda hacia atrás/adelante a gran velocidad sin audio. (búsqueda–/búsqueda+).
• En modo de reproducción, mantenga pulsado este botón para “rebobinar”/”avanzar
rápidamente” y realizar una búsqueda a velocidad 2X. (búsqueda–/búsqueda+ con sonido).
7. Botón Pitch–: Pulse este botón para reducir la velocidad de la reproducción. Durante el
modo de menú, este botón se usa para moverse hacia abajo o para modificar un elemento.
8. Botón Pitch+: Pulse este botón para aumentar la velocidad de la reproducción. Durante el
modo de menú, este botón se usa para moverse hacia arriba o para modificar un elemento.
9. Botón Rec: Pulse este botón para iniciar la grabación desde el modo de parada o el de
grabación-pausa.
10. Botón Rec Pause: Pulse este botón para entrar en el modo de grabación-pausa desde el
modo de parada o el de grabación.
11. LED de nivel (verde, naranja, rojo): Se enciende cuando se graba un sonido durante el modo
de grabación, el de grabación-pausa, o el de reproducción.
12. Botón Skip Back: Pulse el botón Skip Back para saltar hacia atrás durante la reproducción
o la reproducción-pausa. Además, cuando se presione este botón durante el modo
Grabación-pausa, se establecerá el modo Retomar grabación.
40
/ :
17
18
11
2
44
3
8
12
7
14
11
10
16 16
19
15
13
5
6
9
Page 41

13. Botón
botón se utiliza para seleccionar las opciones.
14. Botón Stop: Pulse este botón para detener la reproducción o grabación y para cancelar el
modo de reproducción-pausa o el de grabación-pausa. Durante el modo de menú, pulse
este botón para salir de este modo sin guardar en la memoria.
15. Conector de control Remote: Conector para mando a distancia opcional RC600PMD y el
mando a distancia externo.
16. Conectores Mic/Line In: Entradas XLR combinadas de nivel de micrófono/línea de 1/4 pulg.
17. Interruptor deslizante Phantom/Mic Slide: Interruptor deslizante de 3 posiciones.
Alimentación phantom conectada, desconectada, o línea. La alimentación phantom trabaja
para suministrar +48V a micrófonos externos.
18. Conector Phones (6,35 mm / 1/4 pulg.): Para monitoreo y escuchar en privado, puede
conectar unos auriculares a este conector.
19. Control Hp/Spk Vol: Utilice este control para ajustar el volumen de los auriculares o los
altavoces internos.
Advertencia: Cuando utilice auriculares, tenga cuidado de no aumentar demasiado el
volumen. La escucha a volumen alto durante mucho tiempo puede resultar en daño
permanente de los oídos.
/Enter: Cambia la reproducción o reproducción-pausa En el modo de menú, este
Pantalla
1. Espacio restante de la tarjeta
2. Fuente de entrada
3. Función F2
4. Estado
5. Icono de pilas o AC
6. Icono de temporizador
cuando se ajuste la grabación/reproducción con
temporizador. Durante la grabación/reproducción
con temporizador, parpadeará.)
7. Función F1
8. Número de archivos
9. Tiempo restante total
Consulte Funcionamiento > Control de pantalla para obtener más información sobre las
diversas pantallas de visualización.
(Este icono aparecerá
9
8
7
1
2
3456
41
Page 42

Paneles laterales
Izquierda Derecha
2
1
4
3
5
6
8
7
10
9
11
Izquierda
1. Conector Digital In: Conecte un cable de audio digital con conector RCA de un dispositivo
externo que suministre salida digital S/PDIF.
2. Conector DC In: Conecte la clavija del adaptador de CA incluido. Si la clavija del adaptador
de CA se conecta mientras se utiliza el grabador con las pilas, éste pasa a utilizar la
alimentación del adaptador de forma automática. Del mismo modo, si se desconecta la
clavija del adaptador de CA, el grabador pasa a utilizar la alimentación de las pilas.
3. Puerto USB (Mini-B): Mientras la reproducción está detenida, conecte el cable USB incluido a
un ordenador desde este puerto para entrar en modo USB.
4. Compartimento de la tarjeta: Levante la tapa para extraer o insertar una tarjeta SD.
5. Altavoz: Altavoz interno del canal izquierdo (L).
Derecha
6. Altavoz: Altavoz interno del canal derecho (R).
7. Interruptor deslizante Power: Manténgalo deslizado durante un momento para encender el
grabador. Deslícelo para apagar el grabador. Durante el modo de grabación y pausa de
grabación el interruptor Power (encendido) no funciona.
8. Interruptor deslizante Key Lock: Conmutador deslizante que permite habilitar o inhabilitar
el bloqueo de las teclas.
9. Conectores Line Out (RCA): Conecte la clavija de un cable de audio conectado a un
dispositivo de audio externo en estos conectores para enviar las señales de audio a este
dispositivo externo (amplificador, etc.).
10. Conector Line In 2 (3,5 mm / 1/8 pulg.): Conecte la clavija de un cable de audio conectado a un
dispositivo de audio externo en este conector para grabar las señales reproducidas por este
dispositivo externo.
11. Control Rec Level: Gírelo para ajustar el nivel de grabación cuando Cont. Nivel del menú de
preajustes sea Manual. El control interior (canal derecho) y el control exterior (canal izquierdo)
giran juntos, a menos que sujete uno mientras gire el otro. El nivel de grabación óptimo se
produce cuando el indicador del nivel se acerca al máximo a 0 dB pero no supera este valor.
42
Page 43

A
A
Ajustes
Los elementos que no se enumeran en Introducción > Contenido de la caja se venden por separado.
Diagramas de conexión
Grabación
Ejemplo A Ejemplo B
Microfóno
mplificador,
receptor, etc.
SOURCE SELECT
MASTER VOLUME
Reproducción
ZONE 2
ZONE 2
ZONE 3 ZONE 3
INFO
SOURCE
ON/OFF
ON/OFF
AUX 1
HDMI 7 5V/1A
OPTION
SOURCE STATUS DIMMER
ENTER
PHONES BACK
SETUP
Ejemplo A Ejemplo B
Auriculares
mplificador,
receptor, etc.
SOURCE SELECT
ZONE 2
ON/OFF
ZONE 2
ZONE 3 ZONE 3
SOURCE
SOURCE STATUS DIMMER
ON/OFF
AUX 1
HDMI 7 5V/1A
PHONES BACK
INFO
OPTION
ENTER
SETUP
1 CBL/SAT 3 GAME 4 NETWORK
2 Blu-ray
L - AUDIO - R
VIDEO
AUX 1
1 CBL/SAT 3 GAME 4 NETWORK
2 Blu-ray
L - AUDIO - R
VIDEO
AUX 1
QUICK SELECT
SETUP MIC
IN-Command
SSEERI
INTEGRATED NETWORK AV RECEIVER
AVR-X4000
MASTER VOLUME
QUICK SELECT
SETUP MIC
IN-Command
SSEERI
INTEGRATED NETWORK AV RECEIVER
AVR-X4000
43
Page 44

Ajuste del reloj
La fecha y la hora se escriben en cada pista (archivo) cuando se inicia una pista. Cuando una
pista de audio se ve en un ordenador, esta fecha y hora aparecen como cuando el archivo fue
“modificado”.
1. Desde el modo de parada, pulse el botón F1 (Menu).
2. Pulse el botón Pitch– o Pitch– para seleccionar Hora/Fecha.
3. Pulse el botón
• Pulse el botón Stop para cancelar el ajuste.
• Pulse el botón
• Cuando esté ajustada la hora, pulse el botón
• Cuando se selecciona el año, el botón
• Pulse el botón Pitch+ o Pitch– para seleccionar el valor.
4. Pulse el botón F1 (Exit).
• En pantalla aparecerá Guardar?.
• Seleccione Si y pulse el botón
Nota: Si se ajusta una fecha que no existe, como, por ejemplo, 31 de febrero, se configura el
valor correcto anterior, es decir, 28 de febrero.
Idioma
La opción menú Idioma le permite elegir el idioma de la pantalla.
1. Desde el modo de parada, pulse el botón F1 (Menu).
2. Pulse el botón Pitch+ o Pitch– para seleccionar Idioma.
3. Pulse el botón
• Pulse el botón Stop ara cancelar el ajuste.
• Pulse el botón Pitch+ o Pitch– para seleccionar la opción.
• Pulse el botón
4. Pulse el botón F1 (Exit).
• En pantalla aparecerá Guardar?.
• Seleccione Si y pulse el botón
/Enter para ajustar la hora y la fecha.
o para seleccionar la opción.
para volver al menú principal.
no funciona.
/Enter para escribir en el reloj de tiempo real.
/Enter para introducir el ajuste de idioma.
para volver al menú principal.
/Enter para guardar el cambio.
44
Page 45

Funcionamiento
Grabación
Grabación normal
1. Deslice el interruptor Power y manténgalo en esta posición para encender el grabador.
2. Pulse el botón Rec para iniciar la grabación.
• Durante la grabación, el indicador Grabar permanece encendido sin parpadear.
• La pantalla mostrará información sobre la grabación.
• Pulse el botón Rec Pause para pausar la grabación.
3. Pulse el botón Stop para detener la grabación y terminar el archivo (es decir, cerrar el archivo de audio).
Puede pulsar el botón /Enter para reproducir el archivo recién grabado, o bien volver a pulsar
el botón Stop para pasar al modo de parada. Si después pulsa el botón /Enter se reproducirá
el inicio del primer archivo de audio.
Retomar grabación
El PMD561 está equipado con una función de retomar la grabación para grabar desde cualquier
posición en un archivo.
Funcionamiento de Retomar grabación durante la grabación:
1. Pulse el botón Rec para iniciar la grabación.
2. Pulse el botón Rec Pause para pausar la grabación.
3. Pulse el botón Skip Back para establecer el modo Retomar grabación. La posición de grabación
salta hacia atrás el periodo de tiempo establecido en Saltar hacia atrás en el menú de preajuste y
la reproducción comienza.
4. Mientras se monitoriza el sonido que se está reproduciendo, determine la posición en la que desea
retomar la grabación.
• Pulse el botón /Enter para pausar la reproducción.
• Pulse el botón Skip Back, o para buscar la posición de reproducción deseada.
• La velocidad de reproducción se puede cambiar utilizando los botones Pitch+ y Pitch–.
Pulse el botón Rec Pause para establecer la posición de comienzo para retomar la grabación.
5. Pulse el botón Rec para comenzar a retomar la grabación. Los datos innecesarios (Toma 1) son
borrados y la Toma 2 se grabará en su lugar.
Al comenzar la grabación de la Toma 2, se realizará una grabación previa de 0,5 segundos o del
tiempo establecido en Pregrabado en el menú de preajustes.
Funcionamiento de Retomar grabación durante la reproducción:
1. Pulse el botón o para seleccionar el archivo que desee reproducir.
2. Pulse el botón /Enter para iniciar la reproducción.
3. Mientras se monitoriza el sonido que se está reproduciendo, determine la posición en la que desea
retomar la grabación.
• Pulse el botón /Enter para pausar la reproducción.
• Pulse el botón Skip Back, o para buscar la posición de reproducción deseada.
• La velocidad de reproducción se puede cambiar utilizando los botones Pitch+ y Pitch–.
Pulse el botón Rec Pause para establecer la posición de comienzo para retomar la grabación.
4. Pulse el botón Rec para comenzar a retomar la grabación. Los datos innecesarios (Toma 1) son
borrados y la Toma 2 se grabará en su lugar.
Al comenzar la grabación de la Toma 2, se realizará una grabación previa de 0,5 segundos o del
tiempo establecido en Pregrabado en el menú de preajustes.
45
Page 46

Entrada de audio para la grabación
La entrada de audio para la grabación se puede configurar desde el menú Entrada.
Ajuste el menú Rec a Estereo para crear un archivo de sonido estéreo (2 canales). O ajuste a D.Mono
para crear un archivo de monoaural dual. En este modo, la entrada del canal izquierdo se graba en
ambos canales izquierdo y derecho, pero el canal derecho se atenúa en 20dB—lo que resulta útil en
situaciones en donde un aumento inesperado del nivel de sonido podrían distorsionar la entrada que
no se atenúa. O ajuste a Mono para crear un archivo de sonido monoaural (1 canal). Observe que
todos los ajustes de Mono usan la entrada del canal izquierdo solamente. El archivo monoaural tendrá
aproximadamente la mitad del tamaño del archivo estéreo.
Coloque el interruptor deslizante Phantom/Mic en ON (encendido) para suministrar +48V de potencia
fantasma a los micrófonos condensadores y ajustar la sensibilidad del nivel. Para los micrófonos
dinámicos, colóquelo en OFF (apagado) para ajustar la sensibilidad del nivel del micrófono. Colóquelo
en Line para seleccionar la sensibilidad de entrada de la fuente se nivel de línea.
# Entrada Grabar Interruptor
Descripción
Phantom/Mic
1 INT MIC Estereo Botón inactivo Grabación estéreo en los canales izquierdo/derecho.
2 D.Mono Grabación estéreo en los canales izquierdo/izquierdo. El canal
3 Mono Grabación monoaural en el canal izquierdo.
4 MIC/LINE Estereo On Grabación estéreo de nivel de micrófono en los canales
5 Off Grabación estéreo de nivel de micrófono en los canales
6 Line Grabación estéreo de nivel de línea en los canales
7 D.Mono On Grabación estéreo de nivel de micrófono en los canales
8 Off Grabación estéreo en los canales izquierdo/izquierdo. El canal
9 Line Grabación estéreo de nivel de línea en los canales izquierdo/
10 Mono On Grabación monoaural de nivel de micrófono en el canal
11 Off Grabación monoaural de nivel de micrófono en el canal
12 Line Grabación monoaural de nivel de línea en el canal izquierdo.
13 LINE2 Estereo Botón inactivo Grabación estéreo en los canales izquierdo/derecho.
14 D.Mono Grabación estéreo en los canales izquierdo/izquierdo. El canal
15 Mono Grabación monoaural en el canal izquierdo.
16 D.IN Estereo Botón inactivo Grabación estéreo en los canales izquierdo/derecho.
17 D.Mono Grabación estéreo en los canales izquierdo/izquierdo.
18 Mono Grabación monoaural en el canal izquierdo.
46
derecho se atenúa 20 dB.
izquierdo/derecho. La alimentación phantom de 48 voltios se
suministra a las entradas XLR.
izquierdo/derecho.
izquierdo/derecho.
izquierdo/izquierdo. El canal derecho se atenúa 20 dB. La
alimentación phantom de 48 voltios se suministra a las entradas
XLR.
derecho se atenúa 20 dB.
izquierdo. El canal derecho se atenúa 20 dB.
izquierdo. La alimentación phantom de 48 voltios se suministra a
las entradas XLR.
izquierdo.
derecho se atenúa 20 dB.
Page 47

Reproducción
1. Deslice el interruptor Power y manténgalo en esta posición para encender el grabador
2. Pulse el botón
3. Pulse el botón
Vuelva a pulsar el botón
4. Pulse el botón Stop para detener la reproducción.
Puede pulsar el botón
a pulsar el botón Stop para pasar al modo de parada. Si después pulsa el botón
se reproducirá el inicio del primer archivo de audio.
Nota: El orden de los archivos se puede cambiar con la opción Ordenar. Si se configura a
Alfabetico, los archivos se ordenan en la secuencia de símbolos, números, y letras. Si se
configura a Hora/Fecha, los archivos de audio se ordenan en la secuencia en que fueron creados.
Existen dos formas de seleccionar el archivo que quiere reproducirse. Se pueden utilizar los
botones
1. Desde el modo de parada, pulse el botón F2 (List).
En la pantalla aparecerá la lista de archivos.
2. Pulse el botón Pitch+ o Pitch– para seleccionar el archivo de audio. Después pulse el botón
3. Pulse el botón Pitch+ o Pitch– para seleccionar Play. Pulse el botón
la reproducción.
Durante la reproducción, pulse el botón Stop para volver a la lista de archivos.
o desde el modo de parada, o bien se puede utilizar la lista de archivos:
/Enter para entrar en el menú de lista de archivos.
o para seleccionar el archivo que desee reproducir.
/Enter para iniciar la reproducción.
/Enter para pausar la reproducción.
/Enter para reproducir el archivo recién reproducido, o bien volver
/Enter
/Enter para iniciar
Modo USB
El PMD561 graba directamente en tarjetas SD. Las grabaciones se pueden transferir a un
ordenador de sobremesa o portátil extrayendo la tarjeta SD del PMD561, o conectado el
PMD561 a su ordenador a través del puerto USB. El audio grabado en el conocido formato de
compresión MP3 se puede utilizar directamente para compartir archivos en Internet. Cuando el
PMD561 se conecta a un ordenador, la tarjeta SD se muestra como una unidad externa.
1. Encienda el ordenador.
2. Inserte la tarjeta SD.
3. Encienda el PMD561.
4. En el modo de parada, conecte el PMD561 y el ordenador mediante el cable.
• Cuando se activa el puerto USB, aparece una pantalla de ajuste.
• La tarjeta SD del PMD561 se muestra como un dispositivo extraíble en el ordenador.
Notas:
• La alimentación del bus USB activa esta función incluso sin el servicio de adaptador de CA o pilas.
• No funciona ningún botón aparte del interruptor Power.
Precaución:
• No extraiga la tarjeta SD durante el modo USB. Los datos y la tarjeta SD podrían dañarse.
• En modo de grabación y reproducción, no conecte el PMD561 al ordenador mediante el cable.
El PMD561 podría apagarse o detenerse debido a la recepción de alimentación del bus USB.
47
Page 48

Características avanzadas
Micrófonos
Atenuador
El ajuste de atenuación del micrófono permite el uso directo de micrófonos con diferentes
sensibilidades.
• 0 db: No se produce atenuación de micrófono.
• -6 dB: La entrada de los micrófonos conectados al conector Mic se reduce 6 dB.
• -12 dB: La entrada de los micrófonos conectados al conector Mic se reduce 12 dB.
• -18 dB: La entrada de los micrófonos conectados al conector Mic se reduce 18 dB.
Configure la opción Aten.Mic del menú de preajustes.
Alimentación phantom
Deslice el interruptor Phantom/Mic para suministrar alimentación de +48V para micrófonos de
condensador.
• On: Se suministran +48V de potencia a los micrófonos de condensador.
• Off: No se suministra alimentación a los micrófonos.
Recomendaciones sobre los micrófonos:
Se recomienda el uso de micrófonos de condensador profesionales (que requieren alimentación
adicional, ya sea la alimentación phantom del PMD561 o de otra fuente) porque ofrecen una
mayor sensibilidad y una grabación de audio de mayor calidad.
Se pueden utilizar micrófonos dinámicos, pero en algunos casos no ofrecen grabaciones con la
calidad de audio óptima.
Para conocer cuál es el micrófono más adecuado para cada uso, consulte a su distribuidor local.
Es posible realizar una demostración de los distintos rendimientos y características de los
micrófonos para su caso concreto.
Grabación previa
Cuando PreRecord es On y el PMD561 está en pausa de grabación, escucha las entradas de
audio seleccionadas y almacena continuamente 2 segundos de audio. Después, cuando se inicia
la grabación, el PMD561 escribe los 2 segundos de audio previamente almacenados en la tarjeta
y continúa la grabación a partir de allí.
Configure la opción PreRecord del menú de preajustes.
Filtro de audio
Filtro de graves
Los graves del audio de entrada se reducen al realizar la grabación. Active esta opción para
reducir el ruido como, por ejemplo, el sonido del viento al grabar en exteriores.
Configure la opción Low Cut del menú de preajustes.
48
Page 49

Filtro de agudos
Los agudos del audio de entrada se reducen al realizar la grabación. Active esta opción para reducir el
ruido de alta frecuencia del entorno ambiental.
Configure la opción Filtro Agudos del menú de preajustes.
Silent Skip
La opción “Silent Skip” pausa automáticamente la grabación cuando se produce un periodo de silencio
y la vuelve a iniciar cuando éste termina.
La opción de menú Silent Skip le permite ajustar el nivel de sonido de margen que define el silencio en
Off (desactivado), –60 dB, –54 dB, –38 dB y –20dB.
Configure la opción Silent Skip del menú de preajustes.
Incremento manual de pistas
Cuando la opción “Manual Track” (incremento manual de pistas) esté activada durante la grabación,
pulse el botón Function hasta que en la pantalla aparezca TR, y después pulse el botón F1 (TR) para
añadir un nuevo archivo de audio.
En tal punto se creará un nuevo archivo de audio. No se puede garantizar la continuidad del sonido,
que depende de la velocidad de la tarjeta o del tamaño del archivo de audio.
Auto Track
Cuando la opción “Auto Track” (incremento automático de pistas) está activada, durante la grabación
se crea un nuevo archivo de audio de forma automática a intervalos de tiempo de grabación
especificados. Esta opción se puede configurar para crear un nuevo archivo cada 1, 5, 10, 15, o 30
minutos, o cada 1, 2, 6, 8, 12, o 24 horas. Esto facilita la búsqueda de un determinado punto de una
grabación. Por ejemplo, si se inicia un nuevo archivo de audio cada minuto durante la reproducción, la
opción “Auto Track” facilita la búsqueda de un fragmento concreto porque existe una relación entre los
números y el tiempo. Durante la reproducción, se puede seleccionar el número de archivo 3 para
reproducir aproximadamente el tercer minuto de grabación. Para ir directamente al principio del minuto
10, sólo se tiene que seleccionar el número de archivo 10, etc.
No se puede garantizar la continuidad del sonido, que depende de la velocidad de la tarjeta o del
tamaño del archivo de audio.
Configure la opción Track Auto del menú de preajustes.
Nota: Cuando el tamaño del archivo alcance 4 GB, se iniciará automáticamente un nuevo archivo de
audio.
Copia de segmento
La función “Copy Segment” (copiar segmento) convierte un segmento “resaltado” en un nuevo archivo
separado sin dañar el archivo fuente original.
1. Durante la reproducción la pantalla muestra “COPY”. Pulse el botón F1 (Copy) cuando el audio
alcance el punto inicial que desee. Aparecerá “FIJAR ENTRADA?”.
2. Pulse el botón
que se ha almacenado el punto inicial (IN) y se seguirá reproduciendo el archivo.
3. Deje que el PMD561 siga reproduciendo el archivo hasta el punto final (OUT), o utilice los controles
de desplazamiento estándar como el botón o para recorrer segmentos más grandes.
/Enter para guardar el punto inicial. IN- parpadeará en la pantalla para indicar
49
Page 50

4. Cuando llegue al punto final (OUT) que desee, pulse el botón F1 (Copy). Aparecerá “FIJAR
SALIDA?”.
5. Pulse el botón /Enter para guardar el punto final (OUT). Aparecerá “COPIA SEGMNT?”.
6. Pulse el botón /Enter para iniciar el proceso de copia. En la pantalla aparecerá
“EJECUTANDO...”. Cuando finalice el procedimiento de copia, la pantalla mostrará
“COMPLETADO” durante un segundo y volverá al modo de parada con el nuevo archivo como
archivo actual.
Notas:
• “1” se añadirá al final del nombre de archivo del primer nuevo archivo. (Por ejemplo; archivo
original = “aaa.mp3”, primer nuevo archivo = “aaa_ 1.mp3”)
• Cuando un segmento de copia se extiende a dos o más archivos, se conectan y copian dichos
archivos.
• Cuando un segmento de copia se extiende a archivos con distintos formatos FOMATO o REC, no
se puede realizar la copia.
• El segmento de copia no puede superar los 80 minutos.
División de archivo
La división de archivo le permite dividir un archivo en la posición deseada.
1. Durante la reproducción, pulse el botón Function hasta que la pantalla aparezca DIV. Después
pulse el botón F1 (Div).
En pantalla aparecerá “DIVIDIR?”. Seleccione NO y pulse el botón /Enter para pausar la
reproducción.
2. Seleccione SI y pulse el botón /Enter para iniciar el proceso de división.
En la pantalla aparecerá “EJECUTANDO...”. Cuando finalice el proceso de división, la pantalla
mostrará “COMPLETADO” durante un segundo y la unidad se detendrá al comienzo del segundo
archivo de los archivos divididos.
Notas:
• “A” se añadirá al final del nombre de archivo del primer nuevo archivo. (Por ejemplo; archivo
original = “aaa.mp3”, primer nuevo archivo = “aaa_ A.mp3”)
• “_B” se añadirá al final del nombre de archivo del segundo nuevo archivo.
• Cuando la longitud del nombre de archivo con extensión sea de 63 o más, el proceso de división
no podrá ejecutarse. En la pantalla aparecerá el mensaje “TITULO LARGO” y la reproducción se
pausará en la posición en la que pulse el botón /Enter.
Marcación
Durante la grabación o la reproducción podrán añadirse marcas manual o automáticamente. La
información de marcación se guardará como etiqueta ID3/Ver 2 en un archivo MP3, o como fragmento
en un archivo WAVE. Las marcas le ayudarán a encontrar puntos específicos de una grabación.
• Durante la reproducción podrá localizar instantáneamente marcas.
• A un archivo podrán añadírsele hasta 30 marcas.
• Las marcas se numeran consecutivamente comenzando por uno.
• Durante la grabación o la reproducción, podrá añadir manualmente una marca pulsando el botón
F2 (Mark).
50
Page 51

Adición manual de una marca
Durante la grabación o la reproducción, pulse el botón Function hasta que en la pantalla aparezca
“MARK”. Después pulse el botón F2 (Mark) para añadir manualmente una marca.
Adición automática de una marca
La opción de menú Auto Mark desactiva o activa la función de marcación automática.
• Si la marcación automática está activada y la máquina está en grabación-pausa, cuando se
reanude la grabación se añadirá una marca.
• Si la marcación automática está activada y el PMD561 está grabando audio por debajo del
umbral de sonido durante más de tres segundos, el audio que cruce el umbral causará la
adición de una marca.
La opción de menú Auto Mark le permite:
• Activar o desactivar la marcación automática.
• Ajustar el nivel de sonido de margen que define el silencio e –60dB, –54dB, –38dB o –20dB.
Configure la opción Auto Mark del menú de preajustes.
Búsqueda de marcas
Durante la grabación o la reproducción, pulse el botón Function hasta que en la pantalla aparezcan
“MK–“ y “MK+”. Después pulse el botón F1 (MK–) o F2 (MK+) para seleccionar la marca a la que
desee acceder. El PMD561 se pausará en la marca que haya seleccionado.
Para iniciar la reproducción, pulse el botón /Enter.
Control de velocidad
El control de pitch (tono) permite variar la velocidad (pitch) de la reproducción a lo largo de un rango de
–40% a +20% en incrementos de 5%.
Durante la reproducción, pulse el botón Pitch+ para aumentar la velocidad de reproducción un 5%. La
velocidad de reproducción podrá aumentarse hasta el +20%. O pulse el botón Pitch– para reducir la
velocidad de reproducción un 5%. La velocidad de reproducción podrá reducirse hasta el -40%.
Características adicionales
Bloq. Teclas
Deslice el interruptor Key Lock para bloquear las teclas. El bloqueo de teclas asegura el PMD561 en
el estado que está durante los modos de grabación, reproducción o parada.
Durante el modo de grabación o el de grabación-pausa, el interruptor Power no funciona.
Notas:
• Si el ajuste de BLOQ. TECLAS es TOTAL sólo se puede utilizar el mando a distancia RC600PMD
opcional.
• Si el ajuste de BLOQ. TECLAS es PARCIAL, se pueden pulsar los botones Rec, Rec Pause y Stop
del panel, y también se puede utilizar el mando a distancia RC600PMD.
• TECLAS BLOQ se muestra durante un segundo cuando se pulsa una tecla durante el bloqueo de
teclas.
Configure la opción Bloq. Teclas del menú de preajustes.
51
Page 52

Mando a distancia
El PMD561 permite utilizar el mando a distancia opcional RC600PMD (que se vende por separado). El
RC600PMD está diseñado para realizar entrevistas con micrófono, Se conecta a su micrófono.
El cable de un metro y medio con un miniconector de cuatro contactos se conecta al PMD561. Para utilizar el
RC600PMD no es necesario realizar ningún cambio en los menús.
El RC600PMD incluye:
1. Un indicador luminoso
• Verde: se ilumina sin parpadear durante el modo de espera o el de parada
• Rojo: se ilumina sin parpadear durante la grabación
• Parpadeando en rojo: durante el modo de grabación-pausa
• Naranja: se ilumina en naranja durante 1/2 segundo cuando se produce una
señal que supera el nivel de pico en el modo de grabación o el de grabaciónpausa, y luego vuelve a iluminarse en rojo.
2. Botón para pausar la grabación
3. Pulse para iniciar/reanudar la grabación y para añadir archivos manualmente
4. Pulse para añadir una marca durante la grabación o la reproducción.
Conector de ampliación del mando a distancia
Las teclas Play, FF y REW pueden añadirse a las funciones del mando a distancia utilizando un circuito
equivalente al mostrado a continuación.
R1
R2
1k
3.9kR36.8kR411kR515kR630k
S1
S2 S3 S4 S5 S6
REC PLAY REW MARK FFREC
PAUSE
Notas:
4
3
2
1
• El PMD561 reproduce mientras se mantiene cerrado el interruptor Play, y salta hacia atrás y se pausa
cuando se abre.
• Error de resistencia = Dentro del 5%
• No aplique nunca una tensión externa. Si lo hiciese se produciría un mal funcionamiento.
• Aísle el circuito para que no pueda tocarse directamente. Utilice una estructura que proteja el circuito
contra electricidad estática, porque causaría un mal funcionamiento.
• No accione los interruptores al mismo tiempo que los botones de la unidad.
• Marantz Professional no aceptará ninguna responsabilidad por ningún daño ni la violación de patentes u
otros derechos que puedan resultar de la utilización de los circuitos.
• Esto no sanciona patentes ni otros derechos de Marantz Professional ni de terceros.
• Está estrictamente prohibido imprimir o reproducir los diagramas de circuitos ya sea parcial o totalmente.
Tipo de conector (miniconector de 1/8” T-R-R-S)
ø3,5/4P (TMP-B66)
1. Punta
23
1
4
2. Anillo
3. Anillo
4. Manguito
R7
47k
S7
SKIP
BACK
R8
220R9220
1
2
3
4
52
Page 53

g
g
g
Control de pantalla
Pulse el botón Display para ir cambiando la información que aparece en la pantalla. La
información que se muestra en los modos de parada, grabación y reproducción es ligeramente
distinta.
En modo de parada
1. Tiempo restante total
Espacio restante de la tarjeta
Tiempo restante total
Número de archivos
Función F1
Fuente de entrada
Función F2
2. Hora/fecha actuales
Hora actual
Fecha actual
3. Configuración de la grabación
Fuente de entrada
Formato de
Cuantificación
Icono ALC
rabación
Preajuste
Canal de
Tasa de bits de MP3
Tasa de muestreo
Icono TRACK AUTO
rabación
En modo de grabación
1. Tiempo de grabación
Espacio restante de la tarjeta
Tiempo de
Nombre de archivo
Función F1
2. Tiempo restante total
rabación
Fuente de entrada
Función F2
Tiempo restante total
53
Page 54

g
g
g
3. Nivel de grabación
Nivel de audio de entrada
Configuración de la grabación
4.
Fuente de entrada
Formato de
En modo de reproducción
1. Tiempo transcurrido
Tiempo transcurrido
Nombre de archivo
2. Tiempo restante
rabación
Cuantificación
Icono ALC
Función F1
Preajuste
Canal de
Tasa de bits de MP3
Tasa de muestreo
Icono TRACK AUTO
rabación
Posición actual en el archivo
Función F2
Tiempo restante
3. Nivel de salida
Nivel de audio de salida
4. Propiedades del archivo
Tiempo creado
Canal de
Tasa de bits de MP3
54
rabación
Tasa de muestreo
Cuantificación
Page 55

V
V
V
Menú
Menú principal
1. Desde el modo de parada, pulse el botón F1 (Menu).
• En la pantalla aparecerá la lista de menús.
• La opción seleccionada se resaltará.
• Si está seleccionada la primera opción, pulse el botón Pitch+ para ir a la última.
• Si está seleccionada la última opción, pulse el botón Pitch– para ir a la primera.
2. Pulse el botón Pitch+ o Pitch– para seleccionar la opción.
3. Pulse el botón Enter para confirmar o ejecutar la opción seleccionada.
Opciones y funciones
# Display Description
1 Presets
2 Pantalla
3 Hore/Fecha Ajusta la hora y la fecha actuales.
4 Utilidad
5 Idioma Elije el idioma de indicación en pantalla.
6 Version F/W Muestra la versión del firmware.
a al menú de preajustes.
a al menú de pantalla.
a al menú de utilidades.
Protección de los ajustes del menú
Cuando el Bloqueo de menú en el menú de preajustes esté Activado, se requerirá el código de
acceso para seleccionar las opciones por debajo del menú superior, protegiendo así los ajustes.
El código de acceso es el número que va de 0000 a 9999 establecido en Contraseña en el menú de
preajustes.
Menú de preajustes
Usted podrá guardar 3 preajustes detallados en el grabador, tales como entrada de grabación, formato
de grabación, modo de reproducción, etc. En el menú de preajustes se pueden configurar 20 opciones,
y se pueden establecer 3 preajustes con las condiciones que se deseen.
La opción SELEC.PRESET le permite seleccionar un número de preajuste.
1. Desde el modo de parada, pulse el botón F1 (Menu).
• En la pantalla aparecerá la lista de menús.
• La opción seleccionada se resaltará.
• Si está seleccionada la primera opción, pulse el botón Pitch+ para ir a la última.
• Si está seleccionada la última opción, pulse el botón Pitch– para ir a la primera.
2. Pulse el botón Pitch+ o Pitch– para seleccionar PRESETS. Después pulse el botón Enter.
3. Pulse el botón Pitch+ o Pitch– para seleccionar el preajuste 1, 2, 3, o renombrado preajuste.
4. Pulse el botón Enter para aceptar el preajuste seleccionado.
• En pantalla aparecerá el menú de acción.
• Seleccione el elemento SELECCIONAR y pulse el botón Enter para seleccionar al preset como
el preset activo.
• Seleccione EDITAR y pulse el botón Enter para ajustar o cambiar el preajuste seleccionado.
• Seleccione RENOMBRAR y pulse el botón Enter para cambiar el nombre del preajuste
seleccionado.
55
Page 56

Funciones del menú de acción
# Display Description
1 SELECCIONAR El preset se selecciona como el preset activo.
2 EDITAR Ajusta o cambia el preajuste seleccionado.
3 RENOMBRAR Cambia el título del preajuste seleccionado.
Renombrado de preajustes
1. Desde el modo de parada, pulse el botón F1 (Menu).
2. Pulse el botón Pitch+ o Pitch– para seleccionar el Menú de Preajustes. Después pulse el
botón Enter para aceptar la selección.
3. Pulse el botón Pitch+ o Pitch– para seleccionar el Preajuste 1, 2, 3, o
preajuste. Después pulse el botón Enter para aceptar el preajuste seleccionado.
4. Pulse el botón Pitch+ o Pitch– para seleccionar Renombrar y pulse el botón Enter para
aceptar la selección.
5. Renombre el título del preajuste.
El texto se puede cambiar y borrar. Pulse el botón
o para mover el cursor hasta el
punto desde el que desee cambiar o borrar texto.
• Para cambiar un carácter, pulse el botón Pitch+ o Pitch– para seleccionar el carácter
que desee cambiar.
• Para insertar un carácter, pulse el botón F1 (INS). Se insertará un carácter a la
izquierda del carácter resaltado y después se resaltará.
• Para borrar un carácter, pulse el botón F2 (DEL) para borrar el carácter seleccionado.
6. Pulse el botón Enter para guardar los cambios.
Pulse el botón
para volver a la página anterior sin guardar los cambios cuando la primera
letra del título del preajuste esté resaltada.
Notas:
• Si el último carácter del título del preajuste es un espacio (SP), el título modificado no lo
incluirá.
• La longitud máxima de un título de preajuste está limitada a 8 caracteres. Si se introduce el
noveno carácter, éste se borrará.
• Los caracteres que podrán insertarse son: A B C D E F G H I J K L M N O P Q R S T U V W X
Y Z a b c d e f g h i j k l m n o p q r s t u v w x y z (espacio) ! “ # $ % & ’ ( ) + , – . ; = @ [ ] ^ _ `
{ } ~ 0 1 2 3 4 5 6 7 8 9.
renombrado
56
Page 57

Lista del menú de preajustes
# Pantalla Valor seleccionable
1 ENTRADA INT MIC / MIC/LINE / LINE2 / D.IN
2 FORMATO MP3-320 / MP3-256 / MP3-192 / MP3-128 / MP3-64 / PCM-16 /
PCM-24
3 REC Estereo / Mono / D.Mono
4 FREQ. MUEST. 44.1k / 48k / 96k
5 PRERECORD On / Off
6 CONT. NIVEL Manual / ALC
7 TRACK AUTO Off / 1min / 5min / 10min / 15min / 30min / 1hour / 2hour / 6hour /
8hour / 12hour / 24hour
8 AUTO MARK Off / –60dB / –54dB / –38dB / –20dB
9 SILENT SKIP Off / –60dB / –54dB / –38dB / –20dB
10 ATEN.MIC 0dB / –6dB / –12dB / –18dB
11 Low Cut On / Off
12 FILTRO AGUDOS On / Off
13 SKIP BACK 0.5sec / 1sec / 1.5sec / 2sec / 2.5sec / 3sec / 3.5sec / 4sec/ 4.5sec /
5sec / 5.5sec / 6sec / 6.5sec / 7sec / 7.5sec / 8sec / 8.5sec / 9sec /
9.5sec / 10sec / 15sec / 20sec / 25sec / 30sec / 35sec / 40sec /
45sec / 50sec / 55sec / 60sec
14 BLOQ. TECLAS Total / Parcial
15 PILAS Alcalinas / Ni-MH
16 AUTO APAGADO Off / 5m / 15m / 30m / 60m
17 BEEP Encendido / Apagado
18 BLOQUEO MENÚ On / Off
19 CONTRASEÑA Número de 4 dígitos
20 SP MUTE On / Off
21 MODO REPROD Single / Cont.
22 IDMACHINE 8 caracteres máx.
23 POR DEFECTO
Procedimiento general en el modo de edición
1. En el menú de acción de preajustes, pulse el botón Pitch+ o Pitch– para seleccionar
EDITAR,
y después pulse el botón Enter.
En pantalla aparecerá la lista del menú de acción.
2. Pulse el botón Pitch+ o Pitch– para seleccionar una opción del menú. Después pulse el
botón
o para seleccionar las opciones de introducción.
3. Cuando complete el cambio del preajuste, pulse el botón F1 (Exit). En pantalla aparecerá
“GUARDAR?”.
4. Seleccione SI y pulse el botón Enter button to store the changes, para guardar los cambios
o NO y pulse el botón Enter para salir del modo de menú sin guardar ningún cambio.
57
Page 58

1. Entrada
Utilice este menú para seleccionar la entrada de audio para grabación.
Valor de ajuste Descripción
INT MIC Micrófonos internos estéreo
MIC/LINE
LINE2
D.IN Entrada digital
2. Formato de grabación
“Formato” le permite seleccionar el formato de audio para grabación de compresión MP3 o PCM
de alta fidelidad, la tasa de bits de MP3 (320, 256, 192, 128 o 64 kbps) y la cuantificación de
PCM (16 bits o 24 bits).
Valor de ajuste Descripción
MP3-320 / MP3-256 /
MP3-192 / MP3-128 /
MP3-64
PCM-16 / PCM-24 (PCM)
3. Canal de grabación
Use Rec Channel para seleccionar uno de los siguientes modos de grabación: 2 canales,
monoaural de 1 canal o monoaural de 2 canales (monoaural dual) con el segundo canal
atenuado en 20dB.
Valor de ajuste Descripción
Estereo Archivo de audio de 2 canales estéreo
Mono Archivo de audio monoaural de 1 canal al canal izquierdo solamente
D. Mono Archivo de audio monoaural de 2 canales (monoaural dual) La entrada
4. Tasa de muestreo
“Freq. Muest.” le permite seleccionar la frecuencia de muestreo de la grabación.
Valor de ajuste Descripción
44.1k Frecuencia de muestreo para PCM y MP3.
48k Frecuencia de muestreo para PCM y MP3.
96k Frecuencia de muestreo para PCM.
Micrófonos externos (conector Mic/Line)
Entrada de nivel de línea (conector Line 2)
(MP3)
Mono: 160, 128, 96, 64, 32kbps
Estéreo: 320, 256, 192, 128, 64kbps
Cuantificación: 16bits, 24bits
del canal izquierdo se graba en ambos canales L y R –el canal
derecho se atenúa en 20dB.
58
Page 59

5. Grabación previa
“PreRecord” le permite activar y desactivar la función de grabación previa.
Valor de ajuste Descripción
On Activa la grabación previa.
Off Desactiva la grabación previa.
6. Control del nivel
“Cont. Nivel” le permite seleccionar el tipo de control de nivel de grabación, MANUAL o ALC.
Valor de ajuste Descripción
Manual Control manual del nivel
ALC Control automático del nivel
7. Incremento automático de pistas
“Track Auto” le permite activar o desactivar la función de incremento automático de pistas y
seleccionar el intervalo de tiempo para crear automáticamente una nueva pista.
Valor de ajuste Descripción
Off Desactiva la función de increment automático de pistas.
1min / 5min / 10min / 15min /
30min / 1hour / 2hour / 6hour /
8hour / 12hour / 24hour
Activa la función de incremento automático de pistas y establece
el intervalo de tiempo para crear un nuevo archivo.
8. Marcación automática
“Auto Mark” le permite activar la función de marcación automática y establecer el nivel de silencio, o
desactivar esta función. La marca se añade automáticamente después de finalizar el período de
silencio cuyo nivel de entrada sea inferior al valor preajustado de –60, –54, –38 o –20 (dB) durante más
de 3 segundos.
Valor de ajuste Descripción
Off Desactiva la función de marcación automática.
–60dB / –54dB / –38dB / –20dB Nivel de silencio
9. Salto de silencios
“Silent Skip” le permite activar la función de salto de silencios y establecer el nivel de silencio, o
desactivar esta función. Mientras la función de salto de silencios esté activada, la grabación se pausará
automáticamente cuando el nivel de entrada es sea inferior al valor preajustado de –60, –54, –38 o –20
(dB) durante más de 3 segundos.
Valor de ajuste Descripción
Off Desactiva la función de salto de silencios.
–60dB / –54dB / –38dB / –20dB Activa la función de salto de silencios y selecciona el nivel de
silencio.
59
Page 60

10. Atenuación de micrófono
El menú “Aten. Mic” le permite seleccionar el nivel del atenuador de micrófono.
Valor de ajuste Descripción
0dB Desactiva la función del atenuador de micrófono.
–6dB / –12dB / –18dB Ajusta el atenuador de micrófono.
11. Filtro de graves
La opción de menú “Low Cut” desactiva o activa la función del filtro de graves.
Valor de ajuste Descripción
Off Desactiva el filtro de graves.
On Activa el filtro de graves.
12. Filtro de agudos
La opción de menú “Filtro Agudos” desactiva o activa la función del filtro de agudos.
Valor de ajuste Descripción
Off Desactiva el filtro de agudos.
On Activa el filtro de agudos.
13. Salto hacia atrás
La opción de menú “Skip Back” le permite seleccionar el tiempo de salto hacia atrás de 0,5 a 60
segundos.
Valor de ajuste
0.5sec / 1sec / 1.5sec / 2sec / 2.5sec / 3sec / 3.5sec / 4sec / 4.5sec / 5sec / 5.5sec / 6sec /
6.5sec / 7sec / 7.5sec / 8sec / 8.5sec / 9sec / 9.5sec / 10sec / 15sec / 20sec / 25sec / 30sec /
35sec / 40sec / 45sec / 50sec / 55sec / 60sec
14. Bloq. Teclas
El bloqueo de teclas asegura el PMD561 en el estado que está durante los modos de grabación,
reproducción o parada.
Valor de ajuste Descripción
Total No funciona ningún botón.
Parcial
No funciona ningún botón. Sin embargo, se aceptan los botones Rec,
Rec Pause, y Stop/Cancel.
60
Page 61
15. Pilas
La opción de menú “Pilas” le permite establecer el tipo de pilas o baterías. El grabador PMD561
funciona con 4 pilas alcalinas normales o baterías de Ni-MH estándar de tamaño AA. El ajuste de Pilas
se utiliza para el indicador de energía de pilas restante en la pantalla y la advertencia “BATERÍA
BAJA”. Si el ajuste no concuerda con las pilas instaladas, el PMD561 no mostrará el estado apropiado
de las mismas.
Valor de ajuste Descripción
Alcalinas Establece el tipo de pilas a alcalinas.
Ni-MH Establece el tipo de baterías a Níquel e hidruro metálico.
16. Auto Apagado
Si el PMD561 no durante un largo período de tiempo cuando se encuentra en modo de parada o
reproducción-pausa, se puede apagar automáticamente para evitar que se gasten las pilas.
Valor de ajuste Descripción
Off Desactiva la función de apagado automático.
5m / 15m / 30m / 60m Active la función y seleccione el tiempo hasta que el PMD561 se apague
automáticamente.
17. Pitido
La opción de menú “Beep” le permite activar o desactivar la función de alarma con pitido. Cuando esta
característica está activada, la unidad emite un tono cuando la batería está descargada (“Low
Battery”) o cuando no queda más espacio para grabar en la tarjeta SD.
Valor de ajuste Descripción
Encendido Activa la función de pitido.
Apagado Desactiva la función de pitido.
18. Bloqueo Menú
La opción “Bloqueo de menú” del menú permite proteger las opciones de ajuste debajo del menú
superior mediante el uso de una contraseña.
Valor de ajuste Descripción
On Activa la protección mediante contraseña.
Off Desactiva la protección mediante contraseña.
19. Contraseña
Cuando el Bloqueo de menú esté activado, también se utilizará como contraseña.
Valor de ajuste
Número de 4 dígitos desde 0000 a 9999 (establecido inicialmente a 0000)
61
Page 62

20. Silenciamiento de altavoces
“SP Mute” le permite activar o desactivar la función de silenciamiento de altavoces. Cuando SP
Mute esté ajustado a ON, el sonido que esté grabándose no saldrá a través del altavoz. Cuando
esté ajustado a OFF, el sonido saldrá a través del altavoz, excepto cuando el sonido esté
grabándose mediante el micrófono incorporado.
Valor de ajuste Descripción
On Silenciamiento de altavoces activado.
Off Silenciamiento de altavoces desactivado.
21. Modo de reproducción
La opción de menú “Modo Reprod” le permite seleccionar el modo de reproducción única o el
modo de reproducción continua.
Valor de ajuste Descripción
Single Modo de reproducción única.
Cont. Modo de reproducción continua.
22. ID de máquina
Un archivo de audio creado por el PMD561 contiene información del ID de máquina. La
información se incluye en el nombre del archivo. Por ejemplo, si el ID de máquina es “aaaaa”, el
primer archivo se numerará “aaaaa001.wav” o “aaaaa001.mp3”. La configuración del ID de
máquina se aplica a los tres ajustes.
1. En el modo de edición de preajustes, pulse el botón Pitch+ o Pitch– para seleccionar la
opción IDMachine. Pulse el botón Enter para renombrar el ID.
2. Renombre el ID de máquina.
Consulte el procedimiento Renombrado de preajustes.
3. Pulse el botón Enter para volver al menú de selección de preajustes y pulse el botón F1
(Exit) para guardar los cambios.
Notas:
• Si el último carácter del nombre del ID de máquina es un espacio (SP), el nombre modificado
no lo incluirá.
• Si introduce más de 8 caracteres, se suprimirá el último cuando añada otro
23. Preajuste por defecto
“Por Defecto” le permite volver a los ajustes seleccionados por defecto del preajuste
seleccionado
1. En el modo de edición de preajustes, pulse el botón Pitch+ o Pitch– para seleccionar la
opción Por Defecto Pulse el botón Enter para inicializar.
2. Cuando aparezca el mensaje “POR DEFECT?”, seleccione SI, y después pulse el botón
Enter. El valor preajustado volverá al establecido por defecto y el PMD561 comenzará a
escribir en la memoria no volátil.
62
Page 63
Lista de valores por defecto
# Pantalla Preset-1 Preset-2 Preset-3
1 ENTRADA INT MIC INT MIC INT MIC
2 FORMATO MP3-128 MP3-320 PCM-24
3 REC Estereo Estereo Estereo
4 FREQ. MUEST. 44.1k 44.1k 96k
5 PRERECORD On Off Off
6 CONT. NIVEL ALC Manual Manual
7 TRACK AUTO Off Off Off
8 AUTO MARK Off Off Off
9 SILENT SKIP Off Off Off
10 ATEN.MIC 0dB 0dB 0dB
11 LOW CUT On Off Off
12 FILTRO AGUDOS On Off Off
13 SKIP BACK 3sec 3sec 3sec
14 BLOQ. TECLAS All All All
15 PILAS Alcalinas Alcalinas Alcalinas
16 AUTO APAGADO 15m 15m 15m
17 BEEP Encendido Encendido Encendido
18 BLOQUEO MENÚ Off Off Off
19 CONTRASEÑA 0000 0000 0000
20 SP MUTE Off Off Off
21 MODO REPROD Cont. Cont. Cont.
22 IDMACHINE 1 1 1
23 POR DEFECTO Reunión comprimida Música comprimida Calidad óptima no
comprimida
63
Page 64

Menú de pantalla
Usted podrá guardar preajustes en el menú de pantalla para ajustes tales como Brillo,
Temporizador, LED, Format Hora, Formato Fecha, y Orden.
1. Desde el modo de parada, pulse el botón F1 (Menu).
• En la pantalla aparecerá la lista de menús.
• La opción seleccionada se resaltará.
• Si está seleccionada la primera opción, pulse el botón Pitch+ para ir a la última.
• Si está seleccionada la última opción, pulse el botón Pitch– para ir a la primera.
2. Pulse el botón Pitch+ o Pitch– para seleccionar Pantalla.
3. Pulse el botón Enter.
• La opción seleccionada parpadea.
• La elección de la opción seleccionada se resaltará.
• En el modo del menú de pantalla, pulse el botón Stop para volver al modo de parada.
4. Pulse el botón Pitch+ o Pitch– para seleccionar una oción. Después pulse el botón
para desplazarse por las opciones.
5. Pulse el botón Pitch+ o Pitch– para seleccionar otras opciones del menú
Cuando complete
el cambio del menú de pantalla, pulse el botón F1 (Exit) para guardar los cambios, o pulse el
botón Stop para salir del modo de menú sin guardar ningún cambio.
6. Cuando se muestre “GUARDAR?”, seleccione SI y pulse el botón Enter para guardar los
cambios o NO y pulse el botón Enter para volver al menú principal sin guardar ningún
cambio.
Funciones del menú de pantalla
o
# Pantalla Opciones seleccionables Por defecto
1 BRILLO 1 a 8 5
2 TEMPORIZADOR Off / 30sec / 60sec / 90sec Off
3 LED On / Off On
4 FORMATO HORA 12H / 24H 12H
5 FORMATO FECHA M/D/A / D/M/A
M/D/A *
6 ORDEN Alfabetico / Hora/Fecha Hora/Fecha
7 POR DEFECTO -- --
* El ajuste por defecto de fábrica de Formato Fecha para Europa es D/M/A.
1. Brillo
La opción de menú “Brillo” le permite ajustar el brillo de la pantalla OLED (Organic Light-Emitting
Diode, diodo orgánico de emisión de luz) del grabador PMD561.
Valor de ajuste Descripción
1, 2, 3, 4, 5, 6, 7, 8 (Oscura) 1 – 8 (Brillante)
64
Page 65

2. Temporizador
La opción de menú “Temporizador” le permite activar o desactivar la función de temporizador
con hora preajustada. Mientras el temporizador se encuentra activado, la pantalla se apagará
automáticamente cuando no se pulse ningún botón durante el tiempo seleccionado (30, 60 o 90
segundos). La duración de las pilas se prolongará si está activado.
Valor de ajuste Descripción
Off Desactiva el temporizador.
30sec / 60sec / 90sec Activa el temporizador y la hora.
3. LED
La opción de menú “LED” le permite activar o desactivar la iluminación de todos los LED
Valor de ajuste Descripción
On Activa la iluminación de los LED.
Off Desactiva la iluminación de los LED.
4. Formato de hora
La opción de menú “Formato de hora” le permite seleccionar el formato de la hora actual,
formato de 12 horas con AM/PM, o formato de 24 horas (24H).
Valor de ajuste Descripción
12H Formato de 12 horas (12:00AM – 11:59PM)
24H Formato de 24 horas (00:00 – 23:59)
5. Formato de fecha
La opción de menú “Forma Fecha” le permite seleccionar el orden en que se muestra la fecha:
mes/día/año (M/D/A) o día/mes/año (D/M/A).
Valor de ajuste Descripción
M/D/A Mes/Día/Año
D/M/A Día/Mes/Año
6. Ordenación de archivos
La opción de menú “Orden” le permite seleccionar el orden de los archivos en la lista por
nombre ordenar los archivos de la lista por orden alfabético o cronológico (hora/fecha).
Valor de ajuste
Alfabético o Hora/Fecha
65
Page 66

7. Ajustes por defecto
La opción de menú “Por Defecto” le permite devolver el menú de pantalla a los ajustes por
defecto.
1. Desde el modo de parada, pulse el botón F1 (Menu).
2. Pulse el botón Pitch+ o Pitch– para seleccionar el menú de pantalla. Después pulse el
botón Enter para aceptar la selección.
3. Pulse el botón Pitch+ o Pitch– para seleccionar la opción Por Defecto. Después pulse el
botón Enter para inicializar.
4. Cuando aparezca el mensaje “POR DEFECTO?”, seleccione SI y después pulse el botón
Enter. El ajuste volverá al valor por defecto y se iniciará la escritura en la memoria no volátil.
Menú de utilidades
Los ajustes del temporizador de grabación y reproducción, el ajuste de carga de datos y función
de guardado, y el formato de la tarjeta SD y el rendimiento de escritura se pueden comprobar en
el menú Utilidades.
1. Desde el modo de parada, pulse el botón F1 (Menu).
2. Pulse el botón Pitch+ o Pitch– hasta que aparezca Utilidad.
3. Pulse el botón Enter. En el modo del menú de utilidades, pulse el botón Stop para volver al
modo de parada.
4. Pulse el botón Pitch+ o Pitch– para seleccionar la opción del menú. Pulse el botón Enter
para guardar la opción del menú.
Funciones del menú de utilidades
# Pantalla Descripción
1 TEMP. GRABACION Ajusta la hora de comienzo y la duración de la grabación.
2 TEMP. REPROD. 1 Ajusta la hora de comienzo de la grabación 1.
3 TEMP. REPROD. 2 Ajusta la hora de comienzo de la grabación 2.
4 TEMP. REPROD. 3 Ajusta la hora de comienzo de la grabación 3.
5 CARGAR PRESET Carga los datos de ajustes desde una tarjeta SD.
6 GUARDAR PRESET Guarda los datos de ajustes en una tarjeta SD.
7 COMPROB. TARJETA Compruebe el rendimiento de escritura de la tarjeta SD.
8 FORMAT. TARJETA Suprime todos los archivos
1. Temp. Grabacion
El menú Temp. Grabacion le permite ajustar o cambiar la hora de comienzo y la duración de
una grabación.
1. Seleccione el menú de temporizador de grabación.
• En el modo de parada, pulse el botón F1 (Menu).
• Pulse el botón Pitch+ o Pitch– para seleccionar Utilidad, y después pulse el botón
Enter.
• Pulse el botón Pitch+ o Pitch– hasta que aparezca Temp. Grabacion, y después pulse
el botón Enter.
66
Page 67

2. Seleccione activar o desactivar el temporizador de grabación.
• Pulse el botón Pitch+ o Pitch– hasta que se resalte ON o OFF. Después pulse el botón o
hasta que se resalte ON para activar la función de temporizador de grabación. Pulse el
botón o hasta que se resalte OFF para desactivar la función de temporizador de
grabación.
• Pulse el botón Pitch+ o Pitch– para moverse a otra opción. La opción seleccionada se
resaltará.
3. Ajuste la hora de comienzo
• Mientras Hora Comienzo esté resaltada, pulse el botón Enter.
• Pulse el botón o para seleccionar la opción.
• Pulse el botón Pitch+ o Pitch– para seleccionar el valor.
• Pulse el botón Enter para finalizar el ajuste de la hora.
4. Ajuste la duración.
• Mientras la Duración esté resaltada, pulse el botón Enter.
• Pulse el botón o para seleccionar la hora o los minutos.
• Mientras la hora esté resaltada, pulse el botón Pitch+ o Pitch– para seleccionar la hora de 000
a 999.
• Mientras los minutos estén resaltados, pulse el botón Pitch+ o Pitch– para seleccionar los
minutos de 00 a 59.
5. Guarde los cambios.
• Durante el ajuste, pulse el botón F1 (Exit). En la pantalla aparecerá “GUARDAR?”. Seleccione
SI para guardar los ajustes y volver al menú de utilidades. O seleccione NO para volver al menú
de utilidades sin guardar ningún cambio.
• Durante el ajuste, pulse el botón Stop para volver al modo de parada sin guardar ningún
cambio.
2./3./4. Temporizador de reproducción (1/2/3)
La opción de menú Temp. Reprod le permite ajustar o cambiar la hora de comienzo de la
reproducción y el nombre del archivo para la misma.
1. Seleccione el menú del temporizador de reproducción.
• Desde el modo de parada, pulse el botón F1 (Menu).
• Pulse el botón Pitch+ o Pitch– para seleccionar Utilidad, y después pulse el botón Enter.
• Pulse el botón Pitch+ o Pitch– hasta que aparezca Temporizador de reproducción (1/2/3), y
después pulse el botón Enter.
2. Ajuste el temporizador de reproducción.
• Pulse el botón Pitch+ o Pitch– hasta que se resalte Diario, Dia Lab, o Fin Sem.
• Pulse el botón o hasta que se resalte Dia Lab para ajustar la reproducción para el
lunes al viernes.
• Pulse el botón o hasta que se resalte Fin Sem para ajustar la reproducción para el
sábado y el domingo.
• Pulse el botón Pitch+ o Pitch– para moverse a otra opción. La opción seleccionada se
resaltará.
3. Ajuste la hora de comienzo.
• Mientras Hora Comienzo esté resaltada, pulse el botón Enter.
• Pulse el botón
• Pulse el botón o para seleccionar la opción.
• Pulse el botón Pitch+ o Pitch– para seleccionar el valor.
• Pulse el botón Enter para finalizar el ajuste de la hora.
o para seleccionar AM/PM, la hora, o los minutos.
67
Page 68

4. Seleccione el archivo.
• Mientras Nombre Archico esté resaltado, pulse el botón Enter.
• En la pantalla aparecerá la lista de archivos.
• Pulse el botón Pitch+ o Pitch– para seleccionar el archivo que desee reproducir.
Después pulse el botón Enter.
5. Guarde los cambios
• Durante el ajuste, pulse el botón F1 (Exit). En la pantalla aparecerá “GUARDAR?”.
Seleccione SI para guardar los ajustes y volver al menú de utilidades. O seleccione NO
para volver al menú de utilidades sin guardar ningún cambio.
• Durante el ajuste, pulse el botón Stop para volver al modo de parada sin guardar ningún
cambio.
• Mientras esté ajustando el temporizador, en la pantalla se mostrará el incono T.
5. Carga de ajustes
La opción de menú Cargar Preset le permite permite cargar todos los valores preajustado
desde una tarjeta SD al PMD561.
Para realizar la carga de ajustes, utilice una tarjeta SD en la que se haya guardado el contenido
preajustado con Guardar Preset.
Esta función resulta muy útil para configurar múltiples PMD561 con los mismos ajustes.
1. Desde el modo de parada, pulse el botón F1 (Menu).
2. Pulse el botón Pitch+ o Pitch– para seleccionar Utilidad, y después pulse el botón Enter.
3. Pulse el botón Pitch+ o Pitch– para seleccionar Cargar Preset.
4. Pulse el botón Enter. Aparecerá el mensaje “CARGAR PRESET?”.
• Pul
se el botón Stop para cancelar la carga de las opciones y volver al modo de parada.
5. Cuando aparezca el mensaje “CARGAR PRESET?”, seleccione SI y pulse el botón Enter
para cargar el valor del ajuste en formato de texto desde el archivo de una carpeta de la
tarjeta. El título del archivo cargado es “561preset2.txt”. Durante la carga de los ajustes
aparecerá “EJECUTANDO...”. Una vez terminada la carga del archivo, aparecerá
“COMPLETADO” durante un segundo y se volverá al modo de parada.
6. Guardado de ajustes
Guardar Preset guarda todos los valores preajustados en una tarjeta SD. Para cargar los
archivos guardados en el PMD561, realice la carga de ajustes.
1. Desde el modo de parada, pulse el botón F1 (Menu).
2. Pulse el botón Pitch+ o Pitch– para seleccionar Utilidad, y después pulse el botón Enter.
3. Pulse el botón Pitch+ o Pitch– para seleccionar Guardar Preset.
4. Pulse el botón Enter. Aparecerá el mensaje “SALVA PRESET?”.
• Pulse el botón Stop para cancelar el guardado de los ajustes y volver al modo de parada.
5. Cuando aparezca el mensaje “SALVA PRESET?”, seleccione seleccione SI y pulse el botón
Enter para guardar el valor preajustado en formato de texto en un archivo de una carpeta de
la tarjeta. El título de este archivo es “561preset2.txt”. Durante la salida del preajuste,
aparecerá “EJECUTANDO...”. Una vez terminada la salida del archivo, aparecerá
“COMPLETADO” durante un segundo y se volverá al modo de parada.
68
Page 69

7. Comprob. Tarjeta
La “Comprobación de tarjeta” comprueba el rendimiento de escritura de la tarjeta SD en uso y
muestra los resultados, tal y como se puede observar a continuación.
Pantalla Descripción
Bien Es posible grabar sin problemas.
Baja Pueden ocurrir problemas de escritura durante la grabación. Se
recomienda el uso de otra tarjeta SD.
Notas:
• No apague ni abra la tapa del compartimento de la tarjeta SD mientras la tarjeta esté siendo
comprobada. De lo contrario, podría dañar los datos o la tarjeta. Asimismo, se recomienda
utilizar un adaptador de CA al comprobar la tarjeta.
• La comprobación de los resultados es únicamente para fines ilustrativos; no garantizan el
funcionamiento.
8. Formateo de tarjetas
1. Desde el modo de parada, pulse el botón F1 (Menu).
2. Pulse el botón Pitch+ o Pitch– para seleccionar Utilidad, y después pulse el botón Enter.
3. Pulse el botón Pitch+ o Pitch– para seleccionar Format. Tarjecta.
4. Pulse el botón Enter. Aparecerá el mensaje “FORMATEAR SD?”.
• Pulse el botón Stop para cancelar el formateo de la tarjeta y volver al modo de parada.
5. Cuando aparezca el mensaje “FORMATEAR SD?”, seleccione SI y pulse el botón Enter para
formatear la tarjeta SD. Durante el formateo aparecerá “EJECUTANDO...”. Después del
formateo aparecerá “COMPLETADO” durante un segundo y el PMD561 volverá al modo de
parada.
Menú de lista de archivos
La lista de archivos mostrará una lista de los archivos, MP3 y WAV de “MPGLANG1” u otras
carpetas. La lista podrá utilizarse para reproducir, renombrar, o eliminar un archivo seleccionado
o comprobar la información del mismo.
1. Desde el modo de parada, pulse el botón F2 (List).
• En la pantalla aparecerá la lista de menús.
• La opción seleccionada se resaltará.
• Si está seleccionada la primera opción, pulse el botón Pitch+ para ir a la última.
• Si está seleccionada la última opción, pulse el botón Pitch– para ir a la primera.
• Press the
2. Pulse el botón Pitch+ o Pitch– para seleccionar el archivo al que desee acceder. Después
pulse el botón Enter para entrar en el menú de lista de archivos.
• Durante el modo del menú de lista de archivos, pulse el botón Stop para volver al modo
de parada.
button to enter the Folder List.
69
Page 70

Funciones del menú de lista de archivos
# Pantalla Descripción
1 PLAY Reproduce el archivo.
2 INFORMACION Muestra información del archivo.
3 RENOMBRAR Renombra el título del archivo.
4 BORRAR Elimina el archivo.
5 COPIAR Hace una opia de un archivo en otra carpeta.
6 MOVER Mueve de a carpeta actual a otra.
7 BORRAR MARCAS. Elimina marcas del archivo seleccionado.
1. Reproducción
La opción de menú Play le permite reproducir el archivo seleccionado.
1. En el menú de lista de archivos, pulse el botón Pitch+ o Pitch– para seleccionar Play.
2. Pulse el botón Enter para iniciar la reproducción.
• Pulse el botón Stop para detener la reproducción y volver a la lista de archivos.
2. Información
La opción de menú Información le permite ver la información del archivo seleccionado.
1. En el menú de lista de archivos, pulse el botón Pitch+ o Pitch– para seleccionar
Informacion.
2. Pulse el botón Enter para ver la información.
• Pulse el botón
• Pulse el botón Stop para volver al modo de parada.
3. Renombrado de archivos
La opción de menú Renombrar le permite cambiar el nombre de archivo del archivo
seleccionado.
1. En el menú de lista de archivos, pulse el botón Pitch+ o Pitch– para seleccionar Renombrar.
2. Pulse el botón Enter para
3. Renombre el título del archivo. Consulte el procedimiento Renombrado de preajustes.
Pulse el botón
letra del título del archivo esté resaltada.
Notas:
• Si el último carácter del nombre de archivo es un espacio (SP), el nombre de archivo no lo
incluirá.
• Si introduce más de 60 caracteres, se suprimirá el último cuando añada otro.
para volver al menú de lista de archivos.
acceder a la ventana de renombrado.
para volver a la página anterior sin guardar los cambios cuando la primera
70
Page 71

4. Borrado
La opción de menú Borrar le permite eliminar el archivo seleccionado.
1. En el menú de lista de archivos, pulse el botón Pitch+ o Pitch– para seleccionar Borrar.
2. Pulse el botón Enter. En pantalla aparecerá “ELIM.ARCHIVO?”.
• Seleccione SI y pulse el botón Enter para borrar el archivo. O seleccione NO y pulse el
botón Enter para volver al menú de lista de archivos.
• Pulse el botón Stop para volver al modo de parada.
5. Copiado
La opción de menú Copiar le permite hacer una copia de un archivo de la carpeta actual a otra.
1. En el menú de lista de archivos, pulse el botón Pitch+ o Pitch– para seleccionar Copiar.
Después pulse el botón Enter.
• En la pantalla aparecerá la lista de carpetas.
2. Pulse el botón Pitch+ o Pitch– para seleccionar la carpeta a la que desee copiar. Después
pulse el botón Enter.
• Se iniciará el copiado. Durante el copiado aparecerá “EJECUTANDO...”.
• Pulse el botón Stop para volver al modo de parada.
6. Movimiento
La opción de menú Mover le permite mover un archivo de la carpeta actual a otra.
1. En el menú de lista de archivos, pulse el botón Pitch+ o Pitch– para seleccionar Mover.
Después pulse el botón Enter.
• En la pantalla aparecerá la lista de carpetas.
2. Pulse el botón Pi
tch+ o Pitch– para seleccionar la carpeta a la que desee mover. Después
pulse el botón Enter.
• Se iniciará el movimiento. Durante el movimiento aparecerá “EJECUTANDO...”.
• Pulse el botón Stop para volver al modo de parada.
7. Borrado de marcas
La opción de menú Borrar Marcas le permite eliminar todas las marcas del archivo
seleccionado.
1. En el menú de lista de archivos, pulse el botón Pitch+ o Pitch– para seleccionar Delete
Marks. Then press the Enter button.
• En pantalla aparecerá “BORRAR MARCA?”.
• Seleccione SI y pulse el botón Enter para guardar las marcas. O seleccione NO y pulse
el botón Enter para volver al menú de lista de archivos.
• Pulse el botón Stop para volver al modo de parada.
71
Page 72

Menú de lista de carpetas
La opción de menú de lista de carpetas le permite ver la lista de títulos de las carpetas. Y usted
podrá establecer la carpeta seleccionada como el directorio actual, cambiar el título de la
carpeta, eliminar la carpeta, y crear una carpeta nueva.
1. Mientras esté mostrándose la lista de archivos en el estado LISTA, pulse el botón
• En la pantalla aparecerá la lista de menús.
• La opción seleccionada se resaltará.
• Si está seleccionada la primera opción, pulse el botón Pitch+ para ir a la última.
• Si está seleccionada la última opción, pulse el botón Pitch– para ir a la primera.
2. Pulse el botón Pitch+ o Pitch– para seleccionar la carpeta a la que desee acceder. Pulse el
botón Enter o el botón F1 (Menu) para entrar en el menú de lista de carpetas.
• Pulse el botón
o F1 (Exit) volver a la lista de carpetas.
• Durante el modo del menú de lista de carpetas pulse el botón STOP para volver al modo
de parada.
3. Pulse el botón Pitch+ o Pitch– para seleccionar la opción a la que desee acceder. Pulse el
botón Enter saltar a la opción o ejecutar.
Funciones del menú de lista de carpetas
# Pantalla Descripción
1 SELECCIONAR Establece la carpeta seleccionada como carpeta actual.
2 CREAR CARPETA Crea una nueva carpeta.
3 RENOMBRAR Renombra el título de la carpeta seleccionada.
4 BORRAR Elimina el título de la carpeta seleccionada.
1. Selección
La opción de menú Seleccionar le permite establecer la carpeta seleccionada como carpeta
actual.
1. En el menú de lista de carpetas, pulse el botón Pitch+ o Pitch– para seleccionar
Seleccionar.
2. Pulse el botón Enter para establecer a carpeta seleccionada como carpeta actual.
2. Creación de carpetas
La opción de menú Crear Carpeta le permite crear una nueva carpeta.
1. En el menú de lista de carpetas, pulse el botón Pitch+ o Pitch– para seleccionar Crear
Carpeta.
2. Después pulse el botón Enter.
• Se creará una nueva carpeta titulada “NewFolder”.
• Aparecerá la lista de carpetas y la nueva carpeta estará resaltada.
Notas:
• Si ya existe “NewFolder”, aparecerá el mensaje “YA EXISTE” durante un segundo.
• Si el número de carpetas ya es 32, aparecerá el mensaje “CARPETA LLENA” durante un
segundo.
72
.
Page 73

3. Renombrado
1. En el menú de lista de carpetas, pulse el botón Pitch+ o Pitch– para seleccionar Rename.
2. Pulse el botón Enter para acceder a la ventana de renombrado.
3. Renombre el título de la carpeta. Consulte el procedimiento Renombrado de preajustes.
4. Pulse el botón Enter para volver a la lista de carpetas.
Pulse el botón
para volver a la página anterior sin guardar los cambios cuando la primera
letra del título del archivo esté resaltada.
Notas:
• Si el último carácter del nombre de archivo es un espacio (SP), el nombre de archivo no lo
incluirá.
• Si introduce más de 60 caracteres, se suprimirá el último cuando añada otro.
4. Borrado
La opción de menú Borrar le permite eliminar la carpeta seleccionada.
1. En el menú de lista de carpetas, pulse el botón Pitch+ o Pitch– para seleccionar Borrar.
2. Pulse el botón Enter. En pantalla aparecerá “BORRAR?”.
• Seleccione SI y pulse el botón Enter para eliminar la carpeta. O seleccione NO y pulse el
botón Enter para volver al menú de lista de carpetas.
• Pulse el botón Stop para volver al modo de parada.
Nota:
• Usted no podrá borrar la última carpeta restante en una tarjeta SD. Cuando quede la última
carpeta, aparecerá el “NO PUEDE...” durante un segundo.
73
Page 74

Solución de problemas
Si experimenta problemas, intente estas soluciones primero:
• Asegúrese de que todos los cables y demás dispositivos conectados estén conectados firme y
correctamente.
• Asegúrese de estar utilizando el PMD561 como describe esta Guía del usuario.
• Asegúrese de que todos sus otros dispositivos o medios funcionen correctamente.
• Si cree que el PMD561 no está funcionando correctamente, busque su problema y solución en la
siguiente tabla.
• Si el PMD561 presenta un funcionamiento anómalo, el microprocesador se puede restablecer
apagando el aparato, desconectando la alimentación de CA y quitando las pilas.
Problema Solución
La unidad no se enciende. Instale pilas nuevas.
Asegúrese de que la entrada de corriente del PMD561
esté conectada correctamente a una toma de corriente
utilizando el adaptador de corriente incluido.
El PMD561 se enciende, pero se
apaga solo.
Parece ser que el PMD561 graba
sonidos, pero no se oye nada durante
la reproducción.
No se reproduce el audio a través de
los auriculares ni del altavoz interno.
El PMD561 no graba nada. Compruebe si se ha alcanzado el número máximo de 999
No se obtiene ninguna señal de la
entrada del micrófono.
Se produce demasiado ruido en el
PMD561.
Cuando se reproducen los archivos en
el ordenador, el sonido es de baja
calidad.
El ordenador no lee los archivos. Compruebe que el programa del ordenador sea
74
Instale pilas nuevas.
Compruebe los ajustes de entrada. (Por ejemplo, si se ha
seleccionado la entrada Line pero no se ha conectado
nada al conector Line, el PMD561 grabará silencio, El
PMD561 no reproducirá nada.)
Compruebe el ajuste de control Hp/Spk Vol.
Reproduzca otro archivo de audio o compruebe la tarjeta.
archivos grabados.
Compruebe que el PMD561 reconozca la tarjeta.
Compruebe la selección de entrada.
Compruebe los ajustes de control de Rec Level.
Compruebe si el micrófono requiere alimentación phantom.
Compruebe las conexiones del cable y/o sustitúyalo.
Compruebe que los niveles de ganancia sean correctos.
Compruebe la calidad de la tarjeta de sonido del ordenador
y del programa.
Compruebe el programa de conversión de frecuencias. (El
PMD561 graba archivos de audio con una frecuencia de
muestreo de 48 kHz. Algunos programas de PC convierten
los archivos a 44,1 kHz mediante un convertidor de tasa de
muestreo. Sólo deben utilizarse convertidores de tasa de
muestreo de alta calidad.)
compatible. Algunos programas de reproducción y edición
no admiten los formatos MP3 o Broadcast Wave (.wav).
Utilice DMP Mark Editor para reproducir archivos grabados
con grabación encriptada en un ordenador.
Page 75

Error Message
Pantalla Descripción
SIN TARJETA No se encuentra la tarjeta
SIN FORMATO El formato no es FAT16/32, o se ha producido un error de formato
TARJETA LLENA La memoria es insuficiente
LLENO 999 El número de archivos ya es 999 (máximo)
MARCAS LLENAS El número de marcas del archivo actual ya es 30 (máximo)
SIN ARCHIVO No se ha encontrado ningún archivo
TECLAS BLOQ Se está utilizando el grabador con las teclas bloqueadas
TARJEWTA BLOQ No se pueden escribir datos en la tarjeta
VBR Avance o retroceso rápido de un archivo VBR
NO PUEDE…. El comando no es válido
CONECTE ALIM No existe entrada de CC
BATERÍA BAJA
(parpadeando resaltado)
BATERÍA BAJA Apagado automático con nivel de energía bajo la última vez
NO HAY PRESET No se encuentra ningún archivo de preajustes
ERR PRESET El contenido del archivo de preajustes tiene errores
ERR ACTUALIZ La actualización de versión del archivo o el sistema de archivos no
TAPA ABIERTA La tapa de la tarjeta SD está abierta
ERR FORMAT Se ha producido un error en el formato de un archivo MP3 o PCM
YA EXISTE El nombre del archivo ya existe
LIMITE 80m Se ha superado el límite de 80 minutos en el proceso de copia de
TITULO LARGO El título del archivo supera los 64 bytes
ERR TARJETA Se ha producido un error en la tarjeta
ERR RTC Se ha producido un error de RTC
ERR SRAM Se ha producido un error en la SRAM
ERR FLASHROM Se ha producido un error en la memoria Flash ROM
ACTUALICE MAQ No se ha completado la actualización.
NO COINCIDE El ajuste del preajuste no es correcto
FALLO CONTRAS El código de acceso al desbloquear el “Bloqueo de menú” es incorrecto.
La energía restante de las pilas es inferior al valor establecido
funciona correctamente
segmento
75
Page 76

Guide d’utilisation (Français)
Présentation
Caractéristiques :
• Enregistrement audio de qualité professionnelle sur carte SD/SDHC stable et fiable
• Enregistrement stéréo/mono/WAV/MP3
• Taux d’échantillonnage de 44,1, 48 et 96 kHz (WAV)
• Enregistrement 16 bits et 24 bits
• Six débits binaires de 32 kb/s à 320 kb/s (MP3)
• Entrée numérique S/PDIF pour brancher des interfaces studio et plus encore
• 2 entrées combo microphone asymétriques XLR-6,35 mm (1/4 po) avec alimentation
fantôme +48 V
Contenu de la boîte
PMD561
Adaptateur d’alimentation
Carte SD
Câble audio RCA à 3,5 mm
Câble USB
Guide d’utilisation rapide
Consignes de sécurité et informations concernant la garantie
Assistance technique
Pour les toutes dernières informations concernant la documentation, les spécifications
techniques, la configuration requise, la compatibilité et l’enregistrement du produit, veuillez
visiter marantzpro.com.
Pour de l’assistance supplémentaire, veuillez visiter marantzpro.com/support.
76
Page 77
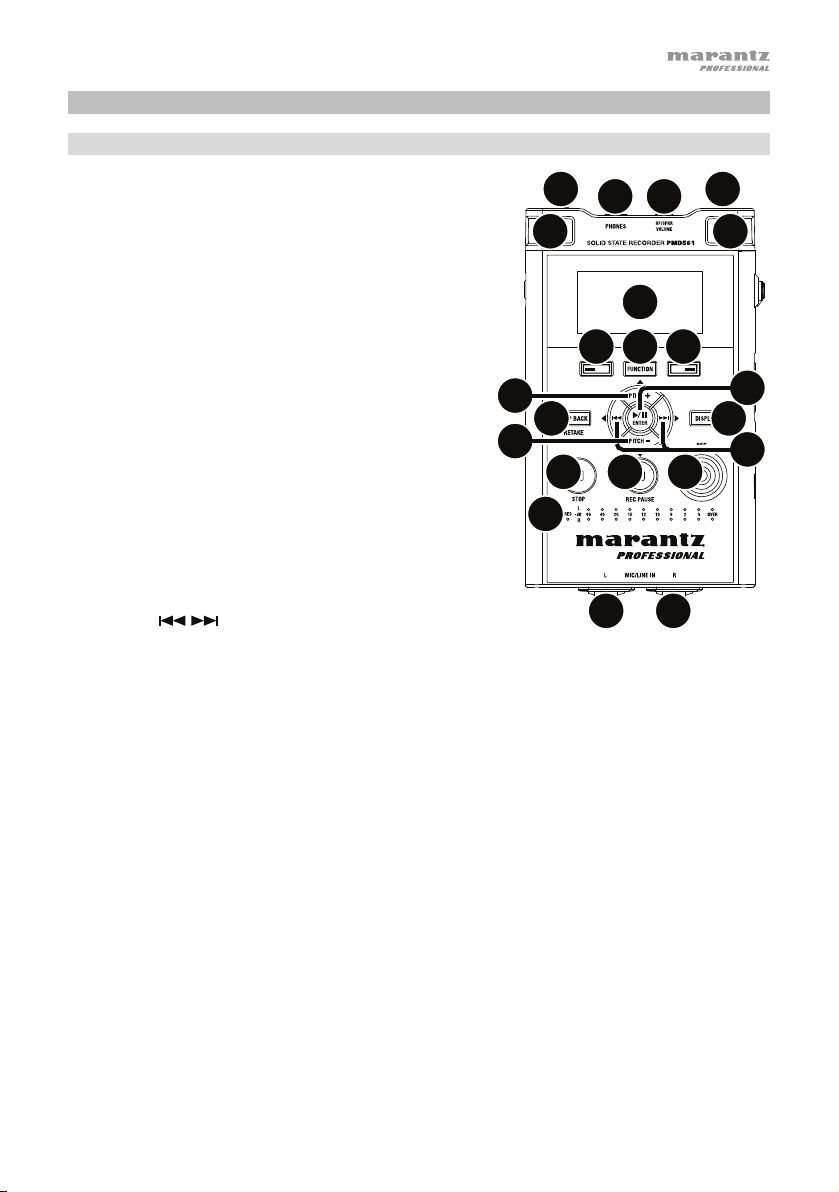
Caractéristiques
Panneau avant
1. Microphones : Microphones à condensateur stéréo.
2. L’affichage : L’affichage montre les informations du
PMD561. Veuillez consulter la section L’affichage
suivante pour plus d’information.
3. Bouton Function : Appuyez sur le bouton Function
pour choisir les fonctions des boutons F1 et F2 par un
fonctionnement en alternance. Les fonctions diffèrent
en fonction du mode de fonctionnement.
4. Bouton F1/F2: Les fonctions des boutons F1 et F2
dépendent du mode de fonctionnement et du bouton
Function. Les fonctions F1/F2 figurent dans le coin
inférieur de l’affichage. Les fonctions changent
automatiquement lorsque l’état change. La deuxième
ou la troisième fonction dans le même état peut être
sélectionnée en appuyant sur le bouton Function.
5. Bouton Display : Appuyez sur le bouton Display pour
modifier le contenu de l’affichage comme l’information
concernant la durée avec le fonctionnement en
alternance. Le contenu varie selon chaque mode de
fonctionnement.
6. Bouton
• En mode Stop, Lecture ou Lecture-Pause, appuyez sur ce bouton pour choisir le fichier
(pour atteindre le fichier précédent/suivant).
• En Lecture-Pause, maintenez la pression sur ce bouton pour effectuer une recherche
avant ou arrière à vitesse rapide sans le son. (Search –/Search +).
• En mode Lecture, maintenez la pression sur ce bouton pour « rembobiner » ou
« avancer rapidement » et effectuer une recherche à 2 fois la vitesse de lecture. (Audible
Search –/Search +).
7. Bouton Pitch– : Appuyez sur ce bouton pour ralentir la lecture. En mode Menu, cette touche
permet de déplacer le curseur vers le bas ou de modifier un élément.
8. Bouton Pitch+ : Appuyez sur ce bouton pour accélérer la lecture. En mode Menu, cette
touche permet de déplacer le curseur vers le haut ou de modifier un élément.
9. Bouton Rec : Appuyez sur ce bouton pour démarrer l’enregistrement à partir du mode Stop
ou du mode Enregistrement-Pause.
10. Bouton Rec Pause : Appuyez sur ce bouton pour passer en mode Enregistrement-Pause à
partir du mode Stop ou du mode Enregistrement.
11. DEL Level (verte, orange, rouge) : Lorsqu’un signal sonore est émis alors que l’appareil est
enmode Enregistrement, Enregistrement-Pause ou Lecture, elle s’allume.
/ :
17
18
11
2
44
3
8
12
7
14
11
10
16 16
19
15
13
5
6
9
77
Page 78

12. Bouton Skip Back : Appuyez sur le bouton Skip Back pour effectuer un saut arrière en
mode Lecture ou Lecture-Pause. De même, lorsque ce bouton est actionné en mode RecPause, le mode Retake Record est réglé.
13. Bouton
Menu, ce bouton est utilisé pour effectuer un choix.
14. Bouton Stop : Appuyez sur ce bouton pour arrêter le mode Lecture ou Enregistrement et
pour annuler le mode Lecture-Pause ou Enregistrement-Pause. En mode Menu, appuyez sur
ce bouton pour sortir du mode Menu sans enregistrer.
15. Prise Remote Control : Prise pour la télécommande en option RC600PMD et la télécommande
externe.
16. Prises Mic/Line In : Combo XLR-6,35 mm pour entrées micro/à niveau ligne.
17. Interrupteur à glissière Phantom/Mic : Interrupteur à glissière 3 positions. Alimentation
fantôme activée (On), désactivée (Off) ou ligne (Line). L’alimentation fantôme fournit +48V
aux microphones externes.
18. Prise Phones (6,35 mm / 1/4 po) : Pour le contrôle et l’écoute privée, vous pouvez brancher
vos casques d’écoute à cette prise.
19. Commande Hp/Spk Vol : Utilisez cette commande pour régler le niveau de sortie des
casques d’écoute ou des haut-parleurs internes.
Avertissement : Lorsque vous utilisez des casques d’écoute, veillez à ne pas monter le
volume trop fort. L’écoute à des volumes sonores élevés pendant des périodes prolongées
peut endommager l’ouïe définitivement.
L’affichage
1. Espace restant sur la carte
2. Source d’entrée
3. Fonction F2
4. État
5. Icône batterie ou CA
6. Icône minuteur
d’enregistrement/de lecture est activé. En cours
d’enregistrement/de lecture, elle clignote.)
7. Fonction F1
8. Nombre de fichiers
9. Temps total restant
Veuillez consulter la section Fonctionnement > Commande d'affichage afin d’en savoir plus
sur les différentes fenêtres d’affichage.
/Enter : Permet de passer du mode Lecture au mode Lecture-Pause. En mode
1
9
2
8
7
(Cette icône apparaît si le minuteur
3456
78
Page 79

Panneaux latéraux
Gauche Droite
2
1
4
3
5
6
8
7
10
9
11
Gauche
1. Prise Digital In : Branchez un câble audio numérique à la prise RCA d’un périphérique
externe pour une sortie numérique S/PDIF.
2. Prise DC In : Insérez la prise de l’adaptateur secteur fourni. Si la prise de l’adaptateur secteur est
branchée alors que l’enregistreur fonctionne sur piles, l’enregistreur bascule automatiquement
sur l’alimentation au moyen de l’adaptateur. De même, si la prise de l’adaptateur secteur est
retirée, l’enregistreur va basculer automatiquement sur l’alimentation par piles.
3. Port USB (Mini-B) : Alors que la lecture est arrêtée, reliez ce port à un ordinateur en utilisant
le câble USB inclus pour passer en mode USB.
4. Logement de la carte : Tirez le volet pour accéder à la carte SD.
5. Haut-parleur : Haut-parleur interne de la voie gauche.
Droite
6. Haut-parleur : Haut-parleur interne de la voie droite.
7. Interrupteur à glissière Power : Faites glisser et maintenez en position pour allumer
l’appareil. Faites glisser pour éteindre l’appareil. Lorsque l’appareil est en mode
d’enregistrement ou lorsque l’enregistrement interrompu, l’interrupteur d’alimentation ne
fonctionnement pas.
8. Interrupteur à glissière Key Lock : Faites glisser l’interrupteur pour commander le
verrouillage ou le déverrouillage des touches.
9. Prises Line Out (RCA) : Insérez une prise de câble audio connectée à un appareil audio
externe dans ces prises pour sortir les signaux audio vers un appareil externe (amplificateur,
etc.).
10. Prise Line In 2 (3,5 mm / 1/8 po) : Insérez une prise de câble audio connectée à un appareil
audio externe dans cette prise pour entrer les signaux de sortie en provenance de l’appareil
externe dans l’enregistreur.
11. Commande Rec Level : Tournez ce bouton de commande pour régler le niveau
d’enregistrement lorsque Cont. Vol. du menu Préréglages est réglé sur Manuel. La
commande intérieure (voie droite) et la commande extérieure (voie gauche) tournent
ensemble, excepté si vous maintenez l’une en position pendant que vous tournez l’autre. Le
niveau d’enregistrement optimal est obtenu lorsque l’indicateur de niveau se trouve aussi
proche que possible de 0 dB mais ne se situe pas au-dessus.
79
Page 80

A
A
Installation
Les articles qui ne figurent pas dans la section Présentation > Contenu de la boîte sont vendus séparément.
Schémas de connexion
Enregistrement
Exemple A Exemple B
Microphone
mplificateur,
récepteur, etc.
SOURCE SELECT
MASTER VOLUME
Lecture
80
ZONE 2
ZONE 2
ZONE 3 ZONE 3
INFO
SOURCE
ON/OFF
ON/OFF
AUX 1
HDMI 7 5V/1A
OPTION
SOURCE STATUS DIMMER
ENTER
PHONES BACK
SETUP
Exemple A Exemple B
Casque d’écoute
mplificateur,
récepteur, etc.
SOURCE SELECT
ZONE 2
ZONE 2
SOURCE
ON/OFF
AUX 1
HDMI 7 5V/1A
ZONE 3 ZONE 3
INFO
SOURCE STATUS DIMMER
ON/OFF
PHONES BACK
OPTION
ENTER
SETUP
1 CBL/SAT 3 GAME 4 NETWORK
2 Blu-ray
L - AUDIO - R
VIDEO
AUX 1
1 CBL/SAT 3 GAME 4 NETWORK
2 Blu-ray
L - AUDIO - R
VIDEO
AUX 1
QUICK SELECT
SETUP MIC
IN-Command
SSEERI
INTEGRATED NETWORK AV RECEIVER
AVR-X4000
MASTER VOLUME
QUICK SELECT
SETUP MIC
IN-Command
SSEERI
INTEGRATED NETWORK AV RECEIVER
AVR-X4000
Page 81

Réglage de l’horloge
La date et l’heure sont écrites sur chaque piste audio (fichier) au démarrage de la piste.
Lorsqu’une piste audio est visualisée sur un ordinateur, cette date et cette heure sont celles
auxquelles le fichier a été modifié pour la dernière fois.
1. En mode Stop, appuyez sur le bouton F1 (Menu).
2. Appuyez sur le bouton Pitch– ou Pitch– pour sélectionner Heure/Date.
3. Appuyez sur le bouton
• Appuyez sur le bouton Stop pour annuler.
• Appuyez sur le bouton
• Lorsque l’heure est réglée, appuyez sur le bouton
• Lorsque l’année est sélectionnée, le bouton
• Appuyez sur Pitch+ ou Pitch– pour sélectionner la valeur.
4. Appuyez sur le bouton F1 (Exit).
• Enregistrer? apparaît sur l’affichage.
• Sélectionnez Oui et appuyez ensuite sur le bouton
temps réel.
Remarque : S’il s’avère que la date entrée n’existe pas, telle que le 31 février, elle est corrigée
au 28 février.
/Enter pour entrer dans le réglage Heure/Date.
ou pour sélectionner l’élément.
pour revenir au menu supérieur.
ne fonctionne pas.
/Enter pour écrire sur l’horloge en
Langue
Les options du menu Langue permettent de choisir une langue d’affichage.
1. En mode Stop, appuyez sur le bouton F1 (Menu).
2. Appuyez sur le bouton Pitch+ ou Pitch– pour sélectionner Langue.
3. Appuyez sur le bouton
• Appuyez sur le bouton Stop pour annuler.
• Appuyez sur le bouton Pitch+ ou Pitch– pour sélectionner une option.
• Appuyez sur le bouton
4. Appuyez sur le bouton F1 (Exit).
• Enregistrer? apparaît sur l’affichage.
• Sélectionnez Oui et appuyez ensuite sur le bouton
modifications.
/Enter pour entrer les paramètres de langue.
pour revenir au menu supérieur.
/Enter pour enregistrer les
81
Page 82

Fonctionnement
Enregistrement
Enregistrement normale
1. Faites glisser et maintenez en position l’interrupteur Power pour allumer l’appareil.
2. Appuyez sur le bouton Rec pour commencer l’enregistrement.
• Le témoin d’enregistrement s’allume de manière fixe pendant l’enregistrement.
• L’affichage indique les informations relatives à l’enregistrement.
• Appuyez sur le bouton Rec Pause pour faire une pause dans l’enregistrement.
3. Appuyez sur le bouton Stop pour arrêter l’enregistrement et terminer le fichier (fermer le fichier audio).
Vous pouvez appuyer sur le bouton /Enter pour lire le fichier qui vient d’être enregistré, ou
appuyer de nouveau sur le bouton Stop pour passer en mode Stop. Un appui sur le bouton
/Enter lance la lecture du début du premier fichier audio.
Reprendre l’enregistrement
Le PMD561 est équipé d’une fonction permettant de reprendre l’enregistrement à partir de n’importe
quelle position dans un fichier.
Reprendre l’opération d’enregistrement pendant l’enregistrement :
1. Appuyez sur le bouton Rec pour commencer l’enregistrement.
2. Appuyez sur le bouton Rec Pause pour faire une pause dans l’enregistrement.
3. Appuyez sur la touche Skip Back pour régler le mode d’enregistrement Retake. La position
d’enregistrement revient en arrière selon la durée réglée dans Skip Back dans le menu de
présélection, et la lecture commence.
4. Tout en surveillant le son lu, trouvez la position à partir de laquelle vous souhaitez commencer à
reprendre l’enregistrement.
• Appuyez sur le bouton /Enter pour mettre la lecture en pause.
• Appuyez sur le bouton Skip Back, ou pour chercher la position de lecture désirée.
• La vitesse de lecture peut être modifiée à l’aide des touches Pitch+ et Pitch–.
Appuyez sur le bouton Rec Pause pour régler la position de départ de reprise.
5. Appuyez sur le bouton Rec pour commencer à reprendre l’enregistrement. Les données inutiles
(Prise 1) sont effacées et la Prise 2 est enregistrée à la place.
Lorsque l’enregistrement de la Prise 2 démarre, 0,5 secondes ou le temps réglé dans Pré-
enregistrement dans le menu de présélection est pré-enregistré.
Reprendre l’opération d’enregistrement pendant la lecture :
1. Appuyez sur le bouton ou pour choisir le fichier à lire.
2. Appuyez sur le bouton /Enter pour commencer la lecture.
3. Tout en surveillant le son lu, trouvez la position à partir de laquelle vous souhaitez commencer à
reprendre l’enregistrement.
• Appuyez sur le bouton /Enter pour mettre la lecture en pause.
• Appuyez sur le bouton Skip Back, ou pour chercher la position de lecture désirée.
• La vitesse de lecture peut être modifiée à l’aide des touches Pitch+ et Pitch–.
Appuyez sur le bouton Rec Pause pour régler la position de départ de reprise.
4. Appuyez sur le bouton Rec pour commencer à reprendre l’enregistrement. Les données inutiles
(Prise 1) sont effacées et la Prise 2 est enregistrée à la place.
Lorsque l’enregistrement de la Prise 2 démarre, 0,5 secondes ou le temps réglé dans Pré-
enregistrement dans le menu de présélection est pré-enregistré.
82
Page 83

Entrée audio pour l'enregistrement
L'entrée audio pour l'enregistrement peut être réglée dans le menu Entrée.
Réglez le menu Enr. sur Stereo pour créer un fichier son en stéréo (2 voies). Réglez-le sur D.Mono
pour créer un fichier son en double mono Pour ce mode, l’entrée du canal gauche est enregistrée sur
les canaux gauche et droit, mais le canal droit est atténué de 20 dB. Ceci s’avère utile dans les
situations où une augmentation du niveau sonore inattendue pourrait fausser le signal de l’entrée non
atténuée. Réglez-le sur Mono pour créer un fichier son monophonique (1 voie). Veuillez noter que tous
les réglages mono utilisent seulement l’entrée du canal gauche. Le fichier monophonique aura une taille
presque deux fois plus petite que le fichier stéréo.
Réglez le commutateur Phantom/Mic sur ON pour fournir une alimentation fantôme de +48 V aux
microphones à condensateur, et réglez la sensibilité. Pour les microphones dynamiques, réglez-le sur
OFF pour régler le niveau de sensibilité du microphone. Réglez-le sur Line pour sélectionner la
sensibilité d’entrée des sources à niveau ligne.
# Entrée Enr. Interrupteur
Phantom/Mic
1 INT MIC Stereo Ne fonctionne
2 D.Mono Enregistrement stéréo voie gauche/gauche. La voie droite
3 Mono Enregistrement monophonique voie gauche.
4 MIC/LINE Stereo On Enregistrement stéréo par microphone voie gauche/droite.
5 Off Enregistrement stéréo par microphone voie gauche/droite.
6 Line Enregistrement stéréo par ligne voie gauche/droite.
7 D.Mono On Enregistrement stéréo par microphone voie gauche/ gauche.
8 Off Enregistrement stéréo voie gauche/gauche. La voie droite
9 Line Enregistrement stéréo par ligne voie gauche/gauche. La voie
10 Mono On Enregistrement monophonique par microphone voie gauche.
11 Off Enregistrement stéréo par microphone voie gauche.
12 Line Enregistrement monophonique par ligne voie gauche.
13 LINE2 Stereo Ne fonctionne
14 D.Mono Enregistrement stéréo voie gauche/gauche. La voie droite
15 Mono Enregistrement monophonique voie gauche.
16 D.IN Stereo Ne fonctionne
17 D.Mono Enregistrement stéréo voie gauche/gauche.
18 Mono Enregistrement monophonique voie gauche.
pas
pas
pas
Description
Enregistrement stéréo voie gauche/droite.
est atténuée de 20 dB.
L’alimentation fantôme 48 volts est fournie pour les entrées
XLR.
La voie droite est atténuée de 20 dB. L’alimentation fantôme
48 volts est fournie pour les entrées XLR.
est atténuée de 20 dB.
droite est atténuée de 20 dB.
L’alimentation fantôme 48 volts est fournie pour les entrées
XLR.
Enregistrement stéréo voie gauche/droite.
est atténuée de 20 dB.
Enregistrement stéréo voie gauche/droite.
83
Page 84

Lecture
1. Faites glisser et maintenez en position l’interrupteur Power pour allumer l’appareil.
2. Appuyez sur le bouton ou pour choisir le fichier à lire.
3. Appuyez sur le bouton /Enter pour commencer la lecture.
Appuyez sur le bouton /Enter pour faire une pause de lecture.
4. Appuyez sur le bouton Stop pour arrêter la lecture.
Vous pouvez appuyer sur le bouton
nouveau sur le bouton Stop pour passer en mode Stop. Un appui sur le bouton
lecture du début du premier fichier audio.
Remarque : Il est possible de modifier l’ordre de tri des fichiers en utilisant le préréglage Tri.
Lorsque l’option Alphabet est sélectionnée, les fichiers sont triés selon leur symbole, numéro et par
ordre alphabétique. Lorsque l’option Date/Heure est sélectionnée, les fichiers sont triés selon
l’ordre dans lequel ils ont été créés.
Il existe deux façons de sélectionner le fichier que vous voulez lire. Utilisez les boutons ou en
mode Stop, ou sélectionnez les fichiers dans la liste des fichiers :
1. En mode Stop, appuyez sur le bouton F2 (List).
La liste des fichiers apparaît sur l’affichage.
2. Appuyez sur le bouton Pitch+ ou Pitch– pour sélectionner le fichier audio. Appuyez ensuite sur le
bouton /Enter pour entrer dans la liste des fichiers.
3. Appuyez sur le bouton Pitch+ ou Pitch– pour sélectionner Lecture. Appuyez ensuite sur le bouton
/Enter pour commencer la lecture.
En cours de lecture, appuyez sur le bouton Stop pour revenir à la liste de fichiers.
Mode USB
Le PMD561 enregistre directement sur des cartes SD. Les enregistrements peuvent ensuite être
transférés sur votre ordinateur de bureau ou votre ordinateur portable en retirant la carte du PMD561,
ou en connectant le PMD561 à votre ordinateur par le biais du port USB. Le contenu audio enregistré
dans le format de compression MP3 très répandu est directement disponible pour le partage de fichiers
sur Internet. La carte SD du PMD561 apparaît comme un lecteur externe sur l’ordinateur auquel
l’enregistreur est connecté.
1. Allumez l’ordinateur.
2. Insérez une carte SD.
3. Allumez le PMD561.
4. En mode Stop, connectez le câble au PMD561 et à l’ordinateur.
• Lorsque la connexion USB est activée, un écran de réglage s’affiche.
• La carte SD du PMD561 apparaît comme un périphérique amovible sur l’ordinateur.
Remarques :
• L’alimentation du bus USB active cette fonction même en l’absence d’adaptateurs secteur ou de piles.
• Aucun bouton autre que la fonction de commutation Power.
Avertissement :
• Ne retirez pas la carte SD en mode USB. Cela pourrait endommager les données et la carte SD.
• Pendant l’enregistrement et la lecture, ne connectez pas le câble au PMD561 et à l’ordinateur. Il est
possible que le PMD561 s’éteigne ou s’arrête, selon l’état de l’alimentation du bus USB.
84
/Enter pour lire le fichier qui vient d’être lu, ou appuyer de
/Enter lance la
Page 85

Caractéristiques avancées
Microphone(s)
Atténuateur
Le réglage d’atténuation du microphone permet l’utilisation de microphones qui n’ont pas le
même réglage de sensibilité.
• 0 db : aucune atténuation de microphone.
• -6 dB : L'entrée d'un(de) microphone(s) branché(s) sur la prise Mic est coupée à 6 dB.
• -12 dB : L'entrée d'un(de) microphone(s) branché(s) sur la prise Mic est coupée à 12 dB.
• -18 dB : L'entrée d'un(de) microphone(s) branché(s) sur la prise Mic est coupée à 18 dB.
Réglez la valeur Atten. Mic du menu Préréglages.
Alimentation fantôme
Positionnez l'interrupteur Phantom/Mic sur On pour fournir une alimentation 48 V pour un(des)
microphone(s) à condensateur.
• On : une tension de +48 V est fournie pour alimenter le(s) microphone(s) à condensateur.
• Off : aucune alimentation n'est fournie pour un microphone.
Recommandations relatives au microphone
Les microphones à condensateur professionnels (qui nécessitent une alimentation
supplémentaire provenant soit de l'alimentation fantôme du PMD561, soit d'une autre source)
sont recommandés car ils fournissent une sensibilité plus élevée et un enregistrement audio de
meilleure qualité.
Il est possible d'utiliser des microphones dynamiques, mais ils ne produisent pas des
enregistrements audio de qualité optimale dans certaines applications.
Consultez votre revendeur local pour sélectionner le(s) microphone(s) approprié(s) à votre
application spécifique. Dans de nombreux cas, ils peuvent vous faire une démonstration des
différentes performances et caractéristiques des microphones pour votre utilisation.
Pre Record (Pré enregistrement)
Lorsque la fonction « PreRecord » est réglée sur On et si le PMD561 est en pause, il écoute la ou
les entrées audio sélectionnées et met en continue en mémoire tampon 2 secondes d'audio.
Puis, lorsque l'enregistrement commence, le PMD561 enregistre ces 2 secondes d'audio sur la
carte et reprend l'enregistrement à partir de là.
Réglez la valeur PreRecord du menu Préréglages.
Filtre audio
Filtre de coupure des graves
La zone des graves de l'entrée audio est coupée lorsque le signal audio est enregistré. Réglez ce
paramètre sur On pour réduire les bruits, tels que le souffle du vent pendant les enregistrements
en extérieur.
Réglez la valeur Filtre Bas du menu Préréglages.
85
Page 86

Filtre de coupure des aigus
La zone des aigus de l'entrée audio est coupée lorsque le signal audio est enregistré. Réglez sur On
pour réduire les bruits haute fréquence en provenance de l'environnement ambiant.
Réglez la valeur Filtre Haut du menu Préréglages.
Saut Silence
La fonction « Silent Skip » (saut de silence) effectue automatiquement une pause de l'enregistrement
pendant une période de silence et reprend l'enregistrement lorsque le son revient.
Le menu Saut Silence permet les opérations suivantes ajuster le niveau du seuil sonore qui définit le
silence : Off, –60 dB, –54 dB, –38 dB, –20 dB.
Réglez la valeur Saut Silence du menu Préréglages.
Manual Track (numérotation manuelle)
Lorsque l'option « Manual Track » (incrémentation de la numérotation manuelle) est sur On pendant
l'enregistrement, appuyez sur le bouton Function jusqu'à ce que TR apparaisse sur l'affichage, puis
appuyez sur F1 (TR) pour incrémenter le fichier audio.
Un nouveau fichier audio est créé à ce point. La continuité du son n'est pas garantie et dépend de la
rapidité de la carte ou de la taille du fichier audio.
Num. Auto
Lorsque la fonction « Num. Auto » (incrémentation automatique de la numérotation) est activée, un
nouveau fichier audio est créé automatiquement à des intervalles de temps d'enregistrement spécifiés.
La fonction de numérotation automatique peut être réglée avec des incréments de 1, 5, 10, 15 ou 30
minutes, ou de 1, 2, 6, 8, 12 ou 24 heures. La fonction de numérotation automatique facilite la
recherche d'un point particulier dans un enregistrement. Par exemple, si un nouveau fichier audio
débute toutes les minutes pendant la lecture, la fonction de numérotation automatique facilite la
recherche d'un passage particulier grâce à la relation entre le nombre de fichiers et la durée. Pendant la
lecture, vous pouvez sélectionner le fichier numéro 3 pour lire approximativement la 3e minute
d'enregistrement. Pour aller directement au début de la 10e minute, sélectionnez le fichier numéro 10,
etc.
La continuité du son n'est pas garantie et dépend de la rapidité de la carte ou de la taille du fichier.
Réglez la valeur Num. Auto du menu Préréglages.
Remarque : Le nouveau fichier audio commence automatiquement lorsque la taille du fichier enregistré
atteint 4 Go.
Copier un segment
La fonction « Copier » un segment transforme votre section « mise en évidence » en un nouveau fichier
séparé sans détruire le(s) fichier(s) source(s) d'origine.
1. Le message « COPY » (Copie) s'affiche pendant la lecture. Appuyez sur le bouton F1 (Copy)
lorsque le signal audio atteint le point d'entrée voulu. Le message « Select. Debut ? » s'affiche.
2. Appuyez sur le bouton Enter pour enregistrer le point d'entrée. L'indication « IN- » clignote sur
l'affichage pour indiquer que le point d'entrée a été enregistré et la lecture du fichier reprend.
3. Poursuivez pour permettre au PMD561 d'effectuer la lecture jusqu'au point de sortie souhaité, ou
utilisez les commandes de déplacement classiques telles que les boutons
atteindre des durées plus longues.
86
ou pour
Page 87

4. Lorsque vous avez atteint le point de sortie souhaité, appuyez sur le bouton F1 (Copy). Le message
« Select. Fin ? » s'affiche.
5. Appuyez sur le bouton Enter pour enregistrer le point de sortie. Le message « CopieSegment? »
s'affiche.
6. Appuyez sur le bouton Enter pour démarrer le processus de copie. Le message « Execution... »
est indiqué sur l'affichage. Lorsque la procédure de copie est achevée, l'affichage indique «
Terminé » pendant une seconde puis retourne en mode Stop avec le nouveau fichier comme fichier
actuel.
Remarques:
• La mention « _1 » est ajoutée à la fin du nom du premier nouveau fichier. (Par exemple, nom du
fichier d'origine = « aaa.mp3 », nom du premier nouveau fichier = « aaa_1.mp3 »)
• Lorsqu'une zone de copie s'étend sur deux fichiers ou plus, un fichier est assemblé puis copié.
• Lorsque la zone de copie s'étend sur des fichiers possédant des réglages « Enr.Format » ou « Enr.
» (voie d'enregistrement) différents, il n'est pas possible d'effectuer la copie.
• La zone de copie ne peut pas dépasser 80 minutes.
Diviser un fichier
La fonction de division de fichier permet de diviser un fichier à l'emplacement de votre choix.
1. Pendant la lecture, appuyez sur le bouton Function jusqu'à ce que le message « DIV » apparaisse
sur l'affichage. Appuyez sur le bouton F1 (Div).
« Diviser? » apparaît sur l'affichage. Sélectionnez « Non » et appuyez sur le bouton Enter pour faire
une pause de lecture.
2. Sélectionnez « Oui » et appuyez sur le bouton Enter pour commencer la division.
Le message « Execution... » est indiqué sur l'affichage. Lorsque la procédure de division est
achevée, l'affichage indique « Terminé » pendant une seconde puis l'appareil s'interrompt au début
du deuxième fichier des fichiers divisés.
Remarques:
• La mention « _A » est ajoutée à la fin du nom du premier nouveau fichier. (Par exemple, nom du
fichier d'origine = « aaa.mp3 », nom du premier nouveau fichier = « aaa_A.mp3 »)
• La mention « _B » est ajoutée à la fin du nom du deuxième nouveau fichier.
• Lorsque le nom du fichier avec l'extension contient déjà 63 caractères ou plus, le processus de
division ne peut pas être exécuté. Le message « Titre Long » apparaît sur l'affichage et la lecture
est interrompue à l'endroit où vous appuyez sur le bouton Enter.
Marque
Il est possible d'ajouter des marques en cours d'enregistrement ou de lecture, manuellement ou
automatiquement. Ces informations sont stockées sous forme de balises ID3 (version 2) dans un fichier
MP3 ou sous forme de segments dans un fichier WAVE. Les marques facilitent la recherche de points
spécifiques dans un enregistrement.
• En cours de lecture, vous pouvez localiser instantanément les marques.
• Il est possible d'ajouter jusqu'à 30 marques dans un fichier.
• Les marques sont numérotées de façon séquentielle à partir de un.
• Au cours de l'enregistrement ou de la lecture, vous pouvez ajouter une marque manuellement en
appuyant sur le bouton F2 (Mark).
87
Page 88

Ajouter une marque manuellement
Pendant l'enregistrement ou la lecture, appuyez sur le bouton Function jusqu'à ce que « MARK »
apparaisse sur l'affichage. Appuyez ensuite sur le bouton F2 (Mark) pour ajouter une marque
manuellement.
Ajouter une marque automatiquement
L'option de menu Auto Mark permet d'activer ou de désactiver l'ajout de marques automatique.
• Si l'option Auto Mark est activée est si l'appareil est en cours d'enregistrement - pause, une
marque est ajoutée à la reprise de l'enregistrement.
• Si l'option Auto Mark est activée et si le PMD561 enregistre un signal audio sous le seuil sonore
pendant plus de trois secondes, le signal audio qui dépasse le seuil entraîne l'ajout d'une
marque.
Le paramétrage de l'option Auto Mark permet d'effectuer les opérations suivantes :
• Activation ou désactivation de l'option Auto Mark.
• Ajustement du niveau du seuil sonore qui définit le silence à –60dB, –54dB, –38dB, ou –20dB.
Régler la valeur Auto Mark du menu Préréglages.
Rechercher les marques
Pendant la lecture - pause ou la lecture, appuyez sur le bouton Function jusqu'à ce que « MK– » et
« MK+ » apparaissent sur l'affichage. Appuyez ensuite sur le bouton F1 (MK–) ou F2 (MK+) pour
sélectionner la marque à laquelle accéder. Le PMD561 effectue une pause au niveau de la marque que
vous avez sélectionnée.
Pour commencer la lecture, appuyez sur le bouton
Commande Pitch
Le contrôle de hauteur tonale permet une plage de réglage de vitesse de lecture de -40 % à +20 % par
incréments de 5 %.
En cours de lecture, appuyez sur le bouton Pitch+ pour augmenter la vitesse de lecture de 5 %. La
vitesse de lecture peut être augmentée de +20 % au maximum. Vous pouvez aussi appuyer sur le
bouton Pitch– pour réduire la vitesse de lecture de 5 %. La vitesse de lecture peut être réduite de
-40 % au maximum.
Caractéristiques supplémentaires
Ver. Clavier
Faites glisser l'interrupteur Key Lock pour verrouiller les touches. Le verrouillage des touches bloque le
PMD561 dans l'état dans lequel il se trouve pendant l'enregistrement, la lecture ou l'arrêt.
En mode Enregistrement et Enregistrement-Pause, l'interrupteur Power ne fonctionne jamais.
Remarques:
• Si le paramètre « Ver.Clavier » est réglé sur Total, seule la télécommande RC600PMD en option
fonctionne.
• Si le paramètre « Ver.Clavier » est réglé sur « Part. », les boutons Rec, Rec Pause et Stop du
panneau et la télécommande RC600PMD fonctionnent.
• L'indication « Touches Ver. » s'affiche pendant une seconde si une touche est utilisée alors que les
touches sont verrouillées.
Régler la valeur Ver.Clavier du menu Préréglages.
88
/Enter.
Page 89

Télécommande
Le PMD561 vous permet d'utiliser la télécommande en option RC600PMD (vendue séparément). La
télécommande RC600PMD est conçue pour les interviews avec un microphone. Elle se fixe à votre
microphone.
Le cordon de cinq pieds de longueur de la télécommande muni d'une mini-prise à quatre contacts se branche
dans le PMD561. L' utilisation de la télécommande RC600PMD ne nécessite aucune modification dans les
menus.
La télécommande RC600PMD comporte les éléments suivants :
1. Un témoin lumineux :
• Vert : allumé et fixe pendant l'attente ou l'arrêt.
• Rouge : allumé et fixe pendant l'enregistrement
• Rouge clignotant : en mode Enregistrement-Pause
• Orange : clignote pendant 1/2 seconde lorsqu'un signal de niveau de crête entre
en mode Enregistrement ou Enregistrement-Pause, puis repasse au rouge.
1
2
3
4
2. Appuyez pour faire une pause dans l'enregistrement
3. Appuyez pour démarrer/reprendre l'enregistrement et incrémenter manuellement les fichiers
4. Appuyez pour ajouter une marque en mode Enregistrement ou Lecture.
Prise télécommande étendue
Les touches de lecture, avance rapide, rembobinage rapide peuvent être ajoutées aux fonctions de
la télécommande en utilisant le circuit équivalent ci-dessous.
R1
R2
1k
3.9kR36.8kR411kR515kR630k
S1
4
3
2
1
S2 S3 S4 S5 S6
REC PLAY REW MARK FFREC
PAUSE
Remarques:
• Le PMD561 effectue la lecture pendant la fermeture et le maintien de l'interrupteur Play, et effectue un
saut arrière puis une pause sur le point à l'ouverture.
• Marge d'erreur sur les résistances = plage de 5 %.
• Ne jamais appliquer de tension externe. Il en résulterait un mauvais fonctionnement.
• Isolez le circuit afin qu'il ne soit pas possible de le toucher directement. Utilisez une structure qui protège
le circuit contre l'électricité statique, qui provoque un mauvais fonctionnement.
• Ne faites pas fonctionner les interrupteurs en même temps que les boutons sur l'appareil.
• Marantz Professional n'accepte aucune sorte de responsabilité pour tout dommage ou violation des
brevets ou d'autres droits résultant de l'utilisation des circuits.
• Cela ne sanctionne pas les brevets ou d'autres droits de Marantz Professional ou de tiers.
• Il est strictement interdit de réimprimer ou de reproduire, en partie ou en totalité, les schémas des circuits.
Type de prise (mini-prise 1/8” T-R-R-S)
ø3,5/4P (TMP-B66)
1. Extrémité
1
23
4
2. Bague
3. Bague
4. Manchon
R7
47k
S7
SKIP
BACK
R8
220R9220
89
Page 90

g
g
Commande d'affichage
Appuyez sur le bouton Display pour alterner les affichages d'informations. Les affichages sont
légèrement différents en mode Stop, Enregistrement et Lecture.
En mode Stop
1. Durée totale restante
Espace restant sur la carte
Durée totale restante
Nombre de fichiers
Fonction F1
2. Heure/Date actuelle
Heure/Date actuelle
Date actuelle
Réglage de l'enregistrement
3.
Source d'entrée
Enr.Format
Afficha
Icône ALC
En mode Enregistrement
1. Durée de l'enregistrement
Durée de l'enre
2. Durée totale restante
istrement
Nom de fichier
Fonction F1
e
Source d'entrée
Fonction F2
Presets
Enr.
Débit binaire d'enregistrement MP3
Fréquence d'échantillonnage
Icône Numérotation
automatique
Espace restant sur la carte
Source d'entrée
Fonction F2
Durée totale restante
90
Page 91

g
g
g
g
g
3. Réglage de l'enregistrement
Niveau audio d'entrée
Réglage de l'enregistrement
4.
Source d'entrée
Enr.Format
Afficha
Icône ALC
En mode Lecture
1. Durée écoulée
Durée écoulée
Nom de fichier
Fonction F1
2. Durée restante
Presets
Enr.
e
Débit binaire d'enregistrement MP3
Fréquence d'échantillonna
Icône Numérotation
automatique
Position actuelle dans le
fichier
Fonction F2
e
3. Niveau de sortie
Niveau audio en sortie
4. Propriétés du fichier
d'enre
Durée restante
Heure de création
Enr.
Débit binaire
istrement MP3
Fréquence d'échantillonna
e
Afficha
e
91
Page 92

Menu
Liste des menus
1. En mode Stop, appuyez sur le bouton F1 (Menu).
• La liste des menus apparaît sur l’affichage.
• L’élément sélectionné est mis en évidence.
• Lorsque le premier élément est sélectionné, appuyez sur le bouton Pitch+ pour atteindre le
dernier élément.
• Lorsque le dernier élément est sélectionné, appuyez sur le bouton Pitch– pour atteindre le
premier élément.
2. Appuyez sur le bouton Pitch+ ou Pitch– pour sélectionner un élément.
3. Appuyez sur le bouton Enter pour confirmer ou exécuter l'élément sélectionné.
Éléments et fonctions
# Affichage Description
1 Presets Atteindre le menu Préréglages
2 Affichage Atteindre le menu Affichage.
3 Heure/Date Ajuster la date et l'heure.
4 Utilitaires Atteindre le menu Utilitaires.
5 Langue Choisir la langue d'affichage.
6 Version Firmware Afficher la version du micrologiciel.
Protection des réglages du menu
Lorsque le « Menu verrouillage » est réglé sur « On » dans le menu de présélection, le mot de passe
est nécessaire pour sélectionner les éléments sous le menu supérieur, ceci afin de protéger les
réglages.
Le mot de passe est le nombre compris entre 0000 et 9999 qui est réglé dans Code secret du menu de
présélection.
Menu Préréglages
Vous pouvez enregistrer 3 préréglages détaillés sur l'enregistreur pour des paramètres tels que l'entrée
d'enregistrement, le format d'enregistrement, le mode de lecture, etc. Il existe 20 éléments de réglage
dans le menu Préréglages, et il est possible de définir 3 préréglages avec les conditions désirées.
La fonction Selection Preset permet de sélectionner un numéro de préréglage.
1. En mode Stop, appuyez sur le bouton F1 (Menu).
• La liste des menus apparaît sur l’affichage.
• L’élément sélectionné est mis en évidence.
• Lorsque le premier élément est sélectionné, appuyez sur le bouton Pitch+ pour atteindre le
dernier élément.
• Lorsque le dernier élément est sélectionné, appuyez sur le bouton Pitch– pour atteindre le
premier élément.
2. Appuyez sur le bouton Pitch+ ou Pitch– pour sélectionner « Presets ». Appuyez ensuite sur le
bouton Enter.
92
Page 93

3. Appuyez sur le bouton Pitch+ ou Pitch– pour sélectionner préréglage 1, 2 ou 3 ou le préréglage
renommé.
4. Appuyez sur le bouton Enter accepter le préréglage sélectionné.
• Le menu Action apparaît sur l'affichage.
• Sélectionnez l'élément « Selectionner » et appuyez sur le bouton Enter pour sélectionner un
préréglage actif.
• Sélectionnez l'élément « Editer » et appuyez sur le bouton Enter pour définir ou modifier le
préréglage sélectionné.
• Sélectionnez l'élément « Renommer » et appuyez sur le bouton Enter pour modifier le nom du
préréglage sélectionné.
Fonctions du menu Action
# Affichage Description
1 Selectionner Le préréglage sera sélectionné comme le préréglage actif.
2 Editer Définir ou modifier le préréglage sélectionné.
3 Renomer Modifier le nom du préréglage sélectionné.
Renommer un préréglage
1. En mode Stop, appuyez sur le bouton F1 (Menu).
2. Appuyez sur le bouton Pitch+ ou Pitch– pour menu Préréglages. Appuyez ensuite sur le bouton
Enter pour accepter.
3. Appuyez sur le bouton Pitch+ ou Pitch– pour sélectionner préréglage 1, 2 ou 3 ou le préréglage
renommé. Appuyez ensuite sur le bouton Enter pour accepter le préréglage sélectionné.
4. Appuyez sur le bouton Pitch+ ou Pitch– pour sélectionner « Renommer ». Appuyez ensuite sur le
bouton Enter pour accepter.
5. Renommez le préréglage.
Il est possible de modifier et de supprimer du texte. Appuyez sur le bouton ou pour
déplacer le curseur à l'endroit où vous désirez modifier ou supprimer du texte.
• Pour modifier les lettres, appuyez sur le bouton Pitch+ ou Pitch– pour sélectionner le
caractère à modifier.
• Pour insérer une lettre, appuyez sur le bouton F1 (INS). Un caractère est inséré à gauche du
caractère en surbrillance, puis il est également mis en surbrillance.
• Pour supprimer une lettre, appuyez sur le bouton F2 (DEL) pour supprimer le caractère
sélectionné.
6. Appuyez sur le bouton Enter pour enregister les modifications.
Appuyez sur le bouton pour revenir à la page précédente sans enregistrer les modifications
lorsque la première lettre du nom du préréglage est mise en évidence.
Remarques:
• Si la dernière lettre du nom du préréglage est un caractère vide, le nom modifié n'inclut pas la
dernière lettre.
• Le nom d'un préréglage peut contenir 8 lettres au maximum. Lorsque la 9ème lettre est insérée, la
dernière est supprimée.
• Les caractères que vous pouvez insérer sont les suivants : A B C D E F G H I J K L M N O P Q R S
T U V W X Y Z a b c d e f g h i j k l m n o p q r s t u v w x y z (Espace) ! “ # $ % & ’ ( ) + , – . ; = @ [ ]
^ _ ` { } ~ 0 1 2 3 4 5 6 7 8 9.
93
Page 94

Liste des menus de préréglages
# Affichage Valeur possible
1 Entrée INT MIC / MIC/LINE / LINE2 / D.IN
2 Enr.Format MP3-320 / MP3-256 / MP3-192 / MP3-128 / MP3-64 / PCM-16 / PCM-
3 Enr. Stereo / Mono / D.Mono
4 Freq. Ech 44,1k / 48k / 96k
5 PrePrecord On / Off
6 Cont. Vol. Manuel / ALC
7 Num. Auto Off / 1 min / 5 min / 10 min / 15 min / 30 min / 1 heure / 2 heures / 6
8 Auto Mark Off / –60dB / –54dB / –38dB / –20dB
9 Saut Silence Off / –60dB / –54dB / –38dB / –20dB
10 Atten. Mic 0dB / –6dB / –12dB / –18dB
11 Filtre Bas On / Off
12 Filtre Haut On / Off
13 Saut Arrière 0,5sec / 1sec / 1,5sec / 2sec / 2,5sec / 3sec / 3,5sec / 4sec/ 4,5sec /
14 Ver. Clavier Total / Part.
15 Batterie Alcaline / Ni-MH
16 Extinct.Auto OFF Off / 5m / 15m / 30m / 60m
17 Bip On / Off
18 Verr. menu On / Off
19 Code secret Numéro à 4 chiffres
20 Coupure SP On / Off
21 ModeLecture Single / Cont.
22 MachineID 8 lettres maximum
23 Preset Default
Procédure en mode Editer
1. Dans le menu Preset Action (Action de préréglage), appuyez sur le bouton Pitch+ ou Pitch–
our sélectionner « Editer ». Appuyez ensuite sur le bouton Enter.
La liste des actions apparaît sur l'affichage
2. Appuyez sur le bouton Pitch+ ou Pitch– pour sélectionner l'option de menu. Appuyez
ensuite sur le bouton
3. Une fois la modification du préréglage terminée, appuyez sur le bouton F1 (Exit).
« Enregistrer? » apparaît sur l'affichage.
4. Sélectionnez « Oui » et appuyez sur le bouton Enter pour enregistrer les modifications ou
sélectionnez « Non » et appuyez sur le bouton Enter pour quitter le mode Menu sans
enregistrer les modifications.
94
24
heures / 8 heures / 12 heures / 24 heures
5sec / 5,5sec / 6sec / 6,5sec / 7sec / 7,5sec / 8sec / 8,5sec / 9sec /
9,5sec / 10sec / 15sec / 20sec / 25sec / 30sec / 35sec / 40sec / 45sec
/ 50sec / 55sec / 60sec
ou pour sélectionner les entrées.
Page 95
1. Entrée
Utilisez ce menu pour sélectionner l'entrée audio pour l'enregistrement.
Valeur possible Description
INT MIC Microphones internes stéréo
MIC/LINE
LINE2
Microphone(s) externe(s) (prise Mic/Line)
Entrée de niveau de ligne (prise Line 2)
D.IN Entrée numérique
2. Enr.Format
L'option « Enr.Format » permet de sélectionner la compression MP3 comme format audio
d'enregistrement ou le format PCM haute fidélité, le débit binaire MP3 (320, 256, 192, 128 ou 64
kbits/s) et l'affichage PCM (16 bits ou 24 bits).
Valeur possible Description
MP3-320 / MP3-256 /
MP3-192 / MP3-128 /
MP3-64
(MP3)
Mono: 160, 128, 96, 64, 32kbps
Stéréo: 320, 256, 192, 128, 64kbps
PCM-16 / PCM-24 (PCM)
Affichage: 16bits, 24bits
3. Enr.
Utilisez « Enr. » pour sélectionner entre les modes d’enregistrement stéréo 2 canaux, mono 1
canal ou mono 2 canaux (double mono) avec le second canal atténué de 20 dB.
Valeur possible Description
Stereo Fichier audio stéréo 2 voies
Mono Fichier audio 1 canal mono sur le canal gauche uniquement
D. Mono Fichier audio 2 canaux mono (double mono). L’entrée du canal gauche
est enregistrée sur les canaux gauche et droit, mais le canal droit est
atténué de 20 dB.
4. Freq. Ech
L'option « Freq. Ech » permet de sélectionner la fréquence d'échantillonnage de l'enregistrement.
Valeur possible Description
44.1k Fréquence d'échantillonnage pour les formats PCM et MP3.
48k Fréquence d'échantillonnage pour les formats PCM et MP3.
96k Fréquence d'échantillonnage pour le format PCM.
95
Page 96

5. PreRecord
L'option « PreRecord » permet d'activer ou de désactiver la fonction PreRecord.
Valeur possible Description
On Active la fonction PreRecord.
Off Désactive la fonction PreRecord.
6. Cont. Vol. (Commande du niveau)
La commande « Cont. Vol. » permet de sélectionner le type de commande de niveau d'enregistrement :
Manuel ou ALC.
Valeur possible Description
Manuel Commande du niveau manuelle
ALC Commande du niveau automatique
7. Num. Auto
L'option « Num. Auto. » permet d'activer ou de désactiver la fonction de numérotation automatique et
de sélectionner un intervalle pour créer une nouvelle piste automatiquement.
Valeur possible Description
Off Désactive la fonction de numérotation automatique.
1 min / 5 min / 10 min / 15 min / 30
min / 1 heure / 2 heure / 6 heure / 8
heure / 12 heure / 24 heure
8. Auto Mark
L'option de menu « Auto Mark » permet d'activer la fonction de marquage automatique et de définir le
niveau de silence ou de désactiver la fonction. La marque est ajoutée automatiquement au bout d'une
période de silence dont le niveau d'entrée est inférieur à la valeur de préréglage –60, –54, –38 ou –20
(dB) pendant plus de 3 secondes.
Valeur possible Description
Off Désactive la fonction Auto Mark.
–60dB / –54dB / –38dB / –20dB Niveau de silence
9. Saut Silence
L'option de menu « Saut Silence » permet d'activer la fonction Saut Silence et de définir le niveau de
silence ou de désactiver la fonction. Si cette fonction est activée, l'enregistrement effectue
automatiquement une pause lorsque le niveau d'entrée est inférieur à la valeur de préréglage –60, –54,
–38 ou –20 (dB) pendant plus de 3 secondes.
Valeur possible Description
Off Désactive la fonction Saut Silence.
–60dB / –54dB / –38dB / –20dB Active la fonction Saut Silence et permet de sélectionner le
96
Active la fonction de numérotation automatique et définit
l'intervalle au bout duquel créer un nouveau fichier.
niveau de silence.
Page 97
10. Atten. Mic (atténuateur de microphone)
L'option de menu « Atten. Mic » permet de sélectionner le niveau de l'atténuateur de
microphone.
Valeur possible Description
0dB Désactive la fonction Atten. Mic.
–6dB / –12dB / –18dB Active la fonction Atten. Mic.
11. Filtre Bas
L'option de menu « Filtre Bas » permet d'activer ou de désactiver la coupure des gras.
Valeur possible Description
Off Désactive la fonction Filtre Bas.
On Active la fonction Filtre Bas.
12. Filtre Haut
L'option de menu « Filtre Haut » permet d'activer ou de désactiver la coupure des aigus.
Valeur possible Description
Off Désactive la fonction Filtre Haut.
On Active la fonction Filtre Haut.
13. SautArriere
L'option de menu « SautArrière » permet de sélectionner le délai de saut arrière et de choisir
entre 0,5 seconde et 60 secondes.
Valeur possible
0,5 sec / 1 sec / 1,5 sec / 2 sec / 2,5 sec / 3 sec / 3,5 sec / 4 sec / 4,5 sec / 5 sec / 5,5 sec / 6
sec / 6,5 sec / 7 sec / 7,5 sec / 8 sec / 8,5 sec / 9 sec / 9,5 sec / 10 sec / 15 sec / 20 sec / 25
sec / 30 sec / 35 sec / 40 sec / 45 sec / 50 sec / 55 sec / 60 sec
14. Ver.Clavier
Le verrouillage des touches bloque le PMD561 dans l'état dans lequel il se trouve pendant
l'enregistrement, la lecture ou l'arrêt.
Valeur possible Description
Total Tous les boutons sont inactifs.
Part.
Tous les boutons sont inactifs. Mais les boutons Rec, Rec Pause et
Stop/Cancel sont acceptés.
97
Page 98

15. Batterie
L'option de menu « Batterie » permet de choisir le type de pile. Le PMD561 fonctionne avec 4 piles
alcalines de taille AA standard, ou des piles Ni-MH. Le paramétrage de l'option Batterie est utilisé par
l'indicateur de signalement d'usure des piles sur l'affichage et pour le message d'avertissement « Batt.
Faible ». Si le paramétrage ne correspond pas aux piles installées, le PMD561 ne pourra pas indiquer
l'état adéquat des piles.
Valeur possible Description
Alcaline Permet de choisir le type de pile Alcaline.
Ni-MH Permet de choisir le type de pile à hydrure métallique de nickel.
16. Extinct.Auto OFF
Si le PMD561 n'est pas utilisé pendant une longue période en mode Stop ou Lecture-Pause,
l'alimentation peut être coupée automatiquement pour préserver la durée de vie des piles.
Valeur possible Description
Off Désactive la fonction Extinct.Auto.
5m / 15m / 30m / 60m Active la fonction et permet de sélectionnerle délai au bout duquel
17. Bip
L'option « Bip » permet d'activer ou de désactiver l'alarme. Lorsque la fonction est activée, l’appareil
émet un signal sonore lorsque la pile est presque déchargée (« Low Battery ») ou lorsqu’il n’y a plus
d’espace mémoire sur la carte SD.
Valeur possible Description
On Active la fonction Bip.
Off Désactive la fonction Bip.
18. Verr. menu
Le « Menu verrouillage » du menu vous permet de protéger par un mot de passe les éléments de
réglage situés sous le menu supérieur.
Valeur possible Description
On Active la protection par code d'accès.
Off Désactive la protection par mot de passe.
19. Code secret
Lorsque le « Menu verrouillage » est activé, cette fonctionne que le mot de passe.
Valeur possible
Numéro à 4 chiffres compris entre 0000 et 9999 (initialement réglé sur 0000)
98
l'alimentation du PMD561 est automatiquement coupée.
Page 99

20. Coupure SP
La fonction « Coupure SP » permet d'activer ou de désactiver le haut-parleur. Lorsque la fonction
« Coupure SP » est activée, le son enregistré n’est pas émis via le haut-parleur. Lorsqu’elle est
désactivée, le son est émis via le haut-parleur, excepté si le son est enregistré au moyen du
microphone intégré.
Valeur possible Description
On La coupure du haut-parleur est activée.
Off La coupure du haut-parleur est désactivée.
21. ModeLecture
L'option de menu « ModeLecture » permet de sélectionner le mode Lecture simple ou le mode
Lecture en continu.
Valeur possible Description
Simple Mode Lecture simple
Cont. Mode Lecture en continu
22. MachineID
Un fichier audio créé par le PMD561 possède un identifiant d'appareil. Cette information est
incluse dans le nom du fichier. Par exemple, si l'identifiant de l'appareil est « aaaaa », le premier
fichier est numéroté « aaaaa001.wav » ou « aaaaa001.mp3 ». Le réglage d'identifiant d'appareil
s'applique aux trois préréglages.
1. En mode d'édition des préréglages, appuyez sur le bouton Pitch+ ou Pitch– pour
sélectionner l'élément « MachineID ». Appuyez ensuite sur le bouton Enter pour le
renommer.
2. Renommez l'identifiant d'appareil
Reportez-vous à la procédure Renommer un préréglage.
3. Appuyez sur le bouton Enter pour retourner au menu de sélection des préréglages et
appuyez sur le bouton F1 (Exit) pour enregistrer les modifications.
Remarques:
• Si la dernière lettre de l'identifiant d'appareil est un caractère vide, l'identifiant modifié
n'inclut pas la dernière lettre.
• Si le nombre de lettres est supérieur à 8, la dernière lettre est supprimée lorsqu'une nouvelle
lettre est ajoutée.
23. Preset Default
L'option « Preset defaut » permet de rétablir les paramètres du préréglage sélectionné à leur
valeur par défaut.
1. En mode d'édition des préréglages, appuyez sur le bouton Pitch+ ou Pitch– pour
sélectionner l'élément « Preset defaut ». Appuyez ensuite sur le bouton Enter pour initialiser.
2. Lorsque le message « Defaut? » est affiché, sélectionnez « Oui » et appuyez sur le bouton
Enter. Le préréglage est
réinitialisé à sa valeur par défaut et le PMD561 commence l'écriture
sur la mémoire rémanente.
99
Page 100

Liste des valeurs par défaut
# Affichage Préréglage-1 Préréglage-2 Préréglage-3
1 Entrée INT MIC INT MIC INT MIC
2 Enr.Format MP3-128 MP3-320 PCM-24
3 Enr. Stereo Stereo Stereo
4 Freq. Ech 44,1 k 44,1 k 96 k
5 PrePrecord On Off Off
6 Cont. Vol. ALC Manuel Manuel
7 Num. Auto Off Off Off
8 Auto Mark Off Off Off
9 Saut Silence Off Off Off
10 Atten. Mic 0dB 0dB 0dB
11 Filtre Bas On Off Off
12 Filtre Haut On Off Off
13 Saut Arrière 3sec 3sec 3sec
14 Ver. Clavier All All All
15 Batterie Alcaline Alcaline Alcaline
16 Extinct.Auto OFF 15m 15m 15m
17 Bip On On On
18 Verr. menu Off Off Off
19 Code secret 0000 0000 0000
20 Coupure SP Off Off Off
21 ModeLecture Cont. Cont. Cont.
22 MachineID 1 1 1
23 Preset Default Réunion compressé Musique compressé Qualité élevée non
compressé
100
 Loading...