

Page 1

Original Instruction Manual
Оригінальні інструкції з експлуатації
Oryginalna instrukcja obsługi
Manual de instrucţiuni original
Originalbetriebsanleitung
Eredeti használati útmutató
Pôvodný návod na obsluhu
Originální návod k obsluze
Important:
Read this instruction manual carefully before putting the brush cutter/string trimmer into operation and strictly observe the safety regulations!
Preserve instruction manual carefully!
Важливо:
Уважно прочитайте ці інструкції з експлуатації перед тим, як використовувати кущоріз/кордову газонокосарку, та строго дотримуйтесь
правил з техніки безпеки!
Зберігайте цю інструкцію з експлуатації!
Ważne:
Przeczytać uważnie niniejszą instrukcję obsługi przed uruchomieniem kosy spalinowej/wykaszarki spalinowej i ściśle przestrzegać przepisów
dotyczących bezpieczeństwa!
Przechowywać niniejszy podręcznik z należytą starannością!
Important:
Citiţi cu atenţie acest manual de instrucţiuni înain
reglementările privind siguranţa!
Păstraţi cu atenţie manualul de instrucţiuni!
Wichtig:
Lesen Sie vor Verwendung der Motorsense/des Motor Rasentrimmers diese Bedienungsanleitung aufmerksam durch und halten Sie die
Sicherheitsregeln strikt ein!
Bewahren Sie diese Betriebsanleitung sorgfältig auf!
Fontos:
A bozótvágó/szegélyvágó első üzembe helyezése előtt figyelmesen olvassa át ezt a használati utasítást, és szigorúan tartsa be a biztonsági
előírásokat!
Gondosan őrizze meg a használati utasítást!
Dôležité:
Pred uvedením krovinorezu/strunovej kosačky do prevádzky si pozorne prečítajte tento návod na obsluhu a striktne dodržiavajte
bezpečnostné predpisy!
Tento návod na obsluhu starostlivo uschovajte!
Důležité:
Před uvedením křovinořezu/strunové sekačky do provozu si důkladně prostudujte tento návod k obsluze a pečlivě dodržujte bezpečnostní
směrnice!
Návod k obsluze pečlivě uschovejte!
te de a pune
în funcţiune motocositoarea/motocositoarea cu fir şi respectaţi cu stricteţe
EM2600U EM2600L
Page 2
English
Thank you for purchasing this MAKITA brush cutter/string trimmer. MAKITA
brush cutters/string trimmers are developed as a product of our many years of
knowledge, experience, and a detailed development programme.
Please read this booklet thoroughly to ensure you gain the best possible
performance and outstanding results that your MAKITA brush cutter/string
trimmer can provide.
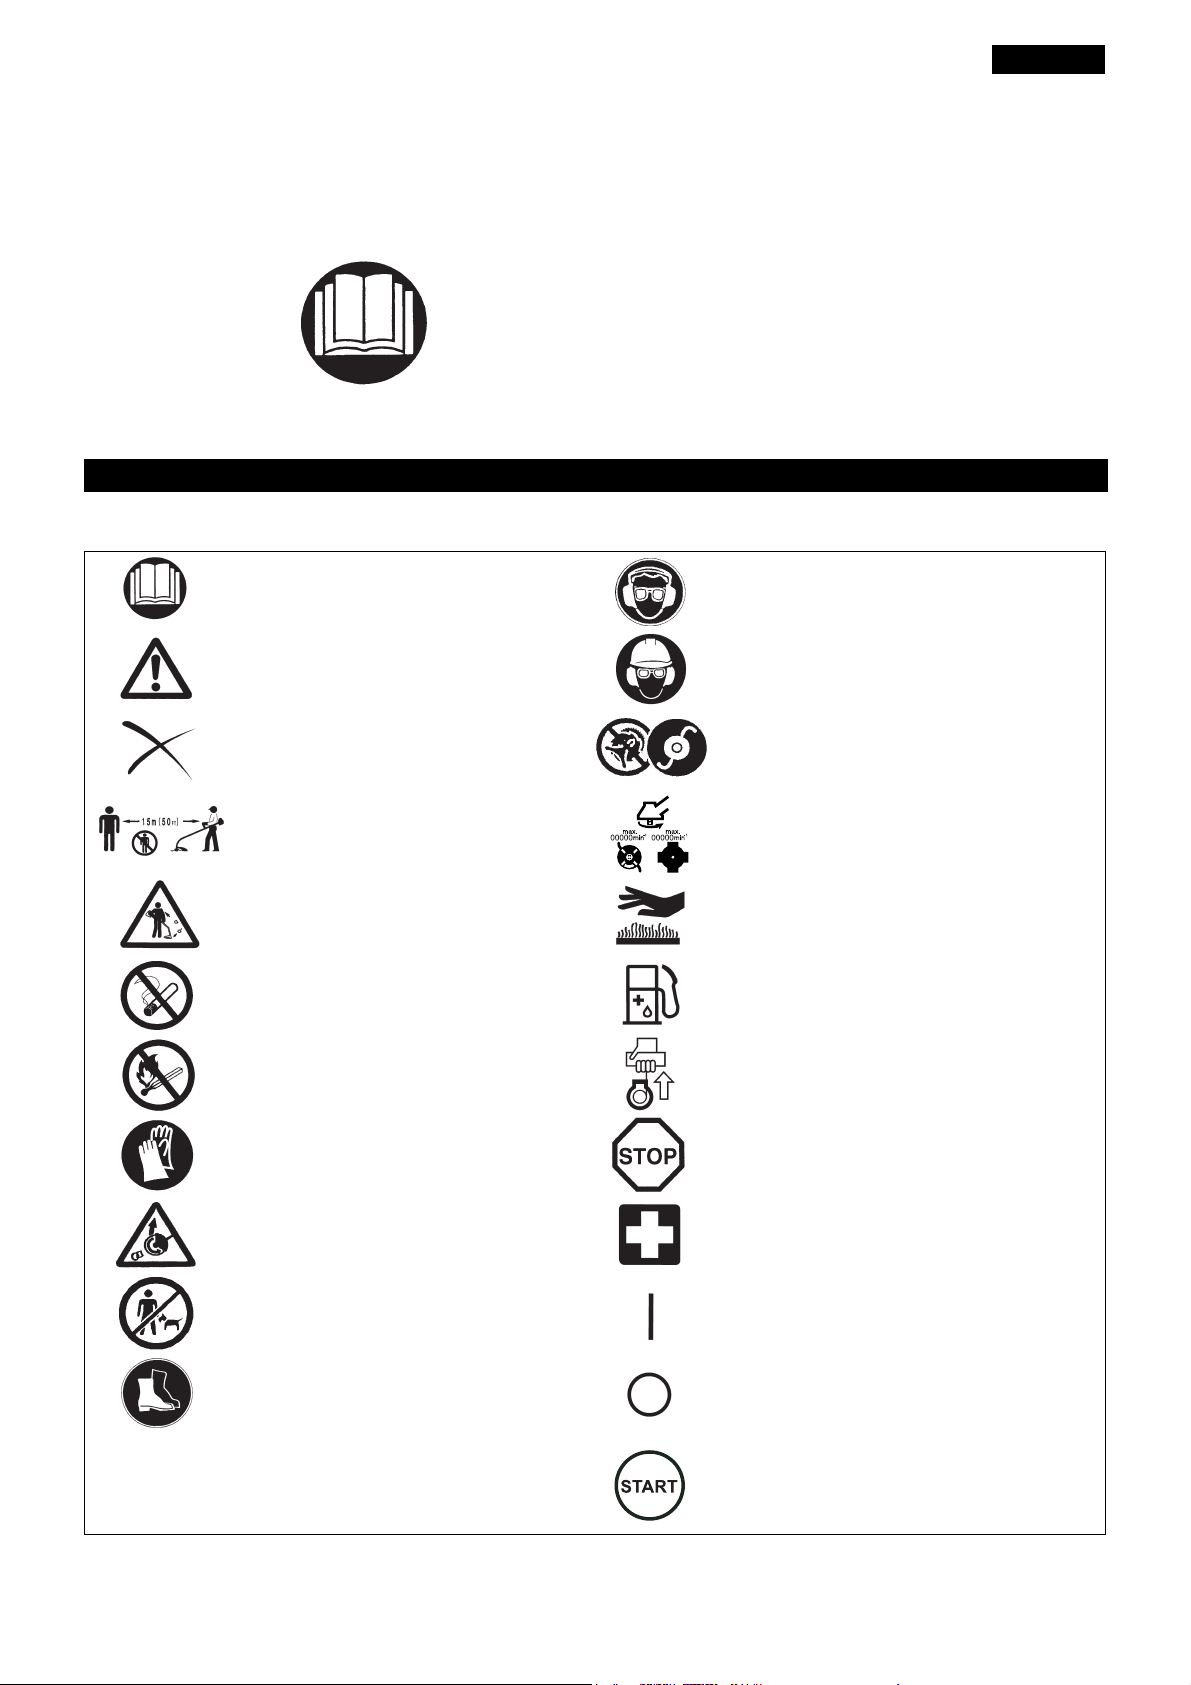
Symbols
You need to note the following symbols when reading the instructions manual.
Read instruction Manual
Take Particular care and Attention
Table of Contents Page
Symbols ........................................................................ 2
Safety instructions......................................................... 3
Technical data............................................................... 7
Names of parts.............................................................. 8
Mounting the handle ..................................................... 9
Mounting the protector ................................................10
Mounting the cutter blade/nylon cutting head ............. 11
Fuel/Refuelling ............................................................ 12
Correct handling.......................................................... 13
Important operating points/stopping the cutter/
trimmer........................................................................ 13
Resharpening the cutting tool ..................................... 15
Servicing instructions .................................................. 17
Storage ....................................................................... 19
Wear eye and ear protection
(for string trimmer only)
Wear protective helmet, eye and ear protection
(for brush cutter only)
Forbidden
Keep your distance Maximum permissible tool speed
Flying object hazard Hot surfaces - Burns to fingers or hands
No Smoking Fuel and oil mixture
No open flames Engine-Manual start
Protective gloves must be worn Emergency stop
Kickback First Aid
Keep the area of operation clear of all
persons and animals
Do not use metal blades
(for string trimmer only)
ON/START
Wear sturdy boots with nonslip soles. Steeltoed safety boots are recommended.
OFF/STOP
START
2
Page 3
Safety instructions
Diagram
15 meters
(1)
(3)
(2)
(4)
(5)
(6)
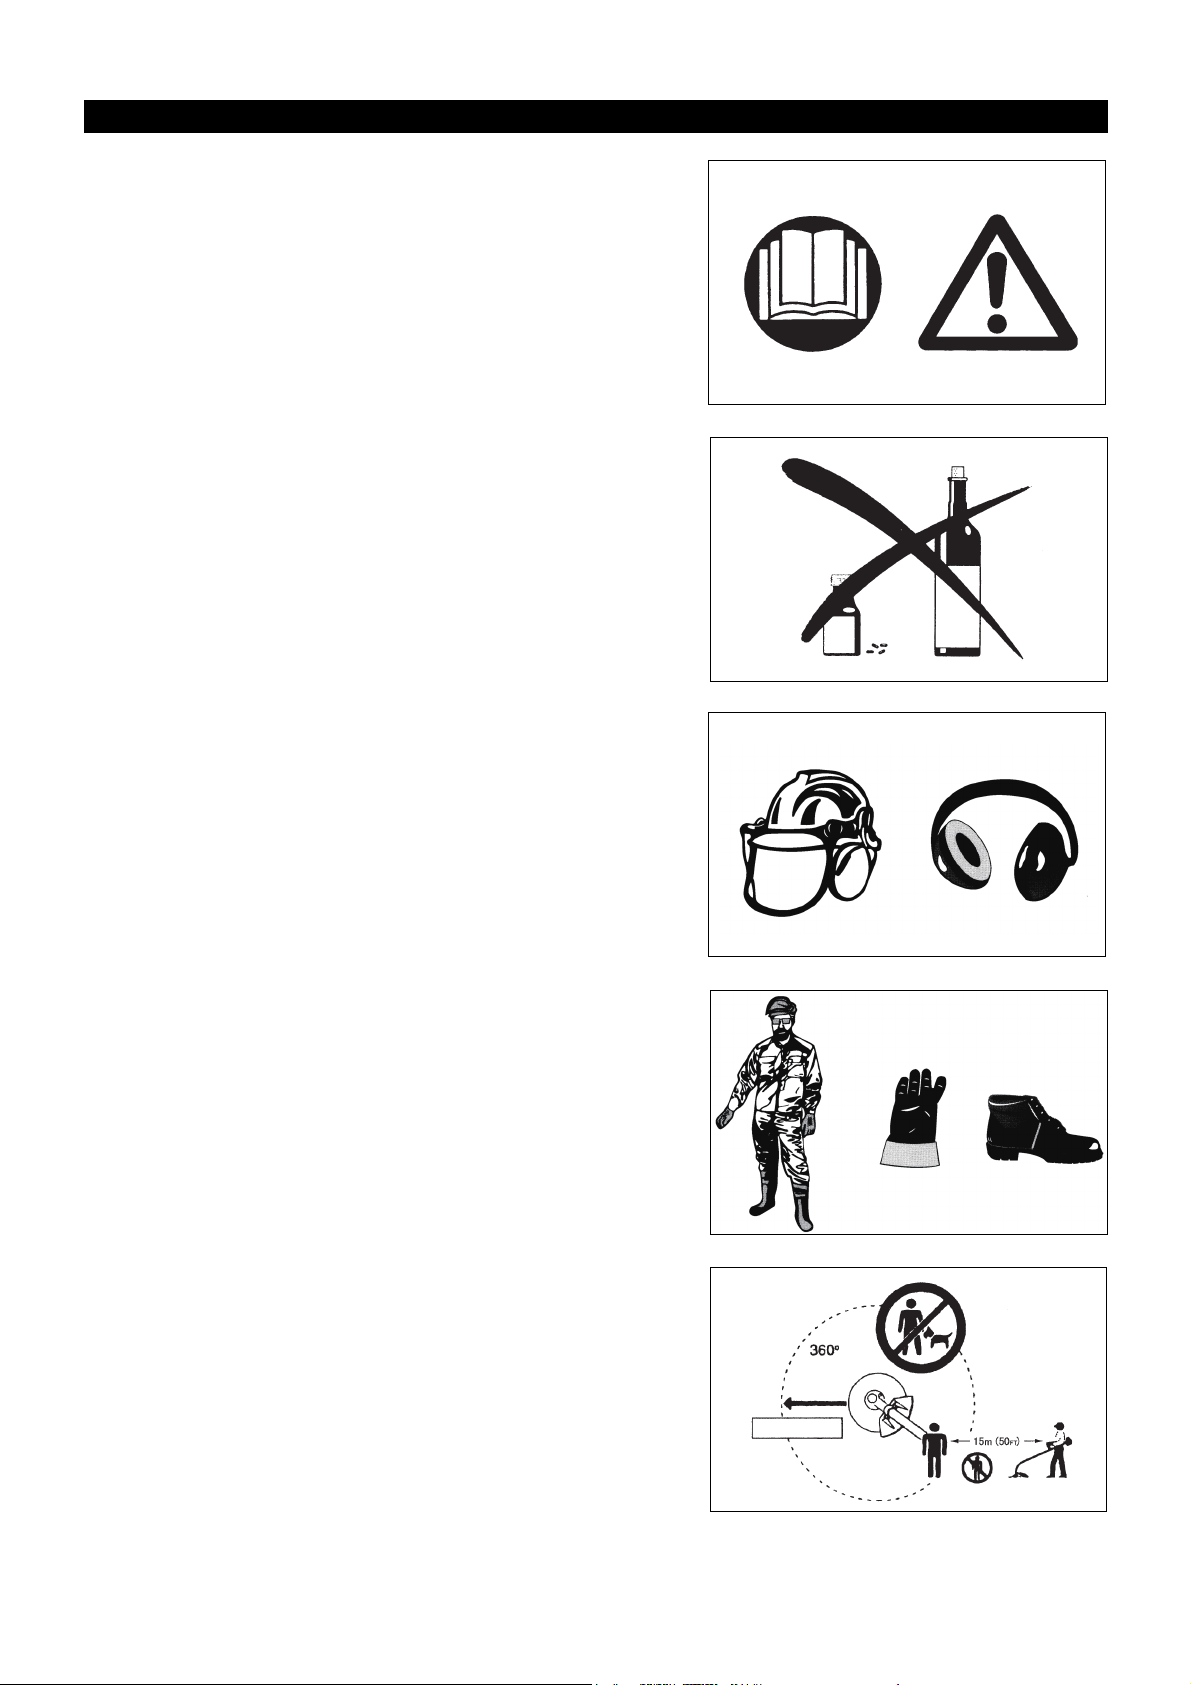
General Instructions
– To ensure correct operation, make sure that you read and fully understand this
instruction manual to familiarise yourself with how to use the brush cutter/
string trimmer. Using this equipment without understanding how to operate it
correctly may result in serious injury to yourself or others.
– Only lend the brush cutter/string trimmer to people who have proved
experienced with brush cutter/string trimmers. Always lend them this
instruction manual at the same time.
– If this is your first time using an engine powered cutter, consult your dealer for
basic instructions.
– Children and young persons aged under 18 years must not be allowed to
operate the brush cutter/string trimmer. Persons over the age of 16 years may
use the device for training purposes, only whilst under supervision of a
qualified trainer.
– Use brush cutter/string trimmers with the utmost care and attention.
– Only operate the brush cutter/string trimmer if you are in good physical
condition. Perform all work calmly and carefully. Users must accept
responsibility for those around them.
– Never use the brush cutter/string trimmer after consumption of alcohol or
medicines, or if you are feeling tired or ill.
WARNING: This power tool produces an electromagnetic field during operation.
This field may under some circumstances interfere with active or passive
medical implants. To reduce the risk of serious or fatal injury, we recommend
persons with medical implants to consult their physician and the medical implant
manufacturer before operating this machine.
Intended use of the equipment
– The brush cutter/string trimmer is only intended for cutting grass, weeds, bush
and other such undergrowth, and should not be used for any other purpose
such as edging or hedge cutting as this may cause injury.
Personal protective equipment
– Always wear clothing that is both functional and appropriate to your work, i.e.
tight-fitting, but not so tight as to cause uncomfortable movement. Do not wear
either jewelry or clothing which could become entangled with bushes or
shrubs.
– In order to avoid head, eye, hand, or foot injuries, as well as to protect your
hearing during operation, the following protective equipment and protective
clothing must be used while using the brush cutter/string trimmer.
– Always wear a helmet where there is a risk of falling objects. The protective
helmet (1) is to be checked at regular intervals for damage and is to be
replaced at the latest after 5 years. Use only approved protective helmets.
– The visor (2) of the helmet (or alternatively goggles) protects the face from
flying debris and stones. During operation of the brush cutter/string trimmer,
always wear goggles or a visor to prevent eye injuries.
– Wear adequate noise protection equipment to avoid hearing impairment (ear
muffs (3), ear plugs etc.).
– Work overalls (4) protect against flying stones and debris.
We strongly recommend that you wear work overalls.
– Special gloves (5) made of thick leather are part of the prescribed equipment
and must always be worn during operation of the brush cutter/string trimmer.
– When using the brush cutter/string trimmer, always wear sturdy shoes (6) with
a non-slip sole. Such shoes protect against injuries and ensure good footing.
Residual risks
– Even when the power tool is used as prescribed it is not possible to eliminate
all residual risk factors. The following hazards may arise in connection with the
power tool’s construction and design:
1. Damage to lungs if an effective dust mask is not worn.
2. Damage to hearing if effective hearing protection is not worn.
3. Damages to health resulting from vibration emission if the power tool is
being used over longer period of time or not adequately managed and
properly maintained.
Starting the brush cutter
– Make sure that there are no children or other people within a working range of
15 meters (50ft), also pay attention to any animals in the working vicinity.
– Before use, always check that the brush cutter/string trimmer is safe for
operation:
Check that the cutting tool is secure, that the control lever can be operated
easily, and that the control lever lock is functioning correctly.
– Rotation of the cutting tool during idling is prohibited. Check with your dealer if
you think the equipment may need adjusting. Check to make sure that the
handles are clean and dry, and that the start/stop switch is functioning
correctly.
3
Page 4
– Start the brush cutter/string trimmer only in accordance with the instructions.
• Resting
• Transport
• Refuelling
• Maintenance
• Tool Replacement
Do not use any other methods to start the engine!
– Only use the brush cutter/string trimmer and tools for the specified purposes.
– Only start the brush cutter/string trimmer engine after the equipment is fully
assembled. Do not operate the equipment until all of the appropriate
accessories are attached!
– Before starting, make sure that the cutting tool is not in contact with hard objects
such as branches, stones etc. as the cutting tool will rotate when starting.
– Switch off the engine immediately if any type of engine problem occurs.
– Should the cutting tool hit stones or other hard objects, immediately switch off
the engine and inspect the cutting tool.
– Inspect the cutting tool at short regular intervals for damage (inspect for
hairline cracks using the tapping test).
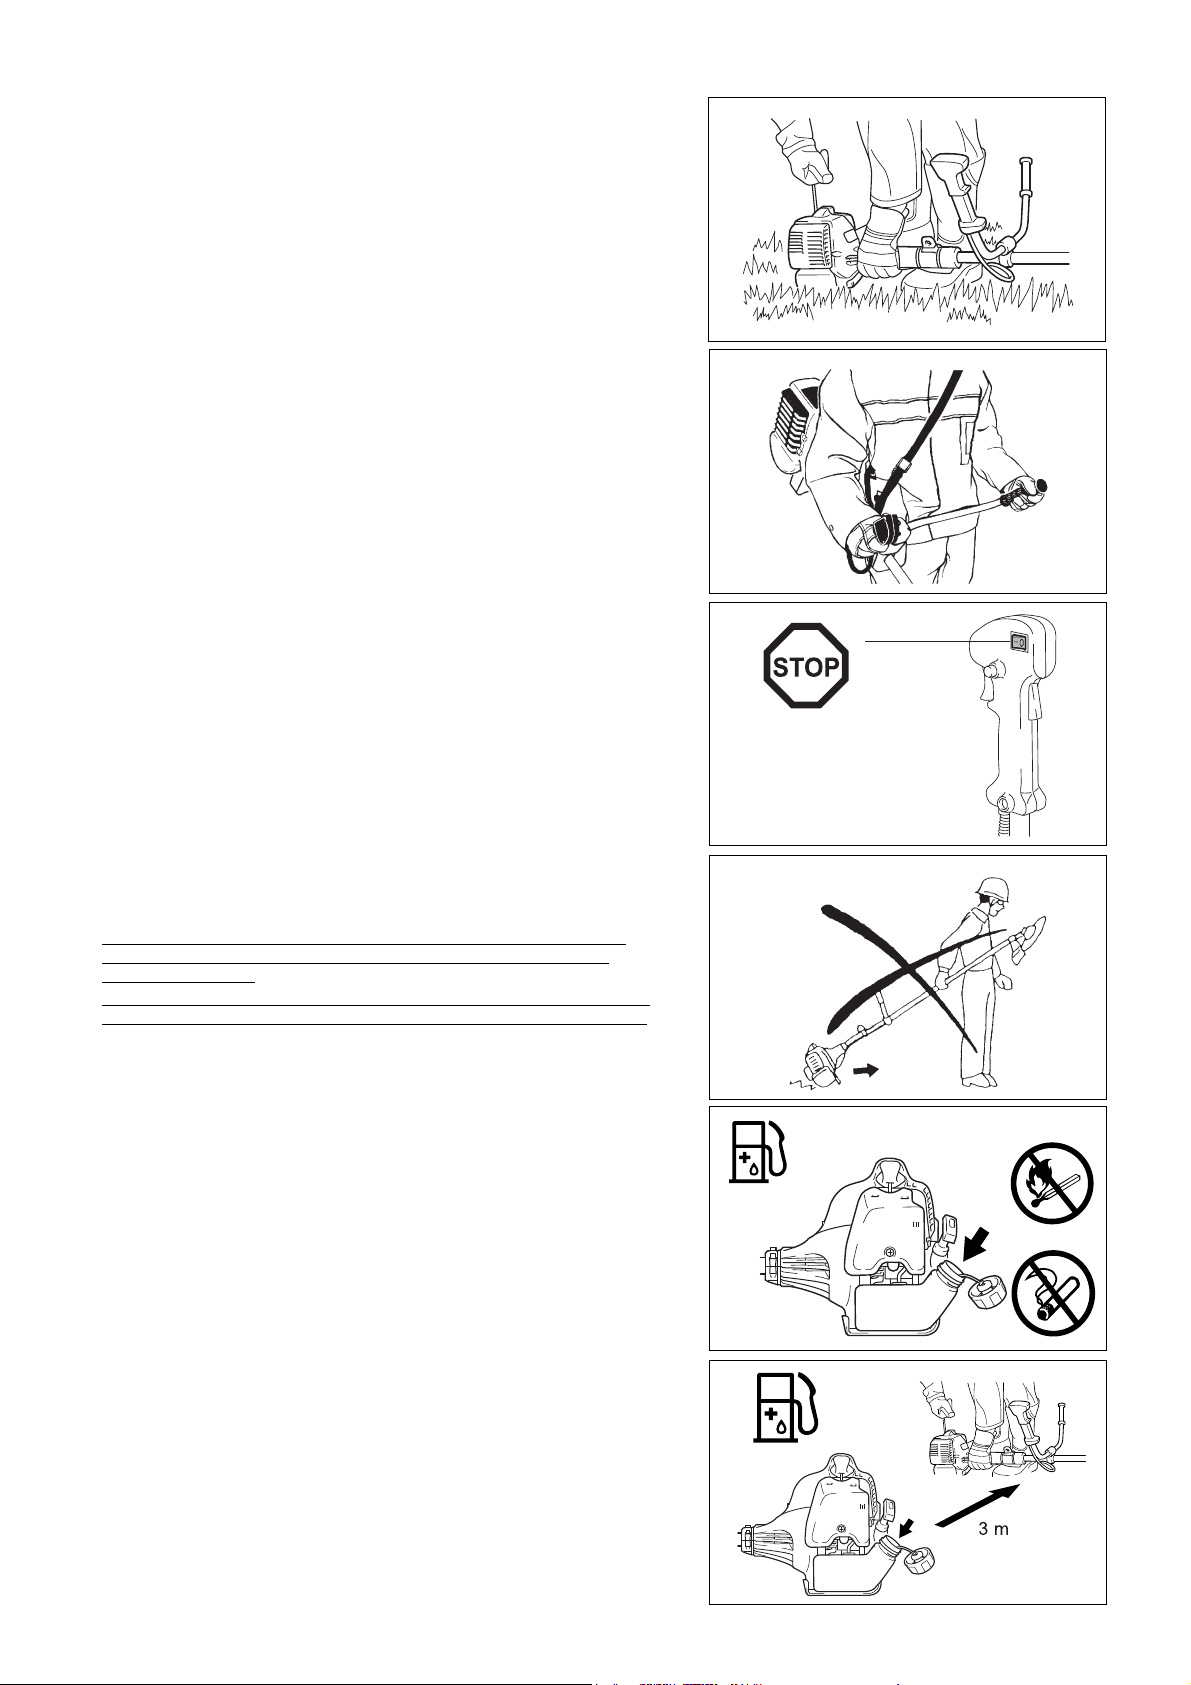
– Only operate the brush cutter/string trimmer after attaching and adjusting the
shoulder strap to the correct length. The shoulder strap must be adjusted to
the user’s size and fastened to prevent fatigue during operation of the
equipment. Never hold the cutter with one hand during operation.
– During operation, always hold the brush cutter/string trimmer with both hands.
Always ensure you are on safe footing.
– Operate the brush cutter/string trimmer in such a manner as to avoid
inhalation of the exhaust gases. Never run the engine in an enclosed space
such as inside a room (risk of gas poisoning). Carbon monoxide is an odorless
gas.
– Always switch off the engine when resting, or if you intend to leave the brush
cutter/string trimmer unattended, and place it in a safe location to prevent
injury to other people and damage to the equipment.
– Never put the hot brush cutter/string trimmer onto dry grass or onto any other
combustible materials.
– The cutting tool must always be equipped with the appropriate guard.
Never run the cutter without this guard!
– All protective installations and guards supplied with the equipment must be
used during operation.
– Never operate the engine if the exhaust muffler is faulty.
– Shut off the engine during transport.
– When transporting the equipment, always attach the cover to the cutting
blade.
– Ensure the brush cutter/string trimmer is positioned safely during transport to
avoid fuel leakage.
– When transporting the brush cutter/string trimmer, ensure the fuel tank is
completely empty.
– When unloading the brush cutter/string trimmer from a truck or other such
vehicle, never drop the engine to the ground, as doing so may severely
damage the fuel tank.
– Unless in an emergency, never drop or cast the brush cutter/string trimmer to
the ground as doing so may severely damage the brush cutter/string trimmer.
– Always lift the entire equipment from the ground when moving it. Dragging the
equipment on its fuel tank is extremely dangerous and may cause fuel to leak,
which may cause fire.
– If the equipment gets heavy impact or fall, check the condition before
continuing work. Check the fuel system for fuel leakage and the controls and
safety devices for malfunction. If there is any damage or doubt, ask our
authorized service center for the inspection and repair.
Refuelling
– Shut off the engine during refuelling, keep away from open flames and do not
smoke during refuelling.
– Ensure mineral oil products do not come into contact with skin. Do not inhale
the fuel vapor. Always wear protective gloves during refuelling. Change and
clean protective clothing at regular intervals.
– To prevent soil contamination (environmental protection), make sure you do
not spill fuel or oil on the ground. If you do spill fuel, clean the brush cutter/
string trimmer immediately.
– Make sure fuel does not come into contact with your clothing. If fuel does
come into contact with your clothing, change your clothing immediately to
prevent fire.
– Inspect the fuel cap at regular intervals to make sure that it can be securely
fastened and does not leak.
– Carefully tighten the fuel tank cap. Once refuelling is complete, move to a
location at least 3 meters away from where you refuelled before starting the
engine.
– Never refuel in an enclosed space such as inside a room. Doing so may cause
an explosion due to the accumulation of fuel vapor at ground level.
4
Page 5
– Only transport and store fuel in approved containers. Make sure stored fuel is
Caution:
Kickback
Diagram
Diagram
not accessible to children.
Method of operation
– Only use the brush cutter/string trimmer in good light and visibility. During the
winter season, beware of slippery or wet areas such as icy or snow-covered
areas (risk of slipping). Always ensure you are on safe footing.
– Never cut above waist height.
– Never stand on a ladder while using the brush cutter/string trimmer.
– Never climb up into trees to use with the brush cutter/string trimmer.
– Never work on unstable surfaces.
– Remove sand, stones, nails etc. found within the working range.
Foreign objects may damage the cutting tool and can cause dangerous kick-
backs.
– Before starting to cut, make sure the cutting tool has reached full working
speed.
– If grass or branches get caught between the cutting tool and guard, always
stop the engine before cleaning. Otherwise unintentional blade rotation may
cause serious injury.
– Take a rest to prevent loss of control caused by fatigue. We recommend to
take a 10 to 20-minute rest every hour.
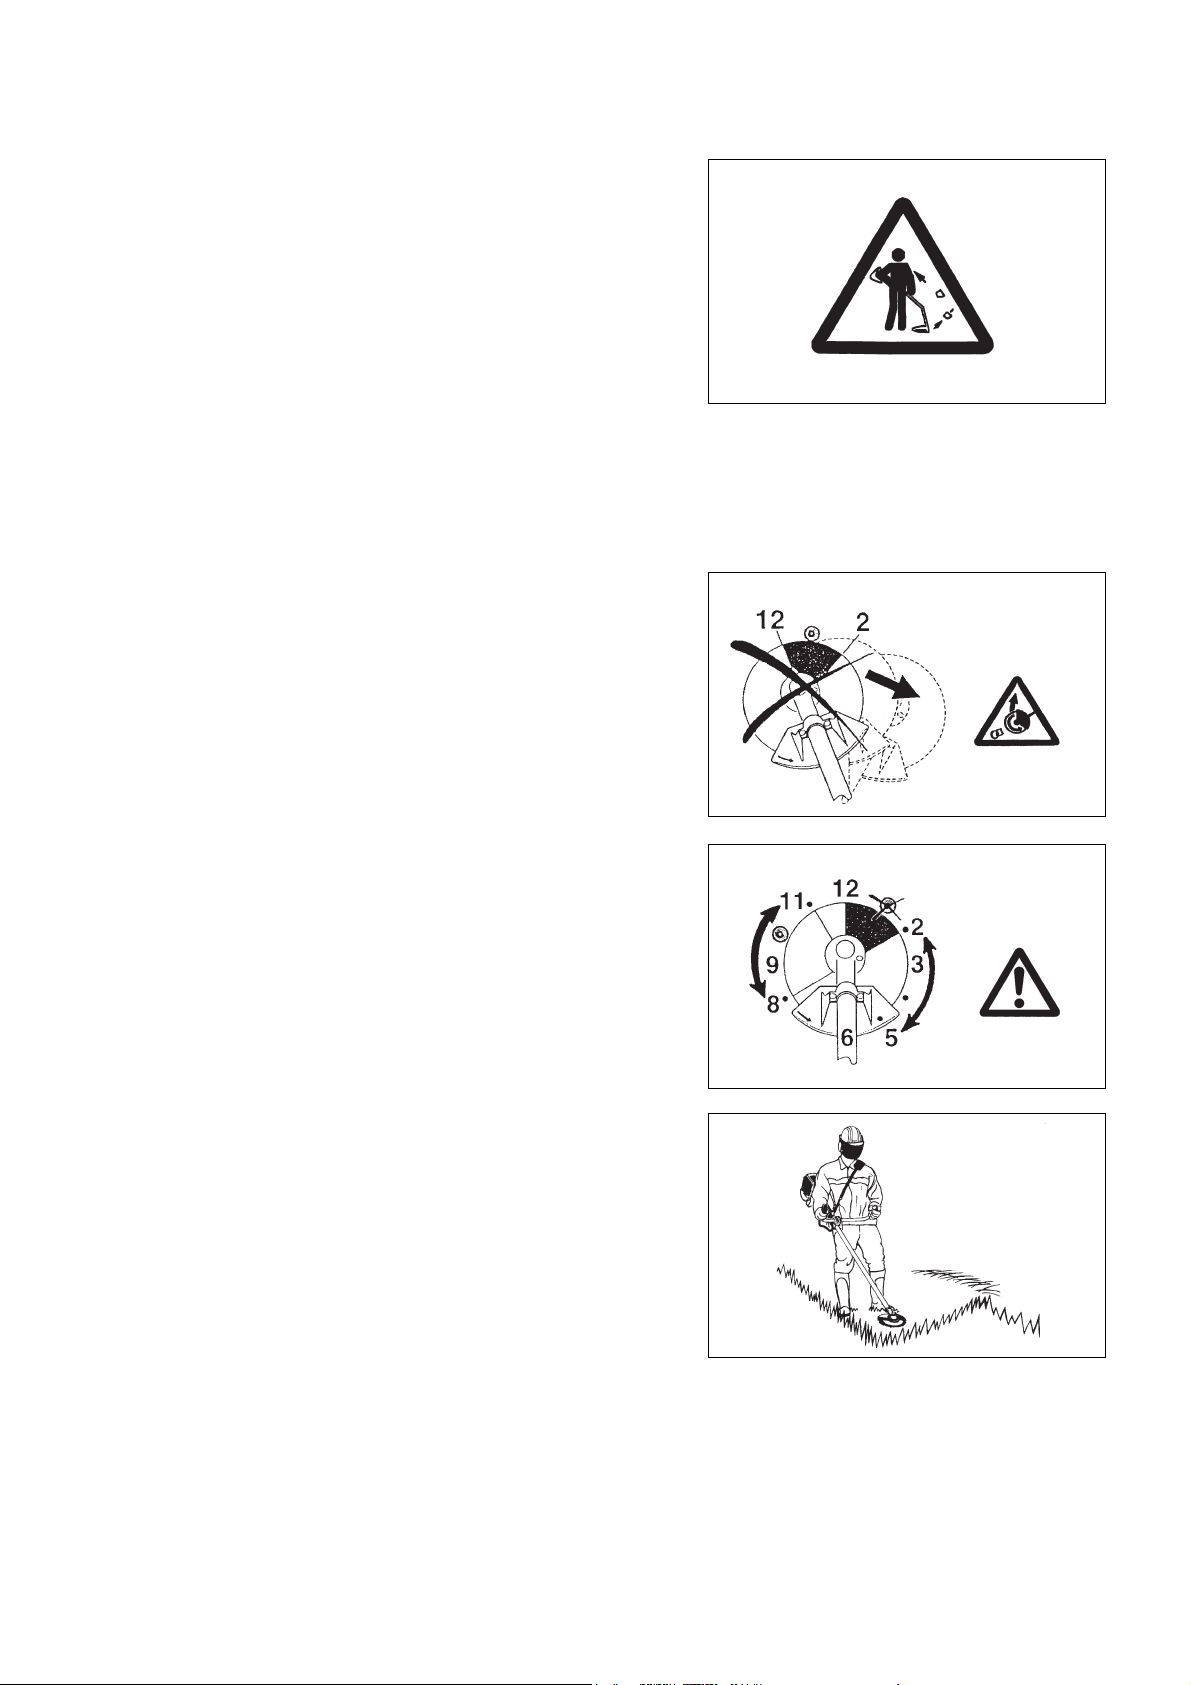
Kickback (blade thrust)
– When operating the brush cutter, uncontrolled kickbacks may occur.
– Kickbacks occur frequently when attempting to cut with the 12 to 2 o’clock
section of the blade.
– Never apply the 12 to 2 o’clock section of the brush cutter blade.
– Never apply this section of the brush cutter blade to solid objects, such as
bushes or trees etc. that have a diameter greater than 3 cm. Doing so will
cause the brush cutter to deflect with a large amount of force, which is
extremely dangerous and may cause injury.
Kickback prevention
To avoid kickbacks, remember the following:
– Using the 12 to 2 o’clock section of the blade is extremely hazardous,
especially when using metal cutting tools.
– Cutting operations using the 11 to 12 o’clock section and 2 to 5 o’clock section
of the blade must only be performed by trained and experienced operators,
and then only at their own risk.
The optimum cutting section for easy cutting with almost no kickback is
between the 8 to 11 o’clock section of the blade.
Cutting Tools
– Use an applicable cutting tool for the job in hand.
Nylon cutting heads (string trimmer heads) are suitable for trimming lawn
grass.
Metal blades are suitable for cutting weeds, high grasses, bushes, shrubs,
underwood, thicket, and the like.
Never use other blades including metal multi-piece pivoting chains and flail
blades. Otherwise serious injury may result.
– When using metal blades, avoid “kickback” and always prepare for an
accidental kickback. See the section “Kickback” and “Kickback prevention”.
Maintenance instructions
– Have your equipment serviced by our authorized service center, always using
only genuine replacement parts. Incorrect repair and poor maintenance can
shorten the life of the equipment and increase the risk of accidents.
– Always check the condition of the cutter, in particular the cutter protective
devices and shoulder strap, before commencing work. Particular attention
should also be paid to the cutting blades, which must be correctly sharpened.
– Turn off the engine and remove the spark plug connector when replacing or
sharpening cutting tools, and also when cleaning the cutter or cutting tool.
5
Page 6
Never straighten or weld damaged cutting tools.
– Operate the brush cutter/string trimmer with as little noise and contamination
as possible. In particular, check that the carburetor is set correctly.
– Clean the brush cutter/string trimmer at regular intervals and check that all
screws and nuts are well tightened.
– Never service or store the brush cutter/string trimmer in the vicinity of naked
flames.
– Always store the brush cutter/string trimmer in locked rooms and with an
emptied fuel tank.
– When cleaning, servicing and storing the equipment, always attach the cover
to the cutting blade.
Observe the relevant accident prevention instructions issued by the relevant
trade associations and insurance companies.
Do not perform any modifications on the brush cutter/string trimmer, as doing so
will endanger your safety.
The performance of maintenance or repair work by the user is limited to those
activities described in the instruction manual. All other work is to be done by an
Authorized Service Agent. Use only genuine spare parts and accessories
released and supplied by MAKITA.
Using non-approved accessories and tools will cause an increased risk of
accidents.
MAKITA will not accept any liability for accidents or damage caused by the use
of non-approved cutting tools, fixing devices of cutting tools, or accessories.
First Aid
In case of accident, make sure that a first-aid box is available in the vicinity of the
cutting operations. Immediately replace any item taken from the first aid box.
When asking for help, please give the following information:
– Place of the accident
– What happened
– Number of injured persons
– Kind of injuries
– Your name
Vibration
– People with poor circulation who are exposed to excessive vibration may
experience injury to blood vessels or the nervous system. Vibration may
cause the following symptoms to occur in the fingers, hands or wrists: “Falling
asleep” (numbness), tingling, pain, stabbing sensation, alteration of skin color
or of the skin. If any of these symptoms occur, see a physician!
– To reduce the risk of “white finger disease”, keep your hands warm during
operation and well maintain the equipment and accessories.
For European countries only
EC Declaration of Conformity
We Makita Corporation as the responsible manufacturer declare that the following Makita machine(s):
Designation of Machine: Brush Cutter/String Trimmer
Model No./ Type: EM2600U, EM2600L
Specifications: see “TECHNICAL DATA” table
are of series production and
Conforms to the following European Directives:
2000/14/EC, 2006/42/EC, 2004/108/EC
And are manufactured in accordance with the following standards or standardized documents:
EN ISO 11806-1, EN ISO 14982
The technical documentation is kept by:
Makita International Europe Ltd., Technical Department,
Michigan Drive, Tongwell, Milton Keynes, Bucks MK15 8JD, England
The conformity assessment procedure required by Directive 2000/14/EC was in Accordance with annex V.
Measured Sound Power Level (as a grass trimmer): 109.77 dB
Measured Sound Power Level (as a brush cutter): 107.29 dB
Guaranteed Sound Power Level: 112 dB
15. 4. 2013
Tomoyasu Kato
Director
Makita Corporation
3-11-8, Sumiyoshi-cho,
Anjo, Aichi, JAPAN
6
Page 7

Technical data
EM2600U EM2600L
Model
U handle Loop handle
Dimensions: length x width x height (without cutting blade) 1,770 x 610 x 410 mm 1,770 x 330 x 185 mm
Net Weight 5 kg 5 kg
Engine displacement
25.7 cm
3
Maximum engine performance 0.83 kW
Maximum rotational frequency of the spindle
8,800 min
-1
Single piece metal blade φ230 mm
Cutting attachment
String trimmer head φ430 mm
Idling speed 3,000/min
Clutch engagement speed 4,100/min
Gear ratio 14/19
Fuel
Gasoline: Two-stroke Engine Oil = 50:1
Mixed gas
Volume (fuel tank) 0.6 L
Carburetor WALBRO WYC
Ignition system Solid state ignition
Spark plug NGK BPMR7A
Electrode gap 0.6 - 0.7 mm
Left handle (Front grip)
14.680 m/s
2
K = 1.5 m/s
2
5.152 m/s2 K = 1.5 m/s
Vibration: (For brush cutter)
Right handle (Rear grip)
Left handle (Front grip)
9.037 m/s
7.961 m/s
2
K = 1.5 m/s
2
K = 1.5 m/s
2
2
9.677 m/s2 K = 1.5 m/s
8.83 m/s2 K = 1.5 m/s
Vibration: (For grass trimmer)
Right handle (Front grip)
7.019 m/s
2
K = 1.5 m/s
2
14.381 m/s2 K = 1.5 m/s
Noise (tested according to 2000/14/EC & 2005/88/EC):
Sound pressure level at the operator’s position (Grass trimmer): 98.52 dB (A) K = 2.5 dB (A)
Sound pressure level at the operator’s position (Brush cutter): 96.15 dB (A) K = 2.5 dB (A)
Measured sound power level (Grass trimmer): 109.77 dB (A) K =2.5 dB (A)
Measured sound power level (Brush cutter): 107.29 dB (A) K = 2.5 dB (A)
Noise (tested according to 2000/14/EC & 2005/88/EC): guaranteed
sound power values
112 dB (A)
2
2
2
2
7
Page 8
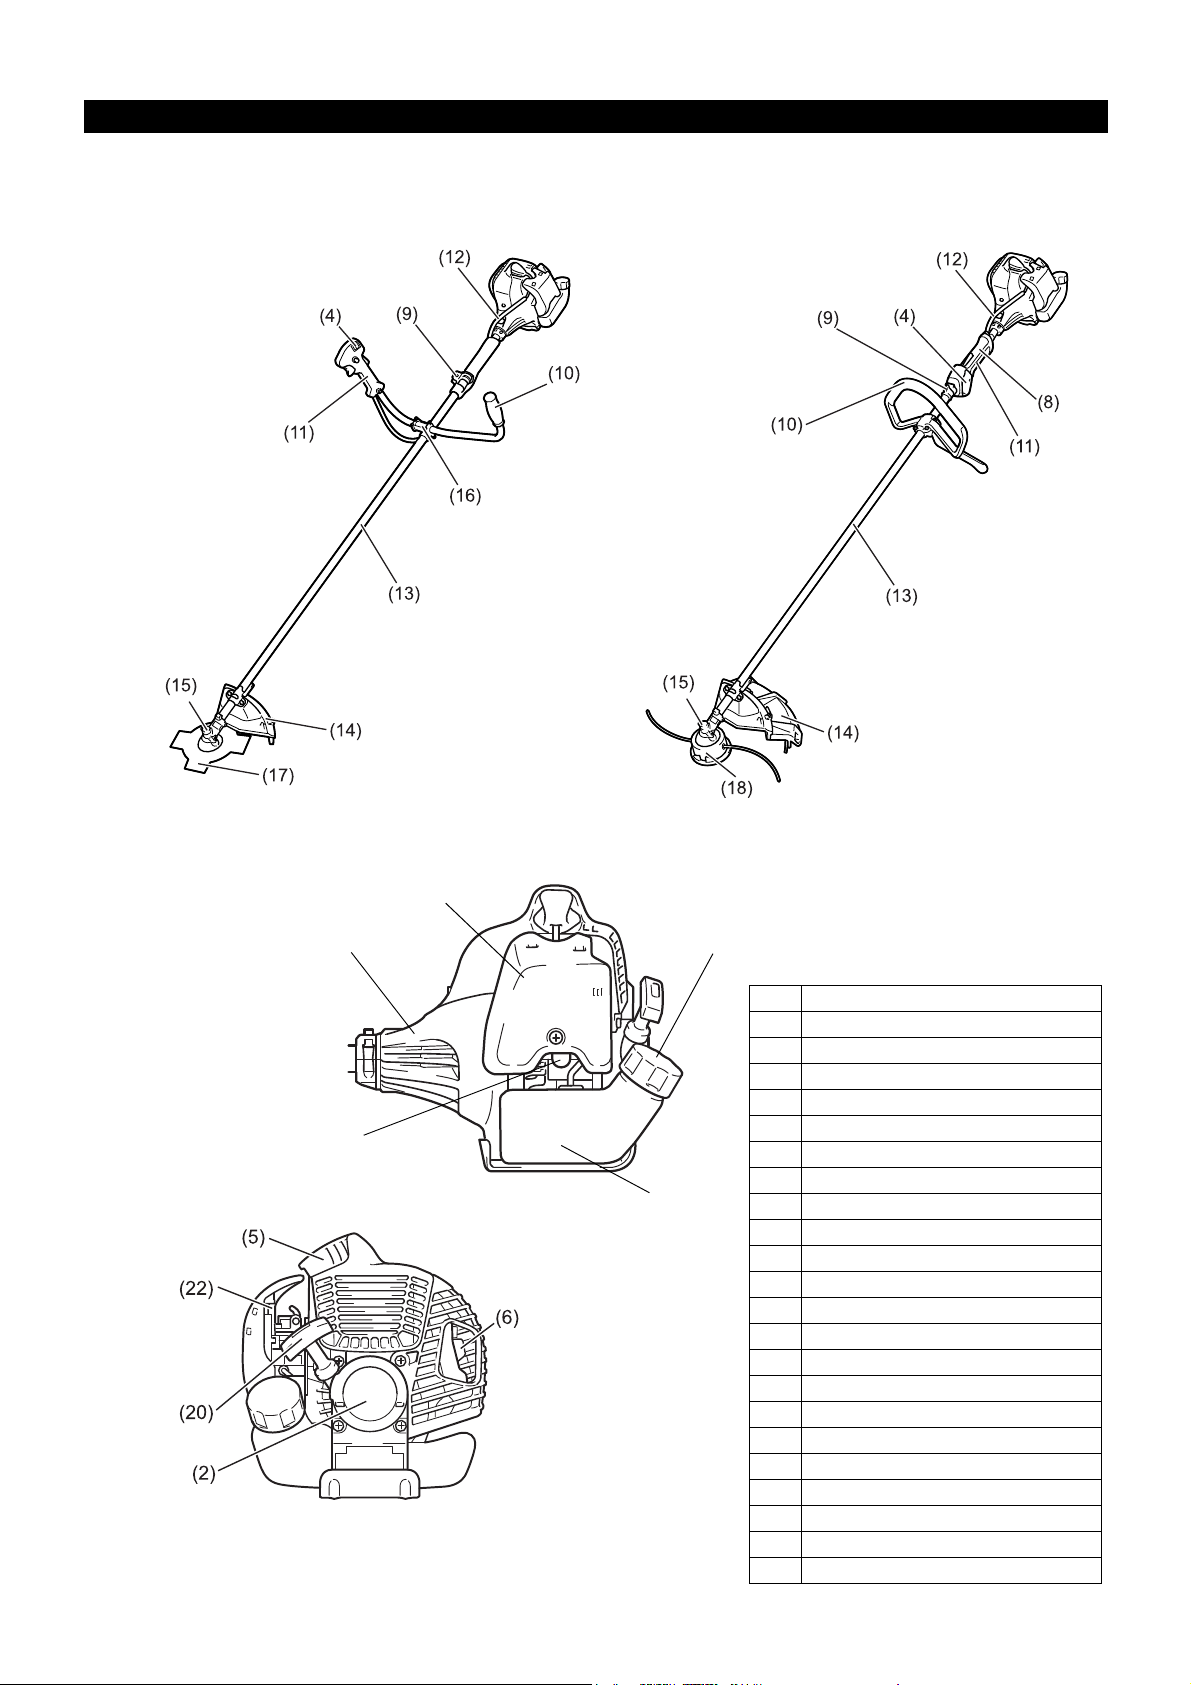
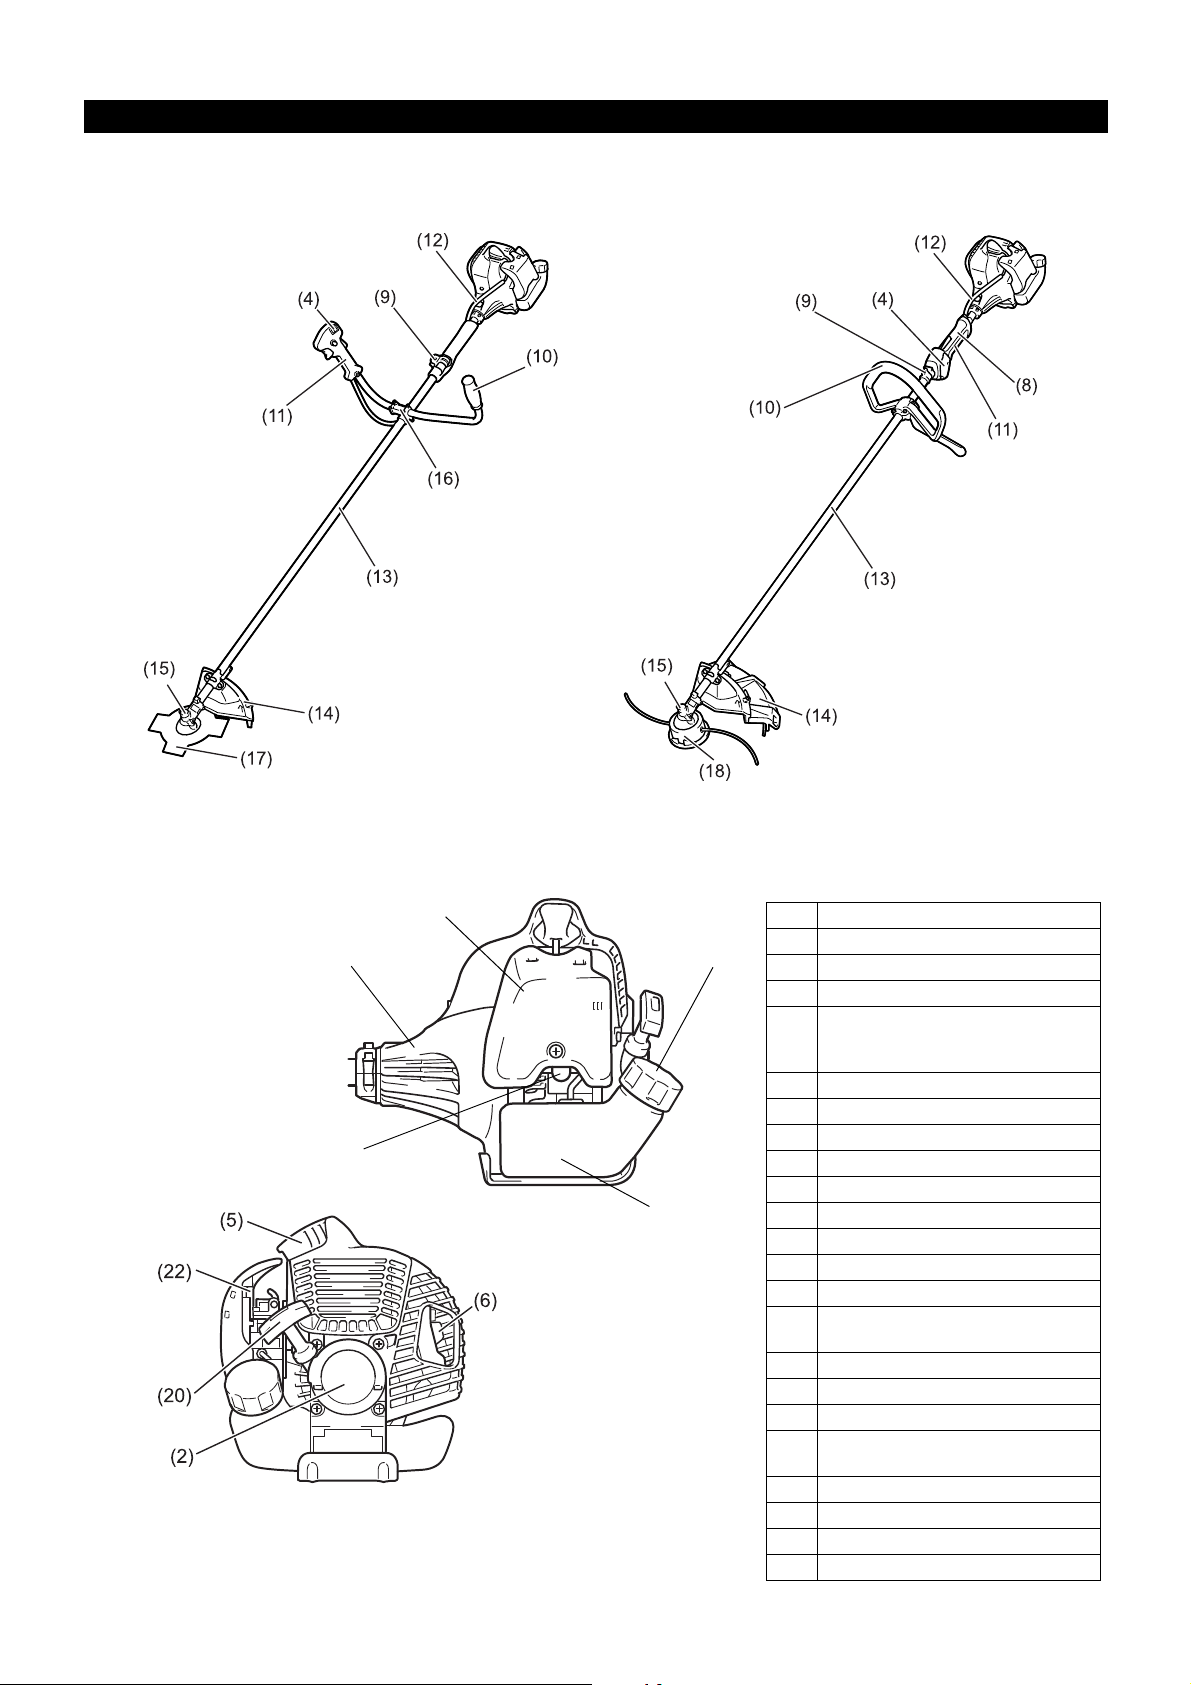
Names of parts
Names of parts
1 Fuel Tank
2 Rewind Starter
3 Air Cleaner
4 I-Stop Switch (on/off)/Start-Stop Switch
5Spark Plug
6 Exhaust Muffler
7Clutch Case
8 Rear Grip
9 Hanger
10 Handle
11 Control Lever
12 Control Cable
13 Shaft
14 Protector (Cutting tool guard)
15 Gear Case
16 Handle Holder
17 Cutter Blade
18 Nylon Cutting Head
19 Fuel Filler Cap
20 Starter Knob
21 Primer Pump
22 Choke Lever
EM2600U
U Handle Type
EM2600L
Loop Handle Type
(3)
(7)
(21)
(1)
(19)
8
Page 9
Mounting the handle
EM2600U
L
R
(1)
EM2600U
(2)
EM2600U
(3)
(1)
EM2600U
CAUTION: Before doing any work on the brush cutter, always stop the engine
and disconnect the spark plug connector from the spark plug.
Always wear protective gloves!
CAUTION: Ensure you have reassembled the brush cutter completely before
starting it.
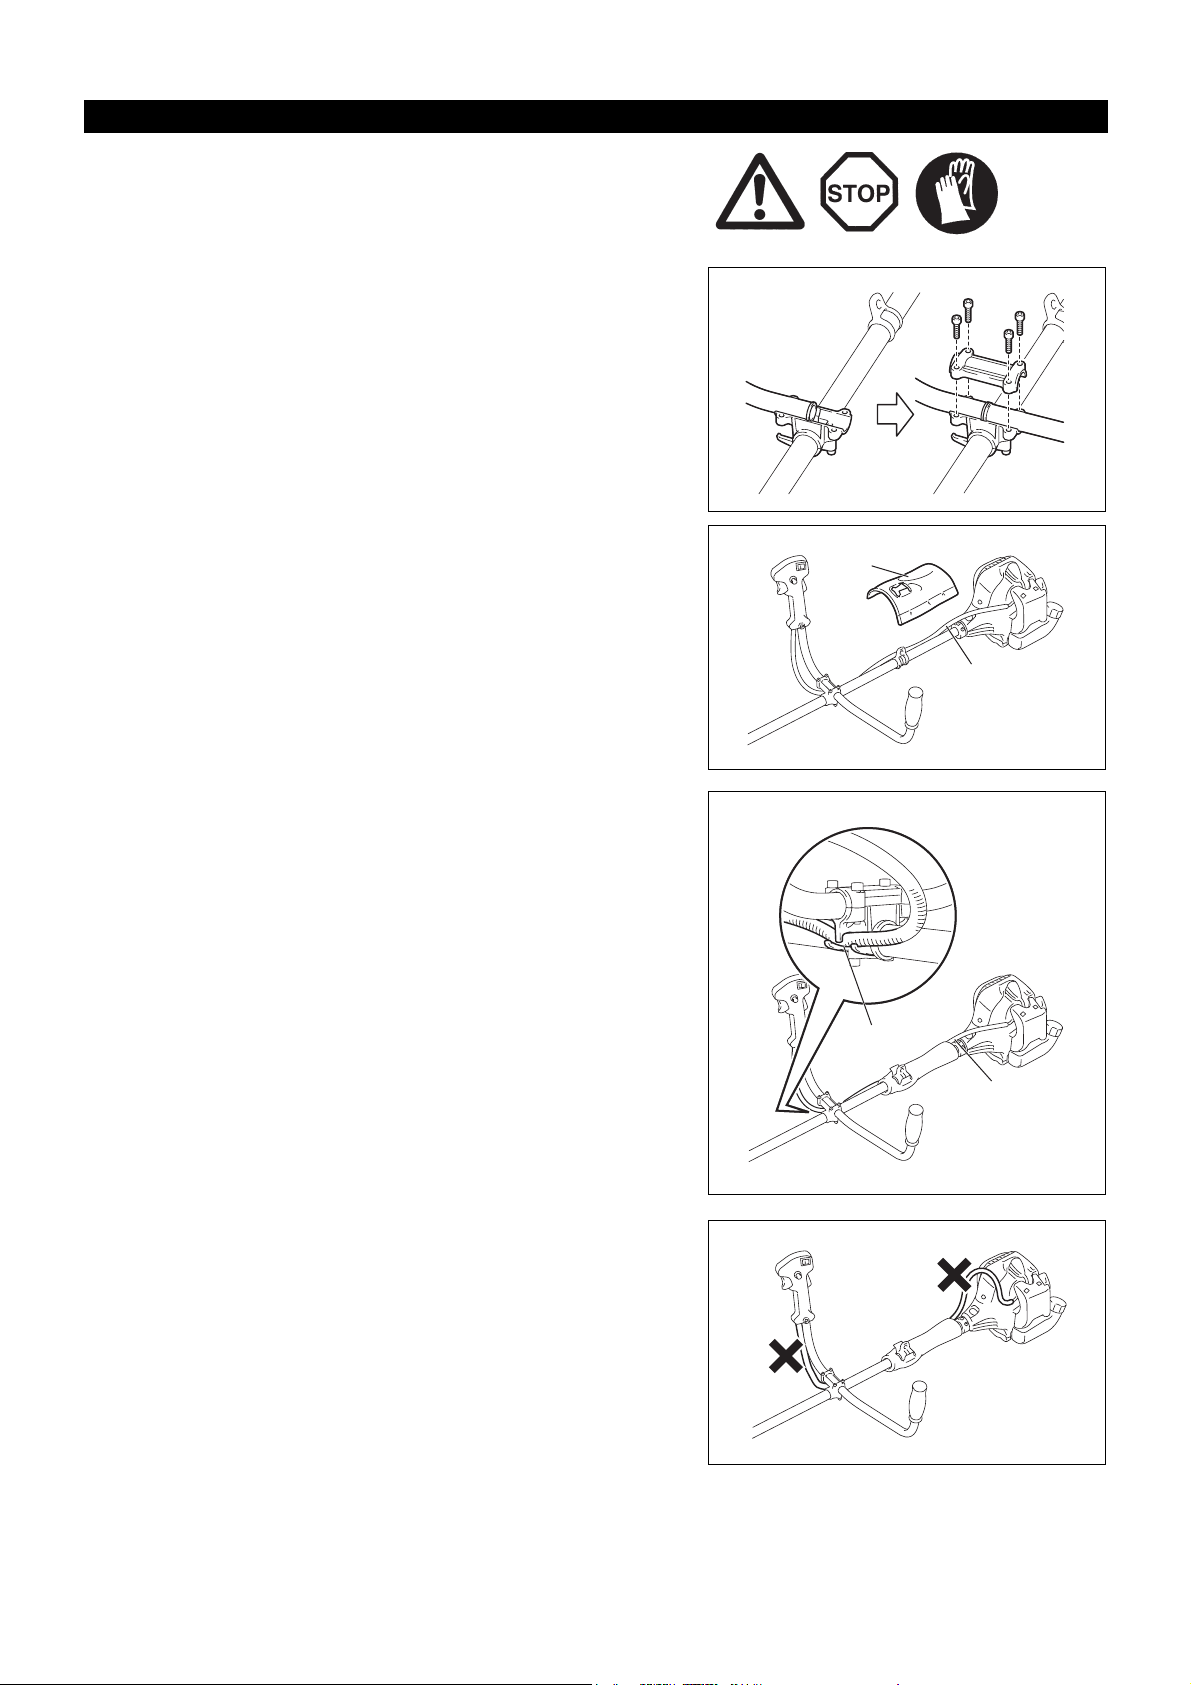
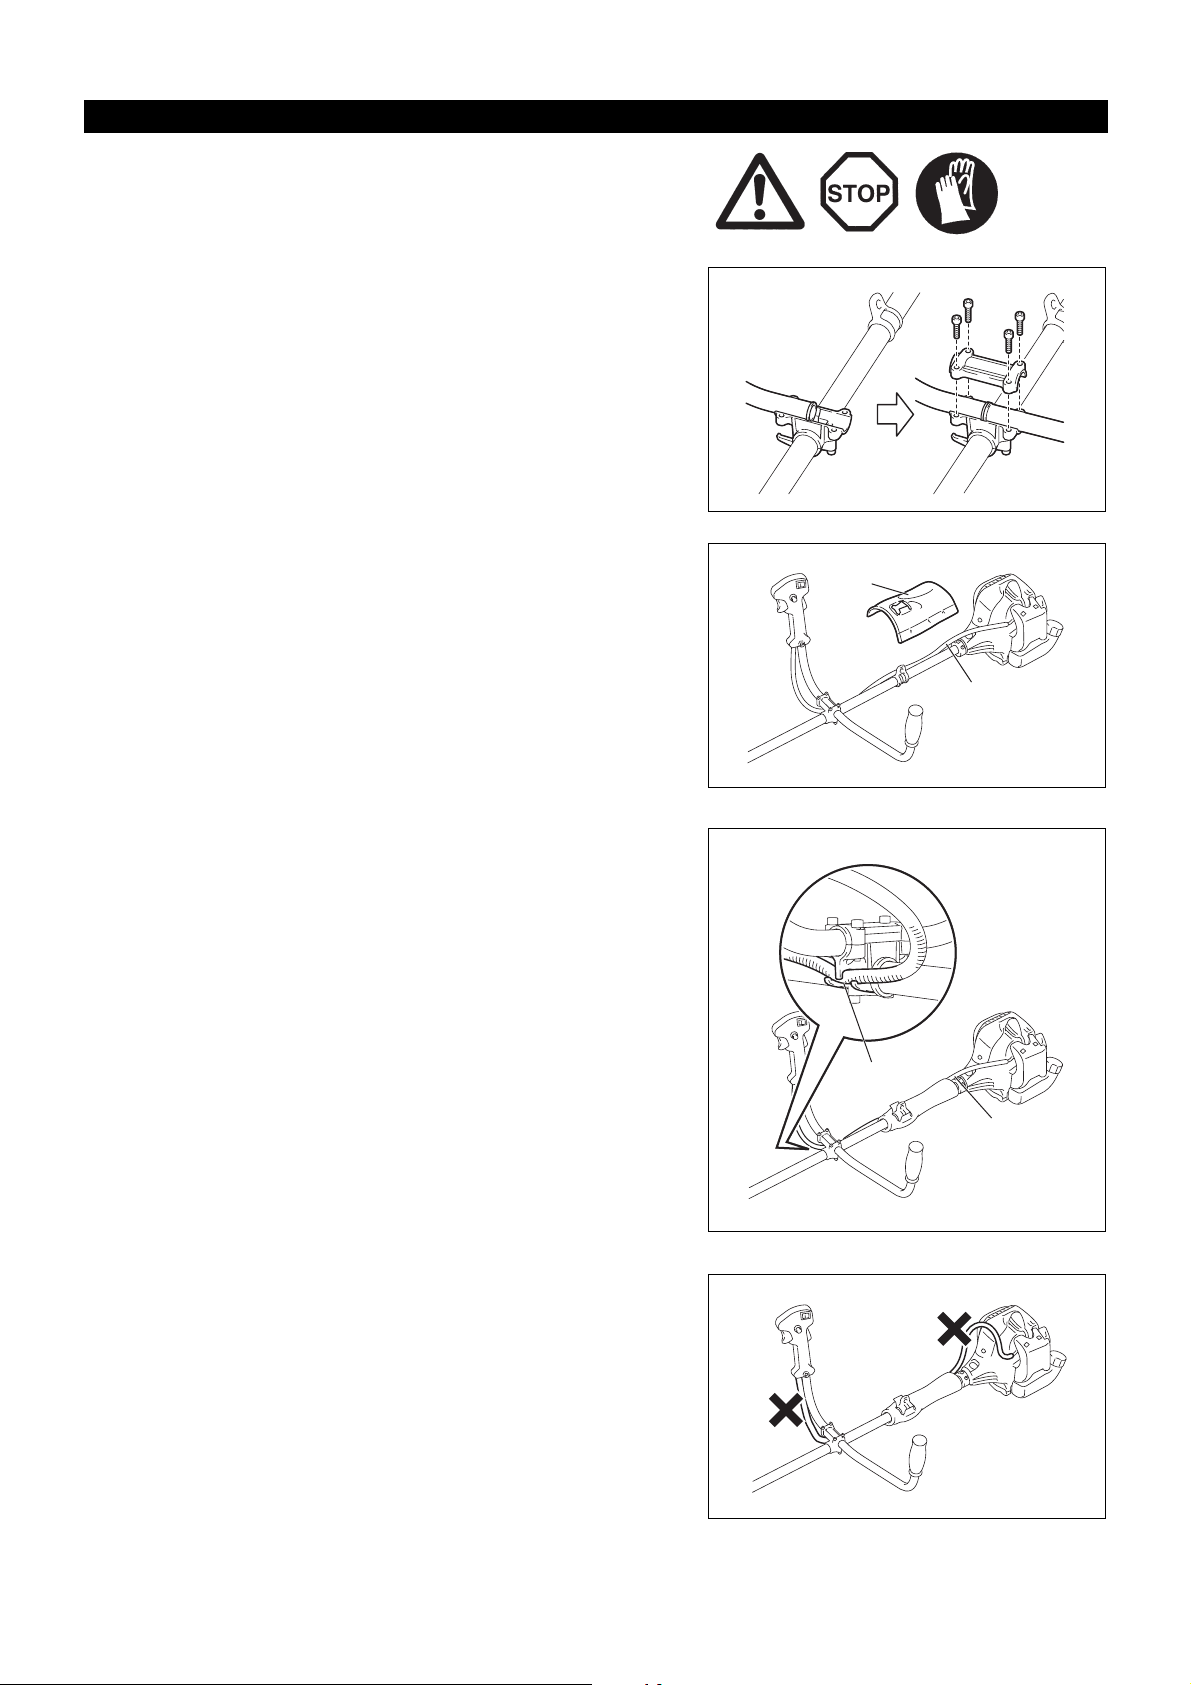
For U handle models
– Place the two handles onto the handle holder. The control lever must come
right side when you look towards the cutting tool.
– Fit the handle ends to the groove on the handle holder and fit the clamp on
them. Loosely tighten them with four bolts for adjustment.
– Adjust handles’ angle, and then tighten all bolts evenly by a hex wrench.
– Place the throttle cable (1) to the control lever side of the shaft. And then wrap
them with the waist pad (2).
– Insert the throttle cable (1) into the clamping slot (3) of the handle holder.
– Make sure the throttle cable is positioned as shown.
– Operate the control lever and make sure it moves smoothly.
CAUTION: Do not position the throttle cable as shown. Otherwise curved cable
may cause high idle speed, and uncontrollable blade may cause
personal injury.
9
Page 10
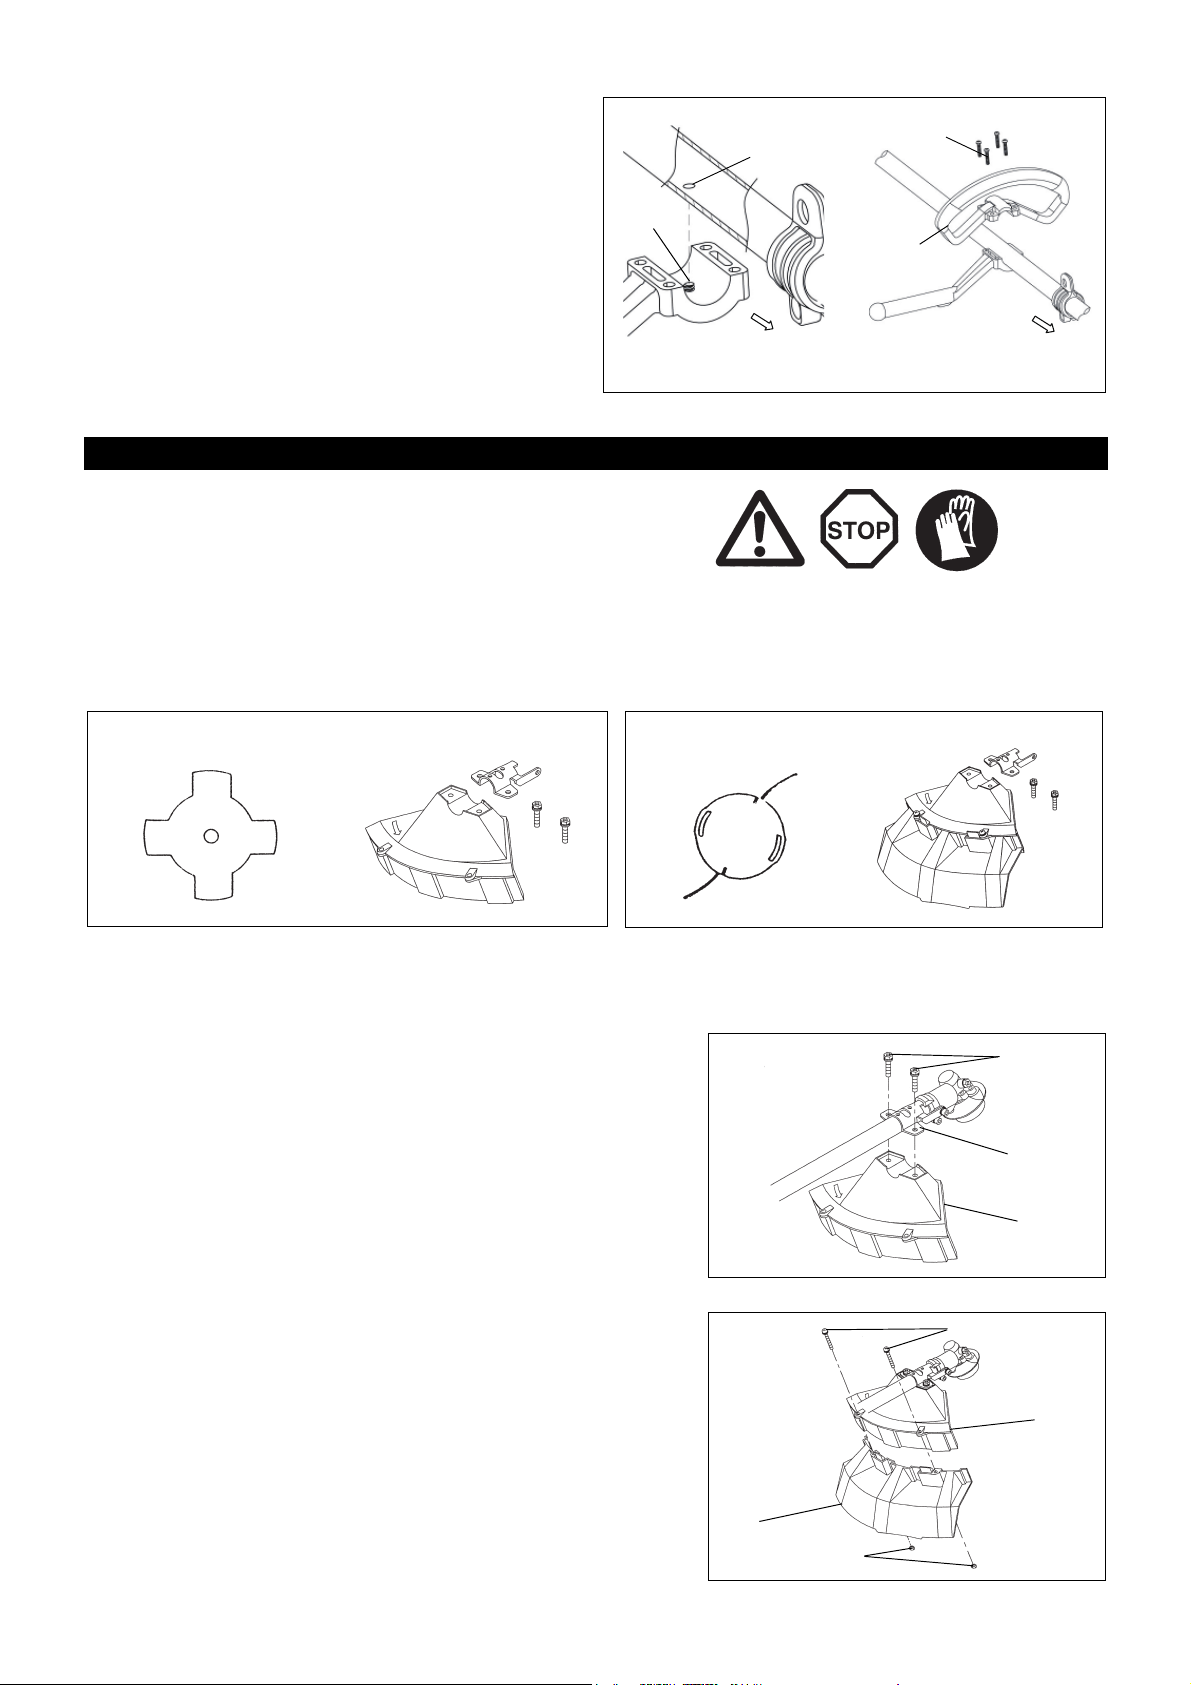
For loop handle model
(2)
(1)
Engine
(4)
(3)
Engine
EM2600L
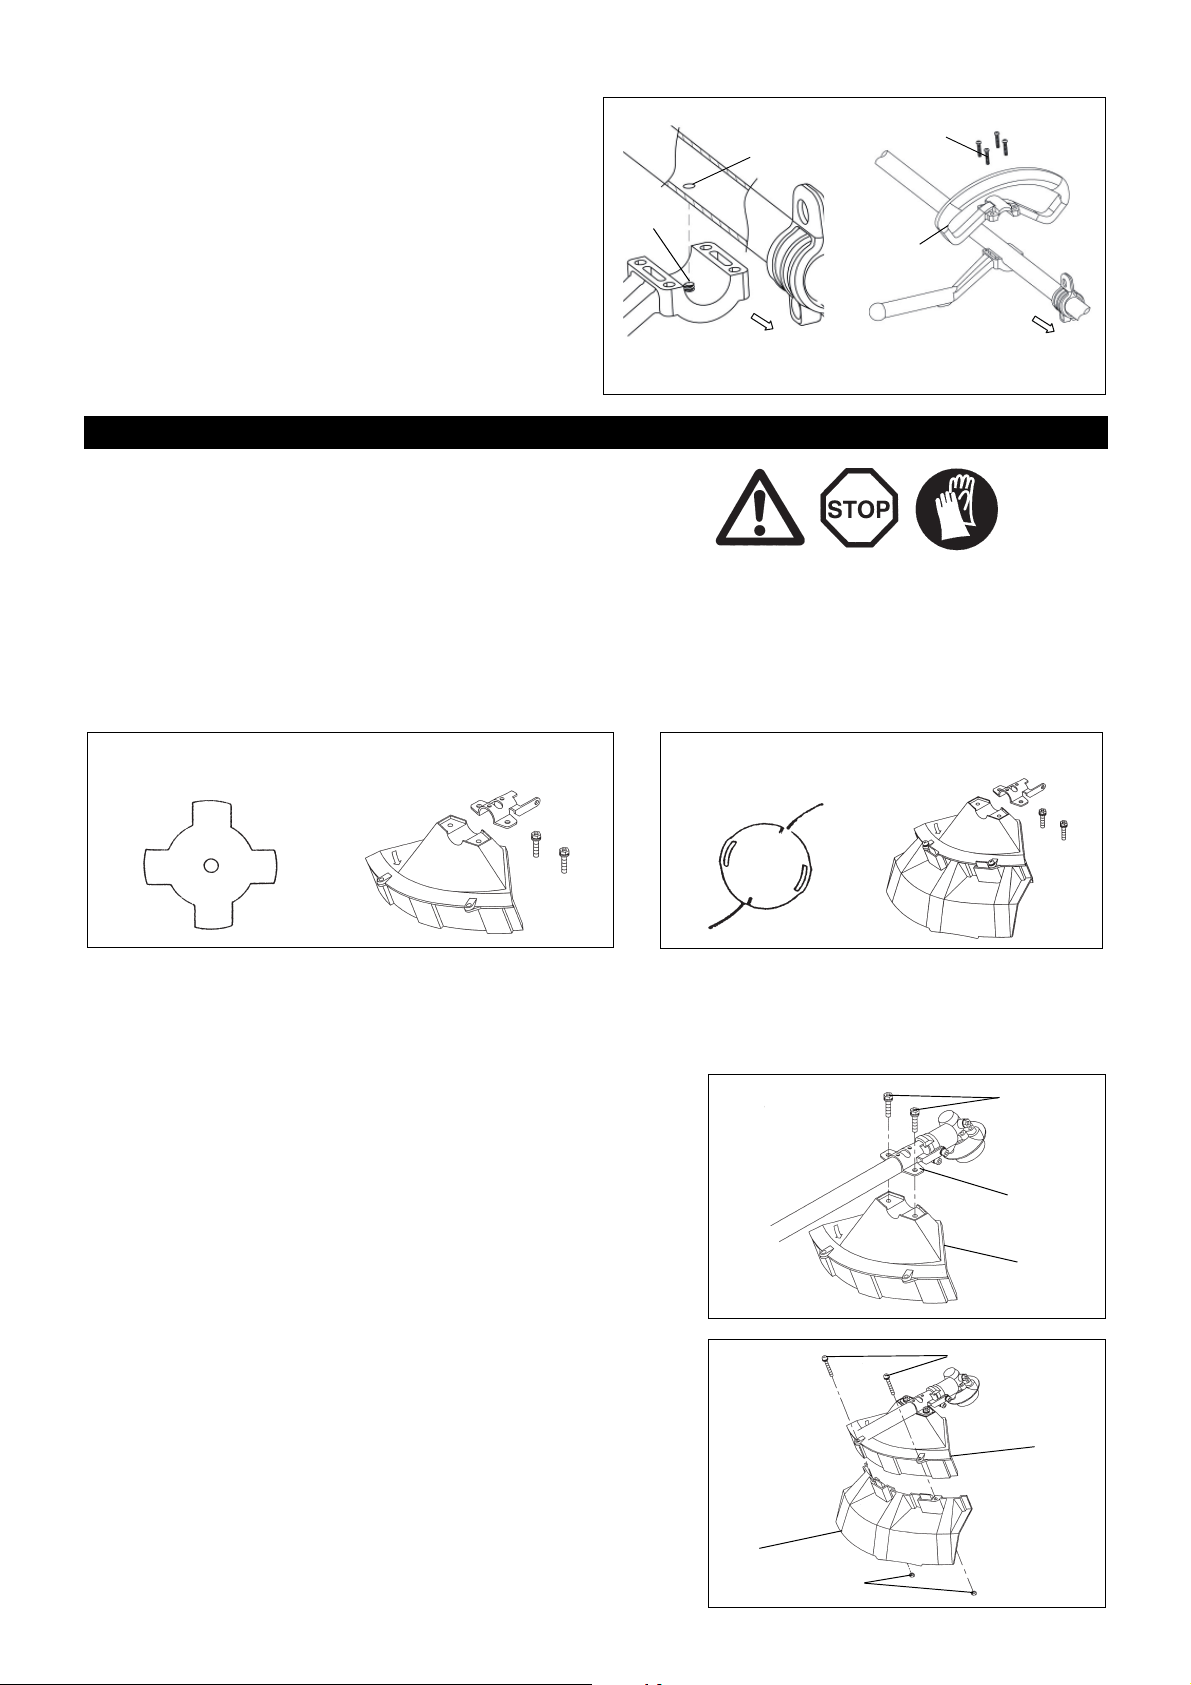
Star Blade Protector for metal blades Nylon cutting head Protector for cord cutter
(2)
(3)
(1)
(4)
(1)
(6)
(5)
– Put the thread (1) on handle holder into the location hole (2) on tube.
– Fix the assistant handle (3) onto the barrier.
– Tighten the 4 bolts (4) M5 x 30.
Mounting the protector
To meet the applicable safety standards, you must only use the tool/protector
combinations indicated in the table.
Always use genuine MAKITA cutter blades/nylon cutting head.
– The cutter blade must be well polished, and free of cracks or breakages. If the
cutter blade hits against a stone during operation, stop the engine and check
the blade immediately.
– Polish or replace the cutter blade every three hours of operation.
– If the nylon cutting head hits against a stone during operation, stop the engine
and check the nylon cutting head immediately.
CAUTION: The appropriate protectors must always be installed for your own
safety and in order to comply with accident-prevention regulations.
Operation of the equipment without the guard installed is prohibited.
– Fix the protector (1) to the clamp (3) with two M6 x 30 bolts (2).
– When using the string head, fit the protector (6) into the protector (1), and
tighten them with two nuts (5) and two screws (4).
10
Page 11

Mounting the cutter blade/nylon cutting head
(2)
(1)
(3)
Loosen
Hex wrench
Tighten
(3)
Loosen
Hex wrench
Tighten
Rotation
The cutter blade or nylon cutting head can be replaced easily by first turning the
equipment upside down.
– Insert the hex wrench through the hole in the gear case and rotate the receiver
washer (3) until it is locked with the hex wrench.
– Loosen the nut/spring washer (1) (left-hand thread) with the socket wrench,
and remove the nut/spring washer (1) and clamp washer (2).
With the hex wrench still in place
– Mount the cutter blade onto the shaft so that the guide of the receiver washer
(3) fits in the arbor hole in the cutter blade. Install the clamp washer (2) and
secure the cutter blade with the nut/spring washer (1).
[Tightening torque: 13 - 23 N-m]
NOTE: Always wear gloves when handling the cutter blade.
NOTE: The cutter blade-fastening nut (with spring washer) is a consumable
part. If there appears any wear or deformation on the spring washer,
replace the nut.
NOTE: The clamp washer (2), and nut/spring washer (1) are not necessary for
mounting the nylon cutting head. The nylon head should go on top of the
receiver washer (3).
– Screw the nylon cutting head onto the shaft.
– Make sure that the blade rotates counterclockwise.
11
Page 12
Fuel/Refuelling
Observe the Safety Instructions on page 3.
20 cm3 40 cm
3
100 cm3 200 cm
3
200 cm3 400 cm
3
1,000 cm3 (1 liter)
5,000 cm
3
(5 liter)
10,000 cm
3
(10 liter)
50:1 25:1
Gasoline
+
Handling fuel
Utmost care is required when handling fuel. Fuel may contain substances similar
to solvents. Refuel either in a well ventilated room or outdoors. Do not inhale fuel
vapors, and avoid any contact of fuel or oil with your skin.
Mineral oil products degrease your skin. Prolonged skin contact with these
products will cause your skin to become extremely dry, which may result in
various kinds of skin disease. In addition, allergic reactions may occur.
Eyes can be irritated by contact with oil. If oil comes into your eyes, immediately
wash them with clear water. If your eyes are still irritated, see a doctor
immediately.
Fuel and oil mixture
The brush cutter engine is a high-efficiency two-stroke engine. It runs on a
mixture of fuel and two-stroke engine oil. The engine is designed for unleaded
regular fuel with a min. octane value of 91 RON. If for any reason no such fuel is
available, you can use fuel with a higher octane value. This will not affect the
engine, but it may cause poor operating behaviour.
Similar problems will arise from the use of leaded fuel. To obtain optimum engine
operation and to protect your health and the environment, use only unleaded
fuel!
To lubricate the engine, add two-stroke engine oil (quality grade: JASO FC or
ISO EGD) to the fuel. The engine has been designed to use the specified twostroke engine oil at mixture ratio of 50:1 to protect the environment.
Additionally, long service life accompanied by reliable operation and minimum
emissions are guaranteed through the use of this mixture ratio. Reliable
functioning of the brush cutter cannot be guaranteed unless this mixture ratio of
50:1 (specified 2-stroke engine oil) is strictly observed.
Correct mixture ratio:
Gasoline: Specified two-stroke engine oil = 50 : 1 or
Gasoline: Other manufacturer’s two-stroke engine oil = 25 : 1 recommended
NOTE: To prepare the fuel-oil mixture, first mix the entire oil quantity with half of
the fuel required, then add the remaining fuel. Thoroughly shake the
mixture before pouring it into the brush cutter tank. To ensure safe
operation, do not add more engine oil than the specified amount. Doing
so will only result in a higher production of combustion residues which
pollute the environment and clog the exhaust channel in the cylinder as
well as the muffler. In addition, the fuel consumption will rise and the
performance will decrease.
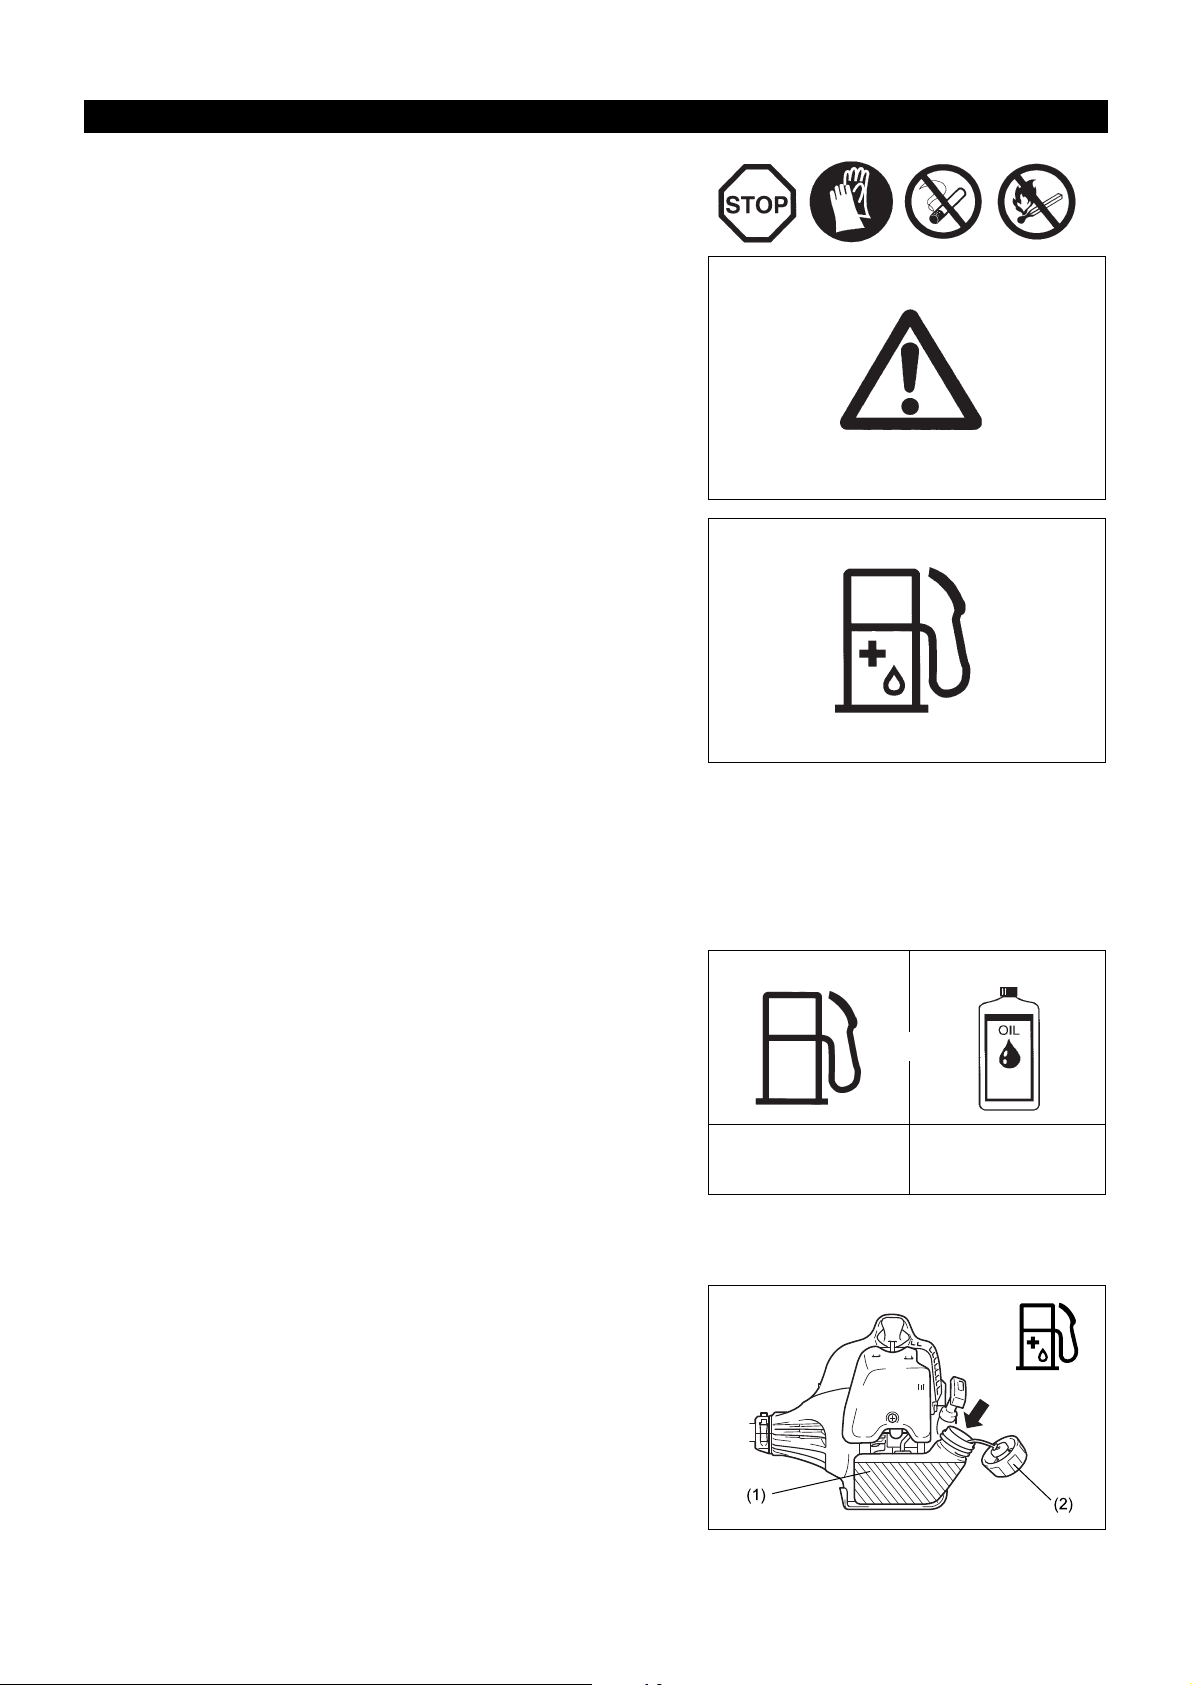
Refuelling
The engine must be switched off.
– Thoroughly clean the area around the fuel filler cap (2) to prevent dirt from
getting into the fuel tank (1).
– Unscrew the fuel filler cap (2) and fill the tank with fuel.
– Tightly screw on the fuel filler cap (2).
– Clean the screw fuel filler cap (2) and tank after refueling.
Storage of Fuel
Fuel cannot be stored for an unlimited period of time.
Purchase only the quantity required for a 4-week operating period. Only use
approved fuel storage containers.
12
Page 13
Correct handling
Hanger
(1)
EM2600U
(1)
(4)
(2)
(3)
(1)
(3)
(2)
EM2600L
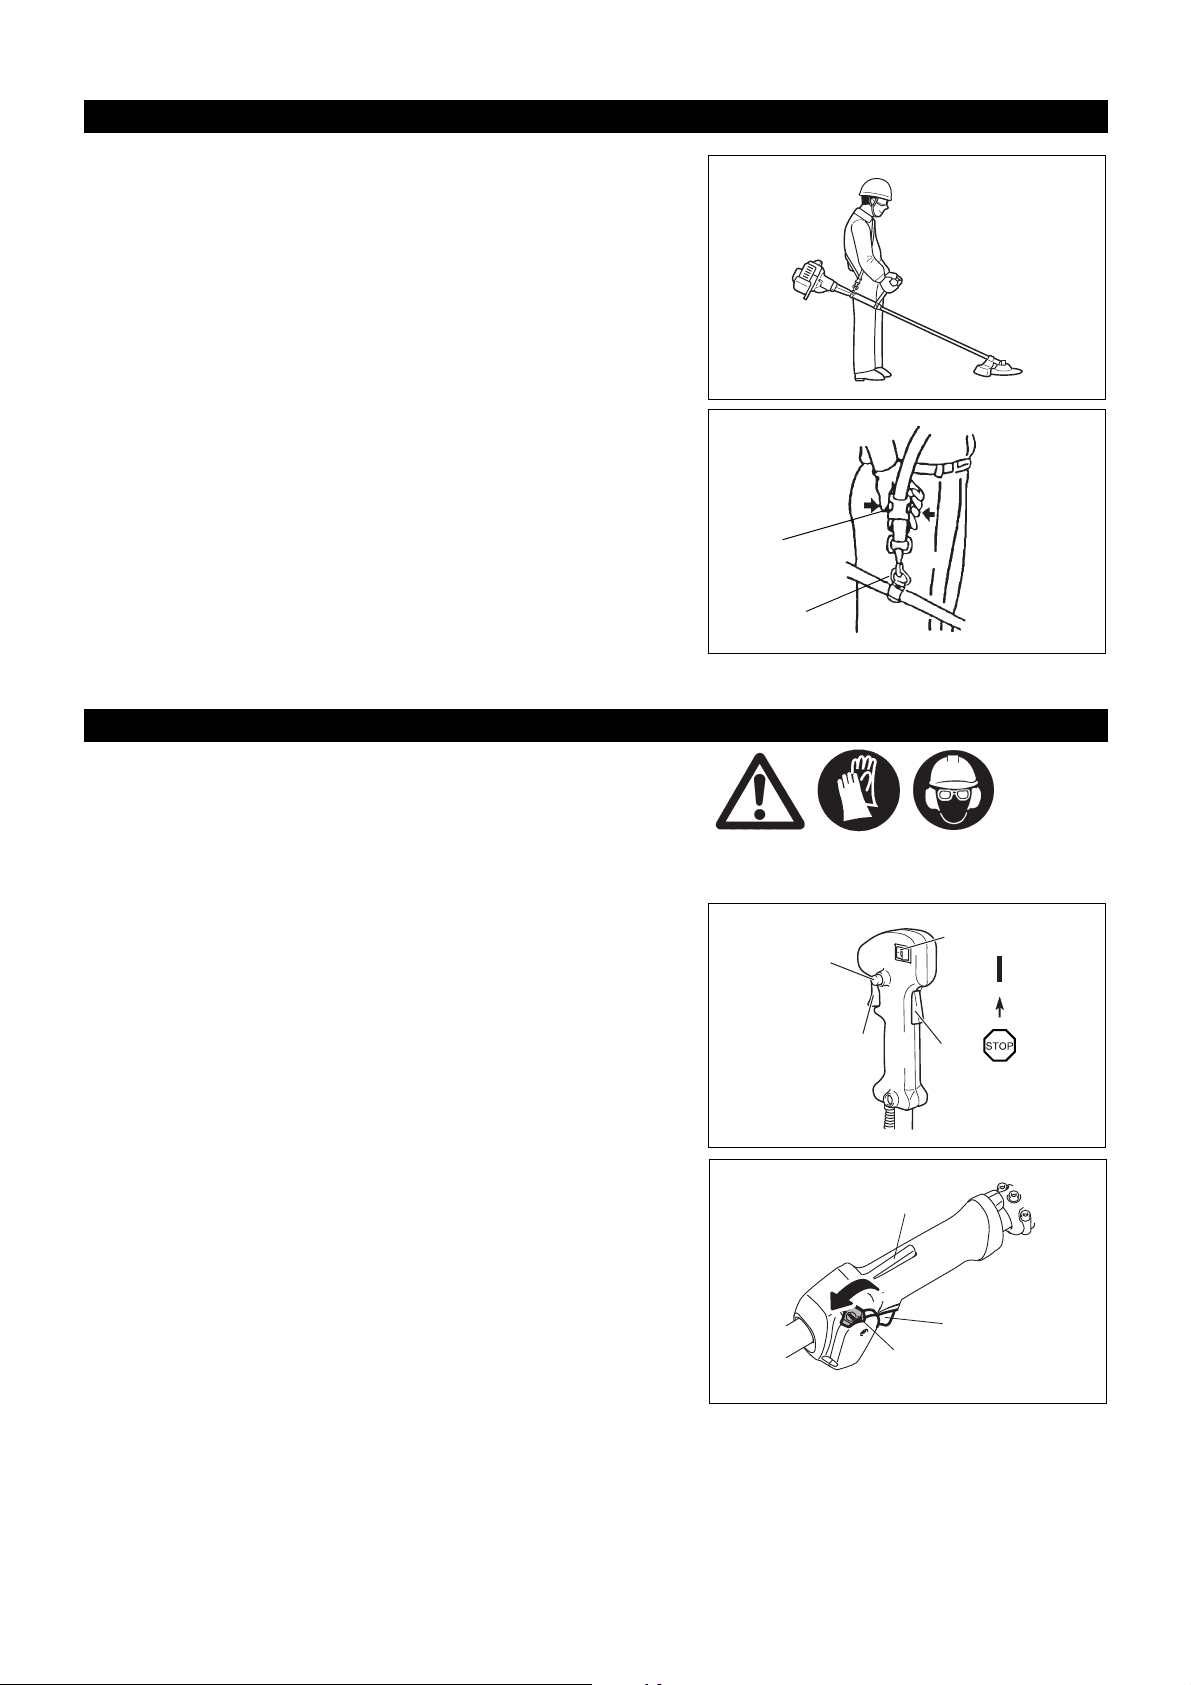
Attachment of shoulder strap
– Adjust the strap length so that the cutter blade is kept parallel with the ground.
Detachment
– In case of emergency, push the notches (1) at both sides, and detach the
equipment.
Be extremely careful to maintain control of the equipment at this time. Do not
allow the equipment to be deflected toward you or anyone in your vicinity.
WARNING: Failure to maintain complete control of the machine at all could
Note: In some countries, shoulder strap does not have this detachment function.
result in serious injury or DEATH.
Important operating points/stopping the cutter/trimmer
Observe the applicable accident prevention regulations.
Starting
Move at least 3 m away from the area where you refuelled the equipment. Place the brush cutter on a clean piece of ground taking care that the
cutting tool does not come into contact with the ground or any other objects.
WARNING: Pay attention that the cutting tool rotates immediately after the
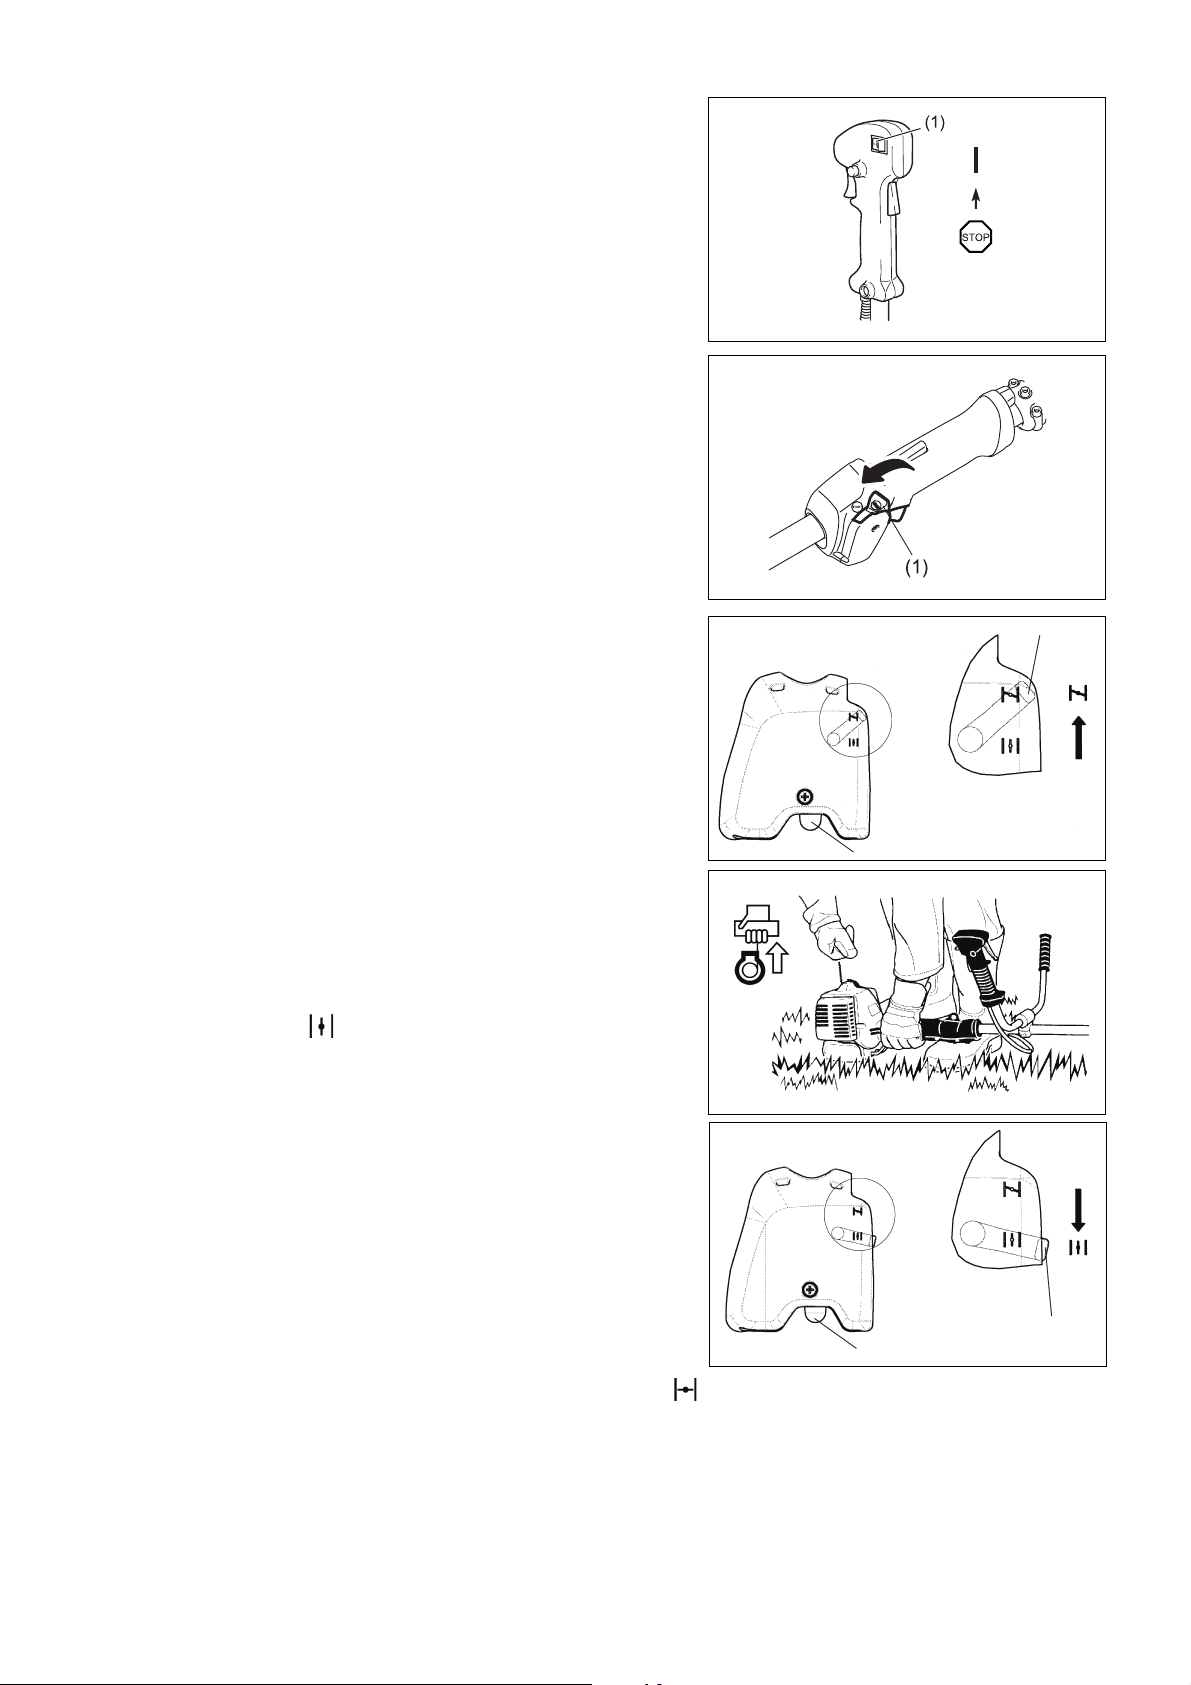
Cold start for U handle models
– Set the I-Stop Switch (on/off) (1) as illustrated.
– Grasp the handle (hand pressure activates the safety lock-off lever (2)).
– Press the throttle lever (3) and hold it down.
– Press the lock button (4) and release the control lever, and then release the
lock button (the lock button holds the throttle lever in the start-up position).
Cold start for loop handle models
– Set the Start-Stop Switch (1) to start position as illustrated.
– Grasp the handle (hand pressure activates the safety lock-off lever (2)).
– Press the throttle lever (3) and hold it down.
– Set the Start-Stop Switch (1) to start position and release the control lever, and
then release the Start-Stop Switch (the Start-Stop Switch holds the throttle
lever in the start-up position).
engine starts.
13
Page 14
Warm start for U handle models
EM2600U
EM2600L
(6)
(5)
CLOSE
(6)
(5)
OPEN
– Set the I-Stop Switch (on/off) (1) as illustrated.
Warm start for loop handle models
– Set the Start-Stop Switch (1) to neutral position as illustrated.
– First, place the equipment on the ground.
– Gently press the primer pump (5) repeatedly (7-10 times) until fuel comes into
the primer pump.
– Close the choke lever (6).
Choke opening:
• Fully closed in cold temperatures or when the engine is cold
• Fully or half open for restart while the engine is still warm
– Firmly hold the clutch case with your left hand, as illustrated.
– Slowly pull the starter grip until you feel resistance, and then continue to pull
sharply.
– Do not pull out the starter rope to its full extent, and do not allow the starter
handle to retract by itself. Maintain control of the starter rope and ensure it
retracts slowly.
– Repeat the starting operation until you hear the engine’s initial ignitions.
– Depress the choke lever (6) ( ) and pull the starter rope again until the
engine starts.
– As soon as the engine starts, immediately tap and release the throttle, to
release the half-throttle lock and allow the engine to idle.
– Run the engine for approximately one minute at a moderate speed before
applying full throttle.
NOTE: – If you pull the starter handle repeatedly when the choke lever is in the at “ ” position, the engine will not start easily due to excessive
fuel intake.
– If excessive fuel intake occurs, remove the spark plug and pull the starter handle slowly to remove excess fuel. Also, dry the electrode
section of the spark plug.
14
Page 15
Caution during operation:
EM2600L
EM2600U
If the throttle lever is opened fully during a no-load operation, the engine revolutions increase over 10,000 min
higher speed than required, and keep the revolutions at an approximate speed of 6,000 - 8,000 min
CAUTION: Always reduce the engine revolutions when the equipment is not being used for work.
Operating the equipment at high revolutions when not being used for work will shorten the lifespan of the equipment.
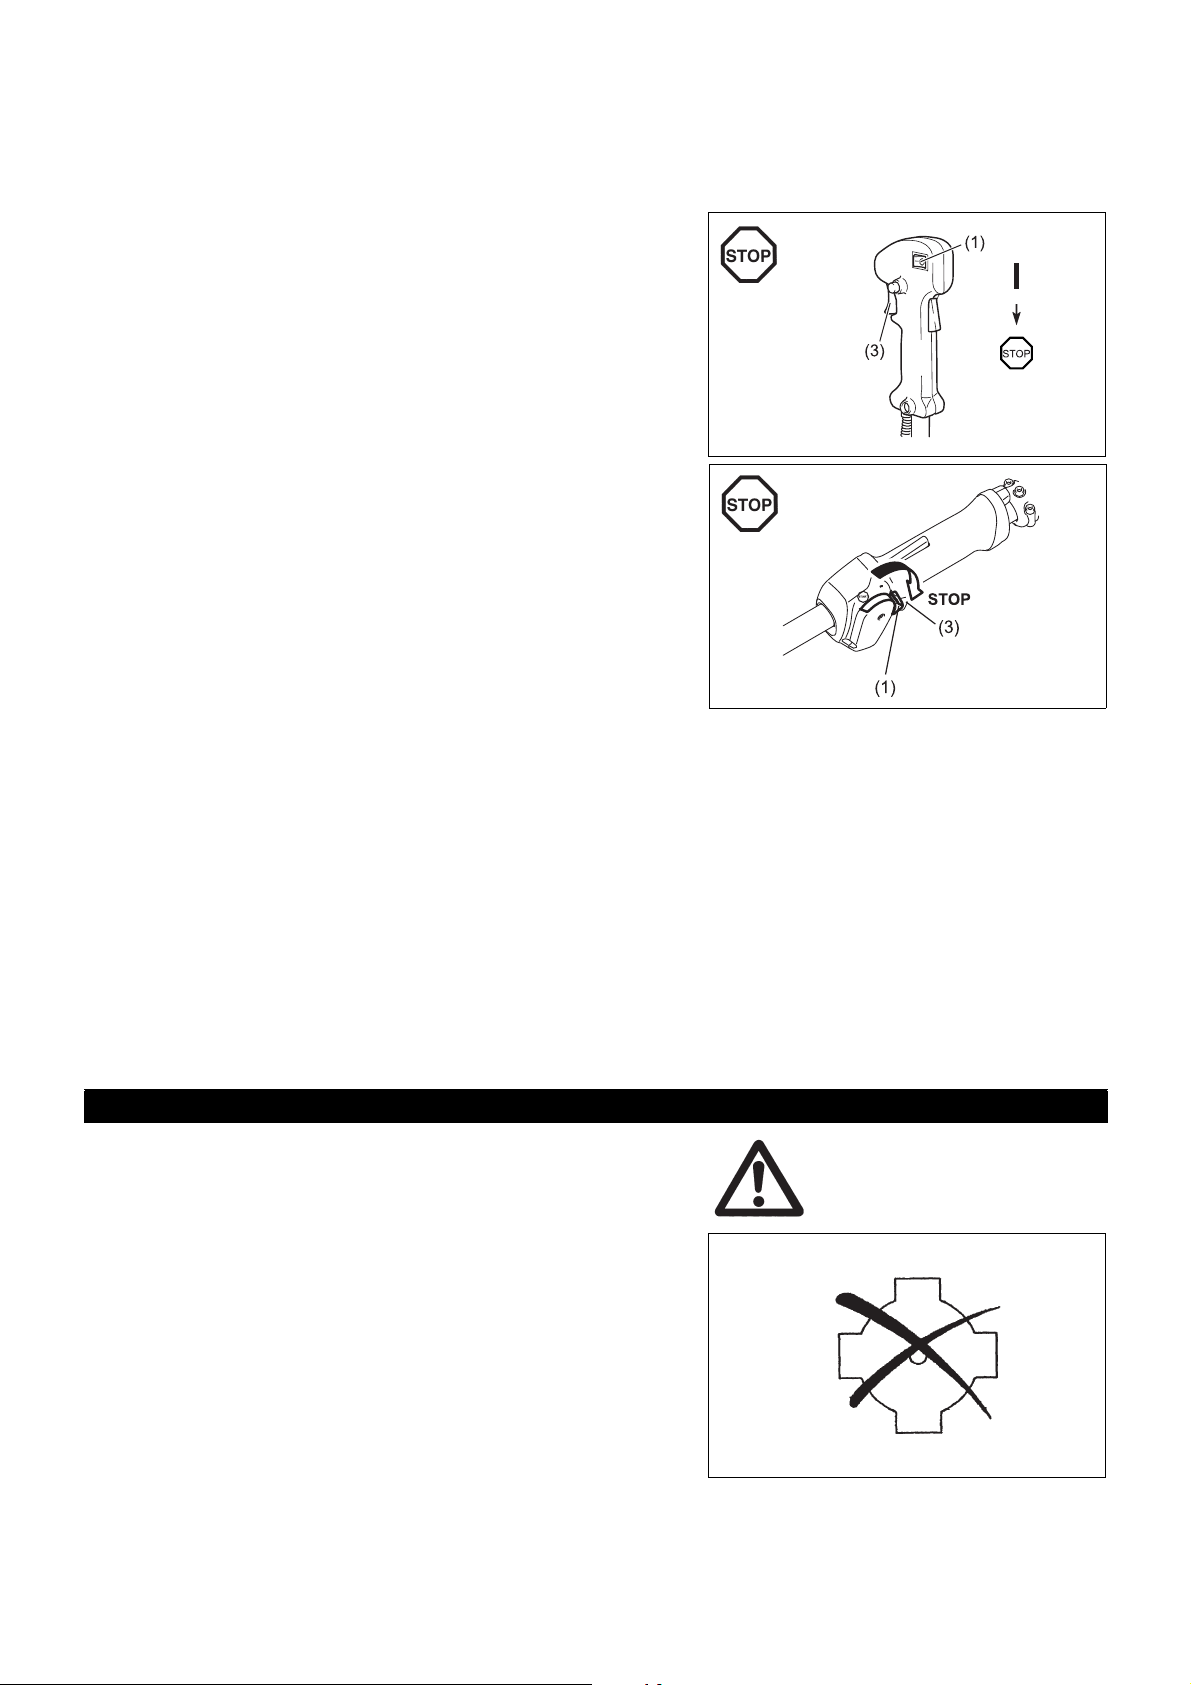
Stopping
– Release the throttle lever (3) fully, and when the engine rpm has lowered,
push the I-Stop Switch (on/off)/Start-Stop Switch (1) to “STOP” position to stop
the engine.
– Be aware that the cutting head may not stop immediately, and always allow it
to slow down and stop fully by itself.
-1
.
-1
. Never operate the engine at a
Resharpening the cutting tool
CAUTION: The cutting tools listed below must only be resharpened by an
authorized facility. Manual resharpening will result in imbalances of
the cutting tool, which will cause vibrations and damage to the
equipment.
– cutter blade (star blade (4 teeth))
A professional resharpening and balancing service is provided by Authorized
Service Agents.
NOTE: To increase the service life of the cutter blade (star blade) the blade may
be turned over to allow both cutting edges to wear.
15
Page 16
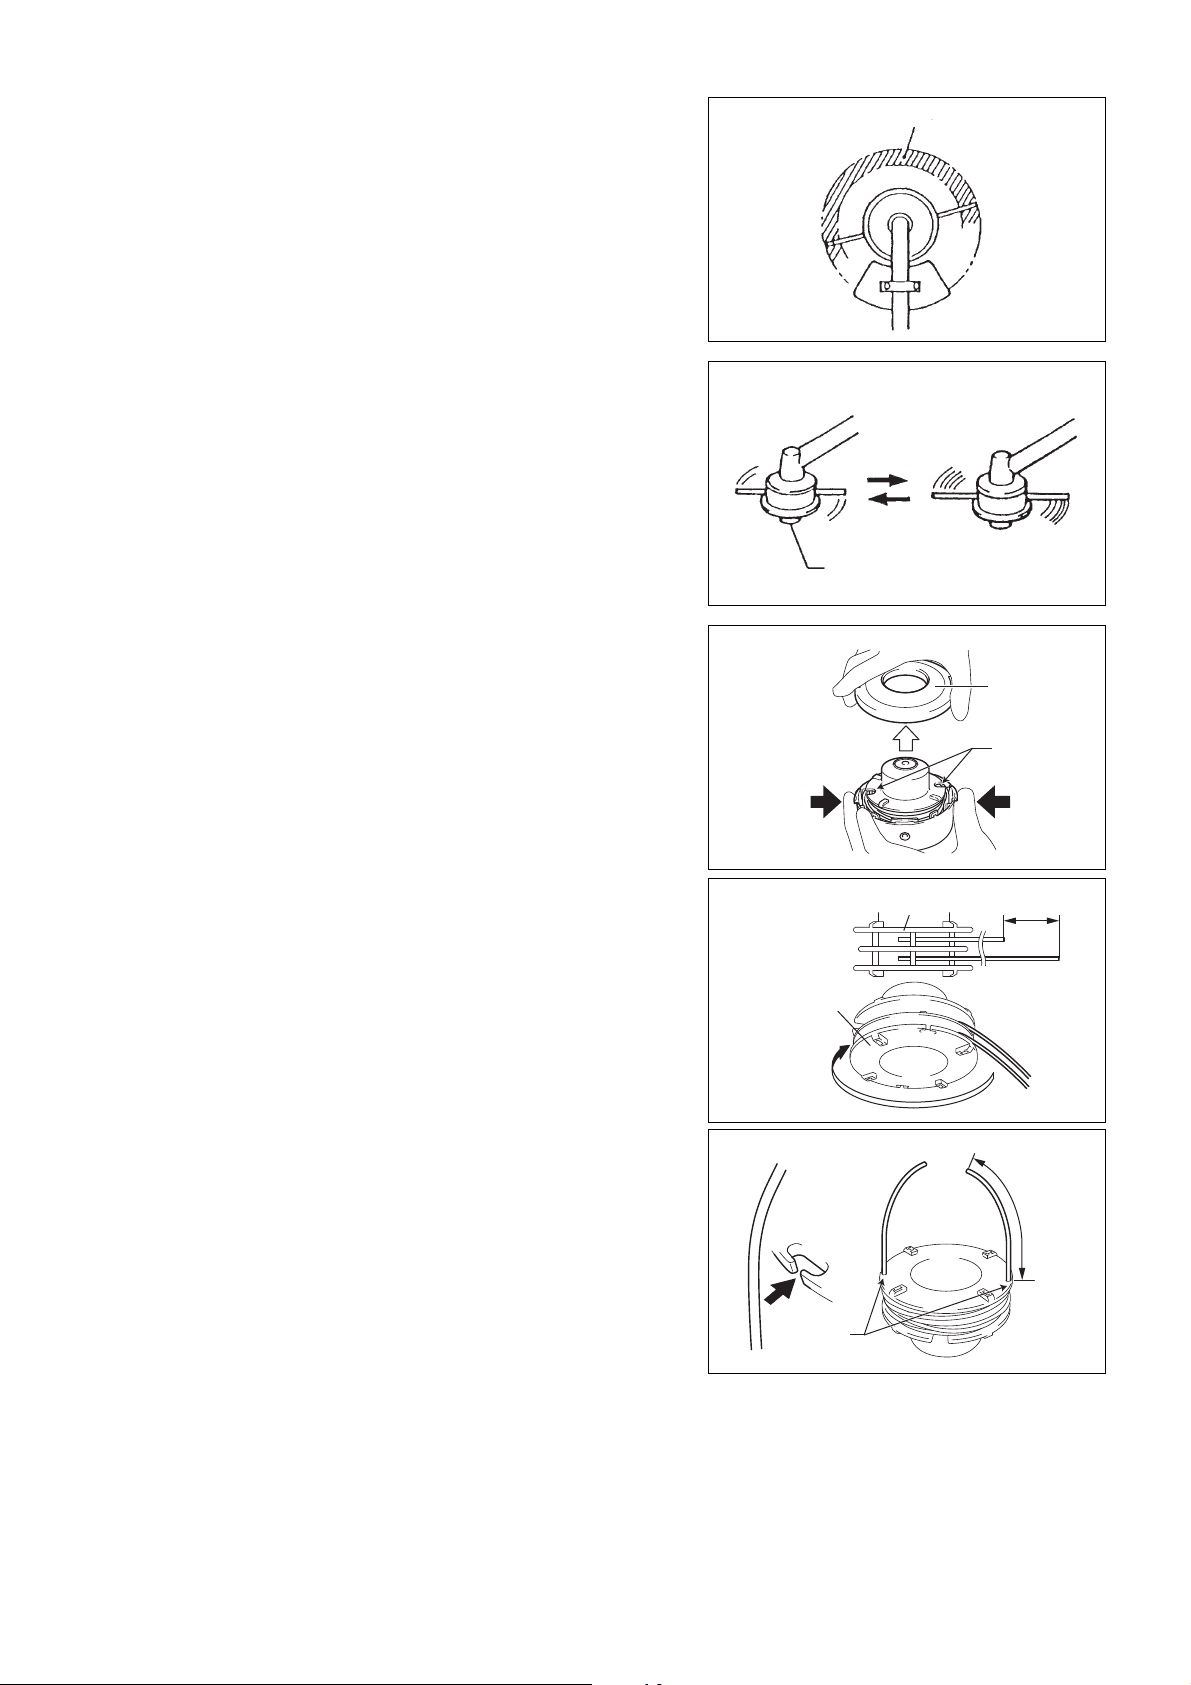
NYLON CUTTING HEAD
Most effective cutting area
Knob
Idle speed
Full speed
Cover
Latches
Press
Press
Spool
80 mm (3-1/8”)
For left hand
rotation
Spool
150 mm (6”)
Notches
The nylon cutting head is a dual string trimmer head capable of both automatic
and bump & feed mechanisms.
The nylon cutting head will automatically feed out the proper length of nylon cord
by the changes in centrifugal force caused by increasing or decreasing rpms.
However, to cut soft grass more efficiently, bump the nylon cutting head against
the ground to feed out extra cord as shown in operation section.
Operation
– Increase the nylon cutting head speed to approx. 6,000 min-1.
Nylon cord will not feed out correctly at lower speeds (under 4,800 min
– The most effective cutting area is shown by the shaded area in the diagram to
the right.
If the nylon cord does not feed out automatically, follow the instructions below:
1. Release the throttle lever so that the engine idles, and then squeeze the
throttle lever fully. Repeat this procedure until the nylon cord feeds out to the
proper length.
2. If the nylon cord is too short to feed out automatically using the procedure
above, bump the knob of the nylon cutting head against the ground to feed
out the nylon cord.
3. If the nylon cord does not feed out using procedure 2, rewind/replace the
nylon cord by following the procedures described under “Replacing the nylon
cord”.
-1
).
Replacing the nylon cord
– Stop the engine.
– Press the housing latches inward to lift off the cover, then remove the spool.
– Hook the center of new nylon cord into the notch in the center of the spool,
with one end of the cord extending about 80 mm (3-1/8”) more than the other.
Then wind both ends firmly around the spool in the direction of the head
rotation (left-hand direction indicated by LH and right-hand direction by RH on
the side of the spool).
– Wind all but about 150 mm (6”) of the cords around the spool, leaving the ends
temporarily hooked through the notch on the side of the spool.
16
Page 17
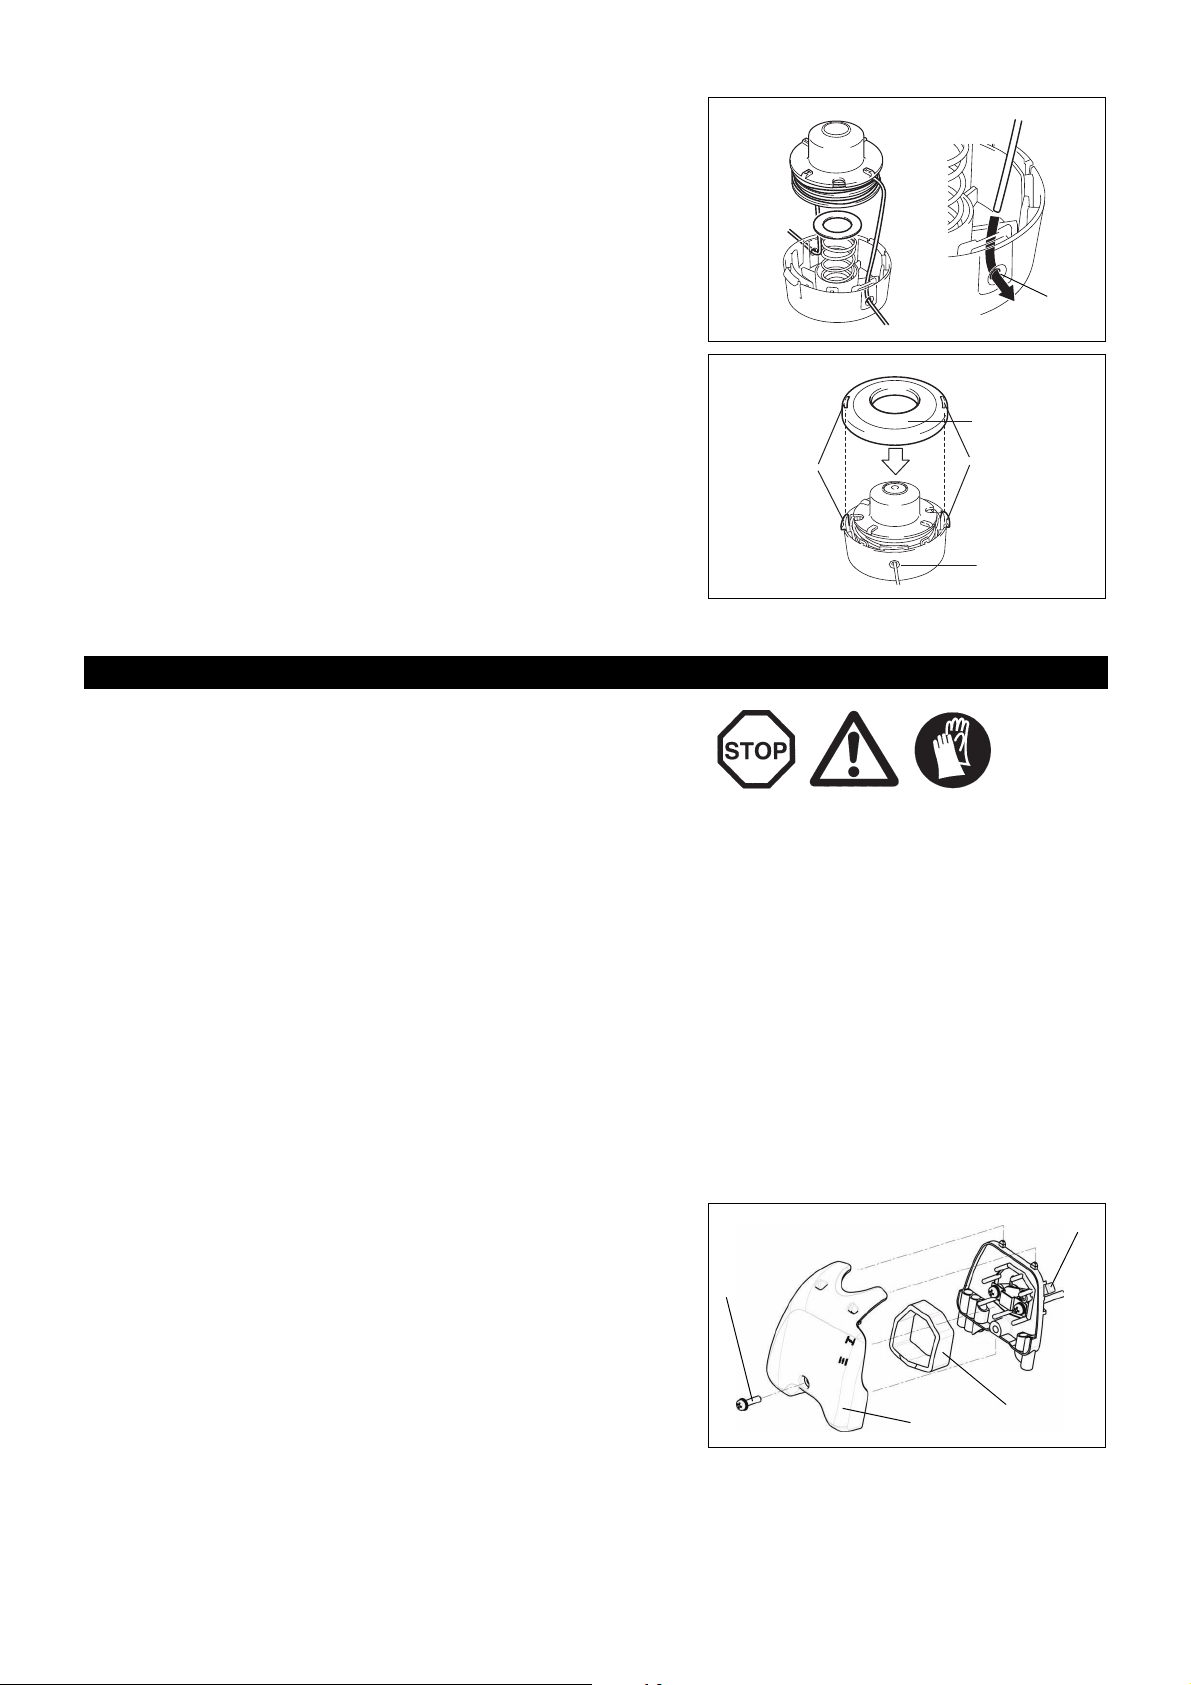
– Feed the cords through the eyelets to come out of the housing.
Eyelet
Cover
Hook
Eyelet
Hook
(1)
(2)
(3)
(4)
Mount the washer, spring, and spool in the housing.
– Align the hooks on the the cover and the housing.
Then push cover firmly onto the housing to secure it.
Servicing instructions
Servicing instructions
CAUTION: Before performing any type of maintenance work on the brush cutter,
always switch off the motor and detach the plug cap from the spark
plug (see “checking the spark plug”).
Always wear protective gloves.
CAUTION: Never remove the recoil starter yourself. Doing so may cause an
accident. This procedure should only be performed by an Authorized
Service Agent.
To ensure a long service life and to avoid any damage to the equipment, perform the following maintenance operations regularly.
Daily inspection and maintenance
– Before operation, check the equipment for loose screws or missing parts. Pay particular attention to the tightness of the cutter blade or nylon
cutting head.
– Before operation, always check to make sure that the cooling air passage and cylinder fins are not clogged.
Clean them if necessary.
– Perform the following maintenance operations daily after use:
• Clean the brush cutter externally and inspect it for damage.
• Clean the air filter. When working under extremely dusty conditions, clean the filter several times a day.
• Check the blade or the nylon cutting head for damage and make sure it is firmly mounted.
• Check that there is sufficient difference between the idling and operating speeds to ensure the cutting tool is at a standstill while the engine
is idling (if necessary, reduce the idling speed).
If the cutting tool continues to rotate during engine idling, consult your nearest Authorized Service Agent.
– Check that the I-Stop Switch (on/off)/Start-Stop Switch, the lock-off lever, the control lever, and the lock button are all functioning correctly.
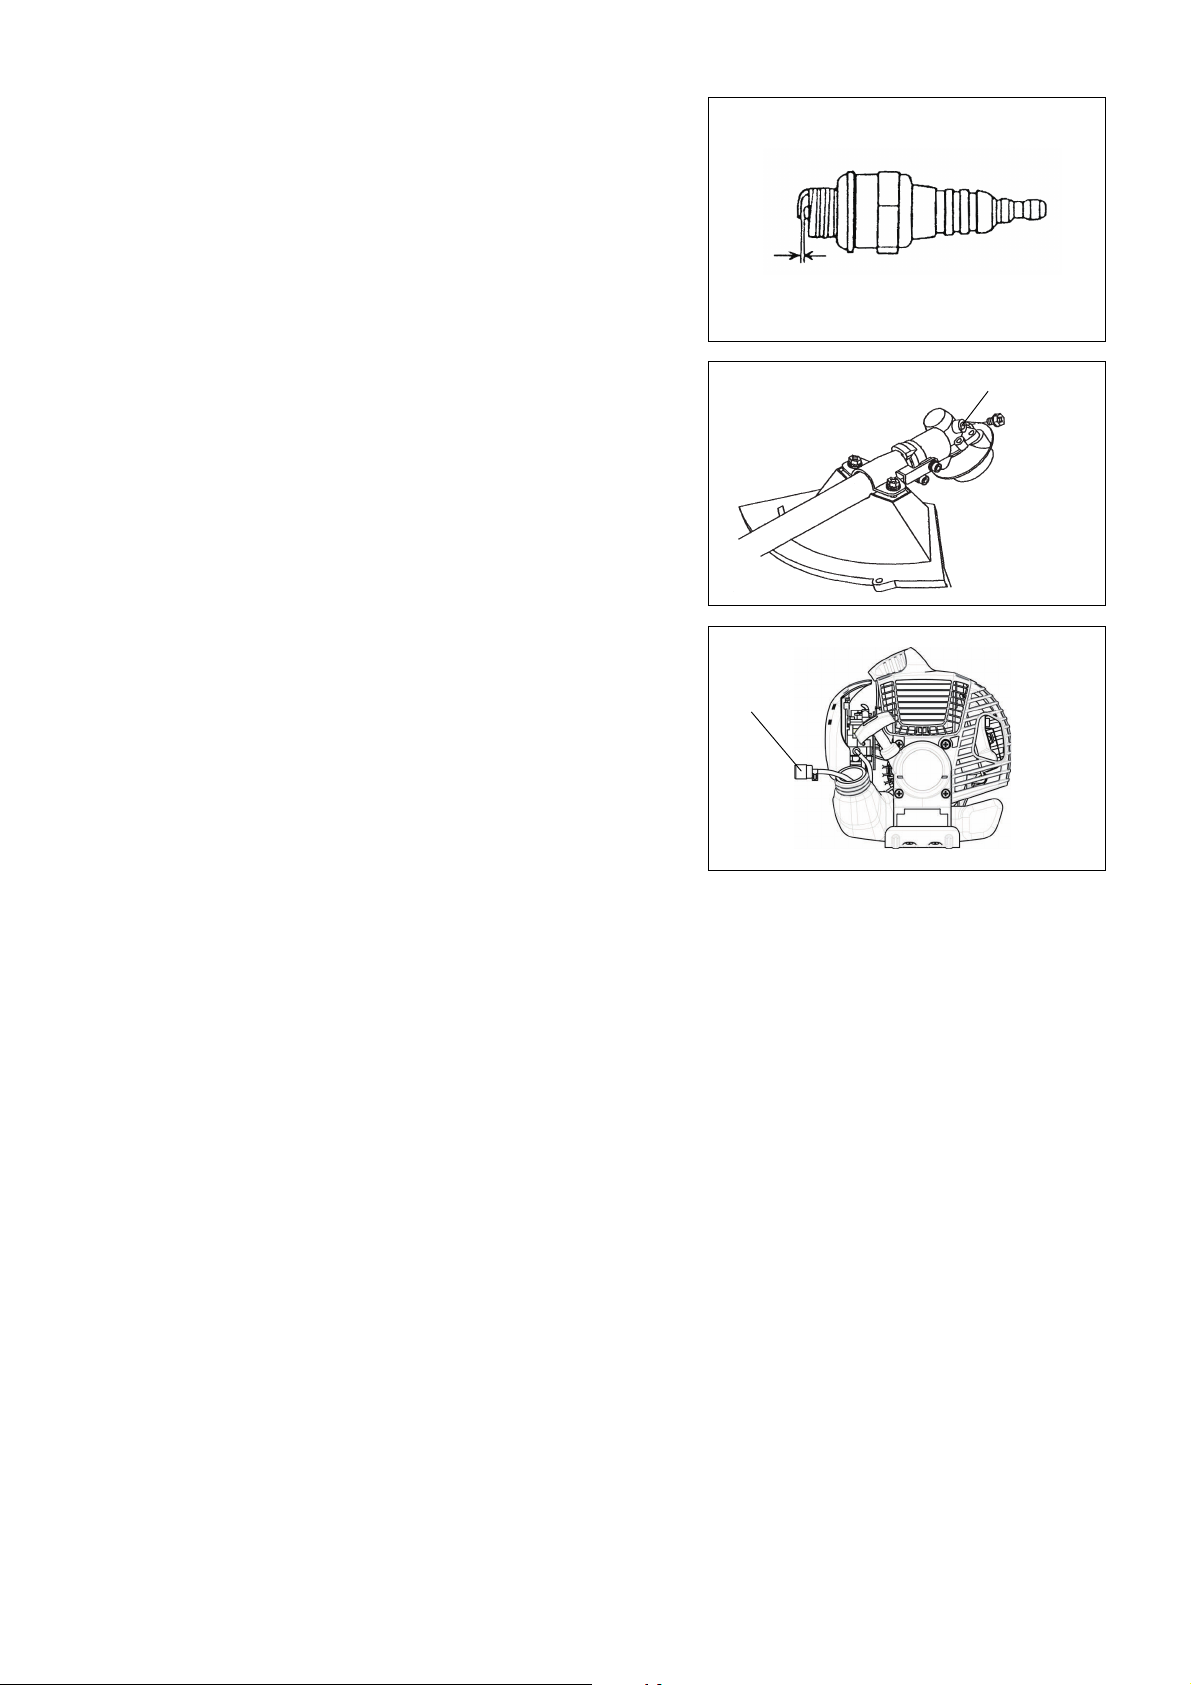
Cleaning the air cleaner (filter)
– Turn the choke lever (4) to the fully closed side, and keep the carburetor away
from any dust or dirt.
– Remove the screw (1).
– Remove the air cleaner cover (3).
– Remove the sponge element (2), wash it in lukewarm water and dry it
completely.
– After cleaning, put back the air cleaner cover (3) and fasten it with screw (1).
NOTE: If there is excessive dust or dirt adhering to the air cleaner, clean it every
day. A clogged air cleaner may make it difficult or impossible to start the
engine, or may increase the engine rotational speed.
17
Page 18
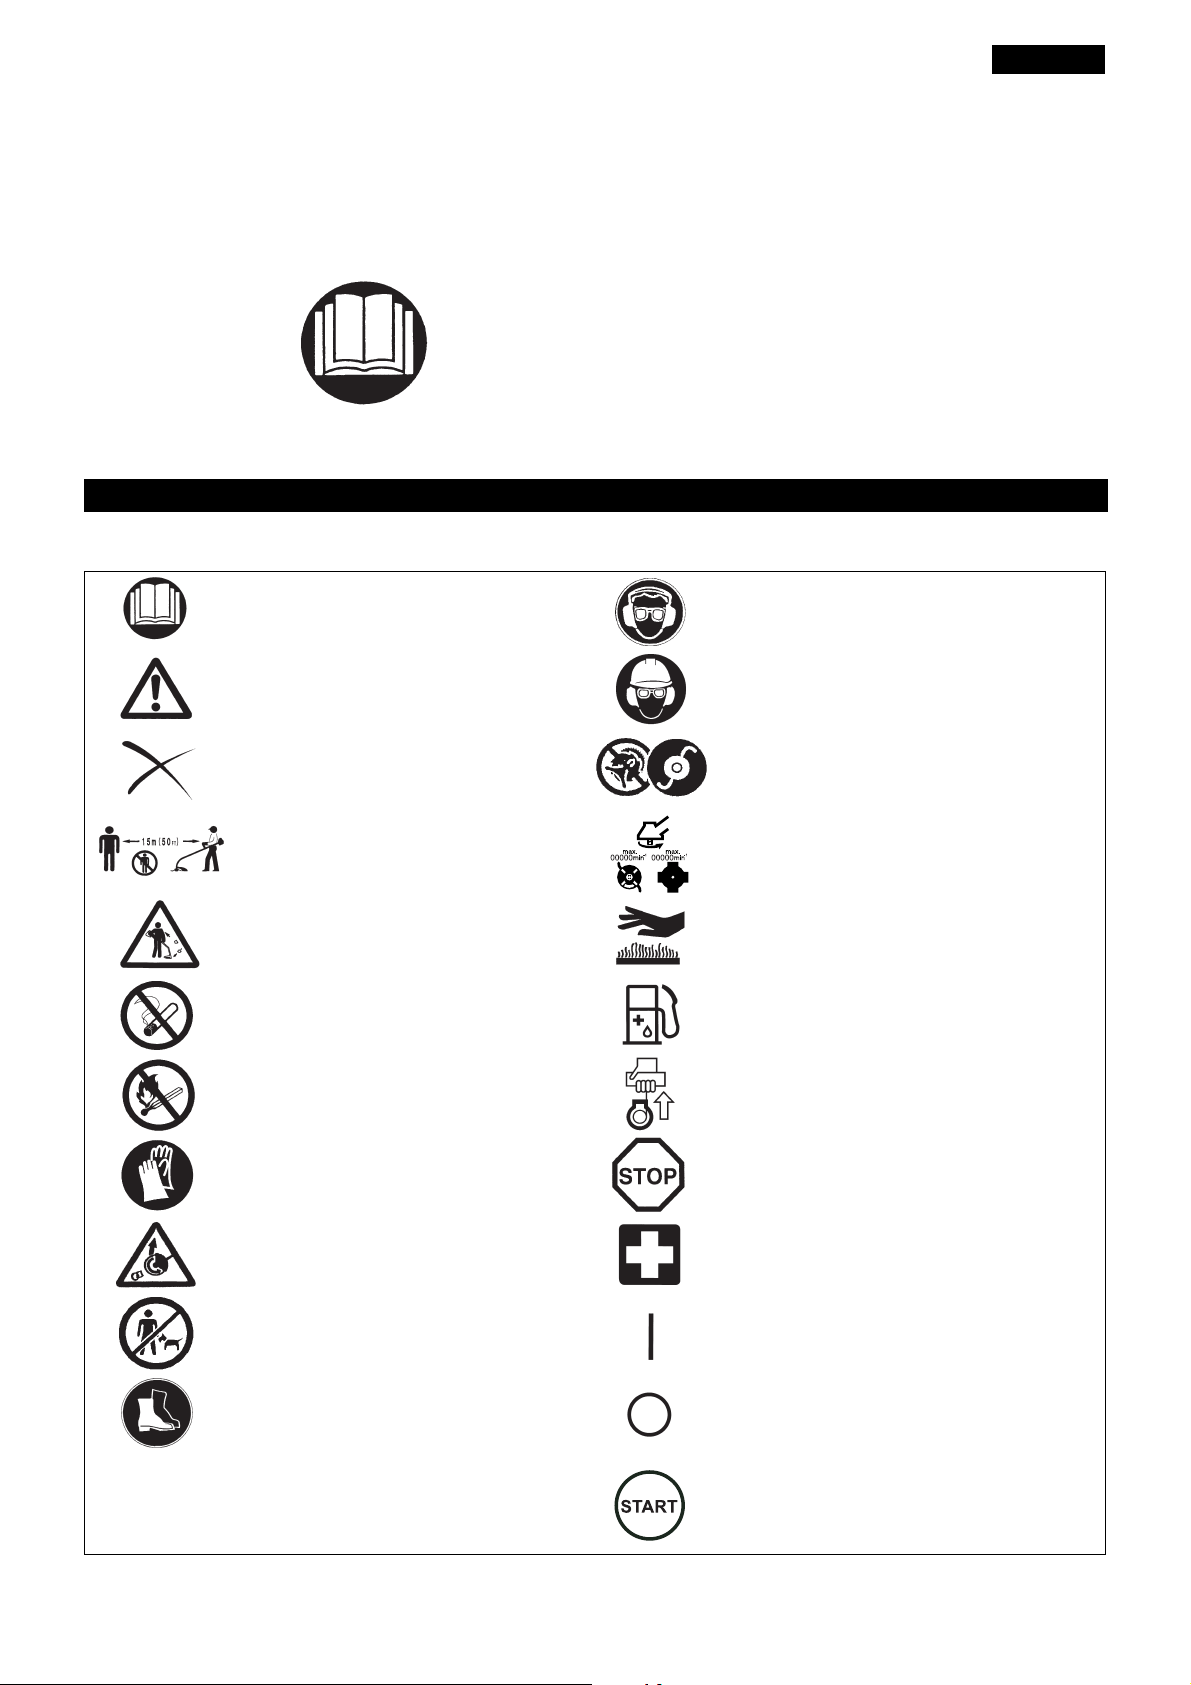
Checking the spark plug
0.6 mm-0.7 mm
(0.024”-0.028”)
Grease hole
(5)
– Only use the supplied universal wrench to remove or to install the spark plug.
– The gap between the two electrodes of the spark plug should be 0.6-0.7 mm
(0.024”-0.028”). If the gap is too wide or too narrow, adjust it. If the spark plug
is clogged with carton or dirty, clean it thoroughly or replace it.
CAUTION: Never touch the spark plug connector while the engine is running
(danger of high voltage electric shock).
Supply of grease to gear case
– Supply grease (Shell Alvania 3 or equivalent) to the gear case through the
grease hole every 30 hours. (Genuine MAKITA grease may be purchased
from your MAKITA dealer.)
Suction head in the fuel tank
– The fuel filter (5) of the suction head is used to supply the fuel required by the
carburetor.
– Visually inspect the fuel filter periodically. To inspect the filter, open the fuel
filler cap, use a wire hook and pull out the suction head through the tank
opening. Replace the filter if it has hardened, become particularly dirty, or
clogged.
– Insufficient fuel supply may result in the maximum permissible speed being
exceeded. Therefore, the fuel filter must be replaced at least quarterly to
ensure satisfactory fuel supply to the carburetor.
Any other maintenance or adjustment work that is not described in this manual must only be performed by Authorized Service Agents.
18
Page 19

Storage
Drain fuel
Humidity
– When storing the equipment for a long period of time, drain all the fuel from
the fuel tank and carburetor. To do this, simple drain all of the fuel from the fuel
tank. Dispose of the drained fuel in accordance with local applicable laws.
– Remove the spark plug and add a few drops of oil into the spark plug hole.
Then, pull the starter gently so that oil coats the inside of the engine, then
tighten the spark plug.
– Clean any dirt or dust from the cutter blade and outside of the engine, and
wipe them with a oil-immersed cloth. Store the equipment in a dry place.
Maintenance schedule
General
After each refuelling Control lever
Daily Air filter
Weekly Spark plug
Quarterly Suction head
Shutting down procedure Fuel tank
Engine assembly, screws and nuts
I-Stop Switch (on/off)/Start-Stop Switch
Cooling air duct
Cutting tool
Idling speed
Muffler
Fuel tank
Carburetor
Visual inspection for damage and tightness
Check for general condition and security
Functional check
Functional check
To be cleaned
To be cleaned
Check for damage and sharpness
Inspection (cutting tool must not move)
Inspection, replace if necessary
Inspect, and clean the opening if necessary
To be replaced
To be cleaned
Empty fuel tank
Operate until engine runs out of fuel
Troubleshooting
Fault System Observation Cause
Engine doesn’t start, or is
difficult to start
Ignition system Ignition spark O.K. Fault in fuel supply or compression system, mechanical
defect
No ignition spark I-Stop Switch (on/off)/Start-Stop Switch operated, wiring
fault or short circuit, spark plug or connector defective,
ignition module faulty
Fuel supply Fuel tank filled Incorrect choke position, carburetor defective, fuel
supply line bent or blocked, fuel dirty
Compression No compression when
pulled over
Mechanical fault Starter not engaging Broken starter spring, broken parts inside the engine
Warm start problems Tank filled. Ignition spark
O.K.
Engine starts but dies Fuel supply Tank filled Incorrect idling adjustment, carburetor contaminated
Insufficient performance Several systems
may simultaneously
be affected
Engine idling poor Air filter contaminated, carburetor contaminated, muffler
Cylinder bottom gasket defective, crankshaft seals
damaged, cylinder or piston rings defective or improper
sealing of spark plug
Carburetor contaminated, must be cleaned
Fuel tank vent defective, fuel supply line interrupted,
cable or I-Stop Switch (on/off)/Start-Stop Switch faulty
clogged, exhaust duct in the cylinder clogged
19
Page 20
Українська
Дякуємо Вам за те, що придбали кущоріз/кордову газонокосарку MAKITA.
Розробка кущорізів/кордових газонокосарок компанії MAKITA є результатом
багаторічного накопичення знань і досвіду, а також детальної програми
розвитку.
Будь ласка, уважно прочитайте цей буклет, щоб забезпечити
найпродуктивнішу роботу кущоріза/кордової газонокосарки MAKITA, яка
дозволить досягти найкращих результатів.
Позначення
ернути увагу на такі позначення.
Під час читання цієї інструкції з експлуатації сл
Читайте інструкцію
Будьте особливо уважними та обережними
ід зв
Зміст Сторінка
Позначення ................................................................ 20
Інструкції з техніки безпеки....................................... 21
Технічні дані............................................................... 25
Назви частин.............................................................. 26
Установлення ручки.................................................. 27
Установлення захисного пристрою.......................... 28
Установлення ріжучої пластини або ріжучої головки з
нейлоновим шнуром ................................................. 29
Пальне/заправляння................................................. 30
Належне поводження................................................ 31
Важливі зауваження щодо експлуатації/зупинення
кущоріза/газонокосарки ............................................ 31
Заточування ріжучого інструмента .......................... 33
Указівки щодо технічного обслуговування.............. 35
Зберігання.................................................................. 37
Слід використовувати засоби захисту зору та
слуху
(стосовно тільки кордової газонокосарки)
Надягайте захисний шолом та засоби захисту
зору й слуху
(стосовно тільки кущоріза)
Заборонено
Тримайте відстань Максимальна швидкість роботи інструмента
Небезпека предметів, що відлітають Гарячі поверхні – Опіки пальців аб
Не
паліть Паливно-мастильна суміш
Не використовуйте поблизу відкритого
вогню
Надягайте захисні рукавиці Аварійне зупинення
Віддача Перша допомога
Заборонено допускати сторонніх осіб та
тварин до зони роботи
Не використовуйте металеві ріжучі пластини
(стосовно тільки кордової газонокосарки)
о рук
Ручний запуск двигуна
УВІМКНЕННЯ/ПУСК
Надягайте міцне взуття із підошвами, що
не ковзають. Ми рекомендуємо захисне
взуття зі сталевим носком.
ВИМКНЕННЯ/ЗУПИНЕННЯ
ЗАПУСК
20
Page 21

Малюнок
15 метрів
(1)
(3)
(2)
(4)
(5)
(6)
Інструкції з техніки безпеки
Загальні положення
– Щоб забезпечити належну роботу, обов’язково прочитайте ці інструкції з
експлуатації для ознайомлення з правилами використання кущоріза/
кордової газонокосарки. Використання цього пристрою без усвідомлення
правил роботи з ним може призвести до серйозних травм користувача та
сторонніх людей.
– Передавати цей кущоріз/кордову газонокосарку у користування
дозволяється тільки тим особам, які довели, що вони є досвідчени
користувачами цього пристрою. Завжди разом із пристроєм віддавайте їм
ці інструкції з експлуатації.
– Якщо Ви вперше використовуєте кущоріз, оснащений двигуном, зверніться
до свого дилера для отримання основних інструкцій з роботи.
– Заборонено користуватись кущорізом/кордовою газонокосаркою дітям та
особам, яким не виповнилося 18 років. Разом із тим особам, яким вж
виповнилося 16 років, дозволяється використовувати цей пристрій із
навчальною метою, однак тільки під безпосереднім наглядом
кваліфікованого інструктора.
– Використовуйте кущоріз/кордову газонокосарку із максимальною
обережністю й увагою.
– Працюйте із кущорізом/кордовою газонокосаркою, тільки якщо Ви
перебуваєте в гарній фізичній формі. Усю роботу виконуйте спокійно та
обережно. Користувачі несуть відповідальність за людей, які їх от
– Ніколи не використовуйте кущоріз/кордову газонокосарку після приймання
ліків чи вживання алкоголю або у разі втоми чи хворобливого стану.
УВАГА: Під час роботи цей інструмент утворює електромагнітне поле. За
певних обставин це поле може впливати на активні або пасивні медичні
імплантати. Щоб зменшити ризик отримання серйозних або смертельних
тілесних ушкоджень, ми рекомендуємо особам із медичними імплантатами
перед використанням цього інструмента звернутися до лікаря та виробника
медичних імплантатів за консультацією.
Використання пристрою за призначенням
– Кущоріз/кордова газонокосарка призначені тільки для підстригання трави,
бур’яну, кущів та підліска; не дозволяється використовувати пристрій за
іншим призначенням, наприклад для окантовки та стриження живоплоту,
оскільки це може призвести до отримання травм.
Засоби індивідуального захисту
– Завжди надягайте придатний для роботи функціональний одяг, який щільно
облягає, але не сковує рухи. Заборонено надягати прикраси та одяг, які
можуть заплутатись у гілках або кущах.
– Для запобігання травмам голови, очей, рук або ніг, а також для захисту
органів слуху, під час роботи з кущорізом/кордовою газонокосаркою слід
використовувати такі засоби захист
– Завжди надягайте шолом, якщо є небезпека падіння предметів. Захисний
шолом (1) слід регулярно перевіряти на наявність пошкоджень та
замінювати не рідше, ніж кожні 5 років. Користуйтесь тільки дозволеними
захисними шоломами.
– Захисна маска (2) шолому (або захисні окуляри) захищає обличчя від
уламків та каміння, що відлітають. Під час роботи з кущорізом/кор
газонокосаркою завжди надягайте захисні окуляри або захисну маску, щоб
запобігти травмам очей.
– Надягайте відповідні засоби захисту від шуму, щоб запобігти порушенням
слуху (навушники (3), вушні втулки тощо).
– Робочий спецодяг (4) захищає від уламків та каміння, що відлітають.
Ми наполегливо рекомендуємо надягати робочий спецодяг.
– Захисні рукавиці (5), зроблені з товстої шкіри, є частин
обладнання; їх слід завжди надягати під час роботи з кущорізом/кордовою
газонокосаркою.
– Використовуючи кущоріз/кордову газонокосарку, завжди надягайте міцне
взуття (6) з підошвами, що не ковзають. Таке взуття захистить Вас від
отримання травм та забезпечить стійку опору на ноги.
у та захисний спецодяг.
ою пр
Залишкові ризики
– Навіть у разі використання інструмента із дотриманням усіх установлених
правил безпеки неможливо повністю усунути всі фактори залишкового
ризику. Із конструкцією інструмента та його дизайном можуть бути пов’язані
такі ризики:
1. Ураження легенів, якщо не використовується ефективна пилозахисна
маска.
2. Ураження органів слуху, якщо не використовуються ефективні засоби
3. Шкода з
для захисту слуху.
доров’ю внаслідок вібрації, якщо інструмент використовується
протягом занадто тривалого часу, керування інструментом
здійснюється неналежним чином та якщо невідповідним чином
здійснюється технічне обслуговування інструмента.
Запуск кущоріза
– Перевіряйте, щоб у зоні 15 метрів (50 футів) не було дітей або сторонніх
осіб, а також слідкуйте за тваринами поблизу місця роботи.
– Перед початком роботи завжди перевіряйте, щоб кущоріз/кордова
газонокосарка перебували в безпечному для роботи стані:
Перевіряйте безпечність ріжучого інструмента, легкість управління
важелем керування двигуном та належне функціонування блокування
важеля керування двигуном.
ертання ріжучого інструмента на холостому ходу заборонено. Якщо Ви
– Об
вважаєте, що пристрій потребує регулювання, звертайтеся до Вашого
дилера. Перевіряйте, чи ручки є чистими й сухими та чи належним чином
функціонує пусковий перемикач.
ми
очують.
довою
опонованого
е
21
Page 22

– Запускайте кущоріз/кордову газонокосарку строго у відповідності до цих
• Відпочинок
• Транспортування
• Заправляння
• Технічне обслуговування
• Заміна частин
3 м
інструкцій. Не використовуйте інші способи запуску двигуна!
– Використовуйте кущоріз/кордову газонокосарку тільки за умов
достатнього освітлення та видимості.
– Запускайте кущоріз/кордову газонокосарку тільки після того, як пристрій
було повністю зібрано. Не використовуйте пристрій, на якому не
встановлене все відповідне приладдя!
– Пере
д
початком роботи слід переконатися, що ріжучий інструмент не
торкається твердих предметів, наприклад гілля, каміння тощо, оскільки під
час пуску він обертатиметься.
– У разі виникнення будь-яких проблем із двигуном його треба негайно
вимкнути.
– Якщо ріжучій інструмент наштовхнувся на каміння або на інші тверді
предмети, негайно вимкніть двигун та огляньте ріж
– Регулярно оглядайте ріжучий інструмент через короткі проміжки часу на
наявність ушкоджень (виявляйте тонкі тріщини за допомогою тесту
постукування).
– Використовуйте кущоріз/кордову газонокосарку тільки після приєднання
плечового ременя та регулювання його довжини. Плечовий ремінь слід
відрегулювати відповідно до статури користувача та закріпити, щоб
запобігти виникненню втоми протягом роботи. Нік
інструмент однією рукою під час роботи.
– Під час роботи завжди тримайте кущоріз/кордову газонокосарку двома
руками.
Постійно слідкуйте за надійністю опори на ноги.
– Користуйтеся кущорізом/кордовою газонокосаркою таким чином, щоб
уникати вдихання вихлопних газів. Ніколи не вмикайте двигун у закритому
просторі, наприклад у приміщенні (небезпека отруєння газом). Чадн
не має запаху.
– Коли Ви відпочиваєте або залишаєте кущоріз/кордову газонокосарку без
нагляду, зупиняйте двигун та кладіть пристрій в належне місце, щоб
запобігти отриманню травм іншими особами або пошкодженню пристрою.
– Ніколи не кладіть гарячий кущоріз/кордову газонокосарку на суху траву
або на поверхню із займистого матеріалу.
– Ріжучий інс
Ніколи не запускайте інструмент без захисного щитка!
– Під час роботи необхідно використовувати всі захисні частини та щитки,
що входять до комплекту цього пристрою.
– Ніколи не користуйтеся двигуном із пошкодженим глушителем.
– Вимикайте двигун під час транспортування.
– Під час транспортування пристрою слід завжди приєднув
ріжучої пластини.
– Задля запобігання витоку пального під час транспортування слідкуйте за
безпечним положенням кущорізу/кордової газонокосарки.
– Перед транспортуванням кущоріза/кордової газонокосарки слід
перевіряти, чи порожній паливний бак.
– Під час знімання кущоріза/кордової газонокосарки з транспортного засобу
ніколи не кидайте двигун на землю, оскільки це може серйозно
пошкодити паливний бак.
– Крім екстрених випадків, ніколи не роняйте та не кидайте кущоріз/кордову
газонокосарку на землю, оскільки це може серйозно пошкодити пристрій.
– Під час переміщення не забувайте повністю піднімати пристрій з землі.
Волочіння паливного баку є дуже небезпечним і може призвести до
витоку пального, що може спричинити пожежу.
– Якщо пристрій зазнав серйозного удару або впав, перш ніж продовжувати
роботу слід перевірити його стан. Перевіряйте паливну систему на
наявність витоку пального, а також нал
керування та засобів безпеки. Якщо Ви виявили пошкодження або якщо у
Вас виникли будь-які сумніви, звертайтеся до нашого авторизованого
сервісного центру для проведення огляду інструмента та його ремонту.
т
румент має бути обладнаний відповідним захисним щитком.
ежне ф
чий інструмент.
у
оли
не тримайте
ати
кришку до
ункціонування усіх важелів
ий га
з
Заправляння
– Під час заправляння вимикайте двигун, тримайтесь подалі від відкритого
вогню та не паліть.
– Уникайте контакту шкіри з мінеральними нафтопродуктами. Не вдихайте
випаровування пального. Під час заправляння завжди надягайте захисні
рукавиці. Регулярно замінюйте та чистьте захисний одяг.
– Щоб запобігти забрудненню ґрунту (захист довкілля), робіть усе можливе,
щоб пальне і мастило не про
пальне, відразу ж очистіть бензиновий кущоріз/кордову газонокосарку.
– Уникайте контакту пального з одягом. Якщо пальне потрапить на одяг,
слід негайно переодягтися, щоб запобігти виникненню пожежі.
– Регулярно перевіряйте кришку паливного баку, аби переконатись, що
вона надійно закривається та не пропускає рідину.
– Надійно затягуйте кришку па
на відстань щонайменше 3 метри від місця заправляння, перед тим як
запустити двигун.
– Ніколи не заливайте пальне у закритому просторі, наприклад у
приміщенні. Це може призвести до вибуху, зумовленого скупченням
випарів пального на рівні підлоги.
ливалися
ливного ба
на землю. Якщо Ви розлили
ку. Після заправляння слід відійти
22
Page 23

– Перевозіть та зберігайте пальне тільки у відповідних контейнерах.
Застереження:
Віддача
Малюнок
Малюнок
Перевіряйте, щоб діти не мали доступу до пального, яке Ви зберігаєте.
Порядок роботи
– Використовуйте кущоріз/кордову газонокосарку тільки за умов
достатнього освітлення та видимості. Узимку бережіться слизьких або
вологих ділянок, а також ділянок, укритих льодом та снігом (небезпека
ковзання). Постійно слідкуйте за надійністю опори на ноги.
– Ніколи не ріжте вище рівня пояса.
– Ніколи не стійте на сходах під час роботи з кущорізом/кордовою
зо
нокосаркою.
га
– Ніколи не забирайтеся на дерево для використання кущоріза/кордової
газонокосарки.
– Ніколи не працюйте на нестійких поверхнях.
– Якщо в межах місця роботи знаходяться цвяхи, пісок, каміння тощо,
прибирайте їх.
Сторонні предмети можуть пошкодити ріжучий інструмент та призвести
до небезпечної віддачі.
– Перед початком роботи перевіряйте, щоб ріжучий інструмент досяг
к
симальної робочої швидкості.
ма
– Якщо трава або гілля застрягнуть між ріжучим інструментом та захисним
щитком, завжди вимикайте двигун перед виконанням очищення. Інакше
неочікуване обертання ріжучої пластини може призвести до серйозних
травм.
– Відпочивайте, щоб не допустити втрати контролю внаслідок
перевтомлення. Ми рекомендуємо робити паузу на 10–20 хвилин після
кожної години роботи.
Віддача (тиск на ріжучу пластину)
– Під час роботи з кущорізом можуть виникати випадки неконтрольованої
віддачі.
– При намаганні різати сегментом ріжучої пластини між 12 та 2 годинами
часто трапляється віддача.
– Ніколи не використовуйте сегмент ріжучої пластини кущоріза між 12 та 2
годинами.
– Ніколи не використовуйте цей сегмент ріжучої пластини кущоріза для
різання твердих предметів, наприклад кущів або дерев тощо, чи
перевищує 3 см. Це може спричинити сильне і небезпечне відхилення
кущоріза, яке може призвести до травми.
й ді
аметр
Запобігання віддачі
Щоб запобігти віддачі, пам’ятайте таке:
– Робота сегментом ріжучої пластини між 12 та 2 годиною може становити
серйозну небезпеку, особливо під час використання металевих ріжучих
інструментів.
– Операції з різання сегментом ріжучої пластини між 11 та 12 годиною та
між 2 та 5 годиною дозволяється виконувати тільки тренованим та
досвідченим операторам, але на їхній власний ризик.
Сегмент мі
оптимального різання практично без віддачі.
ж 8
і 11 годинами ріжучої пластини призначений для легкого і
Ріжучі інструменти
– Для виконання наявної роботи застосовуйте тільки відповідний ріжучий
інструмент.
Ріжучі головки з нейлоновим шнуром (головки кордових газонокосарок)
підходять для підрізування газонної трави.
Металеві ріжучі пластини підходять для різання бур’яну, високої трави,
кущів, чагарнику, підліску, хащі тощо.
Ніколи не використовуйте інші ріжучі пластини, у тому числі ріжучі
металеві ланцюги та шарнірні ріж
до серйозних травм.
– Під час використання металевих ріжучих пластин уникайте віддачі та
завжди будьте готовими до несподіваної віддачі. Див. розділи “Віддача” та
“Запобігання віддачі”.
у
чі пластини. Інакше це може призвести
Інструкції щодо технічного обслуговування
– Пристрій слід ремонтувати тільки в нашому авторизованому сервісному
центрі і завжди з використанням оригінальних запасних частин. Технічне
обслуговування та ремонт, проведені неналежним чином, можуть
призвести до скорочення терміну служби пристрою та до підвищення
ризику виникнення нещасних випадків.
– Перед початком роботи слід завжди перевіряти стан ріжучого
інструмента, особливо його захисних засобів та пле
Особливу увагу слід приділяти ріжучій пластині – вона повинна бути
належним чином заточена.
– Вимикайте двигун та виймайте конектор свічки запалювання, коли
замінюєте або заточуєте ріжучий інструмент, а також під час чищення
ріжучого інструмента або ріжучої пластини.
чового
ременя.
23
Page 24
Ніколи не зварюйте та не випрямляйте пошкоджені ріжучі
інструменти.
– Використовуйте кущоріз/кордову газонокосарку з якомога меншим рівнем
шуму та забруднення. Особливо перевіряйте правильність налаштування
карбюратора.
– Регулярно чистьте кущоріз/кордову газонокосарку та перевіряйте, чи
міцно затягнуті всі гвинти та гайки.
– Ніколи не здійснюйте технічне обслуговування та не зберігайте кущоріз/
кордову газонокосарку поблизу відкритого полум’я.
– Завжди зберігайте кущоріз/кордову г
приміщеннях і з порожнім паливним баком.
– Під час чищення, технічного обслуговування і зберігання пристрою слід
завжди приєднувати кришку до ріжучої пластини.
Дотримуйтесь усіх відповідних правил з техніки безпеки, виданих певними
професійними асоціаціями та страховими компаніями.
Не змінюйте конструкцію кущоріза/кордової газонокосарки жодним чином,
оскільки це може поставити пі
Технічне обслуговування та ремонт, покладені на користувача,
обмежуються діями, описаними в цій інструкції. Усі інші роботи повинні
виконуватися співробітниками авторизованої станції технічного
обслуговування. Використовуйте тільки оригінальні запасні частини та
приладдя, що виробляються та постачаються компанією MAKITA.
Використання нерекомендованого приладдя та інструментів підвищує ризик
нещасного випадку.
Компанія MAKITA не несе відпо
пошкодження, що сталися внаслідок використання будь-яких
нерекомендованих ріжучих інструментів, кріпильних пристроїв або
приладдя.
Перша допомога
На випадок екстреної ситуації перевіряйте, чи добре укомплектована
аптечка знаходиться поблизу місця роботи. Слід відразу ж замінювати
предмети з аптечки, які були використані.
д
азонокосарку
загрозу Вашу безпеку.
відальності
за нещасні випадки або
в зачинених
Викликаючи допомогу, надавайте таку інформацію:
– Місце нещасного випадку
– Що сталося
– Кількість поранених людей
– Тип поранень
– Ваше ім’я
Вібрація
– Людина, яка має поганий кровообіг та постійно стикається з сильною
вібрацією, може здобути порушення кровоносних судин або нервової
системи. Вібрація може спричинити наведені нижче симптоми з боку
пальців, рук або зап’ястя: “Засипання” (оніміння), пощипування, біль,
гострий біль, зміна шкіри або кольору шкіри. За наявності хоча б одного з
цих симптомів сл
– Щоб зменшити ризик отримання синдрому білих пальців, слід тримати
пристрій та приладдя у належному стані та дбати про те, щоб руки під час
роботи залишалися теплими.
ід
обов’язково звернутися до лікаря!
Тільки для країн Європи
Декларація про відповідність стандартам ЄС
Ми, компанія Makita, як відповідальний виробник заявляємо, що наступне обладнання Makita:
позначення обладнання: Kущоріз/Кордова газонокосарка
№ моделі/тип: EM2600U, EM2600L
технічні характеристики: див. таблицю “ТЕХНІЧНІ ДАНІ”
є серійним виробництвом та
відповідає таким Європейським директивам:
2000/14/EC, 2006/42/EC, 2004/108/EC
та виготовлене відповідно до наступних стандартів або стандартизованих документів:
EN ISO 11806-1, EN ISO 14982
Технічна документація ведеться:
Makita International Europe Ltd., Technical Department,
Michigan Drive, Tongwell, Milton Keynes, Bucks MK15 8JD, Англія
Процедура оцінки відповідності яка вимагається Директивою 2000/14/EC, відбулася згідно з до
Виміряний рівень акустичної потужності (як газонокосарки): 109,77 dB
Виміряний рівень акустичної потужності (як кущоріза): 107,29 dB
Гарантований рівень акустичної потужності: 112 дБ
15. 4. 2013
Том оязу Като
Директор
Makita Corporation
3-11-8, Sumiyoshi-cho,
Anjo, Aichi, JAPAN
атком V.
д
24
Page 25

Технічні дані
Модель
EM2600U EM2600L
Ручка U-подібної форми Ручка-дужка
Розміри: довжина x ширина x висота (без ріжучої пластини) 1770 x 610 x 410 мм 1770 x 330 x 185 мм
Вага нетто 5 кг 5 кг
Робочий об'єм двигуна
Максимальна продуктивність двигуна 0,83 кВт
Максимальна частота обертання шпинделя 8800 об./хв.
Одинарна металева ріжуча
пластина
Ріжуча насадка
Головка кордової
газонокосарки
Швидкість холостого ходу 3000 об./хв.
Швидкість включення зчеплення 4100 об./хв.
Передатне відношення 14/19
Пальне
Бензин : мастило для двотактних двигунів = 50:1)
Об'єм (паливного баку) 0,6 л
Карбюратор WALBRO WYC
25,7 см
φ230 мм
φ430 мм
Суміш
3
Система запалювання Запалювання в стані спокою
Свічка запалювання NGK BPMR7A
т
ань між електродами 0,6 – 0,7 мм
Відс
Вібрація: (стосовно кущоріза)
Вібрація: (стосовно газонокосарки)
Ліва ручка (передня ручка)
Права ручка (задня ручка)
Ліва ручка (передня ручка)
Права ручка (передня
ручка)
14,680 м/с
9,037 м/с
7,961 м/с
7,019 м/с
2
K = 1,5 м/с
2
K = 1,5 м/с
2
K = 1,5 м/с
2
K = 1,5 м/с
2
2
2
2
5,152 м/с2 K = 1,5 м/с
9,677 м/с2 K = 1,5 м/с
8,83 м/с2 K = 1,5 м/с
14,381 м/с2 K = 1,5 м/с
Шум (перевірений відповідно до 2000/14/EC та 2005/88/EC):
Рівень звукового тиску у місці знаходження оператора
(газонокосарка):
98,52 дБ (A) K = 2,5 дБ (A)
Рівень звукового тиску у місці знаходження оператора (кущоріз): 96,15 дБ (A) K = 2,5 дБ (A)
Виміряний рівень акустичної потужності (газонокосарка): 109,77 дБ (A) K = 2,5 дБ (A)
Виміряний рівень акустичної потужності (кущоріз): 107,29 дБ (A) K = 2,5 дБ (A)
Шум (перевірений відповідно до 2000/14/EC та 2005/88/EC):
гарантовані значення акустичної потужності
112 дБ (A)
2
2
2
2
25
Page 26
Назви частин
Назви частин
1 Паливний бак
2 Стартер
3 Повітряний фільтр
4
Перемикач I-зупинення
(увімкнення/вимкнення)/
перемикач запуску-зупинення
5 Свічка запалювання
6 Глушитель
7 Корпус муфти зчеплення
8 Задня ручка
9 Кріплення для підвішування
10 Ручка
11 Важіль керування двигуном
12 Кабель керування
13 Вал
14
Захисний пристрій (щиток ріжучого
інструмента)
15 Редуктор
16 Фіксатор ручки
17 Ріжуча пластина
18
Ріжуча головка з нейлоновим
шнуром
19 Кришка заливної горловини
20 Ручк
а
стартера
21 Насос підкачування
22 Важіль дроселювання
EM2600U
Модель з ручкою U-подібної форми
EM2600L
Модель з ручкою-дужкою
(3)
(7)
(21)
(1)
(19)
26
Page 27
Установлення ручки
EM2600U
L
R
(1)
EM2600U
(2)
EM2600U
(3)
(1)
EM2600U
ЗАСТЕРЕЖЕННЯ: Перед проведенням будь-яких робіт на кущорізі завжди
зупиняйте двигун та від’єднуйте конектор свічки
запалювання. Завжди надягайте захисні рукавиці!
ЗАСТЕРЕЖЕННЯ: Запускайте бензиновий кущоріз тільки після того, як
його було повністю зібрано.
Для моделей з ручкою U-подібної форми
– Розташуйте дві ручки на фіксаторі ручки. Важіль керування двигуном
повинен розташовуватися праворуч, якщо дивитися у бік ріжучого
інструмента.
– Уставте кінці ручок у виїмку на фіксаторі й установіть на них затискач.
Злегка затягніть їх чотирма болтами для регулювання.
– Відрегулюйте кут ручок, а потім рівномірно затягніть усі болти
шестигранним ключем.
– Розташуйте трос ке
важеля керування двигуном. А потім загорніть їх притискною накладкою
(2).
– Уставте трос керування подачею пального (1) у проріз затискача (3) на
фіксаторі ручки.
– Переконайтеся в тому, що кабель важеля постачання пального
розташований, як показано на малюнку.
– Попрацюйте важелем керування двигуном і упевніться, що він ру
плавно.
рування
подачею пального (1) на валу зі сторони
хається
ЗА
СТЕРЕЖЕННЯ: Не розташовуйте кабель важеля постачання пального,
як показано на малюнку. А інакше зігнутий трос може
спричинити високу швидкість холостого ходу, а
некерована ріжуча пластина може завдати травм.
27
Page 28
Для моделі з ручкою-дужкою
(2)
(1)
Двигун
(4)
(3)
Двигун
EM2600L
Зіркоподібна ріжуча
пластина
Захисний пристрій для
металевої ріжучої пластини
Ріжуча головка з
нейлоновим шнуром
Захисний пристрій для
ножа шнура
(2)
(3)
(1)
(4)
(1)
(6)
(5)
– Розташуйте різьбу(1), нанесену на фіксатор ручки, у фіксуючому
отворі (2) на трубці.
– Зафіксуйте допоміжну ручку (3) на обмежувачі.
– Затягніть 4 болти (4) M5 x 30.
Установлення захисного пристрою
З метою дотримання встановлених правил з техніки безпеки потрібно
використовувати лише такі комбінації інструментів/захисних пристроїв, які
зазначені в таблиці.
Завжди використовуйте оригінальні ріжучі пластини або
ріжучу головку з нейлоновим шнуром MAKITA.
– Ріжуча пластина має бути гладкою, на ній не повинно бути тріщин або
пошкоджень. Якщо під час роботи ріжуча пластина натрапить на каміння,
зупиніть двигун та негайно перевірте її.
– Заточуйте або замінюйте ріжучу пластину кожні три години роботи.
– Якщо під час роботи ріжуча головка з нейлоновим шнуром натрапить на
каміння, зупиніть двиг
ун та негайно перевірте її.
ЗАСТЕРЕЖЕННЯ: Задля Вашої безпеки та згідно з нормами техніки
безпеки слід завжди встановлювати відповідні захисні
пристрої. Забороняється використовувати інструмент
без установленого захисного щитка.
– Прикріпіть захисний пристрій (1) до затискача (3) за допомогою двох
болтів M6 x 30 (2).
– У разі використання ріжучої головки з нейлоновим шнуром уставте
захисний пристрій (6) у захисний пристрій (1
допомогою двох гайок (5) та двох гвинтів (4).
) та затягніть його за
28
Page 29

Установлення ріжучої пластини або ріжучої головки з нейлоновим шнуром
(2)
(1)
(3)
Послабити
Шестигранний ключ
Затягнути
(3)
Послабити
Шестигранний ключ
Затягнути
Обертання
Ріжучу пластину або ріжучу головку з нейлоновим шнуром можна легко
замінити, спочатку просто перевернувши пристрій.
– Уставте шестигранний ключ в отвір редуктора та поверніть опорну шайбу
(3), доки вона не зафіксується за допомогою шестигранного ключа.
– Послабте гайку/пружинну шайбу (1) (ліва різьба) торцевим гайковим
ключем та зніміть гайку/пружинну шайбу (1) і затискну шайбу (2).
Залишаючи шестигранний ключ на місці
– Установіть ріжучу пластину на вал таким чином, щоб зафіксувати
напрямний пристрій опорної шайби (3) в отворі ріжучої пластини.
Установіть затискну шайбу (2) та зафіксуйте ріжучу пластину гайкою/
пружинною шайбою (1).
[Крутний момент затягування: 13–23 Н-м]
ПРИМІТКА: Під час роботи з ріжучою пластиною завжди надягайте
ПРИМІТКА: Гайка, що затягує ріжучу пластину (з пружинною шайбою), є
ПРИМІТКА: При встановленні ріжучої головки з нейлоновим шнуром
– Пригвинтіть ріжучу головку з нейлоновим шн
рукавиці.
розхідним
зношування чи деформації пружинної шайби гайку слід
замінити.
затискну шайбу (2) та гайку/пружинну шайбу (1) встановлювати
не потрібно. Ріжучу головку з нейлоновим шнуром слід
встановлювати поверх опорної шайби (3).
матеріалом. У разі появи будь-яких ознак
уром
до валу.
– Переконайтеся, що ріжуча пластина обертається проти годинникової
стрілки.
29
Page 30
Пальне/заправляння
Дотримуйтесь інструкцій з техніки безпеки
на стор. 21.
20 см3 40 см
3
100 см3 200 см
3
200 см3 400 см
3
1000 cм3 (1 літр)
5000 cм
3
(5 літрів)
10000 см
3
(10 літрів)
50:1 25:1
Бензин
+
Поводження з пальним
Поводитися з пальним слід особливо обережно. Пальне може вміщати
речовини, подібні розчинникам. Заправляти пристрій пальним необхідно
або в добре вентильованому приміщенні, або просто неба. Не вдихайте
випаровування пального, уникайте будь-якого контакту пального або
мастила зі шкірою.
Нафтопродукти знежирюють шкіру. Через тривалий контакт із цими
речовинами шкіра може сильно пересохнути, і це при
хвороб шкіри. На додаток можуть виникнути алергічні реакції.
Потрапляння мастила в очі може призвести до подразнення. У разі
потрапляння мастила в очі слід негайно промити їх чистою водою. Якщо
подразнення не пройшло, слід негайно звернутись до лікаря.
Паливно-мастильна суміш
Двигун кущоріза – це високопродуктивний двотактний двигун. Він працює
від суміші пального і мастила для двотактних двигунів. Двигун розроблений
для роботи на стандартному неетилованому пальному з мінімальним
октановим числом 91 RON. Якщо такого пального немає, можна
використовувати пальне із більшим октановим числом. Це не призведе до
пошкодження двигуна, однак може спричинити погіршення робочих
характеристик.
Анал
пального. Щоб досягти найкращої продуктивності роботи двигуна та не
завдати шкоди власному здоров’ю та довкіллю, використовуйте тільки
неетиловане пальне!
на ситуація може виникнути внаслідок використання етилованого
огіч
зведе
до появи різних
Для змащування двигуна слід додавати мастило для двотактних двигунів
(марка якості: JASO FC або ISO EGD) до пального. Двигун розрахований на
використання вказаного мастила для двотактних двигунів у співвідношенні
:
1 для захисту навколишнього середовища.
50
Довгий термін служби і надійна робота з мінімальними викидами
гарантовані у разі використання суміші з указаним співвідношенням.
Обов’язково потрібно дотримуватись співвідношення 50:1 щодо суміші
(вказане мастило для двотактних двигунів), інакше не можна гарантувати
надійної роботи кущоріза.
Належний склад суміші:
Бензин : Указане мастило для двотактного дви
Бензин : Мастило для двотактного двигуна іншого виробника = 25 : 1
ПРИМІТКА: Для підготовки паливно-мастильної суміші слід спочатку
Заправляння
Двигун повинен бути вимкненим.
– Ретельно очистіть ділянку навколо кришки заливної горловини (2), щоб
– Відкрутіть кришку заливної горловини (2) та наповніть бак пальним.
– Щільно закрийте кришку заливної горловини (2).
– Після заправляння витріть кришку заливної горловини (2) та бак.
(рекомендовано)
змішати всю кількість мастила з половиною потрібного
пального, а потім додати решту пального. Перш ніж заливати
суміш до баку кущоріза, її треба ретельно збовтати. Для
забезпечення безпечної роботи недоцільно додавати більше
моторного масти
рекомендації призведе тільки до збільшення кількості продуктів
згоряння, які забруднюватимуть довкілля та засмічуватимуть
вихлопний канал в циліндрі й глушитель. До того ж збільшиться
споживання пального, а продуктивність впаде.
запобігти потраплянню бруду в паливний ба
ніж зазначено. Недотримання цієї
ла,
уна = 50 : 1 або
г
к (1)
.
Зберігання пального
Пальне не може зберігатися протягом необмеженого часу.
Купуйте лише кількість, необхідну для 4 тижнів роботи. Зберігайте пальне
тільки у рекомендованих контейнерах.
30
Page 31

Належне поводження
Кріплення для
підвішування
(1)
EM2600U
(1)
(4)
(2)
(3)
(1)
(3)
(2)
EM2600L
Приєднання плечового ременя
– Відрегулюйте довжину ременя таким чином, щоб ріжуча пластина
розташовувалася паралельно землі.
Від’єднання
– У разі надзвичайної ситуації натисніть на виїмки (1), розміщені по обидва
боки, та від’єднайте інструмент від себе.
Будьте надзвичайно обережними, щоб зберегти контроль над пристроєм
в цей час. Не дозволяйте пристрою відхилятися у Ваш бік або в бік інши
що знаходяться поблизу місця роботи.
осіб,
УВАГА: Якщо Ви не зможете зберегти контроль над інструментом, це може
призвести до серйозних травм або СМЕРТІ.
Примітка: Залежно від країни плечовий ремінь не має функції від’єднання.
х
Важливі зауваження щодо експлуатації/зупинення кущоріза/газонокосарки
Дотримуйтесь усіх застосовних правил з техніки безпеки.
Запуск
з
Відійдіть щонайменше на 3 метри від місця заправляння пристрою. Ро
ріжучий інструмент не торкався землі та інших предметів.
УВАГА: Зверніть увагу, що ріжучий інструмент починає обертатись відразу
Холодний запуск для моделей із ручкою U-подібної форми
– Установіть перемикач I-зупинення (увімкнення/вимкнення) (1), як
– Візьміться за ручку (тиск руки
– Натисніть на важіль постачання пального (3) і тримайте його в нижньому
– Після цього натисніть на кнопку блокування (4) і відпустіть важіль
Холодний запуск для моделей із ручкою-дужкою
– Ус
– Візьміться за ручку (тиск руки активізує захисний важіль блокування (2)).
– Натисніть на важіль постачання пального (3) і тримайте його в нижньому
– Установіть перемикач запуску-зупинення (1) у положення запуску і
після запуску двигуна.
зображено на малюнку.
активізує захисний важіль блокування (2)).
положенні.
керування двигуном, а потім відпустіть кнопку блокування (кнопка
блокування утримує важіль постачання пального у положенні запуску).
тановіть
зображено на малюнку.
положенні.
відпустіть важіль керування двигуном, після чого відпустіть перемикач
запуску-зупинення (перемик
постачання пального у положенні запуску).
перемикач запуску-зупинення (1) у положення запуску, як
запуску-зупинення утримує важіль
ач
ташуйте кущоріз на відкритій ділянці землі, слідкуючи за тим, щоб
31
Page 32

Теплий запуск для моделей із ручкою U-подібної форми
EM2600U
EM2600L
(6)
(5)
ЗАКРИТИ
(6)
(5)
ВІДКРИТИ
– Установіть перемикач I-зупинення (увімкнення/вимкнення) (1), як
зображено на малюнку.
Теплий запуск для моделей із ручкою-дужкою
– Установіть перемикач запуску-зупинення (1) у нейтральне положення, як
зображено на малюнку.
– Спочатку поставте пристрій на землю.
– Обережно зробіть декілька натискань (7–10 разів) на насос підкачування
(5), поки пальне не потрапи
– Закрийте важіль дроселювання (6).
Відкривання важеля дроселювання:
• Повністю закритий за низьких температур або при холодному двигуні
• Повністю відкритий або відкритий наполовину для повторного
запуску двигуна, якщо двигун все ще теплий
ть всередину насоса підкачування.
– Міцно тримайте корпус муфти зчеплення лівою рукою, як показано на
малюнку.
– Обережно потягніть за ручку ст
потягніть різко.
– Не витягуйте трос стартера до кінця і не допускайте неконтрольованого
повернення ручки стартера у вихідне положення. Зберігайте контроль
над тросом стартера, щоб він втягувався повільно.
– Повторіть операцію запуску, поки не почуєте звук початкового запуску
двигуна.
– Натисніть на важіль дроселювання (6) ( ) і знов
стартера, поки двигун не запуститься.
– Щойно двигун запуститься, відразу ж натисніть та відпустіть дросельну
заслінку, тим самим відпускаючи кнопку блокування, щоб двигун міг
працювати на холостому ході.
– Дайте двигуну попрацювати протягом однієї хвилини на помірній
швидкості, перш ніж повністю відкрити заслінку.
ПРИМІТКА:– Якщо неодноразово потягнути за ру
запуститься не відразу через надмірну подачу пального.
– У разі надмірної подачі пального зніміть свічку запалювання та повільно потягніть за ручку стартера, щоб видалити зайве
пальне. Також висушіть електрод свічки запалювання.
артера,
поки не відчуєте опір, після чого
потягніть за трос
у
чку ст
артера, коли важіль дроселювання залишається в положенні “ ”, двигун
32
Page 33

Заходи безпеки під час роботи:
EM2600L
EM2600U
ЗУПИНЕННЯ
Якщо важіль постачання пального повністю відкритий при роботі на холостому ходу, кількість обертів двигуна зростає до 10000 об./хв.
або більше. Забороняється працювати з двигуном на швидкості вище потрібної, яка дорівнює 6000 – 8000 об./хв.
ЗАСТЕРЕЖЕННЯ: Завжди скорочуйте кількість обертів двигуна, коли пристрій не використовується для виконання роботи.
Використання пристрою
Зупинення
– Повністю відпустіть важіль постачання пального (3) та, коли знизиться
кількість обертів двигуна на хвилину, установіть перемикач I-зупинення
(увімкнення/вимкнення) (1) в положення “STOP” (ЗУПИНЕННЯ), щоб
зупинити двигун.
– Зверніть увагу, що ріжуча головка може не зупинитися відразу, отже,
дозвольте їй самостійно повністю зу
на високих обертах без виконання роботи скорочує термін служби пристрою.
п
инитися.
Заточування ріжучого інструмента
ЗАСТЕРЕЖЕННЯ: Наведені нижче ріжучі інструменти слід заточувати
тільки на авторизованому обладнанні. Ручне
заточування призведе до розбалансування ріжучого
інструмента, спричиняючи вібрацію та пошкодження
пристрою.
– ріжуча пластина (зіркоподібна ріжуча пластина (4-зубчаста)
Співробітники авторизованої станції технічного обслуговування нададуть
Вам кваліфіковані послуги із заточування та балансування.
ПРИМІТКА: Щоб збільшити термін служби ріжучих пластин (зірк
ріжучої пластини), їх можна перевернути один раз, поки не
затупляться обидва ріжучі краї.
оп
одібної
33
Page 34

РІЖУЧА ГОЛОВКА З НЕЙЛОНОВИМ ШНУРОМ
Сектор, найбільш ефективний для різання
Ручка
Швидкість холостого
ходу
Максимальна швидкість
Кришка
Фіксатори
Натиснути
Натиснути
Котушка
80 мм (3-1/8”)
Для
обертання
ліворуч
Котушка
150 мм (6”)
Прорізи
Ріжуча головка з нейлоновим шнуром – це ріжуча головка з подвійним
шнуром, конструкція якої оснащена як автоматичним механізмом
випускання шнура, так і механізмом випускання шнура за рахунок удару.
Ріжуча головка з нейлоновим шнуром автоматично висуває нейлоновий
шнур на потрібну довжину відповідно до змін відцентрової сили, зумовленої
збільшенням або зменшенням кількості обертів на хв
щоб ефективно стригти м’яку траву, вдарте ріжучу головку з нейлоновим
шнуром об землю, щоб висунути нейлоновий шнур на додаткову довжину,
як вказано в розділі, присвяченому роботі інструмента.
илину.
Разом із тим,
Робота
– Збільште швидкість ріжучої головки з нейлоновим шнуром приблизно до
6000 об./хв.
Нейлоновий шнур не буде висовуватися належним чином на низькій
швидкості (менше 4800 об./хв.).
– Сектор, найбільш ефективний для різання, показаний затемненою
ділянкою на малюнку праворуч.
Якщо нейлоновий шнур не висувається автоматично, зробіть наступне:
1. Відпустіть важіль постачання пального, щоб перевести двигун
холостий хід, після чого повністю стисніть його. Повторюйте цю
процедуру, поки нейлоновий шнур висунеться на потрібну довжину.
2. Якщо нейлоновий шнур занадто короткий та не може висунутися
автоматично, як описано вище, вдарте ручку ріжучої головки з
нейлоновим шнуром об землю, щоб висунути нейлоновий шнур.
о
3. Якщо нейлоновий шнур не висувається за допомог
перемотайте/замініть його таким чином, як описано нижче в пункті
“Заміна нейлонового шнура”.
ю процедури 2,
на
Заміна нейлонового шнура
– Зупиніть двигун.
– Натисніть на фіксатори корпуса, щоб підняти кришку, та витягніть
котушку.
– Просмикніть середину нового нейлонового шнура у формі петлі у проріз в
центрі котушки таким чином, щоб один кінець шнура був приблизно на
80 мм (3–1/8”) довшим за інший. Потім щільно намотайте обидва кінці
шнура на котушку у напрямку обертання головки (на
позначено на боці котушки як LH, а напрямок праворуч – як RH).
– Не намотуйте приблизно 150 мм (6”) обох шнурів на котушку, а,
просмикнувши кінці крізь прорізи з боків котушки, тимчасово залиште їх в
такому положенні.
прямок ліворуч
34
Page 35

– Висуньте шнури з корпусу крізь вушка.
Вушко
Кришка
Гачок
Вушко
Гачок
(1)
(2)
(3)
(4)
Установіть шайбу, пружину та котушку у корпус.
– Узгодьте гачки на кришці та корпусі.
Потім міцно натиснувши на кришку, закріпіть її на корпусі.
Указівки щодо технічного обслуговування
Указівки щодо технічного обслуговування
ЗАСТЕРЕЖЕННЯ: Перед проведенням будь-яких робіт із технічного
обслуговування на кущорізі завжди зупиняйте двигун та
від’єднуйте ковпачок свічки від свічки запалювання (див.
“Перевірка свічки запалювання”).
ЗАСТЕРЕЖЕННЯ: Ніколи не знімайте ручний стартер самотужки.
Для забезпечення довгого терміну служби та для запобігання пошкодженню пристрою слід регулярно проводити таке технічне
обслуговування.
Щоденний технічний огляд та технічне обслуговування
– Перед початком роботи перевіряйте, чи всі гвинти пристрою затягнуті належним чином, а також чи присутні всі деталі. Особливу увагу
звертайте на міцність закріплення ріжучої пл
– Перед початком роботи завжди перевіряйте, чи не закупорені ребра циліндру та повітрязабірник охолоджувального повітря.
За необхідністю чистьте їх.
– Щодня після роботи з приладом здійснюйте такі операції з технічного обслуговування:
• Чистьте кущоріз ззовні та перевіряйте пристрій на предмет пошкоджень.
• Чистьте повітряний фільтр. Якщо Ви прац
• Перевіряйте ріжучу пластину або ріжучу головку з нейлоновим шнуром на предмет пошкоджень, а також перевіряйте, чи надійно
вони встановлені.
• Перевіряйте, щоб між швидкістю холостого ходу та робочою швидкістю була суттєва різниця, щоб забезпечити нерухомість ріжучого
інструмента під ча
Якщо на холостому ходу ріжучий інструмент все ще продовжує обертатися, зверніться до співробітника найближчої авторизованої
станції технічного обслуговування.
– Перевіряйте належне функціонування перемикача I-зупинення (увімкнення/вимкнення)/перемикача запуску-зупинення, важеля
блокування, важеля керування двигуном та кнопки блокування.
Завжди надягайте захисні рукавиці.
Недотримання цієї вимоги може призвести до
нещасного випадку. Ця процедура повинна проводитися
тільки співробітником ав
обслуговування.
с
роботи двигуна на холостому ходу (за необхідності зменште швидкість холостого ходу).
оризованої станції технічного
т
астини
або ріжучої головки з нейлоновим шнуром.
е у надзвичайно запиленому середовищі, чистьте фільтр декілька разів на день.
юєт
Очищення повітряного фільтра
– Повністю поверніть важіль дроселювання (4) в сторону закриття;
тримайте карбюратор подалі від пилу та бруду.
– Викрутіть гвинт (1).
– Зніміть кришку повітряного фільтра (3).
– Зніміть пористий компонент (2), промийте його теплуватою водою, після
чого ретельно просушіть.
– Після чищення встановіть назад кришку повітряного фільтра (3) та
зафіксуйте її за допомогою гвинтів (1).
ПРИМІТКА: Якщо на повітряний фільтр налипає надм
бруду, чистьте його щоденно. Закупорений повітряний фільтр
ускладнює або унеможливлює запуск двигуна та може
спричинити збільшення швидкості обертання двигуна.
ірна кількість пилу або
35
Page 36

Перевірка свічки запалювання
0,6 мм–0,7 мм
(0,024”-0,028”)
Мастильний отвір
(5)
– Для знімання або встановлення свічки запалювання використовуйте
тільки універсальний гайковий ключ, який входить до комплекту.
– Зазор між двома електродами свічки запалювання повинен складати 0,6–
0,7 мм (0,024” - 0,028”). Якщо зазор занадто великий чи занадто малий,
відрегулюйте його. Якщо свічка запалювання вкрита сажею або брудом,
ретельно почистіть або замініть її.
ЗАСТЕРЕЖЕННЯ: Ніколи не торкайтеся конектора свіч
час роботи двигуна (небезпека ураження струмом
високої напруги).
ки запалювання під
Постачання консистентного мастила на редуктор
– Подавайте консистентне мастило (Shell Alvania 3 або еквівалентне) на
редуктор через мастильний отвір кожні 30 годин (оригінальне
консистентне мастило MAKITA Ви можете придбати у дилера компанії
MAKITA).
Усмоктувальна головка в паливному баку
– Паливний фільтр (5) усмоктувальної головки використовується для
постачання пального, необхідного для карбюратора.
– Періодично перевіряйте паливний фільтр. Для того щоб оглянути фільтр,
необхідно відкрити кришку заливної горловини та за допомогою гачка з
дроту витягнути усмоктувальну головку через отвір у баку. У разі
ускладнення фільтрації, забруднення та засмічення фільтра його слід
замінити.
– Недостатнє пос
максимально припустимої швидкості. Тому паливний фільтр слід
замінювати щонайменше один раз на три місяці, щоб забезпечити
задовільне постачання пального до карбюратора.
тачання пального може призвести до перевищення
Будь-які інші види технічного обслуговування та роботи із регулювання, не описані в цій інструкції з експлуатації, повинні виконуватися
тільки співробітником авторизованої станції те
хнічного
обслуговування.
36
Page 37

Зберігання
Злийте пальне
Вологість
– У разі тривалого зберігання пристрою злийте все пальне з паливного баку
та карбюратора. Щоб зробити це, просто злийте все пальне з паливного
баку. Утилізуйте злите пальне належним чином відповідно до
застосовних місцевих законів.
– Зніміть свічку запалювання і додайте декілька крапель мастила в отвір
свічки запалювання. Після цього обережно потягніть за ручку
щоб мастило розтеклося по двигуну, потім установіть свічку запалювання.
– Видаліть пил та бруд з ріжучої пластини та зовнішньої частини двигуна,
протріть їхню поверхню змоченою у мастилі тканиною. Зберігайте
пристрій у сухому місці.
Графік технічного обслуговування
стартера,
Загальне
Після кожного
заправляння
Щодня Повітряний фільтр
Щотижня Свічка запалювання
Щоквартально Усмоктувальна головка
Процедура відключення Паливний бак
Вузол двигуна, гвинти і гайки
Важіль керування двигуном
Перемикач I-зупинення
(увімкнення/вимкнення)/
перемикач запуску-зупинення
Канал охолоджувального повітря
Ріжучий інструмент
Швидкість холостого ходу
Глушитель
Паливний бак
Карбюратор
Оглядайте на наявність пошкоджень і надійність затягування
Перевіряйте загальний стан та безпечність
Перевіряйте функціонування
Перевіряйте функціонування
Чистьте
Чистьте
Перевіряйте на наявність пошкоджень та на якість заточування
Перевіряйте ріжучий інструмент (він не по
Перевіряйте, за необхідності замінюйте
Перевіряйте та за необхідності прочищайте отвір
Замінюйте
Чистьте
Спорожнюйте паливний бак
Працюйте, доки в двигуні закінчиться пальне
Усунення несправностей
Несправність Система Спостереження Причина
Двигун не запускається
або важко запускається
Проблеми теплого запуску Бак заповнений. Є іскра
Двигун запускається, але
відразу ж зупиняється
Недостатня продуктивність Одночасне
Система
запалювання
Постачання
пального
Компресія Немає компресії під час
Механічна
несправність
Постачання
пального
ураження
декількох систем
Є іскра запалювання Несправність системи постачання пального або
Немає іскри
запалювання
Паливний бак
заповнено
запуску
Стартер не вмикається Зламана пружина стартера, зламані деталі всередині
запалювання
Бак заповнений Невірне налаштування холостого ходу, карбюратор
Неналежний холостий
хід двигуна
компресії, механічний дефект
Було натиснуто на переми
(увімкнення/вимкнення)/перемикач запускузупинення, несправність провідні або коротке
замикання, несправність свічки запалювання або
конектора, несправність блока запалювання
Невірне положення дроселя, несправність
карбюратора, перервано або заблоковано лінію
постачання пального, пальне низької якості.
Несправність нижнього сальника циліндра,
пошкоджено ущільнення колінчатого ва
несправність циліндра або поршневих кілець або
ненадійне ущільнення свічки запалювання
двигуна
Засмічено карбюратор, його слід почистити
засмічено
Несправність повітряного клапана паливного баку,
перер
кабелю або перемикача I-зупинення (увімкнення/
вимкнення)/перемикача запуску-зупинення
Засмічено повітряний фільтр, карбюратор, глушитель
або витяжний канал у циліндрі
рухатись)
винен
к
ач I-зупинення
у,
л
в
ано лінію постачання пального, несправність
37
Page 38

Polski
Dziękujemy za zakup kosy spalinowej/wykaszarki spalinowej firmy MAKITA.
Kosa spalinowa/wykaszarka spalinowa firmy MAKITA została zaprojektowana
na podstawie wieloletniej wiedzy, doświadczenia oraz w oparciu o szczegółowy
program rozwoju.
Prosimy o zapoznanie się z niniejszą instrukcją w celu zagwarantowania
najlepszej wydajności i doskonałych wyników pracy kosy spalinowej/wykaszarki
spalinowej firmy MAKITA.
Symbole
Podczas czytania niniejszej instrukcji obsługi można napotkać następujące symbole.
Przeczytaj Instrukcję obsługi
Zachować szczególną ostrożność
Spis treści Strona
Symbole ...................................................................... 38
Zasady bezpieczeństwa.............................................. 39
Dane techniczne ......................................................... 43
Nazwy części .............................................................. 44
Montaż uchwytu .......................................................... 45
Montaż osłony............................................................. 46
Montaż ostrza tnącego/żyłkowej głowicy tnącej.......... 47
Paliwo/uzupełnianie paliwa ......................................... 48
Prawidłowe obchodzenie się z narzędziem ................ 49
Ważne kwestie dotyczące obsługi/zatrzymywanie
kosy/wykaszarki .......................................................... 49
Ostrzenie narzędzia tnącego ...................................... 51
Zalecenia dotyczące serwisowania............................. 53
Przechowywanie ......................................................... 55
Nosić okulary ochronne i stosować odpowiednią
ochronę słuchu
(tylko w przypadku wykaszarki spalinowej)
Nosić kask ochronny oraz odpowiednią ochronę
oczu i słuchu
(tylko w przypadku kosy spalinowej)
Zabronione
Zachować odstęp Maksymalna dopuszczalna prędkość narzędzia
Niebezpieczeństwo zranienia przez wyrzucane
przedmioty
Nie palić Mieszanka paliwa i oleju
Zakaz otwartego ognia Ręczny rozruch silnika
Nosić rękawice ochronne Wyłączanie awaryjne
Odrzut Pierwsza pomoc
W miejscu pracy nie mogą przebywać żadne
osoby ani zwierzęta
Nie używać metalowych ostrzy
(tylko w przypadku wykaszarki spalinowej)
Gorące powierzchnie – ryzyko oparzenia palców i
dłoni
ON/START
Nosić wytrzymałe obuwie robocze na
podeszwie antypoślizgowej. Zaleca się
noszenie obuwia ze stalowymi noskami.
38
OF
F/STOP
START
Page 39

Schemat
15 m
(1)
(3)
(2)
(4)
(5)
(6)
Zasady bezpieczeństwa
Zalecenia ogólne
– W celu zapewnienia prawidłowej pracy narzędzia należy przeczytać ze
zrozumieniem niniejszą instrukcję obsługi, gwarantującą prawidłową obsługę
kosy spalinowej/wykaszarki spalinowej. Użytkowanie niniejszego sprzętu bez
znajomości jego prawidłowej obsługi może przyczynić się do poważnych
obrażeń, zarówno własnej osoby, jak i osób postronnych.
–Kosę spalinową/wykaszarkę spalinową można udostępniać wyłącznie
osobom z doświadczeniem w obsłudze kos spalinowych/wykaszarek
spalinowych. Podczas udostępniania niniejszego sprzętu należy również
przekazać niniejszą instrukcję obsługi.
– W przypadku pierwszego korzystania z kosy spalinowej należy skonsultować
się ze sprzedaw
– Kosa spalinowa/wykaszarka spalinowa nie może być obsługiwana przez
dzieci i młodzież w wieku poniżej 18. roku życia. Młodzież powyżej 16 roku
życia może korzystać ze sprzętu w celach szkoleniowych, jednak tylko pod
nadzorem wykwalifikowanego instruktora.
– Podczas korzystania z kosy spalinowej/wykaszarki spalinowej należy zawsze
zachować maksymalną ostrożność.
–Używać kosy spalinowej/wykaszarki spalinowej, tylko znajdując się w
doskonałym stanie fizycznym. Wszelkie czynności powinny być wykonywane
spokojnie i ostrożnie. Każdy użytkownik musi być świadomy ponoszonej
odpowiedzialności za osoby i przedmioty znajdujące się w jego otoczeniu.
– Nigdy nie używać kosy spalinowej/wykaszarki spalinowej, będąc pod
wpływem alkoholu lub narkotyków, gdy jest się zmęczonym lub chorym.
O
TRZEŻENIE: Podczas pracy niniejsze elektronarzędzie wytwarza pole
S
elektromagnetyczne. W pewnych warunkach pole to może zakłócać pracę
aktywnych lub pasywnych implantów medycznych. Aby zmniejszyć ryzyko
poważnych lub śmiertelnych obrażeń, zalecamy osobom z implantami
medycznymi skonsultowanie się z lekarzem i producentem implantów
medycznych przed przystąpieniem do obsługi tego urządzenia.
Przeznaczenie narzędzia
– Kosa spalinowa/wykaszarka spalinowa przeznaczona jest wyłącznie do
ścinania trawy, chwastów, krzewów i innych zarośli. Nie należy jej używać do
żadnych innych celów, takich jak wykańczanie krawędzi lub przycinanie
żywopłotu, gdyż może to spowodować obrażenia ciała.
Sprzęt ochrony indywidualnej
–Należy zawsze nosić odzież, która zarówno jest funkcjonalna, jak i
odpowiednia do wykonywanej pracy, np. dobrze dopasowane ubrania, ale nie
za ciasne, ponieważ w przeciwnym razie mogą one ograniczać ruchy. Nie
wolno nosić biżuterii lub odzieży, która mogłaby zaplątać się w krzewy lub
gałęzie.
– Aby uniknąć obrażeń głowy, oczu, dłoni lub stóp, jak również w celu ochrony
słuchu podczas pracy z kosą spalinową/wykaszarką spalinową należy używać
następującego sprzętu ochrony indywidualnej oraz odzieży ochronnej.
– Zawsze należy nosić kask ochronny, jeśli istnieje zagrożenie bezpieczeństwa
przez spadające przedmioty. Kask ochronny (1) należy regularnie sprawdzać
pod kątem ewentualnych uszkodzeń i wymieniać przynajmniej raz na 5 lat.
Używać tylko atestowanych kasków ochronnych.
–O
słona twarzy (2) w kasku (lub alternatywnie okulary ochronne) chronią twarz
przed wyrzucanymi drobinkami i kamieniami. Podczas obsługi kosy
spalinowej/wykaszarki spalinowej należy zawsze nosić okulary ochronne lub
osłonę oczu, aby zapobiec obrażeniom oczu.
–Stosować odpowiednie zabezpieczenie słuchu (nauszniki (3), zatyczki do
uszu itp.).
– Kombinezon roboczy (4) chroni przed wyrzucanymi kamieniami i drobinkami.
Zdecydowanie zalecamy użytkownikom noszenie kombinezonu roboczego
podczas pracy ze sprzętem.
–Rękawice ochronne (5) wykonane z grubej skóry stanowią część
przepisowego sprzętu ochronnego i muszą być zawsze noszone podczas
pracy z kosą spalinową/wykaszarką spalinową.
– Podczas pracy z kosą spalinową/wykaszarką spalinową należy zawsze nosić
wytrzymałe obuwie (6) z antypoślizgową podeszwą. Takie obuwie chroni
przed obrażeniami i zapewnia stabilne oparcie.
Ryzyko resztkowe
– Nawet jeśli elektronarzędzie jest użytkowane zgodnie z zaleceniami, nie
można całkowicie wyeliminować wszystkich czynników ryzyka resztkowego.
Istnieje możliwość wystąpienia następujących zagrożeń związanych z
budową oraz przeznaczeniem elektronarzędzia:
1. Uszkodzenie płuc w przypadku braku stosowania maski przeciwpyłowej.
2. Uszkodzenie słuchu w przypadku braku stosowania ochrony słuchu.
3. Utrata zdrowia w wyniku wibracji w przypadku zbyt długiego użytkowania
elektronarzędzia lub nieprawidłowego obchodzenia się z nim bądź
nieprawidłowej konserwacji.
Uruchamianie kosy spalinowej
–Upewnić się, że w promieniu 15 metrów nie przebywają żadne dzieci lub inne
osoby, jak również zwracać uwagę, czy w pobliżu miejsca pracy nie ma
żadnych zwierząt.
– Przed użyciem zawsze sprawdzić, czy kosa spalinowa/wykaszarka spalinowa
jest sprawna i nie stwarza zagrożenia:
Sprawdzić, czy narzędzie tnące jest prawidłowo zamocowane, czy dźwignia
sterująca może być z łatwością obsługiwana oraz czy blokada dźwigni
sterującej działa prawidłowo.
– Obracanie narzędzia tnącego przy pracy na biegu jałowym jest zabronione.
Sprawdzić u sprzedawcy, czy sprzęt wymaga regulacji. Sprawdzić, czy
uchwyty są czyste i suche oraz czy przycisk start/stop działa prawidłowo.
cą w celu uzyskania podstawowych informacji.
39
Page 40

– Uruchamiać kosę spalinową/wykaszarkę spalinową tylko zgodnie z instrukcją.
• Przerwy w pracy
• Transport
•Uzupełnianie paliwa
•Konserwacja
• Wymiana narzędzi
Nie stosować żadnej innej metody w celu uruchomienia silnika!
–Kosę spalinową/wykaszarkę spalinową oraz narzędzia należy używać
wyłącznie zgodnie z przeznaczeniem.
– Uruchamiać silnik kosy spalinowej/wykaszarki spalinowej tylko po całkowitym
zmontowaniu całego sprzętu. Nie obsługiwać narzędzia dopóki nie zostaną
zamontowane wszystkie odpowiednie akcesoria.
– Przed uruchomieniem narzędzia należy upewnić się, że narzędzie tnące nie
dotyka twardych przedmiotów, takich jak gałęzie, kamienie itp., ponieważ przy
rozruchu zaczyna się ono obracać.
– W razie jakichkolwiek problemów z silnikiem należy niezwłocznie go wyłączyć.
– W przypadku uderzenia narzędzia tnącego o kamień lub inny twardy
przedmiot należy n
pod kątem ewentualnych uszkodzeń.
–Należy często, regularnie sprawdzać narzędzie tnące pod kątem uszkodzeń
(wykrywanie pęknięć za pomocą testu odgłosów przy stukaniu).
–Kosę spalinową/wykaszarkę spalinową należy obsługiwać wyłącznie po
zamocowaniu i wyregulowaniu długości paska na ramię. Pasek na ramię musi
zostać dopasowany do wzrostu użytkownika oraz musi zostać zamocowany w
celu niedopuszczenia do zmęczenia operatora podczas obsługiwania
narzędzia. Podczas pracy z narzędziem nie wolno trzymać go jedną ręką.
– Podczas pracy należy zawsze trzymać kosę spalinową/wyk
dwoma rękami.
Należy zawsze upewnić się, czy stopy posiadają właściwe podparcie.
–Kosę spalinową/wykaszarkę spalinową należy obsługiwać w taki sposób, aby
unikać wdychania spalin. Nigdy nie uruchamiać silnika w zamkniętym miejscu,
takim jak pomieszczenie (ryzyko zatrucia gazem). Tlenek węgla jest gazem
bezwonnym.
–Należy zawsze wyłączyć silnik podczas przerwy w pracy lub w przypadku
pozostawienia kosy spalinowej/wykaszarki spalinowej bez nadzoru oraz
odłożyć ją w bezpiecznym miejscu w celu niedopuszczenia do obrażeń u
innych osób lub uszkodzenia narzędzia.
– Nie odkładać gorącej kosy spalinowej/wykaszarki spalinowej na suchą trawę
ani na inne materiały łatwopalne.
–Narzędzie tnące musi być wyposażone w odpowiednią osłonę.
Nigdy nie uruchamiać na
– Wszystkie zabezpieczenia i osłony dostarczone z narzędziem muszą być
używane podczas pracy.
– Nigdy nie uruchamiać silnika z uszkodzonym tłumikiem wydechowym.
–Wyłączać silnik na czas transportu.
– Przed transportem narzędzia należy zawsze zamocować pokrywę ostrza
tnącego.
– Przed transportem należy sprawdzić ustawienie kosy spalinowej/wykaszarki
spalinowej pod kątem bezpieczeństwa, aby uniknąć wycieku paliwa.
– Przed transportem kosy spalinowej/wykaszarki spalinowej należy całkowicie
opróżnić zbiornik paliwa.
– Podczas wyładowywania kosy spalinowej/wykaszarki spalinowej z pojazdu
ciężarowego lub innego pojazdu należy zachować ostrożność, aby nie
dopuścić do upadku silnika na ziemię, w przeciwnym razie może doprowadzić
to do uszkodzenia zbiornika paliwa.
–Z wyjątkiem sytuacji awaryjnych, nigdy nie upuszczać ani nie rzucać kosy
spalinowej/wykaszarki spalinowej na ziemię, gdyż może to spowodować
poważne uszkodzenie narzędzia.
– Podczas przenoszenia narzędzia należy zawsze całkowicie je podnieść z
ziemi. Ciągnięcie narzędzia ze zbiornikiem paliwa na ziemi jest szczególnie
niebezpieczne i może spowodować wyciek paliwa, który z kolei może
doprowadzić do pożaru.
– W przypadku silnego uderzenia narzędziem lub jego upadku należy sprawdzić
stan narzędzia przed ponownym przystąpieniem do kontynuowania pracy.
Sprawdzić układ paliwowy pod kątem szczelności oraz elementy sterujące i
urządzenia zabezpieczające pod kątem prawidłowego działania. W przypadku
stwierdzenia uszkodzenia lub wątpliwości, co do prawidłowej pracy narzędzia,
należy zwrócić się do autoryzowanego centrum serwisowego w celu
przeprowadzenia przeglądu i naprawy.
iezwłocznie wyłączyć si
r
zędzia bez zamontowanej osłony!
lnik i sprawdzić narzędzie tnące
aszarkę spalinową
Uzupełnianie paliwa
– Przed tankowaniem należy wyłączyć silnik. Nie zbliżać się do otwartego ognia
i nie palić tytoniu.
– Nie dopuszczać do kontaktu skóry z produktami na bazie oleju mineralnego.
Nie wdychać oparów paliwa. Podczas uzupełniania paliwa zawsze nosić
rękawice ochronne. Pamiętać o regularnej zmianie i praniu odzieży ochronnej.
– Aby nie dopuścić do zanieczyszczenia gruntu (ochrona środowiska
naturalnego), nie wolno rozlewać paliwa lub oleju na ziemię. W przypadku
rozlania paliwa należy niezwłocznie oczyścić kosę spalinową/wykaszarkę
spalinową.
– Sprawdzić, czy paliwo nie miało kontaktu z noszoną odzieżą. W przypadku
kontaktu odzieży z paliwem należy niezwłocznie zmienić ubranie w celu
niedopuszczenia do pożaru.
– Regularnie sprawdzać korek wlewu paliwa i upewnić się, że można go
dokładnie dokręcić i że jest całkowi
– Starannie dokręcić korek wlewu paliwa. Po zakończeniu uzupełniania paliwa
należy odejść do miejsca napełniania paliwa o co najmniej 3 metry przed
ponownym uruchomieniem silnika.
cie s
zczelny.
40
Page 41

– Nigdy nie napełniać paliwa w zamkniętym miejscu, takim jak wewnątrz
Uwaga:
Odrzut
Schemat
Schemat
pomieszczenia. Nieprzestrzeganie powyższego zalecenia może doprowadzić
do wybuchu w wyniku nagromadzenia się oparów paliwa przy samej
podłodze.
– Paliwo można transportować i przechowywać tylko w atestowanych
kanistrach. Dopilnować, aby paliwo było przechowywane w miejscu
niedostępnym dla dzieci.
Metoda pracy
–Kosę spalinową/wykaszarkę spalinową należy używać tylko przy dobrym
oświetleniu i odpowiedniej widoczności. W sezonie zimowym należy uważać
na śliskim lub mokrym terenie, jak również na lodzie i śniegu (ryzyko
poślizgnięcia). Należy zawsze upewnić się, czy stopy posiadają właściwe
podparcie.
– Nie wolno kosić powyżej poziomu pasa.
–Nie używać kosy spalinowej/wykaszarki spalinowej, stojąc na drabinie.
– Nigdy nie wspinać się na drzewa podczas korzystania z kosy spalinowej/
wykaszarki spalinowej.
– Nie pracować na niestabilnym podłożu.
– Obszar roboczy należy oczyścić z piasku, kamieni, gwoździ itp.
Obce przedmioty mogą uszkodzić narzędzie tnące i spowodować
niebezpieczny odrzut.
– Przed rozpoczęciem cięcia należy upew
pełną prędkość roboczą.
– W przypadku zablokowania się trawy lub gałęzi pomiędzy narzędziem tnącym
a osłoną, należy zawsze przed ich usunięciem zatrzymać silnik. W
przeciwnym razie przypadkowy obrót ostrza może przyczynić się do
powstania poważnych obrażeń.
–Stosować przerwy podczas pracy z narzędziem, aby zapobiec utracie kontroli
w wyniku zmęczenia. Zaleca się 10-20 minutową przerwę po każdej
przepracowanej godzinie.
, że narzędzie tnące osiągnęło
nić się
Odrzut (zablokowanie ostrza)
– Podczas pracy z kosą spalinową może dojść do niekontrolowanego odrzutu.
– Odrzuty występują często w przypadku próby cięcia odcinkiem ostrza
zawartym pomiędzy godziną 12 a 2.
– Nigdy nie ciąć za pomocą odcinka ostrza kosy spalinowej zawartego
pomiędzy godziną 12 a 2.
– Nigdy nie przykładać tej części ostrza kosy spalinowej do twardych
przedmiotów, takich jak krzaki, drzewa itp., których średnica jest większa niż
3 cm. Nieprzestrzeganie powyższej zasady może spowodować odchylenie się
kosy spalinowej z dużą siłą, co jest niezwykle niebezpieczne i może
doprowadzić do obrażeń ciała.
Zapobieganie odrzutowi
W celu uniknięcia odrzutu należy przestrzegać poniższych zasad:
–Cięcie za pomocą odcinka ostrza zawartego pomiędzy godziną 12 a 2 jest
niezwykle niebezpieczne, szczególne w przypadku używania metalowych
narzędzi tnących.
–Cięciem odcinkiem ostrza zawartym między godziną 11 i 12 oraz między 2 i 5
wolno wykonywać tylko przeszkolonym i doświadczonym operatorom, na ich
własne ryzyko.
Optymalne cięcie, gwarantujące prawie całkowity brak odrzutów, zapewnia
cięcie odcinkiem ostrza zawartym pomiędzy godziną 8 a 11.
Narzędzia tnące
– Do pracy należy używać tylko odpowiedniego narzędzia tnącego.
Do podkaszania trawnika należy używać żyłkowych głowic tnących (głowic
wykaszarki spalinowej).
Ostrza metalowe są odpowiednie do koszenia chwastów, wysokiej trawy,
krzewów, krzaków, poszycia, zarośli itp.
Nigdy nie używać innych ostrzy zawierających metalowe wieloczęściowe
łańcuchy obrotowe lub noże bijakowe. W przeciwnym wypadku może to
przyczynić się do powstania poważnych obrażeń.
– W przypadku używania ostrzy metalowych należy unikać sytuacji mogących
spowodować „odrzut” oraz być przygotowanym w każdej chwili na
przypadkowy odrzut. Patrz punkt „Odrzut” oraz „Zapobieganie odrzutowi”.
Instrukcja konserwacji
– Aby narzędzie podlegało serwisowaniu przez nasze autoryzowane centrum
serwisowe należy stosować wyłącznie oryginalne części zamienne.
Nieprawidłowa naprawa i konserwacja mogą przyczynić się do skrócenia
żywotności narzędzia oraz zwiększyć ryzyko wypadków.
– Przed rozpoczęciem pracy należy zawsze sprawdzać stan kosy, w
szczególności urządzenia zabezpieczające kosy oraz pasek na ramię.
Szczególną uwagę należy zwrócić na ostrza tnące, które muszą być
prawidłowo naostrzone.
– Przed przystąpieniem do wymiany lub ostrzenia narzędzi tnących bądź
czyszczenia kosy lub narzędzia tnącego należy wyłączyć silnik i zdjąć nasadki
ze świec zapłonowych.
41
Page 42

Nigdy nie prostować ani nie spawać uszkodzonych narzędzi
tnących.
–Używać kosy spalinowej/wykaszarki spalinowej, powodując możliwie jak
najmniejszy hałas i zanieczyszczenie. Przede wszystkim należy sprawdzić
prawidłowe zamocowanie gaźnika.
– Regularnie czyścić kosę spalinową/wykaszarkę spalinową i sprawdzać
dokręcenie wszystkich śrub i nakrętek.
–Nie serwisować ani nie przechowywać kosy spalinowej/wykaszarki spalinowej
w pobliżu otwartego ognia.
– Zawsze przechowywać kosę spalinową/wykaszarkę spalinową w
pomieszczeniach zamkniętych, z opróżnionym zbiornikiem paliwa.
– Przed czyszczeniem, serwisowanie lub przechowywaniem narzędzia należy
zawsze zamocować pokrywę ostrza tnącego.
Przestrzegać instrukcji dotyczących zapobiegania wypadkom wydanych przez
organizacje branżowe i firmy ubezpieczeniowe.
Nie dokonywać żadnych modyfikacji kosy spalinowej/wykaszarki spalinowej,
ponieważ zagraża to bezpieczeństwu.
akres prac konse
Z
użytkownika ograniczony jest do tych, które opisano w niniejszej instrukcji
obsługi. Wszelkie pozostałe prace muszą być wykonywane przez
przedstawiciela autoryzowanego serwisu. Używać tylko oryginalnych części
zamiennych i akcesoriów dostarczanych przez firmę MAKITA.
Stosowanie niezalecanych akcesoriów i narzędzi może zwiększyć ryzyko
wypadków.
Firma MAKITA nie ponosi żadnej odpowiedzialności za wypadki ani szkody
spowodowane stosowaniem niezalecanych narzędzi tnących i elementów
mocujących do narzędzi tnących lub niezalecanych akcesoriów.
Pierwsza pomoc
Należy zadbać, aby w pobliżu miejsca, w którym wykonuje się pracę, zawsze
dostępna była apteczka pierwszej pomocy, z której można będzie skorzystać w
razie wypadku. Wszelkie braki w apteczce należy niezwłocznie uzupełniać.
rwacyjnych lub naprawczych wykonywanych przez
Wzywając karetkę, należy podać następujące informacje:
– Miejsce wypadku
– Opis wydarzenia
–Liczbę osób, które odniosły obrażenia
– Rodzaje obrażeń
–Własne imię i nazwisko
Drgania
– U osób z problemami krążeniowymi, które są narażone na działanie zbyt
intensywnych drgań, może dochodzić do uszkodzenia naczyń krwionośnych
lub układu nerwowego. Drgania mogą wywoływać poniższe objawy w
palcach, rękach lub nadgarstkach: „senność” (odrętwienie), mrowienie, bóle,
wrażenie kłucia, zmiany w zabarwieniu skóry lub zmiany na skórze. W razie
wystąpienia dowolnego z powyższych objawów, należy zasięgnąć porady
lekarza.
– W celu zmniejszenia ryzyka wystąpienia „choroby białych palców” należy
zapobiegać wyziębieniu dłoni oraz zapewnić prawidłowy stan narzędzia i
akcesoriów.
Dotyczy tylko krajów europejskich
Deklaracja zgodności WE
Firma Makita Corporation, jako odpowiedzialny producent, niniejszym oświadcza, że poniższe narzędzie marki Makita:
Oznaczenie maszyny: Kosa Spalinowa/Wykaszarka Spalinowa
Model/typ: EM2600U, EM2600L
Dane techniczne: patrz tabela „DANE TECHNICZNE”
są produkowane seryjnie oraz
spełniają wymagania następujących dyrektyw Unii Europejskiej:
2000/14/WE, 2006/42/WE, 2004/108/WE
i są produkowane zgodnie z następującymi normami lub dokumentami normalizacyjnymi:
EN ISO 11806-1, EN ISO 14982
Dokumentacja techniczna przechowywana jest przez:
Makita International Europe Ltd., Technical Department,
Michigan Drive, Tongwell, Milton Keynes, Bucks MK15 8JD, Wielka Brytania
Procedura oceny zgodności wymagana przez Dyrektywę 2000/14/WE została przeprowadzona zgodnie z Załącznikiem V.
Zmierzony poziom mocy akustycznej (w przypadku wykaszarki spalinowej): 109,77 dB
Zmierzony poziom mocy akustycznej (w przypadku kosy spalinowej): 107,29 dB
Gwarantowany poziom mocy akustycznej: 112 dB
15. 4. 2013
Tomoyasu Kato
Dyrektor
Makita Corporation
3-11-8, Sumiyoshi-cho,
Anjo, Aichi, JAPAN
42
Page 43

Dane techniczne
Model
EM2600U EM2600L
Uchwyt U Uchwyt pałąkowy
Wymiary: długość x szerokość x wysokość (bez ostrza tnącego) 1 770 x 610 x 410 mm 1 770 x 330 x 185 mm
Masa netto 5 kg 5 kg
Pojemność skokowa silnika
Maksymalna moc silnika 0,83 kW
Maksymalna częstotliwość obrotowa wrzeciona
8 800 min
Jednoczęściowe ostrze
metalowe
Narzędzie tnące
Głowica wykaszarki
spalinowej
Obroty na biegu jałowym 3 000 obr/min
Prędkość włączania sprzęgła 4 100 obr/min
Przełożenie przekładni 14/19
Paliwo
Benzyna: olej do silników dwusuwowych = 50:1
Mieszanka paliwowa
Pojemność (zbiornik paliwa) 0,6 l
Gaźnik WALBRO WYC
25,7 cm
φ230 mm
φ430 mm
3
-1
Układ zapłonowy Zapłon bezrozdzielaczowy
Świeca zapłonowa NGK BPMR7A
Przerwa między elektrodami 0,6 - 0,7 mm
Lewy uchwyt (rękojeść
przednia)
14,680 m/s
2
K = 1,5 m/s
2
5,152 m/s2 K = 1,5 m/s
Wibracje: (dotyczy kosy spalinowej)
Wibracje: (dotyczy wykaszarki
spalinowej)
Prawy uchwyt (rękojeść
tylna)
Lewy uchwyt (rękojeść
przednia)
Prawy uchwyt (rękojeść
przednia)
9,037 m/s
7,961 m/s
7,019 m/s
2
K = 1,5 m/s
2
K = 1,5 m/s
2
K = 1,5 m/s
2
2
2
9,677 m/s2 K = 1,5 m/s
8,83 m/s2 K = 1,5 m/s
14,381 m/s2 K = 1,5 m/s
Hałas (przebadany zgodnie z dyrektywą 2000/14/WE i 2005/88/WE):
Poziom ciśnienia akustycznego na stanowisku operatora (wykaszarka
spalinowa):
Poziom ciśnienia akustycznego na stanowisku operatora (kosa
spalinowa):
98,52 dB (A) K = 2,5 dB (A)
96,15 dB (A) K = 2,5 dB (A)
Zmierzony poziom mocy akustycznej (wykaszarka spalinowa): 109,77 dB (A) K = 2,5 dB (A)
Zmierzony poziom mocy akustycznej (kosa spalinowa): 107,29 dB (A) K = 2,5 dB (A)
Hałas (przebadany zgodnie z dyrektywą 2000/14/WE i 2005/88/WE):
gwarantowany poziom mocy akustycznej
112 dB (A)
2
2
2
2
43
Page 44

Nazwy części
Nazwy części
1 Zbiornik paliwa
2 Rozrusznik mechaniczny
3 Filtr powietrza
4
Przełącznik I-Stop (wł./wył.)/
przełącznik Start-Stop
5 Świeca zapłonowa
6Tłumik wydechowy
7 Obudowa sprzęgła
8Rękojeść tylna
9Zaczep
10 Uchwyt
11 Dźwignia sterująca
12 Linka sterująca
13 Drążek
14 Osłona (osłona narzędzia tnącego)
15 Skrzynka przekładniowa
16 Oprawa uchwytu
17 Ostrze tnące
18 Żyłkowa głowica tnąca
19 Korek wlewu paliwa
20 Pokrętło rozrusznika
21 Pompka zastrzykowa
22 Dźwignia ssania
EM2600U
Uchwyt U
EM2600L
Uchwyt pałąkowy
(3)
(7)
(21)
(1)
(19)
44
Page 45

Montaż uchwytu
EM2600U
L
R
(1)
EM2600U
(2)
EM2600U
(3)
(1)
EM2600U
UWAGA: Przed przystąpieniem do jakiejkolwiek pracy przy kosie spalinowej
należy zawsze wyłączyć silnik i zdjąć nasadkę ze świecy zapłonowej.
Zawsze nosić rękawice ochronne!
UWAGA: Przed uruchomieniem kosy spalinowej należy sprawdzić, czy została
ona całkowicie zmontowana.
Dotyczy modeli z uchwytem U
–Umieścić obydwa uchwyty w oprawie uchwytu. Dźwignia sterująca powinna
znajdować się po prawej stronie, patrząc w kierunku narzędzia tnącego.
–Wsunąć końce uchwytu w rowek w oprawie uchwytu i zamocować na nich
zacisk. Dokręcić je za pomocą czterech śrub, pozostawiając miejsce do
regulacji.
–Ustawić odpowiedni kąt uchwytów, a następnie dokręcić równo wszystkie
śruby za pomocą klucza sześciokątnego.
–Umieścić linkę przepustnicy (1) z boku dźwigni sterującej drążka. A następnie
zasłonić je za pomocą osłony (2).
–Wsunąć linkę przepustnicy (1) w otwór zaciskowy (3) oprawy uchwytu.
– Sprawdzić, czy linka przepustnicy jest zamocowana, jak pokazano na
rysunku.
– Sprawdzić, czy dźwignia sterująca porusza się płynnie.
GA: Nie mocować linki przepustnicy, jak pokazano na rysunku. W
A
UW
przeciwnym wypadku skręcona linka może spowodować wysokie
obroty jałowe, a niekontrolowane ostrze może spowodować obrażenia
ciała.
45
Page 46

Dotyczy modelu z uchwytem pałąkowym
(2)
(1)
Silnik
(4)
(3)
Silnik
EM2600L
Ostrze gwiaździste Osłona ostrzy metalowych
Żyłkowa głowica tnąca
Osłona żyłki tnącej
(2)
(3)
(1)
(4)
(1)
(6)
(5)
–Wkręcić gwint (1) oprawy uchwytu w otwór (2) drążka.
– Zamocować uchwyt pomocniczy (3) do bariery.
–Dokręcić 4 śruby (4) M5 × 30.
Montaż osłony
W celu zachowania zgodności z normami dotyczącymi bezpieczeństwa, należy
stosować wyłączenia zespół narzędzia/osłony wskazany w tabeli.
Należy zawsze stosować wyłącznie oryginalne ostrza tnące/
żyłkową głowicę tnącą formy MAKITA.
–Ostrze tnące musi być dobrze wypolerowane, bez pęknięć i wyszczerbień. W
przypadku uderzenia ostrza tnącego o kamień podczas pracy należy
niezwłocznie wyłączyć silnik i sprawdzić ostrze pod kątem uszkodzeń.
–Ostrze tnące należy ostrzyć lub wymieniać po każdych trzech godzinach
pracy.
– W przypadku uderzenia żyłkowej głowicy tnącej o kamień podczas pracy,
należy niezwłocznie wyłączyć silnik i sprawdzić głowicę pod kątem
uszkodzeń.
UWAGA: Dla własnego bezpieczeństwa, zgodnie z przepisami dotyczącymi
– Zamocować osłonę (1)
– W przypadku używania żyłkowej głowicy tnącej należy zamocować osłonę (6)
zapobiegania wypadkom, narzędzie wolno używać tylko z
odpowiednimi osłonami. Zabrania się użytkowania narzędzia bez
zamontowanych osłon.
do zaci
sku (3) za pomocą dwóch śrub M6 x 30 (2).
do osłony (1) za pomocą dwóch śrub (4) i dwóch nakrętek (5).
46
Page 47

Montaż ostrza tnącego/żyłkowej głowicy tnącej
(2)
(1)
(3)
Poluzowanie
Klucz sześciokątny
Dokręcanie
(3)
Poluzowanie
Klucz sześciokątny
Dokręcanie
Obrót
Ostrze tnące lub żyłkową głowicę tnącą można z łatwością wymienić, obracając
w pierwszej kolejności narzędzie do góry nogami.
–Wsunąć klucz sześciokątny w otwór w skrzynce przekładniowej i obracać nim
podkładkę (3), aż zostanie zablokowana kluczem sześciokątnym.
– Poluzować nakrętkę/podkładkę sprężystą (1) (gwint lewoskrętny) kluczem
nasadowym, a następnie wyjąć nakrętkę/podkładkę sprężystą (1) i podkładkę
dociskową (2).
Z włożonym kluczem sześciokątnym
– Zamontować ostrze tnące na drążku w taki sposób, aby prowadnica podkładki
(3) pokrywała się z otworem osiowym w ostrzu tnącym. Zamontować
podkładkę dociskową (2) i zamocować ostrze tnące za pomocą nakrętki/
podkładki sprężystej (1).
[Moment dokręcania: 13-23 Nm]
UWAGA: Podczas jakichkolwiek czynności wymagających kontaktu z ostrzem
UWAGA: Nakrętka mocująca ostrze tnące (z podkładką sprężystą) jest częścią
tnącym należy nosić rękawice ochronne.
ulegającą zużyciu. W razie zauważenia jakichkolwiek oznak zużycia
lub zniekształcenia podkładki sprężystej, należy wymienić nakrętkę.
icy tną
UWAGA: Do montażu żyłkowej głow
dociskowa (2) ani nakrętka/podkładka sprężysta (1). Żyłkowa głowica
tnąca powinna być zamontowana na podkładce (3).
–Nakręcić żyłkową głowicę tnącą na drążek.
– Sprawdzić, czy ostrze obraca się przeciwnie do ruchu wskazówek zegara.
cej nie jest wymagana podkładka
47
Page 48

Paliwo/uzupełnianie paliwa
Przestrzegać zasad bezpieczeństwa podanych
na stronie 39.
20 cm3 40 cm
3
100 cm3 200 cm
3
200 cm3 400 cm
3
1 000 cm3 (1 litr)
5 000 cm
3
(5 litrów)
10 000 cm
3
(10 litrów)
50:1 25:1
Benzyna
+
Obchodzenie się z paliwem
Zachować maksymalną ostrożność podczas obchodzenia się z paliwem. Paliwa
mogą zawierać substancje podobne do rozpuszczalników. Tankować w
pomieszczeniu o dobrej wentylacji lub na zewnątrz. Nie wdychać oparów paliwa,
chronić skórę przed kontaktem z paliwem lub olejem.
Produkty na bazie oleju mineralnego odtłuszczają skórę. Dłuższy kontakt z
niniejszymi produktami może spowodować nadmierne przesuszenie skóry, które
może prowadzić do wielu różnych chorób skórnych. Mogą także wystąpić
reakcje alergiczne.
Kontakt z olejem może również podrażnić oczy. W przypadku dostania się oleju
do oczu natychmiast przemyć je obficie czystą wodą. Jeżeli oczy są nadal
podrażnione, natychmiast zasięgnąć porady lekarza.
Mieszanka paliwa i oleju
Kosa spalinowa wyposażona jest w silnik dwusuwowy o dużej wydajności. Jest
on zasilany mieszanką paliwa i oleju do silników dwusuwowych. Silnik jest
przeznaczony do pracy ze zwykłą benzyną bezołowiową o liczbie oktanowej
min. 91 RON. Jeżeli paliwo takie nie jest dostępne z jakiegokolwiek powodu,
można je zastąpić paliwem o wyższej liczbie oktanów. Nie uszkodzi to silnika,
ale może obniżyć parametry pracy.
Podobna sytuacja wystąpi w przypadku użycia benzyny ołowiowej. Aby uzyskać
optymalną pracę silnika, a także chronić zdrowie i środowisko naturalne, należy
używać tylko benzyny bezołowiowej!
Do smarowania silnika używać oleju przeznaczonego do silników dwusuwowych
(klasa jakości: JASO FC lub ISO EGD) do paliwa. Silnik jest przeznaczony do
pracy z olejem zalecanym do silników dwusuwowych przy proporcji mieszanki
wynoszącej 50:1, aby chronić środowisko naturalne.
Ponadto stosowanie powyższej proporcji mieszanki gwarantuje długi okres
eksploatacji, dzięki niezawodnej pracy, oraz emisję na minimalnym poziomie.
Jeśli proporcja mieszanki 50:1 nie jest
spalinowej nie może zostać zagwarantowana (olej zalecany do silników
dwusuwowych).
Prawidłowa proporcja mieszanki:
Benzyna: zalecany olej do silników dwusuwowych = 50:1 lub
Benzyna: olej innego producenta do silników dwusuwowych = 25:1 (zalecany)
UWAGA: Aby przygotować mieszankę paliwa i oleju, należy w pierwszej
kolejności wymieszać całą ilość oleju z połową paliwa, a następnie
dodać pozostałą ilość paliwa. Dokładnie wstrząsnąć mieszankę przed
wlaniem jej do zbiornika kosy spalinowej. W celu zapewnienia
bezpiecznej pracy narzędzia nie dodawać większej ilości oleju niż
zalecana. Spowoduje to jedynie powstanie większej ilości
pozostałości spalania, które zanieczyszczą środowisko naturalne i
zapychają kanał wydechowy w cylindrze, a także tłumik. Ponadto
zużycie paliwa wzrośnie, a wydajność silnika ulegnie pogorszeniu.
Uzupełnianie paliwa
Silnik musi być wyłączo
–D
okładnie oczyścić miejsce wokół korka wlewu paliwa (2), aby zapobiec
przedostaniu się zanieczyszczeń do zbiornika paliwa (1).
–Odkręcić korek wlewu paliwa (2) i napełnić zbiornik paliwem.
– Mocno dokręcić korek wlewu paliwa (2).
–Oczyścić korek wlewu paliwa (2) i zbiornik paliwa po tankowaniu.
ny.
przestr
zegana, niezawodna praca kosy
Przechowywanie paliwa
Paliwa nie można przechowywać przez nieograniczony okres.
Paliwo należy kupować tylko w takiej ilości, jaka wystarcza na 4 tygodnie pracy.
Paliwo można przechowywać tylko w atestowanych kanistrach.
48
Page 49

Prawidłowe obchodzenie się z narzędziem
Zaczep
(1)
EM2600U
(1)
(4)
(2)
(3)
(1)
(3)
(2)
EM2600L
Montaż paska na ramię
– Wyregulować długość paska tak, aby ostrze tnące znajdowało się w położeniu
równoległym do podłoża.
Demontaż
– W przypadku sytuacji awaryjnej nacisnąć przyciski (1) po obu stronach i
odczepić narzędzie.
Należy zachować szczególną ostrożność, aby nie utracić kontroli nad
narzędziem. Nie dopuścić, aby narzędzie odchyliło się w stronę użytkownika
lub jakiejkolwiek innej osoby przebywającej w pobliżu.
OSTRZEŻENIE: Niezachowanie całkowitej kontroli nad narzędziem może
spowodować poważne obrażenia lub ŚMIERĆ.
Uwaga: W niektórych krajach pasek na ramię nie posiada funkcji odczepiania.
Ważne kwestie dotyczące obsługi/zatrzymywanie kosy/wykaszarki
Przestrzegać stosownych przepisów dotyczących zapobiegania wypadkom.
Uruchamianie
Oddalić się o co najmniej 3 m od miejsca, w którym nar
terenie tak, aby narzędzie tnące nie stykało się z ziemią ani z żadnym innym przedmiotem.
OSTRZEŻENIE: Zachować ostrożność, ponieważ narzędzie tnące po
uruchomieniu silnika natychmiast zaczyna się obracać.
Rozruch na zimno w przypadku modeli z uchwytem U
–Ustawić przełącznik I-Stop (wł./wył.) (1), jak pokazano na rysunku.
–Chwycić uchwyt (docisk ręką powoduje odblokowanie dźwigni
zabezpieczającej (2)).
– Wcisnąć dźwignię przepustnicy (3) i przytrzymać ją.
–Nacisnąć przycisk blokady (4) i zwolnić dźwignię sterującą, a następnie
zwolnić przycisk blokady (pr
położeniu pracy).
Rozruch na zimno w przypadku modeli z uchwytem pałąkowym
–Ustawić przełącznik Start-Stop (1) w położeniu start, jak pokazano na
rysunku.
–Chwycić uchwyt (docisk ręką powoduje odblokowanie dźwigni
zabezpieczającej (2)).
– Wcisnąć dźwignię przepustnicy (3) i przytrzymać ją.
–Ustawić przełącznik Start-Stop (1) w położeniu start i zwolnić dźwignię
sterującą, a następnie zwolnić przełącznik Start-Stop (przełącznik Start-Stop
powoduje przytrzymanie dźwigni przepustnicy w położeniu rozruchu).
z
ycisk blokady zablokuje dźwignię przepustnicy w
zędzie zostało napełnione paliwem. Umieścić kosę spalinową na oczyszczonym, otwartym
49
Page 50

Rozruch rozgrzanego silnika w przypadku modeli z uchwytem U
EM2600U
EM2600L
(6)
(5)
ZAMKNIĘTE
(6)
(5)
OTWARTE
–Ustawić przełącznik I-Stop (wł./wył.) (1), jak pokazano na rysunku.
Rozruch rozgrzanego silnika w przypadku modeli z uchwytem pałąkowym
–Ustawić przełącznik Start-Stop (1) w położeniu neutralnym, jak pokazano na
rysunku.
– W pierwszej kolejności należy ustawić narzędzie na ziemi.
– Lekko, kilkakrotnie nacisnąć pompkę zastrzykową (5) (7-10 razy), aż zostanie
do niej doprowadzone paliwo.
–Zamknąć dźwignię ssania (6).
Otwieranie ssania:
•Całkowite zamknięcie w przypadku niskiej temperatury lub gdy silnik jest
zimny
• Do połowy lub całkowite otwarcie w przypadku uruchomienia przy
rozgrzanym silniku
–Chwycić mocno obudowę sprzęgła lewą ręką, jak pokazano na rysunku.
– Powoli pociągnąć rękojeść rozrusznika do oporu, a następnie gwałtownie ją
pociągnąć.
– Nie naciągać linki ro
rozrusznika nie cofnął się. Kontrolować linkę rozrusznika i zapewnić jej wolne
cofnięcie się.
–Powtórzyć operację uruchamiania do momentu usłyszenia początkowego
zapłonu silnika.
–Nacisnąć dźwignię ssania (6) ( ) i ponownie pociągnąć linkę rozrusznika,
aż silnik uruchomi się.
– Po uruchomieniu silnika należy niezwłocznie nacisnąć i zwolnić przepustnicę,
aby zwolnić blokadę przepustnicy w pozycji do połowy zamkniętej i umożliwić
pracę silnika na biegu jałowym.
–Zostawić silnik uruchomiony przez około jedną minutę na średnich obrotach,
aby rozgrzać go przed przejściem na pełne obroty.
UWAGA: – Jeżeli uchwyt rozrusznika zostanie wielokrotnie pociągnięty
uruchomieniem silnika spowodowane nadmiernym zassaniem paliwa.
– W przypadku nadmiernego zassania paliwa należy wyjąć świecę zapłonową i pociągnąć powoli uchwyt rozrusznika, aby usunąć
nadmiar paliwa. Osuszyć również odcinek elektrody na świecy zapłonowej.
zrusznika do oporu ani nie dopuszczać, aby uchw
yt
, gdy dźwignia ssania po
zostaje w położeniu „ ”, wystąpią trudności z
50
Page 51

Środki ostrożności podczas tej czynności:
EM2600L
EM2600U
Jeśli dźwignia przepustnicy znajduje się w położeniu otwartym podczas pracy narzędzia bez obciążenia, prędkość obrotowa silnika wzrośnie do
ponad 10 000 min
8 000 min
UWAGA: Należy zawsze zredukować prędkość obrotową silnika, jeśli narzędzie nie jest w danym momencie używane przy pracy.
Wyłączanie
–Całkowicie zwolnić dźwignię przepustnicy (3), a po spadku prędkości
obrotowej silnika ustawić przełącznik I-Stop (wł./wył.)/przełącznik Start-Stop
(1) w położeniu „STOP” – silnik zatrzyma się.
–Należy pamiętać, że głowica tnąca może się jeszcze przez chwilę obracać –
odczekać, aż jej obroty zostaną zredukowane i całkowicie się
-1
-1
Praca narzędzia z wysoką prędkością obrotową, w czasie gdy nie jest ono używane, spowoduje skrócenie żywotności narzędzia.
. Nigdy nie pracować z wyższą prędkością silnika, niż jest to konieczne, i zachować prędkość na poziomie około 6 000-
.
zatrzyma.
Ostrzenie narzędzia tnącego
UWAGA: Wymienione poniżej narzędzia tnące muszą być ostrzone wyłącznie w
autoryzowanym serwisie. Ostrzenie ręczne spowodowałoby brak
wyważenia narzędzia tnącego, powodujące drgania i uszkodzenie
narzędzia.
–ostrze tnące (ostrze gwiaździste (4 zęby))
Usługa ostrzenia i wyważania ostrza oferowana jest przez przedstawicieli
autoryzowanych serwisów.
UWAGA: W celu przedłużenia żywotności ostrza tnącego (gwiaździstego)
można je obrócić i korzystać z niego, dopóki nie stępią się obie
krawędzie tnące.
51
Page 52

ŻYŁKOWA GŁOWICA TNĄCA
Najefektywniejszy obszar koszenia
Pokrętło
Obroty jałowe Pełne obroty
Pokrywa
Zaczepy
Nacisnąć
Nacisnąć
Szpula
80 mm (3-1/8”)
W przypadku
obrotów w lewą
stronę
Szpula
150 mm (6”)
Nacięcia
Żyłkowa głowica tnąca to dwużyłkowa głowica wykaszarki spalinowej,
umożliwiająca zarówno pracę automatyczną, jak i działanie w trybie „bump &
feed”.
Żyłkowa głowica tnąca automatycznie uwalnia prawidłową długość żyłki
nylonowej przy zmianie siły odśrodkowej powodowanej przez zwiększenie lub
zmniejszenie obrotów silnika. W celu efektywniejszego koszenia miękkiej trawy
można jednak lekko uderzyć żyłkową głowicą tnącą o ziemię, aby wysunąć
więcej żyłki, zgodnie z zaleceniami podanymi w rozdziale dotyczącym obsługi.
Obsługa
–Zwiększyć prędkość żyłkowej głowicy tnącej do ok. 6 000 min-1.
Żyłka nylonowa nie wysunie się prawidłowo przy niższej prędkości obrotowej
(poniżej 4 800 min
– Najefektywniejszy obszar koszenia został zaznaczony poprzez zacieniony
obszar na schemacie po prawej stronie.
Jeżeli żyłka nylonowa nie wysuwa się automatycznie, należy postępować
zgodnie z poniższymi zaleceniami:
1. Zwolnić dźwignię przepustnicy, aby silnik pracował na biegu jałowym, po
czym całkowicie przekręcić dźwignię przepustnicy. Powtarzać tę procedurę,
dopóki żyłka nylonowa nie wysunie się na odpowiednią długość.
2. Jeżeli żyłka nylonowa jest zbyt krótka, aby mogła się wysunąć
automatycznie po wykonaniu powyższej procedury, należy uderzyć żyłkową
głowicą tnącą o ziemię, aby spowodować w
3. Jeżeli procedura nr 2 nie spowoduje wysunięcia się żyłki nylonowej, należy
ponownie nawinąć/wymienić żyłkę nylonową zgodnie z procedurą opisaną w
punkcie „Wymiana żyłki nylonowej”.
-1
).
y
sunięcie żyłki.
Wymiana żyłki nylonowej
–Wyłączyć silnik.
–Nacisnąć zaczepy na obudowie, aby podnieść pokrywę i wyjąć szpulę.
– Zaczepić środek nowej żyłki nylonowej w nacięciu na środku szpuli tak, aby
jeden koniec żyłki był dłuższy od drugiego o około 80 mm. Następnie nawinąć
oba końce wokół szpuli w kierunku obrotów głowicy (symbole znajdujące się z
boku szpuli oznaczają odpowiednio – LH obroty w lewo, RH obroty w prawo).
–Nawinąć całą żyłkę na szpulę, pozostawiając ok. 150 mm i zaczepiając
tymczasowo końce w nacięciu z boku szpuli.
52
Page 53

–Przełożyć oba końce żyłki przez otwory na zewnątrz obudowy.
Otwor
Pokrywa
Zaczep
Otwor
Zaczep
(1)
(2)
(3)
(4)
Zamontować podkładkę, sprężynę i szpulę w obudowie.
– Wyrównać zaczepy na pokrywie i obudowie.
Następnie wcisnąć mocno pokrywę w obudowę w celu jej zamocowania.
Zalecenia dotyczące serwisowania
Zalecenia dotyczące serwisowania
UWAGA: Przed przystąpieniem do jakichkolwiek prac konserwacyjnych przy
kosie spalinowej, należy zawsze wyłączyć silnik i zdjąć nasadkę ze
świecy zapłonowej (patrz rozdział „Kontrola świecy zapłonowej”).
Zawsze nosić rękawice ochronne.
UWAGA: Nigdy nie wyjmować samemu rozrusznika mechanicznego.
W celu zapewnienia długiego okresu eksploatacji oraz w celu uniknięcia uszkodzenia narzędzia wszystkie prace konserwacyjne należy
przeprowadzać regularnie.
Codzienna kontrola i konserwacja
– Przed przystąpieniem do pracy sprawdzić narzędzie pod kątem poluzowanych śrub i brakujących części. Zwracać szczególną uwagę na
– Przed przystąpieniem do pracy należy zawsze sprawdzić
– Po zakończeniu pracy z narzędziem wykonać każdorazowo następujące czynności:
– Sprawdzić przełącznik I-Stop (wł./wył.)/przełącznik Start-Stop, dźwignię zabezpieczającą, dźwignię sterującą i przycisk blokady pod kątem
Nieprzestrzeganie powyższego zalecenia może doprowadzić do
wypadku. Procedurę tę powinien przeprowadzać wyłącznie
przedstawiciel autoryzowanego serwisu.
dokręcenie ostrza tnącego lub żyłkowej głowicy tnącej.
W razie potrzeby oczyścić.
przewód pow
•Oczyścić z zewnątrz kosę spalinową i sprawdzić narzędzie pod kątem uszkodzeń.
•Oczyścić filtr powietrza. Podczas pracy w warunkach dużego zapylenia należy czyścić filtr kilka razy dziennie.
• Sprawdzić ostrze lub żyłkową głowicę tnącą pod kątem uszkodzeń i prawidłowego zamocowania.
• Sprawdzić, czy jest zachowana wystarczająca różnica pomiędzy prędkością na biegu jałowym a prędkością roboczą
narzędzie tnące nie obraca się, gdy silnik pracuje na biegu jałowym (w razie konieczności zmniejszyć prędkość biegu jałowego).
Jeśli narzędzie tnące nadal obraca się podczas pracy silnika na biegu jałowym, należy skontaktować się z przedstawicielem
autoryzowanego serwisu.
prawidłowego działania.
ietrza chłodzącego oraz żeberka cylindra pod kątem zablokowania.
, aby upewnić się, że
Czyszczenie filtra powietrza
– Obrócić dźwignię ssania (4) w położenie całkowicie zamknięte i zabezpieczyć
gaźnik przed kurzem i zabrudzeniami.
–Odkręcić śrubę (1).
–Zdjąć pokrywę filtra powietrza (3).
–Wyjąć wkład filtra (2), umyć go w ciepłej wodzie i całkowicie osuszyć.
– Po oczyszczeniu założyć ponownie pokrywę filtra powietrza (3) i zamocować
śrubę (1).
UWAGA: Jeśli filtr powietrza jest nadmiernie zabrudzony lub zakurzony, czyścić
go codziennie. Zatkany filtr powietrza może utrudnić lub uniemożliwić
uruchomienie silnika bądź może spowodować zwiększenie prędkości
obrotowej silnika.
53
Page 54

Kontrola świecy zapłonowej
0,6 mm - 0,7 mm
(0,024”-0,028”)
Otwór smarowy
(5)
– Do montażu i demontażu świecy zapłonowej należy używać tylko
dostarczonego klucza uniwersalnego.
–Odstęp pomiędzy dwoma elektrodami świecy zapłonowej powinien wynosić
0,6-0,7 mm. Jeżeli odstęp jest zbyt duży lub zbyt mały, należy go
wyregulować. Jeśli świeca zapłonowa jest pokryta nagarem lub zabrudzona,
należy ją dokładnie oczyścić lub wymienić.
UWAGA: Nigdy nie dotykać łącznika świecy zapłonowej przy włączonym silniku
(wysokie napięcie, ryzyko porażenia prądem).
Dodawanie smaru do skrzynki przekładniowej
– Dodawać smar (Shell Alvania 3 lub odpowiednik) do skrzynki przekładniowej
przez otwór smarowy co każde 30 godzin pracy (oryginalny smar MAKITA jest
dostępny w punktach sprzedaży produktów MAKITA).
Głowica ssąca w zbiorniku paliwa
– Filtr paliwa (5) głowicy ssącej służy do dostarczania paliwa do gaźnika.
– Okresowo sprawdzać wzrokowo filtr paliwa. W tym celu należy odkręcić korek
wlewu paliwa, użyć drucianego haka i wyciągnąć głowicę ssącą przez otwór
zbiornika. Wymienić filtr na nowy, jeśli stwardniał, jest bardzo
zanieczyszczony lub zablokowany.
– Niedostateczny dopływ paliwa może spowodować przekroczenie
maksymalnej, dopuszczalnej prędkości. W związku z powyższym filtr paliwa
należy wymieniać co najmniej raz na kwartał, aby zapewnić dostateczny
dopływ paliwa do gaźnika.
Wszelkie prace konserwacyjne i regulacyjne niewymienione w niniejszej instrukcji obsługi mogą być wykonywane wyłącznie przez przedstawicieli
autoryzowanego serwisu.
54
Page 55

Przechowywanie
Spuścić paliwo
Wilgotność
– W przypadku przechowywania narzędzia przez dłuższy okres należy spuścić
całkowicie paliwo ze zbiornika i gaźnika. Aby wykonać tę czynność, należy po
prostu spuścić całe paliwo ze zbiornika paliwa. Zutylizować spuszczone
paliwo zgodnie z lokalnymi przepisami.
–Wyjąć świecę zapłonową i dodać kilka kropel oleju przez otwór świecy
zapłonowej. Następnie pociągnąć lekko rozrusznik, aby wnętrze silnika
pokryło się cienką warstwą oleju, a następnie wkręcić świecę zapłonową.
–Oczyścić wszelkie zanieczyszczenia i kurz z ostrza tnącego oraz na obudowie
silnika i przetrzeć je szmatką nasączoną olejem. Narzędzie należy
pr
zechowywać w suchy
Harmonogram konserwacji
m miejscu.
Konserwacja ogólna
Po każdym uzupełnieniu
paliwa
Codziennie Filtr powietrza
Co tydzieńŚwieca zapłonowa
kwartał Głowica ssąca
o
C
Procedura wyłączania Zbiornik paliwa
Zespół silnika, śruby i nakrętki
Dźwignia sterująca
Przełącznik I-Stop (wł./wył.)/
przełącznik Start-Stop
Przewód powietrza chłodzącego
Narzędzie tnące
Obroty na biegu jałowym
Tłumik
Zbiornik paliwa
Gaźnik
Kontrola wzrokowa pod kątem uszkodzeń i dokręcenia
Sprawdzić stan ogólny i bezpieczeństwo
Kontrola działania
Kontrola działania
Oczyścić
Oczyścić
Sprawdzić pod kątem uszkodzeń i naostrzenia
Kontrola (narzędzie tnące nie może się poruszać)
Kontrola, w razie potrzeby wymienić
Sprawdzić i w razie potrzeby oczyścić otwór
Wymienić
Oczyścić
Opróżnić zbiornik paliwa
Uruchomić do czasu, aż silnik zużyje całe paliwo
Rozwiązywanie problemów
Usterka Układ Objaw Przyczyna
Silnik nie uruchamia się lub
występują trudności z jego
uruchomieniem
Układ zapłonowy Prawidłowa iskra
zapłonowa
Brak iskry zapłonowej Zadziałał przełącznik I-Stop (wł./wył.)/przełącznik Start-
Nieprawidłowe działanie układu paliwowego, układu
sprężania, usterka mechaniczna
Stop, usterka okablowania lub zwarcie, wadliwa świeca
zapłonowa lub łącznik, niesprawny moduł zapłonu
Trudności podczas rozruchu
rozgrzanego silnika
Silnik uruchamia się, ale
natychmiast gaśnie
Niewystarczająca moc Może być to
b
Doprowadzanie
paliwa
Sprężanie Brak sprężania podczas
Usterka
mechaniczna
Doprowadzanie
paliwa
spowodowane przez
równoczesną awarię
kilku układów
iornik paliwa
Z
napełniony
ciągnięcia
Rozrusznik nie włącza
się
Zbiornik napełniony.
Prawidłowa iskra
zapłonowa
Zbiornik napełniony Nieprawidłowa regulacja biegu jałowego,
Nieprawidłowa praca
silnika na biegu jałowym
55
Nieprawidłowa pozycja ssania, uszkodzony gaźnik,
zgięty lub zatkany przewód paliwowy, zanieczyszczone
paliwo
Wadliwa dolna uszczelka cylindra, uszkodzone uszczelki
wałka korbowego, wadliwe pierścienie cylindra lub tłoka,
nieprawidłowe uszczelnienie świecy zapłonowej
Pęknięta sprężyna rozrusznika, uszkodzone części
wewnątrz silnika
Zanieczyszczony gaźnik; zlecić jego wyczyszczenie
zanieczyszczony gaźnik
Wadliwe odpowietrzanie zbiornika paliwa, przerwany
przewód doprowadzający paliwo, wadliwy przewód lub
nik I-Stop (wł./wył.)/przełączni
przełącz
Zabrudzony filtr powietrza, zanieczyszczony gaźnik,
niedrożny tłumik, niedrożny kanał wylotowy cylindra
k Start-Stop
Page 56

Română
Vă mulţumim pentru achiziţionarea acestei motocositoare/motocositoare cu fir
MAKITA. Motocositorile/motocositorile cu fir MAKITA sunt dezvoltate pe baza
multor ani de acumulare de cunoştinţe, experienţă, precum şi pe baza unui
program de dezvoltare detaliat.
Vă rugăm să citiţi acest manual cu atenţie pentru a vă asigura că obţineţi cele
mai bune performanţe şi că veţi beneficia de rezultatele excelente pe care le
poate oferi motocositoarea/motocositoarea cu fir MAKITA.
Simboluri
Vă rugăm să ţineţi cont de următoarele simboluri atunci când citiţi manualul de instrucţiuni.
Citiţi manualul de utilizare
Acordaţi grijă şi atenţie specială
Cuprins Pagina
Simboluri ..................................................................... 56
Instrucţiuni de siguranţă.............................................. 57
Date tehnice................................................................ 61
Denumirea pieselor..................................................... 62
Montarea mânerului .................................................... 63
Montarea apărătorii..................................................... 64
Montarea lamei de tăiere/capului de tăiere cu nylon... 65
Carburant/Alimentare.................................................. 66
Manipularea corectă.................................................... 67
Puncte de operare importante/oprirea lamei de
tăiere/motocositoarei................................................... 67
Reascuţirea dispozitivului de tăiere............................. 69
Instrucţiuni de service ................................................. 71
Depozitare................................................................... 73
Purtaţi sisteme de protecţie pentru ochi şi urechi
(doar pentru motocositoarea cu fir)
Purtaţi cască de protecţie şi sisteme de protecţie
pentru ochi şi urechi
(doar pentru motocositoare)
Interzis
Păstraţi distanţaTuraţie maximă permisă a sculei
Pericol de obiecte proiectate Suprafeţe fierbinţi - Arsuri ale degetelor sau mâinilor
Nu fumaţi Amestec între carburant şi ulei
Fără flăcări deschise Pornire manuală motor
Trebuie purtate mănuşi de protecţie Oprire de urgenţă
Recul Primul ajutor
Interziceţi accesul tuturor persoanelor şi
animalelor în zona de operare
Nu utilizaţi lame metalice
(doar pentru motocositoarea cu fir)
PORNIT/START
Purtaţi cizme robuste cu talpă
antiderapantă. Sunt recomandate cizmele
de siguranţă cu bombeuri din oţel.
56
OPRIT/
START
STOP
Page 57

Schemă
15 metri
(1)
(3)
(2)
(4)
(5)
(6)
Instrucţiuni de siguranţă
Instrucţiuni generale
– Pentru a asigura operarea corectă, asiguraţi-vă că citiţi şi înţelegeţi în
întregime acest manual de instrucţiuni, pentru a vă familiariza cu modul de
utilizare a motocositoarei/motocositoarei cu fir. Utilizarea acestui echipament
fără a înţelege modul de utilizare corectă poate duce la accidentări personale
grave sau la accidentări ale persoanelor din jur.
– Împrumutaţi motocositoarea/motocositoarea cu fir doar persoanelor care
dovedesc experienţă în utilizarea motocositorilor/motocositorilor cu fir. În
acelaşi timp, împrumutaţi-le întotdeauna şi acest manual de instrucţiuni.
–Dacă vă aflaţi la prima utilizare a unei motocositoare motorizate, consultaţi-vă
cu distribuitorul pentru instrucţiuni de bază.
– Nu trebuie permisă utilizarea motocositoarei/motocositoarei cu fir de către
copii şi tineri cu vârsta sub 18 ani. Persoanele cu vârsta peste 16 ani pot totuşi
utiliza dispozitivul pentru instruire, numai sub supravegherea unui instructor
calificat.
– Utilizaţi motocositori/motocositori cu fir cu cea mai mare grijă şi atenţie.
– Operaţi motocositoarea/motocositoarea cu fir numai dacă vă aflaţi înt
condiţ
ie fizică adecvată. Executaţi fiecare lucrare cu calm şi cu atenţie.
Utilizatorii trebuie să-şi asume responsabilitatea pentru persoanele din jur.
– Nu utilizaţi niciodată motocositoarea/motocositoarea cu fir după consumul de
alcool sau medicamente, sau dacă sunteţi obosit sau bolnav.
AVERTISMENT: Această unealtă electrică produce un câmp electromagnetic în
timpul operării. În anumite condiţii, acest câmp poate intra în interferenţă cu
implanturi medicale active sau pasive. Pentru a reduce riscul accidentelor grave
sau fatale, recomandăm ca persoanele cu implanturi medicale să consulte
medicul şi producătorul implantului medical înainte a opera această maşină.
Destinaţia de utilizare a echipamentului
– Motocositoarea/motocositoarea cu fir este concepută doar pentru tăierea
ierbii, buruienilor, tufişurilor, subarboretului şi nu trebuie utilizată în niciun alt
scop, precum bordurarea sau tunderea gardului viu, deoarece poate cauza
vătămări corporale.
Echipament personal de protecţie
–Purtaţi întotdeauna haine funcţionale şi adecvate pentru lucrările desfăşurate,
adică strânse pe corp, dar nu atât de strânse încât să cauzeze disconfort la
mişcare. Nu purtaţi bijuterii sau haine care se pot agăţa în tufişuri sau lăstăriş.
– Pentru a evita leziunile la cap, ochi, mâini sau picioare, precum şi pentru a vă
proteja auzul în timpul operării, următoarele echipamente şi haine de protecţie
trebuie purtate în timp ce utilizaţi motocositoarea/motocositoarea cu fir.
–Purtaţi întotdeauna o cască acolo unde există riscul căderii de obiecte. Casca
de protecţie (1) trebuie verificată la intervale regulate pentru depistarea
deteriorărilor şi trebuie înlocuită după cel mult 5 ani. Utilizaţi numai căşti de
protecţie omologate.
– Vizorul (2) al căştii (sau, alternativ, ochelarii de protecţie) protejează faţa de
resturi şi pietrele proiectate. În timpul folosirii motocositoarei/motocositoarei
cu fir, purtaţi întotdeauna ochelari de protecţie sau un vizor de protecţie,
pentru a preveni leziunile oculare.
–Purtaţi echipament ade
auzului (amortizoare pentru urechi (3), dopuri de urechi etc.).
– Salopeta de lucru (4) protejează împotriva pietrelor şi resturilor proiectate.
Vă recomandăm insistent să purtaţi salopetă de lucru.
–Mănuşile speciale (5), confecţionate din piele groasă, sunt o parte a
echipamentului recomandat şi trebuie întotdeauna purtate în timpul operării
motocositoarei/motocositoarei cu fir.
– Când utilizaţi motocositoarea/motocositoarea cu fir, purtaţi întotdeauna
încălţăminte robustă (6) cu talpă antiderapantă. Această încălţăminte
protejează împotriva vătămărilor corporale şi asigură un sprijin bun.
cvat de pr
Riscuri reziduale
– Chiar şi atunci când unealta electrică este utilizată conform instrucţiunilor, nu
este posibilă eliminarea tuturor factorilor de risc reziduali. Următoarele
pericole pot apărea în legătură cu construcţia şi conceptul uneltei electrice:
1. Afecţiuni pulmonare, dacă nu este purtată o mască eficientă de protecţie
contra prafului.
2. Afecţiuni ale auzului, dacă nu este purtat un dispozitiv eficient de
protecţie a auzului.
3. Deteriorarea stării de sănătate în urma vibraţiilor, dacă unealta electrică
este utilizată o perioadă de timp mai îndelungată sau nu este gestionată
sau întreţinută adecvat.
Pornirea motocositoarei
–Vă rugăm să vă asiguraţi că nu există copii sau alte persoane pe o rază de
lucru de 15 metri (50ft), de asemenea, acordaţi atenţie oricăror animale din
apropierea zonei de lucru.
– Înainte de folosire, verificaţi întotdeauna dacă motocositoarea/motocositoarea
cu fir prezintă siguranţă în folosire:
Verificaţi dacă dispozitivul de tăiere este fixat ferm, dacă maneta de control
poate fi operată cu uşurinţă şi dacă opritorul manetei de control funcţionează
corect.
– Rotirea dispozitivului de tăiere la turaţia de ralanti este interzisă. Consultaţi-vă
cu distribuitorul în cazul în care consideraţi că echipamentul trebuie reglat.
Asiguraţi-vă că mânerele sunt curate şi uscate, iar comutatorul de pornire/
oprire funcţionează corect.
otecţie la zgomot, pentru a evita pierderea
57
r-o
Page 58

– Porniţi motocositoarea/motocositoarea cu fir doar în conformitate cu
• Odihnă
• Transport
• Realimentare cu carburant
•Întreţinere
• Înlocuirea dispozitivului
instrucţiunile. Nu utilizaţi alte metode pentru a porni motorul!
– Utilizaţi motocositoarea/motocositoarea cu fir şi accesoriile doar în scopurile
specificate.
– Porniţi motorul motocositoarei/motocositoarei cu fir doar după asamblarea în
totalitate a echipamentului. Utilizaţi echipamentul doar după ataşarea tuturor
accesoriilor corespunzătoare!
– Înainte de pornire, asiguraţi-vă că dispozitivul de tăiere nu intră în contact cu
obiecte dure precum crengi, pietre etc., deoarece dispozitivul de tăiere se va roti la
pornire.
–Opriţi motorul imediat în cazul apariţiei oricărui tip de probleme de motor.
– În cazul în care dispozitivul de tăiere loveşte pietre sau alte obiecte dure, opriţi
imediat motorul şi inspectaţi dispozitivul de tăiere.
– Inspectaţi dispozitivul de tăiere la intervale regulate scurte pentru a detecta
eventuale deteriorări (detectarea fisurilor capilare cu ajutorul testul zgomotului
la lovire uşoară).
– Utilizaţi motocositoarea/motocositoarea cu fir doar după ataşarea şi reglarea
curelei de umăr la lungimea corectă. Cureaua de umăr trebuie reglată la
dimensiunea utilizatorului şi fixată
echipamentului. Este interzisă susţinerea motocositoarei cu o singură mână în
timpul operării.
– În timpul utilizării, ţineţi întotdeauna motocositoarea/motocositoarea cu fir cu
ambele mâini.
Asiguraţi-vă că aveţi întotdeauna o poziţie stabilă.
– Operaţi motocositoarea/motocositoarea cu fir astfel încât să evitaţi inhalarea
gazelor de eşapament. Este interzis să porniţi motorul în spaţii închise, de
exemplu într-o cameră (risc de otrăvire cu gaze). Monoxidul de carbon este un
gaz inodor.
–Opriţi întotdeauna motorul când vă odihniţi sau când intenţionaţi să lăsaţi
motocositoarea/motocositoarea cu fir nesupravegheată şi amplasaţi-o într-o
locaţie sigură, pentru nu pune în pericol alte persoane şi pentru a nu deteriora
echipamentul.
–Nu aşezaţi niciodată motocositoarea/motocositoarea cu fir fierbinte pe iarbă
uscată sa
–
Dispozitivul de tăiere trebuie să fie întotdeauna prevăzut cu o apărătoare
adecvată.
Nu utilizaţi niciodată motocositoarea fără această apărătoare!
– Toate instalaţiile de protecţie şi apărătoarele furnizate împreună cu
echipamentul trebuie utilizate în timpul operării.
– Nu operaţi niciodată motorul cu toba de eşapament defectă.
–Opriţi motorul în timpul transportului.
– La transportarea echipamentului, ataşaţi întotdeauna capacul pe lama de
tăiere.
– Asiguraţi-vă că motocositoarea/motocositoarea cu fir este poziţionată în
siguranţă în timpul transportului, pentru a evita scurgerea de carburant.
– Când transportaţi motocositoarea/motocositoarea cu fir, asiguraţi-vă că
rezervorul de carburant este complet gol.
– Când
vehicul similar, evitaţi scăparea motorului pe sol, deoarece acest lucru ar
putea deteriora grav rezervorul de carburant.
– Cu excep
motocositoarei/motocositoarei cu fir pe sol, deoarece acest lucru ar putea
deteriora grav motocositoarea/motocositoarea cu fir.
– Ridicaţi întotdeauna întregul echipamentul de la sol atunci când îl mutaţi.
Tragerea echipamentului cu rezervorul de carburant pe sol este extrem de
periculoasă, deoarece poate cauza scurgerea carburantului şi posibile
incendii.
–Dacă echipamentul suferă un impact puternic sau o cădere, verificaţi starea
acestuia înainte de a continua lucrul. Verificaţi dacă sistemul de alimentare
prezintă scurgeri şi dacă dispozitivele de comandă şi siguranţă prezintă
defecţiuni. Dacă există semne de deteriorări sau aveţi dubii, contactaţi centrul
nostru de service autorizat pentru inspecţie şi reparaţii.
u pe orice materiale combustibile.
descărcaţi motocositoarea/motocositoarea cu fir dintr-un camion sau un
ţia situaţiilor de urgenţă, evitaţi scăparea sau aruncarea
pentru a preveni oboseala în timpul operă
rii
Realimentare cu carburant
–Opriţi motorul în timpul realimentării, ţineţi-l la distanţă de flăcări deschise şi
nu fumaţi.
– Asiguraţi-vă că produsele din uleiuri minerale nu intră în contact cu pielea. Nu
inhalaţi vapori de carburant. Purtaţi întotdeauna mănuşi de protecţie când
realimentaţi. Schimbaţi şi curăţaţi îmbrăcămintea de protecţie la intervale
regulate.
– Pentru a preveni contaminarea solului (protecţie a mediului înconjurător),
asiguraţi-vă că nu vărsaţi carburant sau ulei pe sol. În cazul în care vărsaţi
carburant, curăţaţi motocositoarea/motocositoarea cu fir imediat.
– Asiguraţi-vă că hainele dumneavoastră nu intră în contact cu carburantul. În
cazul în care carburantul intră în contact cu hainele dumneavoastră,
schimbaţi-vă hainele imed
– Inspectaţi buşonul de alimentare cu carburant la intervale regulate,
asigurându-vă că este bine fixat şi nu prezintă scurgeri.
– Strângeţi cu grijă buşonul rezervorului de carburant. După încheierea
alimentării, mutaţi-vă la o distanţă de cel puţin 3 metri de locul în care aţi
efectuat alimentarea înainte de a porni motorul.
ntru a preveni aprinderea.
iat pe
58
Page 59

– Nu alimentaţi niciodată într-un spaţiu închis, de exemplu în interiorul unei
Atenţie:
Recul
Schemă
Schemă
camere. În caz contrar, pot rezulta explozii din cauza acumulării vaporilor de
carburant la nivelul solului.
– Transportaţi şi depozitaţi carburantul doar în recipiente omologate. Asiguraţi-
vă că depozitaţi carburantul într-un loc inaccesibil copiilor.
Metodă de operare
– Utilizaţi motocositoarea/motocositoarea cu fir doar în condiţii de iluminare şi
vizibilitate adecvată. În timpul sezonului de iarnă, feriţi-vă de zonele
alunecoase sau umede, precum zone acoperite cu gheaţă şi zăpadă (risc de
alunecare). Asiguraţi-vă că aveţi întotdeauna o poziţie stabilă.
–Nu tăiaţi niciodată deasupra nivelului taliei.
–Nu staţi în picioare pe o scară în timp ce utilizaţi motocositoarea/
motocositoarea cu fir.
– Este interzis urcatul în copaci pentru a efectua operaţia de tăiere cu
motocositoarea/motocositoarea cu fir.
–Nu lucraţi niciodată pe suprafeţe instabile.
– Îndepărtaţi nisipul, pietrele, cuiele etc. din zona de lucru.
Obiectele străine pot deteriora dispozitivul de tăiere şi pot cauza reculuri
periculoase.
– Înainte de a începe tăierea, asiguraţi-vă că dispozitivul de tăiere a atins turaţia
de lucru maximă.
– În cazul în care iarbă sau crengi sunt prinse între dispozitivul de tăiere şi
apărătoare, opriţ
rotirea accidentală a lamei poate cauza accidentări grave.
– Odihniţi-vă pentru a preveni pierderea controlului din cauza oboselii. Vă
recomandăm să luaţi o pauză de 10-20 de minute la fiecare oră.
i întotdeauna motorul înainte de curăţare. În caz contrar,
Recul (şoc lamă)
– Atunci când operaţi motocositoarea, poate avea loc un recul necontrolat.
– Reculurile apar frecvent atunci când încercaţi să tăiaţi cu secţiunea de la ora
12 la ora 2 a lamei.
–Nu folosiţi niciodată secţiunea lamei de motocositoare cuprinsă între ora 12 şi
ora 2.
–Nu folosiţi niciodată această secţiune a lamei motocositoarei pe obiecte
solide, precum arbuşti sau arbori etc. cu un diametru mai mare de 3 cm. În caz
contrar, motocositoarea va fi deviată cu forţă, acest lucru fiind extrem de
periculos deoarece poate cauza rănirea.
Prevenirea reculului
Pentru a evita reculurile, respectaţi următoarele:
– Utilizarea secţiunii lamei cuprinsă între ora 12 şi ora 2 este extrem de
periculoasă, în special la utilizarea unor dispozitive de tăiere metalice.
– Operaţiile de tăiere utilizând secţiunea dintre ora 11 şi ora 12 şi secţiunea
dintre ora 2 şi ora 5 a lamei, trebuie efectuate doar de către operatori instruiţi
şi experimentaţi şi atunci doar pe propriul lor risc.
Secţiunea de tăiere optimă pentru o tăiere uşoară cu lipsa aproape totală a
reculurilor este cea cuprinsă între ora 8 şi ora 11.
Dispozitive de tăiere
– Utilizaţi un dispozitiv de tăiere corect pentru lucrarea în curs.
Capetele de tăiere cu nylon (capete de motocositoare cu fir) sunt adecvate
pentru tunderea gazonului.
Lamele metalice sunt adecvate pentru tăierea buruienilor, ierburilor înalte,
tufişurilor, lăstărişului, subarboretului, hăţişului şi altor ierburi asemănătoare.
Nu utilizaţi niciodată alte lame, inclusive lanţuri rotative metalice din mai multe
component şi lame de îmblăciu. În caz contrar, există pericolul de accidentări
grave.
– Când utilizaţi lame metalice, evitaţi “reculul” şi pregătiţi-vă întotdeauna pentru
un recul accidental. Consultaţi secţiunea “Reculul” şi “Prevenirea reculului”.
Instrucţiuni de întreţinere
– Service-ul echipamentului trebuie efectuat la centrul nostru de service
autorizat, folosind întotdeauna piese de schimb originale. Reparaţiile
incorecte sau o întreţinere inadecvată pot scurta durata de viaţă a
echipamentul şi mări riscul accidentărilor.
–Verificaţi întotdeauna starea dispozitivului de tăiere, în special a dispozitivelor
de protecţie, şi cureaua de umăr înainte de începerea lucrului. O atenţie
specială trebuie acordată şi lamelor de tăiere, care trebuie ascuţite corect.
–Opriţi motorul şi scoateţi fişa bujiei atunci când înlocuiţi sau ascuţiţi
dispozitivele de tăiere şi, de asemenea, atunci când curăţaţi motocositoarea
sau dispozitivul de tăiere.
59
Page 60

Este interzisă îndreptarea sau sudarea dispozitivelor de tăiere
deteriorate.
– Operaţi motocositoarea/motocositoarea cu fir la un nivel cât mai redus de
zgomot şi de poluare. În mod special, asiguraţi-vă că aţi reglat corect
carburatorul.
–Curăţaţi motocositoarea/motocositoarea cu fir la intervale regulate şi verificaţi
dacă toate şuruburile şi piuliţele sunt strânse bine.
– Este interzisă efectuarea operaţiilor de service sau depozitarea
motocositoarei/motocositoarei cu fir în apropierea flăcărilor deschise.
– Depozitaţi întotdeauna motocositoarea/motocositoarea cu fir în încăperi
încuiate şi cu rezervorul de carburant golit.
– La curăţarea, service-ul şi depozitarea echipamentului, ataşaţi întotdeauna
capacul pe lama de tăiere.
Respectaţi instrucţiunile relevante de prevenire a accidentelor emise de
asociaţiile profesionale relevante şi de companiile de asigurări.
Nu aduceţi modificări motocositoarei/motocositoarei cu fir, deoarece acestea vă
pot periclita siguranţa.
Efectuarea lucrărilor de întreţinere sau reparaţii de către utilizator este limitată la
acele activităţi descrise în manualul de instrucţiuni. Toate celelalte lucrări vor
fectuate de un agent de service autorizat. Utilizaţi doar piese de schimb
e
originale şi accesorii fabricate şi furnizate de MAKITA.
Utilizarea de accesorii şi unelte neautorizate reprezintă un risc crescut de
accidente.
MAKITA nu va accepta nicio responsabilitate pentru accidente sau daune
cauzate de utilizarea unor dispozitive de tăiere şi de fixare a sculelor de tăiere
sau a unor accesorii neomologate.
fi
Primul ajutor
În caz de accident, asiguraţi-vă că o trusă de prim ajutor este disponibilă în
apropierea locaţiei unde se desfăşoară operaţiile de tăiere. Înlocuiţi imediat orice
element extras din trusa de prim ajutor.
Când solicitaţi ajutor, oferiţi următoarele informaţii:
– Locul accidentului
– Ce s-a întâmplat
–Numărul de persoane rănite
– Tipul leziunilor
– Numele dumneavoastră
Vibraţii
– Persoanele cu probleme circulatorii expuse la vibraţii excesive pot suferi
leziuni ale vaselor sanguine sau ale sistemului nervos. Vibraţiile pot provoca
următoarele simptome la nivelul degetelor, mâinilor sau articulaţiilor mâinilor:
“amorţeală” (insensibilitate), furnicături, durere, înţepături, modificarea culorii
sau texturii pielii. Dacă apare oricare dintre aceste simptome, consultaţi un
medic!
– Pentru a reduce riscul apariţiei “sindromului degetelor albe”, păstraţi-vă
mâinile calde în timpul utilizării şi întreţineţi în mod corect echipamentul şi
accesoriile.
Doar pentru ţările europene
Declaraţie de conformitate CE
Subscrisa, Makita Corporation, în calitate de producător responsabil, declară că următoarea (următoarele) unealtă (unelte) Makita:
Denumirea utilajului: Motocositoare/Motocositoare cu fir
Nr. model/Tip: EM2600U, EM2600L
Specificaţii: consultaţi tabelul “DATE TEHNICE”
este/sunt produs(e) de serie şi
sunt în conformitate cu următoarele Directive Europene:
2000/14/CE, 2006/42/CE, 2004/108/CE
Şi sunt fabricate în conformitate cu următoarele standarde sau documente standardizate:
EN ISO 11806-1, EN ISO 14982
Documentaţia tehnică este păstrată de:
Makita International Europe Ltd., Technical Department,
Michigan Drive, Tongwell, Milton Keynes, Bucks MK15 8JD, Anglia
Procedura de evaluare a conformităţii prevăzută de Directiva 2000/14/CE a fost în concordanţă cu anexa V.
Nivel de putere acustică măsurată (ca motocositoare pentru iarbă): 109,77 dB
Nivel de putere acustică măsurată (ca motocositoare): 107,29 dB
Nivel de presiune sonoră garantat: 112 dB
15. 4. 2013
Tomoyasu Kato
Director
Makita Corporation
3-11-8, Sumiyoshi-cho,
Anjo, Aichi, JAPAN
60
Page 61

Date tehnice
Model
EM2600U EM2600L
Mâner în formă de U Mâner cotit
Dimensiuni: lungime x lăţime x înălţime (fără lamă de tăiere) 1.770 x 610 x 410 mm 1.770 x 330 x 185 mm
Greutate netă 5 kg 5 kg
Capacitate cilindrică motor
Performanţe maxime motor 0,83 kW
Frecvenţa de rotaţie maximă a arborelui
8.800 min
Lamă metalică dintr-o
Accesoriu de tăiere
singură bucată
Cap de motocositoare cu fir φ430 mm
Turaţie la ralanti 3.000/min
Turaţie de cuplare ambreiaj 4.100/min
Raport de transmisie 14/19
Carburant
Benzină: Ulei de motor în doi timpi = 50:1
Volum (rezervor de carburant) 0,6 L
Carburator WALBRO WYC
25,7 cm
φ230 mm
Gaz mixt
3
-1
Sistem de aprindere Aprindere electronică
Bujie NGK BPMR7A
Distanţa dintre electrozi 0,6 - 0,7 mm
Mâner pe stânga (Prindere
faţă)
14,680 m/s
2
K = 1,5 m/ s
2
5,152 m/s2 K = 1,5 m/s
Vibraţii: (Pentru motocositoare)
Vibraţii: (Pentru motocositoare pentru
iarbă)
Mâner pe dreapta (Prindere
spate)
Mâner pe stânga (Prindere
faţă)
Mâner pe dreapta (Prindere
faţă)
9,037 m/s
7,961 m/s
7,019 m/s
2
K = 1,5 m/s
2
K = 1,5 m/s
2
K = 1,5 m/s
2
2
2
9,677 m/s2 K = 1,5 m/s
8,83 m/s2 K = 1,5 m/s
14,381 m/s2 K = 1,5 m/s
Zgomot (testat conform 2000/14/CE & 2005/88/CE):
Nivel de presiune sonoră în poziţia operatorului (Motocositoare pentru
iarbă):
98,52 dB (A) K = 2,5 dB (A)
Nivel de presiune sonoră în poziţia operatorului (Motocositoare): 96,15 dB (A) K = 2,5 dB (A)
Nivel de putere acustică măsurată (Motocositoare pentru iarbă): 109,77 dB (A) K =2,5 dB (A)
Nivel de putere acustică măsurată (Motocositoare): 107,29 dB (A) K = 2,5 dB (A)
Zgomot (testat conform 2000/14/CE & 2005/88/CE): valori garantate
pentru puterea acustică
112 dB (A)
2
2
2
2
61
Page 62

Denumirea pieselor
Denumirea pieselor
1 Rezervor de carburant
2 Demaror cu rapel
3 Filtru de aer
4
Comutator I-Stop (pornit/oprit)/
Comutator pornire-oprire
5Bujie
6Tobă de eşapament
7Carcasă ambreiaj
8 Prindere spate
9Agăţătoare
10 Mâner
11 Manetă de control
12 Cablu de control
13 Arbore
14
Apărătoare (Apărătoare dispozitiv de
tăiere)
15 Carcasă angrenaj
16 Suport mâner
17 Lamă de tăiere
18 Cap de tăiere cu nylon
19 Buşon de alimentare cu carburant
20 Manetă pentru demaror
21 Pompă de amorsare
22 Manetă de şoc
EM2600U
Tip de mâner în formă de U
EM2600L
Tip de mâner cotit
(3)
(7)
(21)
(1)
(19)
62
Page 63

Montarea mânerului
EM2600U
L
R
(1)
EM2600U
(2)
EM2600U
(3)
(1)
EM2600U
ATE NŢIE: Înainte de a efectua orice lucrare la motocositoare, opriţi
întotdeauna motorul şi scoateţi fişa bujiei. Purtaţi întotdeauna
mănuşi de protecţie!
ATE NŢIE: Asiguraţi-vă că aţi reasamblat motocositoarea complet înainte de a
o porni.
Pentru mânere în formă de U
–Amplasaţi cele două mânere pe suportul pentru mâner. Maneta de control
trebuie să fie în dreapta cum priviţi spre dispozitivul de tăiere.
–Fixaţi capetele mânerului în canalul de pe suportul de mâner şi fixaţi o clemă
peste acestea. Strângeţi uşor cu cele patru şuruburi pentru reglare.
–Reglaţi unghiul mânerelor şi apoi strângeţi complet toate şuruburile utilizând o
cheie hexagonală.
–Amplasaţi cablul de acceleraţie (1) pe partea manetei de control a arborelui.
Iar apoi înfăşuraţi-le cu cureaua pentru talie (2).
– Introduceţi cablul de acceleraţie (1) în fanta de fixare (3) a suportului de
mâner.
– Asiguraţi-vă că aţi poziţionat cablul de acceleraţie în modul indicat.
– Operaţi maneta de control şi asiguraţi-vă că se mişcă uşor.
ATE NŢIE: Nu poziţionaţi cablul de acceleraţie în modul prezentat în figură. În
caz contrar, cablul curbat poate cauza o turaţie ridicată la ralanti, iar
t
lama scăpa
ă de sub control poate cauza accidentări.
63
Page 64

Pentru model de mâner cotitl
(2)
(1)
Motor
(4)
(3)
Motor
EM2600L
Lamă în stea
Apărători pentru lame metalice
Cap de tăiere cu nylon
Apărătoare pentru
dispozitivul de tăiere cu fir
de nylon
(2)
(3)
(1)
(4)
(1)
(6)
(5)
–Aşezaţi filetul (1) pe suportul de mâner în orificiul (2) de pe tub.
–Fixaţi mânerul auxiliar (3) pe piedică.
– Strângeţi cele 4 şuruburi (4) M5 × 30.
Montarea apărătorii
Pentru a standardele de siguranţă în vigoare, trebuie să utilizaţi doar
combinaţiile unealtă/apărătoare indicate în tabel.
Utilizaţi întotdeauna lame de tăiere/capete de tăiere cu nylon
originale MAKITA.
– Lama de tăiere trebuie să fie bine lustruită, să nu prezinte fisuri sau rupturi.
Dacă lama de tăiere loveşte o piatră în timpul operării, opriţi motorul şi
verificaţi imediat lama.
– Lustruiţi sau înlocuiţi lama de tăiere la fiecare trei ore de funcţionare.
– În cazul în care capul de tăiere cu nylon loveşte o piatră în timpul operării,
opriţi motorul şi verificaţi imediat capul de tăiere cu nylon.
ATE NŢIE: Trebuie să instalaţi întotdeauna apărătorile corespunzătoare pentru
–Fixaţi apărătoarea (1) pe clema (3) cu două şuruburi M6 x 30 (2).
– Când se utilizează capul cu fir
şi strângeţi-le cu două piuliţe (5) şi două şuruburi (4).
propria dumneavoastră siguranţă şi pentru a respecta
reglementările de prevenire a accidentelor. Operarea
echipamentului fără apărătoare instalată este interzisă.
, introdu
ceţi apărătoarea (6) în apărătoarea (1)
64
Page 65

Montarea lamei de tăiere/capului de tăiere cu nylon
(2)
(1)
(3)
Slăbiţi
Cheie hexagonală
Strângeţi
(3)
Slăbiţi
Cheie hexagonală
Strângeţi
Rotire
Lama de tăiere sau capul de tăiere cu nylon pot fi înlocuite uşor prin întoarcerea
echipamentului invers.
– Introduceţi cheia hexagonală prin orificiul din carcasa angrenajului şi rotiţi
şaiba receptorului (3) până când aceasta este blocată cu cheia hexagonală.
–Slăbiţi piuliţa/şaiba elastică (1) (filet pe partea stângă) cu cheia tubulară şi
scoateţi piuliţa/şaiba elastică (1) şi şaiba de prindere (2).
Cu cheia hexagonală instalată în continuare
– Montaţi lama de tăiere pe arbore astfel încât ghidajul şaibei receptorului (3) să
intre în orificiul arborelui din lama de tăiere. Instalaţi şaiba de prindere (2) şi
fixaţi lama de tăiere cu piuliţa/şaiba elastică (1).
[Cuplu de strângere: 13 - 23 N-m]
NOTĂ:Purtaţi întotdeauna mănuşi atunci când manipulaţi lama de tăiere.
NOTĂ:Piuliţa de fixare a lamei de tăiere (cu şaibă elastică) este o piesă
consumabilă. Dacă apare orice uzură sau deformare pe şaiba elastică,
înlocuiţi piuliţa.
NOTĂ: Şaiba de prindere (2) şi piuliţa/şaiba elastică (1) nu sunt necesare pentru
montarea capului de tăiere cu nylon. Capul cu nylon trebuie să fie
amplasat deasupra şaibei receptorului (3).
–Înşurubaţi capul de tăiere cu nylon pe arbore.
siguraţi-vă că lama se roteşte în sens invers acelor de ceasornic.
A
–
65
Page 66

Carburant/Alimentare
Respectaţi instrucţiunile de siguranţă de la
pagina 57.
20 cm3 40 cm
3
100 cm3 200 cm
3
200 cm3 400 cm
3
1.000 cm3 (1 litru)
5.000 cm
3
(5 litri)
10.000 cm
3
(10 litri)
50:1 25:1
Benzină
+
Manipularea carburantului
Este necesară o atenţie maximă la manipularea carburantului. Carburantul
poate conţine substanţe similare solvenţilor. Alimentaţi fie în exterior, fie într-o
zonă bine ventilată. Nu inhalaţi vapori de carburant şi evitaţi contactul
carburantului sau uleiului cu pielea dumneavoastră.
Produsele pe bază de uleiuri minerale degresează pielea. Contactul prelungit al
pielii cu aceste produse va cauza uscarea accentuată a pielii dumneavoastră,
putând rezulta diverse afecţiuni ale pielii. De asemenea, se pot produce reacţii
alergice.
Ochii pot fi iritaţi de la contactul cu uleiul. Dacă vă intră ulei în ochi, spălaţi-i
imediat cu apă curată. Dacă ochii sunt în continuare iritaţi, consultaţi imediat un
doctor.
Amestec între carburant şi ulei
Motorul motocositoarei este un motor în doi timpi, de înaltă eficienţă. Acesta
funcţionează cu un amestec de carburant şi ulei de motor în doi timpi. Motorul
este conceput pentru carburant normal fără plumb, cu o cifră octanică minimă de
91 RON. În cazul în care din anumite motive un astfel de carburant nu este
disponibil, puteţi folosi carburant cu o cifră octanică mai mare. Acesta nu va
afecta motorul, dar poate determina un randament de funcţionare mai redus.
Probleme similare pot rezulta din folosirea carburantului cu plumb. Pentru
obţinerea unei funcţionări optime a motorului şi pentru a proteja sănătatea şi
mediul, utilizaţi doar carburant fără plumb!
Pentru lubrifierea motorului, folosiţi un ulei de motor în doi timpi (grad calitate:
JASO FC sau ISO EGD) adăugat în carburant. Motorul a fost proiectat să
utilizeze uleiul de motor în doi timpi specificat, la un raport de amestec de 50:1,
pentru protecţia mediului.
Suplimentar, prin utilizarea acestui raport de amestec, sunt garantate o durată
de viaţă lungă, însoţită de operare fiabilă şi emisii minime. Funcţionarea fiabilă a
motocositoarei nu poate fi garantată dacă nu este respectat acest raport de
amestec de 50:1 (uleiul de motor în 2 timpi specificat).
Raport de amestec corect:
Benzină: Ulei de motor în doi timpi specificat = 50 : 1 sau
Benzină: Ulei de motor î
NOTĂ: Pentru pregătirea amestecului carburant-ulei, amestecaţi mai întâi
întreaga cantitate de ulei cu jumătate din carburantul necesar, apoi
adăugaţi restul de carburant. Scuturaţi bine amestecul înainte de a-l
introduce în rezervorul motocositoarei. Pentru a garanta o funcţionare
sigură, nu adăugaţi o cantitate de ulei mai mare decât cea specificată.
Acest lucru ar duce doar la o producţie mai mare de reziduuri de
combustie care vor polua mediul şi vor înfunda canalul de evacuare în
cilindru şi în toba de eşapament. În plus, consumul de carburant va
creşte, iar performanţa se va reduce.
Realimentare cu carburant
Motorul trebuie să fie oprit.
–Curăţaţi temeinic zona din jurul buşonului de alimentare cu carburant (2),
pentru a preveni pătrunderea impurităţilor în rezervorul de carburant (1).
–Deşurubaţi buşonul de alimentare cu carburant (2) şi umpleţi rezervorul cu
carburant.
– Strângeţi bine buşonul de alimentare cu carburant (2).
–Curăţaţi buşonul de alimentare cu carburant cu filet (2) şi rezervorul după
realimentare.
n doi t
impi, de la alţi producători = 25 : 1 recomandat
Depozitarea carburantului
Carburantul nu poate fi păstrat pentru o perioadă nelimitată de
Achiz
iţionaţi doar cantitatea necesară pentru o perioadă de operare de 4
săptămâni. Utilizaţi numai recipiente omologate de depozitare a carburantului.
timp.
66
Page 67

Manipularea corectă
Agăţătoare
(1)
EM2600U
(1)
(4)
(2)
(3)
(1)
(3)
(2)
EM2600L
Ataşarea curelei pentru umăr
–Reglaţi lungimea curelei astfel încât lama de tăiere să fie menţinută paralel cu
solul.
Detaşarea
– În caz de urgenţă, apăsaţi crestăturile (1) de pe ambele părţi şi detaşaţi
echipamentul.
Fiţi foarte atent pentru a menţine controlul echipamentului în acest timp. Nu
permiteţi devierea echipamentului spre dumneavoastră sau spre orice altă
persoană din apropierea zonei de lucru.
AVERTISMENT: Lipsa menţinerii controlului complet asupra maşinii poate
cauza leziuni corporale grave sau MOARTEA.
Notă: În unele ţări, cureaua pentru umăr nu are această funcţie de desprindere.
Puncte de operare importante/oprirea lamei de tăiere/motocositoarei
Respectaţi reglementările aplicabile privind prevenirea accidentelor.
Pornire
Mutaţi-vă la o distanţă de cel puţin 3 metri de zona în care aţi alimentat echipamentul. Aşezaţi motocositoarea pe o porţiune curată de sol, având
grijă ca dispozitivul de tăiere să nu intre în contact cu solul sau cu alte obiecte.
AVERTISMENT: Ţineţi cont de faptul că
Pornire la rece pentru modele cu mânere în formă de U
–Poziţionaţi comutatorul I-Stop (pornit-oprit) (1) în modul ilustrat.
– Prindeţi mânerul (presiunea mâinii activează maneta de blocare de siguranţă
(2)).
–Apăsaţi maneta de acceleraţie (3) şi menţineţi-o apăsată.
–Apăsaţi butonul de blocare (4) şi eliberaţi maneta de control, apoi eliberaţi
butonul de blocare (butonul de blocare menţine maneta de acceleraţie în
poziţie de pornire).
Pornire la rece pentru modele cu mânere cotite
–Poziţionaţi comutatorul de pornire-oprire (1) la poziţia de pornire, în modul
ilustrat.
– Prindeţi mânerul (presiunea mâinii activează maneta de blocare de siguranţă
(2)).
–Apăsaţi maneta de acceleraţie (3) şi menţineţi-o apăsată.
– Aduceţi comut
maneta de control, apoi eliberaţi comutatorul de pornire-oprire (comutatorul de
pornire-oprire menţine maneta de acceleraţie în poziţia de pornire).
după ce motorul porneşte.
atorul de pornire-oprire (1) în poziţ
dispozitivul de tăiere se va roti imediat
ia de pornire şi eliberaţi
67
Page 68

Pornire la cald pentru modele cu mânere în formă de U
EM2600U
EM2600L
(6)
(5)
ÎNCHIS
(6)
(5)
DESCHIS
–Poziţionaţi comutatorul I-Stop (pornit-oprit) (1) în modul ilustrat.
Pornire la cald pentru modele cu mânere cotite
–Poziţionaţi comutatorul de pornire-oprire (1) la poziţia neutră, în modul ilustrat.
– Mai întâi, aşezaţi echipamentul pe sol.
–Apăsaţi uşor şi repetat pompa de amorsare (5) (de 7 - 10 ori) până când
carburantul pătrunde în pompa de pornire.
– Închideţi maneta de şoc (6).
Deschidere şoc:
• Închidere completă la temperaturi joase sau când motorul este rece
• Deschidere completă sau pe jumătate pentru repornire în timp ce motorul
este cald
– Ţineţi ferm carcasa ambreiajului cu mâna stângă, aşa cum se arată în
ilustraţie.
– Retrageţi lent mânerul demarorului până simţiţi o rezistenţă, apoi continuaţi cu
o tragere rapidă.
– Nu trageţi cablul demarorului complet şi nu permiteţi retragerea de la sine a
mânerului demarorului. Menţineţi controlul cablului demarorului şi asiguraţi-vă
că acesta
– Repetaţi operaţia de pornire până când se aud sunetele iniţiale de aprindere
ale motorului.
–Apăsaţi maneta de şoc (6) ( ) şi trageţi din nou cablul demarorului, până
când motorul porneşte.
– Imediat ce motorul a pornit, strângeţi şi eliberaţi imediat maneta de
acceleraţie, eliberând astfel blocajul acceleraţiei parţiale, pentru ca motorul să
poată funcţiona la ralanti.
–Lăsaţi motorul să funcţioneze timp de aproximativ un minut, la turaţie
moderată, înainte de a deschide la maximum clapeta de acceleraţie.
NOTĂ:–Dacă mânerul demarorului este tras în mod repetat atunci când maneta de şoc este în poziţia “ ”, motorul nu va porni uşor, din
se retrage
cauza admisiei excesive de carburant.
– În cazul admisiei excesive de carburant, scoateţi bujia şi trageţi de mânerul demarorului încet pentru a elimina carburantul în exces. De
asemenea, uscaţi secţiunea electrodului bujiei.
încet.
68
Page 69

Atenţionare în timpul operării:
EM2600L
EM2600U
Dacă maneta de acceleraţie este deschisă complet în timpul funcţionării în gol, turaţia motorului creşte la peste 10.000 min
niciodată motorul la o turaţie mai mare decât cea necesară şi păstraţi turaţia la aproximativ 6.000 - 8.000 min
ATE NŢIE: Reduceţi întotdeauna turaţia motorului atunci când echipamentul nu este utilizat pentru lucrări.
Operarea echipamentului la o turaţie ridicată în timp ce nu este utilizat pentru lucrări va scurta durata de viaţă a acestuia.
Oprire
– Eliberaţi maneta de acceleraţie (3) complet şi, când turaţia motorului a scăzut,
setaţi comutatorul I-Stop (pornit/oprit)/comutatorul de pornire-oprire (1) la
poziţia “STOP” pentru a opri motorul.
–Fiţi atent la capul de tăiere, care s-ar putea să nu se oprească imediat, şi
permiteţi încetinirea oprirea completă a acestuia.
-1
.
-1
. Nu operaţi
Reascuţirea dispozitivului de tăiere
ATE NŢIE: Dispozitivele de tăiere menţionate mai jos trebuie reascuţite doar de
către o unitate autorizată. Reascuţirea manuală va avea ca rezultat
dezechilibrarea dispozitivului de tăiere, producând vibraţii şi
deteriorarea echipamentului.
–lamă de tăiere (lamă în stea (4 dinţi))
Un serviciu expert de reascuţire şi echilibrare profesional este furnizat de agenţii
de service autorizaţi.
NOTĂ: Pentru a creşte durata de funcţ
aceasta poate fi întoarsă invers, până la tocirea ambelor muchii de
tăiere.
ionare a lamei de tăiere (lamă în stea),
69
Page 70

CAP DE TĂIERE CU NYLON
Cea mai eficientă zonă de tăiere
Buton rotativ
Turaţie ralanti Turaţie maximă
Capac
Zăvoare
Presă
Presă
Bobină
80 mm (3-1/8”)
Pentru rotire
spre stânga
Bobină
150 mm (6”)
Crestături
Capul de tăiere cu nylon este un cap de motocositoare cu două fire care se
adaptează la ambele mecanisme, automat şi de tip alimentare şi percutare.
Capul de tăiere cu nylon va elibera automat lungimea adecvată a firului de nylon
prin modificările în forţa centrifugă determinate de creşterea sau scăderea
turaţiei. Totuşi, pentru a tăia iarba moale mai eficient, loviţi capul de tăiere cu
nylon de sol, pentru a elibera fir suplimentar, aşa cum este indicat în secţiunea
referitoare la operare.
Operare
–Creşteţi turaţia capului de tăiere cu nylon la aprox. 6.000 min-1.
Firul din nylon nu va fi alimentat corect la turaţii joase (sub 4.800 min
– Cea mai eficientă zonă de tăiere este indicată de zona întunecată în schema
din partea dreaptă.
Dacă firul din nylon nu este alimentat automat, urmaţi instrucţiunile de mai jos:
1. Eliberaţi maneta de acceleraţie pentru a permite motorului să funcţioneze la
ralanti, apoi strângeţi complet maneta de acceleraţie. Repetaţi această
procedură până când firul de nylon este eliberat la lungimea corectă.
2. Dacă firul din nylon este prea scurt pentru a fi eliberat automat cu procedura
de mai sus, loviţi de sol butonul rotativ al capului de tăiere cu nylon, pentru a
elibera firul din nylon.
3. În cazul în care firul din nylon nu este eliberat cu ajutorul procedurii 2,
înfăşuraţi/înlocuiţi firul din nylon urmând procedurile descrise la secţiunea
“Înlocuirea firului de nylon”.
-1
).
Înlocuirea firului din nylon
–Opriţi motorul.
–Apăsaţi pe zăvoarele carcasei spre interior pentru ridicarea capacului, apoi
scoateţi bobina.
–Agăţaţi vârful noului fir de nylon în crestătura din centrul bobinei, cu un capăt
al firului întinzându-se cu circa 80 mm (3-1/8”) mai mult decât celălalt. Apoi,
înfăşuraţi strâns ambele capete în jurul bobinei în sensul de rotaţie al capului
(sens spre stânga indicat prin LH şi sens spre dreapta indicat prin RH pe
partea laterală a bobinei).
–Înfăşuraţi în întregime, mai puţin 150 mm (6”) din fir în jurul bobinei, lăsând
capetele agăţate temporar prin crestătura de pe partea laterală a bobinei.
70
Page 71

– Introduceţi firele prin urechi pentru a ieşi în afara carcasei.
Ureche
Capac
Cârlig
Ureche
Cârlig
(1)
(2)
(3)
(4)
Montaţi şaiba, arcul şi bobina în carcasă.
–Aliniaţi cârligele de pe capac şi carcasă.
Apoi, apăsaţi ferm capacul pe carcasă pentru a-l fixa.
Instrucţiuni de service
Instrucţiuni de service
ATE NŢIE: Înainte de a efectua orice operaţii de întreţinere pe motocositoare,
opriţi întotdeauna motorul şi scoateţi fişa bujiei (a se vedea
“Verificarea bujiei”).
Purtaţi întotdeauna mănuşi de protecţie.
ATE NŢIE: Nu demontaţi niciodată demarorul cu rapel. În caz contrar, pot
rezulta accidentări. Acest procedeu trebuie efectuat doar de către un
agent de service autorizat.
Pentru a asigura o durată de funcţionare îndelungată şi pentru a evita orice deteriorare a echipamentului, următoarele operaţii de întreţinere
trebuie efectuate la intervale regulate.
Inspecţie şi întreţinere zilnică
– Înainte de operare, verificaţi echipamentul pentru a vedea dacă prezintă şuruburi slăbite sau piese lipsă. Acordaţi o atenţie specială strângerii
lamei de tăiere sau capului de tăiere cu nylon.
– Înainte de operare, verificaţi întotdeauna eventuala înfundare a pasajului de aer pentru răcire şi a aripioarelor cilindrului.
Curăţaţi-le, dacă este necesar.
ătoarele operaţii de întreţinere zilnic, după utilizare:
–Efectuaţi ur
•Curăţaţi motocositoarea la exterior şi verificaţi pentru a identifica eventuale defecte.
•Curăţaţi filtrul de aer. Atunci când lucraţi în condiţii cu foarte mult praf, curăţaţi filtrul de mai multe ori pe zi.
•Verificaţi eventuala deteriorare a lamei sau capului de tăiere cu nylon şi asiguraţi-vă că este montat(ă) ferm.
•Verificaţi dacă există diferenţă suficientă între turaţia de ralanti şi de operare pentru a vă asigura că dispozitivul de tăiere este oprit în timp ce
motorul funcţionează la ralanti (dacă este necesar reduceţi turaţia de ralanti).
Dacă în condiţii de ralanti dispozitivul continuă să se rotească, consultaţi cel mai apropiat agent de service autorizat.
–Verificaţi funcţionarea corectă a comutatorului I-Stop (pornit/oprit)/comutatorului de pornire-oprire, manetei de blocare, manetei de control şi
buto
Curăţarea filtrului de aer (filtru)
–Rotiţi maneta de şoc (4) în partea corespunzătoare poziţiei complet închis şi
ţineţi carburatorul la distanţă de praf sau murdărie.
– Îndepărtaţi şurubul (1).
– Demontaţi capacul filtrului de aer (3).
– Scoateţi elementul tip burete (2), spălaţi-l în apă călduţă şi uscaţi-l
corespunzător.
–După curăţare, reinstalaţi capacul filtrului de aer (3) şi fixaţi-l cu şurubul (1).
m
nului de blocare.
NOTĂ:Dacă pe filtrul de aer se depun cantităţi excesive de praf sau impurităţi,
curăţaţi-l zilnic. Un filtru de aer înfundat poate face dificilă sau imposibilă
pornirea motorului sau poate creşte turaţia acestuia.
71
Page 72

Verificarea bujiei
0,6 mm-0,7 mm
(0,024”-0,028”)
Orificiu pentru unsoare
(5)
– Utilizaţi doar cheia universală furnizată pentru a scoate sau a instala bujia.
–Distanţa dintre cei doi electrozi ai bujiei trebuie să fie între 0,6 şi 0,7 mm
(0,024” - 0,028”). Dacă distanţa este prea mare sau prea mică, reglaţi-o. Dacă
bujia este înfundată cu carton sau prezintă impurităţi, curăţaţi-o bine sau
înlocuiţi-o.
ATE NŢIE: Nu atingeţi fişa bujiei în timp ce motorul funcţionează (pericol de şoc
electric la tensiune înaltă).
Alimentarea cu unsoare a carcasei angrenajului
– Alimentaţi cu unsoare (Shell Alvania 3 sau echivalent) carcasa angrenajului
prin orificiul pentru unsoare, la fiecare 30 de ore. (Unsoarea MAKITA originală
poate fi achiziţionată de la distribuitorul dumneavoastră MAKITA.)
Capul de aspiraţie din rezervorul de carburant
– Filtrul de carburant (5) al capului de aspiraţie este utilizat pentru a alimenta
carburantul necesar pentru carburator.
–Verificaţi vizual filtrul de carburant periodic. Pentru a verifica filtrul, deschideţi
buşonul de alimentare cu carburant, utilizaţi un cârlig din sârmă şi trageţi afară
capul de aspiraţie prin deschiderea rezervorului. Înlocuiţi filtrul dacă acesta
este întărit, este foarte murdar sau este înfundat.
– Alimentarea insuficientă cu carburant poate avea ca rezultat depăşirea turaţiei
maxime admisibile. Înlocuiţi filtrul de carburant cel puţin trimestrial, pentru a
asigura o alimentare suficientă cu carburant a carburatorului.
Orice lucrare de întreţinere sau reglare care nu este inclusă şi descrisă în acest manual trebuie efectuată doar de către agenţii de service
autorizaţi.
72
Page 73

Depozitare
Goliţi carburantul
Umiditate
– La depozitarea echipamentului pentru o perioadă lungă de timp, goliţi întreaga
cantitate de carburant din rezervor şi carburator. Pentru a face acest lucru,
trebuie doar să evacuaţi carburantul din rezervorul de carburant. Eliminaţi
carburantul golit în mod corespunzător şi în conformitate cu legislaţia locală.
– Scoateţi bujia şi adăugaţi câteva picături de ulei de motor prin orificiul bujiei.
Apoi, trageţi demarorul încet, pentru ca pelicula de ulei să acopere interiorul
motorului şi strângeţi bujia.
–Curăţaţi murdăria sau praful de pe lama de tăiere şi de pe exteriorul motorului,
apoi ştergeţi-le cu o cârpă înmuiată în ulei. Depozitaţi echipamentul într-un loc
uscat.
Program de întreţinere
Generalităţi Ansamblul motorului, şuruburi şi
piuliţe
După fiecare realimentare Manetă de control
Zilnic Filtru de aer
Săptămânal Bujie
Trimestrial Cap de aspiraţie
Procedură de oprire Rezervor de carburant
Comutator I-Stop (pornit/oprit)/
Comutator pornire-oprire
Conductă aer răcire
Dispozitiv de tăiere
Turaţie la ralanti
To bă de eşapament
vor de carburant
zer
Re
Carburator
Verificare vizuală pentru defecte şi strângere corectă
Verificare a siguranţei şi stării generale
Verificare funcţională
Verificare funcţională
Se va curăţa
Se va curăţa
Verificaţi gradul de ascuţire şi eventuale deteriorări
Verificare (dispozitivul de tăiere trebuie să rămână imobil)
Verificare, înlocuiţi dacă este necesar
Verificaţi şi, dacă este necesar, curăţaţi deschiderea
Se va înlocui
Se va curăţa
Goliţi rezervorul de carburant
Operaţi până la consumarea totală a carburantului
Depanare
Defect Sistem Observaţii Cauză
Motorul nu porneşte sau
pornirea este dificilă
Sistem de aprindere Scânteie de aprindere OKDefect la sistemul de alimentare cu carburant sau în
sistemul de compresie, defect mecanic
Nu există scânteie de
aprindere
Comutator I-Stop (pornit/oprit)/comutator de pornireoprire acţionat, defect de cablaj sau scurtcircuit, bujie
sau fişă defectă, modul de aprindere defect
Probleme de pornire la cald Rezervor plin. Scânteie
torul porneşte, d
Mo
opreşte imediat
Performanţe insuficiente Mai multe sisteme
ar se
Alimentare cu
carburant
Compresie Lipsă compresie la
Defecţiune
mecanică
Alimentare cu
carburant
pot fi afectate
simultan
Rezervorul de carburant
este plin
tragerea demarorului
Demarorul nu cuplează Arc demaror rupt, piese defecte în interiorul motorului
de aprindere OK
Rezervor plin Reglare la ralanti incorectă, carburator contaminat
Turaţie de ralanti motor
defectuoasă
73
Poziţie incorectă a şocului, carburator defect, conductă
de alimentare cu carburant îndoită sau blocată,
carburant murdar.
Garnitură inferioară cilindru defectă, etanşări arbore cotit
deteriorate, segmenţi de cilindru sau piston defecţi sau
etanşare incorectă a bujiei
Carburator murdar, trebuie curăţat
Orificiu de ventilare rezervor de carburant defect,
conductă de alimentare cu carburant întreruptă, cablu
sau comutator I-Stop (pornit/oprit)/comutator de pornireoprire defect
Filtru de aer contaminat, carburator contaminat, tobă de
eşapament înfundată, conductă de evacuare din cilindru
înfundată
Page 74

Deutsch
Herzlichen Glückwunsch, dass Sie sich für den Kauf einer Motorsense/eines
Motor Rasentrimmers von MAKITA entschieden haben. Motorsensen/Motor
Rasentrimmer von MAKITA sind das Ergebnis unserer jahrelangen
Erkenntnisse, Erfahrungen und eines detaillierten Entwicklungsprogramms.
Lesen Sie diese Gebrauchsanweisung aufmerksam durch, damit Sie die
bestmögliche Leistung und außergewöhnliche Ergebnisse erreichen, die Ihnen
die Motorsensen/Motor Rasentrimmer von MAKITA bieten können.
Symbole
Beachten Sie beim Lesen der Gebrauchsanleitung die folgenden Symbole.
Betriebsanleitung lesen
Besondere Aufmerksamkeit erforderlich
Inhaltsverzeichnis Seite
Symbole ...................................................................... 74
Sicherheitsanweisungen ............................................. 75
Technische Daten ....................................................... 79
Bezeichnung der Bauteile ........................................... 80
Montieren des Griffs.................................................... 81
Montieren des Schutzes.............................................. 82
Montieren des Schneidblattes/
des Nylon-Schneidkopfes ........................................... 83
Kraftstoff/Betanken ..................................................... 84
Korrekter Umgang....................................................... 85
Wichtige Betriebsschritte/Stoppen der Sense/
des Trimmers .............................................................. 85
Schärfen des Schneidwerkzeugs................................ 87
Wartungsanweisungen................................................ 89
Aufbewahrung............................................................. 91
Augen- und Gehörschutz tragen
(nur für den Motor Rasentrimmer)
Tragen Sie Schutzhelm, Schutzbrille und
Gehörschutz
(nur für die Motorsense)
Verboten
Halten Sie einen Abstand ein. Maximal zulässige Werkzeugdrehzahl
Gefahr durch herumfliegende Gegenstände
Rauchverbot Kraftstoff-Öl-Gemisch
Umgang mit offenen Flammen verboten Manueller Motorstart
Schutzhandschuhe tragen Not-Aus
Rückschlag Erste Hilfe
Im Arbeitsbereich dürfen sich weder
Personen noch Tiere aufhalten.
Kein Schneidblättern aus Metall verwenden
(nur für den Motor Rasentrimmer)
Heiße Flächen - Verbrennungsgefahr für Finger oder
Hände
EIN/START
Festes Schuhwerk mit rutschfesten Sohlen
tragen. Empfohlen werden
Arbeitsschutzschuhe mit Stahlkappen.
AUS/STOPP
START
74
Page 75

Übersicht
15 Meter
(1)
(3)
(2)
(4)
(5)
(6)
Sicherheitsanweisungen
Allgemeine Sicherheitsregeln
– Für die Sicherstellung eines ordnungsgemäßen Betriebs müssen Sie diese
Betriebsanleitung durchlesen und vollständig verstanden haben, damit Sie mit
der Verwendung der Motorsense/des Motor Rasentrimmers vertraut sind. Die
Verwendung des Motorgeräts, ohne die Handhabung richtig verstanden zu
haben, kann bei Ihnen und anderen Personen zu schweren Verletzungen
führen.
– Verleihen Sie die Motorsense/den Motor Rasentrimmer nur an Personen, die
über Erfahrungen im Umgang mit Motorsensen/Motor Rasentrimmern verfügen.
Verleihen Sie das Motorgerät nur zusammen mit dieser Betriebsanleitung.
– Falls Sie erstmalig ein motorbetriebenes Schneidwerkzeug bedienen, wenden
Sie sich an Ihren Händler, um grundlegende Anweisungen zu erhalten.
– Kindern und Jugendlichen unter 18 Jahren ist die Bedienung der Motorsense/
des Motor Rasentrimmers untersagt. Personen über 16 Jahren dürfen das
Gerät für Übungszwecke verwenden, jedoch nur unter Aufsicht eines
qualifizierten Anleiters.
– Verwenden Sie die Motorsense/den Motor Rasentrimmer stets mit
größtmöglicher Sorgfalt.
– Betreiben Sie die Motorsense/den Motor Rasentrimmer nur, wenn Sie in guter
physischer Verfassung sind. Führen Sie alle Arbeiten ruhig und mit Vorsicht aus.
Der Benutzer ist dafür verantwortlich, was um ihn herum passiert.
– Betreiben Sie die Motorsense/den Motor Rasentrimmer nie nach dem Genuss
von Alkohol oder nach der Einnahme von Medikamenten oder wenn Sie müde
oder krank sind.
WARNUNG: Während des Betriebs erzeugt dieses Elektrowerkzeug ein
elektromagnetisches Feld. Unter bestimmten Umständen kann dieses Feld
Auswirkungen auf aktive oder passive medizinische Implantate haben. Zur
Verminderung der Gefahr ernsthafter oder tödlicher Verletzungen empfehlen wir
Personen mit medizinischen Implantaten, sich vor der Bedienung dieses Geräts an
einen Arzt oder den Hersteller des medizinischen Implantats zu wenden.
Verwendungszweck des Geräts
– Die Motorsense/der Motor Rasentrimmer ist nur zum Schneiden von Gras,
Unkraut, Büschen und Gestrüpp bestimmt, und darf nicht für andere Zwecke
verwendet werden, beispielsweise zum Abkanten oder Heckeschneiden, da
dies zu Verletzungen führen kann.
Persönliche Schutzausrüstung
– Tragen Sie Kleidung, die sowohl praktisch, als auch für Ihre Arbeit geeignet ist,
d.h. eng anliegende, jedoch für die Bewegung nicht zu enge Kleidung. Tragen
Sie keinen Schmuck und keine Kleidung, der/die sich in Büschen oder Gestrüpp
verfangen könnte.
– Um Verletzungen des Gehörs, der Augen, Hände und Füße zu vermeiden, aber
auch um Ihre Hörleistung während des Betriebs zu schützen, müssen Sie
während der Bedienung der Motorsense/des Motor Rasentrimmers die
folgenden Schutzausrüstungen oder Schutzkleidungen tragen.
– Tragen Sie stets einen Helm, wenn die Gefahr herabfallender Gegenstände
besteht. Der Schutzhelm (1) muss regelmäßig auf Beschädigungen überprüft
und spätestens nach jeweils 5 Jahren durch einen neuen Helm ersetzt werden.
Verwenden Sie ausschließlich zugelassene Schutzhelme.
– Das Visier (2) des Helms (oder alternativ eine Schutzbrille) schützt das Gesicht
vor herumfliegenden Bruchstücken und Steinen. Tragen Sie während des
Betriebs der Motorsense/des Motor Rasentrimmers eine Schutzbrille oder ein
Visier, um Verletzungen der Augen zu vermeiden.
– Tragen Sie einen angemessenen Gehörschutz, um eine Schädigung des
Gehörs zu vermeiden (Gehörschutzkapseln (3), Gehörschutzstöpsel usw.).
– Arbeitsanzüge (4) schützen gegen herumfliegende Steine und Fremdkörper.
Wir empfehlen sehr, Arbeitsanzüge zu tragen.
– Spezielle Handschuhe (5) aus dickem Leder sind Bestandteil der
vorgeschriebenen Ausrüstung und müssen beim Betrieb der Motorsense/des
Motor Rasentrimmers stets getragen werden.
– Tragen Sie bei Betrieb der Motorsense/des Motor Rasentrimmers stets feste
Schuhe (6) mit einer rutschfesten Sohle. Solche Schuhe schützen gegen
Verletzungen und gewährleisten eine gute Standsicherheit.
Restrisiko
– Selbst wenn das Elektrowerkzeug vorschriftsmäßig verwendet wird, ist es nicht
möglich, alle Restrisikofaktoren vollständig auszuschließen. Die folgenden
Gefahren können durch die Beschaffenheit und Konstruktion des
Elektrowerkzeugs auftreten:
1. Lungenschäden, falls keine wirksame Staubmaske getragen wird.
2. Gehörschäden, falls kein wirksamer Gehörschutz getragen wird.
3. Durch Vibration hervorgerufene Gesundheitsschäden, falls das
Elektrowerkzeug über einen längeren Zeitraum verwendet wird oder wenn
es nicht ordnungsgemäß gehandhabt und nicht richtig gewartet wird.
Starten der Motorsense
– Vergewissern Sie sich, dass sich in einem Arbeitsbereich von 15 m keine Kinder
oder andere Personen aufhalten. Achten Sie außerdem auf Tiere im
Arbeitsbereich.
– Überprüfen Sie vor der Verwendung stets den sicheren Betrieb der Motorsense/
des Motor Rasentrimmers.
Überprüfen Sie, dass das Schneidwerkzeug gesichert ist, dass der Gashebel
leicht bedient werden kann, und dass die Sperre des Gashebel ordnungsgemäß
funktioniert.
– Das Drehen des Scheidwerkzeugs im Leerlauf ist verboten. Prüfen Sie mit
Ihrem Händler, ob das Werkzeug eingestellt werden muss. Stellen Sie sicher,
dass die Griffe sauber und trocken sind und dass der Start-/Stoppschalter
ordnungsgemäß funktioniert.
75
Page 76

– Starten Sie die Motorsense/den Motor Rasentrimmer immer nur gemäß der
• Ablegen
• Transport
• Betanken
• Wartung
• Werkzeugwechsel
Anleitungen. Starten Sie den Motor auf keine andere Weise!
– Verwenden Sie die Motorsense/den Motor Rasentrimmer und die Werkzeuge
nur für die angegebenen Zwecke.
– Starten Sie den Motor der Motorsense/des Motor Rasentrimmers nur nach der
vollständigen Montage des Werkzeugs. Betreiben Sie das Werkzeug nur nach
der Montage des gesamten geeigneten Zubehörs!
– Überprüfen Sie vor dem Starten, dass das Schneidwerkzeug keine harten
Gegenstände (Geäst, Steine usw.) berührt, da sich das Schneidwerkzeug beim
Starten dreht.
– Schalten Sie den Motor sofort aus, wenn irgendwelche Motorprobleme
auftreten.
– Sollte das Schneidwerkzeug Steine oder andere harte Gegenstände treffen,
schalten Sie sofort den Motor aus und überprüfen Sie das Schneidwerkzeug.
– Überprüfen Sie das Schneidwerkzeug in regelmäßigen, kurzen Intervallen
(Prüfen Sie mit einem Klopftest auf Haarrisse).
– Betreiben Sie die Motorsense/den Motor Rasentrimmer nur nach Anbringen
und Anpassen des Schultergurtes auf die richtige Länge. Der Schultergurt
muss auf die Körpergröße des Benutzers angepasst und festgezogen werden,
um ein Ermüden während des Betriebs des Werkzeugs zu verhindern. Halten
Sie die Sense niemals während des Betriebs mit nur einer Hand.
– Halten Sie die Motorsense/den Motor Rasentrimmer während des Betriebs
stets mit beiden Händen.
Sorgen Sie immer für eine gute Standsicherheit.
– Betreiben Sie die Motorsense/den Motor Rasentrimmer stets so, dass Sie die
Abgase nicht einatmen. Betreiben Sie den Motor niemals in einem
abgeschlossenem Raum (Risiko einer Gasvergiftung). Kohlenmonoxid ist ein
geruchloses Gas.
– Schalten Sie den Motor immer aus, wenn Sie das Werkzeug ablegen, oder
wenn Sie die Motorsense/den Motor Rasentrimmer unbeaufsichtigt lassen
und lagern Sie es immer an einem sicheren Ort, um Verletzungen anderer
Personen und Beschädigungen des Werkzeugs zu vermeiden.
– Legen Sie das heiße Werkzeug niemals in trockenes Gras oder auf andere
entflammbare Materialien.
– Das Schneidwerkzeug muss immer mit dem entsprechenden Schutz
versehen werden.
Betreiben Sie das Werkzeug niemals ohne diesen Schutz.
– Während des Betriebs müssen alle mit dem Werkzeug gelieferten
Schutzvorrichtungen und Abdeckungen verwendet werden.
– Betreiben Sie den Motor niemals mit beschädigtem Abluftschalldämpfer.
– Schalten Sie vor einem Transport den Motor aus.
– Bringen Sie vor dem Transportieren des Werkzeugs stets die Abdeckung am
Schneidblatt an.
– Stellen Sie sicher, dass die Motorsense/der Motor Rasentrimmer sicher
gelagert wird, um ein Auslaufen des Kraftstoffs während des Transports zu
vermeiden.
– Stellen Sie während des Transports der Motorsense/des Motor
Rasentrimmers sicher, dass der Kraftstofftank völlig leer ist.
– Lassen Sie beim Abladen der Motorsense/des Motor Rasentrimmers von
einem Transporter oder einem anderen Fahrzeug niemals den Motor fallen,
da sonst der Tank ernstlich beschädigt werden kann.
– Lassen Sie die Motorsense/den Motor Rasentrimmer nur in einem Notfall
fallen, da sonst die Motorsense/der Motor Rasentrimmer ernstlich beschädigt
werden können.
– Heben Sie beim Bewegen immer das gesamte Werkzeug vom Boden an. Das
Ziehen des Werkzeugs am Kraftstofftank ist extrem gefährlich und kann zum
Auslaufen des Kraftstoffs und somit zu einem Brand führen.
– Wenn das Werkzeug einem starken Stoß ausgesetzt wurde oder
heruntergefallen ist, überprüfen Sie den Zustand des Werkzeugs, bevor Sie
die Arbeiten fortsetzen. Überprüfen Sie das Kraftstoffsystem auf Leckagen
und die Bedienelemente und Sicherheitseinrichtungen auf Fehlfunktionen.
Wenn Sie einen Schaden bemerken oder sich nicht sicher sind, wenden Sie
sich zur Inspektion und Reparatur an unser autorisiertes Servicecenter.
Betanken
– Schalten Sie während des Betankens den Motor aus, halten Sie den Motor
von offenen Flammen fern und rauchen Sie während des Betankens nicht.
– Stellen Sie sicher, dass Mineralölerzeugnisse nicht in Kontakt mit Ihrer Haut
kommen. Atmen Sie den Kraftstoffdampf nicht ein. Tragen Sie zum Betanken
immer Schutzhandschuhe. Wechseln und reinigen Sie Schutzkleidung
regelmäßig.
– Stellen Sie zur Vermeidung einer Kontaminierung des Erdbodens
(Umweltschutz) sicher, dass weder Kraftstoff noch Öl in das Erdreich
eindringt. Falls etwas Kraftstoff ausläuft, reinigen Sie die Motorsense/den
Motor Rasentrimmer sofort.
– Stellen Sie sicher, dass Ihre Kleidung nicht in Kontakt mit dem Kraftstoff
kommt. Falls Ihre Kleidung in Kontakt mit Kraftstoff kommt, wechseln Sie die
Kleidung sofort, um einen Brand zu verhindern.
– Überprüfen Sie den Tankdeckel regelmäßig, damit dieser sicher
festgeschraubt werden kann und kein Kraftstoff ausläuft.
– Schrauben Sie den Tankdeckel ordnungsgemäß fest. Entfernen Sie sich von
dem Ort des Betankens mindesten 3 m, bevor Sie den Motor starten.
76
Page 77

– Nehmen Sie das Betanken niemals in einem geschlossenen Raum vor.
Achtung:
Rückschlag
Übersicht
Übersicht
Andernfalls kann eine Explosion aufgrund der Ansammlung von
Kraftstoffdampf auf dem Boden verursacht werden.
– Transportieren und lagern Sie Kraftstoff ausschließlich in dafür zugelassenen
Behältern. Stellen Sie sicher, dass Kinder keinen Zugang zu dem gelagerten
Kraftstoff haben.
Handhabung
– Verwenden Sie die Motorsense/den Motor Rasentrimmer nur bei guten
Lichtverhältnissen und guter Sicht. Achten Sie im Winter auf rutschige oder
nasse Bereiche, z.B. auf vereiste oder schneebedeckte Flächen
(Rutschgefahr). Sorgen Sie immer für eine gute Standsicherheit.
– Schneiden Sie niemals über Hüfthöhe.
– Betreiben Sie die Motorsense/den Motor Rasentrimmer niemals, wenn Sie auf
einer Leiter stehen.
– Betreiben Sie die Motorsense/den Motor Rasentrimmer niemals, wenn Sie auf
einen Baum geklettert sind.
– Arbeiten Sie niemals auf nicht stabilen Flächen.
– Entfernen Sie Sand, Steine, Nägel usw. aus dem Arbeitsbereich.
Fremdkörper können das Schneidwerkzeug beschädigen und so gefährliche
Rückschläge verursachen.
– Vergewissern Sie sich vor Beginn des Schnitts, dass das Schneidwerkzeug
die volle Arbeitsdrehzahl erreicht hat.
– Falls sich Gras oder Äste zwischen dem Schneidwerkzeug und dem Schutz
verfangen, stoppen Sie vor dem Reinigen stets den Motor. Andernfalls kann
eine unbeabsichtigte Drehung des Blattes schwere Verletzungen
verursachen.
– Legen Sie regelmäßig Pausen ein, damit es nicht zu einem Kontrollverlust
aufgrund von Ermüdungserscheinungen kommt. Wir empfehlen, jede Stunde
eine Pause von 10 bis 20 Minuten einzulegen.
Rückschlag (Kickback)
– Während des Betriebs der Motorsense können unkontrollierte Rückschläge
auftreten.
– Rückschläge treten häufig auf, wenn Sie im Blattabschnitt zwischen der 12
und 2 Uhr-Position schneiden.
– Wenden Sie niemals den Blattabschnitt der Motorsense zwischen der 12 und
2 Uhr-Position an.
– Wenden Sie diesen Bereich des Motorsensenblattes niemals an festen
Gegenständen (Büsche oder Bäume usw.) mit einem Durchmesser von mehr
als 3 cm an. Andernfalls wird die Motorsense mit großer Kraft abgelenkt, was
sehr gefährlich ist und zu Verletzungen führen kann.
Vermeiden von Rückschlägen
Beachten Sie Folgendes, um Rückschläge zu vermeiden:
– Das Arbeiten im Schneidblattbereich zwischen der 12 und 2 Uhr-Position ist
extrem gefährlich, besonders bei Verwendung von Metallschneiden.
– Schnittarbeiten im Schneidblattbereich zwischen der 11 und 12 Uhr-Position
sowie zwischen der 2 und 5 Uhr-Position dürfen nur durch einen geschulten
und erfahrenen Bediener und dann nur auf eigenes Risiko durchgeführt
werden.
Der optimale Bereich für ein leichtes Schneiden mit fast keinen Rückschlägen
ist zwischen 8 und 11 einer Uhr des Schneidblattes.
Schneidwerkzeuge
– Verwenden Sie ein passendes Schneidwerkzeug für die zu erledigenden
Arbeiten.
Nylon-Schneidköpfe (Rasentrimmer-Köpfe) sind zum Trimmen von Gras
geeignet.
Schneidblätter aus Metall eignen sich zum Schneiden von Unkraut, hohem
Gras, Gebüsch, Sträuchern, Unterholz, Gestrüpp u.ä.
Verwenden Sie niemals andere Blätter, auch keine metallischen, mehrteiligen
Pivotketten und Schlegelmesser.
Anderenfalls kann es zu schweren Verletzungen kommen.
– Vermeiden Sie „Rückschläge“ bei der Verwendung von Schneidblättern aus
Metall und seien Sie immer auf einen plötzlichen Rückschlag gefasst.
Beachten Sie den Abschnitt „Rückschlag“ und „Vermeiden von
Rückschlägen.“
Wartungsanweisungen
– Lassen Sie Ihr Werkzeug durch unser autorisiertes Servicecenter warten.
Verwenden Sie stets nur originale Ersatzteile. Unsachgemäße Reparatur- und
Wartungsarbeiten können die Lebenszeit des Werkzeugs verkürzen und das
Unfallrisiko erhöhen.
– Überprüfen Sie immer den Zustand des Schneidmessers, vor allem auch der
Schutzvorrichtungen und des Schultergurtes, bevor Sie mit der Arbeit
anfangen. Achten Sie besonders auf ordnungsgemäß geschärfte
Schneidblätter.
– Schalten Sie den Motor aus und entfernen Sie den Zündkerzenstecker, wenn
Sie das Schneidwerkzeug austauschen oder schärfen, aber auch wenn Sie
die Sense oder das Schneidwerkzeug reinigen.
77
Page 78

Beschädigte Schneidwerkzeuge dürfen auf keinen Fall begradigt
oder geschweißt werden.
– Betreiben Sie die Motorsense/den Motor Rasentrimmer mit möglichst geringer
Geräusch- und Abgasentwicklung, und verursachen Sie möglichst keine
Verschmutzungen der Umwelt. Überprüfen Sie vor allem, dass der Vergaser
richtig eingestellt ist.
– Reinigen Sie die Motorsense/den Motor Rasentrimmer regelmäßig und stellen
Sie sicher, dass alle Schrauben und Muttern fest angezogen sind.
– Warten oder lagern Sie die Motorsense/den Motor Rasentrimmer niemals in
der Nähe offener Flammen.
– Lagern Sie die Motorsense/den Motor Rasentrimmer in verschlossenen
Räumen und mit leerem Tank.
– Bringen Sie vor dem Reinigen, Warten und Einlagern des Werkzeugs stets die
Abdeckung am Schneidblatt an.
Beachten Sie die relevanten Anweisungen zur Verhinderung von Unfällen, die
von den entsprechenden Handelsorganisationen und
Versicherungsunternehmen herausgegeben werden.
Führen Sie keine Veränderungen an der Motorsense/an dem Motor
Rasentrimmer durch, da Sie sonst Ihre Sicherheit gefährden.
Der Bediener darf nur die in dieser Betriebsanleitung beschriebenen Wartungsund Reparaturarbeiten durchführen. Alle anderen Arbeiten müssen von
autorisiertem Wartungspersonal durchgeführt werden. Verwenden Sie
ausschließlich originale Ersatz- und Zubehörteile, die von MAKITA freigegeben
und geliefert wurden.
Die Verwendung nicht genehmigter Zubehörteile und Werkzeuge führt zu einem
erhöhten Unfallrisiko.
MAKITA übernimmt keine Haftung für Unfälle oder Schäden, die durch die
Verwendung nicht genehmigter Schneidwerkzeuge, Befestigungen der
Schneidwerkzeuge und Zubehörteile verursacht werden.
Erste Hilfe
Stellen Sie für den Fall eines Unfalls sicher, dass ein Erste-Hilfe-Kasten in der
Nähe des Schnittbetriebs verfügbar ist. Ersetzen Sie aus dem Erste-Hilfe-Kasten
entnommene Materialien sofort.
Machen Sie folgende Angaben, wenn Sie Hilfe anfordern:
– Ort des Unfalls
– Was ist passiert
– Anzahl der verletzten Personen
– Art der Verletzungen
–Ihr Name
Schwingung
– Wenn sich Personen mit Durchblutungsstörungen zu starken mechanischen
Schwingungen aussetzen, kann es zu Schädigungen von Blutgefäßen und/
oder des Nervensystems kommen. Folgende Symptome können durch
Vibrationen an Fingern, Händen oder Handgelenken auftreten: „Einschlafen“
von Körperteilen (Taubheit), Kribbeln, Schmerz, Stechen, Veränderung von
Hautfarbe oder Haut. Falls eines dieser Symptome auftritt, suchen Sie einen
Arzt auf!
– Um das Risiko der „Weißfingerkrankheit“ zu verringern, halten Sie Ihre Hände
während des Arbeitens warm und warten und pflegen Sie Maschine und
Zubehörteile gut.
Nur für europäische Länder
EG-Konformitätserklärung
Wir, Makita Corporation als verantwortlicher Hersteller, erklären, dass die folgenden Geräte der Marke Makita:
Bezeichnung des Geräts/der Geräte: Motorsense/Motor Rasentrimmer
Nummer/Typ des Modells: EM2600U, EM2600L
Technische Daten: siehe Tabelle „TECHNISCHE DATEN“
in Serienfertigung hergestellt werden und
den folgenden Richtlinien der Europäischen Union genügen:
2000/14/EG, 2006/42/EG, 2004/108/EG
Außerdem werden die Maschinen gemäß den folgenden Standards oder Normen gefertigt:
EN ISO 11806-1, EN ISO 14982
Die technische Dokumentation erfolgt durch:
Makita International Europe Ltd., Technical Department,
Michigan Drive, Tongwell, Milton Keynes, Bucks MK15 8JD, England
Das Verfahren zur Konformitätsbewertung, vorgesehen in 2000/14/EG, erfolgte in Übereinstimmung mit Anhang V.
Gemessener Schallleistungspegel (als ein Rasentrimmer): 109,77 dB
Gemessener Schallleistungspegel (als Motorsense): 107,29 dB
Garantierter Schallleistungspegel: 112 dB
15. 4. 2013
Tomoyasu Kato
Direktor
Makita Corporation
3-11-8, Sumiyoshi-cho,
Anjo, Aichi, JAPAN
78
Page 79

Technische Daten
\
Modell
EM2600U EM2600L
U-Griff Bügelgriff
Abmessungen: Länge x Breite x Höhe (ohne Schneidblatt) 1.770 x 610 x 410 mm 1.770 x 330 x 185 mm
Nettogewicht 5 kg 5 kg
Motor-Hubraum
Maximale Motorleistung 0,83 kW
Maximale Drehzahl der Welle
8.800 min
Einteiliges Schneidblatt aus
Schneidwerkzeug
Metall
Rasentrimmer-Kopf φ430 mm
Leerlaufdrehzahl 3.000 U/min
Drehzahl Kupplungseingriff 4.100 U/min
Übersetzung Getriebe 14/19
Kraftstoff
Ottokraftstoff-Öl-Gemisch
Ottokraftstoff: 2-Takt-Motoröl = 50 : 1
Fassungsvermögen (Kraftstofftank) 0,6 l
Vergaser WALBRO WYC
25,7 cm
φ230 mm
3
-1
Zündsystem Halbleiterzündung
Zündkerze NGK BPMR7A
Elektrodenabstand 0,6 bis 0,7 mm
Linker Handgriff (vorderer
Griff)
14,680 m/s
2
K = 1,5 m/ s
2
5,152 m/s2 K = 1,5 m/s
Schwingung: (Für Motorsense)
Rechter Handgriff (hinterer
Griff)
Linker Handgriff (vorderer
Griff)
9,037 m/s
7,961 m/s
2
K = 1,5 m/ s
2
K = 1,5 m/s
2
2
9,677 m/s2 K = 1,5 m/s
8,83 m/s2 K = 1,5 m/s
Schwingung: (Für Rasentrimmer)
Rechter Handgriff (vorderer
Griff)
7,019 m/s
2
K = 1,5 m/s
2
14,381 m/s2 K = 1,5 m/s
Schallpegel (getestet gemäß 2000/14/EG und 2005/88/EG):
Schalldruckpegel an Bedienerposition (Rasentrimmer): 98,52 dB (A) K = 2,5 dB (A)
Schalldruckpegel an Bedienerposition (Motorsense): 96,15 dB (A) K = 2,5 dB (A)
Gemessener Schallleistungspegel (Rasentrimmer): 109,77 dB (A) K = 2,5 dB (A)
Gemessener Schallleistungspegel (Motorsense): 107,29 dB (A) K = 2,5 dB (A)
Schallpegel (getestet gemäß 2000/14/EG und 2005/88/EG): Garantierte
Schallleistungswerte
112 dB (A)
2
2
2
2
79
Page 80

Bezeichnung der Bauteile
Bezeichnung der Bauteile
1 Kraftstofftank
2 Seilspulstarter
3 Luftfilter
4
I-Stopp-Schalter (Ein/Aus)/
Start-Stopp-Schalter
5 Zündkerze
6 Abgasschalldämpfer
7 Kupplungsgehäuse
8 Hinterer Griff
9 Einhänger
10 Griff
11 Gashebel
12 Seilzug
13 Achse
14 Schutz (Schutz für Schneidwerkzeug)
15 Getriebegehäuse
16 Griffhalterung
17 Schneidblatt
18 Nylon-Schneidkopf
19 Tankdeckel
20 Startergriff
21 Ansaugpumpe
22 Choke-Hebel
EM2600U
U-Griff
EM2600L
Bügelgriff
(3)
(7)
(21)
(1)
(19)
80
Page 81

Montieren des Griffs
EM2600U
L
R
(1)
EM2600U
(2)
EM2600U
(3)
(1)
EM2600U
ACHTUNG: Stoppen Sie vor allen Arbeiten mit der Motorsense den Motor und
trennen Sie den Zündkerzenstecker von der Zündkerze. Tragen
Sie immer Schutzhandschuhe!
ACHTUNG: Stellen Sie sicher, dass Sie die Motorsense vor dem Start wieder
vollständig montiert haben.
Für Modelle mit U-Griff
– Setzen Sie die beiden Griffe auf die Griffhalterung. Der Gashebel muss sich
auf der rechten Seite befinden, wenn Sie in Richtung des Schneidwerkzeugs
blicken.
– Passen Sie die Griffenden in die Rille der Griffhalterung ein und setzen Sie die
Klemmvorrichtung auf. Zum Einstellen ziehen Sie sie leicht mit vier Schrauben
an.
– Stellen Sie den Winkel der Griffe ein und ziehen Sie dann alle Schrauben
gleichmäßig mit einem Inbusschlüssel an.
– Bringen Sie das Gashebel-Kabel (1) auf die Seite der Achse, auf der sich der
Gashebel befindet. Umschließen Sie dann das Kabel mit der Hüftauflage (2).
– Führen Sie das Gashebel-Kabel (1) in die Klemmöffnung (3) an der
Griffhalterung ein.
– Vergewissern Sie sich, dass das Gashebel-Kabel so verläuft, wie in der
Abbildung dargestellt.
– Betätigen Sie den Gashebel und vergewissern Sie sich, dass er freigängig ist.
ACHTUNG: Das Kabel darf nicht so verlaufen, wie in der Abbildung
dargestellt. Ein abstehendes Kabel kann zu einer hohen
Leerlaufgeschwindigkeit führen und ein unkontrolliertes Blatt kann
Verletzungen verursachen.
81
Page 82

Für Modelle mit Bügelgriff
(2)
(1)
Motor
(4)
(3)
Motor
EM2600L
Schlagblatt
Schutz für Schneidblatt aus
Metall
Nylon-Schneidkopf
Schutz für Fadenschneider
(2)
(3)
(1)
(4)
(1)
(6)
(5)
– Führen Sie das Gewinde (1) auf der Griffhalterung in die
Befestigungsöffnung (2) auf dem Rohr.
– Befestigen Sie den Hilfsgriff (3) am Absperrstab.
– Befestigen Sie die 4 Schrauben (4) M5 × 30.
Montieren des Schutzes
Zur Erfüllung der geltenden Sicherheitsstandards dürfen Sie nur die in dieser
Übersicht aufgezeigten Werkzeug/Schutz-Kombinationen verwenden.
Verwenden Sie immer originale Schneidblätter/NylonSchneidköpfe von MAKITA.
– Die Schneidblatt muss gut glänzen und darf keine Risse oder Brüche
aufweisen. Falls das Schneidblatt während des Betriebs gegen einen Stein
geschlagen ist, stoppen Sie sofort den Motor und überprüfen Sie das Blatt.
– Schleifen oder ersetzen Sie das Schneidblatt nach jeweils drei
Betriebsstunden.
– Falls der Nylon-Schneidkopf während des Betriebs gegen Steine schlägt,
stoppen Sie den Motor und überprüfen Sie den Nylon-Schneidkopf sofort.
ACHTUNG: Für Ihre eigene Sicherheit und für die Einhaltung der
Bestimmungen zur Unfallverhinderung müssen Sie stets den
entsprechenden Schutz anbringen. Der Betrieb des Werkzeugs
ohne installierten Schutz ist verboten.
– Befestigen Sie den Schutz (1) mit zwei Schrauben M6 x 30 (2) an der Klemme (3).
– Bei Verwendung des Fadenschneidkopfs passen Sie den Schutz (6) in den
Schutz (1) ein und ziehen Sie diesen mit zwei Muttern (5) und zwei Schrauben
(4) fest.
82
Page 83

Montieren des Schneidblattes/des Nylon-Schneidkopfes
(2)
(1)
(3)
Lösen
Inbusschlüssel
Festziehen
(3)
Lösen
Inbusschlüssel
Festziehen
Drehrichtung
Das Schneidblatt oder den Nylon-Schneidkopf können Sie einfach austauschen,
wenn Sie zuerst das Werkzeug umdrehen.
– Stecken Sie den Inbusschlüssel durch die Öffnung im Getriebegehäuse und
drehen Sie die Aufnahmescheibe (3), bis diese mit dem Inbusschlüssel
einrastet.
– Lösen Sie die Mutter/Federscheibe (1) (Linksgewinde) mit dem
Steckschlüssel, und entfernen Sie die Mutter/Federscheibe (1) und die
Klemmscheibe (2).
Mit eingestecktem Inbusschlüssel
– Montieren Sie das Schneidblatt so auf die Achse, dass die Führung der
Aufnahmescheibe (3) in das Wellenloch im Schneidblatt passt. Befestigen Sie
die Klemmscheibe (2) und sichern Sie das Schneidblatt mit der Mutter/
Federscheibe (1).
[Anzugsmoment: 13 bis 23 Nm]
HINWEIS: Tragen Sie beim Umgang mit dem Schneidblatt immer
HINWEIS: Die Mutter zum Befestigen des Schneidblattes (mit Federscheibe)
Schutzhandschuhe.
ist ein Verschleißteil. Wenn Sie Verschleiß oder Deformation an der
Federscheibe feststellen, ersetzen Sie die Mutter.
HINWEIS: Für die Montage des Nylon-Schneidkopfes werden die
Klemmscheibe (2) und die Mutter/Federscheibe (1) nicht benötigt.
Der Nylonkopf muss auf die Aufnahmescheibe (3) passen.
– Schrauben Sie den Nylon-Schneidkopf auf die Achse auf.
– Vergewissern Sie sich, dass sich die Klinge gegen den Uhrzeigersinn dreht.
83
Page 84

Kraftstoff/Betanken
Beachten Sie die Sicherheitsanweisungen auf
Seite 75.
20 cm3 40 cm
3
100 cm3 200 cm
3
200 cm3 400 cm
3
1.000 cm3 (1 Liter)
5.000 cm
3
(5 Liter)
10.000 cm
3
(10 Liter)
50:1 25:1
Kraftstoff
+
Umgang mit Kraftstoff
Beim Umgang mit Kraftstoffen ist äußerste Vorsicht geboten. Kraftstoffe können
Substanzen enthalten, die wie Lösungsmittel wirken. Tanken Sie nur in einem
gut belüfteten Raum oder im Freien auf. Atmen Sie die Kraftstoffdämpfe nicht ein
und vermeiden Sie jeglichen Kontakt des Kraftstoffs oder Öls mit Ihrer Haut.
Mineralölerzeugnisse wirken hautentfettend. Durch anhaltenden Hautkontakt mit
diesen Erzeugnissen wird Ihre Haut extrem trocken, was zu zahlreichen
Hauterkrankungen führen kann. Außerdem können allergische Reaktionen
auftreten.
Bei Kontakt mit Öl können Augenirritationen auftreten. Falls Öl in Ihre Augen
gelangt, spülen Sie die Augen sofort mit klarem Wasser. Falls die
Augenirritationen anhalten, suchen Sie sofort einen Arzt auf.
Kraftstoff-Öl-Gemisch
Der Motorsense ist ein Hochleistungs-Zwei-Takt-Motor. Dieser wird mit einem
Gemisch aus Kraftstoff und Zwei-Takt-Motorenöl betrieben. Der Motor ist für
bleifreies Normalbenzin mit einer Oktanzahl von ROZ 91 vorgesehen. Ist aus
irgendeinem Grund solcher Kraftstoff nicht verfügbar, können Sie Kraftstoff mit
einer höheren Oktanzahl verwenden. Dies hat keinen Einfluss auf den Motor,
kann jedoch die Betriebsleistung schmälern.
Ähnliche Probleme treten bei der Verwendung von verbleitem Kraftstoff auf.
Verwenden Sie nur bleifreien Kraftstoff, um einen optimalen Motorbetrieb zu
erreichen und um Ihre Gesundheit und die Umwelt zu schützen!
Zur Schmierung des Motors ist 2-Takt-Motoröl (Qualität: JASO FC oder ISO
EGD) als Kraftstoffzusatz zu verwenden. Der Motor ist für die Verwendung des
speziellen Zwei-Takt-Motorenöls in einem Mischverhältnis von 50:1 ausgelegt.
Außerdem werden eine lange Lebensdauer begleitet von einem zuverlässigen
Betrieb und minimalen Emissionen durch die Verwendung dieses
Mischungsverhältnisses garantiert. Die zuverlässige Funktionsweise der
Motorsense kann nicht garantiert werden, wenn das Mischungsverhältnis 50:1
(mit dem speziellen 2-Takt-Motoröl) nicht strengstens eingehalten wird.
Korrektes Mischungsverhältnis:
Ottokraftstoff: vom Hersteller freigegebenes 2-Takt-Motoröl = 50 : 1 oder
Ottokraftstoff: 2-Takt-Motoröl eines anderen Herstellers = 25: 1 empfohlen
HINWEIS: Mischen Sie zur Vorbereitung des Kraftstoff-Öl-Gemischs zuerst die
gesamte Ölmenge mit der Hälfte des erforderlichen Kraftstoffs und
fügen Sie anschließend den restlichen Kraftstoff hinzu. Mischen Sie
das Gemisch gut durch, bevor Sie es in den Tank der Motorsense
einfüllen. Geben Sie nicht mehr Motorenöl als angegeben hinzu, um
einen sicheren Betrieb zu gewährleisten. Andernfalls werden mehr
Verbrennungsrückstände produziert, die Umwelt verschmutzt und
der Abluftkanal sowie der Schalldämpfer verstopft. Außerdem steigt
der Kraftstoffverbrauch und die Leistung sinkt.
Betanken
Der Motor muss ausgeschaltet sein.
– Reinigen Sie den Bereich um den Tankdeckel (2) gründlich, damit kein
Schmutz in den Kraftstofftank (1) gelangt.
– Schrauben Sie den Tankdeckel (2) ab und füllen Sie den Kraftstoff ein.
– Schrauben Sie den Tankdeckel (2) wieder fest auf.
– Reinigen Sie den Tankdeckel (2) und den Tank nach dem Betanken.
Aufbewahrung von Kraftstoffen
Kraftstoff kann nicht unbegrenzt gelagert werden.
Kaufen Sie nur die Menge, die Sie in einem Betriebszeitraum von 4 Wochen
benötigen. Verwenden Sie ausschließlich zugelassene Kraftstoffbehälter.
84
Page 85

Korrekter Umgang
Einhänger
(1)
EM2600U
(1)
(4)
(2)
(3)
(1)
(3)
(2)
EM2600L
Befestigen des Schultergurts
– Stellen Sie die Gurtlänge so ein, dass das Schneidblatt parallel zum Boden ist.
Abtrennung
– Drücken Sie im Notfall die Einrastungen (1) an beiden Seiten und trennen Sie
die Anlage.
Gehen Sie äußerst vorsichtig vor, damit Sie die Kontrolle über das Werkzeug
behalten. Lassen Sie nicht zu, dass das Werkzeug in Ihre Richtung oder in
Richtung anderer Personen in Ihrer Nähe abprallt.
WARNUNG: Andernfalls können Sie die Kontrolle über das Werkzeug verlieren
Hinweis: In einigen Ländern hat der Schultergurt diese Abtrennfunktion nicht.
und schwere oder TÖDLICHE Verletzungen verursachen.
Wichtige Betriebsschritte/Stoppen der Sense/des Trimmers
Beachten Sie die geltenden Bestimmungen zur Unfallvermeidung.
Starten
Bewegen Sie sich mindestens 3 m von dem Bereich weg, wo Sie das Werkzeug betankt haben. Legen Sie die Motorsense auf einem sauberen
Untergrund ab und achten Sie darauf, dass das Schneidwerkzeug nicht in Kontakt mit dem Erdboden oder anderen Gegenständen steht.
WARNUNG: Beachten Sie, dass sich das Schneidwerkzeug sofort nach dem
Motorstart zu drehen beginnt.
Kaltstart für Modelle mit U-Griff
– Stellen Sie den I-Stopp Schalter (Ein/Aus) (1) wie abgebildet ein.
– Erfassen Sie den Griff (der Sicherheits-Entsperrhebel (2) wird durch
Handdruck aktiviert).
– Drücken Sie den Gashebel (3) und halten Sie ihn gedrückt.
– Drücken Sie die Verriegelungstaste (4) und lassen Sie den Gashebel los;
lassen Sie anschließend die Verriegelungstaste los (die Verriegelungstaste
hält den Gashebel in der Startposition).
Kaltstart für Modelle mit Bügelgriff
– Stellen Sie den Start-Stopp-Schalter (1) wie abgebildet auf Startposition.
– Erfassen Sie den Griff (der Sicherheits-Entsperrhebel (2) wird durch
Handdruck aktiviert).
– Drücken Sie den Gashebel (3) und halten Sie ihn gedrückt.
– Setzen Sie den Start-Stopp-Schalter (1) in die Startposition und lassen Sie
den Gashebel los und lassen Sie dann den Start-Stopp-Schalter los (Der
Start-Stopp-Schalter hält den Gashebel in der Startposition).
85
Page 86

Warmstart für Modelle mit U-Griff
EM2600U
EM2600L
(6)
(5)
GESCHLOSSEN
(6)
(5)
OFFEN
– Stellen Sie den I-Stopp Schalter (Ein/Aus) (1) wie abgebildet ein.
Warmstart für Modelle mit Bügelgriff
– Stellen Sie den Start-Stopp-Schalter (1) wie abgebildet auf Neutralposition.
– Legen Sie zuerst das Werkzeug auf dem Boden ab.
– Drücken Sie die Ansaugpumpe (5) mehrmals (7 bis 10 Mal) leicht, bis der
Kraftstoff in die Ansaugpumpe gelangt.
– Schließen Sie den Choke-Hebel (6).
Öffnen des Chokes:
• Bei kalten Temperaturen oder wenn der Motor kalt ist, ist der Choke völlig
geschlossen
• Bei einem erneuten Start bei noch warmen Motor ist der Choke völlig
oder halb geöffnet
– Halten Sie das Kupplungsgehäuse sicher mit der linken Hand fest (siehe
Abbildung).
– Ziehen Sie den Startergriff langsam, bis Sie einen Widerstand spüren, ziehen
Sie dann stark.
– Ziehen Sie das Starterseil nicht bis zur vollen Länge heraus, und verhindern
Sie, dass sich der Startergriff selbst einzieht. Halten Sie das Starterseil unter
Kontrolle und gewährleisten Sie ein langsames Einziehen.
– Wiederholen Sie den Startvorgang, bis Sie die Startzündung des Motors
hören.
– Drücken Sie auf den Choke-Hebel (6) ( ) und ziehen Sie das Starterseil
erneut, bis der Motor startet.
– Lassen Sie sofort nach dem Start des Motors den Gashebel los, lassen Sie
die Halbdrossel-Verriegelung los und lassen Sie den Motor im Leerlauf.
– Lassen Sie den Motor für etwa eine Minute mit einer recht niedrigen Drehzahl
laufen, bevor Sie den Motor voll belasten.
HINWEIS: – Wenn Sie den Startergriff wiederholt ziehen und der Choke-Hebel sich in der Position „ “ befindet, startet der Motor aufgrund der
übermäßigen Kraftstoffaufnahme nicht leicht.
– Falls übermäßig Kraftstoff aufgenommen wird, entfernen Sie die Zündkerze und ziehen Sie den Startergriff langsam, um den
übermäßigen Kraftstoff zu entfernen. Trocknen Sie außerdem die Elektroden der Zündkerze.
86
Page 87

Vorsichtsmaßnahmen bei Betrieb:
EM2600L
EM2600U
STOPP
Falls der Gashebel während des lastlosen Betriebs vollständig geöffnet ist, erreicht die Motordrehzahl über 10.000 U/min
Motor nie mit einer höheren Geschwindigkeit als notwendig und bei etwa 6.000 - 8.000 U/min
ACHTUNG: Reduzieren Sie die Motordrehzahl immer, wenn Sie gerade nicht
mit dem Werkzeug arbeiten.
Der Betrieb des Werkzeugs bei höheren Drehzahlen ohne
Belastung verkürzt die Lebenszeit des Werkzeugs.
Stoppen
– Lassen Sie den Gashebel (3) vollkommen los und drücken Sie, wenn sich die
Motordrehzahl verlangsamt hat, den I-Stopp-Schalter (Ein/Aus)/Start-StoppSchalter (1) in die Position STOPP (STOP), um den Motor zu stoppen.
– Beachten Sie, dass der Schneidkopf nicht sofort stoppt, und stellen Sie sicher,
dass dieser langsamer wird und von selbst stoppt.
-1
.
-1
. Betreiben Sie den
Schärfen des Schneidwerkzeugs
ACHTUNG: Die im Folgenden aufgeführten Schneidwerkzeuge dürfen nur
durch autorisierte Einrichtungen geschärft werden. Manuelles
Neuschärfen führt zu Unwuchten des Schneidwerkzeugs,
wodurch Vibrationen und Beschädigungen des Werkzeugs
verursacht werden.
– Schneidblätter (4-Zahn-Schlagblätter)
Professionelle Schärf- und Auswuchtdienste werden von autorisierten
Dienstleistungsunternehmen angeboten.
HINWEIS: Zur Verbesserung der Lebenszeit der Schneidklinge (Schlagblatt)
muss die Klinge möglicherweise umgedreht werden, damit sich
beide Schneidkanten abnutzen.
87
Page 88

NYLON-SCHNEIDKOPF
Effektivster Schnittbereich
Knauf
Leerlaufdrehzahl
Volle Drehzahl
Abdeckung
Riegel
Drücken
Drücken
Spule
80 mm (3-1/8”)
Für Drehung
nach links
Spule
150 mm (6”)
Einkerbungen
Der Nylon-Schneidkopf ist ein Rasentrimmerkopf mit zwei Fäden. Die
Schneidfäden werden sowohl automatisch als auch durch einen Stoß-ZufuhrMechanismus zugeführt.
Der Nylon-Schneidkopf führt automatisch die entsprechende Länge des
Nylonseils heraus. Dies geschieht durch Ändern der Zentrifugalkraft aufgrund
der Zunahme oder Abnahme der Drehzahl. Um weiches Gras jedoch wirksamer
zu schneiden, stoßen Sie den Nylon-Schneidkopf gegen den Boden, um ein
Stück zusätzliches Seil herauszuführen (siehe Betriebsabschnitt).
Betrieb
– Erhöhen Sie die Drehzahl des Nylon-Schneidkopfes auf ca. 6.000 U/min-1.
Bei niedrigeren Drehzahlen (unter 4.800 U/min
korrekt herausgeführt.
– Der effektivste Schnittbereich ist in der Abbildung rechts schraffiert dargestellt.
Falls das Nylonseil nicht automatisch herausgeführt wird, gehen Sie wie folgt
vor:
1. Lassen Sie den Gashebel los, sodass der Motor im Leerlauf ist und drücken
Sie den Gashebel dann ganz ein. Wiederholen Sie dies, bis das Nylonseil
die richtige Länge hat.
2. Falls das Nylonseil zu kurz ist, um mittels dieser Methode automatisch
herausgeführt zu werden, stoßen Sie den Knauf des Nylon-Schneidkopfs
gegen den Boden, um das Nylonseil herauszuführen.
3. Falls das Nylonseil nicht mithilfe der Vorgehensweise 2 herausgeführt
werden kann, spulen Sie das Nylonseil auf und tauschen Sie es aus (siehe
Abschnitt „Ersetzen des Nylonseils“).
-1
) wird das Nylonseil nicht
Ersetzen des Nylonseils
– Stoppen Sie den Motor.
– Drücken Sie die Riegel nach innen, um die Abdeckung anzuheben und die
Spule zu entfernen.
– Haken Sie die Mitte des Nylonseils in die Kerbe in der Mitte der Spule ein, das
eine Ende des Seils muss etwa 80 mm länger als das andere sein. Winden
Sie anschließend beide Enden fest um die Spule in Richtung der Kopfdrehung
(Linksdrehung wird durch „LH“ und Rechtsdrehung durch „RH“ an der Seite
der Spule gekennzeichnet).
– Winden Sie etwa 150 mm des Seils um die Spule und lassen Sie die Enden
vorübergehend in der Einkerbung an der Seite der Spule eingehängt.
88
Page 89

– Fädeln Sie die Fäden durch die Ösen aus dem Gehäuse heraus.
Öse
Abdeckung
Haken
Öse
Haken
(1)
(2)
(3)
(4)
Montieren Sie die Unterlegscheibe, Feder und Spule im Gehäuse.
– Richten Sie die Haken auf der Abdeckung mit dem Gehäuse aus.
Drücken Sie dann die Abdeckung fest auf das Gehäuse, um sie zu sichern.
Wartungsanweisungen
Wartungsanweisungen
ACHTUNG: Schalten Sie vor allen Wartungsarbeiten an der Motorsense den
Motor aus und trennen Sie den Zündkerzenstecker von der
Zündkerze (siehe „Überprüfen der Zündkerze“).
Tragen Sie unbedingt Schutzhandschuhe.
ACHTUNG: Bauen Sie den Rückstoßstarter niemals selbst aus.
Zuwiderhandlungen können zu Unfällen führen. Diese
Vorgehensweise sollte nur von autorisierten Servicezentren
durchgeführt werden.
Führen Sie die folgenden Wartungsarbeiten regelmäßig durch, um eine lange Lebenszeit zur erzielen und Beschädigungen des Werkzeugs zu
vermeiden.
Tägliche Inspektionen und Wartungsarbeiten
– Überprüfen Sie vor dem Betrieb das Werkzeug auf lose Schrauben und fehlende Teile. Achten Sie besonders auf den festen Sitz des
Schneidblattes/des Nylon-Schneidkopfes.
– Überprüfen Sie vor jedem Betrieb, dass die Kühlluftdurchgänge und Zylinderlamellen nicht verstopft sind.
Reinigen Sie diese bei Bedarf.
– Führen Sie die folgenden Wartungsarbeiten täglich nach der Arbeit durch:
• Reinigen Sie die Motorsense im ausgebauten Zustand und überprüfen Sie diese auf Beschädigungen.
• Reinigen Sie den Luftfilter. Wenn Sie unter sehr staubigen Bedingungen arbeiten, reinigen Sie den Filter mehrmals am Tag.
• Überprüfen Sie das Schneidblatt/den Nylon-Schneidkopf auf Beschädigungen und auf ordnungsgemäßen Sitz.
• Prüfen Sie, dass der Abstand zwischen Leerlauf- und Betriebsdrehzahlen ausreichend ist, damit das Werkzeug bei Leerlauf des Motors im
Stillstand ist (reduzieren Sie bei Bedarf die Leerlaufdrehzahl).
Falls sich das Schneidwerkzeug während des Leerlaufs des Motors weiter dreht, wenden Sie sich an das nächste autorisierte
Servicezentrum.
– Prüfen Sie den I-Stopp-Schalter (Ein/Aus)/Start-Stopp-Schalter, den Entriegelungshebel, den Regelungshebel und die Verriegelungstaste auf
ordnungsgemäße Funktionsweise.
Reinigen des Luftreinigers (Luftfilter)
– Drehen Sie den Choke-Hebel (4) vollständig zu, und halten Sie den Vergaser
fern von Staub oder Schmutz.
– Entfernen Sie die Schraube (1).
– Nehmen Sie die Luftfilterabdeckung (3) ab.
– Entfernen Sie den Schwamm (2), waschen Sie diesen in lauwarmen Wasser
und trocknen Sie diesen vollständig.
– Setzen Sie nach dem Reinigen den Luftfilterdeckel (3) wieder auf und
befestigen Sie ihn mit der Schraube (1).
HINWEIS: Sollten übermäßiger Staub und Schmutz am Luftfilter anhaften,
reinigen Sie den Liftfilter täglich. Der Motor kann mit einem
verstopften Luftreiniger nur schwer oder gar nicht gestartet werden,
oder die Motordrehzahl nimmt zu.
89
Page 90

Überprüfen der Zündkerze
0,6 mm - 0,7 mm
(0,024”-0,028”)
Schmieröffnung
(5)
– Schrauben Sie die Zündkerze ausschließlich mit dem mitgelieferten
Universalschlüssel heraus- und ein.
– Der Abstand zwischen den Elektroden der Zündkerze muss zwischen 0,6 und
0,7 mm liegen. Wenn der Abstand zu klein oder zu groß ist, korrigieren Sie
den Abstand. Falls die Zündkerze mit einem Karton oder Schmutz verstopft
ist, reinigen Sie diese gründlich oder ersetzen Sie sie.
ACHTUNG: Berühren Sie bei laufendem Motor niemals den
Zündkerzenstecker (Gefahr eines Hochspannungsschlags).
Einbringen von Schmierfett in das Getriebegehäuse
– Bringen Sie nach jeweils 30 Betriebsstunden Schmierfett (Shell Alvania 3 oder
gleichwertig) durch die Schmieröffnung in das Getriebegehäuse ein.
(Originales MAKITA-Schmierfett erhalten Sie bei Ihrem MAKITA-Händler.)
Ansaugkopf im Kraftstofftank
– Mit dem Kraftstofffilter (5) des Ansaugkopfes wird der benötigte Kraftstoff in
den Vergaser geleitet.
– Führen Sie regelmäßig eine Sichtprüfung des Kraftstofffilters durch. Für die
Inspektion des Filters öffnen Sie den Deckel des Tankeinfüllstutzens und
ziehen Sie mit einem Drahthaken den Ansaugkopf durch die Tanköffnung.
Ersetzen Sie den Filter, falls dieser verhärtet, schmutzig oder verstopft ist.
– Eine unzureichende Kraftstoffzufuhr kann dazu führen, dass die maximal
zulässige Drehzahl überschritten wird. Aus diesem Grund muss der
Kraftstofffilter mindestens quartalsweise ersetzt werden, um eine
zufriedenstellende Kraftstoffzufuhr zum Vergaser zu gewährleisten.
Alle weiteren Wartungsarbeiten oder Einstellungen, die in diesem Handbuch nicht beschrieben wurden, müssen von autorisierten Servicezentren
durchgeführt werden.
90
Page 91

Aufbewahrung
Kraftstoff ablassen
Feuchtigkeit
– Wenn Sie das Werkzeug über einen längeren Zeitraum lagern, lassen Sie den
gesamten Kraftstoff aus den Tank und dem Vergaser ab. Lassen Sie dazu
einfach den Kraftstoff aus dem Tank ab. Entsorgen Sie den abgelassenen
Kraftstoff gemäß den örtlichen Bestimmungen.
– Entfernen Sie die Zündkerze und geben Sie einige wenige Tropfen Öl in die
Zündkerzenöffnung. Ziehen Sie anschließend den Starter leicht, sodass das
Öl die Innenseite des Motors bedeckt und ziehen Sie dann die Zündkerze fest.
– Entfernen Sie allen Staub und Schmutz von dem Schneidblatt und dem
Äußeren des Motors und reiben Sie diese mit einem ölgetränkten Tuch ein.
Lagern Sie das Werkzeug an einem trockenem Platz.
Wartungsplan
Allgemein Motorbaugruppe, Schrauben und
Muttern
Nach jedem Betanken Gashebel
I-Stopp-Schalter (Ein/Aus)/StartStopp-Schalter
Täglich Luftfilter
Kühlluftkanal
Schneidwerkzeug
Leerlaufdrehzahl
Wöchentlich Zündkerze
Schalldämpfer
Quartalsweise Ansaugkopf
Kraftstofftank
Vorgehen für Stilllegung Kraftstofftank
Vergaser
Sichtprüfung auf Beschädigungen und festen Sitz
Überprüfen von allgemeinem Zustand und Sicherheit
Funktionsprüfung
Funktionsprüfung
Reinigen
Reinigen
Prüfen auf Beschädigungen und Schärfe
Überprüfen (Schneidwerkzeug darf sich nicht bewegen)
Inspektion, ggf. Austausch
Inspektion und Reinigung der Öffnung bei Bedarf
Austauschen
Reinigen
Kraftstofftank leeren
Betreiben des Motors, bis der Kraftstoff vollständig verbraucht ist
Fehlerbehandlung
Problem System Beobachtung Ursache
Motor startet nicht oder nur
schwer
Zündsystem Zündfunke OK Fehler in der Kraftstoffzufuhr oder im
Verdichtungssystem, mechanischer Defekt
Kein Zündfunke I-Stopp-Schalter (Ein/Aus)/Start-Stopp-Schalter betätigt,
Fehler oder Kurzschluss in Verdrahtung, Zündkerze oder
Zündkerzenstecker defekt, Zündmodul defekt
Probleme bei Warmstart Tank gefüllt, Zündfunke OKVergaser verschmutzt, muss gereinigt werden
Motor startet, geht jedoch
gleich wieder aus
Unzureichende Leistung Möglicherweise sind
Kraftstoffzufuhr Kraftstofftank gefüllt Falsche Choke-Position, Vergaser defekt, Kraftstoff-
Verdichtung Keine Verdichtung beim
Durchziehen
Mechanischer
Fehler
Kraftstoffzufuhr Tank gefüllt Falsche Leerlaufeinstellung, Vergaser verschmutzt
mehrere Systeme
gleichzeitig
betroffen.
Starter greift nicht ein Gebrochene Starterfeder, gebrochenen Teile innerhalb
Motorleerlaufdrehzahl
zu niedrig
Zufuhrleitung verbogen oder blockiert, Kraftstoff
verschmutzt
Zylinderkopfdichtung defekt, Kurbelwellendichtungen
beschädigt, Zylinder oder Kolbenringe defekt oder
ungeeignete Dichtung an der Zündkerze
des Motors
Problem mit Lüftungsöffnung im Kraftstofftank, KraftstoffZufuhrleitung unterbrochen, Kabel oder I-Stopp-Schalter
(Ein/Aus)/Start-Stopp-Schalter defekt
Luftfilter verschmutzt, Vergaser verschmutzt,
Schalldämpfer verstopft, Auslasskanal im Zylinder
verstopft
91
Page 92

Magyar
Köszönjük, hogy megvásárolta ezt a MAKITA bozótvágót/szegélyvágót. A
MAKITA bozótvágó/szegélyvágó termékek fejlesztése többéves tudásunk,
tapasztalatunk, valamint részletes fejlesztési programunk eredményeként jött
létre.
Kérjük, figyelmesen olvassa el ezt a füzetet, hogy a MAKITA bozótvágó/
szegélyvágó által nyújtott lehető legnagyobb teljesítményt és használati élményt
érhesse el.
Szimbólumok
A használati utasítás olvasása közben a következő szimbólumokkal találkozik.
Olvassa el a használati utasítást!
Legyen különösen elővigyázatos és figyelmes!
Tar tal om Ol dal
Szimbólumok............................................................... 92
Biztonsági tudnivalók .................................................. 93
Műszaki adatok ........................................................... 97
Alkatrészek megnevezése .......................................... 98
A fogantyú felszerelése............................................... 99
A védőburkolat felszerelése...................................... 100
A vágókés/nejlonszálas vágófej felszerelése............ 101
Üzemanyag/Tankolás ............................................... 102
Helyes használat....................................................... 103
Fontos használati szempontok/a bozótvágó/
szegélyvágó leállítása............................................... 103
A vágószerszám újraélezése .................................... 105
Szervizelési utasítások.............................................. 107
Tárolás ...................................................................... 109
Viseljen szem- és hallásvédőt!
(csak a szegélyvágóhoz)
Sisak, szem- és hallásvédő eszköz viselendő!
(csak a bozótvágóhoz)
Tilos!
Tartson kellő távolságot!
Repülő tárgyak veszélye! Forró felületek – Megégetheti ujjait vagy kezét
Dohányozni tilos! Keverék üzemanyag
Nyílt láng használata tilos! Motor kézi indítása
Védőkesztyű viselése kötelező! Vészleállítás
Visszarúgás Elsősegély
A működési területtől tartson távol minden
embert és állatot!
Ne használjon fém késeket!
(csak a szegélyvágóhoz)
A szerszám legmagasabb megengedett
fordulatszáma
BE/INDÍTÁS
Viseljen csúszásmentes védőlábbelit!
Acélbetétes lábbeli viselete javasolt.
KI/LEÁLLÍTÁS
INDÍTÁS
92
Page 93

Ábra
15 méter
(1)
(3)
(2)
(4)
(5)
(6)
Biztonsági tudnivalók
Általános tudnivalók
– A helyes használat biztosítása érdekében győződjön meg arról, hogy teljesen
megértette a jelen használati utasítást, valamint megismerte a bozótvágó/
szegélyvágó használatát. Ha a gépet anélkül használja, hogy tisztában lenne
a kezelés módjával, azzal súlyos sérülést okozhat saját maga és mások
számára.
– Csak olyan személyeknek adja kölcsön a bozótvágót/szegélyvágót, akik
igazolhatóan tapasztalattal rendelkeznek a bozótvágók/szegélyvágók
használata terén. A géppel együtt mindig adja oda ezt a használati utasítást.
– Amennyiben először használ motoros vágót, az alapvető utasításokra
vonatkozóan érdeklődjön forgalmazójánál.
– Gyermekek és 18 év alatti fiatalok nem használhatják a bozótvágót/
szegélyvágót. 16 év feletti személyek szakképzett oktató felügyelete mellett
oktatási célból használhatják az eszközt.
– A bozótvágóval/szegélyvágóval végzett munka különleges figyelmet igényel.
– A bozótvágót/szegélyvágót csak megfelelő egészségi és fizikai állapotban
használja. Minden munkát nyugodtan és elővigyázatosan végezzen. A
közelben tartózkodó személyekért a felhasználó felelős.
– Soha ne használja a bozótvágót/szegélyvágót alkohol vagy gyógyszerek
fogyasztása után, vagy ha betegnek, fáradtnak érzi magát.
FIGYELEM: A szerszámgép működés közben elektromágneses mezőt generál.
Ez az elektromágneses mező bizonyos körülmények között zavarhatja az
emberi szervezetbe beültetett aktív vagy passzív implantátumokat. Az esetleges
súlyos vagy halálos következmény elkerülése érdekében javasoljuk, hogy a
beültetett implantátummal élő személy a gép használata előtt konzultáljon
orvosával és az implantátum gyártójával.
A gép rendeltetésszerű használata
– A bozótvágó/szegélyvágó csak fű, gaz, bokrok és egyéb aljnövényzet
vágására alkalmas, semmilyen más célra, például sövényvágásra vagy
szélezésre nem használható, mert azzal személyi sérülést okozhat.
Személyi védőeszközök
– Mindig viseljen a célnak megfelelő és a munkához alkalmas, vagyis szoros
szabású, de a kényelmes munkavégzés szempontjából nem túl szoros
ruházatot. Ne viseljen ékszert vagy laza ruhadarabot, ezek ugyanis
beakadhatnak a bozótba vagy az ágakba.
– Annak érdekében, hogy a benzinmotoros bozótvágó/szegélyvágó
használatakor elkerülhetőek legyenek a fej-, szem-, kéz- és lábsérülések,
valamint a halláskárosodás, az alábbi védőeszközöket és védőruházatot kell
viselni:
– Ahol fennáll a lezuhanó tárgyak veszélye, ott mindig viseljen védősisakot. A
védősisak (1) épségét rendszeresen meg kell vizsgálni, és legkésőbb 5 év
elteltével ki kell cserélni. Kizárólag jóváhagyott, engedélyezett sisakot szabad
használni.
–A védősisak arcvédője (2) (vagy esetleg védőszemüveg) megvédi az arcát a
repülő hulladékoktól és kövektől. A szemsérülések elkerülése végett a
bozótvágó/szegélyvágó használata közben mindig viseljen védőszemüveget
vagy arcvédőt.
– A halláskárosodások elkerülése végett arra alkalmas hallásvédő eszközöket
(fülvédő (3), füldugó stb.) kell használni.
– A kezeslábas munkaruha (4) megvédi a repülő kövektől és törmeléktől.
Nyomatékosan javasoljuk munkaoverall viselését.
–Az erős bőrből készült védőkesztyű (5) az előírt védőfelszerelés részét képezi
és a bozótvágóval/szegélyvágóval végzett munkák során állandóan hordani
kell.
– A bozótvágó/szegélyvágó használatakor mindig csúszásmentes talpú, erős
bakancsot (6) viseljen. Az ilyen lábbelik biztos állást nyújtanak és védenek a
sérülések ellen.
Fennmaradó kockázatok
– A szerszámgép előírás szerinti használata esetén sem lehetséges az összes
kockázati tényezőt kiküszöbölni. A szerszámgép kialakításából fakadóan az
alábbi kockázati tényezők léphetnek fel:
1. Tüdőkárosodás, amennyiben az érintett személy(ek) nem visel(nek)
megfelelő hatékonyságú porvédő maszkot.
2. Halláskárosodás, amennyiben az érintett személy(ek) nem visel(nek)
3. A szerszámgép vibrációjából eredő, hosszabb idejű használat vagy nem
megfelelő hatékonyságú fülvédő eszközt.
megfelelő karbantartás esetén jelentkező egészségkárosodás.
A bozótvágó üzembe helyezése
– Ügyeljen arra, hogy 15 méteres munkakörnyezetben ne legyenek gyerekek
vagy más emberek, és figyeljen arra is, hogy állatok se legyenek a
munkakörnyezetben.
– Használat előtt mindig ellenőrizze, hogy a bozótvágó/szegélyvágó
biztonságosan használható-e:
Ellenőrizze a vágószerszám biztonságos állapotát, a vezérlőkar könnyű
mozgathatóságát és a vezérlőkar reteszének megfelelő működését.
– A vágószerszám alapjáraton nem foroghat. Amennyiben úgy látja, hogy
berendezése beállítást igényel, forduljon a forgalmazóhoz. Ellenőrizze a
markolatok tiszta és száraz állapotát, valamint az indító/leállító kapcsoló
megfelelő működését.
93
Page 94

– A bozótvágót/szegélyvágót csak az utasításban leírtak szerint indítsa be. Ne
• Lefektetés
• Szállítás
• Tankolás
• Karbantartás
• Szerszámcsere
használjon más módszert a motor beindítására!
– A bozótvágót/szegélyvágót, valamint a szerszámokat kizárólag a rendeltetési
célra használja.
– A bozótvágó/szegélyvágó motorját csak a gép teljes összeszerelése után
indítsa be. Ne működtesse a gépet, amíg az összes szükséges tartozék fel
nincs szerelve!
– A beindítás előtt ellenőrizze, hogy a vágószerszám nem érintkezik-e kemény
tárgyakkal, például ágakkal, kövekkel stb., mert beindításkor a vágószerszám
forogni kezd.
– Bármilyen motorhiba esetén azonnal állítsa le a motort.
– A vágószerszám kővel vagy kemény tárggyal való ütközésekor azonnal állítsa
le a motort, és vizsgálja át a vágószerszámot.
– Rendszeres időközönként vizsgálja át a vágószerszámot esetleges
károsodásokat keresve (hajszálrepedések keresése ütögetéssel).
– A bozótvágót/szegélyvágót csak a vállszíj felszerelése és megfelelő
hosszúságának beállítása után használja. A vállszíjat a felhasználó
méretéhez kell állítani, valamint a gép használata során fellépő fáradás
elkerülése érdekében rögzíteni kell. Használat közben soha ne egy kézzel
tartsa a berendezést.
– Használat közben mindig két kézzel tartsa a bozótvágót/szegélyvágót.
Mindig ügyeljen arra, hogy stabilan álljon.
– Úgy használja a bozótvágót/szegélyvágót, hogy elkerülje a kipufogógázok
belélegzését. Soha ne járassa a motort zárt térben, például szobán belül
(gázmérgezésveszély). A szén-monoxid szagtalan gáz.
– Pihenés idejére vagy ha a bozótvágót/szegélyvágót őrizetlenül kívánja hagyni,
mindig állítsa le a motort, és mások és a gép biztonsága érdekében helyezze
a gépet biztonságos helyre.
– A forró bozótvágót/szegélyvágót soha ne tegye száraz fűre vagy gyúlékony
anyagra.
– A vágószerszámot mindig fel kell szerelni a megfelelő védőelemekkel.
A vágószerszámot soha ne használja e védőburkolat nélkül!
– A géphez adott összes védelmi felszerelést és védőelemet használni kell.
– Ne használja a motort meghibásodott kipufogóval!
– A szállítást leállított motorral végezze.
– Az eszköz szállításakor mindig helyezze fel a burkolatot a vágókésre.
– Az üzemanyag-szivárgás elkerülése érdekében szállításkor ügyeljen a
bozótvágó/szegélyvágó biztonságos elhelyezésére.
– A bozótvágó/szegélyvágó szállításakor ügyeljen arra, hogy az
üzemanyagtartály teljesen üres legyen.
– A bozótvágó/szegélyvágó teherautóból vagy hasonló járműből történő
kivételekor a motort soha ne dobja a földre, mert az üzemanyagtartály
komolyan károsodhat.
– A vészhelyzetet kivéve soha ne ejtse vagy dobja a bozótvágót/szegélyvágót a
földre, mert ez a gép súlyos károsodásához vezethet.
– Mozgatáskor mindig emelje fel az egész gépet a földről. A gép
üzemanyagtartállyal a földön történő húzása különösen veszélyes,
üzemanyag-szivárgást is okozhat, ami tűzveszélyhez vezethet.
– Ha az eszközt erős ütés éri, illetve leesik, a munka folytatása előtt ellenőrizze
állapotát. Ellenőrizze, hogy az üzemanyag-rendszer nem szivárog-e, továbbá
ellenőrizze, hogy a kezelőszervek és biztonsági eszközök helyesen
működnek-e. Ha bármilyen károsodást észlel vagy felmerül a károsodás
gyanúja, ellenőrzésért és javításért forduljon a hivatalos
szervizközpontunkhoz.
Tankolás
– Tankolás előtt állítsa le a motort, ügyeljen rá, hogy ne legyen nyílt láng a
közelben, és ne dohányozzon.
– Ügyeljen arra, hogy az ásványolajtermékek bőrrel ne érintkezzenek. Ne
lélegezze be az üzemanyag gőzét! Tankolás közben viseljen védőkesztyűt.
Rendszeres időközönként cserélje, és tisztítsa meg a védőruházatot.
– A talajszennyezés elkerülése érdekében (környezetvédelem) ügyeljen arra,
hogy ne folyjon üzemanyag vagy olaj a talajra. Üzemanyag kifolyása esetén
azonnal tisztítsa meg a bozótvágót/szegélyvágót.
– Ügyeljen arra, hogy az üzemanyag ne érintkezzen ruhájával. Ha üzemanyag
kerül a ruhájára, a tűzveszély elkerülése érdekében azonnal váltson ruhát.
– Rendszeres időközönként ellenőrizze, hogy az üzemanyagtartály sapkája jól
zár-e, nem szivárog.
– Óvatosan húzza meg az üzemanyagtartály sapkáját. A tankolást követően a
motor beindítása előtt menjen legalább 3 méterre a tankolás helyéről.
– Soha ne tankoljon zárt térben, például helyiségben! Az üzemanyag gőzeinek
talajszintű felhalmozódása miatt ez robbanáshoz vezethet.
– Az üzemanyagot csak arra engedélyezett kannákban szállítsa és tárolja. Az
üzemanyagot mindig gyerekektől elzárva tárolja.
94
Page 95

A használat módja
Vigyázat:
Visszarúgás
Ábra
Ábra
– A bozótvágót/szegélyvágót csak megfelelő fény- és látási viszonyok mellett
használja. Télen ügyeljen a csúszós vagy nedves, például jeges vagy hóval
fedett területekre (csúszásveszély). Mindig ügyeljen arra, hogy stabilan álljon.
– Soha ne végezzen vágást derékmagasság felett.
– A bozótvágó/szegélyvágó használatakor soha ne álljon létrára.
– Soha ne másszon fára a bozótvágó/szegélyvágó használatához.
– Soha ne dolgozzon instabil felületen.
– Távolítsa el a munkaterületen található homokot, köveket, szegeket stb.
Az idegen tárgyak károsíthatják a vágószerszámot és veszélyes visszarúgást
okozhatnak.
– A vágás megkezdése előtt győződjön meg arról, hogy a szerszám elérte a
teljes üzemi fordulatszámot.
– Amennyiben fű vagy gallyak szorulnak a vágószerszám és a védőelem közé,
mindig állítsa le a motort tisztítás előtt. Ellenkező esetben a vágókés nem
kívánt forgása súlyos sérüléseket okozhat.
– Tartson pihenőt, nehogy a fáradság miatt elveszítse uralmát a gép felett.
Célszerű óránként 10–20 perc pihenőt tartani.
Visszarúgás (a vágókés lökőereje)
– A bozótvágó használata közben nem kontrollálható visszarúgás fordulhat elő.
– A visszarúgás gyakran akkor következik be, amikor a bozótvágó 12 és 2 óra
közötti szegmensével próbál dolgozni.
– Ne a 12 és 2 óra közötti szegmenssel végezzen vágást.
– Soha ne használja a bozótvágónak ezt a szakaszát 3 cm-nél nagyobb
átmérőjű szilárd tárgyak, például bozót, fa stb. vágásához. Ellenkező esetben
a bozótvágó nagy erővel kitér a helyzetéből, ami különösen veszélyes és
sérülést okozhat.
Visszarúgás megelőzése
A visszarúgások megelőzéséhez ne feledje a következőket:
– A bozótvágó 12 és 2 óra közötti szegmensének használata fokozottan
veszélyes, különösen fém vágószerszámok használata esetén.
– A bozótvágó 11 és 12 óra, illetve 2 és 5 óra közötti szegmensében csak
gyakorlott és tapasztalt kezelők végezzenek vágási műveletet, és csakis a
saját felelősségükre.
A könnyű és szinte visszarúgásmentes vágás a bozótvágó 8 és 11 óra közötti
szegmensével végezhető.
Vágószerszámok
– Mindig az adott munkához megfelelő vágószerszámot használjon.
A nejlonszálas vágófejek (szegélynyíró fejek) gyep nyírására szolgálnak.
A fém kések gyom, magas fű, sövény, bokor, aljnövényzet, cserjék és
hasonlók vágására alkalmasak.
Soha ne használjon más kést, például fém többrészes csuklósláncokkal
ellátott fejet vagy lengőkéseket, ellenkező esetben súlyos sérüléseket
okozhat.
– Fém kések használatakor mindent tegyen meg a „visszarúgás” elkerülésére,
mégis készüljön fel arra, hogy a gép visszarúghat. Lásd a „Visszarúgás”,
valamint a „Visszarúgás megelőzése”című szakaszt.
Karbantartási útmutató
– Az eszközt hivatalos szervizközpontban szervizeltesse, és kizárólag eredeti
cserealkatrészeket használjon. A helytelen javítás vagy nem megfelelő
karbantartás csökkentheti az eszköz élettartamát és megnöveli a balesetek
kockázatát.
– A munka megkezdése előtt mindig ellenőrizze a berendezés állapotát,
különös tekintettel a védőelemekre és vállszíjra. Különös figyelmet kell
fordítani még a vágókésekre, amelyeknek megfelelően élesnek kell lenniük.
– A vágószerszám cseréjéhez vagy élesítéséhez, valamint a berendezés vagy a
vágószerszám tisztításához is állítsa le a motort, és vegye le a gyertyapipát.
95
Page 96

Soha ne egyenesítse ki vagy hegessze meg a sérült
vágószerszámokat.
– A bozótvágót/szegélyvágót a lehető legkisebb zajjal és legkevesebb
szennyezéssel működtesse. Fordítson különös figyelmet a karburátor
megfelelő beállítására.
– A bozótvágót/szegélyvágót rendszeres időközönként tisztítsa meg, valamint
ellenőrizze a csavarok és az anyák meghúzott állapotát.
– Tilos a bozótvágót/szegélyvágót nyílt láng közelében karbantartani vagy
tárolni!
– A bozótvágót/szegélyvágót mindig zárt helyiségben és üres
üzemanyagtartállyal tárolja.
– Az eszköz tisztításakor, szervizelésekor és tárolásakor mindig helyezze fel a
burkolatot a vágókésre.
Tartsa be a megfelelő kereskedelmi szervezetek és biztosítók által kiadott
baleset-megelőzési utasításokat.
Semmilyen módosítást ne végezzen a bozótvágón/szegélyvágón, mert azzal a
biztonságos munkavégzést veszélyezteti.
A felhasználó által csak azok a karbantartási és javítási munkák végezhetők,
amelyek a használati utasításban le vannak írva. Minden más műveletet a
hivatalos szervizzel kell elvégeztetni. Csak eredeti, a MAKITA által gyártott és
szállított alkatrészeket és tartozékokat használjon.
A nem engedélyezett tartozékok és szerszámok használata megnöveli a
balesetveszélyt.
A MAKITA nem vállal felelősséget a nem engedélyezett vágószerszámok és
vágószerszám-rögzítő eszközök vagy tartozékok használata miatti bekövetkező
balesetekért vagy károkért.
Elsősegély
Ügyeljen rá, hogy baleset esetére legyen egy mentődoboz a vágási műveletek
közelében. Az elsősegélydobozból kivett dolgokat azonnal pótolni kell.
Ha segítséget kell hívni, adja meg az alábbi információkat:
– a baleset helyszíne
– a bekövetkezett esemény
– a sérült személyek száma
– a sérülés típusa
– az Ön neve
Vibráció
– A keringési rendellenességben szenvedő emberek véredényei vagy
idegrendszere a túlzott mértékű rezgés hatására megsérülhetnek. A rezgés a
következő tünetek megjelenését okozhatja az ujjakban, a kézben vagy a
csuklóban: Álmosság (zsibbadtság), bizsergő érzés, fájdalom, szúró
fájdalomérzet, a bőr- vagy annak színének elváltozása. Ha ezen tünetek
bármelyikét észleli, forduljon orvoshoz!
– A „fehér ujj betegség” kockázatának csökkentése érdekében tartsa melegen
kezeit a működtetés alatt, és tartsa megfelelő állapotban az eszközt és
tartozékait.
Csak európai országokra vonatkozóan
EK Megfelelőségi nyilatkozat
Mi, a Makita Corporation mint a termék felelős gyártója kijelentjük, hogy az itt megnevezett Makita gép(ek):
Gép megnevezése: Bozótvágó/Szegélyvágó
Típusszám/Típus: EM2600U, EM2600L
Műszaki adatok: lásd a „MŰSZAKI ADATOK” című táblázatban
sorozatgyártásban készülnek, és
megfelelnek az alább felsorolt európai irányelvek előírásainak:
2000/14/EK, 2006/42/EK, 2004/108/EK
Illetve gyártásuk a következő szabványoknak, valamint szabványosított dokumentumoknak megfelelően történik:
EN ISO 11806-1, EN ISO 14982
A műszaki dokumentációt őrzi:
Makita International Europe Ltd., Technical Department,
Michigan Drive, Tongwell, Milton Keynes, Bucks MK15 8JD, Anglia
A 2000/14/EK irányelv által előírt megfelelőségi auditálási eljárás az V. függelék szerint történt.
Mért hangteljesítményszint (mint szegélynyíró): 109,77 dB
Mért hangteljesítményszint (mint bozótvágó): 107,29 dB
Garantált hangteljesítményszint: 112 dB
15. 4. 2013
Tomoyasu Kato
Igazgató
Makita Corporation
3-11-8, Sumiyoshi-cho,
Anjo, Aichi, JAPAN
96
Page 97

Műszaki adatok
Típus
EM2600U EM2600L
U fogantyú Kengyel fogantyú
Méretek: hosszúság x szélesség x magasság (vágókés nélkül) 1770 x 610 x 410 mm 1770 x 330 x 185 mm
Nettó tömeg 5 kg 5 kg
Motor lökettérfogata
Maximális motorteljesítmény 0,83 kW
Az orsó maximális fordulatszáma
8800 min
Egy darab fém kés φ230 mm
Vágóeszköz
Szegélynyíró fej φ430 mm
Üresjárati fordulatszám 3000/perc
Tengelykapcsoló kapcsolási fordulatszáma 4100/perc
Áttétel 14/19
Üzemanyag
Keverék üzemanyag
Benzin: Kétütemű motorolaj = 50:1
Űrtartalom (üzemanyagtartály) 0,6 l
Karburátor WALBRO WYC
Gyújtásrendszer Szilárdtest gyújtás
25,7 cm
3
-1
Gyújtógyertya NGK BPMR7A
Elektródahézag 0,6 – 0,7 mm
Bal fogantyú (elülső
markolat)
14,680 m/s
2
K = 1,5 m/s
2
5,152 m/s2 K = 1,5 m/s
Vibráció: (a bozótvágóhoz)
Jobb fogantyú (hátsó
markolat)
Bal fogantyú (elülső
markolat)
9,037 m/s
7,961 m/s
2
K = 1,5 m/s
2
K = 1,5 m/s
2
2
9,677 m/s2 K = 1,5 m/s
8,83 m/s2 K = 1,5 m/s
Vibráció: (szegélynyíróhoz)
Jobb fogantyú (elülső
markolat)
7,019 m/s
2
K = 1,5 m/s
2
14,381 m/s2 K = 1,5 m/s
Zaj (tesztelve a 2000/14/EK és 2005/88/EK irányelvek szerint):
Hangnyomásszint a felhasználó pozíciójából (szegélynyíró): 98,52 dB (A) K = 2,5 dB (A)
Hangnyomásszint a felhasználó pozíciójából (bozótvágó): 96,15 dB (A) K = 2,5 dB (A)
Mért hangteljesítményszint (szegélynyíró): 109,77 dB (A) K =2,5 dB (A)
Mért hangteljesítményszint (bozótvágó): 107,29 dB (A) K = 2,5 dB (A)
Zaj (tesztelve a 2000/14/EK és 2005/88/EK irányelvek szerint): Garantált
hangteljesítmény-értékek:
112 dB (A)
2
2
2
2
97
Page 98

Alkatrészek megnevezése
Alkatrészek megnevezése
1 Üzemanyagtartály
2 Berántós
3 Légszűrő
4
I-Stop kapcsoló (be/ki)/
Indítás/leállítás kapcsoló
5 Gyújtógyertya
6 Kipufogó hangtompítója
7 Tengelykapcsoló ház
8 Hátsó markolat
9Akasztó
10 Fogantyú
11 Vezé rlőkar
12 Gázbovden
13 Tengely
14
Védőburkolat (vágószerszám
védőburkolat)
15 Hajtóműház
16 Fogantyú tartó
17 Vágókés
18 Nejlonszálas vágófej
19 Az üzemanyag-betöltő zárósapkája
20 Indítógomb
21 Üzemanyagpumpa
22 Hidegindító kar
EM2600U
U-típusú fogantyú
EM2600L
Kengyelfogantyús típus
(3)
(7)
(21)
(1)
(19)
98
Page 99

A fogantyú felszerelése
EM2600U
L
R
(1)
EM2600U
(2)
EM2600U
(3)
(1)
EM2600U
VIGYÁZAT: Mindig állítsa le a motort, és húzza le a gyertyapipát a bozótvágón
VIGYÁZAT: Indítás előtt győződjön meg arról, hogy a bozótvágó teljesen össze
U fogantyús típusok
– Helyezze a két fogantyút a fogantyútartóba. A vezérlőkarnak a vágószerszám
irányába nézve a jobb oldalra kell esnie.
– Illessze a fogantyú végeit a vájatba, majd szerelje fel rájuk a bilincset. A
beállításhoz lazán rögzítse a négy csavarral.
– Állítsa be a fogantyúk állásszögét, majd imbuszkulccsal húzza meg az összes
csavart.
– Helyezze el a gázbovdent (1) a tengely vezérlőkar felőli oldalán. Ezután
helyezze köréjük a derékpárnát (2).
történő bármilyen munkavégzés előtt. Mindig viseljen védőkesztyűt!
van szerelve.
– Helyezze a gázbovdent (1) a fogantyútartó bilincsének a vájatába (3).
– A gázbovden az ábrán látható módon helyezkedjen el.
–Működtesse a vezérlőkart, és győződjön meg arról, hogy akadálymentesen
mozgatható.
VIGYÁZAT: Ne az ábrán látható módon vezesse el a gázbovdent! Így a
meghajlított gázbovden magas alapjárati fordulatszámhoz vezethet,
és a nem szabályozható vágókés személyi sérülést okozhat.
99
Page 100

Kengyelfogantyúval rendelkező típus
(2)
(1)
Motor
(4)
(3)
Motor
EM2600L
Keresztkés
Védőburkolat a fém késekhez
Nejlonszálas vágófej
Védőburkolat a nejlonszálas
vágófejhez
(2)
(3)
(1)
(4)
(1)
(6)
(5)
– Helyezze a fogantyútartón lévő menetet (1) a csövön található
pozícionáló furatba (2).
– Rögzítse a segédfogantyút (3) az védőburkolatra.
– Húzza meg a 4 db M5 × 30 csavart (4).
A védőburkolat felszerelése
A vonatkozó biztonsági normák betartása érdekében csak a táblázatban
szereplő vágószerszám/védőburkolat kombinációkat szabad használni.
Mindig eredeti MAKITA vágókést/nejlonszálas vágófejet
használjon.
– A vágókésnek jól polírozottnak, karcolás- és törésmentesnek kell lennie. Ha a
vágókés használat közben kőbe ütközik, azonnal állítsa le a motort, és
ellenőrizze a kést.
– Minden három óra használat után köszörülje meg, vagy cserélje ki a vágókést.
– Ha a nejlonszálas vágófej használat közben kőbe ütközik, azonnal állítsa le a
motort, és ellenőrizze a nejlonszálas vágófejet.
VIGYÁZAT: A saját biztonsága és a baleset-megelőzési előírásoknak való
megfelelés érdekében a megfelelő védőburkolatot mindig fel kell
szerelni. A gépet tilos felszerelt védőburkolat nélkül használni.
– Rögzítse a védőburkolatot (1) a bilincshez (3) két darab M6 x 30 (2) csavarral.
– Nejlon vágószál használata esetén a védőburkolatot (6) helyezze a
védőburkolatba (1), majd rögzítse két csavarral (4) és két anyával (5).
100
 Loading...