

ENGLISH — FRANÇAIS — ESPAÑOL
AUDIO
MACK AUDIO SYSTEM
SYSTÈME AUDIO MACK
SISTEMA DE AUDIO MACK
OPERATING INSTRUCTIONS
INSTRUCTIONS D’UTILISATION
INSTRUCCIONES DE OPERACIÓN

ts955TOC.fm Page i Tuesday, March 3, 2009 1:43 PM
TABLE OF CONTENTS
English . . . . . . . . . . . . . . . . . . . . . . . . . . . . . . . . . . . . . . . . . . . . . . . . 1
Safe Operation of the Radio . . . . . . . . . . . . . . . . . . . . . . . . . . . . . 1
Introduction . . . . . . . . . . . . . . . . . . . . . . . . . . . . . . . . . . . . . . . . . . 1
General Overview . . . . . . . . . . . . . . . . . . . . . . . . . . . . . . . . . . . . . 2
Radio/CD Controls Quick Reference Guide . . . . . . . . . . . . . . . 2
Display Quick Reference Guide . . . . . . . . . . . . . . . . . . . . . . . . 4
Main Functions . . . . . . . . . . . . . . . . . . . . . . . . . . . . . . . . . . . . . . . 6
Power . . . . . . . . . . . . . . . . . . . . . . . . . . . . . . . . . . . . . . . . . . . . . . . 6
Switching On & Off, Mute and Pause of the Audio System . . . . 6
Radio Mode . . . . . . . . . . . . . . . . . . . . . . . . . . . . . . . . . . . . . . . . . . 6
Band Selection (FM and AM) . . . . . . . . . . . . . . . . . . . . . . . . . . 6
Seek in Radio Mode . . . . . . . . . . . . . . . . . . . . . . . . . . . . . . . . . 6
Manual Tuning . . . . . . . . . . . . . . . . . . . . . . . . . . . . . . . . . . . . . . 6
Presets (Storing Radio Stations) . . . . . . . . . . . . . . . . . . . . . . . . 7
Presets (Selecting a Stored Radio Station) . . . . . . . . . . . . . . . . 7
Scan Mode . . . . . . . . . . . . . . . . . . . . . . . . . . . . . . . . . . . . . . . . 7
Using the Weather Band . . . . . . . . . . . . . . . . . . . . . . . . . . . . . . 8
Satellite Radio Service (Optional Feature) . . . . . . . . . . . . . . . . 8
CD Mode . . . . . . . . . . . . . . . . . . . . . . . . . . . . . . . . . . . . . . . . . . . . 9
Switching to CD Mode . . . . . . . . . . . . . . . . . . . . . . . . . . . . . . . . 9
Eject a CD . . . . . . . . . . . . . . . . . . . . . . . . . . . . . . . . . . . . . . . . 10
Changing a Track on a CD . . . . . . . . . . . . . . . . . . . . . . . . . . . 10
Fast Reverse or Fast Forward of a CD . . . . . . . . . . . . . . . . . . 10
Playing Tracks on a CD in Random Order . . . . . . . . . . . . . . . 10
Repeating Tracks on a CD (Optional Feature) . . . . . . . . . . . . 11
Changing to Another Folder on a CD (Optional Feature) . . . . 11
Scan a CD . . . . . . . . . . . . . . . . . . . . . . . . . . . . . . . . . . . . . . . . 11
External Audio Input (Optional Feature) . . . . . . . . . . . . . . . . . . . 12
USB Mode (Optional Feature) . . . . . . . . . . . . . . . . . . . . . . . . . . . 12
Switching to USB Mode . . . . . . . . . . . . . . . . . . . . . . . . . . . . . . 12
Disconnecting a USB Device . . . . . . . . . . . . . . . . . . . . . . . . . . 12
Changing a Track on a USB Device . . . . . . . . . . . . . . . . . . . . 12
Fast Reverse or Fast Forward on a USB Device . . . . . . . . . . 13
Playing Tracks on a USB Device in Random Order . . . . . . . . 13
Repeating Tracks on a USB Device . . . . . . . . . . . . . . . . . . . . 13
Changing to Another Folder on a USB . . . . . . . . . . . . . . . . . . 14
Scan a USB . . . . . . . . . . . . . . . . . . . . . . . . . . . . . . . . . . . . . . . 14
iPod Mode (Optional Feature) . . . . . . . . . . . . . . . . . . . . . . . . . . . 14
Connecting the iPod . . . . . . . . . . . . . . . . . . . . . . . . . . . . . . . . 14
Switching to iPod Mode . . . . . . . . . . . . . . . . . . . . . . . . . . . . . . 15
i

ts955TOC.fm Page ii Tuesday, March 3, 2009 1:43 PM
TABLE OF CONTENTS
Disconnecting the iPod Device . . . . . . . . . . . . . . . . . . . . . . . . 15
iPod Menu . . . . . . . . . . . . . . . . . . . . . . . . . . . . . . . . . . . . . . . . 15
Changing a Track on iPod . . . . . . . . . . . . . . . . . . . . . . . . . . . . 15
Fast Forward on iPod . . . . . . . . . . . . . . . . . . . . . . . . . . . . . . . . 15
Playing Tracks on iPod in Random Order . . . . . . . . . . . . . . . . 16
Repeating a Track on iPod . . . . . . . . . . . . . . . . . . . . . . . . . . . 16
Scan iPod . . . . . . . . . . . . . . . . . . . . . . . . . . . . . . . . . . . . . . . . . 16
AUX Mode (Optional Feature) . . . . . . . . . . . . . . . . . . . . . . . . . . . 17
Audio Settings . . . . . . . . . . . . . . . . . . . . . . . . . . . . . . . . . . . . . . . 17
Adjusting Volume Up and Down . . . . . . . . . . . . . . . . . . . . . . . 17
Adjusting Bass Up and Down . . . . . . . . . . . . . . . . . . . . . . . . . 17
Adjusting Treble Up and Down . . . . . . . . . . . . . . . . . . . . . . . . 18
Adjusting Balance Left and Right . . . . . . . . . . . . . . . . . . . . . . . 18
Adjusting Fader Front and Back . . . . . . . . . . . . . . . . . . . . . . . 18
Adjusting Mid (Medium Frequency Range) Up and Down
(Optional Feature) . . . . . . . . . . . . . . . . . . . . . . . . . . . . . . . . 19
Speakers Selection . . . . . . . . . . . . . . . . . . . . . . . . . . . . . . . . . 19
Activating Speed Dependant Volume (ASC) (Optional
Feature) . . . . . . . . . . . . . . . . . . . . . . . . . . . . . . . . . . . . . . . . 19
Bluetooth Hands Free Phone Mode (Optional Feature) . . . . . . . . 20
Bluetooth Activation . . . . . . . . . . . . . . . . . . . . . . . . . . . . . . . . . 20
Adding a Phone . . . . . . . . . . . . . . . . . . . . . . . . . . . . . . . . . . . . 21
Activating Another Phone . . . . . . . . . . . . . . . . . . . . . . . . . . . . 21
Deleting a Phone . . . . . . . . . . . . . . . . . . . . . . . . . . . . . . . . . . . 22
Deleting All Phones . . . . . . . . . . . . . . . . . . . . . . . . . . . . . . . . . 22
Switching Phone Calls Between the Vehicle and an Active
Phone . . . . . . . . . . . . . . . . . . . . . . . . . . . . . . . . . . . . . . . . . 23
Clock . . . . . . . . . . . . . . . . . . . . . . . . . . . . . . . . . . . . . . . . . . . . . . 23
Displaying the Time . . . . . . . . . . . . . . . . . . . . . . . . . . . . . . . . . 23
12- or 24-Hour Format . . . . . . . . . . . . . . . . . . . . . . . . . . . . . . . 23
Setting the Clock . . . . . . . . . . . . . . . . . . . . . . . . . . . . . . . . . . . 24
Turning the Alarm ON or OFF (Optional Feature) . . . . . . . . . . 24
Setting the Alarm (Optional Feature) . . . . . . . . . . . . . . . . . . . . 25
Anti Theft Code (Guard) . . . . . . . . . . . . . . . . . . . . . . . . . . . . . . . . 25
In Case of Malfunction . . . . . . . . . . . . . . . . . . . . . . . . . . . . . . . 25
Deactivating Guard . . . . . . . . . . . . . . . . . . . . . . . . . . . . . . . . . 26
Tips and Tricks (Optional Feature) . . . . . . . . . . . . . . . . . . . . . . . . 27
USB and MP3 . . . . . . . . . . . . . . . . . . . . . . . . . . . . . . . . . . . . . 27
Bluetooth . . . . . . . . . . . . . . . . . . . . . . . . . . . . . . . . . . . . . . . . . 27
ii

ts955TOC.fm Page iii Tuesday, March 3, 2009 1:43 PM
TABLE OF CONTENTS
iPod . . . . . . . . . . . . . . . . . . . . . . . . . . . . . . . . . . . . . . . . . . . . . 28
CD, MP3, and WMA . . . . . . . . . . . . . . . . . . . . . . . . . . . . . . . . 28
Français . . . . . . . . . . . . . . . . . . . . . . . . . . . . . . . . . . . . . . . . . . . . . . 29
Sécurité et utilisation de la radio . . . . . . . . . . . . . . . . . . . . . . . . . 29
Introduction . . . . . . . . . . . . . . . . . . . . . . . . . . . . . . . . . . . . . . . . . 29
Vue d’ensemble . . . . . . . . . . . . . . . . . . . . . . . . . . . . . . . . . . . . . . 30
Guide de référence rapide des commandes de la radio/du
lecteur de CD . . . . . . . . . . . . . . . . . . . . . . . . . . . . . . . . . . . 30
Guide de référence rapide de l’afficheur . . . . . . . . . . . . . . . . . 32
Fonctions principales . . . . . . . . . . . . . . . . . . . . . . . . . . . . . . . . . . 34
Alimentation . . . . . . . . . . . . . . . . . . . . . . . . . . . . . . . . . . . . . . . . . 34
Mise en marche, mise à l’arrêt, sourdine et pause du
système audio . . . . . . . . . . . . . . . . . . . . . . . . . . . . . . . . . . . 34
Mode radio . . . . . . . . . . . . . . . . . . . . . . . . . . . . . . . . . . . . . . . . . . 35
Sélection de bandes (FM et AM) . . . . . . . . . . . . . . . . . . . . . . . 35
Recherche en mode radio . . . . . . . . . . . . . . . . . . . . . . . . . . . . 35
Syntonisation manuelle . . . . . . . . . . . . . . . . . . . . . . . . . . . . . . 35
Préréglages (mémorisation) des stations radio . . . . . . . . . . . . 35
Préréglages (sélection d’une station radio mémorisée) . . . . . 36
Mode balayage . . . . . . . . . . . . . . . . . . . . . . . . . . . . . . . . . . . . 36
Utilisation de la bande radiométéo . . . . . . . . . . . . . . . . . . . . . 37
Service de radio par satellite (Caractéristiques en option) . . . 38
Mode CD . . . . . . . . . . . . . . . . . . . . . . . . . . . . . . . . . . . . . . . . . . . 39
Sélection du mode CD . . . . . . . . . . . . . . . . . . . . . . . . . . . . . . . 39
Éjection d’un CD . . . . . . . . . . . . . . . . . . . . . . . . . . . . . . . . . . . 39
Changement de la plage du CD . . . . . . . . . . . . . . . . . . . . . . . 39
Recul rapide ou avance rapide d’un CD . . . . . . . . . . . . . . . . . 39
Activation des plages d’un CD dans un ordre aléatoire . . . . . . 40
Répétition de plage sur un CD (Caractéristiques en option) . . 40
Changement de fichier sur un CD (Caractéristiques en
option) . . . . . . . . . . . . . . . . . . . . . . . . . . . . . . . . . . . . . . . . . 41
Balayage d’un CD . . . . . . . . . . . . . . . . . . . . . . . . . . . . . . . . . . 41
Entrée audio externe (Caractéristiques en option) . . . . . . . . . . . 41
Mode USB (Caractéristiques en option) . . . . . . . . . . . . . . . . . . . 42
Sélection du mode USB . . . . . . . . . . . . . . . . . . . . . . . . . . . . . 42
Déconnexion d’un appareil USB . . . . . . . . . . . . . . . . . . . . . . . 42
Changement de la plage d’un appareil USB . . . . . . . . . . . . . . 42
Recul rapide ou avance rapide sur un appareil USB . . . . . . . . 42
Activation des plages d’un appareil USB dans un ordre
aléatoire . . . . . . . . . . . . . . . . . . . . . . . . . . . . . . . . . . . . . . . 43
iii

ts955TOC.fm Page iv Tuesday, March 3, 2009 1:43 PM
TABLE OF CONTENTS
Répétition de plages sur un appareil USB . . . . . . . . . . . . . . . . 43
Changement de fichier sur un USB . . . . . . . . . . . . . . . . . . . . . 44
Balayage d’un USB . . . . . . . . . . . . . . . . . . . . . . . . . . . . . . . . . 44
Mode iPod (Caractéristiques en option) . . . . . . . . . . . . . . . . . . . . 44
Connexion d’un iPod . . . . . . . . . . . . . . . . . . . . . . . . . . . . . . . . 45
Sélection du mode iPod . . . . . . . . . . . . . . . . . . . . . . . . . . . . . . 45
Déconnexion de l’appareil iPOd . . . . . . . . . . . . . . . . . . . . . . . . 45
Menu iPod . . . . . . . . . . . . . . . . . . . . . . . . . . . . . . . . . . . . . . . . 45
Changement de plage sur le iPod . . . . . . . . . . . . . . . . . . . . . . 46
Avance rapide sur un iPod . . . . . . . . . . . . . . . . . . . . . . . . . . . . 46
Activation des plages d’un iPod dans un ordre aléatoire . . . . . 46
Répétition de plage sur le iPod . . . . . . . . . . . . . . . . . . . . . . . . 47
Balayage sur le iPod . . . . . . . . . . . . . . . . . . . . . . . . . . . . . . . . 47
Mode AUX (Caractéristiques en option) . . . . . . . . . . . . . . . . . . . . 48
Réglages audio . . . . . . . . . . . . . . . . . . . . . . . . . . . . . . . . . . . . . . 48
Réglage du volume vers le haut et vers le bas . . . . . . . . . . . . 48
Réglage des graves vers le haut et vers le bas . . . . . . . . . . . . 48
Réglage des aigus vers le haut et vers le bas . . . . . . . . . . . . . 49
Réglage à gauche et à droite de l’équilibre . . . . . . . . . . . . . . . 49
Équilibreur avant-arrière . . . . . . . . . . . . . . . . . . . . . . . . . . . . . 49
Réglage Mid (Plage des moyennes fréquences) vers le
haut et vers le bas (Caractéristiques en option) . . . . . . . . . 50
Sélection de haut-parleurs . . . . . . . . . . . . . . . . . . . . . . . . . . . . 50
Activation de la commande automatique de sensibilité (CAS)
(Caractéristiques en option) . . . . . . . . . . . . . . . . . . . . . . . . 50
Mode Téléphone mains libres Bluetooth (Caractéristiques
en option) . . . . . . . . . . . . . . . . . . . . . . . . . . . . . . . . . . . . . . . . . 51
Activation Bluetooth . . . . . . . . . . . . . . . . . . . . . . . . . . . . . . . . . 52
Addition d’un téléphone . . . . . . . . . . . . . . . . . . . . . . . . . . . . . . 52
Activation d’un autre téléphone . . . . . . . . . . . . . . . . . . . . . . . . 53
Suppression d’un téléphone . . . . . . . . . . . . . . . . . . . . . . . . . . 53
Suppression de tous les téléphones . . . . . . . . . . . . . . . . . . . . 54
Transférer les appels téléphoniques du véhicule à un
téléphone actif . . . . . . . . . . . . . . . . . . . . . . . . . . . . . . . . . . . 54
Horloge . . . . . . . . . . . . . . . . . . . . . . . . . . . . . . . . . . . . . . . . . . . . . 55
Affichage de l’heure . . . . . . . . . . . . . . . . . . . . . . . . . . . . . . . . . 55
Format 12- ou 24- heures . . . . . . . . . . . . . . . . . . . . . . . . . . . . 55
Réglage de l’horloge . . . . . . . . . . . . . . . . . . . . . . . . . . . . . . . . 56
iv

ts955TOC.fm Page v Tuesday, March 3, 2009 1:43 PM
TABLE OF CONTENTS
Mise en marche et arrêt de l’alarme (Caractéristiques en
option) . . . . . . . . . . . . . . . . . . . . . . . . . . . . . . . . . . . . . . . . . 56
Programmation de l’alarme (Caractéristiques en option) . . . . 57
Code antivol . . . . . . . . . . . . . . . . . . . . . . . . . . . . . . . . . . . . . . . . . 57
En cas de dysfonctionnement . . . . . . . . . . . . . . . . . . . . . . . . . 58
Désactivation de l’antivol . . . . . . . . . . . . . . . . . . . . . . . . . . . . . 58
Conseils et astuces . . . . . . . . . . . . . . . . . . . . . . . . . . . . . . . . . . . 59
USB et MP3 . . . . . . . . . . . . . . . . . . . . . . . . . . . . . . . . . . . . . . . 59
Bluetooth . . . . . . . . . . . . . . . . . . . . . . . . . . . . . . . . . . . . . . . . . 60
iPod . . . . . . . . . . . . . . . . . . . . . . . . . . . . . . . . . . . . . . . . . . . . . 60
CD, MP3 et WMA . . . . . . . . . . . . . . . . . . . . . . . . . . . . . . . . . . 61
Español . . . . . . . . . . . . . . . . . . . . . . . . . . . . . . . . . . . . . . . . . . . . . . 62
Operación Segura del Radio . . . . . . . . . . . . . . . . . . . . . . . . . . . . 62
Introducción . . . . . . . . . . . . . . . . . . . . . . . . . . . . . . . . . . . . . . . . . 62
Vista General . . . . . . . . . . . . . . . . . . . . . . . . . . . . . . . . . . . . . . . . 63
Controles de Radio/CD, Guía de Referencia Rápida . . . . . . . 63
Pantalla, Guía de Referencia Rápida . . . . . . . . . . . . . . . . . . . 65
Funciones principales . . . . . . . . . . . . . . . . . . . . . . . . . . . . . . . . . 67
Energía . . . . . . . . . . . . . . . . . . . . . . . . . . . . . . . . . . . . . . . . . . . . 68
Encendido y Apagado, Enmudecimiento y Pausa del
Sistema de Audio . . . . . . . . . . . . . . . . . . . . . . . . . . . . . . . . 68
Modalidad de Radio . . . . . . . . . . . . . . . . . . . . . . . . . . . . . . . . . . . 68
Selección de Banda (FM y AM) . . . . . . . . . . . . . . . . . . . . . . . . 68
Buscar en la modalidad de radio . . . . . . . . . . . . . . . . . . . . . . . 68
Sintonización manual . . . . . . . . . . . . . . . . . . . . . . . . . . . . . . . 68
Programaciones (Almacenamiento de Estaciones de
Radio) . . . . . . . . . . . . . . . . . . . . . . . . . . . . . . . . . . . . . . . . . 69
Programaciones (Selección de una Estación de Radio
Almacenada) . . . . . . . . . . . . . . . . . . . . . . . . . . . . . . . . . . . . 69
Modalidad de exploración . . . . . . . . . . . . . . . . . . . . . . . . . . . . 70
Empleo de la banda de Clima . . . . . . . . . . . . . . . . . . . . . . . . . 70
Servicio de Radio Satelital (Características Opcionales) . . . . 71
Modalidad de CD . . . . . . . . . . . . . . . . . . . . . . . . . . . . . . . . . . . . . 72
Cambio a la Modalidad de CD . . . . . . . . . . . . . . . . . . . . . . . . . 72
Expulsar un CD . . . . . . . . . . . . . . . . . . . . . . . . . . . . . . . . . . . . 72
Cambio de Pista en un CD . . . . . . . . . . . . . . . . . . . . . . . . . . . 72
Retroceso Rápido o Avance Rápido de un CD . . . . . . . . . . . . 73
Reproducción de Pistas en un CD en Orden Aleatorio . . . . . . 73
Repetición de Pistas en un CD (Características
Opcionales) . . . . . . . . . . . . . . . . . . . . . . . . . . . . . . . . . . . . . 73
v

ts955TOC.fm Page vi Tuesday, March 3, 2009 1:43 PM
TABLE OF CONTENTS
Cambio a otra Carpeta en un CD (Características
Opcionales) . . . . . . . . . . . . . . . . . . . . . . . . . . . . . . . . . . . . . 74
Exploración de un CD . . . . . . . . . . . . . . . . . . . . . . . . . . . . . . . 74
Entrada de audio externa (Características Opcionales) . . . . . . . . 74
Modalidad de USB (Características Opcionales) . . . . . . . . . . . . . 75
Cambio a la Modalidad de USB . . . . . . . . . . . . . . . . . . . . . . . . 75
Desconexión de un dispositivo USB . . . . . . . . . . . . . . . . . . . . 75
Cambio de Pista en un dispositivo USB . . . . . . . . . . . . . . . . . 75
Retroceso Rápido o Avance Rápido en un Dispositivo
USB . . . . . . . . . . . . . . . . . . . . . . . . . . . . . . . . . . . . . . . . . . . 75
Reproducción de Pistas en un Dispositivo USB en Orden
Aleatorio . . . . . . . . . . . . . . . . . . . . . . . . . . . . . . . . . . . . . . . 76
Repetición de Pistas en un Dispositivo USB . . . . . . . . . . . . . . 76
Cambio a otra Carpeta en un USB . . . . . . . . . . . . . . . . . . . . . 77
Exploración de un USB . . . . . . . . . . . . . . . . . . . . . . . . . . . . . . 77
Modalidad de iPod (Características Opcionales) . . . . . . . . . . . . . 77
Conexión del iPod . . . . . . . . . . . . . . . . . . . . . . . . . . . . . . . . . . 78
Cambio a la Modalidad de iPod . . . . . . . . . . . . . . . . . . . . . . . . 78
Desconexión del dispositivo iPod . . . . . . . . . . . . . . . . . . . . . . 78
Menú del iPod . . . . . . . . . . . . . . . . . . . . . . . . . . . . . . . . . . . . . 78
Cambio de Pista en el iPod . . . . . . . . . . . . . . . . . . . . . . . . . . . 79
Avance Rápido en iPod . . . . . . . . . . . . . . . . . . . . . . . . . . . . . . 79
Reproducción de Pistas en el iPod en Orden Aleatorio . . . . . . 79
Repetición de Pista en el iPod . . . . . . . . . . . . . . . . . . . . . . . . . 80
Exploración del iPod . . . . . . . . . . . . . . . . . . . . . . . . . . . . . . . . 80
Modalidad AUX (Características Opcionales) . . . . . . . . . . . . . . . 81
Ajustes de Audio . . . . . . . . . . . . . . . . . . . . . . . . . . . . . . . . . . . . . 81
Ajuste de Volumen Arriba y Abajo . . . . . . . . . . . . . . . . . . . . . . 81
Ajuste de Bass (Bajo) Arriba y Abajo . . . . . . . . . . . . . . . . . . . . 81
Ajuste de Treble (Tiple) Arriba y Abajo . . . . . . . . . . . . . . . . . . 82
Ajuste de Balance Izquierda y Derecha . . . . . . . . . . . . . . . . . . 82
Ajuste de Fader (Desvanecimiento) Adelante y Atrás . . . . . . . 82
Ajuste de Mid (Límites de Frecuencia Media) Arriba y Abajo
(Características Opcionales) . . . . . . . . . . . . . . . . . . . . . . . . 83
Selección de Bocinas . . . . . . . . . . . . . . . . . . . . . . . . . . . . . . . . 83
Activación de Volumen Dependiente de Velocidad (ASC)
(Características Opcionales) . . . . . . . . . . . . . . . . . . . . . . . . 83
Modalidad de Teléfono Bluetooth Manos Libres (Características
Opcionales) . . . . . . . . . . . . . . . . . . . . . . . . . . . . . . . . . . . . . . . 84
Activación de Bluetooth . . . . . . . . . . . . . . . . . . . . . . . . . . . . . . 85
vi

ts955TOC.fm Page vii Tuesday, March 3, 2009 1:43 PM
Agregar un Teléfono . . . . . . . . . . . . . . . . . . . . . . . . . . . . . . . . 85
Activación de otro Teléfono . . . . . . . . . . . . . . . . . . . . . . . . . . . 86
Suprimir un Teléfono . . . . . . . . . . . . . . . . . . . . . . . . . . . . . . . . 86
Suprimir todos los Teléfonos . . . . . . . . . . . . . . . . . . . . . . . . . . 87
Cambiar Llamadas de Teléfono Entre el Vehículo y un
Activo Teléfono . . . . . . . . . . . . . . . . . . . . . . . . . . . . . . . . . . 87
Reloj . . . . . . . . . . . . . . . . . . . . . . . . . . . . . . . . . . . . . . . . . . . . . . . 88
Despliegue de Hora . . . . . . . . . . . . . . . . . . . . . . . . . . . . . . . . . 88
Formato de 12- ó 24- Horas . . . . . . . . . . . . . . . . . . . . . . . . . . 88
Ajuste del Reloj . . . . . . . . . . . . . . . . . . . . . . . . . . . . . . . . . . . . 89
Activar o Desactivar la Alarma (Características
Opcionales) . . . . . . . . . . . . . . . . . . . . . . . . . . . . . . . . . . . . . 89
Ajustar la Alarma (Características Opcionales) . . . . . . . . . . . . 90
Código Contra Robo (Guard) . . . . . . . . . . . . . . . . . . . . . . . . . . . . 90
En caso de mal funcionamiento: . . . . . . . . . . . . . . . . . . . . . . . 91
Desactivación de Guard . . . . . . . . . . . . . . . . . . . . . . . . . . . . . 91
Consejos y Trucos . . . . . . . . . . . . . . . . . . . . . . . . . . . . . . . . . . . . 92
USB y MP3 . . . . . . . . . . . . . . . . . . . . . . . . . . . . . . . . . . . . . . . 92
Bluetooth . . . . . . . . . . . . . . . . . . . . . . . . . . . . . . . . . . . . . . . . . 93
iPod . . . . . . . . . . . . . . . . . . . . . . . . . . . . . . . . . . . . . . . . . . . . . 94
CD, MP3, y WMA . . . . . . . . . . . . . . . . . . . . . . . . . . . . . . . . . . 94
TABLE OF CONTENTS
vii

ts955TOC.fm Page viii Tuesday, March 3, 2009 1:43 PM
NOTES
viii

ts955.bk Page 1 Friday, February 20, 2009 10:23 AM
ENGLISH
SAFE OPERATION OF THE RADIO
The driving conditions today require that the driver pays full attention to
the road at all times. It is advised that when using this radio while
driving the driver maintain full concentration on the road. Therefore it is
strongly advised to do the following:
앫 Never change a CD or read CD labels while driving.
앫 Always ensure the volume of the audio system is set so that
outside acoustics can also be heard.
INTRODUCTION
The following instructions explain the general functions and operations
of Mack Radio Models.
Radio information is displayed through the LCD display on the radio.
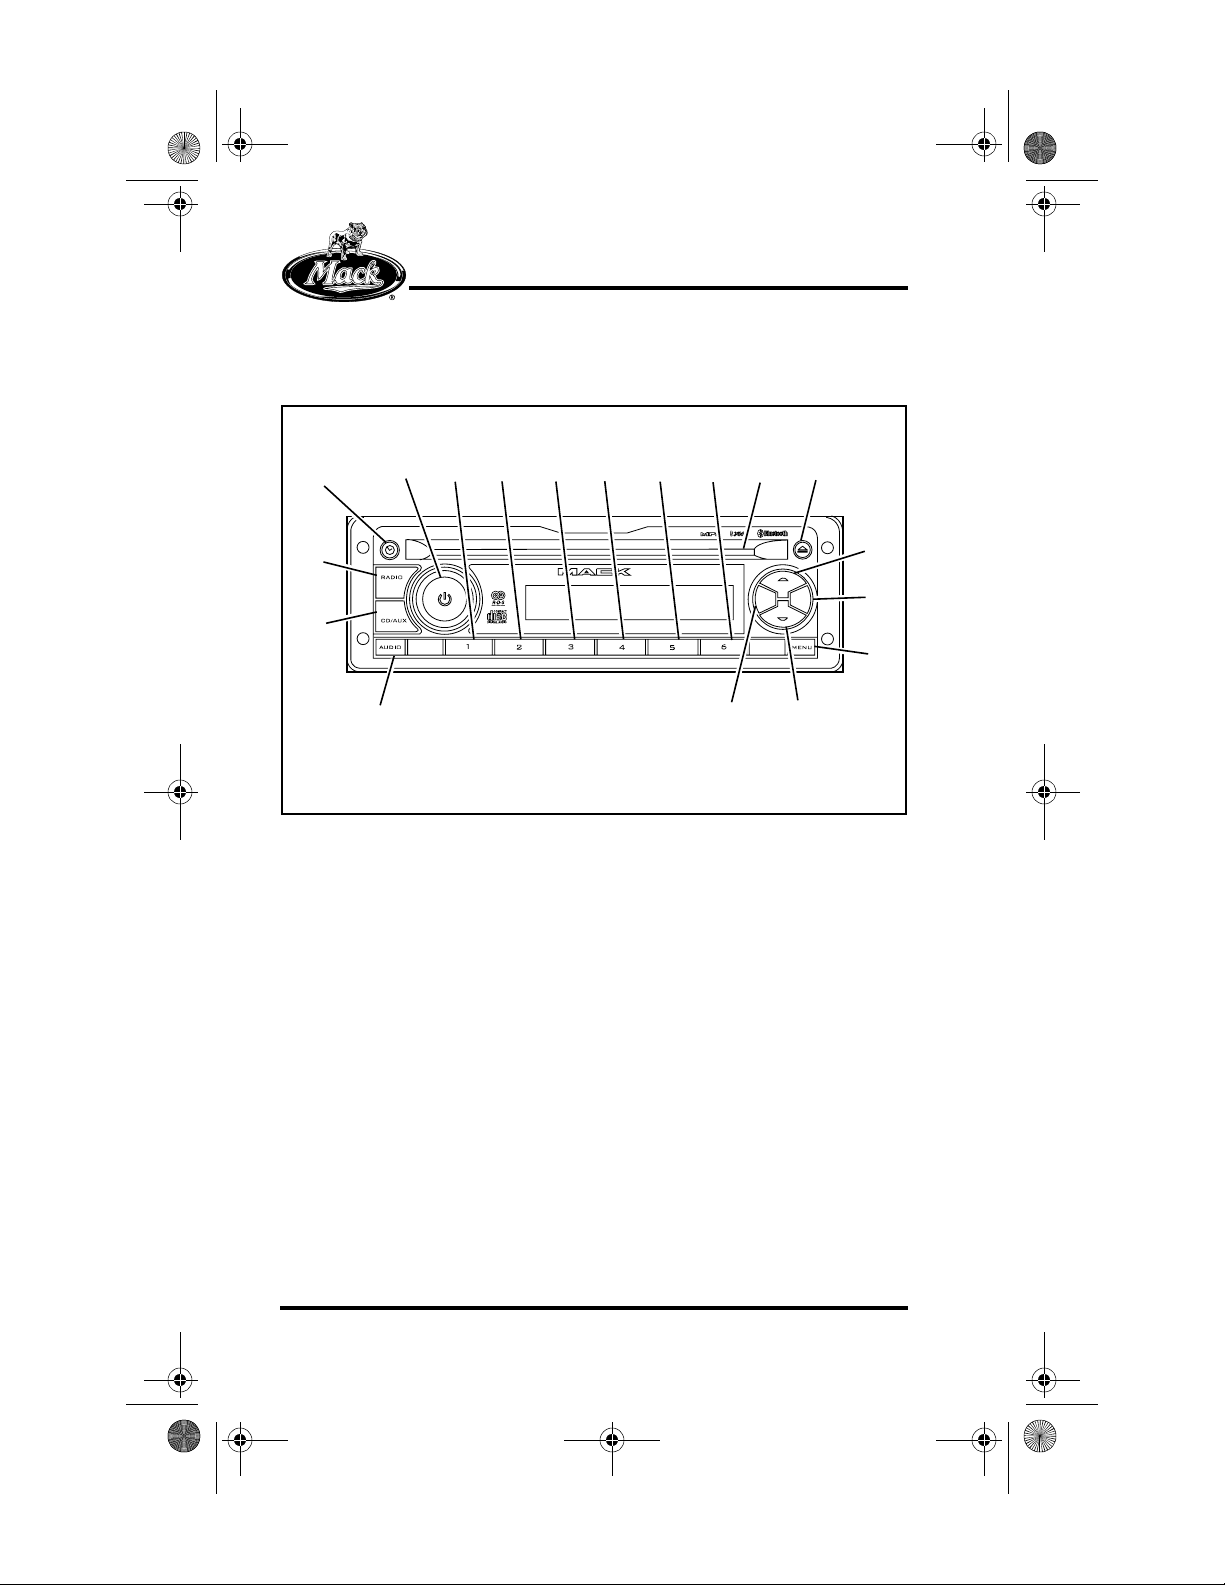
The radio is commanded by the Faceplate, shown in Fig 1.
The main functions of the radio unit are Radio Mode and CD.
The main optional functions are:
앫 CD supporting mp3 and WMA
앫 USB (supporting mp3 and WMA)
앫 iPod
앫 Auxiliary audio input
앫 Hands free (Bluetooth Phone Operation)
1
ts955.bk Page 2 Friday, February 20, 2009 10:23 AM
GENERAL OVERVIEW
Radio/CD Controls Quick Reference Guide
ENGLISH
Fig. 1
1. “Preset #1” Button:
Radio: Push and release: Recall Preset Station
Radio: Push and hold: Store Preset Station
2. “Preset #2” Button:
Radio: Push and release: Recall Preset Station
Radio: Push and hold: Store Preset Station
3. “Preset #3” Button:
Radio: Push and release: Recall Preset Station
Radio: Push and hold: Store Preset Station
4. “Preset #4” Button:
Radio: Push and release: Recall Preset Station
Radio: Push and hold: Store Preset Station
5. “Preset #5” Button:
Radio: Push and release: Recall Preset Station
Radio: Push and hold: Store Preset Station
2

ts955.bk Page 3 Friday, February 20, 2009 10:23 AM
6. “Preset #6” Button:
Radio: Push and release: Recall Preset Station
Radio: Push and hold: Store Preset Station
7. Rotary Knob/PWR Button:
Push: Power On and Off
Turn : Volume Adjust & Audio Value Update
8. CD Slot:
CD: Insert/Remove CD
9. “Eject CD” Button:
CD: Eject CD
10. Radio Select Mode:
Radio: Choose from FM1, FM2, FM3 (optional), AM, Weather
band, and Satellite radio (optional)
11. Clock Button:
General: Display the time of day
12. CD/Aux Mode Select:
CD/USB: Switch between sources other than radio
13. Up Button:
Radio: Manual tuning up
14. (Fast) Forward Button:
Radio: Seek
CD/USB: Push and release: Select Next Track
CD/USB: Push and hold: Fast Forward
Bluetooth Phone: Accept incoming call (optional)
15. Menu Button:
Radio: Push and release: Menu Access
16. (Fast) Reverse Button:
Radio: Seek
CD/USB: Push and release: Select previous Track
CD/USB: Push and hold: Fast Reverse
Bluetooth Phone: Reject incoming call or hang up (optional)
iPod: Push and hold: Enter iPod menu (optional)
17. Down Button:
Radio: Manual tuning down
18. Audio Button:
General: Audio Settings
ENGLISH
3

english.fm Page 4 Tuesday, March 3, 2009 8:03 AM
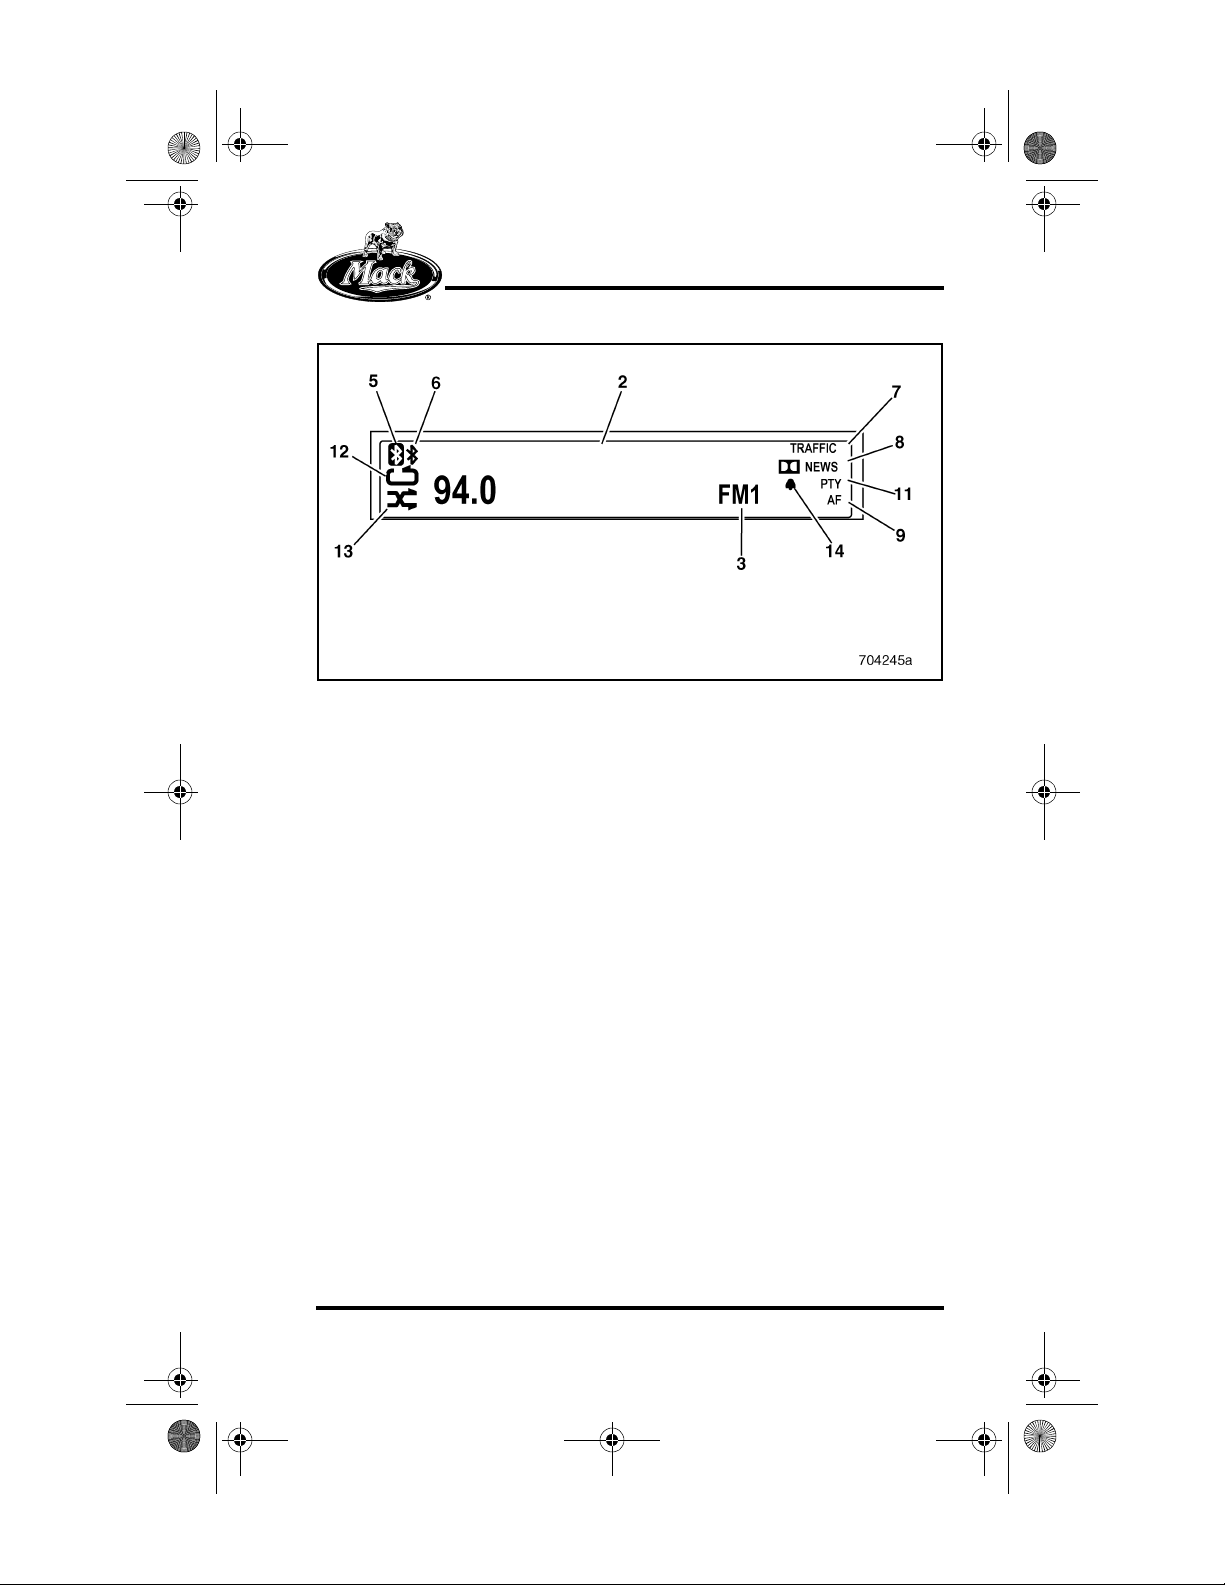
Display Quick Reference Guide
Radio LCD Display
ENGLISH
Fig. 2 Base Radio LCD Display
Fig. 3 Mid Radio LCD Display (Optional)
4

ts955.bk Page 5 Friday, February 20, 2009 10:23 AM
1. Base Radio Text Display
Radio: Displays radio frequency and station name
CD: Displays track, time and music info when available
2. Mid Radio Text Display
Radio: Displays radio band (FM/AM) and frequency
CD/USB: Displays track, time and music info when available
3. Source Display
Radio: Displays radio band (FM1, FM2, FM3 [Mid radio only] AM,
WX, or SAT [Mid radio only])
CD/USB: Displays other source than radio
4. Preset Number
Radio: Displays preset number
5. Phone Connected
General: Indicates a phone is connected
6. Bluetooth On
General: Indicates that the Bluetooth function is on
7. Traffic Info
General: Indicates that the traffic function is on
8. News Info
General: Indicates that the news function is on
9. AF
General: Indicates that the AF (Alternative Frequency) function is
on
10. Menu
General: Displayed when in Menu
11. PTY
General: Indicates that the PTY (Program Type) function is on
12. Repeat
CD/USB: Displayed when Repeat is on
13. Random
CD/USB: Displayed when Random is on
14. Alarm
General: Indicates that the Alarm clock function is on
ENGLISH
5

ts955.bk Page 6 Friday, February 20, 2009 10:23 AM
ENGLISH
MAIN FUNCTIONS
Many functions are controlled or adjusted through the radio Menu. If
the Menu screen is open and the radio experiences no activity for a
10 second period, the radio will cancel any incomplete actions, close
the Menu screen and return to normal operation. The radio will save all
completed changes.
POWER
Switching On & Off, Mute and Pause of the Audio System
The audio system is switched on or off by pressing the (7) button.
If the driver wants to quickly mute the audio system sound, press the
(7) button.
RADIO MODE
Band Selection (FM and AM)
To select the radio as the play mode, turn the radio on and press the
RADIO button (10). The radio will then be active on the last used radio
band (AM, FM, etc.).
To switch between the bands (AM/FM1/FM2) use the RADIO button
(10).
Seek in Radio Mode
Use the Seek buttons ESC (16) or OK (14) to seek up or down
respectively on the radio. Once a station is found the seek function will
stop.
Manual Tuning
Push the UP (13) or DOWN (17) button to tune up or down
respectively.
6

ts955.bk Page 7 Friday, February 20, 2009 10:23 AM
ENGLISH
Presets (Storing Radio Stations)
Up to 12 FM and 6 AM radio stations can be stored for fast access.
There are two sets of FM radio preset bands, which are FM1 and FM2,
and one AM radio preset band. Each preset band can store 6 stations
on buttons 1 thru 6. In addition one FM preset band and one satellite
preset band are optional.
To store a specific station into a preset button, do the following:
1. Push RADIO (10) button until the required frequency band is
active (AM, FM1, FM2, FM3 [Optional], Weather, or Satellite radio
[Optional]).
2. Tune the radio to the desired station.
3. Push and hold the desired preset button (1) (2) (3) (4) (5) (6).
4. There will be a short mute as the station is stored. When audio
returns the process is completed.
Presets (Selecting a Stored Radio Station)
To select one of the preset stations, perform the following:
1. Push the RADIO (10) button to select the required band (AM, FM1,
FM2, FM3 [Optional], Weather, or Satellite radio [Optional]).
2. Push and release the required preset button (1) 2) (3) (4) (5) (6) to
activate the desired station.
Scan Mode
The scan feature allows the user to perform a radio station search
without having to toggle manually thru the stations. When in scan
mode, each station found will play for 10 seconds to give the user a
chance to sample the station program or music. The scan will then
continue on to the next available station unless the user chooses to
stop the scan and stay at the present station.
To enter scan mode, perform the following:
1. Press MENU button (15) on the radio.
2. Select “SCAN” by pressing OK (14).
To exit scan mode and stay at the present station, press the RADIO
(10) button.
7

ts955.bk Page 8 Friday, February 20, 2009 10:23 AM
ENGLISH
Using the Weather Band
NOAA Weather Radio is a service of the National Weather Service. It
provides continuous broadcasts of the latest weather information
directly from the National Weather Service offices. Taped weather
messages are repeated every four to six minutes and are revised every
one to three hours or more frequently if needed. Most of the stations
operate 24 hours a day. The weather for the area you are in can be
found on one of 7 stations. When in the Weatherband mode, the
display will show the “WX” icon and “CH” plus the channel number. The
channel can be changed using the UP (13) and DOWN (17) buttons
and can be also be preset to the pushbuttons.
The frequency associated with each channel is as follows:
1. 162.550 MHz.
2. 162.400 MHz.
3. 162.475 MHz.
4. 162.425 MHz.
5. 162.450 MHz.
6. 162.500 MHz.
7. 162.525 MHz.
The National Weather Service operates approximately 372 stations.
Close to 90 percent of the nation’s population is within listening range
of a NOAA Weather Radio broadcast.
Satellite Radio Service (Optional Feature)
If your radio has the XM™ or SIRIUS™ logo, it is satellite radio
compatible. XM and Sirius are satellite radio services that offer more
than 100 channels of digital quality audio programming and can be
heard uninterrupted across the contiguous United States. A service fee
is required to receive satellite broadcasts. For more information,
contact XM at www.xmradio.com or by phone at 1-800-852-XMXM
(9696) or Sirius at http://activate.siriusradio.com or by phone at
1-888-539-7474.
8
ts955.bk Page 9 Friday, February 20, 2009 10:23 AM
To activate the integrated satellite receiver, you must furnish your
satellite radio provider with the satellite receiver’s Electronic Serial
Number. To find the electronic serial number complete the instructions
that follow.
If your satellite radio provider is XM Satellite Radio:
1. With the ignition and the radio ON, press the RADIO (10) button
and select XM1 or XM2.
2. Tune your radio to channel 0 and the 8-digit serial number will
appear.
If your satellite radio provider is Sirius Satellite Radio:
1. With the ignition and radio ON, press the RADIO (10) button and
select SR1 or SR2.
2. Tune your radio to channel 0 and the 12-digit serial number will
appear.
ENGLISH
Satellite radio reception may be degraded by satellite
signal obstruction.
CD MODE
The radio is designed to work with standard CD format and MP3 and
WMA files (optional).
The CD player will accept CD-R as well as CD-RW discs.
Switching to CD Mode
There are two ways to switch to the CD mode.
1. Push the CD/AUX button (12) until CD shows on display.
OR
2. Insert a CD into the CD slot (8).
9

ts955.bk Page 10 Friday, February 20, 2009 10:23 AM
ENGLISH
Eject a CD
To eject a CD press the EJECT (9) button. When CD is ejected the
radio will play the previous audio source.
If the CD is not removed from the CD slot, it will automatically reload
after 15 seconds.
Changing a Track on a CD
To change a track on a CD, do the following:
Push and release the ESC (16) or OK (14) button on the radio to move
to the next or previous track respectively.
Fast Reverse or Fast Forward of a CD
To fast reverse or fast forward a CD, do the following:
Push and hold the ESC (16) or OK (14) button on the radio to fast
forward or fast reverse respectively.
Playing Tracks on a CD in Random Order
There are two possible Random settings for a CD: Random All and
Random Folder (If the content of the CD is stored in folders). To play
tracks in random order, do the following:
1. Press the MENU button (15).
2. Push button UP (13) or DOWN (17) until “RANDOM” is displayed.
3. Enter Random Sub menu by pressing button OK (14).
4. Push button UP (13) or DOWN (17) to choose between All and
Folder.
5. Push button OK (14) to activate the desired Random mode.
10

ts955.bk Page 11 Friday, February 20, 2009 10:23 AM
ENGLISH
Repeating Tracks on a CD (Optional Feature)
There are three possible Repeat settings for a CD: Repeat All, Repeat
track and Repeat Folder (If the content of the CD is stored in folders).
By default, Repeat All is active.
To change the repeat setting, do the following:
1. Press the MENU button (15).
2. Push button UP (13) or DOWN (17) until “REPEAT” is displayed.
3. Enter Random Sub menu by pressing button OK (14).
4. Push button UP (13) or DOWN (17) to choose between All, Track
and Folder.
5. Push button OK (14) to activate the desired Repeat mode.
Changing to Another Folder on a CD (Optional Feature)
If the content of the CD is stored in folders, it is possible to change
folders directly. To do this, push either the UP (13) or DOWN (17)
button to move to the next or previous album/folder respectively.
Scan a CD
When CD is scanned, the first 10 seconds of each track is played.
To activate Scan, do the following:
1. Press the MENU button (15).
2. Select “SCAN” by pressing button OK (14).
Scanning will stop if:
1. The face plate buttons ESC (16) or OK (14).
OR
2. All tracks are browsed through.
11

ts955.bk Page 12 Friday, February 20, 2009 10:23 AM
ENGLISH
EXTERNAL AUDIO INPUT (OPTIONAL FEATURE)
There are three possible external audio input modes, USB, iPod and
Aux. A USB and an AUX device can be connected and accessible at
the same time. However, if an iPod is connected the USB and the AUX
devices will be disabled as an available source.
USB MODE (OPTIONAL FEATURE)
The radio is designed to work with USB devices formatted with the
USB Mass Storage Device Class standard. Other USB devices may
still work with the radio though.
If a USB device doesn’t work properly, try reconnecting the device
which may solve the problem in some cases.
A USB device must be connected prior to operating in this mode.
Switching to USB Mode
There are two ways to switch to USB mode.
1. Push the CD/AUX button (12) until USB shows on the display.
OR
2. Connect a USB device.
Disconnecting a USB Device
No special preparations are needed to disconnect the USB device.
When USB device is removed the radio will play the previous audio
source.
Changing a Track on a USB Device
To change tracks, do the following:
Push and release the ESC (16) or OK (14) button on the radio to move
to the previous or next track respectively.
12

ts955.bk Page 13 Friday, February 20, 2009 10:23 AM
ENGLISH
Fast Reverse or Fast Forward on a USB Device
To fast reverse or fast forward on a USB device, do the following:
Push and Hold the ESC (16) or OK (14) button on the radio to fast
reverse or fast forward respectively.
Playing Tracks on a USB Device in Random Order
There are two possible Random settings for a USB device: Random All
and Random Folder (If the content of the USB device is stored in
folders).
To play tracks in random order, do the following:
1. Press the MENU button (15).
2. Push button UP (13) or DOWN (17) until “RANDOM” is displayed.
3. Enter Random Sub menu by pressing button OK (14).
4. Push button UP (13) or DOWN (17) to choose between All and
Folder.
5. Push button OK (14) to activate the desired Random mode.
Repeating Tracks on a USB Device
There are three possible Repeat settings for a USB device: Repeat All,
Repeat track and Repeat Folder (If the content of the USB device is
stored in folders). By default, Repeat All is active.
To change the repeat setting, do the following:
1. Press the MENU button (15).
2. Push button UP (13) or DOWN (17) until “REPEAT” is displayed.
3. Enter Random Sub menu by pressing button OK (14).
4. Push button UP (13) or DOWN (17) to choose between All, Track
and Folder.
5. Push button OK (14) to activate the desired Repeat mode.
13

ts955.bk Page 14 Friday, February 20, 2009 10:23 AM
ENGLISH
Changing to Another Folder on a USB
If the content of the USB is stored in folders, it is possible to change
folders directly. To do this, push either the UP (13) or DOWN (17)
button to move to the next or previous album/folder respectively.
Scan a USB
When USB is scanned, the first 10 seconds of each track is played.
To activate Scan, do the following:
1. Press the MENU button (15).
2. Select “SCAN” by pressing button OK (14).
Scanning will stop if:
1. The face plate buttons ESC (16) or OK (14).
OR
2. All tracks are browsed through.
IPOD MODE (OPTIONAL FEATURE)
The radio supports iPod Classic, iPod Video, and iPod nano.
The iPod settings, e.g. Shuffle or Repeat, used prior to connecting the
iPod to the radio will be used by the radio.
An iPod device must be connected prior to operating in this mode.
Connecting the iPod
Connecting the iPod can be done with two different cable sets.
앫 A split cable from the iPod 30-pin connector to a USB connector
and a 3.5 mm audio connector
앫 A separate iPod/USB cable plus a 3.5 mm male/male stereo
audio cable connected to the iPod earphone output. The iPod
volume should in this case be set to maximum prior to connecting
to the radio.
When the iPod is connected to the radio, the iPod’s controls will lock.
All control of the iPod is done by the radio buttons. When in this state,
the iPod will display a Mack logotype.
14

ts955.bk Page 15 Friday, February 20, 2009 10:23 AM
ENGLISH
Switching to iPod Mode
There are two ways to switch to iPod mode:
1. Push the CD/AUX button (12) until iPod shows on the display.
OR
2. Connect an iPod device.
Disconnecting the iPod Device
No special preparations are needed to disconnect the iPod device.
When the iPod device is removed the radio will play the previous audio
source.
iPod Menu
When iPod is connected and source, the user can Push and hold the
ESC (16) button to enter the iPod Menu. This Menu contains some of
the most common functions used in the iPod, e.g., the user can search
for Artists and Albums, as well as starting a Playlist.
Push and hold the ESC (16) button for 1 second to enter the iPod Menu
at last used level.
Push and hold the ESC (16) button for 2 seconds to enter the iPod
Menu at top level.
Changing a Track on iPod
To change a track on iPod, do the following:
Push and release the ESC (16) or OK (14) button on the radio to move
to the previous or next track respectively.
Fast Forward on iPod
To fast forward on iPod, do the following:
Push and Hold the OK (14) button on the radio to fast forward.
Please note that Push and hold the ESC (16) button will enter the iPod
menu.
15

ts955.bk Page 16 Friday, February 20, 2009 10:23 AM
ENGLISH
Playing Tracks on iPod in Random Order
There are two possible Random settings for iPod: Random Album and
Random All.
To play songs in random order, do the following:
1. Press the MENU button (15).
2. Push button UP (13) or DOWN (17) until “RANDOM” is displayed.
3. Enter Random Sub menu by pressing button OK (14).
4. Push button UP (13) or DOWN (17) to choose between All and
Folder.
5. Push button OK (14) to activate the desired Random mode.
Repeating a Track on iPod
There are two possible Repeat settings for iPod: Repeat One, and
Repeat All.
To change the repeat setting, do the following:
1. Press the MENU button (15).
2. Push button UP (13) or DOWN (17) until “REPEAT” is displayed.
3. Enter Random Sub menu by pressing button OK (14).
4. Push button UP (13) or DOWN (17) to choose between All, Track
and Folder.
5. Push button OK (14) to activate the desired Repeat mode.
Scan iPod
When iPod is scanned, the first 10 seconds of each track is played.
To activate Scan, do the following:
1. Press the MENU button (15).
2. Select “SCAN” by pressing button OK (14).
16
ts955.bk Page 17 Friday, February 20, 2009 10:23 AM
Scanning will stop if:
1. The face plate buttons ESC (16) or OK (14).
OR
2. All tracks are browsed through.
AUX MODE (OPTIONAL FEATURE)
To select an auxiliary audio input:
Push the CD/AUX button (12) until Aux shows on the display.
An auxiliary audio input may be selected except when in iPod mode.
The output volume of the Aux device should be set to maximum.
Please note that for an Aux device, changing tracks, fast forwarding
etcetera must be done directly on the Aux device.
ENGLISH
AUDIO SETTINGS
Adjusting Volume Up and Down
The audio systems volume can be adjusted UP by turning the (7) knob
in a clockwise direction and adjusted DOWN by turning the knob (7) in
a counter-clockwise direction.
Adjusting Bass Up and Down
To adjust the audio systems bass, press the AUDIO (18) button until
BASS shows on the display.
The bass is then adjusted UP by turning the (7) knob in a clockwise
direction and adjusted DOWN by turning the knob (7) in a
counter-clockwise direction.
It can also be adjusted UP and DOWN by using ESC (16) or OK (14)
on the radio respectively.
17

ts955.bk Page 18 Friday, February 20, 2009 10:23 AM
ENGLISH
Adjusting Treble Up and Down
To adjust the audio systems treble, press the AUDIO (18) button until
TREBLE shows on the display.
The treble is then adjusted UP by turning the (7) knob in a clockwise
direction and adjusted DOWN by turning the knob (7) in a
counter-clockwise direction.
It can also be adjusted UP and DOWN by using ESC (16) or OK (14)
on the radio respectively.
Adjusting Balance Left and Right
To adjust the audio systems balance, press the AUDIO (18) button until
BALANCE shows on the display.
The balance is then adjusted right by turning the (7) knob in a
clockwise direction and adjusted left by turning the knob (7) in a
counter-clockwise direction.
It can also be adjusted left and right by using ESC (16) or OK (14) on
the radio respectively.
Adjusting Fader Front and Back
To adjust the audio systems fader, press the AUDIO (18) button until
FADE shows on the display.
The fade is then adjusted to the front by turning the (7) knob in a
clockwise direction and adjusted to the back by turning the knob (7) in
a counter-clockwise direction.
It can also be adjusted left and right by using ESC (16) or OK (14) on
the radio respectively.
18

ts955.bk Page 19 Friday, February 20, 2009 10:23 AM
ENGLISH
Adjusting Mid (Medium Frequency Range) Up and Down
(Optional Feature)
To adjust the audio systems mid, press the AUDIO button (18) until
MID shows on the display.
The mid is then adjusted UP by turning the (7) knob in a clockwise
direction and adjusted down by turning the knob (7) in a
counter-clockwise direction.
It can also be adjusted UP and DOWN by using ESC (16) and OK (14)
on the radio respectively.
Speakers Selection
The audio system can be adjusted to 4 or 2 speaker mode by
performing the following:
1. Press the MENU button (15).
2. Push button UP (13) or DOWN (17) until “ADVANCE” is displayed.
3. Press the OK (14) button to enter the “ADVANCE” submenu.
4. Push button UP (13) or DOWN (17) until “SPEAKERS” is
displayed.
5. Change between 2CH and 4CH by pressing the OK (14) button.
Activating Speed Dependant Volume (ASC) (Optional
Feature)
The volume of the audio system can be set to increase with the speed
of the vehicle. This is sometimes preferred to compensate for road and
engine sounds. The feature can be set to three levels of sensitivity,
LOW, MID and HIGH.
To activate ASC, perform the following:
1. Press the MENU button (15).
2. Push button UP (13) or DOWN (17) until “ADVANCE” is displayed.
3. Press button OK (14) to enter the Advanced sub menu.
19

ts955.bk Page 20 Friday, February 20, 2009 10:23 AM
ENGLISH
4. Push button UP (13) or DOWN (17) until “ASC” is displayed.
5. Press button OK (14) to enter the ASC sub menu.
6. Push button UP (13) or DOWN (17) to choose between LOW, MID
and HIGH.
7. Press button OK (14) to enter the desired ASC setting.
BLUETOOTH HANDS FREE PHONE MODE (OPTIONAL
FEATURE)
The radio is designed to work with mobile phones that support the
Bluetooth Hands Free Profile 1.5. Other Bluetooth capable mobile
phones may still work with the radio though.
To connect a mobile phone to the radio through Bluetooth, the following
steps must be completed on the radio.
1. Activate the Bluetooth function.
2. Add the Phone.
Please note that corresponding steps have to be taken on the mobile
phone.
An added phone will be stored in a list for quick access when
connecting at another time.
Bluetooth Activation
The purpose of this process is to make a Bluetooth connection
possible.
1. Push the MENU button (15).
2. Push button UP (13) or DOWN (17) until “Hands Free” is
displayed.
3. Push button OK (14) to enter the Hands Free sub menu.
4. Push button OK (14) to activate Bluetooth.
When Bluetooth is active, the display shows the (45) icon.
20

ts955.bk Page 21 Friday, February 20, 2009 10:23 AM
ENGLISH
Adding a Phone
The purpose of this process is to make a connection between the radio
and a phone as well as to add a phone to the radio phone list.
1. Push the MENU button (15).
2. Push button UP (13) or DOWN (17) until “Hands Free” is
displayed.
3. Push button OK (14) to enter the Hands Free sub menu.
4. Push button UP (13) or DOWN (17) until “Add phone” is displayed.
5. Push button OK (14) to initiate the phone connection.
The radio will now do a search for a bluetooth phone. This is indicated
by the (45) icon blinking. Note that the phone must be in a
corresponding connecting state during this process.
When a connection is established, the user will be prompted to enter a
code on the phone. Enter code 0000 to verify connection.
Activating Another Phone
The purpose of this process is to disconnect a present bluetooth phone
and establish a connection to another phone in the phone list.
1. Push the MENU button (15).
2. Push button UP (13) or DOWN (17) until “Hands Free” is
displayed.
3. Push button OK (14) to enter the Hands Free sub menu.
4. Push button UP (13) or DOWN (17) until the display shows
“ChangePhName” (where “PhName” will be the name of the
presently connected phone).
5. Push button OK (14) to enter the Change phone sub menu.
6. Push button UP (13) or DOWN (17) until the phone name that is
to be connected is displayed.
7. Push button OK (14) to connect to the other phone.
21

ts955.bk Page 22 Friday, February 20, 2009 10:23 AM
ENGLISH
Deleting a Phone
The purpose of this process is to delete a specific phone from the
phone list in the radio.
1. Push the MENU button (15).
2. Push button UP (13) or DOWN (17) until “Hands Free” is
displayed.
3. Push button OK (14) to enter the Hands Free sub menu.
4. Push button UP (13) or DOWN (17) until “Edit Phone” is displayed.
5. Push button OK (14) to enter the Edit Phone sub menu.
6. Push button UP (13) or DOWN (17) until the phone name that is
to be deleted is displayed.
7. Push button OK (14) to delete the phone.
8. The display will show “Delete?”. Push button OK (14) to verify.
Deleting All Phones
The purpose of this process is to delete all phones from the phone list
in the radio.
1. Push the MENU (15) button.
2. Push UP (13) or DOWN (17) buttons until “Hands Free” is
displayed.
3. Push OK (14) button to enter the Hands Free sub menu.
4. Push button UP (13) or DOWN (17) until “Edit Phone” is displayed.
5. Push button OK (14) to enter the Edit Phone sub menu.
6. Push button UP (13) or DOWN (17) until “Delete All” is displayed.
7. Push button OK (14) to delete all phones.
8. The display will show “Are U sure?”. Push button OK (14) to verify.
22

ts955.bk Page 23 Friday, February 20, 2009 10:23 AM
ENGLISH
Switching Phone Calls Between the Vehicle and an Active
Phone
The purpose of this process is to allow switching of phone calls from
being received and heard through the radio to being received and
heard through an active phone.
1. To switch a call from the vehicle to an active phone, press the
AUDIO button.
2. To switch a call from an active phone to the vehicle, press the
AUDIO button.
CLOCK
Displaying the Time
By default, the time of day is displayed only when the ignition is ON and
the radio is OFF. The Clock can be set to show the time also when
radio is ON, by doing the following:
1. Push MENU (15) button.
2. Push button UP (13) or DOWN (17) until “CLOCK” is displayed.
3. Push button OK (14) to enter Clock sub menu.
4. Push button UP (13) or DOWN (17) until “VISIBLE” is displayed.
5. Push button OK (14) to change between ON/OFF status.
While the radio is ON and in any mode, press the CLOCK (11) button
to display the time of day for 10 seconds.
12- or 24-Hour Format
The clock can be set to 12-hour or 24-hour mode. The 12-hour mode
distinguishes between AM and PM.
To change the time format, do the following:
1. Push MENU (15) button.
2. Push button UP (13) or DOWN (17) until “CLOCK” is displayed.
23

ts955.bk Page 24 Friday, February 20, 2009 10:23 AM
ENGLISH
3. Push button OK (14) to enter Clock sub menu.
4. Push button UP (13) or DOWN (17) until “12/24 HR” is displayed.
5. Push button OK (14) to change between 12H or 24H options.
Setting the Clock
Normally the time is set automatically by the trucks system. The option
to manually set the time will then not be available.
To set the clock manually, do the following:
1. Push MENU (15) button.
2. Push button UP (13) or DOWN (17) until “CLOCK” is displayed.
3. Push button OK (14) to enter Clock sub menu.
4. Push button UP (13) or DOWN (17) until “SET TIME” is displayed.
5. Push button OK (14) to enter the Set time sub menu.
6. Push button UP (13) or DOWN (17) to adjust the hours UP or
DOWN respectively.
7. Push button OK (14) to set the hour and toggle to the minute
adjustment.
8. Push button UP (13) or DOWN (17) to adjust the minutes UP or
DOWN respectively.
9. Push button OK (14) to save the time and finish the process.
Turning the Alarm ON or OFF (Optional Feature)
To turn the Alarm On or Off, do the following:
1. Push MENU (15) button.
2. Push button UP (13) or DOWN (17) until reaching “WAKE UP
ALARM” is displayed.
3. Push button OK (14) to enter the Wake up alarm sub menu.
4. Push button UP (13) or DOWN (17) until “ON/OFF” is displayed.
5. Push OK (14) button to change the alarm status.
24

ts955.bk Page 25 Friday, February 20, 2009 10:23 AM
Setting the Alarm (Optional Feature)
To set the Alarm time, do the following:
1. Push MENU (15) button.
2. Push button UP (13) or DOWN (17) until “WAKE UP ALARM” is
displayed.
3. Push button OK (14) to enter the Wake up alarm sub menu.
4. Push button UP (13) or DOWN (17) until “SET TIME” is displayed.
5. Push button OK (14) to enter the Set time sub menu.
6. Push button UP (13) or DOWN (17) to adjust the hours UP or
DOWN respectively.
7. Push button OK (14) to set the hour and toggle to the minute
adjustment.
ENGLISH
8. Push button UP (13) or DOWN (17) to adjust the minutes UP or
DOWN respectively.
9. Push button OK (14) to save the time and finish the process.
ANTI THEFT CODE (GUARD)
The radio unit is set to function with only one vehicle. The Guard
feature prohibits operation of the radio anywhere else. The Guard is
automatic and no manual handling is normally needed.
In Case of Malfunction
If, by some reason, the radio fails in detecting the required vehicle, the
user will be prompted to enter the Anti Theft Code (sticker found in
Drivers Handbook). The display will then show “CODE 0000”. Please
note that this is a malfunction and should be checked at an
authorized workshop.
25

ts955.bk Page 26 Friday, February 20, 2009 10:23 AM
ENGLISH
To enter the code, do the following:
1. For the current (blinking) digit, turn the volume knob (7) until the
right number is shown.
2. Press the power button to enter the digit. The next digit will start to
blink.
3. Repeat steps 1 and 2 until all four digits have been entered.
The user has three tries to enter the code. If these are unsuccessful
the radio will be locked for 60 minutes until three new tries are allowed.
Deactivating Guard
It is possible to deactivate Guard, but not recommended.
To deactivate the Guard function, do the following:
1. Push MENU (15) button.
2. Push button UP (13) or DOWN (17) until “ADVANCE” is displayed.
3. Push button OK (14) to enter Advance sub menu.
4. Push button UP (13) or DOWN (17) until “GUARD” is displayed.
5. Push button OK (14) to enter.
6. Push button OK (14) to set Guard ON or OFF.
The user will be requested for the Anti Theft Code to deactivate or
activate Guard. The display will then show “CODE 0000” with the first
digit blinking.
To enter the code, do the following:
1. For the current (blinking) digit, turn the volume knob (17) until the
right number is shown.
2. Press the power button to enter the digit. The next digit will start to
blink.
3. Repeat steps 1 and 2 until all four digits have been entered.
The user has three tries to enter the code. If these are unsuccessful
the radio will be locked for 60 minutes until three new tries are allowed.
26

ts955.bk Page 27 Friday, February 20, 2009 10:23 AM
ENGLISH
TIPS AND TRICKS (OPTIONAL FEATURE)
USB and MP3
The radio is designed to work with USB devices that support the USB
Mass Storage Device Class Standard.
Other USB devices may still work with the radio.
If a USB device does not work together with the radio, please try to
re-connect the USB device which in some cases solves the problem.
Some USB devices come with extra software installed which makes
them incompatible with the USB Mass Storage Device Class Standard.
If this is the case, formatting the USB device can sometimes solve the
problem.
Formatting the unit will erase all data on the USB
device, so be sure to back-up the data before trying
this.
앫 WMA and MP3 are the only formats readable by the device.
앫 Playlist must be in .PLS or .M3U format.
Bluetooth
The radio is designed to work with Bluetooth capable cellular phones
that support the Bluetooth Hands-Free Profile 1.5.
Some Bluetooth capable cellular phones that do not
support this standard may still work.
27

ts955.bk Page 28 Friday, February 20, 2009 10:23 AM
ENGLISH
To see if your phone supports BlueTooth Hands-Free Profile 1.5, visit
the BlueTooth organization homepage at
https://www.bluetooth.org/tpg/listings.cfm
specifications of your phone.
The link above could change if the structure of the
BlueTooth homepage is updated. You can also try
contacting your cellular supplier to get the details
directly from them.
앫 Compatible with standard 1.5.
앫 More information at www.bluetooth.org.
iPod
and search for the detailed
The radio is designed to support the following iPod models:
앫 iPod nano — 1st, 2nd and 3rd generation
앫 iPod classic — 5th and 6th generation
Both older and newer generations of these iPods may
also work.
앫 An iPod adapter can be purchased through Volvo as part number
21259125.
앫 Other adapters may also be found at www.sendstation.com
앫 For best performance, the iPod firmware should be recently
updated, www.apple.com
.
.
CD, MP3, and WMA
앫 A CD with MP3 or WMA will take several seconds to read before it
starts playing.
앫 For best performance, an MP3/WMA CD should not contain other
file types than MP3, WMA, M3U and PLS.
28

ts955.bk Page 29 Friday, February 20, 2009 10:23 AM
FRANÇAIS
SÉCURITÉ ET UTILISATION DE LA RADIO
De nos jours, les conditions de conduite sont telles que le conducteur
doit garder à tout moment sa concentration sur la route. Il est conseillé,
lors de l’utilisation de cette radio tout en conduisant, que le conducteur
reste concentré sur la conduite. Il est par conséquent vivement
conseillé de :
앫 Ne jamais changer un CD ni lire une étiquette de CD lorsqu’on
est au volant.
앫 Toujours s’assurer que le volume du système audio permette
d’entendre les bruits extérieurs.
INTRODUCTION
Les instructions suivantes expliquent le fonctionnement des modèles
de radio Mack.
Les renseignements sur la radio paraissent sur l’afficheur LCD.
Les commandes de la radio sont accessibles sur sa façade, Fig.1.
Les fonctions principales de la radio sont le mode radio et lecteur de
CD.
Les fonctions principales en option de la radio sont :
앫 CD en format mp3 et WMA
앫 USB (format mp3 et WMA)
앫 iPod
앫 Entrée audio auxiliaire
앫 Mains libres (utilisation du téléphone à l’aide de Bluetooth)
29

ts955.bk Page 30 Friday, February 20, 2009 10:23 AM
FRANÇAIS
VUE D’ENSEMBLE
Guide de référence rapide des commandes de la radio/du
lecteur de CD
Fig. 1
1. Bouton « Préréglage nº 1 » :
Radio : Appuyer et relâcher : Rappel de la station préréglée
Radio : Appuyer et maintenir enfoncé : Mémorisation de la
station préréglée
2. Bouton « Préréglage nº 2 » :
Radio : Appuyer et relâcher : Rappel de la station préréglée
Radio : Appuyer et maintenir enfoncé : Mémorisation de la
station préréglée
3. Bouton « Préréglage nº 3 » :
Radio : Appuyer et relâcher : Rappel de la station préréglée
Radio : Appuyer et maintenir enfoncé : Mémorisation de la
station préréglée
4. Bouton « Préréglage nº 4 » :
Radio : Appuyer et relâcher : Rappel de la station préréglée
Radio : Appuyer et maintenir enfoncé : Mémorisation de la
station préréglée
30

ts955.bk Page 31 Friday, February 20, 2009 10:23 AM
5. Bouton « Préréglage nº 5 » :
Radio : Appuyer et relâcher : Rappel de la station préréglée
Radio : Appuyer et maintenir enfoncé : Mémorisation de la
station préréglée
6. Bouton « Préréglage nº 6 » :
Radio : Appuyer et relâcher : Rappel de la station préréglée
Radio : Appuyer et maintenir enfoncé : Mémorisation de la
station préréglée
7. Bouton de mise en marche à pousser/rotatif :
Pousser : Mise en marche et arrêt
Tourner : Réglage du volume et mise à jour des valeurs audio
8. Fente pour CD :
CD : Insertion/Extraction du CD
FRANÇAIS
9. Bouton d’éjection du CD :
CD : Éjection du CD
10. Mode de sélection radio :
Radio : Choisir : FM1, FM2, FM3 (en option), AM, météo ou radio
par satellite (en option)
11. Bouton de l’horloge :
Généralités : Affiche l’heure actuelle.
12. Mode CD/Aux :
CD/USB : Choisir entre les sources non radio
13. Bouton vers le haut :
Radio : Syntonisation manuelle vers le haut
14. Bouton d’avance (rapide) :
Radio : Recherche
CD/USB : Appuyer et relâcher : Choisir prochaine plage
CD/USB : Appuyer et maintenir enfoncé : Avance rapide
Téléphone Bluetooth : Accepter les appels entrants (e option)
15. Bouton du menu :
Radio : Appuyer et relâcher : Accès au menu
31

ts955.bk Page 32 Friday, February 20, 2009 10:23 AM
16. Bouton de recul (rapide) :
Radio : Recherche
CD/USB : Appuyer et relâcher : Choisir plage précédente
CD/USB : Appuyer et maintenir enfoncé : Recul rapide
Téléphone Bluetooth : Refuser les appels entrant ou rccrocher
(en option)
iPod : Appuyer et maintenir enfoncé : Entrer le menu iPod (en
option)
17. Bouton vers le bas :
Radio : Syntonisation manuelle vers le bas
18. Bouton audio :
Généralités : Réglages audio
Guide de référence rapide de l’afficheur
FRANÇAIS
Affichage à cristaux liquides de la radio
Fig. 2 Affichage LCD de la radio
32
ts955.bk Page 33 Friday, February 20, 2009 10:23 AM
Fig. 3 Affichage LCD de la radio (en option) — Optional
FRANÇAIS
1. Affichage texte de la radio :
Radio : Radiofréquence et nom de station
CD : Plage, heure et information musicale fournie
2. Affichage texte de la radio :
Radio : Bande radio (FM/AM) et fréquence
CD/USB : Plage, heure et information musicale fournie
3. Affichage de la source
Radio : Bande radio (FM1, FM2, FM3 (en option) AM, WX ou
SAT (en option))
CD/USB : Autres sources que la radio
4. Nombre préréglé
Radio : Nombre préréglé
5. Téléphone connecté
Généralités : Indique qu’un téléphone Bluetooth est connecté
6. Bluetooth en marche
Généralités : Indique que la fonction Bluetooth est activée
7. Information sur la circulation
Généralités : Indique que la fonction circulation est activée
33

ts955.bk Page 34 Friday, February 20, 2009 10:23 AM
8. Bulletin d’information
Généralités : Indique que la fonction Bulletin d’information est
activée
9. AF
Généralités : Indique que la fonction AF (Alternative Frequency)
est activée
10. Menu
Généralités : Affiché si intégré au menu
11. PTY
Généralités : Indique que la fonction PTY (Program type) est
activée
12. Répétition
CD/USB : Affiché lorsque la fonction Répétition est activée
13. Aléatoire
CD/USB : Affiché si la fonction Aléatoire est activée dans le
menu
FRANÇAIS
14. Alarme
Généralités : Indique que la fonction Alarme est activée
FONCTIONS PRINCIPALES
Un grand nombre de fonctions se commandent ou s’ajustent en
passant par le menu de la radio. Si le menu est affiché à l’écran et
qu’aucune activité ne se présente pendant 10 secondes au niveau de
la radio, toute action incomplète sera alors annulée, l’écran avec menu
sera fermé et la radio reviendra à son fonctionnement normal. Tous les
changements réalisés seront mémorisés par la radio.
ALIMENTATION
Mise en marche, mise à l’arrêt, sourdine et pause du
système audio
Appuyer sur le bouton (7) pour allumer ou éteindre le système audio.
Si le conducteur souhaite une activation rapide du mode de discrétion,
appuyer sur le bouton (7).
34

ts955.bk Page 35 Friday, February 20, 2009 10:23 AM
FRANÇAIS
MODE RADIO
Sélection de bandes (FM et AM)
Pour choisir le mode radio, allumer la radio et appuyer sur le bouton
RADIO (10).
La bande de fréquence de la radio sera alors la dernière utilisée (AM,
FM, etc.).
Pour passer d’une bande à une autre (AM/FM1/FM2), utiliser le bouton
RADIO (10).
Recherche en mode radio
Utiliser le bouton de recherche ESC (16) ou le OK (14) pour
rechercher une station radio vers le haut ou le bas. Une fois que la
station voulue est obtenue, la fonction de recherche s’arrête.
Syntonisation manuelle
Appuyer sur le bouton (13) ou le (17) pour un réglage vers le haut ou le
bas.
Préréglages (mémorisation) des stations radio
Jusqu’à 12 stations FM et 6 AM peuvent être préréglées pour un accès
rapide. Il existe deux bandes de fréquence préréglées pour la radio
FM, la FM1 et la FM2, et une pour la radio AM. Chaque bande
préréglée peut comporter 6 stations sur les boutons allant de 1 à 6. Et
en plus, une bande FM ainsi qu’une bande satellite sont en option.
Pour enregistrer une station particulière sur un bouton de préréglage, il
faut :
1. Appuyer sur le bouton RADIO (10) jusqu’à l’activation de la bande
de fréquence nécessaire (AM, FM1, FM2, FM3 [en option], météo,
ou radio satellite [en option]).
2. Rechercher la station souhaitée.
35

ts955.bk Page 36 Friday, February 20, 2009 10:23 AM
FRANÇAIS
3. Appuyer et maintenir le bouton de préréglage voulu (1) (2) (3) (4)
(5) (6).
4. Lors de la mémorisation de la station, la radio n’émet aucun son.
Le processus est terminé au retour de l’audio.
Préréglages (sélection d’une station radio mémorisée)
Pour choisir l’une des stations préréglées, il faut :
1. Appuyer sur le bouton RADIO (10) pour choisir la bande
nécessaire (AM, FM1, FM2, FM3 [en option], météo ou radio par
satellite [en option]).
2. Appuyer momentanément sur le bouton de préréglage (1) (2) (3)
(4) (5) (6) nécessaire pour activer la station souhaitée.
Mode balayage
Le balayage permet à l’utilisateur de rechercher une station sans avoir
à manuellement passer d’une station à une autre. En mode balayage,
chaque station détectée diffuse pendant 10 secondes pour donner à
l’utilisateur une idée du programme ou de la musique. Le balayage
continue alors jusqu’à la station suivante à moins que l'utilisateur
décide d’arrêter le balayage sur la station qu’il vient d’entendre.
Pour obtenir le mode balayage, il faut :
1. Appuyer sur le bouton MENU de la radio (15).
2. Choisir « SCAN » (balayage) en appuyant sur OK (14).
Pour quitter le mode de balayage et rester sur la station courante,
appuyer sur le bouton de radio (10).
36

ts955.bk Page 37 Friday, February 20, 2009 10:23 AM
FRANÇAIS
Utilisation de la bande radiométéo
La radiométéo NOAA est un service de National Weather Service.
Cette radiodiffusion transmet en continu les dernières informations
météorologiques directement des bureaux du National Weather
Service. Des messages enregistrés sur les conditions
météorologiques sont répétés toutes les quatre à six minutes et revus
toutes les une à trois heures et même plus souvent dans certaines
circonstances. La majorité des stations émettent 24 heures sur 24.
La météo de votre région est retransmise par une des 7 stations
disponibles. En mode de bande radiométéo, l’afficheur donne l’icône
« WX » et « CH » plus le numéro du canal. Il est possible de changer
de canal avec le bouton (13) ou le (17) et le canal peut également être
préréglé avec les touches.
La fréquence associée avec chacun des canaux est la suivante :
1. 162,550 MHz
2. 162,400 MHz
3. 162,475 MHz
4. 162,425 MHz
5. 162,450 MHz
6. 162,500 MHz
7. 162,525 MHz
Le National Weather Service exploite environ 372 stations. Près de
90 % de la population se trouve dans la zone de radiodiffusion de la
météo de la NOAA.
37

ts955.bk Page 38 Friday, February 20, 2009 10:23 AM
FRANÇAIS
Service de radio par satellite (Caractéristiques en option)
Si votre radio comporte le logo XMMC ou SIRIUSMC, elle est donc
compatible pour la radio par satellite. XM et Sirius sont des services de
radio par satellite offrant plus de 100 canaux de programmation audio
de qualité numérique. La transmission est sans interruption aux
États-Unis continentaux. Le service de radiodiffusion par satellite est
disponible moyennant une cotisation. Pour obtenir de plus amples
renseignements, prendre contact avec XM à www.xmradio.com ou par
téléphone au 1-800-852-XMXM (9696) ou avec Sirius à
http://activate.siriusradio.com ou par téléphone au 1-888-539-7474.
Pour activer le récepteur de signaux de satellite intégré, il faut donner
au fournisseur de la radiodiffusion par satellite le numéro de série
électronique du récepteur. Voici les instructions qui permettent de
trouver le numéro de série électronique :
Si votre fournisseur de radiodiffusion par satellite est XM Satellite
Radio :
1. La clé de contact étant tournée et la radio ALLUMÉE, appuyer sur
le bouton RADIO (10) et choisir XM1 ou XM2.
2. Syntoniser la radio sur le canal 0 et le numéro de série à 8 chiffres
paraîtra.
Si votre fournisseur de radiodiffusion par satellite est Sirius Satellite
Radio :
1. La clé de contact étant tournée et la radio ALLUMÉE, appuyer sur
le bouton RADIO (10) et choisir SR1 ou SR2.
2. Syntoniser la radio sur le canal 0 et le numéro de série à
12 chiffres paraîtra.
REMARQUE : La réception de la radiodiffusion par satellite peut être
perturbée s'il y a des obstructions au niveau des signaux.
38

ts955.bk Page 39 Friday, February 20, 2009 10:23 AM
FRANÇAIS
MODE CD
La radio est conçue pour fonctionner avec des CD de format standard
et des fichiers MP3 et WMA (en option).
Le lecteur de CD accepte les disques CD-R ainsi que les CD-RW.
Sélection du mode CD
Il existe deux façons de passer au mode CD.
1. Appuyer sur le bouton CD/AUX (12) jusqu’à ce que CD s'affiche.
OU
2. Introduire un CD dans la fente pour CD (8).
Éjection d’un CD
Pour éjecter un CD, appuyer sur le bouton (9). Une fois le CD extrait, la
radio se remet en marche sur la dernière station utilisée.
Si le CD n’est pas extrait de son logement, il se remettra en marche
dans les 15 secondes.
Changement de la plage du CD
Pour changer de piste sur un CD, procéder comme suit :
Enfoncer et relâcher le bouton ESC (16) ou le OK (14) de la radio pour
passer à la plage suivante ou à la précédente.
Recul rapide ou avance rapide d’un CD
Pour reculer ou faire une avance rapide sur un CD, procéder comme
suit :
Maintenir enfoncé le bouton ESC (16) ou le OK (14) de la radio pour
une avance rapide ou un recul rapide.
39

ts955.bk Page 40 Friday, February 20, 2009 10:23 AM
FRANÇAIS
Activation des plages d’un CD dans un ordre aléatoire
Il existe deux modes de réglage aléatoire pour un CD : Ordre aléatoire
total ou ordre aléatoire de fichiers (si le contenu du CD est enregistré
sous forme de fichiers).
Pour activer les plages dans un ordre aléatoire, il faut :
1. Appuyer sur le bouton MENU (15).
2. Appuyer sur le bouton (13) ou le (17) jusqu’à ce que « RANDOM »
s’affiche.
3. Entrer le sous-menu du réglage aléatoire en appuyant sur le
bouton OK (14).
4. Appuyer sur le bouton (13) ou le (17) pour choisir entre « All »
(tous) et « Folder » (fichier).
5. Appuyer sur le bouton OK (14) pour activer le mode aléatoire
souhaité.
Répétition de plage sur un CD (Caractéristiques en option)
Il existe trois modes de réglage de répétition pour un CD : Répétition
pour tous, répétition de plage ou répétition de fichier (si le contenu du
CD est enregistré sous forme de fichiers). Par défaut, « Repeat All »
(répétition pour tous) est activé.
Pour changer le réglage de répétition, il faut :
1. Appuyer sur le bouton MENU (15).
2. Appuyer sur le bouton (13) ou le (17) jusqu’à ce que « REPEAT »
s’affiche.
3. Entrer le sous-menu du réglage aléatoire en appuyant sur le
bouton OK (14).
4. Appuyer sur le bouton (13) ou le (17) pour choisir entre « All »
(tous), « Track » (piste) et « Folder » (fichier).
5. Appuyer sur le bouton OK (14) pour activer le mode de répétition
souhaité.
40

ts955.bk Page 41 Friday, February 20, 2009 10:23 AM
FRANÇAIS
Changement de fichier sur un CD (Caractéristiques en
option)
Si le contenu du CD est mémorisé dans des fichiers, il est alors
possible de changer directement de fichiers. Pour cela, appuyer sur le
bouton (13) ou le (17) pour passer au suivant ou au précédent
album/fichier.
Balayage d’un CD
Lors du balayage d’un CD, on entend les 10 premières secondes de
l’enregistrement de chaque plage.
Pour activer le balayage, il faut :
1. Appuyer sur le bouton MENU (15).
2. Choisir « SCAN » (balayage) en appuyant sur le bouton OK (14).
Le balayage s’arrête si :
1. Le bouton ESC (16) ou le OK (14) de la façade est activé.
OU
2. si toutes les plages sont explorées.
ENTRÉE AUDIO EXTERNE (CARACTÉRISTIQUES EN
OPTION)
Il existe trois modes d’entrée externe, USB, iPod et Aux. Un appareil
USB et un appareil auxiliaire peuvent être branchés et être accessibles
simultanément. Cependant, si un iPod est connecté, la source des
appareils USB et AUX est désactivée.
41
ts955.bk Page 42 Friday, February 20, 2009 10:23 AM
FRANÇAIS
MODE USB (CARACTÉRISTIQUES EN OPTION)
La radio est conçue pour fonctionner avec des dispositifs USB
formatés selon la norme pour support mémoire de masse USB. Les
autres appareils USB pourraient encore fonctionner avec la radio.
Si un appareil USB ne fonctionne pas correctement, essayer de le
rebrancher. Ceci peut résoudre le problème dans certains cas.
L’appareil USB doit être connecté avant d’utiliser ce mode.
Sélection du mode USB
Il existe deux façons de passer au mode USB :
1. Appuyer sur le bouton CD/AUX (12) jusqu’à ce que USB s'affiche
OU
2. connecter un appareil USB.
Déconnexion d’un appareil USB
Aucune préparation spéciale n’est nécessaire pour débrancher un
appareil USB. Une fois l’appareil USB déconnecté, la radio se remet en
marche sur la dernière station utilisée.
Changement de la plage d’un appareil USB
Pour changer de piste, il faut :
Enfoncer et relâcher le bouton ESC (16) ou le OK (14) de la radio pour
passer à la plage suivante ou à la précédente.
Recul rapide ou avance rapide sur un appareil USB
Pour reculer ou faire une avance rapide sur un dispositif USB, procéder
comme suit :
Maintenir enfoncé le bouton ESC (16) ou le OK (14) de la radio pour
une avance rapide ou un recul rapide.
42

ts955.bk Page 43 Friday, February 20, 2009 10:23 AM
FRANÇAIS
Activation des plages d’un appareil USB dans un ordre
aléatoire
Il existe deux modes de réglage aléatoire pour un appareil USB : Ordre
aléatoire total ou ordre aléatoire de fichiers (si le contenu de l’USB est
enregistré dans des fichiers).
Pour activer les plages dans un ordre aléatoire, il faut :
1. Appuyer sur le bouton MENU (15).
2. Appuyer sur le bouton (13) ou le (17) jusqu’à ce que « RANDOM »
s’affiche.
3. Entrer le sous-menu du réglage aléatoire en appuyant sur le
bouton OK (14).
4. Appuyer sur le bouton (13) ou le (17) pour choisir entre « All »
(tous) et « Folder » (fichier).
5. Appuyer sur le bouton OK (14) pour activer le mode aléatoire
souhaité.
Répétition de plages sur un appareil USB
Il existe trois modes de réglage de répétition pour un appareil USB :
Répétition pour tous, répétition de plage ou répétition de fichier (si le
contenu du dispositif USB est enregistré dans des fichiers). Par défaut,
« Repeat All » (répétition pour tous) est activé.
Pour changer le réglage de répétition, il faut :
1. Appuyer sur le bouton MENU (15).
2. Appuyer sur le bouton (13) ou le (17) jusqu’à ce que « REPEAT »
s’affiche.
3. Entrer le sous-menu du réglage aléatoire en appuyant sur le
bouton OK (14).
4. Appuyer sur le bouton (13) ou le (17) choisir entre « All » (tous),
« Track » (piste) et « Folder » (fichier).
5. Appuyer sur le bouton OK (14) pour activer le mode de répétition
souhaité.
43

ts955.bk Page 44 Friday, February 20, 2009 10:23 AM
FRANÇAIS
Changement de fichier sur un USB
Si le contenu de l’USB est mémorisé dans des fichiers, il est alors
possible de changer directement de fichiers. Pour cela, appuyer sur le
bouton (13) ou le (17) pour passer au suivant ou au précédent
album/fichier.
Balayage d’un USB
Lors du balayage d’un USB, on entend les 10 premières secondes de
l’enregistrement de chaque plage.
Pour activer le balayage, il faut :
1. Appuyer sur le bouton MENU (15).
2. Choisir « SCAN » (balayage) en appuyant sur le bouton OK (14).
Le balayage s’arrête si :
1. Le bouton ESC (16) ou le OK (14) de la façade est activé.
OU
2. si toutes les plages sont explorées.
MODE IPOD (CARACTÉRISTIQUES EN OPTION)
La radio est compatible avec iPod Classic, iPod Vidéo et iPod nano.
Les réglages du iPod, par ex. « Shuffle » (réarrangement) ou
« Repeat » (répétition), utilisés avant de connecter le iPod à la radio
seront utilisés par la radio.
Un appareil iPod doit être connecté avant d’utiliser ce mode.
44

ts955.bk Page 45 Friday, February 20, 2009 10:23 AM
FRANÇAIS
Connexion d’un iPod
Le branchement du IPod est possible avec deux ensembles de câble
différents.
앫 Un câble divisé du connecteur iPod à 30 broches au connecteur
USB et un connecteur audio de 3,5 mm
앫 Un câble séparé iPod/USB plus un câble stéréo audio mâle/mâle
de 3,5 mm connecté à la sortie pour écouteur du iPod. Dans ce
cas, le volume du iPod doit être réglé au maximum avant de le
brancher sur la radio.
Une fois le iPod connecté à la radio, ses commandes se retrouvent
verrouillées. Toutes les commandes du iPod se font alors avec les
boutons de la radio. Lors de cet agencement, le iPod affiche un logo
Mack.
Sélection du mode iPod
Il existe deux façons de passer au mode iPod :
1. Appuyer sur le bouton CD/AUX (12) jusqu’à ce que iPod s'affiche
OU
2. connecter un appareil iPod.
Déconnexion de l’appareil iPOd
Aucune préparation spéciale n’est nécessaire pour débrancher
l’appareil iPod. Une fois l’appareil iPod déconnecté, la radio se remet
en marche sur la dernière station utilisée.
Menu iPod
Une fois le iPod connecté et identifié, l’utilisateur peut maintenir
enfoncé le bouton ESC (16) pour entrer le menu iPod. Ce menu
contient certaines des fonctionnalités les plus courantes utilisées sur le
iPod. Par exemple, l’utilisateur peut rechercher des artistes ou des
albums, et commencer une liste de diffusion.
45

ts955.bk Page 46 Friday, February 20, 2009 10:23 AM
FRANÇAIS
Maintenir enfoncé le bouton ESC (16) pendant 1 seconde pour entrer
le menu iPod au dernier niveau utilisé.
Maintenir enfoncé le bouton ESC (16) pendant 2 secondes pour entrer
le menu iPod au niveau supérieur.
Changement de plage sur le iPod
Pour changer de piste sur un iPod, procéder comme suit :
Enfoncer et relâcher le bouton ESC (16) ou le OK (14) de la radio pour
passer à la plage suivante ou à la précédente.
Avance rapide sur un iPod
Pour changer de piste sur un iPod, procéder comme suit :
Appuyer et maintenir le bouton (14) sur la radio pour faire une avance
rapide.
Remarquer qu’en maintenant enfoncé le bouton ESC (16) on entre le
menu iPod.
Activation des plages d’un iPod dans un ordre aléatoire
Il existe deux modes de réglage aléatoire pour un iPod : Ordre
aléatoire pour album et ordre aléatoire pour tous.
Pour activer des chansons dans un ordre aléatoire, il faut :
1. Appuyer sur le bouton MENU (15).
2. Appuyer sur le bouton (13) ou le (17) jusqu’à ce que « RANDOM »
s’affiche.
3. Entrer le sous-menu du réglage aléatoire en appuyant sur le
bouton OK (14).
4. Appuyer sur le bouton (13) ou le (17) pour choisir entre « All »
(tous) et « Folder » (fichier).
5. Appuyer sur le bouton OK (14) pour activer le mode aléatoire
souhaité.
46

ts955.bk Page 47 Friday, February 20, 2009 10:23 AM
FRANÇAIS
Répétition de plage sur le iPod
Il existe deux modes de réglage aléatoire pour un iPod : Répéter Un,
répéter Tous.
Pour changer le réglage de répétition, il faut :
1. Appuyer sur le bouton MENU (15).
2. Appuyer sur le bouton (13) ou le (17) jusqu’à ce que « REPEAT »
s’affiche.
3. Entrer le sous-menu du réglage aléatoire en appuyant sur le
bouton OK (14).
4. Appuyer sur le bouton (13) ou le (17) pour choisir entre « All »
(tous), « Track » (piste) et « Folder » (fichier).
5. Appuyer sur le bouton OK (14) pour activer le mode de répétition
souhaité.
Balayage sur le iPod
Lors du balayage d’un iPod, on entend les 10 premières secondes de
l’enregistrement de chaque plage.
Pour activer le balayage, il faut :
1. Appuyer sur le bouton MENU (15).
2. Choisir « SCAN » (balayage) en appuyant sur le bouton OK (14).
Le balayage s’arrête si :
1. Le bouton ESC (16) ou le OK (14) de la façade est activé.
OU
2. si toutes les plages sont explorées.
47

ts955.bk Page 48 Friday, February 20, 2009 10:23 AM
FRANÇAIS
MODE AUX (CARACTÉRISTIQUES EN OPTION)
Pour choisir une entrée audio auxiliaire :
Appuyer sur le bouton CD/AUX (12) jusqu’à ce que Aux s'affiche.
Une entrée audio auxiliaire peut être sélectionnée sauf en mode iPod.
Le volume de l’appareil auxiliaire doit être réglé au maximum.
Noter que pour un appareil auxiliaire, le changement de plage,
l’avance rapide etc. doit être exécuté directement sur l’appareil aux.
RÉGLAGES AUDIO
Réglage du volume vers le haut et vers le bas
Le volume du système audio peut être monté en tournant le bouton (7)
dans le sens horaire et baissé en tournant le bouton dans le sens
antihoraire.
Réglage des graves vers le haut et vers le bas
Pour ajuster les graves sur le système audio, appuyer sur le bouton
AUDIO (18) jusqu’à ce que BASS s’affiche.
Le niveau des graves du système audio peut être monté en tournant le
bouton (7) dans le sens horaire et baissé en tournant le bouton (7)
dans le sens antihoraire.
Il est aussi possible d’ajuster les aigus avec ESC (16) ou OK (14) sur
la radio.
48

ts955.bk Page 49 Friday, February 20, 2009 10:23 AM
FRANÇAIS
Réglage des aigus vers le haut et vers le bas
Pour ajuster les aigus sur le système audio, appuyer sur le bouton
AUDIO (18) jusqu’à ce que TREBLE s’affiche.
Le niveau des aigus du système audio peut être monté en tournant le
bouton (7) dans le sens horaire et baissé en tournant le bouton (7)
dans le sens antihoraire.
Il est aussi possible d’ajuster les aigus avec ESC (16) ou OK (14) sur
la radio.
Réglage à gauche et à droite de l’équilibre
Pour ajuster la balance sur le système audio, appuyer sur le bouton
AUDIO (18) jusqu’à ce que BALANCE s’affiche.
Le réglage de l’équilibre vers la droite s'obtient en tournant le bouton
(7) dans le sens horaire et le réglage vers la gauche en tournant le
bouton (7) dans le sens antihoraire.
Il est aussi possible d’ajuster la gauche et la droite avec ESC (16) ou
OK (14) sur la radio.
Équilibreur avant-arrière
Pour ajuster l’équilibreur sur le système audio, appuyer sur le bouton
AUDIO (18) jusqu’à ce que FADE s’affiche.
L’équilibreur se règle alors vers l’avant en tournant le bouton (7) dans
le sens horaire et vers l’arrière en tournant le bouton (7) dans le sens
antihoraire.
Il est aussi possible d’ajuster la gauche et la droite avec ESC (16) ou
OK (14) sur la radio.
49

ts955.bk Page 50 Friday, February 20, 2009 10:23 AM
FRANÇAIS
Réglage Mid (Plage des moyennes fréquences) vers le haut
et vers le bas (Caractéristiques en option)
Pour ajuster le MID sur le système audio, appuyer sur le bouton AUDIO
(18) jusqu’à ce que MID s’affiche.
Le MID du système audio peut être monté en tournant le bouton (7)
dans le sens horaire et baissé en tournant le bouton (7) dans le sens
antihoraire.
Il est aussi possible d’ajuster les aigus avec ESC (16) et OK (14) sur la
radio.
Sélection de haut-parleurs
Pour le réglage du système audio en mode de 2 ou de 4 haut-parleurs,
il faut :
1. Appuyer sur le bouton MENU (15).
2. Appuyer sur le bouton (13) ou le (17) jusqu’à ce que « ADVANCE »
s’affiche.
3. Appuyer sur le bouton OK (14) pour entrer le sous-menu
« ADVANCE ».
4. Appuyer sur le bouton (13) ou le (17) jusqu’à ce que « SPEAKER »
s’affiche.
5. Passer de 2CH à 4CH en appuyant sur le bouton OK (14).
Activation de la commande automatique de sensibilité (CAS)
(Caractéristiques en option)
Le volume du système audio se règle afin que celui-ci augmente avec
la vitesse du véhicule. Ce réglage permet de compenser pour les
bruits de la route et du moteur. Cette fonctionnalité comporte trios
niveaux de sensibilité « LOW, MID et HIGH » (BAS, MOYEN et HAUT).
50

ts955.bk Page 51 Friday, February 20, 2009 10:23 AM
FRANÇAIS
Pour activer la CAS, il faut :
1. Appuyer sur le bouton MENU (15).
2. Appuyer sur le bouton (13) ou le (17) jusqu’à ce que « ADVANCE »
s’affiche.
3. Appuyer sur le bouton OK (14) pour entrer le sous-menu
« ADVANCE ».
4. Appuyer sur le bouton (13) ou le (17) ce que « ASC » s’affiche.
5. Appuyer sur le bouton OK (14) pour entrer le sous-menu ASC.
6. Appuyer sur le bouton (13) ou le (17) pour choisir entre « LOW,
MID et HIGH » (BAS, MOYEN et HAUT).
7. Appuyer sur le bouton OK (14) pour entrer le réglage CAS
souhaité.
MODE TÉLÉPHONE MAINS LIBRES BLUETOOTH
(CARACTÉRISTIQUES EN OPTION)
La radio est conçue afin de fonctionner avec un téléphone cellulaire
compatible avec Bluetooth mains libres Profile 1.5. D’autres
téléphones cellulaires avec Bluetooth pourraient aussi fonctionner avec
la radio.
Pour brancher un téléphone cellulaire sur la radio par l’intermédiaire de
Bluetooth, il est nécessaire de passer par les étapes suivantes au
niveau de la radio.
1. Activer la fonction Bluetooth.
2. Ajouter le téléphone.
Noter que les étapes correspondantes doivent être prises sur le
téléphone cellulaire.
Un téléphone ajouté sera mémorisé dans une liste pour donner un
accès facile lors de la prochaine connexion.
51

ts955.bk Page 52 Friday, February 20, 2009 10:23 AM
FRANÇAIS
Activation Bluetooth
Le but de ce processus est de réaliser une connexion Bluetooth.
1. Appuyer sur le bouton MENU (15).
2. Appuyer sur le bouton (13) ou le (17) jusqu’à ce que « Hands
Free » (mains libres) s’affiche.
3. Appuyer sur le bouton OK (14) pour entrer le sous-menu Mains
libres.
4. Appuyer sur le bouton OK (14) pour activer Bluetooth.
Lorsque Bluetooth est actif, l’icône (45) s’affiche.
Addition d’un téléphone
Le but de ce processus est d’obtenir une connexion entre la radio et un
téléphone et d’ajouter un téléphone à la liste de téléphones de la radio.
1. Appuyer sur le bouton MENU (15).
2. Appuyer sur le bouton (13) ou le (17) jusqu’à ce que « Hands
Free » (mains libres) s’affiche.
3. Appuyer sur le bouton OK (14) pour entrer le sous-menu Mains
libres.
4. Appuyer sur le bouton (13) ou le (17) jusqu’à ce que « Add phone »
(ajouter téléphone) s’affiche.
5. Appuyer sur le bouton OK (14) pour lancer la connexion
téléphonique.
La radio recherche alors un téléphone Bluetouth. L’icône (45) se met à
clignoter pour indiquer que la recherche est en cours. Remarquer que
les paramètres de connexion du téléphone doivent correspondre entre
eux pendant ce processus.
Une fois la connexion établie, l’utilisateur devra entrer un code sur le
téléphone. Entrer le code 0000 pour vérifier la connexion.
52

ts955.bk Page 53 Friday, February 20, 2009 10:23 AM
FRANÇAIS
Activation d’un autre téléphone
Le but de ce processus est de déconnecter un téléphone Bluetooth et
établir une connexion à un autre téléphone se trouvant sur la liste de
téléphones.
1. Appuyer sur le bouton MENU (15).
2. Appuyer sur le bouton (13) ou le (17) jusqu’à ce que « Hands
Free » (mains libres) s’affiche.
3. Appuyer sur le bouton OK (14) pour entrer le sous-menu Mains
libres.
4. Appuyer sur le bouton (13) ou le (17) jusqu’à ce que
« ChangePhName » (« PhName » étant le nom du téléphone
actuellement connecté) s’affiche.
5. Appuyer sur le bouton OK (14) pour entrer le sous-menu
Changement de téléphone.
6. Appuyer sur le bouton (13) ou le (17) jusqu’à ce que le nom du
téléphone à connecter s’affiche.
7. Appuyer sur le bouton OK (14) pour connecter l’autre téléphone.
Suppression d’un téléphone
Le but de ce processus est d’éliminer un téléphone spécifique de la
liste de téléphones de la radio.
1. Appuyer sur le bouton MENU (15).
2. Appuyer sur le bouton (13) ou le (17) jusqu’à ce que « Hands
Free » (mains libres) s’affiche.
3. Appuyer sur le bouton OK (14) pour entrer le sous-menu Mains
libres.
4. Appuyer sur le bouton (13) ou le (17) jusqu’à ce que « Edit
phone » (modification téléphone) s’affiche.
5. Appuyer sur le bouton OK (14) pour entrer le sous-menu
Modification de téléphone.
6. Appuyer sur le bouton (13) ou le (17) jusqu’à ce que le nom du
téléphone à supprimer s’affiche.
53

ts955.bk Page 54 Friday, February 20, 2009 10:23 AM
FRANÇAIS
7. Appuyer sur le bouton OK (14) pour supprimer le téléphone.
8. « Delete? » (Éliminer?) s’affiche. Appuyer sur le bouton (14) pour
effectuer une vérification.
Suppression de tous les téléphones
Le but de ce processus est d’éliminer tous les téléphones de la liste de
téléphones de la radio.
1. Appuyer sur le bouton MENU (15).
2. Appuyer sur le bouton (13) ou le (17) jusqu’à ce que « Hands
Free » (mains libres) s’affiche.
3. Appuyer sur le bouton OK (14) pour entrer le sous-menu Mains
libres.
4. Appuyer sur le bouton (13) ou le (17) jusqu’à ce que « Edit
phone » (ajouter téléphone) s’affiche.
5. Appuyer sur le bouton OK (14) pour entrer le sous-menu
Modification de téléphone.
6. Appuyer sur le bouton (13) ou le (17) jusqu’à ce que « Delete
All » (éliminer tous) s’affiche.
7. Appuyer sur le bouton OK (14) pour éliminer tous les téléphones.
8. « Are U sure? » (Valider?) s’affiche. Appuyer sur le bouton (14)
pour effectuer une vérification.
Transférer les appels téléphoniques du véhicule à un
téléphone actif
Le but de cette opération est de permettre de transférer les appels
téléphoniques afin de les recevoir et de les entendre par le truchement
d’un téléphone actif au lieu de par la radio.
1. Pour transférer un appel du véhicule à un téléphone actif, appuyer
sur la touche AUDIO.
2. Pour transférer un appel d’un téléphone actif au véhicule, appuyer
sur la touche AUDIO.
54

ts955.bk Page 55 Friday, February 20, 2009 10:23 AM
FRANÇAIS
HORLOGE
Affichage de l’heure
Par défaut, l’heure n’est affichée que si la clé de contact est ACTIVÉE
ou que si la radio est ÉTEINTE. Pour programmer l’horloge afin de
pouvoir voir l’heure lorsque la radio est allumée, il faut :
1. Appuyer sur le bouton MENU (15).
2. Appuyer sur le bouton (13) ou le (17) jusqu’à ce que « CLOCK »
s’affiche.
3. Appuyer sur le bouton OK (14) pour entrer le sous-menu Horloge.
4. Appuyer sur le bouton (13) ou le (17) jusqu’à ce que « VISIBLE »
s’affiche.
5. Appuyer sur le bouton OK (14) pour passer de « ON » (marche) à
« OFF » (arrêt).
Pendant que la radio est activée et sous n’importe quel mode, appuyer
sur le bouton CLOCK (11) afin d’afficher l’heure pendant 10 secondes.
Format 12- ou 24- heures
Le mode de 12 heures et celui de 24 heures sont programmables sur
cette horloge. Le mode de 12 heures permet de faire la distinction
entre AM et PM.
Pour changer la base horaire, il faut :
1. Appuyer sur le bouton MENU (15).
2. Appuyer sur le bouton (13) ou le (17) jusqu’à ce que « CLOCK »
s’affiche.
3. Appuyer sur le bouton OK (14) pour entrer le sous-menu Horloge.
4. Appuyer sur le bouton (13) ou le (17) jusqu’à ce que « 12/24 HR »
s’affiche.
5. Appuyer sur le bouton OK (14) pour passer à l’une de ces options
12H ou 24H.
55

ts955.bk Page 56 Friday, February 20, 2009 10:23 AM
FRANÇAIS
Réglage de l’horloge
Normalement l’heure est automatiquement programmée par le
système du camion. L’option de programmation manuelle n’est alors
pas disponible.
Pour manuellement programmer l’horloge, il faut :
1. Appuyer sur le bouton MENU (15).
2. Appuyer sur le bouton (13) ou le (17) jusqu’à ce que « CLOCK »
s’affiche.
3. Appuyer sur le bouton OK (14) pour entrer le sous-menu Horloge.
4. Appuyer sur le bouton (13) ou le (17) jusqu’à ce que « SET
TIME » (programmation de l’heure) s’affiche.
5. Appuyer sur le bouton OK (14) pour entrer le sous-menu
Programmation de l’heure.
6. Appuyer sur le bouton (13) ou le (17) pour changer l’heure dans
un sens ou dans l’autre.
7. Appuyer sur le bouton OK (14) pour obtenir l’heure et appuyer en
alternance pour obtenir le réglage des minutes.
8. Appuyer sur le bouton (13) ou le (17) pour changer les minutes
dans un sens ou dans l’autre.
9. Appuyer sur le bouton OK (14) pour gagner du temps et terminer
le processus.
Mise en marche et arrêt de l’alarme (Caractéristiques en
option)
Pour mettre l’alarme ou l’éteindre, il faut :
1. Appuyer sur le bouton MENU (15).
2. Appuyer sur le bouton (13) ou le (17) jusqu’à ce que « WAKE UP
ALARM » (réveil par alarme) s’affiche.
3. Appuyer sur le bouton OK (14) pour entrer le sous-menu Réveil
par alarme.
56

ts955.bk Page 57 Friday, February 20, 2009 10:23 AM
FRANÇAIS
4. Appuyer sur le bouton (13) ou le (17) jusqu’à ce que « jusqu’à ce
que « ON/OFF » (marche/arrêt) s’affiche » s’affiche.
5. Appuyer sur le bouton OK (14) pour changer le réglage de
l’alarme.
Programmation de l’alarme (Caractéristiques en option)
Pour programmer l’heure de réveil, il faut :
1. Appuyer sur le bouton MENU (15).
2. Appuyer sur le bouton (13) ou le (17) jusqu’à ce que « WAKE UP
ALARM » (réveil par alarme) s’affiche.
3. Appuyer sur le bouton OK (14) pour entrer le sous-menu Réveil
par alarme.
4. Appuyer sur le bouton (13) ou le (17) jusqu’à ce que « SET
TIME » (programmation de l’heure) s’affiche.
5. Appuyer sur le bouton OK (14) pour entrer le sous-menu
Programmation de l’heure.
6. Appuyer sur le bouton (13) ou le (17) pour changer l’heure dans
un sens ou dans l’autre.
7. Appuyer sur le bouton OK (14) pour obtenir l’heure et appuyer en
alternance pour obtenir le réglage des minutes.
8. Appuyer sur le bouton (13) ou le (17) pour changer les minutes
dans un sens ou dans l’autre.
9. Appuyer sur le bouton OK (14) pour gagner du temps et terminer
le processus.
CODE ANTIVOL
La radio est programmée pour qu’elle ne fonctionne que sur un seul
véhicule. La caractéristique antivol empêche la radio de fonctionner
partout ailleurs.
L’antivol fonctionne automatiquement et normalement il ne nécessite
aucune manipulation manuelle.
57

ts955.bk Page 58 Friday, February 20, 2009 10:23 AM
FRANÇAIS
En cas de dysfonctionnement
Si, pour une raison quelconque, la radio ne détecte pas le bon
véhicule, l’utilisateur devra entrer le code antivol (étiquette située dans
le guide du conducteur). Le code « CODE 0000 » s’affiche alors.
Remarquer que cela est une défaillance et que celle-ci doit être vérifiée
dans un atelier agréé.
Pour entrer le code, il faut :
1. Changer le chiffre (clignotant), en tournant le bouton du volume
(7) jusqu’à obtention du bon chiffre.
2. Appuyer sur le bouton de mise en marche pour entrer le chiffre. Le
prochain chiffre se mettra à clignoter.
3. Répéter les étapes 1 et 2 jusqu’au quatrième chiffre.
Trois essais sont possibles pour entrer le code. Si ces trois essais sont
manqués, la radio sera alors verrouillée pendant 60 minutes avant de
pouvoir faire trois nouveaux essais.
Désactivation de l’antivol
Il est possible de désactiver l’antivol, mais cela est vivement
déconseillé.
Pour désactiver la fonction antivol, il faut :
1. Appuyer sur le bouton MENU (15).
2. Appuyer sur le bouton (13) ou le (17) jusqu’à ce que « ADVANCE »
s’affiche.
3. Appuyer sur le bouton OK (14) pour entrer le sous-menu
Avancement.
4. Appuyer sur le bouton (13) ou le (17) jusqu’à ce que « GUARD »
(antivol) s’affiche.
5. Appuyer sur le bouton OK (14) pour valider.
6. Appuyer sur le bouton OK (14) pour programmer l’antivol sur
« ON » (marche) ou sur « OFF » (arrêt).
58

ts955.bk Page 59 Friday, February 20, 2009 10:23 AM
FRANÇAIS
L’utilisateur devra alors fournir le code antivol pour activer ou
désactiver l’antivol. « CODE 0000 » s’affichera alors et le premier
chiffre clignotera.
Pour entrer le code, il faut :
1. Changer le chiffre (clignotant), en tournant le bouton du volume
(7) jusqu’à obtention du bon chiffre.
2. Appuyer sur le bouton de mise en marche pour entrer le chiffre. Le
prochain chiffre se mettra à clignoter.
3. Répéter les étapes 1 et 2 jusqu’au quatrième chiffre.
Trois essais sont possibles pour entrer le code. Si ces trois essais sont
manqués, la radio sera alors verrouillée pendant 60 minutes avant de
pouvoir faire trois nouveaux essais.
CONSEILS ET ASTUCES
USB et MP3
La radio est conçue pour fonctionner avec des dispositifs USB
compatibles avec le support mémoire de masse USB régulier.
Remarque : D’autres appareils USB peuvent fonctionner avec la radio.
Si un appareil USB ne fonctionne pas avec la radio, essayer de le
rebrancher, ceci résout, dans certains cas, le problème. Certains
appareils USB sont livrés avec des logiciels installés ce qui les rend
incompatibles avec le support mémoire de masse USB régulier. Dans
ce cas, le formatage d’un appareil USB peut parfois résoudre le
problème.
Remarque : Le formatage de l’appareil efface toutes les données sur
le dispositif USB, il est préférable de sauvegarder toutes les données
avant de procéder.
앫 WMA et MP3 sont les seuls formats qui sont lisibles par cet
appareil.
앫 La liste de diffusion doit être en version .PLS ou .M3U.
59

ts955.bk Page 60 Friday, February 20, 2009 10:23 AM
FRANÇAIS
Bluetooth
La radio est conçue afin de fonctionner avec un téléphone cellulaire
compatible avec Bluetooth mains libres Profile 1.5.
Remarque : Certains téléphones cellulaires compatibles Bluetooth
n’étant pas compatibles avec cette norme peuvent fonctionner malgré
tout.
Pour savoir si votre téléphone est compatible avec le profil Mains-libres
BlueTooth 1,5, veuillez consulter la page d’accueil BlueTooth,
https://www.bluetooth.org/tpg/listings.cfm
correspondantes à votre téléphone.
Remarque : Si la structure de la page d’accueil BlueTooth est mise à
jour, le lien ci-dessus pourrait changer. Vous pouvez également
prendre contact avec votre fournisseur de téléphone cellulaire afin
d’obtenir directement les détails.
et trouver les spécifications
앫 Compatible avec la norme 1.5.
앫 De plus amples renseignements sur www.bluetooth.org.
iPod
La radio est conçue afin d’être compatible avec les modèles iPod
suivants:
앫 iPod nano – 1e, 2e et 3e génération
앫 iPod classic – 5e et 6e génération
Remarque : Les anciennes et les nouvelles générations de ces iPod
peuvent également fonctionner.
앫 Un adaptateur iPod peut être acheté par Volvo sous le numéro de
référence 21259125.
앫 D’autres adaptateurs se trouvent aussi sur le
site,www.sendstation.com
앫 Pour obtenir les meilleures performances possibles, le
micrologiciel iPod doit être à jour en allant www.apple.com
60
.
.

ts955.bk Page 61 Friday, February 20, 2009 10:23 AM
FRANÇAIS
CD, MP3 et WMA
앫 Au début d’un CD avec MP3 ou WMA, les quelques premières
secondes de lecture ne produisent pas de son.
앫 Pour obtenir les meilleures performances possibles, un CD
MP3/WMA ne doit pas contenir des fichiers de types autres que
MP3, WMA, M3U et PLS.
61

ts955.bk Page 62 Friday, February 20, 2009 10:23 AM
ESPAÑOL
OPERACIÓN SEGURA DEL RADIO
Las condiciones de conducción hoy en día requieren que el conductor
ponga total atención al camino en todo momento. Es aconsejable que
al utilizar este radio mientras conduce, el conductor mantenga total
concentración en el camino. Por lo tanto, es fuertemente
recomendable realizar lo siguiente:
앫 Nunca Cambie un CD ni lea etiquetas de CD mientras conduce.
앫 Siempre Asegure que el Volumen del Sistema de Audio quede
ajustado de modo que también sea escuchada la acústica del
exterior.
INTRODUCCIÓN
Las siguientes instrucciones explican las funciones y operaciones
generales de Modelos de Radios Mack.
La información de la radio es desplegada a través de la pantalla LCD
en el radio.
El radio es comandado por medio de la carátula, mostrada en la Fig. 1.
Las funciones principales de la unidad de radio son Modalidad de
Radio y CD.
Las funciones opcionales principales son:
앫 CD con soporte de mp3 y WMA
앫 USB (con soporte de mp3 y WMA)
앫 iPod
앫 Entrada de audio auxiliar
앫 Manos libres (Operación de Teléfono Bluetooth)
62

ts955.bk Page 63 Friday, February 20, 2009 10:23 AM
VISTA GENERAL
Controles de Radio/CD, Guía de Referencia Rápida
ESPAÑOL
Fig. 1
1. Botón “Programar #1”:
Radio: Oprimir y soltar: Vuelve a Llamar la Estación Programada
Radio: Oprimir y sostener: Almacena Estación Programada
2. Botón “Programar #2”:
Radio: Oprimir y soltar: Vuelve a Llamar la Estación Programada
Radio: Oprimir y sostener: Almacena Estación Programada
3. Botón “Programar #3”:
Radio: Oprimir y soltar: Vuelve a Llamar la Estación Programada
Radio: Oprimir y sostener: Almacena Estación Programada
4. Botón “Programar #4”:
Radio: Oprimir y soltar: Vuelve a Llamar la Estación Programada
Radio: Oprimir y sostener: Almacena Estación Programada
63

ts955.bk Page 64 Friday, February 20, 2009 10:23 AM
5. Botón “Programar #5”:
Radio: Oprimir y soltar: Vuelve a Llamar la Estación Programada
Radio: Oprimir y sostener: Almacena Estación Programada
6. Botón “Programar #6”:
Radio: Oprimir y soltar: Vuelve a Llamar la Estación Programada
Radio: Oprimir y sostener: Almacena Estación Programada
7. Botón de “Perilla Rotatoria/Enc.”:
Oprimir: Enciende y Apaga
Girar: Ajusta Volumen & Actualiza Valor de Audio
8. Ranura de CD:
CD: Insertar / Retirar CD
9. Botón “Expulsar CD”:
CD: Expulsar CD
ESPAÑOL
10. Modalidad de Selección de Radio:
Radio: Elegir a partir de FM1, FM2, FM3 (opcional), AM, Banda
de Clima, y Radio satelital (opcional)
11. Botón de Reloj:
General: Despliega la hora del día
12. Seleccionar Modalidad CD/Aux.:
CD/USB: Cambia entre fuentes diferentes del radio
13. Botón Arriba:
Radio: Sintonización manual hacia arriba
14. Botón de Avance (Rápido):
Radio: Buscar
CD/USB: Oprimir y soltar: Selecciona Pista Siguiente
CD/USB: Oprimir y sostener: Avance Rápido
Teléfono Bluetooth: Aceptar llamada entrante (opcional)
15. Botón de Menú:
Radio: Oprimir y soltar: Acceso al Menú
64

ts955.bk Page 65 Friday, February 20, 2009 10:23 AM
16. Botón de Retroceso (Rápido):
Radio: Buscar
CD/USB: Oprimir y soltar: Selecciona Pista anterior
CD/USB: Oprimir y sostener: Retroceso Rápido
Teléfono Bluetooth: Rechazar llamada entrante o colgar
(opcional)
iPod: Oprimir y sostener: Ingresa a menú de iPod (opcional)
17. Botón Abajo:
Radio: Sintonización manual hacia abajo
18. Botón de Audio:
General: Ajustes de Audio
Pantalla, Guía de Referencia Rápida
ESPAÑOL
Pantalla LCD de Radio
Fig. 2 Pantalla LCD de Radio
65
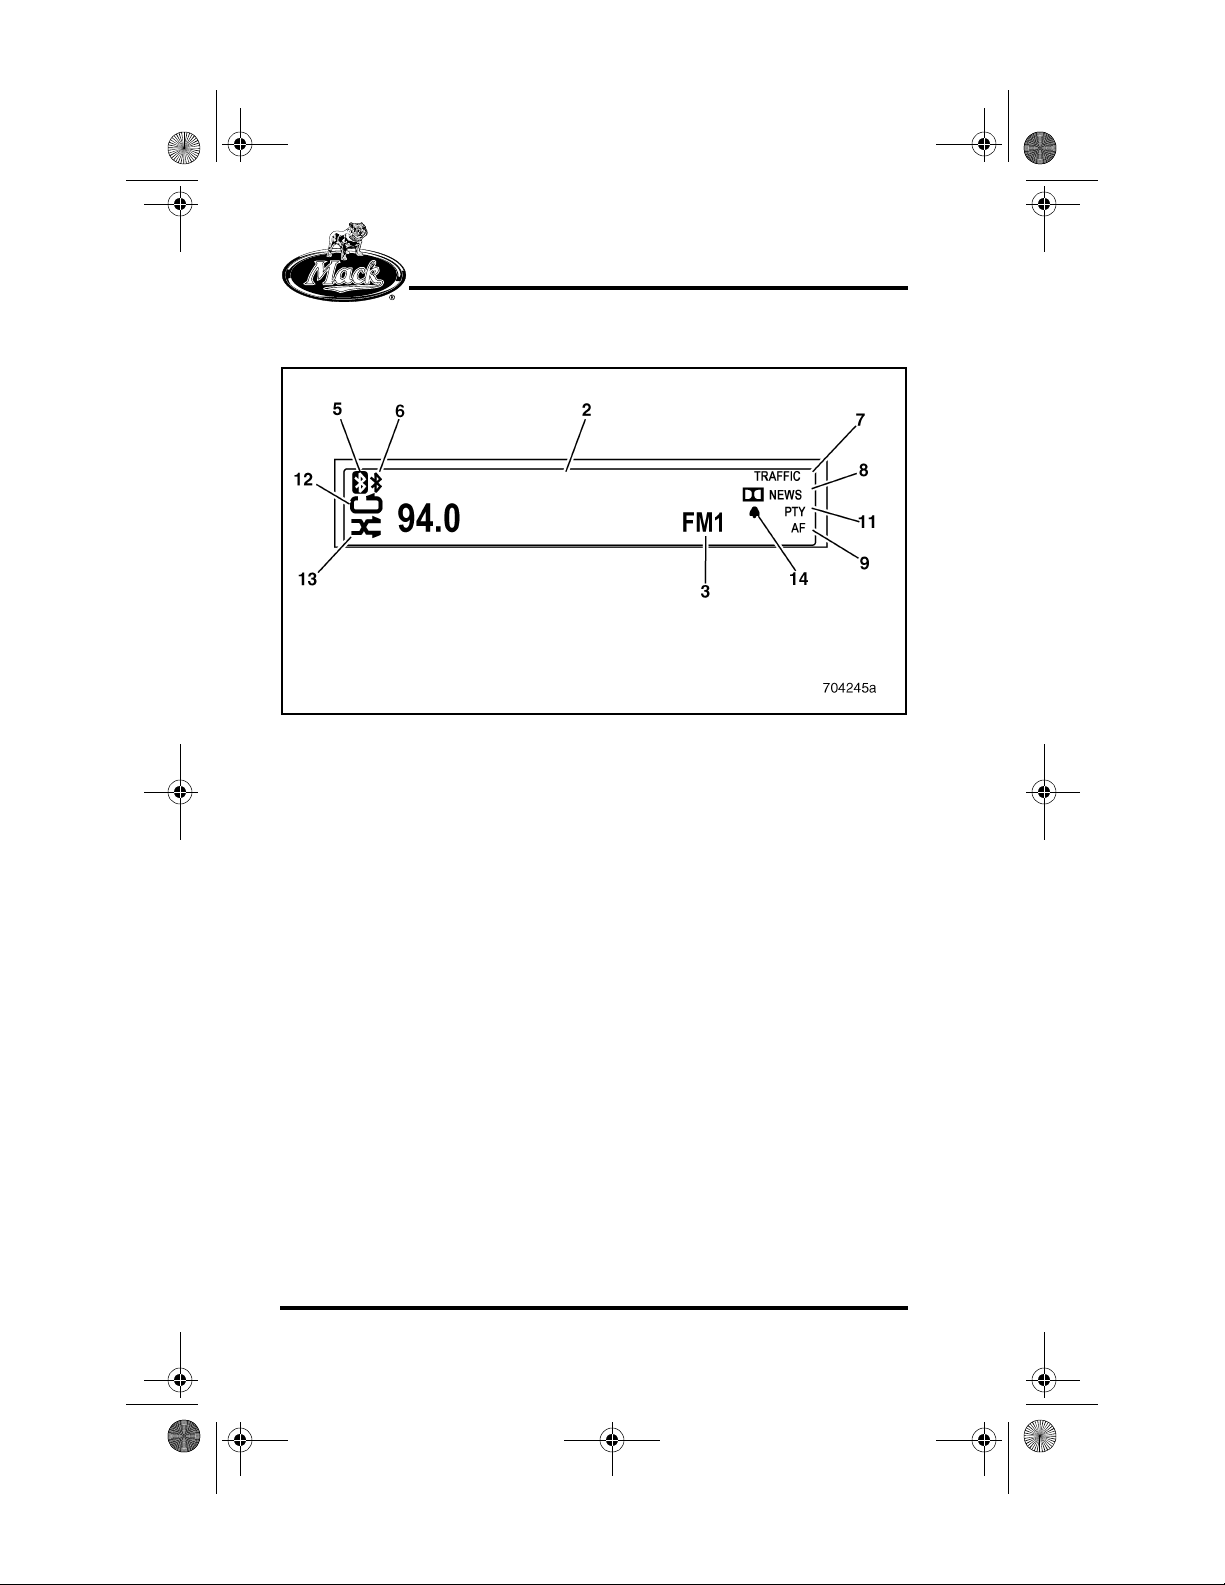
ts955.bk Page 66 Friday, February 20, 2009 10:23 AM
Pantalla LCD de Radio (Opcional)
ESPAÑOL
Fig. 3 Pantalla LCD de Radio (Opcional)
1. Pantalla de Texto del Radio
Radio: Despliega la frecuencia de radio y el nombre de la
estación
CD: Despliega inf. de pista, de hora y de música cuando está
disponible
2. Pantalla de Texto del Radio
Radio: Despliega la banda (FM/AM) de radio y la frecuencia
CD/USB: Despliega inf. de pista, de hora y de música cuando
está disponible
3. Pantalla de fuente
Radio: Despliega la banda de radio (FM1, FM2, FM3 [opcional]
AM, WX, o SAT [opcional])
CD/USB: Despliega otra fuente diferente del radio
4. Número programado
Radio: Despliega el número programado
5. Teléfono conectado
General: Indica que un teléfono Bluetooth está conectado
66

ts955.bk Page 67 Friday, February 20, 2009 10:23 AM
6. Bluetooth encendido
General: Indica que la función Bluetooth está encendida
7. Inf. de Tráfico
General: Indica que la función tráfico está encendida
8. Inf. de Novedades
General: Indica que la función de novedades está encendida
9. AF
General: Indica que la función de AF (Frecuencia Alterna) está
encendida
10. Menú
General: Desplegado al estar en el Menú
11. PTY
General: Indica que la función de PTY (Tipo de programa) está
encendida
ESPAÑOL
12. Repetir
CD/USB: Despliega cuando es activado Repetir
13. Aleatorio
CD/USB: Desplegado cuando Aleatorio es activado en el Menú
14. Alarma
General: Indica que la función Reloj de alarma está encendida
FUNCIONES PRINCIPALES
Muchas funciones son controladas o ajustadas a través del Menú del
radio. Si la pantalla del Menú es abierta y el radio no experimenta
actividad por un período de 10 segundos, el radio cancelará todas las
acciones incompletas, cerrará la pantalla del Menú y volverá a la
operación normal. El radio guardará todos los cambios completados.
67

ts955.bk Page 68 Friday, February 20, 2009 10:23 AM
ESPAÑOL
ENERGÍA
Encendido y Apagado, Enmudecimiento y Pausa del
Sistema de Audio
El Sistema de audio es encendido y apagado oprimiendo el botón (7).
Si el conductor desea enmudecer rápidamente el sonido del Sistema
de audio, oprime el botón (7).
MODALIDAD DE RADIO
Selección de Banda (FM y AM)
Para seleccionar el radio como la modalidad de reproducción,
encienda el radio y oprima el botón de RADIO (10).
El radio será entonces activado en la última banda de radió empleada
(AM, FM, etc.).
Para cambiar entre las bandas (AM/FM1/FM2) utilice el botón de
RADIO (10).
Buscar en la modalidad de radio
Utilice los botones de Búsqueda ESC (16) ó OK (14) para buscar hacia
arriba y hacia abajo respectivamente en la radio. Una vez que sea
encontrada una estación, la función de búsqueda se detendrá.
Sintonización manual
Oprima los botones (13) ó (17) para sintonizar hacia arriba y hacia
abajo respectivamente.
68

ts955.bk Page 69 Friday, February 20, 2009 10:23 AM
ESPAÑOL
Programaciones (Almacenamiento de Estaciones de Radio)
Hasta 12 estaciones de radio de FM y 6 de AM pueden ser
almacenadas para rápido acceso. Hay dos grupos de bandas
programadas de radio FM, los cuales son FM1 y FM2, y un grupo de
banda programada de radio AM. Cada banda programada puede
almacenar 6 estaciones en los botones del 1 al 6. Además son
opcionales una banda programada de FM y una banda programada
satelital.
Para almacenar una estación específica en un botón programado,
realice lo siguiente:
1. Oprima el botón de RADIO (10) hasta que esté active la banda de
frecuencia requerida (AM, FM1, FM2, FM3 [Opcional], de Clima,
ó la radio Satelital [Opcional]).
2. Sintonice la radio hasta la estación deseada.
3. Oprima y sostenga el botón programado deseado (1) (2) (3) (4) (5)
(6).
4. Habrá un breve enmudecimiento cuando la estación sea
almacenada. Cuando el audio regresa el proceso está terminado.
Programaciones (Selección de una Estación de Radio
Almacenada)
Para seleccionar una de las estaciones programadas, realice lo
siguiente:
1. Oprima el botón de RADIO (10) para seleccionar la banda
requerida (AM, FM1, FM2, FM3 [Opcional], de Clima, o la radio
Satelital [Opcional]).
2. Oprima y suelte el botón programado requerido (1) (2) (3) (4) (5)
para activar la estación deseada.
69

ts955.bk Page 70 Friday, February 20, 2009 10:23 AM
ESPAÑOL
Modalidad de exploración
La característica de exploración le permite al usuario realizar una
búsqueda de estaciones de radio sin tener que cambiar manualmente
a través de las estaciones. Al estar en la modalidad de exploración,
cada estación encontrada será reproducida por 10 segundos para dar
al usuario la oportunidad de tener muestra del programa o la música
de la estación. La exploración continuará entonces en la siguiente
estación disponible, amenos que el usuario elija detenerla y
permanecer en la estación actual.
Para ingresar a la modalidad de exploración, realice lo siguiente:
1. Presione el botón MENU (15) en el radio.
2. Seleccione “SCAN” presionando OK (14).
Para salir de la modalidad de exploración y permanecer en la estación
actual, presione el botón de RADIO (10).
Empleo de la banda de Clima
NOAA Weather Radio es un servicio del Servicio Nacional de Clima.
Éste proporciona transmisiones continuas de la información más
reciente del clima directamente de las oficinas del Servicio Nacional de
Clima. Los mensajes de clima utilizados son repetidos cada cuatro a
seis minutos y son revisados cada uno hasta tres horas o con más
frecuencia si es necesario. La mayoría de las estaciones opera
24 horas al día.
El clima para el área en la que usted está puede ser encontrado en
una de 7 estaciones. Al estar en la modalidad de Weatherband (Banda
de Clima), la pantalla mostrará el icono “WX” y “CH” más el número del
canal. El canal puede ser cambiado empleando los botones (13) y
(17), y también puede ser programado para los botone de contacto.
La frecuencia asociada con cada canal es como sigue:
1. 162.550 MHz.
2. 162.400 MHz.
70

ts955.bk Page 71 Friday, February 20, 2009 10:23 AM
ESPAÑOL
3. 162.475 MHz.
4. 162.425 MHz.
5. 162.450 MHz.
6. 162.500 MHz.
7. 162.525 MHz.
El Servicio Nacional de Clima opera aproximadamente
372 estaciones. Cerca del 90 por ciento de de la población del país
está dentro del rango de escucha de una transmisión de NOAA
Weather Radio.
Servicio de Radio Satelital (Características Opcionales)
Si su radio tiene el logotipo XM™ ó SIRIUS™, éste es compatible con
la radio satelital. XM y Sirius son servicios de radio satelital que
ofrecen más de 100 canales de programación de audio de calidad
digital y pueden ser escuchados de manera ininterrumpida a través de
las cercanías de los Estados Unidos. Un pago de servicio es requerido
para recibir transmisiones satelitales. Para mayor información,
póngase en con XM en www.xmradio.com ó por teléfono al
1-800-852-XMXM (9696) ó con Sirius en http://activate.siriusradio.com
ó por teléfono al 1-888-539-7474.
Para activar el receptor satelital integrado, usted tiene que dar a su
proveedor de radio satelital el Número de Serie Electrónico del
receptor satelital. Para encontrar el número de serie electrónico
complete las instrucciones que siguen.
Si su proveedor de radio satelital es XM Satellite Radio:
1. Con el encendido en ON y el radio prendido, oprima el botón
RADIO (10) y seleccione XM1 ó XM2.
2. Sintonice su radio hasta el canal 0 y aparecerá el número de serie
de 8-dígitos.
71

ts955.bk Page 72 Friday, February 20, 2009 10:23 AM
ESPAÑOL
Si su proveedor de radio satelital es Sirius Satellite Radio:
1. Con el encendido en ON y el radio prendido, oprima el botón
RADIO (10) y seleccione SR1 ó SR2.
2. Sintonice su radio hasta el canal 0 y aparecerá el número de serie
de 12-dígitos.
NOTA: La recepción de radio satelital puede ser degradada por la
obstrucción de la señal satelital.
MODALIDAD DE CD
El radio está diseñado para funcionar con el formato de CD estándar y
con archivos de MP3 y WMA (opcional).
El reproductor de CD acepta discos CD-R así como CD-RW.
Cambio a la Modalidad de CD
Hay dos formas de cambiar a la modalidad de CD.
1. Oprima el botón CD/AUX (12) hasta que muestre CD en la
pantalla.
Ó
2. Inserte un CD dentro de la ranura de CD (8).
Expulsar un CD
Para expulsar un CD oprima el botón EJECT (9). Cuando un CD sea
expulsado, el radio reproducirá la fuente de audio anterior.
Si el CD no es retirado de la ranura de CD, éste se volverá a cargar
automáticamente después de 15 segundos.
Cambio de Pista en un CD
Para cambiar una pista en un CD, haga lo siguiente:
Oprima y suelte el botón ESC (16) ó OK (14) en el radio, para moverse
a la pista anterior o a la siguiente respectivamente.
72

ts955.bk Page 73 Friday, February 20, 2009 10:23 AM
ESPAÑOL
Retroceso Rápido o Avance Rápido de un CD
Para retroceder rápido o avanzar rápido un CD, haga lo siguiente:
Oprima y sostenga el botón ESC (16) ó OK (14) en el radio, para
avance rápido o retroceso rápido respectivamente.
Reproducción de Pistas en un CD en Orden Aleatorio
Hay dos ajustes Aleatorios posibles para un CD: Random All (Todo
Aleatorio) y Random Fólder (Carpeta Aleatoria) (Si el contenido del
CD está almacenado en carpetas).
Para reproducir pistas en orden aleatorio, realice lo siguiente:
1. Oprima el botón MENU (15).
2. Oprima el botón (13) ó (17) hasta que sea desplegado “RANDOM”
(Aleatorio).
3. Ingrese al Submenú de Random oprimiendo el botón OK (14).
4. Oprima el botón (13) ó (17) para elegir entre All (Todo) y Folder
(Carpeta).
5. Oprima el botón OK (14) para activar la modalidad Aleatoria
deseada.
Repetición de Pistas en un CD (Características Opcionales)
Hay tres ajustes de Repetición posibles para un CD: Repeat All
(Repetir Todo), Repeat track (Repetir pista) y Repeat Folder (Repetir
Carpeta) (Si el contenido del CD está almacenado en carpetas).
Repeat All (Repetir Todo) es activado como predeterminado.
Para cambiar el ajuste de repetición, realice lo siguiente:
1. Oprima el botón MENU (15).
2. Oprima el botón (13) ó (17) hasta que sea desplegado “REPEAT”
(Repetir).
3. Ingrese al Submenú de Random oprimiendo el botón OK (14).
73

ts955.bk Page 74 Friday, February 20, 2009 10:23 AM
ESPAÑOL
4. Oprima el botón (13) ó (17) para elegir entre All (Todo), Track
(Pista) y Folder (Carpeta).
5. Oprima el botón OK (14) para activar la modalidad de Repetición
deseada.
Cambio a otra Carpeta en un CD (Características
Opcionales)
Si el contenido del CD está almacenado en carpetas, es posible
cambiar directamente carpetas. Para hacer esto, oprima ya sea el
botón (13) o el botón (17) para trasladarse al siguiente o anterior
álbum/carpeta respectivamente.
Exploración de un CD
Cuando es explorado el CD, son reproducidos los primeros
10 segundos de cada pista.
Para activar Scan (Explorar), realice lo siguiente:
1. Oprima el botón MENU (15).
2. Seleccione “SCAN” oprimiendo el botón OK (14).
La exploración se detendrá si:
1. Los botones de carátula ESC (16) ó OK (14).
Ó
2. Si se busca a través de todas las pistas.
ENTRADA DE AUDIO EXTERNA (CARACTERÍSTICAS
OPCIONALES)
Hay tres modalidades posibles de entrada de audio externa, USB, iPod
y Aux. Un USB y un dispositivo AUX pueden estar conectados y
accesibles al mismo tiempo. Sin embargo, si un iPod está conectado,
los dispositivos de USB y AUX serán deshabilitados como fuente
disponible.
74

ts955.bk Page 75 Friday, February 20, 2009 10:23 AM
ESPAÑOL
MODALIDAD DE USB (CARACTERÍSTICAS
OPCIONALES)
El radio está diseñado para trabajar con dispositivos USB formateados
con la norma USB Mass Storage Device Class. Otros dispositivos USB
sin embargo, pueden funcionar aún con el radio.
Si un dispositivo USB no funciona apropiadamente, intente reconectar
el dispositivo, esto puede resolver el problema en algunos casos.
Un dispositivo USB tiene que estar conectado antes de operar en esta
modalidad.
Cambio a la Modalidad de USB
Hay dos formas de cambiar a la modalidad de USB:
1. Oprima el botón CD/AUX (12) hasta que muestre USB en la
pantalla.
Ó
2. Conecte un dispositivo USB.
Desconexión de un dispositivo USB
No so necesarios preparativos especiales para desconectar el
dispositivo USB. Cuando el dispositivo USB sea retirado, el radio
reproducirá la fuente de audio anterior.
Cambio de Pista en un dispositivo USB
Para cambiar pistas, realice lo siguiente:
Oprima y suelte el botón ESC (16) ó OK (14) en el radio, para moverse
a la pista anterior o a la siguiente respectivamente.
Retroceso Rápido o Avance Rápido en un Dispositivo USB
Para retroceder rápido o avanzar rápido en un dispositivo USB, haga lo
siguiente:
Oprima y Sostenga el botón ESC (16) ó OK (14) en el radio, para
retroceso rápido o avance rápido respectivamente.
75

ts955.bk Page 76 Friday, February 20, 2009 10:23 AM
ESPAÑOL
Reproducción de Pistas en un Dispositivo USB en Orden
Aleatorio
Hay dos ajustes Aleatorios posibles para un dispositivo USB: Random
All (Todo Aleatorio) y Random Folder (Carpeta Aleatoria) (Si el
contenido del dispositivo USB está almacenado en carpetas).
Para reproducir pistas en orden aleatorio, realice lo siguiente:
1. Oprima el botón MENU (15).
2. Oprima el botón (13) ó (17) hasta que sea desplegado “RANDOM”
(Aleatorio).
3. Ingrese al Submenú de Random oprimiendo el botón OK (14).
4. Oprima el botón (13) ó (17) para elegir entre All (Todo) y Folder
(Carpeta).
5. Oprima el botón OK (14) para activar la modalidad Aleatoria
deseada.
Repetición de Pistas en un Dispositivo USB
Hay tres ajustes de Repetición posibles para un dispositivo USB:
Repeat All (Repetir Todo), Repeat track (Repetir pista) y Repeat Folder
(Repetir Carpeta) (Si el contenido del dispositivo USB está
almacenado en carpetas). Repeat All (Repetir Todo) es activado como
predeterminado.
Para cambiar el ajuste de repetición, realice lo siguiente:
1. Oprima el botón MENU (15).
2. Oprima el botón (13) ó (17) hasta que sea desplegado “REPEAT”
(Repetir).
3. Ingrese al Submenú de Random oprimiendo el botón OK (14).
4. Oprima el botón (13) ó (17) para elegir entre All (Todo), Track
(Pista) y Folder (Carpeta).
5. Oprima el botón OK (14) para activar la modalidad de Repetición
deseada.
76

ts955.bk Page 77 Friday, February 20, 2009 10:23 AM
Cambio a otra Carpeta en un USB
Si el contenido del USB está almacenado en carpetas, es posible
cambiar directamente carpetas. Para hacer esto, oprima ya sea el
botón (13) o el botón (17) para trasladarse al siguiente o anterior
álbum/carpeta respectivamente.
Exploración de un USB
Cuando es explorado el USB, son reproducidos los primeros
10 segundos de cada pista.
Para activar Scan (Explorar), realice lo siguiente:
1. Oprima el botón MENU (15).
2. Seleccione “SCAN” oprimiendo el botón OK (14).
ESPAÑOL
La exploración se detendrá si:
1. Los botones de carátula ESC (16) ó OK (14).
Ó
2. Si se busca a través de todas las pistas.
MODALIDAD DE IPOD (CARACTERÍSTICAS
OPCIONALES)
El radio soporta iPod Classic, iPod Video, y iPod nano.
Los ajustes de iPod, p.ej. Shuffle (Mezclar) o Repeat (Repetir),
utilizados antes de conectar el iPod al radio, serán utilizados por el
radio.
Un dispositivo iPod tiene que estar conectado antes de operar en esta
modalidad.
77

ts955.bk Page 78 Friday, February 20, 2009 10:23 AM
ESPAÑOL
Conexión del iPod
Conectar el iPod puede ser hecho con dos diferentes juegos de cables.
앫 Una derivación de cable partido proveniente del conector de
30-pins del iPod hacia un conector USB y un conector de audio
de 3.5 mm
앫 Un cable iPod/USB separado más un cable de audio estéreo
macho/macho de 3.5 mm conectado a la salida de auriculares
del iPod. El volumen del iPod en este caso, debe ser ajustado a
máximo antes de conectar al radio.
Cuando el iPod sea conectado al radio, los controles del iPod se
bloquearán. Todo control del iPod será hecho por medio de los
botones del radio. Al encontrarse en este estado, el iPod desplegará
un logotipo de Mack.
Cambio a la Modalidad de iPod
Hay dos formas de cambiar a la modalidad de iPod:
1. Oprima el botón CD/AUX (12) hasta que muestre iPod en la
pantalla.
Ó
2. Conecte un dispositivo iPod.
Desconexión del dispositivo iPod
No so necesarios preparativos especiales para desconectar el
dispositivo iPod. Cuando el dispositivo iPod sea retirado, el radio
reproducirá la fuente de audio anterior.
Menú del iPod
Cuando el iPod esté conectado y sea la fuente, el Usuario podrá
oprimir y sostener el botón ESC (16) para entrar al Menú del iPod. Este
Menú contiene algunas de las funciones más comunes empleadas en
el iPod. P.ej., el usuario puede buscar por Artistas y por Álbumes, así
como iniciar una Lista de Reproducción.
78

ts955.bk Page 79 Friday, February 20, 2009 10:23 AM
ESPAÑOL
Oprima y sostenga el botón ESC (16) por 1 segundo para entrar al
Menú del iPod en el ultimo nivel utilizado.
Oprima y sostenga el botón ESC (16) por 2 segundos para entrar al
Menú del iPod en el nivel superior.
Cambio de Pista en el iPod
Para cambiar una pista en iPod, haga lo siguiente:
Oprima y suelte el botón ESC (16) ó OK (14) en el radio, para moverse
a la pista anterior o a la siguiente respectivamente.
Avance Rápido en iPod
Para avance rápido en iPod, haga lo siguiente:
Oprima y Sostenga el botón OK (14) en el radio, para avanzar rápido.
Por favor observe que al Oprimir y sostener el botón ESC (16) entrará
al menu del iPod.
Reproducción de Pistas en el iPod en Orden Aleatorio
Hay dos ajustes Aleatorios posibles para iPod: Random Album (Álbum
Aleatorio) y Random All (Todo Aleatorio).
Para reproducir canciones en orden aleatorio, realice lo siguiente:
1. Oprima el botón MENU (15).
2. Oprima el botón (13) ó (17) hasta que sea desplegado “RANDOM”
(Aleatorio).
3. Ingrese al Submenú de Random oprimiendo el botón OK (14).
4. Oprima el botón (13) ó (17) para elegir entre All (Todo) y Folder
(Carpeta).
5. Oprima el botón OK (14) para activar la modalidad Aleatoria
deseada.
79

ts955.bk Page 80 Friday, February 20, 2009 10:23 AM
ESPAÑOL
Repetición de Pista en el iPod
Hay dos ajustes de Repetición posibles para iPod: Repeat One
(Repetir Una), y Repeat All (Repetir Todo).
Para cambiar el ajuste de repetición, realice lo siguiente:
1. Oprima el botón MENU (15).
2. Oprima el botón (13) ó (17) hasta que sea desplegado “REPEAT”
(Repetir).
3. Ingrese al Submenú de Random oprimiendo el botón OK (14).
4. Oprima el botón (13) ó (17) para elegir entre All (Todo), Track
(Pista) y Folder (Carpeta).
5. Oprima el botón OK (14) para activar la modalidad de Repetición
deseada.
Exploración del iPod
Cuando es explorado el iPod, son reproducidos los primeros
10 segundos de cada pista.
Para activar Scan (Explorar), realice lo siguiente:
1. Oprima el botón MENU (15).
2. Seleccione “SCAN” oprimiendo el botón OK (14).
La exploración se detendrá si:
1. Los botones de carátula ESC (16) ó OK (14).
Ó
2. Si se busca a través de todas las pistas.
80

ts955.bk Page 81 Friday, February 20, 2009 10:23 AM
ESPAÑOL
MODALIDAD AUX (CARACTERÍSTICAS OPCIONALES)
Para seleccionar una entrada de audio auxiliar:
Oprima el botón CD/AUX (12) hasta que muestre Aux en la pantalla.
Puede ser seleccionada una entrada de audio auxiliar excepto al estar
en la modalidad de iPod.
El volumen de salida del dispositivo Aux. debe ser ajustado a máximo.
Por favor observe que para un dispositivo Aux, cambiar pistas, avanzar
rápidamente, etc., tiene que ser hecho directamente en el dispositivo
Aux.
AJUSTES DE AUDIO
Ajuste de Volumen Arriba y Abajo
El volumen de los sistemas de audio puede ser ajustado hacia arriba
girando la perilla (7) en dirección de las manecillas del reloj y ajustado
hacia abajo girando la perilla (7) en dirección contraria a las manecillas
del reloj.
Ajuste de Bass (Bajo) Arriba y Abajo
Para ajustar el bajo de los sistemas de audio, oprima el botón AUDIO
(18) hasta que muestre BASS en la pantalla.
El bajo es entonces ajustado hacia arriba girando la perilla (7) en
dirección de las manecillas del reloj y ajustado hacia abajo girando la
perilla (7) en dirección contraria a las manecillas del reloj.
Este también puede ser ajustado hacia arriba y hacia abajo
empleando ESC (16) ó OK (14) en el radio respectivamente.
81

ts955.bk Page 82 Friday, February 20, 2009 10:23 AM
ESPAÑOL
Ajuste de Treble (Tiple) Arriba y Abajo
Para ajustar el tiple de los sistemas de audio, oprima el botón AUDIO
(18) hasta que muestre TREBLE en la pantalla.
El tiple es entonces ajustado hacia arriba girando la perilla (7) en
dirección de las manecillas del reloj y ajustado hacia abajo girando la
perilla (7) en dirección contraria a las manecillas del reloj.
Este también puede ser ajustado hacia arriba y hacia abajo
empleando ESC (16) ó OK (14) en el radio respectivamente.
Ajuste de Balance Izquierda y Derecha
Para ajustar el balance de los sistemas de audio, oprima el botón
AUDIO (18) hasta que muestre BALANCE en la pantalla.
El balance es entonces ajustado a la derecha girando la perilla (7) en
dirección de las manecillas del reloj y ajustado a la izquierda girando la
perilla (7) en dirección contraria a las manecillas del reloj.
Este también puede ser ajustado a la izquierda y a la derecha
empleando ESC (16) ó OK (14) en el radio respectivamente.
Ajuste de Fader (Desvanecimiento) Adelante y Atrás
Para ajustar el desvanecimiento de los sistemas de audio, oprima el
botón AUDIO (18) hasta que muestre FADE en la pantalla.
El desvanecimiento es entonces ajustado adelante girando la perilla
(7) en dirección de las manecillas del reloj y ajustado atrás girando la
perilla (7) en dirección contraria a las manecillas del reloj.
Este también puede ser ajustado a la izquierda y a la derecha
empleando ESC (16) ó OK (14) en el radio respectivamente.
82

ts955.bk Page 83 Friday, February 20, 2009 10:23 AM
ESPAÑOL
Ajuste de Mid (Límites de Frecuencia Media) Arriba y Abajo
(Características Opcionales)
Para ajustar los mid de los sistemas de audio, oprima el botón AUDIO
(18) hasta que muestre MID en la pantalla.
Los mid son entonces ajustados hacia arriba girando la perilla (7) en
dirección de las manecillas del reloj y ajustado hacia abajo girando la
perilla (7) en dirección contraria a las manecillas del reloj.
Estos también pueden ser ajustados hacia arriba y hacia abajo
empleando ESC (16) y OK (14) en el radio respectivamente.
Selección de Bocinas
El sistema de audio puede ser ajustado a modalidad de 4 o de
2 bocinas, realizando lo siguiente:
1. Oprima el botón MENU (15).
2. Oprima el botón (13) ó (17) hasta que sea desplegado
“ADVANCE” (Avanzar).
3. Oprima el botón OK (14) para entrar al submenu de “ADVANCE”.
4. Oprima el botón (13) ó (17) hasta que sea desplegado
“SPEAKERS” (Bocinas).
5. Cambie entre 2CH y 4CH, oprimiendo el botón OK (14).
Activación de Volumen Dependiente de Velocidad (ASC)
(Características Opcionales)
El volumen del sistema de audio puede ser ajustado para incrementar
con la velocidad del vehículo. Esto es preferido algunas veces para
compensar los sonidos de la carretera y del motor. La característica
puede ser ajustada a tres niveles de sensibilidad, LOW (Bajo), MID
(Medio) y HIGH (Alto).
83

ts955.bk Page 84 Friday, February 20, 2009 10:23 AM
ESPAÑOL
Para activar ASC, lleve a cabo lo siguiente:
1. Oprima el botón MENU (15).
2. Oprima el botón (13) ó (17) hasta que sea desplegado
“ADVANCE” (Avanzar).
3. Oprima el botón OK (14) para entrar al submenú de “Advanced”
(Avanzados).
4. Oprima el botón (13) ó (17) hasta que sea desplegado “ASC”.
5. Oprima el botón OK (14) 14 para entrar al submenú de ASC.
6. Oprima el botón (13) ó (17) para elegir entre LOW, MID y HIGH.
7. Oprima el botón OK (14) para entrar al ajuste de ASC deseado.
MODALIDAD DE TELÉFONO BLUETOOTH MANOS
LIBRES (CARACTERÍSTICAS OPCIONALES)
El radio está diseñado para funcionar con teléfonos móviles que
soportan el Perfil Bluetooth Manos Libres 1.5. Otros teléfonos móviles
Bluetooth competentes sin embargo, pueden funcionar aún con el
radio.
Para conectar un teléfono móvil al radio a través del Bluetooth, los
siguientes pasos tienen que ser terminados en el radio.
1. Activar la función de Bluetooth.
2. Agregar el Teléfono
Observe por favor que los pasos correspondientes tienen que ser
tomados en el teléfono móvil.
Un teléfono agregado será almacenado en una lista para acceso
rápido al conectar en otro momento.
84

ts955.bk Page 85 Friday, February 20, 2009 10:23 AM
ESPAÑOL
Activación de Bluetooth
El propósito de este proceso es hacer posible una conexión de
Bluetooth.
1. Oprima el botón MENU (15).
2. Oprima el botón (13) ó (17) hasta que sea desplegado “Hands
Free” (Manos Libres).
3. Oprima el botón OK (14) para entrar al submenú de “Hands Free”.
4. Oprima el botón OK (14) para activar el Bluetooth.
Cuando Bluetooth está activo, la pantalla muestra el icono (45).
Agregar un Teléfono
El propósito de este proceso es hacer una conexión entre el radio y un
teléfono así como agregar un teléfono a la lista de teléfonos del radio.
1. Oprima el botón MENU (15).
2. Oprima el botón (13) ó (17) hasta que sea desplegado “Hands
Free” (Manos Libres).
3. Oprima el botón OK (14) para entrar al submenú de “Hands Free”.
4. Oprima el botón (13) ó (17) hasta que sea desplegado “Add
phone” (Agregar teléfono).
5. Oprima el botón OK (14) para iniciar la conexión del teléfono.
El radio realizará ahora una búsqueda por un teléfono bluetooth. Esto
es indicado por medio del icono (45) destellando. Observe que el
teléfono tiene que estar en un estado de conexión correspondiente
durante este proceso.
Cuando sea establecida una conexión, al usuario le será avisado que
ingrese un código en el teléfono. Ingrese el código 0000 para verificar
la conexión.
85

ts955.bk Page 86 Friday, February 20, 2009 10:23 AM
ESPAÑOL
Activación de otro Teléfono
El propósito de este proceso es desconectar un teléfono Bluetooth
presente y establecer una conexión a otro teléfono en la lista de
teléfonos.
1. Oprima el botón MENU (15).
2. Oprima el botón (13) ó (17) hasta que sea desplegado “Hands
Free” (Manos Libres).
3. Oprima el botón OK (14) para entrar al submenú de “Hands Free”.
4. Oprima el botón (13) ó (17) hasta que la pantalla muestre
“ChangePhName” (donde “PhName” será el nombre del teléfono
conectado actualmente).
5. Oprima el botón OK (14) para entrar al submenú de “Change
phone” (Cambiar teléfono).
6. Oprima el botón (13) ó (17) hasta que sea desplegado el nombre
del teléfono que va a ser conectado.
7. Oprima el botón OK (14) para conectar el otro teléfono.
Suprimir un Teléfono
El propósito de este proceso es suprimir un teléfono específico de la
lista de teléfonos en el radio.
1. Oprima el botón MENU (15).
2. Oprima el botón (13) ó (17) hasta que sea desplegado “Hands
Free” (Manos Libres).
3. Oprima el botón OK (14) para entrar al submenú de “Hands Free”.
4. Oprima el botón (13) ó (17) hasta que sea desplegado “Edit
phone” (Editar teléfono).
5. Oprima el botón OK (14) para entrar al submenú de “Edit Phone”
(Editar Teléfono).
6. Oprima el botón (13) ó (17) hasta que sea desplegado el nombre
del teléfono que va a ser suprimido.
7. Oprima el botón OK (14) para suprimir el teléfono.
8. La pantalla mostrará ahora “Delete?” (¿Suprimir?). Oprima el
botón (14) para verificar.
86

ts955.bk Page 87 Friday, February 20, 2009 10:23 AM
ESPAÑOL
Suprimir todos los Teléfonos
El propósito de este proceso es suprimir todos los teléfonos de la lista
de teléfonos en el radio.
1. Oprima el botón MENU (15).
2. Oprima el botón (13) ó (17) hasta que sea desplegado “Hands
Free” (Manos Libres).
3. Oprima el botón OK (14) para entrar al submenú de “Hands Free”.
4. Oprima el botón (13) ó (17) hasta que sea desplegado “Edit
phone” (Editar teléfono).
5. Oprima el botón OK (14) para entrar al submenú de “Edit Phone”
(Editar Teléfono).
6. Oprima el botón (13) ó (17) hasta que sea desplegado “Delete
All”(Suprimir Todo).
7. Oprima el botón OK (14) para suprimir todos los teléfonos.
8. La pantalla mostrará ahora “Are U sure?” (¿Está seguro?).
Oprima el botón (14) para verificar.
Cambiar Llamadas de Teléfono Entre el Vehículo y un Activo
Teléfono
El propósito de este proceso es permitir cambiar de teléfono llamadas
que están siendo recibidas y escuchadas a través del radio, para ser
recibidas y escuchadas a través de un teléfono activo.
1. Para cambiar una llamada de un vehículo a un teléfono activo,
oprima el botón AUDIO.
2. Para cambiar una llamada de un teléfono activo al vehículo,
oprima el botón AUDIO.
87

ts955.bk Page 88 Friday, February 20, 2009 10:23 AM
ESPAÑOL
RELOJ
Despliegue de Hora
Como predeterminada, la hora del día es desplegada sólo cuando el
encendido está en ON y el radio se encuentra APAGADO. El Reloj
puede ser ajustado para mostrar la hora también cuando el radio está
ENCENDIDO, haciendo lo siguiente:
1. Oprima el botón MENU (15).
2. Oprima el botón (13) ó (17) hasta que sea desplegado “CLOCK”
(reloj).
3. Oprima el botón OK (14) para ingresar al submenú Clock.
4. Oprima el botón (13) ó (17) hasta que sea desplegado “VISIBLE”.
5. Oprima el botón OK (14) para cambiar entre el estado ON/OFF
(Encendido/Apagado).
Mientras el radio esté Encendido y dentro de alguna modalidad,
oprima el botón CLOCK (11) para desplegar la hora del día por 10
segundos.
Formato de 12- ó 24- Horas
El reloj puede ser ajustado a la modalidad de 12-horas o de 24-horas.
La modalidad de 12 horas se distingue entre AM y PM.
Para cambiar el formato de la hora, realice lo siguiente:
1. Oprima el botón MENU (15).
2. Oprima el botón (13) ó (17) hasta que sea desplegado “CLOCK”
(reloj).
3. Oprima el botón OK (14) para ingresar al submenú Clock.
4. Oprima el botón (13) ó (17) hasta que sea desplegado “12/24 HR”.
5. Oprima el botón OK (14) para cambiar entre las opciones de 12H
ó 24H.
88

ts955.bk Page 89 Friday, February 20, 2009 10:23 AM
ESPAÑOL
Ajuste del Reloj
Normalmente la hora es ajustada automáticamente por el sistema de
camiones. La opción para ajustar manualmente la hora, no estará
entonces disponible.
Para ajustar el reloj manualmente, realice lo siguiente:
1. Oprima el botón MENU (15).
2. Oprima el botón (13) ó (17) hasta que sea desplegado “CLOCK”
(reloj).
3. Oprima el botón OK (14) para ingresar al submenú Clock.
4. Oprima el botón (13) ó (17) hasta que sea desplegado “SET
TIME” (Ajustar Hora).
5. Oprima el botón OK (14) para entrar al submenú de “Set time”.
6. Oprima el botón (13) ó (17) para ajustar las horas hacia arriba o
hacia abajo respectivamente.
7. Oprima el botón OK (14) para ajustar la hora y cambiar hasta el
ajuste de los minutos.
8. Oprima el botón (13) ó (17) para ajustar los minutes hacia arriba
o hacia abajo respectivamente.
9. Oprima el botón OK (14) para guardar la hora y terminar el
proceso.
Activar o Desactivar la Alarma (Características Opcionales)
Para activar o desactivar la alarma realice lo siguiente:
1. Oprima el botón MENU (15).
2. Oprima el botón (13) ó (17) hasta lograr que sea desplegada
“WAKE UP ALARM” (Alarma Despertador).
3. Oprima el botón OK (14) para entrar al submenú de “Wake up
alarm”.
4. Oprima el botón (13) ó (17) hasta que sea desplegado “ON/OFF”.
5. Oprima el botón OK (14) para cambiar entre el estado de la
alarma.
89

ts955.bk Page 90 Friday, February 20, 2009 10:23 AM
ESPAÑOL
Ajustar la Alarma (Características Opcionales)
Para ajustar la hora de Alarma, realice lo siguiente:
1. Oprima el botón MENU (15).
2. Oprima el botón (13) ó (17) hasta que sea desplegado “WAKE UP
ALARM” (Alarma Despertador).
3. Oprima el botón OK (14) para entrar al submenú de “Wake up
alarm”.
4. Oprima el botón (13) ó (17) hasta que sea desplegado “SET
TIME” (Ajustar Hora).
5. Oprima el botón OK (14) para entrar al submenú de “Set time”.
6. Oprima el botón (13) ó (17) para ajustar las horas hacia arriba o
hacia abajo respectivamente.
7. Oprima el botón OK (14) para ajustar la hora y cambiar hasta el
ajuste de los minutos.
8. Oprima el botón (13) ó (17) para ajustar los minutes hacia arriba
o hacia abajo respectivamente.
9. Oprima el botón OK (14) para guardar la hora y terminar el
proceso.
CÓDIGO CONTRA ROBO (GUARD)
La unidad de radio es ajustada para funcionar únicamente con un
vehículo. La característica Guard prohíbe la operación de radio en
cualquier otro lugar.
La Guard es automática y no es necesario manejarla manualmente.
90

ts955.bk Page 91 Friday, February 20, 2009 10:23 AM
ESPAÑOL
En caso de mal funcionamiento:
Si, por alguna razón, el radio falla en detectar el vehículo requerido, el
usuario será avisado para ingresar el Código Contra Robo (etiqueta
encontrada en el Manual del Conductor). La pantalla mostrará
después “CODE 0000” (Código 0000). Observe por favor que éste
es un mal funcionamiento y debe ser revisado en un taller
autorizado.
Para ingresar el código, haga lo siguiente:
1. Para el dígito actual (destellando), gire la perilla de volumen (7)
hasta que el número correcto sea mostrado.
2. Presione el botón de energía para ingresar el dígito. El siguiente
dígito comenzará a destellar.
3. Repita el paso 1 y el paso 2 hasta que sean ingresados los cuatro
dígitos.
El usuario tiene tres intentos para ingresar el código. Si estos no tienen
éxito, el radio será bloqueado por 60 minutos hasta que sean
permitidos tres nuevos intentos.
Desactivación de Guard
Es posible desactivar Guard, pero no es recomendado.
Para desactivar la función Guard, haga lo siguiente:
1. Oprima el botón MENU (15).
2. Oprima el botón (13) ó (17) que sea desplegado “ADVANCE”
(Avanzar).
3. Oprima el botón OK (14) para ingresar al submenú de “Advance”.
4. Oprima el botón (13) ó (17) hasta que sea desplegado “GUARD”.
5. Oprima el botón OK (14) para entrar.
6. Oprima el botón OK (14) para ajustar Guard ON (Activado) u OFF
(Desactivado).
91
 Loading...