

Page 1
Getting started with
Logitech® Wireless Solar Keyboard K750
Page 2

Logitech® Wireless Solar Keyboard K750
Contents
English 3
繁體中文 7
简体中文 11
한국어 15
www.logitech.com/support 19
2
Page 3
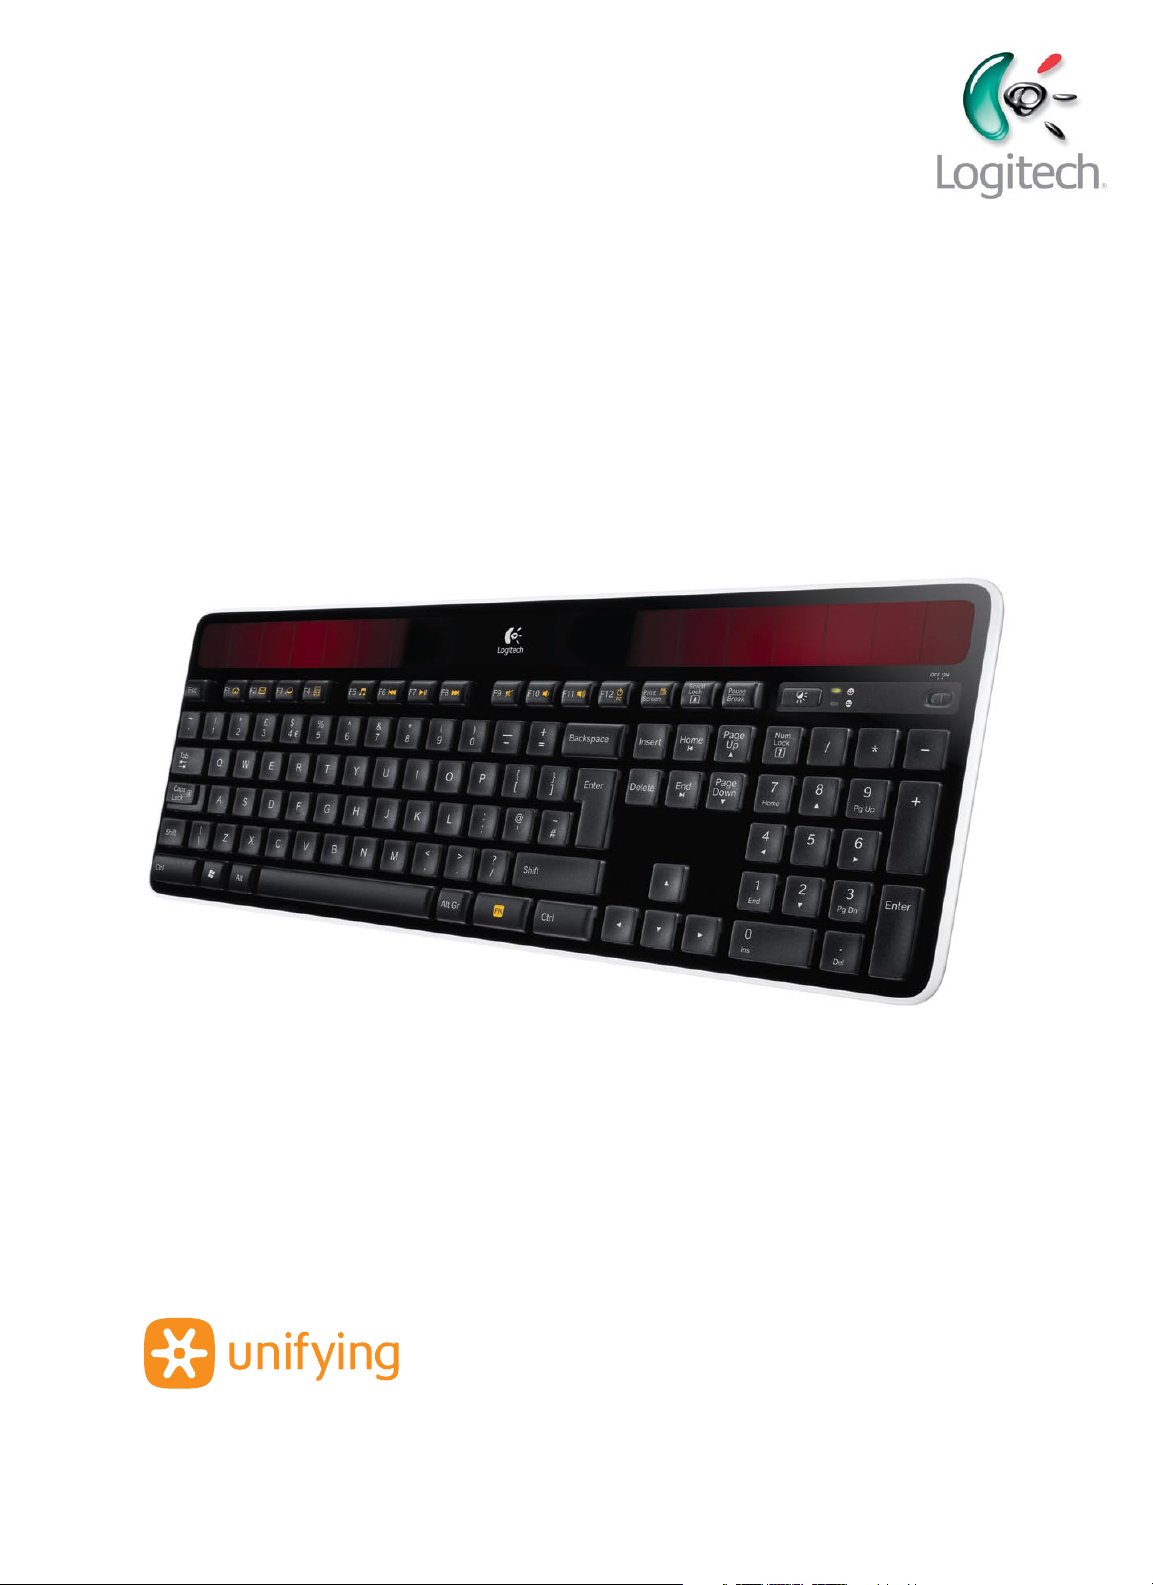
What’s in the box
Logitech® Wireless Solar Keyboard K750
Wireless Solar Keyboard K750
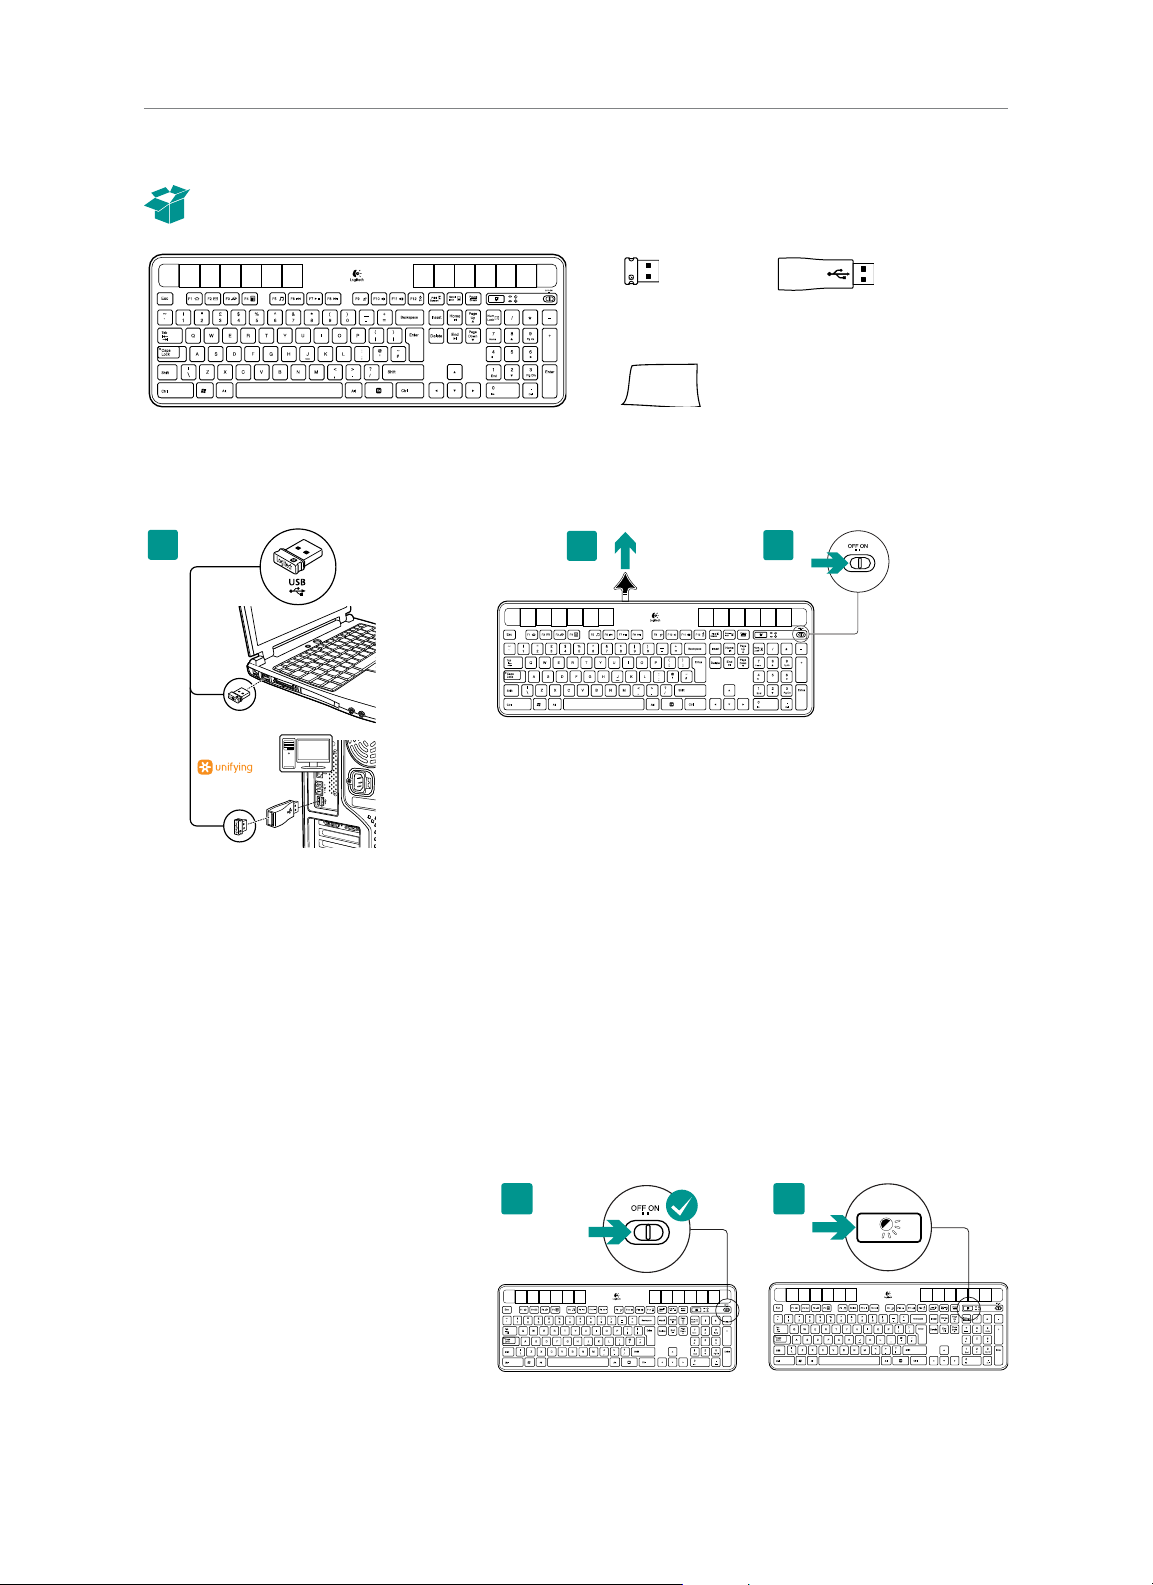
Setting up the keyboard
1
Unifying
receiver
1. Plug the Unifying receiver into a computer USB port. For PC towers,
use the Wireless extender to minimize the possibility of radio
frequency (RF) interference.
2. Pull the tab to activate the keyboard.
3. Turn on the keyboard.
Wireless extender
Cleaning cloth
How much light is needed?
The K750 requires only a modest level of light to operate and store energy. Indirect sunlight or indoor illumination is fine.
When exposed to dim room light on a continuous basis, the K750 has enough power for use. Because indoor environments usually
have periods of darkness, a moderate level of room lighting is recommended for much of the day. The recharge time for the K750 is
much less in brightly lit environments or when the K750 is placed in direct sunlight.
The K750 stores energy automatically, even when turned off. This stored energy allows you to use the K750 without light for a while.
With a full charge, the K750 can operate at least three months in total darkness before needing a recharge.
Checking for adequate light
How do you know whether there’s enough light for the K750? Use the Light-check hot key. The K750 tells you if it’s getting
enough illumination.
1. Make sure the K750 is turned on.
2. Press the Light-check hot key. The Light-check
LED will flash either green or red, or it won’t
produce any light at all. For more information,
see
Reading the Light-check LED
.
1
2
3 English
Page 4
Logitech® Wireless Solar Keyboard K750
Reading the Light-check LED
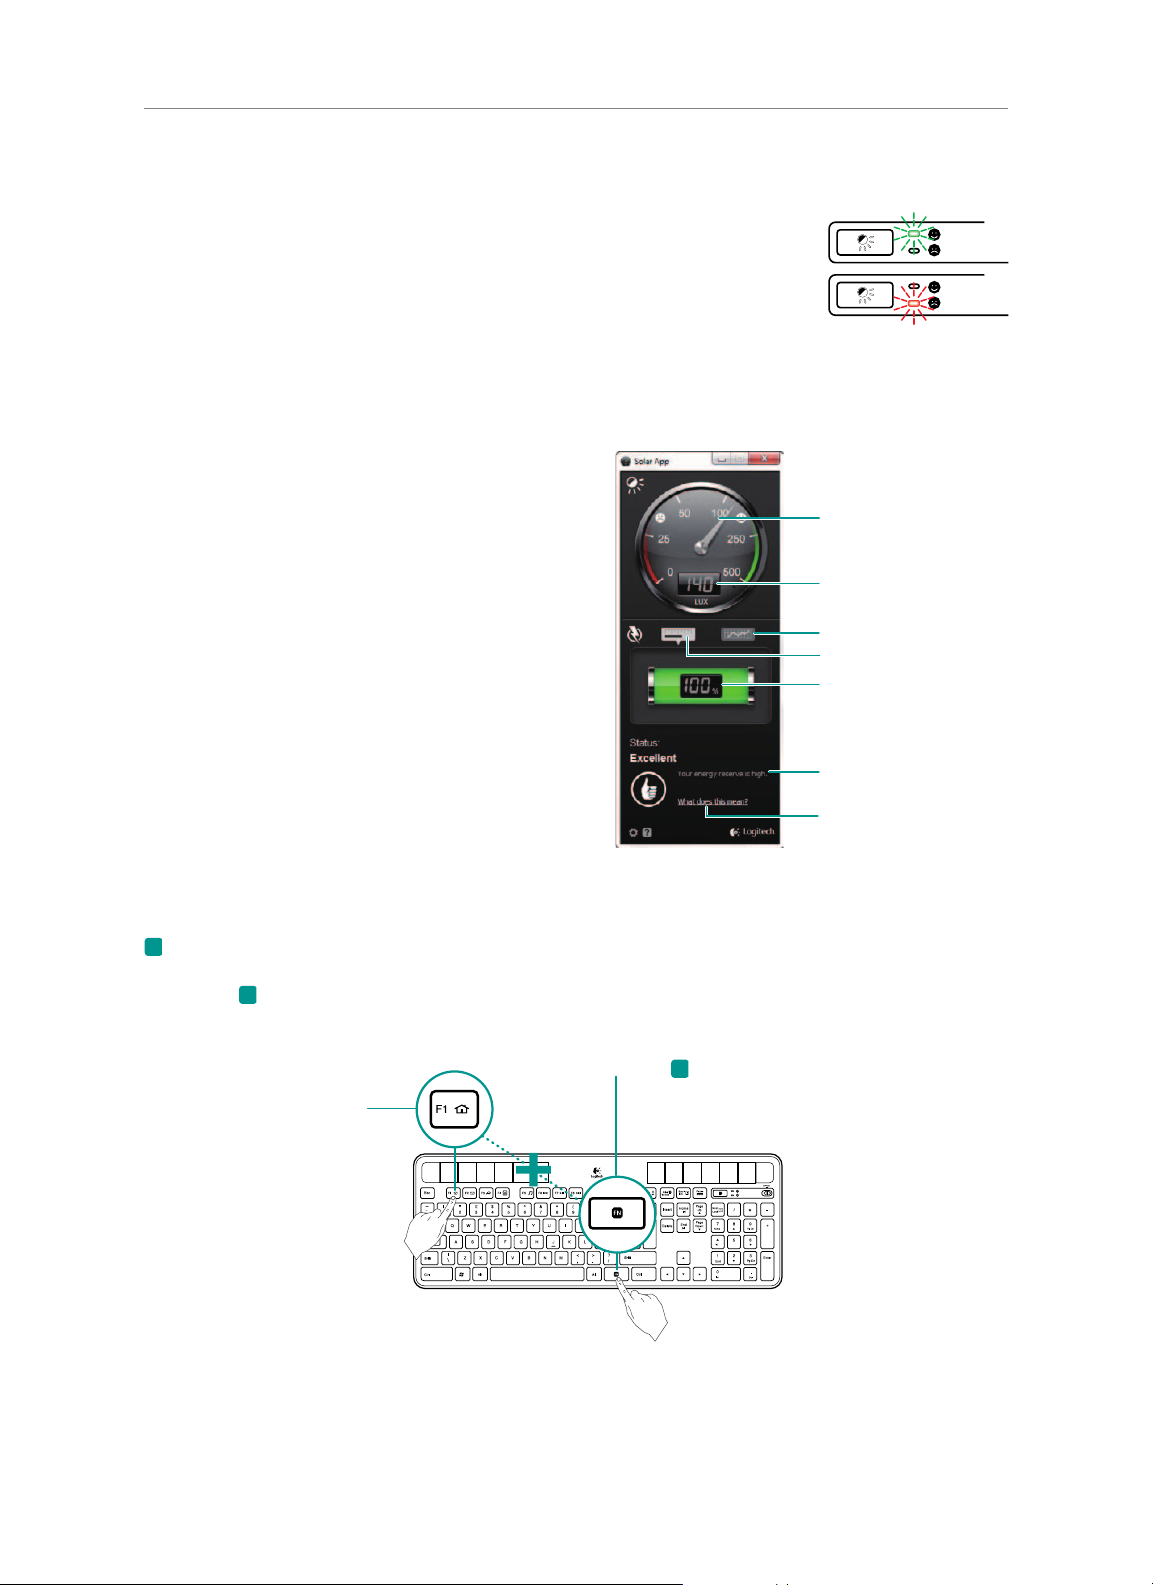
• Light-checkLEDashesgreen. The K750 is receiving enough light and is ready for use.
• Light-checkLEDashesred. The K750 requires more light to continue working on a
long-term basis.
Note If the Light-check LED produces no light, please see Help with setup for more information.
Using the Solar App
Want an easy and more visual way of checking the available light falling on the K750 while keeping track of the keyboard’s energy
reserve? Download and install the Solar App from www.logitech.com/k750/solarapp
• TheSolarAppoperatesinthebackgroundandnotiesyou
whenever there is a change (up or down) in the K750’s
energy reserve.
• TrytokeeptheLight-checkgaugepointingat100luxorhigher
to make sure the K750 will have plenty of energy.
• TobringtheSolarApptotheforeground,presstheLight-check
hot key on the keyboard. The Solar App will pop up, and the
Light-check gauge will activate immediately.
Light-check gauge
Light-check gauge readout
Energy reserve (historical)
Energy reserve (real time)
Energy reserve readout
(real time)
Status notifications about
energy reserve
Click for guidance
about energy reserve
management
Using the keyboard F-key
User-friendly enhanced F-keys let you launch applications easily. To use the enhanced functions (yellow icons), first press and hold the
FN
key; second, press the F-key you want to use.
Tip In the software settings, you can invert the FN mode if you prefer to access directly the enhanced functions without having to
press the FN key.*
* Requires SetPoint™ Software (available for download at
2nd: Press an F-key
www.logitech.com/downloads
1st: Press and hold the FN key
).
4 English
Page 5
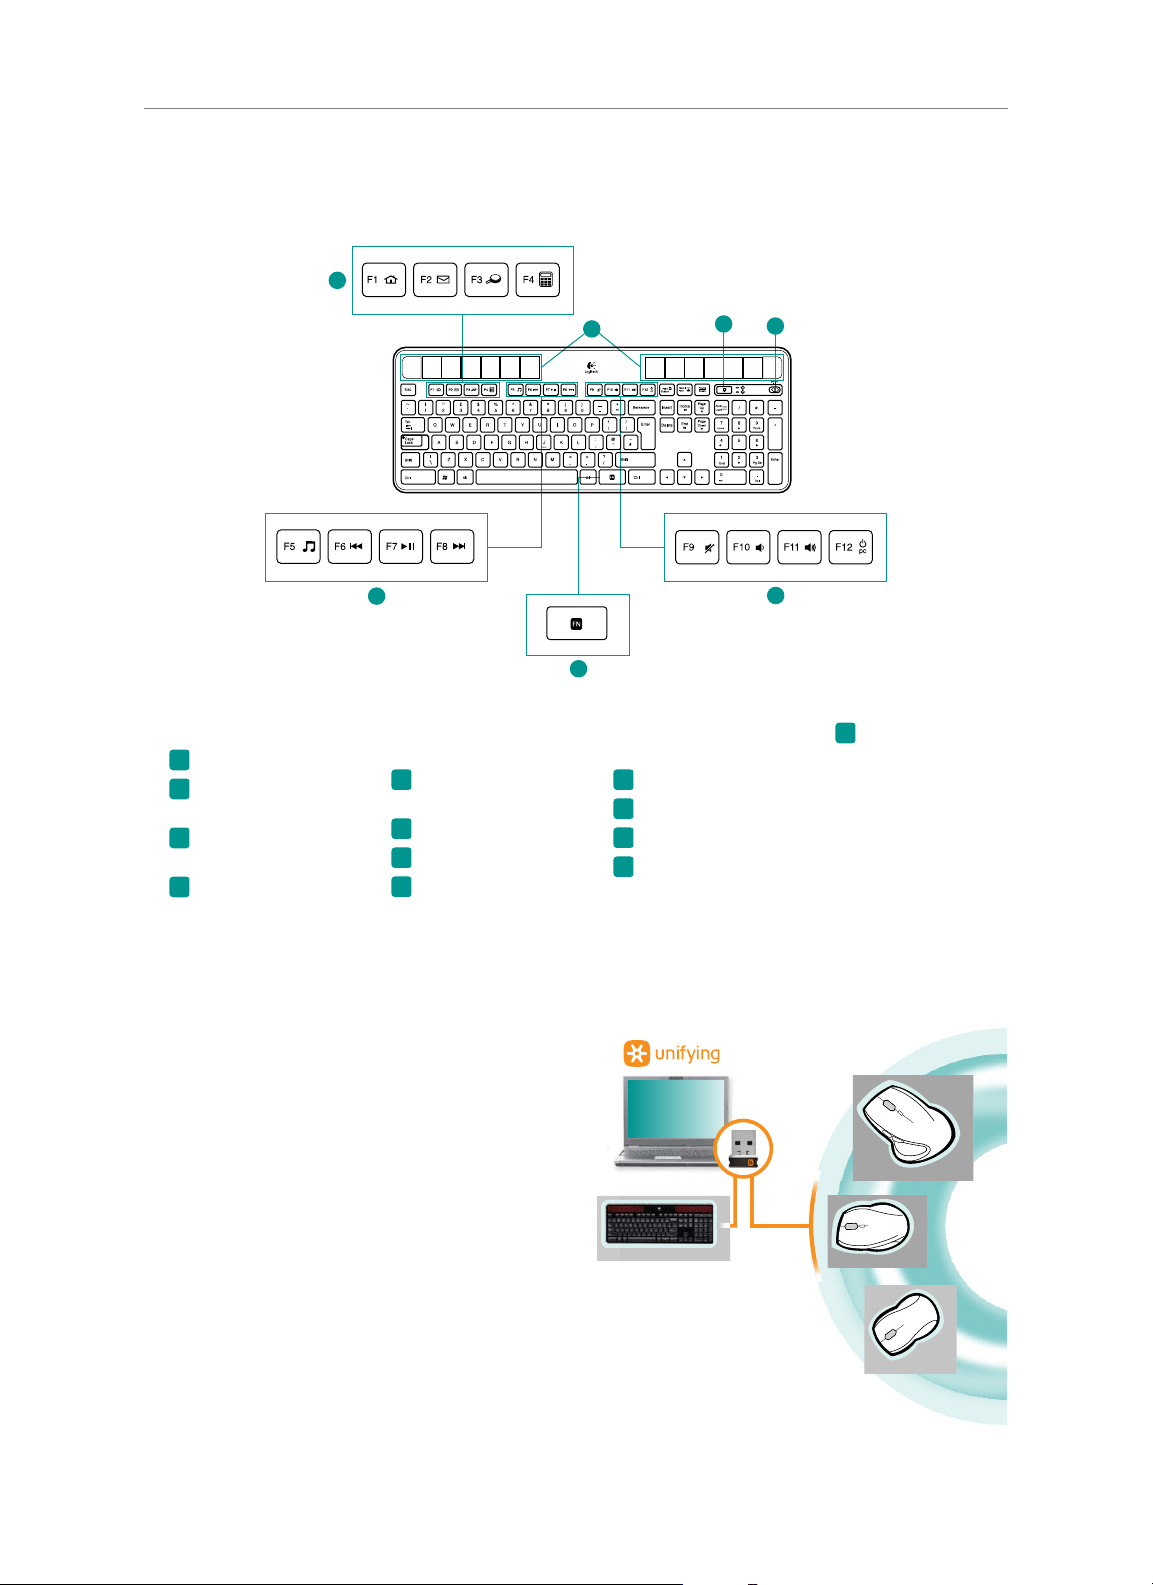
Keyboard features
1
Logitech® Wireless Solar Keyboard K750
7
5
6
2
1. Application zone
+ F1 Internet home
FN
+ F2 Launch e-mail
FN
application
+ F3 Launch
FN
Windows Search*
+ F4 Launch
FN
2. Multimedia
navigation zone
+ F5 Launch media
FN
application
+ F6 Previous track
FN
+ F7 Play/Pause
FN
+ F8 Next track
FN
calculator
* One Touch Search if the SetSpoint® software is installed.
Plug it. Forget it. Add to it.
You’ve got a Logitech® Unifying receiver. Now add a
compatible wireless keyboard or mouse that uses the same
receiver.
It’s easy. Just start the Logitech® Unifying software* and
follow the onscreen instructions.
For more information and to download the software, visit
www.logitech.com/unifying
*Go to Start / All Programs / Logitech / Unifying / Logitech
Unifying Software
4
3. Multimedia volume
zone
+ F9 Mute
FN
+ F10 Volume down
FN
+ F11 Volume up
FN
+ F12 Sleep mode
FN
3
FN
4.
key
5. Light-check hot key
6. Keyboard power switch
7. Solar cells
5 English
Page 6
Logitech® Wireless Solar Keyboard K750
Help with setup: keyboard not working
• ChecktheUnifyingreceiver. Also, try changing USB ports.
• Movecloser? Try moving the K750 closer to the Unifying receiver, or plug the Unifying receiver into the Wireless extender if you
are using a tower PC.
• IstheK750turnedon? Slide the keyboard Off/On switch to Off and then to On position.
• Re-establishtheconnection. Use the Unifying software to reset the connection between the K750 and Unifying receiver. Refer
to the Unifying section in this guide for more information.
• Restartthecomputer.
• PresstheLight-checkhotkey. If the Light-check LED produces no light, the K750 is out of energy. To use the K750 again,
significantly increase the amount of light over the keyboard to a level you might see in a brightly lit office. It may take a day or
two for the K750 to recharge when exposed to this increased level of illumination, but only several hours if the K750 is placed in
direct sunlight.
Note Any time the Light-check LED flashes red automatically, the K750 is nearly our of energy and needs more light to keep
working on a long-term basis.
• DownloadandusetheSolarApp. This handy widget gives you an easy and more visual way of checking the available light
hitting the K750 while keeping track of the keyboard’s energy reserve. Download the Solar App from www.logitech.com/k750/
solarapp
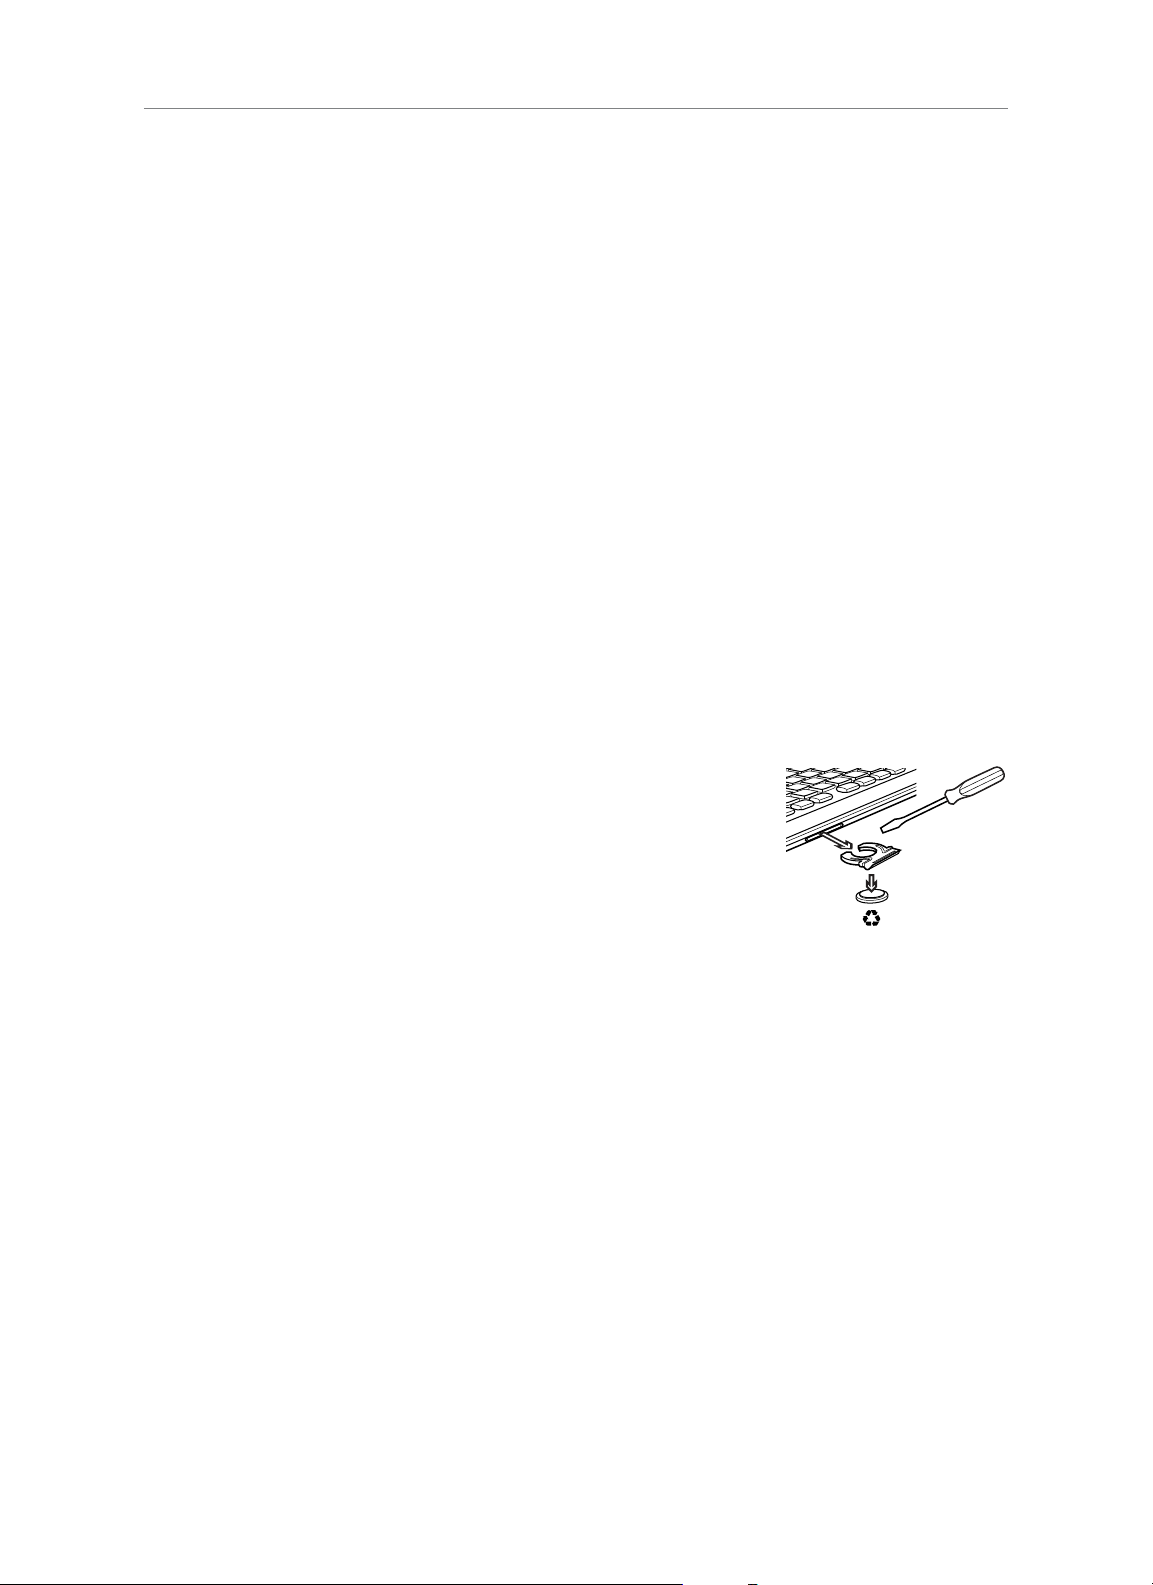
Handling the product at end of life
When you have made the decision to stop using your product, recycle it according to your local laws. Follow the instructions below
to remove the battery (not user replaceable) from the keyboard, and then recycle both the keyboard and battery as recommended in
steps 3 and 4.
1. Use a screwdriver to open the battery tray.
2. Carefully remove the battery from the tray.
3. Hand over the spent battery to the appropriate collection point for the recycling of batteries.
4. Hand over the product to the appropriate collection point for the recycling of electrical and
electronic equipment.
6 English
Page 7

包裝內容
Logitech® Wireless Solar Keyboard K750
設定鍵盤
1
無線太陽能鍵盤 K750
Unifying
接收器
清潔布
1. 將 Unifying 接收器插入電腦的 USB 連接埠。針對直立式電腦,
請使用無線延伸器以盡可能降低無線電頻率 (RF) 干擾的可能性。
2. 拉開標籤以啟用鍵盤。
3. 開啟鍵盤電源。
無線延伸器
需要多少光源?
K750 僅需些許的光源就可運作並儲存電力。間接日光或室內照明也適用。
當 K750 持續處於昏暗的室內光線下,還是有足夠的電力可用。因為在室內環境下,通常會有陰暗的時候,所以建議白天時
盡量提供適量的室內光線。在較亮的環境或受陽光直射的位置時,K750 的充電時間較短。
即使是關機時,K750 也可自動儲存電力。所儲存的電力可讓您在沒有光線的環境下使用 K750 一段時間。K750 在充飽電力
時,可於完全黑暗的環境下運作至少三個月,才需要再充電。
檢查光線是否適量
如何得知 K750 是否有足夠的光線?請使用「光線檢測」快捷鍵。您會知道 K750 是否有足夠的照明。
1. 請確定 K750 的電源是否已開啟。
2. 請按下「光線檢測」快捷鍵。「光線檢
測」的 LED 燈會閃爍綠光或紅光,或完全
不亮。如需更多資訊,請參閱
檢測」LED 燈
。
判讀「光線
1
2
7 繁體中文
Page 8

Logitech® Wireless Solar Keyboard K750
判讀「光線檢測」LED 燈
• 「光線檢測」LED 燈閃爍綠光。K750 有收到足夠的光線,且已就緒可用。
• 「光線檢測」LED 燈閃爍紅光。K750 需要更多光線,才可繼續長時間運作。
注意 如果「光線檢測」LED 燈不亮,請參閱安裝說明,以取得更多資訊。
使用 Solar App
想以簡便且更視覺化的方法來檢查 K750 可用光線,同時保持追蹤鍵盤的電力儲備情況嗎?
請從 www.logitech.com/k750/solarapp 下載並安裝 Solar App
• SolarApp會在背景執行,並且在每當 K750 的電力儲備有變
化 (變多或變少) 時通知您。
• 請試著讓光線檢測儀保持指向 100 lux 或以上,以確保 K750
會有足夠的電力。
• 若要讓 Solar App 於前景中執行,請按下鍵盤上的「光線檢
測」快捷鍵。Solar App 會彈出,且光線檢測儀會自動啟動。
光線檢測儀
光線檢測儀讀數
電力儲備 (過去記錄)
電力儲備 (即時結果)
電力儲備讀數 (即時結果)
電力儲備的狀態通知
按一下以取得電力儲備管
理的指引
使用鍵盤的 F 功能鍵
方便使用的加強 F 功能鍵,便於讓您啟動應用程式。若要使用加強的功能 (黃色圖示),請先按住 FN 鍵;然後, 再按下想使
用的 F 功能鍵。
秘訣 如果您偏好直接存取加強的功能,而不要按下 FN 鍵,可在軟體設定中取消 FN 模式。*
* 必須要有 SetPoint™ 軟體 (可從
www.logitech.com/downloads
下載取得)。
第一步:請按住 FN 鍵
第二步:請按下
F 功能鍵
8 繁體中文
Page 9

鍵盤功能
Logitech® Wireless Solar Keyboard K750
1
5
7
6
2
4
1. 應用程式區
+ F1 網際網路首頁
FN
+ F2 啟動電子郵件
FN
應用程式
+ F3 啟動 Windows
FN
搜尋*
+ F4 啟動小算盤
FN
2. 多媒體導覽區
+ F5 啟動媒體應
FN
用程式
+ F6 上一首
FN
+ F7 播放/暫停
FN
+ F8 下一首
FN
3. 多媒體音量區
+ F9 靜音
FN
+ F10 音量降低
FN
+ F11 音量提高
FN
+ F12 睡眠模式
FN
* 如果已安裝 SetSpoint® 軟體,即可使用 One Touch Search (單鍵搜尋)。
插上後即可忘掉,並且輕鬆擴展。
您已擁有 Logitech® Unifying 接收器。現在您可以加
入使用相同接收器的相容的無線鍵盤或滑鼠。
步驟非常簡單。只需要啟動 Logitech® Unifying 軟體*
並遵循螢幕上的指示即可完成。
如需更多資訊以及如何下載此軟體的說明,請瀏覽
www.logitech.com/unifying
3
FN
4.
鍵
5. 光線檢測快捷鍵
6. 鍵盤電源開關
7. 太陽能電池板
* 依序執行「開始」/「所有程式」/「Logitech」/
「Unifying」/「Logitech Unifying Software」
9 繁體中文
Page 10

Logitech® Wireless Solar Keyboard K750
安裝說明:鍵盤沒有作用
• 請檢查 Unifying 接收器。同時,嘗試更換 USB 連接埠。
• 再靠近一點?嘗試將鍵盤移近 Unifying 接收器,或如果您是使用立式個人電腦,請將 Unifying 接收器插到無線延伸器。
• K750的電源是否已開啟?將鍵盤的 Off/On 開關滑動到 Off,然後再到 On 的位置。
• 重新建立連線。使用 Unifying 軟體重新設定 K750 與 Unifying 接收器之間的連線。請參閱本指南的「Unifying」一節以取
得更多資訊。
• 重新啟動電腦。
• 請按下「光線檢測」快捷鍵。如果「光線檢測」LED 燈不亮,表示 K750 沒電。若要再次使用 K750,請將鍵盤的光線量
大幅調高,例如達到明亮辦公室中的光線強度。將 K750 暴露於這種增強照明程度的環境下,可能要花一至兩天才能重
新充飽電力,但如果放置於陽光直射的位置,則僅需要幾小時即可完成。
注意 每當「燈光檢測」LED 燈自動閃爍紅光時,表示 K750 快要沒電,需要更多光線才能再保持長時間運作。
• 下載並使用 Solar App。這個方便的小工具,可讓您以簡便且更視覺化的方法來檢查 K750 的可用光線,同時保持追蹤鍵
盤的電力儲備情況。請從 www.logitech.com/k750/solarapp 下載 Solar App。
產品壽命結束時的處置
當您決定停用產品時,請依照當地法令做回收。請依照以下指引來從鍵盤卸除電池 (使用者無法更換),然後依照在步驟 3 與
4 中的建議來做鍵盤與電池的回收。
1. 使用螺絲起子打開電池槽。
2. 謹慎從槽中卸除電池。
3. 將電池交到適當的電池回收站。
4. 將鍵盤交到適當的電子電機設備回收站。
10 繁體中文
Page 11

包装内容
Logitech® Wireless Solar Keyboard K750
设置键盘
1
太阳能无线键盘 K750
Unifying
接收器
擦拭布
1. 将 Unifying 接收器插入到电脑的 USB 端口。如果您使用的是台式电脑,
请使用无线延长器尽可能减少射频 (RF) 干扰。
2. 拉出接环激活键盘。
3. 开启键盘。
无线延长器
需要多强的光照?
K750 只需要中等强度的光照即可正常工作并储存能量。间接日照或室内照明即可满足要求。
就算是持续在昏暗的室内灯光照射下工作,K750 也有足够的能量可用。但由于室内环境一般会有一些时段处于黑暗之中,因
而建议在一天中的大多数时间里都使用中等强度的室内灯光。在灯光明亮的环境中或在接受直接日照时,K750 的充电时间将
会大大缩短。
即使处于关闭状态,K750 也会自动储存能量。储存的能量使您可在无光照的环境下使用 K750 一段时间。充满电后,K750
在完全黑暗的环境中工作时间至少三个月,才需再次充电。
检查是否有充足的光照
如何知道是否有充足的光照可供 K750 使用?请使用“光照检查”热键。K750 将显示其是否接受了足够的光照。
1. 确保 K750 处于开启状态。
2. 按下“光照检查”热键。“光照检查”LED
将发出绿光或红光,也可能不发出任何灯
光。有关详细信息,请参见
查”LED
。
判读“光照检
1
2
11 简体中文
Page 12

Logitech® Wireless Solar Keyboard K750
判读“光照检查”LED
• “光照检查”LED 发出绿光。K750 正在接受足够强的光照,可供使用。
• “光照检查”LED 发出红光。K750 需要更强的光照才能继续长期工作。
注意 如果“光照检查”LED 不发出任何灯光,请参见“设置帮助”了解更多信息。
使用 Solar App
想要以更简单、更直观的方式检查 K750 的可用光照强度并持续跟踪键盘的能量储备情况?
请从 www.logitech.com/k750/solarapp 下载并安装 Solar App
• SolarApp将在后台运行并在 K750 的能量储备发生任何变
化(增加或减少)时向您发出通知。
• 尽量使光照检查测量仪指向 100 lux 或更大的值,以确保
K750 有充足的能量可用。
• 要在前台显示 Solar App,请按键盘上的“光照检查”热
键。Solar App 将随即弹出,并且光照检查测量仪也将立
即激活。
光照检查测量仪
光照检查测量仪读数
能量储备(历史)
能量储备(实时)
能量储备读数(实时)
能量储备状态通知
点击此处查看能量储备管
理的相关说明
使用键盘上的 F 键
用户友好的增强型 F 键使您可轻松启动应用程序。要使用增强功能(黄色图标),请先按住 FN 键,然后再按想要使用的 F 键。
提示 如果要直接使用增强功能而无需按住 FN 键,可在软件设置中取消 FN 模式。*
* 需要 SetPoint™ 软件(可从
www.logitech.com/downloads
下载)。
第 1 步:按住 FN 键
第 2 步:按想要
使用的 F 键
12 简体中文
Page 13

键盘功能
Logitech® Wireless Solar Keyboard K750
1
5
7
6
2
1. 应用程序区
+ F1 互联网主页
FN
+ F2 启动电子邮件
FN
应用程序
+ F3 启动 Windows
FN
搜索*
+ F4 启动计算器
FN
2. 多媒体导航区
+ F5 启动多媒体
FN
应用程序
+ F6 上一首曲目
FN
+ F7 播放/暂停
FN
+ F8 下一首曲目
FN
* 如果安装了 SetSpoint® 软件,则可启动“一键搜索”。
即插即忘、一联百通。
您已获得 Logitech® Unifying 接收器。立即连接使用同一
接收器的可兼容无线键盘或鼠标。
操作非常简单。只需启动 Logitech® Unifying 软件*并执
行屏幕说明即可。
4
3. 多媒体音量区
+ F9 静音
FN
+ F10 音量减小
FN
+ F11 音量增大
FN
+ F12 休眠模式
FN
3
FN
4.
键
5. “光照检查”热键
6. 键盘电源开关
7. 太阳能电池
有关详细信息,以及要下载该软件,请访问
www.logitech.com/unifying
*依次单击“开始”/“所有程序”/“罗技”/
“Unifying”/“罗技 Unifying 软件”
13 简体中文
Page 14

Logitech® Wireless Solar Keyboard K750
设置帮助:键盘不工作
• 检查 Unifying 接收器。同时尝试更换 USB 端口。
•
移近一点?移动 K750 使其更靠近 Unifying 接收器,或者,如果您使用的是台式电脑,请将 Unifying 接收器插入无线延
长器。
• K750是否已开启?将键盘的 Off/On 开关滑动到 Off 位置,然后再滑动到 On 位置。
• 重新建立连接。使用 Unifying 软件重置 K750 与 Unifying 接收器之间的连接。请参阅本指南中的 Unifying 部分了解更多信息。
• 重新启动电脑。
• 按下“光照检查”热键。如果“光照检查”LED 不发出任何灯光,则说明 K750 的电量已耗完。要再次使用 K750,请大幅
增加键盘所接受的光照强度,例如达到明亮办公室中的光强级别。在增强到这种光照强度后,K750 可能需要一至两天才
能充满电,但如置于直接日照下,则只需几个小时即可充满电。
注意 一旦“光照检查”LED 开始自动发出红光,就说明 K750 的电量已快用完,需要更强的光照才能继续长期工作。
• 下载并使用 Solar App。这个方便的小工具使您能够以更简单、更直观的方式检查 K750 的可用光照强度并持续跟踪键盘
的能量储备情况。请从 www.logitech.com/k750/solarapp 下载 Solar App
产品达到使用期限后的处理方式
当您决定停止使用该产品时,请根据当地法律进行回收利用。遵循下述说明从键盘中取出电池(不可由用户更换),并按照
第 3 步和第 4 步的指示对键盘和电池进行回收。
1. 使用螺丝刀打开电池槽。
2. 小心地将电池从槽中取出。
3. 将废旧电池交给适当的电池回收点。
4. 将键盘交给适当的电气和电子设备回收点。
14 简体中文
Page 15

내용물
Logitech® Wireless Solar Keyboard K750
무선 솔라 키보드 K750
키보드 설정
1
Unifying
수신기
청소용 천
1. Unifying 수신기를 컴퓨터 USB 포트에 연결합니다. 타워형
PC의 경우 무선 확장기를 사용하여 무선 주파수(RF) 간섭
을 최소화하십시오.
2. 탭을 잡아당겨 키보드를 활성화합니다.
3. 키보드를 켭니다.
무선 확장기
어느 정도의 빛이 필요합니까?
K750은 키보드 작동과 에너지 저장을 위한 약간의 빛만 있으면 됩니다. 간접적인 일광 또는 실내 조명이면 충분합니다.
K750은 조명이 있는 실내에 지속적으로 노출해 놓기만 하면 사용하기에 충분한 전원을 확보할 수 있습니다. 실내 환경에서는
일반적으로 조명이 꺼져 있어 어두울 때가 있으므로, 하루 중 일정시간 동안은 약간의 실내 조명을 유지하는 것이 좋습니다.
K750의 재충전 시간은 조명이 밝은 환경에 있거나 K750이 직사광선에 노출되는 경우 훨씬 적게 걸립니다.
K750은 전원이 꺼져 있는 경우에도 자동으로 에너지를 저장합니다. 그리고 저장된 에너지를 사용하여 일정 기간동안 다른
빛 없이도 K750을 사용할 수 있습니다. 한번 완충되면 K750은 최소 3개월동안 완전한 암흑속서도 재충전 없이 사용할 수
있습니다.
적당한 광원 확인
K750이 사용에 필요한 충분한 빛(조명)을 받고 있는지에 대한 여부를 어떻게 알 수 있습니까? 조명 확인 핫키를 사용하십시오.
삭제 K750이 충분한 빛을 받고 있는지 여부를 알려줍니다.
1. K750이 켜져 있는지 확인하십시오.
2. 조명 확인 핫키를 누릅니다. 조명 확인 LED
가 녹색 또는 빨간색으로 깜박이거나 불빛
이 전혀 나오지 않습니다. 자세한 내용은
'조명 확인 LED'보기 부분을 참조하십시오.
1
15 한국어
2
Page 16

Logitech® Wireless Solar Keyboard K750
조명 확인 LED 보기
조명 확인 LED가 녹색으로 깜박입니다. K750이 충분한 빛을 받고 있으며 사용할 준비가
되었습니다.
조명 확인 LED가 빨간색으로 깜박입니다. K750을 장시간 계속 작동하려면 더 많은 빛이
필요합니다.
참고 조명 확인 LED에서 불빛이 깜빡이지 않는 경우 설정에 대한 자세한 내용은 도움말을 참
조하십시오.
Solar App 사용
키보드의 잔여 에너지 변화를 확인하고, K750이 저장하는 에너지 량을 보다 쉽고 간편하게 확인하고 싶으십니까?
www.logitech.com/k750/solarapp에서 Solar App을 다운로드해서 설치하십시오.
Solar App• 은 백그라운드에서 작동하며 K750의
잔여 에너지가 변경(상승 또는 하락)될 때마다
알려줍니다.
조명 확인 측정기가• 100 lux(럭스) 이상을 가리키
도록 유지하여 K750이 충분한 양의 에너지를
확보할 수 있도록 하십시오.
Solar App• 을 앞쪽으로 불러오려면 키보드의 조명
확인 핫키를 누르십시오. Solar App이 표시되고
조명 확인 측정기가 즉시 활성화됩니다.
조명 확인 측정기
조명 확인 측정기 표시값
에너지 보유량(기록)
에너지 보유량(실시간)
에너지 보유량 표시값
(실시간)
에너지 보유량에 대한
상태 알림
에너지 보유량 관리에
대한 지침을 보려면 클릭
키보드의 F 키 사용
사용하기 간편한 향상된 F키를 사용하여 응용 프로그램을 쉽게 실행할 수 있습니다. 향상된 기능(노란색 아이콘)을
사용하려면FN 키를 누른 상태로 사용하려는 F 키를 누릅니다.
TIP FN 키를 누르지 않고도 향상된 기능을 직접 액세스하려는 경우 소프트웨어 설정에서 FN 모드를 바꿀 수 있습니다.*
* SetPoint™ 소프트웨어(
www.logitech.com/downloads
2단계: F 키를
누릅니다.
에서 다운로드 가능)가 필요합니다.
1단계: FN 키를 계속 누르고 있습니다.
16 한국어
Page 17

키보드 기능
Logitech® Wireless Solar Keyboard K750
1
5
7
6
3
FN
4.
5. 조명 확인 핫키
6. 키보드 전원 스위치
7. 태양 전지
1. 응용 프로그램 영역
+ F1 인터넷 홈
FN
+ F2 이메일 응용
FN
프로그램 실행
+ F3 Windows 검색
FN
실행*
+ F4 계산기 실행
FN
2
2. 멀티미디어 탐색
영역
+ F5 미디어 응용
FN
프로그램 실행
+ F6 이전 트랙
FN
+ F7 재생/일시
FN
중지
+ F8 다음 트랙
FN
4
3. 멀티미디어 볼륨
영역
+ F9 음소거
FN
+ F10 볼륨 작게
FN
+ F11 볼륨 크게
FN
+ F12 절전 모드
FN
* 원터치 검색(SetSpoint® 소프트웨어가 설치된 경우)
간편한 설치. 자유로운 이동. 다양한 장치 추가.
이 장치에는 Logitech Unifying 수신기가 포함되어 있습
니다. 이제 동일한 수신기를 사용하는 호환 가능한
무선 키보드 또는 마우스를 추가하기만 하면 됩
니다.
이 작업은 쉽고 간단합니다. Logitech® Unifying 소프
트웨어*를 시작하고 화면에 나타나는 지침을 따르
기만 하면 됩니다.
소프트웨어에 대한 자세한 내용을 보고 소프트웨
어를 다운로드하려면 www.logitech.com/unifying
을 방문하십시오.
*시작 / 모든 프로그램 / Logitech / Unifying / Logitech
Unifying Software로 이동합니다.
키
17 한국어
Page 18

Logitech® Wireless Solar Keyboard K750
설치 도움말: 키보드가 작동하지 않을 때
• Unifying수신기를 점검하십시오. 다른 USB 포트에도 연결해 보십시오.
• 키보드를 수신기에 가까운 위치로 옮겼습니까? K750을 Unifying 수신기에 가깝게 이동하거나 타워형 PC를 사용 중인 경우
Unifying 수신기를 무선 확장기에 연결하십시오.
• K750이 켜져 있습니까? 끄기에서 켜기 위치로 키보드의 켜기/끄기 스위치를 미십시오.
• 연결을 다시 설정하십시오. Unifying 소프트웨어를 사용하여 K750과 Unifying 수신기 간의 연결을 다시 설정하십시오.
자세한 내용은 이 가이드의 Unifying 사용 지침을 참조하십시오.
• 컴퓨터를 다시 시작하십시오.
• 조명 확인 핫키를 누릅니다. 조명 확인 LED에서 불빛이 나오지 않는 경우 K750의 에너지가 부족한 것입니다. K750을 다시
사용하려면 밝은 조명이 있는 사무실의 수준으로 키보드가 받을 수 있는 빛의 양을 대폭 늘리십시오. 이와 같이 방
안 조명 수준을 높이는 경우 K750을 재충전하는 데 하루나 이틀이 걸릴 수 있지만, K750을 직사광선에 노출시키면 몇 시간
이면 충분합니다.
참고 조명 확인 LED가 자동으로 빨간색으로 깜박이는 경우 K750은 에너지가 거의 부족한 상태이며 장시간 작동하려면 더
많은 빛이 필요합니다.
• SolarApp을 다운로드해서 사용하십시오. 이 편리한 위젯을 통해 키보드의 키보드의 에너지 잔여량을 확인하면서, 보다 쉽
고 간편하게 K750의 에너지 저장 상태를 확인할 수 있습니다. www.logitech.com/k750/solarapp에서 Solar App을 다운
로드하십시오.
수명이 다한 제품 처리
더 이상 제품을 사용하지 않기로 결정한 경우 현지 법률에 따라 재활용하십시오. 아래의 지침에 따라 키보드에서 배터리
(사용자가 교체할 수 없음)를 제거한 다음, 3단계 및 4단계에서 권장된 대로 키보드와 배터리 모두를 재활용하십시오.
1. 드라이버를 사용하여 배터리 트레이를 엽니다.
2. 트레이에서 배터리를 조심스럽게 꺼냅니다.
3. 배터리 재활용을 위해 사용한 배터리를 적합한 수거함에 폐기하여 주십시오.
4. 전기 및 전자 장비 재활용을 위해 제품을 적합한 수거함에 폐기하여 주십시오.
18 한국어
Page 19

Logitech® Wireless Solar Keyboard K750
19
Page 20

www.logitech.com
© 2010 Logitech. All rights reserved. Logitech, the Logitech logo, and other Logitech marks are owned by Logitech and may be
registered. All other trademarks are the property of their respective owners. Logitech assumes no responsibility for any errors that may
appear in this manual. Information contained herein is subject to change without notice.
621-000035.002
 Loading...