

Page 1

STANDARD BULK TRUCK SYSTEMSTANDARD BULK TRUCK SYSTEM
INSTALLATION PROCEDURESINSTALLATION PROCEDURES
LectroCount³
Page 2

Table Of Contents
SECTION page
1. System Overview 3
2. Installation Overview 4
3. Parts Requirements 4
3.1 Liquid Controls Supplied Components 4
3.2 Liquid Controls Supplied Options 4
3.3 Installer Supplied Parts 4
4. Electrical Check 5
5. Truck Cab Computer Installation 6
5.1 General Requirements 6
5.2 Locating Components 6
5.3 Electrical Power Connections 7
5.3.1 Overview 7
5.3.2 Run Battery Cable 7
5.3.3 Installation of Accessory Cable 8
5.4 Truck Seat Grounding 9
5.4.1 Static Electricity and Grounding 9
5.4.2 Installation of Ground Strap Kit 10
6. Supervisory Console Grounding 12
6.1 Grounding Strap Installation 13
7. Lap Pad Connection 14
8. Printer Mounting 14
8.1 Printer Connection & Printer Dimensional Drawing 14 & 15
9. Removal of Mechanical Registration Equipment 15
10. Installation of Electronic Temperature Volume Compensator 15
10.1 Installation of Strainer Cover Mounted Thermowells 16 & 17
10.2 Installation of Pipe Mounted Thermowells 18
10.2.1 For Canadian Installations 18
11. Mounting the Remote Supervisory Control Box (RSCB) 19
11.1 Liquid Controls Meters/RSCB with Internal Pulsers 19
11.2 LC Meter with External Pulse Output Device 20
11.3 Neptune Non-Compensated Meter Retrofit Kit 21
11.4 Neptune Temperature Compensated Meter Retrofit Kit 22
11.5 RSCB Mounting Bolt Pattern 23
12. Wiring the RSCB 24
12.1 Wiring of the Valve Solenoids to the RSCB 25
12.1.1 "Diddle" Valve Wiring 26
12.1.2 Liquid Controls Dual Stage Wiring 26
12.1.3 Single Stage Valve and Three Way Solenoid Wiring 26
12.2 Wiring of the RTD Temperature Probe to the RSCB 26
12.3 POD Wiring (Pulse Output Device) 26
12.4 Internal Pulser Wiring 27
12.5 Truck Cab Cable Routing 27
12.6 Connection of the Meter Signal Cable 28
12.6.1 Single Meter Systems 28
12.6.2 Dual Meter Systems 28
13. System Start-Up 28
14. Software Part Numbering System 29
15. Troubleshooting 29 - 37
16. Wiring Diagrams 38
16.1 Mounting Arrangements for Components w/ Brackets 43
Page 3

1. System Overview
The LectroCount3 On-Board Truck
Computer system works in conjunction
with many models of Positive
Displacement Flow Meters. It
accurately measures fuel deliveries,
prints priced receipts, and streamlines
driver record keeping. It can be
equipped with accessories that allow for
temperature volume compensation,
deliveries to be made (net volume), and
delivery information to be exchanged
between the truck computer and an
office computer.
The basic system consists of:
1. Remote Supervisory Control
Box/Remote Electronic Counter
Assembly (RSCB/REC) that is
mounted in place of mechanical
registration equipment on the meter.
2. Supervisory Control Module and
Printer that are mounted in the truck
cab.
3. Lap Pad operator interface.
For trucks equipped with two meters, a
dual meter configuration is available that
allows two RSCB/RECs to be connected
to a single truck computer.
This manual describes the installation of
these components and their
accessories. Read this entire
installation manual before beginning
the installation to make sure that you
understand the total scope of the
project. Specific installation
requirements will vary with the model of
truck. Meter type, configuration of
existing metering equipment, selected
options, and the type of fluid being
metered, all influence installation. Make
sure that the RSCB/REC, Electronic
Temperature Volume Compensation kit
(ETVC), pulser, and valves can be
installed in such a manner so as to not
interfere with routine service of the
meter, the strainer, and the meter
compartment door.
The conduit and wiring for the above
components need to be routed with
similar concerns in mind. If a dual meter
system is being installed, the
RSCB/REC, ETVC, pulser, and valve
work must be duplicated for the second
meter.
NOTE: Power, input and output (I/O) wiring must be in accordance with
Class I, Division 2, wiring methods in Article 501-4(b) of the National
Electrical Code, NFPA 70 and in accordance with the authority having
jurisdiction.
WARNING: Explosion Hazard - Substitution of Components May
WARNING: Explosion Hazard - When in Hazardous Locations, Turn
WARNING: Explosion Hazard - Do NOT Disconnect Equipment
Impair Suitability for Class I, Division 2.
Off Power Before Replacing or Wiring Modules;
Unless Power Has Been Switched Off or the Area is
Known to be Non-hazardous.
3
Page 4

2. Installation Overview
q Ensure that the truck electrical
system meets specifications and
can provide at least 5 Amps for
the LectroCount3 with all truck
accessories operating.
q Electrically ground the truck
seats.
q Mount supervisory control
module and printer in cab.
q Install battery/accessory cables.
q Install odometer kit (optional).
q Remove any existing mechanical
q Remove any existing manual
preset valve.
q Install an electronically controlled
security valve or solenoid kit.
q Mount RSCB / REC
q Install pulser assembly (optional)
q Install Electronic Temperature
Volume Compensation Kit
(optional).
q Route Meter Signal Cable to
truck cab.
registration equipment.
3. Parts Requirements
3.1 LIQUID CONTROLS SUPPLIED COMPONENTS
q RSCB / REC
q Meter Signal Cable (pre-wired to RSCB)
q Battery/Accessory Cable
q Supervisory Control Module
q Lap Pad (driver key pad)
q Ticket Printer with cables
3.2 LIQUID CONTROLS SUPPLIED OPTIONS
q ETVC Kit
q Pulse Output Device (pulser)
q Odometer Pulser
q Dual Meter Switch Box
q RAM Interface Module
q Two Stage Valve or 3-Way Solenoid
3.3 INSTALLER SUPPLIED PARTS
q Protective Sheathing/Conduit for cables
q All Fittings
q Hardware for Truck Computer Mounting Brackets
4
Page 5

4. Electrical Check
Before beginning to install the LectroCount3, it is essential that you complete the
following checklist. If the vehicle electrical system cannot meet the following
requirements, corrective action must be taken before installing the LectroCount3. This
checklist is also included with the system. That copy should be filled out and filed with
the distributor or truck builder. NOTE: Contact the factory if the truck has a positive
ground.
The truck system must meet the following requirements:
q Battery terminals and cables must be in good condition with clean, corrosion free
connections.
q Battery must be charged in accordance with manufacturer’s specifications.
q The alternator must be large enough to meet the total demands of the truck,
including the LectroCount3. LectroCount3 requires 5A minimum for proper
operation. A typical alternator size is 90 amperes.
q If the truck has a history of electrical problems, make sure that these problems
have been corrected before installing the LectroCount3.
q Inspect all truck electrical/electronic equipment for proper installation.
q Determine if the truck is positive or negative ground. (If the system is positive
ground, contact the factory).
q Be sure that the radio antennas were installed in accordance with the
manufacturer’s specifications to prevent RF interference.
To ensure that these requirements are met, check the voltage across the battery
terminals under the following conditions:
LectroCount
3
Vehicle Inspection Check List
With the truck running at low idle, and all accessories off, the voltage should be between
12.6 and 18 VDC.
With all the accessories (lights, heater, radio, and radio mike) on, the voltage must be
between 12.6 and 18 VDC. If the voltage drops significantly when the accessories
are turned on, it may indicate that the alternator will not be able to support the
LectroCount3.
Extend the delivery hose to its full length, engage the hose reel and measure the voltage
as the hose is reeled in. It shouldn’t drop below 10VDC.
With the truck running at high idle, and all accessories off, check the voltage. Again it
should be between 12.6 and 18 VDC.
Repeat the hose reel test with the truck at high idle. Make sure that the voltage does not
drop below 10 VDC.
5
Page 6

5. Truck Cab Computer Installation
5.1 GENERAL REQUIREMENTS
A minimal truck cab computer system
includes:
1. A supervisory control module (SCM)
that is mounted between two right
angle brackets
2. A dot matrix ticket printer
3. A Lap Pad (key pad/display).
Systems equipped with the RAM card
option will have a RAM interface module
mounted atop the supervisory control
module. Dual meter systems will have a
Dual Meter Switch mounted below the
SCM. (See Figure to the right)
The truck computers are shipped with
the components and brackets
assembled. The installer has to bolt the
brackets to the cab floor, ground the
SCM to the truck electrical system, and
route the power and signal cables to the
appropriate connectors on the SCM and
Dual Meter Switch.
Component Configuration
Single Meter/Non-RAM Configuration
Truck Cab
The printer also needs to be mounted in
the truck cab, usually on top of the SCM
“stack”. The Lap Pad is secured in a
holder on the side of one of the
brackets.
5.2 LOCATING COMPONENTS
The SCM bracket should be mounted in
a location where:
q Both the front and back can be
accessed to connect cables
q The Lap Pad and printer will be
accessible to the driver.
q The Supervisory Control Module
fuses can be replaced.
q There is enough room to insert and
remove a RAM card from the RAM
interface module. (RAM systems
only)
Single Meter / RAM Configuration
Dual Meter / RAM System
6
Page 7

5.3 ELECTRICAL POWER CONNECTIONS
5.3.1 Overview
The LectroCount3 is designed to run only
when the ignition switch is in the “on” or
“accessory” position. This prevents the
LectroCount3 from being damaged by
the voltage spikes or electrical noise
that occur when the starter is engaged,
or from draining the truck battery power
when the truck isn’t running.
Voltage from the battery is switched by
a relay that is controlled by the truck’s
accessory circuit. It is vital that the
battery and accessory cables be
properly connected and fused, and that
the SCM is properly grounded.
5.3.2 Run Battery Cable
(Part Number 81232)
The battery cable is supplied with
heavy-duty ring terminals that must be
installed directly to the battery posts.
Make sure that the truck’s electrical
system has been properly checked.
Clean the battery terminals for a
good electrical connection.
q Remove the ATO 7.5 amp fuse from
the battery cable’s black splashproof fuse holder so that the wire is
not live while the cable is routed and
terminated.
q Attach the black cable to the
negative (-) terminal of the battery.
q Connect the orange cable terminal
to the positive (+) terminal of the
battery.
q On truck systems with several
batteries connected in parallel, the
last battery in the system usually has
the least number of connections and
will be the best location to attach the
battery cable.
q Route the cable to the supervisory
control module in the truck cab.
q Seal any holes that you may have
made in the cab wall.
(continued next page)
7
Page 8

q Make sure that you route the cable
in such a manner so as not to
interfere with the operation or
maintenance of the truck.
q The wires will be connected to a
three pin terminal block on the back
of the SCM.
q The block can be removed from the
SCM to ease the process.
q Use a 1/8” screwdriver to back off
the terminal block screws.
q Strip 7/32” of insulation from the
wires.
q Connect the white wire to Pin 2 on
the block and connect the black wire
to Pin 3.
q Make sure that the screws are re-
tightened and that no loose strands
of wire are exposed.
5.3.3 Install Accessory Cable
(Part Number 80747)
The accessory cable consists of a RED and a BLACK conductor in a shielded cable.
The conductors are both connected to the same ring terminal on one end. They are not
terminated on the other end.
The accessory cable must be wired to the truck’s accessory circuit. The power to this
circuit should be:
q OFF when the ignition is off or the engine is cranking,
q ON when the truck is running or the ignition switch is in the “accessory”
position:
Key Switch OFF 0VDC
Key Switch ON 12 VDC (battery voltage)
Key Switch ACCESSORY 12 VDC (battery voltage)
Key Switch or starter button CRANKING 0 VDC
q Check the voltage using an accurate multi-meter.
q Be sure to use a good ground to avoid false readings.
q The voltage should drop momentarily to 0 as the engine is cranked.
If the ignition switch is accessible:
q Connect the ring terminal on the
accessory cable to the accessory
stud on the switch.
q It is usually best to install the ring
terminal over the stud and the nut
that hold the existing accessory
wires in place.
q An additional nut should then be
used to hold the LC accessory cable
on the stud.
8
Page 9

If the ignition switch is not
accessible:
q Install a voltage tap on the
accessory fuse.
q Remove the ring terminal from the
accessory cable.
q Connect both the red and black
conductors in the cable to the fuse
tap.
q Trim back the drain wire and foil
shield at the outer insulation on the
cable.
q Use electrical tape or heat
shrinkable tubing to insulate the
edge of the shield.
q Route the cable to the rear of the
supervisory control module.
5.4 TRUCK SEAT GROUNDING
5.4.1 Static Electricity and Grounding
q Trim the cable to the appropriate
length and strip back the outer
insulation, foil shield, and drain wire.
q Use electrical tape or heat
shrinkable tubing to insulate the
edge of the shield.
q Remove 7/32” of insulation from
both the red and black conductors,
twist the wires together, and insert
them in Pin 1 of the three pin
terminal block.
q Tighten the terminal block screw
using 1/8” flat blade screwdriver.
q Plug the terminal black back into the
SCM.
Static electricity can build up on drivers
and truck seats, especially during cold,
dry weather. Adjustable, shockabsorbing seats add to the problem
because they isolate the seat cushion
from an electrical ground. If the static is
it can cause the truck computer to reset
and/or cause a number of other hard to
trace faults. The discharge can occur
when the driver touches the
LectroCount3 or a part of the truck that
provides a good ground path.
discharged on or near the LectroCount3,
WARNING
To prevent the occurrence of electrostatic discharge (ESD), it is
mandatory that the truck seat(s) be properly grounded. This allows
the static electricity to “bleed off’ the driver and seat before it can
build up to the point where a discharge can interfere with the
operation of the LectroCount3 (or cause an explosion in hazardous
environments!)
9
Page 10

5.4.2 Installation of Ground Strap Kit
q Locate a good ground point near the back of the seat frame. The bottom of the seat
base bracket is usually a good spot.
q Drill a 9/32” hole in the seat frame near the back of the base.
q Attach one end of the ground strap to the bracket using the lock washer, flat washer
and nut provided. The lock washer should penetrate any paint on the bracket to
ensure a good electrical connection.
q Attach the other end of the strap to a metal part of the seat frame at a point where it
contacts the seat cushion. Make sure that there are no intervening pivot points,
guides, adjustment mechanisms, etc., which could interfere with the ground path
between the seat cushion and the ground strap.
q If the seat cushion has a wooden base, use a wood screw and washer to attach the
strap lug to the bottom of the seat at a point where the seat fabric is attached to the
wood. There must be good contact between the seat fabric and ground strap lug.
q Make sure that the strap is positioned so that it doesn’t interfere with the movement
of the seat or is exposed to physical damage.
Checking for a good ground
The resistance should be checked. Use a multi-meter to test the resistance between a
bare spot on the seat frame and PIN 3 on the SCM power connector.
(The ground terminal should be connected directly to the negative terminal of the battery
on a negative ground system)
The test should be done with all accessories, including the dome light, turned OFF. This
will prevent other currents from distorting the measurement.
If the resistance is less than 3 ohms:
The system is grounded sufficiently and no further action is necessary.
If the resistance is greater than 3 ohms:
Locate a better ground on the base of the seat or at some other point in the cab.
“Fan fold” the excess ground strap and tie it with a wire tie to the back of the seat frame.
Make sure that you have left enough slack in the strap to accommodate the seat’s full
range of adjustment.
10
Page 11

A. Air Cushion Type Seat-Adjustable for Height (Bostrom 914 Series Seat or
Equivalent)
B. Air Cushion Type Seat-Adjustable for Height (This includes Dura-Form
Seats or equivalent)
11
Page 12

C. Bench Style Seats-Adjustable for Distance to Steering Wheel (Includes
Manufacturers Standard Production Seats
6. Supervisory Control Module Grounding
The Supervisory Control Module (SCM) case must be grounded to a good chassis
ground on the truck to ensure proper operation. Usually, a good ground path is
established from the SCM case through the mounting brackets and bolts to the chassis.
The ground effectiveness can be reduced over time due to corrosion, dirt, etc., leading to
electrostatic discharge problems.
The ground path should be checked, whenever the LectroCount³ is serviced. This
ensures that the SCM’s case remains properly grounded.
Checking for a good ground:
Resistance should be checked using a multi-meter. Testing should be done with all
accessories, including the dome light, turned OFF to prevent other currents from
distorting the measurement.
Measure the resistance between one of the silver hex head screws on the LectroCount³
mounting bracket and the ground terminal (Pin 3) on the power plug of the SCM.
(The ground terminal should be connected directly to the negative terminal of the battery
on a negative ground system.)
12
Page 13

If the resistance is less than 3 ohms:
The system is grounded sufficiently and no further action is necessary.
If the resistance is greater than 3 ohms:
A grounding strap needs to be attached between the mounting bracket and a
good ground in the cab.
6.1 GROUNDING STRAP INSTALLATION
Mobile Installations
One end of the strap should be attached to the SCM mounting bracket per the following
picture:
Use a star washer between the lug and the bracket. Make sure that the washer
penetrated the paint on the bracket. Attach the other end of the strap to a convenient
ground point in the cab.
The bolt used to ground the seat ground strap on the seat base is usually a good
location. Measure the resistance between the silver hex head screw and (Pin3) again to
make sure that the system is grounded sufficiently.
If the resistance is still greater than 3 ohms:
• Make sure that the proper metal to metal contact is being made on both ends
of the grounding strap. Clean any paint or oxidation that may have
accumulated on the grounding point. Recheck the resistance again.
• Attach the ground strap to another ground point in the cab and repeat the
process.
Fixed Installations
If the LectroCount3 is being installed in a fixed installation, a ground wire should be
connected between one of the silver hex head screws on the SCM chassis and earth
ground on the power supply.
13
Page 14
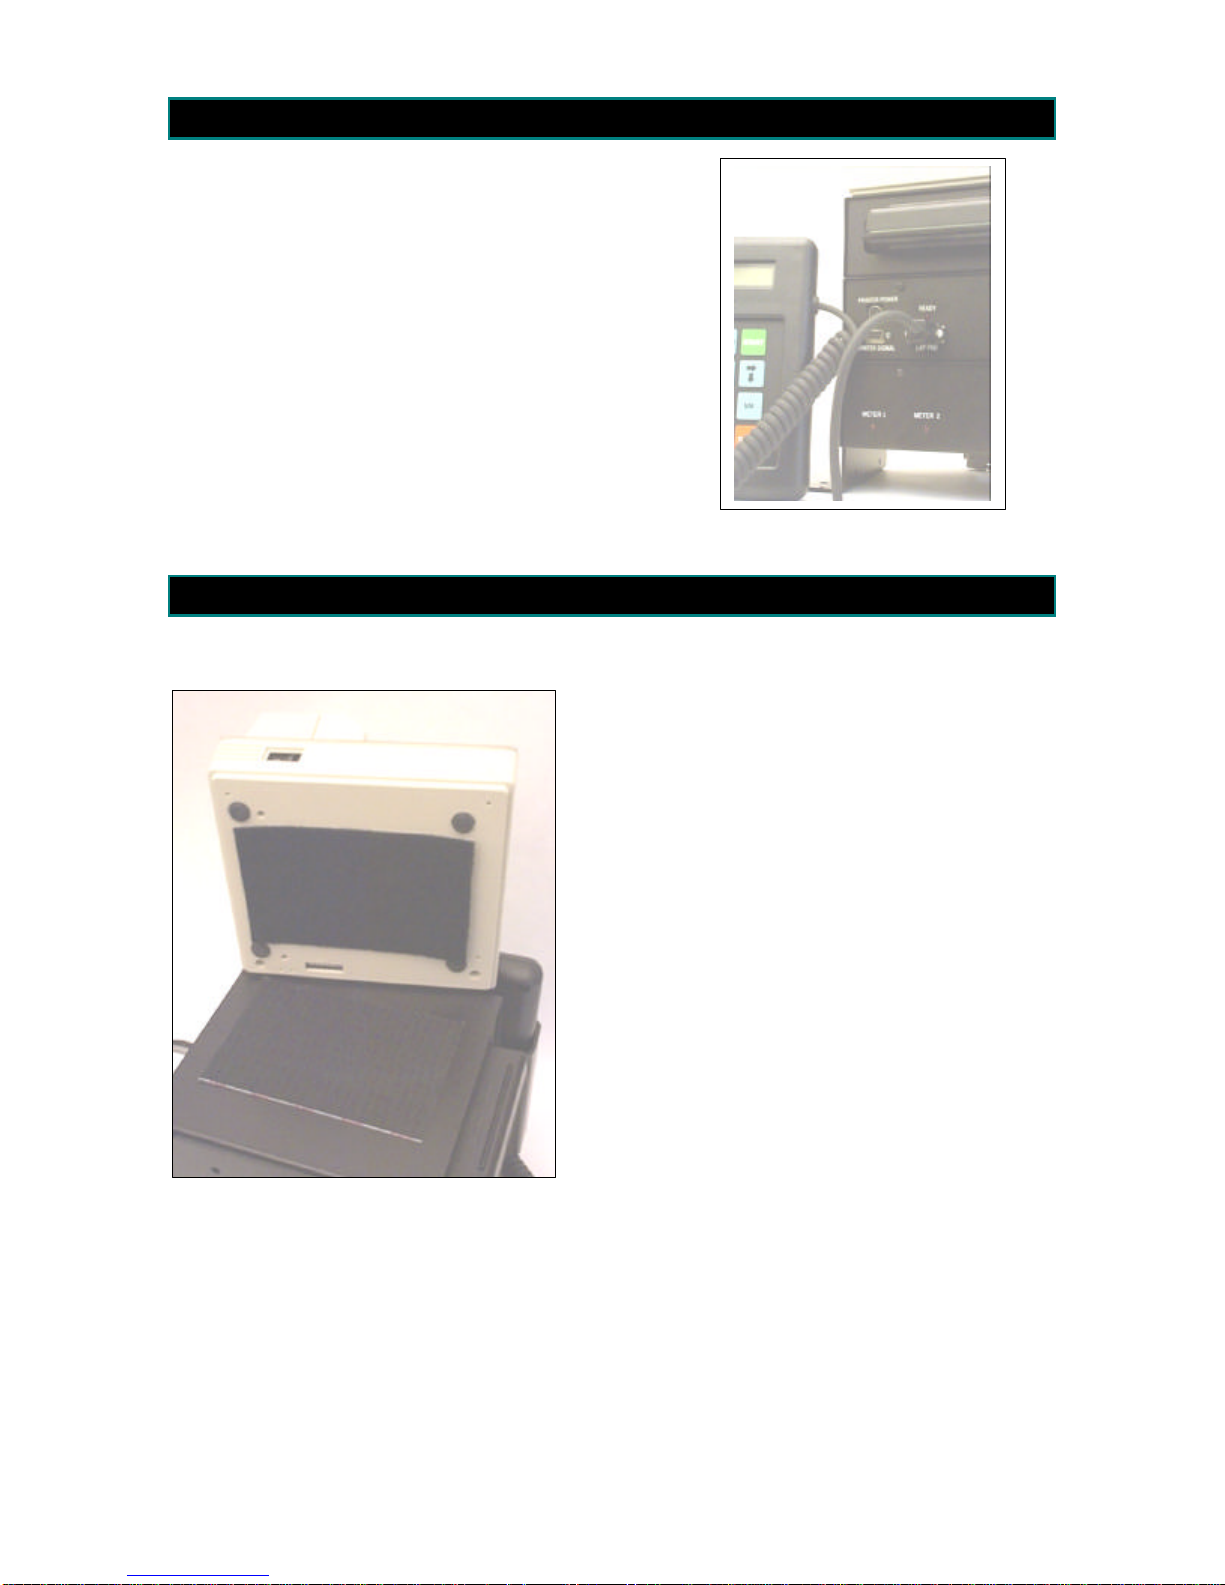
7. Lap Pad Connection
The “D” connector on the end of the Lap Pad’s coiled
cable should be plugged into the socket labeled “Lap
Pad” on the front of the supervisory console. Tighten
the two captive screws on the connector to hold it in
place.
8. Printer Mounting
8.1 PRINTER CONNECTION
The printer is connected to the
supervisory console via data cable and
a power cable.
The data cable is terminated with a 25
Pin D-connector on the printer end.
The printer is usually mounted on top of the top
module of the SCM bracket assembly. It can
also be mounted on the dash, the passenger
seat, or any other location in the cab that is:
• Level
• Not subject to physical abuse
• Easy for the driver to reach
• Within reach of the printer’s data and
power cables
Industrial strength Velcro (supplied with the
printer) is used to hold the printer in place.
Always place the same type of Velcro (hook or
loop) on the printer to enable easy replacement.
This plugs into the socket labeled “RS232” on the back of the printer, and into
the socket labeled “Printer Signal” on
the supervisory console.
14
Page 15
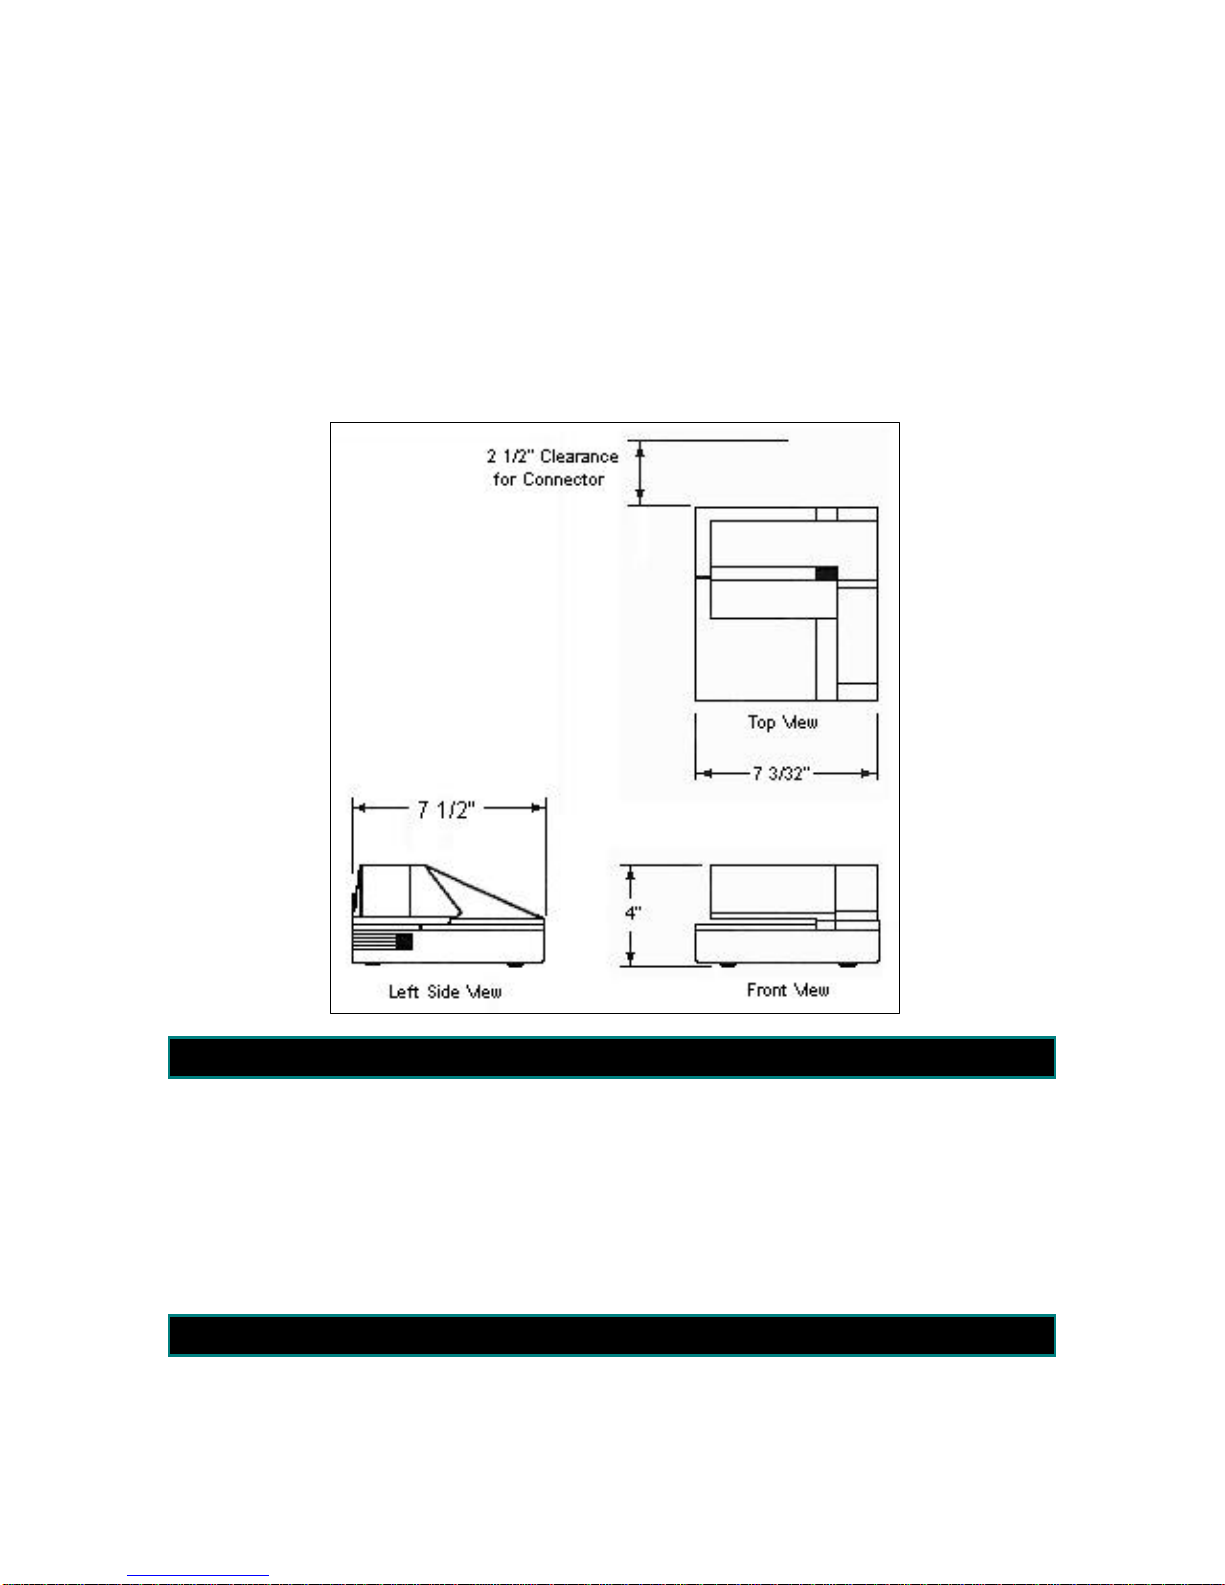
The power cable is terminated in round,
3 conductor connectors on both ends.
The printer end plugs into the socket
labeled ‘24VDC” on the back of the
printer and the socket labeled “Printer
Power” on the front of the supervisory
console.
E-4900-1 Printer Dimensional Drawing
Avoid placing undue stress on the cable
connectors. (i.e. avoid tight bends,
make sure that the cable is properly
supported independently from the
connector.)
The Sockets labeled “KD” (telephone
style connector) and “FG” on the back of
the printer are NOT used.
9. Removal of Mechanical Registration Equipment
Remove the existing mechanical
register components (if present) by
removing the four bolts that attach the
register “stack” to the meter and lifting
the stack off of the meter.
If you are retrofitting to Neptune Meters,
remove all of the mechanical
10. Install Electronic Temperature Volume Compensator
Nine different ETVC kits are available for use with the LectroCount3 System. Nine of the
kits are designed for installation on common strainers. One is for use on systems where
a strainer cover is not available, or when physical constraints prevent its installation.
components from the meter, leaving just
the star shaped gear and two squareheaded studs.
If the system is equipped with a
mechanical temperature volume
compensation system, remove all of the
mechanical TVC components.
15
Page 16

CAUTION!!!
Be sure to relieve all pressure on the system before installing the ETVC.
10.1 INSTALLATION OF STRAINER COVER MOUNTED THERMOWELLS
q Remove the old cover from
the strainer.
q While the cover is off,
remove the strainer basket,
clean it thoroughly, and then
reinstall it.
Union Fitting
q Lightly coat the new cover
O-ring with grease and place
in position on the strainer.
q Bolt the strainer cover in
place, ensuring that the
weights and measures
thermowell tip points
downwards in the strainer.
q On some cover castings the
designation “this side up” or
an arrow is cast in the cover
to indicate the proper
orientation.
q The weights and measures
thermowell will be filled with
appropriate oil at the time of
inspection. Until then, coat the
supplied 3/8-inch NPT pipe plug with
thread sealant and thread it into the
hole.
Slotted Disk
4 Foam Washers
RTD Probe
Thermowell
RTD PROBE / THERMOWELL
INSTALLATION
16
Page 17

INSTALLATION OF STRAINER COVER MOUNTED THERMOWELLS (CONT.)
q The aluminum thermowell will be
used for the 3-wire platinum RTD
temperature probe.
q Before inserting the probe into the
aluminum thermowell, thoroughly
coat the entire probe length with the
copper, heat transfer grease that is
supplied.
q Insert, then remove, the probe from
the thermowell. Re-coat the end of
the RTD with the heat transfer
grease. Repeat the
insertion/removal process 2 or 3
times. This will provide a uniform
coating inside the thermowell that
ensures the proper heat transfer
from the liquid to the probe inside
the thermowell.
q The kit includes four foam washers
and a slotted metal disc. Slide the
foam washers down the RTD wires
and position them at the tail end of
the RTD.
RTD INSTALLED IN THERMOWELL
q Re-coat the RTD probe and insert it
into the thermowell for the final time.
Position it as far down in the
thermowell as possible.
q The foam washers should “bottom
out” inside the hex nut body of the
thermowell. The disc should be
positioned on top of the foam
washers with the RTD wires running
through its slot.
q Next, feed the RTD wires through
the explosion proof union. Thread
the male ½ NPT side of the union
into the thermowell until the union
contacts the disc and compresses
the foam washers. The number of
washers can be added or subtracted
to provide an optimum fit.
q The slotted disk will prevent the RTD
from being removed from the
thermowell, without removing the
union. After attaching the conduit,
the union should be sealed with the
seal wire kit.
17
Page 18

10.2 INSTALLATION OF PIPE MOUNTED THERMOWELLS
q Re-coat the RTD probe with the
Thermowells can also be installed in half
couplings that are welded in place on
the fluid line.
The two thermowells should be located
within 3” to 6” of each other and within 3
ft. of the meter inlet or outlet.
Avoid placing thermowells directly in
line, or a vortex may form behind the
first thermowell. This could affect the
temperature reading of the second
thermowell.
Both thermowell tips must point to the
center of the pipe.
A ½” NPT half coupling should be used
for the RTD stainless steel ½” NPT
thermowell.
The RTD well must be filled with the
copper, heat transfer grease (supplied).
The RTD must be positioned within 90
degrees of vertical. There must be
enough clearance to allow the RTD and
its electrical conduit to be installed, or
removed for service.
The stainless steel thermowell is used
for the 3-wire platinum RTD temperature
probe. Before inserting the probe into
the thermowell, thoroughly coat the
entire probe length with the copper, heat
transfer grease.
q Insert, then remove the probe from
the thermowell. Re-coat the end of
the RTD with the copper grease and
repeat the inserting/removal process
2 or 3 times. This will help make the
grease coating uniform inside the
thermowell, ensuring the heat
transfers from the liquid to the probe
inside the thermowell.
q The Thermowell Installation kit also
includes four foam washers and a
slotted metal disc.
q Slide the foam washers down the
RTD wires and position them at the
tail end of the RTD.
grease and insert it into the
thermowell for the final time,
positioning it as far down in the
thermowell as possible.
The foam washers should “bottom out”
inside the Hex nut body of the
thermowell.
The disc should be positioned on top of
the foam washers, with the RTD wires
running through its slot.
q Next, feed the RTD wires through
the explosion proof union. Thread
the male ½" NPT side of the union
into the thermowell until the union
contacts the disc and compresses
the foam washers.
The washers can be added or
subtracted to provide an optimum fit.
The slotted disc will prevent the RTD
from being removed from the thermowell
without removing the union.
After attaching the conduit, the union
should be sealed with the seal wire kit.
10.2.1 For Canadian Installations
q A 3/8” NPT half coupling must be
welded in place to accommodate the
brass or stainless 3/8” NPT Weights
and Measures thermowell.
q The thermowell will be filled with a
light oil
q It needs to be positioned with 60
degrees of vertical to allow it to be
filled.
q Make sure that there is enough
clearance (typically 4 to 8 in.) to
allow the weights and measures
temperature probe to be inserted
and remove.
18
Page 19

11. Mounting the Remote Supervisory
Control Box (RSCB)
The RSCB can be mounted directly on,
or near, a liquid flow meter. To
accommodate the variety of different
Specific installation instructions are
available for mounting the RSCB on
the following:
meter styles, the RSCB is available in
two styles:
q Liquid Controls Positive
Displacement Meters
1. With internal pulser.
2. Without internal pulser
Installation kits are available from Liquid
Controls to facilitate the RSCB
installation on many industry standard
meters.
q Neptune Meters
q Neptune Meters w/Temp
Compensator
11.1 LIQUID CONTROLS METERS/RSCB WITH INTERNAL PULSERS
The internal pulser version of the RSCB allows traditional mechanical registration
equipment to be easily replaced with the LectroCount³ electronic register.
(Requires Part Number 81369 Mounting Kit, LC Meter)
q Remove the
mechanical register
components from
the counter bracket
by removing the 4
bolts that attach
them to the meter
flange.
RSCB with an internal pulser mounted on a LC
meter with a two piece cover.
q Remove the adjuster
(and adjuster
mounting plate, if
present) from the
counter bracket.
q Replace the old
meter drive shaft
and bearing with
new drive shaft,
(item#8), and
bearing, (item #9),
using the original
face gear in either
right to left of left to
right positions.
19
Page 20

q Remove the cotter pin from the drive
shaft on the bottom of the RSCB,
taking care not to lose the washer.
Avoid pushing shaft into housing
until drive shaft adapter, item #1, is
pinned onto shaft.
q Place the o-ring; item #3, onto the
pulser drive shaft of the RSCB.
q Place the drive shaft adapter, item
#1, over the pulser drive shaft and o-
ring, lining up the cross-drilled holes.
Make sure that the shaft adapter is
pushed up over the o-ring. Secure
the Drive Shaft Adapter to the Pulser
Drive Shaft, with a cotter pin item
#2.
q Place the RSCB on the counter
bracket, sliding the drive shaft
adapter over the drive shaft of the
meter. Check for shaft engagement.
q Attach RSCB to counter bracket with
4 screws, items #4 and #7, and 4
washers, item #5. (Two of the
screws have been cross drilled to
accommodate a Weights and
Measures seal.)
11.2 LC METER WITH EXTERNAL PULSE OUTPUT DEVICE
The pulse output device replaces the
dynamic seal of a packing gland with a
static seal.
The motion of the meter rotor is
magnetically coupled to the meter when
a POD or other external pulser is used.
The RSCB is not mechanically coupled
to the meter when a POD or other
external pulser is used. The RSCB can
be mounted up to 1000 feet (304.m)
away from the meter. The installer must
provide a suitable bracket to support the
RSCB if it is mounted remotely.
If the RSCB is being mounted directly to
the meter, the RSCB mounting kit is
required.
The POD can only be attached to LC
meters with two piece covers that were
manufactured after 1990.
To install the RSCB mounting kit:
q Attach the short side of the RSCB
mounting bracket to the RSCB using
the four .250-20 x .750” screws and
lock washers provided.
q The right angle bend of the bracket
should be lined up with the front of
the RSCB.
q Attach the bracket and RSCB
assembly to the front meter cover
using the four .250-28 x .750”
screws provided.
q Make sure that the hole in the meter
cover center, lines up with the hole
in the bracket.
q Install the pulse output device
according to the instructions in its
manual (Series E2800”Installation,
Operation, and Parts Manual).
20
Page 21

11.3 NEPTUNE NON-COMPENSATED METER RETROFIT
Field Installation / Replacement of Register Stack With RSCB
Using 81364 Neptune Mounting Kit
q Remove all of the mechanical register components from the meter. Leave just the
star-shaped gear and the two square-headed studs.
q Screw the two cone-tipped clamping screws, (item #7) into sides of adapter bracket,
(item #6), until the conical tip is protruding inside of the bracket.
q Place the bracket onto Neptune meter. Place the square-headed studs through the
holes on the same legs as the cone-tipped screws. Place mounting screws, (item
#4), with washers, (item #3), through the other two holes in the bottom of the
bracket. Screw them into the Neptune meter. Make sure that the bracket is flush
with the meter casting.
q Tighten the cone-tipped clamping screws until the conical tips engage firmly against
the tapered sides of the square-headed studs.
q Remove the cotter pin from the drive shaft on the bottom of the RSCB, taking care
not to lose the washer. Place the driver, (item #5), onto the drive shaft and secure
with the cotter pin, (item #1). Avoid forcing the shaft into the RSCB housing.
q Place RSCB on the adapter bracket. Carefully align the four-pronged driver with the
star-shaped gear. Make sure that all four of the driver’s prongs are properly aligned
with the teeth of the star gear. Fasten the RSCB to the bracket using four screws,
(item #2), and four washers, (item #9).
Correct INCORRECT!
Alignment of Star-Shaped Gear and RSCB Driver
21
Page 22

11.4 NEPTUNE TEMPERATURE COMPENSATED METER RETROFIT KIT
Remove the mechanical registration equipment and the mechanical Temperature
Volume Compensator from the top of the meter.
q Remove the cotter pin from the drive
shaft on the bottom of the RSCB,
taking care not to lose the washer.
q Position the adapter shaft (item #2)
over the pulser shaft. Align the
cross-drilled holes. Secure them in
position with a cotter pin. Remove
the cotter pin from the drive shaft on
the bottom of the RSCB, taking care
not to lose the washer. Place the
driver, (item #5), onto the drive shaft
and secure with a cotter pin (item
#1). Avoid forcing the shaft into the
RSCB housing.
q Position the weather plate
(item #8) on the bottom of the
RSCB.
q Install the Adapter Flange Assembly,
(item #1), on the bottom of the
RSCB. Secure it and the weather
plate with four screws and washers.
q Attach the Neptune Driver Adapter
to the bottom of the adapter shaft
with a cotter pin.
q Position the adapter flange
assembly on top of the meter. Be
sure to center the four arms of the
driver adapter over the meter’s star
gear.
q Fasten the adapter flange to the
meter using 4 screws and washers.
RSCB Mounting Kit for Neptune
Meter with Mechanical
Temperature Compensation
22
Page 23
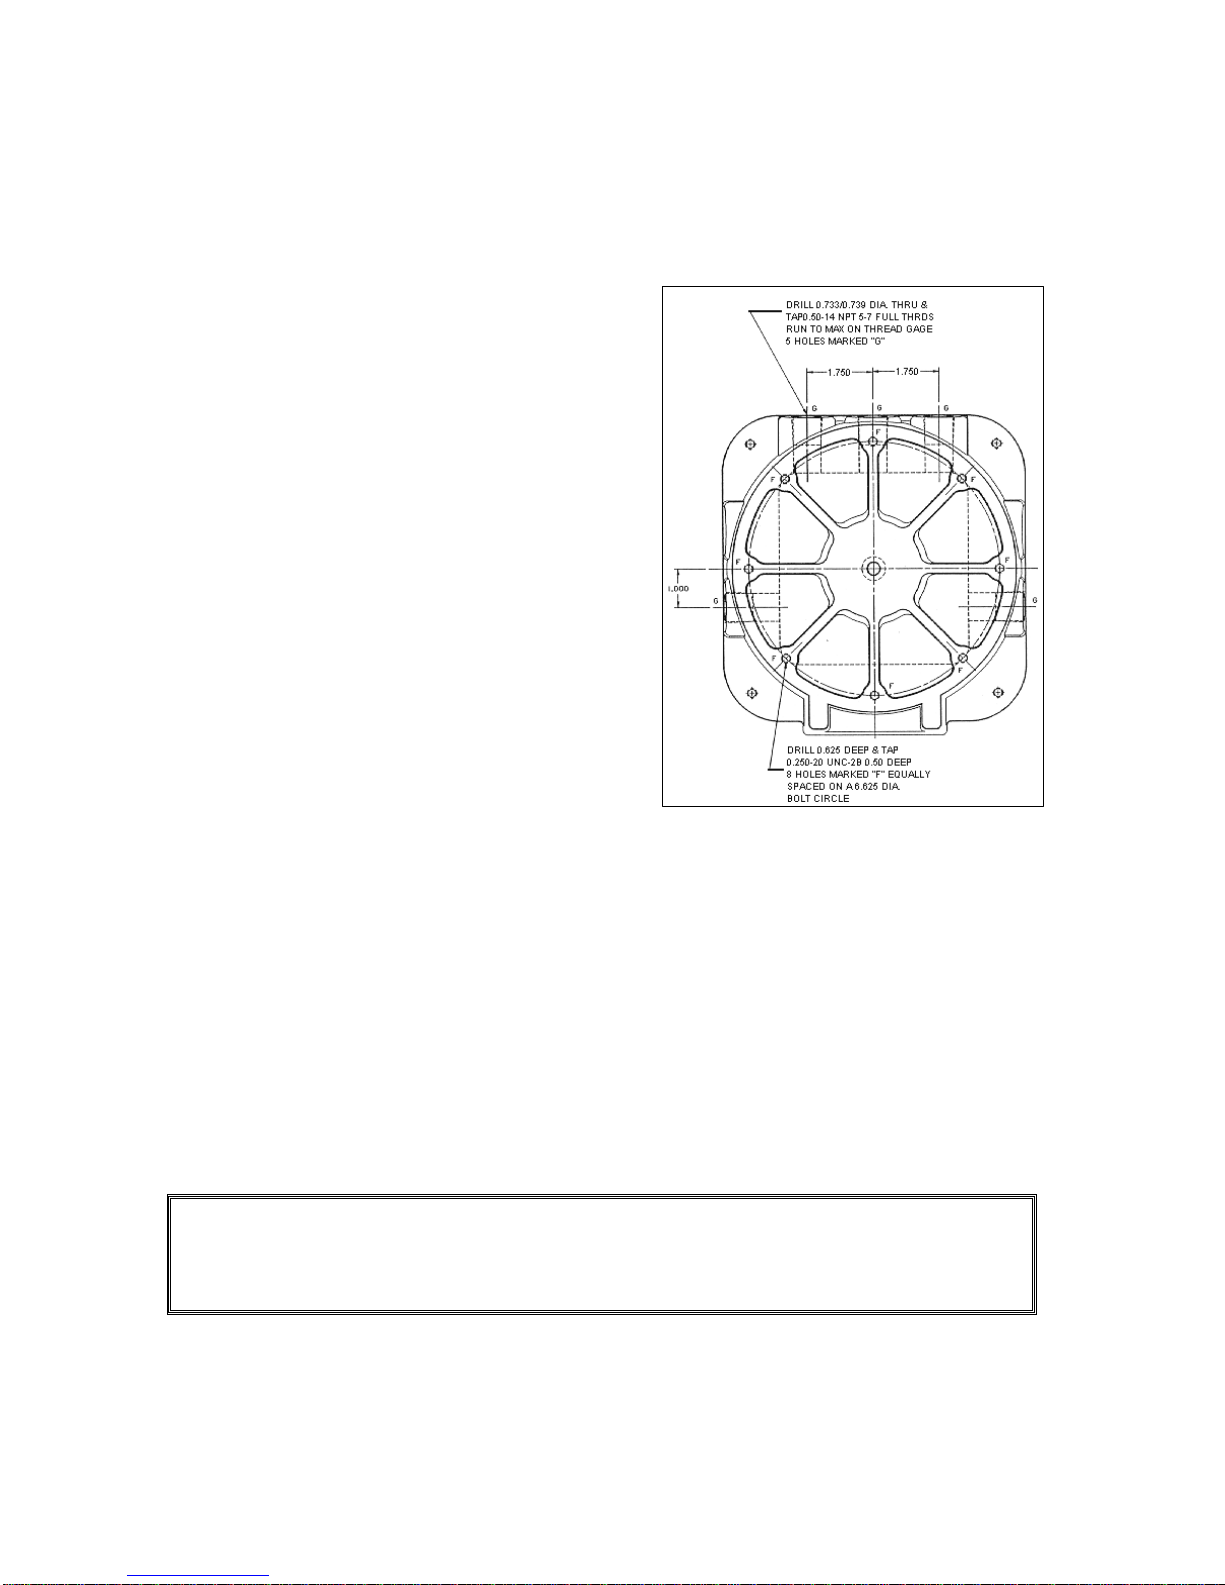
11.5 RSCB MOUNTING BOLT PATTERN
The RSCB base casting contains eight mounting holes in an industry standard bolt
pattern that allow it to be easily attached to a number of common meters. All of the
holes are ½” deep and will require .250-20 screws.
q When mounting the RSCB leave the
cover assembly fastened to the base
to protect the internal components.
q Before securely fastening the RSCB
to the meter or bracket, make sure
that:
§ The remote electronic counter
(REC) is visible.
§ The multi-position switch can be
easily operated.
q If the RSCB will be exposed to the
elements before the installation is
complete, make sure that the cover
gasket is in place and that all (12)
7/16” mounting bolts and washers
are installed.
q Remove all of the pipe plugs from
the RSCB’s seven ½” NPT conduit
hubs. Apply pipe sealant or Teflon
tape to the threads, then re-install
the plugs in the ports.
Refer to the above drawing if you will
need to fabricate a mounting bracket
for the LectroCount
3
RSCB. Brackets
and adapters are available for many
common meters.
NOTE: If the RSCB was not pre-wired from the factory then refer to the wiring diagram in
the back of this manual to assist in field wiring. Terminal block numbers, signal
functions, and wire colors can be found there. Please read the special notes listed on
the drawing.
Liquid Controls will not honor any warranty claims for damage due to
negligence during the installation of the LectroCount3 system.
23
Page 24

12. Wiring the RSCB
Once the control valves, pulser, and ETVC kit (if so equipped) have been mechanically
installed, they need to be wired to the RSCB. The RSCB has seven ½” NPT ports to
accommodate the wires and cables that enter it. Typically, the ports in the back are
used for the signal cables that run to the truck cab and for the optional three-way
solenoid. The installer must choose the ports that best fit the requirements of a particular
installation.
q Remove the 12 bolts that secure the cover of the RSCB.
q Gently lift the cover off of the RSCB until the black coiled wire is accessible.
q Remove the telephone style connector from socket J8 on the RSCB terminal board.
q Place the top cover assembly out of the way.
The wires from the valve, ETVC kit, and pulser need to be routed through suitable
conduit to the RSCB.
The type of conduit used depends on the physical constraints of the installation and the
safety rating required.
Thin wall conduit, Liquid-Tight, and Synflex are among the choices.
The conduit hubs on the RSCB, solenoids, and pulser are all ½ "-14 NPT.
The conduit/cable entrances must be sealed inside and out using appropriate cable
glands to prevent moisture from accumulating in the RSCB.
Avoid chaffing or nicking the cables when pulling them through conduit or compression
fittings.
When routing the conduit, allow ample clearance for service access to the meter and
strainer.
If the system is installed inside a meter box, make sure that there is enough clearance to
close the door.
The RSCB terminal board has six removable terminal blocks (J1-J6) for ease of field
wiring.
Once the wires have been routed into the RSCB, they should be connected to the
appropriate terminal block.
When routing wires to respective terminal block, cut wire to length (always leave 1”-2”
extra length).
When attaching wires to the terminal blocks, remove the terminal block by pulling it
straight up from the circuit board.
q Use a 1/8-inch screwdriver to back off the screw at the desired terminal block
location.
q Strip 7/32” inch of the insulation from the end of the wire and insert the wire into the
desired location on the terminal block.
q Retighten the screw and check to make sure that the wire is fully inserted and that
none of the strands are loose.
q Insert the terminal block onto corresponding mating connector on the RSCB terminal
board.
24
Page 25

Note: The numbers and wires on the wiring blocks face towards the outside of the
box.
12.1 WIRING OF VALVE SOLENOIDS TO RSCB
The solenoid conduit hubs should be
positioned to allow the conduit to be
efficiently routed to the RSCB.
Loosening the 11/8” Hex nut on top of
the solenoid rotates the hubs.
§ Then turn the hub.
§ Loosen the nut a half turn, position
the hub, and then re-tighten.
When wiring the solenoids into the
RSCB junction box, the wires may have
to be spliced in order to reach the
appropriate terminal strip location.
Use stranded 18 GA wire.
It is recommended that red wire be used
for main connections, though black can
be used as a substitute.
Green 18 GA stranded wire should be
used for the case ground.
Use an in-line twist solder splice
(Western Union style splice). Stagger
the splice to make the wires easy to pull.
Leave a small amount of excess wire to
allow for future servicing of the junction
box wiring. Secure the excess wire with
wire ties.
25
Page 26

12.1.1 "Diddle" Valve Wiring
(Part Numbers: A29251 for 2" and A39251 for 3")
One of the solenoids’ green case grounds can be attached to terminal block J5-24 and
the other to J5-25. Solenoid 1 (S1) is on the inlet to the bonnet solenoid. Solenoid 2
(S2) connects the bonnet to the outlet. The wires from S1 connect to terminal block J-4SOL1. The wires from S2 connect to terminal block J-4-SOL2.
12.1.2 Liquid Controls Dual Stage Valve Wiring
(Part Number: A284811 for 2")
Solenoid S1 is hard piped to the top of the differential valve and represents the first
stage of the closure. Solenoid S2 connects the inlet of the differential directly to the
outlet of the differential valve. The second stage and shut-off is controlled here. The
wiring of these solenoids is the same as the "diddle" valve wiring described above in
section 12.1.1.
12.1.3 Single Stage Valve and Three Way Solenoid Wiring
Wire the solenoid to J4-SOL2. Wire the case ground to J5-24 or J5-25.
12.2 WIRING OF RTD TEMPERATURE PROBE TO THE RSCB
Make sure that there is enough slack in
the conduit leading from the RSCB to
the strainer mounted RTD to allow the
strainer cover to be removed.
Feed the cable from the back of the
RTD through the conduit to the RSCB.
Cut the cable on the RSCB end, leaving
enough slack for about two loops of
cable inside the RSCB.
12.3 POD WIRING
Install the pulse output device according
to the instructions in its manual (Series
E2800 “Installation, Operation and Parts
manual).
Wire the POD to terminal block J3 in the
RSCB. The pulser cable is usually best
12.4 INTERNAL PULSER WIRING
Trim back the Teflon sheathing enough
to expose a few inches of the wires
inside.
Strip the insulation from the wires and
connect them to terminal block J2 as
follows:
q 22GA Red Wire J2 - 11
q 22GA Red Wire J2 - 12
q 22GA White Wire J2 - 13
installed with the conduit hub facing
down and the wires routed to one of the
½” NPT conduit hubs on the left side of
the RSCB, using right angle fittings.
It can, however, be wired through any of
the ½” NPT conduit hubs.
If the system is equipped with an internal pulser, the pulser circuit board should already
be connected to the RSCB circuit board through connector J9.
26
Page 27

12.5 TRUCK CAB CABLE ROUTING
We recommend that the following installation practices be followed when
The RSCB is supplied with a cable assembly, consisting of two cables, which connect it
to the truck computer.
The two cables are terminated on the RSCB end with connectors that have been routed
through RSCB hubs and connected to the RSCB circuit board at locations J1 and J6.
On the cab side of the cable assembly, the two cables join in a black 16 pin circular
connector. This connector is supplied with a red plastic cover, which should be kept in
place during the installation. The cable is available in a variety of lengths, ranging from
25 to 500 feet. In most cases, the RSCB is shipped with these two cables attached. If
the cable has not been terminated and connected on the RSCB end, you should connect
the wires to terminal blocks J1 and J6 per the wiring diagram in the back of this manual.
The black cable has a drain wire and a foil shield that must be cut off even with the outer
cable insulation. The edge of the foil must be taped with electrical tape to ensure a
proper floating shield. (The drain wire is connected to pin 16 on the truck computer end,
which in turn is connected to chassis ground.)
q Do not pull the cable too tight in
q Install all exposed cable in ¾”
automotive plastic corrugated loom
(wire tubing).
q Run the cable down the inside edge
of the truck’s frame rail.
q Secure the cable to the frame rail
every 18 to 24 inches with wire ties.
q Install rubber grommets to protect
the cable where it passes through
the cab wall, meter box, etc.
q Keep the cable away from heat
sources such as the engine exhaust
manifold, exhaust pipe, mufflers, etc.
q When routing the cable, avoid
suspension parts, springs, shocks,
rotating shafts, linkages, etc., which
could crush, pinch, or rub the cable.
q Avoid installing the cable where it
will be exposed to excessive flexing.
areas where it will be moved. For
example: in cab-over trucks, leave
enough slack in the cable so that the
cab can be tilted forward without
damaging the cable.
q Leave enough slack in the cable to
allow for easy removal and
installation of the Supervisory
Console and RSBC should they
require servicing.
q In the meter box, avoid leaving the
cable unsecured. Be sure that it
won’t be snagged when tools or
other items are moved. Keep loose
cable from lying on the meter box
floor.
q On some trucks, extra harness cable
can be secured in the frame rail.
Otherwise, coil up extra cable and
securely fasten it to the back wall of
the cab. DO NOT place cable on
the floor of the cab or where it may
be damaged. Also, DO NOT attach
to cable seats that can be moved.
routing the cables to the cab:
27
Page 28

12.6 CONNECT THE METER SIGNAL CABLE
12.6.1 Single Meter Systems
q Remove the cover from the 16 pin
circular connector on the meter
signal cable.
q Insert the connector into the 16-pin
socket on the back of the
supervisory console.
12.6.2 Dual Meter Systems
q Remove the covers from the meter
signal cables.
q Connect the cable that you had
labeled “M1” into the “Meter
1”connector on the back of the dual
meter switch box.
q Connect the cable that you had
labeled “M2” into the “Meter 2”
connector.
The connectors are keyed to ensure that
the pins are properly aligned.
Do Not Force the Connector In!
q After the connector has been
properly inserted, turn the securing
ring clockwise at least ½ turn.
The connectors are keyed to ensure that
the pins are properly aligned.
q After the connector has been
properly inserted, turn the securing
ring clockwise at least ½ turn.
q Each dual meter system is shipped
with a short signal cable connecting
the Dual Meter switch to the
Supervisory Control Module.
Do Not Force the Connector In!
13. System Start Up
q Re-install the in-line ATO 7.5 amp in
the battery cable line.
q Place the ignition switch in the
accessory position. This will initiate
the computer’s start up routine.
q After 15 seconds, the unit will fully
power-up.
The installation is now complete.
Refer to the owner’s manual for instructions
on setting-up and calibrating the system
The dual meter systems also have the
4-pin connector on the switch box wired
to the 10-pin connector on the SCM.
q The “READY” lamp on the SCM will
illuminate.
q The Lap Pad will display:
“NET VOLUME GALLONS"
(Or LITRES).
28
Page 29

14. SOFTWARE PART NUMBERING SYSTEM
Prefix Product
SC 1 LPG 0 Single/Dual Stage 0 Linear/degree F 0 Required 0 single/single Three digit
Dispensed
2 Refined Fuels 1 Diddle Valve 1 Linear/degree C 1 Not Req'd 1 multi-/single e.g. 158
3 Aviation Apps. 2 Selectable in Prover 2 Table 54B/D API 2540 2 multi-/dual
4 NH3 3 Table 54 API 2540 3 single/dual
Security Valve
Type
Temperature
Compensation
4 NH3 Table Canada 4 24 product
5 Mass Flow (No Comp)
6 Table 54B/C &
Methanol
Portable
Ram
# of Products /
# of Meters
Application
15. TROUBLESHOOTING
Troubleshooting Rules
1. Before attempting to troubleshoot the LectroCount3 System, become familiar with the
operation and program of the specific installation.
2. Make sure all electrical connections are secure.
3. Make sure all circuit cards are firmly connected.
4. ALWAYS use a good digital multimeter. Voltage levels are critical to proper system
operation. Use an accurate, reliable multimeter to test for proper voltages at the start
of any service procedures. Voltage requirements are listed under each component.
NOTE: Check for proper operating voltages before changing modules.
5. Enter Mode 7 – diagnostics by pushing M#, 7, and ENTER. Make sure all field
programming entries are accurate, e.g., pulses per unit volume, temperature
coefficient, base temperature, and maximum pulser reversals.
6. NEVER remove a connector with the power on.
7. NEVER install a connector with the power on.
8. NEVER force a connector into a connector receptacle.
9. NEVER exchange or reposition components on circuit boards.
10. In case of a major problem, such as a burned circuit board, evaluate possible causes
before replacing the module and turning on the power.
11. Isolate the problem before changing modules.
12. Be careful when handling ribbon cable. Ribbon cables can be easily damaged.
13. Return all faulty modules with the proper forms, concisely completed.
29
Page 30

There may be several probable causes for a system malfunction. Listed below are
several probable causes to aid in returning the system to operation as quickly as possible.
This list is not all-inclusive and should be only used as a guide.
LectroCount3 Troubleshooting
PROBLEM: Unit will not power-up (no ready light).
PROBABLE CAUSE: No +12VDC to the Supervisory Control Module.
Low Battery voltage.
SOLUTION:
1) Check the 5A fuse for continuity, replace if necessary. (part # 70946)
2) Check battery voltage to the Supervisory Control Module at TB1 # 2 using TB1 #3 as a DC
ground. While LectroCount3 will power-up at 10VDC, it is recommended that the input be at
least +12.6VDC or higher. Refer to the LectroCount3 installation manual and wiring diagram for
more detailed information. If voltage is not present, inspect the battery cable (part # 81232) for
damage.
3) Check the 7.5A in-line fuse (part # 70985) (located near the positive battery terminal) for
continuity and replace if necessary.
4) Check the accessory line voltage at TB1 #1 using TB1 #3 as a DC ground. The DC voltage
should be +12VDC or higher. If the voltage is present, (ignition key in accessory) replace the
power supply board (part # 81213). If voltage is not present, trace the accessory line back to its
source, inspecting any in-line fuses for breaks.
PROBLEM: Unit blows 7.5A fuse.
PROBABLE CAUSE: +12VDC Battery line shorted to ground.
SOLUTION:
1) For safety reasons, Remove the 7.5 Amp in-line fuse from the battery cable (connected to the
positive battery post)
2) Remove the 3-pin power connector (TB1) and inspect for stray wire strands and visible shorts.
3) Inspect the full length of the battery cable, looking for damaged insulation which may cause
shorting between the cable and ground potential (i.e.: truck frame, chassis) If the battery cable
is damaged, replace it. (part #81232)
4) Replace the 7.5 Amp fuse (part # 70985)
PROBLEM: Unit blows 5.0A fuse.
PROBABLE CAUSE: Excessive current on 5A circuit.
SOLUTION:
1) Remove the cable marked PRINTER POWER from the rear panel of the EPSON printer and
replace the 5A fuse. (part # 70946) If the READY light remains on, replace the EPSON
printer.(part # E4900-1) If the 5A fuse blows, replace the printer power cable (part # 81233). If
the 5A fuse continues to blow, replace the power supply board. (part #81213)
30
Page 31

TROUBLESHOOTING
PROBLEM: Unit blows 1.0A fuse / Lap-Pad is blank.
PROBABLE CAUSE: Excessive current on 1 Amp circuit
SOLUTION:
Isolate the problem by disconnecting the following devices until the problem is resolved. After
removing each device, re-install a fresh 1Amp fuse.
1) Lap-Pad: Disconnect the Lap-Pad from the Supervisory Console. Replace the
fuse. If the fuse remains intact, this may indicate a defective Lap-Pad. (part#
E4030-1) Swap the suspect unit with a known working unit for verification.
2) Ram-Card: Remove the Ram-Card from the Ram-Card module. Replace the
fuse. If the fuse remains intact, this may indicate a defective Ram-Card. (part #
E4101-X) Swap the suspect unit with a known working unit for verification. (part
# E4101-X)Verify also that the ribbon cable located on the rear of the RamCard module (part # 81248 ) is not damaged.
3) Odometer Cable: ( if equipped ) (from 10-pin connector on rear of the
Supervisory Console) Replace the fuse. If the fuse remains intact, this may
indicate a defective odometer assembly and cable. (part # 821251) Replace
the assembly with a known-working unit for verification.
4) Pulser Assembly: If after replacing the above units the fuse continues to blow,
it is possible that the pulser assembly is defective. Replace the pulser board
(part # 811521 for internal pulser, part # 81159 for POD type pulsers) with a
known working pulser. Note: For dual-meter systems, it is important to note
which pulser may be causing the problem. Always check the METER 1 and
METER 2 LED indicators on the Dual Meter Switch Box to determine which
pulser may be at fault.
PROBLEM: “Power Loss Stop” appears on Lap-Pad.
PROBABLE CAUSE: Power to LectroCount3 Interrupted during delivery
Static Discharge
SOLUTION:
1) Check battery and accessory cables for damage. Ensure that the Battery, Accessory, and
Ground wires on power connector TB1 (rear of supervisory console) are secure.
2) Turn on all truck accessories. (headlamps, 2-way radio, heater, etc.) Engage the hose reel
and monitor DC voltage at TB1 #2, using TB1 # 3 as a ground. If the voltage drops below +10
VDC, the truck electrical system may not be adequate to handle the current load for the
LectroCount3. It may be necessary to upgrade the electrical system to accommodate the 5
Amp LectroCount³ current requirements.
3) Verify proper grounding of the LectroCount3, including the driver’s seat. Refer to the
LectroCount3 Installation manual for proper grounding procedures.
31
Page 32

PROBLEM: EPSON printer release Light Flashes.
PROBABLE CAUSE: Low voltage to the EPSON printer.
SOLUTION:
1) Check battery voltage for +12.6VDC reading or higher.
2) If voltage is present, replace the LectroCount3 power supply, (part # 81213), located in the
supervisory console.
3) If the release light continues to flash, replace the EPSON printer (part # E49001).
PROBLEM: No power / indicator lights to the EPSON printer.
PROBABLE CAUSE: No power to the EPSON printer.
SOLUTION:
1) Verify that the power switch (located on the left-hand side of the EPSON printer) is in the ON
position.
2) Check the printer power cable ( part # 81233 ) to ensure that it is seated properly. If this does
not correct the problem, replace the power cable (part # 81233), followed by the EPSON
printer (part # E49001).
PROBLEM: “Temperature Over-Range Failure” or “Temperature Under-Range Failure" appears on
Lap-Pad (Single-Meter Configuration)
PROBABLE CAUSE: Open or shorted circuit between RTD probe and Supervisory Control
Module.
SOLUTION:
Check the RTD probe & Signal harness for continuity.
Remove the signal harness (gray / black cable) from the Supervisory Control Module. On the
cable, measure and record the resistance in ohms between the following pins on the cable:
Pin # Pin # Reading
14 to 15 100 Ω ±20
14 to 13 100 Ω ±20
If the readings are not within the above tolerances, replace the RTD probe (part #70229).
If the problem is not corrected, replace the signal harness. (part # 81340)
PROBLEM: “Temperature Over-Range Failure” or “Temperature Under-Range Failure" appears on
Lap-Pad. (Dual-Meter Configuration)
PROBABLE CAUSE: Open or shorted circuit between RTD probe and Supervisory Console.
SOLUTION:
1) Determine which meter is causing the problem. Attempt to make a delivery for
products assigned to both Meter 1 and Meter 2. The Lap-Pad will show a temperature
failure for the suspect meter.
2) Isolate the Dual Meter Switch box. After determining which meter is causing the problem,
(meter #1 or meter # 2) isolate the Dual Meter Switch Box by removing the wiring harness for
32
Page 33

the suspect meter from the METER #1 or METER #2 position. (located on the rear panel of the
Dual Meter Switch Box) Plug the cable directly into the Supervisory Console. To do this, first
remove the 10” signal harness (grey / black cable) with 15-pin connector (part # 81242) from J2
on the rear panel of the Supervisory Console. Attempt to make a delivery. If the problem is
resolved, replace the Dual Meter Switch Box (Part # E2535-1).
Check the RTD probe & Signal harness for continuity.
Remove the Meter #1 or Meter #2 signal harness from the Supervisory Console. On the
cable, measure and record the resistance in ohms between the following pins on the cable:
Pin # Pin # Reading If the readings are not within these tolerances, replace RTD
14 to 15 100 Ω ±20 probe (part#70229). If the problem is not corrected, replace the
14 to 13 100 Ω ±20 signal harness. (part#81340)
PROBLEM: “Temperature Calibration Error” appears on Lap-Pad
PROBABLE CAUSE: Missing temperature calibration information
SOLUTION: Contact the Liquid Controls Service Department @ 1(800) 458-5262
PROBLEM: “Temperature Out Of Table Domain” appears on Lap-Pad
PROBABLE CAUSE: Missing temperature calibration information
SOLUTION: Contact the Liquid Controls Service Department @ 1(800) 458-5262
PROBLEM: REC Counter does not reset / register / counts intermittently
PROBABLE CAUSE: Counter is not receiving pulses during delivery.
SOLUTION:
1) Set up a delivery in Mode #1 and ensure that product flow is registering on the Lap-Pad. If not,
see Product flow does not register on Lap-Pad or REC display
2) Loosen the screws on the REC display cover and gently pull the cover outward to expose the
2 fiber-optic cables. Loosen one of the collars securing the fiber-optic cables to the display
board. Slide the collar away from the fiber-optic cable end approximately ¼” and reseat the
cable. Tighten the collar on the fiber-optic connector ‘finger tight’. Using the same method, reseat the remaining cable. Attempt a delivery and check the rear display to see if it is counting
properly.
3) Remove the (12) 7/16” bolts securing the REC cover. Dis-connect the coiled phone cable and
set it aside. Remove the 2 screws securing the metal ‘L’ bracket to the under-side of the REC
cover. Using the above method, Reset the fiber-optic cables on the I/R driver board. ( part #
81316) Re-install the metal bracket.
4) If the problem persists, replace the following assemblies with known working units until the
problem is resolved:
I / R Driver Bd. ( Part # 81316)
Display Bd. ( Part # 81277)
Coiled Cable (Part #81330)
Signal Harness (Part # 81340)
REC Bd. (Part # 81268)
33
Page 34

Dual Meter Switch Box (if applicable, Part # E2535-1)
PROBLEM: Product flow does not register on Lap-Pad or REC display. (Units with POD type
pulser)
PROBABLE CAUSE: Pulser shaft is not turning with product flow
Pulser Failure
SOLUTION:
1) In Mode # 1, select a product code and initiate a delivery. Do not flow product.
2) Remove the cover from the POD pulser assembly by rotating the cover counter-clockwise.
3) Remove the 3 phillips screws securing the pulser assembly and gently pull the pulser out,
taking care not to damage the attached wiring harness.
4) Manually spin the pulser shaft and monitor the REC display.
5) If the REC display counts, this may indicate a mechanical problem. Contact your local Liquid
Controls Service Center or the Liquid Controls Service Department for additional assistance.
6) If the REC display does not count, see PULSER FAILURE.
PROBLEM: REC Counter display is blank
PROBABLE CAUSE: 9VDC Lithium Battery is low / dead
SOLUTION:
If the display goes blank during the first year of service, replace the display board( LC Part# 81277
) If the display goes blank after more than a year, replace the display board battery (LC Part#
71022)
PROBLEM: “Pulser Failure” appears on Lap-Pad
PROBABLE CAUSE: Missing pulse counts / excessive reversals
SOLUTION:
1) Determine which meter is causing the problem. Attempt to make a delivery for
products assigned to both Meter 1 and Meter 2. The Lap-Pad will show a failure for
the suspect meter.
2) Isolate the Dual Meter Switch box. After determining which meter is causing the
problem, isolate the Dual Meter Switch Box by removing the wiring harness ( grey / black
cable) from either the Meter #1 or Meter #2 position and plug the cable directly into the
Supervisory Console. To do this, first remove the grey / black cable from the back of the
Supervisory Console. Attempt to make a delivery. If the problem is corrected, replace the Dual
Meter Switch Box (Part # E2535-1).
3) Check the pulser output
Select a product code in Mode #1 for the suspect meter. Remove the 12 bolts securing the
REC cover. Lift the cover and remove the coiled phone cable. Set the cover to the side, taking
care not to damage the phone cable connector. Using a reliable voltmeter, measure the
following DC voltages on the REC board (part # 81268)
Terminal # Voltage
J3 #19 +12.6VDC
J3 #18 +6VDC±.5 or 0VDC
J3 #17 +6VDC±.5 or 0VDC
If any of the readings below are observed, check for loose pulser wiring connections. If no loose
connections are found, replace the signal harness. (part # 81340)
34
Page 35

Terminal # Voltage
J3 #19 0VDC
J3 #18 2VDC (or higher)
J3 #17 12VDC (or higher)
Select a product code corresponding to the suspect meter. Insert a ticket into the EPSON printer ,
and begin a delivery. With product flowing through the meter, measure the following DC voltages
on the REC board (part # 81268)
Terminal # Voltage
J3 #19 +12.6VDC
J3 #18 +3VDC± .5VDC
J3 #17 +3VDC± .5VDC
If the following voltages are observed, ensure that the pulser shaft is rotating. Look for any
mechanical problems which may cause either the meter or pulser shaft to lock-up.
Terminal # Voltage
J3 #19 +12.6VDC
J3 #18 +6VDC±.5 or 0VDC
J3 #17 +6VDC±.5 or 0VDC
If the Lap-Pad continues to indicate a pulser failure, replace the pulser board (part # 811521 or
81159 for POD pulsers)
PROBLEM: Valve will not open (single-stage)
PROBABLE CAUSE: Solenoids Inactive / Inoperative
SOLUTION:
1) In Mode # 1, select a product code, insert a delivery ticket into the EPSON printer and start a
delivery.
1) Move the selector switch from ‘RUN’ to the ‘EMERGENCY STOP’ and back to the ‘RUN’
position, listening for an audible ‘clicking’ from the solenoid.
If the solenoid clicks:
This may indicate a mechanical problem with the valve or its associated components. Refer the
problem to a qualified Liquid Controls Service Center.
If the solenoid does not click:
1) Remove the (12) 7/16” bolts securing the REC cover. Lift the cover and remove the coiled
phone cable. Set the cover to the side, taking care not to damage the phone-type cable
connector.
2) Using a reliable voltmeter, measure the following DC voltages on the REC board (part #
81268)
Terminal # Voltage
J4 # 20 1.0VDC ± .5VDC
J4 # 21 12.0VDC ± 1.5VDC
J4 # 22 1.0VDC ± .5VDC
J4 # 23 12.0VDC ± 1.5VDC
35
Page 36

If the above voltages are correct:
This may indicate a mechanical problem with the valve or its associated components. Refer the
problem to a qualified Liquid Controls Service Center.
If the above voltages are NOT correct:
Replace the following components with known-working units until the problem is resolved:
CPU Board* (part # 81204)
Signal Harness (part # 81340)
*Contact your local Liquid Controls Service Center or contact the Liquid Controls Customer Service
Department for assistance.
PROBLEM: Valve will not open (Dual Stage).
PROBABLE CAUSE: Solenoids Inactive / Inoperative.
SOLUTION:
1) Remove the (12) 7/16” bolts securing the REC cover. Lift the cover and remove the coiled
phone cable. Set the cover to the side, taking care not to damage the phone-type cable
connector.
2) Using a reliable voltmeter, measure the following DC voltages on the REC board ( part #
81268)
Terminal # Voltage
J4 # 20 1.0VDC ± .5VDC
J4 # 21 12.0VDC ± 1.5VDC
J4 # 22 1.0VDC ± .5VDC
J4 # 23 12.0VDC ± 1.5VDC
If the above voltages are correct:
This may indicate a mechanical problem with the valve or its associated components. Refer the
problem to a qualified Liquid Controls Service Center.
If the above voltages are not correct:
Replace the following components with known-working units until the problem is resolved:
CPU Board* (part # 81204)
Signal Harness (part # 81340)
*Contact your local Liquid Controls Service Center or contact the Liquid Controls Service center for
assistance.
36
Page 37

PROBLEM: “Ram-Card Disconnected” appears on Lap-Pad
TROUBLESHOOTING
PROBABLE CAUSE: Ram-Card is disconnected from the Supervisory Console
SOLUTION:
Reseat the Ram-Card. If this does not correct the problem, replace the following components until
the problem clears:
Ram-Card ( Part # E4101x )
Ram Module ( Part # E4310-1)
Cable ( Part #81248 )
PROBLEM: “Invalid Ram-Card Status” appears on Lap-Pad
PROBABLE CAUSE: Ram-Card contains invalid account information
SOLUTION:
Refer to the LectroCount3 Owner’s Manual for instructions on clearing the Ram-Card
Due to the complexity of the LectroCount3 system, this trouble-shooting guide cannot cover all
possible situations. Call your local Liquid Controls Service Center or the Liquid Controls Electronic
Customer Service department for any problems which are not covered by this guide.
It may be necessary to break Weights & Measure seals to perform certain trouble-shooting steps in
this guide. Contact your local Weights & Measures authorities for information before breaking any
seals.
Use extreme caution when taking any and all electrical measurements in hazardous environments
to avoid potential electrical shorts and / or sparking.
When taking measurements, always use a reliable digital volt-meter.
37
Page 38

38
P/N 70946
P/N 70945
SINGLE METER TRUCK SYSTEM WIRING DIAGRAM - NEGATIVE GROUND
Page 39

METER #1 REMOTE S.C. CONTROL BOX WIRING
39
Page 40

DUAL METER TRUCK SYSTEM WIRING DIAGRAM – NEGATIVE GROUND
81242 SIGNAL CABLE
40
Page 41

LECTROCOUNT (SHEET 1 OF 2)
E2535 –1 DUAL METER SWITCH ASSEMBLY
81340
81340
89044 NEGATIVE GROUND DUAL METER TRUCK SYSTEM
EO 320 REV. A
1-2-96
41
Page 42

METER #1 REMOTE S.C. CONTROL BOX WIRING
42
Page 43

MOUNTING ARRANGEMENT
FOR SYSTEMS WITH MOUNTING BRACKETS
SINGLE METER SYSTEM
DUAL METER SYSTEM
43
Page 44

SOLD AND SERVICED BY
A NETWORK OF HIGHLY TRAINED
Distributed By:
Backed By Our Worldwide Reputation For
1999 Liquid Controls Printed in U.S.A. (0799) Bulletin #49137C
FULL SERVICE DISTRIBUTORS
Quality, Accuracy and Advanced Design.
Warranty:
Liquid Controls, L.L.C. (“Seller”) products are warranted against
defects in materials or workmanship for a period of one (1) year
from date of installation, provided that the warranty shall not
extend beyond twenty-four (24) months from the date of original
shipment from seller. Seller’s obligations, set forth below, shall
apply only to failure(s) to meet the foregoing obligations
provided that seller is given written notice within (30) days of
any occurrence from which a claim of defect arises. If a warranty
dispute occurs, the purchaser shall be required to provide Seller
with proof of date of sale. The minimum requirement to establish
date of sale shall be a copy of the Seller’s invoice. In the event
that a factory inspection by Seller or its designee(s) supports the
validity of a claim, at the discretion of Seller, repair, replacement
or refund shall be sole remedy for defect
LIQUID
CONTROLS, LLC
CONTROLS
105 Albrecht Drive
Lake Bluff, IL 60044-2242
Telephone: (847) 295-1050
FAX: (847) 295-1057
Website: www.lcmeter.com
and shall be made, free of charge, ex-works factory. In no event
shall Seller be liable for any special, consequential, incidental,
indirect or exemplary damages arising out of warranty, contract,
tort, (including negligence) or otherwise, including but not
limited to, loss of profit or revenue, loss of use of the product or
any associated products and/or equipment, cost of substitute
goods or services, downtime costs or claims of or by Purchaser’s
clients or customers. In any event, the total liability of Seller for
any and all claims arising out of or resulting from the
performance, non-performance or use of the product shall not
exceed the purchase price of the individual product giving rise to
the claim. All other guaranties, warranties, conditions and
representations, either express or implied, whether arising under
any statute, common law, commercial usage or otherwise are
excluded. Electronic Products require
Installation, start-up and servicing by local factory-trained
service representatives. In the absence of installation, start-up and
servicing of Electronic Products by Seller trained service
representatives, this warranty is null and void. Seller’s
obligations as set forth above shall not apply to any product, or,
or any component part thereof, which is not properly installed,
used, maintained or repaired, or which is modified other than
pursuant to Seller’s instructions or approval. NOTE: The above
warranty applies only to products manufactured by Liquid
Controls, Lake Bluff, Illinois. Private label, OEM, and/or
products manufactured by Liquid Controls licensee(s) are
specifically excluded from the above warranty. Consult the
factory for all non-Liquid Controls manufacturers’ warranties.
NO IMPLIED OR STATUATORY WARRANTIES OF
MERCHANTABILITY OR FITNESS FOR A PARTICULAR
 Loading...