

Page 1
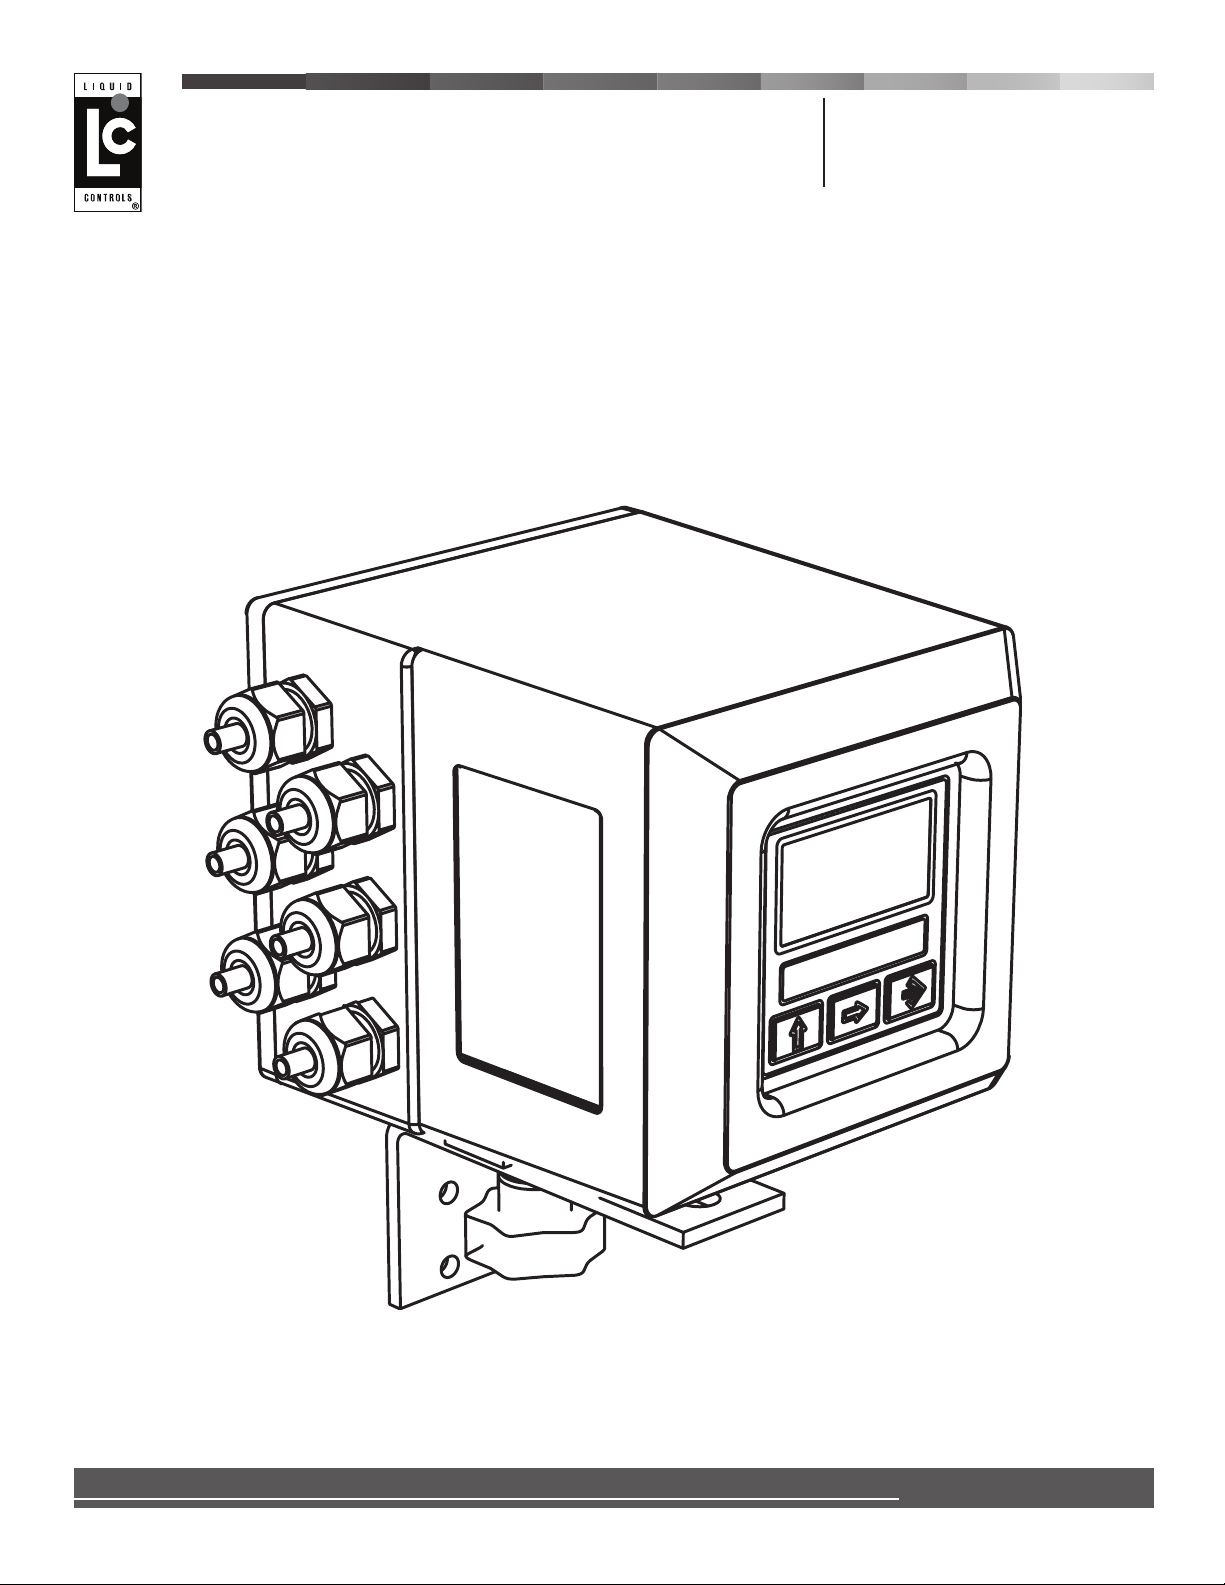
HML210 Converter
LCMag Electromagnetic Flowmeters
Installation &
Operation
Release number: 210_EN_LC_R8_3_9X –
The last three digits of le name identify the software version which the manual refers to; it is
visualized at the instrument start up, or by specic function on DIAGNOSTIC menu.
Liquid ControLs Group
An IDEX Fluid & Metering Business
IOM: IEM200-10
Page 2

Page 3

HML 210
3
converter
sensor
INTRODUCTION
These operating instructions and description of device functions are provided as part of the
scope of supply. They could be modified without prior notice. The improper use, possible
tampering of the instrument or parts of it and substitutions of any components not original,
renders the warranty automatically void.
The converter is to be used only to be coupled with a sensor to realize a measuring device,
flow meter, that is to be used for measuring the flow of conductive liquids in closed pipes with
conductivity greater than 5µS/cm.
The converter could be coupled directly on the sensor (compact version) or coupled to the
sensor by cable supplied with it (remote version).
The reproduction of this manual and any supplied software is strictly forb
id
den.
S
AFETY
INFORMATIONS
Any use other than described in this manual affects the protection provided by the
manufacturer and compromises the safety of people and the entire measuring system and is,
therefore, not permitted.
The manufacturer is not liable for damaged caused by improper or non-designated use.
1) Transport the measuring device to the measuring point in the original packaging. Do
not remove covers or caps until immediately before installation. In case of cartons
packaging it is possible to place one above the other but no more than three cartons.
In case of wooden packaging do not place one above the other.
2) Disposal of this product or parts of it must be carried out according to the local public
or private waste collection service regulations.
3) The converter must only be installed, connected and maintained by qualified and
authorized specialists (e.g. electrical technicians) in full compliance with the
instructions in these Operating Instructions, the applicable norms, legal regulations
and certificates (depending on the application).
4) The specialists must have read and understood these Operating Instructions and must
follow the instructions it contains. The Operating Instructions provide detailed
Page 4

HML 210
4
information about the converter. If you are unclear on anything in these Operating
Instructions, you must call the service.
5) The converter should only be installed after have verified technical data provided in
these operating instructions and on the data plate.
6) Specialists must take care during installation and use personal protective equipment as
provided by any related security plan or risk assessment.
7) Never mount or wire the converter while it is connected to the power supply and avoid
any liquid contact with the instrument’s internal components. To connect remove the
terminals from the terminal block.
8) Before connecting the power supply check the functionality of the safety equipment.
9) Repairs may only be performed if a genuine spare parts kit is available and this repair
work is expressly permitted.
10) For the cleaning of the device use only a damp cloth, and for the maintenance/repairs
contact the service center.
Before starting up the equipment please verify the following:
q Power supply voltage must correspond to that specified on the data plate
q Electric connections must be completed as described
q Ground (earth) connections must be completed as specified
Verify periodically (every 3-4 months):
q The power supply cables integrity, wiring and other connected electrical parts
q The converter housing integrity
q The suitable tightness of the sealing elements
q The front panel integrity (display and keyboard)
q The mechanical fixing of the converter to the pipe or wall stand.
SAFETY CONVENTIONS
DANGER
Wa
rning indicates an action or procedure which, if not performed correctly,
can result in injury or a safety hazard. Comply strictly with the instructions
and proceed with care.
WARNING
Caution indicates an action or procedure which, if not performed correctly, can
result in incorrect operation or destruction of the device. Comply strictly with
the instructions.
NOTES
N
ote indicates an action or procedure which, if not performed correctly, can
have an indirect effect on operation or trigger an unexpected response on the
part of the device.
Page 5
HML 210
5
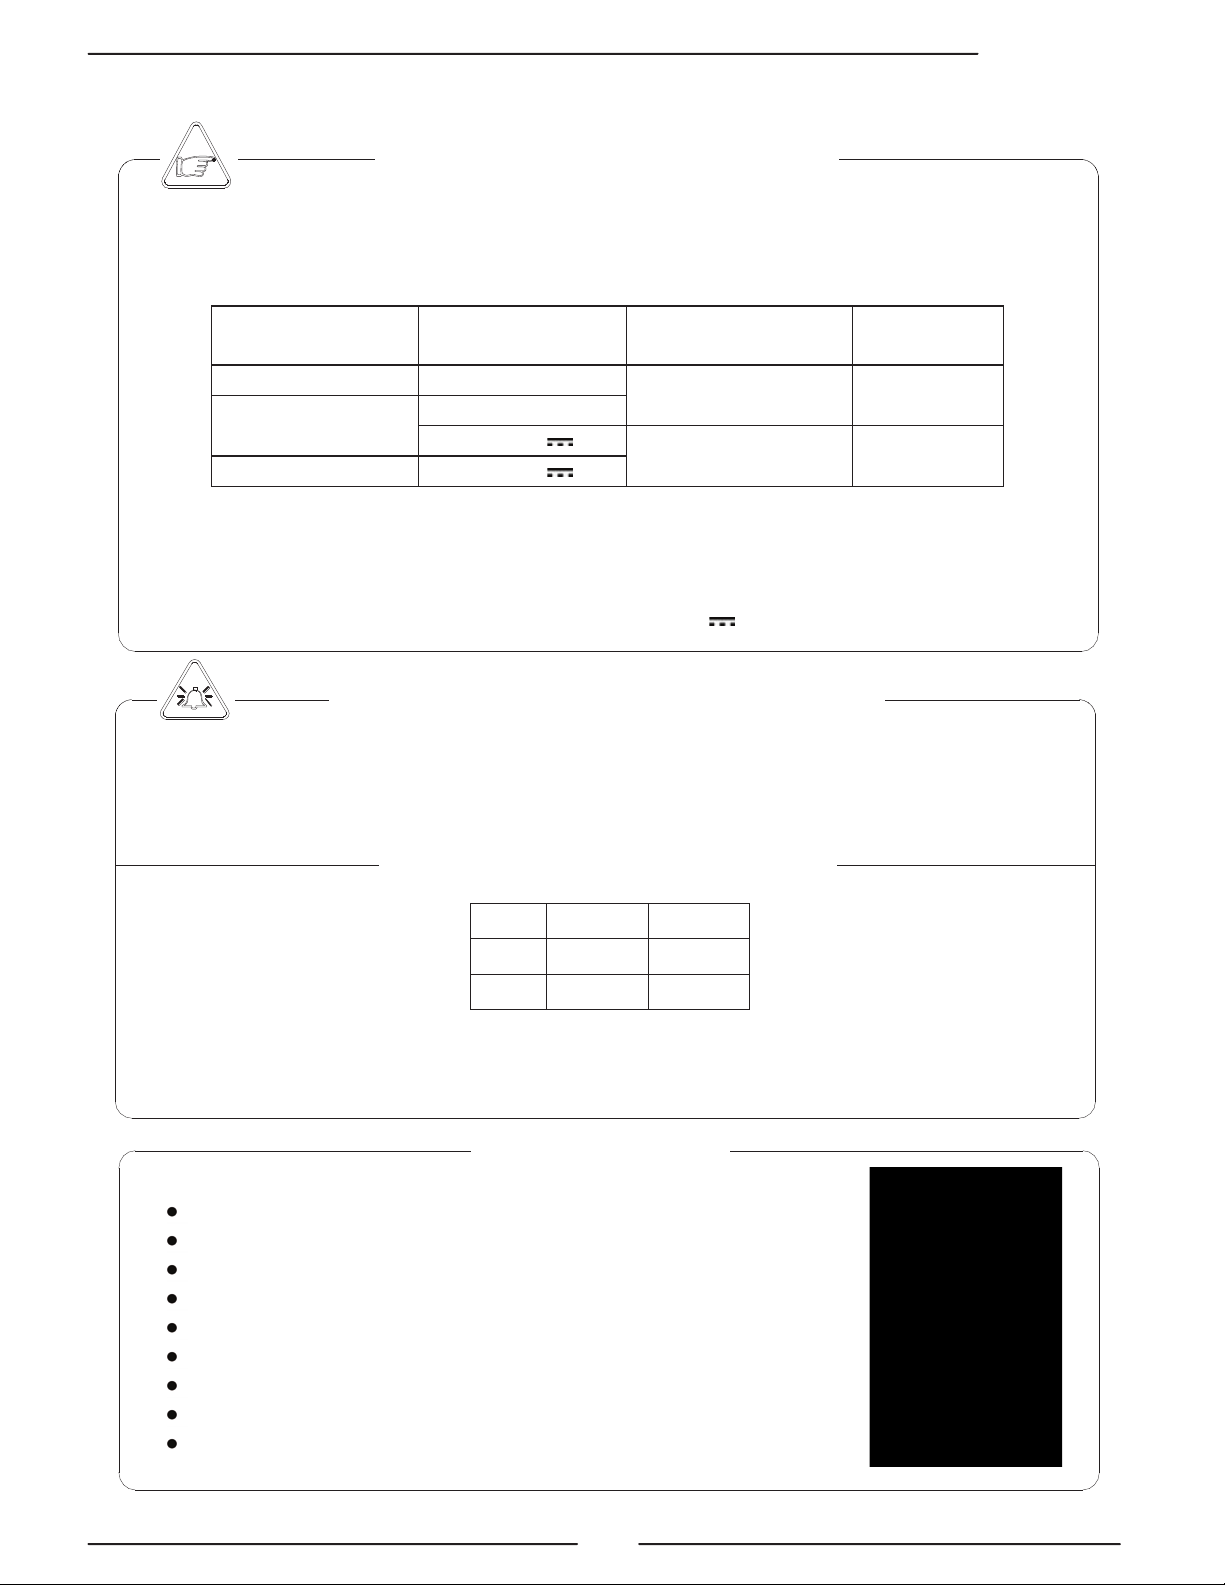
TECHNICAL CHARACTERISTICS
ELECTRIC CHARACTERISTICS
ENVI
RONMENTAL USE CONDITIONS
AMBIENT TEMPERATURE
Data plate
On the data plate there is some technical information:
MODEL: Converter Model
S/N: Serial Number of the converter
P.S.: Power Supply
POWER: Maximum power consumption
Hz: Frequency (AC)
T: Operating temperature
IP: Protection grade
COUPLING: Serial number of sensor coupled
ITEM: free for user
Min. *
Max
°C
-20
60
°F
-4
140
q The instrument can be installed inside or outside buildings
q Altitude: from –200m to 2000m (from -656 to 6560 feet)
q
Humidity range: 0-100% (IP 67), 0-90% without condensation (IP54) for panel version
If the converter is supplied in compact version to the sensor, consider the ambient
temperatures more restrictive, otherwise refer to the respective manuals.
* For discontinuous use, a thermostat heat source installation may be necessary.
Instrument classification: class I, IP67 for compact/separate version, IP54 for panel
version (IP65 with optional transparent frontal cover), installation category II, rated
pollution degree 2.
Power supply
versions
Power supply
voltage
Power supply
frequency
Pmax
HV
100-240V~
44-66Hz 25VA
LV
18-45V~
18-45V
// 20W
LLV
10-35V
q Voltage variations must not exceed ±10% of the nominal one.
q All instrument versions can be equipped with all power supply versions.
q Input/output are insulated up to 500V
q The output 4-20 mA (optional) and the output 24V are electrically connected.
Page 6
HML 210
6
144.0
145.0
67.0
137.0
IP65, TRASPARENT FRONTAL COVER
(OPTIONAL)
72.0
160.0
80.0
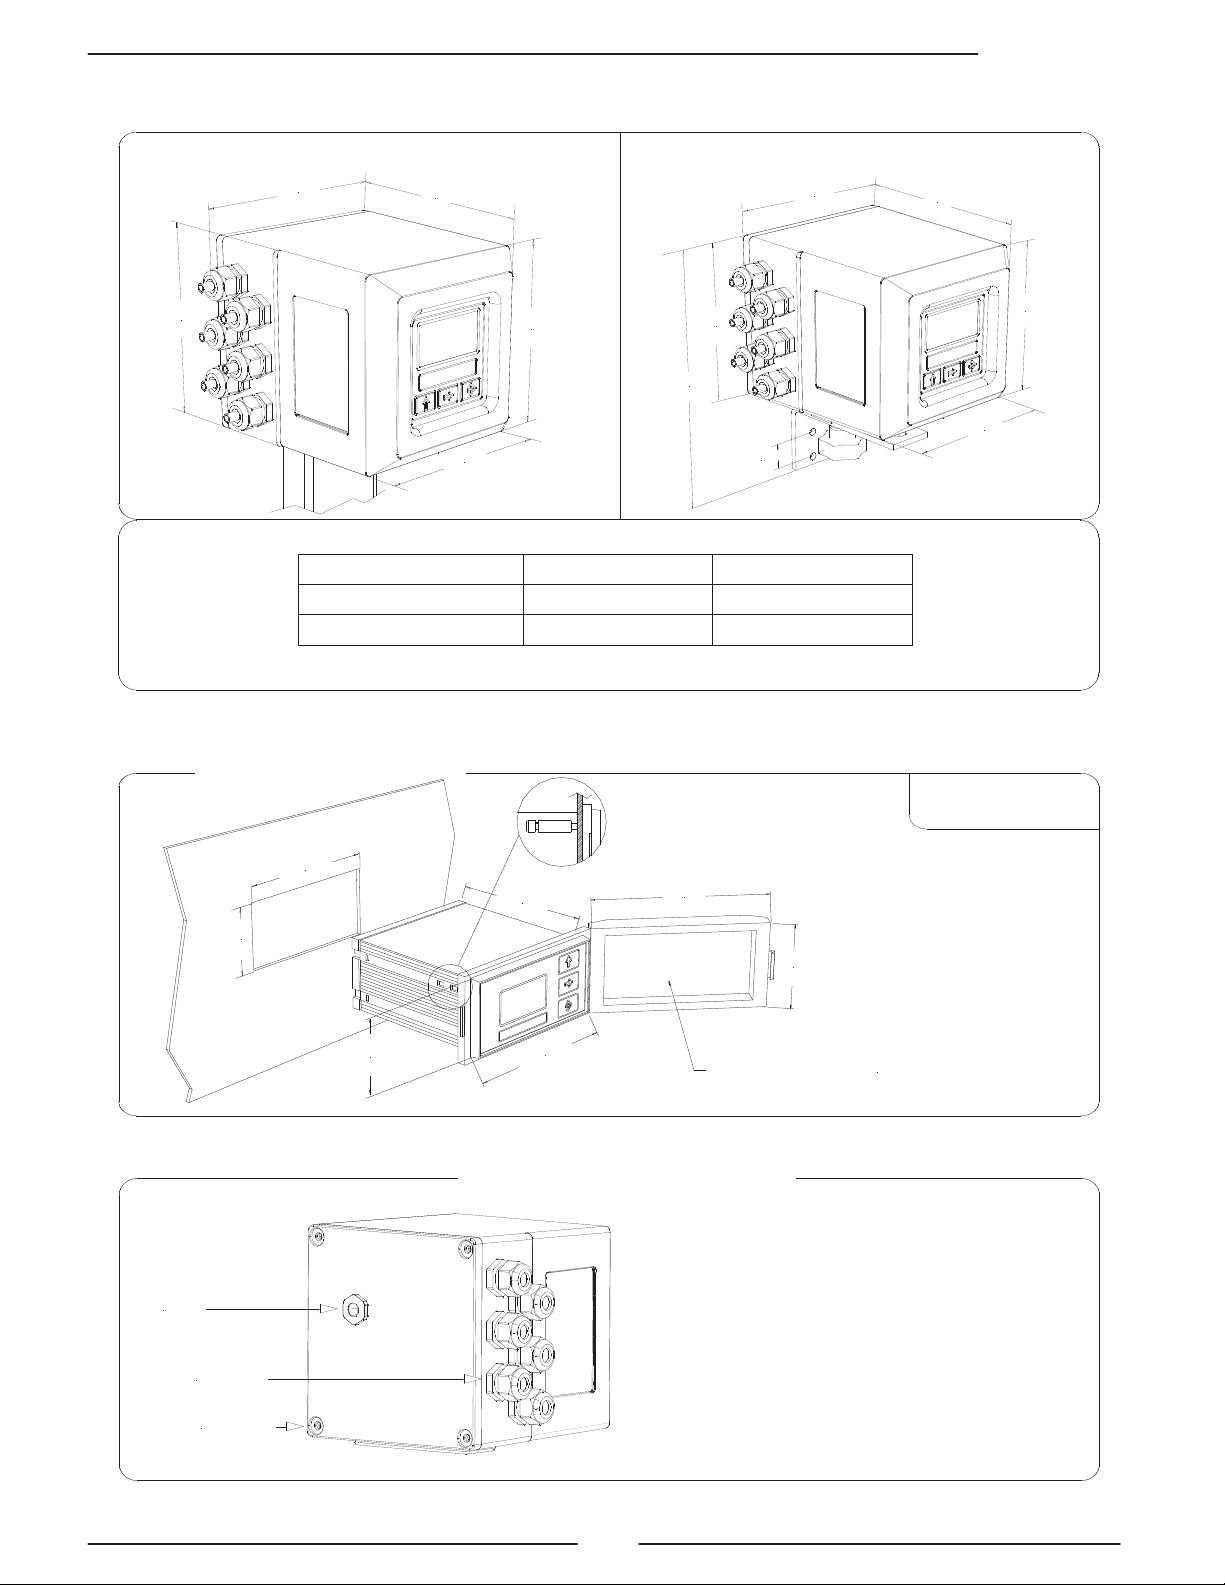
OVERALL DIMENSIONS
CABLE GLAND
IF2 CAP
COVER SCREW
138
170
138
146
146
138
170
146
146
230
25
138
SEPARATE VERSION
WEIGHT
Compact
Separate
INOX AISI 304
3kg
3.5kg
Alluminum
2.5kg
3kg
To guarantee the compact/separate
housing’s IP degree the following torques
are required
:
q cover screws: 1.5Nm
q cable glands
: 4Nm (in reference
conditions)
q IF2 cap: 4Nm
TORQUES
COMPACT VERSION
PANEL VERSION
Weight: 0.5kg
Page 7

HML 210
7
L
(+)
N
(-)
L
N
(+)
(-)
M3
M3
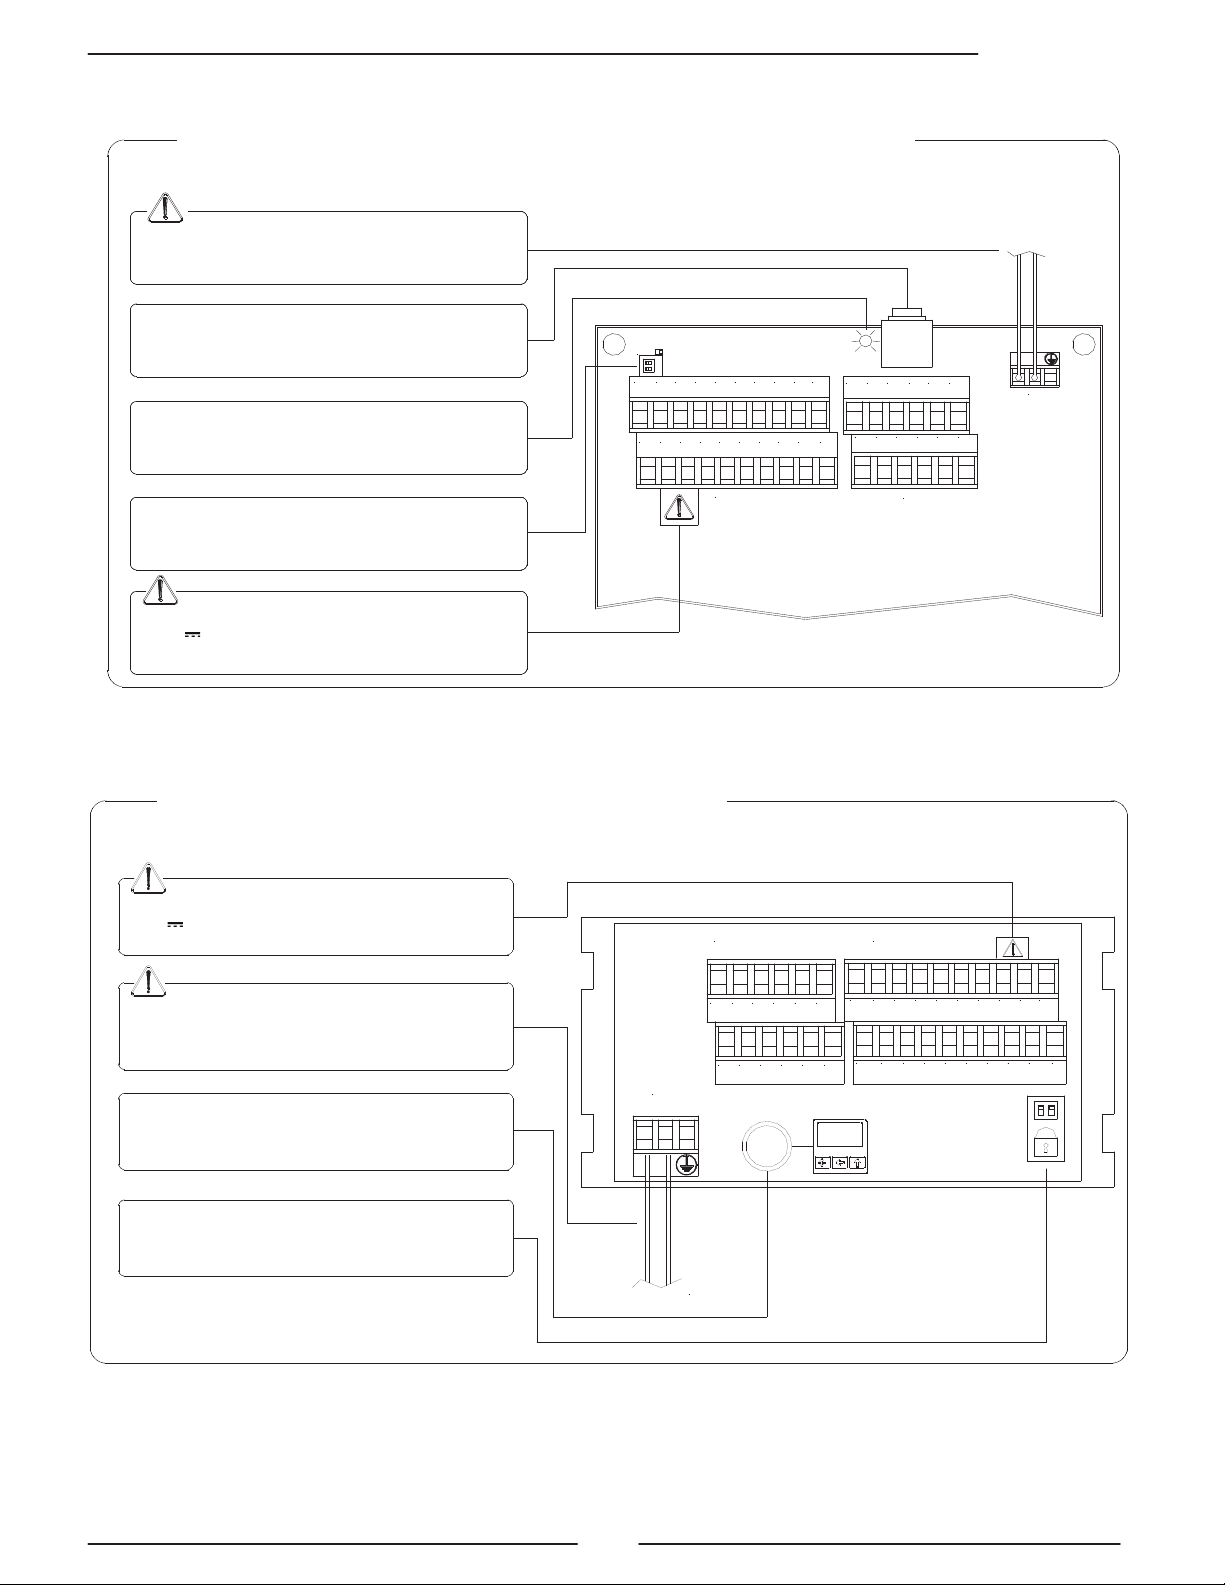
ELECTRICAL CONNECTIONS
GROUNDING INSTRUCTIONS
CONVERTER POWER SUPPLY
Compact/separate version
Panel version
ALWAYS ensure that the converter and the sensor are grounded (earthed) correctly. The
grounding of the sensor and converter ensures that the equipment and liquid are
equipotential.
q
Before connecting the power supply, verify that the mains voltage is within the limits
indicated on data plate.
q For the connections use only approved conductors, with fire-
proof properties, whose
section varies from 0.25mm2 to 2.50mm2, based on distance/power; additionally
fix
the power supply wires with a additional fastening system
located close to the
terminal.
q The powe
r supply line must be equipped with an external protection for overload
current (fuse or automatic line breaker).
q Provide in close proximity the converter
a circuit breaker easily accessible for the
operator and clearly identified; whose symbols must conform to the
electrical safety
and local electrical requirements.
q
Ensure that the component complies with the requirements of the standard for
electrical safety distance.
q Check chemical compatibility of materials used in the connection
security systems in
order to minimize electrochemical corrosion.
q
The sensor, hardwired inputs and outputs are connected to the converter through a
terminal blocks located inside the converter.
q To locate the compact/separate version terminal block loosen t
he 4 screws on the
back cover. When the front cover is
lifted, the terminal block is visible. The terminal
block is the hardwire connection of the converter to external equipment, including
the sensor.
The following pages give information
s on the terminal
block numbering, and the
respective connecting of the sensor cables, and inputs/outputs.
Page 8
HML 210
8
20 19 18 17 16 15 14 13 12 11
10 9 8 7 6 5 4 3 2 1
32 31 30 29 28 27
26 2524 23 22 21
M1
M2
M3
M1
M3
1 2 3 4 5 6 7 8 9 10
11 12 13 14 15 16 17 18 19 20
LOCK
323130292827
262524232221
M2
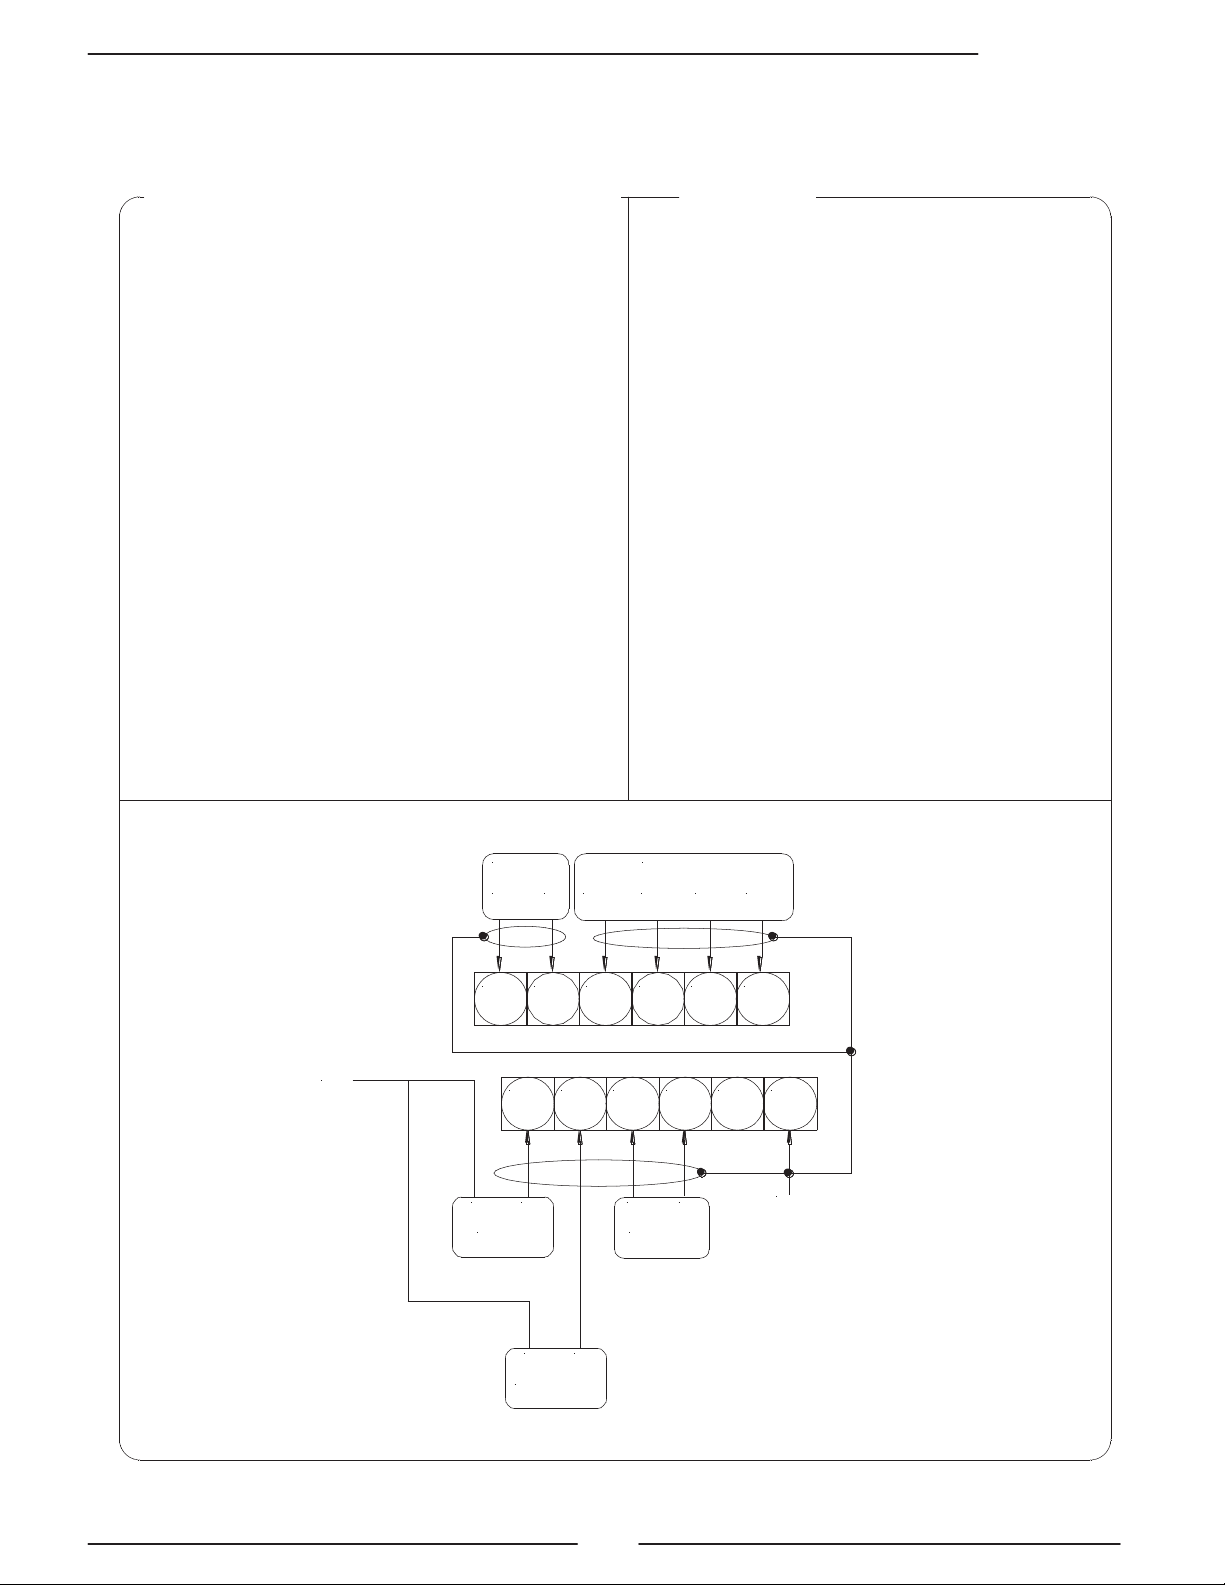
COMPACT/SEPARATE VERSION M1 TERMINAL BLOCK
Dangerous voltage on block 12-13:
- 60V Max
- 250V Max on commutation coils
Dip switch, when the switch is ON, there is NO
more access to the programming functions
Signalling LED: see display flags and led warning
interpretation section
IF2 socket
Power supply
PANEL VERSION M1 TERMINAL BLOCK
Power supply
Dangerous voltage on block positions 12-13:
- 60V Max
- 250V Max on commutation coils
IF2 socket
Dip switch, when the switch is ON, there is NO
more access to the programming functions
Page 9
HML 210
9
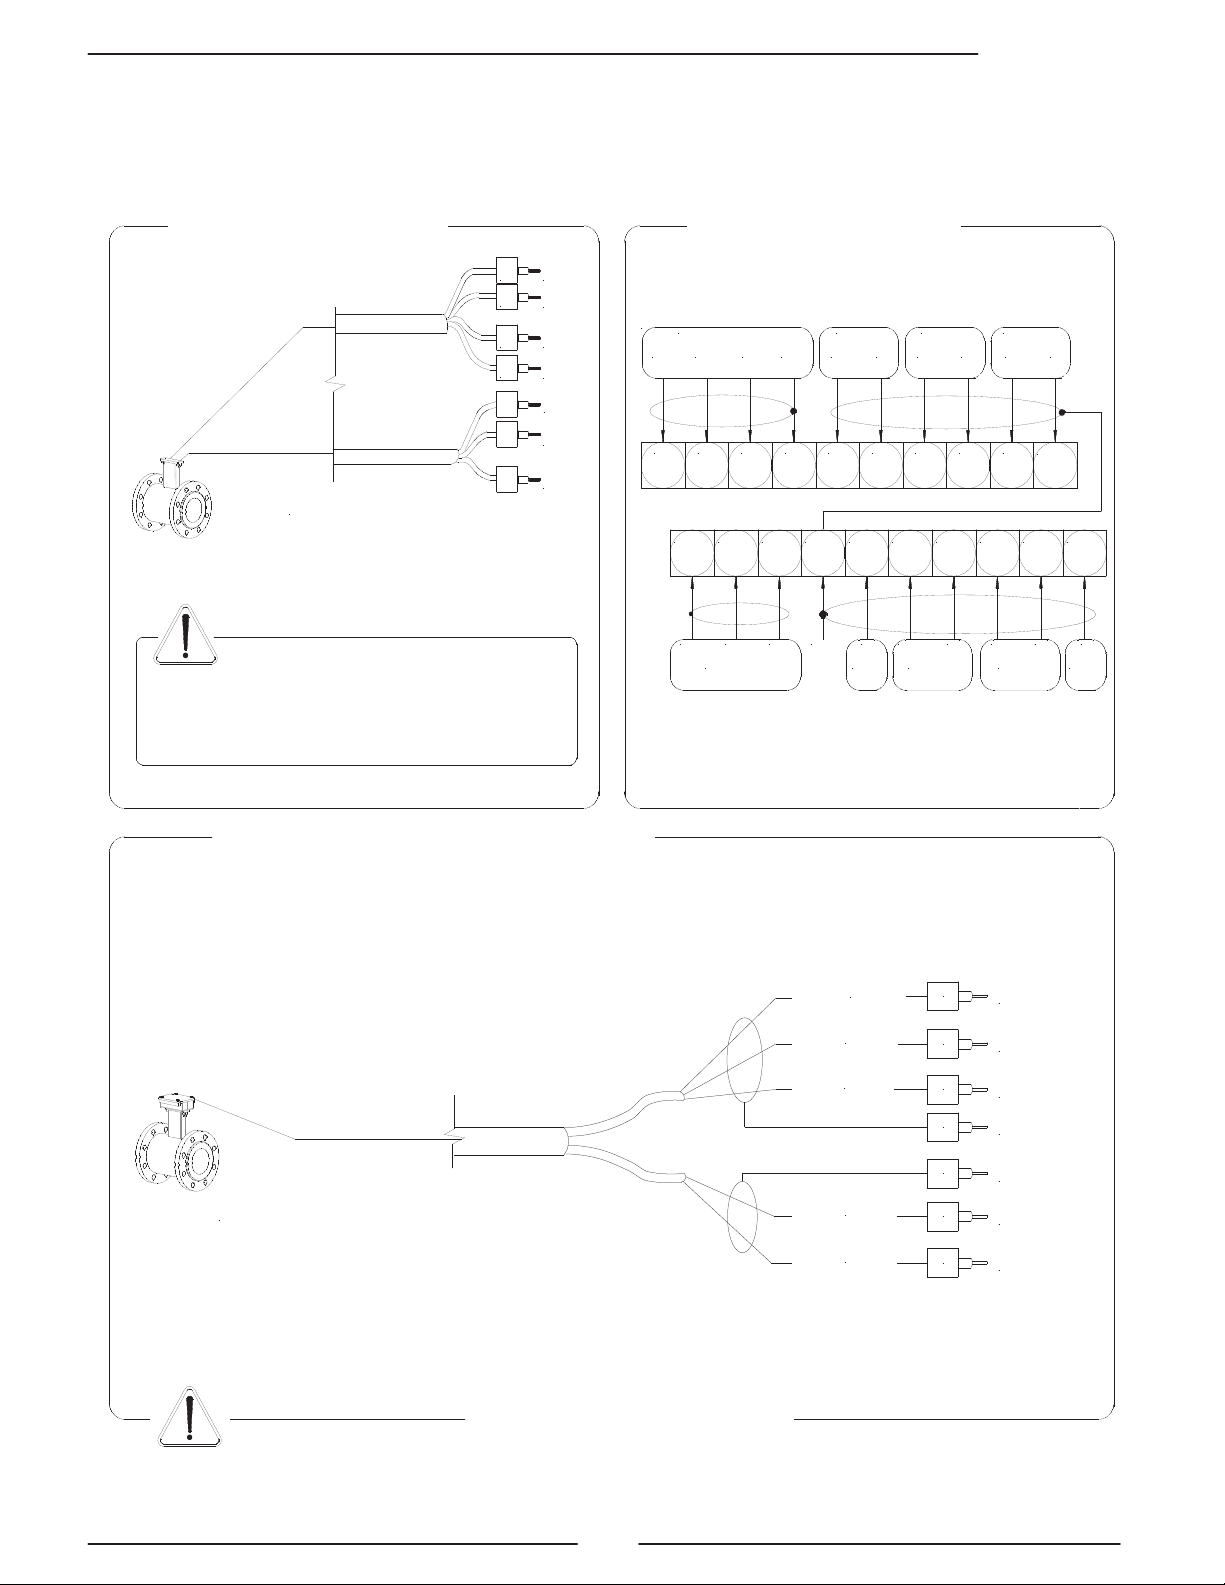
CONVERTER TO SENSOR ELECTRICAL CONNECTIONS
1
2
3
4
11
12
13
E1
E2
C
SH
SH
B1
B2
1
13
2
3
4
11
12
1 (E1)
10 (preamp.)
9 (preamp.)
8 (preamp.)
7 (preamp.)
6 (preamp.)
2 (E2)
3 (C)
4 (SH)
11 (SH)
12 (B1)
13 (B2)
1 2 3 4 5 6 7 8 9
10
11 12 13 14 15 16 17 18 19 20
E1 E2 C SH + - B A + -
ELECTRODES INPUT RS485 4-20mA
-ECEC+SHB2B1SH
OUT2OUT124VCOILS 24V
ALL SENSORS
ALL SENSORS
WITH PREAMPLIFER
Max cable length: 500m
SENSOR WITH PREAMPLIFIER
Sudden movements of the electrodes
cable, can cause noise on
measure.
Max cables length: 20m.
SEPARATE VERSION
TERMINAL BLOCK M1
Page 10
HML 210
10
OPTIONAL MODULES
OPTIONAL MODULES (NO RELÈ MODULES)
q ME200: 2 programmable on/off outputs +
1 on/off input
q ME201:
1 programmable on/off output + 1
high frequency output + 1 on/off input
q ME202: 1 4-
20mA output + 2
programmable on/off output + 1 on/off
input
q ME203:
1 RS232 port + 2 programmable
on/off outputs + 1 on/off input
q ME204:
1 RS232 port + 2 programmable
on/off outputs + 1 4-
20mA output + 1
on/off input
q ME220, ME221, ME222: data logger
, see
the related manual
q
Protocols: profibus DP, HART and
Modbus, see the related manuals
SH: Cable shield, electrically connected to
ground and to the casing
CTS: Input terminal of the signal “CLEAR TO
SEND” of the RS232 port
RD: Input terminal of the signal “RECEIVE
DATA” RS232 port
TD: Output terminal of the signal “TRASMIT
DATA” of the RS232 port
SG: Terminal “SIGNAL GROUND” common to
all signals of the RS232 port
C: Terminal connected with the on/off output
transistor COLLECTOR
E: Terminal connected with the on/off output
transistor EMITTER
21 22 23 24 25 26
27 28 29 30 31 32
OUT 3
E C
CTS RD
TD
SG
RS 232
- +
INP2
E C
OUT 4
SH
- +
4-20mA
20
(M1)
LEGEND
Page 11
HML 210
11
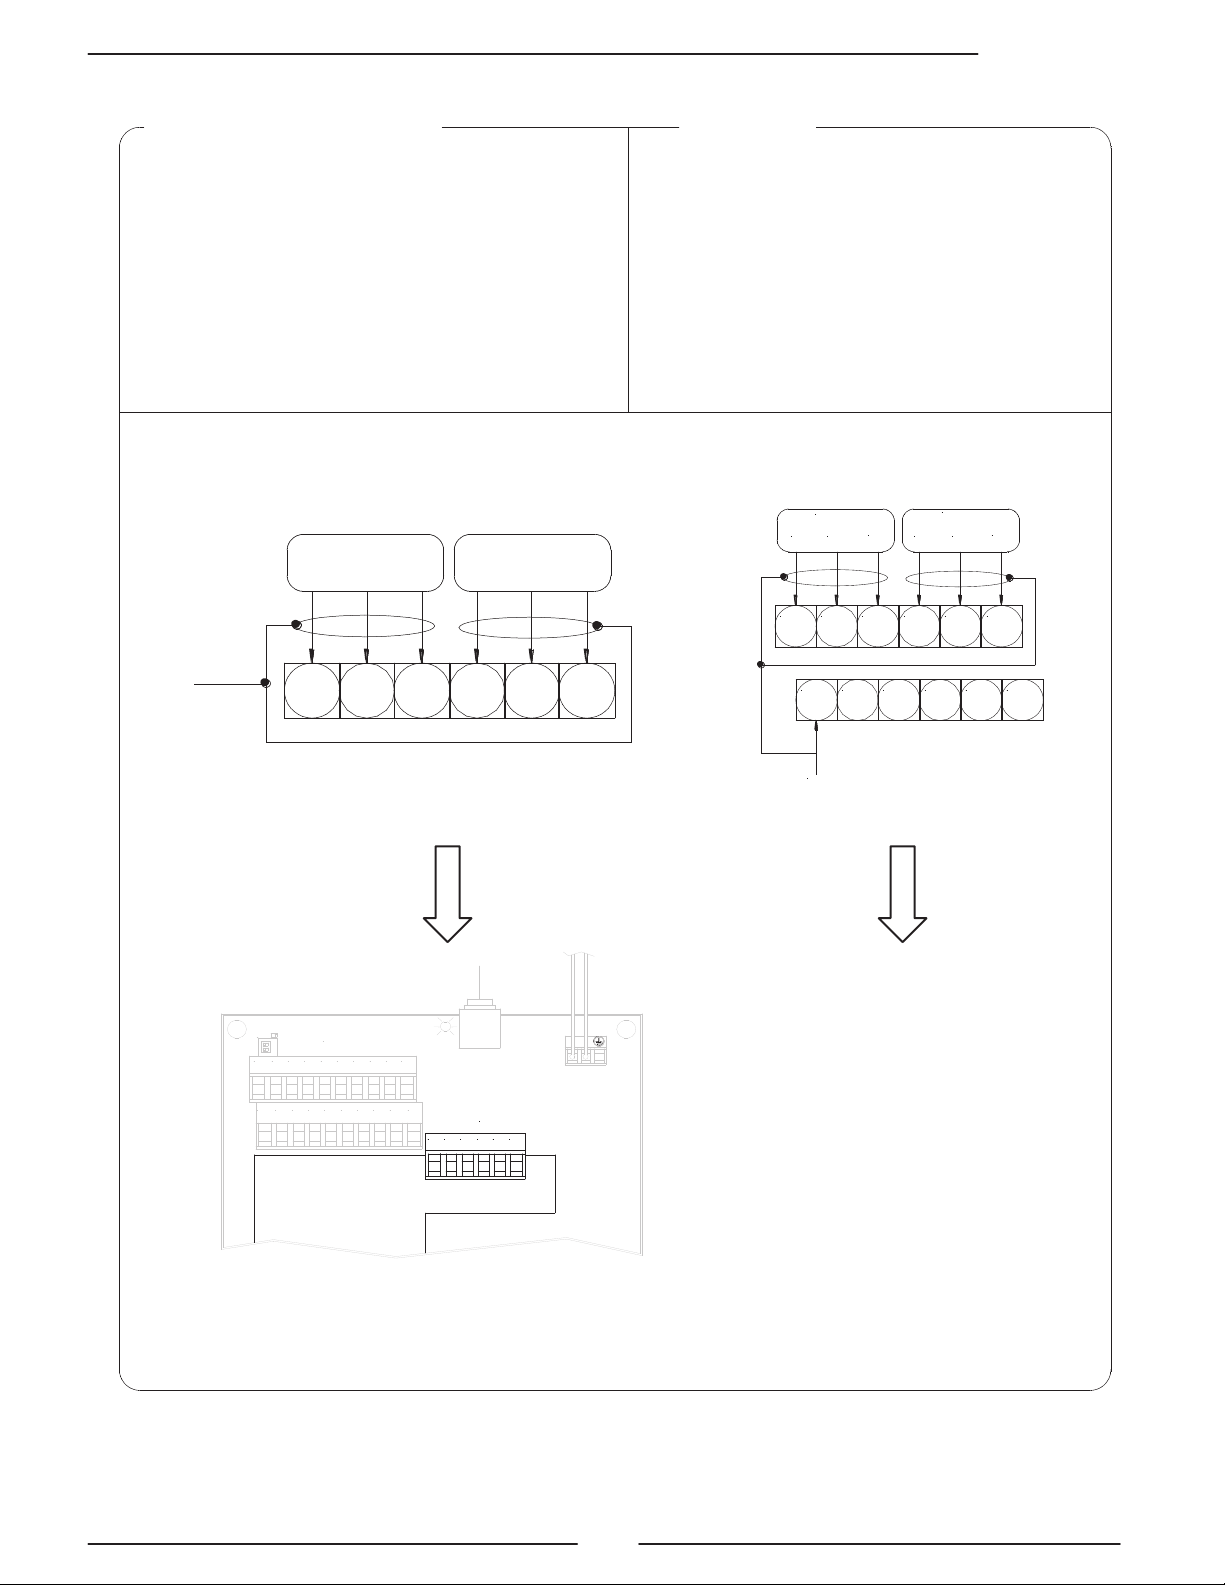
OPTIONAL RELÈ MODULES
q ME205: 2 relay outputs with 1 NO
contact + 1 NC contact each, 2A 60V~
,
60W/125VA
q ME207:
2 relay outputs with 1 NO
contact + 1 NC contact each, 2A 250V~
,
60W/125VA
q SH:
Cable shield, electrically connected to
ground and to the casing
q C: Relay – common
q NC: Normally closed contact
q NO: Normally open contact
LEGEND
26 25 24 23 22 21
OUT 4
C NC
NO
OUT 3
C NC
NO
32 31 30 29 28 27
SH
21 22 23 24 25 26
OUT 3
NO NC
C
OUT 4
NO NC
C
14
(M1)
M2
M1
1 2 3 4 5 6 7 8 9 10
11 12 13 14 15 16 1718 19 20
LOCK
262524232221
M2 for
ME205 and ME207
M2 position on separate/compact version
Teminal block on
compact/separate version
Teminal block on panel
version
NOTE: On panel version
the terminal block
M2
is
the same than other
modules.
Page 12
HML 210
12
The functions referring to the inputs could be divided in three groups:
1) only assignable functions to the input 1
2) functions that act directly on the inputs independently from the select input
3) only assignable functions to the input 1 and only to the inpu
t 2 which interact
between them
For details see the following pages.
Remember that the activation of any functions of batch automatically disable the other.
The list of such functions is suitable in
the table of the batch function configuration
section.
INPUTS/OUTPUTS
DIGITAL INPUT
3-40VDC (ON)
0-1.5VDC (OFF)
5 (+)
6 (-)
10k
5
6
20
0
15
+24
10k
External power supply
Internal power supply
Page 13
HML 210
13
0-1.5 V
3-40 V
AUTOCALIB. OFF
T
RESET
0-1.5 V
3-40 V
Tmin = 100ms
BLOCK
0-1.5 V
3-40 V
T
0-1.5 V
3-40 V
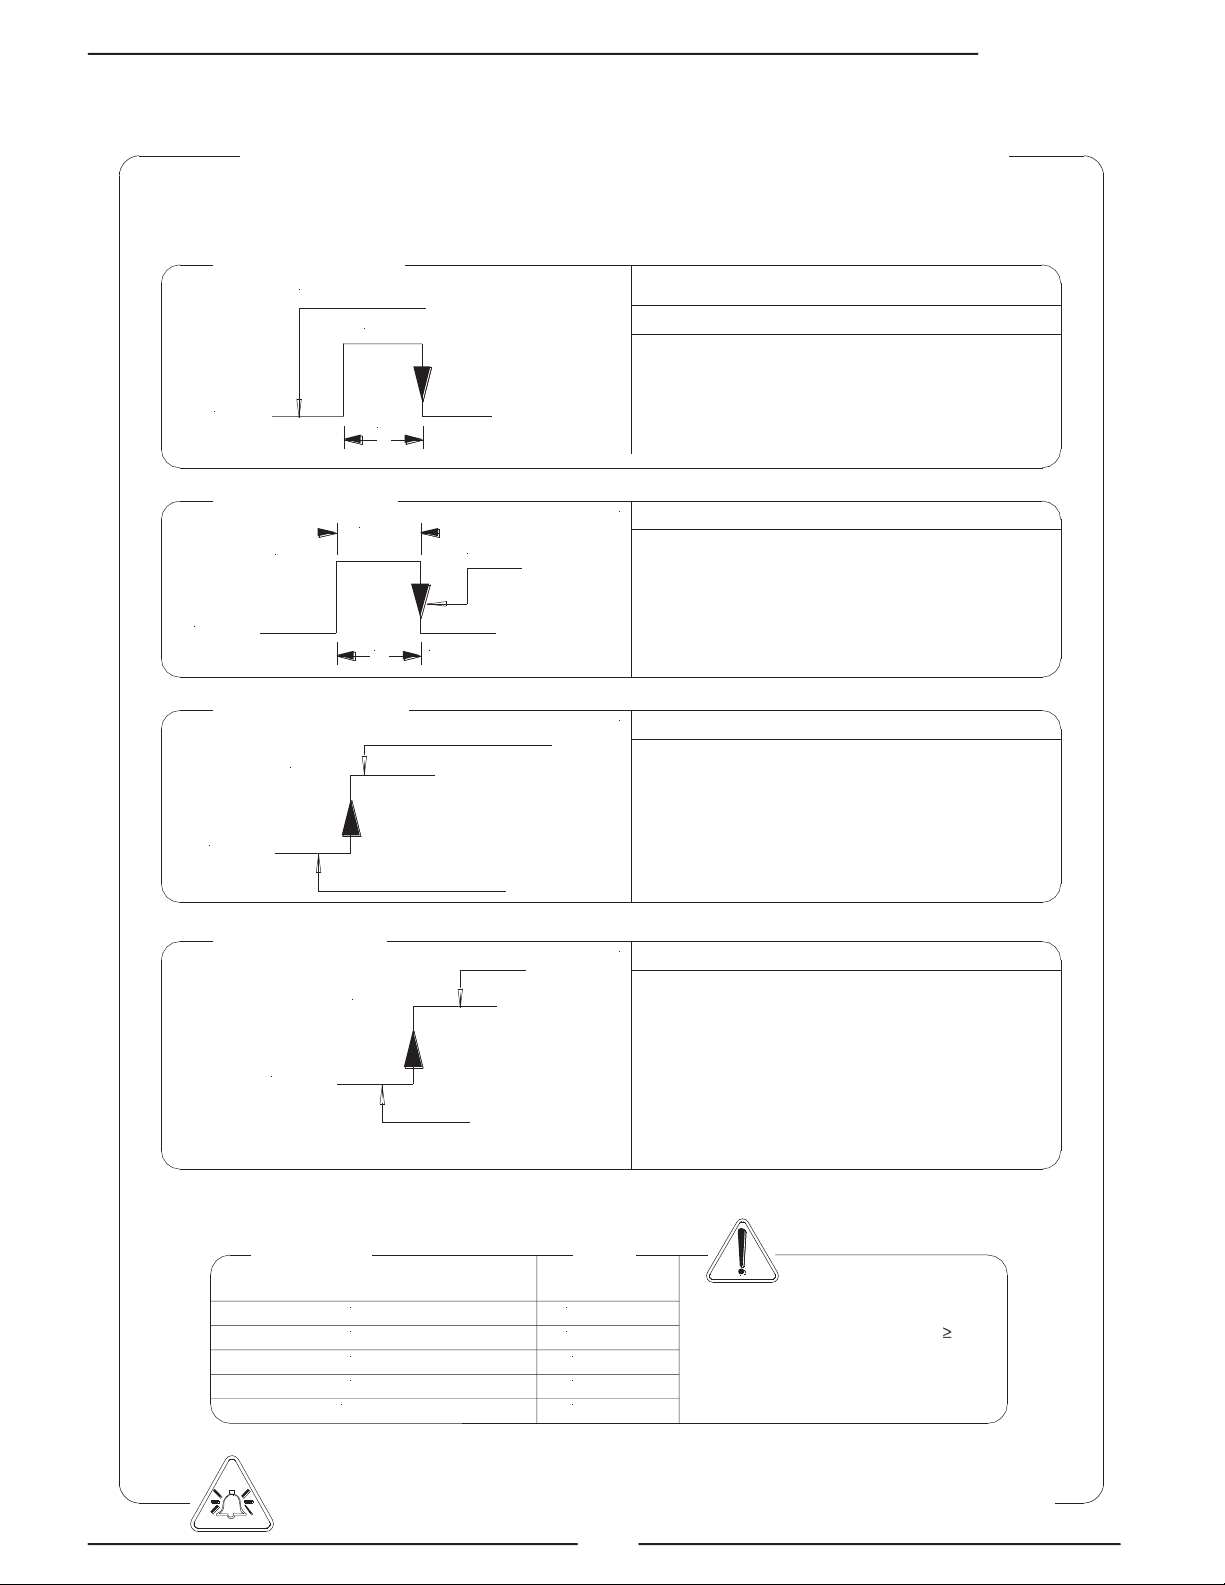
OPERATION ON INPUT ON/OFF
INPUT OPERATION STAGE (GENERIC FUNCTIONS)
10Hz
20Hz
50Hz
80Hz
150Hz
220ms
110ms
45ms
30ms
15ms
ATTENTION: time T must be
to Tmin
Auto-calibration
Reset totalizers
Block totalizers
Speed rate
Tmin
Block totalizers
Totalizers active
Necessary conditions for enabling the function
Necessary conditions for enabling the function
Necessary conditions for enabling the function
Tmin<T<1sec. = autocalibration
T > 1 sec. = Auto zero
POS. 5.7 ENABLED (Autozero calibration external command)
POS. 5.9 DISABLED (batch on input 1)
POS. 5.10 DISABLED (batch functions assign to input 2
(optional)
POS. 5.1 to 5.4 ENABLED (partial positive or reverse
flow totalizers reset enable).
N.B.: This function is even assignable to the input 2
POS. 5.6 ENABLED (totalizers counting lock command)
POS. 12.5 DISABLED (auto-batch)
POS. 12.7 DISABLED (batch consent)
POS. 5.8 ENABLED (range change)
POS. 5.9 DISABLED (batch on input 1)
POS. 5.10 DISABLED (batch functions assign to input
2 (optional))
POS. 6.1-4 DISABLED (end-batch functions assign to
output 2)
Necessary conditions for enabling the function
Range change
Note: THE FUNCTIONS ABOVE ARE ENABLED ONLY ON INPUT 1
Scale 2
Scale 1
Page 14
HML 210
14
T
T
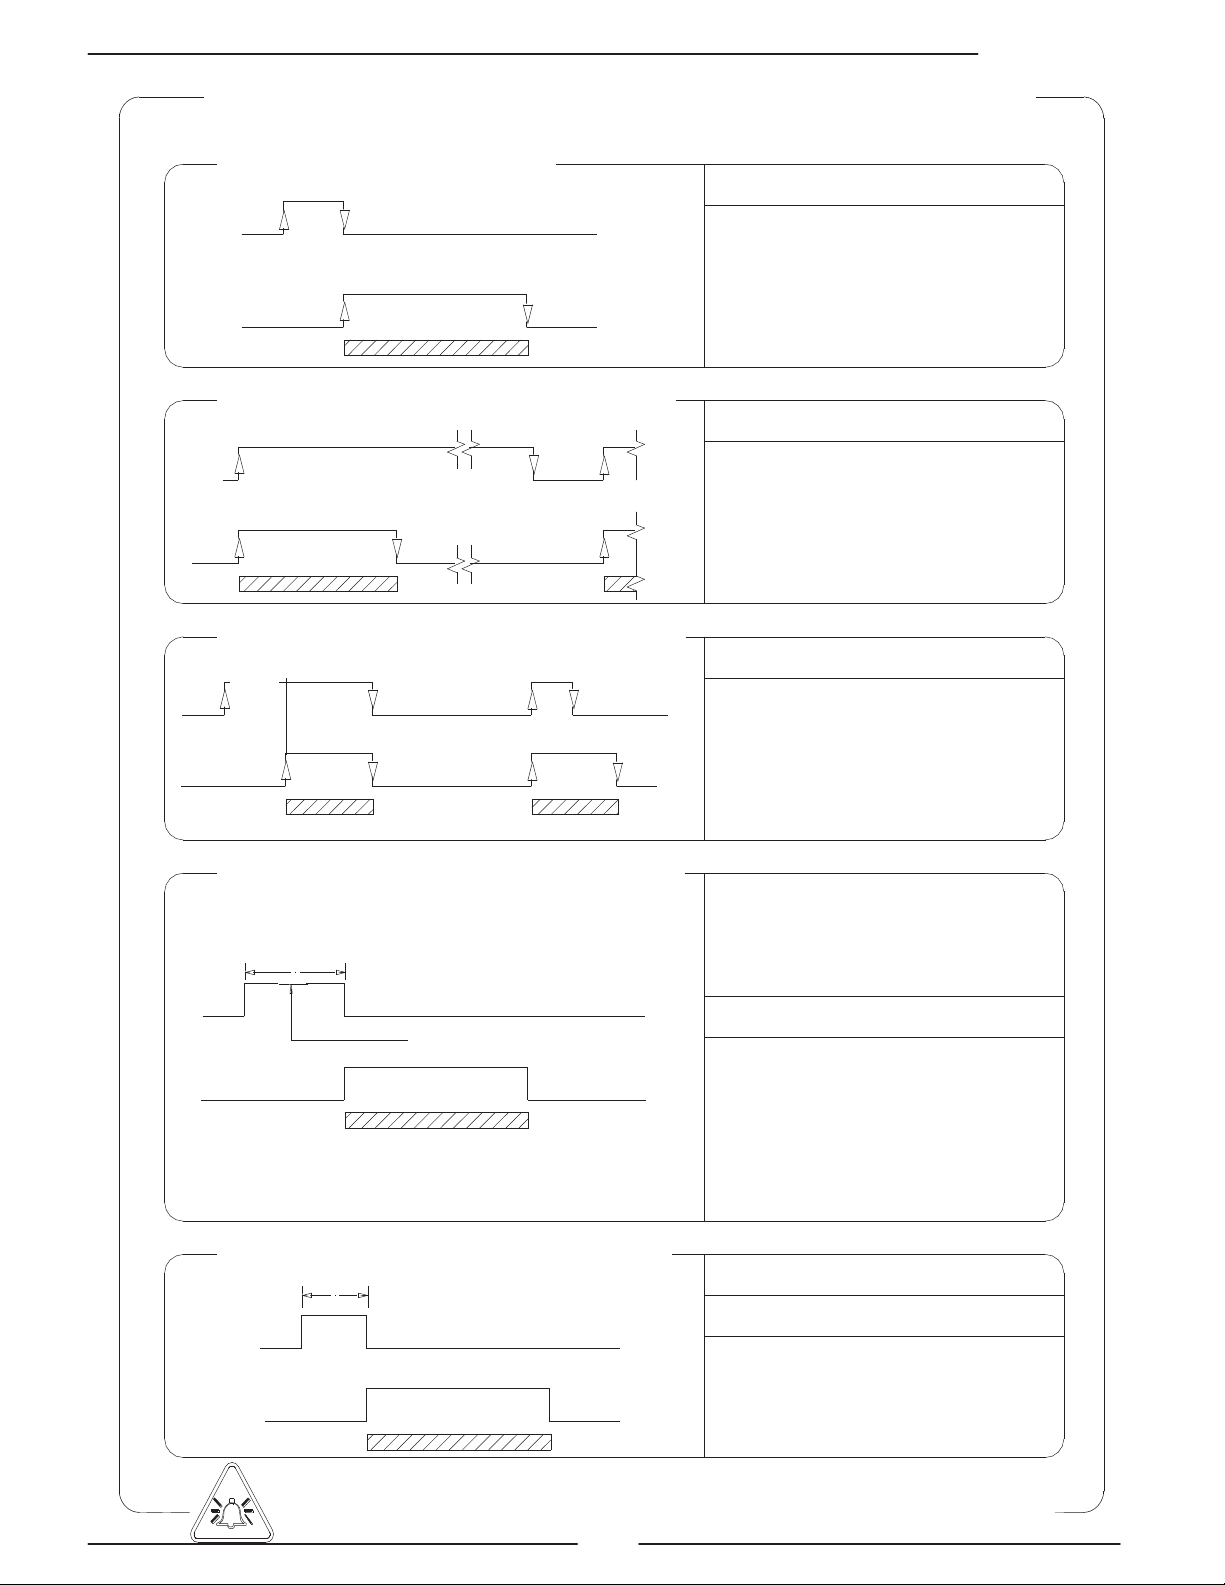
OPERATION STAGE ON INPUT 1 OR 2 (BATCH FUNCTION)
Start batch from remote input
Start batch from consent (remote)
Start batch from remote input with auto-
batch enabled
q POS. 5.9 or POS. 5.10 ENABLED on batch
q POS. 6.1 to 6.4 on end batch
Start batch from remote input with
automatic selection of formula 00/03
N.B.: THE ACTIVATION OF BATCH FUNCTIONS ON INPUT 2
PREVENTS THE ACTIVATION OF BATCH FUNCTIONS ON INPUT 1
Necessary conditions for enabling the function
Necessary conditions for enabling the function
q POS. 5.9 ENABLED or POS. 5.10 on
batch
q POS. 6.1 to 6.4 on batch
q POS. 12.7 ENABLED (Consent mode)
q POS. 5.9 or POS. 5.10 ENABLED on BATCH
q POS. 6.1 to 6.4 on END BATCH
q POS. 12.5 ENABLED (auto-batch)
q POS. 12.7 DISABLED (consent mode)
Necessary conditions for enable the function
T= 100ms ±50ms for select the formula 00
T= 200ms ±50ms for select the formula 01
T= 300ms ±50ms for select the formula 02
T= 400ms ±50ms for select the formula 03
In case of stop batch from remote input the
time of input
q POS. 5.9 ENABLED on BATCH or POS. 5.10
q POS. 6.1 to 6.4 on END BATCH
q POS. 12.6 ENABLED (automatic selection
of formula)
q POS. 12.7 DISABLED (consent mode)
q POS. 5.10 DISABLED selection function for
the formula 00/01 assigned to input 2 (optional)
Necessary conditions for enabling the function
Start batch from remote input 1 reset p+
enabled on remote input 1
T BETWEEN 1 E 4 = RESET TOTALIZER
T<1 = START E RESET TOTALIZER
Necessary conditions for enabling the function
q POS. 5.9 ENABLED (Batch on input 1)
q POS. 6.1 - 6.4 on BATCH
q POS. 5.2 ENABLED (reset P+)
0-1.5V
3-40V
INPUT
OUTPUT
Closing
valve
Opening
valve
BATCH
INPUT
OUTPUT
0-1.5V
3-40V
Opening
valve
Opening
valve
Closing
valve
BATCH
3-40V
0-1.5V
5 Sec.
<5 sec.
INPUT
OUTPUT
Closing valve
quantity to batch
memorized
Opening
valve
Closing
valve
AUTO-BATCH
BATCH
3-40V
0-1.5V
Formula selection
Start
INPUT
OUTPUT
Opening
valve
Closing
valve
BATCH
INPUT
OUTPUT
3-40V
0-1.5V
Start
Opening
valve
Closing
valve
BATCH
Start
Page 15

HML 210
15
T
T T
Start batch on remote input 1 stop from output
selection formula 00 o 01 from remote input 2
Block totalizer from remote input 1 start batch from
remote input 2
Block and reset totalize from remote input 1
start batch from remote input 2 consent mode to batch enable
OPERATION STAGE ON INPUT 1 AND 2 (BATCH FUNCTION)
Necessary conditions for enabling the function
q POS. 5.9 ENABLED
q POS. 6.1 or 6.4 on BATCH
q POS. 5.10 ENABLED function of
formula selection 00/01 assigned to input 2
(optional)
The block of the totalizer always
determines the interruption of the
batch. By re-energizing input 2 is
possible to get 2 results:
1) T< 1Sec = restart interrupted
batch
2) T between 1 e 4 Sec = reset
interrupted batch. N.B.: will be
necessary to give a new start
impulse to the input 2 (T< 1Sec)
to begin a new batch
Necessary conditions for enabling the
function
q POS. 5.6 ENABLED (Block
totalize)
q POS. 6.1 or 6.4 on END BATCH
q POS. 5.10 ENABLED (Batch
function for input 2 (optional))
q POS. 5.2 ENABLED (P+)
The block of the totalizer (Input 1 signal)
always determines the stopping of the batch.
With the T2 reset function enabled through the
stopping of the input 1 signal the batch
totalizer goes to zero. With the totalizer at zero
a new pulse on Input 2 will restart a new
batch.
Necessary conditions for enabling the function
q POS. 5.6 ENABLED (Block totalizer)
q POS. 5.10 ENABLED Batch function
assigned to input 2 (optional)
q POS. 12.7 ENABLED (consent mode)
q POS. 5.2 ENABLED (P+)
3-40V
0-1.5V
Start
Opening
valve
Closing
valve
Opening
valve
Closing
valve
BATCH FORMULA 00
BATCH FORMULA 01
BATCH FORMULA 00
BATCH FORMULA 01
3-40V
INPUT 2
OUTPUT
INPUT 1
3-40V
0-1.5V
Start
Start
Opening
valve
Closing
valve
Opening
valve
Closing
valve
NEW BATCH
RESTART INTERRUPTED
BATCH
OUTPUT
OUTPUT
INPUT 2
INPUT 2
INPUT 1
T<1 Sec.
T between1 and 4 Sec.
3-40V
0-1.5V
Start
RESET
T<1 sec.
Start
Opening
valve
Closing
valve
Opening
valve
Closing
valve
INTERRUPTED BATCH
0-1.5V
3-40 V
BLOCK
0-1.5 V
3-40 V
Start
INPUT 2
Opening
valve
Closing
valve
Opening
valve
Closing
valve
0-1.5V
3-40 V
BLOCK
RESET T2
INPUT 1
OUTPUT
INTERRUPTED BATCH
NEW BATCH
INTERRUPTED BATCH
Page 16

HML 210
16
16 (out1)
18 (out2)
17 (out1)
19 (out2)
43V
30
29
43V
24V COMMON
+24V INTERNAL
4-20mA OUT
mA
9 (+)
10 (-)
I
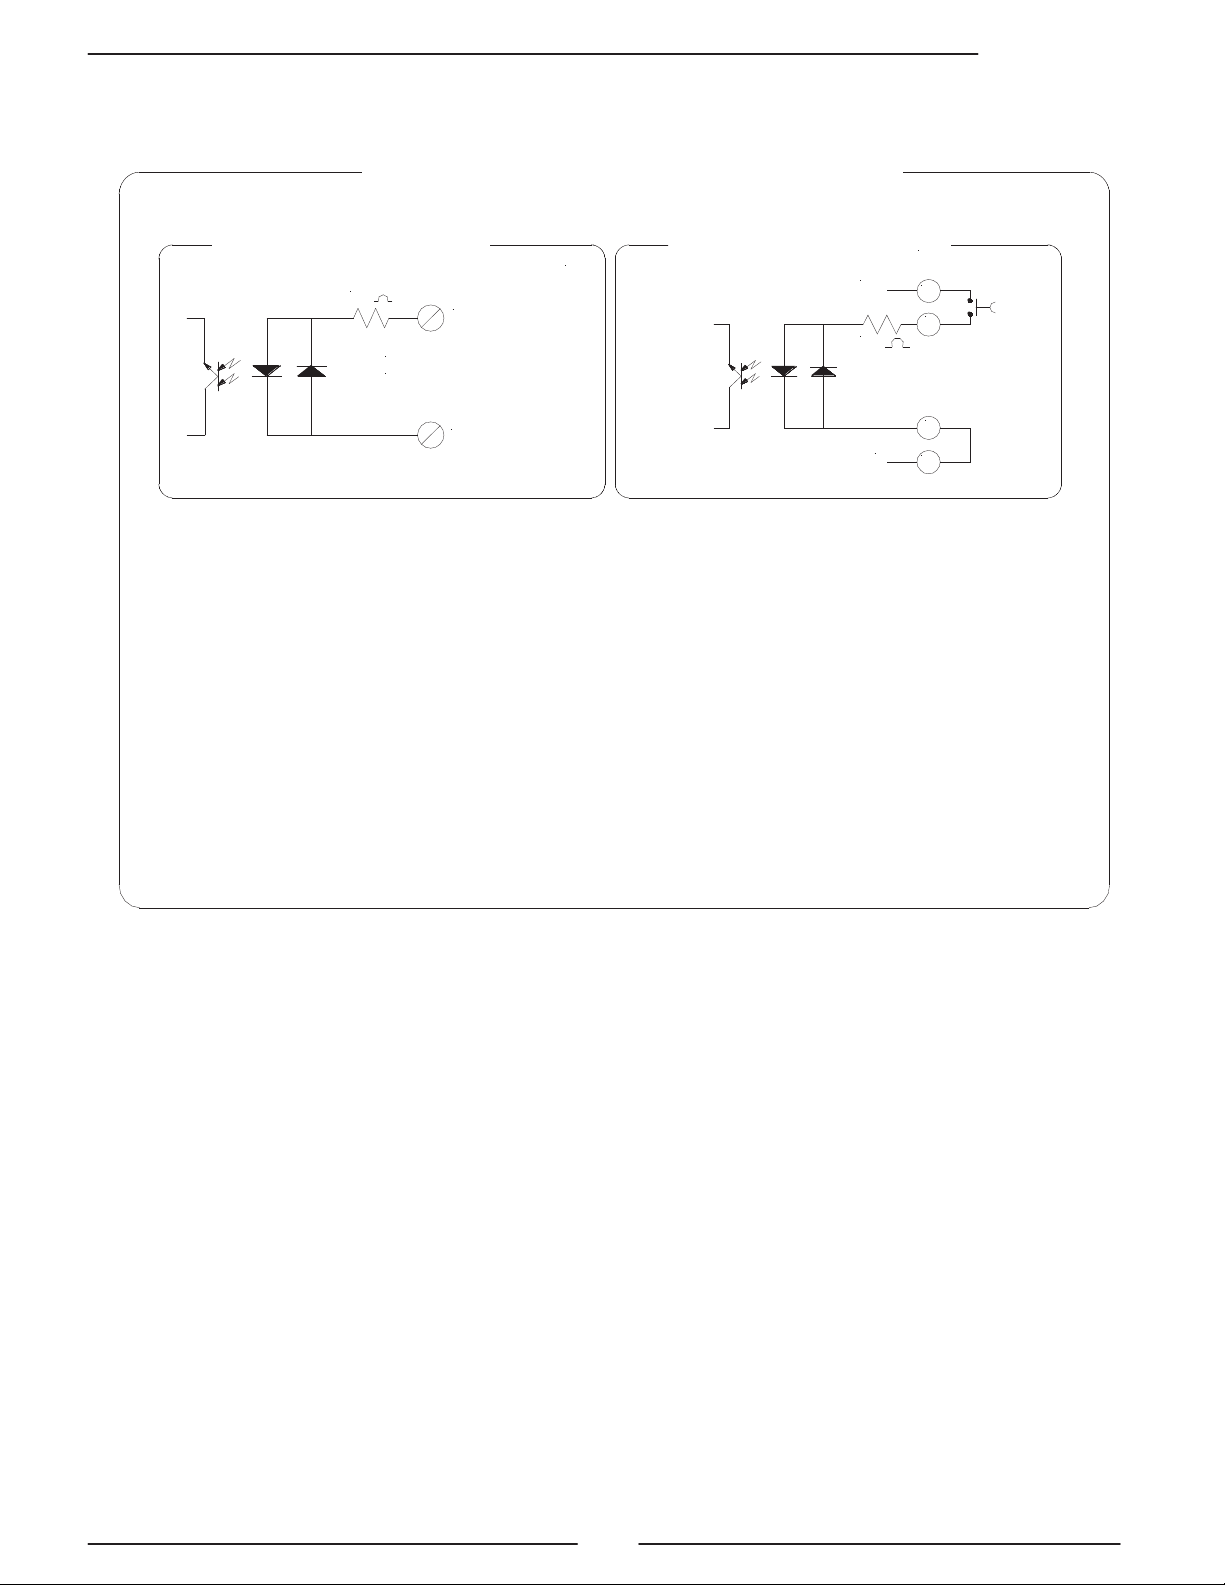
OUTPUT WIRINGS
N
O
TE: shielded cables are recommended for inputs and outputs wiring.
Output on/off 1250Hz
q Opto-insulated output with collector and emitter
terminals floating and freely connectable
q Maximum switching voltage: 40V
q Maximum switching current: 100mA
q
Maximum saturation voltage between collector
and emitter @100mA: 1.2V
q
Maximum switching frequency (load on the
collector or emitter, RL=470
, VOUT=24V
):
1250Hz
q
Maximum reverse current bearable on the input
during and accidental polarity reversion (VEC):
100mA
q Insulation from other secondary circuits: 500V
q Opto-insulated output
q Maximum load 1000Ω
q Maximum voltage without load 27V
q
Refresh frequency equal to the sample frequency
of the connected sensor
q
Protected against persistent over voltages up to
30V
q Opto-insualted output with collector and emitter terminals
floating and freely connectable. In ord
er to get the
maximum speed performances it is necessary to connect
the emitter to the common terminal of the outputs (0V),
while the load has to be on the collector. This output is
internally connected to the power supply source 24V
available on the terminal block.
q Maximum switching voltage: 40V
q Maximum switching current: 100mA
q
Maximum saturation voltage between collector and emitter
100mA, load on the collector and internal power supply:
0.3V
q Maximum saturation voltage between
collector and emitter
100mA, load on the emitter and internal power supply: 3V
q
Maximum switching frequency, load on the collector and
internal power supply: (RL=470
, VOUT=24V ): 12500Hz
q
Maximum switching frequency, load on the emitter or
external power supply: (RL=470 , VOUT=24V ): 2500Hz
q
Insulation from the other secondary circuits (except 24V
and 4-20mA outputs): 500V
OUTPUT 1/2 standard - OUTPUT 3/4 with modules
Only with ME 201 module
Output on/off 12500 Hz
The converter detect a loss of load on the 4 to 20mA output; to disable this
function set the value "mA val. fault" to 0 (Pos. 4.6)
4-20mA output
Page 17

HML 210
17
M1
M3
1 2 3 4 5 6 7 8 9 10
11 12 13 14 15 16 17 18 19 20
LOCK
CONVERTER ACCESS
FLAGS AND LED INTERPRETATION
FLAGS INTERPRETATION
FLAG
DESCRIPTION
Alarm max/min activated
!
- Interruption coils circuit
- Segnal error
- Empty pipe
C
Calibration running
S
Simulation
Pulse output saturation
(reduce TIME PULSE )
LED
LED INTERPRETATION
PERMANENT LIGHT:
initialization
FLASHING
LIGHT (1 sec.): normal function
FLASHING
LIGHT (<1 sec.): alarm on
The LED signals the real alarm status only if the display visualizes
one of the visualization pages
ATTENTION: The LED is not visible in the panel version of the
converter
FLAGS
Page 18

HML 210
18
For the converters without keyboard (blind
version), the programming is made through
ISOCON (cable and software needed).
Being the housing closure dependent by the
installer, the IP degree may be compromised, so
follow the torques mentioned.
KEYBOARD
BLIND CONFIGURATION
SHORT PRESSING (< 1 SECOND):
Increases the numeric figure or the parameter selected by the cursor
Returns to the previous subject on the menu
Batch start/stop
(when enabled)
LONG PRESSING (> 1 SECOND):
Decreases the numeric figure or the parameter selected by the cursor.
Proceeds to the next subject on the menu
SHORT PRESSING (< 1 SECOND):
Moves/positions the cursor rightward on the input
field
Proceeds to the following subject of the menu
Change the display of the process data
LONG PRESSING (> 1 SECOND):
Moves/positions the cursor leftward on the input field
Returns to the previous subject on the menu
SHORT PRESSING (< 1 SECOND):
Enter /leave the selected function
Enables the main menu for the instrument configuration
Cancels the selected function under progress
LONG PRESSING (> 1 SECOND):
Leaves the current menu
Enables the totalizer reset request (when enabled)
Confirms
the selected function
Page 19

HML 210
19
The direct exposure of the converter to the solar rays, could damage
the liquid crystal display. For the contrast set see pos. 8.3
* The maximum digits shown by the totalizer is 999999999 independently from the number of
selected decimals. Beyond this value the totalise are reset.
Flow rate value
% full scale
Direct/reverse totalizer
Sampling rate
Three vertical bars
Flow direction +/-
See: anomalies codes and
interpretation of flags
C=Calibration
S=Simulation
Flow speed
Scale (1=low); (2=high)
Flow rate value
% full scale
Measure units
Flow direction
Time scale (see Pos. 3.1)
% full scale
Active scale
Flow rate value
Currency value
Total direct totalizer
Partial reverse totalizer
The three vertical bars represent the filters behaviors: first
bar, “F”, is the FAST filter, second bar, “S”, is the “SLOW”
filter and the third bar represents
the variation of the new
measure samples respect to the averaged value. It can give
an indication about the total noise of the measure.
START-UP VISUALIZATION PAGES
Push to change
visualization
CONVERTER VISUALIZATION PAGE WITH CURRENCY FUNCTION ENABLE
The visualization of the pages can be change respect to some functions enabled o disabled (Pos.
8.4÷7÷8 and batch functions)
NOTE
*
Page 20

HML 210
20
The HML 210 can to show a 5 digit character display for flow rate units; this mean the
maximum flow rate value that can be represent
ed on the display is 99999
(no matter the
positioning of the decimal point). The minimum is
0.0025.
The
representable measure unit depends from sensor flow rate and
diameter; the
permitted units
are those,
set the instrument full scale value, allow to be represented with
a
numerical field which the maximum value do not exceed 99999.
Example for DN 300:
- Full scale value: 3m/s
- PERMITTED measure unit (example): l/s (216.00); m3/h (777.60); m3/s (0.2160)
- NOT PERMITTED measure unit (example): l/h (777600)..
FLOW RATE VISUALIZATION
Page 21

HML 210
21
Functions in the converter main menu are enabled by the access codes. The information
of this manual is related to all the functions available with the L2 level.
All the
functions
available through higher level are protected and reserved to the service.
Description of the L2 access code
(menu “11 Internal data” pos. 11.1)
q with code L2 = 00000 (only with this code) you can disable the L2 code request
q * with L2 customized
(freely chosen by the user) you can program all the
functions up to L2 security level, entering this code whenever you enter the Main
menu.
* ATTENTION:
take careful note of the customized code, since
there is no way for the
user to ret
rieve or reset it if lost.
Factory preset access codes
The converter is delivered with the d
efault L2 (level 2) access code:
11111
ACCESS CODES
The block dip-switch disables the access to the converter’s functions.
BLOCK DIP-SWITCH
To activate this block move both switch to the ON position
NOTE: with block enabled is possible to view all visualization pages pressing the
key
Factory pre-setting:
DIP-SWITCH OFF
Page 22

HML 210
22
QUICK START MENU
The user has immediate access to the Quick Start menu when the converter is powered up
by pressing the key . If access to the quick start menu does not occur, then it has been
disabled through the function 8.6
The set up functions (batching, regulation, flow and SMART measure) regulate
a
uto
matically the values of filters for the operation set modifying optimally the parameters
related to the function chosen.
To enable one of
four types operation press the key while the function is highlighted,
to confirm the changes press the key .
Filters settings for different S.rate (sensor menu, not user modifiable):
Batching
Regulation
Flow measure
SMART measure
MFSLN
MFFLN
MFSLN
MFFLN
MFSLN
MFFLN
MFSLN
MFFLN
10Hz 0 0
10 0 20 0 100
10
20Hz 0 0 5 0
10 0 50
5
50Hz 0 0 2 0 4 0
20
2
80Hz 0 0
1.3 0 2.5
0
12.5
1.25
150Hz 0 0
0.7 0 1.3 0 6.7
0.67
See the functions description section for more details regarding filters.
See programming functions section
Automatic parameters optimization (see below)
Access to all functions
Page 23

HML 210
23
Functions can be accessed by the keyboard in two different ways:
q The Quick start menu makes direct access possible to a
range of principal
functions for setting the scale reading and display characteristics of the sensor.
Quick start menu can be enabled by function 8.6 (menu display)
q Through the Main menu
it is possible to access functions with the access code
level 2. These control the sensor’s monitoring, data processing, input/output as
well further display options.
The following example shows how to change the Full scale by Quick Start menu; the
second illustrates how to change the function by the Main menu.
The converter configuration menu can be accessed in two different ways:
1) by
ISOCON interface
2) by keyboard of converter
Isocon is a Windows® software
that allows to set all the converter
functions
and personalize the
menu (IF2X is required), see
suitable manual for details
ACCESS TO THE CONFIGURATION MENU BY THE KEYBOARD
Factory pre-setting:
QUICK START MENU=ON
ACCESS TO THE CONFIGURATION MENU
ACCESS TO THE CONFIGURATION MENU BY ISOCON INTERFACE
Page 24

HML 210
24
Enter in the “Quick start menu”
Access to the function “Fs1”
Push
repeatedly
Change the value
Confirm the new value
Long push
Main page
EXAMPLE: modifying the full scale value from 4dm³/s to 5dm³/s.
from the “Quick start menu”
Page 25

HML 210
25
EXAMPLE: modifying the full scale value from 4dm³/s to 5dm³/s.
from the “Main Menu” (quick start menu enabled)
Enter in the “Quick start menu”
Access to the “Main Menu”
Access to the “Scale” menu
Access to the function “Fs1”
Change the value
Confirm the new value
Long push
Long push
X 5 TIMES
Push
repeatedly
Main page
Page 26

HML 210
26
2.1* Full scale value set for range N.1
2.2* Full scale value set for range N.2
2.3* Unit of measure and number of decimal place
2.4* Pulse value on channel 1
2.6* Duration of the pulse generated on channel 1
2.7* Duration of the pulse generated on channel 2
2.8 Full scale freq. for channel 1 (0.1Hz-1000.0Hz) (0.1Hz-10000Hz with opt. module)
2.9 Full scale freq. for channel 2 (0.1Hz-1000.0Hz) (0.1Hz-10000Hz with opt. module)
2.10 Enable/disable the selection of mass units on full scale set
2.11 Specific gravity set in kg/dm³
2.5* Pulse value on channel 2
1.1 Insert sensor ND (0-3000mm)
1.2 Sensor calibration data, visualized on sensor's label
1.3 Type of sensor: Enter the first two characters of the sensor serial number
1.4 Position for insertion sensors: 0=1/8DN, 1=1/2DN, 2=7/8DN
1.5 Factory parameters automatically calculated (ONLY for insertion sensors)
1.6 Length of the cable connecting the sensor to the converter
1.7 Enables the empty pipe detection feature
1.9* Value of empty pipe sensibility detection
1.10* Enables the automatic procedure of zero calibration
1.8* Electrodes cleaning
3.1* Main frequency filter
3.4 Enable every hour an internal cycle of calibration. Measurement stopped for 8-15 sec.
3.5* Automatic change of scale
3.6* Energy saving mode
3.3 Low flow zero threshold: 0-25% of full scale value
3.2* Measure filter
4.1 Maximum value alarm set for direct flow rate
4.2 Maximum value alarm set for reverse flow rate
4.3 Minimum value alarm set for direct flow rate
4.4 Minimum value alarm set for reverse flow rate
4.6* Current output value in case of failure
4.7* Frequency output value in case of failure
4.8* Batch safety timer
4.5 Hysteresis threshold set for the minimum and maximum flow rate alarms
PROGRAMMING FUNCTIONS
(functions with access code < 3, those with symbol “*” see the next section)
Attention:
The menu functions in grey colour are visualized on display only with other active functions
or with optional modules
Page 27

HML 210
27
5.1* Total direct (positive) flow totalizers reset enable
5.2* Partial direct (positive) flow totalizers reset enable
5.3* Total reverse (negative) flow totalizers reset enable
5.4* Partial reverse (negative) flow totalizers reset enable
5.6 Totalizers counting lock command (see page 13)
5.7* Autozero calibration external command
5.8 Range change external command (see function 3.5)
5.9 Batch start/stop external command (see batch functions)
5.10*Functions assigned to input 2
5.5 Reset totalizers of pulse from digital input (see page 13)
6.1* Output 1 functions
6.2* Output 2 functions
6.3* Output 3 functions
6.4* Output 4 functions
6.5* Choice of the function and the range of current output n.1
6.6* Choice of the function and the range of current output n.2
8.3* Display contrast
8.4 Partial totalizer visualization (with batch enable the function is always on)
8.5 Date and time visualization with data logger enable
8.6 Quick start menu visualization
8.7 Enable the page of net totalizer (difference between direct and reverse)
8.8 Visualizes the values of the partial totalizers in the unit of selected currency
8.9 Choice of the numbers of decimals for the visualization currency value: From 0 to 3
8.10* Value of conversion/currency for direct totalizer
8.11* Value of conversion/currency for reverse totalizer
8.2 Display updating frequency: 1-2-5-10 Hz
8.1 Choice of the language: EN= English, IT=italian, FR= French, SP= Spanish, DE=German
8.12 Reset the processor of the display (useful in case of particular badly operations of the display)
8.13* Total direct (positive) flow totalizer reset
8.14* Partial direct (positive) flow totalizer reset
8.15* Total reverse (negative) flow totalizer reset
8.16* Partial reverse (negative) flow totalizer reset
7.1 Choice of the communication protocol for the IF2 device
7.2 Choice of the communication protocol for the RS232 port
7.11 Address value of converter (range 0 - 255)
7.3 Speed of the RS485 output (possible choices: 4800, 9600, 19200, 38400 bps)
7.5 Print function enable (optional)
7.6 Print of the performed batch
7.7 Print of the data process on regular intervals
7.8 Print of events
7.12 Address of a further converter connected like a terminal
7.13 Start remote connection to the terminal. Connection interrupted after 10sec. of inactivity
7.4 Speed of the RS232 output (possible choices: 4800, 9600, 19200, 38400 bps)
7.9 Instrument answer delay
7.10 RS485 parity
Page 28

HML 210
28
9.1* Date and time set
9.2 Automatic data logger enable
9.4 Displaying of the data stored in the data logger
9.5 Displaying of the last 64 alarms stored in the data logger
9.6 Visualization function of minimum and maximum peak of flow rate
9.7 Logged data cancel function
9.8 Reset all alarm events
9.9 Reset all minimum and maximum peak of flow rate stored
9.3 Interval time for the data logging function: 1, 2, 3, 6, 8, 12, 24, 48 hours
11.1 Level 2 access code enter
11.3 Load user data saved
11.4 Save user data
11.5 Ignore the calibration error during the switch on test
11.6 Ks coefficient (only for service purposes)
11.2 Load factory data pre-set
12.1* Number of batch cycles to define the value of compensation. Value 0=OFF
12.2* % limit of compensation threshold
12.4* Prebatch value
12.5* Auto-batch
12.6* Automatic selection of batch formula
12.7* Static consent of batch
12.3* Compensation value
10.1* Calibration of the converter
10.2* Autotest converter
10.3* Flow rate simulation enabling
10.4 Firmware revision/version
Menu 12: Menu visualized only with batch active
(see from batch function configuration section)
Page 29

HML 210
29
MENU 1-SENSOR
(POS. 1.1) Nominal diameter of sensor [ND= XXXX]
FUNCTIONS DESCRIPTION
(description of the functions with access code< 3)
The following pages give a description of the most important functions and how they can be changed
or enabled/disabled by the user
MENU 1 - SENSOR
(POS. 1.8) Electrodes cleaning [El. Cleaning=MIN]
Selectable options: OFF, minimum, average and maximum. It is not recommended the use of this
function (let OFF) when the liquid has a conductivity less than 100µS/cm.
(POS. 1.9) Empty pipe threshold [E.P. thr.=XXX]
This value represents the threshold of measure block to zero in empty pipe condition; the span
function is 20-250. Since the sensibility of empty pipe detection could be changed by the liquid
conductivity, ground connections, type of lining, in case of needed it is possible to adjust manually
the preset threshold. It is recommended to check periodically its proper functioning. Value increasing
means sensibility decreasing.
(POS. 1.10) Autozero calibration [Autozero cal.]
This function activates the zero calibration automatic system. To perform this operation, it is
necessary for the sensor to be full of liquid, and the liquid be perfectly still. Even minimal movement
of the liquid may affect the result, and consequently, the accuracy of the system. Once you are sure
the above conditions have been fulfilled (and the percentage flow rate value is stable) press long the
key and automatically activates the zeroing procedure, after which it is necessary to check that
the percentage value showed goes to zero, repeat the operation otherwise. When the value is stable
at zero, then press the key .
MENU 2 - SCALES
(POS. 2.1-2) Full scale n° 1-2 [Fs1-2=
dm³/S
X.XXXX]
The full scale is used to indicate to the maximum meter’s flow rate; a volume per time is required.
The full scale should be chosen carefully as it’s parameters are used for several other parameters
(Pls1-2, and 3 Measure). There are four fields to fill in order to set this parameter, from left to right:
1) volume unit of measure, 2) type of unit, 3) time unit of measure and 4) numeric value. The
selection is made by positioning the cursor on the field to modify. To change the type of unit of
measure (metric, British or American, mass or volume) the cursor has to be positioned on the symbol
“/” (field N. 2). When the nominal diameter is set to zero it is possible to modify only the numeric
field, since the unit of measure stays at m/sec. The following tables show the units of measure
available and the conversion factor by comparison with 1dm3 and 1kg. The converter accepts any
k
i
nd of combination of units of measure satisfying both the following conditions:
q Numeric field value 99999
q 1/25 fs
max
numeric field value fs
max
.
Menu visualized on the converter (from 1 to 11)
Synthetic description of the function
Identification of the function (not visualized on display)
Converter request
Page 30

HML 210
30
where fs
max
is the maximum full scale value corresponding to the sensor, equal to a 10m/s liquid
speed. The measure units are shown as appear on the display. The British and American units are
diversified by using capital and small characters.
When a measure mass unit is set, the specific gravity function is automatically enabled by the system.
Please, note that the mass measure is heavily affected by the temperature. With certain liquids this
may cause significant measurement errors. The following measure of time units can be selected: s =
second, m = minute, h = hour, d = day.
(POS. 2.3) Measure unit and decimal totalizers number [Tot.MU:dm³X.XXX]
Setting the measure unit and decimals number for visualized totalizers or the volumes to batch.
Setting the measure unit and decimals places number displayed for the volumes. To set the measure
unit, position the cursor on field of the measure unit. To set the unit type, position the cursor on the
blank space between the measure unit and the numeric value; the number decimal places can be
selected by placing the cursor on numeric field and choosing one of the possible combinations: 1000-
01.00-001.0-00001.
(POS. 2.4-5) Pulse value channel 1-2 and unit of measure of tot. [Pls1-2=
dm³
X.XXXXX]
This function allows the user to set a signal (a pulse) to be given from the converter when a defined
amount of liquid has passed through the sensor. To set the parameter, complete the three fields,
from left to right: 1) measure unit, 2) unit type and 3) numeric value. The selection is performed by
positioning the cursor in the field to be modified. To change the unit type (metric, British or American,
mass or volume) position the cursor on the blank space between the measure unit and the numeric
value. When the nominal diameter is set to zero it is possible to modify only the numeric field since
the measure unit stays at meters (m) or feet (ft). Only those units described above are available to be
selected.
(POS. 2.6-7) Pulse duration channel 1-2 [Tpls1-2=msXXXX.XX]
With the liquid volume to generate the pulse value (pos. 2.4-2.5) set by the user. The user must set
the corresponding duration of the pulse to be outputed. This value is expressed in milliseconds and
has to be between 0.4 and 9999.99. When the high frequency output is present, then the minimum
value can type of device is connected to the converter, the user must verify that the set pulse
duration is compatible with the external device processing such pulses. If, for example, an electromechanical pulse counter is connected, one of be set to a minimum of 0.04 milliseconds.
ATTENTION: since the converter can not detect which two problems may occur; firstly, if the pulse is
too long the coils may burn out, secondly, if the pulse is too short, the counter may not be able to
function, with the possibility of causing damage of the output.
MENU 3 - MEASURE
(POS. 3.1) Main frequency filter [AC filter=s XX.X]
This function allow to filter electrical noise on the liquid coming from the main frequency. The allowed
values are: 0.1s, 0.2s, 1.0s, OFF; 0.1s=ready measure, 0.2s=liquid noise filter, 0.5s=liquid STRONG
noise filter.
cm3
Cubic centimetre
ml
Millilitre
l
Liter
dm3
Cubic decimeter
dal
Decalitre
hl
Hectolitre
m3
Cubic metre
in3
Cubic inch
Gal
American gallon
GAL
British gallon
ft3
Cubic foot
Bbl
Standard barrel
BBL
Oil barrel
yd3
Cubic yard
kgl
KAmerican gallon
KGL
KBritish gallon
G
Gram
Kg
Kilogram
T
Ton
Oz
Ounce
Lb
Pound
Ton
short tons
Page 31

HML 210
31
(POS. 3.2) Measure filter [M. filter=s XXX.X]
This section of the manual is extremely important because the right settings of filters allow to get a
proper meter reaction according to the flow rate behaviour.
WORKING PRINCIPLE
There are two filters:
MFSLN (Measure Filter Slow LeNght): available via ETP and through the display, in menu 3.
Measure, function “M. filter”
The M. filter function effects the converter response time while measuring (it is like LOW PASS filter);
the value needs to be chosen carefully as it effects the meter behaviours. A smaller value with a
fluctuating flow will lead to unstable flow readings as the integration filter will be measuring over very
short periods. A higher value corresponds to a more stable but slower measure, a smaller value gives
a faster measure but is more unstable.
MFFLN (Measure Filter Fast LeNght): is available ONLY via ETP
The MFFLN must be set by the user in accordance with the MFSLN (M. filter) to meet the required
meter behaviour.
How the system functions: If the period of flow rate variation is over the MFFLN time (i.e. a slow flow
variation), the outputs (display/4-20mA/Alarms) are refreshed according to MFSLN (M. filter); as soon
as the flow rate variation is within MFFLN time, the output will be set immediately at the new value.
The combination of MFSLN & MFFLN is useful as it allows the converter to react quickly to large flow
rate variations, regardless of the MFSLN (M. filter) set, therefore delaying (dampening) smaller
fluctuations in flow, resulting in very stable measures.
The value of those parameters has to be within the range from 0 (filter disabled) to the maximum
value defined on below table:
Sampling rate
M Filter (MFSLN)
F Filter (MFFLN)
10
100.0
15.00
20
50.0
7.50
50
20.0
3.00
80
12.5
1.88
150
6.7
1
Page 32

HML 210
32
10
20
30
40
50
60
0
0 2 4 6 8 10 1 2 14 1 6 18 2 0 22
MFS LN: 0,0s
MFFLN: 0,0s
FL OW R ATE ME ASUR E
FI LTERS
>> >>
>> >>
10
20
30
40
50
60
0
0 2 4 6 8 10 1 2 14 1 6 18 2 0 22
10
20
30
40
50
60
0
0 2 4 6 8 10 1 2 14 1 6 18 2 0 22
1,0sec.
1,0sec.
1,0sec.
1,0sec.
1,0sec.
5,0sec.
IN
OU T
MFS LN: 5,0s
MFFLN: 1,0s
FL OW R ATE ME ASUR E
FI LTERS
>> >>
>> >>
IN
OU T
MFS LN: 5,0s
MFFLN: 0,0s
FL OW R ATE ME ASUR E
FI LTERS
>> >>
>> >>
IN
OU T
FL OW RAT E (%)
TIM E (S ec)
TIM E (S ec)
FL OW RAT E (%)
TIM E (S ec)
FL OW RAT E (%)
The following diagrams show the response of the instrument for a flow rate variation from 0 to 100%
of full scale set using different settings of filters.
Both filters to zero
(batching setup): the
measure
quickly
follows
the flow rate
behaviour
Both filters are used
(Smart mode): prompt
reaction to quick flow
variation (based on
the MFFLN value);
smoothing the
measure result
to slow
flow variations (based
on MFSLN value)
Only M. filter (MFSLN)
is used
(regulation
and flow measure
setup)
: smoothing the
measure result (based
on MFSLN value) in
reaction to quick and
slow flow variation
(MFFLN does no
t
work).
Page 33

HML 210
33
(POS. 3.5) Automatic scale change enable [Autorange=ON/OFF]
Enables the automatic change of scale. The meter may have two different working ranges in order to
suit to the variable process conditions. In order to get the best results out of this function it is
important range N.2 (Fs2) if enabled is bigger than N.1 (Fs1). When the flow rate increases and
reaches the 100% of the full scale 1, then the meter automatically switches to scale 2. When the flow
rate decreases again reaching a value on scale 2 equal to the 90% of full scale N.1, then the active
scale is 1 again. Allowed values for this parameter: ON/OFF. Note: the autorange does not allow
using the manual change of range (pos. 5.8)
(POS. 3.6) Energy saving enable [E.saving=ON/OFF]
Automatic energy saving function enables. This function is used when the instrument is powered by a
battery or solar cells, allowing an energy saving up the 60-80%. The energy saving function controls
the powering cycles ratio of the coils while the measuring cycling remain unaffected. When the
energy saving function is enabled and the flow rate is stable the number of “off” cycles is greater
than the “on” cycles, reducing the average power consumption. If the flow rate suddenly changes,
the meter switches to a higher number of measuring cycles, achieving a higher response time.
To allow this function to work properly set the SMART measure setup (see quick start menu).
MEN
U
4 - ALARMS
(POS. 4.6) Current output value in case of failure [mA V.fault =% XXX]
The output current signal can be specified by the user in case of failure of either, empty pipe, coils
interrupted, or ADC error. The signal current is set as a percentage (0 to 120%) of the 0/4-20mA
current. 120% corresponds to 24mA and does not depend on the selected range (0-20/4-20mA).
The NAMUR NE43 recommendation asks for a alarms signalling value for the current output lower
than 3.6mA (<18%) or bigger than 21mA (>105%). It would then be preferable to set the value of
this function at the 10%, so that the current value in case of the a.m. cases would be 2 mA, allowing
the following diagnostics:
q current < 2mA - 5%: line interrupted, power supply failure or faulty converter;
q 2mA -5%
current 2mA + 5%: hardware alarm;
q 4mA current 20mA: normal working range;
q 20mA < current
22mA: out of range, measure above 100% f.s.
Note: To set this parameter to zero disables the alarm
(POS. 4.7) Frequency output value in case of failure [Hz V.fault=%XXX]
To set the frequency value assigned to the on/off output in one or more of the following failure cases:
q Empty pipe; Coils interrupted ; ADC error
Allowable range is from 0 to 125% of the frequency full scale value.
Although there are no specific rules regulating cases such as these, it would be convenient to use the
failure information as follows:
q 0% Hz
frequency 100% f.s.: normal working range;
q 100% f.s. < frequency 110% f.s.: overflow, measure above the 100% of the f.s.;
q 115% f.s. frequency 125% f.s.: hardware alarm condition.
(POS. 4.8) Batch safety timer [Timeout =s XX.X]
With this function is possible to set a maximum time for the batch ; over this time will be generate
an alarm.
This function is useful when you need control one or both of the following conditions:
q batch valve open and flow rate is zero
q batch valve closed and flow rate different to zero
When this alarm is activate, the batch operation and power supply to the value is halted. The allowed
values of function are from 0 (disable) to 25.5 seconds and is active only if one or more of the batch
functions are enabled.
Page 34

HML 210
34
FUNCTIONS FOR INPUT 2
OFF:
DISABLE
T+ RESET:
RESET TOTAL DIRECT TOTALIZER FOR DIRECT FLOW RATE (+)
P+ RESET:
RESET PARTIAL DIRECT TOTALIZER FOR DIRECT FLOW RATE (+)
T
- RESET: RESET TOTAL REVERSE TOTALIZER FOR REVERSE FLOW RATE (-)
P
- RESET: RESET PARTIAL REVERSE TOTALIZER FOR REVERSE FLOW RATE (-)
BATCH
: START/STOP BATCH
BM SELECTION:
STATIC SELECTION OF FORMULA
MENU 5 - INPUTS
(POS. 5.1-4) Reset totalizer enable [T/P+/-RESET=ON/OFF]
When one of this function is enabled, the related totalizer may be reset through the on/off input.
(POS. 5.7) “Autozero” calibration external command enable [Calibration=ON/OFF]
When this function is active, applying a voltage on the on/off input terminals the meter performs a
autozero calibration cycle. ATTENTION: If the voltage pulse is less than 1 sec., the meter performs a
calibration cycle to for compensate possible thermal drifts. If the voltage pulse is more 1 sec, the
meter performs a zero calibration measure. This function enables/disables the automatic zero
calibration of the system. To perform the calibration it is absolutely necessary for the sensor to be full
of liquid and that the liquid is perfectly staying still. Even very small movement of the liquid may
affect the result of the calibration, and, consequently, the accuracy of the system.
(POS. 5.10) Functions assigned to input 2 [Inp.2=XXXXXX]
Allows to choose the function associated to input 2. The functions are listed in the table below.
MENU 6 - OUTPUTS
(POS. 6.1-4) Function corresponding to on/off output 1-2-3-4 [OUT1=XXXXXX]
Choice of the function corresponding to digital outputs. The functions are listed in the table below.
The output 3-4 are optional and the output 4 is the only output, which can reach a 12.5
kHz frequency.
FUNCTIONS ASSOCIATED TO THE OUTPUTS 1, 2, 3, 4
OFF: DISABLED
#1 IMP+: PULSE ON CHANNEL 1 FOR POSITIVE FLOW RATE
#1 IMP-: PULSE ON CHANNEL 1 FOR NEGATIVE FLOW RATE
#1 IMP: PULSE ON CHANNEL 1 FOR POSITIVE AND NEGATIVE FLOW RATE
#2 IMP+: PULSE ON CHANNEL 2 FOR POSITIVE FLOW RATE
#2 IMP-: PULSE ON CHANNEL 2 FOR NEGATIVE FLOW RATE
#2 IMP: PULSE ON CHANNEL 2 FOR POSITIVE AND NEGATIVE FLOW RATE
#1 FREQ+: FREQUENCY CHANNEL 1 FOR POSITIVE FLOW RATE
#1 FREQ-: FREQUENCY CHANNEL 1 FOR NEGATIVE FLOW RATE
#1 FREQ: FREQUENCY CHANNEL 1 FOR POSITIVE AND NEGATIVE FLOW RATE
#2 FREQ+: FREQUENCY CHANNEL 2 FOR POSITIVE FLOW RATE
#2 FREQ-: FREQUENCY CHANNEL 2 FOR NEGATIVE FLOW RATE
#2 FREQ: FREQUENCY CHANNEL 2 FOR POSITIVE AND NEGATIVE FLOW RATE
SIGN: FLOW DIRECTION OUTPUT (ENERGIZED = -)
RANGE: RANGE INDICATION OUTPUT (ENERGIZED = SCALE 2)
MAX AL.+: MAX DIRECT FLOW RATE OUTPUT(ENERGIZED = AL. OFF)
MAX AL.-: MAX REVERSE FLOW RATE OUTPUT(ENERGIZED = AL. OFF)
MAX AL.: MAX DIRECT/REVERSE FLOW RATE OUTPUT(ENERGIZED = AL. OFF)
MIN AL.+: MIN DIRECT FLOW RATE OUTPUT(ENERGIZED = AL. OFF)
MIN AL.-: MIN REVERSE FLOW RATE OUTPUT(ENERGIZED = AL. OFF)
MIN AL.: MIN DIRECT/REVERSE FLOW RATE OUTPUT(ENERGIZED = AL. OFF)
MAX+MIN: MAX AND MIN FLOW RATE ALARM OUTPUT (ENERGIZED = AL. OFF)
P. EMPTY: EMPTY PIPE ALARM OUTPUT (ENERGIZED = FULL PIPE)
OVERFLOW: OUT OF RANGE ALARM OUTPUT (ENERGIZED = FLOW RATE OK)
HARDW AL.: CUMULATIVE ALARM OUTPUT interrupt coils, empty pipe, measure error (ENERGIZED = NO ALARMS
BATCH AL.: BATCH ALARM
EXT. COMM.: ONLY AVAILABLE WITH DATA LOGGER MODULE
BATCH SYN.: AT THE AND OF BATCH THE OUTPUT CHANGE STATUS
END BATCH.: END BATCH OUTPUT (ENERGIZED =BATCH IN PROGRESS)
PREBATCH.: PREBATCH OUTPUT (ENERGIZED = PREBATCH IN PROGRESS)
Page 35

HML 210
35
(POS. 6.5-6) Function and the range of current output n.1-2 [Out mA1-2=X÷XX+]
The function associated to the signal current on output N.1-2. The current output N.1 is optional
and it is mounted on the main board
. There are three fields to modify for this function:
q Scale zero: 4 or 0mA;
q Full scale: 20 or 22mA
q Field: + = positive, - = negative, blank = both, -0+ = central zero scale
The values corresponding to the scale points are shown in the following chart:
In hardware alarm conditions “HARDW AL.” (interrupted coils, empty pipe, measure error) the current
value is programmed by the function “mA v.fault” (pos. 4.6) and it is expressed as percentage of a
fixed current range, where: 0% = 0mA and 110% = 22mA.
MENU 8 - DISPLAY
(POS. 8.3) Display contrast set [Contrast=X]
Visual display contrast set. The contrast can change according to the room temperature. The set
values are from 0 to 15. The entered value has effect only when leaving the function itself.
WARNING >10 is a dark screen and obscures writing on the display
Contrast also can be set from visualization pages pushing the key for 8 seconds or
more. In this way the contrast set that will be visualized at release of the key.
(POS. 8.10-11) Conversion factor for flow rate totalizers [EUR/dm³+/- =X]
Setting of the conversion/currency value for direct (and reverse) flow totalizers. There are three
setting fields for this parameter, from left to right: 1) monetary symbol, 2) default/personalized
monetary symbol, 3) conversion coefficient. To modify, set the cursor over the required field. Setting
the monetary symbol can be achieved in two ways:
1. Choosing one of the 7 predetermined monetary symbols (standard ISO 4217-REV81):
EUR=Euro; USD=USA dollar; CAD=Canadian dollar; AUD=Australian dollar; GPB=English
pound; CHF=Swissfranc; JPY=Japanese yen.
2. Entering a three character (numbers or letters) personalized currency. To change the
characters, the cursor must be set on the symbol “/” (second field)
CURRENT VALUES IN mA ASSOCIATE TO THE % VALUE OF FULL SCALE
POSSIBLE FIELD
REVERSE FLOW VALUE
ZERO
DIRECT FLOW VALUE
-110%
-100%
0%
+100%
+110%
OutmA = 0 ÷ 20 +
0 0 0
20
20
OutmA = 0 ÷ 22 +
0 0 0
20
22
OutmA = 4 ÷ 20 +
4 4 4
20
20
* OutmA = 4 ÷ 22 +
4 4 4
20
22
OutmA = 0 ÷ 20 -
20
20 0 0
0
OutmA = 0 ÷ 22 -
22
20 0 0
0
OutmA = 4 ÷ 20 -
20
20 4 4
4
OutmA = 4 ÷ 22 -
22
20 4 4
4
OutmA = 0 ÷ 20
20
20 0 20
20
OutmA = 0 ÷ 22
22
20 0 20
22
OutmA = 4 ÷ 20
20
20 4 20
20
OutmA = 4 ÷ 22
22
20 4 20
22
OutmA = 0 ÷ 20 –0+
0 0 10
20
20
OutmA = 0 ÷ 22 –0+
0 1 11
21
22
** OutmA = 4 ÷ 20 –0+
4 4 12
20
20
OutmA = 4 ÷ 22 –0+
4
4.8
12.8
20.8
22
* Example 1: out 4-22 +
** Example 2: out 4-20 –0+
22 mA
20 mA
-110% F.S. -100% F.S. +100% F.S. +110% F.S.
zero
4 mA
I (mA)
I (mA)
20 mA
-110% F.S. -100% F.S. +100% F.S. +110% F.S.
zero
12 mA
4 mA
Page 36

HML 210
36
(POS. 8.13-16) Total/partial totalizers reset [T/P/-/+ reset]
Activates the reset of total and partial flow totalizer. These functions are activated by pressing the key
during the visualization of the function itself. When "EXECUTE?" is required, press to
proceed. Press any other key to delete the operation.
MENU 9 - DATA LOGGER
(POS. 9.1) Date and time set [·
= dd/mm/yy hh:mm]
Dat
e and time set. If the real time clock optional module is present, then the time setting is kept
when the converter power supply is off, otherwise the clock is frozen untill the power supply to the
converter is resumed. For example, if the power supply has been off for one hour, when switched on
the converter will be one hour behind actual time. The calendar is valid till year 2091.
MENU 10 - DIAGNOSTIC
(POS. 10.1) Meter calibration [Calibration]
Enables the calibration of the meter. The activation of this function happens pressing the key
during the visualization of the function. The following message will be visualised on the screen: "
EXECUTE?" press the key to proceed. Press any other key to delete the operation.
(POS. 10.2) Autotest function [Self test]
Meter autotest function. This function stops the normal functions of the meter and performs a
complete test cycle on the measure input circuits and on the excitation generator. To activate this
function, after select it, push key , at the question: “EXECUTE?” push the key for start
autotest, or any other key for delete operation. The result of the test is shown on the display. At the
end of operation the converter will revert to one of the initial visualization pages. This function is
automatically performed when switching on the device.
(POS. 10.3) Flow rate simulation [Simulation=ON/OFF]
Flow rate simulation enabling. With this function it is possible to generate an internal signal that
simulates the flow rate, allowing the outputs and all the connected instruments test. After enabling it,
a ‘S’ appears in the top left of the screen and the flow rate simulation can be:
q set: by pushing the key from one of visualization pages, to set the required % flow rate
(Fl.rate=%) and the same key to confirm the value;
q finished: by pushing the key from visualization pages and then by pushing the key .
Page 37

HML 210
37
The batch functions allow the user to set the converter to measure a defined volume of fluid
and control outputs. An example is opening and closing a value after a predefined volume
has passed the sensor. The user sets the volume and the control parameters by the converter
through the follwing fuctions (Main menu function group 12 Batch)
MENU 12 - BATCH
Menu visualized only with batch active (output on batch and/or pos. 5.9 enable or 5.10
on batch)
(POS. 12.1) Number of batch samples [N.samples=XXX]
Number of batch cycles to be completed to define the value of compensation. This function allows the
converter to automatically determine the average value for the automatic compensation of the system
delay (pos. 12.3). Set the value to ZERO to manually introduce the compensation value.
(POS. 12.2) % limit of compensation [Diff.thr=%XXX]
This value defines the percentage of maximum difference between the compensation value set (see
pos. 12.3) and the average compensation value defined with the function 12.1. Over this threshold
the new compensation value will be automatically set (if number of batch samples is different from
zero)
(POS. 12.3) Compensation value [V.com.=XX.XXX]
This value is expressed in the units of measure selected. The compensation value is the difference
between the batch value set and the actual system delays due to closing valves, stop pumps, stop
motors, etc. To set the compensation value manually, preset to ZERO the number of batch samples
(pos. 12.1)
(POS. 12.4) Prebatch value [V.pre=XX.XXX]
This sets the volume of liquid at which the Pre-batch is enabled. When the pre-batch volume (V.pre)
is reached the output (if enabled) is deactivated. This value is constant for all quantities to be batched
and must be set in current volume unit of measure. The pre-batch function is useful when you need
fast and accurate dosages.
(POS. 12.5) Enable/disable auto-batch function [Auto batch=ON/OFF]
By applying a voltage to the on/off input terminals for more than 5 second opens the value controlled
by the converter. When the required flow volume has passed, the input voltage is removed, closing
the value. The converter memorizes the volume supplied in the current batch memory. (see “Batch
Functions”). The volume set in this procedure will be the batch volume supplied in every following
activation of the batch function. In order to modify this value, repeat the operations described above.
This procedure set the safety timer at a value 1.25 times greater than the time used to reach the
batched quantity; after that the counter will be reset.
(POS. 12.6) Automatic selection of batch formula [BM auto sel=ON/OFF]
The function allows the automatic selection of the first 4 formulas depending on the duration of the
pulse of the batch start (see page 15 "Operation stage on input 1 or 2"). This function is active only if
the function Cons. mode (pos. 12.7) has not enabled (OFF). With the ‘Static consent of batch’, the
automatic compensation of the batch volume is excluded (additionally the value of the parameter
"N.samples" (pos. 12.1) will be automatically be set to zero). However the manual compensation is
possible by inserting an appropriate value on the parameter "V.com" (pos. 12.3)
(POS. 12.7) Static consent of batch [Cons. mode=ON/OFF]
This function enables the start and stop of the batch dosing using a static signal, instead of and
impulse, applied to the input (see page 13 “Digital inputs”), this signal has to be constantly applied
throughout the batch. This function automatically disables the functions ‘BM auto sel’ (pos. 12.6) and
‘Auto batch’ (pos. 12.5).
Page 38

HML 210
38
For each formula you can
associate:
q Product quantity
q Product name
q
Maximum time for
batch (safety time for
each formula)
After activating the
batch
function from visualization
page, proceed as
illustrated and described in
the aside example.
BATCH FUNCTION CONFUGURATION
VISUALIZATION PAGE WITH BATCH FUNCTION ENABLED
PROGRAMMING A BATCH
Programming formula n°
Product Name
Batch in progress
Visualizations:
1) batch off: n° batch effected
2) batch on: decrease safety timer
3) programming: programming safety timer
indefinite if timer=0 timer disabled
Programming batch quantity
Visualization batched product
Input key code
Choose the formula number for associate
quantity batch (between 00 and 15)
Input quantity product for each batch
Input product name for batch (max 8 characters.)
Input maximum time for batch
If timer = 0, safety timer disabled max time set
= 6000 sec.
N.B. If one of the outputs has a batch alarm
assigned. Upon the completion of the batch or
an interruption, an alarm is activated.
From the visualization pages
ENABLE BATCH
Select one of the following functions to enable and program the batch on the converter:
q POS. 5.9-10: START/STOP batch from input
q POS. 6.1-2: assign one of the functions ouputs one and/or two
Some examples of operation of such functions are visualized from page 14.
Long push
Long push
Page 39

HML 210
39
START STOP BATCH
START: it is possible to activate the start of batch in two different ways:
1. From remote input:
assigning the functions of start/stop batch to the input 1 (pos. 5.9)
or input 2 (pos. 5.10) and using the inputs like visualized from page 14.
2. From keyboard: short pressing of the key
N.B.: The start of batch from keyboard is always initiated on the release of the key.
The
function is not available with the batch consent (pos. 12.7) function enabled.
STOP: A batch may stop (be stopped) due to three events:
1. Keyboard or remote input (manual stop): short pressing of the key
2. End of batch: In th
is case the batch will be stopped once the batch quantity has been
achieved and a signal given
3. Maximum time of batch:
If a maximum batch time has been set, and is exceeded, the
batch in progress is stopped independently from the batched quantity.
Notes:
q
during the batch the symbol of the active batch and the name of the formula are
visualized on display.
q When the batch outputs are enabled, pushing the
key for more than 5 seconds will
energize the outputs until the key is released. On the display, I
n place of the CT and ST
totalizers the following message will appear:
!! VALVE !!
!! OPENED !!
IMPORTANT NOTES
The start of the batch disables any function listed in the table below:
* If using Input 1
** Value set to zero
POS 12.5
POS 12.6
POS 5.6
POS 12.1
POS 5.9
POS 3.5-5.8
POS 3.6
POS 5.7
AUTO BATCH
BM AUTO SEL
BLOCK TOTALIZER
N. SAMPLES
INPUT 1 ON START/STOP
BATCH
AUTO RANGE CHANGE OR
FROM INPUT
ENERGY SAVING
CALIBRATION
POS 12.5
AUTO BATCH
*DISABLE
POS 12.6
BM AUTO SEL
** DISABLE
POS 12.7
CONS. MODE
DISABLE
DISABLE
* DISABLE
POS 5.9
INPUT 1 ON START/STOP
BATCH
DISABLE DISABLE DISABLE
POS 5.10
INPUT 2 ON START/STOP
BATCH
DISABLE
DISABLE DISABLE DISABLE
POS 5.10
INPUT 2 on BM SELECT
DISABLE
** DISABLE
POS 6.1-4
OUTPUT ON END BATCH
DISABLE
To optimize the performances of the meter used as a batch instrument (bat
ch time < 5s), it is
recommended to set it as prompt as possible according to the plant requirements, choosing the
batching setup for the automatic parameter optimization of the quick start menu. It is also
reccomended to disactivate the function 3.1, AC filter.
Page 40

HML 210
40
CODES
ANOMALIE DESCRIPTIONS
ACTION TO TAKE
0001
Problem with watch-dog circuit
ADDRESSING TO SERVICE
0002
Wrong configuration work data in eeprom
0004
Wrong configuration safety data in eeprom
0008
Defective eeprom
0010
Defective keyboard (one or more key are pushed during the test)
0020
Power supply voltage (+3.3) is out of range
0040
Power supply voltage (+13) is too low (<10V)
0080
Power supply voltage (+13) it’s too high (>14V)
0200
Timeout calibration input (input circuit is broken)
0400 Gain input stage is out of range
Check the status of the cables connecting the sensor to
the converter, the grounding connections of the devices
or the possible presence of strong and anomalous noise
sources
0800 Interruption on the coils circuit
Check the status of the cables connecting the sensor to
the converter
0C00 Cumulative alarm 0800 + 0400
See single codes 0800 and 0400 above.
ALARM MESSAGES
CAUSES AND ACTIONS TO BE TAKEN
ANOMALIES CODES
Messages ANOMALIES ACTION TO TAKE
NO ALARMS
All works regularly
-----
MAX ALARM
The flow rate is higher than the maximum threshold set
Check the maximum flow rate threshold set and the
process conditions
MIN ALARM
The flow rate is lower than the minimum threshold set
Check the minimum flow rate threshold set and the
process conditions
FLOW RATE >FS
The flow rate is higher than the full scale value set on the
instrument
Check the full scale value set on the instrument and
the process conditions
PULSE/FREQ>FS
The pulse generation output of the device is saturated and cannot
generate
the sufficient number of impulses
Set a bigger unit of volume or, if the connected
counting device allows it, reduce the pulse duration
value
EMPTY PIPE
The measuring pipe is empty or the detection system has not
been properly calibrated
Check whether the pipe is empty or
repeat
the empty
pipe calibration procedure
BATCH ALARM
Batch interrupted for the followings condition:
q Timer batch expired before the end of the batch
q
Batch valve open and flow rate to zero for a time longer
to the safety timer set
q Batch valve closed and flow rate different fr
om zero for
a time longer than the safety timer set
Verify:
q Presetting
q System conditions
INPUT NOISY
The measure is strongly effected by exter
nal noise or the cable
connecting the conv
erter to the sensor is broken
Check the status of the cables connecting the sensor,
the groundi
ng connections of the devices and the
possible presence of noise sources
EXCITATION FAIL
The coils or the cable connecting the sensor are interrupted
Check the connecting cables to the sensor
CURR. LOOP
OPEN
The 4-20mA output on board or the optional one are not correctly
closed on a
valid load
Verify the load is applied to the output (max 1000
ohm).
To disable the alarm,
set the “mA V.fault” value
(menu alarm ) to 0.
P.SUPPLY FAIL
Power supply different from that indicated on the label.
Verify that the power supply is
with in the
specifications indicated on the label
Page 41

HML 210
41
Fixing screw
of board
q Unscrew the screw as indicated in pic. 1
q Lift the board, remove the flat cable
from the display (pic. 2) and extract
completely the board from the box
Pic.2
4 mm hex spanner
Display
q Partially unscrew the screw fixing the
display to allow the angular shift and
extraction of the display
N.B.: Do not unscrew entirely the screw
Take off the
flat cable
1
2
3
4
Display
q Rotate the display to the desired location,
verify the correct set of the seal, the
cleaning
of the contact surfaces it set
the display
housing.
q Place
the fixing angles in the suitable
positions (pic. 5) and screw down firmly until
they make contact with the display housing.
q Screw up tightly the 4 screws (1, 2, 3,
4)
indicated in pic. 4
Pic.6
Pic.4
Pic.7
Note: the display is rotable ONLY in the aluminum IP67 version.
APPENDIX
DISPLAY ROTATION PROCEDURE
Pic.3
q Restore the flat cable connection to the display
q Verify the board is set correctly in the fixing
clip (pic. 7)
q
Fix the board to the box to complete the
assembly process.
Pic.5
Pic.1
Page 42

LCMag Meter Pulse Output to LectroCount Input
J17 with Jumper
LC Part #71045
Terminal Block M1
10K
1. Use a 10K Ω pull up resistor between terminals 15 and 16 on the LCMag Converter.
2. Install a jumper wire between teminals 17 and 20 to tie the collector to the ground.
3. Wire the FTE according to the schematic above.
4. In the OUTPUT menu of the LCMag flowmeter, set the OUT1+ to oneof the following: IMP+, IMP- or IMP+/-
5. In the SCALES menu of the LCMag flowmeter, set the IMP=gal to 0.100 (this will output 10 pulses per gallon)
6. In the SCALES menu of the LCMag flowmeter, set the TPUL (pulse width) between 1-5ms
7. In the MEASUE menu of the LCMag flowmeter, set the CUT-OFF=% between 5% and 10%
IRF 530
1VR 216F
0A OI
J4 with Jumper
84040
840404
81920
813902
81547
LCR 600 (84040 & 840404 CPU BOARDS)
8. On the LCR CPU board, place a jumper over the bottom two pins of the J17 terminal
9. In System Setup, set the Decimal: field to TENTHS
10. In Calibration Setup, set the Pulse/Unit field to 20.000
LCR-II (84040 & 840404 CPU BOARDS)
8. On the LCR CPU board, place a jumper over the bottom two pins of the J17 terminal
9. In System Calibration, set the Decimal: field to TENTHS
10. In Product Calibration, set the Pulse/Unit field to 20.000
LCR & LCR-II (81920, 813902, and 81547 CPU Boards)
8. On the LCR CPU board, place a jumper over the second and third pin (from the top) of the J4 terminal
9. In System Calibration, set the Decimal: field to TENTHS
10. In Product Calibration, set the Pulse/Unit field to 20.000
42
Page 43

CONFORMITY DECLARATION
it declares under the own responsibility that the product:
Converter model:
HML 210
Sensors model:
HMS 501 – HMS 600 – HMS 1000 – HMS 2410 – HMS 2500 – HMS 377
0
– HMS 3800 – HMS 5000
to which this declaration refers, is in compliance with the following
Harmonized
European Norms:
§ EN 61010-1:2010
§ EN 61326-1:2006
and therefore answering to essential requirement of CE directives:
§ 2006/95/CE (Low voltage directive – LVD)
§ 2004/108/CE (Electromagnetic compatibility Directive – EMC)
04/03/2011
Page 44

Liqui d conTro LS
105 Albrecht Drive
Lake Bluff, IL 60044
(847) 295-1050
Liqui d conTro LS europe/S Ampi
Via Amerigo Vespucci 1
55011 Altopascio (Lucca), Italy
+39 0583 24751
ideX FLuid An d m eTering pvT. LTd.
Survey No. 256, Alindra
Savli GIDC, Manjusar
Dist. Vadodara 391 770
Gujarat, India
+91 265 2631855
Liqui d conTro LS SponSLer
105 Albrecht Drive
Lake Bluff, IL 60044
(847) 295-1050
TopTe ch SySTemS
1124 Florida Central Parkway
Longwood, FL 32750
(407) 332-1774
Nateus Business Park
Nieuwe Weg 1-Haven 1053
B-2070 Zwijndrecht (Antwerp), Belguim
+32 (0)3 250 60 60
FAu re hermA n
Route de Bonnetable
B.P. 20154
72406 La Ferté-Bernard Cedex, France
+33 (0)2 43 60 28 60
6961 Brookhollow West Drive
Houston, TX 77040
(713) 623-0808
corke n
3805 Northwest 36th St.
Oklahoma City, OK 73112
(405) 946-5576
105 Albrecht Drive
Lake Bluff, IL 60044-2242
1.800.458.5262 • 847.295.1050
Fax: 847.295.1057
www.lcmeter.com
© 2004 Liquid Controls
Pub. No. 500120
(6/12)
 Loading...