

Page 1
ACOUSTIC
Pilot’s Handbook
40-00-0039 Electrophonic Limited Edition available @ www.line6.com Rev A
Page 2

Before using your Variax you should read these Important
Safety Instructions. Keep these instructions in a safe place.
1. Obey all warnings in this Pilot's Handbook.
2. Do not place near heat sources, such as radiators, heat registers, or appliances which produce heat.
3. Guard against objects or liquids.
4. To avoid damage to Variax’s Digital Communications Connector, always use Line 6 supplied cables and replace the protective end cap
when not in use.
5. Power the XPS Footswitch only with the included PX-2 Power Supply or equivalent.
6. Connect the PX-2 Power Supply only to AC power outlets rated 100-120V or 230V 47-63Hz (depending on the voltage range of the
included power supply).
7. Do not step on power cords. Do not place items on top of power cords so that they are pinched or leaned on.
8. Unplug your Variax Acoustic and XPS Footswitch when not in use for extended periods of time.
9. Do not perform service operations beyond those described in the Variax Acoustic Pilot's Handbook. Repairs and service operations
beyond the scope of those in the Pilot's Handbook should be performed only by qualified service personnel.
10. Prolonged listening at high volume levels may cause irreparable hearing loss and/or damage. Always be sure to practice "safe listening."
Gigbag, XPS Footswitch, PX-2 Power Supply, TRS Cable, Bridge Saddle Wrench, Truss Rod Wrench
Your Variax should include these accessories:
WARNING: To reduce the risk of fire or electric shock,
do not expose this appliance to rain or moisture.
CAUTION: This equipment has been tested and found to comply with the limits for a Class B digital device pursuant to
Part 15 of FCC Rules. Operation is subject to the following two conditions: (1) This device may not cause harmful interference, and
(2) this device must accept any interference received, including interference that may cause undesired operation.
CAUTION: No user-serviceable parts inside. Refer
servicing to qualified service personnel.
Page 3

Please Note:
Line 6, Variax Acoustic, Variax, POD, and the Line 6, Variax Acoustic and
Variax logo are trademarks of Line 6, Inc. All other product names,
trademarks, and artists' names are the property of their respective owners,
which are in no way associated or affiliated with Line 6. Product names, images,
and artists' names are used solely to identify the products whose tones and
sounds were studied during Line 6's sound model development for this
product. The use of these products, trademarks, images, and artists' names
does not imply any cooperation or endorsement.
Page 4

Table of Contents
Welcome to Variax................................. 1–2
Basic Operations...................................... 3-6
Connections
Battery Power
XPS Direct Box Operation
Primary Controls........................................ 7
Volume
Mic Position
Compressor
Model Select
Instant Alternate Tuning........................ 8-10
Preset Tunings
Custom Tunings
Save Our Sounds....................................... 11
The Guitars of Variax Acoustic..........12-28
Care and Maintenance........................29-30
Customer Service..................................... 32
Warranty Information..............................33
Page 5

Welcome to Variax Acoustic
Thanks for buying a Variax Acoustic and joining
us in our quest to apply the miracle of modern
technology to the pursuit of great acoustic guitar
tone. You now own detailed models of some of the
most distinctive acoustic instruments of all
time–wrapped up in a single comfortable and highly
playable guitar.
How does it work?
How do we get so much great acoustic sound from
the compact Variax Acoustic? We use piezo bridge
saddles, similar to the piezo pickup in many electricacoustic guitars, to capture each individual string's
vibrations. We then process the signals through
software algorithms that capture the physical
properties of the guitars that we've modeled.
This process dynamically alters Variax Acoustic's
own natural string vibrations in real time to match
the modeled instrument's unique tonal
characteristics. That means there's no delay caused
by having to detect a pitch and turn it into a MIDI
note, and there's also no issue with tracking hammeron's, pull-off's, slides, bends, slurs or any other
techniques that are a part of your style.
How did we manage to capture the tonal souls of
1
these classic instruments for instant recall from
your Variax Acoustic? We're glad you asked....
The Dream...
Several years before Variax Acoustic was born, we
turned our attention from the PODs, amps, and
effects that we had been developing to take a fresh
look at the guitar itself. We wondered–could it be
possible to capture a complete range of guitar tone
in a single instrument? After a couple of years of
research, development, and countless hours playing
dozens of vintage electric and acoustic guitars, we
released the original Variax, the world’s first
modeling guitar. But while the Variax is perhaps
the ultimate general-purpose guitar, we also wanted
to specifically address the unique needs of the
acoustic musician.
How, we asked ourselves, can we use modeling
technology to improve such a traditional instrument?
The first requirement, of course, would be sound.
Since this new instrument would be dedicated
entirely to acoustic instruments, we developed new
algorithms that use all of the power of the Variax
brain to authentically re-create the complex timbres
of the vibrating strings and resonant bodies of the
guitars we were modeling.
Page 6

Next, we decided to tackle a problem that had
plagued acoustic guitarists since the advent of
electrified music–how to get a great acoustic sound
on-stage and in the studio. With our unique Mic
Position control, you can adjust your tone the way
professionals do–by changing mic position. And
since our mic is a DSP algorithm, you don’t have
to worry about feedback or noise leakage.
Another key ingredient to both live and recorded
acoustic instrument sound is compression. To
further simplify the life of the Variax Acoustic
owner we decided to add a remarkably effective,
yet simple to operate compressor.
Many acoustic guitarists are fond of alternate
tunings, but re-tuning during a performance can
often become–literally–a show-stopper. To remove
this obstacle from between you and your creativity,
we gave the Variax Acoustic the ability to re-tune
for you, at the press of a button.
The Journey
Once we had decided what we wanted the Variax
Acoustic to do, we then had to figure out how to
make it work. As we refined the modeling
techniques we developed for the original Variax,
we created a guitar that would feel (and look) right
for the wide variety of musical environments in
which this instrument would live.
A guitar this different, with so many unique abilities,
deserved an equally unique approach to its onboard controls. So we worked out a way to give
the player simple ways to optimize the sound for
specific techniques and musical contexts. And easy
access to the memory and alternate tuning functions
that make the Variax Acoustic so amazingly
convenient. And of course, to fill our instrument
with the sounds of so many archetype acoustics, we
had to audition truckloads of vintage guitars to find
the ones with just the right sound. Just as we did
with the original Variax, we refined our models
while constantly referring back to the originals for
accuracy. When each model reached the point of
not only sounding like the original, but also being
as much fun to play, it was done.
The result of our labors? Variax Acoustic. An entire
acoustic collection in a single instrument.
2
Page 7
Basic Operations
Connections
You may have already noticed that the Variax
Acoustic has two output connectors: a familiar 1/4inch jack and a second RJ45 jack protected by a
rubber cap. The RJ45 connector will be the way
you will connect to Line 6 products with a “Variax”
input, and add additional sounds and abilities to
your Variax Acoustic in the future. The uses of the
RJ45 connection will be described in the owners
manual for the products that offer that input; all
of the operations described in this manual will use
the 1/4-inch output.
OR
Battery Power
Of course, the electronics of the Variax Acoustic
will need power, so to use this simple hookup, you'll
need to install six AA cells in the on-board battery
compartment. If you use fresh alkalines, you should
get approximately 10-12 hours of operation.
Battery Low Indication
Being surprised by a battery failure is no fun, so we
give you a warning when your AA’s are failing.
The indicator LED, if green, will give a short red
blink about once every second. If it’s red, it will
give a short green blink about once every second.
More on the indicator LED later…
The battery will only be used when a standard guitar
cable is connected. For longest battery life, always
"turn off" your Variax Acoustic by unplugging it
when not in use.
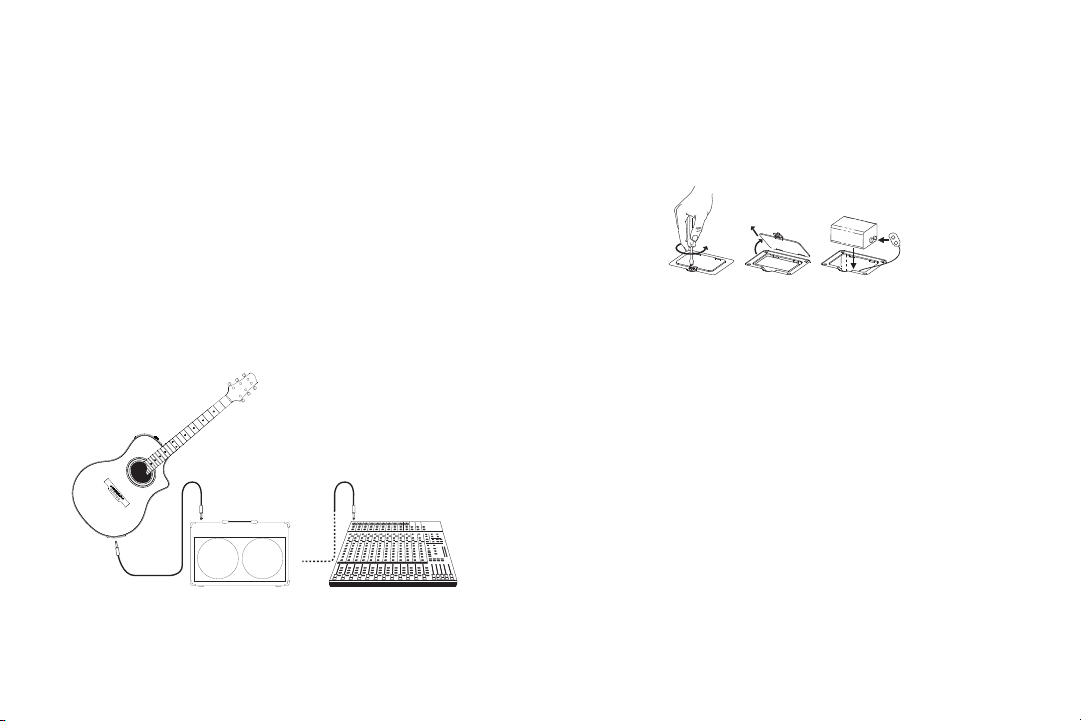
Simple Operation
The simplest way to use the Variax Acoustic is to
connect it directly to the mixer or an acoustic
amplifier with a standard mono guitar cable.
3
NOTE: At the gig with no AA batteries? Unclip
the plastic battery holder from the connector and
swap in an ordinary 9V battery. This "emergency"
setup will give 1 to 2 hours of battery life.
Page 8
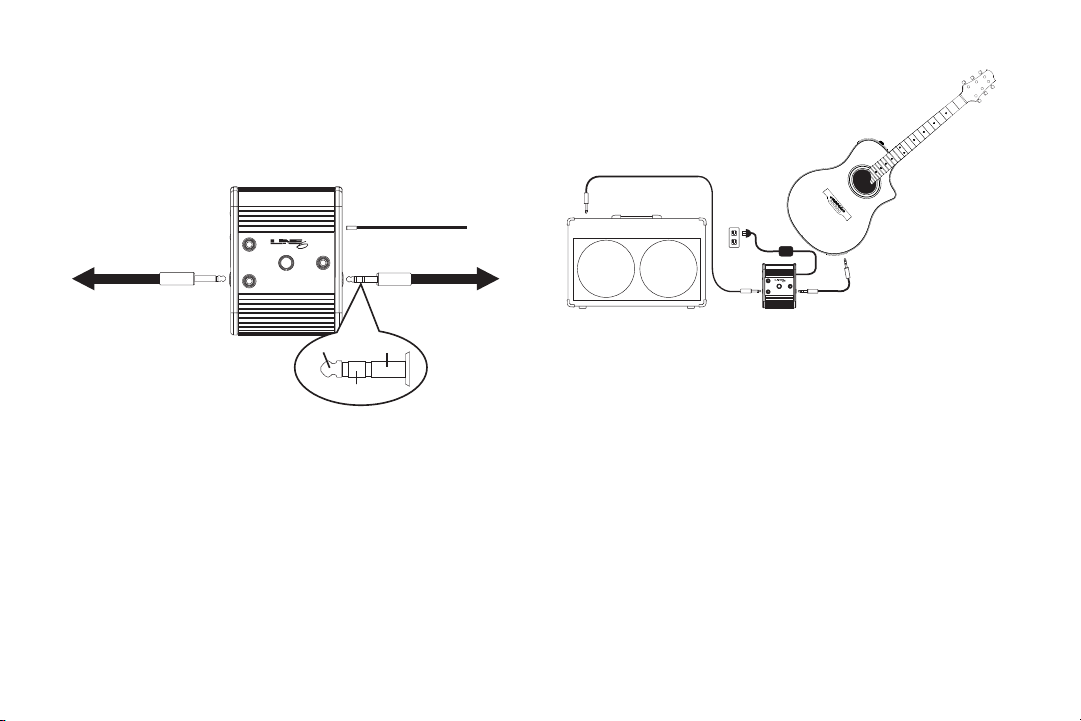
XPS Direct Box Operation
We realize that constantly changing batteries can
be a real drag, so we included a more convenient
option–the unobtrusive yet capable XPS.
PX-2 Power Supply
Mono Cable
XLR
1/4”
POWER
Tip
To VariaxTo Amp
Sleeve
Ring
Powering your Variax Acoustic with the XPS is
easy. Use the included TRS cable (meaning "TipRing-Sleeve" or also simply known as a "stereo"
cable) to connect the Variax Acoustic to the INPUT
jack of the XPS. Connect the PX-2 power supply
to the XPS POWER jack, and use a standard mono
guitar cable to connect the XPS's 1/4-inch OUTPUT
to your acoustic amp or mixer.
POWER
XLR
1/4”
TRS Cable
Use a standard XLR/mic cable to connect the XPS's
XLR output to feed a mixer or recorder's input with
a balanced, +4dBu "line level" signal. While you
can also connect this to some acoustic guitar amps,
you may get better results with the 1/4-inch cable,
because most amps like to receive a lower level
signal than the XPS's XLR puts out.
The XPS can also work as either an A/B or a
Standby switch. If, for example, you want to send
your DREADNOUGHT sound to the PA but want
to send your ROUNDNECK sound to an acoustic
amp, just use the switch: When the 1/4" indicator
light is lit on your XPS, you've got your signal
routed to the 1/4" OUTPUT. When the XLR
4
Page 9

indicator light is lit, your signal will now be routed
to the XLR OUTPUT. If you are only using one
of the outputs, selecting the other one is a handy
way to mute your output.
The Phantom Menace
When sending the XLR output of the XPS to a
mixing board, be sure that phantom power is either
off or not supplied to the XPS. Since phantom
power puts a healthy voltage on the cable, using
the A/B switching function of the XPS will produce
a very unhealthy pop in the speakers. The
soundman will not be pleased.
XLR Hum
The XLR output of the XPS is designed to connect
to the balanced inputs that are typical on good
quality mixers and recording systems. Connecting
the XLR output to a device with an un-balanced
input may cause hum on that device when the XPS
1/4-inch output is selected.
Cable Specifications
If you happen to lose the Custom Cable supplied
with your Variax Acoustic, you can obtain a
replacement from Line 6 Customer Service (see
page 32 of the Pilot's Handbook for contact
information). You can also simply use any high-
5
quality TRS cable up to 18 feet in length.
NOTE: If you have batteries installed in your
Variax Acoustic, they will be bypassed when using
your XPS Direct box. If the guitar is connected to
the XPS and the XPS power is disconnected, any
batteries installed in the Variax acoustic will be
drained.
Page 10
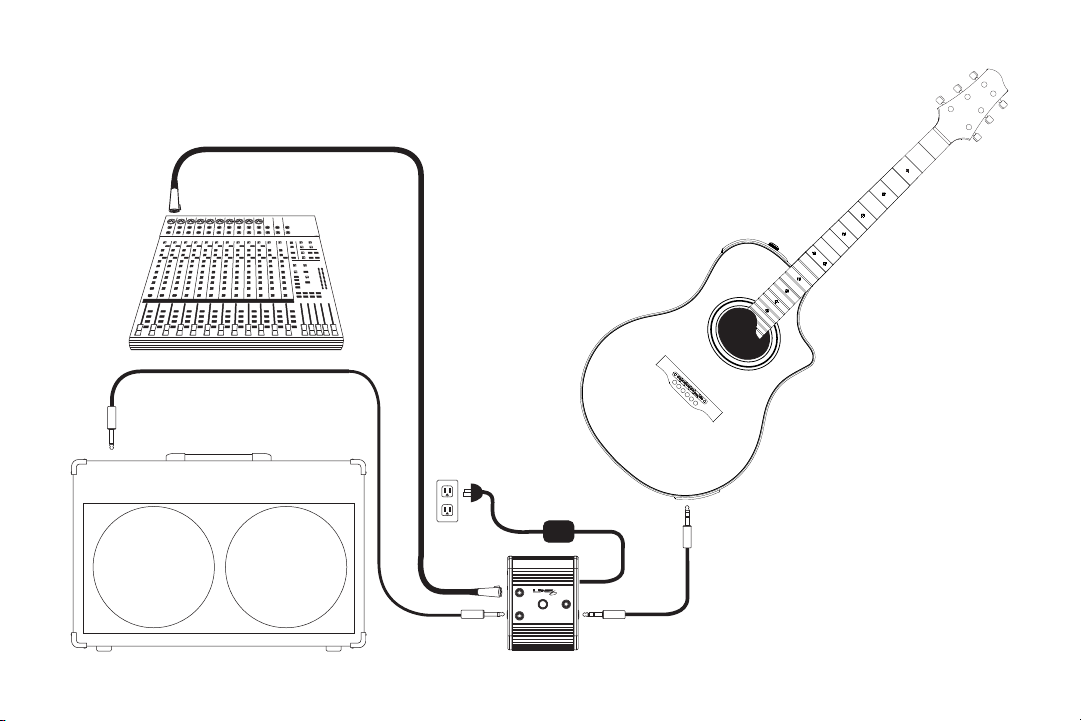
XLR Cable
To P.A., Mixer or Recorder
To Amp - Mono Cable
POWER
XLR
1/4”
TRS Cable
6
Page 11
Primary Controls
Let’s start simple, and work up to the fancy stuff:
Volume
The center slider is also the most important. Push
it toward the Model Select knob to get louder.
Pretend to push it away from the Model Select knob
when people ask you to turn down.
Mic Position
The top slider (the one furthest away from you when
you hold the guitar) allows you to alter the position
of the modeled microphone. Here’s a simple way
to remember how it works: As you move the slider
closer to the soundhole (away from the Model Select
knob), the Mic Position is also getting closer to the
soundhole. Some of the instruments modeled in the
Variax Acoustic don't have a soundhole, but the
control will work similarly for these instruments.
When the slider is close to the Model Select knob,
the strings (and upper frequencies) are emphasized;
when the slider is close to the soundhole, the body
(and lower frequencies) are emphasized.
Compressor
The bottom slider allows you to change the level
of compression. A compressor usually has a lot of
controls to adjust, but we take care of all the
7
complicated stuff for you. Just push the slider toward
the Model Select knob for more compression, and
away from the knob for less.
Model Select
The Model Select knob has several functions. First
of all, it allows you to choose the active instrument
model. Rotate the knob to choose from the 16
Variax Acoustic models. The name visible in the
slot is the active model. The LED will help you see
the name on dark stages, or in the closet if you are
very shy. The Model Select knob also lets you engage
the Instant Alternate Tuning function. With a
quick press on the knob, the LED will change from
green to red. Now, none of the notes are where you
thought they were! To learn the method to our
madness, refer to the next section, Instant Alternate
Tuning. But wait, there’s more: The Model Select
knob also lets you save any customizations you have
carried out. More on that in the upcoming Save
Our Sounds section
MIC POSITION
VOLUME
COMPRESSOR
.
Page 12

Instant Alternate Tuning
Many guitarists, especially acoustic guitarists, play
in tunings other than the familiar EADGBE. Rather
than deal with the hassles of retuning during a
performance or transporting multiple guitars,
wouldn’t it be great to have a guitar that could
retune itself automatically? We thought so too, so
we included this function on the Variax Acoustic.
Of course, this magic is performed on the output
signal only. The physical strings are unchanged…and
you’re still responsible for being in tune. For the
most pleasant experience, you’ll want to have your
amplified signal loud enough to drown out the sound
of the physical strings. You should keep in mind
that the retuning is relative to the actual strings.
If you tune the actual strings of the Variax Acoustic
something besides EADGBE, and apply one of the
tuning presets, you're going to get some unexpected,
though not necessarily unmusical, results.
A few of the models included in the Variax, like
the 12 strings and exotic instruments, won't let you
retune the pitch of the strings. For these models,
Alternate Tuning gives you control over other
aspects of the sound. For details, see the Model
Descriptions section.
Engaging Alternate Tuning is simple: All it takes
is a quick press on the Model Select knob. The
indicator LED will change from green to red to let
you know something is up. When you first engage
the Alternate Tuning, you'll hear whatever tuning
we saved to that particular model. But since we
know you're going to want to change that, turn the
page for the not-so-gory details.
8
Page 13

OPEN E
OPEN A
OPEN D
LOW G
HIGH G
DADGAD
DROP D
PRESET TUNINGS
VOL
E & A OCTAVE DOWN
We made it easy to get to some of the most
commonly used alternate tunings. First, enter the
Alternate Tuning Set-Up mode with a quick double
press on the model select knob. The LED will flash
red-green-red-green to let you know you are in this
mode. With the bottom (COMPRESSOR) slider
all the way down, choose the tuning you want with
the top (MIC) slider.
9
ALL STRINGS "CAPO"
HIGH E
B
G
D
A
LOW E
VOL
NO SHIFT
-1
-2
-3
-4
-5
-6
-7
-8
-9
SHIFT AMOUNT
-10
IN HALF STEPS
-11
-12
+7
+6
+5
+4
+3
+2
+1
NO SHIFT
Of course, part of the fun of alternate tunings is in
being different, so we give you the ability to retune
any of the strings up to a 5th (7 half steps) higher
or up to an octave (12 half steps) lower. Enter
Alternate Tuning Set-Up with a quick DOUBLE
press on the Model Select knob. Select the string
you want to tune with the bottom
(COMPRESSOR) slider. The selected string will
Page 14

be louder than all of the others, so the easy way to
select a string is to pluck it while moving the slider
until you hear it get louder. The other strings will
still be audible to assist you in selecting the right
interval.
Use the top (MIC POSITION) slider to change
the interval. With the slider at either extreme,
there is no retuning. Moving the slider away from
the model select pot lets you lower the pitch in
half step increments; Moving it toward the model
select pot lets you raise the pitch in half step
increments. To find your desired retuning, listen
for the steps, and use the strings not being retuned
as a reference. Here's an example: Let's say you
want to retune to play the live version of The Rain
Song, and you know the tuning is (low to high)
EADADE. So you'll be raising the pitch of the G
string two half steps to A, and raising the pitch of
the B string three half steps to D. Starting with
the Model you want to use this tuning with, give
the Model Select Knob two quick presses to get
into the Custom Tuning mode. The LED will be
blinking red-green-red-green to let you know you
are in this mode. Pluck the G string, and move
the lower (COMPRESSOR) slider until you hear
that string get louder. Move the upper (MIC
POSITION) slider as far as possible from the Model
Select knob. Then move the slider back toward
the Model Select knob until you hear the pitch
change twice. Check the note against your 5th (A)
string to confirm the pitch. Repeat the process for
the B string, except this time move the slider until
you hear the pitch change three times, and check
the note against your 4th (D) string.
When the COMPRESSOR slider is in the position
closest to the Model Select Knob, all strings are
being retuned at once - think of this as a special
capo that lets you tune higher and lower. Select
all of the strings for tuning, and drop them an
octave - instant bass!
With your custom tuning all set, just press the
Model Select knob once to leave Alternate Tuning
Set-Up mode. You are now back in regular "Play"
mode, with the Alternate Tuning on - notice the
red LED. A quick press on the Model Select knob,
and the Alternate Tuning goes away - notice the
green LED. Another quick press - presto - Alternate
Tuning returns, just as you left it. When you have
an Alternate Tuning you like, you're going to want
to save it - so don't stop reading now...
10
Page 15

Save our Sounds
To really take advantage of the sonic capabilities
of the Variax Acoustic, especially when performing,
you want each instrument model to be set up for
your specific needs. Use the Customize function of
Variax Acoustic's model knob to get all sixteen
models sounding just the way you want.
1. Choose which of the 16 instrument models you
want to customize.
2. Find a Mic position and Compressor setting that
suit your needs.
3. Select an Alternate Tuning in Alternate Tuning
Set-Up, if desired.
4. Switch Alternate Tuning on or off, depending
on how you want it to be saved.
5. Press the Model Select Knob down and hold for
a few seconds until the indicator LED shines solid
green or red.
6. Release the Model Select knob.
That's all there is to it. You've saved your settings
for that model. Now that you've got it all down,
you can repeat these steps for the remaining 15
positions. (Or not, if you like the factory settings.)
And if your needs or tastes change, you can recustomize any of your models as often as you like.
11
Page 16

The Guitars of Variax Acoustic
Now that you have a firm grasp on the operational
details, let's take a slightly closer look at the models
available with a simple twist of your MODEL
SELECT knob.
You'll see a diverse range of instruments on the
following pages, from no-frills workhorses to the
upper echelons of collectibility. And a few exotic
oddities that most of us don't even know how to
tune, much less play.
With the Variax Acoustic, you won't get the vintage
patina or the strangely erotic musty case smell, but
you won't have to deal with the neck re-sets and
cracked tops either. Instead, you get only the very
best part: the sound.
12
Page 17

PARLOR
based on 1941 Martin® 5-17
Introduced 1898
All mahogany body, rosewood fingerboard
21 3/8" scale
Before the days of audio recording, radio, or internet
file sharing, the only way to hear music was for
someone to play it. Parlor instruments were designed
to be kept in homes for the musical amusements of
residents and guests. A wide variety of parlor guitars
were available from a number of manufacturers, but
they are all distinguished by their small size and
even, balanced tone. The 5 was one of the smallest,
and was often used tuned a major third over standard
tuning. Marty Robbins was a prominent user of the
size 5 in the early 1960's.
Martin is a registered trademark of C.F. Martin & Co., Inc. and is in no way associated or affiliated with Line 6.
The product name, descriptions and images are provided for the sole purpose of identifying the specific products
13
that were studied during Line 6’s sound model development.
Page 18

TRIPLE O
based on 1946 Martin® 000-28
Introduced 1902
Brazilian rosewood back and sides, ebony fingerboard
24.9" scale
The evolution of musical styles in the early 20th
century was mirrored by the evolution of American
guitar design. By combining larger bodies and steel
strings with its innovative X bracing, Martin®
created the modern flat-top acoustic. The unique
tonal properties of the 000 make it ideal for music
in which the guitar is the dominant instrument. In
recent years, electric rock artists like Eric Clapton
have chosen the 000-28 for unplugged performances.
Martin is a registered trademark of C.F. Martin & Co., Inc. and is in no way associated or affiliated with Line 6.
The product name, descriptions and images are provided for the sole purpose of identifying the specific products
that were studied during Line 6’s sound model development.
14
Page 19

DREAD
based on 1960 Martin® D-21
Introduced 1955
Brazilian Rosewood back, sides, and fingerboard
25.4" scale
The “D” or dreadnought guitar has been around
since 1916, but its loud bass and large body did not
make it popular for the musical style of the time.
As music continued to evolve, Martin®
Dreadnoughts, particularly the D-18 and D-28,
became the instrument of choice for folk, bluegrass,
country, and rock.
The 21 series used similar materials to the 28 series,
but with simplified ornamentation and a rosewood
fingerboard. This particular specimen puts to rest
the myth that postwar Martin® instruments are
tonally inferior to their prewar brethren.
Martin is a registered trademark of C.F. Martin & Co., Inc. and is in no way associated or affiliated with Line 6.
The product name, descriptions and images are provided for the sole purpose of identifying the specific products
15
that were studied during Line 6’s sound model development.
Page 20

JUMBO
based on 1954 Gibson® J-45®
Introduced 1941
Mahogany back and sides, rosewood fingerboard
24 3/4" scale
Gibson® added flat-tops to its product line in the
mid 1920’s, and by the mid thirties had introduced
the classic Jumbo series. Though one of the less
ornate of the Jumbo family, the distinctive sunburst
finish and warm tone of the J-45® made it perhaps
the most successful model of their diverse acoustic
range.
Gibson, J-45, SJ, and Dobro are registered trademarks of Gibson Guitar Corp. and are in no way associated or
affiliated with Line 6. These product names, descriptions and images are provided for the sole purpose of identifying
the specific products that were studied during Line 6’s sound model development.
16
Page 21

C & W
based on 1951 Gibson® SJ®-200
Introduced 1938
Maple back and sides, ebony fingerboard
25 3/8" scale
The Gibson® “Super Jumbo” was conceived as the
ideal stage companion for singing cowboys and was
developed with the input of Western actor, singer,
and songwriter Ray Whitley. It’s enormous size,
ostentatious ornamentation, and rich sound made
it a favorite of artists like Tex Ritter, Elvis Presley,
and Emmylou Harris.
Gibson, J-45, SJ, and Dobro are registered trademarks of Gibson Guitar Corp. and are in no way associated or
affiliated with Line 6. These product names, descriptions and images are provided for the sole purpose of identifying
17
the specific products that were studied during Line 6’s sound model development.
Page 22

GYPSY
based on 1933 Selmer® Maccaferri
Introduced 1932
Rosewood back and sides, ebony fingerboard
648mm scale
Italian guitarist and luthier Mario Maccaferri
designed his best known instrument during his short
association with Selmer®, a French manufacturer.
The distinctive cutting tone of these unique benttop guitars was used to great effect by legendary
gypsy guitarist Django Reinhardt. We’ve modeled
the first “D-Hole” version, without the controversial
internal resonator.
Selmer is a registered trademark of Conn-Selmer, Inc. and is in no way associated or affiliated with Line 6. The
product name, description and image are provided for the sole purpose of identifying the specific products that
were studied during Line 6’s sound model development.
18
Page 23

JAZZ
based on 1951 D'Angelico™ New Yorker
Introduced 1936
Figured maple back and sides, ebony fingerboard
25 3/4" scale
New York luthier John D’Angelico started making
Gibson® derivative archtops in 1932, but in a few
short years had developed his own models. With
its 18 inch body and ornate yet tasteful appointments,
the D’Angelico™ New Yorker is the epitome of the
arch-top jazz guitars for many connoisseurs. The
instrument we modeled formerly belonged to Ray
Gogarty, Brian Setzer’s guitar teacher.
D’Angelico is a trademark of G.H.S. Corp. in the United States.
D’Angelico is a trademark of D’Angelico Guitars of America LLC, registration is pending in the CT.
19
Page 24

NYLON
based on 1958 Manuel Velazquez™
Introduced 1930’s
Brazilian rosewood back and sides, ebony fingerboard
640mm scale
One of America’s most respected classical luthiers,
Manuel Velazquez has been called the “dean of
luthiers” for the balance and clarity of his instruments.
Velazquez instruments are built in the Torres/Hauser
tradition and notable for quality rather than
innovation.
All product names are trademarks of their respective owners, which are in no way associated or affiliated with
Line 6. These product names, descriptions and images are provided for the sole purpose of identifying the specific
products that were studied during Line 6’s sound model development.
20
Page 25

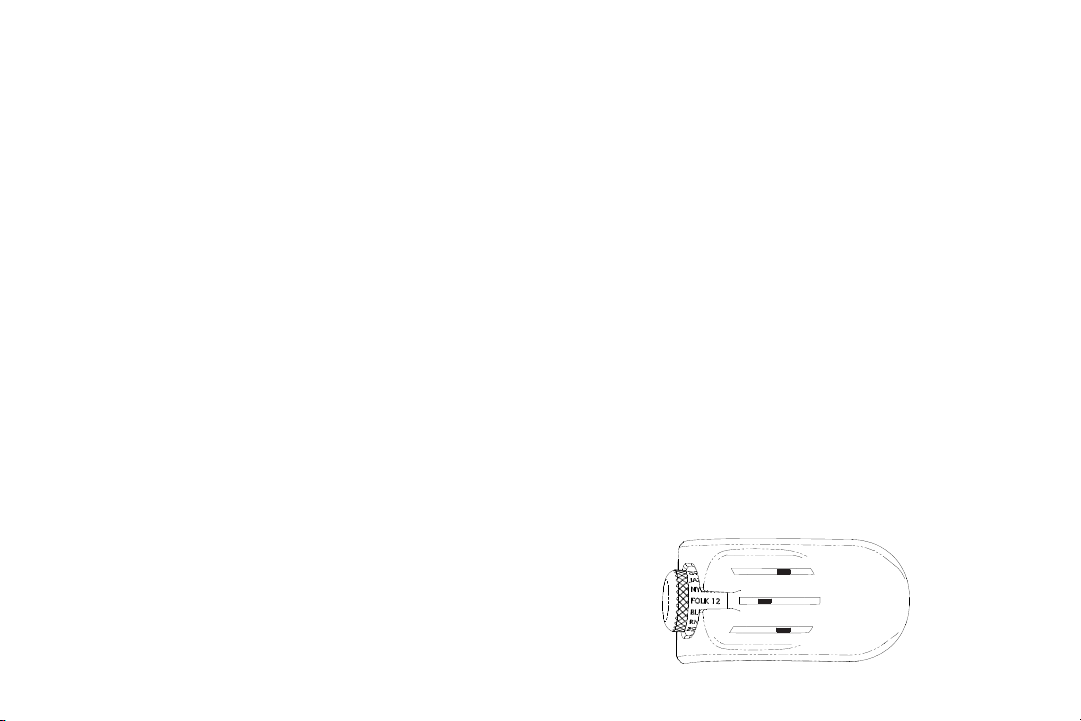
FOLK 12
based on 1973 Guild® F412
Introduced late 1960's
Arched maple back, maple sides, ebony fingerboard
25 5/8" scale
While many 12-string guitars seem to be the result
of simply adding extra strings to an existing six string
model, Guild® 12-strings were actually designed as
12-string guitars from the ground up. The wide
fingerboard offered enough room to fret cleanly, and
the jumbo body provided the elusive combination
of volume and clarity. To hear a Guild® 12-string
in action, check out the intro to “And You and I”
from Yes album Close to the Edge.
Alternate Tuning Setup works differently for the
FOLK 12 and a few other models. You won’t be
able to change the pitch of the strings, but you can
customize the sound in other ways. See BLUES 12
for details.
Guild is a registered trademark of Fender Musical Instruments Corporation and is in no way associated or
affiliated with Line 6. The product name, description and image are provided for the sole purpose of identifying
21
the specific products that were studied during Line 6’s sound model development.
Page 26

BLUES 12
based on 1935 Stella® Auditorium
introduced 1935
Birch back and sides
26 3/8" scale
The Stella® brand guitars before 1940 have achieved
legendary status despite the fact that they were
originally budget instruments. The 12-strings are
especially prized because of their association with
blues artists like Huddie “Leadbelly” Ledbetter. The
long scale made these guitars especially suitable for
low tunings, over half a century before the advent
of Nü Metal.
For the BLUES 12 and FOLK 12 models, Alternate
Tuning Setup works as described in the illustration.
"Mix" gives you control of the loudness of the
octave string set, and "Separation" gives you control
of detuning between the strings in each pair.
OCTAVE STRINGS ONLY
MAX
50/50
NORMAL STRINGS ONLY
MIX
MIN
SEPARATION
Stella is a registered trademark of Harmony Industries, Inc. and is in no way associated or affiliated with Line 6.
The product name, description and image are provided for the sole purpose of identifying the specific products
that were studied during Line 6’s sound model development.
22
Page 27

RND NECK
based on
1939 National Reso-Phonic™ Style "O"
Introduced 1930
Nickel plated Brass Body
25 3/8" scale
The Style "O" was developed as a simpler and less
expensive alternative to their mechanically complex
Tricone instruments.
Though the convoluted relationship between
National Reso-Phonic™ and Dobro® make precise
distinctions difficult, single-cone Nationals are now
usually associated with Delta blues, and musicians
like Son House.
National Reso-Phonic is a trademark of National Reso-Phonic Guitars, Inc. and is in no way associated or affiliated
with Line 6. The product name, description and image are provided for the sole purpose of identifying the specific
23
products that were studied during Line 6’s sound model development.
Page 28

SQUARE NECK
based on 1937 Dobro® Model 27
Introduced 1934
Birch back and sides
24 2/4" scale
John Dopyera formed Dobro® (short for "Dopyera
Brothers") to compete with his former partners at
National Reso-phonic™. To overcome what he felt
were deficiencies in single cone guitars, John
designed an aluminum "spider" to transfer vibrations
to the edge, rather than the center, of the cone.
This arrangement produced a sweeter sound with
more sustain. Dobro® wood-bodied instruments
are associated with bluegrass music and musicians
like Bashful Brother Oswald.
Gibson, J-45, SJ, and Dobro are registered trademarks of Gibson Guitar Corp. and are in no way associated or
affiliated with Line 6. These product names, descriptions and images are provided for the sole purpose of identifying
the specific products that were studied during Line 6’s sound model development.
24
Page 29

BANJO
inspired by the Gibson® Mastertone
Introduced 1925
Maple Ply Rim, Figured maple resonator
26 3/8" scale
The innovative tone ring gave the Gibson®
Mastertone the power to cut through the loudest
bluegrass band. The Mastertone series quickly
became the definitive Bluegrass banjo, due in no
small measure to a long-standing association with
virtuoso Earl Scruggs.
Gibson, J-45, SJ, and Dobro are registered trademarks of Gibson Guitar Corp. and are in no way associated or
affiliated with Line 6. These product names, descriptions and images are provided for the sole purpose of identifying
25
the specific products that were studied during Line 6’s sound model development.
Page 30

MANDOLA
inspired by the Mandolin Family
introduced 19th century
25" scale
Around the beginning of the 20th century, a peculiar
form of mass hysteria swept the United States called
mandolin orchestras. In these ensembles, mandolins
functioned as violins, mandolas were used as violas,
and mandocellos played the part of cellos. While
the mandolin itself is still a main ingredient in
bluegrass, the rest of the family (and the similar
bouzouki) are now often used for folk, celtic, and
Middle Eastern music.
"UNISON" STRINGS ONLY
MAX
In the MANDOLA model, Alternate Tuning Setup
50/50
follows the 12 string pattern.
NORMAL STRINGS ONLY
MIX
MIN
SEPARATION
All product names are trademarks of their respective owners, which are in no way associated or affiliated with
Line 6. These product names, descriptions and images are provided for the sole purpose of identifying the specific
products that were studied during Line 6’s sound model development.
26
Page 31

SHAMISEN
inspired by the Japanese Shamisen
Introduced 16th Century
various body woods, catskin or dogskin heads
The shamisen, essentially a three-stringed fretless
banjo played with an ice-scraper sized plectrum, is
closely related to the Chinese sanxian and Okinawan
shanshin. No samurai movie soundtrack would be
complete without at least a few poignant notes from
this instrument.
Part of what makes the Shamisen sound unique is
that the notes go flat when plucked, but then return
to pitch as the note sustains. The special Alternate
Tuning Setup mode for this model let's you fine
tune this aspect of the sound. "Detune" controls
how flat the note goes, and "Settle Time" controls
the speed at which it returns to normal pitch.
MAX
MAX
MIN
SETTLE TIME
All product names are trademarks of their respective owners, which are in no way associated or affiliated with
Line 6. These product names, descriptions and images are provided for the sole purpose of identifying the specific
27
products that were studied during Line 6’s sound model development.
DETUNE
MIN
Page 32

SITAR
inspired by the Indian Sitar
introduced late Mogul era (circa 1700)
pumpkin body and resonator
scale varies with pumpkin size
Still very popular in Northern India, the unique
buzz of the sitar is used in Indian classical, folk, and
popular music. The sitar is widely recognized in the
west largely because of the brilliant performances
and recordings of Ravi Shankar.
We've tuned the drone strings chromatically, so the
Sitar model will work in any key. The Alternate
Tuning Setup mode for this model lets you vary the
volume of the drone strings with "Drone Level",
and fine tune them with "Drone Tuning".
MAX
MIN
DRONE LEVEL
A=400
+50 CENT
DRONE TUNING
All product names are trademarks of their respective owners, which are in no way associated or affiliated with
Line 6. These product names, descriptions and images are provided for the sole purpose of identifying the specific
products that were studied during Line 6’s sound model development.
28
Page 33

Care and Maintenance
Only a few simple measures are required to keep
your Variax Acoustic looking and performing like
new.
• After playing, wipe down the guitar and strings
with a clean, soft cloth.
• Change strings when they become discolored or
the guitar begins to sound dull.
• Occasionally clean the fingerboard surface with
lemon oil and the painted surfaces with guitar or
furniture polish.
Neck Relief Adjustment
Depending on where you live, seasonal temperature
and humidity variations may make it necessary to
adjust the neck relief of the Variax. If you find that
your Variax suddenly starts buzzing or is generally
difficult to play, it may be time for this kind of
adjustment. To check the neck relief, press the
high E string to the first fret with your left hand,
and press the same string to the last fret with your
right hand. While holding the string at both points,
check the point where the E string passes over the
10th fret. If the string is touching the fret, or if
there is more space under the string than the
29
thickness of a thin pick, it’s time to adjust the neck.
If you are familiar with this kind of adjustment,
remove the truss rod cover and use the supplied
wrench to adjust the truss rod. If the string was
touching at the 10th fret (too little relief), turn the
rod counterclockwise. If the gap was too great (too
much relief), turn the rod clockwise. In both cases,
make small adjustments and check the relief as you
go. Never force the rod to turn—excessive
tightening can damage your Variax. If you are
unfamiliar or uncomfortable with this kind of
adjustment, ask your local guitar shop to refer you
to a qualified guitar tech.
LESS RELIEF
Page 34

Action Adjustment
HIGHER
ACTION
LOWER
ACTION
Variax Acoustic leaves the factory adjusted for
playability across a wide range of playing styles.
The bridge saddle height can be adjusted to optimize
playability for a particular style. If you are familiar
with this kind of adjustment, use the supplied Allen
wrench to raise or lower the bridge saddle screws
as shown. As with neck adjustment, if you are
unfamiliar with this kind of adjustment, ask your
local guitar shop to refer you to a qualified guitar
tech.
30
Page 35

Customer Service
Before contacting the Line 6 Customer Service team, please take the time to look through this publication
to see if it can answer your questions. Additional helpful information is on the Support page of the Line 6
web site (www.line6.com), including the searchable FAQTRAQ system which is often the fastest and easiest
way to get answers.
If you need to talk to an actual human on the Line 6 Customer Service team by phone, it will generally help
to take some notes for yourself before you call, to insure that you remember everything you want to ask about.
In the USA or Canada, you can contact Line 6 at (818) 575-3600, 8AM to 5PM Monday through Friday
(Pacific Time). Outside the USA and Canada, please contact your distributor directly to arrange service.
The list of Line 6 distributors is available on the Internet at www.line6.com.
To obtain factory service:
If a member of the Line 6 Customer Service Team determines that your Variax needs to be sent to Line 6
for service, you will be given a return authorization (RA) number. Products returned without an RA number
will be returned to you at your sole expense. Pack the product in its original shipping carton and attach a
description of the problem along with your name, address and a phone number where Line 6 can contact
you if necessary. Ship the product insured and freight prepaid to:
Line 6 Customer Service
6033 De Soto Avenue
Woodland Hills, CA 91367
32
Page 36

Line 6 Warranty Policy
Line 6, Inc. (hereinafter “Line 6”) warrants that your new Line 6 instrument shall be free of defects in workmanship and materials for the lifetime of the product and that the electronics contained
within the instrument (printed circuit boards, piezo saddles, potentiometers, etc.) shall be free from defects in workmanship and materials for a period of one (1) year from the original date of
purchase. In addition, the accessories (carrying case, power supply, and footswitch) shall be free of defects in workmanship and materials for a period of one (1) year from the original purchase
date. This warranty is extended to the original retail purchaser only and may not be transferred or assigned to subsequent owners. In order to validate your warranty, and as a condition precedent
to warranty coverage hereunder, a copy of the original sales receipt must accompany all warranty requests. This warranty policy is valid only when a new Line 6 instrument is purchased from
an Authorized Line 6 dealer. This warranty is subject to the following exceptions and/or limitations:
This warranty does NOT cover:
1. Any instrument that has been altered or modified so that the serial number, name, identification numbers or logos have been tampered with or are missing.
2. Instruments or accessories not purchased from an Authorized Line 6 dealer.
3. Standard maintenance and adjustment of the instrument, electronics and action. Standard adjustments and maintenance are the sole responsibility of the owner.
4. Any defects in the instrument or accessories that are caused by or are the result of a lack of maintenance or adjustment.
5. Any instrument or accessory that has been repaired, altered or modified by a repair facility that is not authorized by Line 6, or any repairs, alterations, or
modifications, regardless of the origin, that Line 6 has not approved.
6. Any damages to the instrument or accessory that is a result of abuse, accident or misuse, as determined by Line 6 in its sole discretion.
7. Any issues regarding the tonal aspects of the instrument. Tone is a product of perception and therefore cannot be warranted. Issues regarding the authenticity
or interpretation of the models used also cannot be warranted.
8. Damages (due to shipping or otherwise) to the instrument or accessories that relate to improper storage or transportation.
9. Any failures to either the instrument or accessories that are a result of exposure to extreme conditions (including, without limitation, humidity, sunlight, bodily
fluids, unapproved cleaning solutions or solvents, temperature and/or adhesives).
10. Any failures to either the instrument or accessories that are a result of normal “wear and tear” (including, without limitation, strings, fret wear, finish damage,
potentiometers and connectors, pick guard, bridge, machine heads, finger board and carrying case).
If you feel that you have a warranty issue, please contact Line 6 or your authorized Line 6 dealer or distributor. Line 6 may issue a Return or Repair authorization
as needed. No instrument or accessory will be accepted at the Line 6 facility for repair without (i) prior receipt of your original sales receipt, (ii) proper authorization
by Line 6 or an authorized Line 6 dealer or distributor, and (iii) a Return Authorization number. Line 6 will refuse shipment of any instrument that is received without
the foregoing three (3) prerequisites. Line 6 will repair or replace your instrument at its sole discretion. Parts that are replaced under this warranty are warranted
for ninety (90) days or the reminder of the warranty period, whichever is longer. Line 6 reserves the right to use reconditioned parts and assemblies as warranty
replacements for authorized repairs. All shipping charges to any repair facility are the sole responsibility of the owner of the instrument or accessory.
Line 6 reserves the right to update any unit returned for repair, and reserves the right to change or improve the design of the product at any time without notice.
This is your sole warranty. Line 6 does not authorize any third party, including any dealer or sales representative, to assume any liability on behalf of Line 6 or to
make any warranty for Line 6.
DISCLAIMER AND LIMITATION OF WARRANTY: THE FOREGOING WARRANTY IS THE ONLY WARRANTY GIVEN BY LINE 6 AND IS IN LIEU OF ALL OTHER WARRANTIES.
ALL IMPLIED WARRANTIES, INCLUDING WARRANTIES OF MERCHANTABILITY AND FITNESS FOR ANY PARTICULAR PURPOSE, EXCEEDING THE SPECIFIC PROVISIONS OF THIS
WARRANTY ARE HEREBY DISCLAIMED AND EXCLUDED FROM THIS WARRANTY. UPON EXPIRATION OF THE APPLICABLE EXPRESSED WARRANTY PERIOD (1 YEAR), LINE 6 SHALL
HAVE NO FURTHER WARRANTY OBLIGATION OF ANY KIND, EXPRESS OR IMPLIED. LINE 6 SHALL IN NO EVENT BE LIABLE FOR ANY SPECIAL, INCIDENTAL OR CONSEQUENTIAL
DAMAGES SUFFERED BY THE PURCHASER OR ANY THIRD PARTY, INCLUDING, WITHOUT LIMITATION, DAMAGES FOR LOSS OF PROFITS OR BUSINESS, OR DAMAGES RESULTING
FROM USE OR PERFORMANCE OF THE INSTRUMENT, WHETHER IN CONTRACT OR IN TORT. LINE 6 SHALL NOT BE LIABLE FOR ANY EXPENSES, CLAIMS, OR SUITS ARISING OUT
OF OR RELATING TO ANY OF THE FOREGOING. Some states do not allow the exclusion or limitation of implied warranties so some of the above limitation and exclusions may not apply
to you. This warranty only applies to products sold and used in the United States of America and Canada. Line 6 shall not be liable for damages or loss resulting from the negligent or intentional
acts of the shipper or his contract affiliates. You should contact the shipper for proper claims procedures in the event of damage or loss resulting from shipment.
33
 Loading...