

Page 1
Pilot’s Handbook
40-00-0007 Electrophonic Limited Edition Rev B
Page 2

Before using your Variax you should read these Important
Safety Instructions. Keep these instructions in a safe place.
1. Obey all warnings in this Pilot’s Handbook.
2. Do not place near heat sources, such as radiators, heat registers, or appliances which produce heat.
3. Guard against objects or liquids.
4. Power the XPS Footswitch only with the included PX-2 Power Supply or equivalent.
5. Connect the PX-2 Power Supply only to AC power outlets rated 100-120V or 230V 47-63Hz (depending on the voltage range of the
included power supply).
6. Do not step on power cords. Do not place items on top of power cords so that they are pinched or leaned on.
7. Unplug your Variax and XPS Footswitch when not in use for extended periods of time.
8. Do not perform service operations beyond those described in the Variax Pilot’s Handbook. Repairs and service operations beyond the
scope of those in the Pilot’s Handbook should be performed only by qualified service personnel.
9. Prolonged listening at high volume levels may cause irreparable hearing loss and/or damage. Always be sure to practice “safe listening.”
Gigbag, XPS Footswitch, PX-2 Power Supply, TRS Cable, 1.5mm Allen wrench, 4mm Allen wrench
WARNING: To reduce the risk of fire or electric shock,
do not expose this appliance to rain or moisture.
CAUTION: This equipment has been tested and found to comply with the limits for a Class B digital device pursuant to
Part 15 of FCC Rules. Operation is subject to the following two conditions: (1) This device may not cause harmful interference, and
(2) this device must accept any interference received, including interference that may cause undesired operation.
Your Variax should include these accessories:
CAUTION: No user-serviceable parts inside. Refer
servicing to qualified service personnel.
Page 3

Please Note:
Line 6, Variax, POD, Vetta and the Line 6 and Variax logo are trademarks of
Line 6, Inc. All other product names, trademarks, and artists’ names are the
property of their respective owners, which are in no way associated or affiliated
with Line 6. Product names, images, and artists’ names are used solely to
identify the products whose tones and sounds were studied during Line 6’s
sound model development for this product. The use of these products,
trademarks, images, and artists’ names does not imply any cooperation or
endorsement.
Page 4

Table of Contents
Welcome to Variax ................................. 1–2
Basic Operations......................................... 3-6
Connections
Battery Power
XPS Footswitch Power
XPS Footswitch Direct Out
Controls.................................................. 7-10
Controls
Build a Custom Guitar
Contents of Custom Knob Positions
The Guitars of Variax...........................12-22
General Notes About the Models
Pickup Numbering
Model Descriptions
Care and Maintenance ........................ 23-24
Neck Relief Adjustment
Intonation Adjustment
Action Adjustment
Customer Service..................................... 26
Warranty Information..............................27
Page 5

Welcome to Variax
Thanks for buying a Variax and joining us in our
quest to apply the miracle of modern technology to
the pursuit of great guitar tone. You now own detailed
models of some of the most distinctive electric and
acoustic guitars of all time—all wrapped up in a
single comfortable and highly-playable instrument
with a style all its own.
How does it work?
How do we get all of these sounds in a guitar that
doesn't even have any visible pickups? We use piezo
bridge pickups to capture each individual string’s
vibrations, and process the signals through software
algorithms that capture the physical and electronic
properties of the guitars that we've modeled.
This process dynamically alters Variax’s own natural
string vibrations to match the modeled instrument's
unique tonal characteristics. That means there’s no
delay caused by having to detect a pitch and turn
it into a MIDI note, and there’s also no issue with
tracking bends, hammer-on's, pull-off's, slides or
any other techniques that are a part of your style.
Plus, since Variax delivers its uncannily accurate
sounds without the use of traditional magnetic
pickups, it isn't susceptible to hum from fluorescent
lights or computer monitors.
1
How did we manage to capture the tonal souls of
all these classic guitars and spirit them into your
Variax? We’re glad you asked.…
The Dream...
A couple of years before Variax was born, we turned
our attention from the PODs, amps, and effects that
we had been developing to take a fresh look at the
guitar itself. Like all guitarists, we were intimately
familiar with the unique pleasures that come from
various instruments, and the great tonal variety that
the world of electric and acoustic guitars has to offer.
We wondered—could it be possible to capture a
complete range of this tone in one single instrument?
It was a daunting task, but then so was the idea of
squeezing a whole collection of amps and effects
into one little kidney bean shaped metal box. So
we figured, why not give it a go?
What, we asked ourselves, might this marvel do?
Well, for one thing, how about giving you access to
an unprecedented number of certified classic sounds?
How about letting you change from the sound of a
50’s solidbody to the sound of a 60’s electric 12string as easily as using a pickup selector switch?
How about the round, smoky tone of a hollowbody
Page 6

archtop or the full-bodied resonance of a
dreadnought acoustic? How about the raspy growl
of a resonator, or the buzzing drone of a sitar?
The Journey
We knew our sounds would have to be amazingly
accurate to meet the needs of discriminating
guitarists, so we began an intensive research project
into guitar physics. Like Frankenstein’s lab, our own
R&D facility became the site of round-the-clock
investigations of the mysterious secrets of guitars’
life force. We systematically examined every factor
that contributes to each guitar’s tone, and developed
ways to measure the complex interactions of
vibrating strings, resonant bodies, and magnetic
pickups. Equally important, we developed ways to
capture these interactions mathematically so we
could get the same sounds from our own guitar-inthe-making.
Of course, a guitar that delivers such a vast array of
tones really needs a look all it’s own, so we started
developing the look and feel of a guitar that could
be used in any musical endeavor. We combined our
innovative guitar modeling technology with a
deceptively simple control layout and a comfortable,
balanced body inspired by the best aspects of many
of the guitars we had chosen to model.
With the body and brain of the Variax completed,
it was time for us to create the soul. We auditioned
a drool-inducing array of vintage instruments to
find the ones with the most distinctive voices and
personalities. We applied our painstaking measuring
techniques to these specimens, and refined our
models while constantly referring back to the
originals for accuracy. When each model reached
the point of not only sounding like the original, but
also being as much fun to play, it was done.
As we refined our measuring and modeling
techniques, we perfected a new, powerful hardware
platform that could deliver our astoundingly accurate
sounds. With the ability to switch sounds in the
fraction of a second that it takes to slap a pickup
selector switch to the next position. With less noise
than a standard humbucker. That could be powered
in a variety of ways. And, most importantly, that
performs so flawlessly that you can forget it’s even
there.
The result of our labors? Variax. An entire guitar
collection in a single instrument.
2
Page 7
Basic Operations
Connections
You may have already noticed that the Variax has
two output connectors: a familiar 1/4-inch jack and
a second “mystery” jack protected by a rubber cap.
This “mystery” connector will be the way you will
add future upgrades and additional capabilities to
your Variax, but all of the operations described in
this manual will use the 1/4-inch output.
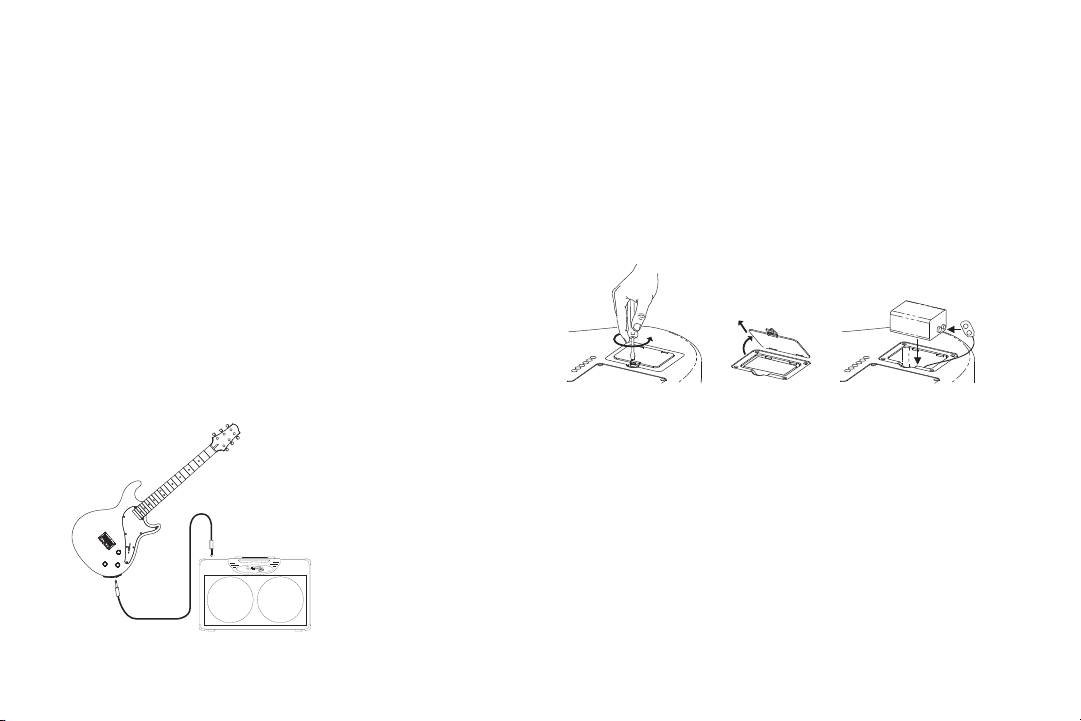
Guitar Cable to Amp
The simplest way to use the Variax is to connect it
directly to your amplifier (or stompboxes) with a
standard mono guitar cable.
3
Battery Power
Of course, the electronics of the Variax will need
power, so you’ll have to install six AA cells in the
on-board battery compartment. If you use fresh
alkalines, you should get approximately 12 hours of
continuous operation.
The battery will only be used when a mono cable
is connected – the standard cable you’d use for a
guitar. For longest battery life, always unplug your
Variax when not in use.
NOTE: If you find yourself at a gig with no AA
cells, you can unclip the plastic battery holder from
the connector and substitute an ordinary 9V battery.
This is only an “emergency” alternative, though, as
the battery will only last 1 to 2 hours
Page 8

XPS Footswitch Power
We realize that constantly changing batteries can
be a real drag, so we included a more convenient
option—the unobtrusive yet capable XPS
Footswitch.
PX-2 Power Supply
Mono Cable
XLR
1/4”
POWER
Tip
To VariaxTo Amp
Sleeve
Ring
Powering your Variax with the XPS Footswitch is
easy. Use the included TRS cable (meaning “tipring-sleeve” or also simply known as a “stereo” cable)
to connect the Variax to the INPUT jack of the
XPS Footswitch. Connect the PX-2 power supply
to the XPS Footswitch POWER jack, and use a
standard mono guitar cable to connect the XPS
Footswitch’s 1/4" OUTPUT to your amp or effects.
POWER
XLR
1/4”
TRS Cable
NOTE: If you have batteries installed in your Variax,
they will be bypassed when using your XPS
Footswitch. If the guitar is connected to the XPS
and the XPS power is disconnected, any batteries
installed in the Variax will be drained.
Cable Specifications
If you happen to lose the Custom Cable supplied
with your Variax, you can obtain a replacement
from Line 6 Customer Service (see page 24 of the
Pilot's Handbook for contact information). You
can also simply use any high-quality TRS cable up
to 18 feet.
4
Page 9

XPS Footswitch Direct Out
But wait—there’s more: Not content to merely
provide power to the Variax, the eager to please
XPS Footswitch also functions as a combination
A/B switch and direct box.
Why, you ask? Well, the detailed acoustic models
of the Variax may lack something when played
through an electric guitar amplifier, because these
guitar amps don’t have the extended high frequency
range of, say, an acoustic guitar amp with a tweeter,
or a PA system. To insure that you get that allimportant high end shimmer from your acoustic
sounds, here’s the drill:
Connect your guitar cable from the XPS 1/4"
OUTPUT jack to your amp and/or stompboxes.
Connect the (balanced, +4 dBu compatible) XLR
OUTPUT of your XPS to your PA system or
acoustic amplifier with a standard mic cable.
When the 1/4" indicator light is lit on your XPS
Footswitch, you’ve got your guitar routed to your
standard amp. Jump on the switch to light the XLR
indicator light, and your signal will now be routed
to the XLR OUTPUT, bathing you in the tonal
glory of full frequency range sound!
XLR Hum and A/B Switching
The XLR output of the XPS is designed to connect
to the balanced inputs that are typical on good
quality mixers and recording systems. Connecting
the XLR output to a device with an un-balanced
input may cause hum on that device when the XPS
1/4-inch output is selected. You may be able to use
an XLR to 1/4-inch in-line transformer (the kind
that does impedance matching as well as adapting
the connectors) to eliminate the hum. Better yet,
if you find that you want to be able to send your
Variax's output to two separate, un-balanced devices
with 1/4-inch inputs (like guitar amps, say) we
recommend the use an of ordinary A/B switch
connected to the 1/4-inch output of the XPS.
5
Page 10

To P.A. or Acoustic Amp
To Amp - Mono Cable
POWER
XLR
1/4”
TRS Cable
6
Page 11

Controls
Let’s start simple, and work up to the fancy stuff:
The Volume Knob, appropriately enough, controls
the volume. You may notice that the taper (how
fast you go from minimum to medium to maximum),
as well as the volume control’s effect on tone, will
be slightly different for various models. For electricbased models, volume response and tone interaction
duplicate the experience of the modeled
instrument—maximizing model authenticity. For
acoustic models, the Volume is simply a level control.
The Tone Knob controls—you guessed it!—the
tone. As with the Volume, the response of this
control varies to match the modeled electric
instruments. If you’ve spent much time recording
acoustic instruments, you’ve probably discovered
the kind of tonal variations possible by simply
altering microphone position. For the ACOUSTIC
and RESO models, the tone control gives you the
same kind of variations.
When you get to the Model Select Knob, things
start to get really interesting. Ten of its positions
each offer 5 distinct sounds (representing one, two
or even five different guitars), accessed by the Pickup
7
Selector. For specifics on the models and variations
available, see “The Guitars of Variax”.
The other two positions of the Model Select Knob
— Custom 1 and Custom 2 save and recall your
own custom setups. For the secrets of the Custom
positions, see “Build a Custom Guitar”.
The Pickup Selector will work exactly as you
expect it to on the electric models. In a three pickup
model, like SPANK, all five positions will duplicate
those on the modeled instrument. In more common
two pickup models, positions 1, 3, and 5 will give
you the characteristic sounds for those instruments
— bridge pickup only, both pickups, and neck pickup
only. The “in-between” positions (2 and 4) usually
offer sounds from related guitars. After all, who can
have enough variety?
When it comes to the acoustic models, the Pickup
Selector offers 5 distinct instrument sounds, all a
switch-flick away! The individual model descriptions
in “The Guitars of Variax” section get down and
dirty with the details.
Page 12

MODEL SELECT
OUTPUT JACK
TONE
VOLUME
PICKUP SELECTOR
8
Page 13

Build a Custom Guitar
To really take advantage of the range and versatility
of the Variax, especially when performing, you need
immediate access to your essential sounds. Use the
custom banks of Variax’s model knob to get your
ten favorite tones ready for recall with a well-timed
flick of your pinky.
You’ve got
Select rotation, and
these can store a different set of five of your favorite
sounds. You could, for instance, put acoustic sounds
in
load one up for your disco band, and the other for
your polka gig.
Let’s say you found a sound that you know you’ll be
coming back to again and again. Here’s what you
do:
, and electric sounds in
at the beginning of the Model
at the end. Each of
. Or
1. Pull up on the Model Select Knob
to start the Save process
2. Flick the Pickup Selector to the
position you want to save your sound
to. (Moving the Pickup Selector while
you’re saving won’t change the sound,
only the save location.)
3. Rotate the Model Select Knob to the
custom bank of your choice (
or ).
4. Press the Model Select knob down.
That’s all there is to it. You’ve saved your sound to
the current position of the Pickup Selector in the
Custom Bank you’ve chosen. Now that you’ve got
it all down, you can repeat these steps for the
remaining nine positions. (Or not, if you like the
ones we’ve already saved there for you. ) And if
your tastes change, you can Save over any of those
ten custom variations as often as you like.
9
Page 14

When you save a particular sound to one of the
CUSTOM banks, the tone knob's position is also
saved by default. You'll find that when you select
a stored sound, it will sound as if the tone control
was in the position it was in when you first saved
the sound. The actual position of the tone control
will be ignored, until you adjust it.
Knob (it won't change the sound during this special
Save mode) and before you press it back down.
When you select then this sound later, the actual
position of the tone control will be used instead of
a saved value. You can use both methods if you
wish, sometimes choosing to save the tone,
sometimes not, even in the same CUSTOM bank.
If you don't want to save the position of the tone
control to your CUSTOM banks, just rotate the
tone control after you've pulled up the Model Select
Contents Of Custom Knob Positions
Here's what's in the custom slots when a Variax ships from the factory:
Knob/Pickup Sel Model is based on... Which is also at...
CUSTOM 1 / 1 1995 Gibson J-200 ACOUSTIC / 5
CUSTOM 1 / 2 Gibson Mastertone Banjo RESO / 4
CUSTOM 1 / 3 1966 Guild F212 ACOUSTIC / 4
CUSTOM 1 / 4 Coral Sitar RESO / 2
CUSTOM 1 / 5 1935 Dobro Model 32 RESO / 1
CUSTOM 2 / 1 1958 Gibson Les Paul Standard, bridge pickup LESTER / 1
CUSTOM 2 / 2 1956 Gretsch Silverjet, bridge pickup R-BILLY / 2
CUSTOM 2 / 3 1968 Rickenbacker 360, bridge and neck pickups CHIME / 3
CUSTOM 2 / 4 1959 Fender Stratocaster, middle and neck pickups SPANK / 4
CUSTOM 2 / 5 1967 Epiphone Casino, neck pickup SEMI / 4
All product names are trademarks of their respective owners, which are in no way associated or affiliated with Line 6. These product names, descriptions
and images are provided for the sole purpose of identifying the specific products that were studied during Line 6’s sound model development.
10
Page 15

THE GUITARS OF VARIAX
General Notes About the Models
Each Variax model has five different variations
available—one at each position of the Pickup
Selector Switch. These five variations may all
be based on the same guitar, two or three similar
guitars, or, for the and models, each
variation may be based on an entirely different
instrument.
For electric models, the Volume and Tone controls
work like the ones found on the instruments we
modeled. Rolling off the volume, for instance, will
typically result in a darker sound. The output level
of each model is based on the modeled instrument.
Models with humbucking pickups, for example,
will tend to be louder than those with single-coils.
For acoustic models, the Volume control acts as
a simple level control. Since acoustic guitars don’t
have tone controls, we got to have some fun with
Variax’s Tone control with the acoustic models.
Give it a spin to explore a varying range of tonal
flavor for each model. To preserve the full range of
the acoustic and resonator guitars, use the XLR
output of the XPS Footswitch to send the signal
directly to your mixer or acoustic amp.
Pickup Position Numbering
We’ve numbered the pickup positions in the manual
starting with “bridge” (the position toward the
bridge) as 1. Moving the pickup selector from there,
you go through positions 2, 3 and 4 on your way to
the “neck” position (the position toward the neck)
which we label as number 5.
3
4
Bridge
2
1
5
Neck
12
Page 16

T-MODEL
4
1
Based on 1960 Fender Telecaster Custom
Leo Fender’s Telecaster, originally known as the
Broadcaster, was the first commercially successful
solidbody electric guitar and has been in continuous
production for over fifty years. A brilliant example
of functional, efficient design, the Telecaster has
been the guitar of choice for guitarists like Jeff Beck,
Based on 1968 Fender Telecaster Thinline
Faced with the difficulty of obtaining lightweight
ash, Fender introduced the Thinline model in 1967.
The chambered body reduced the weight to about
half that of a typical Tele of the time, while the
traditional electronics were retained to deliver a
variation of the trademark Tele sound.
3
5
Roy Buchanan, James Burton, Albert Collins, Danny
Gatton, and Keith Richards.
Position 3: Bridge+Neck
Position 5: Neck
Note: The neck pickup position of this model, like the
original, has a very “deep” sound and the tone control
2
is bypassed.
Based on modified 1968 Fender Telecaster
Position 1: Bridge
Position 4: Neck
Players looking for more versatility from the
workhorse Tele discovered they could get a much
more powerful sound by combining the two pickups
in series (as on a humbucking pickup).
13
All product names are trademarks of their respective owners, which are in no way associated or affiliated with Line 6. These product names, descriptions
and images are provided for the sole purpose of identifying the specific products that were studied during Line 6’s sound model development.
Page 17

SPANK
Based on 1959 Fender Stratocaster
The curvaceous Stratocaster is further evidence of
the genius of Leo Fender. Considered a radical
departure at its introduction in 1954, the Strat soon
eclipsed the popularity of its older sibling and became
one of the most visible instruments in the formative
years of rock and roll. The Stratocaster influenced
electric guitar design more than any other single
instrument and its distinctive comfort-contoured
body, bolt-on neck, and versatile electronics have
become industry standard features.
3
4
2
5
1
Our model takes one slight liberty; unlike the
modeled instrument, the tone control works on the
Bridge pickup, too. We trust that Leo won’t mind.
Position 1: Bridge
Position 2: Bridge+Middle
Position 3: Middle
Position 4: Neck+Middle
Position 5: Neck
All product names are trademarks of their respective owners, which are in no way associated or affiliated with Line 6. These product names, descriptions
and images are provided for the sole purpose of identifying the specific products that were studied during Line 6’s sound model development.
14
Page 18

LESTER
3
5
1
2
Based on 1958 Gibson Les Paul Standard
Gibson’s first solidbody electric design was a
collaboration with popular guitarist and recording
pioneer Les Paul. Unlike the easy-to-manufacture
Fender designs, the Les Paul retains the carved top
Based on 1952 Gibson Les Paul “Goldtop”
The “Goldtop”, nicknamed for it’s metallic gold
finish, was the first model of the Les Paul series.
Our version features a P-90 pickup in the bridge
position.
and set neck construction of their hollowbody
models. The original series was a commercial failure,
however, and was discontinued in 1961. Influential
musicians like Mike Bloomfield and Eric Clapton
4
discovered the sweet sustain of a Les Paul through
an overdriven amp. The resulting resurgence of
popular interest led to its reintroduction in 1968.
Based on 1961 Gibson Les Paul Custom
In addition to its sophisticated ornamentation, this
We’ve modeled a 1958 version that features the
coveted “P.A.F.” pickups.
particular incarnation of the Les Paul Custom offers
three P.A.F.’s. We’ve modeled the combination of
bridge and middle pickups that set this Paul apart.
Position 1: Bridge
Position 3: Bridge+Neck
Position 5: Neck
15
All product names are trademarks of their respective owners, which are in no way associated or affiliated with Line 6. These product names, descriptions
and images are provided for the sole purpose of identifying the specific products that were studied during Line 6’s sound model development.
Page 19

SPECIAL
4
1
2
Based on 1956 Gibson Les Paul Junior
The Les Paul Junior was introduced in 1954 as the
budget member of the Les Paul Series. The body is
a flat mahogany slab, and the electronics are
simplified to include only a single P-90 in the bridge
position. The meaty tone, light weight, and
uncompromised playability made the Junior a
favorite of Mountain’s Leslie West.
Based on 1955 Gibson
Les Paul Special
Based on 1976 Gibson Firebird V
The Firebird, introduced in 1963, was created with
the help of Detroit automobile designer Ray Dietrich.
Neck-through construction and Epiphone-style
mini-humbuckers gave the Firebird a unique
combination of good sustain and a biting, trebly
sound—characteristics which made it a favorite of
blues slide guitar legend Johnny Winter.
Position 2: Bridge
Position 4: Neck
The Special was added to the Les Paul line in 1955
as an intermediate step between the utilitarian Junior
and more luxurious Standard. The greater tonal
options made possible by the second P-90 helped
make the Special a favorite of reggae legend Bob
Marley. Our model is based on the original single
cutaway version.
3
5
Position 3: Bridge+Neck
Position 5: Neck
All product names are trademarks of their respective owners, which are in no way associated or affiliated with Line 6. These product names, descriptions
and images are provided for the sole purpose of identifying the specific products that were studied during Line 6’s sound model development.
16
Page 20

R-BILLY
3
5
1
Based on 1959 Gretsch 6120
The 6120 was the first of several models that Gretsch
developed with country guitar whiz Chet Atkins.
The 6120 is usually associated with the “twangy”
sounds of players like Duane Eddy, Eddie Cochran,
and Brian Setzer, but Pete Townshend found his
6120 perfect for the crushing power chords of “Who’s
Next.” This particular specimen is equipped with
Filter’tron hum-canceling pickups designed by Ray
Butts.
Based on 1956 Gretsch Silver Jet
Gretsch introduced a series of so-called Solid Body
guitars in 1955 that included the Jet Fire Bird with
a red top, the Duo-Jet with a black top, and the
Silver Jet with — you guessed it — a silver top.
Though called a solidbody by Gretsch, the Jet series
actually has internal hollow chambers that contribute
to its light weight and resonant tone. The black
version (the Duo-Jet) was the favorite instrument
of Cliff Gallup, original lead guitarist for Gene
4
2
Vincent’s Blue Caps. The guitar we modeled had
Position 1: Bridge
DeArmond pickups and a Melita bridge.
Position 3: Bridge+Neck
Position 5: Neck
Position 2: Bridge
Position 4: Neck
17
All product names are trademarks of their respective owners, which are in no way associated or affiliated with Line 6. These product names, descriptions
and images are provided for the sole purpose of identifying the specific products that were studied during Line 6’s sound model development.
Page 21

CHIME
3
5
1
Based on 1968 Rickenbacker 360
Though overshadowed by the success of the 12
string, the 6 string versions of Rickenbacker’s stylish
models continue to be popular with players looking
for something a bit out of the ordinary, like Ed
O’Brien of Radiohead.
Position 1: Bridge
Position 3: Bridge+Neck
Based on 1966 Rickenbacker 360-12
Popularized by George Harrison in the Beatles and
Roger McGuinn in the Byrds, the distinctive jangle
of 12 string Rickenbackers was a significant part of
the 60’s rock sound. Our Ricky has the original
“toaster” pickups.
Position 2: Bridge
Position 4: Neck
4
2
Position 5: Neck
All product names are trademarks of their respective owners, which are in no way associated or affiliated with Line 6. These product names, descriptions
and images are provided for the sole purpose of identifying the specific products that were studied during Line 6’s sound model development.
18
Page 22

SEMI
3
5
1
Based on 1961 Gibson ES-335
The Semi-hollow Gibsons were conceived as a blend
of the tone and sustain of a solidbody with the
balance and aesthetics of a hollowbody. The “woody”
tone of these guitars made them popular with Jazz
artists like Larry Carlton and Blues greats like B. B.
and Albert King. Our model is based on a 1961 dot
neck, with P.A.F.’s and a stop tailpiece.
Based on 1967 Epiphone Casino
Gibson acquired former rival Epiphone in 1957 and
began producing Epiphone guitars in its Kalamazoo
factory. Some of the models developed for Epiphone
were variations on then-current Gibson models.
The Casino, for example, was essentially a Gibson
ES-330. John Lennon was particularly fond of the
Casino, and continued to record with it long after
4
2
the breakup of the Beatles.
Position 1: Bridge
Position 3: Bridge+Neck
Position 5: Neck
19
All product names are trademarks of their respective owners, which are in no way associated or affiliated with Line 6. These product names, descriptions
and images are provided for the sole purpose of identifying the specific products that were studied during Line 6’s sound model development.
Position 2: Bridge
Position 4: Neck
Page 23

JAZZBOX
3
5
1
Based on 1957 Gibson ES-175
Gibson added a sharp “Venetian” cutaway and a
slightly fancier fingerboard to the budget ES-125
model to create the ES-175 in 1949. With the
addition of a second pickup in 1953, and humbucking
pickups in 1957, the ES-175 quickly became a
popular and enduring choice for electric jazz guitarists.
Based on 1953 Gibson Super 400
By the end of the 1940’s, changing musical styles
found premium archtops like the L-5 and Super 400
to be lacking in volume. By simply adding the
pickups and controls developed for its early electric
guitars, Gibson created the electric version of the
Super 400 in 1951. Our model is based on the early
4
2
version with P-90’s. Check out Scotty Moore (and
Position 1: Bridge
Position 3: Bridge+Neck
Elvis) playing a Super 400 in the ’68 Comeback
Special.
Position 5: Neck
Position 2: Bridge
Position 4: Neck
All product names are trademarks of their respective owners, which are in no way associated or affiliated with Line 6. These product names, descriptions
and images are provided for the sole purpose of identifying the specific products that were studied during Line 6’s sound model development.
20
Page 24

ACOUSTIC
3
Based on 1967 Martin O-18
The smaller “parlor” sized body with mahogany back
and sides has a balanced tone ideal for fingerstyle
playing.
4
1
Based on 1966 Guild F212
Guild’s Jumbo-bodied 12-strings offered players the
Based on 1959 Martin D-28
The D-28 is generally considered the definitive
Martin flat-top. The Dreadnought (or “D”) body
combined with rosewood back and sides produces
a full sound ideal for flatpicking.
2
elusive combination of volume and clarity. We’ve
modeled one of the simpler models in the line, the
F212 with mahogany back and rims.
5
Based on 1995 Gibson J-200
Easily identified by its impressive size and
Based on 1970 Martin D12-28
In 1970, Martin added 6 more strings to the successful
D-28 to capitalize on then-current folk music trends.
21
All product names are trademarks of their respective owners, which are in no way associated or affiliated with Line 6. These product names, descriptions
and images are provided for the sole purpose of identifying the specific products that were studied during Line 6’s sound model development.
ornamentation, the J-200 was often seen played by
flashy country and western artists and was a later
favorite of Elvis Presley.
Page 25

RESO
3
Based on 1965 Danelectro 3021
Danelectro managed to make great sounding guitars
from Masonite and lipstick tubes. Our model is
based on a 3021 (Jimmy Page’s favorite Dano) with
both pickups active.
4
1
Inspired by the Gibson Mastertone Banjo
Based on 1935 Dobro Model 32
Though most Dobros were wood-body instruments,
a few were made from other materials. This model
is based on an unusual specimen with an allaluminum body that emphasizes midrange.
2
The Mastertone series was introduced in 1925 and
quickly became the definitive Bluegrass banjo, due
in no small measure to a long-standing association
with virtuoso Earl Scruggs.
5
Based on 1928 National Tricone
Inspired by the Coral Sitar
Designed in conjunction with session guitarist and
electronics experimenter Vinnie Bell, the Coral
Sitar offered guitarists the ability to get the buzz and
drone of a sitar without having to learn a new
instrument. On this model, the tone control changes
the level of the drone strings.
All product names are trademarks of their respective owners, which are in no way associated or affiliated with Line 6. These product names, descriptions
and images are provided for the sole purpose of identifying the specific products that were studied during Line 6’s sound model development.
The first National guitar was the Tricone (or “Tri-
Plate) introduced in 1926. The Tricone used three
6-inch cones mechanically coupled to the bridge to
amplify string vibrations. The Tricone has a smoother
sound than later, single-cone resonators and was
the primary instrument of Sol Hoopii, influential
Hawaiian steel guitarist.
22
Page 26

Care and Maintenance
Only a few simple measures are required to keep
your Variax looking and performing like new.
• After playing, wipe down the guitar and strings
with a clean, soft cloth.
• Change strings when they become discolored or
the guitar begins to sound dull.
• Occasionally clean the fingerboard surface with
lemon oil and the painted surfaces with guitar or
furniture polish.
Neck Relief Adjustment
Depending on where you live, seasonal temperature
and humidity variations may make it necessary to
adjust the neck relief of the Variax. If you find that
your Variax suddenly starts buzzing or is generally
difficult to play, it may be time for this kind of
adjustment. To check the neck relief, press the
high E string to the first fret with your left hand,
and press the same string to the last fret with your
right hand. While holding the string at both points,
check the point where the E string passes over the
10th fret. If the string is touching the fret, or if
there is more space under the string than the
thickness of a thin pick, it’s time to adjust the neck.
23
If you are familiar with this kind of adjustment,
remove the truss rod cover and use the supplied
Allen wrench to adjust the truss rod. If the string
was touching at the 10th fret (too little relief), turn
the rod counterclockwise. If the gap was too great
(too much relief), turn the rod clockwise. In both
cases, make small adjustments and check the relief
as you go. Never force the rod to turn—excessive
tightening can damage your Variax. If you are
unfamiliar or uncomfortable with this kind of
adjustment, ask your local guitar shop to refer you
to a qualified guitar tech.
LESS RELIEF
Page 27

Intonation Adjustment
DECREASE
STRING LENGTH
Intonation is adjusted by changing the position of
the bridge saddles, which changes the length of the
vibrating strings. The saddle position of each Variax
is adjusted before it leaves the factory, but changing
string brand, gauge, or action can change the
intonation. To adjust the intonation, you will need
an accurate tuner and a screwdriver. For each string,
tune the open string as close as possible to correct
pitch, then fret that string at the 12th fret and
check the pitch. (Make this adjustment while
holding the guitar in playing position.) If the fretted
note is sharp, the string length is too short—turn
the adjust screw clockwise. If the fretted note is
flat, the string length is too long. Turn the adjust
screw counterclockwise. Make small adjustments
and retune and check the pitch as you go.
Important Note: Never attempt to remove the
bridge saddles. If any of the wires attached to the
piezo elements are broken or damaged, the Variax
will not function properly.
Action Adjustment
DECREASE
SADDLE HEIGHT
The Variax leaves the factory adjusted for playability
across a wide range of playing styles. The bridge
saddle height can be adjusted to optimize playability
for a particular style. If you are familiar with this
kind of adjustment, use the supplied Allen wrench
to raise or lower the bridge saddle screws as shown.
As with neck adjustment, if you are unfamiliar with
this kind of adjustment, ask your local guitar shop
to refer you to a qualified guitar tech.
24
Page 28

Customer Service
Before contacting the Line 6 Customer Service team, please take the time to look through this publication
to see if it can answer your questions. Additional helpful information is on the Support page of the Line 6
web site (www.line6.com), including the searchable FAQTRAQ system which is often the fastest and easiest
way to get answers.
If you need to talk to an actual human on the Line 6 Customer Service team by phone, it will generally help
to take some notes for yourself before you call, to insure that you remember everything you want to ask about.
In the USA or Canada, you can contact Line 6 at (818) 575-3600, 8AM to 5PM Monday through Friday
(Pacific Time). Outside the USA and Canada, please contact your distributor directly to arrange service.
The list of Line 6 distributors is available on the Internet at www.line6.com.
To obtain factory service:
If a member of the Line 6 Customer Service Team determines that your Variax needs to be sent to Line 6
for service, you will be given a return authorization (RA) number. Products returned without an RA number
will be returned to you at your sole expense. Pack the product in its original shipping carton and attach a
description of the problem along with your name and a phone number where Line 6 can contact you if
necessary. Ship the product insured and freight prepaid to:
Line 6 Customer Service
6033 De Soto Avenue
Woodland Hills, CA 91367
26
Page 29

Line 6 Warranty Policy
Line 6, Inc. (hereinafter “Line 6”) warrants that your new Line 6 instrument shall be free of defects in workmanship and materials for the lifetime of the product and that the electronics contained
within the instrument (printed circuit boards, piezo saddles, potentiometers, etc.) shall be free from defects in workmanship and materials for a period of one (1) year from the original date of
purchase. In addition, the accessories (carrying case, power supply, and footswitch) shall be free of defects in workmanship and materials for a period of one (1) year from the original purchase
date. This warranty is extended to the original retail purchaser only and may not be transferred or assigned to subsequent owners. In order to validate your warranty, and as a condition precedent
to warranty coverage hereunder, a copy of the original sales receipt must accompany all warranty requests. This warranty policy is valid only when a new Line 6 instrument is purchased from
an Authorized Line 6 dealer. This warranty is subject to the following exceptions and/or limitations:
This warranty does NOT cover:
1. Any instrument that has been altered or modified so that the serial number, name, identification numbers or logos have been tampered with or are missing.
2. Instruments or accessories not purchased from an Authorized Line 6 dealer.
3. Standard maintenance and adjustment of the instrument, electronics and action. Standard adjustments and maintenance are the sole responsibility of the owner.
4. Any defects in the instrument or accessories that are caused by or are the result of a lack of maintenance or adjustment.
5. Any instrument or accessory that has been repaired, altered or modified by a repair facility that is not authorized by Line 6, or any repairs, alterations, or
modifications, regardless of the origin, that Line 6 has not approved.
6. Any damages to the instrument or accessory that is a result of abuse, accident or misuse, as determined by Line 6 in its sole discretion.
7. Any issues regarding the tonal aspects of the instrument. Tone is a product of perception and therefore cannot be warranted. Issues regarding the authenticity
or interpretation of the models used also cannot be warranted.
8. Damages (due to shipping or otherwise) to the instrument or accessories that relate to improper storage or transportation.
9. Any failures to either the instrument or accessories that are a result of exposure to extreme conditions (including, without limitation, humidity, sunlight, bodily
fluids, unapproved cleaning solutions or solvents, temperature and/or adhesives).
10. Any failures to either the instrument or accessories that are a result of normal “wear and tear” (including, without limitation, strings, fret wear, finish damage,
potentiometers and connectors, pick guard, bridge, machine heads, finger board and carrying case).
If you feel that you have a warranty issue, please contact Line 6 or your authorized Line 6 dealer or distributor. Line 6 may issue a Return or Repair authorization
as needed. No instrument or accessory will be accepted at the Line 6 facility for repair without (i) prior receipt of your original sales receipt, (ii) proper authorization
by Line 6 or an authorized Line 6 dealer or distributor, and (iii) a Return Authorization number. Line 6 will refuse shipment of any instrument that is received without
the foregoing three (3) prerequisites. Line 6 will repair or replace your instrument at its sole discretion. Parts that are replaced under this warranty are warranted
for ninety (90) days or the reminder of the warranty period, whichever is longer. Line 6 reserves the right to use reconditioned parts and assemblies as warranty
replacements for authorized repairs. All shipping charges to any repair facility are the sole responsibility of the owner of the instrument or accessory.
Line 6 reserves the right to update any unit returned for repair, and reserves the right to change or improve the design of the product at any time without notice.
This is your sole warranty. Line 6 does not authorize any third party, including any dealer or sales representative, to assume any liability on behalf of Line 6 or to
make any warranty for Line 6.
DISCLAIMER AND LIMITATION OF WARRANTY: THE FOREGOING WARRANTY IS THE ONLY WARRANTY GIVEN BY LINE 6 AND IS IN LIEU OF ALL OTHER WARRANTIES.
ALL IMPLIED WARRANTIES, INCLUDING WARRANTIES OF MERCHANTABILITY AND FITNESS FOR ANY PARTICULAR PURPOSE, EXCEEDING THE SPECIFIC PROVISIONS OF THIS
WARRANTY ARE HEREBY DISCLAIMED AND EXCLUDED FROM THIS WARRANTY. UPON EXPIRATION OF THE APPLICABLE EXPRESSED WARRANTY PERIOD (1 YEAR), LINE 6 SHALL
HAVE NO FURTHER WARRANTY OBLIGATION OF ANY KIND, EXPRESS OR IMPLIED. LINE 6 SHALL IN NO EVENT BE LIABLE FOR ANY SPECIAL, INCIDENTAL OR CONSEQUENTIAL
DAMAGES SUFFERED BY THE PURCHASER OR ANY THIRD PARTY, INCLUDING, WITHOUT LIMITATION, DAMAGES FOR LOSS OF PROFITS OR BUSINESS, OR DAMAGES RESULTING
FROM USE OR PERFORMANCE OF THE INSTRUMENT, WHETHER IN CONTRACT OR IN TORT. LINE 6 SHALL NOT BE LIABLE FOR ANY EXPENSES, CLAIMS, OR SUITS ARISING OUT
OF OR RELATING TO ANY OF THE FOREGOING. Some states do not allow the exclusion or limitation of implied warranties so some of the above limitation and exclusions may not apply
to you. This warranty only applies to products sold and used in the United States of America and Canada. Line 6 shall not be liable for damages or loss resulting from the negligent or intentional
acts of the shipper or his contract affiliates. You should contact the shipper for proper claims procedures in the event of damage or loss resulting from shipment.
27
 Loading...