

Page 1
Ve r s i o n 1.01 Us e r GU i d e
Getting Started With Your Hardware
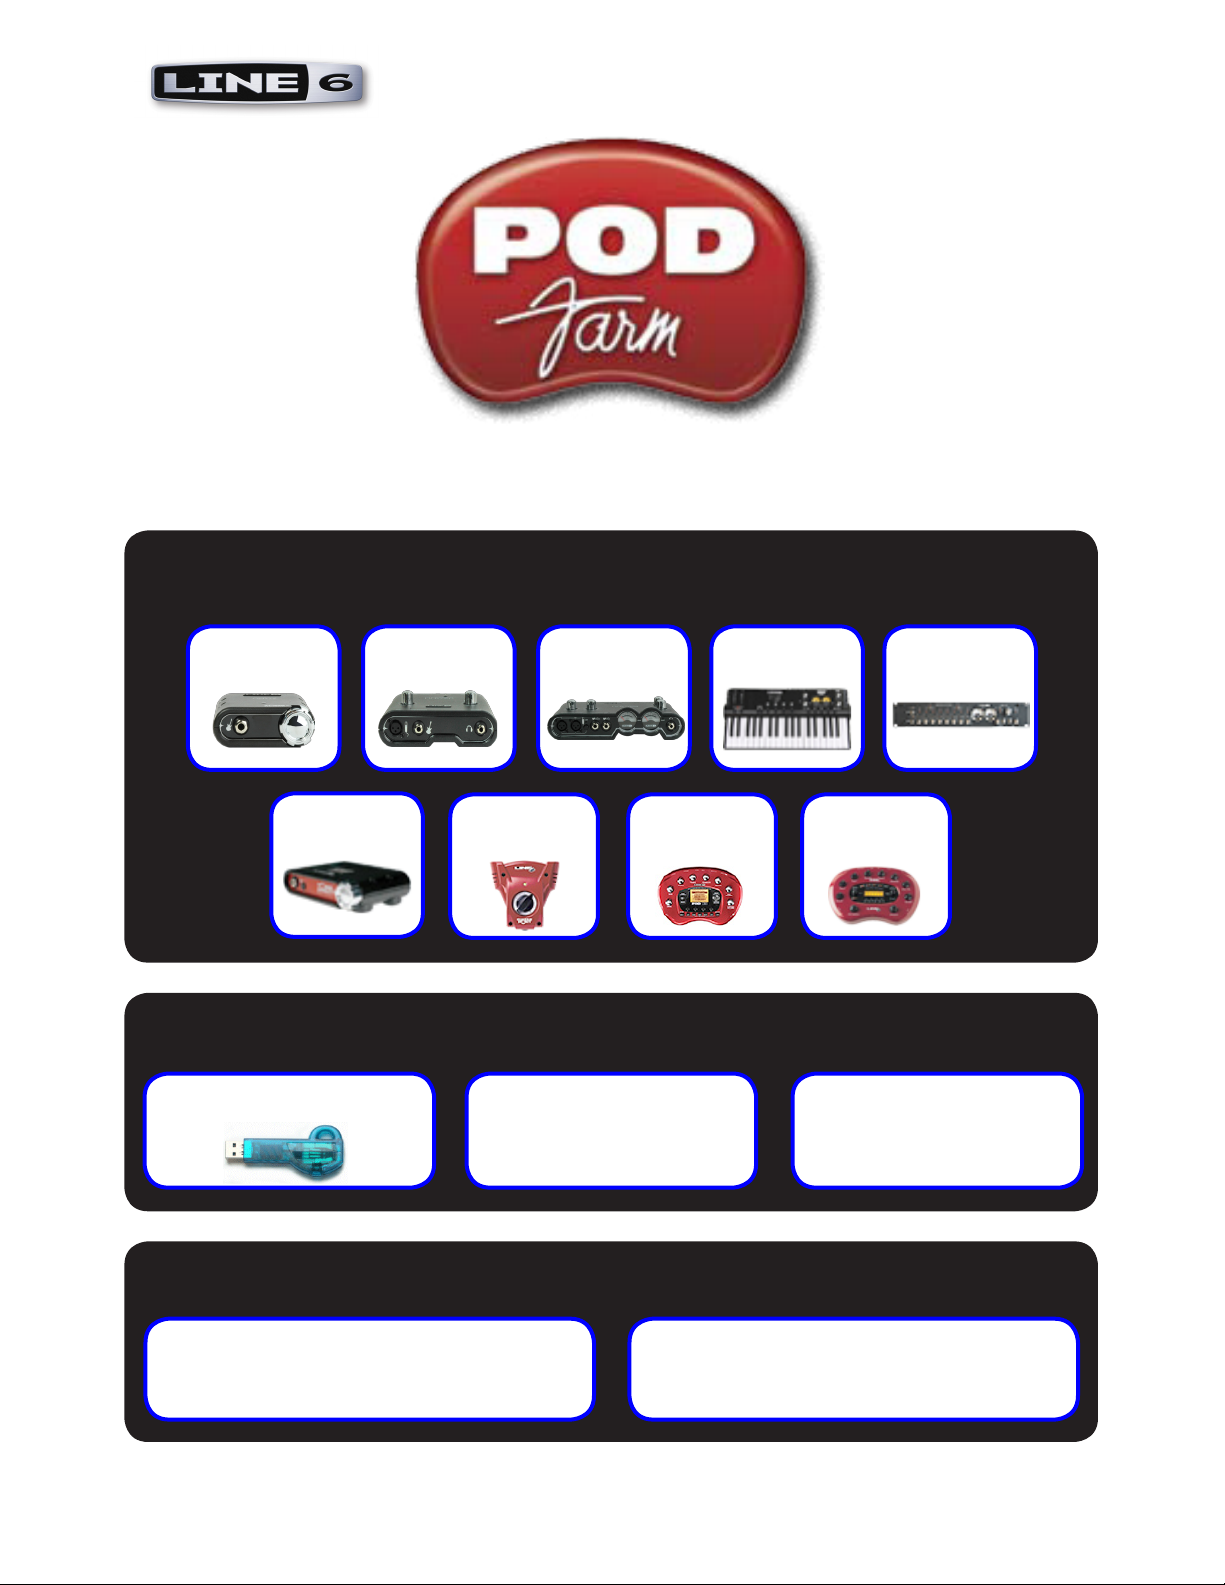
GX KB37
DI
UX1 UX2
Guitar
Port
POD X3
Family
PODXT
Family
POD Farm Basics
iLok
POD Farm
Plug-In
UX8
Standalone
Operation
Online Resources
POD Farm
Online Support
Line 6
Online Store
Page 2

Table of Contents
Start Here ................................................................................................1•1
About Line 6 Hardware & Software ..............................................................................1•1
System Requirements - POD Farm Plug-In & Standalone Operation .......................... 1•1
Updating & Registering with Line 6 Monkey ................................................................ 1•2
Product Activation & Authorization ............................................................................. 1•4
Transferring Activations ................................................................................................. 1•5
POD Farm Plug-In for iLok ............................................................................................ 1•6
Using Your Line 6 Hardware ...................................................................2•1
Making the Connection ................................................................................................. 2•1
GX (POD Studio & TonePort) ...................................................................................... 2•2
UX1 (POD Studio & TonePort) .................................................................................... 2•3
UX2 (POD Studio & TonePort) .................................................................................... 2•4
TonePort UX8 ................................................................................................................. 2•6
TonePort KB37 ............................................................................................................. 2•10
TonePort DI .................................................................................................................. 2•11
GuitarPort ..................................................................................................................... 2•13
Using POD X3 Family Devices with Your Computer... ............................................... 2•14
POD X3 ......................................................................................................................... 2•15
POD X3 Live ................................................................................................................ 2•16
POD X3 Pro .................................................................................................................. 2•17
Using PODxt Family Devices with Your Computer... .................................................. 2•22
PODxt Live ................................................................................................................... 2•24
PODxt PRO .................................................................................................................. 2•25
PODxt - Audio Signal Routing & Re-Amping ............................................................ 2•26
Routing Audio From Your Line 6 Hardware to an External Device ............................ 2•27
ToneDirect™ Monitoring .............................................................................................. 2•28
Sound Cards & Sound Issues ........................................................................................ 2•30
Line 6 Driver Panel & Recording ............................................................3•1
Audio Routing ................................................................................................................ 3•1
The Line 6 Audio-MIDI Devices Dialog ....................................................................... 3•1
Windows® - Line 6 Audio-MIDI Devices Dialog ........................................................... 3•2
Mac® - Line 6 Audio-MIDI Devices Dialog ................................................................. 3•13
Important Things to Know for Recording .................................................................... 3•25
POD Farm Plug-In ...................................................................................4•1
Windows
A Quickie Plug-In Primer ............................................................................................... 4•1
®
64 Bit Support ............................................................................................... 4•1
i i
Page 3

Plug-In Parameter Automation ...................................................................................... 4•2
Supported Plug-In Formats ............................................................................................. 4•3
Activating the Plug-In .................................................................................................... 4•3
Plug-In User Interface Overview .................................................................................... 4•4
Main Control Bar ...........................................................................................................4•4
View Selection Buttons .................................................................................................. 4•6
Gear View ....................................................................................................................... 4•6
Panel View ...................................................................................................................... 4•7
Presets View .................................................................................................................. 4•11
Signal Flow View .......................................................................................................... 4•14
POD Farm Standalone Operation .........................................................5•1
ToneDirect™ Monitoring .............................................................................................. 5•1
Input Source Select & Input Metering .......................................................................... 5•2
Tuner View ...................................................................................................................... 5•3
Mixer View ..................................................................................................................... 5•4
Preferences ...................................................................................................................... 5•6
Saving Tones ................................................................................................................... 5•8
Model Gallery ...........................................................................................6•1
About the Model Gallery ............................................................................................... 6•3
Guitar Amp & Cab Models ............................................................................................ 6•3
Bass Amp & Cab Models.............................................................................................. 6•11
Preamp Models ............................................................................................................. 6•14
Effects Models ............................................................................................................... 6•15
Model List ..................................................................................................................... 6•25
How To... ....................................................................................................7•1
Troubleshooting .......................................................................................8•1
What Is… ..................................................................................................9•1
Online Help & Support ........................................................................ 10•1
Line 6, POD, PODxt, POD X3, POD Farm, POD Farm Plug-In, TonePort, GearBox, GearBox Plug-In, Line
6 Monkey, ToneDirect Monitoring, GuitarPort, FBV, Variax, Line 6 Edit and Custom Tone are trademarks of
Line 6, Inc. All other product names, trademarks, and artists’ names are the property of their respective owners,
which are in no way associated or affiliated with Line 6.
© 2008 Line 6, Inc.
i i i
Page 4

Line 6 POD Farm 1.01 – Start Here
St a r t He r e
About Line 6 Hardware & Software
OK, you’ve got your guitar, a computer and a head full of songs and cool licks, so how do you get this
all going? You’re just a few steps away from turning your computer into a serious tone, jamming and
recording machine. First, here is some valuable information on getting started, and to ensure you have
all the latest and greatest updates….
System Requirements - POD Farm Plug-In & Standalone Operation
Windows
®
Pentium 4 -1.2GHz or better (2.5 GHz or better, or multi-core CPU recommended)•
Windows•
Windows® Vista® X64
512 MB RAM minimum (1 GB or more recommended)•
1 GB free hard disk space minimum (10 GB or more recommended for recording)•
Drive speed 5400 rpm minimum (7200 rpm or faster recommended)•
1024 x 768 minimum screen display resolution•
CD-ROM drive•
One free USB 1.1 or 2.0 compatible port on computer (USB hubs are not supported for Line 6 •
devices)
Internet connection for online features•
Compatible Line 6 USB hardware or iLok (device must be connected to computer & authorized •
to use POD Farm):
POD Farm Plug-In• - POD Studio, TonePort, GuitarPort, POD X3, PODxt hardware, or
iLok
POD Farm Standalone Operation• - POD Studio, TonePort, or GuitarPort hardware
®
XP® (with SP2 or SP3), Windows® XP® X64, Windows® Vista® (including SP1),
®
®
Mac
Intel or Power PC based G4 1.5 GHz or better (G4 1.67 or better, or multi-core CPU •
recommended)
OS X 10.4 or later •
512 MB RAM minimum (1 GB or more recommended)•
1GB free hard disk space minimum (10GB or more recommended for recording)•
Drive speed 5400 rpm minimum (7200 rpm or faster recommended)•
1024 x 768 minimum screen display resolution•
CD-ROM drive•
One free USB 1.1 or 2.0 compatible port on computer (USB hubs are not supported for Line 6 •
devices)
1•1
Page 5
Line 6 POD Farm 1.01 – Start Here
Internet connection for online features•
Compatible Line 6 USB hardware or iLok (device must be connected to computer & authorized •
to use POD Farm):
POD Farm Plug-In• - POD Studio, TonePort, GuitarPort, POD X3, PODxt hardware, or
iLok
POD Farm Standalone Operation• - POD Studio, TonePort, or GuitarPort hardware
Windows 64 Bit support
If you have a 64 bit Windows PC, then no worries! POD Farm 1.0 and the included Line 6 USB
hardware drivers do indeed support Windows® XP® x64 and Windows® Vista® 64-Bit systems. Note
that POD Farm 1.0 (as well as the POD Farm Plug-in) still runs as a 32 bit application, but has been
made compatible to run on these Windows 64 bit operating systems. If you need to check the specific
system requirements or need some assistance with installing POD Farm on your computer, please refer
to the additional documents located on the POD Farm Online Help page of the Line 6 web site.
Updating & Registering with Line 6 Monkey
Attention iLok users... You won’t need to run Line 6 Monkey. Obtaining and authorizing a POD Farm
Plug-In license for an iLok USB key has its own simple, online process that you can perform on any
Internet-connected computer. Please skip ahead to the POD Farm for iLok section for details.
Line 6 Monkey is the intelligent updater utility automatically installed with your POD Farm application.
It is highly recommended that you run Line 6 Monkey at the end of your POD Farm installation, and
to do so often to be sure you have all the latest updates for all your Line 6 software and hardware
products. Registering your Line 6 hardware is also very important because it ensures that you’re dialed
in for warranty service and makes it possible for us to contact you if new software versions or other
cool enhancements are offered - cutting edge technology and such! So don’t put this off any longer.
Connect your Line 6 hardware to your computer and follow these steps to launch Line 6 Monkey...
On Mac•
On Windows•
®
, go to Applications - Line 6.
®
, go to the Start button menu - Programs - Line 6 - Tools.
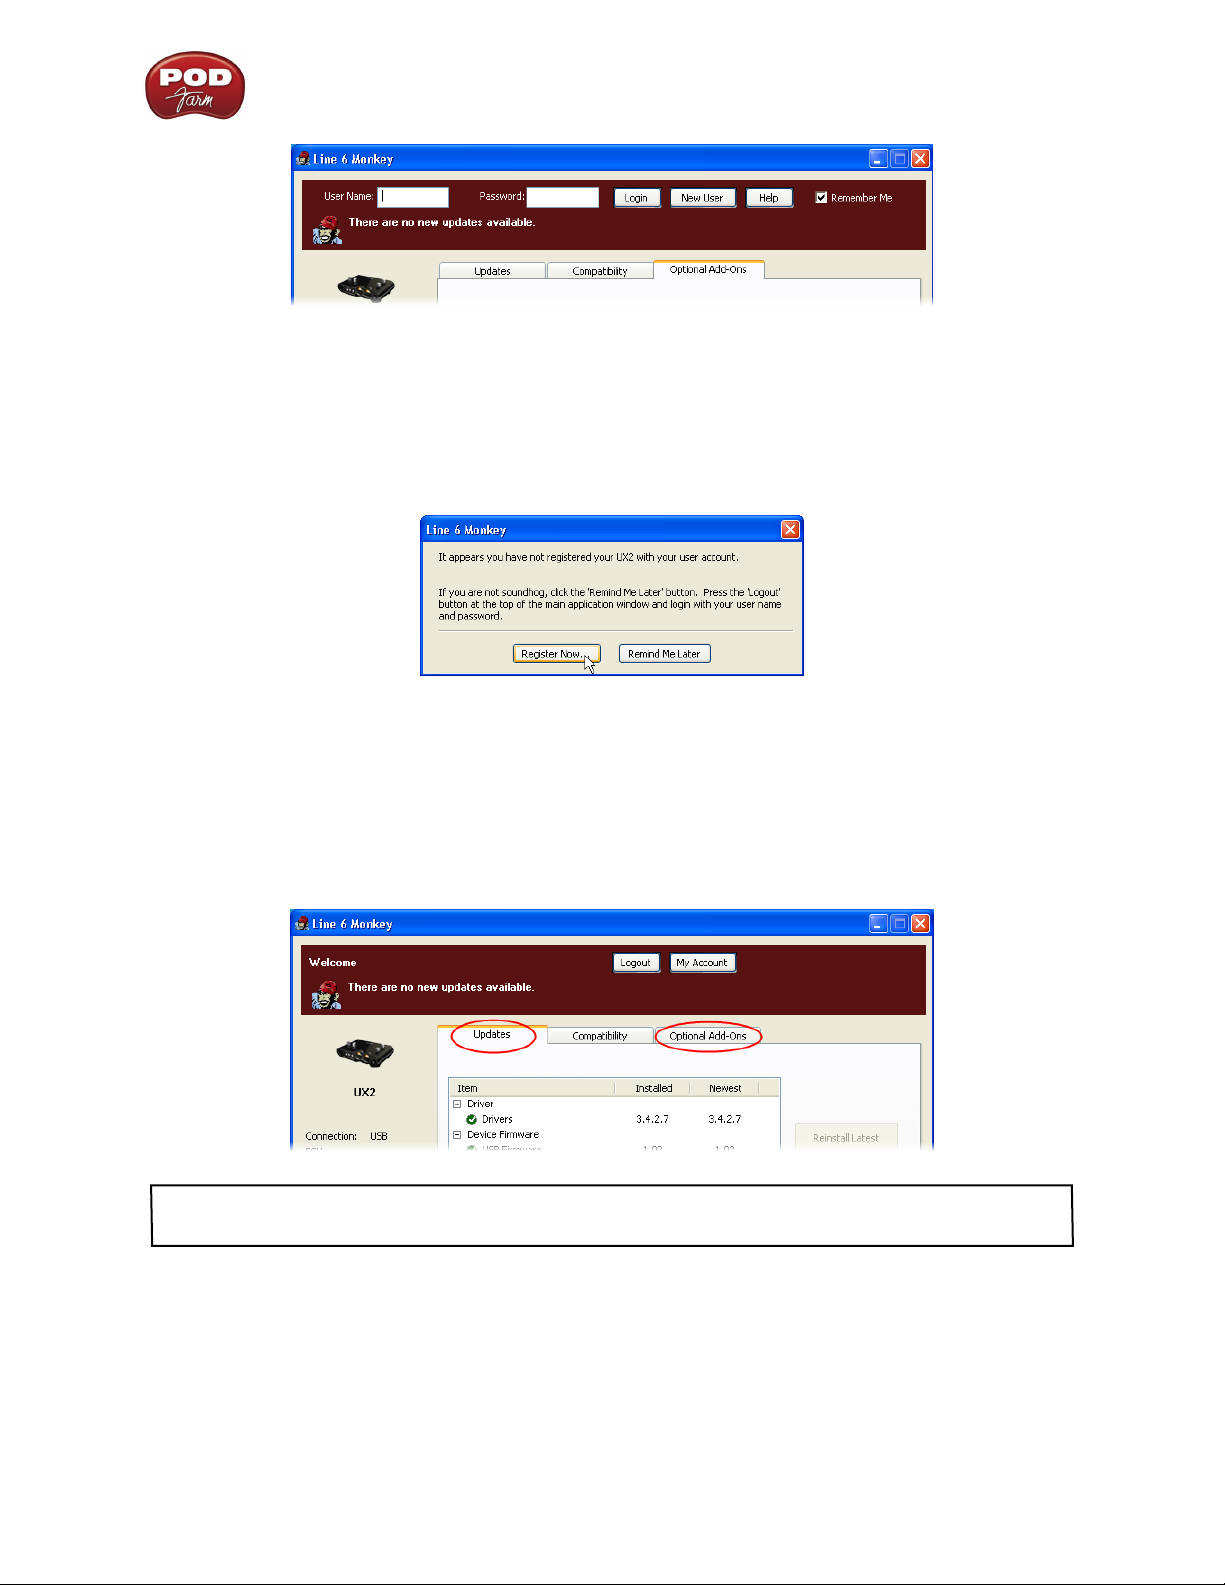
Login Account
You’ll need to Login so that Line 6 Monkey can communicate with the online Line 6 Server and
provide you with exactly what you need. It’s just a few clicks, and it’s free!
If you have a Line 6 account, then type in your User Name and Password at the top of the •
Monkey dialog.
If you have not yet created an account, click the New User button and you’ll be walked right •
through the steps.
1•2
Page 6
Line 6 POD Farm 1.01 – Start Here
Register Your Hardware
If you have not already done so, you’ll be prompted to Register your connected Line 6 hardware. It’s a
painless process really, so click that Register Now button and fill in the blanks on the Web page. This
page will list all your registered Line 6 gear in one place.
Grab Those Updates
Go to the Updates tab in Line 6 Monkey. If you see any items where a newer, updated version is
available, then you should click on that item and let the little monkey fellow walk you through the
installation steps. This is the easiest way to stay current on the latest POD Farm software updates, as
well as drivers and firmware updates. You can check the Optional Add-Ons* tab to see what other
goodies might be available for your specific Line 6 device too.
*Note - Some Line 6 hardware models already include the POD Farm Plug-In, and/or other Add-Ons for
free. You’ll need to “activate” these items by running Line 6 Monkey - see the following section.
Purchasing POD Farm Plug-In
POD Farm Plug-In is of course already included with the new POD Studio hardware. But if you own a
Line 6 TonePort, GuitarPort, POD X3 or PODxt device, then you can purchase the POD Farm Plug-In
as an Add-On. Just click on the Optional Add-Ons tab in Line 6 Monkey, select POD Farm Plug-In,
then click on Purchase Add-Ons.
1•3
Page 7
Line 6 POD Farm 1.01 – Start Here
You will be taken to the Line 6 Store, where you can purchase a license for the plug-in. Follow the
instructions on the resulting page to receive your activation key. Or, just head on over to the Line 6
site any time and see what is “in Store” for you.
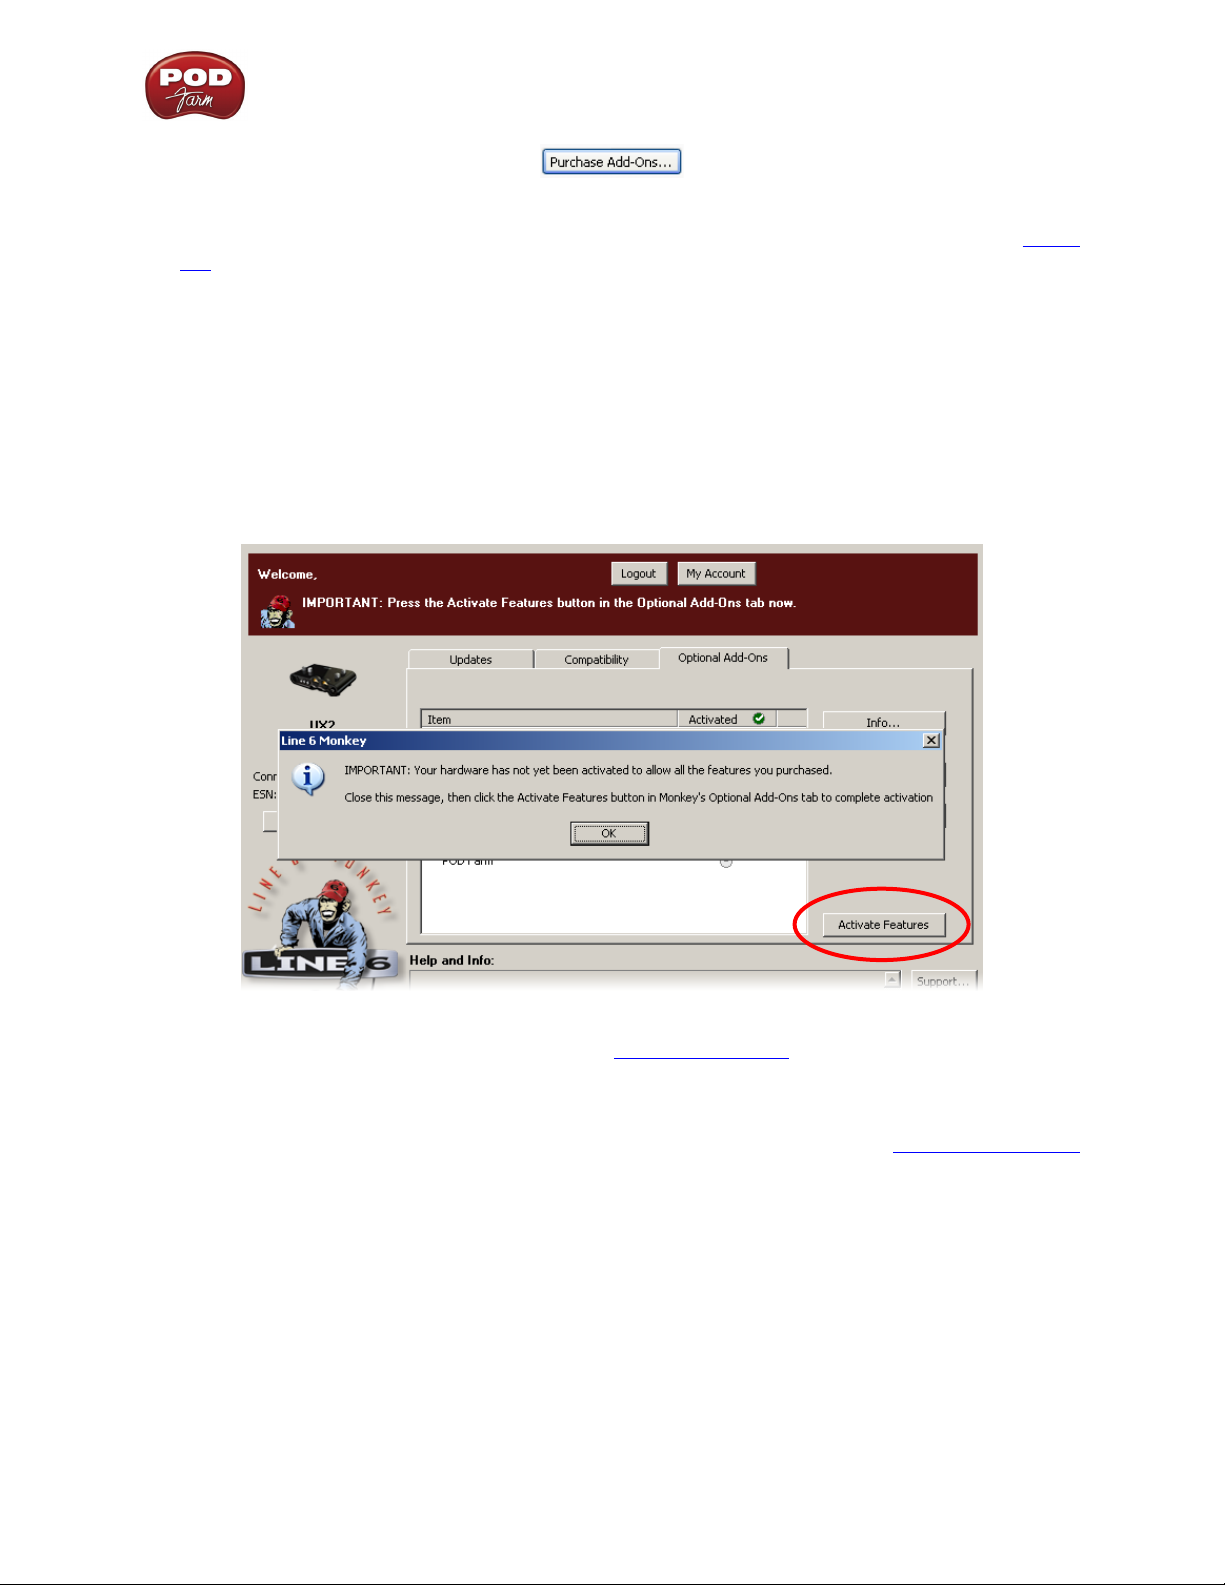
Product Activation & Authorization
Some features of POD Farm and your Line 6 hardware require “Activation” using Line 6 Monkey and
a live Internet connection. As mentioned above, POD Studio and some other Line 6 devices include
one or more Add-Ons already “installed” on the hardware device itself. When you connect your Line
6 device and launch Line 6 Monkey for the first time, if you are prompted to press the “Activate
Features” button, then go ahead and do so to activate the included Add-On(s).
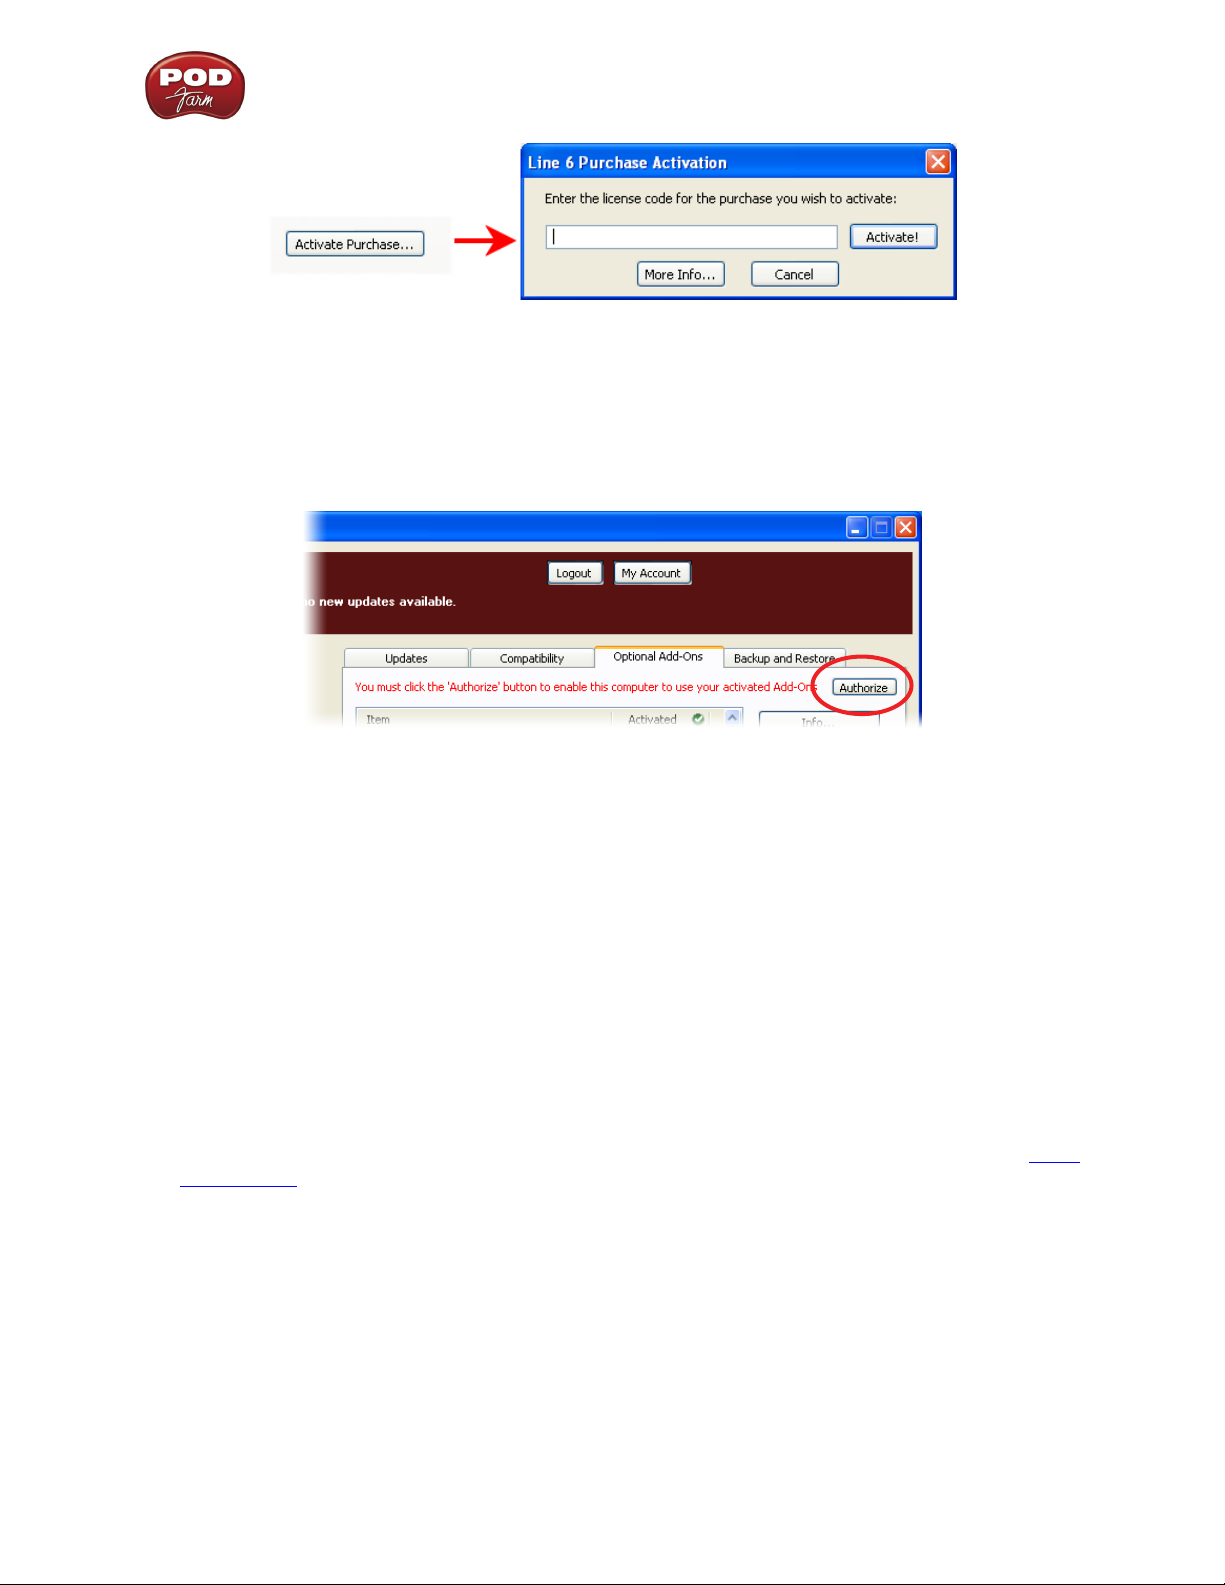
If you’ve purchased additional Add-Ons from the Line 6 Online Store - these also need to be activated.
You will have received a License Key for each Add-On purchase. To activate purchased Add-ons,
launch Line 6 Monkey, go to the Optional Add-Ons tab, and then follow these steps...
You can find all Add-On license keys you’ve purchased by logging into the • Line 6 - My Account
online page, and looking in the License Keys page.
Copy the numerical License key code that appears on this page.•
Go back to the Line 6 Monkey screen and click on the • Activate Purchase button. A window
will pop up, prompting you to enter the activation key you just received.
1•4
Page 8
Line 6 POD Farm 1.01 – Start Here
Activation turns the Add-On features “on” in your POD Farm-compatible hardware, so they can •
operate in the POD Farm stand-alone application and/or POD Farm Plug-in.
When using your Line 6 USB hardware on a new computer for the first time, you may also see the
following message at the top of the Add-Ons tab - just click the Authorize button to finish configuring
your computer to use your new hardware and Add-Ons.
Just remember that for POD Farm Plug-in operation, your Line 6 hardware must always be connected
via USB (even if you’re using a 3rd-party interface). You don’t necessarily need to be using your Line
6 hardware as your active USB audio device - it just needs to be USB-connected (and powered on for
units that have a power switch).
Transferring Activations
So, you’ve just upgraded your computer to the latest and greatest (this week anyway…) model, and
want to move POD Farm and your Add-Ons to your new system? In this section, we’ll explain how to
make the transfer process as easy as A-B-C, whether the new computer can connect to the Internet
or not.
The destination computer has an Internet connection
This is the easiest scenario: Download and install the POD Farm application (always available at line6.
com/software). This will also install the necessary drivers for your hardware and the Line 6 Monkey
application.
POD Farm Plug-in doesn’t work!!! Where are my Model Packs??? Relax – Your Add-Ons (Model
Packs, Plug-in, etc…) are tied-in to your hardware’s, built-in Electronic Serial Number (ESN), but also
need to be authorized with each new computer you’ll be using POD Farm on. In other words, they work
but just haven’t been enabled on the new computer yet.
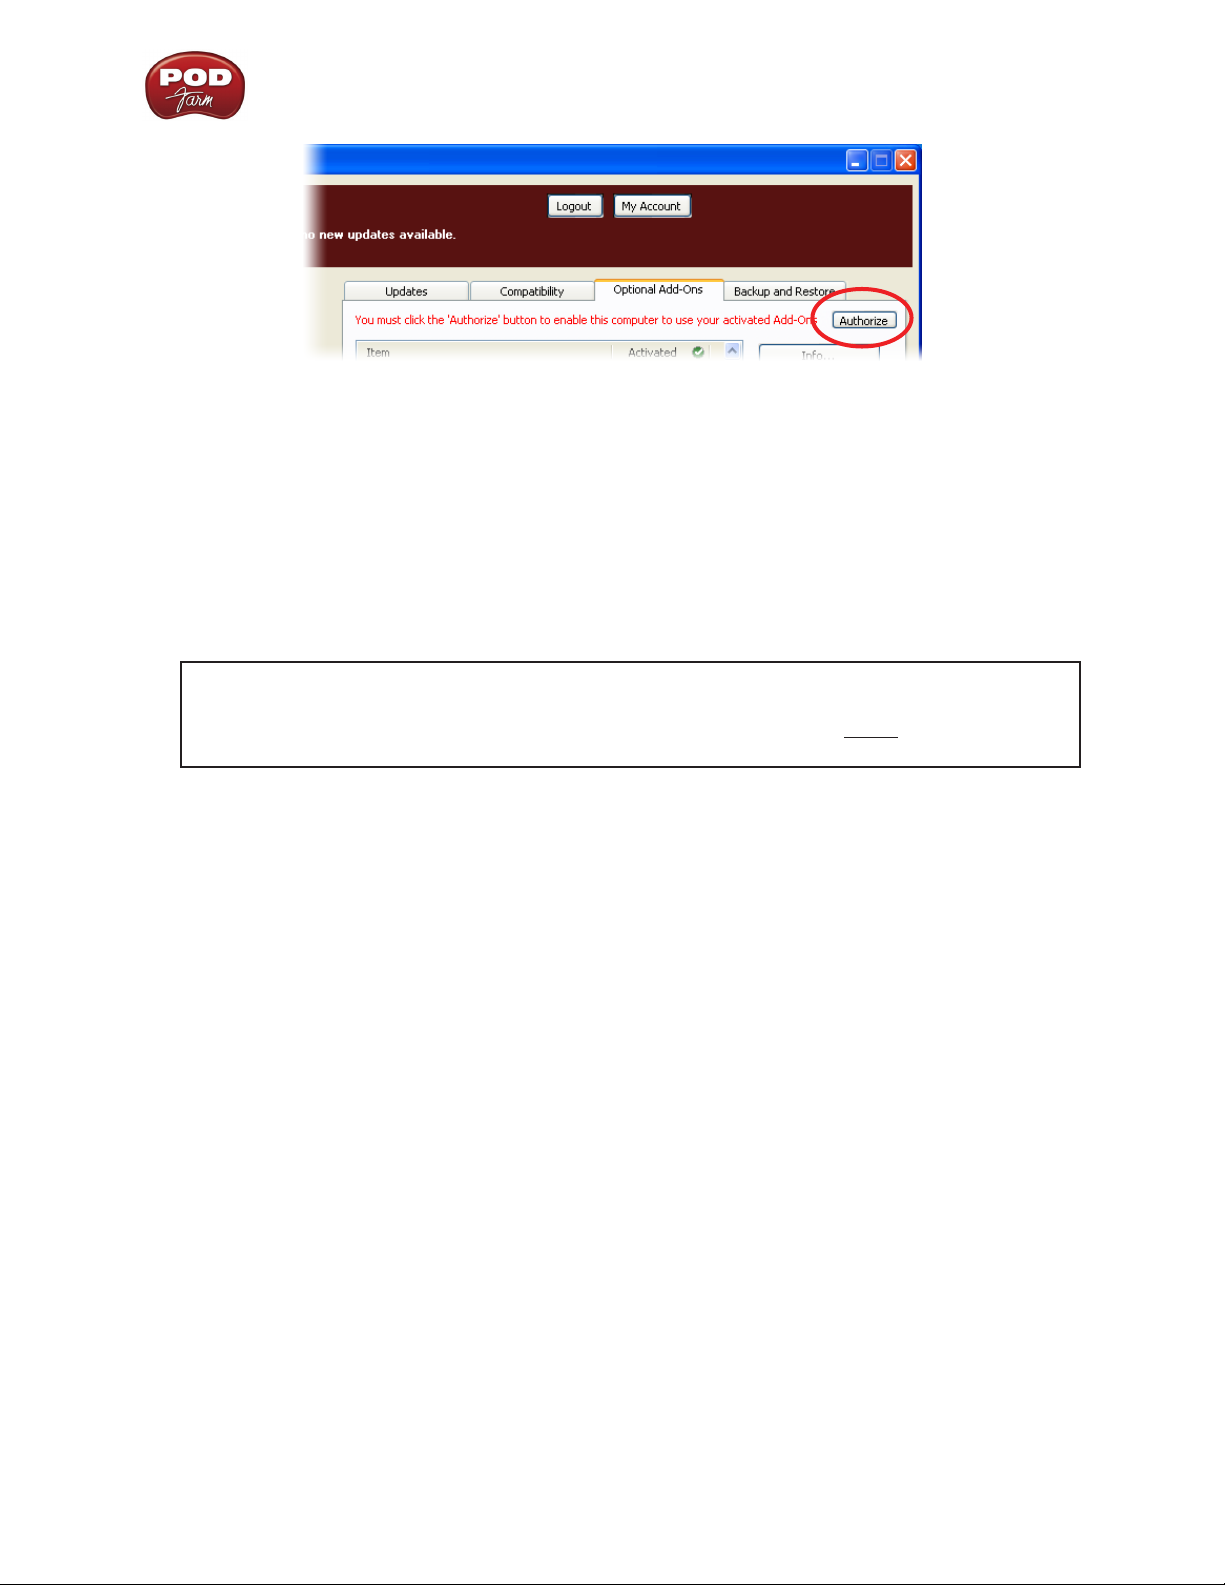
Launch Line 6 Monkey. The Monkey utility will connect to the server and scan your hardware for any
activated Add-ons, and if it finds any, will display the following message in red text:
1•5
Page 9
Line 6 POD Farm 1.01 – Start Here
Just click Authorize, and Monkey will enable the use of your activated Add-On(s) on the new
computer system.
The destination computer lacks an Internet connection
So you just got the call from Mr. Big Time Producer for a session at so-and-so’s studio, and you want
to bring all this great Line 6 tone along for tracking – but their computer does not connect to the
Internet. You can still move your POD Farm activation to their recording environment by following
these steps:
Prerequisite - This may seem obvious but we’ll mention it anyway: Your hardware and all POD
Farm software and Add-ons must already be activated and authorized on your own computer
(meaning, an Internet connection is required and has been used for the initial activation of your
POD Farm assets).
On your computer:
Locate and copy all • .aet files to removable media (burn to a CD, copy to a Flash drive, etc…).
In Windows® environments, these files can be found in the C:\Document_and_Settings\
(username)\Application Data\Line 6\GuitarPort folder; on Mac®, look in /Users/(username)/
Library/Application Support/Line 6/GuitarPort.
Copy the POD Farm installer to removable media, since the destination computer will not be •
able to download it.
On the destination computer:
Install the POD Farm software. •
Copy the • .aet files from your removable media into the correct folder (described above). You
may have to create this folder manually if it isn’t present on your destination computer.
You’re done! You should now be able to launch the POD Farm application with all Add-Ons
enabled.
POD Farm Plug-In for iLok
POD Farm Plug-In is a protected software and requires an authorized license to run on your computer.
The POD Farm Plug-In license comes with, or can be added to, all the Line 6 USB audio interfaces,
as discussed in the Line 6 Monkey and Hardware sections of this User Guide. And now, Line 6 also
offers the POD Farm Plug-In license to be purchased specifically for your iLok USB “smart key”! If
1•6
Page 10

Line 6 POD Farm 1.01 – Start Here
you don’t already have an iLok key, you can purchase one at most store where audio software is sold,
or directly from iLok.com. To follow are the steps for purchasing and configuring POD Farm Plug-In
and your iLok.
What is an iLok?
The iLok key is a proprietary USB hardware dongle that holds licenses for software protected by PACE
Anti-Piracy’s Interlok® system.
The iLok USB Key
If you own an iLok and purchase the POD Farm Plug-In for iLok, you can use the iLok USB key to
store your POD Farm Plug-In license, as well as any other Mac® and Windows® iLok-enabled software
licenses, all on the one iLok USB key. The iLok is portable and allows you to run POD Farm Plug-In
on any computer. It is also easy to manage all your iLok software licenses with iLok.com - where you
can set up a secure account, view all licenses on your iLok key, take delivery of new licenses, and even
move them between multiple iLok keys!
Create an iLok Account
If you’ve just purchased a new iLok, your first step is to go to the iLok.com site to set up an account.
Note that it is important you set up only ONE account, even if you own multiple iLok keys! Create
your account here. If you already have an iLok account, then you’ll use it for the following steps.
Next, for a new iLok USB key, you’ll need to download the iLok Client Software and the iLok Driver
and install them. There are a few different options here, depending if you want to manage your iLok
on the same computer as you plan on actually using POD Farm Plug-in on or not. Please see the steps
outlined on the iLok.com Help page for the complete instructions.
Purchasing POD Farm Plug-In for iLok
If you don’t already have one, create a Line 6 account now. It is free and is necessary for activating
and retrieving your POD Farm Plug-In license. To create your account, go here.
To purchase the POD Farm Plug-In license for iLok, you can go the Line 6 Online Store and select
the iLok hardware option, or visit your favorite music gear retailer and pick up the boxed version.
(Note that the iLok USB software key is sold separately, and not part of the Line 6 POD Farm Plug-In
purchase). There are a few options for the purchase of POD Farm Plug-In for iLok...
POD Farm• - Includes the same great set of guitar & bass amps, mic preamps and effects that
come with our POD Studio devices.
POD Farm Platinum• - Includes all the models of the POD Farm product, and additionally
includes all the optional Model Pack Add-Ons we make!
POD Farm Platinum Upgrade• - For owners of the POD Farm iLok version that want to step up
to the Platinum, you can purchase this upgrade.
All POD Farm Plug-In versions include RTAS/VST/AU support for Mac® and RTAS/VST support for
Windows®. See the info on the Online Store pages for more details.
1•7
Page 11
Line 6 POD Farm 1.01 – Start Here
If you’ve purchased the POD Farm iLok license from the Line 6 Online Store, please skip ahead to
the following iLok Deposit section, since your purchase does not require the “Activation” steps.
Note: You can perform the following Online Purchase, Activation and iLok licensing processes on any
computer that has Internet access - These steps do not necessarily need to be performed on the computer
on which you plan to use POD Farm Plug-In.
Product Activation (Retail boxed version only)
For your purchase of the boxed POD Farm license for iLok, you’ll find an Activation Code printed
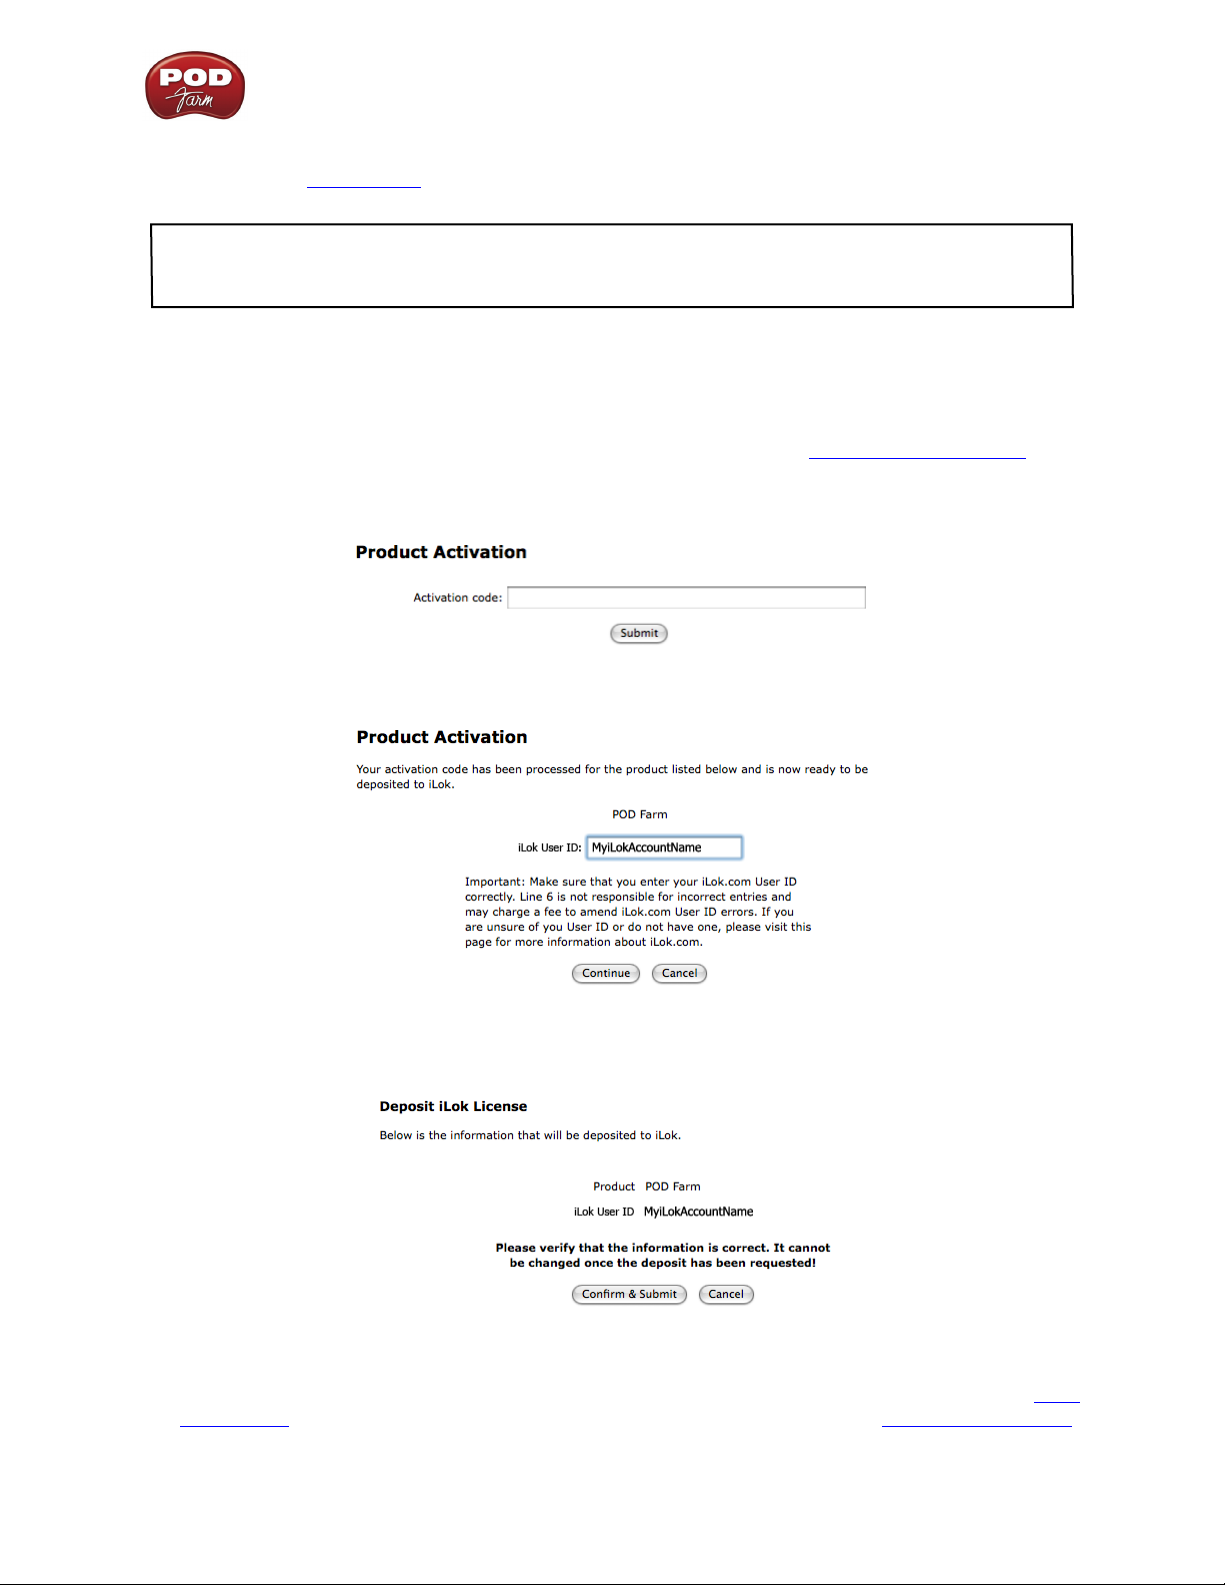
on a card within the box. With this card in hand, go to the Line 6 Online iLok Activation page,
read through the steps in the Product Activation section, and enter your Activation Code and click
Submit:
Next you’ll be prompted for the iLok User ID for your iLok.com account...
Enter your iLok User ID - This is the Username you use to login to your account at iLok.com. Type
it in and click Continue.
Next you are prompted to verify that your iLok User ID is entered correctly - Please be sure it is to
avoid the added task of contacting iLok to fix it! Click Confirm & Submit if all is correct. Once the
process completes, a POD Farm license is “Deposited” in your iLok.com account. Proceed to the iLok.
com website to download the license to your iLok USB key. Please skip to the iLok License section.
1•8
Page 12

Line 6 POD Farm 1.01 – Start Here
iLok Deposit (Line 6 Online Store purchase)
If you’ve purchased POD Farm Plug-In for iLok directly from the Line 6 Online Store... Once your
transaction is complete, log into your Line6.com account and go to the iLok Deposits page. Here you
can check the Status of your iLok License.
Initially, following your Online Store transaction, you should see the Status listed here as “inserted”,
as shown above. Click the Deposit button to proceed.
Next you are prompted to enter your iLok User ID - This is the Username you use to login to your
account at iLok.com. Type it in and click Continue.
You are then asked to verify the iLok User ID is entered correctly - Please be sure it is to avoid the
added task of contacting iLok to fix it! Click Confirm & Submit if all is correct. You should next see
confirmation that your iLok Deposit was successful and your license sent to iLok.com. Head on over
to the iLok.com website and log into your account there to download your license. If any error was
encountered, you can return to the iLok Deposits page and repeat the process.
iLok License
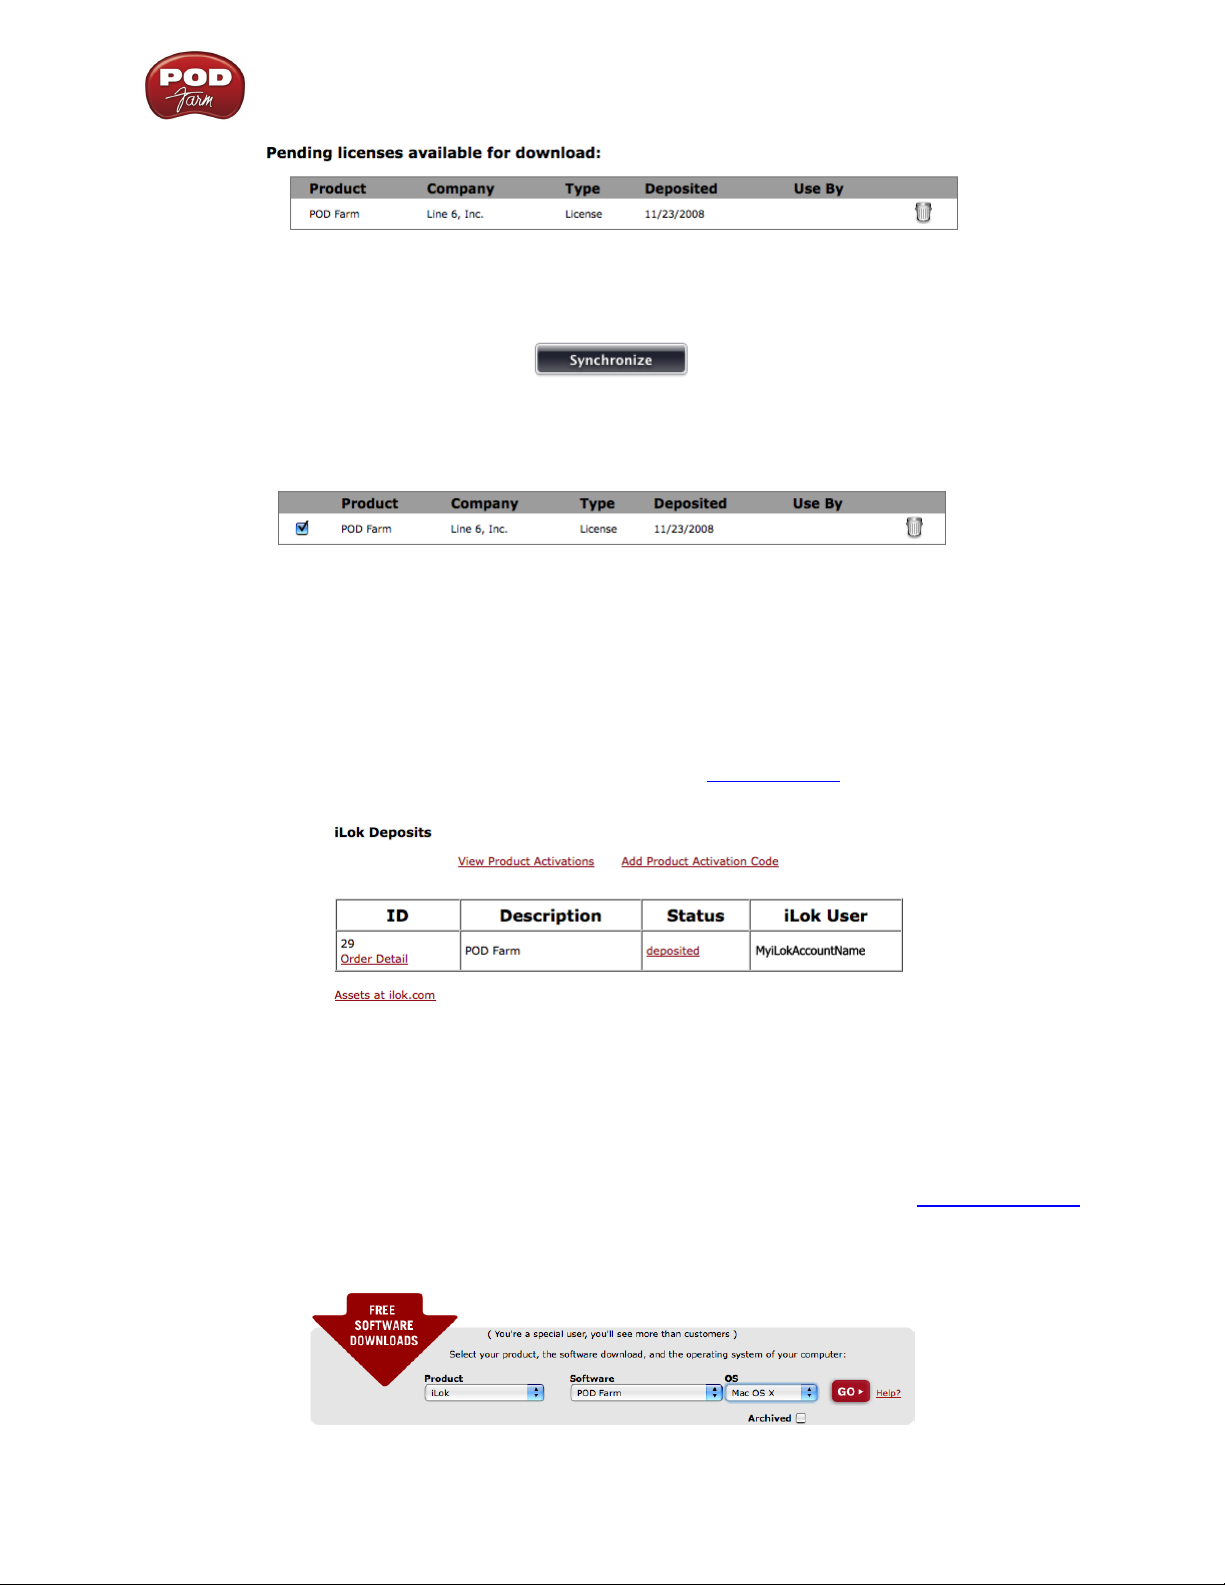
Once logged in to your iLok.com account, you should find your “pending” POD Farm license waiting
for you in the Download Licenses section.
1•9
Page 13
Line 6 POD Farm 1.01 – Start Here
Connect your iLok to your USB port and follow the instructions on the iLok site to Synchronize your
iLok key.
Allow the Synchronize process to complete, and you’ll then be able to select your POD Farm license
for download.
Follow the steps listed on the iLok.com page to Download the POD Farm License to your iLok key...
And you’re done! Now that your iLok USB key is all configured, you can log out and exit the iLok
web site. Your next step is to download the POD Farm application installer and run it on any Mac®
or Windows® computer where you want to run POD Farm Plug-In! Remember, you need to have the
iLok key connected to the computer for POD Farm Plug-In to run in its “authorized” state within your
host software.
In the event that your POD Farm license does not appear on your iLok.com account, you can check
the status of the deposit on the iLok Deposits page of your Line 6 account.
Note that the Status may initially appear as “queued” for a short time until accepted by iLok.com
for processing. Once it appears as “deposited”, as shown above, then this means your new POD Farm
license asset has been sent to your iLok.com account.
Download and POD Farm Application Installer
We always have the latest POD Farm installer available for free download on the Line 6 Downloads
page. On the Downloads page, select “iLok” as the Product, “POD Farm” as the Software, and then
select your computer’s Operating System (Mac® OS X, Windows® XP® or Vista®), as shown here:
1•10
Page 14
Line 6 POD Farm 1.01 – Start Here
Then press the “Go” button and the correct installer will be displayed for your system so that you can
download it to your computer. Once the download of the installer file completes, run the installer file
following its step-by-step instructions.
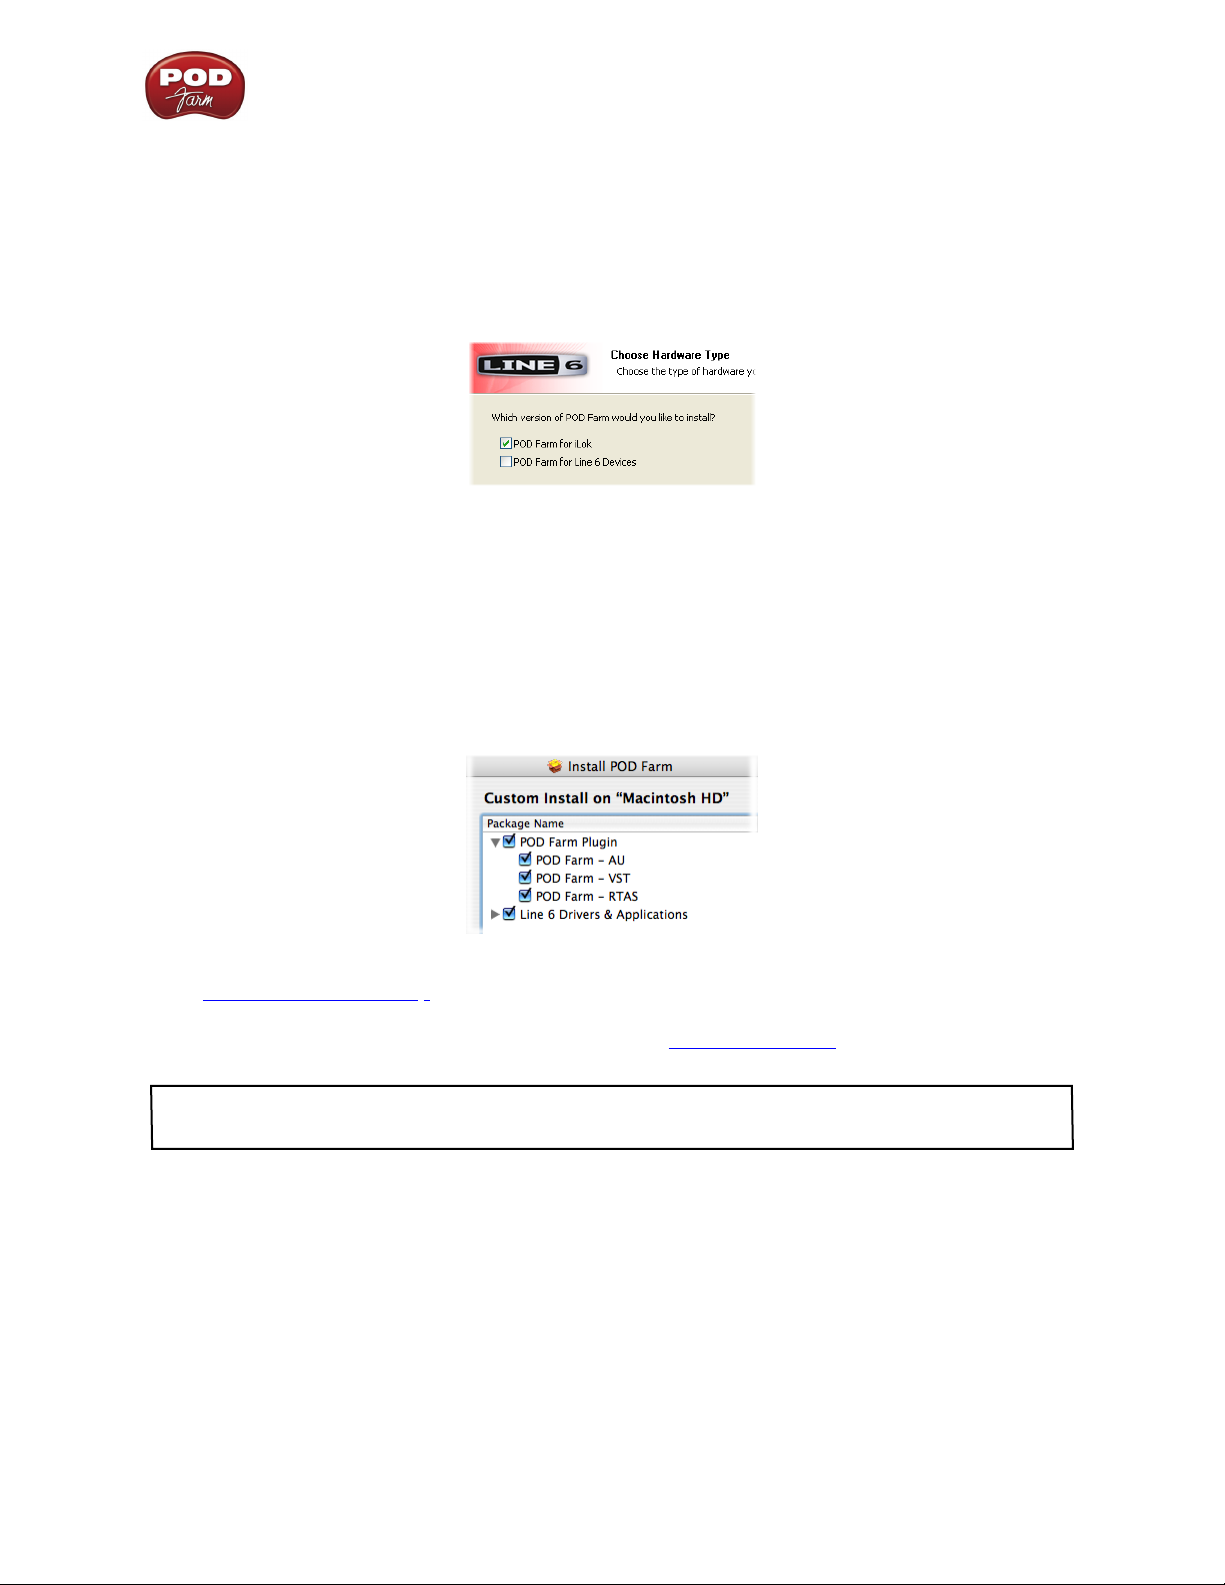
Windows® XP® and Vista® users... When you see the Choose Hardware Type screen during the
POD Farm installation, be sure to check the box for “POD Farm iLok”, as shown here:
If you are also going to be using any Line 6 USB audio device (POD Studio, TonePort, POD X3,
PODxt or GuitarPort) then you’ll want to check the “POD Farm for Line 6 Devices” box as well.
Mac® Users... The POD Farm installer’s default settings will install the necessary files for your
iLok, as well as the audio drivers for any Line 6 USB audio devices automatically. If desired, you
can uncheck any individual POD Farm Plug-In formats and/or Line 6 Device Drivers that you may
not need. But you will need to install at least one POD Farm Plug-In format supported by your host
audio software so that you will be able to use POD Farm Plug-In with your iLok:
For further assistance with POD Farm installation, check out the Installer Guide document available
at POD Farm Online Help. With the above steps completed, you’ll be able to access and utilize POD
Farm Plug-In in your host audio software! You are, of course, free to use any audio type of audio
interface with your DAW configuration. Please see the POD Farm Plug-In chapter for more info.
Note that POD Farm cannot be run in Standalone Operation with the iLok alone, since this requires the
use of a Line 6 POD Studio, TonePort or GuitarPort USB audio interface.
1•11
Page 15

POD Farm 1.01 – Using Your Line 6 Hardware
US i n g Y o U r Li n e 6 Ha r d w a r e
The POD Farm software is designed to work with the new Line 6 POD Studio family of USB audio
interfaces. Additionally, a POD Farm Plug-In license can purchased for an iLok USB “smart key”. POD
Farm also supports all Line 6 TonePort (models GX, UX1, UX2, UX8, D.I. & KB37) and GuitarPort
USB devices. All Line 6 POD X3 and PODxt family devices can be used with the POD Farm Plug-
In Add-On as well! This chapter includes details on using POD Farm with all Line 6 USB hardware.
Please be sure to see the additional documentation on the POD Farm Online Help site.
All Line 6 USB audio interfaces utilize the high-performance Line 6 Audio & MIDI drivers, and
therefore, are easily configured to work as your computer’s sound card. This means that you can access
all your POD Tones directly from most any audio recording application, all at the highest quality! But
you are of course not just limited to using your Line 6 hardware to record into your computer – the
outputs provided on the back of your device additionally allow you to feed your POD Farm signal to
external tape machines, DAT recorders, PA systems, or any other external audio hardware!
If you are using an iLok USB smart key to run POD Farm Plug-In, then you are, of course, free to use
any audio interface with your computer and audio software. Once you have your POD Farm license
successfully added to your iLok key, just keep the iLok in your USB port and you can skip ahead to the
POD Farm Plug-In chapter.
Making the Connection
You do need to connect your Line 6 hardware to your computer via a USB cable to utilize POD Farm,
POD Farm Plug-In and/or to use your Line 6 hardware as your computer’s sound card device. Note
that you should always connect to a separate USB controller channel from other USB audio or MIDI
interfaces to provide your device with the full USB bandwidth. You should also always connect directly
to a USB 1.1 or 2.0 USB port on your computer and not into a USB hub.
Note - Be sure to always power off or mute your speakers or monitoring setup before connecting and
disconnecting the USB cable between your Line 6 device and computer, as well as before booting up or
shutting down your computer if the device is already connected. The best practice is to always power on
your speakers last, and power them off first when connected to other audio gear to avoid a “pop” which
could be damaging to your speakers (or to your ears!)
There are some differences in the setup and functionality between the supported Line 6 devices, so
be sure to look for the instructions in the following sections for your specific device. Primarily, POD
Studio, TonePort and GuitarPort devices function quite similarly since all the Digital Signal Processing
(DSP) is performed on your computer when using these units. POD X3 & PODxt devices do all their
DSP magic inside the POD hardware itself. Use the handy links here to jump directly to the section
covering your Line 6 device...
GX
UX1
UX2
TonePort UX8
TonePort KB37
TonePort DI
GuitarPort
POD X3 Family Devices
PODxt Family Devices
2•1
Page 16

POD Farm 1.01 – Using Your Line 6 Hardware
GX (POD Studio & TonePort)
Connect your electric
Guitar or Bass
Instrument Input - To input your electric guitar or bass, plug it in here using a standard 1/4-inch TS
instrument cable. When in POD Farm Standalone operation, this inputs the signal into POD Farm,
where you can choose your Tone, and then route the processed signal both to the Record Sends (to
your audio software) and directly to the GX hardware outputs.
Connect your stereo
Headphones/Line Out Cable
Connect USB cable from here
to your computer
USB - This of course is where you connect the supplied USB cable to GX, with the other end going
to your computer’s USB 1.1 or 2.0 port.
Line Out/Phones - Connect here to either a monitoring system or stereo headphones, using an 1/8inch stereo cable. When connecting GX as an audio interface for your recording application, this line
out/headphone jack outputs the playback audio from your audio software on the computer, as well as
anything plugged into the Instrument input. If you ‘re using a 3rd-party audio interface, these outputs
supply the ToneDirect™ magic to your interface or mixer, when using POD Farm in Standalone
operation alongside the plug-in. See the ToneDirect™ Monitoring section for more details.
2•2
Page 17

POD Farm 1.01 – Using Your Line 6 Hardware
UX1 (POD Studio & TonePort)
Connect your electric guitar or bass
Connect a microphone
Mic - To input a signal from a microphone, connect it here using an XLR cable. When in POD Farm
Standalone operation, this inputs the microphone signal into POD Farm, where you can choose your
Tone, and then route the processed signal both to the Record Sends (to your audio software) and
directly to the UX1 hardware outputs.
Instrument Input - To input your electric guitar or bass, plug it in here using a standard 1/4-inch TS
instrument cable. When in POD Farm Standalone operation, this inputs the signal into POD Farm
where you can choose your tone, and then route the processed signal both to the Record Sends (to your
audio software) and directly to the UX1 hardware outputs.
Connect your stereo headphones
Phones - If you want to listen to the audio from UX1 using stereo headphones, then plug them into this
1/4-inch stereo jack. This headphone jack outputs the same signal fed to the Analog Outs on the rear
panel; the audio from your audio software, as well as anything plugged into any front panel input.
Connect any line level input
source for monitoring to the Stereo
Connect a USB cable from here to
your computer’s USB port
Connect the Analog Outs
to your audio monitors
Line Inputs - To record the signal from a line level source, such as a keyboard, your stereo receiver,
the line out from a mixing console, etc., connect to these Left and Right ins using 1/4-inch TS audio
cables.
Monitor In
Connect any line level input
source that you want to record
into the Line Inputs
2•3
Page 18
POD Farm 1.01 – Using Your Line 6 Hardware
Monitor In - If you want to hear the signal from a line level source along with all the other audio
coming from your computer, but do not want this audio recorded via the UX1 Record Sends, then plug
the source in here. Note that this is a stereo jack, so you should use a stereo, 1/4-inch TRS audio cable
for this connection.
USB - This of course is where you connect the supplied USB cable to UX1, with the other end going
to your computer’s USB 1.1 or 2.0 port.
Analog Outs - These Left and Right unbalanced jacks output all the audio from UX1; the audio from
your audio software on the computer, and anything plugged into any input. These are what you want to
connect to your powered speakers or monitoring system for a recording setup. Use 1/4-inch TS cables
to connect directly to powered speakers, mixer or power amp setup. Note that you can also use the
headphone jack on the front of UX1 if you want to use headphones for monitoring.
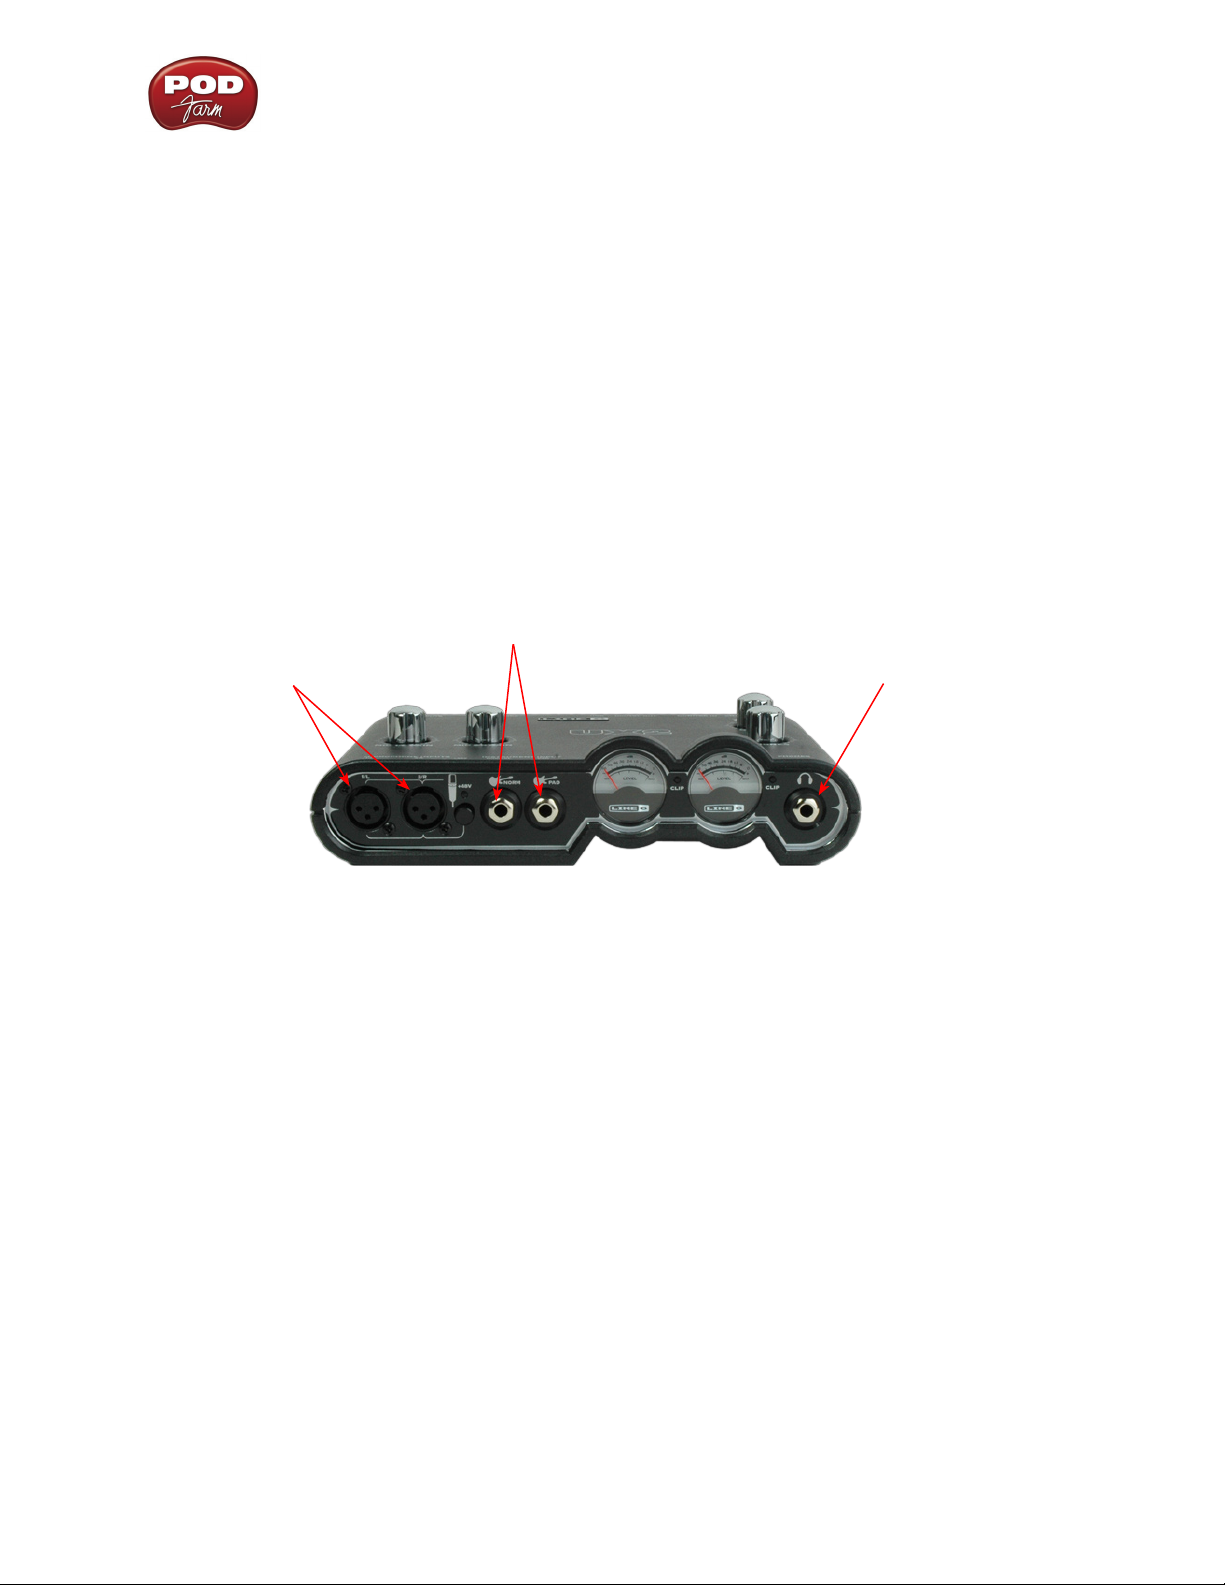
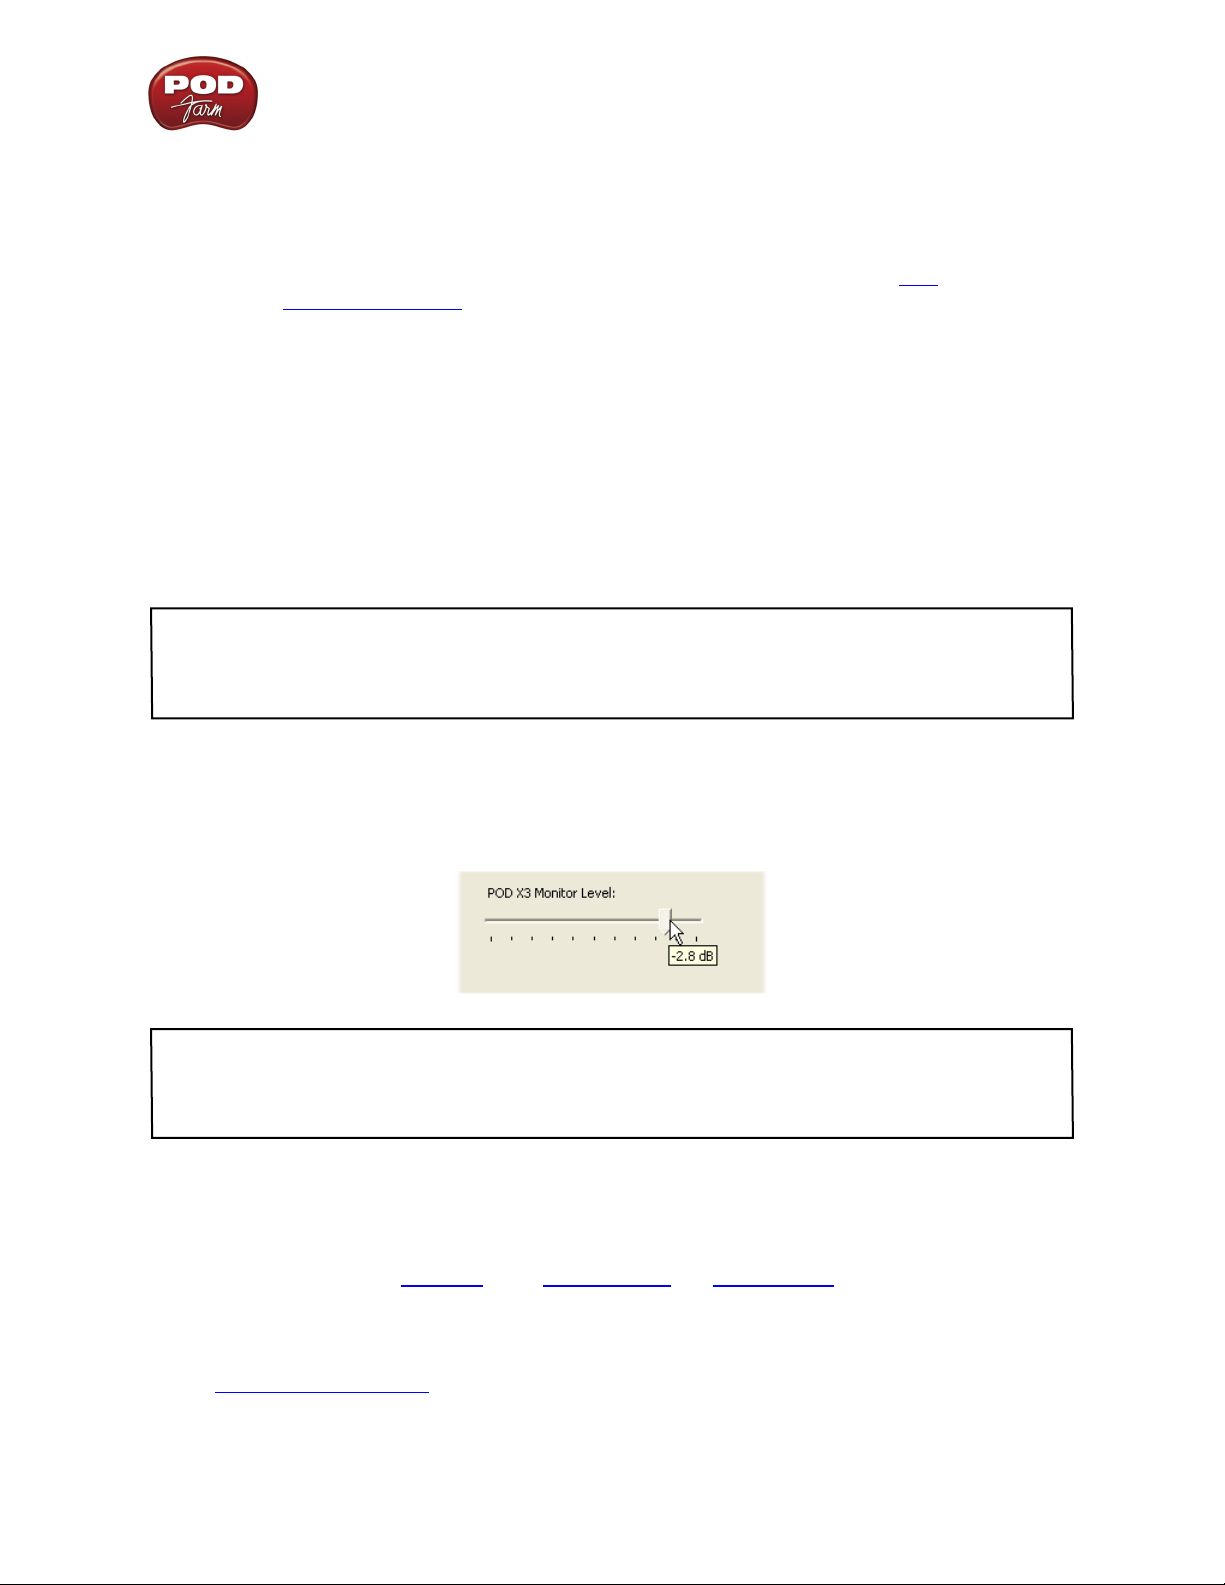
UX2 (POD Studio & TonePort)
Connect your electric Guitar or Bass
Connect up to two
Microphones
Connect your stereo
Headphones
Microphone Inputs - You can receive input from one or two mics at the same time using these ins.
There is also a +48V Phantom Power switch that you should set to “on” if your mic requires phantom
power (most condenser type mics do, but check the documentation for your mic if you are not sure).
Connect each mic using an XLR cable. When in POD Farm Standalone operation, this inputs each
microphone signal independently into POD Farm where you can choose your Tone, and then route the
processed signal to the Record Sends (to your audio software) and to the UX2 Analog Outs.
Instrument Inputs -To input your electric guitar or bass, plug it into one of these inputs. When in
POD Farm Standalone operation, either of these routes the instrument’s signal into POD Farm where
you can choose your tone, and then route the processed signal to the Record Sends (and to your audio
software) and to the UX2 Analog Outs. The difference between these two input jacks is:
Norm• – This input is for a standard instrument level output. Plug your guitar/bass into here using
a standard 1/4-inch TS instrument cable.
Pad • - This input is designed for high output level basses and guitars, especially those with active
pickups. Plug your high output instrument into here using a standard 1/4-inch TS instrument
cable.
Headphone - If you want to listen to the audio from UX2 using stereo headphones, then plug them
into this 1/4-inch stereo jack. This Headphone jack outputs the same signal fed to the Analog Outs on
the rear panel; the audio from your audio software, as well as anything plugged into any UX2 input.
2•4
Page 19

POD Farm 1.01 – Using Your Line 6 Hardware
Connect to the S/PDIF input of an
external device to send UX2’s output
digitally
Connect any line level input
source for monitoring to the
Stereo Monitor In
Connect the
Analog Outs
to your audio
monitors
Line Inputs - If you want to record the signal from a line level source, such as a keyboard, your stereo
receiver, the line out from a mixing console, etc., connect to these Left and Right ins using 1/4-inch
TS audio cables.
USB - This of course is where you connect the supplied USB cable to UX2, with the other end going
to your computer’s USB 1.1 or 2.0 port.
Connect your USB cable from
your computer’s USB port
Connect any line level
input source that you
want to record into the
Line Inputs
S/PDIF Digital Out - To send the output of UX2 to an external device digitally, connect a 75-Ohm
coaxial cable into this RCA jack and then into the S/PDIF digital input on the external device. This
is the best choice for connecting to digital recording devices, such as a DAT recorder, MiniDisc, etc.
This S/PDIF output sends the same audio as is sent to the Analog Outs (with the exception that any
audio coming into the Monitor In jack is not routed to the S/PDIF output). The digital signal is always
sent at 24-bit resolution.
Monitor In - If you want to hear the signal from a line level source mixed with all the other audio
coming from your computer, but do not want this audio recorded, then plug the source in here. Note
that this is a stereo jack, so you should use a stereo 1/4-inch TRS audio cable for this connection.
Analog Outs - These Left and Right unbalanced jacks output all the audio from UX2; the audio from
your DAW, and anything plugged into any input. These are what you want to connect to your powered
speakers or monitoring system for a recording setup. Use 1/4-inch TS cables to connect directly to
powered speakers, mixer or power amp setup. Note that you can also use the headphone jack on the
front of UX2 if you want to use headphones for monitoring.
2•5
Page 20
POD Farm 1.01 – Using Your Line 6 Hardware
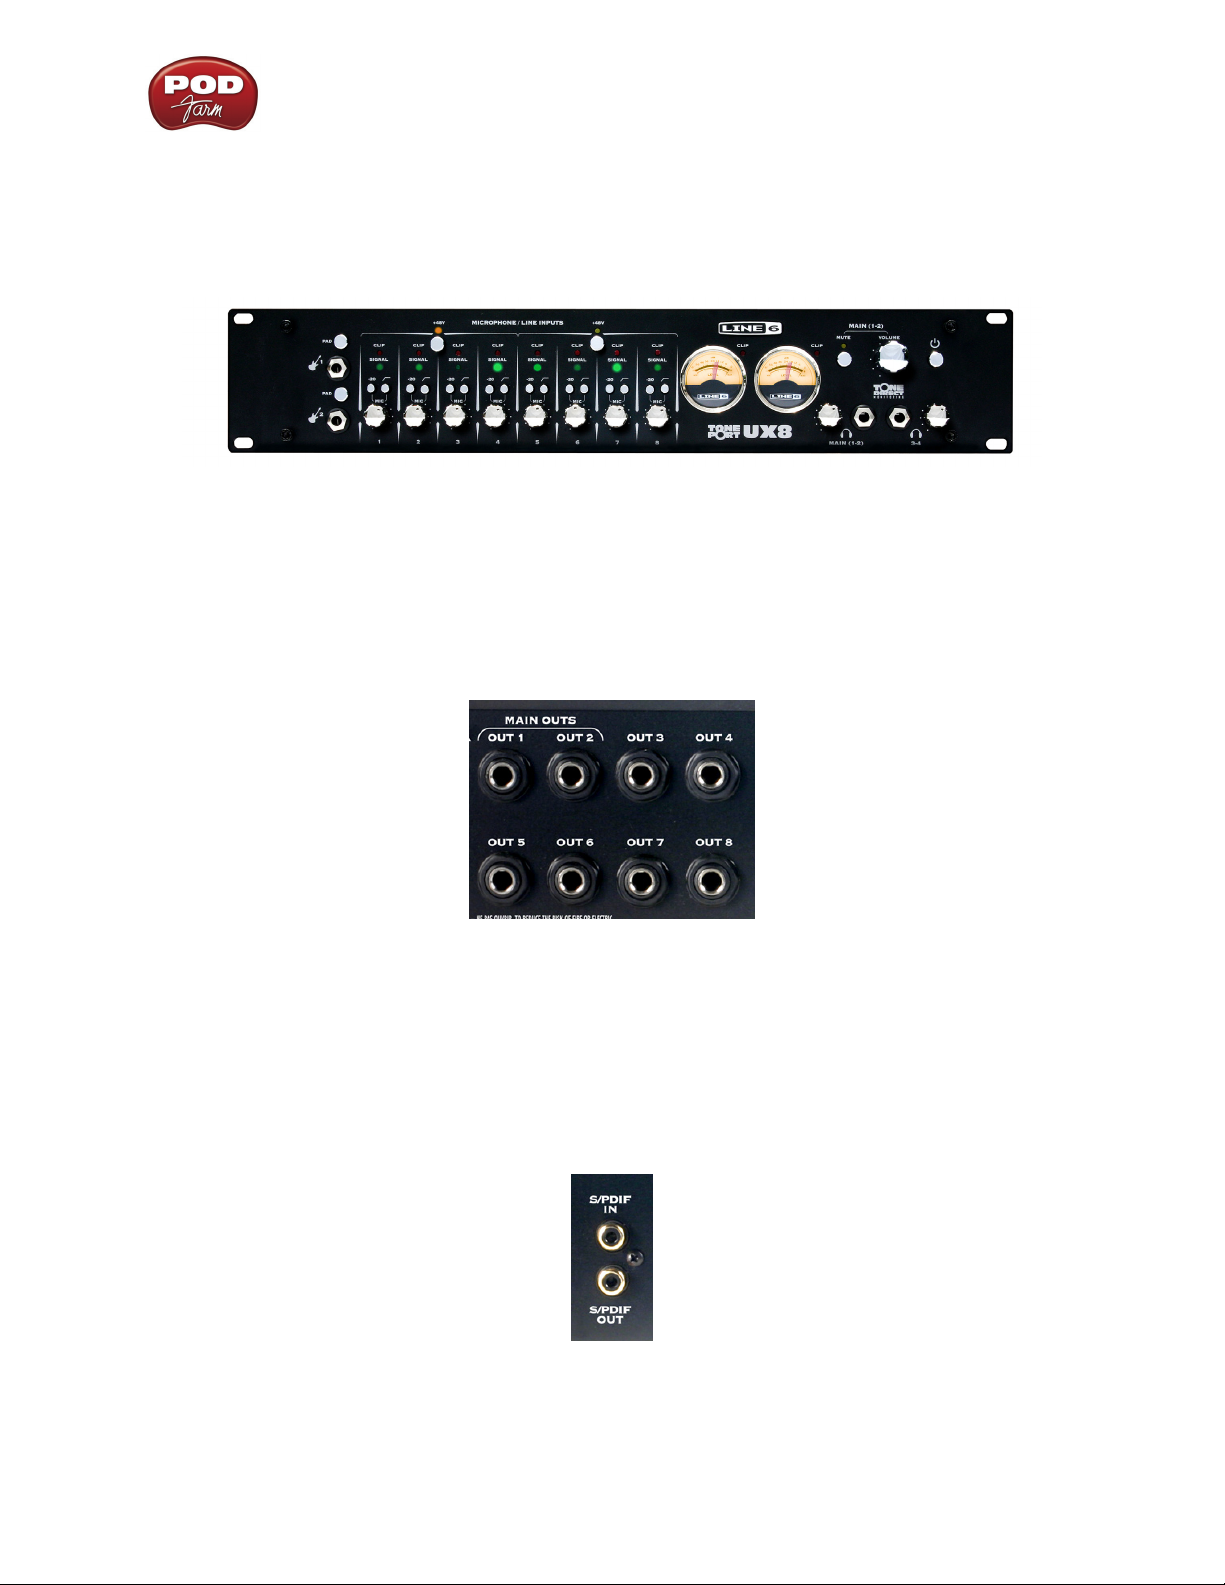
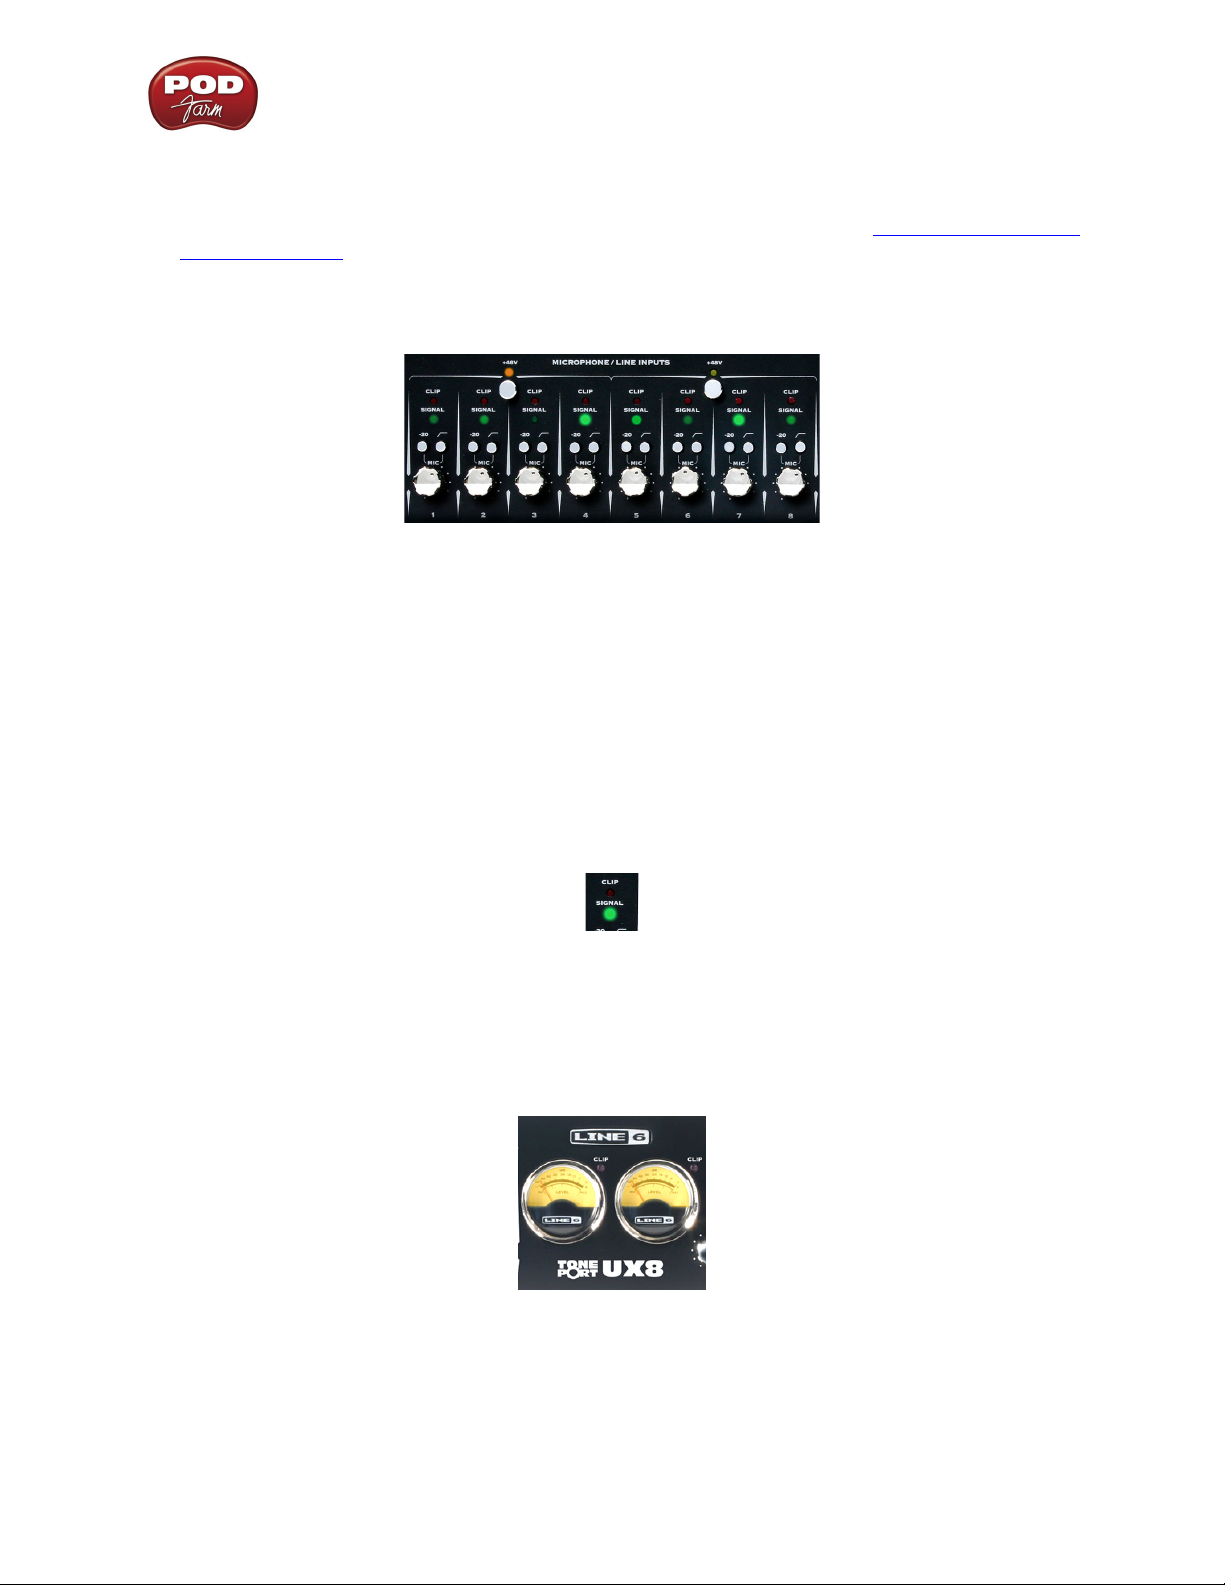
TonePort UX8
TonePort UX8 is a multichannel recording interface designed for professional use, offering plenty
of headroom, a wide dynamic range and an exceedingly low noise floor. Designed with high quality
electrical components and a rugged exterior, UX8 is built to provide many years of reliability.
UX8 can be used with the POD Farm Plug-In, providing all your DAW tracks with same POD quality
Tone trusted by scores of platinum-selling musicians and recording engineers!
Rear Panel Features
Balanced Outputs
UX8 provides 8 balanced analog outputs (4 stereo pairs). For the cleanest audio signal, use 1/4-inch
TRS cables to connect directly to your powered speakers, mixer or power amp setup.
Note that you can use each output pair to provide different monitor mixes for musicians during a
tracking session. You can set the input mix levels for each output pair using the Line 6 Audio-MIDI
Devices application.
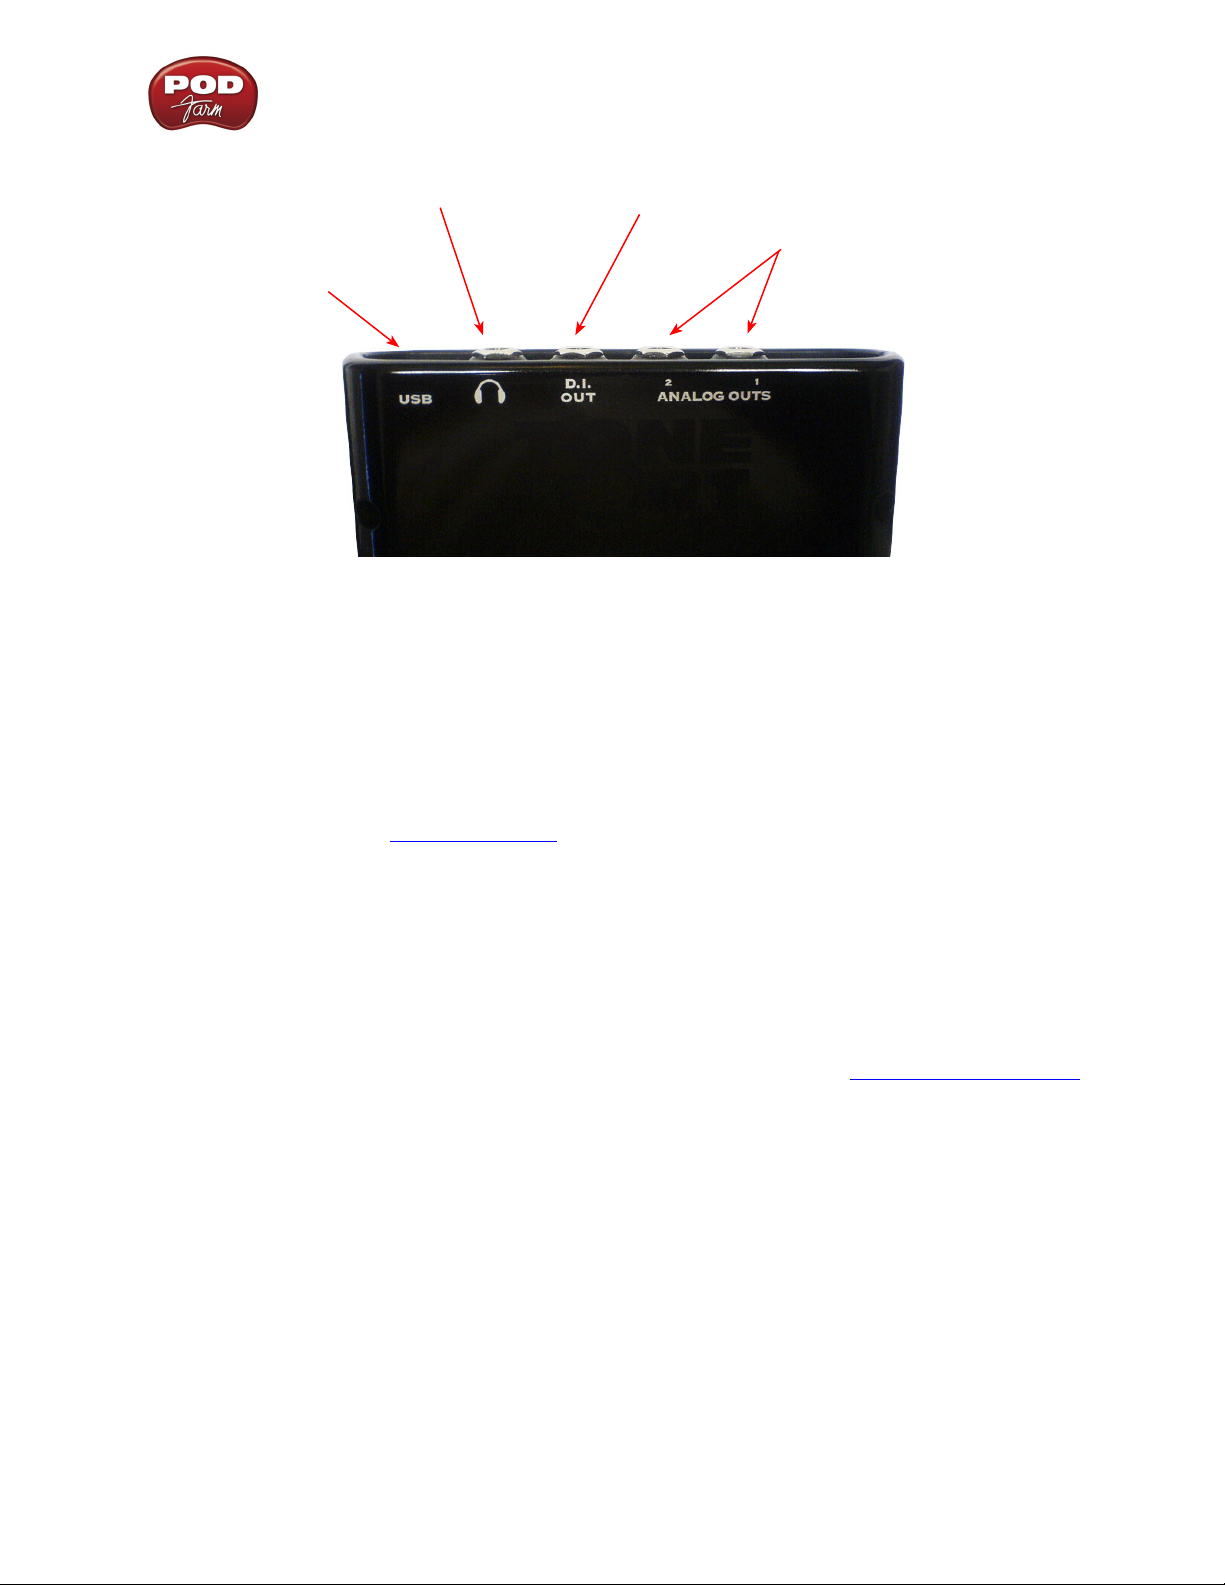
S/PDIF Digital Audio
To send or receive S/PDIF, connect a 75-Ohm coaxial cable to the UX8’s RCA jack and the external
S/PDIF device. This is the best choice for connecting to digital recording devices, such as a DAT
recorder, MiniDisc, etc. This S/PDIF output sends the same audio as Main Outs 1-2. The digital signal
2•6
Page 21
POD Farm 1.01 – Using Your Line 6 Hardware
is always received and sent at 24 bit. To sync to an external S/PDIF device, set the UX8 clock to sync
to S/PDIF in the Line 6 Audio-MIDI Devices application.
USB 2.0
This of course is where you connect a USB cable to UX8, with the other end going to one of your
computer’s USB 2.0 ports.
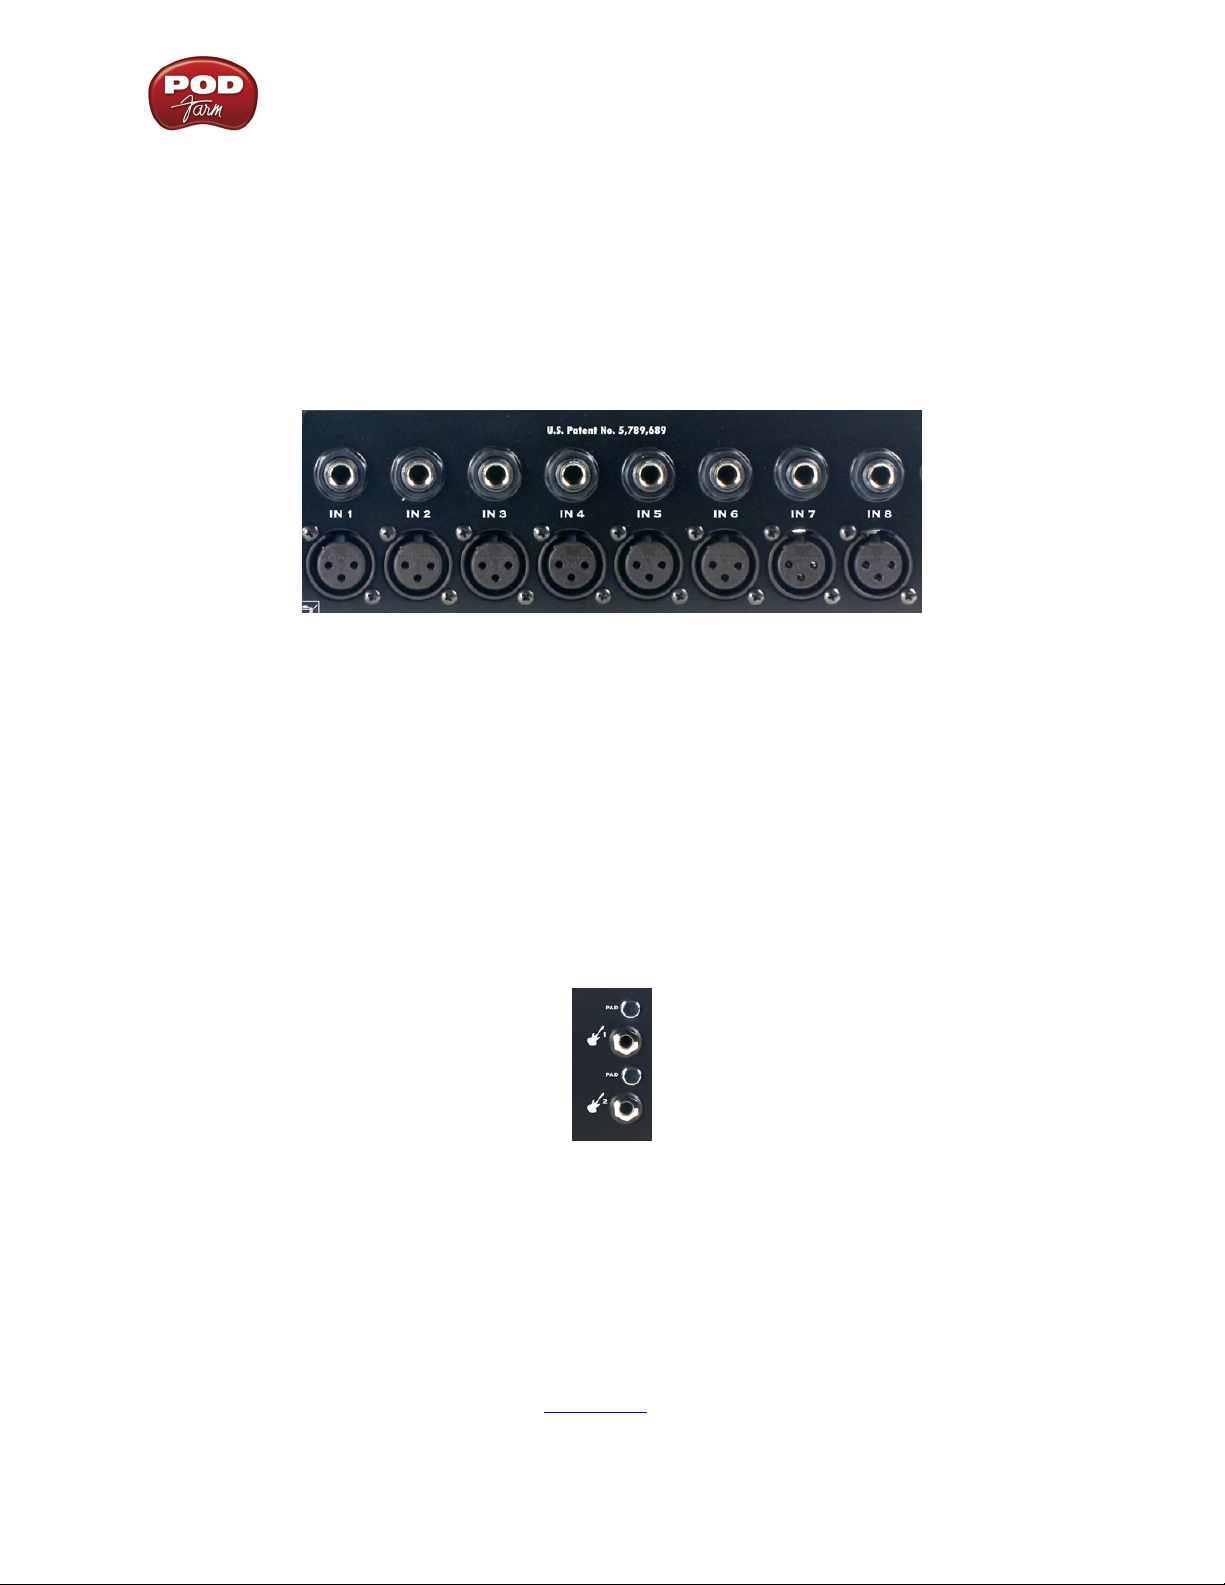
Line Level and XLR Inputs
8 unbalanced line level inputs are available for recording line level sources, such as a keyboard, stereo
receiver, the line out from a mixing console, etc. Connect to line level inputs using 1/4-inch TS audio
cables.
8 XLR preamp inputs are provided for balanced and mic input sources. +48v Phantom Power switches
are located on the front panel for mics requiring phantom power (most condenser type mics do, but
check the documentation for your mic if you are not sure). Connect to these inputs using XLR
cables.
Front Panel Features
Guitar/Bass Inputs
High-Z instrument inputs for guitar and bass are conveniently located on the front panel, •
providing convenient access for fast instrument switching.
-20 dB pad switches provide attenuation for hot levels, typically for instruments with onboard •
preamps or active pickups.
UX8’s instrument inputs work directly with POD Farm when in Standalone Operation to provide •
ToneDirect™ Monitoring, which provides a fully processed signal with ultra-low latency, critical
for tracking with the desired sound.
Note that the Tones from POD Farm in Standalone operation will show up in your recording application
as Record Sends 9-10 and 11-12. Use the Mixer View in POD Farm Standalone operation to configure
the level and type of audio you want fed to these Record Sends (Tone 1, Tone 2, Mix of Tone 1 &
2•7
Page 22
POD Farm 1.01 – Using Your Line 6 Hardware
2, as well as Processed, Semi-Processed, or Dry Input). You’ll also see four additional Record Sends in
your recording application for UX8 (Sends 1-2 thru 7-8). These Sends are fed directly by UX8’s analog
inputs 1 – 8. You can simultaneously record the direct, unprocessed signal from any of these Sends
for later processing using POD Farm Plug-In! For more info, check out the POD Farm Standalone
Operation chapter.
Microphone Input Controls
Rear panel XLR input levels are controlled by a row of Trim knobs on the front panel. Use these inputs
for microphones or balanced input signals with a gain range of 0 dB to 45 dB.
Each XLR input has a -20 dB pad switch, which can be used to provide more headroom for high output
microphones. A 75 Hz cutoff switch is also provided, useful for eliminating low frequency rumble from
microphone sources.
Two +48v phantom power switches are provided for powered mics, such as condenser mics. Phantom
power is distributed via two XLR input banks, permitting the option to run dynamic mics in a nonpowered bank.
Signal and Clip LEDs
Signal and Clip LEDs exist for each input. The signal LED lights up when signal activity is present,
glowing brighter as the signal level increases. When the input level reaches the 0 dBfs, the clip LED
lights up momentarily.
VU Meter and Clip Display
UX8 provides a stereo pair of large VU meters on the front panel. By default, these meters display
Inputs 1-2 levels. Using the Inputs & Recording Tab of the Line 6 Audio-MIDI Devices application,
you can assign the hardware meters to display input and output levels of any stereo pair or POD Farm
Record Send. The clip LEDs light up when the signal reaches 0 dBfs.
2•8
Page 23
POD Farm 1.01 – Using Your Line 6 Hardware
Main Output Level Controls
Main Outputs 1-2 are controlled by a main volume knob and main mute button. The volume knob
is an analog level control and does not affect any level being sent to your computer. When Mute is
engaged, as solid amber LED illuminates, blinking about once every 2 seconds.
Note that these controls operate on main outputs 1-2 only (headphone and S/PDIF levels are not
affected). Outputs 3 – 8 are software controlled, via the Line 6 Audio-MIDI Devices application.
Headphone Output Controls
Headphone outputs 1-2 and 3-4 provide duplicate stereo outputs or Main Outs 1-2 and 3-4 respectively,
providing discrete control over output levels sent over the headphone jacks. Note that headphone
output levels are controlled independently of the Main volume control.
Power Button
When the power button is engaged, UX8’s main LEDs will illuminate. UX8 is not USB powered and
receives no power from the computer.
LED status indicators
The Main Mute and Main Clip LEDs provide secondary functions in their ability to indicate the
connection status of USB and S/PDIF, as follows:
No USB connection - The main clip LEDs alternate steadily between left and right, about once •
every second. The USB cable may be unplugged or the UX8 Line 6 audio driver may not be
installed on your computer.
The Line 6 audio driver is installed with the POD Farm applications installer - or you can launch Line 6
Monkey
and go to the Updates tab to check for and install the latest driver version.
No S/PDIF clock sync - The Mute LED blinks 3 times rapidly about once every second when the •
clock mode set to S/PDIF, and no external clock is present.
2•9
Page 24

TonePort KB37
Connect any line
level input source for
monitoring to the Stereo
Monitor In
POD Farm 1.01 – Using Your Line 6 Hardware
Connect any line level input
source that you want to
record into the Line Inputs
Connect your electric
Guitar or Bass
Connect
your stereo
Headphones
Connect the Analog Outs
to your monitor system
Microphone Inputs - You can receive input from one or two mics at the same time using these ins.
There is also a +48V Phantom Power switch that you should toggle to “on” if your mic requires phantom
power (most condenser type mics do, but check the documentation for your mic if you are not sure).
Connect each mic using an XLR cable. When using POD Farm in Standalone operation, this inputs
each microphone signal independently into POD Farm, where you can choose your Tone, and then
route the processed signal to the Record Sends (to your audio software) and to the Analog Outs.
Instrument Input - To connect your electric guitar or bass, plug it into this input. When using POD
Farm in Standalone operation, this inputs the signal into POD Farm, where you can choose your Tone,
and then route the processed signal to the Record Sends (to your audio software) and to the Analog
Outs.
This input also features a Pad switch; engage this switch when using a guitar/bass with high-output or
active pickups, to avoid overdriving the input.
Headphones - If you want to listen to the audio from KB37 using stereo headphones, then plug them
into this 1/4-inch stereo jack. This Headphone jack outputs the same signal fed to the Analog Outs on
the rear panel; the audio from your audio software on the computer, as well as anything plugged into
any KB37 input.
Connect up to two
Microphones
Connect to the S/PDIF input
of an external device to send
TonePort’s output digitally
Connect your USB
cable from your
computer’s USB port
Line Inputs - If you want to record the signal from a line level source, such as a keyboard, your stereo
receiver, the line out from a mixing console, etc., connect to these Left and Right ins using 1/4-inch
TS audio cables.
USB - This of course is where you connect a USB cable to KB37, with the other end going to your
computer’s USB 1.1 or 2.0 port.
S/PDIF Digital Out - To send the output of KB37 to an external device digitally, connect a 75-Ohm
coaxial cable into this RCA jack and then into the S/PDIF digital input on the external device. This
is the best choice for connecting to digital recording devices, such as a DAT recorder, MiniDisc, etc.
This S/PDIF output sends the same audio as is sent to KB37’s Analog Outs (with the exception that
2•10
Page 25
POD Farm 1.01 – Using Your Line 6 Hardware
any audio coming into the Monitor In jack is not routed to the S/PDIF output). The digital signal is
always sent at 24-bit resolution.
Monitor In - If you want to hear the signal from a line level source mixed with all the other audio
coming from your computer, but do not want this audio recorded via the POD Farm Record Sends,
then plug the source in here. Note that this is a stereo jack, so you should use a stereo 1/4-inch TRS
audio cable for this connection.
Analog Outs - These Left and Right balanced jacks output all the audio from KB37; the audio from
your DAW, and anything plugged into any KB37 input. So, these are what you want to connect to your
monitoring system when using KB37 as your computer’s sound card. Use either 1/4-inch TS or TRS
cables to connect directly to your powered speakers, mixer or power amp setup. Note that you can also
use the headphone jack if you want to use headphones for monitoring.
TonePort DI
Connect your electric Guitar
or Bass
Instrument Input - To connect your electric guitar or bass, plug it into this input. When using POD
Farm in Standalone operation, this connection routes the instrument’s signal into POD Farm where
you can choose your Tone, and then route the processed signal to the Record Sends (to your audio
software) and to the Analog Outs. This input also features a Pad switch; engage this switch when using
a guitar/bass with high-output or active pickups, to avoid overdriving the input.
2•11
Page 26
POD Farm 1.01 – Using Your Line 6 Hardware
Connect to your 3rd-party audio
Connect your stereo
Headphones
interface’s input for “dry” recording
Analog Line Outs – connect
Connect a USB cable from
here to your computer
to your powered speakers or
mixer
USB - This of course is where you connect a USB cable to TonePort DI, with the other end going to
your computer’s USB 1.1 or 2.0 port.
Phones - If you want to listen to the audio from TonePort DI using stereo headphones, then plug them
into this 1/4-inch stereo jack. This headphone jack outputs the same signal fed to the Analog Outs on
the rear panel; the audio from your audio software on the computer, as well as anything plugged into
the Instrument Input.
D.I. Out - This analog connection lets you record an unprocessed signal to your DAW audio track,
to which you can apply POD Farm Plug-In. If you use a 3rd-party audio interface (such as a Digidesign
Mbox, for example), connect the D.I. Out to one of its inputs, and record the “dry” signal into your
audio software, while still having the ability to hear your POD Farm “processed” signal through
TonePort D.I.’s Analog Outs.
Analog Outputs - These Left and Right unbalanced jacks are your main outputs and carry all the audio
from TonePort D.I.; the audio from your audio software on the computer, and anything plugged into
D.I.’s Instrument input. These are what you want to connect to your powered speakers or monitoring
system if you are using TonePort D.I. as your primary audio interface for your recording software. If you
are using a 3rd-party audio interface, these outputs supply the ToneDirect™ magic to your interface or
mixer, when using the POD Farm application alongside the plug-in. See the ToneDirect™ Monitoring
section for more details.
2•12
Page 27
POD Farm 1.01 – Using Your Line 6 Hardware
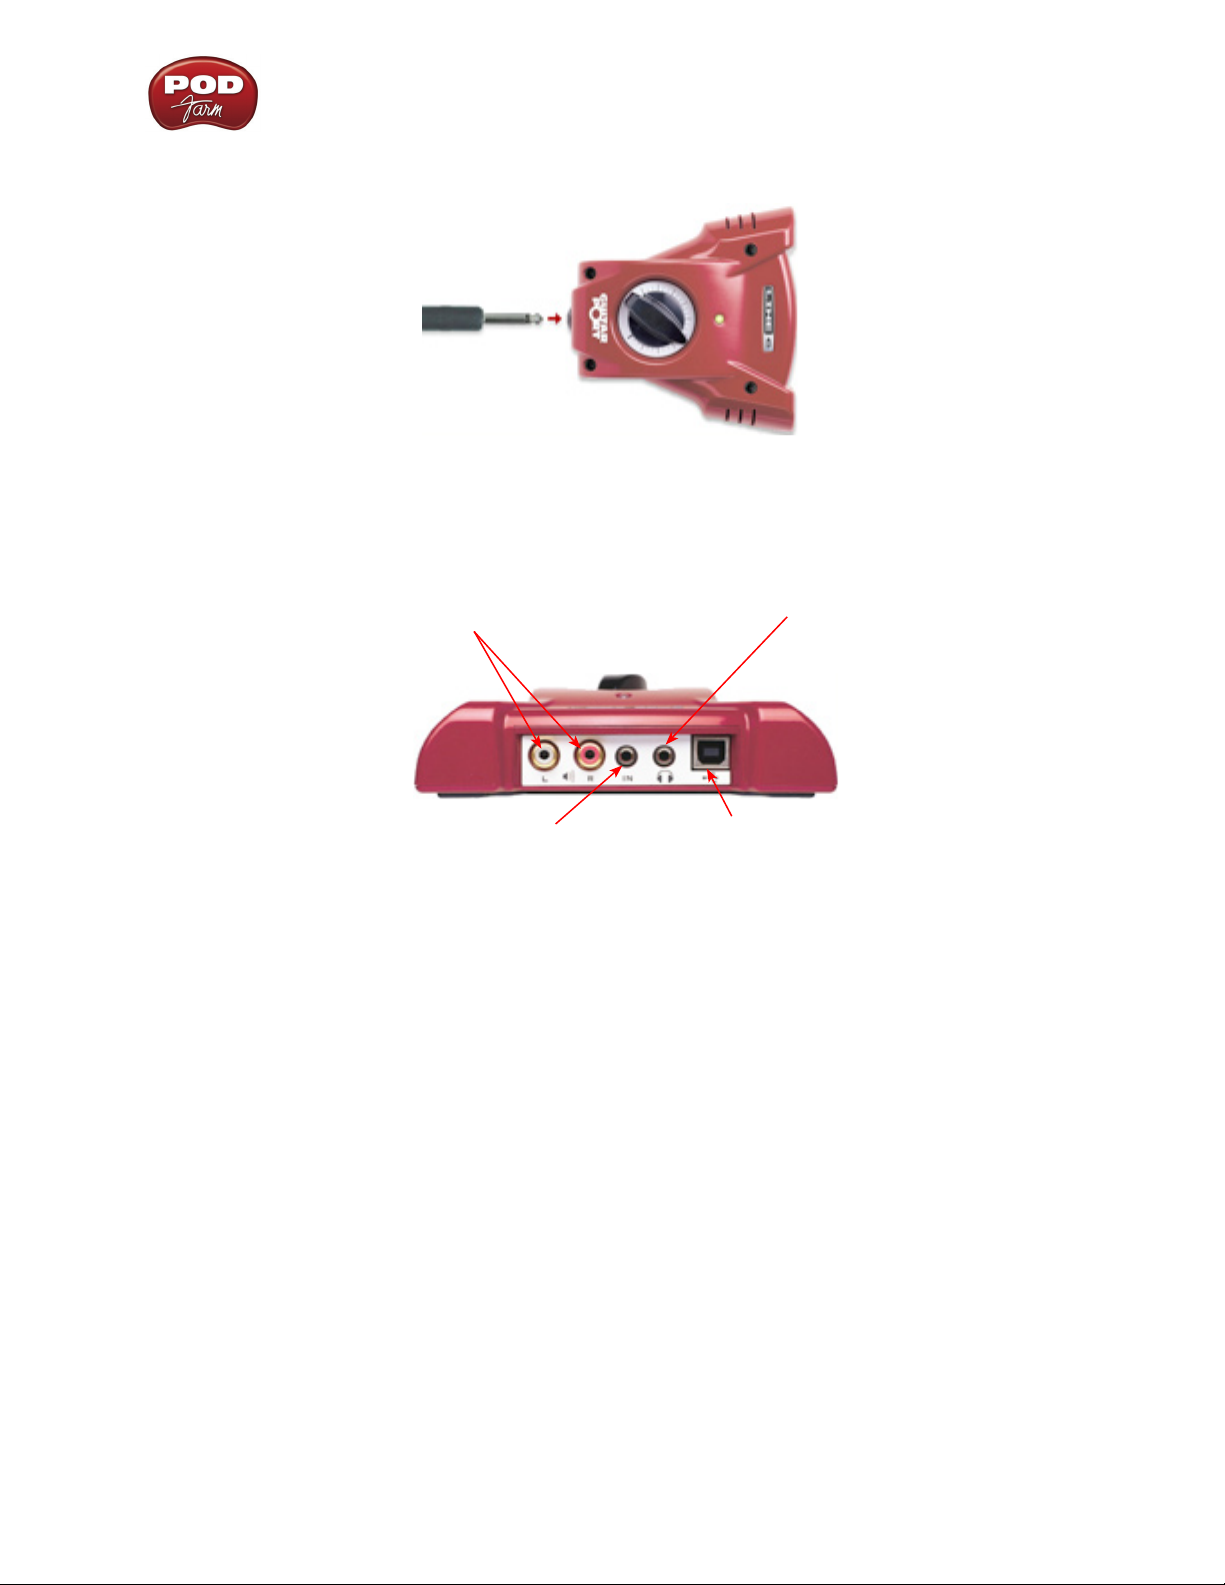
GuitarPort
Instrument Input - To connect your electric guitar or bass, plug it into this input. When using POD
Farm in Standalone operation, this connection routes the instrument’s signal into POD Farm, where
you can choose your Tone, and then route the processed signal to the Record Sends (to your audio
software) and to the Analog Line Outs.
Analog Line Outs – connect to your
powered speakers or mixer
Monitor In – connect a line level, stereo
output (from your stereo, MP3 player,
etc).
Analog Line Outs - These Left and Right RCA jacks output all audio signals; the audio from your
DAW, and anything plugged into any the Instrument or Monitor inputs. So, these are what you want
to connect to your monitoring system when using GuitarPort as your computer’s sound card. Use
shielded RCA to RCA tipped cables to connect directly to your powered speakers, mixer or power amp
setup. Note that you can also use the headphone jack on GuitarPort if you want to use headphones for
monitoring.
Headphones - If you want to listen using stereo headphones, then plug them into this 1/8-inch stereo
jack. This Headphone jack outputs the same signal fed to the Analog Line Outs; the audio from your
audio software on the computer, as well as anything plugged into the Instrument or Line inputs.
Connect your stereo headphones
Connect USB cable from here to your
computer
Monitor In - If you want to hear the signal from a line level source mixed with all the other audio
coming from your computer, but do not want this audio recorded, then plug the source in here. Note
that this is a stereo jack, so you should use a stereo 1/8-inch tipped stereo audio cable for this connection.
You’ll hear any audio coming into this jack via the Analog Line Outs and Phones, but it won’t be fed
to GuitarPort’s Record Sends.
USB - This is where you connect the supplied USB cable to GuitarPort, with the other end going to
your computer’s USB 1.1 or 2.0 port.
2•13
Page 28
POD Farm 1.01 – Using Your Line 6 Hardware
Using POD X3 Family Devices with Your Computer...
If you own a POD X3, POD X3 Live or POD X3 Pro, then you can also reap the DAW benefits with
POD Farm Plug-In! To get the POD Farm Plug-In, as well as any other available “Add-Ons”, just
connect POD X3 to your computer and run Line 6 Monkey to download, install and authorize the
POD Farm software & Plug-In. Read more about Line 6 Monkey and this process here, or just head on
over to the Line 6 Online Store.
You can also of course utilize POD X3 as a high performance sound card for your Windows® or Mac®
computer, allowing you to record all those groovy POD X3 Tones, or even dry input signals, directly
into your audio recording software. POD X3 devices offer four stereo Record Sends, which carry the
following signals:
Record Send 1-2: Main Out (Studio/Direct Mix) •
Record Send 3-4: Tone 1 Only•
Record Send 5-6: Tone 2 Only•
Record Send 7-8: Tone 1 Inputs Dry (on Send 7) and Tone 2 Inputs Dry (on Send 8)•
POD Farm software does not function in Standalone operation with POD X3 family devices. Since all
processing is done on your POD X3 hardware itself, you can call up your POD X3 tones and adjust
settings on the device itself to feed whatever signal you want out the Record Sends for use with your DAW
software!
To control the Monitor level of POD X3 independently of the Record Send levels, use the Monitor
Level slider in the Inputs & Recording tab in the Line 6 Audio-MIDI Devices dialog on you computer
(found in the System Preferences on Mac®, and in the Control Panel on Windows®).
Note - be sure to always power off or mute your speakers or monitoring setup before connecting/
disconnecting the USB cable and powering on/off POD X3, as well as before booting up or shutting down
your computer if POD X3 is already connected. The best practice is to always power on your speakers last,
and power them off first when connected to other audio gear to avoid a “pop”.
The following sections cover the basic connections for using POD X3 family devices for recording.
Use these links to jump to the section covering your specific POD X3 device:
POD X3 POD X3 Live POD X3 Pro
Be sure to also check out your POD X3 Pilot’s Handbook and the additional documentation found on
the POD Farm Online Help page of the Line 6 site.
2•14
Page 29
POD X3
POD Farm 1.01 – Using Your Line 6 Hardware
USB 2.0 - Connect
to your computer
Left & Right Analog Outputs
– Connect to your powered
speakers or mixer
Phones - Connect your
stereo Headphones
Input 1 (Instrument) – Connect your guitar or bass here using a standard 1/4-inch TS instrument
cable. POD X3 itself contains the processing power that turns your naked input signal into that roaring
guitar Tone, which is then fed to the “Direct/Studio Mix”, out the Analog Left & Right Outputs, as
well as fed to the S/PDIF digital output, and out the Record Sends digitally to your computer across
the USB 2.0 connection. POD X3 is of course also capable of applying two Tones on your Input 1 - just
dial up one of the tone presets in the “Blends” folder of POD X3 and you’ll have two complete Tones
applied to your Input 1 signal! Or, go the POD X3’s Inputs screen to choose what you want Tone 1 and
Tone 2 applied to.
S/PDIF Out - Connect
to other S/PDIF devices
Input 2 - Connect
your microphone
Input 1 - Connect
your guitar or bass
Input 2 (Mic) & Trim knob – Connect a microphone here using a standard XLR cable. You can use
the little “Trim” knob to adjust the mic signal coming into POD X3, much like you would on a mixer
console. Just like with Input 1, POD X3 itself applies preamp and effects models to your mic input,
which is then fed out the Analog Left & Right Outputs, as well as fed to the S/PDIF digital output, and
out the Record Sends digitally to your computer across the USB 2.0 connection. POD X3 is of course
also capable of applying a Dual-Tone, such as independently slathering a guitar Tone on Input 1, and a
mic preamp and effects on Input 2 simultaneously! Just go to the “Pairs” folder of your POD X3 to call
up some of these pre-baked guitar/mic Dual-Tones! Or, go the POD X3’s Inputs screen to choose what
you want Tone 1 and Tone 2 applied to.
Phones - If you want to listen using stereo headphones, then plug them into this 1/4-inch stereo jack.
This Headphone jack outputs the same signal fed to the Analog Line Outs; the audio from your audio
software on the computer, as well as anything plugged into Inputs 1 &2.
Left & Right Outputs - These Left and Right ¼-inch jacks output all audio signals; the audio from
your DAW, and anything plugged into any Inputs 1 & 2. So, these are what you want to connect to
your monitoring system when using POD X3 as your computer’s sound card. Use shielded ¼-inch
cables to connect directly to your powered speakers, mixer or power amp setup. Note that you can also
use the Phones jack if you want to use headphones for monitoring.
USB - This is where you connect a USB cable from POD X3 to your computer’s 2.0 port. Of course
your POD X3 is capable of processing your guitar Tone all by itself, but you’ll need to connect the USB
2•15
Page 30

POD Farm 1.01 – Using Your Line 6 Hardware
cable to your computer to use it with POD Farm Plug-In, and/or to use POD X3 as your computer’s
sound card device.
S/PDIF Digital Output - To send output from POD X3 to another device digitally, connect from this
S/PDIF Dig Out to the S/PDIF in on your other device. Connecting digitally is the best choice for
routing to external digital recording devices, such as a DAT recorder or MiniDisc. The S/PDIF output
sends out the Tone(s) according to your device settings - these options are found on the POD X3
device itself by pressing the “Outputs” button. The digital signal is always sent at 24-bit resolution.
POD X3 Live
Left & Right Direct Outs
Use as a D.I. for recording or
to the house mixer/P.A.
Left & Right Live Outs
Connect to your powered
speakers or mixer
Aux In - Connect a 2nd
instrument
S/PDIF Out - Connect
to other S/PDIF devices
USB 2.0 - Connect
to your computer
Guitar in - Connect
your guitar or bass
CD/MP3 In - Connect
an audio player
Guitar In – Connect your guitar or bass here using a standard 1/4-inch TS instrument cable. POD X3
itself contains the processing power that turns your naked input signal into that roaring guitar Tone,
which is then fed to the “Direct/Studio Mix”, out the Analog Left & Right Outputs, as well as fed to
the S/PDIF digital output, and out the Record Sends digitally to your computer across the USB 2.0
connection. POD X3 is of course also capable of applying two Tones on your Input 1 - just dial up one
of the tone presets in the “Blends” folder of POD X3 and you’ll have two complete Tones applied to
your Input 1 signal! Or, go the POD X3’s Inputs screen to choose what you want Tone 1 and Tone 2
applied to.
CD/MP3 Input – Connect a CD player, MP3 player, drum machine or other audio device into this
stereo 1/8-inch jack and you’ll hear it at POD X3 Live’s Phones, Direct Out, and Live Out so you can
jam along. Note that the audio coming into this input is not routed to the Record Sends, so it won’t
be recorded.
Phones - If you want to listen to the audio using stereo headphones, then plug them into this 1/4-inch
stereo jack. This Headphone jack outputs the same signal fed to the Analog Line Outs; the audio from
your audio software on the computer, as well as anything plugged into the Guitar, Mic, Aux, Variax or
CD/MP3 inputs.
Phones - Connect your
stereo Headphones
Mic In & Trim - Connect
a Mic & adjust trim level
Variax In - Connect your
Variax Guitar here
2•16
Page 31

POD Farm 1.01 – Using Your Line 6 Hardware
Microphone Input & Trim knob – Connect a microphone here using a standard XLR cable. You can
use the little “Trim” knob to adjust the mic signal coming into POD X3, much like you would on a
mixer console. Just like with Input 1, POD X3 itself applies preamp and effects models to your mic
input, which is then fed out the Analog Left & Right Outputs, as well as fed to the S/PDIF digital
output, and out the Record Sends digitally to your computer across the USB 2.0 connection. POD X3
is of course also capable of applying a Dual-Tone, such as independently slathering a guitar Tone on
Input 1, and a mic preamp and effects on Input 2 simultaneously! Just go to the “Pairs” folder of your
POD X3 to call up some of these pre-baked guitar/mic Dual-Tones! Or, go the POD X3’s Inputs screen
to choose what you want Tone 1 and Tone 2 applied to.
Variax In - Got yourself a Line 6 Variax guitar? Plug it in here for a direct digital audio connection
between the guitar and POD X3 Live. The POD X3 Live Inputs screen is where you assign whether
this input feeds Tone 1, Tone 2 or both.
Left & Right Live Outs - The unbalanced 1/4-inch connectors here get your POD X3 Live’s sound to
a guitar amplifier, recorder, mixer or PA system. Go to POD X3 Live’s Output screen to configure these
outputs for Studio or Live use. In Studio Mode, they’re ready to plug into a recorder with unbalanced
–10 dBV inputs. In Live Mode, they don’t have speaker simulation, and are ready for connection to
an on-stage power amp. Whichever you choose, the front panel Master Volume knob determines how
much signal you’ll get at these jacks. You can use either jack as a mono output.
Left & Right Direct Outs - These balanced XLR connectors always provide studio-quality sound with
speaker/microphone/room simulation ideal for direct recording and as a direct send to the house mixer
or PA when playing live. Go to POD X3 Live’s System page to disable the Master Volume control for
these outputs, so you can independently make on-stage adjustments to the 1/4-inch “Live” outputs
feeding an amp without affecting the levels sent to the house sound mixer or PA.
Aux Input – This mono, unbalanced 1/4-inch input can be used for a second guitar or just about any
other instrument. Go to POD X3 Live’s Inputs screen to assign whether this input feeds Tone 1, Tone
2 or both.
S/PDIF Digital Output - To send output from POD X3 to another device digitally, connect from
this S/PDIF Dig Out to the S/PDIF in on your other device. Connecting digitally is the best choice
for routing to external digital recording devices, such as a DAT recorder. The S/PDIF output sends
out the Tone(s) according to your device settings - these options are found on the POD X3 device
itself by pressing the “Outputs” button. The digital signal is always sent at 24-bit resolution. For more
information on using these digital connections, please see your POD X3 Pilot’s Handbook.
USB - This is where you connect a USB cable from POD X3 Live to your computer’s 2.0 port. Of
course your POD X3 is capable of processing your guitar Tone all by itself, but you’ll need to connect
the USB cable to your computer to use it with POD Farm Plug-In, and/or to use POD X3 Live as your
computer’s sound card device.
POD X3 Pro
Guitar and Mic Input Channel Strips
POD X3 Pro offers two independent sets of inputs on the front left of the unit. Think of these as
two identical sets of inputs, for which you can use the options on the POD X3 Pro’s Inputs page to
determine whether these inputs feed Tone 1, Tone 2 or both. There are lots of possibilities here,
since not only can you assign these inputs independently, but you can also do things such as apply
2•17
Page 32

POD Farm 1.01 – Using Your Line 6 Hardware
two different tones at once on a single input, choose how to pan them, record them into your audio
software, etc! For details about Single versus Dual Tone and other signal routing options, please refer
to your POD X3 Pilot’s Handbook.
Signal Present and Clip
Indicator lights
Mic Input Trim knob
Phantom Power switch
Mic Input Low Cut Filter and
Pad switches
Guitar In Pad switch
Mic Input - Connect your
Microphone
Guitar Input - Connect your
guitar or bass
POD X3 Pro’s Input Channel Strips
Guitar Input – Connect up to two guitars or basses here in the 1/4-inch 1 and 2 inputs using standard
TS instrument cables. POD X3 Pro itself contains the processing power that turns your naked input
signal into that roaring guitar Tone, which is then fed to the “Direct/Studio Mix”, out the Analog Left
& Right Live Outputs, as well as fed to the AES/EBU & S/PDIF digital outputs, and out the Record
Sends digitally to your computer across the USB 2.0 connection. POD X3 is of course also capable of
applying two Tones on your Input 1 - just dial up one of the tone presets in the “Blends” folder of POD
X3 and you’ll have two complete Tones applied to your channel strip 1 input signal! Or, go the POD
X3’s Inputs screen to choose exactly what you want Tone 1 and Tone 2 applied to.
Guitar Input Pad Switch – This little button can be engaged to tame hotter signals at the Guitar In
jack, such as if your guitar or bass has high output active pickups or an on-board preamp.
Input Signal Present and Clip Indicator Lights – The green “Signal Present” indicator lights when
either a guitar or mic input signal is detected. The red “Clip” indicator lights up if input clipping is
detected at the Channel Strip Mic or Guitar Inputs. To avoid clipping (and you really should always
avoid clipping), engage the Mic Pad or Guitar Pad switch or turn down the Mic Trim knob. You might
also try adjusting the output level of the device that’s feeding into these inputs.
Microphone Input – Connect up to two microphones into the channel strip 1 and 2 XLR inputs using
standard XLR mic cables. POD X3 itself applies preamp and effects models to your mic input, which
is then fed out the Analog Left & Right Live Outputs, Direct/Studio XLR Outputs, the AES/EBU
& S/PDIF digital outputs, and out the Record Sends digitally to your computer across the USB 2.0
connection. POD X3 is of course also capable of applying a Dual Tone, such as independently applying
different set of guitar amps, bass amps, mic preamps and effects to whatever you are inputting into
channel strips 1 & 2! Just go the POD X3’s Inputs screen to choose what you want Tone 1 and Tone
2 applied to.
Mic Input Trim knob – You can use the little “Trim” knob at the top of the channel strip to adjust the
respective mic input signal level, just like you would on a traditional mixing console’s channel strip.
Note that you can also engage the Mic In Pad switch if the input is too high. The Signal Present and
Clip lights will help with setting your input level.
2•18
Page 33

POD Farm 1.01 – Using Your Line 6 Hardware
Mic Input Low Cut Filter and Pad Switches – Engage the Low Cut Filter for the Mic Input to cut off
all frequencies 75Hz and below - useful for eliminating rumble from mic sources. If you are plugging in
a Mic with a hot signal level, engage this pad to attenuate the channel strip’s Mic Input by -20dB.
Phantom Power Switch – Pushing in this button activates 48V Phantom Power for both Channel
Strip Mic Inputs. An LED will light when Phantom Power is activated.
Phones Output
Phones Output - If you want to listen to the audio using stereo headphones, then plug them into this
1/4-inch stereo jack. This Phones jack outputs the same signal fed to the Analog Line Outs; the audio
from your DAW, as well as anything plugged into the Guitar, Mic, Aux, Variax, digital or Line inputs.
The volume is set by the Master Volume knob. Any time you use headphones, it important to be sure
the Master Volume knob is not set at a ridiculous level first!
Rear Panel Connections
Look around back of your X3 Pro for more ins & outs...
AES/EBU In & Out - Connect
digitally to other AES/EBU devices
FBV Pedal In - Connect
a Line 6 FBV controller
S/PDIF In & Out - Connect
digitally to other S/PDIF devices
MIDI In & Out/Thru Connect to external MIDI
hardware
2•19
Variax In - Connect
your Variax Guitar
USB 2.0 - Connect
to your computer
Page 34

POD Farm 1.01 – Using Your Line 6 Hardware
AES/EBU Digital Input & Output - To record digitally from another digital device, connect it’s
AES/EBU output to this Input. The AES/EBU In always receives 24-bit audio. To send output from
POD X3 to another device digitally, connect from this AES/EBU Output to the AES/EBU In on your
other device. Connecting digitally is the best choice for routing to external digital recording devices,
such as a DAT recorder, digital video player, digital mixing board, etc. The AES/EBU output sends
out the Tone(s) according to your device settings - these options are found on the POD X3 device
itself by pressing the “Outputs” button. The digital signal is always sent at 24-bit resolution. For more
information on using these digital connections, please see your POD X3 Pilot’s Handbook.
S/PDIF Digital Input & Output - To record digitally from another digital device, connect it’s S/PDIF
output to this S/PDIF Input. The S/PDIF In always receives 24-bit audio. To send output from POD X3
to another device digitally, connect from this S/PDIF Output to the S/PDIF in on your other device.
The S/PDIF Out jack sends out 24-bit digital versions of the Direct Out signals. The System setup
screen lets you choose the sample rate and adjust the level. Connecting digitally is the best choice for
routing to and from external digital recording devices, such as a DAT recorder, digital video player,
digital mixing board, etc. For more information on using these digital connections, please see your
POD X3 Pilot’s Handbook.
FBV Pedal Input – Connect an optional Line 6 FBV Series foot controller here, including the FBV,
FBV Shortboard, and FBV Express, to remotely control even more of the internal POD X3 settings
and parameters. The System page lets you set it all up. Note that POD X3 Pro doesn’t support the older
Line 6 Floor Board or FBV2.
MIDI In & Out/Thru - Connect your POD X3 Pro to your MIDI equipment to send and receive
Program Change Messages for selecting Presets or for communicating with other MIDI hardware &
software. POD X3 Pro’s MIDI Out connects to another device’s MIDI In; the X3’s MIDI In goes
to another device’s MIDI Out. Use standard 5-pin MIDI cables for these connections. For more
information, please see your POD X3 Pilot’s Handbook.
Variax In - Got yourself a Line 6 Variax guitar or bass? Plug it in here for a direct digital audio
connection between the guitar and POD X3 Pro. The POD X3 Inputs screen is where you assign
whether this input feeds Tone 1, Tone 2 or both. See your POD X3 Pilot’s Handbook for more info.
Be sure to keep the protective plastic cap on this connection when it’s not connected to a Variax, so you
won’t damage it by mistakenly inserting a 1/4-inch guitar cable or other connection. When you are ready
to connect a Variax, use only Line 6 supplied Variax-compatible cables – not standard Ethernet or other
cables – to avoid damage to the jack. You can learn more about the Variax family of guitars, each one giving
you the sound of an entire guitar collection in one instrument, at www.line6.com/variax.
USB - This is where you connect a USB cable from POD X3 Pro to your computer’s 2.0 port. Of course
your POD X3 Pro is capable of processing your guitar Tone all by itself, but you’ll need to connect
the USB cable to your computer to use it with POD Farm Plug-In, and/or to use POD X3 Pro as your
computer’s sound card device.
2•20
Page 35

POD Farm 1.01 – Using Your Line 6 Hardware
Output Level Switch
Optimize the Studio/
Direct Outs level for Mic
vs. Line
Stereo FX Loop Send & Return Jacks
Studio/Direct Outputs – These balanced XLR outs carry your tone complete with speaker/microphone/
room simulation, perfect in the studio for pro-quality sound or as a direct send to a house mixer or PA
when playing live.
Studio/Direct Outputs
Connect here to route your
fuly processed tones to
external gear.
Left & Right Live Outputs
Connect to your powered
speakers or mixer
Ground Lift Switch
Toggle the ground on/off
Unprocessed Outputs
Use as a dry out to D.I.
to your recording gear
Line Inputs - Connect
the stereo audio feed
from another device
Output Level Switch Optimize your Live Outs
level for feeding an amp vs.
line level devices
Output Level Switch – Use this to toggle the level of the Studio/Direct Outputs to best match the
hardware inputs you are plugging into - Mic or Line level.
Ground Lift Switch – This switch lets you lift the grounds of POD X3 Pro’s XLR Studio/Direct Outs.
You can set this to “LIFT” if you get an audible hum caused by a ground loop when connecting to other
grounded equipment. Otherwise, best to keep this set to “GND”.
Unprocessed Outputs – These unbalanced 1/4-inch connectors give you an unprocessed guitar signal,
tapped directly off of your POD X3 Pro’s guitar input. This is perfect for recording a “naked” guitar,
allowing you to later re-amp or use plug-ins to process your recorded guitar track.
Line Inputs – These two unbalanced 1/4-inch inputs can be used for a second guitar, another instrument,
line outs from other audio devices, etc. The Inputs page on POD X3 Pro is where you assign whether
these inputs feed Tone 1, Tone 2 or both.
Left & Right Live Outs – The unbalanced 1/4-inch connectors here get your POD X3 Pro’s sound to
a guitar amplifier, recorder, mixer or PA system. Go to POD X3 Pro’s Output screen to configure these
outputs for Studio or Live use. In Studio Mode, they’re ready to plug into a recorder with unbalanced
–10 dBV inputs. In Live Mode, they don’t have speaker simulation, and are ready for connection to
an on-stage power amp. Whichever you choose, the front panel Master Volume knob determines how
much signal you’ll get at these jacks. You can use either jack as a mono output. The POD X3 System
page has options allowing you to disable the Master Volume control for these outputs, so you can
make on-stage adjustments to the 1/4-inch outputs feeding an amp without affecting the Direct/Studio
Output levels sent to the house sound mixer or PA.
Output Level Switch – This switch allows you to set the level of the Left & right Live Outs to AMP
or LINE level.
Effects Loop – The Effects Loop provides two jacks for stereo FX Send and two for stereo FX Return,
2•21
Page 36

POD Farm 1.01 – Using Your Line 6 Hardware
operating at approximately 19.5 Volts peak-to-peak, making it optimal for line level devices. The loop
can also be used with most stomp boxes by adjusting the send and return levels. Use the Left Return
jack for mono return. The loop can run pre or post Amp Model, and if nothing is connected to it, POD
X3 Pro is smart enough to disable the loop so you still get sound.
Using PODxt Family Devices with Your Computer...
If you own a PODxt, PODxt Live or PODxt Pro, then you can also reap the DAW benefits with the
purchase of the POD Farm Plug-In Add-On! To get POD Farm Plug-In, just connect PODxt to your
computer and run Line 6 Monkey, where you can purchase, download and install everything you need
without even leaving your chair. Read more about Line 6 Monkey and this process here, or just head
on over to the Line 6 Online Store.
POD Farm software does not function in Standalone operation with PODxt family devices. Since all
processing is done on your PODxt hardware itself, you can call up your PODxt tones and adjust settings
on the device itself, and use the Line 6 audio driver settings to feed whatever signal you want out the
Record Sends for use with your DAW software!
You can also of course utilize PODxt as a high performance sound card for your Mac® or Windows
computer, allowing you to record all those groovy POD Tones, or even dry input signals, directly into
your DAW. To control the Monitor level and type of signal fed to PODxt’s Record Send 1-2 (Processed,
Semi-Processed, Dry), launch the Line 6 Audio-MIDI Devices dialog on you computer. For details on
all the audio driver settings and options, please check out the PODxt - Audio Signal Routing & Re-
Amping section that follows.
Note - be sure to always power off or mute your speakers or monitoring setup before connecting/
disconnecting the USB cable and powering on/off POD X3, as well as before booting up or shutting down
your computer if POD X3 is already connected. The best practice is to always power on your speakers last,
and power them off first when connected to other audio gear to avoid a “pop”.
The following sections cover the basic connections for using PODxt family devices for recording.
Use these links to jump to the section covering your specific PODxt device:
PODxt ProPODxt LivePODxt
Be sure to also check out your PODxt Pilot’s Handbook, and the additional documentation found on
the POD Farm Online Help page of the Line 6 site.
®
2•22
Page 37

PODxt
POD Farm 1.01 – Using Your Line 6 Hardware
Phones - Connect your
stereo Headphones
Instrument Input – Connect your electric guitar or bass here using a standard 1/4-inch TS instrument
cable. PODxt itself contains the processing power that turns your naked input signal into that roaring
guitar Tone, which is then fed out the Analog Line Outs, as well as fed to the Record Send 1-2 digitally
to your computer across the USB connection.
Phones - To listen using stereo headphones, then plug them into this 1/4-inch stereo jack. This
Headphone jack outputs the same signal fed to the Analog Line Outs; the audio from your audio
software on the computer, as well as anything plugged into the Instrument input.
Analog Line Outs –
connect to your powered
speakers or mixer
USB - Connect to
your computer
Instrument Input Connect your guitar or bass
Analog Line Outs - These Left and Right ¼-inch jacks output all audio signals; the audio from your
audio software on the computer, and anything plugged into any the Instrument input. So, these are
what you want to connect to your monitoring system when using PODxt as your computer’s sound
card. Use shielded ¼-inch tipped cables to connect directly to your powered speakers, mixer or power
amp setup. Note that you can also use the Phones jack on PODxt if you want to use headphones for
monitoring.
USB - This is where you connect a USB cable from PODxt to your computer’s USB 1.1 or 2.0 port.
Of course your PODxt is capable of processing your guitar Tone all by itself, but you’ll need to connect
the USB cable to your computer to use it with the optional POD Farm Plug-In, and/or to use PODxt
as your computer’s sound card device.
2•23
Page 38

PODxt Live
POD Farm 1.01 – Using Your Line 6 Hardware
Instrument Input - Connect
your guitar or bass
Aux Input – (Monitor in)
connect a line level, stereo
output (from your stereo, MP3
player, etc)
Instrument Input – Connect your electric guitar or bass here using a standard 1/4-inch TS instrument
cable. PODxt Live itself contains the processing power that turns your naked input signal into that
roaring guitar Tone, which is then fed out the Analog Line Outs, as well as fed to the Record Send 1-2
digitally to your computer across the USB connection.
Analog Line Outs - These Left and Right ¼-inch jacks output all audio signals; the audio from your
DAW, and anything plugged into any the Instrument and Aux inputs. So, these are what you want
to connect to your monitoring system when using PODxt Live as your computer’s sound card. Use
shielded ¼-inch tipped cables to connect directly to your powered speakers, mixer or power amp
setup. Note that you can also use the Phones jack on PODxt Live if you want to use headphones for
monitoring.
Phones - Connect your
stereo Headphones
Analog Line Outs – connect to
your powered speakers or mixer
USB - Connect to
your computer
Aux In (Monitor In) - If you want to hear the signal from a line level source mixed with all the other
audio coming from your computer, but do not want this audio recorded, then plug the source in here.
Note that this is a stereo jack, so you should use a stereo 1/8-inch tipped stereo audio cable for this
connection. You’ll hear any audio coming into this jack via the Analog Line Outs and Phones, but it
won’t go to PODxt Live’s Record Send 1-2.
Phones - If you want to listen to the audio using stereo headphones, then plug them into this 1/4-inch
stereo jack. This Headphone jack outputs the same signal fed to the Analog Line Outs; the audio
from your audio software on the computer, as well as anything plugged into the Instrument and Aux
inputs.
USB - This is where you connect a USB cable to PODxt Live, with the other end going to your
computer’s USB 1.1 or 2.0 port. Of course your PODxt Live is capable of processing your guitar Tone
all by itself, but you’ll need to connect the USB cable to your computer to use it with the optional
POD Farm Plug-In, and/or to use PODxt Live as your computer’s sound card device.
2•24
Page 39

PODxt PRO
POD Farm 1.01 – Using Your Line 6 Hardware
Phones - Connect
your stereo
Headphones
Instrument input – Connect your electric guitar or bass here using a standard 1/4-inch TS instrument
cable. PODxt Pro itself contains the processing power that turns your naked input signal into that
roaring guitar Tone, which is then fed out the Analog and Digital Outs, as well as fed to the Record
Send 1-2 digitally to your computer across the USB connection.
Phones - If you want to listen to the audio using stereo headphones, then plug them into this 1/4-inch
stereo jack. This Headphone jack outputs the same signal fed to the Analog Line Outs; the audio from
your audio software on the computer, as well as anything plugged into the Instrument input.
Connect any Line-Level
source you want to
record to the Line Input
Unprocessed Instrument Out- When
using POD Farm Plug-in, connect to
3rd-party audio recording interface
Instrument Input Connect your guitar or bass
USB - Connect to
your computer
Analog Line Outs, Use either Unbalanced
(¼ -inch) jacks or Balanced (XLR) jacks to
connect to your powered speakers or mixer
Line Input - if you want to record the signal from a line level source, such as a keyboard, your receiver,
the line out from a mixing console, etc…, connect it to this input using a 1/4-inch TS audio cable.
Unprocessed Guitar Out - This connection allows you to send an unprocessed, analog signal to DAW
setup, while monitoring the fully processed signal thru the main Outputs. Very handy if you’re using
a 3rd party recording interface (such as a Digidesign® Mbox®) with your recording application and
the optional POD Farm Plug-In. For more info, go to the ToneDirect™ Monitoring section of this
Guide.
Note that PODxt Pro can also send an unprocessed signal thru its USB connector, as explained here.
Unbalanced and Balanced Analog Line Outs - The Left and Right Unbalanced ¼-inch jacks and
the Balanced XLR jacks output all audio signals; the audio from your DAW, and anything plugged
Digital Input and Output – use the AES/EBU
or S/PDIF type connections to connect to other
digital gear that uses one of these formats
2•25
Page 40

POD Farm 1.01 – Using Your Line 6 Hardware
into any the Instrument inputs (and effects loop, if you are using it). So, these are what you want
to connect to your monitoring system when using PODxt Live as your computer’s sound card. Use
shielded ¼-inch tipped or XLR tipped cables to connect directly to your powered speakers, mixer
or power amp setup. Note that you can also use the Phones jack on PODxt Pro if you want to use
headphones for monitoring.
USB - This is where you connect a USB cable to PODxt Pro, with the other end going to your
computer’s USB 1.1 or 2.0 port. Of course your PODxt Pro is capable of processing your guitar Tone all
by itself, but you’ll need to connect the USB cable to your computer to use it with the optional POD
Farm Plug-In, and/or to use PODxt Pro as your computer’s sound card device.
AES/EBU and S/PDIF Digital connections - To connect to another digital audio device with your
PODxt Pro, use the pair of these digital jacks that matches the format of your other device (AES/EBU
or S/PDIF). Connecting digitally is the best choice for routing to external digital recording devices,
such as a DAT recorder, digital mixer, etc.. These digital outputs send the same audio as is sent to PODxt
Pro’s Analog Outs. The digital signal is always sent at 24-bit resolution. All settings for configuring the
PODxt Pro’s digital in/out options are found on the PODxt Pro device itself by pressing the “I/O Dig
Select” button on the front panel. For more information on using these digital connections, please see
your PODxt Pro Pilot’s Handbook.
PODxt - Audio Signal Routing & Re-Amping
Re-Amping is the fancy, schmancy name for recording a dry, unaltered instrument signal to be processed
later during mixing - this gives you the greatest flexibility to make later tone tweaks, since you don’t
have to commit a particular sound to the track(s). This is of course the way that plug-ins work, so it’s
something that all plug-ins, including the optional POD Farm Plug-in, provide. If you don’t have plugins but do have PODxt, there’s another kind of re-amping available.
PODxt, PODxt Pro and PODxt Live provide an additional set of driver options for recording where
the signal fed to Record Send 1-2 can be set to “processed” or “unprocessed” independently from
what you are hearing as your monitor signal from the PODxt device. Access the PODxt Audio Signal
Routing options by clicking the Advanced button in the Line 6 Audio-MIDI Devices control panel...
Select the signal to be
routed to the Record
Sends here.
The text in the Record
Sends panel describes the
signal now being fed to
the Record Send 1-2
2•26
This slider sets the
level of the re-amped
signal sent to PODxt for
monitoring
Page 41

POD Farm 1.01 – Using Your Line 6 Hardware
In the PODxt Signal Routing selector you can choose one of four routing modes for the signals that
run inside PODxt, and to Record Send 1-2:
Send Processed Guitar• - This is the normal mode of operation: PODxt-processed sound is sent
to your computer via Record Send 1-2 so it can be recorded in your audio software. PODxt gets
its input from the guitar plugged into its INPUT jack, and you can listen to PODxt-processed
guitar sound as well as sound coming from your computer via PODxt’s LEFT OUTPUT, RIGHT
OUTPUT and PHONES jacks.
Send Clean Guitar• - This mode sends unprocessed guitar to your to Record Send 1-2, while you
listen to PODxt-processed guitar and software playback coming out of your PODxt. You can use
this to record an unprocessed guitar signal in your audio software for later re-amping, while hearing
your PODxt-processed guitar signal without latency being added by your recording program. You
can then choose USB Signal Routing modes 3 and 4 when you’re ready to playback that track
and re-amp it through your PODxt. You may also want to record a copy of your PODxt-processed
sound from the analog outputs of your PODxt when you are making your digital recording of the
clean guitar, so you have the processed version for reference when re-amping. This track is also
handy for punch-ins, since you can listen to it during punch-ins to hear the processed version of
the part of the previously recorded track that you want to keep.
Send Clean Guitar Re-Amp Playback• - This mode sends unprocessed guitar to your recording
software, feeds the signal from your computer into PODxt’s processing, and lets you hear the
PODxt-processed computer sound at PODxt’s outputs. You can use this to run an unprocessed
guitar track that you recorded using USB Signal Routing mode 2 into your PODxt for re-amping,
allowing you to listen to or record the PODxt-processed result via PODxt’s analog outputs. You
can also use this mode during initial recording, so that unprocessed guitar can be recorded to a
track, and the output of that track can be sent by the recording program to PODxt at the same
time. This lets you punch-in on the track while you’re recording, and hear PODxt processing of
the already recorded part of the track as well as the new portion that you’re recording during the
punch-in. Your recording software will add some latency to the guitar signal that it is monitoring
back through to PODxt. You can generally get the lowest latency by reducing your buffer size in
the recording software, but lower buffer settings will utilize more of your computer’s processing,
so you may not be able to run as many tracks or effects in your recording software when you do
this. See your recording software’s instructions for details.
Send Re-Amp Playback• - This mode is designed to receive unprocessed guitar from your recording
program, and send processed guitar back to the recording program for recording. You can use this
to run an unprocessed guitar track that you recorded using USB Signal Routing mode 2 into your
PODxt for re-amping, so you can digitally record the PODxt-processed signal back to another
track in the recording program.
Note – it is not a supported practice to “hot swap” your Line 6 device (unplug the USB cable and plug
it into a different USB device) while it is in use by your computer and DAW software. In fact, this just
isn’t a good idea to do with any USB audio devices, since it can result in a loud pop, loss of sync and
possibly crash or corrupt your current DAW project.
Routing Audio From Your Line 6 Hardware to an External Device
In addition to the ability to route digital audio directly within your computer, you may instead want to
route your POD Farm or POD signal into another sound card on the same or separate computer. Better
yet, with all the great tones you can now create for your mics & instruments, there is no need to limit
them to the inside of a computer! You may also want to send the signal to external hardware such as
an analog or tape Multitrack unit, a DAT or video tape recorder, or even to an amplifier or P.A. system
2•27
Page 42

POD Farm 1.01 – Using Your Line 6 Hardware
for live performance. To follow are instructions for these different types of setups.
Connecting analog outputs to an external device
You can route your POD Farm Tone to just about any type of external device simply by connecting
the Analog Outs from the back of your POD Studio, GuitarPort, TonePort or POD directly into the
external device’s line level, analog inputs. This allows you to amplify or record your POD Farm/POD
signal using any external device that accepts analog line level inputs.
Connect your POD Studio,
TonePort, GuitarPort or POD
Analog Outs to the analog
inputs on any external audio
device
Routing analog outputs to another sound card
If you want to use POD Farm and your Line 6 device in a computer recording setup where a sound
card already exists, then you might find it useful to connect your Line 6 hardware’s Analog Outs into
the analog inputs of the existing sound card. More information can be found in the Sound Card and
Sound Issues section of this guide.
Connecting the Digital Output to an external digital device
UX2, UX8, KB37, POD X3, POD X3 Live, POD X3 Pro and PODxt Pro also include digital outputs,
which allow you to connect to digital devices such as a DAT recorder, MiniDisc, another sound card,
or most any device that offers a S/PDIF (or AES/EBU for POD X3 & PODxt Pro) format digital input.
Please refer to your hardware’s User Guide, or check out the additional documentation on the POD
Farm Online Help page of the Line 6 web site.
ToneDirect™ Monitoring
A unique feature of Line 6 POD Studio, TonePort and GuitarPort hardware is ToneDirect™
Monitoring, which is a separate audio path that allows you to monitor the incoming signal with the
lowest possible latency, for uncompromised feel and responsiveness when recording or jamming.
Additionally, when using POD Farm in Standalone operation along with your DAW software, this
allows you to set the audio buffer size in your DAW software at a large value for efficient use of your
computer, yet still enjoy extreme low latency monitoring while recording. On Windows® systems, the
ToneDirect™ audio path has its own buffer adjustment while on Mac®, no adjustments are needed.
ToneDirect™ Monitoring buffer size slider (Windows®)
POD Studio, TonePort & GuitarPort devices - The Line 6 ToneDirect™ Monitoring audio path has
its own buffer to allow you to keep your ASIO Buffer Size at a high value, for more solid performance
and more efficient performance of your ASIO software. to access the ToneDirect™ Monitoring buffer
slider, launch the Line 6 Audio-MIDI Devices dialog - (just click the Driver Console button within
2•28
Page 43

POD Farm 1.01 – Using Your Line 6 Hardware
the POD Farm Mixer View, or go to the Windows® Control Panel). The initial default is one tick to
the right of “Extra Small” as shown. Raise this slider if you are getting any dropouts in your monitor
signal.
POD X3 & PODxt devices - These devices do not utilize POD Farm in Standalone operation, however,
they do offer low latency “USB Audio Streaming” feature with a USB audio buffer adjustment slider
(rather than ToneDirect™ Monitoring) within the Windows® - Line 6 Audio-MIDI Settings dialog
which provides an independent, direct monitor signal with its own buffer adjustment. When a POD
X3 or PODxt is connected, this buffer slider is displayed:
ToneDirect™ Monitoring while recording with POD Farm Plug-in
ToneDirect™ is a feature of the POD Farm application when run in Standalone mode, not the POD
Farm Plug-in, so in order for you to enjoy the feel and responsiveness provided by ToneDirect™,
you’ll need to run the “stand-alone” POD Farm application alongside the DAW host software hosting
POD Farm Plug-in. Keep in mind that these applications run independently of each other, so any
Tone settings you make in the POD Farm’s Standalone mode will have to be matched in the Plug-in
to provide the same results. You can achieve this by making your settings in POD Farm Standalone,
saving them as a Tone Preset to your computer’s POD Farm Tones folder, and then recalling that preset
later within the POD Farm Plug-in. Here are the steps to configure this type of setup:
Connect the recording source to your Line 6 hardware•
Launch POD Farm in Standalone mode, and monitor the POD Farm processed signal thru your •
hardware’s Line Outputs. These outputs supply the ToneDirect™ Monitoring magic.
In the POD Farm Mixer View, configure one of Record Sends’ Source to be a • Dry Input signal.
Choose this Record Send as the input for the DAW track you’re recording into.
Disable your DAW software’s Input Monitoring for the track you’re recording into.•
Load POD Farm Plug-In on the recorded DAW audio track and dial in your desired Tone for •
playback!
2•29
Page 44

POD Farm 1.01 – Using Your Line 6 Hardware
Sound Cards & Sound Issues
One of the many unique features of your Line 6 Hardware is its ability to function as a computer
sound card. You can choose to make your hardware the preferred sound card for your computer, or
alternatively keep your current “Built-In” sound card the default device for playing system sounds,
etc…, and connect your hardware to it so you can hear POD Farm tone thru your computer’s sound
card.
Choosing your Line 6 Hardware as the Preferred Audio Device
Setting up your Line 6 Hardware as the preferred Audio device means that all system sounds, as well
as the audio output of your mp3 player software and other audio applications will be routed thru your
hardware.
Windows® XP
Go to the Windows XP Control Panel, and select Sounds and Audio Devices.
®
Click on the Audio Tab
All your sound devices appear here
Select your Line 6 Hardware as the
default audio device for Playback
and Recording
Click Apply when done
2•30
Page 45

POD Farm 1.01 – Using Your Line 6 Hardware
Windows® Vista
®
Go to the Vista Control Panel, and select Sound.
In the Playback tab...
Select your Line 6 hardware if it
shows the green checkmark then it
is currently the default device for
playback. If not, then click the Set
Default button.
If yo want to set your Line 6 hardware as the default recording Device,
then repeat these steps in the
Recording tab.
®
Mac
Go to your computer’s System Preferences, and click on Line 6 Audio-MIDI Devices
Click on the Audio Devices Tab
All your sound devices appear in the
drop down menus
Select your Line 6 Hardware as the
default audio device for Input and
Output
Close the window when done.
Connecting Line 6 Hardware to your Preferred Audio Device
If you want to use POD Farm in Standalone operation and your Line 6 device in a computer recording
setup where a sound card already exists, then you might find it useful to connect your Analog Outs
into the analog inputs of the existing sound card. This allows you to use the existing sound card with
your recording application to also receive additional discrete inputs directly from other sources at the
same time, if this is your desired setup. When your Line 6 device is connected to another sound card
this way, then you will want to be sure your recording software is set to use the other sound card as
its input device for recording. In this configuration, since your Line 6 device is not in use by an audio
application as a sound card, its Analog Out signal is what is being recorded, and therefore, levels are
controlled by the POD Farm Standalone’s Volume knobs and the Line 6 hardware Volume knob.
2•31
Page 46

GuitarPort users...
POD Studio & TonePort users...
POD Farm 1.01 – Using Your Line 6 Hardware
Connect a 1/8-inch stereo cord to
the Headphone Out, or use the
Stereo RCA Line outputs with an
adapter.
Connect the other end to the Line
Input of your sound card.
Connect the mono 1/4-inch
Analog Outputs (if you have a
UX8 then you probably want to use
Outs 1 &2). Or, connect a 1/4-inch
stereo cord to the Headphone Out
POD X3 & PODxt users
Connect the mono 1/4inch Analog Left & Right
Outputs. Or, connect a
1/4-inch stereo cord to the
Headphone Out
Use an adapter if needed to
connect to the Line Input of
your sound card.
Use an adapter if needed to connect
to the Line Input of your sound
card.
2•32
Page 47

POD Farm 1.01 – Driver Panel & Recording
Li n e 6 dr i v e r Pa n e L & re c o r d i n g
So, just how does all that huge amount of Tone get routed around between your Line 6 gear, computer
and recording software you ask? All this is performed by the audio driver - a software component
installed with POD Farm that allows the audio to be routed to the right place. This section provides
an overview of the different driver types and where you can tweak a few settings to work best with your
particular computer setup. For more instructions about setting up POD Farm and your Line 6 hardware
for recording with specific audio recording programs, please check out the additional documentation
found on the POD Farm Online Help page.
Windows® 64 bit users... The installation of POD Farm also installs Windows® XP® and Vista® 64
bit compatible audio drivers for your Line 6 hardware. The Windows® features described here in this
chapter are the same for 32 bit or 64 bit Window systems.
Audio Routing
POD Studio, TonePort and GuitarPort hardware - Input sources fed into the Line 6 hardware are
handled by the audio driver, which manages applying the POD Farm Tone processing to your signal,
feeding the processed audio out the Record Sends to your audio software, gathering playback audio
from your audio software and then routing the audio back to the Line 6 hardware’s outputs and to your
monitoring system. The audio driver also grabs the POD Farm processed signal before routing it to the
Record Sends and hands this off to ToneDirect™ Monitoring immediately, to provide a low latency
monitor signal, which is then routed to the Line 6 hardware and mixed with the rest of your audio and
fed to your monitoring system.
POD X3/PODxt hardware - Input sources fed into POD devices are fully processed right on the POD
hardware itself. The POD-processed audio is then handled by the audio driver, which manages feeding
the audio out to the USB Record Send(s) to your audio software, gathering playback audio from the
audio software, and then routing the mixed audio back to the POD’s outputs and to your monitoring
system. POD also grabs its processed signal before routing it to the Record Sends its internal USB
Monitoring system immediately, to provide a low latency monitor signal, and then mixes it with the
rest of your audio to your monitoring system.
The Line 6 Audio-MIDI Devices Dialog
Since your Line 6 device includes our high-performance audio driver, it can act as a USB sound card
for just about any audio software that might be installed on your Mac® or Windows® computer. This
dialog is the place where you can access the audio driver settings for your connected device to see and
configure things such as the current Sample Rate, Bit Depth, Buffer settings, etc. One thing to note here
is that this dialog offers controls specifically for your Line 6 hardware type. The POD Farm Standalone
software is independent of these settings, however, you’ll see information regarding your Record Sends
here which may change depending on whether POD Farm is currently running in Standalone mode or
not. For POD Studio, TonePort and GuitarPort devices, you can think of the POD Farm Standalone
software like a giant rack of gear – if it is not running and configured to use your POD Studio/TonePort/
GuitarPort hardware, your guitar signal will still be heard, but will be “naked”, without all those lovely
amp & effects sounds. For POD X3 & PODxt devices, since your Tone is always running on the POD
itself, you’ll hear whatever your POD’s Tone and audio routing settings are set to deliver. POD Farm
Standalone software does not run with POD X3 and PODxt connected hardware (however, you can
3•1
Page 48

POD Farm 1.01 – Driver Panel & Recording
utilize the POD Farm Plug-In with these devices). There, aren’t you feeling smarter already?
The options in the Line 6 Audio-MIDI Devices dialog are slightly different if you are on a Windows®
versus a Mac® system, and also slightly different depending on which Line 6 hardware you are using.
Just check out the descriptions that match your setup in the following sections…
Windows® - Line 6 Audio-MIDI Devices Dialog
You can launch the Line 6 Audio-MIDI Devices dialog from within the Windows® XP® or Vista®
Control Panel (Start button > Settings > Control Panel), or from the POD Farm Help > Hardware &
Driver Settings.
Driver Tab - Windows
POD Studio, TonePort & GuitarPort - This example shows UX2 as the selected device, with POD
Farm running in Standalone mode. You’ll see some differences with a POD device selected, which are
noted in the following diagram - click on a number to go to its description. If you have a UX8 device,
you’ll have even more options, so be sure to also read up on the UX8 specific sections...
2 3
1
9
10
11
4
5
6
7
8
1 – Line 6 Device selector: Allows selection of any supported Line 6 USB audio device that is
connected. Note that if you have more than one supported device connected, each will be selectable
in this list, regardless if it is in use by the POD Farm Standalone application or not. If your device is
not connected and powered on, it will not appear in this list.
3•2
Page 49

POD Farm 1.01 – Driver Panel & Recording
2 – Selected Device icon: An icon for the selected Line 6 Device appears here.
3 – Driver version: Displays the current device’s installed driver version number.
4 – ESN: Displays the current device’s unique Electronic Serial Number.
5 – ASIO Client indicator: If you are running audio software that is using this Line 6 device as its
ASIO sound card, the name of the software will appear here. If not in use by an ASIO software, “none”
is displayed here, as shown in the above example.
6 – Buffer Size: The ASIO buffer size in use. Note this field is only active when in use by an ASIO
application. As your DAW software documentation will likely tell you, the ASIO Buffer Size will affect
the “responsiveness” and “latency” of the DAW software. The lower the setting, the faster the response,
but with the trade-off of higher processor usage and the risk of audio dropouts. Raise the value if you
are getting inconsistent playback or recording in the audio software. Basically, 512 is generally a good
average setting.*
*Note that POD Studio, TonePort and GuitarPort devices also offer ToneDirect™ Monitoring,
which is a separate audio path with its own Buffer setting. This allows you to keep the above
ASIO Buffer Size at a high “stable” value, yet still benefit from low latency monitoring of your
input signal while recording. Similarly, POD devices offer a USB audio buffer which provides
an independent, direct monitor signal with its own buffer adjustment as well. More info on
ToneDirect monitoring can be found in this section.
7 – Bit Depth: The ASIO bit depth in use. Note this field is only active when in use by an ASIO
application. It is recommended to use the 24-bit option here as well as the 24-bit option within your
ASIO recording software. (If your ASIO audio software only supports or is set to 16-bit, then it is
recommended to set your Line 6 hardware’s Bit Depth setting here also to 16-bit to match).
8 – Sample Rate Converter Active indicator: POD Studio, TonePort & GuitarPort devices support
44.1 and 48 kHz sample rates natively, and also support 88.2 and 96 kHz sample rates by way of an
internal sample rate converter. This indicator lights up to show you when this converter is active,
which can be any time your ASIO software is requesting a different sample rate than what your device
“natively” supports. UX8 and POD X3 family devices support 44.1, 48, 88.2 and 96 kHz sample rates
natively.
9 – Driver Operation indicator:
POD Studio, TonePort & GuitarPort devices - Displays what sample rate and bit depth the current
device is operating at (or with no text if not in use).
10 – Lock Driver Format: When checked, this forces the Line 6 audio driver to operate at the Sample
Rate and Bit Depth settings entered in the two fields below (as opposed to following the sample rate
requested by a Windows audio application).
Note – This checkbox will remain grayed-out while the current Line 6 device is in use by the
POD Farm Standalone application and/or any 3rd party audio application. To access the Force
Driver Format feature, you will need to exit POD Farm, as well as any audio software that
might be using the currently selected Line 6 device as its audio device. This checkbox will then
be selectable.
Windows Vista users... you won’t see these options in this portion of the dialog since these driver
format options are handled by Vista itself. You will instead see a Sound Control Panel button:
3•3
Page 50

POD Farm 1.01 – Driver Panel & Recording
Pressing this button (not surprisingly) launches the Vista Control Panel’s Sound dialog. Here in the
Playback tab you can designate your Line 6 USB device as the “Default” audio device if you want all
your Vista programs such as Win Media Player, Flash Player, iTunes, Internet video players, etc., to
send their playback to it. However, if you are going to set your Line 6 device as the default, it is a good
idea to also go to the Sounds tab and set it to the No Sounds sound scheme to avoid also getting blasts
of all those Vista system alerts, beeps and dings blaring through your monitors or headphones!
The Vista Sound Control Panel dialog - Playback tab
You can also click on the Properties button and access the default format setting for the Sample Rate
and Bit Depth for your Line 6 device when used with Vista audio applications. (Note that if you are
using an audio application that is set to utilize the ASIO driver for your Line 6 device, then ASIO
communicates directly with the device, and these Vista “default format” settings do not apply).
3•4
Page 51

POD Farm 1.01 – Driver Panel & Recording
The Vista Control Panel>Sounds>Properties - Advanced tab
11 – ToneDirect Monitoring Buffer Size: This slider adjusts the buffer size for the audio responsiveness
of the ToneDirect Monitoring signal. Basically, the default setting should be fine for most systems, but
if getting audio dropouts or working with large CPU demands on your system, raise the slider a notch
or two to the right until it alleviates the problem. Please see the ToneDirect Monitoring section for
more details.
Inputs & Recording Tab - Windows
Input Source Menu: This allows the user to select which physical input “source” is used on the Line 6
USB hardware (Mic 1, Instrument, etc.). Note that this menu is ONLY selectable when the POD Farm
Standalone software is not in use by the Line 6 hardware. When POD Farm is in use, it remains grayed
out, but displays the current Source that is selected within POD Farm Standalone.
When POD Farm Standalone is not in use by the selected Line 6 device, this Input Source menu, like
the POD Farm Tone 1 Input Source menu, offers a list of input options.
GX, DI and GuitarPort are always “fixed” to only route their “instrument” 1 /4 input signal into
POD Farm Standalone.
PODxt & POD X3 devices do not offer an Input Source menu in this dialog.
3•5
Page 52

POD Farm 1.01 – Driver Panel & Recording
TonePort UX8 has a larger set of options - see the next section for its Inputs & Recording tab.
Record Sends Info box: One line for each Record Send appears here along with a general description
for the signal each Send is carrying. Refer to your specific Line 6 device type in the following
descriptions.
Note that multiple Sends for your Line 6 device are only available when using the ASIO driver
in your recording software. If your recording software is configured to access the device via its
WDM or DirectSound driver, then only one Send will be available in the recording software
(Send 1-2).
POD Studio, TonePort & GuitarPort devices (except UX8) show the following Sends:
TonePort devices show two stereo Sends (Record 1-2 and Record 3-4)
Single Tone Source (Mono/Stereo): When the POD Farm Standalone application is not •
running, Record Send 1-2 and 3-4 both carry the unprocessed signal. When running POD Farm
Standalone, Record Send 1-2 and 3-4 carry the type of signal defined within POD Farm’s Mixer
View - Record Send Source menus (Processed, Semi-Processed or Dry) - see the POD Farm
Standalone - Mixer section for details.
POD X3 devices show a list of 5 Record Sends:
3•6
Page 53

POD Farm 1.01 – Driver Panel & Recording
Note that the type of signal that is fed to each Send is configured on the POD X3’s on-board Outputs Studio/Direct Mix settings screen. To put it another way, Send 1-2 is fed the same “Studio/Direct Mix”
as your main outputs, which could be just a Tone 1, or some combination of Tone 1 & 2, depending on
how you set the Studio/Direct mix controls. Please refer to your POD X3 Pilot’s Handbook for details
on the Output screen options and especially about POD X3’s unique Dual Tone operation.
POD X3 also offers a Monitor Level slider in this tab as well - you can use this to independently adjust
your POD X3 hardware monitor signal while recording (independently of the Send signal level that is
being recorded).
PODxt devices show one Record Send (Record 1-2).
The type of signal that is routed to the Record Send 1-2 is determined by the PODxt Signal Routing
option within the Audio Signal Routing menu at the left, (see the PODxt Audio Signal Routing
section for more about the options in this menu). PODxt also offers a Monitor Level slider in this
tab as well - you can use this to independently adjust your PODxt monitor signal while recording
(independently of the Send signal level that is being recorded).
3•7
Page 54

POD Farm 1.01 – Driver Panel & Recording
Inputs & Recording Tab (TonePort UX8 only - Windows)
The Inputs & Recording tab lets you select specific inputs for recording. Input Source options are as
follows:
Input 1: Instrument 1 or XLR 1 or Line 1 or S/PDIF (L)
Input 2: Instrument 2 or XLR 2 or Line 2 or S/PDIF (R)
Input 3: XLR 3 or Line 3
Input 4: XLR 4 or Line 4
Input 5: XLR 5 or Line 5
Input 6: XLR 6 or Line 6
Input 7: XLR 7 or Line 7
Input 8: XLR 8 or Line 8
You can also link inputs into stereo pairs. This affects
hardware monitoring controls in the Outputs &
Monitoring tab (see below).
Using Inputs 1 & 2 with the POD Farm Standalone application
The POD Farm Standalone application works with the UX8 driver to provide ultra-low latency
3•8
Page 55

POD Farm 1.01 – Driver Panel & Recording
via ToneDirect™ monitoring for Inputs 1 & 2 of the UX8, which includes two high-Z Instrument
inputs, two XLR inputs, two Line level inputs and stereo S/PDIF input. POD Farm’s ToneDirect™
Monitoring is ideally suited for recording guitar and bass with amp and effects processing, providing
the instantaneous feel necessary for competent performance while tracking.
ASIO Record Sends
This box displays the ASIO names of the UX8’s input sources as they appear in recording applications
utilizing the UX8’s ASIO driver, along with a description of what each Send is carrying. UX8’s Input
Sources 1 through 8 are mapped directly to the corresponding Send number (i.e. - Inputs 1-2 are fed
to Record Send 1-2). Sends 9-10 and 11-12 will carry a different signal depending on if the POD Farm
Standalone application is running...
If the POD Farm Standalone application is not currently running, then you’ll see the list appear as
follows:
When POD Farm Standalone is not running, Sends
9-10 and 11-12 carry the Input 1 (dry, unprocessed)
signal
If the POD Farm Standalone application is currently running, then Sends 9-10 and 11-12 will carry
the type of signal defined within POD Farm’s Mixer view - Record Send Source menus (Processed,
Semi-Processed or Dry) - see the POD Farm Standalone - Mixer section for details.
Hardware Meters Show
Use this menu to select the input and output
levels you want the UX8’s hardware meters to
display.
Clock Source
Set your preferred UX8 clock source with this menu.
Select S/PDIF to sync the UX8 to S/PDIF clock source
from another device’s digital output.
3•9
Page 56

POD Farm 1.01 – Driver Panel & Recording
Outputs & Monitoring Tab (UX8 Only - Windows)
Important: Note that the Outputs & Monitoring tab provides control over the volume of whatever
you are inputting into UX8. These controls do not affect Send levels (the audio that streams into
your recording software), nor do they control the level of audio coming from your computer (such as
the playback level of your software’s session). In other words, volume and pan levels here are purely
analog, intended for monitoring live input levels (from instruments, mics, etc) to provide you with
independent level control over these items versus the playback levels of your audio software’s tracks.
You can specify different mix settings for each pair of UX8 outputs if you like. By default, the only
sounds that come out of the UX8 are the computer’s output and POD Farm Record Send 9-10 signal
(determined by the POD Farm Mixer View - Record Send settings), all through the physical Main
Outs 1-2. You can directly monitor other UX8 inputs by unmuting (uncheck the Mute checkbox for)
the corresponding input source in this tab. Note that the Mute and volume controls here only act upon
inputs (your guitar, bass, mic etc., plugged into the UX8), and not audio coming from your computer
(such as the playback of your DAW software session). UX8 provides monitoring through the hardware
with zero latency, which is ideal for tracking with multiple sources simultaneously.
Use the drop-down menu at the top to
select the output pair that you want to mix.
Each output pair can have different mix
settings.
3•10
Page 57

POD Farm 1.01 – Driver Panel & Recording
Mix Controls
Inputs 1 - 12 offer the following controls:
Mute (On/Off) Monitor Volume (-100dB to +6dB)
Monitor Pan (100% Left - 100% Right)* Stereo Monitor Meters
* -3dB panning law is applied to the pan control to maintain a constant monitoring level across the
panorama.
Main Monitor Volume
This slider controls the overall monitoring volume for the current output pair. What you hear is
displayed in the adjacent level meter and includes the combination of input sources and computergenerated signals, such as those assigned to the current output from within your DAW software. Note
that computer-generated signals (e.g. - the playback audio from your DAW software’s session) are
unaffected by the volume slider. The level meter’s clip LED graphics light up when the signal reaches
0 dB.
Main Mix vs. Talent Mix
UX8’s two front panel headphone outputs mirror Outs 1-2 and 3-4 respectively. You can use the
monitor controls, for example, to create a “main mix (1-2)” that captures the overall image of the
recording project, while a separate “talent mix (3-4)” can be provided for the musician who is currently
performing a new part, and may need a click track and an ample level of themselves above the rest
of the mix (you know, the guy asking for “more me” in his headphones). Additional output pairs 5-6
and 7-8 are available for headphone mixers or sending to an external tape deck, other monitors, or
whatever else you might want to send out a customized mix to.
Stereo Pairs
When the “Stereo” checkbox is active in the Inputs & Recording tab for a pair of Inputs, the
representative Inputs in the Ouputs and Monitoring tab will display them as “locked” as a stereo pair.
3•11
Page 58

POD Farm 1.01 – Driver Panel & Recording
The lock icon represents
two sources linked as a
stereo pair.
Using tool tips
You can obtain precise value readings for output levels, volume sliders and pan sliders. Do this by
hovering the mouse cursor over the meter or slider you wish to read.
The Pan sliders for a
“locked” stereo pair are
automatically set to
100% Left and Right.
3•12
Page 59

POD Farm 1.01 – Driver Panel & Recording
Mac® - Line 6 Audio-MIDI Devices Dialog
You can launch the Line 6 Audio-MIDI Devices dialog from within the Mac® System Preferences, or
from the POD Farm Standalone application’s Preferences > Hardware tab. On Mac® systems, all Line
6 hardware utilizes the Mac® OS X® Core Audio driver format, which means that some of your Line
6 device settings are found in the OS X Audio-MIDI Setup dialog. You can get to this dialog from
within the Line 6 Audio-MIDI Devices dialog (or, from the Finder by going to Applications > Utilities
> Audio-MIDI Setup).
Line 6 Audio-MIDI Settings - Driver Tab
POD Studio, TonePort & GuitarPort devices – The following example shows POD Studio UX2 as
the selected device, with the POD Farm Standalone software running. If you have the UX8 hardware,
you’ll have even more options, so be sure to also read up on the UX8 specific sections...
POD X3 & PODxt devices - You’ll see some differences with a POD device selected – as noted in the
following descriptions…
1 2 3 4
5
6
1 – Line 6 Device selector: Allows selection of any supported Line 6 USB audio device that is
connected. Note that if you have more than one supported device connected, each will be selectable
in this list, regardless if it is in use by the POD Farm Standalone application or not. If your device is
not connected and powered on, it will not appear in this list.
2 – Selected Device Icon: An icon for the selected Line 6 Device appears here.
3 – Driver version: Displays the current device’s installed driver version number.
4 - ESN: Displays the current device’s unique Electronic Serial Number.
5 – Run Audio-MIDI Setup button: On Mac® systems, Core Audio sound card driver settings are
configured in the OS X® Audio-MIDI Settings utility. This button launches this dialog for you (see
following OS X Audio-MIDI Settings Dialog section).
6 – Sample Rate Converter Active indicator: POD Studio, TonePort and GuitarPort devices support
3•13
Page 60

POD Farm 1.01 – Driver Panel & Recording
44.1 and 48 kHz sample rates natively, and support 88.2 and 96 kHz sample rates by way of an internal
sample rate converter.* This indicator lights up to show you when this converter is active, which can
be any time your audio software is requesting a different sample rate you’re your device “natively”
supports or is “fixed” at. Also see the Force Driver Format checkbox option. See the description for the
Mac Audio-MIDI Setup dialog for more about Sample Rates.
*UX8 and POD X3 hardware supports 44.1, 48, 88.2 and 96 kHz sample rates natively.
Note that POD Studio, TonePort & GuitarPort devices all offer ToneDirect™ Monitoring,
which is a separate audio path than the Mac® Core Audio system uses to route your processed
signal to your audio software. ToneDirect Monitoring allows your POD Farm processed
monitor signal to function with very low latency. There are no adjustments necessary for these
monitoring systems. More information on ToneDirect can be found in the next section.
®
Mac
OS X® Audio-MIDI Setup Dialog
Note: For UX8, please see the following UX8 Audio-MIDI Settings section.
5a
5b
5c
5d
5a – System Settings:
The • Default Input and Default Output options allow you to choose the sound card you want
your audio applications to use by default. If you want this to be your Line 6 device, select it
here.
The • System Output option allows you to choose which sound card the Mac System Settings are
played through. You may NOT want to choose this to be your Line 6 device, since it can be rather
annoying to hear those dings, beeps or frogs croaking at blaring volumes in your headphones
or monitors when working in your audio application! Even better, you can turn these system
settings off completely in the System Preferences > Sounds dialog.
5e
5f
5b – Properties For: Choose your Line 6 device here to allow the Audio Input and Audio Output
3•14
Page 61

POD Farm 1.01 – Driver Panel & Recording
options display its settings.
5c – Audio Input:
In the top selector, you will be able to choose your Record Send for your Line 6 device to view •
it’s format settings below.
The • Format selectors show you the Sample Rate* and Bit Depth that the Line 6 device is
operating at for recording. The Bit Depth for all Line 6 devices is fixed at 24 bit.
*It is recommended that you do not use the Sample Rate selector here in the Mac Audio-MIDI
Setup dialog to set your sample rate when your recording software is running. Typically, your
recording software will offer a Sample Rate option within its own “Preferences” or “Audio
Setup” settings. It is best to configure the Sample Rate within the recording software, and you
will see the device’s sample rate switch automatically to match it.
5d – Volume sliders (audio input):
These sliders are not functional with Line 6 hardware - use the POD Farm Standalone Mixer sliders
and/or the Tone’s Volume controls instead of using these sliders to set your Record Send levels for Line
6 devices.
5e – Audio Output:
The • Format selectors show you the Sample Rate* and Bit Depth that the Line 6 device is
operating at for playback. The Bit Depth for all Line 6 devices is fixed at 24 bit.
*It is recommended that you do not use the Sample Rate selector in the Mac Audio-MIDI
Setup dialog to set your sample rate when your recording software is running. Typically, your
recording software will offer a Sample Rate option within its own “Preferences” or “Audio
Setup” settings. It is best to configure the Sample Rate within the recording software for your
project, and you will see the device’s sample rate switch automatically to match it.
5f – Volume sliders (audio output):
These sliders are not functional for Line 6 hardware - use the POD Farm Standalone application’s
Volume controls (or the Volume knobs on your Line 6 hardware) instead of these sliders to adjust
output levels.
3•15
Page 62

POD Farm 1.01 – Driver Panel & Recording
Mac® OS X® Audio-MIDI Settings Dialog (UX8 Only)
5a
5b
5c
5d
5e
5f
5a – System Settings:
The • Default Input and Default Output options allow you to choose the sound card you want
your audio applications to use by default. If you want this to be your Line 6 device, select your
UX8 here.
The • System Output option allows you to choose which sound card the Mac System Settings are
played through. You may NOT want to choose this to be your Line 6 device, since it can be rather
annoying to hear those dings, beeps or frogs croaking at blaring volumes in your headphones
or monitors when working in your audio application! Even better, you can turn these system
settings off completely in the System Preferences > Sounds dialog.
5b – Properties For: Choose your UX8 here to allow the Audio Input and Audio Output options
display its settings.
5c – Audio Input:
In the top selector, you will be able to choose your Record Send for the UX8 to view its Format •
settings below.
The • Format selectors show you the Sample Rate* and Bit Depth that the Line 6 device is
operating at for recording. The Bit Depth is fixed at 24 bit.
3•16
Page 63
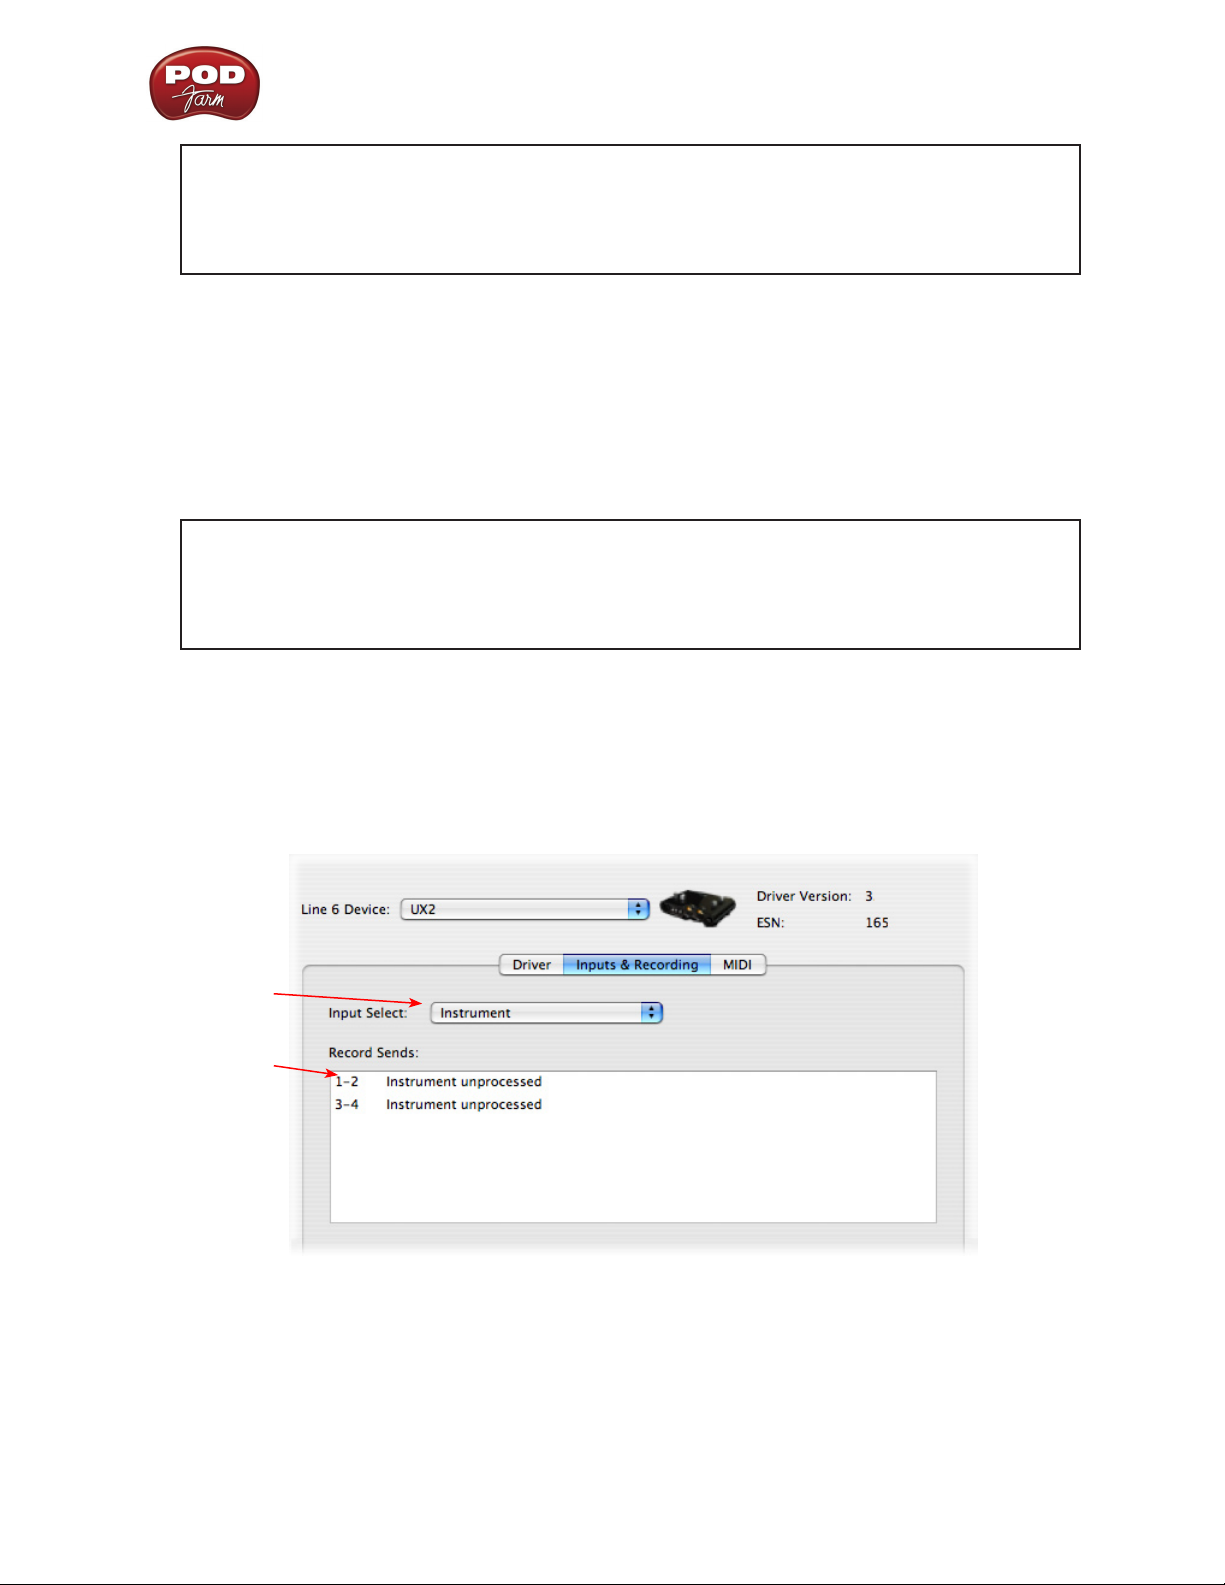
POD Farm 1.01 – Driver Panel & Recording
*It is recommended that you do not use the Sample Rate selector in the Mac Audio-MIDI
Setup dialog to set your sample rate when your recording software is running. Typically, your
recording software will offer a Sample Rate option within its own “Preferences” or “Audio
Setup” settings. It is best to configure the Sample Rate within the recording software, and you
will see the device’s sample rate switch automatically to match it.
5d – Volume sliders (audio input):
These sliders 1 - 12 are not functional with UX8 - use the POD Farm Standalone Mixer sliders and/or
Tone volume instead of using these sliders to set your Record Send levels for Line 6 devices.
5e – Audio Output:
The • Format selectors show you the Sample Rate* and Bit Depth that the UX8 is operating at for
playback. The Bit Depth for all Line 6 devices is fixed at 24 bit.
*It is recommended that you do not use the Sample Rate selector in the Mac Audio-MIDI
Setup dialog to set your sample rate when your recording software is running. Typically, your
recording software will offer a Sample Rate option within its own “Preferences” or “Audio
Setup” settings. It is best to configure the Sample Rate within the recording software, and you
will see the device’s sample rate switch automatically to match it.
5f – Volume sliders (audio output):
These sliders are not functional for Line 6 hardware - use the POD Farm Standalone volume controls
(or the Volume knobs on your Line 6 hardware) instead of these sliders to adjust output levels.
Line 6 Audio MIDI Settings Dialog - Inputs & Recording Tab
1
2
1 –Input Select Menu: This allows the user to select which physical input “source” is fed from the Line
6 USB hardware (Mic 1, Instrument, etc.). Note that this menu is ONLY selectable when the POD
Farm Standalone software is not in use by the Line 6 hardware. When POD Farm is in use, it remains
grayed out, but displays the current Source that is selected within POD Farm Standalone.
3•17
Page 64

POD Farm 1.01 – Driver Panel & Recording
When POD Farm Standalone is not in use by the selected Line 6 device, this Input Source menu,
like the POD Farm Tone 1 Input Source menu, offers a list of input options. The options will differ
depending on the Line 6 device - (POD Studio and TonePort) UX2 displays the following:
When POD Farm Standalone is not
running, the Input Source Select menu
is available. As shown here, UX2 offers
several input Sources to choose from.
The selected Source is what gets routed
to the Device Sends.
GX, DI and GuitarPort devices are always “fixed” to only route their 1/4-inch input signals. With
one of these devices, this Input Source Select list offers only “Instrument” as the source.
POD X3 and PODxt devices are “fixed” to route their input signals. With one of these devices
there is no Source Select menu displayed in the dialog.
2 – Device Sends info box: One line for each Record Send appears here along with a general description
for each Send.
POD Studio, TonePort & GuitarPort devices (except UX8) show two stereo Sends (1-2 and
3-4):
The Device Sends description shows the
Input Source, and informs you if that signal
is “processed” or not. Since POD Farm
Standalone is not running, the signals are
unprocessed.
3•18
Page 65

POD Farm 1.01 – Driver Panel & Recording
POD X3 devices show a list of 5 Record Sends:
Note that the type of signal that is fed to each Send is configured on the POD X3’s on-board Outputs
settings screen. For example, Send 1-2 carries the same “Direct/Studio” signal you hear on POD X3’s
Main outputs, which could be just Tone 1, or some combination of Tone 1 & 2. Your POD X3 Output
screen options allow you to mute, pan or swap Tone 1 and Tone 2, so these options will of course also
affect what is fed to the Sends. Please refer to your POD X3 Pilot’s Handbook for details on the Output
screen options and especially to learn more about the unique POD X3 Dual Tone feature.
POD X3 also offers a Monitor Level slider in this tab as well - you can use this to independently adjust
your POD X3 monitor signal while recording (independently of the Send signal level that is being
recorded).
PODxt devices show one Record Send (1-2).
The type of signal that is routed to the Record Send 1-2 is determined by the PODxt Signal Routing
option within the Audio Signal Routing menu at the left. Note that this Audio Signal Routing
determines this signal type (see the PODxt Audio Signal Routing section for more about the options
in this menu). PODxt also offers a Monitor Level slider in this tab as well - you can use this to adjust
your PODxt monitor signal while recording (independently of the Record Send 1-2 signal level that
is being recorded).
3•19
Page 66

POD Farm 1.01 – Driver Panel & Recording
Line 6 Audio MIDI Settings Dialog - Inputs & Recording Tab (UX8 Only)
1
1 – Input Source Select: UX8 offers 8 individual input sources, each with its own selector where you
can choose which physical input is to be used for each. Input source options are as follows:
2
3
4
5
Input 1: Instrument 1 or XLR 1 or Line 1 or S/PDIF (L)
Input 2: Instrument 2 or XLR 2 or Line 2 or S/PDIF (R)
Input 3: XLR 3 or Line 3
Input 4: XLR 4 or Line 4
Input 5: XLR 5 or Line 5
Input 6: XLR 6 or Line 6
Input 7: XLR 7 or Line 7
Input 8: XLR 8 or Line 8
Using Inputs 1 & 2 with the POD Farm Standalone application
The POD Farm Standalone application works with the UX8 driver to provide ultra-low latency via
ToneDirect™ Monitoring for Inputs 1 & 2 of the UX8, which includes two high-Z Instrument inputs,
two XLR inputs, two Line level inputs and stereo S/PDIF input. POD Farm’s ToneDirect Monitoring is
ideally suited for recording guitar and bass with amp and effects processing, providing the instantaneous
feel necessary for competent performance while tracking.
3•20
Page 67

When POD Farm Standalone is not running,
the Input 1 & input 2 selectors are available. As
shown here, UX8 offers several input Sources to
choose from. The selected Source is what gets
routed to the Record Send.
Stereo Paired Inputs
You can also link inputs into stereo pairs. This affects
hardware monitoring controls in the Outputs &
Monitoring tab (see below).
POD Farm 1.01 – Driver Panel & Recording
2 – Record Sends info box: This box displays the names of the UX8’s input sources as they appear in
Mac recording applications utilizing the UX8’s Core Audio driver, along with a description of what
each Send is carrying. UX8’s Input Sources 1 through 8 are mapped directly to the corresponding Send
number (i.e. - Inputs 1-2 are fed to Record Send 1-2). Sends 9-10 and 11-12 will carry a different signal
depending on if the POD Farm Standalone application is running...
If the POD Farm Standalone application is not currently running, then you’ll see the list appear as
follows:
When POD Farm Standalone is not running, Sends
9-10 and 11-12 carry the Input 1 (dry, unprocessed)
signal
If the POD Farm Standalone application is currently running, then Sends 9-10 and 11-12 carries
the type of signal defined within POD Farm’s Mixer view - Record Send Source menus (Processed,
Semi-Processed or Dry) - see the POD Farm Standalone - Mixer section for details.
3 - Clock Source - Set your preferred UX8 clock source with this menu. Select S/PDIF to sync the
UX8 to an external S/PDIF clock source from another device’s digital output. If you are not connecting
anything into UX8’s digital S/PDIF input, then keep this set to Internal to use the UX8’s own clock.
4 - Hardware Meters Show - This selector allows you to choose what the VU meters on the front of
the UX8 are measuring. Note that these hardware meters function even if the POD Farm Standalone
software is not currently running.
3•21
Page 68
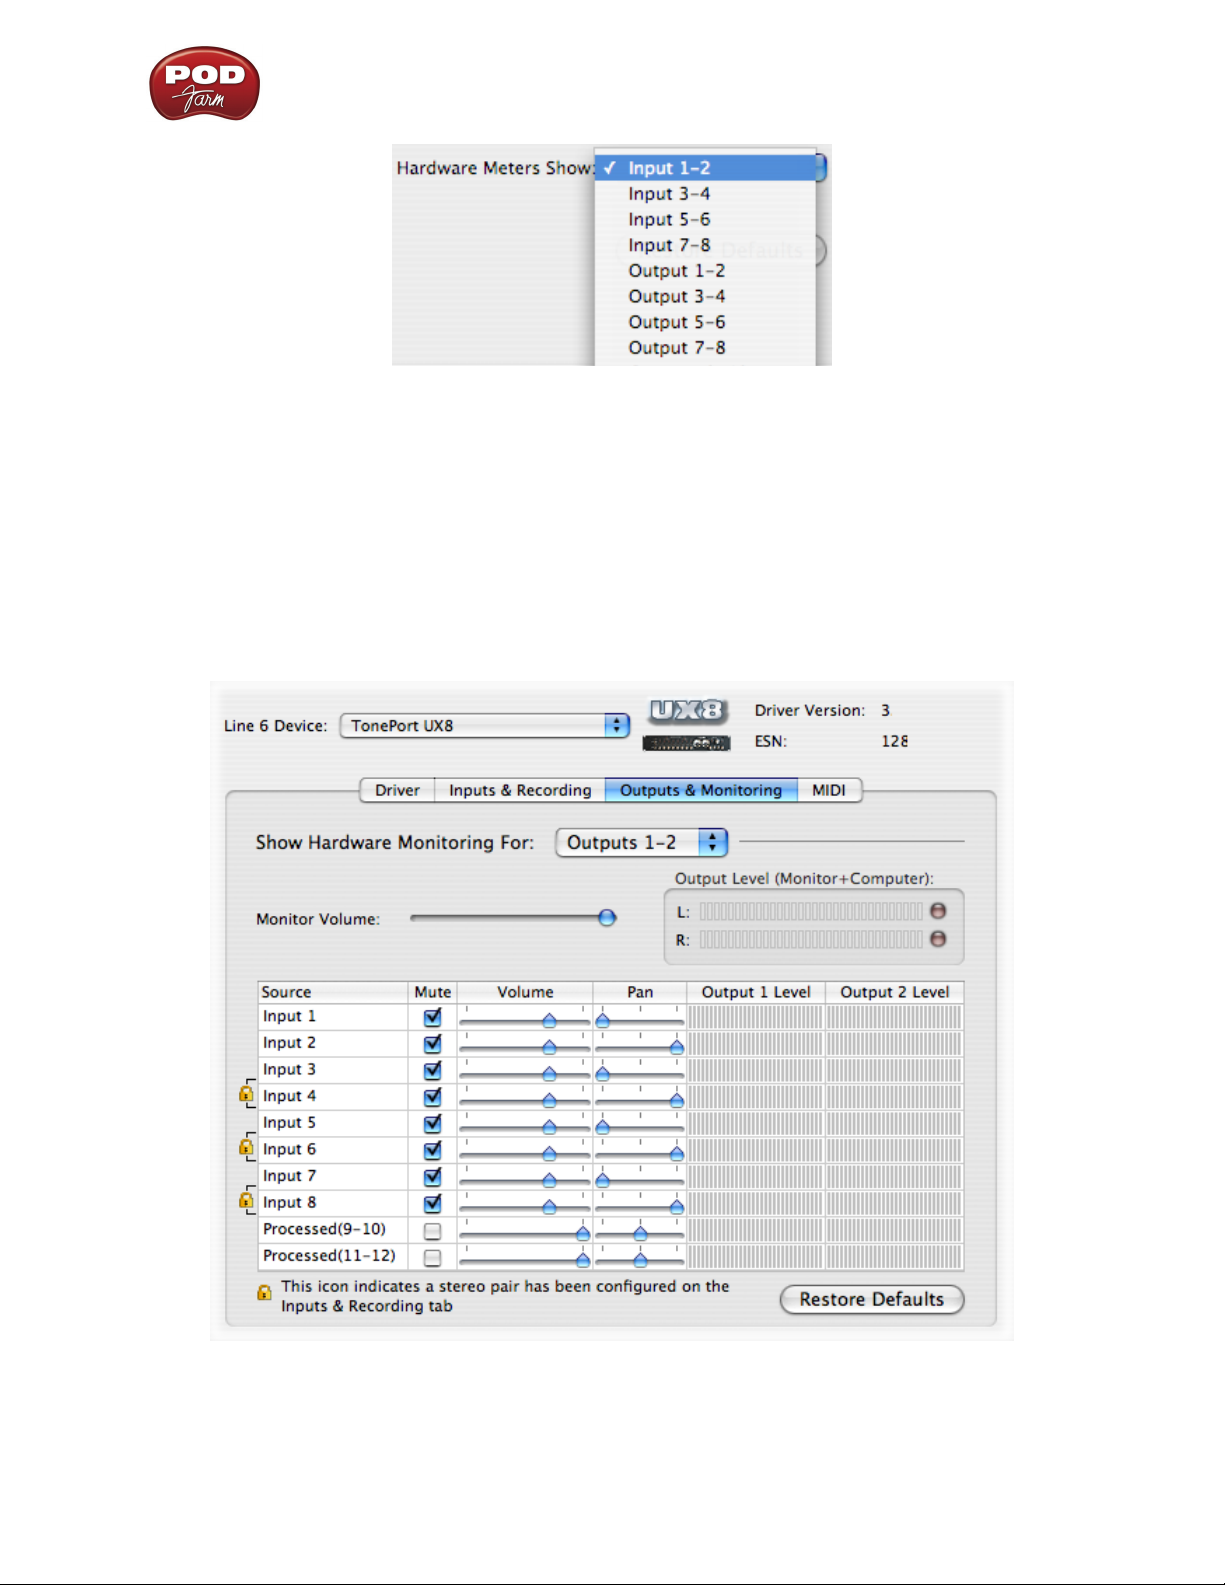
POD Farm 1.01 – Driver Panel & Recording
5 - Restore Defaults - click this button to restore all this tabs settings to their original default values.
Outputs & Monitoring Tab (UX8 Only - Mac®)
Important: Note that the Outputs & Monitoring tab provides control over monitoring levels,
specifically, what you hear coming out of the UX8. These controls do not affect Send levels, the
audio that streams into your recording software. In other words, volume and pan levels here are purely
analog, intended for monitoring live input levels (from instruments, mics, etc) and computer output
levels, in order to facilitate the recording process.
The Outputs & Monitoring tab provides control over hardware monitoring settings, including input
source volume, pan and mute states. You can specify different mix settings for each pair of UX8 outputs
if you like.
3•22
Page 69

POD Farm 1.01 – Driver Panel & Recording
By default, the only sounds that come out of the UX8 are the computer’s output and POD Farm 9-10
signal, all through Main Outs 1-2. You can directly monitor other UX8 inputs by un-muting (unchecking
the Mute checkbox for) the corresponding input source in this tab. UX8 provides monitoring through
the hardware with zero latency, which is ideal for tracking with multiple sources simultaneously.
Use the drop-down menu at the top
to select the output pair for which you
want to mix. Each output pair can
have different mix settings.
Mix Controls
Inputs 1 - 12 offer the following controls:
Mute (On/Off) Monitor Volume (-100dB to +6dB)
Monitor Pan (100% Left - 100% Right)* Stereo Monitor Meters
* -3dB panning law is applied to the pan control to maintain a constant monitoring level across the
panorama.
Main Monitor Volume
This slider controls the overall monitoring volume for the current output pair. What you hear is
displayed in the adjacent level meter and includes the combination of input sources and computergenerated signals, such as those assigned to the current output from within your recording software.
Note that computer-generated signals are unaffected by the volume slider. The level meter’s clip LED
graphics light up when the signal reaches 0 dB.
Main Mix vs. Talent Mix
The UX8’s two front panel headphone outputs mirror Outs 1-2 and 3-4 respectively. You can use the
monitor controls, for example, to create a “main mix (1-2)” that captures the overall image of the
recording project, while a separate “talent mix (3-4)” can be provided for the musician who is currently
performing a new part (you know, the guy asking for “more me” in his phones), and may need a click
3•23
Page 70

POD Farm 1.01 – Driver Panel & Recording
track and an ample level of themselves above the rest of the mix. Additional output pairs 5-6 and 7-8
are available for headphone mixers or sending to a mixer, other monitors, etc.
Stereo Pairs
When the “Stereo” checkbox is active in the Inputs & Recording tab for a pair of Inputs, the
representative Inputs in the Outputs and Monitoring tab will display them as “locked” as a stereo
pair.
The lock icon represents two sources linked as a stereo pair.
The Pan sliders for a “locked” stereo pair are automatically set to 100% Left and Right.
Using tool tips
You can obtain precise value readings for output levels, volume sliders and pan sliders. Do this by
hovering the mouse cursor over the meter or slider you wish to read.
3•24
Page 71

POD Farm 1.01 – Driver Panel & Recording
Important Things to Know for Recording
This section will give you some pointers for using your Line 6 Hardware for recording, to help you
get your brain wrapped around a few of the complex computer things your geeky friends talk about at
parties. We’ve got even more info, including setup tips for specific audio programs and system tweaking
tips in the additional documentation found at the POD Farm Online Help site.
Sample Rate and Bit Depth
When you select a Sample Rate in your audio recording software, your Line 6 hardware’s audio driver
will automatically match the sample rate setting. It is important to manually match the Bit Depth
settings between your audio recording software and Line 6 audio driver as well. Here are a few things
to check:
Configure your recording program’s sample rate settings, and then confirm that your Line 6 •
hardware is running at the correct settings in the Line 6 Audio-MIDI Devices dialog (Windows®)
or in the Audio-MIDI Setup dialog (on Mac®). It is best to always change the sample rate settings
in your audio software. In most audio software you’ll want to make this setting as a Global setting
or as a per project setting, and always before you start a new project for it to use a new sample
rate.
Typically, you can choose the 44,100 sample rate in your audio software for most projects. But if •
you have special requirements for your session, then you can alternatively choose 48,000, 88,200
or 96,000 Hz in your audio software and your Line 6 device will support any of these rates.
For the Bit Depth on Windows systems, it is typically best choose the 24-bit option in your •
Windows audio software and to manually select 24-bit in the Line 6 Audio-MIDI Devices dialog
if your Windows audio software supports this rate - most all audio recording software does these
days. If your Windows audio software is set to 16-bit operation, then it is best to match this
setting and choose the 16-bit option in the Line 6 Audio-MIDI Settings dialog.
For the Bit Depth on Mac systems, it is recommended you choose 24-bit in your recording •
software for all projects. As you’ll see in the Mac Audio-MIDI Setup dialog, 24-bit is the fixed
setting for both Audio Input and Output for all Line 6 devices.
3•25
Page 72

Line 6 POD Farm 1.01 - POD Farm Plug-In
Pod Fa r m PL U g -in
Welcome to the wonderful world of POD Farm Plug-In, where legendary, studio-standard Tone and
classic vintage effects are all available to you within your favorite Windows® or Mac® DAW (Digital
Audio Workstation) software, in a flexible native software Plug-In format! Note that most features
described in this chapter are also the same for POD Farm when in Standalone operation. For details
covering the additional features unique to Standalone operation, please see the following POD Farm
Standalone Operation chapter.
Windows
As mentioned at the start of this User Guide, POD Farm Plug-In supports Windows® XP® and Vista®
64 bit systems, so if you have one of those new-fangled 64 bit PC’s, POD Farm Plug-In and any POD
Farm-supported Line 6 USB hardware, then you are ready to rock. This of course includes the use
of the POD Farm in Standalone Operation on Windows 64 bit systems and with 64 bit audio host
applications!
®
64 Bit Support
A Quickie Plug-In Primer
There are many types of “Plug-Ins” in the world of software. Plug-Ins are relatively small applications
that can only run when loaded inside a compatible “host” software application. Plug-Ins operate within
the host application to extend the capabilities of the host. In the world of music software, audio PlugIns find frequent use inside audio/MIDI host recording & sequencing programs, commonly referred to
as DAW (Digital Audio Workstation) applications. Audio Plug-Ins provide signal processing for your
4•1
Page 73

Line 6 POD Farm 1.01 - POD Farm Plug-In
audio tracks or live audio input.
A helpful analogy for Plug-Ins is to think of them as effects pedals. Effects pedals change the Tone
of your bass or guitar before the signal reaches your amplifier. As with pedals, rack effects units, or
any other conventional piece of outboard gear, Plug-Ins provide familiar knobs, sliders & buttons for
tweaking their parameters. For example, a distortion Plug-In will most likely have similar controls to
a typical distortion pedal (such as drive, gain and tone). Visually, Plug-Ins often resemble the physical
gear they emulate.
When working with DAW software, using Plug-Ins provides some great benefits over using outboard
effects like pedals or rack processors, such as:
Plug-Ins are “non-destructive” to your audio track – this means that you can add or remove effects •
and tweak their settings as often as you like without permanently affecting the original audio
recording. If any processing (such as an effect or amp tone) is added before the signal is recorded
into your DAW, it is permanent and cannot be changed without recording another pass.
Plug-Ins sound the same way twice. Because you can store Plug-In settings as presets, precise •
settings can be recalled easily and loaded reliably. Every time you go back to work on a specific
song, you can rest assured that your Tones will be identical to the last session.
Plug-Ins are automatable. Host applications provide easy ways to create and manipulate parameter •
automation, giving you surgical precision of your Tone without having to “ride the faders” of
external gear during a record pass.
Plug-Ins don’t break, corrode, use up batteries, or take up space on your floor!•
Plug-In Parameter Automation
Most audio Plug-Ins are “automatable” from within your audio host software - meaning, you can
tweak the Plug-In’s parameters (e.g. - wah pedal position, delay mix level, stomp on/off, etc.) and your
adjustments will be recorded by the DAW in real-time, and recreated during playback.
All major DAW host applications, such as Steinberg Cubase®, Digidesign Pro Tools®, and Cakewalk
SONAR®, provide Plug-In parameter automation capabilities. Each host software offers parameter
automation options slightly differently, so it is recommended you consult your host software’s
documentation for their specific instructions.
In all host audio software, you’ll be able to access a menu of POD Farm Plug-In’s parameters so
that you can choose exactly which Amp and Effects models’ parameter(s) you want to automate.
POD Farm Plug-In presents its list of parameters with their names in abbreviated form in order to
accommodate length limitations of the host software. Also note that you’ll see two menu items for
each parameter, labeled with “1” and “2” at the start of their names. These numeric labels indicate
whether the parameter is for Tone 1 or Tone 2. For example, “1 Wah-Pos” and “2 Wah-Pos” are the
abbreviated names that appear in the host automation menu for the Tone 1 Wah Position and the
Tone 2 Wah Position parameters respectively.
For a description of all POD Farm Plug-In automation parameters, please see Parameter Automation
Table in the What is... chapter. For more info about using Plug-In Parameter Automation, as well as
more pointers for specific 3rd party audio software, please see the additional documentation at POD
Farm Online Help.
4•2
Page 74

Line 6 POD Farm 1.01 - POD Farm Plug-In
Supported Plug-In Formats
The POD Farm Plug-In comes in the following formats, making it compatible with just about every
major audio “host” software on the planet:
®
VST•
(Virtual Studio Technology) format for Windows® and Mac® recording environments
®
AU•
(Audio Units) format on the Mac® platform
®
RTAS•
(Real Time Audio Suite - for Digidesign Pro Tools and Pro Tools LE) for both Mac and
Windows
Activating the Plug-In
POD Studio and Other Line 6 Hardware: POD Farm Plug-In is included free on all POD Studio
family devices, and available as an optional Add-On for all Line 6 TonePort, GuitarPort, POD X3 and
PODxt devices. You will need to first launch Line 6 Monkey and “activate” POD Farm Plug-In, as well
as activate any additional Add-Ons for your device before you’ll be able to use them. You can do all
this quite simply with the Line 6 Monkey application that is automatically installed along with your
POD Farm software. Please see the Product Activation & Authorization instructions in the Getting
Started chapter.
iLok USB Smart Key: If you’ve purchased the POD Farm Plug-In license for your iLok, then you’ll
need to configure your iLok key to add the POD Farm Plug-In authorization (you do not run Line 6
Monkey for this process). Please see the iLok section in the Start Here chapter for the details.
Where Can I Find the POD Farm Plug-In On My Computer?
Most DAW “host” applications will scan and find your POD Farm Plug-In automatically on launch. But
if you don’t see POD Farm in your host’s Plug-In menus, then you’ll need to configure your host’s PlugIn options to find it (such options are typically found in the host’s Preferences). You have some options
during POD Farm installation to tell POD Farm Plug-In where to install, but if you did not define a
custom location, here is the default install location for each of the POD Farm Plug-In formats...
On • Mac
On • Windows®
®
Audio Units•
®
VST•
is installed to /Library/Audio/Plug-Ins/VST/Line 6
RTAS•
®
VST•
is installed to \Program Files\Line 6\POD Farm\VST\Line 6
RTAS•
®
is installed in Library/Audio/Plug-Ins/ Components
®
is installed to Library/Application Support/ Digidesign/Plug-Ins/Line 6
®
is installed to \Program Files\Common Files\Digidesign\DAE\Plug-Ins\Line 6
For detailed help on using the POD Farm Plug-In with today’s most popular audio recording
software applications, please visit the POD Farm Online Help page.
4•3
Page 75

Plug-In User Interface Overview
1
2
Line 6 POD Farm 1.01 - POD Farm Plug-In
3
4
1 - Main Control Bar
2 - View Selection Buttons
3 - Gear View/Panel View/Presets View
4 - Signal Flow View
Main Control Bar
Input Gain Control & Meter
Preset Name Display & Menu Output Level Control & Meter
Next/Previous Preset Control Preset View Shortcut Dual Tone Control
Input Gain Control - Sets the input gain fed into the Plug-In.
Input Meter - This stereo meter Meter displays input signal level fed into the Plug-In.
Next/Previous Preset Control - Next/previous buttons let you navigate sequentially through the
presets in the currently selected folder. You can select different preset folders in the Presets View.
Tone New/Open/Save Options
4•4
Page 76

Line 6 POD Farm 1.01 - POD Farm Plug-In
Note - These Next/Previous buttons are intended to allow you to incrementally go from one
preset to the next - if you click multiple times repeatedly then things may appear a bit sluggish
as POD Farm attempts to “catch up” in running through multiple presets. If you want to jump
around or find a particular preset, better to use the Presets View.
Presets View Shortcut Control - Provides a shortcut to Presets View.
Preset Name Display & Menu - Indicates the currently selected preset name. When a preset parameter
has changed, an asterisk will appear at the end of the name to indicate the preset is in the “tweaked”
(unsaved) state.
Tone New/Open/Save options - Click on this little folder icon to select from the following Tone
commands:
New - Creates a new, empty Tone so you can start from scratch and build your own sonic •
masterpiece.
Open - Allows you to browse your computer to open a specific .l6t Tone Preset file directly. (Note •
that this includes .l6t Tone files you may have created with Line 6 Edit, GearBox or GuitarPort
applications too!)
Save - Saves the currently loaded tone, if it is in a “tweaked” state.•
Save As - Creates a copy of the current Tone settings as a new .l6t Tone Preset File wherever •
you like on your computer. You’ll first be prompted with the Tone Info dialog where it is a good
idea to fill in some of the fields to allow you to store some descriptive info about this Tone, such
as the instrument or song you used it for, pickup position, etc. Click OK and the Save As dialog
is displayed so you can name the Tone file and choose where to save it. Note that you’ll want to
save the Tone in your POD Farm Source Directory if you want the Presets View to list the saved
tone for you.
Dual Tone Control
POD Farm’s Dual Tone feature allows you to create two different Tones in the Plug-In using one
common input signal. You have the option of running one tone (single tone), or two tones (dual
tone).
The Dual Tone button lets you switch between running in “Dual Tone” versus “Single Tone” •
mode.
If only one Tone is in the Signal Flow View, the Dual Tone button state appears ‘off’ and is not •
lit. If you click the Dual Tone button on, it adds the Default tone settings to Tone 2.
When two Tones are in the Signal Flow View, the Dual Tone button state appears ‘on’. If you then •
click the Dual Tone button when it is on, a menu drops from the button, listing two functions
Remove Tone 1 or Remove Tone 2.
Selecting either above options removes that corresponding Tone from the SFV, which then •
shows only a single Tone.
If you remove Tone 1, Tone 2 becomes the single Tone, and is now considered “Tone 1”; •
its input setting will be the same as the previous Tone 1 prior to its removal. If you discard
Tone 2, Tone 1 becomes the single Tone and its input setting does not change.
4•5
Page 77

Line 6 POD Farm 1.01 - POD Farm Plug-In
Output Level Control and Meters
The Output Level knob controls the main Plug-In output level, which is the total mix of •
Tones 1 and 2.
Stereo meters provide peak display with clip indicators. As always, you want to avoid clipping •
- adjust your individual Tone Output Levels, as well as the main Output Level knob here to
a achieve a healthy output reading on these meters, but without clipping.
View Selection Buttons
These buttons located along the upper left side of the application window allow you to the select what
is displayed within the View area: Gear, Panel, or Preset Views.
Gear View
Selected Gear Category Model Categories
Selected Model Scroll Bar Peripheral Models
Selecting Gear Categories
Press the Gear button once to access Amp and Effect Models.•
Model categories are listed horizontally along the top of the Gear view (e.g. - Guitar Amps, •
Bass Amps, Pre-Amps, etc.)
The currently selected category is lit amber. To select a different category, simply click on •
the model category name. The first model in the category will appear in the Gear View
window. Use the scroll bar (or your mouse wheel) to view other models in that category.
4•6
Page 78
Selecting a Model
When you hover over a model category a rectangle box is displayed and a downward arrow •
shows to the right of the category name. Pressing on the arrow displays a drop down list of
available models within that category. Select a model by clicking on the model name in the
list.
Double-click on the centered model and it is then placed in a default position within the •
signal flow of the currently selected Tone. Alternatively, you can drag the any model shown
in the Gear View panel into either Tone below and place it in within the signal flow. You’ll
see white downward arrows appear in the Signal Flow View indicating which position(s)
the model you are dragging can be dropped into (some effects models can optionally be
positioned in two spots - “Pre” or “Post”). You can also switch the effect’s position using the
Pre and Post buttons - see the following Effects View section.
When adding a model to your Tone where a Model of the same category already exists in the •
Tone, then the new model will replace it.
Scroll Bar
Click and drag left or right to browse through models in the selected category. •
Alternatively, use your mouse wheel to scroll through the models.•
Line 6 POD Farm 1.01 - POD Farm Plug-In
Panel View
Panel View provides a close-up view of the selected model and control over all its available parameters.
To access Panel View for any Amp, Cab or Effect model, click the Panel View button, then click on
the desired item within the Signal Flow View.
Amp View
Click on a guitar amp, bass amp or preamp within the Signal Flow View to display its controls in the
Panel View. Here you can choose to display the Amp or Cabinet/Mic options.
Amp Bypass Button Amp Model Menu Amp/Cab View Buttons
Amp Bypass Button - Press to individually bypass the Amp model processing.
Amp/Cab View Buttons - Press to toggle between displaying the Amp or the Cab View. (If you have
a preamp in use, rather than a guitar or bass amp, you won’t see these Amp/Cab buttons.)
Amp Model Menu - The current model name is displayed. Click the downward arrow to display and
select from a list of available amp models, or to swap out the current amp model with another one.
4•7
Page 79

Line 6 POD Farm 1.01 - POD Farm Plug-In
Cabinet View
From the Amp View, pressing the Cab button displays the Cabinet View. From here you can select
different guitar or bass speaker cabinets, change the positioning of the cabinet in the room, and select
among four different microphone emulations. There are many sonic possibilities available here by
trying different cabs and mics on the current amp, so tweak away!
Cabinet Model Menu Room (Early Reflections) Value Mic Model Menu Cab View
Amp Bypass Button Amp Model Menu
Cabinet Model Menu - The currently selected Cabinet model name is displayed. Click the down
arrow to switch to a different Cab.
Tip - To configure your Tone without speaker cabinet or mic simulation added, select “no
Cabinet” in the Cabinet menu.
Room (Early Reflections) Value
Drag the cabinet toward the back of the room for more ambient room tone, or toward the front •
for less. Alternatively, you can click the up/down arrows to adjust the amount of “room” sound
(or “early reflections” in recording lingo).
Drag the cabinet to the front of the room for less room sound - 0% Room effectively simulates a •
close-mic’ed cabinet.
Mic Model Menu
The currently selected microphone model name is displayed.•
Press the downward arrow, to the right of the microphone name, to select one of several •
microphone models.
If you have a guitar cabinet in use, you’ll be able to select from 57 On Axis, 57 Off Axis, 421 •
Dynamic, and 67 Condenser.
If you have a bass cabinet in use, you’ll be able to select from 20 Dynamic, 112 Dynamic, •
Tube 47 Close, and Tube 47 Far.
4•8
Page 80

Line 6 POD Farm 1.01 - POD Farm Plug-In
Effects View
Selecting any Effect in the Signal Flow View displays its controls in the Panel View...
Effect Bypass Button Effect Model Menu Pre/Post Toggle Host Sync/Tap Tempo Options
FX Time/FX Speed Controls
Effect Bypass Button - Bypasses the displayed effect without removing it from the signal flow.
Effect Model Menu - Displays the name of the current effect model. Click on the downward arrow
next to the name to select another model from within the current effect model category.
Pre and Post Toggle Buttons - With these buttons you can move the effect’s position within the signal
flow.
Click the Pre button to place the effect before the Amp*.•
Click Post to place the effect after the Amp, and near the end of the signal chain.•
*Note - Placing effects that offer stereo output (many Modulation and Delay effects are stereo
effects, for example) in the Pre position will change their output to mono, so that it can be
routed into the Amp as a single, mono input.
Host Sync and Tap Tempo Options (Master Tempo) - For most Delay and Modulation category
effects, you’ll see these options available at the top right of the Panel View. These allow you to set a
“Master Tempo” that all time-based effects in the Plug-In can automatically follow - this is how you
can get those echo repeats and swirly modulation effects to run “in time” with your song! (Note that
individual effects can alternatively have their tempo set independently - see the following FX Time/FX
Speed controls description). For this Plug-In Master Tempo, there are two “modes” of operation - sync
to the DAW host versus setting a BPM manually:
Host Sync On Host Sync Off
Host Sync - Click the Host Sync button to activate this feature. This sets the POD Farm Plug-In
Master Tempo to follow the current project tempo of the VST/AU/RTAS host software. Note that
even if your host project includes tempo changes, POD Farm Plug-In will follow those changes as
well when Host Sync is active! To have a Modulation or Delay effect utilize this Host Sync Master
Tempo, you additionally need to set the effect’s FX Time/FX Speed - Sync On/Off button to “On”.
4•9
Page 81

Line 6 POD Farm 1.01 - POD Farm Plug-In
*Note that when in POD Farm Standalone mode, you’ll see only the BPM & Tap Tempo
options (since obviously there is no “Host” application tempo to follow!)
BPM Tempo Field /Tap Tempo Button - Click the Host Sync button to toggle the Host Sync mode
“off” and you can then use these options to manually set a Master Tempo for POD Farm Plug-In.
To set a specific BPM, click directly on the BPM value and drag up/down. Or, “tap” in the desired
tempo by clicking directly on the Tap button - you’ll see the BPM field then display the new Master
Tempo you just tapped in. For best results, click several times at a steady rate for it to determine your
desired tap tempo. To have a Modulation or Delay effect utilize this BPM Master Tempo value, you
additionally need to set the effect’s FX Time/FX Speed - Sync On/Off button to “On”.
FX Time/FX Speed Controls - Within the Panel View for Modulation and Delay effects, you’ll see
this set of options. These controls work to modify the Master Tempo behavior, or allow you to set the
effect’s delay time/modulation speed parameter independently of the current POD Farm BPM setting.
Note Value Display Sync On/Off Button
Time/Speed Knob Time/Speed Display
Sync On/Off Button - Click to toggle FX Time/FX Speed On/Off.
When FX Time/FX Speed Sync is OFF• , the effect’s time/speed parameter will follow the
speed setting shown in this field (displayed in milliseconds for delay effects, and Hertz for
modulation effects). The Sync button also determines the behavior of the Time/Speed
knob.
When FX Time/FX Speed Sync is ON• , this tells the effect parameters to follow the Master
Tempo (see previous section). With Sync on, you’ll also be able to modify the effect tempo
by a note value - see the Time/Speed knob description below.
Time Knob (Delay effects) / Speed Knob (Modulation effects)
When FX Time/FX Speed Sync is OFF• , the Time/Speed knob adjusts the Delay Time
parameter from 20 - 2000 ms (for Delay effects) or the Speed knob adjusts the parameter
from 0.10 - 15.0 Hz (for Modulation effects). You’ll see the tempo in the numerical field to
the right of the speed knob - alternatively, you can double-click directly in this numerical
field to type in an exact value. In this OFF mode, the effect is not following the Master
Tempo (see Sync On/Off descriptions above).
When FX Time/FX Speed Sync is ON• , the effect follows the Host Sync/BPM Master
Tempo of the Plug-In (see Sync On/Off descriptions above). The Time/Speed knob selects a
note length division of the current Master Tempo value - from a whole note to a sixteenth
note triplet.
4•10
Page 82
Line 6 POD Farm 1.01 - POD Farm Plug-In
Presets View
Presets View provides a convenient way to browse and load Tones from your local Tone library into
POD Farm. Just double-click any preset Name to load it into POD Farm.
Source Contents Preset List Pane Search Field Clear Button Refresh Button
Source Folder Config Button Tone Info Button Selected Preset
Source Contents - The contents of the POD Farm “Tone Folder” is listed here. POD Farm creates
its own Tone Folder on your computer and fills it with preset Tone files during installation in \My
Documents\Line 6\Tones\POD Farm (on Windows®), or Documents/Line 6/Tones/POD Farm on
Mac®.
Preset List Pane - This multi-column list displays the contents of the sub-directory selected in the
left Source pane. Click on any preset to select it. Note that you can sort this list in different ways by
clicking directly on a column heading (Name, Date Modified, etc.). Note that Presets that contain
Dual Tones have the twirl-down arrow at the left of their names, which you can click to show the
individual Tone 1/Tone 2 names it includes. Double-clicking one of these Dual Tone presets loads both
these Tone 1 and Tone 2 settings.
A Dual Tone Preset
Search Field/Clear Button - Type in the Search field to locate a Tone - this will search based on
keywords in Line 6 Tone metadata, such as name, amp, artists, notes about the Tone, etc. Press the
Clear button to clear any text in the Search field and reset to Preset List display.
Refresh Button - If you’ve modified Tones, such as by doing a Save As, created New Tones, or made
changes to the Source Folder configuration, you may need to click this Refresh button to update the
Preset List to show them all.
4•11
Page 83

Line 6 POD Farm 1.01 - POD Farm Plug-In
Info Button - When a Tone preset is selected, you’ll see the Info button to the left of its name. Click
this button to launch the Edit Tone Info dialog, where you can enter and edit text that is saved with
the Tone. Text you enter in the dialog’s Notes field will then appear in the Preset List’s Notes column.
Note that when you do a Save As for any Tone, this Info dialog is automatically launched so you can
enter some details about the Tone before saving. It is a great idea to add some things here, such as what
guitar you used, your pickup position, what song or parts you used this specific Tone for, etc.
The Edit Tone Info dialog
Source Folder Configure Button - If you want to configure the Source Folder contents, so that the
Presets View can display other sets of presets you have stored on your computer (such as .l6t preset files
you may have created with other Line 6 applications, such as GuitarPort®, Line 6 Edit®, or GearBox®)
press this button. This displays a configuration view:
Preset View Add Tone Folder Remove Tone Folder
List of Current Tone Folders
4•12
Page 84

Line 6 POD Farm 1.01 - POD Farm Plug-In
Saving a Preset
To save the currently loaded Tone Preset, click on the folder button to the right of the Preset menu on
the Main Control Bar.
Loading a Preset with “Non-authorized” Models
As discussed in the Start Here chapter, Line 6 offers Model Pack Add-Ons for your Line 6 hardware,
which expand the set of Amp & Effects Models available within POD Farm Plug-In (as well as in POD
Farm in Standalone operation). You’ll discover that among the hundreds of factory POD Farm Tones
within the Presets View, that when some are loaded, one or more individual models appear bypassed in
the Signal Flow View, and with a red slashed circle icon. This is telling you that the Preset was created
using an optional Model Pack that your device does not have included. When you click on one of
these “non-authorized” Models in the SFV, you’ll see a message in the Panel View explaining this, and
you can see model’s name (Hiway 100 in this example) appears in italics in the Panel View menu to
indicate it is not an available model:
A Preset is loaded that includes an Amp Model requiring an optional Add-On Model Pack
You can still use any preset like this that includes unavailable models - they are simply bypassed, and
you can choose to remove the model or replace it with another model from the Panel View menu
above. Or, you can, of course, launch Line 6 Monkey, go to the Optional Add-Ons tab and purchase
some Model Packs to load up your Line 6 hardware with these additional Amp & Effects Models!
Please see the Start Here chapter for more info. You can also check the Model List in the Model
Gallery chapter to see exactly which models are included “standard” on your Line 6 hardware, and
what each optional Model Pack offers.
4•13
Page 85

Line 6 POD Farm 1.01 - POD Farm Plug-In
Signal Flow View
The bottom of the application window is the Signal Flow View (SFV) which displays the chain of
models making up the current Single or Dual Tone paths. To edit any model’s settings, just doubleclick directly on the model within the SFV and its editable controls will be displayed in the upper
window (see the Panel View section).
Output Level Knob & Meter Input Source Selector
Tone Mute Button Tone Preset Menu Pan Knob
Tone 1
Selected Model Bypass & Close Controls
Signal Flow View - Single Tone Mode
Output Level Knob & Meter Input Source Selector
Tone Mute Button Tone Preset Menu Pan Knob
Tone 1
Tone 2
Selected Model Bypass & Close Controls
Signal Flow View - Dual Tone Mode
4•14
Page 86

Line 6 POD Farm 1.01 - POD Farm Plug-In
Tone Mute - Click this button to mute a Tone - Tones 1 or 2 can be muted individually in Dual Tone
mode. When muted, the Tone path is displayed dimmed and the Tone is silenced. All models remain
visible within the Signal Flow View, and still fully editable.
Tone Input Source Selector - Depending on your DAW host software*, you can select the input
source (left channel, right channel, both channels) of the track’s audio that is fed into each of the
Plug-In’s Tone Paths.
*It is important to note here that not all DAW host software designs are consistent in the way they
offer their audio channel routing and the resulting behaviors within Plug-Ins. For example, some
hosts do not define tracks as either “Mono” or “Stereo” and may offer slightly different behaviors
with a Mono versus Stereo audio clip in the track. So, depending on your DAW host software,
your POD Farm Plug-In results may differ slightly than listed below - please check your DAW
software’s documentation for specifics. Either way, these Input Source options should provide you
with a great deal of flexibility on any host.
When POD Farm Plug-In is inserted on a Stereo audio track:•
In Dual Tone mode• , the Plug-In functions as a stereo Plug-In with Tone 1 and Tone 2 each
capable of processing an audio channel independently. Use the Input Source menu of each
Tone to choose what input source (Left or Right incoming audio channel) you want each
to process.
In Single Tone Mode• , Tone 1 is a stereo-capable processing path. Use the Input Source
menu to choose if you want both channels of the Stereo track to be processed, or just the
Left or Right.
When POD Farm Plug-In is inserted on a Mono audio track• , the Input Source Select menus
are non-selectable*, since they always just accept the track’s Mono input.
In Dual Tone mode• , the Plug-In functions as stereo-capable processing path. The Mono
track signal is “split” and fed into each Tone signal path, allowing you to process each
separately, and the output is stereo (but of course will only be routed thru your DAW software
in stereo if you’ve configured the audio track itself with a stereo output).
In Single Tone mode• , you’ll of course have only the Tone 1 signal path, however, this
processing path is still stereo-capable, meaning that if you add a stereo effect into Tone 1, it
will process the signal with both channels of the stereo effect. The Plug-In output is stereo
(but might only be routed thru your DAW software in stereo if the audio track is configured
with a stereo output).
*As noted above, some DAW hosts do not define audio tracks strictly as “Mono”, therefore, you
may have selectable options in some hosts with Mono input tracks.
Tone Preset Name and Menu Display - Each Tone has a Preset Menu, which makes it easy to select
individual Tones, and to create new Dual Tone configurations. The Menu control displays the currently
loaded preset. Click the downward arrow at the right of the Tone name to display a list of available
Tones. The Menu displays presets within current folder only.
Pan Knob, Output Level Knob & Meter - Each Tone offers these controls to pan its output left/
right and accurately set its level. Try panning and adjusting the levels differently on Dual Tones for a
spacious wall of sound!
4•15
Page 87

Line 6 POD Farm 1.01 - POD Farm Plug-In
Model Bypass & Delete Controls - Hovering over or selecting a model within the SFV illuminates
the model, and a set of controls is displayed. Use these controls to bypass the model, or to remove it
completely from the Tone path.
Bypass Button Delete Button
Model Name
Moving Effects Models
Many POD Farm Effects models offer the ability to be placed either “Pre” or “Post” within the signal
chain (before or after the Amp model within the Tone path), which can offer slightly different sonic
results, depending on the effect and amp settings in use. To move an effect, simply click and drag it
left or right and you’ll see white arrows pointing downward, indicating the Pre and Post positions into
which the effect can be dropped. Note that when in Dual Tone mode, you can also drag any model
between Tones to copy the selected model into the other Tone path! For example, in the screen below,
the Tone 1 Analog Chorus modulation effect is being dragged from its original Tone 1 “Post” position
to the Tone 2 “Pre” position - this will copy the Analog Chorus, along with its current parameter
settings, into the Tone 2 signal path.
Dragging an effect to copy it from Tone 1 to Tone 2
4•16
Page 88

Line 6 POD Farm 1.01 – POD Farm Standalone Operation
Pod Fa r m St a n d a L o n e oP e r a t i o n
This chapter covers features unique to POD Farm Standalone Operation. Note that all other features
are identical in operation to those of the Plug-In, so please review the POD Farm Plug-In chapter for
details on other features.
If you own a Line 6 POD Studio, TonePort or GuitarPort device, the POD Farm Standalone application
is available to you. You can run POD Farm in Standalone mode all by itself to use your computer as
a virtual rack of amps & effects, and jam along with your favorite tracks, or simultaneously with your
favorite Digital Audio Workstation (DAW) software and take advantage of POD Farm’s ToneDirect™
Monitoring while recording your tracks! To launch POD Farm in Standalone operation:
On Windows•
On Mac•
®
, go to the Start button menu > Programs > Line 6 > POD Farm
®
, go to Applications > Line 6 > POD Farm
POD Farm running in Standalone Operation
ToneDirect™ Monitoring
ToneDirect™ Monitoring is a unique feature of your Line 6 hardware that provides an extremely low
latency monitor signal of your POD Farm Tones through your device directly to your Main/Analog
Outputs, while your Source signal is simultaneously fed out the Record Sends to your DAW software
for recording. This allows you to configure your Tones in POD Farm while Standalone mode however
you want to hear them for your performance, and then choose to feed either this “processed” signal, or
a “dry”, unprocessed signal to your DAW. Recording a dry signal in your DAW software allows you to
5•1
Page 89

Line 6 POD Farm 1.01 – POD Farm Standalone Operation
then use POD Farm Plug-In on the DAW track to “non-destructively” make changes to your recorded
track’s Tone any time up until your final mix. Or, you can choose to feed the fully processed Tone from
POD Farm’s Standalone mode to the Record Sends, and record your POD Farm Tones exactly as you
hear them! Please see the Mixer View section for details on configuring the Record Sends.
Also, since ToneDirect™ handles all the monitoring completely through your Line 6 hardware rather
than through your DAW software, you won’t need to use your DAW’s “software monitoring” features.
This means you can keep the DAW software’s buffers at higher settings for greater stability and better
CPU performance! Please also see the ToneDirect™ Monitoring section in the Hardware Chapter.
Input Source Select & Input Metering
POD Farm Standalone operation offers the following Input Source Controls, which differ from those
in POD Farm Plug-In...
Input Source Select Menu Input Meter
POD Farm’s Input Source selectors are found at the top of the Signal Flow panel (Dual Tone configuration)
The • Input Source Select menu allows you to choose which of your Line 6 hardware’s input
“sources” is routed to a given Tone path, (e.g. - Instrument, Mic 1, Line Stereo, etc.) Note that
the options available in the menu differ depending on the connected Line 6 hardware*, and for
Single versus Dual Tone modes.
The Tone 1 Input Source Select menu with UX2 device, Single Tone mode (left) Dual Tone mode (right)
5•2
Page 90

Line 6 POD Farm 1.01 – POD Farm Standalone Operation
*Note - Some Line 6 devices offer only a 1/4 inch Instrument input (such as GX, TonePort DI, GuitarPort
devices). When one of these devices is in use, no Input Menus nor Input Meters are displayed since this
hardware type offers a “fixed” Instrument Input. All other devices offer Instrument, Mono “1” and “2”
as well as “Stereo” Sources.
In Single Tone mode, the menu lists each of the Mono and Stereo input sources your specific •
Line 6 device offers.
In Dual Tone mode, there is an Input Source Select menu provided for each Tone (as in the •
above example with UX2). The Source menu for Tone 1 lists all Mono inputs your device
offers. The Source menu for Tone 2 is dynamic and contingent upon the source selected for
Tone 1. For example, “Same as Tone 1” is typically one option, as well as an input related to
the current Tone 1 Source - when Tone 1’s Source is “Mic 1”, Tone 2 offers “Mic 2”.
Note that whenever a “2” numbered Mono Source is selected for Tone 1 (Mic 2, Line 2, S/PDIF 2, etc.)
Tone 2’s Source is automatically set to “Same as Tone 1” .
You’ll see an Input Meter at the top left of the Tone’s signal flow for each Tone 1 and Tone 2, •
whenever that Tone’s Input is set to a Mic, Line or digital input (no meter appears if the Tone
Input is set to an Instrument input).
Unlike the Plug-In interface, there is no Input knob or meter at the top left of the Standalone •
application - to adjust input levels, use your guitar’s volume, the Mic Gain knobs on your Line 6
hardware, or the output controls on any source device that is feeding into your Line 6 hardware
to control the level coming into POD Farm - clipping should always be avoided.
Tuner View
The Tuner accepts input from anything connected into your Line 6 device’s Instrument input. Click
the Tuner button at the left to display the Tuner View and pluck an open single string on your guitar
(or bass guitar). Use the indictors and controls to get in tune!
Pitch Indicator “Flat” Indicator Arrow Note Display
Reference Control Mute/Bypass Buttons
Tuning Indicators
The Note Display in the center of the tuner will tell you the note you plucked, while the Pitch
Indicator appears within the meter to show you if your tuning is flat (left of the center of the meter)
or sharp (right of center). You’ll see a right-pointing, green arrow appear (as pictured above) if your
tuning is flat, or a left-pointing, green arrow if sharp. Additionally, you’ll see the Pitch Indicator turn
green when your plucked string is in tune.
5•3
Page 91

Line 6 POD Farm 1.01 – POD Farm Standalone Operation
Reference Control
The Tuner’s Reference Control tells the Tuner what to use as the base tuning reference note. 440Hz is
the standard reference value for A and is generally used for tuning reference in modern, western music.
Unless you have a particular need to adjust the Tuner’s reference, you probably want to stick with the
standard 440Hz setting for this control. To adjust the reference, either click on the number and drag
up/down, or double click and enter the desired reference frequency.
Mute/Bypass Switches
The Mute and Bypass switches let you choose whether to Mute your guitar input signal or to hear it
while tuning (with amp/cab/effect processing bypassed).
Mixer View
Device Send Name Source Menu Preferences and Driver Console Buttons
Mute Main Outs
Send Level Meter Send Level Fader +18 dB Button
Mute Main Outs
The Mute button silences POD Farm’s signal that is fed to your hardware’s Main Outputs.
The POD Farm Tone 1 and Tone 2 signals are still fed to the Headphone outs and Record •
Sends.
This feature facilitates recording with microphones, (e.g. - recording vocals, in the same room as •
the monitor speaker system). Simply, press the Mute Line Out button and listen via Headphones
while recording vocals in the same room.
Record Send Controls
The controls in this section allow you to select the type of signal routed to POD Farm’s Record Sends*
1-2 & 3-4 (or Sends 9-10 & 11-12 for UX8 devices). You can think of the two Record Sends as “virtual
pipelines” that each carry a stereo output signal from POD Farm, allowing you to select these POD
Farm signals within your recording software as Input sources for recording into audio tracks. Here you
can control what signal is fed to each of the two Record Sends, and set their levels.
*Note that the Record Send Source selection and Level controls do not affect the POD Farm Monitoring
signal. These controls affect only the POD Farm signals fed to your Record Sends, providing you with
independent control over your software recording levels versus your Monitoring signals!
5•4
Page 92

Line 6 POD Farm 1.01 – POD Farm Standalone Operation
Audio Source Selection Menus
Select the audio Source you want fed independently to each Record Send. •
If POD Farm is in Single Tone mode, the options available in the Source menus will be •
Processed, Semi-Processed (Amp, Cab, Comp, EQ, and “Pre” positioned effects only), and
Dry Inputs. (The Dry Inputs option feeds a stereo signal, with the same signal on both the
left and right channels).
If POD Farm is in Dual Tone mode, the Source menu options will be • Tone 1, Tone 2, Mix
(Tone 1 & 2)*, and Dry Inputs.
*Note that when either Send Source is set for “Mix Tone (1 & 2)”, that the Tone 1 & 2 Mute, Pan and
Volume controls within the Signal Flow View affect the Tone levels fed to that Send. For all other Send
Source options, the Tone Mute, and Pan & Volume controls affect only the Monitor signal.
Level Controls
Use the • Level Slider to adjust the level of the signal fed to the Record Send. This is how you
adjust the level of the signal that gets recorded into your audio software.
Use the • Level Meter to gauge your levels. The red clip indicator will light up if your level is too
high - clipping should always be avoided in order to produce good quality recordings!
Use the• +18 dB button if your signal is not hot enough. When this button is lit, an 18 dB “boost”
is applied to the Record Send signal. Watch the meters and adjust the Level Slider for a nice,
hot signal.
Preferences and Driver Console Buttons
The • Preferences button provides shortcut access to the POD Farm Preferences dialog, where
you can configure various POD Farm applications settings. See the following Preferences section
for details.
The• Driver Console button provides shortcut access to the Driver Console (Line 6 Audio-MIDI
Devices) dialog, where you can configure ASIO, WDM (Windows®) or Core Audio (Mac®)
audio driver settings. For everything about audio drivers & settings you always wanted to know
but were afraid to ask, please check out the Driver Panel & Recording chapter.
5•5
Page 93

Line 6 POD Farm 1.01 – POD Farm Standalone Operation
Preferences
The Preferences dialog offers some handy configuration settings for the POD Farm application. Launch
the Preferences dialog from the File menu, or from the Preferences button in the Mixer View. There
are two tabs of settings to behold here - Tones and Hardware...
POD Farm Preference - Tones tab
Automatically load last tone when POD Farm starts - This checkbox is checked by default and is
quite handy since it loads the complete last set of Tone settings you were last using in Standalone mode
when you launch in Standalone mode again - regardless if things were saved as a Preset or not.
Default Tone Author Name - Type in your name here if you want all newly created Tone presets to
automatically have this entered in the Tone Info and saved with the Tone Preset (see the Edit Tone
Info dialog in the Presets View section for details).
Tone File Association - The file types listed here are automatically “associated” with the POD Farm
Standalone application... meaning, if you double click on any of these Line 6 file types outside of POD
Farm (such as in a Windows® Explorer or a Mac® Finder window), the file will automatically launch
POD Farm in Standalone operation and load the Tone.
5•6
Page 94

Line 6 POD Farm 1.01 – POD Farm Standalone Operation
POD Farm Preferences - Hardware tab
Launch POD Farm using - Here you can choose a specific Line 6 device for POD Farm Standalone
to always use when it launches (provided that device is connected and powered on). If you typically
connect only one supported Line 6 device to your computer at a time, then it is easiest to just leave
this set to Auto-Detect and POD Farm will do just that. But if you keep more than one Line 6 device
connected to your computer, you can set this to have the POD Farm Standalone application always
connect to just that device. (Note that POD Farm Plug-In and Model Pack authorizations will still be
detected for any connected device, regardless of this setting).
Note that when the POD Farm Standalone application is running, you can see what device is in use
at the bottom of the POD Farm window.
Or, if no compatible Line 6 USB device is connected, you’ll see this alert at the bottom of the POD
Farm window
When no single compatible Line 6 USB device is detected at startup - Keep this set to Prompt me
with a dialog and you can choose a device (or, just connect your Line 6 USB device if you forgot!) Or,
you can set this to use a specific device - useful if you just want to look at the POD Farm Standalone
application as if connected to a device, such as to review some presets or Preferences settings.
5•7
Page 95

Line 6 POD Farm 1.01 – POD Farm Standalone Operation
Advanced Hardware and Driver Settings - Click on the button here to launch the Line 6 AudioMIDI devices if you want to configure audio driver settings. For lots of geeky info about audio driver
settings, please visit the Driver Console and Recording Applications chapter.
Updates and Auto-Configuration - Click on this button to launch Line 6 Monkey. If your computer
is connected to the Internet, the little Monkey fellow can walk you right through checking your Line
6 products, downloading and installing any needed updates, and even take you to the Line 6 Store for
more goodies! Get more info about Line 6 Monkey here.
Saving Tones
Just as with POD Farm Plug-In, you can Save (or do a Save As for) the current Tone settings as a
Tone Preset (.l6t file) by clicking on the little folder icon in the Main Control Bar. When running in
Standalone mode, you can also choose these options from the POD Farm File menu.
5•8
Page 96

POD Farm 1.01 – Model Gallery
mo d e L ga L L e r Y
About the Model Gallery ........................................................................6•3
Guitar Amp & Cab Models ......................................................................6•3
1964 Blackface ‘Lux ....................................................................................................... 6•3
Brit Gain 18 .................................................................................................................... 6•4
1990 Brit J-800 ............................................................................................................... 6•4
Citrus D-30 ..................................................................................................................... 6•5
1967 Class A-30 Top Boost ............................................................................................ 6•5
1987 Jazz Clean .............................................................................................................. 6•6
Line 6 Chemical X ......................................................................................................... 6•6
Line 6 Insane ................................................................................................................. 6•6
Line 6 Piezacoustic 2 ...................................................................................................... 6•6
Line 6 Spinal Puppet .....................................................................................................6•7
Line 6 Treadplate ........................................................................................................... 6•7
1968 Plexi Jump Lead .................................................................................................... 6•7
1968 Plexi Lead 100 ...................................................................................................... 6•7
Power Amp ..................................................................................................................... 6•8
1953 Small Tweed .......................................................................................................... 6•8
1993 Solo 100 Head ...................................................................................................... 6•8
2001 Treadplate Dual ..................................................................................................... 6•9
Tube Preamp .................................................................................................................. 6•9
1958 Tweed B-Man ........................................................................................................ 6•9
Guitar Cab Models .......................................................................................................6•10
Bass Amp & Cab Models ...................................................................... 6•11
Rock Classic .................................................................................................................. 6•11
Flip Top ......................................................................................................................... 6•12
Adam and Eve .............................................................................................................. 6•12
Silverface Bass ............................................................................................................... 6•12
Eighties .......................................................................................................................... 6•13
Bass Cab Models .......................................................................................................... 6•13
Preamp Models ..................................................................................... 6•14
American Classic .......................................................................................................... 6•14
Vintage U.K. ................................................................................................................. 6•14
Lo-Fi .............................................................................................................................. 6•15
Vintage .......................................................................................................................... 6•15
Modern ......................................................................................................................... 6•15
Console ......................................................................................................................... 6•15
6•1
Page 97

POD Farm 1.01 – Model Gallery
Effects Models ....................................................................................... 6•15
Delay ............................................................................................................................. 6•15
Analog Delay w/Modulation ..................................................................... 6•16
Tube Echo .................................................................................................. 6•16
Digital Delay ............................................................................................. 6•17
Modulation ...................................................................................................................6•17
Sine Chorus ............................................................................................... 6•17
Line 6 Flanger ............................................................................................ 6•17
Phaser ........................................................................................................ 6•17
U-Vibe ....................................................................................................... 6•18
Opto Tremolo ............................................................................................ 6•18
Rotary Drum + Horn ................................................................................. 6•18
Stomp (Distortions, Dynamics, & Filters) .................................................................. 6•19
Facial Fuzz .................................................................................................. 6•19
Fuzz Pi ........................................................................................................ 6•19
Screamer .................................................................................................... 6•20
Classic Distortion ...................................................................................... 6•20
Bass Overdrive ........................................................................................... 6•20
Bronze Master ............................................................................................ 6•21
Sub Octaves ............................................................................................... 6•21
Female De-Esser ........................................................................................6•21
Male De-Esser ............................................................................................ 6•21
Vetta Comp ............................................................................................... 6•22
Reverb .......................................................................................................................... 6•22
Standard Spring ......................................................................................... 6•22
Brite Room ................................................................................................ 6•22
Medium Hall ............................................................................................. 6•22
Cavernous .................................................................................................. 6•22
Slap Plate ................................................................................................... 6•23
Wah ............................................................................................................................... 6•23
Vetta Wah ................................................................................................. 6•23
Weeper ...................................................................................................... 6•23
Other Effects ................................................................................................................. 6•23
Gate .......................................................................................................... 6•23
Comp (Compressor) ................................................................................. 6•24
EQ ............................................................................................................. 6•24
Model List .............................................................................................. 6•25
6•2
Page 98

POD Farm 1.01 – Model Gallery
About the Model Gallery
You probably know by now that we’re relentless tone fanatics here at Line 6. Once we’ve set our sights
on creating a software emulation of a particular piece of gear, we go to great lengths to be sure that
we’ve gotten our hands on the very best example of an amp, preamp, effect or speaker cabinet that we
can find to study. We will (and have) scoured the globe in search of just the right specimen — that
one, very particular piece of “holy grail” gear that has the magic. In fact, we pride ourselves on hand
selecting each and every one of the amps, effect, preamps and speaker cabinets that we studied to create
the software models in POD Farm, and for all Line 6 software and hardware products. The result is an
extensive line up of Models, some completely original to Line 6, some based on well-loved classics.
To follow is the list of amp, cab and FX models that are included as “Factory-Standard*” models for
POD Studio, TonePort, GuitarPort devices, as well as for the standard POD Farm License for iLok.
Note that the new POD Studio UX1 & UX2 devices also come with the FX Junkie Model Pack AddOn included for free!
For the breakdown of the Factory-Standard Models for each supported Line 6 device, please see the
Model List section in this chapter. For descriptions of the Factory-Standard Models included in POD
X3 and PODxt family devices, please refer to your Pilot’s Handbook, and more info is also available in
the Model Pack Handbooks.
*Factory-Standard Models are those that are included as permanently installed models on a Line
6 device. These models cannot be transferred to other Line 6 devices. Likewise, Add-Ons that
come included with Line 6 device (such as the FX Junkie Model Pack Add-On that comes free
on POD Studio UX1 & UX2 devices), are also “fixed” to the hardware. However, it is possible
to transfer the License Key that you are granted for any Add-Ons that you purchase separately
between any supporting Line 6 device that you own by using Line 6 Monkey. Please see the
Start Here chapter or Line 6 Online Support for more about Transferring License Keys.
Guitar Amp & Cab Models
1964 Blackface ‘Lux
The Holy Grail for many blues, country, and “roots” players has
been a blackface Fender® Deluxe Reverb®. After listening to
quite a few candidates back when we were seeking the ultimate
Deluxe Reverb® for our 1964 Blackface ‘Lux model to be based
on*, we stumbled upon an extremely cool ‘64 Deluxe Reverb®.
We still haven’t found one better.
Most players love a Deluxe Reverb® when it’s turned up to
about 7 for a nice gritty sound that cleans up when you back
off your guitar’s volume knob just a little. Notice how the tone
control response changes as this Amp Model’s Drive is changed: clean settings are crisp and present,
while more driven settings will mellow the high end. This is typical of what you get from a Deluxe
Reverb® and is nicely captured here. The Deluxe Reverb® itself has only Bass and Treble controls,
leaving us, once again, with the prospect of a couple knobs with nothing to say for themselves. But
fear not; in this case, we’ve set up the model’s Middle knob so you can add some post-Amp Model
Midrange contouring for a little more flexibility, while Presence adds, well, Presence. Once again, set
the Middle knob to its “neutral” 12 o’clock position and the Presence knob to 0 for the classic Deluxe
6•3
Page 99
POD Farm 1.01 – Model Gallery
sound. Tweaked up right, this tone will cut through and sing. We jacked into Input 1 of the Vibrato
Channel to get this model cooked up.
* FENDER® and DELUXE REVERB® are registered trademarks of Fender Musical Instruments
Corporation and are in no way associated or affiliated with Line 6. These product names, descriptions and
images are provided for the sole purpose of identifying the specific products that were studied during Line 6’s
sound model development.
p Return to Model Gallery List
Brit Gain 18
Based on the Marshall® 1974X “authentic re-issue” of the famous 1974
18W Combo from the late ‘60’s. (Brief editorial aside: Marshall® has had a
long tradition of coming up with model numbers that can easily be taken
for years. The Model 1974 combo was manufacturer from 1965 to 1968, the
Model 1961 and 1962 combos were first made in 1965. Is it any wonder we
look confused sometimes?) The 1974 has a basic preamp, (gain and tone
controls) and a cathode biased twin EL84 power amp. It is a great recording
amplifier, with a wonderfully compressed and harmonically rich tone.
*All product names are trademarks of their respective owners, which are in
no way associated or affiliated with Line 6. These product names, descriptions
and images are provided for the sole purpose of identifying the specific products
that were studied during Line 6’s sound model development. MARSHALL® is
a registered trademark of Marshall Amplification PLC.
p Return to Model Gallery List
1990 Brit J-800
The 1990 Brit J-800 Amp Model is based on* a Marshall® JCM 800.
Turn to this Amp Model to conjure up tones of the coveted JCM
800, one of Marshall’s most universally acclaimed modern amps. This
updated version of the Plexi continued Marshall’s heritage with added
gain and edge for a new generation of rock guitarists. One of the biggest
differences here is that the tone controls are located after the preamp
tubes.
Incidentally, some versions of JCM 800’s get their distortion by clipping
a diode. The amp we modeled uses a tube for distortion.
The JCM 800 is, of course, the metal sound Marshall made famous. And
although not many people play Marshalls clean, it is a great tone, so you
should also be sure to check out this model with a low Drive setting. Of
course, you can always pump up the drive and rage...
* MARSHALL® is a registered trademark of Marshall Amplification PLC and is in no way associated or
affiliated with Line 6. These product names, descriptions and images are provided for the sole purpose of
identifying the specific products that were studied during Line 6’s sound model development.
p Return to Model Gallery List
6•4
Page 100

POD Farm 1.01 – Model Gallery
Citrus D-30
In 1968, in a little music store on Old Compton St. in London, Clifford
Cooper was having trouble getting amplifier manufacturers to take him
seriously as a dealer, as they thought he was too young, and his shop
too small. So he did what seemed only logical to an enthusiastic young
man with a background in electrical engineering – he designed and built
his own amplifiers. Since he had come into a large quantity of bright
orange vinyl that was what he used to cover his cabinets. It wasn’t long
before high-profile musicians like Fleetwood Mac, Stevie Wonder, and
Frank Zappa were beating a path to his door. This model is based on
an Orange®AD30TC head, a 30 watt, Class A number with a great
personality that gracefully marries vintage British mid-gain breakup with
modern shimmer and presence. Back off the drive and you’ll get chimey
boutique tones, dig in with the drive up and the AD30 purrs pure Brit
Rock tone.
*All product names are trademarks of their respective owners, which are in no way associated or affiliated
with Line 6. These product names, descriptions and images are provided for the sole purpose of identifying
the specific products that were studied during Line 6’s sound model development. ORANGE® is a registered
trademark of Orange Musical Electronic Company, Ltd.
p Return to Model Gallery List
1967 Class A-30 Top Boost
The 1967 Class A-30 Top Boost model is based on* a Vox®
AC 30. Music was changing in the early ‘60s and guitarists
were asking for more brilliance & twang. So the Jennings
Company, makers of Vox® amps, decided to add Treble and
Bass controls (and an extra 12AX7 gain stage, incidentally)
in addition to the Treble Cut knob it already had (which in
actuality was a sliding bandpass filter that always seemed like it
was working backwards); this additional circuit became known
as Top Boost.
The AC 30 with Top Boost was the amp made famous by many
British invasion bands. Much of the unique character of the Vox® sound can be attributed to the
fact that Class A amps overdrive in a very different way than Class AB. Brian May of Queen, Mike
Campbell of Tom Petty’s Heartbreakers, and The Edge of U2 have all used classic AC 30s to make their
music. Although usually played fairly clean, a cranked AC 30 has a great saturated lead tone, a la Brian
May on the early Queen albums.
On this Amp Model, the Middle control acts like the original Cut knob on the AC 30. We plugged
into the Hi gain input of the AC 30’s Brilliant channel when creating it. We also turned the tone
controls around, since original Top Boost amps had the bass and treble turned all the way down when
the knob was all the way up. Go figure.
VOX® is a registered trademark of Korg Europe Limited and is in no way associated or affiliated with Line
6. These product names, descriptions and images are provided for the sole purpose of identifying the specific
products that were studied during Line 6’s sound model development.
p Return to Model Gallery List
6•5
 Loading...