

Page 1

FIREHAWK 1500
PILOT’S GUIDE
MANUEL DE PILOTAGE
PILOTENHANDBUCH
MANUAL DEL PILOTO
取扱説明書
试用指南
40-00-0373 Rev C Pilot’s Guide also available at www.line6.com/manuals ©2015 Line 6, Inc.
Page 2

2
Page 3

Please Note: Line 6, AMPLIFi, POD and Variax are registered trademarks of Line 6, Inc. registered in the U.S. and other
countries. Firehawk, FBV and EX-1 are trademarks of Line 6, Inc. All rights reserved. James Tyler is a trademark of James
Tyler used under license. Apple, Mac, and iPad are trademarks of Apple, Inc. registered in the U.S. and other countries. Apple
is not responsible for the operation of this device or its compliance with safety and regulatory standards. iOS is a trademark
or registered trademark of Cisco in the U.S. and other countries and is used under license. The Bluetooth word mark and
logos are registered trademarks owned by Bluetooth SIG, Inc. and any use of such marks by Line 6 is under license. Android
is a trademark of Google, Inc. Windows is a trademark of Microsoft Corp., registered in the US and other countries.
3
Page 4
WELCOME TO FIREHAWK 1500 -
STAGE, STUDIO & BEYOND
Firehawk1500 takes the guitar amp to the next level by using a high
performance Full Range Flat Response reproduction system to deliver
a wide range of ampliers, cabinets and eects while avoiding the
compromises of traditional narrow band and coverage speakers. The
sound is consistently translating from the studio to monitoring on stage
and delivering through XLR outs to the PA and your audience.
Package includes: Firehawk 1500, power cable, literature pack.
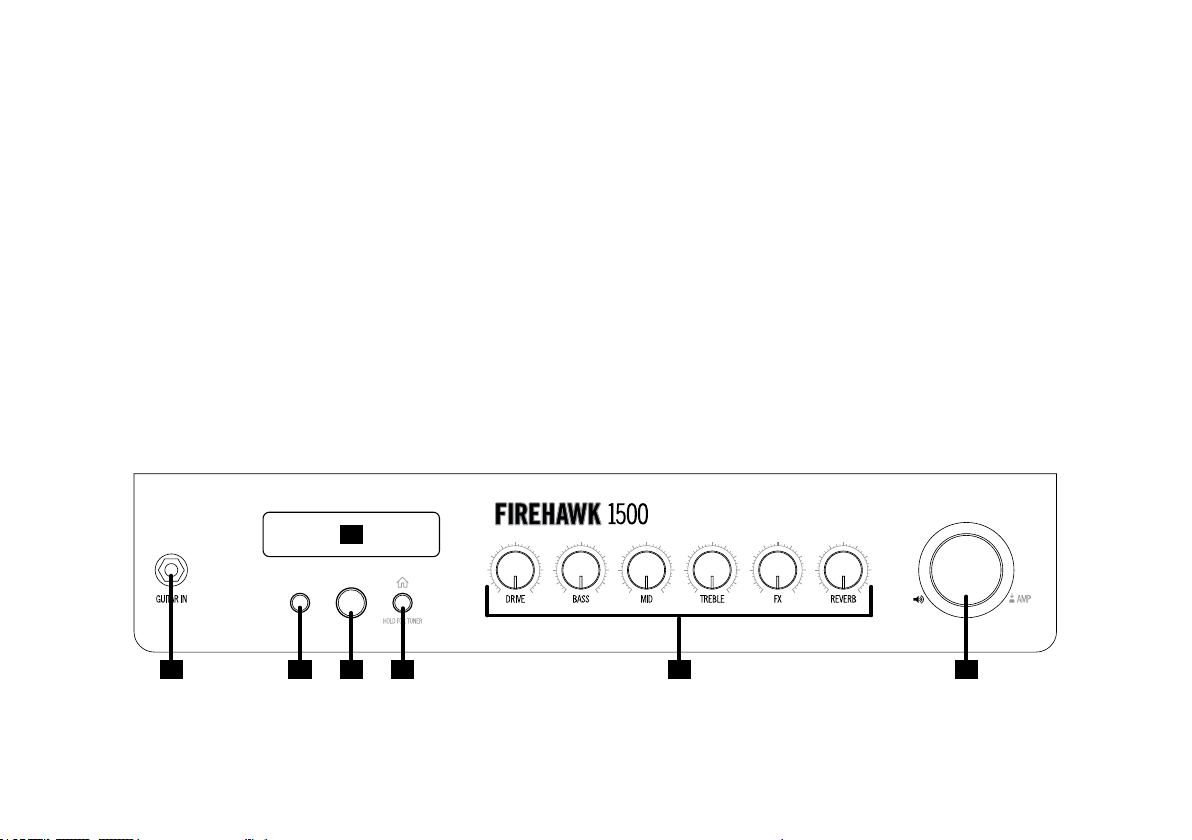
Top Panel Controls
1
Firehawk 1500 Features:
• High-performance guitar amp
• 1500W/ 132 dBSPL 6- Speaker Wet/ Dry Stereo System
• Full Range/ Flat Response system translates your tone from your
monitoring to the audience and from studio to stage at any level
• Extensive sets of Line 6 HD and classic Amp and FX Models
• Edit comfortably on your Tablet or Smartphone and stream audio
via Bluetooth compatible with iOS, Android, and Mac or PC)
• USB direct recording to Mac, Windows and iPad.
iPad connectivity requires the use of an iPad Camera Connection
Kit USB adapter (not included).
4
4 6
3 5 72
Page 5
1. LCD Display - The Firehawk 1500 display is multifunctional, showing
dierent information depending on the footswitches and modes you
access. In most cases, you’ll see the Bank & Preset location and title
for the currently loaded tone. We cover other items shown in the LCD
display throughout this Guide!
2. Guitar Input - plug in your 1/4 inch guitar cable here.
3. Bluetooth Pairing Button - Using Bluetooth technology, your
Firehawk 1500 communicates wirelessly with your mobile device.
Before running the Firehawk Remote app, you'll need to pair
Firehawk 1500 with your mobile device as follows:
• Enter Pairing mode on the Firehawk 1500 by pressing the
Bluetooth button on the top panel - it will ash.
• Enter Bluetooth Pairing mode on your iOS device, or open the
Bluetooth Settings menu on your Android device.
• Your Firehawk 1500 device’s unique name will appear on your
mobile device. Android users may need to select "Scan for
Devices" to refresh the list of available Bluetooth devices.
• Select your Firehawk 1500 unit's unique name on your mobile
device - this completes the pairing conguration and you are
ready for wireless operation!
4. Preset & Bank Select Encoder - Firehawk 1500 comes loaded with
128 Presets, comprised of 4 Preset locations (A–D) stored within
each of the Banks (1–32). The LCD display shows the Bank number,
location and title of the currently loaded Preset.
01B Lead the Way
Note: An unlimited number of Presets can be downloaded, created,
edited, saved and rearranged on your device using the app! See
more details in the following Firehawk Remote App section.
5. Tap Tempo Button - Pressing the TAP button a few times sets the
tempo, which Delays and other FX that o "sync-to-tempo" can then
follow. The TAP LED ashes in time to indicate the tempo for the
current Preset (the ashing behavior can optionally be disabled in the
Firehawk Remote app).
6. Tone Controls - When using Firehawk Remote with your iOS
device, all Tone adjustments can be made using the app Editor. You
can also tweak your guitar sound manually with these Firehawk
1500 onboard Tone controls:
DRIVE: Adjusts the current Amp Model's Drive level.
BASS, MID, TREBLE: Adjusts the Bass, Mid and Treble levels for
the current Amp Model's tone stack.
FX: Adjusts the FX parameter saved with the preset and selected in
the Firehawk Remote application.
REVERB: Adjusts the Reverb level for the current Guitar Preset.
7. Master Volume Knob - This big knob controls the overall output
level of your Firehawk 1500 amp. It also has a Secondary Function
of adjusting your Channel Volume relative to the overall audio mix.
This can be useful when you're jamming to a track and your guitar
level is too soft or too loud.
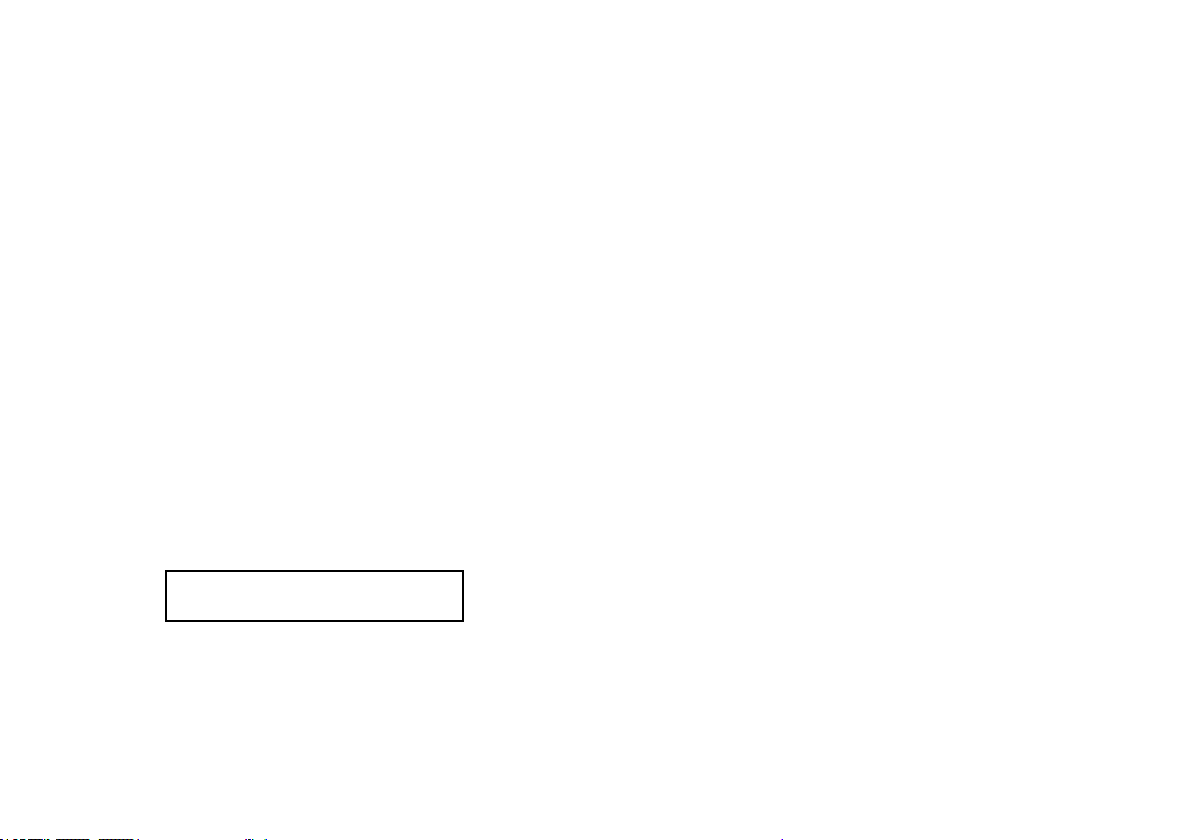
LCD display showing Bank, Preset location and title
Each Preset stores all of the Amp and FX parameter settings that
dene the characteristics of the tone, optional FBV Footswitch &
Controller assignments and FX Loop settings. Use the push encoder
to load and save Presets on Firehawk 1500. Turn the encoder to
change presets - press and hold to save to a new location.
5
Page 6
Master Volume LED RIng
8
10 11 12 13 14 15 16
9
Master Volume LED Ring - The ring of LEDs surrounding the
Master Volume knob light up in various ways, depending on the
current parameter being adjusted, as follows:
• Master Volume: LEDs are lit red to indicate Master Volume level.
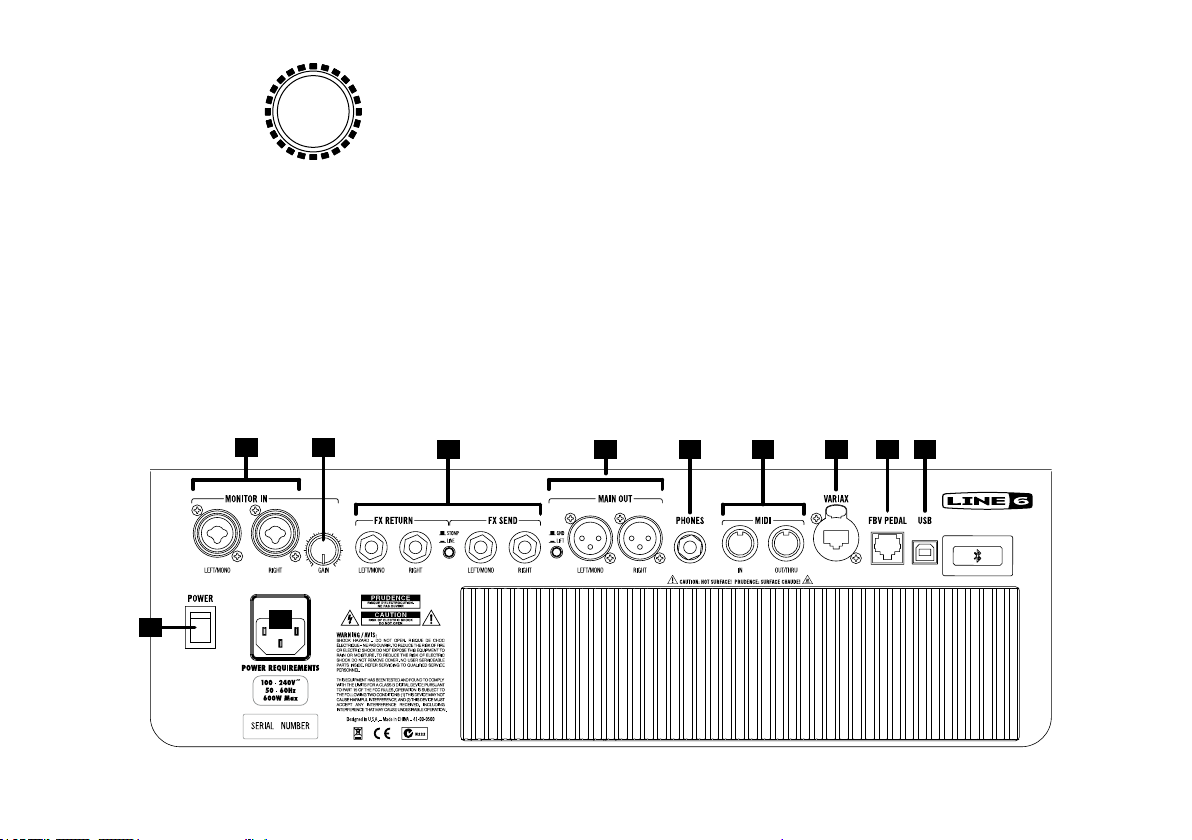
Rear Panel Connections
• Channel Volume: when the Secondary Function is activated via
knob press, all LEDs are lit white; as your guitar level is adjusted,
LEDs are lit red.
• Tone Controls: when an individual Tone Control is adjusted, the
saved level is indicated in red; all other LEDs are lit white to display
the current level as you turn the knob.
18
17
6
Page 7

8. Monitor Input - This line level input goes straight to the amps and
speakers without any guitar processing. Use your Firehawk 1500 as
a stage monitor while the guitar input is still processed
9. Monitor Gain - Adjust the level of your line level monitor input.
10.EectLoop-Provides two jacks each for mono or stereo FX SEND
and FX RETURN. Set the FX LOOP LEVEL switch to optimize the
signal for either LINE (for line-level devices) or STOMP (for most
“stomp box” guitar pedals). Note that the position of the FX LOOP
Block within any Preset’s signal chain can be edited using the
Firehawk Remote app.
11. XLR Output - Connect XLR cables here for an ideal connection
to recording devices or as direct sends to the house mixer, PA, or
to Line 6 StageSource
®
powered, full-range speakers. If you are
experiencing hums and buzzes, set the Ground Switch to LIFT to
eliminate ground loops between your equipment.
12. Headphones - plug in your 1/4 inch stereo headphones cable here.
Headphones volume is controlled by the Master Volume knob.
13. Midi In/ Out/ Thru - connect midi devices to control Firehawk 1500
on Midi channel 1. See Midi implementation chart for details.
14. Variax - Connect your Line 6 Variax guitar here. This input captures
all the Variax output and provides power to the instrument. See the
following Using a Line 6 Variax section for more info.
15. FBV Port - Connect an FBV foot controller for channel and bank
switching, FX on/ o, wah/ volume pedal control, tuner, tap tempo,
and access to more editing functionality.
16 USB Input - Connect to a Mac, Windows computer or iPad to
utilize Firehawk 1500 as a quality Stereo In/Out, 24-Bit digital audio
interface for direct recording with your favorite software.
For Mac or iPad: Just connect via USB and Firehawk 1500 is
ready to use. iPad connectivity requires the use of an iPad Camera
Connection Kit USB adapter (not included).
For Windows: Download & install the Line 6 Firehawk 1500 USB
ASIO audio driver from www.line6.com/software.
17. Power Input - Connect an IEC 320 C14 power cable.
18. Power - switch on the power with this rocker switch.
7
Page 8

Firehawk Remote Mobile Application
A
B
Lead the Way
D
Variax Gate Wah Stomp Mod Delay
FX Loop
C
Vol Amp+Cab EQ Comp Reverb
Stomp Classic Distortion
Drive
Gain
E
Tone
FS1 FS2 FS3 FS4 FS5
Looper
68%
43%
50%
F
G
H
Firehawk Remote App - Editor Screen
A. Menu/Back Button - Tap to reveal the slide-out Main Menu screen.
(See the following App Features section for more info.) This button
changes to a Back button within other screens.
B. Preset Title - The title for the current Preset is shown here.
C. Signal Flow Pane - Each icon button represents a Processing Block
and shows the routing order and bypass state of all eects for your
8
current tone. Tap on any Block here to select it and the Block's
options are displayed within the Inspector Pane below.
D. Processing Blocks - Each of the several Block types oers its own
properties and functions. Many Blocks are moveable within the
signal chain, as indicated below. To move a Block, press, hold and
drag the Block left/right in the signal chain - vertical line indicators
show all available locations where you can "drop" the Block.
• Variax Input Block - Provides options for a Line 6 Variax guitar.
See the following Using a Line 6 Variax section.
• Standard Blocks - The Amp & Cab Block contains your choice of
Amp & Cab models, and the others include a "xed" eect (Comp
and Gate). Standard Blocks cannot be moved.
• FX Blocks - Contain a dedicated eect type (Volume, Wah &
Reverb) and have some moveability.
• Flex FX Blocks - Can change the FX type they contain (Stomp,
Mod, Delay or Pitch/Synth) and have more exible routing
capabilities.
• Looper Block - Displays its Volume and EQ parameters below.
The Looper can also be assigned to any one of the FS1-FS5
footswitches and can be moved to either the start or end of the
signal chain - see the Using the Looper section for details.
E. Block Inspector Pane - All editable parameters for the selected
Block are presented here.
F. Model Select and Bypass Buttons - The Model Select button (at
the left) pops up a menu to choose an Amp, Cab or FX model for the
selected Block's type. The Bypass button toggles the Block On/O.
G. Parameter Sliders - Allow adjustment for all settings for the selected
Block's Amp or FX models. Note that you can press and hold a
slider to assign the parameter to be controlled by the FX Knob and
Expression Pedal (see “Firehawk 1500 with FBV 3 Footcontroller”
on page 11).
H. FS1–FS5 Footswitch Assignment Buttons - Tap the desired FS
button to assign your FBV 3 device's respective FX footswitch to toggle
the selected FX Block On/O. Note that the footswitch LED will match
the color of the assigned FX Block model type for easy identication.
Page 9

Firehawk Remote App Features
The slide-out Main Menu is where you'll nd central access to all features
in the Firehawk Remote app.
Editor - Edit any tone that is currently loaded by the app. Change
Amp Models, FX, Footswitch & Pedal Assignments and routing of
processing “Blocks” - See the previous app Editor section.
Hardware Presets - Browse, recall, edit, manage and back up
tones saved within your Firehawk 1500 device.
Cloud Search - Search for tones from the ever-growing Line 6
Cloud for new guitar tones published by other Firehawk 1500 &
AMPLIFi users just like you!
My Tones - Browse, recall, search, edit and manage the saved
tones in your Line 6 account. You can also send tones to your
device as hardware presets.
Tone Info/Save - Edit the tone’s name and other metadata that
facilitates searching & Tone Matching to songs. Save tones
directly to your Firehawk 1500 or to the Cloud, or publish tones
to support the Firehawk community.
Tuner - Get in tune quickly by using the Tuner.
Settings - View info about the app, get help, update your
Firehawk 1500 device’s rmware, and set preferences for music
playback and tone loading.
Music Library - Jam along with tracks from your mobile device's
music library and Firehawk Remote will serve up guitar tones to
match based on the song title, artist, genre, or other tags.
Levels - Remotely adjust the "blend" of guitar to music playback
volume.
Firehawk 1500 Device Firmware Updates
Always run the latest rmware in your Firehawk 1500 for best
performance results. There are two methods for checking and installing
rmware updates:
• Using the Line 6 Updater Utility - This is the recommended
method and is fastest for device rmware updates. The Line 6
Updater Utility is a free software application for Mac and Windows
available from www.line6.com/software. Download and install
the utilily on your computer to get started. With your Firehawk
1500 device powered On, connect it to your computer's USB
port and launch the Updater Utility. It will automatically detect
your connected device and inform you of available updates - Just
follow the steps in the Updater Utility to install the latest rmware.
• Using the Firehawk Remote application - The Firehawk
Remote app will automatically inform you whenever a device
rmware update is available. It is also possible to install rmware
updates from within the app - Just follow the prompts and it will
walk you through the entire update process. Note that this updates
the Firehawk 1500 device wirelessly via Bluetooth, without the
need for a computer or added software, however, the process
takes quite a bit longer than using the Line 6 Updater Utility.
9
Page 10

Using a Line 6 Variax
Firehawk 1500 supports the use of any Line 6 Variax instrument via
the VARIAX connection on the rear panel. And with any James Tyler
Variax
(JTV) or Variax Standard instrument, control of alternate tunings
and model/magnetic pickup switching are supported as well. For best
results, use only Line 6 supplied, Variax-compatible cables – not standard
Ethernet or other cables – to avoid damage to the jack. Learn more about
the Variax instruments at www.line6.com.
To Edit and Save Variax guitar Model & Tone Knob options: Launch
the Firehawk Remote app, go to the app's Editor screen and tap the
Variax Input block at the left of the Signal Flow pane. The following
Variax options will appear in the lower portion of the app screen.
• MODEL CONTROLLED BY: This is a global option that aects
behavior for all Firehawk 1500 presets.
• When set to FIREHAWK: The Firehawk 1500 sends the
stored Variax Model & Tone Knob settings to the guitar upon
the loading of a Firehawk Preset. If you adjust your Variax
guitar's on-board settings, the Variax settings are captured
and then stored within the Firehawk Preset.
• When set to VARIAX: The stored MODEL & TONE KNOB
POSITION Variax settings are not sent to the guitar upon
loading a Firehawk preset. If you adjust your Variax guitar's onboard settings, these will be heard, but not captured or stored
within the Firehawk preset.
• TUNING CONTROLLED BY: This is a global option that aects
the behavior of all Firehawk presets.
• When set to FIREHAWK: The Alt. Tunings stored within any
Firehawk Preset are sent to your Variax guitar upon recall of
the Preset.
• When set to VARIAX: The Alt. Tunings stored within any
Firehawk preset are not sent to your Variax guitar upon recall
of the preset.
• VARIAX STRING 1 - 6: With a JTV or Standard Variax, you can
use these six parameters to congure the tuning oset (by number
of frets) you want applied to each individual guitar string. (The note
value displayed assumes your guitar is tuned to standard tuning
- E, A, D, G, B, E.)
• MODEL: Allows you to select the desired Variax guitar model &
pickup position to be stored as part of the Firehawk 1500 preset.
• TONE KNOB POSITION: Allows the Variax guitar's Tone Knob
value to be stored with the Firehawk preset.
• PICKUP MODE: (On JTV or Variax Standard guitars only.) Allows
choosing the Model and Magnetic pickup options.
Variax Alternate Tuning options: Use the VARIAX STRING 1- 6 options
to edit the pitch oset individually for each string, as described above.
The tuning is saved as part of the Firehawk Preset and the Variax Tuning
option provides the option to load the saved tunings on your Variax when
recalling Firehawk Presets.
Factory Reset
Performing a Factory Reset restores the Firehawk 1500 to the original
factory settings and Presets. Be sure to use the Firehawk Remote app
to back up your customized Presets before performing a Factory
Reset! After performing a Factory Reset, it is recommended that you
next perform the Pedal Calibration for proper Pedal operation.
• Factory Reset: Simultaneously press and hold the Master
Volume Knob and the TAP as you power on the unit.
10
Page 11
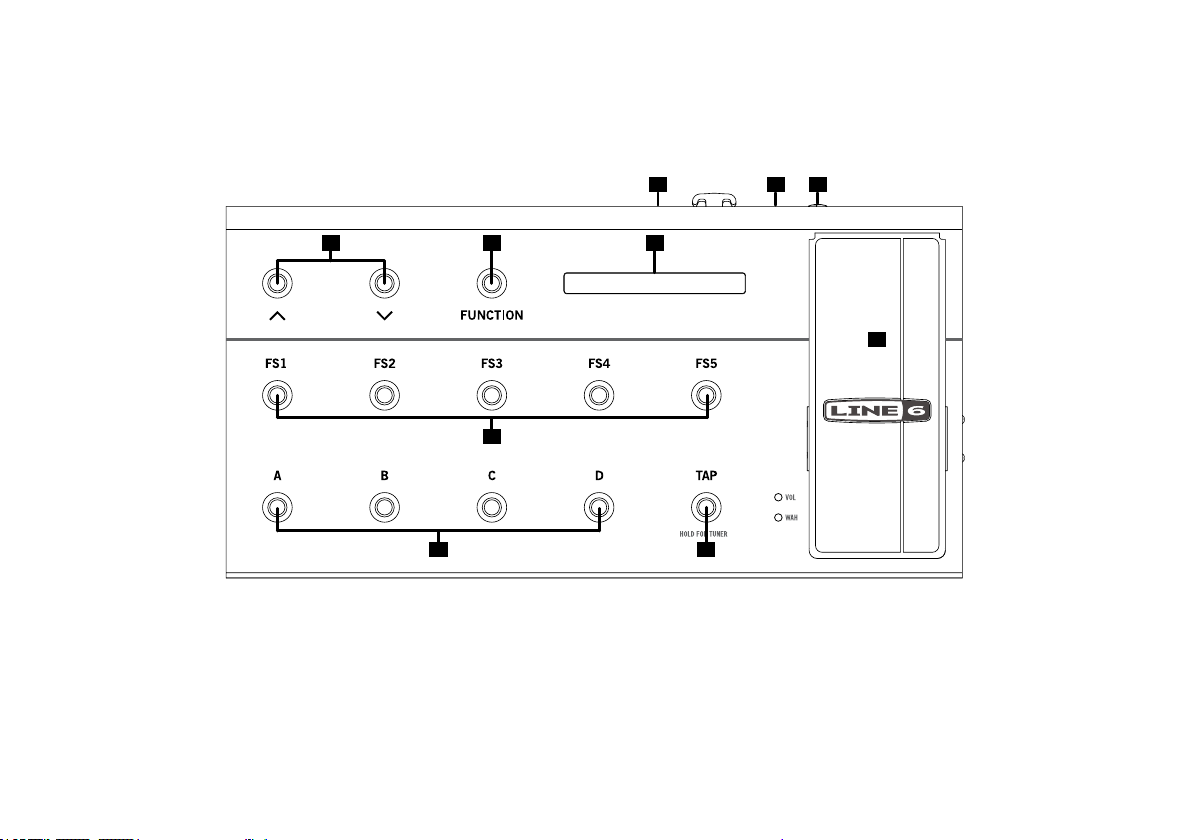
Firehawk 1500 with FBV 3 Footcontroller
1 2 3
An optional FBV 3 gives you hands free control of your Firehawk 1500.
Connect the separately available FBV 3 footcontroller to your Firehawk 1500 using the FBV cable and get instant access to your presets, amps,
eects, wah and volume pedal.
4 65
7
8
109
1. USB - Connect to Mac/ PC for USB Midi.
2. FBV Connector - Connect your Line 6 Amp or POD
3. ¼" Expression Pedal - Optionally add a 2nd pedal for even greater
control! The Line 6 EX-1 Expression Pedal is designed to work with
the FBV 3.
4. Bank Up / Down - Press the “Bank” buttons (labeled with the up and
down arrows) to scroll through the User Banks.
5. Function Assign Footswitch - Function assignable footswitchEnter Live Edit mode.
6. LED Display - This display shows your current Bank, Preset and
Preset Name or Tuner interface when activated.
7. Volume / Wah Pedal - Typically controls either the Wah or Volume of
the current preset - press the pedal forward to activate the toe switch
to toggle between Wah or Volume. The LEDs on bottom left shows
the active function of your on board expression pedal.
11
Page 12

8. FS1–FS5 Footswitches - User dened footswitches. Press to toggle
<>
the assigned eect on/o in the current preset.
9. Channel A,B,C,D Footswitches - Select to call up one of the four
“Channels” in the current Bank.
10. Tap Tempo - Tap in a tempo for your active Delay or Modulation
eects of the current preset to follow. Press and hold TAP to activate
the chromatic tuner. The Tap button is also used to exit menus in Live
Edit mode.
Live Edit Mode with Firehawk 1500
Note: Both Firehawk 1500 and FBV 3 reect Live Edit mode, regardless
of how the user engages it; that is, pressing FUNCTION on FBV 3 will
also change the UI state of Firehawk 1500’s top panel.
Pressing FS1-FS5 will display the model assignment for ~1 second, and
then time out:
Analog Chorus
Line 6 FBV Control Application Installation
If you plan on using your FBV 3 to control software on your Mac or
Windows computer, then you’ll also want to install the latest Line 6
FBV Control application. This free software provides you with the ability
to create, load, edit and store FBV presets - full sets of customized
MIDI controller congurations - all in an easy-to-use application!
The FBV Control App can be downloaded from line6.com/software/
12
After ~1 second...
16B Pastor of Muppet
1. Press FUNC to enter Live Edit mode.
CMP REV CHR DLY DRV
FUNC lights FS1-FS5 ash. Please select one for editing. The display
ashes 3-character abbreviations for models assigned to FS1-FS5:
2. Press the desired stomp you wish to edit (FS1–FS5).
The selected FS switch is bright (indicating it is selected) and the
other four go dim; the VOL and WAH LEDs go dark.
The full model name appears in the display for ~1 second, after
which the most recently accessed of its parameters appears and the
big encoder’s LED ring represents its value.
Page 13

Analog Chorus
<>
After ~1 second...
CHO:Speed 1.09 Hz
3. Repeatedly press the same switch to cycle through all parameters.
Pressing a dierent switch displays the full model name for ~1
second before displaying its most recently accessed parameter.
Pressing the switch repeatedly overrides the model name time-out;
that is, pressing a new FS switch twice quickly will show the rst
parameter immediately, without having to wait for the name to time
out.
4. Move the expression pedal to adjust the selected parameter’s value.
Press or to adjust the value in ne increments.
5. Press FUNC to exit Live Edit mode.
Its LED goes dark.
Hold FUNC for ~2 seconds to save changes to the current preset
and exit Live Edit mode.
Note: Selecting a dierent preset (pressing A, B, C, or D) will exit
Live Tweak mode as well.
Using the kickback stand
Use the kickback stand to tilt your Firehawk 1500. Important, be sure the
stand is fully pulled out before tilting your amp back.
13
Page 14

MIDI CC
Firehawk has reserved a number of MIDI CC#s for global functions.
MIDI CC# Value Function
001 0 - 127 EXP-1 Pedal Assignment
002 0 - 127 EXP-2 Pedal Assignment
051 0 - 127 Toggles FS1 Assignment On/O
052 0 - 127 Toggles FS2 Assignment On/O
053 0 - 127 Toggles FS3 Assignment On/O
054 0 - 127 Toggles FS4 Assignment On/O
055 0 - 127 Toggles FS5 Assignment On/O
059 0 - 127 Toggles EXP Toe Switch Assignment On/O
060 0-63 = Overdub, 64-127 = Record Looper Record/Overdub Switch
061 0-63 = Stop, 64-127 = Play Looper Play/Stop Switch
062 64-127 = Play Once Looper Play Once Switch
063 64-127 = Undo Looper Undo Switch
065 0-63 = Forward 64-127 = Reverse Looper Forward/Reverse Switch
067 0-63 = Pre 64-127 = Post Looper Pre/Post Position Switch
068 0-63 = Full 64-127 = Half Looper Full/Half Speed Switch
099 0-63 = O 64-127 = On Looper Mode On/O
064 64-127 = Tap Tap Tempo - Enter Tap Tempo
069 0-63 = O 64-127 = On Tuner Mode On/O
14
 Loading...