

Page 1

ECHO PRO
Programmable Delay & Loop Sampler with MIDI Sync
Pilot’s Handbook
An in-depth exploration of the revolutionary technologies
and the pulsing tonal pleasures that power your Echo Pro.
Electrophonic Limited Edition. Also available at www.line6.com. Revision A.
Page 2
The serial number can be found on the back panel of your
Echo Pro. Please note it here for future reference:
SERIAL NO:
WARNING:
electric shock, do not expose this appliance to
rain or moisture.
CAUTION:
pursuant to Part 15 of FCC Rules. Operation is subject to the following two conditions: (1) This device may not cause
harmful interference, and (2) this device must accept any interference received, including interference that may cause
undesired operation.
To reduce the risk of fire or
This equipment has been tested and found to comply with the limits for a Class B digital device
The lightning symbol within a triangle means
“electrical caution!” It indicates the presence
of information about operating voltage and
potential risks of electrical shock.
CAUTION:
do not remove screws. No user-serviceable parts inside. Refer
servicing to qualified service personnel.
To reduce the risk of fire or electric shock,
The exclamation point within a
triangle means “caution!” Please
read the information next to all
caution signs.
Echo Pro Pilot’s Handbook © 2001, Line 6, Inc.
YOU
SHOULD READ THESE IMPORTANT SAFETY INSTRUCTIONS
Before using your Echo Pro, be sure to carefully read the applicable
items of these operating instructions and the safety suggestions.
1. Obey all warnings on the Echo Pro and in this Pilot’s Handbook.
2. Do not place near heat sources, such as radiators, heat registers, or appliances which produce heat.
3. Guard against objects or liquids entering the enclosure.
4. Connect only to AC power outlets rated 100-120V or 230V 47-63Hz (depending on the voltage range of the
unit; refer to the back panel). Current ratings should be 400mA for the 120V range and 200mA for the 230V
range.
5. Do not step on power cords. Do not place items on top of power cords so that they are pinched or leaned on.
Pay particular attention to the cord at the plug end and the point where it connects to the amp.
6. Unplug your Echo Pro when not in use for extended periods of time.
7. Do not perform service operations beyond those described in the Echo Pro Pilot’s Handbook. In the following
circumstances, repairs should be performed only by qualified service personnel:
• liquid is spilled into the unit
• an object falls into the unit
•the unit does not operate normally or changes in performance in a significant way
•the fuse is blown (replace with 400mA timed fuse for 120V, and 200mA timed fuse for 230V)
•the unit is dropped or the enclosure is damaged
8. Prolonged listening at high volume levels may cause irreparable hearing loss and/or damage. Always be sure
to practice “safe listening.”
Page 3

Please Note:
Line 6, Echo Pro, Mod Pro, Filter Pro, POD, POD Pro
and Flextone are trademarks of Line 6, Inc. All
other product names, trademarks, and artists’
names are the property of their respective owners,
which are in no way associated or affiliated with
Line 6. Product names, images, and artists' names
are used solely for the purpose of identifying the
specific products that were studied during Line 6’s
sound model development and describing certain
types of tones produced with Line 6’s digital
modeling technology. Use of these products, images,
trademarks, and artists' names does not imply any
cooperation or endorsement.
Page 4

Page 5

CHAPTER 1: I
NTRODUCTION
I
NTRODUCTION
Thanks . . . . . . . . . . . . . . . . . . . . . . . . . . . . . . . . . . . . . . . . . . . . . . . . . . . . . . . . . . . . . . .1•1
Who is Line 6? . . . . . . . . . . . . . . . . . . . . . . . . . . . . . . . . . . . . . . . . . . . . . . . . . . . . . . . . .1•1
Q
UICK START GUIDE
Plug it In . . . . . . . . . . . . . . . . . . . . . . . . . . . . . . . . . . . . . . . . . . . . . . . . . . . . . . . . . . . . .1•3
CHAPTER 2: G
Front Panel Controls . . . . . . . . . . . . . . . . . . . . . . . . . . . . . . . . . . . . . . . . . . . . . . . . . . . 2•2
Rear Panel Connections . . . . . . . . . . . . . . . . . . . . . . . . . . . . . . . . . . . . . . . . . . . . . . . . 2•4
CHAPTER 3: B
Audio Hookup Options . . . . . . . . . . . . . . . . . . . . . . . . . . . . . . . . . . . . . . . . . . . . . . . . . 3•1
Selecting a Program . . . . . . . . . . . . . . . . . . . . . . . . . . . . . . . . . . . . . . . . . . . . . . . . . . . . 3•4
Editing a Program. . . . . . . . . . . . . . . . . . . . . . . . . . . . . . . . . . . . . . . . . . . . . . . . . . . . . . 3•4
Setting Delay Time/Tempo . . . . . . . . . . . . . . . . . . . . . . . . . . . . . . . . . . . . . . . . . . . . . . 3•4
Global Time/Tempo . . . . . . . . . . . . . . . . . . . . . . . . . . . . . . . . . . . . . . . . . . . . . . . . . . . . 3•7
Set Expression Pedal . . . . . . . . . . . . . . . . . . . . . . . . . . . . . . . . . . . . . . . . . . . . . . . . . . . 3•7
Mix Control . . . . . . . . . . . . . . . . . . . . . . . . . . . . . . . . . . . . . . . . . . . . . . . . . . . . . . . . . . 3•8
Compare. . . . . . . . . . . . . . . . . . . . . . . . . . . . . . . . . . . . . . . . . . . . . . . . . . . . . . . . . . . . . 3•8
Saving a Program . . . . . . . . . . . . . . . . . . . . . . . . . . . . . . . . . . . . . . . . . . . . . . . . . . . . . . 3•9
MIDI/Sys Functions . . . . . . . . . . . . . . . . . . . . . . . . . . . . . . . . . . . . . . . . . . . . . . . . . . . . 3•10
Mix Mode. . . . . . . . . . . . . . . . . . . . . . . . . . . . . . . . . . . . . . . . . . . . . . . . . . . . . . . . . . . . 3•10
Bypass Mode. . . . . . . . . . . . . . . . . . . . . . . . . . . . . . . . . . . . . . . . . . . . . . . . . . . . . . . . . . 3•11
Midi Channel. . . . . . . . . . . . . . . . . . . . . . . . . . . . . . . . . . . . . . . . . . . . . . . . . . . . . . . . . 3•12
Program Format . . . . . . . . . . . . . . . . . . . . . . . . . . . . . . . . . . . . . . . . . . . . . . . . . . . . . . . 3•12
MIDI Clock . . . . . . . . . . . . . . . . . . . . . . . . . . . . . . . . . . . . . . . . . . . . . . . . . . . . . . . . . . 3•13
MIDI Map . . . . . . . . . . . . . . . . . . . . . . . . . . . . . . . . . . . . . . . . . . . . . . . . . . . . . . . . . . . 3•13
MIDI Out/Thru . . . . . . . . . . . . . . . . . . . . . . . . . . . . . . . . . . . . . . . . . . . . . . . . . . . . . . . 3•14
MIDI Dump . . . . . . . . . . . . . . . . . . . . . . . . . . . . . . . . . . . . . . . . . . . . . . . . . . . . . . . . . . 3•14
Pedal Update Mode . . . . . . . . . . . . . . . . . . . . . . . . . . . . . . . . . . . . . . . . . . . . . . . . . . . . 3•15
MIDI Controller Assignments. . . . . . . . . . . . . . . . . . . . . . . . . . . . . . . . . . . . . . . . . . . . 3•16
Restoring Factory Settings . . . . . . . . . . . . . . . . . . . . . . . . . . . . . . . . . . . . . . . . . . . . . . . 3•17
UIDED TOUR
ASIC OPERATION
CHAPTER 4: M
Tube Echo to Auto-Volume Echo . . . . . . . . . . . . . . . . . . . . . . . . . . . . . . . . . . . 4•1 to 4•13
Loop Sampler . . . . . . . . . . . . . . . . . . . . . . . . . . . . . . . . . . . . . . . . . . . . . . . . . . . . . . . . . 4•14
ODEL DESCRIPTIONS
Page 6

CHAPTER 5: MIDI C
What is MIDI, Anyway? . . . . . . . . . . . . . . . . . . . . . . . . . . . . . . . . . . . . . . . . . . . . . . . . .5•1
Why Should I Care?. . . . . . . . . . . . . . . . . . . . . . . . . . . . . . . . . . . . . . . . . . . . . . . . . . . . .5•2
General Usage . . . . . . . . . . . . . . . . . . . . . . . . . . . . . . . . . . . . . . . . . . . . . . . . . . . . . . . . .5•3
MIDI Mapping. . . . . . . . . . . . . . . . . . . . . . . . . . . . . . . . . . . . . . . . . . . . . . . . . . . . . . . . .5•3
Parameter Control . . . . . . . . . . . . . . . . . . . . . . . . . . . . . . . . . . . . . . . . . . . . . . . . . . . . . .5•6
MIDI Clock and Delay Time Control . . . . . . . . . . . . . . . . . . . . . . . . . . . . . . . . . . . . . . .5•9
MIDI Out/Thru (and what it means to you) . . . . . . . . . . . . . . . . . . . . . . . . . . . . . . . . . .5•10
ONTROL
CHAPTER 6: S
Syncing to MIDI Clock . . . . . . . . . . . . . . . . . . . . . . . . . . . . . . . . . . . . . . . . . . . . . . . . . .6•1
In the Studio . . . . . . . . . . . . . . . . . . . . . . . . . . . . . . . . . . . . . . . . . . . . . . . . . . . . . . . .6•1
Syncing Live. . . . . . . . . . . . . . . . . . . . . . . . . . . . . . . . . . . . . . . . . . . . . . . . . . . . . . . . .6•3
Other Live Performance Hints . . . . . . . . . . . . . . . . . . . . . . . . . . . . . . . . . . . . . . . . . . . .6•4
Using Multiple Studio Modelers . . . . . . . . . . . . . . . . . . . . . . . . . . . . . . . . . . . . . . . . . . .6•5
Basic Chain Hookup . . . . . . . . . . . . . . . . . . . . . . . . . . . . . . . . . . . . . . . . . . . . . . . . . .6•5
Using another MIDI Device as Master Controller . . . . . . . . . . . . . . . . . . . . . . . . . . .6•6
Using a Foot Controller . . . . . . . . . . . . . . . . . . . . . . . . . . . . . . . . . . . . . . . . . . . . . . . .6•7
Controlling From a Studio Modeler . . . . . . . . . . . . . . . . . . . . . . . . . . . . . . . . . . . . . .6•8
Using the Looper. . . . . . . . . . . . . . . . . . . . . . . . . . . . . . . . . . . . . . . . . . . . . . . . . . . . . . .6•9
The Basic Rundown . . . . . . . . . . . . . . . . . . . . . . . . . . . . . . . . . . . . . . . . . . . . . . . . . . .6•9
Record/Overdub . . . . . . . . . . . . . . . . . . . . . . . . . . . . . . . . . . . . . . . . . . . . . . . . . . . . . .6•9
Play/Stop . . . . . . . . . . . . . . . . . . . . . . . . . . . . . . . . . . . . . . . . . . . . . . . . . . . . . . . . . . .6•9
Play Once . . . . . . . . . . . . . . . . . . . . . . . . . . . . . . . . . . . . . . . . . . . . . . . . . . . . . . . . . . .6•10
1/2 Speed/Reverse . . . . . . . . . . . . . . . . . . . . . . . . . . . . . . . . . . . . . . . . . . . . . . . . . . . .6•10
Configuring Controllers for the Looper. . . . . . . . . . . . . . . . . . . . . . . . . . . . . . . . . . . . . .6•11
Looping 101. . . . . . . . . . . . . . . . . . . . . . . . . . . . . . . . . . . . . . . . . . . . . . . . . . . . . . . . . . .6•11
Advanced Looping . . . . . . . . . . . . . . . . . . . . . . . . . . . . . . . . . . . . . . . . . . . . . . . . . . . . .6•13
Using a Keyboard . . . . . . . . . . . . . . . . . . . . . . . . . . . . . . . . . . . . . . . . . . . . . . . . . . . . .6•14
Using two Echo Pros for more than one Loop . . . . . . . . . . . . . . . . . . . . . . . . . . . . . . .6•15
Dancing the Double Loop Fandango . . . . . . . . . . . . . . . . . . . . . . . . . . . . . . . . . . . . . .6•15
OME REAL LIFE EXAMPLES
APPENDICES
Model Chart . . . . . . . . . . . . . . . . . . . . . . . . . . . . . . . . . . . . . . . . . . . . . . . . . . . . . . . . . . A•1
MIDI Implementation - Program Change. . . . . . . . . . . . . . . . . . . . . . . . . . . . . . . . . . . . A•2
MIDI Implementation - Continuous Controller & Note Functions. . . . . . . . . . . . . . . . A•3
MIDI Continuous Controller Map for Note Values . . . . . . . . . . . . . . . . . . . . . . . . . . . . A•4
Audio Performance Specifications. . . . . . . . . . . . . . . . . . . . . . . . . . . . . . . . . . . . . . . . . . A•5
Page 7

Page 8

NTRODUCTION
I
Introduction
:
Thanks and what the heck did you just buy, anyway?
Thanks and what the heck did you just buy, anyway?
Thanks for your purchase, and congratulations on being the proud new owner of an
Echo Pro, part of Line 6’s Studio Modeler line of products. We hope that your new
toy will make your musical and creative life more fun, exciting, fulfilling, and will
stop the awful drip under the bathroom sink (although we suspect you're gonna
have to break down and call a plumber for that one).
If you're familiar with Line 6’s award-winning series of Stompbox Modelers–the
DL4 Delay Modeler, MM4 Modulation Modeler, and FM4 Filter Modeler–you’ve
already got a pretty good idea of some of what your new Echo Pro can do. We’ve
added a lot of new features and capabilities to the Studio Modelers, though, so
you’ll want to give this manual at least a quick once-over, if not a thorough reading
before diving in. Don’t worry, we’ll try and make it as painless as possible. If you’re
not yet familiar with Line 6 products, let’s start with a brief introduction. But first,
you’ve filled out that attractive registration card and put it in the outgoing mail,
right? No? Well then, have you logged onto
online registration? If you haven’t yet, that’s okay, we’ll wait here…
www.line6.com
and filled out the
1 •
1
Who is Line 6?
Hi! We’re Line 6. As you may know, Line 6 first came on the scene with a new
kind of guitar amplifier – the first to put digital software modeling technology to
work in a combo amp for guitarists. In order to pioneer this technology, we focused
our efforts on the vacuum tube, the little glass wonder that sat at the heart of most
every great guitar amp in history – plus quite a few stomp boxes, effect processors,
and other pieces of great audio gear. The Line 6 crew assembled a dream collection
of amplifiers recognized by guitarists the world over as true “tone classics”, and,
with a guitar in one hand and modern computer measuring gear in the other, put
these amps through their paces and got them to give up their secrets–a guitar
pickup output, after all, is an electronic signal, and tubes and the rest of the guitar
amplifier electronics are really just a complex form of signal processing. These
electronic explorers thus distilled the noble history of guitar tone heritage into a
revolutionary, patented DSP (digital signal processing) software-based modeling
technology which gave Line 6 the power to create super silicon-based life forms like
our history-making amplifiers and POD.
Page 9

Introduction
:
Who is Line 6?
1 •
2
Well, it’s been some years since the first Line 6 amp brought modeling to the combo
amp world, followed by the Line 6 POD that revolutionized the world of guitar
recording. During that time, our thoughts have often turned from our amps to our
feet. We started thinking about all those great stompboxes that have been as much a
part of the electric guitar experience as the amplifier. So, turning from our massive
collection of vintage amps we had assembled for our first products, we began the task
of assembling the most in-demand and hippest stompboxes ever made in order to put
them through the same rigorous modeling procedures. Many a night we had to stay up
late comparing different delay pedals, and on the weekends we had to haul vintage
effects home for more testing in our personal studios. (Yes, it's a rough job, but
someone has to do it.) When all was said and done, though, we had created a series of
Stompbox Modelers, each one containing a dream collection of lovingly crafted
digital software models of a whole carpet-full of some of the greatest effects in guitar
history.
Once we'd accomplished that, our attention turned to guitarists who love rack gear,
as well as keyboard players, recording engineers, home recordists, and other nonguitarist types. After all, they needed these sounds, too! One night, a vindaloo
inspired dream came to us, in which a voice called out, "Rackmount! With serious
MIDI functions, too!" Never ones to ignore visions brought on by amazingly hot, yet
tasty food, we started work on what you now hold in your hands.
Page 10

Introduction
:
Quick Start Guide
Quick Start Guide
Hate long-winded manuals? Want to use your Echo Pro
having to worry about any details? Here’s the important stuff to know:
1. Hook It Up
Input (for mono sources) or both
– Plug the output of something into Echo Pro’s rear panel
R/Mono
and
Left
the Echo Pro outputs to the input of whatever you’re feeding the echo to – guitar
amp, mixing board, etc. Chapter 3 gives details.
2. Power It Up
down, press the
– Turn the
Power
button. Light show! Make sure the volume is turned up on
Input
and
Output
knobs on your Echo Pro all the way
whatever is receiving Echo Pro’s output signal, so you’ll hear what you’re doing.
3A. Crank It Up: Guitar Source
– If you’re connecting a guitar directly to Echo
Pro and running straight into the front of a guitar amp, turn the Echo Pro
knob way up (probably to max). Don’t expect to hit the yellow or red lights on the
Echo Pro input meter; you’ll only get the green. Don’t set the Echo Pro
level too high, since the Echo Pro can put out a much hotter signal than your guitar
can and will overload the front end of your amp if you do. The ideal setting is to be
at the same level as your guitar would be if it were plugged straight into the amp.
3B. Crank It Up: Line Level Sources
– If you’re feeding Echo Pro a signal from a
line level source (keyboard, mixing board, etc.) do this: while sending a healthy
signal to your Echo Pro, turn up the Echo Pro
Input
flashing red occasionally, then back it down just a hair so you're living in the yellow
zone.
Avoid hitting the red in normal use
. Next, press the
Pro and turn up the output volume until the meter on your mixer (or whatever)
reads about the same as the input meter. Now, press the Bypass button again to let
the echo through. If you made all your connections correctly, and remembered to
turn up the Aux send and return and other levels on your board (D’oh! Been there,
done that!) you should be hearing echo.
RIGHT NOW
without
inputs (for stereo). Connect
Output
knob until the input meter is
Bypass
button on the Echo
R/Mono
Input
1 •
3
4. Dial It Up
– The
Program Select
knob is ‘velocity sesitive’ – when you turn it
slowly, the programs change one by one, but if you flip it fast, you’ll jump ahead(or
back) a number of programs at a time. See the included
5. Read Up
– Have fun for a while, then come back to this manual for more
Preset Chart
for details.
insights into the details....
Page 11

Page 12

G
UIDED TOUR
UIDED
G
There are a few types of tourists. First, there are the ones who sign up with the tour
group, read the itinerary in advance, hang on every word of the tour guide, and come
home with a solid overall understanding of the new place they’ve visited, although they
may have missed that neat little cafe that was just up the side street they rushed past on
the way to another museum. Then, there are the adventurous types who just strike out
on their own, wander around, find that little cafe – but who might wander into the
wrong part of town and get into trouble. Finally there are the (in our opinion) wiser
tourists who read the guide book before travelling, ask questions, use small tours to
figure out where they want to come back and visit in more depth, and still leave
themselves a chance for some adventure. In an attempt to join this last group, let's take
this opportunity to look at all the controls and connections that your Echo Pro has, and
give you a little bit of explanation of what they do, shall we? You've got a lot of control
at your fingertips here, and you don't want to miss out on any of it.
T
OUR
2 •
1
Page 13
G
UIDED TOUR
2 •
2
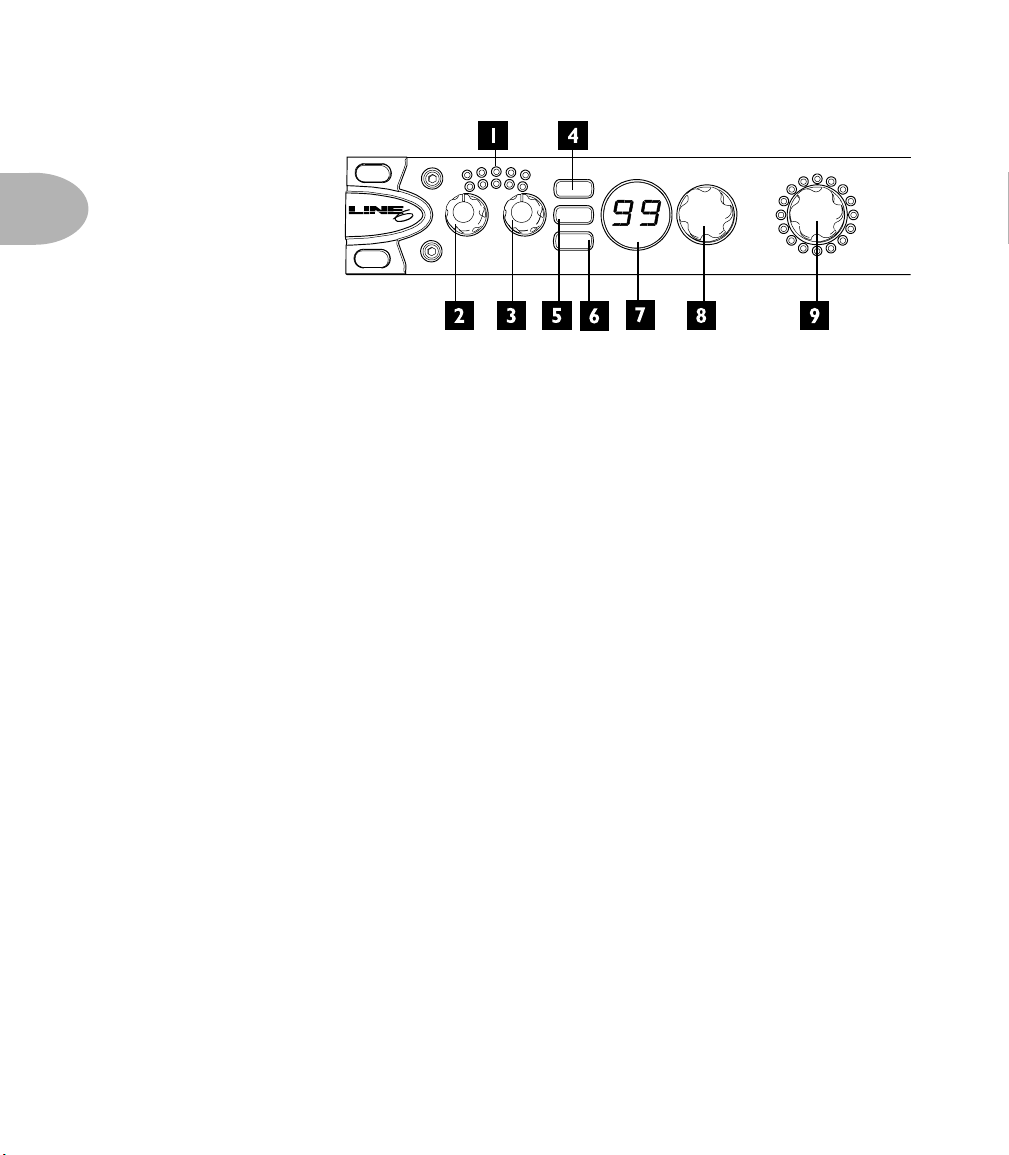
Front Panel Controls
1. Input Level Meters –
input of your Echo Pro (in which case you’ll see red and should turn down).
2. Input Level –
level until the input meter is flashing red occasionally, then back it down a hair.
3. Output Level –
4. Save button –
5. MIDI/Sys button –
functions like Bypass Mode, Mix Mode, or to recall factory programs. Flickers when
there’s incoming MIDI on the MIDI Channel Echo Pro is set to listen to.
L
R
INPUT OUTPUT
P
ROGRAMMABLE DELAY & LOOP SAMPLER with
CLIP
SAVE
MIDI/SYS
BYPASS
PROGRAM SELECT
MIDI S
YNC
LO RES DELAY
ANALOG W/ MOD
ANALOG ECHO
SWEEP ECHO
MULTI-HEAD
TAPE ECHO
TUBE ECHO
DIGITAL DELAY
LOOP SAMPLER
DIGITAL W/ MOD
ECHO PLATTER
STEREO DELAYS
PING PONG
REVERSE
DYNAMIC DELAY
AUTO-VOLUME ECHO
Shows you input levels and whether you’re clipping the
Set the input level here. While feeding a signal, turn up the input
Set the output level here.
Press to save an edited program.
Press to access MIDI functions and other System editing
6. Bypass button –
7. Program Display –
Press to bypass effect processing.
Shows which program you’ve selected. See later sections for
detail on its use for Save, Compare and MIDI/Sys functions.
8. Program Select knob –
Selects one of Echo Pro’s programs. See later sections
for detail on its use for MIDI/Sys functions.
9. Model Select knob –
10. Time/Note Display –
Selects model. (Kinda figures, doesn't it?)
Shows Delay Time in
Seconds
or
BPM
, depending on
whether the Seconds or BPM buttons are lit. The Note Value is also always shown.
See later sections for detail on the display’s use for Saving and MIDI/Sys mode.
Page 14

G
UIDED TOUR
TIME REPEATS
SECONDS NOTE BPM
PLAY ONCERECORD/OVERDUB PLAY/STOP
SET EXPRESSION PEDAL
11. Seconds button –
WOW & FLTR
TAP
GLOBAL
HALF SPEED/REVERSE
BASS
HEADS 1-2
SPEED
TONE
RIGHT TIME
DELAY OFFSET
THRESHOLD
ECHO MODULATION
Press to display current Time in Seconds. Also functions as
DRIVE
TREBLE
HEADS 3- 4
SWEEP DEPTH
MOD DEPTH
RIGHT RPTS
SPREAD
DUCKING
SWELL TIME
ECHO VOLUME
TWEEZ MIXTWEAK
POWER
Record/Overdub button for Loop Sampler.
12. Note button –
Sets Note Value to determine Delay Time. Also functions as Play/
Stop for the Loop Sampler.
13. BPM button –
Press to display current Tempo in BPM (beats per minute). Also
functions as Play Once button for the Loop Sampler.
14. Time knob –
15. Tap button –
16. Global button –
Sets Delay Time in Seconds or BPM, whichever you’ve chosen.
Tap to set Tempo for Delay Value.
Press to enable Global Time/Tempo Mode. Global overrides the
time/tempo stored within each program with the current time/tempo. The Global
button also functions as Half Speed/Reverse for the Loop Sampler.
ECHO
PRO
2 •
3
17. Repeat knob –
18. Tweak knob –
Controls number of echo repeats (aka “feedback”).
Controls various functions depending on the model chosen. The
lights to its immediate left show just what you're adjusting for each model.
19. Tweez knob –
Controls various functions depending on the model chosen. The
lights to its immediate left show just what you're adjusting for each model.
20. Mix knob –
21. Power switch –
Sets Effect Mix from 0% to 100% Wet (or is that 100% to 0% dry?).
Makes all the pretty lights go on and off.
Page 15
G
UIDED TOUR
4
2 •
POWER RATING
100– 240V~
IN L/STEREO R/MONOL/STEREO R/MONO
50– 60Hz
N222
CAUTION
RISKOF ELECTRICSHOCK
DONOT OPEN
0.3 A
OUT
MIDI INPUTOUTPUT
Rear Panel Connections
PEDAL
Tip = Left Ring = RightTip = Left Ring = Right
RIGHTLEFTEXPRESSION
RIGHTLEFT
22. Power –
23. MIDI In –
Where the end of the power cord that doesn't plug into the wall goes.
Connect the MIDI Out from your sequencer, synthesizer, or other MIDI
Device to the MIDI In here.
24. MIDI Out/Thru –
Connect the MIDI Out on the Echo Pro to the MIDI In of
your sequencer, synthesizer, or other MIDI Device. You can switch this to function
as a MIDI Out or a MIDI Thru via the MIDI/Sys Menu.
25. Expression Pedal Input –
26. +4dBu Balanced XLR Out Left –
Plug the optional EX-1 expression pedal in here.
This audio connection keeps ground separate
from the signal by running 3 lines; two conductors (+ and –) and a ground/shield.
This type of connection siginificantly reduces noise with longer cable runs, and
enables hotter levels to be transmitted (which is a good thing). There's a certain
amount of controversy about which pin should be “positive” or “hot”, so it's always
a good idea to check. (Some manufacturers have staked their claim to pin 2, others
to pin 3. We come down firmly on the pin 2 side.)
27. +4dBu Balanced XLR Out Right
28.–10dBV Unbalanced 1/4" Out Left/Stereo –
un
balanced cable (like a guitar cable) this functions as the left output. To connect to
When you connect a 1/4"
the FX Return of a POD Pro, Flextone II, or other Line 6 product that uses 1/4" TRS
connections for its loop, use a 1/4" TRS cable and connect to the loop’s return jack.
“TRS” means Tip, Ring, Sleeve and you’ll see that this type of connector has an extra
ring carved out on it that a standard mono 1/4" cable (like the ones normally used for
guitar) lacks. See the pretty pictures in Chapter 3.
Page 16

G
UIDED TOUR
Very Important Note:
if you want to run balanced signals, please use the XLR jacks
to connect the Studio Modeler to your rest of your system. The 1/4" connectors are set
up to run strictly unbalanced.
29. –10dBV Unbalanced 1/4" Out Right/Mono –
Mono Out unless something's
plugged into the Left/Stereo Out, in which case it's the Right Channel.
30. +4dBu Balanced XLR In Left
31. +4dBu Balanced XLR In Right
32. –10dBV Unbalanced 1/4" In Left/Stereo –
With a 1/4" unbalanced cable this
is the left input. To connect the Stereo Effects Send of a POD Pro or Flextone II to
the Echo Pro, use a 1/4" TRS cable to connect to this input.
33. –10dBV Unbalanced 1/4" In Right/Mono –
Mono In unless something's
plugged into the Left/Stereo In, in which case it's the Right Channel.
2 •
5
Page 17

Page 18
Basic Operation
:
Audio Hookup Options
ASIC
B
PERATION
O
Audio Hookup Options
Note that you’ll want to get the best cables you can afford. Although we’d avoid claims
that the cables are packed with Australian air or any such audiophile voodoo, good
cables can make a difference. Really. And if you’ve got one of those setups with five
different adapters plugged into each other to make the gazinta-gazoutas* match up (and
we’ve been there, believe me!), we’d suggest actually going out and buying or making
the correct cables. But it’s just a suggestion....
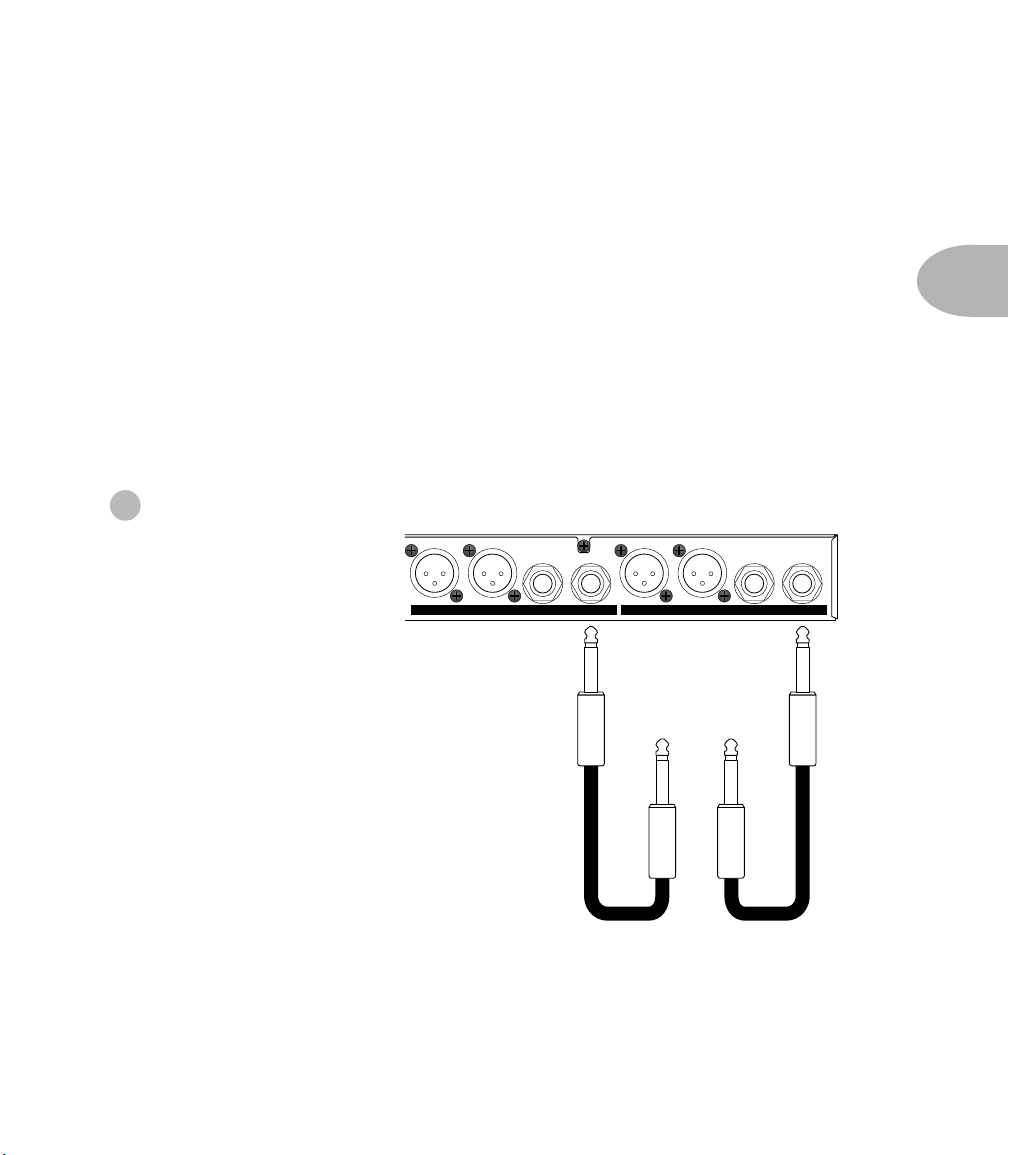
Here’s our first contestant in the Audio Hookup Diagram Regional Finals:
1 Mono In & Out
Tip = Left Ring = RightTip = Left Ring = Right
TO AMP,
MIXER OR
RECORDER
RIGHTLEFTRIGHTLEFT
INPUTOUTPUT
FROM GUITAR,
KEYBOARD,
ETC.
L/STEREO R/MONOL/STEREO R/MONO
Connect the ouput of a guitar,
keyboard, etc. to the R/MONO
input of the Studio Modeler.
Connect the R/MONO output
of the Studio Modeler to the
input of your amp, mixer or
recorder.
3 •
1
* Or, as translated from audio technician speak: goes in to’s and goes out of’s
Page 19
Basic Operation
Connect the Stereo Effects
Loop Send to the Stereo input
of the Studio Modeler using a
3 •
2
1/4” TRS cable.
Connect the Stero output of
the Studio Modeler to the
Stereo Effects Loop Return
on your Flextone II or POD
Pro using a 1/4” TRS cable.
Connect the Effects Loop
Send on your amp to the
R/MONO input on the Studio
Modeler.
:
Audio Hookup Options
2 Using with a Line 6 Flextone II or POD Pro
EFFECTS LOOP or AUX SEND
STEREO STEREO
SENDRETURN
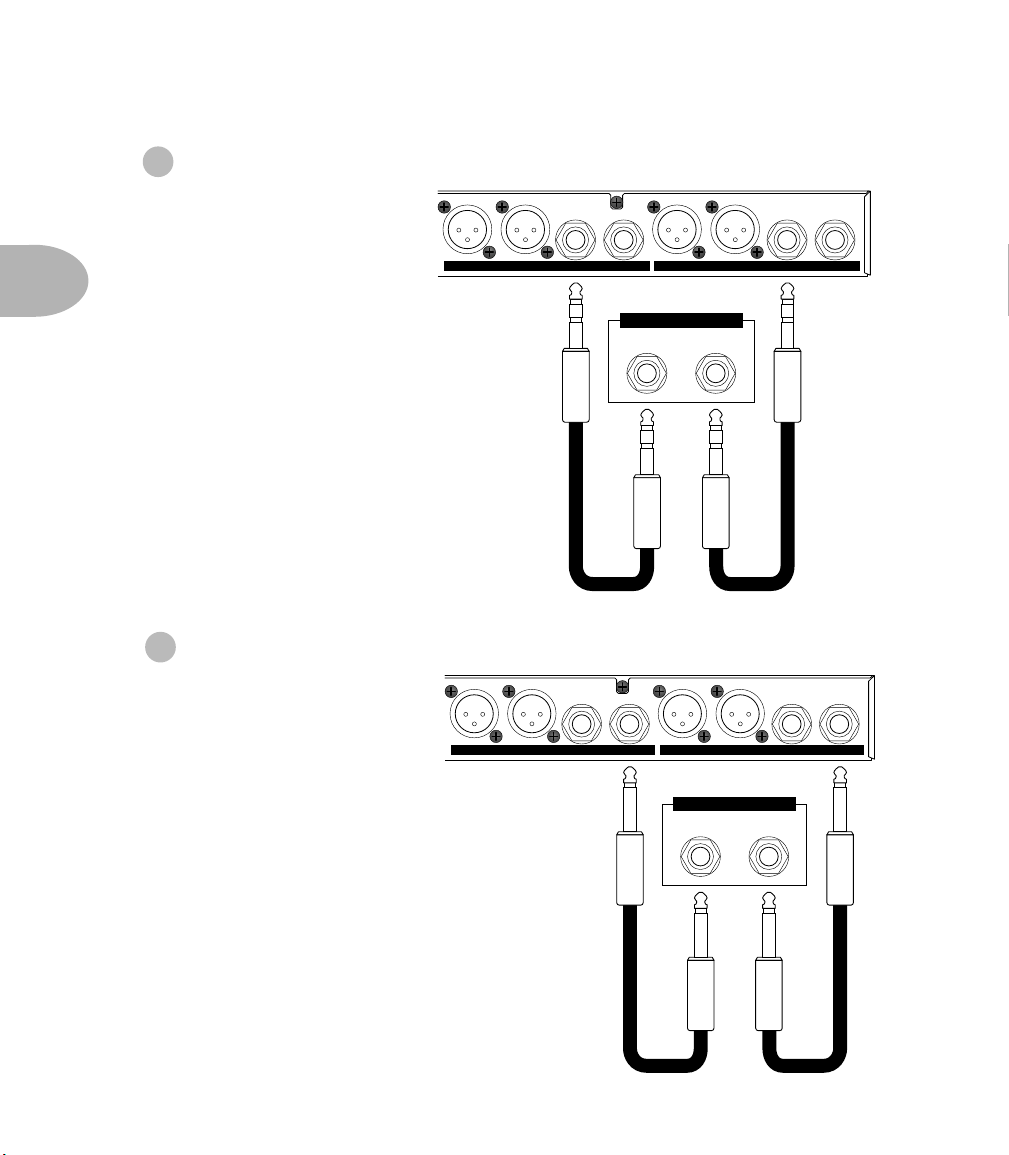
3 Connecting to an Amp with a Mono Effects Loop
Tip = Left Ring = RightTip = Left Ring = Right
RIGHTLEFTRIGHTLEFT
L/STEREO R/MONOL/STEREO R/MONO
INPUTOUTPUT
Tip = Left Ring = RightTip = Left Ring = Right
RIGHTLEFTRIGHTLEFT
L/STEREO R/MONOL/STEREO R/MONO
INPUTOUTPUT
Connect the mono output of
the Studio Modeler to the
Effects Loop Return on your
Amp. If your amp has an Effects
Loop Mix control, set it to
100% wet.
EFFECTS LOOP or AUX SEND
MONO MONO
SENDRETURN
Page 20
Basic Operation
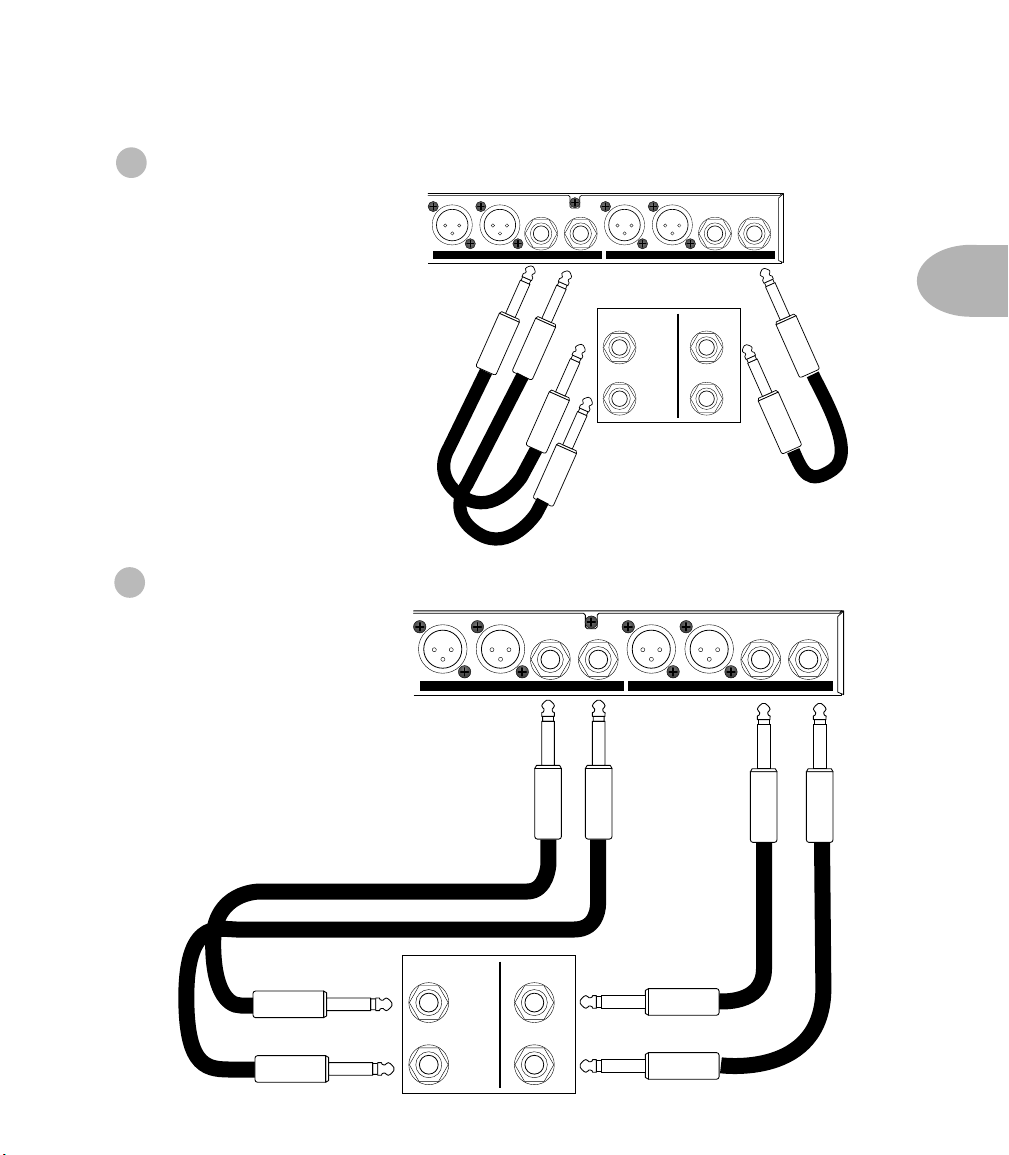
4 Connecting to a Mixer - Mono Send, Stereo Return
Tip = Left Ring = RightTip = Left Ring = Right
Connect an Aux Send from
RIGHTLEFTRIGHTLEFT
your mixer to the R/MONO
input of the Studio Modeler.
INPUTOUTPUT
Connect the Left and Right
outputs of the Studio Modeler
to a pair of Aux Returns or
channels on your mixer with
AUX SENDAUX RETURN
LEFT / MONO
1/4” unbalanced cables.
RIGHT
5 Connecting to a Mixer - Stereo Send, Stereo Return
Connect a Stereo pair of Aux
Sends from your mixer to the
Left & Right inputs of the
Studio Modeler.
:
Audio Hookup Options
L/STEREO R/MONOL/STEREO R/MONO
3 • 3
1
2
Tip = Left Ring = RightTip = Left Ring = Right
RIGHTLEFTRIGHTLEFT
L/STEREO R/MONOL/STEREO R/MONO
INPUTOUTPUT
Connect the Left and Right
outputs of the Studio Modeler
to a pair of Aux Returns or
channels on your mixer with
1/4” unbalanced cables.
LEFT / MONO
RIGHT
AUX SENDAUX RETURN
1
2
Page 21

Basic Operation: Selecting a Program
Selecting a Program
There are two methods of selecting a program:
First, you can dial it up from the Program Select knob. Remember that the Program
Select knob is ‘velocity sensitive’. The faster you spin it, the further it jumps, so if you
3 • 4
need to get from program 1 to program 99 in a hurry, just twirl it quickly. A slow spin
moves you one program at a time.
If you’re using MIDI with the Echo Pro, send a MIDI Program change message from any
MIDI controller to change the program. And because we were thinking ahead, you can
actually call up the basic models as Programs, giving you a total of 115 available
programs. MIDI Program Changes also control looper functions like record/overdub,
play/stop, reverse, etc. See the MIDI Program Change Chart in the Appendix.
Editing a Program
Just call up a program or select a model with the Model Select knob and start twisting
and tweaking. You can tell that you’ve edited a program by the hypnotic, slow flashing
of the Save button (just don’t stare at it for too long, or you may start clucking like a
chicken).
Setting Delay Time/Tempo
When digital delays first hit the market back in the late 70’s, long before Tap Tempo
hit the scene, calculators and stop watches were standard issue in most studios.
Engineers would calculate the correct delay time for the tempo of a song by dividing
60,000 into the tempo. This would give them the 1/4 note delay value, and from there
they could calculate all of the wonderful possible rhythmic divisions like a dotted 8th
or a 1/2 note triplet by using the a multiplier table like the one on the next page:
Page 22
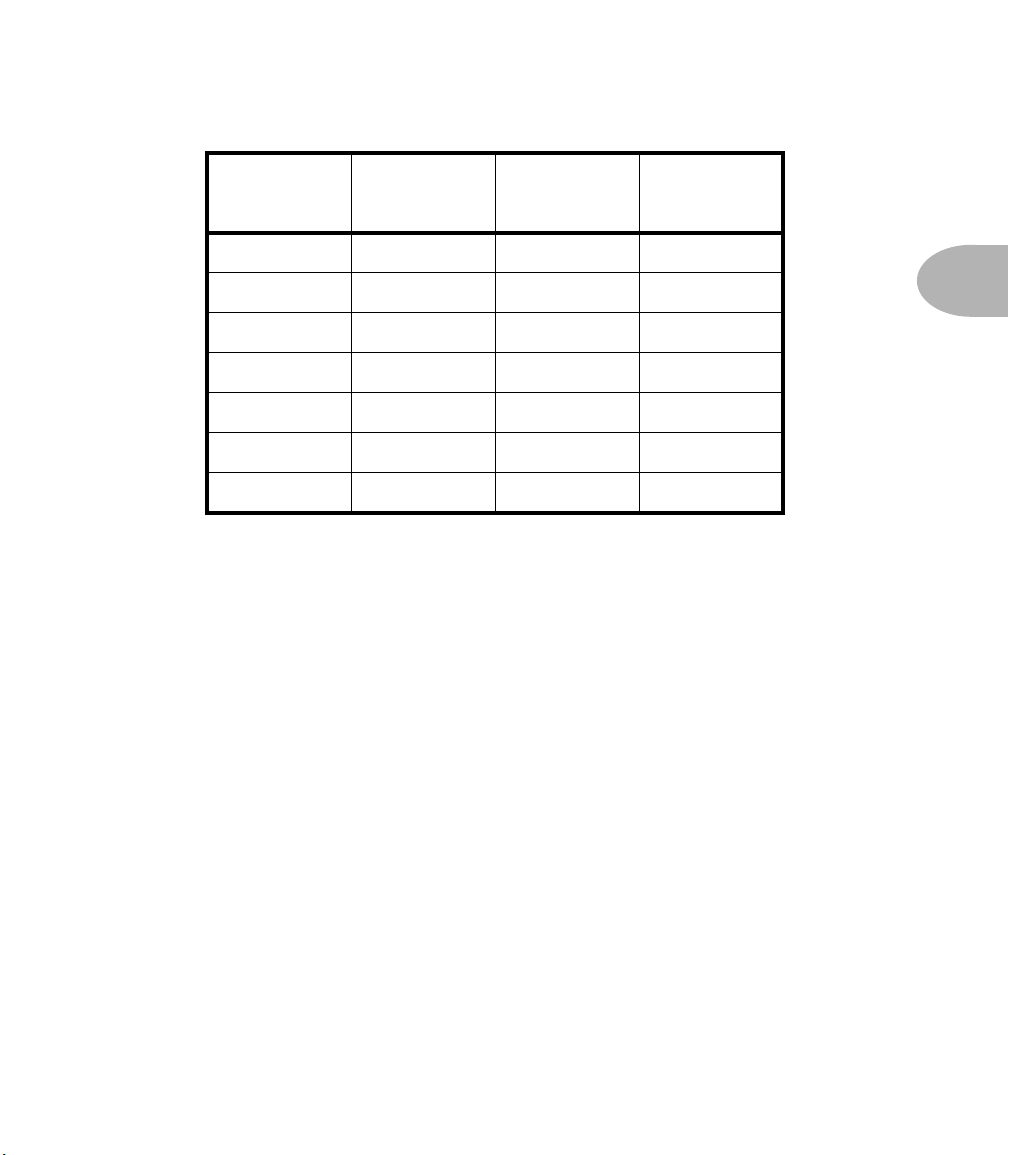
Basic Operation: Setting Delay Time/Tempo
1/4 Note Delay Time Multiplier Table
Note
Value
Whole Note 4 Dotted 1/8 .75
Dotted 1/2 3 1/8 Note .5
1/2 Note 2 Triplet 1/8 .333
Triplet 1/2 1.333 Dotted 1/16 .375
Dotted 1/4 1.5 1/16 Note .250
1/4 Note 1 Triplet 1/16 .167
Triplet 1/4 .667
Multiplier
Note
Value
Multiplier
With the Echo Pro, you get to bypass the math and just press buttons:
Setting Delay Time in BPM
To set the delay time in terms of tempo and rhythm:
3 • 5
1. Press BPM to see the delay time expressed as a tempo.
2. Tap a tempo with the TAP button. (Tap on the 1/4 notes along with the music
that you’re adding echo to.)
3. Press the NOTE button as needed to select the note division you’d like for your
echo effect.
Page 23
Basic Operation: Setting Delay Time/Tempo
Setting Delay Time in Seconds
To set the delay time in seconds:
1) Press SECONDS
3 • 6
2) Use the TIME knob to set the delay time. The Time knob is velocity sensitive. Twist
it quickly for coarse adjustments, and slowly for finer adjustments.
SECONDS NOTE BPM
Now let’s talk a little bit about the Time/Note display and its related buttons, since
that’s where you’ll get a lot of your information about what’s going on. This display
shows you the delay time in either Seconds or in Beats Per Minute (BPM). The buttons
underneath it let you determine which of those two options you get, as well as select
what rhythmic value you want the delay to have. Bear in mind, though, that we’re not
trying to force you into anything – if you don’t want to have a specific note value for a
delay, just press the Seconds button and use the seconds display and the Time knob to
dial up a delay value and ignore the whole BPM/note thing.
But, just in case you do want to do something cool with note values, here’s an example:
Let’s say you’re writing a new Drum’n’Bass dance hit, with the leisurely tempo of 183
bpm. Let’s also say that you want the sample of Mark McGwire hitting #70 that you’re
using as a snare to have a synced delay of a quarter note triplet. There’s no need to get
out the calculator (or boot up that special piece of software you have) to figure out
what the millisecond value would need to be. You simply press the button labeled
“BPM”, turn the Time knob until the display reads “183” and press the Note button
until “
3” is lit, and you’re there. If your curiosity gets the better of you (or you’re
working on the project with a friend and he needs to know ’cause he hasn’t bought his
own Echo Pro yet) and you decide you really need to know what the millisecond value
is for that, just hit the Seconds button. Ta-da! The display switches back to
milliseconds, and you haven’t even had to think about that math stuff.
Page 24

Basic Operation: Global (Time/Tempo)
Global (Time/Tempo)
Global Time/Tempo determines whether models and programs will load with their
stored delay time or ignore that and use a Global delay time or BPM value. Just press
the Global button to toggle it on and off.
Hint: It’s on when the button is lit.
Set Expression Pedal
Pedal Assign mode lets you create two different versions (kind of like 2 snapshots of the
front panel controls) of a program and morph between them with an expression pedal
(like the Line 6 EX-1) connected to the 1/4" jack on the rear of the Echo Pro. This is
great for controlling single parameters on the fly like the wet/dry mix, or exploring
more radical soundscapes like adjusting delay time and feedback in tandem on the Tape
Echo model. The expression pedal is a key performance tool for both live and studio
work. You can also do the same thing via MIDI using MIDI continuous controller # 4.
If you’re one of those types who’s used to the way an Expression Pedal works with the
Line 6 DL4 Delay Modeler stompbox, you’ll want to listen carefully. The Echo Pro
works a little differently, but the concept remains the same. You may also want to
check out page 15 in this chapter which describes the intricacies of the Pedal Update
Mode options. But for now, here’s the basics:
1. Make sure that your EX-1 is plugged into the correct jack on the back of your Echo
Pro. From Program Select Mode, press and hold the Global button and then press
the BPM button at the same time.
2. With the EX-1 in the heel down position, set up your basic program (model, time,
repeats, tweak, tweez, etc.).
3 • 7
3. Move the EX-1 to the toe down position and set up a variation on the same
program (note: you can change any knob but model).
4. Move the EX-1 from heel to toe and back while feeding a signal through your Echo
Pro so you can make sure that the program is working the way you want.
5. Store the program (if you like what you’ve done and want to keep it), or press BPM
and Global at the same time. Either one will exit Pedal Assign mode.
Page 25
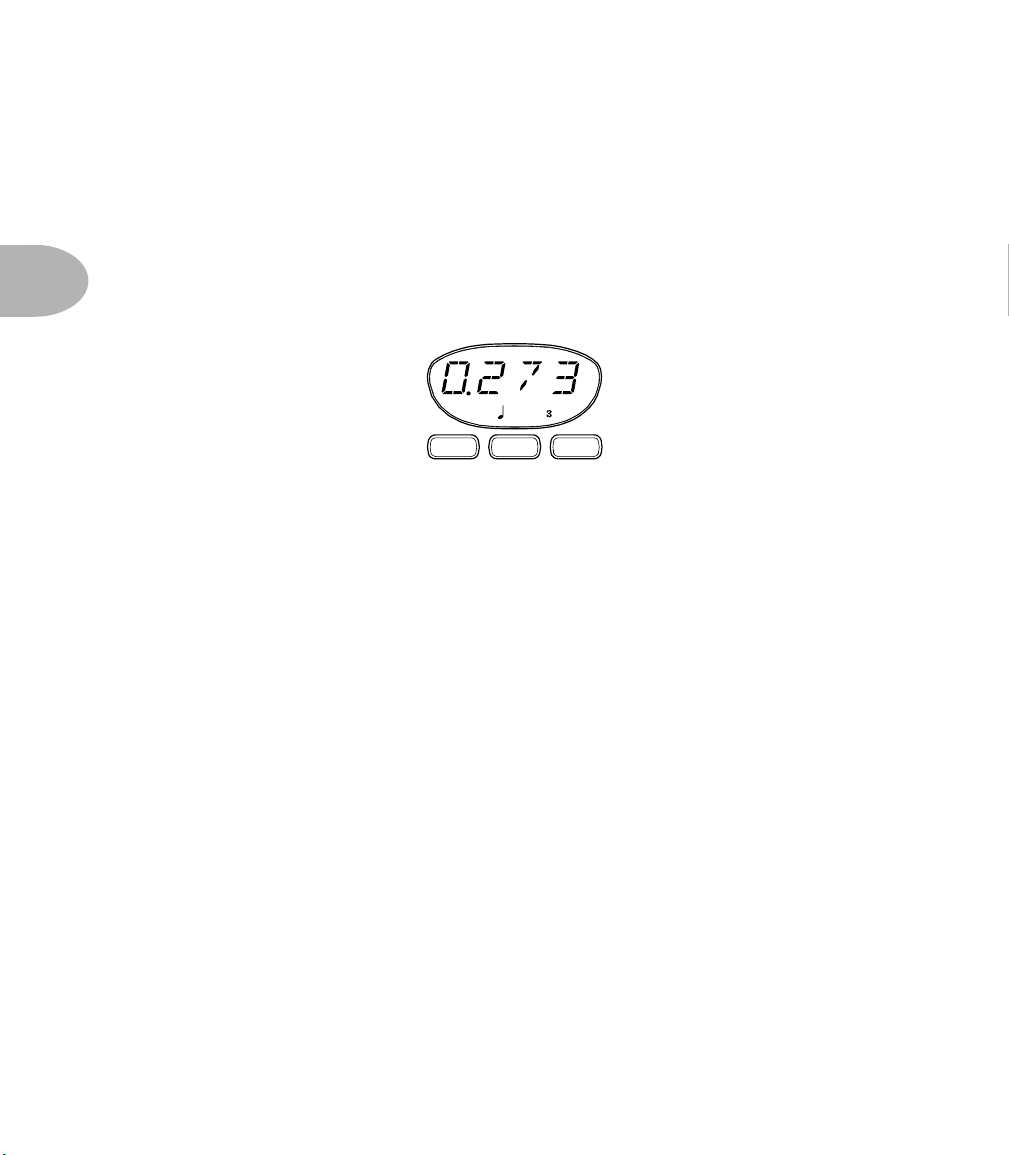
Basic Operation: Mix Control
Mix Control
The Mix control has been optimized for each model to give you the most usable range
of mix variation. Watch the display as you adjust the knob. 50% Dry/50% Wet will not
always be at 12 O’Clock like you might be expecting. We’ve used our ears to set this up
intuitively, giving you the best balance of delay vs. dry signal range, so close your eyes if
3 • 8
you have to and dial away.
Compare
Wonder exactly what edits you’ve made? Do you want to get back to the original
program settings? Did you increase or decrease the wow and flutter and now wonder
what it was when you started out? It’s easy to tell! Whenever you’re editing a Program,
you’ve also got some handy Compare information available. Just look at the Program
display while you turn a knob. You’ll see that when you turn any knob to edit the
program, one or more dots in the Program display will turn on, depending on whether
you’ve turned the knob up or down versus the saved settings for the Program. As
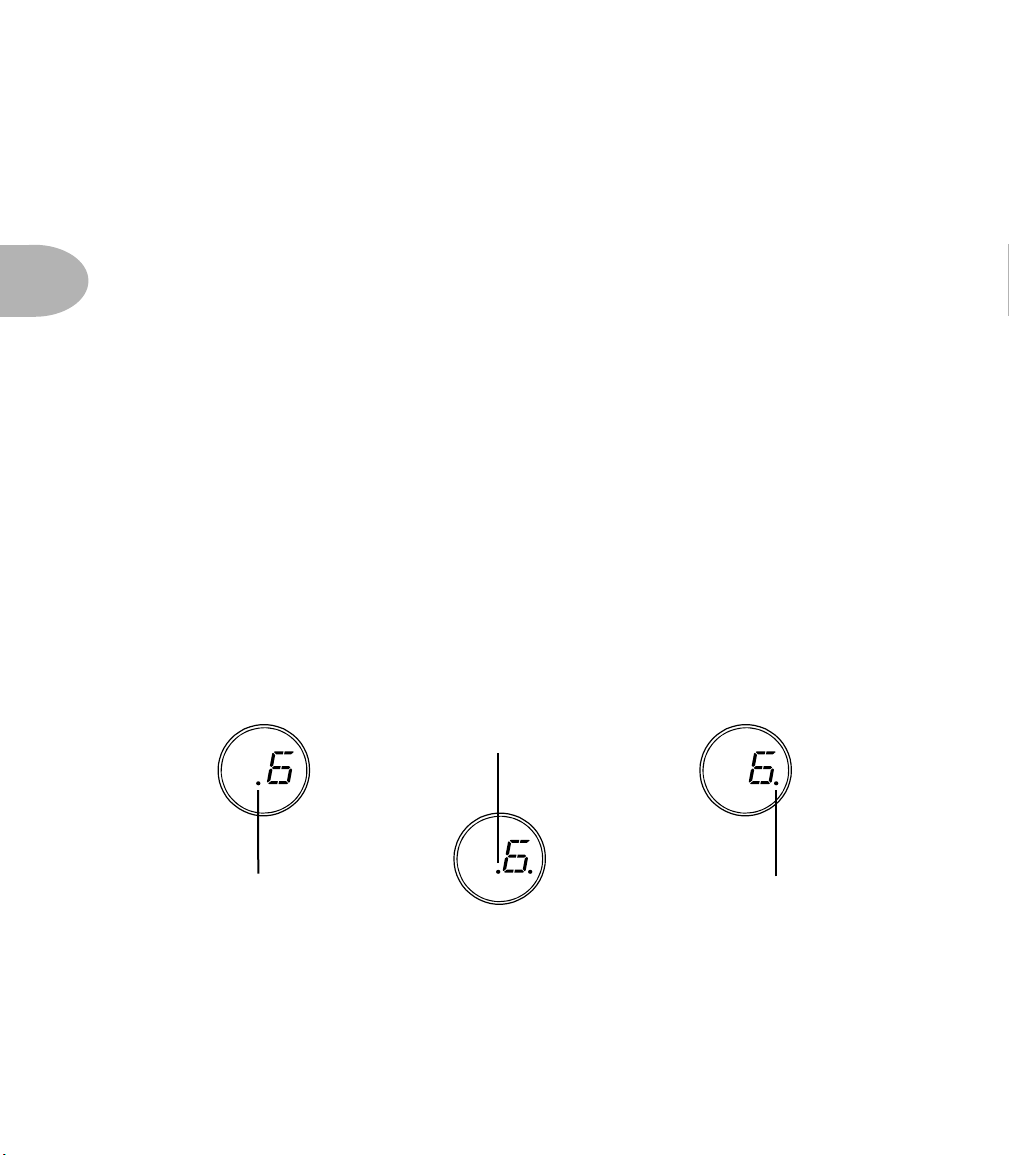
illustrated by the images below, there are three possibilities: If the left dot is lit, the
current value is less than the stored version of the program. If the dot to the right is lit,
it’s greater than the stored version. If both dots are lit, the value matches the stored
program. Pretty simple, huh?
Equal To Original
Less Than Original More Than Original
Page 26

Basic Operation: Saving a Program
Saving a Program
Okay, so you’ve edited a program and come up with your ultimate Multi-Head setting.
Now what do you do? You save it so you can always amaze your friends with your
impression of a six-armed guitar player, of course! There are a couple of different ways
to save a program, so here goes with the explanation type stuff:
Regular Save
If you want to save your edits as a regular program, overwriting the program you started
from, simply press the Save button twice. That’s it, no muss, no fuss, you’re done. If, on
the other hand, you like the original program and want to keep it, but also like your
edited version, you’ll need to save it to a new location. To do this, press Save once. The
Save Button will start flashing quickly. (If you have never saved your own program to
this location before, the display will show “FACT” to let you know that you’re saving
over a factory setting. If you have saved to that location before, it will show “USER”.)
Now, use the Program Select knob to choose the location where you want to save your
new sound and press Save a second time.
Hint: It’s probably a good idea to go through all the presets and figure out which ones you like,
which ones you could live without, and make a list of both. The best time to figure that one out
isn’t when you’re trying to save a fabulous new program. And what if you blow it and
overwrite one that you loved? Not to worry, just skip ahead a couple of pages to the section on
Restoring Factory Settings.
Custom Save
Here we come to one of the very cool features of Echo Pro. If you love your new edited
program so much that you just want it to pop up every time you select that model with
the Model Select knob, you can do that, too. Just press Save once, so the button begins
to flash. Then turn the Program Select knob all the way down. This will take you to an
extra setting below 1 that shows up on the display as “FX”. When you see “FX” in the
program display, press Save a second time, and your edited program will overwrite the
default sound on the Model Select knob. Now, whenever you twirl that Model Select
knob to “Multi-Head” it’s your very own, custom, amazing sound that pops up. It may
not be quite as cool as a major label recording contract, but it’s getting there.
3 • 9
Page 27
Basic Operation: MIDI/Sys Functions
MIDI/Sys Functions
MIDI/Sys Mode is where you set different system defaults and determine how your Echo
Pro should respond to MIDI program change and controller information, handle
information from expression pedals, initiate bulk dumps of MIDI system exclusive
information, and various other housekeeping tasks. You get there by, surprisingly
3 • 10
enough, pressing the MIDI/Sys button. Once you’re in MIDI/Sys mode, you use the
Program Select knob to choose which stuff you want to change, and then the Time
knob to change it. It’s pretty simple, and here’s a list of what you can do:
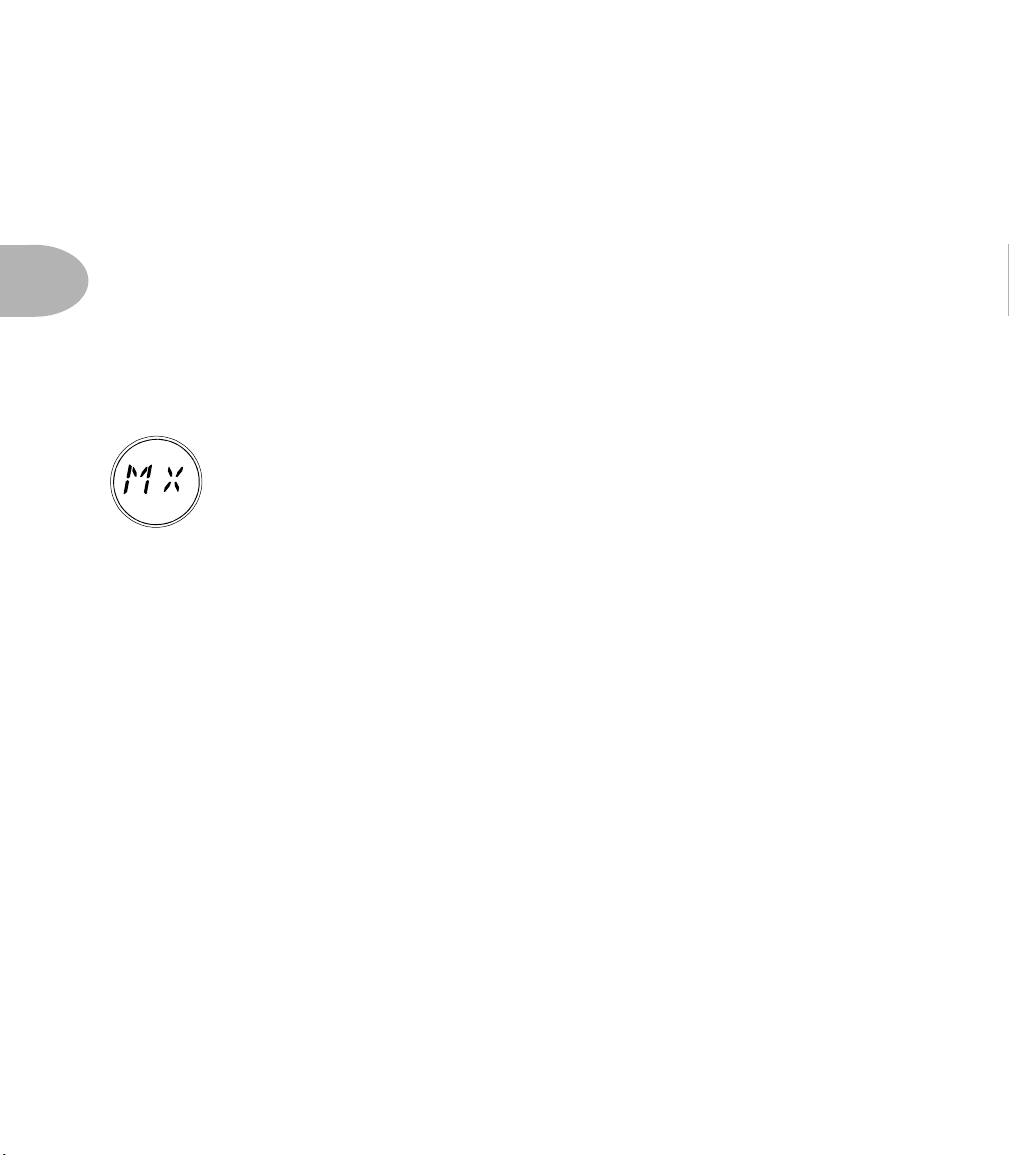
Mix Mode
Mix Mode lets you decide whether you want to use the mix (wet/dry) ratio
that’s stored with the individual programs (PROG), “globally” override the
mix ratio for each program in your Echo Pro (GLOB), or eliminate any dry
signal altogether for using Echo Pro in a parallel effects loop as is typical with a
mixing board (LOOP). To set your desired Mix type:
1. Press MIDI/Sys to enter MIDI/Sys mode.
2. Turn the Program Select knob down until the Program display shows “MX” if it’s
not showing already.
3. Turn the Time knob to select which Mix type you want. Bang, you’re done!
“PROG” Mix Mode stores the mix (wet/dry) ratio with each individual program.
“GLOB” Mix Mode sets the front panel mix knob (or the corresponding MIDI
Continuous Controller) to “globally” override the mix ratio for every program in your
Echo Pro as determined by the front panel Mix control. This Global Mix Mode doesn’t
rewrite your programs; it only applies the Global mix value temporarily. It’s especially
handy when you’ve set the delay time/tempo you want, and you then want to surf the
models for just the right echo flavor to go with it.
“LOOP” Mix Mode eliminates the dry signal altogether (100% Wet) for using Echo
Pro in a parallel effects loop, as with a typical mixing board hookup.
Page 28

Basic Operation: Bypass Mode
Bypass Mode
There are several different types of bypass available in your Echo Pro. Which
one you’ll want to use is going to depend on your application and personal
taste. To select or change Bypass Mode:
1. Press the MIDI/Sys button to enter MIDI/Sys mode.
2. Turn the Program Select knob until the Program display shows “BY”.
3. Turn the Time knob to select the bypass mode you want. The options are:
Bypass Mode: Dry
When bypassed, this mode routes the dry signal only from the inputs, through the DSP,
directly to the outputs, regardless of current Mix settings. It’s equivalent to setting the
Mix knob to 0% Wet. It like Analog Bypass mode, with the advantage that the pop or
click that sometimes happens with ANALOG BYPASS is eliminated in DRY mode.
3 • 11
Bypass Mode: Input Mute (IMUT)
When bypassed, this mode cuts off, (mutes) the input to the effect, but not the output.
This enables your effect to “ring out” or decay naturally.
Bypass Mode: All Mute (AMUT)
When bypassed, this cuts off both input and output, so no audio at all is passed through.
Bypass Mode: Analog Bypass (ANLG)
This mode gives you a straight, buffered analog path (with no analog-to-digital
conversion) between the inputs and outputs of the Echo Pro when you are in bypass.
Page 29

Basic Operation: MIDI Channel
MIDI Channel
Here’s where you select which MIDI channel you want your Echo Pro to
communicate on. The choices are 1-16 and Omni (which, in MIDI-speak
means, “I don’t care, I’ll listen to every channel”). The default is MIDI
channel 1, but if you want to change it:
3 • 12
1. Press MIDI/Sys to enter MIDI/Sys mode.
2. Turn the Program Select knob until the Program display shows “CH”.
3. Turn the Time knob to select the MIDI channel of your dreams.
Program Format
For those of you who own other Line 6 gear like POD, POD Pro, Flextone II,
etc., and have gotten used to seeing your program numbers displayed in the
Bank/Channel format, we provide the Program Format mode selection. You
can choose to have your programs numbered 1-99 (1-99) or 1A-9D (BANK).
Since POD and Flextone have only 36 channel locations, programs 37-99 will
be displayed normally, regardless of which program format you choose. To choose which
you’d prefer, simply:
1. Press MIDI/Sys to enter MIDI/Sys mode.
2. Turn the Program Select knob until the Program display shows “PF”.
3. Turn the Time knob to select which Program display type you want.
Page 30

Basic Operation: MIDI Clock Mode
MIDI Clock Mode
This one tells the product whether to listen to MIDI Clock Sync or not. For
more information about using MIDI Clock, see the chapter on MIDI control.
In the meantime:
1. Press MIDI/Sys to enter MIDI/Sys mode.
2. Turn the Program Select knob until the Program display shows “CL”.
3. Turn the Time knob to select “ON” or “OFF”.
Note: When MIDI Clock is enabled, tapping the Tap Tempo button or adjusting the
time knob will have no effect on the tempo/delay time. If you wish to regain manual
control of these parameters, de-activate MIDI Clock.
MIDI Map Mode
This one turns MIDI Mapping on and off. For more information about using
MIDI Mapping, see the chapter on MIDI control. In the meantime:
3 • 13
1. Press MIDI/Sys to enter MIDI/Sys mode.
2. Turn the Program Select knob until the Program display shows “MM”.
3. Turn the Time knob to select “ON” or “OFF”.
Note: if any change is made to the MIDI Map, this parameter is automatically set to
‘ON’.
Page 31

Basic Operation: MIDI Out/Thru
MIDI Out/Thru
The MIDI Out/Thru jack on the rear panel of your Echo Pro is softwareconfigurable to be either a MIDI Out or a MIDI Thru. When set as MIDI
Out, Echo Pro will send internally generated MIDI controllers and Program
Changes (e.g. You select Program 58 and Echo Pro sends out a MIDI Program
3 • 14
to Program 58), but will not send any MIDI information that it receives. In MIDI Thru
mode, it will simply pass along any MIDI messages it receives, but won’t send any internally
generated MIDI messages out. In either case, Echo Pro will still react appropriately to MIDI
messages that are received at its MIDI In. The factory default is MIDI Out. To change it:
1. Press MIDI/Sys to enter MIDI/Sys mode.
2. Turn the Program Select knob until the Program display shows “MO”.
3. Turn the Time knob to select “OUT” or “THRU”.
Change message telling other MIDI devices on the same channel to change
MIDI Dump
Here’s where you can send out either the current state of the running program
(including any edits that you might have made, but not saved) or the entire
contents of your Echo Pro as a MIDI System Exclusive Bulk Dump. If you
need to know more about just what information is being sent (in other words,
if you’re some kind of MIDI freak who knows his F0 from his F7), all that’s in
the appendix on MIDI Implementation. To send data wildly scurrying from your Echo Pro:
1. Press MIDI/Sys to enter MIDI/Sys mode.
2. Turn the Program Select knob until the Program display shows “DU”. You’ll notice
that when you do this, the Save button also starts blinking.
3. Turn the Time knob to select either “CURR” or “ALL”.
4. Make whatever preparations you need to with the sequencer, librarian, or MIDI
utility that’s going to be receiving the information (we’re not gonna go into all that
here), and press the Save button. When Echo Pro is finished Dumping the data the
display will read “DONE”.
Page 32

Basic Operation: Pedal Update Mode
Pedal Update Mode
This one toggles between Immediate and Delayed mode for the expression
pedal or MIDI controller information. In the Immediate mode, when a new
program is selected, the current position of the expression pedal, or the last
received MIDI Continuous Controller #4 message will immediately affect the
program by morphing its values as set in “SET EXPRESSION PEDAL” mode.
(The MIDI controller messages will be ignored if an Expression Pedal is connected to the
rear panel 1/4" jack.) In the Delayed mode, when a new program is selected, its settings will
be loaded, and will not be affected by the Expression pedal or MIDI CC#4 until they are
adjusted by you. Here’s how to set the Pedal Update mode:
1. Press MIDI/Sys to enter MIDI/Sys mode.
2. Turn the Program Select knob until the Program display shows “PU”.
3. Turn the Time knob to select either Immediate “IMMD” or Delayed “DLYD”. The
factory default is Immediate.
Why would you want to delay the expression pedal’s effect on your sound anyway?
How about this: Let’s say your Program 1 utilizes the expression pedal to adjust the
REPEATS of a model, while Program 2 uses the Expression Pedal to adjust the delay
time. And now let’s say you want to be able to call up Program 1, pedal the REPEATS
like crazy, and then switch to the Programmed state of Pedal 2 without having to worry
what position you just left your Expression pedal in. DELAYED mode would insure that
you could switch to Program 2, and have the Echo Pro wait for you to move the
Expression Pedal again before morphing Program 2. Sound like a good idea? Well then
congratulations, DELAYED mode is for you!
3 • 15
Page 33

Basic Operation: MIDI Controller Assignments
MIDI Controller Assignments
You’ll find an extensive discussion of MIDI Controller Assignments in the
MIDI Control chapter under “Parameter Control”. You’ll also find a complete
list of just what’s controllable in the appendix on MIDI Implementation. Here
are the basics to setting it up:
3 • 16
1. Press MIDI/Sys to enter MIDI/Sys mode.
2. Turn the Program Select knob until the Program display starts blink between “CC”
and a number of other cryptic TLAs (Two Letter Abbreviations). Keep turning the
Program Select knob until you come to the controller you want to change (for a
complete list of what you can change, including those TLAs, see the chapter on
MIDI Control).
3. Either send your Echo Pro a controller message from the controller you want to use,
or turn the Time knob to select the controller number you want to use.
Your Echo Pro shipped from our factory pre-configured with the following default MIDI
Controller Assignments:
CC# 4 Expression Pedal CC# 76 Mix Knob
CC# 28 Play/Stop CC# 77 Bypass Button
CC# 36 Half Speed CC# 78 Effect Model Select
CC# 50 Record/Overdub CC# 80 Play Once
CC# 64 Tap Button CC# 81 Stop Only
CC# 65 Note Value CC# 82 Overdub Only
CC# 66 Time Knob CC# 83 Rec/Play/Stop/Play/Stop
CC# 67 Repeats Knob CC# 84 Rec/Stop/Play/Stop/Play
CC# 68 Tweak Knob CC# 85 Reverse
CC# 69 Tweez Knob
Page 34

Restoring Factory Settings
Made a mistake? Overwrote a factory preset you really loved? Never fear, we’ve
given you a way to restore the factory settings, either all at once, or one at a
time.
Basic Operation: Restoring Factory Settings
Press the MIDI/Sys button and use the Program Select knob to select “FR” (for
Factory Recall, in case you were wondering).
Note that the Save button will be flashing quickly and the question mark in the Time
Display will be flashing slowly.
Individual Restore
At this point, you can restore any single program to its factory default by using the
Time knob to select the program number you want to restore (since the display shows
Program #1, we’ll use that as an example), then pressing Save. At this point, the Time
Display will prompt you to see if you’re absolutely positive this is what you want to do.
If you’re sure and there’s no changing your mind, just press Save a second time. The
Echo Pro will restore the program to its factory setting, flash “Done” on the Time
Display for a couple of seconds, then return to the display shown above. If you’re
finished, simply press MIDI/Sys to go back to Program mode. If you’ve got other
programs you want to restore, you may (as they say in the shampoo biz) repeat as
necessary.
1. Press MIDI/Sys to enter MIDI/Sys mode.
2. Turn the Program Select knob until the Program display shows “FR”. You’ll notice
that the ol’ Save button starts blinking, just awaiting your command.
3. Turn the Time knob to select Program 1-99. You’ll notice a blinking question mark
in the Time display, next to the program number.
3 • 17
4. Press Save. The Time Display will prompt you with “SURE” so you have ample
opportunity to question your motives and reason for existence, as well as determining
that this is, in fact, the program number you want to restore.
5. If you’re sure, press Save a second time, and you’ll be rewarded with the word
“DONE” in the time display, and then...
Page 35

Basic Operation: Restoring Factory Settings
6.Press MIDI/Sys to exit MIDI/Sys mode.
Global Restore
Let’s say you decide that you want to wipe out all 99 Programs and start with a clean
slate. You can set them all back to the factory defaults very easily. Simply follow the
procedure we outlined above, but instead of selecting a program number, turn the Time
3 • 18
knob all the way up. Keep going when you hit Program 99 and the Time Display will
show “All”. Press Save, and once again you’ll be prompted to make sure this is what you
want. If you’ve got your heart set on it, take a deep breath and press Save a second time,
then press MIDI/Sys to return to Program Select mode. Presto, your Echo Pro now
sounds as if it’s been freshly removed from the box.
Page 36

Page 37

Page 38

Model Descriptions: Tube Echo – based on Maestro EP-1
MODEL DESCRIPTIONS
TUBE ECHO – BASED ON MAESTRO EP-1
The classic 1963 Maestro EP-1 was the first of a series of “Echoplex” designs distributed
by the company, and made by Harris-Teller in Chicago. As touted in a Maestro
advertisement, the Echoplex’s “...special effects range all the way from a controlled
high speed reverberation to a full, throbbing echo”!
4 • 1
The main feature of the Echoplex design is a special cartridge of looped 1/4" tape that
wraps past separate record and playback heads. The position of the playback head can
be moved to adjust the delay time from 60 to 650 milliseconds. Your Echo Pro’s Tube
Echo emulates the classic Echoplex tone with the extra advantage of up to 2.57 seconds
of delay time.
TWEAK adjusts the emulated tape’s wow and flutter from 0-100%
TWEEZ adjusts “drive,” which is the amount of distortion created by the unit's tube
electronics and tape saturation. Range: 0-100%
This image is provided for the sole purpose of identifying the specific product that was studied during Line 6’s sound model development,
and does not imply any cooperation or endorsement.
Page 39

Model Descriptions: Tape Echo – based on Maestro EP-3
TAPE ECHO – BASED ON MAESTRO EP-3
4 • 2
After the tube-based EP-1 and EP-2, Maestro introduced the solid state EP-3, with
transistors instead of tubes for the sound electronics. The EP-3 uses the same basic
mechanical design as the original Echoplex, including the looped 1/4" tape, but does
not have the tube distortion sound of the EP-1.
EP-3s contributed to many classic recordings of the 70’s. Eddie Van Halen and Jimmy
Page were both avid EP-3 users.
Unlike the Tube Echo Model based on the EP-1, which gives you control of wow,
flutter and distortion, our EP-3 emulation is designed to give you a less distorted tape
emulation with adjustable tone controls.
TWEAK adjusts bass response. Range: –15.2dB to +8.8dB.
TWEEZ adjusts treble. Range: –15.2dB to +8.8dB.
This image is provided for the sole purpose of identifying the specific product that was studied during Line 6’s sound model development,
and does not imply any cooperation or endorsement.
Page 40

Model Descriptions: Multi-Head – based on Roland RE-101 Space Echo
MULTI-HEAD – BASED ON ROLAND RE-101 SPACE ECHO
Long before Boss pedals, the Space Echo was Roland’s first venture into the world of
effects processing. Instead of having one m33ovable playback head (like the Echoplex)
this machine has multiple stationary heads. You change delay times by switching
amongst these heads, and then fine-tune delay time with a motor speed control. The
groovy part is that you can play back on multiple heads at the same time to get multitap delay effects. Like the other effects in Echo Pro, Multi-Head has a maximum delay
length of 2.57 seconds, however, the Multi-Head delay divides the selected delay time
evenly between the 4 heads.
4 • 3
The TWEAK and TWEEZ knobs let you select combinations of the emulated tape
heads. When you're adjusting Tweak and Tweez, the display will look something like
this:
You can always tell which heads are turned on and off from this display, since, if the
head's not on, you'll see a dash, instead of the head number.
TWEAK turns heads 1 & 2 on and off.
TWEEZ turns heads 3 & 4 on and off.
This image is provided for the sole purpose of identifying the specific product that was studied during Line 6’s sound model development,
and does not imply any cooperation or endorsement.
Page 41

Model Descriptions: Sweep Echo
SWEEP ECHO
This Model is a Line 6 original. Starting with the basic tone of our EP-1 tape delay
emulation, we added a sweeping filter effect to the delay repeats to give you unique new
creative possibilities for adjusting the tone of your delays.
In technical terms, the TWEAK and TWEEZ knobs adjust the speed and depth of a
sine wave used to modulate the tone of the tape emulation. You can use these controls
to create and explore your own shifting landscape of tonal possibilities. Grab a hold of
4 • 4
your guitar and your Echo Pro’s knobs and see where you end up.
With the optional Line 6 expression pedal, you can set things up so that the pedal takes
you from no modulation (TWEEZ at its minimum value) at the heel-down position to
swimming modulation when you pedal forward, so you can bring out the Sweep part of
the Sweep Echo for your big solo.
TWEAK adjusts the sweep speed from 0.1 to 20 Hz.
TWEEZ adjusts the sweep depth from 0% to 100%.
Page 42

Model Descriptions: Analog Echo – based on the Boss DM-2
ANALOG ECHO – BASED ON THE BOSS DM-2
Analog echo units like the DM-2 were designed as improvements over the tape echoes
that came before them, using “bucket brigade” electronics to give guitarists echo units
that were more reliable than the tape-based delays, with the added advantage of a low
power circuit that can be run on batteries.
4 • 5
Analog delays are treasured for the warm, distorted tones they produce, and are also
great for creating more experimental sounds. Try this, for instance: set the DELAY
TIME to 1 second and the REPEAT knob to max and play in some guitar, so the delay
circuit “overloads.” Now spin the DELAY TIME knob quickly to get something like the
sound of a space-aged speeding race car imploding on itself.
TWEAK adjusts bass. Range: -15.2dB to +8.8dB.
TWEEZ adjusts treble. Range: -15.2dB to +8.8dB.
This image is provided for the sole purpose of identifying the specific product that was studied during Line 6’s sound model development,
and does not imply any cooperation or endorsement.
Page 43

Model Descriptions: Analog Echo w/ Mod – based on Deluxe MemoryMan
ANALOG ECHO W/ MOD – BASED ON DELUXE MEMORYMAN
4 • 6
This model is based on the Electro-Harmonix Deluxe Memoryman. This pedal uses the
“bucket brigade” electronics of other analog echoes, and adds a chorus circuit. This
adjustable chorus is applied to the echoes only, leaving the direct sound unaffected.
This popular pedal, with its warm, distorted tone and swimming echoes, became an
important tool for many guitarists, and was an essential part of the guitar sounds for the
first U2 album.
Part of the Deluxe in Deluxe Memoryman was the increased delay time of 500
milliseconds. Your Echo Pro’s Analog Echo emulates classic Memoryman tone with the
added advantage of 2.5 seconds of delay time.
TWEAK adjusts modulation speed from 0.05 to 9.40 Hz.
TWEEZ adjusts modulation depth from 0% to 100%.
This image is provided for the sole purpose of identifying the specific product that was studied during Line 6’s sound model development,
and does not imply any cooperation or endorsement.
Page 44

Model Descriptions: Lo Res Delay
LO RES DELAY
The first digital delay units were introduced in the early 80’s. These pedals and rack
boxes took advantage of emerging digital technology to provide guitarists with longer
delay times. Unlike the 16 bit digital of today's CDs, and the even higher resolution
provided by some audio gear (like the 24 Bit processing of your Line 6 Echo Pro), these
early digital units generally had only 8 bit resolution.
Low bit resolution can create a unique sort of grunge and noise that is sometimes just
the sound you’re looking for, and that’s why these old delays are still used to give a
particular shape to the sounds that are run through them. Early model digital samplers
are sometimes used in modern-day industrial and electronica to achieve these effects.
Try this model on a low resolution setting to get that characteristic digital grunge.
Use the TWEEZ knob with this model to adjust the Echo Pro’s processing anywhere
from its normal 24 bit resolution down to as little as 6 bits. Your direct sound, of course,
will not be affected. Tone control of the delay is also provided, via the TWEAK knob.
TWEAK adjusts tone with a lowpass filter ranging from 0.3kHz to 12.0kHz
TWEEZ adjusts digital resolution from 24 down to 6 bits.
4 • 7
Page 45

Model Descriptions: Digital Delay
DIGITAL DELAY
This model is a digital delay with bass and treble tone controls. The 24 bit processing
and true stereo audio path of the Line 6 Echo Pro series make it one of the best digital
delays you’ll find.
TWEAK adjusts bass. Range: -15.2dB to +8.8dB.
TWEEZ adjusts treble. Range: -15.2dB to +8.8dB.
4 • 8
DIGITAL DELAY WITH MODULATION
Choose this model to add a chorus effect to your digital delays. Like the chorus of the
Analog Delay w/ Mod, this modulation is applied to the delay repeats only, leaving
your direct sound unaffected.
TWEAK adjusts modulation speed from 0.05 to 9.40 Hz.
TWEEZ adjusts modulation depth from 0% to 100%
Page 46

ECHO PLATTER
Model Descriptions: Echo Platter
4 • 9
Another Line 6 original, Echo Platter was inspired by magnetic platter echos similar to
the Binson Echorec used by psychedelliclinicians like Pink Floyd. At the heart of these
units is a spinning metal platter and a record/playback head that floated on the platter
(hey, it’s kinda like a real primitive hard drive!). This delay is somewhere between the
tube and solid-state Echoplexes in tone, with a very interesting wow and flutter that
you can dial up to suit your mood. See you on the dark side of the moon...
TWEAK adjusts Wow and Flutter from 0% to 100%.
TWEEZ adjusts Drive from 0% to 100%.
This image is provided for the sole purpose of identifying the specific product that was studied during Line 6’s sound model development,
and does not imply any cooperation or endorsement.
Page 47

Model Descriptions: Stereo Delays
STEREO DELAYS
Ever asked yourself, “How did The Edge (U2) get that groovy sound on Where the
Streets Have No Name”? (Check out Preset #11)
Stereo delays, my friend. It’s the secret to many a U2 song, as well as the “Big L.A.
Solo” sound of the late ’80s. Set one side as a fast echo with many repeats, and the
other as a slow delay with just a few repeats. Voila, you’re famous!
4 • 10
This model highlights one of the features of your Echo Pro – the True Stereo nature of
both the direct path and the delay processing. Signals that come in the left and right
inputs are kept discrete, processed separately, and passed out the left and right outputs
separately (for a mono in/out hookup, left and right delays are both sent to the left/
mono out).
Thus, any stereo signals that you process with your Echo Pro will retain their stereo
separation, rather than collapsing to mono, as happens with lesser effect units that offer
left and right inputs, but simply sum these together for processing. This means that your
delay signal shows up in your mix with the same stereo placement as the direct sound,
instead of your delay signal showing up right in the center of your mix.
TIME sets Delay Time for left channel.
REPEATS sets number of Repeats for left channel.
TWEAK sets Delay Time for right channel.
TWEEZ sets number of Repeats for right channel.
Page 48

Model Descriptions: Ping Pong
PING PONG
The Ping Pong Delay has two separate channels of delay, with the output of each
channel flowing into the other, going back and forth like a game of ping pong.
4 • 11
The DELAY TIME knob sets the time for the right side delay line, and the TWEAK
knob sets the time for the left side delay line, as a percentage of the Main Delay Time.
Sound too tricky? Just turn DELAY TIME to set the longer delay time you hear, and
turn TWEAK to adjust the shorter delay time. If you set TWEAK straight up at 12
o’clock, your left and right delays are evenly spaced.
TWEAK adjusts the offset between the two delays from 0% - 98%
TWEEZ adjusts stereo spread from 0% to 100% (at minimum, signal is mono).
This image is provided for the sole purpose of identifying the specific product that was used during Line 6’s sound model development,
and does not imply that we have any fun doing this stuff.
Page 49

Model Descriptions: Reverse
REVERSE
!seltaeB eht dna xirdneH imiJ ekil tsuJ – Take a step back in time with your cool new
reverse delay. Whatever you play in comes back at you backwards, delayed by the time
you set with the DELAY TIME knob.
To use this little wonder most effectively, try playing a legato lick, ignoring the reverse
playback as well as you can. Longer licks can translate into very cool reverse phrases.
4 • 12
When using Reverse, try setting MIX fully-clockwise (100% wetness) so all you hear is
the reversed sound – instant backwards guitar solo fun.
If you have an expression pedal connected (directions for using the optional Line 6
expression pedal are in the early pages of this handbook), try setting the toe position to
a very short delay time – this will give you a weird “resonant filter” effect. Set the heel
position to a nice long reverse time. Then start playing and sweep the pedal back from
toe to heel for the hippest time warp ever available for guitar.
TWEAK adjusts speed for a modulation of the delay from 0.05 Hz to 9.40 Hz.
TWEEZ adjusts depth for a modulation of the delay from 0% to 100%.
Page 50

Model Descriptions: Dynamic Delay
DYNAMIC DELAY
This effect was made popular by the tc electronic 2290 Dynamic Digital Delay. This is
a sort of “smart” volume control for your delay effect’s echoes, and sets the loudness of
the delay echoes based on how hard you play.
While you play, the Dynamic Delay keeps the volume of the echoes turned down, so
that the echoes don’t overwhelm what you’re doing. Then, when you stop playing for a
moment, the volume level of the repeats turns up to allow the echoes to be heard. The
TWEAK knob sets the threshold – the breakpoint where this automatic volume
control stops working and lets the echoes through at full volume. The TWEEZ knob
adjusts the level of the “ducked” repeats – higher settings will duck the delay level
down more.
Try setting TWEAK and TWEEZ to reasonably high values, and hear how the delay
effect gets partially muted while you play, helping to avoid that unwanted “muddy”
sound.
TWEAK adjusts threshold from -20dB to -60dB.
TWEEZ adjusts ducking from 0 to -138dB
4 • 13
AUTO-VOLUME ECHO
This model gives you two effects in one. The Auto Volume part of the equation is a
volume fade-in swell, like the attack time on a synthesizer’s envelope generator. Since,
unlike other effects in Echo Pro, the swell affects your dry signal, this can be used for a
bowing effect, like the one you get by turning the volume knob on your guitar quickly
up from zero just after you pick a note. Higher settings for the TWEEZ knob will give
you a longer swell time, so that the sound slowly fades in, like a wave.
The other effect is an echo, complete with tape-style wow & flutter modulation,
adjustable via the TWEAK knob.
TWEAK sets modulation depth from 0% to 100%.
TWEEZ sets ramp time for the auto-volume swell. Range: 0.030-1.900 seconds
Page 51

Model Descriptions: Loop Sampler
LOOP SAMPLER
One of our favorites, the Loop Sampler lets you layer yourself until you’ve become a
virtual orchestra. Inspired by everything from the venerable Electro-Harmonix 16
Second Delay to Robert Fripp’s odd arrangement of reel-to-reel tape machines, it can
give you a fascinating new place to get lost in the convolutions of your own musical
brain. We’ve even given it its own internal 800ms delay. For a more complete
breakdown see the chapter “Some Real Life Examples”.
4 • 14
RECORD/OVERDUB (SECONDS) Press it to start Recording. The button will
light. If you press this button a second time while recording, the recording will finish,
loop playback will immediately begin, and you’ll be in Overdub mode.
PLAY/STOP (NOTE) Once you’ve recorded the loop you like, you can start and stop
it any time you like by pressing this button.
PLAY ONCE (BPM) This button allows “one shot” playback (the Play Once and
Play/Stop lights come on during one shot playback). From Stop, press this button to
play your loop one time and stop.
HALF SPEED/REVERSE (GLOBAL) This is a dual function switch. One tap gets
you half speed, and a double-tap will give you reverse. You can even use them both at
the same time.
DELAY sets the internal delay time from 0 to 800 ms
REPEATS sets the number of repeats (feedback) of the internal delay.
TWEAK sets the internal Echo Modulation from 0% to 100%
TWEEZ sets the internal Echo Level from 0%-100%.
Page 52

Page 53

Page 54

MIDI Control: What Is MIDI, Anyway?
MIDI CONTROL
By this point, you should have a pretty good idea of how all this stuff works when you’re
just spinning knobs on the front panel of the unit. But there’s a whole other world
available here. Just look at the rear panel and you’ll notice those two funny looking 5
pin jacks labeled MIDI In and MIDI Out. This is where the fun starts! Controlling your
Echo Pro via MIDI is the best way to really make it start jumping through hoops. If
you’re already familiar with MIDI, you can skip to the next section of this manual, but
if you’re a MIDI neophyte, let’s take a moment for a brief history lesson.
What Is MIDI, Anyway?
MIDI (pronounced Mih-dee) stands for Musical Instrument Digital Interface. When
you come right down to it, it’s simply a way for one device to communicate with
another. (And it’s not restricted to musical instruments, either. Practically anything
can be controlled from MIDI with the proper accessories. A number of amusement
parks even use MIDI to do motion control on various rides and attractions. Crazy,
huh?) So, how did this MIDI come to be? That’s the next part of our story.
In the mid-1970s, when synthesizers were first starting to make an impact on the sound
of mainstream music, there was no convenient way for one synthesizer to "talk” to
another. Say you had 5 different synths, and you wanted to play the same note on all of
them, but using different sounds, by pressing only one key. Couldn’t happen! Different
manufacturers used different control voltages to represent different notes, so even if you
could hook one keyboard up to control all 5 units, there was no guarantee that they’d
all sound the same note when you pressed that key. In 1981, some manufacturers
started talking about the bright idea of creating a communications standard so that you
could connect a synth from Company A into a synth made by Company B, press a key,
and get the same note out, with the same dynamics, sustain, modulation, etc. In early
1983, the initial MIDI standard debuted and NAMM show attendees marveled at
seeing one keyboard control another. That was the original idea of MIDI, but it soon
began to get more complicated.
It didn’t take long for engineers to realize that digital information passing from one
keyboard to another could also be stored and played back at a later time, just like a tape
deck, by something called a sequencer (because it records a sequence of MIDI events).
Early sequencers were stand alone hardware devices that had a limited resolution.
5 • 1
Page 55

MIDI Control: Why Should I Care?
(Some only could deal with 24 divisions of a single beat and would force a note to the
nearest one of those divisions making things like playing a little behind or in front of
the beat, not to mention playing triplets smaller than eighth notes, a bit of a problem.)
These early sequencers didn’t have a lot of memory either, so there were also
restrictions on the length of a song. Once someone figured that you could build a small
hardware interface and write a software program that could do the same thing with a
desktop computer, things really started to roll. A big plus was that once you got the
information in the computer, you could play with the data. You could fluff a note and
fix it afterwards without having to retake the whole song or punch in and out and hope
that you didn’t inadvertently erase something that you wanted to keep. You could even
add information (called continuous controllers) about the expression of the note after
the fact. MIDI also has channels, 16 of ’em, so that you can even direct certain notes to
5 • 2
a specific MIDI device by simply telling it to listen to only one channel, and ignore
others. This means that you can, in theory, have 16 different devices connected to a
single MIDI connector (or port, as they’re frequently called), each playing different
parts.
Another big plus for MIDI is that certain types of information are left fairly
unstructured, so manufacturers can support device specific features easily. This type of
data is called System Exclusive (or Sysex). Sysex is not just channel specific, it’s device
specific. Even with more than one device assigned to a specific MIDI channel, sysex
data will only affect the specific device for which it’s intended. With the Echo Pros,
controller and Sysex information can both be put to work controlling your sound.
Why Should I Care?
Well, even if you’re only going to be using your Echo Pro in a stage rack, and not with a
whole MIDI studio setup, its MIDI capabilities can make your life much simpler and
more fulfilling (and isn’t that what we’re all after, anyway?). Even just something as
simple as being able to have a program change on another device (like the amazing
Line 6 Flextone II or POD), call up any program on your Echo Pro (or even have
several program changes call up the same program), can make your performance or
recording life far easier.
Page 56

MIDI Control: General Usage
General Usage
There are three general things that you’ll probably be using MIDI for with your Echo
Pro: Program Changes, Parameter Control, and Tempo/Speed Control. (Sorry, we just
couldn’t think of a third “P” word that would work.)
Program Change
Much of the time, when you’re using MIDI with your Echo Pro, you’ll be sending
“Program Change” messages. These are the commands that tell a MIDI device to
switch from one program to another. While there are 128 different MIDI program
numbers and the Echo Pros only have 99, we haven’t let those other 29 program
numbers go to waste, as you will see.
Sending a program change is just like using the “Program Select” knob on the Echo Pro
front panel. If you’ve got the Echo Pro MIDI’d up to a sequencer, you can use the
sequencer’s program change (usually a drop down menu or the like) to select which
program you’d like to bring up. If an Echo Pro’s slaved to a MIDI keyboard, MIDI Floor
Controller, or guitar amp/preamp with MIDI, when you select a program on the first
device, your Echo Pro can switch to the same program number you’ve chosen on the
master unit. Much of the time this will be all you need, but what happens if you want to
use the same Echo Pro program (let’s just say a specific Tape Echo program) with more
than one of your synth programs? Does this mean that you have to have the same
settings stored in more than one program location? Well, you could do it that way, but
enough of that type of situation and you’d start to run out of program locations, even
though you’ve got 99 of ’em to work with. Fortunately, there’s....
MIDI Mapping
MIDI Mapping is the ability to assign (or map) a received MIDI Program
Change message to a specific program in your Echo Pro, regardless of what the
internal program number happens to be. This means that you can easily set
things up so that programs 12, 48, and 127 on your synth all call up program 33
on your Echo Pro. In fact, you’re not restricted to mapping program change
messages to program numbers. You can also map a program change to call up a specific
Effect Model or even run the Loop Sampler controls on the Echo Pro!
5 • 3
So how do we do this? Well, let’s look at how we would go about mapping MIDI
Program Change message 26 to the Echo Pro’s program 14.
Page 57

MIDI Control: MIDI Mapping
1. Press and hold the MIDI/Sys button for two seconds to enter MIDI Map mode
(you’ll know you’re there when the display flashes MIDI… Map).
2. Use the Time knob to select MIDI Program Change 26. (You can also send MIDI
Program Change 26 from your master unit to set this.)
3. Use the Program Select knob to choose Program 14 on your Echo Pro.
4. Press “Save” to save the changes.
5. To test, select various Programs on your MIDI Controller. The program numbers
on the Echo Pro should mirror the program number on your controller until you
5 • 4
select Program 26. At this point, the Echo Pro should change to Program 14.
Okay, pretty simple, no? Now, if you wanted other program change messages to point at
the same Echo Pro Program, you would simply perform steps 1-4 above, then, instead
of hitting MIDI/Sys to go back to Program Select mode, you would just twirl the Time
knob to the other Program Change numbers you wanted to map to program 14 (or send
those program change messages directly from your MIDI Master Controller), pressing
“Save” after selecting each one, until you were done, then you’d proceed to step 5. You
can even have all 127 Program Change messages select the same program on the Echo
Pro, but that would be more than a little silly. Not that there’s anything wrong with
that.
With the Echo Pro’s Custom Save feature, you’ve actually got an extra 16 user
definable programs available on your Echo Pro, cleverly concealed beneath the Model
Select knob. Thanks to MIDI Mapping, and a little forethought from those clever
engineers at Line 6, you can assign MIDI Program Changes to those and treat them just
like other programs. (See, we told you we weren’t gonna let those extra 29 Program
Change Messages go to waste.) In order to map these, here’s what you do:
Press and hold the MIDI/Sys button for 2 seconds to enter MIDI Map Mode.
1. Turn the Program Select knob to 99, but don’t stop there, keep on turning. You’ll
notice that the Program Display now reads “FX” and the LEDs around the Model
Select knob start to light up in order as you spin the knob. Enjoy the light show for
a moment or two, then decide which model you want to map a program change to.
(Let’s assume you choose Analog w/Mod.)
Page 58

MIDI Control: MIDI Mapping
2. Use the Time knob to select the MIDI Program Change number of your choice.
(Once again, you can also send a MIDI Program Change from your master unit to
set this.)
3. Press “Save” to save the changes.
4. Press “MIDI/Sys” to return to Program Select mode and test the same way we tested
above.
If you keep turning the Program Select knob while in MIDI Map mode, you’ll notice
that the Program Display will change from “FX” to “LP”, and the buttons for the Looper
controls will light up, in order, one by one. Guess what? This means that you can also
map MIDI Program Changes to control those functions (Record/Overdub, Play/Stop,
Play Once, Reverse, and Half Speed).
Note: If MIDI Mapping is turned off in the MIDI/SYS menu, (See MIDI/SYS
functions) it will automatically turn back on when you edit the MIDI map.
5 • 5
Page 59

MIDI Control: Parameter Control
Parameter Control
Another feature of using MIDI with your Echo Pro is the ability to control
virtually every parameter of each effect in real-time using MIDI
Continuous Controllers (henceforth referred to as MIDI CC#). There are
actually 127 of these little devils to go around, which is more than enough
to control everything your Echo Pro can do (and then some!).
This means that, for instance, you could create a sequencer track that controlled the
number of repeats on an echo, the time, and/or the Tweak parameter of a particular
model and have these change from section of a song. There are a number of different
ways to do this, and it will vary from one keyboard or sequencer to the next.
5 • 6
For example, your keyboard may allow you to assign different controller numbers to the
mod wheel or a slider or knob on the keyboard, or your sequencer may have some sort
of virtual control surface that you can configure to send different controllers. Say you
wanted to control the Mix parameter remotely. You’d simply assign MIDI CC#76
(which is the default assignment for the Mix control) to whichever control type you
have available and control away. Obviously, there’s enough variation in how this is
done that we’re going to have to refer you to the owner’s manual for your keyboard,
sequencer, or control surface.
There’s a complete listing of MIDI Controller assignments in the Appendix at the end
of this manual, but one of the great things about the Echo Pro is that all those MIDI
CC#s, like Program Changes, can be reassigned. You can even use the same MIDI CC#
to control multiple parameters simultaneously (although you’ll want to think that
through carefully before you start ganging ’em up. While some controllers will work
together nicely, there will be some combinations that may be somewhat less than
desirable. Remember, just because you can, doesn’t mean you have to).
Let’s assume for a moment that you’re one of those serious MIDI geeks who’s got an old
breath controller and you want to assign MIDI CC#34 (which is reserved for the breath
controller) to the Tweez knob on your Echo Pro. This would give you the ability to
control the Sweep Depth of the Sweep Delay model by blowing into the breath
controller and the prospect makes you so excited that you can barely sleep (hey, it
could happen). All you would have to do is:
1. Press MIDI/SYS to enter MIDI/SYS mode.
Page 60

MIDI Control: Parameter Control
2. Turn the Program Select knob until the Program display is blinking back and forth
between “CC" and “TZ".
3. At this point, you can either simply use the breath controller (assuming you’ve got
it hooked up via MIDI to your Echo Pro) and the Echo Pro will automatically learn
the controller number, or spin the Time knob until the desired controller number
(34) shows up in the display. In either case, your display should now look like this:
SECONDS NOTE BPM
PLAY ONCERECORD /OVERDUB PLAY/STOP
TIME
SET EXPRESSION PEDAL
TAP
GLOBAL
HALF SPEED/REVERSE
4. Press MIDI/SYS to return to Program mode. Your changes are automatically saved.
These parameters are available for Parameter Control via MIDI:
Delay Time Delay Repeats
Tweak Knob Tweez Knob
Note Value Bypass
Expression Pedal Effect Model Select
5 • 7
Mix Knob Tap Button
Page 61

MIDI Control: Parameter Control
Immediate vs. Delayed Controller response
When you’re using your Echo Pro with either the optional EX-1 Expression Pedal or
sending MIDI Controllers to dynamically change a program, you’ve got a couple of
decisions to make regarding how it should respond when a program loads. One choice is
to have a new program load using the current controller value for the Expression Pedal
(or the last known controller value if no pedal is connected or controller information is
not currently being received). The other is to have programs always load as if there
were no expression pedal connected and not update until they receive a controller
message or see the expression pedal move. Why? Well, if you were to set up two
different programs, with the Expression Pedal set to control the note value of the delay
time, and wanted to switch between the two and still have the delays set to the same
5 • 8
note value, regardless of what was stored in the programs, you’d want to use the
Immediate mode for maximum flexibility. On the other hand, if you want programs to
always load with exactly the programmed sound, regardless of where the Expression
Pedal or external controller is happens to be set positioned right now, you would want
to use Delayed mode. It’s easy to change:
1. Press MIDI/Sys to enter MIDI/Sys mode.
2. Turn the Program Select knob until the Program display shows “PU”.
3. Turn the Time knob to select either Immediate “IMMD” or Delayed “DLYD”. The
factory default is Immediate.
Page 62

MIDI Control: MIDI Clock and Delay Time Control
MIDI Clock and Delay Time Control
One of the coolest things you can do with delay and echo effects is sync them
up to your music (something we like to call the “Follow The Bouncing Ball
Effect”). The note value parameter of the Echo Pro makes this very easy to do,
once you’ve tapped in the tempo. But there’s an even easier way. If you’re in
the studio, and you’re using a MIDI sequencer, all you have to do is set that
sequencer to transmit MIDI Clock to the Echo Pro, and tell the Echo Pro to pay attention
to MIDI Clock. Once Echo Pro receives that MIDI Clock from the sequencer (or other
device, like a drum machine), it will lock right up to it. How can you do this, you ask?
1. Press the MIDI/SYS button to get into MIDI/SYS mode.
2. Turn the Program Select Knob until the display shows: “CL”.
3. Turn the Time knob until you see: “ON”.
4. Press MIDI/SYS to go back to Program mode.
When MIDI Clock is on, the Global Button will light, and will blink once a second to
indicate that your Echo Pro is not yet locked to MIDI Clock pulses if that is the case.
(Since most sequencers only send clock pulses while the sequence is actually running, it
is normal for this to be the case when the sequencer is stopped.) Once your Echo Pro
sees valid incoming MIDI clock, the Global button will light solid, and the Tap Tempo
button with start to flash at the current tempo of the sequencer. When you stop the
sequence, or if the Echo Pro loses the clock for more than two seconds, the Global
button will once again start to blink, but the Tap Tempo will stay at its last received
value.
5 • 9
Page 63

MIDI Control: MIDI Out/Thru (and what it means to you)
MIDI Out/Thru (and what it means to you)
As we touched on briefly in the previous chapter section on MIDI/Sys modes, your
Echo Pro’s MIDI Out jack can be set to function as either MIDI Out or MIDI Thru. If
you’re new to MIDI, this might seem a tad strange, since going through something
would tend to imply that it’s going in and then coming out, right? In the world of
MIDI, this isn’t always the case.
When a device is set up to function as MIDI Thru, it will look at the MIDI data stream
to see if there’s a message that means anything to it, but otherwise simply pass the data
along to its “Out” port, without changing it, so that another MIDI device connected to
this “Thru” port will see exactly the same thing as the “Thru-ing” device. This can be a
5 • 10
good thing if you’re running a sequencer or MIDI controller device that you want to
have several devices listening to at once. And, yes, we did make up the word Thru-ing
just then, but sometimes that’s what it takes to get the job done.
When a device is set up for MIDI Out, by contrast, it’s still looking at the MIDI data
stream, but it becomes selfish and doesn’t pass along any information. It will only send
out messages that it has generated itself (kinda like living in a Dilbert comic strip,
working for a pointy haired boss), keeping any devices after it in the dark about what
data it’s received. This is the mode that you would use if you wanted your Echo Pro to
be a Master unit, with other devices in a MIDI chain slaved to it (and thus the
workplace metaphor is getting really dark at this point).
So, which mode you’re going to use will be completely dependent on what you’re trying
to accomplish (and it’s important to set goals, isn’t it?), what else might be in your
MIDI setup, and what you want taking orders from what. We just make the tools; it’s up
to you to put ‘em to work.
Page 64

Page 65

Page 66

Some Real Life Examples: Syncing to MIDI Clock
SOME REAL LIFE EXAMPLES
Syncing to MIDI Clock
If you’re using your Echo Pro with MIDI equipment, whether live or in the studio,
you’re in for a lot of fun. Echo Pro’s ability to assign note values as delay times and then
sync to MIDI Clock will enable you to quickly achieve great time synchronized effects
that otherwise would be a royal pain to manually calculate.
In The Studio
If you’re in the Studio, using your Echo Pro with MIDI tracks that you’ve sequenced, or
audio that you’ve tracked in sync with the click generated by your software, it doesn’t
get much simpler. Just make sure that your sequencer/audio application is sending
MIDI Clock, set Echo pro to listen to MIDI Clock (see Chapter 3) and let ‘er rip.
NOTE: Most devices only send MIDI Clock when they’re actually playing back the
music. When you stop the device, it stops sending clock and Echo Pro will remain at
the last tempo, flashing its Global Button to indicate the absence of MIDI Clock.
The tricky part comes when you’ve got a track you’ve recorded that wasn’t sequenced
or played to a click, but instead was played in ‘free time’ (especially if your drummer
doesn’t have the world’s steadiest tempo!). Luckily, modern technology offers a strategy
to deal with just that.
If you’ve tracked your tune to a computeer-based or stand-alone hard disk recorder
without playing to a click or sequence, set up a tempo map so that the software can
generate the correct MIDI Clock to jive along with the track. Most hardware hard disk
recorders and software sequencing programs do this; check your product’s manual for
details, since every system does this slightly differently. Most often, it involves selecting
the whole song, telling the program/device “This is (x number) of bars”, and letting it
do the math to figure out the tempo. Then, since your drummer’s not perfect, you find
where the bars don’t match up anymore, select smaller sections, recalculate the tempo,
6 • 1
Page 67

Some Real Life Examples: Syncing to MIDI Clock
find where the bars don’t match up, select an even smaller section, etc. Well, we told
you there’d be some work involved, didn’t we? When you’re done, you’ll have a
sequence where the bar numbers match up to the audio track.
If you want to keep your tracks on tape or a hard disk recorder that doesn’t support
tempo maps and MIDI Clock, but you want the advantages of MIDI Clock syncing of
Echo Pro, the process is a bit more involved. Once again, we’ll give you the quick basics
here. Start by surrounding yourself with your machine that has your recorded tracks and
a computer running a recording/sequencer program. You will also need a MIDI
interface that can deal with SMPTE or MTC (see below), or a separate MIDI/SMPTE
synchronizer plus MIDI interface. Once you’ve got the gear, follow these steps:
1a If you’re using a Modular Digital Multitrack (MDM) or hard disk recorder unit that
generates MTC (which stands for MIDI Time Code, and which is different from
MIDI Time Clock, just to keep things challenging), set it to transmit MTC to the
6 • 2
MIDI interface connected to your computer system, and put your sequencing
program into External sync mode, with the sequencer set to start at 1:00:00:00. Hit
play on your tape/disk machine, and it and the computer should now be locked
together in time.
1b If you aren’t able make the system you recorded on generate MTC (heck, maybe
you’re recording on an analog 24 track), you’ll need to establish sync the oldfashioned way: record a track of SMPTE Time Code on your source audio system,
from a bit before the beginning of the tune that you’re working on through to its
end, following the directions that came with your SMPTE reader/generator. We
advise following the standard of starting the time code at 1:00:00:00. Play your
tape/disk machine so it’s playing out this SMPTE track, feed the SMPTE signal
into the SMPTE synchronizer/MIDI interface you’ve got hooked to your computer,
put your sequencing software into External sync mode, set the sequencer to start at
1:00:00:00, and your source audio system and computer should now be marching in
lock step.
2. Now that you’ve got your computer running in sync with your audio source, dump a
rough mix (or even just a couple of tracks that you can use for reference) of your
recording over to the computer’s sequencing program.
3. Using your sequencing program, create a ‘tempo map’ for the song. Unfortunately,
as we explained above, we can’t give you a whole lot more detailed instruction than
that, since every program does this slightly differently. Like we said, most often it
Page 68

Some Real Life Examples: Syncing to MIDI Clock
involves selecting the whole song, telling the program “Hey, this is (x number) of
bars”, and letting it do the math to figure out the tempo. Then, since your
drummer’s not perfect. you find where the bars don’t match up anymore, and drop
in some beat markers.
4. At this point, you can play the track on tape, with the sequencer locking to the
SMPTE Time Code and sending MIDI clock to the Echo Pro. You now should be
able to get perfectly timed quarter note triplet stereo delays at any point in the
song, no matter how much the band was making the tempo ‘breathe’.
Syncing Live
Lots of performers are using sequencers live these days, especially in the dance and
electronica world. Sometimes it’s just to automate program changes for the band, so
that they can avoid comments about their avant garde choreography going into the
bridge, when they’re all really just changing patches, channels, and such. Sometimes
it’s to add orchestration without having to hire a full orchestra to play a club gig.
Sometimes, it’s to sync up multimedia. For whatever purpose, we don’t have a problem
with it. If you’re doing the MIDI shuffle live, though, there are a couple of
considerations.
1. If you’re using a computer sequencer live, you’ll want to invest in a multi-port
MIDI interface, so you can send MIDI data to multiple devices without having to
chain them all together (more than 3 or 4 MIDI devices chained together can start
to develop latency delays. Line 6 products have a fairly minimal amount of latency
on their MIDI ports, but some stuff out there isn’t as quick). It also makes it easier
to hook up cabling if you don’t have to run In and Out of everything.
6 • 3
2. By the same token, if you’re using a hardware based sequencer, you’ll want to invest
in a multi-port MIDI Thru box. If you’re going this way, pay particular attention to
the MIDI channel assignments of everything you’re hooking up, since a program
change intended for the keyboard player that ends up selecting a Reverse Delay
program in the Echo Pro could really spoil the mood of a sensitive ballad.
If you do start using MIDI sequencing live, Echo Pro will be glad to sync up to MIDI
clock for ya as well as automatically change programs. In addition, the MIDI Mapping
feature of the Echo Pro can come in very handy, since several songs might all use the
same delay program, even though other instruments are using different patches. No
Page 69

Some Real Life Examples: Other Live Performance Hints
problem, just go in and set up your MIDI Map (you can also play cruel jokes with this
feature, like mapping Mute to that incredibly dated, tired old electronic piano sound
that your keyboard player uses way too much. But you didn’t hear that from us).
Other Live Performance Hints
If you should decide to run your Echo Pro in front of an amplifier, as if it were a
stompbox (and why not? If you’re using two amps, not only can you get great stereo
effects, but Echo Pro acts as a real high quality buffered Line splitter), you’ll want to be
sure to check your settings of Echo Pro’s Input and Output levels both with and
without whatever stompboxes you might be using in line and turned on. Because Echo
Pro can put out a signal that can seriously overload a guitar amp or instrument level
device like a stompbox, you may have to do some tweaking before you find the level
settings that work best in all situations.
6 • 4
You’ll also want to pay attention to what your Bypass Mode settings are if you’re
running in front of an amplifier. Modes like All Mute, that are great for parallel effects
loops and standalone usage, can really freak you out live when your guitar disappears
completely when all you wanted to do was just stop the delay.
Page 70

Some Real Life Examples: Using Multiple Studio Modelers
Using Multiple Studio Modelers
Want to develop the ultimate guitar rack to impress your friends and colleagues?
Consider chaining together a rack full of Studio Modelers for total effects mayhem.
MIDI will give you the power to remotely select Programs with a MIDI footswitch or, if
you’re already using a Flextone II or POD, match Programs to the channels you already
have set up on your amp.
If that doesn’t float your boat you could employ the first unit in the chain to control the
others. As a matter of fact, we kinda designed them to work that way. While there are
so many possibilities that we can’t even begin to go into all of them here, we’ll give you
a couple of basic examples to help you kick off your particular voyage of self-discovery.
Basic Chain Hookup
If you’re chaining multiple units and want to have them slaved together via MIDI,
there are two things you may want to keep in mind:
First, if we can wax philosophical for a moment, MIDI is like a river of data flowing
through a series of villages. It flows Out of the first village and In to the second village.
Passing Out of that village, it meanders past a lovely pastoral scene on the bank, flows
In to a third village, and so on. So remember to hook up your MIDI cables from “Out”
to “In” (not Out to Out or In to In) as you hook devices together, or the datafish have
no place to swim, and the villagers starve, revolt, and rampage through the countryside
laying waste to all that’s in their path, and we wouldn’t want that, would we?
Secondly, it makes a difference whether your Studio Modeler is set to MIDI Out mode
or MIDI Thru mode (see MIDI Out/Thru section in Chapter 3). There are reasons for
both, but having this set incorrectly for your particular application can lead to a
frustrating journey through “MIDI Hell”, as it’s become fondly known.
For the purposes of the following examples, note that it’s essential to properly set
the status of the MIDI Out/Thru to determine just how everything’s going to
behave. Let’s assume that you’re running 3 Studio Modelers together with some other
equipment. To keep from getting hopelessly confused (and we’re talking about us, not
you), let’s deal with them one at a time, starting with:
6 • 5
Page 71

Some Real Life Examples: Using Multiple Studio Modelers
LIVE MODE
DIGITAL OUTPUT (NO SPEAKER SIMULATION)
STUDIO MODE
DIGITAL RECORDING OUTPUT (w/ A.I.R.)
AES/EBU Out External
In
6 • 6
In
AES-EBU/S-PDIF
Out
MIDI
Out
MIDI
S/PDIF
Expression
Pedal
Expression
Pedal
Digital
Out
Clock In
MIDI
In Out
ECHO PRO
MIDI is set to “Thru”
FILTER PRO
MIDI is set to “Thru”
POD PRO
Expression
In
Out
Pedal
MOD PRO
MIDI
Using another MIDI Device as Master Controller
This one’s the simplest. Just set the MIDI Out/Thru of each Studio Modeler to Thru
(See Chapter 3), and they’ll all take their cue from whatever you do on your Master
Controller (in the case of this particular diagram, a POD Pro). When you select a
channel from your Floor Board hooked to the POD Pro, or select a channel on the
POD Pro itself, a corresponding program change message will be sent via the POD Pro’s
MIDI Out, and will flow Thru to all the Studio Modelers. By the same token, any other
MIDI messages, like Tap Tempo or continuous controllers, will pass down the chain
and be interpreted by each device as applicable (this is where the MIDI mapping and
controller reassignment features come in real handy. You can set your Studio Modelers
Page 72

Some Real Life Examples: Using Multiple Studio Modelers
up so that the same controller message could change Repeats on an Echo Pro, Speed on
a Mod Pro, and Depth on a Filter Pro, all at the same time!).
Using a Foot Controller
This is great for those of you who are adding a Studio Modeler, or a number of them, to
an existing rack system. Just like the previous example, set the MIDI Out/Thru of each
Studio Modeler to Thru (See Chapter 3), and they’ll all take their cue from whatever
you do on your Foot Controller. Use the MIDI Map function to map the correct
Program to the appropriate MIDI Program Change message.
Foot Controller
MIDI
In Out
6 • 7
Expression
Out
In
In
In
Pedal
ECHO PRO
MIDI
Out
MIDI
Out
MIDI is set to “thru”
Expression
Pedal
FILTER PRO
MIDI is set to “Thru”
Expression
Pedal
MOD PRO
MIDI
Page 73

Some Real Life Examples: Using Multiple Studio Modelers
Controlling From A Studio Modeler
For this setup, you’ll want to set the MIDI Out/Thru of the first Studio Modeler to Out
and set the others to Thru. Program changes and Tap Tempo events will act like they
did before, but only the first Studio Modeler will respond to other MIDI messages.
However, if you change knob settings on the first Studio Modeler, it will send the
appropriate controller message to the others. If you have an Expression Pedal
connected to the first Studio Modeler, it will send out MIDI CC#4 messages for the
other Studio Modelers to act on as well. The only exception is if you also have an
Expression Pedal plugged into one of the other Studio Modelers, in which case that
unit will only respond to its own pedal and ignore the pedal messages that come from
the first unit (although it will continue to respond to all other MIDI messages.) Once
again, the MIDI mapping and controller reassignment features of your Studio Modelers
will come in very handy here, as will the Pedal Assign mode (for which, see Chapter 3:
Basic Operations).
6 • 8
Expression
In
Out
Pedal
ECHO PRO
MIDI
MIDI is set to “Out”
Expression
In
Out
Pedal
FILTER PRO
MIDI
In
Out
MIDI is set to “Thru”
Expression
Pedal
MOD PRO
MIDI
Page 74

Some Real Life Examples: Using The Looper
Using The Looper
We’ve saved the most fun for last. One of the coolest things about the Echo Pro is that,
in addition to having all those great vintage, classic, and modern delay models, it has a
looper built in with 60 second of sampling time (which can be 120 seconds, if you use
Half Speed). If you’re feeling loopy, select the Loop Sampler model ’cause here comes a
quick overview and some ideas for getting loopalicious.
The Basic Run Down...
If you’re already familiar with the Line 6 DL4 Delay Modeler, you’ve got a pretty good
grasp of the way the looper in Echo Pro works. But there are a few differences, so you’ll
want to pay attention here.
The Loop Sampler has its own set of controls that take over when you select it. Some of
the buttons you’ve used for other Echo Pro functions with other models suddenly do
something different with the looper. Of course, like almost every control on your Echo
Pro, you can set the loop controls to work with whatever MIDI Controller you’re using.
RECORD/OVERDUB
When you enter Looper Mode, the Seconds button magically becomes Record/
Overdub (as you might have guessed from reading the front panel). Press it to start
Recording. The button will light. If you press this button a second time while
recording, that recording will finish, loop playback will immediately begin, and you’ll
be in Overdub mode. With each pass of recording in overdub mode, the alreadyrecorded sound gets a little quieter, fading away entirely after many overdub passes.
The Record/Overdub button flashes to indicate that the Echo Pro is in Overdub
record mode.
6 • 9
NOTE: Any time Record/Overdub is pressed while not playing back a loop, the
Echo Pro will start recording a new loop and erase whatever was previously recorded.
PLAY/STOP
Once you’ve recorded the loop you like, you can start and stop it any time you like by
pressing the Play button. Once again, the button will light. From Stop, it starts
playback from the beginning of the loop. From Play or Overdub, pressing it stops
playback/overdub. You can also press this button while Recording to stop the recording
and start immediate loop playback with overdubbing.
Page 75

Some Real Life Examples: Using The Looper
PLAY ONCE
This button allows “one shot” playback (the Play Once and Play/Stop lights come on
during one shot playback). From Stop, press this button to play your loop one time and
stop. The button will, as you may have guessed by now, light. From Record, press Play
Once to stop recording and start one shot playback immediately. From Play, this
button will turn on Once mode, meaning the loop will continue playing to the end of
the loop and stop. If Play Once is already turned on, pressing this button will re-trigger
the start of the loop. (You can get classic “stuttering” effects with this.) From Overdub,
things are the same as from Play: press the button, and loop playback (and the
Overdub) will stop at the end of the loop.
1/2 SPEED/REVERSE
This is a dual function switch. One tap gets you half speed, and a double-tap will give
you reverse. You can even use them both at the same time:
6 • 10
1/2 Speed: One tap puts you in 1/2 Speed, or returns you to normal speed. Once
you’ve turned 1/2 Speed on, it stays on until you turn it off again. The light will turn on
to show that 1/2 Speed is on.
When a loop is playing forward and at normal speed, press this button once and the
loop drops down one octave and plays at half the tempo. Press this button a second
time to return the loop to normal speed.
For Recording, you can “arm” 1/2 Speed with a tap on this button before you start.
Hit the Record/Overdub button to start recording your loop at half speed. Then,
when you first play back, remember you’re still in half speed – so your loop sounds
just like what you recorded. Once you turn off half speed (by tapping the 1/2
SPEED / REVERSE button) the loop will be playing at double speed. Now that’s
easy, isn’t it? Just give it a try and you’ll get the hang of it.
Overdub works with 1/2 Speed just like Record does. Play with it; you’ll like it.
Reverse: A double-tap of this button activates/deactivates Reverse. The light will
flash slowly when Reverse is on.
Double-tapping this button while the loop is playing reverses playback. Double-tap
again to get back to forward play. You can “arm” Reverse before hitting play.
Page 76

Some Real Life Examples: Configuring controllers for the Looper
Reverse doesn’t work while Recording. Double-tapping the button will be ignored.
Once you’ve got a loop recorded, you can start overdubbing, and then double-tap
the 1/2 SPEED / REVERSE button to reverse your recorded loop and dub over it.
You can use 1/2 Speed and Reverse at the same time. The light will flash quickly.
Configuring controllers for the Looper
At this point, you’re probably saying to yourself, “How can I possibly play and hit those
buttons at the same time? This is stupid!” Well, stupid is as stupid does, and our
mommas didn’t raise no dummies. You can also control the Looper with MIDI Program
Changes, MIDI Continuous Controllers, or MIDI Notes, so that, with pretty much
whatever controller you’re using, you can use it to start, stop, and otherwise mess about
with your Echo Pro’s Looper. There’s a complete list of what controls what in the
Appendix at the back of this manual.
Looping 101
OK, for this bit, we invite you to get set up comfortably with your guitar and the Echo
Pro set for Loop Sampler operation, and a foot controller set to control the loop
functions. Turn TWEEZ to minimum to turn off the Pre-Echo, and set MIX straight
up. Start chunking along on an up-tempo rhythm guitar part. Once you’ve got a groove,
tap the foot control you’ve assigned to the RECORD/OVERDUB function at the
downbeat of your measure, record two bars worth of rhythm, and then stomp on the
footswitch that you’ve assigned to PLAY/STOP at the downbeat of what would be the
third measure. You may need to try it a couple times to get the foot timing coordination
down.
6 • 11
Once you’re happy with the loop, your next assignment is to overdub a lead part. Turn
up TWEEZ if you want some echo on your lead; DELAY TIME and REPEATS
control the echoes, and TWEAK lets you add some modulation to the echoes, too.
MIX lets you to turn down the volume of the loop playback.
If the loop’s not already playing, start loop playback with the PLAY/STOP button, and
get a feel for what you want to record. Once you’re ready for your big moment, hit the
RECORD/OVERDUB button as the loop plays and go wild for two bars. If you’re
Page 77

Some Real Life Examples: Looping 101
really feeling fancy, you can keep the overdub running after the first loop through and
record a second layer, for a doubled solo. Hit the RECORD/OVERDUB button at the
end of your two bars to turn off overdub, and your loop will keep playing – now
featuring the dual pleasures of rhythm plus solo.
Once the novelty of listening to this loop wears off, hit the 1/2 SPEED/REVERSE
button once and you’ll hear the whole thing at half speed. Then, double-tap this button
and you’ll be playing backwards, and still at half speed.
As the loop plays, tap RECORD/OVERDUB and lay down some more guitar. Hit
RECORD/OVERDUB to stop the overdubbing and play the whole shebang, and then
double-tap the 1/2 SPEED/REVERSE button. Now the loop is playing forward again,
and the last part you recorded is backward in relation to everything else.
One more tap on 1/2 SPEED/REVERSE and half speed turns off. You can imagine
6 • 12
where a half hour of this kind of thing could get you.
And If That’s Not Exciting Enough For You...
You might want to turn the lights down low for this next bit. We’re going to record a
new loop that highlights the opportunities for sonic experimentation that your new
Loop Sampler provides:
From Stop, tap the 1/2 SPEED/REVERSE button once to light it and “arm” half
speed. Set DELAY TIME, REPEATS, and TWEEZ to 12 o’clock. Mute the strings of
your guitar with your left hand, and begin tapping a rhythm quickly on your low strings
with your right index finger. Hit RECORD/OVERDUB to record some of this, then
hit PLAY/STOP to finish the recording and start playback. Tap 1/2 SPEED/
REVERSE to turn off half speed – the loop now plays back at twice the speed. Doubletap to put it in Reverse. Tap RECORD/OVERDUB while the loop plays and start
overdubbing. Drag your pick on the low E string, immediately followed by a note with a
strong attack and some sustain. Tap RECORD/OVERDUB (stops the overdub and
keeps the loop playing) and then double-tap 1/2 SPEED/REVERSE. Freak out.
One thing to keep in mind is that loops are not saved. Echo Pro is all about the here
and now. So, when you power the Echo Pro down, it’s bye bye musical masterpiece, so
long inspiration, and hasta la vista sonicsoundscapes. And, of course, next time you
power the Echo Pro up, fresh inspiration awaits you.
Page 78

Some Real Life Examples: Advanced Looping
Advanced Looping
There are several cool “advanced” functions in Echo Pro’s Loop Sampler that aren’t in
the DL4 Delay Modeler’s Loop Sampler. These greatly expand what you can do with
loops. Here’s a breakdown, and some examples:
1. Program Change 101 = Looper Record/play/stop/play/stop/play/stop etc.
2. Program Change 102 = Looper Record/stop/play/stop/play/stop/play etc.
These first two new commands allow you to control the looper with a single foot
switch! When you first send MIDI Program Change 101, it will put the Echo Pro
Looper into its Record mode. Send it a second time, the Looper drops out of record
mode, and starts playing back the loop immediately. A third Program Change 101
command stops the looper. After that, the same handy, dandy Program Change 101
will just toggle between Play and Stop, as long as there’s something recorded in the
looper. Program Change 102 works the same way, except that the second program
change stops recording and stops the loop as well. The third change then starts the
cycle of Play, Stop, Play, Stop, etc. This second mode comes in handy if you want to do
something like record an 8 bar phrase, play something different for a while (who can
blame you if you’re fickle), then come back to that 8 bars, to play harmony over it. If
your drummer is really solid, you could even use it to record the first verse and chorus of
a song, play the bridge, then kick on the Loop Sampler and get yourself a beer while the
rest of the band finishes playing the tune. They’ll never know you were gone. When
you want to reset the Loop Sampler (like when the song is over) after this function has
been engaged, you can either re-select the Loop Sampler from the front panel, or send
MIDI Program Change 126 (Loop Sampler select). This will clear out the recorded
loop and leave the Echo Pro patiently awaiting your next excursion into Loopland.
6 • 13
3. Program Change 103 = Looper overdub only
The Overdub only command, MIDI Program Change 103, can be used to record over
any loop that is currently playing. This command will have no effect on a loop that is
stopped. This can be especially handy if you have more than one Echo Pro.
4. Program Change 104 = Looper stop only
Unlike Play/Stop, this one obviously just stops.
Page 79

Some Real Life Examples: Advanced Looping
Using a Keyboard
As if that wasn’t enough, we’ve also assigned the functions of the Loop Sampler to
MIDI note values so that keyboard players, friends of keyboard players, and those of us
who use MIDI Bass pedals (Geddy Lee is the man!) could get in on the loop lovin’
along with the rest of the crew...
Dial up the Echo Pro’s MIDI Channel on your keyboard, and use the MIDI notes as
illustrated below to activate the Loop Sampler functions:
Each Press=Record,
Stop, Play, Stop, etc.
Press=Play
6 • 14
Each Press=Record,
Play, Stop,Play, etc.
Press=Record
C#4 D#4 F#4 G#4 A#4
C4 D4 E4 F4 G4 A4 B4
Press=Record
Release=Overdub
Press=Play
Release=Stop
Press=Play Once
Press=Overdub
Press=Half Speed
Press=Reverse
Press=Stop
Press=Loop Reset
Page 80

Some Real Life Examples: Advanced Looping
Using two Echo Pros for more than one loop
More than one Echo Pro, you say? Giving you the potential for running two Loop
Samplers at a time? You betcha. If you get really serious about looping, you can run a
bunch and turn yourself into a cult figure. You can access multiple Echo Pro Loop
Samplers with one MIDI foot controller by using MIDI mapping.
The easiest way to do this is to set Echo Pro number 2 with opposite responses to the
program change commands of looper one. Here is how you do it:
1. Hold the MIDI/sys button for two seconds on the front panel of looper number two
to access its MIDI mapping functions.
2. Turn the Time knob to the MIDI Program Change message 101. The display will
read M 101.
3. Turn the Program select knob clockwise to select LS (Loop Sampler Stop).
4. Turn the Time knob to the MIDI Program Change message 104. The display will
read M 104.
5. Turn the Program select knob counter-clockwise to select LS (Loop Sampler).
6 • 15
Congratulations! You have just mapped looper two so that it will respond opposite to
looper one for the MIDI Program Change messages of 101 and 104.
Dancing the Double Loop Fandango
Plug the MIDI output of your MIDI foot controller into the MIDI input of Echo Pro
one. Plug Echo Pro one MIDI out into Echo Pro two MIDI in.
Set Echo Pro one MIDI out to Thru: Press the MIDI/Sys button on Echo Pro one, turn
the Program Select knob until the display shows MO, turn the Time knob so that the
Time display shows THRU. While you’re in MIDI mode, make sure that both Echo
Pros and your MIDI foot controller are set to the same MIDI channel (generally this is
defaulted to MIDI Channel 1)....
Page 81

Some Real Life Examples: Advanced Looping
Select Loop Sampler on both Echo Pros. You can save time if you set up a Loop
Sampler program on both units and save them both to the same Program number. You
should now be ready to try this wild looping ride:
Play the riff that you want looped, and send MIDI Program Change 101 from your
MIDI foot controller. Looper one will start recording. At the end of the riff, send MIDI
Program Change 101 again. Looper one starts playing back the loop. When you are
ready for riff #2, start playing it and send MIDI Program Change 104 as you do. Looper
two will start recording, and looper one will stop. This is because of the MIDI mapping
that you set up earlier. As you reach the end of riff #2, send MIDI Program Change 104
(again). Looper two starts playing, and looper one remains in Stop mode. Now you can
press MIDI Program Change 101 and 104 at any time to play whichever loop you want.
Send MIDI Program Change 126 to reset both loopers. Take a deep breath, a moment
of silence to appreciate your own uniqueness, and feel free to do it all over again.
6 • 16
Page 82

APPENDICES
Model Chart
Appendices: Model Chart
Model
Tube Echo Delay Time Repeats Wow and Flutter Drive
Tape Echo Delay Time Repeats Bass Treble
Multi-Head Delay Time Repeats Heads 1 and/or 2 Heads 3 and/or 4
Sweep Echo Delay Time Repeats Sweep Speed Sweep Depth
Analog Echo Delay Time Repeats Bass Treble
Analog Echo w/Mod Delay Time Repeats Mod Speed Mod Depth
Lo Res Delay Delay Time Repeats Tone Bit Resolution
Digital Delay Delay Time Repeats Bass Treble
Digital Delay w/ Mod Delay TIme Repeats Mod Speed Mod Depth
Echo Platter Delay Time Repeats Wow and Flutter Drive
Stereo Delay left Delay Time Repeats Right Delay Time Right Delay
Ping Pong Left Delay Time Repeats Delay Time Offset Stereo Spread
Reverse Delay Time Repeats Mod Speed Mod Depth
Dynamic Delay Delay Time Repeats Threshold Ducking Amount
Auto Volume Echo Delay Time Repeats Depth Swell Time
Loop Sampler Loop Pre Echo
Knob 1 =
Time
Time
Knob 2 =
Repeats
Pre Echo
Repeats
Knob 3 =
Tweak
Pre Echo Mod Pre Echo Volume
Knob 4 =
Tweez
Repeats
A • 1
Page 83

Appendices: MIDI Implementation - Program Change
MIDI Implementation Program Change
A • 2
Program
Change
000 Enable Bypass
001 Program 1
……
099 Program 99
100 Ignored
101 Looper Rec/Play/Stop/Play/Stop
102 Looper Rec/Stop/Play/Stop/Play
103 Looper Record Only
104 Looper Overdub Only
105 Looper Stop Only
106 Looper Play/Stop
107 Looper Play Once
108 Looper Half Speed
109 Looper Reverse
110 Ignored
111 Tube Echo
112 Tape Echo
113 Multi-head
114 Sweep Echo
115 Analog Echo
116 Analog w/Mod
117 Lo Res Delay
118 Digital Delay
119 Digital w/Mod
120 Echo Platter
121 Stereo Delays
122 Ping Pong
123 Reverse
124 Dynamic Delay
125 Auto-Volume Echo
126 Loop Sampler (Reset)
127 Ignored
Program Change
Assignment
Page 84

Appendices: MIDI Implementation - Continuous Controller & Note Functions
MIDI Implementation Continuous Controller & Note Functions
Cont.
Controller
CC# 04 N/A Expression Pedal 0 - 127 0 to 127
CC# 28 62 (D4) Play/Stop 0 - 63=Stop
CC# 36 67 (G4) Half Speed 0 - 63= Normal
CC# 50 60 (C4) Record/Overdub 0 - 63= Overdub
CC# 64 N/A Tap Button Tap = 127 Tap = 127
CC# 65 N/A Note Value 0 - 127 0 to127
CC# 66 N/A Time Knob 0 - 127 0 to 127
CC# 67 N/A Repeats Knob 0 - 127 0 to 127
CC# 68 N/A Tweak Knob 0 - 127 0 to 127
CC# 69 N/A Tweez Knob 0 - 127 0 to 127
CC# 76 N/A Mix Knob 0 - 127 0 to 127
CC# 77 N/A Bypass Button 0 - 63 0 to 63
CC# 78 N/A Effect Model Select 0-15 0-15
CC# 80 64 (E4) Play Once 0 - 63= Normal
CC# 81 70 (A#4) Stop Only Stop=127 No Transmit
CC# 82 65 (F4) Overdub Only Overdub=127 No Transmit
CC# 83 61 (C#4) Rec/Play/Stop/Play/Stop Advance=127 No Transmit
CC# 84 Rec/Stop/Play/Stop/Play Advance=127 No Transmit
CC# 85 69 (A4) Reverse 0 - 63= Normal
N/A 66 (F#4) Record Only N/A N/A
N/A 68 (G#4) Play Only N/A N/A
N/A 71 (B4) Loop Reset N/A N/A
MIDI Note
Number
Echo Pro Control
Received
Value Range
64 - 127=Play
64 - 127= Half
64 - 127= Record
64 - 127= Once
64 - 127= Reverse
Transmitted
Value Range
No Transmit
No Transmit
No Transmit
No Transmit
No Transmit
A • 3
Page 85

Appendices: MIDI Continuous Controller Map for Note Values
MIDI Continuous Controller Map for Note Values
Note Value CC Value
Whole 120 to 127
Dotted Half 110 to 119
Half 100 to 109
Half Triplet 90 to 99
Dotted Quarter 80 to 89
Quarter (default) 70 to 79
Quarter Triplet 60 to 69
Dotted Eighth 50 to 59
Eighth 40 to 49
Eighth Triplet 30 to 39
Dotted Sixteenth 20 to 29
Sixteenth 10 to 19
Sixteenth Triplet 00 to 09
A • 4
Page 86

Appendices: Audio Specifications
Audio Specifications
Audio Performance Specifications
Conversion 24 bit
Sample Rate 46.8kHz
DSP 24 bit
Delay Memory
Delay Product Only =
S/N Ratio 105dB, A-weighted w/shorted inputs, XLR & TRS, Digital bypass enabled
Frequency response
Input Impedance 1 Meg Ohm
24 bit x 64 Megabits
2.570 seconds in stereo Delay programs
59.94 seconds (mono) in Loop Sampler with 800ms Echo
+/-0.5dB, 20Hz to 20kHz, XLR connectors / Digital Bypass enabled
+/- 0.03dB, 20Hz to 20kHz, XLR connectors / Analog Bypass enabled
A • 5
Page 87

 Loading...