

Page 1
Nu
V
erb
TM
U s e r G u i d e
TDM
Page 2

Unpacking and Inspection
After unpacking the NuVerb TDM module, save all packing materials in case you ever need to ship the unit. Thoroughly inspect the module and
packing materials for signs of damage. Report any damage to the carrier at once; report equipment malfunction to your dealer.
Lexicon Part #070-10752 Rev 1
Copyright 1995, Lexicon Inc.
All Rights Reserved.
Printed in the U.S.A.
Lexicon Inc.
3 Oak Park
Bedford, MA 01730
Tel 781-280-0300
Fax 781-280-0490
Notice
This equipment generates and uses radio frequency energy and if not installed and used properly, that is, in strict accordance with the manufacturer's
instructions, may cause interference to radio and television reception. It has been type tested and found to comply with the limits for a Class A
computing device in accordance with the specifications in Subpart J of Part 15 of FCC Rules, which are designated to provide reasonable protection
against such interference in a residential installation. However, there is no guarantee that interference will not occur in a particular installation. If
this equipment does cause interference to radio or television reception, which can be determined by turning the equipment OFF and ON, the user
is encouraged to try to correct the interference by one or more of the following measures:
Reorient the receiving antenna
Relocate the computer with respect to the receiver
Move the computer away from the receiver
Plug the computer into a different outlet so that the computer and receiver are on different branch circuits.
If necessary, the user should consult the dealer or an experienced radio/television technician for additional suggestions. The user may find the
following booklet prepared by the Federal Communications Commission helpful:
"How to identify and Resolve Radio/TV Interference Problems."
This booklet is available from the U.S. Government Printing Office, Washington, DC 20402, Stock No. 004-000-00345-4.
Le présent appareil numérique n'émet pas de bruits radioélectriques dépassant les limites applicables aux appareils numériques de la class A
prescrites dans le Règlement sur le brouillage radioélectrique édicté par le ministère des Communications du Canada.
This triangle, which appears on
your component, alerts you to
the presence of uninsulated,
dangerous voltage inside the
enclosure... voltage that may be
sufficient to constitute a risk of
shock.
CAUTION
RIS K OF ELECTRIC S HOCK
DO NOT OPEN
This triangle, which appears on
your component, alerts you to
important operating and maintenance instructions in this accompanying literature.
Apple, the Apple logo, and Macintosh are registered trademarks of Apple Computer, Inc.
NuBus is a trademark of Texas Instruments
TDM and Pro Tools are trademarks of Digidesign, Inc.
NuVerb is a trademark of Lexicon, Inc.
Page 3
Nu
V
erb
TM
U s e r G u i d e
TDM
Page 4

i
Table of Contents
1 Getting Started ................................................1
About the Documentation.................................................. 1
Customer Support ............................................................... 1
System Requirements.......................................................... 2
2 Installing the Hardware and Software ............3
Attaching the NuVerb TDM Module to a
NuVerb card ................................................................. 5
Installing TDM-enhanced NuVerb card(s) into
your Macintosh ............................................................ 7
Installing the Card Assembly ............................................ 9
TDM Ribbon Cable............................................................ 10
Software Installation ......................................................... 11
3 Using TDM...................................................13
Opening the NuVerb TDM Plug-In ................................ 14
Opening pre-1.5 Libraries................................................. 15
Plug-In Functions .............................................................. 15
Hot Faders • Save Functions
Using Multiple NuVerb Cards ........................................ 17
The NuVerb TDM Option Advantage............................ 18
4 Using NuVerb in Third-Party
TDM Systems ..............................................19
Traditional Reverb or Effects Send ................................. 19
The NuVerb Insert used as a "Shared Resource" to
all Tracks in a Submix ............................................... 20
Applying a NuVerb Insert to a Mixer Channel............. 21
5 Program Descriptions ...................................23
Appendix
MS decoding using the Stereo Adjust Program
Applying PONS Dither in Mastering Applications
Page 5

1
1
Getting StartedNuVerb TDM User Guide
1
Getting Started
Congratulations on the purchase of the NuVerb TDM Plug-In. We’re sure you will find the new
features in this software quite useful, as they allow you to access a whole new level of system
integration.
About the Documentation
In general, this manual should be used in conjunction with the NuVerb User Guide. Many
existing NuVerb features remain unchanged and are explained in detail there. New features,
with notes regarding any changes to NuVerb behavior, are given here. In addition, this manual
contains descriptions of all of the NuVerb programs.
For your convenience, your software package includes an On Line version of the installation
procedures and operational information contained here. An Installer Read Me file is also
provided to alert you to any changes which may have been incorporated since this manual was
printed. Please check this file first to make sure you are informed of any variations, particularly
in the installation procedure.
Customer Support
Fill out and send in your product registration card immediately. As a registered user, you are
entitled to telephone support, and new product information — and we want to keep you up
to date.
Page 6
Getting Started
2
2
Lexicon
System Requirements
The NuVerb Plug-In provides direct control of NuVerb functions from a window within other
TDM-compatible software packages. The Plug-In requires:
• 1 Megabyte of free RAM
• An installed TDM-compatible software application such as Digidesign's Pro Tools
• Lexicon's NuVerb TDM Option.
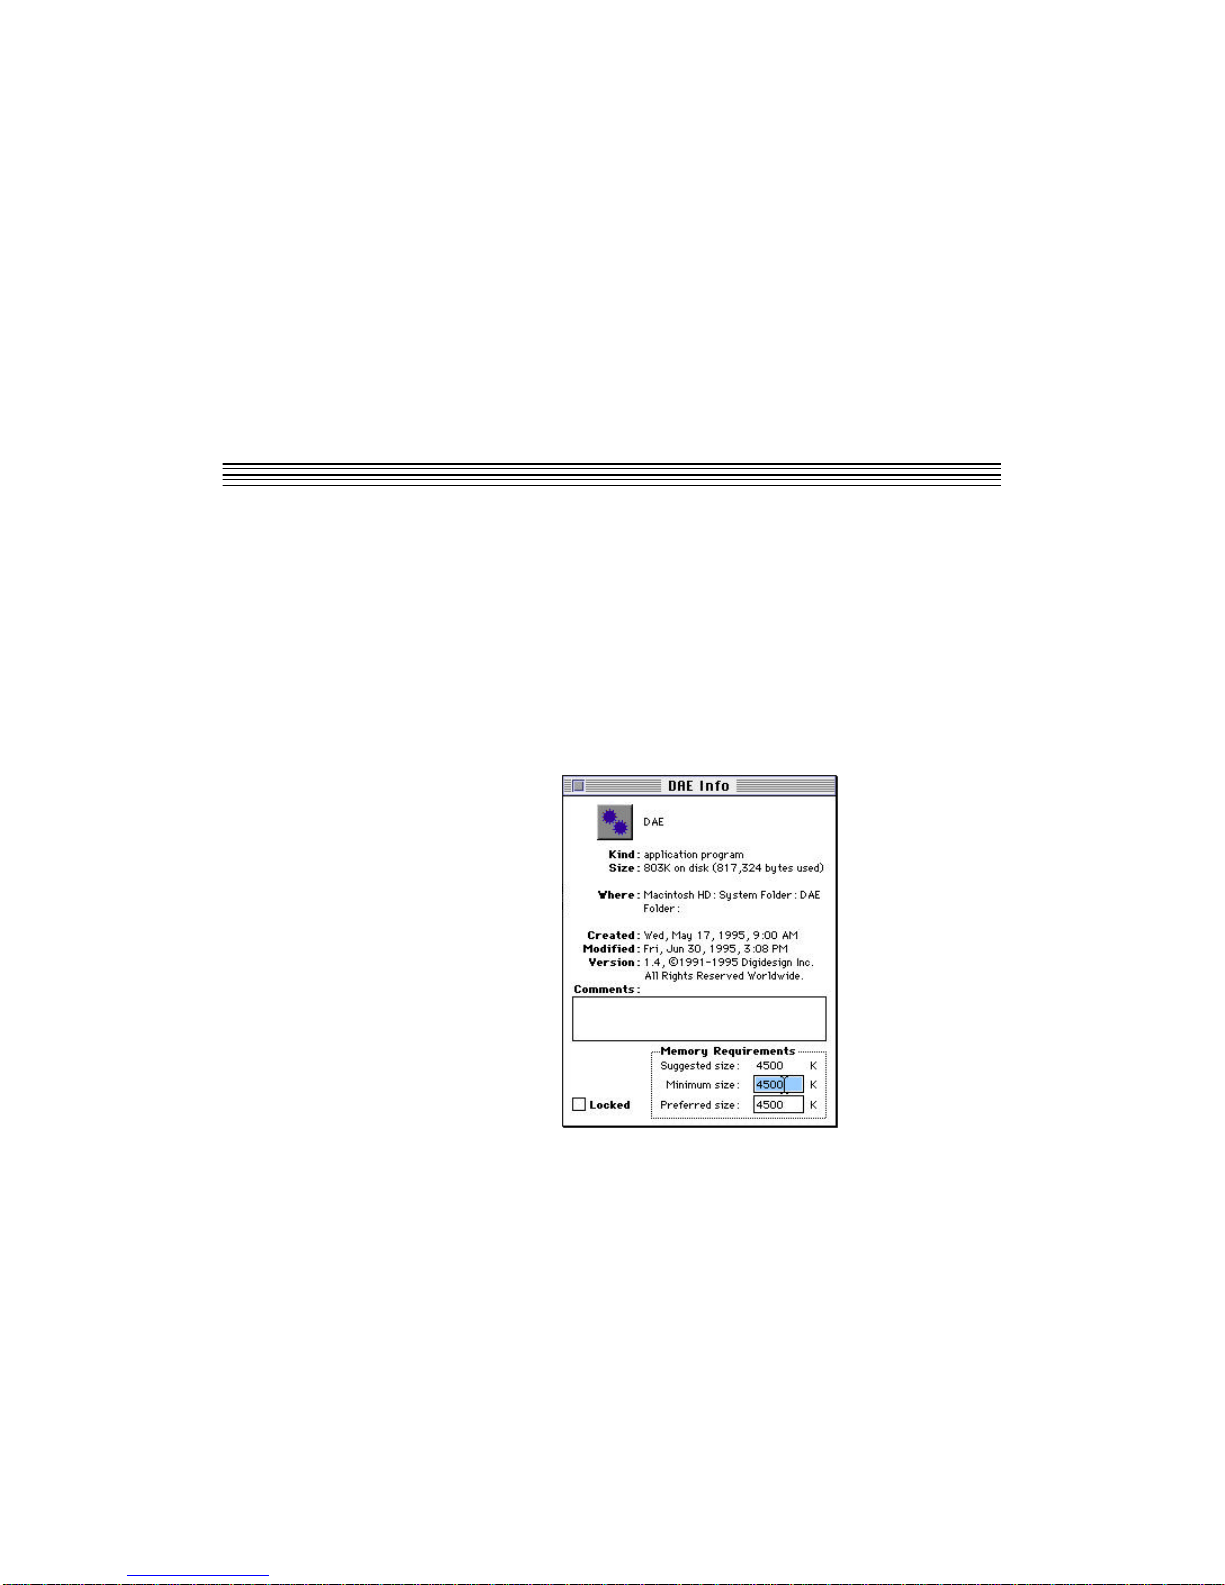
If you have problems loading Plug-Ins, you may need to increase the memory allocation of the
DAE. To do this, quit Pro Tools (and DAE) and select the DAE icon from the DAE folder (inside
your System folder). Select Get Info from the File menu (or press Command I) to open the
memory allocation window shown.
Page 7

3
3
NuVerb TDM User Guide
Installing the Hardware and Software
2
Installing the Hardware and Software
In order to get your NuVerb TDM option up and running as quickly as possible, and to avoid
damage to your hardware, please follow these instructions carefully.
If you are a first time NuVerb owner, unpack the NuVerb Card and the TDM option first.
Verify that you have all of the items shown on the packing list. Fill out and return your NuVerb
registration and warranty cards. Please take the time now to look over the NuVerb User Guide
before attempting to install the TDM option. This will be time well spent.
Make sure that the Digidesign TDM system is properly installed in your Macintosh or
Digidesign Expansion Chassis before you begin NuVerb installation. If you have not yet
installed the Digidesign TDM system, refer to Section B of the Digidesign TDM Bus Software
User Guide for installation instructions. Once you have successfully installed your Digidesign
TDM system, you can proceed with the NuVerb installation.
If you already have a Digidesign TDM system with NuVerb installed, you will need to
disconnect and remove the NuVerb card(s) from your Macintosh or Digidesign Expansion
Chassis in order to retrofit them with the NuVerb TDM option. Remove the NuVerb card(s)
and place them in the antistatic bag(s) in which they were shipped.
The installation procedure includes:
1. Attaching the NuVerb TDM module to a NuVerb card.
2. Installing TDM-enhanced NuVerb card(s) into your Macintosh.
3. Connecting NuVerb TDM to the Digidesign TDM system via the TDM ribbon cable.
Page 8

4
4
LexiconInstalling the Hardware and Software
Note
Only Lexicon TDM cards can be used with NuVerb. Cards from other manufacturers are
incompatible and can damage your application hardware.
Precautions
• Be sure your Macintosh is turned off and unplugged.
• Before handling NuVerb cards, NuVerb TDM modules, or other NuBus cards, discharge
any static electricity that may be on your clothes or body by touching a grounded metal
surface, such as the power supply case inside your Macintosh.
• Handle cards only by their edges, as you would a CD. Be careful to avoid touching the pins
on the bottom edge of the cards.
• Save the anti-static bags containing your NuVerb card and NuVerb TDM module. These
special bags prevent static electricity from damaging sensitive electronic components on
the cards. Always store your cards in these anti-static bags when the cards are removed
from the Macintosh.
• Put the anti-static bags containing the cards near your Macintosh to avoid having to walk
around with a card after it is removed from its bag (and generating static electricity).
Depending on your studio setup, installation of NuVerb TDM hardware and software will
probably take about 20 minutes. Please read through the entire procedure before you actually
start to perform the installation.
Page 9
5
5
NuVerb TDM User Guide
Installing the Hardware and Software
Attaching the NuVerb TDM module to a NuVerb card
The NuVerb TDM module attaches to your NuVerb card. Only NuVerb cards with an attached
NuVerb TDM module can use the TDM option. NuVerb cards without the TDM module must
use the AES/EBU ports for audio input and output.
1. Place the foam from your NuVerb card package on top of a work surface next to your
Macintosh. (Any flat piece of foam with similar dimensions to the NuVerb card can be
used.)
2. Turn off and unplug your Macintosh.
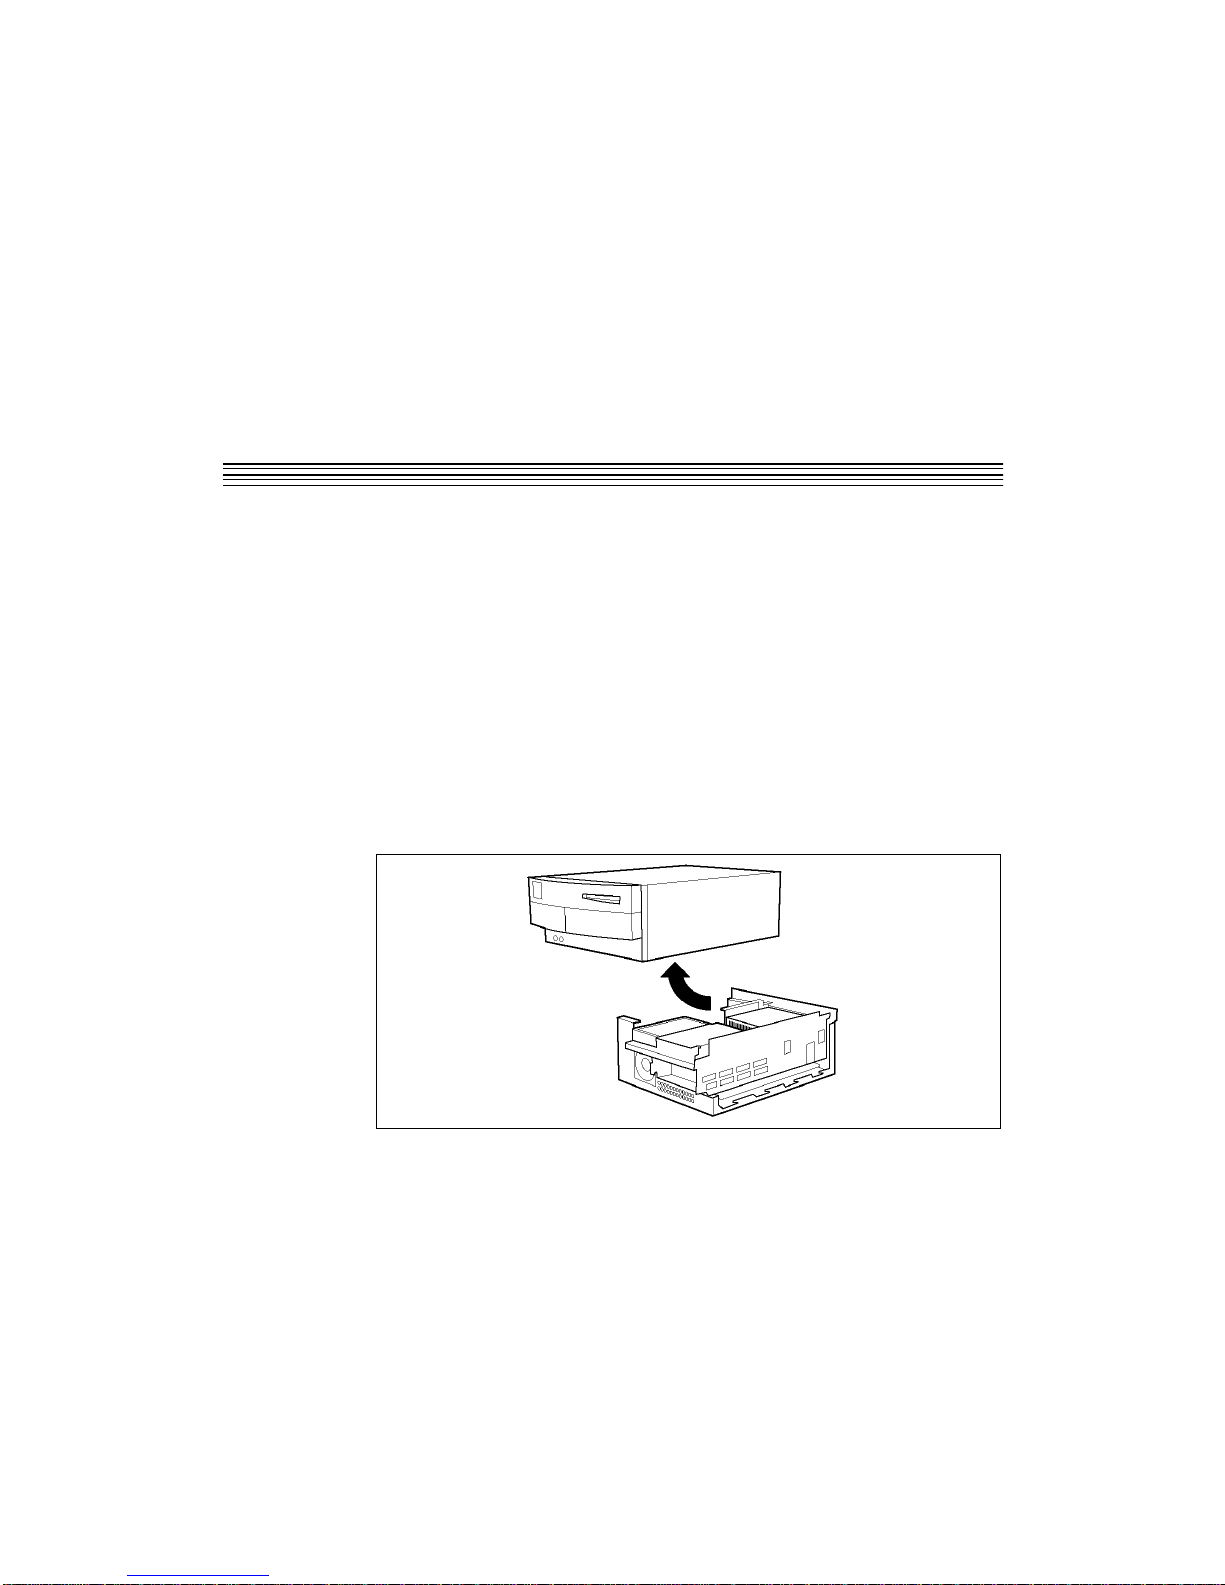
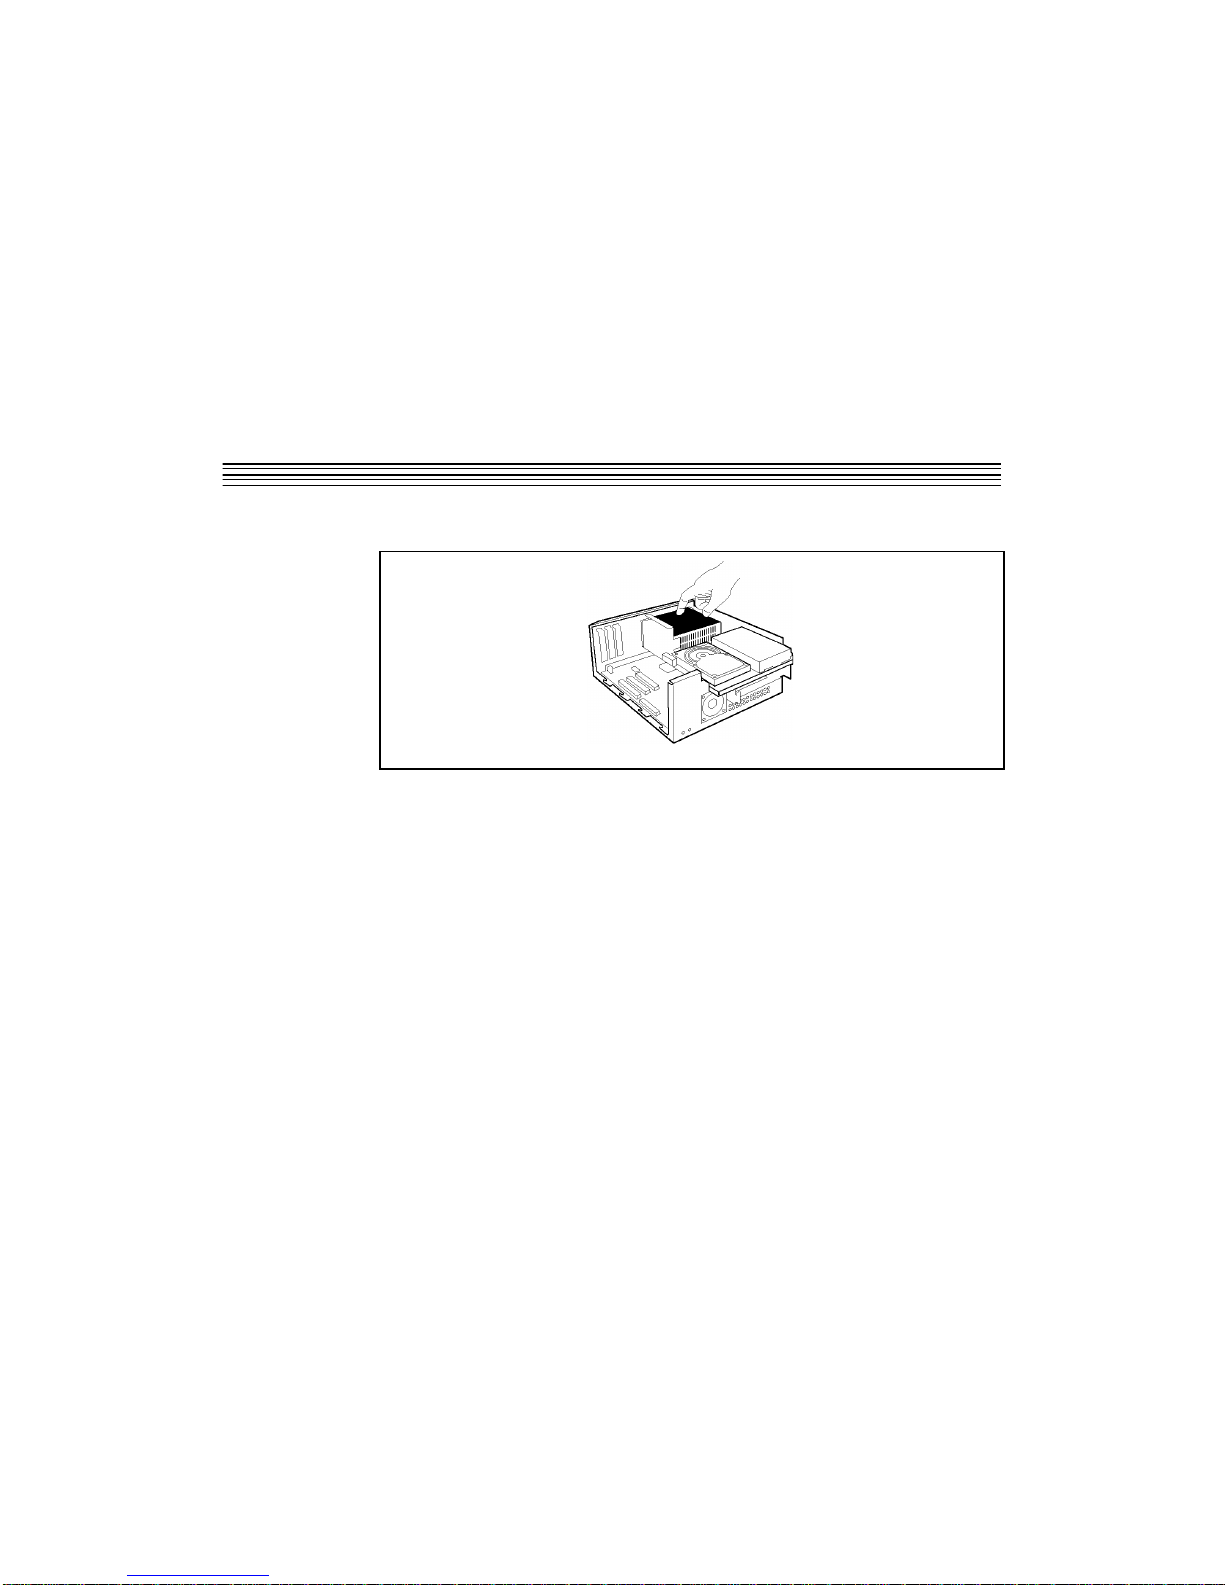
3. Remove the Macintosh top cover and slot cover(s) of those NuBus slot(s) you’ve selected
for installation. Although the illustrations shown here depict installation in a typical
Quadra/Centris 650-model Macintosh, your installation should be similar. If you are
unsure of how to open and install a NuBus card in your particular Macintosh or Digidesign
Expansion Chassis, please refer to your Macintosh Owner’s Guide or Digidesign Expansion Chassis User Guide.
Page 10
6
6
LexiconInstalling the Hardware and Software
4. Touch the Macintosh power supply case to discharge any personal static electricity.
5. Remove the NuVerb card from its anti-static bag. Place the anti-static bag on top of the
foam and place the card with its component side facing downward on top of the anti-static
bag. Hold the card only by its edges, and be careful to avoid touching the pins on the
bottom edge of the card.
6. Touch the Macintosh power supply case again to discharge any personal static.
7. Remove the NuVerb TDM card from its anti-static bag. Hold the card by its edges, and
orient it so that the component side faces away from the palm of your hand.
8. With the TDM card in one hand, pick up the NuVerb card in your other hand. Orient the
cards so that the component sides are facing each other. Carefully line up the black
connectors at the top of each card. Firmly press them together until they are fully
connected.
9. Once the cards are mated, place the assembly, with the TDM card on top, on the anti-static
bag. When the cards are properly aligned, the four holes in each card (for the four screws
supplied with the TDM card) are aligned.
Page 11

7
7
NuVerb TDM User Guide
Installing the Hardware and Software
10. Four screws (three metal and one nylon) are provided to attach the cards. Begin by
inserting the nylon screw in the upper left corner, as shown below. Next, insert one of the
metal screws in the top right corner. Complete the assembly by inserting the remaining two
metal screws at the bottom.
Repeat steps 4-10 for each NuVerb card with TDM option that you wish to install. Place each
card assembly in an anti-static bag until you are ready to install it.
Installing TDM-enhanced NuVerb card(s) into your Macintosh
The TDM-equipped NuVerb card should be installed in the NuBus slot immediately adjacent
to the last of your TDM-ready Digidesign NuBus Cards. If you are installing more than one
NuVerb card, install them next to each other.
If you are unsure of the correct placement of these cards , refer to the Digidesign TDM Bus
Software User Guide and documentation that came with your cards. Also refer to the
Digidesign TDM manual for proper termination of your TDM bus.
Page 12
8
8
LexiconInstalling the Hardware and Software
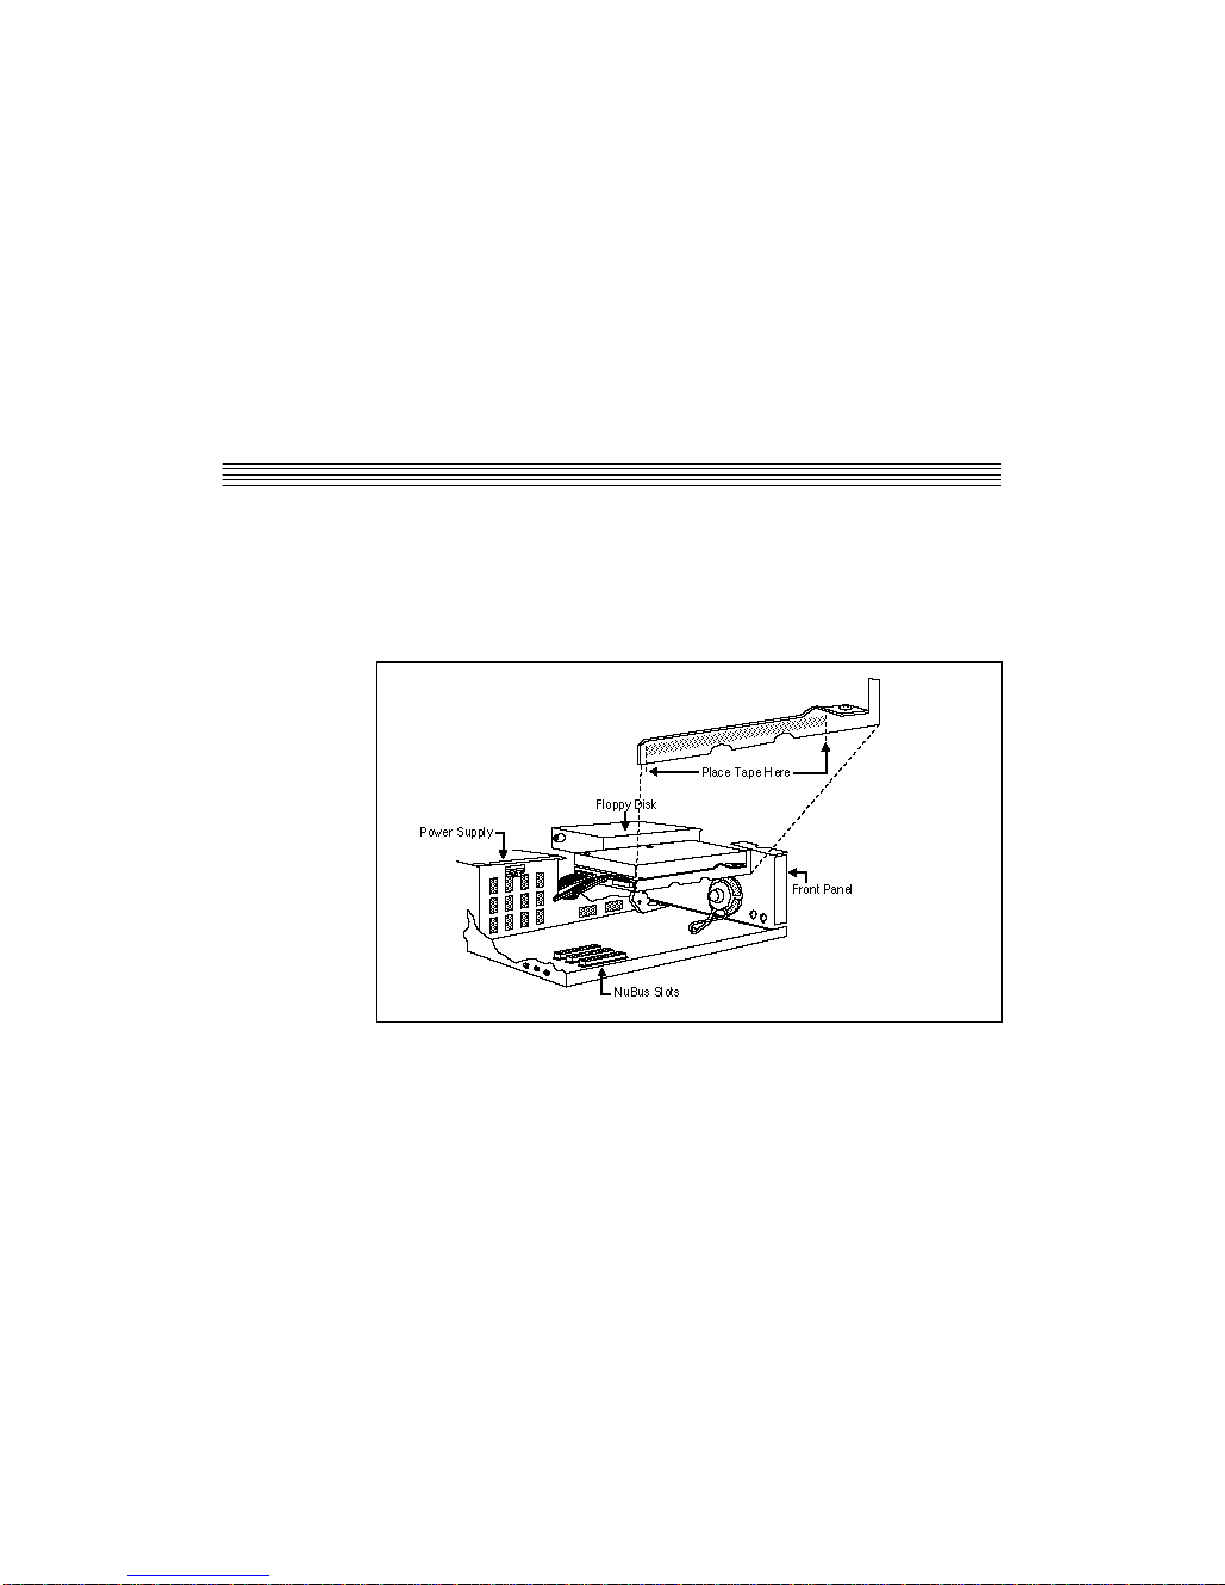
WARNING: For Power PC 7100, Macintosh IIvx and Quadra/Centris
650 Users
The TDM Option board can short against the edge of the hard drive assembly. To avoid
potential damage, place non-conducting UL approved insulating tape (provided by Lexicon
with the NuVerb TDM Option) as shown.
Page 13

9
9
NuVerb TDM User Guide
Installing the Hardware and Software
Installing the Card Assembly
1. Touch the Macintosh power supply case to discharge personal static.
2. Pick up the NuVerb TDM card assembly by the top of the metal bracket and the top of the
other end of the card.
3. Align the card assembly over the slot you’ve chosen. Make sure that the connector on the
bottom of the card is aligned directly over the slot, and that the rear edge is aligned with
the tab on the inside of the back panel.
4. Place one hand along the top edge of the card and push down firmly until the card is fully
seated in the slot. Do not force the card.
Repeat steps 1-4 for any additional cards you wish to install. Plug each additional card into the
NuBus slot immediately adjacent to the last.
Page 14
10
10
LexiconInstalling the Hardware and Software
TDM Ribbon Cable
The TDM ribbon cable is used to connect NuVerb TDM-equipped cards to the rest of your
Digidesign TDM system. 5-node and 12-node TDM ribbon cables are available from
Digidesign dealers. You will need a TDM ribbon cable with enough plugs for each NuVerb
card you intend to install as well for the rest of your Digidesign TDM system. Refer to the
information provided by Digidesign for proper TDM Bus termination.
Be sure all TDM-ready NuBus cards are installed in your Macintosh or Digidesign Expansion
Chassis. Connect the TDM-ready NuBus cards of your TDM system with the TDM ribbon cable
beginning with the card closest to the Macintosh power supply case, or slot 1 of the Digidesign
Expansion Chassis. Connect each TDM-ready card to the next available node on the TDM
ribbon cable until all of the cards are connected. If you have a Digidesign terminator, it belongs
in the last node of the ribbon cable. Refer to Section B of the Digidesign TDM Bus Software User
Guide.
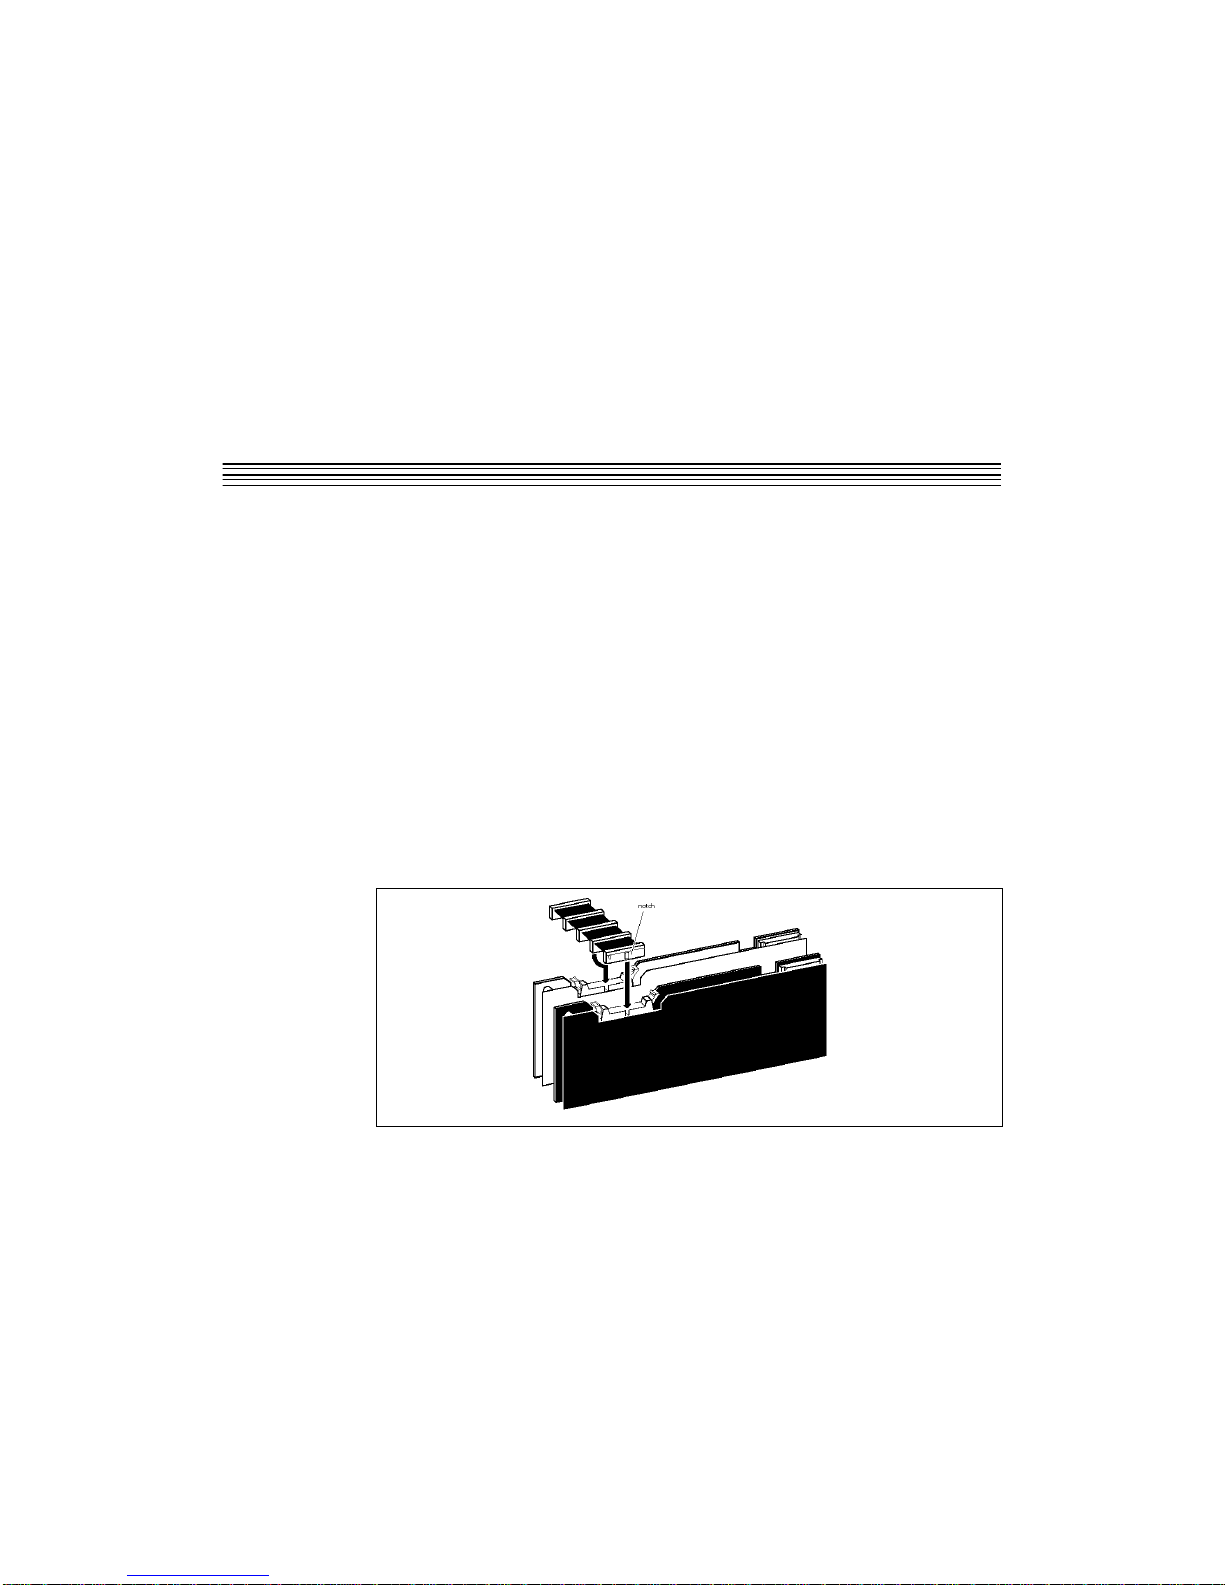
There is a notch on each ribbon cable node that fits into a slot on all TDM-ready NuBus cards
(including the NuVerb TDM card assembly). Push down gently but firmly until the node is
fully connected to the card. Do not force this connection. When the plug is properly seated, the
two blue tabs at the top of the connector will click shut.
Page 15

11
11
NuVerb TDM User Guide
Installing the Hardware and Software
If you wish to detach the ribbon cable, push down on the blue tabs. Allow any unused nodes
to remain unattached. Do not cut the TDM ribbon cable to shorten it! If you do, you will damage
your TDM system.
Once you have connected your NuBus card(s) to the Pro Tools TDM system with the ribbon
cable, replace the top cover of your Macintosh.
Software Installation
These instructions replace the software installation instructions in the NuVerb User Guide.
NuVerb TDM software is installed with the NuVerb Installer program provided with your
NuVerb TDM system. NuVerb TDM software must be installed on the same system disk as Pro
Tools TDM.
1. Insert the NuVerb Installer disk provided with your system into your Macintosh.
2. Double-click on the Installer Read Me file and review the latest information about your
NuVerb software. This file also gives you detailed information on what new files and
folders have been created, and where they are located on your system.
3. Double-click the NuVerb Installer icon. When the program opens, click OK to continue.
When asked to select the disk on which you’d like to install the NuVerb TDM software,
select the drive in which your System Folder is located. Select Easy Install to have the
Installer place the recommended NuVerb TDM software on your startup disk. If you have
a technical reason for a custom installation, select Customize to select only certain files to
be placed on your startup disk.
4. In the Installer dialog box, click on Install. Follow the on-screen instructions to complete
the installation. The Installer will prompt you to insert the correct installation disks.
Page 16

12
12
LexiconInstalling the Hardware and Software
When the installation procedure is finished, the Installer will instruct you to restart your
computer. After restarting your computer, check the Installer Read Me text included on your
floppy disk for detailed information on what new files and folders have been created, and
where they are located on your system.
You will also find an On-Line User Guide for convenient access to much of the operational
information found in this manual.
Page 17

13
13
NuVerb TDM User Guide Using TDM
3
Using TDM
The TDM option makes NuVerb an integral part of your Digidesign TDM system. If you are
a new Pro Tools or Digidesign TDM owner, please refer to your Pro Tools Software User Guide
and/or the Digidesign TDM Bus Software User Guide to learn how to use your TDM system
before trying to use the NuVerb TDM option.
If you are a new NuVerb owner, please refer to the NuVerb User Guide to learn how to use
NuVerb application. The NuVerb TDM Plug-In allows fast editing of program settings, but
libraries can only be built in the NuVerb application. In order to take full advantage of the
NuVerb TDM option, you must be familiar with the application itself.
Page 18

14
14
LexiconUsing TDM
Opening the NuVerb TDM Plug-In
Select NuVerb™ in the Inserts pop-up menu to open the Plug-In. The Plug-In, like the
standard Pro Tools TDM Insert/Send Editor, features a Track selector, an Insert/Send selector,
an Insert Type/Send destination selector, and a Bypass button. Click on any of these to activate
them.
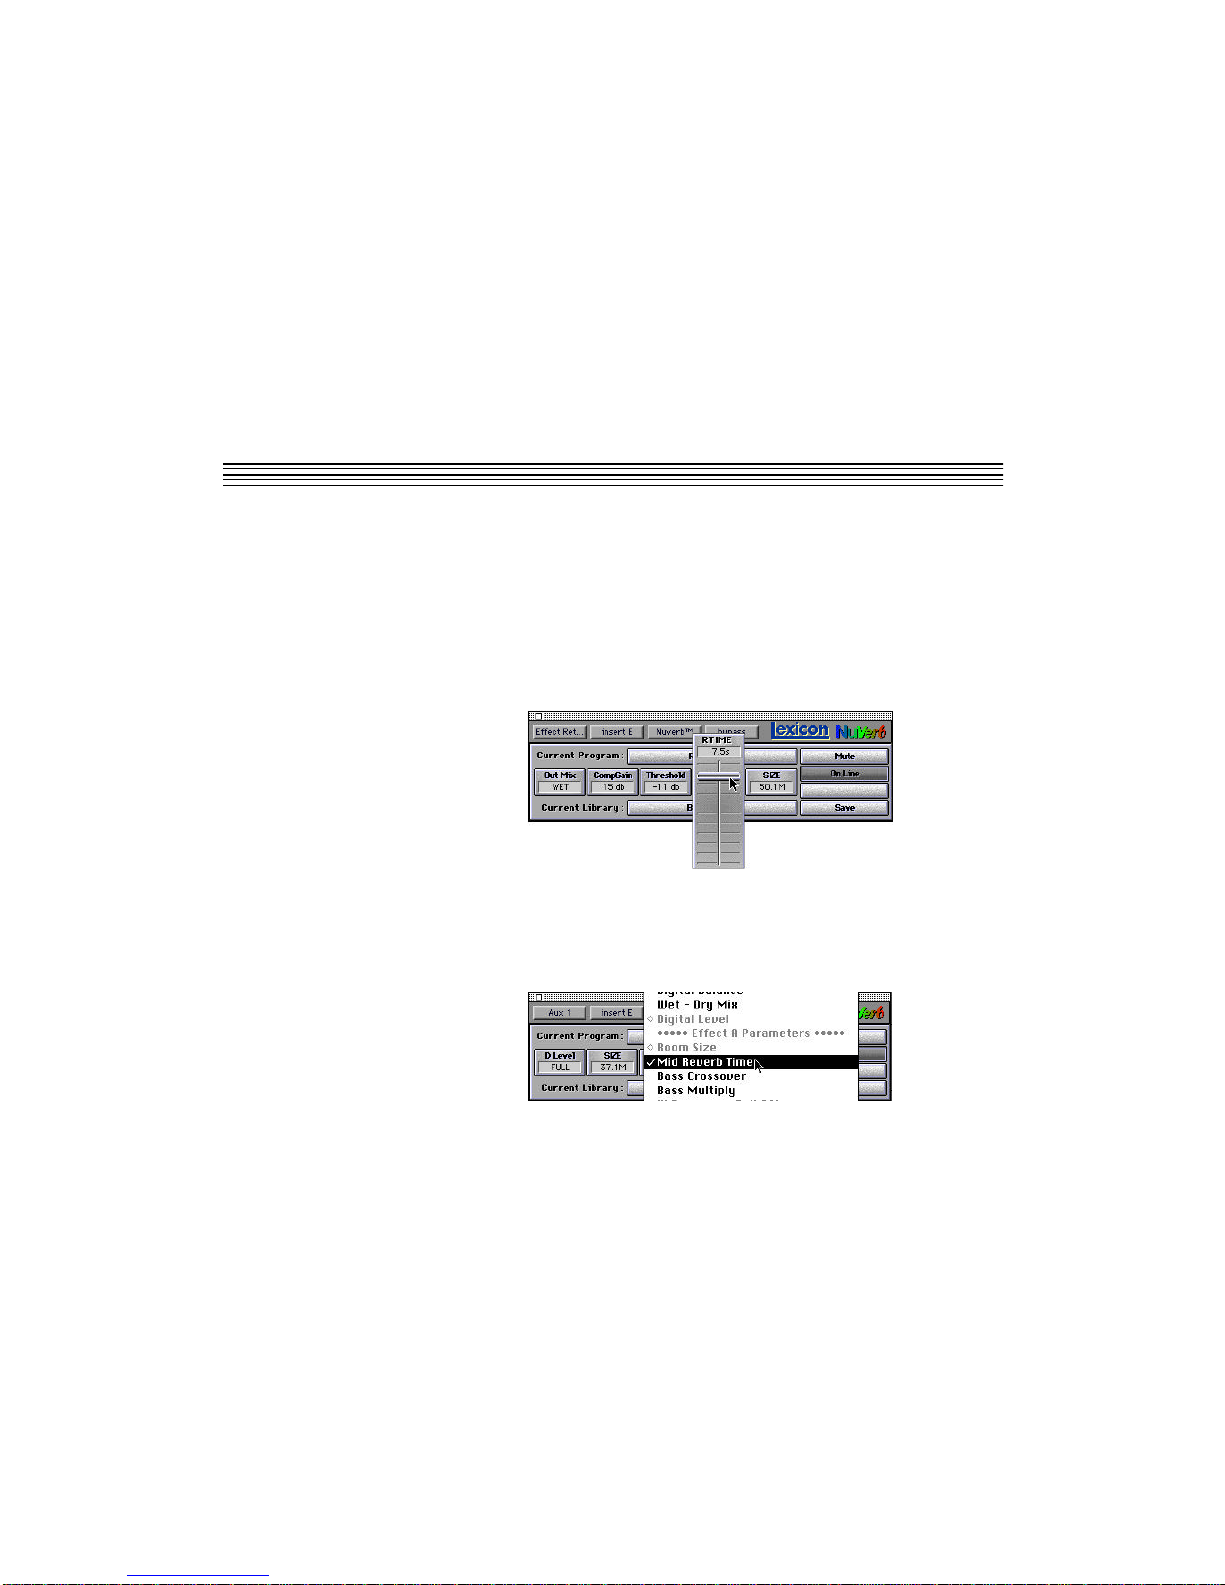
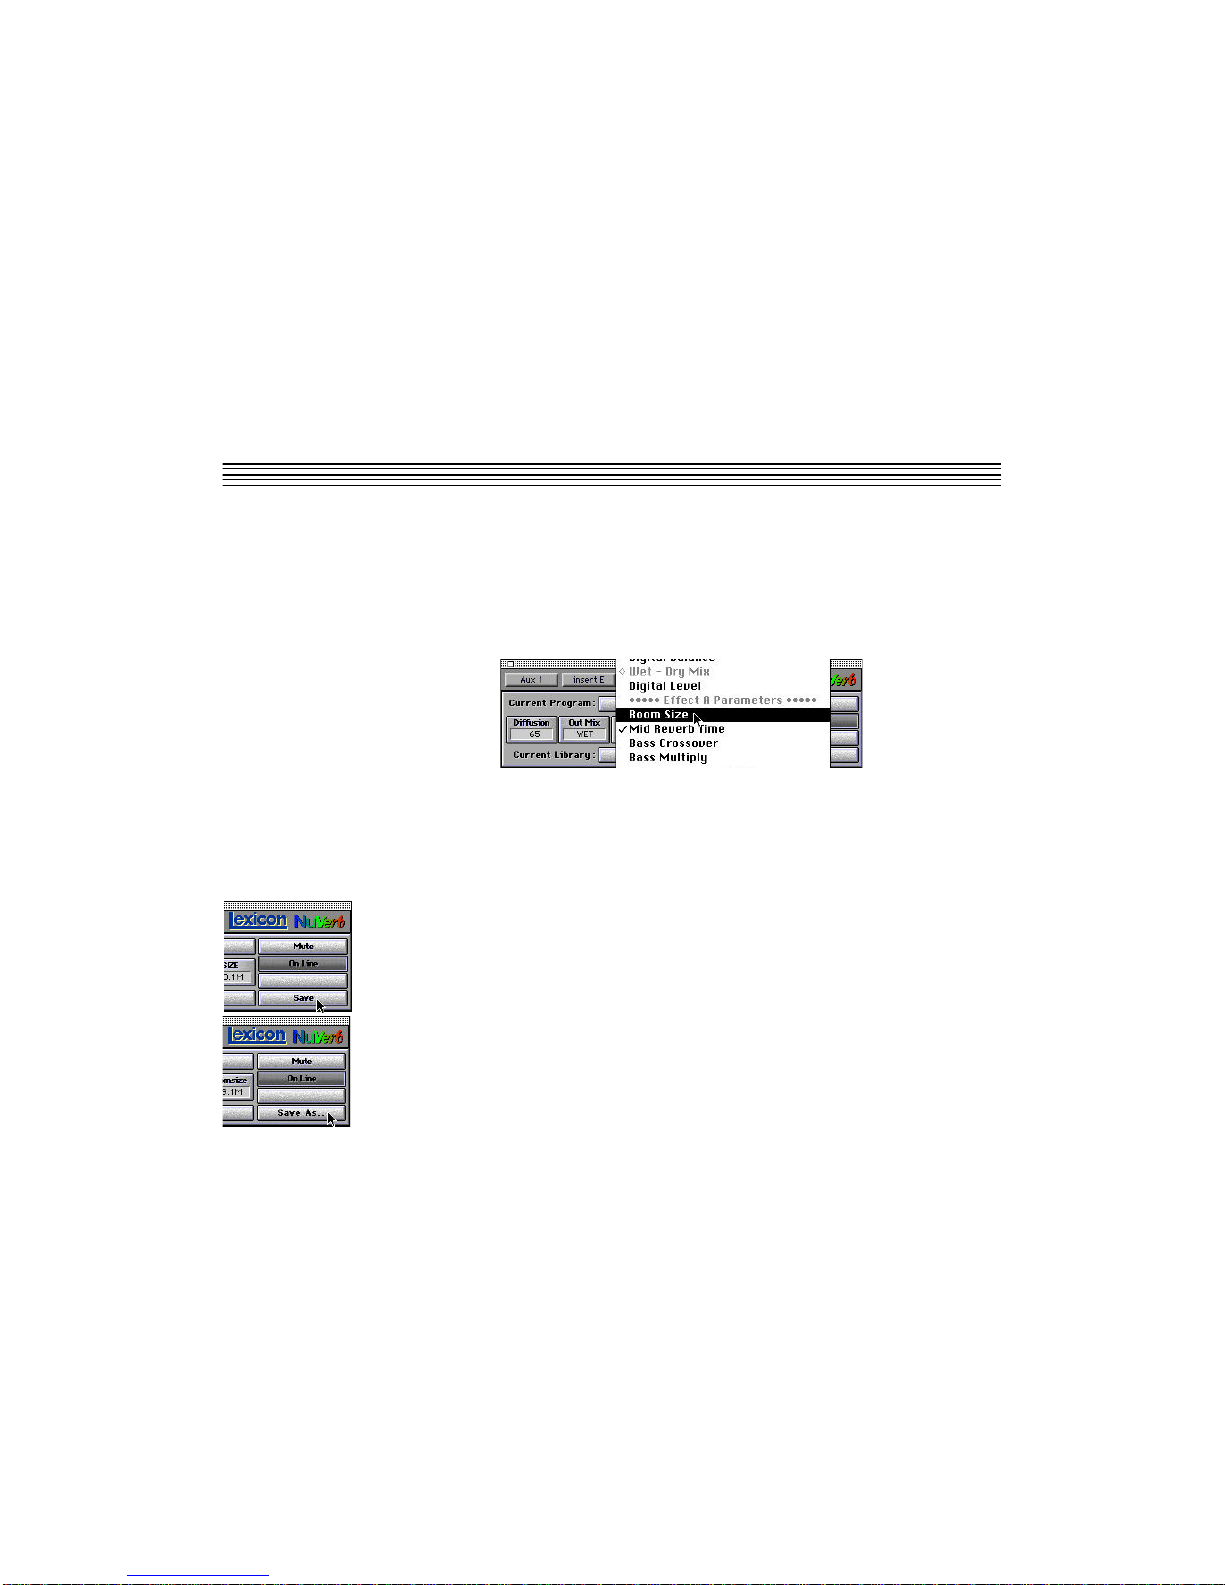
Five effect parameters from the
current program are assigned to the
Plug-In. Click and hold on any
Parameter box to pop up a control
fader.
Click here to activate
NuVerb control.
Click here to mute all
audio through NuVerb.
Click and hold to pop up a menu of
programs from the current library.
Click here to mute NuVerb-processed audio.
Click here to select another NuVerb
library. (Libraries are created in the
NuVerb application — a default library is
located in your NuVerb folder.)
From the Inserts menu, select
Nuverb™ to open the Plug-In ...
...click here to return to
the Inserts menu.
When multiple NuVerb
cards are installed, Link
appears here. (See
Using Multiple Cards.)
Save appears here whenever a program
parameter is changed. Pressing option
while Save is displayed, or while changing
a parameter displays Save As ... Click to
activate the displayed Save function.
Click here to select channel.
Displays insert or send ID.
Page 19
15
15
NuVerb TDM User Guide Using TDM
Opening pre-1.5 Libraries
Older libraries are converted to the 1.5 format when you open them. They will open as Untitled,
with the Save as... button activated to allow for immediate renaming.
Plug-In Functions
Plug-In Faders
Pop-up faders allow adjustment of five labeled effect parameters in the current program. Click
on any parameter box to pop up its fader. Use the mouse to move the fader and adjust the
parameter value.
You can redefine the parameter assignment at any time, on a scrolling menu of parameters. To
open the parameter menu, press Command, then click and hold on a parameter box. Continue
holding down the mouse button to scroll through the parameters, which are sequentially
highlighted as you scroll through them. A checkmark appears next to the currently selected
parameter(s).
Click on a parameter
box to pop up its fader.
Page 20
16
16
LexiconUsing TDM
Multiple parameters can be assigned to a single fader. To assign another parameter, open the
menu and scroll through the list, highlighting the parameter you want. When you release the
mouse button, the menu will close and the parameter box will be relabeled Multiple.
(Depending on the program, as many as 8-10 parameters can be assigned to the Hot Palette.
You can make all assignments to a single fader, or to any combination of faders you want.) Each
fader named Multiple will scale its assigned parameters linearly.
To remove a parameter assignment, highlight it, then release the mouse button. The menu will
close, and the parameter box will be appropriately relabeled, depending on the remaining
assignments. (If no parameters are assigned, the parameter box will be labeled Unused.)
Save Functions
Save is displayed as an option whenever a hot fader value is changed. Click on Save to store
the current library (and any current program changes) to disk, replacing the old library of the
same name.
If you change a program and do not deliberately store your changes, the parameters will revert
to their original settings when you load a different program. You can temporarily store
changes by pressing option while selecting a new program. The new version of the program will
be stored in RAM until you quit the application and deliberately select Don't Save Changes
(at whichpoint the original parameters will be restored) or until you click on Save.
Whenever Save is displayed, pressing option activates the Save As... function and displays
a dialog box. Mod is appended to the file name to differentiate the new library from the original.
Page 21
17
17
NuVerb TDM User Guide Using TDM
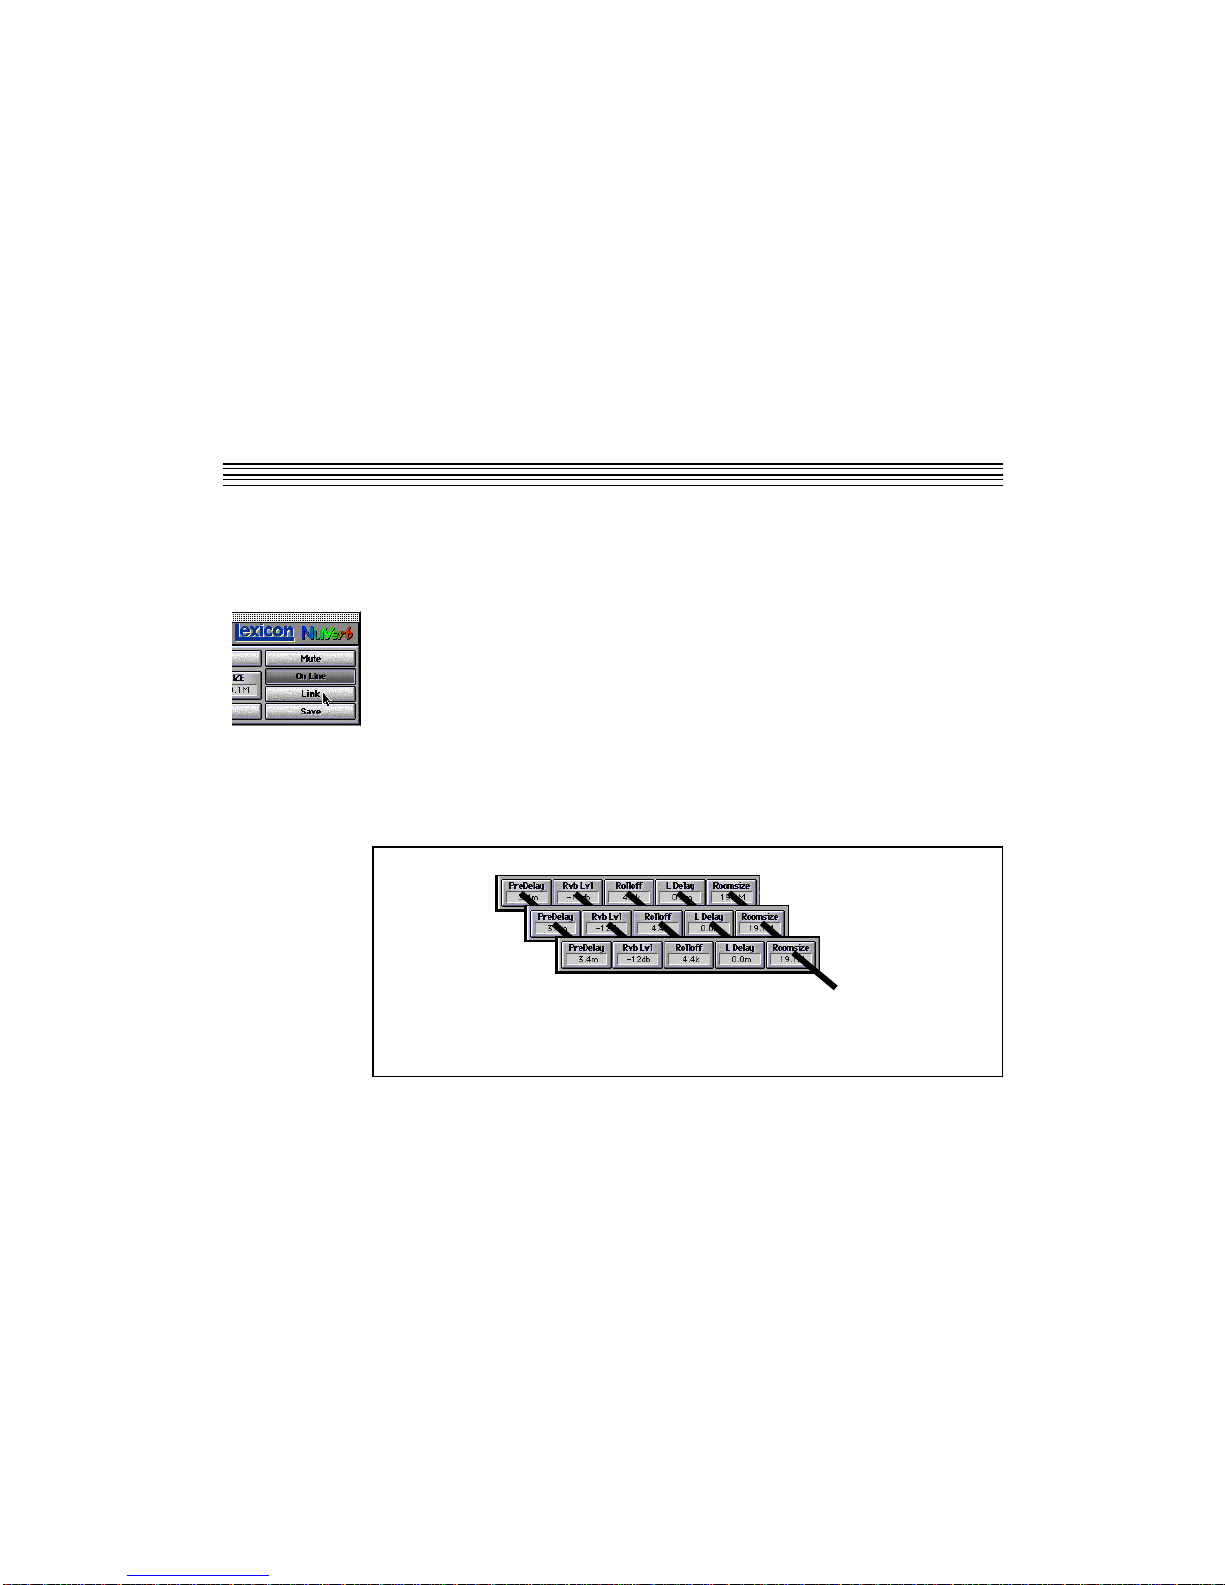
Using Multiple NuVerb Cards
When more than one NuVerb card is installed, Link will appear on the Plug-In below the On
Line button. This control allows you to gang parameter control across cards.
When Link is pressed, each Plug-In fader will assume control over the faders in corresponding
positions on other linked cards. To use this function effectively , you must be careful to assign
faders to the locations you want linked. For instance, you could assign Mid Rtime to the first
fader on the first card, and Dly Fdbck to the first fader on a second card. When you adjust the
first fader on either insert, reverb time and delay feedback will respond linearly. With the
ability to assign 8-10 parameters to any given fader, two linked faders can give you single fader
control over as many as 20 parameters. This is a very powerful function, but it must be used
with extreme caution, as linking certain parameters can cause excessive feedback and other
undesireable effects.
Remember that when Link is enabled, all parameters on the linked Plug-Ins are affected.
Faders which you do not want linked must be Unused.
When cards are linked, each
parameter will exert group
control over any parameters in
corresponding positions on
other linked cards.
Page 22

18
18
LexiconUsing TDM
The NuVerb TDM Option Advantage
Unlike other outboard gear, the NuVerb TDM option does not use the inputs and outputs on
your Audio Interface(s), leaving them free for use with other equipment.
Digital signal processing in the NuVerb TDM option uses 20-bit data paths. This permits you
to employ Lexicon’s PONS (Psychoacoustically Optimized Noise Shaping) program for
dithering before audio signals are truncated to 16-bit sound files, or before audio is output from
your digital or analog outputs. Application of the PONS program in mastering applications is
discussed further in the Appendix.
Page 23

19
19
NuVerb TDM User Guide Using NuVerb in Third-Party TDM Systems
4
Using NuVerb in Third-Party TDM Systems
NuVerb is compatible with most TDM systems such as Pro Tools and EMagic. The following
examples illustrate the basic steps of several general NuVerb TDM applications. The precise
steps used in any given session may differ, but should be similar. When you save your Pro
Tools session, any changes you have made to a NuVerb insert will be saved and recalled the
next time you open the session.
Traditional Reverb or Effects Send
This setup follows the usual effects send and return mode used on analog mixers. Send controls
are used to adjust the amount of signal sent to NuVerb from single tracks, and the output from
NuVerb is returned to the mix outputs. This setup is optimized for applying a NuVerb program
when you want individual control of the proportion of wet/dry for each of the individual
tracks. The stereo image and sends level assigned to NuVerb can be independently adjusted
for each track. The term "Main Mix" as used below, refers to the outputs you have selected to
use for listening to your stereo mix.
TDM Mix Setup
1. Create stereo auxiliary inputs by choosing new auxiliary input(s) from the File menu.
Click on stereo input.
2. Set the output of the tracks you want to include in the submix to Main Mix. Set the panning
of each track as desired.
3. Configure Sends A and B on each of the tracks you want to include in the submix to bus
1 and bus 2, respectively. Choose pre or post for each send. Refer to your Pro Tools
manual for the differences between selection of pre or post.
Page 24

20
20
LexiconUsing NuVerb in Third-Party TDM Systems
4. Set the input of the stereo auxiliary input track to bus 1-2.
5. Set the output of the stereo auxiliary input track to Main Mix.
6. From the Inserts pop-up menu of the stereo auxiliary input track, select NuVerb™. The
Plug-In will appear.
7. Click on Select Library and select the default library included in your NuVerb folder, or
any library you have created with the NuVerb application.
8. Select the desired program from the Plug-In pop-up menu, and adjust the available effect
parameters as desired.
The NuVerb Insert used as a “Shared Resource” to All Tracks in a Submix
You can apply a NuVerb insert to all tracks in a submix when you select NuVerb™ on a stereo
auxiliary input receiving the bussed signals from several tracks. In this case, the NuVerb Insert
is simultaneously applied to the mixed signals of several inputs. This is useful as it maximizes
the available DSP resources of the NuVerb TDM option. The following two examples illustrate
the application of NuVerb as a shared resource. They are each optimized for different effects
applications.
TDM Mix Setup
This setup is optimized for applying a NuVerb program with the same proportions of wet/dry
for all tracks included in the submix. For example, applying a compressor and spatial EQ
effects 100% wet to all tracks included in the submix.
1. Create stereo auxiliary inputs by choosing new auxiliary input(s) from the File menu.
Click on stereo input.
2. Set the output of the tracks you want to include in the submix to bus 1-2. Set the panning
of each track as desired.
3. Set the input of the stereo auxiliary input track to bus 1-2.
Page 25

21
21
NuVerb TDM User Guide Using NuVerb in Third-Party TDM Systems
4. Set the output of the stereo auxiliary input track to Main Mix.
5. From the Inserts pop-up menu of the stereo auxiliary input track, select NuVerb™. The
NuVerb Plug-In will appear.
6. Click on Select Library and select the default library included in your NuVerb folder, or
any library you have created with the NuVerb application.
7. Select the desired program from the Plug-In pop-up menu, and adjust the available effect
parameters as desired.
Applying a NuVerb Insert to a Mixer Channel
You can apply a NuVerb insert to one track when you select NuVerb™ on a stereo or mono
mixer channel. NuVerb will only be available to this individual channel. On a mono channel,
the output will be stereo, and the pan pot display will change to show this.
Page 26

22
22
LexiconUsing NuVerb in Third-Party TDM Systems
Page 27

23
23
NuVerb TDM User Guide
Program Descriptions
5
NuVerb Program Descriptions
This section contains brief descriptions of each of the NuVerb programs, including any fader settings. Program
descriptions are presented in the order in which they appear in the default library and are numbered for convenience.
Descriptions of the Effects and their parameters are contained in the Reference section of the NuVerb User Guide.
Program Name Type
1 IN TO OUTPUT SINGLE
This program is a strong mastering tool. It contains the large Stereo Adjust algorithm with all settings set to zero. Stereo
Adjust offers fine adjustments of level and equalization as well as manipulation of stereo width.
Faders: All faders come up unused.
2 LARGE HALL SINGLE
Used as a great standard reference point. The hall size is big, with a gentle bloom in the reverberation envelope. The first
set of pre-echoes is set to 14 and 20ms, but the levels are set to OFF. Set these levels to taste if you want to add some
initial reflections.
Faders: Predelay: 0M
RTIME: 1.9s
BASS: 1.2X
TDCY: 3.6k
SPREAD: 118
Page 28

24
24
LexiconProgram Descriptions
3 AMBIENCE SINGLE
A great sounding starting point. Wonderful for soloists.
Faders: PreDelay: 2.5M
Rvb Lvl: -12dB
Rolloff: 4.4k
L Delay: 0.0m
Roomsize: 19.1M
4 RICH PLATE SINGLE
An old standard comes back to the future.
Faders: Predelay: 0m
RTIME: 1.0s
TDCY: 8.9k
Diffusion: 73
SIZE: 24.2M
5 RVB/RVB 1 DUAL MONO
Two independent reverberators run this dual mono program: Effect A is a relatively large room with clean acoustics. Warm
yet not too much of a tail on the reverb time. Effect B has similar settings, but with a smaller room size.
Faders: A Mix: WET
B Mix: WET
RTIME: 2.4s
RTIME: 2.4s
Predelay: 6m
Page 29

25
25
NuVerb TDM User Guide
Program Descriptions
6 RVB/DLY 1 DUAL MONO
This program uses a reverb algorithm and a delay algorithm. Like most Dual Mono programs, they are hard panned from
one another to be used separately. Effect A is a reverb with strength and support. Sound from within a medium sized room
with bright characteristics. Effect B is a powerful, trailing delay with reflections answering from deep within a cave.
Faders: A Mix: WET
B Mix: WET
RTIME: 0.6s
TDCY: 1.0k
Multiple (Delay 1 & Delay 2): 89
7 RVB/COMP 1 DUAL MONO
This program presents a reverb preset to the left effect input/output, and a 2:1 compressor preset to the right effect input/
output. Effect A is a clear and vibrant reverb with no Predelay at all. Effect B is a nice preset to add to an overall mix. You
may need to adjust the Threshold parameter to make it work for the particular signal you’re feeding it. Release is set to
abruptly fall away after 181ms.
Faders: A Mix: WET
B Mix: WET
RTIME: 1.5s
TDCY: 2.2k
Threshold: -12dB
8 DLY/DLY 1 DUAL MONO
This program consists of two separate delays. One in the left effect input/output, and one in the right effect input/output.
Effect A has no delay unless you manipulate Feedback levels first. Effect B is a much broader delay with a slower tap time.
Faders: A Mix: WET
B Mix: WET
Multiple (Delay 1 & Delay 2 from Effect A): 5
Multiple (Feedback 1 & 2 from Effect A): 0
Multiple (Delay 1 & Delay 2 from Effect B): 19
Page 30

26
26
LexiconProgram Descriptions
9 DLY/COMP 1 DUAL MONO
This program presents a delay preset to the left effect input/output, and a drum compressor preset to the right effect input/
output. Effect A incorporates a bit of left-right diffused delays, along with some small delay offset between left and right
delay outputs. If the effect is too strong, try lowering feedback levels for delays 3 and 4. Effect B is a bit more aggressive,
with 8dB of boost below the selected threshold. A quick release of 73ms snaps up the volume. As with all compressor
presets, Threshold is the critical parameter.
Faders: B Balance: R-CH
B Level: FULL
Threshold: -15dB
CompGain: 8dB
Attack: 7ms
10 COMP/COMP DUAL MONO
Two independent compressors run this dual mono program. Effect A has a Slope of 2.57:1 and a moderate Release of
142m. Effect B is similar, but with a much higher slope.
Faders: A Mix: WET
B Mix: WET
Threshold: -12dB
CompGain: 9 dB
Threshold: -11dB
11 VERB AND ECHOES CASCADE
This is a rich reverb with a slight delay tail. With fader manipulation, you can lengthen out the delay to make a very strong,
wet signal. Effect A is a split chamber reverb. With the use of SHAPE and SPREAD, this effect can create the illusion of
larger spaces with a relatively short RTIME. Effect B adds a touch of delay. If the Multiples on the Plug-In are used, the
effect gets much more drastic. Infinite delay is one of the many options this effect provides.
Faders: A Mix: WET
B Mix: 57%
RTIME: 2.4s
Multiple(Delay 1 & Delay 2): 0
Multiple(Feedback 1 & Feedback 2): 0
Page 31

27
27
NuVerb TDM User Guide
Program Descriptions
12 SLAP VERB CASCADE
Effect A provides a faint reverb. Turn up Multiple on the Plug-In to make answering delay taps appear. Effect B is a small
room reverb with abrupt reverb time. With SHAPE and SPREAD, this effect can create the illusion of larger spaces with
a relatively short RTIME.
Faders: A Mix: WET
B Mix: 70%
Multiple (Delay 1 & Delay 2): 0.0m
RTIME: 0.4s
TDCY: 1.0k
13 RVB > COMPRESSOR CASCADE
Effect A is a split chamber reverb with the Link function is set to Unlink to achieve low reverb time with a moderate Spread
and large Size. Effect B is a compressor set to a dramatic 3.59:1 Slope. While compressing, it is also strongly expanding
the signal. CompGain is set 9dB up.
Faders: A Mix: WET
B Mix: WET
RTIME: 0.7s
Threshold: -12dB
CompGain: 9 dB
14 GTR COMP > RVB CASCADE
This effect provides a room with a warm tone and slight compression. Effect A is a compressor with only a 1.48:1 Slope.
Effect B is a big, wide-sounding room for guitars. For heavy rock stuff, you might consider panning “in” the returns, although
in this program the room output is in mono. The room is a little bottom heavy for additional warmth. Could also work well
on vocals.
Faders: A Mix: WET
B Mix: WET
CompGain: 9 dB
RTIME: 0.5s
TDCY: 1.0k
Page 32

28
28
LexiconProgram Descriptions
15 DUCKING DELAYZ CASCADE
The delay in this effect is set up so that the taps will pan from left to right. Adding heavy compression allows this program
to produce very wild delay effects. Effect A has two taps (Delays 3 and 4 ), set with delay ratios of 1:2, meaning that, when
one is 200ms, the other is 400ms, or when one is 359, the other is 718ms. The compressor in Effect B has a deep Slope
of 3:1 and a high CompGain of 16 dB, allowing the differences in your program’s dynamics to be pulled much closer
together.
Faders: A Mix: WET
B Mix: WET
Delay 1: 0.0m
Delay 2: 0.0m
Threshold: -22 dB
16 COMP > DLY CASCADE
This program has huge compression, feeding the compressed signal into a standard delay. The compressor in Effect A
takes the signal and crushes it. With a high Slope of 4.25:1, this compressor presses almost all dynamics out. Effect B
is a standard delay effect, defaulted to have a small Delay Time and small Feedback levels. The Multiples on the PlugIn allow you to easily change that, however.
Faders: A Mix: WET
B Mix: WET
CompGain: 11 dB
Multiple (Delay 1 & Delay 2): 4
Multiple (Feedback 1 & Feedback 2): 40
17 SPATIAL VERB CASCADE
Provides a large, warm sounding atmosphere. Effect A contains a recital hall. This medium large (44.5M) space opens
sound sources beautifully. Made for string pads and voice. Effect B contains a stereo adjust effect which equalizes a high
amount of bass content, adding a warm tone to the signal.
Faders: A Mix: WET
B Mix: WET
RTIME: 2.5S
Spatial: +4.0
Rotate: <0>
Page 33

29
29
NuVerb TDM User Guide
Program Descriptions
18 FILTERED ECHOES CASCADE
This delay program matched with stereo adjust filters out a bit of high end, making a warm tone. Effect A is a delay effect
set with a multiple of Delay 1 and Delay 2 in the Plug-In to increase delay tap time. Effect B is a stereo adjust program
which cuts the Treble by 12 dB. Stereo Treble Crossover is set to 6.3k.
Faders: A Mix: WET
B Mix: WET
Multiple (Delay 1 & Delay 2): 20
Multiple (Bass L & Bass R): 65
Multiple (Treb L & Treb R): 18
19 RVB > PONS CASCADE
Effect A is a split chamber reverb with a high Reverb Time of 36.7 seconds. Effect B has PONS (Psycoacoustically
Optimized Noise Shaping) turned on and dither is set to a level of 21. Experiments have shown this to be an optimum
starting level of dither.
Faders: A Mix: WET
B Mix: WET
RTIME: 36.7s
TDCY: 1.6k
Dither: 21
20 ST. COMPRESSOR CASCADE
This Program is a good mastering tool. A gentle 2:1 Slope in compression as well as a zeroed stereo adjust lend many
possibilities for an overall mix. Effect A is a cut down version of the larger Stereo Adjust program with separate Left and
Right Bass and Treble on the Plug-In. You may need to adjust the Threshold parameter in the Compressor in Effect B to
make it work for the particular signal you’re feeding it. Release is set to fall away after 286ms.
Faders: A Mix: WET
B Mix: WET
Multiple (Bass L & Bass R): 65
Multiple (Treb L & Treb R): 65
Threshold: -12 dB
Page 34

30
30
LexiconProgram Descriptions
21 RECITAL ROOM CASCADE
This program features two split chamber reverbs that provide a bright tone with a short Reverb Time. Effect A is a great
general purpose reverb tail. The size is set to 28.1M (the largest value is 66.4M) so the density is rather tight. As you adjust
SIZE, the Rt value will also change. If you want to unlink this natural phenomena, set LINK to Unlink. Effect B is a nice
“bloomy” sounding reverb with Diffusion set at 79. Use this on most keyboards.
Faders: A Mix: WET
B Mix: 50%
RTIME: 0.4s
TDCY: 1.6K
RTIME: 2.5s
22 COMP > PONS CASCADE
This program has a compressor with a 2:1 Slope feeding into Lexicon’s own PONS. You may need to adjust the Threshold
parameter in the compressor in Effect A to make it work for the particular signal you’re feeding it. Release is set to fall away
after 222ms. Effect B has PONS (Psycoacoustically Optimized Noise Shaping) turned on and dither set to a level of 25.
Faders: A Mix: WET
Multiple (Threshold & CompGain): 38
Attack: 15m
Dither: 25
Unused:
23 XFADE REVERB 1 CASCADE
This program is set up so that A Mix and B Mix and inversely proportionate. When Effect A is at a maximum, Effect B is
at a minimum and vice versa. This functions as a smooth cross-fade between the two effects. Effect A is a fairly long reverb
tail. The size is set to 58.5M (the largest value is 66.4M). As you adjust SIZE, the Rt value will also change. If you want
to unlink this natural phenomena, set LINK to Unlink. Effect B is a nice “bloomy” sounding reverb. Diffusion is set to zero.
Use this on most keyboards, but those with a strong point may require much more Diffusion.
Faders: A Mix: WET
B Mix: DRY
SIZE 1: 58.5M
RTIME: 5.3s
RTIME: 0.2s
Page 35

31
31
NuVerb TDM User Guide
Program Descriptions
24 L HALL + STAGE SINGLE
This is the Large Hall program with the reflections of a stage added. Shape is larger here than in Large Hall.
Faders: Predelay: 0m
RTIME: 1.9s
BASS: 1.2X
TDCY: 3.6k
SHAPE: 126
25 MEDIUM HALL SINGLE
Similar to Large Hall, but the size is not as big (29.8) and the reverb time is proportionately shorter. The same arrangement
exists for the pre-echoes.
Faders: SIZE: 29.8M
RTIME: 1.3s
Rolloff: 4.0k
TDCY: 3.6k
SPREAD: 96
26 MEDIUM HALL+STAGE SINGLE
Settings much like Medium Hall, but added reflections of a nearby stage can be heard.
Faders: SIZE: 29.8M
RTIME: 1.2s
Rolloff: 4.4k
TDCY: 3.6k
SPREAD: 96
Page 36

32
32
LexiconProgram Descriptions
27 SMALL HALL SINGLE
An even smaller version, a bit denser - good for general reverb fill.
Faders: SIZE: 24.2M
RTIME: 0.9s
Rolloff: 4.4k
SPREAD: 83
R Level: FULL
28 SMALL HALL+STAGE SINGLE
Similar settings to Small Hall, but Reverb Level is set 2dB down.
Faders: SIZE: 24.2M
RTIME: 0.9s
Rolloff: 4.4k
TDCY: 3.6k
R Level: -2dB
29 PIANO HALL SINGLE
This is a Random Hall effect. The short reverb tail and small delay taps make this program ideal for piano.
Faders: SIZE: 24.2M
RTIME: 0.9s
Rolloff: 4.4k
Diffusion: 73
R Level: FULL
Page 37

33
33
NuVerb TDM User Guide
Program Descriptions
30 GUITAR ROOM SINGLE
A Random Hall effect reproduces a practice room. With a short Reverb Time of 0.8 seconds and a size of 19.7 meters,
this program is great to add body and width to guitars, especially acoustic.
Faders: SIZE: 19.7M
RTIME: 0.8s
Rolloff: 5.1k
TDCY: 4.4k
SPREAD: 36
31 GOTHIC HALL SINGLE
Suitably large space (29.8M) filtered medium bright, as in a space made of rock and stone. A hefty sound is an
understatement! Smaller sizes make beefy dense spaces.
Faders: SIZE: 29.8M
Diffusion: 90
Rolloff: 6.6k
TDCY: 4.4k
R Level: FULL
32 GATED HALL SINGLE
If one existed, this is what it would sound like. Very diffused, strong, and abrupt.
Faders: Size: 35.5M
Rolloff: 4.2k
TDCY: 3.6k
SPREAD: 118
R Level: FULL
Page 38

34
34
LexiconProgram Descriptions
33 STUDIO “A” SINGLE
This preset sounds like the “big” rooms ($125/hour).
Faders: SIZE: 23.6M
RTIME: 0.7s
Diffusion: 73
SPREAD: 21
R Level: FULL
34 WESTMINSTER SINGLE
This is a giant, robust cathedral reverb. Beautiful for choirs and organs.
Faders: SIZE: 38.8M
RTIME: 3.7s
Rolloff: 2.9k
TDCY: 3.6k
SPREAD: 228
35 NUBRICKS SINGLE
Medium large room size adds width and body to this program, but the extremely short Reverb Time makes the reverb
appear to be somewhat gated. Good for adding a reverberant feel without muddying the sound with a long reverb tail.
Faders: Predelay: 0m
RTIME: 0.1s
BASS: 1.5X
TDCY: 21.2k
SPREAD: 111
Page 39

35
35
NuVerb TDM User Guide
Program Descriptions
36 WIDE CHAMBER SINGLE
Similar size (23.6M) with a “wider” shape and spread. Pre-echoes are added for wall strength. A good starting point for
pop sounds.
Faders: SIZE: 23.6M
Rolloff: 5.1k
TDCY: 4.4k
Diffusion: 90
SPREAD: 100
37 VOCAL SPACE SINGLE
Medium Reverb Time and large Size lends this program for use with human voice.
Faders: SIZE: 32.1M
RTIME: 1.8s
Rolloff: 6.3k
TDCY: 2.9k
R Level: FULL
38 HOTEL LOBBY SINGLE
You can hear the reflections off the floor tiles and hard wood check-in desk.
Faders: PreDelay: 1.6m
Rvb Lvl: -10dB
Rolloff: 6.3k
L Delay: 85.0m
Roomsize: 20.8M
Page 40

36
36
LexiconProgram Descriptions
39 747 HANGAR SINGLE
Big, wide, open, enclosed space (31.0M). Very diffuse.
Faders: PreDelay: 45.9m
Rvb Lvl: 4.4k
L Delay: 97.8 m
Roomsize: 31.0M
40 PREDELAY ROOM SINGLE
PreDelay is set to 51.0m ( a maximum of 108m).
Faders: PreDelay: 51.0m
Rvb Lvl: -9dB
Rolloff: 3.6k
L Delay: 27.2m
Roomsize: 13.0M
41 GATED AMBIENCE SINGLE
This program adds large Room Size with extremely short Reverb Time to make a gated effect.
Faders: PreDelay: 5.9m
Rvb Lvl: OFF
Rolloff: 12.8k
L Delay: 0.0m
Roomsize: 32.1M
42 LECTURE AUDITORIUM SINGLE
This program has a Reverb Time of 1 second and a relatively small Size of 16.9M. The program reproduces the ambience
of a lecture hall, where the seats mop up most of the high end.
Faders: PreDelay: 25.5m
Rvb Lvl: -16dB
Rolloff: 4.4k
L Delay: 13.6m
Roomsize: 16.9M
Page 41

37
37
NuVerb TDM User Guide
Program Descriptions
43 TUBBY ROOM SINGLE
This program has a very small Room Size and Reverb Time, which recreates a small, bright sounding room.
Faders: Predelay: 5.1m
Rvb Lvl: -9dB
Rolloff: 2.9k
L Delay: 20.4m
Roomsize: 5.1M
44 SHORT AMBIENCE SINGLE
This program features the Ambience algorithm with a short RTIME.
Faders: Predelay: 11.9m
Rvb Lvl: -5dB
Rolloff: 3.6k
L Delay: 22.9m
Roomsize: 21.4M
45 BATHROOM SINGLE
A high diffusion of 66 and small Size recreate the sound of reflections off tile in a small room.
Faders: Predelay: 0.0m
Rvb Lvl: -4dB
Rolloff: 8.9k
L Delay: 13.6m
Roomsize: 5.1M
Page 42

38
38
LexiconProgram Descriptions
46 CLUB STAGE SINGLE
Relatively large Size and Reverb Time for an Ambience program. The Rolloff of 4.4k helps achieve the effect of your source
playing on a small stage at a club.
Faders: Predelay: 16.1M
Rvb Lvl: -12dB
Rolloff: 4.4k
L Delay: 0.0m
Roomsize: 19.1M
47 REC ROOM SINGLE
This program has the physical properties of an isolation booth at a recording studio.
Faders: Predelay: 19.5m
Rvb Lvl: -12dB
Rolloff: 2.9k
L Delay: 0.0m
Roomsize: 11.3M
48 WALK-IN WARDROBE SINGLE
No high end at all. Sounds just like the title says, with clothes and wall muffling the higher frequencies.
Faders: Predelay: 0.8m
Rvb Lvl: OFF
Rolloff: 0.5k
L Delay: 0.0m
Roomsize: 4.0M
Page 43

39
39
NuVerb TDM User Guide
Program Descriptions
49 HALLWAY SINGLE
Small Size and Reverb Time achieve the sound on this program. Increase Room Size to stretch the hall longer.
Faders: Predelay: 1.6m
Rvb Lvl: -6dB
Rolloff: 3.6k
L Delay: 27.2m
Roomsize: 7.3M
50 YMCA POOL SINGLE
Reflections bounce off tile all over this medium large room.
Faders: Predelay: 22.9m
Rvb Lvl: -10dB
Rolloff: 5.5k
L Delay: 48.4m
Roomsize: 28.7M
51 STAGE, SCORE SINGLE
Sound from on the stage, not off it. Performance perspective is changed.
Faders: Predelay: 9.3m
Rvb Lvl: -10dB
Rolloff: 2.9k
L Delay: 0.0m
Roomsize: 25.3M
52 MEDIUM AMB. SINGLE
Similar characteristics, but smaller sound than Ambience.
Faders: PreDelay: 0.0m
Rvb Lvl: -12dB
Rolloff: 2.2k
L Delay: 0.0m
Roomsize: 18.6M
Page 44

40
40
LexiconProgram Descriptions
53 DIRTY PLATE SINGLE
Somewhat darker tone than other plate reverb programs due to a Treble Decay of 7.5k.
Faders: Predelay: 22m
RTIME: 1.1s
TDCY: 7.5k
Diffusion: 25
SIZE: 21.4M
54 DENSE PLATE SINGLE
Delay taps are further apart which makes for deeper reflections than from the Dirty Plate.
Faders: Predelay: 6m
RTIME: 1.1s
TDCY: 10.6k
Diffusion: 95
SIZE: 19.1M
55 SALAD PLATE SINGLE
Smaller than a dinner plate. Very bright, and somewhat thin. Medium reverb time.
Faders: Predelay: 0m
RTIME: 1.0s
TDCY: 10.6k
Diffusion: 46
SIZE: 17.5M
Page 45

41
41
NuVerb TDM User Guide
Program Descriptions
56 MONDO PLATE SINGLE
Bright plate sound with medium Reverb Time make a larger plate sound.
Faders: Predelay: 22m
RTIME: 2.1s
TDCY: 12.8k
Diffusion: 79
SIZE: 34.3M
57 VOCAL JIZZ SINGLE
Medium large Size and moderate Reverb Time lend this program for use with vocals.
Faders: Predelay: 46m
RTIME: 1.5s
TDCY: 6.3k
Diffusion: 46
SIZE: 30.4M
58 ROUND PLATE SINGLE
Soft, but articulate.
Faders: Predelay: 22m
RTIME: 1.0s
TDCY: 8.9k
Diffusion: 76
SIZE: 25.9M
59 MINI PLATE SINGLE
An extremely short Reverb Time and small Size makes for a small plate sound.
Faders: Predelay: 6m
RTIME: 0.7s
TDCY: 8.9k
Diffusion: 29
SIZE: 9.0M
Page 46

42
42
LexiconProgram Descriptions
60 DARK PLATE SINGLE
Medium Reverb Time and Treble Decay of 6.3k give this program a dimmer, darker tone.
Faders: Predelay: 14m
RTIME: 1.3s
TDCY: 6.3k
Diffusion: 83
SIZE: 27.6M
61 LONG PLATE+EKO SINGLE
Large Delays 1 and 2 make for somewhat of an echo effect.
Faders: Predelay: 62m
RTIME: 1.4s
TDCY: 10.6k
Diffusion: 73
SIZE: 31.5M
62 1 FRAME DLY SINGLE
30 ms of delay at 44.1 and 48kHz.
Faders: All faders are unused.
63 2 FRAME DLY SINGLE
60 ms of delay at 44.1 and 48kHz.
Faders: All faders are unused.
64 3 FRAME DLY SINGLE
90ms of delay at 44.1 and 48kHz.
Faders: All faders are unused.
Page 47

43
43
NuVerb TDM User Guide
Program Descriptions
65 TELEPHONE SINGLE
No bottom end....AT ALL.
Faders: All faders are unused.
66 RVB ->RVB CASCADE
Two independent reverbs with the left input feeding Machine A and the right input feeding Machine B. Each can be used
independently and, in fact, should be used that way. Pan the output of each Machine (at the console) to suit the mix. Effect
A is a great general purpose reverb tail. The size is set to 27.6M (the largest value is 66.4M) so the density is rather tight.
As you adjust SIZE, the Rt value will also change. If you want to unlink this natural phenomena, set LINK to Unlink. Effect
B is a nice “bloomy” sounding reverb. Diffusion is set midway, so there is some good articulation at the beginning of the
reverb envelope. Use this on most keyboards, but those with a strong point may require a bit more Diffusion.
Faders: Predelay: 0m
Predelay: 0m
RTIME: 3.4s
RTIME: 2.5s
SPREAD: 93
67 DYNO VERB CASCADE
Medium Reverb Time and large Size add width to the tone. This cascade program feeds an ample reverb through a
compressor with a high CompGain of 15dB. Effect A is a split chamber reverb with the Link function is set to Unlink to
achieve low reverb time with moderate Spread and large Size. The compressor in Effect B is set to a dramatic 2.33:1
Slope. While compressing, it is also strongly expanding the signal. CompGain is set 15 dB up.
Faders: A Mix: WET
B Mix: WET
RTIME: 2.0s
Threshold: -12dB
CompGain: 15 dB
Page 48

44
44
LexiconProgram Descriptions
68 VINDALOO CASCADE
The atmosphere is created more with delay taps than Reverb Time in this program. Effect A is a great general purpose
reverb tail. The size is set to 11.8M (the largest value is 66.4M. As you adjust SIZE, the Rt value will also change. If you
want to unlink this natural phenomena, set LINK to Unlink. In Effect B, Delays 1 and 2 are programmable taps up to 2.5
seconds each. Delays 3 and 4 are cross feedback delay lines.
Faders: B Mix: WET
SIZE: 11.8M
Delay 1: 0.0m
Delay 2: 0.0m
69 DEEP CAVE CASCADE
Delay Times set at periodic intervals with ample Feedback create reflections that answer from deep within a cavern. Effect
A is a great general purpose reverb tail. The size is set to 15.2M (the largest value is 66.4M. As you adjust SIZE, the Rt
value will also change. If you want to unlink this natural phenomena, set LINK to Unlink. In Effect B, Delays 1 and 2 are
programmable taps up to 2.5 seconds each. Delays 3 and 4 are cross feedback delay lines.
Faders: A Mix: 75%
B Mix: WET
SIZE: 15.2M
Delay 1: 212m
Delay 2: 340m
70 RVB -> COMP CASCADE
A medium sized reverb sound feeding into the EZ compressor. Great standard for electric guitars. Effect A is a big, widesounding room for your guitars. For heavy rock stuff, you might consider panning “in” the returns, although in this Setup
the Room output is in Mono.. The room is a little bottom heavy for additional warmth. Could also work well on vocals. The
compressor in Effect B is nice to add to an overall mix. You may need to adjust the Threshold parameter to make it work
for the particular signal you’re feeding it. Release is set to gently fall away after 363ms.
Faders: A Mix: WET
B Mix: WET
SIZE: 27.6M
Diffusion: 64
Attack: 7m
Page 49

45
45
NuVerb TDM User Guide
Program Descriptions
71 RVB-> STADJ CASCADE
This program has rich reverb with a Reverb Time of 4.1 seconds. Stereo Adjust capbility in Effect B allows you to equalize
it to taste, as well as manipulating phase. Effect A is a Recital Hall This medium large (44.5M) space opens sound sources
beautifully. Made for string pads and voice. Effect B is a cut down version of the larger Stereo Adjust program.
Faders: A Mix: WET
B Mix: WET
SIZE: 44.5M
RTIME: 4.1s
SPATIAL: FLAT
72 RVB->PONS CASCADE
A standard chamber reverb, set with a Reverb Time of 3.4 seconds. Effect A is a great general purpose reverb tail. The
size is set to 27.6M (the largest value is 66.4M) so the density is rather tight. As you adjust SIZE, the Rt value will also
change. If you want to unlink this natural phenomena, set LINK to Unlink. Effect B provides PONS (Psycoacoustically
Optimized Noise Shaping) with dither set to 29.
Faders: A Mix: WET
B Mix: WET
SIZE: 27.6M
RTIME: 3.4s
Dither: 29
73 DLY ->RVB CASCADE
Dual Delays feed a Bar & Grill. Changing A MIX will add more or less impact to the reverb. In Effect A, Delays 1 and 2
are programmable taps up to 2.5 seconds each. Delays 3 and 4 are cross feedback delay lines. Effect B provides live
performances in a 13.5M Bar & Grill.
Faders: A Mix: WET
B Mix: WET
Delay 1: 0.0m
Delay 2: 0.0m
SIZE: 13.5M
Page 50

46
46
LexiconProgram Descriptions
74 DLY->COMP CASCADE
A 3Voice Delay gives it’s atmosphere with three taps after the original signal. In Effect A two taps (Delays 3 and 4 ) are
set with delay ratios of 1:2, meaning that, when one is 200ms, the other is 400ms, or when one is 359, the other is 718ms.
The compressor in Effect B is a nice preset to add to an overall mix. You may need to adjust the Threshold parameter to
make it work for the particular signal you’re feeding it. Release is set to gently fall away after 363ms.
Faders: A Mix: WET
B Mix: WET
Delay 1: 0.0m
Delay 2: 0.0m
Release: 363m
75 MIDI CHORUS CASCADE
A delay doubler with stereo adjust. With connections to a MIDI sequencer, you can generate a chorus effect. On it’s own,
the Chorus in Effect A creates a doubling effect from the left and right delays. With help from a MIDI sequencer, this effect
can generate chorus once it is receiving LFO. Effect B is a cut down version of the larger Stereo Adjust program. See the
Application Notes provided with NuVerb TDM software for related information on virtual LFOs.
Faders: A Mix: WET
B Mix: WET
Delay 1: 0.0m
Delay 2: 0.0m
Rotate: <0>
76 SQUEEZE ME CASCADE
A tight program, useful for very staccato instruments. Works well on snare drums. Effect A is a drastic compressor with
a Slope of 4:1 and a high CompGain of 21 dB. Effect B is a basement-like space. Size is 18.0 meters, and the tonality is
fairly resonant sounding. Almost trashy-sounding (low diffusion), and will certainly get so if the Rt is made longer. Explosive
on snare drums.
Faders: A Mix: WET
B Mix: WET
Attack: 7m
SIZE: 18.0M
Diffusion: 33
Page 51

47
47
NuVerb TDM User Guide
Program Descriptions
77 COMP -> RVB CASCADE
This has similar traits to SQUEEZE ME, but is not quite as rigid due to the lower compression value and CompGain. Good
for percussion. A compressor in Effect A is a bit more aggressive, with 7dB of boost below the selected threshold. A quick
release of 58ms snaps up the volume. As with all compressor presets, Threshold is the critical parameter. Effect B is the
same basement-like space used in SQUEEZE ME.
Faders: A Mix: WET
B Mix: WET
Attack: 7m
SIZE: 15.8M
Diffusion: 25
78 COMP-> DLY CASCADE
This program uses compression and slight delay to create the effect of reflections off a wall. Manipulating Feedback 2 can
make the wall appear larger or smaller. The compressor in Effect A is nice to add to an overall mix. You may need to adjust
the Threshold parameter to make it work for the particular signal you’re feeding it. Release is set to gently fall away after
363ms. In Effect B, Delay 2 taps reflections off a wall to your right. Relatively low level on Feedback 2 assures that the
effect isn’t too drastic.
Faders: A Mix: WET
B Mix: WET
Attack: 7m
Delay 1: 0.0m
Delay 2: 21.2m
79 COMP-> STADJ CASCADE
Compression feeding into a Small Stereo Adjust effect. The compressor in Effect A is nice to add to an overall mix. You
may need to adjust the Threshold parameter to make it work for the particular signal you’re feeding it. Release is set to
gently fall away after 363ms. Effect B is a cut down version of the larger Stereo Adjust program.
Faders: A Mix: WET
B Mix: WET
ExpGain: 7 dB
Rotate: <0>
TXLR: 1.7k
Page 52

48
48
LexiconProgram Descriptions
80 COMP->PONS CASCADE
A good program for an overall mix. Gentle 2:1 compression with Lexicon’s own PONS effect. The compressor in Effect
A is nice to add to an overall mix. You may need to adjust the Threshold parameter to make it work for the particular signal
you’re feeding it. Release is set to gently fall away after 363ms. Effect B provides PONS (Psycoacoustically Optimized
Noise Shaping) with dither set to 29.
Faders: A Mix: WET
B Mix: WET
PreDelay : 6m
Attack: 7m
Dither: 29
81 RVB->MIDI PAN CASCADE
This program is a rectial hall feeding into a stereo adjust which is panned hard left. By connecting NuVerb to a MIDI
sequencer supplying virtual LFO, you will hear the source pan left and right. Effect A is a large space (44.5M) that opens
sound sources beautifully. As you adjust SIZE, the Rt value will also change. If you want to unlink this natural phenomena,
set LINK to Unlink. See the Application Notes provided with NuVerb TDM software for related information on virtual LFOs.
Faders: A Mix: WET
B Mix: WET
SIZE: 44.5M
RTIME: 4.1s
SPATIAL: FLAT
Page 53

49
49
NuVerb TDM User Guide
Program Descriptions
82 MIDI PAN CASCADE
A Small Stereo Adjust effect feeding into a gentle 2:1 compressor. Effect A is a cut down version of the larger Stereo Adjust
program. The compressor in Effect B is nice to add to an overall mix. You may need to adjust the Threshold parameter
to make it work for the particular signal you’re feeding it. Release is set to gently fall away after 363ms. Assigning BALANCE
to a virtual LFO lets you pan the effect repeatedly from left to right. See the Application Notes provided with NuVerb TDM
software for related information on virtual LFOs.
Faders: A Mix: WET
B Mix: WET
Rotate: <0>
SPATIAL: FLAT
Attack: 7m
83 TUMBLEWEED CASCADE
A bright, rolling delay sound with panning delay taps. Effect A provides Stereo Adjust with Bass boosted 6dB. In Effect
B, all delay lines are set with different tap times and feedback levels, resulting in delay taps answering one another as they
fade.
Faders: A Mix: WET
B Mix: WET
SPATIAL: +4.0
Delay 1: 21.2m
Delay 2: 42.4m
84 STADJ-> DLY CASCADE
This cascade features the Small Stereo Adjust effect feeding into a 3-Voice Delay. Effect A is a cut down version of the
larger Stereo Adjust program. The delay in Effect B has two taps (Delays 3 and 4 ) set with delay ratios of 1:2, meaning
that, when one is 200ms, the other is 400ms, or when one is 359, the other is 718ms.
Faders: A Mix: WET
B Mix: WET
SPATIAL: FLAT
Delay 1: 0.0m
Delay 2: 0.0m
Page 54

50
50
LexiconProgram Descriptions
85 STADJ->COMP CASCADE
Here, the small stereo adjust is all set to zero, with equalization flat. Effect A is a cut down version of the larger Stereo
Adjust program. The compressor in Effect B is nice to add to an overall mix. You may need to adjust the Threshold
parameter to make it work for the particular signal you’re feeding it. Release is set to gently fall away after 363ms.
Faders: A Mix: WET
B Mix: WET
Rotate: <0>
SPATIAL: FLAT
Attack: 7m
86 XFADE REVERB 2 CASCADE
This program has two separate split chamber reverbs with Mix controls inverted to provide a smooth transition from a very
large reverb to a small reverb via cross-fade. The reverb in Effect A has a fairly long reverb tail. The size is set to 58.5M
(the largest value is 66.4M. As you adjust SIZE, the Rt value will also change. If you want to unlink this natural phenomena,
set LINK to Unlink. Effect B is a nice “bloomy” sounding reverb. Diffusion is set to zero. Use this on most keyboards, but
those with a strong point may require much more Diffusion.
Faders: A Mix: WET
B Mix: DRY
SIZE: 58.5M
RTIME: 5.3s
RTIME: 0.2s
87 DRY TO WET CASCADE
This program features a multiple of A Mix and B Mix in the Plug-In that is set inversely proportionate. The function is a
smooth transition from a guitar room to a recital hall. Effect A is a big, wide-sounding room for your guitars. For heavy rock
stuff, you might consider panning “in” the returns, although in this Setup the Room output is in Mono.. The room is a little
bottom heavy for additional warmth. Could also work well on vocals. Effect B is a recital hall This large (44.5M) space opens
sound sources beautifully. Made for string pads and voice.
Faders: Multiple (A Mix & B Mix inversely proportionate): 0
SIZE: 27.6M
SIZE: 44.5M
RTIME: 0.7s
RTIME: 4.1s
Page 55

51
51
NuVerb TDM User Guide
Program Descriptions
88 BIG TO SMALL CASCADE
This program features a multiple of A Mix and B Mix in the Plug-In that is set inversely proportionate. The function is a
smooth transition from a tight room to a hangar-sized space. Effect A is a reverb with a small-medium Room Size and
relatively short Reverb Time. In Effect B, huge Room Size and equally large Reverb Time make this reverb expansive and
powerful.
Faders: Multiple (A Mix & B Mix inversely proportionate): 0
RTIME: 1.3s
RTIME: 7.5s
SIZE: 27.6M
SIZE: 60.2M
89 RVB->RVB CASCADE
This program consists of two split chamber reverbs, making a fairly large room sound. Effect A provides a great general
purpose reverb tail. The size is set to 27.6M (the largest value is 66.4M) so the density is rather tight. As you adjust SIZE,
the Rt value will also change. If you want to unlink this natural phenomena, set LINK to Unlink. Effect B is a nice “bloomy”
sounding reverb. Diffusion is set midway, so there is some good articulation at the beginning of the reverb envelope. Use
this on most keyboards, but those with a strong point may require a bit more Diffusion.
Faders: A Mix: WET
B Mix: WET
SIZE: 27.6M
SIZE: 43.3M
Diffusion: 65
Page 56

52
52
LexiconProgram Descriptions
90 WILD SPACES CASCADE
A bold, reverberant room with unnatural delay taps that pan slowly from left to right. Effect A provides a great general
purpose reverb tail. The size is set to 57.4M (the largest value is 66.4M). As you adjust SIZE, the Rt value will also change.
If you want to unlink this natural phenomena, set LINK to Unlink. In Effect B, Delays 1 and 2 are programmable taps up
to 2.5 seconds each. Delays 3 and 4 are cross feedback delay lines.
Faders: A Mix: WET
B Mix: WET
SIZE: 57.4M
Delay 1: 0.0m
Delay 2: 0.0m
91 DARK DELAY CASCADE
This program has deep bass equalization through the Stereo Adjust effect. Along with delay, this creates a dark, eerie tone.
Effect A is a Stereo Adjust program with equalization catering to a warmer tone with bass boost. Delay 1 and Delay 2 taps
in Effect B move the image from right to left.
Faders: Delay 1: 510m
Delay 2: 233m
FBK 1: 28%
FBK 2: 33%
unused: 42
92 BIG SIZZLE CASCADE
Combines bright equalization with mild delay. Effect A is a Stereo Adjust effect with Bass cut by 18 dB and Treble boosted
3.5 and 4.5 dB. Effect B provides faint taps from Delays 3 and 4.
Faders: A Mix: WET
B Mix: 73%
Balance: R+ 2
SPATIAL: -4.50
unused: 42
Page 57

53
53
NuVerb TDM User Guide
Program Descriptions
93 NASTY THING CASCADE
Delays can create interesting effects when manipulated from the hot palette. In Effect A, Delays 1 and 2 are programmable
taps up to 2.5 seconds each. Delays 3 and 4 are cross feedback delay lines. Effect B provides live performances in a 24.2M
Bar.
Faders: A Mix: WET
B Mix: 63%
Delay 1: 42.4m
Delay 263.8m
SIZE: 24.2M
94 ROLLED NUTZ CASCADE
This cascade features Stereo Adjust, brightening the tone by boosting the treble, and cutting bass, feeding into a standard
Chamber Reverb. Effect A is a bright EQ Stereo Adjust catering to a brighter, treble boosted tone. Effect B is a reverb with
a great general purpose reverb tail. The size is set to 26.5M (the largest value is 66.4M) so the density is rather tight. As
you adjust SIZE, the Rt value will also change. If you want to unlink this natural phenomena, set LINK to Unlink.
Faders: A Mix: WET
B Mix: WET
Rotate: <0>
SIZE: 26.5M
RTIME: 0.2s
95 HOLD ON! CASCADE
Huge Room Size and unnatural delay taps that move from right to left create this unusual and bizarre program. In Effect
A, Delays 1 and 2 are programmable taps up to 2.5 seconds each. Delays 3 and 4 are cross feedback delay lines. Effect
B provides live performances in a 65.3M barroom. With along Reverb Time as well, this is the largest bar you’ll hear.
Faders: A Mix: WET
B Mix: 68%
Delay 1: 701m
Delay 2: 340m
SIZE: 65.3M
Page 58

54
54
LexiconProgram Descriptions
96 RVB/RVB 2 DUAL MONO
Similar to RVB/RVB, but set up as a dual mono, rather than cascade. Effect A provides a great general purpose reverb
tail. The size is set to 27.6M (the largest value is 66.4M) so the density is rather tight. As you adjust SIZE, the Rt value
will also change. If you want to unlink this natural phenomena, set LINK to Unlink. Effect B is a nice “bloomy” sounding
reverb. Diffusion is set midway, so there is some good articulation at the beginning of the reverb envelope. Use this on
most keyboards, but those with a strong point may require a bit more Diffusion.
Faders: A Mix: WET
B Mix: WET
SIZE: 27.6M
SIZE: 43.3M
Diffusion: 65
97 RVB/DLY 2 DUAL MONO
Left Delay and Right Delay are selected on the Plug-In. As this is a dual mono program, delay taps are only heard in their
respective channels. Effect A is a good starting point for acoustic drums. This preset is slightly smaller than the standard
drum chamber, but has less Diffusion. Rt is set to 1.8 seconds at mid frequencies. Effect B is a basic delay effect with
moderate tap times and low feedback levels.
Faders: A Mix: WET
B Mix: WET
SIZE: 23.6M
L Delay : 0.0m
R Delay: 0.0m
Page 59

55
55
NuVerb TDM User Guide
Program Descriptions
98 RVB/COMP 2 DUAL MONO
This dual mono program consists of a reverb with a 4.7 second Reverb Time and 1.88:1 compressor in their respective
channels. Effect A provides a chamber shaped liked an upside down “U” with the speaker on top of the wall and a
microphone on either side of the wall. The compressor in Effect B is nice to add to an overall mix. You may need to adjust
the Threshold parameter to make it work for the particular signal you’re feeding it. Release is set to gently fall away after
363ms.
Faders: A Mix: WET
B Mix: WET
SIZE: 31.5M
RTIME: 4.7s
Attack: 7m
99 DLY/DLY 2 DUAL MONO
Two separate delays, with varying tap time lengths. On the Hot Palette, Delay 1 belongs to Effect A, and Delay 2 belongs
to Effect B. Effect A is a delay with short tap time; Effect B is a delay with long tap time.
Faders: Delay 1: 85.0m
FBK 1: 25%
Delay 2: 297m
FBK 2: 22%
unused:
100 DLY/COMP 2 DUAL MONO
A dramatic delay with fairly hard compression, split dual mono. Effect A incorporates a bit of left-right diffused delays, along
with some small delay offset between left and right delay outputs. If the effect is too strong, try lowering feedback levels
for delays 3 and 4. The compressor in Effect B is a bit more aggressive, with 7dB of boost below the selected threshold.
A quick release of 58ms snaps up the volume. As with all compressor presets, Threshold is the critical parameter.
Faders: A Mix: WET
B Mix: WET
Multiple (Delay 1 & Delay 2): 21
Multiple (Feedback 1 & Feedback 2): 78
Attack: 7m
Page 60

56
56
LexiconProgram Descriptions
101 COMP 3:1 / 3:1 DUAL MONO
Two separate mono compressors, running their own channels with the same parameters. Both Effect A and Effect B
contain rather aggressive compressors, with 7dB of boost below the selected threshold. A quick release of 58ms snaps
up the volume. As with all compressor presets, Threshold is the critical parameter.
Faders: A Mix: WET
B Mix: WET
Attack: 7m
Release: 58m
X Thresh: -52 dB
102 COMP 2:1 / 2:1 DUAL MONO
Two separate mono compressors, running their own channels with the same parameters. Effect A and Effect B both
contain a compressor which is nice to add to an overall mix. You may need to adjust the Threshold parameter to make
it work for the particular signal you’re feeding it. Release is set to gently fall away after 363ms.
Faders: A Mix: WET
B Mix: WET
Threshold: -12 dB
Attack: 7m
Release: 363m
103 COMP 2:1 / 3:1 DUAL MONO
This program has two different compressors, each running their own respective channel. 2:1 compression on the left, and
3:1on the right. The compressor in Effect A is nice to add to an overall mix. You may need to adjust the Threshold parameter
to make it work for the particular signal you’re feeding it. Release is set to gently fall away after 363ms. The compressor
in Effect B is a bit more aggressive, with 7dB of boost below the selected threshold. A quick release of 58ms snaps up
the volume. As with all compressor presets, Threshold is the critical parameter.
Faders: A Mix: WET
B Mix: WET
PreDelay : 6m
Attack: 7m
Release: 58m
Page 61

57
57
NuVerb TDM User Guide
Program Descriptions
104 EXPAND/EXPAND DUAL MONO
This program has two different compressors, each running their own respective channel. 3:1 compression on the left, and
1:1 on the right. They both serve as expanders in this program. Effect A is a compressor with a Slope of 3:1, and 0
CompGain. The compressor in Effect B has no Slope at all (1:1), but an Expander Gain of 24 dB.
Faders: A Mix: WET
B Mix: WET
X Slope: 2.65
ExpGain: 15 dB
Attack: 7m
105 MOVE OVER DUAL MONO
This dual mono program has a multiple of both effect’s Reverb Times. They scale linearly with one another, as multiples
should. Effect A is a split chamber reverb with a Reverb Time of 1.1 seconds. Large diffusion of 79 articulates this effect.
Effect B is a split chamber reverb with small Reverb Time. With the use of SHAPE and SPREAD, this effect can create
the illusion of larger spaces with a relatively short RTIME.
Faders: Multiple (RTIME A and RTIME B): 60
SIZE: 27.6M
SIZE: 27.6M
TDCY: 0.5k
TDCY: 0.5k
Page 62

58
58
LexiconProgram Descriptions
Page 63

1
A-1
NuVerb TDM User Guide
Appendix
6
Appendix
Mid/Side Stereo Decoding using the Stereo Adjust algorithm
MS (Mid-Side) stereo recording uses a front-facing microphone (usually cardioid) and a
coincident, sideways-facing figure-of-eight. By convention, the side microphone's positive
lobe faces audience left. The Mid and Side signals are mixed in an MS matrix decoder to
produce the left and right outputs of a standard stereo pair. The matrix is simple: the mid signal
goes equally to both output channels. The side signal is summed into the output corresponding
to the side microphone's positive lobe. The side is subtracted to the other output. The matrix
decoding can be done either before, or after, recording.
With a little care, the Stereo Adjust program can perform this matrixing in the digital domain.
1. Connect the Mid signal to the right channel input, and the Side channel to the left.
2. Set the ROTATION control to maximum right.
3. Use the BALANCE control to adjust the width of the stereo signal. — If the inputs are
connected normally, maximum right will produce Mid on both outputs.
Normally, the correct output is obtained by feeding Side to the left input and Mid to the right
as described above. If Mid and Side are not correctly assigned before decoding, the matrix will
appear to work, but the output channels will be out-of-phase. If you are using a digital source
where Mid is left, you must correct the assignments. As the FLIP'n'SWAP control precedes the
matrix decoding, if you have a digital source where Mid is left and Side is right, you can swap
the channels before decoding. Otherwise, you must physically swap the left and right input
cables on the digital interface.
Page 64

2
A-2
LexiconAppendix
The BALANCE control precedes ROTATION so that BALANCE can vary the ratio of Mid to
Side and, thus, the width of the output stereo image. Full right BALANCE produces mono. Full
left is pure figure-of-eight.
If the tape has been recorded such that the Side signal has equal sensitivity from the side as the
Mid has from the front, an equal BALANCE setting will yield a microphone array of optimum
stereo separation. For a cardioid M microphone, the resulting array will be two hypercardioids
at an angle of 109°. For an omni M, the equal mix produces back-to-back cardioids.
Note that the 11µs delay compenstation and the de-emphasis controls also precede the
ROTATION control. If the tape was recorded on a recorder such as the PCM-F1, which inserts
a delay in the left channel relative to the right, this control should be activated before decoding.
The resulting output will have the channels synchronized in phase, as required for CD
mastering. It is not necessary to de-emphasize unless a tape with no emphasis is desired.
Note also that the additional controls on the Stereo Adjust program operate after the ROTATION control, so they can be used as intended, without compromising the MS decoding. This
is particularly important for the SPATIAL EQ and individual TREBLE controls.
Page 65

3
A-3
NuVerb TDM User Guide
Appendix
Applying PONS Dither in Mastering Applications
TDM Mix Setup
1. Create a stereo Master Fader by selecting New Master Faders from the File menu. Click
on stereo.
2. If you are employing the Bounce to Disk command or routing the mix to the Main Mix
outputs for auditioning or recording to an external recording device, set the output of the
Master Fader to the Main Mix output pair.
If you are recording the mix to disk, set the output of the Master Fader to the the same bus
pair as the inputs of the recording pair of audio tracks.
3. From the Inserts pop-up menu of the Master Fader, select NuVerb™. The NuVerb TDM
Plug-In will appear.
If you are employing other inserts on this Master Fader be sure that you select NuVerb on
insert E.
4. Click on Select Library and select the default library included in your NuVerb folder, or
any library you have created with the NuVerb application containing a program with
PONS.
5. Select a program with PONS from the Program pop-up menu. (PONS is Effect B in the
factory Cascade Programs.) Turn the OUTMIX of Effect A to DRY if you wish to only apply
PONS. Adjust the Dither parameter as desired.
Placement of PONS in the signal chain
PONS is only effective when it is applied as the last DSP element in the signal chain. When
using other inserts on the Master Fader with PONS, always select insert E to apply PONS. As
Master Fader inserts are post fader inserts, this allows you to use the Master Fader to adjust the
volume of the mix and employ PONS at the same time.
Page 66

4
A-4
LexiconAppendix
PONS Mastering Notes
Effect A>PONS is a particularly powerful mastering tool. For example, select RVB->PONS to
add reverb to a classical music mix. Select COMP->PONS to compress a master mix for FM or
TV broadcast, or for audio cassette duplication. Select STADJ->PONS to apply spatial equalization to enhance the stereo image of a master mix.
Page 67

Lexicon Part # 070-10752 Rev 1
Lexicon Inc.
3 Oak Park
Bedford, MA 01730
Tel 781-280-0300
Fax 781-280-0490
 Loading...