

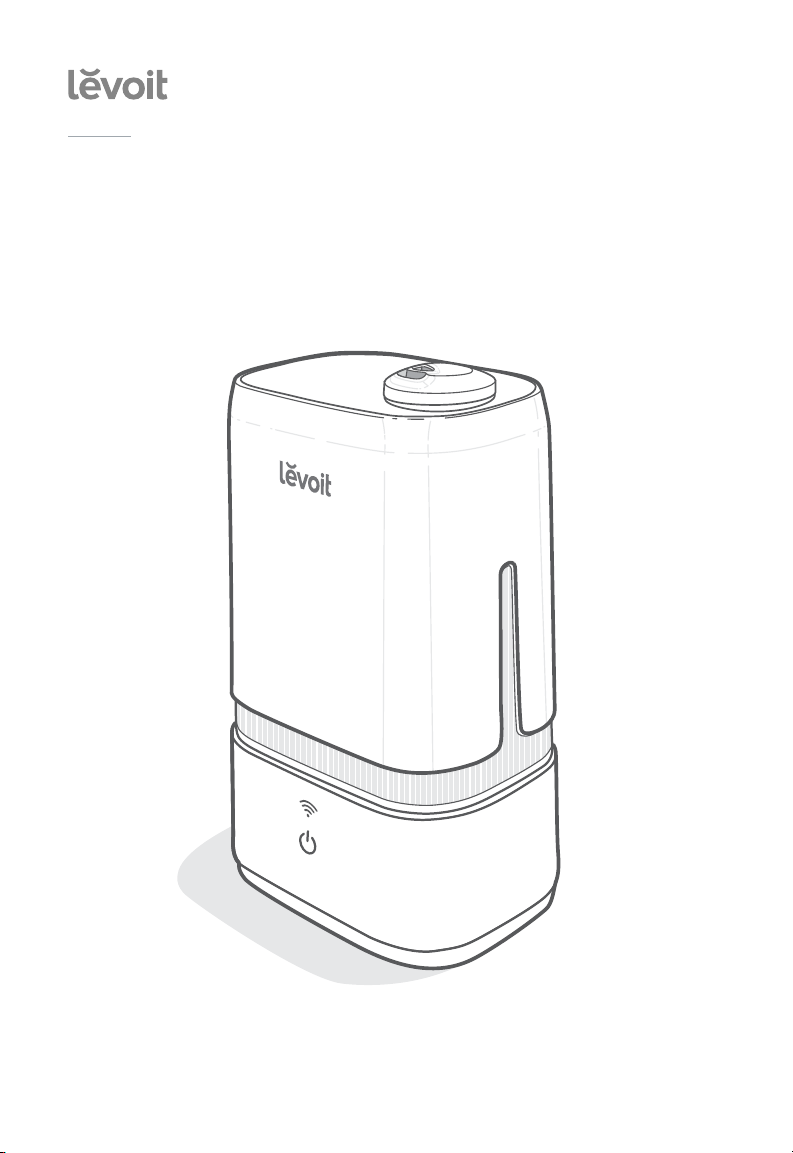
levoit Classic 200S User Manual
USER MANUAL
Smart Ultrasonic Cool Mist Humidifier
Model: Classic 200S
Questions or Concerns?
Please contact us Mon–Fri, 9:00 am–5:00 pm PST/PDT
at support@levoit.com or at (888) 726-8520.

Table of Contents
Package Contents
Package Contents
Specifications
Safety Information
• General Safety
• Plug & Cord
Getting to Know Your Smart Humidifier
Getting Started
• Filling & Refilling
VeSync App Setup
Using Your Smart Humidifier
• Auto Mode
• VeSync App Features
• Important Tips
• Using the Aroma Box
• Preventing Leaks
Care & Maintenance
• Cleaning
• Cleaning the Aroma Pad
• Reassembling
• Storing
Troubleshooting
VeSync App Troubleshooting
Warranty Information
Customer Support
10
12
13
13
14
14
17
18
18
19
21
23
24
2
1 x Smart Ultrasonic Humidifier
2
3 x Aroma Pads (1 Pre-Installed)
3
1 x Cleaning Brush
3
1 x User Manual
4
1 x Quick Start Guide
5
6
6
Specifications
8
9
Power Supply AC 120V, 60Hz
11
Rated Power 24W
Water Tank
Capacity
Max Run
Time
Noise Level ≤ 30dB
Eective
Range
Dimensions
Weight 3.7 lb / 1.7 kg
1.05 gal / 4 L
Up to 40 hours on low
mist setting
Note: The humidifier will
be able to run for a longer
or shorter time depending
on the environmental
temperature and humidity.
285–376 ft² / 24–35 m²
14 x 8 x 6 in /
35.4 x 20.2 x 15.2 cm
Note: To access additional smart humidifier
functions, download the free VeSync app (see
page 8).
2

READ AND SAVE THESE
INSTRUCTIONS
SAFETY INFORMATION
To reduce the risk of fire, electric shock, or other injury, follow all instructions and
safety guidelines.
General Safety
• Only use the humidifier as described in
this manual.
• Place the humidifier and cord so that it
will not be knocked over. Do not place
near large pieces of furniture or in hightrac areas.
• When not in use, turn the humidifier
o and disconnect from power by
removing the plug from the outlet.
• Do not use the humidifier in wet
environments.
• Keep the humidifier out of reach from
children.
• Do not open the base or remove the
water level sensor for self-servicing.
• Always unplug your humidifier from
the power outlet before cleaning your
humidifier or detaching the water tank
from the humidifier base.
• Always make sure to place the
humidifier on a flat, level surface before
operation.
• Only fill the water tank with clean water.
Never fill the water tank with any other
liquids.
• Do not place the humidifier near
sources of heat, such as stovetops,
ovens, or radiators.
• Do not place the humidifier directly on
floors, carpets, or rugs.
• Do not use other items as replacement
parts for this product.
• Do not cover the nozzles while the
humidifier is on. Doing so may damage
the humidifier.
• Remove the water tank from the base
before moving the humidifier.
• Do not immerse the humidifier base,
power cord, or plug in water.
• If the humidifier is damaged or is not
functioning properly, stop using it and
contact
Customer Support immediately
(see page 24).
• Not for commercial use.
Household use only.
Caution: Risk of Leaks and
Electric Shock
• Do not add essential oils,
supplemental water treatment
liquids, or water filters into the
water tank or base chamber. This
will damage the humidifier and
cause leaks. Only add essential
oils to the aroma pad.
3

SAFETY INFORMATION (CONT.)
Plug & Cord
• Ensure that the plug fits properly into
a polarized socket.
• Do not handle the power cord or
plug with wet hands. Keep the plug
and power cord away from liquids.
• Your humidifier has a polarized plug
(one prong is wider than the other),
which fits into a polarized outlet only
one way. This is a safety feature to
reduce the risk of electric shock. If
the plug does not fit, reverse the
plug. If it still does not fit, do not use
the plug in that outlet. Do not bypass
this safety feature.
4
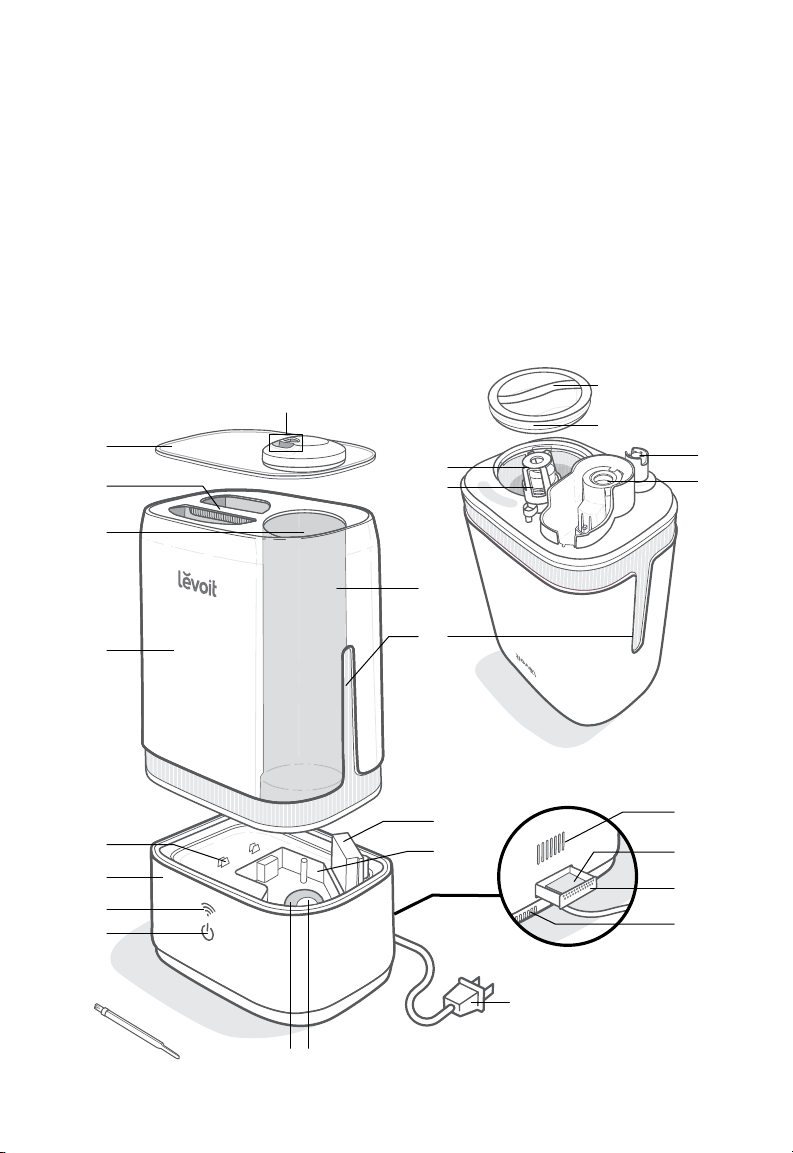
GETTING TO KNOW YOUR SMART HUMIDIFIER
A. Nozzles
B. Nozzle Cover
C. Water Tank Handle
D. Mist Outlet
E. Water Tank
F. Cleaning Brush
G. Cleaning Brush Storage
H. Base
®
I. WiFi
Button
B
C
D
E
J. Control Button
K. Insulation Ring
L. Transducer
M. Float Housing
N. Float
O. Mist Tube
P. Water Tank Windows
Q. Air Outlet
R. Base Chamber
A
S. Power Cord
T. Water Tank Cap
U. Silicone Sealing Ring
V. Water Valve
W. Noise Silencer
X. Humidity Sensor
Y. Aroma Pad
Z. Aroma Box
AA. Air Inlet
T
U
M
N
V
W
O
P
Water tank, upside down
Q
G
R
H
I
J
X
Y
Z
AA
Back
S
F
LK
5
GETTING STARTED
Filling & Refilling
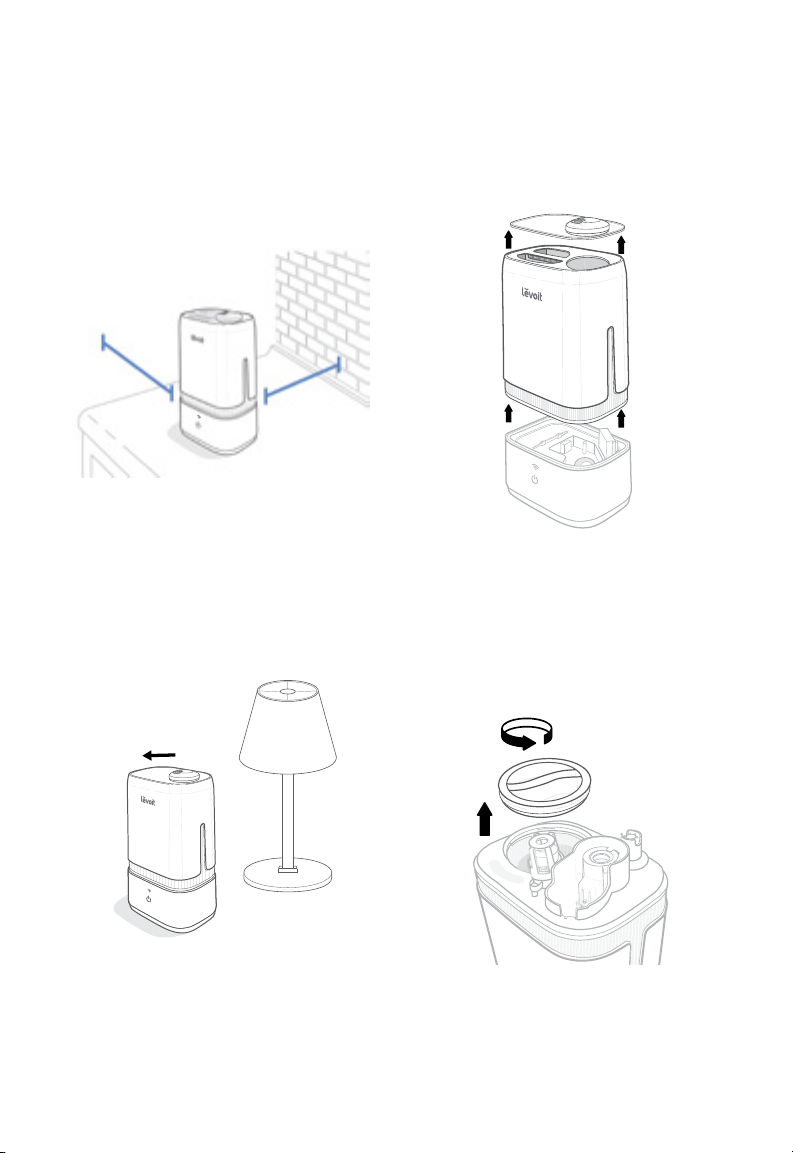
1. Remove all packaging.
2. Choose a hard, flat location for the
humidifier at least 12 in / 30 cm away
from any walls. The surface must be
water-resistant. [Figure 1.1]
12 in /
30 cm
12 in /
30 cm
Figure 1.1
3. Mist should be directed away
from walls, furniture, bedding, and
appliances. [Figure 1.2]
1. Remove the nozzle cover from the
water tank. Use the handle to lift the
water tank from the base. [Figure 1.3]
Figure 1.3
2. Flip over the water tank and remove
the water tank cap by twisting it
counterclockwise. [Figure 1.4]
Figure 1.2
Figure 1.4
6
Filling & Refilling (cont.)
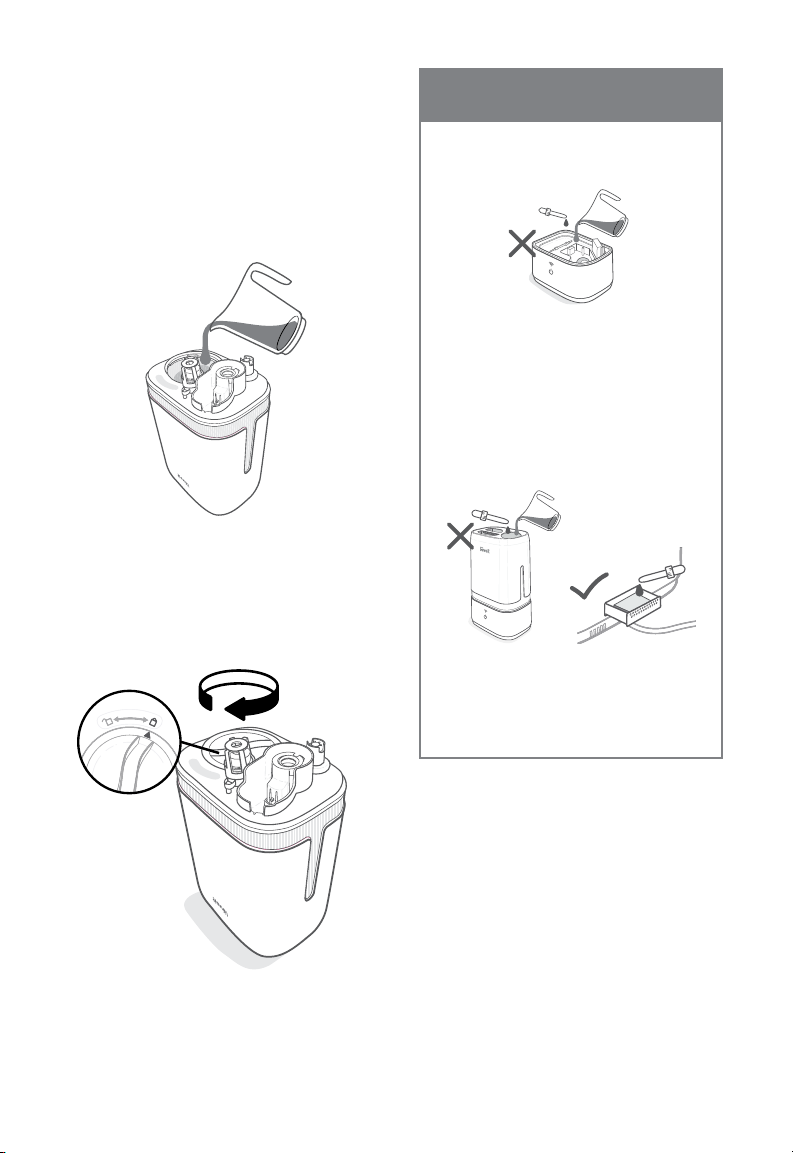
3. Fill the tank with room-temperature
water. [Figure 1.5] Do not fill with hot
water.
Note: We recommend using purified or distilled
water to fill the tank.
Figure 1.5
4. Replace the water tank cap and align
the arrow with the lock. [Figure 1.9]
CAUTION
• Do not add water directly into the base
chamber. [Figure 1.6]
Figure 1.6
• Do not add water through the mist tube.
• Do not add essential oils into the
humidifier. [Figure 1.7] Only add
essential oils to the aroma pad.
[Figure 1.8]
Figure 1.9
Figure 1.7
Figure 1.8
• Do not use water treatment liquids, or
third-party water filters in this humidifier.
7

Filling & Refilling (cont.)
VESYNC APP SETUP
5. Place the tank back on the base and
replace the nozzle cover onto the water
tank. [Figure 1.10]
Figure 1.10
Note: Due to ongoing updates and improvements,
the VeSync app may be slightly dierent than
shown in the manual. In case of any dierences,
follow the in-app instructions.
1. To download the VeSync app, scan
the QR code or search “VeSync” in the
Apple App Store
®
or Google Play Store.
[Figure 2.1]
Note: For Android™ users, choose “Allow” to use
VeSync.
2. Open the VeSync app. If you already
have an account, tap
new account, tap
Note: You must create your own VeSync account
to use third-party services and products. These
will not work with a guest account. With a VeSync
account, you can also allow your family and
friends to control your smart humidifier.
Log In. To create a
Sign Up.
3. Follow the in-app instructions to set up
your smart humidifier.
Note: You can use the VeSync app to connect
your smart humidifier to Amazon Alexa or Google
Assistant™. Follow the in-app instructions to
connect VeSync to your voice assistant.
Available on the
App Store
GET IT O N
Google Play
Figure 2.1
8

USING YOUR SMART HUMIDIFIER
Note: Using the VeSync app allows you to control
your smart humidifier remotely and access additional
functions and features (see page 11).
1. Plug in the humidifier.
2. Tap to turn your humidifier on.
Tap repeatedly to cycle through mist
settings: Auto Mode, Low, Medium,
High, and O. [Figure 3.1]
Note: For more information on Auto Mode, see
page 10.
3. Rotate the nozzles to adjust the
direction of the mist. [Figure 3.2]
4. When your room has reached your
preferred humidity level, turn the
humidifier to a lower setting or turn it o.
A healthy humidity level is between 40%
and 50%. [Figure 3.3]
5. Press and hold for 2 seconds to turn
your humidifier o.
Note:
• If there is no water in the tank or the tank is
removed, the humidifier will stop misting,
will turn red, and the fan will turn o after 5
seconds.
• When the tank is empty or removed,
you can tap
humidifier o.
or to turn the
• Refill the tank and properly place it on
the base to use your humidifier.
• To restart the humidifier, tap
as normal. You can also turn the
humidifier back on in the app, which
will remember your previous mist level
setting.
• To reset the humidifier, press and hold for
15 seconds. This will restore the humidifier’s
default settings and disconnect it from the
VeSync app.
Figure 3.1
Figure 3.2
Figure 3.3
9
 Loading...