

Page 1

USER MANUAL
Ultrasonic Cool Mist Humidifier
Model: Classic 100
Questions or Concerns?
Please contact us at [email protected]
Page 2

Thank you for purchasing the
ULTRASONIC COOL MIST
HUMIDIFIER BY LEVOIT.
If you have any questions or concerns, please
reach out to us at [email protected].
We hope you enjoy your new humidifier!
Find Us Online
Search for @LevoitUK on social media for tips,
special deals, giveaways, inspiration, and more.
2
Page 3

Table of Contents
Package Contents
Package Contents
Specifications
Safety Information
Getting to Know Your Humidifier
Getting Started
Using Your Humidifier
Important Tips
Care & Maintenance
Troubleshooting
Warranty Information
Customer Support
3
15
15
3
4
5
6
9
9
9
13
1 x Ultrasonic Cool Mist Humidifier
1 x Power Adapter
1 x Cleaning Brush
1 x User Manual
1 x Quick Start Guide
Specifications
Rated Power DC 24V, 24W
Water Tank
Capacity
Max Run Time Up to 24 hours on low
Noise Level ≤ 30dB
Eective
Range
Dimensions 21.7 x 17 x 26 cm /
Weight 1.1 kg / 2.5 lb
Adapter
Rated Power
2.4 L / 0.63 gal
mist setting
Note: The humidifier
may run for a longer or
shorter time depending
on environmental
temperature and humidity.
10–27 m² / 107–290 ft²
8.5 x 6.7 x 10.2 in
Input: AC 100–240V,
50/60Hz
Output: DC 24V, 1A
3
Page 4

SAFETY INFORMATION
To reduce the risk of fire, electric shock, or other injury, follow all instructions and
safety guidelines.
General Safety
• Only use the humidifier as described in this
manual.
• Place the humidifier and power adapter cord so
that it will not be knocked over. Do not place
near large pieces of furniture or in areas with
high foot trac.
• When not in use, turn the humidifier o and
disconnect from power by removing the power
adapter from the outlet.
• Do not use the humidifier in wet environments.
• Keep the humidifier out of reach from children.
• To avoid risk of electric shock, always unplug
the humidifier from the power outlet before
cleaning it or detaching the water tank from
the base.
• Always make sure the humidifier is placed on a
hard, flat, level surface before operation.
• Do not place the humidifier near sources of
heat, such as stovetops, ovens, or radiators.
• Do not place the humidifier directly on floors,
carpets, or rugs. Only place on water-resistant
surfaces.
• Do not place foreign objects into the humidifier
base or water tank.
• Do not use power adapters that are not
recommended by Levoit for the humidifier.
• Do not cover the nozzle while the humidifier is
on. Doing so may damage the humidifier.
• Do not allow water or other liquids into the air
outlet.
• Remove the water tank from the base before
moving the humidifier.
• Do not immerse the humidifier base or power
adapter in water.
• Always allow the humidifier to completely
cool before cleaning.
• Do not use detergents to clean the humidifier.
Only use distilled white vinegar.
• If the humidifier is damaged or is not
functioning properly, stop using it and contact
Customer Support immediately (see page
15).
• Not for commercial use. Household
use only.
Power Adapter
• Do not handle the power adapter with wet
hands. Keep the power adapter away from
liquids.
Caution: Risk of Leaks and
Electric Shock
Do not add essential oils, water treatment
liquids, or third-party water filters into
the humidifier (including the water tank
or base chamber). This will damage the
humidifier and cause leaks.
READ AND SAVE THESE
INSTRUCTIONS
4
Page 5
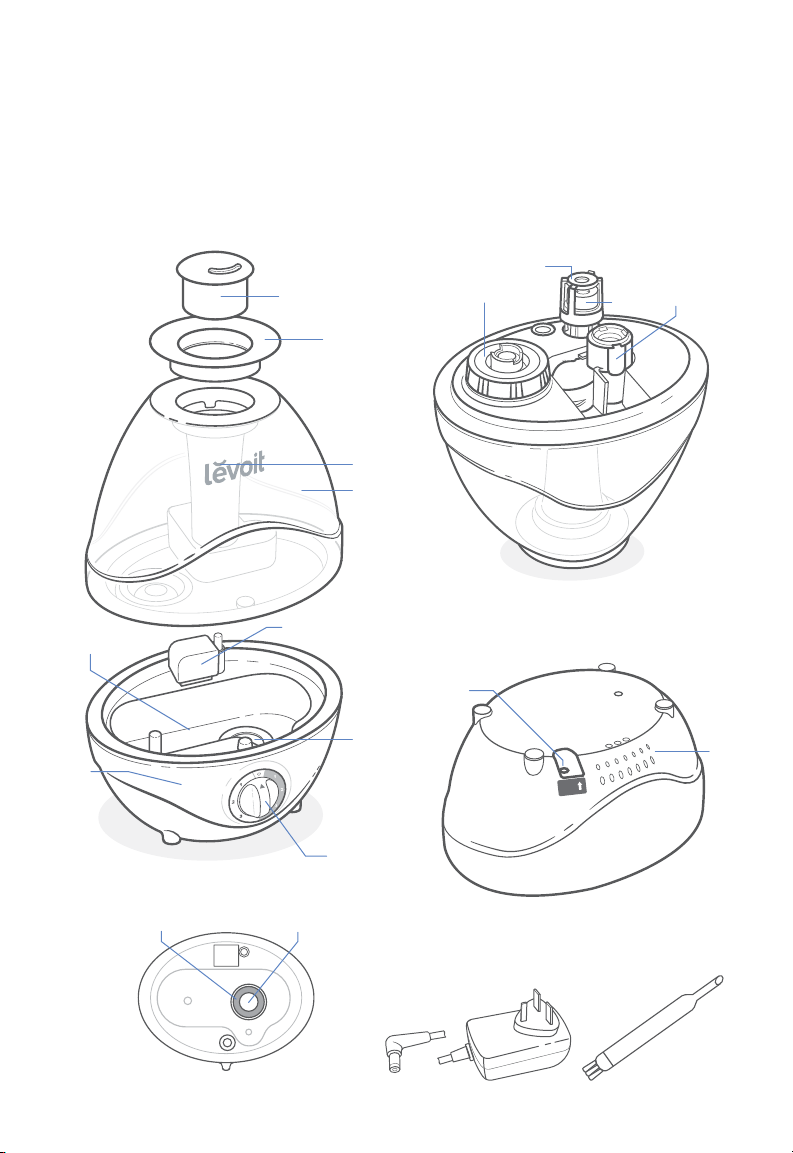
GETTING TO KNOW YOUR HUMIDIFIER
A. Nozzle
B. Nozzle Cap
C. Mist Tube
D. Water Tank
E. Base Chamber
E
F. Air Outlet
G. Base
H. Night Light
I. Mist Level Dial
J. Insulation Ring
A
B
F
K. Transducer
L. Water Tank Cap
M. Float Housing
N. Float
O. Noise Silencer
C
D
P. Power Socket
Q. Air Inlet
R. Power Adapter
S. Cleaning Brush
M
L
Underside of
Water Tank
O
N
P
G
Front
J
Top view of Inner Chamber
H
S
o
c
ke
t
Po
w
e
r
Q
I
K
Underside of Base
R
S
5
Page 6
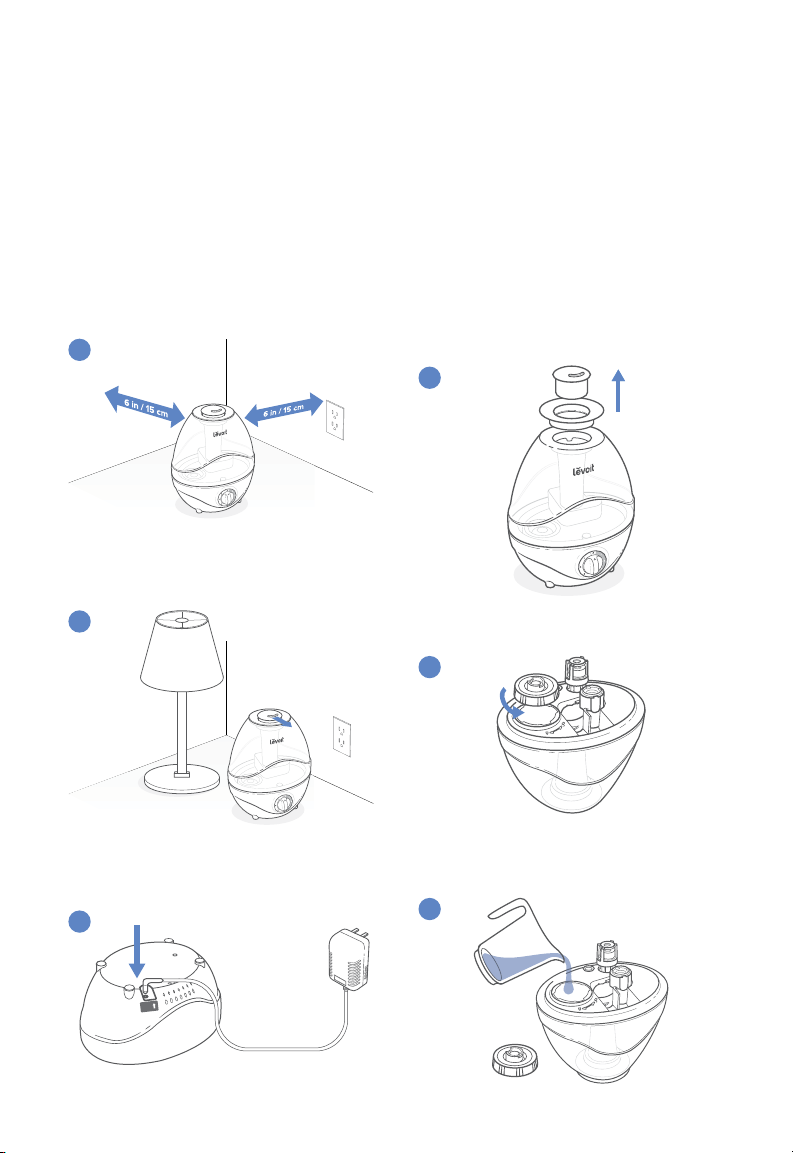
GETTING STARTED
Filling & Refilling
1. Remove all packaging. Choose a hard,
flat location for the humidifier at least
15 cm / 6 in away from any walls. The
surface must be water-resistant.
2. Make sure the mist nozzle is directed
away from walls, furniture, bedding, and
appliances.
3. Connect the power adapter to the base.
1
2
1. Remove the nozzle and nozzle cap from
the water tank.
2. Flip over the water tank and remove
the water tank cap by twisting it
anticlockwise.
3. Fill the tank with cool water. Do not fill
with warm or hot water.
Note: We recommend using purified or
distilled water in the humidifier.
1
2
3
S
o
c
ke
t
Po
w
e
r
3
6
Page 7
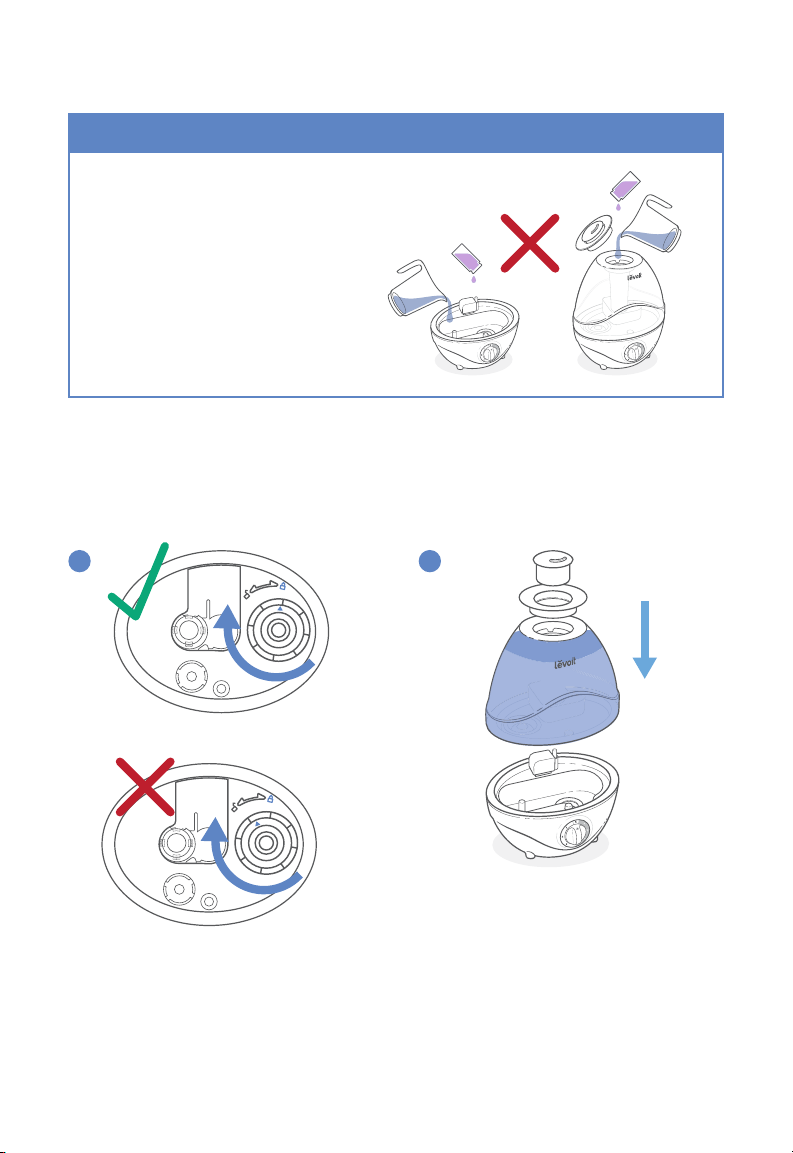
Filling & Refilling (Cont.)
CAUTION
• Do not add water directly into
the base chamber.
• Do not add water through the
mist tube.
• Do not add essential oils into
the humidifier.
4. Replace the water tank cap by firmly twisting it back in place, aligning the arrow with the lock.
5. Place the tank properly on the base. Replace the nozzle and nozzle cap onto the water tank.
54
7
Page 8
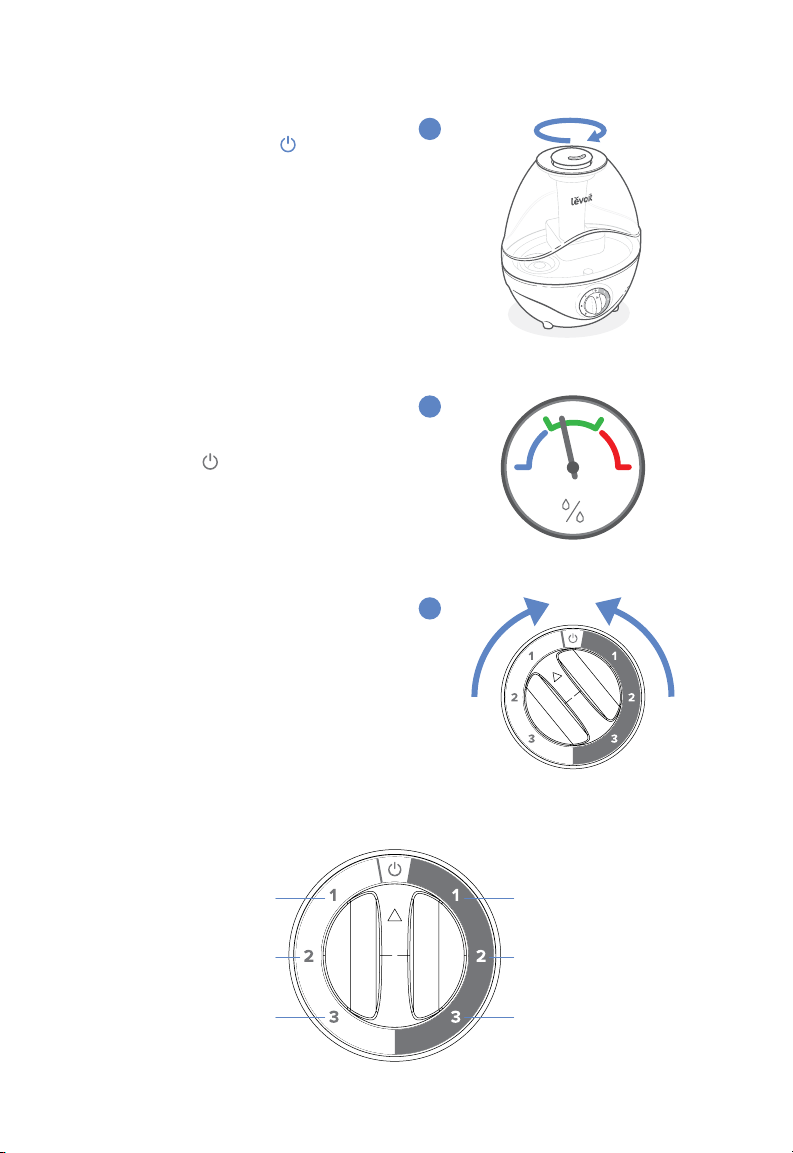
USING YOUR HUMIDIFIER
Note: If there is no water in the tank, the
humidifier will not turn on and will light
up red. Fill the water tank (see Filling &
Refilling, page 6).
1. Plug in the adapter.
2. Turn the dial to the desired setting.
[Figure 3.1]
3. Rotate the nozzle to adjust the direction
of the mist.
4. When your room has reached a
comfortable humidity level, turn your
humidifier to a lower setting or turn it o.
A comfortable humidity level is above
40% and below 60%.
5. Turn the dial to
humidifier o.
to turn the
3
4
5
Low Mist, Light On Low Mist, Light Off
Medium Mist, Light On Medium Mist, Light Off
High Mist, Light On High Mist, Light Off
Figure 3.1
8
Page 9
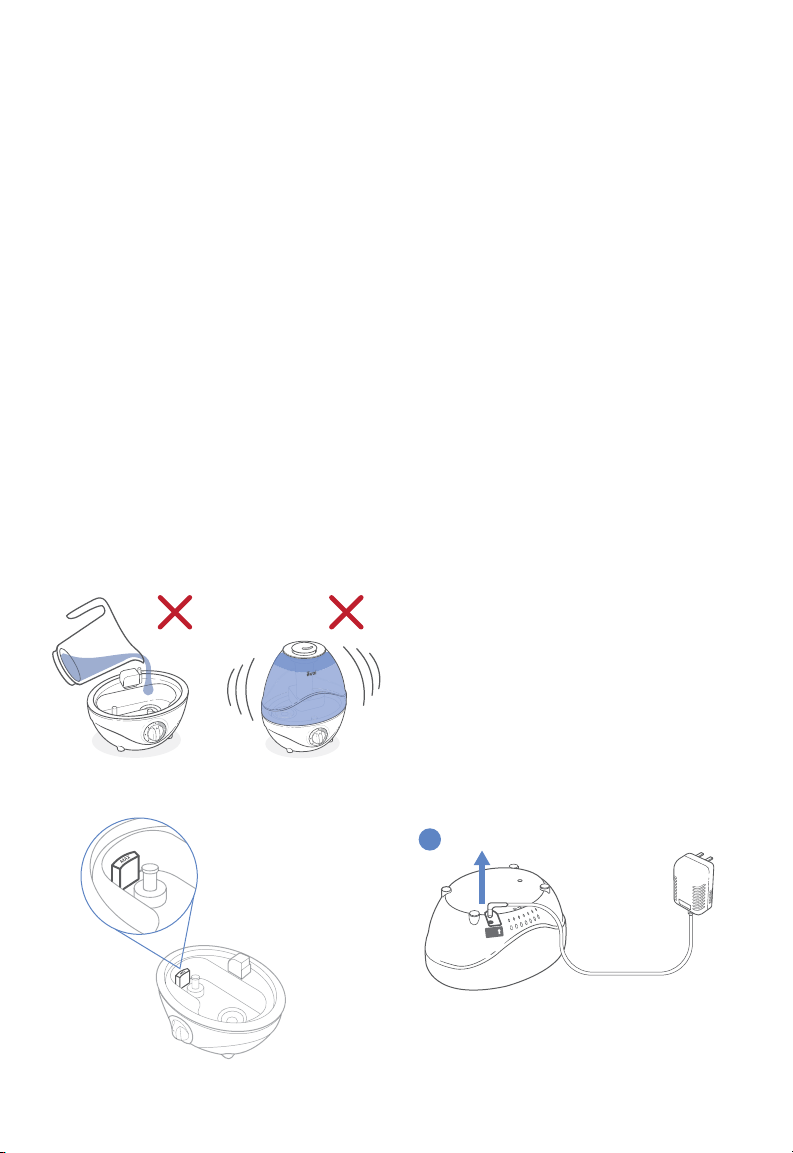
IMPORTANT TIPS
• Never pour water directly into the
base chamber. [Figure 1.1] Only add
water to the water tank. The humidifier
will automatically release the correct
amount of water into the base chamber.
• Avoid moving or shaking the humidifier.
[Figure 1.2] This may cause the water
tank to release too much water into the
base chamber.
• Before moving the humidifier, turn it o,
unplug it, and remove the water tank.
• If your humidifier doesn’t produce mist
correctly, check the max water line
[Figure 1.3] to see if there is too much
water in the base chamber. Pour out
any extra water if water is over the max
line.
CARE & MAINTENANCE
Note:
• All maintenance should be done on
a water-resistant surface, such as a
kitchen counter.
• Change the water daily to avoid
bacteria growth.
• Use a tissue or cloth to clean the nozzle
regularly.
• If not using the humidifier for 1 week or
longer, do not leave water inside. Clean
and dry the humidifier instead.
Cleaning
Note: The max water line is only for
this purpose. Do not pour water into
the base.
Figure 1.1 Figure 1.2
Figure 1.3
You should clean your humidifier every week,
and when you’re ready to store it.
Note:
• Never immerse the base in water or
liquid. Do not place any part of the
humidifier in a dishwasher.
• Do not use detergents to clean the
humidifier.
1.
Unplug the humidifier and remove the
power adapter from the base.
1
S
o
c
ke
t
Po
w
e
r
9
Page 10
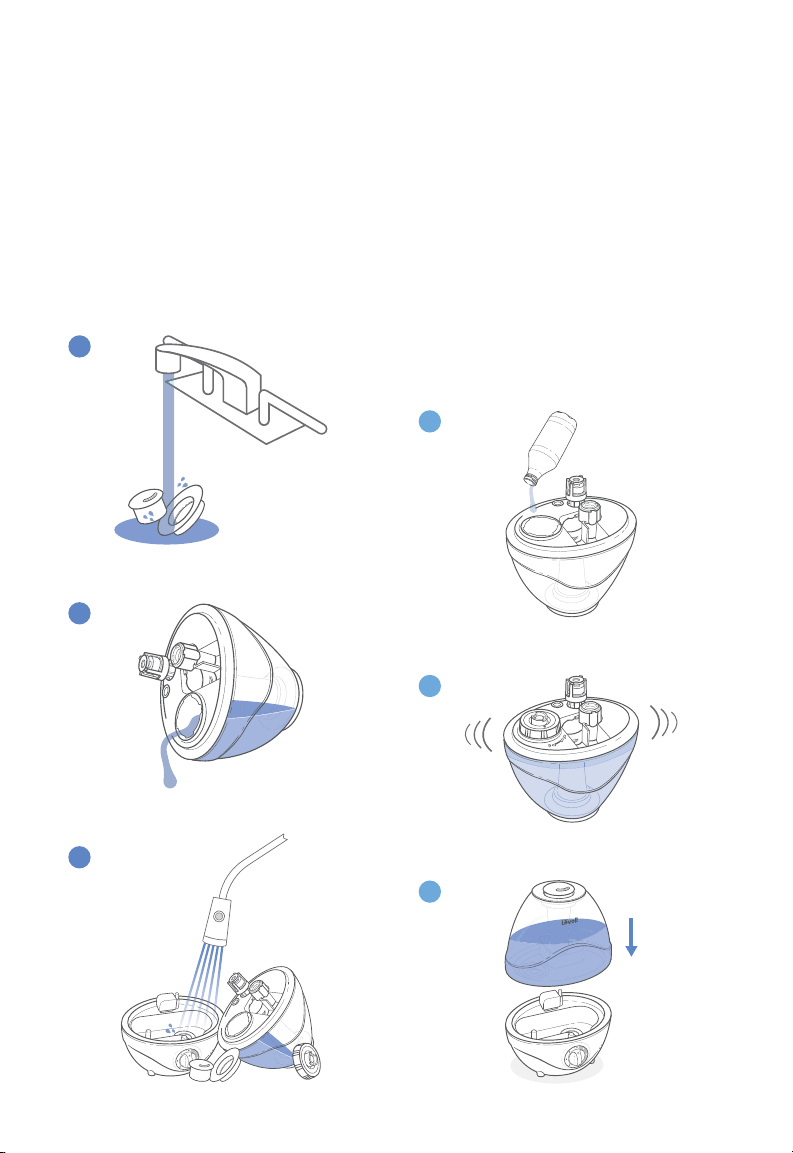
Cleaning (Cont.)
2. Remove and rinse the nozzle and
nozzle cap.
3. Remove the water tank from the base.
Pour out all water from the tank and
base.
4. Rinse the tank and the base chamber
with room temperature water.
2
3
5. To descale the humidifier:
01. Fill the water tank with 237 mL / 2
US cups of distilled white vinegar.
02. Replace the tank cap and swish the
vinegar around in the tank.
03. Place the tank properly on the
base. Vinegar will drain into the
base chamber and loosen scale
(mineral buildup) in the tank and in
the base (including the transducer
and float).
01
02
10
4
03
Page 11
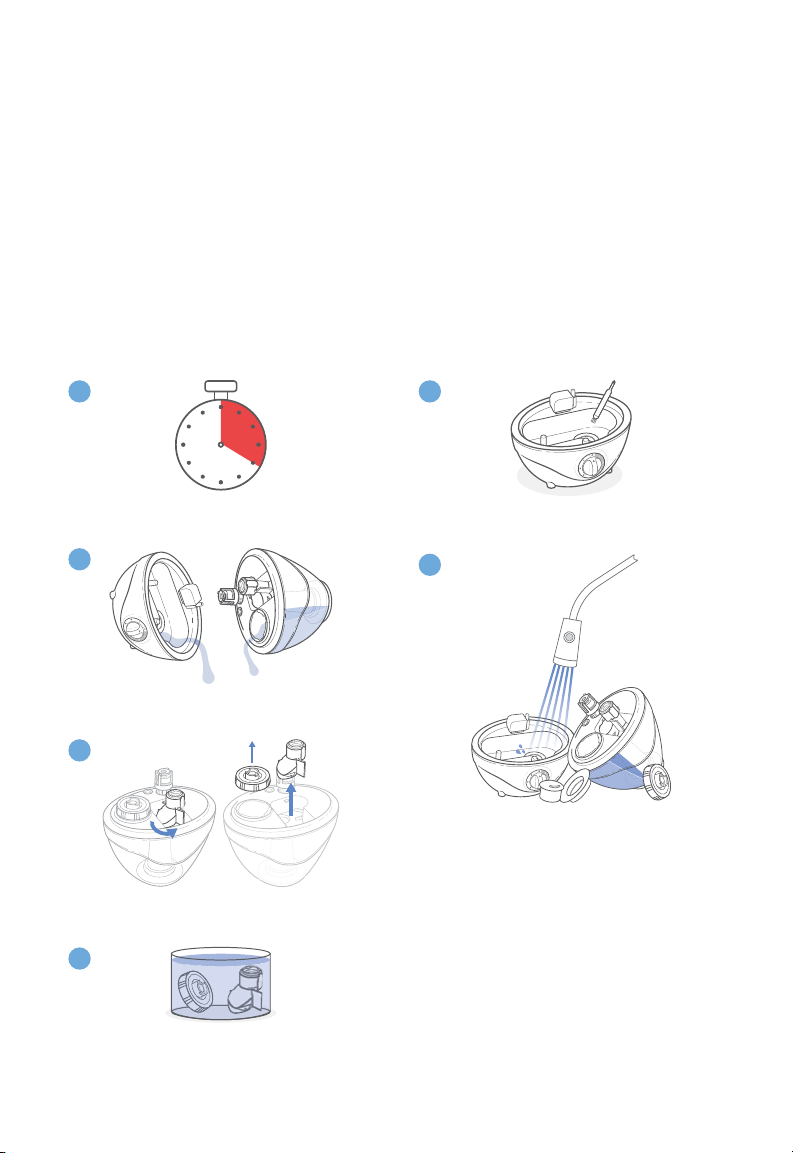
Cleaning (Cont.)
04. Soak for 15–20 minutes.
05. Remove the tank and pour out any
vinegar.
06. Flip the tank over and remove the
tank cap and noise silencer.
07. Place the tank cap and noise silencer
in a small container (or the base
chamber). Fill with enough vinegar to
cover them. Soak for 15–20 minutes.
04
05
08. Use a soft cloth and the included
cleaning brush to remove scale.
09. Rinse all parts until any vinegar
smell is completely gone.
6. Dry all parts with a cloth. Make sure all
parts are completely dry.
08
09
06
07
11
Page 12
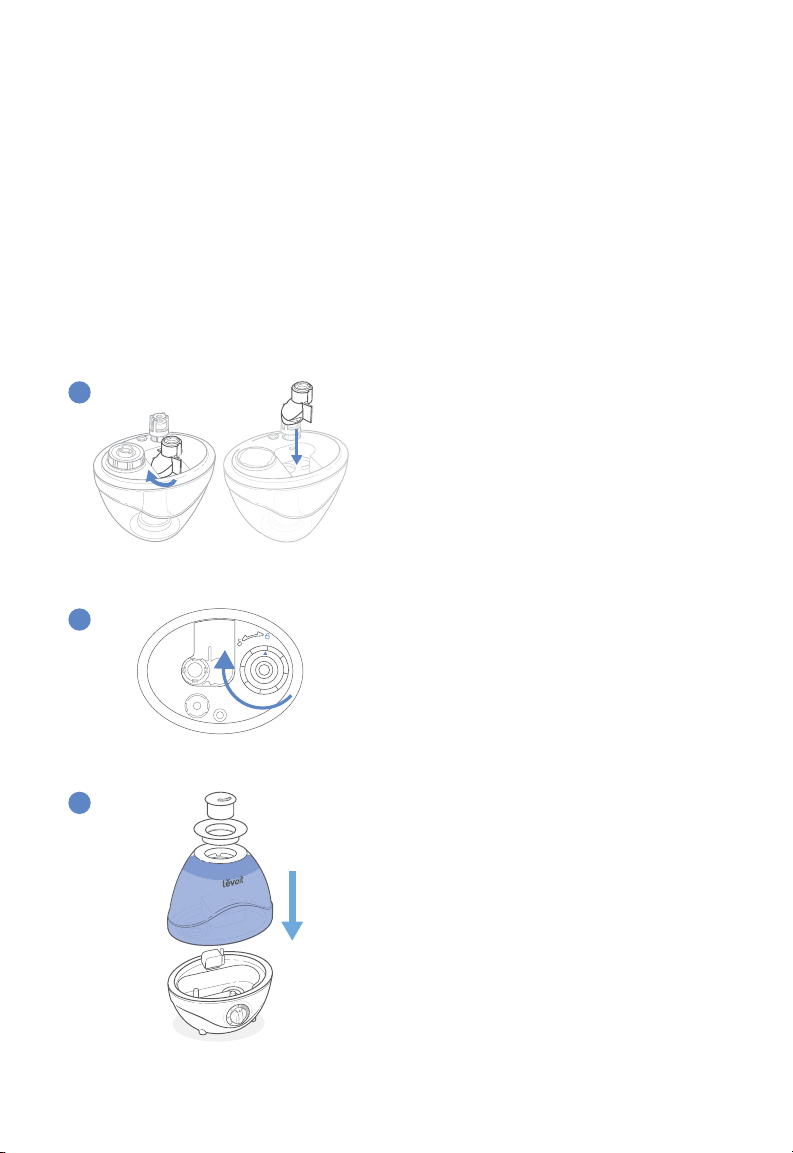
Reassembling Storing
1. Flip the water tank over and replace the
noise silencer on the tank.
2. Refill the tank, if necessary. Replace
the water tank cap by firmly twisting it
back in place, aligning the arrow with
the lock.
3. Place the tank properly on the base.
Replace the nozzle and nozzle cap onto
the water tank.
1
2
Follow the cleaning instructions and allow all
parts to dry completely before storing. Store
in a cool, dry location.
12
3
Page 13

TROUBLESHOOTING
Problem Possible Solution
Make sure the power adapter is correctly plugged into a working
Humidifier doesn’t turn on.
Little or no mist comes out. Turn the mist level dial to a higher setting.
outlet.
Make sure the power adapter is correctly plugged into the
humidifier base.
Fill the water tank.
There may be too much water in the base chamber. Empty the
base chamber. Refill the water tank (not the base chamber) and
place the water tank properly onto the base.
Make sure the air inlet on the bottom of the base is not blocked.
The humidifier should not be set on carpet or other surfaces that
may block the air inlet.
Make sure the nozzle is not blocked or clogged.
Make sure the humidifier is on a level surface.
The water temperature may be too low. Turn the mist level dial
to the highest setting and let the humidifier run for a while, then
adjust to the desired setting.
If the water tank or base was washed with detergent, rinse
thoroughly with clean water to remove any detergent.
Humidifier uses water
too quickly.
Humidifier produces an
unusual smell.
Water leaks from the
humidifier.
Condensation forms around
humidifier or windows.
The humidifier uses up water based on the environmental
temperature and humidity. If your environment is cold and/or dry,
the humidifier will run out of water faster.
Clean the water tank and base chamber
(see Care & Maintenance, page 9).
Tighten the water tank cap.
Check the water tank for leaks. If there are leaks, contact
Customer Support (see page 15).
Humidity may be too high. Turn down the mist level, turn o the
humidifier, or open the door to the room.
13
Page 14

TROUBLESHOOTING (CONT.)
Problem Possible Solution
Mist is leaking from the base.
White dust appears around
the humidifier.
is red.
Empty the base chamber. Refill the water tank (not the base
chamber) and place the water tank properly onto the base.
Use purified or distilled water to fill the humidifier. Avoid using
water with high mineral content.
Clean the humidifier (see Care & Maintenance, page 9).
Fill the water tank.
Place the water tank properly on the base.
If your problem is not listed, please contact Customer Support (see page 15).
14
Page 15

WARRANTY INFORMATION
Terms & Policy
Arovast Corporation warrants all products to be
of the highest quality in material, craftsmanship,
and service for 2 years, eective from the date
of purchase to the end of the warranty period.
Warranty lengths may vary between product
categories.
If you have any questions or concerns about your
new product, please contact our helpful Customer
Support Team.
CUSTOMER SUPPORT
Arovast Corporation
1202 N. Miller St., Suite A
Anaheim, CA 92806
USA
Email: [email protected]
* Please include your order ID when
contacting Customer Support.
15
Page 16

levoit.com
Connect with us @LevoitUK
JJ02320CC-M1_0320Classic100_uk
 Loading...