

Page 1
USER MANUAL
Smart Ultrasonic Top-Fill
Cool Mist Humidifier
Model: Classic 300S
Questions or Concerns?
Please contact us Mon–Fri, 9:00 am–5:00 pm PST/PDT
at [email protected] or at (888) 726-8520.
Page 2

Table of Contents
Package Contents
Specifications
Safety Information
• General Safety
• Plug & Cord
Getting to Know Your Smart Humidifier
Controls
Getting Started
• Filling & Refilling
VeSync App Setup
Using Your Smart Humidifier
• Sleep Mode
• Auto Mode
• VeSync App Functions
• Important Tips
• Using the Aroma Box
Care & Maintenance
• Cleaning
• Cleaning the Aroma Pad
• Reassembling
• Storing
Troubleshooting
VeSync App Troubleshooting
Warranty Information
Customer Support
12
13
13
13
14
15
16
16
20
21
21
22
24
26
27
Package Contents
2
1 x Smart Ultrasonic Humidifier
2
3 x Aroma Pads (1 Pre-Installed)
3
1 x Cleaning Brush
3
1 x User Manual
4
1 x Quick Start Guide
5
7
8
Specifications
9
11
Power Supply AC 120V, 60Hz
Rated Power 26W
Water Tank
Capacity
Max Run
Time
Noise Level ≤ 30dB
Eective
Range
Dimensions
Weight 4.3 lb / 2 kg
1.58 gal / 6 L
Up to 60 hours on low
mist setting
Note:
The humidifier may
run for a longer or shorter
time depending on the
environmental temperature
and humidity.
215–505 ft² / 20–47 m²
9.6 x 7.5 x 13.4 in /
24.5 x 19.2 x 34 cm
Note:
To access additional smart humidifier
functions, download the free VeSync app (see
page 11).
2
Page 3

READ AND SAVE THESE
INSTRUCTIONS
SAFETY INFORMATION
To reduce the risk of fire, electric shock, or other injury, follow all instructions and
safety guidelines.
General Safety
• Only use the humidifier as
described in this manual.
• Place the humidifier and cord so
that it will not be knocked over.
Do not place near large pieces of
furniture or in high-trac areas.
• When not in use, turn the humidifier
o and disconnect from power by
removing the plug from the outlet.
• Do not use the humidifier in wet
environments.
• Keep the humidifier out of reach
from children.
• Do not open the base or remove
the water level sensor for selfservicing.
• Always unplug your humidifier from
the power outlet before cleaning
your humidifier or detaching the
water tank from the humidifier base.
• Always make sure to place the
humidifier on a flat, level surface
before operation.
• Only fill the water tank with clean
water. Never fill the water tank with
any other liquids.
• Do not place the humidifier near
sources of heat, such as stovetops,
ovens, or radiators.
• Do not place the humidifier directly
on floors, carpets, or rugs.
• Do not use other items as
replacement parts for this product.
• Do not cover the nozzle while
the humidifier is on. Doing so may
damage the humidifier.
• Remove the water tank from the
base before moving the humidifier.
• Do not immerse the humidifier
base, power cord, or plug in water.
• If the humidifier is damaged or is
not functioning properly, stop using
it and contact Customer Support
immediately (see page 27).
• Not for commercial use.
Household use only.
Caution: Risk of Leaks and
Electric Shock
• Do not add essential oils,
supplemental water treatment
liquids, or water filters into
the water tank or base
chamber. This will damage the
humidifier and cause leaks.
Only add essential oils to the
aroma pad.
3
Page 4

SAFETY INFORMATION (CONT.)
Plug & Cord
• Ensure that the plug fits properly
into a polarized socket.
• Do not handle the power cord
or plug with wet hands. Keep the
plug and power cord away from
liquids.
• Your humidifier has a polarized
plug (one prong is wider than the
other), which fits into a polarized
outlet only one way. This is a
safety feature to reduce the risk
of electric shock. If the plug does
not fit, reverse the plug. If it still
does not fit, do not use the plug
in that outlet. Do not bypass this
safety feature.
4
Page 5
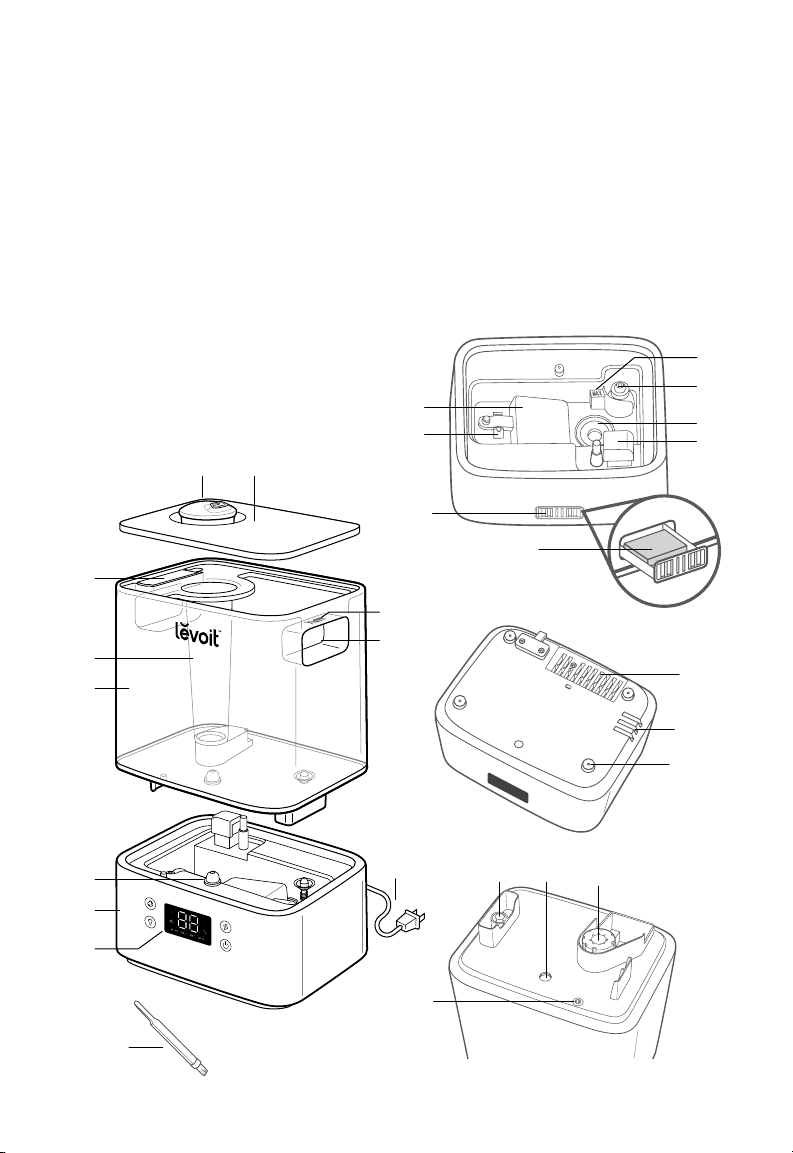
GETTING TO KNOW YOUR SMART HUMIDIFIER
A. Nozzle
B. Water Tank Cover
C. Dust Cover
D. Mist Tube
E. Water Tank
F. Night Light
G. Base
H. Display
I. Cleaning Brush
J. Max Water Line (Tank)
A B
C
D
E
K. Water Tank Handles
L. Power Cord
M. Float
N. Float Brackets
O. Aroma Box
P. Aroma Pad
Q. Max Water Line (Base)
R. Secondary Float
S. Transducer
T. Air Outlet
M
N
O
J
K
U. Air Inlet
V. Humidity Sensor
W. Feet
X. Water Outlet Valve
Y. Night Light Cover
Z. Noise Silencer
AA. Tank Placement
Sensor
Q
R
S
T
P
U
V
W
F
L
X Y
Z
G
H
AA
I
Water tank, upside down
5
Page 6

Getting To Know Your Smart Humidifier (cont.)
A B DC
F G H I
A. Sleep Mode Button
B. Wifi® Indicator
C. Humidity Level
D. Timer Indicator
Note:
The timer must
be set in the VeSync
app.
E. Mist Level Button
F. Night Light Button
G. No Water Indicator
H. Mist Level Indicator
I. Power Button
E
6
Page 7

CONTROLS
Note:
You can also control these functions using
the VeSync app, as well as additional functions
(see page 13).
Power Button
Press to turn the humidifier
•
on/o.
• Press and hold for 5
seconds to pair with the
VeSync app. See the
VeSync in-app instructions
for more information.
• Press and hold for 15
seconds to reset the
humidifier. This will restore
the humidifier’s default
settings and disconnect it
from the VeSync app.
Mist Level Button
Press repeatedly (or press
•
and hold) to cycle through
mist level settings: Auto
Mode, Low, Medium, and
High. (For more details on
Auto Mode, see page 13.)
• Press during Sleep Mode
to turn Sleep Mode o.
The humidifier will keep
misting on Auto Mode.
Sleep Mode Button
Press to turn Sleep Mode
•
on/o (see page 13).
Night Light Button
Press repeatedly to cycle
•
through night light settings:
50%, 100%, and O.
• Press and hold for 3
seconds to turn the display
and the night light o.
• Press and hold for 3
seconds during Sleep
Mode to turn Sleep
Mode o.
7
Page 8
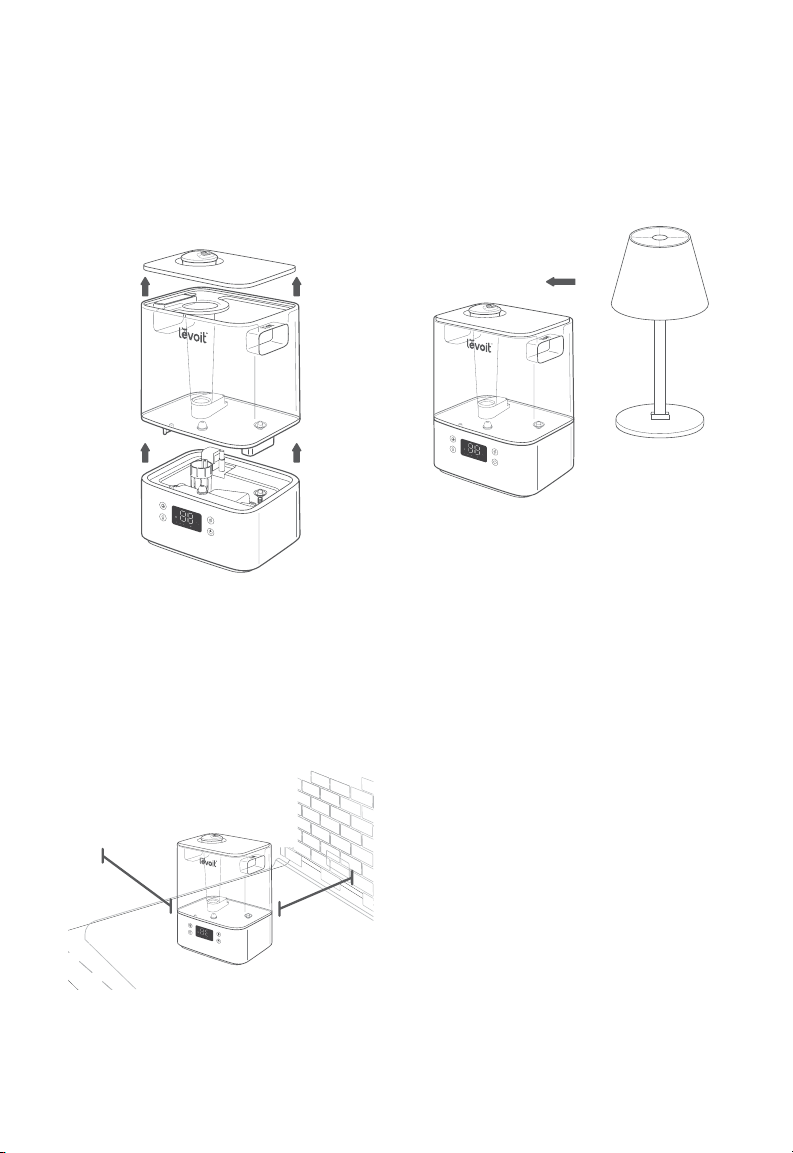
GETTING STARTED
1. Remove all packaging.
2. Take the water tank o of the base and
remove all tape, including any tape on
the float. [
3. Choose a hard, flat location for the
humidifier at least 12 in / 30 cm away
from any walls. The surface must be
water-resistant. [
Figure 1.1
Figure 1.1
Figure 1.2
]
]
4. Mist should be directed away
from walls, furniture, bedding, and
appliances. [
Figure 1.3
Figure 1.3
]
12 in /
30 cm
12 in /
30 cm
Figure 1.2
8
Page 9
Filling & Refilling
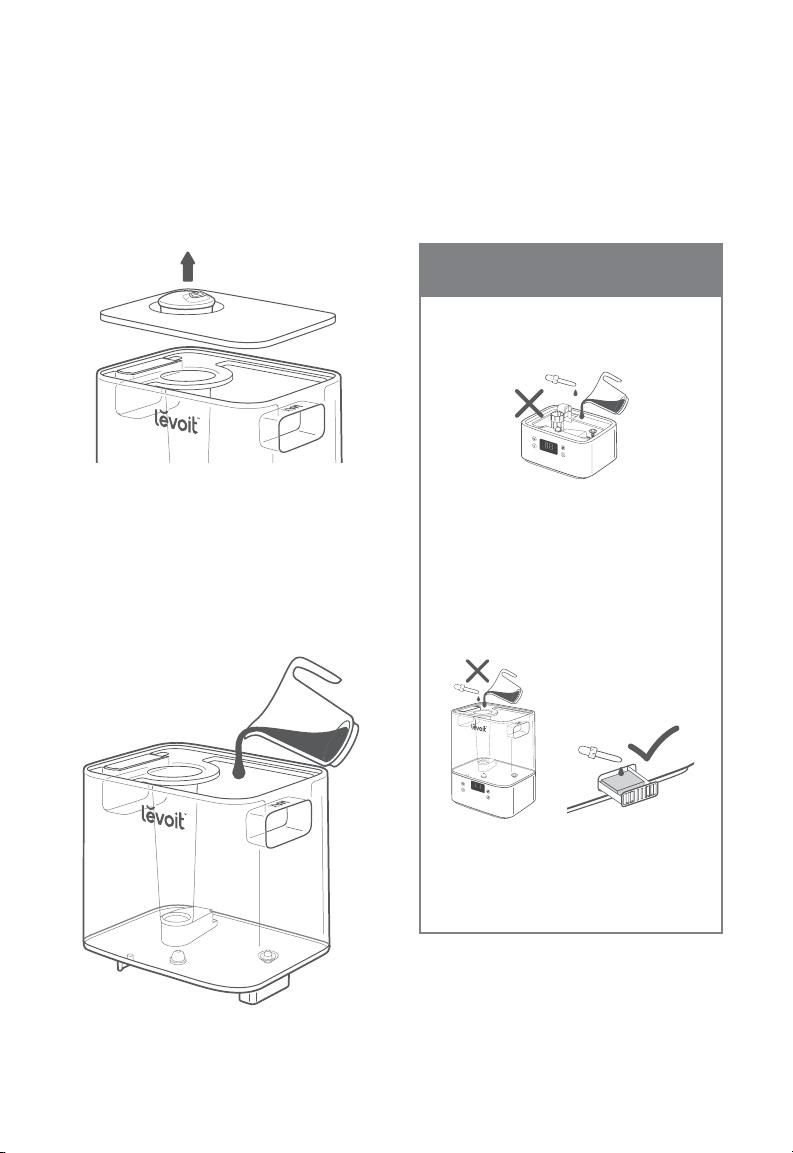
1. Remove the water tank cover by holding
the nozzle and pulling upward.
[
Figure 1.4
]
Figure 1.4
2. Use the handles to remove the tank
from the base. Fill the tank with roomtemperature water. [
Figure 1.5
]
Do not fill with hot water.
Note:
• We recommend using purified or distilled
water to fill the tank.
•
Do not
fill past the tank’s max water line.
CAUTION
• Do not add water directly into the base
chamber. [
• Do not add water through the mist tube.
• Do not add essential oils into the
humidifier. [
essential oils to the aroma pad.
[
Figure 1.8
Figure 1.6
Figure 1.6
Figure 1.7
]
]
] Only add
Figure 1.5
Figure 1.7
Figure 1.8
• Do not use water treatment liquids or
third-party water filters in this humidifier.
9
Page 10
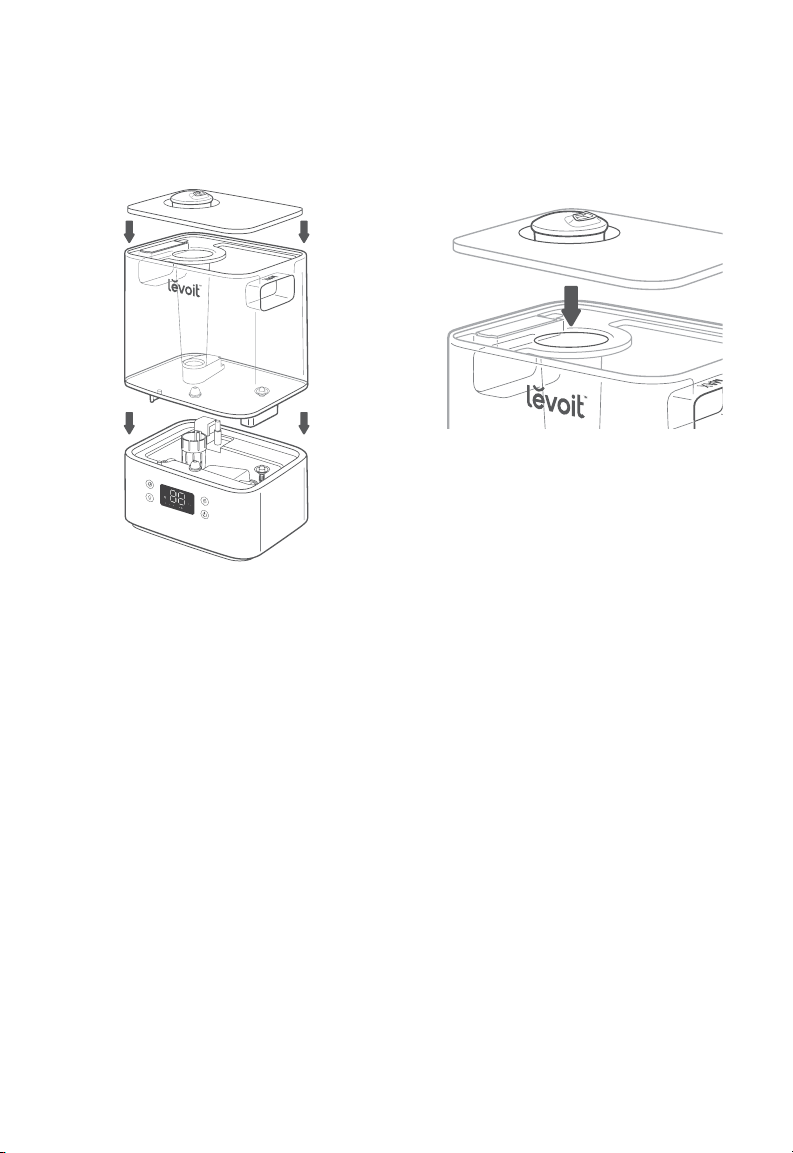
Filling & Refilling (cont.)
3. Replace the water tank cover and place
the tank back on the base.
Figure 1.9
[
Figure 1.9
]
Note:
Make sure the nozzle on the water
tank cover is placed over the mist tube, or the
humidifier may not work correctly. [
Figure 1.10
Figure 1.10
]
10
Page 11

VESYNC APP SETUP
Note:
Due to ongoing updates and improvements,
the VeSync app may be slightly dierent than
shown in the manual. In case of any dierences,
follow the in-app instructions.
1. To download the VeSync app, scan
the QR code or search “VeSync” in the
Apple App Store
[
Figure 2.1
Note:
For Android™ users, choose “Allow” to use
VeSync.
2. Open the VeSync app. If you already
have an account, tap
new account, tap
Note:
You must create your own VeSync account
to use third-party services and products. These
will not work with a guest account. With a VeSync
account, you can also allow your family and
friends to control your smart humidifier.
3. Follow the in-app instructions to set up
your smart humidifier.
Note:
You can use the VeSync app to connect
your smart humidifier to Amazon Alexa or Google
Assistant™. Follow the in-app instructions to
connect VeSync to your voice assistant.
®
or Google Play Store.
]
Log In. To create a
Sign Up.
Available on the
App Store
Figure 2.1
GET IT O N
Google Play
11
Page 12
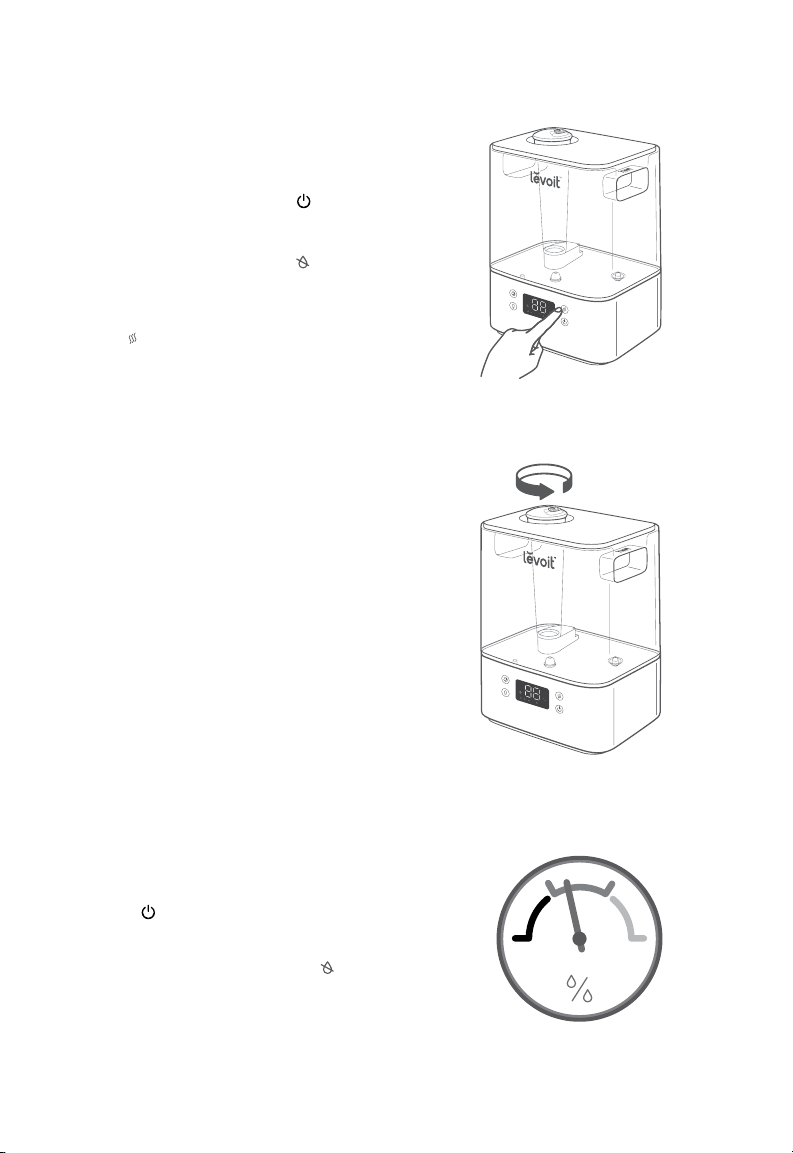
USING YOUR SMART HUMIDIFIER
Note:
Using the VeSync app allows you to control
your smart humidifier remotely and access additional
functions and features (see page 13).
1. Plug in the humidifier. Press to turn
your humidifier on.
Note:
If there is no water in the tank, will flash
10 times, and the humidifier will turn o. Fill the
water tank (see Getting Started, page 8).
2. Tap repeatedly to cycle through mist
settings: Auto Mode, Low, Medium, and
High. [
Figure 3.1
Note:
• The humidifier will not mist in Auto Mode if the
humidity level is above 50%. If you want the
humidifier to keep misting, change the mist
setting, or change the Auto Mode settings in
the VeSync app.
• For more information about Auto Mode, see
page 13.
3. Rotate the nozzle to adjust the direction
of the mist. [
4. Optionally, use the controls to activate
Sleep Mode, turn the night light on/o,
and more (see Controls, page 7).
5. When your room has reached your
preferred humidity level, turn the
humidifier to a lower setting, or turn it
o. A healthy humidity level is between
40% and 50%. [
]
Figure 3.2
Figure 3.3
]
Figure 3.2
]
Figure 3.1
Note:
You can also use Auto Mode to keep the
humidity level between 40% and 50%.
6. Press to turn your humidifier o.
Note:
If there is no water in the tank or the tank is
removed, the humidifier will stop misting,
flash 10 times, and the humidifier will turn o. Refill
the tank and properly place it on the base to use
your humidifier.
12
will
Figure 3.3
Page 13

Sleep Mode
VeSync App Functions
Sleep Mode changes the humidifier’s mist
setting to Auto Mode, turns o the display
lights, and turns o the night light.
•
When Sleep Mode is on, you can press
to turn the night light on/o. The
humidifier will stay in Sleep Mode.
Auto Mode
Auto Mode uses the humidifier’s sensor to
automatically adjust the mist level (or turn it
o) to maintain a comfortable and healthy
level of humidity.
•
Auto Mode automatically adjusts the
mist level to maintain 40–50% relative
humidity. You can change the target
humidity level in the VeSync app.
• By default, Auto Mode uses Automatic
Stop. The humidifier will stop misting
when the highest target humidity level is
reached. If the humidity drops below the
target humidity level, the humidifier will
begin misting again.
• If Auto Mode is selected when the
humidity is higher than the target
humidity range, the humidifier will not
start misting until the humidity lowers.
The VeSync app allows you to access
additional smart functions, including those
listed below.
Remote Control
•
Turn the humidifier on/o from your phone.
• Cycle through mist levels and turn on/o
Auto Mode and Sleep Mode from your
phone.
• Turn the display lights and night light
on/o from your phone.
• Customize Auto Mode settings like target
humidity and auto-o.
Monitor Humidity Levels
•
Check current humidity levels in the
humidifier’s environment.
Set Timers & Schedules
•
Program individual timers or create a
schedule for your smart humidifier.
Third-Party Voice Control
•
Compatible with Amazon Alexa and
Google Assistant for voice commands.
Note:
The VeSync app is continually updated and
app features will expand.
• In the VeSync app, you can turn
Automatic Stop on/o. If Automatic Stop
is o, the humidifier will keep running on
Low mist level when the highest target
humidity level is reached.
13
Page 14
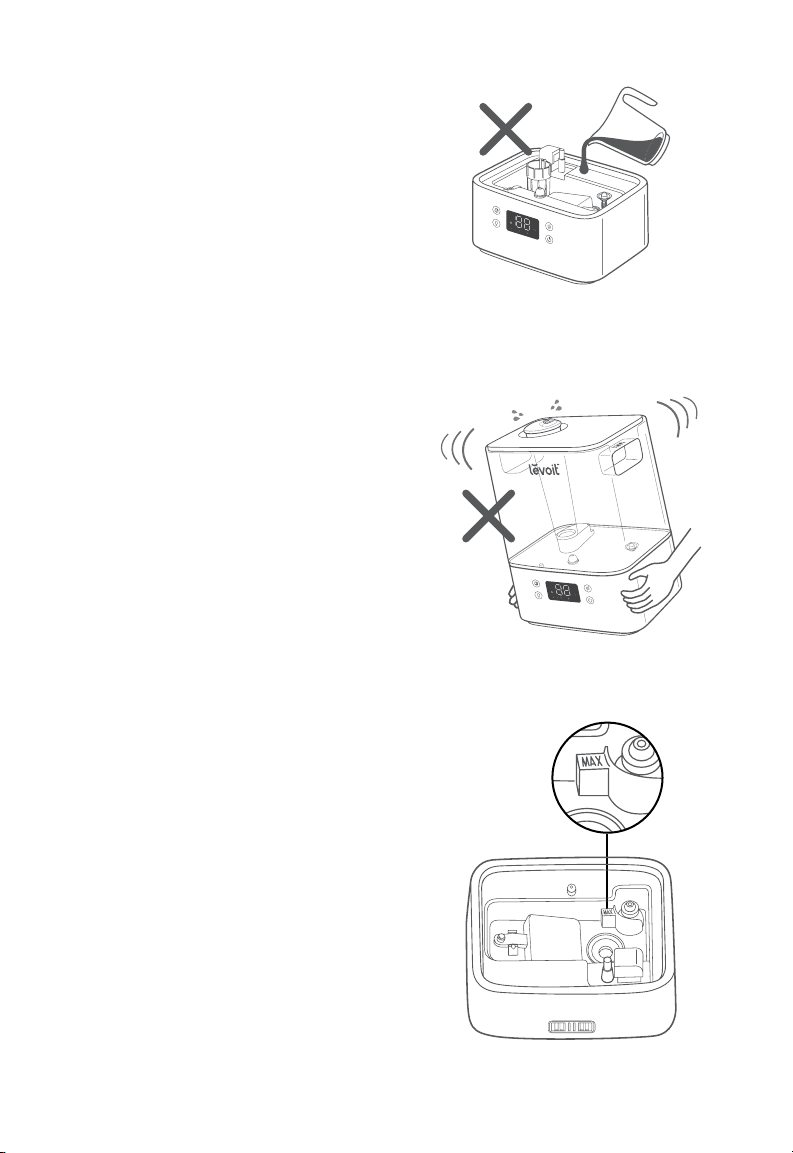
Important Tips
Your humidifier must have the correct level of
water in the base chamber to work properly. If
there is too much water in the base chamber,
the humidifier cannot create mist.
• Never pour water directly into the
base chamber. [
water to the water tank. The humidifier
will automatically release the correct
amount of water into the base chamber.
• Avoid moving or shaking the humidifier.
[
Figure 3.5
tank to release too much water into the
base chamber.
• Before moving the humidifier, turn it o,
unplug it, and remove the water tank.
• If your humidifier doesn’t produce mist
correctly, check the max water line to
see if there is too much water in the
base chamber. Pour out extra water if
water is over the max line. [
Note:
The max water line is
Do not pour water into the base chamber.
Figure 3.4
] Only add
] This may cause the water
Figure 3.6
only
for this purpose.
]
Figure 3.4
Figure 3.5
14
Figure 3.6
Page 15
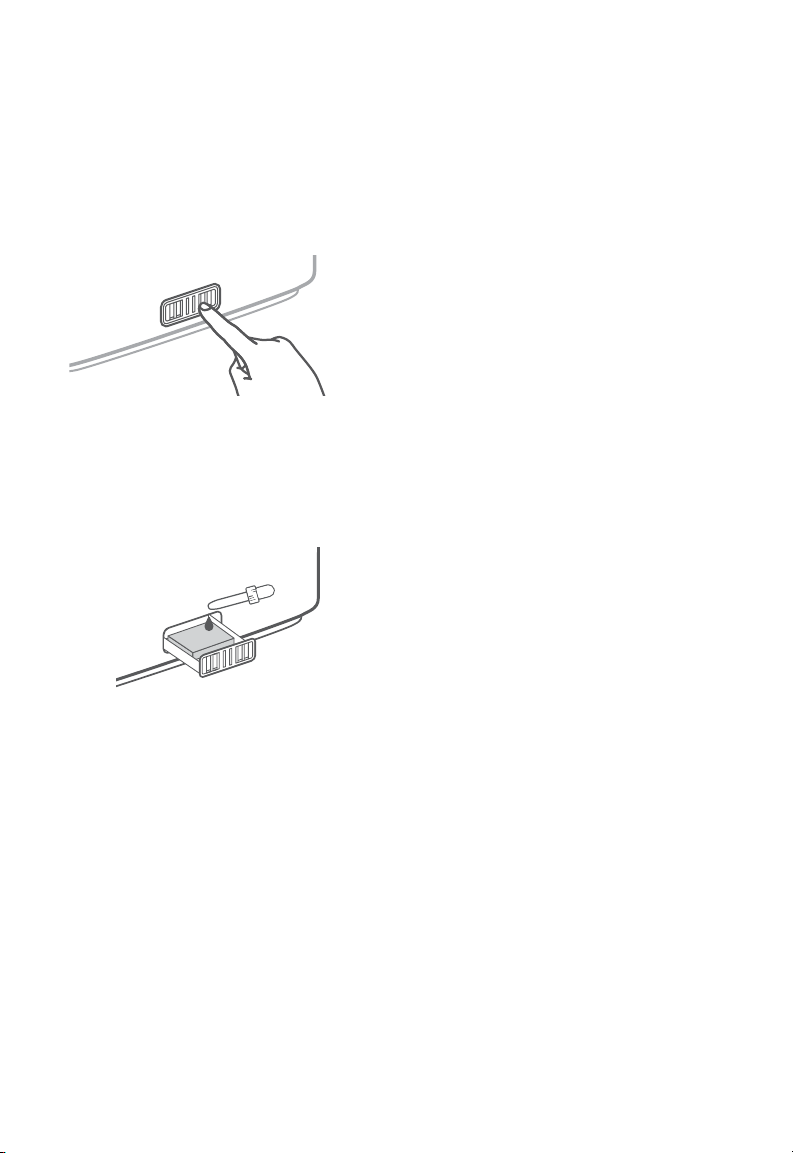
Using the Aroma Box
Your humidifier can be used for
aromatherapy.
1. Push the aroma box at the back of the
base and pull it out. [
Figure 3.7
]
Figure 3.7
2. Put 8–10 drops of essential oil on the
aroma pad. [
Figure 3.8
]
3. Place the aroma box into the humidifier.
4. Turn on the humidifier. The humidifier
will automatically diuse aroma when
used.
Note:
•
Do not
add essential oils, water treatment
liquids, or third-party water filters into the
water tank or base chamber. Only add
essential oils to the aroma pad.
• The aroma pads can be cleaned and reused
after diusing essential oils (see
Aroma Pad
, page 20).
Cleaning the
• The aroma is intended to be light. This
humidifier is not an aroma diuser.
Figure 3.8
15
Page 16
CARE & MAINTENANCE
Note:
• All maintenance should be done on a water-
resistant surface, such as a kitchen counter.
• Change the water daily to avoid bacteria
growth.
• Use a tissue or cloth to clean the nozzle
regularly.
• If not using the humidifier for 1 week or longer,
do not
leave water inside. Clean and dry the
humidifier instead.
Cleaning
You should clean your humidifier every
week, and when you’re ready to store it.
Note:
•
Never
immerse the base in water or liquid.
Do not
place any part of the humidifier in a
dishwasher.
•
Do not
use detergents to clean the humidifier.
1. Unplug the humidifier.
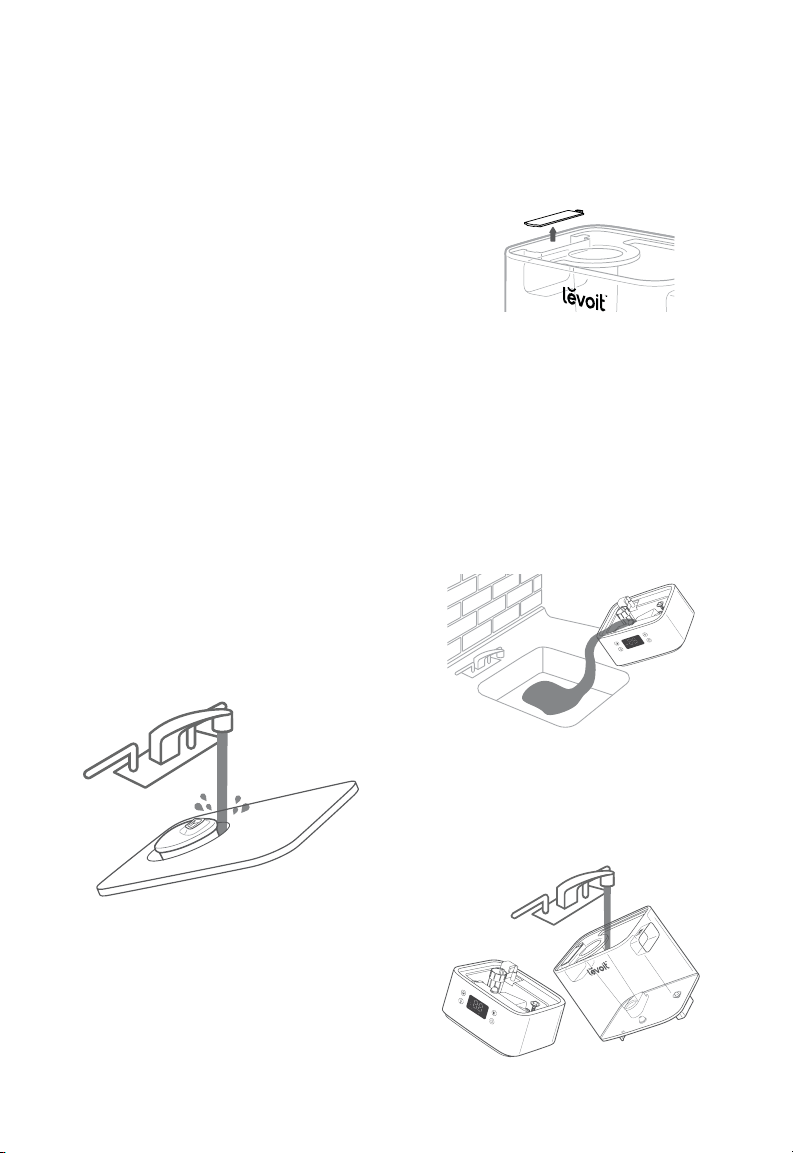
2. Remove and rinse the water tank cover.
[
Figure 4.1
]
3. Remove and rinse the dust cover if
necessary.
[Figure 4.2]
Figure 4.2
4. Remove the water tank from the base
and pour out any water from the tank
and base chamber. [
Note:
When pouring out water, hold down the
float to ensure that it does not fall out of the base
chamber.
Figure 4.3
]
16
Figure 4.1
Figure 4.3
5. Rinse the tank and base chamber with
room temperature water. [
Figure 4.4
]
Figure 4.4
Page 17
Cleaning (cont.)
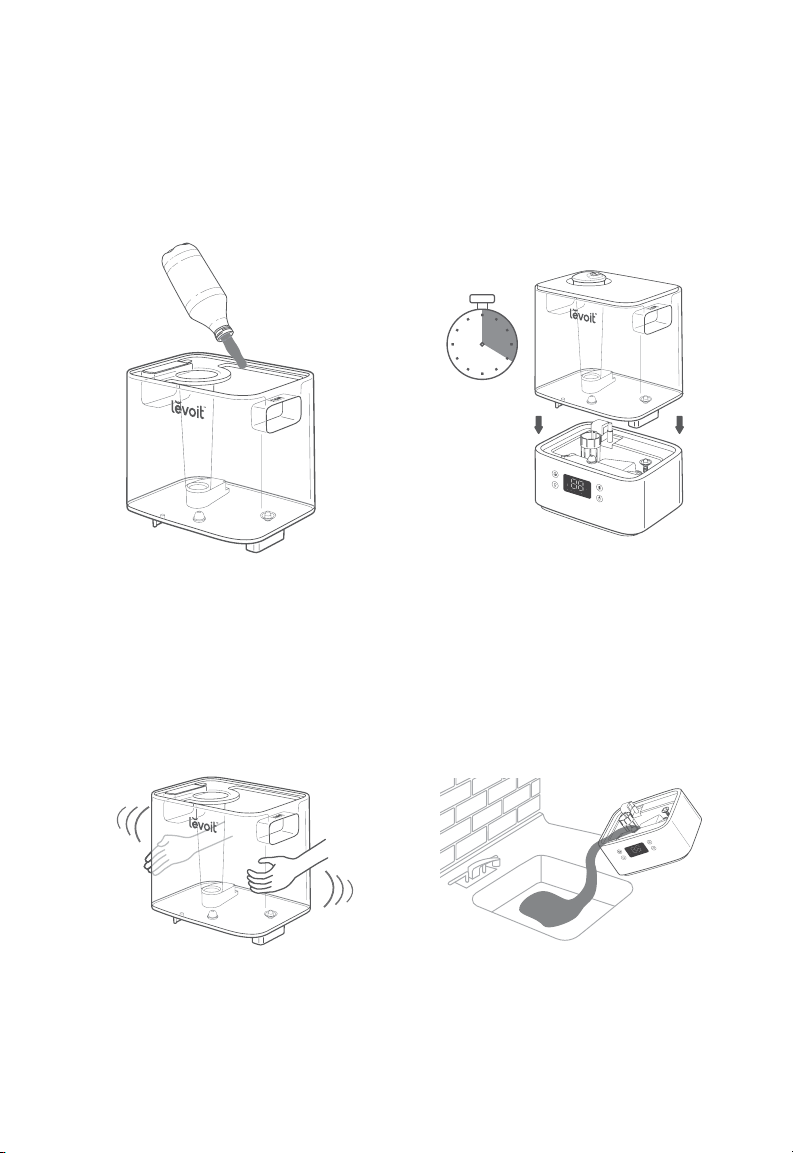
6. To descale the humidifier:
a. Fill the tank with 3 US cups /
710 mL of distilled white vinegar.
[
Figure 4.5
b. Replace the tank cover and swish
the vinegar around the tank.
[
Figure 4.6
]
Figure 4.5
]
c. Place the tank on the base and
soak for 15–20 minutes. Vinegar
will drain into the base chamber
and loosen scale (mineral buildup)
in the tank and in the base
chamber (including the transducer
and float). [
d. Remove the tank, remove the tank
cover, and pour out any vinegar.
[
Figure 4.8
Figure 4.7
Figure 4.7
]
]
Figure 4.6
Figure 4.8
17
Page 18
Cleaning (cont.)
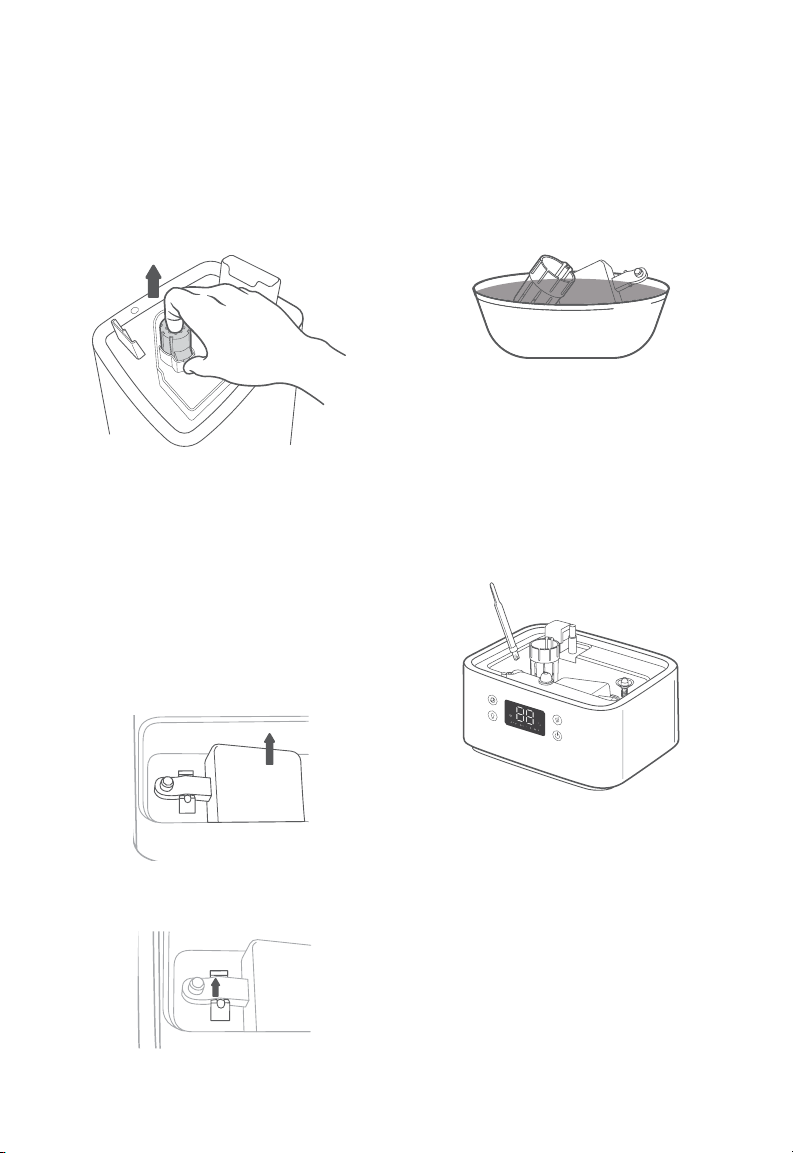
e. Flip the tank over and remove
the noise silencer. To remove the
noise silencer, press the release
tab and gently pull away from the
humidifier. [
f. Remove the float from the base
chamber by pulling up the larger
side of the float [
pulling the shaft out from the float
brackets. One side of the float
brackets is open (U-shaped) to
allow the shaft to be removed.
[
Figure 4.11
Figure 4.9
Figure 4.9
]
]
Figure 4.10
] and
g. Place the float and noise silencer
in a small container. Fill with
enough vinegar to cover them.
Soak for 15–20 minutes.
[
Figure 4.12
h. Use a soft cloth and the included
cleaning brush to remove scale
from all parts. [
]
Figure 4.12
Figure 4.13
]
18
Figure 4.13
Figure 4.10
Figure 4.11
Page 19
Cleaning (cont.)
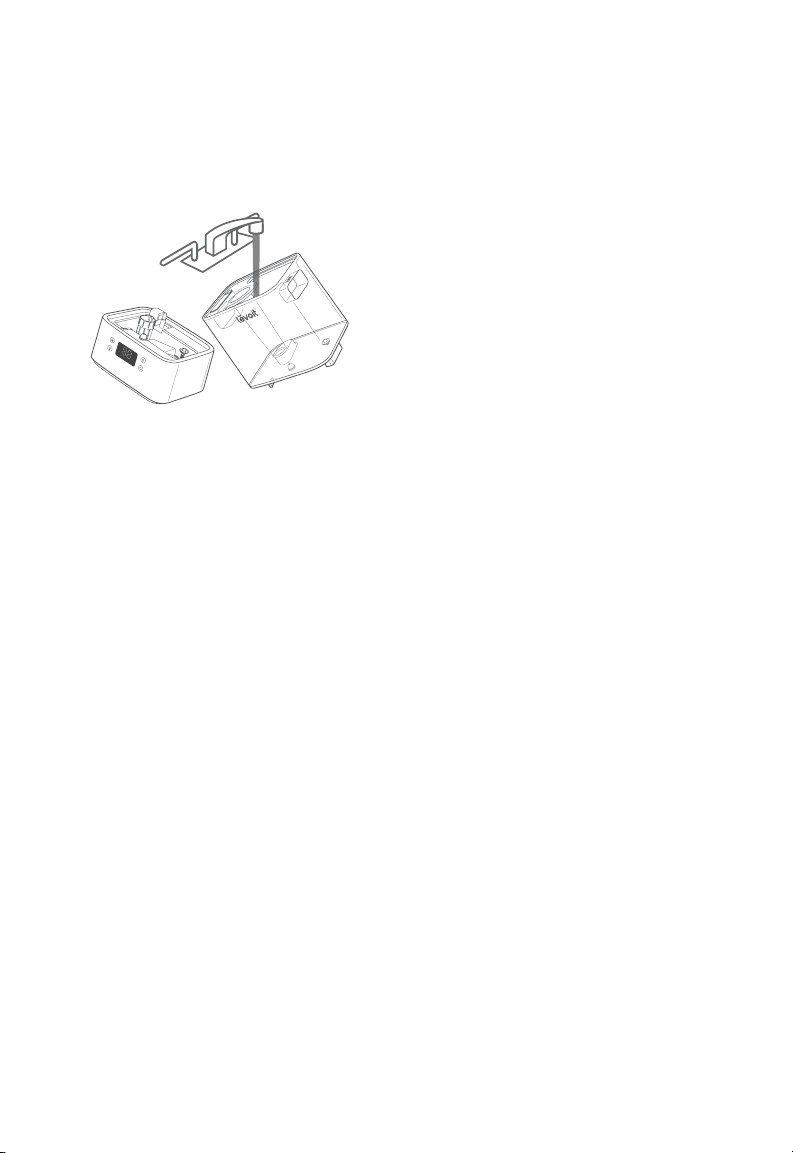
i. Rinse all parts until any vinegar
smell is completely gone.
[
Figure 4.14
7. Dry all parts with a cloth. Make sure
all parts are completely dry before
reassembling or storing.
]
Figure 4.14
19
Page 20
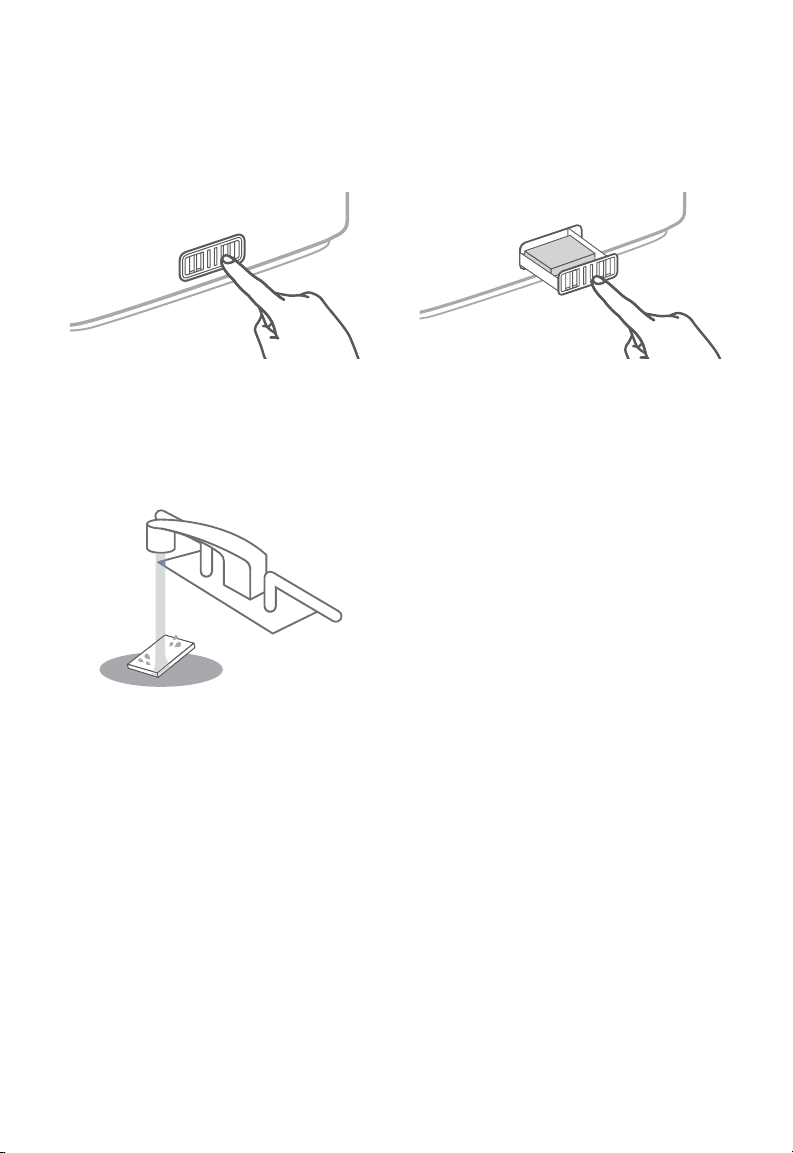
Cleaning the Aroma Pad
1. Press the aroma box to release it from
the base, and pull it out. [
Figure 4.15
2. Remove the aroma pad and rinse under
warm, running water. [
Figure 4.15
Figure 4.16
]
]
3. Dry with a clean cloth and place it back
into the aroma box. [
Note: Do not
into the aroma pad or box.
pour liquid cleaners or detergents
Figure 4.17
Figure 4.17
]
20
Figure 4.16
Page 21
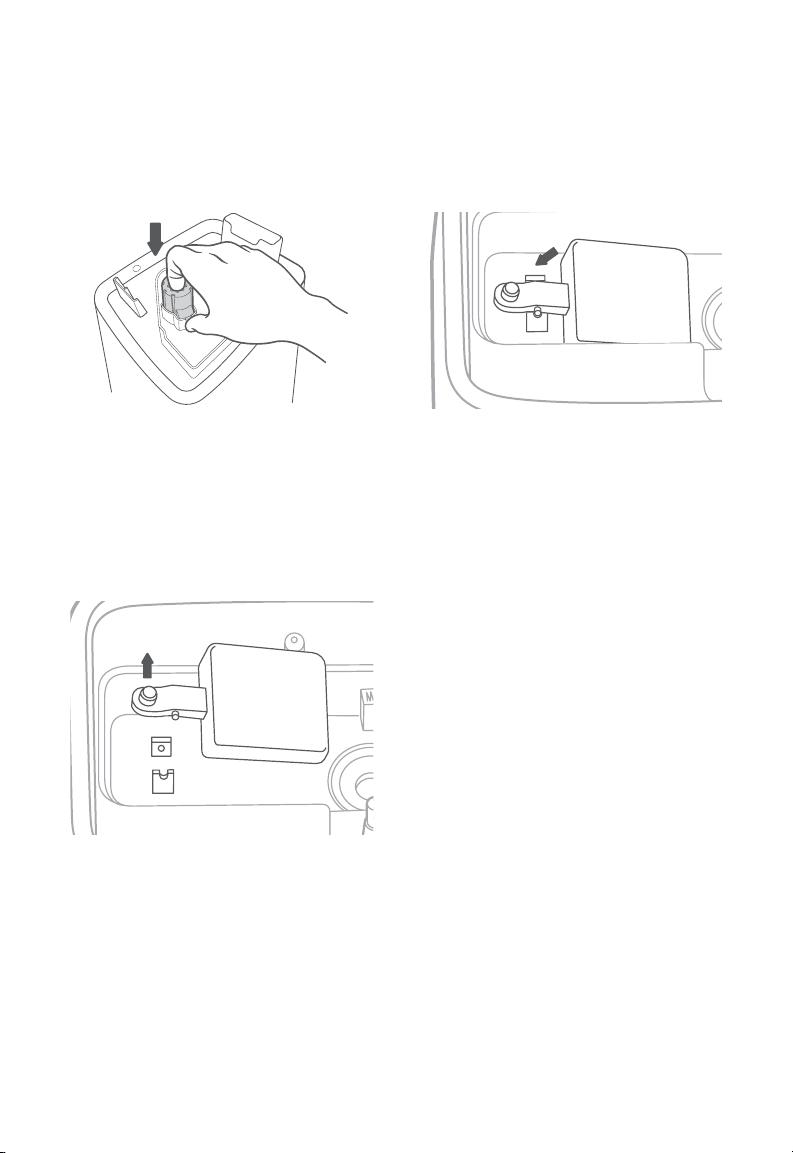
Reassembling
1. Flip the water tank over and place
the noise silencer back into the tank.
[
Figure 4.18
2. Place the float back into the base
chamber:
a. Make sure the correct side of the
]
Figure 4.18
float is facing up. [
Figure 4.19
b.
Insert the smaller prong into the
closed side of the float brackets.
[
Figure 4.20
c. Place the larger prong into the
open (U-shaped) side of the float
brackets.
]
3. Place the tank back on the base. Refill
the tank, if necessary.
4. Place the tank properly on the base and
place the tank cover on the water tank.
]
Figure 4.20
Storing
Figure 4.19
Follow the cleaning instructions (see page
16) and allow all parts to dry completely
before storing. Store in a cool, dry location.
21
Page 22
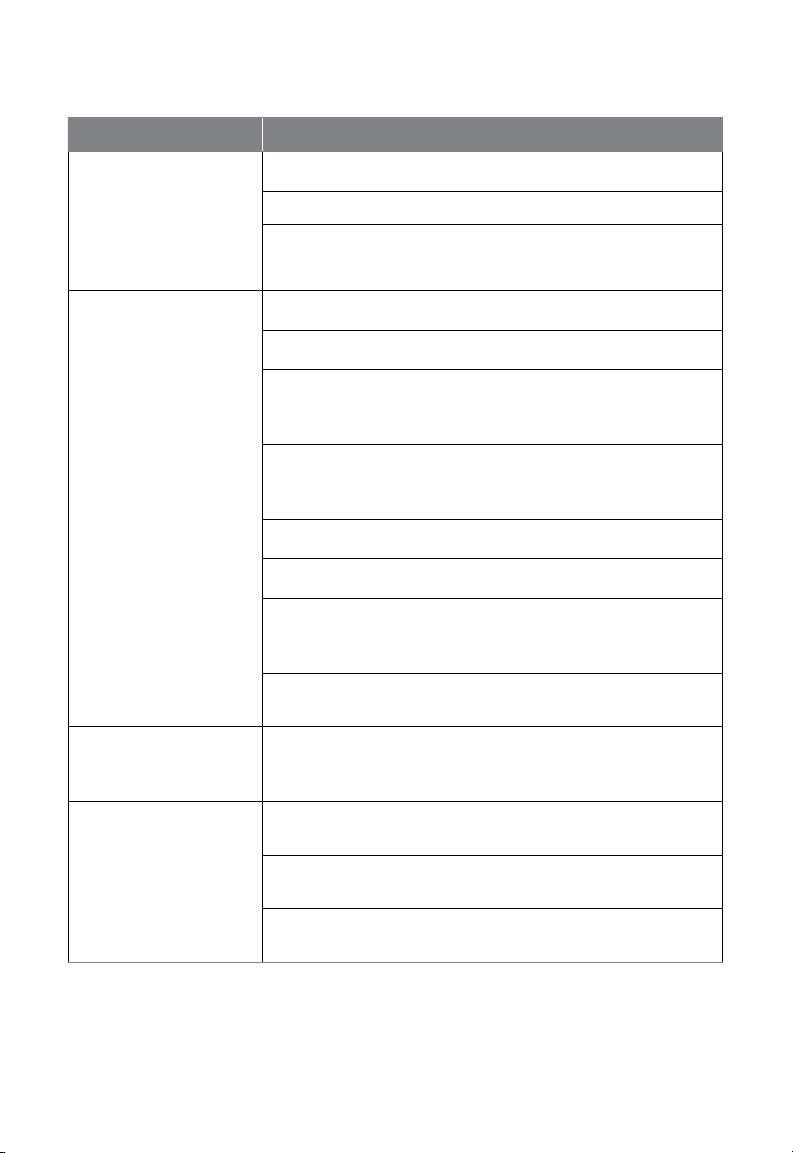
TROUBLESHOOTING
Problem Possible Solution
Plug in the humidifier and turn it on.
Humidifier doesn’t turn on,
or turns o unexpectedly.
Little or no mist comes out.
Humidifier uses water too
quickly.
Humidifier produces an
unusual smell.
Add purified or distilled water to the water tank.
Check to see if the humidifier is in Auto Mode. Depending on Auto Mode
settings, the humidifier may automatically turn o when the humidity
level is above the target level.
Turn the mist level to a higher setting.
Fill the water tank.
There may be too much water in the base chamber. Empty the base
chamber. Refill the water tank (not the base chamber) and place the
water tank properly onto the base.
Make sure the air inlet on the bottom of the base is not blocked. The
humidifier should not be set on carpet or other surfaces that may block
the air inlet.
Make sure the nozzle is not blocked or clogged.
Make sure the humidifier is on a level surface.
The water temperature may be too low. Turn the mist level to the highest
setting and let the humidifier run for a while, then adjust to the desired
setting.
If the water tank or base was washed with detergent, rinse thoroughly
with clean water to remove any detergent.
The humidifier uses up water based on the environmental temperature
and humidity. If your environment is cold and/or dry, the humidifier will
run out of water faster.
If the humidifier is new, unplug and rinse all parts, then place in a cool,
dry place for 12 hours.
If essential oils were placed on the aroma pad, rinse the pad under clean
water and allow it to dry.
Clean the water tank and base chamber (see Care & Maintenance,
page 16).
22
Page 23
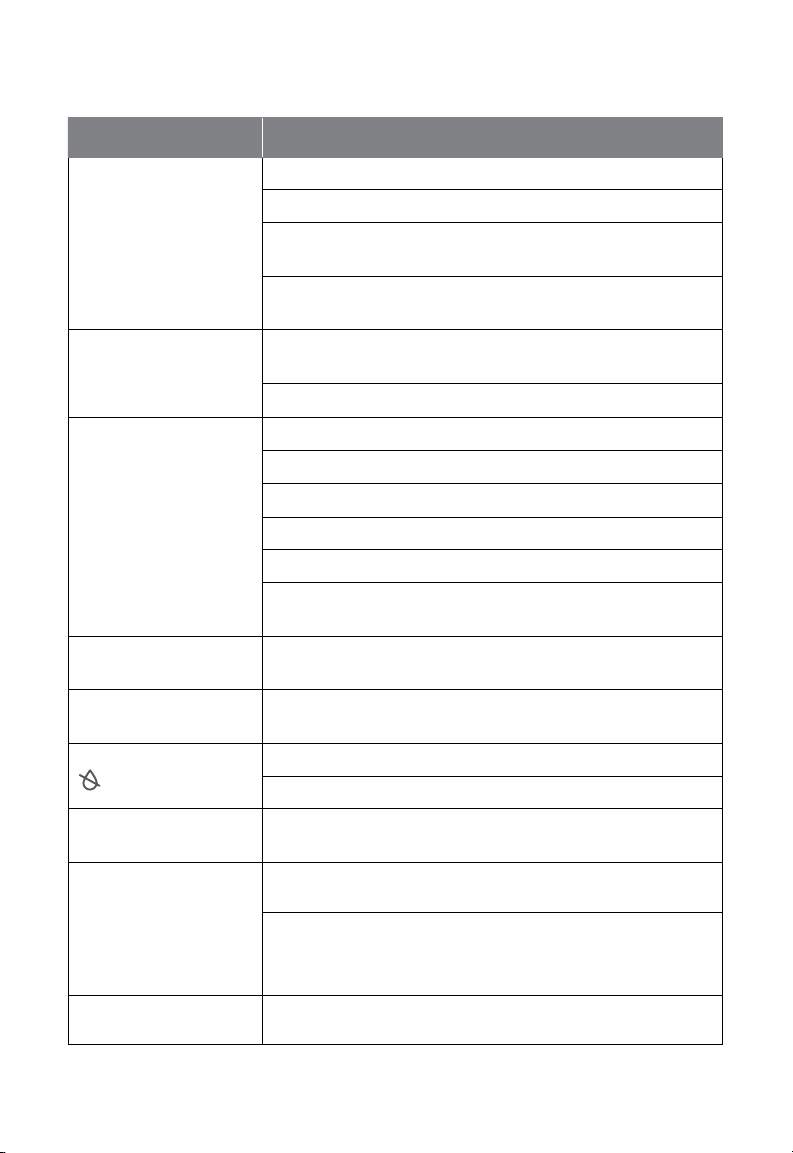
TROUBLESHOOTING (CONT.)
Problem Possible Solution
Make sure the water tank is properly in place (see Getting Started, page 8).
Set mist level to a lower setting.
Humidifier makes a loud or
unusual noise.
White dust appears around
the humidifier.
Water leaks from the
humidifier.
Condensation forms around
humidifier or windows.
Mold grows inside the
humidifier.
is red.
Essential oil has little or no
smell.
Display shows an incorrect
humidity percentage.
Display shows Error Code
“E1”.
Empty the base chamber. Refill the water tank (not the base chamber)
and place the water tank properly onto the base.
The humidifier may be malfunctioning. Stop using the humidifier and
contact Customer Support (see page 27).
We recommend using purified or distilled water to fill the humidifier.
Avoid using water with high mineral content.
Clean the humidifier (see Care & Maintenance, page 16).
Make sure the silicone sealing ring around the water outlet valve is secure.
Avoid running the humidifier in a room with over 60% relative humidity.
Wipe any excess water o the top and bottom of the base.
Do not shake the humidifier.
Make sure to place the humidifier on a flat, level surface.
Check the water tank for leaks. If there are leaks, contact Customer
Support (see page 27).
Humidity may be too high. Turn down the mist level, turn o the
humidifier, or open a door or window to the room.
Clean the water tank and base chamber regularly
(see Care & Maintenance, page 16).
Fill the water tank.
Place the water tank properly on the base.
Add more essential oil. For best results, use pure essential oil.
The room may be larger than the humidifier’s eective range. Move to a
room smaller than 215–505 ft² / 20–47 m².
Moisture may have built up inside the humidity sensor. Turn o the humidifier
and allow the sensor to air dry. Make sure the nozzle is facing away from the
sensor so that mist does not settle on the sensor (see diagram in
Getting To Know Your Smart Humidifier, page 5).
The humidifier is malfunctioning. Contact Customer Support (see page 27).
If your problem is not listed, please contact Customer Support (see page 27).
23
Page 24

VESYNC APP TROUBLESHOOTING
Why isn’t my humidifier connecting to the
VeSync app?
•
Make sure your phone has Bluetooth®
turned on and is not currently connected
to another Bluetooth device.
• During the setup process, you must be
on a secure 2.4 GHz WiFi® network.
Confirm that the network is working
correctly.
• Make sure the WiFi password you
entered is correct.
• Make sure your humidifier and phone are
within 30 ft / 10 m of each other.
• Reset the humidifier by pressing and
holding
connecting again.
for 15 seconds. Then try
My humidifier is oine.
•
Make sure the humidifier is plugged in.
The humidifier may appear to be oine
if it is unplugged, or if the outlet does not
have power.
• Refresh the VeSync menu by swiping
down on the screen.
• Make sure your router is connected to
the internet and your phone’s network
connection is working.
• Reset the humidifier using one of these
options:
a. Delete the humidifier from the
VeSync app. Swipe left (iOS®) or
press and hold (Android), then tap
Delete. Then reconfigure your
humidifier with the VeSync app.
b. Press and hold for 15 seconds.
Then reconfigure your humidifier
with the VeSync app.
The VeSync app is displaying an incorrect
humidity percentage while the humidifier
is turned on.
•
The room may be larger than the
humidifier’s eective range. Move to a
room smaller than 505 ft² / 47 m².
• Moisture may have built up inside the
humidity sensor. Turn o the humidifier
and allow the sensor to air dry. Make sure
the nozzle is facing away from the sensor
so that mist does not settle on the sensor
(see diagram in
Getting To Know Your
Smart Humidifier, page 5).
Note:
Power outages, internet outages, or
changing WiFi routers may cause your humidifier
to go oine.
24
Page 25

FCC STATEMENT
This device complies with Part 15 of the FCC Rules. Operation is subject to the following two
conditions:
1. This device may not cause harmful interference, and
2. This device must accept any interference received, including interference that may cause
undesired operation.
Any changes or modifications not expressly approved by the party responsible for compliance
could void the user’s authority to operate this equipment.
This equipment has been tested and found to comply with the limits for a Class B digital device,
pursuant to Part 15 of the FCC Rules. These limits are designed to provide reasonable protection
against harmful interference in a residential installation. This equipment generates, uses and can
radiate radio frequency energy and, if not installed and used in accordance with the instructions,
may cause harmful interference to radio communications. However, there is no guarantee
that interference will not occur in a particular installation. If this equipment does cause harmful
interference to radio or television reception, which can be determined by turning the equipment
o and on, the user is encouraged to try to correct the interference by one of the following
measures:
• Reorient or relocate the receiving antenna.
• Connect the equipment into an outlet on a circuit dierent from that to which the receiver is
connected.
• Increase the separation between the equipment and receiver.
• Consult the dealer or an experienced radio/TV technician for help.
FCC RADIATION EXPOSURE STATEMENT
This equipment complies with FCC radiation exposure limits set forth for an uncontrolled
environment. End users must follow the specific operating instructions for satisfying RF exposure
compliance. To maintain compliance with FCC RF exposure compliance requirements, please
follow operation instructions as documented in this manual. This transmitter must not be colocated or operating in conjunction with any other antenna or transmitter. This equipment should
be installed and operated with a minimum distance of 20 cm between the radiator and your
body. The availability of some specific channels and/or operational frequency bands are country
dependent and are firmware programmed at the factory to match the intended destination. The
firmware setting is not accessible by the end user.
25
Page 26

WARRANTY INFORMATION
Product
Date of Purchase
Order ID
Smart Ultrasonic Top-Fill
Cool Mist Humidifier
Model Classic 300S
Terms & Policy
Arovast Corporation (“Arovast”) warrants this
product to the original purchaser to be free from
defects in material and workmanship, under
normal use and conditions, for a period of one
year from the date of original purchase.
Arovast agrees, at our option during the
warranty period, to repair any defect in material
or workmanship or furnish an equal product in
exchange without charge, subject to verification
of the defect or malfunction and proof of the date
of purchase.
There is no other express warranty. This
warranty does not apply:
• If the product has been modified from its
original condition;
• If the product has not been used in
accordance with directions and instructions
in the user manual;
• To damages or defects caused by accident,
abuse, misuse or improper or inadequate
maintenance;
• To damages or defects caused by service
or repair of the product performed by an
unauthorized service provider or by anyone
other than Arovast;
• To damages or defects occurring during
commercial use, rental use, or any use for
which the product is not intended;
• To damages or defects exceeding the cost
of the product.
Arovast will not be liable for indirect, incidental,
or consequential damages in connection with the
use of the product covered by this warranty.
This warranty extends only to the original
consumer purchaser of the product and is not
transferable to any subsequent owner of the
product regardless of whether the product is
transferred during the specified term of the
warranty.
This warranty does not extend to products
purchased from unauthorized sellers. Arovast’s
warranty extends only to products purchased from
authorized sellers that are subject to Arovast’s
quality controls and have agreed to follow its
quality controls.
All implied warranties are limited to the period of
this limited warranty.
This warranty gives you specific legal rights
and you may also have other rights which
vary from state to state. Some states do not
allow the exclusion or limitation of incidental or
consequential damages, so the above limitation or
exclusion may not apply to you.
If you discover that your product is defective
within the specified warranty period, please
contact Customer Support via
[email protected]. DO NOT dispose of your
product before contacting us. Once our Customer
Support Team has approved your request, please
return the product with a copy of the invoice and
order ID.
Extend Your Warranty by 1 Year
Register your product within 14 days of purchase
at www.levoit.com/warranty to extend your
1-year warranty by an additional year.
This warranty is made by:
Arovast Corporation
1202 N. Miller St. Suite A
Anaheim, CA 93806
26
Page 27

CUSTOMER SUPPORT
If you have any questions or concerns
about your new product, please contact our
helpful Customer Support Team.
Arovast Corporation
1202 N. Miller St., Suite A
Anaheim, CA 92806
Email: [email protected]
Toll-Free: (888) 726-8520
Support Hours
Mon–Fri, 9:00 am–5:00 pm PST/PDT
*Please have your order invoice and order ID
ready before contacting Customer Support.
ATTRIBUTIONS
Apple App Store is a trademark of Apple Inc.
Google, Android, and Google Play are trademarks of Google LLC.
Wi-Fi® is a registered trademark of Wi-Fi Alliance®.
Amazon, Alexa and all related logos are trademarks of Amazon.com, Inc. or its aliates.
iOS is a registered trademark of Cisco Systems, Inc. and/or its aliates in the United States
and certain other countries.
The Bluetooth® word mark and logos are registered trademarks owned by Bluetooth SIG, Inc.
and any use of such marks by Arovast Corporation is under license.
27
Page 28

levoit.com
Connect with us @LevoitLifestyle
JJ110620GY-M1.1_0820Classic300S
 Loading...